- Home
- Claude Governance & Access Control for Jira

Claude Governance & Access Control for Jira
A simple, step-by-step guide to installing the Claude Governance & Access Control for Jira app, connecting it to Claude, and deciding exactly what your AI assistants are allowed to do in Jira & Confluence—with a full record of every action.
Part 1 · Connect the app to Claude | Part 2 · Set rules & check logs
What does this app do?
AI assistants like Claude can now read and change things in Jira and Confluence for you. That's powerful — but it raises two questions: who decides what the AI is allowed to touch, and how do you know what it actually did?
The Claude Governance & Access Control for Jira app sits in the middle. Claude connects to our app, "Claude Governance & Access Control for Jira," instead of connecting directly to Atlassian. Every request the AI makes passes through two checks before anything happens:
- Is this allowed? — Your rules decide what each AI, person, or group may do.
- Write it down. — Every action is recorded: who did it, what they did, and when.

Three reasons teams use it
- Control — Allow or block actions by AI, by user group, or by type of action — for example, “never let any AI delete anything.”
- Visibility — A complete, searchable record of every AI action — including the exact request and the response size, details Atlassian's own audit log doesn't show.
- Safety — Stop risky actions before they happen, not after — and sign in as yourself so every action is tied to a real person.
Part 1 · Connect the app to Claude
Goal: By the end of Part 1, Claude communicates with your Atlassian environment through the Claude Governance & Access Control for Jira app.
1: Install the Claude Governance & Access Control for Jira app from the Atlassian Marketplace
- Open the Claude Governance & Access Control for Jira listing on the Atlassian Marketplace and click Get it now.
- Search for Claude Governance & Access Control for Jira on the Atlassian Marketplace.
- Once it's installed, open the Claude Governance & Access Control for Jira app in Jira: Apps → Claude Governance. (On some sites it appears under Settings → Apps.) You'll land on the Getting Started page.
 Try it for free
2: Allow this domain in Rovo (one-time setup)
This one-time step makes sure every AI tool is forced to go through your governed URL — instead of quietly connecting straight to Atlassian, where nothing is checked or logged. You'll find this card on the Getting Started page, just below your MCP server URL. (Rovo is Atlassian's own AI service that your app connects through.)
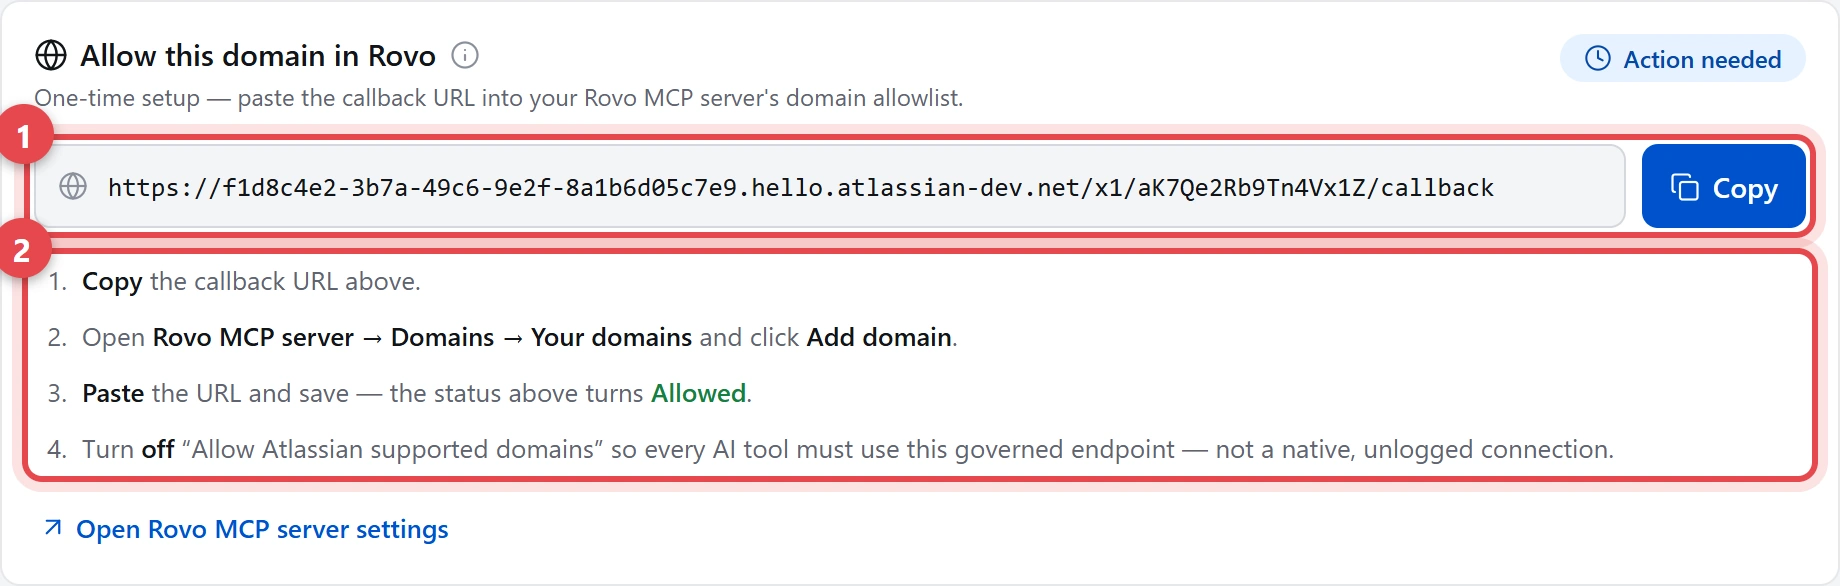
-
Callback URL + Copy. The address to add to Rovo's allowlist —
it's your site's MCP server URL with
/callbackon the end. Click Copy. - The four steps. Do them in order on the Rovo side (spelled out below). When you're done, the card's status flips from Action needed to Allowed.
What to do, step by step
- Copy the callback URL shown on the card.
- Open your Rovo MCP server → Domains → Your domains, and click Add domain.
- Paste the URL and save. The card's status turns Allowed (green).
- Turn off “Allow Atlassian supported domains.” This is the important one — it forces every AI tool to use your governed endpoint, so nothing can reach Atlassian through an unlogged, native connection.
Why this matters: without this step, an AI client could still connect directly to Atlassian and bypass your rules and your log. Turning the native domains off closes that back door.
Tip: the card's “Open Rovo MCP server settings” link takes you straight to the right page.
3: Copy your MCP server URL
This is your site's private address for AI assistants. Claude connects to this URL instead of connecting to Atlassian directly — and that's exactly what makes every call pass through your rules and your log.
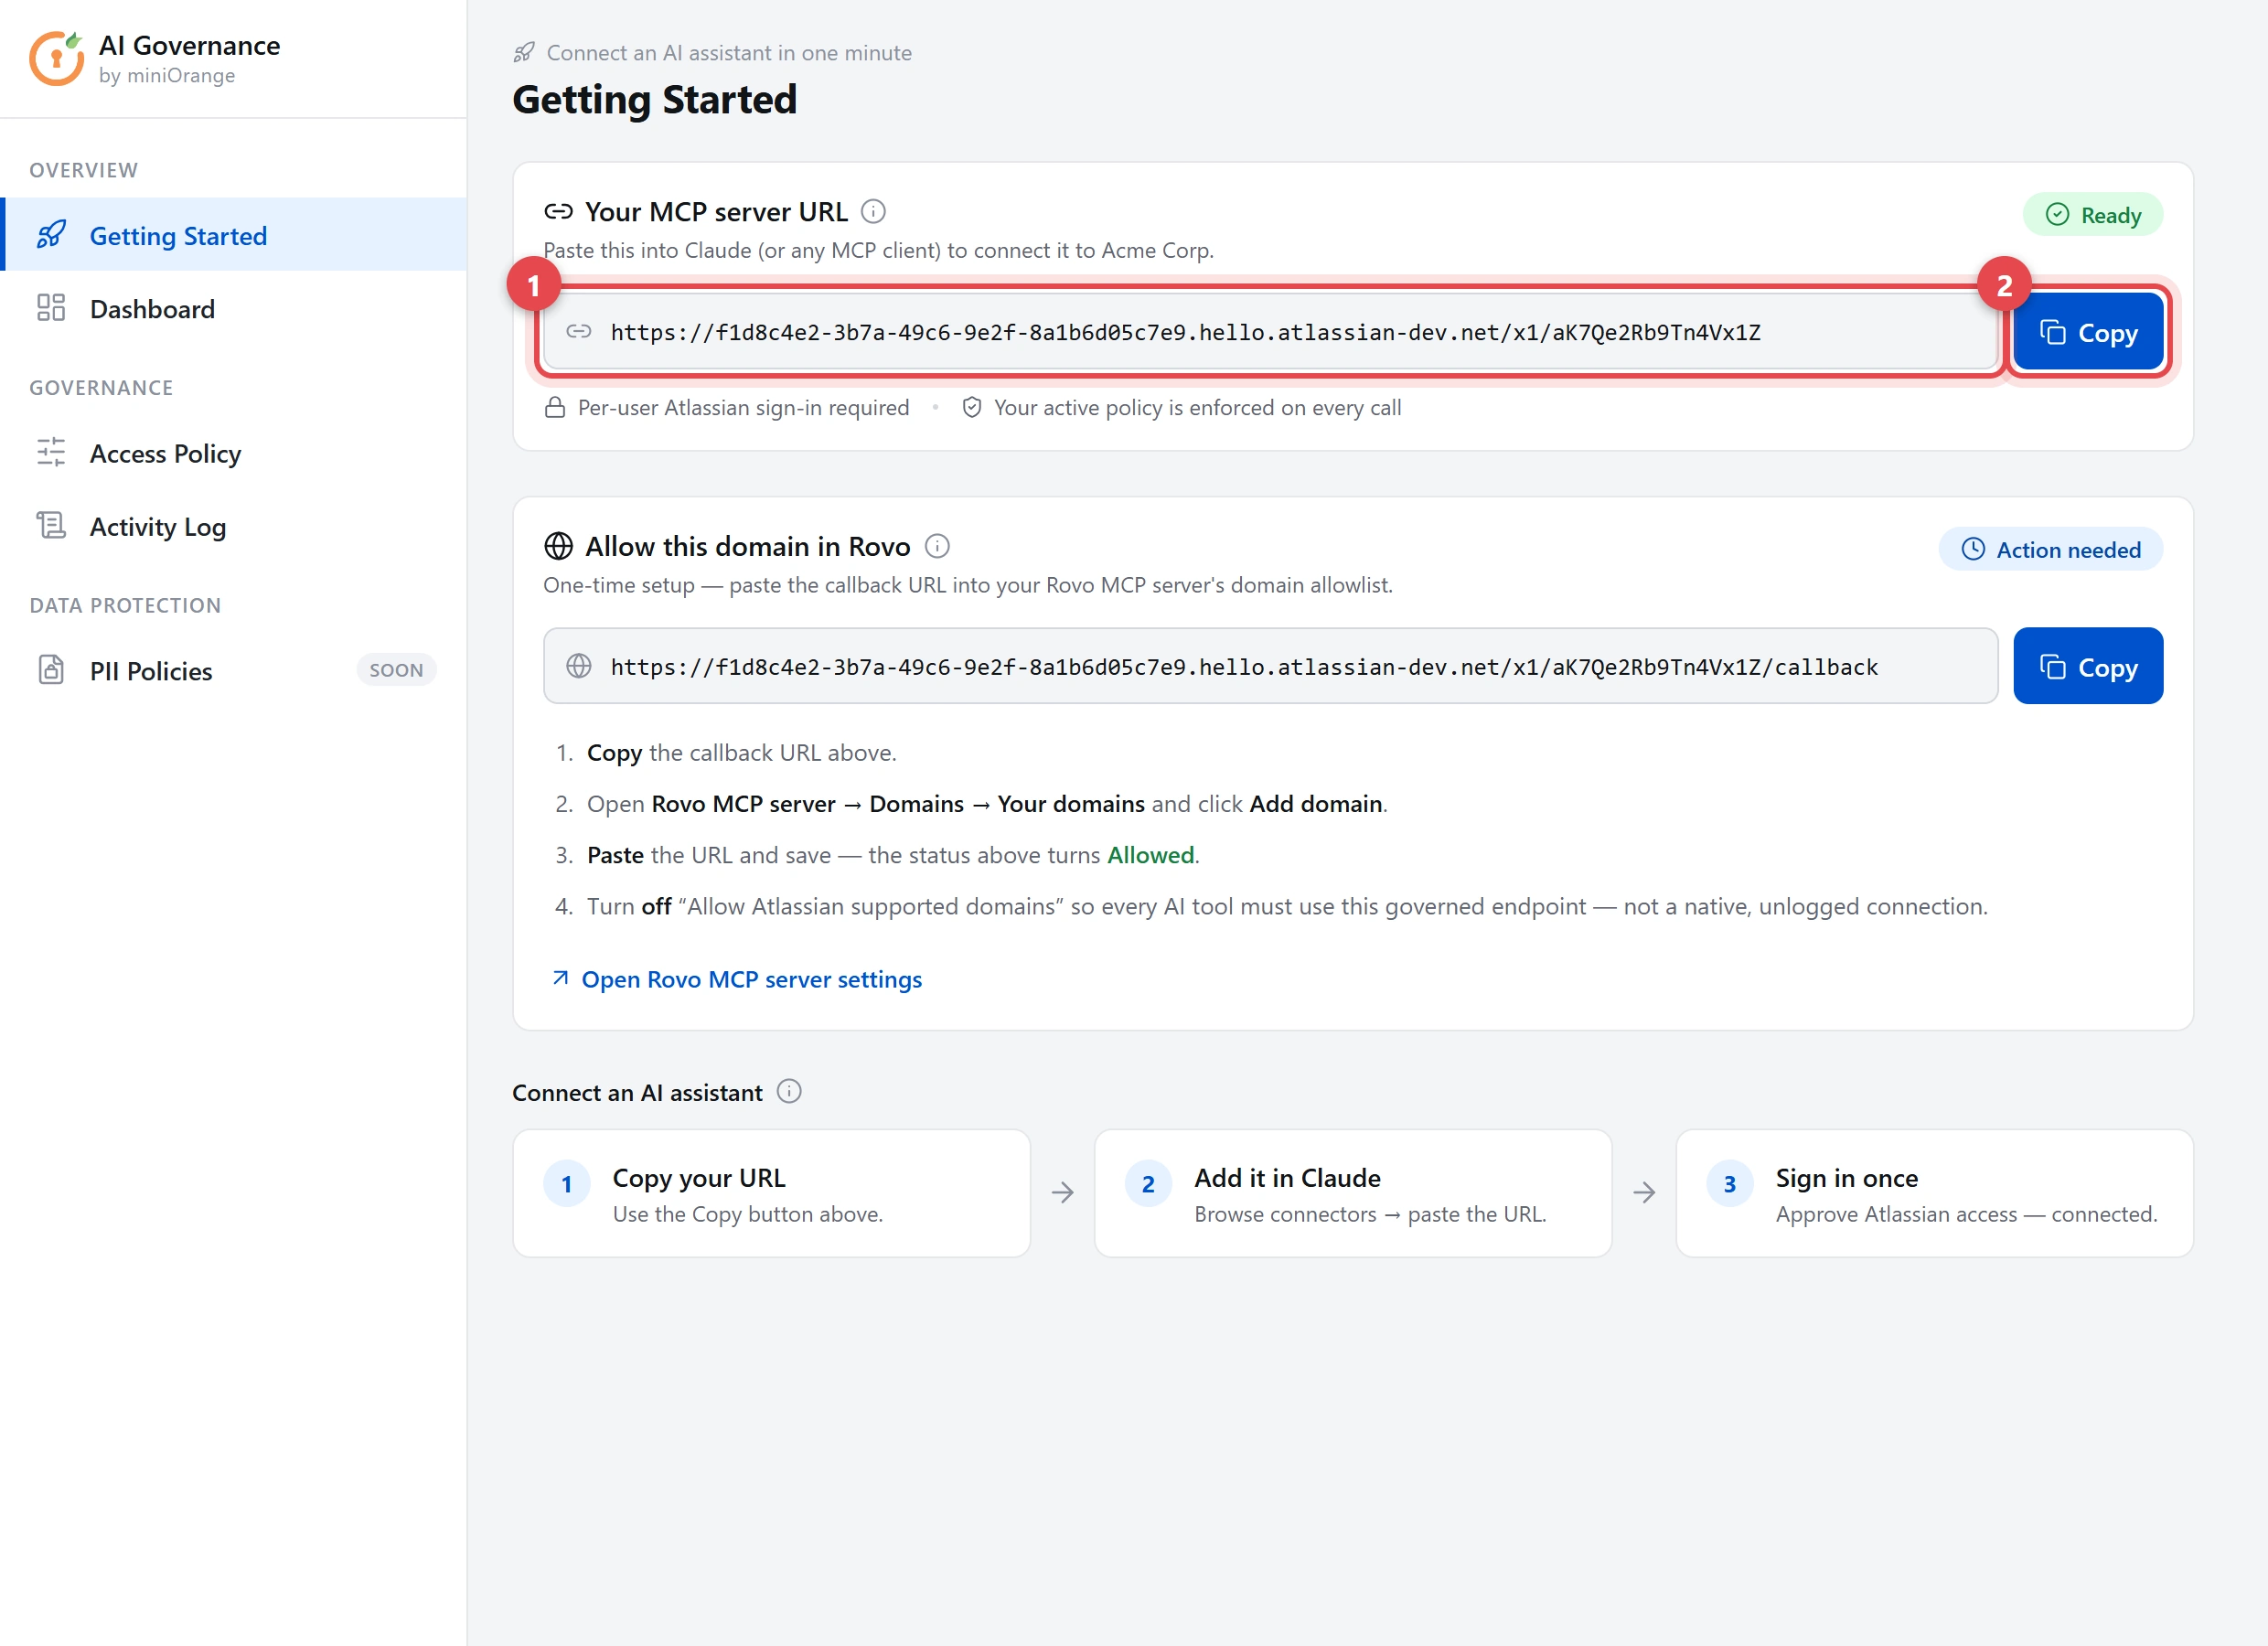
-
Your MCP server URL. A unique web address for your site. It
looks like
https://…hello.atlassian-dev.net/x1/…— you don't type it, it's generated for you. - Copy. Copies the URL to your clipboard. Keep it handy — you'll paste it into Claude next.
4: Paste the URL into Claude
Now hand that URL to Claude:
- Open Claude → Settings → Connectors.
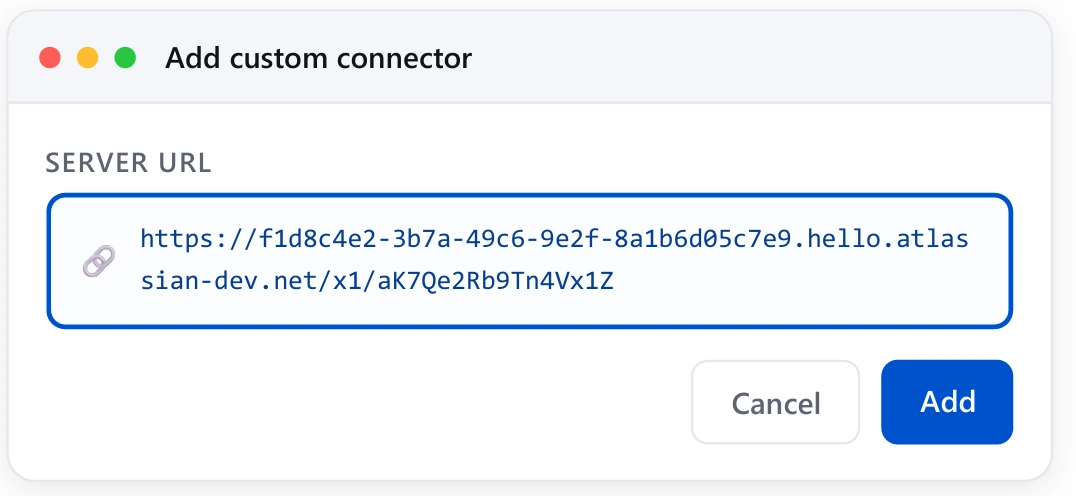
- Click Add custom connector.
- Paste the URL you copied into the URL (or Server URL) field.
- Leave any “advanced” OAuth fields blank — Claude fills those in automatically.
- Click Add / Connect.
If you don't see “Add custom connector,” your Claude plan may not include custom connectors yet. Custom connectors are available on Claude's paid plans.
5: Sign in once — and you're connected
Claude will open an Atlassian sign-in. Approve it. This proves who you are, so the Claude Governance & Access Control for Jira app can apply your rules and record every action under your name. You only do this once per connection.
Done! Test it now: ask Claude something like “Search my open Jira issues.” If you see results, the connection works end to end.
Part 2 · Set the rules & watch the activity
Claude is connected. Now decide what it's allowed to do — and keep an eye on what it does.
2A: Set your access rules — the Access Policy
Open the Access Policy tab in the left menu.
A policy is a default decision plus an ordered list of rules. For each AI request, the Claude Governance & Access Control for Jira app evaluates your rules from top to bottom and uses the first one that matches. If none match, the default decision applies.
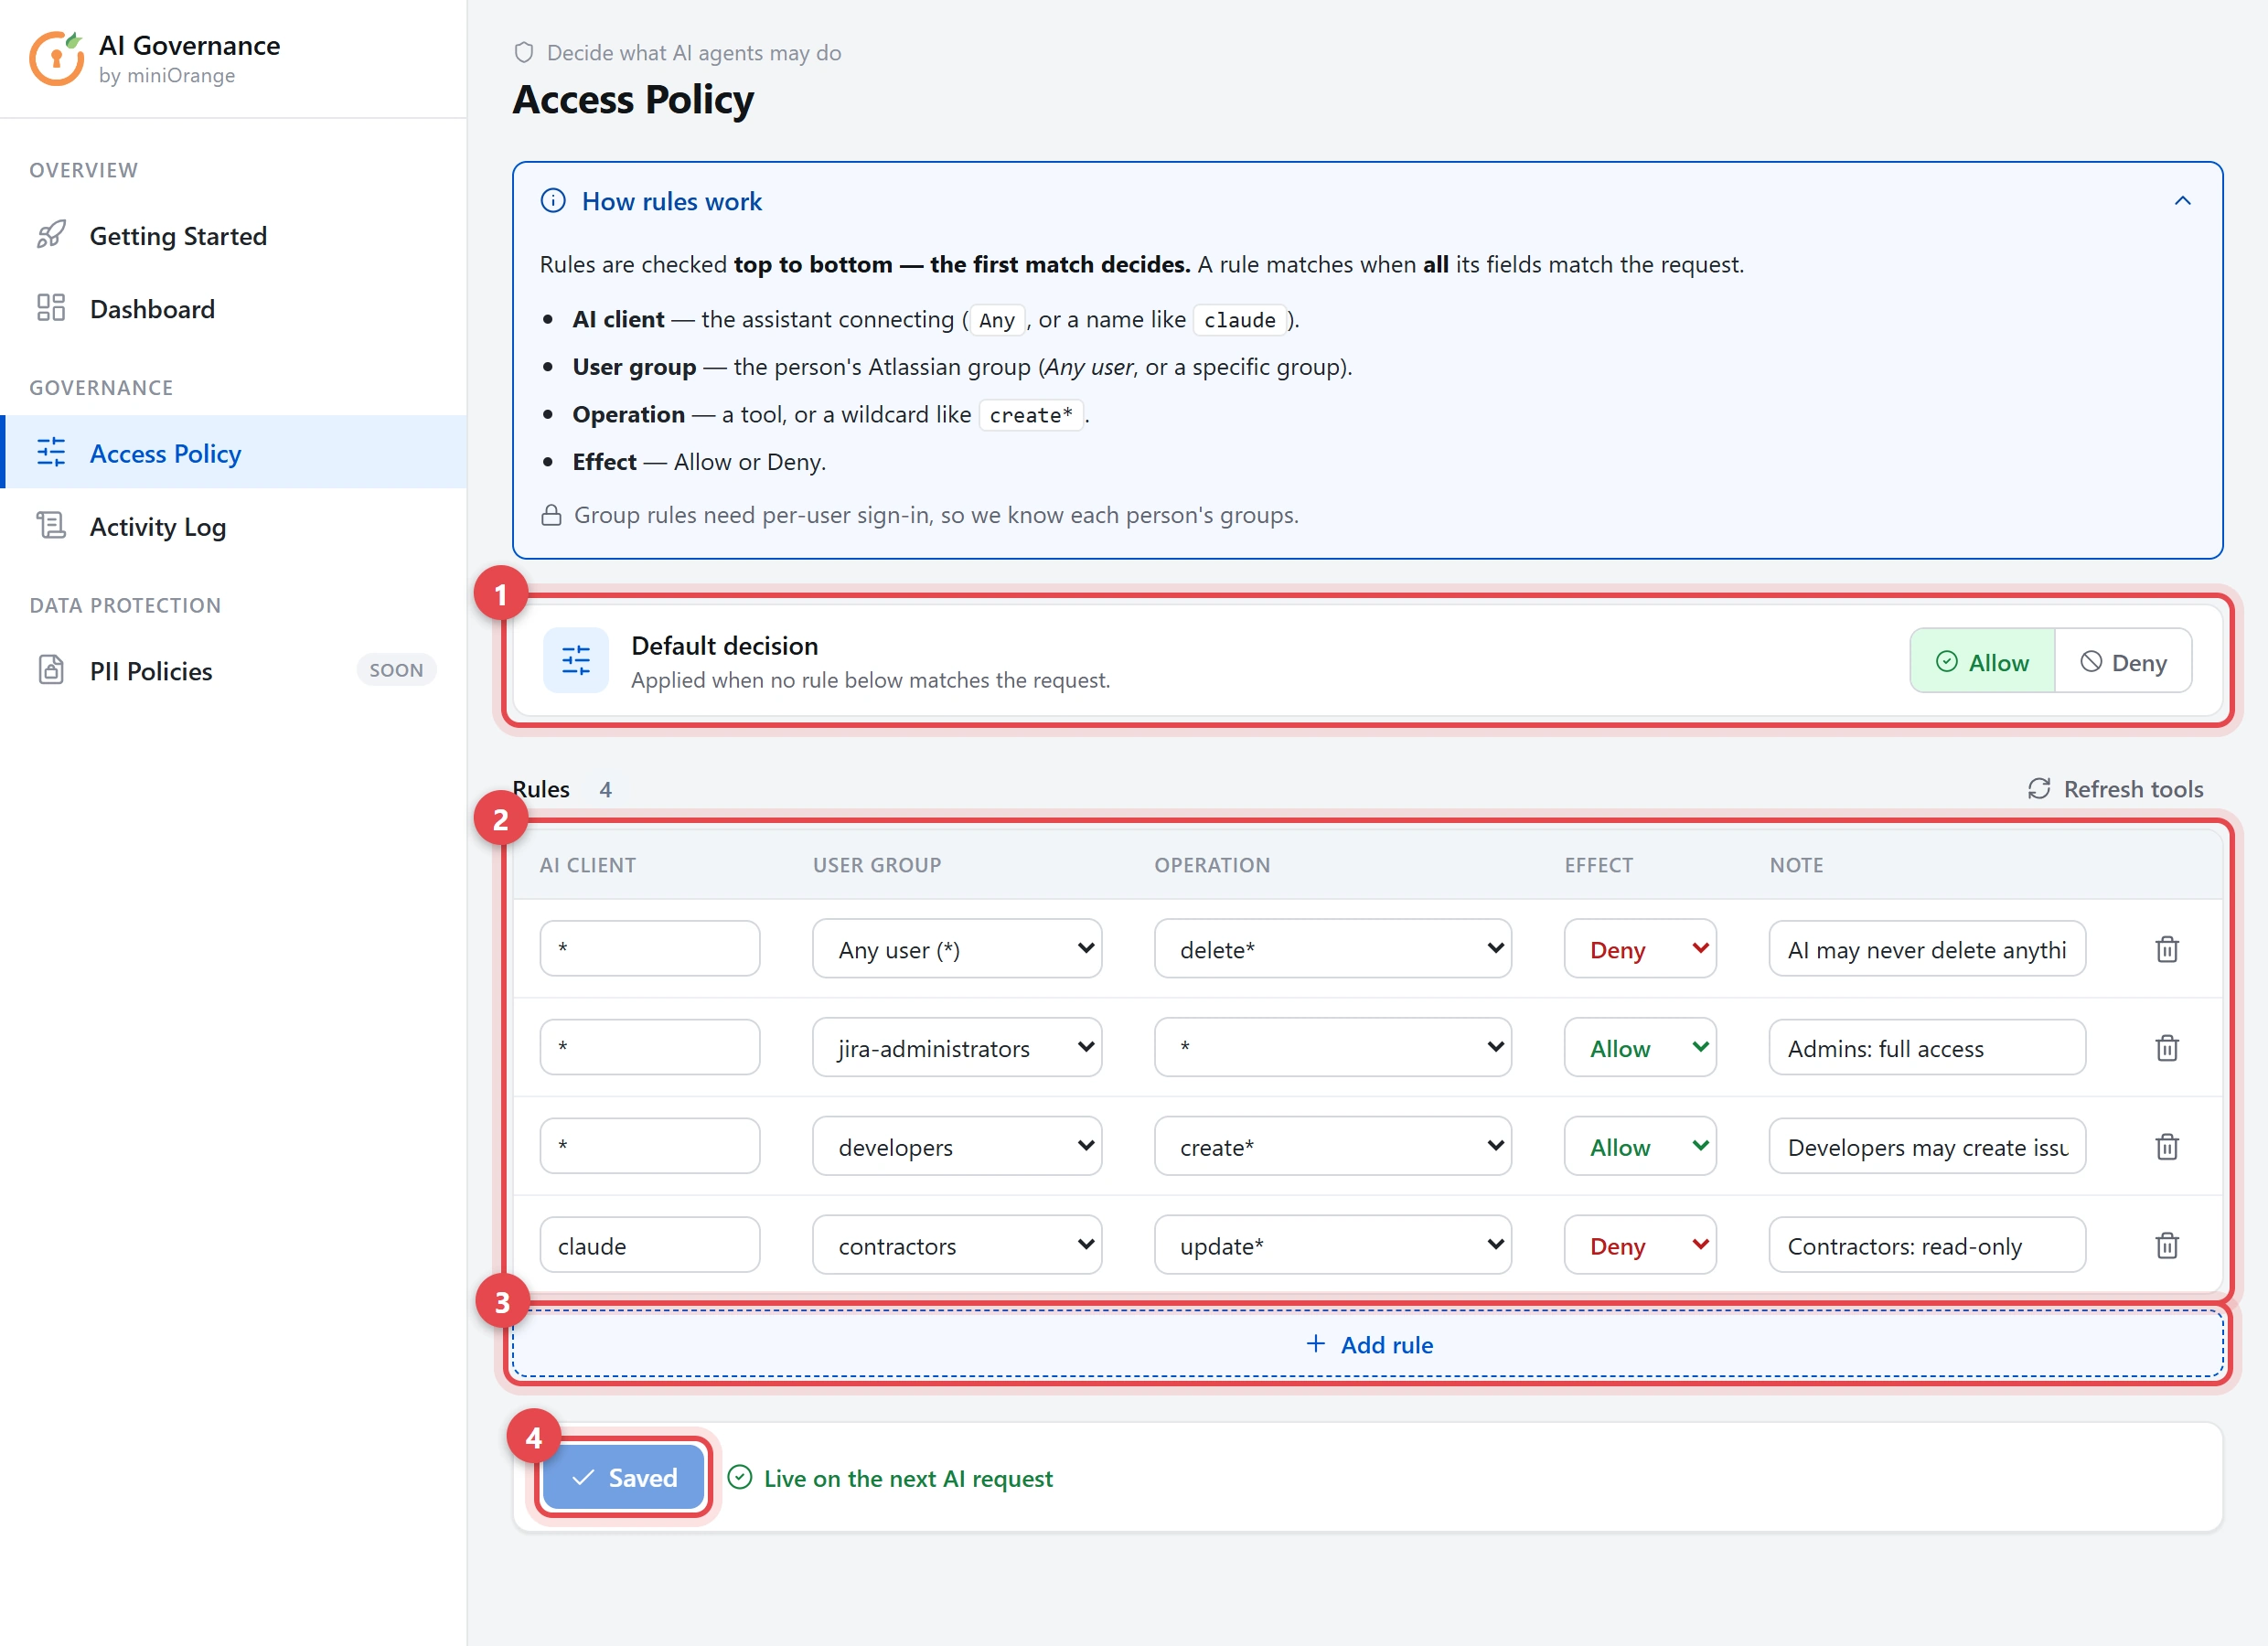
- Default decision. The fallback used when no rule below matches. Allow = let things through unless a rule blocks them. Deny = block everything unless a rule allows it.
- Rules. Each row is one rule, read left to right (explained in the table below).
- Add rule. Adds a new row at the bottom.
- Save policy. Applies your changes. It takes effect on the very next AI request.
What each column in a rule means
| Column | What to put there |
|---|---|
| AI client |
Which assistant the rule applies to. Leave it as
* for any AI, or type a name like
claude.
|
| User group |
The person's Atlassian group. Choose Any user, or pick a
group such as administrators or
developers.
|
| Operation |
What the AI is trying to do. Pick a specific tool, or a wildcard:
delete* = anything that deletes,
jira create* = anything that creates,
* = everything.
|
| Space / Project | Restrict the rule to specific Confluence spaces / Jira projects (Any space = all). Blocks the AI only — people's own access is unaffected. |
| Effect | Allow or Deny. |
| Note | An optional reminder to yourself about why the rule exists. |
Example — “AI may never delete anything.” Add a rule, set
Operation to delete*, set Effect to
Deny, and keep it near the top. Now no AI, for anyone, can
delete a Jira issue or a Confluence page.
About group rules: They only work because each person signs in individually (Step 5). That sign-in allows the Claude Governance & Access Control for Jira app to identify the user's Atlassian groups.
2B: Check the logs — the Activity Log
Open the Activity Log tab.
Every AI action — allowed or blocked — shows up here, newest first.
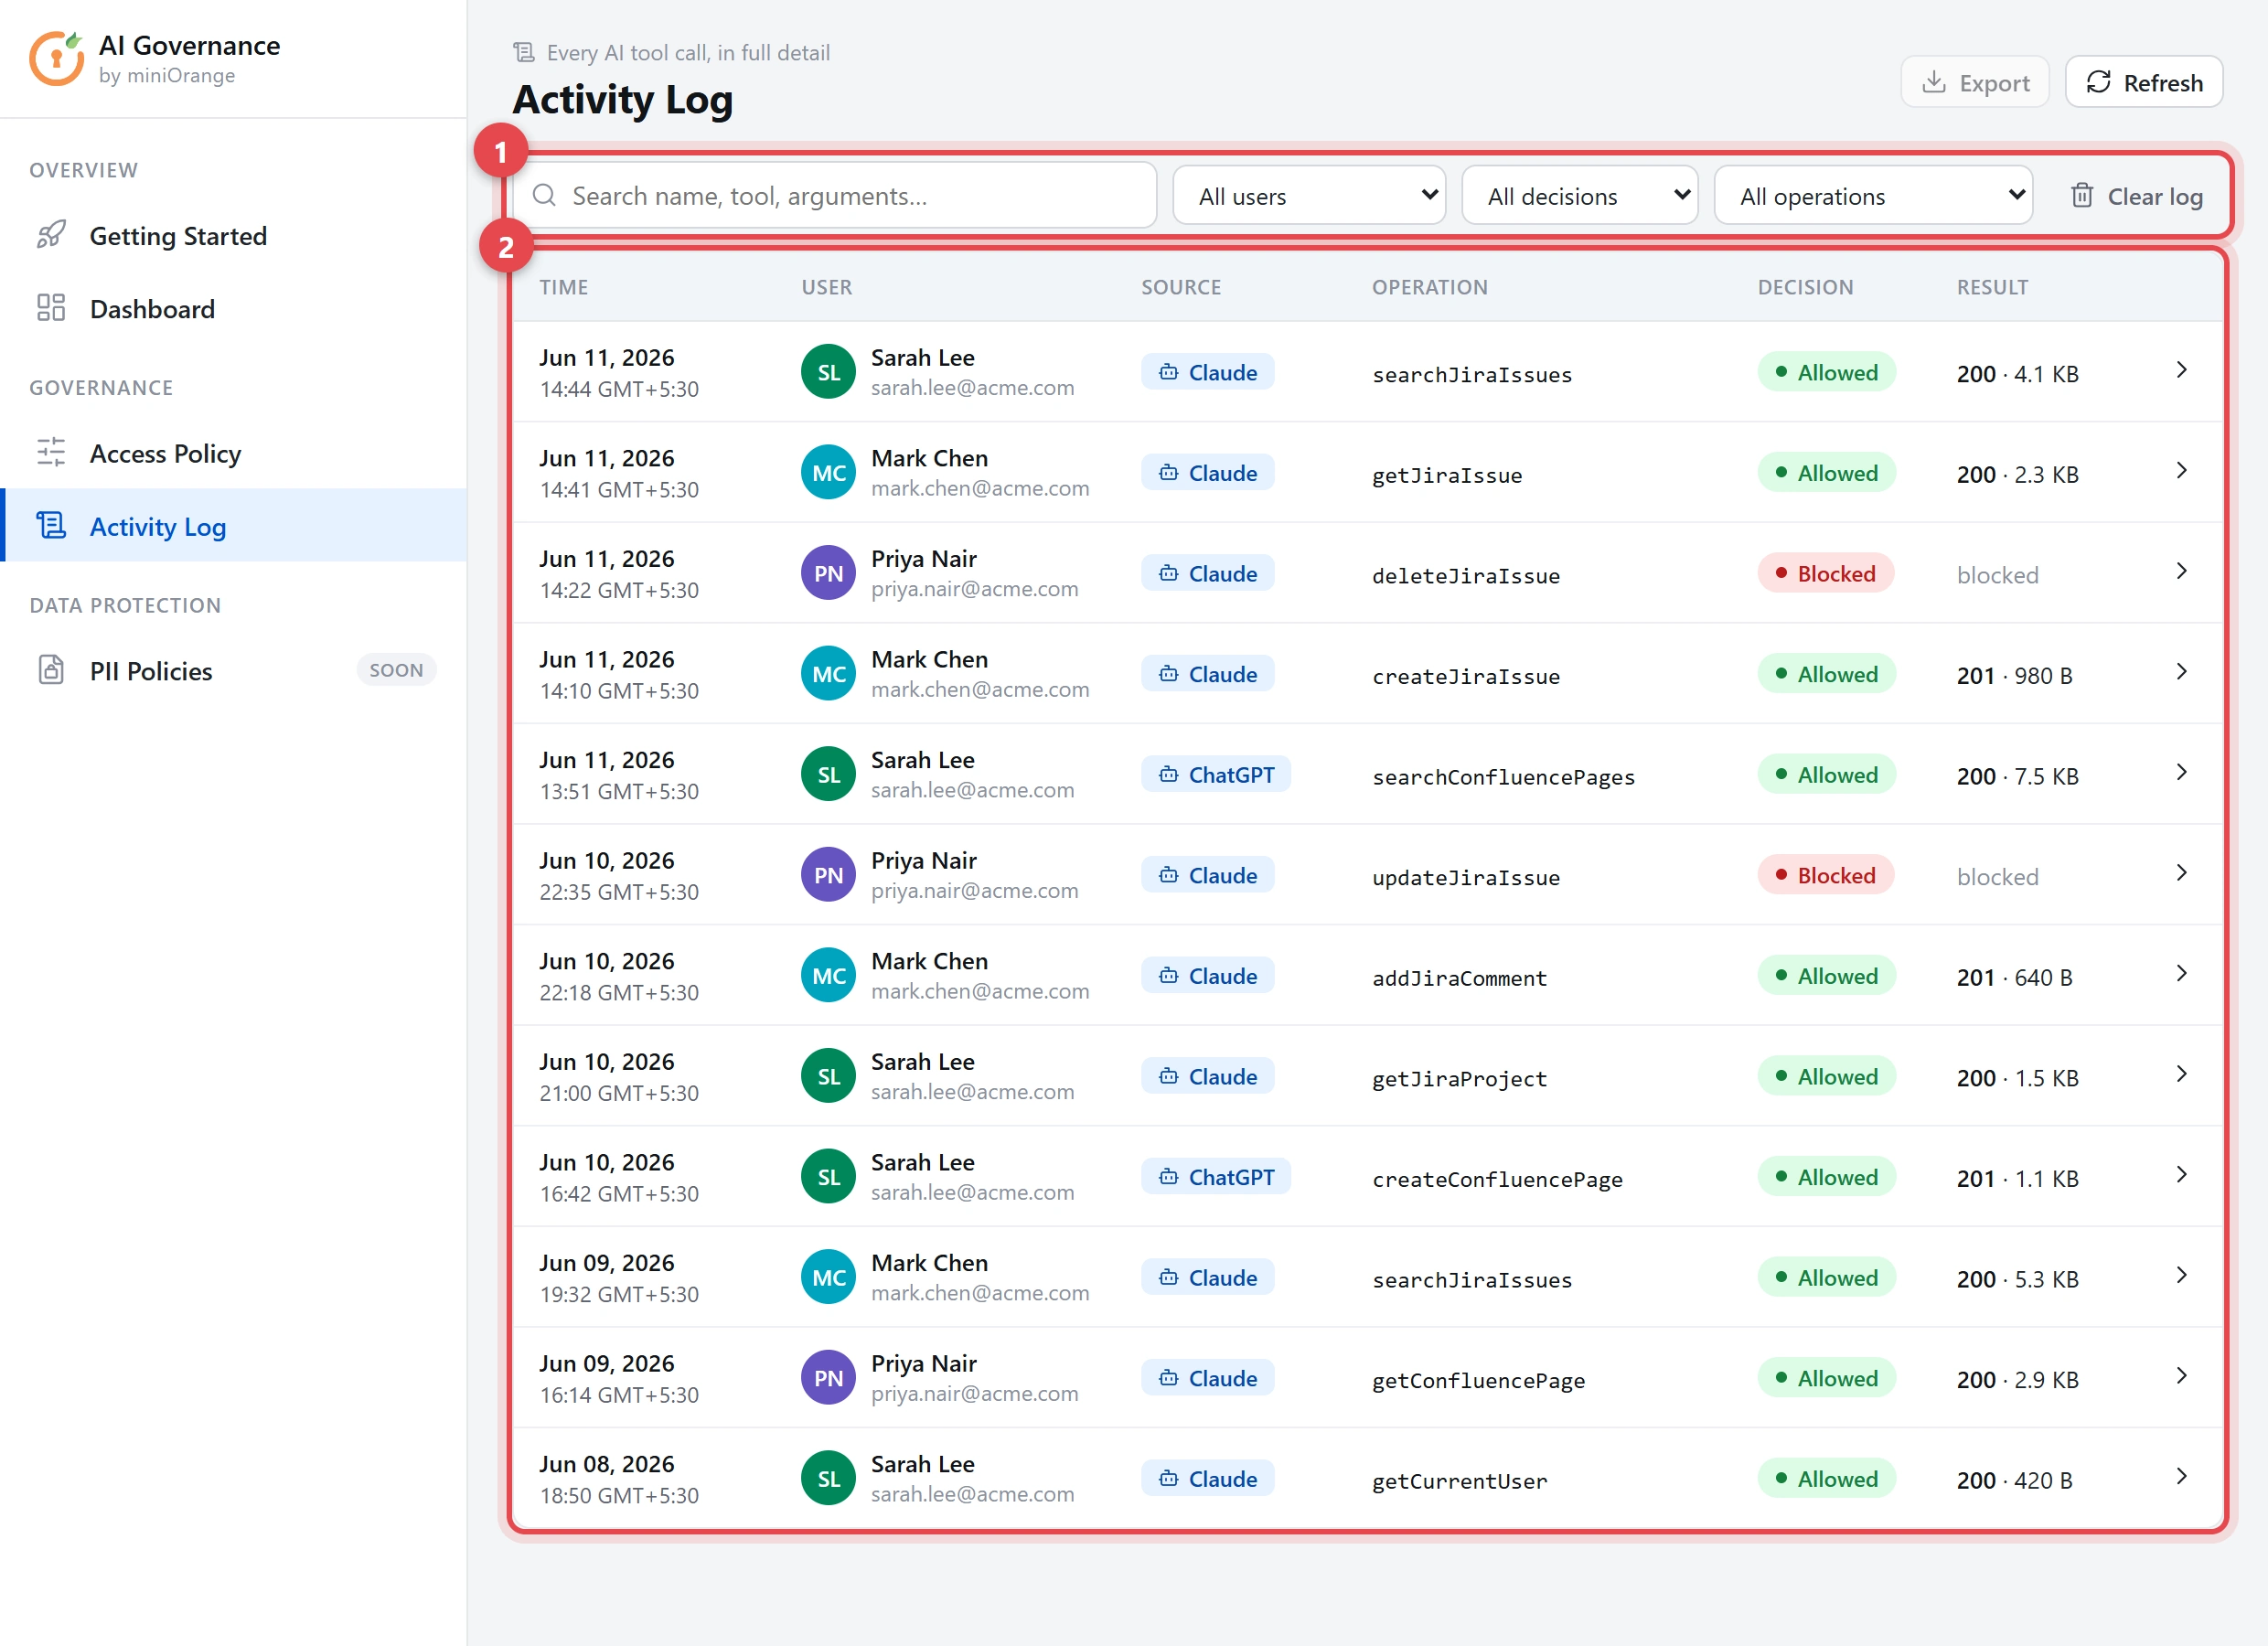
One row per AI action, with search and filters along the top.
- Search & filters. Find what you need fast — type a name, a tool, or a word from the request; or filter by user, by decision (Allowed / Blocked), or by operation.
- The log. Each row is one action. The columns are explained below.
What each log column shows
| Column | What it shows |
|---|---|
| Time | When the action happened. |
| User | The real person behind the AI — their name and email. |
| Source | Which AI assistant made the call (Claude, ChatGPT…). |
| Operation |
The exact tool that ran, e.g. searchJiraIssues.
|
| Decision | Allowed or Blocked by your policy. |
| Result | The response status and how much data came back. |
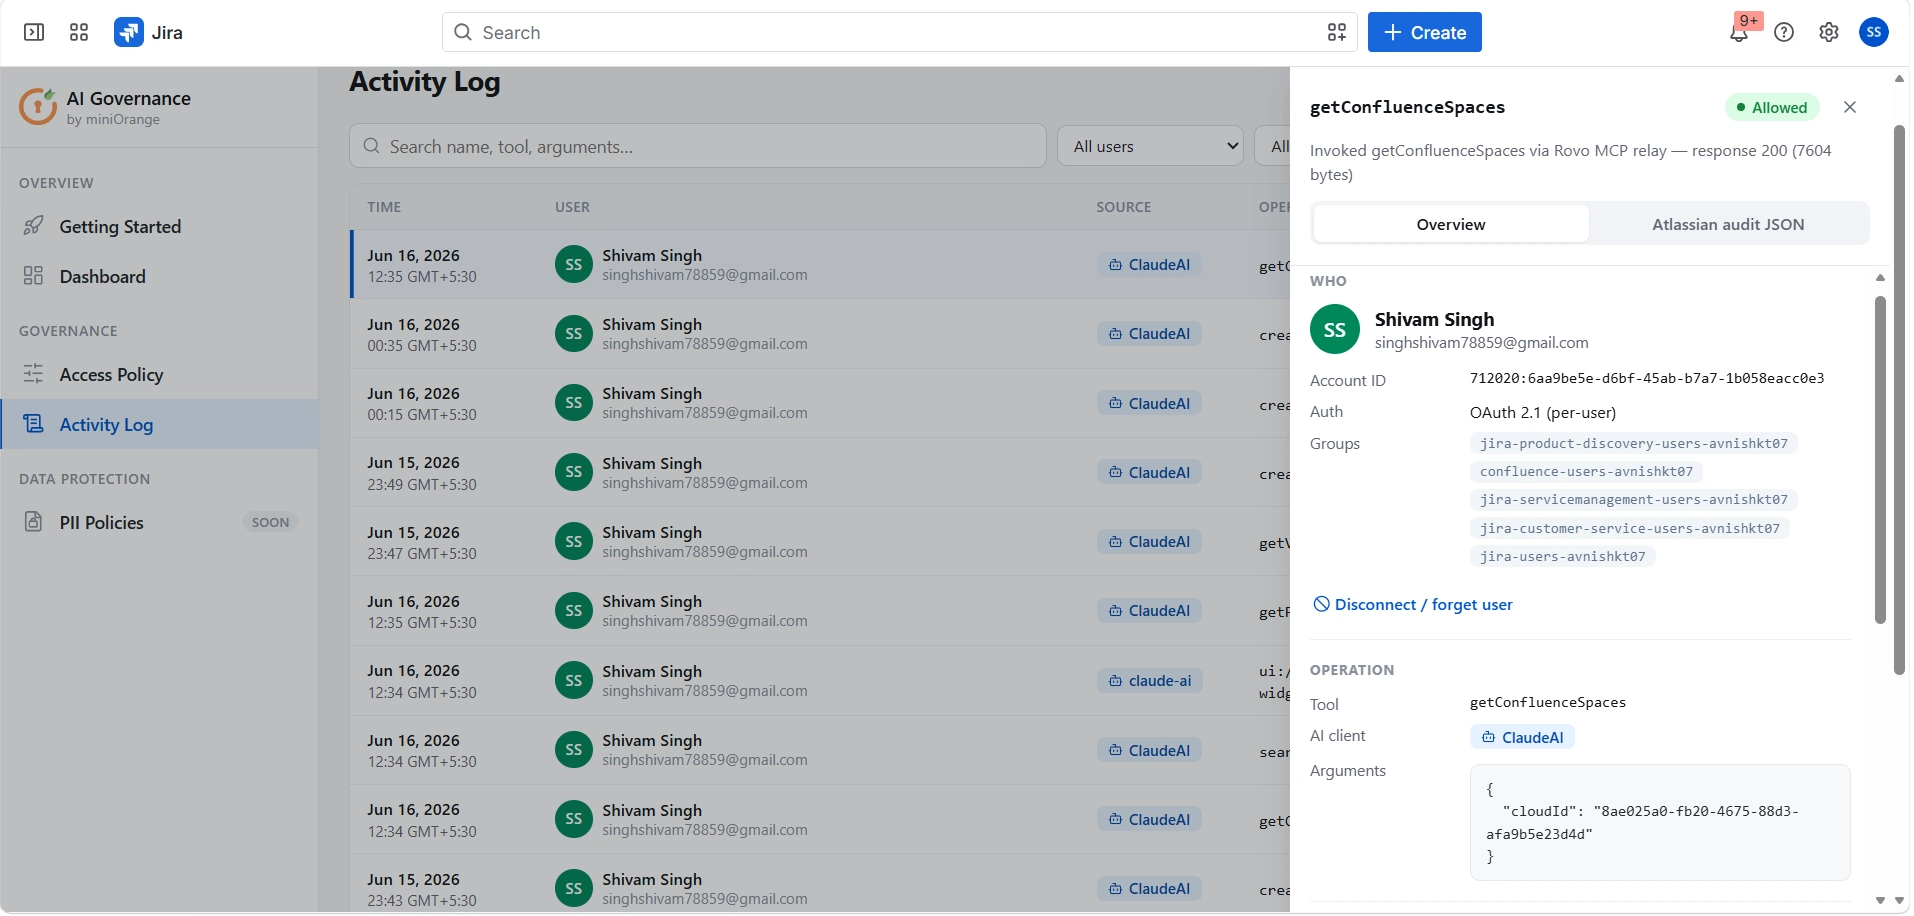
Click any row for the full story
Selecting a row opens a detail panel showing everything about that single action:
- Who ran it — name, email, and their Atlassian groups.
- The exact arguments the AI sent (e.g. the search query).
- The decision, and which rule applied if it was blocked.
- The response size and speed (latency).
- An “Atlassian audit JSON” tab showing the same event in Atlassian's native format.
Bonus: The Dashboard — activity at a glance
Open the Dashboard tab for a quick summary over Today, 7 days, or 30 days.

Quick troubleshooting
A few things that occasionally come up — and the one-line fix for each.
| If you see… | Do this |
|---|---|
| MCP URL says “Needs setup” | The URL is ready as soon as the app is installed. Refresh the page, or reopen the app from Jira → Apps. |
| Claude connects but finds no tools | Re-copy the URL and re-add the connector in Claude, and make sure you approved the Atlassian sign-in when prompted — that's what unlocks the tools. |
| An action was blocked | Open Access Policy to review your rules. The blocked row in the Activity Log shows exactly which rule stopped it. |
| You want to revoke someone | Open that person's action in the Activity Log and use Disconnect / forget user, or remove their access from your policy. |
| The connection stops working after a while | Reconnect Claude (sign in again). Connections refresh periodically for security. |
That's it. Claude is connected through the Claude Governance & Access Control for Jira app, your rules determine what it can do, and every action is recorded for review. Revisit the Access Policy any time to tighten or relax the rules — changes apply on the very next AI request.
Did this page help you?
