- Home
- Crowd OAuth SSO
- OAuth SSO into Crowd using Keycloak as OAuth Provider

OAuth/OpenID Single Sign On (SSO) into Crowd using Keycloak
Crowd OAuth/OpenID app gives the ability to enable OAuth/OpenID Single Sign On for Crowd. Crowd is compatible with all OAuth/OpenID Providers. Here we will go through a guide to configure SSO between Crowd and Keycloak as OAuth Provider. By the end of this guide, users from your OAuth/OpenID Provider should be able to login and register to Crowd.
 Try it for free
Pre-requisites
- Crowd should be installed and configured.
- Admin credentials are set up in Crowd.
- Crowd Server is HTTPS enabled (optional).
- Valid Crowd Server or Datacenter Licence.
To configure your Identity Provider integration with Crowd OAuth/OIDC SSO, you need the following items:
Download And Installation
- Log into your Crowd instance as an admin.
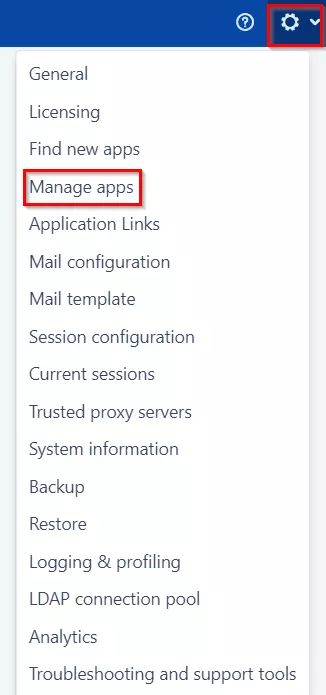
- Navigate to the Administration menu and Click Manage Apps.
- Click Find new apps or Find new add-ons from the left-hand side of the page.
- Locate OAuth/OIDC SSO via search and click on install.
- Create an account with miniOrange.
- Login to miniOrange Admin console.
- Navigate to License > Manage License > Release and Download .
- Download the jar file from the Download link.
- Now, click on the View License button to get the license key.
- Log in to the Crowd Admin console.
- Navigate to Administration > Manage Apps.
- Click on the Upload App and upload the jar file.
- Now, click on the Configure button. You will be asked to verify the miniOrange credential and license key.
- Navigate to Crowd Admin Console → Manage Apps.
- Click on the Configure button of the miniOrange Crowd OAuth/OIDC SSO plugin.
- Log in with your miniOrange account. Once authenticated, you will be prompted to enter the license key.
- Enter the license key and click on the verify button.
Step 1: Set Up Keycloak as OAuth Provider
Follow the following steps to configure Keycloak as IdP to achieve Keycloak SSO
Select Keycloak version:
 Pre-requisites : Download And Installation
- First of all, Download Keycloak and install it.
- Start the keycloak server based on your keycloak version. (See table below)
| For the Keycloak Version 16 and below |
Go to the Root Directory of keycloak bin standalone.bat |
| For the Keycloak Version 17 and above |
Go to the Root Directory of keycloak bin kc.bat and run the below commands.
|
Configure Keycloak as IdP
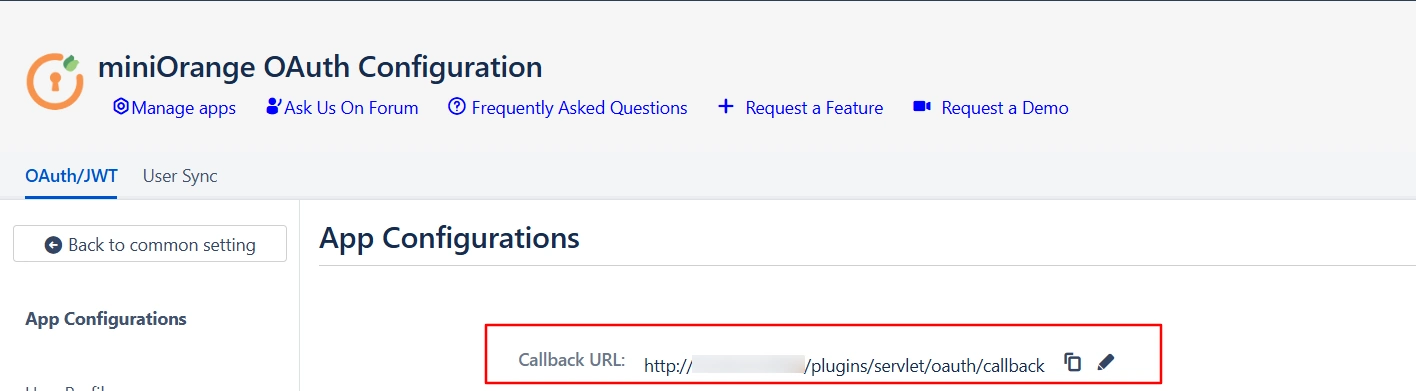
- Navigate to the plugin configuration page, click the "Add New Provider" button (located either in the middle or top-right corner), select Keycloak as the application, and copy the callback URL from the plugin and keep it handy, as you'll need it to configure Keycloak as the OAuth provider.
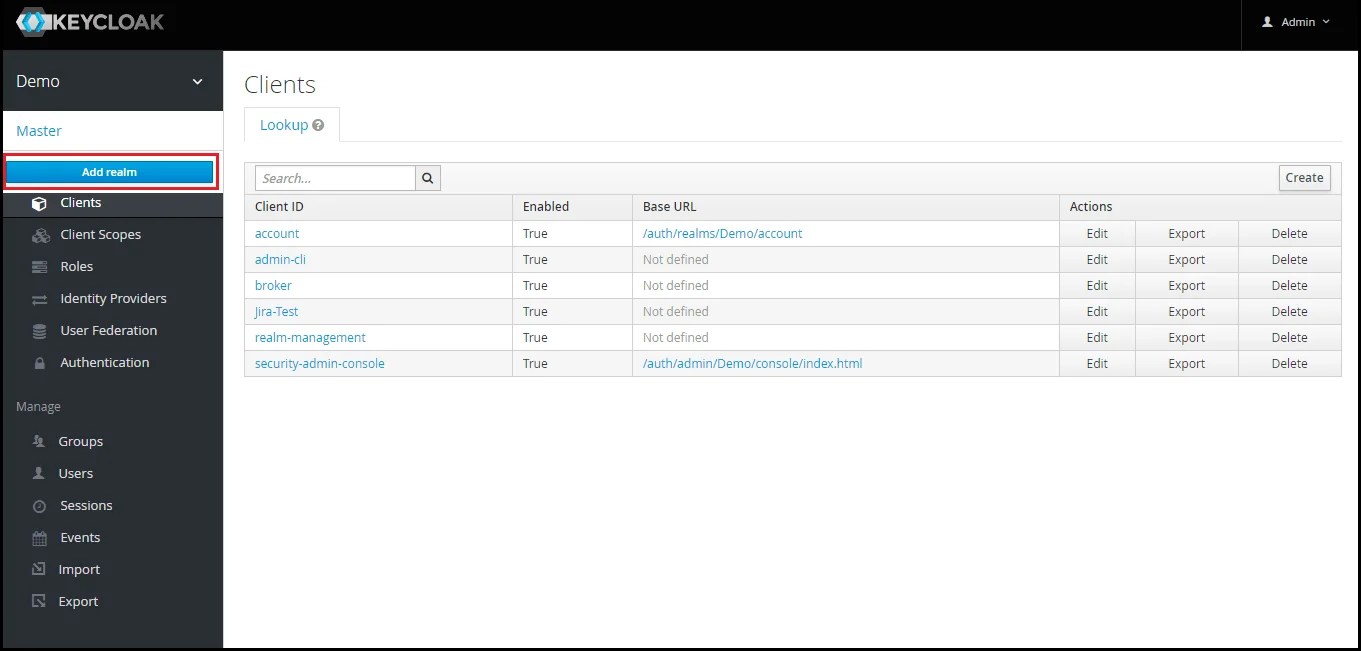
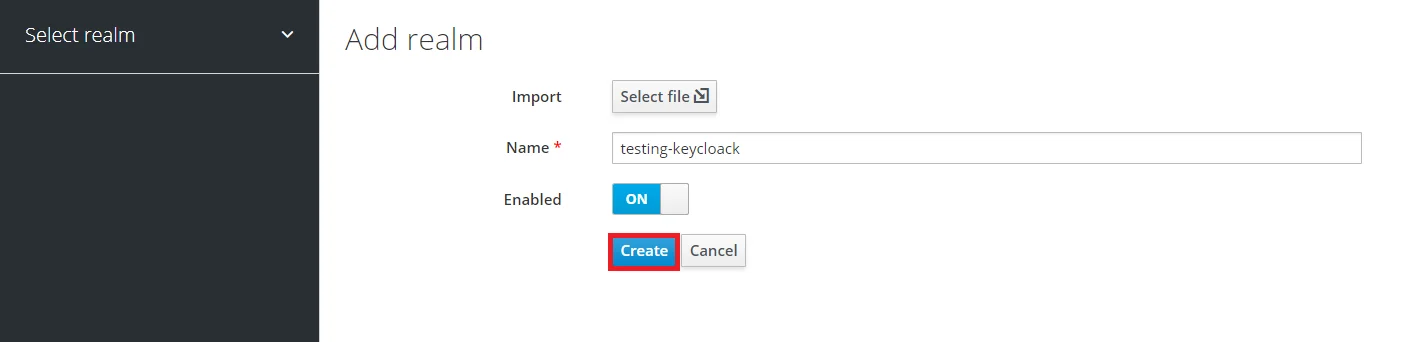
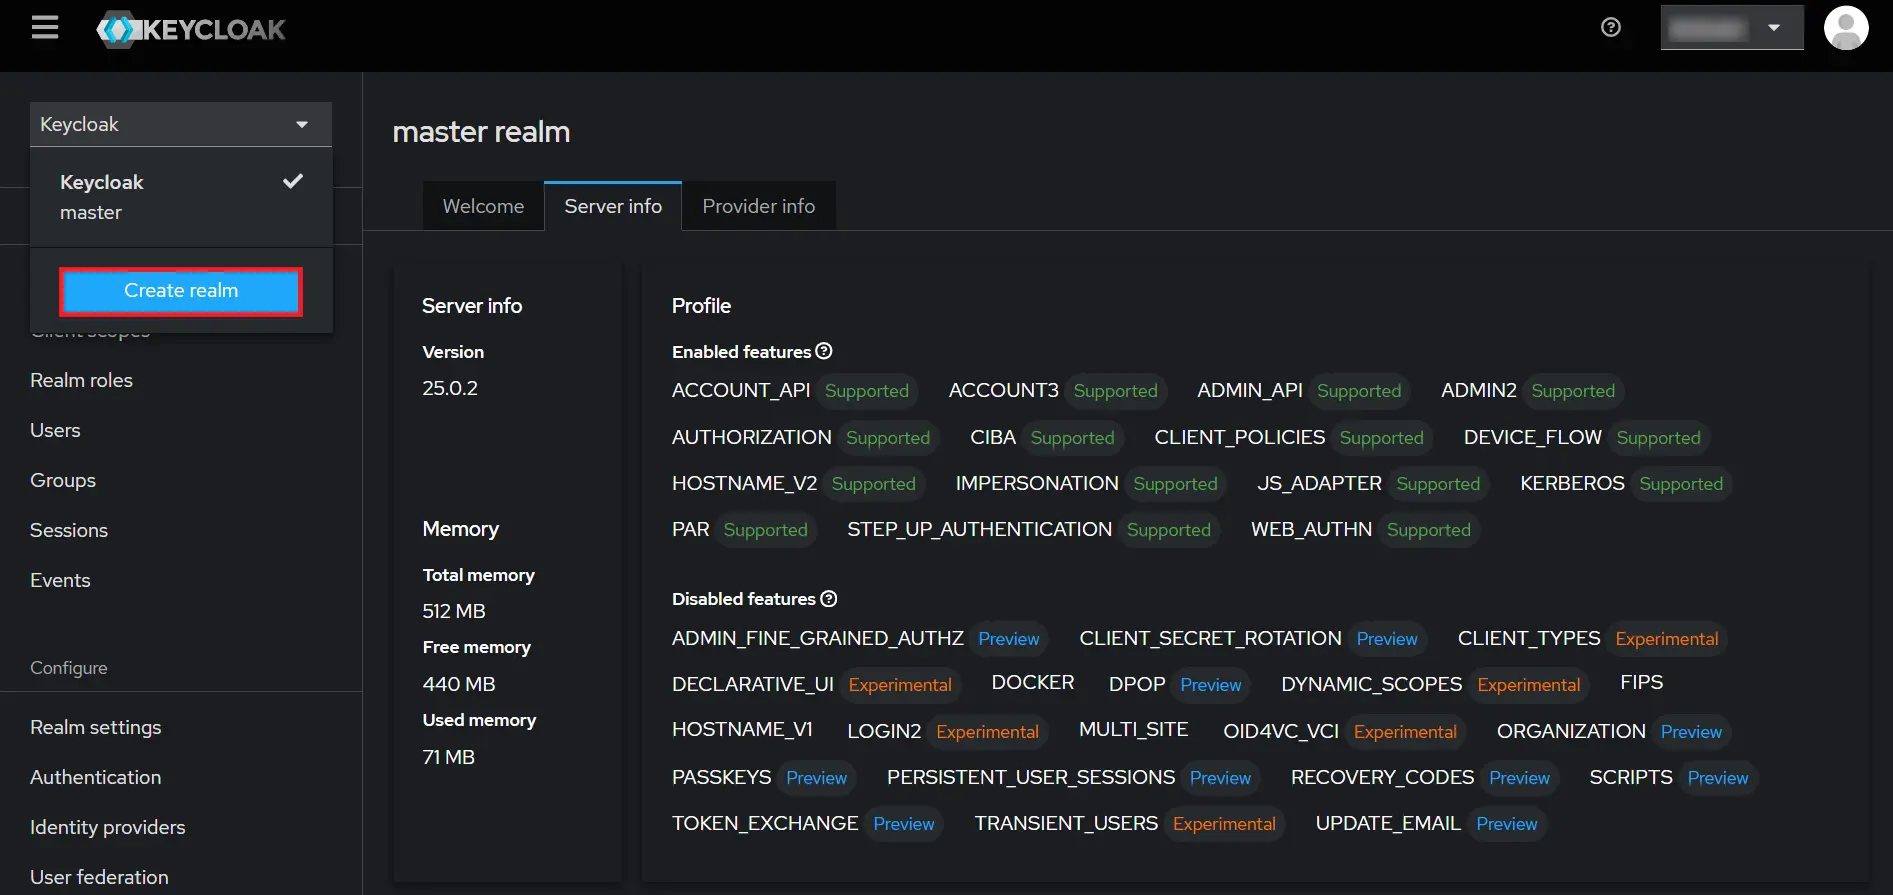
- Add Realm : Now login to keycloak administration console and navigate to your desired realm. You can add new realm by selecting Add Realm option.
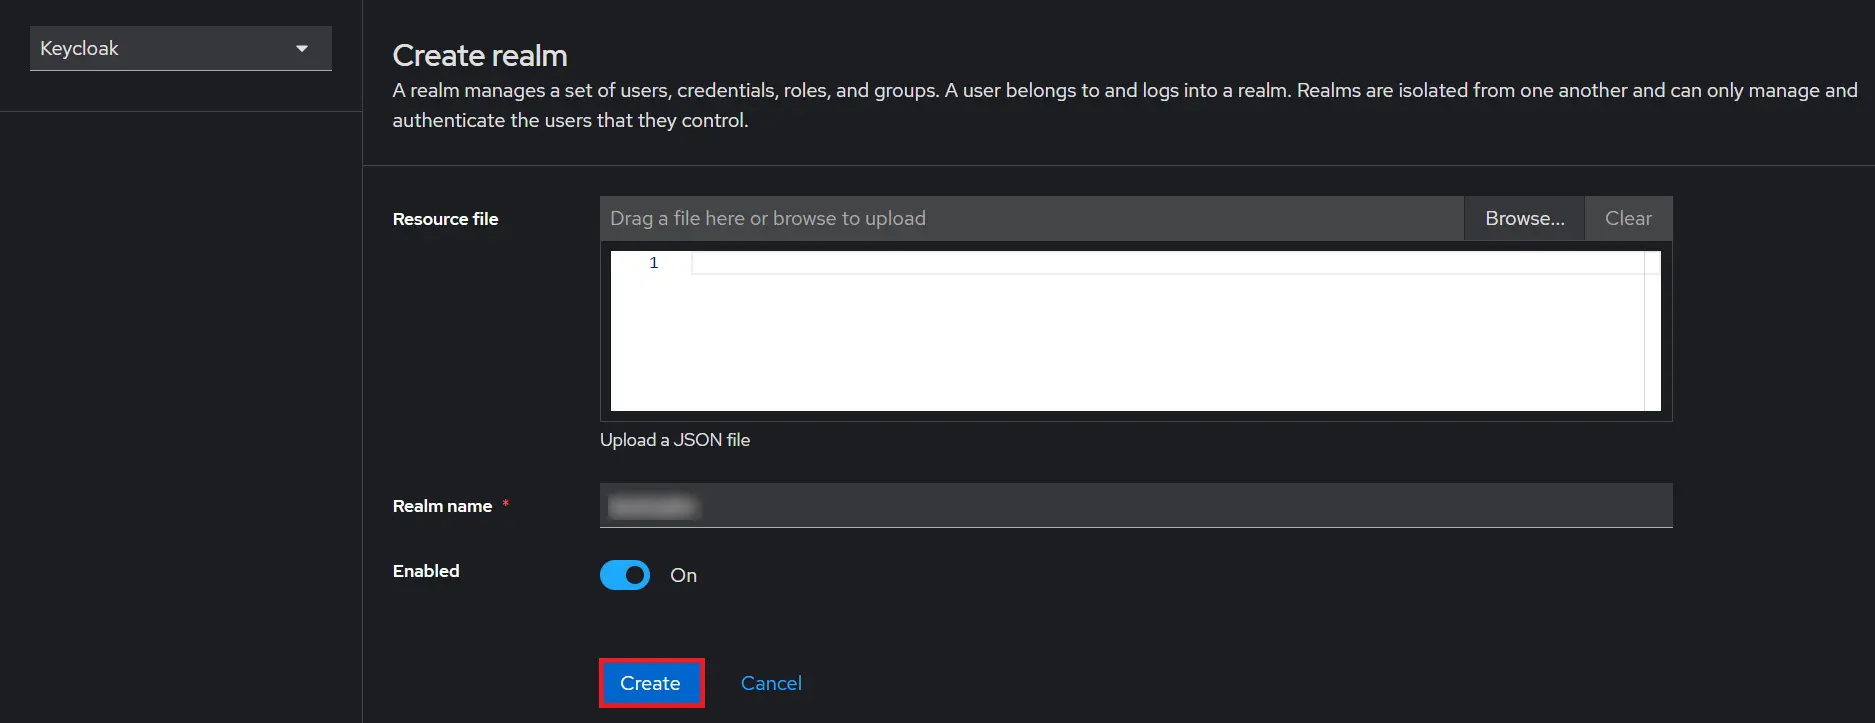
- Create realm: Enter Realm Name and keep the realm name handy as it will required later to configure the Realm under the plugin. Click on CREATE to add realm.
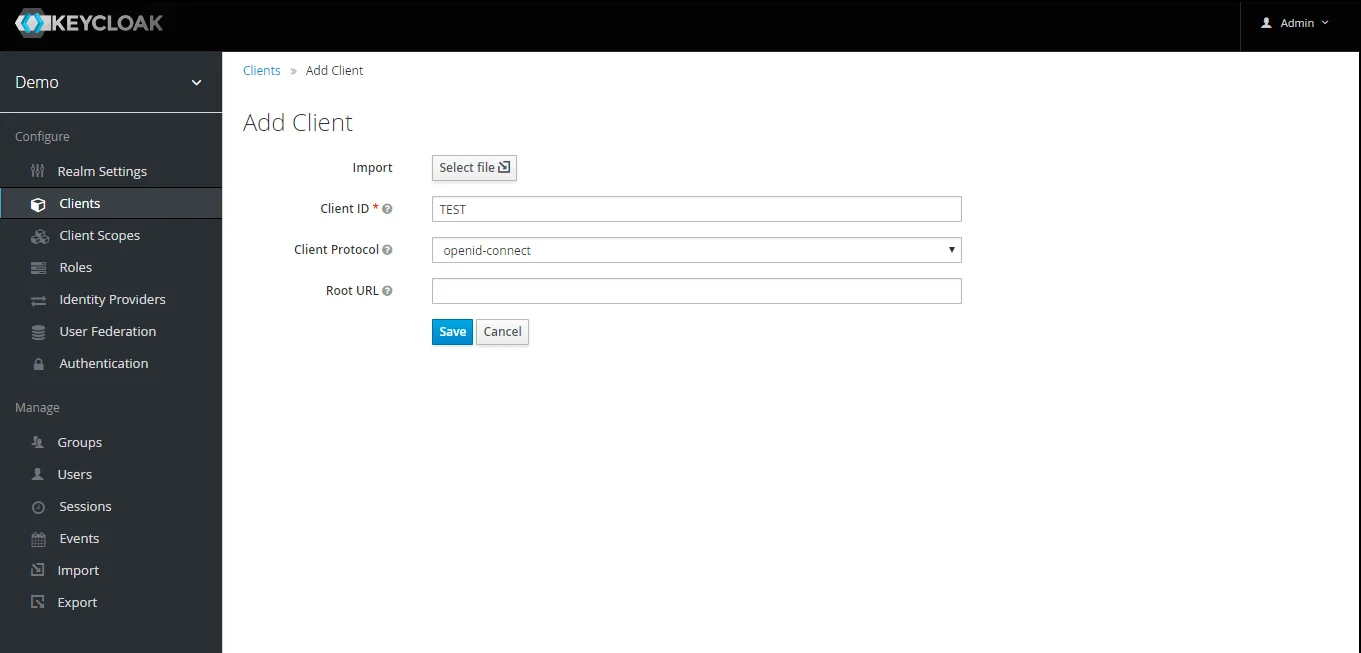
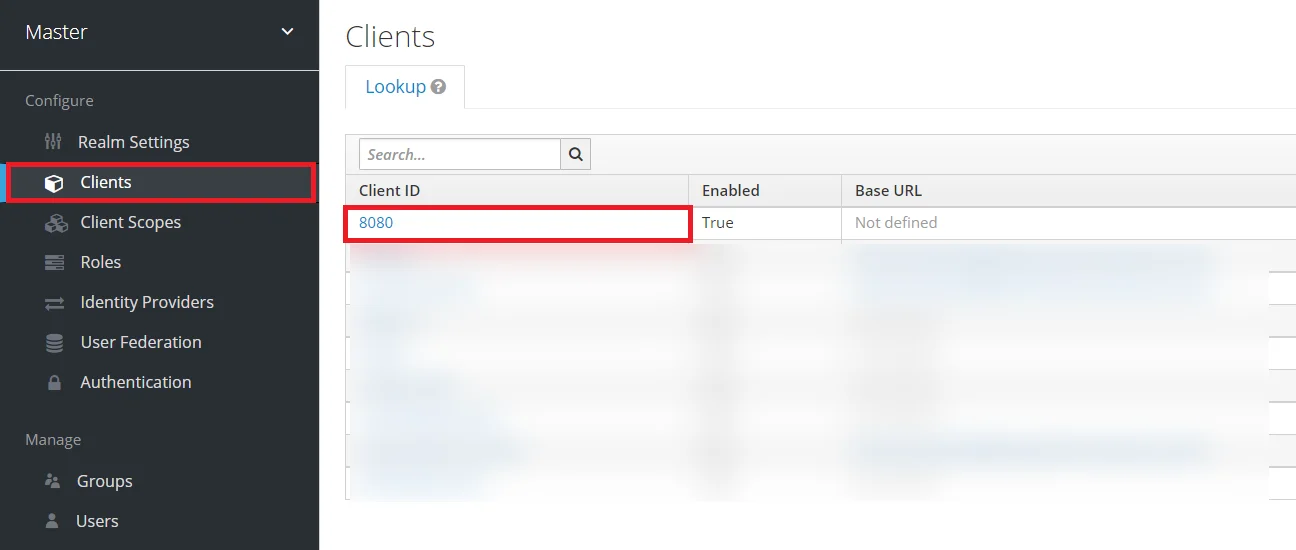
- Create OpenID client: Click on the Clients and choose create to create a new client. Enter client id and select client protocol openeid-connect and select Save.
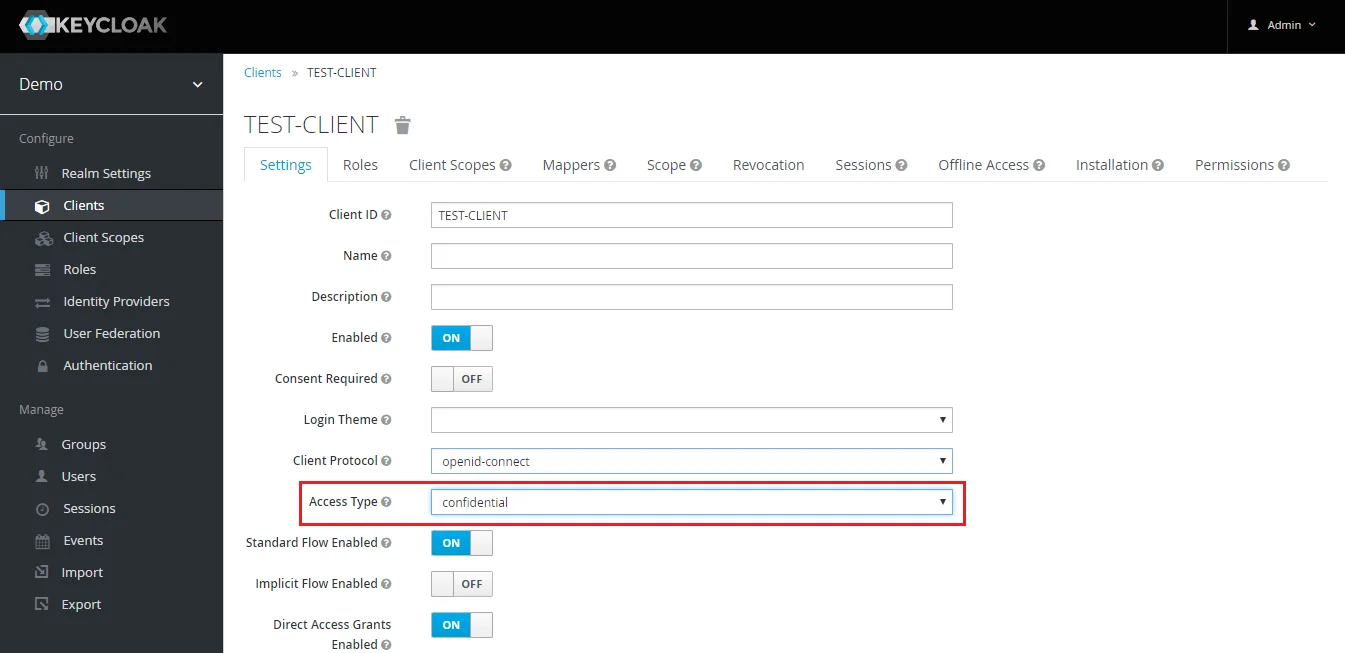
- Change Access type: After client is created change its access type to confidential.
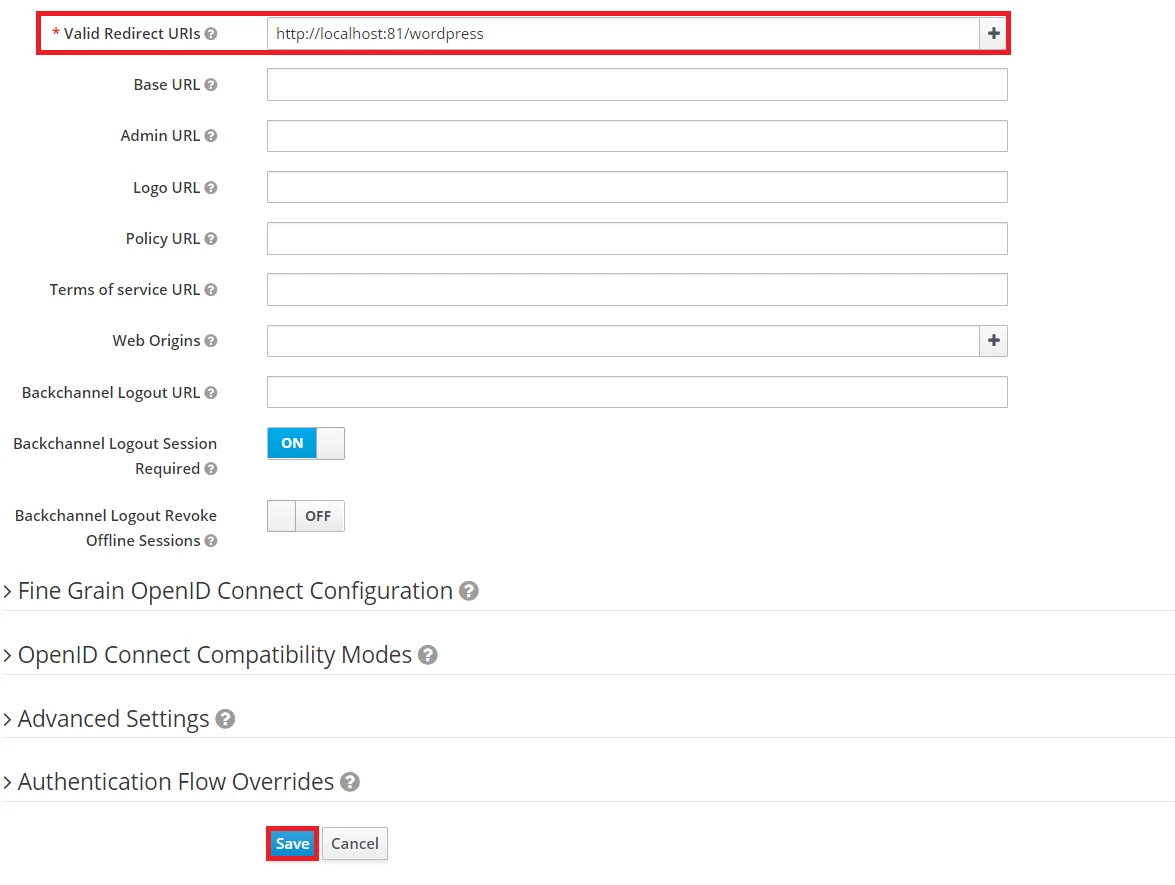
- Enter Valid Redirect URIs: Copy callback URL from plugin and then click on
SAVE. Ex -- https://
/oauth/callback - Get Client Secret: Now we need to get client secret. So select Clients and select credentials and copy your secret from here.
- Plugin Configuration: Enter copied Client Secret under Client secret field in the OAuth Client plugin, and enter the Client Name under the Client ID field.
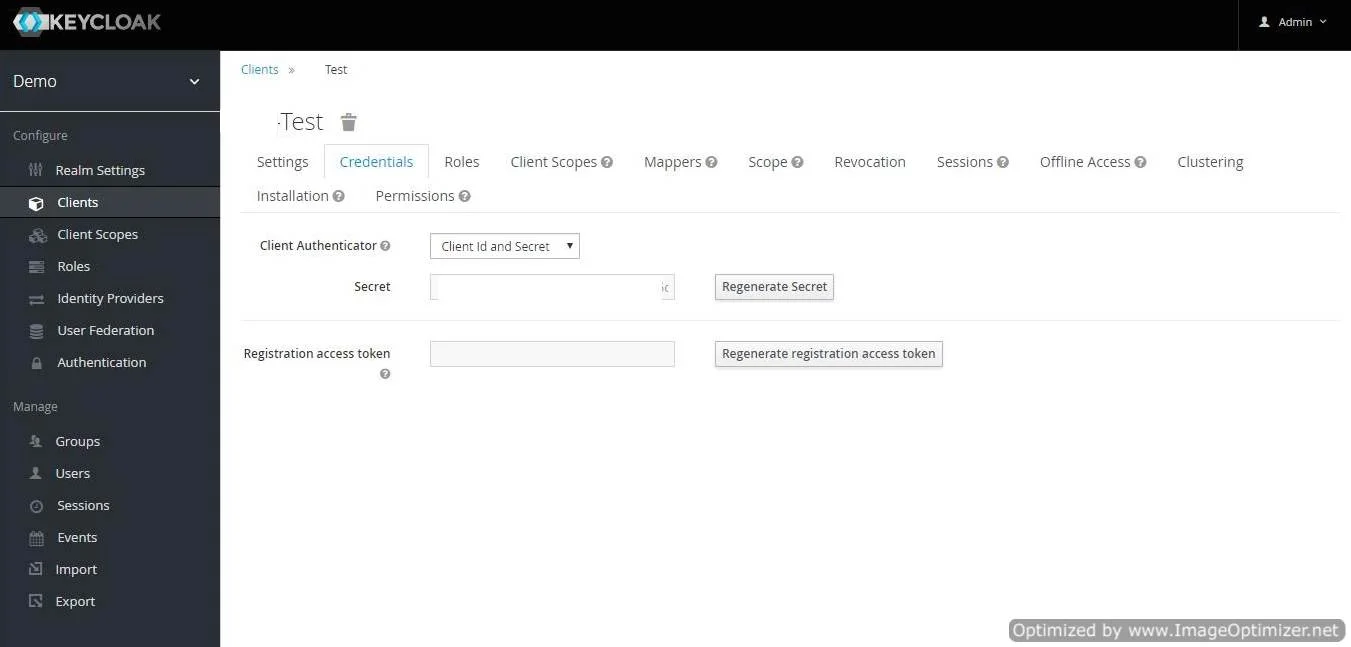
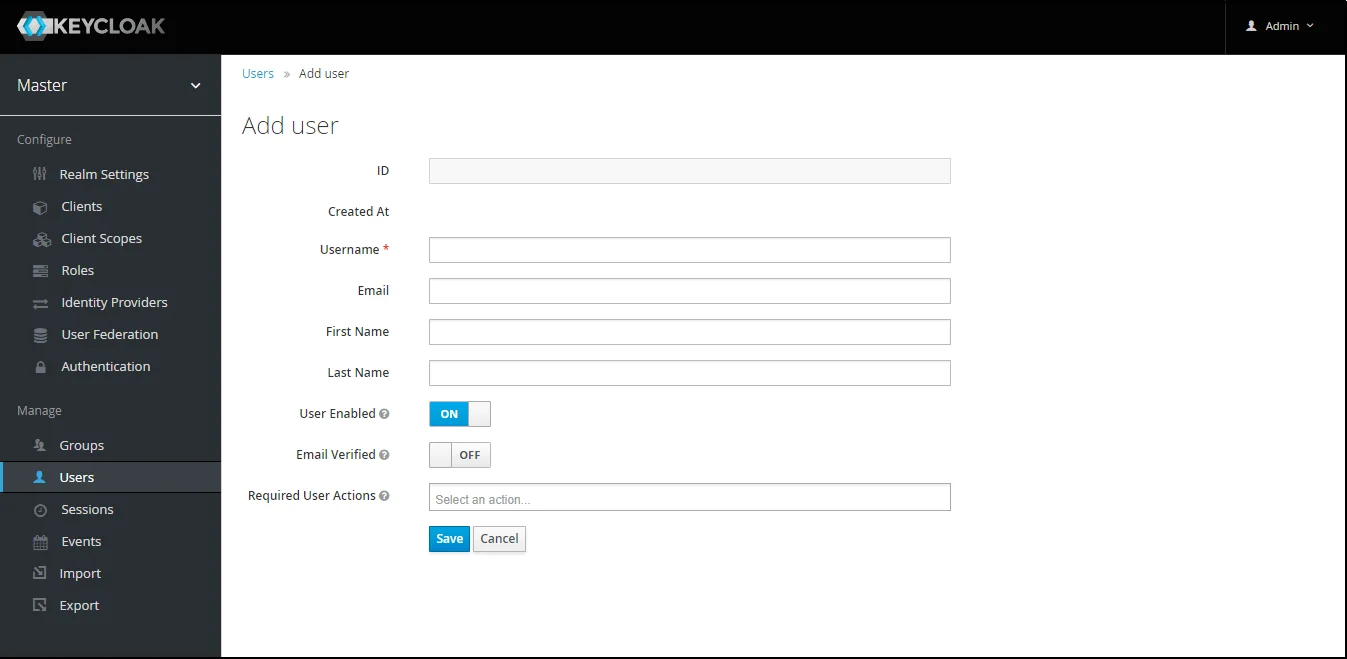
- Add User: We need to add users to realm who will be able to access the resources of realm. Click on the Users and choose to Add a new User.
- User Configuration: After user is created following action needs to be performed on it.
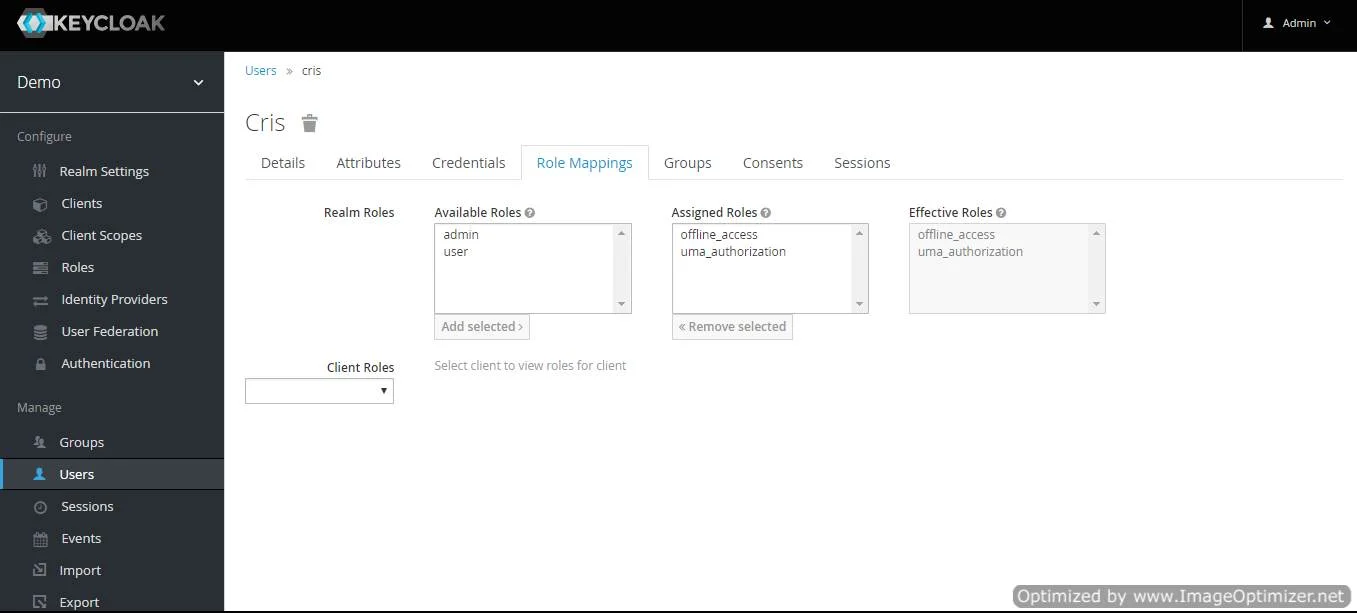
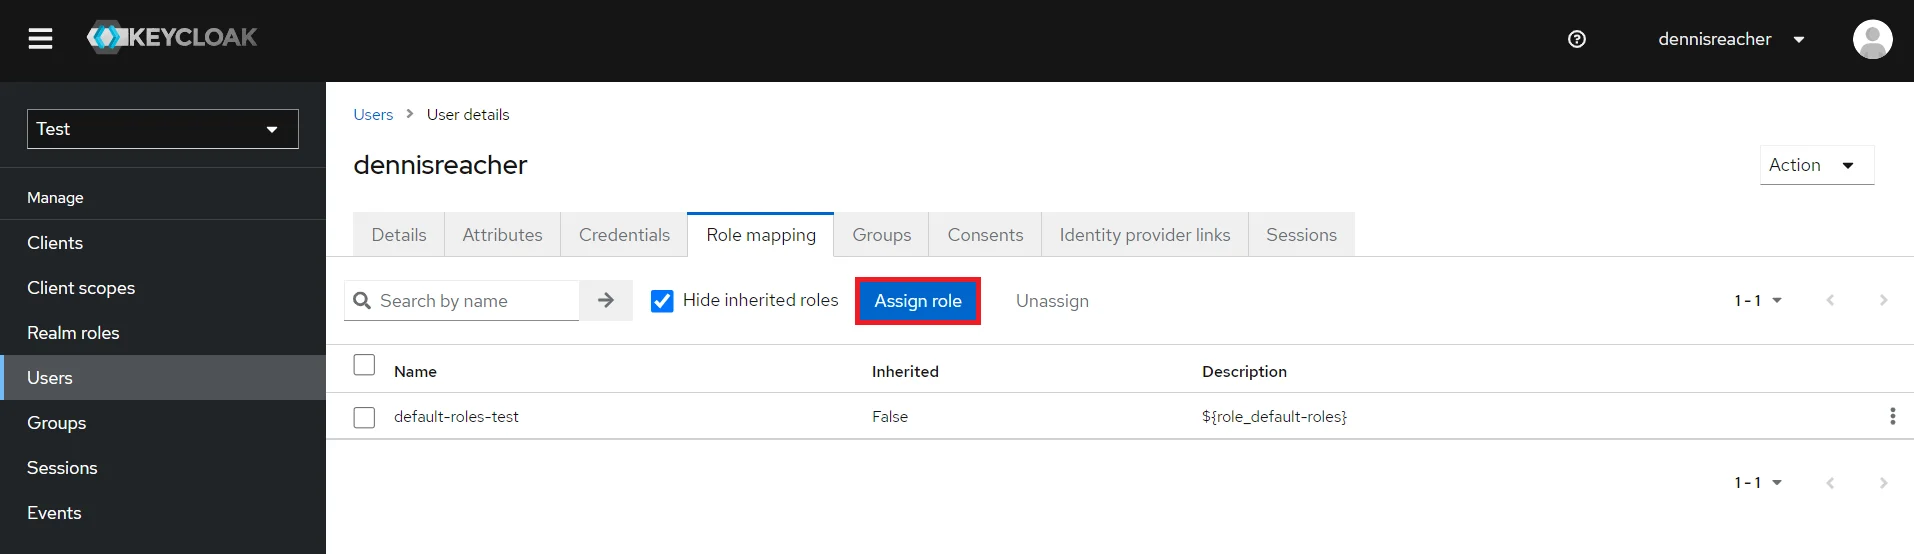
- Map User: We need to map user to a role. Click on Role Mappings and assign the user desired role from available roles and clicking on add selected.
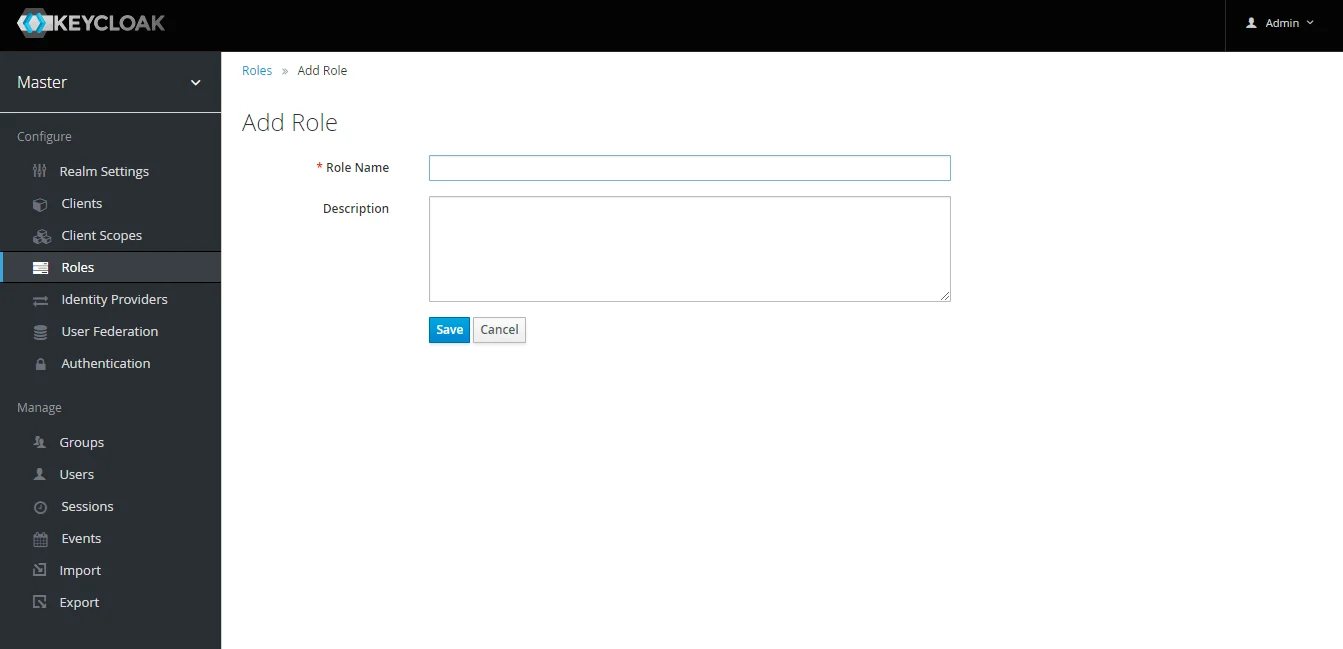
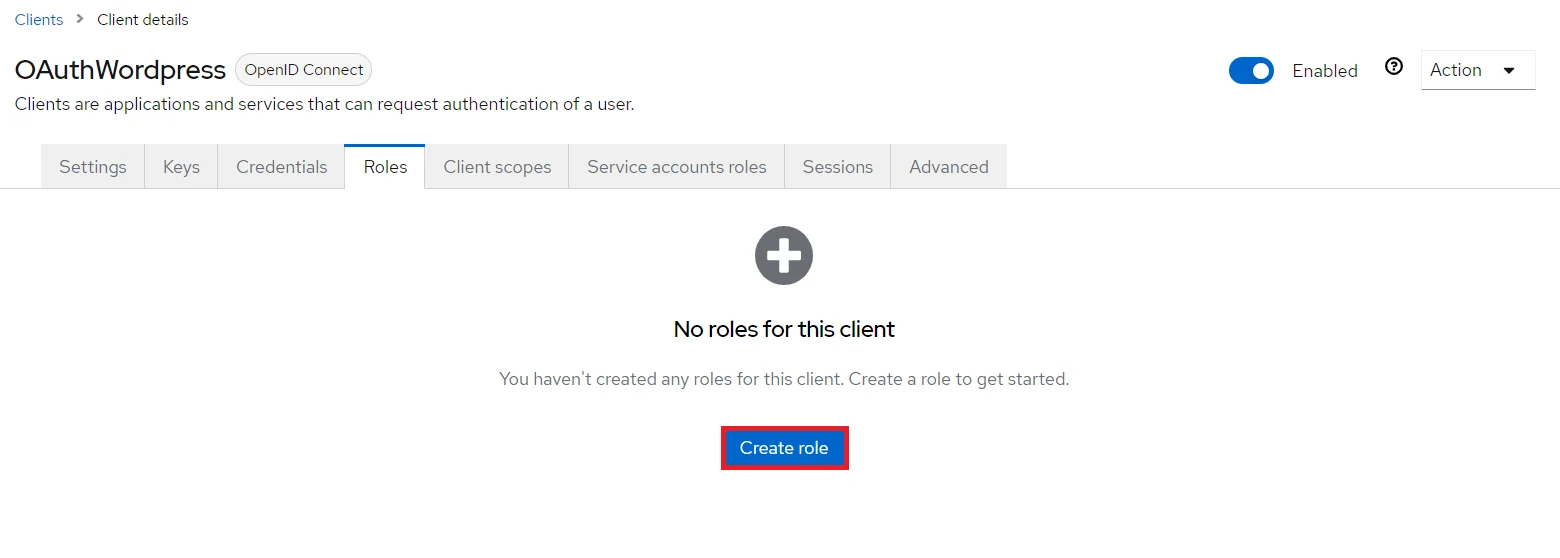
- Create ROLE: The Role will be used by your applications to define which users will be authorized to access the application. Click on the Roles and choose Add Role.
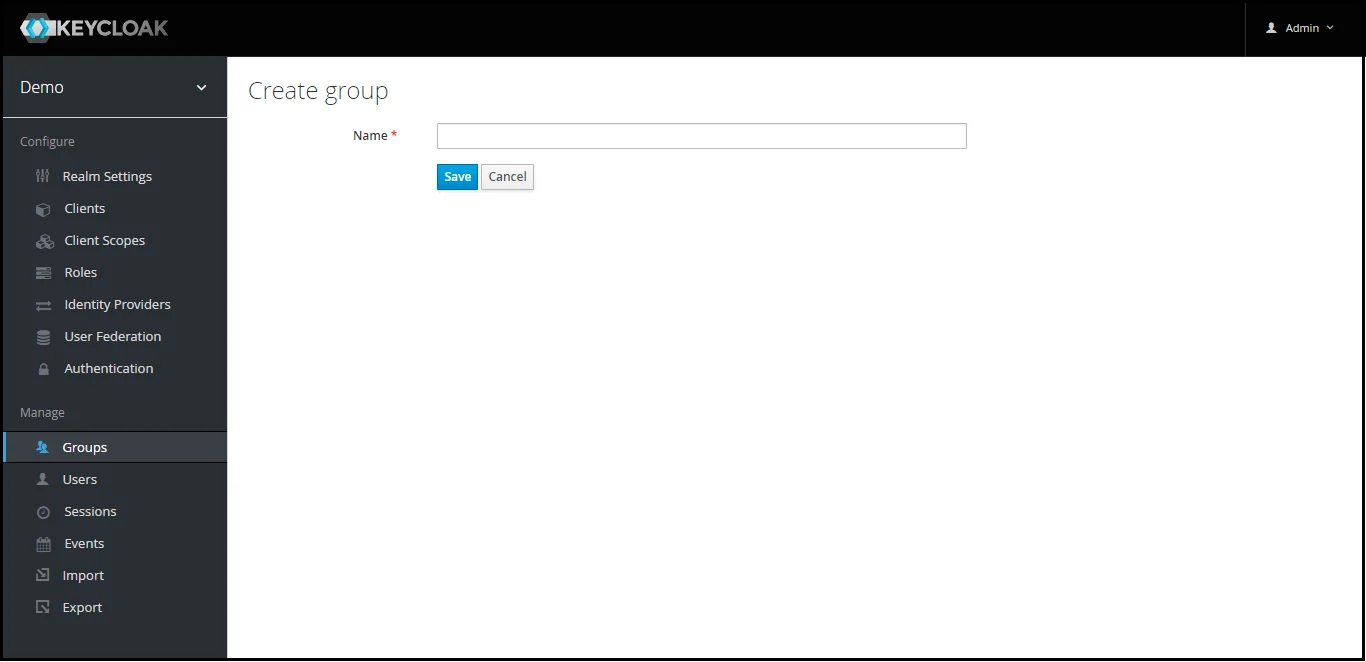
- Create groups: Click on the Groups and choose New to create a new group.
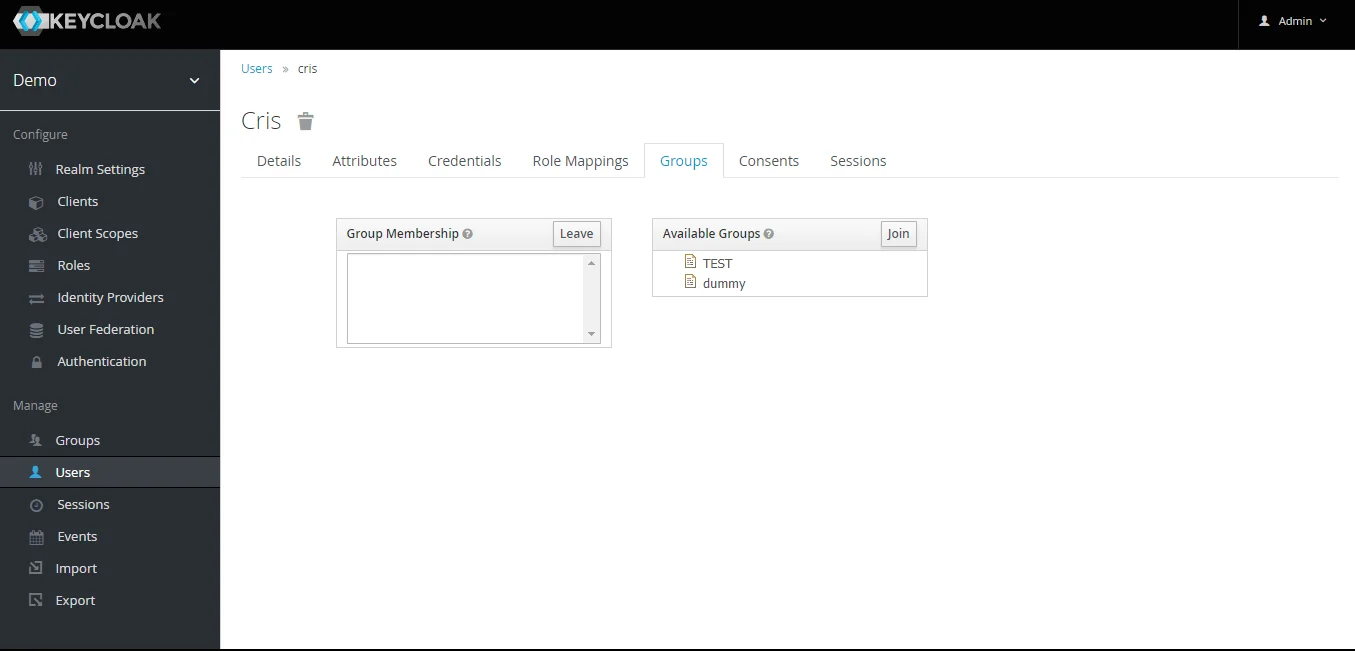
- Assign user to group: Select the user whom you want to add in group. Choose Groups option from tab and then select the group-name and click on join.
- Keycloak Group Mapper: Now to get group details we need to perform its client mapping with group membership else group details will not be fetched. So in Client section, select your client and then click on mapper->create.
- Now, select mapper type as Group Membership and enter the name and token claim name i.e the attribute name corresponding to which groups will be fetched. Turn Off the full group path, Add to ID token and Add to access token options, and click on Save.
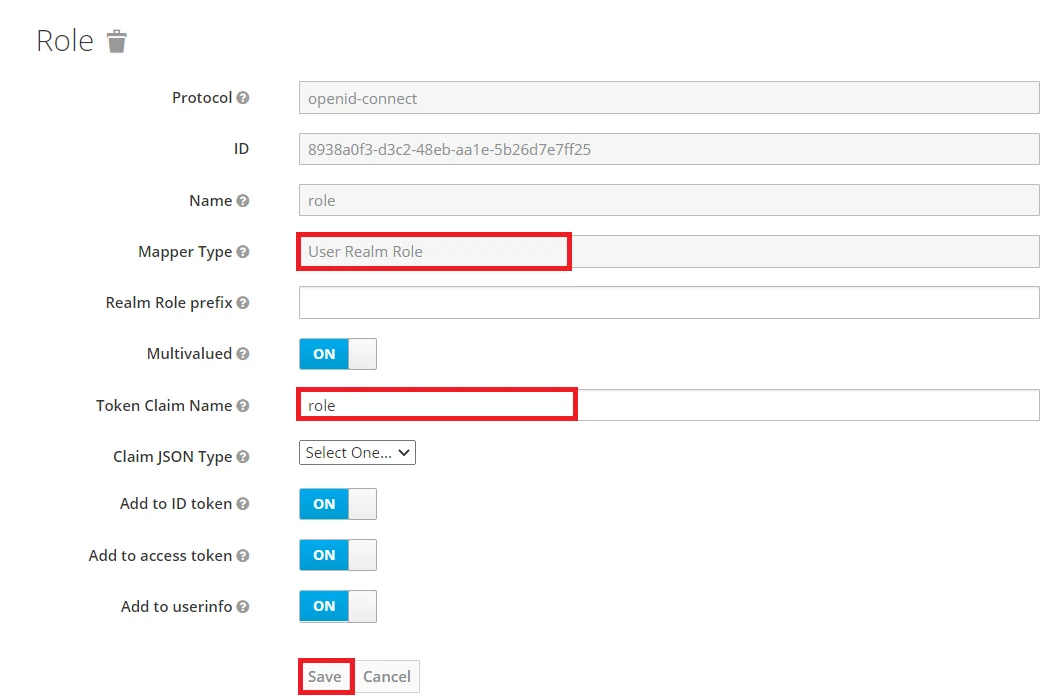
- Keycloak Role Mapper: Now to get role details we need to perform its client mapping with role membership else role details will not be fetched. So in Client section, select your client and then click on mapper->create.
- Now, select mapper type as user realm Role Membership and enter the name. and token claim name i.e the attribute name corresponding to which groups will be fetched. Add to ID token and Add to access token options, and click on Save.
- Navigate to the plugin configuration page, click the "Add New Provider" button (located either in the middle or top-right corner), select Keycloak as the application, and copy the callback URL from the plugin and keep it handy, as you'll need it to configure Keycloak as the OAuth provider.
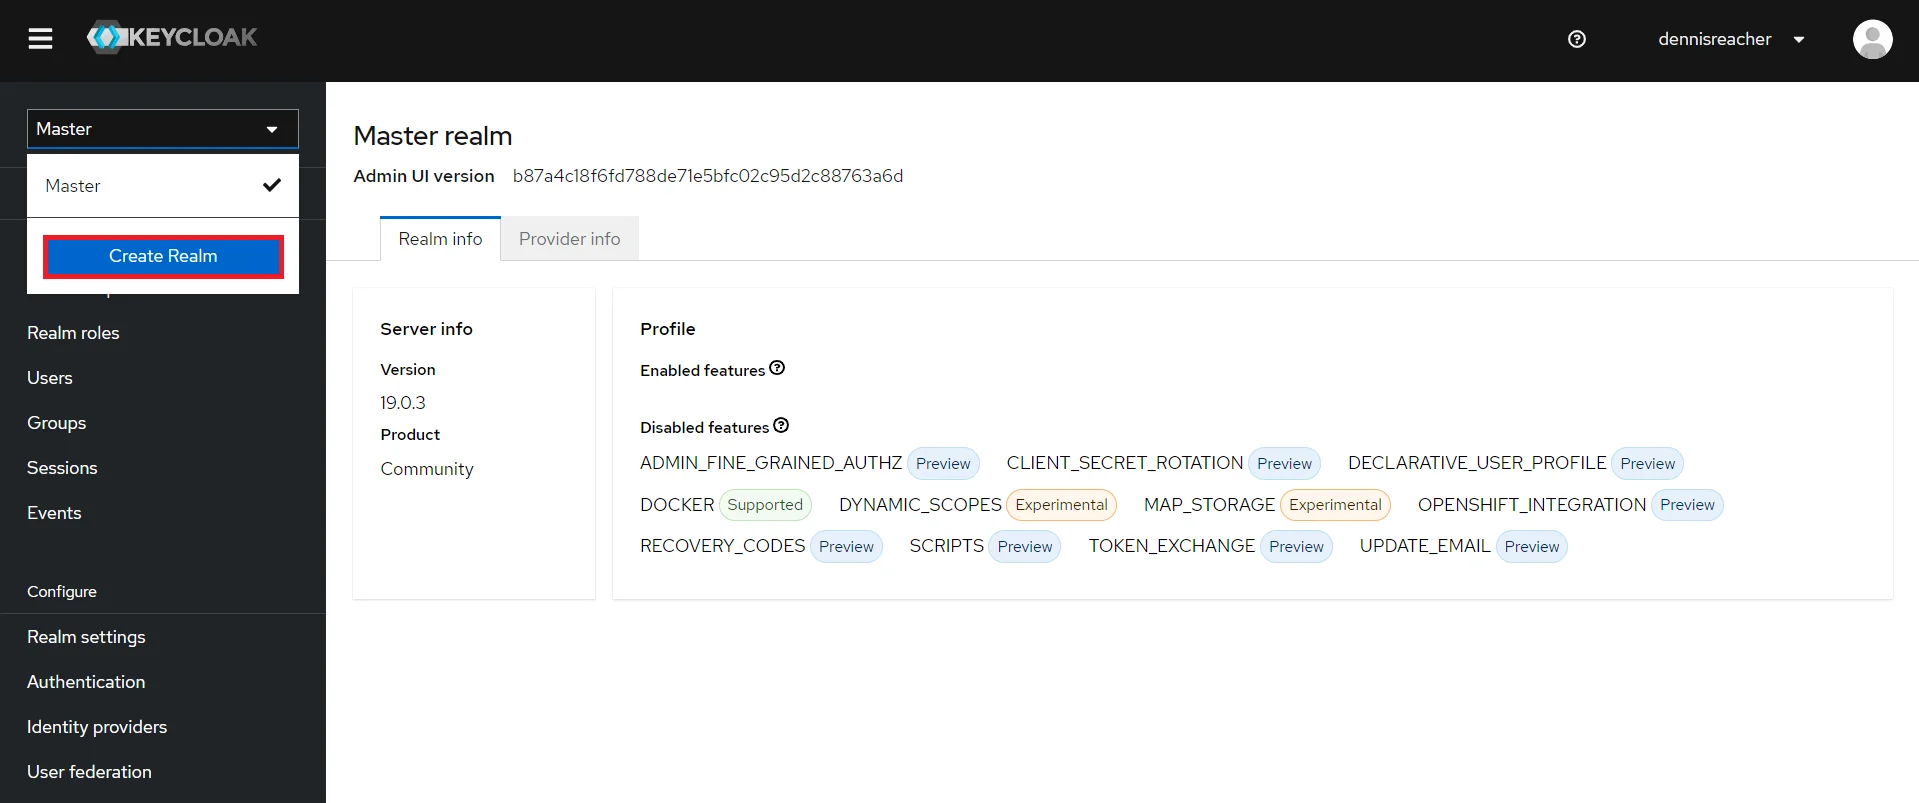
- Add Realm : Now login to keycloak administration console and navigate to your desired realm. You can add new realm by selecting Create Realm option.
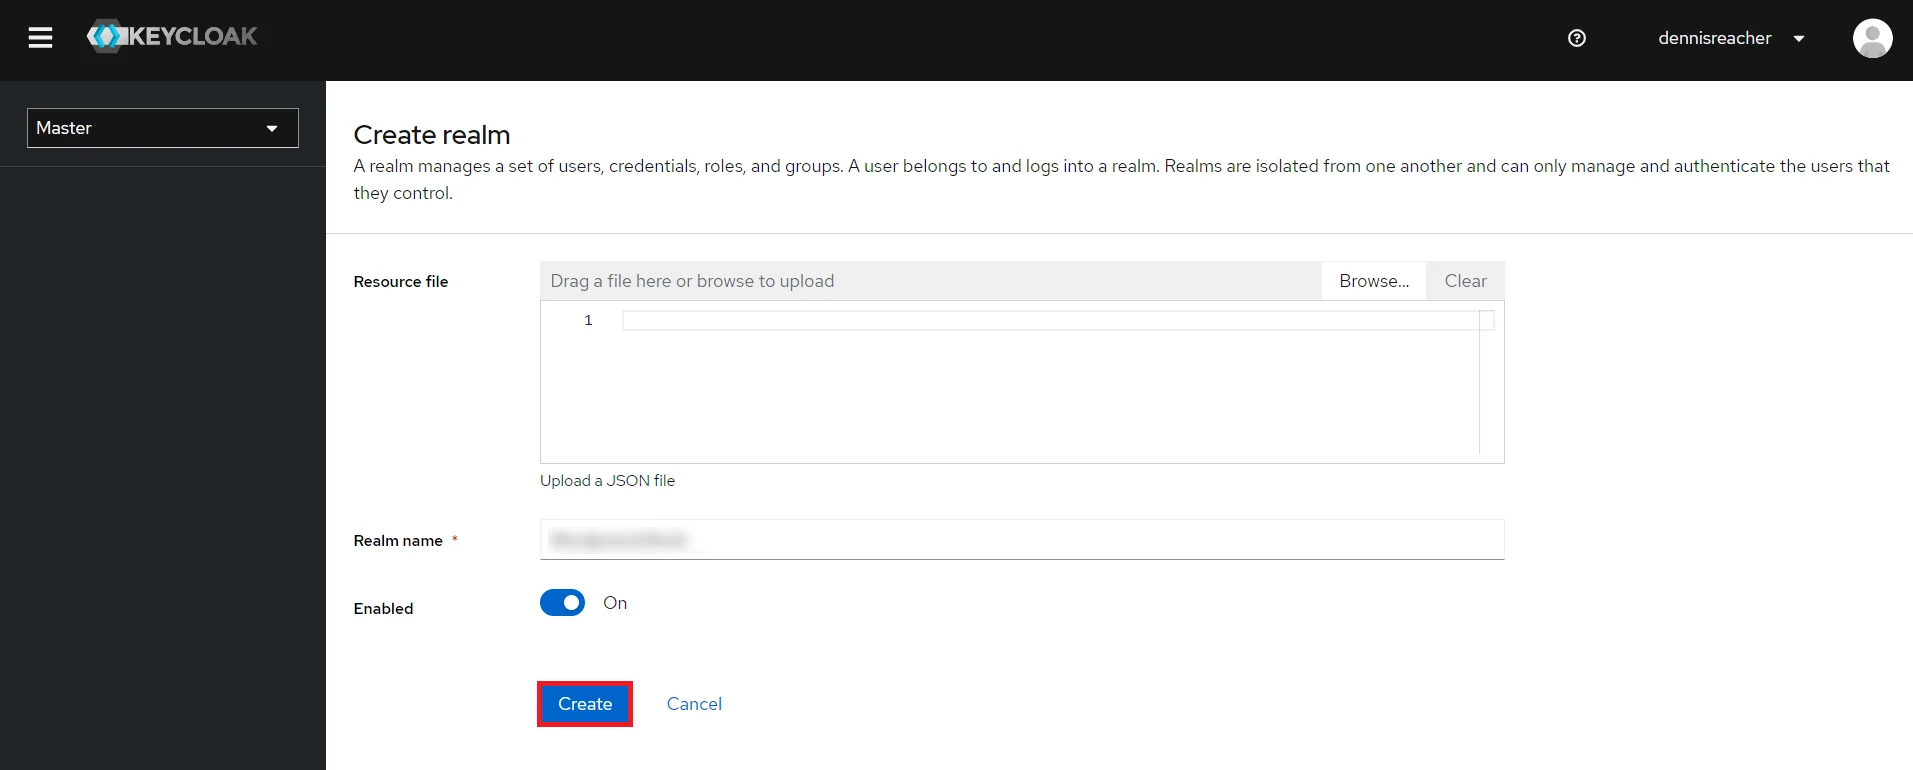
- Create realm: Enter Realm Name and keep the realm name handy as it will required later to configure the Realm under the OAuth Client plugin. Click on CREATE to add realm.
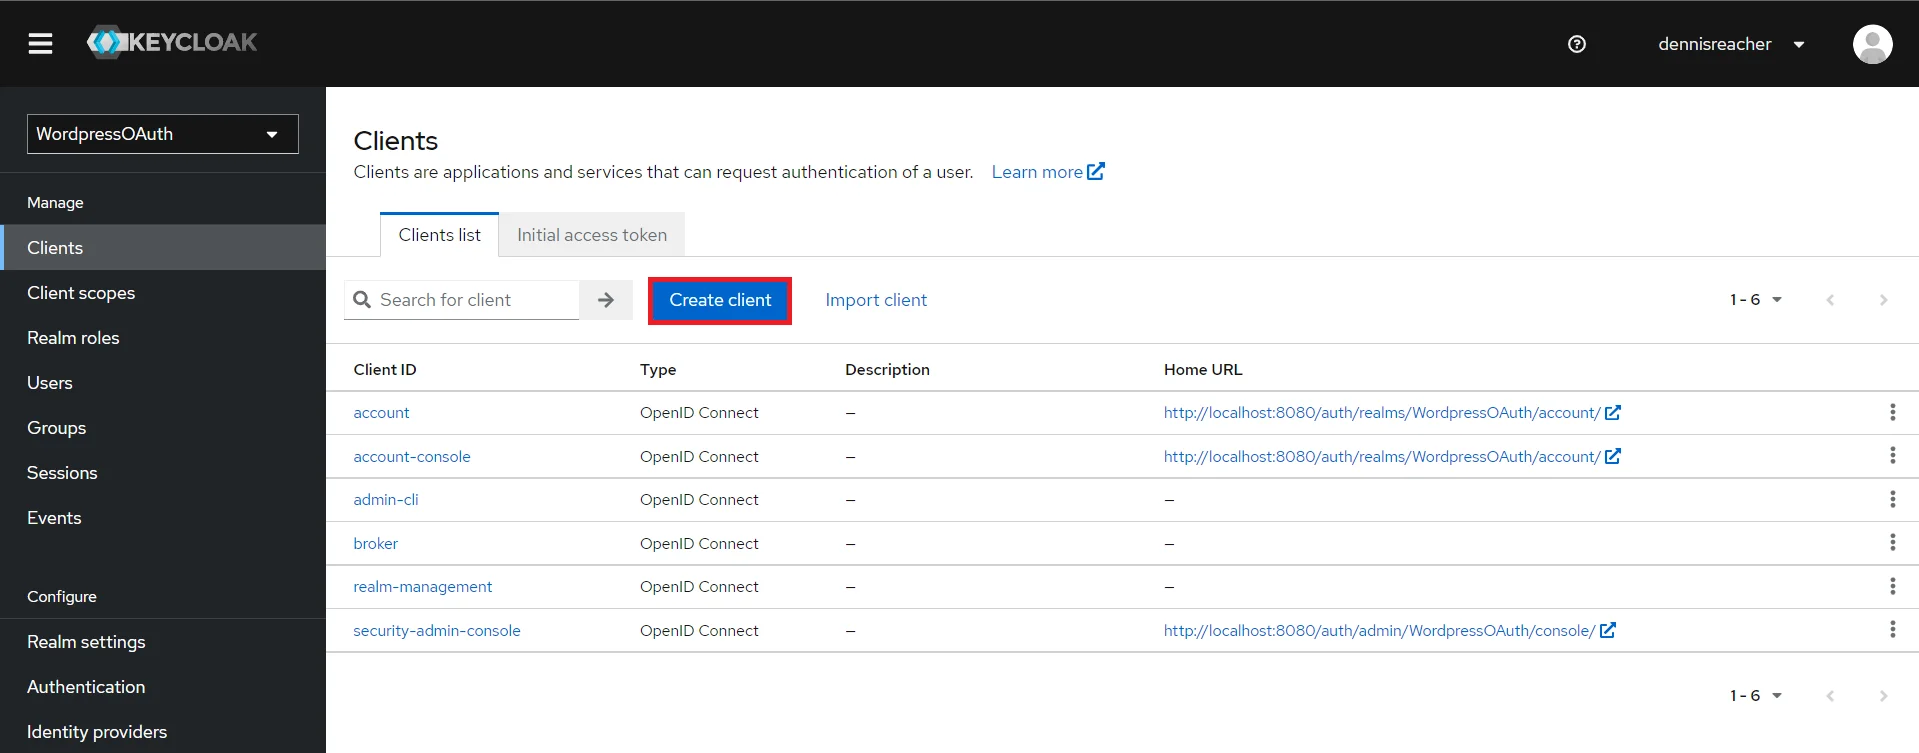
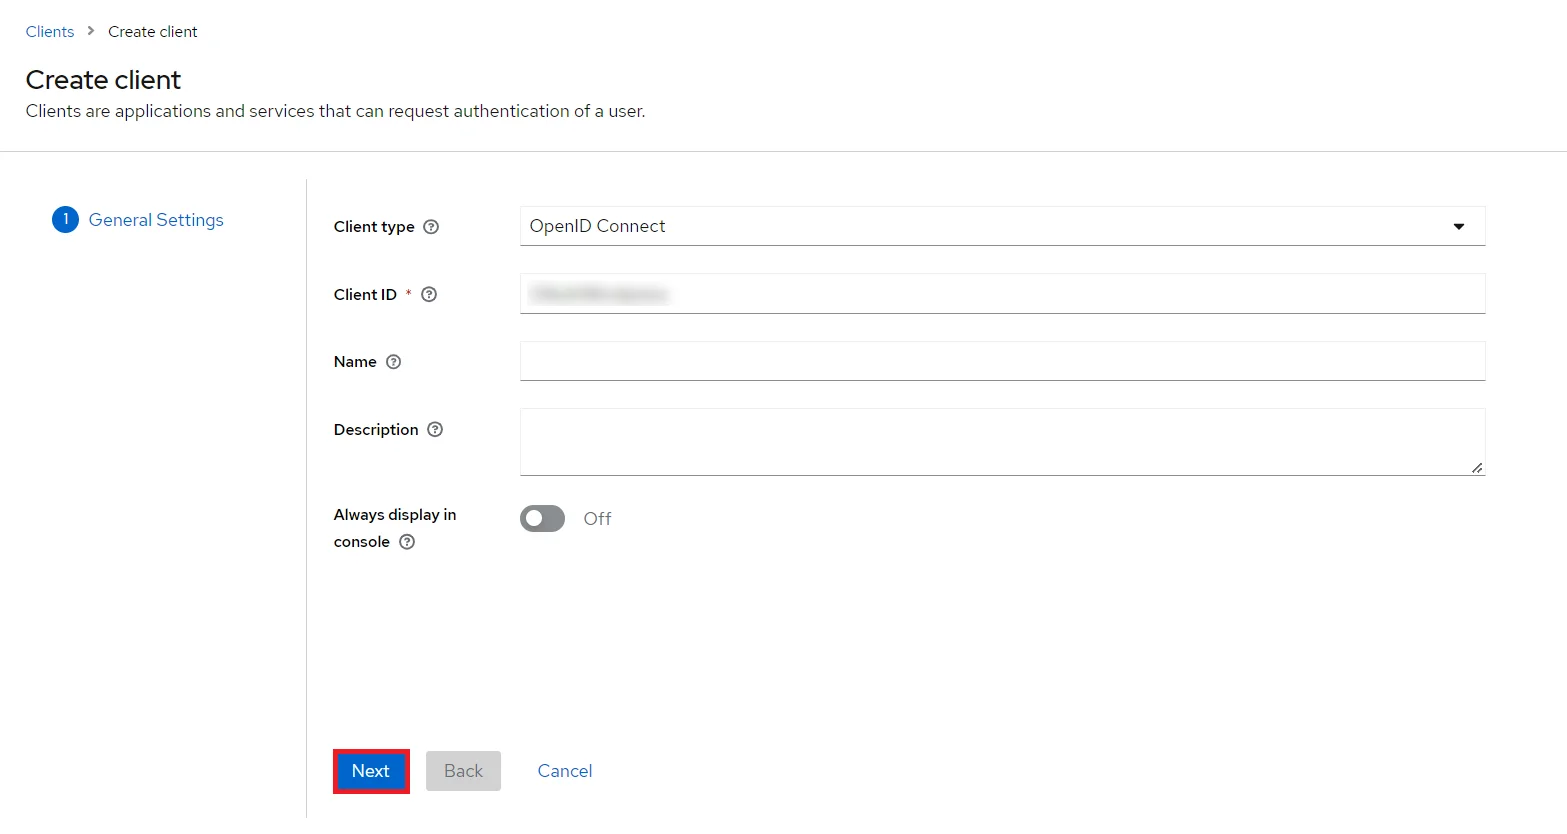
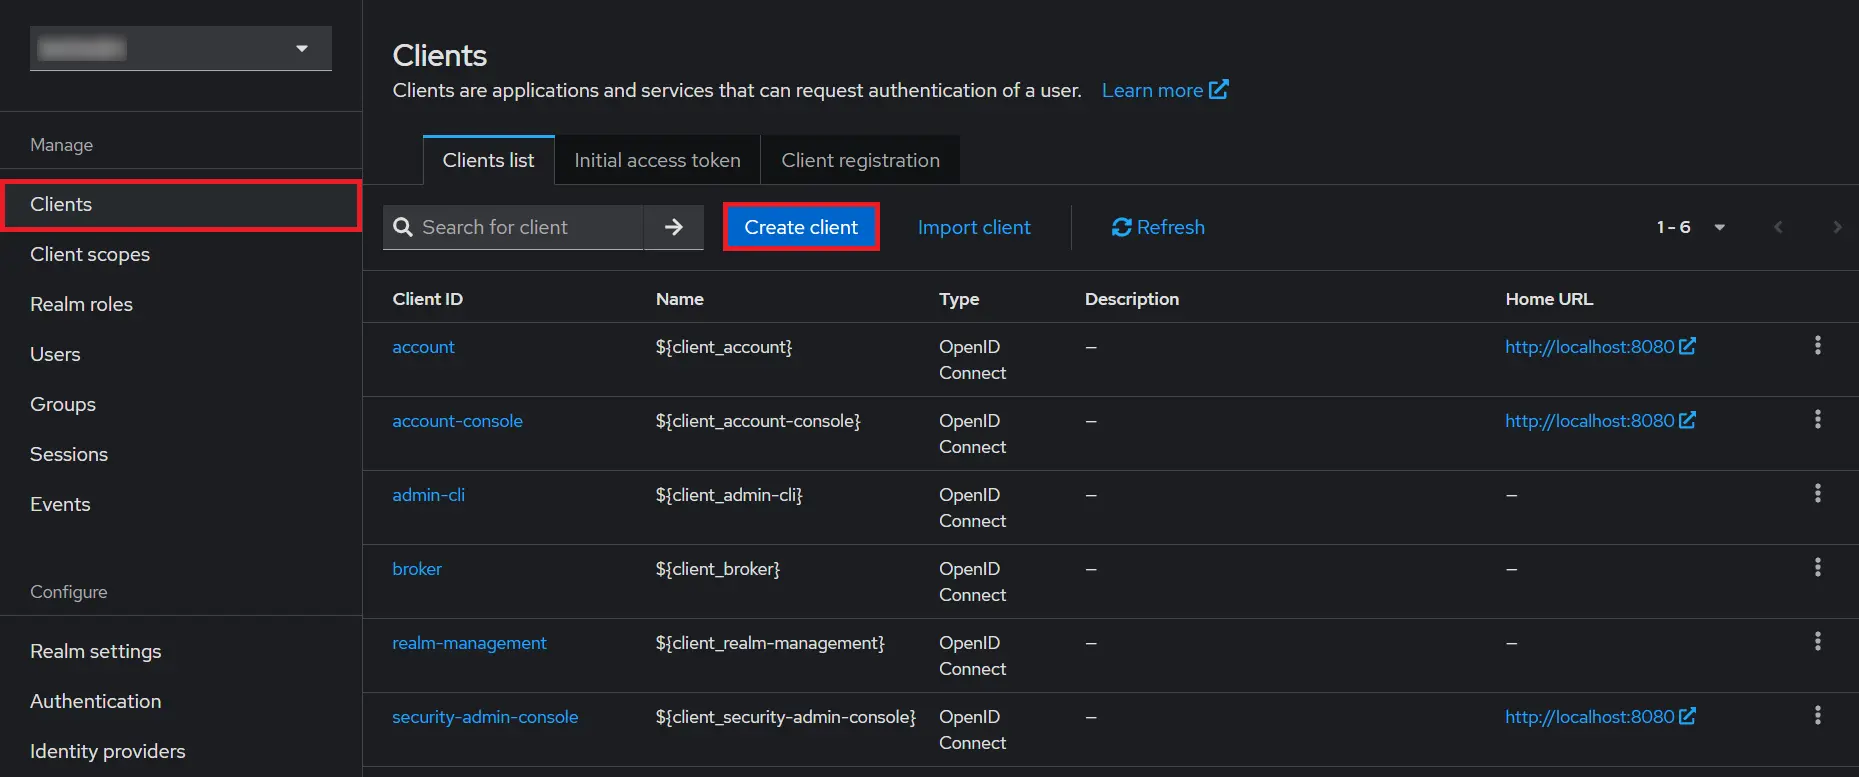
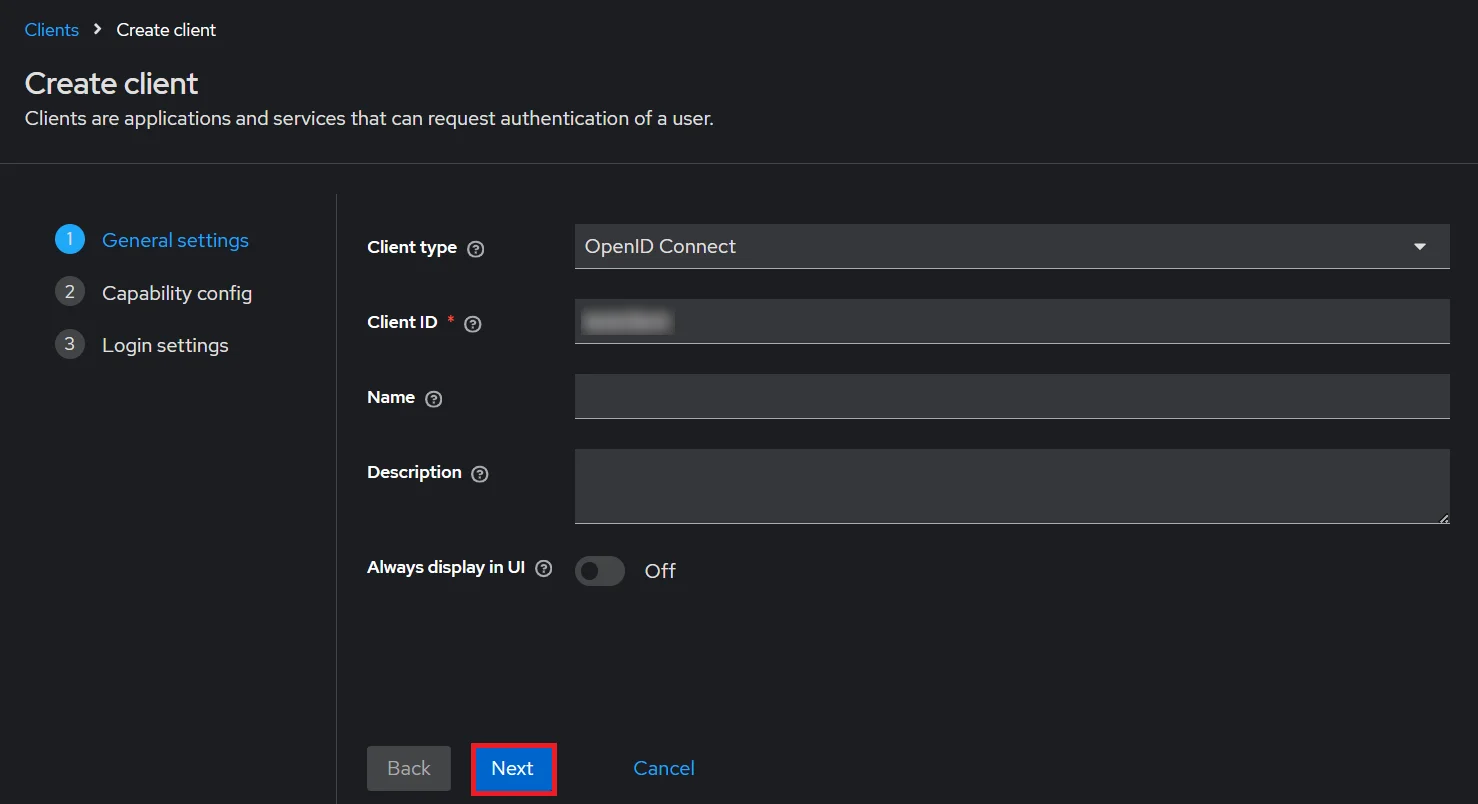
- Create OpenID client: Click on the Clients and choose Create Client to create a new client. Enter Client id and select client protocol openeid-connect and Click Next.
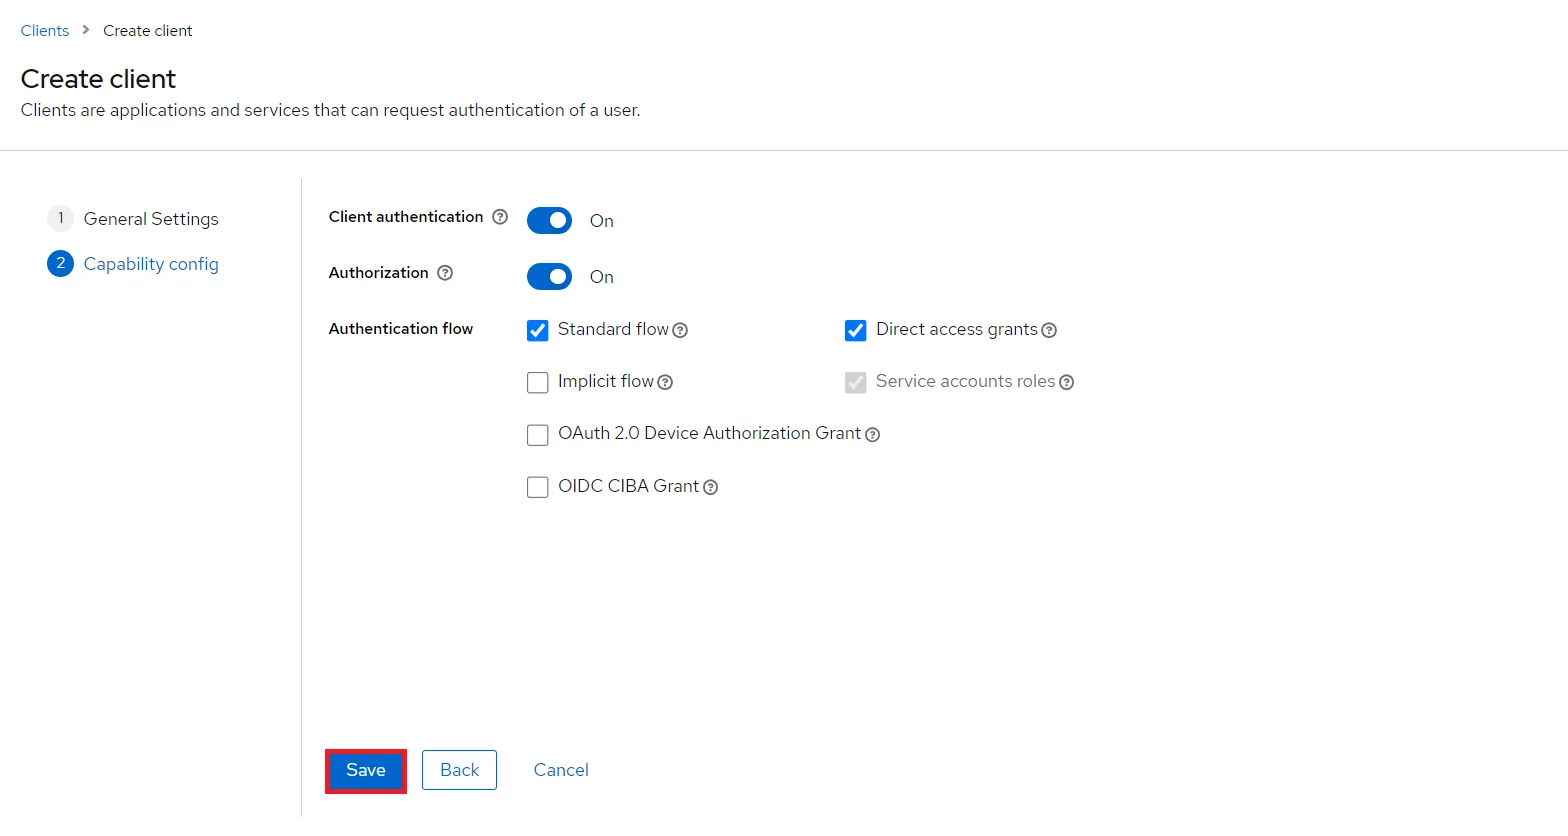
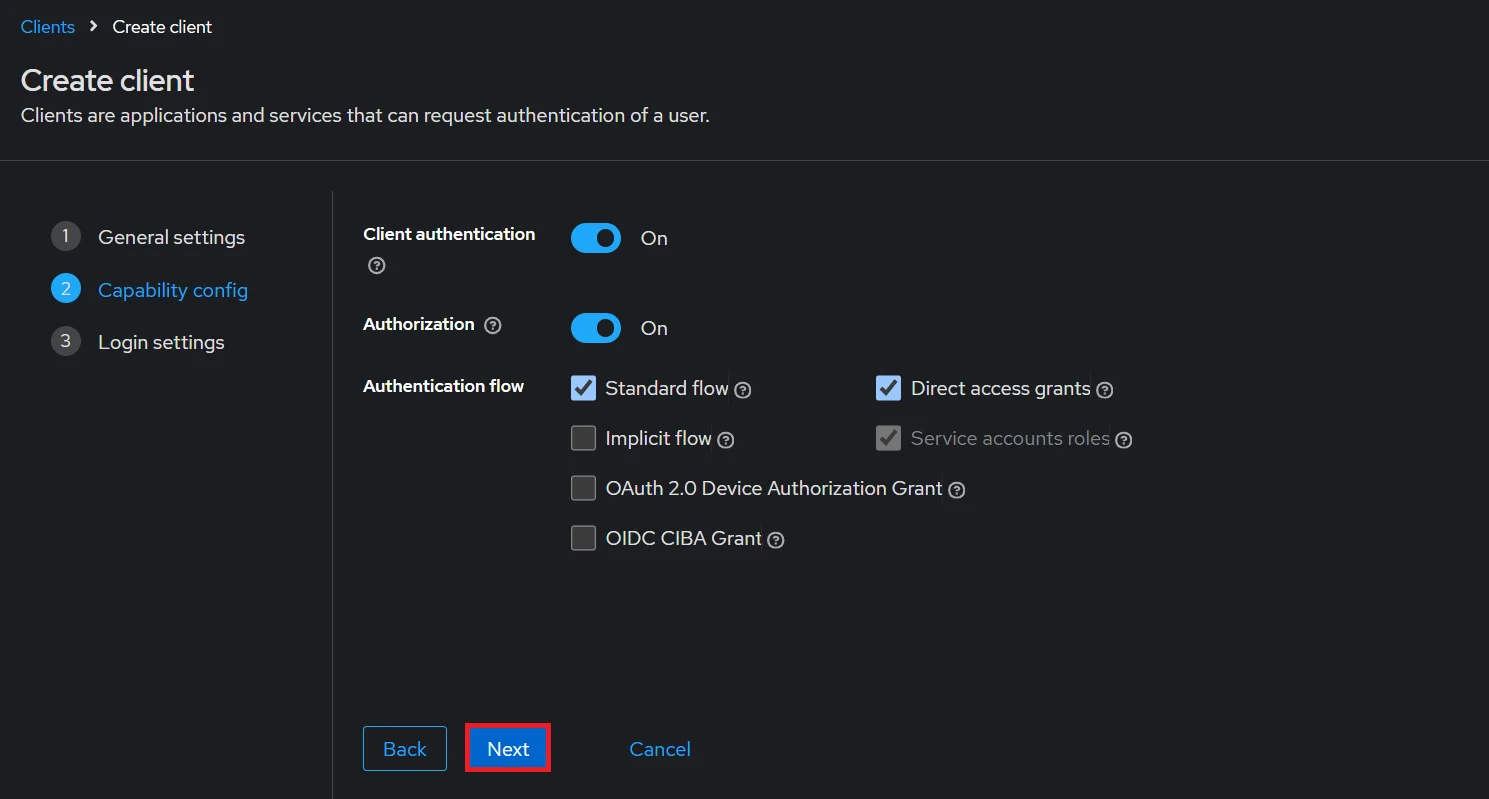
- Enable the Client Authentication and Authorization toggle.
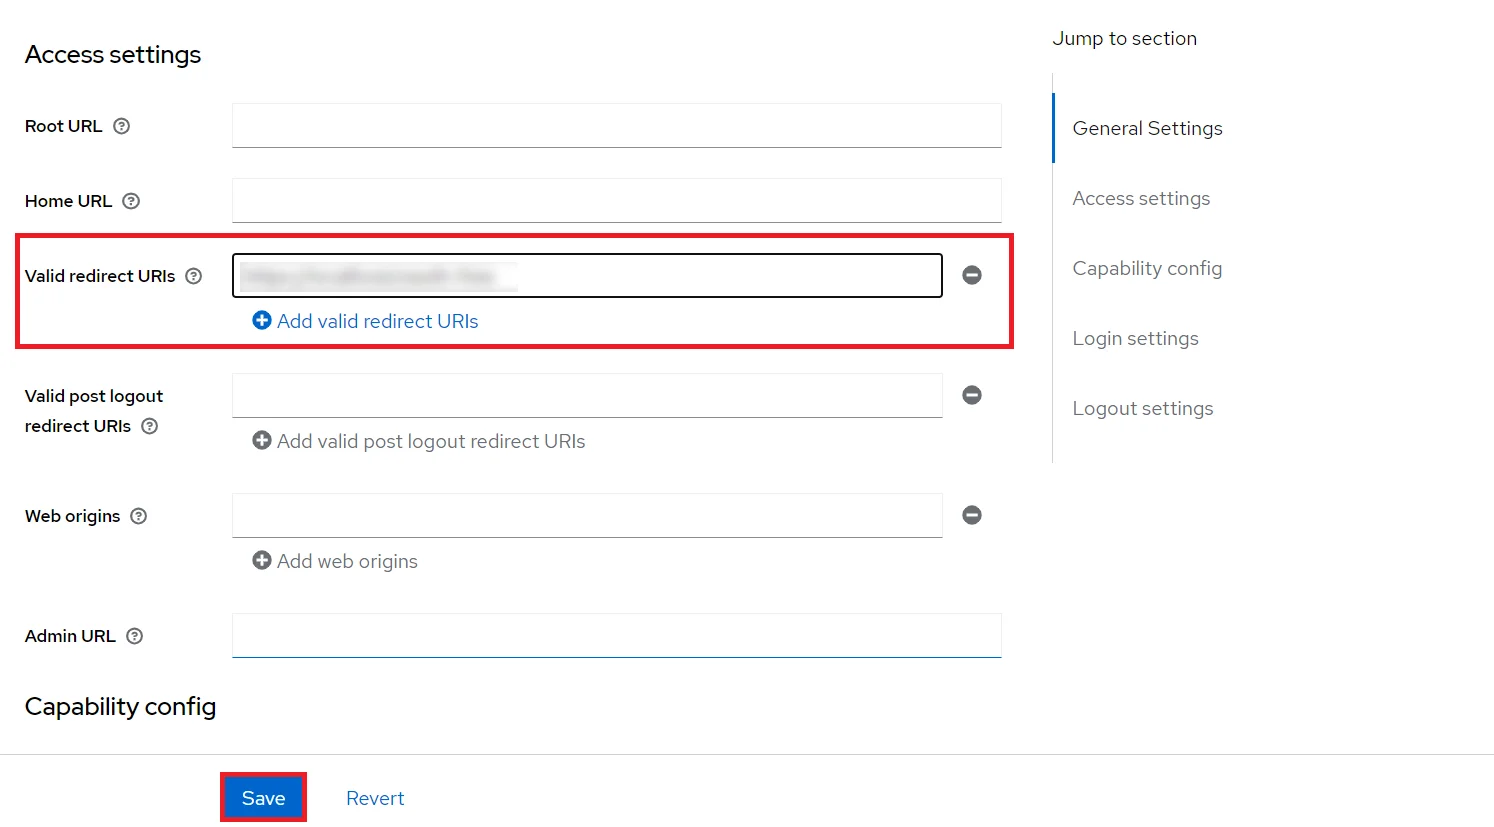
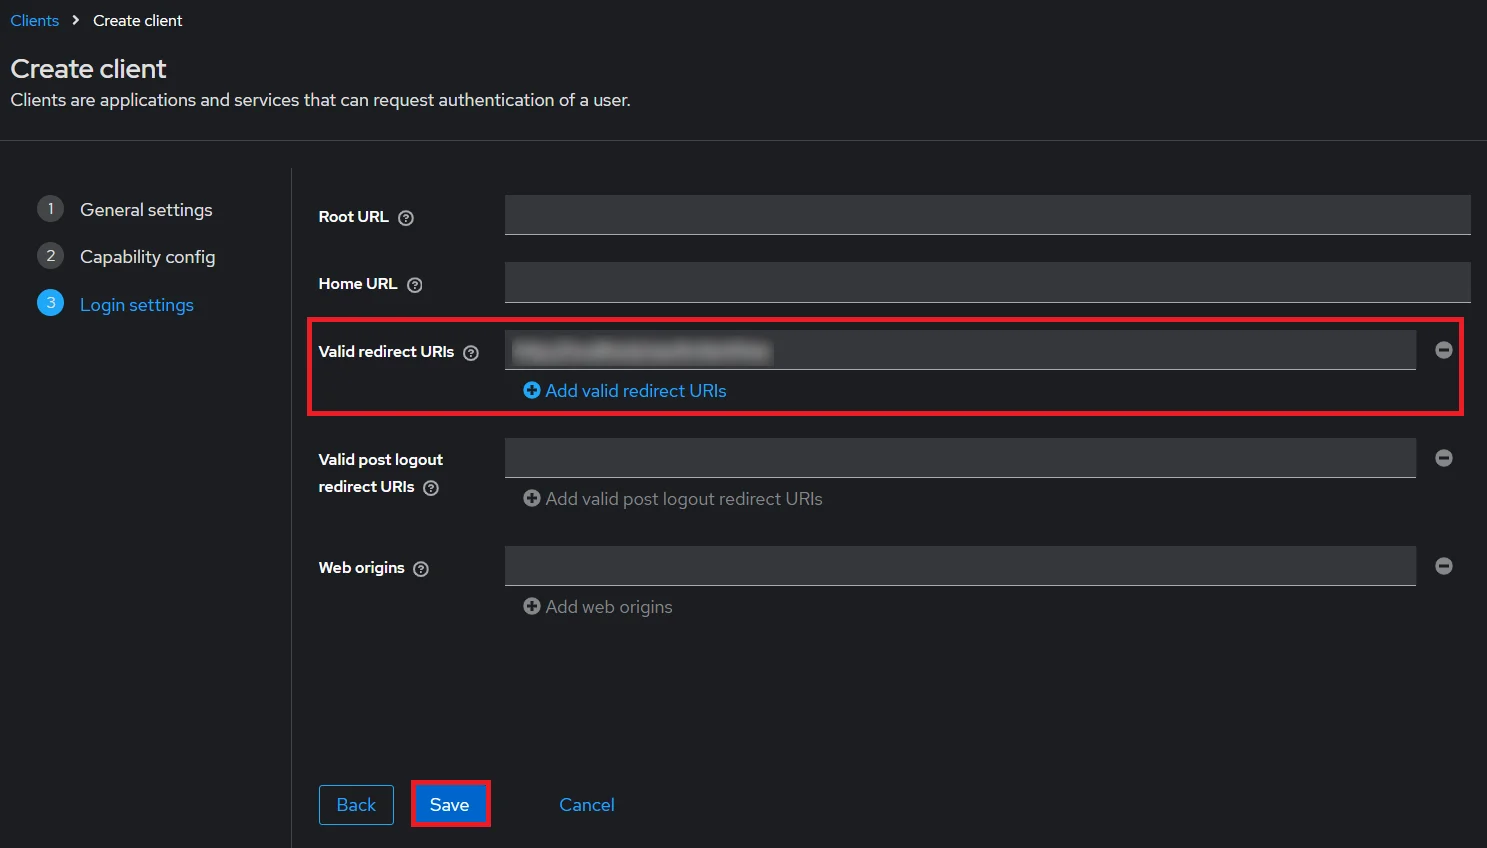
- Scroll down to the Access settings and enter your Callback/Redirect URL which you will get from your plugin present on your Client side under the CallBack URLs text-field.
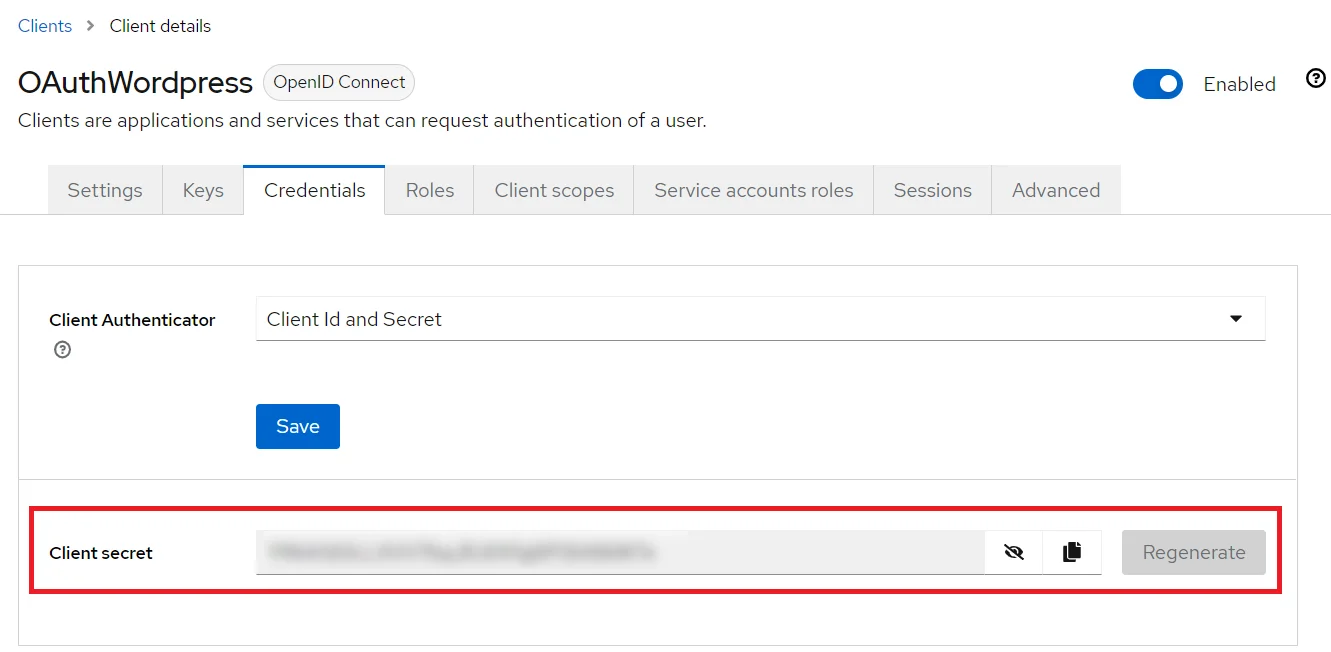
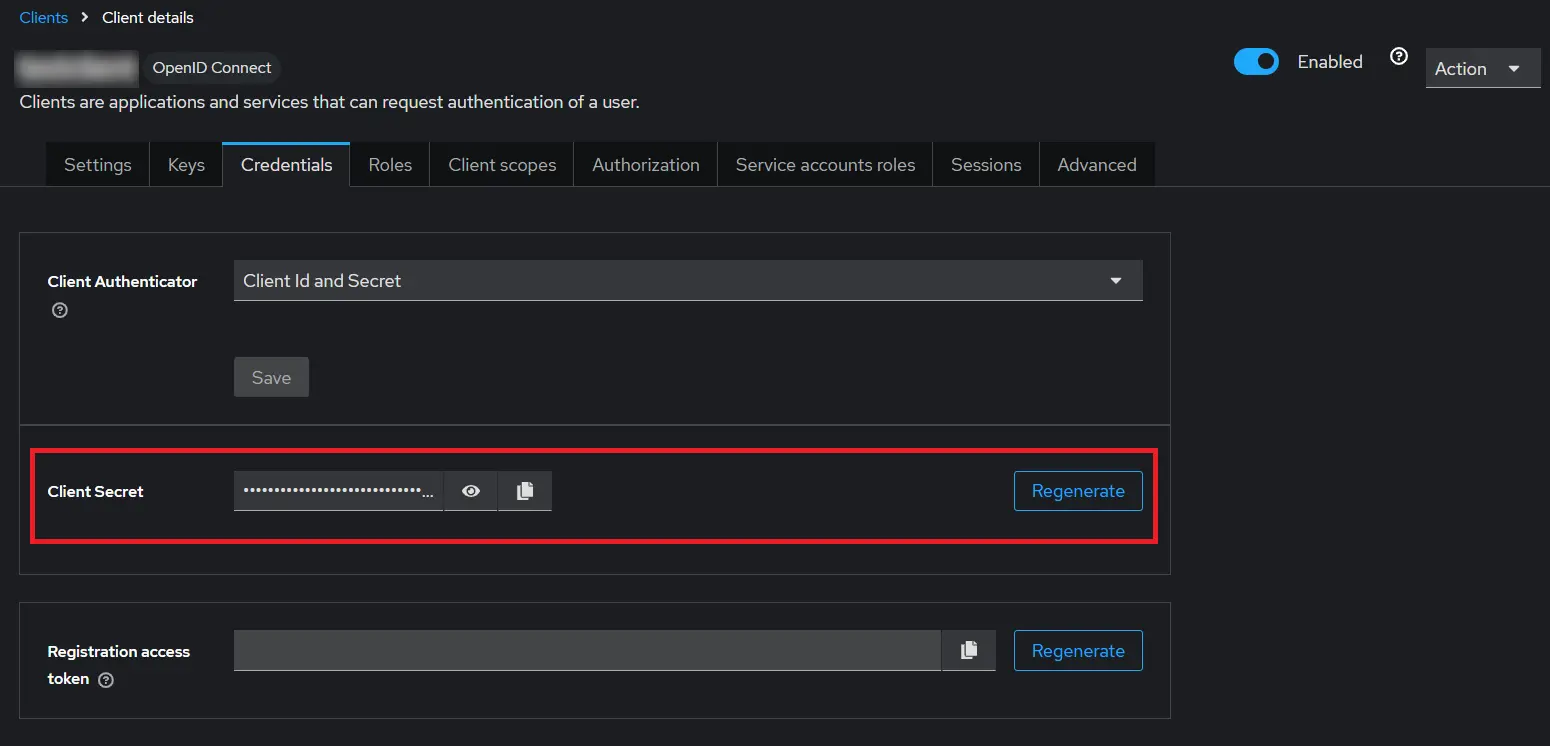
- Go to the Credentials tab, copy the Client Secret and keep it handy as we will require it later while configuring plugin.
- Plugin Configuration: Enter copied Client Secret under Client secret field in the OAuth Client plugin, and enter the Client ID under the Client ID field.
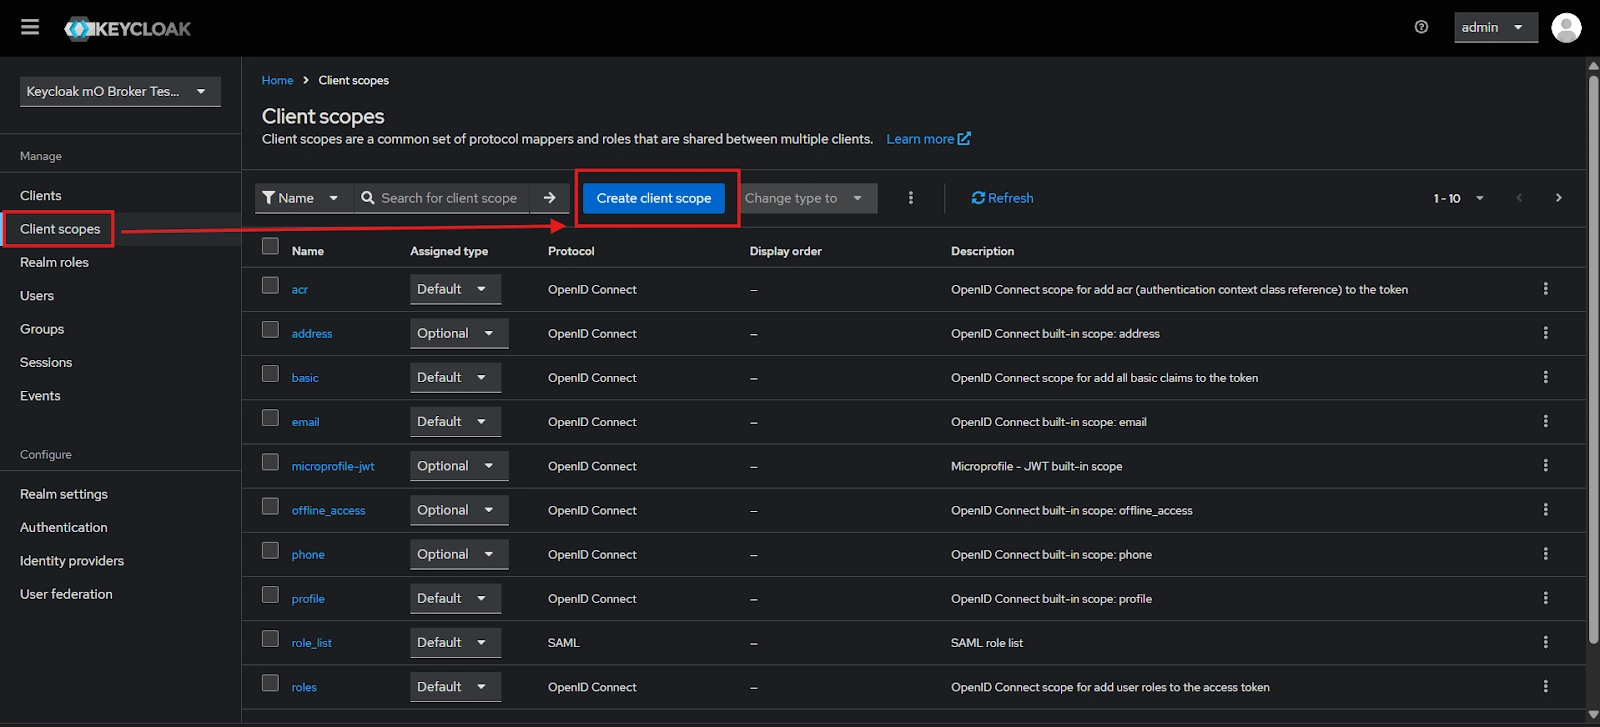
- After Plugin Configurations, go to Client Scopes to configure the Group Mapper and create a client scope.
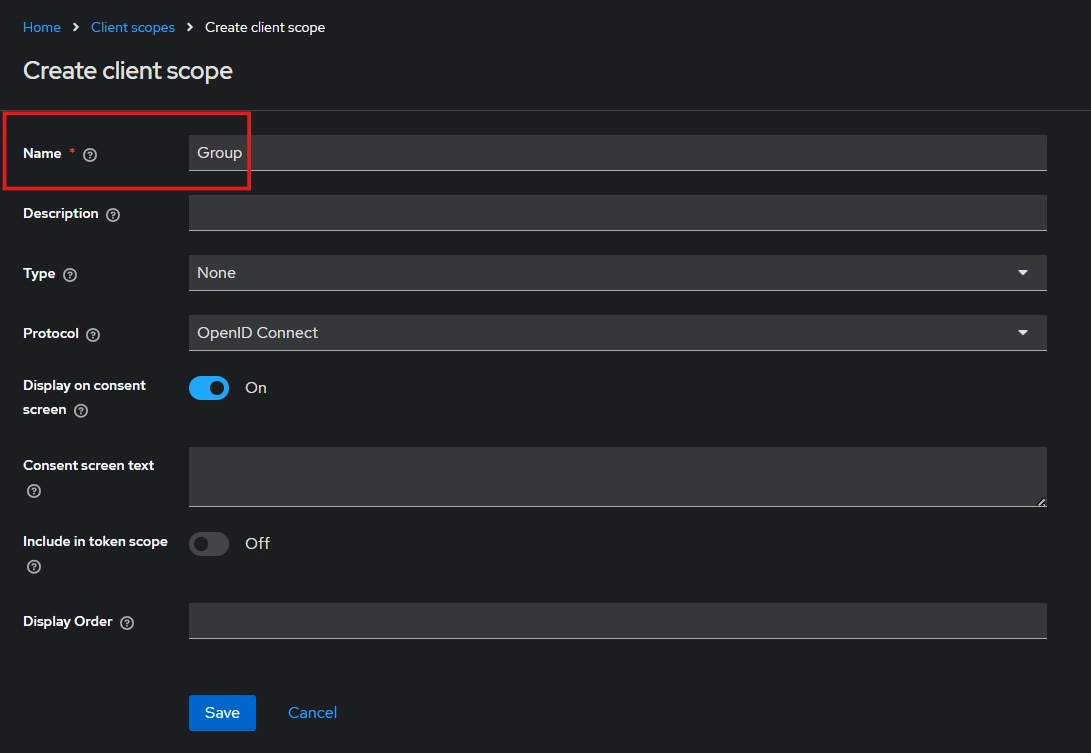
- Enter Name:- “Group” and Save.
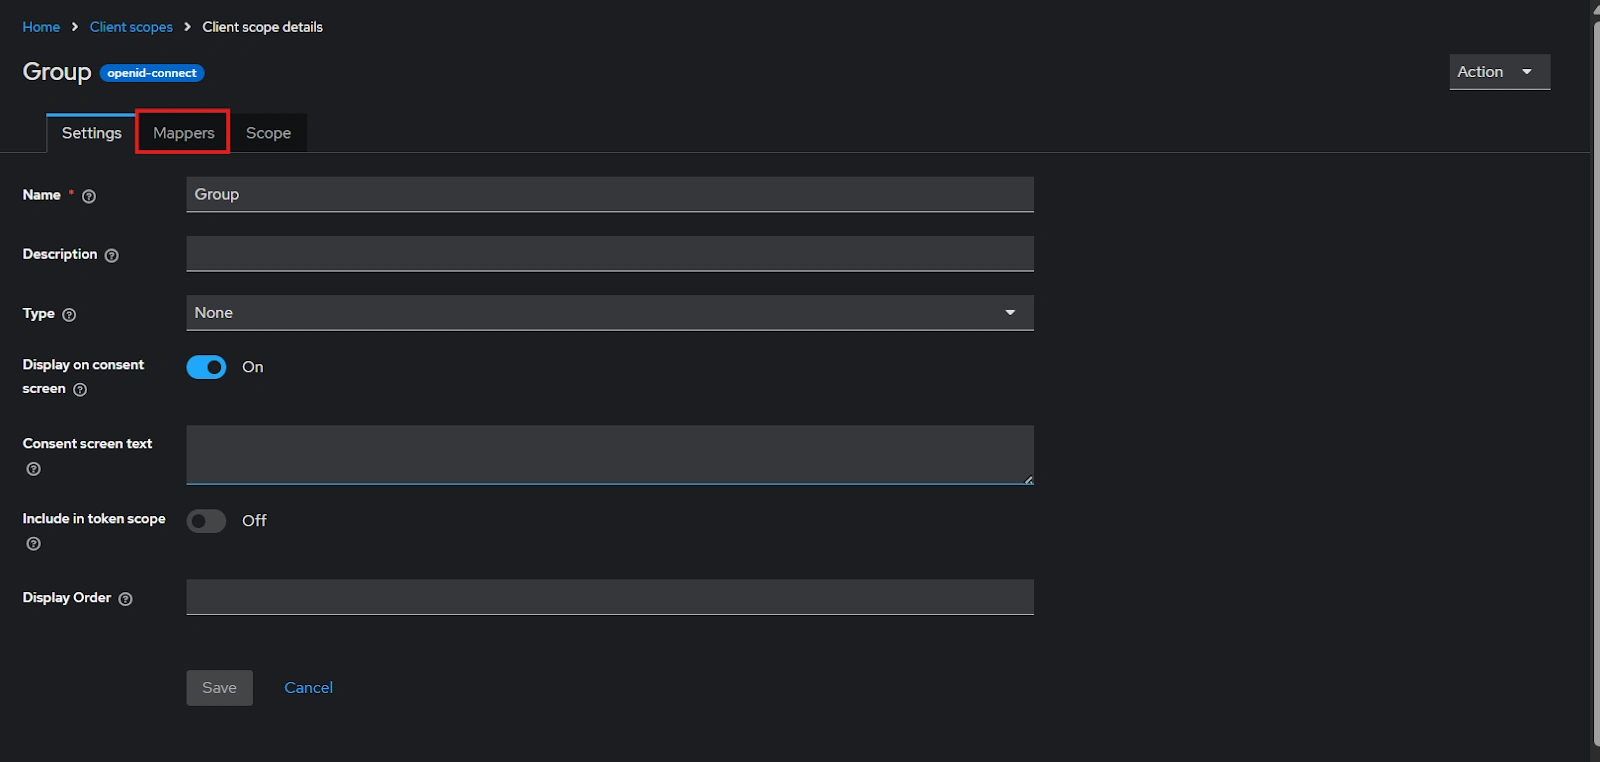
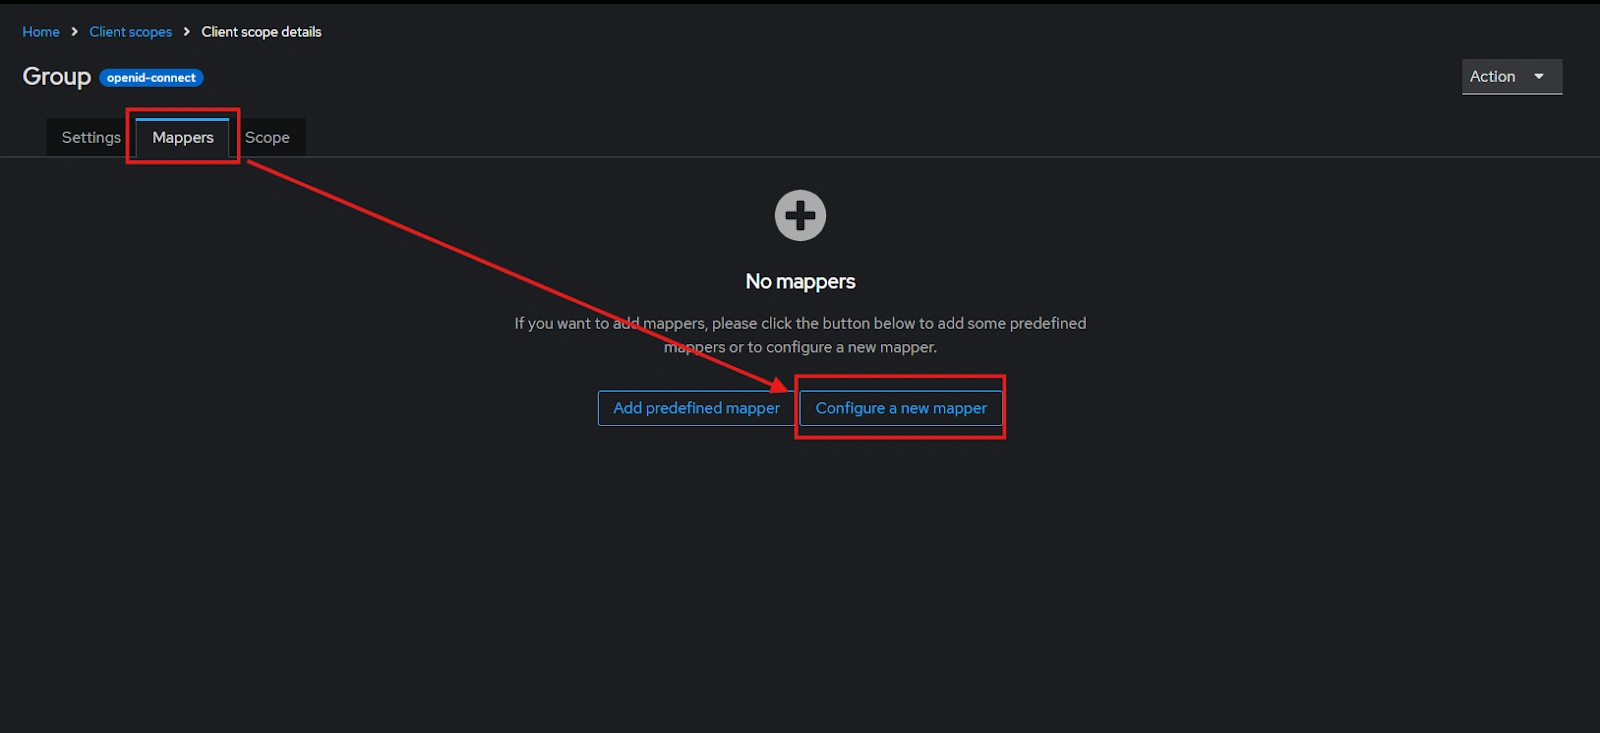
- After saving, click on “Mappers” and configure a new Mapper.
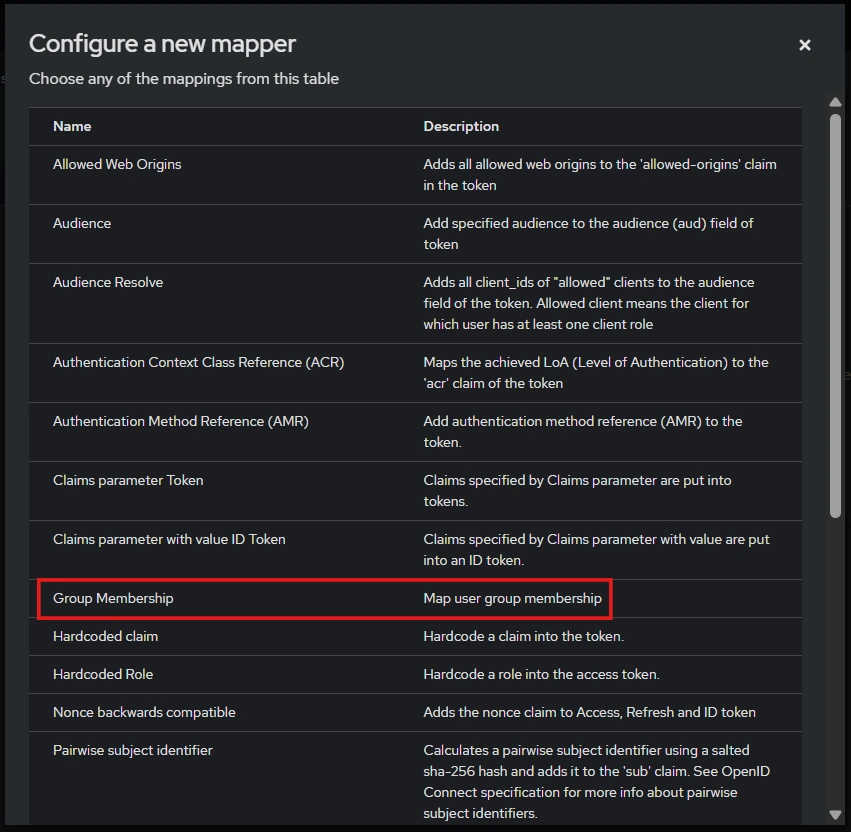
- Select “Group Membership”
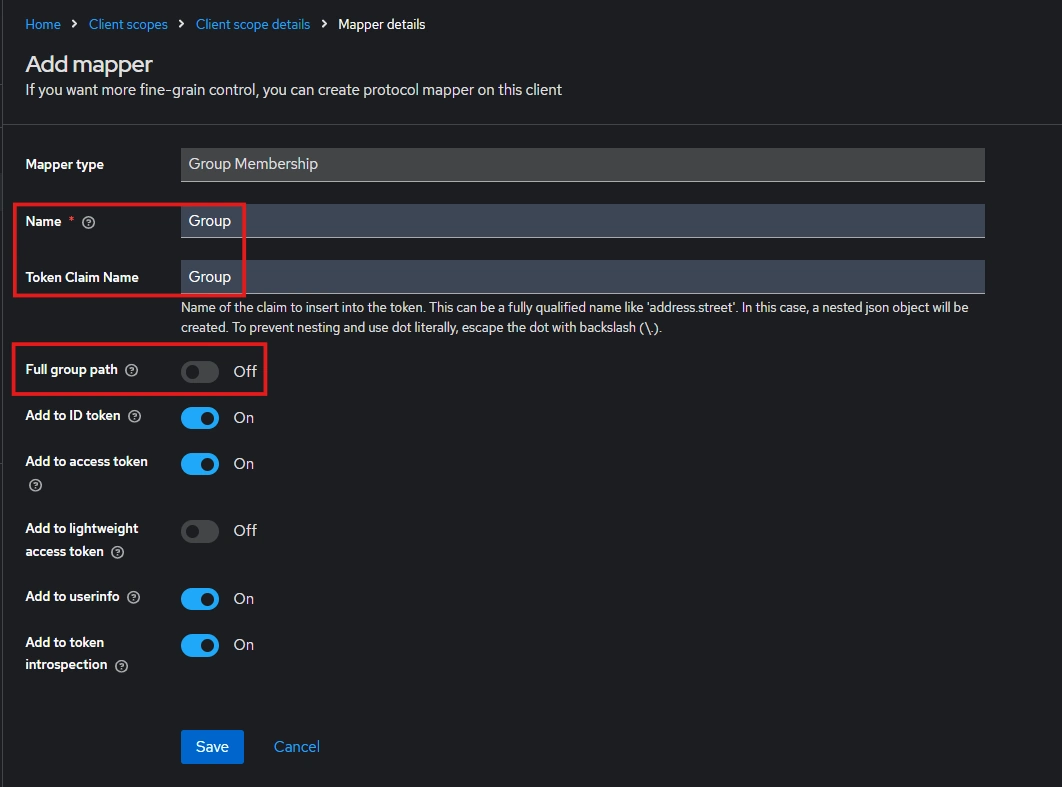
- Enter the Name, Token claim name and disable “Full group path” and Save.
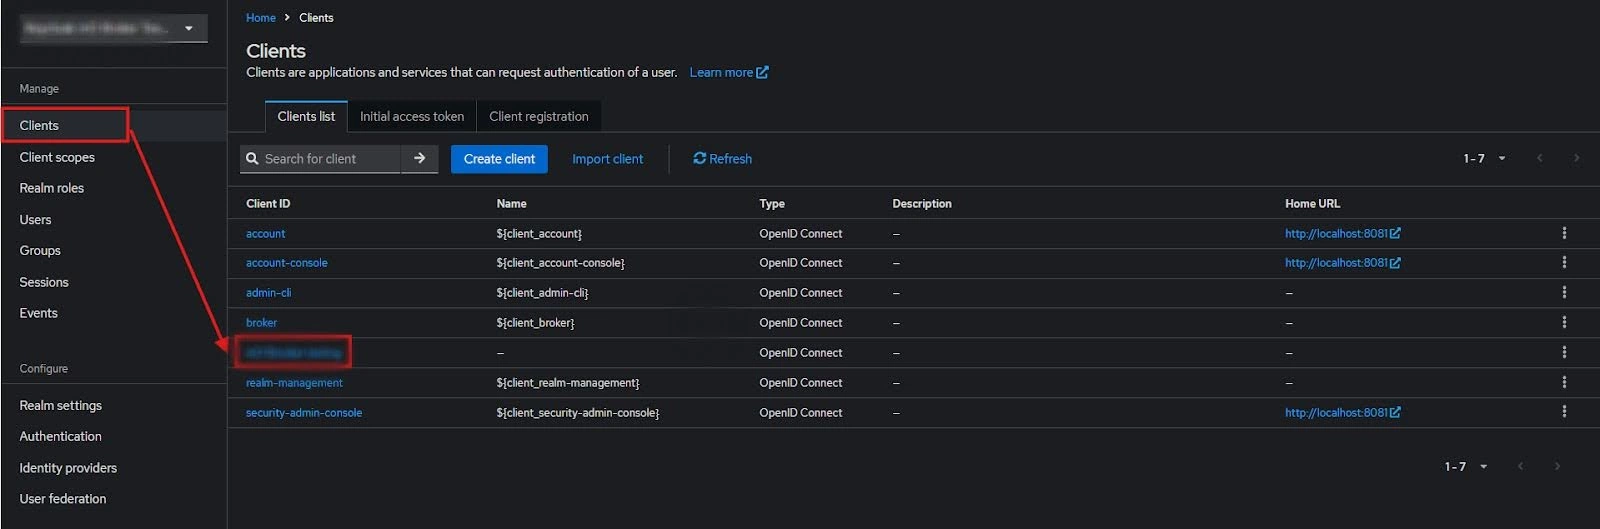
- Then go to “Clients” and select your Client ID.
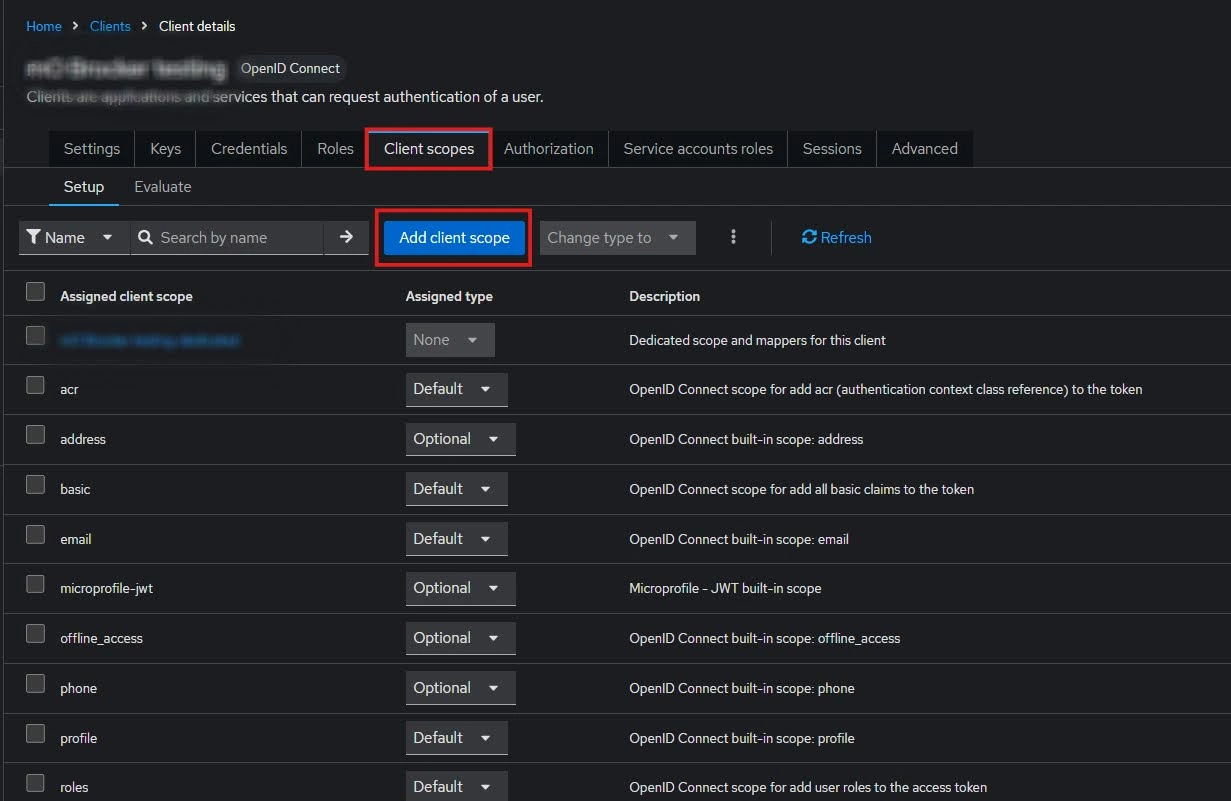
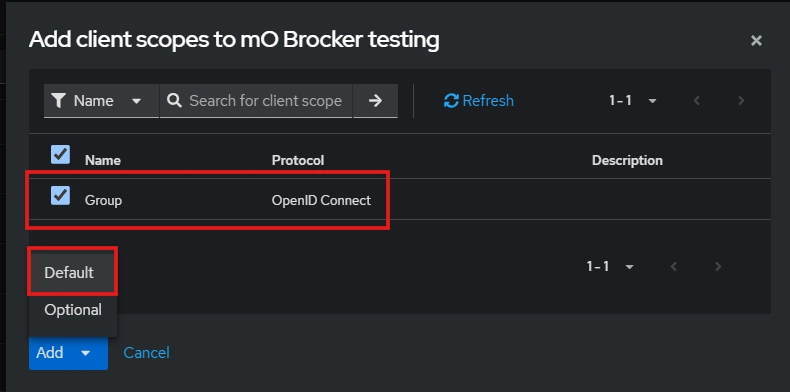
- Go to Client scopes and Add client scope.
- Select the client scope and Add (default).
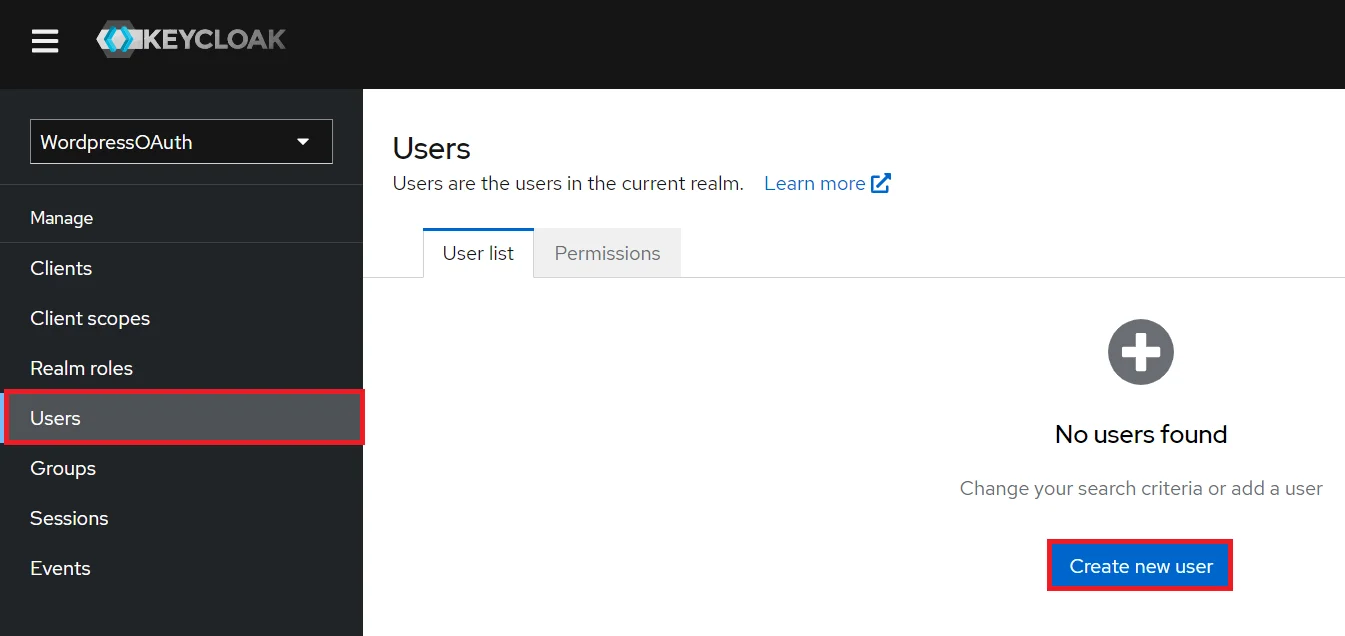
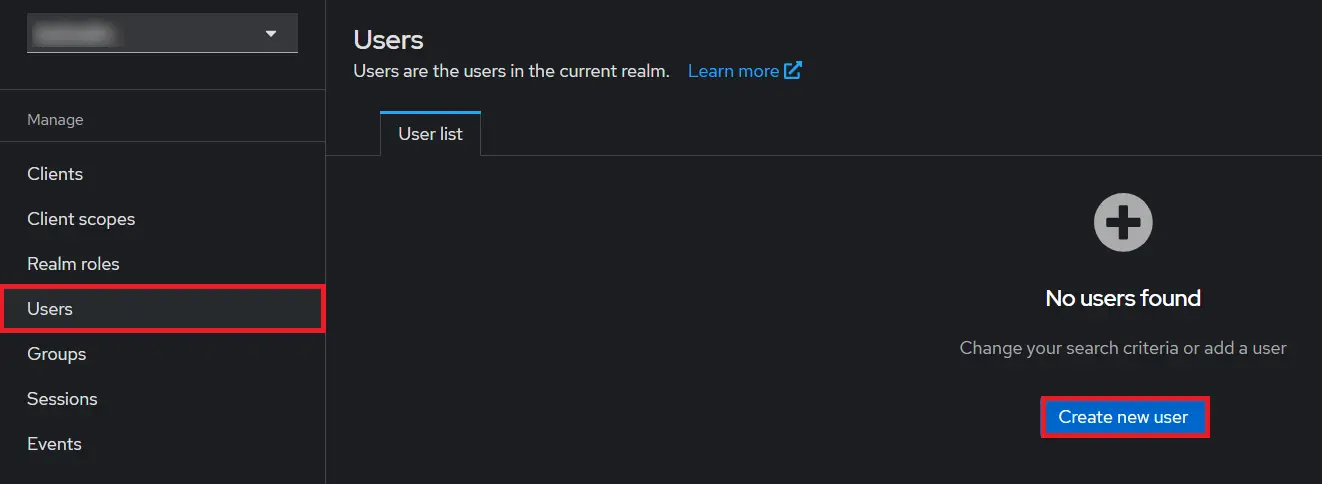
- Add User: We need to add users to realm who will be able to access the resources of realm. Click on the Users and Click on Create new user to Add a new User.
- User Configuration: After user is created following action needs to be performed on it.
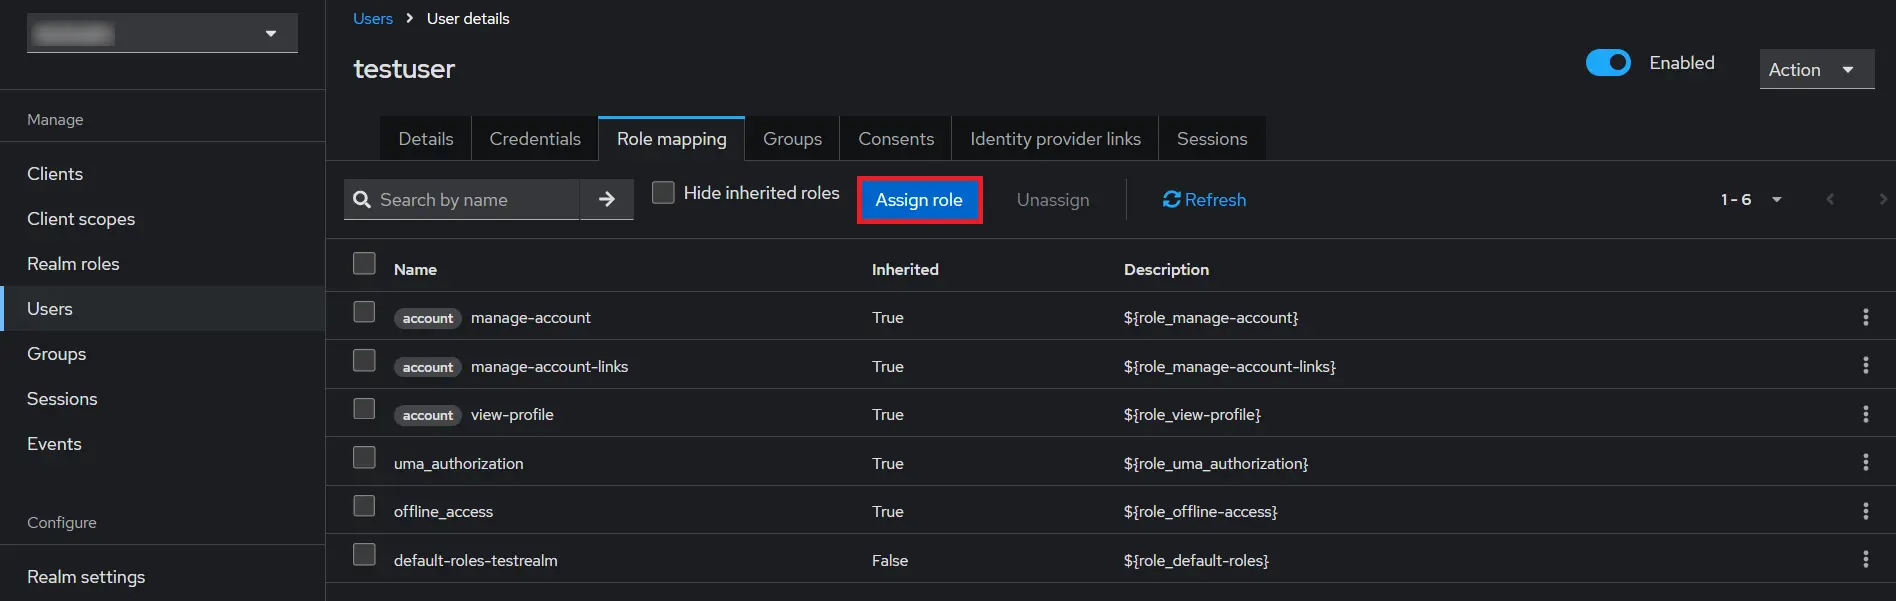
- Map User: We need to map user to a role. Click on Role Mappings and assign the user desired role from available roles.
- Create ROLE: The Role will be used by your applications to define which users will be authorized to access the application. Click on the Roles and choose Create Role.
- Navigate to the plugin configuration page, click the "Add New Provider" button (located either in the middle or top-right corner), select Keycloak as the application, and copy the callback URL from the plugin and keep it handy, as you'll need it to configure Keycloak as the OAuth provider.
- Add Realm : Now login to keycloak administration console and navigate to your desired realm. You can add new realm by selecting Create Realm option.
- Create realm: Enter Realm Name and keep the realm name handy as it will required later to configure the Realm under the OAuth Client plugin. Click on CREATE to add realm.
- Create OpenID client: Click on the Clients and choose Create Client to create a new client. Enter Client id and select client protocol openeid-connect and Click Next.
- After Plugin Configurations, go to Client Scopes to configure the Group Mapper and create a client scope.
- Enter Name:- “Group” and Save.
- After saving, click on “Mappers” and configure a new Mapper.
- Select “Group Membership”
- Enter the Name, Token claim name and disable “Full group path” and Save.
- Then go to “Clients” and select your Client ID.
- Go to Client scopes and Add client scope.
- Select the client scope and Add (default).
- Enable the Client Authentication and Authorization toggle.
- Scroll down to the Access settings and enter your Callback/Redirect URL which you will get from your plugin present on your Client side under the CallBack URLs text-field.
- Go to the plugin and copy the Client Secret and keep it handy as we will require it later while configuring plugin.
- Plugin Configuration: Enter copied Client Secret under Client secret field in the plugin, and enter the Client ID under the Client ID field.
- Add User: We need to add users to r+ealm who will be able to access the resources of realm. Click on the Users and Click on Create new user to Add a new User.
- User Configuration: After user is created following action needs to be performed on it.
- Map User: We need to map user to a role. Click on Role Mappings and assign the user desired role from available roles.
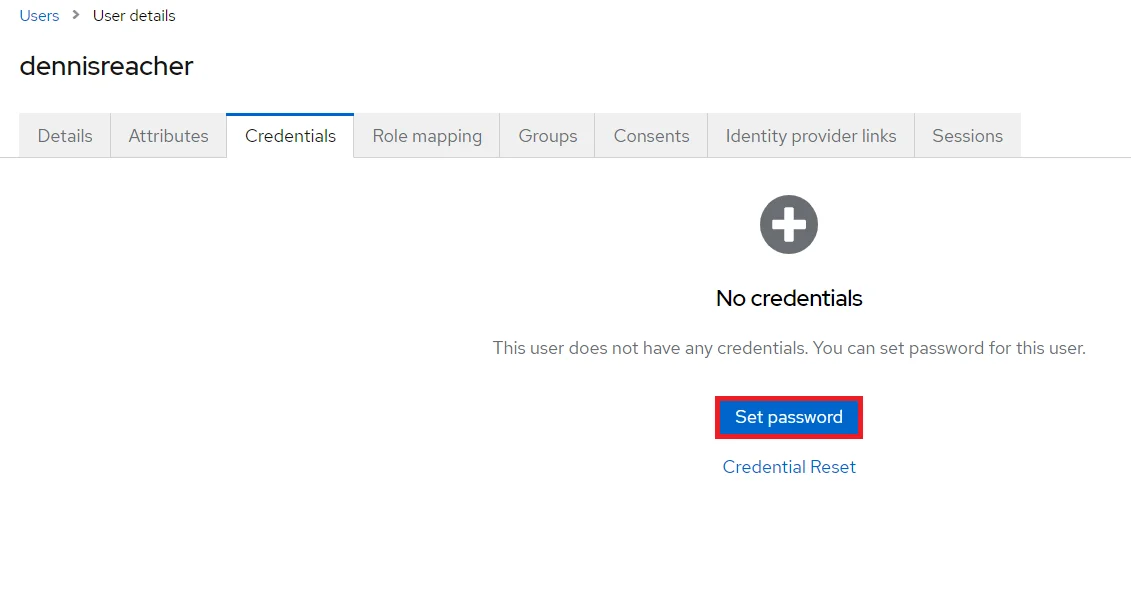
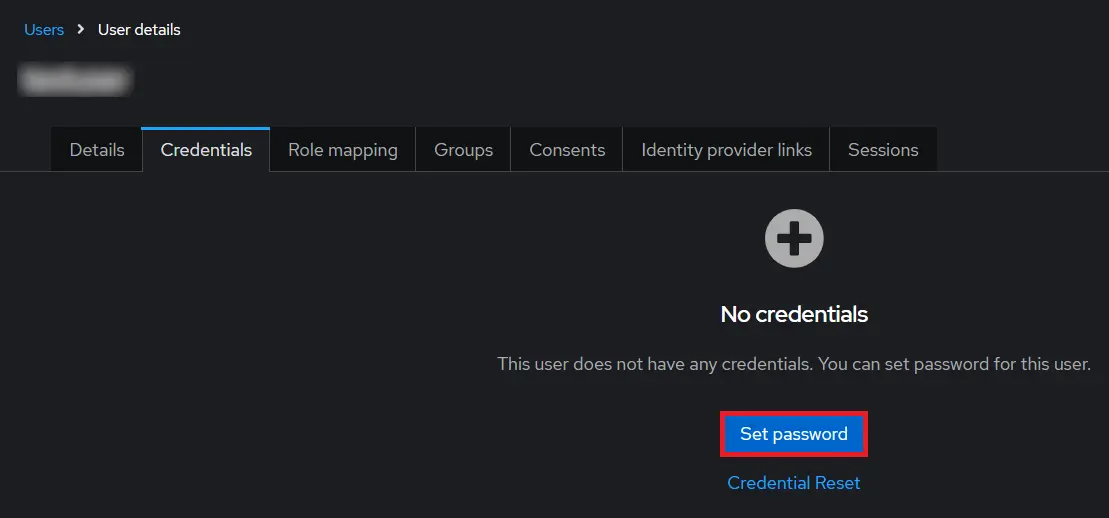
- 1) Setting a password for it so click on Credentials and set a new Password
for the user.
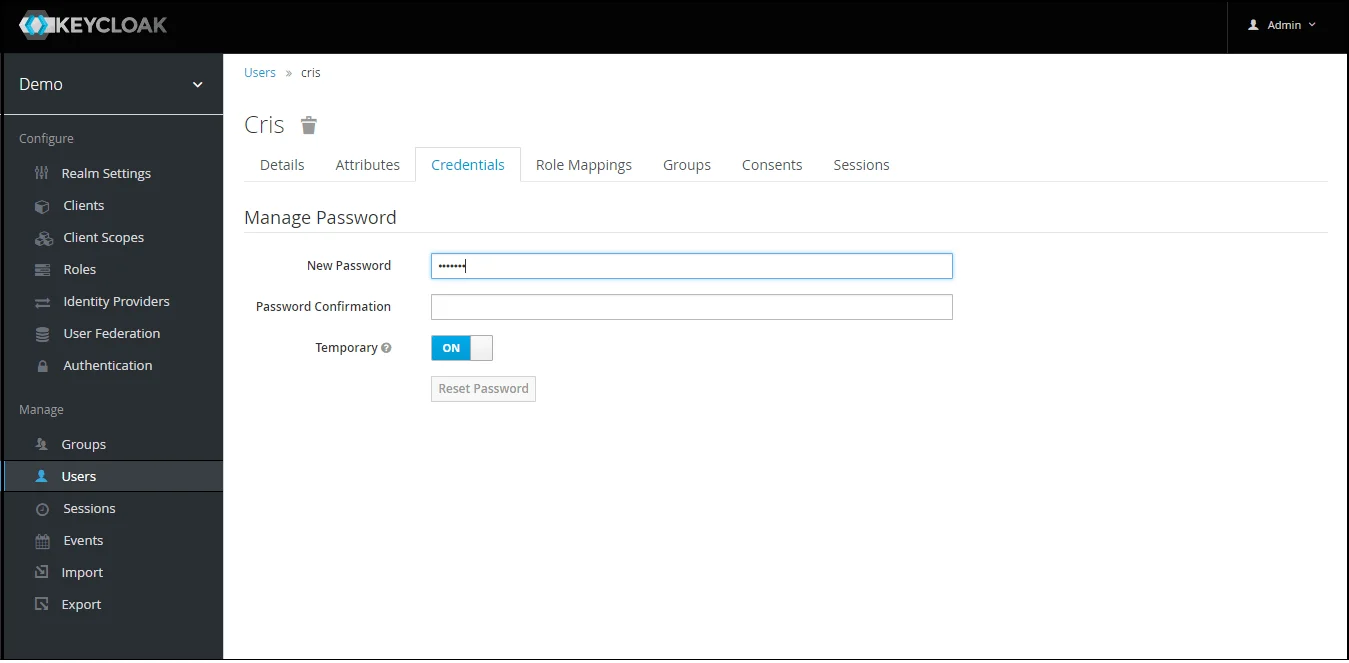
NOTE : Disabling Temporary will make user password permanent.
Step 1.1: Steps to fetch Keycloak Groups [Premium]

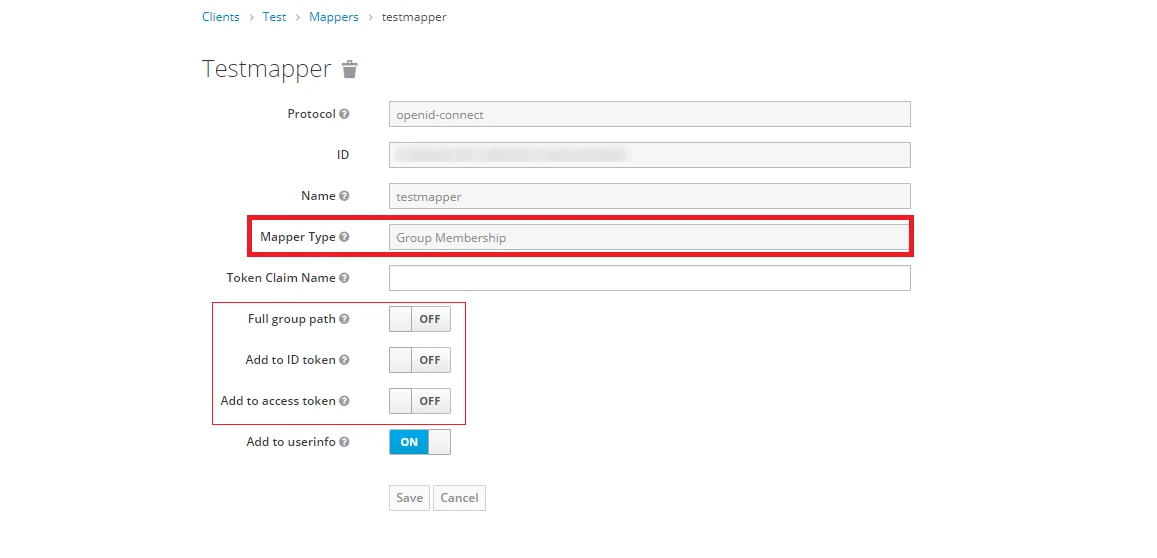
Note: -- If full path is on group path will be fetched else group name will be fetched.
Step 1.2: Steps to fetch Keycloak Roles [Premium]
- 1) Setting a password for it so click on Credentials and set a new Password
for the user.
NOTE : Disabling Temporary will make user password permanent.
 x
x
- 1) Setting a password for it so click on Credentials and set a new Password
for the user.
NOTE : Disabling Temporary will make user password permanent.
Step 2: Setup Crowd as OAuth Client
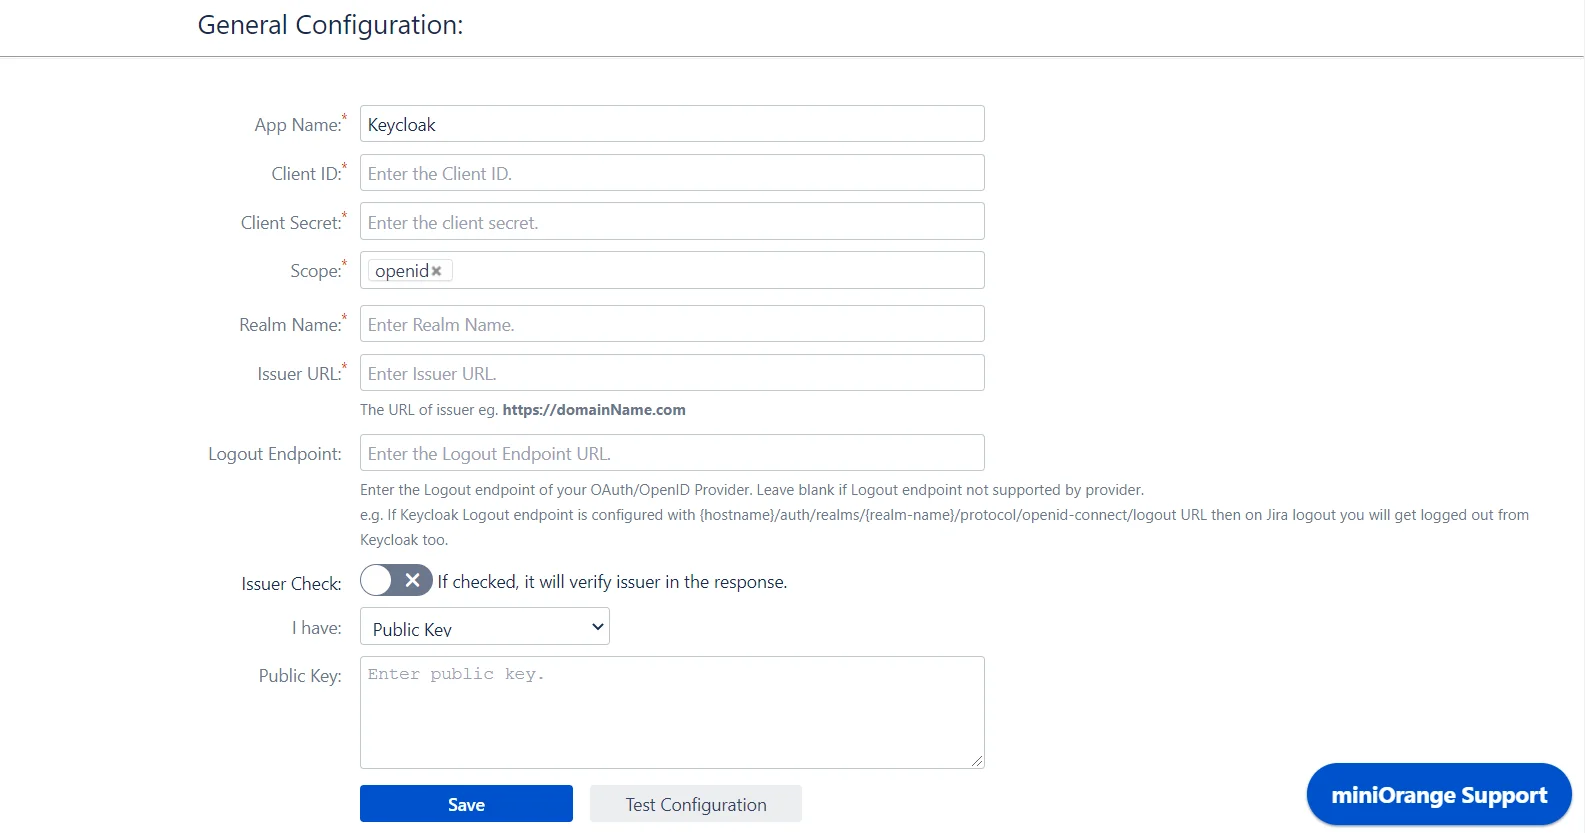
- Click on Add new Provider and select Keycloak from the list.
- Enter copied Client ID, Secret, Issuer URL(Host Name), Realm Name in the plugin.
- Enter JWKS EndPoint URL or Public Key for signature validation.
eg.http://${yourKeycloakDomain}/auth/realms/${realmName}/protocol/openid-connect/certs - Click on Test Configuration.
Step 3: Multiple IDPs
If your use case requires multiple IDPs to be configured on your SP, the plugin supports that as well. You can choose how end users use these IDPs to perform SSO.
3.1 Configuring Multiple IDPs
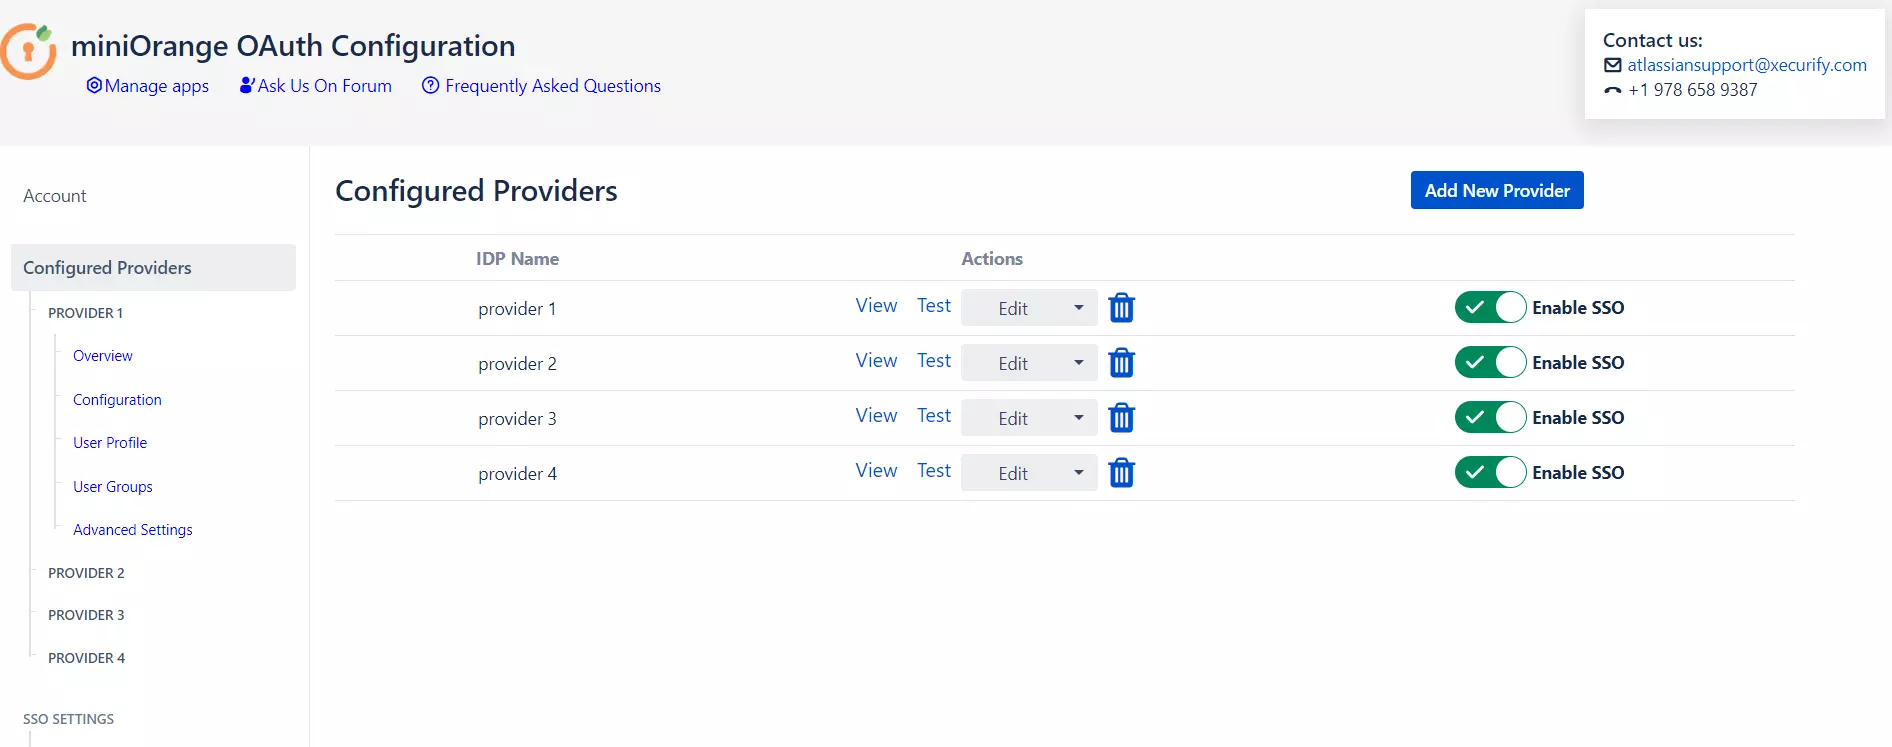
- If your use case requires multiple IDPs to be configured on your SP, the plugin supports that as well. You can add another IDP by going to the Configured Providers section and using the Add New Provider button.
3.2 Managing SSO with multiple IDPs
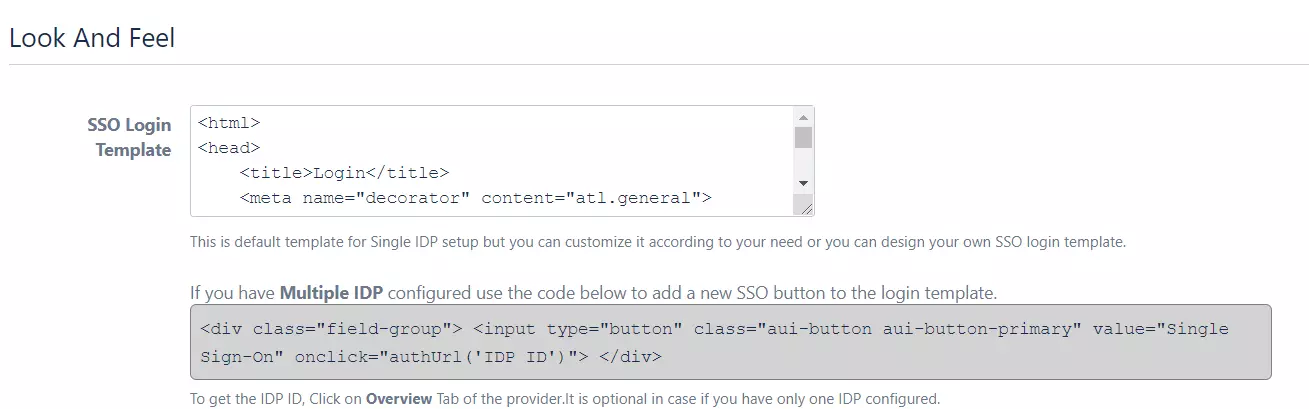
- If you have multiple IDPs configured, you will have to modify the custom login template by adding a new SSO button.
- Go to the Look and Feel tab and paste the code given to add an SSO button.
Step 4: User Profile
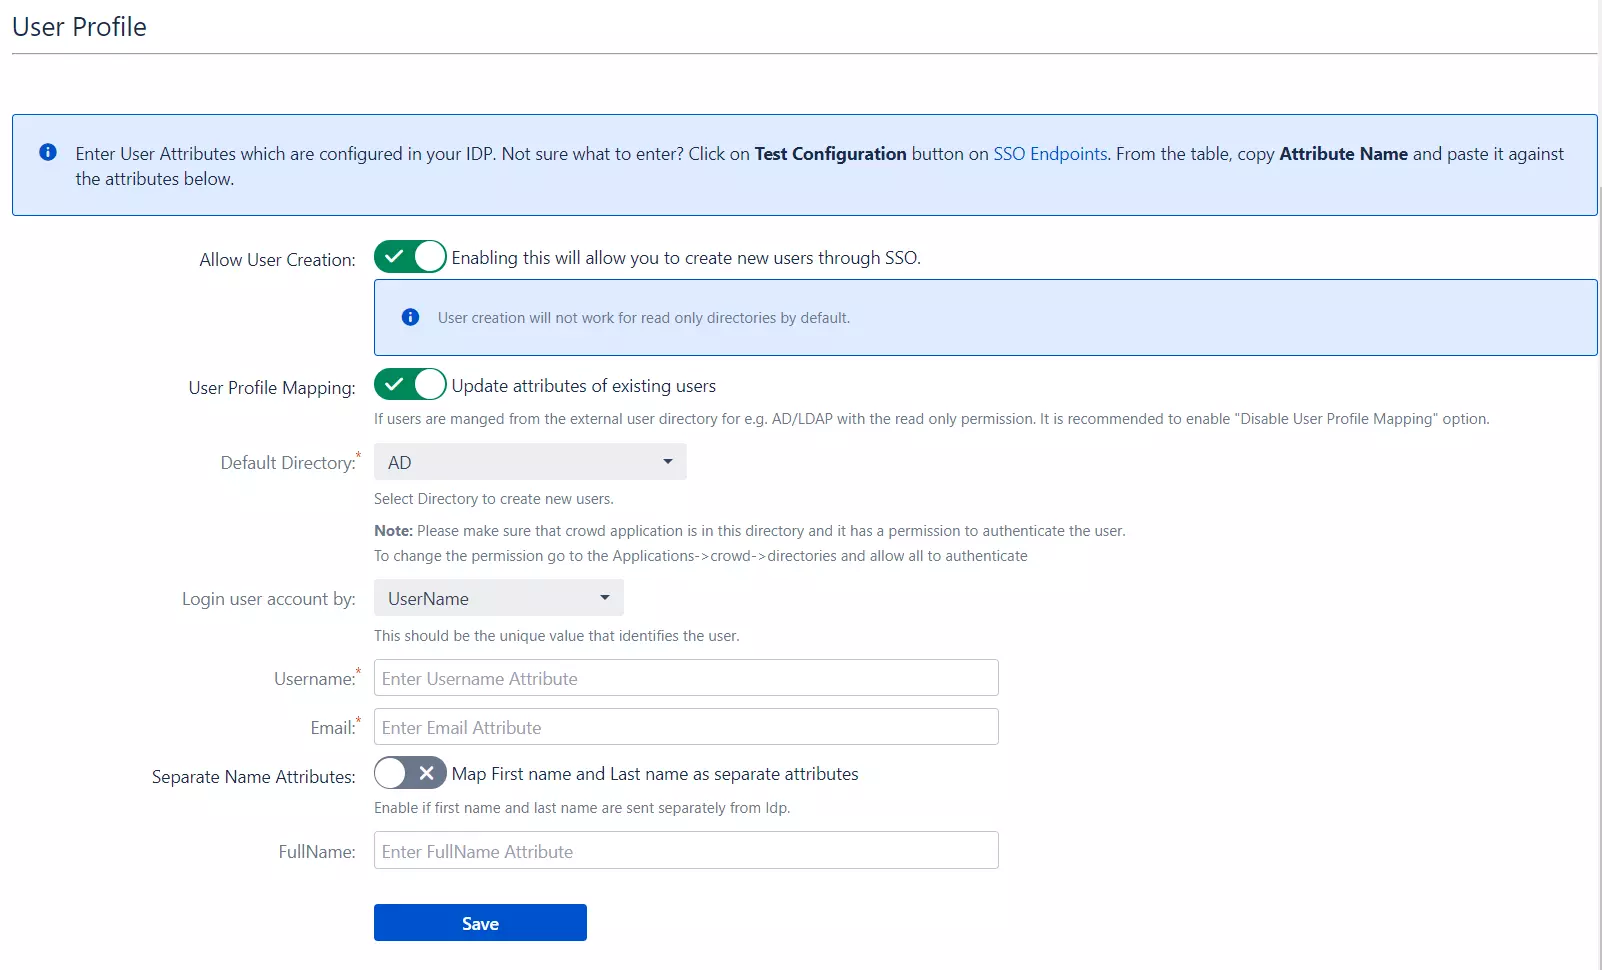
We will be setting up user profile attributes for Crowd. If your users are stored in a Read-Only directory, please check Disable Attribute Mapping in the User Profile tab and follow the steps given in Matching a User.
a. Finding correct attributes
- Go to Configure OAuth tab. Scroll down and click on Test Configuration.
- You will see all the values returned by your OAuth/OpenID Provider to Crowd in a table. If you don't see a value for First Name, Last Name, Email, or Username, make the required settings in your OAuth/OpenID Provider to return this information.
- Once you see all the values in Test Configuration, keep the window open and go to the User Profile tab.
b. Setting profile attributes
- In this tab, fill the values by matching the name of the attribute. For instance, if the Attribute Name in the Test Configuration window is NameID, enter NameID against Username.
- Setting up both Username and Email is required if you want to let users register. If you want existing users to the only login, configure the attribute using which you will match the user in Crowd.
c. Matching a User
When the user logs into Crowd, one of the user's data/attributes coming in from the OAuth/OpenID Provider is used to search the user in Crowd. This is used to detect the user in Crowd and log in the user to the same account.
- Go to the User Profile tab.
- Select Username or Email for Login/Search Crowd user account by.
- Enter the attribute name from OAuth/OpenID Provider which corresponds to Username or Email using Finding Correct Attributes
Step 5: User Groups
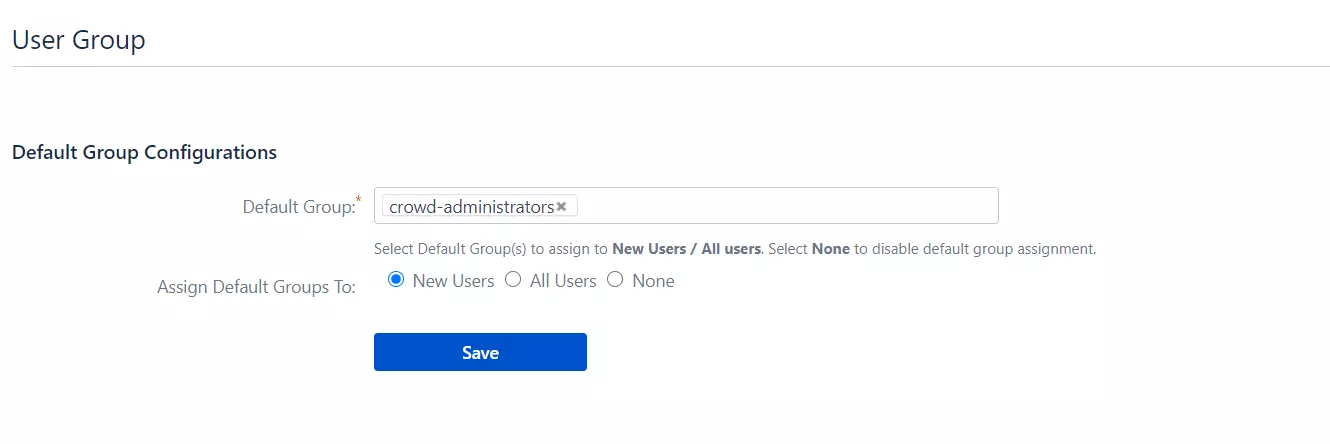
We will be setting up user group attributes for Crowd. If your users are stored in a Read-Only directory, please select assign default groups to "None".
Setting default group
- Select the users' Default Group in the tab User Groups. If no group is mapped, users are added by default to this group.
- You can enable default groups for All Users or New Users using the option. Select None if you don't want to assign any default group to SSO users. Using the option Enable Default Groups for.
Step 6: Sign In Settings
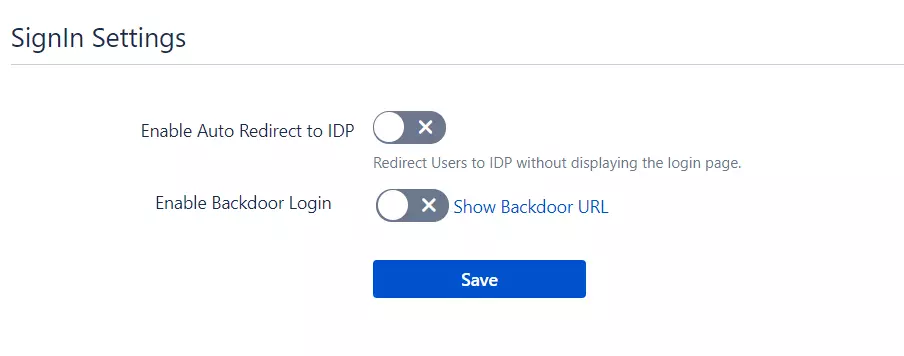
- The settings in the SSO Settings tab define the user experience for Single Sign-On.
- Enable Auto-redirect to OAuth/OpenId Provider if you want to allow users to log in only using OAuth/OpenId Provider. Enable backdoor for an emergency.
Step 7: Advance SSO options
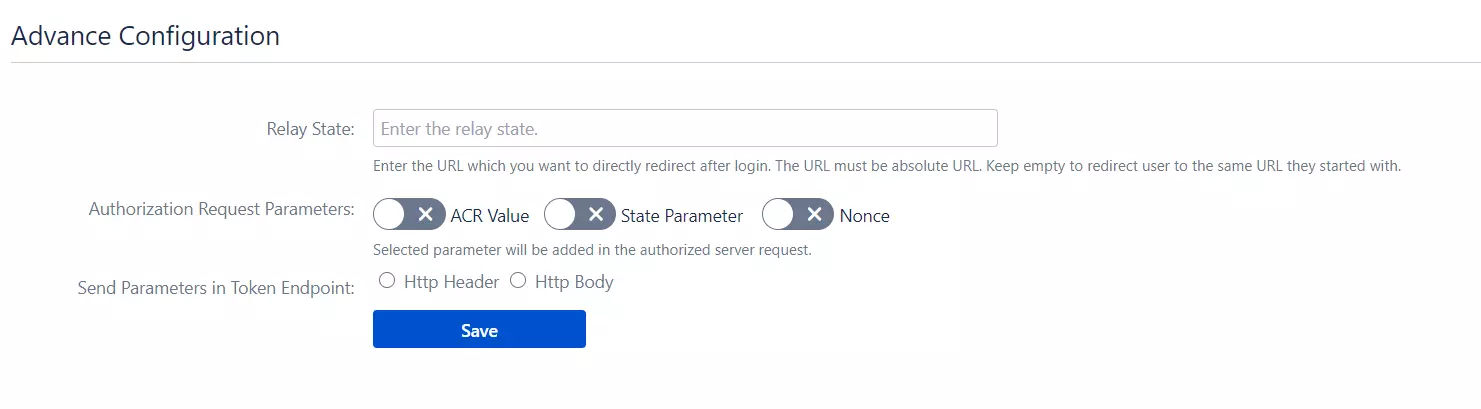
- Set the Relay State to the URL to which the users would be redirected after login. Keep this empty to redirect users to the same page they started with.
- Click on ACR Value Check checkbox if you want to add ACR Value parameter to the authorised server request. This setting is optional. The ACR value specifies the authentication method used by the Authorization Server and is used to enable the multi-factor authentication.
- Click on Nonce checkbox if you want to add the nonce parameter to authorised server request. The nonce parameter is used to validate the tokens received from the provider. Its purpose is to mitigate the replay attack.
- Select the Check State Parameter if required by your OAuth Provider. Using state parameter, a client application can validate that the response received from the provider is not altered in between.
Additional Resources for SSO Implementation
Did this page help you?