
Unlock the Potential of miniOrange Crowd Automated User Management
Cost-Efficiency at Its Finest
Every active user in your Atlassian environment comes at a cost. miniOrange Crowd Automated User Management plugin empowers you to optimize licensing expenses effortlessly. By automatically identifying and deactivating or deleting users who haven't logged in for a predefined period, you can reduce active users, potentially leading to substantial savings in licensing fees.
Boost Your Security
With miniOrange Crowd Automated User Management plugin, you can maintain a clean and secure user base throughout your organization. Bid farewell to lingering "active" users who left your organization unnoticed. No more active accounts for external vendors whose work concluded long ago. Forget about overlooked elevated access permissions for project leads of disbanded projects. Our solution ensures that your system remains fortified against unnecessary vulnerabilities.
Streamline User Operations for Agile Collaboration
In today's agile business landscape, dynamic cross-functional teams assemble for specific projects and disband upon project completion. Effective user-group management and streamlined access permissions are vital.
miniOrange Crowd Automated User Management enables you to seamlessly orchestrate user permissions to foster collaboration among internal users from diverse business units. It also simplifies the onboarding of external contractors and vendors into your internal systems, facilitating frictionless collaboration.
Grant necessary permissions to users in bulk, effortlessly adjust access levels, and revoke permissions once projects conclude. Achieve agility without compromising security, empowering your organization to work efficiently and safely. Unlock the potential of miniOrange Crowd Automated User Management for cost-effective operations, fortified security, and agile collaboration support. Embrace the future of User Management with miniOrange.
Without Automated User Management for Crowd
In the absence of the Crowd Automated User Management solution, managing user-related tasks becomes a manual and time-consuming process. Crowd administrators with the highest privileges must spend significant time reviewing all users in the Crowd user database.
Performing actions like moving users between groups, deleting users, or deactivating them must be done on an individual basis. There is no convenient means to execute these actions in bulk. ***Additionally, documenting each action must be done manually for each user.
With Automated User Management for Crowd
Automated User Management for Crowd offers a more efficient, effective, and consistent approach to addressing these challenges.
With this solution, you can:
- Automate Routine Tasks: Easily configure schemes like 'deactivate users inactive for 90 days' and schedule them to run daily at your chosen time (e.g., 3 am). Let the system handle these tasks automatically.
- Bulk User Operations: Simplify user management by performing bulk actions. Delete or deactivate users in a single, straightforward operation, eliminating the current cumbersome process.
- Effortless Group Management: Seamlessly move users between different user groups, add or remove them from specific groups. Achieve these tasks efficiently and cleanly, enhancing overall Crowd management.
Utilize Automated User Management for Crowd to streamline your administrative tasks, enhance efficiency, and maintain consistency in user management operations.
Overview - Automated User Management for Crowd
In this comprehensive guide, we'll walk you through the simple steps to configure Automated User Management with Crowd. By the end of this guide, you'll gain the ability to perform bulk activations, deletions, and automatic identification of inactive users based on their last login time.
Say goodbye to manual user management hassles and optimize your Atlassian license costs by ensuring you only pay for active users. Experience the future of user management with miniOrange Crowd Automated User Management – where efficiency meets simplicity.
Pre-requisites
To configure Automated User Management for Crowd, you need the following items:
- Crowd should be installed and configured.
- Admin credentials are set up in Crowd.
- Valid Crowd Server or Datacenter Licence.
Download And Installation
Free Plugin Installation
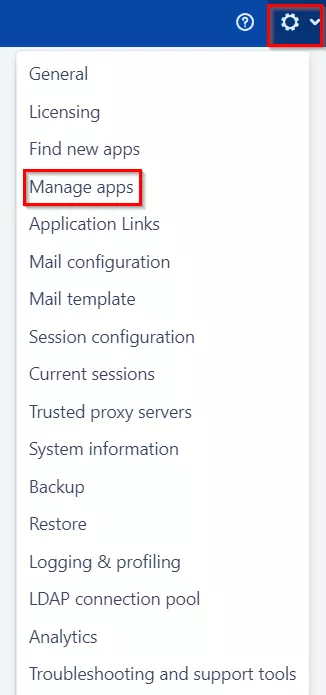
- Log into your Crowd instance as an admin.
- Navigate to the Administration menu and click Manage Apps.
- Click Find new apps or Find new add-ons from the left-hand side of the page.
- Locate Automated User Management for Crowd via search and click on install.
Premium Plugin Installation
- Create an account with miniOrange.
- Login to miniOrange Admin console.
- Navigate to License > Manage License > Release and Download.
- Download the jar file from the Download link.
- Click on the View License button to get the license key.
- Log in to the Crowd Admin console.
- Navigate to Administration > Manage Apps.
- Click on Upload App and upload the jar file.
- Click on the Configure button and verify the miniOrange credential and license key.
- Navigate to Crowd Admin Console → Manage Apps.
- Click on the Configure button of the miniOrange Crowd Automated User Management plugin.
- Log in with your miniOrange account.
- Enter the license key and click on the Verify button.
A. License and Plugin Download
B. Installation
C. Plugin Activation
Dashboard: Visual Analytics & User License Insights
The Dashboard tab in the miniOrange Automated User Management and License Management Plugin provides a comprehensive visual overview of your Crowd user base. With intuitive graphs and live statistics, it allows administrators to monitor user activity, track license usage, and evaluate user segmentation over a selected time period.
This centralized view helps Crowd admins make informed decisions about license optimization, deactivation strategies, and overall system hygiene.

Visual Components of the Dashboard
Pie Chart: User Distribution Overview
The pie chart provides a snapshot breakdown of user types based on their current status in the Crowd environment:
- Active Users – Users currently enabled and using the application.
- Inactive Users – Users who have not logged in during the selected time range.
- Deactivated Users – Users who have been explicitly disabled or deactivated.
Example Use Case: If the pie chart shows a high percentage of deactivated users (e.g., 96.9%), it may be time to clean up directories or re-evaluate auto-deactivation rules.
Bar Graph: User Activity Trends Over Time
The bar graph provides a time-based visual trend of user activity:
- Track how many users were active, inactive over the selected number of days.
- Evaluate spikes or drops in login behavior to understand usage patterns, such as after a major release or a policy change.
Example Use Case: If user activity dropped significantly over the past 30 days, it could indicate a misconfigured access rule or a scheduled maintenance window that impacted logins.
User Status Metrics
Below the visualizations, the dashboard lists real-time numeric insights for various user categories:
| Metric | Description |
|---|---|
| Active Logged-In Users | Enabled users who have successfully authenticated with a Crowd application within the specified timeframe. |
| Active Never Logged-In Users | Enabled users who have been provisioned in the system but have never logged in since their account creation. |
| Inactive Users | Enabled users who have not logged into the Crowd application during the defined timeframe. |
| Deactivated Users | Enabled users who have not logged into the Crowd application during the defined timeframe. |
| Activated Users | Users with enabled accounts who are permitted to access Crowd applications. |
Example Use Case: If "Never Logged-In Users (Licensed)" shows a non-zero count, this may indicate underutilized licenses or onboarding issues.
Time Range Selection
Use the "Displaying User data for the past X days" dropdown to choose how far back you'd like to evaluate user behavior. The default is 30 days, but you can adjust it to analyze shorter or longer timeframes depending on your audit or reporting needs.
After changing the date range, click the "Refresh" button to reload updated data across all dashboard widgets.
Benefits of the Dashboard
- Quick Overview of user segmentation and login behavior
- Graphical Insights for presentations or internal reporting
- License Optimization through visibility into unused or inactive accounts
- Audit Readiness by analyzing activation and deactivation trends over time
Sample Scenario
You are preparing for a quarterly license review. By opening the dashboard and setting the display range to 90 days, you quickly find:
- 2 active licensed users
- 1 never logged-in licensed user
- 7181 deactivated users
This helps you justify a potential reduction in user licenses and clean-up inactive or orphaned accounts.
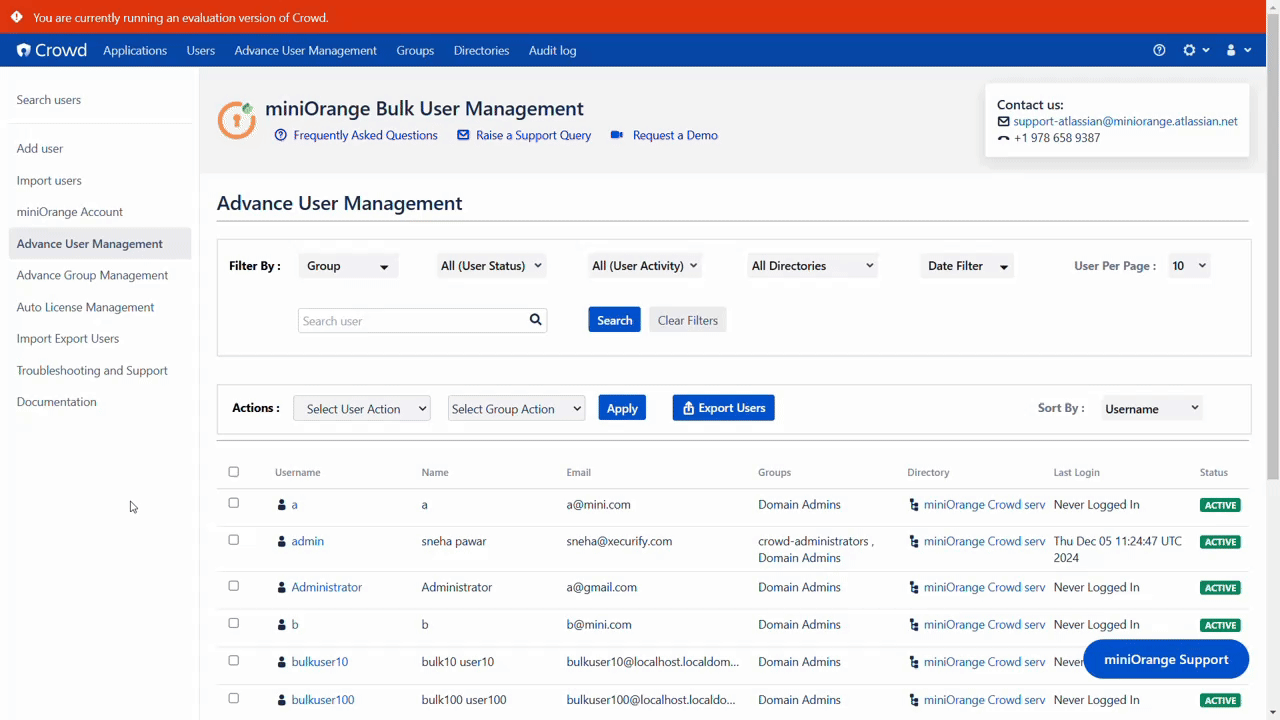
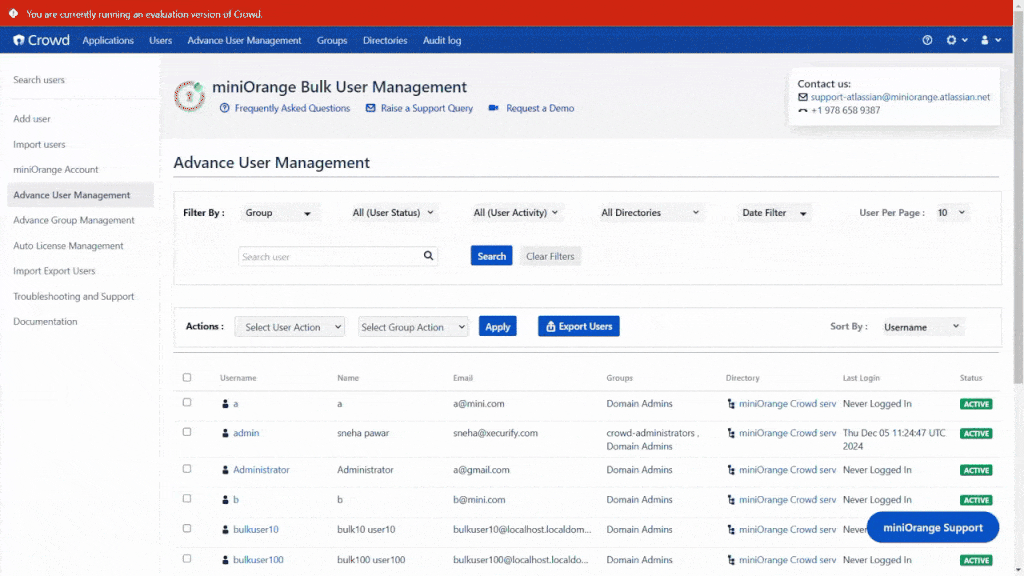
Advance User Management
Advance User Management provides you with a powerful user search functionality. You can effortlessly search for users based on various filters.
These filters are:
- Groups
- Directory
- Status (Active, Inactive, All Users)
- Last Login Date
- Username
Initiate your search and progressively refine it until you pinpoint the exact users you're looking for. Once identified, you can swiftly execute bulk actions on these users, ensuring a quick, efficient, and seamless process.
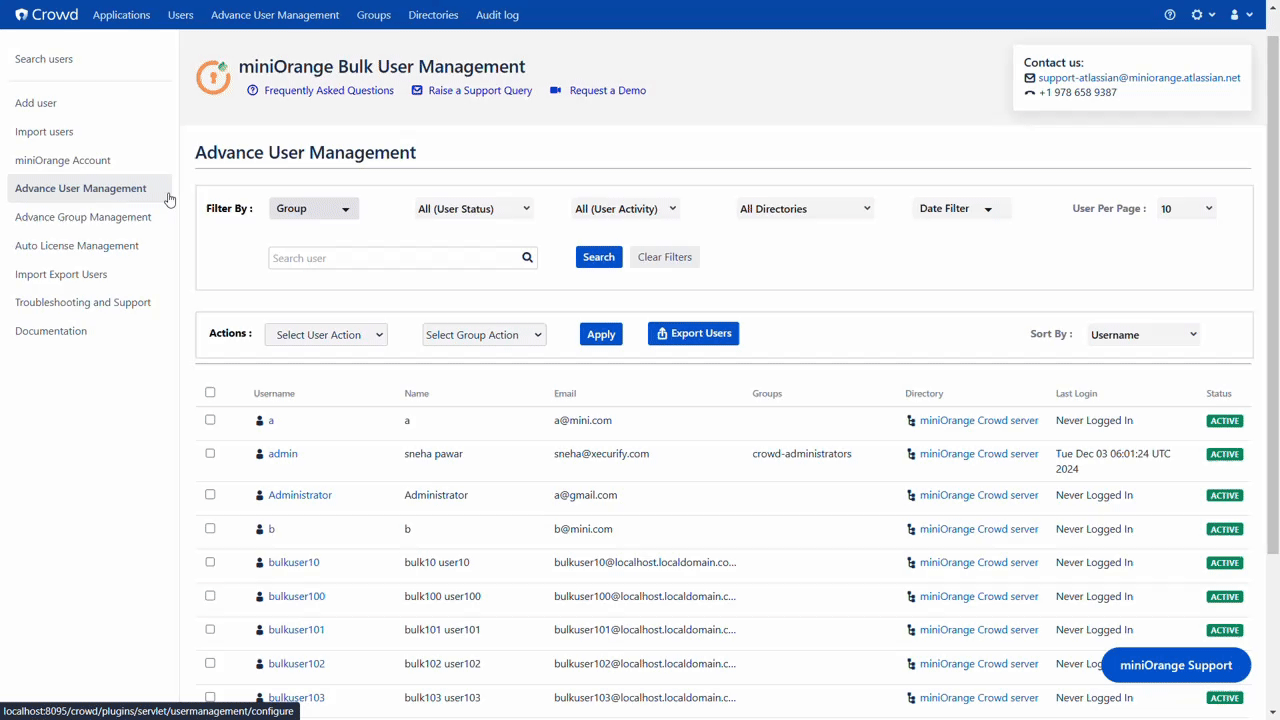
Select the Users for bulk operation using the checkbox associated with them.
- Easily bulk edit users:- Activate, Deactivate or delete them - all in one easy go
- Easily move users into different user groups, remove them from one group, add them to another group.
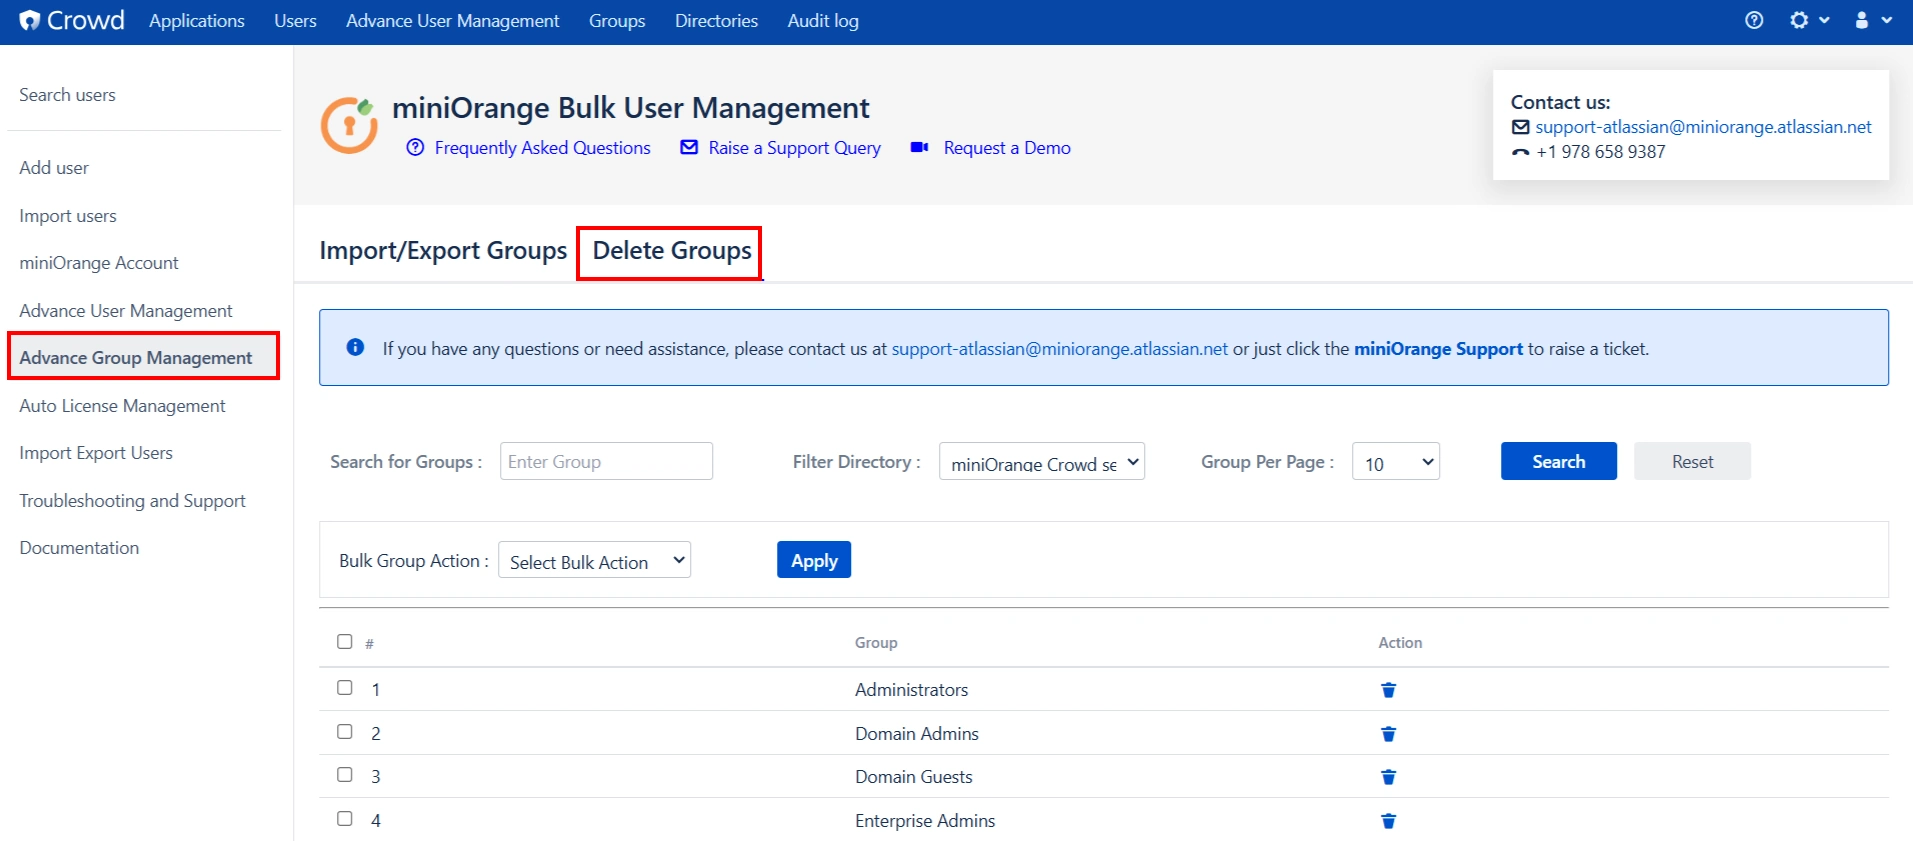
Advance Group Management
Advance Group Management section enables you to create and delete groups in large numbers.
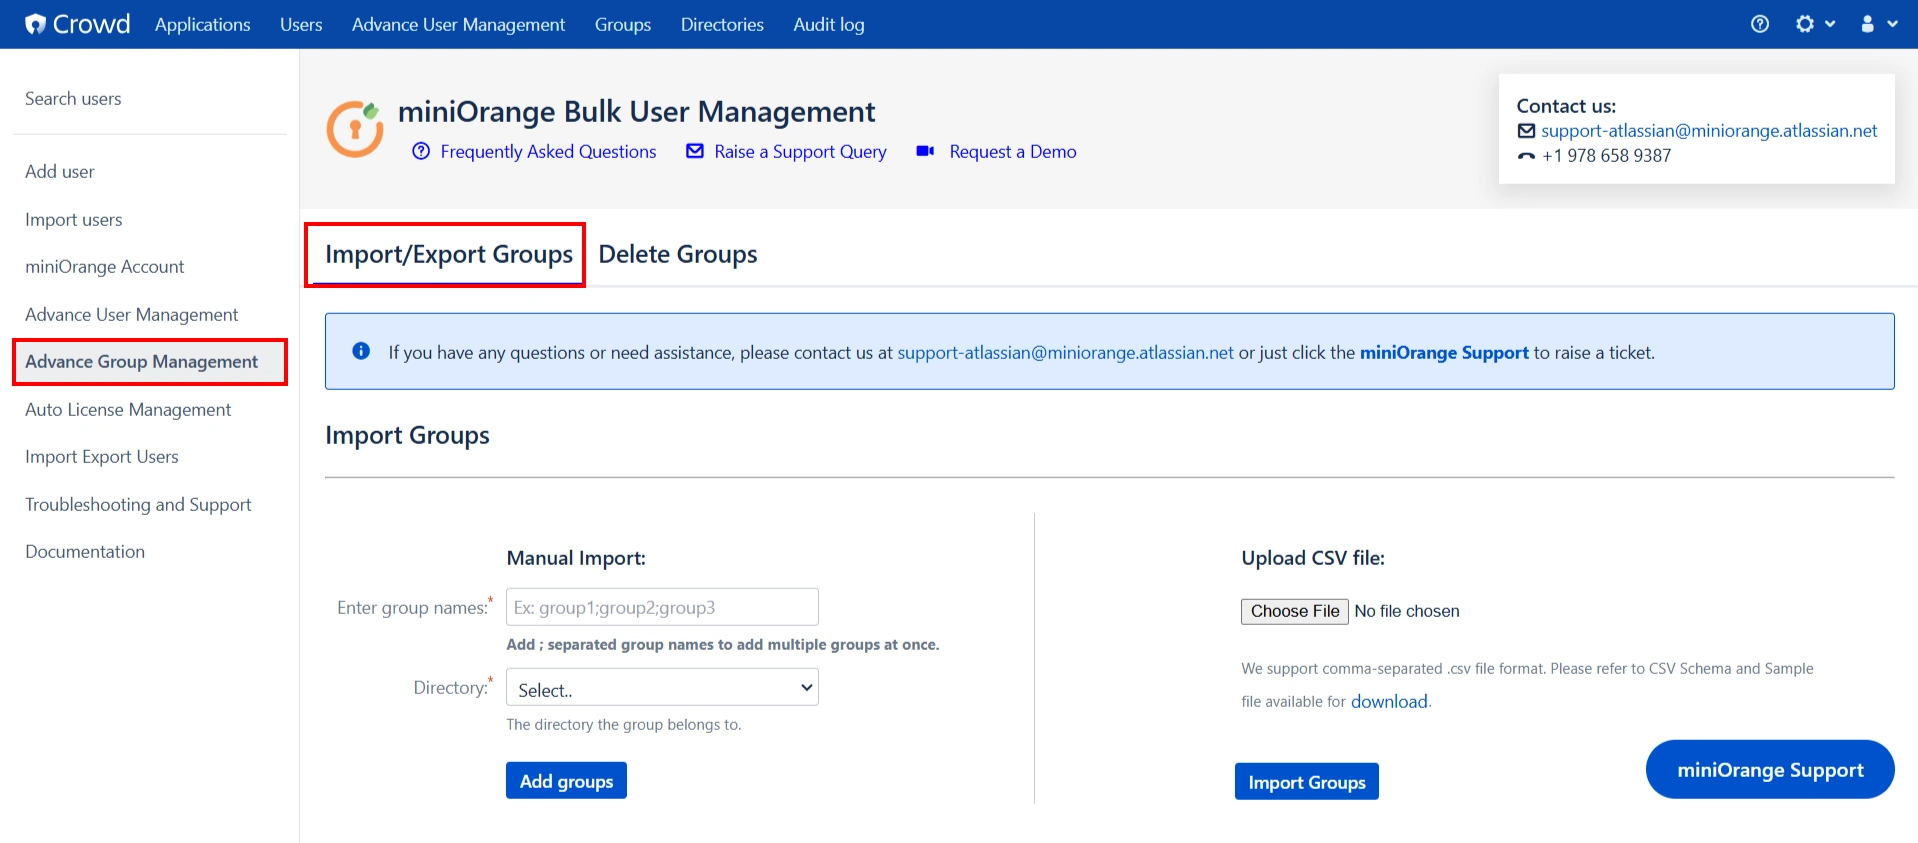
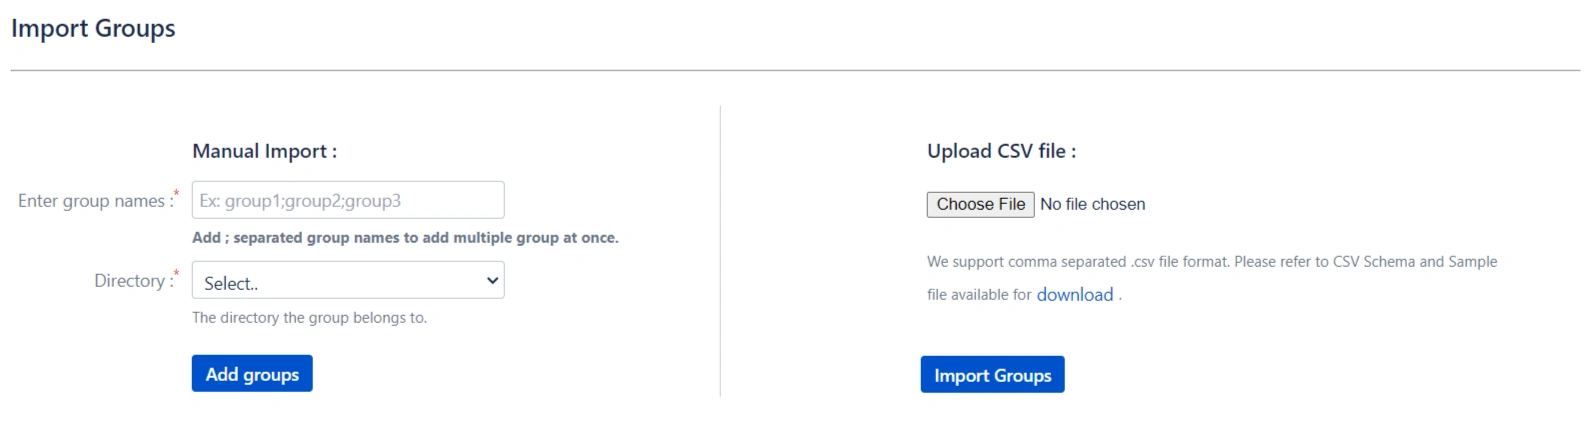
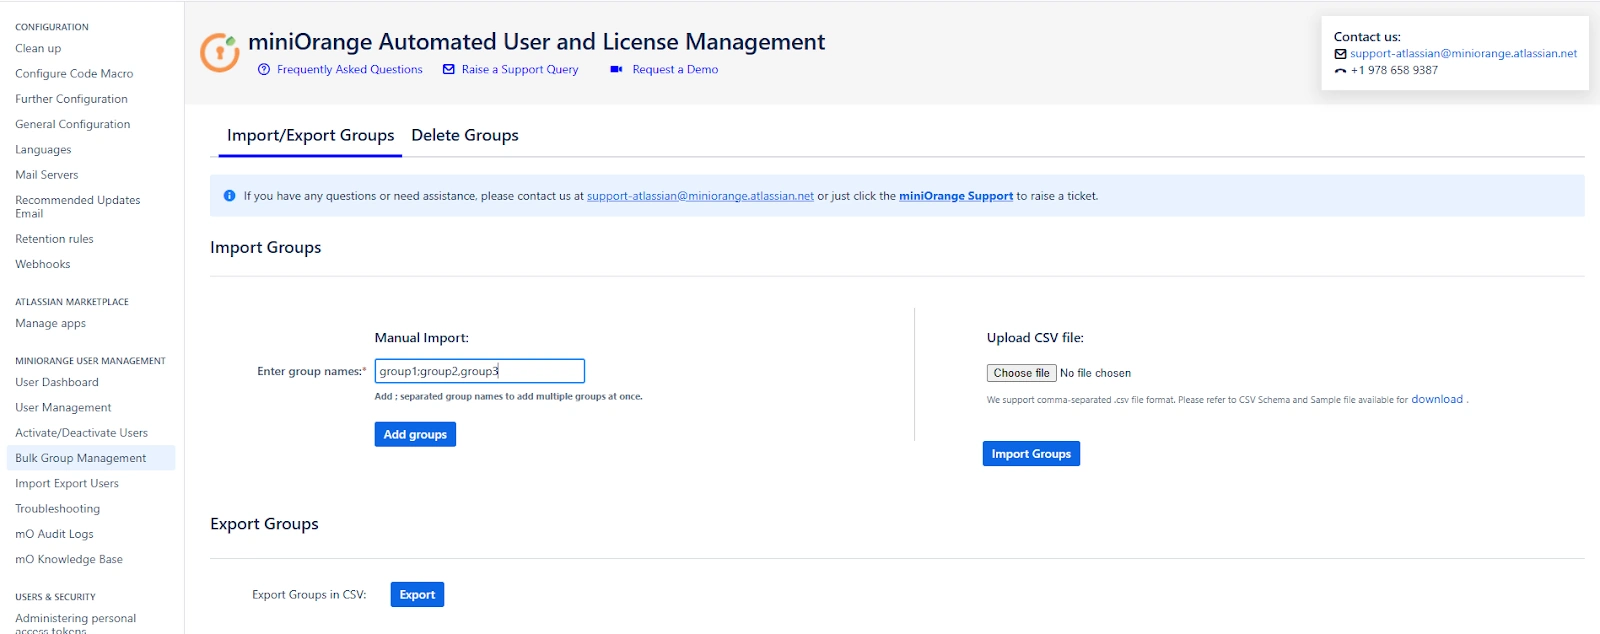
Import Groups
- Manual Entry:- In the Enter group names field, enter the group names manually. You can add multiple groups at a time by adding multiple group names separated by semicolons.
- Upload csv file:- Import the groups by uploading the CSV file with Groups names that contain Group names in it. You can also get the Sample CSV file format by clicking on the download link.
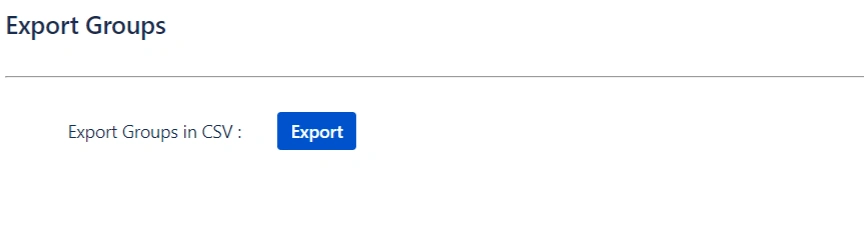
Export Groups
In the export groups section you can export the groups in .CSV file format by clicking on Export Groups in CSV button.
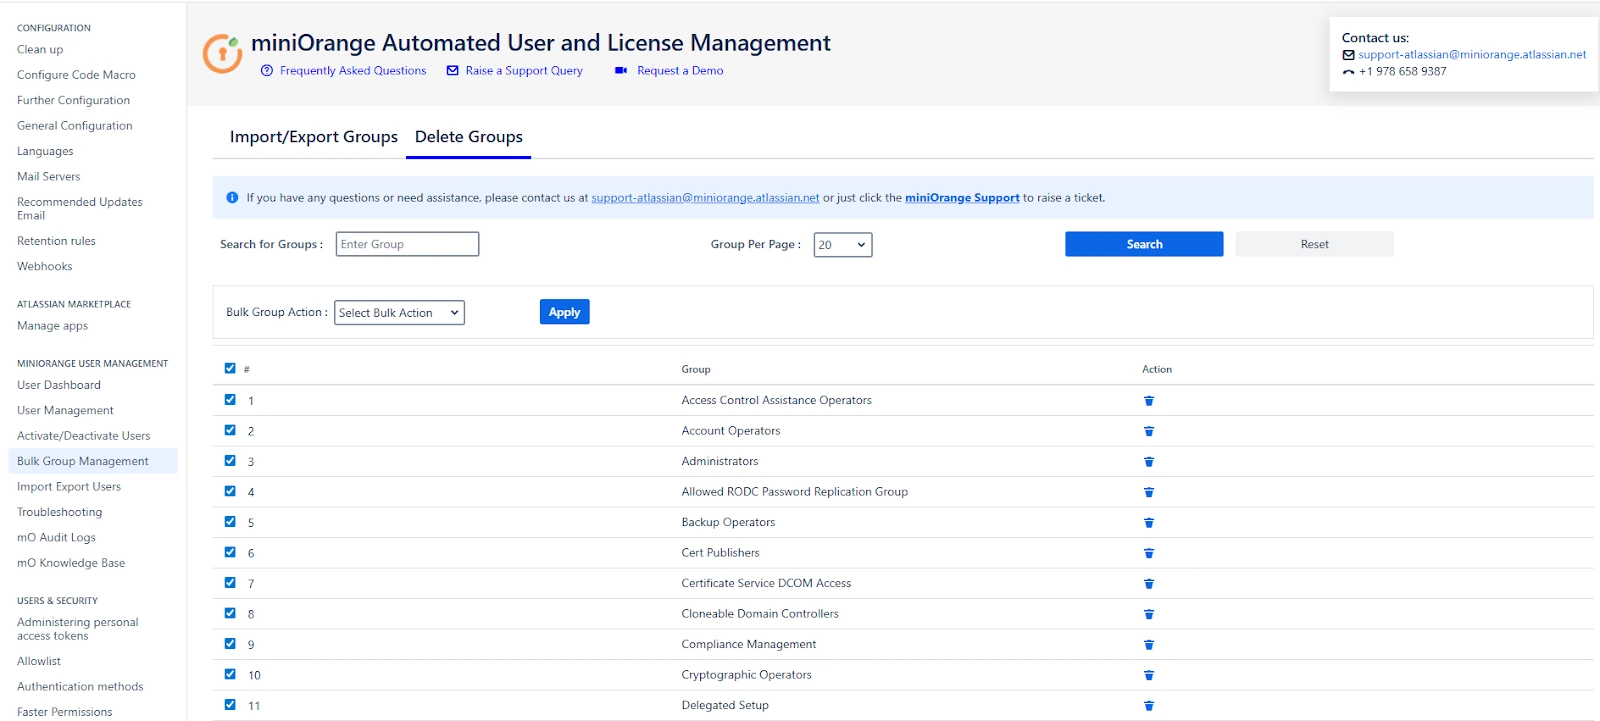
Delete Groups
Select the required groups that you want to delete from the Select groups dropdown. You can select multiple groups here.
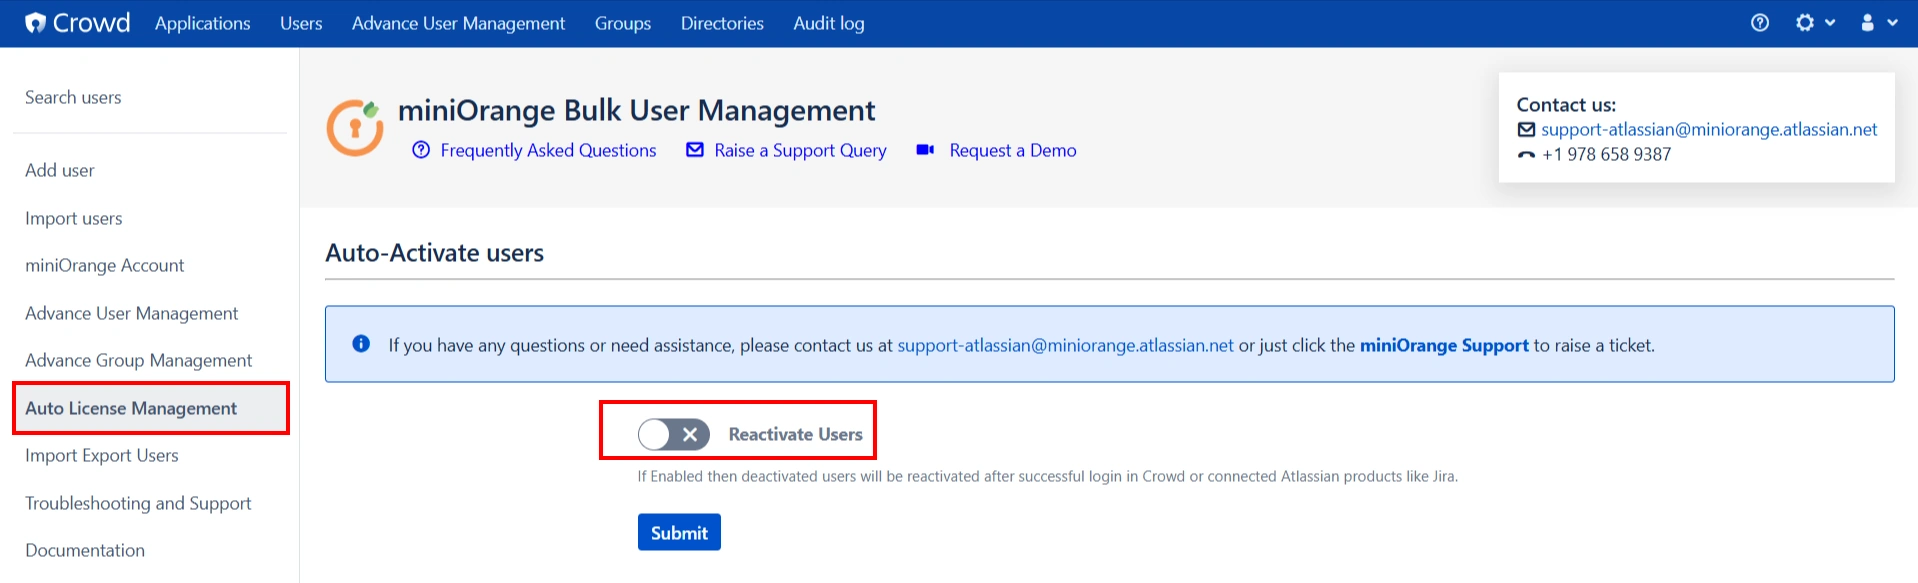
Auto License Management
Enabling the "Reactivate Users" toggle will automatically reactivate previously deactivated users upon their successful login in Crowd or connected Atlassian products.
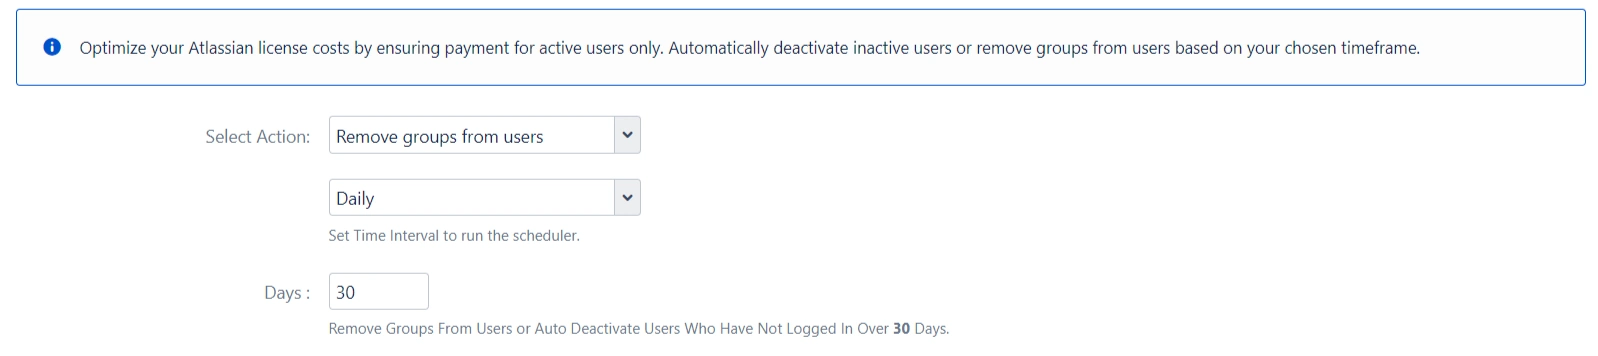
Auto User Management simplifies the management of your Atlassian license expenses by ensuring that you only pay for actively engaged users. This is achieved through automated processes that identify and take action on users based on their group memberships and the duration of their inactivity.
There are three options to help maintain a clean user directory:
- Auto Deactivate User
- Remove Groups from Users
- Auto Deactivate User & Remove Groups from Users
Auto Deactivate User
- Automatically deactivates multiple users on a scheduled basis.
- You can set a custom time for the scheduler to run, whether it's hourly, daily, weekly, monthly, or at your specified time interval.
- Specify the number of days, e.g., 5, to automatically deactivate users who haven't logged in within that time frame.
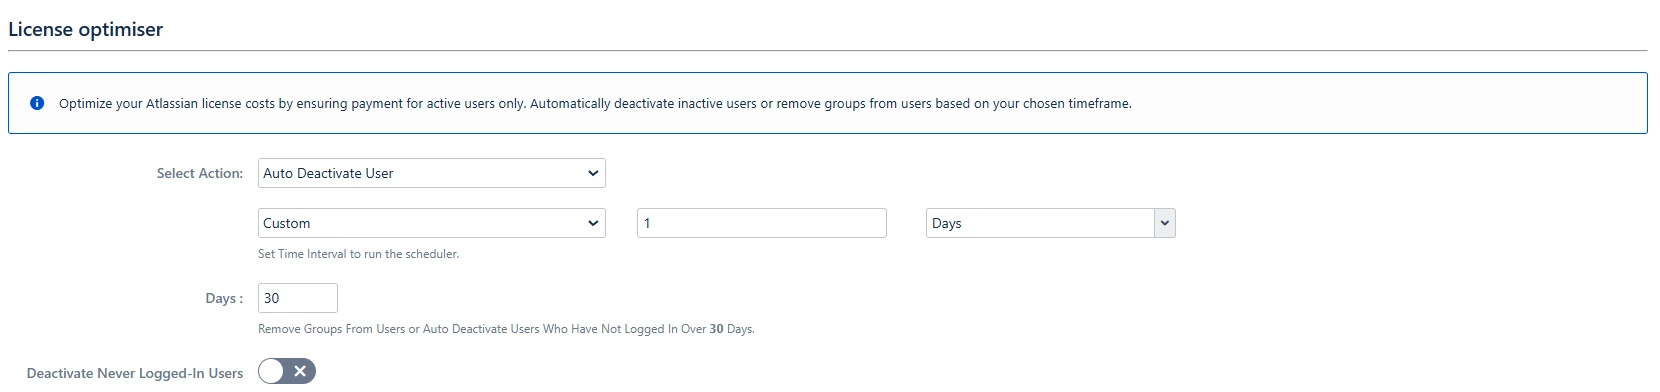
- If you want to deactivate a never-logged-in user then enable the Deactivate Never Logged-In Users.
- Choose to send an email notification before deactivating a user.
- Ability to exclude members of specific groups from deactivation.
- Option to exclude specific members from deactivation.

Remove Groups from Users
Automatically remove users from groups that grant application access if they remain inactive for the specified period. Users are removed from the group if they do not login to the application within the specified days of the defined inactivity period.
- Automatically remove groups from users on a scheduled basis.
- You can set a custom time for the scheduler to run, whether it's hourly, daily, weekly, monthly, or at your specified time interval.
- Select the groups to remove from users. Multiple groups can be set. The user will be removed from these groups. Keep empty to remove none.
If a user is part of a group in the application, then app removes the user from that group in the local application.

- Utilize regular expressions to identify groups for removal
To check the output of the regex, click on the Test Regex button. Enter a value in the field provided. Click the Test button to apply the given regex to the entered value.

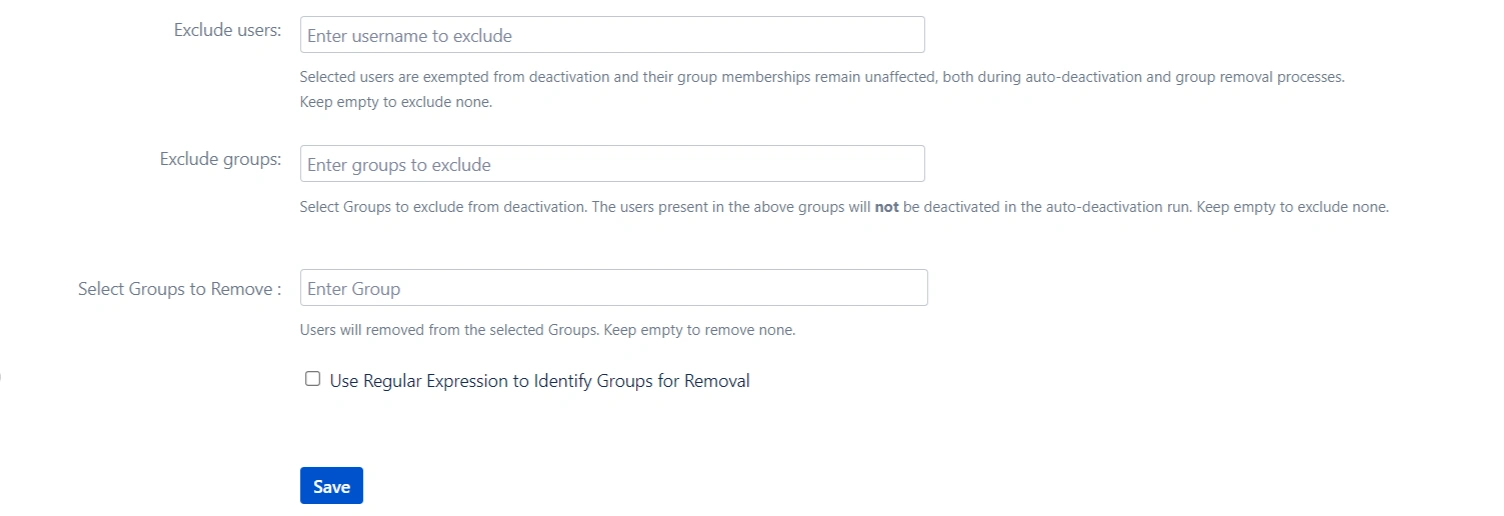
Auto Deactivate User & Remove Groups from Users

- Automatically deactivates multiple users & removes groups from users on a scheduled basis.
- Exclude Users :- Selected users are exempted from deactivation and their group memberships remain unaffected, both during auto-deactivation and group removal processes.
- Exclude Groups:- Select Groups to exclude from deactivation. The users present in the above groups will not be deactivated in the auto-deactivation run. Keep empty to exclude none.
- Select Groups to Remove:- Users will be removed from the selected Groups. Keep empty to remove none.
Bulk Group Management
The Bulk Group Management tab in the miniOrange Confluence User Management plugin offers administrators a centralized interface to manage user groups efficiently. Whether you're creating new groups, importing groups from external files, exporting existing group data, or cleaning up outdated groups, this tab allows you to perform all actions in bulk—saving significant time and effort.
This section details the functionality of the Bulk Group Management tab, followed by practical use cases to demonstrate how and when to apply each feature.
1. Create Groups Manually
You can create multiple groups at once by entering group names in the "Enter Group Names" field. To add more than one group, separate each group name using a semicolon (;).
Use Case:
Your organization is onboarding three new departments: content-team, product-strategy, and frontend-dev. Instead of creating each group manually, you can enter them like so:
content-team;product-strategy;frontend-dev
Clicking the Add groups button will add all three groups simultaneously. This is especially useful during initial setup or mass onboarding scenarios.
2. Import Groups from CSV File
If you already maintain a list of groups in a CSV file (e.g., from another system or export), you can upload that file to create the groups in bulk. The file should contain group names in each row.
Use Case:
Suppose you are migrating from another user management system or have received a list of 50 standard project groups from your IT team in CSV format. Instead of entering them one by one, you simply upload the file to have all groups created instantly, ensuring speed and accuracy.
3. Export Groups to CSV File
You can export the current list of Confluence groups into a downloadable CSV file. This file can optionally include the number of users in each group if you enable the “Include No. of Users in Group” checkbox before exporting.
Use Case:
If you need to share a report with compliance or management that shows which groups exist in Confluence and how many users belong to each, this feature gives you exactly that in a structured CSV format. It’s ideal for auditing, documentation, or bulk review activities.
4. Delete Groups in Bulk
From the Select Groups dropdown, you can choose one or more groups to delete. After selecting the desired groups, click the Delete button to initiate the deletion process.
Deletion Summary Window:
Once the deletion is initiated, a summary window appears displaying the outcome of each deletion attempt. This includes:
- Group Name – The name of the group being deleted.
- Status – Indicates whether the group was successfully deleted or if the deletion failed.
- Error Message (if applicable) – Provides information if the group could not be deleted, such as "Group has admin access" or "Group not found".
This real-time feedback ensures transparency and helps administrators take corrective action immediately if needed.
Use Case:
You select and delete 10 outdated groups such as old-project-x, archived-beta-testers, and temp-review-board. After clicking Delete, the summary window displays:
- 7 groups deleted successfully
- 2 groups skipped due to admin access
- 1 group not found (possibly already deleted by another admin)
This allows you to verify what happened at a glance and take further action if necessary.
Summary of Benefits
The Bulk Group Management tab enables administrators to:
- Rapidly set up new organizational units or project teams.
- Seamlessly migrate groups from legacy systems.
- Efficiently document current group structures.
- Remove obsolete or unused groups to maintain a clean access control environment.
Import Export Users Tab
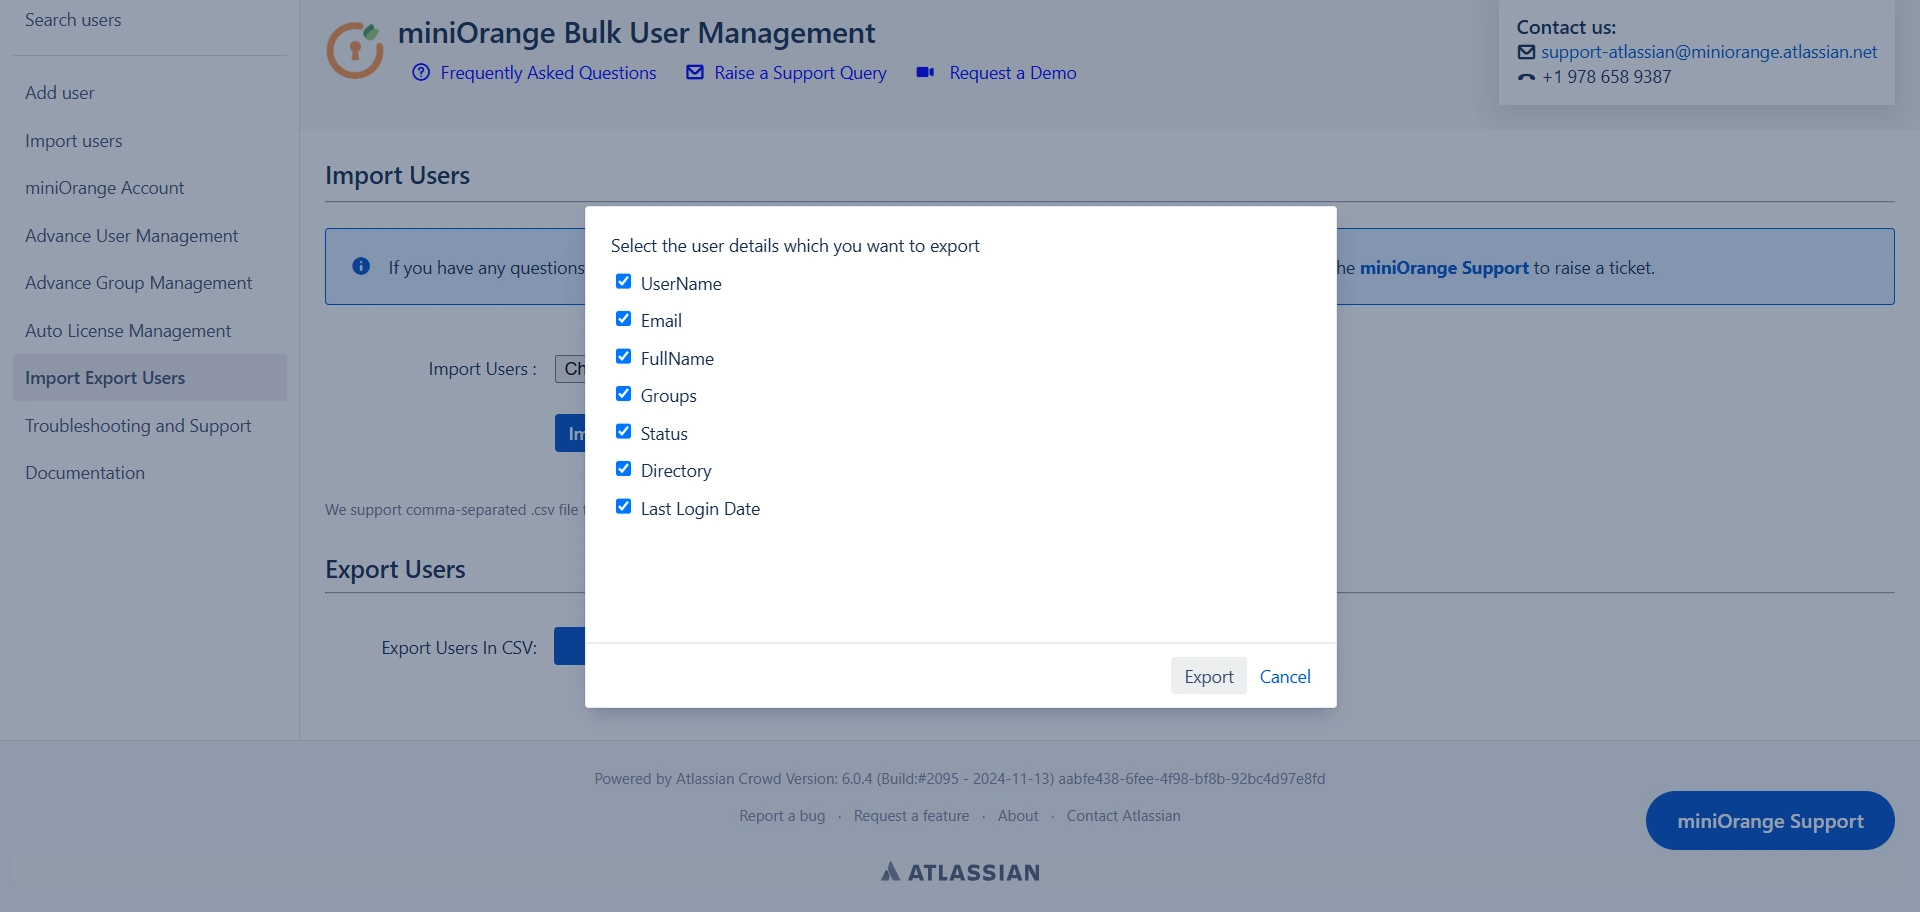
To import the users, you need to upload a .CSV file. You will find the format in by clicking on the download link as highlighted in the below image.
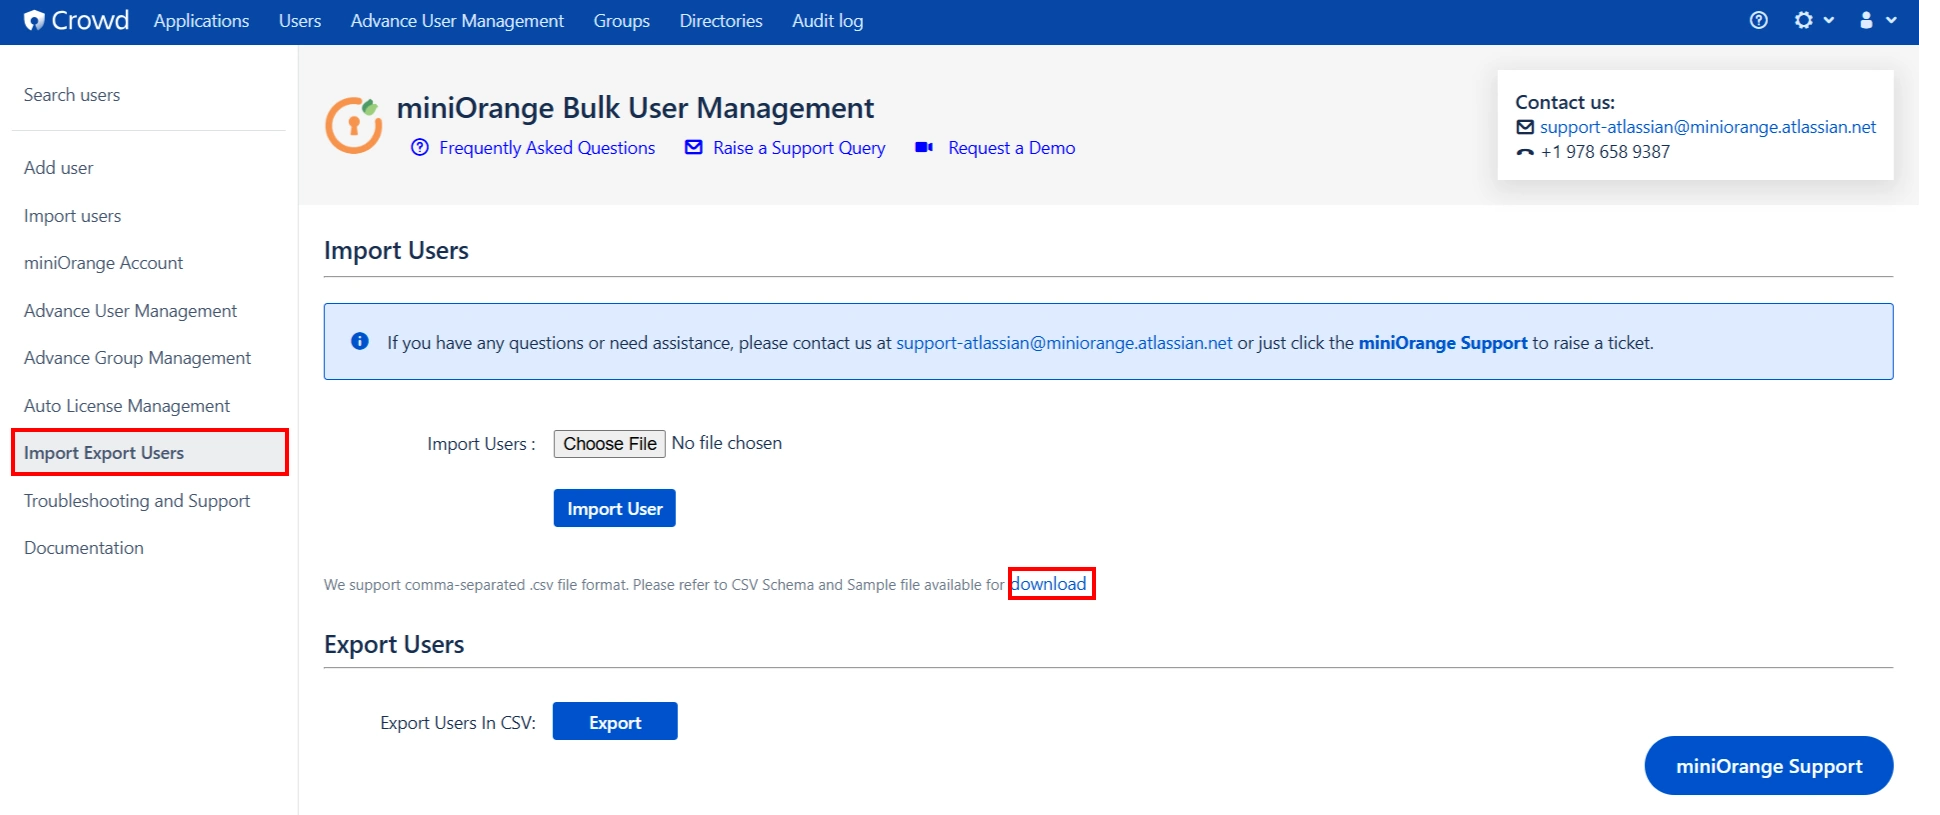
Export Users allows you to download all user data, with the option to select specific user details for export.
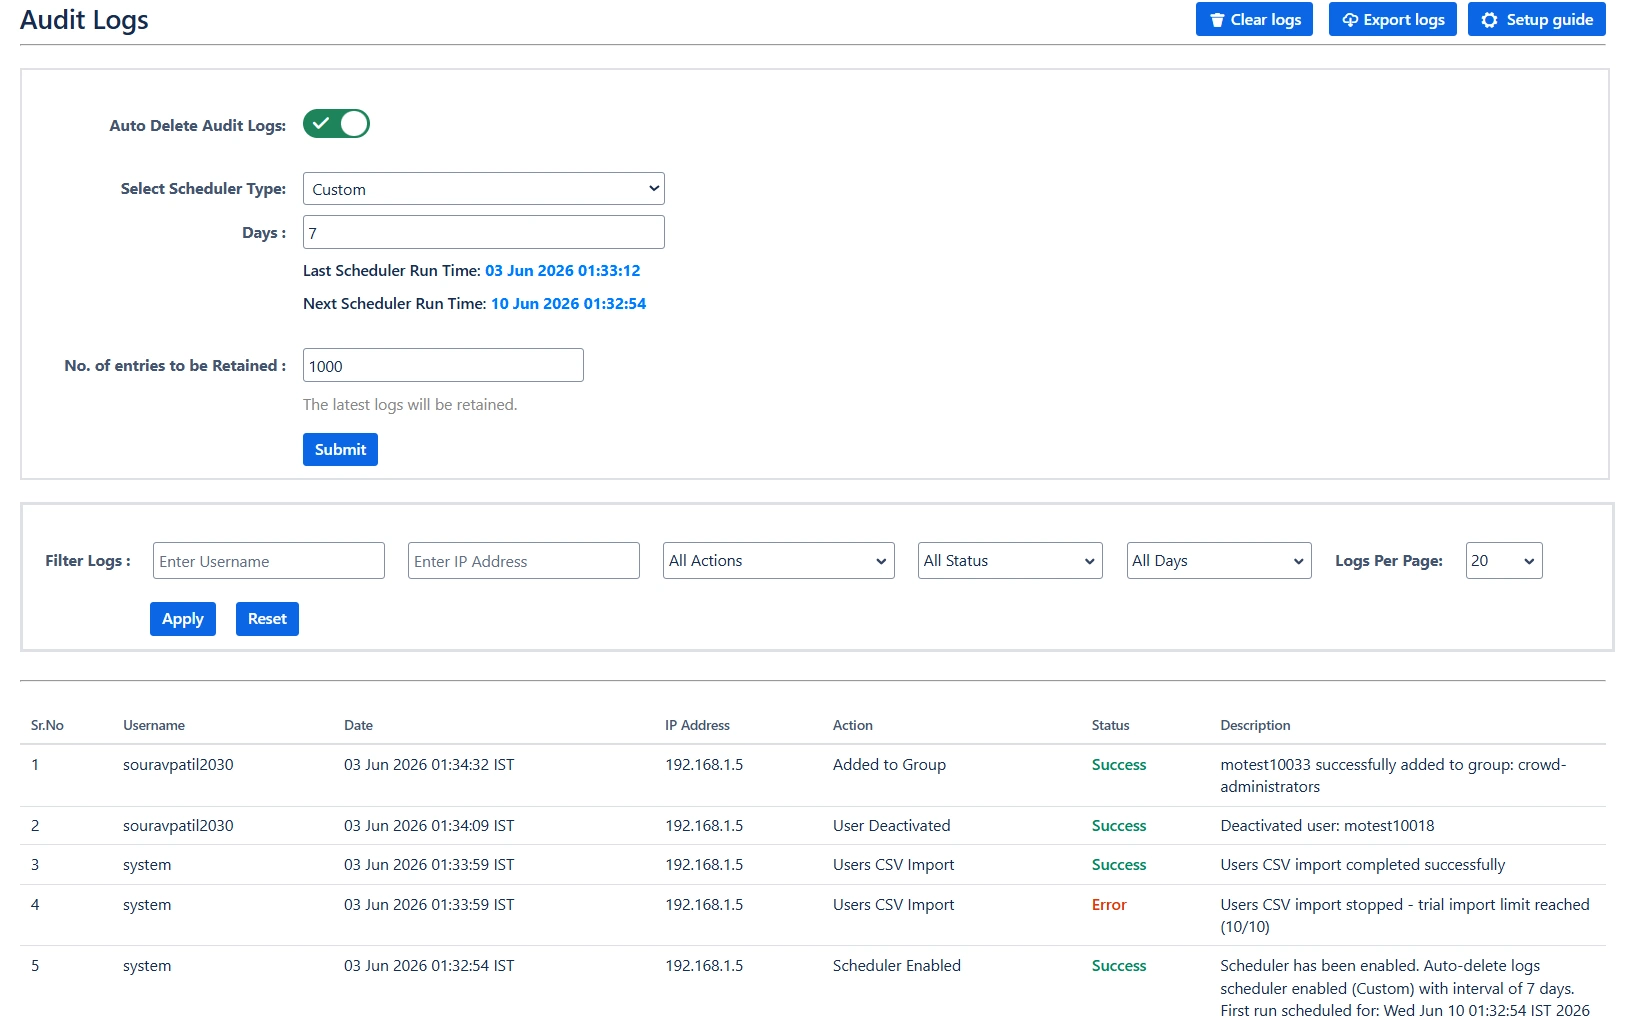
Audit Log Tab
The Audit Log tab in the miniOrange Automated User Management and License Management Plugin is designed to give administrators full visibility and traceability into all actions performed through the plugin. This is essential for compliance, security, and internal accountability.
It captures a detailed timeline of what action was taken, when, by whom, and on which user or group—ensuring a complete audit trail of user-related administrative activities.
🔐 Why it matters: Audit logs help you maintain security, support compliance efforts, and troubleshoot with confidence.
Key Features
View Audit Logs
To access the audit log, go to the "Audit Log" option from the plugin menu section in the left sidebar.
Each entry in the log includes the following details:
- Username – Who performed the action
- Date – When the action was performed
- IP Address – From where the action was triggered
- Action – What kind of operation was executed (e.g., Deactivate User, Add to Group)
- Status – Whether the action was successful or failed
- Description – Additional details about the action (e.g., user's group or directory)
Export Logs to CSV
You can export logs as a .CSV file by applying filters such as action type or date range. This is helpful for sharing data with compliance teams or for long-term record-keeping.
Auto Delete Audit Logs
Enable the "Auto Delete Audit Logs" option to automatically purge logs after a specified number of days. This helps keep your logs manageable and ensures that sensitive data doesn't persist indefinitely unless required.
You can select the scheduler type as Daily or Custom run by setting the number of days in the Days input field, after which all logs older than the specified duration will be removed automatically. You can also retain how many number of entries you have to retain from deletion on scheduler run.
Filter Logs by Action Type
You can filter log records based on the following actions:
- User Deactivated
- User Activated
- User Deleted
- Removed from Group
- Added to Group
- Users CSV Import
- Group CSV Import
- Exported Users
- Exported Groups
- Scheduler Enabled / Disabled
- Group Created / Deleted
- User Reactivated
- Scheduler Triggered
Example Use Cases
Example 1: Investigating Unexpected Group Removal
Scenario: A user reports they suddenly lost access to Crowd.
- Open the Audit Log tab.
- Filter by Action = Removed from Group.
- Locate the entry for the user and check:
- Date and Time of removal
- Admin who performed it
- IP address to validate access location
- Use this information to reverse the change or escalate further.
Example 2: Monthly Compliance Review
Scenario: Your IT security policy requires monthly validation of all user deactivations.
- Go to the Audit Log tab.
- Filter by Action = User Deactivated and set the Date Range to the current month.
- Export the filtered logs as .CSV.
- Share the report with your IT compliance team for review and approval.
Example 3: Monitoring Scheduler Configuration Changes
Scenario: You want to track when the auto-deactivation scheduler was disabled.
- Filter by Action = Scheduler Disabled.
- Review the logs to identify:
- Who disabled the scheduler
- When it was disabled
- Follow up with that administrator if needed.
Example 4: Managing Audit Log Size
Scenario: Your audit log has grown too large over time.
- Enable Auto Delete Audit Logs.
- Set Days = 90 to retain logs for the past 3 months only.
- Going forward, logs older than 90 days will be automatically deleted, maintaining log hygiene without manual cleanup.
Additional Notes
🟢 Enabled by Default: No configuration needed to start capturing logs.
⚠️ If certain expected actions aren't showing, ensure you're on the latest plugin version.