
Unlock the Potential of miniOrange Jira Cloud Automated User Management
Cost-Efficiency at Its Finest
Every active user in your Atlassian Jira Cloud environment contributes to your licensing cost. The miniOrange Jira Cloud Automated User Management (AUM) plugin helps you optimize these expenses by automatically identifying users who haven’t logged in for a predefined period—and deactivating or removing them as per your configuration.
By streamlining the user base, this plugin enables substantial savings in licensing fees, especially for organizations dealing with hundreds or thousands of users.
Boost Your Security
With the Jira Cloud Automated User Management plugin, your user base stays clean, current, and secure. Inactive accounts—such as those belonging to past employees, temporary vendors, or former contractors—can pose a security risk if left unattended.
This solution ensures:
- Timely deactivation or removal of users no longer needed.
- Removal of unnecessary elevated access.
- A secure, lean user database free of inactive or forgotten accounts.
No more hidden vulnerabilities from dormant users—your Jira Cloud environment remains tightly controlled.
Streamline User Operations for Agile Collaboration
Today’s fast-moving project teams form and dissolve rapidly. Managing user access manually in such an environment becomes a bottleneck.
miniOrange Jira Cloud AUM enables:
- Bulk permission and group assignment to streamline onboarding.
- Assign license group trough auto activate users feature using JSM portal, Slack, Microsoft Teams, and the intranet, ensuring easy and seamless access.
- Automatic group assignment or removal based on activity or rule-based configurations.
- Clean-up of dormant users using an automated scheduler rules setup.
Grant, adjust, and revoke user access quickly—enhancing agility without compromising security.
Why You Need Jira Cloud Automated User Management
Without Jira Cloud Automated User Management:
- Jira Cloud admins must manually review each user in the user directory.
- Routine actions like deactivation, deletion, or group assignment must be done one by one.
- There’s no support for bulk actions, resulting in wasted time and effort.
- Documentation and tracking of changes become tedious and error-prone.
With Jira Cloud Automated User Management:
miniOrange Jira Cloud AUM offers a smarter, automated, and scalable solution for user management:
- Automate routine tasks: For example, "Deactivate/Suspend users inactive for 90 days" can be configured and scheduled to run automatically.
- Bulk user operations: Deactivate or delete hundreds of users with a single action.
- Effortless group management: Move users between groups, assign licenses, or remove unnecessary group memberships efficiently.
- Custom filters: Combine multiple conditions like group, status, or last login to take precise action on selected users.
- Export user lists: Export filtered or selected users to CSV for review or reporting.
Embrace the Future of Jira Cloud User Management
Optimize your licensing, improve your security posture, and support agile, secure collaboration—all with one powerful tool.
miniOrange Jira Cloud Automated User Management Plugin is your all-in-one solution for maintaining a healthy, cost-effective, and well-organized user base in Jira Cloud.
Overview
The miniOrange Automated User Management app simplifies and streamlines user lifecycle management across Jira Cloud, Confluence Cloud, and Jira Service Management (JSM).
It automates repetitive administrative tasks such as user deactivation, license optimization, and group management.
By automating these actions, the app helps organizations reduce manual workload, optimize license usage, and maintain compliance with internal security and access policies.
Benefits
License Optimization
- Automatically remove inactive users from licensed groups to free up seats and reduce operational costs.
Automation Flexibility
- Easily configure rules to automate deactivation, suspension, restoration, and activation of users with product-specific targeting.
Compliance and Governance
- Maintain accurate user records and access controls aligned with security and audit standards.
Centralized User Visibility
- Monitor all user activities, statuses, and automation runs in one dashboard with detailed analytics and audit trails.
Scalability
- Designed to support growing organizations by efficiently handling thousands of users across multiple Atlassian products.
Key Features
Automated User and Group Management
- Automatically deactivate inactive users based on login inactivity or product usage.
- Bulk manage user groups across Jira Software, Confluence, Jira Service Management, and Bitbucket Cloud.
License Optimization
- Automatically remove users from licensed groups when inactive to free valuable licenses.
- Run scheduled cleanup rules to maintain active user pools without manual effort.
Bulk User Operations
- Import and export users in CSV format for faster setup or audits.
- Perform group additions, removals, activations, or deletions at scale.
Automated Email Notifications
- Notify users before their accounts are deactivated or suspended.
Audit Logs and Reports
- Get full visibility into all automated and manual actions.
- Track who performed an operation, when it occurred, and which users were affected.
NOTE: All timestamps in the app are displayed in UTC.
Cleanup Scheduler
- Schedule automatic cleanup rules to deactivate or suspend inactive users.
- Define custom inactivity thresholds, protected groups, and execution timing.
Auto-Activation Rules
- Automatically assign groups to users when they create Jira Service Management (JSM) tickets.
- Configure domain-based or existing group-based assignment logic.
Safe and Live Execution Modes
- Safe Mode: Runs automation rules in preview mode to show the expected results without making any real changes.
- Live Mode: Executes automation rules immediately, applying all configured changes to users and groups.
Additional Capabilities
Advanced Filtering and Search
- Filter users by account status, membership, inactivity, or groups for targeted management.
Protected Groups
- Exclude critical user groups (e.g., admins, system accounts) from cleanup operations.
CSV-Based Operations
- Import user data directly from Atlassian exports.
- Perform mass updates, suspensions, or activations through one-step uploads.
Comprehensive Audit Trail
- View detailed execution history for each action.
- Export logs to CSV for compliance or auditing.
24/7 miniOrange Support
- Access setup guides, documentation, and live expert assistance anytime.
Pre-requisites
Before configuring the Automated User Management app, ensure the following:
Atlassian Tools Installation
- Jira Cloud must be configured and accessible.
- The app requires admin privileges within admin's Atlassian organization.
Supported Environment
- Supported to be installed for Jira Cloud.
- You can centrally manage users across Jira, Confluence, and JSM Cloud.
Admin Credentials
- Administrative rights for both Jira Cloud and the installed app are required to set up automation rules and API connections.
Licensing
- A valid Jira Cloud license.
- A valid license for the miniOrange Automated User Management app.
API Token Setup
- Admins must generate an Atlassian API token and connect it via the app’s configuration page for authenticated automation.
Dashboard Tab
The Dashboard Tab provides a single-pane overview of user activity, license usage, and system recommendations. It helps administrators monitor user health, spot inactive accounts, and quickly jump to common user-management features.
Listed below are the settings and features available in this tab:
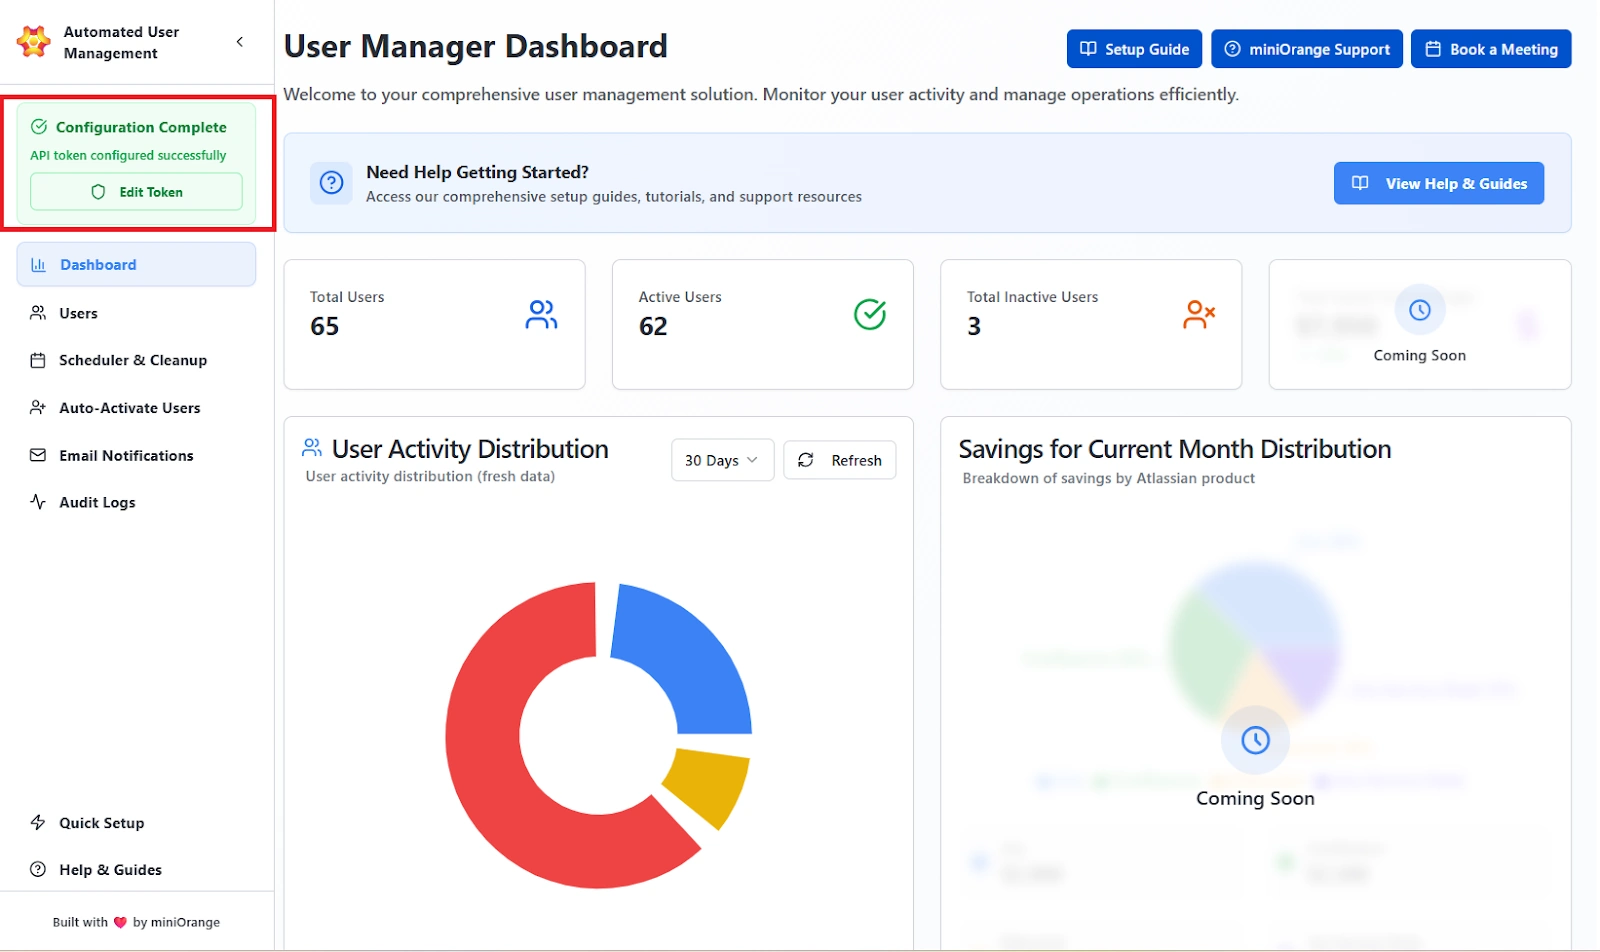
Configuration Status
After the setup of the Automated User Management app, once the credentials are validated, the dashboard displays:
Configuration Complete – APItoken configured successfully
This signifies:
- Both the API Token and API Key are valid.
- The connection between Jira Cloud and the app is active.
- Automation and scheduled tasks are ready to execute.
If invalid credentials are provided, an error message will appear prompting re-entry of valid details.
Configuration & API Setup
This feature allows administrators to authorize the app using Atlassian’s API credentials, ensuring all automated operations (like user management, group modification, and reporting) run through verified, secure, and permission-controlled channels.
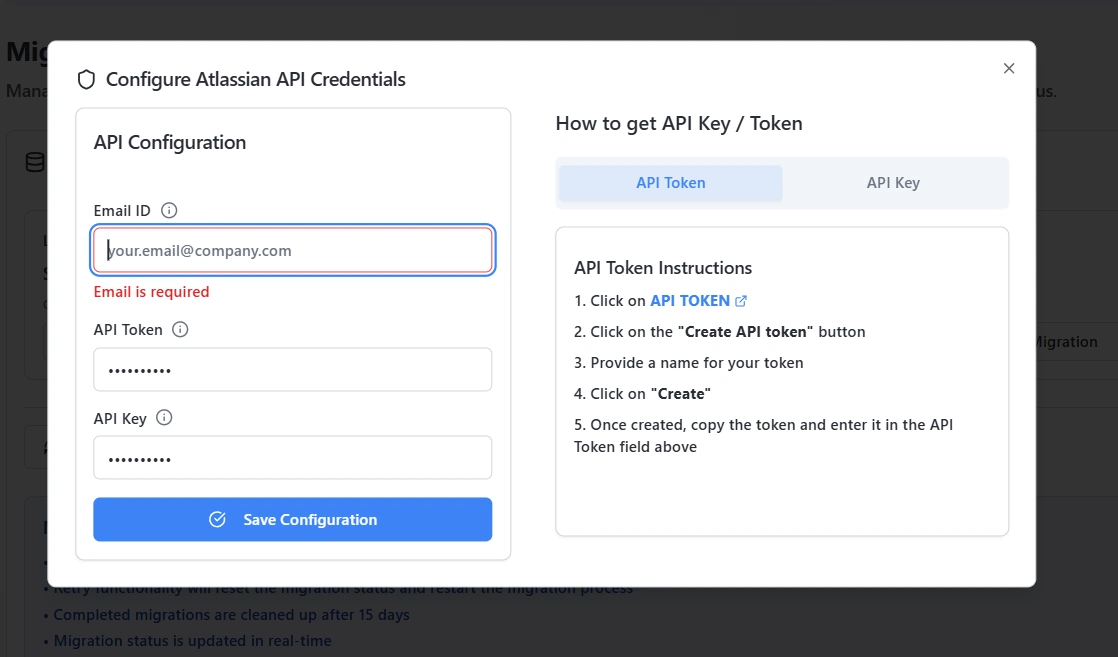
The Configure Atlassian API Credentials dialog contains:
- Email ID: Displays the admin email ID that was used to authenticate with Atlassian.
- API Token: Represents the personal authentication token used for user-specific API actions.
- API Key: Represents the organization-level authentication key that allows broader access for automation and reporting.
- Save Configuration: Verifies and saves the credentials to complete setup.
Statistic Cards
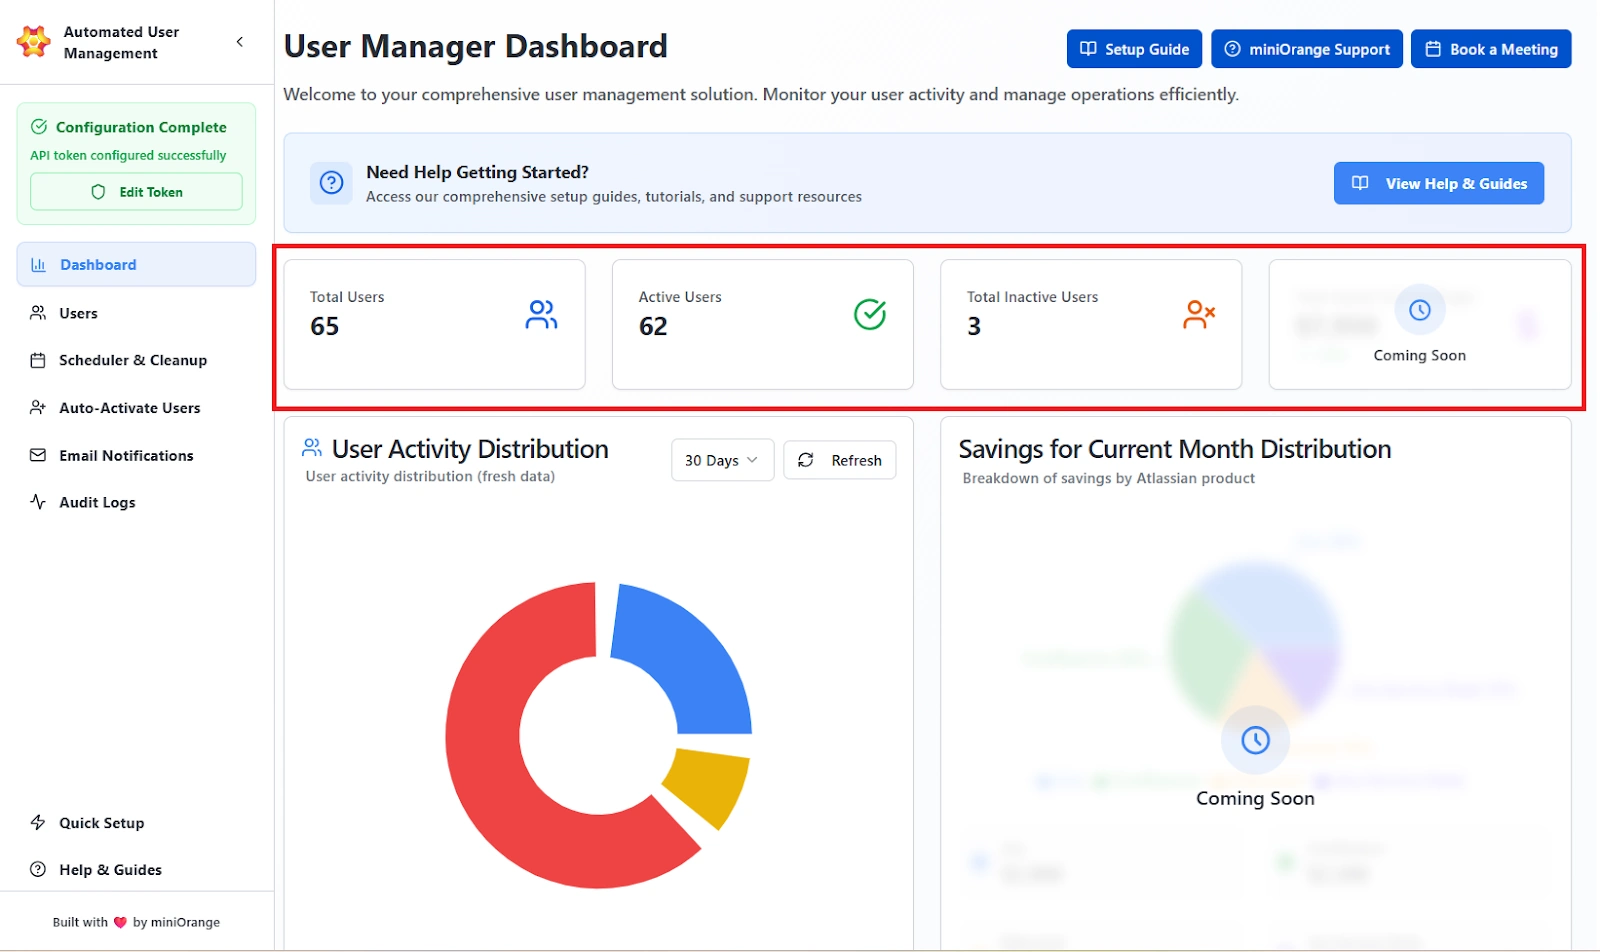
The Statistic Cards section gives top-level counts and trends.
Cards Displayed
- Total Users: The complete count of all users managed by the app. This includes active, inactive, and deactivated accounts.
- Active Users: Users who have logged into Jira within the selected time range. This metric reflects actual activity, not just license allocation.
- Inactive Users: Users who currently hold a license but have not logged in within the selected time range, along with users who have been suspended or deactivated. This helps identify accounts that may qualify for cleanup.
- Savings for Current Month: Placeholder (Coming Soon) for cost-savings summary.
Analytics Charts
Analytics charts visualize user engagement and planned savings.
This section is divided into two charts:
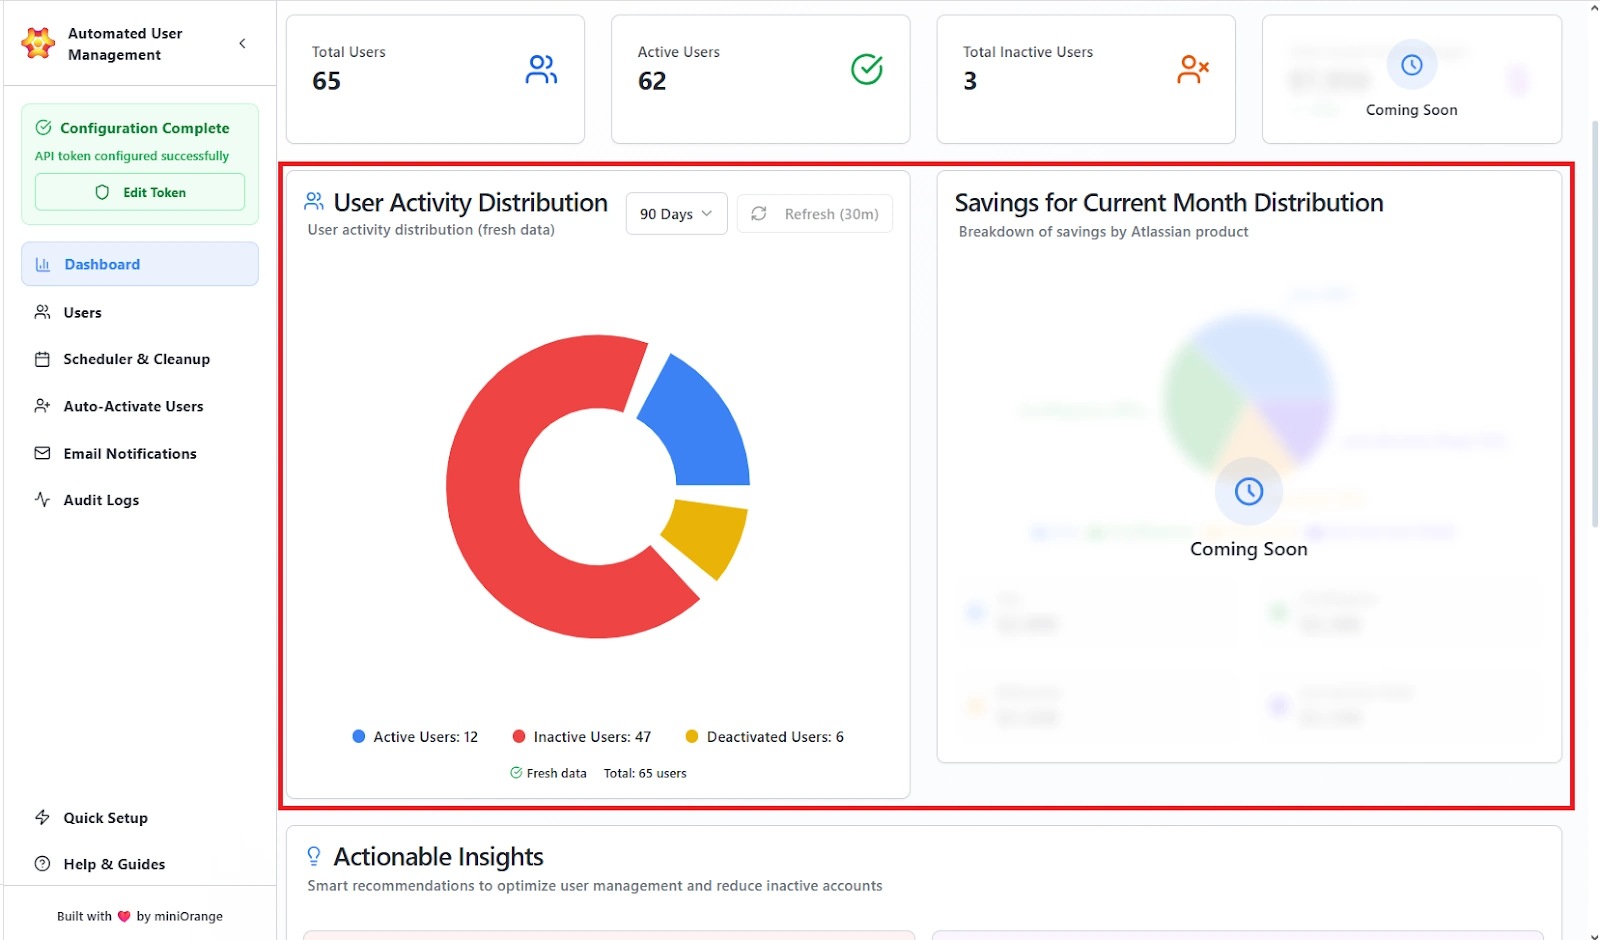
User Activity Distribution
- Pie chart showing distribution of user activity.
- Active users are those who have recently logged in.
- Inactive users are those who have licenses but have not logged in recently.
- Deactivated users are those who do not have a license.
- Time range selector (for example: 30 Days).
- Refresh button to pull latest data from Atlassian APIs.
Savings for Current Month Distribution (Coming Soon)
- Pie chart showing estimated savings by product(Jira, Confluence, Bitbucket, JSM).
Actionable Insights
The Actionable Insights area lists smart recommendations the system generates to reduce inactive accounts and cost.
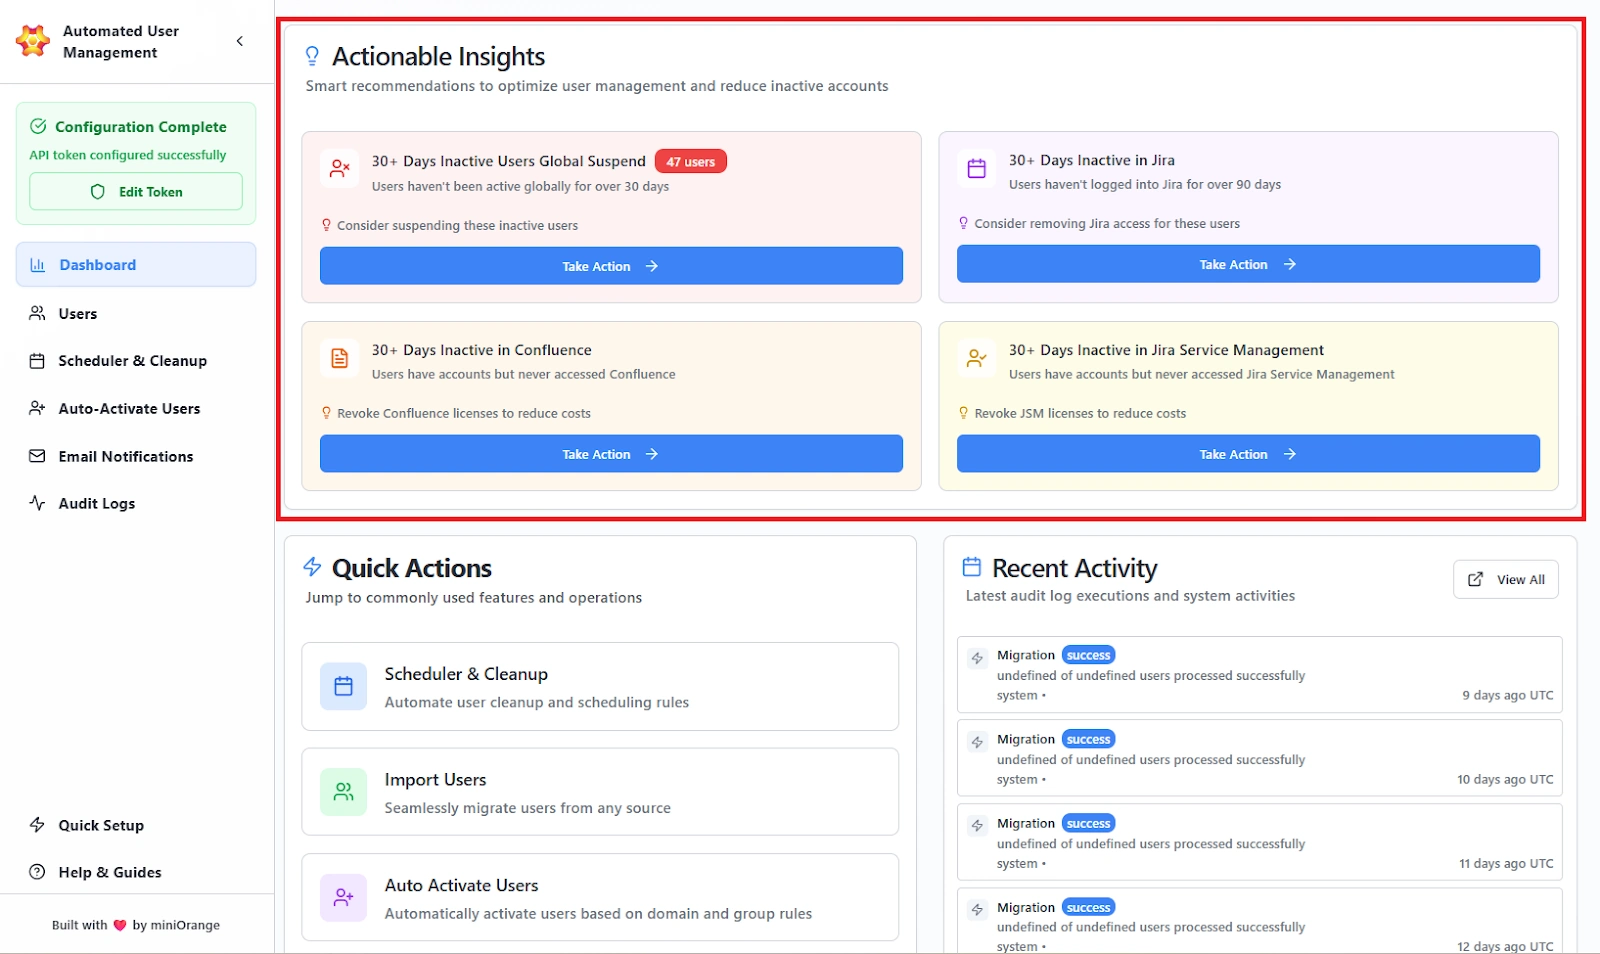
Insight Cards (each card shows a condition and recommended next step)
- 30+ Days Inactive in Jira: Users who haven’t logged into Jira for 30+ days.
- 30+ Days Inactive in Confluence: Users who have not accessed Confluence in the past 30 days or more.
- 30+ Days Inactive Users Globally Suspended: Accounts that haven’t accessed any licensed product in the past 30 days.
- 30+ Days Inactive in Jira Service Management: Users who have not logged in to JSM in the past 30 days.
Card Content
- Short description of the issue.
- Recommendation (for example, “Consider removing Jira access for these users”).
- Highlighted count badge or status (when available).
Actions Available
- Take Action button on each card, to create a new rule with pre-applied filters to remediate the insight.
Quick Actions
Quick Actions provide one-click navigation to frequently used features so admins can act fast.
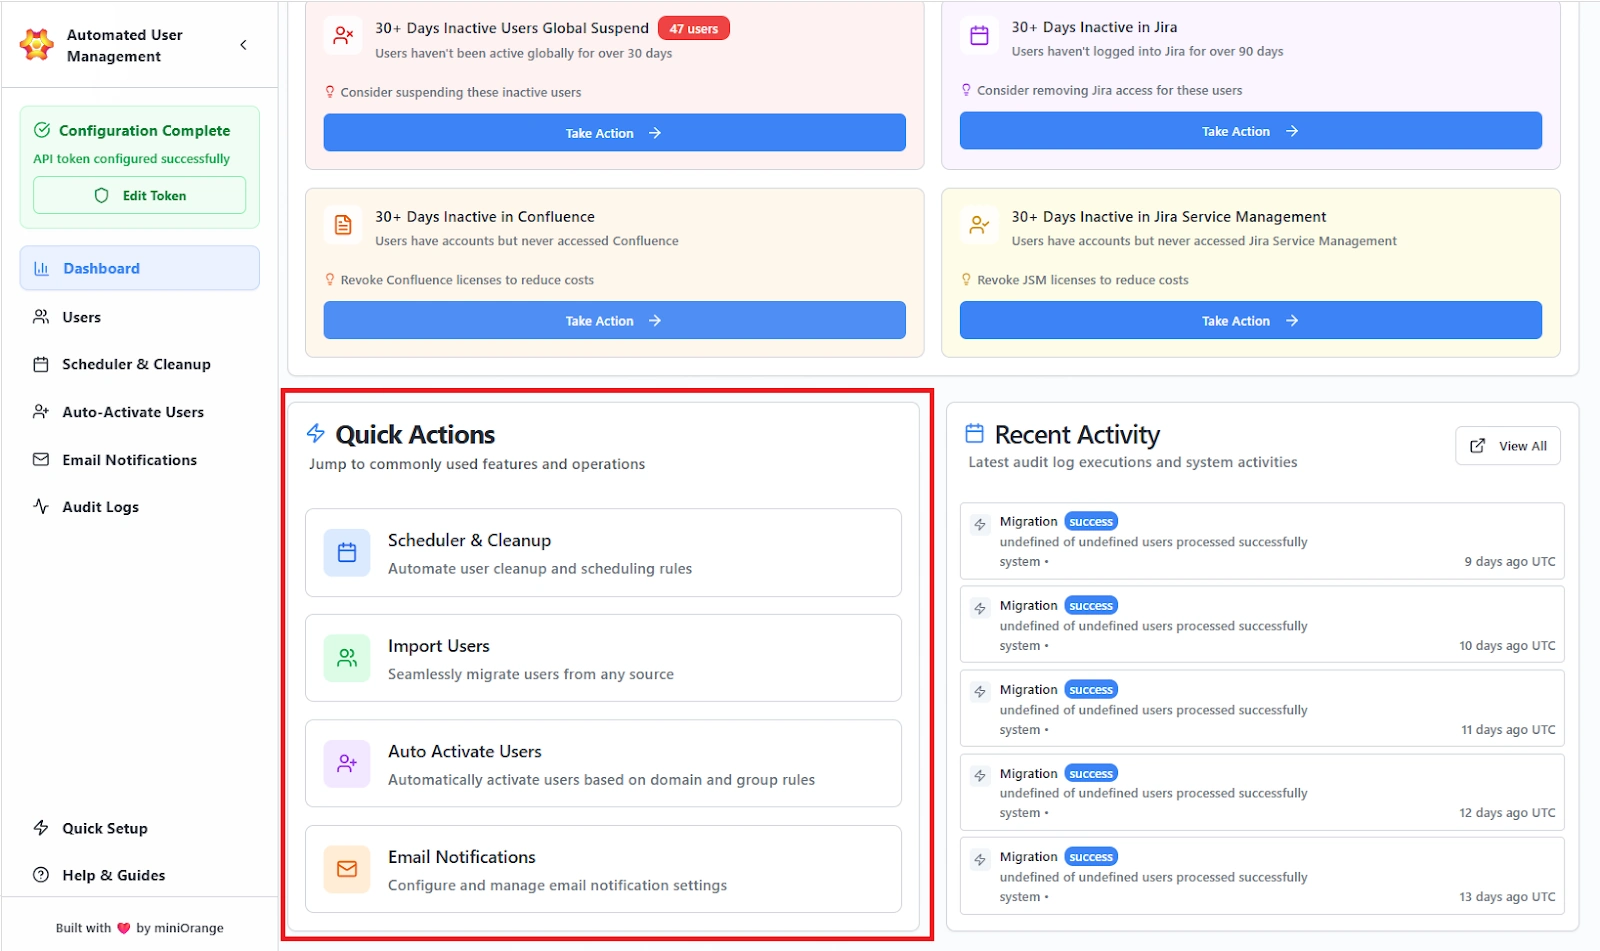
Features provided:
Action Tiles (each tile links directly to the module)
- Scheduler & Cleanup: Configure cleanup rules and schedules.
- Import Users: Open bulk import workflow to import users via importing a CSV file.
- Auto Activate Users: Configure domain/group based auto-activation rules.
- Email Notifications: Manage notification templates and preview/test emails.
Recent Activity
The Recent Activity panel lists the latest system operations and job executions for traceability.
Features provided:
- Action Type (e.g., Migration, Jira Access Removal Scheduler)
- Status Badge (e.g., success, failure)
- Summary (brief note such as “35 of 50 users processed successfully”)
- Timestamp in UTC
View All button to open the full Audit Logs with advanced filtering and export. Helps in quick verification that scheduled rules and imports ran successfully and to spot failures early.
Use Case Scenario
You want to identify users who have been inactive for more than 30 days across Jira and Confluence so you can plan license cleanup and reduce unnecessary costs.
How the Dashboard enables this
- You open the Dashboard and instantly see real-time activity metrics, including active and inactive user counts.
- The Actionable Insights section highlights inactivity patterns, such as “30+ Days Inactive in Jira” or “30+ Days Inactive in Confluence.”
- You select Take Action on the relevant card.
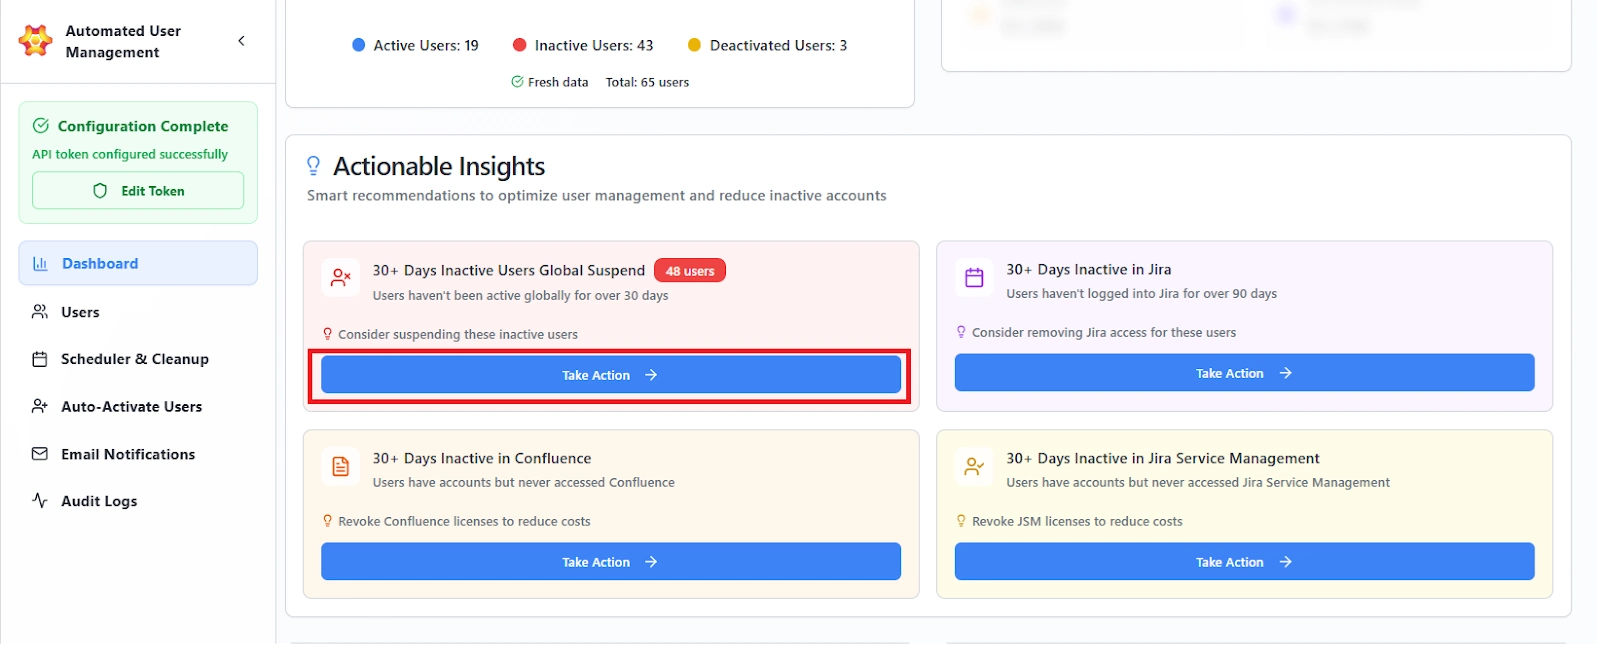
The system opens a new Cleanup Rule with all filters already applied: inactivity threshold, product type, and user selection.
You review and confirm the rule, and the job is now scheduled or executed with no manual user hunting.
Benefits
- Eliminates manual cross-checking across multiple products and user lists.
- Reduces decision-making time by providing data-driven recommendations.
- Enables admins to move from insight to remediation in one click.
- Ensures cleanup actions are consistent, rule-based, and auditable.
Users Tab
The Users Tab provides admins with a central interface to manage all user accounts within Jira Cloud. It allows filtering, searching, and performing bulk actions to activate, deactivate, suspend, or delete users, as well as manage their group memberships.
This section is divided into two key areas:
- Basic User Info
- Detailed User Info (CSV)
Basic User Info
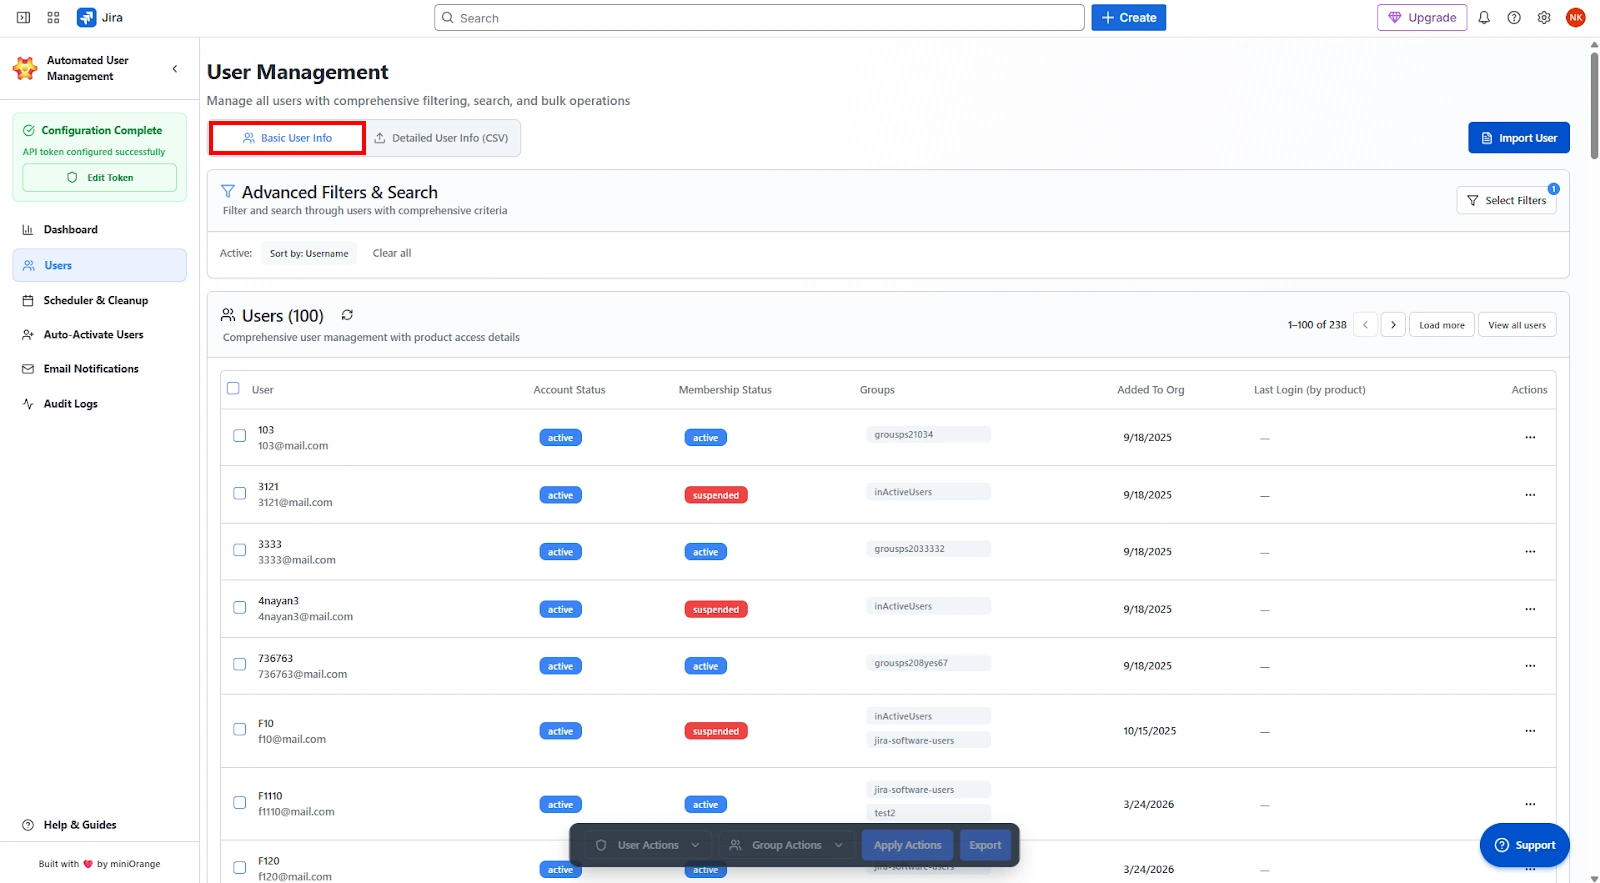
The Basic User Info section displays a dynamic table of all users connected to your Atlassian organization. Administrators can filter, search, and perform individual or bulk actions directly from this interface.
Advanced Filters & Search
The Advanced Filters & Search section enables fine-grained filtering based on multiple criteria.
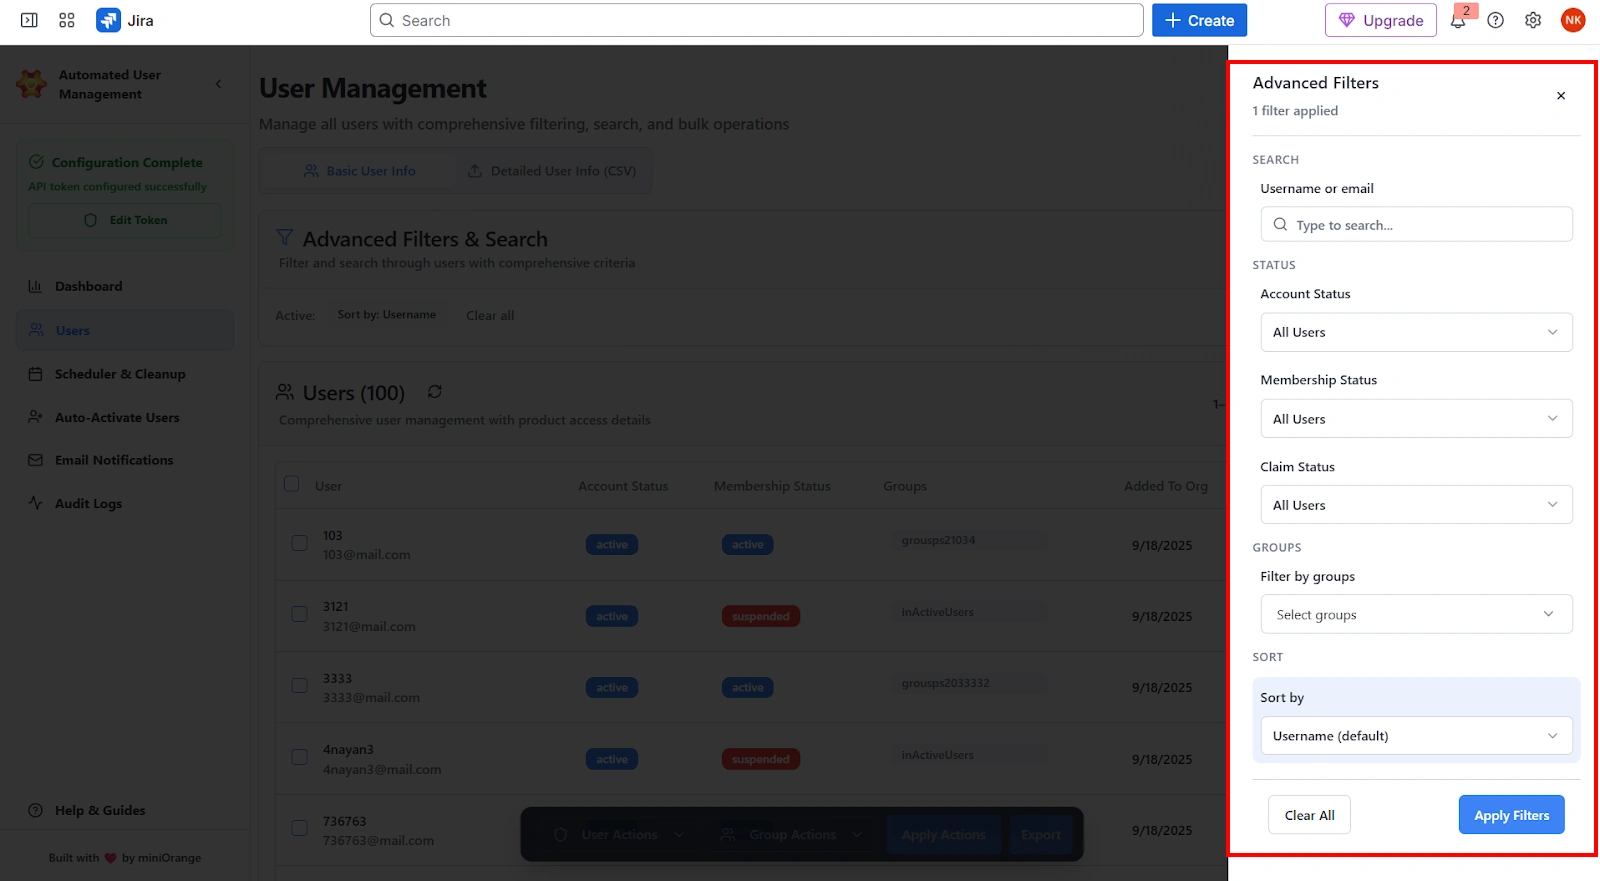
Available Filters:
- Search: Locate users by their username or email address.
- Account Status: Filter the users on the basis of their account status, whether it is active or deactivated.
- Membership Status: Filter the users based on whether their account is active or suspended.
- Claim Status: Filter users by their claim type, that is all users or only managed users.
- Groups Filter: Filter users belonging to one or more specific groups.
- Filters users by username (ascending order) and by last login date for Jira users.
Actions Available:
- Search Filters: Apply selected filter combinations.
- Clear All Filters: Reset all applied filters to view the complete user list.
User List
Displays all users in a paginated table along with account and product-level information.
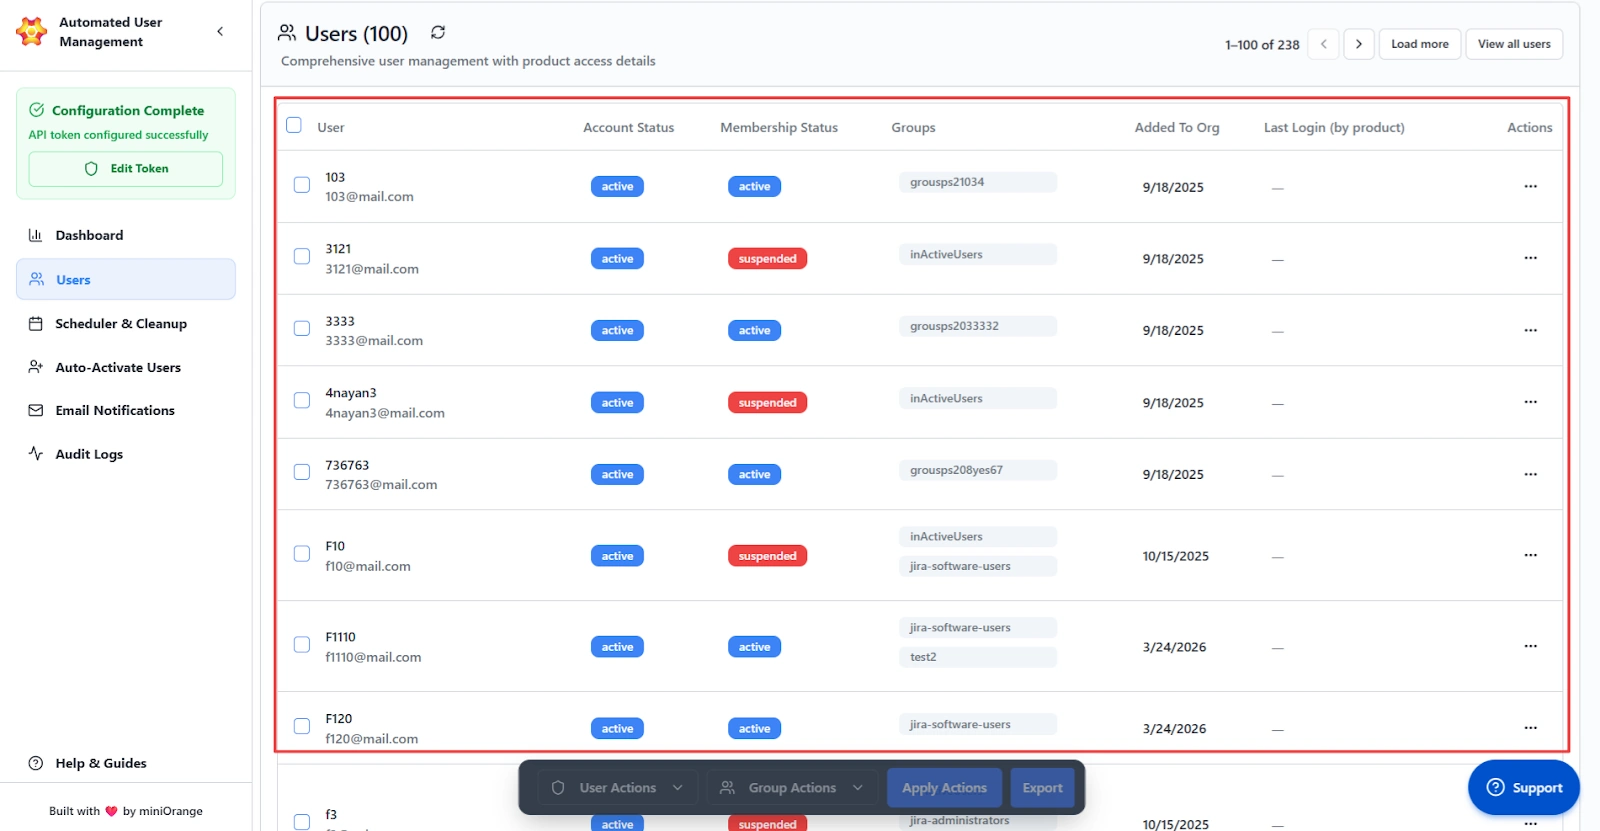
Columns Shown:
- User: Username and email address.
- Account Status: Indicates if the user is active or deactivated.
- Membership Status: Shows whether the user’s account is active or suspended.
- Groups: Lists all groups the user is assigned to (expandable for multiple groups).
- Added to Org: Displays the date the user was added to the organization.
- Last Login (by Product): Displays the most recent login across Atlassian products the user has access to.
- Actions: Context menu (three-dot icon) for individual user operations. These actions include Fetch Last Login, Deactivate User, Suspend/Restore User, and Delete User.
Load all users using the “View All Users” button and perform manual actions on a large number of users simultaneously.
Bulk Actions
The Users tab supports performing bulk operations on multiple users simultaneously. Select users via checkboxes to enable the Action Bar at the bottom of the screen.
User Actions
Bulk actions related to user accounts.
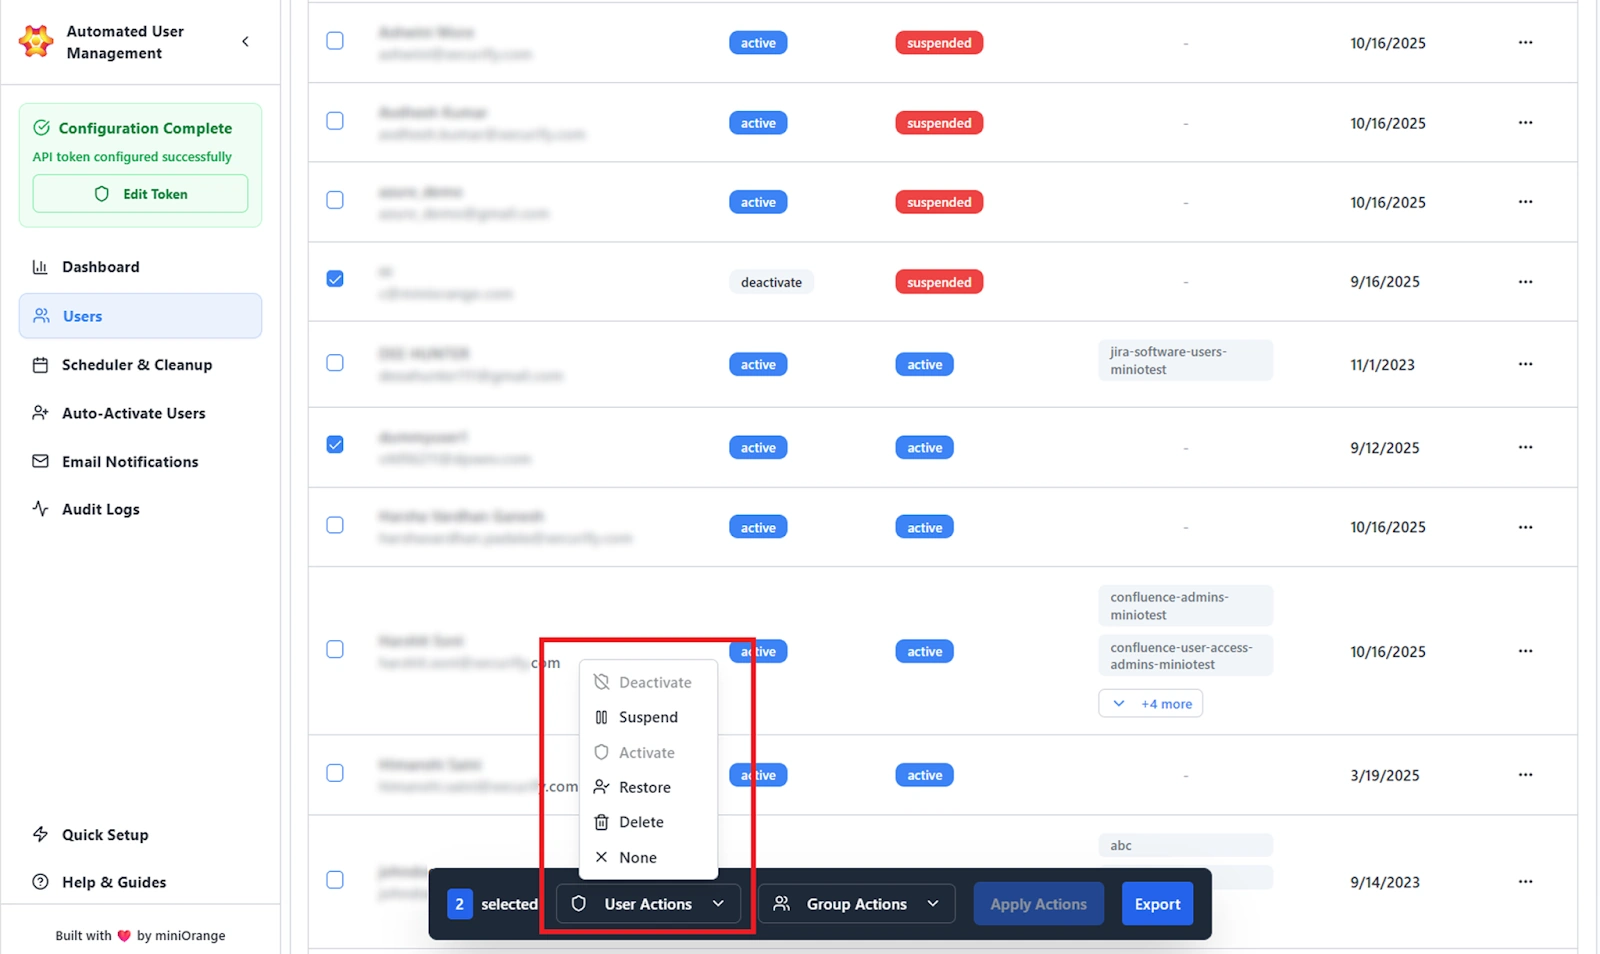
Options Available:
- Deactivate: With this operation, admins can disable managed accounts. Once deactivated, the users will not be able to log in.
- Suspend: Temporarily pause product access for all users, including managed and external. This action can be performed on all users and removes their access to selected products only.
- Activate: Reactivate users who were previously deactivated.
- Restore: Reinstate access for suspended users.
- Delete: Permanently remove selected users. This will cause the removal of their Atlassian account permanently.
- None: No action selected (resets dropdown).
Group Actions
Bulk actions related to user group management.
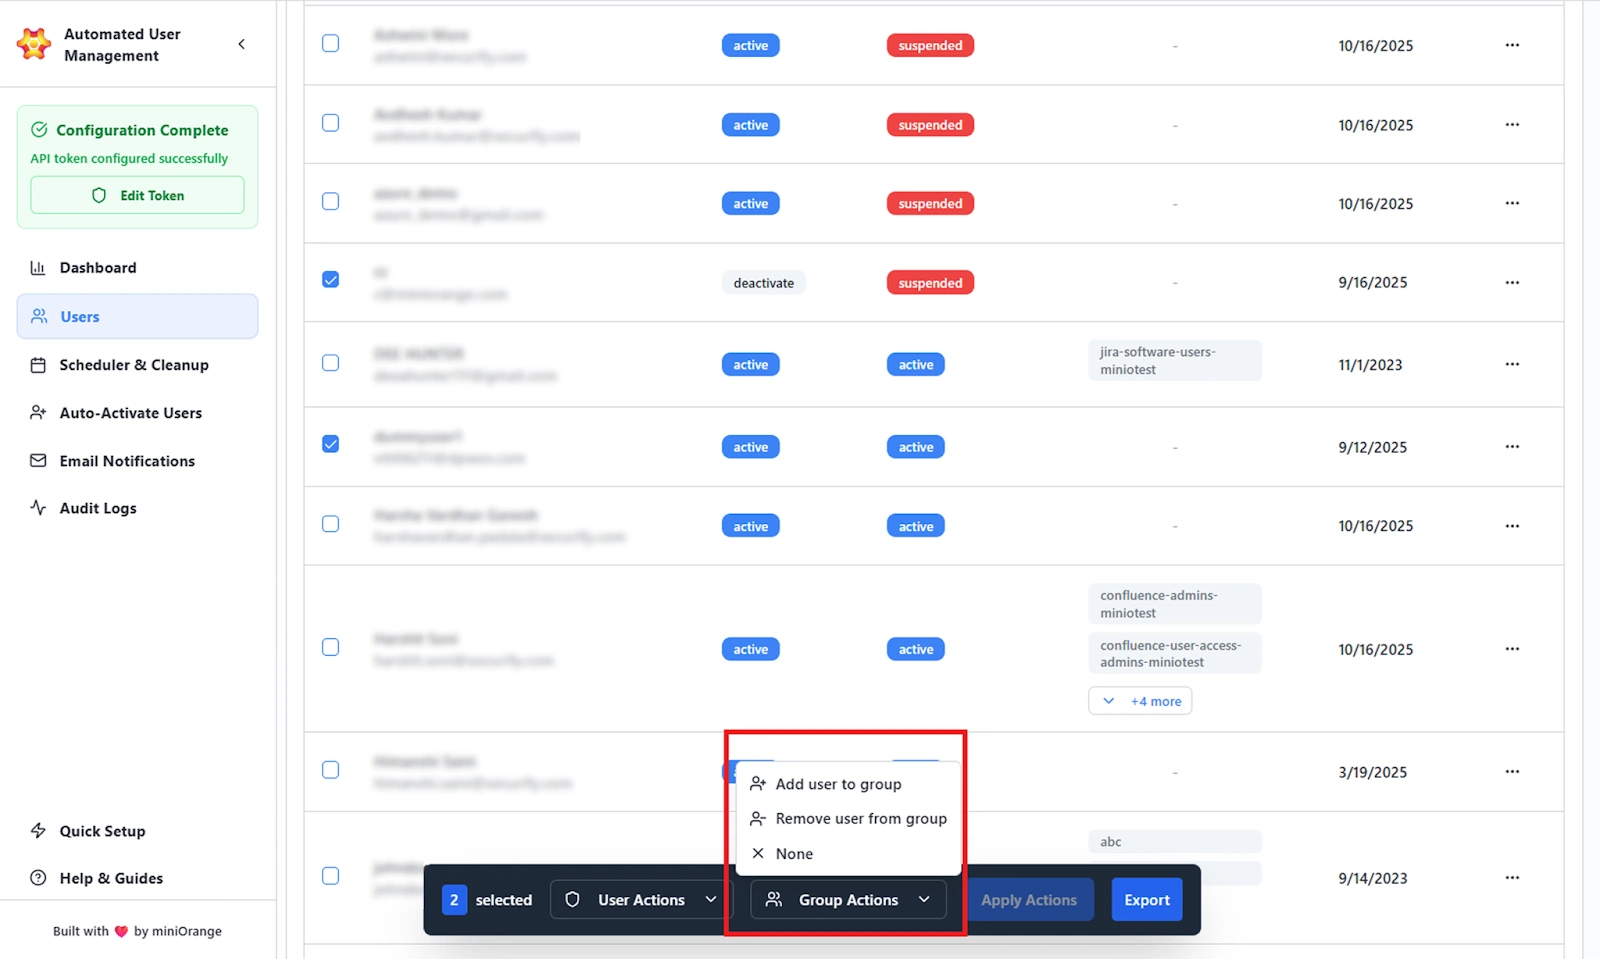
Options Available:
- Add User to Group: Assign one or more selected users to existing groups.
- Remove User from Group: Remove selected users from specific groups.
- None: No action selected (resets dropdown).
When “Add User to Group” is selected, a Group Selector window opens:
- Search for and select one or more groups.
- Click Confirm to apply the change.
Once one or more users are selected:
- Click Apply Actions to execute all selected User and Group Actions simultaneously.
- Click Export to download the filtered user list as a .csv file.
Use Case Scenario
You need to identify all users in the “contractors” group who were added more than 60 days ago, so you can review their access and decide whether they should retain licenses or remain in the organization.
How it works
- Open the Users tab and apply the Groups filter to select the “contractors” group.
- Apply Membership Status and Claim Status filters to isolate external or unmanaged users, depending on your organization’s setup.
- The filtered list instantly shows only users who match all selected conditions.
From this view, you can:
- Export the list for audits, compliance checks, or reporting.
- Perform bulk actions such as Deactivate, Suspend, or Remove from Group to enforce access policies.
Benefits
This workflow allows admins to precisely segment users based on identity type, group assignment, organizational membership, and historical account activity. It simplifies governance over external vendors, contractors, and part-time resources while keeping core employees unaffected.
Scheduler & Cleanup
The Scheduler & Cleanup tab automates the removal, suspension, or deactivation of inactive users across all connected Atlassian products. It helps admins maintain license hygiene, reduce unused seats, and enforce access policies through scheduled cleanup rules.
This area lists all existing cleanup rules and provides direct control over their status and execution. One can see the following details:
Cleanup Rules Management
Runs Globally / Product-Specific
This indicates the scope of the rule.
- Runs Globally: The rule applies to all Atlassian products.
- Product-Specific: The rule applies only to the product selected when the rule was created.
Example: If the rule is set to Jira Service Management, users inactive in JSM will be affected by the rule, but inactivity in Jira Software is ignored.
Inactivity Period
Shows the exact number of days a user must go without logging in to the selected product(s) before the rule considers them "inactive." This is a fixed threshold, not a range, and the rule will only target users who cross this number of days.
Run Frequency
Defines how often the rule executes automatically. Common options include daily, weekly, or monthly. Whatever frequency is shown here is exactly when the system checks for users who meet the rule’s criteria and takes action.
Protected Groups
Lists the user groups that are never affected by this rule, even if their members match the inactivity criteria. If a user belongs to one of these groups, the rule will skip them entirely. This prevents accidental cleanup of VIPs, administrators, or essential teams.
Last Run
Displays the most recent date and time the rule was executed. If this shows a blank, it means the rule has either never been run.
The following rule actions are also provided:
Resume / Pause
This toggles whether the rule is active.
- Resume: The rule will start running on its scheduled frequency again.
- Pause: The rule stops running entirely until resumed.
Pausing a rule means no cleanup actions will occur, even if users meet the inactivity condition.
Run Now
Immediately executes the rule, regardless of its scheduled time. Useful when you need to perform cleanup on demand instead of waiting for the next automated run.
Edit
Opens the rule setup screen so you can change any part of the configuration, including scope, inactivity period, protected groups, frequency, or actions. Changes take effect the next time the rule runs (or immediately if you use Run Now).
Delete Rule
Permanently removes the rule from the system. Once deleted, the rule cannot be recovered, and all its settings are lost.
Creating a New Cleanup Rule
Administrators can create a new rule by clicking Create Rule. The process is divided into several configuration sections that define the rule’s logic, target, and schedule.
1. Schedule Configuration
This section defines how the rule will behave and be identified.
Fields:
Scheduling Display Name:
Enter a descriptive title for the rule (e.g., Deactivate Inactive Jira Users - 60 Days).
Execution Mode:
Choose between two operational modes:
- Safe Mode (Recommended): Runs in audit-only mode. Generates reports but does not make any changes. This helps in previewing affected users before live enforcement.
- Live Mode: Executes real cleanup actions immediately upon running. Admins can apply configured deactivation, suspension, or access removal automatically.
Actions to Perform:
Select one of the available automation actions:
- Deactivate (Managed Users Only): Disables managed accounts at the organization level. Users lose access to all Atlassian products until reactivated. Only works for IdP-managed users.
- Suspend Users (All Users): Temporarily blocks access for any inactive user (managed or unmanaged). The account stays intact and can be restored later.
- Remove Product Access: Removes users from product-specific access groups without disabling their account. Admins choose which products the rule targets:
- Jira Software
- Confluence
- Jira Service Management
- Bitbucket
2. Selection Criteria
Define the conditions used to identify users targeted by this cleanup rule. The following options are provided to define the criteria:
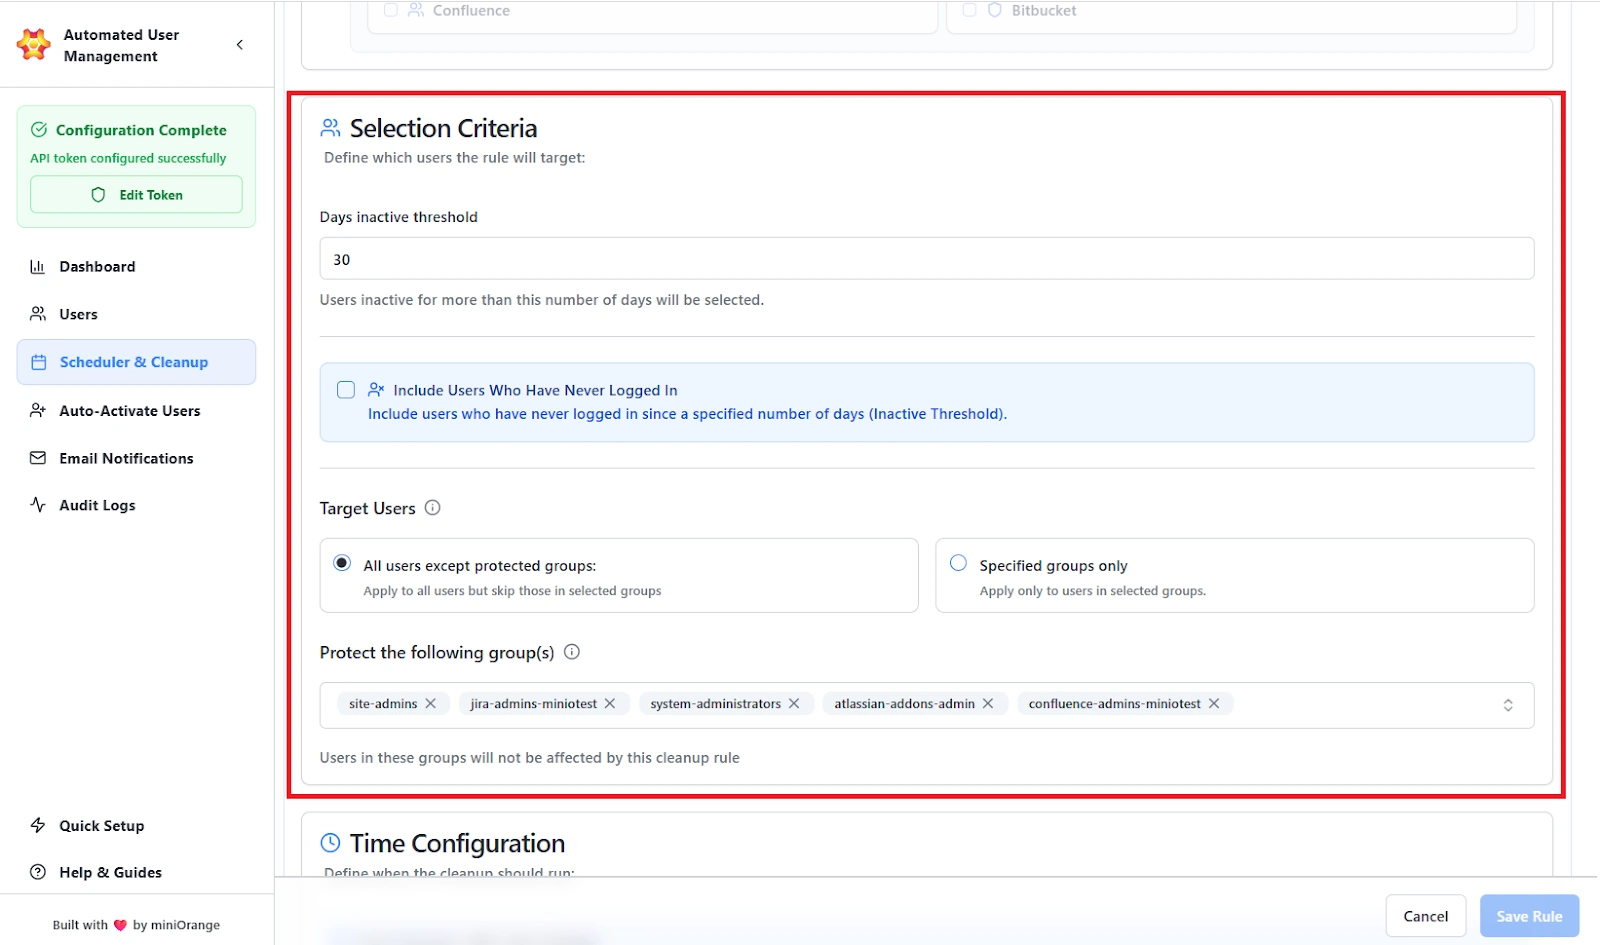
Days Inactive Threshold:
Enter the number of inactive days after which users should be flagged (e.g., 30 days). This will check the global last login date and deactivate/suspend users accordingly. Similarly, it will check product-specific last login data to remove product access.
Include Users Who Have Never Logged In:
Optionally target users who have never accessed any Atlassian application. The admins can mention the threshold number of days after which the configured rule will be executed. The threshold will be checked against the date the invite was sent.
Target Users
- All Users Except Protected Groups: The rule applies to every user except those in the groups you mark as protected. Anyone in a protected group is completely excluded from cleanup actions.
- Specified Groups Only: The rule targets only the users who belong to the groups you select. No one outside those groups is affected.
3. Time Configuration
Define when and how often the cleanup rule should execute. The fields provided to configure are:
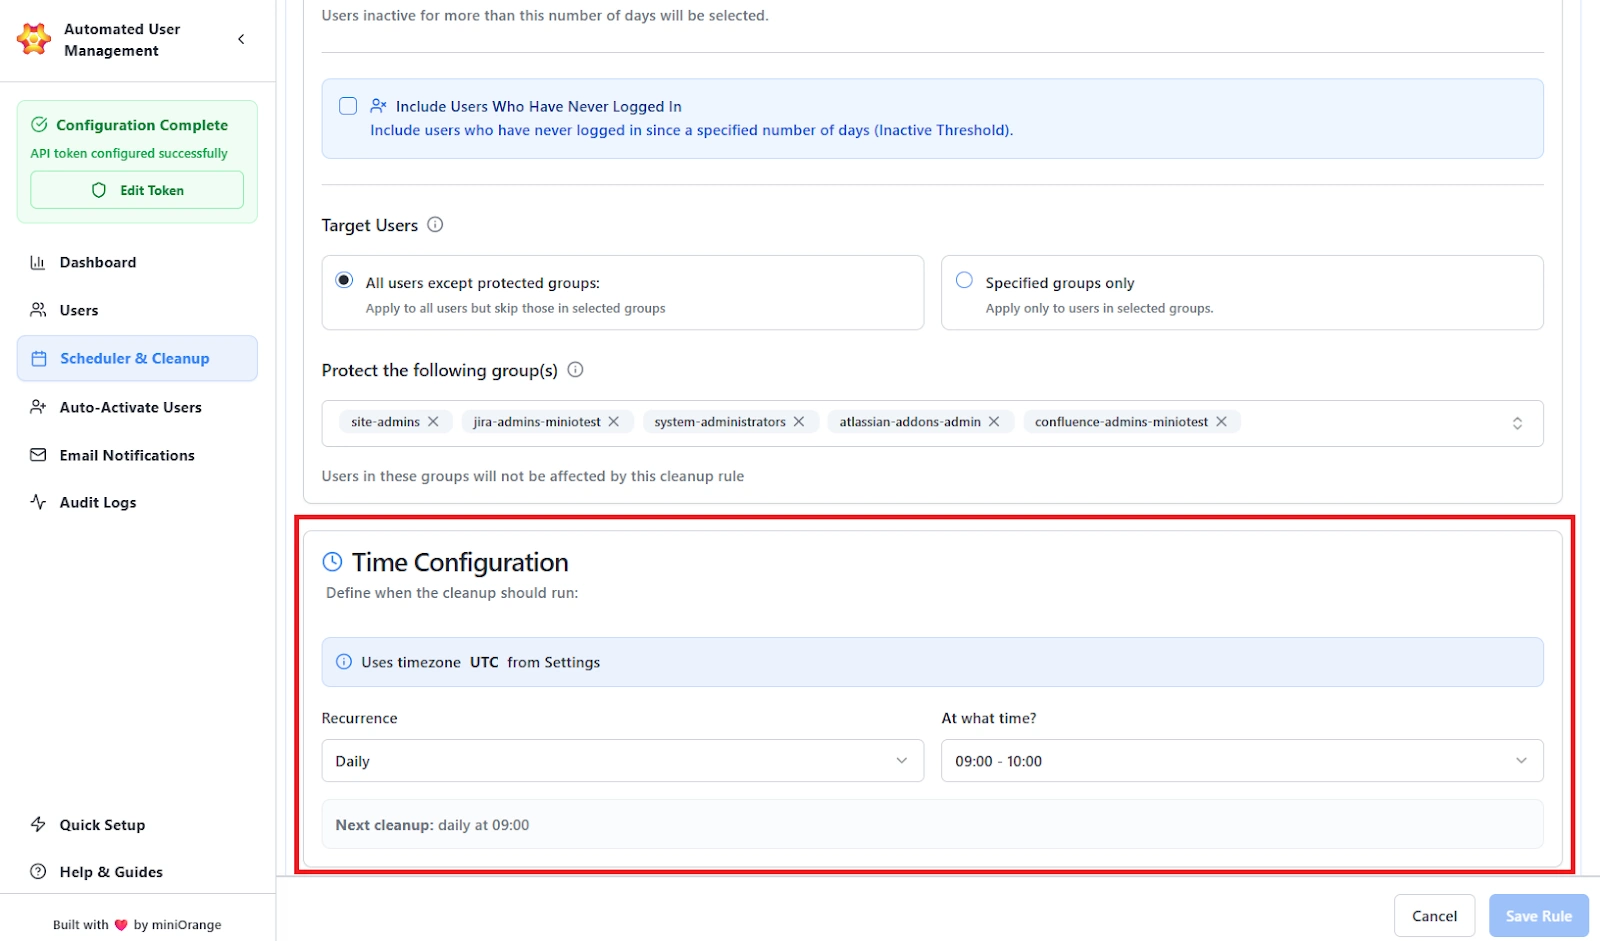
Uses Timezone:
The rule follows the timezone set in the app settings. If nothing is changed, it uses UTC.
Recurrence:
- Daily
- Weekly
- Monthly
Execution Time:
Select the exact time for rule execution (e.g., 09:00–10:00).
Next Cleanup:
Shows the date and time of the upcoming scheduled run.
4. Save and Manage Rule
Once configuration is complete:
- Click Save Rule to finalize.
- The rule appears in the Cleanup Rules Management list.
Use Case Scenario
Your security policy requires automatically suspending every user who hasn’t logged into Jira for 60 or more days, while making sure administrator accounts are never touched.
How it works
- Create a new Cleanup Rule with:
- Action: Suspend
- Product: Jira
- Inactivity Threshold: 60 days
- Protected Groups: jira-admins
- Mode: Safe Mode
- Let the rule run in Safe Mode to see exactly which accounts would be suspended.
- Once the results look correct, switch the rule to Live Mode so the cleanup runs automatically on schedule.
Benefit
This setup enforces your compliance requirements without relying on anyone to remember periodic checks. It keeps unused licenses from piling up, protects high-privilege admin accounts, and ensures the system stays clean with zero manual effort.
Auto-Activate Users
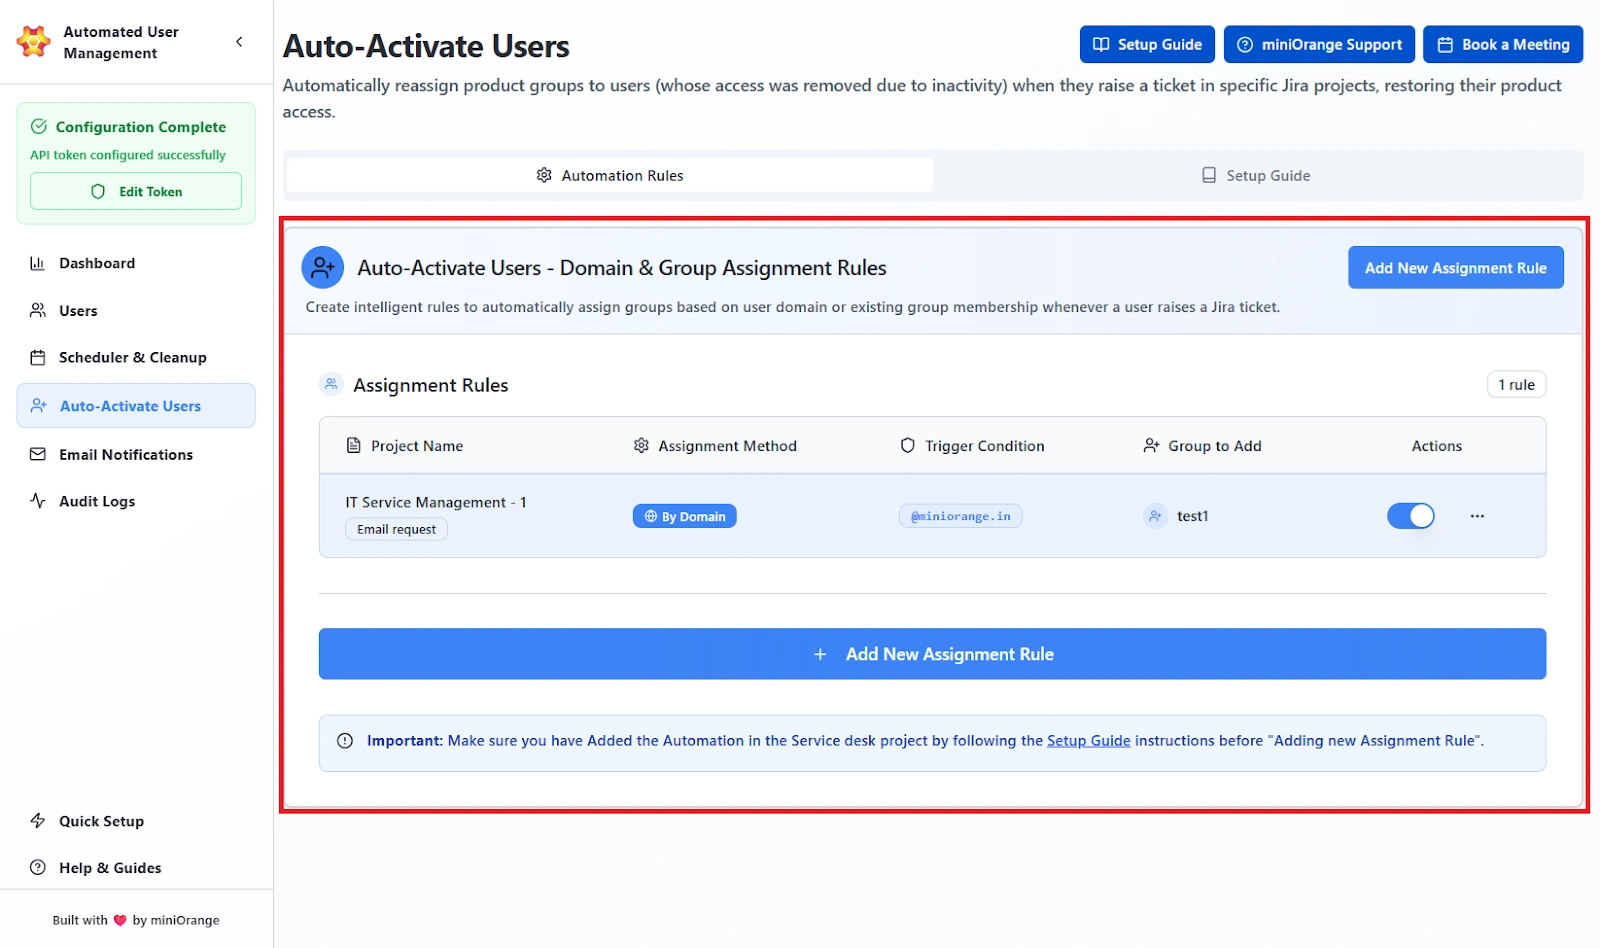
The Auto-Activate Users tab allows admins to automatically assign users to specific groups when they raise a ticket. It reduces manual intervention in onboarding workflows and ensures users gain the right access immediately upon creating requests.
This section is divided into two key areas:
Automation Rules Overview
The Automation Rules panel displays all configured auto-assignment rules that control how users are automatically added to groups.
Assignment Rules Table:
Here, the admins will find the list of all the existing rules (if configured) with details such as:
- Project Name: Displays the Jira service desk project where the auto-assignment rule is applied.
- Assignment Method: Indicates whether the rule assigns users based on their email domain or existing group membership.
- Trigger Conditions: Defines the email domain or the group that was specified in the assignment method to activate the rule.
- Group to Add: Shows the Jira group(s) that users will automatically be added to when the rule is triggered.
- Action Toggle (Active/Inactive): Allows administrators to enable or disable a specific rule without deleting it.
Setup Note:
The system requires that Jira Automation be configured before assignment rules can be activated.
Setup Guide for Jira Automation
Before creating an assignment rule, administrators must set up Jira’s internal automation to detect ticket creation events. The Setup Guide tab provides a detailed walkthrough for this setup.
Add New Assignment Rule

Administrators can define new assignment rules to automate user group additions based on either domain or existing group logic. Click Add New Assignment Rule to launch the rule creation wizard.
This can be done in the following two steps:
Step 1: Select Internal Jira Project:
Choose the Jira project to monitor for user activation (e.g., IT Support).

Step 2: View Available Sub-Request Types:
Once you have selected the Internal Jira Project, you will be able to see the section displaying all request types under the selected project.
Example:
- Fix an account problem
- Get IT help
- Onboard new employees
- Request a new device
Step 3: Configure Assignment Rules
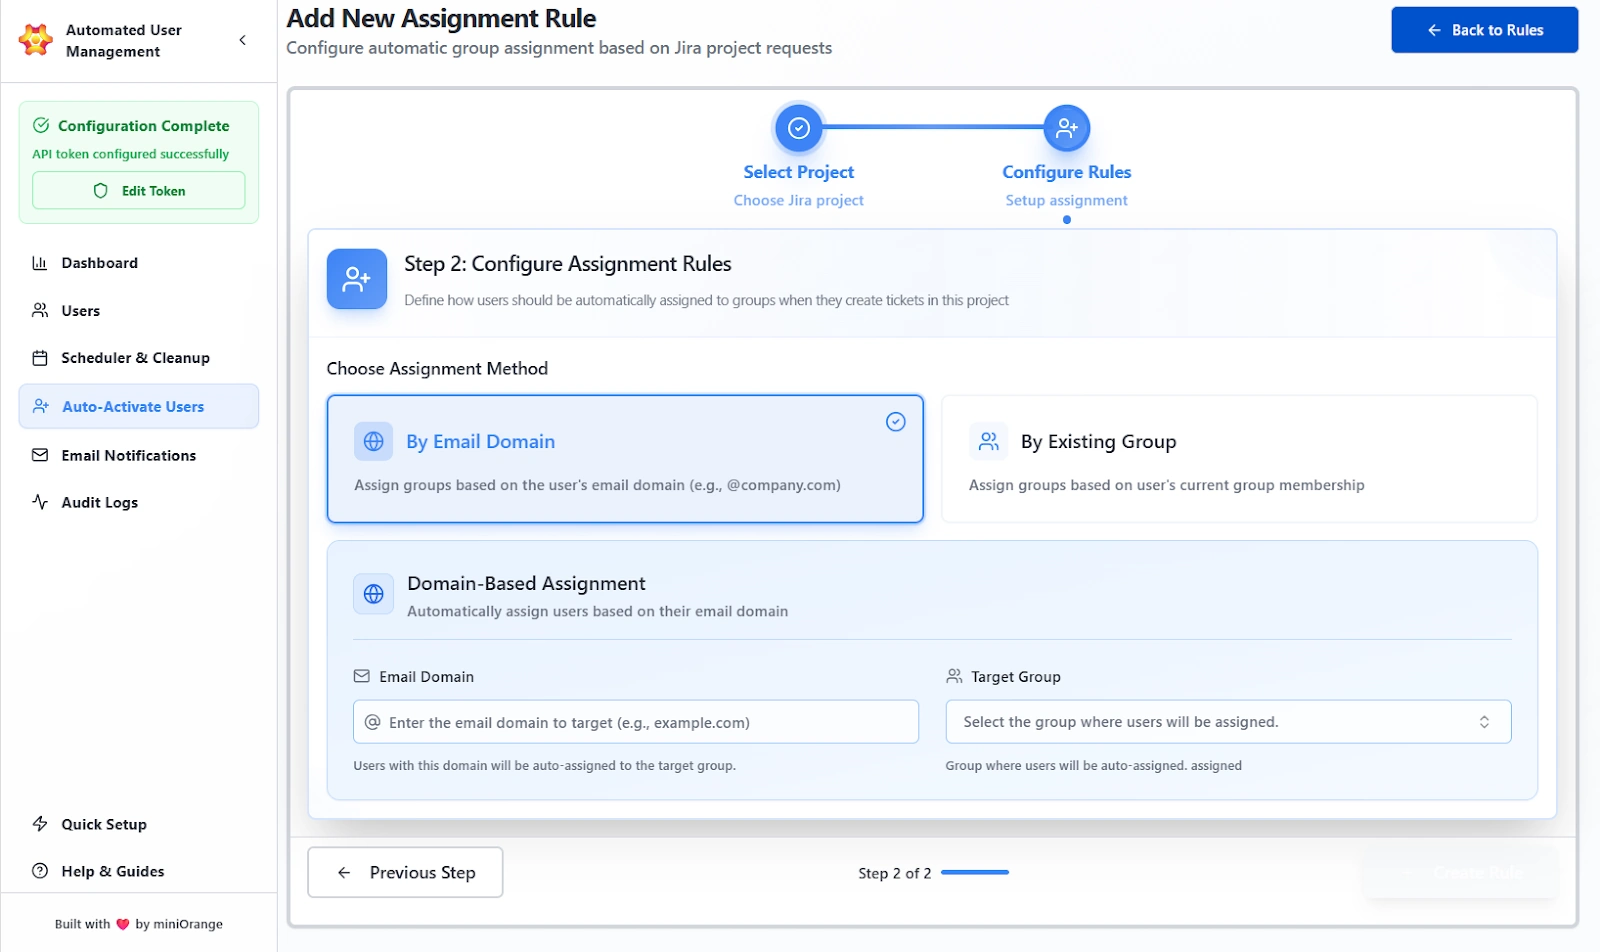
After selecting a project and request type, configure how users will be assigned to groups.
Assignment Methods Available:
1. By Email Domain
Automatically assign users to groups based on their email domain. Here, the admin can:
- Enter the domain to target (e.g., example.com)
- Select the Jira group to which users from this domain should be added
2. By Existing Group
Assign users to new groups based on their existing group memberships.
- Select the group that the user is already part of
- Choose the group to which the user should be auto-assigned
Once the complete configuration of the rule is done, admins can save and activate the rule. It will now appear in the main list under Assignment Rules.
Use Case Scenario
A new user submits an IT Support ticket using an email ending in employer.com, and you want them to be added to the “employees” group automatically without anyone manually approving or assigning them.
How it works
- Create a new assignment rule with:
- Project: IT Support
- Trigger: Any Request Type
- Assignment Method: Email Domain
- Domain: employer.com
- Add to Group: employees
Once the rule is saved, any requester with that domain is automatically placed in the “employees” group the moment they create a ticket.
This removes the usual onboarding delay that happens when support teams wait for admins to grant access. It ensures new employees get the permissions they need instantly, keeps support workflows moving, and cuts down on repetitive admin tasks.
Email Notifications
The Email Notifications tab allows administrators to configure automated email alerts related to user deactivation, product access removal, or other automated user management events. These notifications ensure that users are informed in advance before their accounts are modified or deactivated, improving transparency and compliance.
All email notifications configured will be sent from “noreply@miniorange.com”.
Email Templates Overview
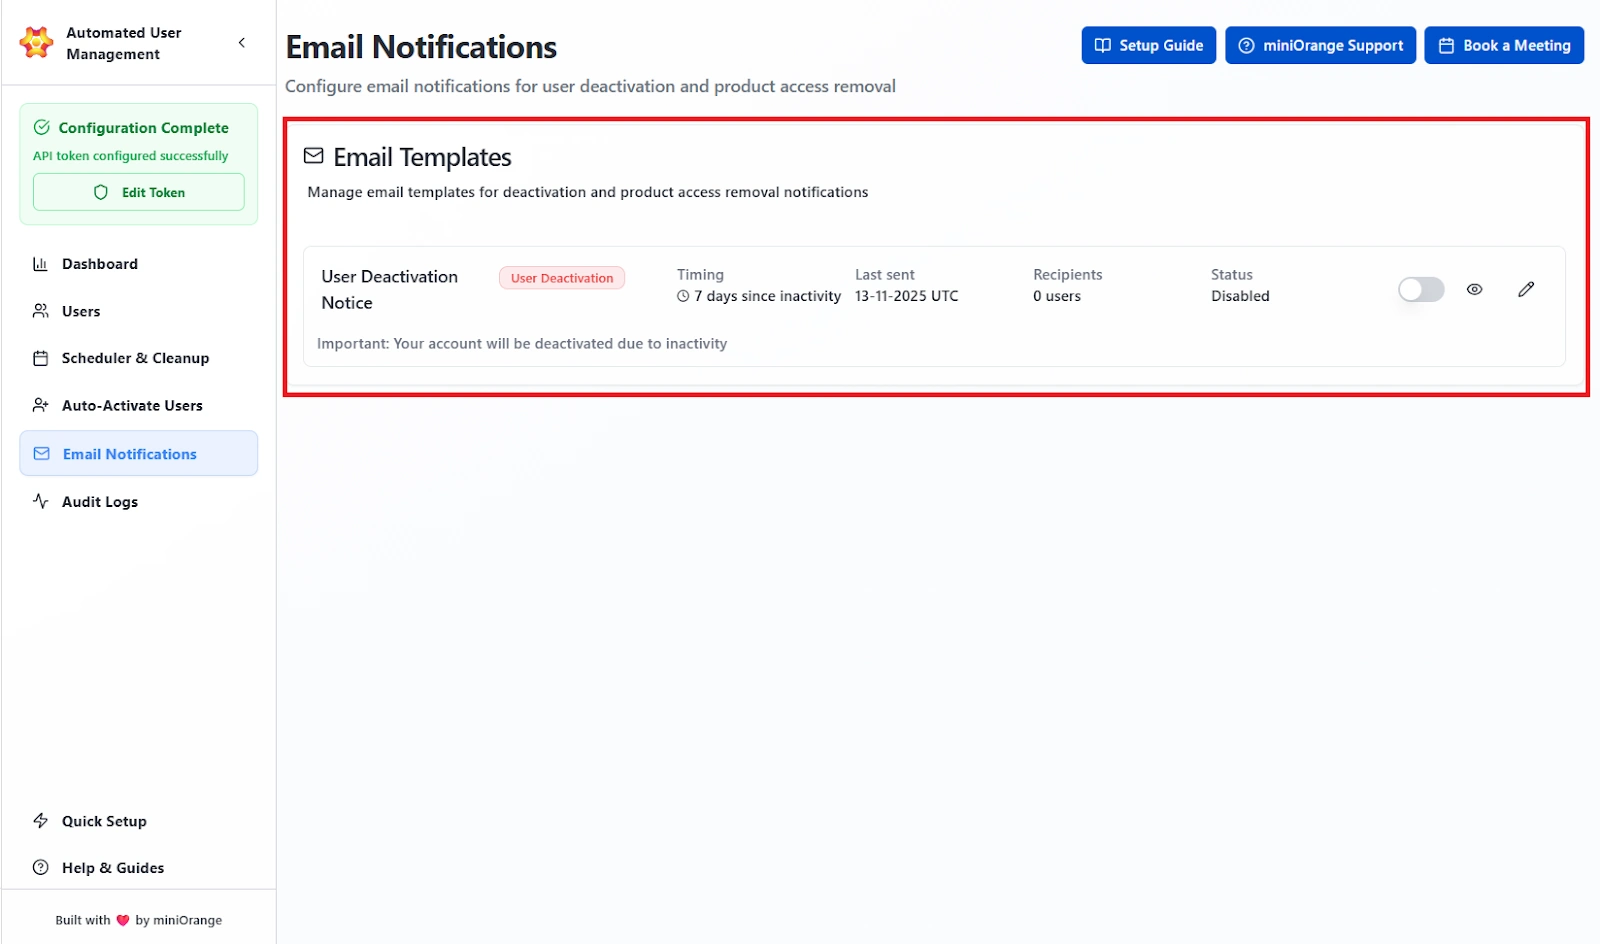
The Email Templates section lists all available notification templates and their details at a glance. The admins will find a list of all configured email templates in this section.
The following details are shown in each section:
- Template Name
- Timing
- Last Sent
- Recipients
- Status Toggle
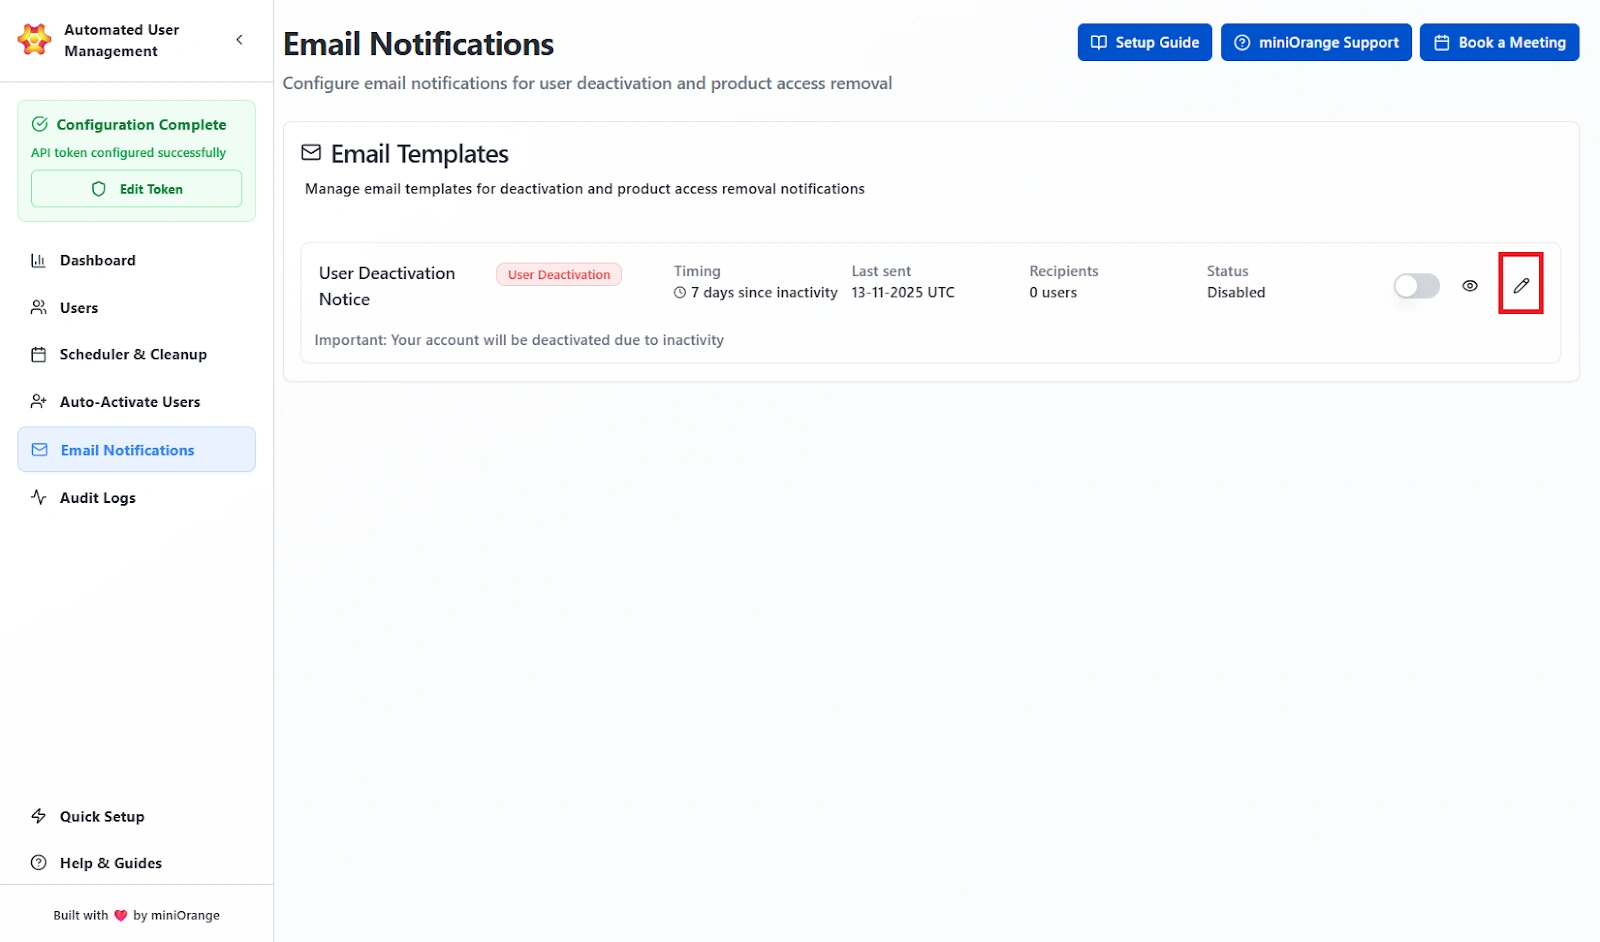
Available Actions
- View
- Edit
Click Edit to open the configuration form.
Creating or Editing an Email Template
This interface allows administrators to define the content, timing, and format of an email notification. Dynamic placeholders can be used in both the Subject and Body to insert user-specific data automatically.
Configurable Fields:
- Template Name
- Days Since Inactivity
- Email Subject
- Email Body
- BCC Recipients
Supported HTML Tags:
| <h1>, <h2>, <h3> | Headings |
| <p>, <br> | Paragraphs and line breaks |
| <strong>, <em> | Bold and italic text |
| <ul>, <ol>, <li> | Lists |
Previewing and Managing Templates
After saving, templates can be reviewed directly from the Email Templates list. The preview feature opens a pop-up window showing:
- The Subject line
- The Rendered Email Content with sample placeholder values (e.g., Dear John Doe)
- The Dynamic Variables Notice at the bottom
Use Case Scenario
You need users to receive a warning 7 days before their Jira access is removed because they’ve been inactive.
How it works
- Create or edit a template and set:
- Days Since Inactivity: 23 (because cleanup rule triggers at 30)
- Subject: “Your Jira access will be removed soon”
- Body: Add placeholders such as username, inactivity days, last login date, etc.
- Enable the template
When the cleanup rule runs, the system automatically sends the notification exactly 7 days before the user reaches the 30-day inactivity threshold.
Benefit
Users and managers get advance notice, preventing surprise lockouts and reducing support tickets. It keeps the cleanup process transparent and aligned with compliance requirements since every notification is timestamped and traceable.
Email Notifications
The Email Notifications tab allows administrators to configure automated email alerts related to user deactivation, product access removal, or other automated user management events. These notifications ensure that users are informed in advance before their accounts are modified or deactivated, improving transparency and compliance.
All email notifications configured will be sent from “noreply@miniorange.com”.
Email Templates Overview
The Email Templates section lists all available notification templates and their details at a glance. The admins will find a list of all configured email templates in this section. The following details are shown in each section:
Template Name
Shows the exact purpose of the email template, such as “User Deactivation Notice” or “Access Removal Warning.” The name must clearly reflect what the email communicates.
Timing
Displays the number of days of user login inactivity after which the email will be sent. Example: “7 days since inactivity” means the email goes out seven days after the user last logged in.
Last Sent
Shows the most recent date and time (UTC) when this template was successfully triggered and delivered to users.
Recipients
Shows the number of users who received this template the last time it was triggered. This confirms the email was actually used and who it reached.
Status Toggle
Turns the template on or off.
- Enabled: The system will send this email when the rule conditions are met.
- Disabled: The template will not be sent under any circumstances.
Available Actions
- View
- Edit
View: Opens a preview of the template with sample values inserted, so you can confirm the layout and placeholders.
Edit: Opens the full edit form where you can change the subject, body content, placeholders, and timing.
Creating or Editing an Email Template
Click Edit to open the configuration form. This interface allows administrators to define the content, timing, and format of an email notification.
Dynamic placeholders can be used in both the Subject and Body to insert user-specific data automatically.
Here are the field settings included that can be configured in the template:

- Template Name: The internal name used to identify the template. Example: User Deactivation Notice.
- Days Since Inactivity: Defines how many days of inactivity should trigger the notification (e.g., 7 days).
- Email Subject: Subject line of the notification email. Example: Important: Your account will be deactivated due to inactivity.
- Email Body: The main message content of the notification. Supports HTML formatting for styling.
- BCC Recipients: Optionally add admin or manager addresses to receive copies of outgoing notifications.
Supported HTML Tags
| <h1>, <h2>, <h3> | Headings |
| <p>, <br> | Paragraphs and line breaks |
| <strong>, <em> | Bold and italic text |
| <ul>, <ol>, <li> | Lists |
Previewing and Managing Templates
After saving, templates can be reviewed directly from the Email Templates list.
The preview feature opens a pop-up window showing:
- The Subject line.
- The Rendered Email Content with sample data populated for placeholders (e.g., Dear John Doe).
- The Dynamic Variables Notice at the bottom, indicating placeholders replaced with mock values.
Use Case Scenario
You need users to receive a warning 7 days before their Jira access is removed because they’ve been inactive.
How it works
- Create or edit an email template and set:
- Days Since Inactivity: 23 (because the cleanup rule triggers at 30 days)
- Subject: “Your Jira access will be removed soon”
- Body: Add placeholders such as username, inactivity days, or last login date so each email is personalized
- Enable the template.
When the cleanup rule runs, the system automatically sends the notification exactly 7 days before the user reaches the 30-day inactivity threshold.
Users and managers get advance notice, preventing surprise lockouts and reducing support tickets. It keeps the cleanup process transparent and aligned with compliance requirements since every notification is timestamped and traceable.
Benefit
Users and managers get advance notice, preventing surprise lockouts and reducing support tickets. It keeps the cleanup process transparent and aligned with compliance requirements since every notification is timestamped and traceable.
Audit Logs
The Audit Logs tab provides administrators with complete visibility into all operations, automation runs, and user management activities within the Automated User Management app. It tracks every event, from manual actions to scheduled rule executions, ensuring full traceability and compliance across the system.
Dashboard Overview
The top of the Audit Logs page presents a real-time operational summary that helps administrators monitor recent activities at a glance.
Dashboard Summary Cards
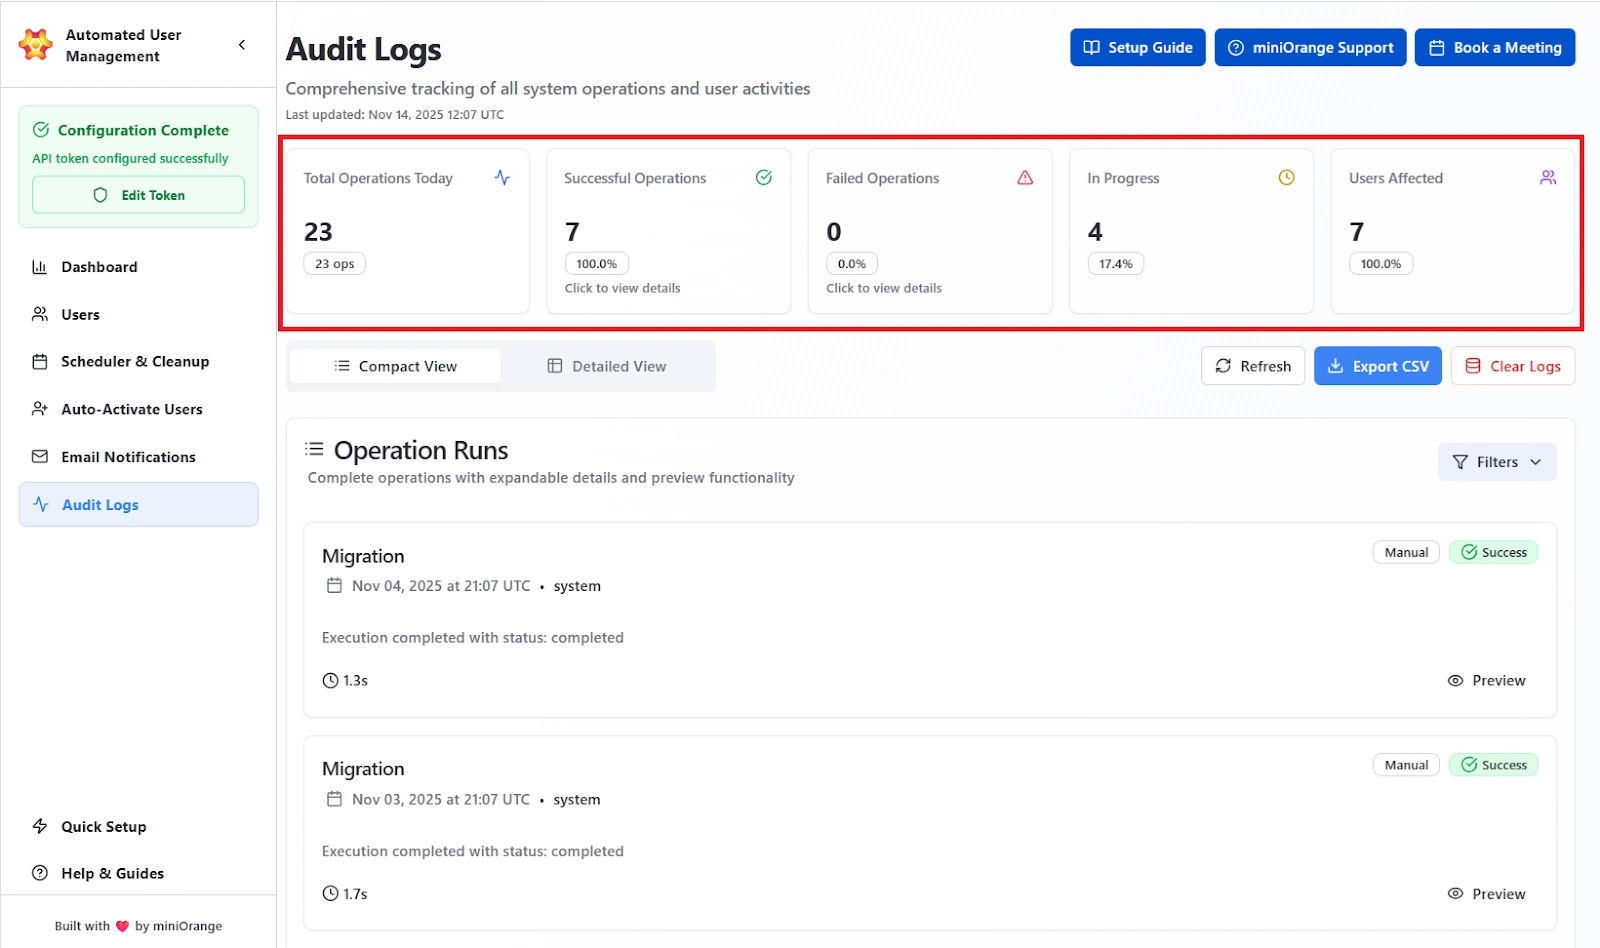
The summary cards give a quick overview of the following information:
- Total Operations Today: Shows the total number of actions the system executed in the last 24 hours. This includes every job, rule run, import, or cleanup action.
- Successful Operation: Displays how many operations completed without errors, along with the success percentage. This tells you at a glance whether the system is running smoothly.
- Failed Operations: Shows the number and percentage of operations that failed, typically due to permission issues, missing access, invalid credentials, or API errors. Any spike here needs attention.
- In Progress: Lists operations that are currently running. Useful when you expect a large import or cleanup and need to confirm it hasn’t stalled.
- Users Affected: Shows how many individual user accounts were impacted by today's logged operations. This helps quantify the real impact of the system’s activity.
The following controls are also provided:
- Refresh: Updates the dashboard with the latest log data.
- Export CSV: Downloads all audit logs for offline analysis.
Clear Logs
Clear Logs: Permanently deletes all audit and execution records (confirmation required).
Click on any of the cards opens an expanded view displaying all affected users and their outcomes. The detailed preview shows the following details:
- User Email: Email address of each affected user.
- Action: The task performed on the user (e.g., Suspend, Restore).
- Status: Result of the operation (Success, Failed).
- Group: Group associated with the action (if relevant).
- Details: Summary of results or failure reason.
Operation Runs with Compact view title
The Operation Runs section lists all recorded executions in a chronological timeline, giving administrators insight into how and when key operations occurred.
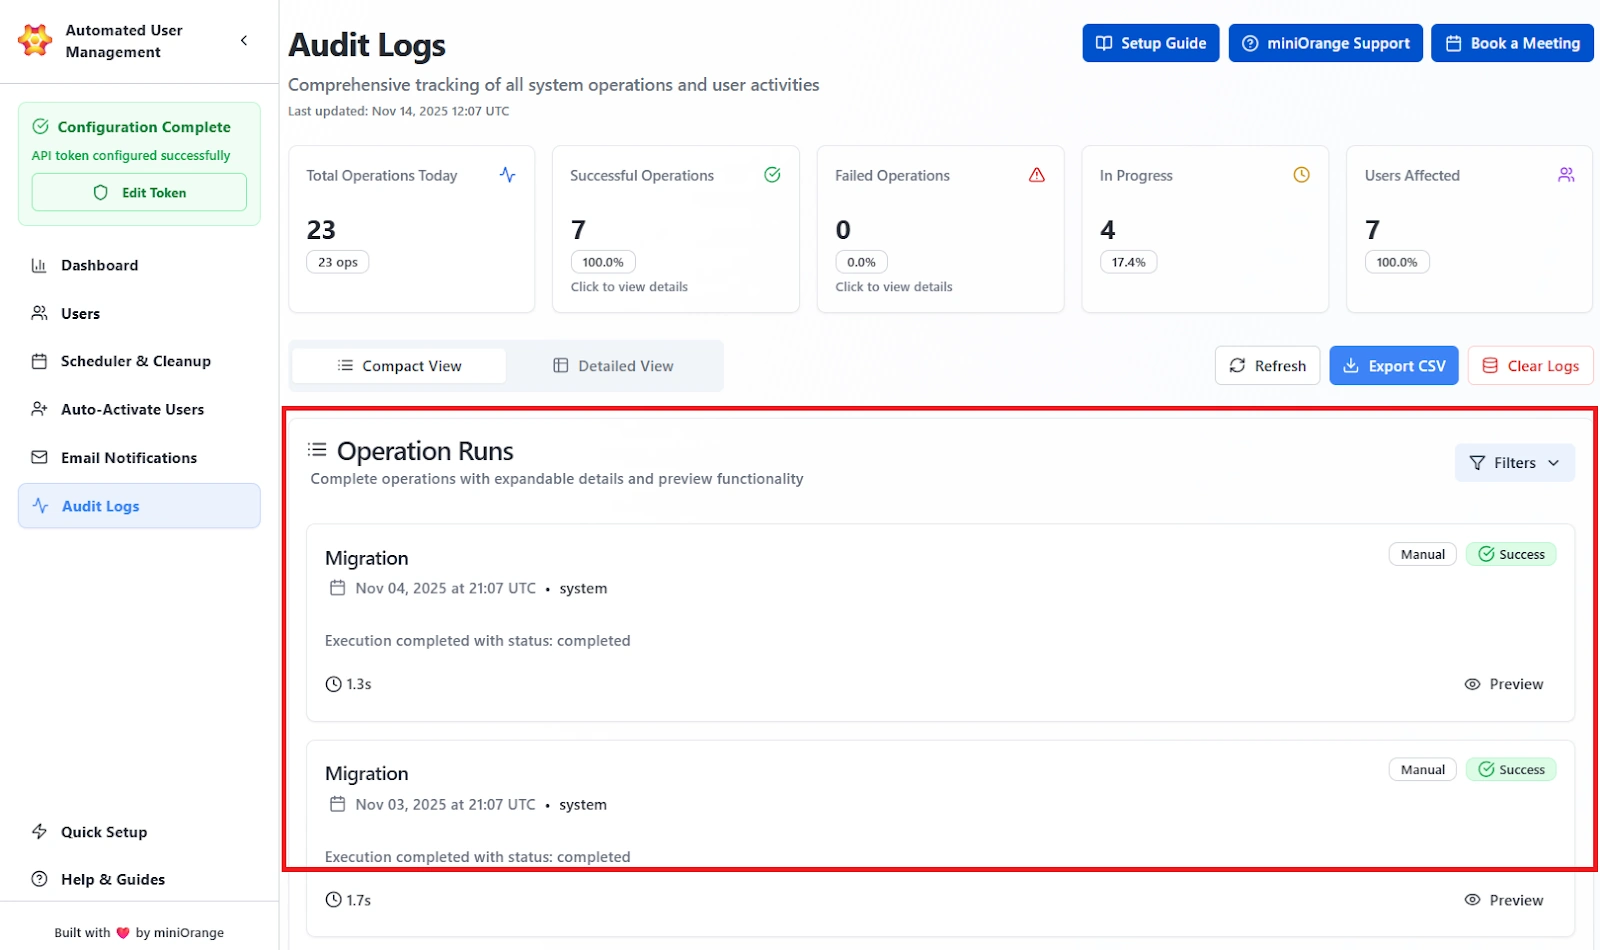
Here are the details that are shown per operation:
- Operation Name: Shows the exact type of task that was performed, such as Migration, User Suspension, or Cleanup. This tells you immediately what the system executed.
- Timestamp: Displays the exact UTC time when the operation finished. Useful for audits and verifying scheduled runs.
- Initiator: Indicates who triggered the operation:
- Manual: An admin started it.
- Automated: A scheduler or rule ran it on its own.
- Status: Shows whether the operation succeeded, failed, produced a warning, or is still in progress.
- Execution Time: Shows how long the operation took to complete, down to the second. Useful for spotting delays or system issues.
- Preview Option: Expands the entry to reveal the full details of the operation, including user counts, errors, and step-by-step results.
Detailed View
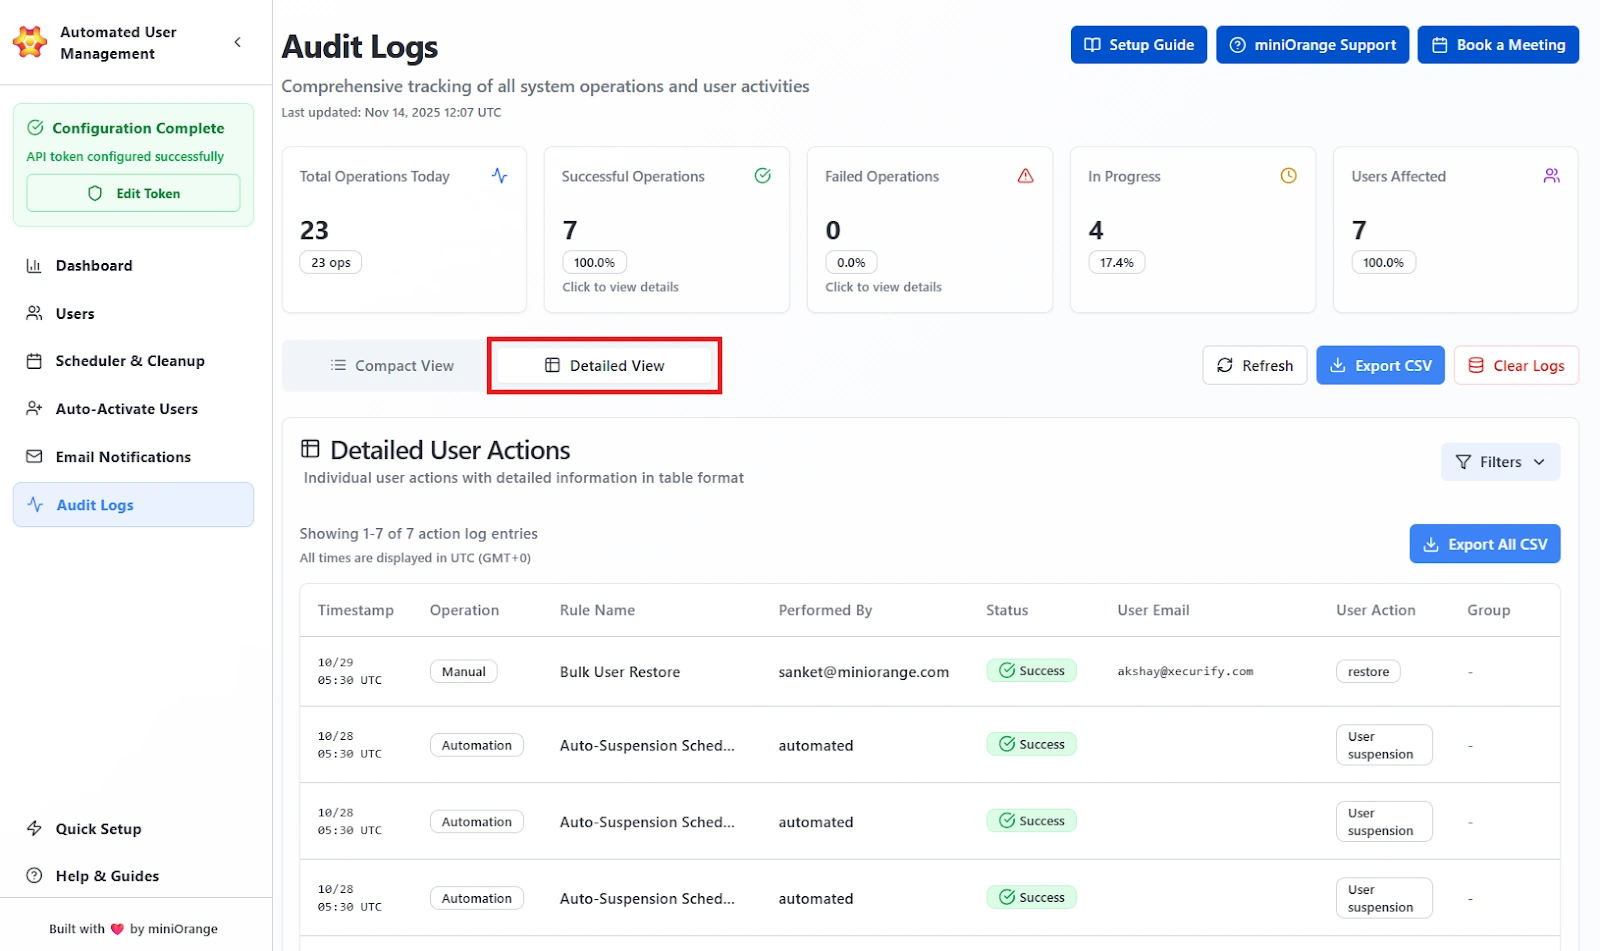
Switching to Detailed View displays granular information about each individual user action recorded during operations. The admin will be able to view the following information in this section:
- Timestamp: When the action was executed (in UTC).
- Operation: The type of process executed (e.g., Bulk Import, Auto-Suspension).
- Rule Name: The rule or job name associated with the operation.
- Performed By: Identifies who or what triggered the action (manual admin name or “automated”).
- Status: Indicates the action result (Success, Failed, Partial Failure).
- User Email: The email ID of the affected user.
- User Action: Describes the operation performed (e.g., Restore, Suspend, Delete).
- Group: The group related to the operation (if applicable).
Advanced Filters
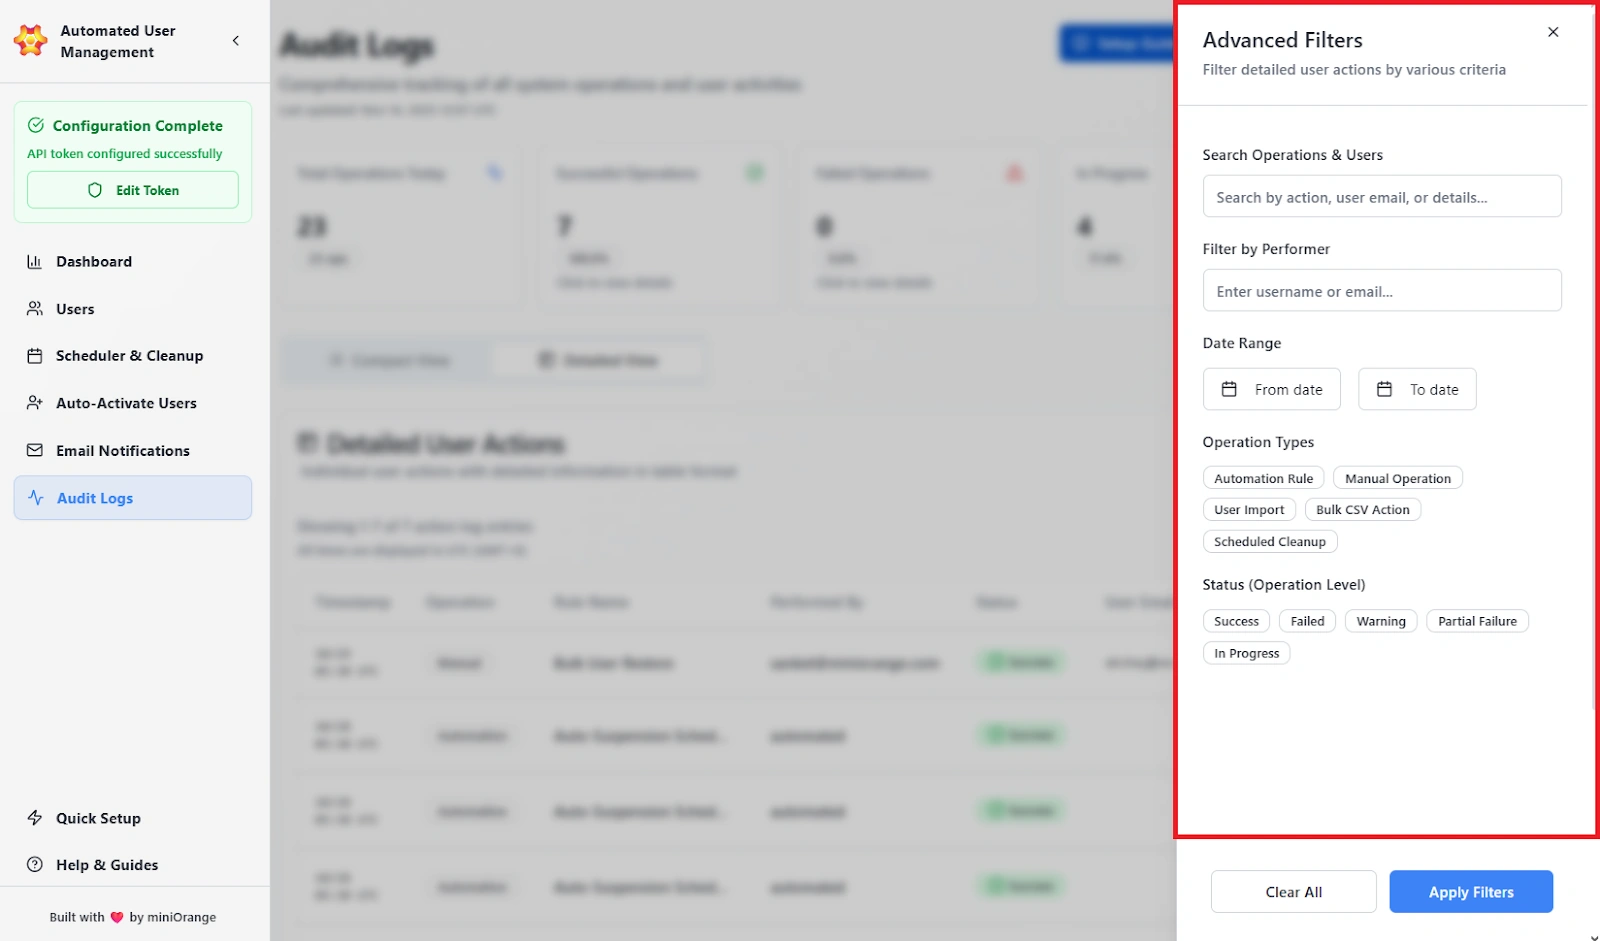
The Filters panel refines the displayed results based on defined criteria, allowing admins to locate specific actions or investigate issues efficiently.
The filters available are as follows:
- Search Operations: Search by operation type, rule name, or keywords.
- Filter by User / Performer: Filter logs by username or email.
- Date Range: Define a start and end date for the activity timeline.
Operation Types:
- Automation Rule
- Manual Operation
- User Import
- Bulk CSV Action
- Scheduled Cleanup
Status:
- Success
- Failed
- Warning
- Partial Failure
- In Progress
The admins can apply the chosen filters to view the logs that are required. When they click on Clear All, they will be able to remove all active filters.
Export Options
The audit logs can be exported in CSV format with UTC timestamps and all data fields.
Clear Logs
Administrators can delete all audit and action logs by selecting Clear Logs.
Use Case Scenario
You need to verify that last night’s cleanup rule suspended the correct users and didn’t touch anyone outside the intended criteria.
How it works
- 1. Open Audit Logs.
- 2. Apply filters:
- Operation Type: Scheduled Cleanup
- Status: Success
- Date: Yesterday
- 3. Expand the matching operation to view the full list of impacted users.
- 4. Export the log if you need to send the results to compliance, security, or internal audit teams.
Benefit
Audit Logs give complete, timestamped traceability for every automated and manual action. They make it easy to verify correct behavior, investigate issues, and provide solid evidence during compliance checks. Every decision and outcome is documented and reviewable.
Help & Guides
The Help & Guides tab provides administrators with quick access to setup resources, documentation, and support channels to help configure and maintain the Automated User Management app efficiently.
It serves as the central reference point for guidance, troubleshooting, and plugin maintenance tasks.
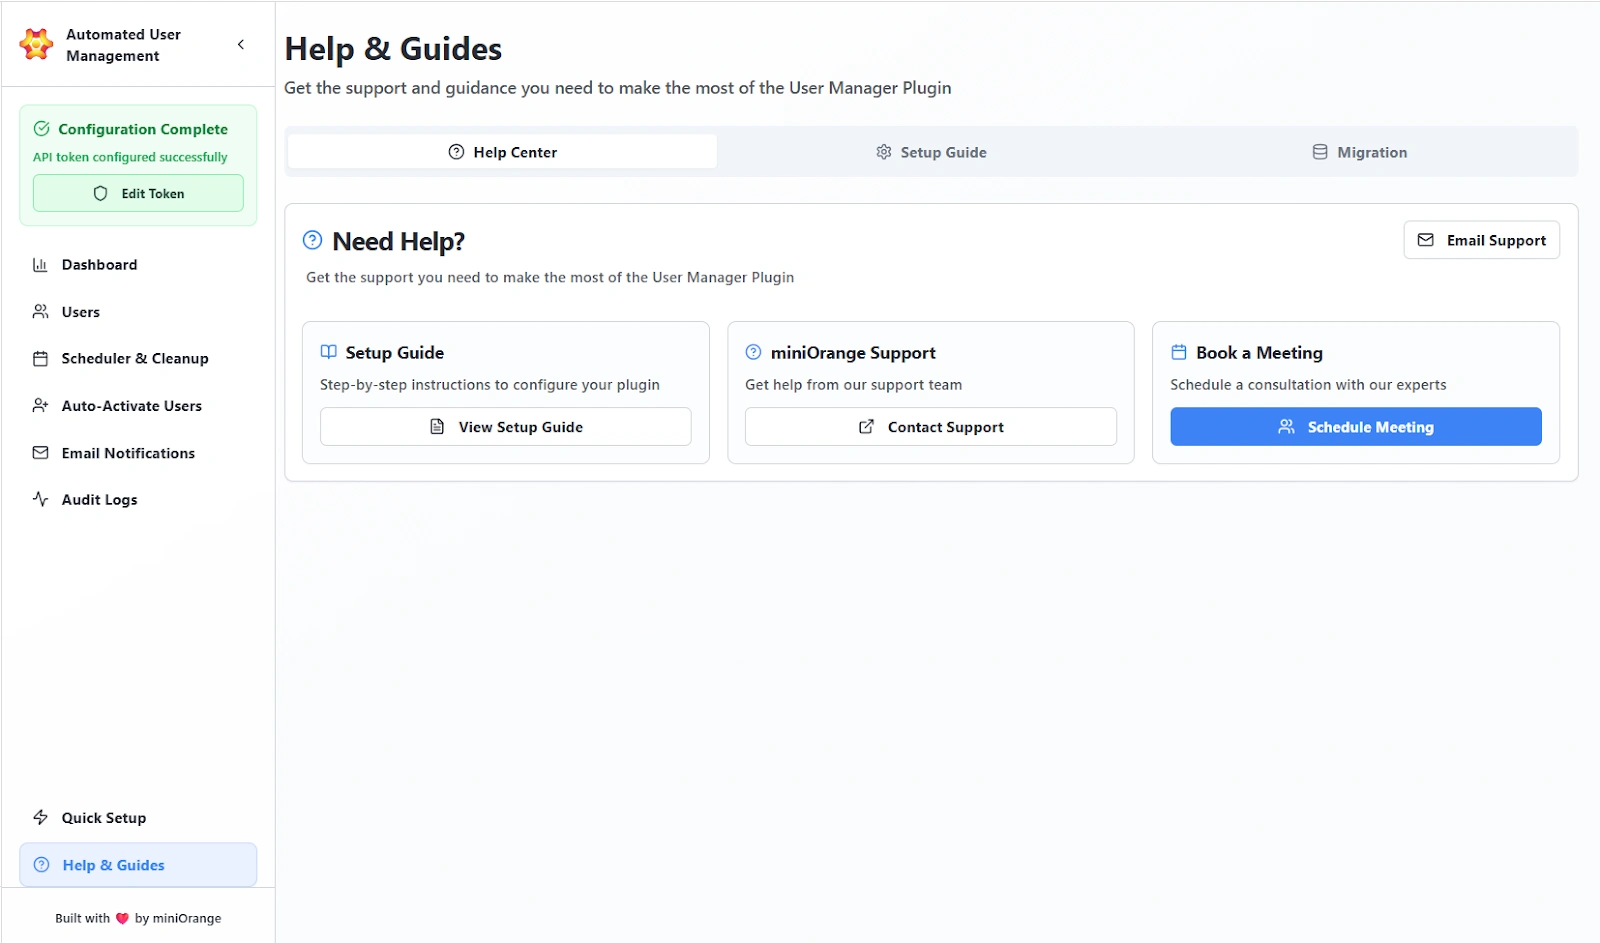
Help Center
The Help Center section acts as a quick-access dashboard for all support and assistance options. It allows admins to reach setup instructions, contact the miniOrange support team, or schedule live assistance. The following options are provided under Help Center:
- Setup Guide: Opens the detailed configuration manual for the app. This provides step-by-step guidance to complete installation, API configuration, and initial rule setup.
- miniOrange Support: Admins can directly contact the miniOrange support team. They can use this option for technical help, troubleshooting errors, or configuration guidance.
- Book a Meeting: The option lets administrators schedule a free personalized session with a miniOrange expert for assistance with deployment or troubleshooting.
- Email Support: Opens a direct mail channel for asynchronous communication with the support team.
Setup Guide
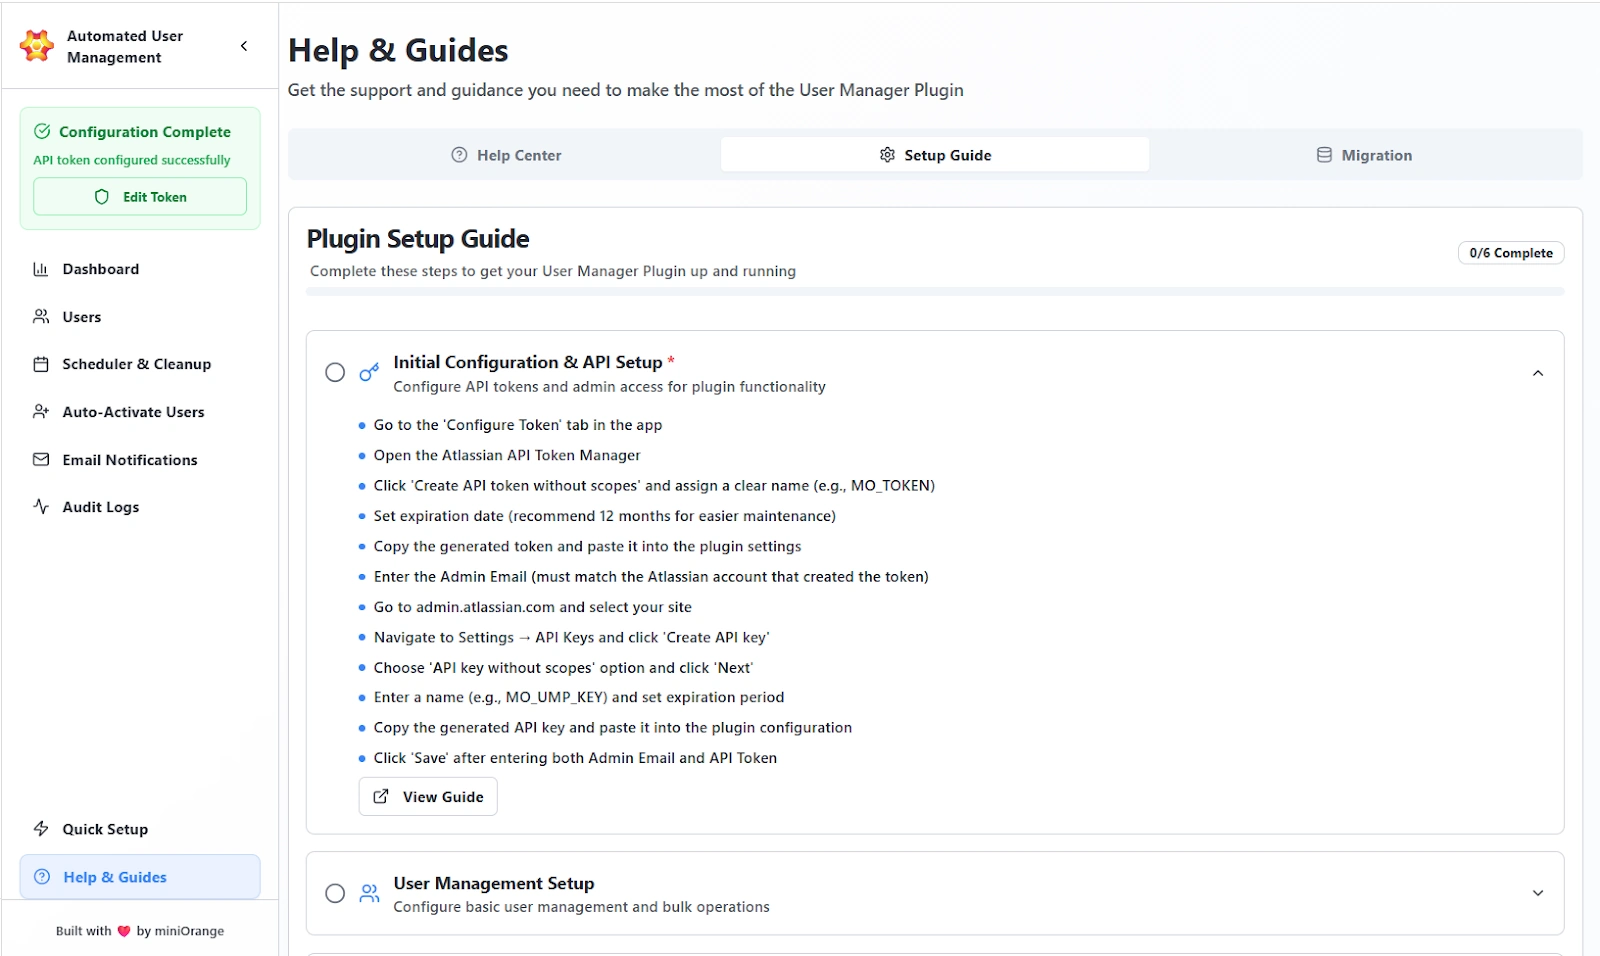
The Setup Guide tab walks administrators through the full process of configuring the Automated User Management app from scratch. It’s divided into structured modules covering everything from token setup to user management configuration.
Migration Management
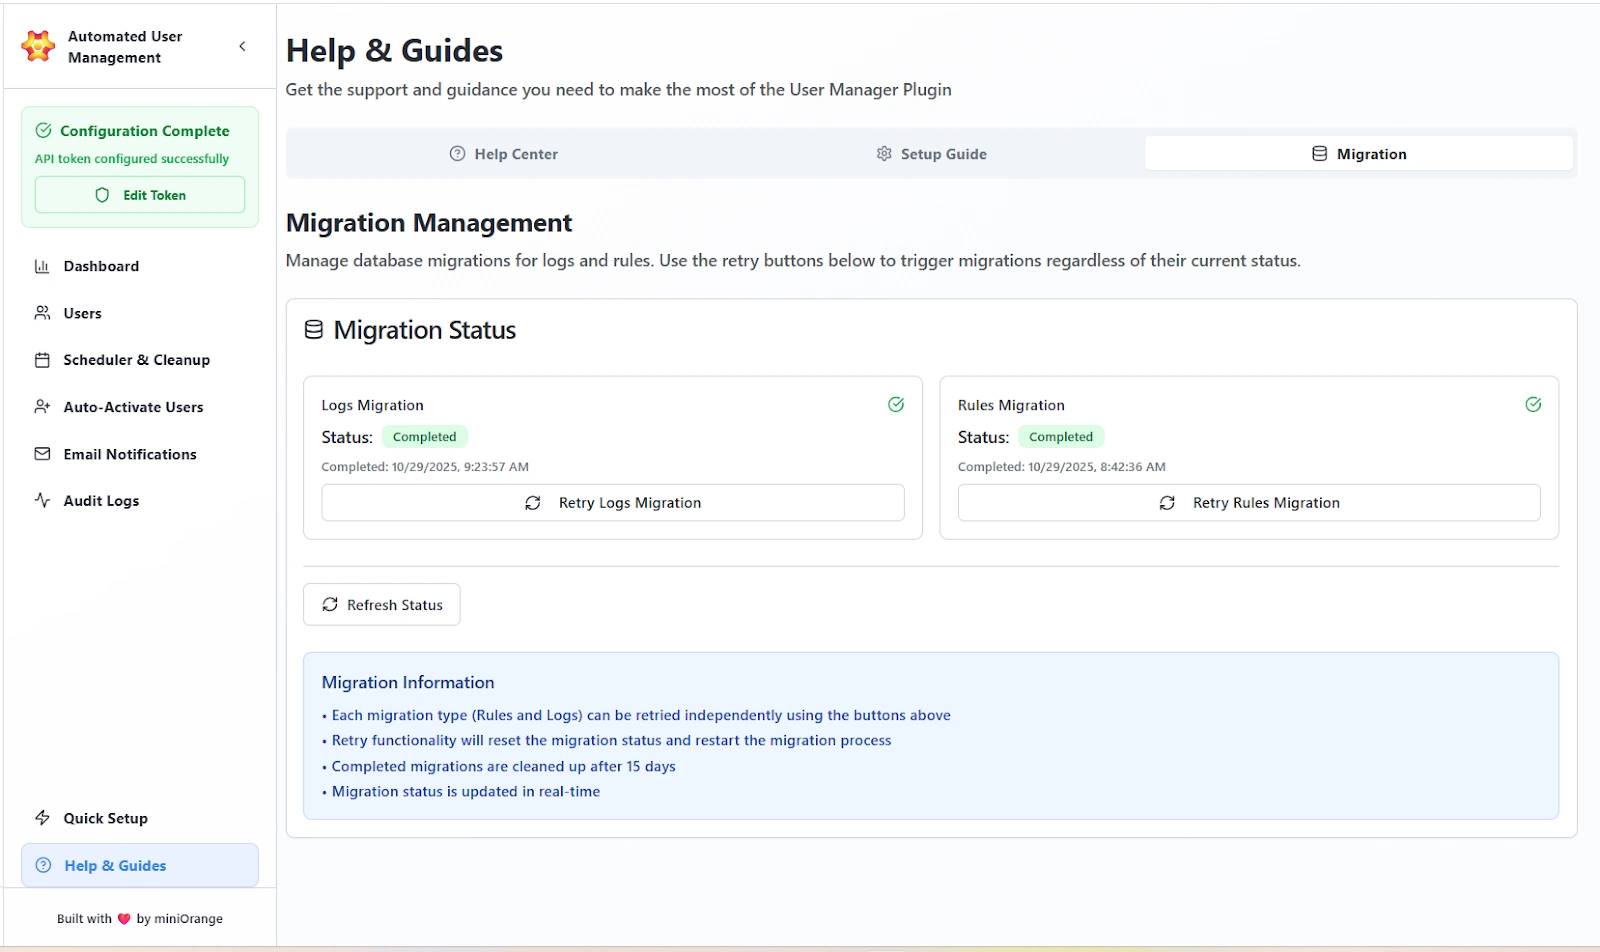
The Migration tab allows administrators to monitor and manage internal database migrations related to rules, logs, and operations history.
Displays the latest migration results for:
- Logs Migration: Tracks and updates log data migration.
- Rules Migration: Manages migration of configured rules and automation settings.
Each migration entry includes:
- Status: Completed / In Progress / Failed
- Completion Timestamp: Date and time (in UTC) when the migration was last executed.
- Retry Option: Re-run individual migration processes if needed.
- Refresh Status: Updates the migration progress display.
Provides important notes regarding migration functionality:
- Each migration type (Rules and Logs) can be retried independently.
- Retrying a migration resets its status and restarts the process.
- Completed migrations are automatically cleaned up after 15 days.
- Migration progress is updated in real time.
Features Provided
- Migration Status
- Migration Information Panel