- Home
- Identity Governance, Auditing & Access Control via JSM Guide
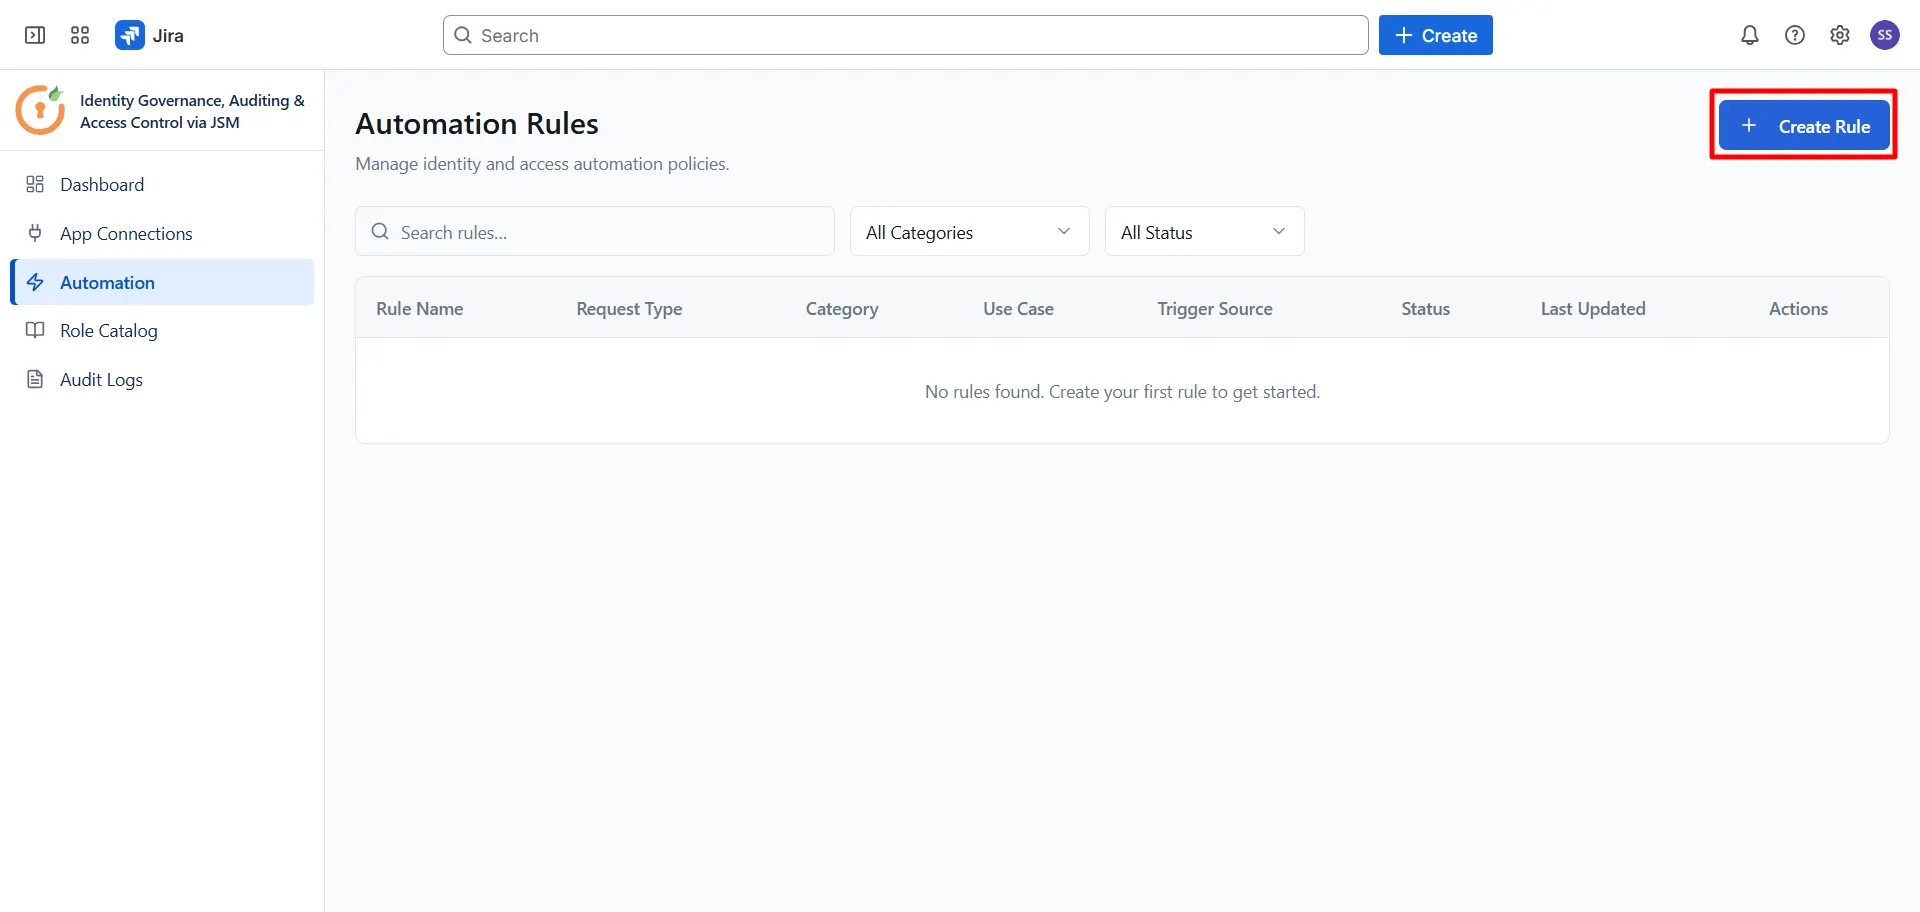
- Privileged Access Automation Rule

Privileged Access Automation Rule
With the Privileged Access Automation Rule, you can automatically grant a JSM requester elevated access in a connected application when their request is approved. This guide walks you through creating and configuring the rule from start to finish.
 Try it for free
Pre-requisites
- Jira and JSM admin access You need admin permissions in both Jira and Jira Service Management to create and save rules.
- A connected application At least one application must already be connected to the Identity Governance app via App Connections, and its access options must be visible in the rule builder. Confirm this before creating the rule.
- A JSM project and request type set up for privileged access requests You need an existing JSM project with a dedicated request type for privileged access requests. One request type can only be used by one automation rule, so make sure the request type you plan to use is not already assigned to another rule.
- Your Approved and Rejected workflow status names Make note of the exact JSM workflow status names for approval and rejection in your project. You will need them when configuring the Access Decision Mapping block.
-
A custom field created and added to the request type form
Before building the rule, create the following custom field in Jira
and add it to your request type form. The rule builder only shows
fields that are already on the form. If the admin needs a specific
field, they can create one prior to setting up the app.
- Access level (single-select list): used to show requesters the friendly access option names you define.
Installation
- Log in to your Jira instance and go to Apps in the top navigation bar.
- Select Explore more apps and search for Identity Governance, Auditing and Access Control via JSM.
- Click Try it free to start a trial, then follow the prompts to install the app.
- Once installed, open the app from Apps in the top navigation bar. You will see the app sidebar with Dashboard, App Connections, Automation, Role Catalog, and Audit Logs.
1: Connect your application
Before creating a rule, confirm your target application is connected.
- In the app sidebar, click App Connections.
- Verify your application is listed and its status shows as connected.
- If it is not connected yet, add it here before continuing.
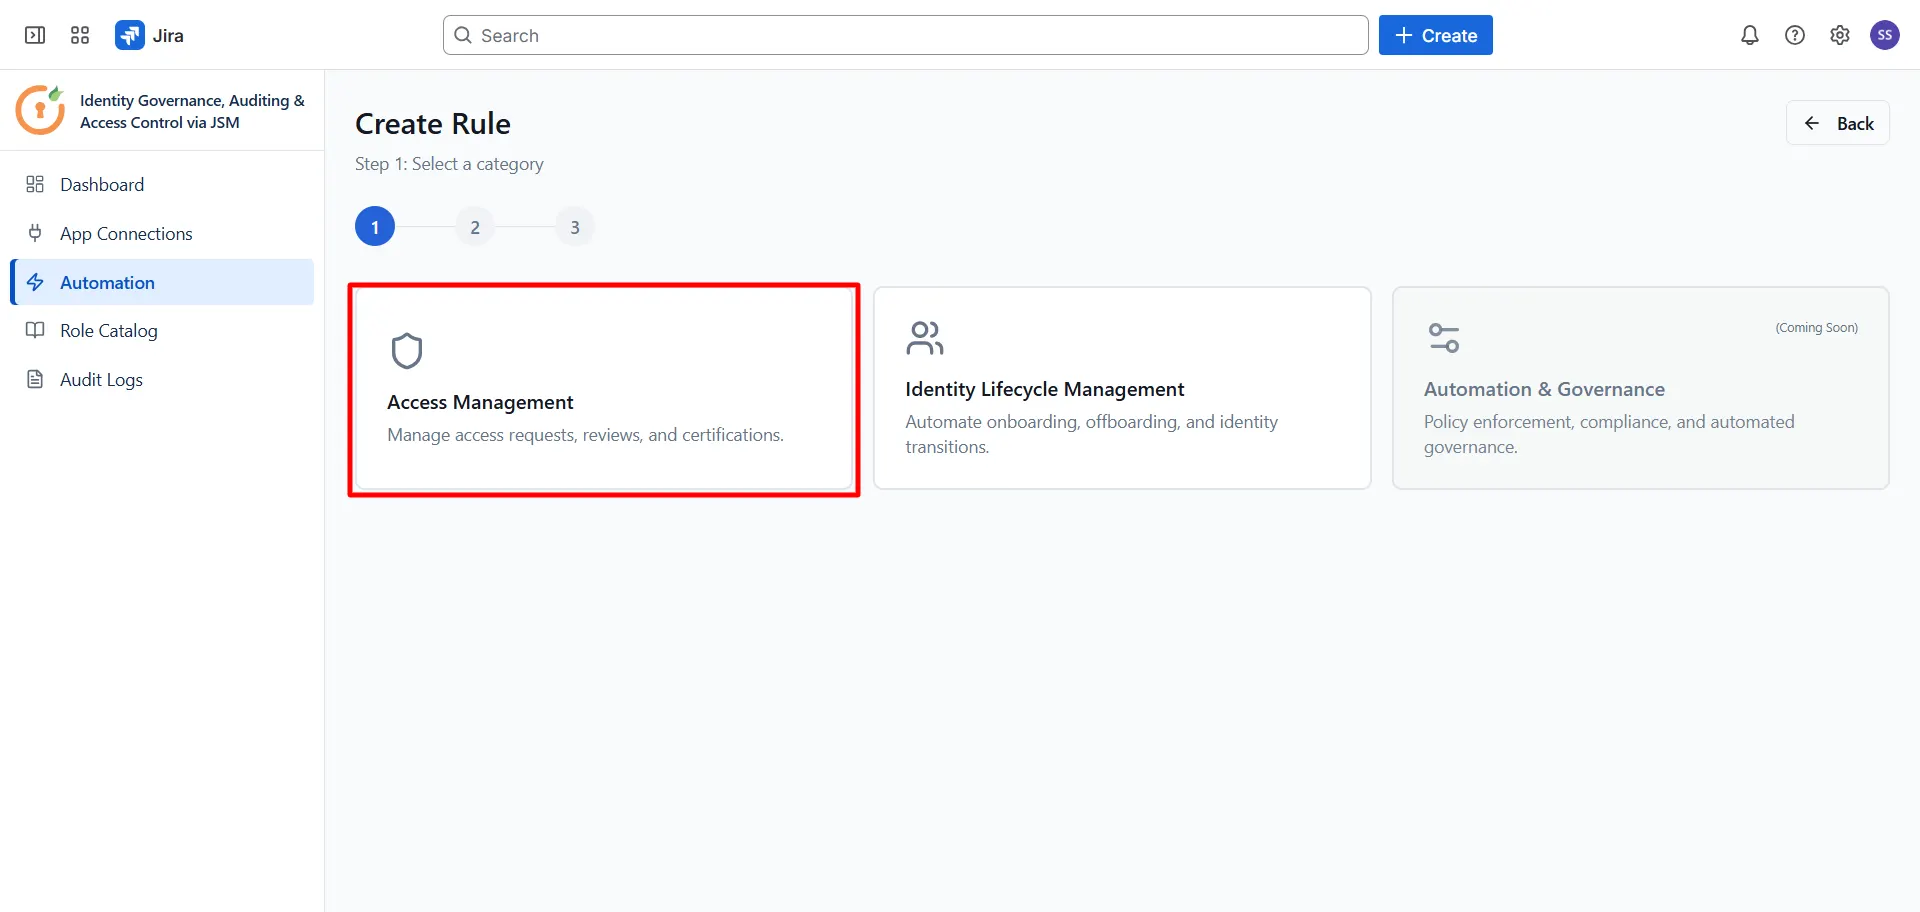
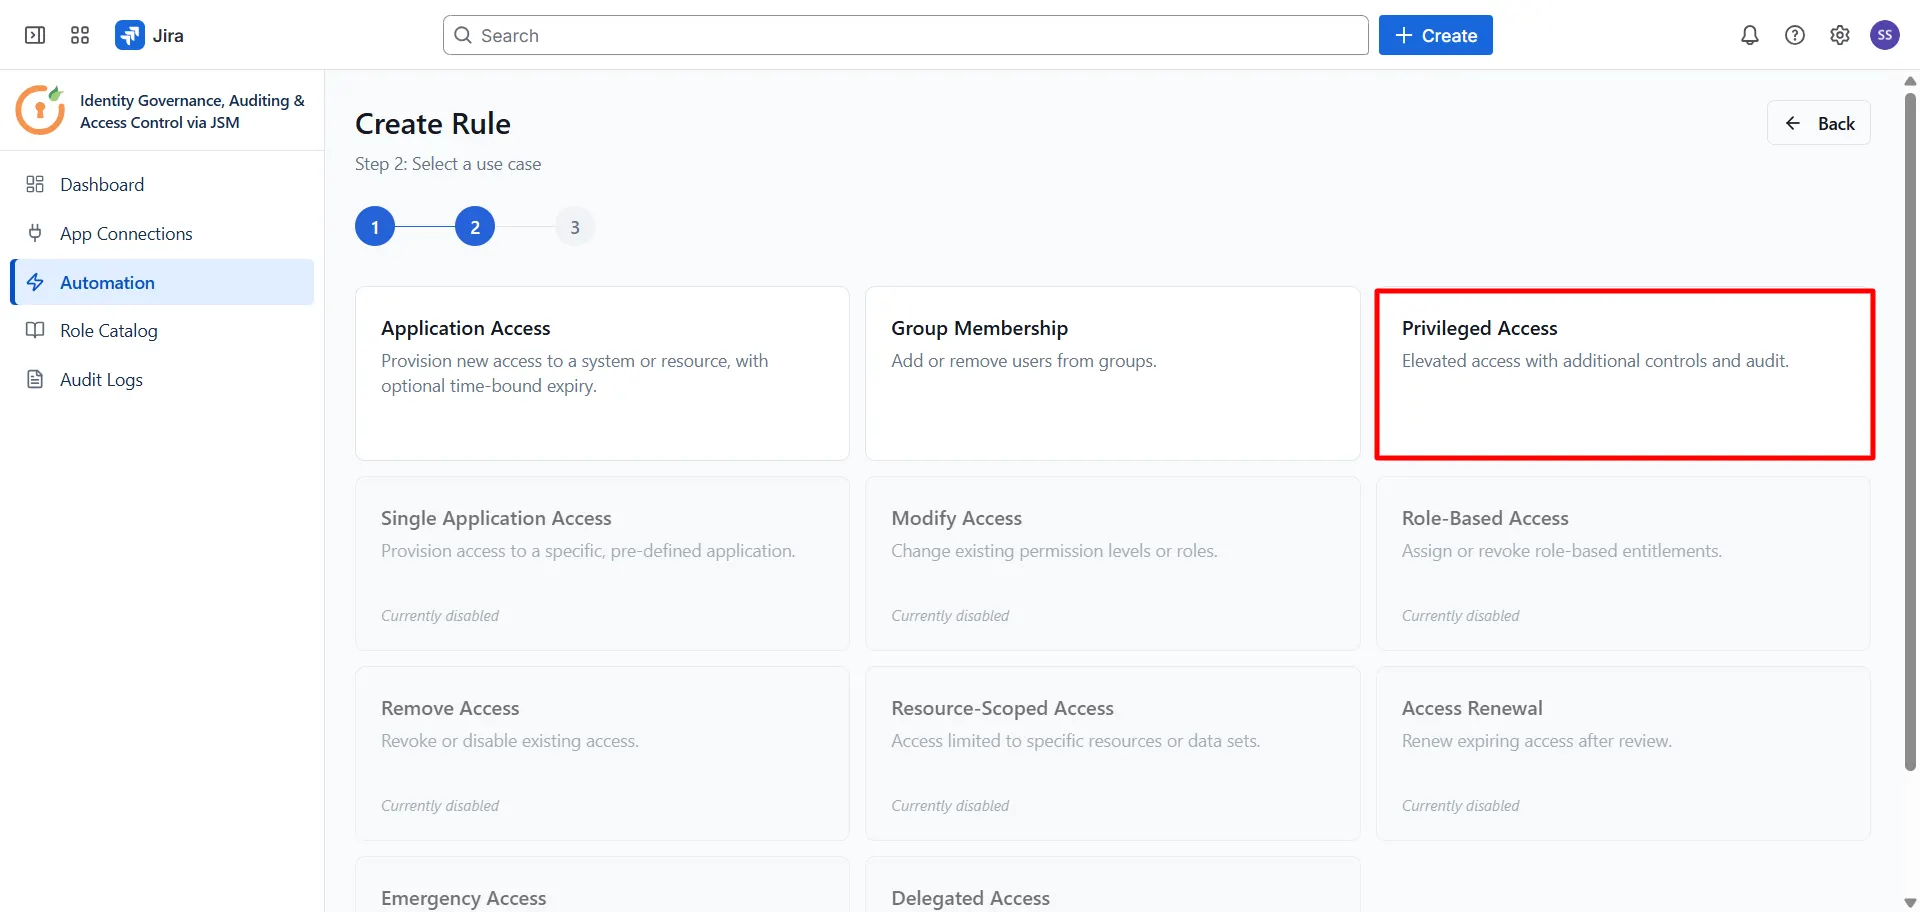
2: Create a Privileged Access rule
- Click Create Rule in the top right corner.
- In the app sidebar, click Automation → Access Management.
- On the use case screen, click Privileged Access.
3: Configure the Project block
The Project block is the trigger for your rule. It tells the app which JSM project and request type to watch.
- In the rule builder, click the Project block to open its settings panel on the right.
- Under Project, select your JSM project from the dropdown.
- Under Request Type, select the request type designated for privileged access requests.
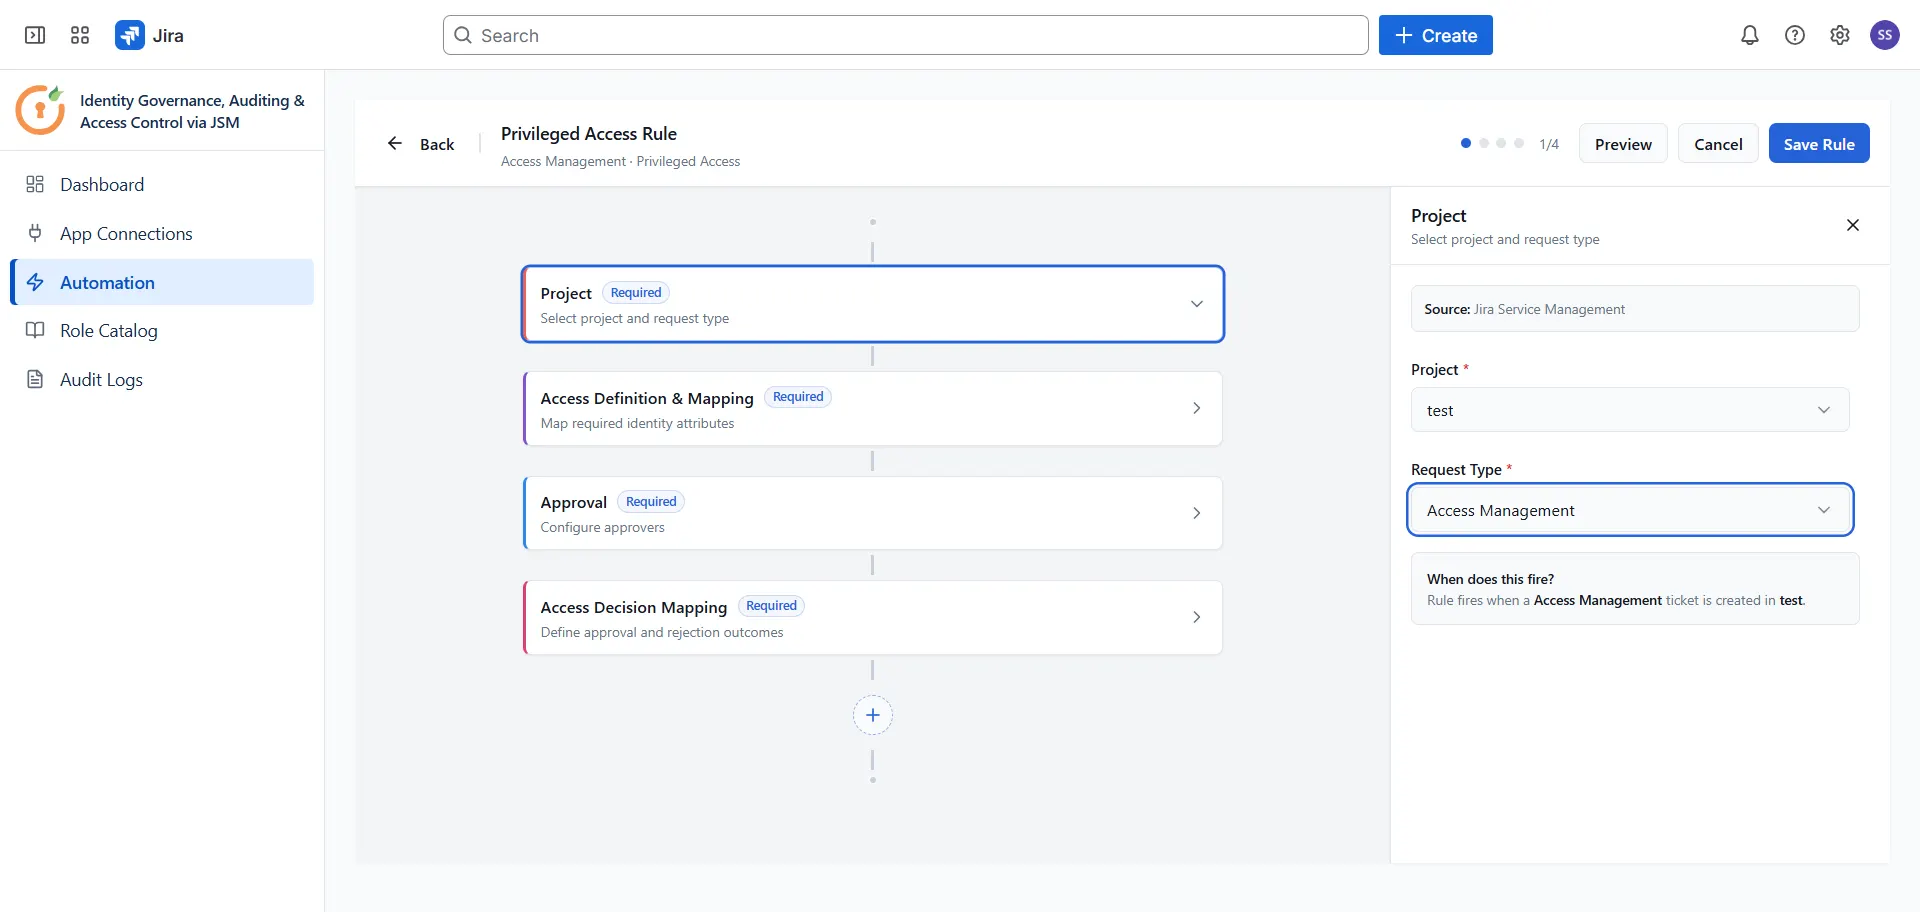
Once both are selected, the field mapping options in the next block will become available.
4: Configure Access Definition and Mapping
This block defines which application to provision into and how the requester selects their access level.
- Click the Access Definition and Mapping block to open its settings panel.
Target Application
- Under Application, select the connected application where privileged access will be granted.
- Confirm that access options load for the selected application before moving on.
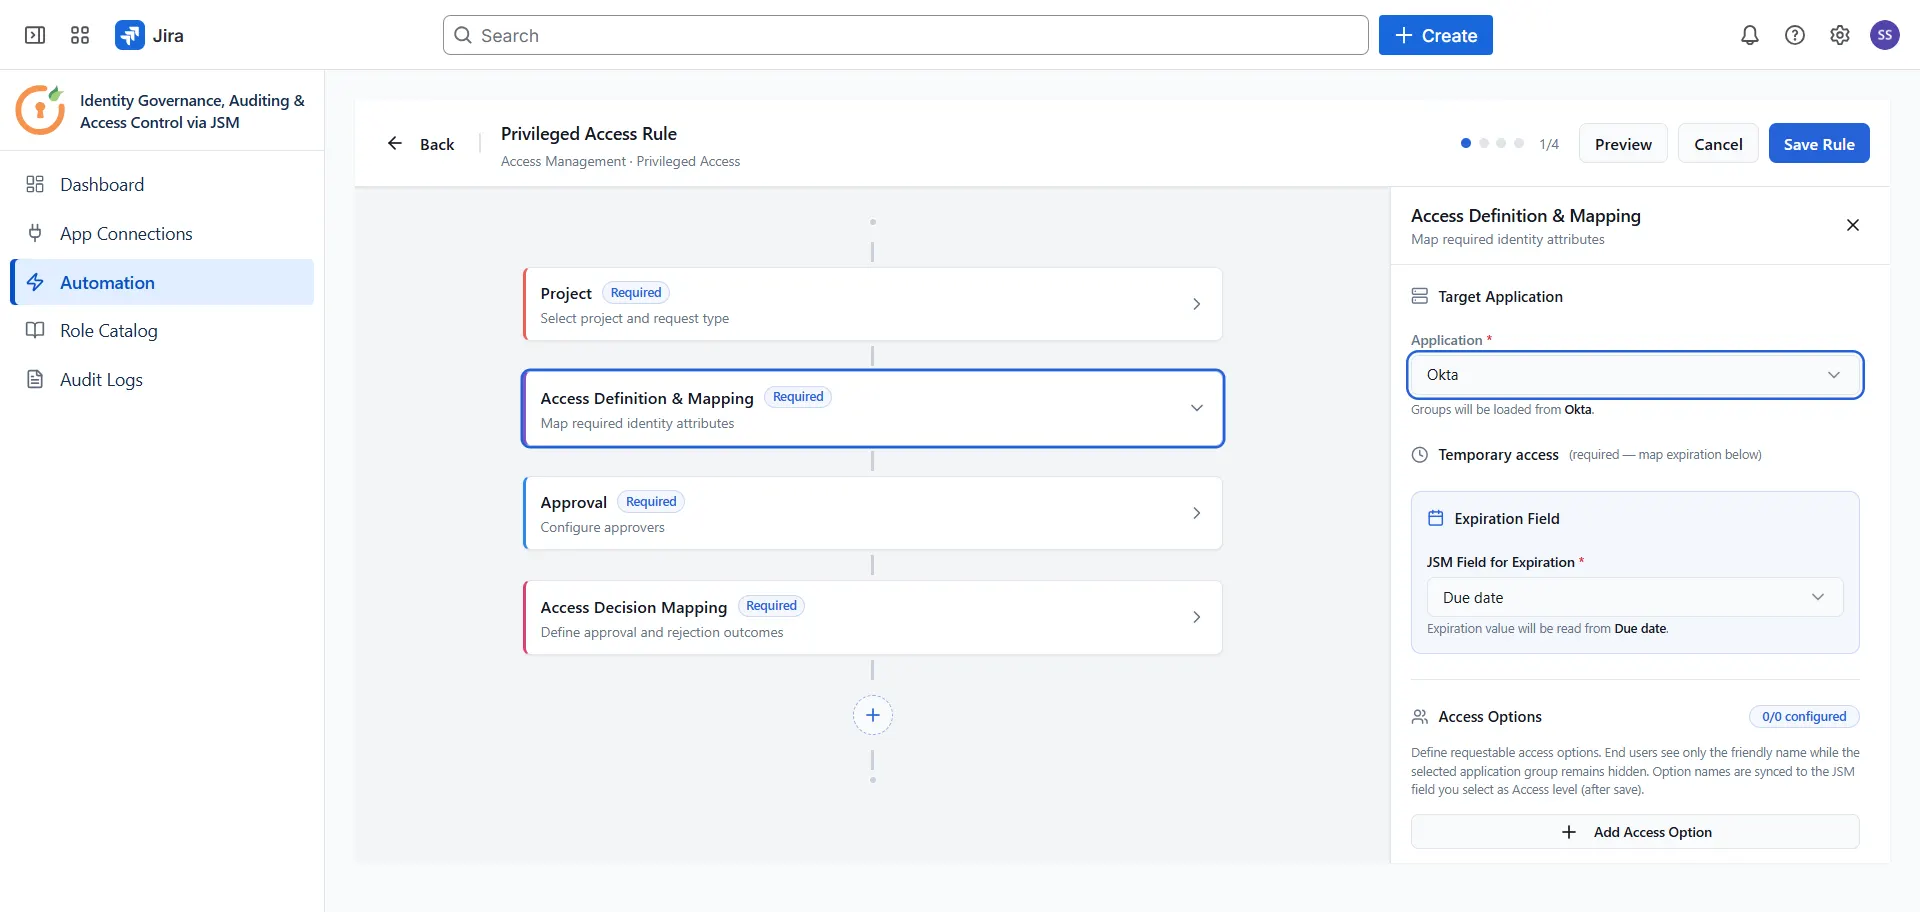
Create User if Missing (optional)
-
If you want the app to automatically create the requester in the
target application when they do not already exist there, toggle
Create user if missing on.
- Skip this if your application is invite-based (such as GitHub or Zoom), as this option will not be available for those.
Access Options
Here you define the access levels requesters can choose from. The requester will see the friendly names you define, the underlying access level names from the connected application stay hidden.
- Click Add Access Option.
- Give it a name the requester will see (e.g., "Admin access" or "Read-only access").
- Map it to one or more real access levels in the connected application.
- Repeat for each access option you want to offer.
- Under Access level, select the JSM single-select custom field you created in the pre-requisites.

After you save the rule, the app will write your Access Option names into that field so requesters can select from them when submitting a request.
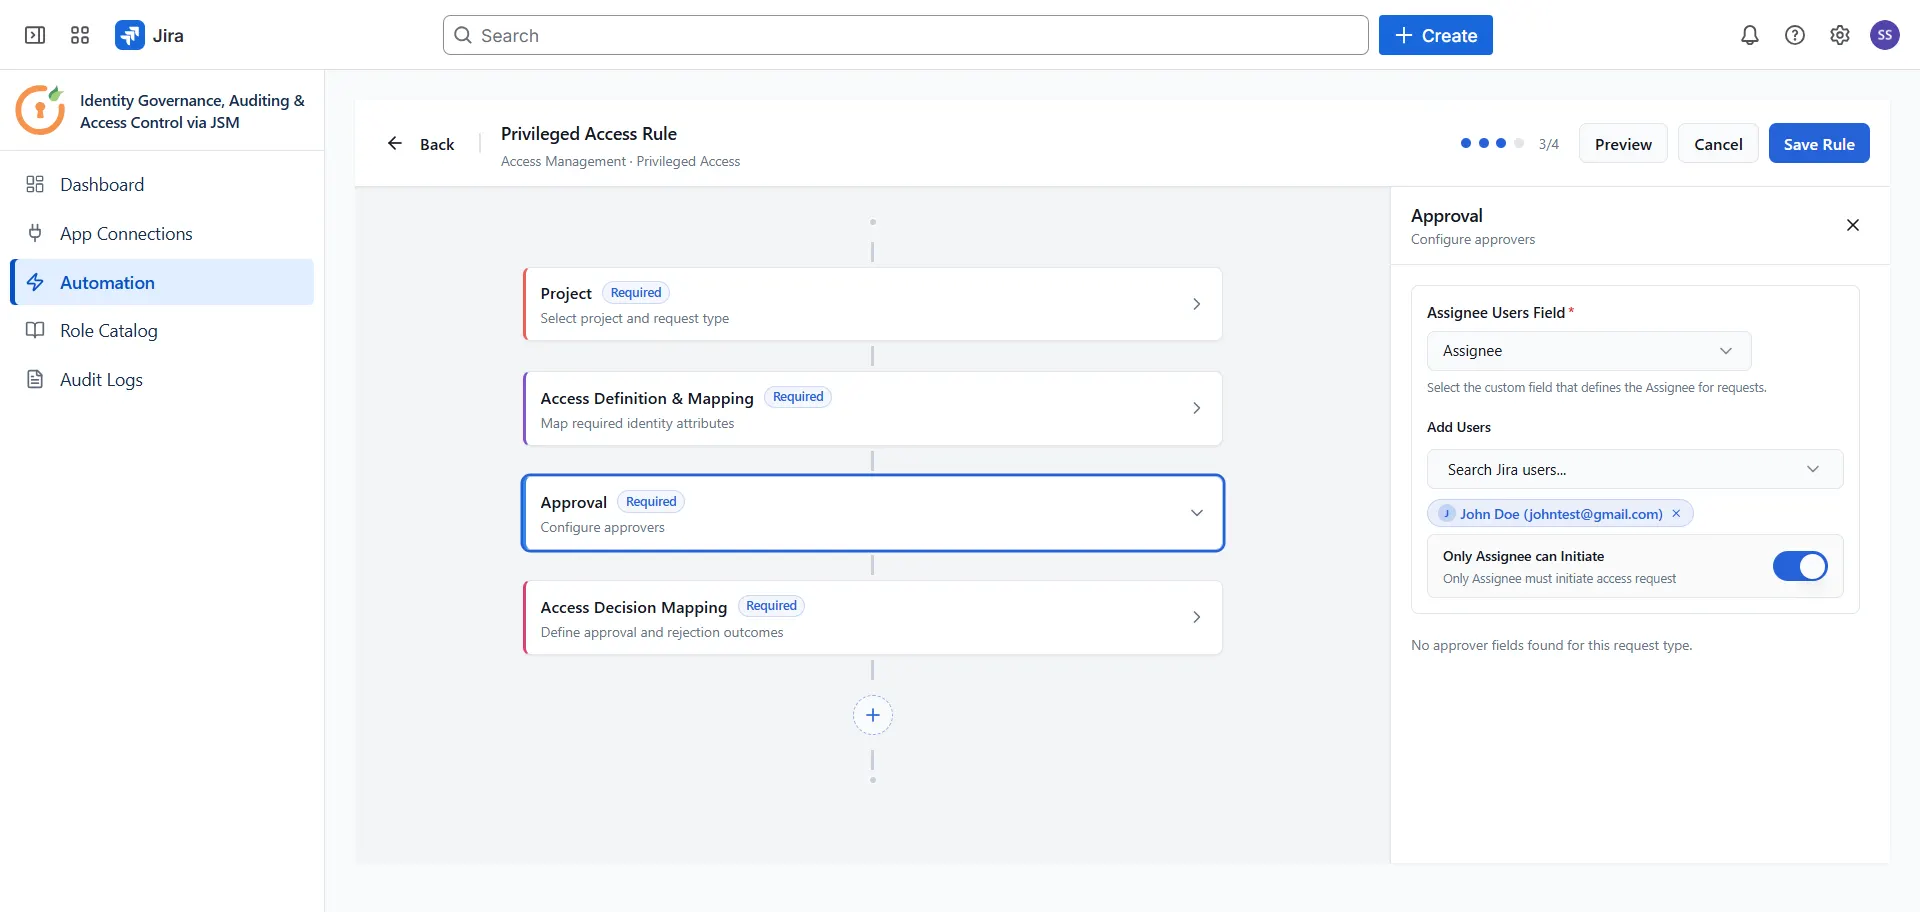
5: Configure the Approval block
- Click the Approval block to open its settings panel.
- Configure who should approve privileged access requests for this rule.
6: Configure Access Decision Mapping
This block tells the app what to do when a request is approved or rejected.
- Click the Access Decision Mapping block to open its settings panel.
- Under Approval Status (JSM), select the JSM workflow status that means a request has been approved. When a ticket moves to this status, the app will grant the requester the selected access level.
- Under Rejection Status (JSM), select the JSM workflow status that means a request has been rejected. When a ticket moves to this status, no access is granted.
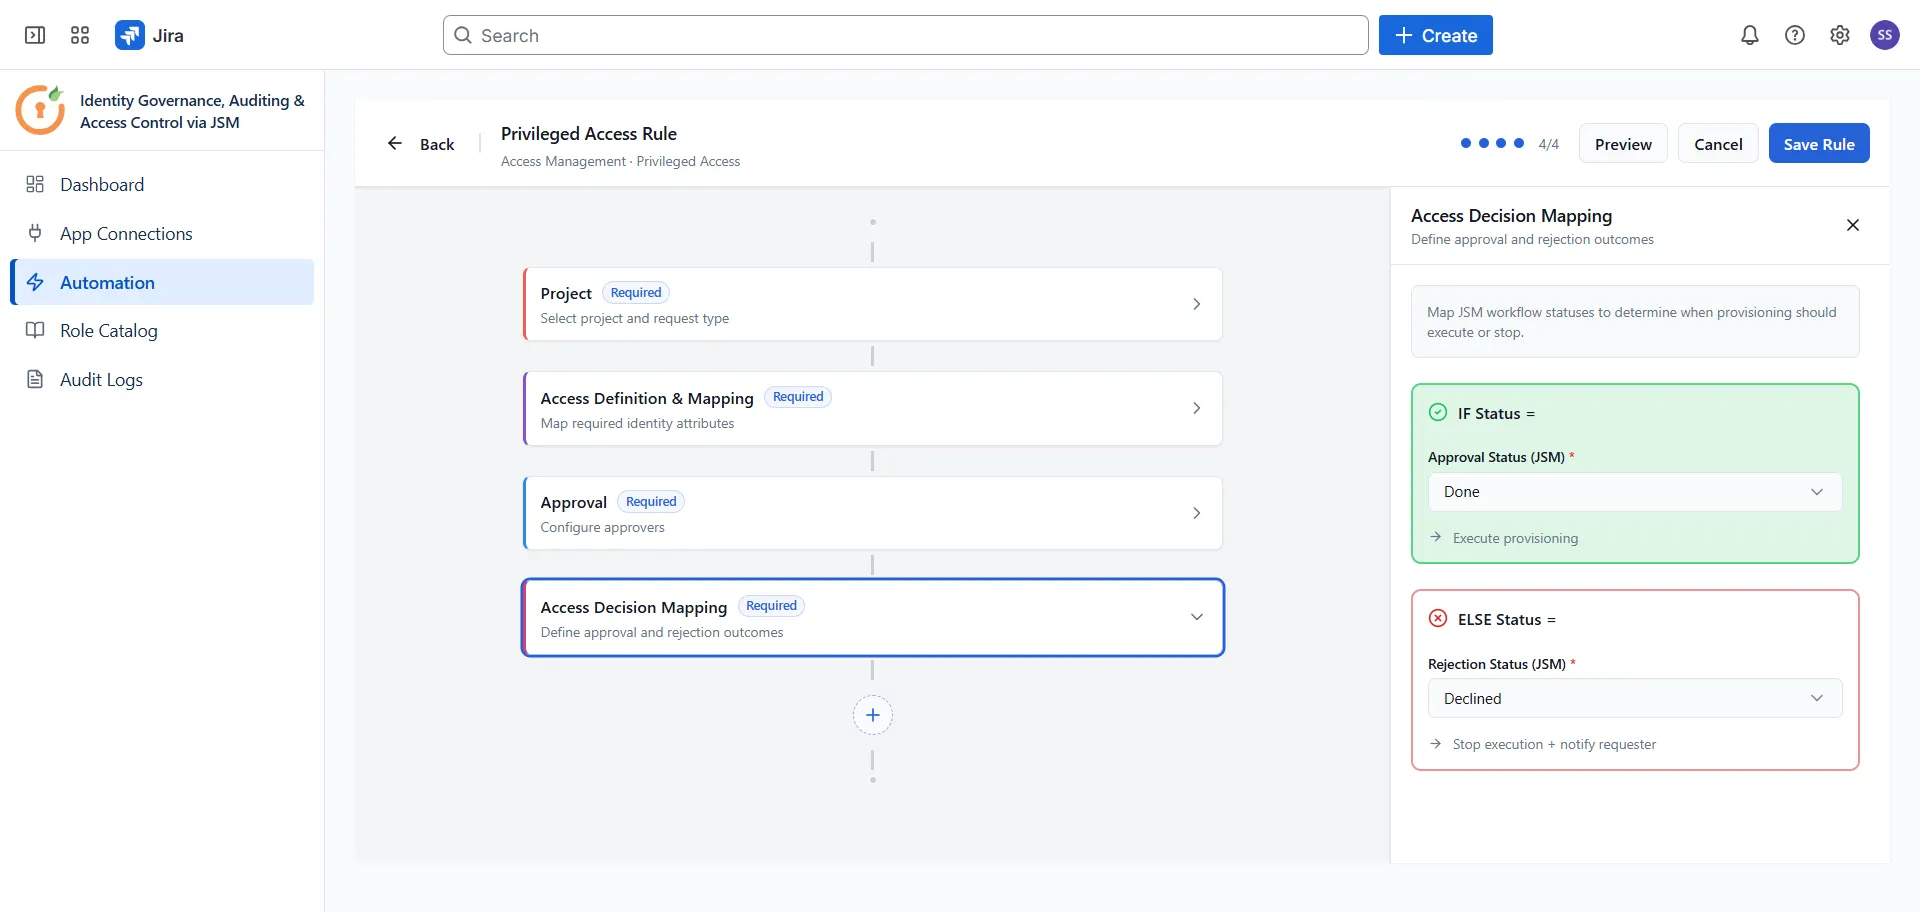
The app automatically posts a comment on the ticket when either outcome is reached, so requesters and approvers have a clear record of what happened.
7: Save the rule
- Click Save Rule in the top-right corner.
- After saving, open the JSM request type form and check that the Access level field is showing the friendly access option names you defined.
- If the options have not appeared yet, save the rule a second time to trigger the sync.
Test the rule
Before going live, run a quick test.
- Submit a test privileged access request through the JSM portal.
- Move the ticket to your approved status.
- Confirm the requester has been granted the expected access level in the target application.
- Check that a comment was posted on the ticket confirming the outcome.
Did this page help you?
