- Home
- SAML SSO
- SAML SSO Documentation
- SAML SSO into Confluence using OpenAM as IDP

SAML Single Sign On (SSO) into Confluence using OpenAM as IDP
Confluence SAML app gives the ability to enable SAML Single Sign On for Confluence Software. Confluence Software is compatible with all SAML Identity Providers. Here we will go through a guide to configure SSO between Confluence and your Identity Provider. By the end of this guide, users from your Identity Provider should be able to login and register to Confluence Software.
 Try it for free
Pre-requisites
To integrate your Identity Provider(IDP) with Confluence, you need the following items:
- Confluence should be installed and configured.
- Admin credentials are set up in Confluence.
- Confluence server is https enabled (optional).
- Valid Confluence Server and Data center Licence.
Download and Installation
Now, let’s look at how you can download and install the miniOrange Confluence SAML Single Sign On (SSO) plugin for your Confluence Data Center.
- Log into your Confluence instance as an admin.
- Navigate to the settings menu and Click Manage Apps.
- Click Find new apps or Find new add-ons from the left-hand side of the page.
- Locate Confluence SSO/ Single Sign On, SAML SSO via search.
- Click Try free to begin a new trial or Buy now to purchase a license for Confluence SSO/ Single Sign On, SAML SSO.
- Enter your information and click Generate license when redirected to MyAtlassian.
- Click Apply license.
Step 1: Set Up OpenAM as Identity Provider
- Login to the OpenAM admin console.
- From the REALMS, select realms, under which you want to create hosted IDP. You will be redirected to the Realm overview page.
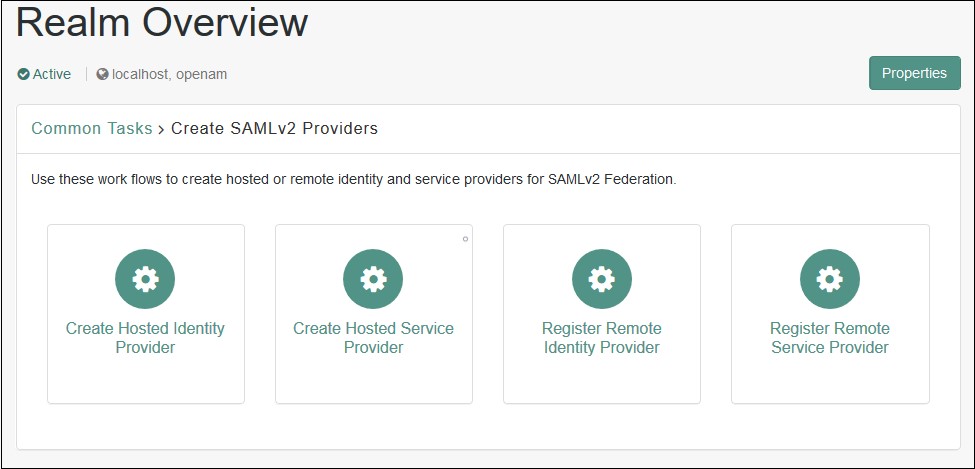
- Click on Create SAMLv2 Providers in the Realm Overview page.
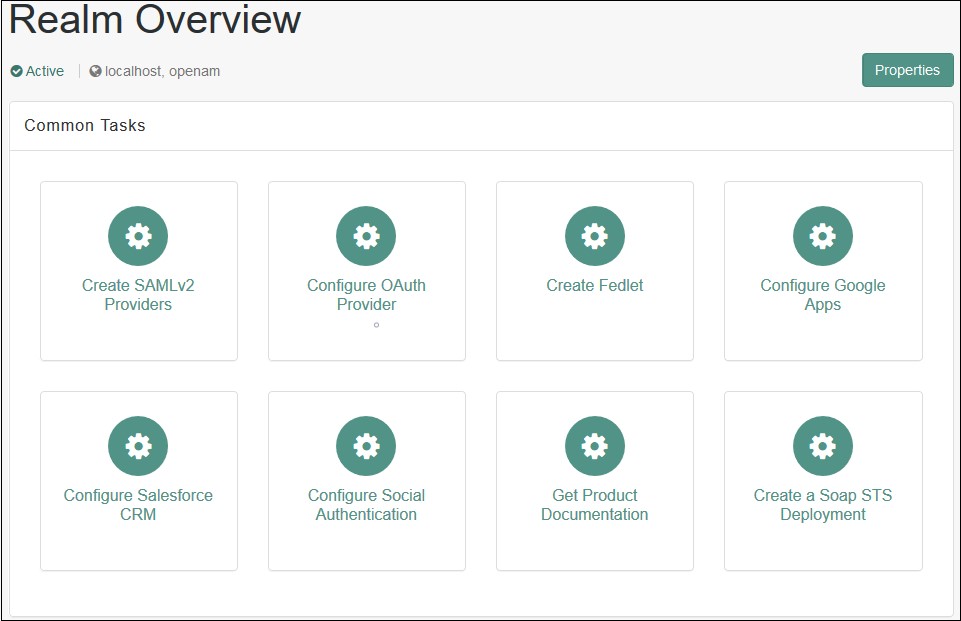
- Click on Create Hosted Identity Provider. You will be redirected to the configuration page.
- Configure IDP as given below.
- Name: Name of the IDP
- Signing Key: Select the signing key from the dropdown.
- New Circle of Trust: Provide a name of the groups of IDP and SP that trust each other.
- Attribute Mapping: Configure user profile attributes to be sent to the Service Provider application.
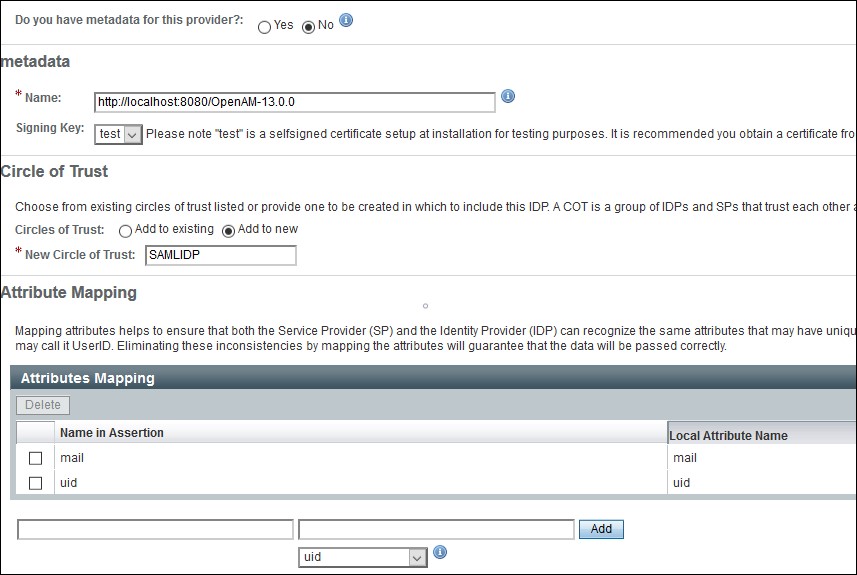
- Click on the Configure button on the top right corner.
- Verify the configuration from the Federation tab of OpenAM.
- Login to the OpenAM admin console.
- From the REALMS, select realms, under which you want to configure your application. You will be redirected to the Realm overview page.
- Click on Create SAMLv2 Providers.
- Click on Register Remote Service Provider. You will be redirected to the configuration page.
- Configure the Service Provider as given below.
- Where does the metadata file reside: URL.
- URL of metadata: Configure miniOrange plugin's metadata here.
- Circle of Trust: Add to existing.
- Existing Circle of Trust: Select the Circle of Trust (group) in which your hosted IDP is located.
- Attribute Mapping: Configure user profile attributes for mapping.
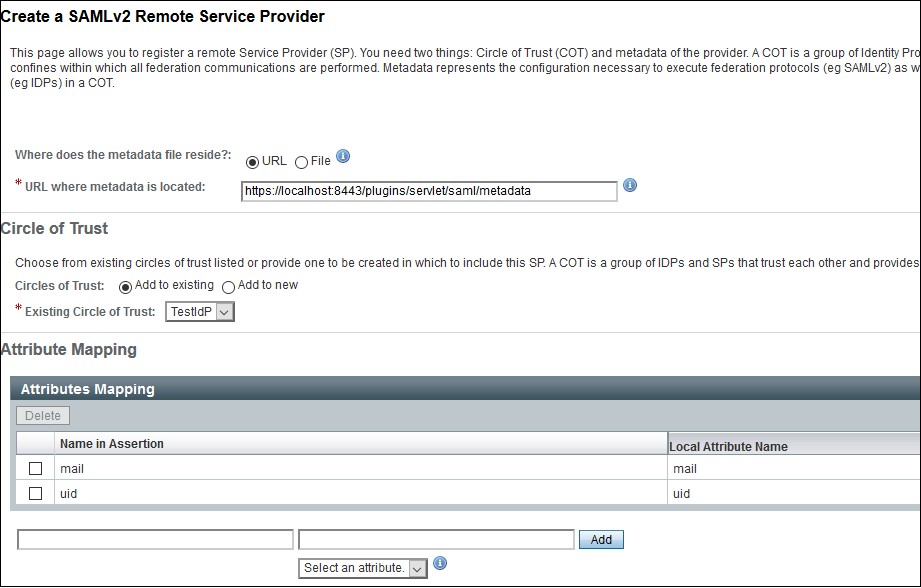
- Click on the Configure button on the top right corner.
- Verify the configuration from the Federation tab of OpenAM.
- Provide OpenAM SAML metadata to Service Provider application(miniOrange SAML plugin).
- You can download the OpenAM metadata using the URL given below. [OpenAM ServerURL]/saml2/jsp/exportmetadata.jsp
- In case if you have multiple realms and hosted identity Provider configured then use the URL given below. [OpenAM ServerURL]/saml2/jsp/exportmetadata.jsp?entityid=[IdPentityID]&realm=/realmname
All the information required to configure in the OpenAM i.e. plugin’s metadata is given in the Service Provider Info tab of the miniOrange plugin.
 Create OpenAM as a Hosted Identity Provider
Note: – You can skip this step and navigate to Configure Remote Service Provider if you have already configured OpenAM hosted IDP.
Configure Remote Service Provider.


Step 2: Set Up Confluence as Service Provider
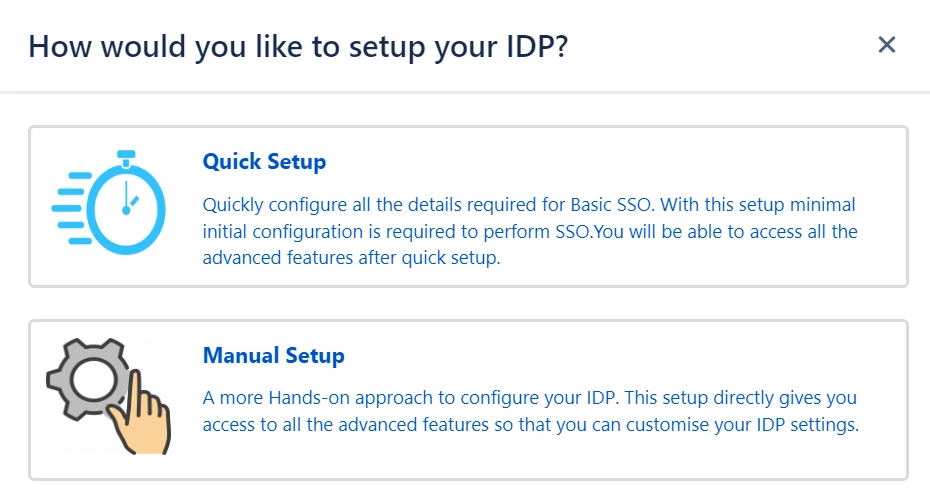
Quick Setup streamlines the initial configuration process by automatically handling all essential details required for a basic SSO setup. This allows you to quickly enable SSO functionality and then configure more advanced features at your own pace.
You can follow the steps provided below to initiate a Quick Setup:
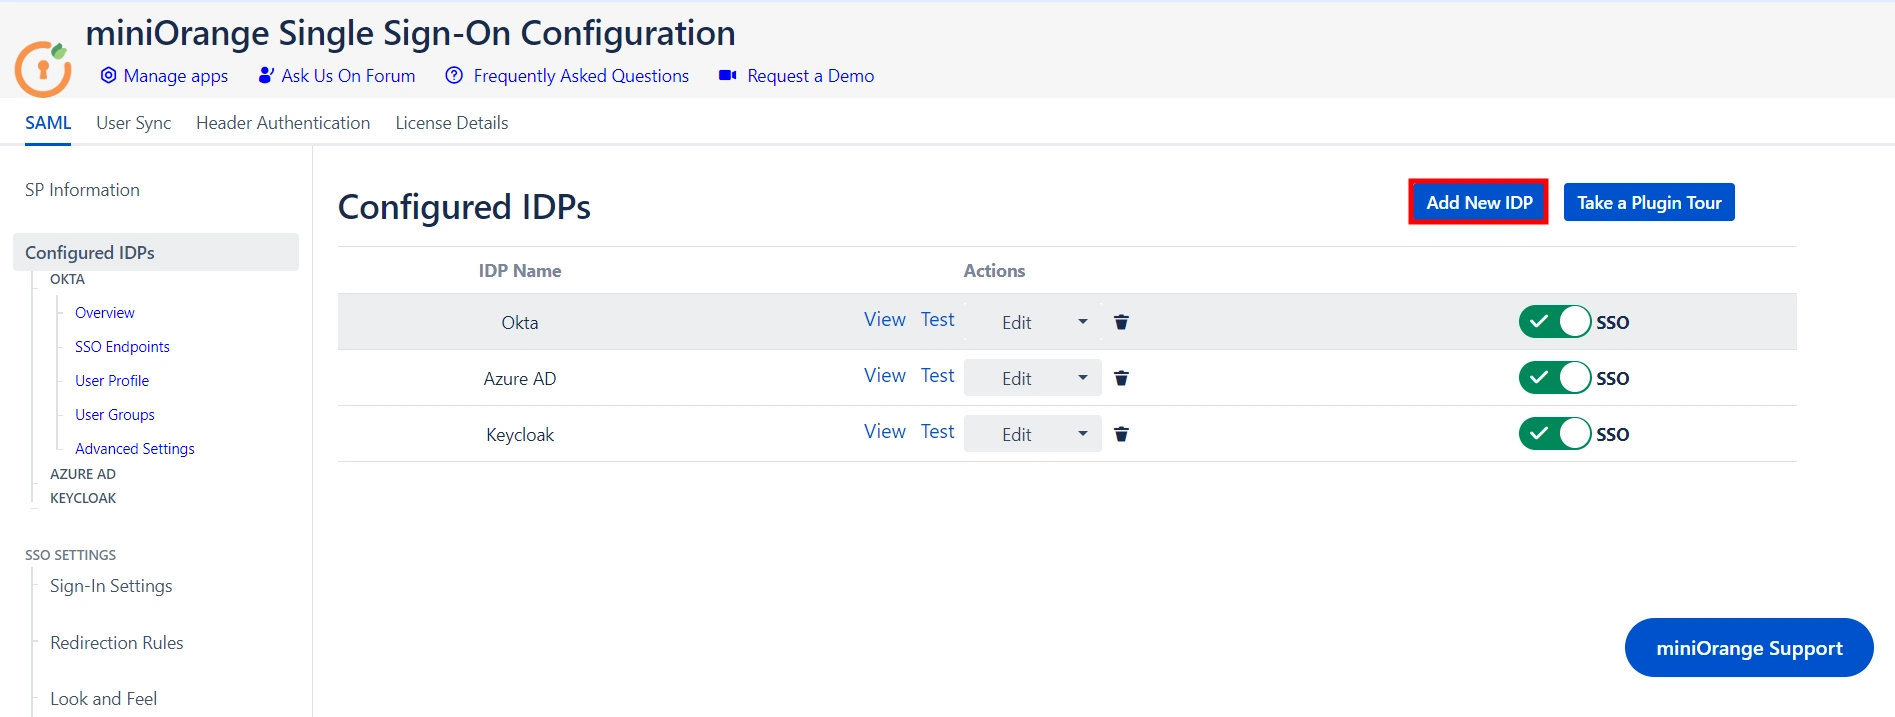
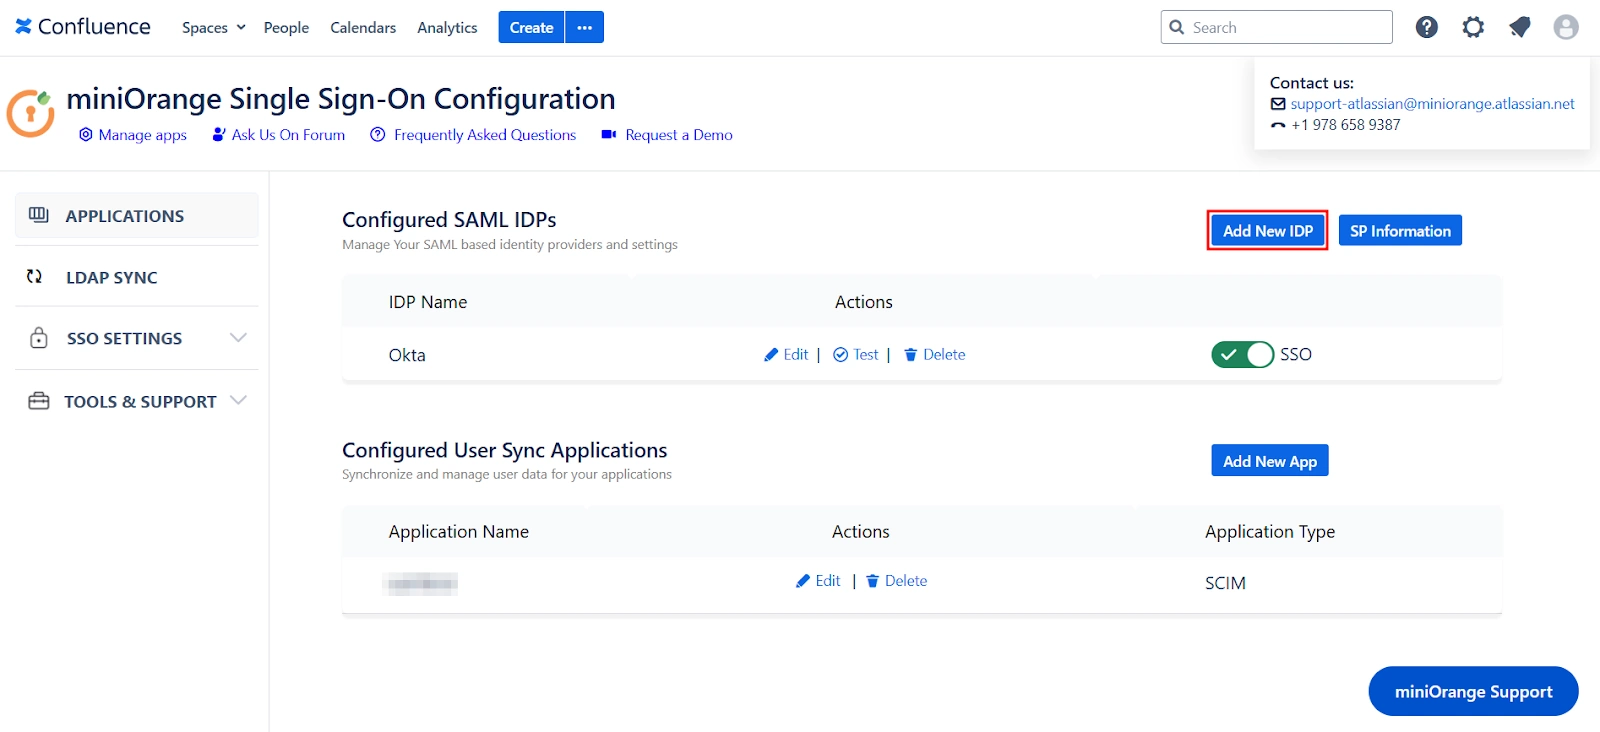
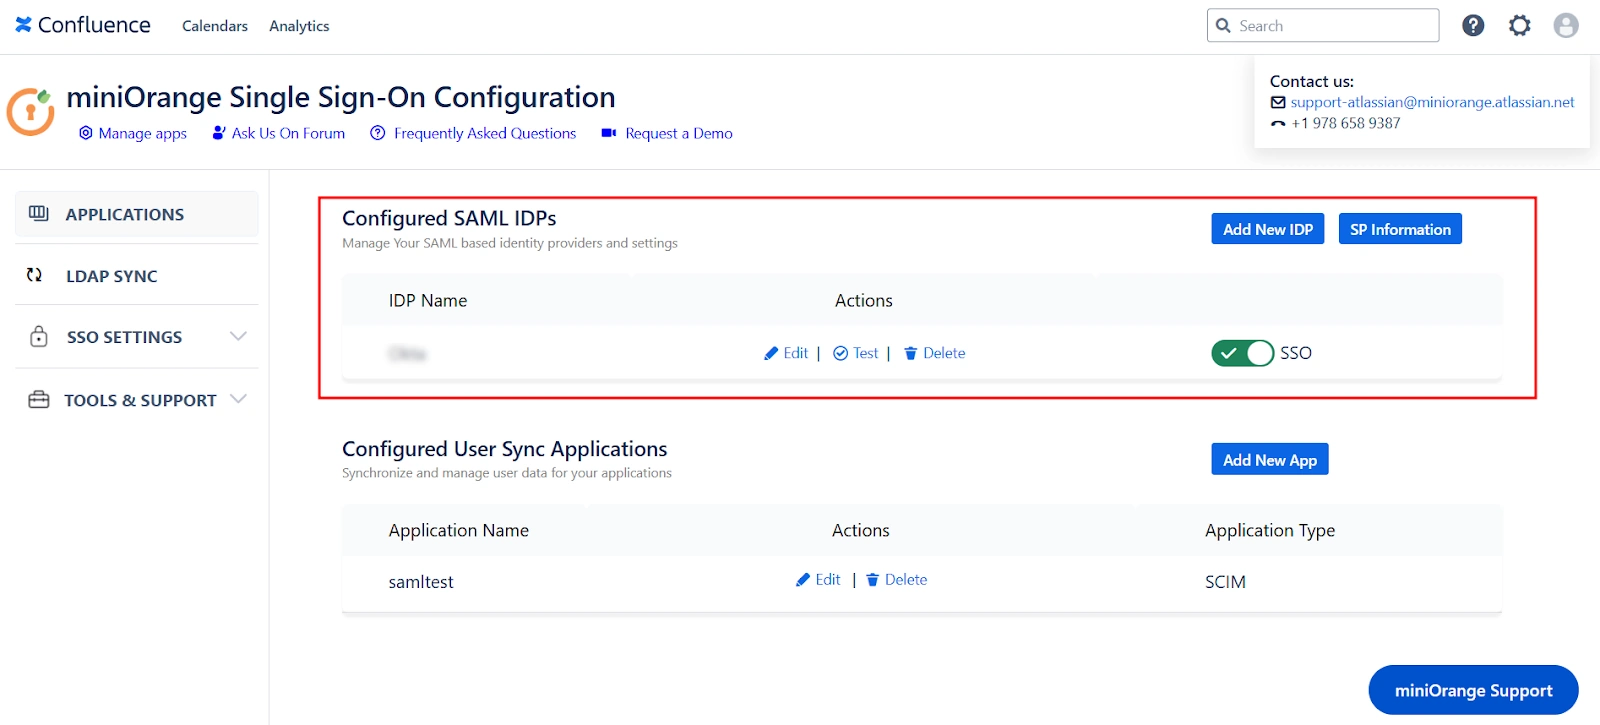
- Click on the Add New IDP in the Configured SAML IDPs section.
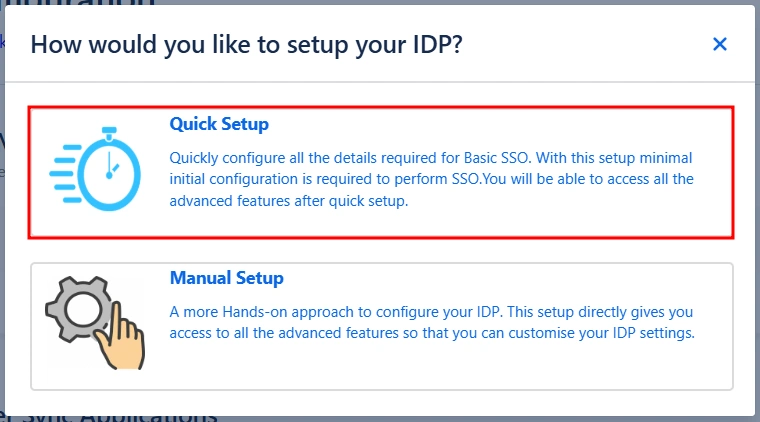
- Next, select the Quick Setup option in the pop-up.
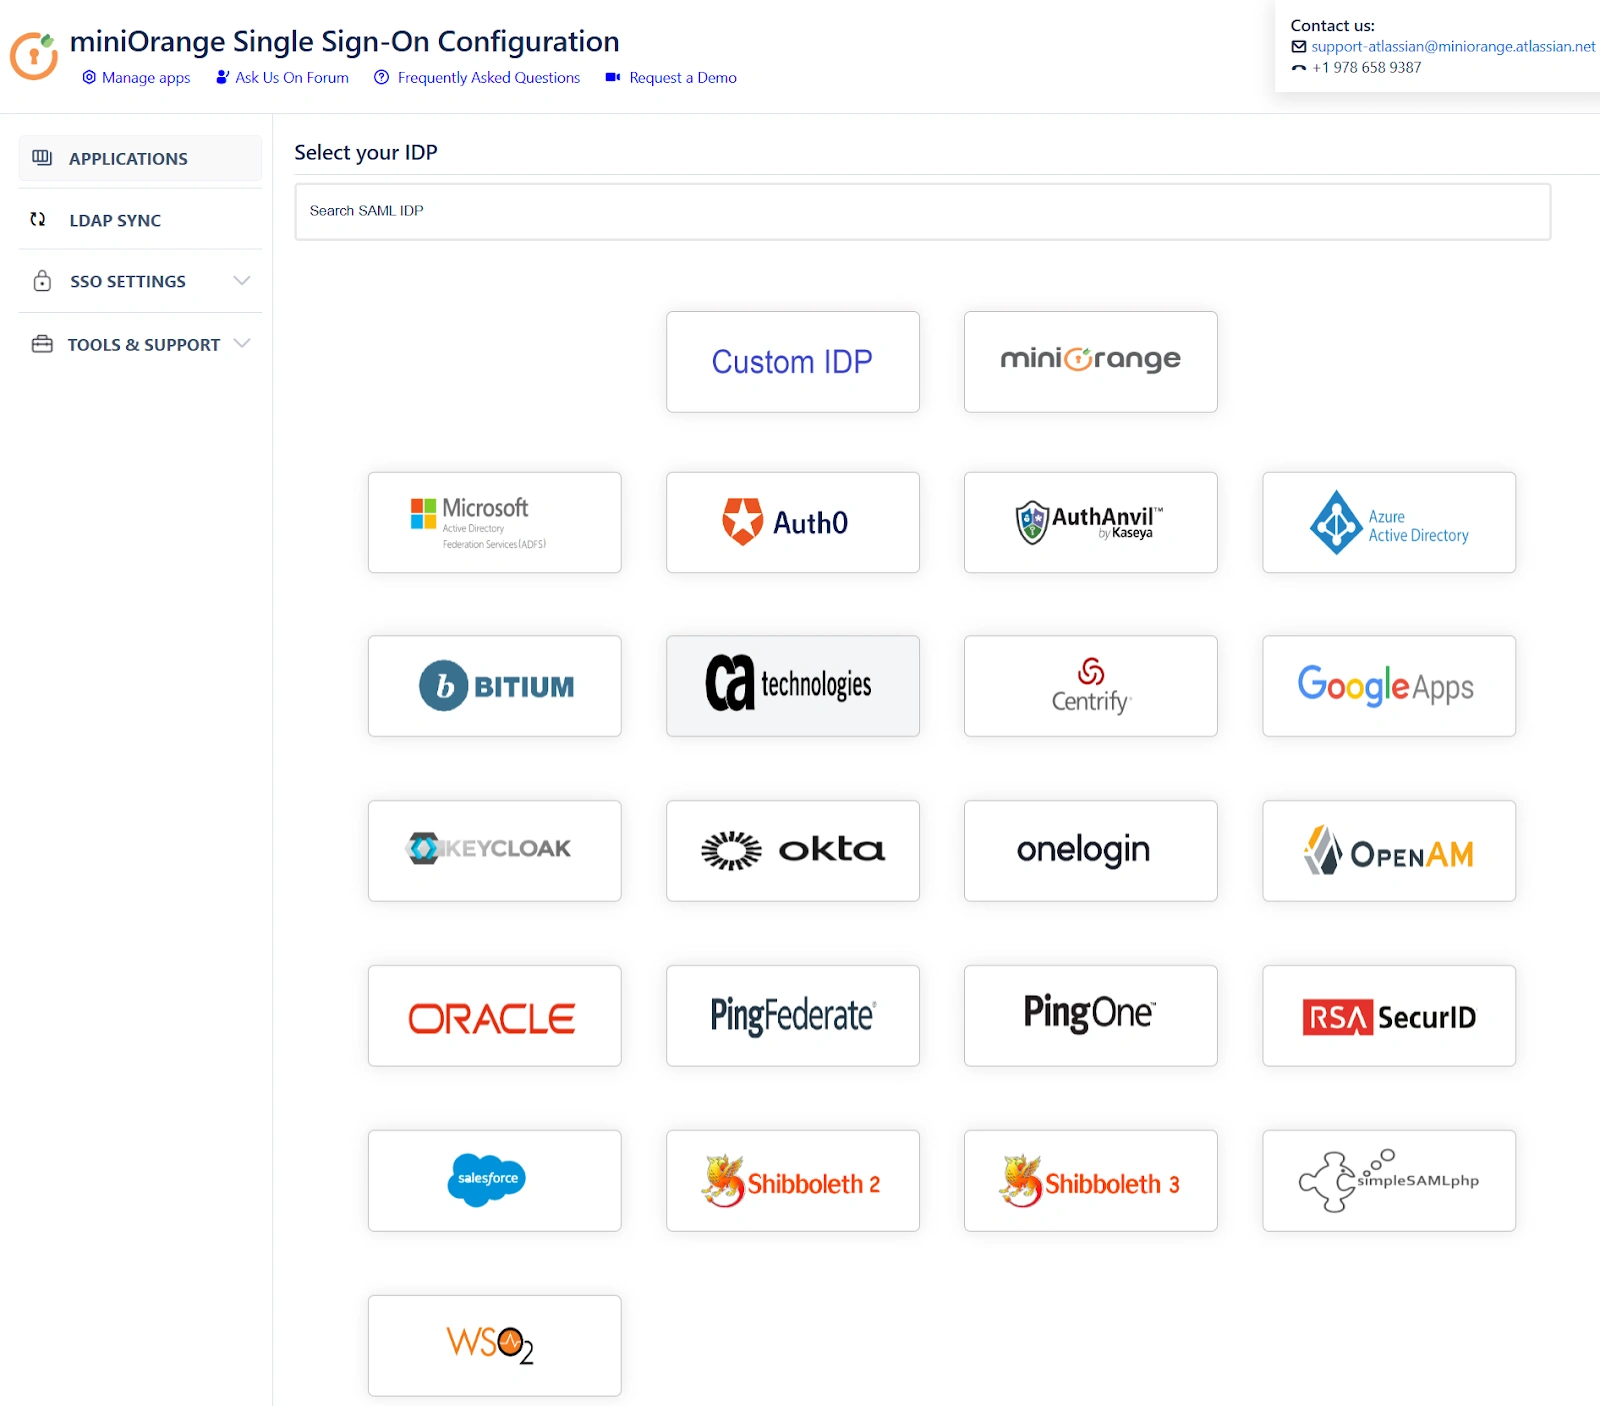
- Select your preferred IDP from the list of IDPs. You can also search for an IDP using the search bar.
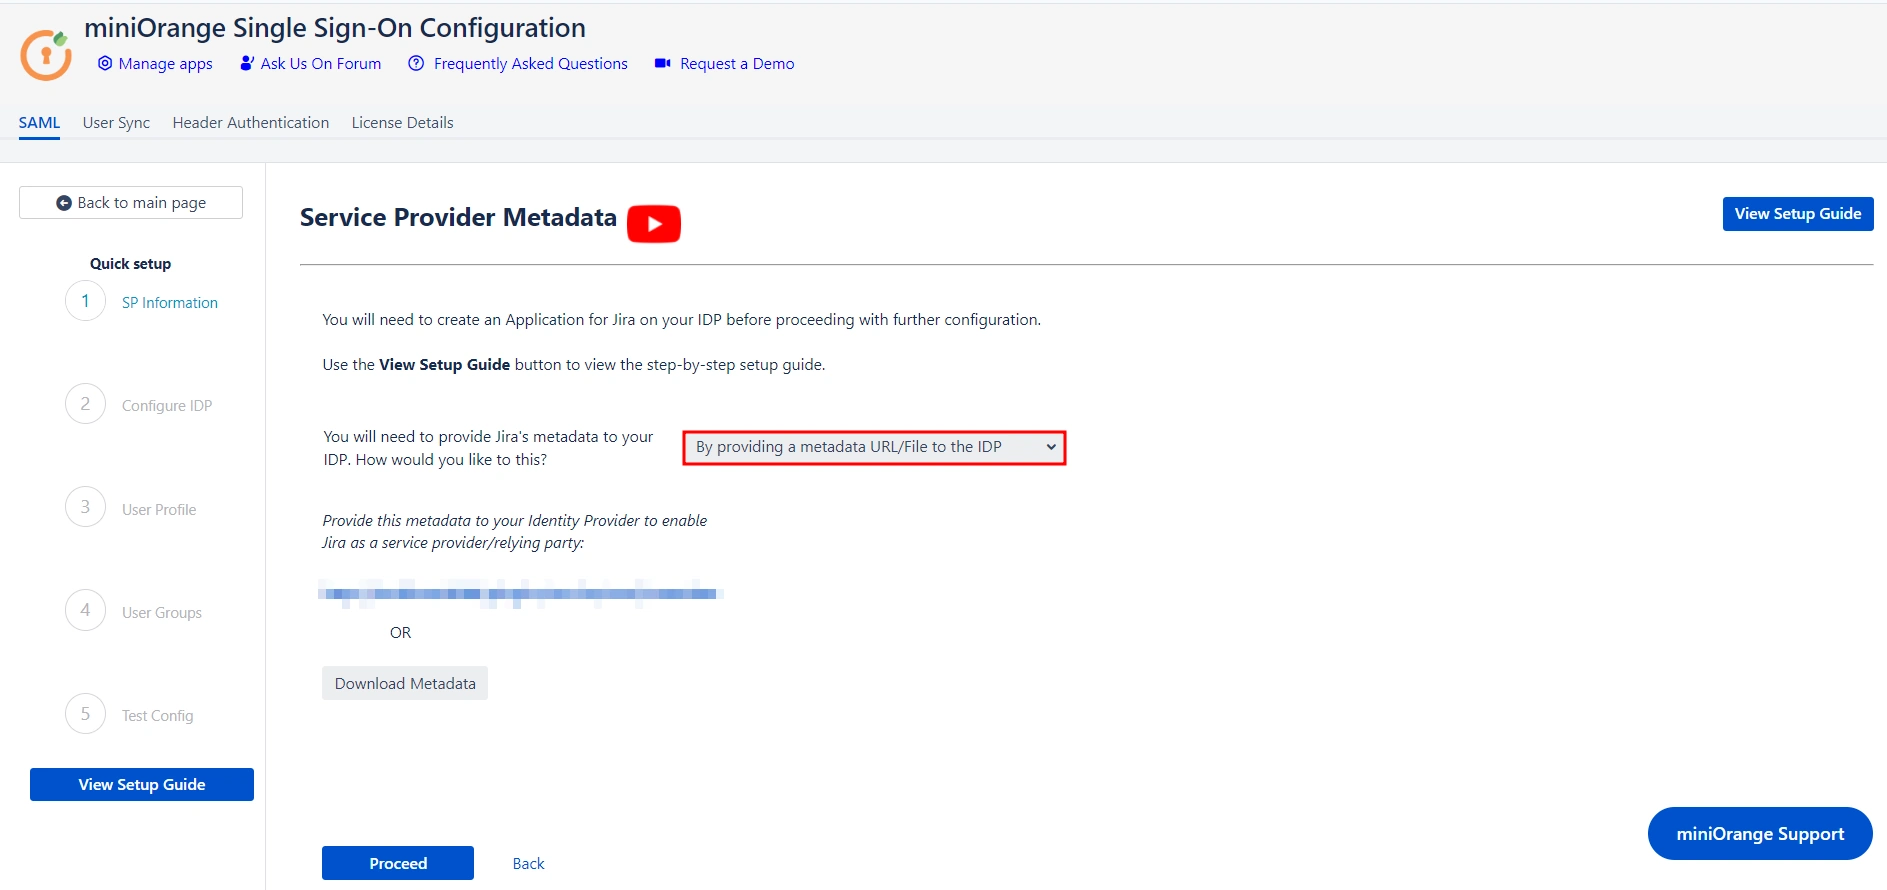
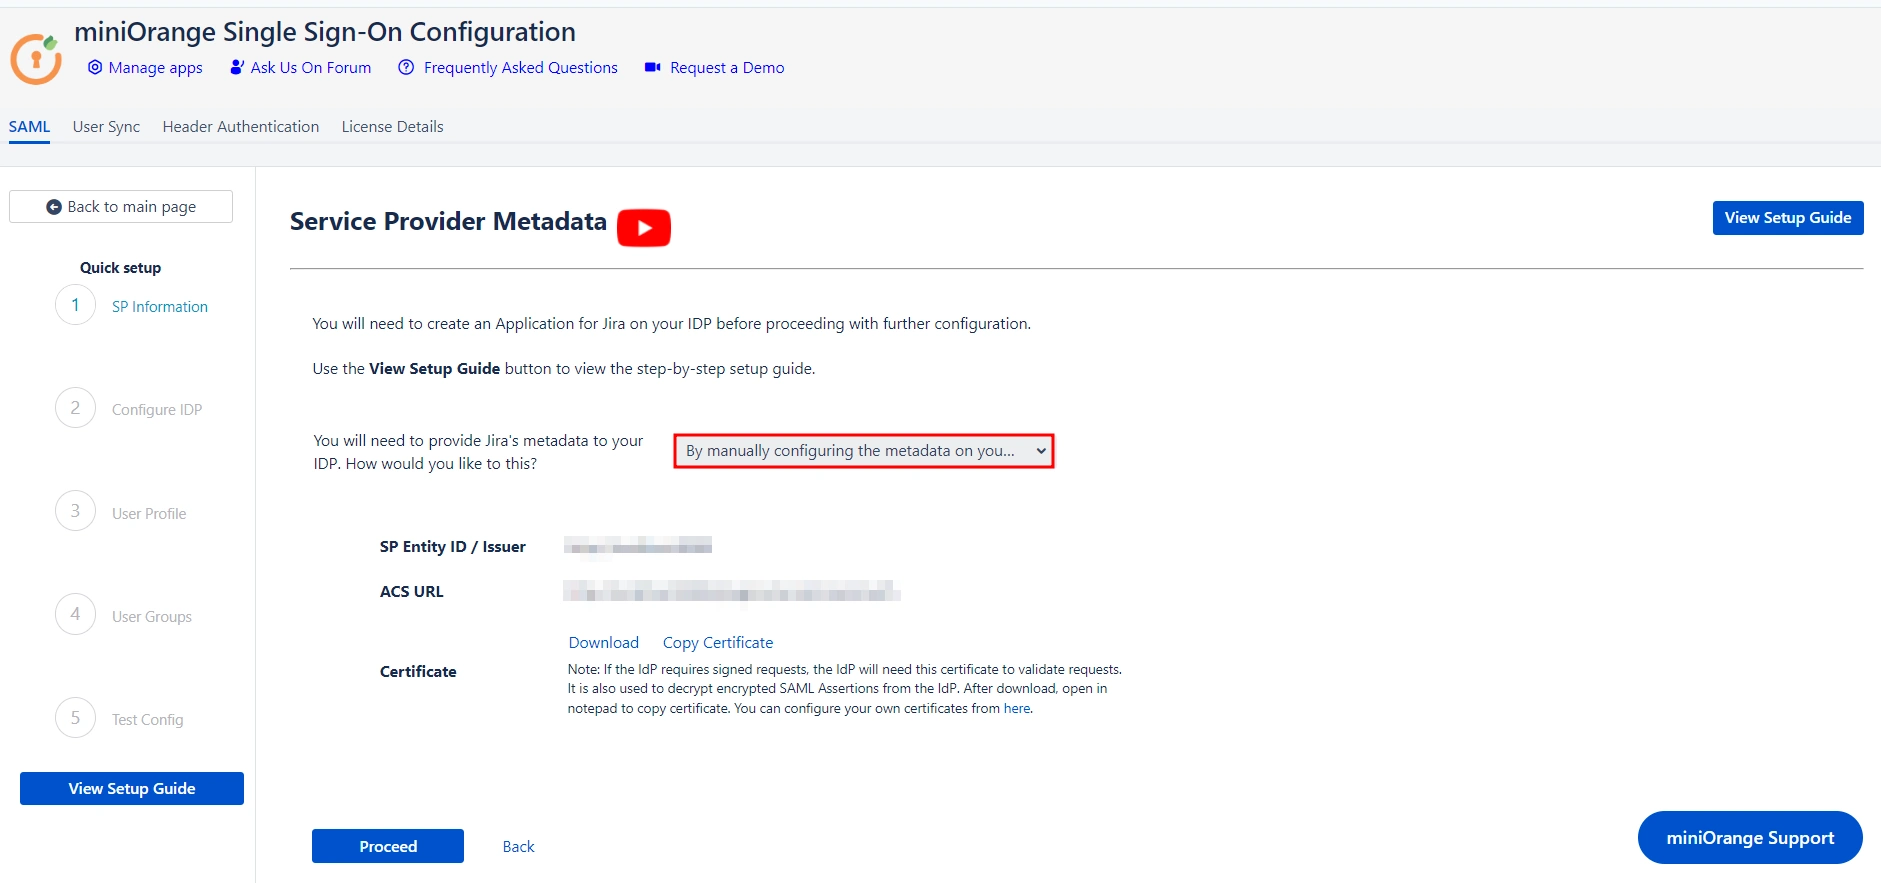
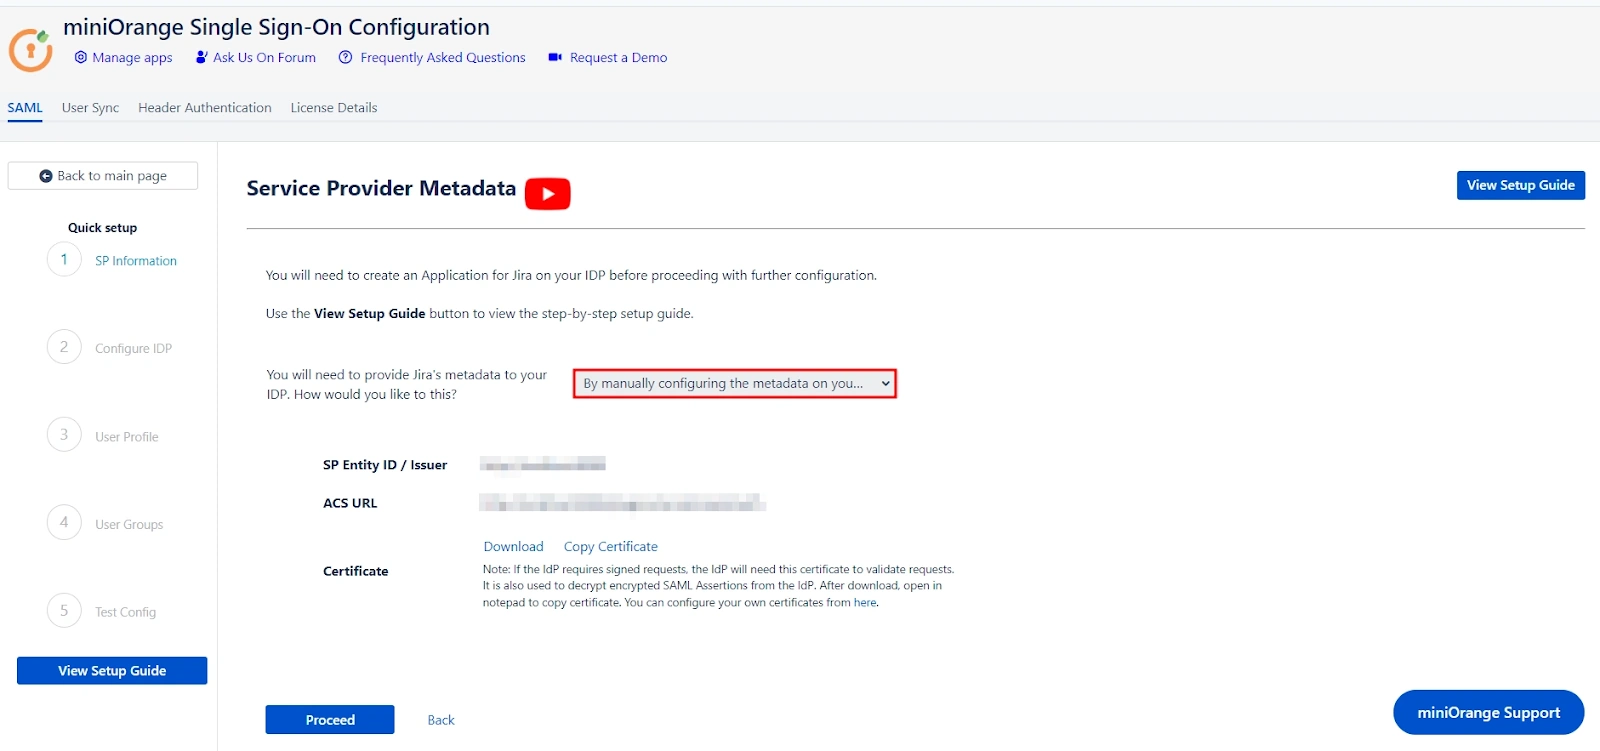
Service Provider Metadata
After selecting your preferred IDP, you’ll be taken to the Service Provider (SP) Metadata section. Here, you will find the metadata that you need to provide to your IDP.
The setup gives you two ways to add this metadata to your IDP. Let’s explore these two methods in depth:
- Importing the metadata
- If your IDP supports importing of metadata, then you can select By providing a metadata URL/File to the IDP from the dropdown list.
- Based on your Identity Provider's requirements, you can either provide the metadata URL or download an XML metadata file. To obtain the XML file, click on Download Metadata.
- Manually adding the metadata
- If you wish to add the metadata manually, then you can select By manually configuring the metadata on your IDP from the dropdown list.
- If you select the manual method the screen will provide you with SP Entity ID, ACS URL, and SP Certificate. You will have to provide these details to your IDP.
- Click on Proceed once you’re done.

Configuring your Identity Provider
Let’s explore how you can configure your IDP using the metadata.
- Custom IDP name
- Adding the IDP metadata
- I have the metadata URL for my IDP
- I have a file which contains the metadata
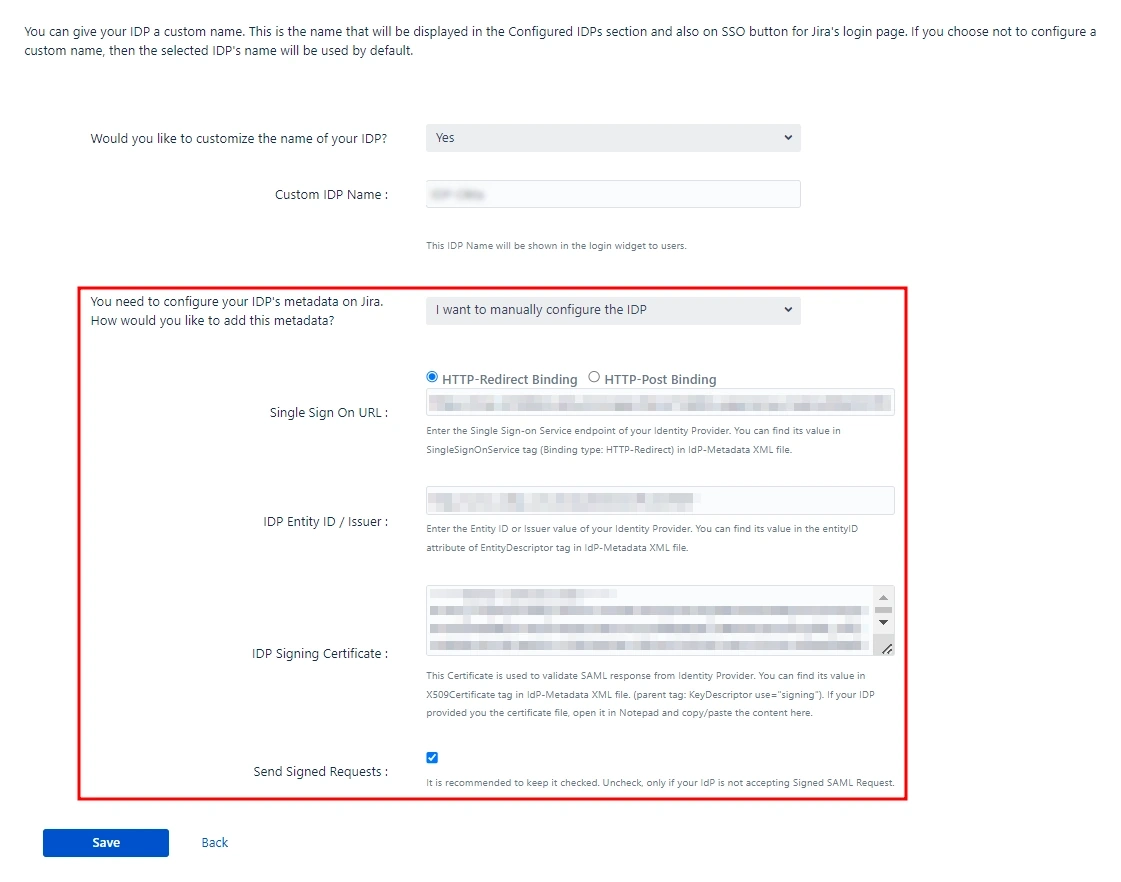
- I want to manually configure the IDP
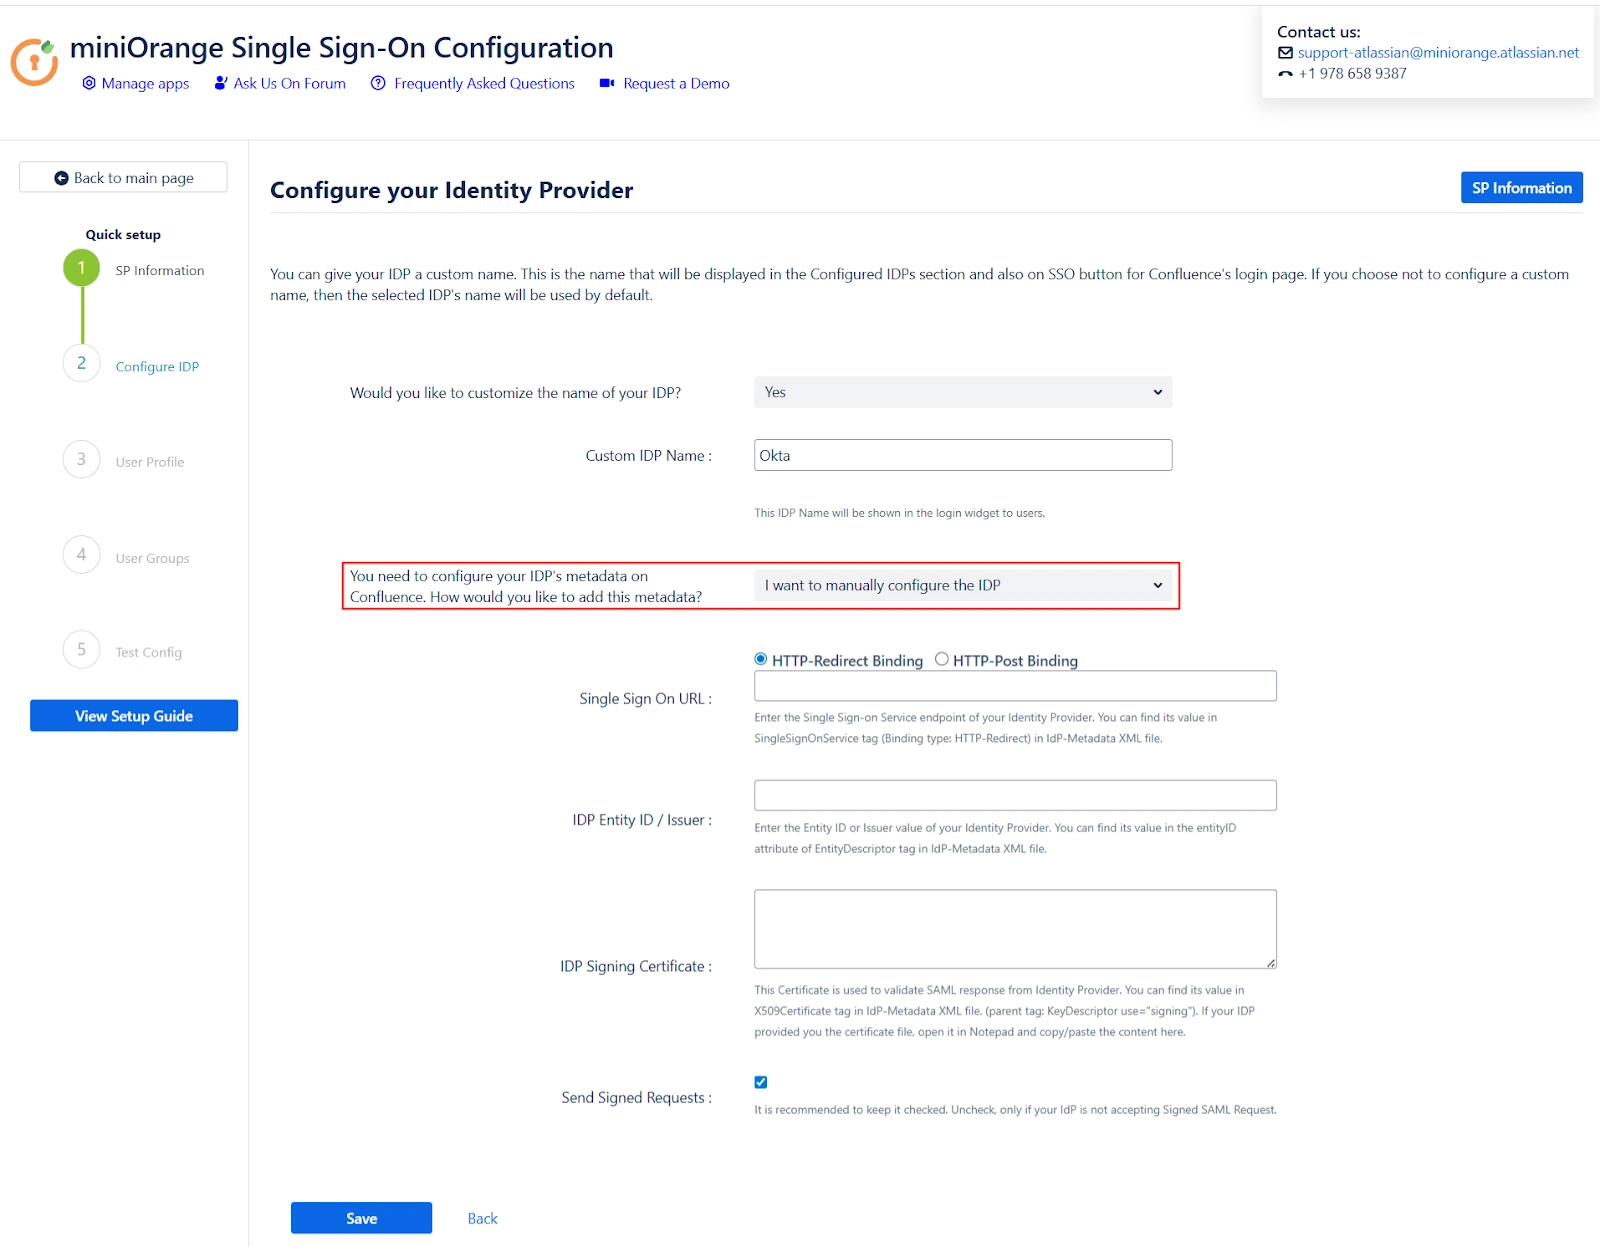
- Single Sign On URL.
- IDP Entity ID.
- IDP Signing Certificate.
- Testing the configuration
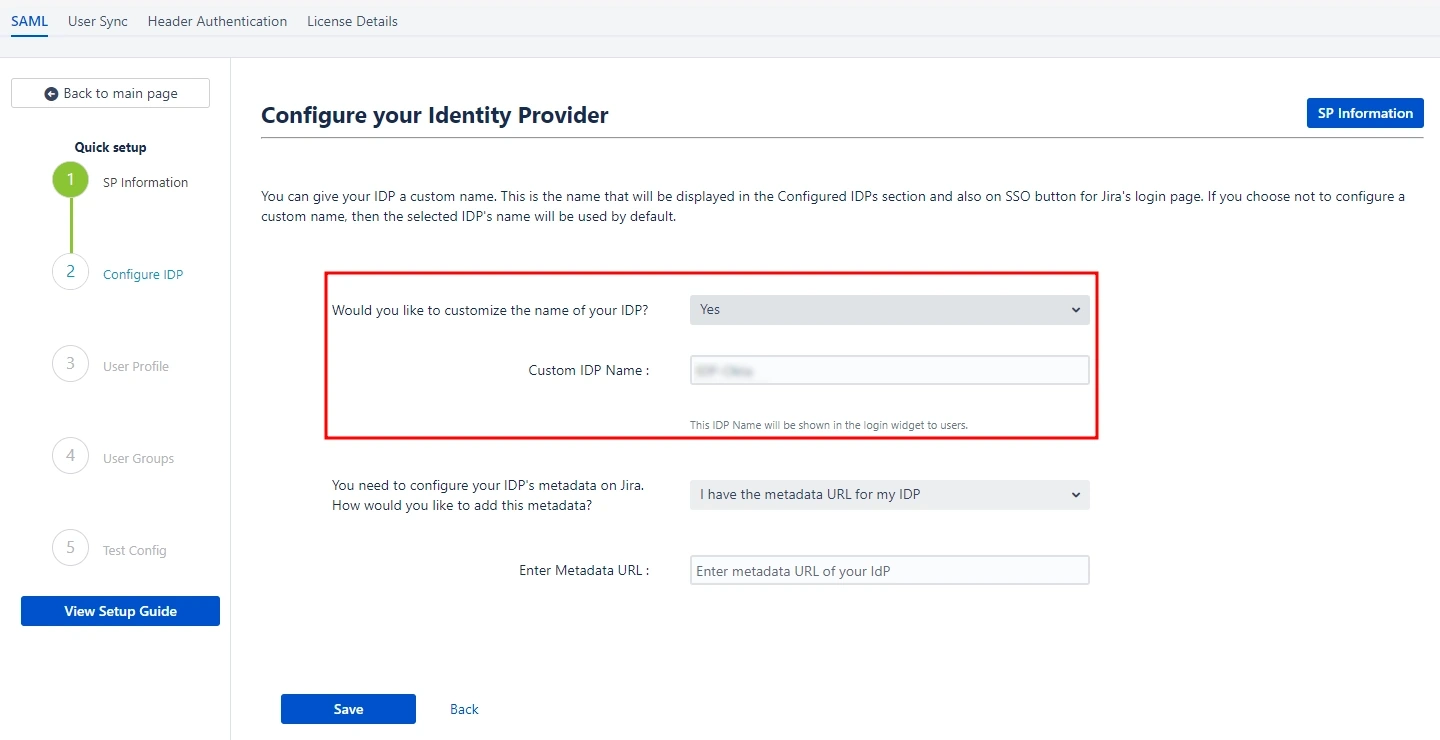
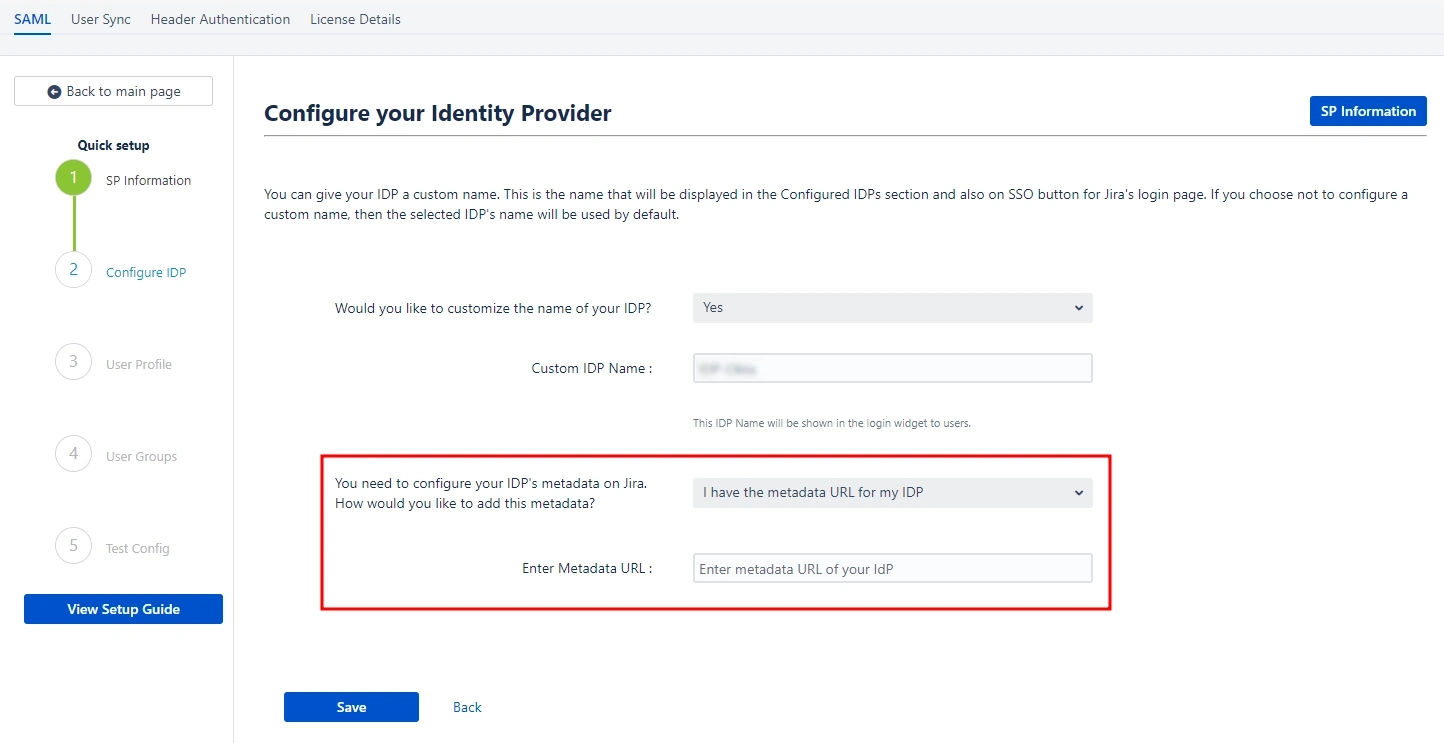
Our app gives you the option to name your IDP through the Custom IDP Name field. This feature is useful if you need to set up multiple IDPs. It will display the custom name on the SSO button on the login page for each configured IDP.
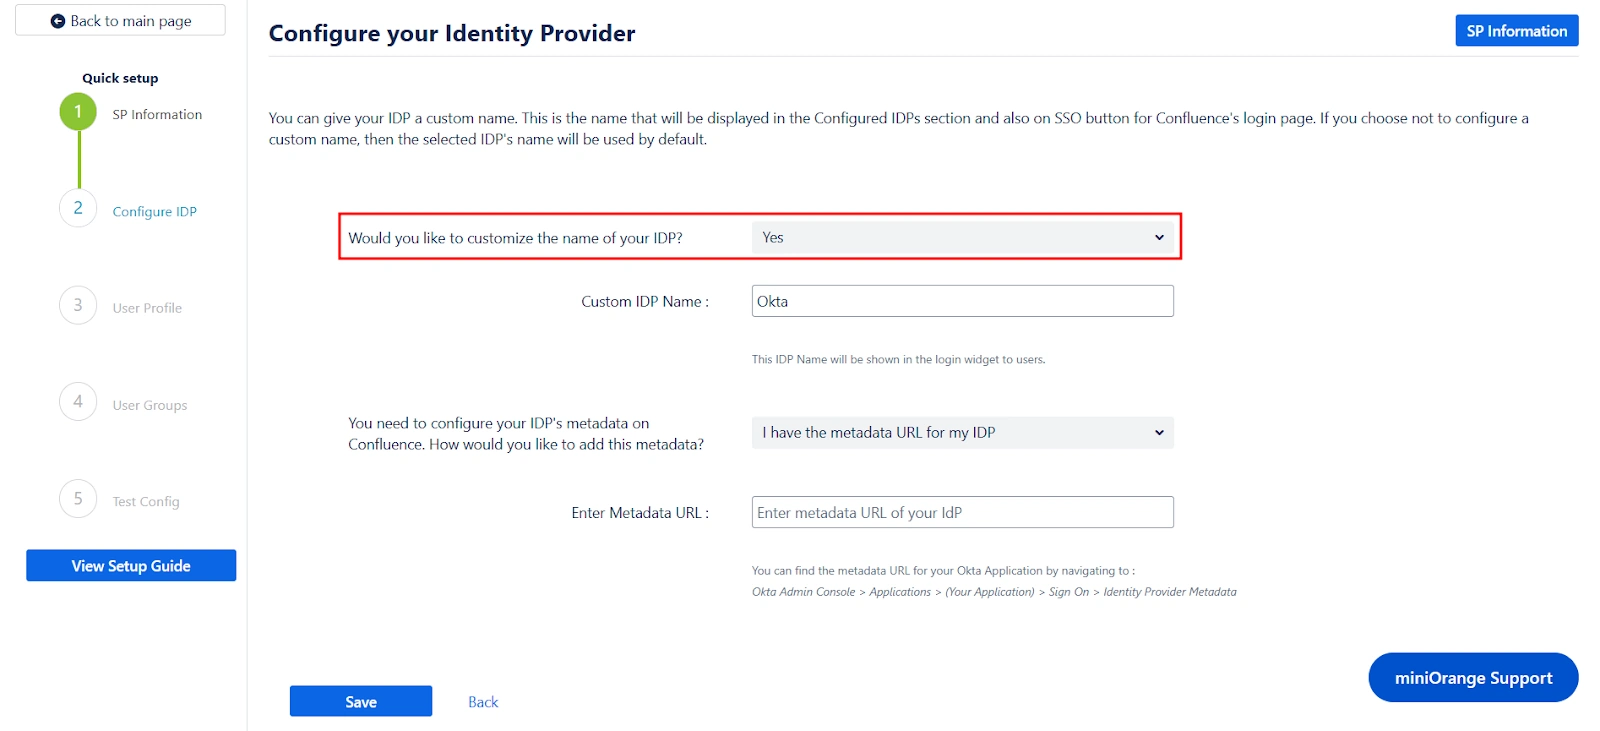
If you do not wish to set a custom name, simply select No from the dropdown menu.
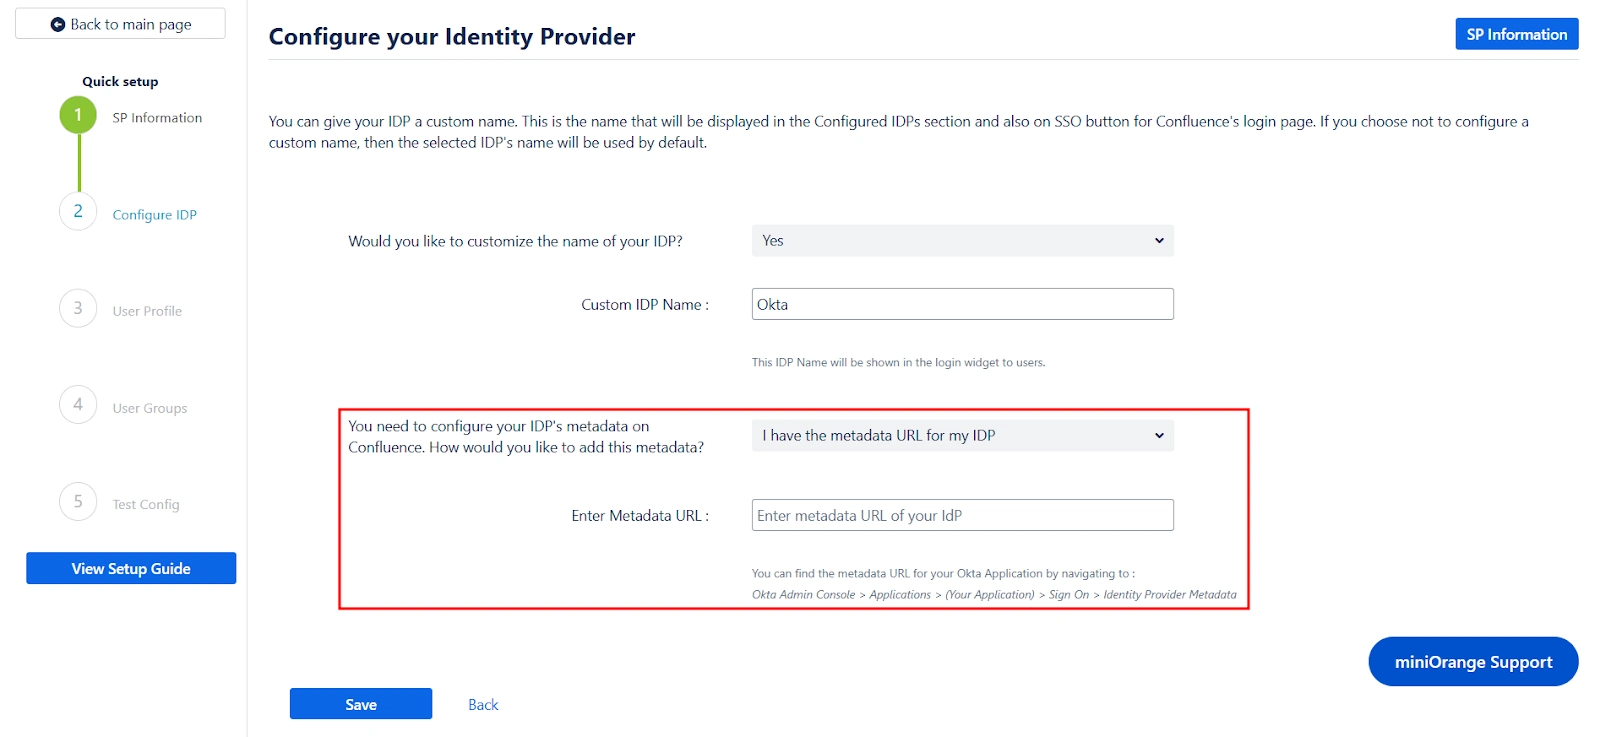
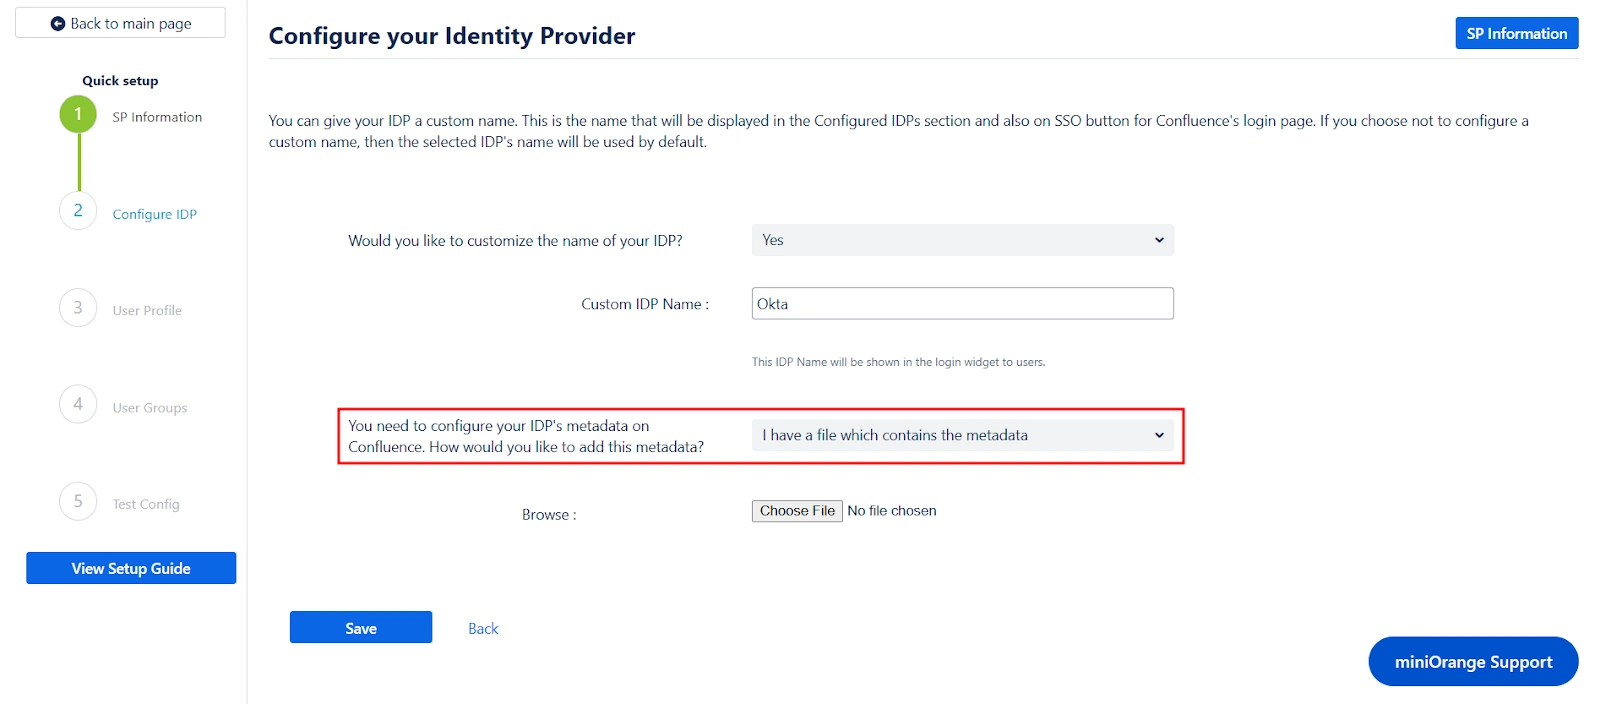
Next, you can scroll down on the same page to add IDP metadata. Our app provides three ways for you to add your IDP metadata. You can select any one of the three methods using the corresponding dropdown list.
Let’s look at the three options individually:
If you select this option from the dropdown list, you just need to paste your metadata URL in the Enter Metadata URL field. This is the same URL we fetched before initiating the Service Provider setup step.
If you select this option, you just need to upload the metadata file to the app using the Choose File button.
Selecting this option requires manually configuring the IDP details. To do so, you will need to obtain the following information from your IDP's metadata:
After adding the IDP metadata, click Save. If the IDP was added successfully, you will see a field labeled Test and Get Attributes URL. To verify the configuration, open the URL in an incognito window to Get the Attributes from IDP. This will test if the IDP integration was set up correctly.
User Profile
With the Identity Provider (IDP) configured, we will now set up the basic user profile attributes for your Service Provider (SP).
- Matching a user
- Setting profile attributes
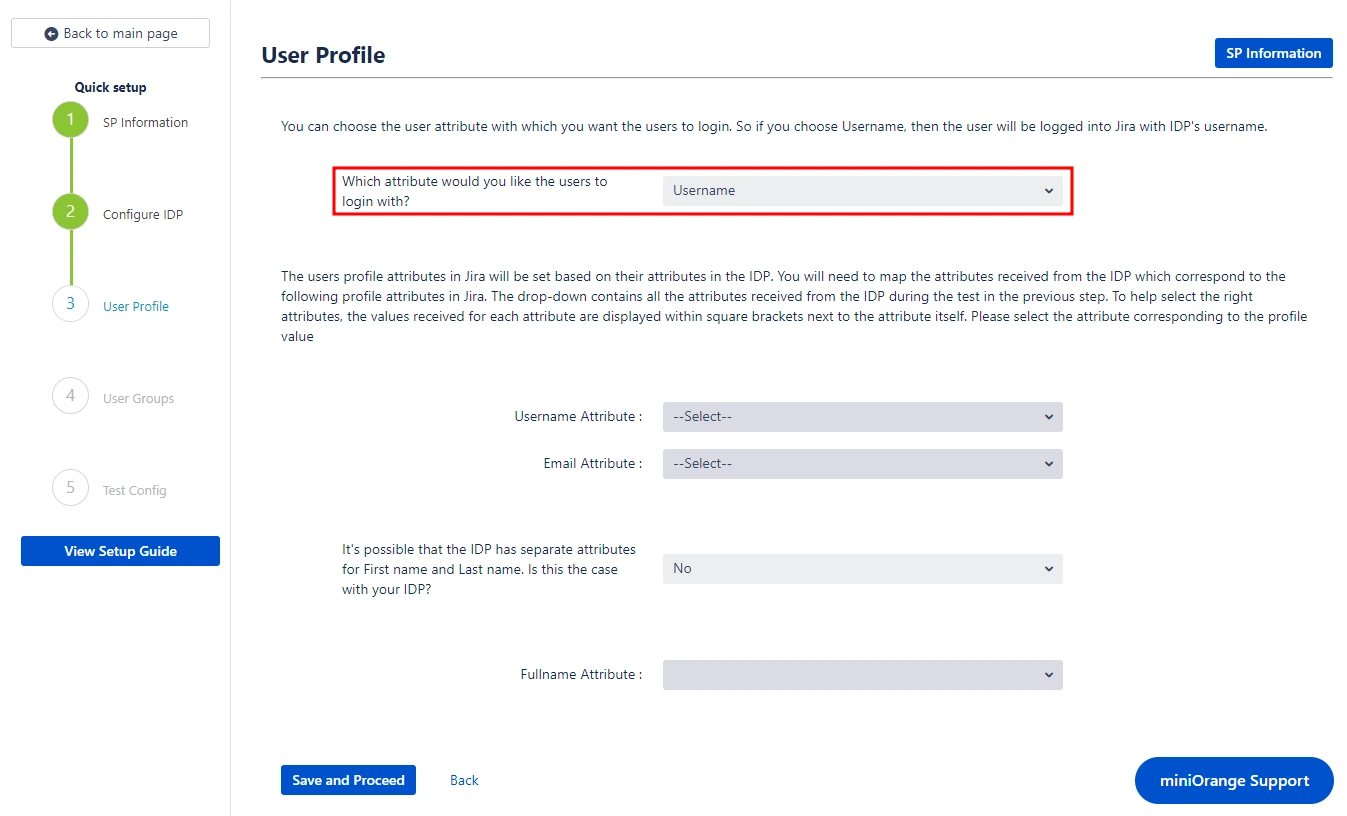
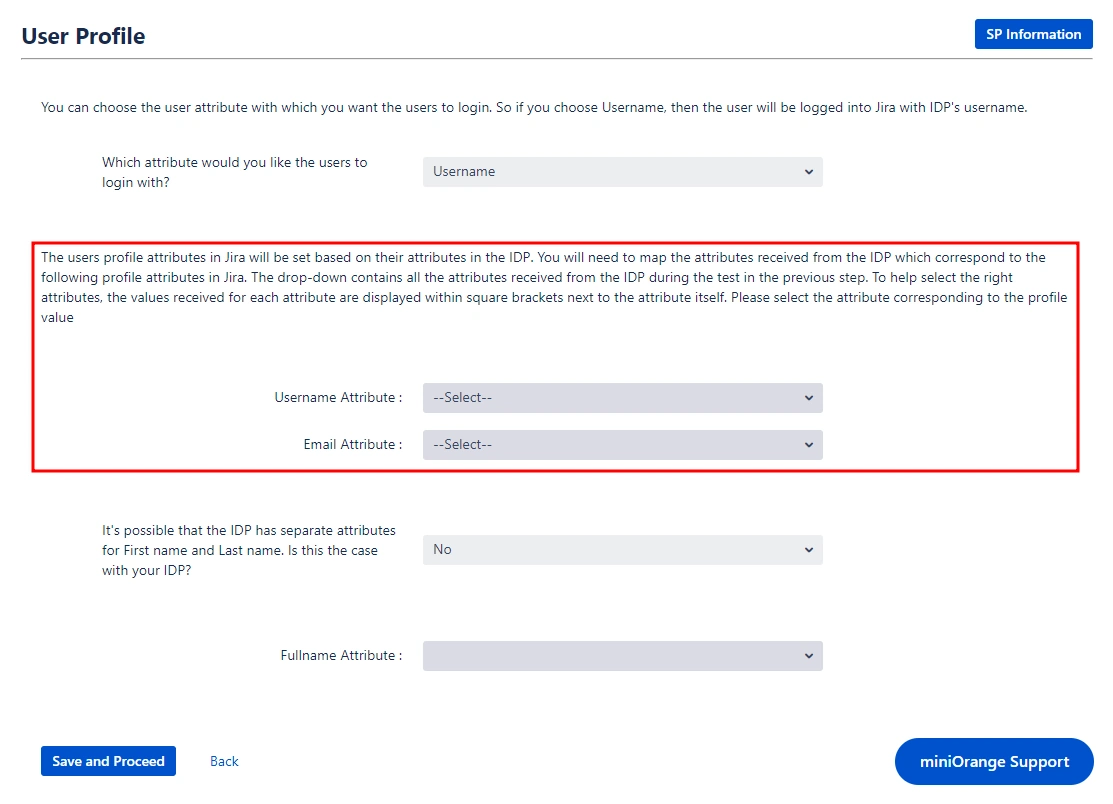
During the Confluence SSO process, the user's account is identified based on an attribute received from the Identity Provider (ISP).
This attribute value is used to locate the corresponding user account in Confluence and log the user into that account. You can select which specific attribute should be used for this user mapping by choosing from the provided dropdown menu.

Setting up both Username and Email is required if you want to let users register. If the test configuration performed in the previous step was successful, then the inputs for the username and email attributes will be dropdowns.
These dropdowns will contain all of the users’ attribute names sent from the IDP. You will need to select the appropriate options containing the user's username and email.

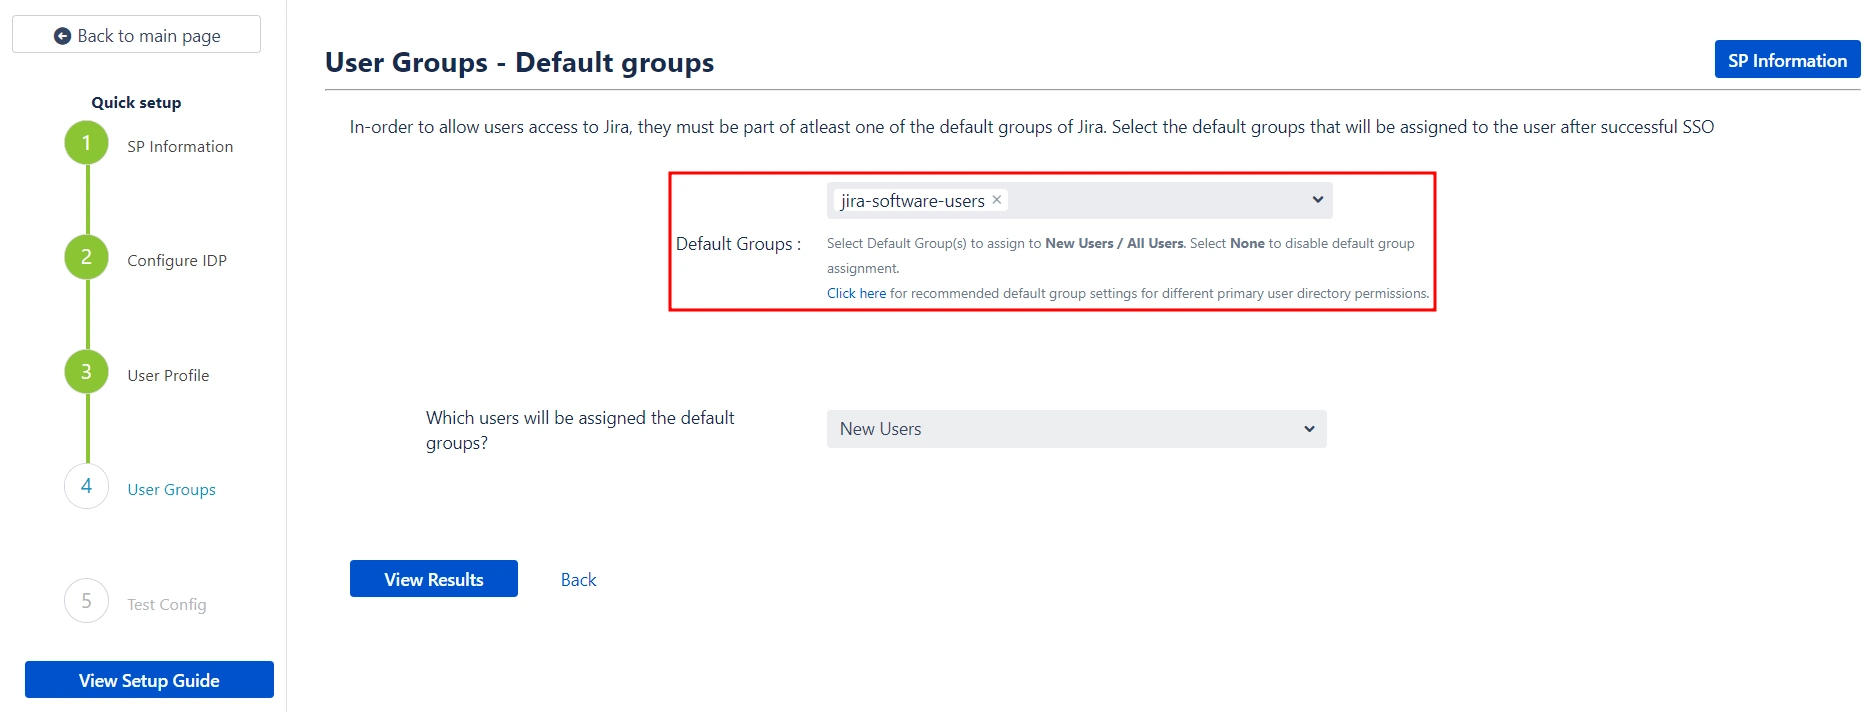
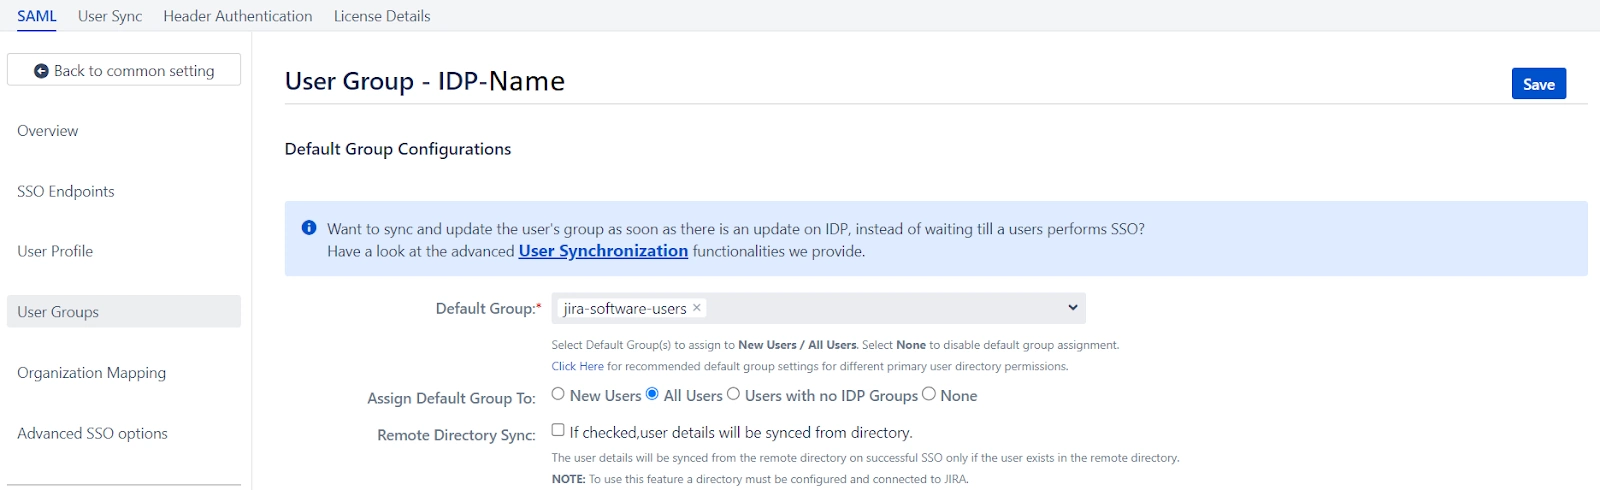
User Groups - Default groups
To grant users access to Confluence, they must be members of at least one of the default Confluence groups. This step allows you to select the default groups that will be automatically assigned to users upon successful SSO authentication. You can set multiple groups as default groups.

Our app gives you the option to enable default groups for All Users, New Users, or Users with No IDP Groups using a dropdown list. If you don't want to assign any default group to SSO users, you can select None.
This concludes the Quick Setup flow. If you encountered any issues or errors while setting up your Identity Provider (IDP), refer to the Troubleshooting section for guidance or contact our support.
Troubleshooting and Support
Here, you can review the results of a successful test configuration, including the attributes received from your IDP, the SAML request sent, and the SAML response received.
The Quick Setup method establishes basic SSO functionality for your end-users. However, you can further customize your setup by utilizing the full set of features provided by the app.
To access advanced configuration options:
- Navigate to the Configured IDPs page.
- Locate the Edit dropdown menu for your configured IDP.
- From here, you can access your SP Metadata and customize settings for User Profile and User Groups.
For detailed information on customizing User Profile and User Groups settings, refer to the Custom Setup section of this guide.
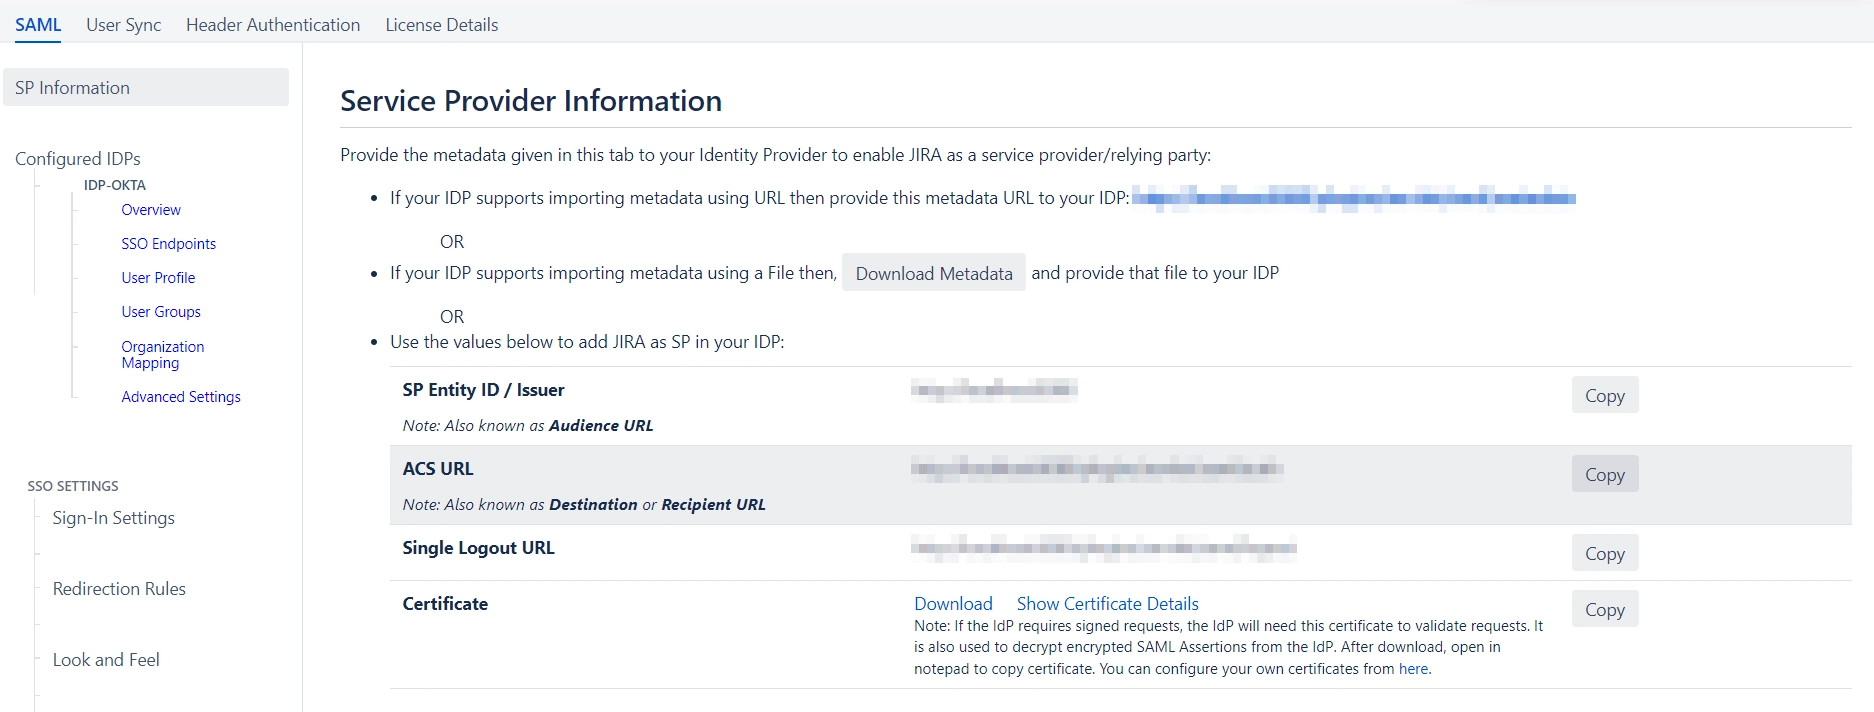
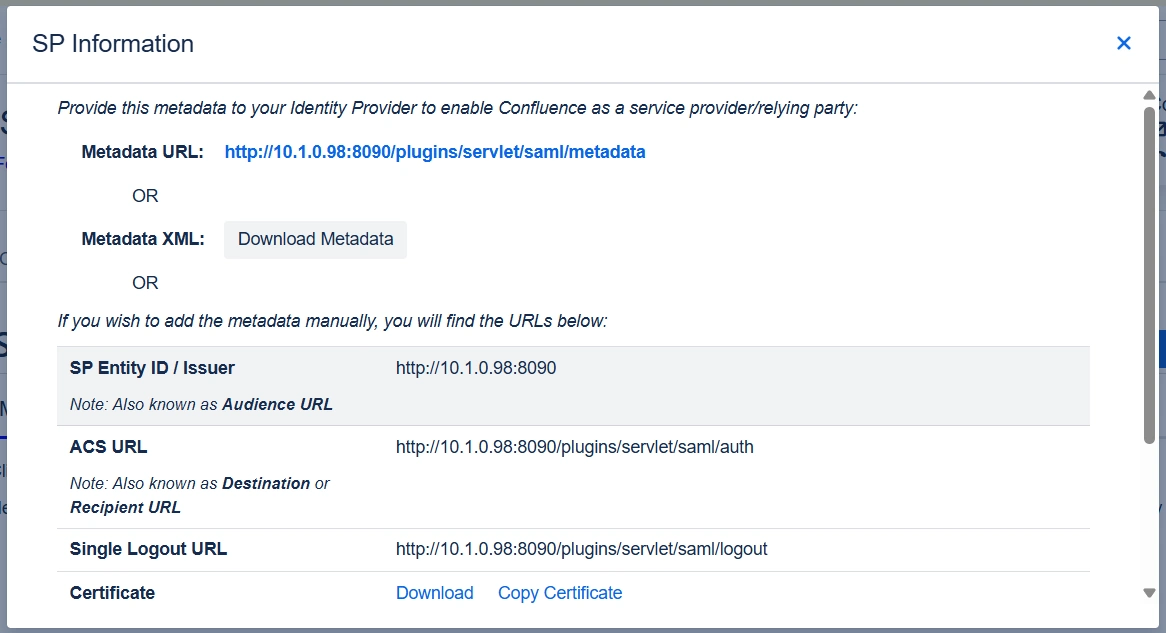
If you intend to customize your IDP setup from the start, you can find the required Service Provider (SP) metadata under the SP Metadata section. It contains essential information about your SP configuration that you will need to provide to your IDP for seamless integration.
There are multiple ways to add this metadata to your IDP:
Service Provider Metadata
If you intend to customize your IDP setup from the start, you can find the required Service Provider (SP) metadata under the SP Metadata section. It contains essential information about your SP configuration that you will need to provide to your IDP for seamless integration.
There are multiple ways to add this metadata to your IDP:
- Importing the metadata
- Manually adding the metadata
- SP Entity ID
- ACS URL
- SP Certificate
- Click on Proceed once you’re done.
Depending on how your IDP accepts the metadata, you can either provide the metadata URL or you can use the Download Metadata button to download an XML file for the same.
If you wish to add the metadata manually, you will find the following information in this section. You will need to provide these details to your IDP.
Configuring your Identity Provider
The manual setup flow allows you to dive into the complete set of configurations provided by the plugin to add a SAML IDP.
The steps to configure an IDP using the Manual Setup option are:
- Adding IDP Metadata
- By Metadata URL
- Navigate to the Advanced SSO options from the menu on the left-hand side of the page.
- Enter your metadata URL in the Certificate Rollover field.
- Toggle the Refresh Certificate periodically option on.
- Use the drop-down provided to set the interval for a periodic refresh. We recommend you select five minutes for the best results.
- By Uploading Metadata XML File
- Manual Configuration
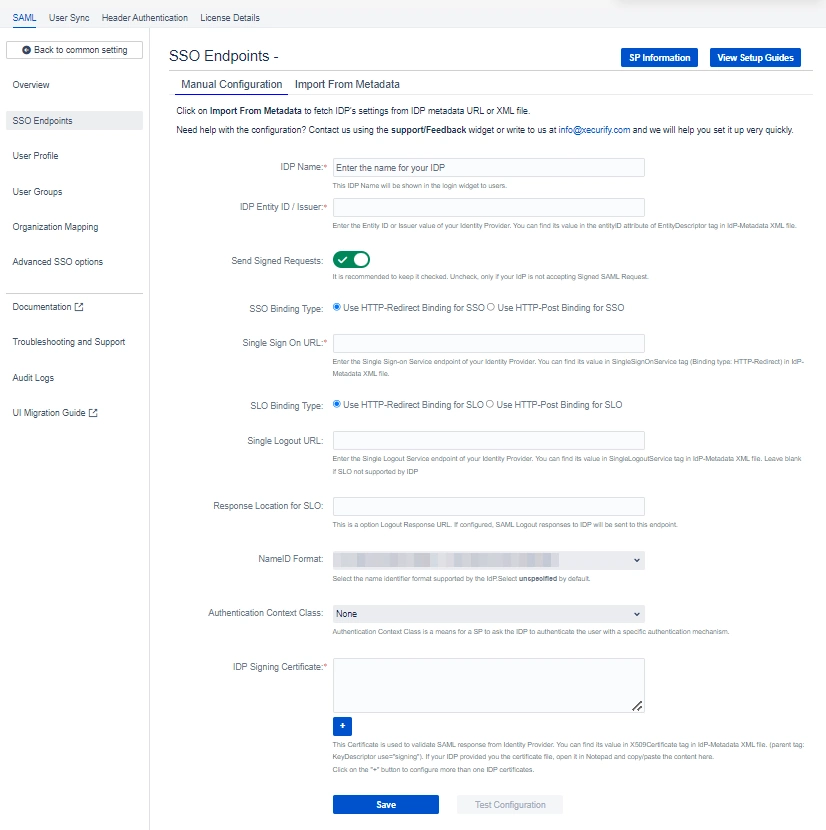
- IDP Entity ID.
- Single Sign On URL.
- Single Logout URL.
- X.509 Certificate.
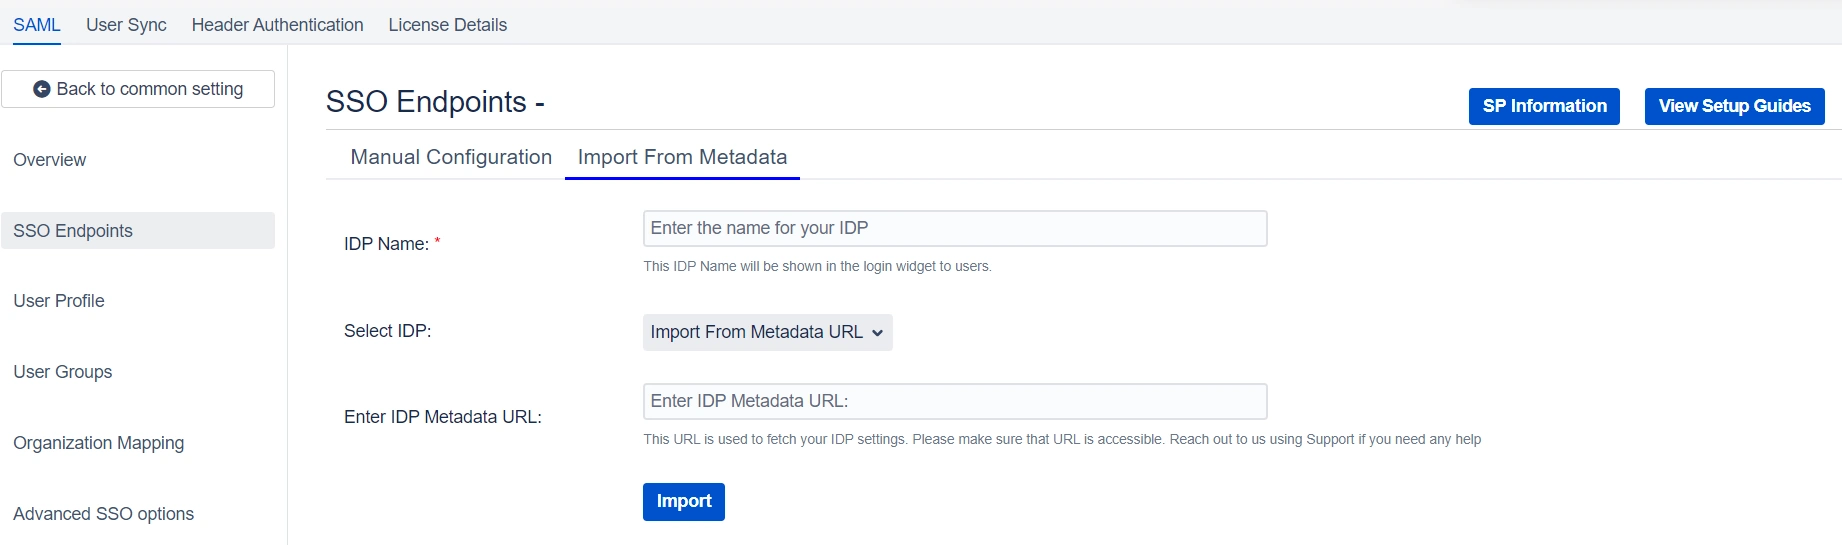
There are three ways you can configure IDP settings with the information you have been given by your IDP team:
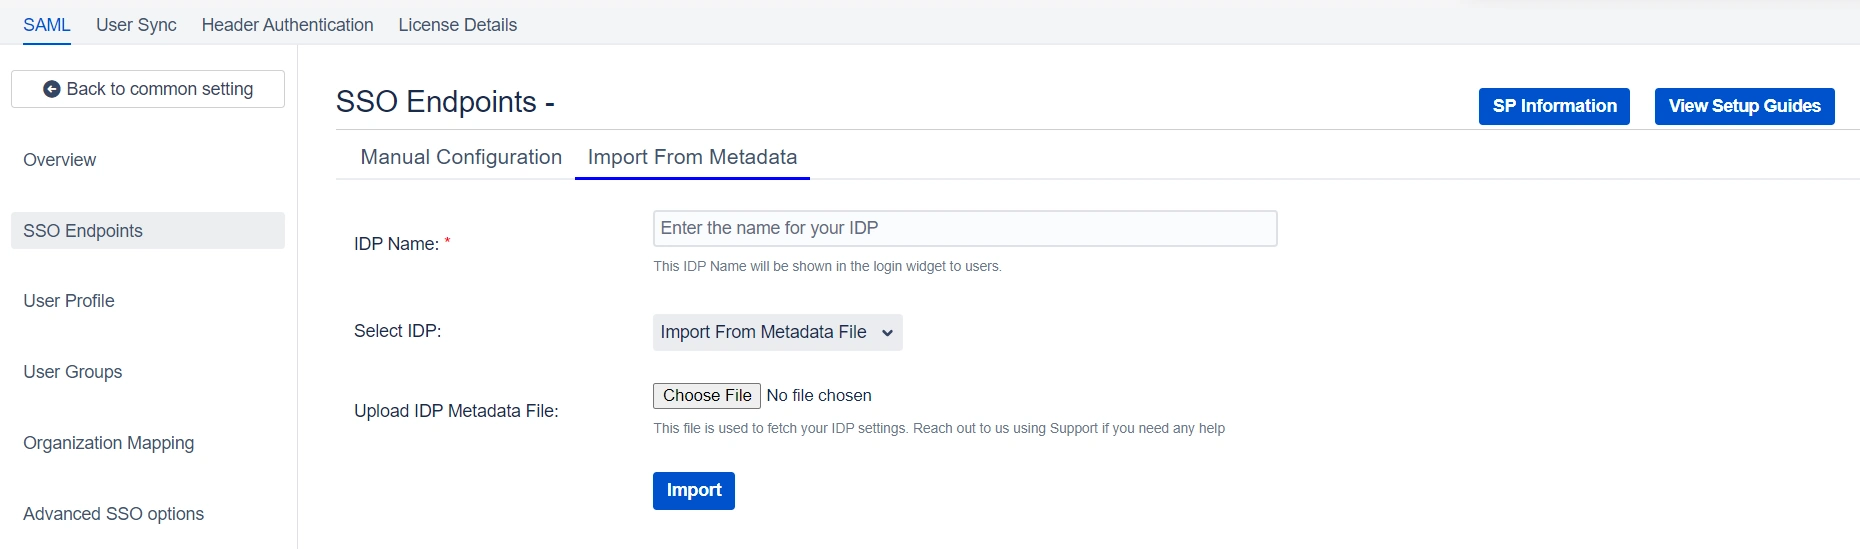
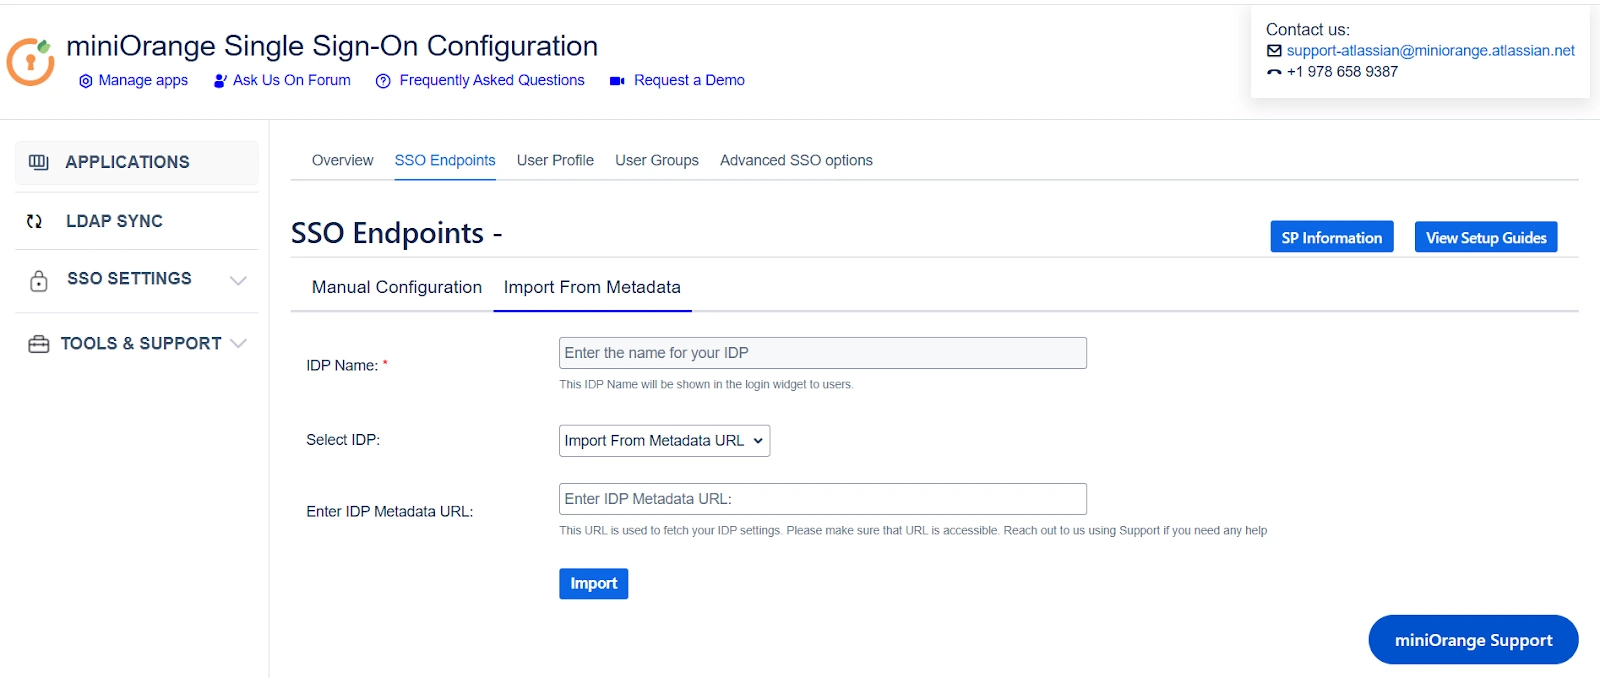
1. Click on the Import from Metadata tab.
2. Select IDP – Import From Metadata URL.
3. Enter IDP metadata URL – paste the metadata URL that we fetched before initiating the Service Provider.
4. If your IDP changes certificates at intervals (Eg. Azure AD), you can refresh your IDP metadata accordingly:
5. Click Import.
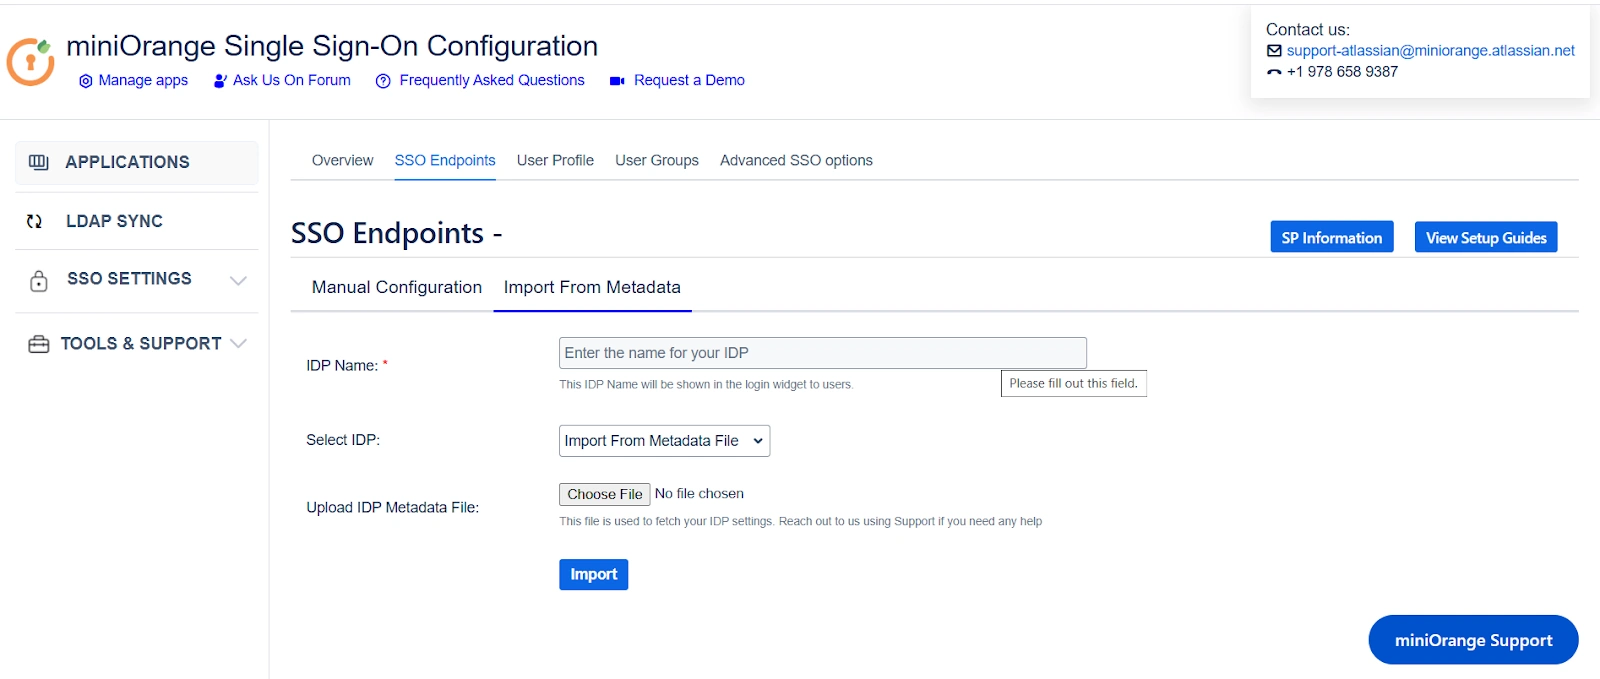
1. Click on the Import from Metadata tab.
2. Select IDP: Import from Metadata File.
3. Upload metadata file.
4. Click Import.
Go to Manual Configuration tab and enter the following details:
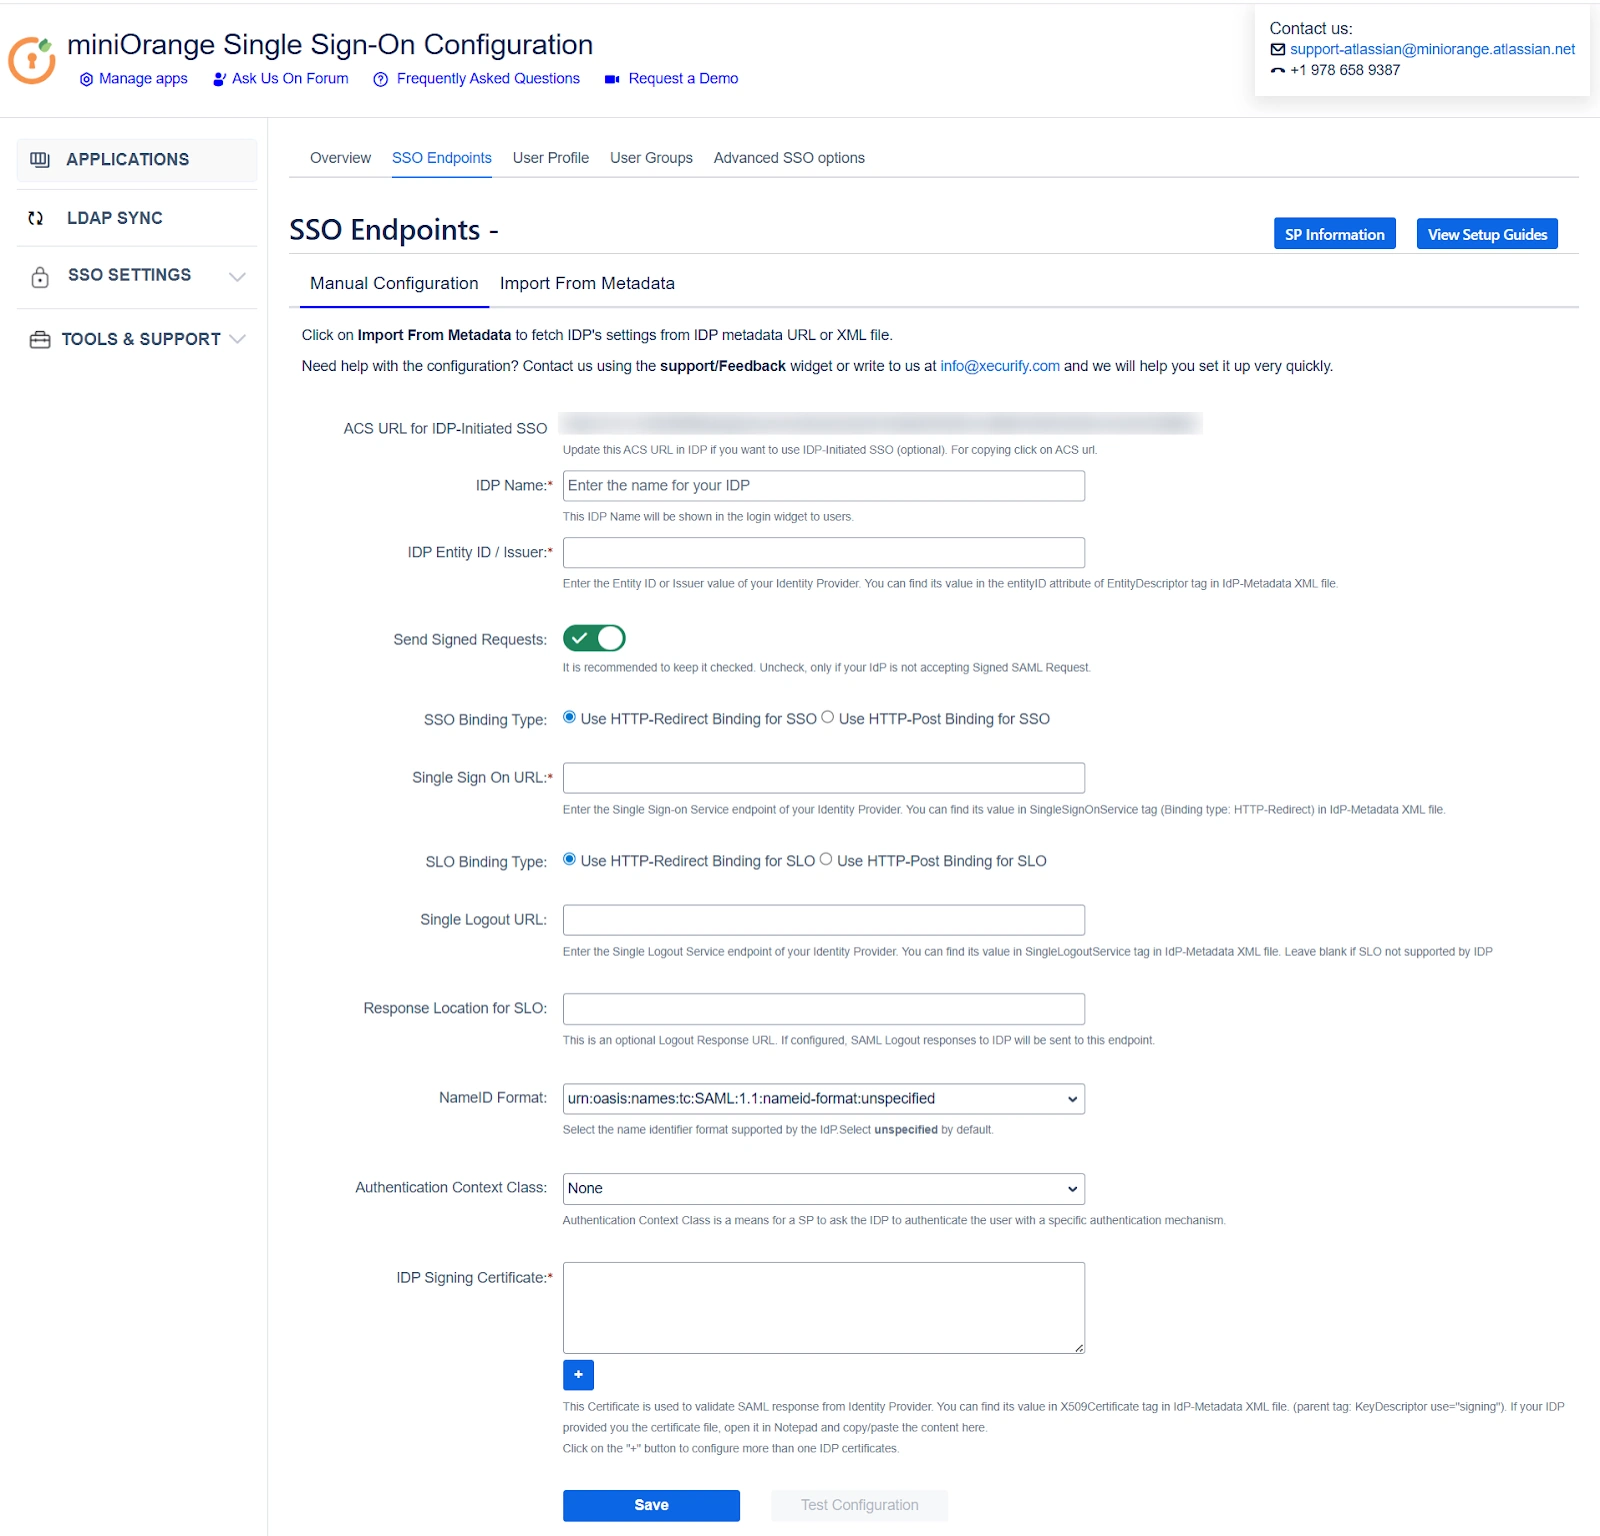
Note: If you need to add an additional X.509 Certificate, you can do so by clicking on the Add button below the textbox.

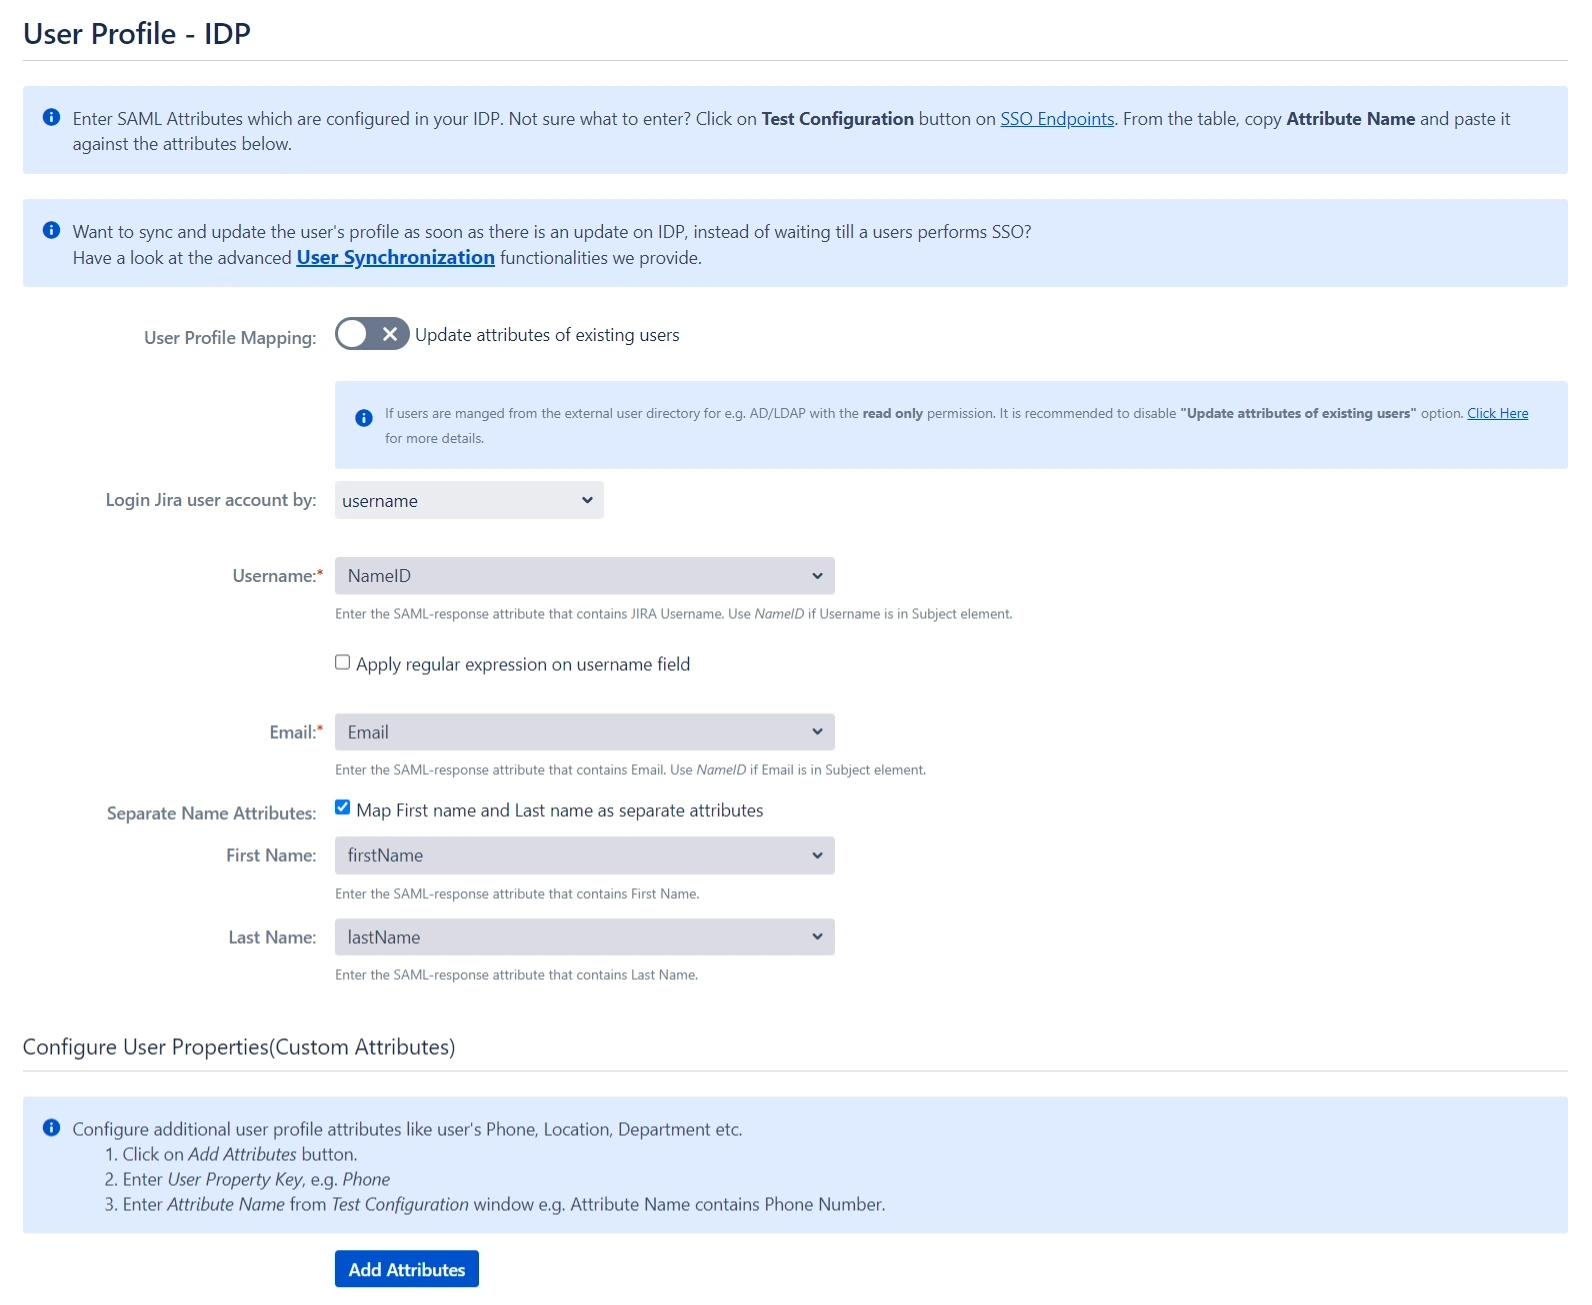
User Profile
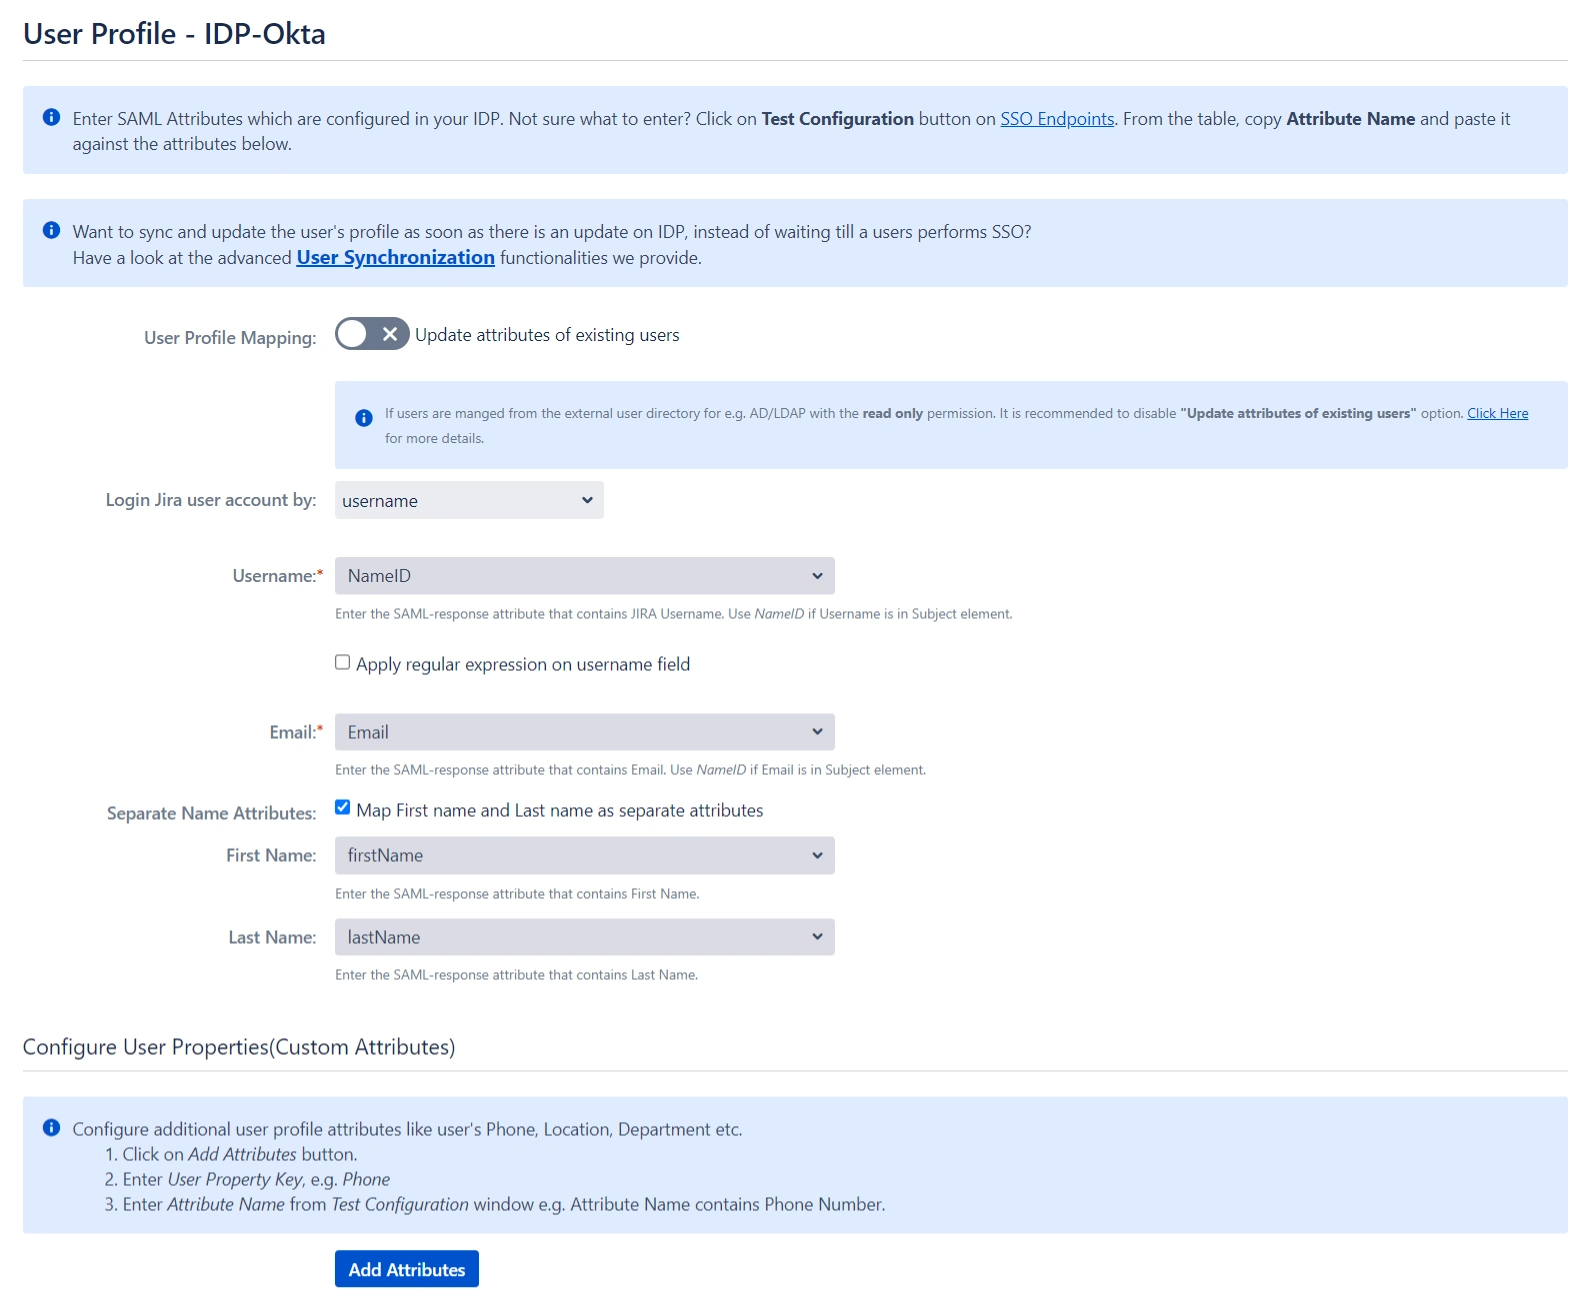
Next we will be setting up user profile attributes for Confluence. The settings for this can be found in the User Profile section.
- Finding correct attributes
- Go to the IDP Configuration section. Scroll down and click on Test Configuration.
- You will see all the values returned by your IDP to Confluence in a table. If you don't see value for First Name, Last Name, Email, or Username, change the required settings in your IDP so that it returns this information.
- Once you see all the values in Test Configuration, keep the window open and go back to the User Profile section.
- Setting profile attributes
- In the User Profile section, fill the values by matching the name of the attribute. For instance, if the Attribute Name in the Test Configuration window is NameID, enter NameID against Username.
- For user registration, ensure both the Username and Email fields are set up. If you're only allowing existing users to log in, configure the attribute that will match the user in Confluence.
- Matching a user
- Select Username or Email for the Login user account by option.
- Enter the attribute name from IDP which corresponds to Username or Email using Finding Correct Attributes.
When a user logs into Confluence, one of their attributes from the IDP is used to search for their account. This enables Confluence to detect the user and log them into the corresponding account.
You can configure it using the steps given below:

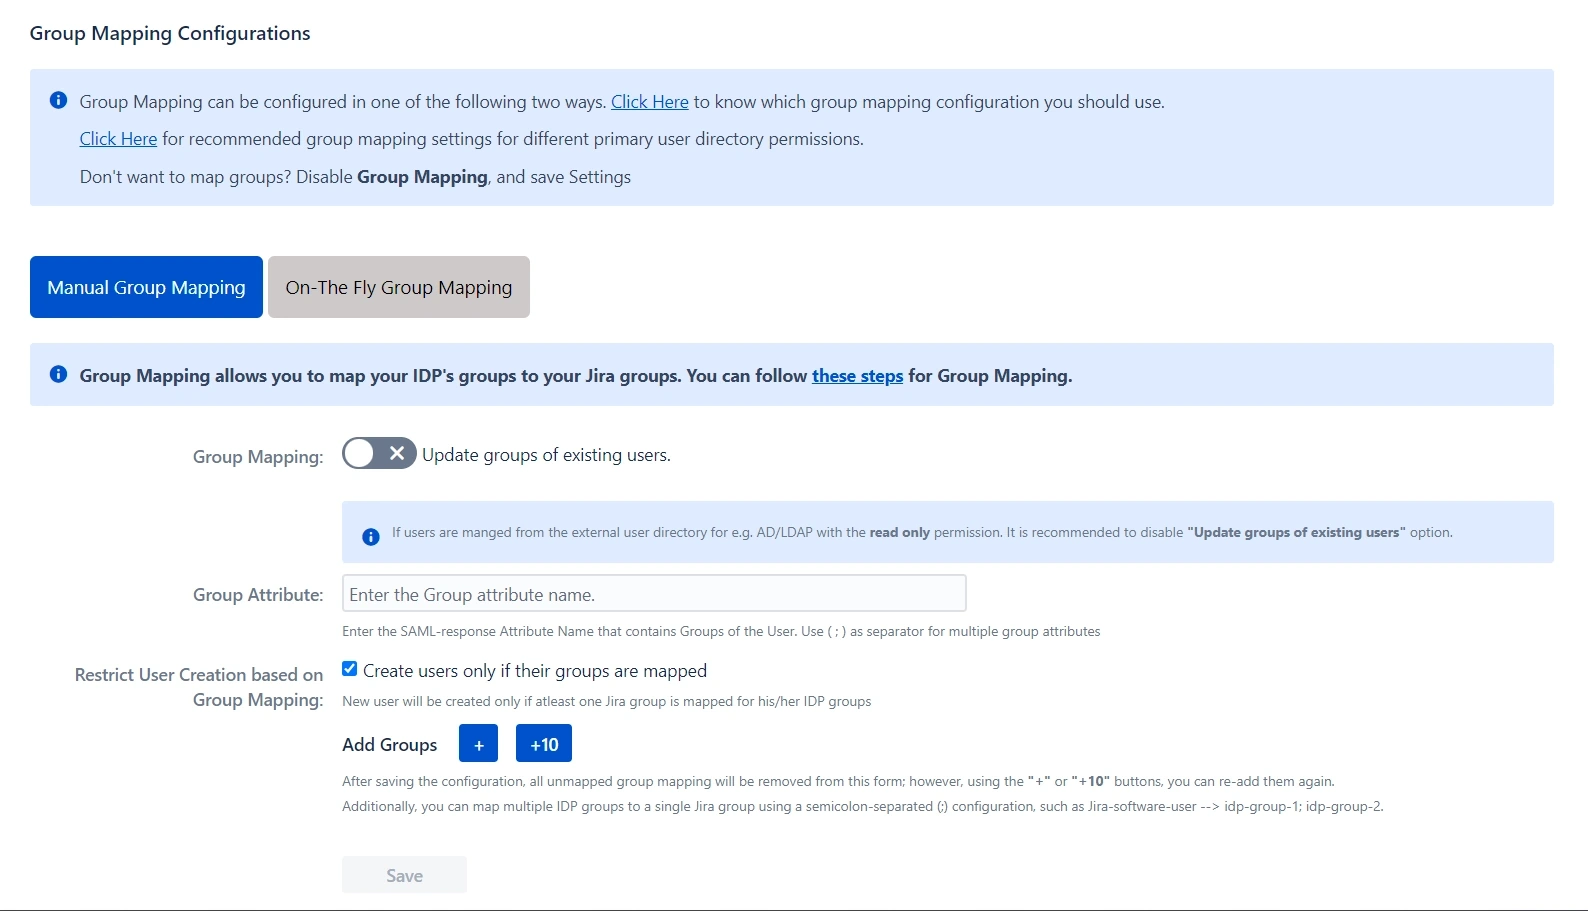
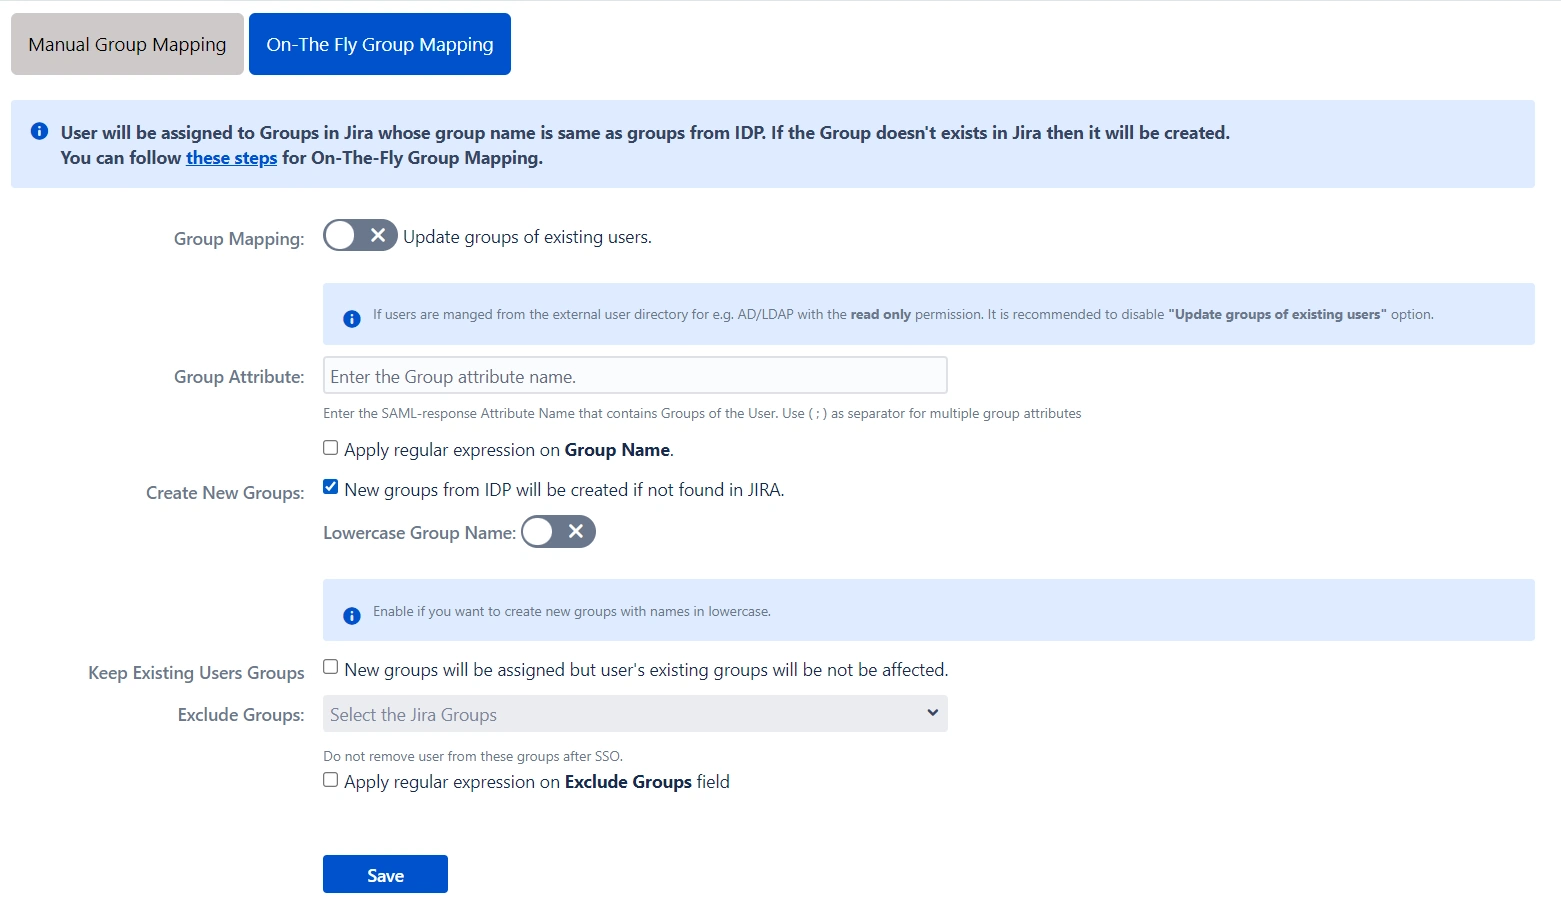
User Groups
Now, let's move on to configure user group attributes for Confluence. This feature allows you to replicate the user groups present in your IDP within your Service Provider (SP) environment.
You can accomplish this in the following ways:
- Setting default group
- Finding Group Attribute
- Go to the IDP Configuration section. Scroll down and click on Test Configuration.
- A table will display all the values returned by your IDP to Confluence. If you don't see group information, adjust your IDP settings to ensure it returns the appropriate group names.
- In the User Groups tab, enter the Attribute Name for groups in the Group Attribute field.
- Enter the Attribute Name of the group against Group Attribute.
- If you don't want to update groups of existing users, check the Disable Group Mapping option.
- Group Mapping
- Manual Group Mapping
- If the names of groups in Confluence are different from the corresponding groups in IDP, then you should use Manual group mapping.
- Check Restrict User Creation Based on Group Mapping option if you want new users to be created only if at least one of the user's IDP groups is mapped to a group in the application.
- To do the mapping, first select a Confluence group from the dropdown which lists all groups present in Confluence and then enter the name of the IDP group to be mapped in the textbox beside.
- For example, if you want all users in the 'dev' group in IDP to be added to Jira-software-users, you will need to select Jira-software-users from the dropdown and enter 'dev' against Jira-software-users.
- Use '+1' and '+10' buttons to add extra mapping fields.
- Use the '-' button next to each mapping to delete that mapping.
- On-The-Fly Group Mapping
- If the names of groups in Confluence and IDP are the same, we recommend you use On-The-Fly group mapping.
- Check Create New Groups option if you want new groups from IDP to be created if not found in Confluence.
- If the user is part of some group in Confluence and that group is not present in the SAML response returned by IDP, then the user will be removed from that group in Confluence.
- If you don't want On-The-Fly group mapping to affect Confluence groups which are managed locally then add those groups in the Exclude Groups field.
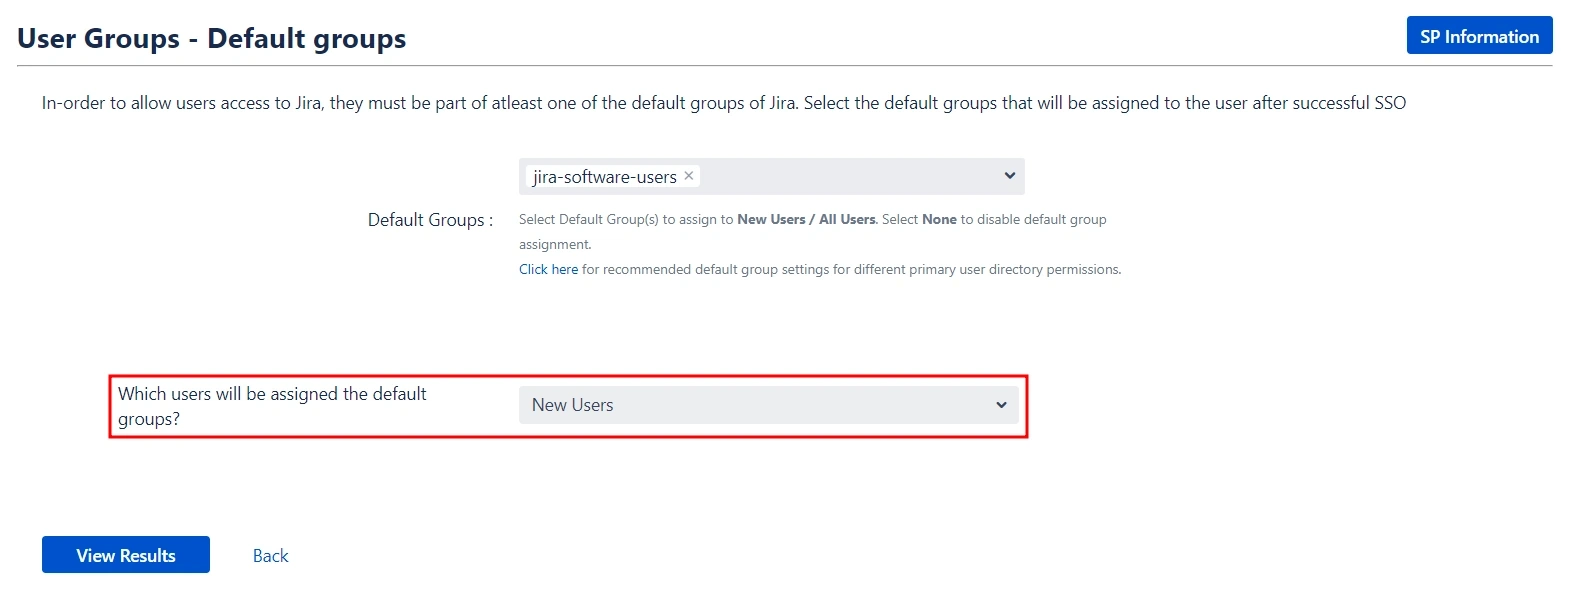
Select the users' Default Group in the User Groups tab. If no group is mapped, users are added to this group by default.
You can enable default groups for All Users or New Users using the option. Select None if you don't want to assign any default group to SSO users.
Similarly to how you identified the Attribute Names for User Profiles, you will need to locate the attribute name corresponding to group information.
Here’s how you can do this:
Group Mapping can be done in two ways:
Troubleshooting and Support
You can verify if your SAML SSO configuration is correct by clicking the Test Configuration button on the IDP configuration tab of the plugin.
After a successful test configuration, you will be able to review the results on the Troubleshooting and Support page. This includes the attributes received from your Identity Provider (IDP), the SAML request sent, and the SAML response received.
In case you encounter any issues or errors while setting up your IDP, refer to the Troubleshooting section for guidance on how to contact our support team.
Step 3: Redirection on Login Page
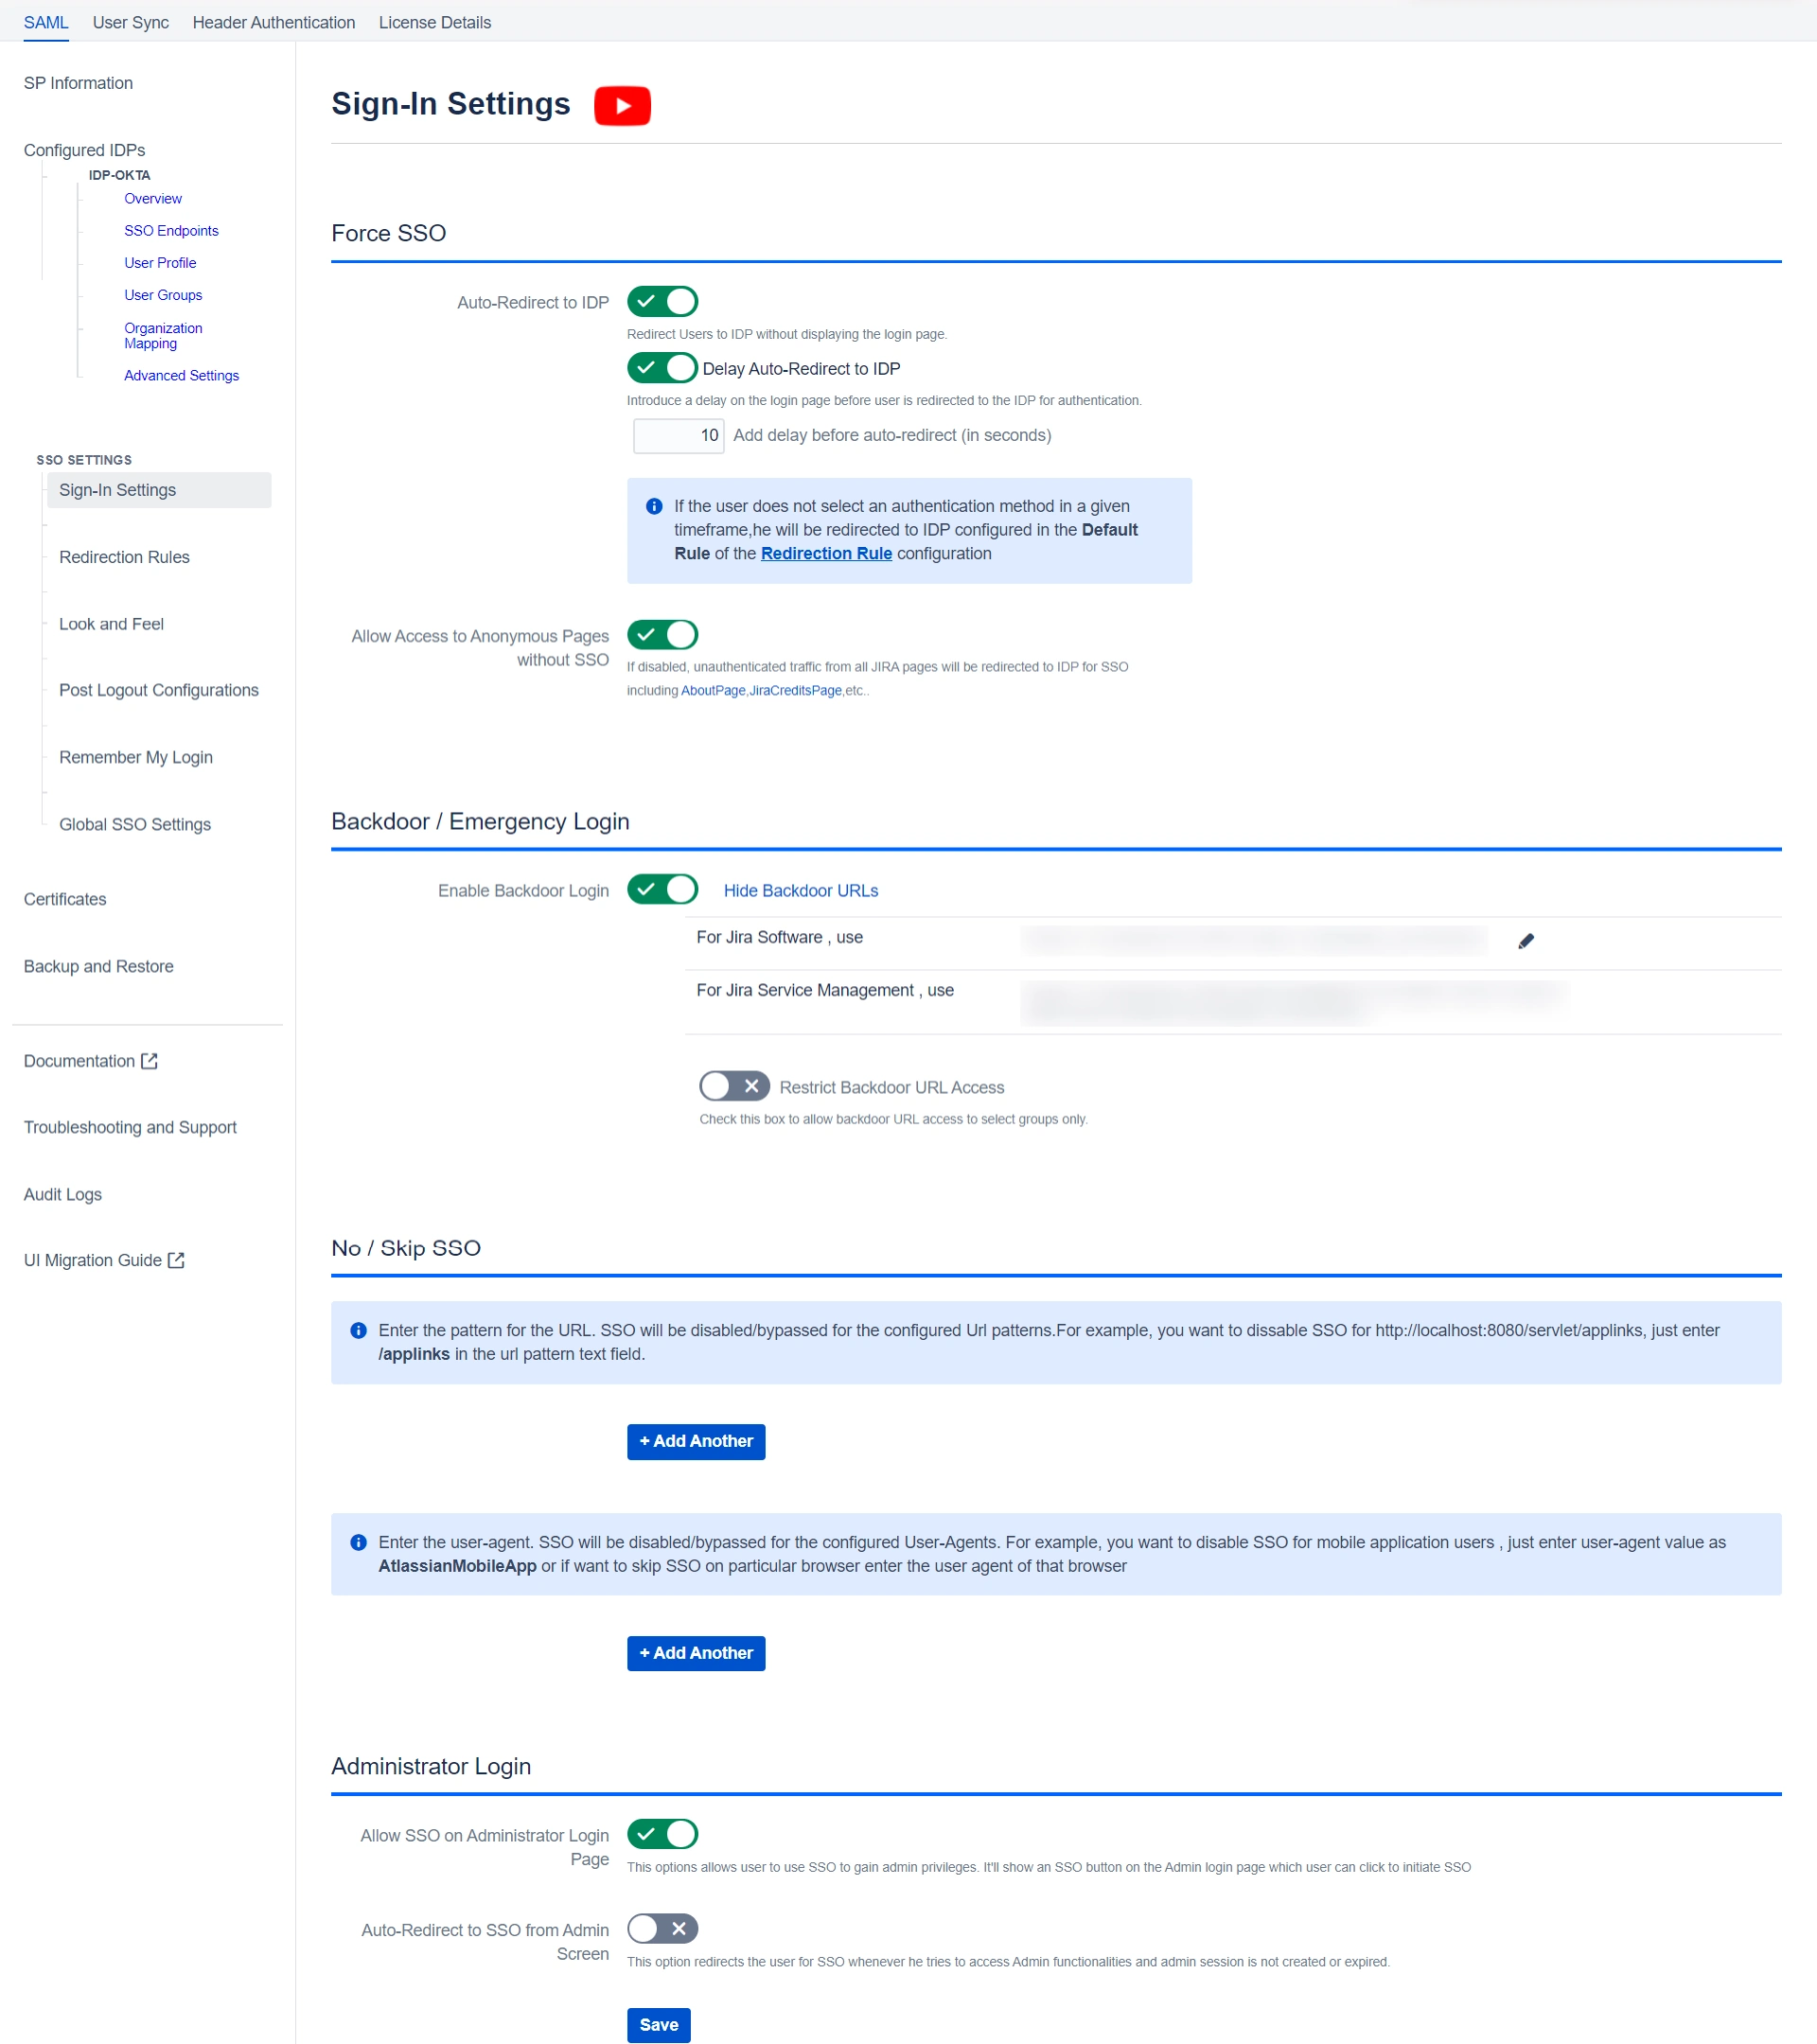
- If you have only one IDP configured, then you can use the features provided on the SSO Settings tab and Redirection Rules tab of the plugin to manage the redirection on the login page.
- Enable the Auto Redirect to IDP option on the SSO Settings tab if you want to allow users to log in only using IDP.
- Use the Emergency/Backdoor Login URL to allow all admins to access the default login page of Confluence and log in using local credentials. You can also restrict access to this URL for certain users.
- Use the settings given on the Redirection Rules tab to redirect users to their specific IDPs based on their email domains, groups, and directories. This feature is particularly useful in instances where you have multiple IDPs configured.
Step 4: Multiple IDPs
Our plugin offers the flexibility to configure multiple identity providers (IDPs) on your service provider (SP), expanding your options for authentication..
4.1 Configuring Multiple IDPs
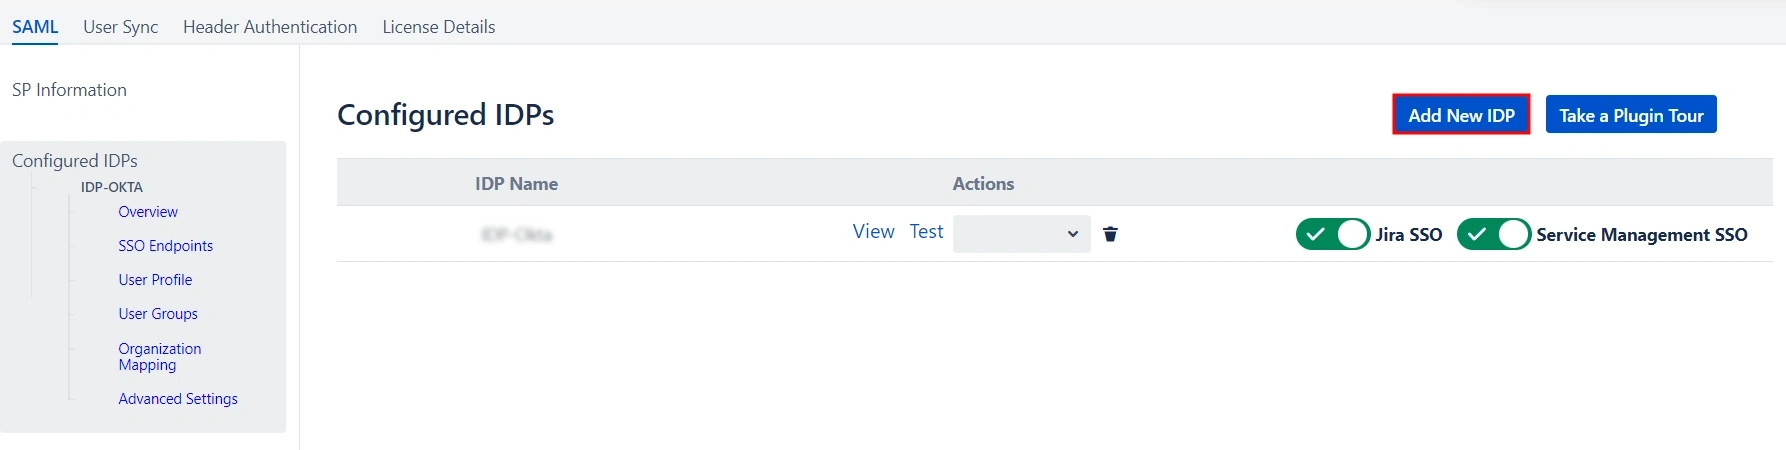
- If you need to configure multiple IDPs on your SP you can do so by going to the Configured IDPs section and clicking on Add New IDP.
4.2 Managing SSO with Multiple IDPs
- If you have multiple IDPs configured, you can choose how you want your end users to use these IDPs to perform SSO.
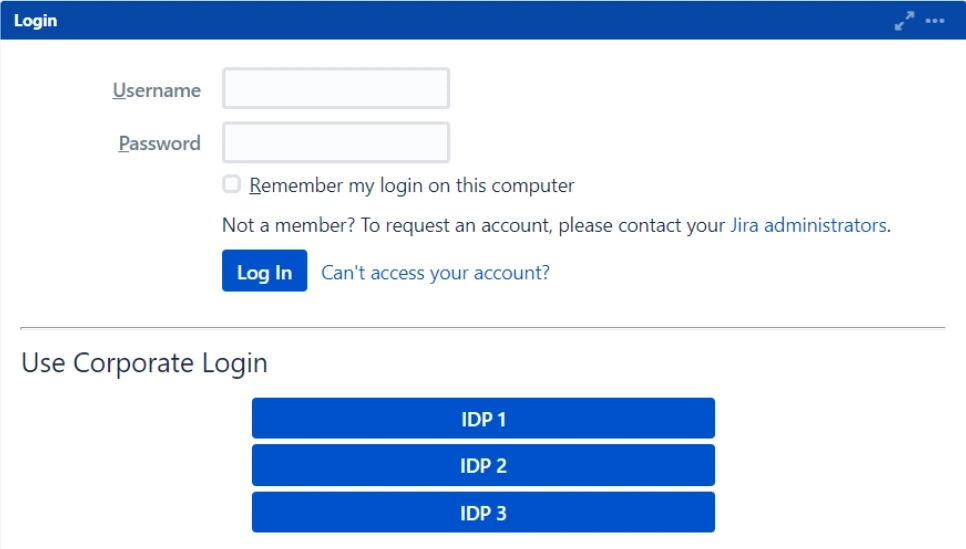
- For instance, you can display individual buttons for different IDPs on the login page and let the users decide which IDP to use for SSO. Additionally, you can force certain users to use a specific IDP based on the domain of their username/email.
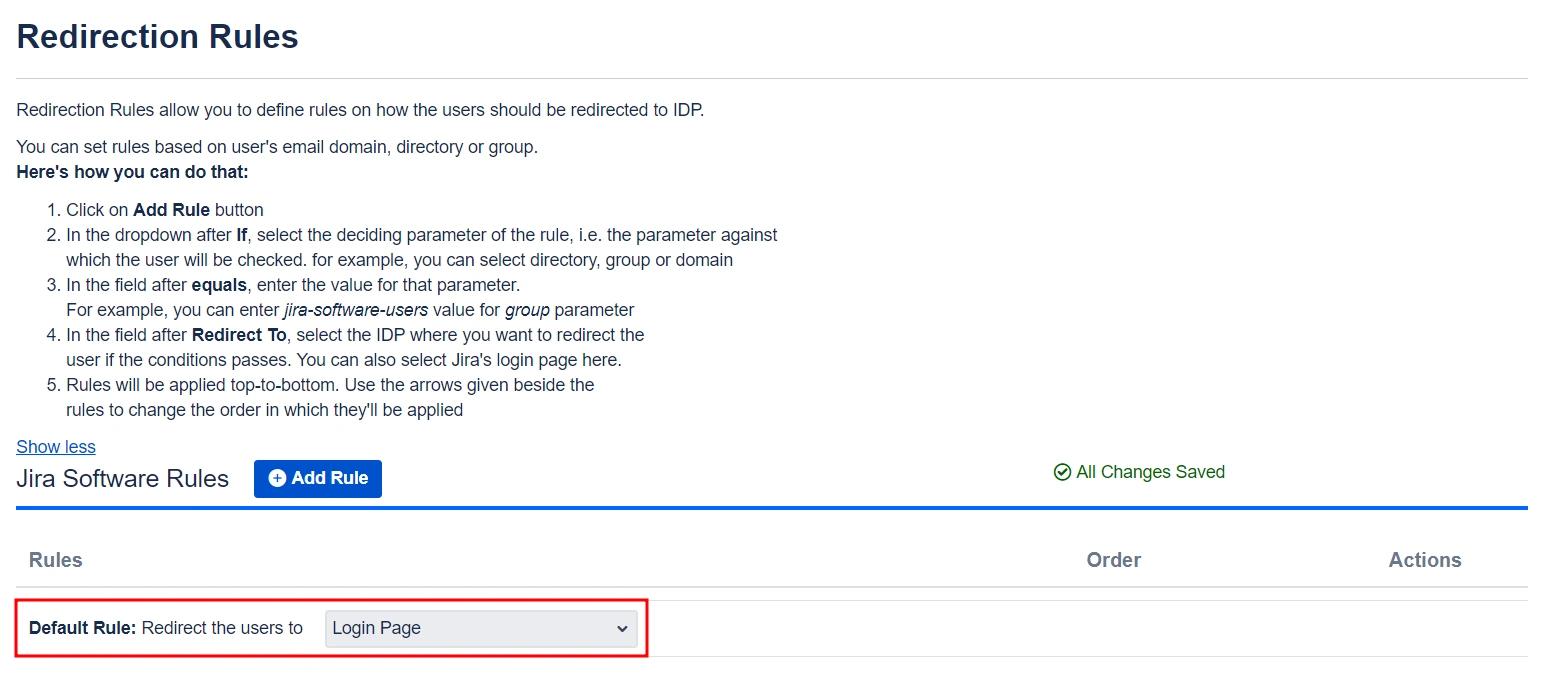
- You’ll be able to configure these rules in the Redirection Rules section.
- The plugin has a default rule that is pre-configured and applied to all the users irrespective of their domains. For instance, if you want to display the login page with SSO buttons for each of the IDPs then your Default Rule will be as follows:
- Based on the default rule mentioned above, the login form will contain buttons for each IDP. Users will have the freedom to choose any of the configured IDPs to initiate SSO.
- You can also configure a rule so that your users will be automatically redirected to an IDP based on their email domains.
- For instance, if you want users that have example.com as their domain to be redirected to IDP 1, you can add a rule for that as follows:
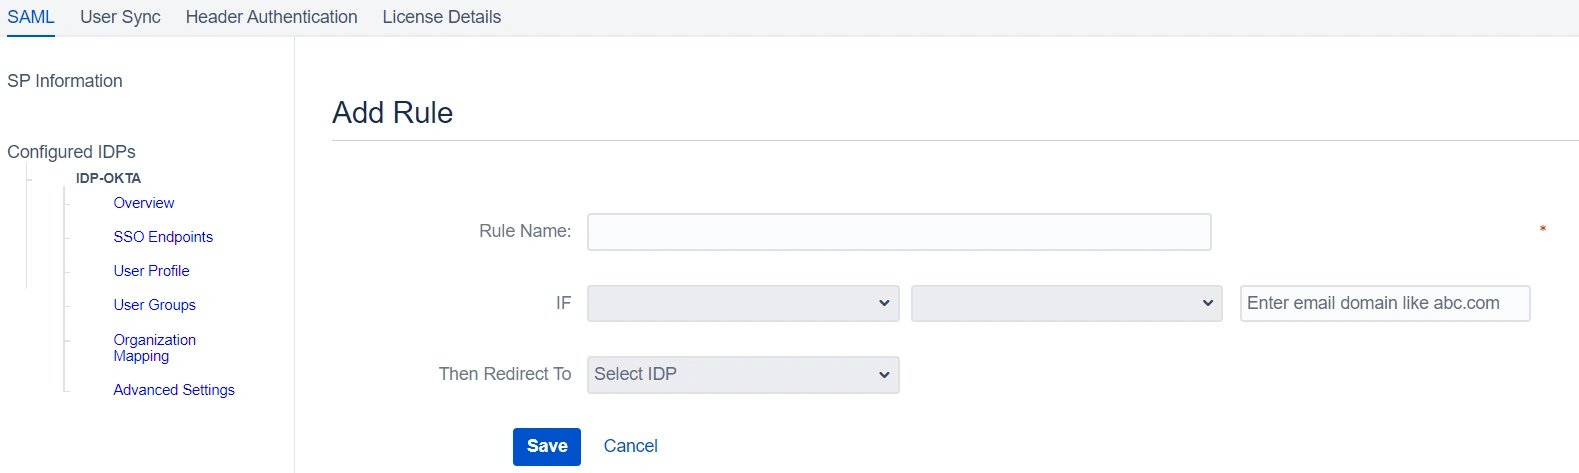
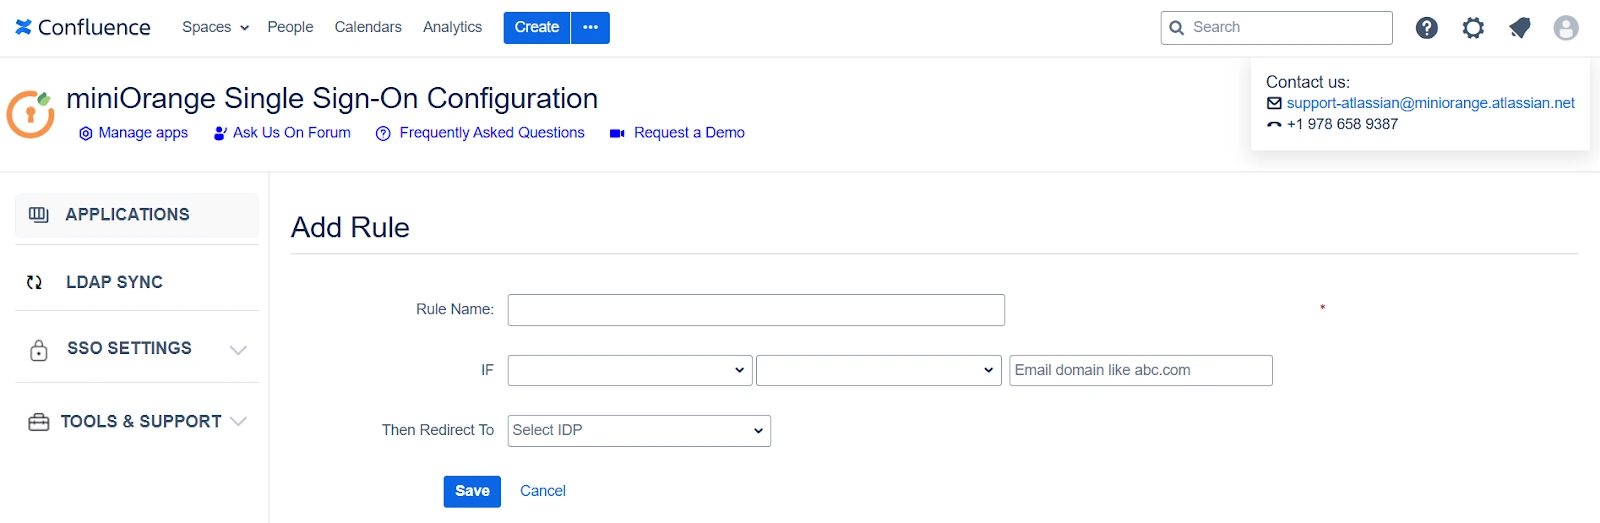
- Click on the Add Rule in the Redirection Rules tab.
- Enter a name for your rule in Rule Name.
- In the IF statement select Email Domain in the first drop-down.
- For the same statement select equals in the second drop-down.
- In the last field of the IF statement, enter the email domain(example.com for the purpose of this example)
- In the Then Redirect To drop-down, select the IDP you want the users with example.com to be redirected to(IDP 1 in this case)
- Click on Save.
- When a rule like the one described above is configured, users will see a login form where they will have to input their email address.
- Additionally, within the Sign-In Settings, you have the option to configure SSO for administrators, grant access to anonymous pages, and establish an emergency URL for bypassing SSO. These settings can be found in the left-hand side menu bar.


Additional Resources
Did this page help you?
