- Home
- Identity Governance, Auditing & Access Control
- Integrate Active Directory with the Identity Governance, Auditing & Access Control App

Integrate Active Directory with the Identity Governance, Auditing & Access Control App
The Active Directory integration enables your organization to automate user provisioning, group membership, onboarding, offboarding, and access governance directly from Jira Service Management (JSM). Once connected, approved access requests can automatically provision users and manage Active Directory groups through governed workflows.
This step-by-step guide will help you:
- Add the Active Directory integration in App Connections
- Enter connection, bind, and default provisioning details
- Test the connection and configure automation rules for access and lifecycle events
By the end of this guide, you’ll have a secure Active Directory connection in place so approved JSM requests can provision users and manage groups through governed workflows.
App Overview
The Identity Governance, Auditing & Access Control App is an advanced solution built on Jira Service Management (JSM) to simplify and automate access request workflows across your organization.
Instead of relying on manual request and approval steps, the app enables:
- End users to submit access requests through the JSM portal.
- Automated routing of approval workflows based on predefined rules.
- Instant provisioning actions once approvals are complete.
By automating these processes, the Identity Governance, Auditing & Access Control via JSM ensures secure, policy-driven, and audit-ready access management across your tech ecosystem.
 Try it for free
Pre-requisites
Before configuring the integration, ensure that:
- Your Active Directory server is reachable from the system running the Identity Governance, Auditing & Access Control App.
- Network connectivity allows communication to your Domain Controller over LDAP (389) or LDAPS (636), depending on your configuration.
- You have an Active Directory account with sufficient permissions to authenticate and perform the required provisioning operations.
-
You have collected the following information from your Active Directory environment:
- Server Hostname
- Domain Name
- Base DN
- Bind Username
- Bind Password
- Default Target OU
- Default Password
1: Add the Active Directory Integration
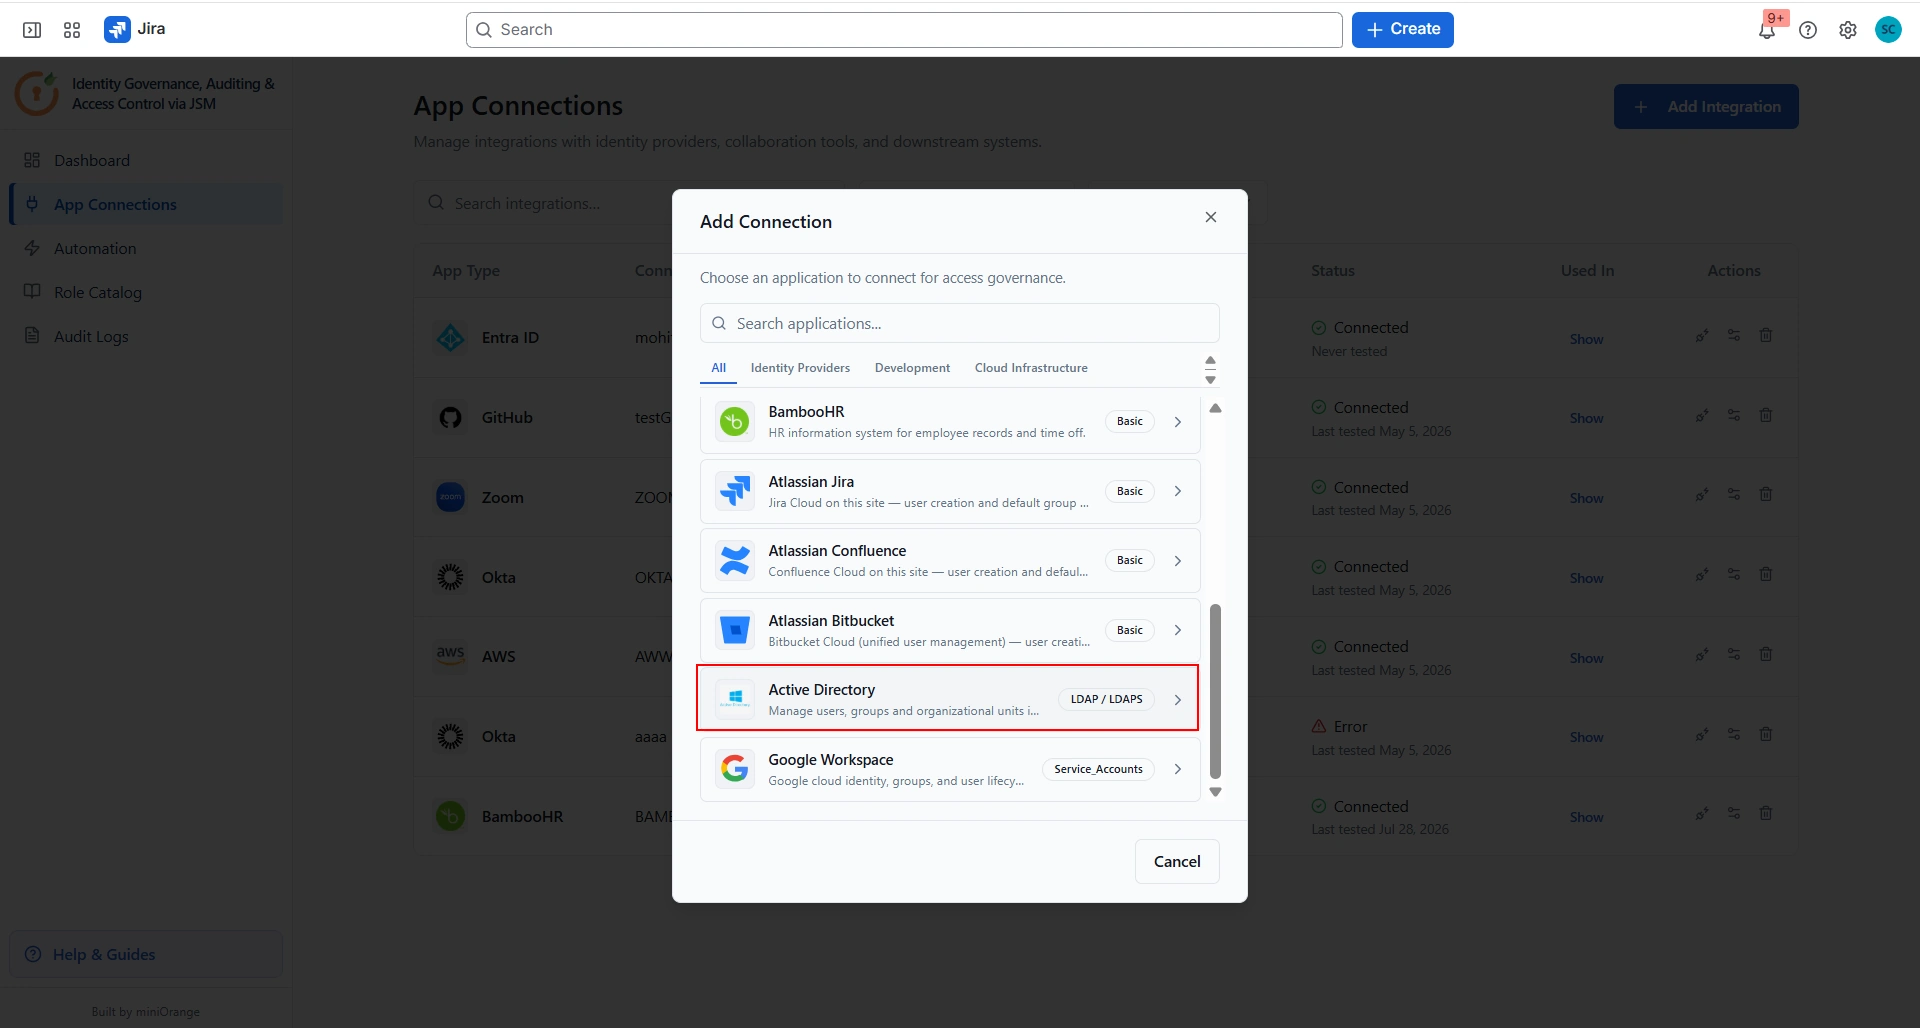
To begin the integration:
- Open the Identity Governance, Auditing & Access Control App.
- Navigate to App Connections from the left sidebar.
- Click + Add Connection and select Active Directory from the list.
2: Enter the Connection Details
In the Connect Active Directory panel, configure the following settings.
Connection Details
-
Connection Name: Enter a descriptive name for the connection. This name helps other administrators identify the
Active Directory connection.
Example: My Active Directory
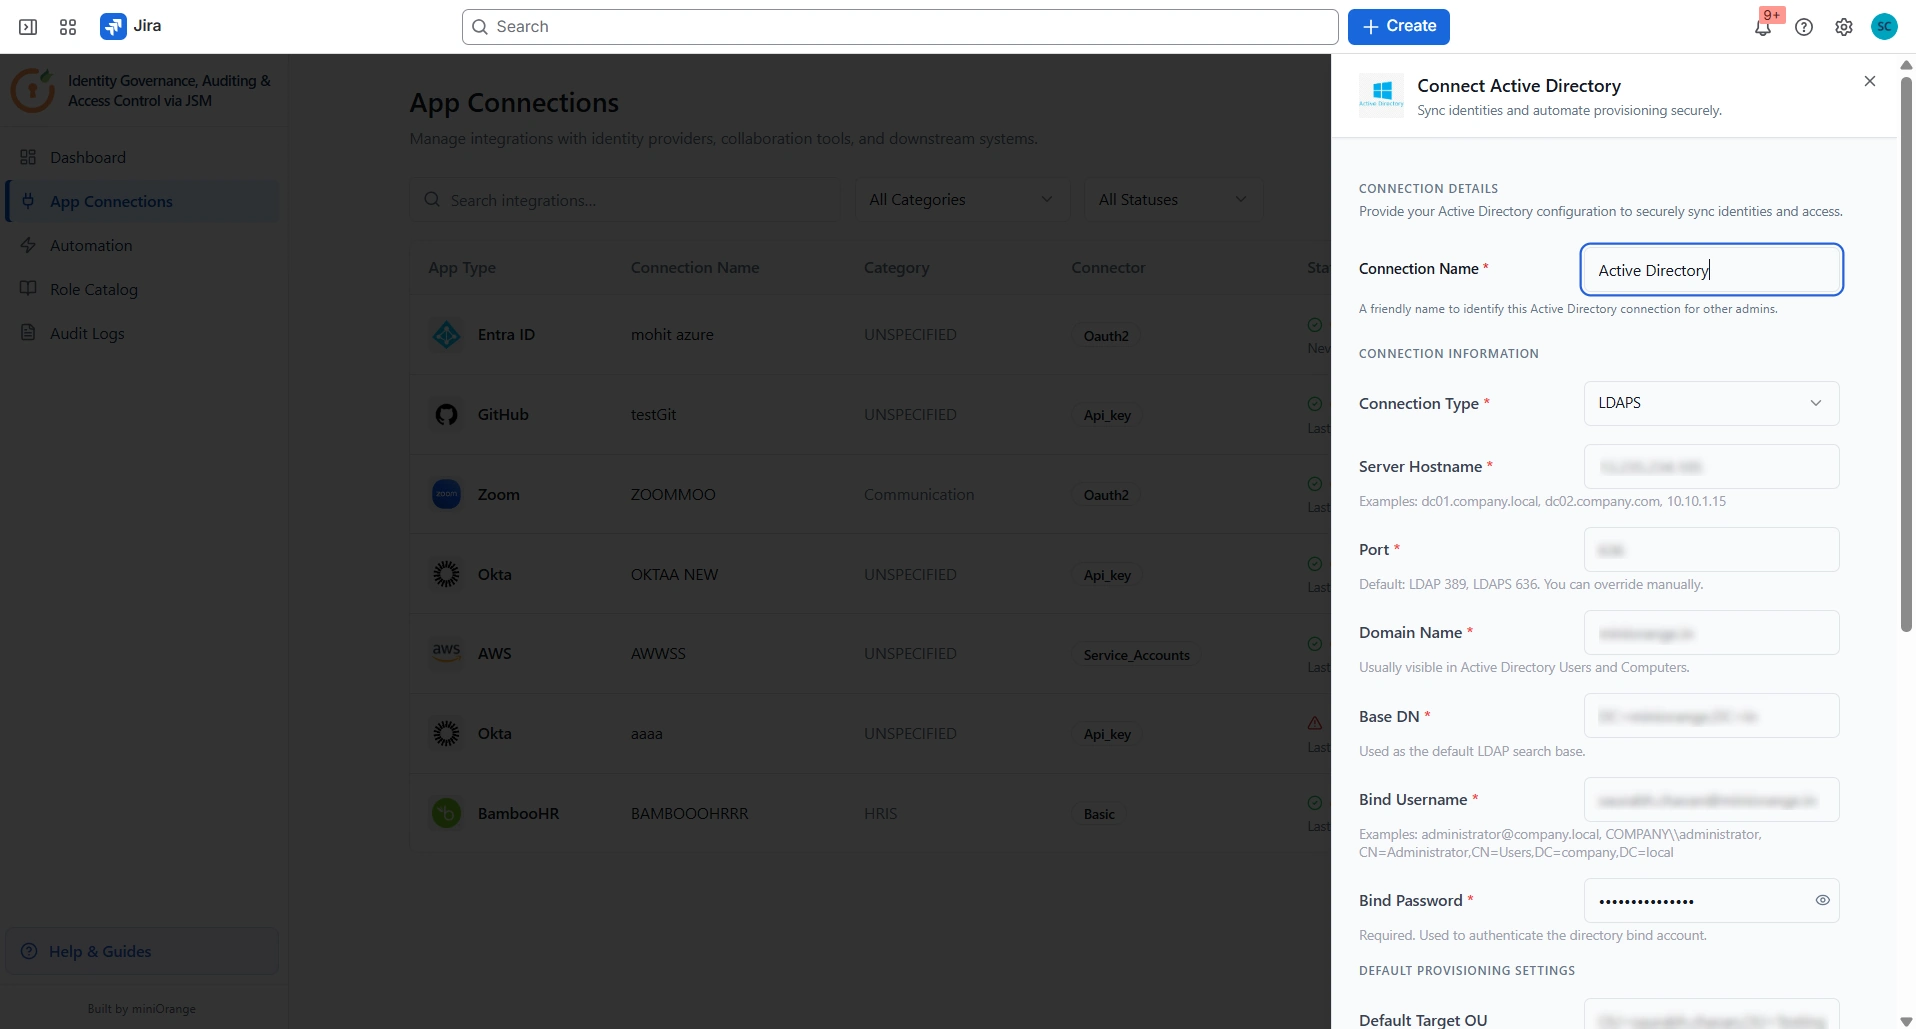
Connection Information
-
Connection Type: Select the protocol used to connect to your Active Directory server.
- LDAP – Uses the default port 389.
- LDAPS – Uses the default port 636 and encrypts communication using SSL/TLS. This option is recommended for production environments.
-
Server Hostname: Enter the hostname or IP address of your Active Directory server.
Examples:dc01.company.localdc02.company.com10.10.1.15
To find the Server Hostname (FQDN)
- Open PowerShell on your Domain Controller.
-
Run the following command to get the server hostname:
hostname -
Run the following command to get the Active Directory domain name:
Recommended (PowerShell 3.0+ / PowerShell 7+):
(Get-CimInstance Win32_ComputerSystem).Domain
For older Windows PowerShell versions (legacy):
(Get-WmiObject Win32_ComputerSystem).Domain -
Combine the hostname and domain name to form the Fully Qualified Domain Name
(FQDN).
Example:
Hostname:dc01
Domain:company.local
FQDN:dc01.company.local
-
Port: Enter the port used for LDAP communication. The default ports are:
- 389 for LDAP
- 636 for LDAPS
- Domain Name: Enter your Active Directory domain name.
To find your domain name
- Open Active Directory Users and Computers.
- Locate the top-level domain in the left navigation pane.
-
Base DN: Enter the Base Distinguished Name (Base DN) used as the default LDAP search base.
Example:DC=company,DC=local
To locate the Base DN
- Open ADSI Edit.
- Right-click ADSI Edit and select Connect To.
- Select Default Naming Context.
- Click OK.
- Copy the displayed Distinguished Name.
-
Bind Username: Enter the Active Directory account used to authenticate the LDAP connection.
Go to LDAP Portal > LDAPUsers > Click on the user >distinguishedName
Use an account with sufficient permissions for the provisioning operations you plan to automate. -
Bind Password: Enter the password for the bind account.
The bind account is used to authenticate the LDAP connection and perform provisioning operations in Active Directory. Ensure that this account has the required read and write permissions and has been delegated read/write access to the configured Default Target OU.
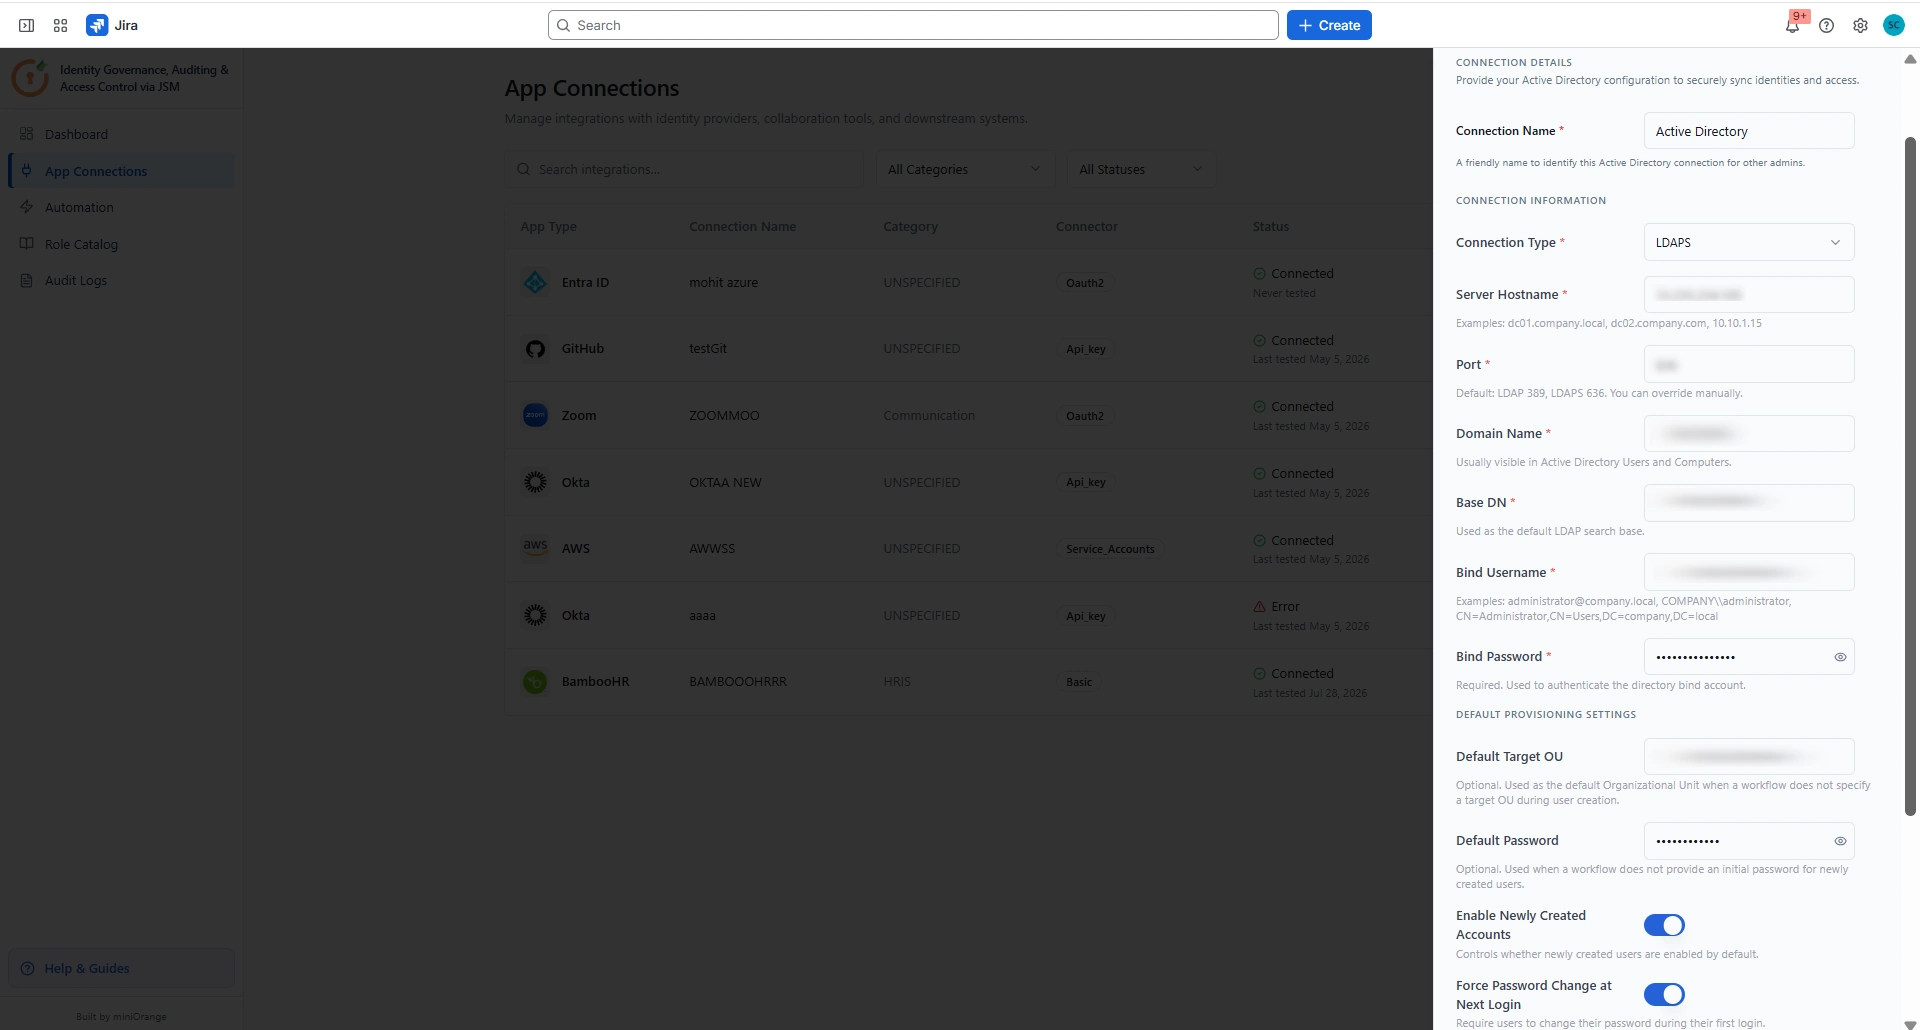
Default Provisioning Settings
-
Default Target OU: Specify the Organizational Unit (OU) where newly provisioned users should be created when a
workflow does not specify a target OU.
Example:OU=Employees,DC=company,DC=local
- Default Password: Specify the default password assigned to newly created users when a provisioning workflow does not provide an initial password.
- Enable Newly Created Accounts: Enable this option if newly provisioned users should be created in an enabled state by default. Disable this option if accounts should remain disabled until they are manually activated or enabled through a workflow.
- Force Password Change at Next Login: Enable this option to require users to change their password the first time they sign in using their newly provisioned account.
Application Admin
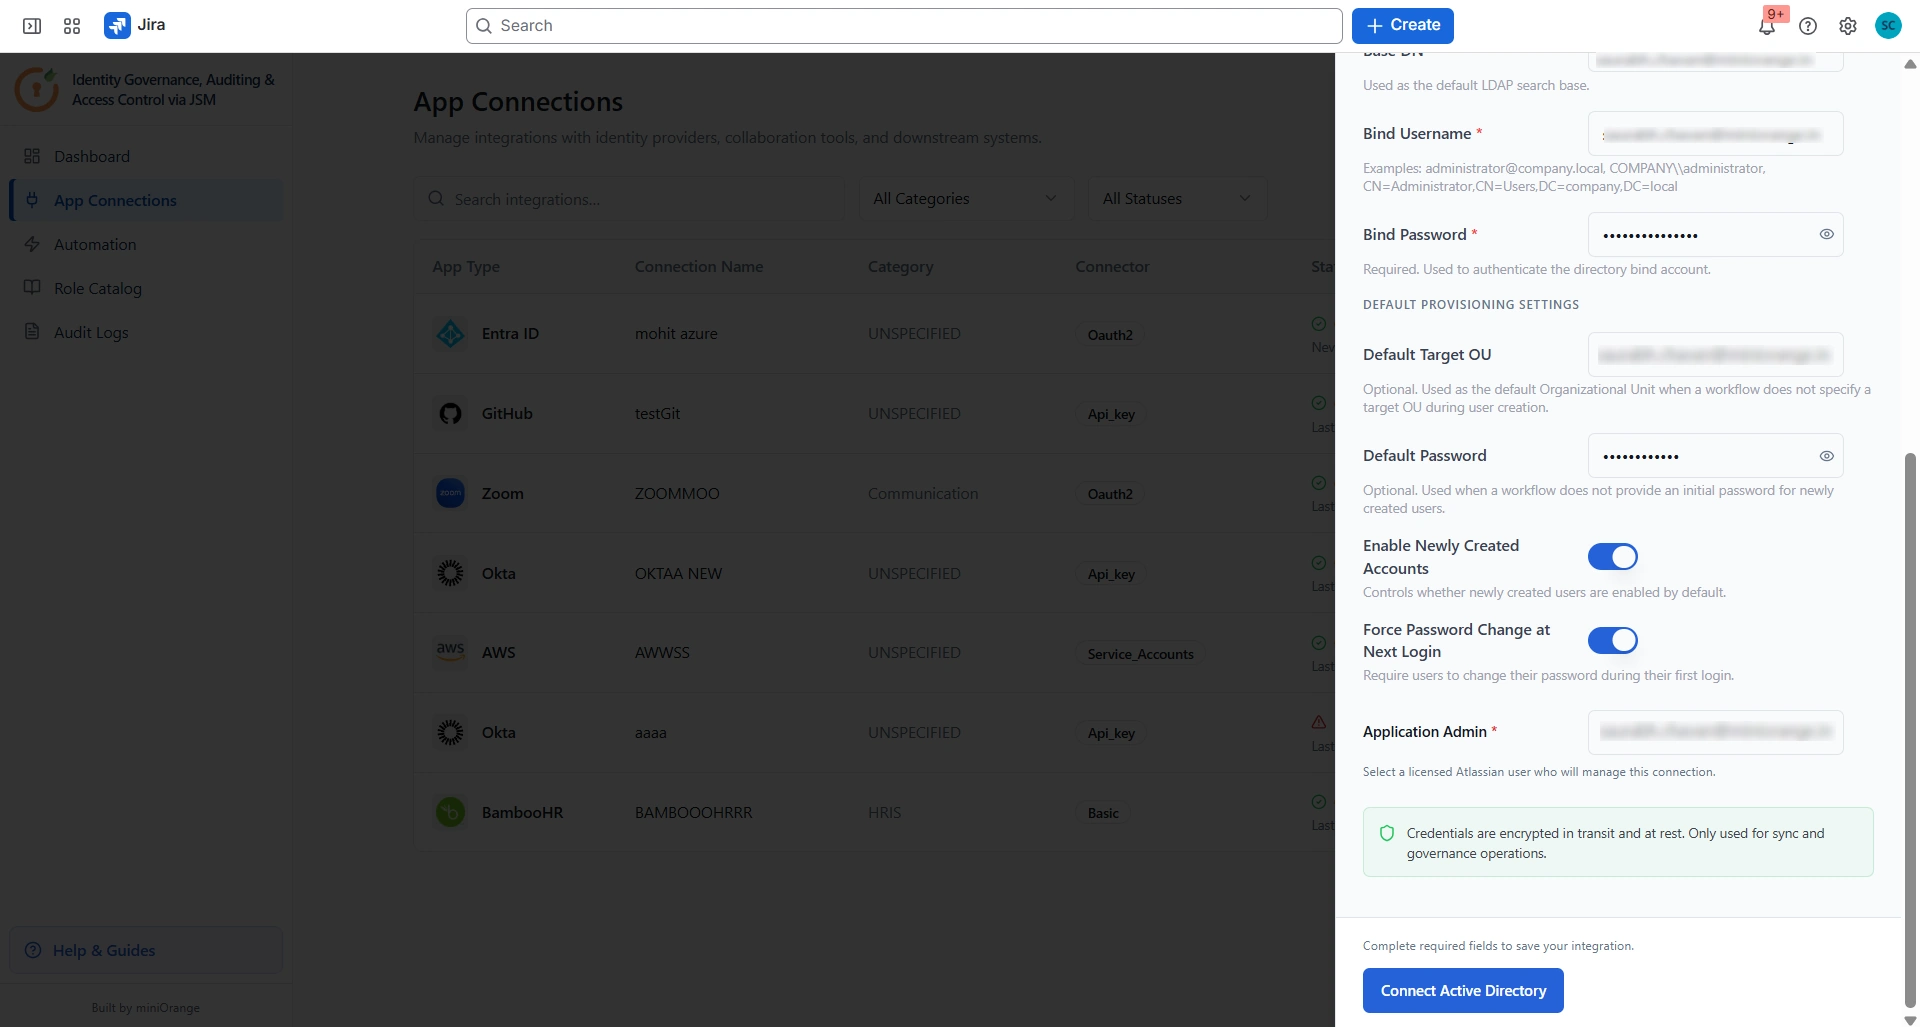
- Application Admin: Select the licensed Atlassian user who will manage this Active Directory connection.
After completing all required fields, click Connect Active Directory to save the integration.
Click Test Connection to verify that the application can successfully connect to your Active Directory server using the configured connection details and bind credentials.
If the connection test fails, review the server hostname, port, domain name, Base DN, bind credentials, and network connectivity before trying again.
Next Steps: Configure Automation Rules
Once the connection is established, configure automation rules to define how users receive access and how identity lifecycle events are managed.
Available automation rules include:
- Application Access Automation Rule – Automatically provision or revoke Active Directory access.
- Group Membership Automation Rule – Add or remove users from Active Directory groups based on approval workflows.
- Identity Lifecycle Management – Automate user onboarding, transfers, and offboarding.
- Privileged Access Automation Rule – Govern requests for privileged Active Directory groups and administrative access.
Did this page help you?