- Home
- Automated User Management
- Automated User Management Documentation
- Automated User Management for Crowd

Automated User and License Management for Crowd
In this comprehensive guide, we'll walk you through the simple steps to configure Automated User Management with Crowd. By the end of this guide, you'll gain the ability to perform bulk activations, deletions, and automatic identification of inactive users based on their last login time.
Say goodbye to manual user management hassles and optimize your Atlassian license costs by ensuring you only pay for active users. Experience the future of user management with miniOrange Crowd AUM– where efficiency meets simplicity.
 Try it for free
Video Setup Guide
Pre-requisites
To configure Automated User Management for Crowd, you need the following items:
- Crowd should be installed and configured.
- Admin credentials are set up in Crowd.
- Valid Crowd Server or Datacenter Licence.
Download and Installation
- Log into your Crowd instance as an admin.
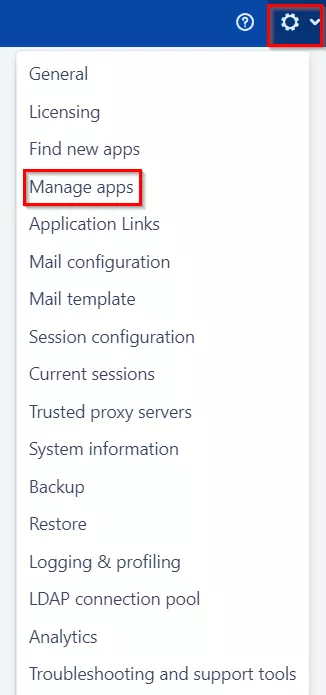
- Navigate to the Administration menu and click Manage Apps.
- Click Find new apps or Find new add-ons from the left-hand side of the page.
- Locate Automated User Management for Crowd via search and click on install.
A. License and Plugin Download
- Create an account with miniOrange.
- Login to miniOrange Admin console.
- Navigate to License > Manage License > Release and Download.
- Download the jar file from the Download link.
- Now, click on the View License button to get the license key.
B. Installation
- Log in to the Crowd Admin console.
- Navigate to Administration > Manage Apps.
- Click on the Upload App and upload the jar file.
- Now, click on the Configure button. You will be asked to verify the miniOrange credential and license key.
C. Plugin Activation
- Navigate to Crowd Admin Console → Manage Apps.
- Click on the Configure button of the miniOrange Crowd Automated User Management plugin.
- Log in with your miniOrange account. Once authenticated, you will be prompted to enter the license key.
- Enter the license key and click on the verify button.
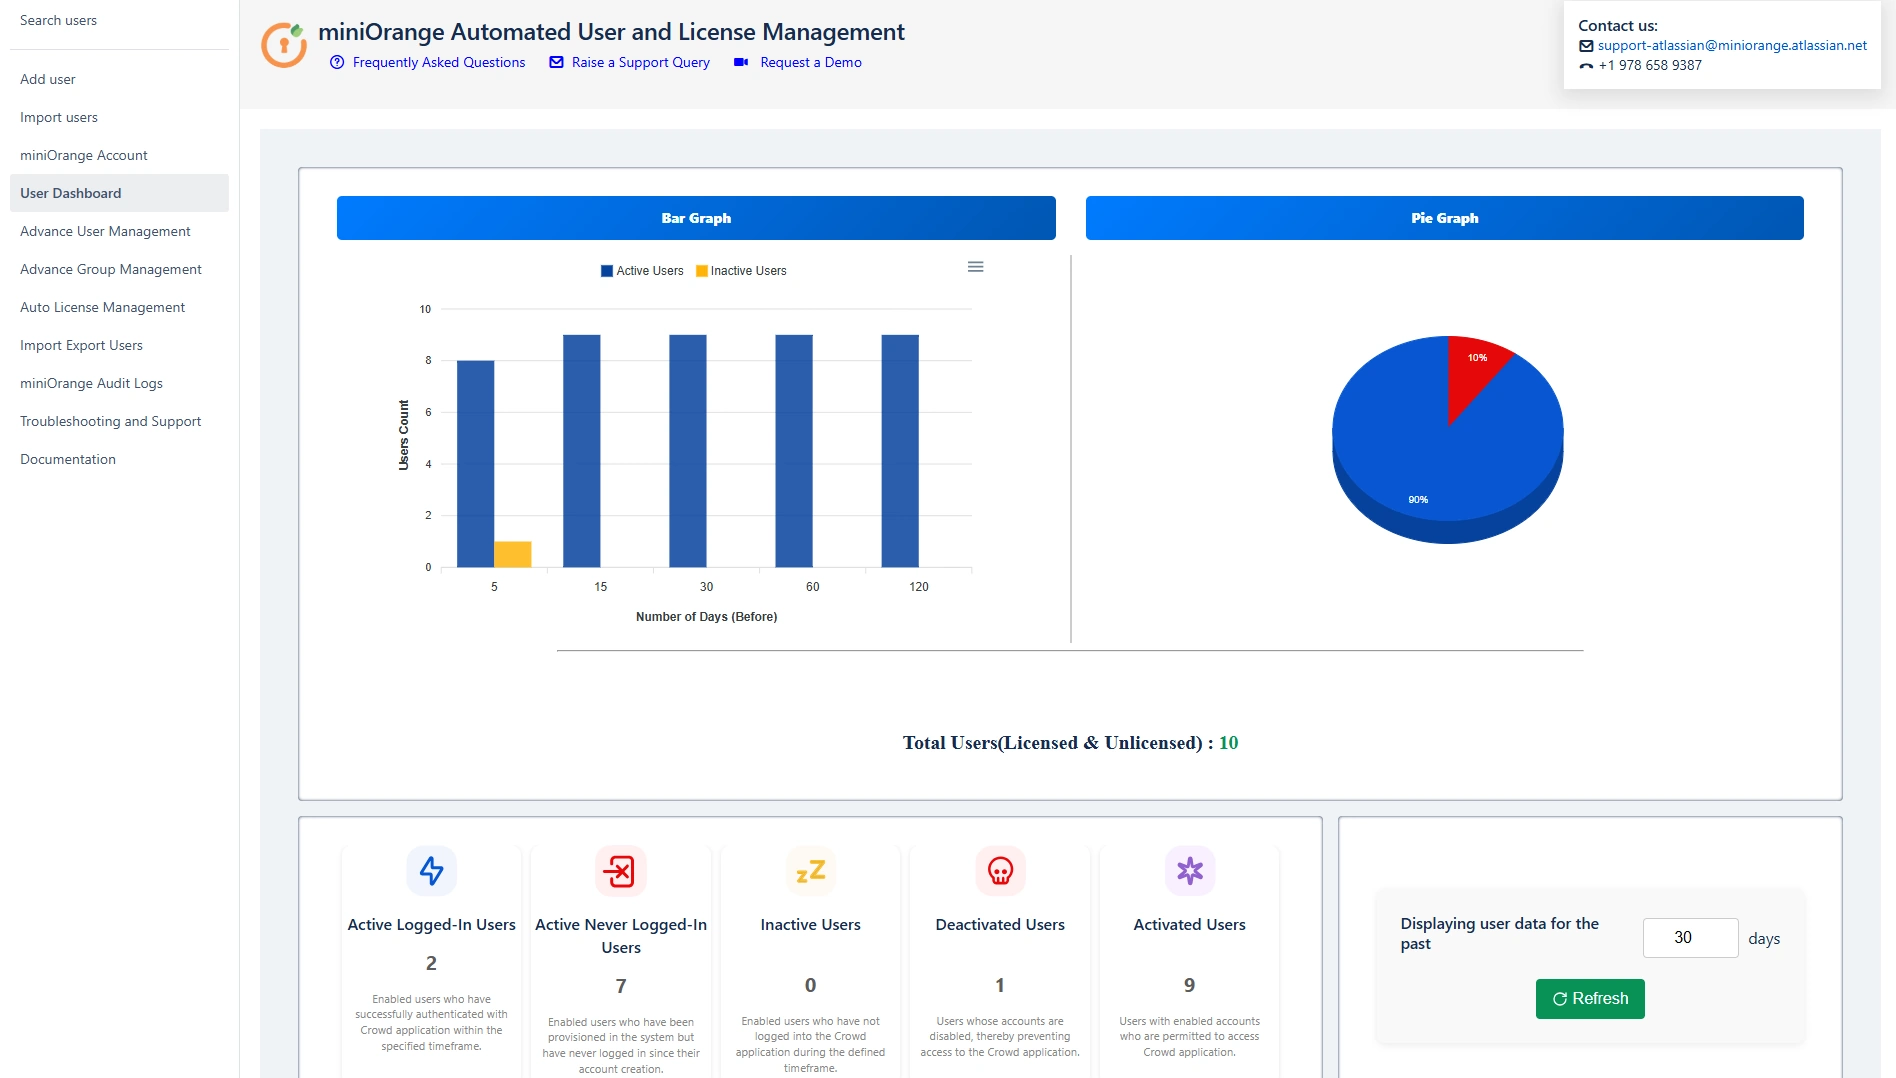
Dashboard: Visual Analytics & User License Insights
The Dashboard tab in the miniOrange Automated User and License Management Plugin provides a comprehensive visual overview of your Crowd user base. With intuitive graphs and live statistics, it allows administrators to monitor user activity, track license usage, and evaluate user segmentation over a selected time period.
This centralized view helps Crowd admins make informed decisions about license optimization, deactivation strategies, and overall system hygiene.
 Visual Components of the Dashboard
- Active Users – Users currently enabled and using the application.
- Deactivated Users – Users who have been explicitly disabled or deactivated.
- Track how many users were active, inactive over the selected number of days.
- Evaluate spikes or drops in login behavior to understand usage patterns, such as after a major release or a policy change.
1. Pie Chart: User Distribution Overview
The pie chart provides a snapshot breakdown of user types based on their current status in the Crowd environment:
Example Use Case: If the pie chart shows a high percentage of deactivated users (e.g., 96.9%), it may be time to clean up directories or re-evaluate auto-deactivation rules.
2. Bar Graph: User Activity Trends Over Time
The bar graph provides a time-based visual trend of user activity:
Example Use Case: If user activity dropped significantly over the past 30 days, it could indicate a misconfigured access rule or a scheduled maintenance window that impacted logins.
Benefits of the Dashboard
- Quick Overview of user segmentation and login behavior
- Graphical Insights for presentations or internal reporting
- License Optimization through visibility into unused or inactive accounts
- Audit Readiness by analyzing activation and deactivation trends over time
Sample Scenario
You are preparing for a quarterly license review. By opening the dashboard and setting the display range to 90 days, you quickly find:
- 2 active licensed users
- 1 never logged-in licensed user
- 7181 deactivated users
This helps you justify a potential reduction in user licenses and clean-up inactive or orphaned accounts.
Visualize your Crowd user activity and license usage via miniOrange's dashboard. Spot trends, optimize allocations, drive smart decisions.
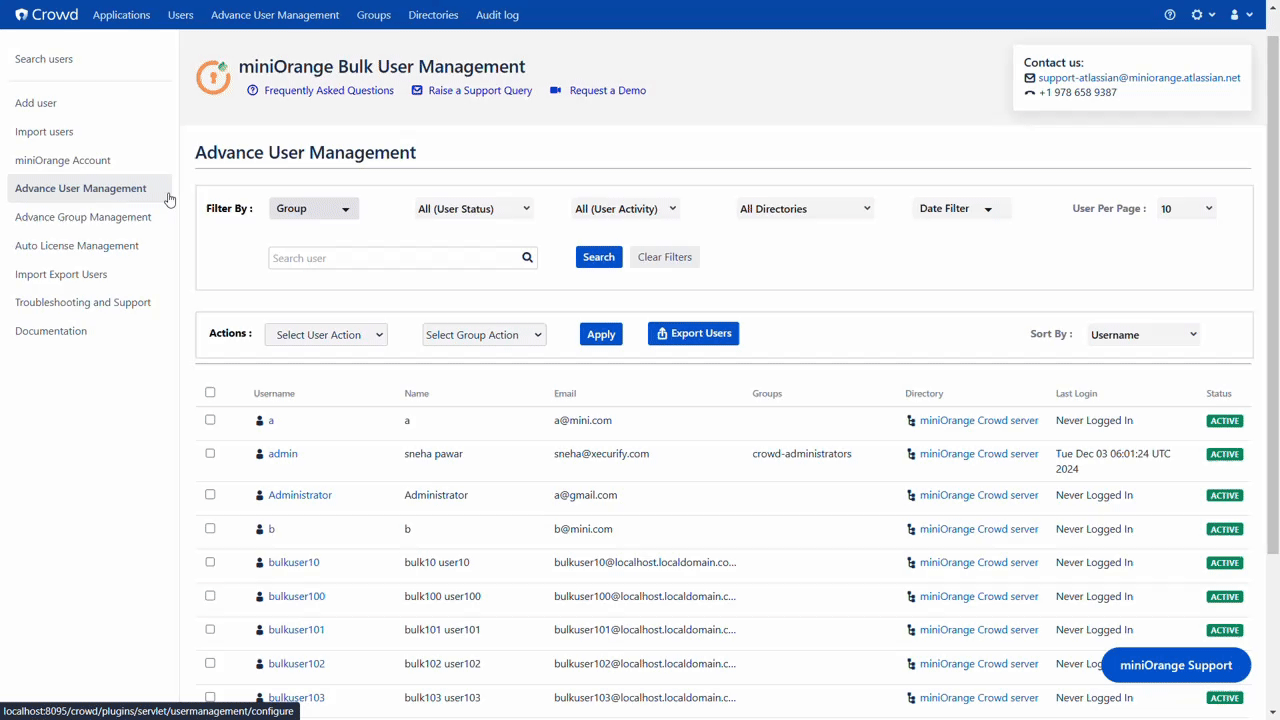
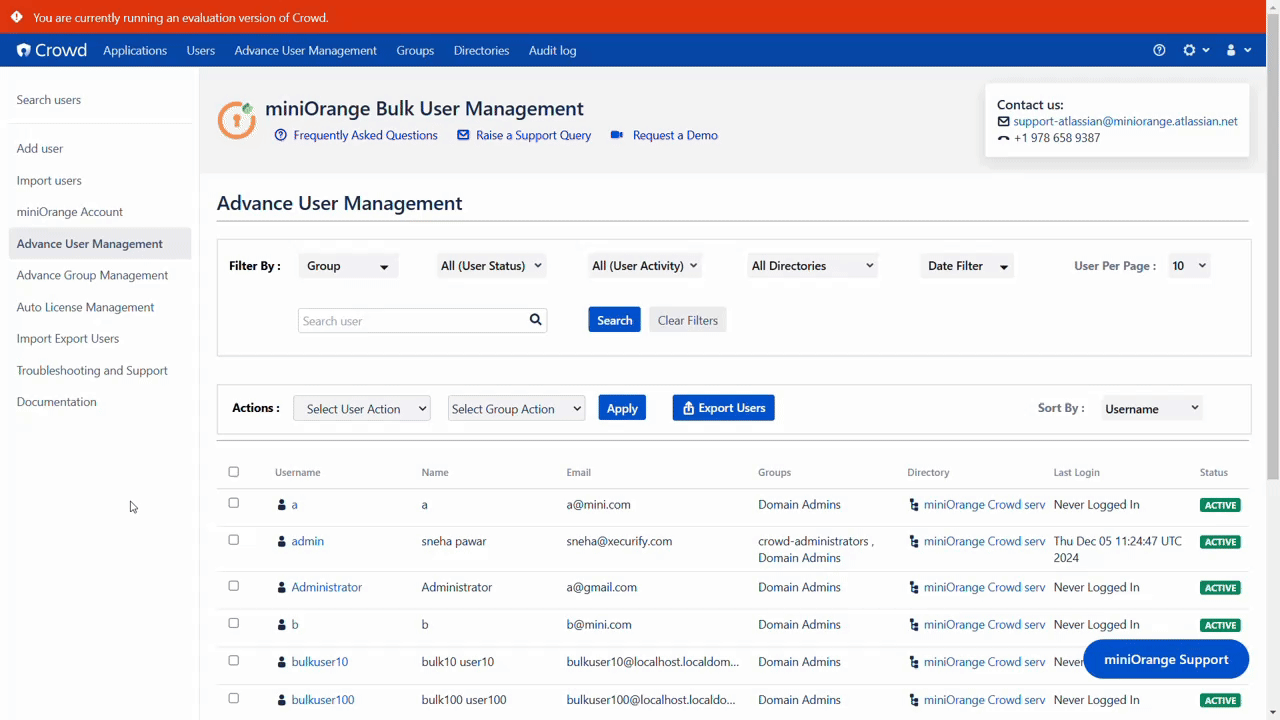
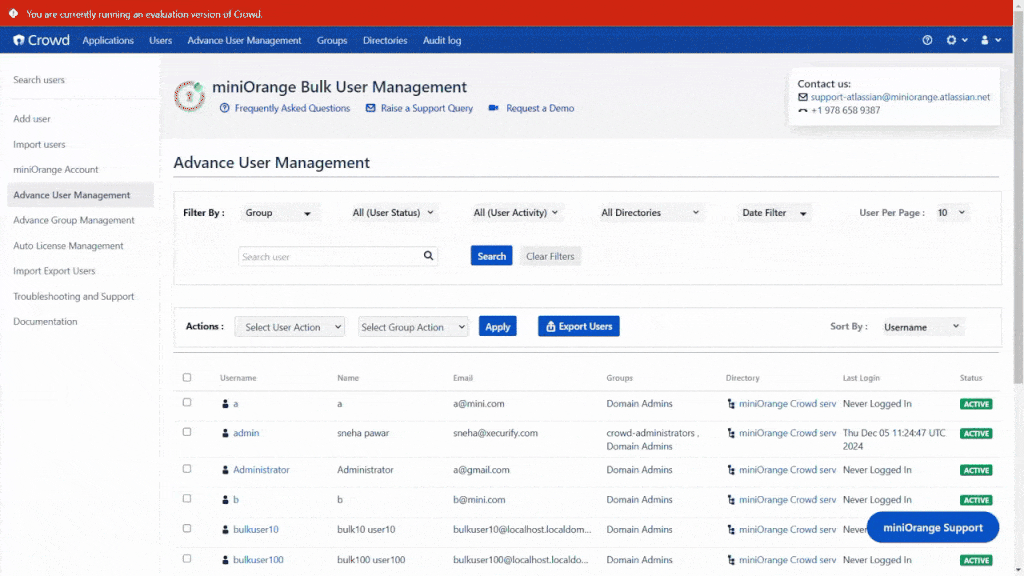
Advanced User Management
Advanced User Management provides you with a powerful user search functionality. You can effortlessly search for users based on various filters.
These filters are:
- Groups
- Directory
- Status (Active, Inactive, All Users)
- Last Login Date
- Username
- Initiate your search and progressively refine it until you pinpoint the exact users you're looking for. Once identified, you can swiftly execute bulk actions on these users, ensuring a quick, efficient, and seamless process.
- Select the Users for bulk operation using the checkbox associated with them.
- Easily bulk edit users:- Activate, Deactivate or delete them - all in one easy go
- Easily move users into different user groups, remove them from one group, add them to another group.
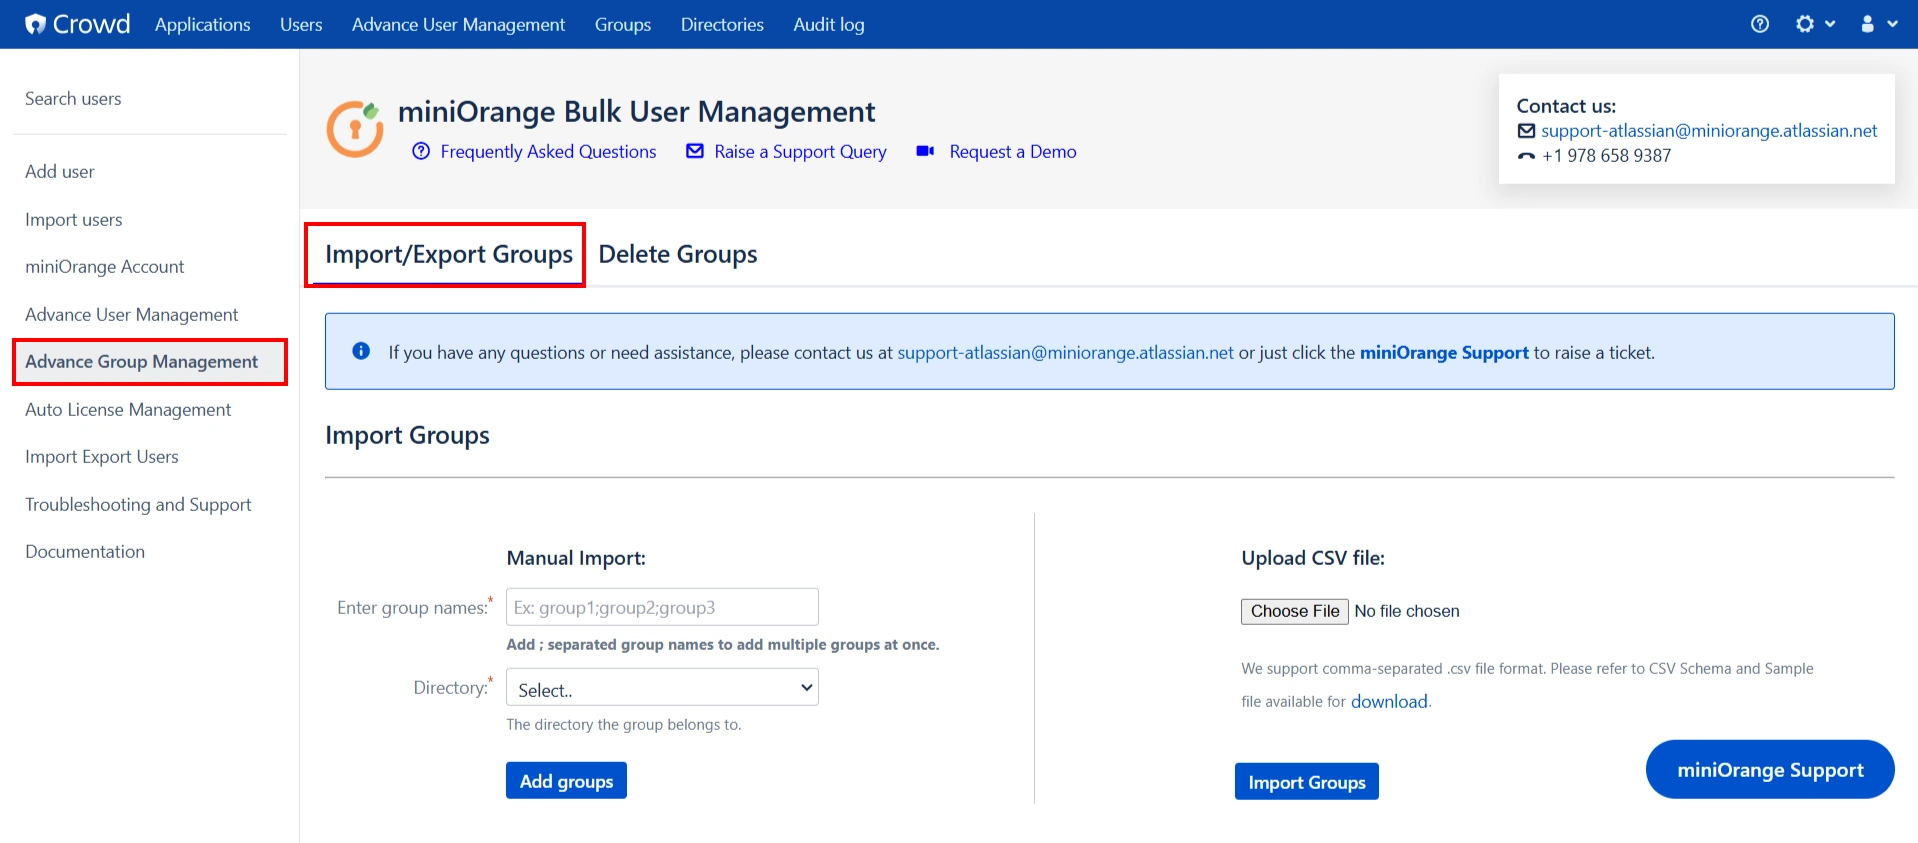
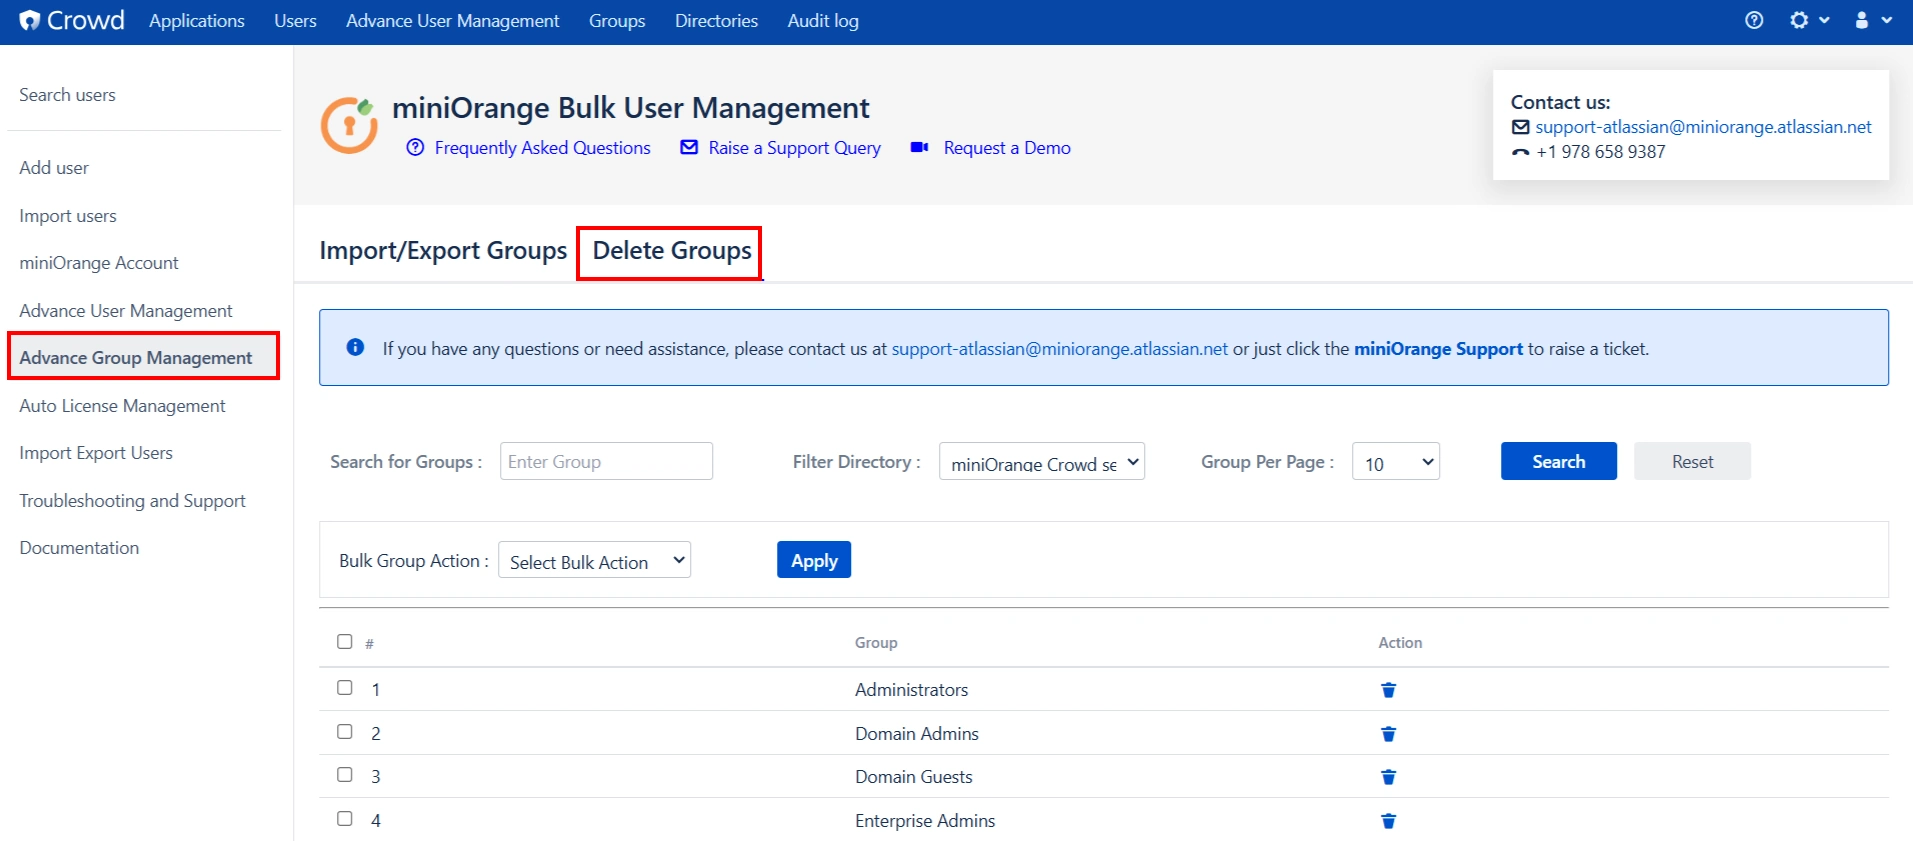
Advance Group Management
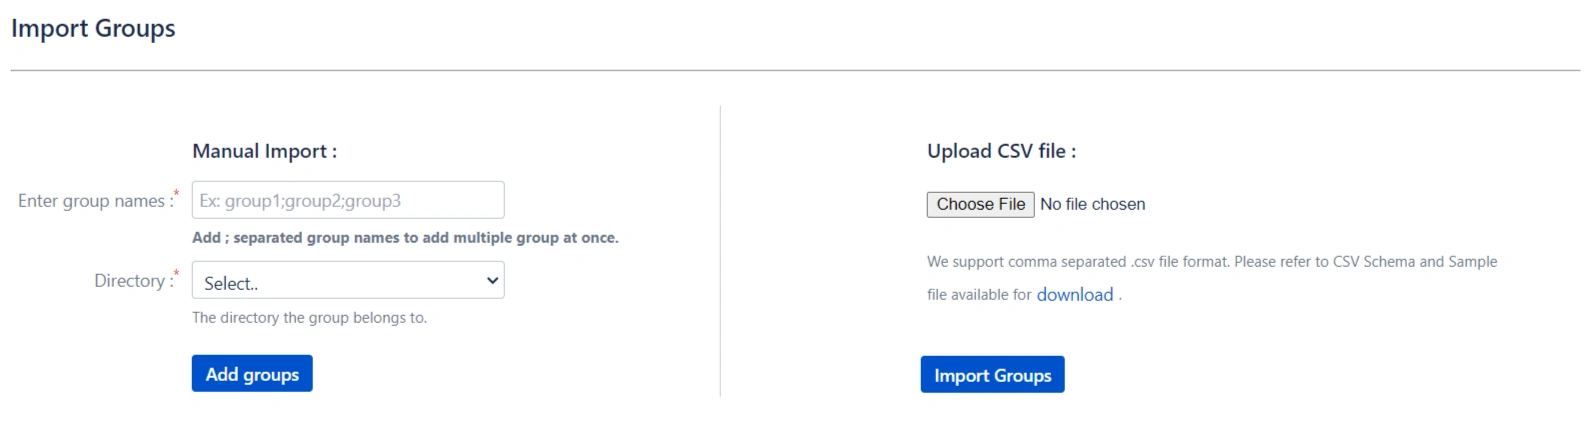
- Advance Group Management section enables you to create and delete groups in large numbers.
- Manual Entry:- In the Enter group names field, enter the group names manually. You can add multiple groups at a time by adding multiple group names separated by semicolons.
- Upload csv file:- Import the groups by uploading the CSV file with Groups names that contain Group names in it. You can also get the Sample CSV file format by clicking on the download link.
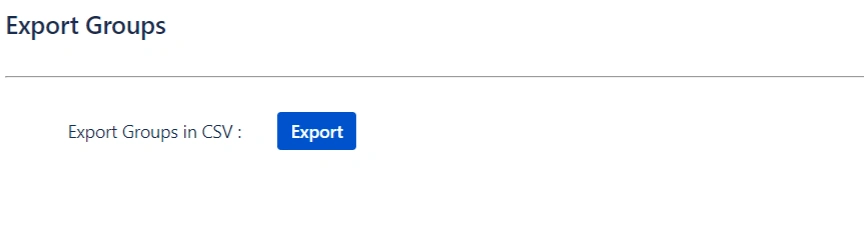
- In the export groups section you can export the groups in .CSV file format by clicking on Export Groups in CSV button.
- Select the required groups that you want to delete from the Select groups dropdown. You can select multiple groups here.
Import
Groups
Export
Groups
Delete
Groups
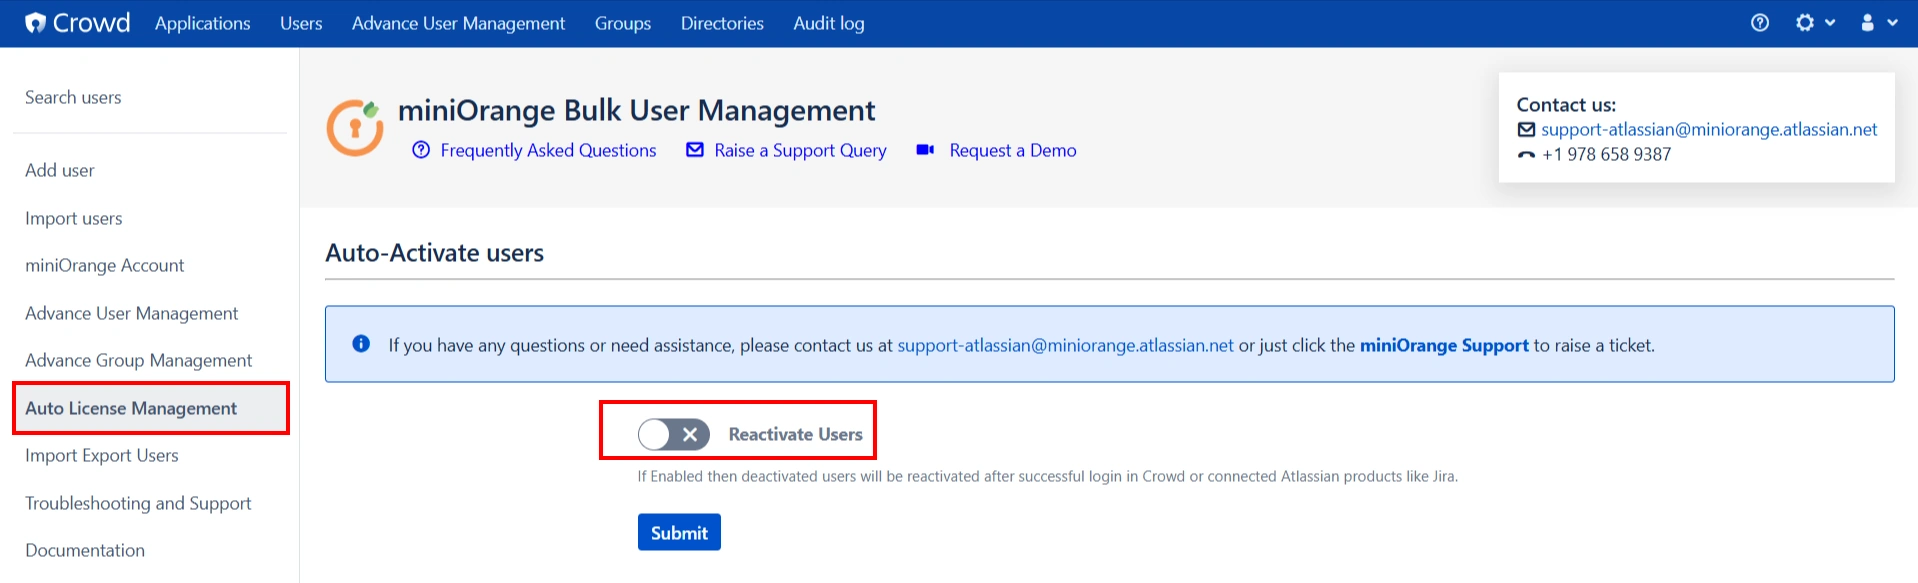
Auto License Management
- Enabling the "Reactivate Users" toggle will automatically reactivate previously deactivated users upon their successful login in Crowd or connected Atlassian products.
- Auto User Management simplifies the management of your Atlassian license expenses by ensuring that you only pay for actively engaged users. This is achieved through automated processes that identify and take action on users based on their group memberships and the duration of their inactivity.
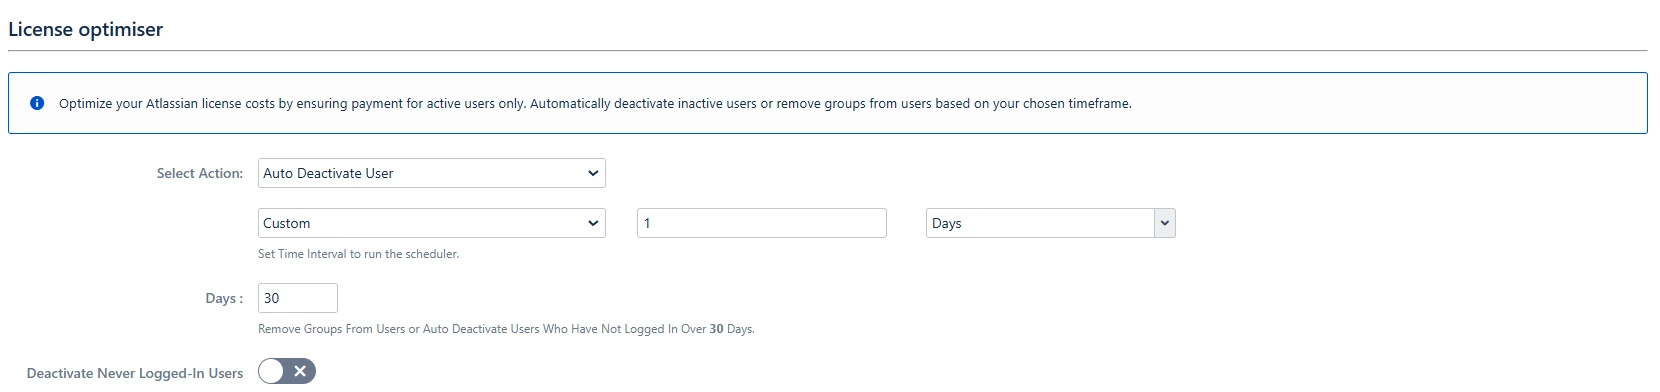
- Automatically deactivates multiple users on a scheduled basis.
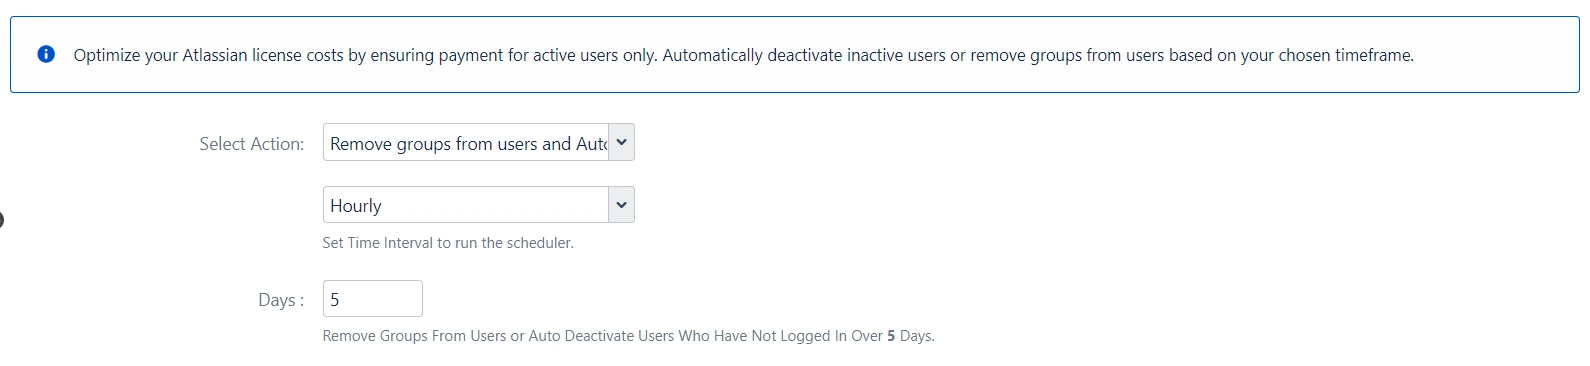
- You can set a custom time for the scheduler to run, whether it's hourly, daily, weekly, monthly, or at your specified time interval.
- Specify the number of days, e.g., 5, to automatically deactivate users who haven't logged in within that time frame.
- If you want to deactivate a never-logged-in user then enable the Deactivate Never Logged-In Users.
- Choose to send an email notification before deactivating a user.
- Ability to exclude members of specific groups from deactivation.
- Option to exclude specific members from deactivation.
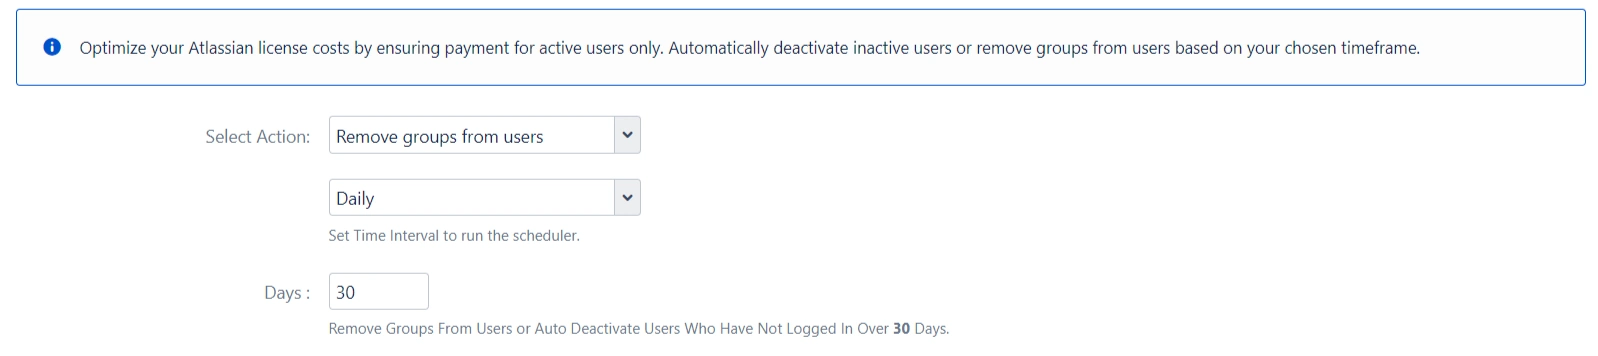
- Automatically remove groups from users on a scheduled basis.
- You can set a custom time for the scheduler to run, whether it's hourly, daily, weekly, monthly, or at your specified time interval.
- Select the groups to remove from users. Multiple groups can be set. The user will be removed from these groups. Keep empty to remove none.
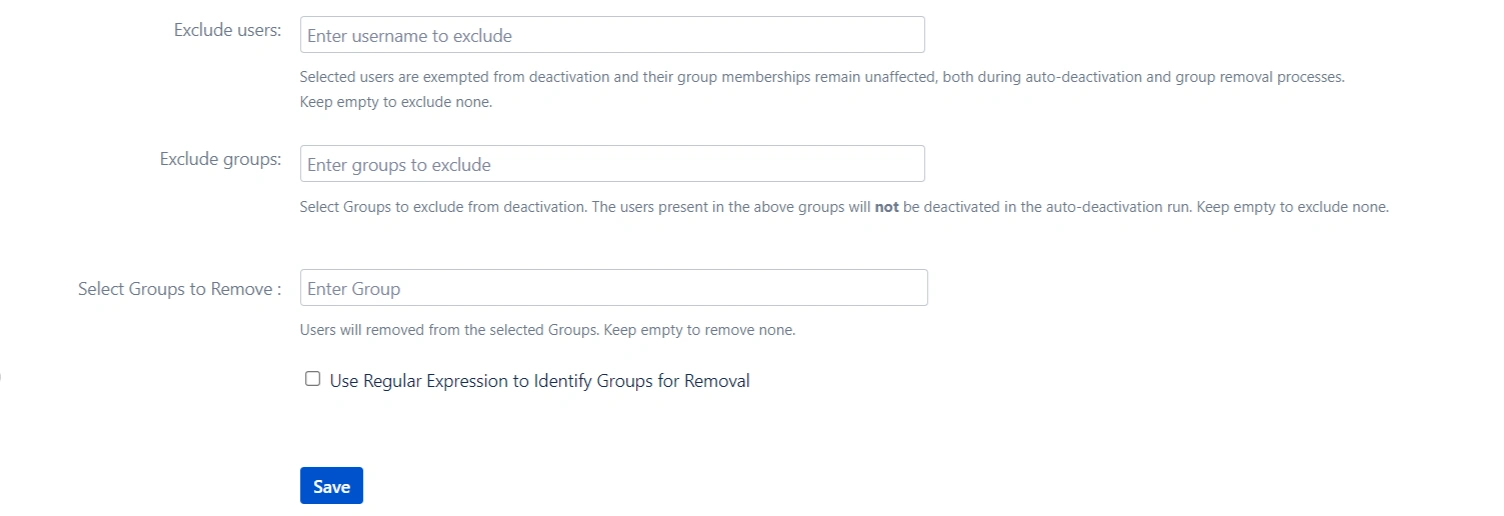
- Utilize regular expressions to identify groups for removal.
- To check the output of the regex, click on the Test Regex button. Enter a value in the field provided. Click the Test button to apply the given regex to the entered value.
- Automatically deactivates multiple users & removes groups from users on a scheduled basis.
- Exclude Users :- Selected users are exempted from deactivation and their group memberships remain unaffected, both during auto-deactivation and group removal processes.
- Exclude Groups:- Select Groups to exclude from deactivation. The users present in the above groups will not be deactivated in the auto-deactivation run. Keep empty to exclude none.
- Select Groups to Remove:- Users will be removed from the selected Groups. Keep empty to remove none.
Auto
Deactivate User

Remove
Groups from Users
Automatically remove users from groups that grant application access if they remain inactive for the specified period. Users are removed from the group if they do not login to the application within the specified days of the defined inactivity period.


Auto
Deactivate User & Remove Groups from Users
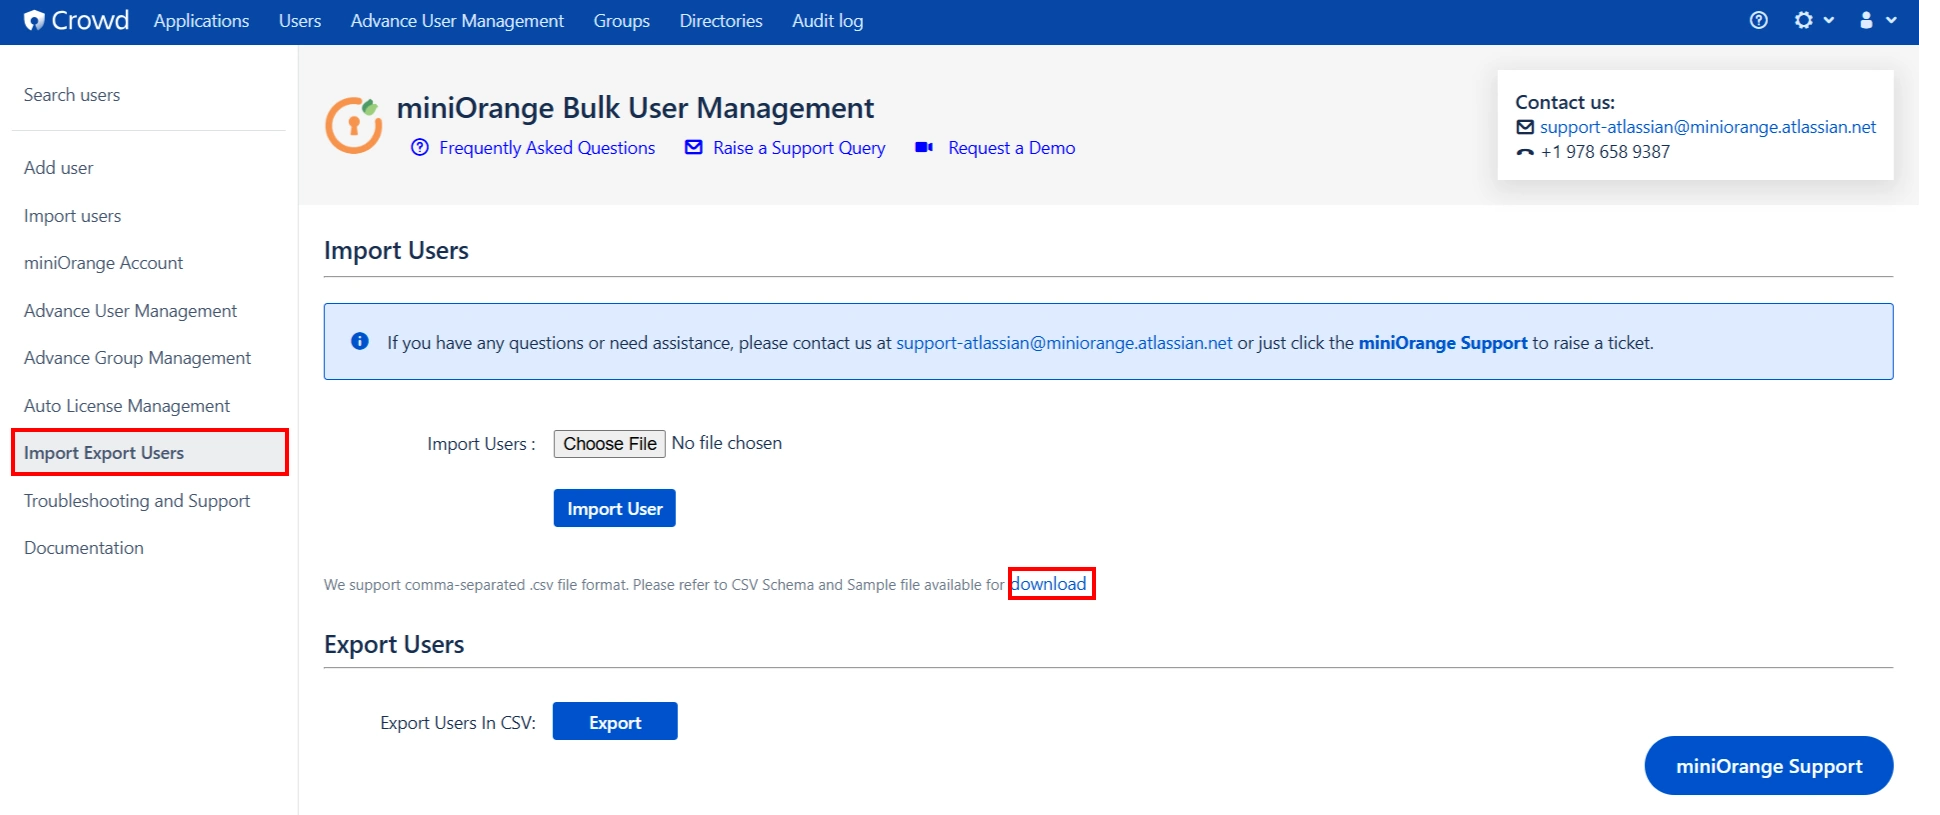
Import Export Users
- To import the users, you need to upload a .CSV file. You will find the format in by clicking on the download link as highlighted in the below image.
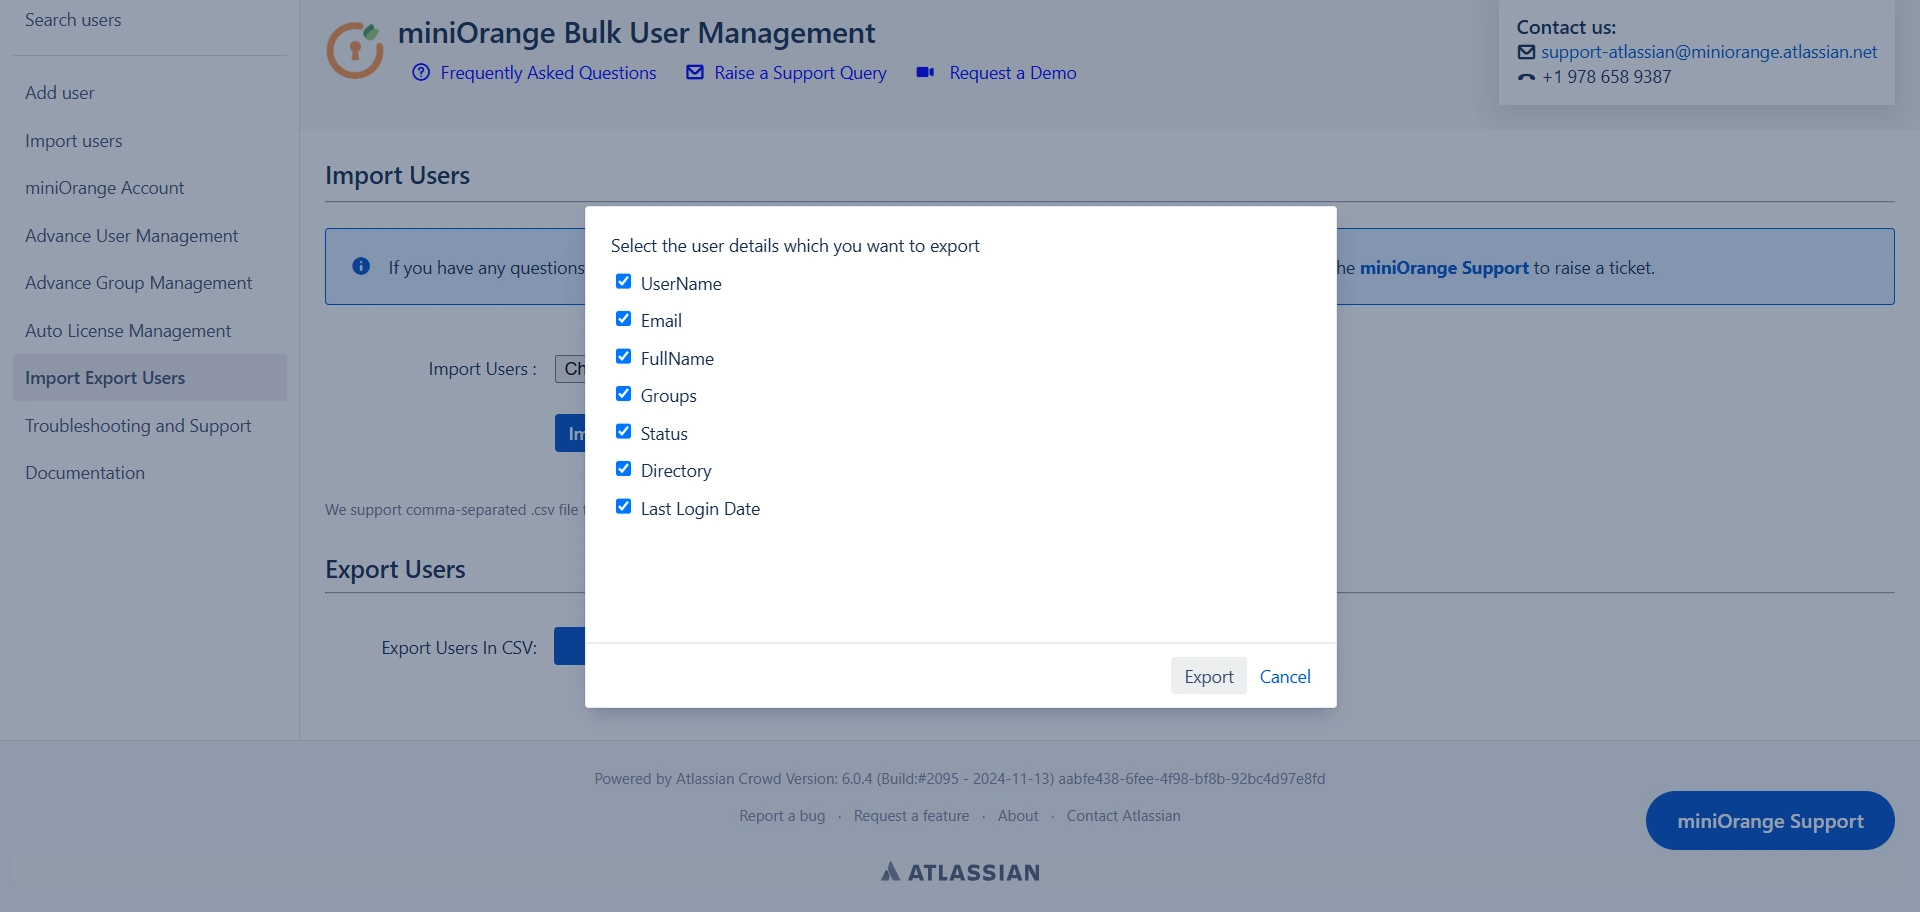
- Export Users allows you to download all user data, with the option to select specific user details for export.
Audit logs
The Audit Logs section helps you track and monitor all major actions performed using the miniOrange User Management plugin in Crowd. This ensures better visibility, accountability, and easier troubleshooting of admin operations.
What is Logged?
- Activation of users
- Deactivation and deletion of users
- Reactivation of previously deactivated users
- Adding groups to users
- Removing groups from users
- User import/export actions
- Group import/export actions
- Enabling/disabling:
- Auto User Deactivation
- Auto Group Removal
- Combined operations
- Audit logging is enabled by default and starts capturing from the moment the plugin is active.
The following actions are captured automatically in the Audit Logs:
User Management
Group Operations
Import/Export
Scheduled Tasks
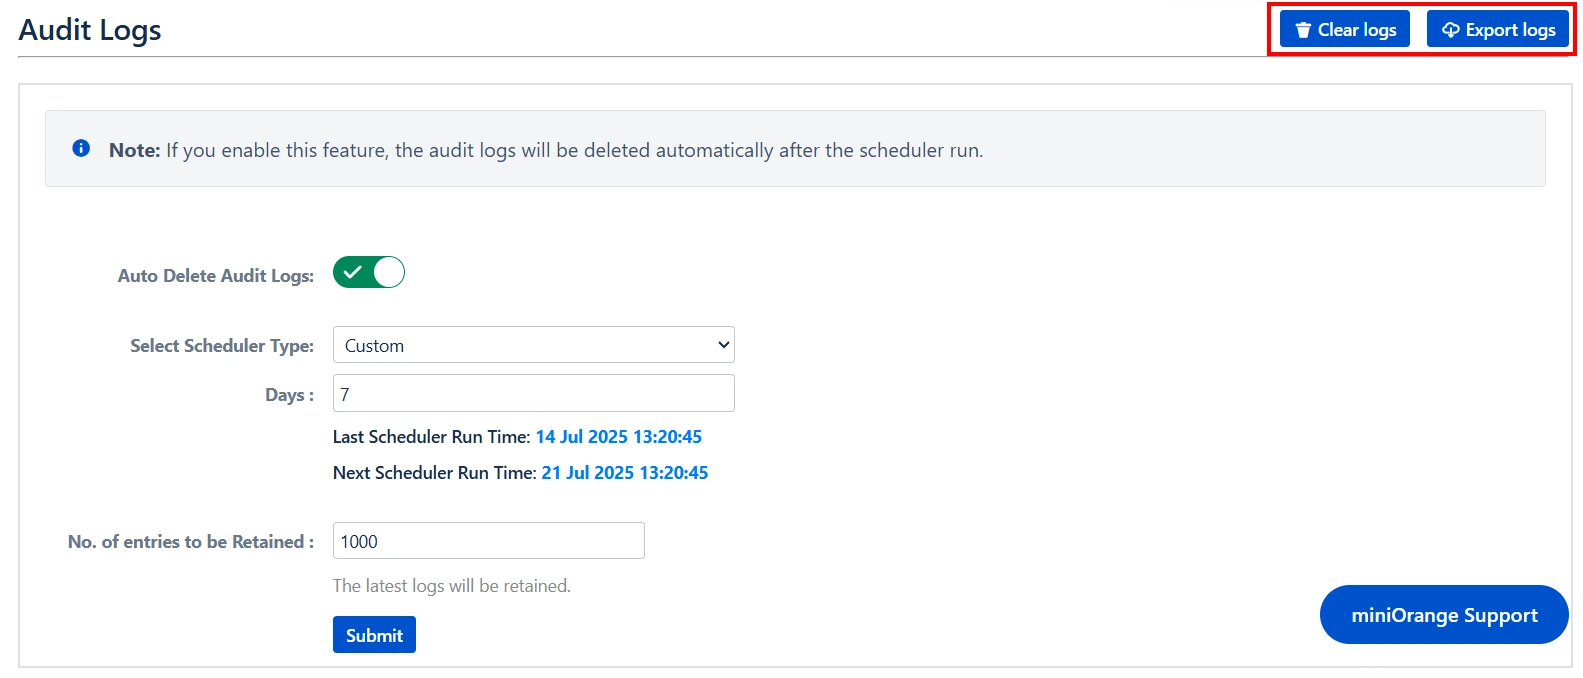
Configure Auto Delete for Logs
- Navigate to Crowd Admin → Manage Apps miniOrange Automated User Management → miniOrange Audit Logs
- Enable the Auto Delete Audit Logs toggle
- Select Scheduler Type (e.g., Custom, Daily,)
- Set:
- Number of days after which logs should be deleted
- Number of entries to retain
- Click Submit to save
- Youʼll see the Last and Next Scheduler Run Times listed below the configuration panel.
To help manage log volume, the plugin allows administrators to configure automatic deletion of older entries.
Steps to configure:

Filtering and Exporting Logs
- Username Filter: Used to isolate or search for a specific user from a list of users.
- IP Address Filter: Used to locate a specific IP address within the audit logs.
- Action Filter: Used to sort or filter entries based on the actions performed.
- Status Filter: Used to filter between success and error logs specifically.
- Days Filter: Used to filter audit log entries within a specific number of days.
- Logs Per Page Filter: Used to control the number of log entries displayed per page.
- Clear Logs: This option is used to permanently delete all stored entries from the audit logs. It helps in removing outdated or unnecessary log data, freeing up storage space, and maintaining a clean and manageable audit trail. Use this feature with caution, as once the logs are cleared, the deleted entries cannot be recovered.
- Export Logs: This feature allows you to export all audit log entries into a downloadable CSV file. It is useful for record-keeping, analysis, compliance reporting, or sharing logs with other teams. The exported file contains detailed information from the logs and can be opened with spreadsheet applications for further review.
Youʼll find advanced filters to help search through log data easily.
Filter by:
You can also:
Additional Resources
Did this page help you?
