Step 2: Setup Fisheye/Crucible as Service Provider
Configuring Single IDP
With the information you have been given by Your IDP team, you can configure IDP settings in 3 ways:
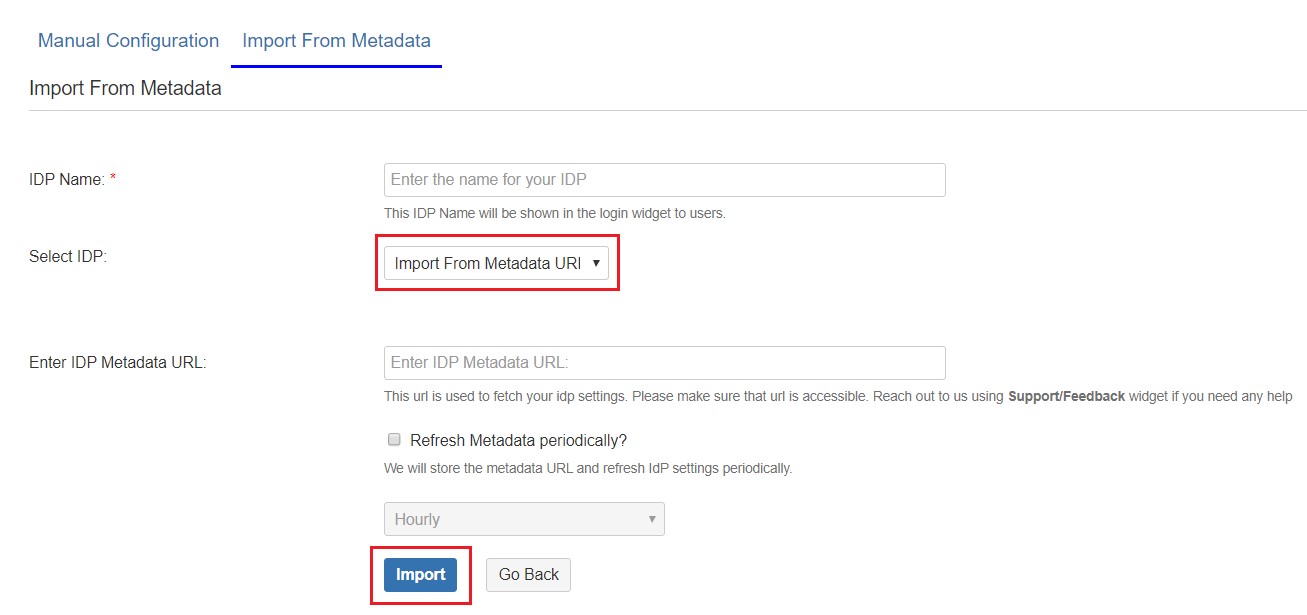
A. By Metadata URL
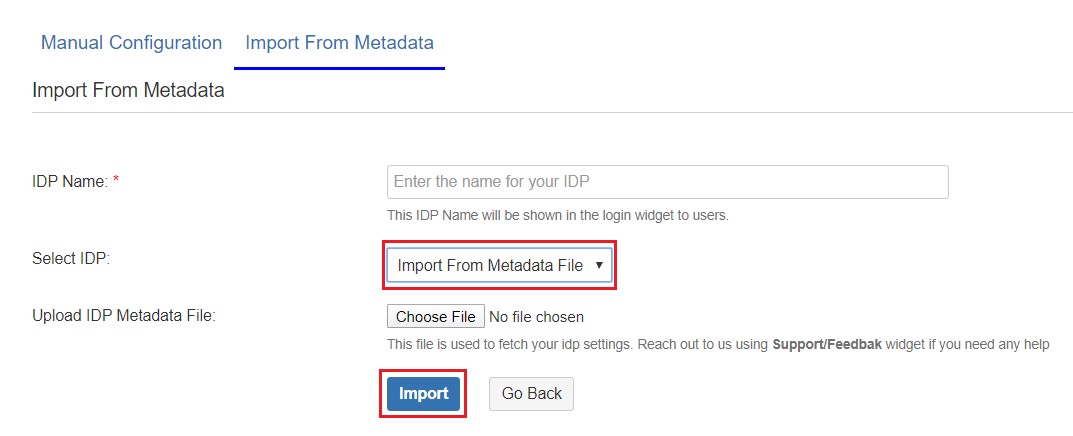
B. By Uploading Metadata XML File
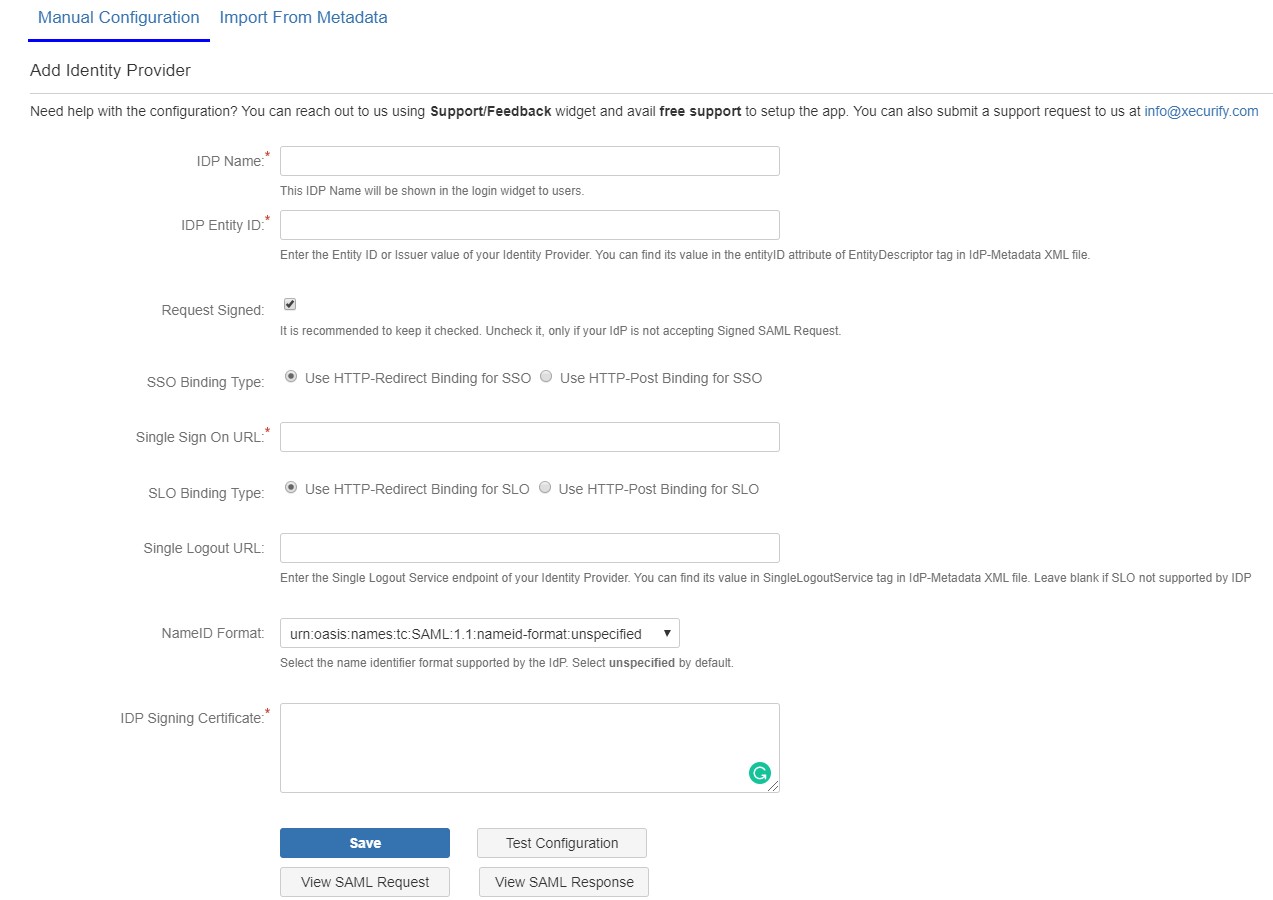
C. Manual Configuration
Go to Configure IDP tab and enter the following details
With the information you have been given by Your IDP team, you can configure IDP settings in 3 ways:
A. By Metadata URL
- Click on Import from Metadata in Configure IDP tab.
- Select IDP: Import From Metadata URL.
- Enter IDP metadata URL: Enter your metadata URL.
- If your IDP changes certificates at intervals(Eg.Azure AD), you can select Refresh metadata periodically. Select 5 minutes for the best results.
- Click Import.
B. By Uploading Metadata XML File
- Click on Import from Metadata in Configure IDP tab.
- Select IDP: Import from Metadata File
- Upload metadata file.
- Click Import.
C. Manual Configuration
Go to Configure IDP tab and enter the following details
- IDP Entity ID
- Single Sign On URL
- Single Logout URL
- X.509 Certificate
Configure New IDP
If you already have one IDP & you are looking to add Second IDP then you can do it by performing the following steps.

Configure multiple IDPs
If you have configured more than two IDPs then it will show you the list of IDP that you have configured with Fisheye/Crucible.
Click on Add new IdP button for adding new IDP on Fisheye/Crucible. The steps for adding new IDP will remain the same.

An operation that you can perform with List of IdPs page.
If you already have one IDP & you are looking to add Second IDP then you can do it by performing the following steps.
- Navigate to Configure IDP tab.
- Click on Add new IDP.
- It will present a blank form & you can configure new IDP using steps from Single IdP Setup.
Configure multiple IDPs
If you have configured more than two IDPs then it will show you the list of IDP that you have configured with Fisheye/Crucible.
Click on Add new IdP button for adding new IDP on Fisheye/Crucible. The steps for adding new IDP will remain the same.
An operation that you can perform with List of IdPs page.
- Add / delete Identity Provider.
- Test Connection between Fisheye/Crucible & IdP by click on Test button for respective IDP.
- Edit the IdP configuration by clicking on the Edit button.
- You can allow an only specific set of users to access Fisheye/Crucible by using Domain Mapping.
- Single Sign-On with Multiple Identity Provider(IDP)
- Select your IdP from the list. It will redirect you to selected IdP login page.

- Configure Domain Mapping
- You can enable domain mapping using Use Domain Mapping option.
- Once enable it, you need add domain name against each IDP.
- After enabling Domain Mapping it allows SSO only for those users whose domain matches with the specified one.

- Single Sign-On using Domain mapping
- Enter the user email address. It will check your domain name with the configured domain if it matches then it will redirect you to the respective Identity Provider Login page.
- This is how the login screen would appear after enabling domain mapping.

Step 3: Setting up Fisheye/Crucible user profile attributes
-
We will be setting up user profile attributes for Fisheye/Crucible. If your users are stored in
a directory that is Read Only, please check Disable Attribute
Mapping in User Profile tab and follow steps given in Matching a User.
- Go to Configure IDP tab. Scroll down and click on Test Configuration.
- You will see all the values returned by your IDP to Fisheye/Crucible in a table. If you don't see value for First Name, Last Name, Email or Username, make the required settings in your IDP to return this information.
- Once you see all the values in Test Configuration, keep the window open and go to User Profile tab.
- In this tab, fill the values by matching the name of the attribute. For instance, if the attribute name in the Test Configuration window is NameID, enter NameID against Username.
- Setting up both Username and Email is required if you want to let users register. If you want existing users to the only login, configure the attribute using which you will match the user in Fisheye/Crucible.
- Go to User Profile tab.
- Select Username or Email for Login/Search Fisheye/Crucible user account by.
- Enter the attribute name from IDP which corresponds to Username or Email using Finding Correct Attributes.
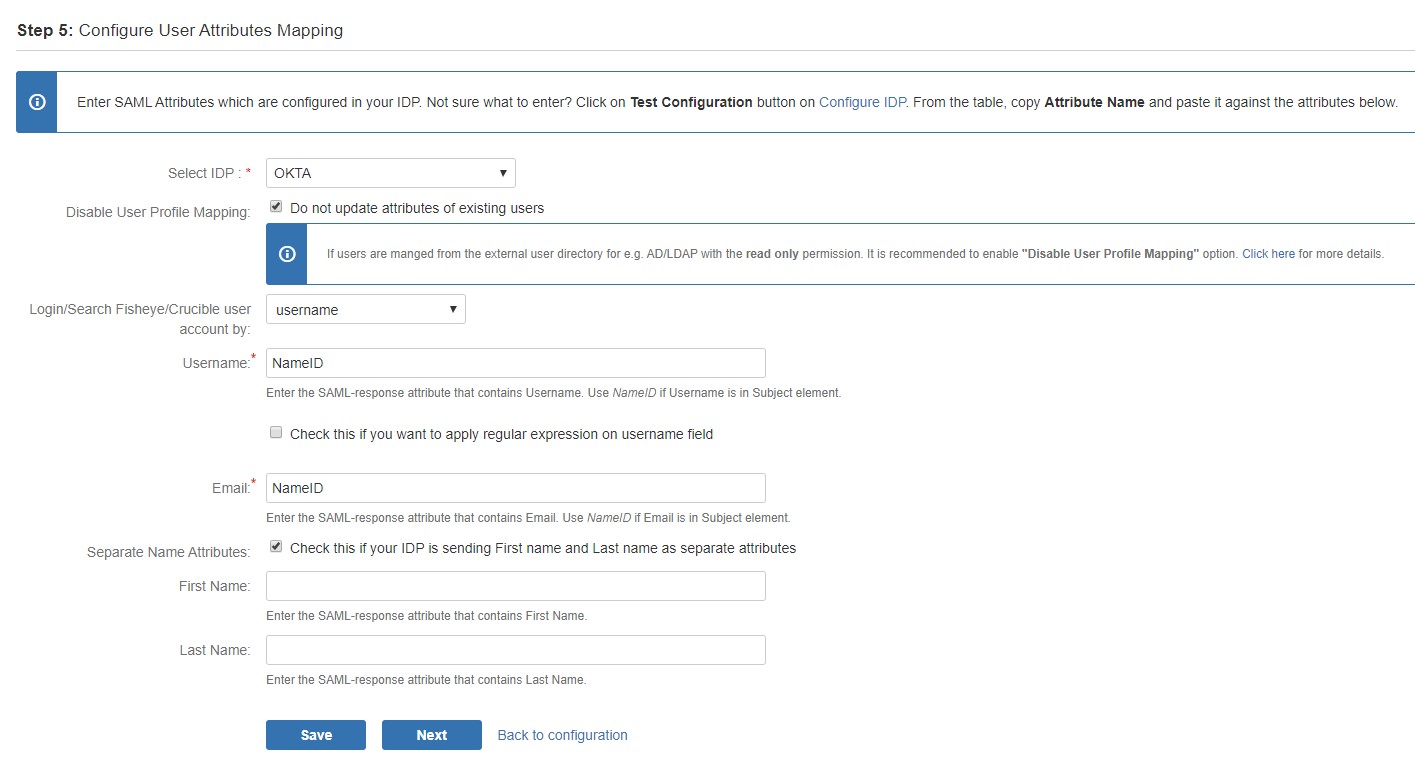
a. Finding correct attributes
b. Setting profile attributes
c. Matching a User
When the user logs into Fisheye/Crucible, one of the user's data/attribute coming in from the IDP is used to search the user in Fisheye/Crucible. This is used to detect the user in Fisheye/Crucible and log in the user to the same account.Step 4: Assigning groups to users
-
We will be setting up user group attributes for Fisheye/Crucible. If your users are stored in a
directory that is Read Only, please check Disable Group
Mapping in User Groups tab and skip to set default group.
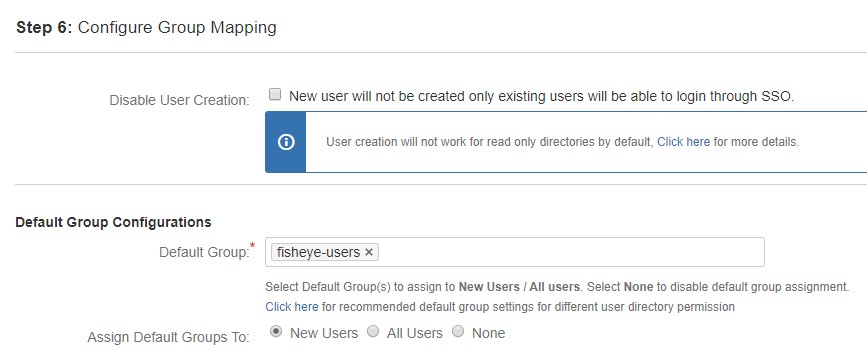
- Select the users' Default Group in the tab User Groups. If no group is mapped, users are added by default to this group.
- You can enable default groups for All Users or New Users using the option.Select None if you don't want to assign any default group to SSO users. Using the option Enable Default Groups for.
- Just like we found attribute name for user profile attributes, we find group attribute.
- Go to Configure IDP tab. Scroll down and click on Test Configuration.
- You will see all the values returned by your IDP to Fisheye/Crucible in a table. If you don't see value with groups, make the required settings in your IDP to return group names.
- Once you see all the values in Test Configuration, keep the window open and go to User Groups tab.
- Enter the attribute name of group against Group Attribute.
- Check Disable Group Mapping option if you don't want to update groups of existing users.
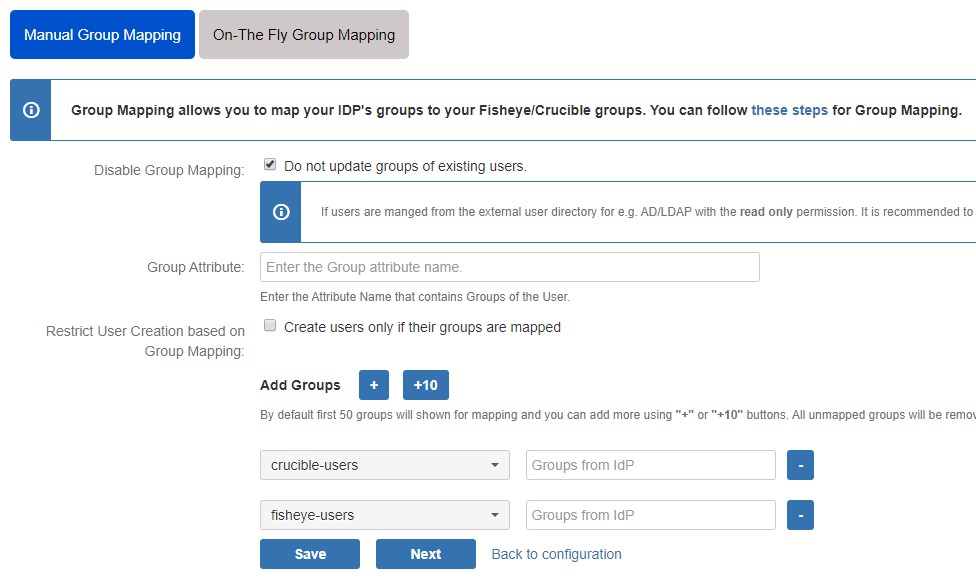
- Manual group mapping: If the names of groups in Fisheye/Crucible are different than the corresponding groups in IDP, then you should use Manual group mapping.
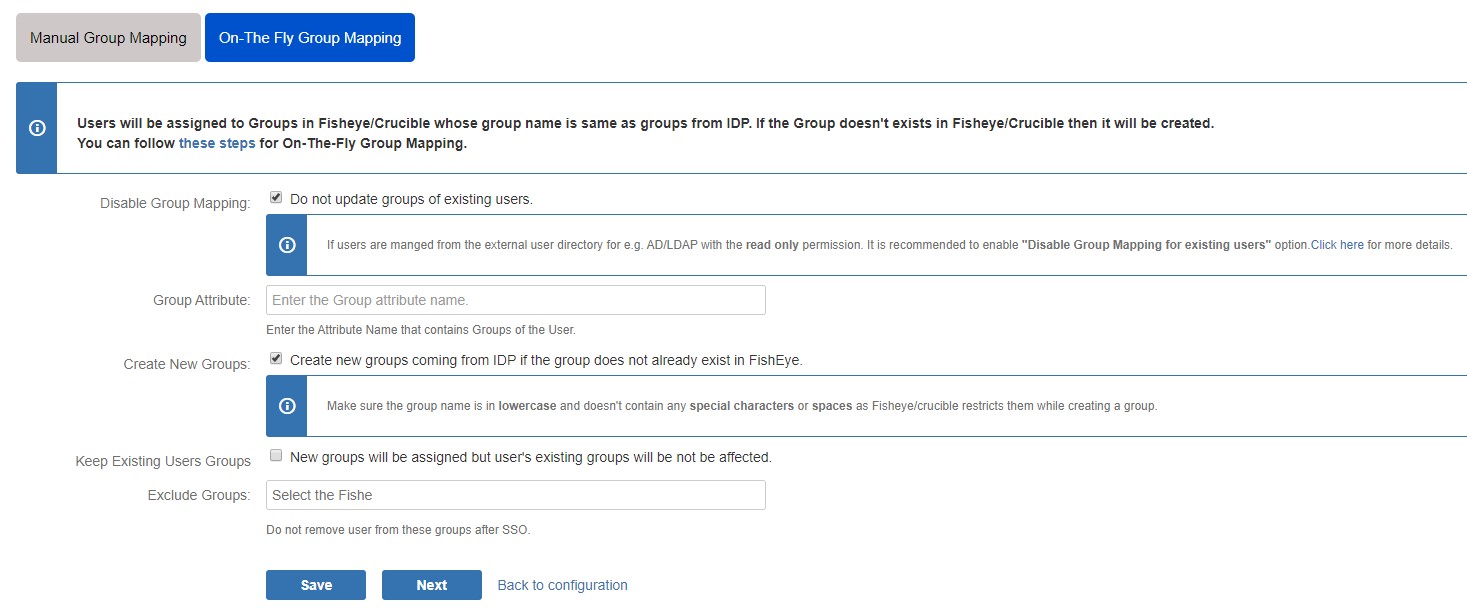
- On-The-Fly group mapping: If the names of groups in Fisheye/Crucible and IDP are same, you should use On-The-Fly group mapping.
a. Setting default group
b. Finding Group Attribute
c. Group Mapping
Group Mapping can be done in two ways:-
I. Manual Group Mapping
- Check Restrict User Creation Based on Group Mapping option if you want new users to be created only if at least one of the user's IDP groups is mapped to a group in the application.
- For mapping, first select a Fisheye/Crucible group from the dropdown which lists all groups present in Fisheye/Crucible and then enter the name of the IDP group to be mapped in the textbox beside
- For example, if you want all users in 'dev' group in IDP to be added to fisheye-software-users, you will need to select fisheye-software-users from the dropdown and enter 'dev' against fisheye-software-users.
- Use '+1' and '+10' buttons to add extra mapping fields.
- Use '-' button next to each mapping to delete that mapping.
-
II. On-The Fly Group Mapping
- Check Create New Groups option if you want new groups from IDP to be created if not found in Fisheye/Crucible.
- If the user is part of some group in Fisheye/Crucible and that group is not present in the SAML response returned by IDP, then the user will be removed from that group in Fisheye/Crucible.
- If you don't want On-The-Fly group mapping to affect Fisheye/Crucible groups which are managed locally then add those groups in Exclude Groups field.
Step 5: SSO Settings
-
The settings in SSO Settings tab define the user experience for Single Sign On.
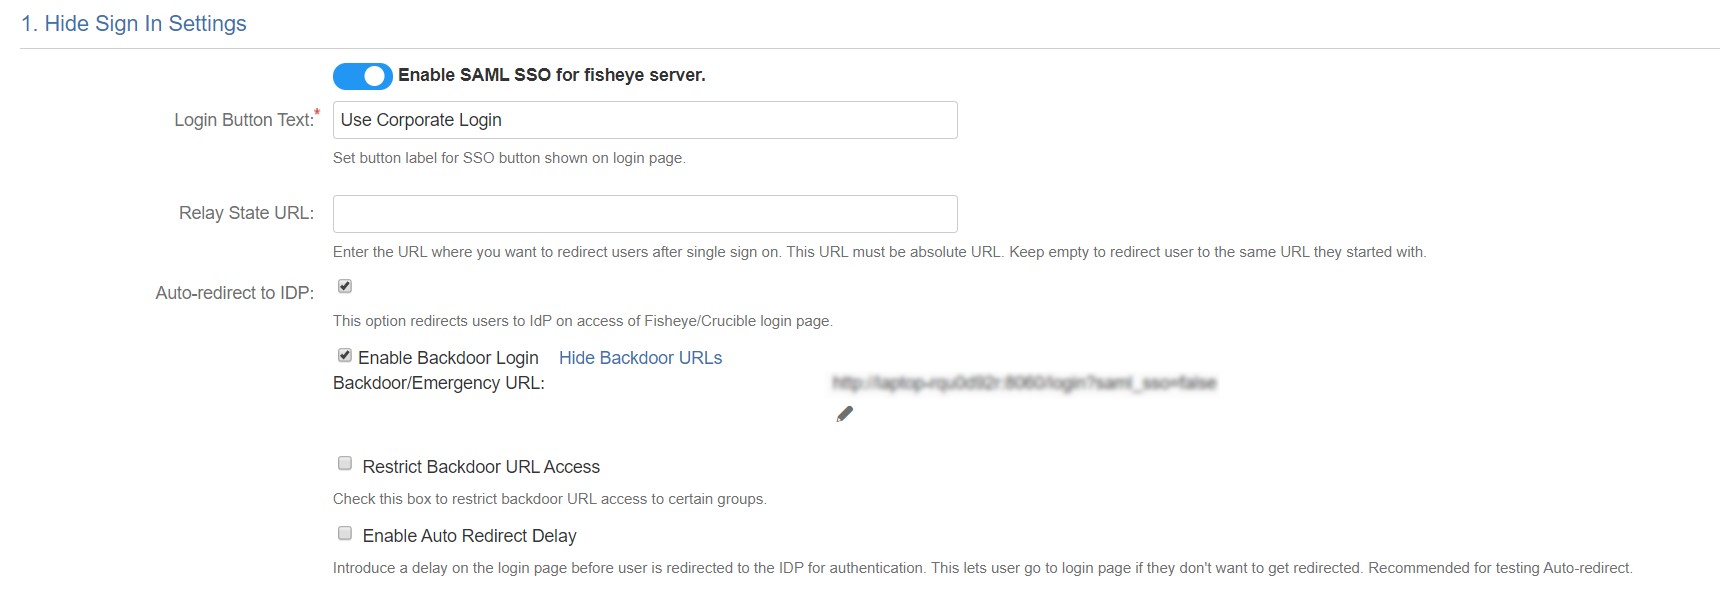
- Set Enable SSO for Fisheye/Crucible Software to allow SSO for Fisheye/Crucible Software users.
- Set button text for button on login page using Login Button Text.
- Set redirect URL after login using Relay State. Keep this empty for coming back to the same page user started from.
- Enable Auto-redirect to IDP if you want to allow users to login only using IDP. Enable backdoor for emergency.
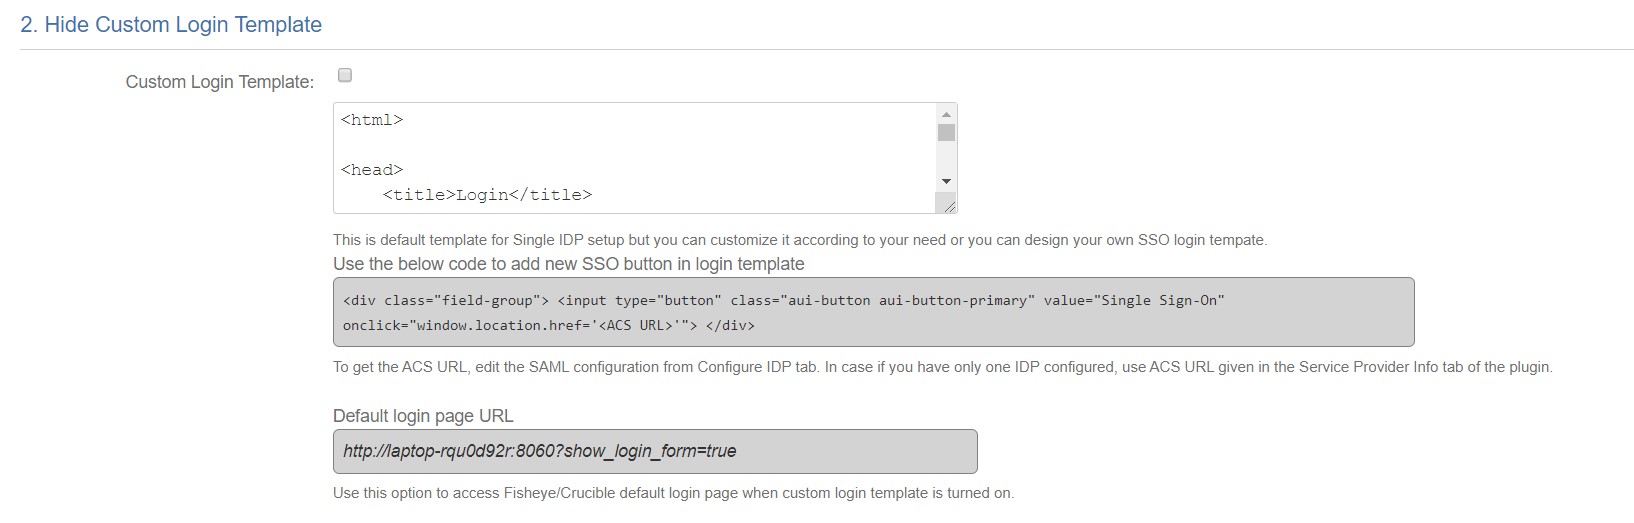
- Design your own login template that will be used to intitate SSO.
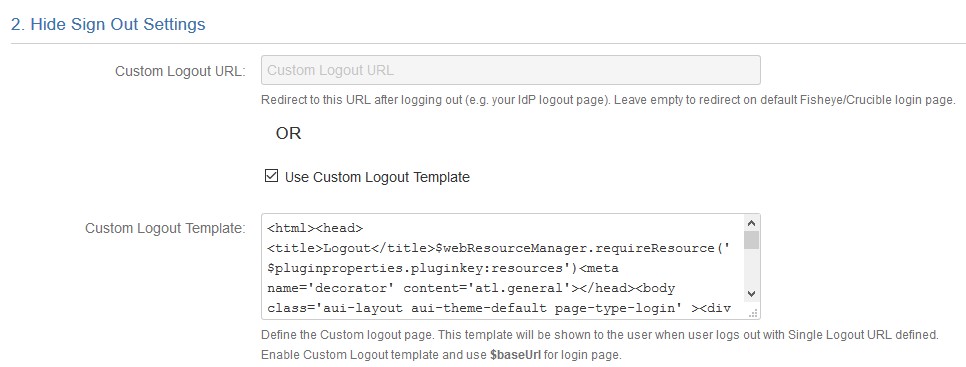
- Set Logout URL or Logout Template to redirect users after logout action.
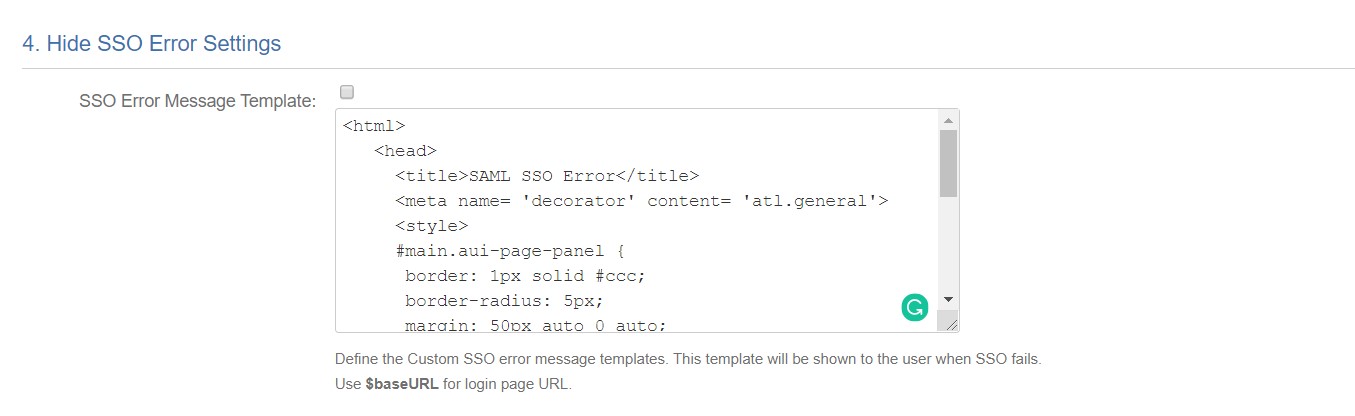
- Set error template to redirect users to a custom error page instead of login page. Use this if you have Auto-redirect to IDP enabled.
- Validate IDP's SAML Response: Configure time difference(in minute) here In case Fisheye/Crucible server time is not in sync with your IDP's time.
a. Sign In Settings
b. Custom Login Template
c. Sign Out Settings
d. SSO Error Settings
e. Advanced settings



