Bitbucket Enterprise Git Client app allows you to authenticate your Git operation for Bitbucket repository using OAuth Providers login credentials. It supports all the Git clients like SourceTree, GitKraken, or Command Prompt and Git bash, etc. Once configured, plugin will be responsible to authenticate the user from OAuth provider and Bitbucket will continue to manage access right for that user.
Pre-requisites
To integrate your OAuth Provider with Bitbucket, you need the following items:
- Bitbucket should be installed and configured.
- Bitbucket Server is https enabled.
- Admin credentials are set up in Bitbucket.
- Valid Bitbucket Server and Data center Licence.
Download and Installation
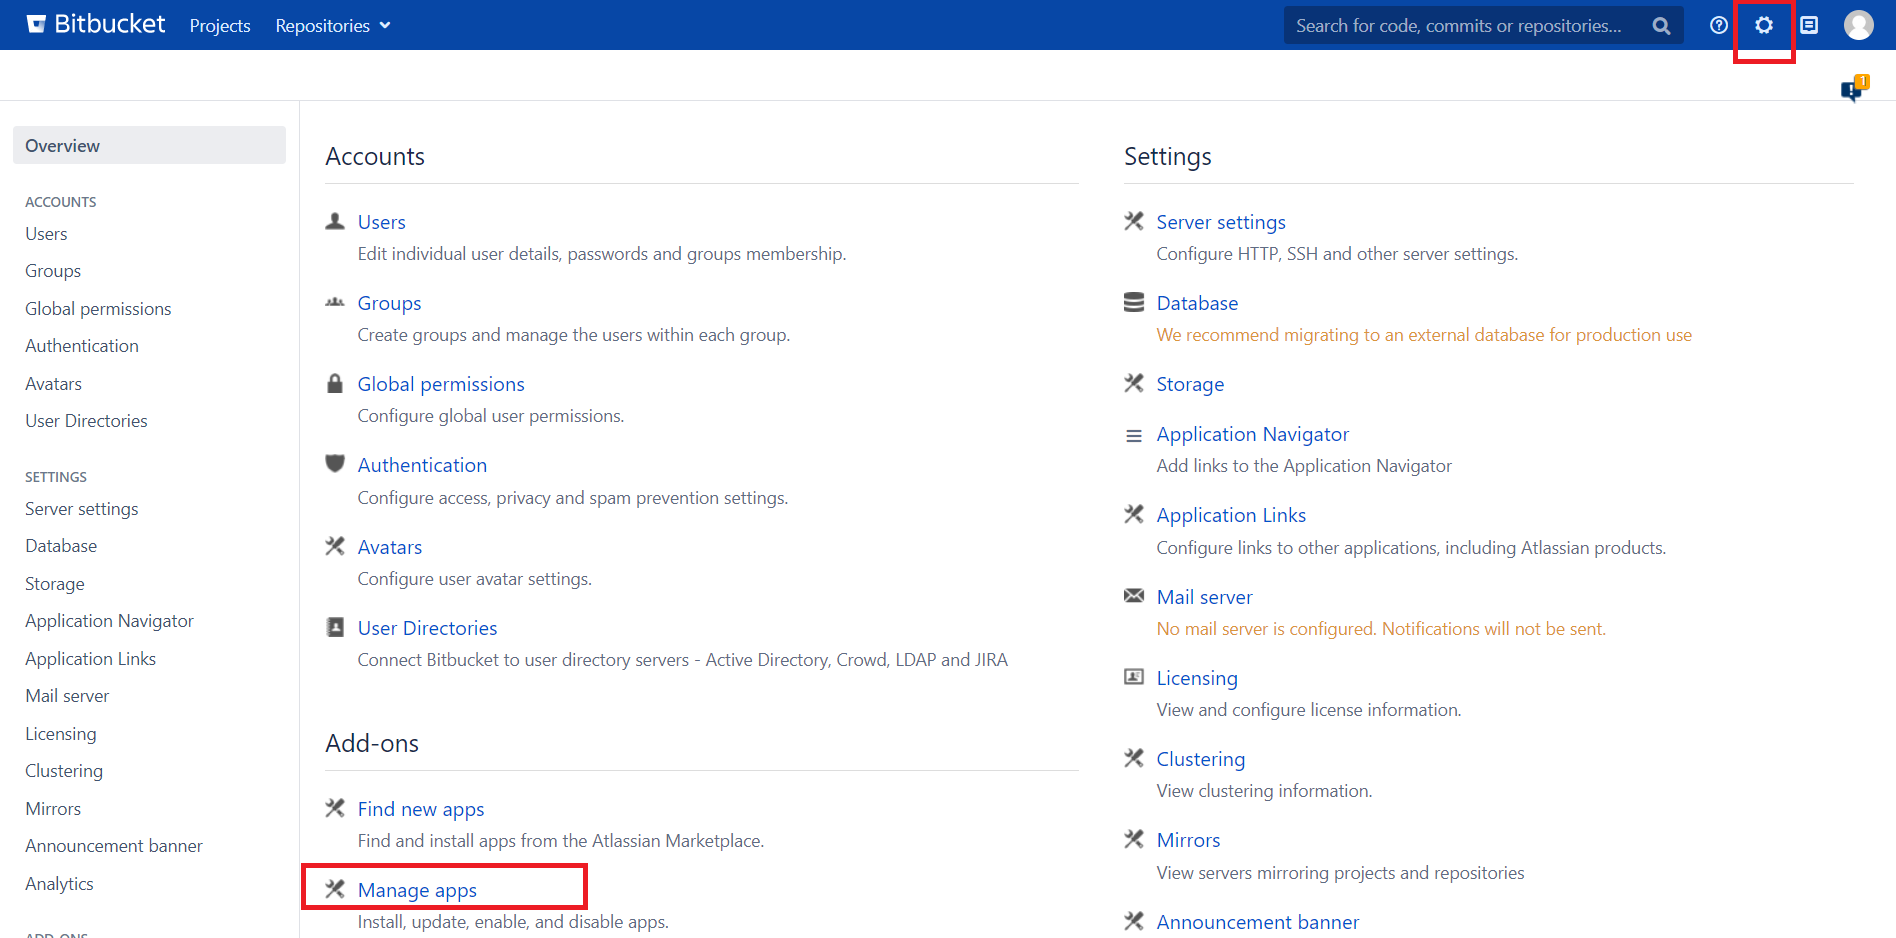
- Log into your Bitbucket instance as an admin.
- Navigate to the settings menu and Click Manage Apps.
- Click Find new apps or Find new add-ons from the left-hand side of the page.
- Locate Bitbucket Enterprise Git Client and CMD Login/SSO via search.
- Click Try free to begin a new trial or Buy now to purchase a license for Bitbucket Enterprise Git Client and CMD Login/SSO.
- Enter your information and click Generate license when redirected to MyAtlassian.
- Click Apply license.
Git Authentication Configuration
 Git Authentication with AWS Cognito
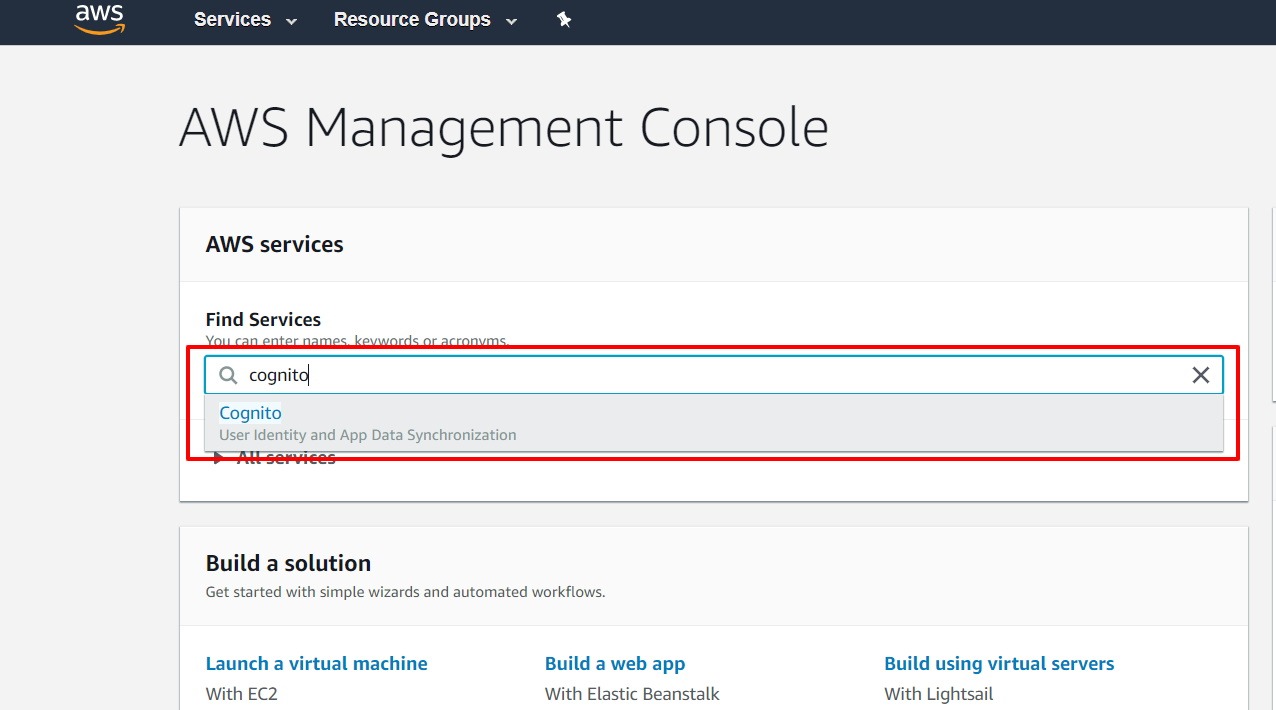
- Sign in to AWS Console with admin credentials.
- Search for “cognito” in search box & select it from drop-down.
- Go to Manage User Pools and select the User Pool that you want OR you can create a new one.
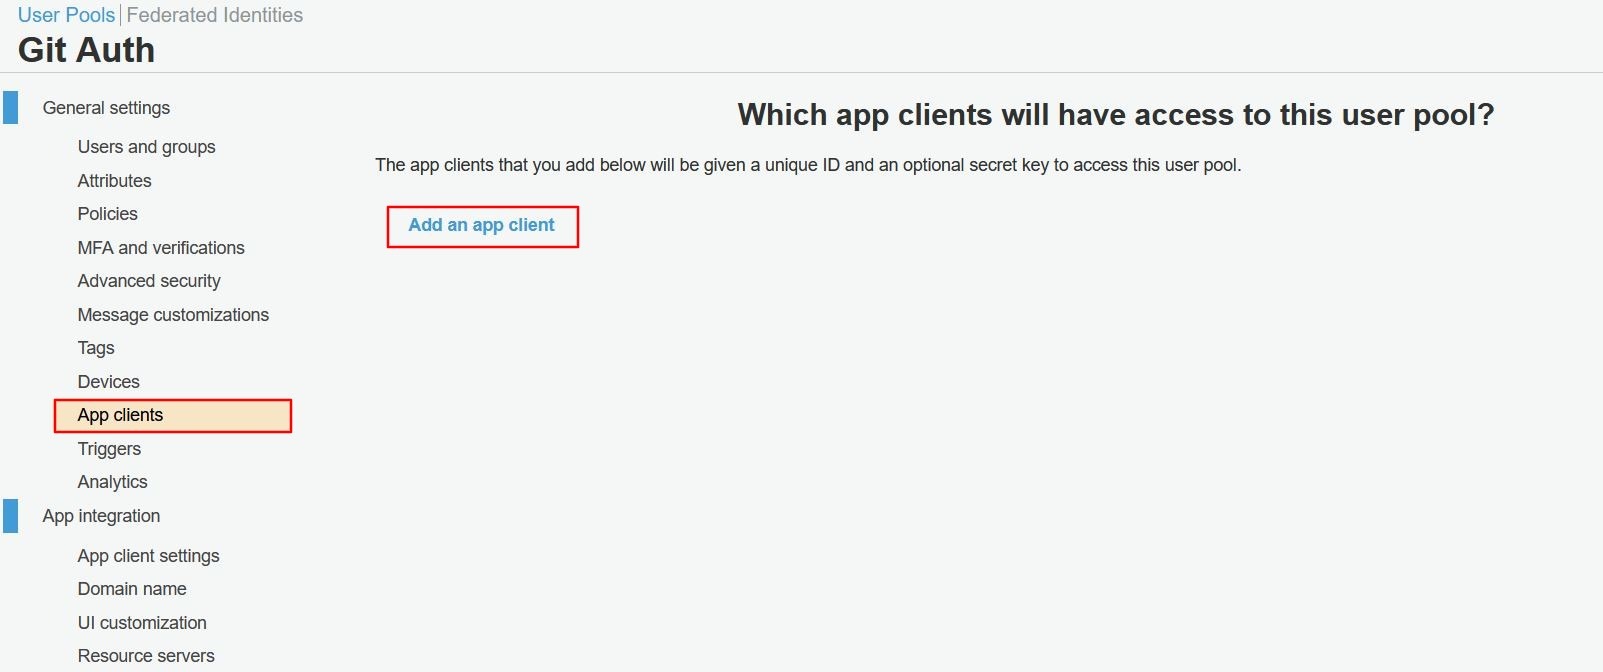
- In user pool settings, go to App clients tab and click on Add an app client link.
- Provide a name for your app client.
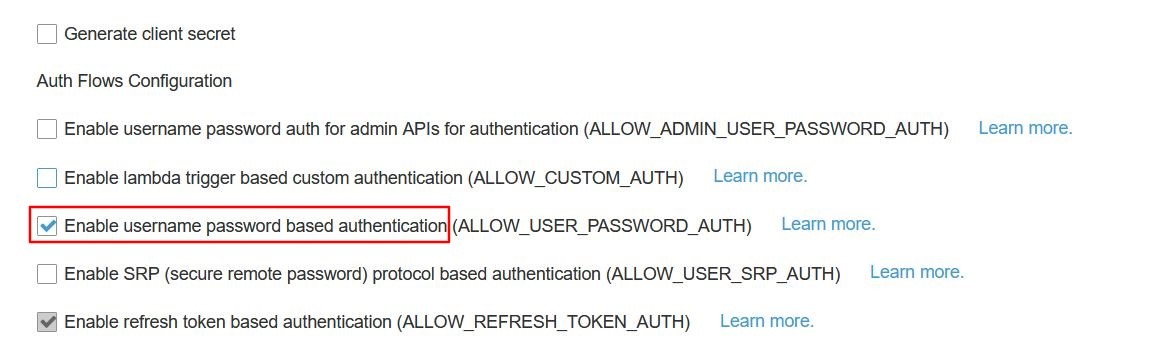
- Uncheck the Generate client secret option.
- Check the Enable username password based authentication option and click on Create app client button.
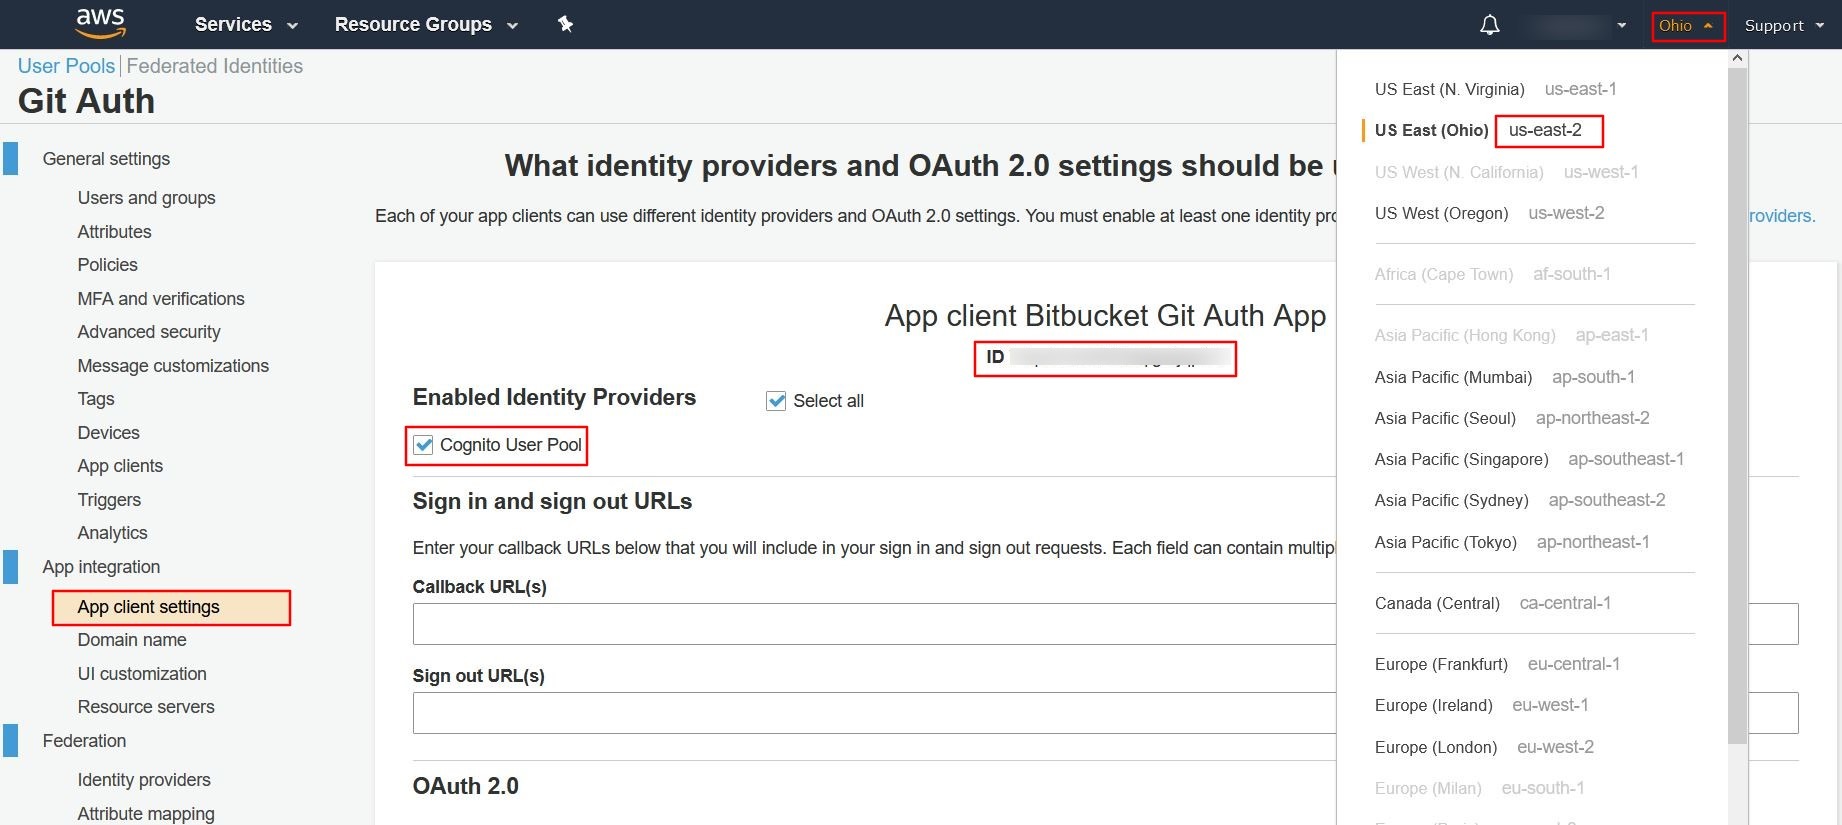
- Now go to App client settings tab and enable the user pool by selecting Cognito user pool checkbox and save the changes.
- Copy the ID value and also note down the Region Code of your user pool.
- Go to Git Authentication Configuration tab of the plugin and select AWS Cognito from dropdown.
- Enter the ID into Client ID field and Region Code into Region field and save the changes.
Git Authentication with Azure AD
- Log in to Azure AD Portal.
- Select Azure Active Directory ⇒ App Registrations. Click on New registration.
- Enter friendly name for your application, for example Bitbucket-Git-App.
- For the Redirect URI, select Public client/native (mobile & desktop) as the Application Type and enter https://<tenant_name>/Bitbucket-Git-App. Replace “tenant_name” with the name or id of your Azure AD Tenant.
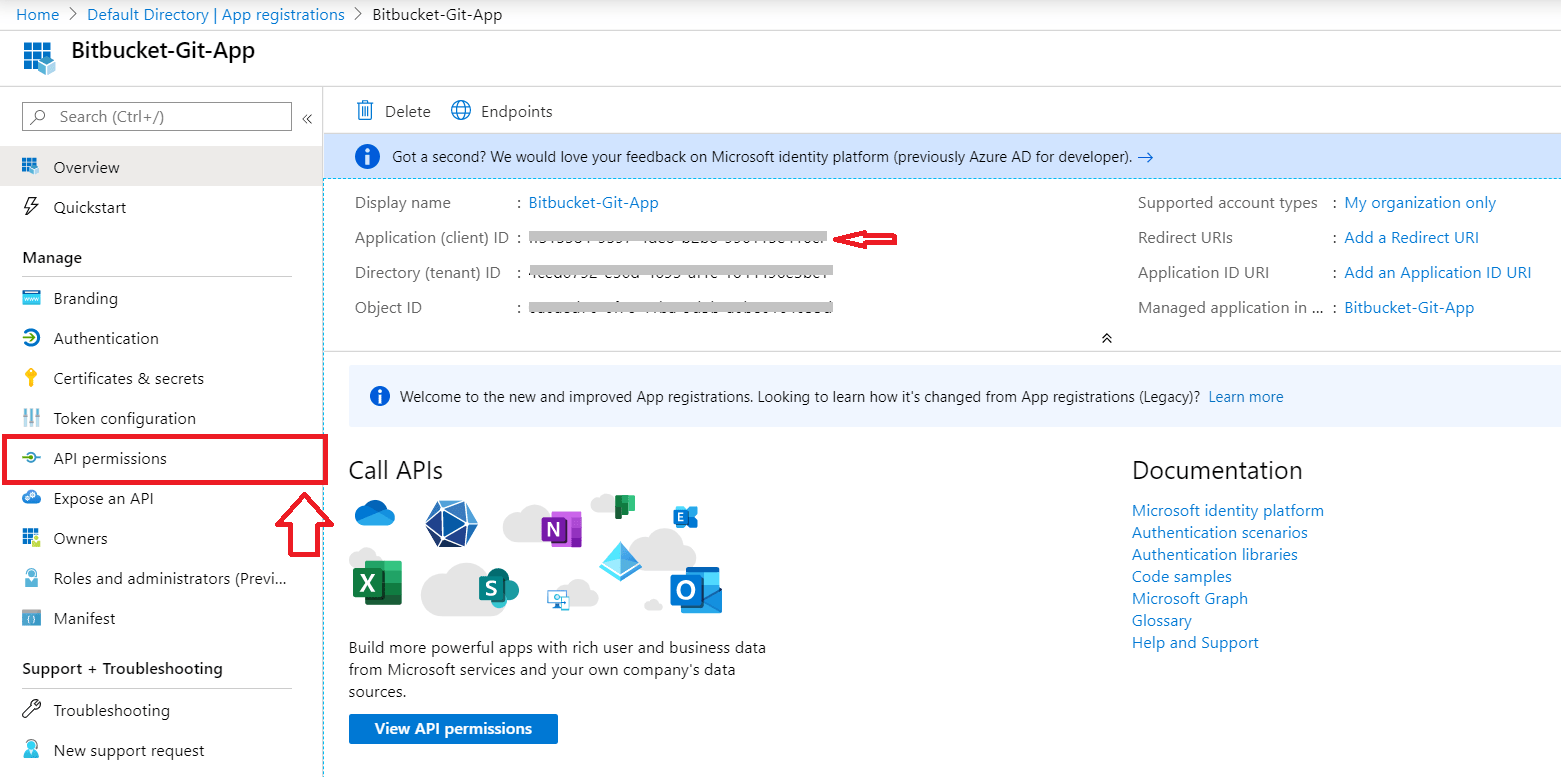
- Click on Register to create the application. Copy the application ID, and keep it handy. It will be your client ID.
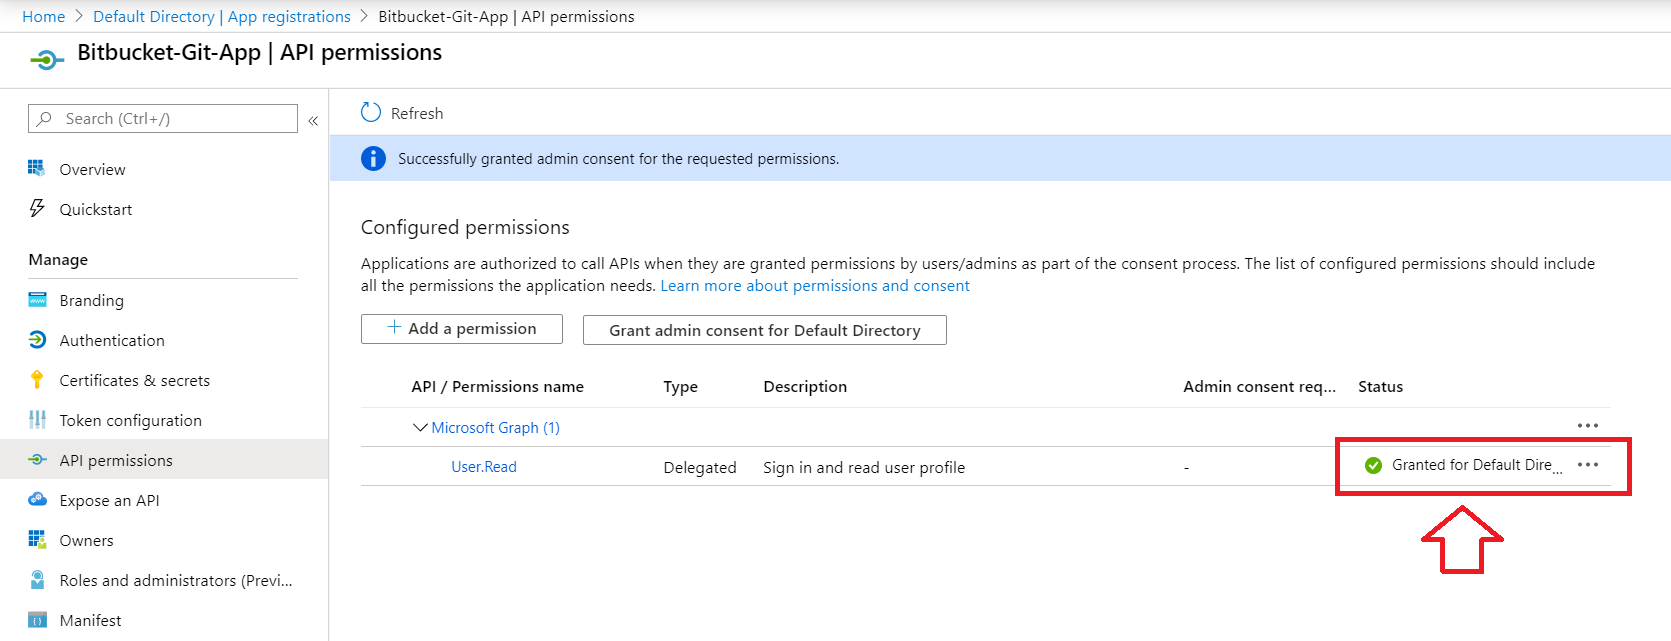
- Now, click on API permissions to update directory permission.
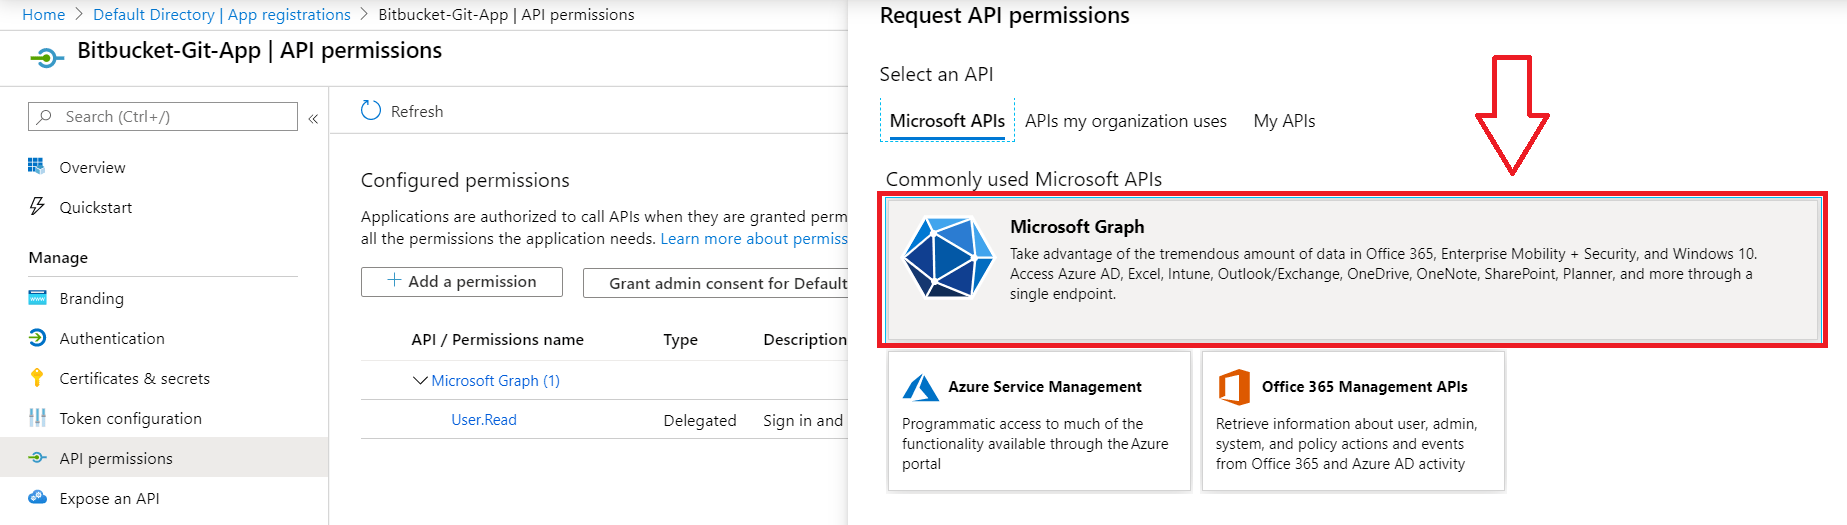
- Click on the Add a permission, then select Microsoft Grap, and add user related permissions like User.Read.All, User.ReadWrite.All etc.
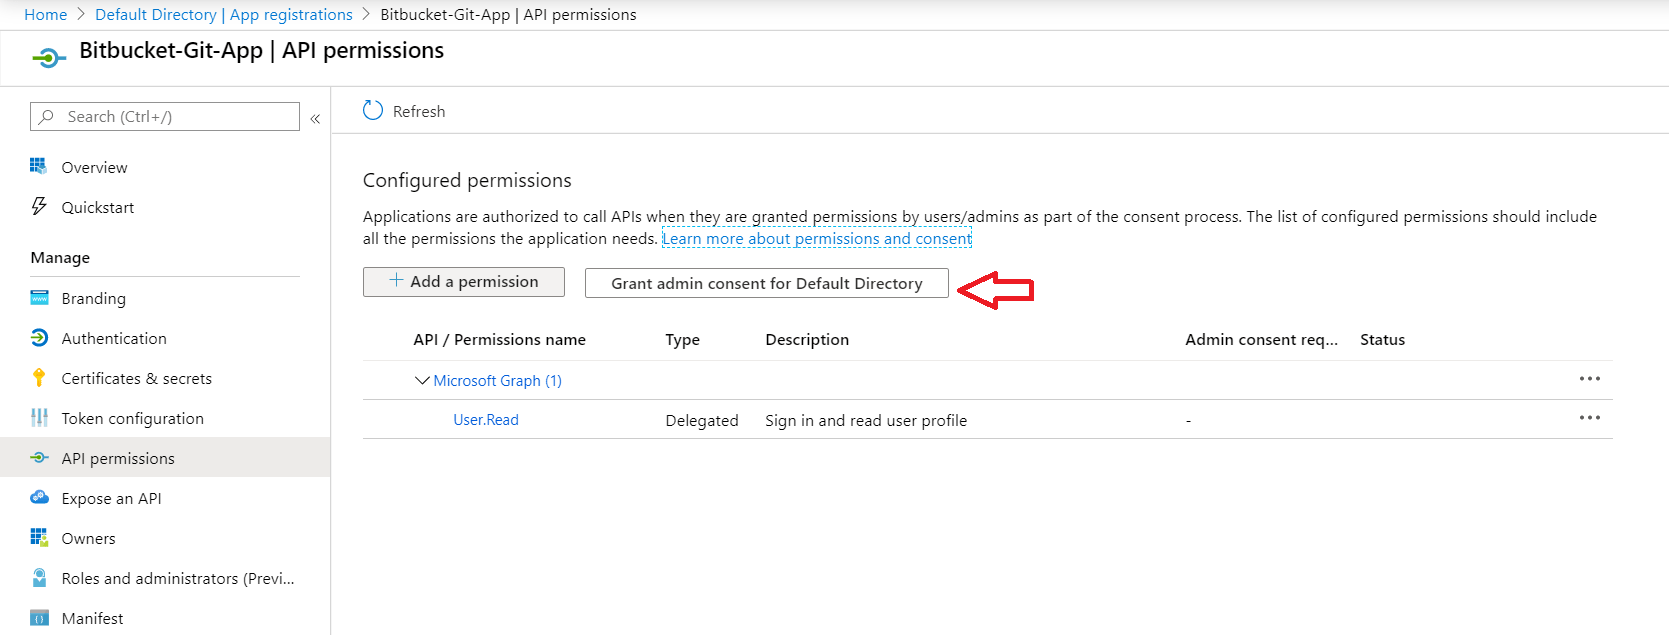
- Click on the Grant admin consent.
- Kindly verify granted permissions.
- Navigate to Authentication and set Default client type to yes and Save settings.
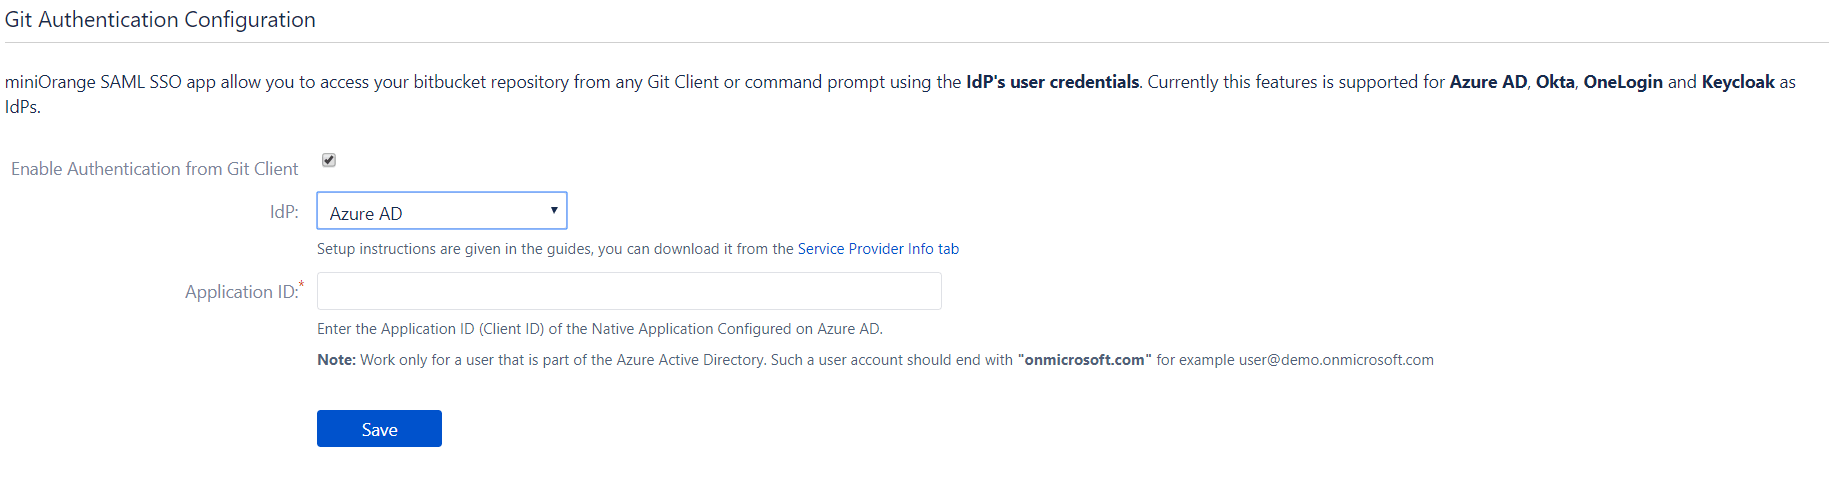
- Navigate to the Git Authentication Configuration tab of the plugin, and select Azure AD from dropdown.
- Configure the Application ID that you have copied from the above steps.
- Make sure to use Azure Active Directory user account with "onmicrosoft.com" domain, e.g., user@demo.onmicrosoft.com.
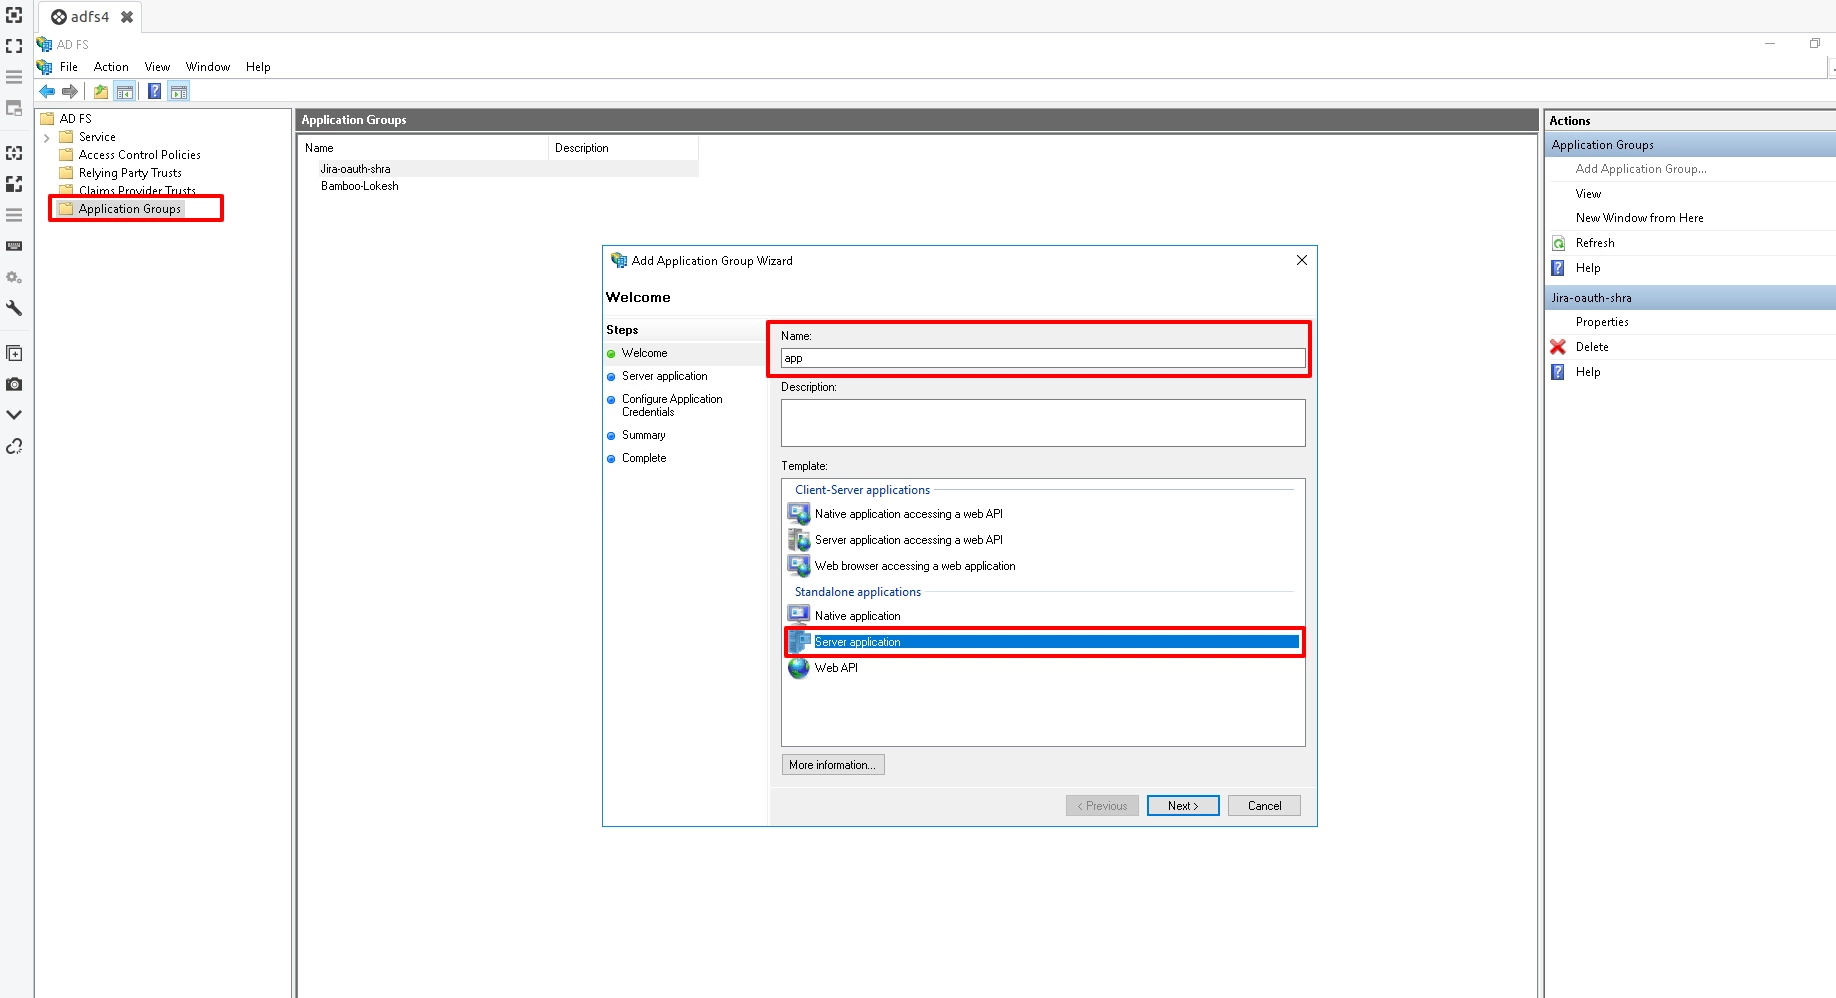
- Go to the ADFS Management application.
- Right click on the Application Groups & select Add Application Group option. A pop-up window will open.
- Enter the Application Name. Select Server Application option from template and click on Next.
- Take a note of a given Client Identifier value. This will be your Client ID.
- Add https://<bitbucket_base_URL>/<app_name> in the Redirect URL field and then click Next.
- Select a Generate shared secret option.
- Take a note of the generated Secret value. It will be your Client Secret. Click on Next.
- On the Summary screen, click Next. and then click Close.
- Now, right-click on the newly added Application Group and select Properties.
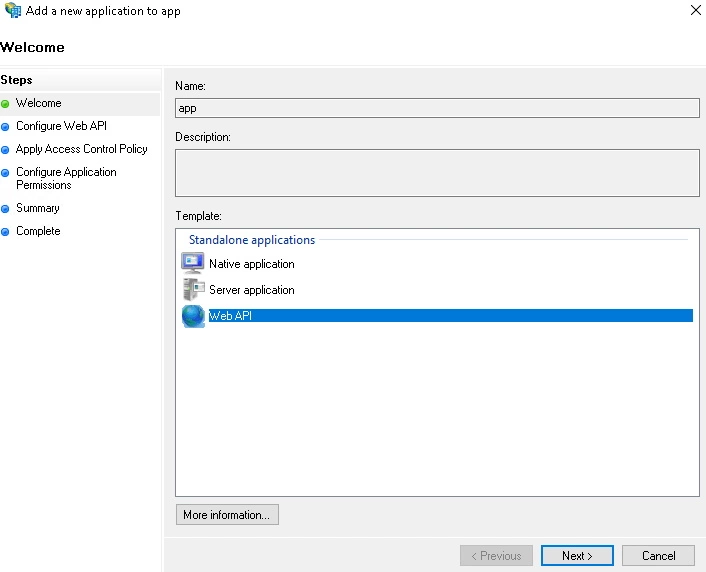
- Click on the Add application button from App Properties.
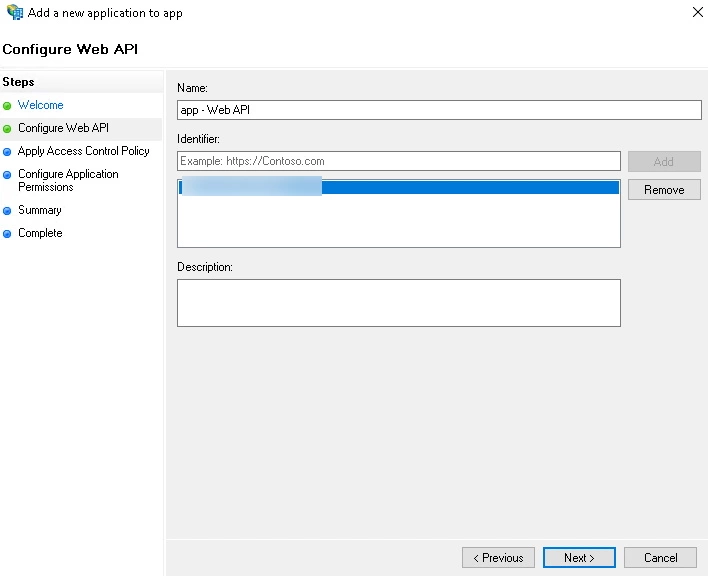
- Then select the Web API option from the template and click on Next.
- On the Configure Web API screen, provide the https://<bitbucket_base_URL>/<app_name> in the Identifier field. Click Add & then Next.
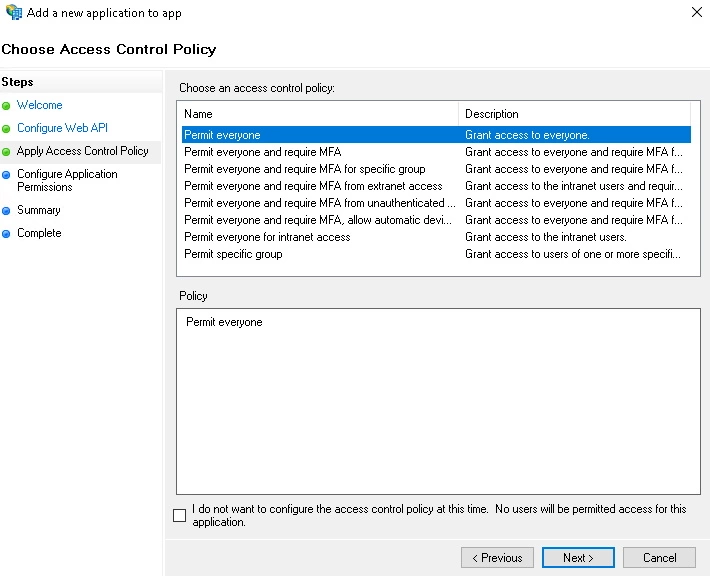
- On the Choose Access Control Policy screen, select Permit everyone and click on Next.
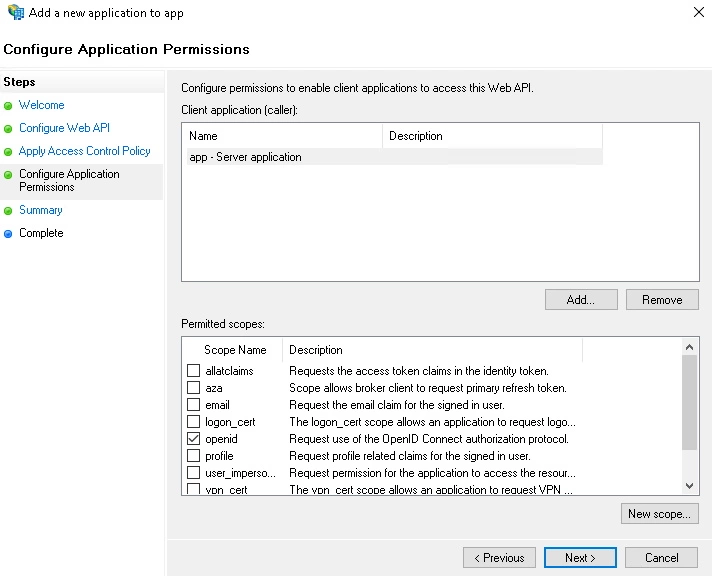
- On the Configure Application Permission screen select openid as a scope & click on Next.
- On the Summary screen, click Next and then click Close.
- On the Application Group Properties window, click OK.
- Now, go to the a plugin configuration page, select ADFS from IdP drop down.
- Configure the Client ID, Client Secret, and Domain in respective fields and save the changes.
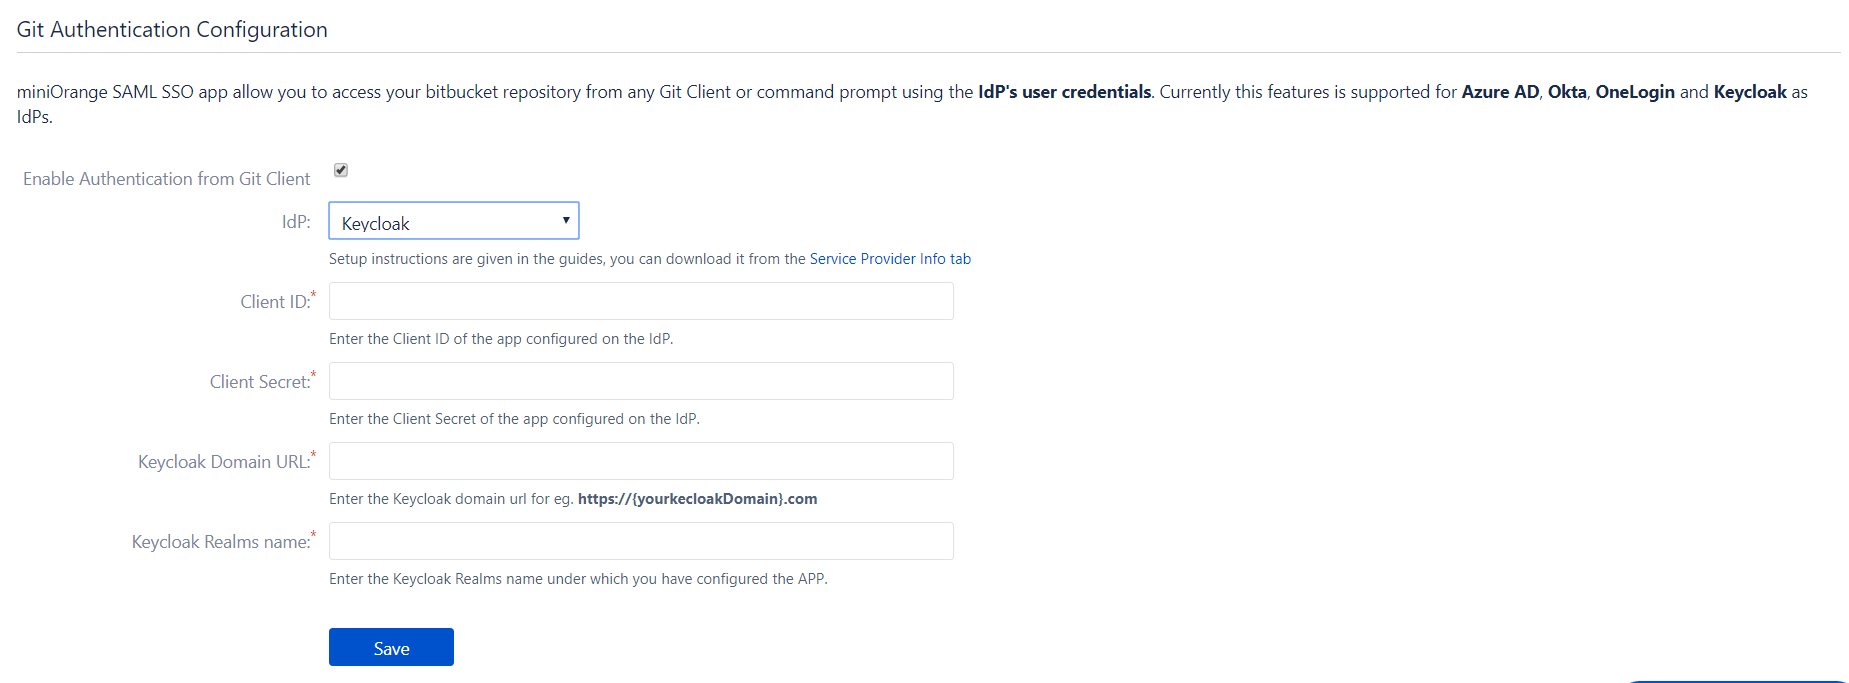
- Sign in to the Keycloak admin console.
- From left menu, select Clients.
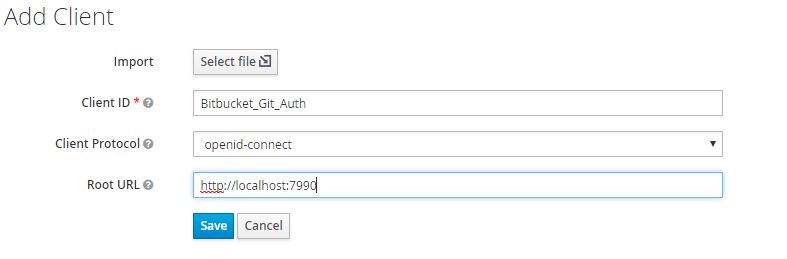
- Create a new Client and configure Bitbucket base URL as Redirect URL and select client Protocol as Openid-connect.
- Now again go to the list of Client and click on the App that you have created.
- In the Settings tab change the configure Access type as Confidential and save the settings.
- Navigate to the Credentials Tab and copy Secret to the clipboard.
- Also copy the client ID from the Step 3 and the Realm name.
- Navigate to the Git Authentication Configuration tab, select Keycloak as IdP and configure the information details gathered from above step.
- Git Configuration will help you to access the bitbucket repository using your OKTA credentials. Navigate to the Git Authentication Configuration tab of the plugin and configure your OKTA Domain URL for Eg: https://{youroktadomain}.com
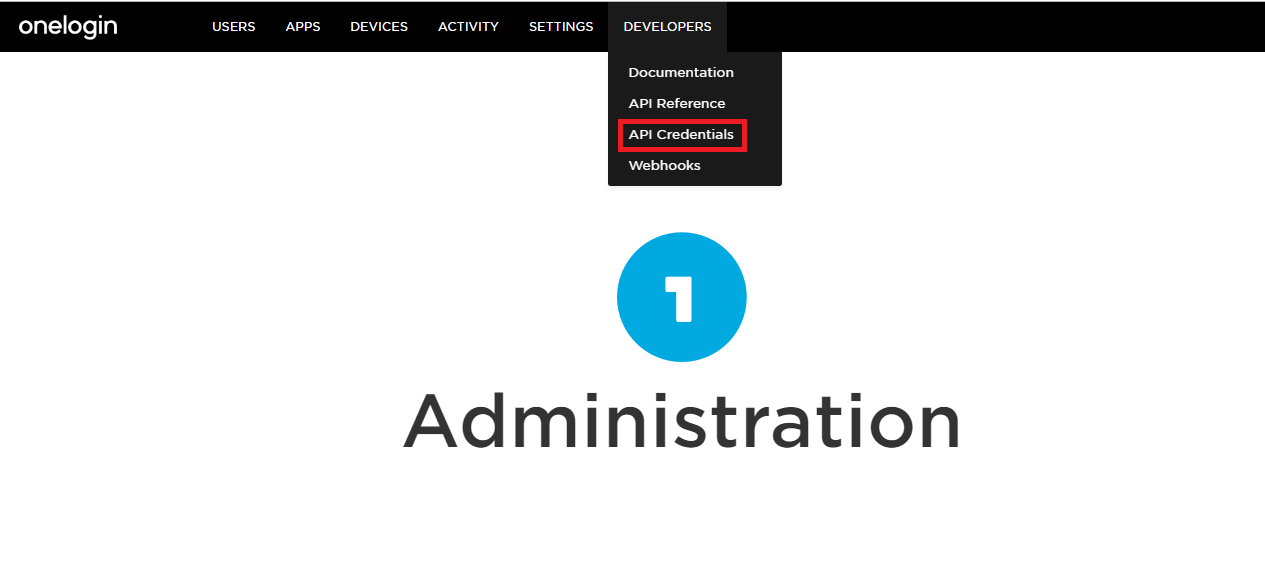
- Login to your oneLogin account.
- Click on Administration link
- Now Click on Developers option and select API Credentials options.
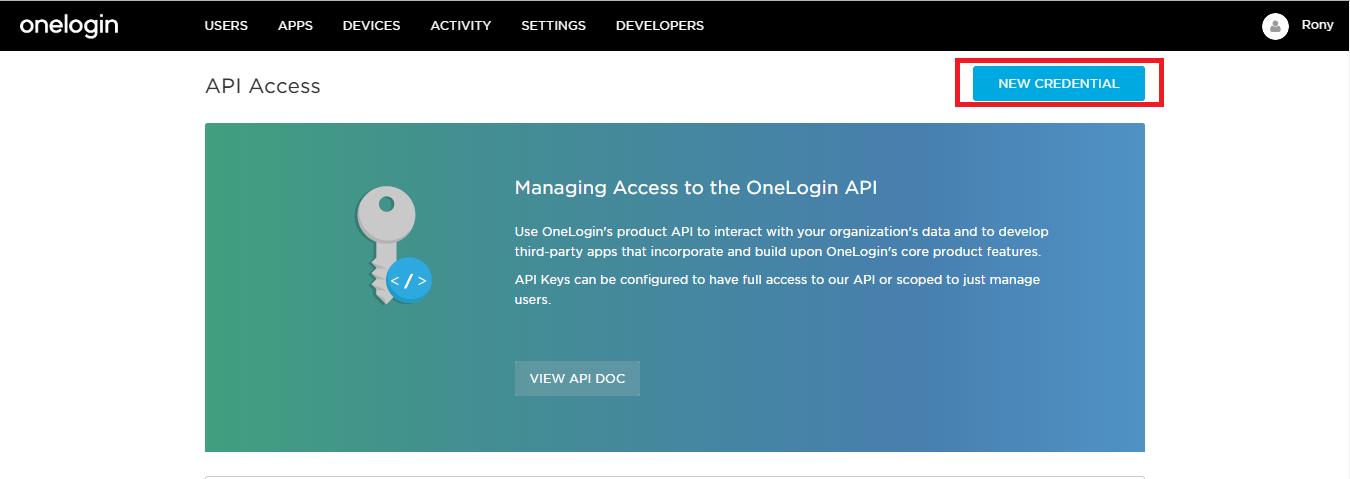
- Click on New Credentials to generate new API keys.
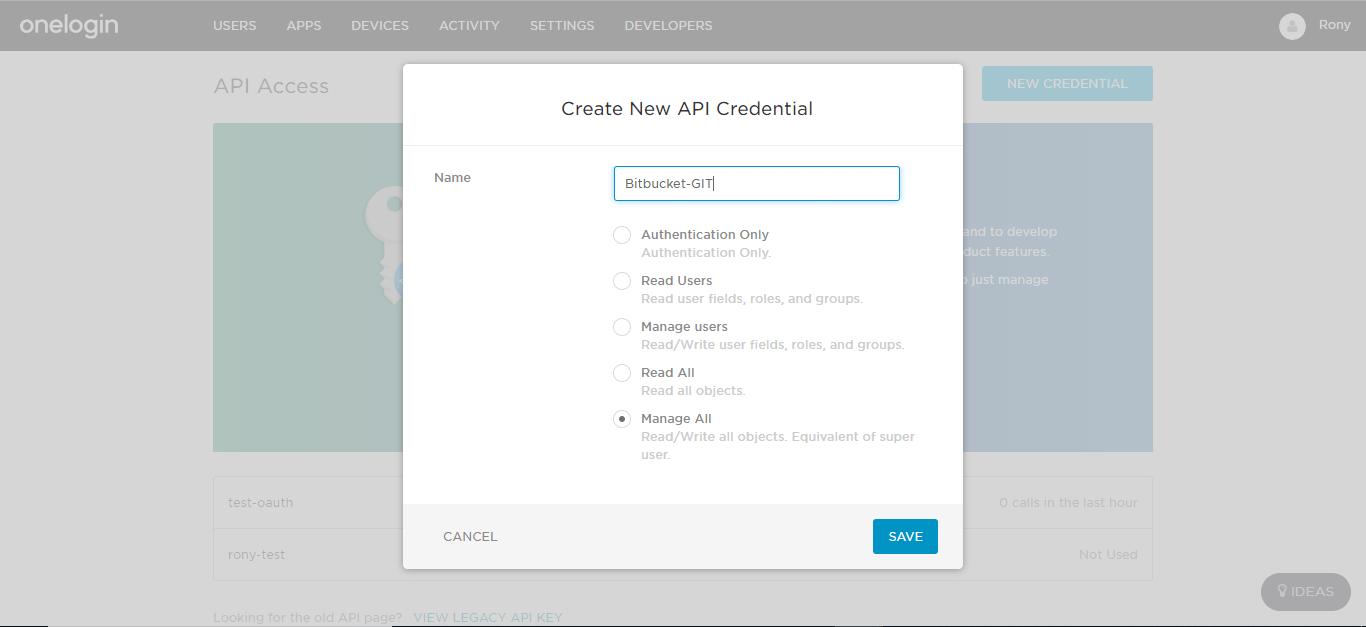
- Now enter name for your API keys and select Manage All option.
- Click on SAVE.
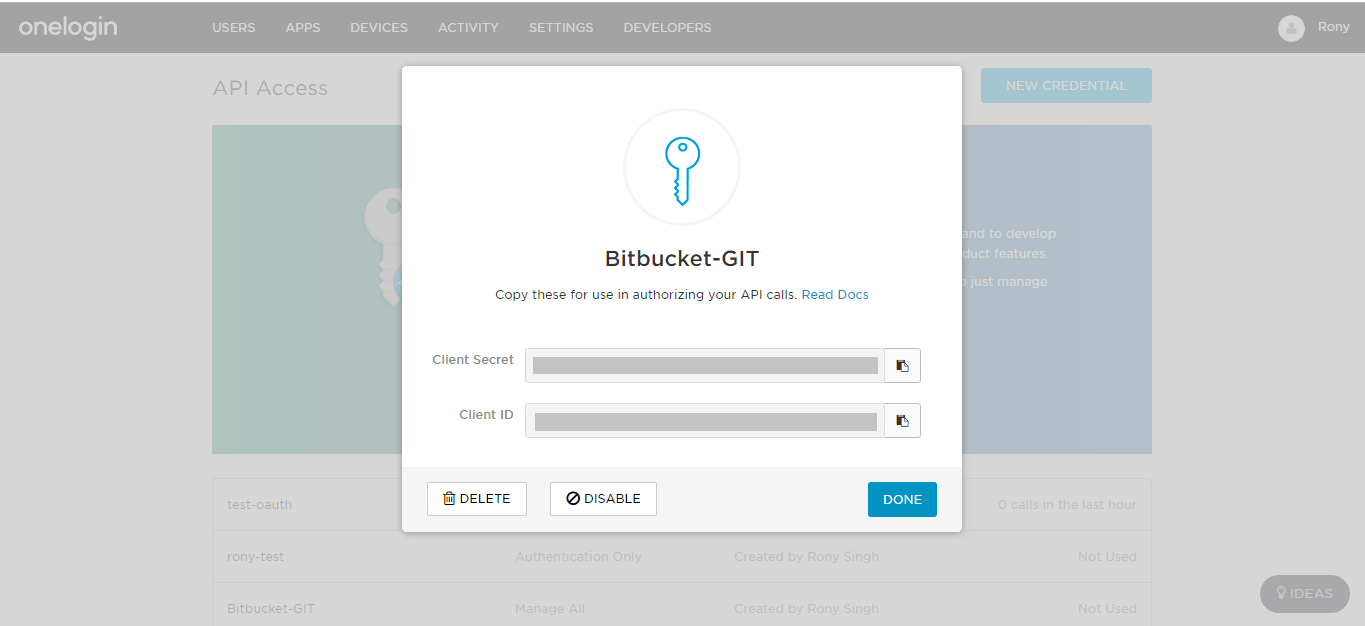
- After this a prompt will open with your generated Client ID and Client Secret. Copy these values.
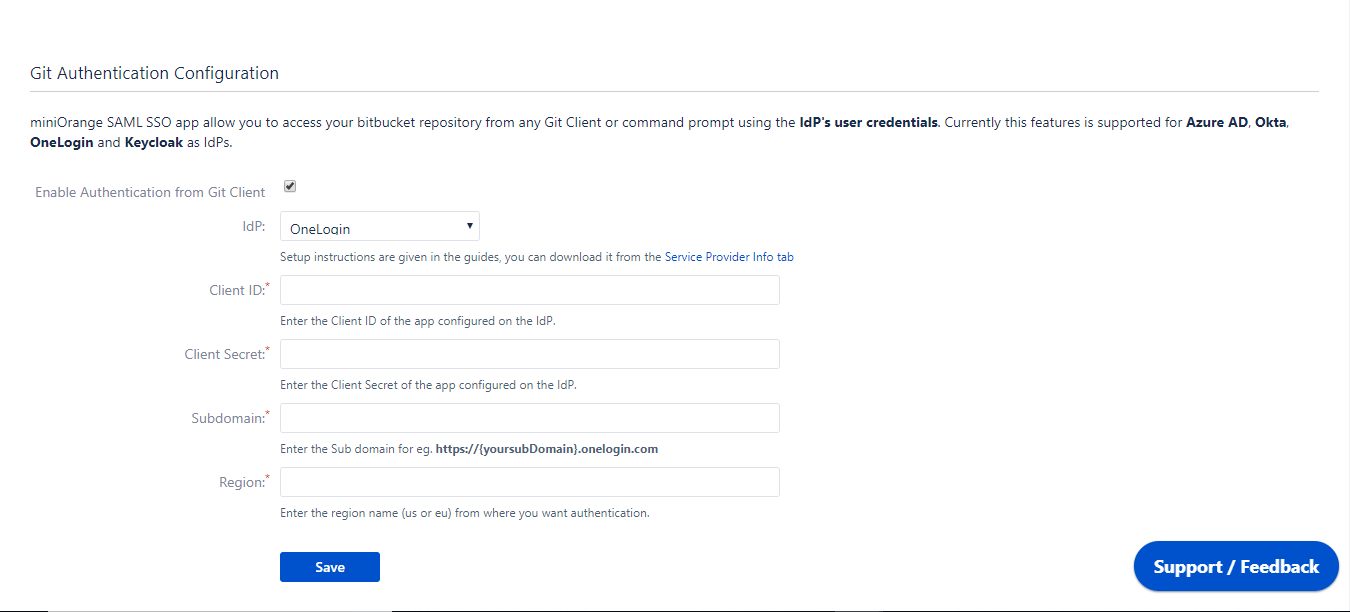
- Navigate to the Git Authentication Configuration tab, enable Authentication from Git Client and select OneLogin as IdP.
- Now enter Client ID and Client Secret.
- Enter Subdomain of your account. Eg: https://{yoursubDomain}.onelogin.com.
- Enter the region code from where you want authentication. Eg: us or eu.
- Click on Save.
1. Configure Azure AD

Git Authentication with ADFS
1. Add Application Group

2. Add Application in Application Group
Git Authentication with Keycloak
1. Configure Keycloak

2. Configure Bitbucket
Git Authentication with Okta

Git Authentication with OneLogin
1. Configure OneLogin

2. Configure Bitbucket
Additional Resources
Our Other Apps:
SAML SSO Apps
|
OAuth Apps
|
Crowd Apps
|
2FA Apps
|
REST API Apps
|
User Sync Apps
|
Bulk User Management
|
Secure Share
|
Bitbucket Git Authentication App | Kerberos/NTLM Apps | Word/PDF Exporter | WebAuthn | SonarQube SSO | Jenkins SSO
Bitbucket Git Authentication App | Kerberos/NTLM Apps | Word/PDF Exporter | WebAuthn | SonarQube SSO | Jenkins SSO
If you don't find what you are looking for, please contact us at support-atlassian@miniorange.atlassian.net or raise a support ticket here.