
Unlock the Potential of miniOrange Confluence Automated User Management
Cost-Efficiency at Its Finest
Every active user in your Atlassian CONFLUENCE environment contributes to your licensing cost. The miniOrange CONFLUENCE Automated User Management (AUM) plugin helps you optimize these expenses by automatically identifying users who haven’t logged in for a predefined period—and deactivating or removing them as per your configuration.
By streamlining the user base, this plugin enables substantial savings in licensing fees, especially for organizations dealing with hundreds or thousands of users.
Boost Your Security
With the CONFLUENCE Automated User Management plugin, your user base stays clean, current, and secure. Inactive accounts—such as those belonging to past employees, temporary vendors, or former contractors—can pose a security risk if left unattended.
This solution ensures:
- Timely deactivation or removal of users no longer needed.
- Removal of unnecessary elevated access.
- A secure, lean user database free of inactive or forgotten accounts.
No more hidden vulnerabilities from dormant users—your CONFLUENCE environment remains tightly controlled.
Streamline User Operations for Agile Collaboration
Today’s fast-moving project teams form and dissolve rapidly. Managing user access manually in such an environment becomes a bottleneck.
miniOrange CONFLUENCE AUM enables:
- Bulk permission and group assignment to streamline onboarding.
- Easy access control for internal teams and external collaborators.
- Automatic group assignment or removal based on activity or rule-based configurations.
- Clean-up of group memberships after project completion.
Grant, adjust, and revoke user access quickly—enhancing agility without compromising security.
Why You Need Confluence Automated User Management
Without Confluence Automated User Management:
- CONFLUENCE admins must manually review each user in the user directory.
- Routine actions like deactivation, deletion, or group assignment must be done one by one.
- There’s no support for bulk actions, resulting in wasted time and effort.
- Documentation and tracking of changes become tedious and error-prone.
With CONFLUENCE Automated User Management:
miniOrange CONFLUENCE AUM offers a smarter, automated, and scalable solution for user management:
- Automate routine tasks: For example, "Deactivate users inactive for 90 days" can be configured and scheduled to run automatically.
- Bulk user operations: Deactivate or delete hundreds of users with a single action.
- Effortless group management: Move users between groups, assign licenses, or remove unnecessary group memberships efficiently.
- Custom filters: Combine multiple conditions like group, directory, status, or last login to take precise action on selected users.
- Export user lists: Export filtered or selected users to CSV for review or reporting.
Embrace the Future of CONFLUENCE User Management
Optimize your licensing, improve your security posture, and support agile, secure collaboration—all with one powerful tool.
miniOrange CONFLUENCE Automated User Management Plugin is your all-in-one solution for maintaining a healthy, cost-effective, and well-organized user base in CONFLUENCE.
Overview - Confluence Automated User Management Plugin
Welcome to the comprehensive guide for configuring and using the miniOrange CONFLUENCE Automated User Management Plugin.
This guide walks you through the simple steps to manage users at scale—empowering you to perform bulk activations, deactivations, deletions, group assignments, and automatically identify inactive users based on their last login activity.
Say goodbye to manual user management hassles and optimize your Atlassian CONFLUENCE license costs by ensuring you're only paying for active users.
Experience the future of user management with miniOrange CONFLUENCE Automated User Management—where efficiency meets simplicity.
Key Benefits
- Reduce license costs by deactivating or deleting unused users
- Improve security by managing inactive or dormant accounts
- Streamline access control through group-based automation
- Automate repetitive admin tasks with schedulers
- Export precise user lists for compliance and reporting
- Gain visual insights into user activity and license usage with the dashboard
Key Capabilities
- Bulk User Operations: Activate, deactivate, delete users, or modify their group memberships in bulk—directly from the UI.
- Advanced Filtering:
- Groups (include/exclude specific groups)
- Directories (internal/external)
- License type (licensed users or all users)
- Activity status (active, inactive, or all)
- Last login date range
- Username or email address
- Combine multiple filters for precise targeting
- User Export: Export selected users or all users matching applied filters. This supports reporting, compliance, and auditing needs.
Automation Features
The plugin includes multiple automation modules that reduce manual effort and improve operational consistency:
- User Auto Deactivation: Automatically deactivate users after a specified period of inactivity. Options include:
- Excluding users from specific groups
- Filtering by directory
- Deactivating users who have never logged in
- Customizable suffix addition after deactivation
- Email Notifications: Send customizable email alerts to users a few days before their deactivation. Separate options are available for never-logged-in users.
- Application Access Revocation:
Revoke application access by removing users from specific groups after inactivity. Includes support for:
- Directory selection
- Exclusion groups
- Crowd Read-Only directory handling
- Users who have never logged in
- Group Assignment for Inactive Users: Assign specific groups to inactive users to help in segregation and reporting. These users can be filtered and exported easily.
- Floating License Rules: Dynamically assign license groups at login based on user group membership using "If–Then" rule-based configurations. This feature helps enforce floating license policies effectively.
- Reactivation on Login: Automatically reactivate inactive users when they log in, optionally removing or assigning specific groups during the process.
Scheduled Execution & Notifications
All automation features can be scheduled to run automatically at a defined time. Admins can configure:
- Scheduler run time and frequency
- License usage alerts when limits are exceeded (via email)
Dashboard & Visual Analytics
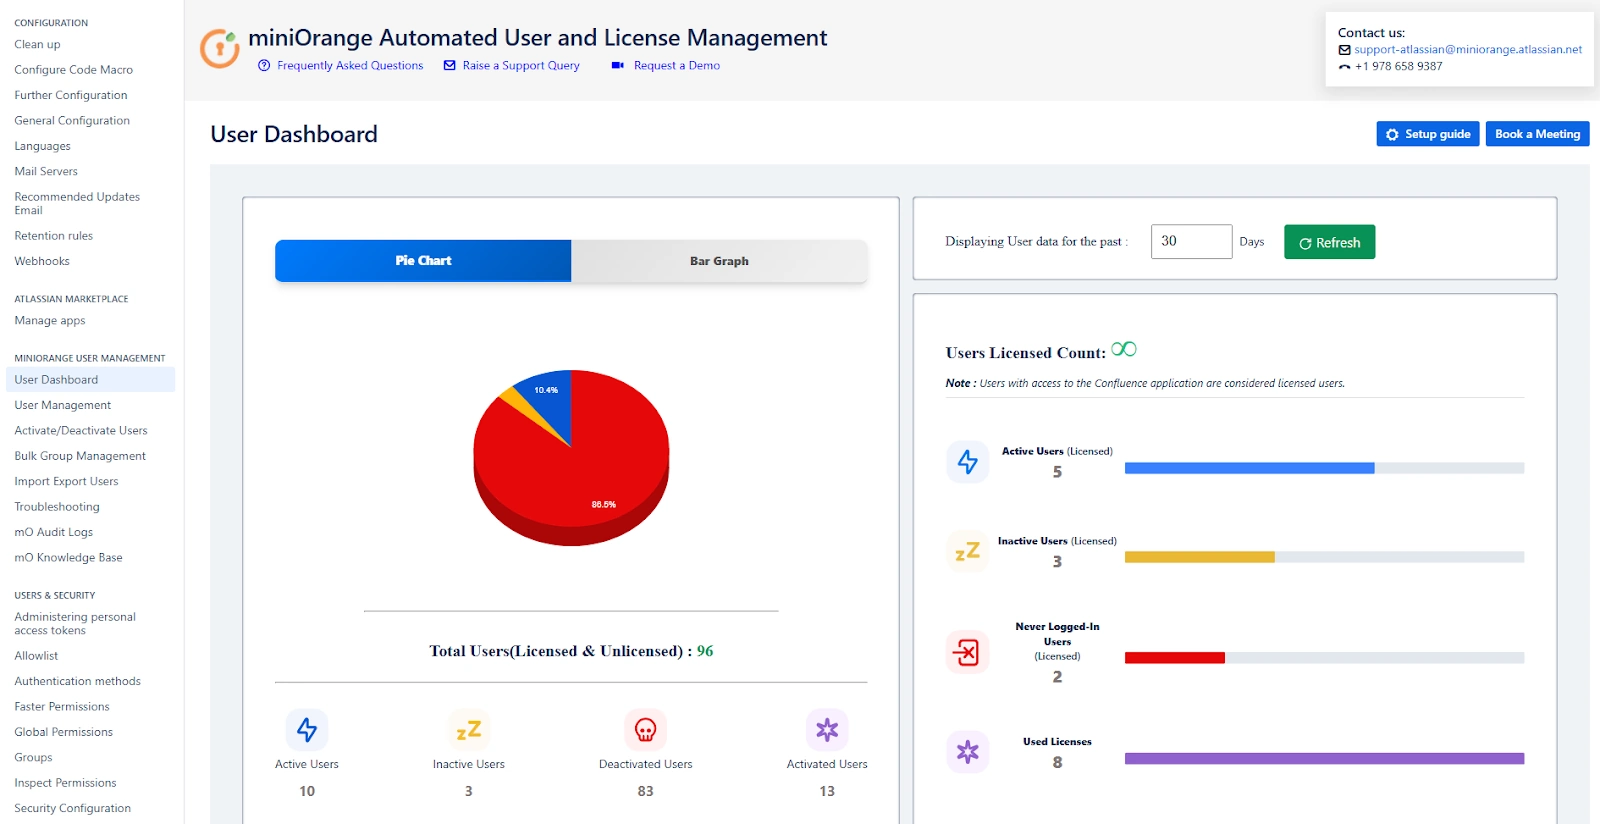
The Dashboard tab offers a powerful visual breakdown of your CONFLUENCE user base, license utilization, and user activity trends. This allows administrators to gain actionable insights and optimize license usage effectively.
Features Include:
- Pie Charts: View the percentage distribution of active, inactive, and deactivated users.
- Bar Graphs: Analyze trends in user activity over a selected number of days.
- User Count Cards: Get real-time counts for:
- Active Users
- Inactive Users
- Deactivated Users
- Activated Users
- Never Logged-In Users (Licensed)
- Licensed User Count
- Used Licenses
- Available Licenses
Example Use Case:
If the dashboard shows a high number of “Never Logged-In Users (Licensed),” you can take informed action by deactivating or auditing these accounts, freeing up licenses and improving system efficiency. The dashboard is especially useful during quarterly reviews or compliance checks, providing a complete snapshot of user access, activity, and system usage.
Export & Reporting
Use the Export Users button to download a CSV of users:
- If users are selected, only those will be exported.
- If no selection is made, all users matching the current filters will be exported.
- Multiple filters can be applied together to export a precise user list.
Installation Guide – Confluence Automated User Management Plugin
There are two methods to install the miniOrange Confluence Automated User Management Plugin on your Atlassian Confluence application:
Installation from Atlassian Marketplace
This is the recommended and easiest way to install the plugin directly from your Confluence admin console.
Steps:
- Log in to Confluence as an admin user.
- Navigate to Administration → Manage Apps.
- Click on Find new apps (or Find new add-ons for older versions).
- In the search bar, type "miniOrange Automated User Management".
- Click on Free Trial next to the plugin entry.
- Click Accept & Install when prompted.
- After installation, click on Get License. You’ll be redirected to MyAtlassian to generate a license.
- Generate and apply the license to activate the plugin.
Installation via File Upload
- Download the Plugin:
- Go to the Atlassian Marketplace.
- Search for miniOrange Confluence Automated User Management.
- Click on Try it free.
- Choose your hosting type (Server or Data Center).
- Click Start Free Trial.
- Enter your organization name and click Generate License.
- You’ll receive:
- The license key
- A download link for the .jar file
- Upload and Install:
- Log in to your Confluence instance as an admin.
- Navigate to Administration → Manage Apps.
- Click Upload App.
- Upload the downloaded .jar file.
- Wait for the installation to complete.
- Apply the License Key:
- Navigate back to the Manage Apps page.
- Locate miniOrange Confluence Automated User Management in the list.
- Click on the plugin entry to expand it.
- Paste your generated license key into the license input box.
- Click Apply License. You're all set!
Dashboard: Visual Analytics & User License Insights
The Dashboard tab in the miniOrange Automated User Management Plugin provides a comprehensive visual overview of your Confluence user base. With intuitive graphs and live statistics, it allows administrators to monitor user activity, track license usage, and evaluate user segmentation over a selected time period.
This centralized view helps Confluence admins make informed decisions about license optimization, deactivation strategies, and overall system hygiene.
Visual Components of the Dashboard
- Pie Chart: User Distribution Overview
The pie chart provides a snapshot breakdown of user types based on their current status in the Confluence environment:
- Active Users – Users currently enabled and using the application.
- Inactive Users – Users who have not logged in during the selected time range.
- Deactivated Users – Users who have been explicitly disabled or deactivated.
Example Use Case: If the pie chart shows a high percentage of deactivated users (e.g., 96.9%), it may be time to clean up directories or re-evaluate auto-deactivation rules.
- Bar Graph: User Activity Trends Over Time
The bar graph provides a time-based visual trend of user activity:
- Track how many users were active, inactive over the selected number of days.
- Evaluate spikes or drops in login behavior to understand usage patterns, such as after a major release or a policy change.
Example Use Case: If user activity dropped significantly over the past 30 days, it could indicate a misconfigured access rule or a scheduled maintenance window that impacted logins.
User Status Metrics
Below the visualizations, the dashboard lists real-time numeric insights for various user categories:
| Metric | Description |
|---|---|
| Active Users | Total number of currently active users |
| Inactive Users | Users who haven't logged in during the selected time period |
| Deactivated Users | Users explicitly disabled by the admin or automation settings |
| Activated Users | Users who were reactivated within the time period |
Example Use Case: If “Never Logged-In Users (Licensed)” shows a non-zero count, this may indicate underutilized licenses or onboarding issues.
Time Range Selection
Use the "Displaying User data for the past X days" dropdown to choose how far back you'd like to evaluate user behavior. The default is 30 days, but you can adjust it to analyze shorter or longer timeframes depending on your audit or reporting needs.
After changing the date range, click the “Refresh” button to reload updated data across all dashboard widgets.
License Utilization Metrics
The dashboard also includes detailed license insights, which are especially useful for budget-conscious teams.
| Metric | Description |
|---|---|
| Active Users (Licensed) | Licensed users who actively logged in during the selected period |
| Inactive Users (Licensed) | Licensed users who haven’t logged in during the time range |
| Never Logged-In Users (Licensed) | Licensed users who have never logged in since account creation |
| Used Licenses | Number of Confluence licenses currently consumed |
| Available Licenses | Remaining licenses available (may show "Unlimited" for open environments) |
Benefits of the Dashboard
- Quick Overview of user segmentation and login behavior
- Graphical Insights for presentations or internal reporting
- License Optimization through visibility into unused or inactive accounts
- Audit Readiness by analyzing activation and deactivation trends over time
Sample Scenario
You are preparing for a quarterly license review. By opening the dashboard and setting the display range to 90 days, you quickly find:
- 2 active licensed users
- 1 never logged-in licensed user
- 7181 deactivated users
This helps you justify a potential reduction in user licenses and clean-up inactive or orphaned accounts.
Advanced User Management
The Automated User Management tab is the core utility within the miniOrange Confluence User Management plugin. It allows administrators to view, filter, and manage user accounts efficiently across both internal and external directories. This interface is designed to handle operations in bulk, such as activation, deactivation, deletion, and group assignment changes, thereby streamlining administrative workflows and reducing manual overhead.
This section describes each filtering and action capability available within the tab, along with relevant usage examples to help you understand how to apply them in real-world scenarios.
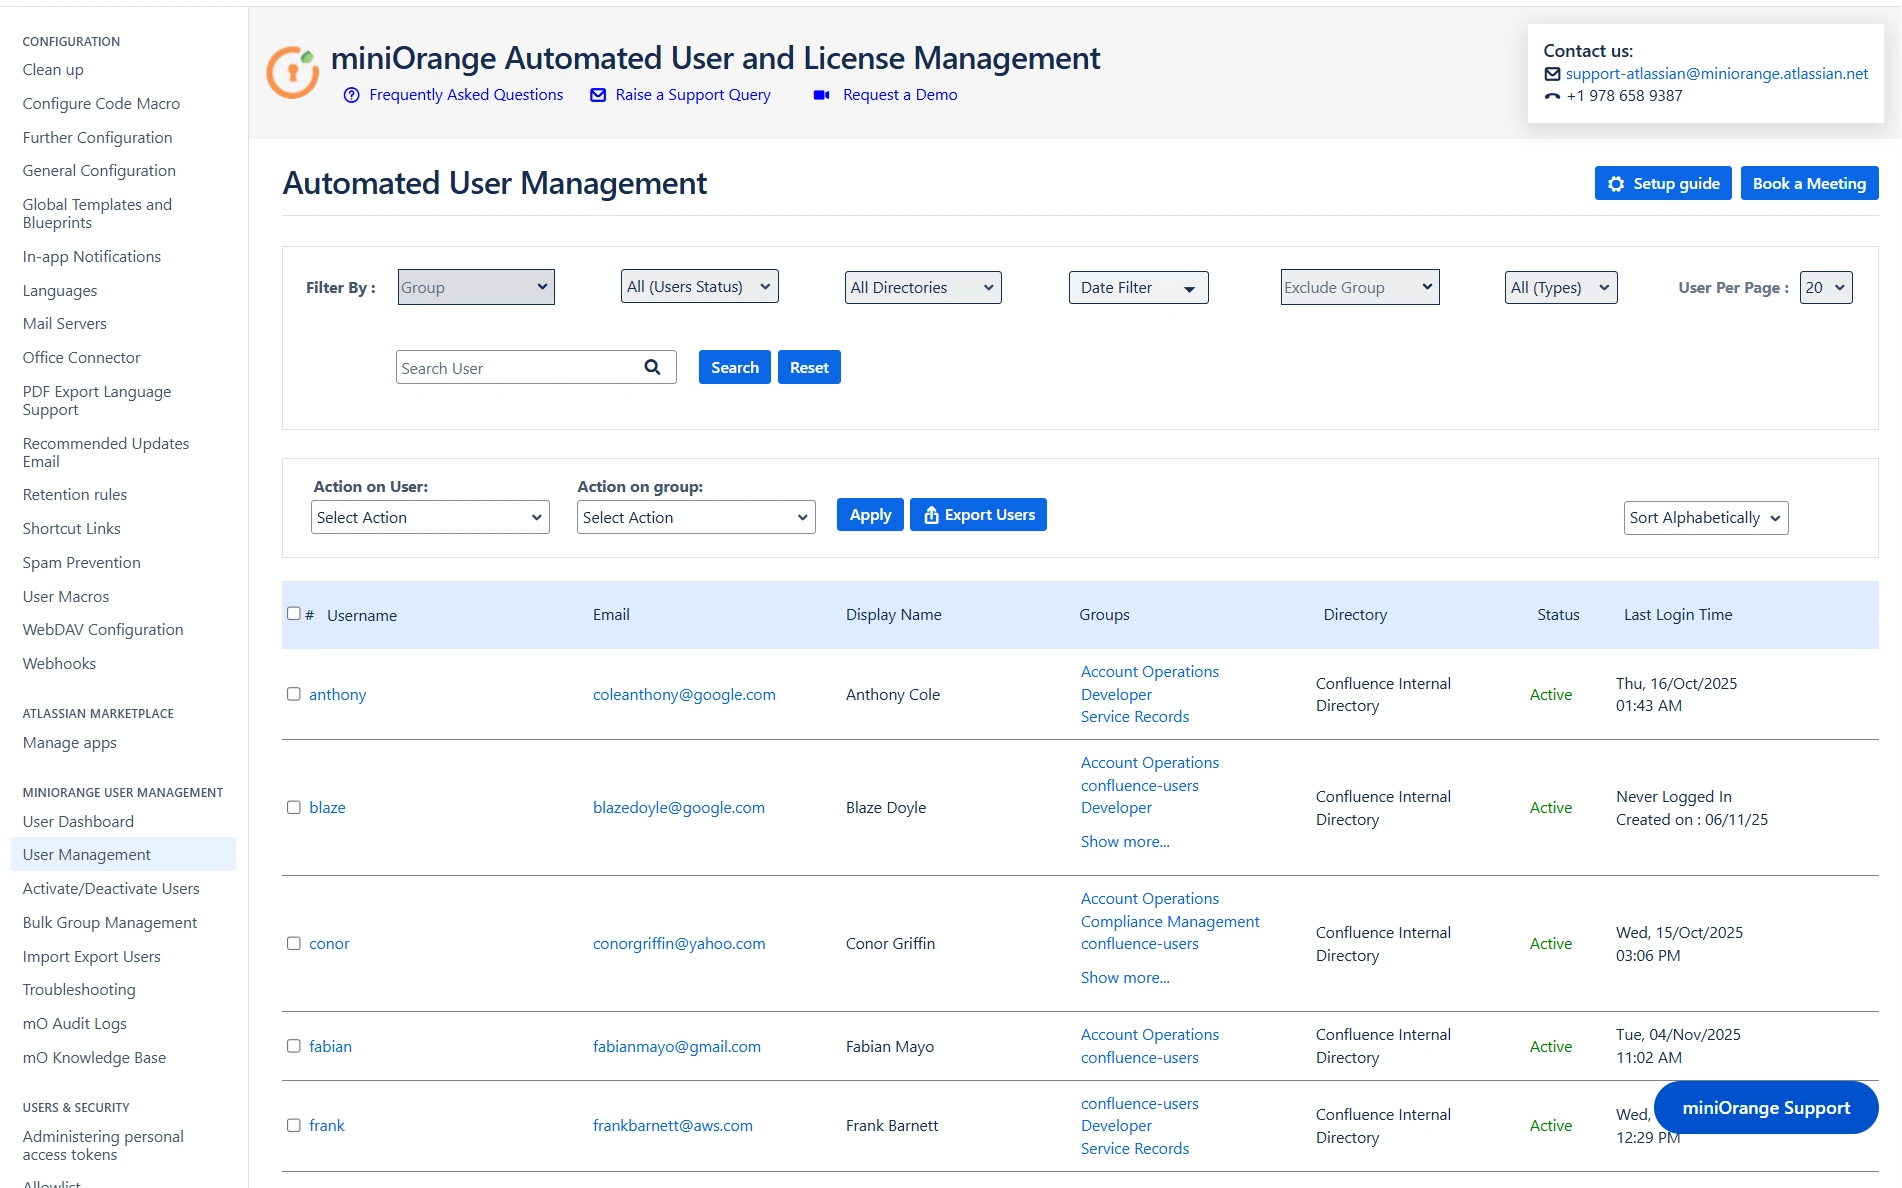
Filtering Options
1. Filter by Groups
This filter allows administrators to view only those users who belong to one or more selected groups.
Use Case:
If you want to identify users who are part of the Confluence-software-users and testers groups, you can select these from the dropdown. The system will list all users associated with any of the chosen groups. This is particularly useful when you need to take actions—like deactivation or reassignment—on a specific team or department.
2. Filter by Directory
This filter allows administrators to view only those users who belong to one or more selected groups.
Use Case:
In scenarios where your organization uses both internal and external directories (e.g., Crowd for external contractors), and you want to isolate internal employees for administrative actions, selecting only the Internal Directory provides a focused view for action.
3. Filter by Activity Status
This option filters users based on whether they are currently Active, Inactive, or includes All users.
Use Case:
When auditing unused accounts, selecting "Inactive" helps you focus only on users who have not logged in for a while. These users may be candidates for deactivation or removal to optimize license usage
4. Exclude Groups
This filter hides users who are members of specified groups.
Use Case:
To perform actions on regular users while excluding administrators or service accounts, you can exclude groups like Confluence-administrators or system-users. This ensures that high-privilege users are left unaffected by bulk operations.
5. Filter by License Type
Enables filtering between users who consume a license (licensed users) and all users, including unlicensed ones.
Use Case:
To analyze who is currently utilizing application licenses, filtering by "Licensed Users" provides a quick view. This helps in optimizing license allocations and planning cleanup operations.
6. Filter by Date Range (Last Login)
Filters users based on their last login date. Administrators can set a custom start and end date to define the login activity window.
Use Case:
If you want to identify users who have not logged in during the past 90 days, set the start date accordingly and leave the end date as today. This filter helps in identifying dormant users for review or deactivation.
7. Users Per Page
This setting determines how many users are displayed per page in the table view. Options include 10, 20 (default), 50, and 100.
Use Case:
When working with a large user base, increasing the number of users per page (e.g., to 100) reduces navigation effort and improves visibility while performing actions.
8. Search by Username or Email
Provides a search field to quickly find users by their exact username or email address.
Use Case:
If you need to update group memberships for a specific user such as alex.james@example.com, using the search bar provides immediate access without applying broader filters.
Action Options
Once users are filtered or searched, you can perform the following actions in bulk:
1. Action on Users
This dropdown enables bulk operations like Activate, Deactivate, or Delete on the selected users.
Use Case:
If you have filtered users who haven’t logged in for over 180 days, you can select all and deactivate them in one step, helping reduce unnecessary license consumption
2. Action on Groups
This option allows you to add or remove multiple users from specific groups simultaneously.
Use Case:
If a new compliance policy requires adding all users from the support team into a restricted-access group, this feature enables bulk addition without having to edit each user profile individually.
3. Sort or Filter Users
Additional options allow you to sort users alphabetically or by their last login time.
Use Case:
Sorting users by "last login" allows you to identify the least active accounts first, which is helpful when prioritizing users for review or deactivation.
Export Users
The Export Users button allows you to download a CSV file of the currently displayed users.
- If specific users are selected, only those users will be included in the export.
- If no users are selected, the entire user list as per the current filters will be exported.
Use Case:
You want to report all inactive users from the developers group who haven’t logged in for 90+ days. Apply the filters accordingly and export the resulting list for audit or review purposes.
Filters such as group, activity status, and directory can be combined to fine-tune the export. This enables very precise reporting or data backup operations based on current administrative needs.
Setup Users Auto License Management
The Activate/Deactivate Users tab provides centralized control for managing your licensed users efficiently by automating key administrative tasks such as user activation, deactivation, and access revocation based on inactivity. This helps optimize license usage, enhance security, and ensure only relevant users retain access.
A. Summary Section
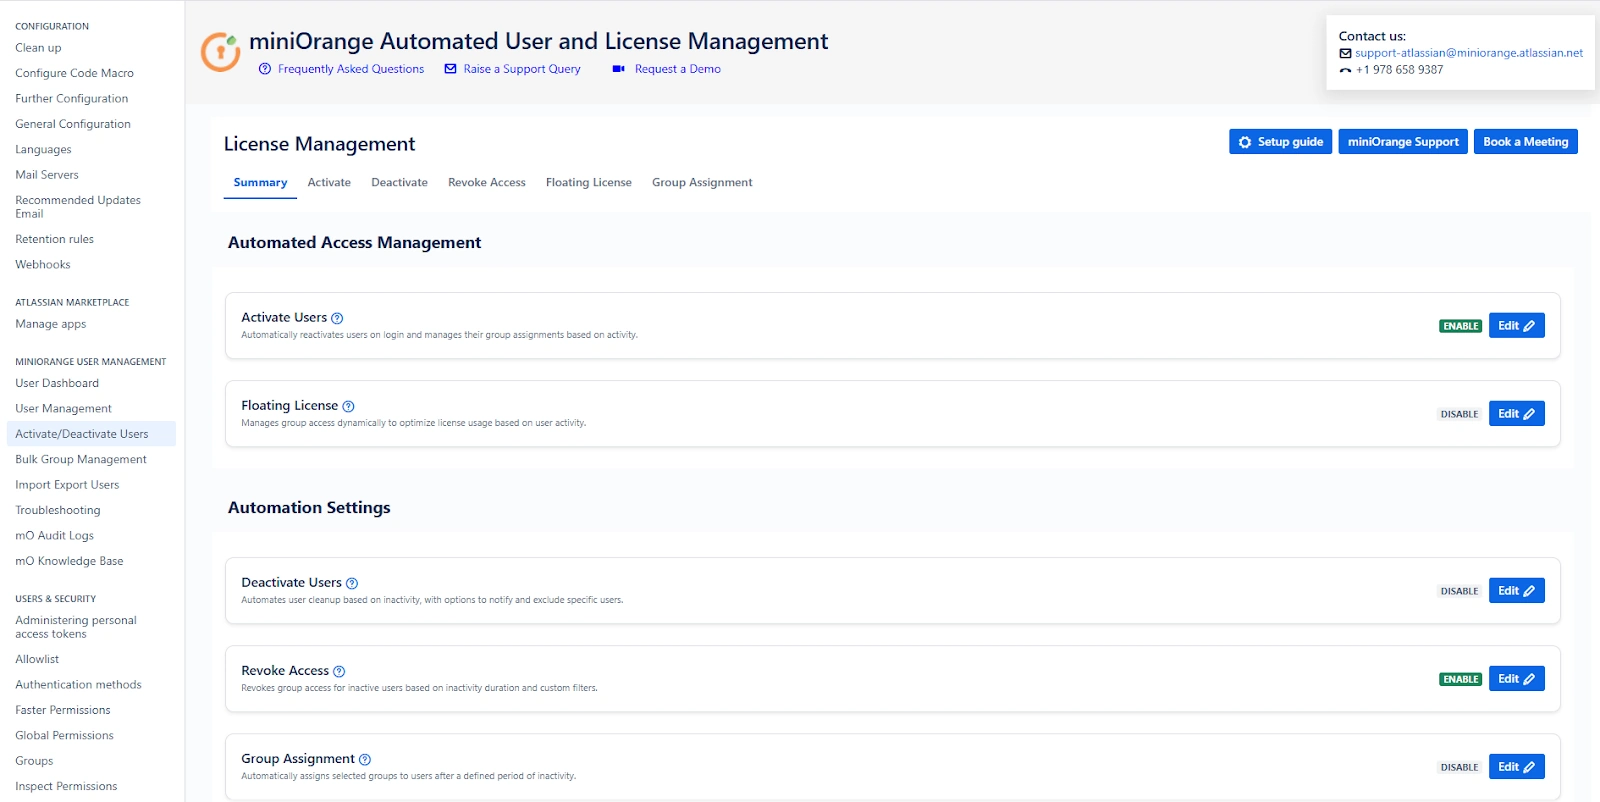
Upon navigating to the Activate/Deactivate Users tab, you will land on the Summary screen. This provides quick insights into:
- License Management: display the status of reactivation and floating license toggle
- Scheduler Status: View when the next scheduler run is planned.
- Automation Overview: Displays which automation toggles are currently active.
You can click the Edit buttons to quickly access and configure license management rules or automation preferences.
Scheduler Configuration
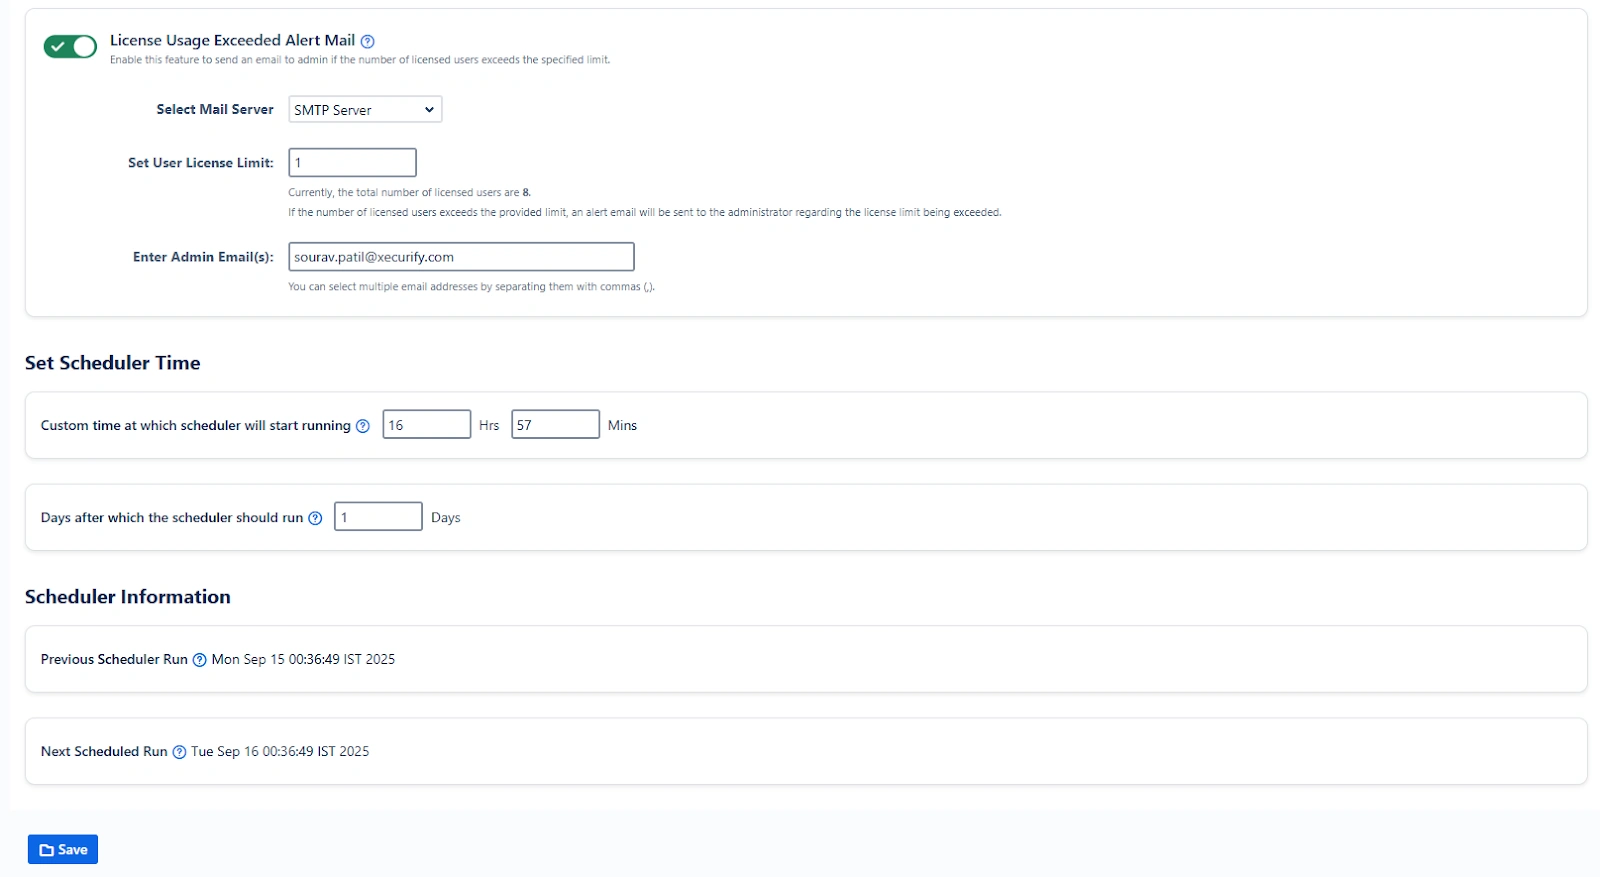
The scheduler ensures your configured automations (e.g., user deactivation or group updates) are run automatically at a defined time.
Features:
- Custom Time Setup: Define the exact time (HH:MM) at which the automation should run daily.(24 hr display time)
- If the current time has already passed, the scheduler starts from the next scheduled day.
- License Usage Alert: Enable the “License Usage Exceeded Alert Mail” toggle to receive emails when license consumption crosses a set threshold.
Example Use Case:
An admin sets the scheduler to run every day at 2:00 AM. This allows inactive users to be deactivated nightly without impacting working hours. If the license limit exceeds 500, the admin gets notified immediately to take corrective action.
B. Reactivate Tab
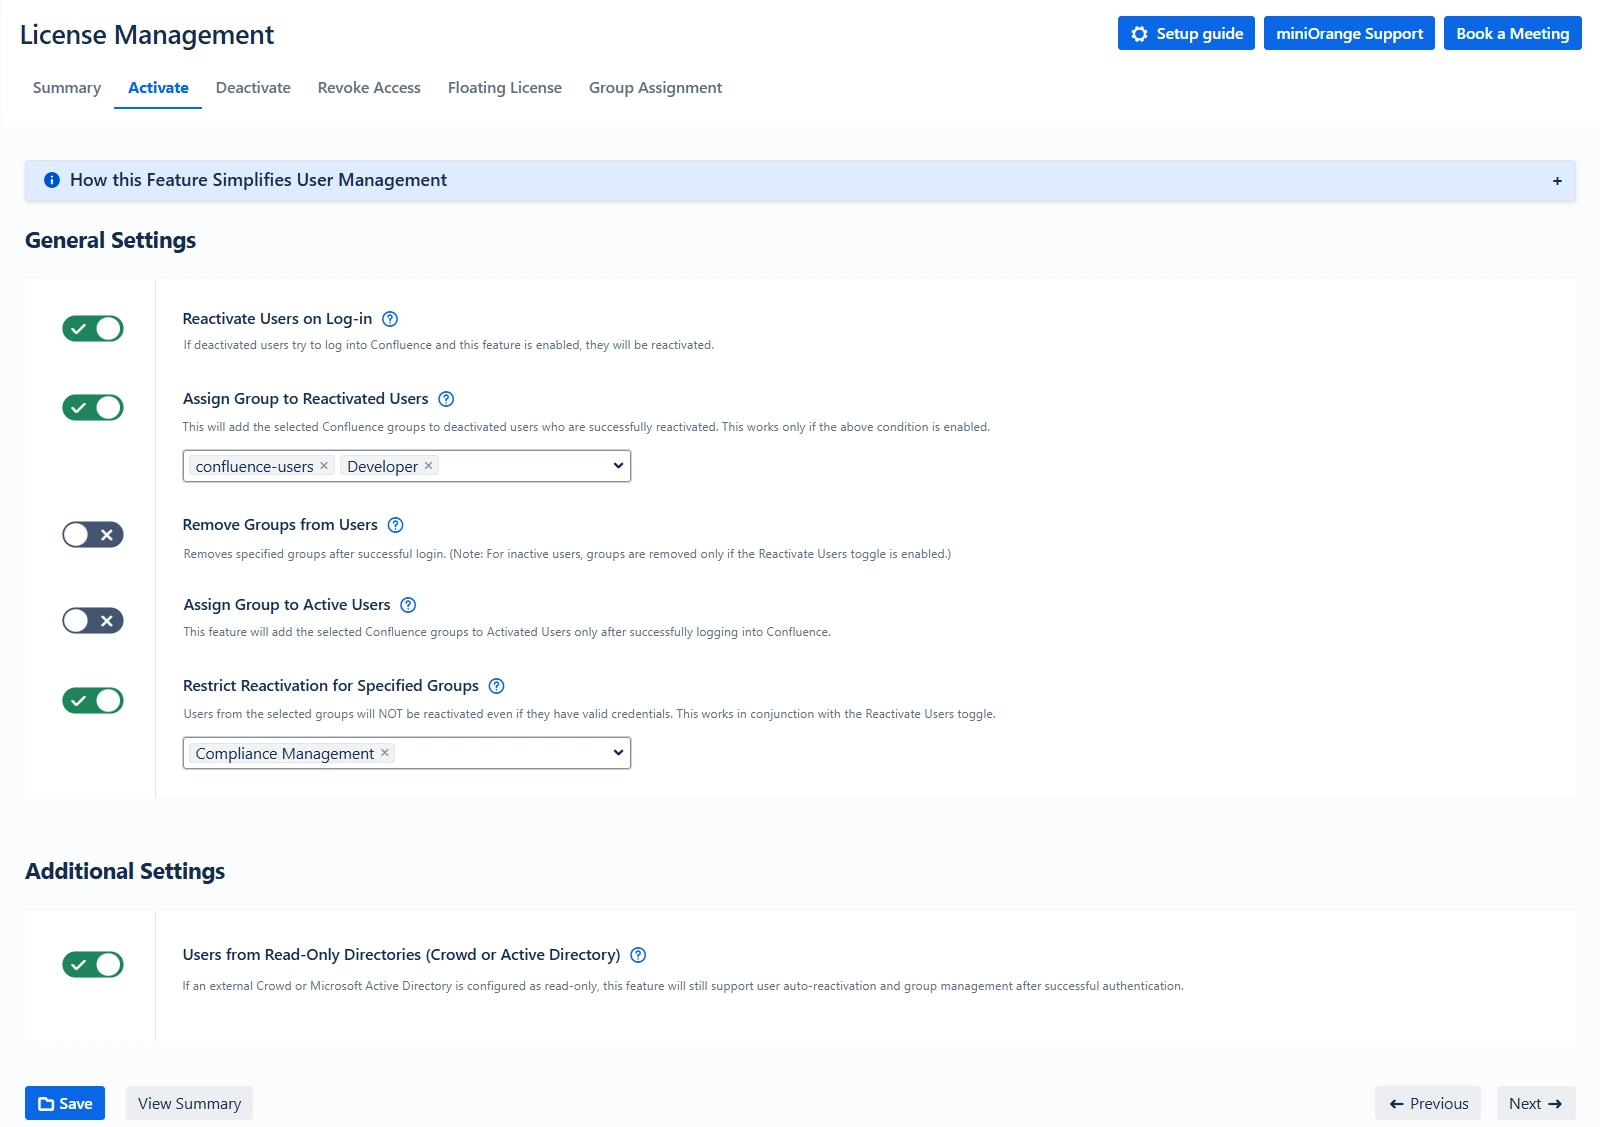
The Reactivate Users feature ensures seamless reactivation of inactive users when they attempt to log in—based on defined rules.
Key Toggles and Options:
- Enable Reactivation: Automatically reactivates users upon login.
- Add Groups After Login: Automatically assign specified groups to reactivated users.
- Remove Groups After Login: Automatically remove unwanted groups from reactivated or active users on login.
- Restrict Reactivation for Specified Groups: Users from the selected groups will NOT be reactivated upon login.
- Crowd Read-Only Support: Allow reactivation even for users from external read-only directories.
Example Use Case:
A user who was marked inactive after 90 days returns for a new project. Upon login, their account is reactivated and assigned the group Confluence-developers, while outdated access like temp-access is removed automatically.
C. Deactivate Tab
This section allows for rule-based deactivation of users based on login activity.
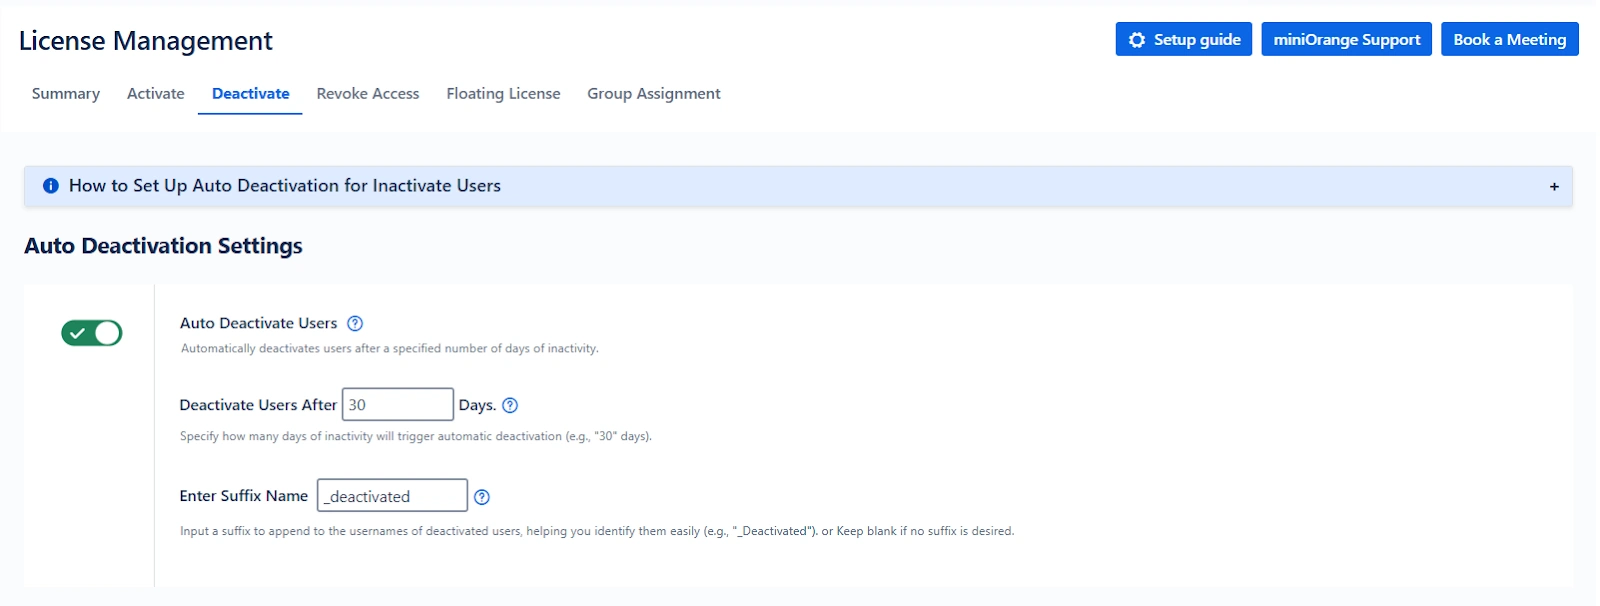
Features:
- Auto Deactivate Toggle: Set the number of days after which users with no activity are deactivated (default is 30).
- Add Suffix to Username: Helps identify users who will be deactivated (e.g., appending “_deactivated” to usernames).
Preferences for Deactivation
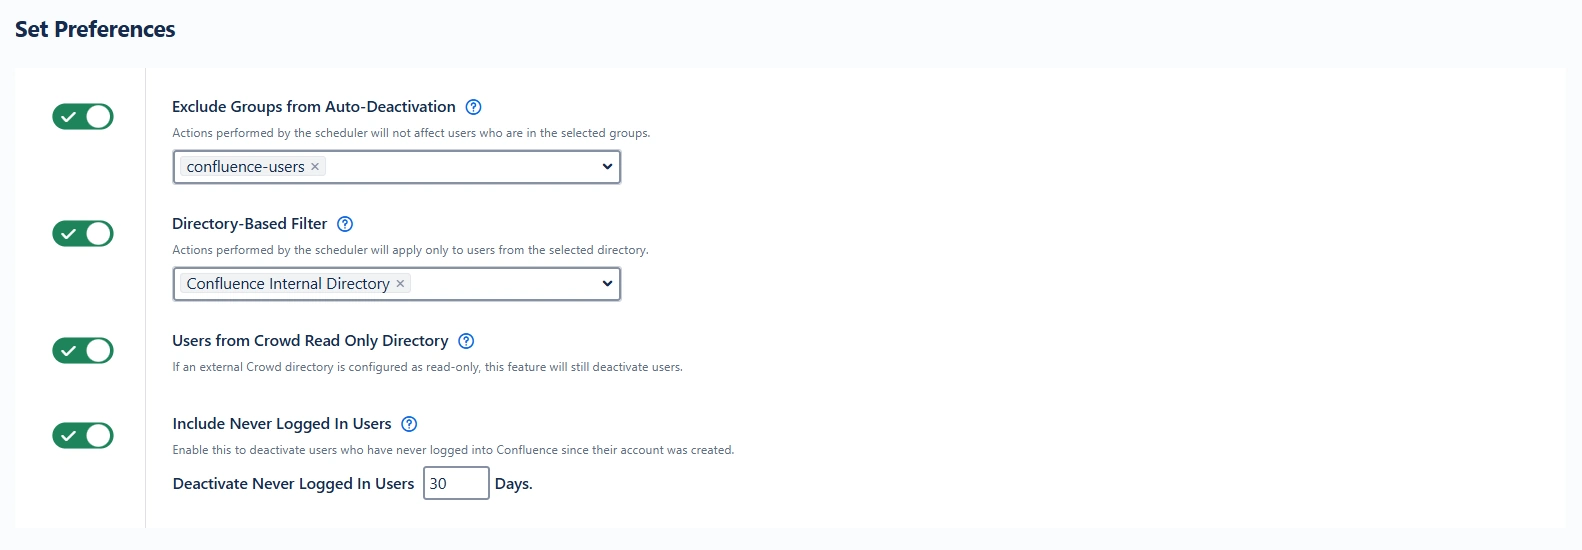
- Exclude Groups: Skip deactivation for certain critical groups (e.g., Confluence-admins, Confluence-software-user).
- Select Directory: Choose specific directories for user evaluation.
- Crowd Read-Only Support: Allow deactivation even for users from external read-only directories.
- Include Never Logged-In Users: Deactivate users who have never logged in since account creation.
- Include Once Logged-In Users: Deactivate users who logged in only once, with a day threshold.
Example Use Case:
You configure that users inactive for 45 days will be deactivated and receive the suffix "_old". Users in support-staff group are excluded from this rule. This lets your system remain lean without affecting ongoing support teams.
Example Use Case:
Before deactivating a QA engineer, the system reassigns their unresolved tickets to the test lead. This ensures no issue is left unattended post-deactivation.
Email Notifications Before Deactivation
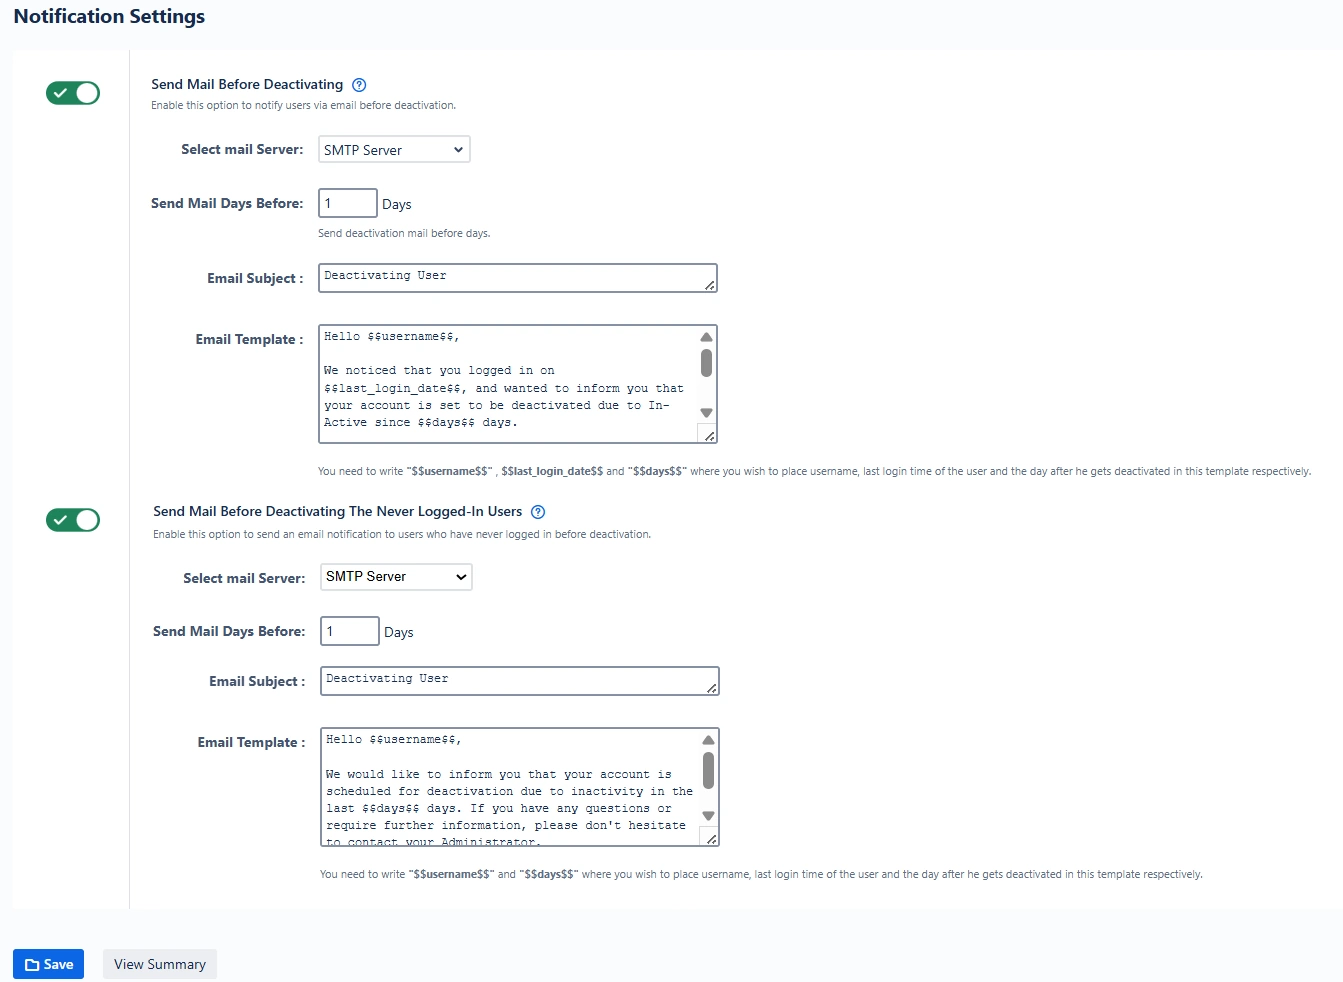
You can notify users ahead of their deactivation to reduce surprises or reactivation requests.
Configuration Options:
- Set the number of days before deactivation that an email is sent.
- Customize the subject and body of the notification email.
- Separate toggle for users who have never logged in.
Example Use Case:
An email is sent 7 days before deactivation warning users that inactivity will lead to removal. A never-logged-in intern account created months ago receives a notice as well, with instructions to contact the admin if access is still needed.
D. Revoke Access Tab
The Revoke Access tab allows administrators to revoke application access for users who have been inactive over a certain period, while still keeping the user accounts in the system (i.e., not deleting or deactivating them). This approach helps enforce license hygiene and reduce unnecessary license usage without affecting user data or historical records.

Key Features
Group-Based Access Revocation Toggle
Enables revoking access by removing users from specific groups after a defined period of inactivity.
- Set Target Groups: Choose one or more groups from which users will be removed (e.g., Confluence-software-users or developers).
- Set Inactive Days Threshold: Specify the number of days of inactivity after which the access should be revoked. : The default is 30 days.
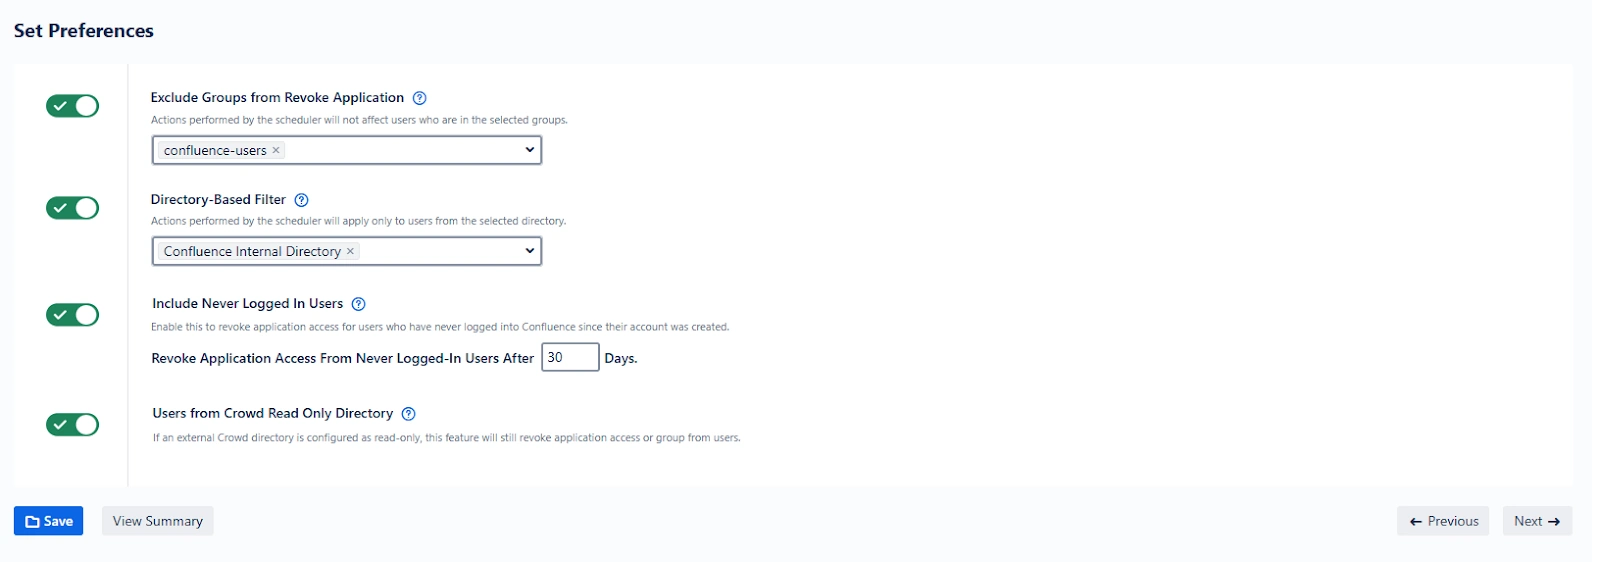
These preferences provide more granular control over which users should be evaluated for access revocation.
- Exclude Groups from Revoking Access: Prevents revoking access for certain critical groups.
- Select Directory for Revoking Access: Allows targeting specific internal or external directories for the revocation logic.
- Include Never Logged-In Users: Revoke access for users who have never logged into the system.
- Include Once Logged-In Users: Revoke access for users who have logged in only once and remained inactive beyond the defined days.
- Crowd Read-Only Directory Support: If you're using external Crowd directories in read-only mode, this toggle allows user access revocation from those directories as well.
Example Use Case
Scenario: Your organization has a floating pool of users in a group Confluence-contractors. These users are expected to log in frequently for collaboration.
You configure the Revoke Access tab with:
- Target group: Confluence-contractors
- Inactivity threshold: 45 days
- Include never-logged-in users: Enabled
Now, if a contractor hasn't logged in for 45 days or never logged in at all, their group access will be revoked, releasing the license and ensuring your user base remains compliant and clean.
E. Floating License Tab
The Floating License feature enables dynamic assignment of license-related groups to users at the time of login. This is done using rule-based logic to assign users to specific groups (e.g., Confluence-software-users, Confluence-servicedesk-users) only when required.
This feature is especially useful for organizations that have more users than available licenses, ensuring that only active or concurrent users consume a license.
Crowd Read-Only Support:
Floating licenses are supported even for users coming from external read-only directories.
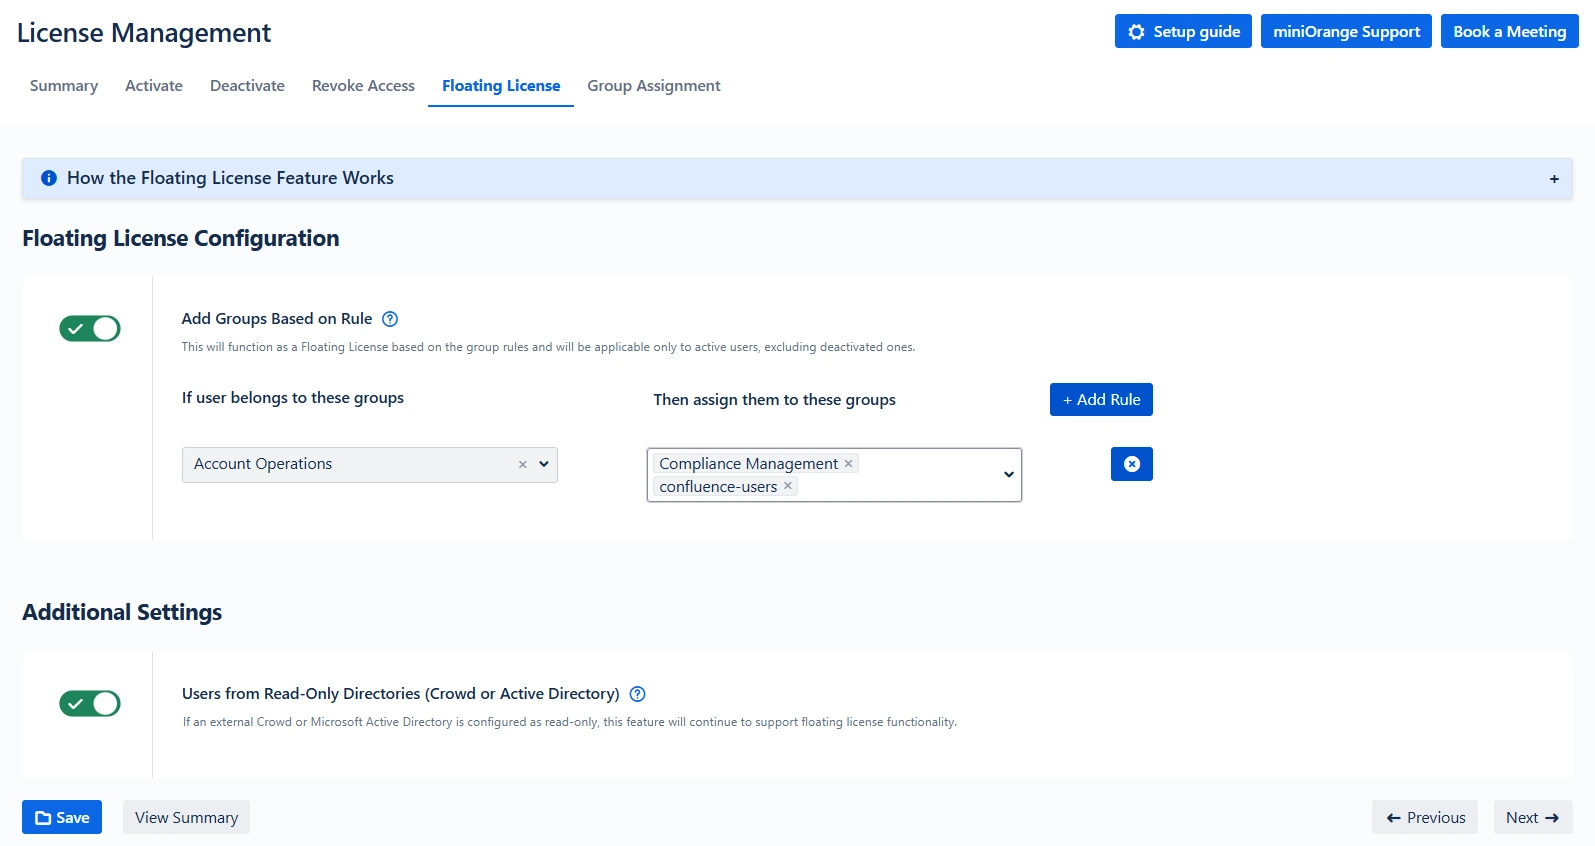
Key Features
Rule-Based Group Assignment Toggle
Enables rule-driven group assignments for license usage optimization.
- Only applies to active users.
- Deactivated users are not considered in this logic.
Define Mapping Rules
Each rule is defined as:
- Source Groups ("If User Belongs to These Groups"): The initial group(s) a user belongs to (e.g., sales-team, external-contractors).
- Target Groups ("Then Assign Them to These Groups"): The license or functional groups that should be added at login (e.g., Confluence-software-users).
Manage Rules
- Add multiple rules based on different roles or departments.
- Remove rules by clicking the ❌ icon beside the rule.
Example Use Case
Scenario: Your marketing team (marketing-users) and support team (support-temp) share a pool of Confluence licenses. You have only 30 licenses but 60 users.
Configuration:
- Rule 1: If user is in marketing-users, assign to Confluence-software-users
- Rule 2: If user is in support-temp, assign to Confluence-servicedesk-users
When a user from either team logs in:
- The system checks their base group.
- Assigns them a license-based group only during active use.
This setup dynamically manages access and prevents license overconsumption.
F. Group Assignment Tab
The Group Assignment tab enables administrators to automatically assign specific groups to users who have been inactive for a defined number of days. This is especially useful for labeling, reporting, or grouping inactive users for specific workflows or audits without revoking their access.
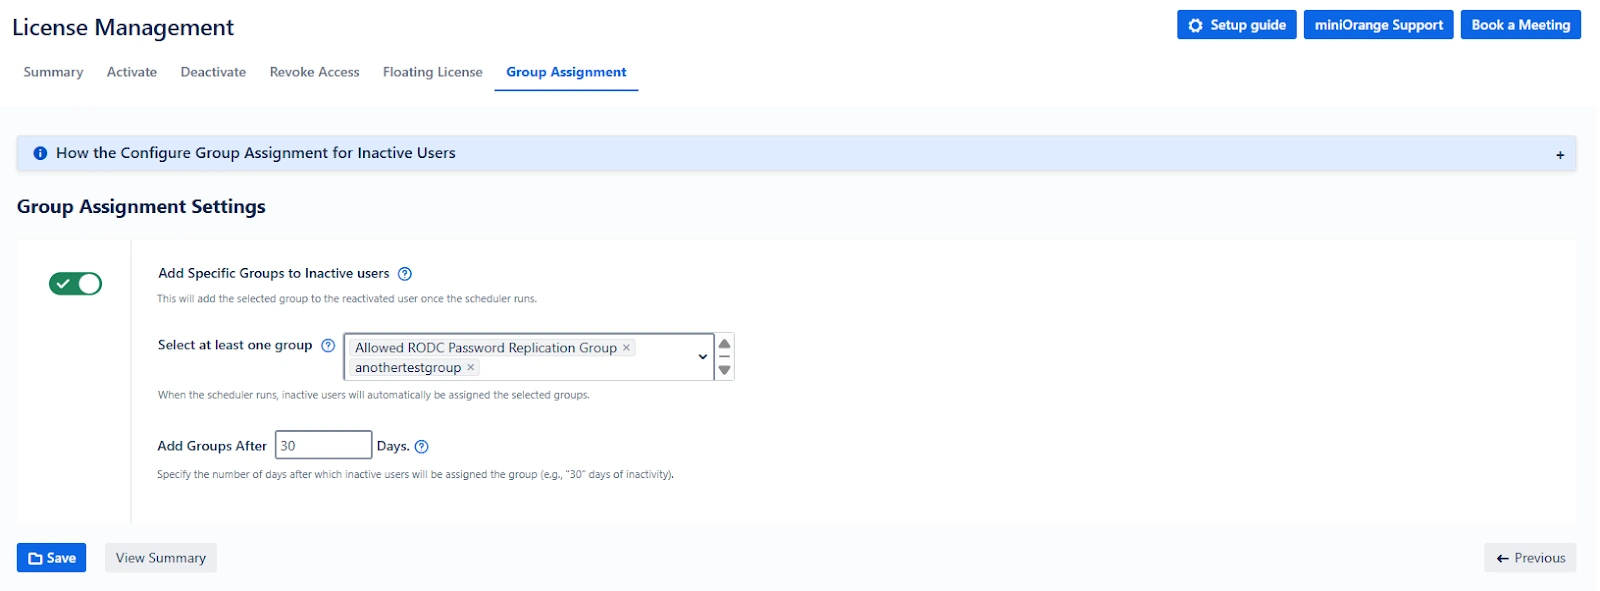
Key Features
Add Specific Groups to Inactive Users Toggle
Activates the logic for automatically tagging inactive users with a defined group.
- Specify Target Groups: Enter one or more groups to assign (e.g., inactive-users, needs-review).
- Set Inactivity Period: Define how many days of inactivity qualify a user for this assignment.
This does not affect login permissions but helps categorize and track inactive users more effectively.
How to View or Export Assigned Users
To audit or export these users:
- Go to the Bulk User Management tab.
- Use the Filter by Groups option.
- Enter the target group(s) like inactive-users defined in this setting.
- Apply the filter and export as CSV.
Example Use Case
Scenario: You want to track users who have not logged in for 60 days but do not want to deactivate or revoke their access yet.
You configure:
- Inactivity threshold: 60 days
- Assigned group: review-required
When the scheduler runs:
- All users who meet the 60-day inactivity condition are added to the review-required group.
- These users can now be reviewed periodically, reminded, or tracked for further action (like deactivation).
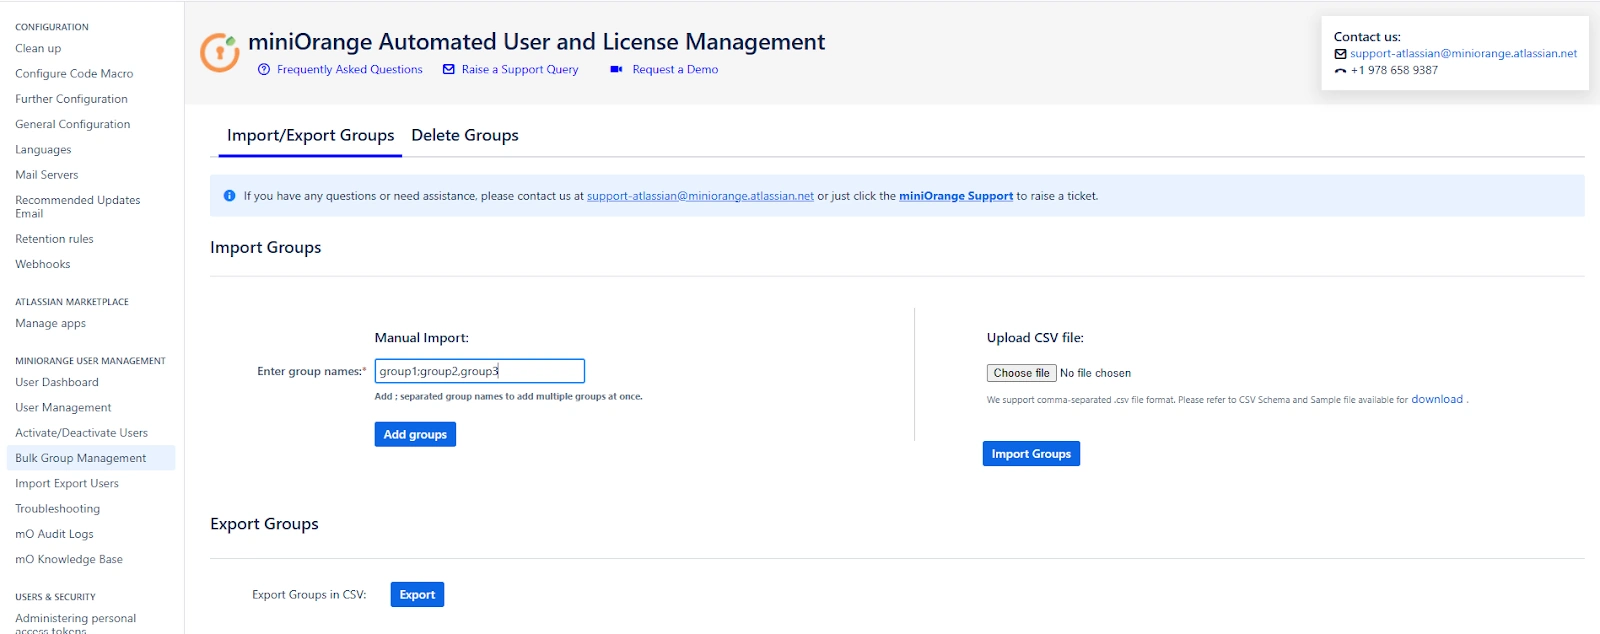
Bulk Group Management
The Bulk Group Management tab in the miniOrange Confluence User Management plugin offers administrators a centralized interface to manage user groups efficiently. Whether you're creating new groups, importing groups from external files, exporting existing group data, or cleaning up outdated groups, this tab allows you to perform all actions in bulk—saving significant time and effort.
This section details the functionality of the Bulk Group Management tab, followed by practical use cases to demonstrate how and when to apply each feature.
1. Create Groups Manually
You can create multiple groups at once by entering group names in the "Enter Group Names" field. To add more than one group, separate each group name using a semicolon (;).
Use Case:
Your organization is onboarding three new departments: content-team, product-strategy, and frontend-dev. Instead of creating each group manually, you can enter them like so:
content-team;product-strategy;frontend-dev
Clicking the Add groups button will add all three groups simultaneously. This is especially useful during initial setup or mass onboarding scenarios.
2. Import Groups from CSV File
If you already maintain a list of groups in a CSV file (e.g., from another system or export), you can upload that file to create the groups in bulk. The file should contain group names in each row.
Use Case:
Suppose you are migrating from another user management system or have received a list of 50 standard project groups from your IT team in CSV format. Instead of entering them one by one, you simply upload the file to have all groups created instantly, ensuring speed and accuracy.
3. Export Groups to CSV File
You can export the current list of Confluence groups into a downloadable CSV file. This file can optionally include the number of users in each group if you enable the “Include No. of Users in Group” checkbox before exporting.
Use Case:
If you need to share a report with compliance or management that shows which groups exist in Confluence and how many users belong to each, this feature gives you exactly that in a structured CSV format. It’s ideal for auditing, documentation, or bulk review activities.
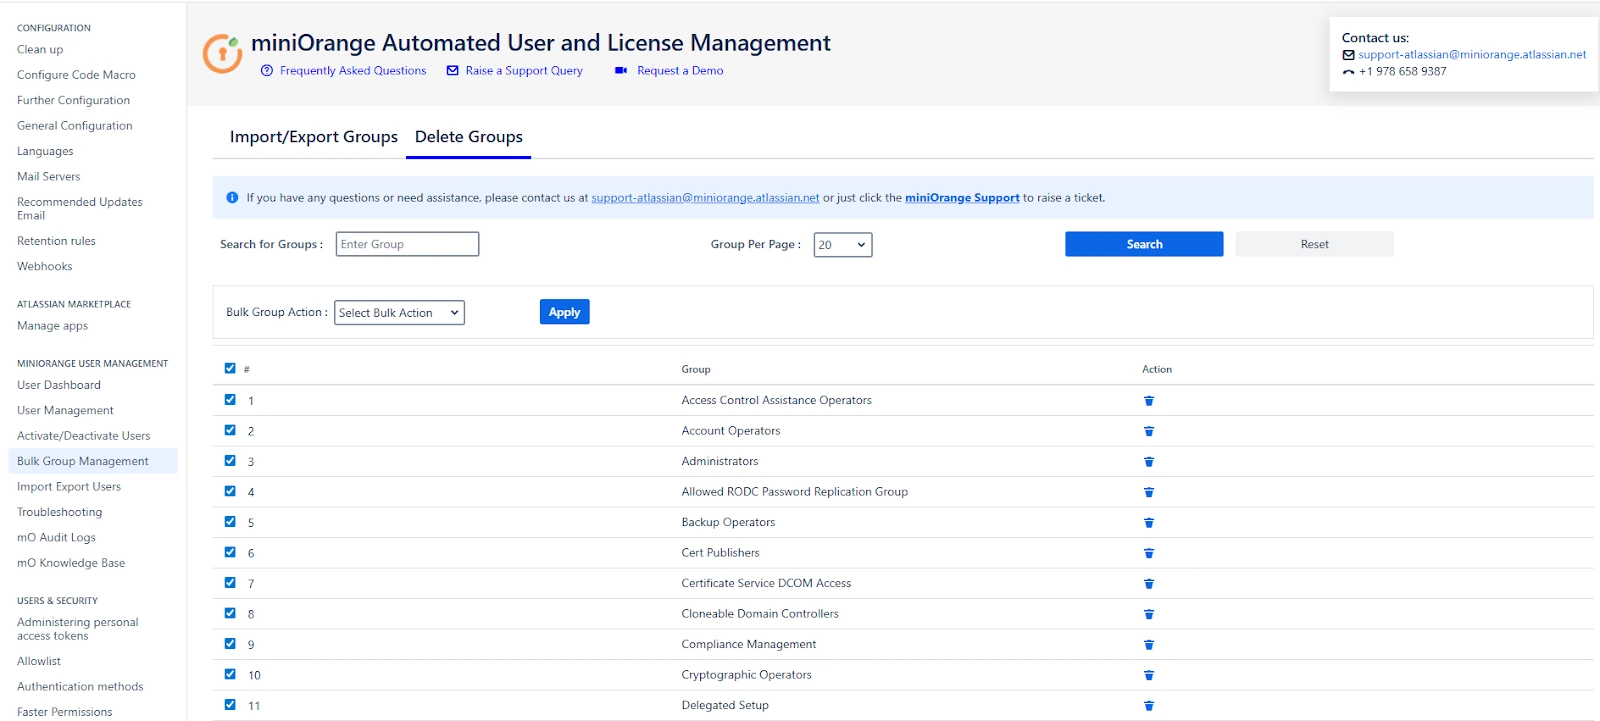
4. Delete Groups in Bulk
From the Select Groups dropdown, you can choose one or more groups to delete. After selecting the desired groups, click the Delete button to initiate the deletion process.
Deletion Summary Window:
Once the deletion is initiated, a summary window appears displaying the outcome of each deletion attempt. This includes:
- Group Name – The name of the group being deleted.
- Status – Indicates whether the group was successfully deleted or if the deletion failed.
- Error Message (if applicable) – Provides information if the group could not be deleted, such as "Group has admin access" or "Group not found".
This real-time feedback ensures transparency and helps administrators take corrective action immediately if needed.
Use Case:
You select and delete 10 outdated groups such as old-project-x, archived-beta-testers, and temp-review-board. After clicking Delete, the summary window displays:
- 7 groups deleted successfully
- 2 groups skipped due to admin access
- 1 group not found (possibly already deleted by another admin)
This allows you to verify what happened at a glance and take further action if necessary.
Summary of Benefits
The Bulk Group Management tab enables administrators to:
- Rapidly set up new organizational units or project teams.
- Seamlessly migrate groups from legacy systems.
- Efficiently document current group structures.
- Remove obsolete or unused groups to maintain a clean access control environment.
Import Export Users Tab
The Import Export Users tab provides an efficient way to onboard or offboard users in bulk within Confluence. This is particularly helpful for Confluence administrators managing large teams, rotating user bases (e.g., vendors or interns), or performing periodic user audits.
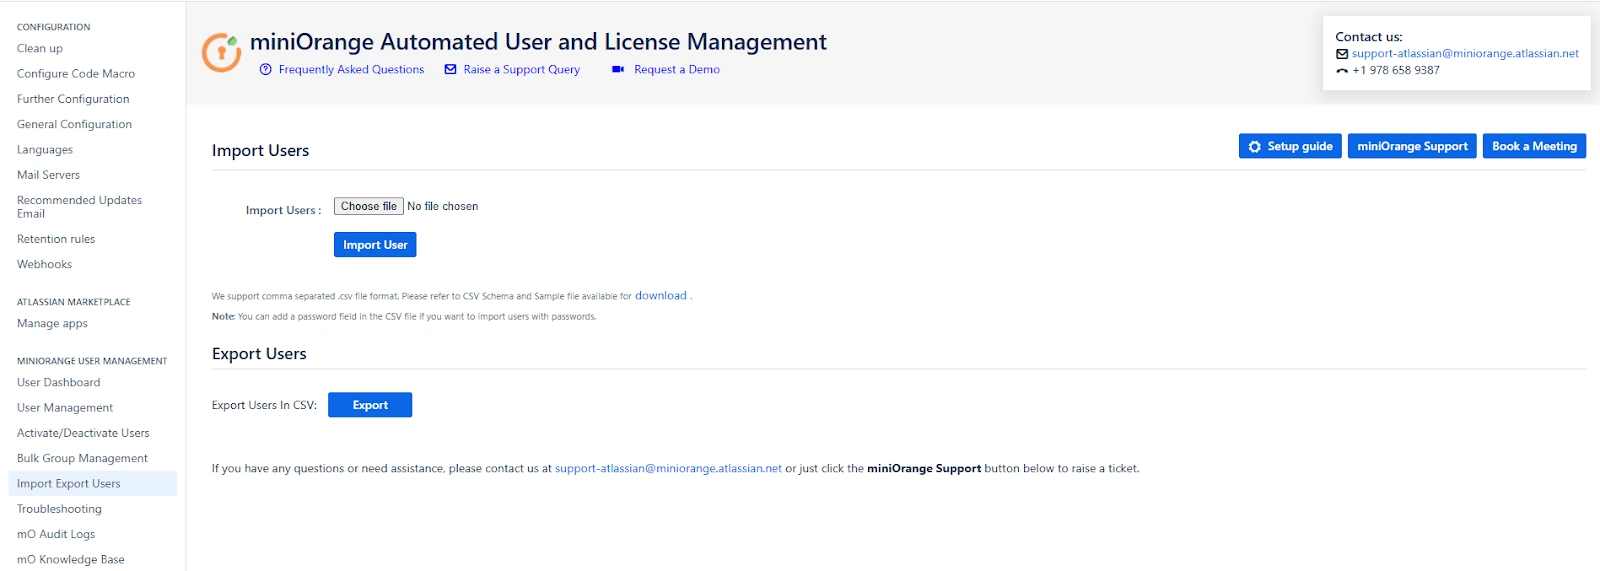
Import Users (via CSV)
This feature allows you to bulk-create or update user accounts in Confluence using a structured .CSV file. It’s a fast and repeatable method to provision user access without manually creating each user from the admin panel.
Steps:
- Click on Download Format to get the sample .CSV template.
- Fill in user details (e.g., username, email, display name, group assignment) in the file.
- Upload the completed .CSV file via the Import Users section.
Additional Options
-
Send Mail to Newly Imported Users:
- Sends a customizable email to each new user created via the CSV.
- You can edit the email subject and template content (HTML or plain text) before sending.
-
Send Password Reset Email to New Users:
- Automatically sends a secure password reset link to imported users.
- Helps ensure users can set their own passwords without admin intervention.
Example Use Case:
Scenario: Your HR department provides a monthly list of new employees in CSV format. You can use the Import Users feature to onboard all users in one action:
- Upload the list.
- Enable email notification.
- Send each user a welcome message with a link to set their password. This simplifies onboarding, especially for large batches like interns, new hires, or partners.
Export Users
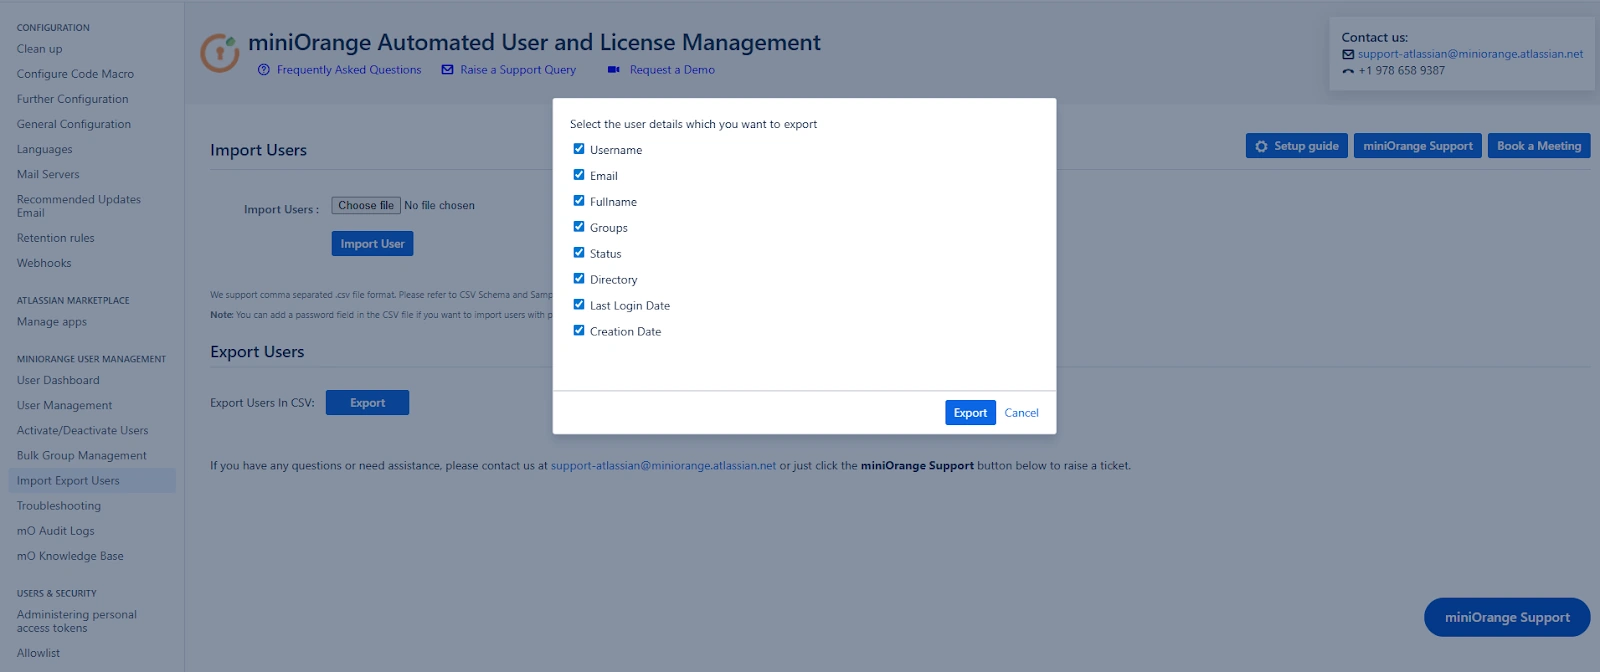
This feature allows you to extract user data from Confluence, either for reporting, auditing, or data analysis.
Steps:
- From the Export Users section, select the user attributes you wish to include in the export (e.g., username, email, groups).
- Click on Export, and the system will generate a .CSV file with the selected user details.
Audit Log Tab
The Audit Log tab in the miniOrange Automated User Management Plugin is designed to give administrators full visibility and traceability into all actions performed through the plugin. This is essential for compliance, security, and internal accountability.
It captures a detailed timeline of what action was taken, when, by whom, and on which user or group—ensuring a complete audit trail of user-related administrative activities.
Key Features
View Audit Logs
To access the audit log, go to the “Audit Log” option from the MINIORANGE USER MANAGEMENT section in the left sidebar.
Each entry in the log includes the following details:
- Username – Who performed the action
- Date – When the action was performed
- IP Address – From where the action was triggered
- Action – What kind of operation was executed (e.g., Deactivate User, Add to Group)
- Status – Whether the action was successful or failed
- Description – Additional details about the action (e.g., user’s group or directory)
Export Logs to CSV
You can export logs as a .CSV file by applying filters such as action type or date range. This is helpful for sharing data with compliance teams or for long-term record-keeping.
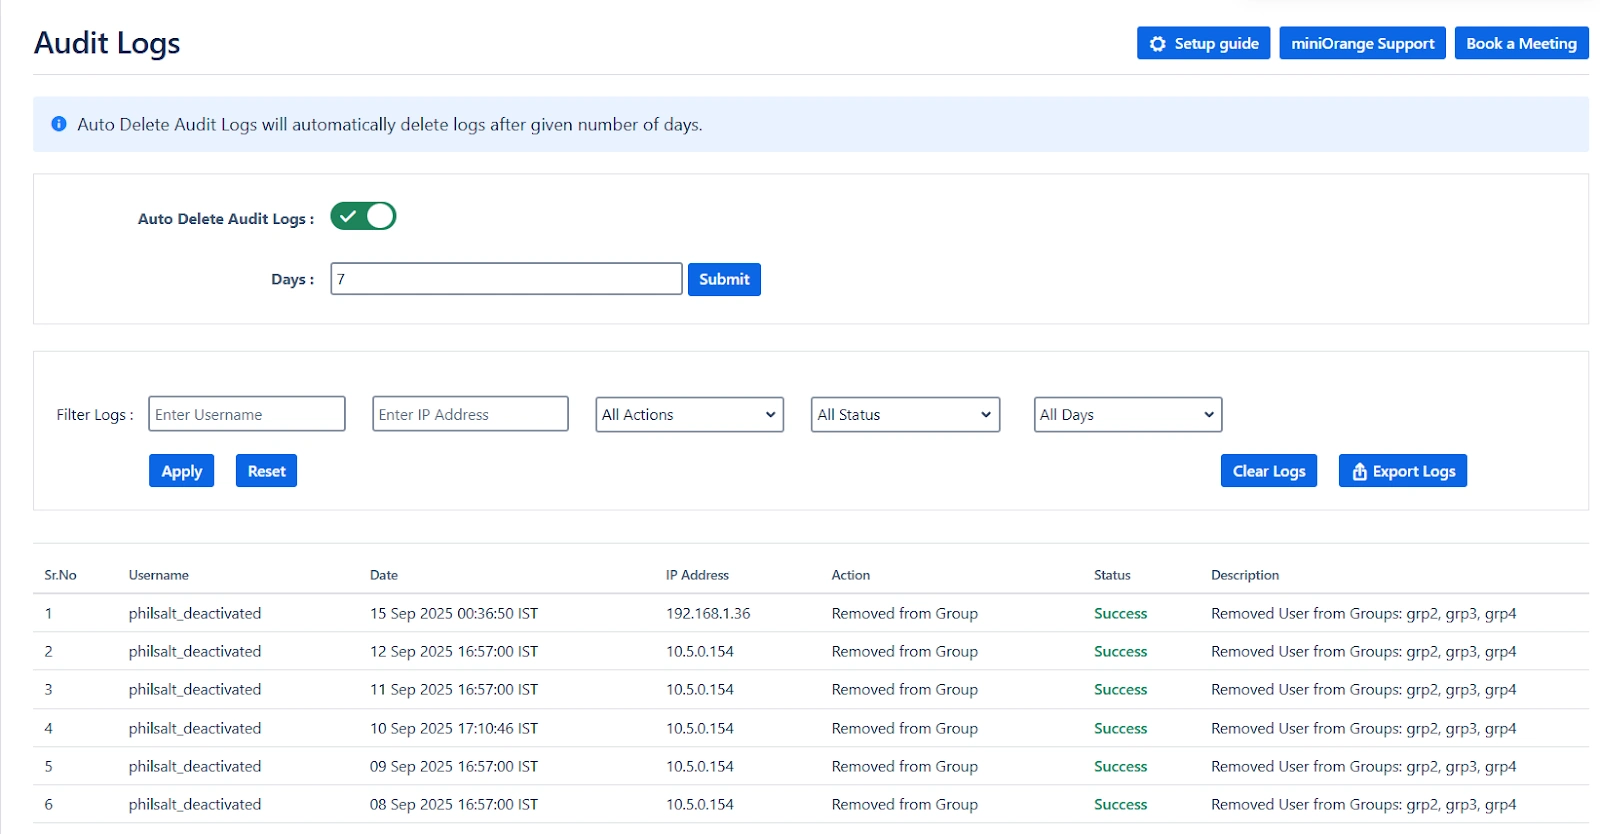
Auto Delete Audit Logs
Enable the "Auto Delete Audit Logs" option to automatically purge logs after a specified number of days. This helps keep your logs manageable and ensures that sensitive data doesn’t persist indefinitely unless required.
You can set the number of days in the Days input field, after which all logs older than the specified duration will be removed automatically.
Filter Logs by Action Type
You can filter log records based on the following actions:
- User Deactivated
- User Activated
- User Deleted
- Removed from Group
- Added to Group
- Imported Users
- Scheduler Enabled / Disabled
- Group Created / Deleted
- Delete Logs Scheduler Enabled / Disabled
- User Reactivated
Example Use Cases
Example 1: Investigating Unexpected Group Removal
Scenario: A user reports they suddenly lost access to a Jira board.
- Open the Audit Log tab.
- Filter by Action = Removed from Group.
-
Locate the entry for the user and check:
- Date and Time of removal
- Admin who performed it
- IP address to validate access location
- Use this information to reverse the change or escalate further.
Example 2: Monthly Compliance Review
Scenario: Your IT security policy requires monthly validation of all user deactivations.
- Go to the Audit Log tab.
- Filter by Action = User Deactivated and set the Date Range to the current month.
- Export the filtered logs as .CSV.
- Share the report with your IT compliance team for review and approval.
Example 3: Monitoring Scheduler Configuration Changes
Scenario: You want to track when the auto-deactivation scheduler was disabled.
- Filter by Action = Scheduler Disabled.
-
Review the logs to identify:
- Who disabled the scheduler
- When it was disabled
- Follow up with that administrator if needed.
Example 4: Managing Audit Log Size
Scenario: Your audit log has grown too large over time.
- Enable Auto Delete Audit Logs.
- Set Days = 90 to retain logs for the past 3 months only.
- Going forward, logs older than 90 days will be automatically deleted, maintaining log hygiene without manual cleanup.