
miniOrange SAML Single Sign-On Plugin for Atlassian
Overview
miniOrange SAML Single Sign-on Plugin allows seamless login into the JIRA, Confluence and other Atlassian applications through any SAML 2.0 Identity Provider.
We support all SAML 2.0 capable Identity Providers (IDPs) like Okta, ADFS, Azure AD, OneLogin, F5 BIG-IP, Google Apps, Salesforce, Keycloak, Shibboleth, SimpleSAMLphp, OpenAM, Centrify, PingOne, PingFederate, RSA SecureID, IBM, Oracle, Bitium, WSO2, NetIQ and many more.
Seamless User Access & Management
The plugin allows users to sign into and update their existing accounts and also enables new account creation via Single Sign-On (SSO). It helps you manage application user permissions by mapping your user’s IDP groups to corresponding local Atlassian application groups.
The plugin is compatible with user directories like Crowd, LDAP, etc., ensuring flexibility across different environments.
Key Features
Here are some of the key features of the miniOrange SAML SSO plugin:
- SSO Support: Enable SSO into both Atlassian Server and Data Center installations.
- Service Desk Integration: Supports SSO on the service desk customer portal.
- JIT Provisioning: Just In Time (JIT) user creation, profile updates, and group assignments.
- Single Logout: Seamless SAML Single Logout functionality.
- Secure Assertions: Support for signed and encrypted SAML assertions.
- Force SSO: Enforce SSO for all unauthenticated traffic and anonymous pages.
- Emergency Access: Fallback login option in case the Identity Provider is inaccessible.
- Secure Admin Access: Customize and secure fallback URLs for administrator-only access.
- Cost Optimization: Allow users to access without creating new accounts, reducing licensing costs.
- Custom UI: Customize login pages, logout pages, and error messages.
- Multiple IDP Support: Enable SSO from multiple SAML Identity Providers.
- Redirection Rules: Route users to different IDPs based on email, groups, or directories.
- Header-Based SSO: Seamless authentication using VPN or reverse proxy setups.
- World-Class Support: Dedicated support to assist you at every step.
Supported SSO Methods
The miniOrange SSO SAML Plugin provides multiple methods for authentication and authorization of users, ensuring flexibility based on your infrastructure and security requirements.
The plugin supports the following authentication methods:
- SAML Single Sign-On
- Header-Based Authentication
SAML Single Sign-On
Security Assertion Markup Language (SAML) is an XML-based protocol used for secure authentication and authorization of users.
How it Works:
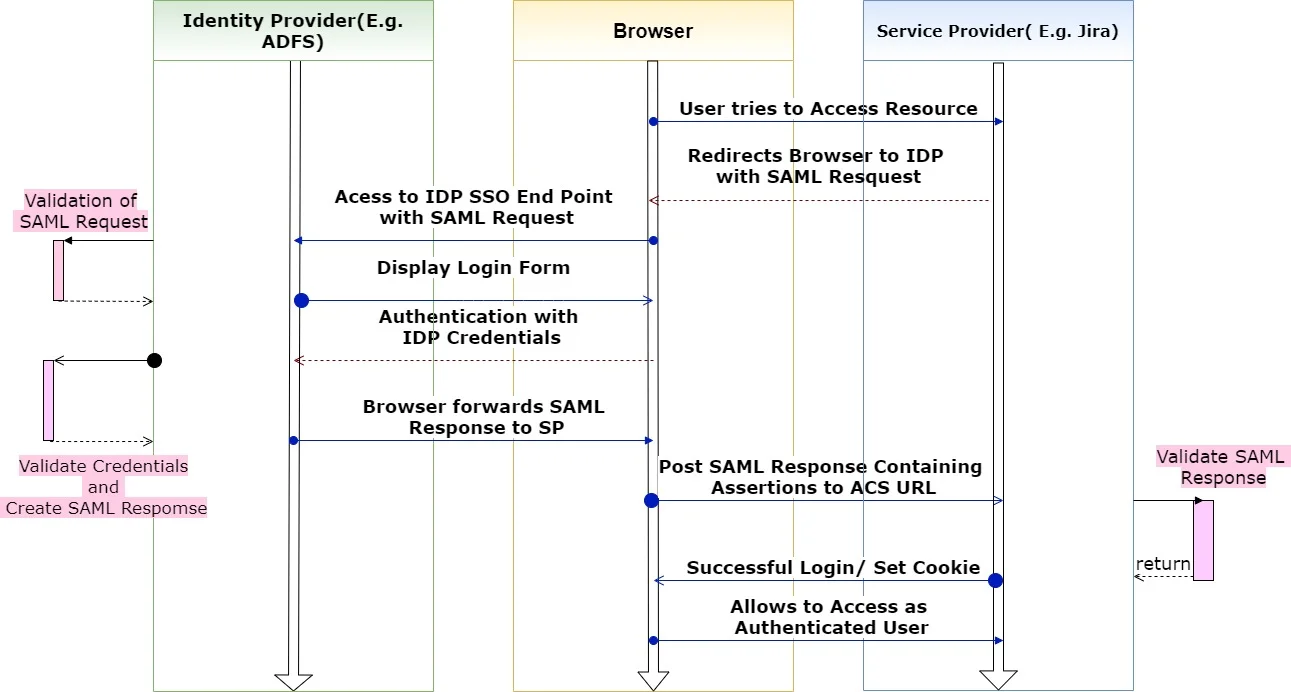
- User requests access to an application or tries to log in using an Identity Provider (e.g., logging into Jira using Azure AD).
- An authentication request is generated from Jira and sent to the Identity Provider.
- The user is redirected to the Identity Provider (e.g., Azure AD) for authentication.
- If not already logged in, the user provides their credentials.
- The Identity Provider validates the credentials and sends back a SAML response with assertions.
- The application validates the response and creates a login session for the user.
- User access is granted or restricted based on the received assertions.
Header-Based Authentication
Header-based authentication is commonly used when your Atlassian application (such as Jira) is deployed behind a proxy or load balancer.
- The proxy server authenticates the user and sends the username in the HTTP header.
- The Atlassian application reads the header and identifies the user.
- A login session is created automatically without requiring additional authentication steps.
By supporting both SAML and header-based authentication, the miniOrange plugin ensures seamless and secure access across different deployment environments.
Installation
There are two methods to install the app and use it on your Atlassian applications for Single Sign-On (SSO). The two methods are explained below.
1. Directly from Atlassian Marketplace
You can install the plugin directly from the Atlassian application’s admin console.
- Log in to the application with an admin account.
- Navigate to the administration section. You may need to log in again.
- Choose Manage apps and on the left navigation menu bar and click on Find new apps (Find new add-ons on the older versions)
- Search for “miniOrange SAML” and click on Free Trial for the miniOrange SAML SSO App for eg. SAML Single Sign On (SSO), JIRA SSO.
- Click on Accept & Install.
- Once the installation is complete, click on Get License. You will be redirected to MyAtlassian for generating a license.
2. Installing by file upload
1. Download app
- Navigate to the Atlassian Marketplace.
- Search for miniOrange SAML SSO for your Atlassian application.
- Select the app (for eg. JIRA SAML Single Sign On (SSO), JIRA SSO from the search result.
- Click on Try it free button.
- You will be asked to select your application’s hosting type(Server or Datacenter) and then click on the start free trial link.
- Enter your organization name and click on the Generate License button.
- You will see the license key along with the link to download the add-on.
2. Install add-on
- Log in to the application with an admin account.
- Navigate to the administration section. You may need to log in again.
- Choose to Manage apps and on the left navigation menu bar.
- Click on the Upload app link and upload the jar file downloaded in the last step.
3. Apply license key
- Keep your generated license copied from MyAtlassian.
- Navigate to the “Manage Apps” page of your instance (the “Install” section in older versions).
- Locate your installed SAML Single Sign On (SSO) add-on in the list.
- Click the app entry and paste the license into the license box for your add-on. All done!
SAML
These options are available while setting up SAML SSO
- Configure IDP
- SP Metadata
- Certificates
- Redirection Rules
- Look and Feel
- Post Logout Configuration
- Remember My Login
- Global SSO Settings
- Backup and Restore
- Troubleshooting and Support
Configure IDP
You can perform the following operations while configuring an Identity Provider (IDP):
- Add New IDP: Easily configure and add a new Identity Provider to enable SAML Single Sign-On for your Atlassian applications.
- Edit IDP Settings: Modify existing IDP configurations such as endpoints, certificates, and attribute mappings as per your requirements.
- Manage IDPs: View, organize, enable, or disable multiple configured Identity Providers from a centralized interface.
Add New IDP
With this plugin, there are two ways you can go about adding a new IDP. You can choose either of these ways to enable SSO for your Service Provider depending on how comfortable you are with the intricacies of Single Sign On.
Once you get into the plugin you will be guided through each step, every tab and all the different settings that we provide. To get a brief overview of what you’re getting into you can have a look at both methods of the configuration below:
Quick Setup : This method is for the express configuration of SSO for your Service Provider. It guides you through minimum configurations required to set up a successful SSO connection. Add your IDP and enable SSO within a matter of minutes.
Custom Setup : This is a more hands-on approach. You can dive right into the myriad of settings we provide that give you control over the SSO flow and allows you to highly customize it according to your needs.
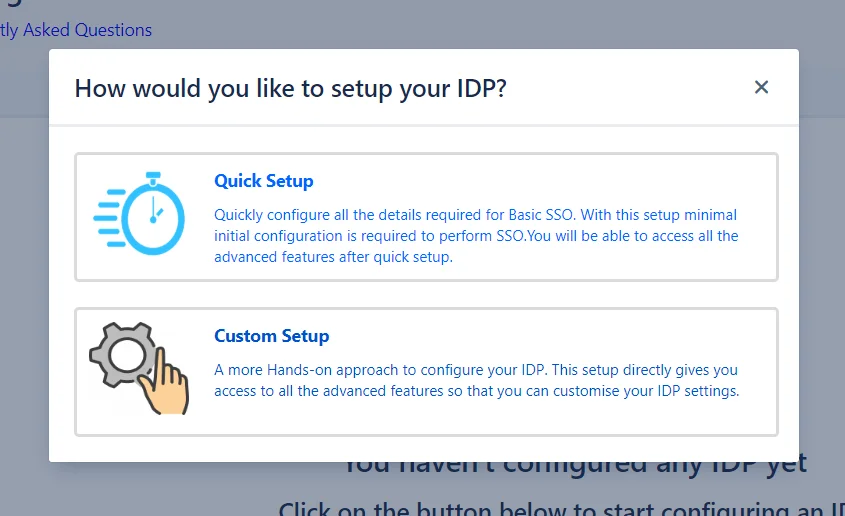
Quick Setup
Quickly setup Single Sign-On with our guided setup wizard. The settings covered in quick setup are minimum and aimed at getting a quick start with SSO. All of these settings are presented in a convenient Q&A format that gives you a better understanding of what a particular setting is for. You can always go through our detailed Custom Setup.
When this option is chosen from the pop-up, a page is displayed with a list of all the supported IDPs. After an IDP is chosen, the Quick Setup method is initiated.
This method consists of 5 quick and easy to understand steps that will let you:
- Setup an application on your Identity Provider for your Service Provider.
- Add this Identity Provider to your Service Provider.
- Sync a user’s profile after SSO.
- Choose which groups you want to assign to all the users from this Identity Provider.
- Testing final setup.
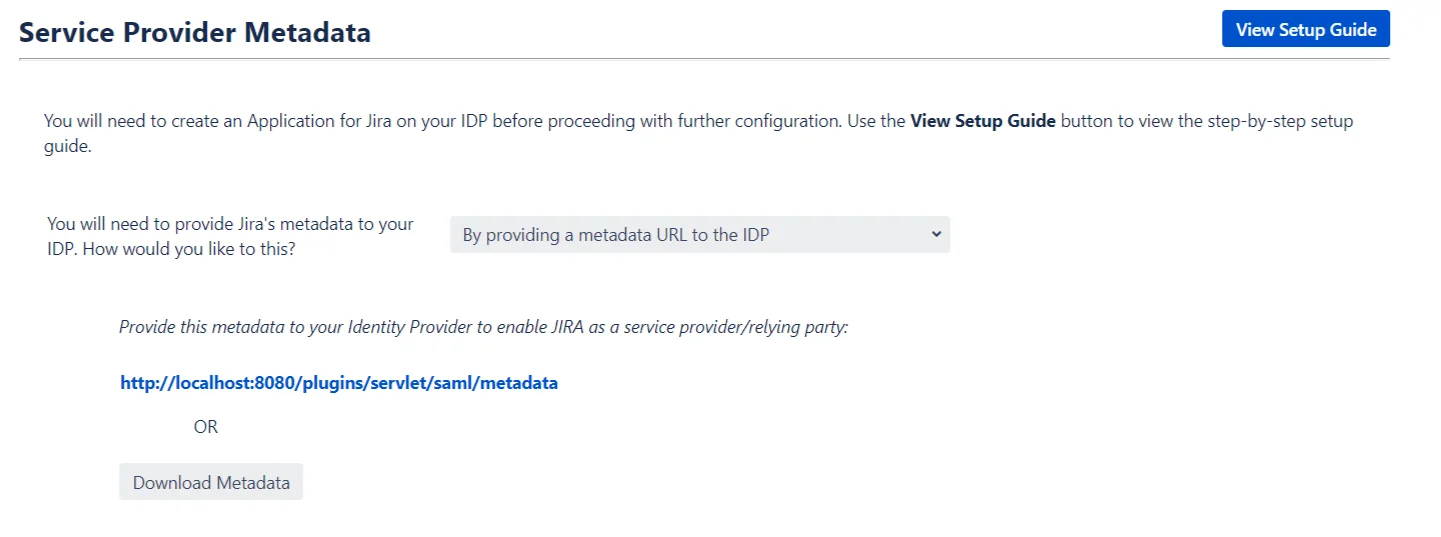
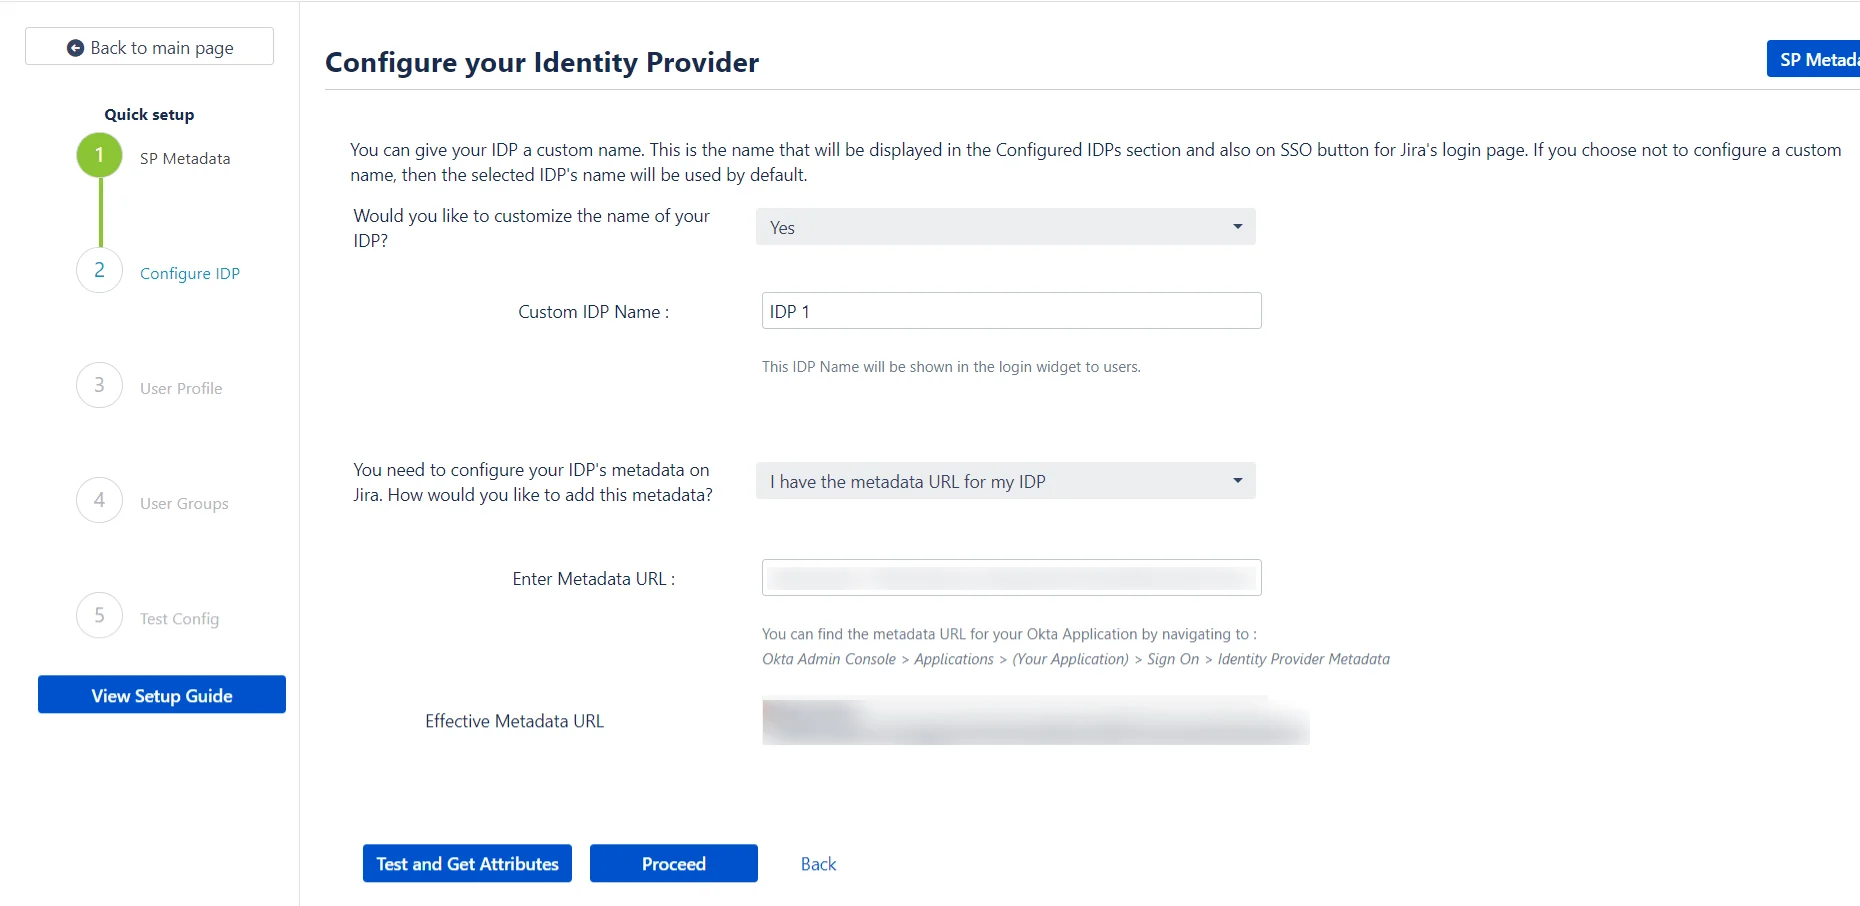
Step 1: Service Provider Metadata
In-order to perform SSO, the IDP and the SP need to be able to talk to each other. In this step, you will be configuring an application on your IDP that will allow communication with your SP.
The steps to configure this application can be accessed by clicking on the View Setup Guide button.
There are some details about the SP that will need to be provided to the IDP to configure the aforementioned application.
Configuring SP metadata on your IDP
- By providing a metadata URL or File to the IDP:This is by far the easiest way to configure the application on your IDP. We recommend this option as it reduces the amount of configuration needed to set up the application. On choosing this option, a metadata URL and a Download Metadata button will be displayed. Depending on the IDP either the URL can be used to import SP metadata or the metadata file, which can be downloaded using the provided button.
- By manually configuring the metadata: In-case your IDP does not support importing the metadata via URL or file, you will need to manually enter the details on your IDP. These SP details are displayed in a tabular format on selecting this option.
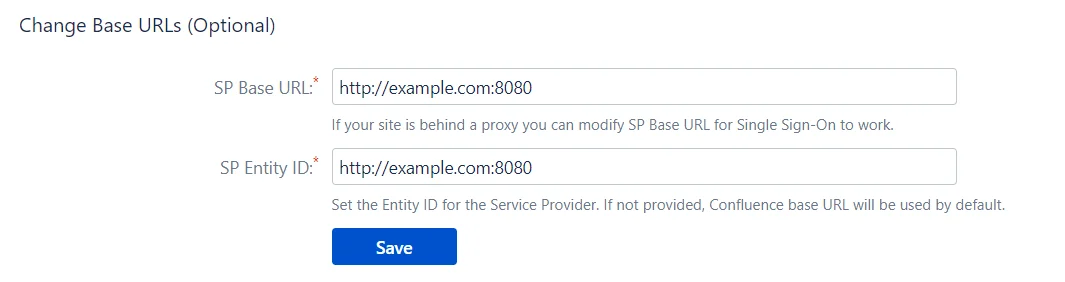
What if I have a proxy setup?
If the SP is being run behind a proxy, then its metadata will need to be updated accordingly.
Running your SP with a proxy changes it’s base URL. The metadata needs to be updated according to the proxy because most of the details in the metadata are subject to change based on the URL used to access your SP.
You can update the metadata by using the link provided in the info section at the bottom of this step.
Clicking on this link will reveal two input fields, one for SP Base URL and another for SP Entity ID.
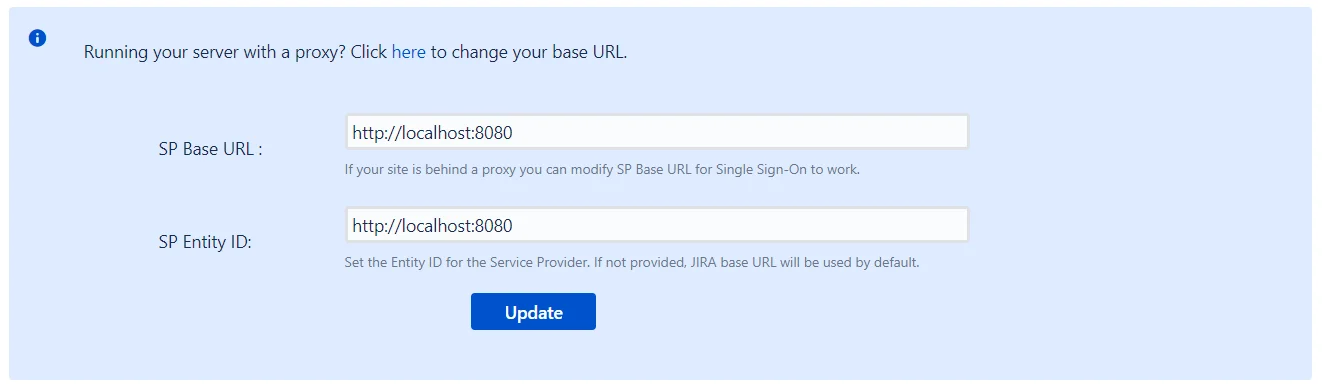
The updated values for both these fields can be entered here and saved. This will update the SP’s metadata and this updated metadata will need to be provided to your IDP.
Step 2: Configure IDP
Now that we have configured your IDP to be able to communicate with your SP, we need to make sure that your SP can, in turn, communicate with the IDP.
This is done by configuring your IDP’s metadata within the plugin.
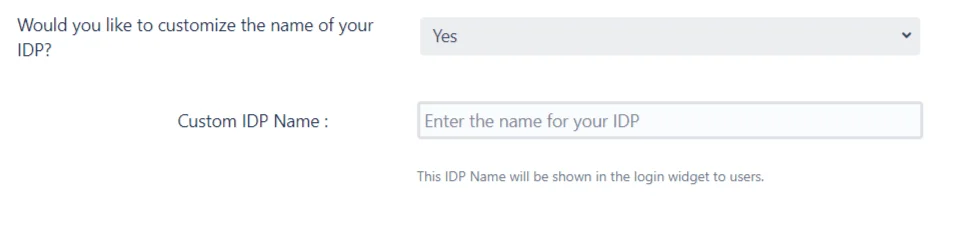
The plugin allows a custom name to be configured for the IDP being added.
Users can use this button to initiate SSO. Configuring a custom name will help distinguish this IDP from any previously added IDPs in the Configured IDPs tab. This is the name that will also be used as a label for the IDP’s button on the login page.
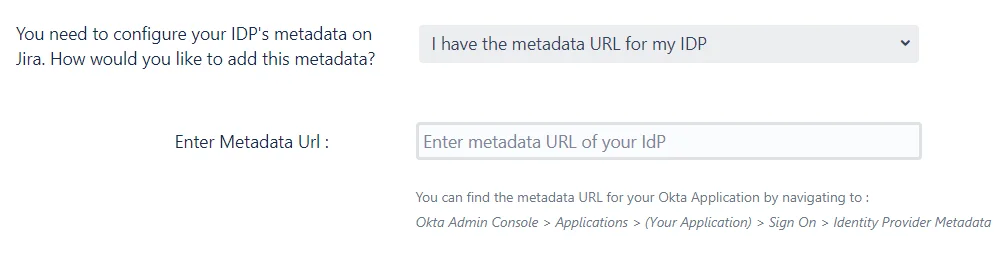
The plugin provides multiple ways to import the IDP’s metadata.
Configuring IDP metadata on SP
I Have the metadata URL for my IDP: This is one of the simplest approaches to adding your IDP in the plugin. All you need is the URL for your IDP’s metadata, and you can then enter this URL is entered in the Enter Metadata URL field. After clicking on Save, the IDP will be imported into SP.
I Have a file which contains the metadata: It’s possible that your IDP provides it’s metadata in the form of an XML file instead of a URL. If this is the case, then you can use this option and search of this file the Browse button. After clicking on Save, the IDP will be imported into SP.

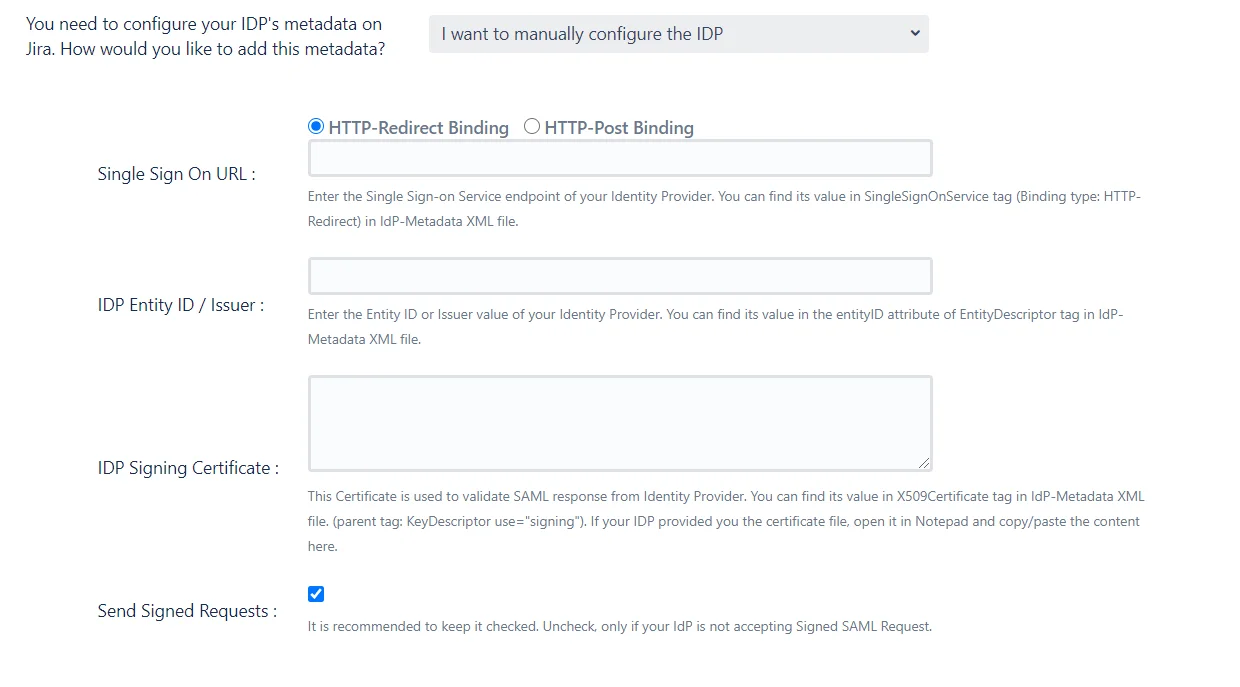
I want to manually configure the IDP: If your IDP does not provide its metadata via a file or a URL, then the IDP will have to be configured manually. When this option is selected a set of fields where IDP details must be entered will be displayed. The IDP’s SAML SSO URL, Entity ID and Signing certificate are required to configure the IDP manually.
Testing the IDP Configuration
Once the source of IDP’s metadata has been added and the Save button is clicked, the plugin will import the metadata from the source and add the IDP to SP.
If this import is successful, a Test and Get Attributes button will be displayed. This option can be used to test the connection between the SP and the IDP.
Another advantage of performing this test is that IDP user attributes can be captured and recorded by the plugin. These user attributes are the SAML entries that will contain the end user’s IDP profile data. This means that these attributes will be helpful in configuring a user’s profile on the SP after they perform SSO.
While it’s not absolutely necessary to perform this action, it is recommended as it makes configuration in the next step a lot easier.
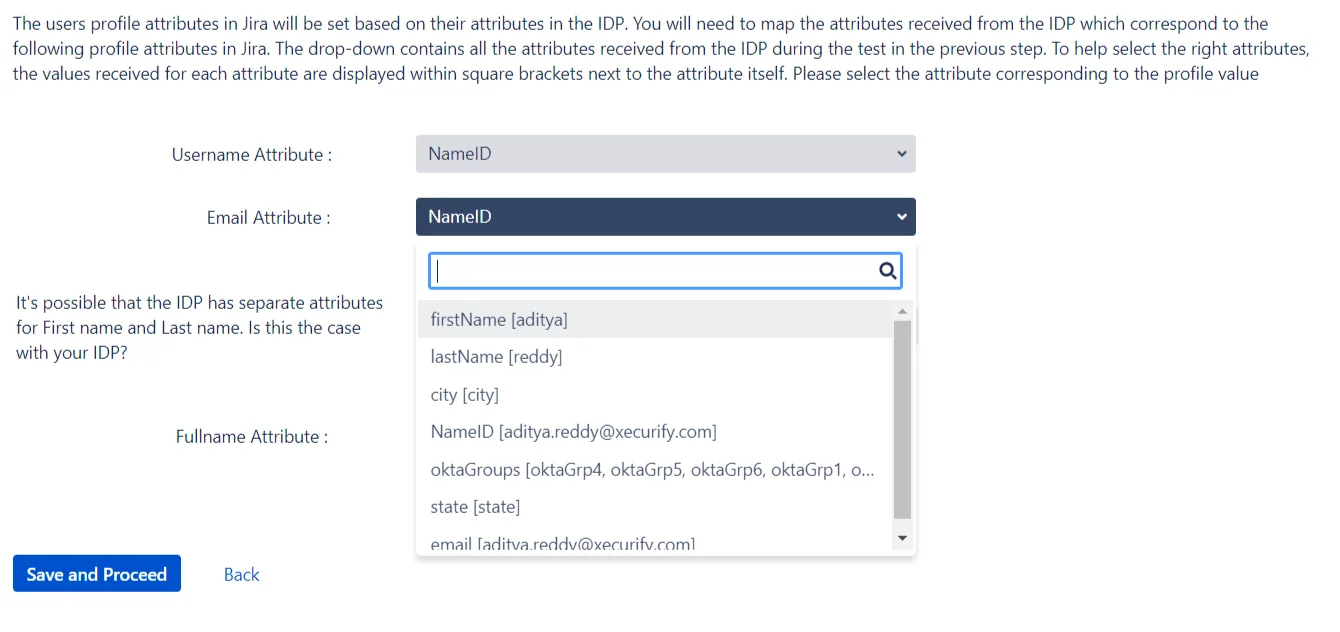
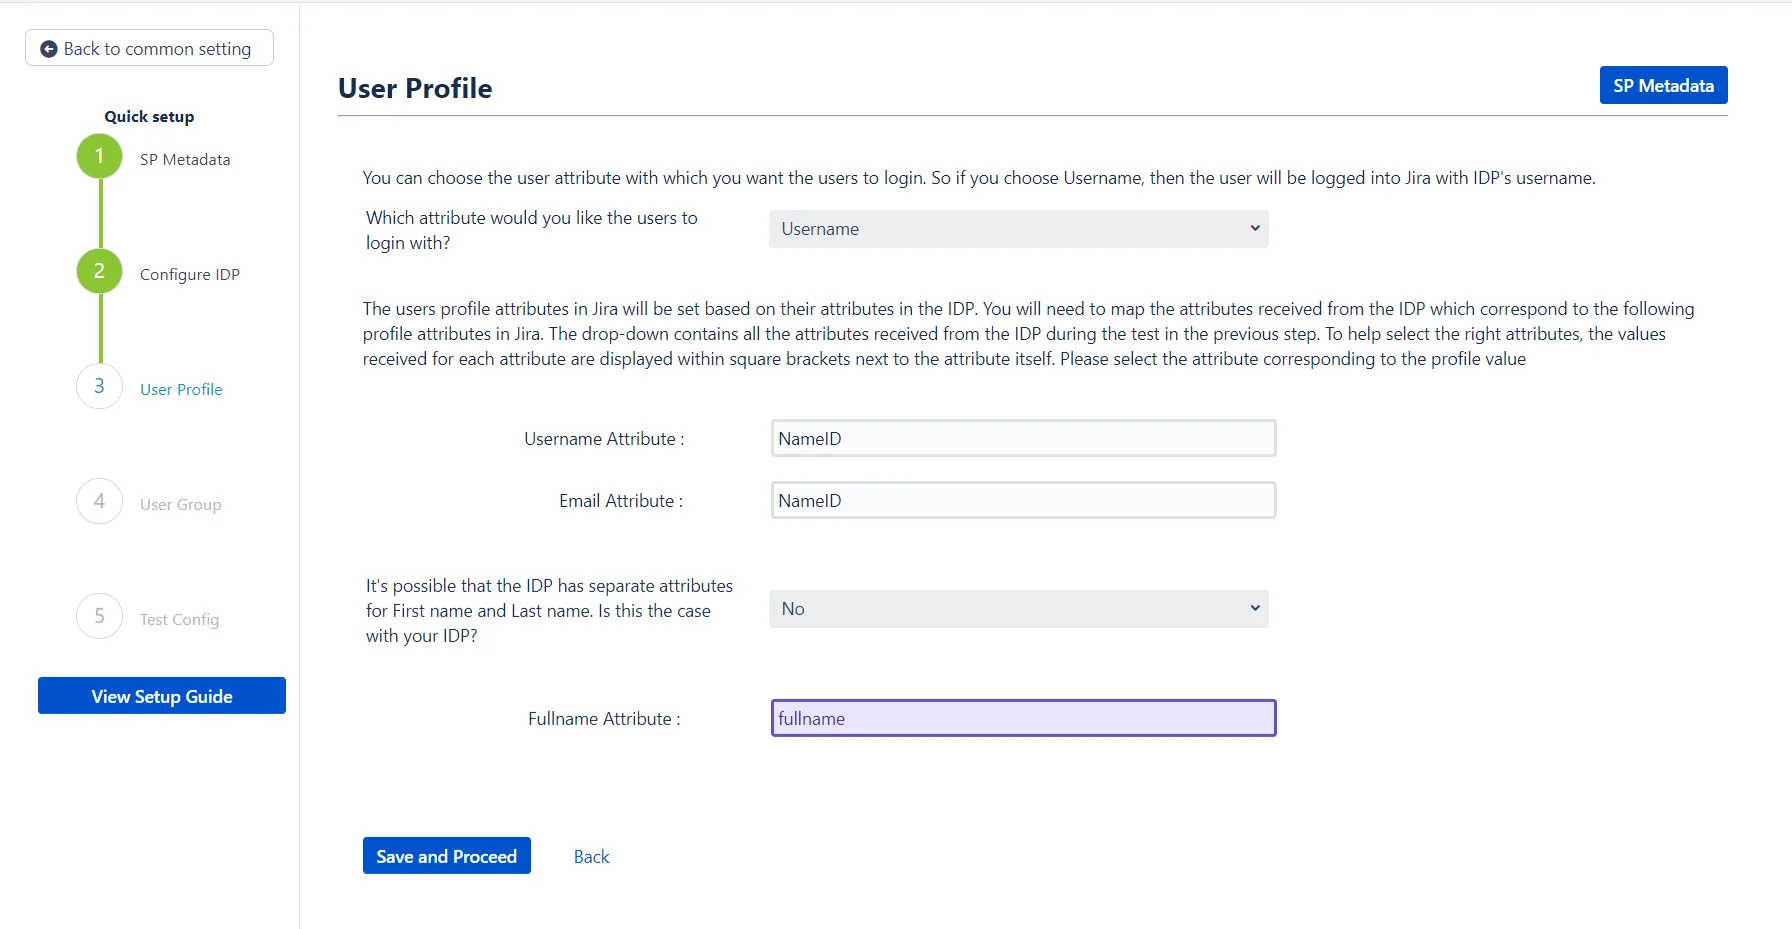
Step 3: User Profile
In this step, some of the user’s profile attributes in the SP can be added or updated according to the user’s profile in the IDP.
Attribute Mapping
During the process of SSO, the user’s profile data on the IDP is sent to the SP in a SAML response. Each element of the data is sent against an attribute in the response, which is to say that each attribute contains one aspect of the user’s data. For example, there will be one attribute which contains the user’s user name and another attribute that contains the user’s email and so on. In-order to update the user’s profile in the SP, the plugin needs to know the attributes which contain the user’s data in the SAML response.
These attributes are the details that will be configured in this step. The process of doing this is called attribute mapping.
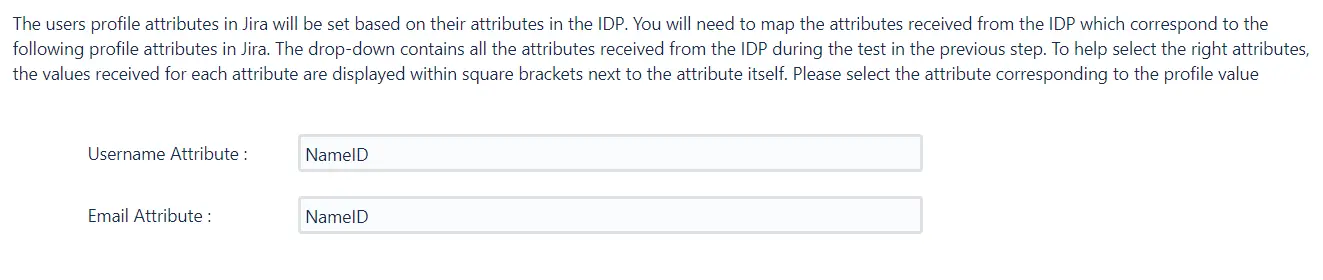
How will your users login?
First, the plugin gives an option to choose whether the users will be logged in using their IDP username or IDP email.The default option is set to username. We recommend that this option be set to username because while there can be multiple users with the same email, the usernames will always be unique. If the option is set to email and a user who has multiple accounts with the same email ID tries to login, then SSO will fail.
Then, the attribute names for the user’s username and email on the IDP need to be entered. If the Test and Get Attributes action had been performed in the previous step, then a dropdown will be displayed for each input. This dropdown contains all the attribute names received from the IDP after performing the test. If this is the case, then all that needs to be done is to select the appropriate attribute for each input field from the dropdown.
If the Test action has not been performed, then each input field will be a text field. The attribute names from each input will need to be searched for and entered manually.
Configuring some additional user attributes
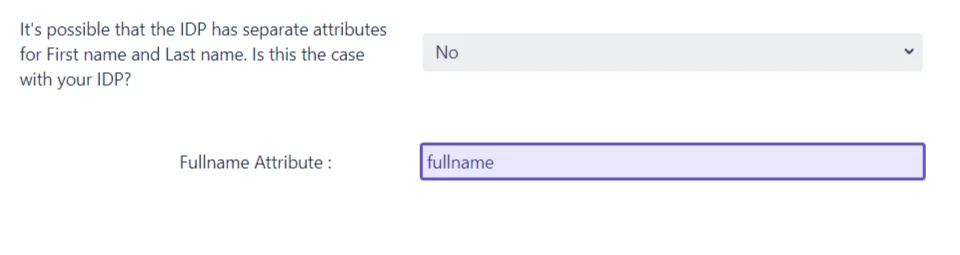
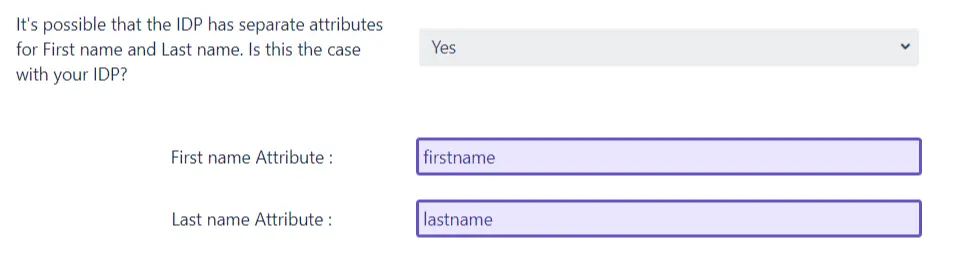
Next, the attributes for the user’s full name will need to be configured. The attribute mapping for the user’s name will depend on how the IDP sends the name in the SAML response. The IDP could either send the user’s full name against one attribute, or have two separate attributes for the user’s first name and last name.
The plugin has an option to configure the user’s name according to the attributes received in the response. If the user’s name is sent against one attribute, then yes is selected in the dropdown and the input field for the user’s fullname attribute is displayed.
On the other hand, if there are two attributes for the user’s name and no is selected in the dropdown, two input fields will be displayed for the first name attribute and the last name attribute.
Again, as in the case of username and email input fields, if the Test action has been performed in the previous step, then the input fields will be dropdowns. The appropriate attribute name can be selected from the dropdowns.
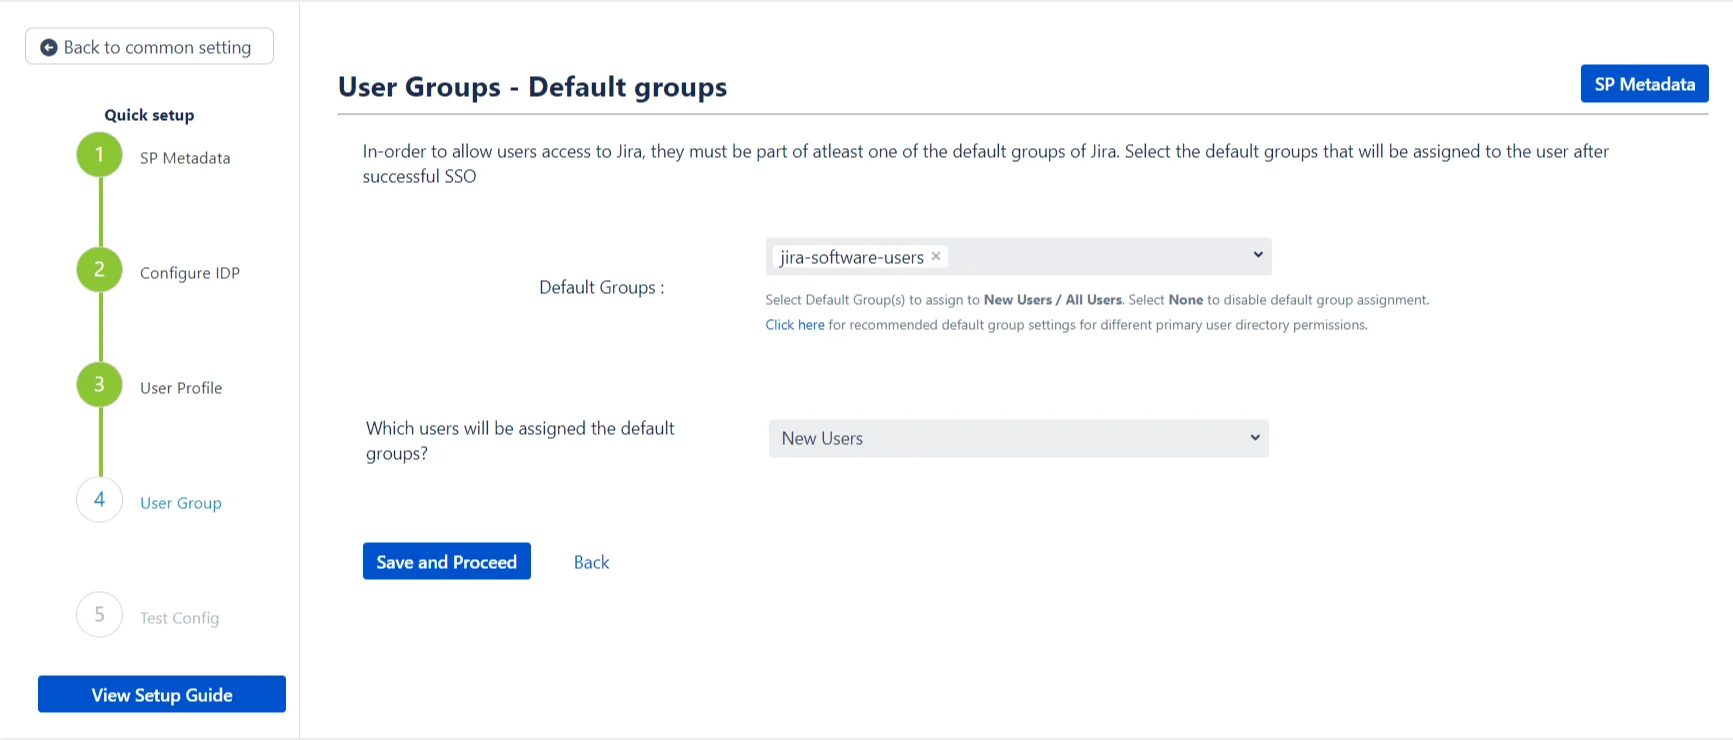
Step 4: User Groups – Default
In this step, the default groups are configured for all the users who SSO into SP using this IDP. These groups will be assigned to the user by default after successful SSO. This does not depend on the user’s IDP groups that are received from the IDP in the SAML response.
If you wish to configure the user’s SP groups based on the group information received from the IDP in the SAML response, you may do so by going into the advanced IDP settings.
Configuring the default groups
The default groups to be assigned can be selected from the dropdown provided. The dropdown will list all the groups that have been configured or added in the SP. It is possible to select multiple groups for this input field.

When will these groups be assigned?
- New Users: Only new users performing SSO will be added to the default groups. Users that already exist in the SPs user directory will not be assigned to these groups.
- All-users: Every user is added to the default groups after successfully performing SSO.
- None: Select this option if you don’t want to assign any default group while SSO. The default groups are not assigned to any users logging in via SSO.
Step 5: Troubleshooting and Support
This step marks the end of the Quick setup process. If you’ve reached this step, then your IDP has been added successfully and basic SSO has been configured for your SP.
In case you’ve faced any issues during this process you can let us know by following the steps given in the Troubleshooting section. We will be happy to assist you.
Even though the IDP has been added, there are still many settings and configurations that you can try out and which could enhance your user’s SSO experience.
You can access these settings by going to the Configured IDPs page and using the Edit dropdown in the actions section of your IDP.

Custom setup
If you want to customize your IDP setup from the get-go, you can use this setup flow. The Custom setup flow gives you access to all the various setup options that we provide to add a SAML Identity Provider. As with the quick setup, there are two ways you can add your IDP’s metadata. These methods are presented as separate tabs on the Custom Setup page.
1. Manual Configuration
In this method, you will get to configure each SSO endpoint by entering it in the provided fields. You will also be able to configure options such as whether or not the requests sent should be signed, the NameID format and the SSO and SLO binding type.
2. Import From Metadata
Most IDPs have the provision of providing their metadata via a metadata URL or file. If your IDP supports this, then you will be able to use this method to directly import the SSO endpoints into the plugin. The plugin supports both, metadata URLs and metadata files.
Once you import the metadata, you will be able to configure the same options that were provided in the Manual Configuration section.
Edit IDP Settings
To Edit IDP Settings,
- Click on the Configure button below the app name on the Manage Apps page.
- Under Action column, select edit >> SSO Endpoints.
- You’ll see the following menu:
- IDP Overview
- SSO Endpoints
- User Profile
- User Groups
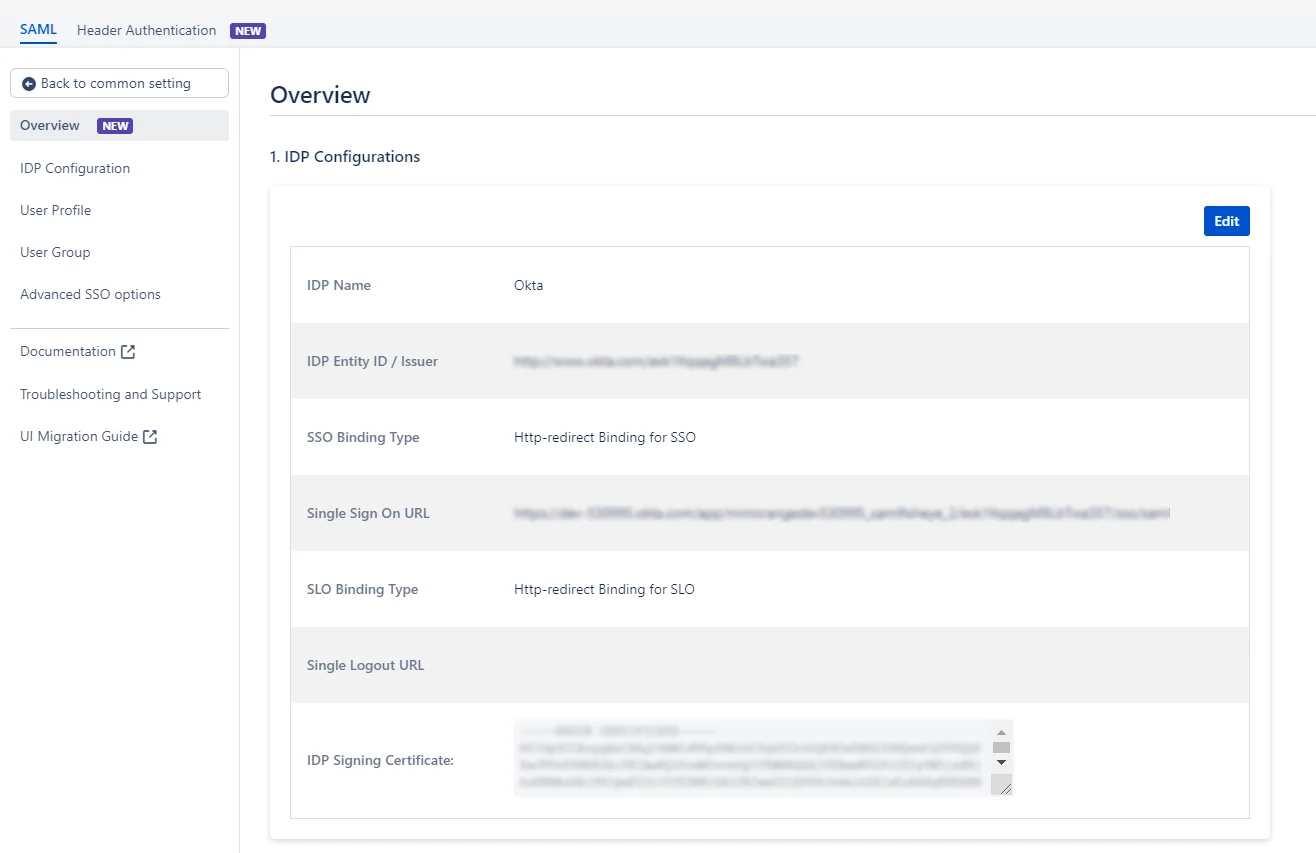
IDP Overview
This tab contains the overview of all the IDP specific configurations for IDP Configurations related Settings, User Profile Settings, and User Group Settings.
SAML single sign on
IDP Configuration
IDP configuration shows the basic configuration related to the selected Identity Provider. This provides with a preview of your IDP related settings. You can review your configurations here and make changes if necessary. Click on the Edit button to make changes to the basic and advanced IDP configuration.
User Profile Settings
Profile/Attribute Mapping gets user attributes from your provider and maps them to the User’s Profile. User Profile Settings contain the preview of all the attribute mapping configuration.
You can review your configurations here and make changes if necessary. Click on the Edit button to make changes to the basic and advanced User Profile configuration.
User Group Settings
User Group Settings shows the basic configuration for creating new users and updating existing users based on groups.
You can review your configurations here and make changes if necessary. Click on the Edit button to make changes to the basic and advanced User Group configuration.
IDP Configuration
IDP Configuration tab allows a user to add a SAML Identity Provider to enable SAML Single Sign-on in your Atlassian Application. You will get all the required information from the SAML Metadata URL/file provided by the Identity Provider.
You can setup the miniOrange SAML plugin using one of the ways given below
- 1. Manual Configuration
- 2. Import From Metadata
Manual Configuration
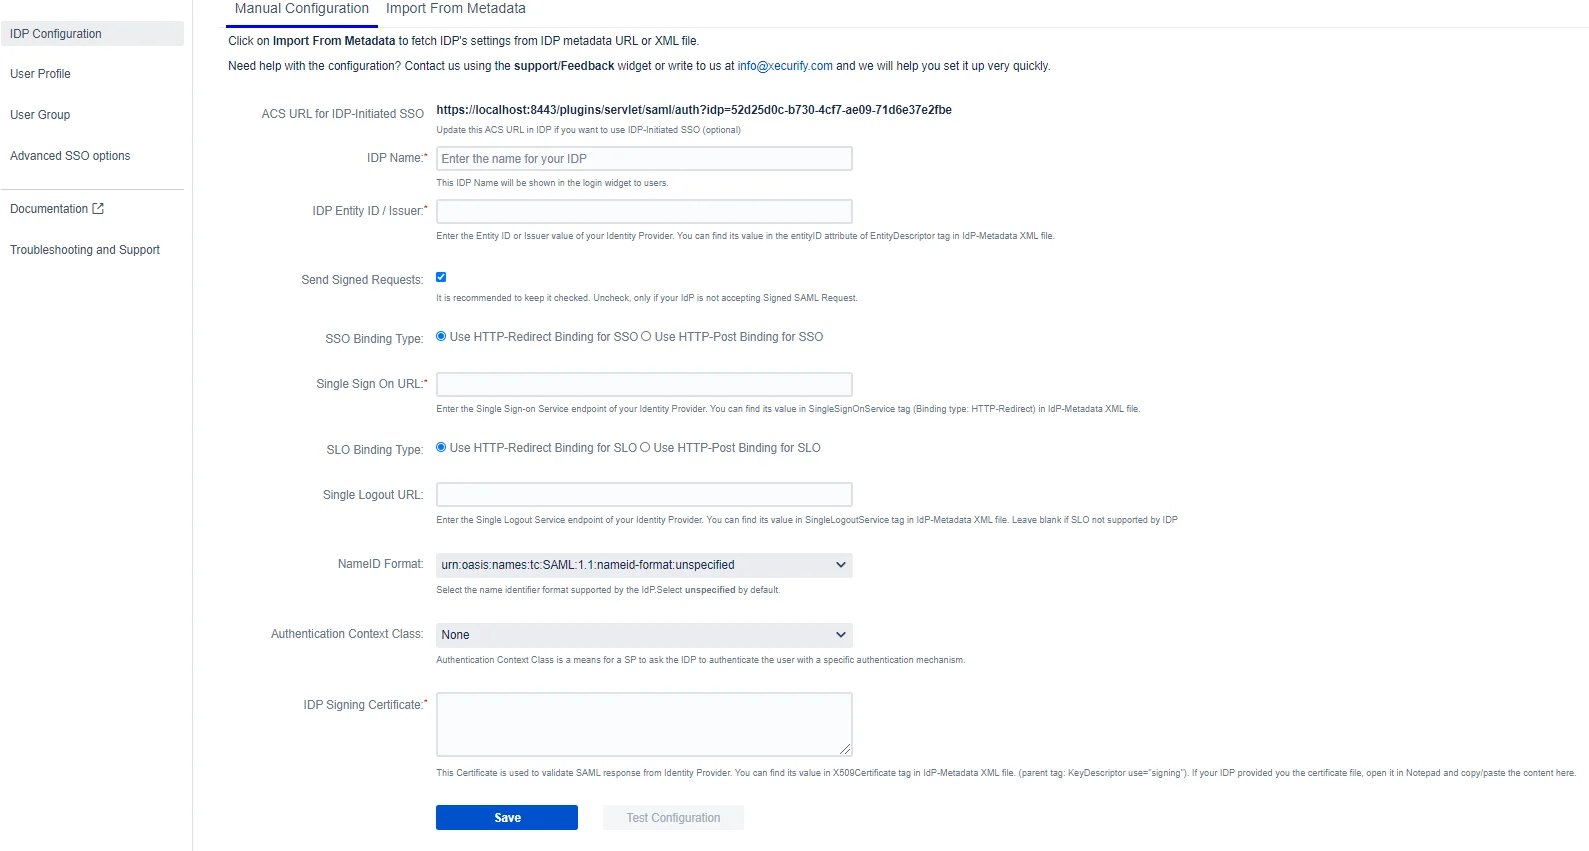
If you have the following information from your IDP, you can configure the plugin by manually adding this information in the respective field. Here are the required fields:
IDP Name (required)
You can enter a name for your IDP in this field. This field will be useful if you have configured multiple SAML IDPs.

SAML Single sign on
For example, if you configure 2 IDPs namely IDP1 and IDP2, you manage them easily from the list as shown in the image below

The IDP name that is entered in this field will be the name that will be displayed on the login button for this IDP. This login button will be used by end-users to initiate SSO for this IDP.
IDP Entity ID/Issuer (required)
A unique URI/name used to identify the Identity Provider. This ID is provided by all SAML 2.0 compliant IDPs. Also, this is required for SAML SSO to work properly. The app uses IDP Entity ID to validate SAML Response.
Send Signed Request (optional)
The plugin will send signed SAML Authentication Request to the SAML IDP during SSO. Most of the IDPs verify the signature of the SAML request before performing SSO. You will need to add the public certificate of the app as the signing certificate in the IDP to use this feature.
This public certificate is available for download in SP Metadata tab of the app. You can also change it and add your own certificate in Certificates tab.
Single Sign-on URL (required)
An endpoint from IDP responsible for parsing the SAML Authentication request. The plugin sends SAML Request to this endpoint after initiating SSO. The SAML SSO URL might change according to the binding type selected in the app. Refer to the binding type section to know how to determine the binding type and SSO URL.
Single Logout URL (optional)
If you want the user to be logged out from the IDP as soon as they logout from the Atlassian application, you can set this URL. A Single Logout URL is provided by most of the SAML 2.0 Compliant IDPs. The plugin sends SAML Logout Request to this endpoint after the user logs out from the application and this endpoint is responsible for parsing the SAML logout request.
The SAML SLO URL might change according to the binding type selected in the app. Refer to the binding type section know how to determine the binding type and SLO URL.
This is an optional field. Configure it, only when you want to logout users from IDP after they log out from the application.
SSO and SLO Binding Type (required)
The app sends XML Messages to IDP to perform Single Sign On and Single Logout. These SAML Messages are called SAML Request and Logout Request respectively. The Binding Type defines how the app will send these messages.
HTTP Redirect:
The SAML Request message is sent as a GET request to IDP when HTTP redirect is selected. This means that the app will send SAML Request in URL parameters. This increases the length of the URL significantly. The URL length is even larger if a signed request is sent.
Some IDPs have a limit on the length of the URL, hence we recommend not using this method if your IDP supports HTTP-POST.
HTTP Post:
The SAML Request message is sent as a POST request to IDP when HTTP Post is selected. This allows you to send SAML Request to IDP without increasing the length of the URL and hence it is recommended to use this binding type.
How to know which Binding Type your IDP supports?
You can find this information in IDP’s metadata file.
- Open IDP’s metadata
- Search for SingleSignOnService.
- Check the value of Binding attribute. You can see in the image below that this sample IDP supports both Binding Types
- The value of Location attribute is the Single Sign-On URL for that binding type.

NameID Format (required)
NameID is considered as a unique identifier of the user performing SSO. Some IDPs require SP to request a specific NameID format for SSO to work properly. Keep the value of this field Unspecified if your IDP doesn’t require any specific NameID format.
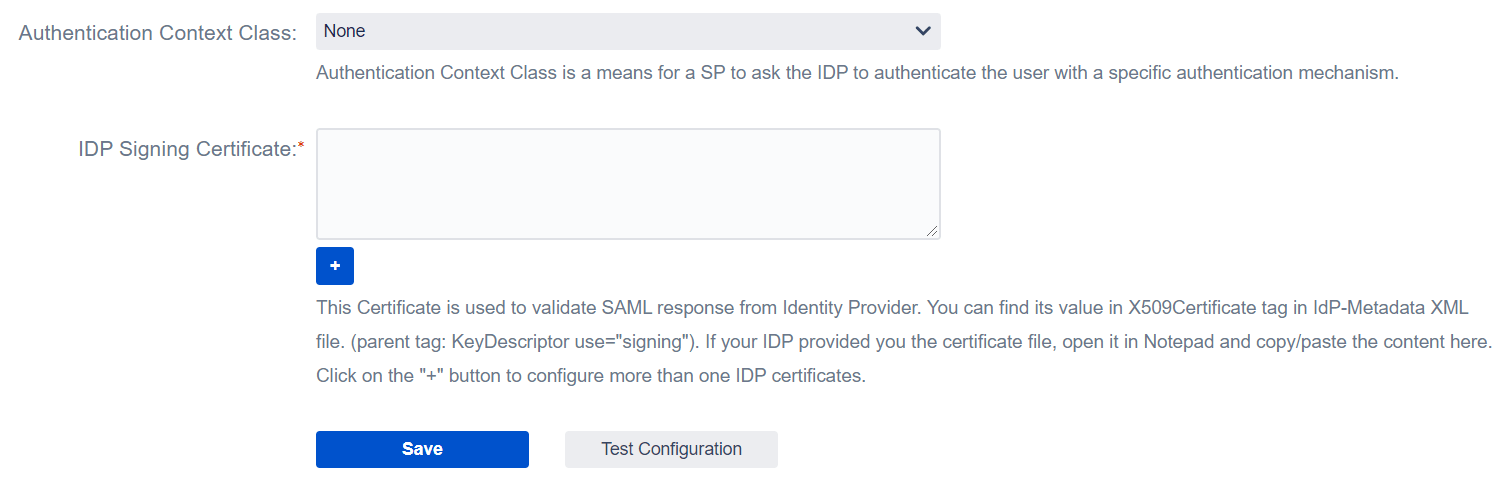
Authentication Context Class (optional)
The authentication context indicates how a user authenticated at an Identity Provider. The Identity Provider includes the authentication context in an assertion at the request of a Service Provider or based on configuration at the Identity Provider.
IDP Signing Certificate (required)
This is the public signing certificate provided by the IDP. IDP signs the SAML Response before sending it to the app. The app uses this public certificate to verify the signature in the SAML Response.
Configure Multiple IDP Signing Certificate
The IDP Signing certificate (public key) is used to validate signatures in the SAML Response, and if the certificate changes on the IDP side, it must be updated as soon as possible on the plugin, or the app will not be able to verify the SAML Response and the user will be unable to access the application.
Some IDPs, such as Azure AD, roll over the certificate on a regular basis, and it can be rolled over immediately in an emergency. This is a critical situation that prevents users from accessing the application, and in this case Atlassian administrators should request updated IDP Metadata (Certificate) and manually update the certificate in the plugin.
This feature allows you to configure the upcoming certificate that the IDP will use to sign the SAML Response in advance so that even if the certificate on the IDP changes, the end-user login will not be affected.
This option is available in the Configure IDP tab of the plugin. You can create a new text field and configure an additional certificate or In case IDP metadata contains the additional certificate then you can simply configure the add-on by uploading the IDP metadata file (or fetching information from metadata URL) and along with the SSO configuration additional certificate will get configured automatically.
Manual Configuration Fields image
Other Features/ Troubleshooting Options
Test Configuration
You can use this button to verify your configurations. Once you click on this button,
- a popup window will open.
- This will initiate an SSO flow and you’ll need to log in to the IDP. If you’re already logged into the IDP, this step will be skipped
- Once you log in, you’ll see a test status window.
If,
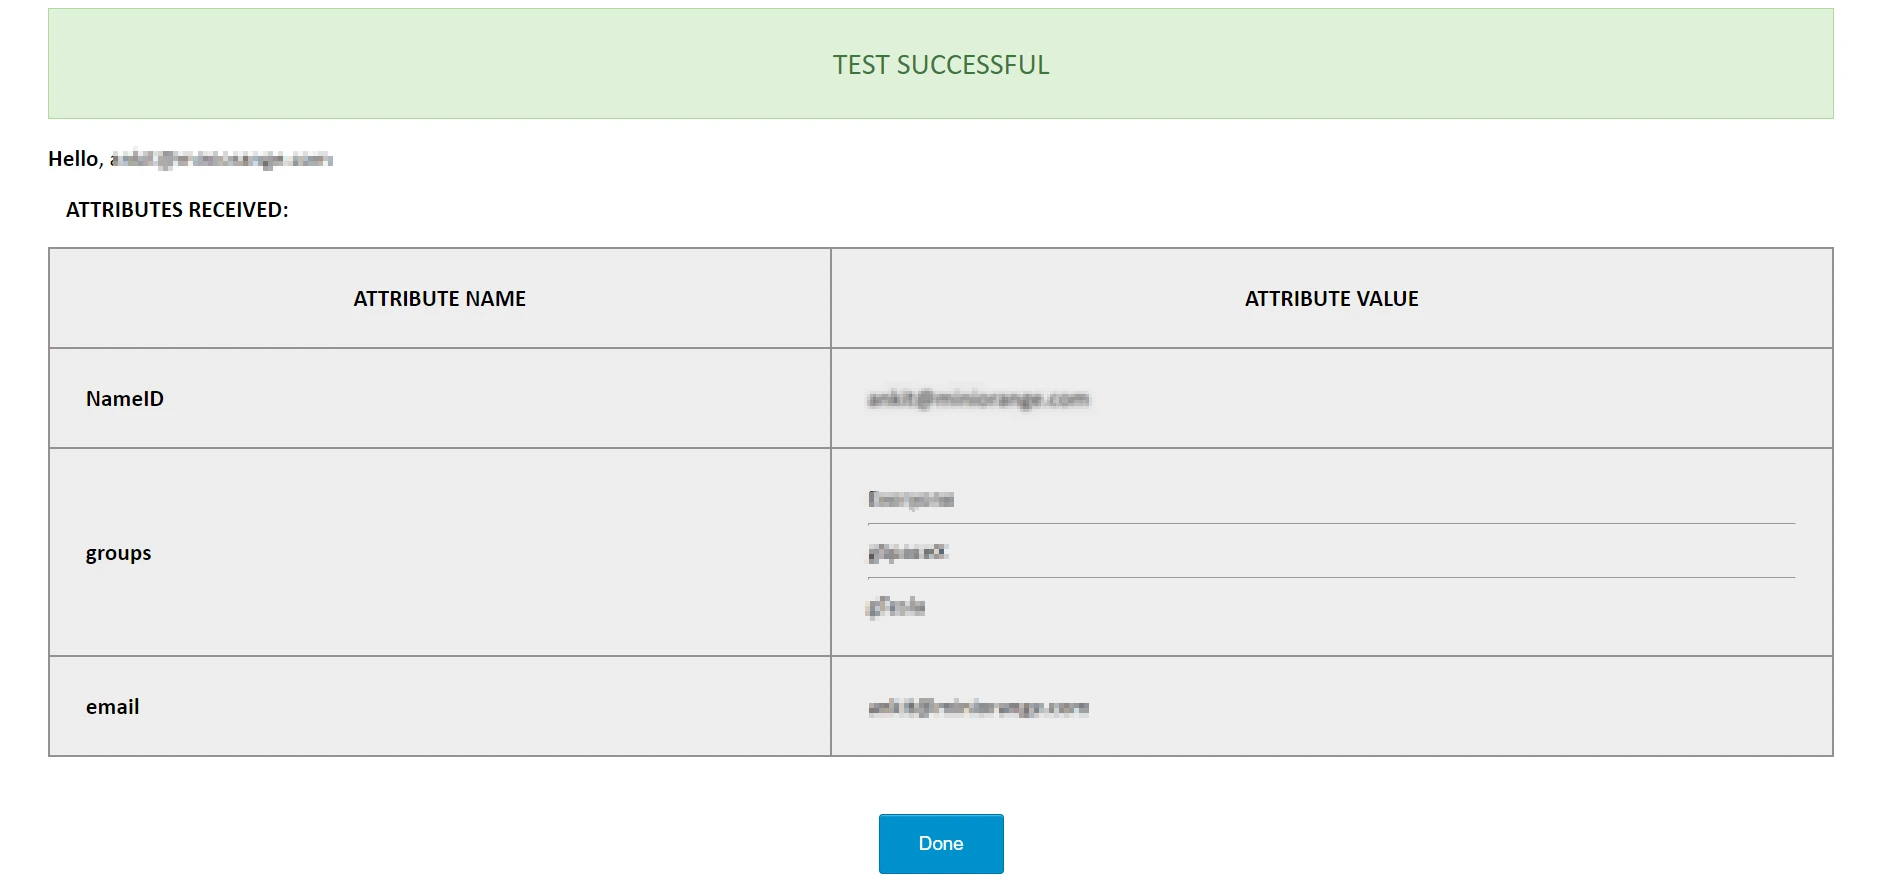
Configurations are correct: You’ll see a Test Successful message with a list of attributes from the IDP as shown below.
Configurations are incorrect: you’ll see a Test Failed message with the cause of the error and resolution as shown below.

Test Failed: You can refer miniOrange SAML App troubleshooting page to fix it.
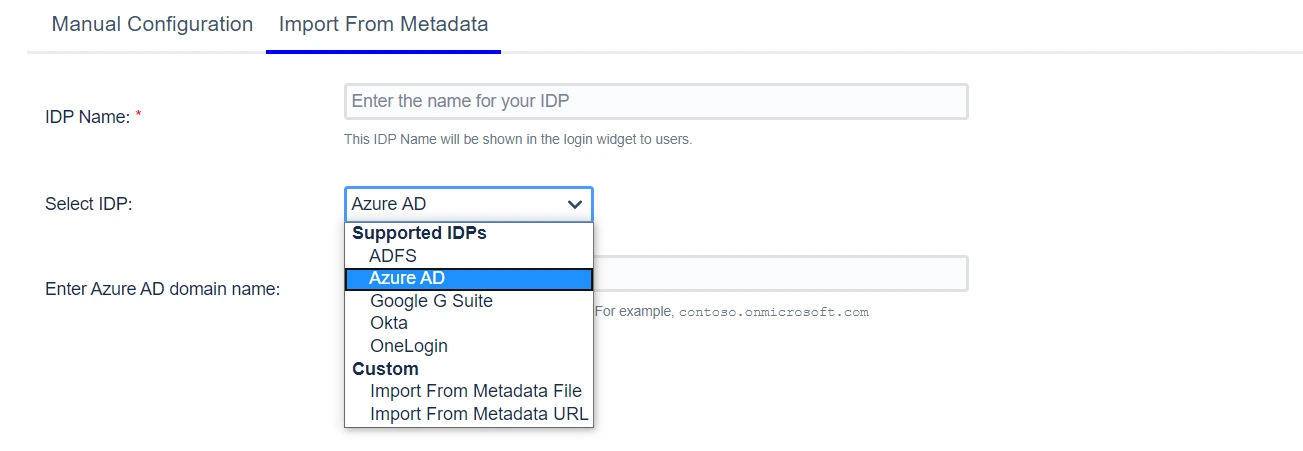
Import From Metadata
If your IDP provides a SAML Metadata file/URL, you can configure the plugin SSO settings by uploading the metadata file or configuring the metadata URL.
The Select IDP dropdown has a few pre-configured IDPs like ADFS and Azure AD. Each IDP has a unique method of making the metadata available – some can be configured to fetch the metadata URL and some only have the option of uploading a file. For example, if ADFS is your IDP, you will be asked for the hostname of your AD server. The metadata URL will then be generated based on the hostname and the plugin will retrieve IDP metadata from this URL. For IDPs like Okta, G Suite or One Login, the process for getting metadata is standard. For example, if you choose G-Suite, you will be asked to upload a metadata file.
For IDPs other than the ones mentioned in the drop-down, you may choose whether to upload a metadata file or to give a metadata URL depending on what your IDP supports. Custom options will be relevant here.
User Profile
Overview
The options in this tab are used to map user attributes from an Identity Provider to their local profile in the application. The plugin keeps the user’s application in sync with his IdP profile during SSO.
How it works?
The Identity Provider sends user attributes like email, username, first name, and last name in a SAML Response. The default attribute sent in a SAML response is the NameID attribute. Most Identity Providers allow users to choose additional attributes to be sent in the SAML response. This can be configured in the Identity Provider’s admin console. The attribute names received from Identity Provider are mapped to attributes in the user’s profile.
Example Scenario
Let us consider a scenario in which we use Okta as an Identity Provider. A SAML response that is not configured will only contain the default NameID attribute. The value of NameID is typically the email with which the user accesses their account on Identity Provider. The Attribute Statements section of the Configure SAML tab can be configured to send more attributes in response. A basic configuration of the Attribute Statements section looks like this :
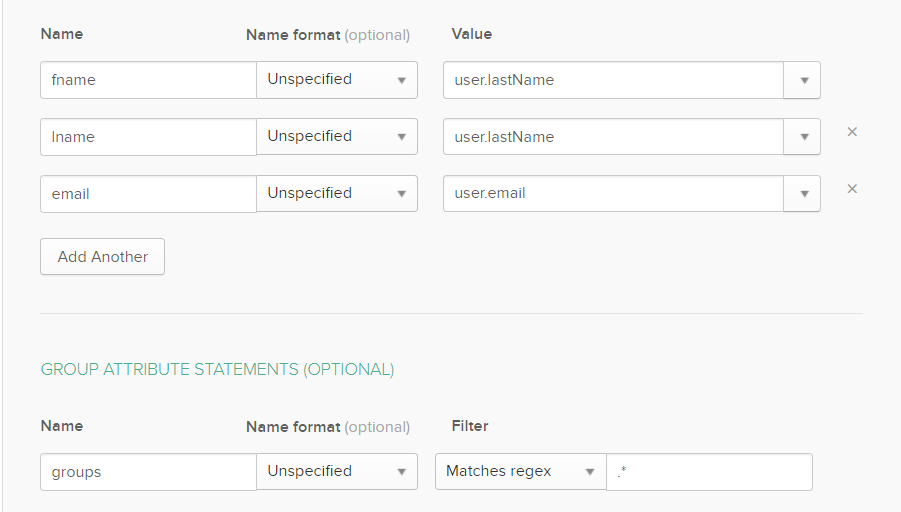
When a user attempts SSO the SAML response from Okta will contain the user’s first name, last name and email address. These are sent in addition to the default NameID attribute. The content of the response is viewed by clicking the Test Config button in the IdP Configuration tab :
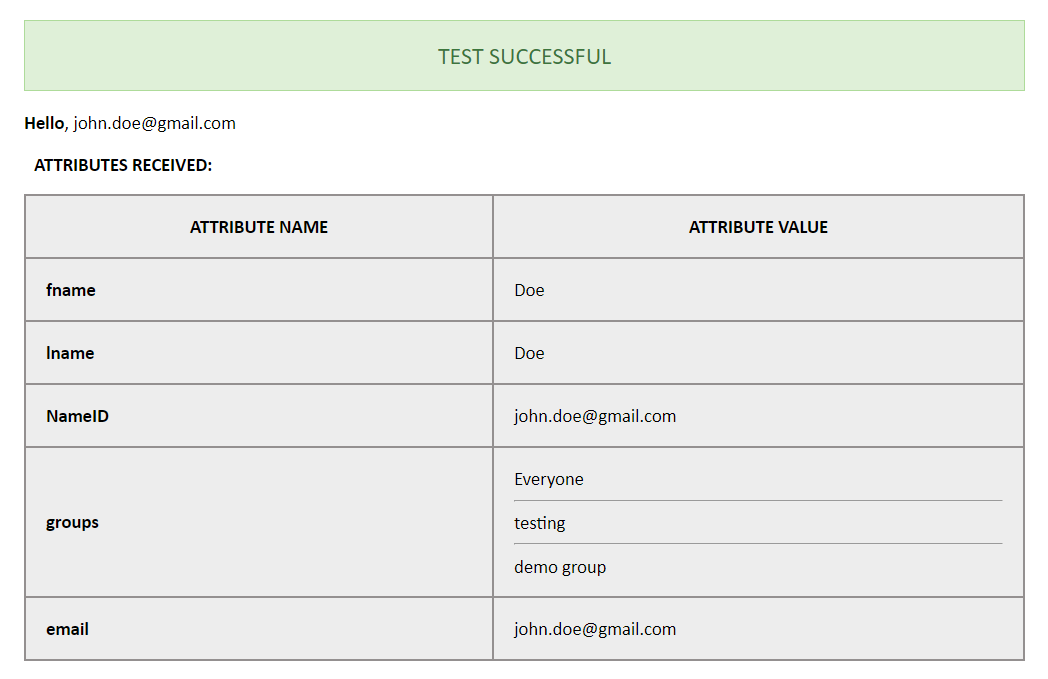
The attribute names displayed in the test configuration window can be mapped to attributes in the application. The detailed procedure to do the same is explained in a later section.
Disable user profile mapping
Checking this option will ensure that the profile attributes of existing users will not be updated whenever they attempt SSO. This will not affect new users. The plugin creates a new user’s profile in the application based on the attributes received in the SAML response.
If this option is set then the user’s profile will only be updated once, after the first successful SSO attempt. The profile of existing users will not be updated, irrespective of the attributes received in a SAML response.
In case a directory is being used to as a user store, this option may need to be checked based on the type of directory permission provided to the application. The recommended setting for each permission :
- Read Only or Read Only With Local Groups : With either of these permissions the user’s profile in the directory cannot be updated, so the option should be checked.
- Read/Write : This permission allows the user’s profile to be updated. Here there is no restriction for this option. If left unchecked, then the user’s profile in the directory will be updated whenever SSO is performed successfully. If checked, then the user’s profile will be updated only after the first time SSO is performed successfully.
Login via user mail/email
This option is used to identify the users in Atlassian application(Jira/Confluence) based on users attribute received in the SAML response.
For example, you can use the user's username or email or any other attribute for authentication. While this allows user authentication through email, it is recommended that the option be set to username (or any other attribute which is unique for all users) as there is no restriction on the creation of multiple user profiles having the same email attribute.
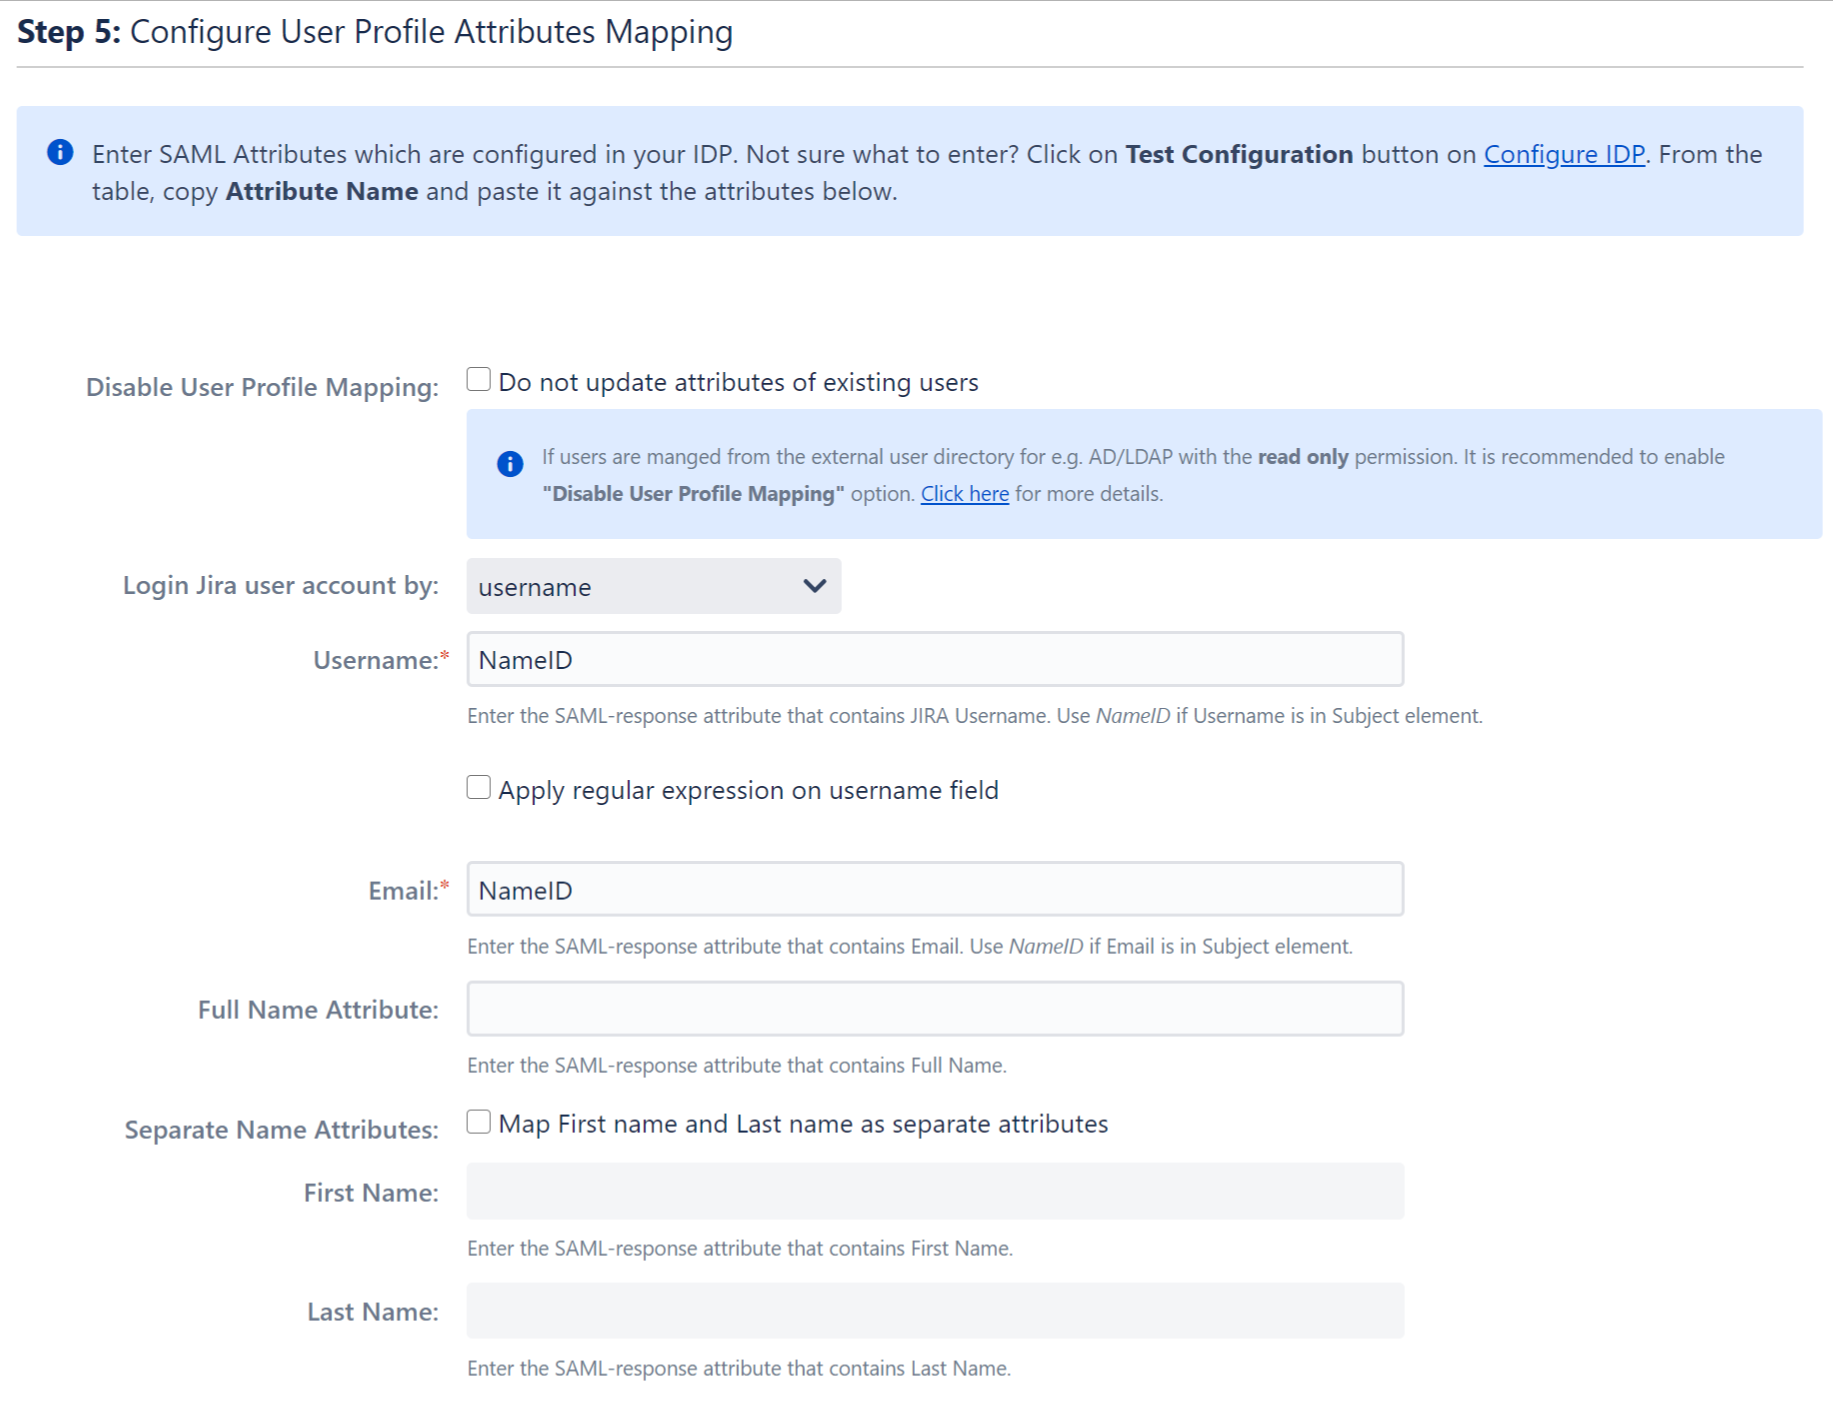
Attribute Mapping
The plugin allows the updating of the user’s profile in the application with attribute values in the Identity Provider. This is done by mapping the attribute names received in the SAML response to the attributes of the user’s profile.
In order to map attributes from the Identity Provider to the application, the attribute names received in the SAML response need to be entered in their corresponding fields. These attribute names can be viewed by clicking the Test Configuration button in the Configure Identity Provider tab. The plugin will assign the attribute values received in the SAML response to user profile attributes according to the attribute mappings configured.
The user profile attributes that can be configured via attribute mapping are :
- Username: The attribute name that corresponds to the username of the user is entered in this field. This is a required field and cannot be left empty. The default attribute name in the field is NameID. There is an option to extract the username from the attribute value of any other attribute name returned in the SAML response.
- Email ID: The attribute name with the user’s email as attribute value is entered in this field. This is a required field and cannot be empty. The default attribute name in this field is NameID.
- Full Name Attribute: The attribute name that has the user’s full name as value is entered in this field. This field is left blank by default and is not a required field.
- First Name: If the Identity Provider returns the user’s first name in the SAML response, the attribute name that contains the first name value is entered in this field.
- Last Name: If the Identity Provider returns the user’s last name in the SAML response, the attribute name that contains the last name value is entered in this field.
Apply regex on username
This option is used if the username value needs to be extracted from any one of the attribute values returned in the SAML response. This option takes a regular expression (or regex) pattern as input.
Let’s consider a case where the username needs to extracted from the user’s email. The attribute name containing the user’s email as value is entered in the Username field and the Apply Regular expression on username field option is checked. The regex ^.*?(?=@) is entered in the regex field. If the email attribute value received in the SAML response is abc@domain.com, then the plugin will apply the entered regex on this value and extract abc and this will be set as the username in the user’s profile.
Separate Name Attributes
This option is used to switch between using the Full Name Attribute field or using the First Name and Last Name fields to set the user’s full name in the user profile.
If the response contains one attribute that contains the user’s full name, then the Full Name Attribute field can be used. But if the response contains two attribute names, one each for first name and last name then the fields First Name and Last Name need to be used. To do this the Separate Name Attributes option needs to be checked.
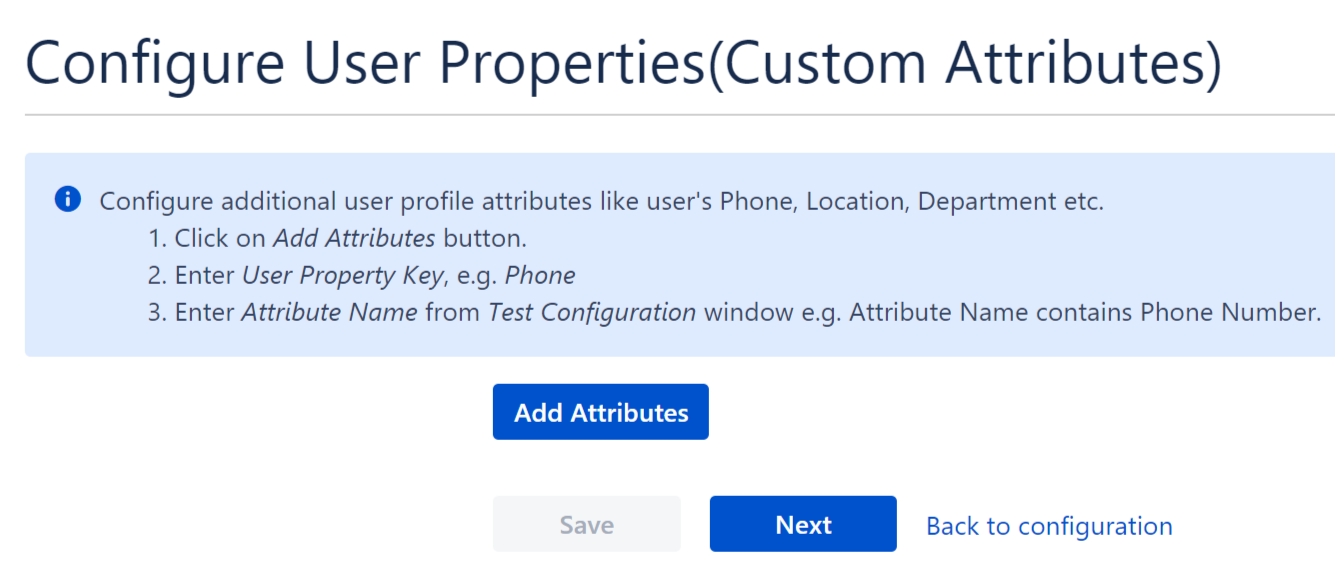
Configure User Properties (Custom Attributes)
User Groups
Overview
The user groups settings allow you to keep the application groups of your users in sync with IdP groups and manage permissions and access from the IdP. To do this, you’ll need an attribute in the SAML assertion which has the names or IDs of user groups on the IdP. You can map these groups against the local groups in your Atlassian application.
For example, If you map the groups in the app like this:
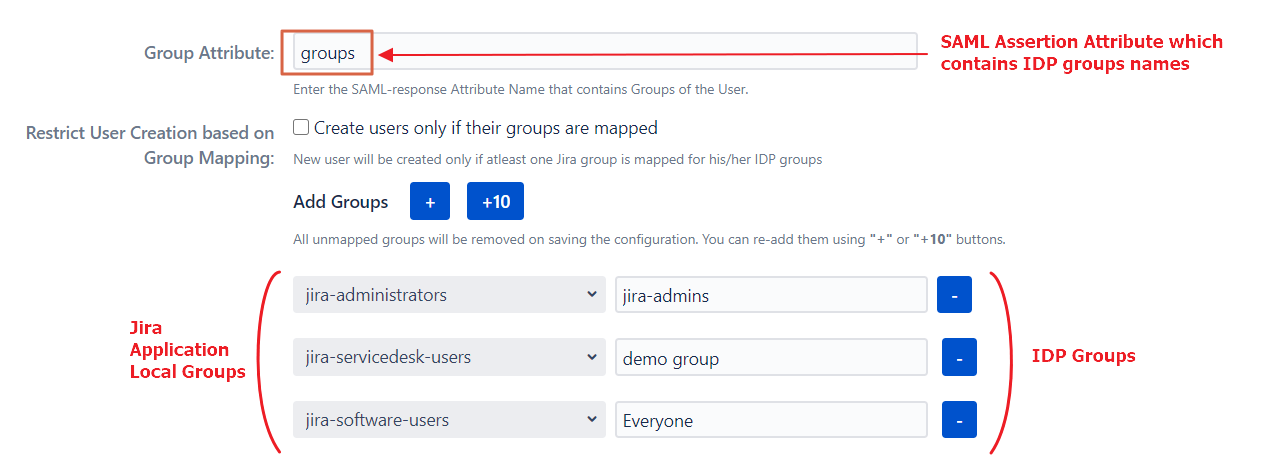
The users belonging to the IdP group IdP_admins will be added to the group jira-administrators after SSO, IdP_users to the jira-software-users group, and so on.
This can also be used to revoke access. for example, if an employee leaves the company and removed from the IdP_users group on the IdP, he’ll be removed from the jira-software-users group during SSO and will lose access to Jira.
User Group Mapping is useful when:
- Managing groups and permissions related to those groups at IdP only
- Removing user access from the application as soon as it’s removed from the IdP.
- You have project access based on the groups and want to change the project of an employee by simply changing his group on the IdP.
How to configure group mapping
Follow these steps to reach these settings:
- Click on the Configure button present below the app name on the Manage Apps page.
- Click on Edit dropdown under the Actions column.
- Select User Groups.
Here are the options available to manage user groups:
Default Group Configurations
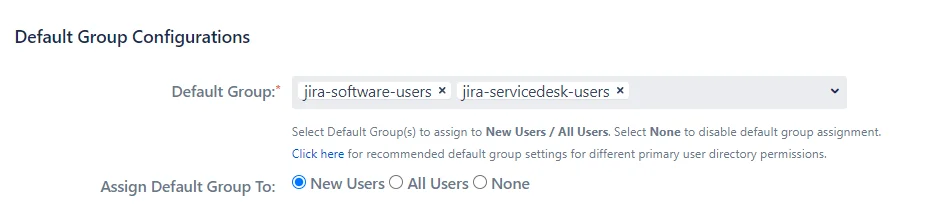
Default group configuration gives you an option to choose a set of groups all users should be assigned while performing SSO.
1. Default Group
A set of groups that will be assigned after SSO to the type of users selected in Assign Default Group To option. This is useful when you want to assign application access to all the users.
2. Assign Default Group To
You can select the type of users to whom the default groups will be assigned after SSO:
- New Users: The default groups will be assigned only to users performing SSO for the first time
- All Users: The default groups will be assigned to each user after SSO every time. This means even if the user is removed from all the groups, the default groups will be assigned to them after SSO.
- None: The default groups won’t be assigned after SSO.
Group Mapping
Mapping IdP groups to application groups allows you to assign and update user groups and permissions whenever their groups change on the IdP.
Groups can be mapped in two ways, Manually or On-The-Fly
1. Manual Group Mapping
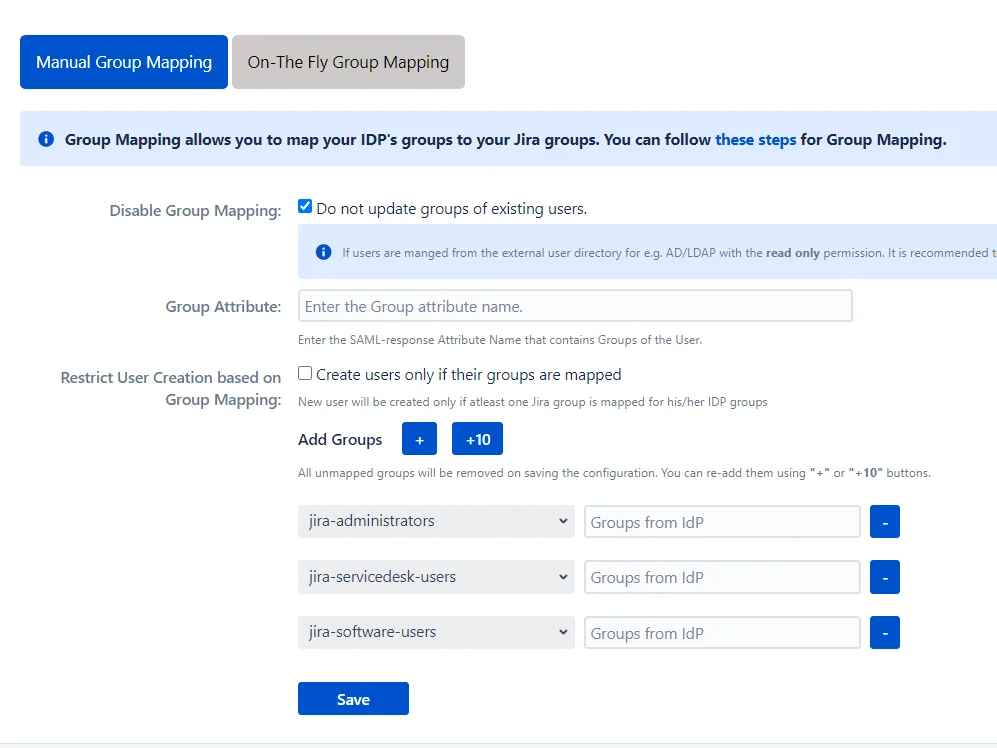
Manual Group Mapping is useful when you want to manage groups from the IdP but the names of application groups and IdP groups are different.
Disable Group Mapping
Selecting this option will disable group mapping for existing users, which means the existing application users won’t be added or removed from any groups during SSO.
Group Attribute
This is the name of the attribute in SAML assertion which has names of all the groups returned by IdP during SSO.
Note: The group attribute is case sensitive
Restrict User Creation on Group Mapping
If this option is checked, the app will create new users after SSO only if one of their IdP groups are mapped to an application group in the app.
Group Mapping
Here, you can map IdP’s groups to the Atlassian application’s local groups.
2. On-The-Fly Group Mapping
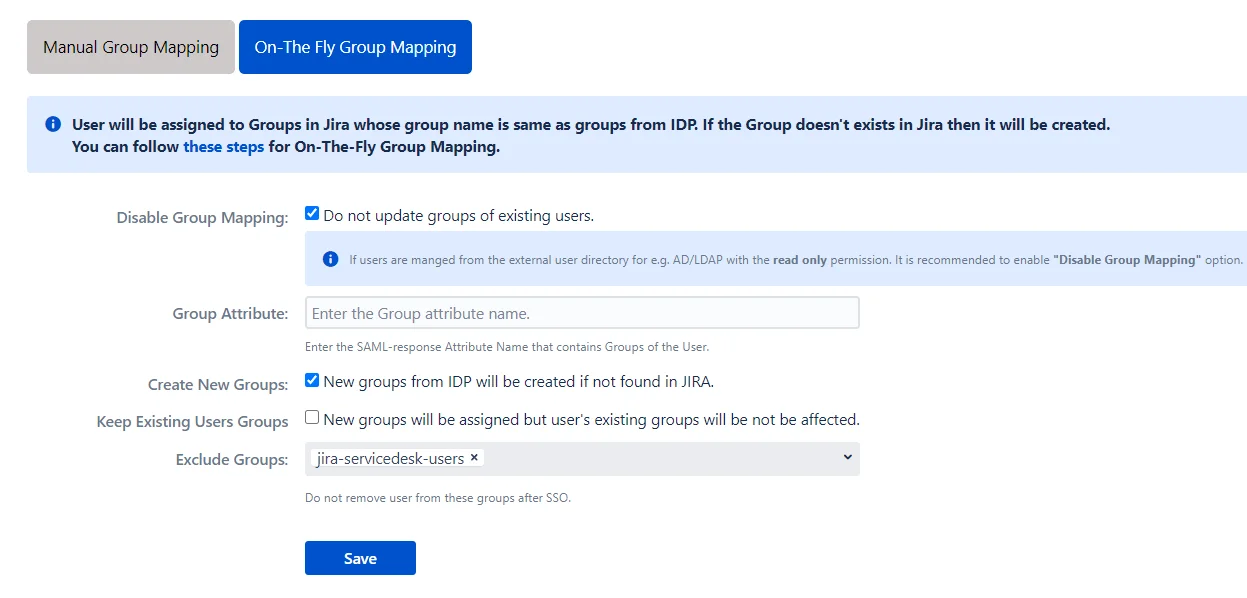
On-The-Fly Group Mapping is used when the name of groups on your IdP and SP are the same.
1. Create New Groups
If this option is enabled, the app will create new groups with the name of IdP groups in case no such group exists in the application.
2. Keep Existing User Groups
This option makes sure that the user is added to new groups during SSO but is not removed from his existing groups.
3. Exclude Groups
This option allows you to preserve selected local groups while still removing users from IdP groups.
4. Apply Regular expression on Exclude groups field
This option takes a regular expression (or regex) pattern as input. The user will not be removed from the groups matching the regular expression.

Manage IDPs
This is the first page you see when you open the miniOrange SAML SSO add-on. This tab shows all the configured Identity Providers in a tabular format along with the actions like View, Test, Edit, Delete, Enable and Disable SSO that can be performed on that Identity Provider. There are options to add a new Identity Provider and take a Plugin Tour. The Plugin Tour takes you through all the tabs and features of the add-on.
Add New IDP
This option allows a user to add a new SAML Identity Provider to enable SAML Single Sign-on in your Atlassian Application. You can choose one of the two options: Quick setup or the Custom setup. You can read more about these options on the Add new IDP page.
Plugin Tour
We provide a wide range of settings and features. We suggest that you explore the app and see which combination of configurations allows you to achieve your use case. To assist you with this exploration, we have added a guided tour to the plugin. This tour will take you through each and every tab of the plugin and will let you know what the setting on that tab does.
All Configured IDPs and actions
View
This link shows an overview page for a particular IDP. The Overview page shows all the Settings related to that IDP. It highlights SSO, user profile and groups settings for the selected IDP. Advanced Settings are not included here which can be seen separately from the menu.
Test
This option can be used to test the configuration or settings of the IDP before performing SSO. It lets you know if your configurations are correct or not. If all your configurations are correct and the test is successful, then you can see all the attributes that are received from your Identity Provider for that user in a tabular format. But if your configurations have any issues then you will see an error message. You can refer this Troubleshooting document to resolve the issue. This document lists all the possible errors that you may encounter and the steps to overcome them.
Edit
This dropdown contains the following 4 options,
- SSO Endpoints: This option shows a page where all the IDP endpoints and certificates are configured. You can edit the SSO/SLO endpoints or certificates here.
- User Profile: This option redirects to a page that allows you to edit user login attribute and map user profile attributes from the IDP to the Atlassian application.
- User Groups: This option redirects to a page which contains settings related to group mapping.
- Advanced Settings: This option redirects to a page which provides advanced SSO related settings for a particular IDP.
Delete
This option can be used to delete all the configurations for that IDP. Once deleted, there is no option to get it back. If you are looking to use these settings later, it is recommended to disable the IDP instead.
Enable/Disable SSO
Using this option you can enable/disable the SSO for a particular IDP. In Jira add-on, there are different options available to enable/disable SSO for both Jira Software and Jira ServiceDesk.
Continue Quick Setup
If you leave the Quick Setup in between then, this option appears for those IDPs. You can resume the Quick Setup of the IDP from where you left it. If you don’t want to continue the quick setup and configure the IDP manually then you can remove this option using the cross button beside it.
Service Provider Info
To perform the SAML SSO you need to configure both the Identity Provider and the Service Provider. First, you have to create an SSO application on your Identity Provider and provide the details about your Service Provider there. Then you will get the metadata for Identity Provider which will be given to the Service Provider by configuring the IdP on the SSO add-on. Once these 2 steps are over, the connection between your IdP and SP will be complete.
Service Provider Metadata
To configure the Service Provider(SP) as an application on the Identity Provider(IdP) some details about the Service Provider are needed. You can find all these details on this Service Provider Info tab of the add-on. You can provide the SP information to your IdP in 3 ways – using Metadata URL, using Metadata XML file or by manually configuring the URLs on IDP.
Metadata URL: The Metadata URL provides the application’s SAML Metadata information that can be used to configure the application in the IdP as a SP in one go. The provided metadata url will be in this format : <Application Base URL>/plugins/servlet/saml/metadata
Metadata XML: This file contains all the information about the SP in an XML format. If the IdP supports importing the metadata from a file, then you can configure the application on your IdP in minutes by just uploading this metadata file.
Configure IDP manually: You have the option of configuring your IdP manually using the SP URLs displayed this Service Provider Info tab. You will need to copy and paste the required URLs from the table into your IDP SAML Configuration to add the application as a SAML SP.
Most SAML 2.0 Identity Providers will require the following URLs to configure an application :
- SP Entity ID/Issuer: This URL will be used to uniquely identify your Service Provider.
- ACS URL: This URL is often referred to as the Service Provider (SP) sign-in URL.
- Single Logout URL: This URL can be used to configure Single Logout.
- Certificate: This certificate is used by the IdPs to validate the requests and to encrypt the responses.

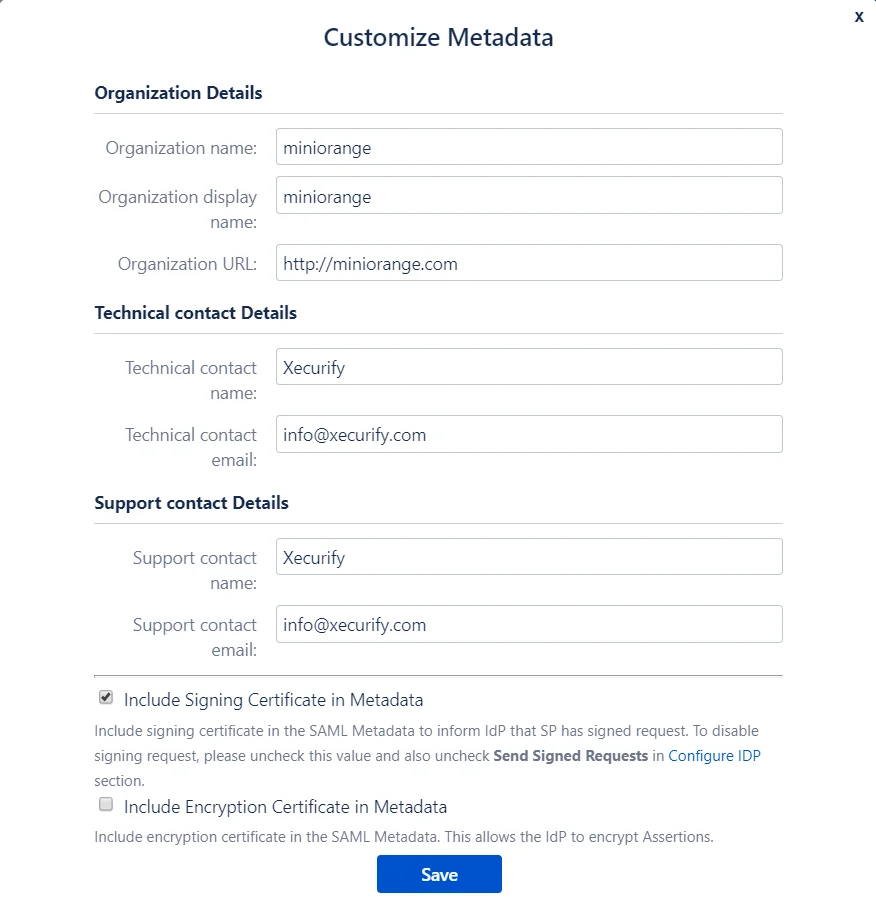
Customize the SP Metadata (Optional)
You can customize the SP metadata according to you using the Customize Metadata feature. When you click on this button you will see a popup showing all the fields in the metadata that can be customized.
Along with these fields, there are options to choose which certificates will be sent in the metadata. The options provided are :
- Include Signing Certificate in Metadata: If enabled, public certificate of the plugin will be added in the Service Provider Metadata.
- Include Encryption Certificate in Metadata: If enabled, public encryption certificate of the plugin will be added in the Service Provider Metadata.
Change SP Base URLs (Optional)
The add-on allows you to change the SP BASE URL and SP ENTITY ID to values other than the set defaults.
- SP Base URL: Typically all the Service Provider SAML endpoints are generated based on the Service Provider’s Base URL.
- SP Entity ID: It also referred to as Issuer. It is used by the Identity Provider to uniquely identify your Atlassian application.
Custom Certificates
In SAML SSO, the Service Provider and the Identity Provider exchange data using SAML requests and responses. To secure these transactions you can sign your requests and enable encryption for responses received from the Identity Provider. A Keypair of the public and private X.509 certificate is used to sign SAML Single Sign-On/ Logout Request and to decrypt SAML Assertion/Response from the Identity Provider(IdP).
The public key provided in the add-on(SP) is used by the IdP to correctly identify the SP sending the request. The SP sends SAML requests by signing them. This makes sure that a third party system can’t forge the SAML request and makes it impossible to change data in the SAML request through attacks like the man in the middle attack.
The public key of SP is also used by the IdP to encrypt the assertion data which can be decrypted by the add-on only. This encryption ensures that no one else gets access to sensitive information about users sent in the SAML response.
We have pre-configured the public and private certificates for you to get started quickly, but you also can use your own custom certificates to increase the security of the SAML configuration. You just simply need to copy and paste your own Public key and Private key in this section.
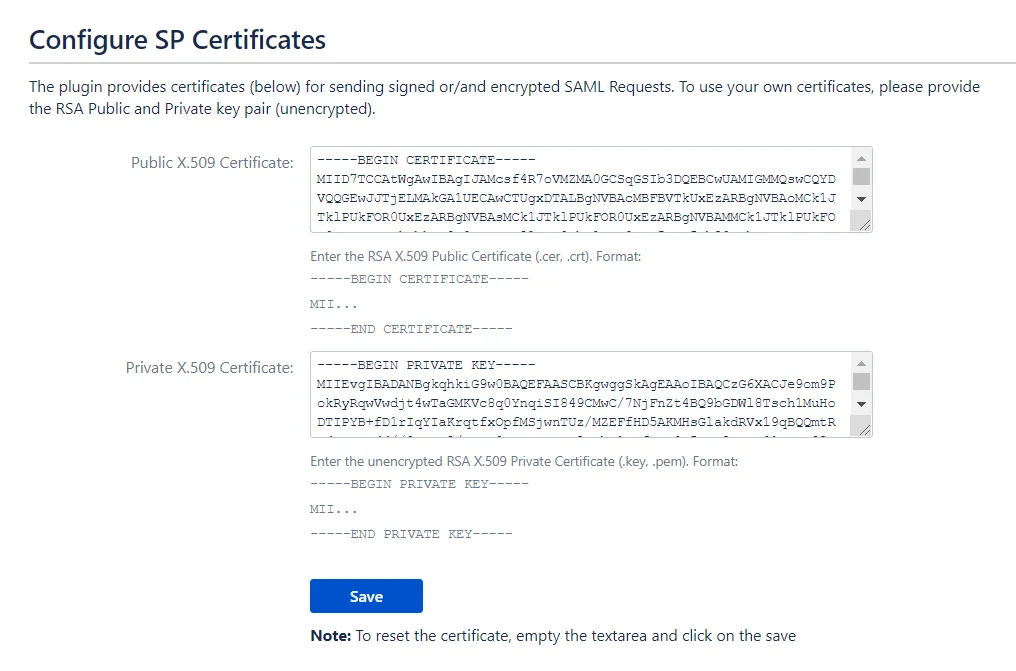
Steps to Configure Custom Public and Private Certificates
- Generate Custom Certificates. Refer to this document to generate your own certificates.
- After generating the certificates, go to your IdP and update the X.509 certificate that you have set up on your IdP with the newly created public certificate, or contact your IdP team to change the certificate.
- Paste the Public and Private Certificates on this page. Make sure that the certificates are entered in the proper format as given below.
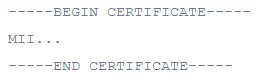
Format for Public Certificate
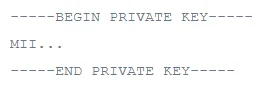
Format for Private Key
Important Note: The certificates must be updated simultaneously in both the IdP and the add-on or it will break the SSO.
Redirection Rules
Overview
Redirection Rules allow you to control how your users log into your Atlassian application. You can control which users see the login page vs. use SSO to login into your application. This can be managed using different parameters such as email address domain, groups, or user directory. We will learn more about configuring redirection rules in this section.
You can set up multiple rules and change the order in which they’ll be matched. The first rule satisfied by a user will decide if the user will be allowed to perform SSO and if yes, then which IDP he’ll be redirected to. You can also set up a default fallback rule in case none of the rules are satisfied.
Here’s an example of Redirect Rules

Based on this example: the user will be asked to enter his username or email on the login page. Once entered:
- The domain of the email address of the user will be checked. If the email address ends with @domain1.com the user will be redirected to IDP1 for SSO. If the domain doesn’t match then,
- The group of the user will be checked. If the user belongs to the jira-software-users group, he’ll be redirected to IDP2 for SSO. Else,
- The directory of the user will be checked. If the user belongs to the Jira Internal Directory user directory, he’ll be shown the login page and asked to enter credentials.
- If none of these conditions is specified, the user will be shown the login page.
How to Configure Redirection Rules
To configure redirection rules,
- Click on the Configure button below the miniOrange SAML SSO app listing on the Manage Apps window
- Proceed to SSO & Redirection Rules >> Redirection Rules
- Click on the Add Rule button.
Creating a New Rule
Here are the options required for creating a rule
Rule Name
This is a unique identifier of the rule. This field allows only alphanumeric characters.
Rule based on the Email Domain
If you select the email domain, you’ll be asked to enter the domain of the users who should be redirected to the selected IDP.
Rule based on the User’s Directory
If Directory is selected, you’ll be asked to select the user directory to which the user belongs to while creating a rule. If the user’s directory matches the configured one, the rule will be satisfied and the user will be redirected to the configured IDP.
Rule based on User’s Group
If Directory is selected, you’ll be asked to select the user directory to which the user belongs to while creating a rule. If the user’s group matches the configured one, the rule will be satisfied and the user will be redirected to the configured IDP.
Reordering the Rules
When the user enters the username on the login page, his username is processed against the order in which rules are added. To change the order you can use the up and down arrow on the Redirection Rules page.
The order of the Default Rule can’t be changed as it works as a fallback rule and always executes at the end

Settings
The settings tab provides you additional options for the login flow. It allows you to configure SSO for Anonymous users, administrators and to customize or secure the Backdoor/Emergency URL.
How to Configure Settings
To configure settings,
- Click on the Configure button of the app on the Manage Apps window
- Proceed to SSO & Redirection Rules >> Settings
Anonymous Access and Redirect Delay

Anonymous Access
Some pages in the Atlassian applications can be accessed by unauthenticated traffic like public filters, public spaces, About pages, etc. Also, there are some pages that are not available to unauthenticated users but don’t prompt login and just show an error message.
Disabling Allow Access to Anonymous Pages without SSO switch makes sure that all unauthenticated traffic on your application is prompted for login before being able to view such pages.
Delay Auto-Redirect to IDP to IDP
If you have just one IDP set as default IDP in the Redirection Rules, the user is redirected for SSO as soon as he accesses the application. To add a delay here, you can enable this option. In this case, a progress bar will be shown on the login page which will allow users to cancel redirection and use application credentials to log in.
Administrator Login

Allow SSO on Administrator Login Page
When the administrator logs in and accesses admin functionalities, the admin is prompted for credentials again. Enabling this option makes sure that if the Admin logs in using SSO, he’ll be allowed to use SSO for accessing admin functionalities.
Disable this option, if you want the admin to always use application credentials to access admin functionalities.
Auto-Redirect to SSO from Admin Screen
When the admin accesses admin functionality, this option redirects him to the IDP he used to log into the application. This makes sure that all administrators use SSO only to get admin access.
Backdoor/Emergency Login
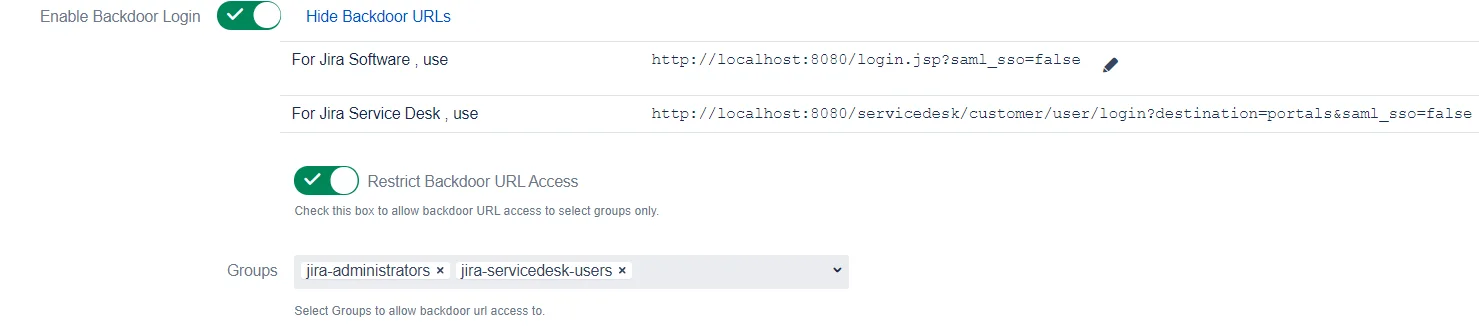
Backdoor/Emergency URL
Backdoor/Emergency URL can be used by local administrators to access the login page when SSO is enabled. This is useful when you’ve Redirection Rules set or when the Default Rule doesn’t have the login page selected.
You can customize the Backdoor URL by clicking on the edit button beside it and entering new parameter values

Restrict Backdoor URL
You can Restrict the Backdoor URL to certain groups in the application. When you enable this option, you’ll be asked to enter the groups to whom backdoor access should be provided. Now, when a user tries to access the backdoor URL, he’ll be asked for his username first and if that username belongs to the configured group, only then will he be able to use the login page.
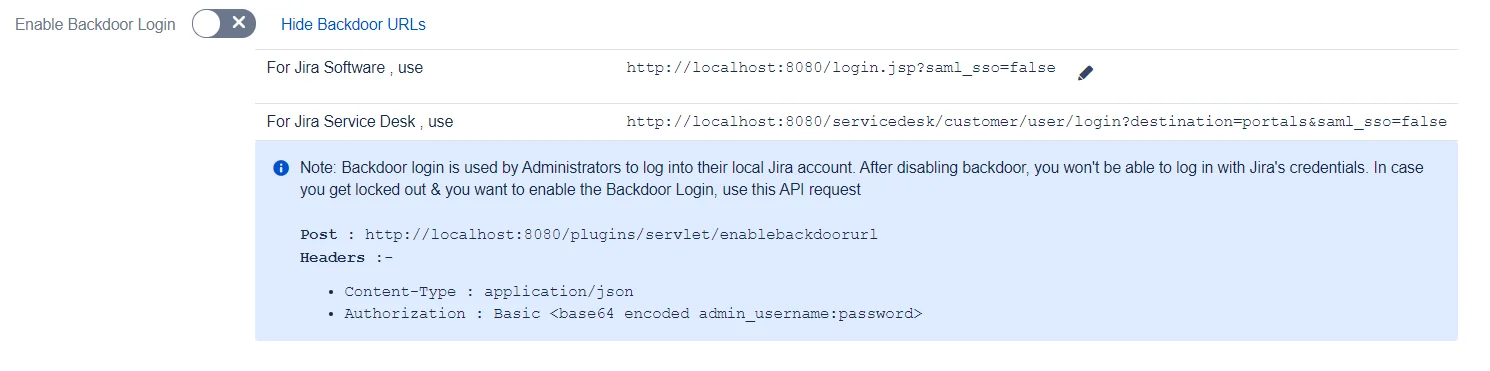
Disable Backdoor Login
The Backdoor Login option is enabled by default. However, you can disable it and enable it only when needed. To do this, you’ll need to call the API /plugins/servlet/enablebackdoorurl with your admin credentials. The details are provided in the app once you disable backdoor login
Disable SSO based on user-agent
User-agent based SSO can be used by administrators to skip SSO for a particular user-agent coming in the request. Administrators can configure multiple user-agents for which SSO should not be invoked. This is useful when you want to disable SSO for specific browsers/devices.

Added option to configure No SSO URL(s)
Sometimes Atlassian applications are integrated with other applications to share some information and generally these integrations work on top of basic authentication and use local user accounts (service accounts). In this case, if we enable force SSO in the miniOrange SSO then all Pages/URLs will be protected with SSO and the app always redirects to IDP for authentication which will break the integration with other applications.
To handle this we have added the No SSO URL(s) option which lets you bypass the SSO for specific URLs that give access to some public resource or redirects to other linked applications, etc.
You need to provide the relative path of the URL like, /resource, /jira etc.

Post Logout Configurations
This tab allows the admin to define what should be done after the user logs out from the application.
This is very useful:
- To enhance the logout Page UI: Custom logout templates can be used to change the message after logout and show a custom message.
- To redirect to the IDP page after logout: Redirecting to your IDP after logout is possible using the Custom Logout URL option.
This tab has the following options:
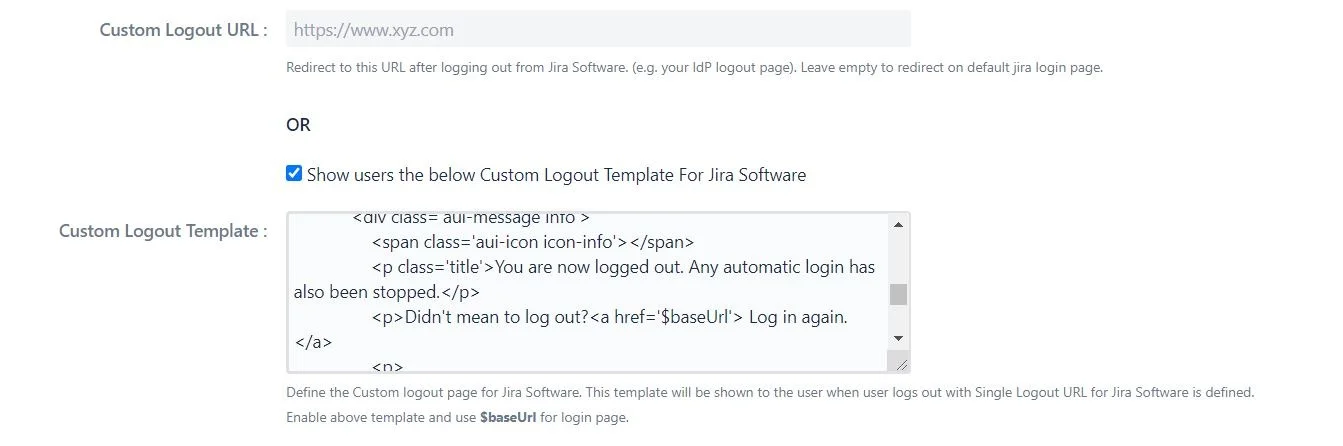
Custom Logout URL
The user will be redirected to this URL after logout. This can be any existing URL in the application or outside the application.
Custom Logout Template
The user will be redirected to this template after signing out. You can show custom messages or action items after the user logs out.
The template is written in HTML, so it’s easy to understand and modify. You can edit the logout template as per your requirement.
If you add $baseurl in the template, it will be replaced by the base URL of your application, allowing you to easily add links.
Look and Feel Settings
This tab provides the user an option to design the login, logout, and error page for Atlassian instances as per requirements.
This is very useful when:
- IDP initiated SSO: You can choose not to show the SSO buttons on the login page when all the users logging in through SSO will be initiating it from the IDP only.
- Custom Login Button: The login button text can be modified to make it easy to understand for the users.
- To enhance the login Page UI: Custom login template will allow you to customize and show an easy-to-use login page to the end-users.
- Detect Errors in login easily: Error template allows you to show support portal links, support emails, or show custom instructions when a user faces an issue during login.
Login Page Settings
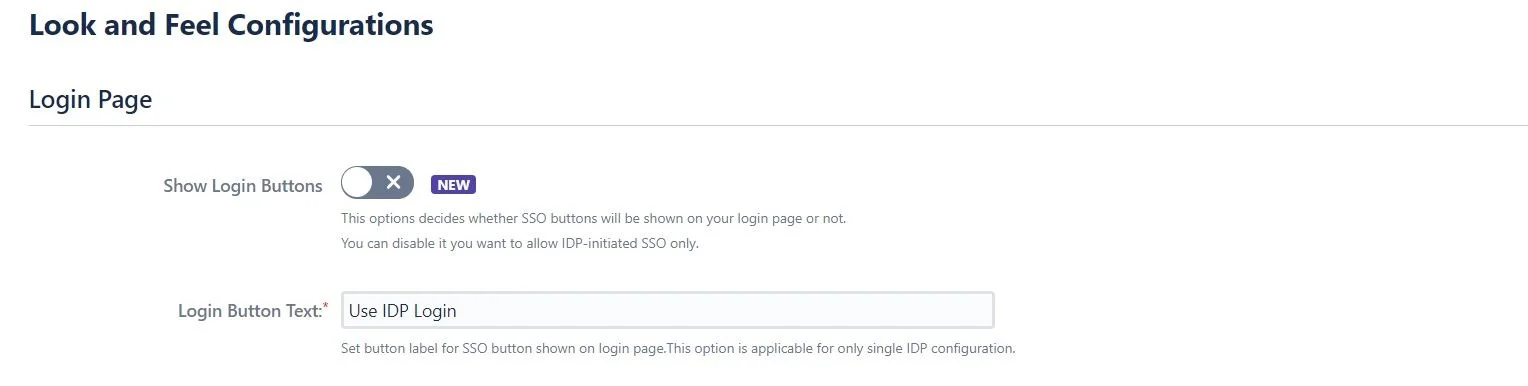
If enabled, the users won’t see the SSO buttons on the login page. You can turn off this option if your users are going to use IDP initiated SSO only.
Login Button Text
Customize SSO button text as per requirement using this option (This text is visible only in case of Single IDP.)
Custom Login Template
This template defines the UI of the dashboard and login page. The template is written in HTML. You can add more SSO buttons (in case of multiple IDP configuration) using idpID.

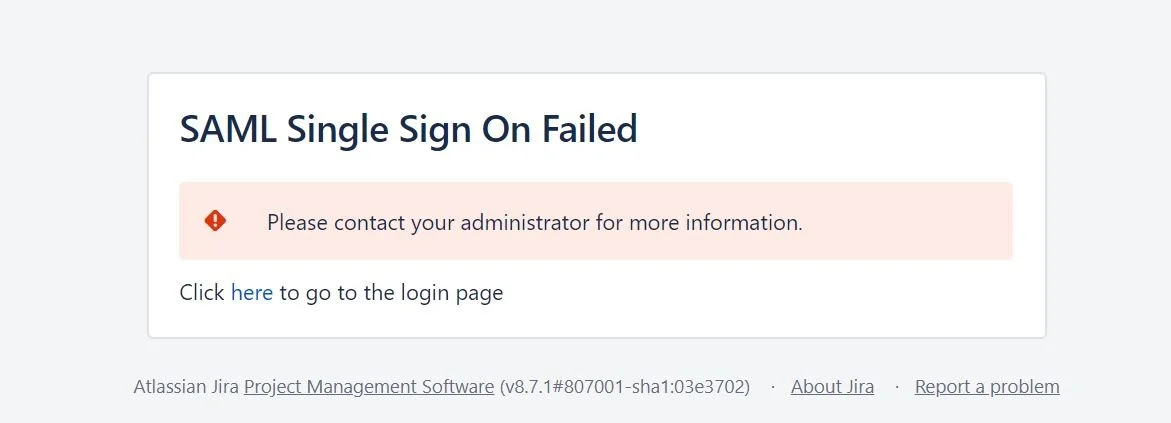
Error Page Settings
Custom Error Template
This template can be customized to change the page which appears when SSO fails. You can add a link to the support portal or add support contact on the page if anyone wants to raise an issue from the error page. Use $baseurl in the template to redirect to the login page.
Remember My Login
The settings in this section allow you to manage how long your end users can stay logged in after the initial successful SSO. After a user successfully performs SSO, a session is created for that user.
This section of the plugin allows you to manage your user’s sessions. The description of each section is given below:
Remember-Me Settings
This section allows you to set the Remember-Me cookie. When this option is enabled, a cookie is set in the browser when the user performs SSO. This cookie will allow the user’s session to remain valid until the user explicitly logs out from the application.
The user can switch applications, close the browser, or exit the application without logging out. In all these cases, the user’s session will remain active until a logout action is performed.
User Session Timeout
The time-out values for user sessions are typically set to some default value, depending on the application. These default values can be increased or decreased according to your convenience. This section provides steps to modify the end-user session’s time-out value.
The default value for this timeout is set to 300, which is 5 hours. You can set it to 0 to keep the user logged in indefinitely.
These changes will generally have to be done in your application’s configuration files. You will need to restart the application after making these changes.
Admin Session Timeout
Similar to the previous section, this section provides steps to modify a user’s session. The difference is that here you will be modifying the timeout value for Admin user sessions.
The default value for this timeout is 10 minutes. Lack of activity for more than 10 minutes will end the admin session. On the other hand, the timeout resets if any admin activity is performed before the session ends.
Again, these changes will have to be made in your application’s configuration files. In order to apply the changes, you will need to restart your application.
Global SSO Settings
The Global SSO Settings tab provides the options to enable/disable the configurations for how your users and administrators will login using SSO. Below you will find the details for the options that are present in this tab.
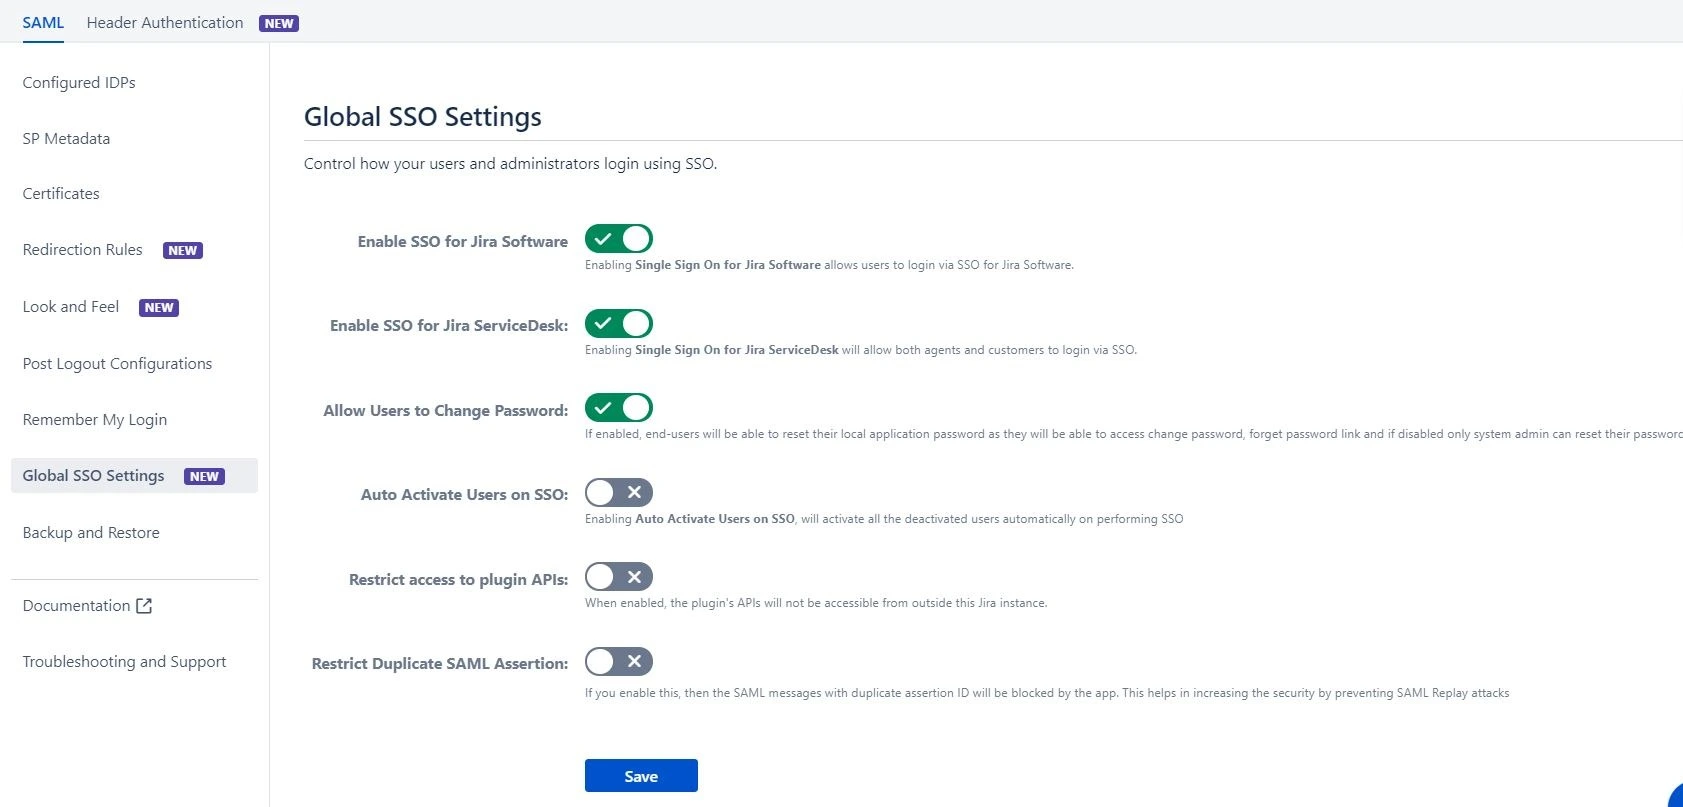
Enable SSO for Jira Software
Enabling this option will allow all your Jira software users to perform SSO. If this option is disabled, then the SSO for all the users is disabled. You can use this feature to test SSO on your environment without affecting the end users by disabling the SSO for all. Enabling/disabling this feature will override your IDP specific Enable SSO for Jira Software settings you have configured in the IDP menu.
Enable SSO for Jira Service Desk
Enabling SSO for Jira Service Desk will allow all the users from the service desk to perform SSO. Enable this only when all the users from the service desk are able to perform SSO. If your application is used only by customers, disable this feature so they can log in with their default application credentials. This feature works irrespective of the IDP specific Enable SSO for Jira Service Desk settings you have configured in the IDP menu.
Allow users to Change Password
This feature allows end-users to change their local application password. If disabled, end-users won’t be able to reset their local application password as they won’t be able to access change password, forget password link and only system admin can reset their password.
Auto Activate Users on SSO
Enabling Auto Activate Users on SSO will activate the deactivated users who perform SSO in the application. This will ease the admin’s work as they won’t have to enable the deactivated users to allow them to perform SSO.
Restrict Access to Plugin API’s
When enabled, the plugin’s APIs will not be accessible from outside of the application. This feature allows you to restrict access of the plugin’s APIs within the scope of the application instance.
Restrict Duplicate SAML Assertion
This feature allows you to restrict duplicate SAML assertion. If you enable this, then the SAML messages with duplicate assertion ID will be blocked by the app. This helps in increasing the security by preventing SAML Replay attacks.
Advance Settings
When configuring an IDP, there are advanced settings available that allow for greater customization and control over the authentication and authorization process. Below are some of the features available in Advanced Settings for the SSO.
Allow User Creation
Enabling the "Allow User Creation" feature creates new users during the single sign-on login process. This is necessary because a user must already exist in Atlassian to be able to log in with SSO. When this feature is enabled, a new user is created if it doesn't exist through SSO.
User Directory
By selecting this option, administrators can specify a user directory to use when creating new users through SSO. If a user is not found in Jira after a successful SSO, a new user account will be created in the selected user directory. Additionally, a new directory can be created by clicking the "Create Directory" button.
Certificate Rollover
With this option, administrators can designate a metadata URL where the metadata certificate is regularly updated. The plugin will automatically check this URL and update the IDP certificate as needed. In addition, the miniOrange SAML SSO plugin is capable of periodically checking the metadata to ensure that it stays updated with any changes made on the IDP. Administrators can also choose a time interval after which the URL should be called through the SSO plugin.
Relay State
Relay State allows administrators to redirect users to a certain page/link after they successfully login with SSO. If administrators want to redirect users to a certain page/link every time after SSO, they can select the Force Redirect option and provide the URL in the input box. If no relay state is available, this option can be chosen to redirect the user after SSO to any page/link.
Validate IDP's SAML Response
This option permits slight variations in the SAML response time from the IDP to accommodate various time zones. Administrators can specify the number of minutes of permissible difference in response time. Any difference in timestamps beyond this value will be considered invalid.
Force Authentication
In traditional SSO procedure, when a user tries to log in to the Service Provider (SP) and initiates the SSO flow, the user is redirected to the IDP. If the user already has an active session at the IDP, they are redirected back to the SP and logged in automatically. However, this can pose a security risk if the user's session has been compromised or if the IDP's session timeout is set too high.
When Force Authentication is enabled, the user is prompted to log in at the Identity Provider (IDP), even if they already have an active session. This adds an extra layer of security to your SSO flow and helps protect your resources from unauthorized access.
Passive SSO
Passive SSO provides a more streamlined SSO flow for users who already have an active session at the Identity Provider (IDP). With Passive SSO enabled, users are required to have an active IDP session prior to attempting an SSO login. Otherwise, the IDP will send a failed SAML response, and the authentication page will not be presented to the user.
Passive SSO is particularly useful in situations where users need to quickly access protected resources without having to re-enter their login credentials. By requiring users to have an active IDP session, the SAML SSO plugin can skip the authentication step and provide a more seamless SSO experience.
Custom SP Entity ID
Custom SP Entity ID is a feature that provides greater flexibility in configuring your Service Provider (SP) settings. By default, SP Entity ID is a unique identifier that identifies your SP in the SAML SSO flow.
With the Custom SP Entity ID feature enabled, you can change your SP Entity ID to a customized URL of your choice. This feature is useful when you want to customize your SP settings to match your organization's branding or naming conventions. It also helps simplify the SAML SSO configuration process by allowing you to use a URL that is easy to remember and identify.
To use the Custom SP Entity ID feature, simply enable the option in your SAML SSO plugin and enter the customized URL of your choice. The plugin will then generate a new SP Entity ID using your custom URL. This new SP Entity ID can be used in the SAML SSO flow to identify your SP, and it will be displayed in the SAML responses sent by the IDP.
Backup and Restore
This tab provides an option to download or upload the SAML SSO plugin’s configurations. This is very useful as it helps to:
1. Transfer Configuration File
If you are moving from a Test instance to a Production instance, there is no need to reconfigure the plugin again on the production instance. You can simply download the configurations from the test instance and upload them to the production instance. This feature also helps when migrating settings between different instances.
2. Backup
You can take backups of your working configurations for future use and disaster recovery.
3. Troubleshoot
If users face issues during SSO, the configuration file can be shared with the support team for debugging and issue resolution.
Available Options
Download / Upload App Configuration Manually
Download App Configuration
Downloads all the app configurations in a JSON file.
Import App Configuration
Upload a previously downloaded configuration file to restore the app settings.
Configure / Fetch App Configuration via REST API
Fetch App Configuration
- Request Method: HTTP GET
- URL: <application_base_URL>/plugins/servlet/configureplugin
- Content Type: application/json
- Authorization: Basic <base64 encoded admin_username:password>
Update App Configuration
- Request Method: HTTP POST
- URL: <application_base_URL>/plugins/servlet/configureplugin
- Content Type: application/json
- Authorization: Basic <base64 encoded admin_username:password>
- Body: Raw format (application/json)
Example JSON Format
{
  "PLUGIN_NAME": "JIRA SSO / Single Sign On, JIRA SAML SSO",
  "PLUGIN_VERSION": "2.0.0",
  "Identity Providers": [
    {
      "ID": "example-id",
      "Name": "IdP_1",
      "Configure SP": {
        "Send Signed Requests": true,
        "SSO Binding Type": "HttpRedirect",
        "SLO Binding Type": "HttpRedirect",
        "NameID Format": "urn:oasis:names:tc:SAML:1.1:nameid-format:unspecified",
        "Enable SSO for Software": true,
        "Enable SSO for ServiceDesk": true
      },
      "Attribute Mapping": {
        "Username": "NameID",
        "Email": "NameID"
      },
      "Group Mapping": {
        "Create New Groups": true,
        "Default Groups": ["jira-software-users"]
      },
      "Advanced SSO Options": {
        "Allow User Creation": true,
        "Relay State URL": ""
      }
    }
  ]
}
Troubleshooting
The Troubleshooting tab provides steps to download necessary information such as application log files, SAML Request, and SAML Response required to diagnose and resolve issues.
You can follow the instructions below to enable debug logs for the plugin and download logs or other files required for debugging. This information can also be shared with the miniOrange support team.
Available Troubleshooting Options
- Enable debug logs for the miniOrange plugin
- Download application log files (e.g., atlassian-jira.log, atlassian-confluence.log)
- Download SAML Request and SAML Response in XML format
- Download plugin configuration file
Troubleshooting Steps
Steps to Enable Debug Logs
- Go to Logging and Profiling.
- Click on Configure in the Default Loggers section.
- Enter
com.miniorange.sso.samlin the package field. - Select Debug as the logging level and click Add.
- Perform Single Sign-On again in an incognito/private window and record logs.
Steps to Download Support Zip
- Go to Troubleshooting and Support Tools.
- Navigate to the Create Support Zip tab.
- Click on Customize Zip.
- Select only Jira Application Logs and save.
- Click on Create Zip, then Download Zip.
Download SAML Request
If the SAML Request is not visible, follow these steps:
- Go to Configure IdP tab.
- Select the required IdP (in case of multiple IdPs).
- Click on Test.
- Click on Download SAML Request from the Authentication (SAML) Request panel.
Download SAML Response
If the SAML Response is not visible, follow these steps:
- Go to Configure IdP tab.
- Select the required IdP (in case of multiple IdPs).
- Click on Test Configuration.
- Click on Download SAML Response from the Authentication (SAML) Response panel.
Test Configuration
Refer to the above steps for downloading SAML Request/Response. Capture the test configuration results and share them with the support team.
App Configuration
Download the app configuration file and share it with the support team for debugging purposes.
Support
In case of any queries, you can reach out via the customer portal, use the Support Widget in the plugin, or email at info@xecurify.com.
Header Based Authentication
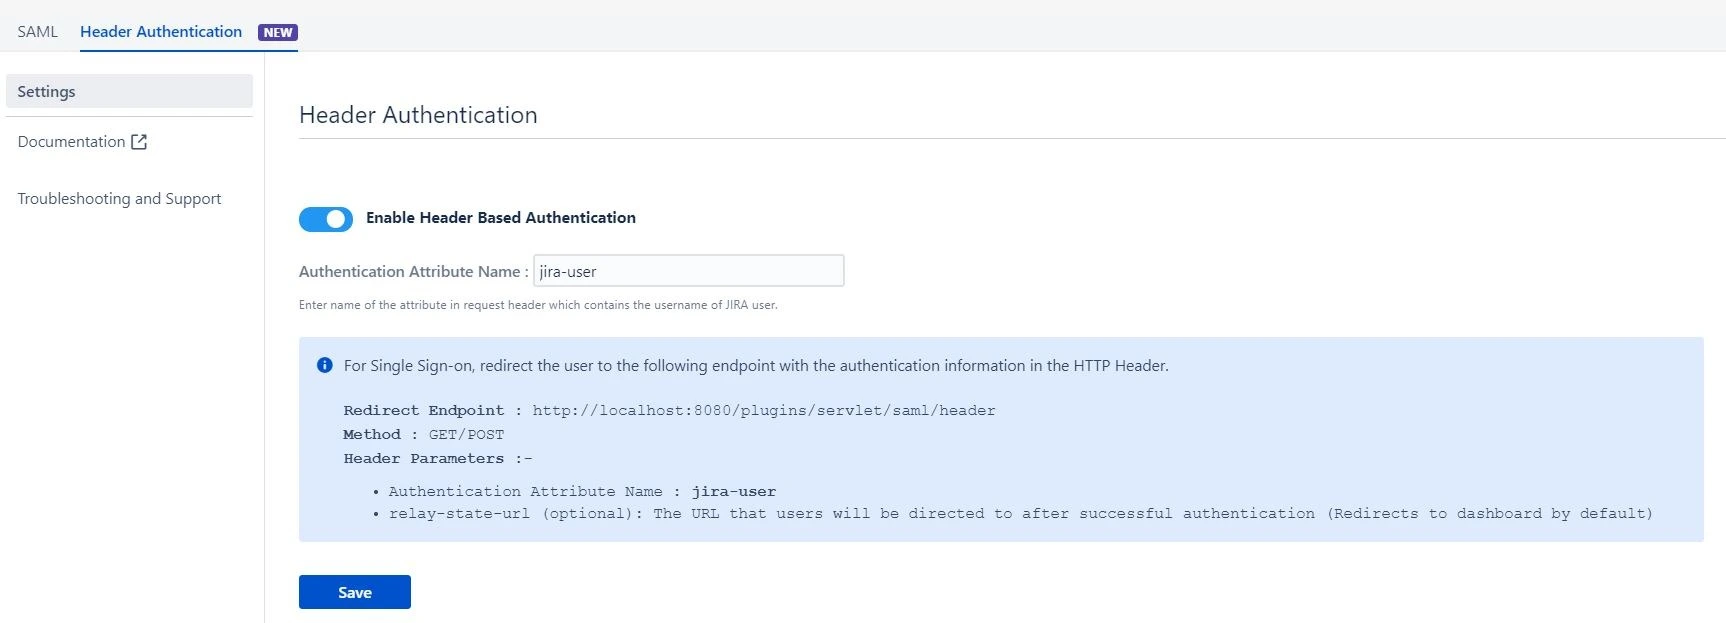
Header Based Authentication allows users to be authenticated using the user information (such as username) received in HTTP headers. This feature is commonly used in environments where a reverse proxy or VPN is used and handles user authentication.
Enable Header Based Authentication
When enabled, this feature allows users to log in automatically based on request headers.
If you are using a reverse proxy or VPN that performs authentication, it typically sends the authenticated user’s username in the request headers when accessing the application.
The plugin reads this header and automatically logs the user into the application without prompting for credentials again, providing a seamless authentication experience.