- Home
- Jenkins SSO
- Jenkins SSO Documentation
- SAML SSO into Jenkins using PingFederate as IDP

SAML Single Sign On (SSO) into Jenkins using PingFederate
Jenkins SAML SSO app gives the ability to enable SAML Single Sign-On (SSO) for Jenkins. Here we will go through a guide to configure Single Sign On (SSO) between Jenkins and PingFederate. By the end of this guide, Ping Federate users should be able to log in and register to Jenkins.
 Try it for free
Pre-requisites
To integrate your Identity Provider (IDP) with Jenkins, you need the following items:
- Jenkins should be installed and configured.
- Jenkins Server is https enabled (optional).
- Admin credentials are set up in Jenkins.
Download and Installation
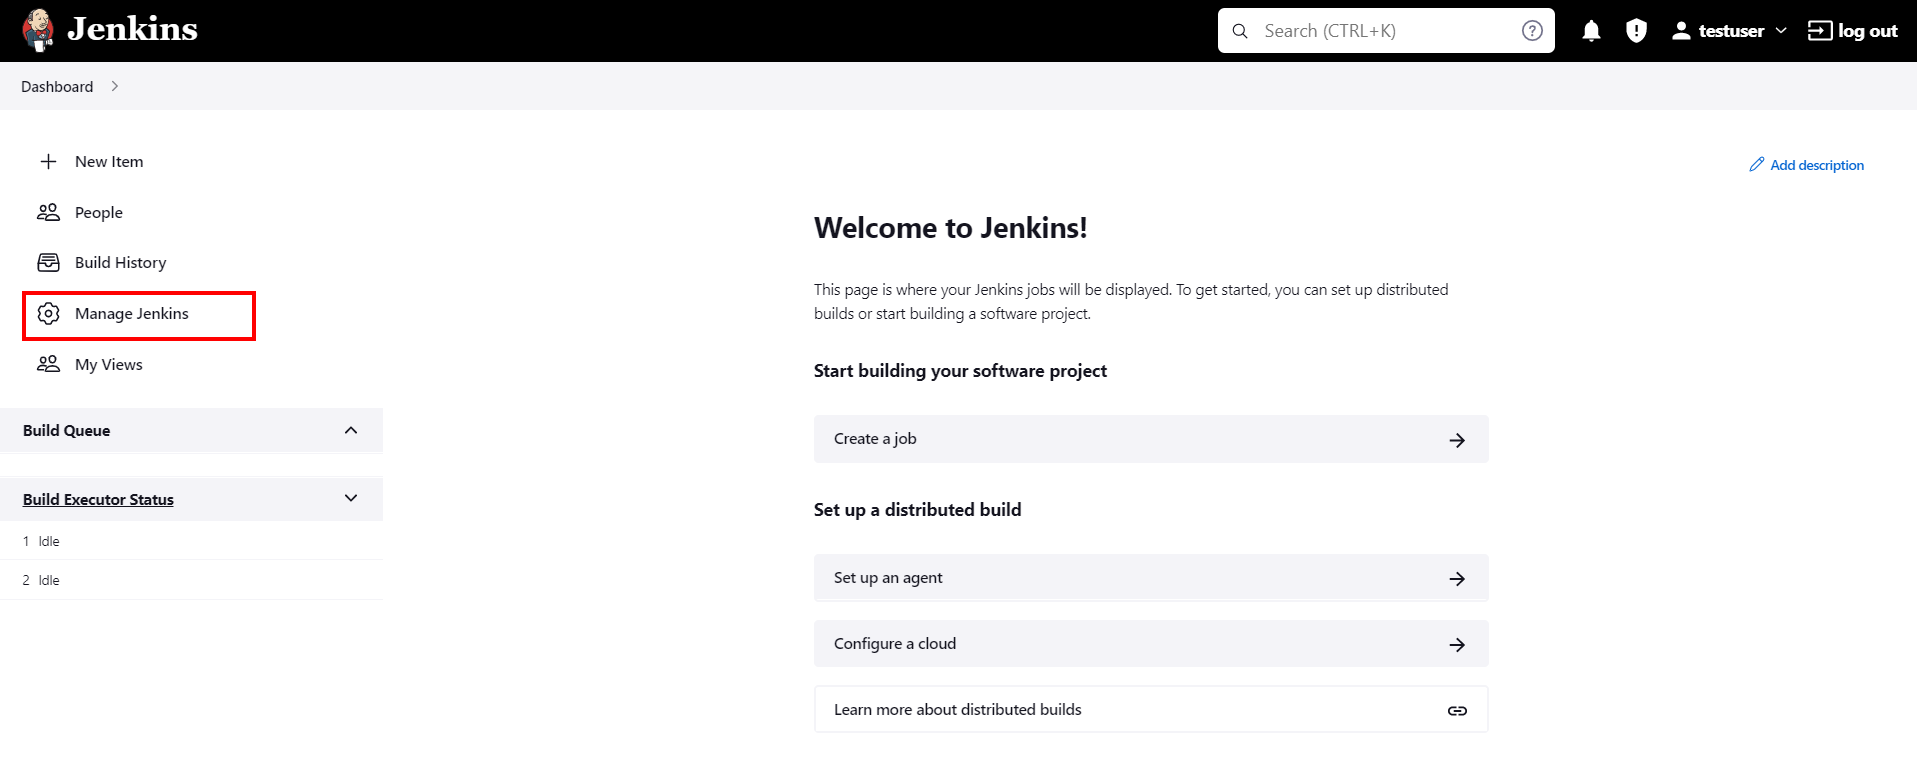
- Login to your Jenkins Admin Account.
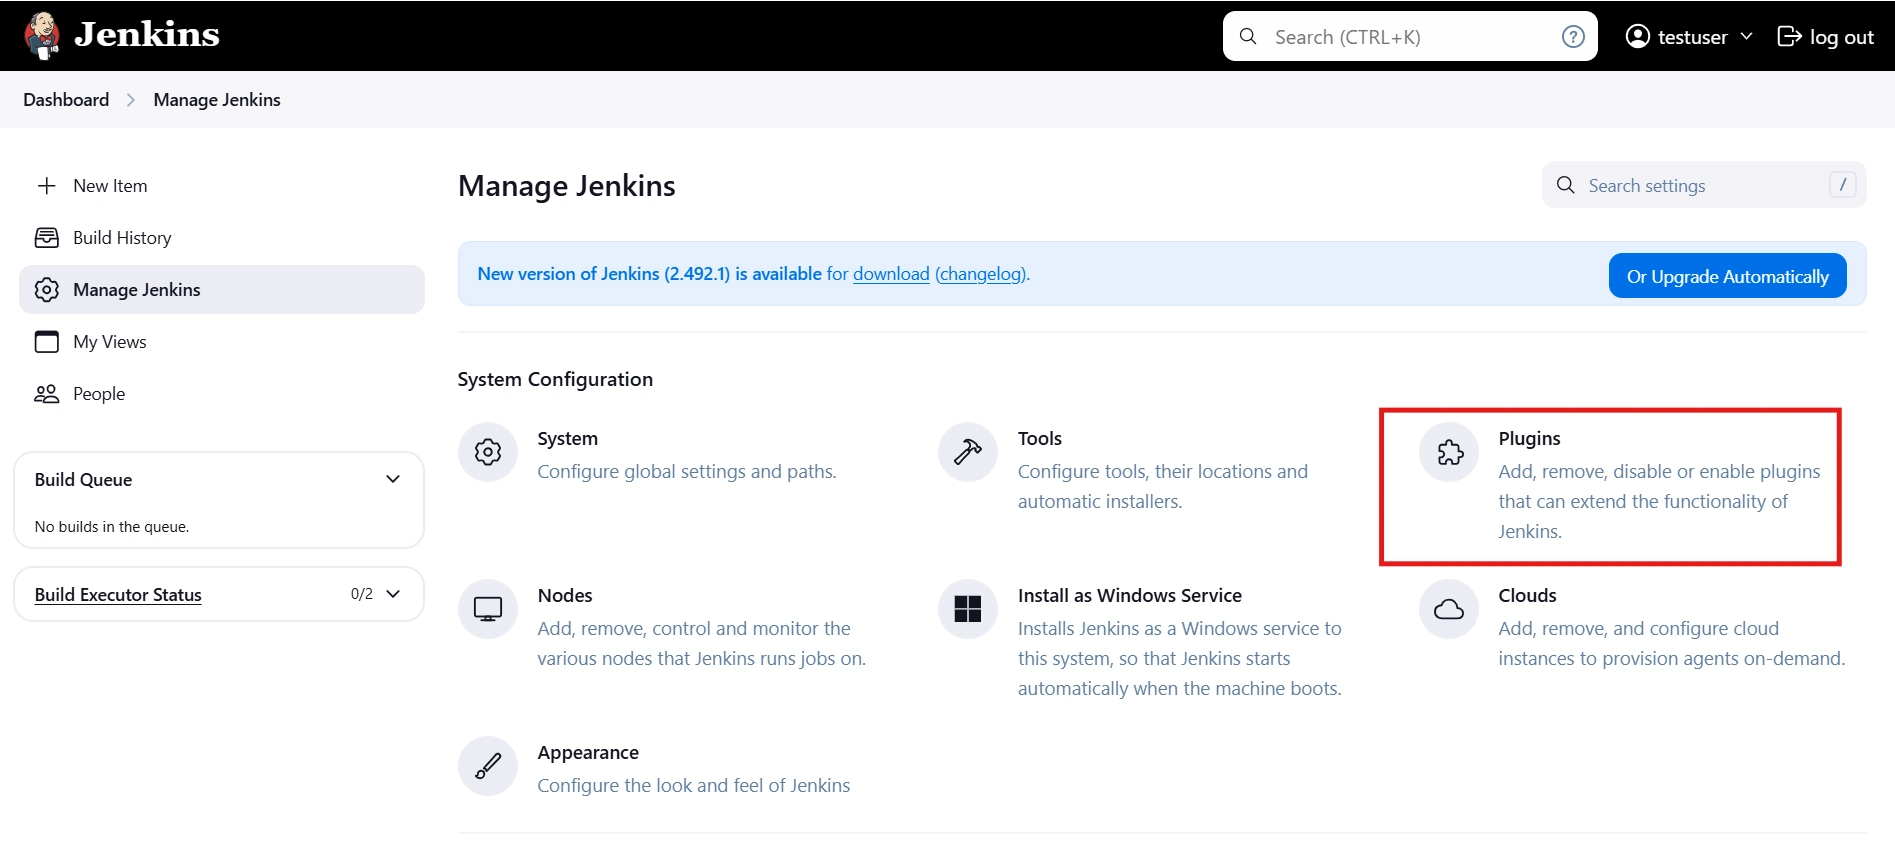
- Go to Manage Jenkins option from the left pane, and open Plugins tab.
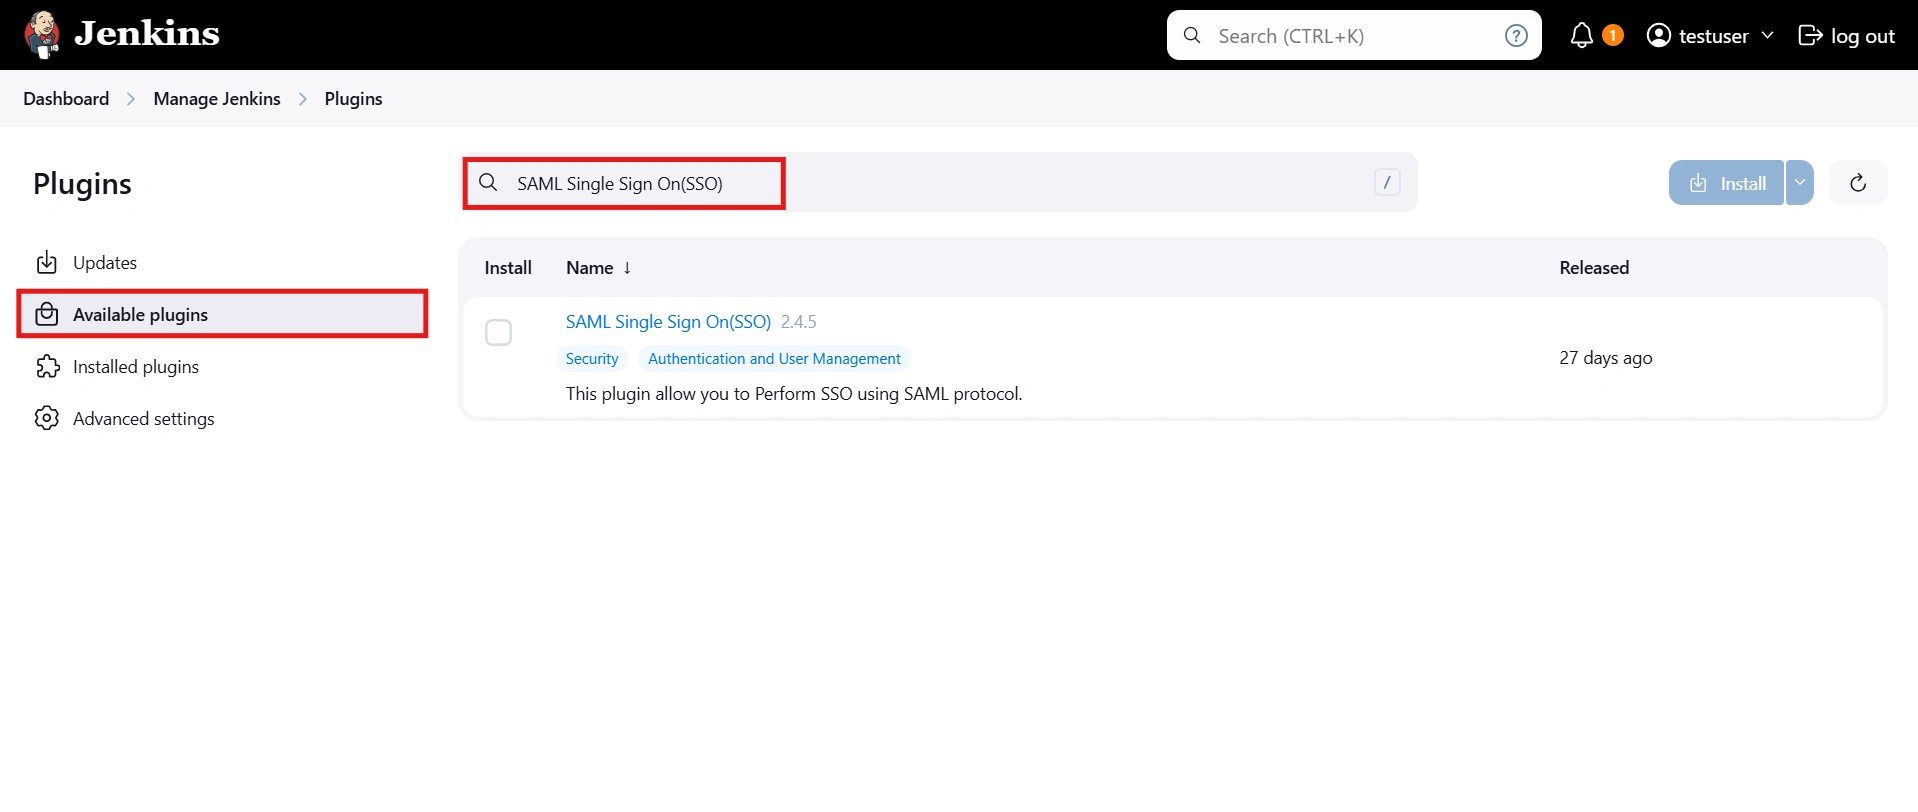
- Search for SAML Single Sign On (SSO) in the available plugins tab.
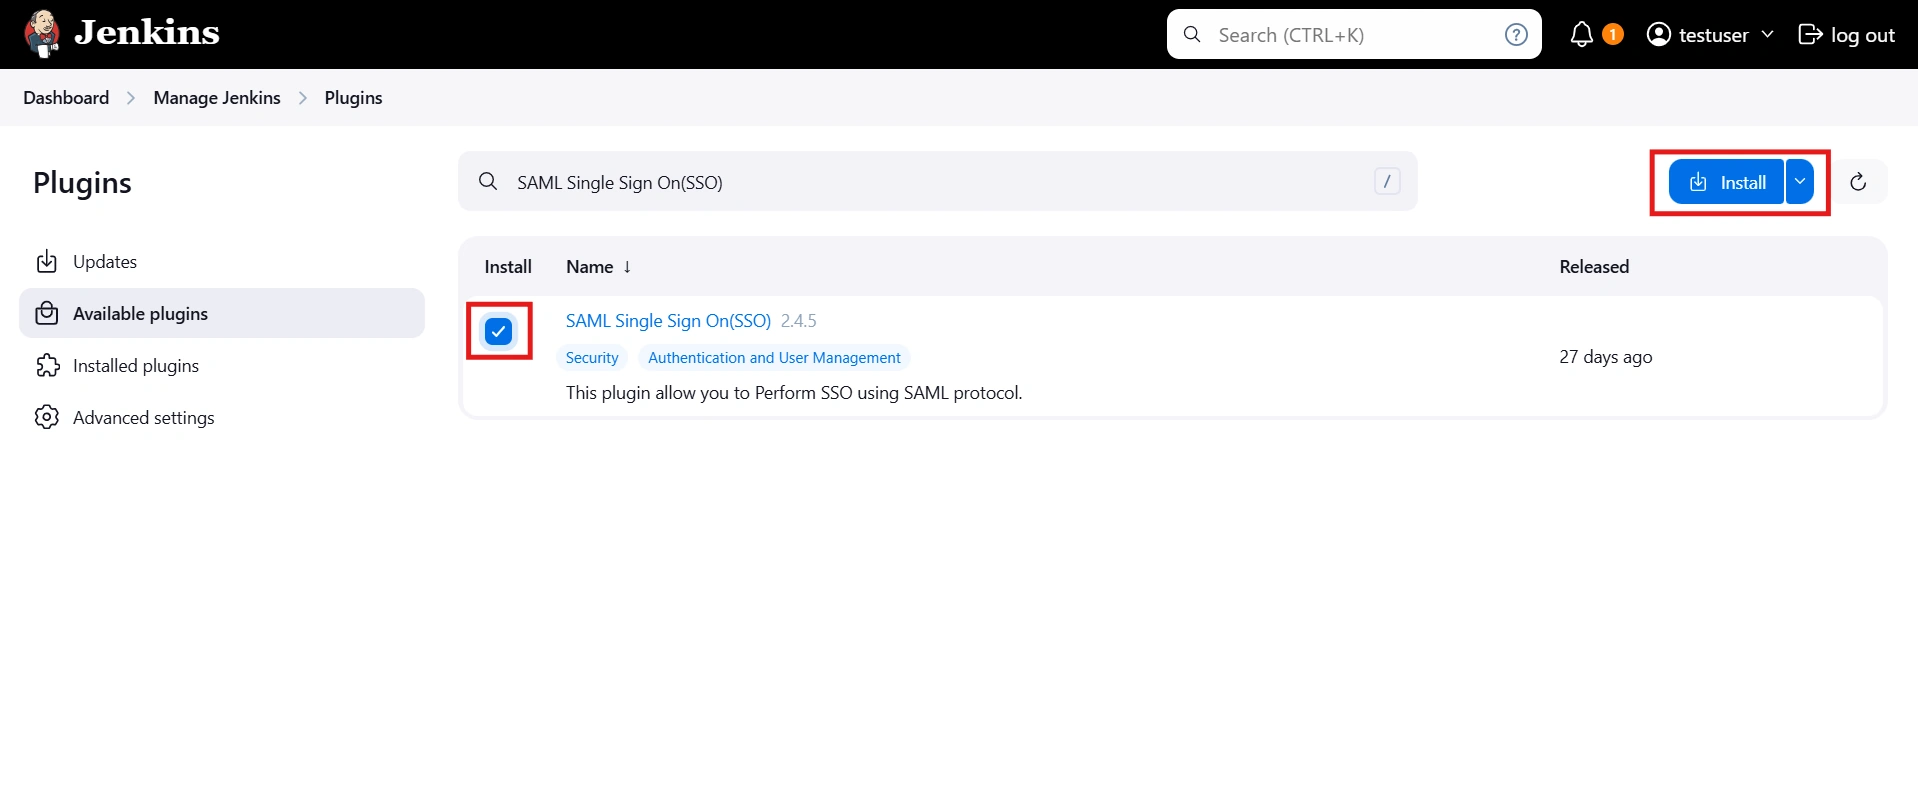
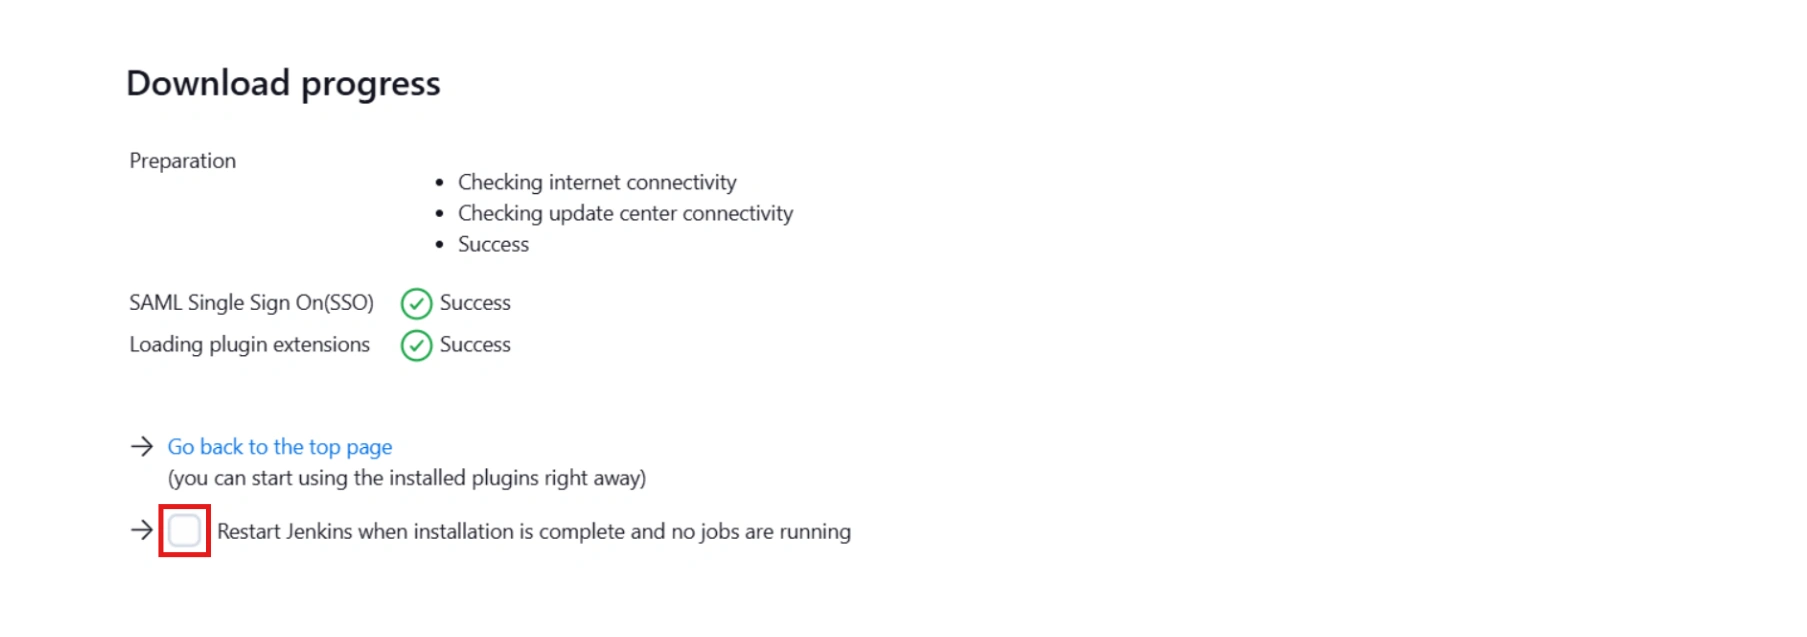
- Download and install with a restart.
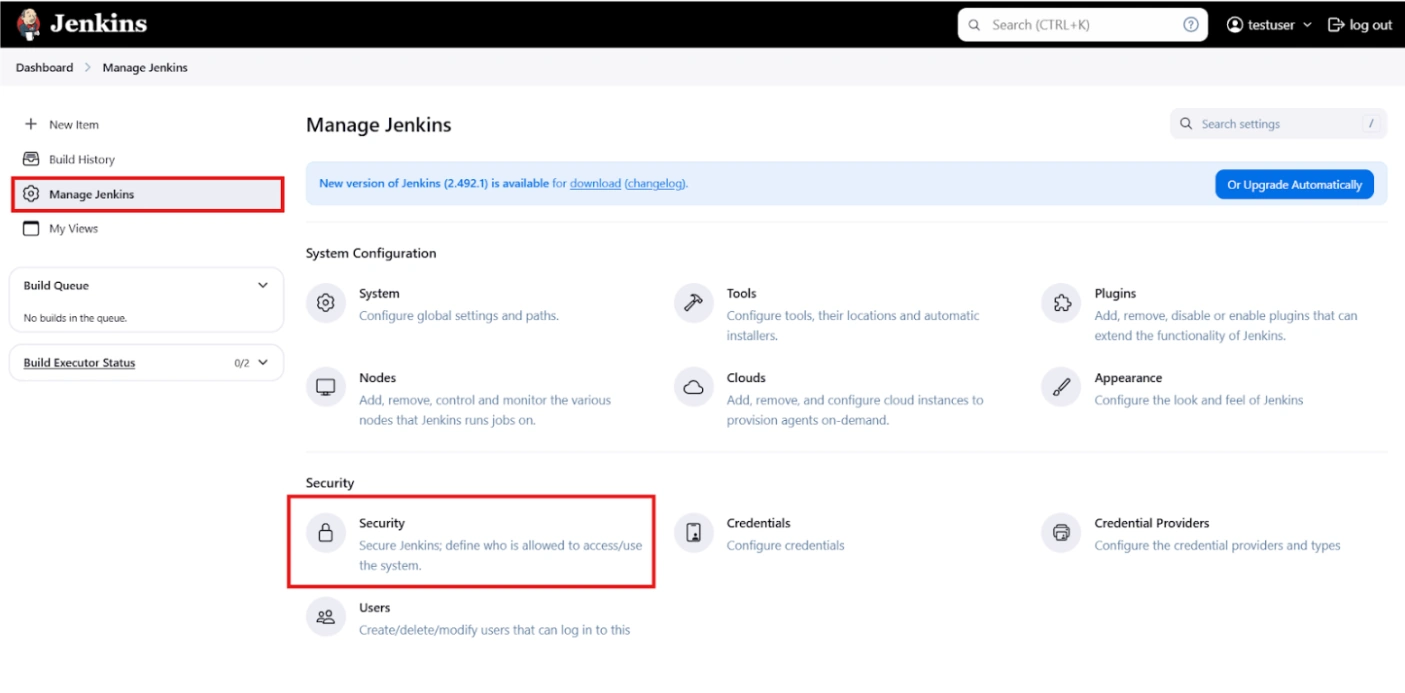
- After restarting Jenkins, navigate to Manage Jenkins and select Security.
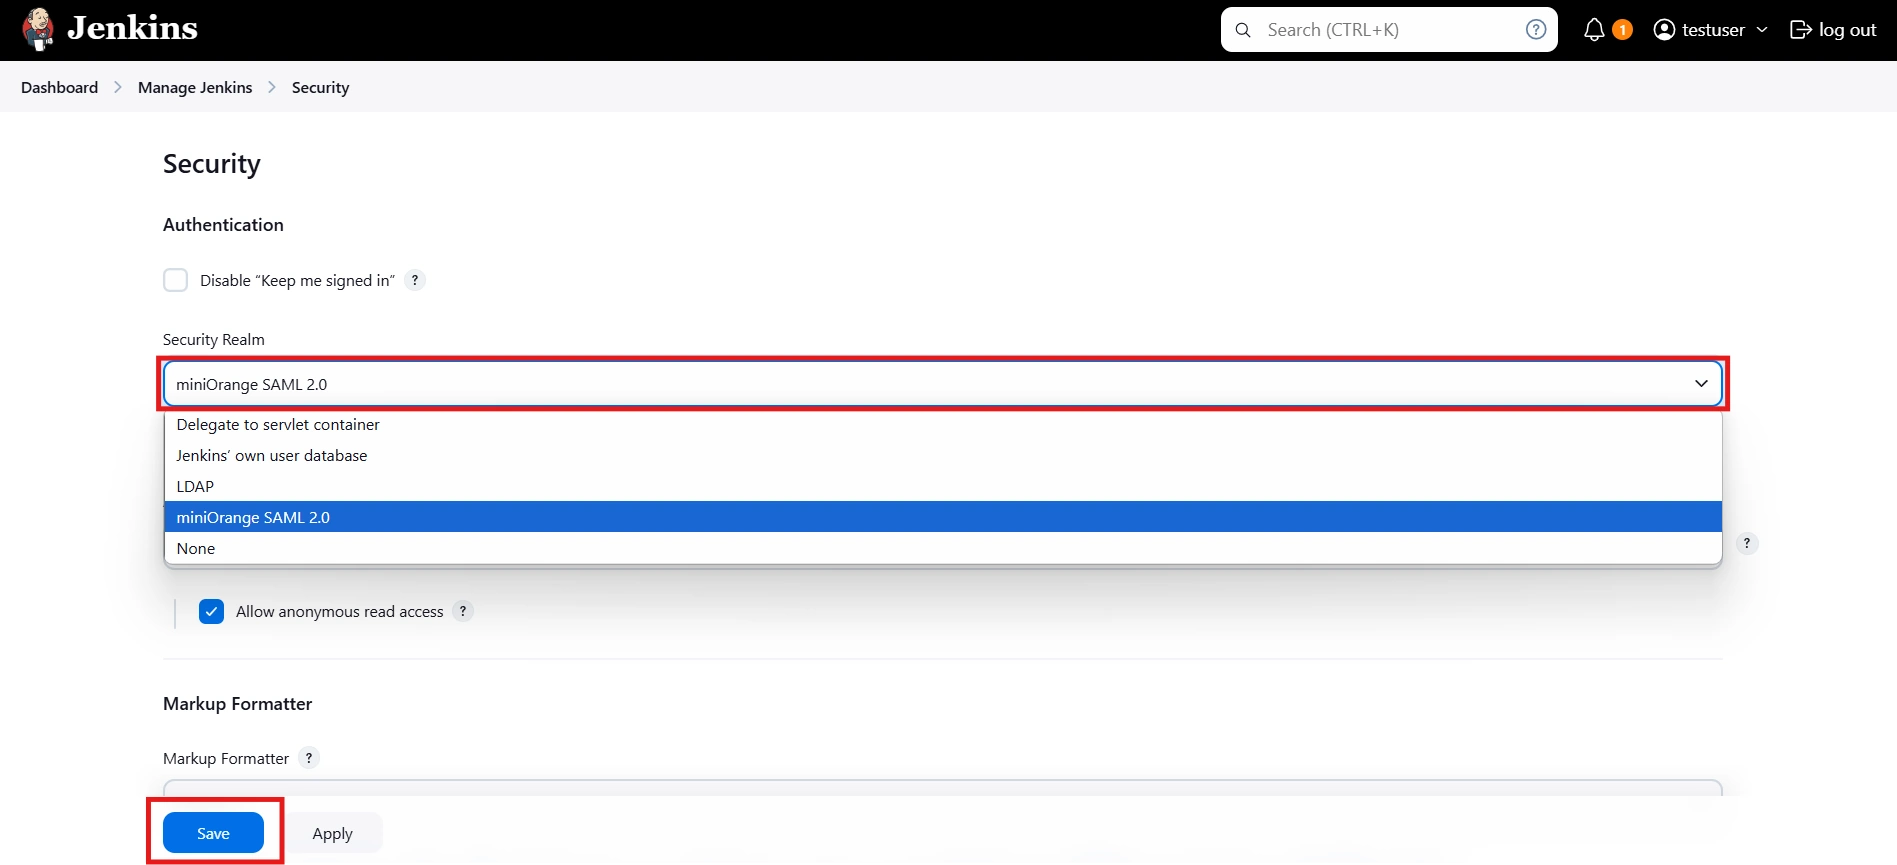
- Under the Security Realm dropdown, choose miniOrange SAML 2.0, then click the Save button.
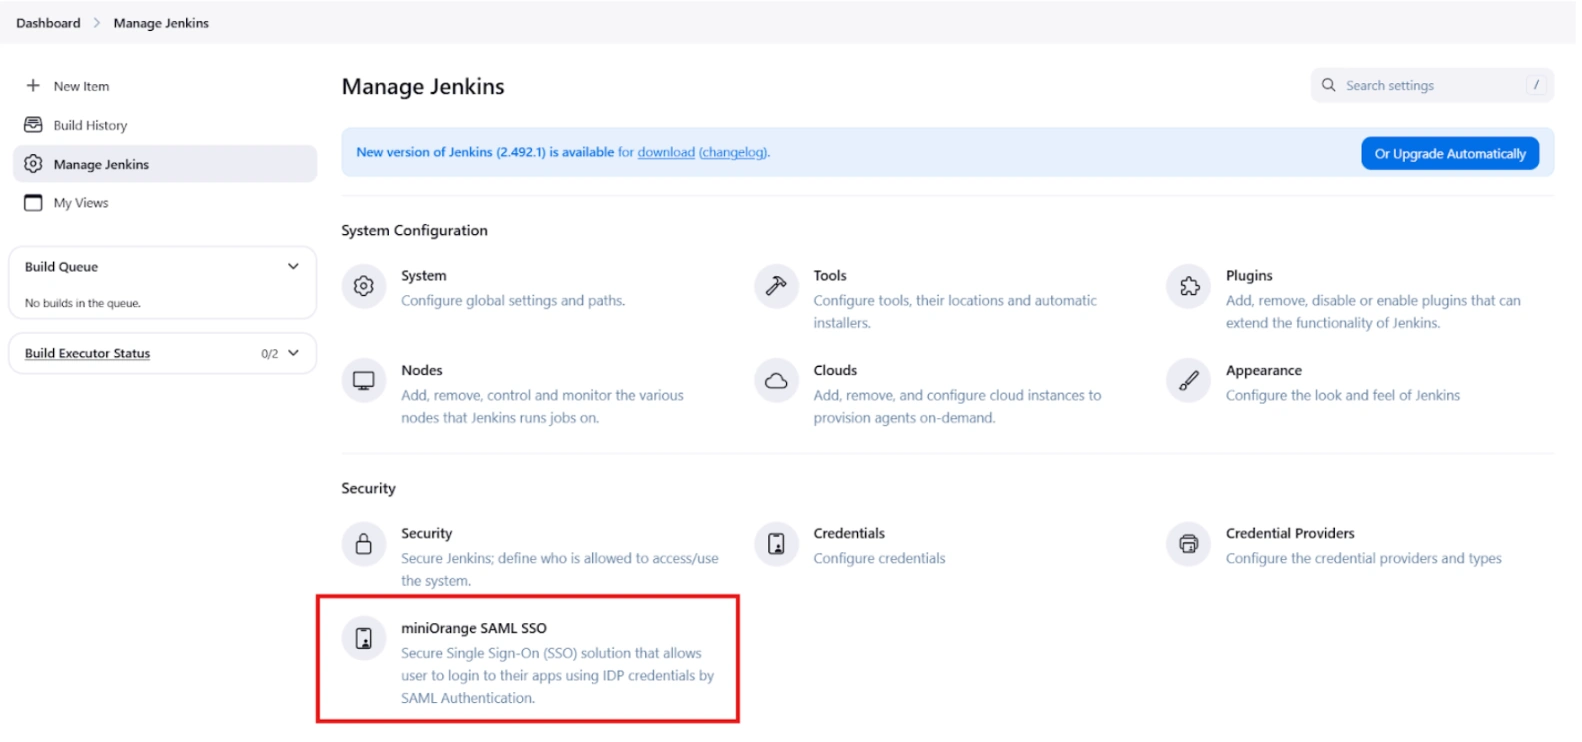
- Once saved, click on miniOrange SAML SSO under the Security section and go to the Plugin settings.
Step 1: Set Up PingFederate as Identity Provider
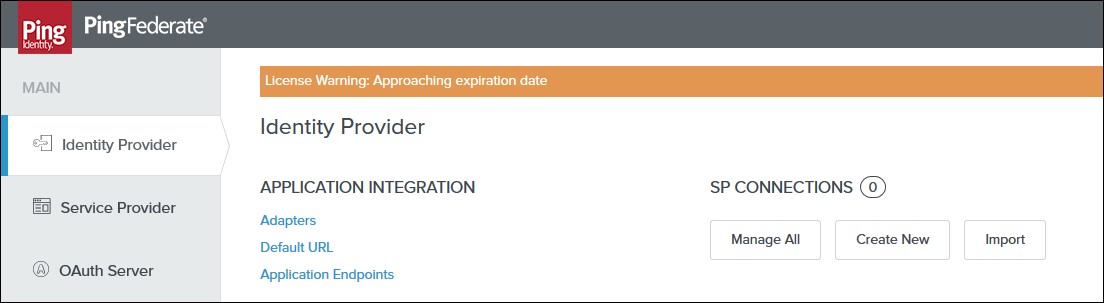
- Login to your Ping Federate user admin dashboard.
- Click on the Identity Provider in the left navigation menu.
- Under SP CONNECTION, click on Create New button.
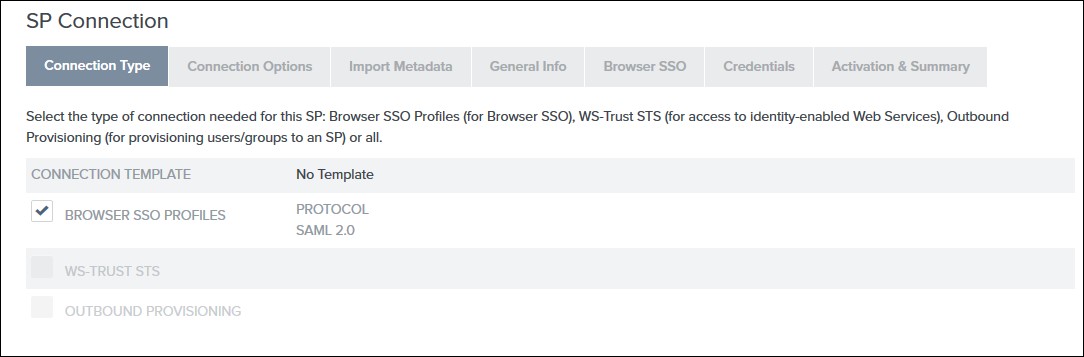
- Select the Browser SSO Profiles connection template on the Connection Type tab and click Next.
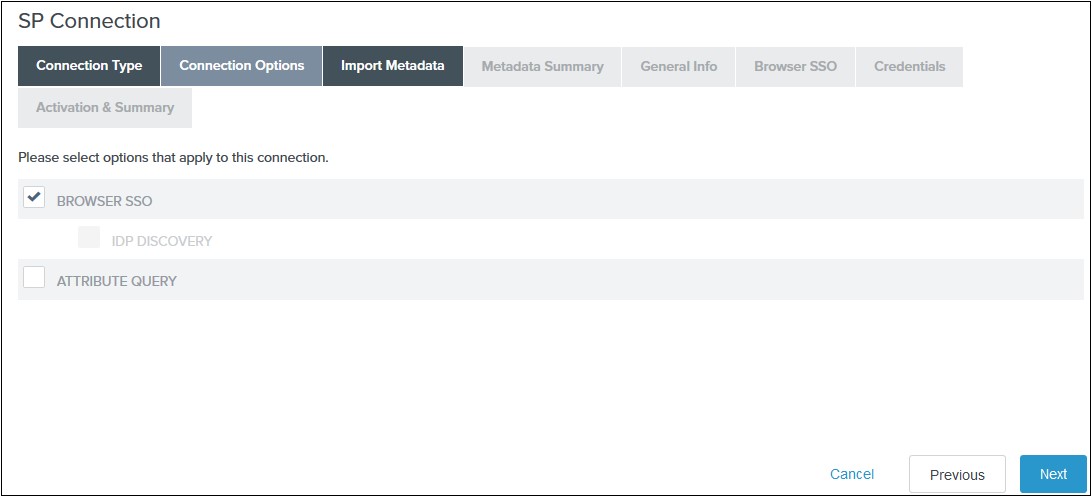
- Select Browser SSO on the Connection Options tab and click Next.
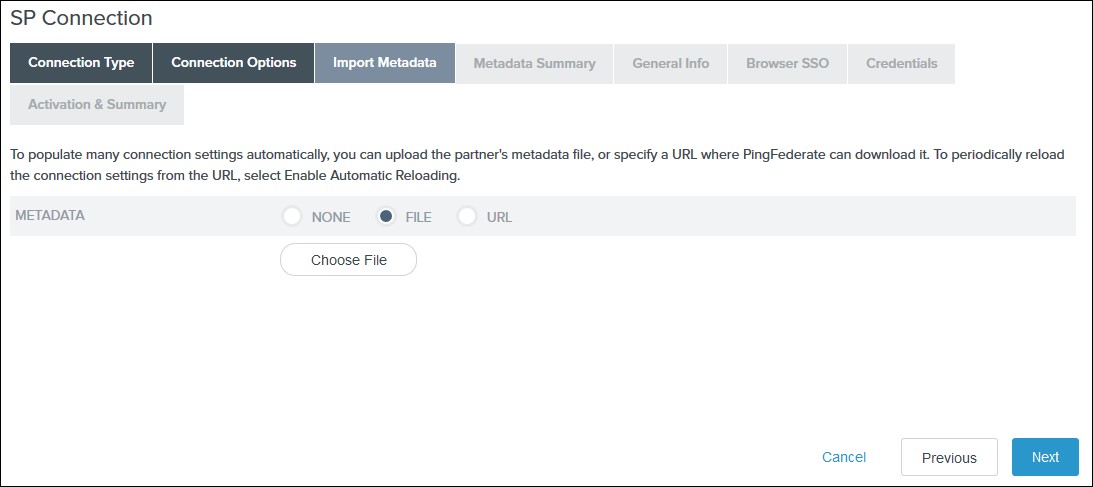
- Select File as the method for importing metadata and click Choose File to choose the miniOrange SSO plugin’s metadata on the Import Metadata tab or you can add SP Metadata information manually by selecting the None Option. You will need to copy SP Entity ID, SP ACS URL, and Certificate from Service Provider Tab.
- Review the information on the Metadata Summary tab and click Next.
- In the General Info tab ensure that the Service Provider’s Entity ID, Connection Name, and Base URL fields pre-populate based on the metadata. Click Next.
- Navigate to the Browser SSO tab and click on the Configure Browser SSO. You will be redirected to Browser SSO Setup wizard.
- Navigate to the Protocol Settings tab of the Browser SSO
wizard and click on the Configure Protocol settings.
-
1) Select POST for Binding and specify the single
sign-on endpoint URL in the Endpoint URL field on
the Assertion Consumer Service URL. Click Next.
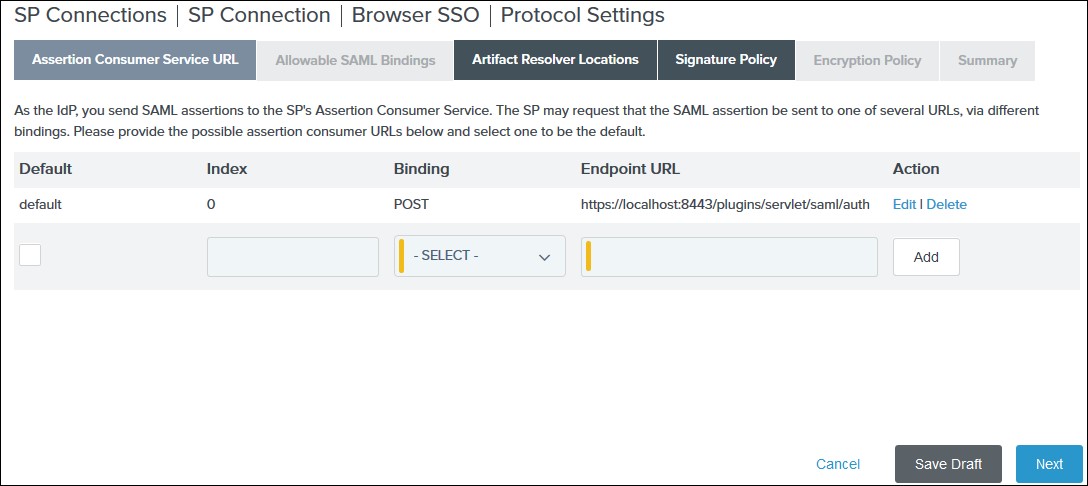
2) Select POST on the Allowable SAML Bindings tab and click Next.
3) Select your desired signature policies for assertions on the Signature Policy tab and click Next.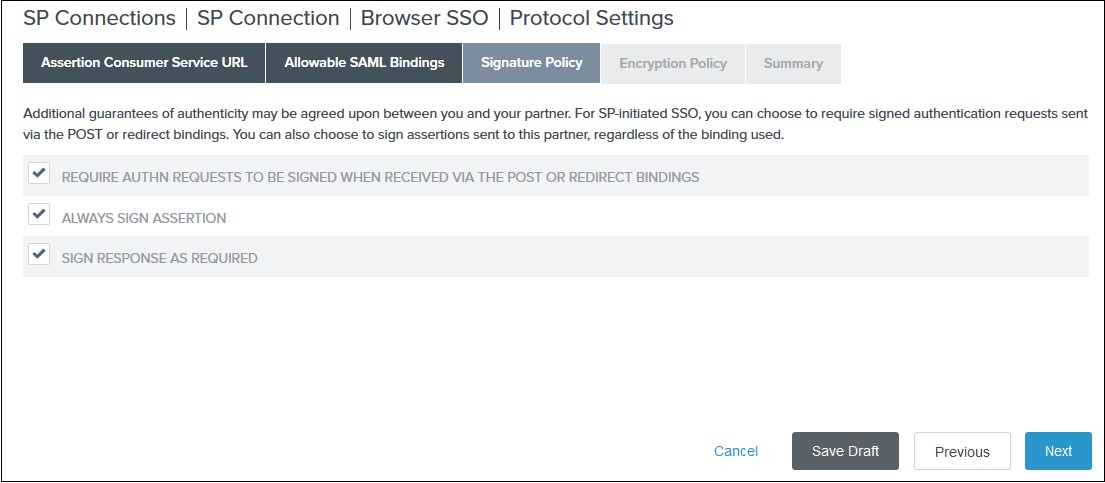
4) Select your desired encryption policy for assertions on the Encryption Policy tab and click Next.
5) Click Done on the Protocol Settings Summary tab.
6) Click Done on the Browser SSO Summary.
- Navigate to the Credentials and click on the Configure
Credentials. You will be redirected to the Credentials setup wizard.
-
1) Select the Signing Certificate to use with the Single Sign-On service
and select Include the certificate in the signature element in the
Digital Signature Settings tab. Click Done.
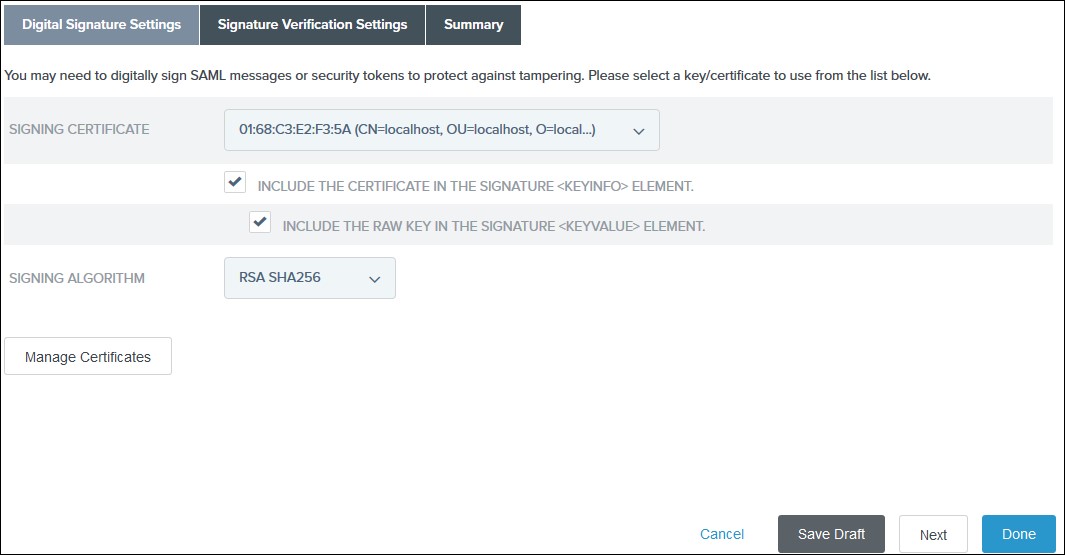
2) Click Done on the Summary.
3) Click Next on the Credentials.
- Select Active for the Connection Status on the Activation & Summary tab and click Save.
- Now, navigate to the Ping Federate User Admin dashboard Identity Provider.
- Click Manage All under SP Connections.
- Click Export Metadata for the desired service provider connection.
- Click Export on the Export & Summary tab and click Done.
All the information required to configure the Ping Federate as SAML IDP i.e. plugin’s metadata is given in the Service Provider Info tab of the miniOrange plugin.
-
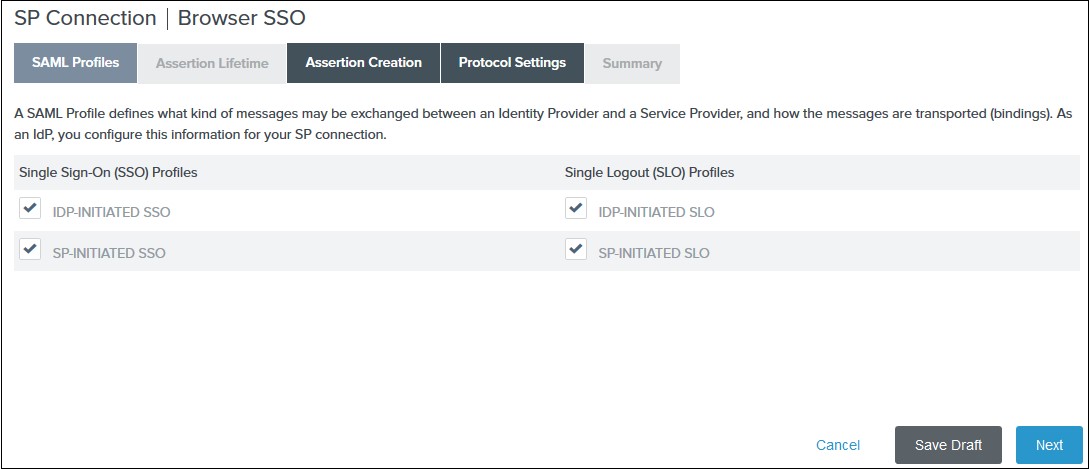
1) Select the IdP-Initiated SSO and SP-Initiated SSO options
on the SAML Profiles tab and click
Next.
2) Enter your desired assertion validity time from on the Assertion Lifetime tab and click Next. By default, it is configured 5 minutes for both. 3) Navigate to the Assertion Creation and click on the Configure Assertion Creation. You will be redirected to the assertion creation setup wizard.
-
I. In the Identity Mapping tab select STANDARD and click
Next.
II. Select a Subject Name Format for the SAML_SUBJECT on the Attribute Contract tab and click Next.
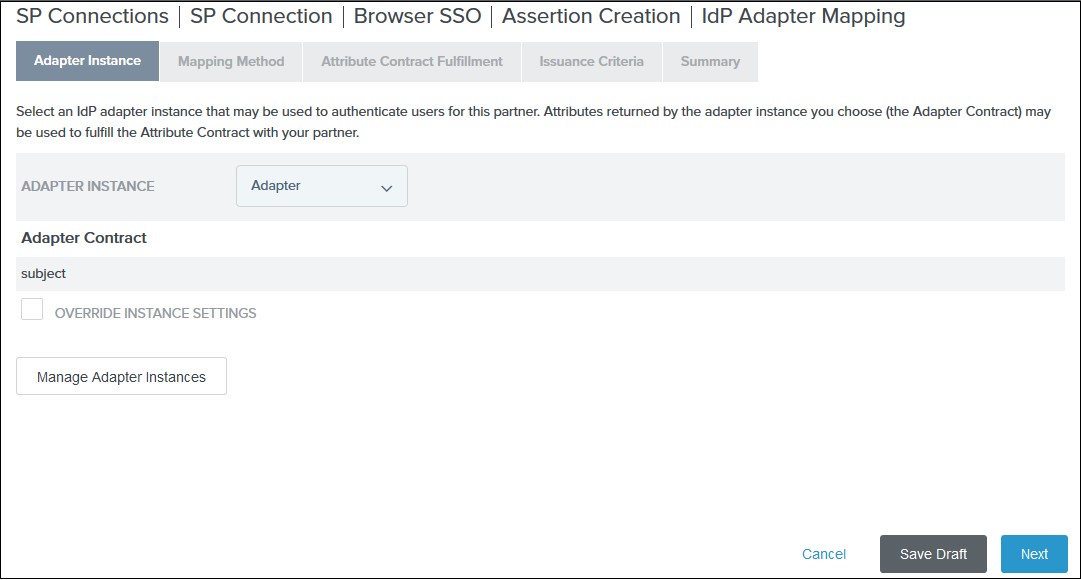
III. Click Map New Adapter Instance on the Authentication Source Mapping.
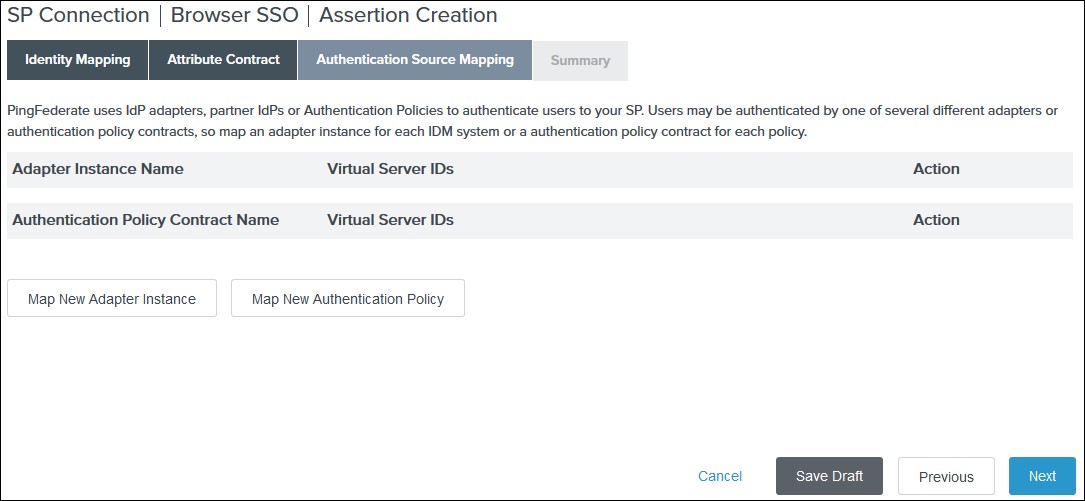
IV. Select an Adapter Instance and click Next. The adapter must include the user’s email address.
V. Select the Use only the adapter contract values in the SAML assertion option on the Mapping Method tab and click Next.
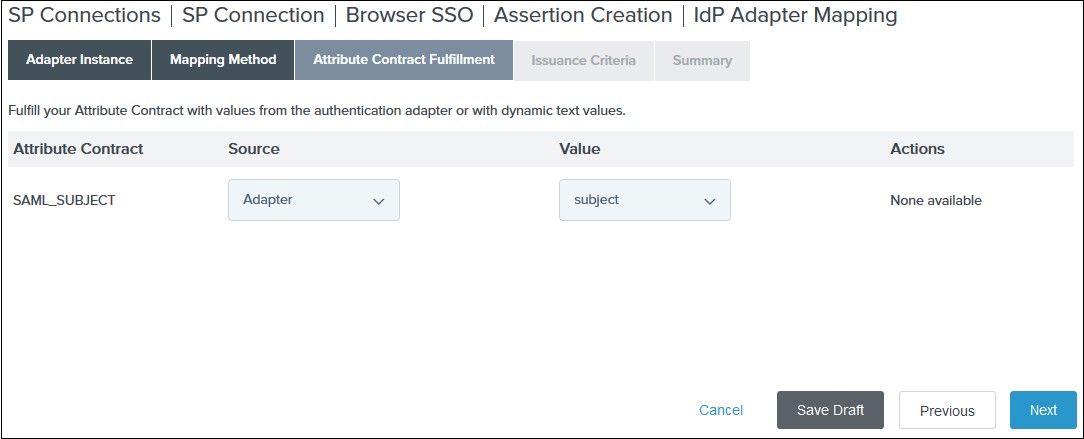
VI. Select your adapter instance as the Source and the email as the Value on the Attribute Contract Fulfilment tab and click Next.
VII. (Optional) Select any authorization conditions you would like on the Issuance Criteria tab and click Next.
VIII. Click Done on the Summary. IX. Click Next on the Authentication Source Mapping tab. X. Click Done on the Summary tab. XI. Click Next on the Assertion Creation
Step 2: Setup Jenkins as Service Provider
- Open Manage Jenkins and select Security.
- Under the Security Realm dropdown, choose miniOrange SAML 2.0, then click the Save button.
- Make sure that Enable Security checkbox is checked.
- Choose miniOrange SAML SSO from the manage Jenkins tab.
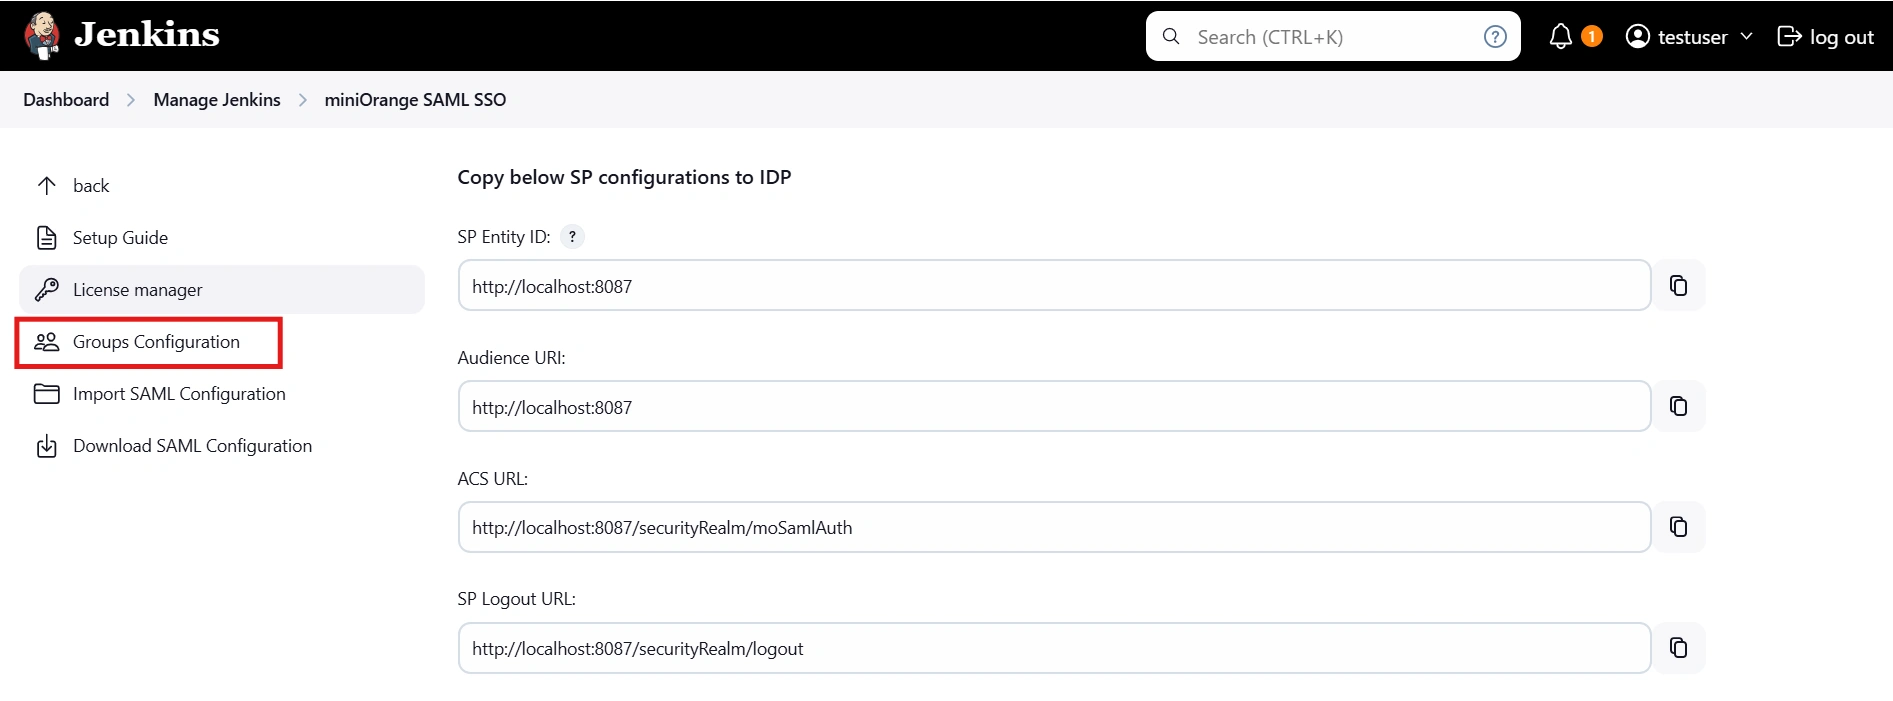
 SP Configurations
You can configure SP settings in IDP in 2 ways:
- By uploading Metadata XML file
- Click on Service Provider Metadata in SP Configuration section.
- Metadata xml file will be downloaded.
- Use this file to setup IDP.
- Manual Configuration
- To Configure SP Settings at IDP copy below URL and paste in respective fields at IDP end.
- SP Entity ID: https://your-jenkins-domain
- Audience URI: https://your-jenkins-domain
- ACS URL: https://your-jenkins-domain/securityRealm/moSamlAuth

IDP Configuration
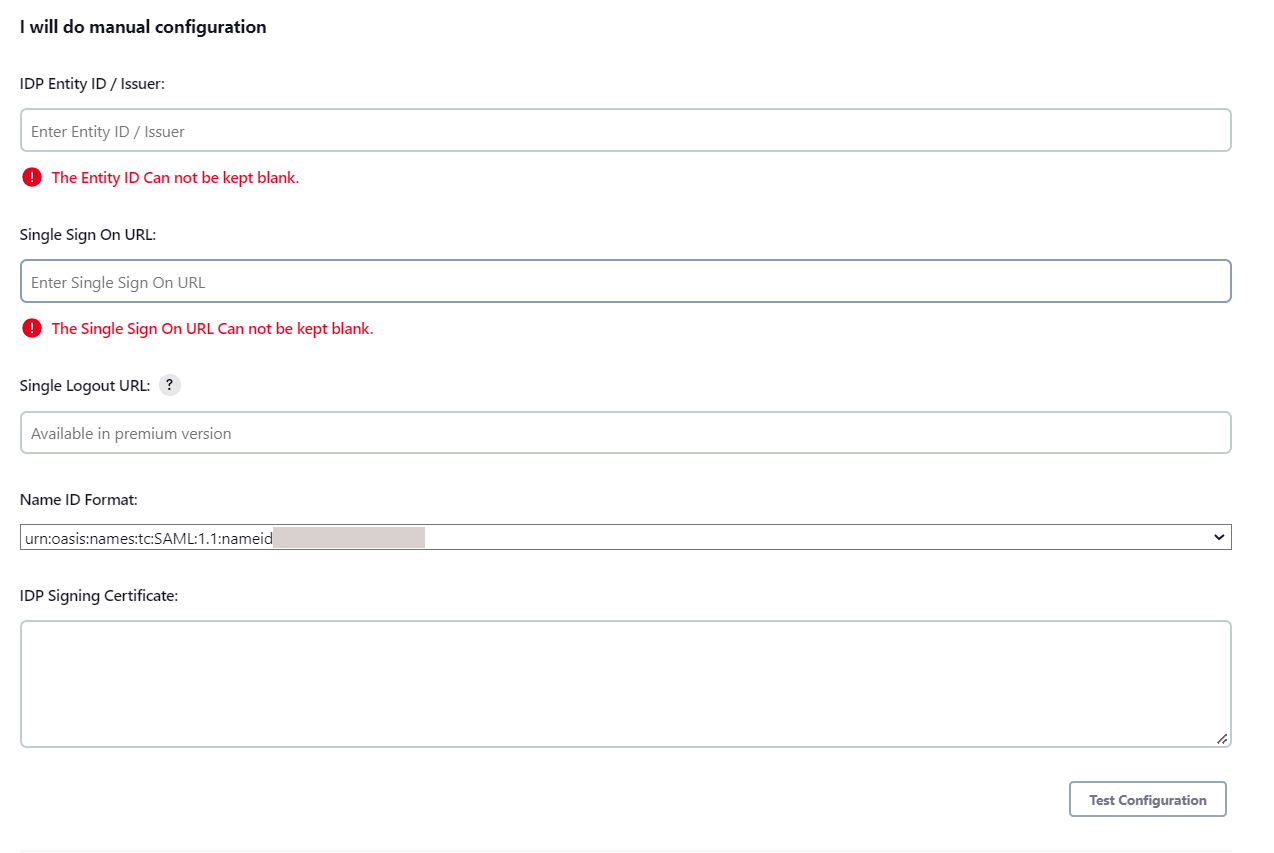
To Configure IDP enter the following details and press apply and save the settings.
- IDP Entity ID
- Single Sign On URL
- Name ID Format
- X.509 Certificate
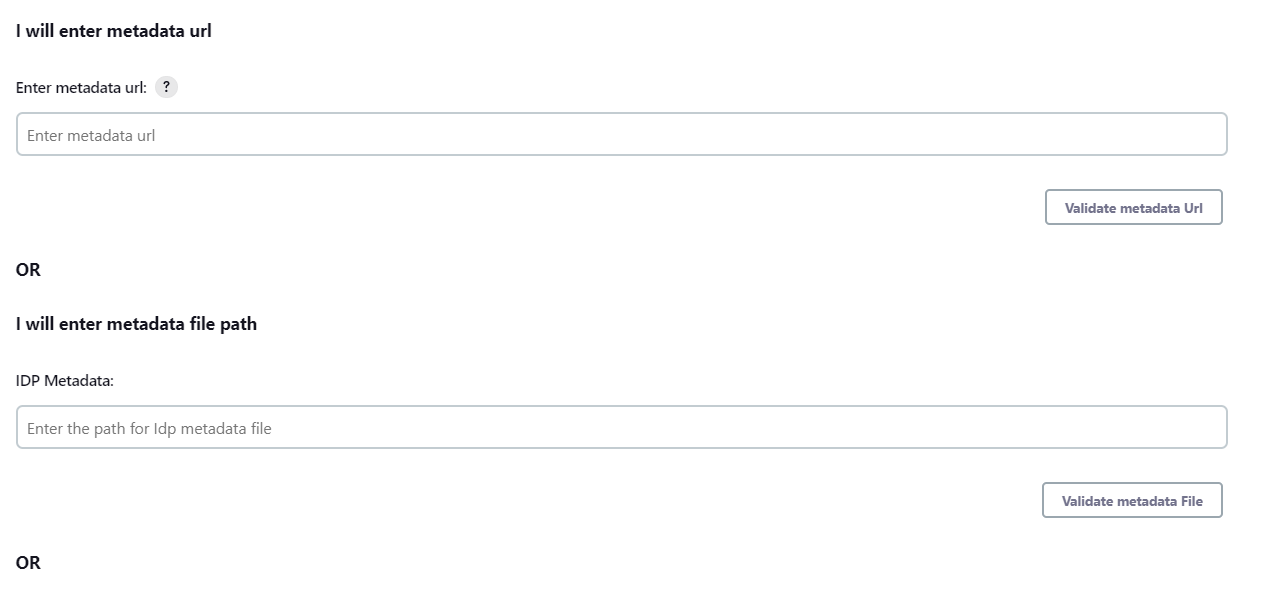
- You can either enter the metadata URL or the metadata file path.
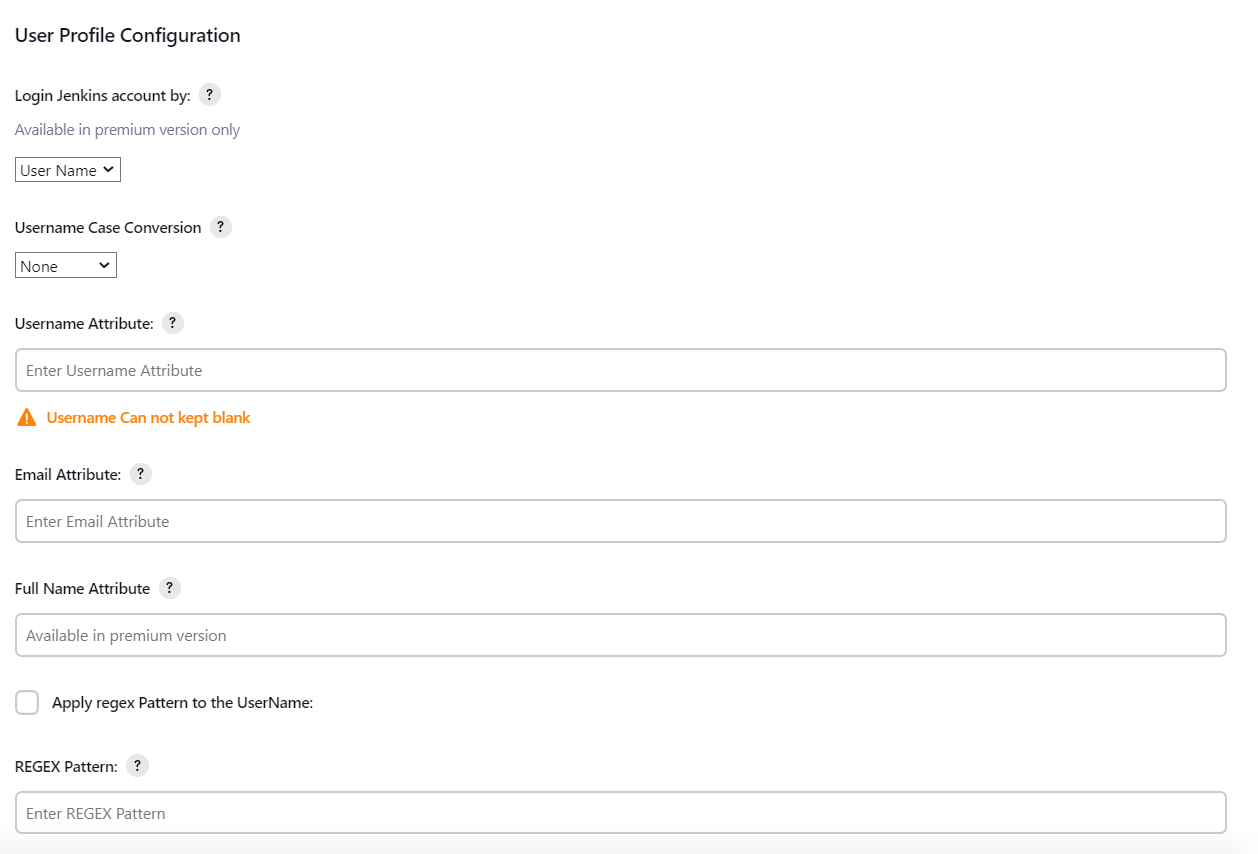
User Profile Configuration
- Select Username Case Conversion.
- Enter the attribute name from IDP which corresponds to Username in Username Attribute textbox.
- Enter the attribute name from IDP which corresponds to Email in Email Attribute textbox.
- Select the checkbox Apply regex Pattern to the UserName if the userID returned from SAML is not same as username of Jenkins.
- Enter the regular expression in REGEX Pattern textbox. It will be applied on user ID from SAML Response and will convert it into the username same as Jenkins. For example, you can use regular expression ^.*?(?=@) to extract demo from username demo@example.com
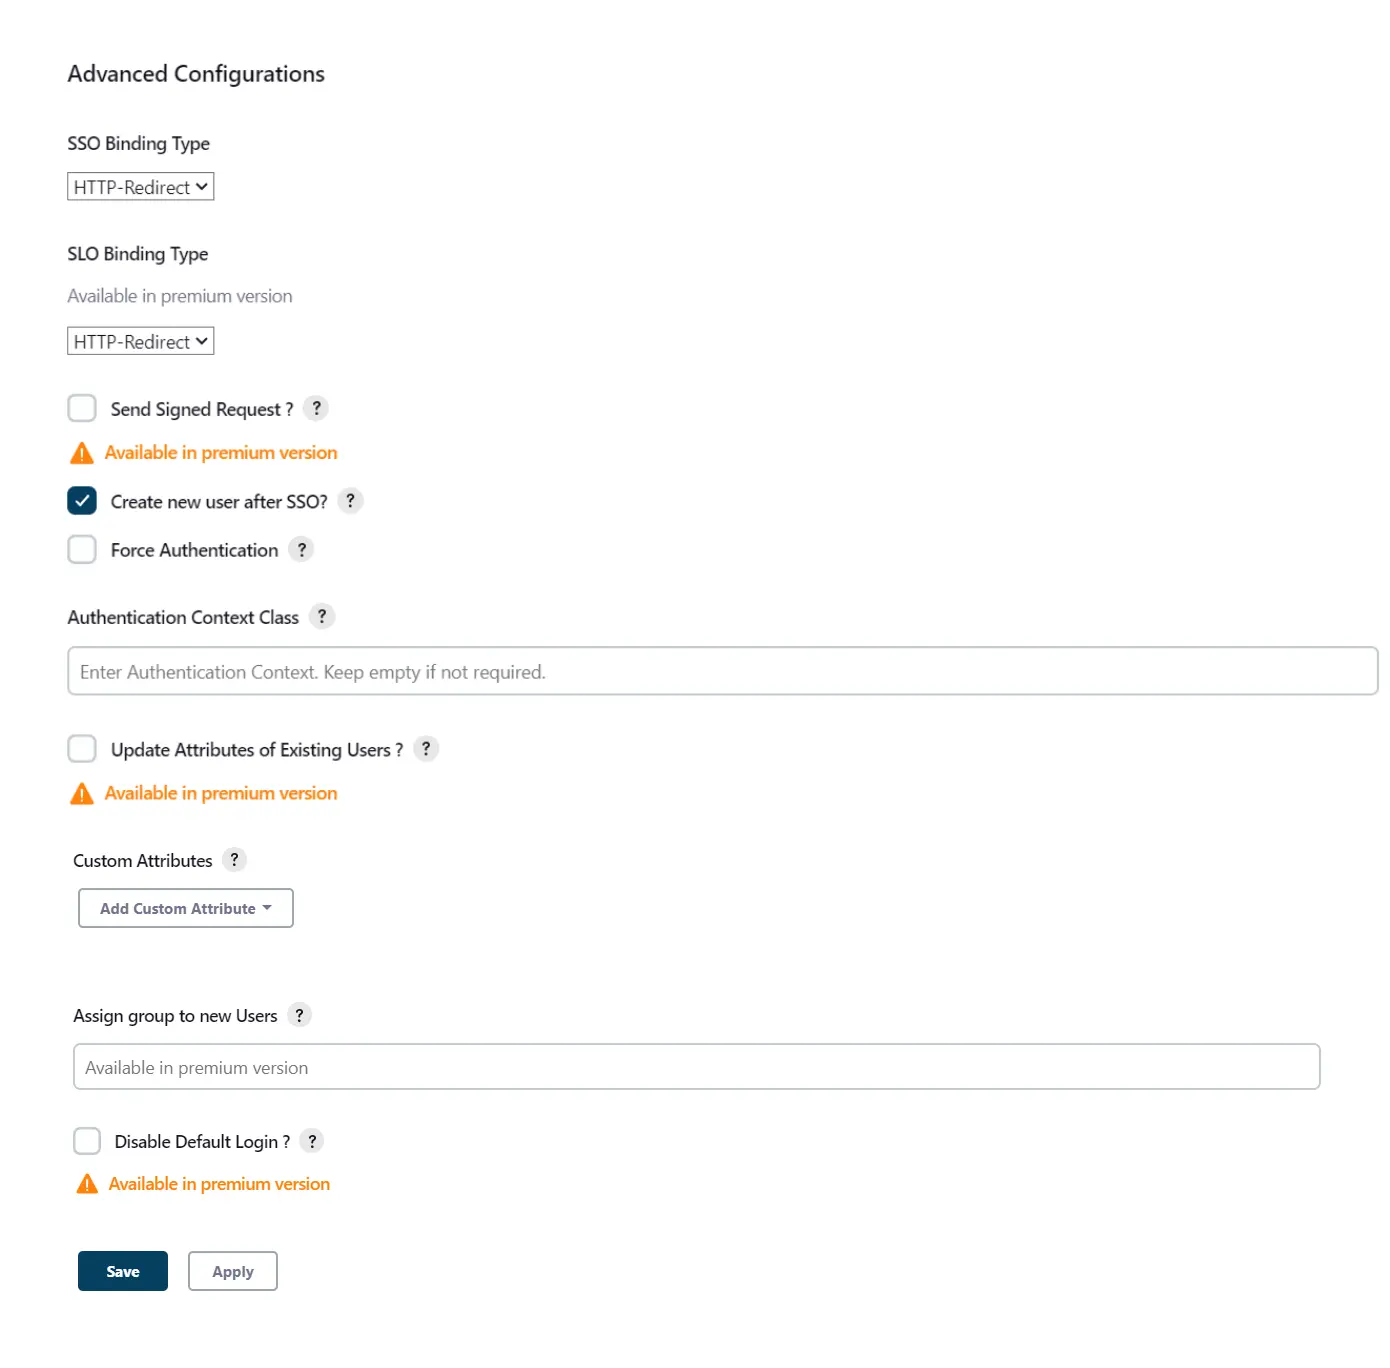
Advanced Configurations
- Select the SSO Binding Type.
- Select the Create new user after SSO? to allow user creation through SAML.
- Select Force Authentication.
- To Add custom Attributes select Add option.
- Set Attribute Name as the one set in IDP eg. lname
- Set display name in user proprties as one you want it appear in jenkins user's config.xml file and in user's configure tab.
SP Configurations
You can configure SP settings in IDP in 2 ways:
- By uploading Metadata XML file
- Click on Service Provider Metadata in SP Configuration section.
- Metadata xml file will be downloaded.
- Use this file to setup IDP.
- Manual Configuration
- To Configure SP Settings at IDP copy below URL and paste in respective fields at IDP end.
- SP Entity ID: https://your-jenkins-domain
- Audience URI: https://your-jenkins-domain
- ACS URL: https://your-jenkins-domain/securityRealm/moSamlAuth
IDP Configuration
To Configure IDP enter the following details and press apply and save the settings.
- IDP Entity ID
- Single Sign On URL
- Single Logout URL
- Name ID Format
- X.509 Certificate
- You can either enter the metadata URL or the metadata file path.
User Profile Configuration
- Select Username or Email for Login Jenkins account by:
- Select Username Case Conversion.
- Enter the attribute name from IDP which corresponds to Username in Username Attribute textbox.
- Enter the attribute name from IDP which corresponds to Email in Email Attribute textbox.
- Enter the attribute name from IDP which corresponds to full name in Full Name Attribute.
- Select the checkbox Apply regex Pattern to the UserName if the userID returned from SAML is not same as username of Jenkins.
- Enter the regular expression in REGEX Pattern textbox. It will be applied on user ID from SAML Response and will convert it into the username same as Jenkins. For example, you can use regular expression ^.*?(?=@) to extract demo from username demo@example.com
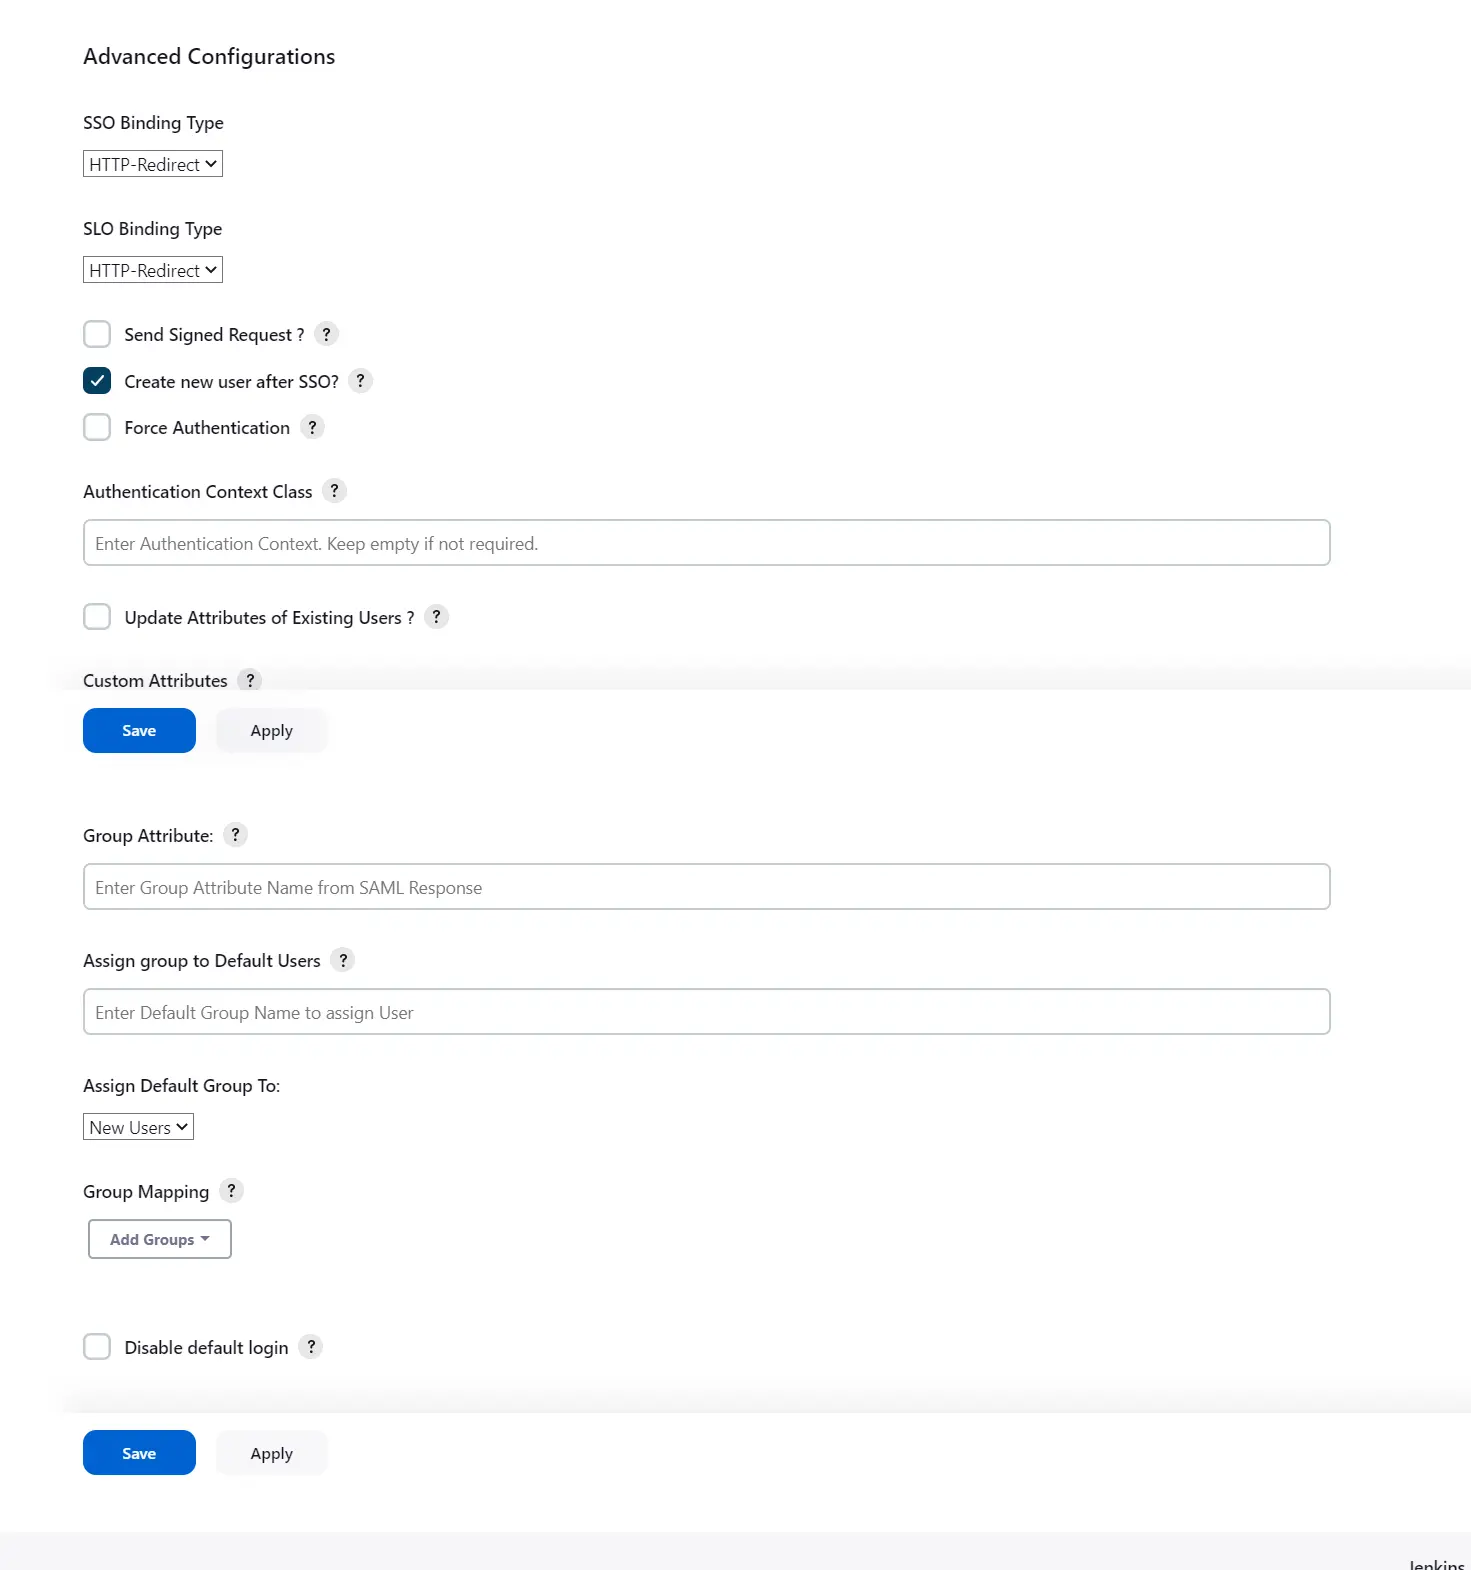
Advanced Configurations
- Select the SSO Binding Type.
- Select the SLO Binding Type.
- Select the Send Signed Request ? to send signed login and logout requests. Requests will be signed using public certificate from option Download SP Certificate in SP Configuration section.
- Select the Create new user after SSO? to allow user creation through SAML.
- Select Force Authentication.
- Select the Update Attributes of Existing Users ? to update attributes of existing user's each time they sign in Jenkins through SSO.
- To Add custom Attributes select Add option.
- Set Attribute Name as the one set in IDP eg. lname
- Set display name in user proprties as one you want it appear in jenkins user's config.xml file and in user's configure tab.
- If Disable Default login option is enabled, any unauthenticated user trying to access the default Jenkins login page will get redirected to the IDP login page for authentication. After successful authentication, they will be redirected back to the Jenkins base URL.
- Copy backdoor URL and save it for emergency.
Step 3: Manage permissions/Groups
Click on the Group Configuration tab from the left panel.
3.1 Sync groups from IDP
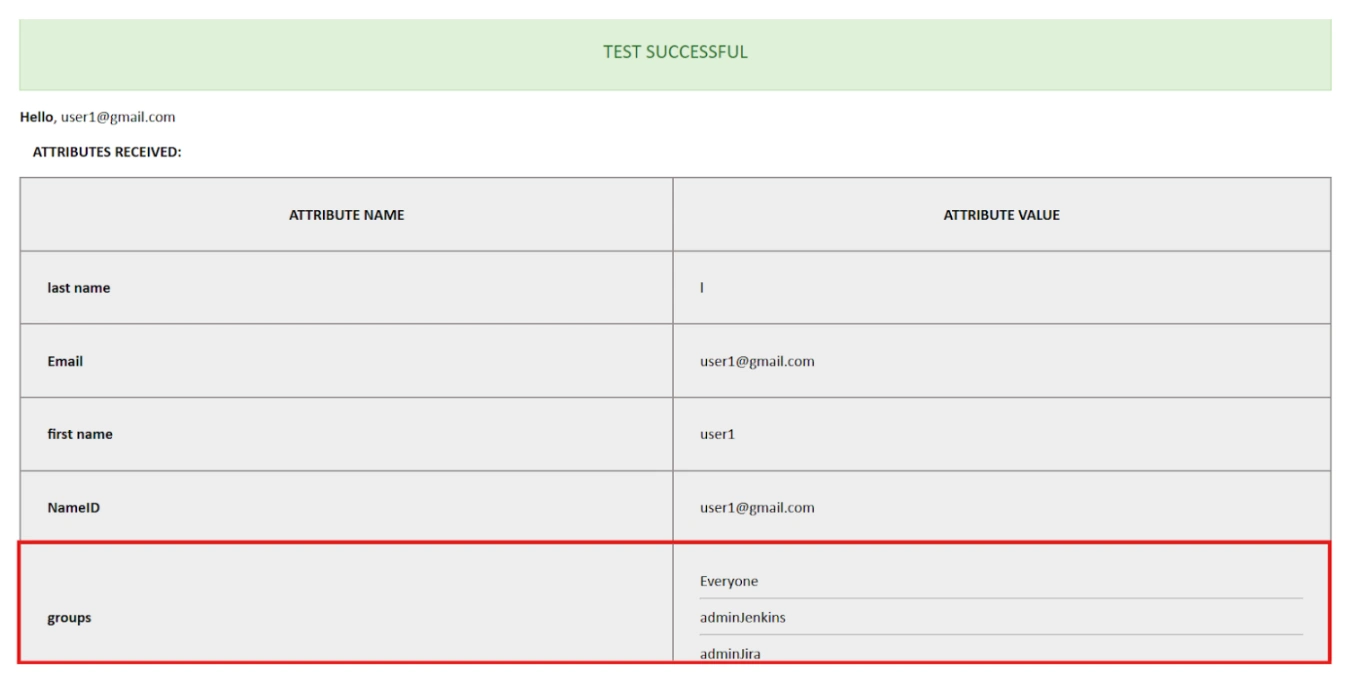
- You can assign groups from IDP to users created through SSO by adding the name of the group attribute that contains the IDP groups in the SAML response in the Group Attribute field in the plugin configuration. You can find out the group attribute name by performing the test configuration from the test configuration button under the I will do manual configuration tab.
- To assign a default group to users created through SSO add the group name in the Assign group to new Users option. Multiple groups can be added using a comma (,) separator.
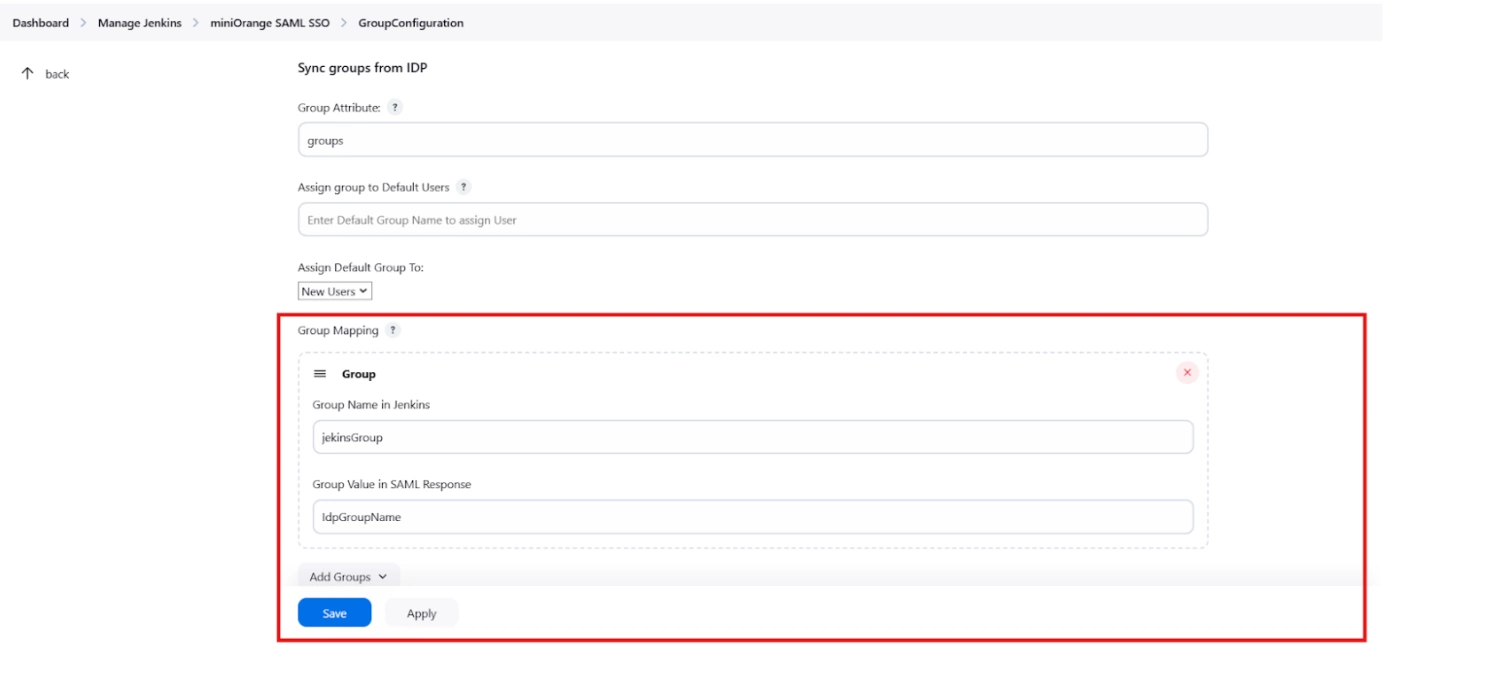
- Group Mapping allows you to align user groups from your identity provider (IdP) with the corresponding groups in Jenkins. This is especially useful when the group names in your IDP differ from those in Jenkins. By configuring group mappings, you can ensure that users are assigned the correct roles and permissions within Jenkins based on their IdP group membership.
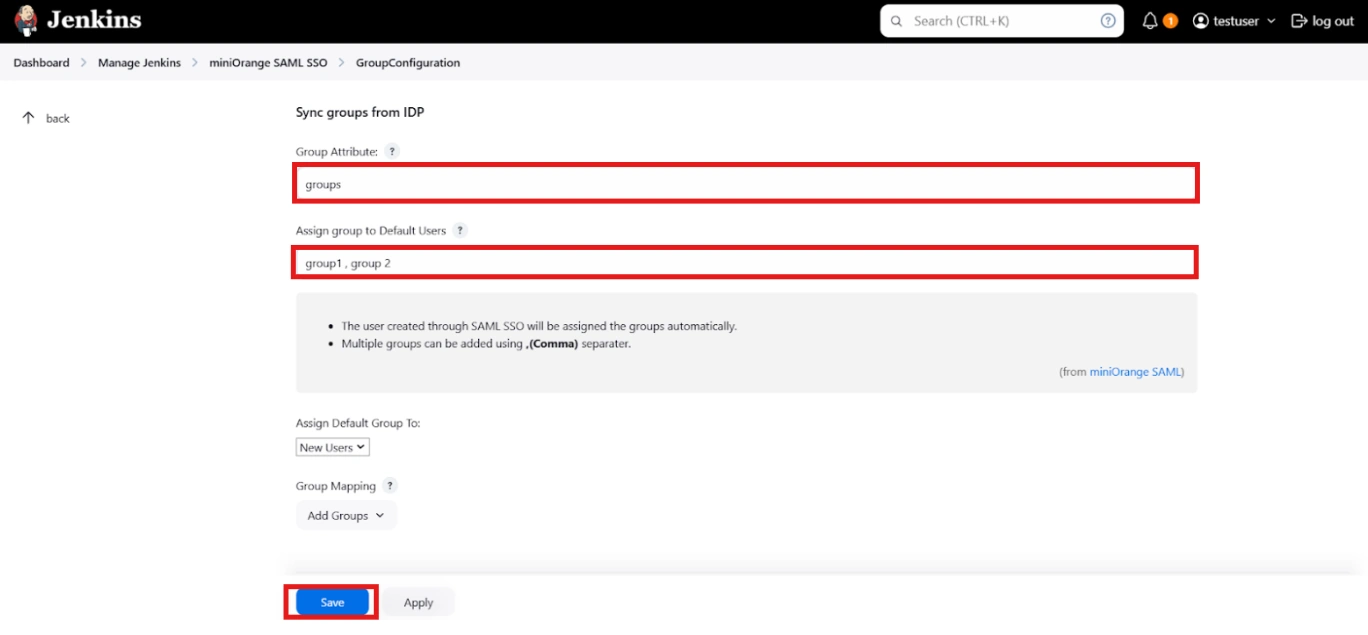
For example, if your IdP group is named "idpGroupName" but the corresponding group in Jenkins is "jenkinsGroup", you can map idpGroupName to jenkinsGroup to maintain consistent access control.
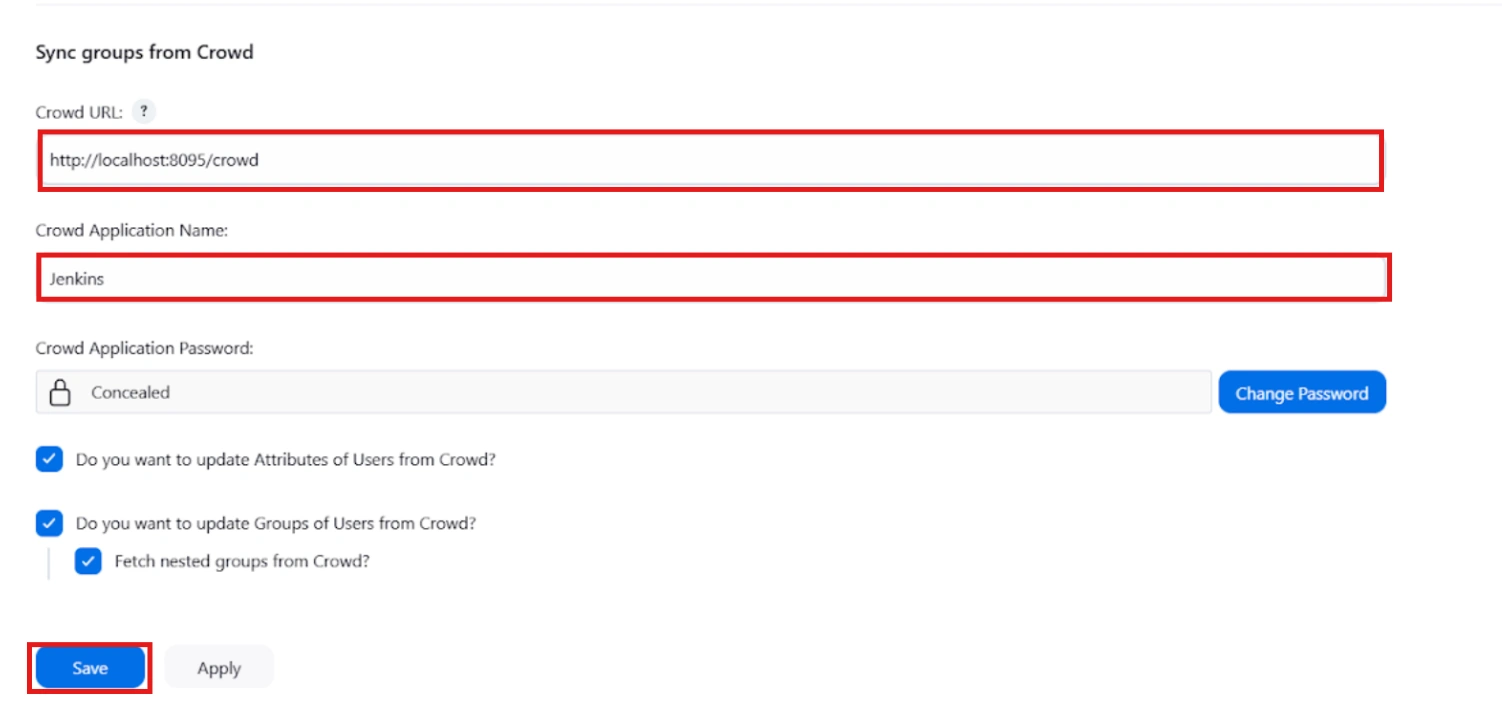
3.2 Sync groups from crowd
- To Assign groups from the crowd just enter your crowd instance url and crowd application name and password as shown below.
- You can refer to this guide to add a jenkins application to your crowd instance.
- If you want to update user details or want to fetch groups or nested groups check the options accordingly.
Additional Resources
Did this page help you?
