- Home
- SSO for JSM Customers
- SSO for JSM Customers Documentation
- SSO for JSM Customers using Keycloak

SSO for JSM Customers using Keycloak as OAuth Provider
Our SAML/OAuth SSO for JSM Customers app offers the functionality to seamlessly integrate OAuth/OpenID Single Sign-On into the JSM customer portal, ensuring compatibility with all OAuth/OpenID Providers. This guide will outline the steps for configuring SSO between the JSM customer portal and your OAuth/OpenID Provider. By following these instructions, customers will undergo authentication via your OAuth/OpenID Provider prior to accessing the JSM customer portal. This integration facilitates a smooth customer experience while also mitigating spam ticket.
 Try it for free
Download and Installation
- Log into your Jira instance as an admin.
- Navigate to the settings and Click on Apps.
- Locate SAML/OAuth SSO for JSM Customers.
- Click on free trial to begin a new trial SAML/OAuth SSO for JSM Customers.
- On menu bar click on Apps. Locate SAML/OAuth SSO for JSM Customers .
Step 1: Set Up Keycloak as OAuth Provider
Follow the following steps to configure Keycloak as IdP to achieve Keycloak SSO
Select Keycloak version:
 Pre-requisites : Download And Installation
- First of all, Download Keycloak and install it.
- Start the keycloak server based on your keycloak version. (See table below)
| For the Keycloak Version 16 and below |
Go to the Root Directory of keycloak bin standalone.sh |
| For the Keycloak Version 17 and above |
Go to the Root Directory of keycloak bin kc.bat and run the below commands.
|
Configure Keycloak as IdP
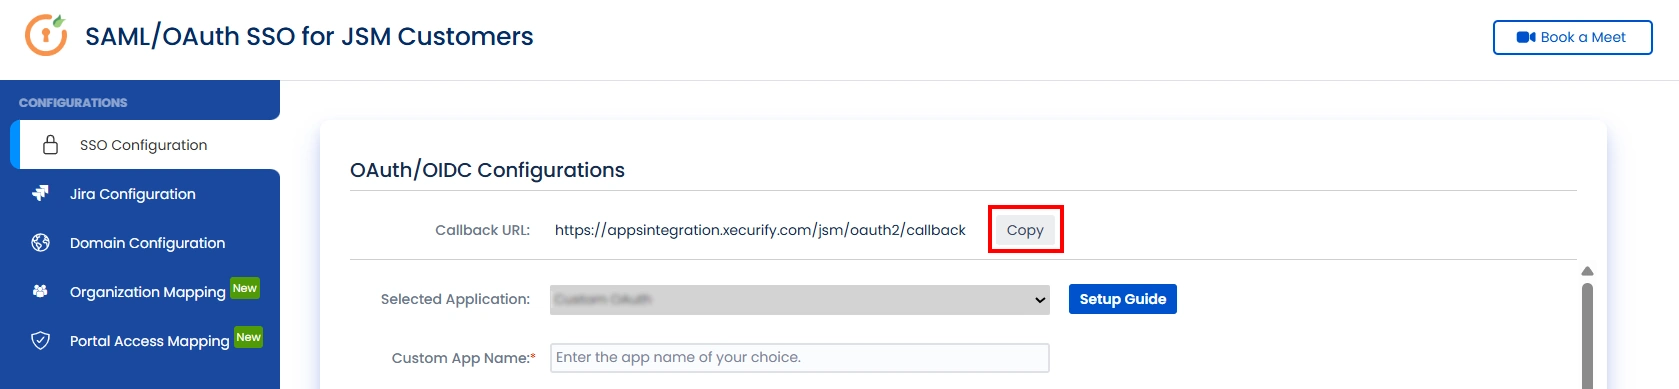
- Navigate to the plugin configuration page, click the "Add New Provider" button (located either in the middle or top-right corner), select Keycloak as the application, and copy the callback URL from the plugin and keep it handy, as you'll need it to configure Keycloak as the OAuth provider.
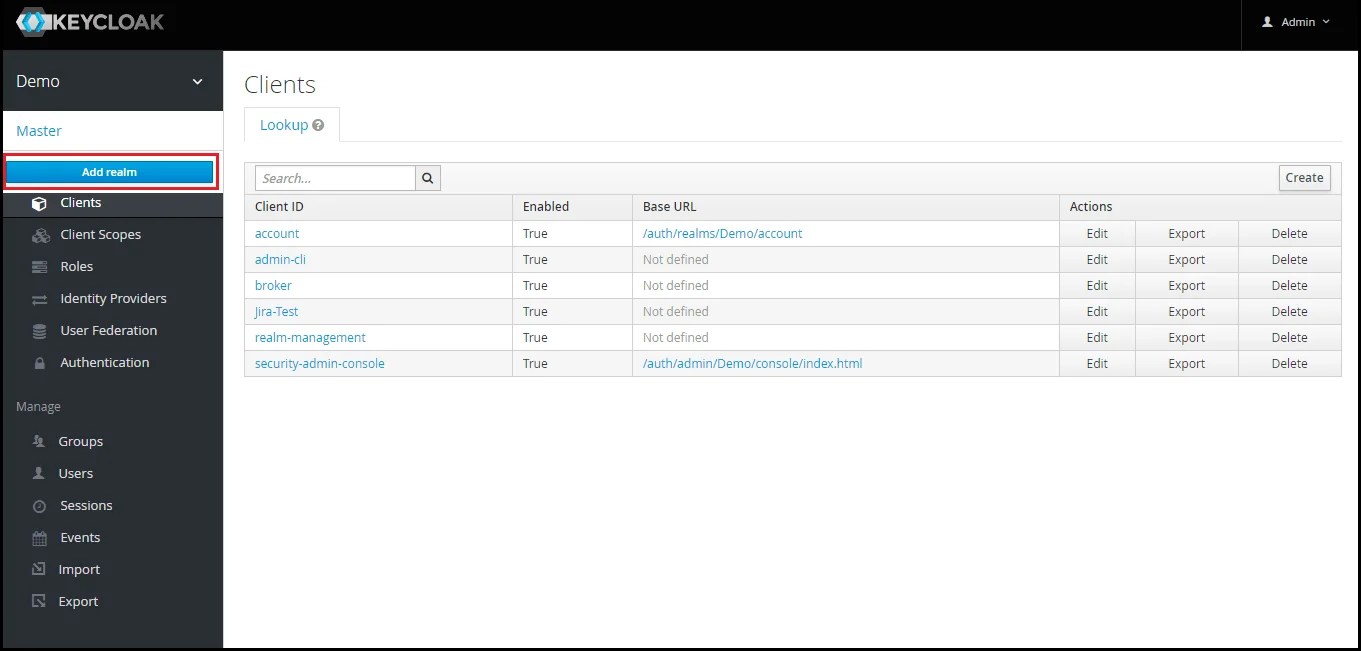
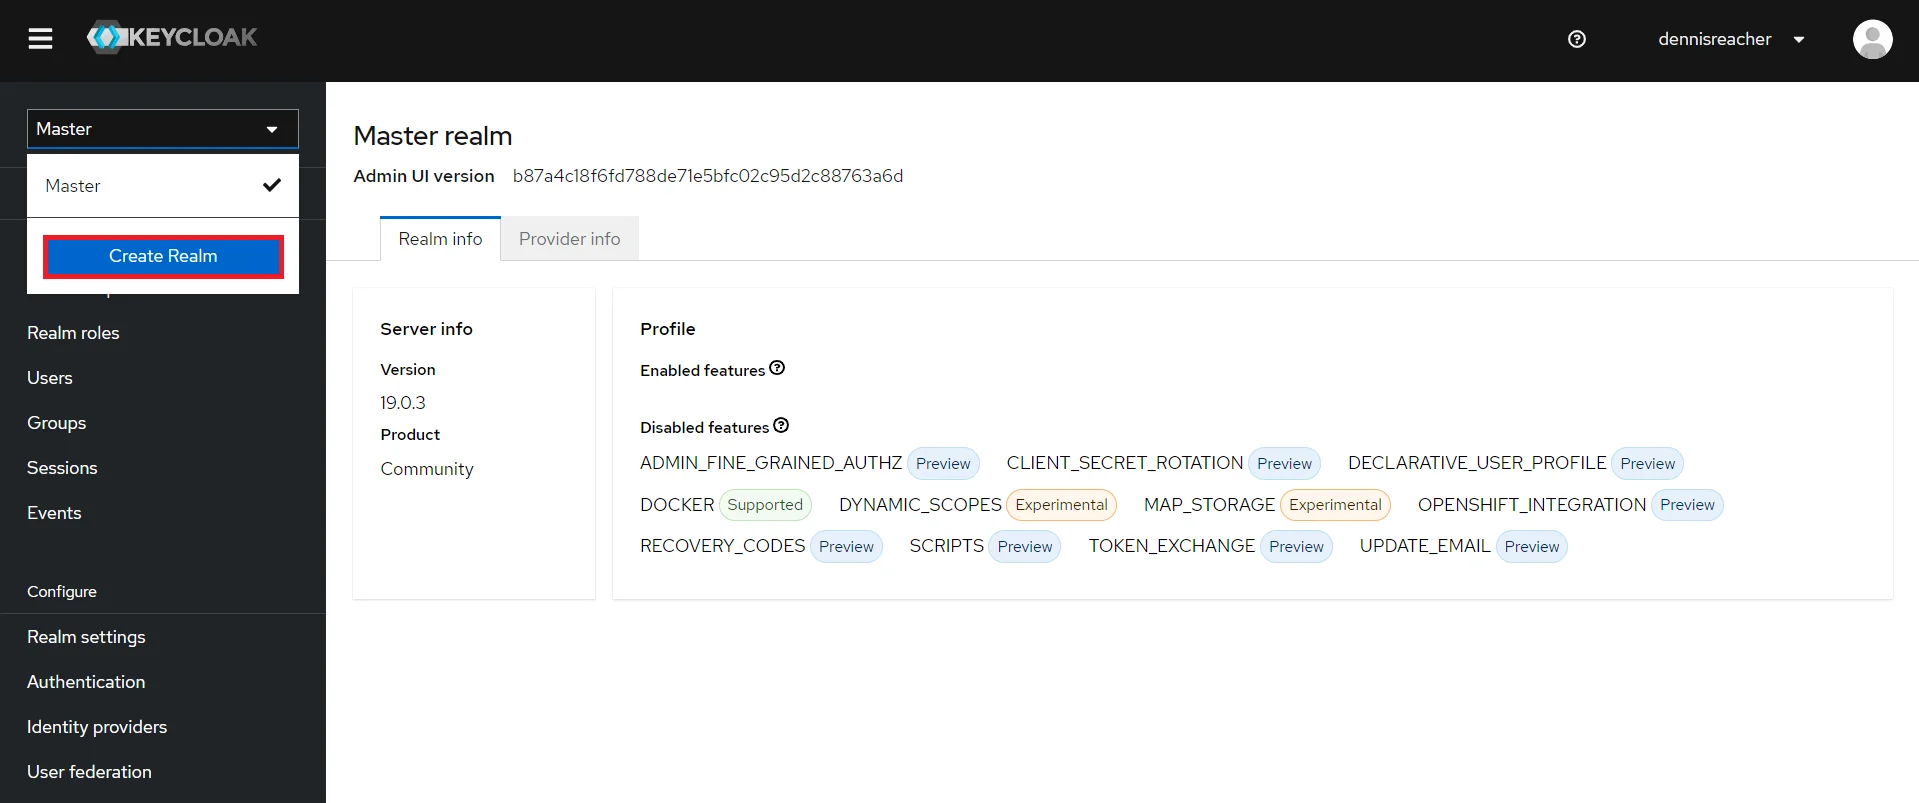
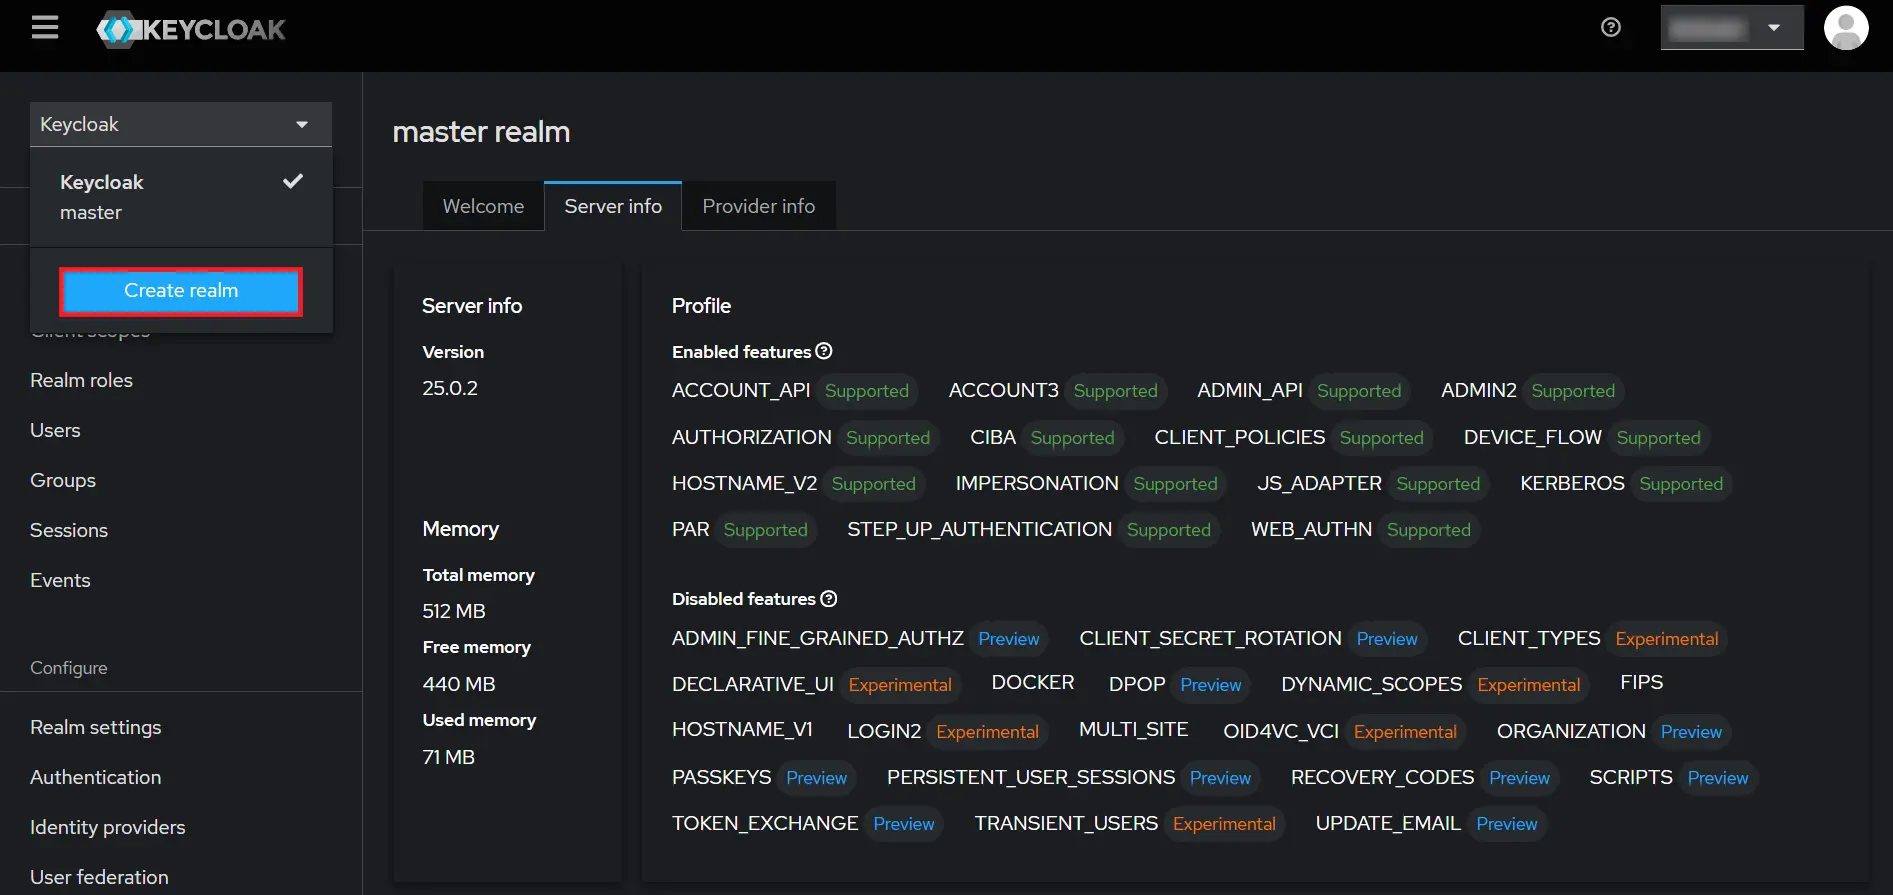
- Add Realm : Now login to keycloak administration console and navigate to your desired realm. You can add new realm by selecting Add Realm option.
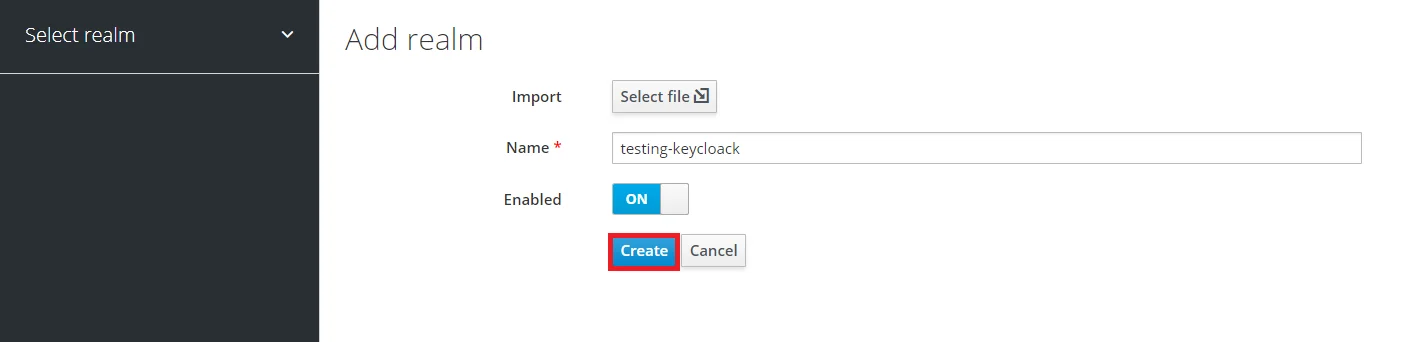
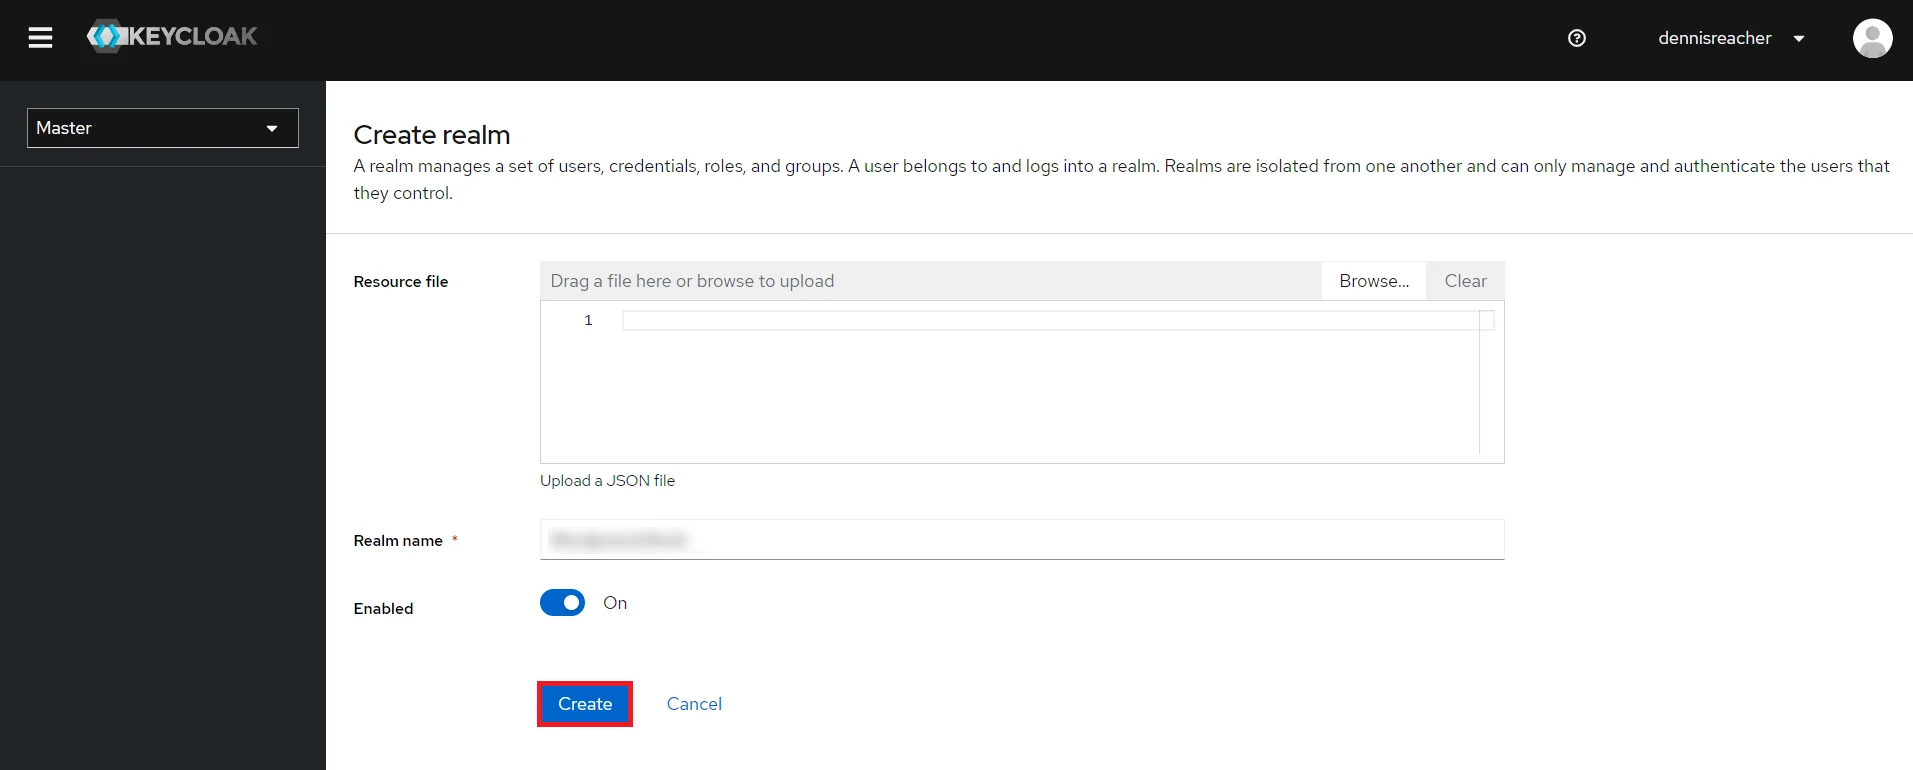
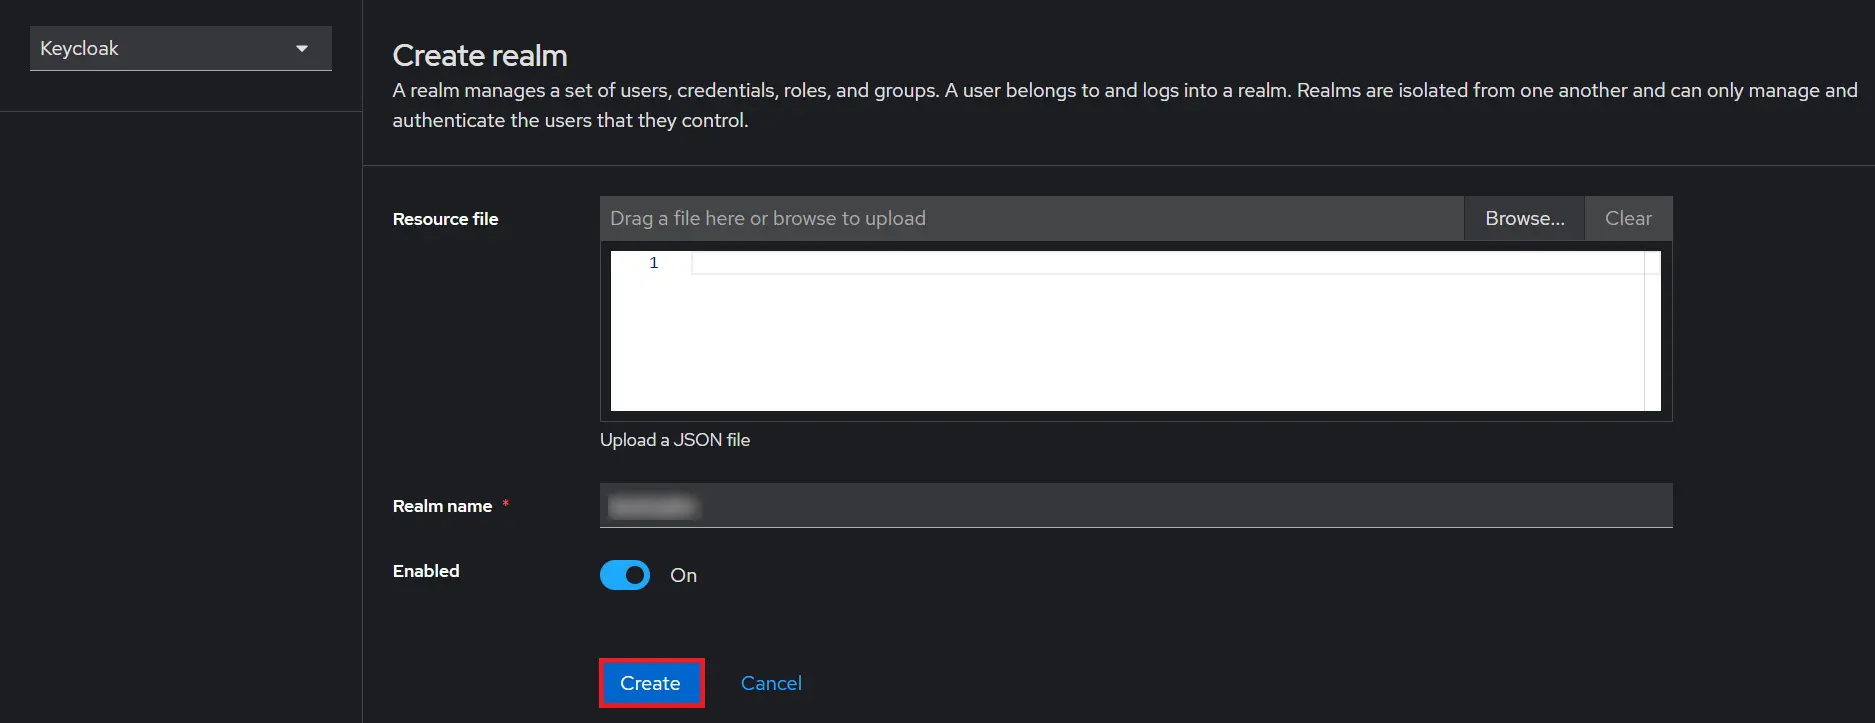
- Create realm: Enter Realm Name and keep the realm name handy as it will required later to configure the Realm under the plugin. Click on CREATE to add realm.
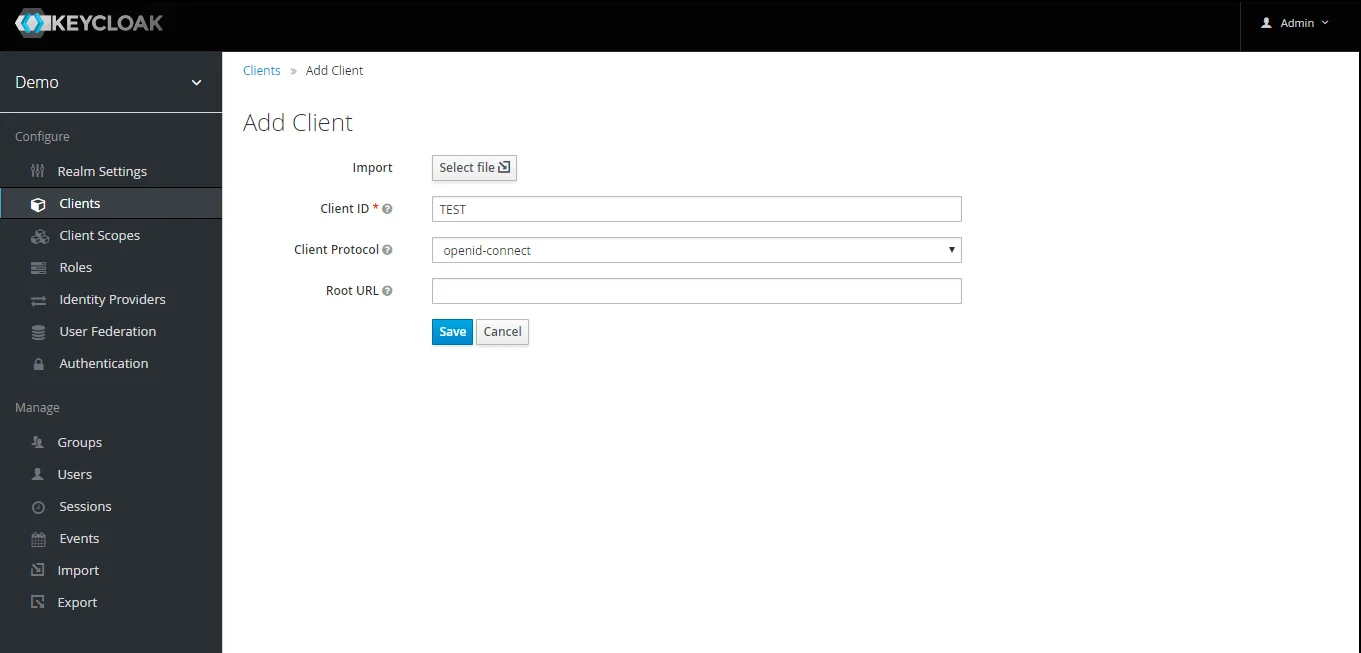
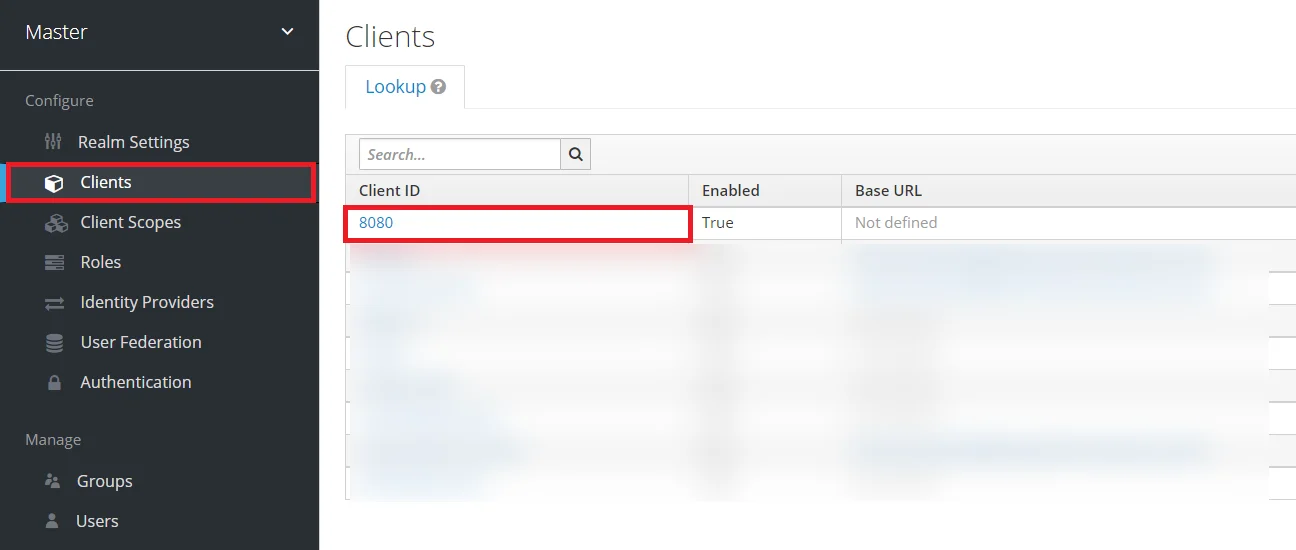
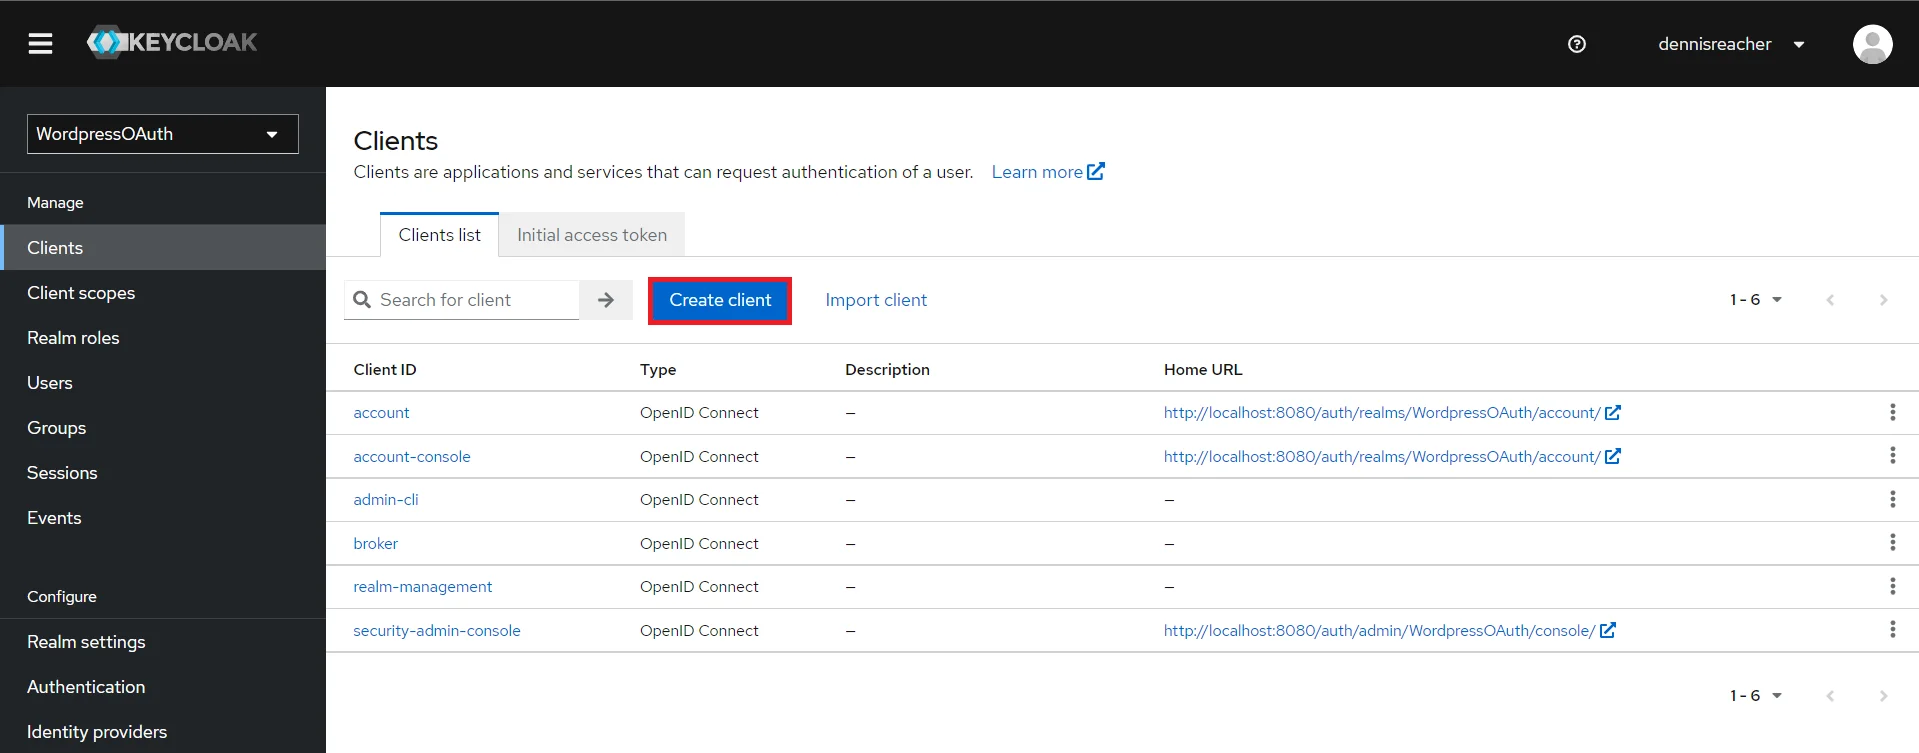
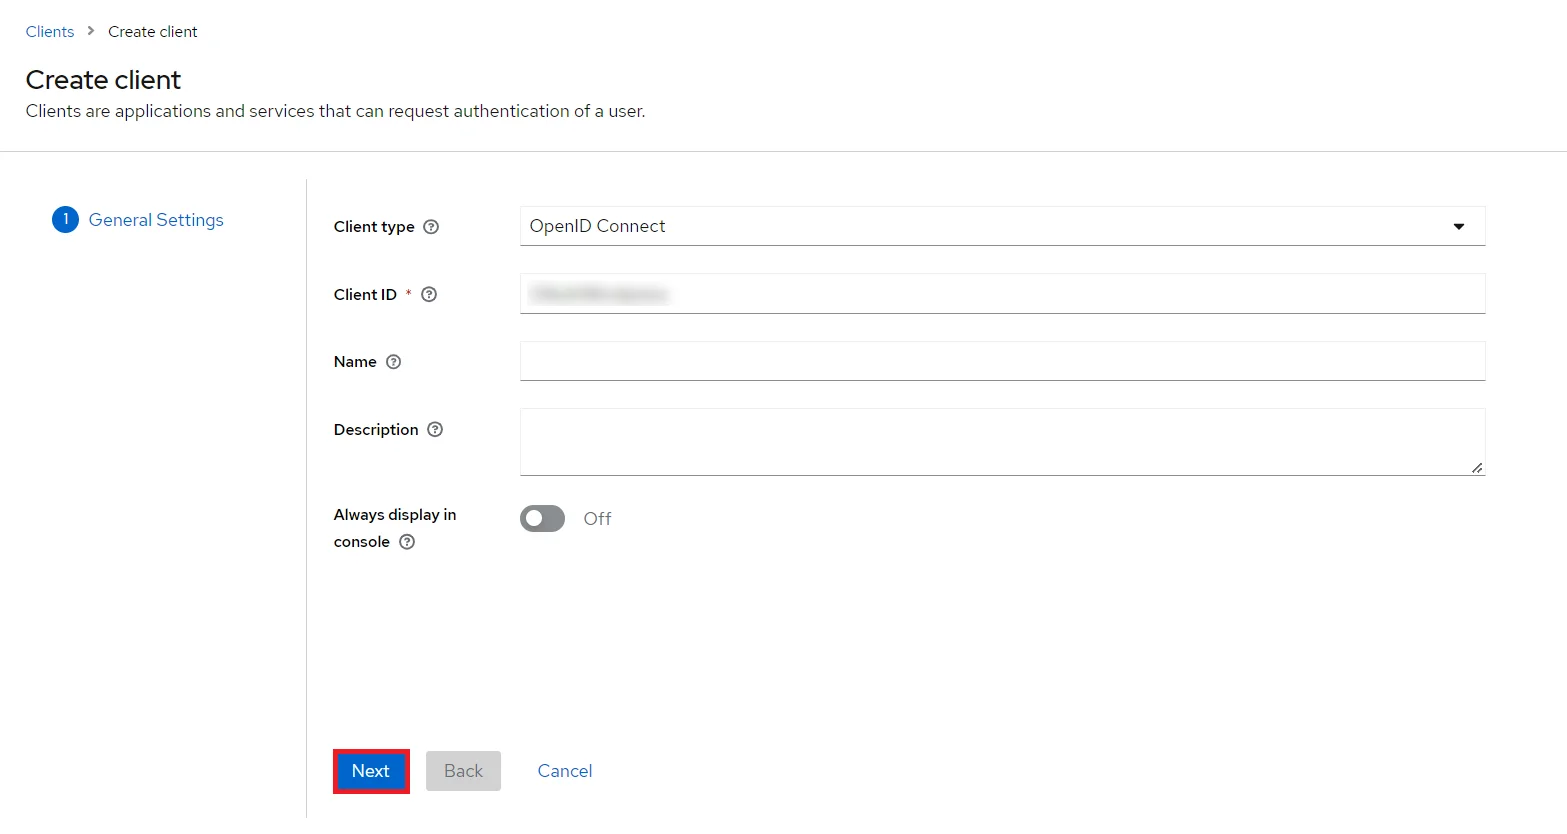
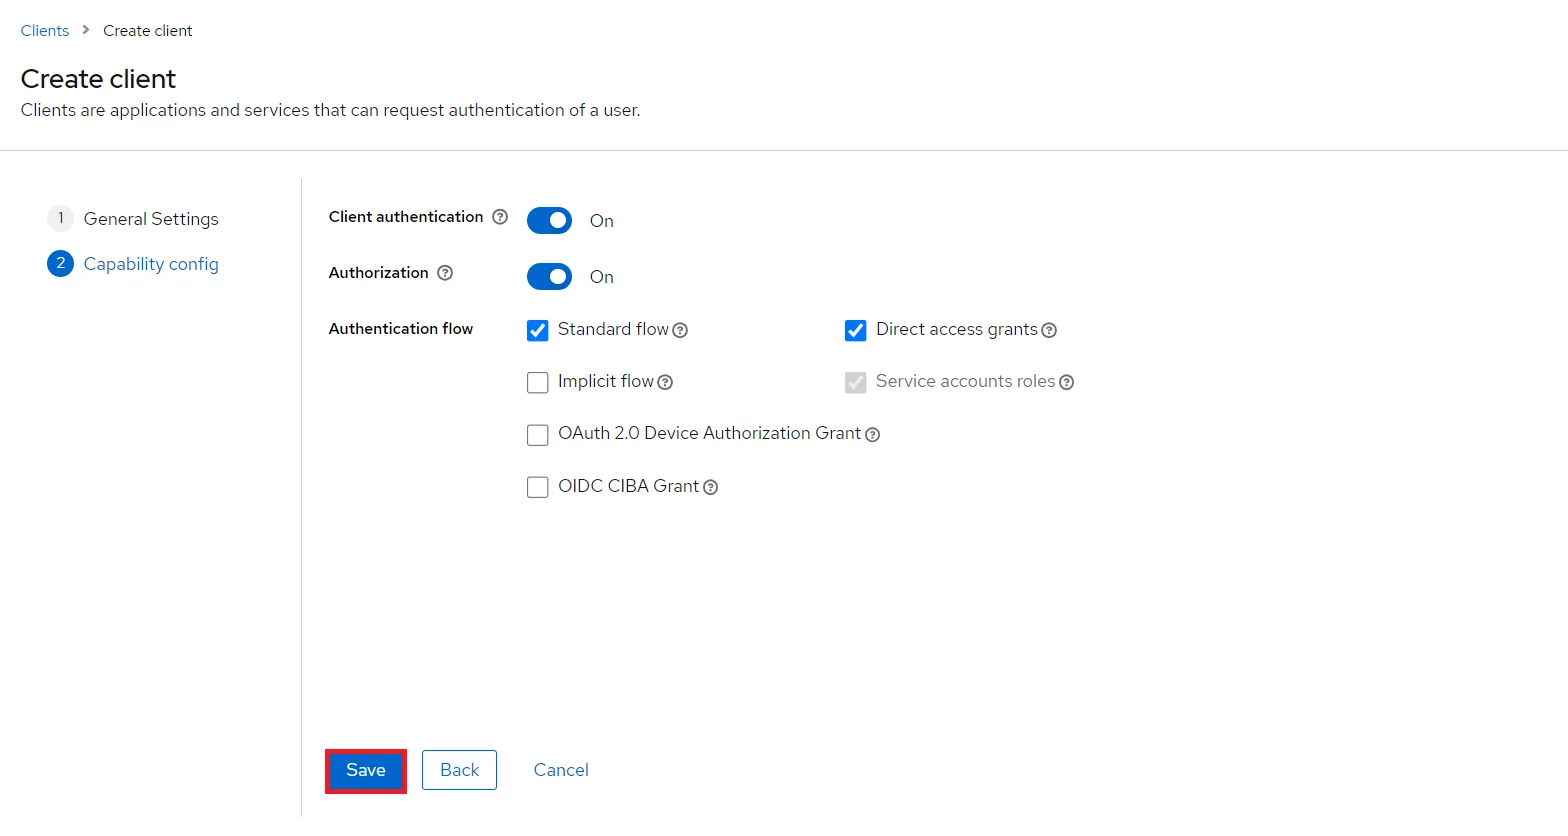
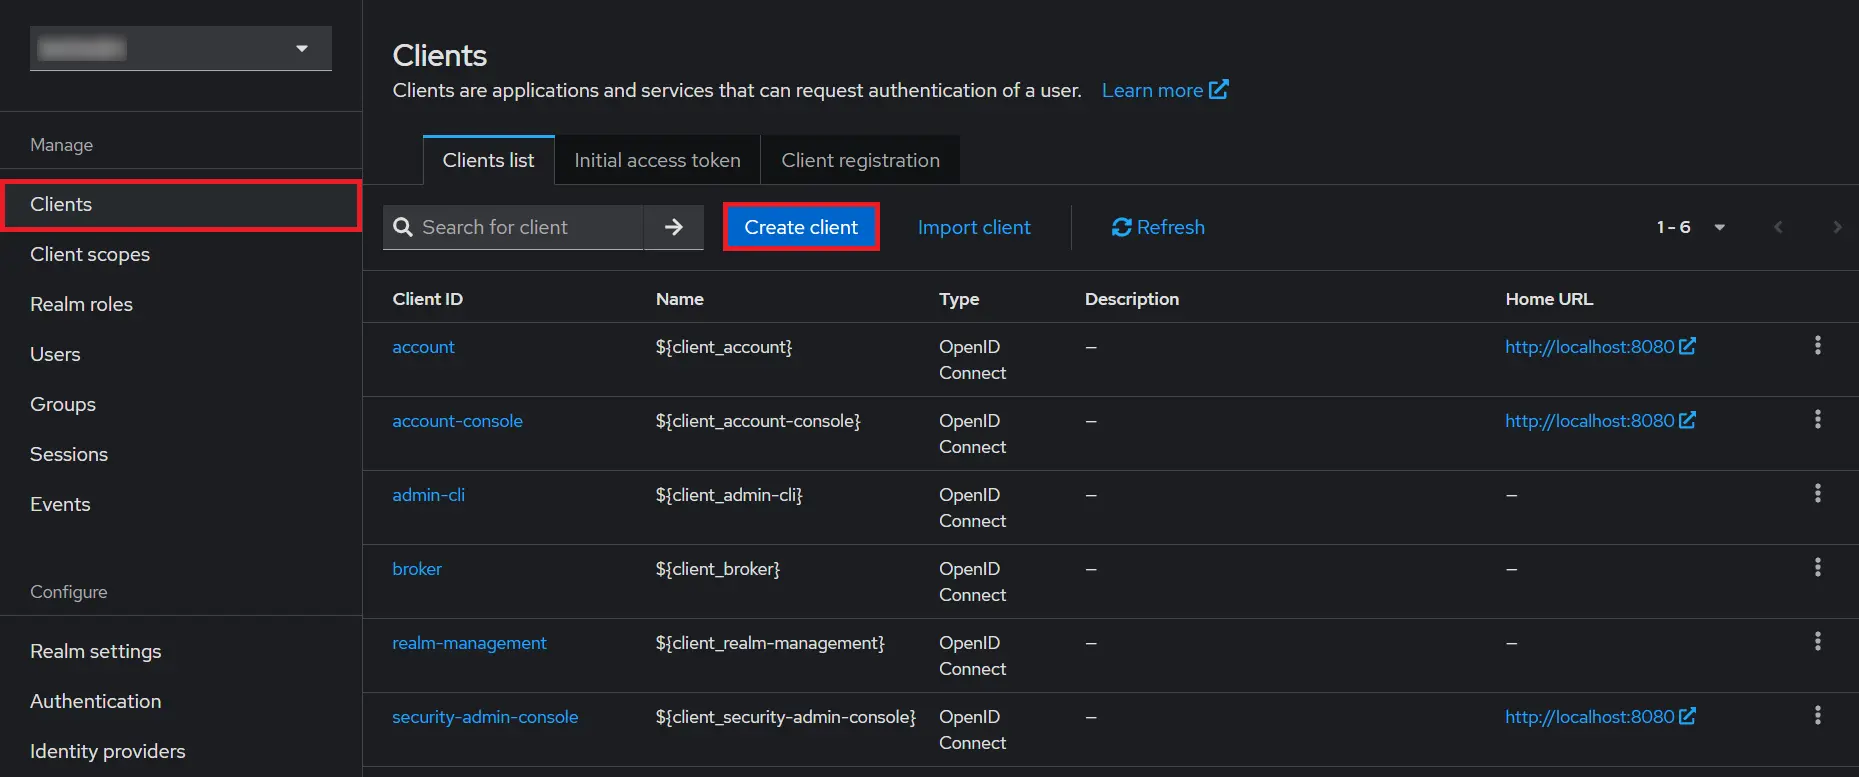
- Create OpenID client: Click on the Clients and choose create to create a new client. Enter client id and select client protocol openeid-connect and select Save.
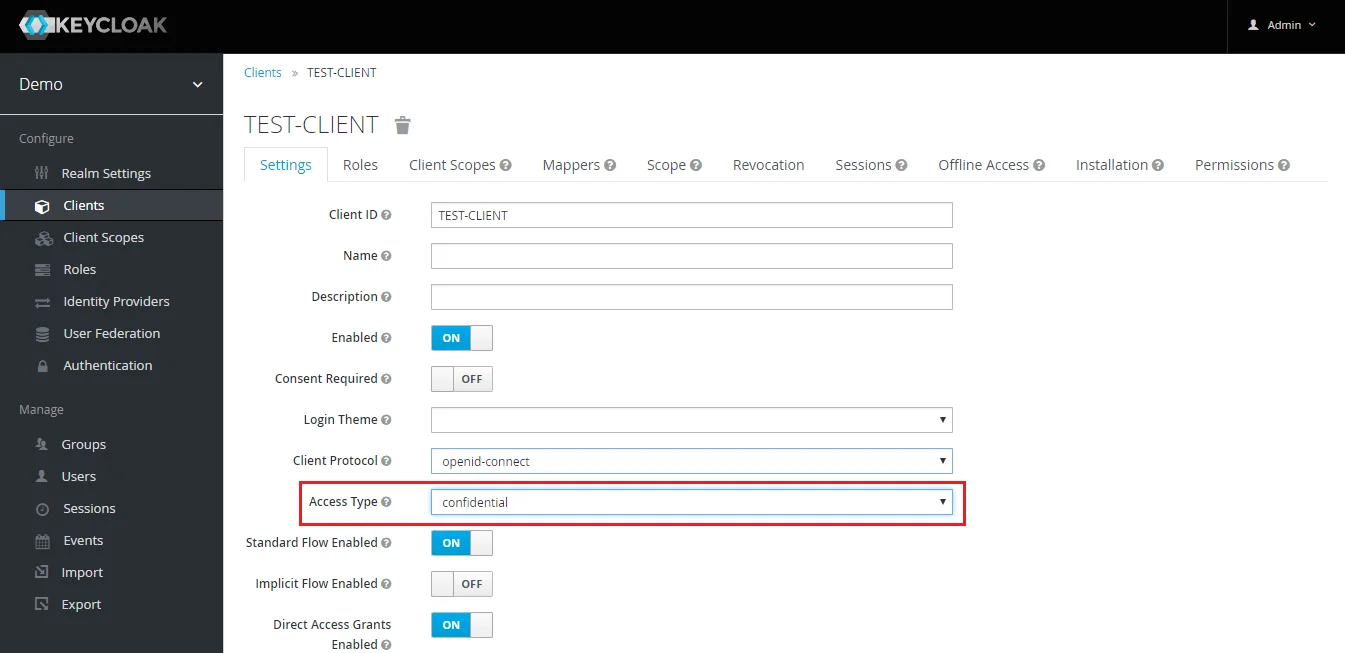
- Change Access type: After client is created change its access type to confidential.
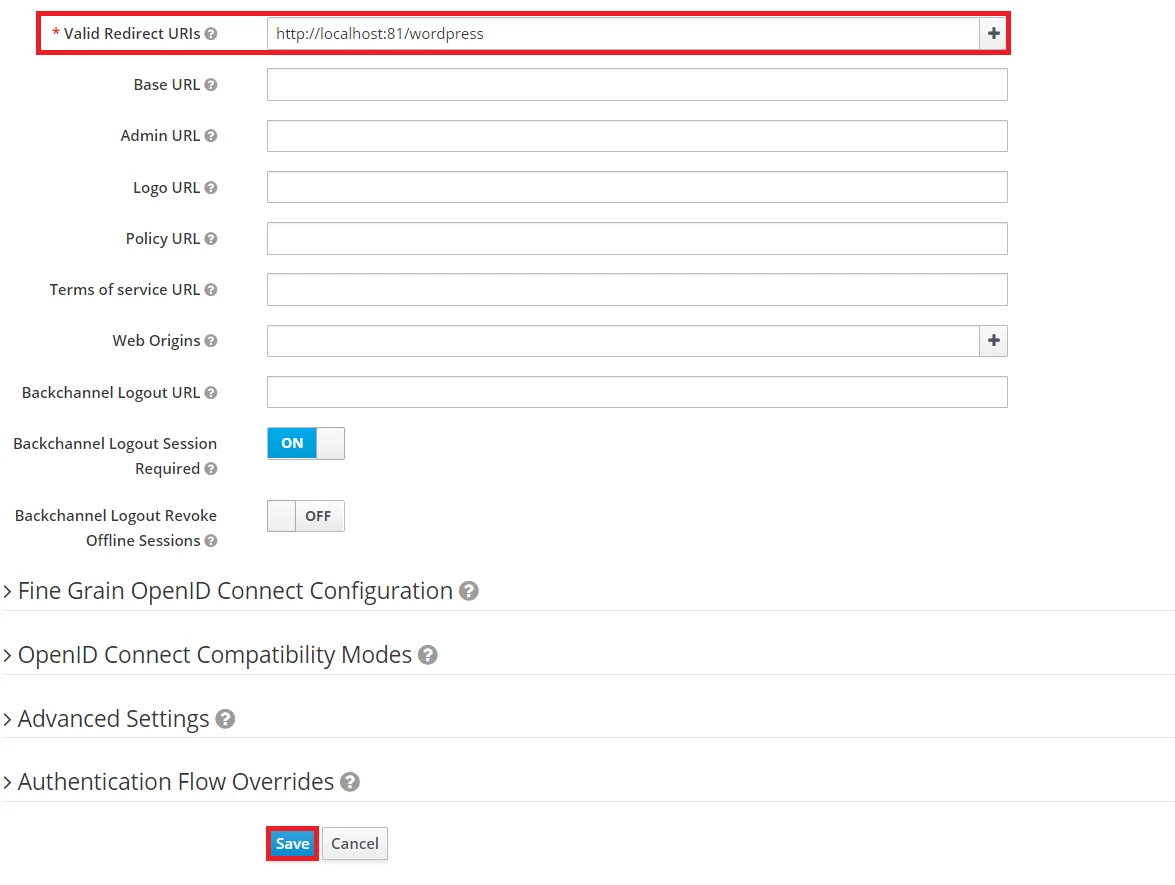
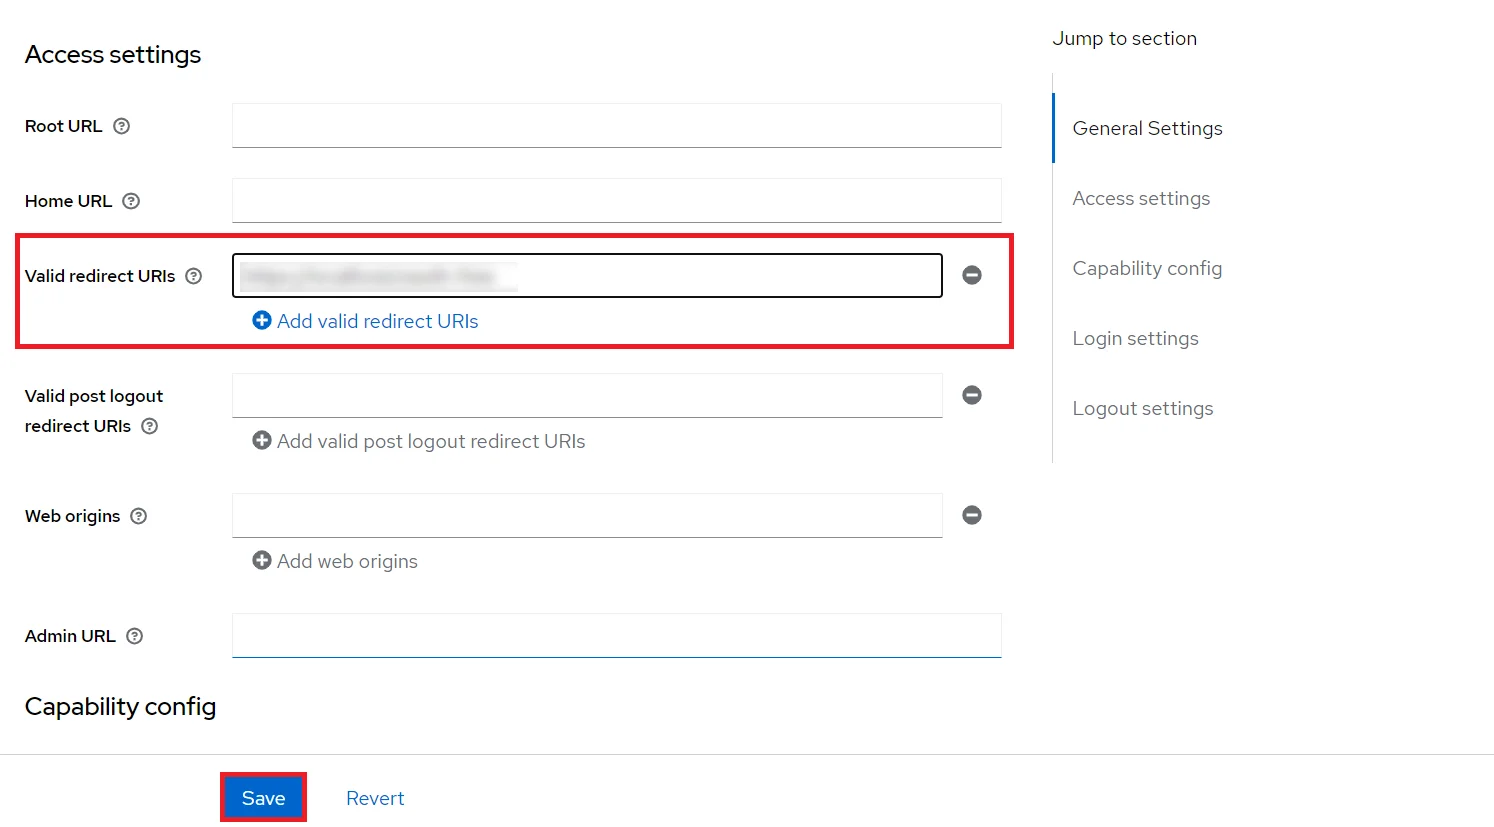
- Enter Valid Redirect URIs: Copy callback URL from plugin and then click on
SAVE. Ex -- https://
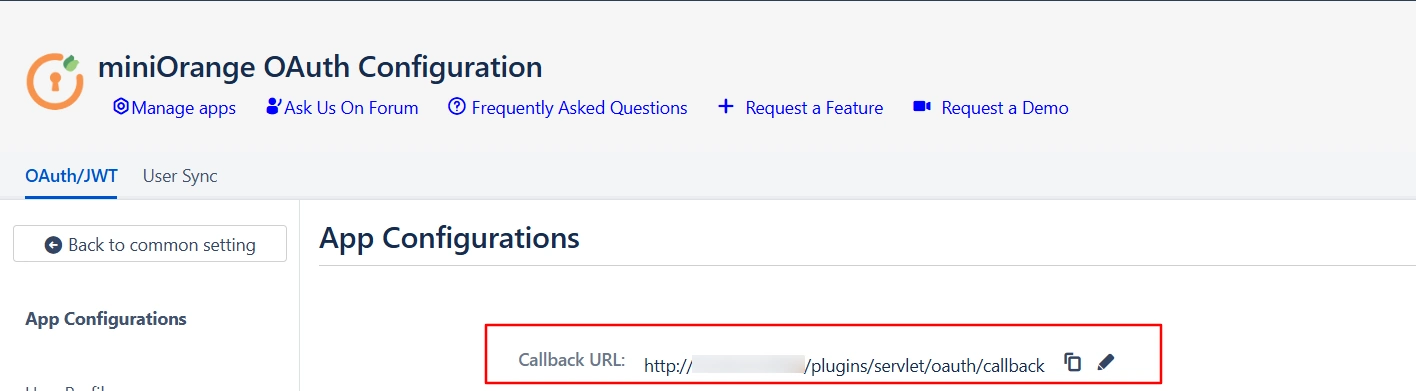
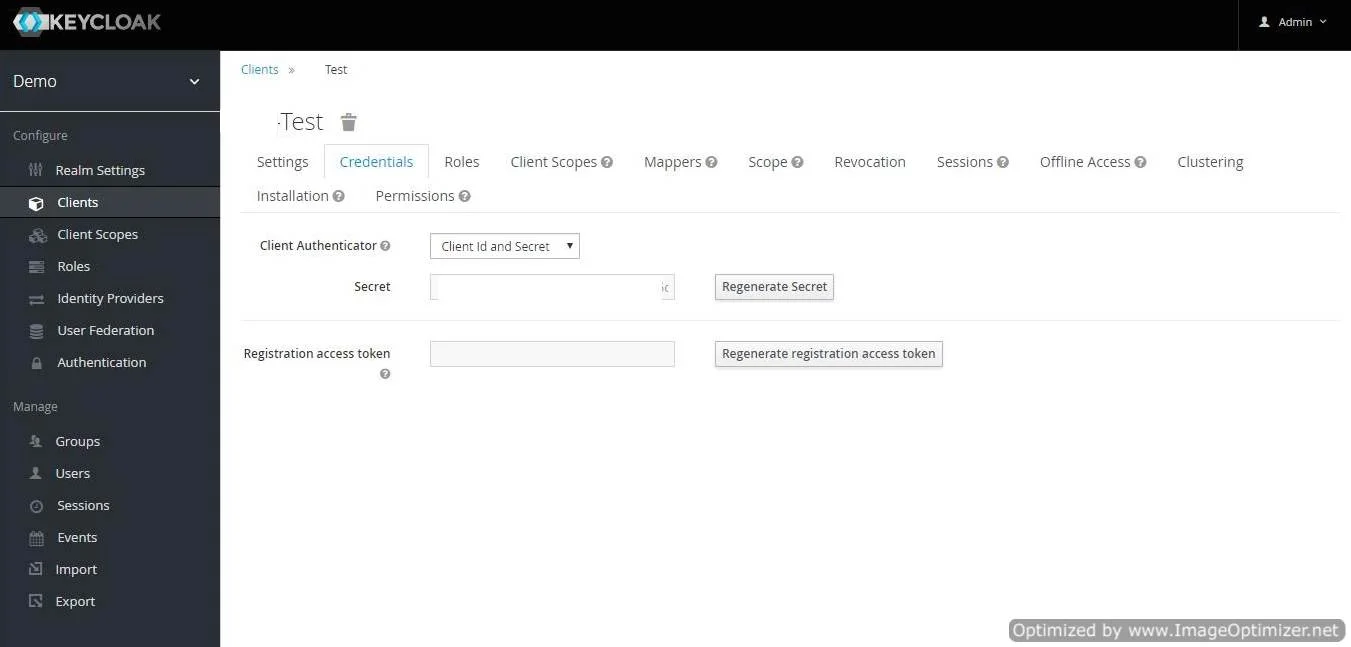
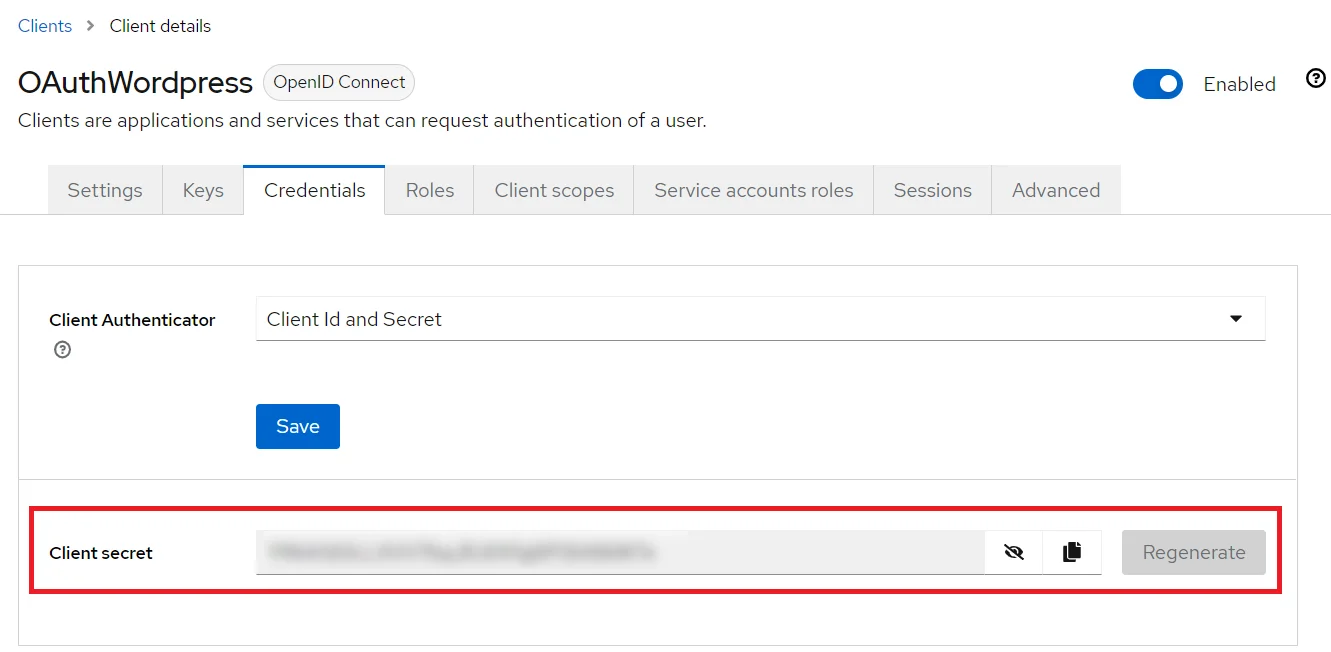
/oauth/callback - Get Client Secret: Now we need to get client secret. So select Clients and select credentials and copy your secret from here.
- Plugin Configuration: Enter copied Client Secret under Client secret field in the OAuth Client plugin, and enter the Client Name under the Client ID field.
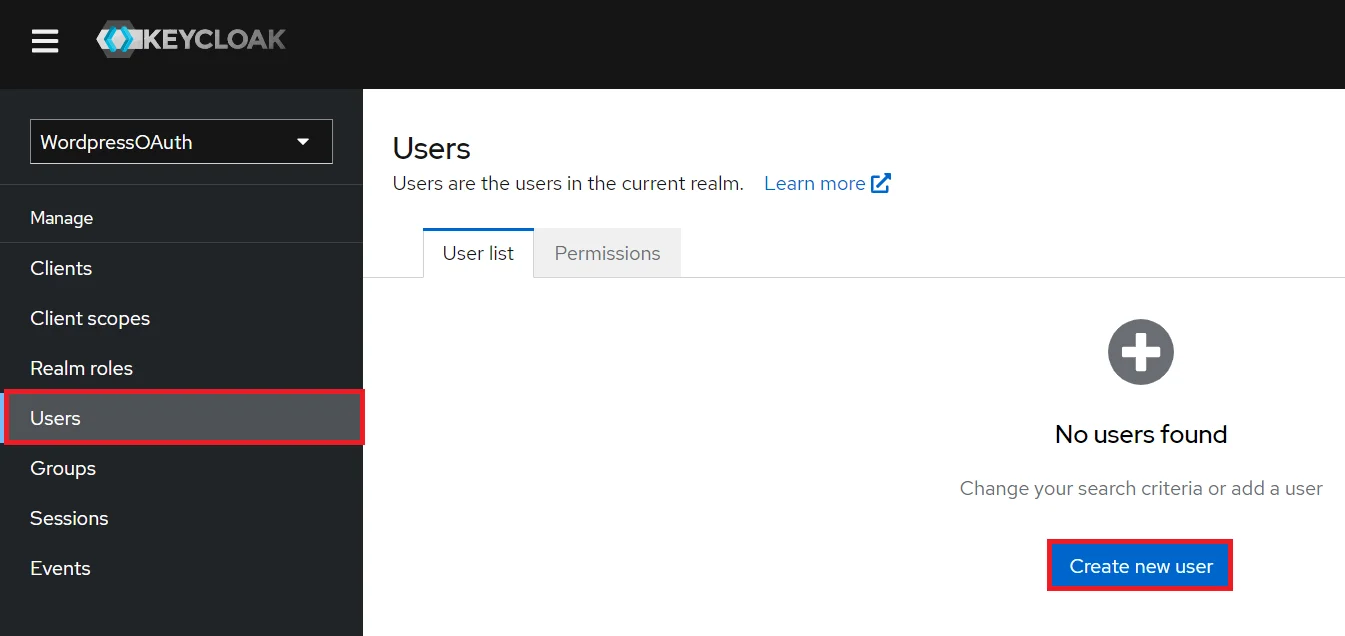
- Add User: We need to add users to realm who will be able to access the resources of realm. Click on the Users and choose to Add a new User.
- User Configuration: After user is created following action needs to be performed on it.
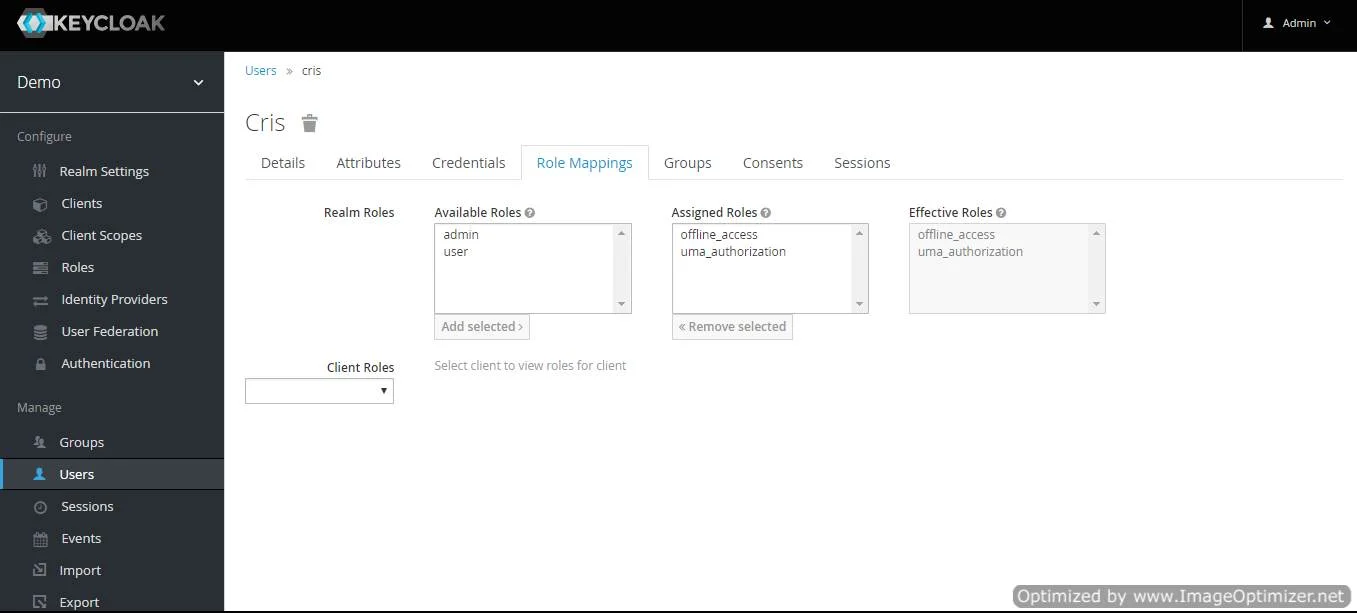
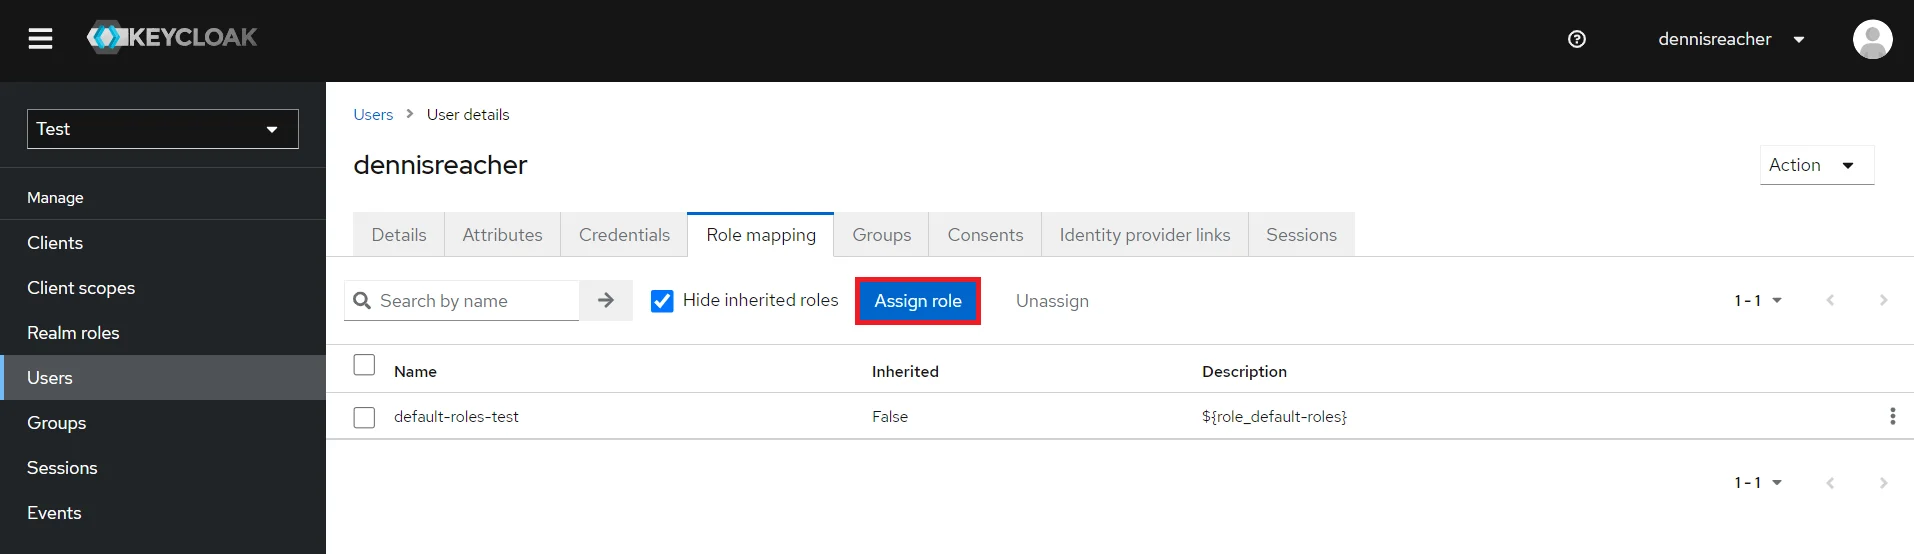
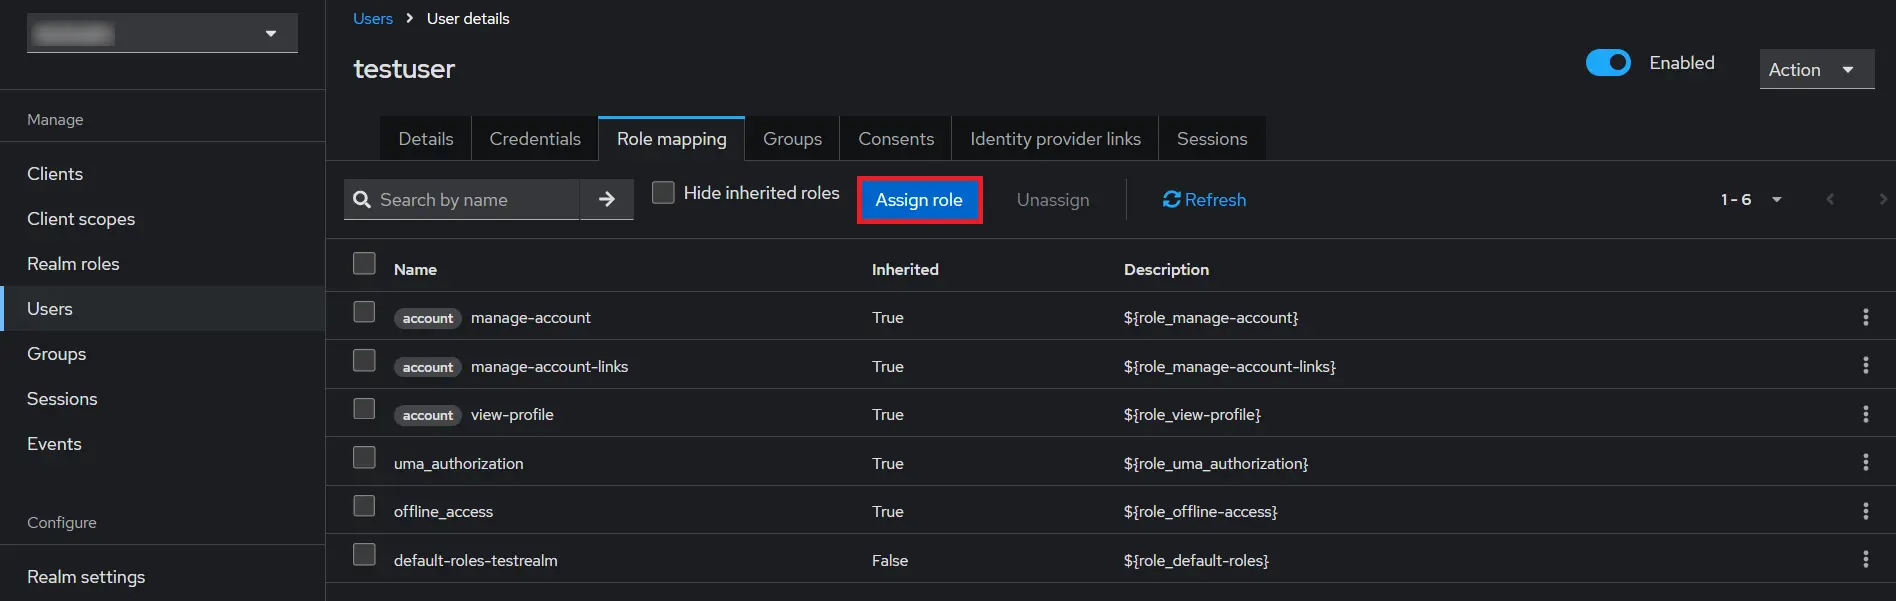
- Map User: We need to map user to a role. Click on Role Mappings and assign the user desired role from available roles and clicking on add selected.
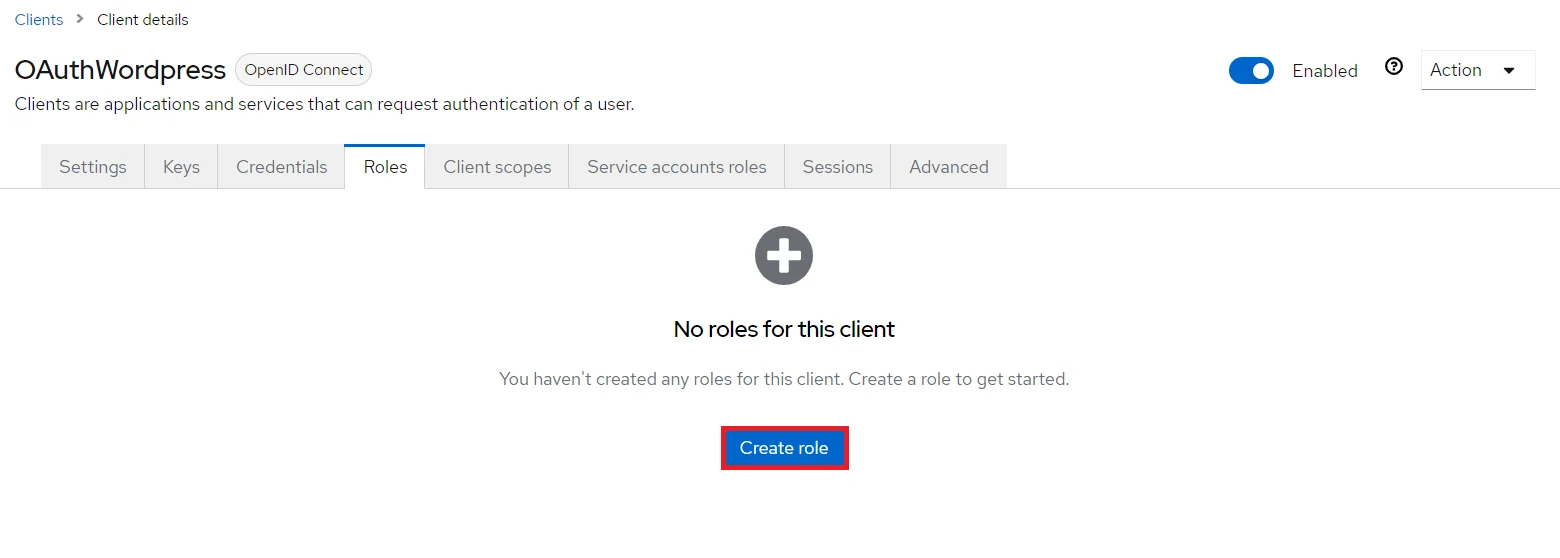
- Create ROLE: The Role will be used by your applications to define which users will be authorized to access the application. Click on the Roles and choose Add Role.
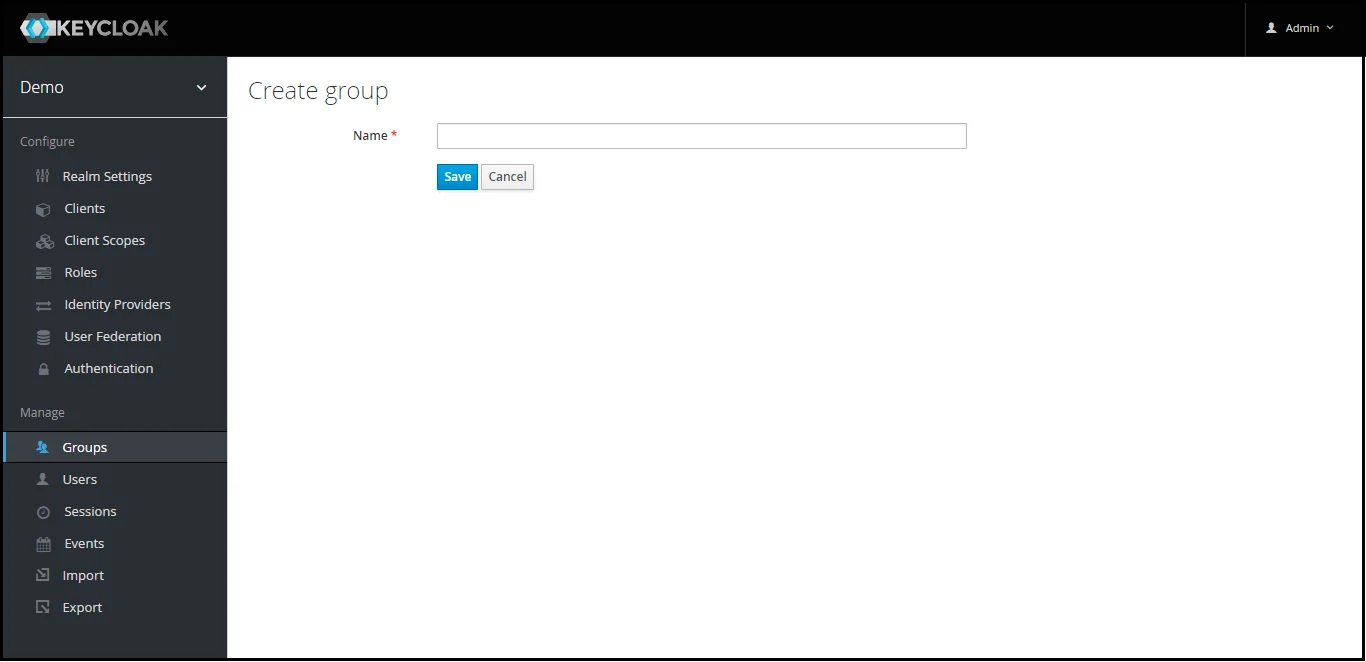
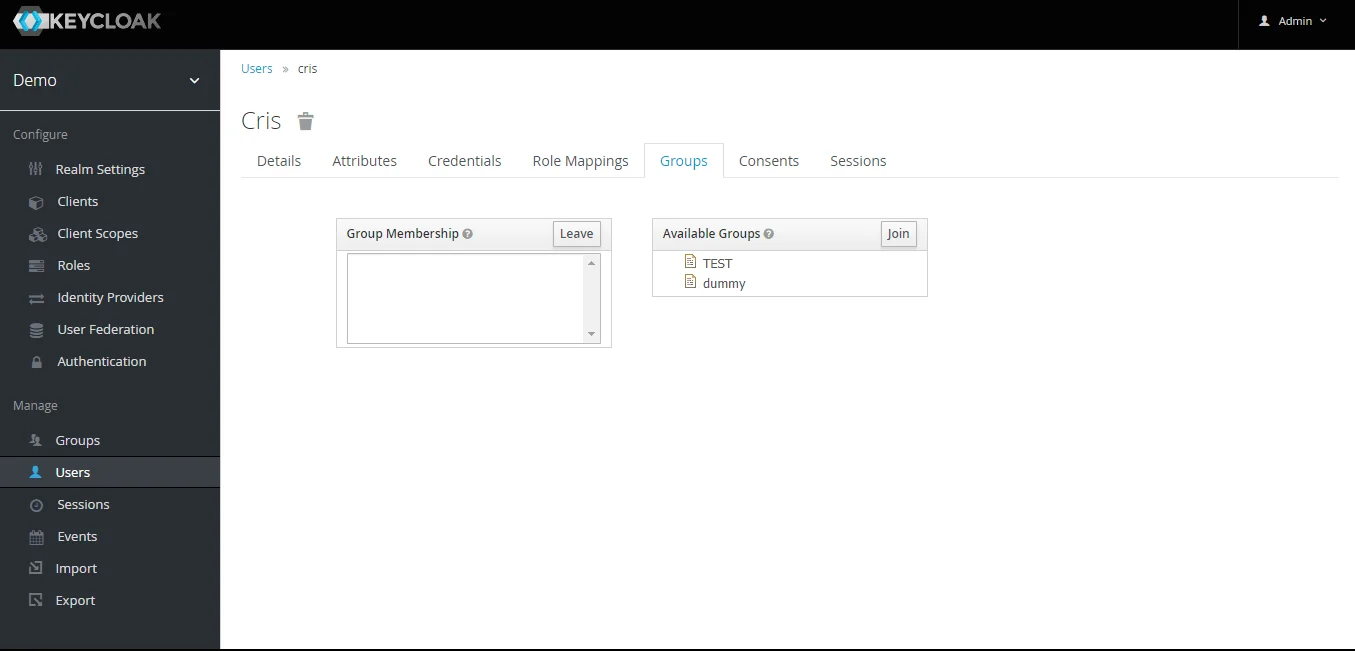
- Create groups: Click on the Groups and choose New to create a new group.
- Assign user to group: Select the user whom you want to add in group. Choose Groups option from tab and then select the group-name and click on join.
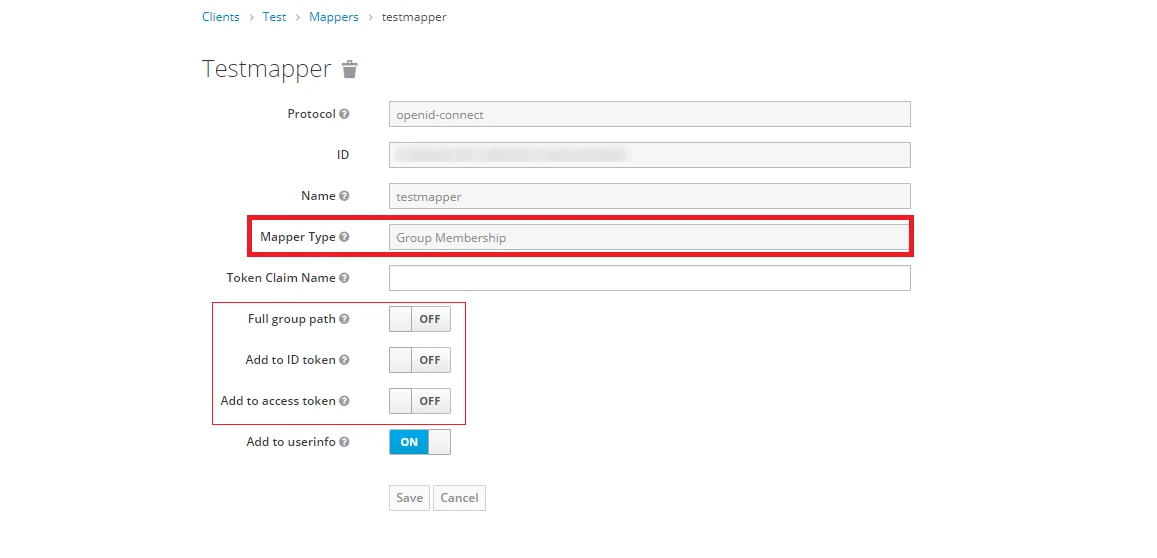
- Keycloak Group Mapper: Now to get group details we need to perform its client mapping with group membership else group details will not be fetched. So in Client section, select your client and then click on mapper->create.
- Now, select mapper type as Group Membership and enter the name and token claim name i.e the attribute name corresponding to which groups will be fetched. Turn Off the full group path, Add to ID token and Add to access token options, and click on Save.
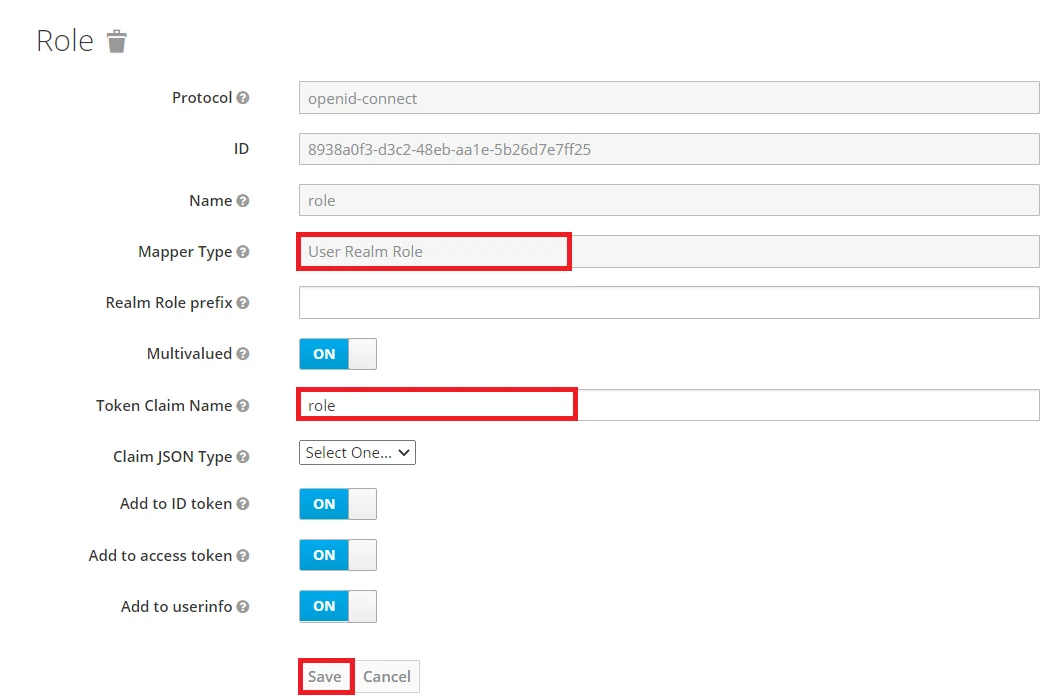
- Keycloak Role Mapper: Now to get role details we need to perform its client mapping with role membership else role details will not be fetched. So in Client section, select your client and then click on mapper->create.
- Now, select mapper type as user realm Role Membership and enter the name. and token claim name i.e the attribute name corresponding to which groups will be fetched. Add to ID token and Add to access token options, and click on Save.
- Navigate to the plugin configuration page, click the "Add New Provider" button (located either in the middle or top-right corner), select Keycloak as the application, and copy the callback URL from the plugin and keep it handy, as you'll need it to configure Keycloak as the OAuth provider.
- Add Realm : Now login to keycloak administration console and navigate to your desired realm. You can add new realm by selecting Create Realm option.
- Create realm: Enter Realm Name and keep the realm name handy as it will required later to configure the Realm under the OAuth Client plugin. Click on CREATE to add realm.
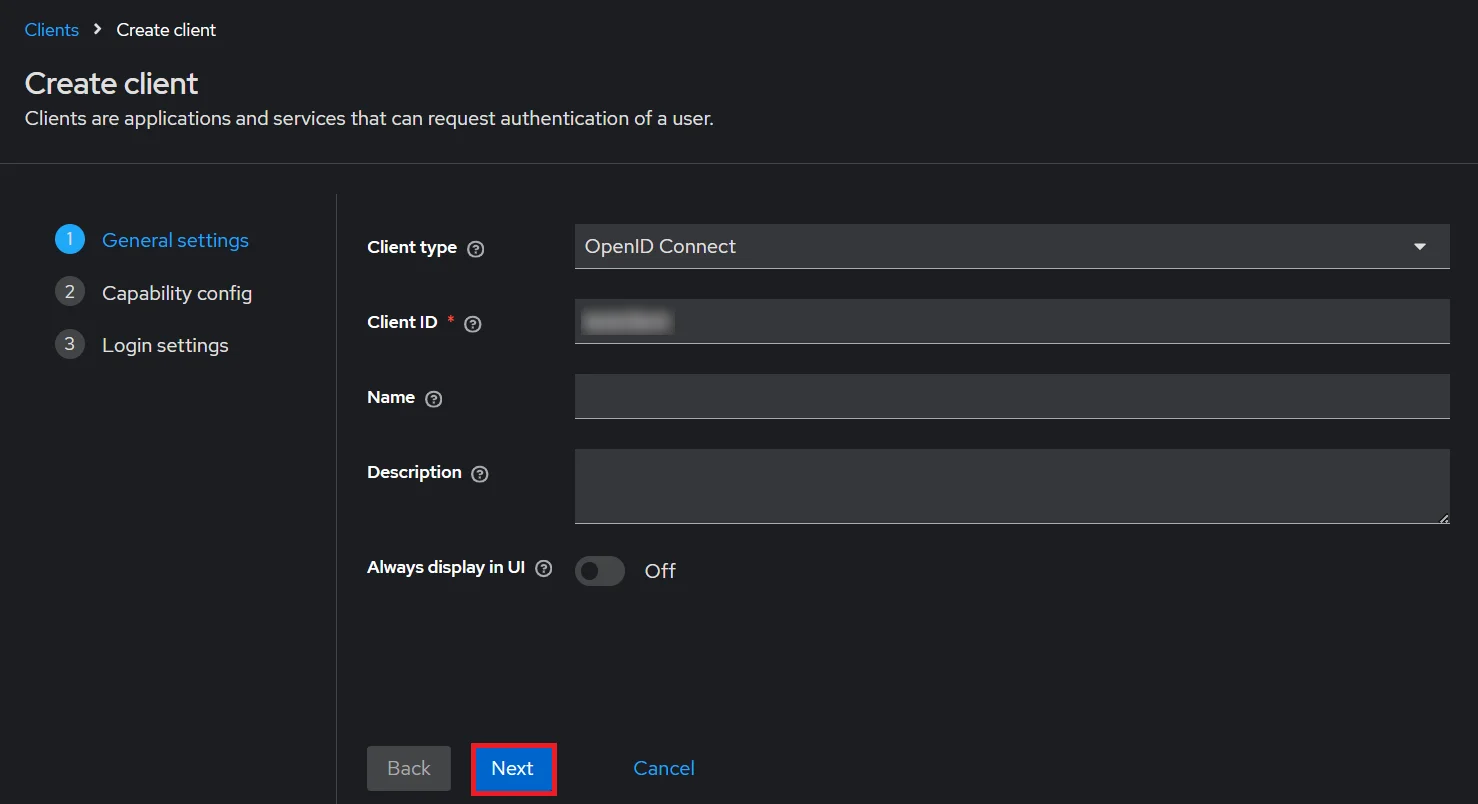
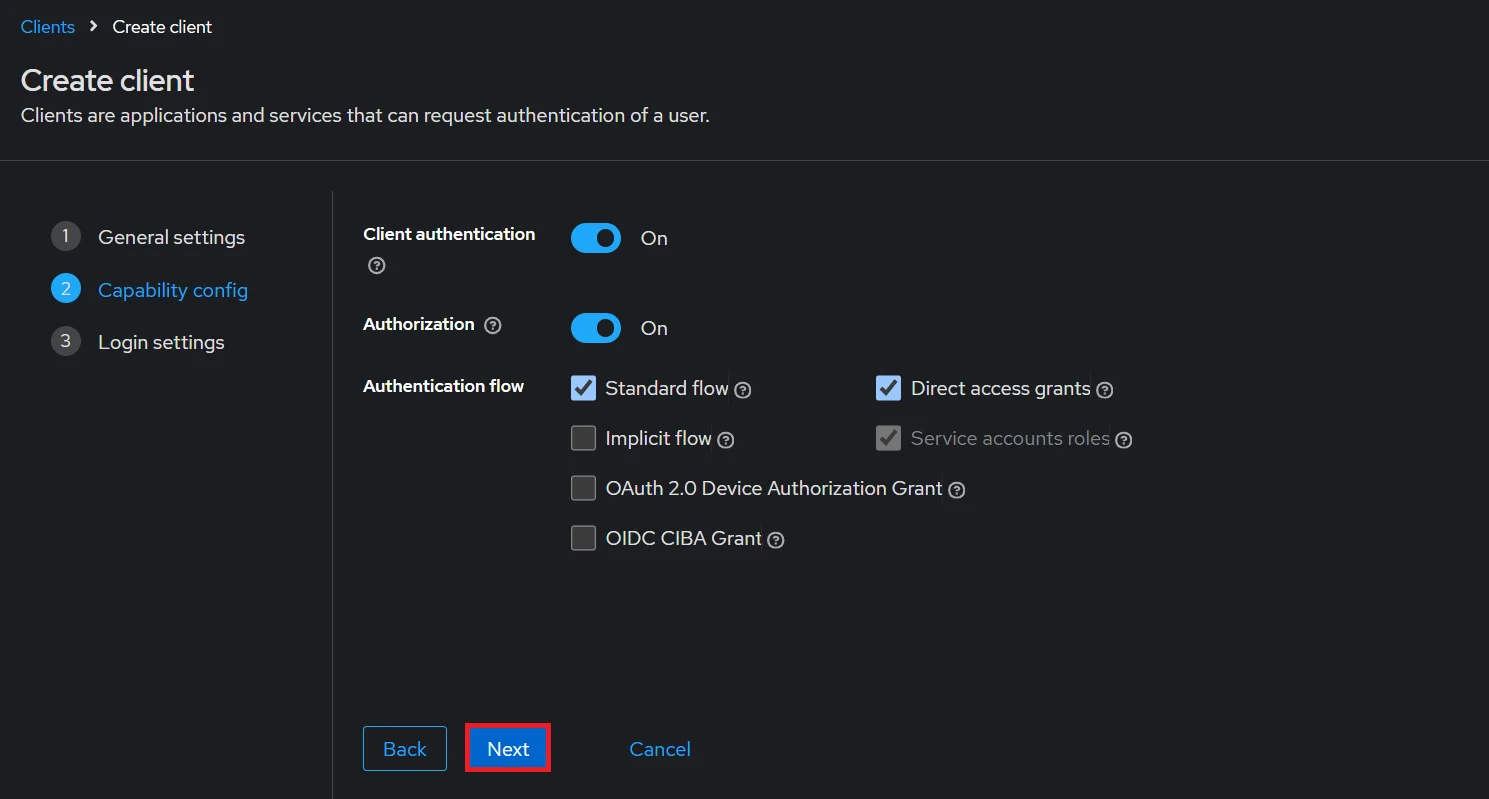
- Create OpenID client: Click on the Clients and choose Create Client to create a new client. Enter Client id and select client protocol openeid-connect and Click Next.
- Enable the Client Authentication and Authorization toggle.
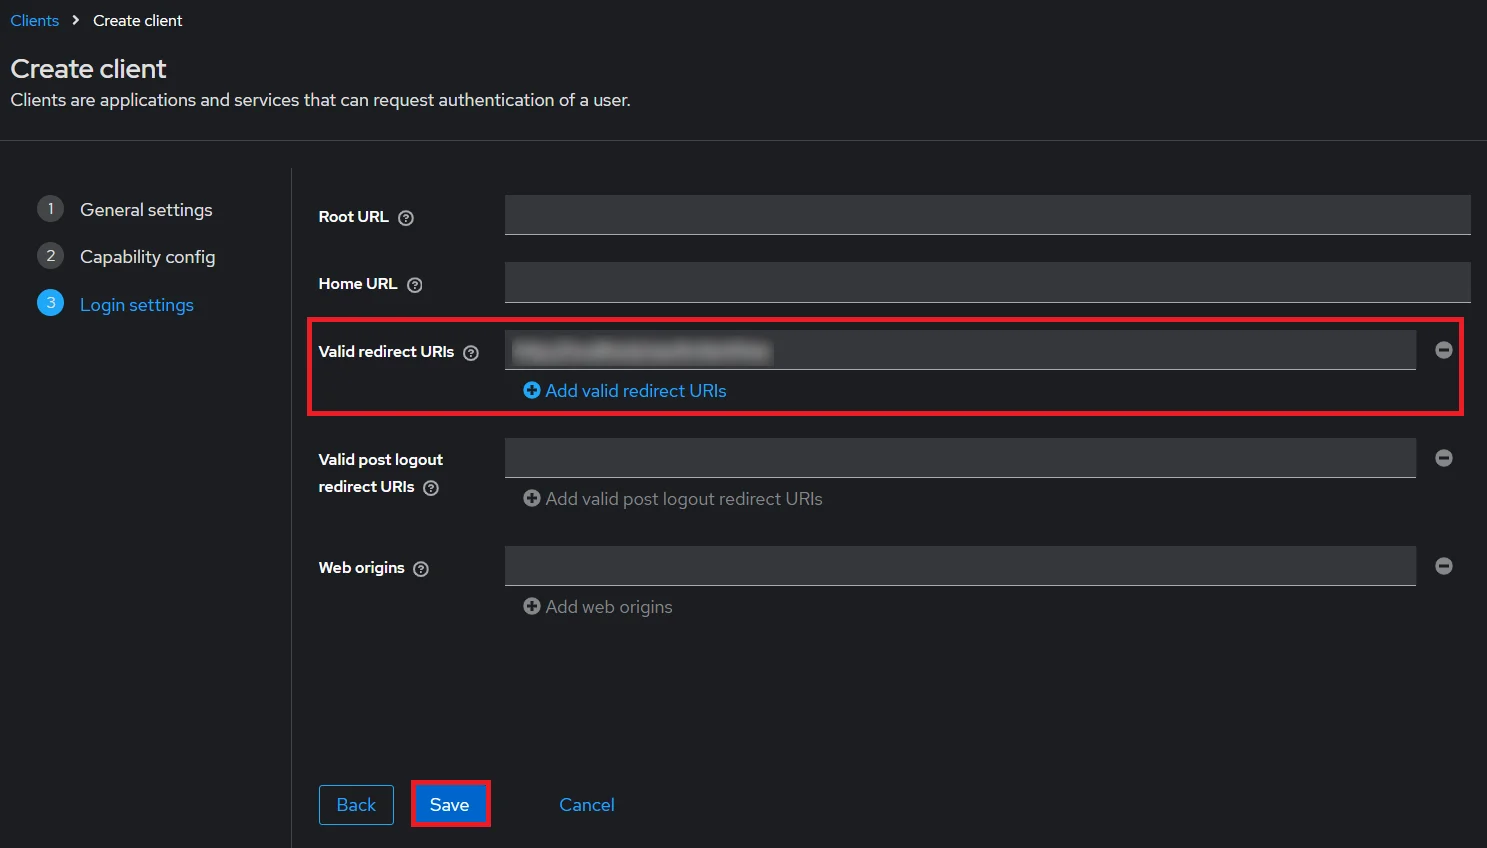
- Scroll down to the Access settings and enter your Callback/Redirect URL which you will get from your plugin present on your Client side under the CallBack URLs text-field.
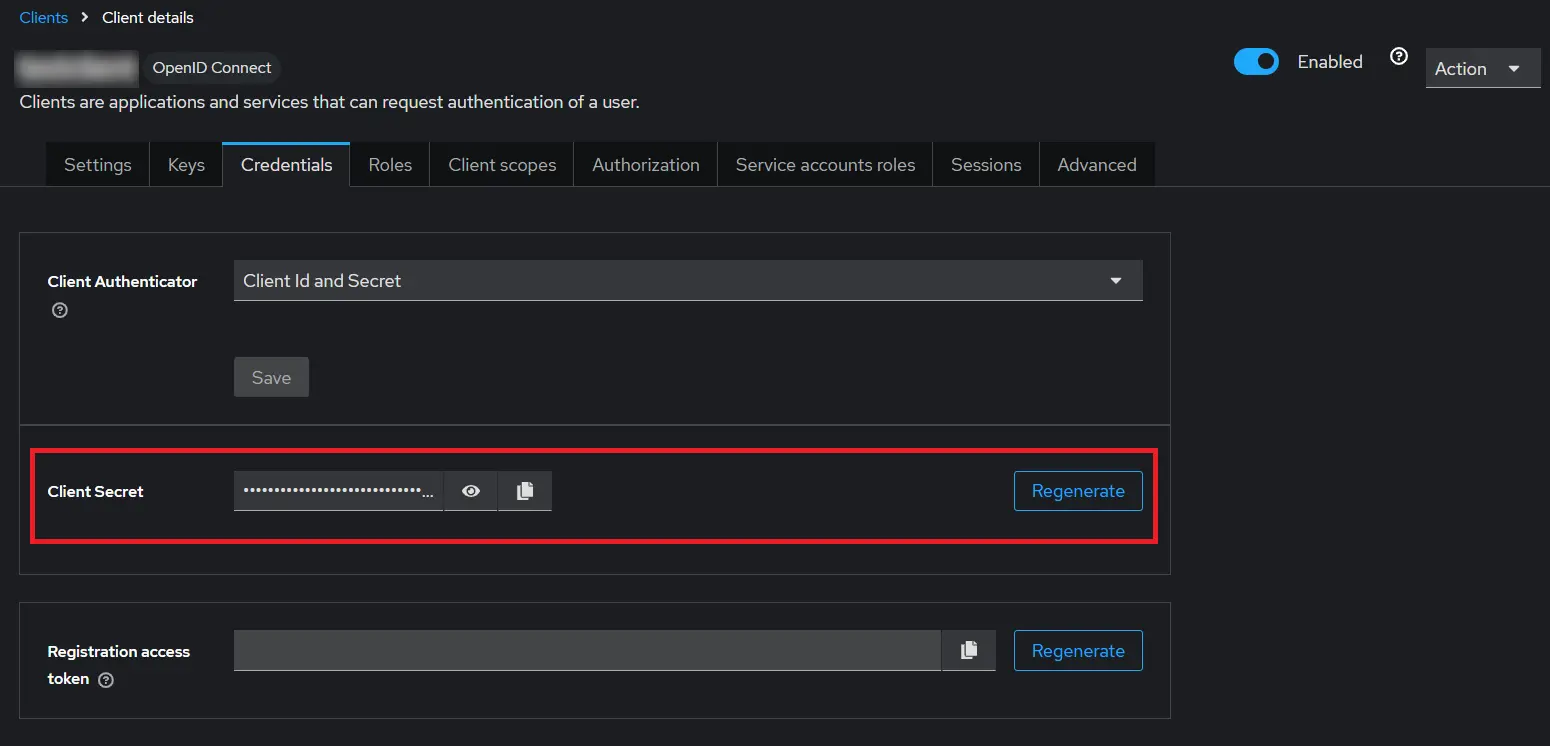
- Go to the Credentials tab, copy the Client Secret and keep it handy as we will require it later while configuring plugin.
- Plugin Configuration: Enter copied Client Secret under Client secret field in the OAuth Client plugin, and enter the Client ID under the Client ID field.
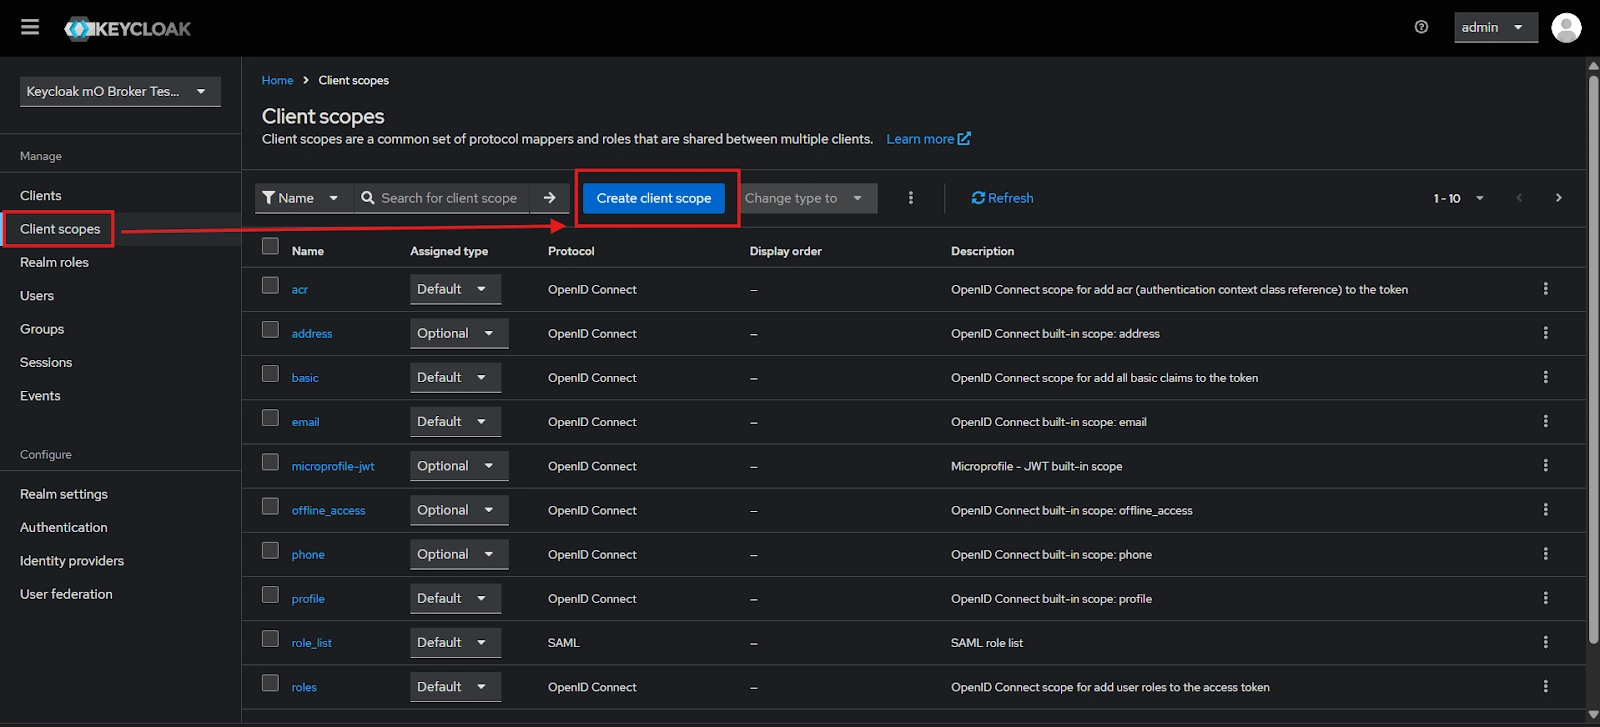
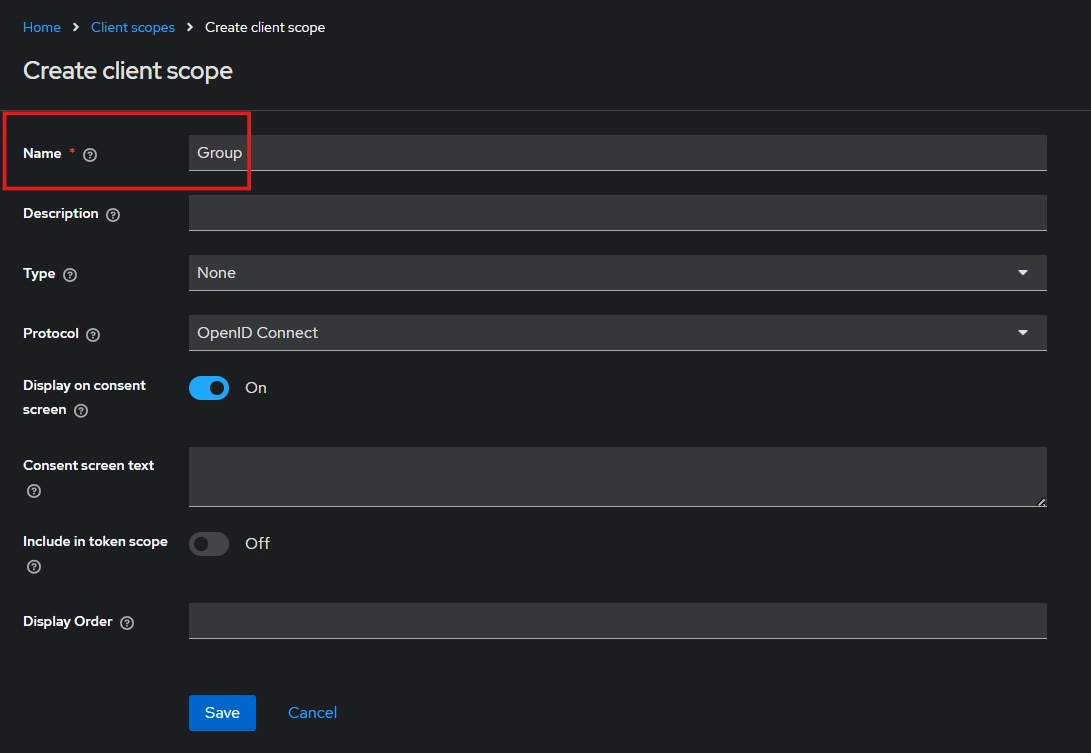
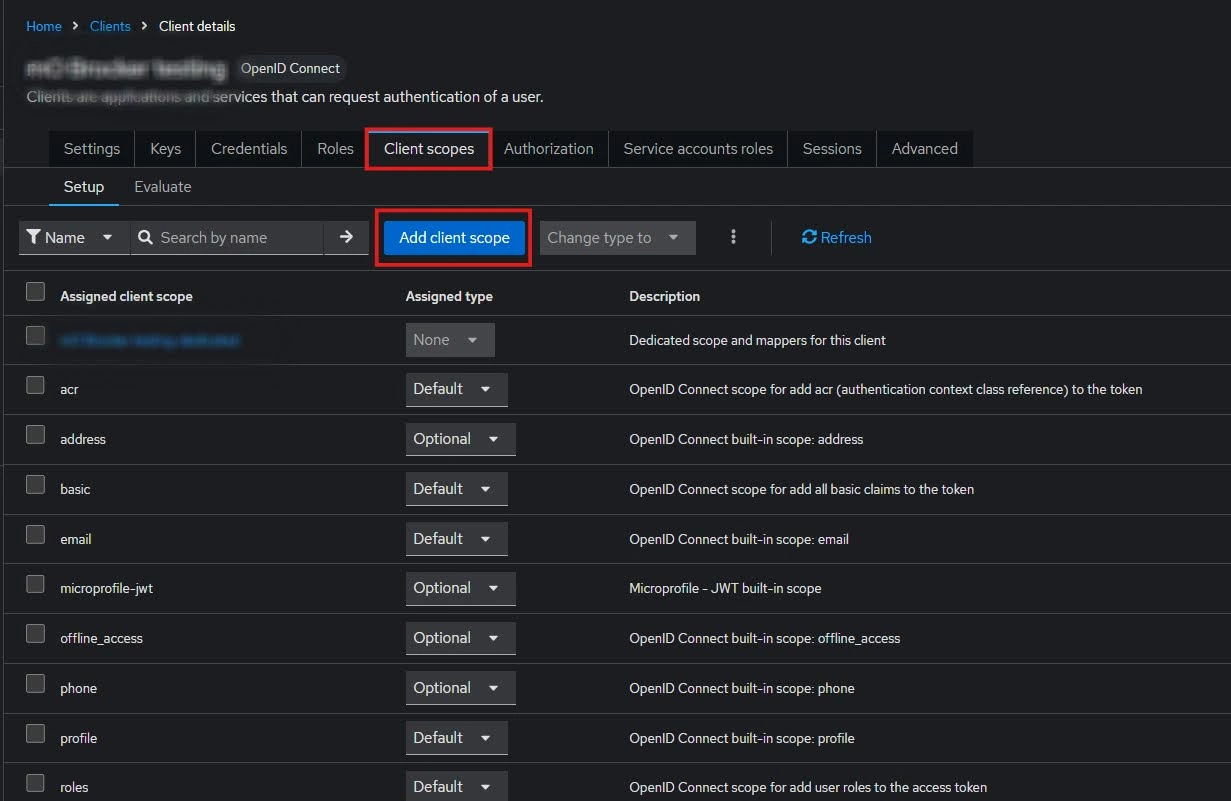
- After Plugin Configurations, go to Client Scopes to configure the Group Mapper and create a client scope.
- Enter Name:- “Group” and Save.
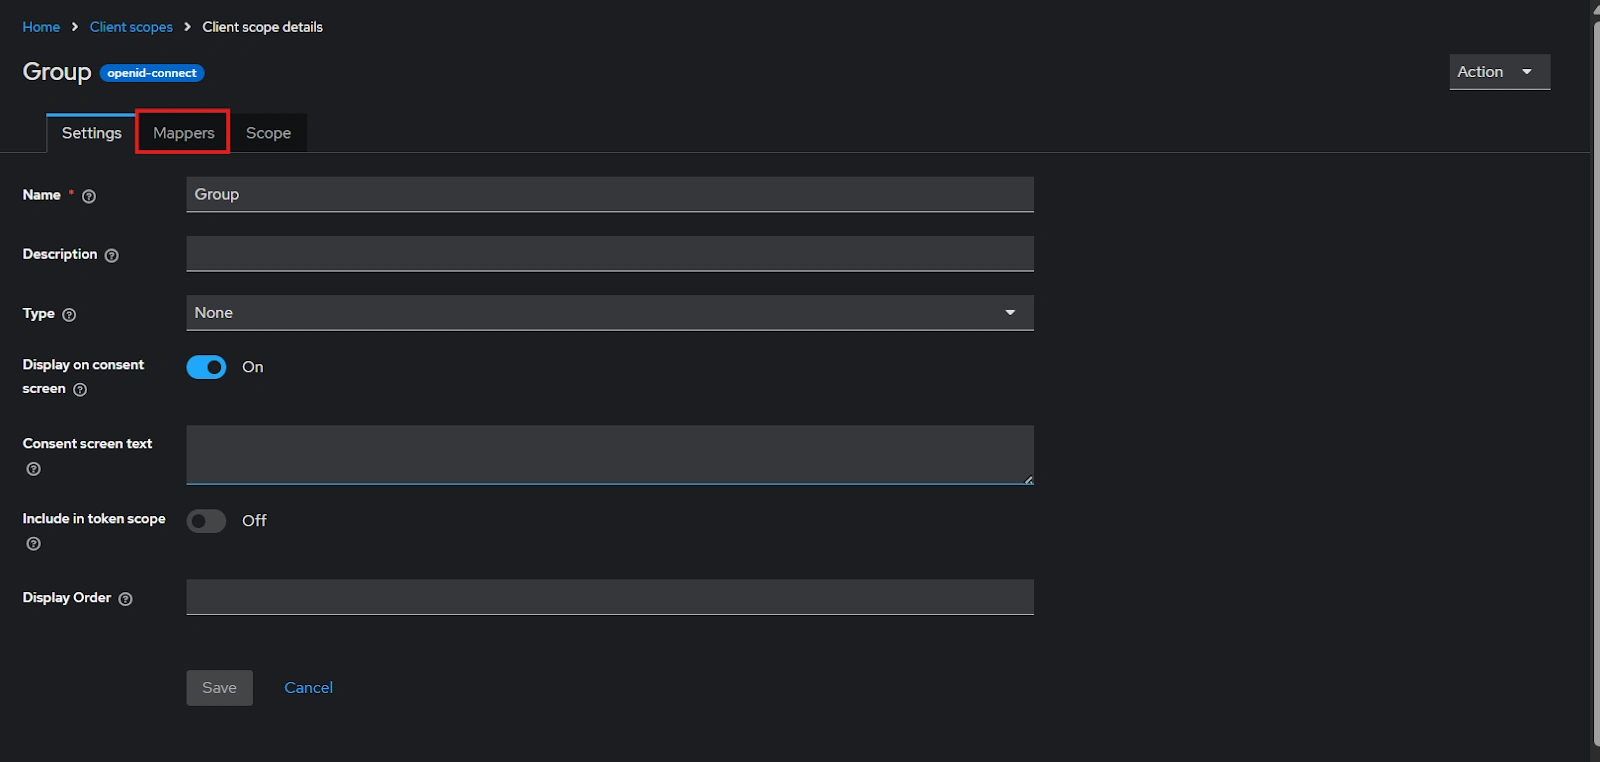
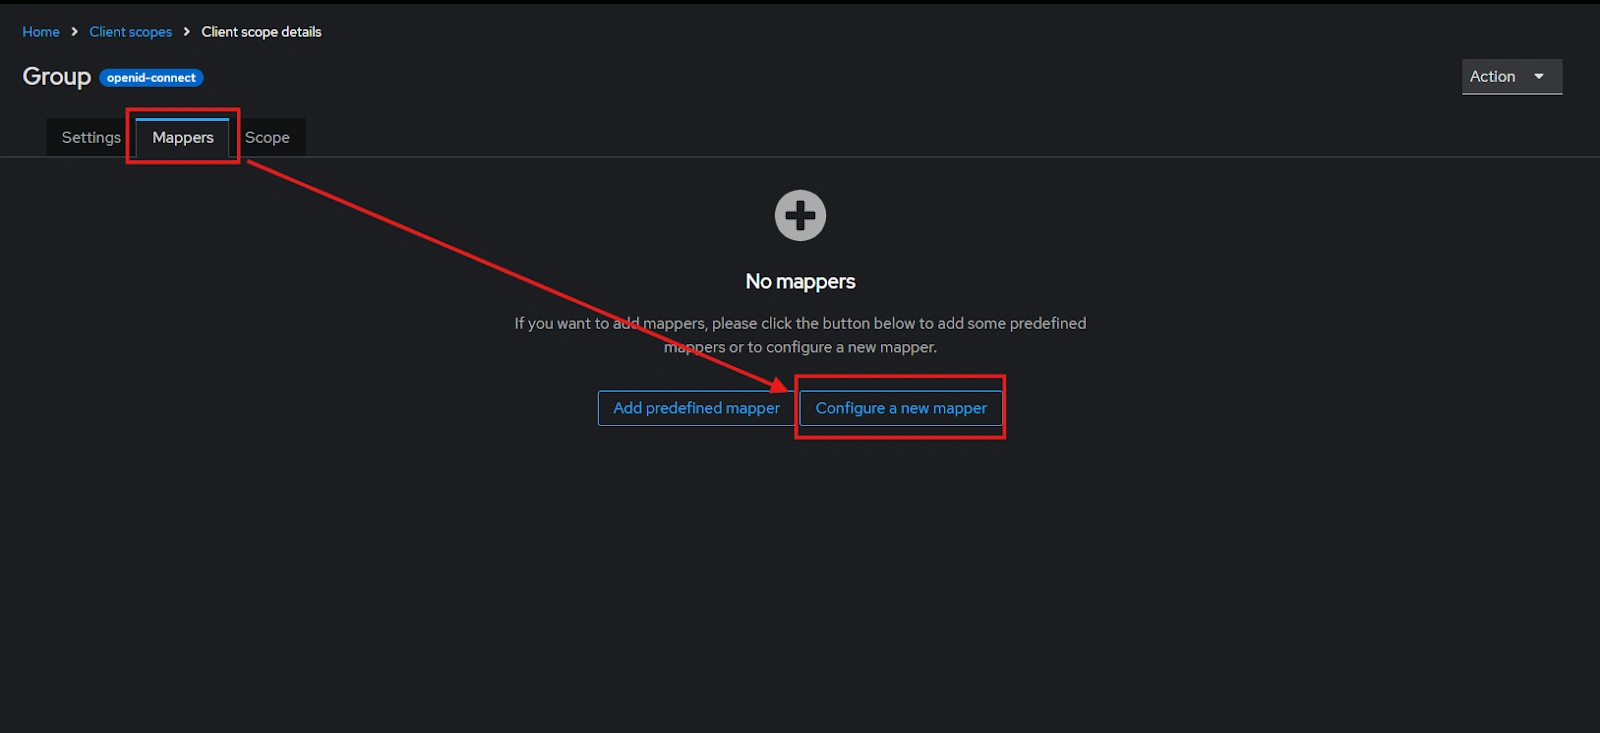
- After saving, click on “Mappers” and configure a new Mapper.
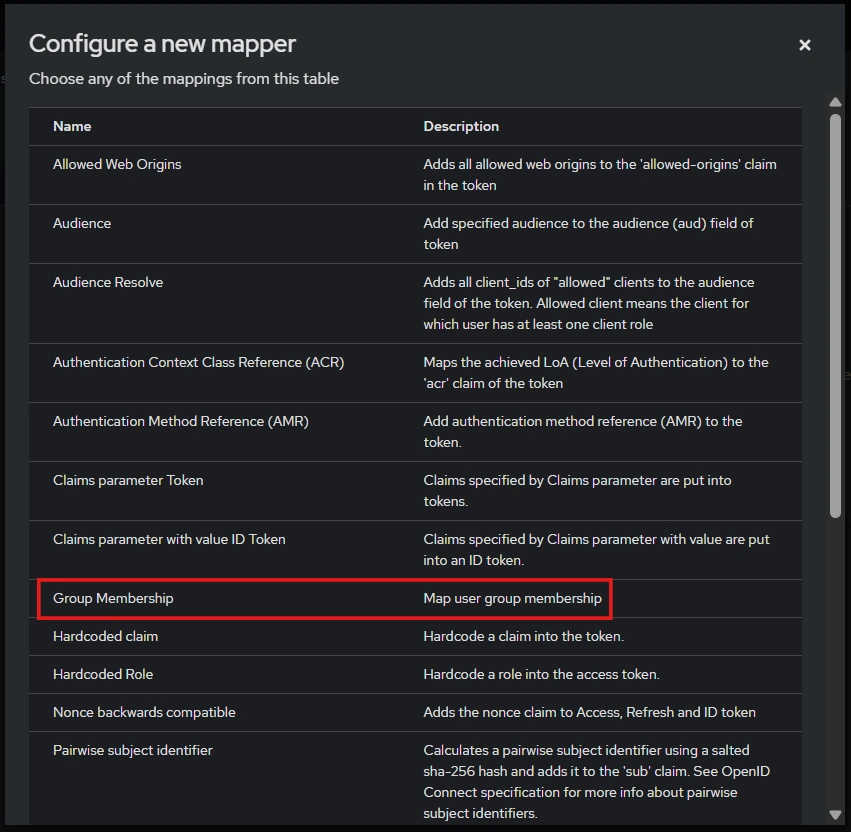
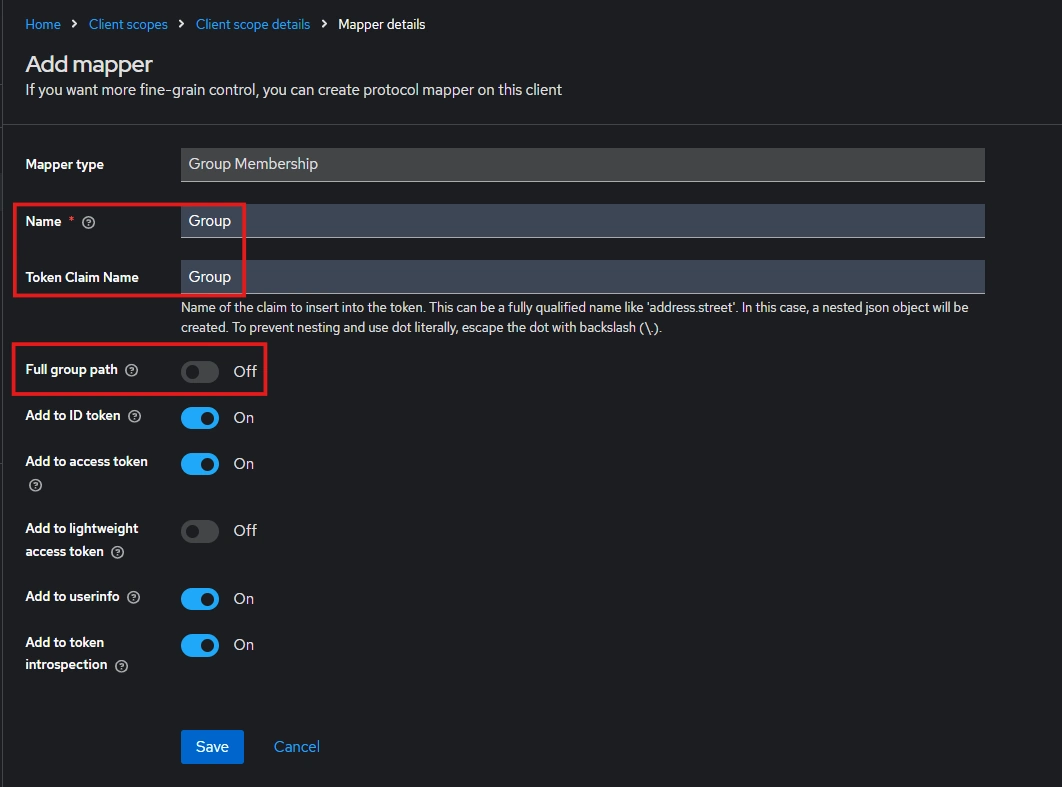
- Select “Group Membership”
- Enter the Name, Token claim name and disable “Full group path” and Save.
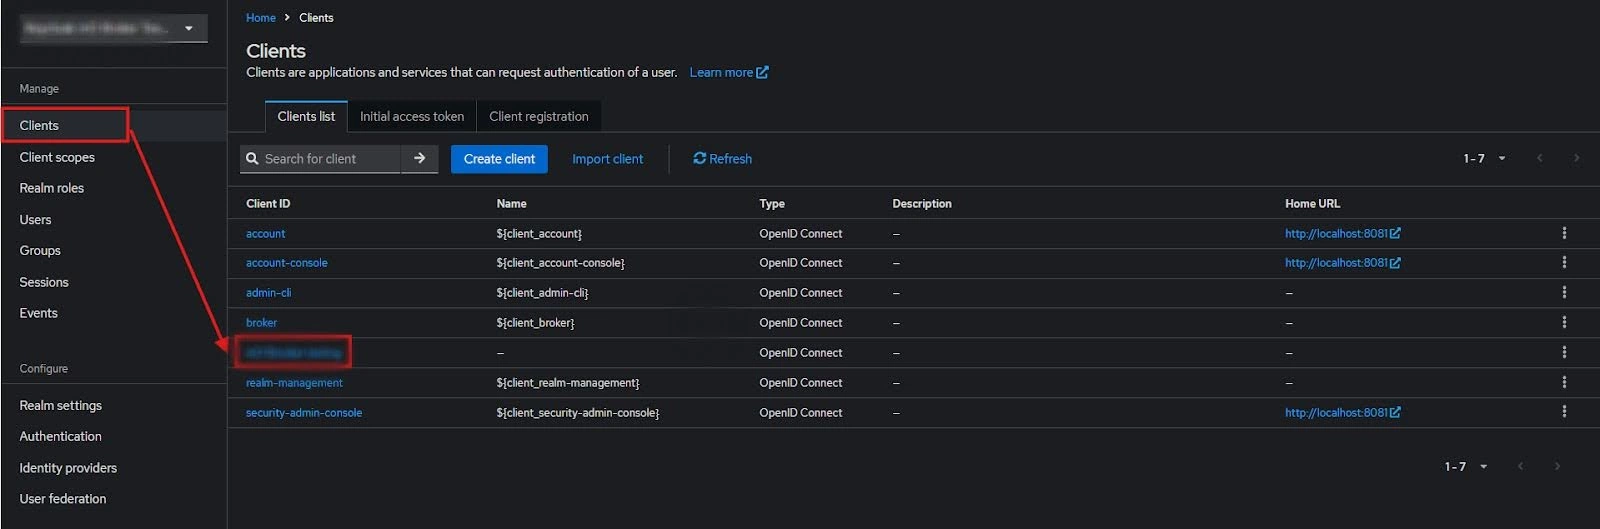
- Then go to “Clients” and select your Client ID.
- Go to Client scopes and Add client scope.
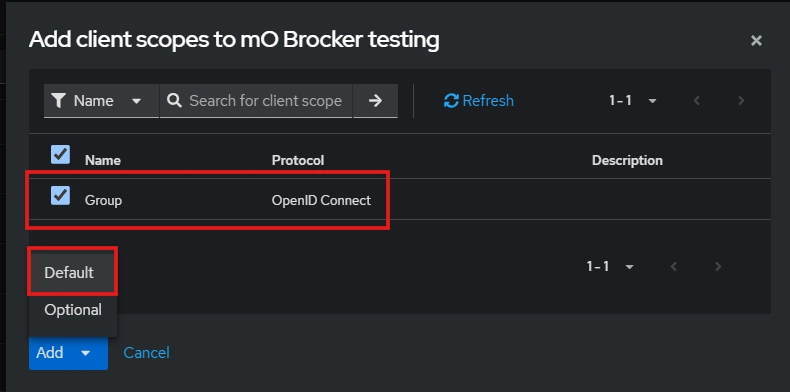
- Select the client scope and Add (default).
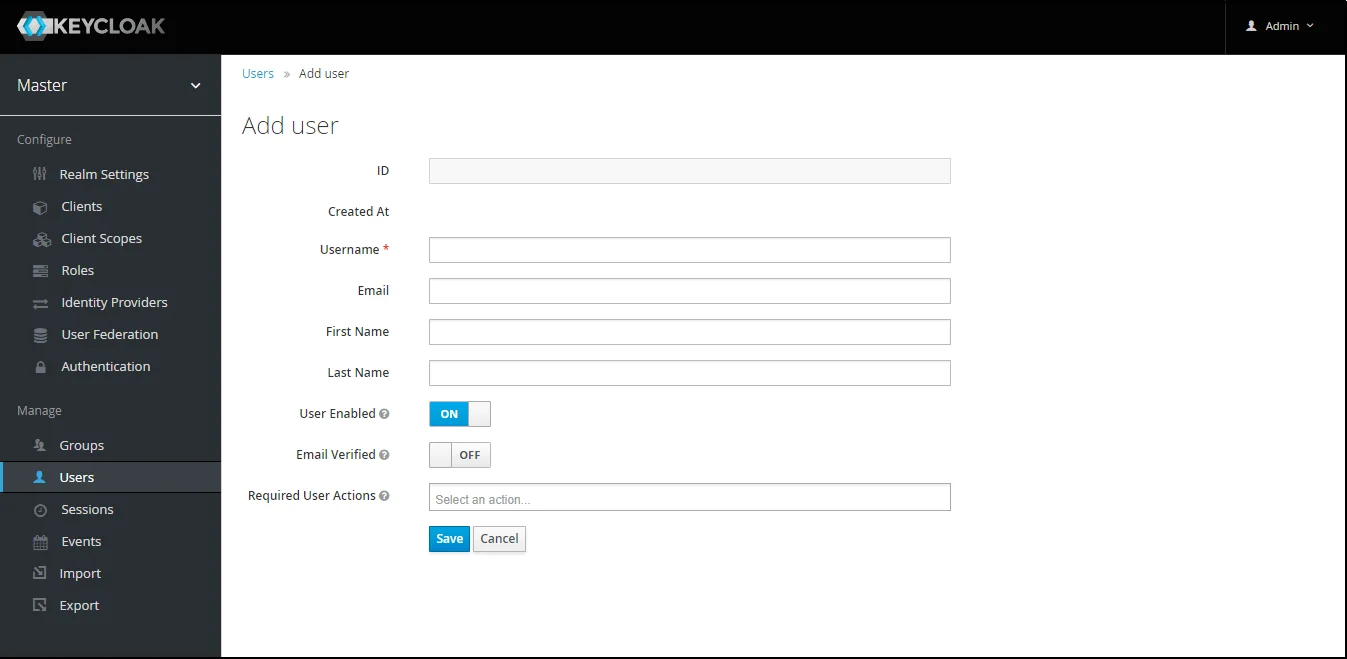
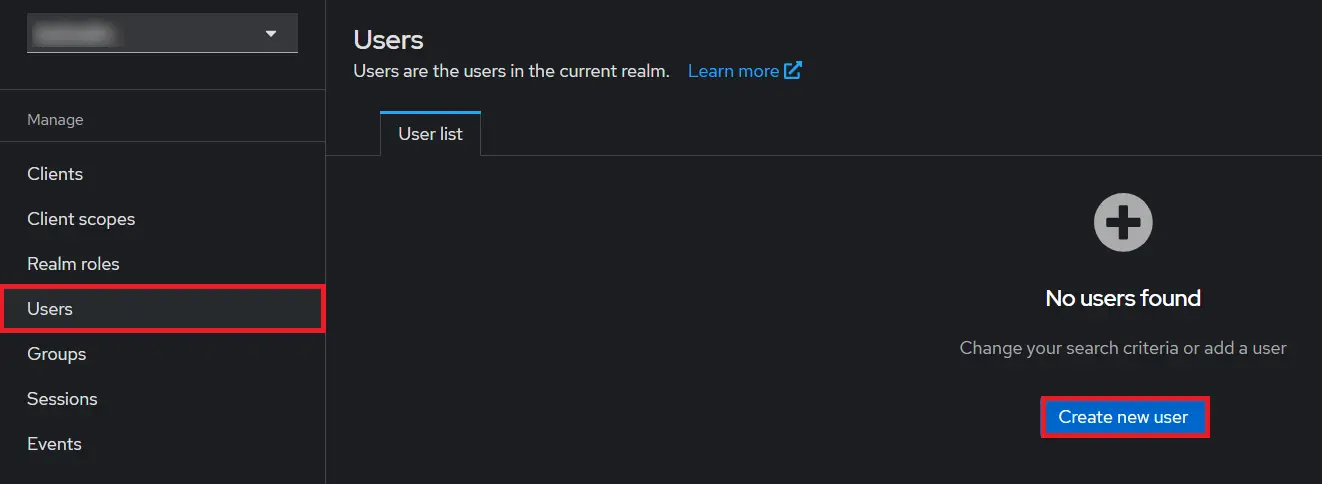
- Add User: We need to add users to realm who will be able to access the resources of realm. Click on the Users and Click on Create new user to Add a new User.
- User Configuration: After user is created following action needs to be performed on it.
- Map User: We need to map user to a role. Click on Role Mappings and assign the user desired role from available roles.
- Create ROLE: The Role will be used by your applications to define which users will be authorized to access the application. Click on the Roles and choose Create Role.
- Navigate to the plugin configuration page, click the "Add New Provider" button (located either in the middle or top-right corner), select Keycloak as the application, and copy the callback URL from the plugin and keep it handy, as you'll need it to configure Keycloak as the OAuth provider.
- Add Realm : Now login to keycloak administration console and navigate to your desired realm. You can add new realm by selecting Create Realm option.
- Create realm: Enter Realm Name and keep the realm name handy as it will required later to configure the Realm under the OAuth Client plugin. Click on CREATE to add realm.
- Create OpenID client: Click on the Clients and choose Create Client to create a new client. Enter Client id and select client protocol openeid-connect and Click Next.
- Enable the Client Authentication and Authorization toggle.
- Scroll down to the Access settings and enter your Callback/Redirect URL which you will get from your plugin present on your Client side under the CallBack URLs text-field.
- Go to the plugin and copy the Client Secret and keep it handy as we will require it later while configuring plugin.
- Plugin Configuration: Enter copied Client Secret under Client secret field in the plugin, and enter the Client ID under the Client ID field.
- After Plugin Configurations, go to Client Scopes to configure the Group Mapper and create a client scope.
- Enter Name:- “Group” and Save.
- After saving, click on “Mappers” and configure a new Mapper.
- Select “Group Membership”
- Enter the Name, Token claim name and disable “Full group path” and Save.
- Then go to “Clients” and select your Client ID.
- Go to Client scopes and Add client scope.
- Select the client scope and Add (default).
- Add User: We need to add users to r+ealm who will be able to access the resources of realm. Click on the Users and Click on Create new user to Add a new User.
- User Configuration: After user is created following action needs to be performed on it.
- Map User: We need to map user to a role. Click on Role Mappings and assign the user desired role from available roles.
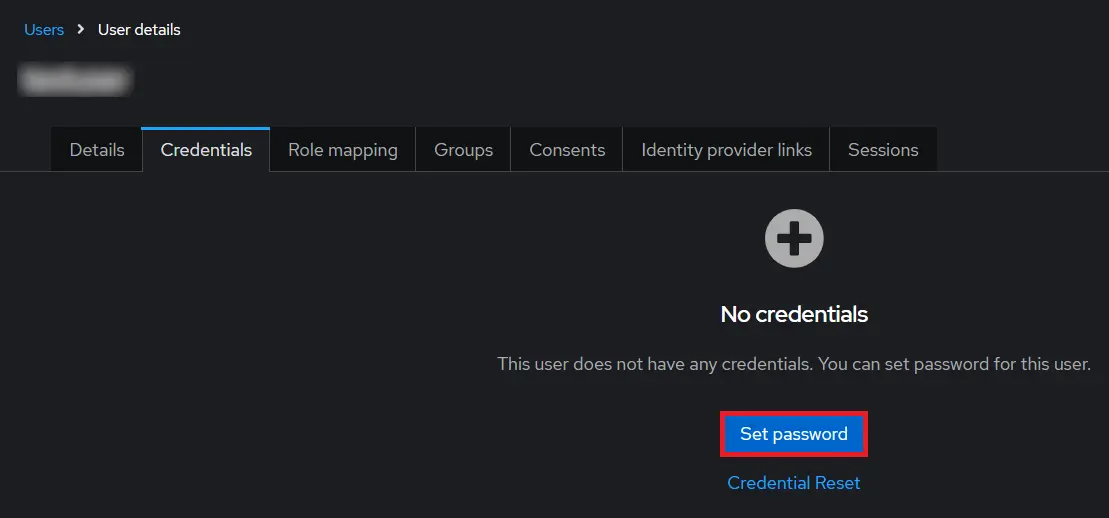
- 1) Setting a password for it so click on Credentials and set a new Password
for the user.
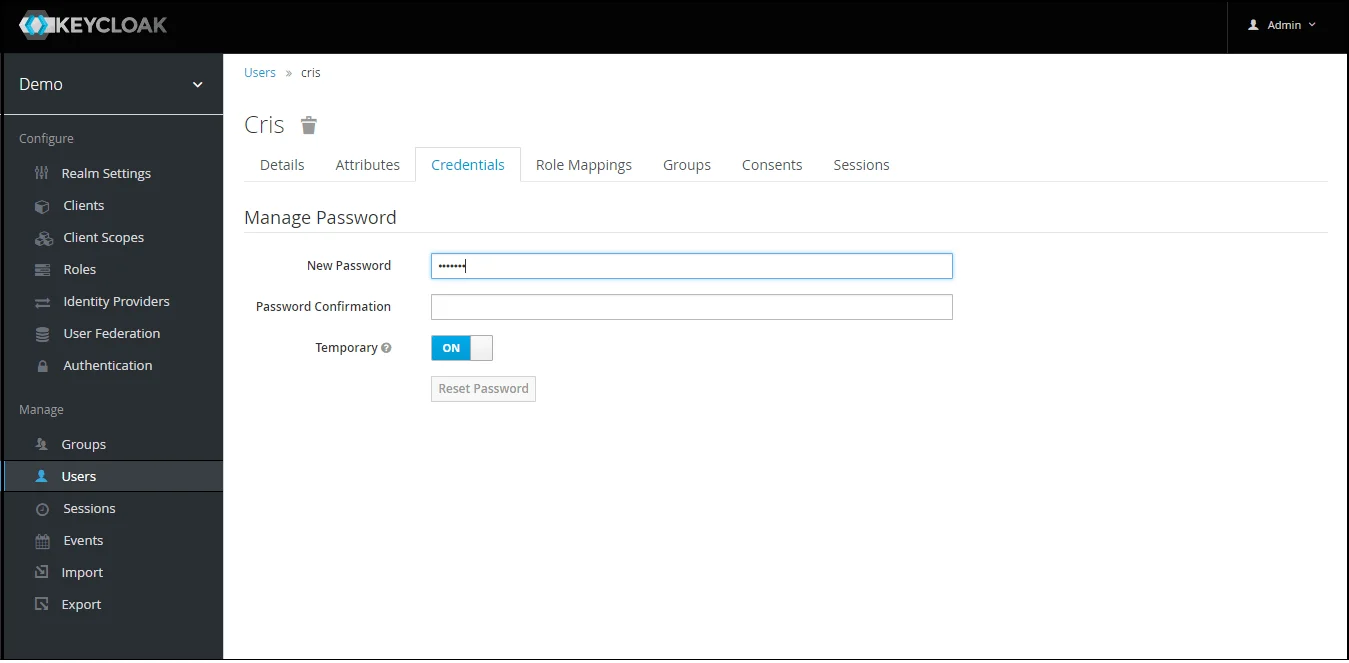
NOTE : Disabling Temporary will make user password permanent.

Step 1.1: Steps to fetch Keycloak Groups [Premium]

Note: -- If full path is on group path will be fetched else group name will be fetched.
Step 1.2: Steps to fetch Keycloak Roles [Premium]
- 1) Setting a password for it so click on Credentials and set a new Password
for the user.
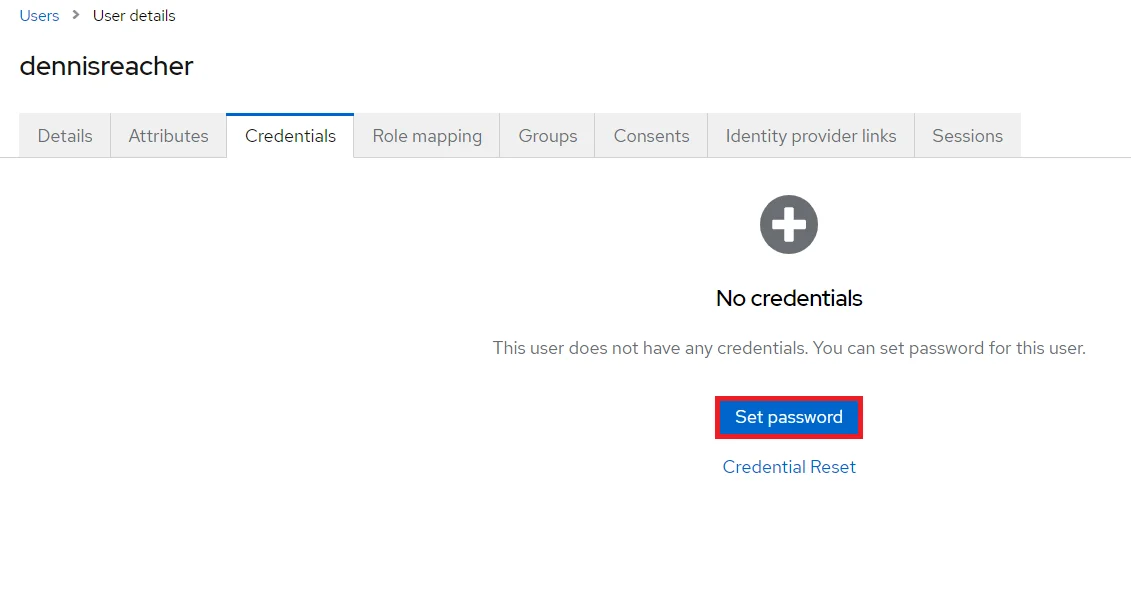
NOTE : Disabling Temporary will make user password permanent.
 x
x
- 1) Setting a password for it so click on Credentials and set a new Password
for the user.
NOTE : Disabling Temporary will make user password permanent.
Step 2: Setup JSM as OAuth Client
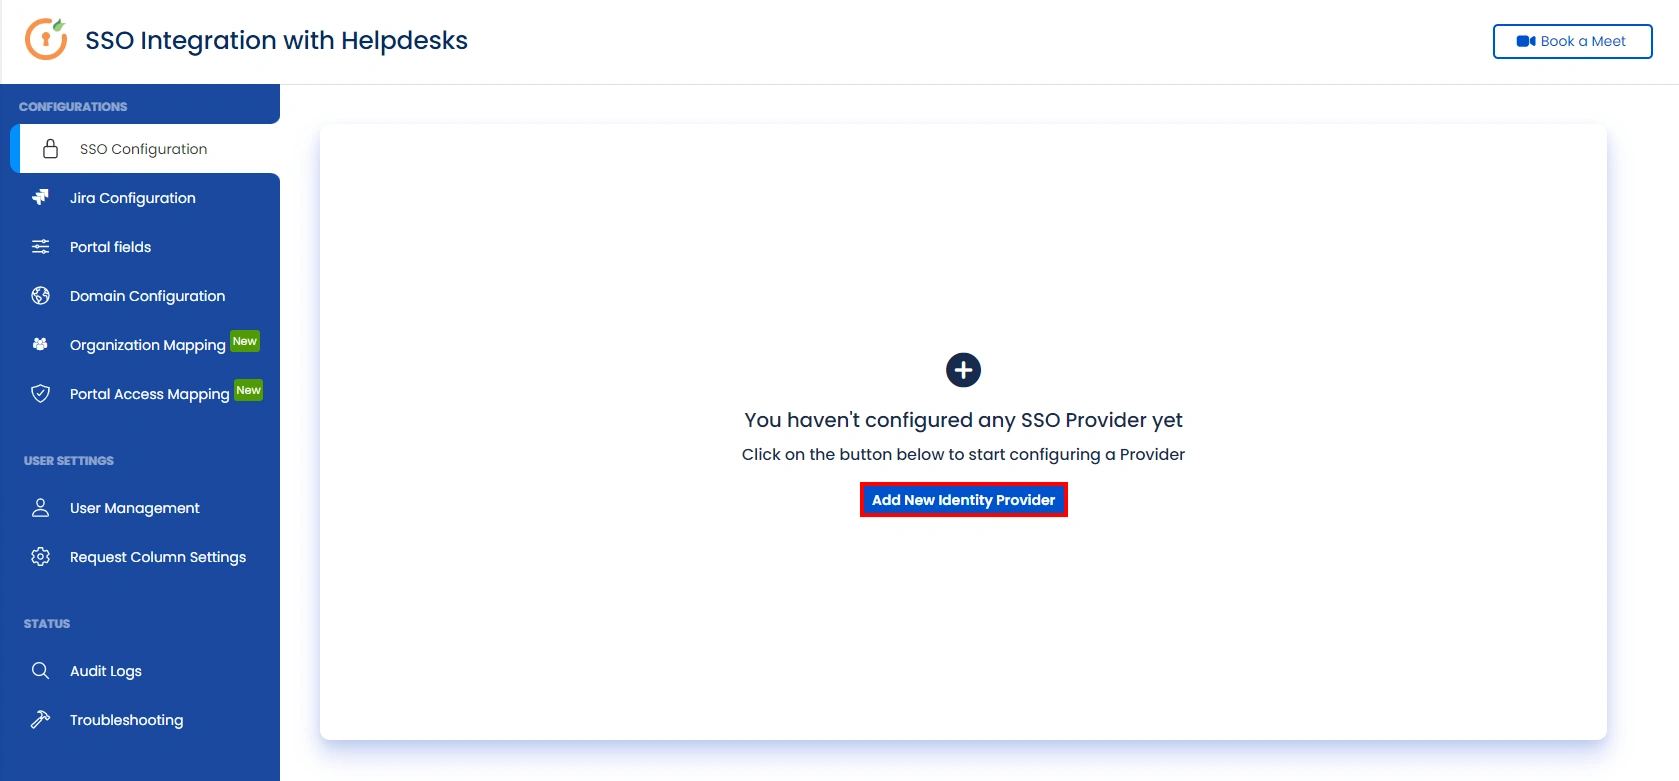
- Go to the Manage Apps -> click Getting started under SSO Integration with Helpdesk then click on the Add New Identity Provider.
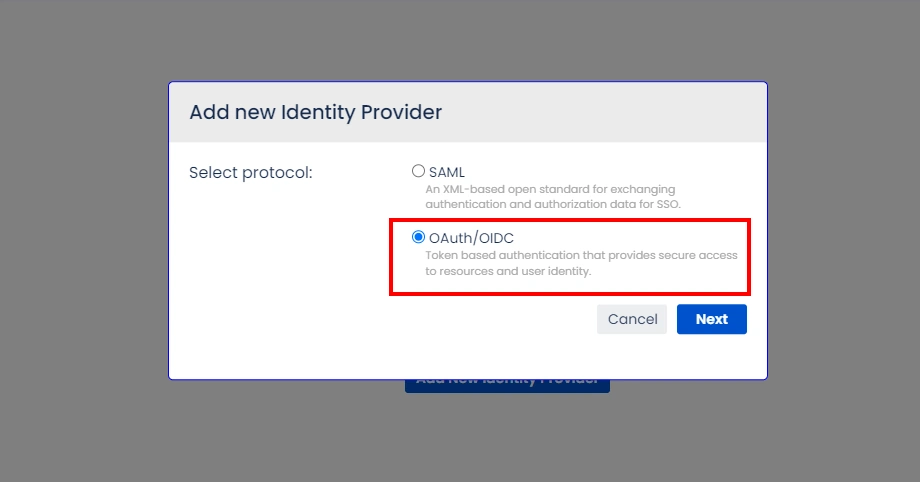
- Select OAuth/OIDC and click on the next button.
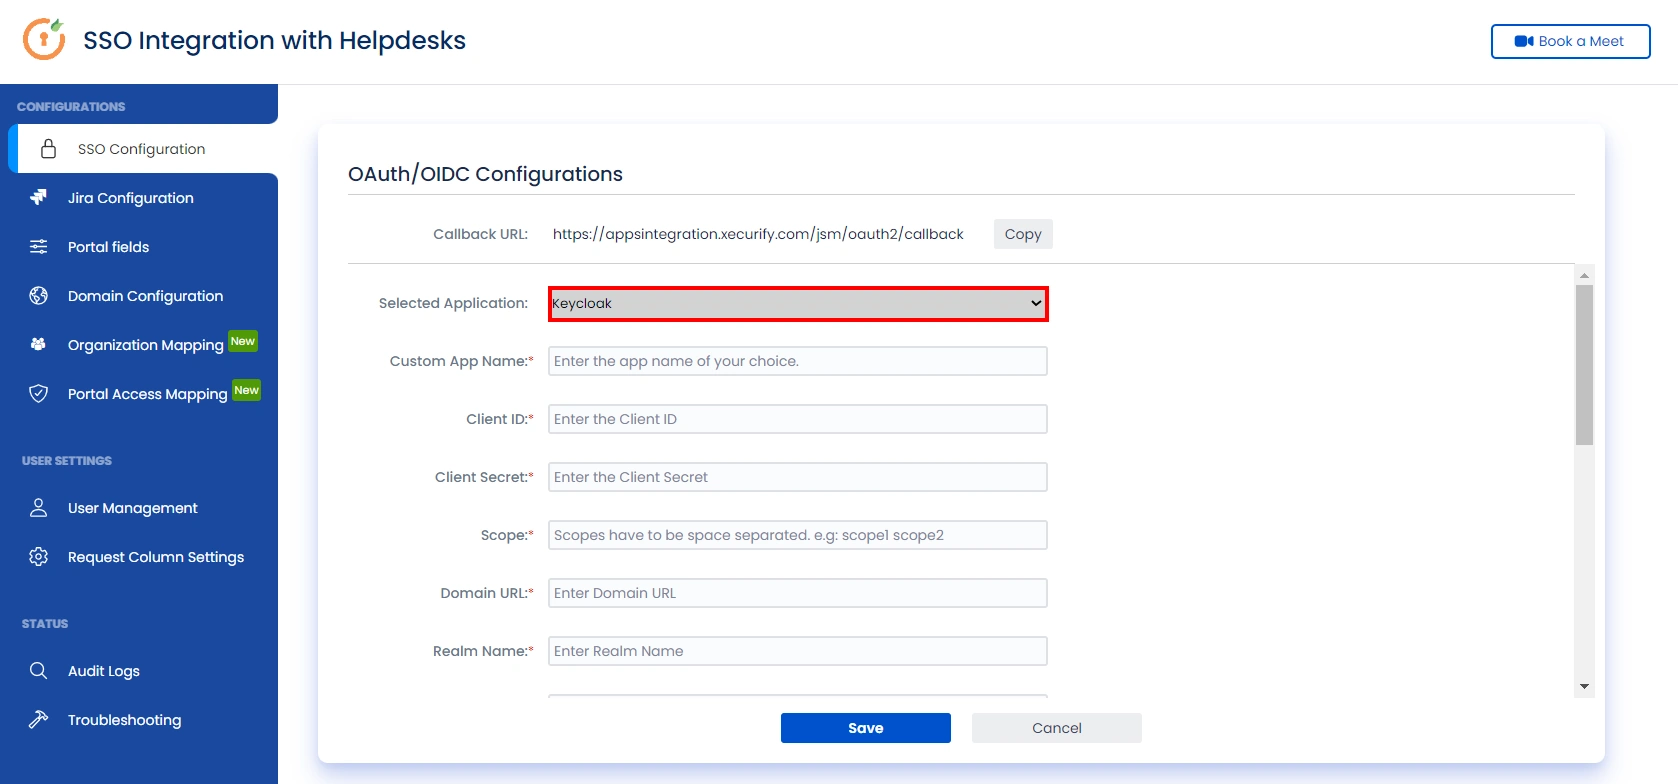
- Select Keycloak from the Selected Application dropdown menu.
- Enter copied Client ID, Secret, Host Name, Realm Name in the plugin.
- Enter JWKS EndPoint URL or Public Key for signature validation.
eg.http://${yourKeycloakDomain}/auth/realms/${realmName}/protocol/openid-connect/certs - Click on Save button and then test connection for verifying the entered details.
Step 3: User Attribute Mapping
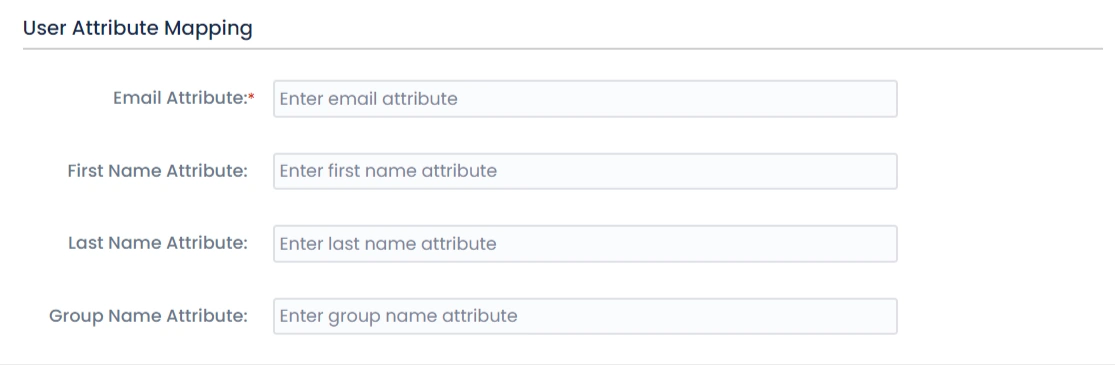
- Once you see all the values in Test connection, go to User Attribute Mapping. Map attributes like Email, firstname, lastname, etc. Click on Save.
Step 4: Integrate Atlassian HelpDesk with JSM SSO
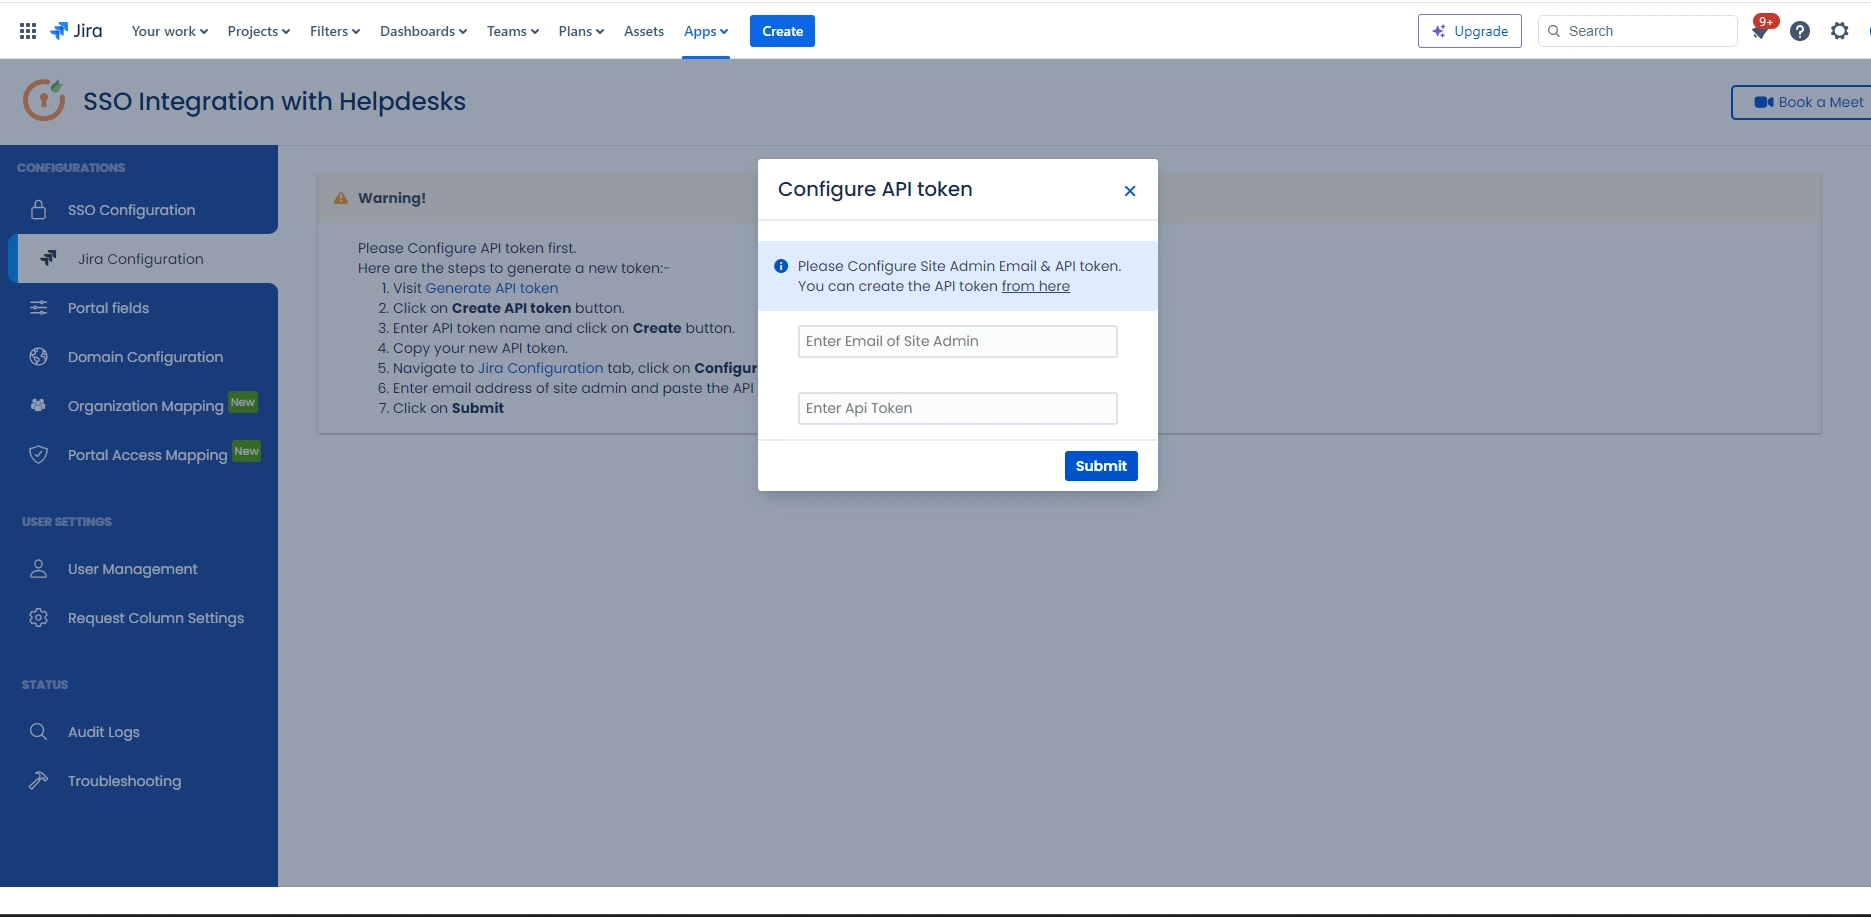
- Navigate to the Jira Configuration tab. Click on the Configure API Token and configure the Service Account API token with the email.
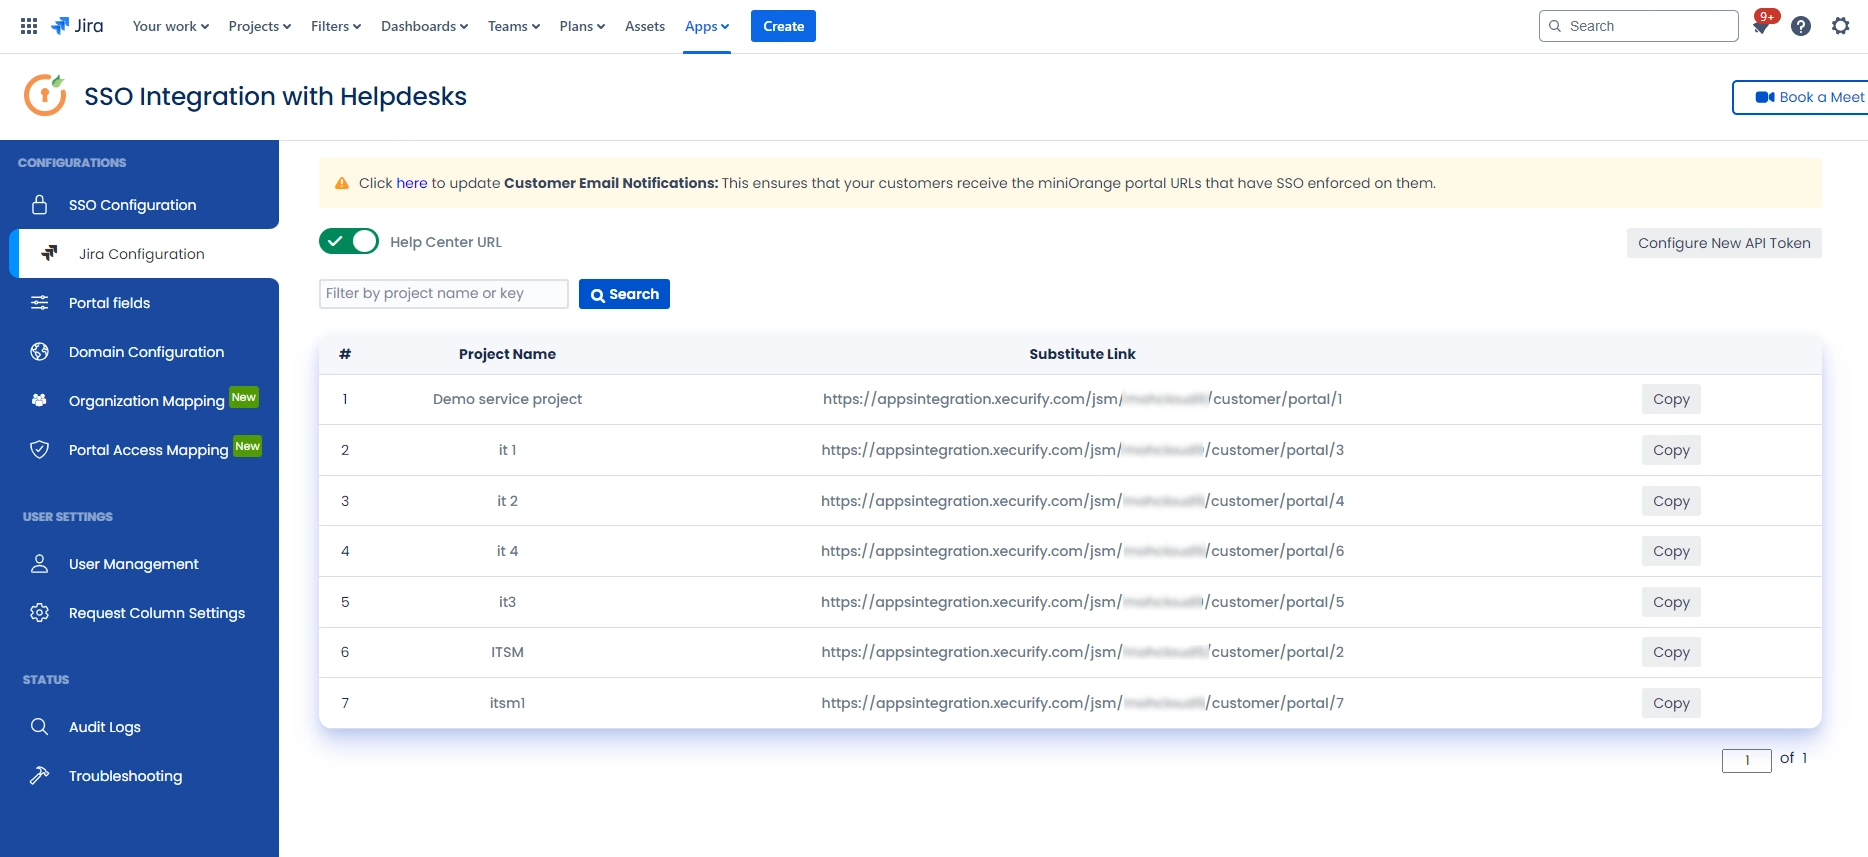
- After successful configuration of API token all the service desk projects with respective links will be displayed. These substituted links will be used by customers for accessing particular projects with SSO.
- Copy any of the substitute links you see for your portals and try accessing it in a private browser window. You would be automatically redirected to your Identity Provider for authentication and would be allowed access to the portal only after successful authentication.
Additional Resources
Did this page help you?
