- Home
- 2FA
- 2FA Documentation
- Two-factor Authentication for JSM

How to Set Up Two-Factor Authentication (2FA) for JSM Portal Customers
The miniOrange Two-Factor Authentication (2FA) app lets you enforce 2FA for your Jira Service Management (JSM) portal-only customers through Atlassian Guard. This guide walks you through the complete setup, from selecting your region and activating Atlassian Guard Standard, to configuring SAML or OAuth SSO (with or without an external Identity Provider) and enabling 2FA authentication policies.
 Try it for free
Pre-requisites
- A Jira Cloud instance with admin access.
- Atlassian Admin permissions.
Download and Installation
- Access Jira Admin
- Log in to your Jira Cloud instance as an administrator.
- Navigate to Settings → Apps → Manage Apps.
- Install the App
- Click Find New Apps.
- Search for mO Two Factor Authentication (2FA) for JSM Cloud.
- Click Try it free to begin a trial, or Buy now to purchase.
- Select a site if you have multiple sites, then click Review.
- Click Start Free Trial. You will be redirected to MyAtlassian.
- Click Apply license.
- Access the Application
- Navigate to Apps → mO Two Factor Authentication (2FA) for JSM Cloud.
- You will be redirected to the application in a new tab.
Setup Tab
The Setup tab guides you through the initial configuration in a linear wizard. Complete each step in order: select your region, configure Atlassian Guard, choose whether your customers use an external Identity Provider, and finish the Guard integration.
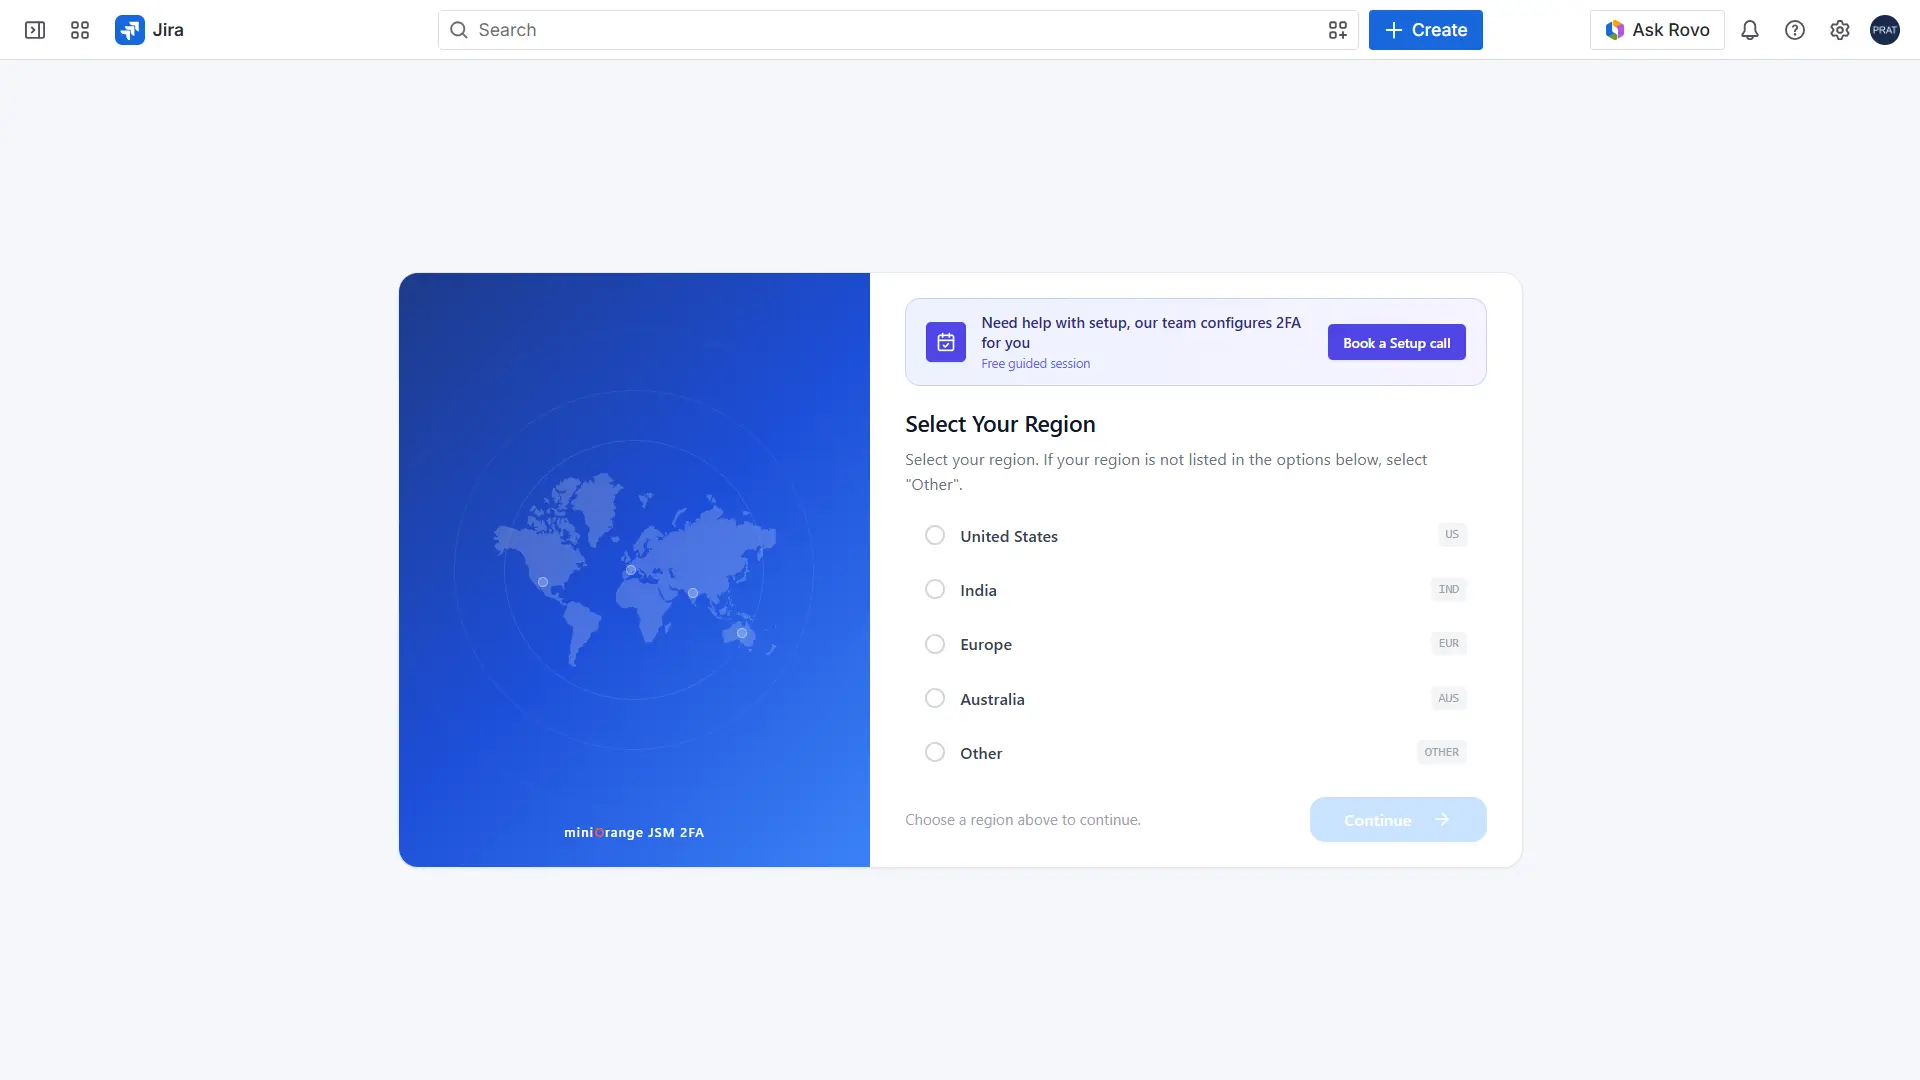
1: Select Your Preferred Region
To ensure optimal performance, low latency, and compliance with data residency requirements, the plugin provides multiple regional server locations. Servers are currently available in the following regions:
- United States
- India
- Europe
- Australia
- Other (for regions not listed above)
Select the region that best matches your organization's data residency requirements, or the one geographically closest to your users, for the best authentication performance and response times.
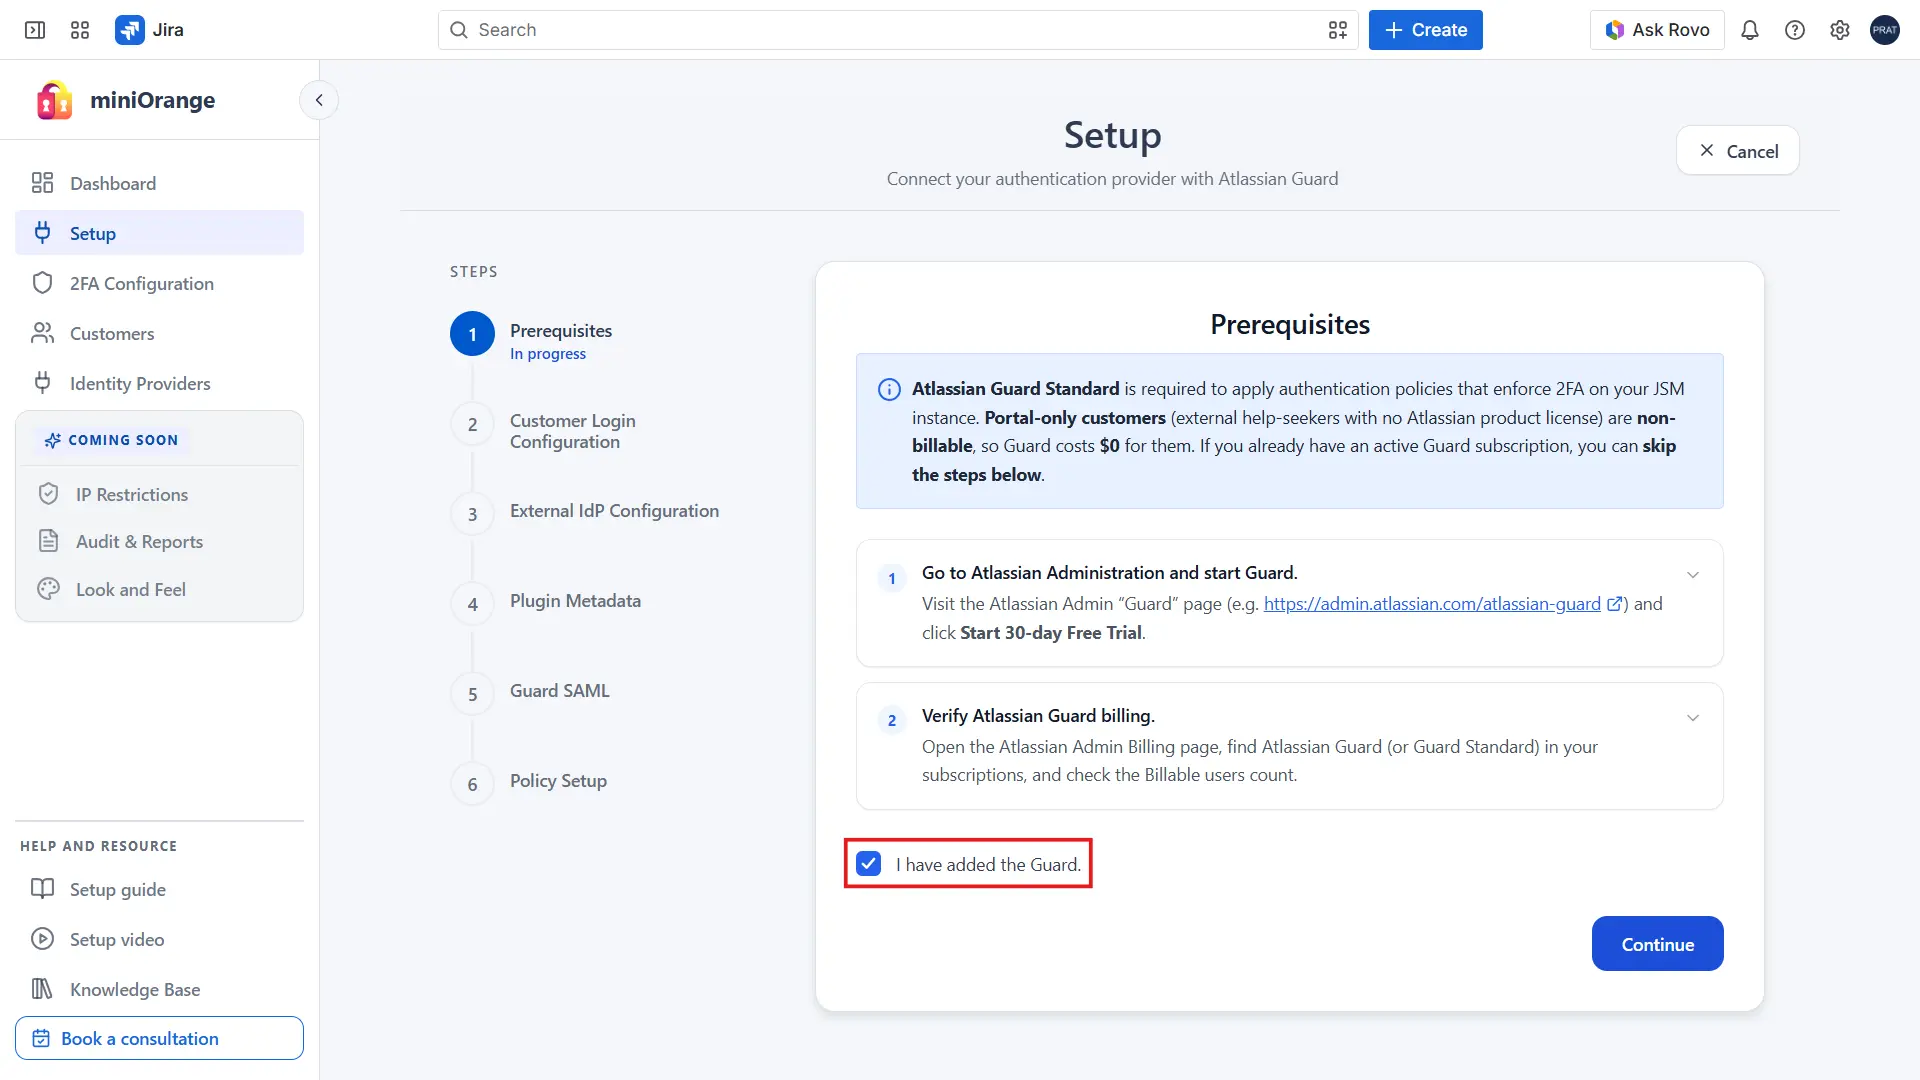
2: Configure Atlassian Guard
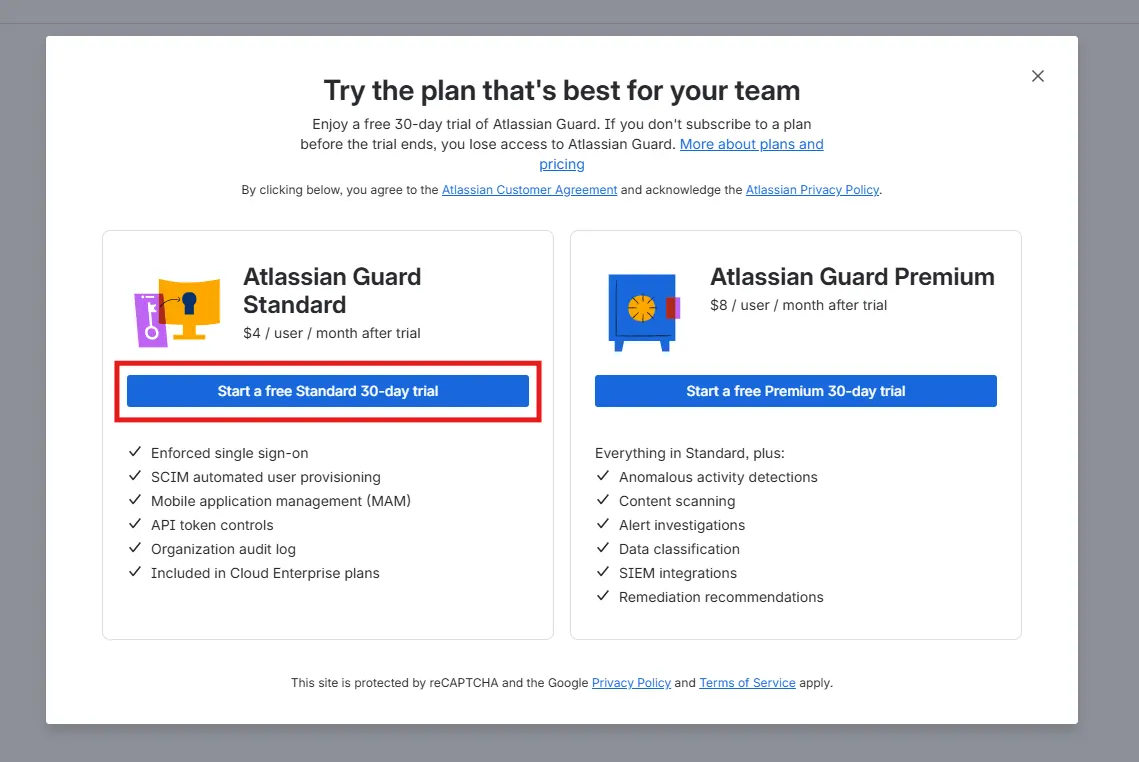
To configure 2FA for your Jira Service Management (JSM) portal customers, you must have an active Atlassian Guard Standard subscription for your organization.
If Atlassian Guard Standard is already active for your organization, you can skip this step and proceed to the next section.
If you do not yet have an active Guard subscription, follow the steps below:
Enable Atlassian Guard Standard (Free Trial)
- Open the Atlassian Guard admin page: https://admin.atlassian.com/atlassian-guard
- If your account manages multiple organizations, select the organization where you want to configure 2FA for portal users.
- Click Start a free Standard 30-day trial to activate the trial for the selected organization.
- Return to the 2FA app's Setup tab, select the confirmation checkbox, then click Continue to proceed.
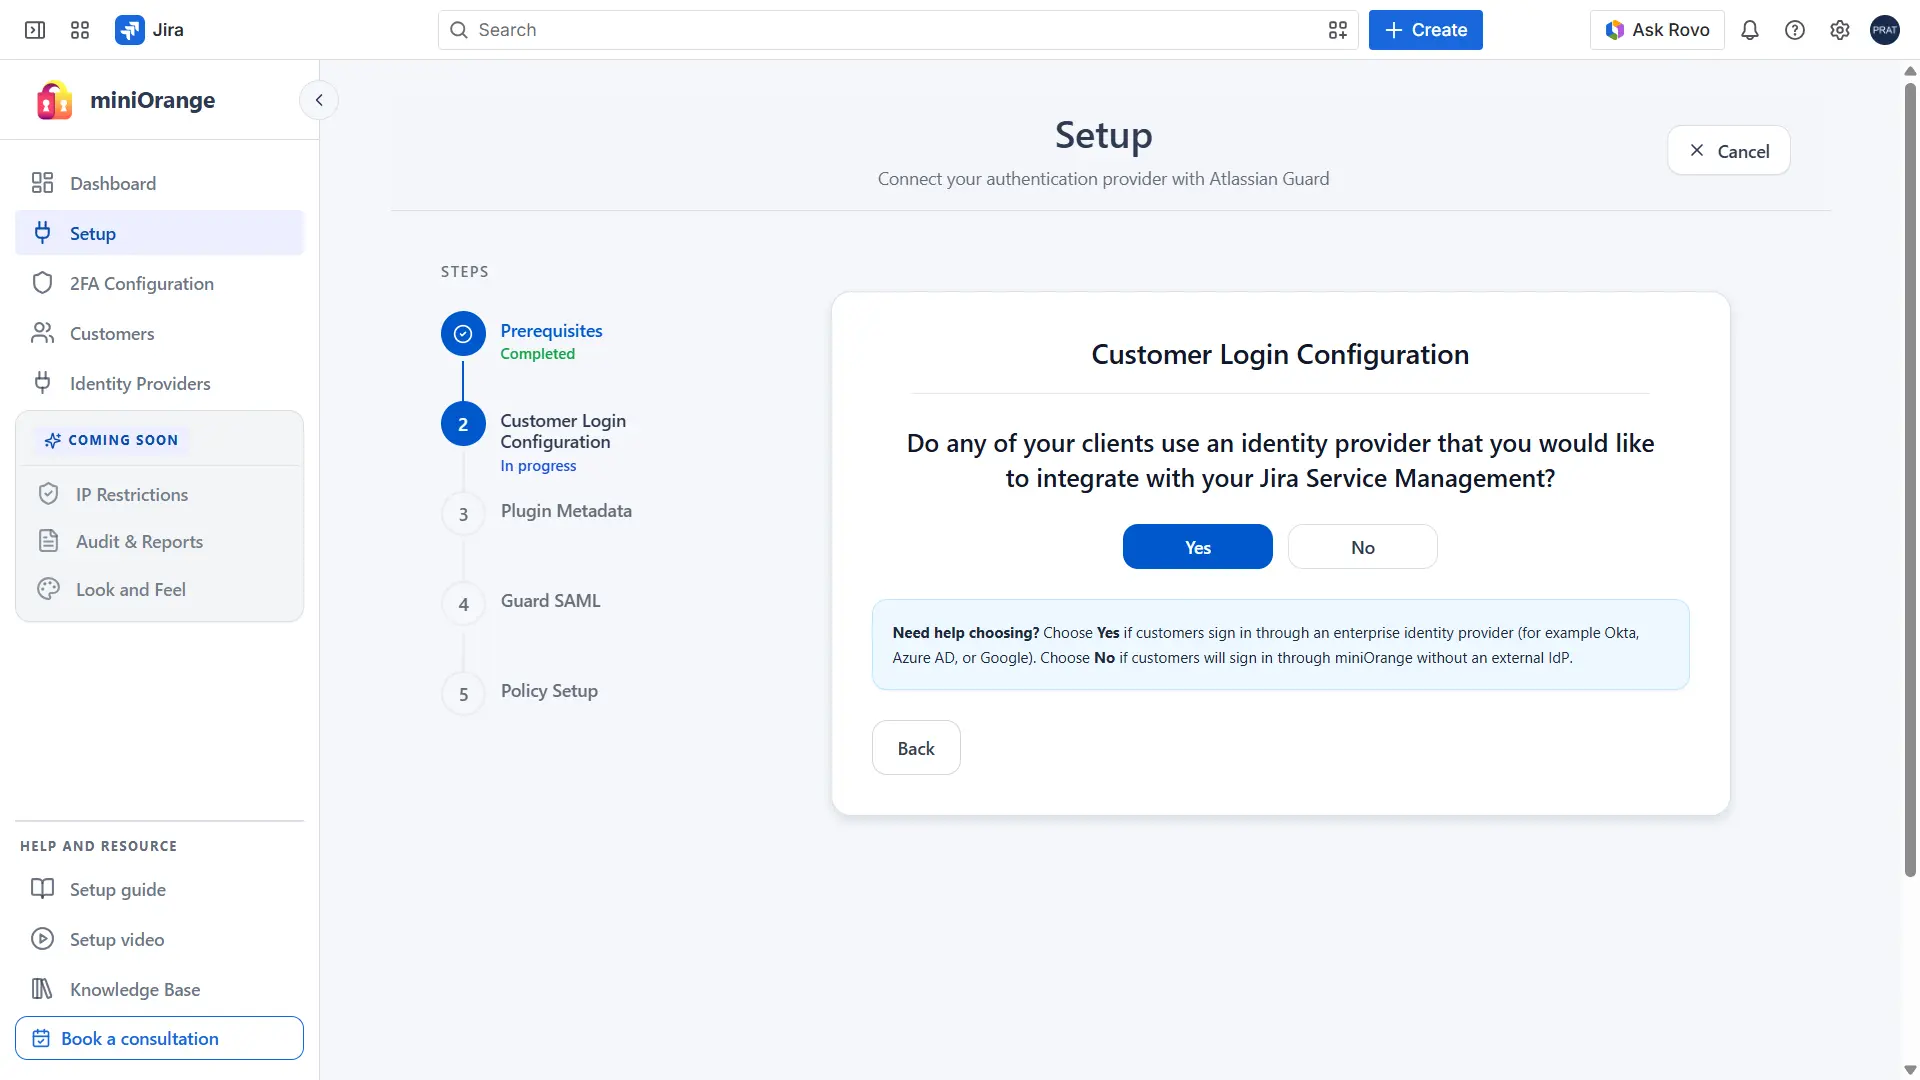
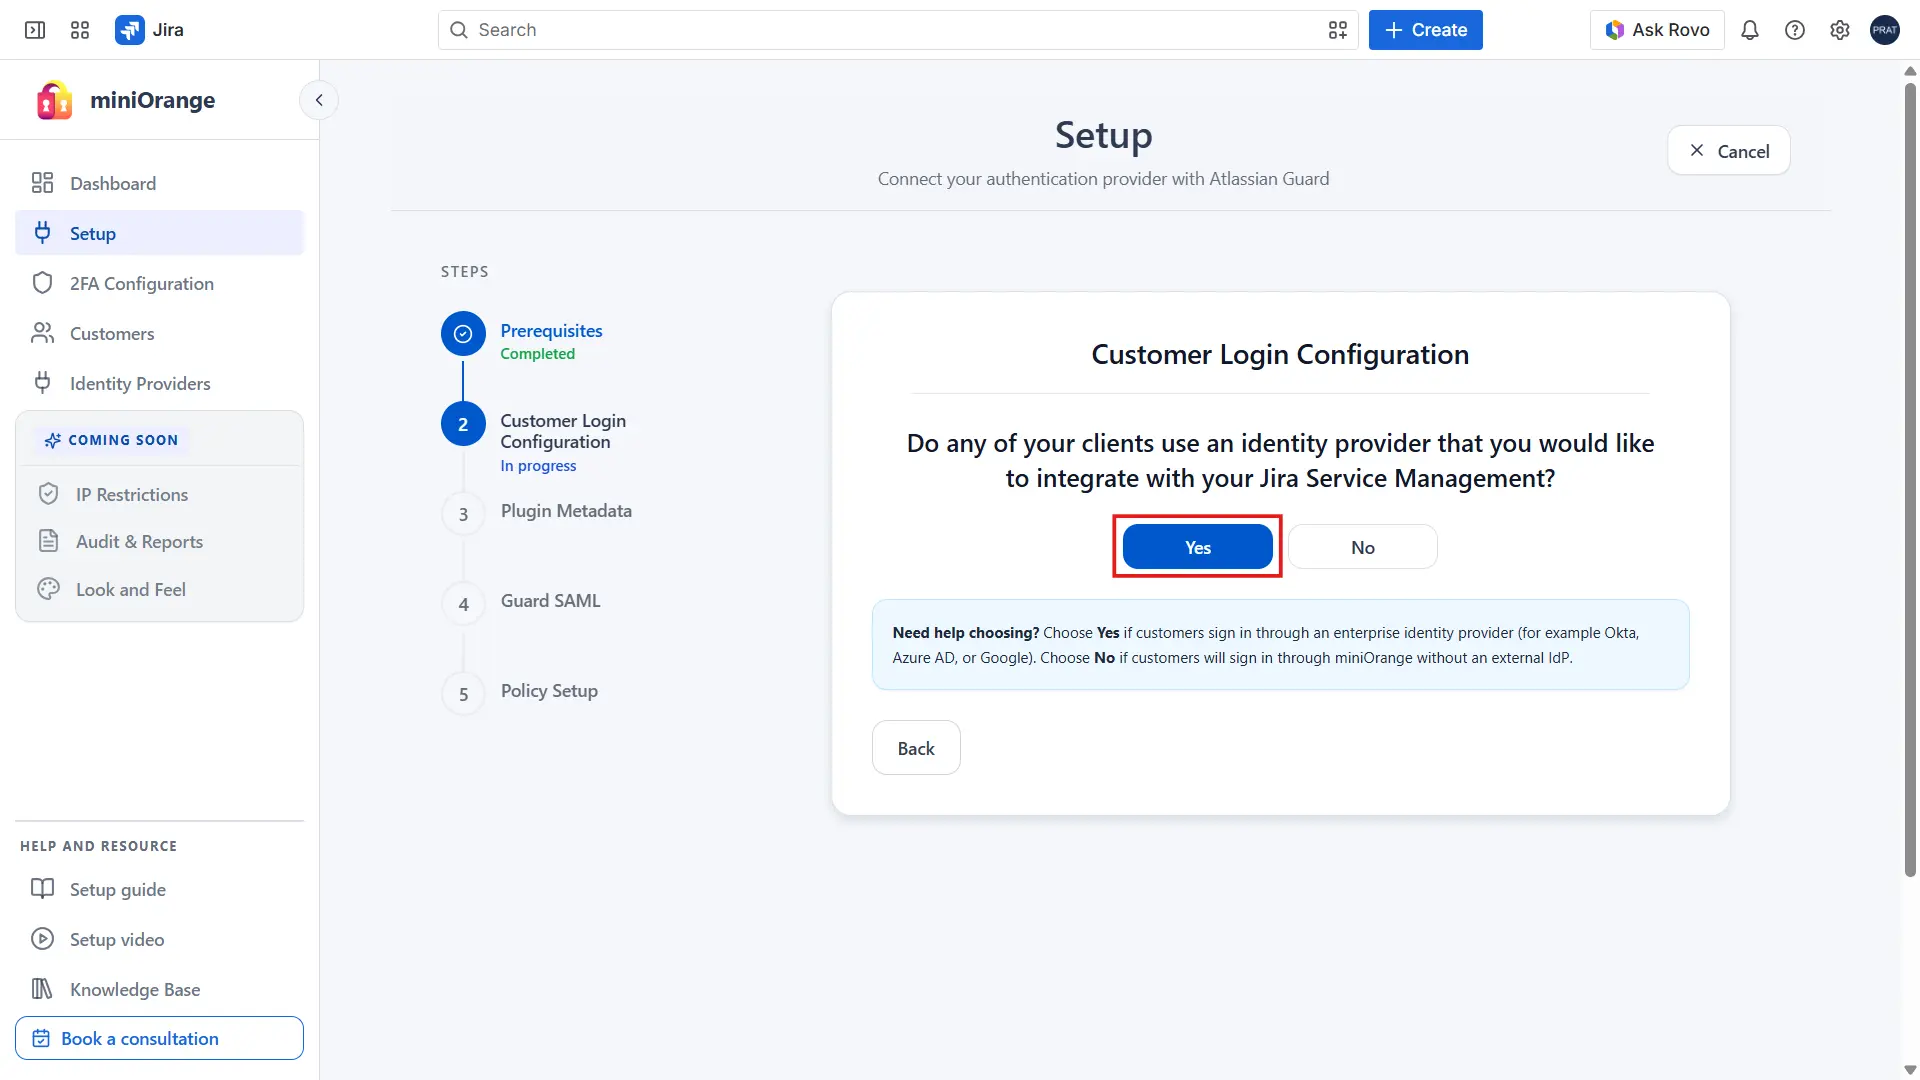
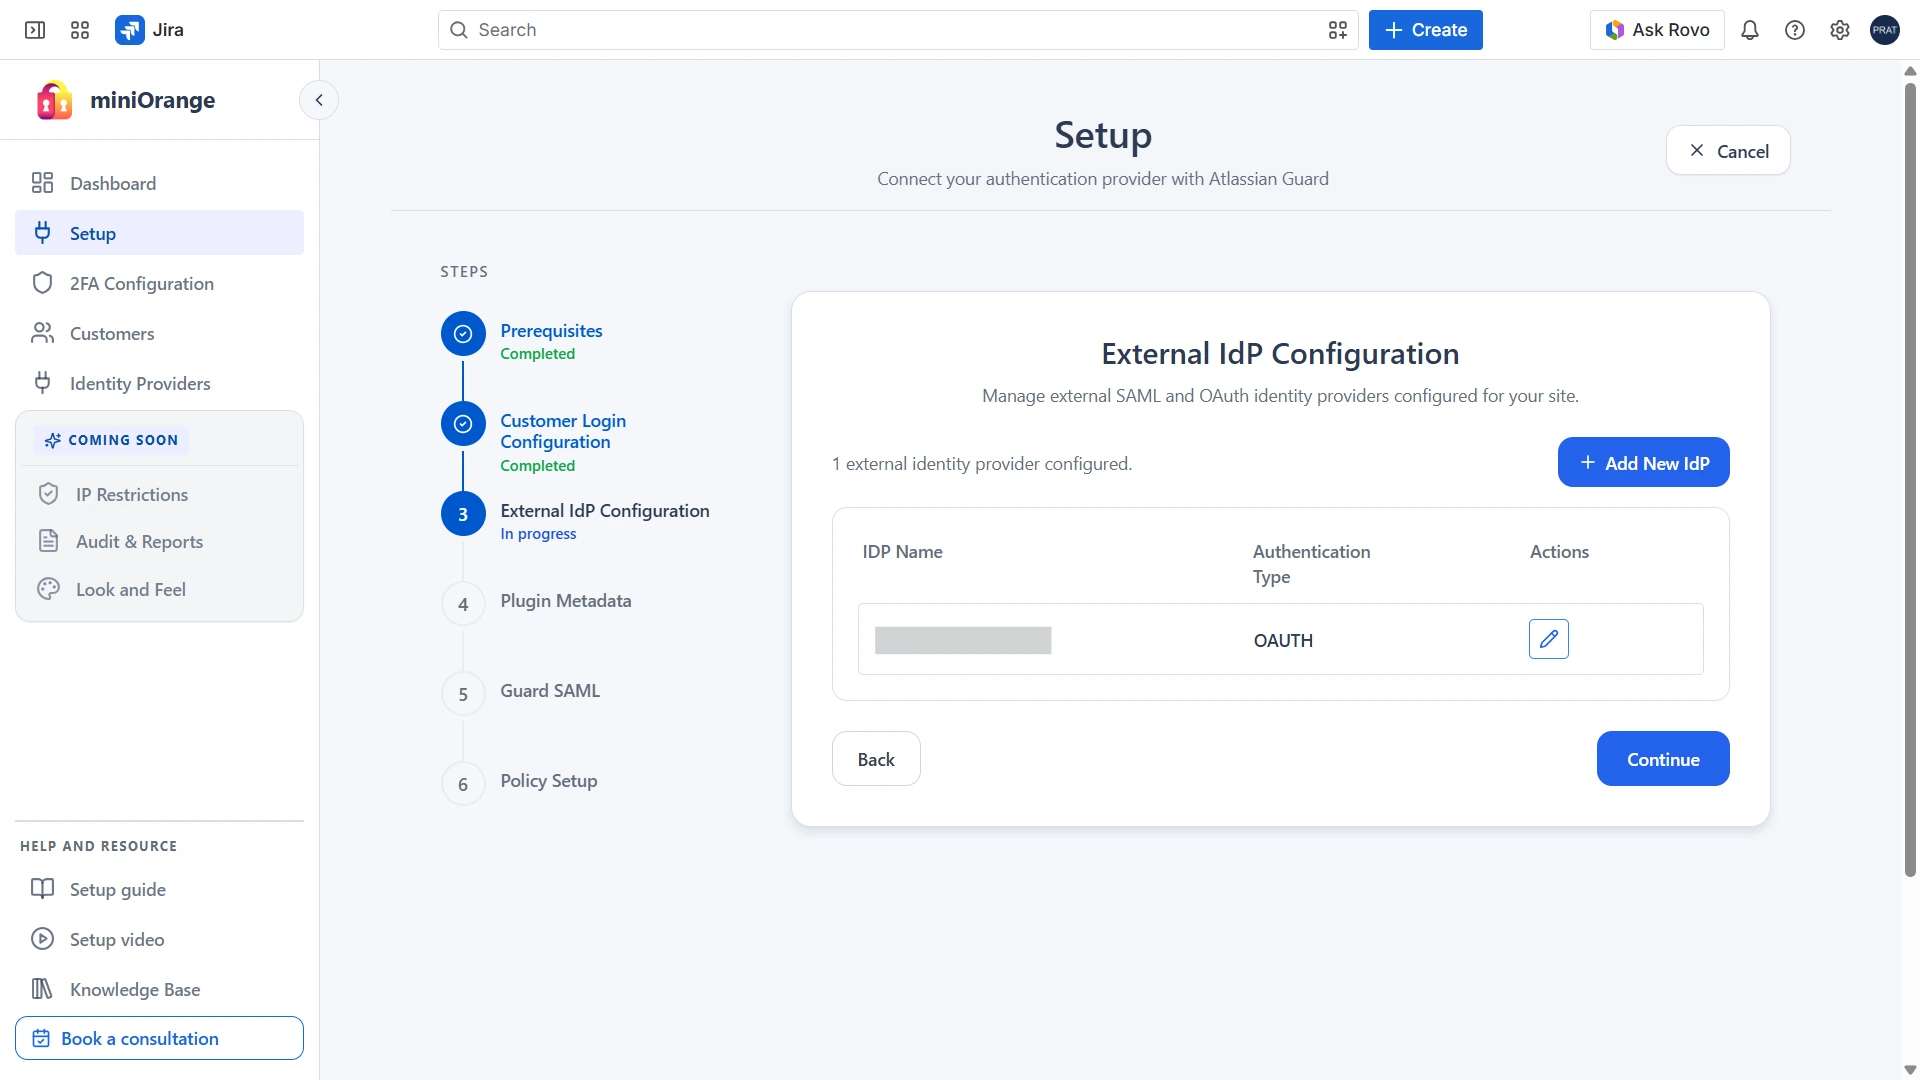
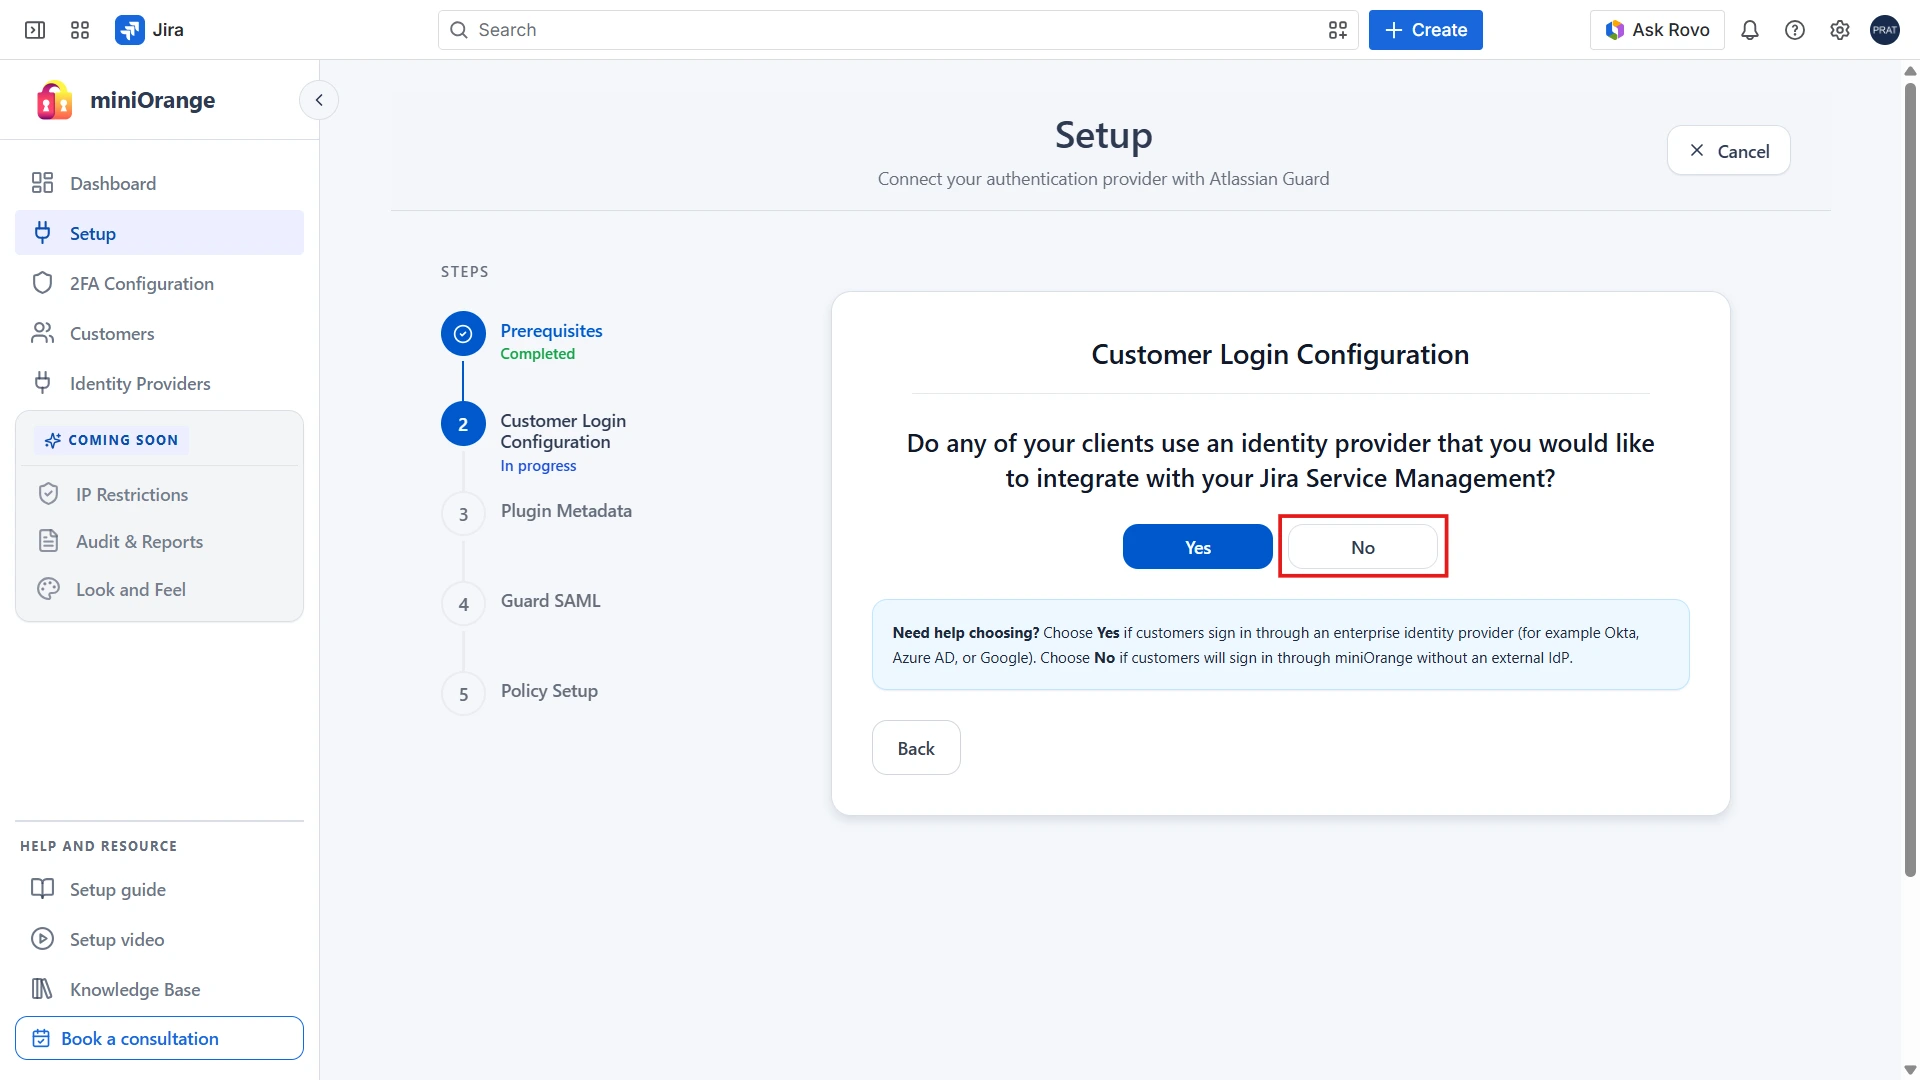
3: Configure External Identity Provider
In this step, choose whether your customers authenticate using an external Identity Provider (IdP).
- Select Yes if your customers use an external Identity Provider, such as Okta, Microsoft Entra ID (Azure AD), Google Workspace, or any other SAML/OAuth provider, to sign in to your JSM portal. You will then continue with the Identity Provider configuration below.
- Select No if your customers do not use an external Identity Provider. In this case, you can skip the IdP configuration and proceed directly to the Guard Setup step.
 3A. If You Use an External Identity Provider
If you selected Yes, configure your external IdP using either SAML or OAuth/OIDC, depending on what your provider supports.
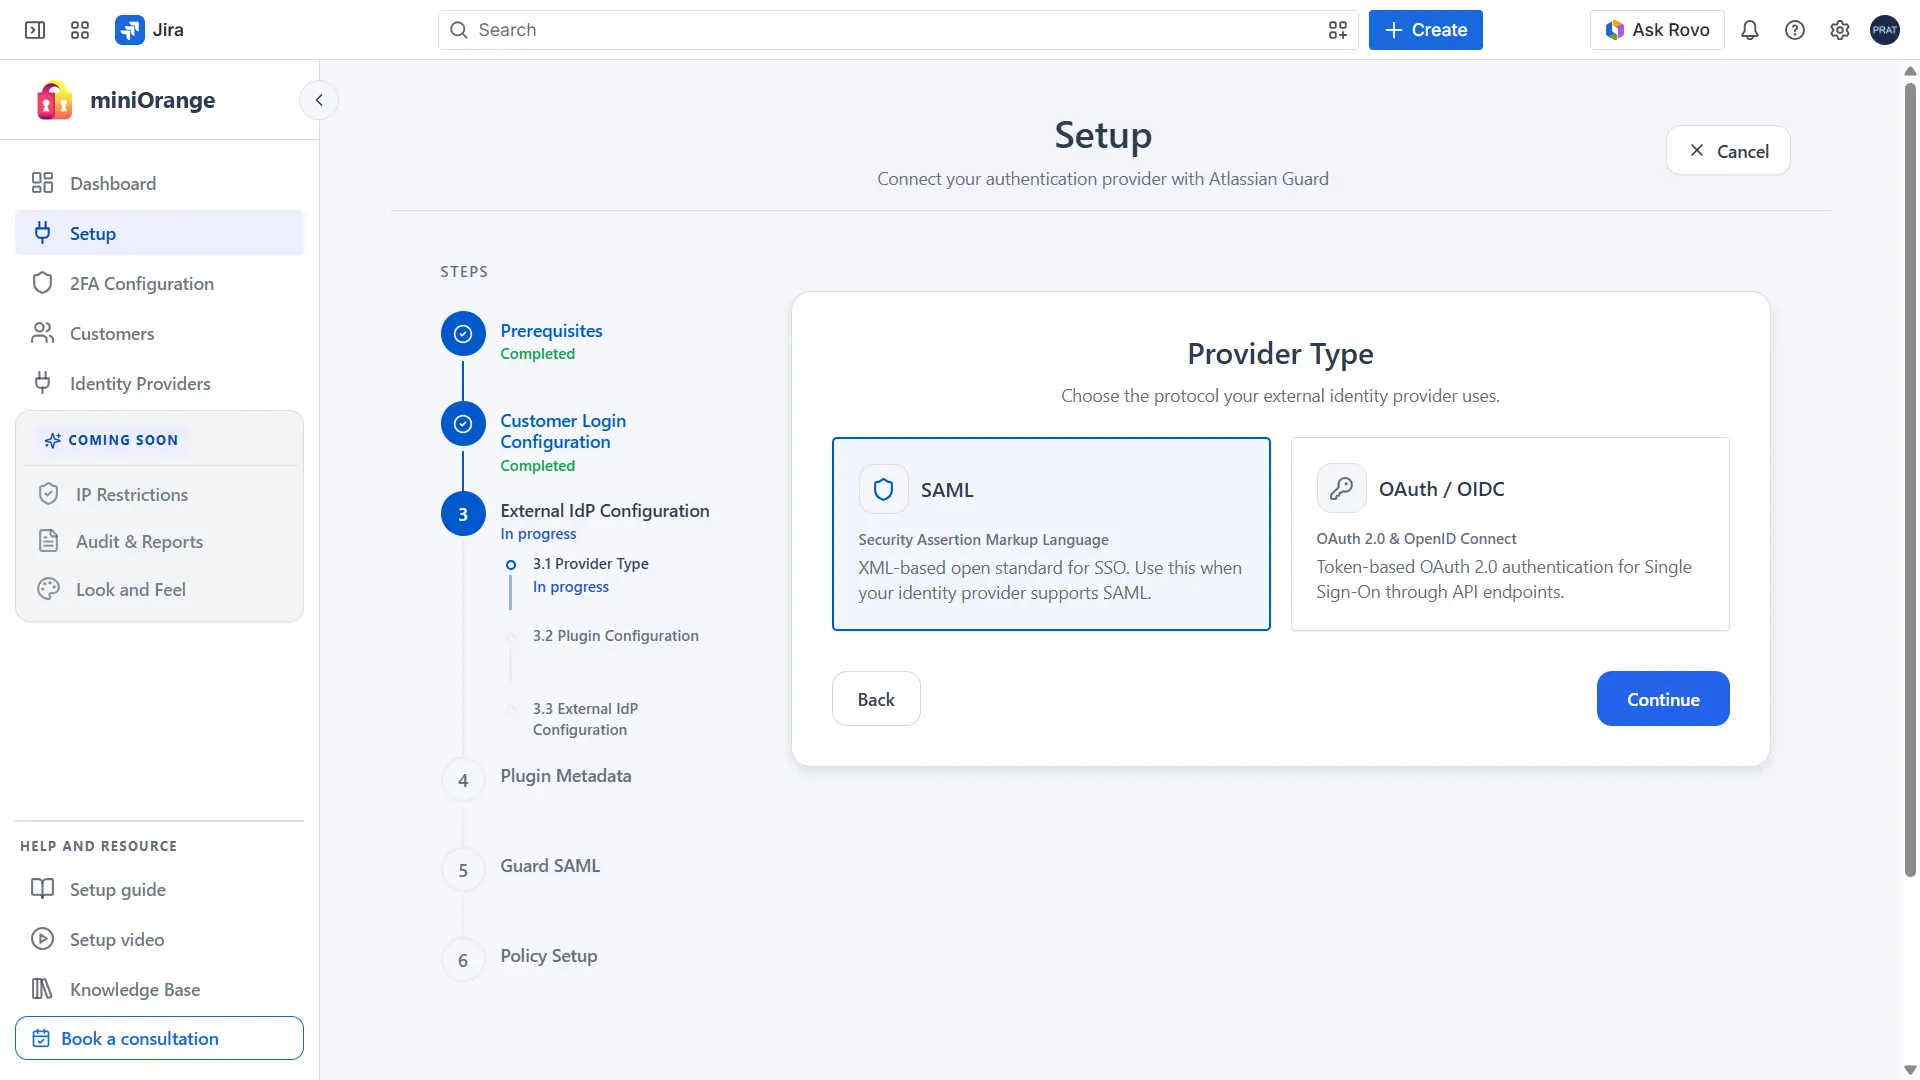
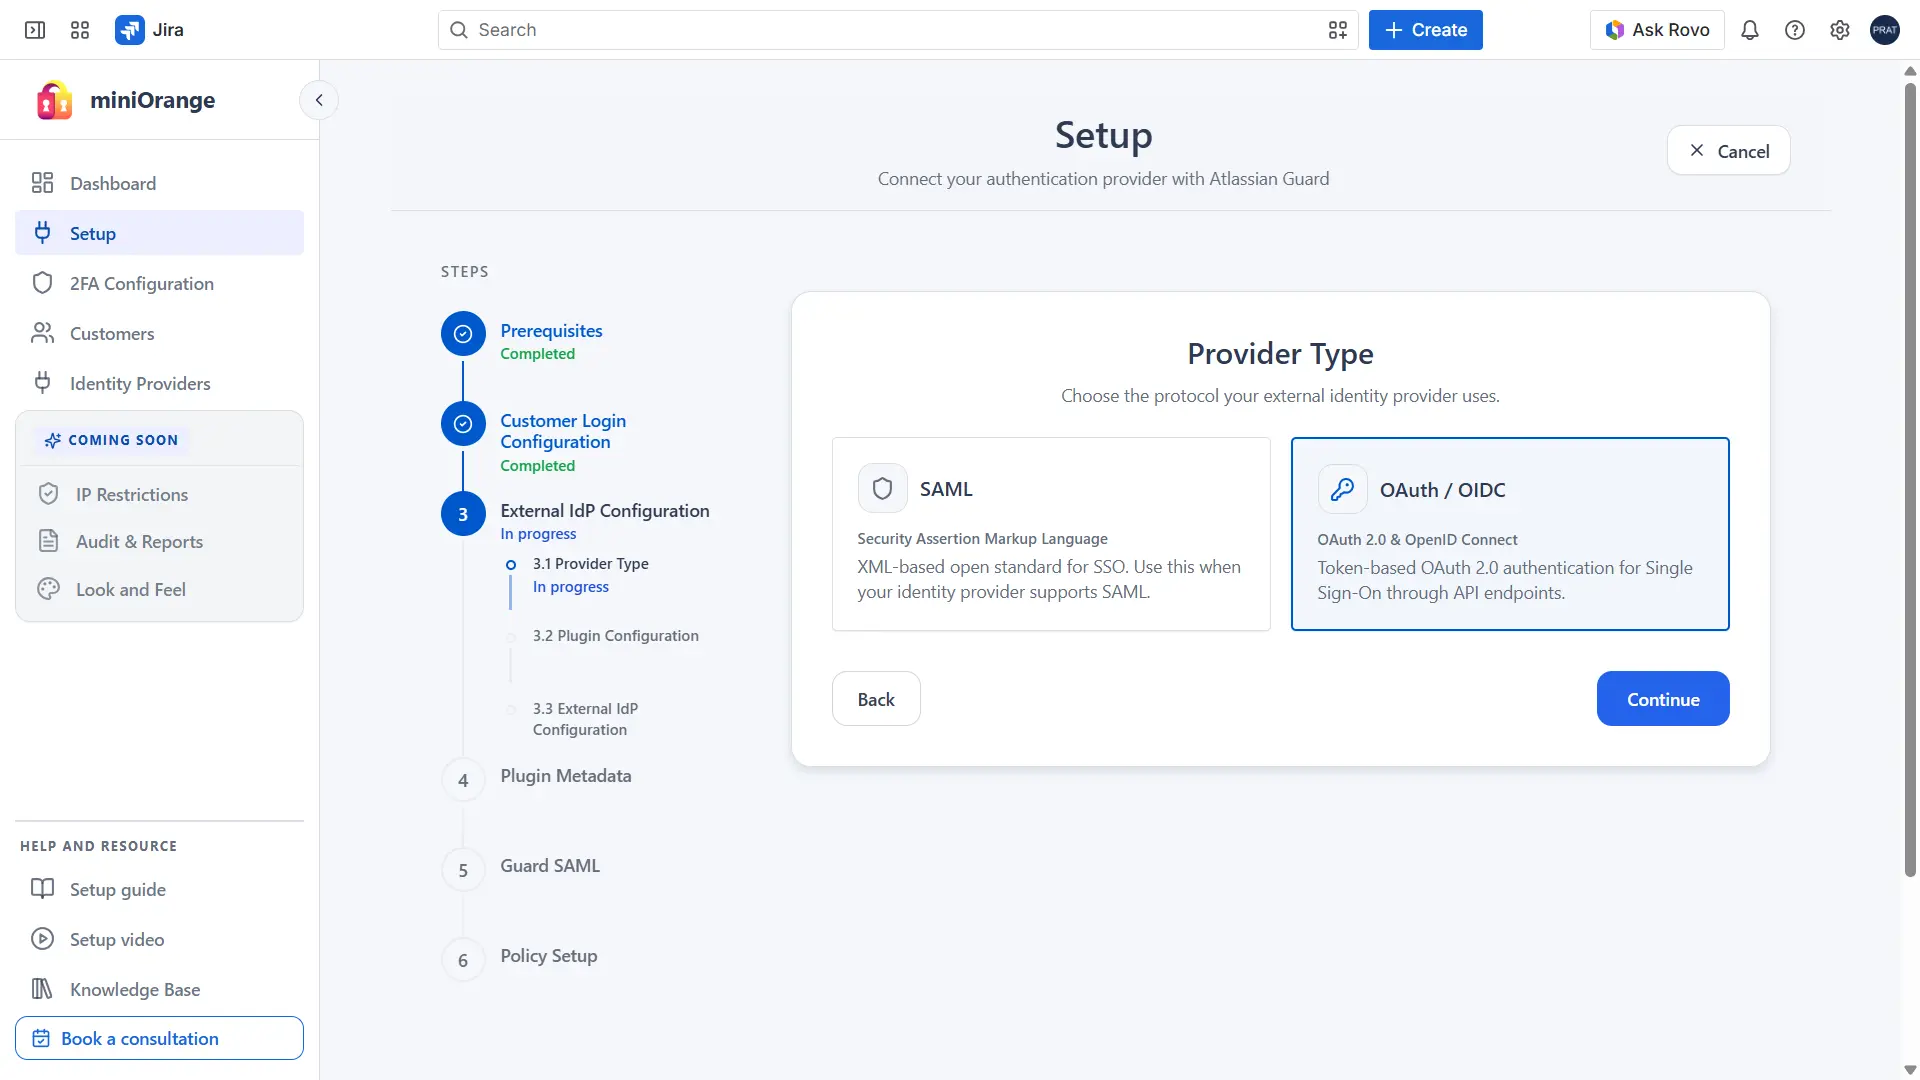
Select the Identity Provider Protocol
Select the authentication protocol used for Single Sign-On (SSO). The plugin supports:
- SAML
- OAuth / OpenID Connect (OIDC)
Choose the protocol supported by your Identity Provider and follow the matching configuration below.
Option 1: SAML Configuration
i. Configure Your Application in the Identity Provider (IdP)
Create a SAML application in your Identity Provider using the Service Provider (SP) details provided by the plugin.
- Copy the SAML Service Provider (SP) configuration metadata displayed by the plugin.
- Log in to your Identity Provider's administrator dashboard and navigate to the Applications section.
- Click Create Application (also called Create App Integration, or the equivalent in your IdP).
- When prompted for a sign-in protocol, choose SAML 2.0 and proceed.
- Enter the requested details: Application Name, Audience URI (SP Entity ID), Single Sign-On (ACS) URL, and any other SAML settings. These values are shown in the SAML Plugin Configuration step within the plugin.
- Review the configuration and complete the application creation process.
- Assign the required users and/or groups to the application so they can access your Atlassian instance via SSO.
- Return to the plugin setup wizard and click Continue to proceed to the SAML External IdP Configuration step.
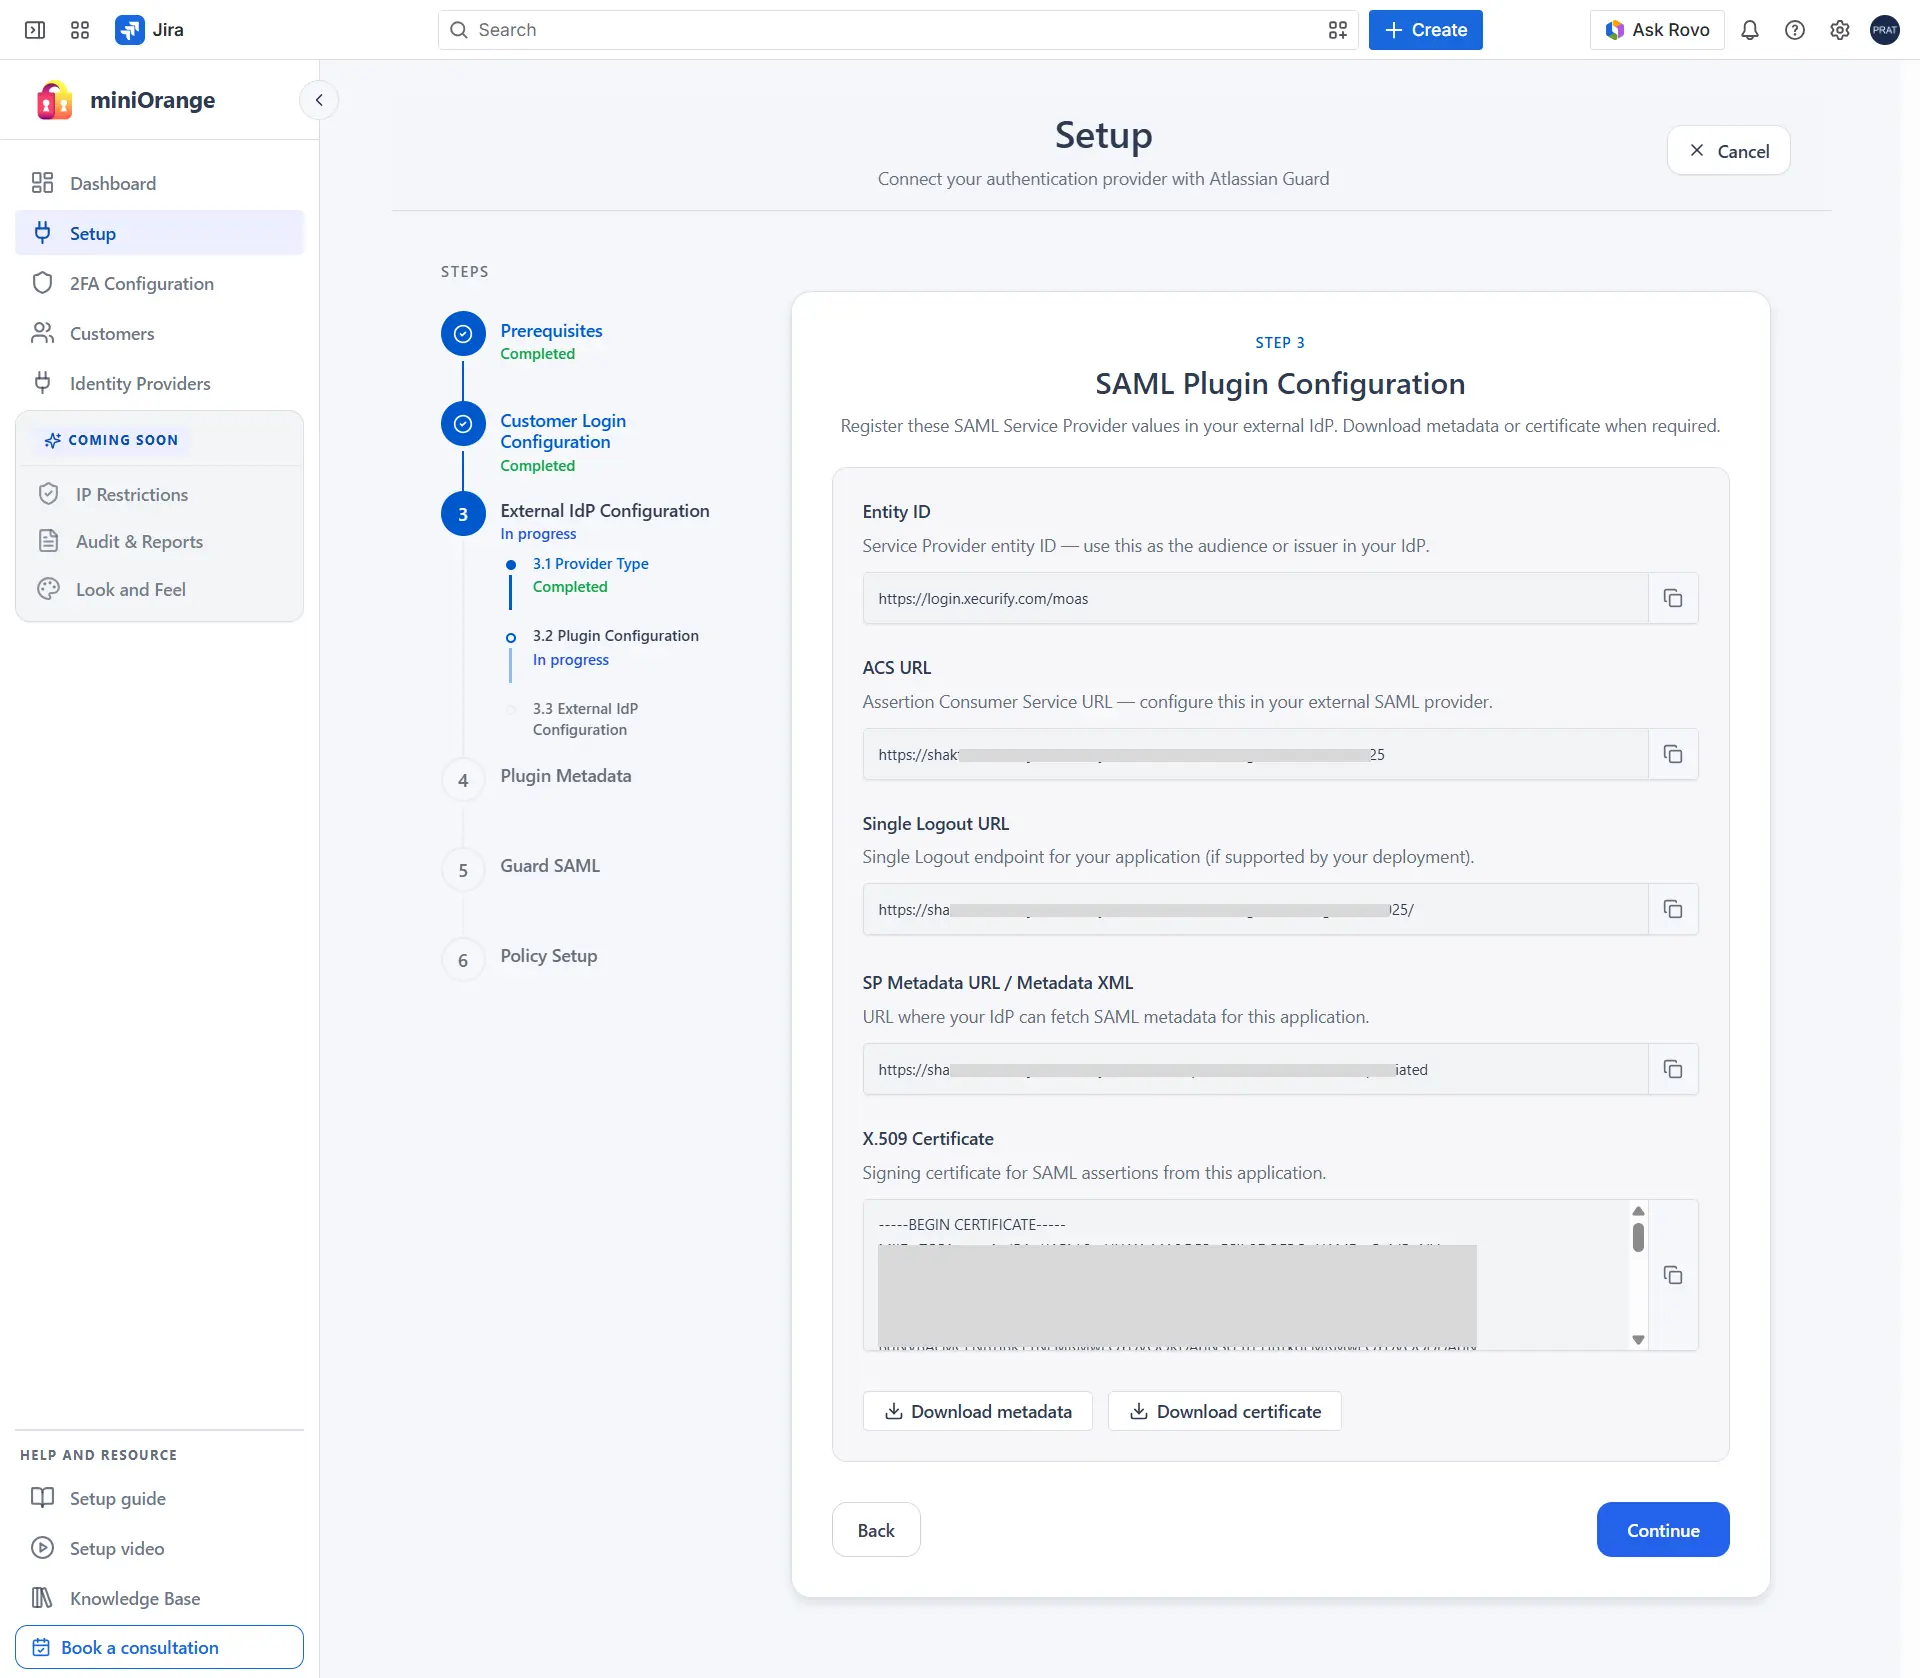
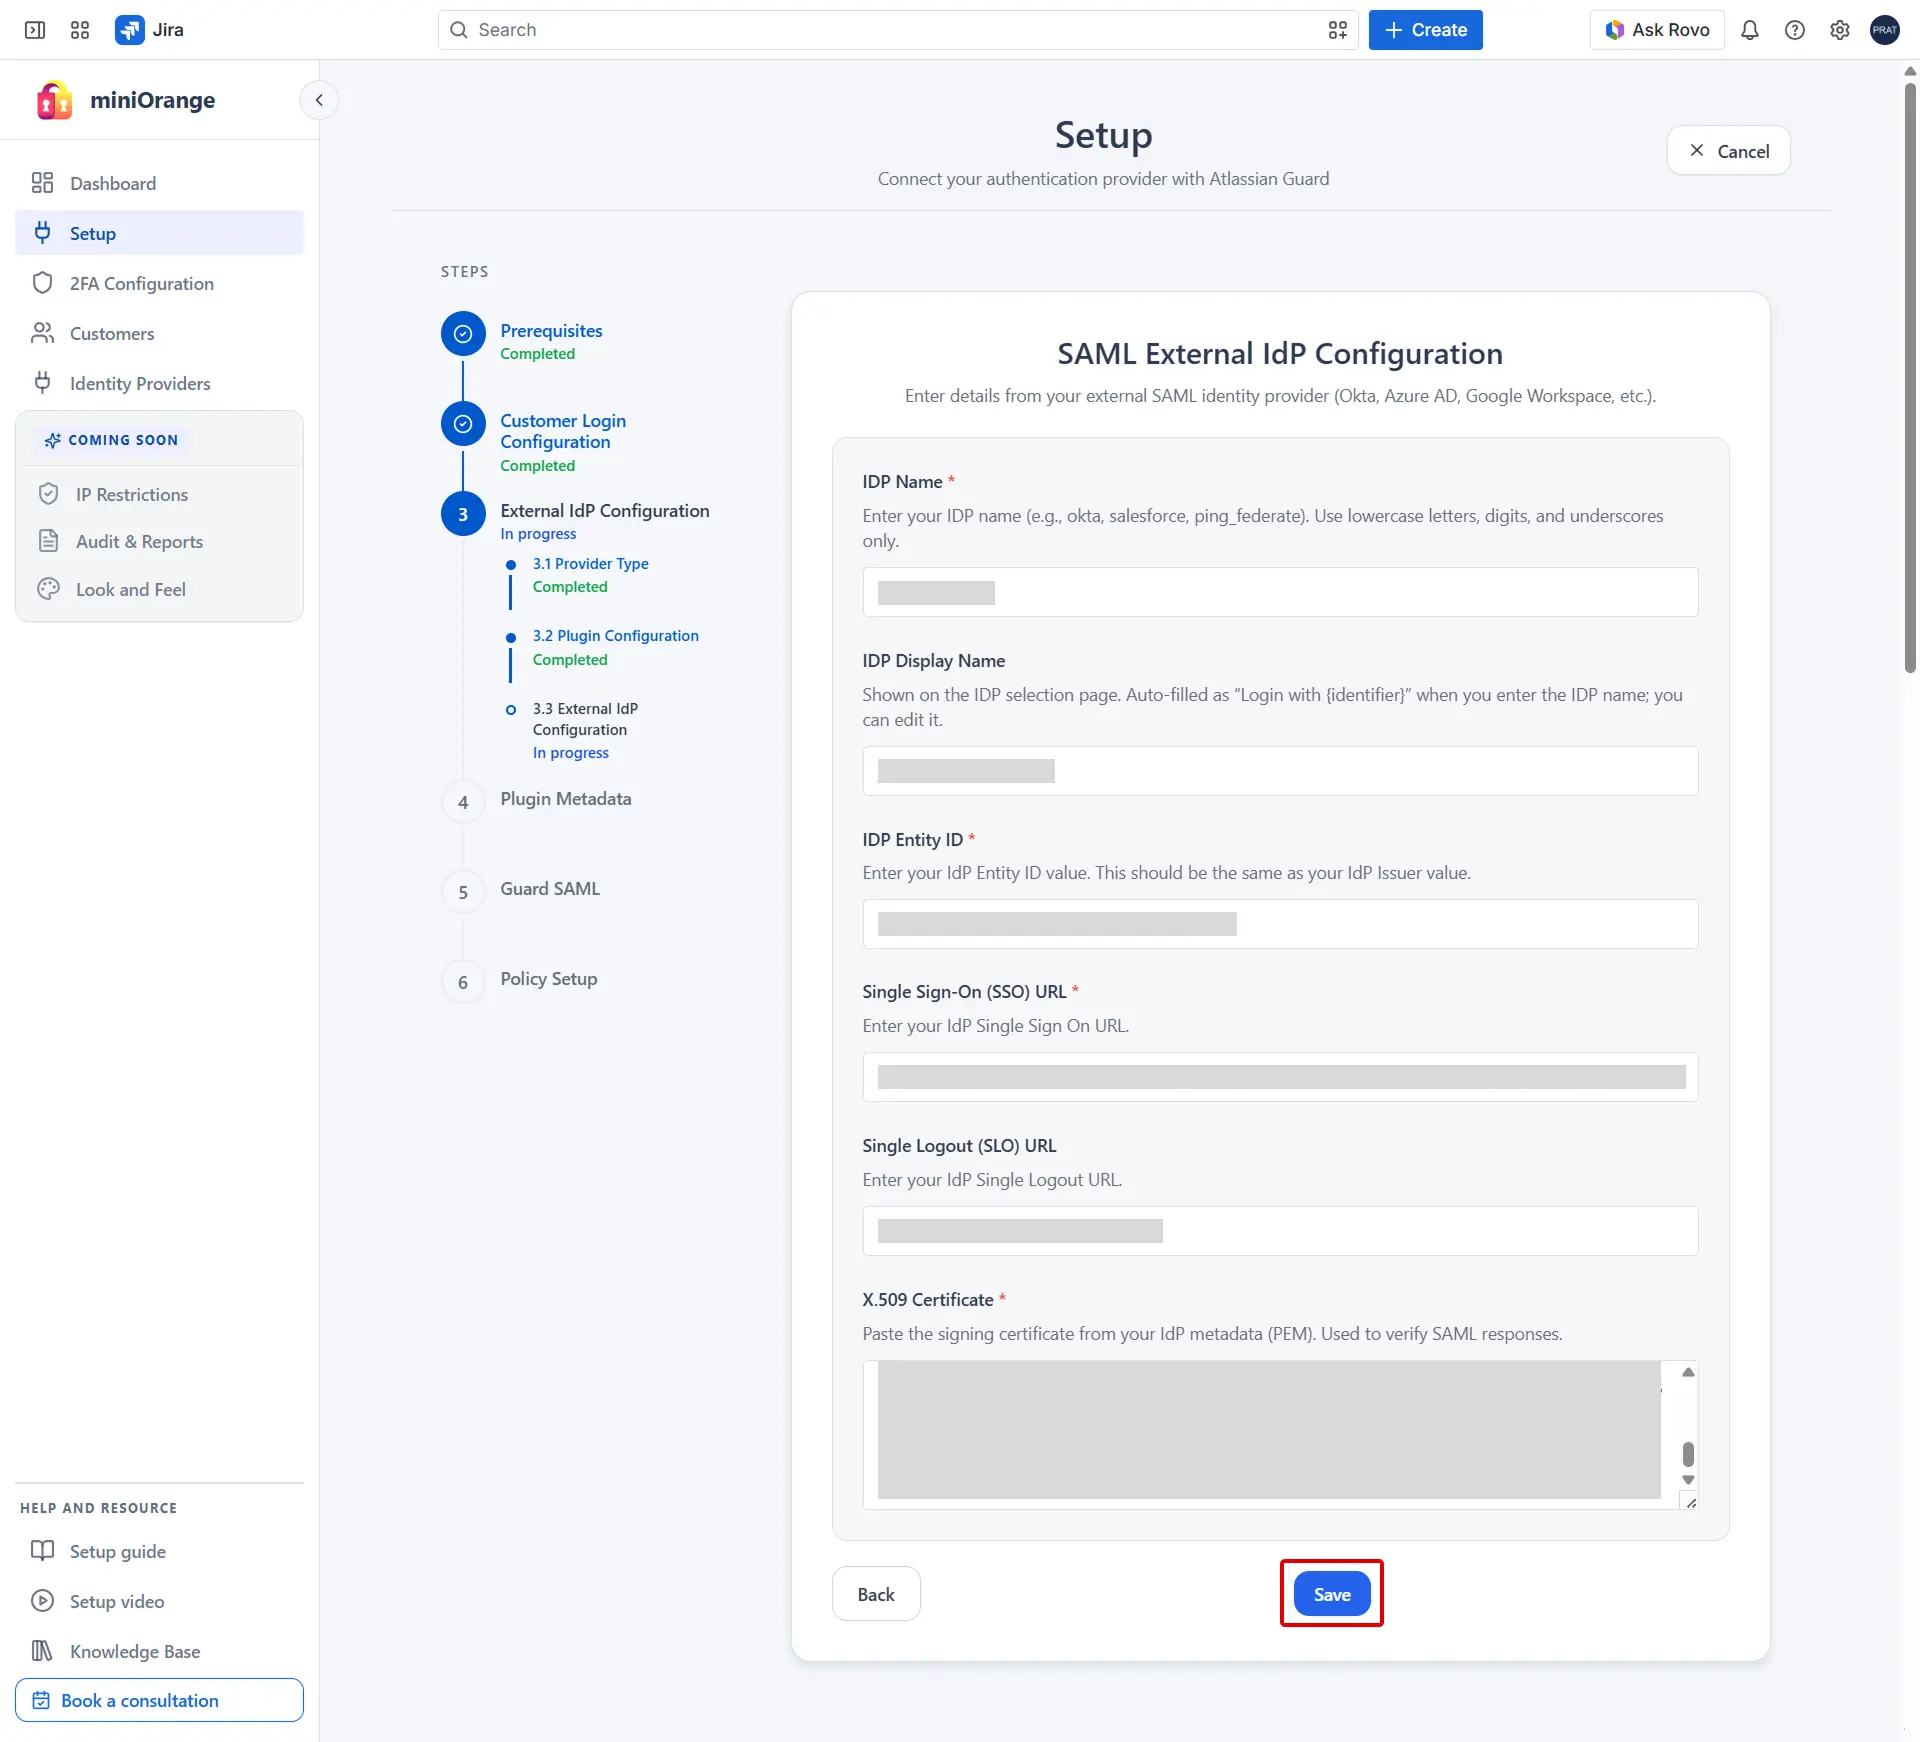
ii. Configure Identity Provider Details in the Plugin
Configure the plugin using the SAML metadata provided by your Identity Provider. The following values are required:
- IdP Name
- IdP Entity ID (Issuer)
- Single Sign-On (SSO) URL
- X.509 Certificate
These values are typically found in the SAML configuration or metadata section of your IdP after the application has been created.
- Locate the required SAML configuration values in your IdP dashboard.
- Paste the copied values into the corresponding fields in the SAML External IdP Configuration step and click Save.
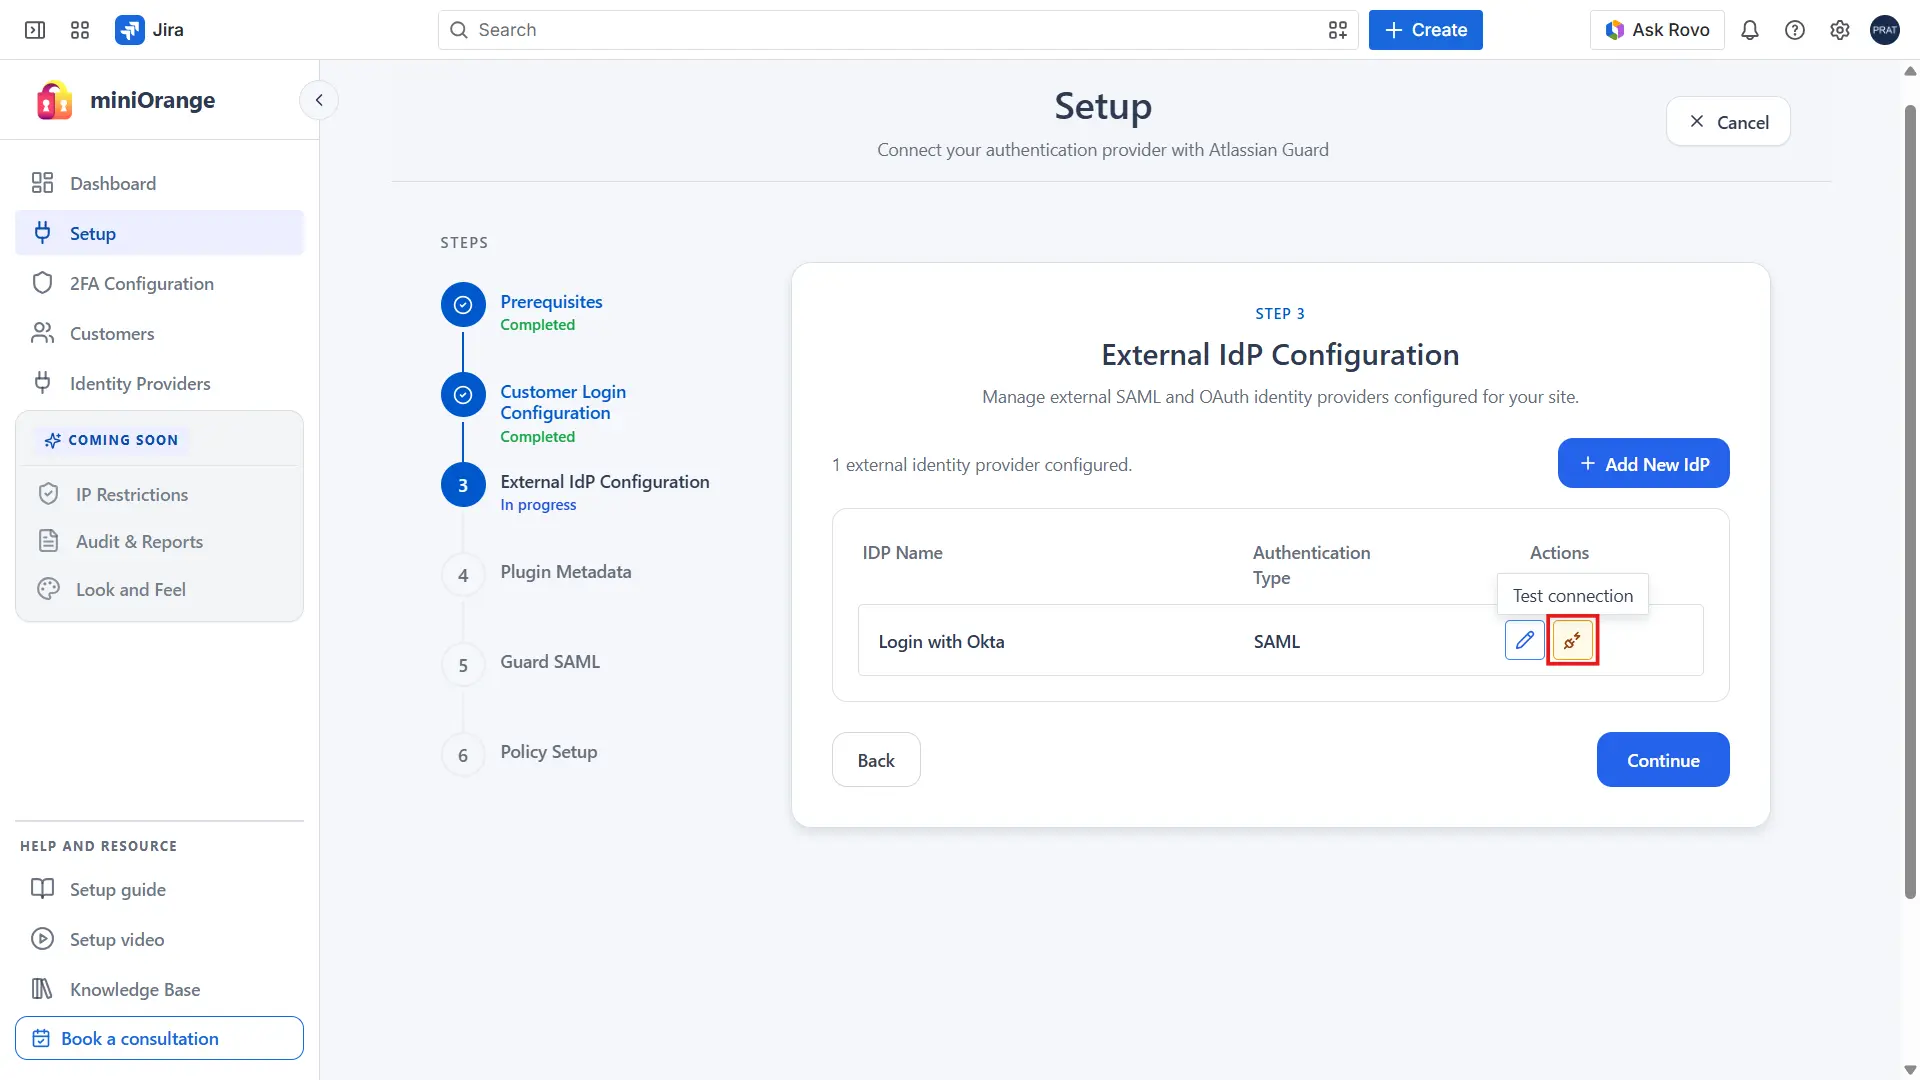
- After saving, the Identity Provider will be listed on the Configured IdPs page, where you can edit it, test the SSO connection, add more Identity Providers, or manage existing configurations.
iii. Test the SAML Connection
- Click Test Connection on the Configured IdPs page to verify that the plugin can communicate with your Identity Provider.
- If the test succeeds, the SAML integration has been configured correctly.
Option 2: OAuth / OIDC Configuration
i. Configure Your Application in the Identity Provider (IdP)
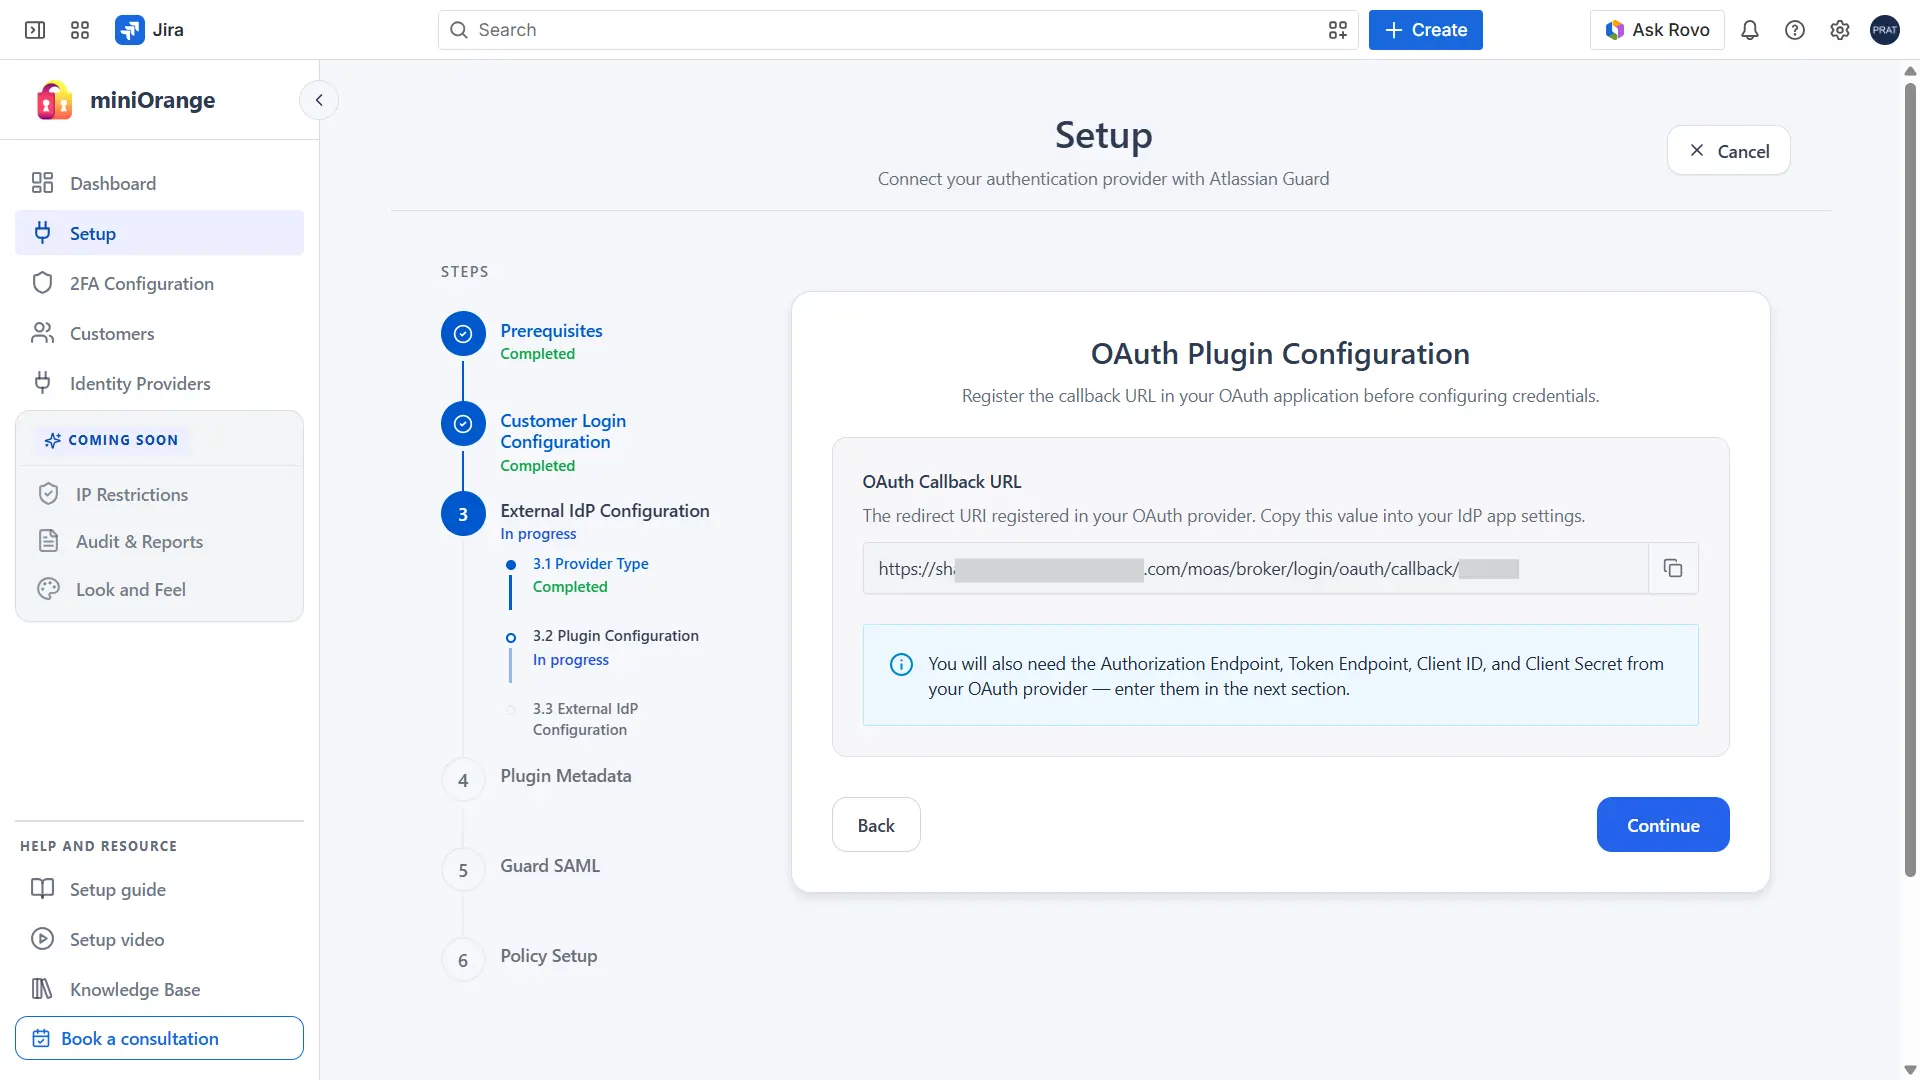
Create an OAuth/OpenID Connect (OIDC) application in your Identity Provider using the callback URL provided by the plugin.
- Log in to your Identity Provider's administrator dashboard and navigate to the Applications section.
- Click Create Application (also called Create App Integration, or the equivalent in your IdP).
- When prompted for a sign-in protocol, choose OpenID Connect (OIDC) or OAuth 2.0, depending on your Identity Provider. If asked for an application type, select Web Application and continue.
- Enter the Application Name and the Sign-in Redirect URL / OAuth Callback URL. The callback URL is shown in the OAuth Plugin Configuration step within the plugin.
- Review the configuration and complete the application creation process.
- Assign the required users and/or groups to the application so they can access your Atlassian instance via SSO.
- Return to the plugin setup wizard and click Continue to proceed to the OAuth External IdP Configuration step.
ii. Configure Identity Provider Details in the Plugin
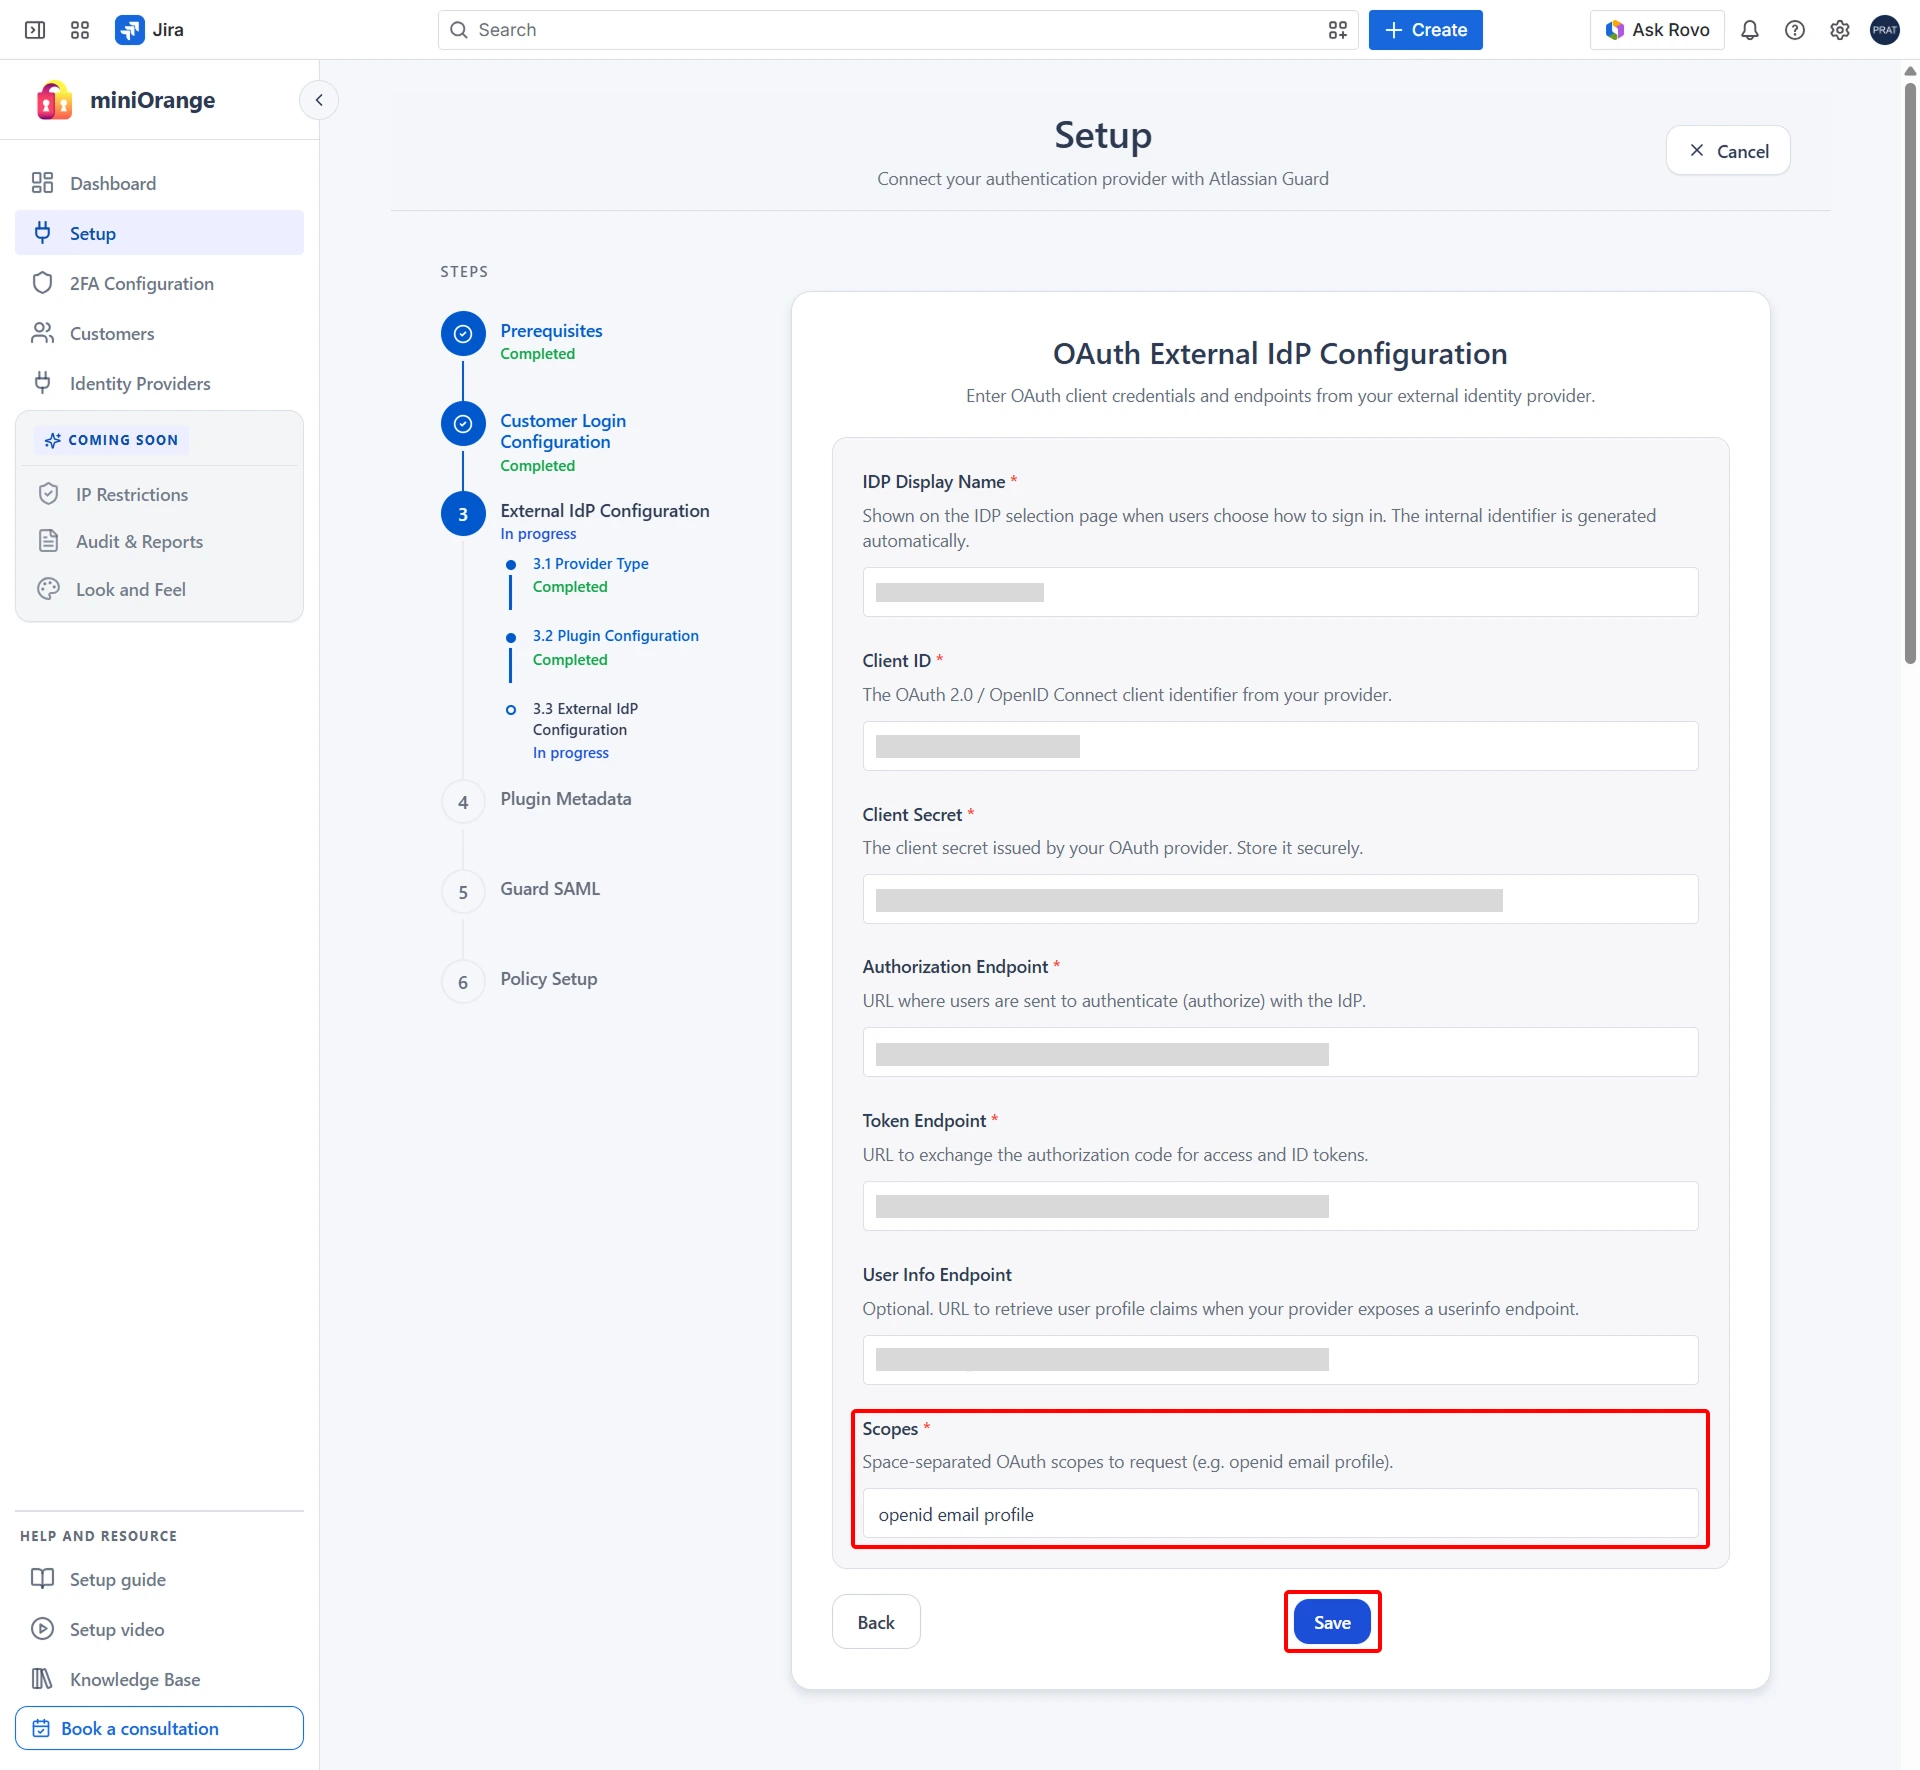
Configure the plugin using the OAuth/OIDC credentials generated by your Identity Provider. The following values are required:
- IdP Name
- Client ID
- Client Secret
- Authorization Endpoint
- Token Endpoint
- Scopes (openid and email are mandatory)
- Locate the required OAuth credentials (Client ID, Client Secret) and endpoints in your IdP dashboard.
- Paste the copied values into the corresponding fields in the OAuth External IdP Configuration step, ensuring the openid and email scopes are included, then click Save.
- After saving, the Identity Provider will be listed on the Configured IdPs page, where you can edit it or add more Identity Providers.
iii. Test the OAuth Connection
After saving the configuration, the Identity Provider will be listed on the configured IdPs page. From this page, you can:
- Edit the IdP configuration
- Add additional Identity Providers
3B. If You Do Not Use an External Identity Provider (miniOrange
IdP)
If you selected No, configure the authentication source for portal-only customers directly in Atlassian Guard using SAML SSO.
4: Configure the Authentication Source in Atlassian Guard
Follow the steps below to configure the authentication source for portal-only customers using SAML SSO.
-
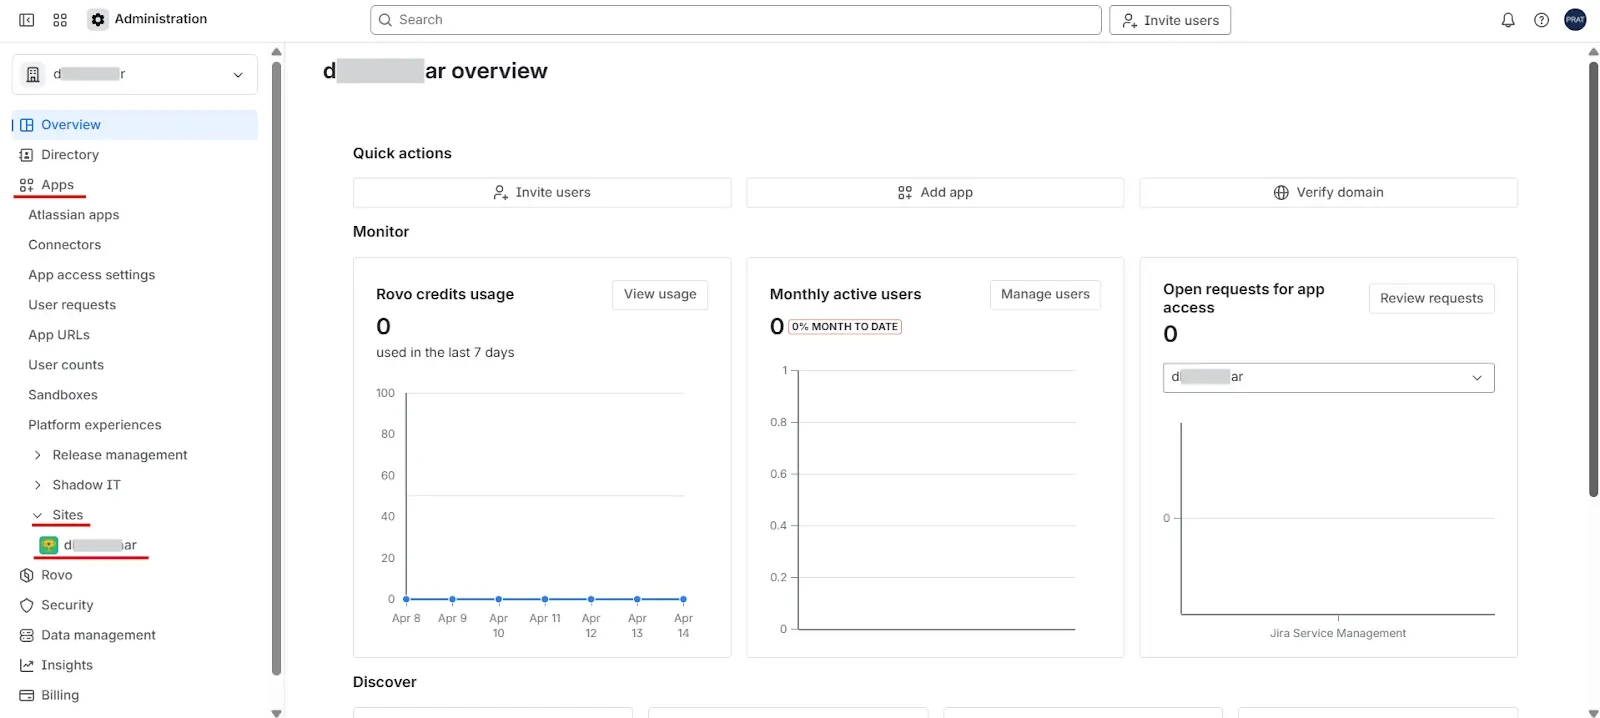
Open the Atlassian Admin console:
https://admin.atlassian.com
If your account manages multiple organizations, select the organization where you want to configure 2FA for portal users. - From the left navigation panel, go to: Apps, Sites. Then select your Jira Service Management (JSM) site.
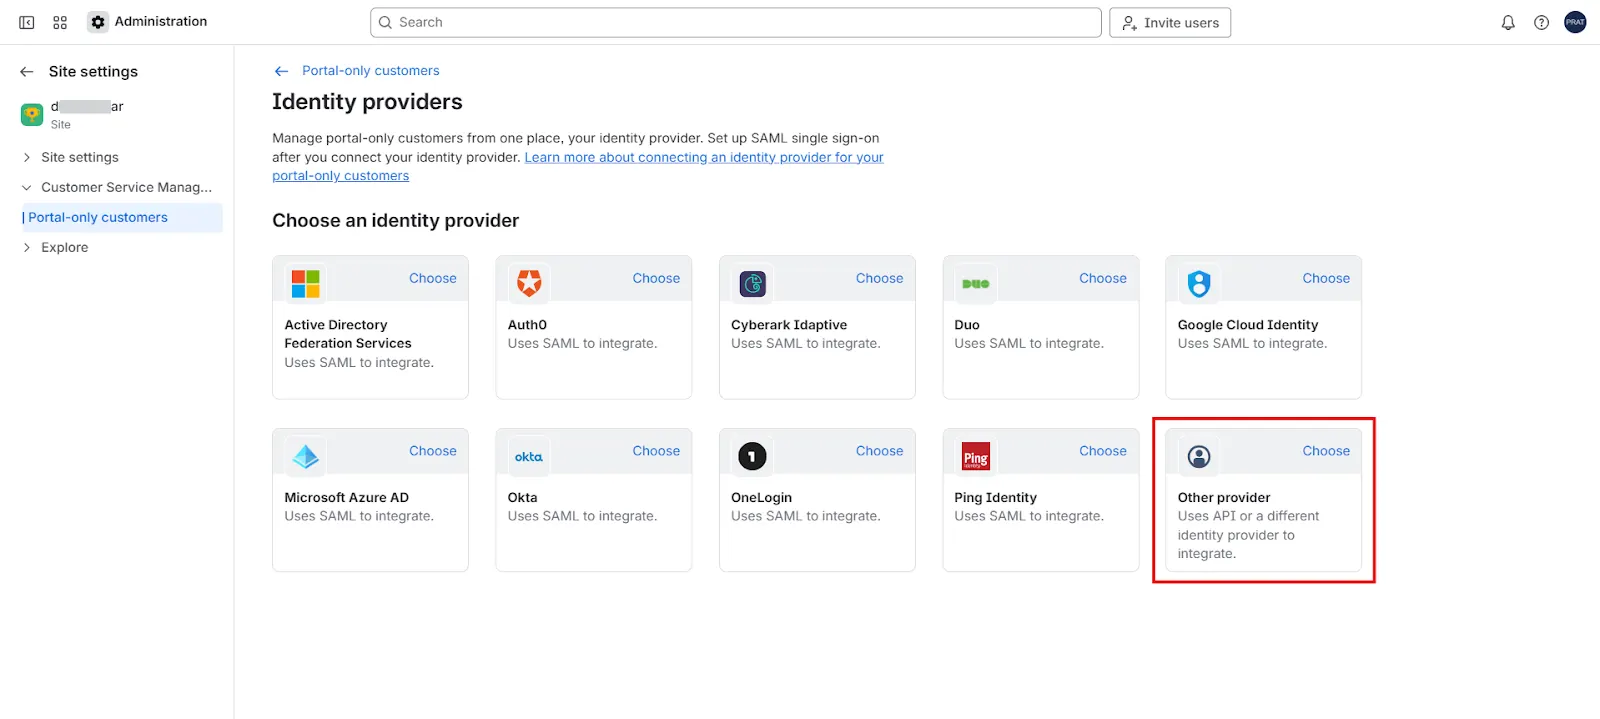
- Under Customer Service Management, click Portal-only customers.
- In the top-right corner of the page, click the three-dot menu (⋯) and select Identity provider.
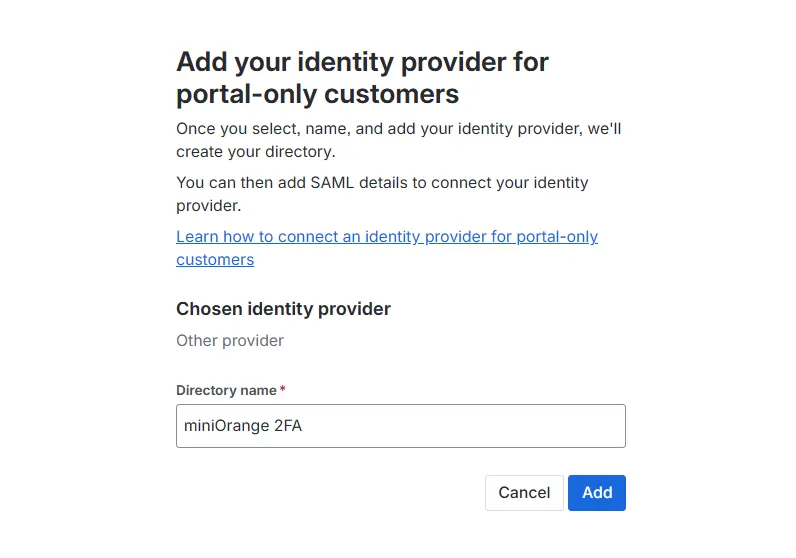
- From the list of available providers, choose Other Provider.
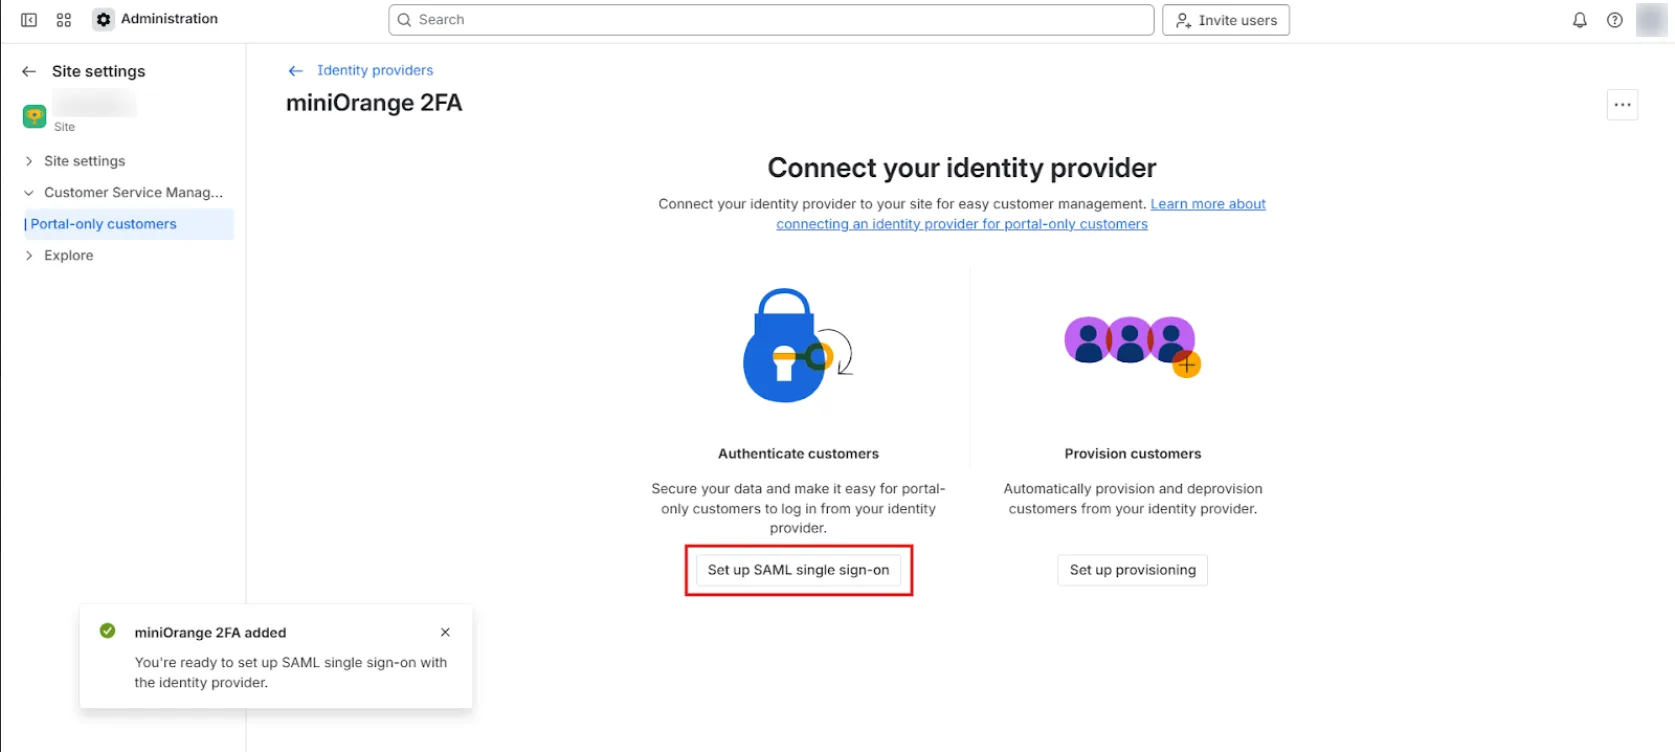
- Enter a Directory name (any meaningful name for identification), then click Add.
- When the confirmation message appears, click Set up SAML single sign-on.
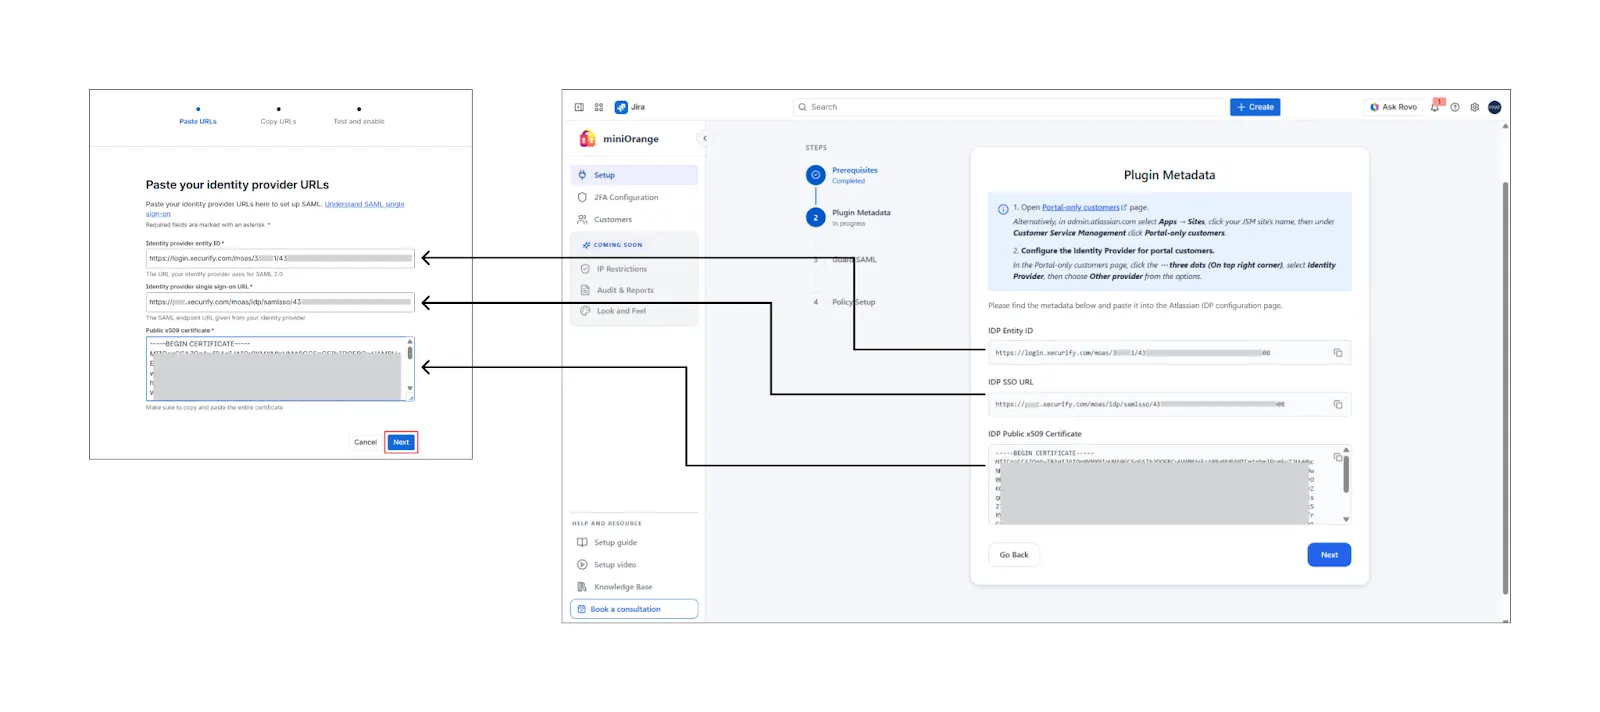
- On the SAML configuration page, enter the following values:
- Identity provider entity ID
- Identity provider single sign-on URL
- Public X.509 certificate
- Copy each value from the app into the corresponding field in Atlassian Guard, then click Next on both configuration screens.
- Atlassian Guard generates SAML configuration details. Copy the Service provider entity ID and Assertion Consumer Service (ACS) URL from the Atlassian Admin page into the corresponding fields in the app.
- Click Save & Continue in the app, then return to the Atlassian Admin page and click Next to proceed.


These values are available on the app configuration page.

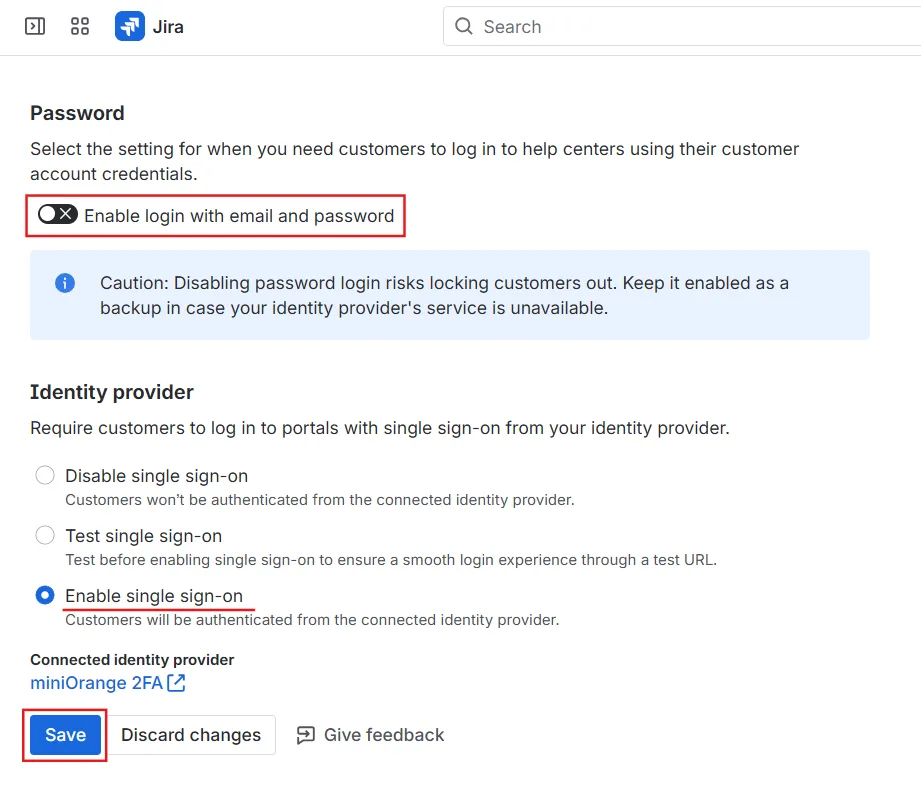
5: Configure the Authentication Policy
After completing the SAML configuration, configure the authentication policy for portal-only customers.
- On the Test single sign-on screen, click Test single sign-on. You are redirected to the Authentication for portal-only customers settings page.
- Select Test single sign-on, then click Save.
- Click View testing steps. A popup appears with instructions to verify the SAML login configuration; follow the steps to complete verification.
- Once testing is successful:
- Select Enable single sign-on
- Disable the toggle for Login with email and password
- Click Save
- Return to the app configuration page, select the confirmation checkbox, and click Save.

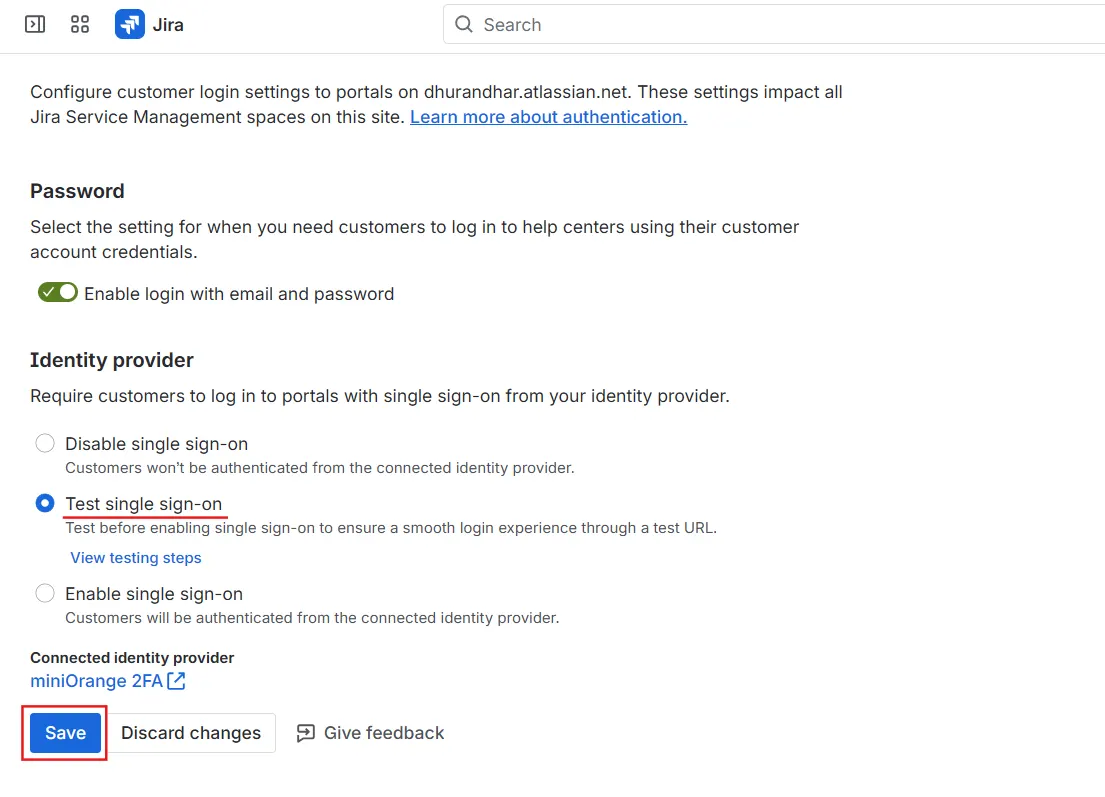
This ensures portal-only customers authenticate using SSO.
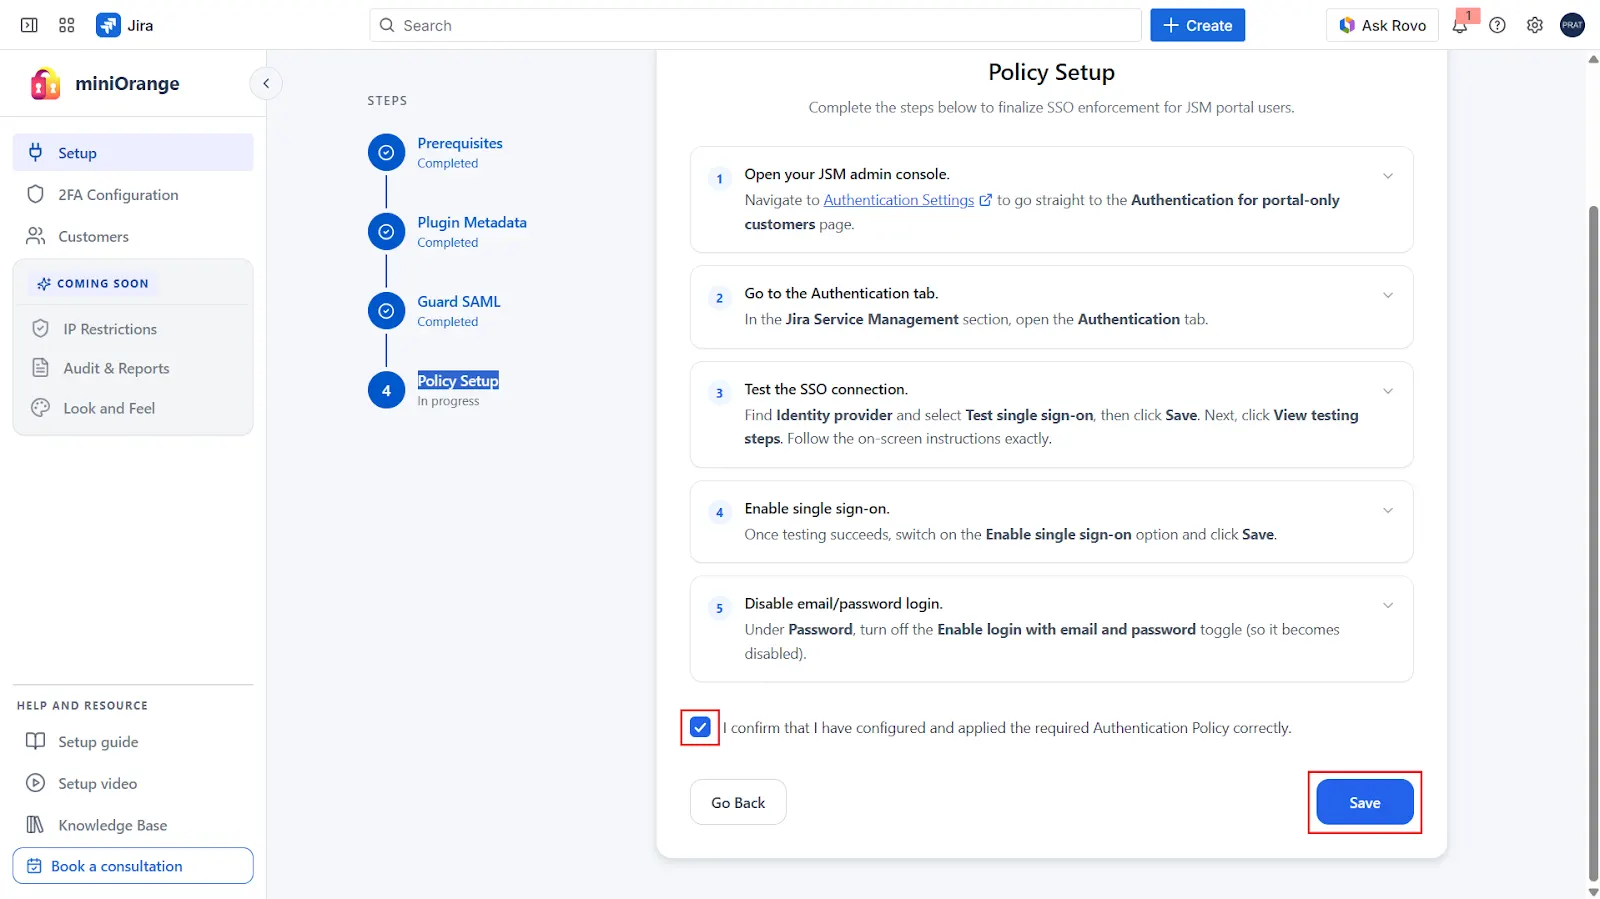
You have now completed the Guard integration setup successfully!
Proceed to the 2FA Configuration tab to configure authentication methods according to your requirements.
2FA Configuration Tab
After completing the Guard integration, navigate to the 2FA Configuration tab to enable and configure Two-Factor Authentication for your JSM portal customers.
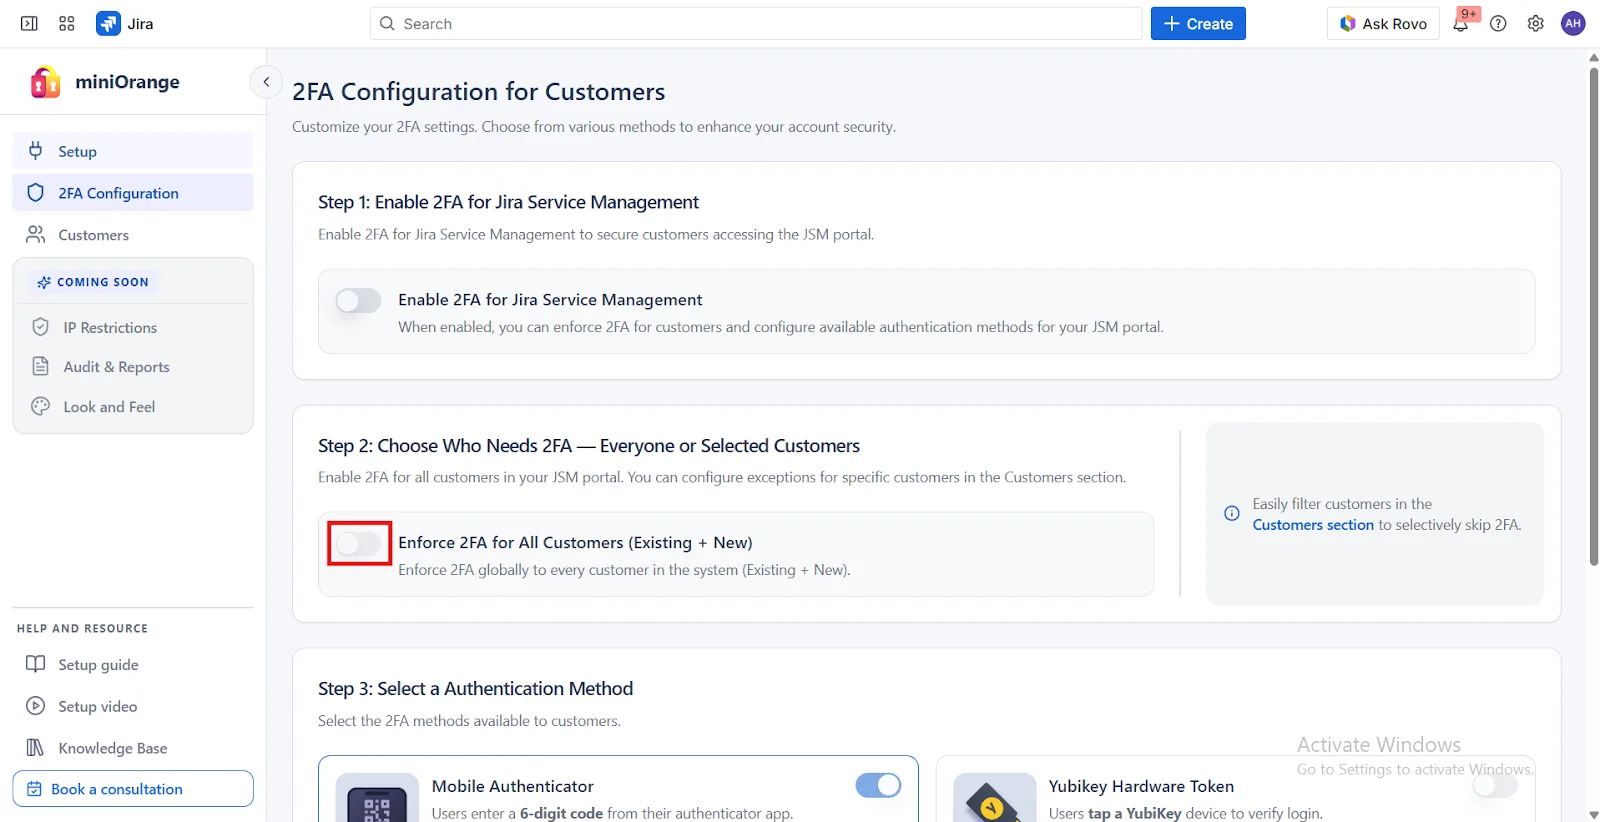
1. Enable 2FA for Jira Service Management
Enable the toggle for Jira Service Management to activate 2FA for portal customers. Once enabled, you can configure the available 2FA methods and manage customer-level settings.
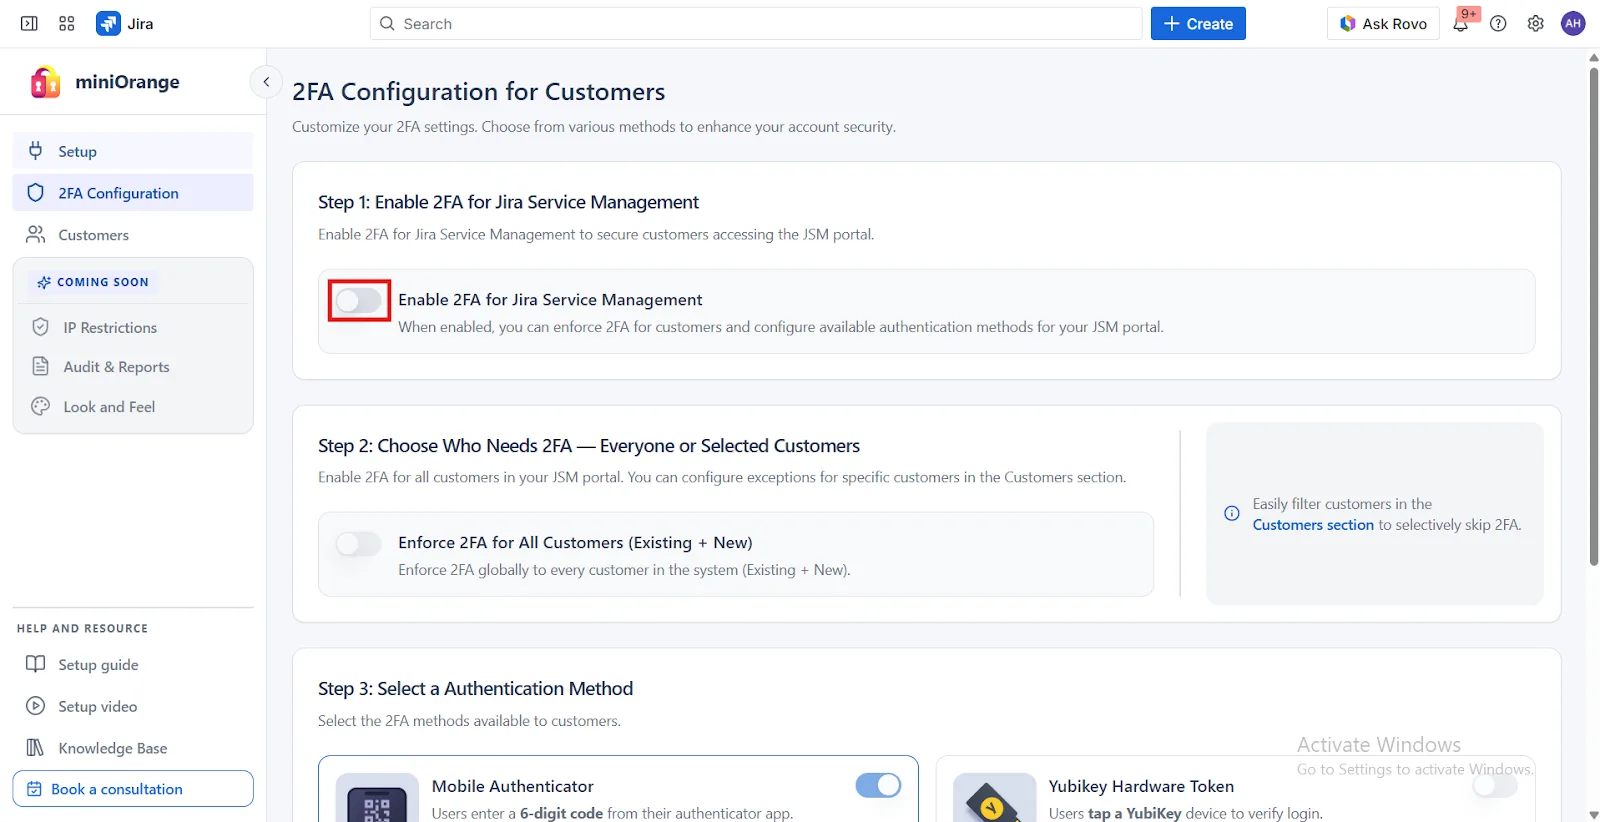
2. Choose Who Needs 2FA — Everyone or Selected Customers
How you enroll customers depends on whether you configured an external Identity Provider in the Setup tab.
2A. If You Use an External Identity Provider
When an external IdP is configured, the Enforce 2FA for All Users (Existing + New) toggle is disabled. Because enrollment is tied to your external IdP's user records, blanket enforcement is not applied automatically.
Instead, enable 2FA manually for the users who require it from the Customers tab, individually or in bulk. See Enable/Disable 2FA for Individual Customers and Bulk Actions below for detailed instructions.
2B. If You Do Not Use an External Identity Provider
If you are allowing users to login via miniOrange, you have full control over organization-wide enforcement:
- Enable 2FA for all users in your organization to enhance security across the board. You can create exceptions for specific users or groups from the Customers tab.
- Enforce 2FA for all users (existing and newly created) to ensure consistent security coverage across your organization.
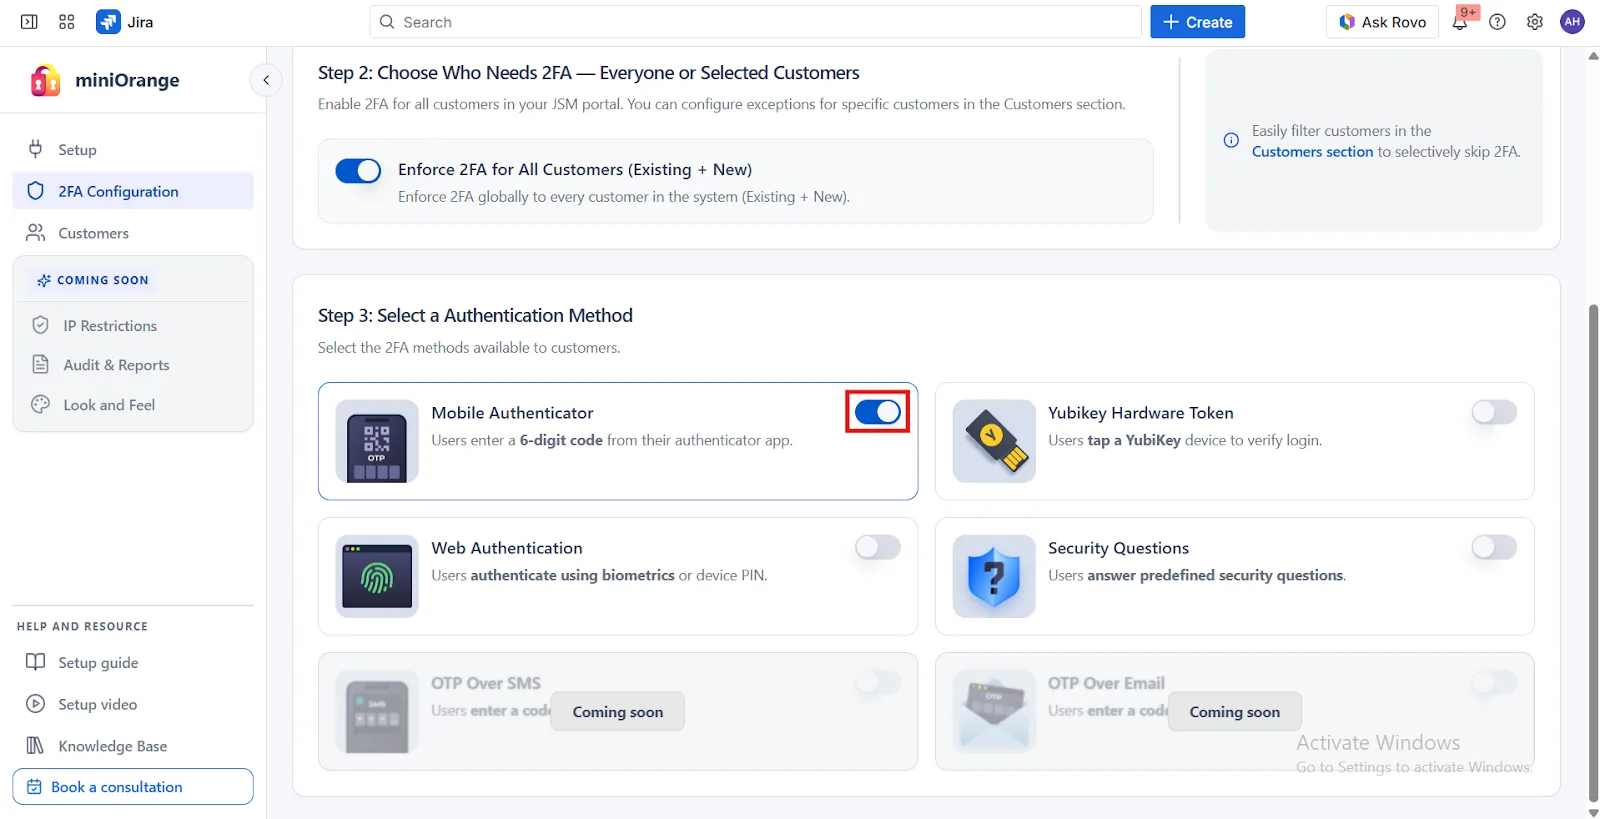
3. Select an Authentication Method
The miniOrange 2FA add-on offers a range of 2FA methods, including Web Authentication, KBA, TOTP, and more. Enable the methods you want from the provided list during configuration simply select a 2FA method option and toggle it active to make it available to your users.
Customers Tab
The Customers tab is a centralized interface for managing JSM portal customers and their 2FA settings, supporting both individual and bulk operations. It is organized into three sub-tabs:
- 2FA Enabled Customers
- 2FA Disabled Customers
- All Customers
1. Import Portal Customers
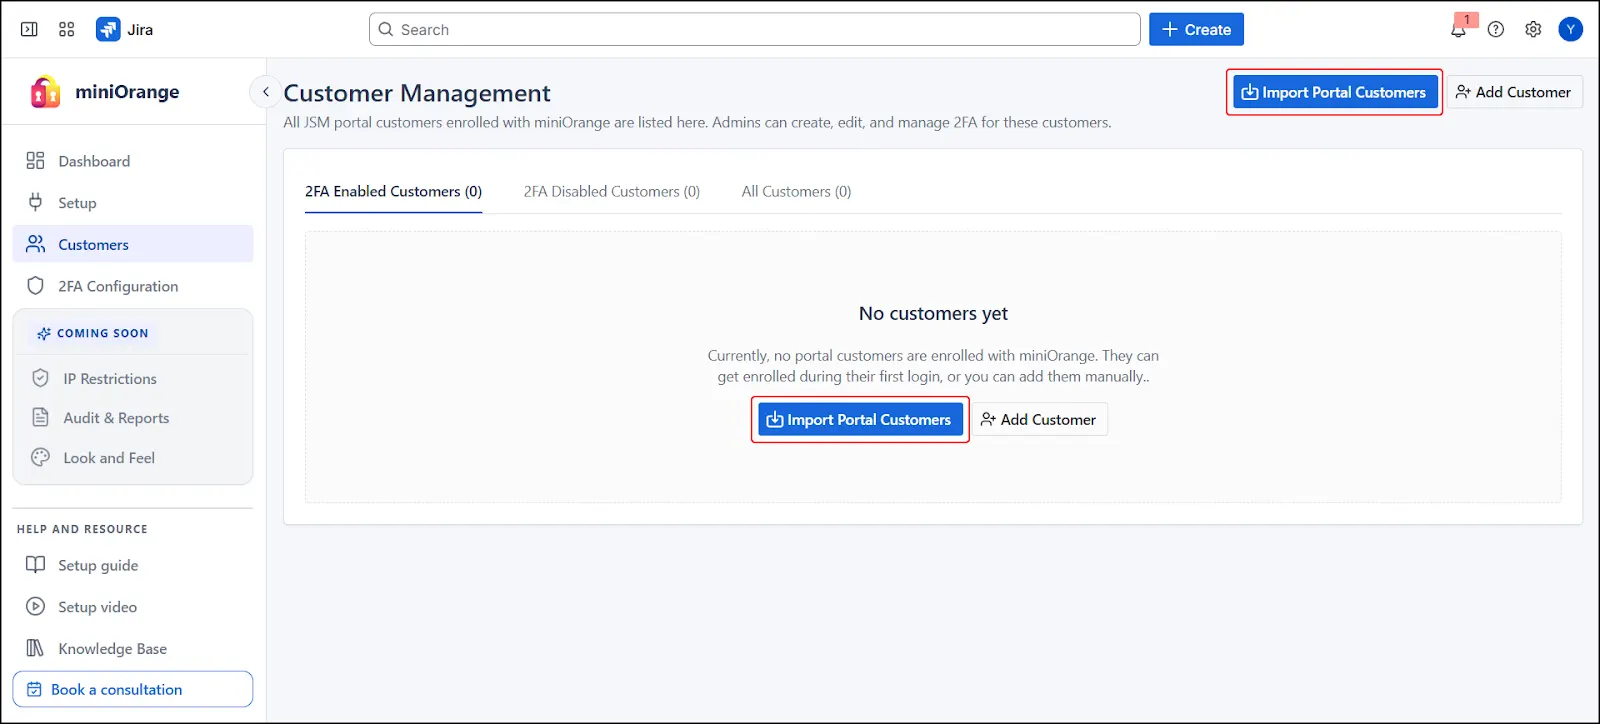
- Click Import Portal Customers in the Customers tab.
- A step-based modal wizard opens.
- Choose an import method to proceed.
Option 1: Import from CSV
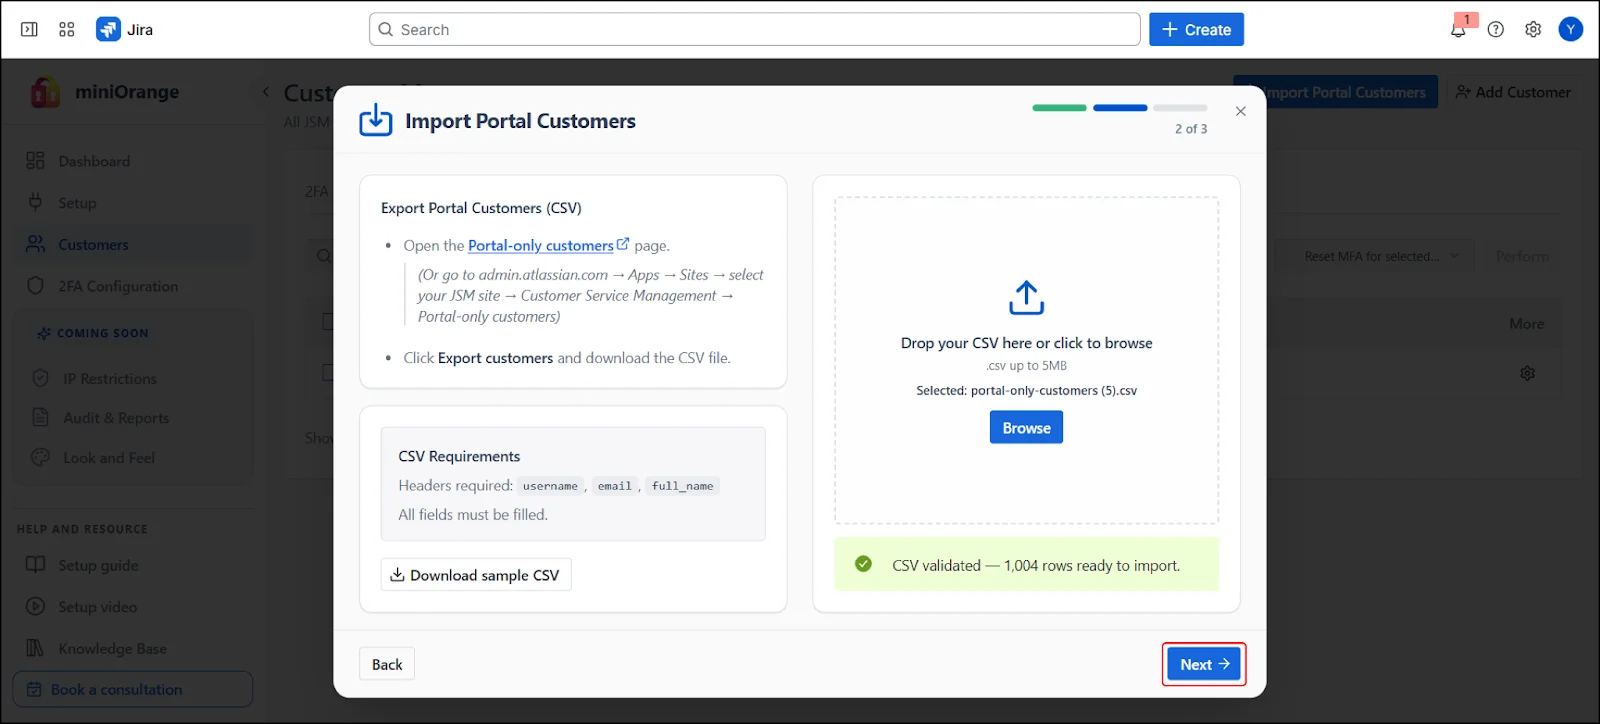
Upload a CSV file exported from JSM.
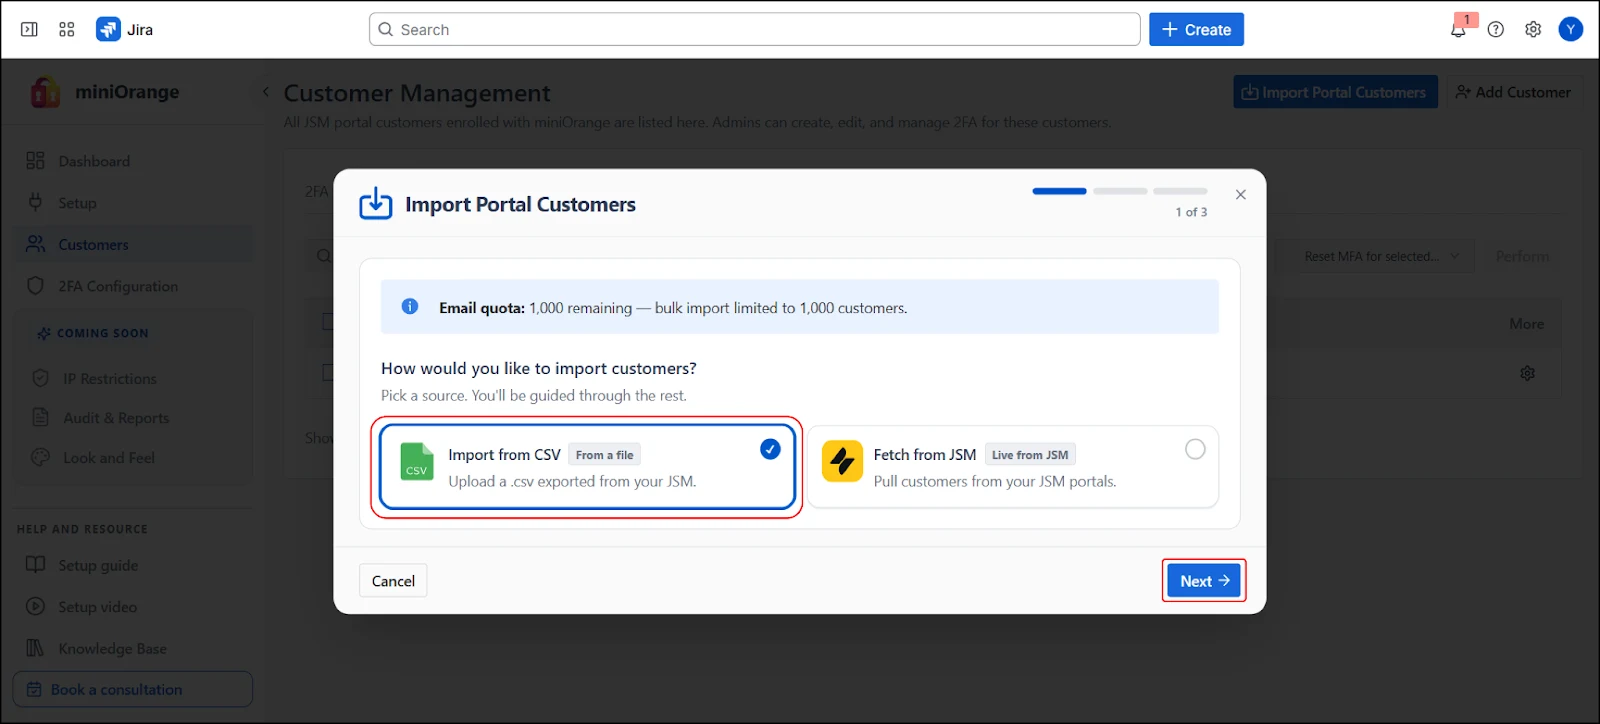
- Select Import from CSV and click Next.
- Export your JSM customers from Atlassian: go to admin.atlassian.com → Apps → Sites → select your JSM site → Customer Service Management → Portal-only customers, then select Export Customers and download the generated CSV.
- Upload the CSV using drag-and-drop or the file browser in the Step 2 section, then proceed to the next step.

Option 2: Fetch from JSM
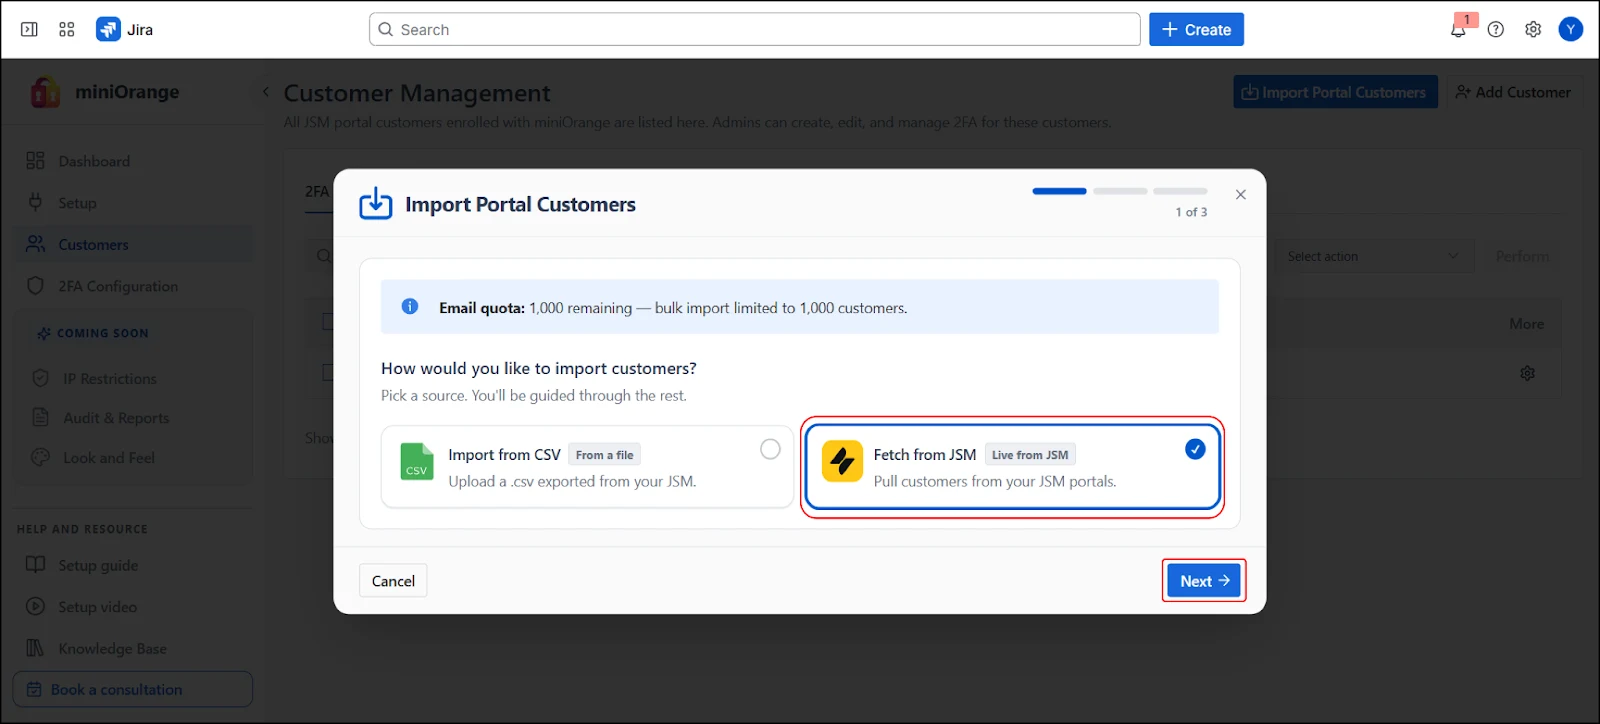
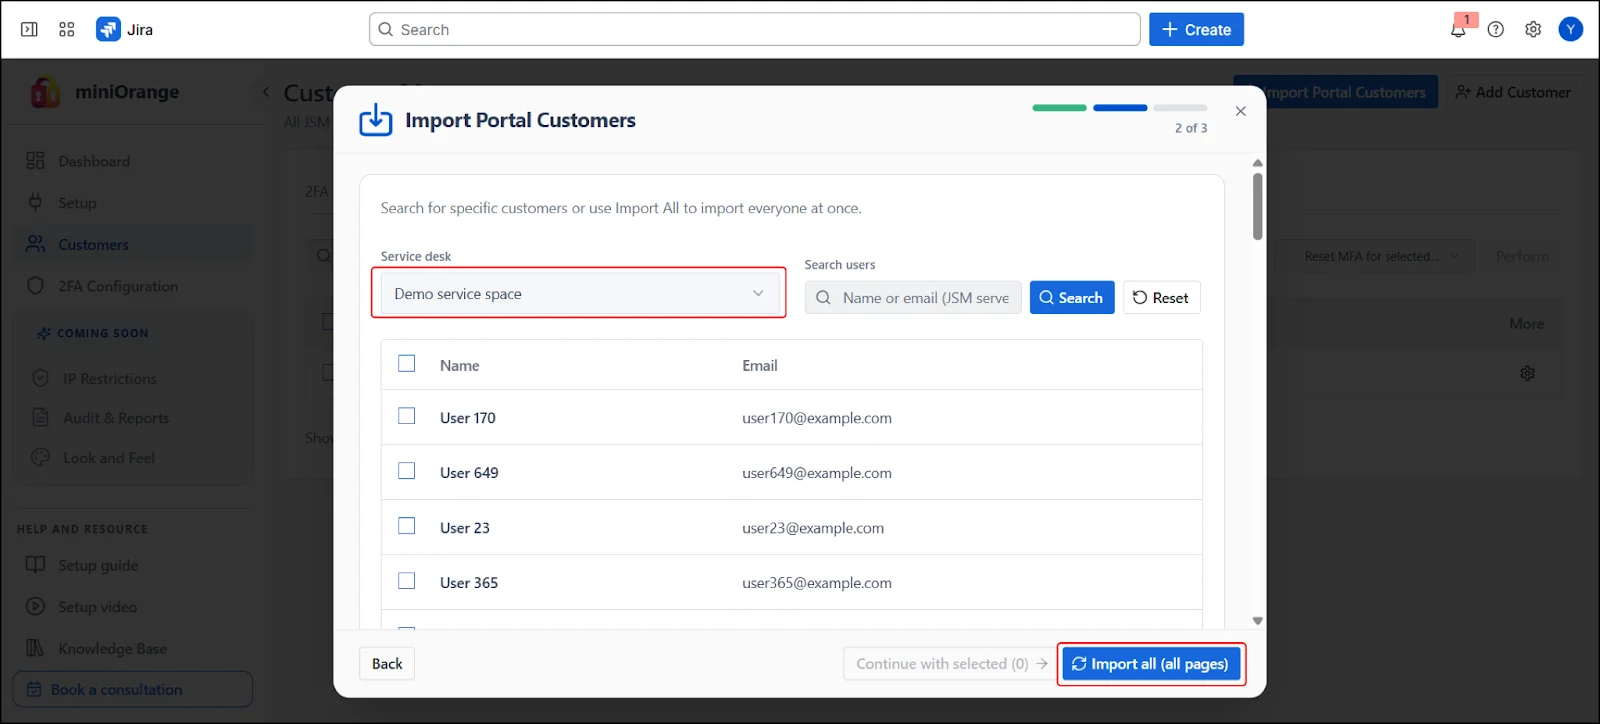
- Select Fetch from JSM.
- Choose Import All Pages, then select a Service Desk / Portal from the dropdown (e.g., “Demo service space”). The customer list is displayed in a table.
- From the fetched list you can:
- Search by name or email
- Select individual customers using checkboxes
- Select all customers from the portal
- Import the full portal customer list
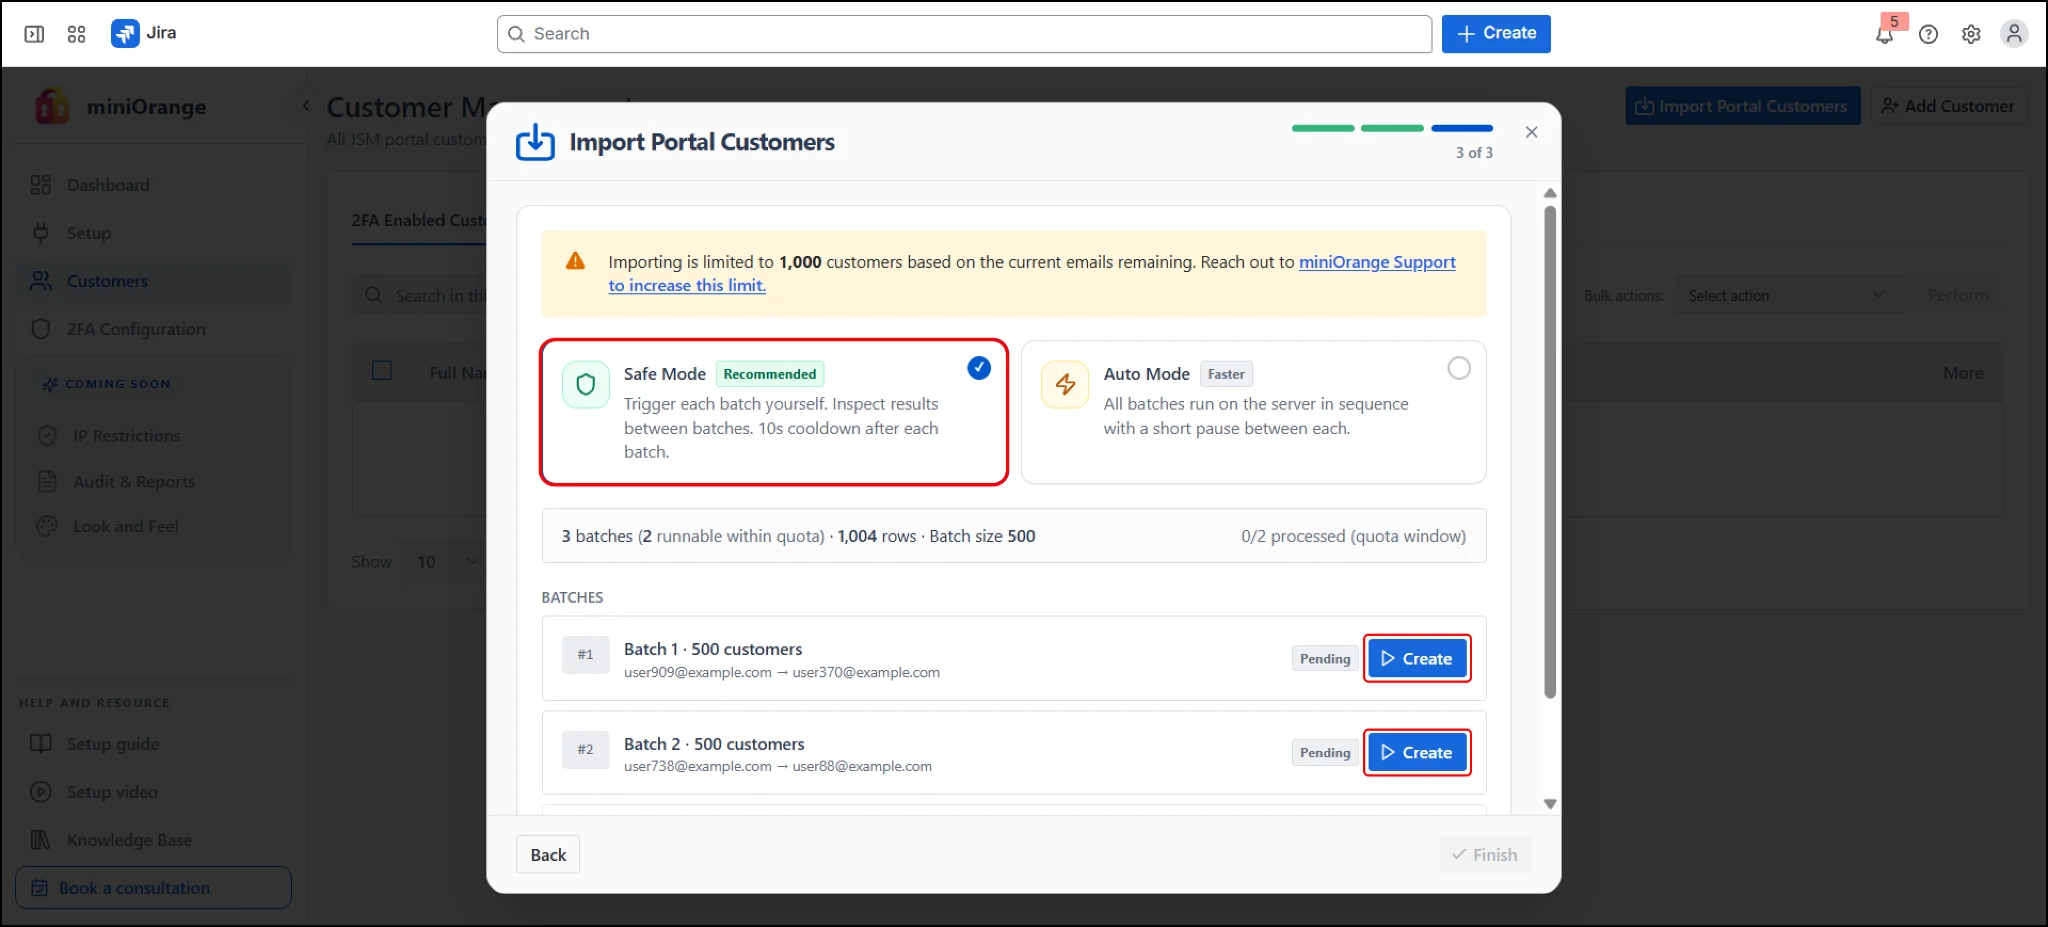
Select an Import Mode
- Safe Mode (Recommended) manually trigger each batch and inspect results between batches.
- Auto Mode (Faster) all batches run automatically in sequence on the server.
- Select your preferred mode.
- In Safe Mode, click Create next to each batch to trigger it manually. In Auto Mode, click Start automatic run.
- Wait for all batches to complete, then click Finish.
2. Add Customers Manually
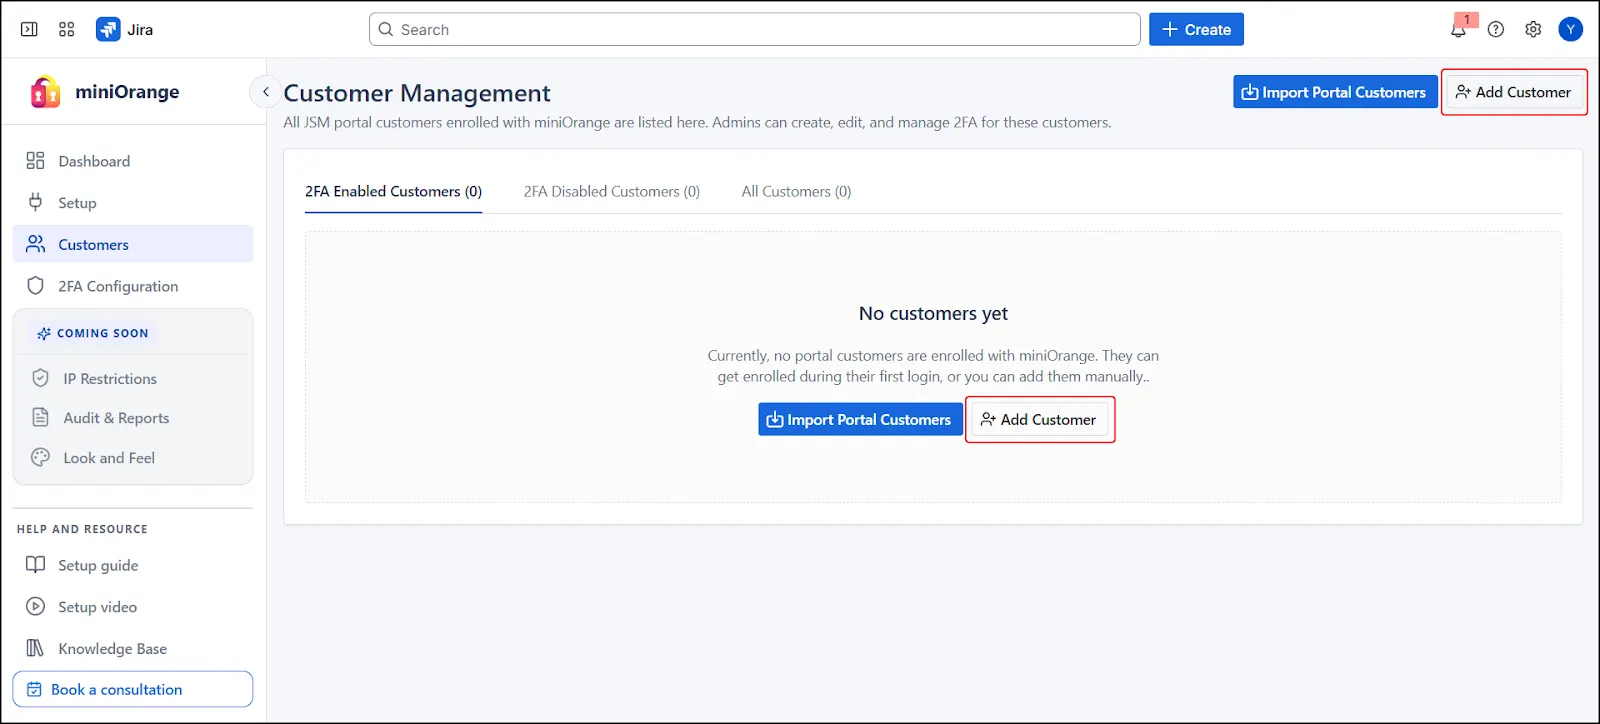
- Click Add Customer in the Customers tab. A modal form appears.
- Fill in the required fields: First Name, Last Name, Email (used for communication and authentication), Username, and Password (optional).
- Click Create Customer to complete the form.
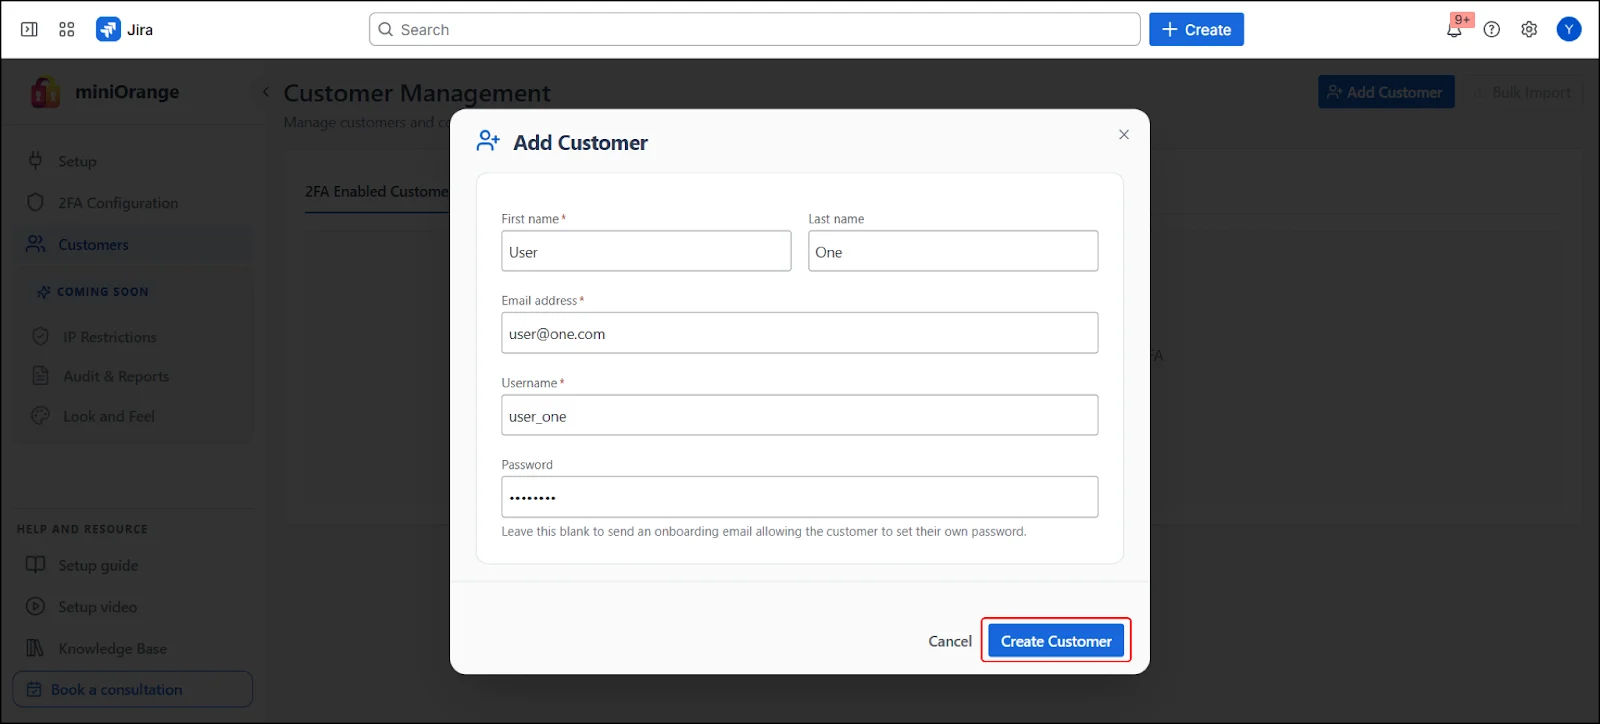
Password behavior:
- If a password is provided, the customer receives a welcome email and can log in using the provided credentials.
- If the password is left blank, the customer receives an onboarding email to set their own password.
After creation, the customer appears under All Customers, as well as under either 2FA Enabled or 2FA Disabled based on your MFA configuration.
3. View and Filter Customers
Customers are organized into three sub-tabs:
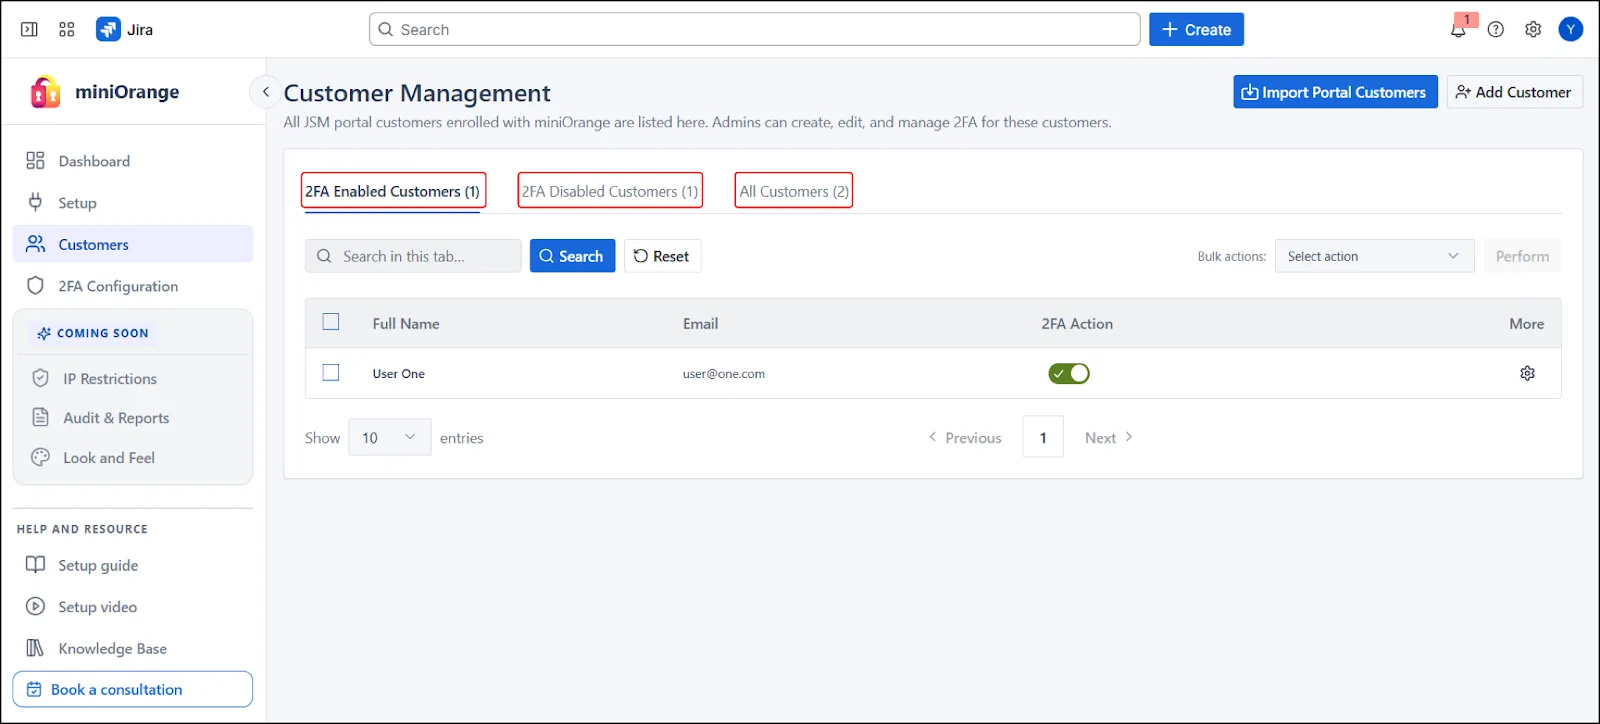
2FA Enabled Customers
- All customers who currently have 2FA enabled. Helps monitor secured customers and allows disabling 2FA for specific customers if required.
2FA Disabled Customers
- All customers without 2FA. Useful for identifying unprotected customers and enabling 2FA individually or in bulk.
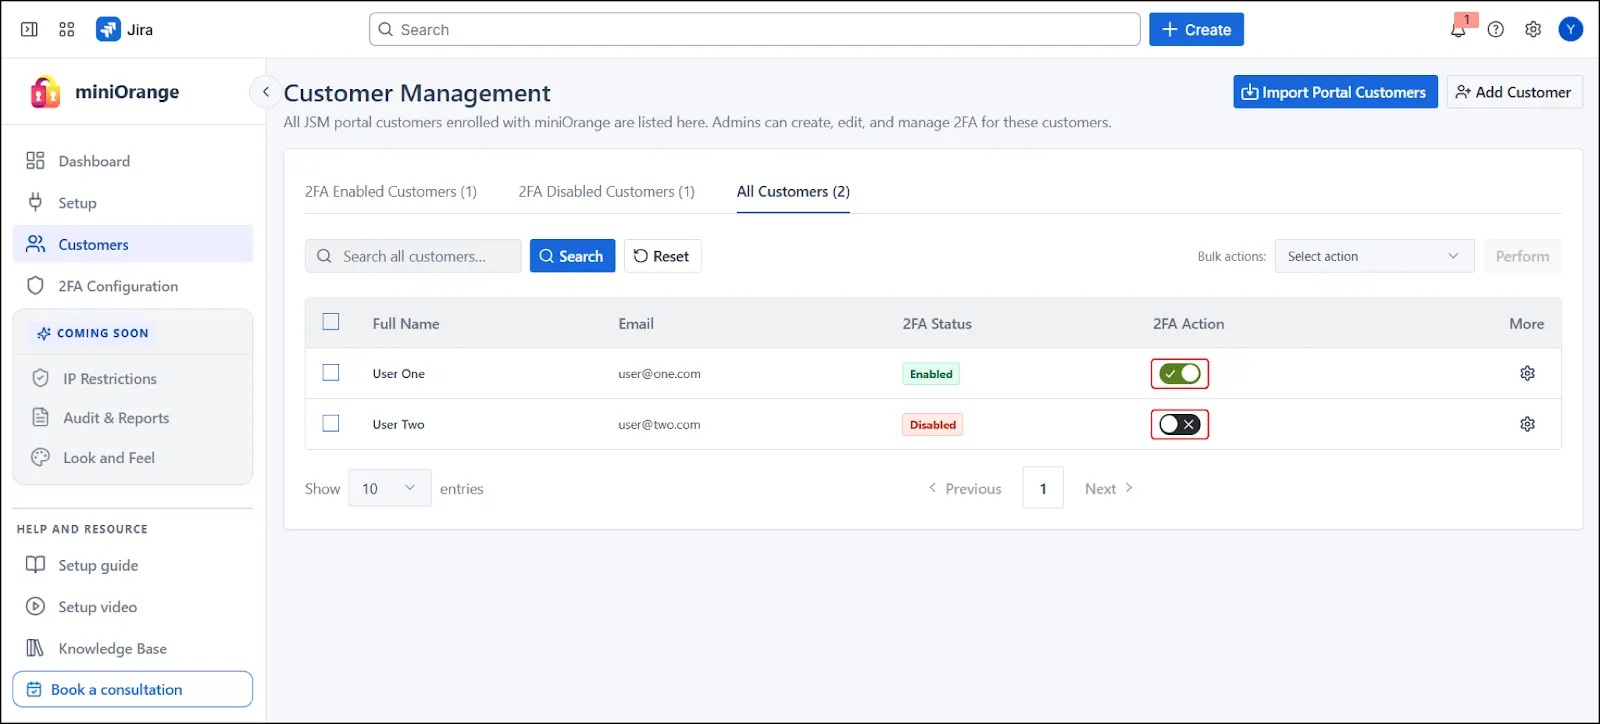
All Customers
- All customers regardless of 2FA status, with a Fetch Status option to view each customer's current 2FA state.
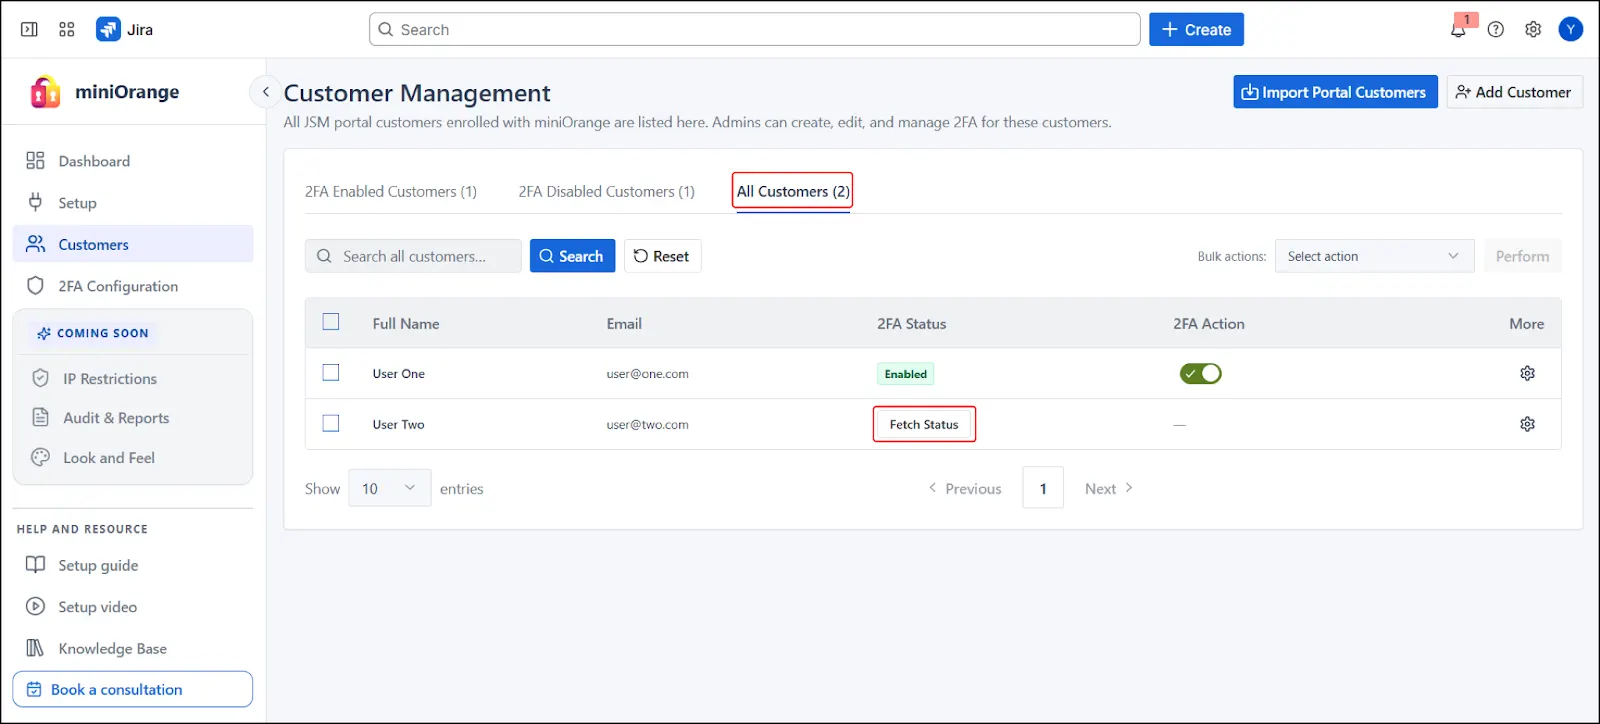
4. Enable or Disable 2FA
2FA management is available from all three sub-tabs; the available actions depend on the selected tab and the customer's current state.

Individual Customers
Use the toggle switch under the 2FA Action column to control 2FA for each customer toggle ON to enable, OFF to disable.
Multiple Customers (Bulk Actions)

- Select customers using the checkboxes.
- Choose an action from the Bulk Actions dropdown.
- Click Perform.
To prevent invalid operations, actions are restricted by tab:
- 2FA Enabled Customers tab only Disable 2FA is available.
- 2FA Disabled Customers tab only Enable 2FA is available.
- All Customers tab both Enable and Disable are available, after fetching 2FA status.
5. Edit Customer Details
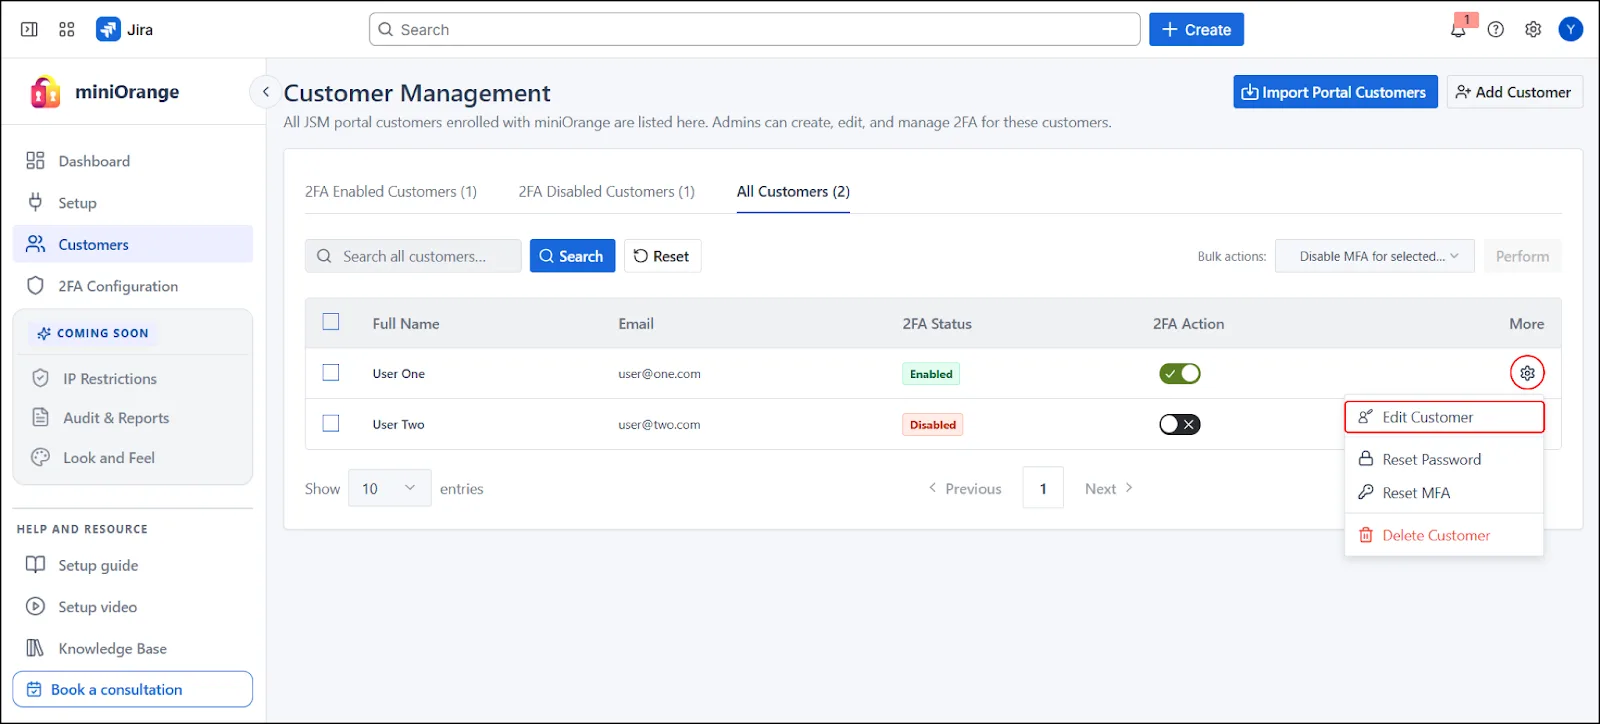
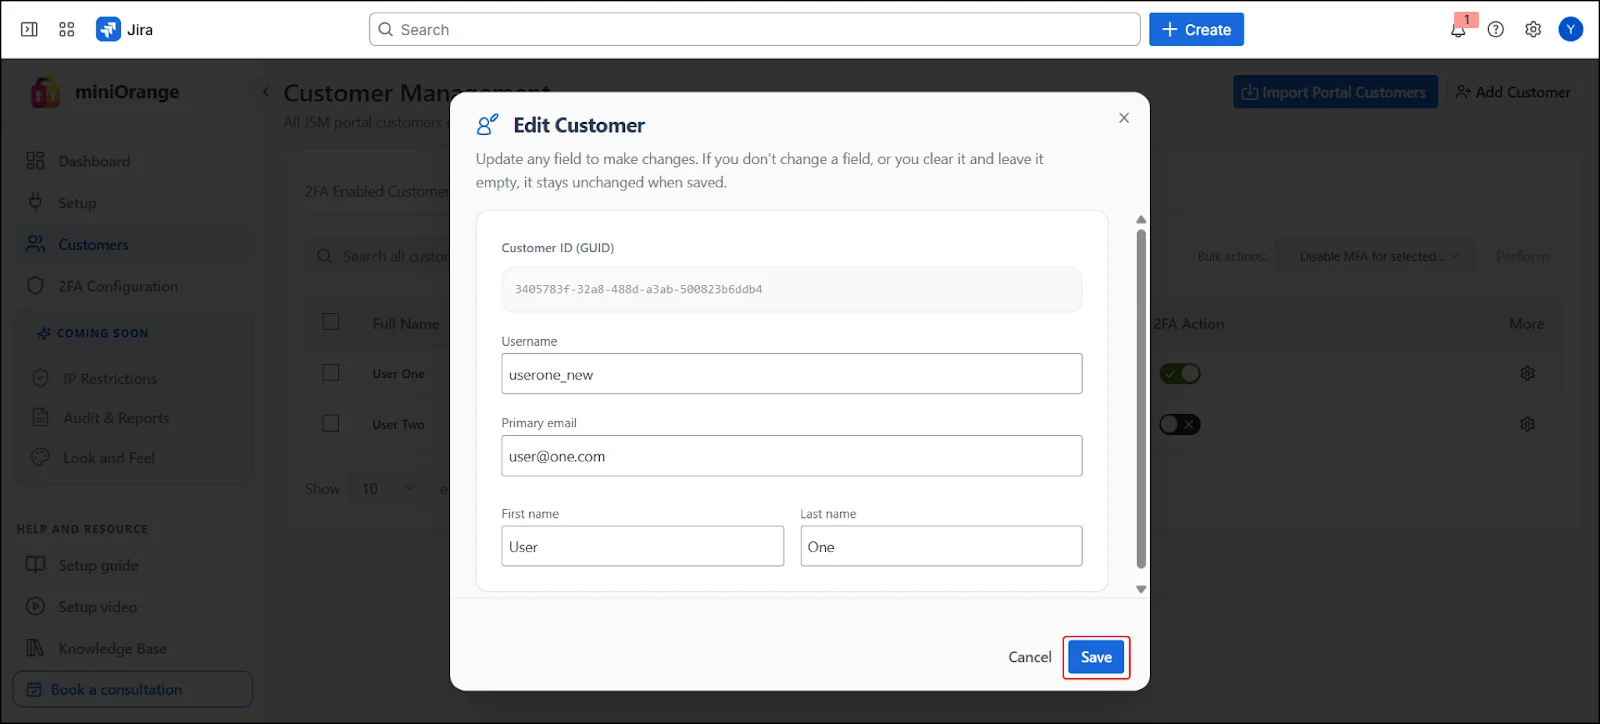
- Select the settings (⚙️) icon next to a customer entry.
- Choose Edit Customer and update the required fields.
Note: Unmodified or cleared fields remain unchanged.
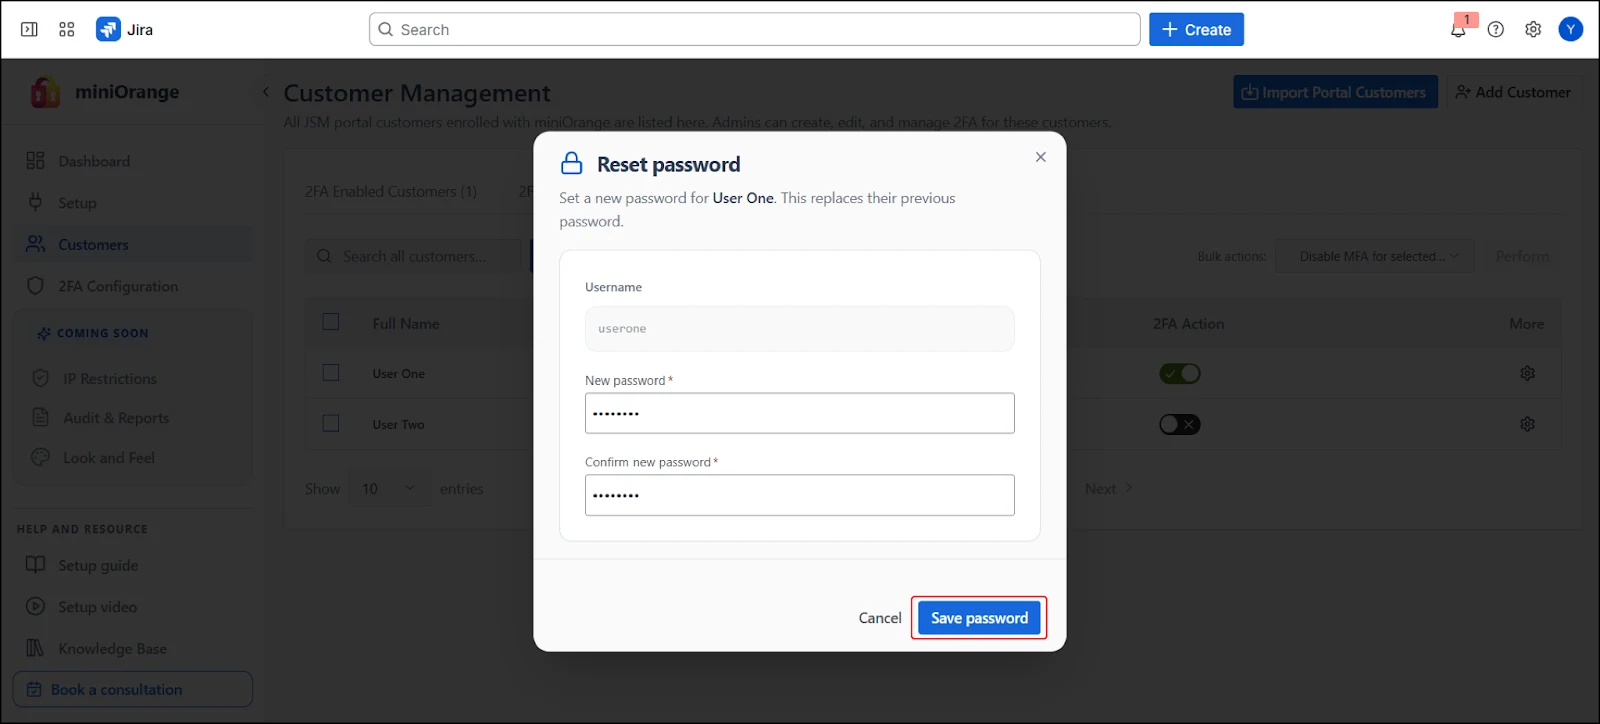
6. Reset Customer Password

- Select the settings (⚙️) icon next to a customer entry.
- Choose Reset Password.
- In the modal dialog, enter and confirm the new password, then click Save Password.
7. Delete Customer
Individual

- Select the settings (⚙️) icon next to a customer entry.
- Choose Delete Customer and confirm the action.
Bulk
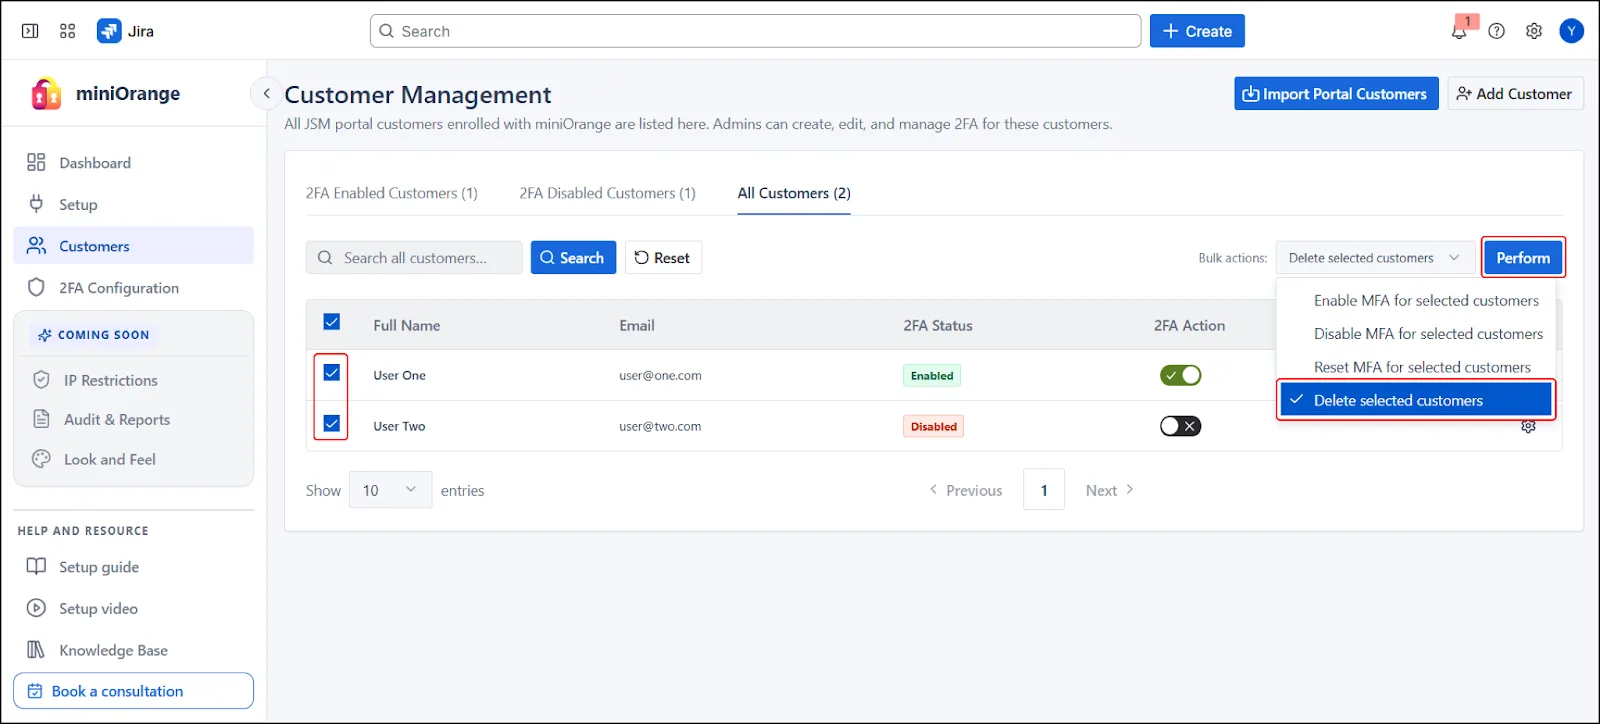
- Select multiple users using the checkboxes.
- Choose Delete Users from Bulk Actions, then execute and confirm.
Note: This action permanently removes the customer and cannot be undone.
8. Reset MFA
Individual
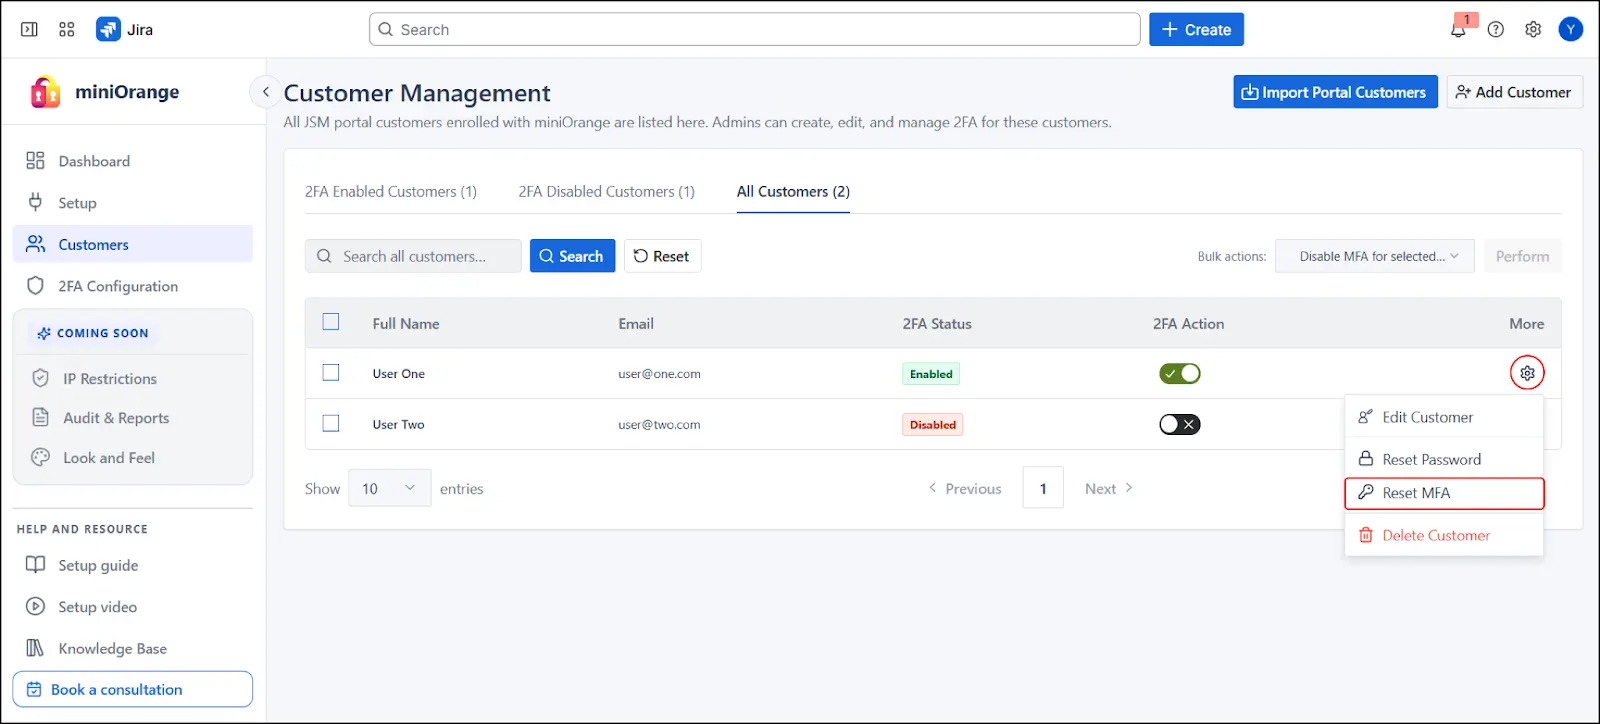
- Select the settings (⚙️) icon next to a customer entry.
- Choose Reset MFA and confirm. MFA reconfiguration is required on the customer's next login.
Bulk
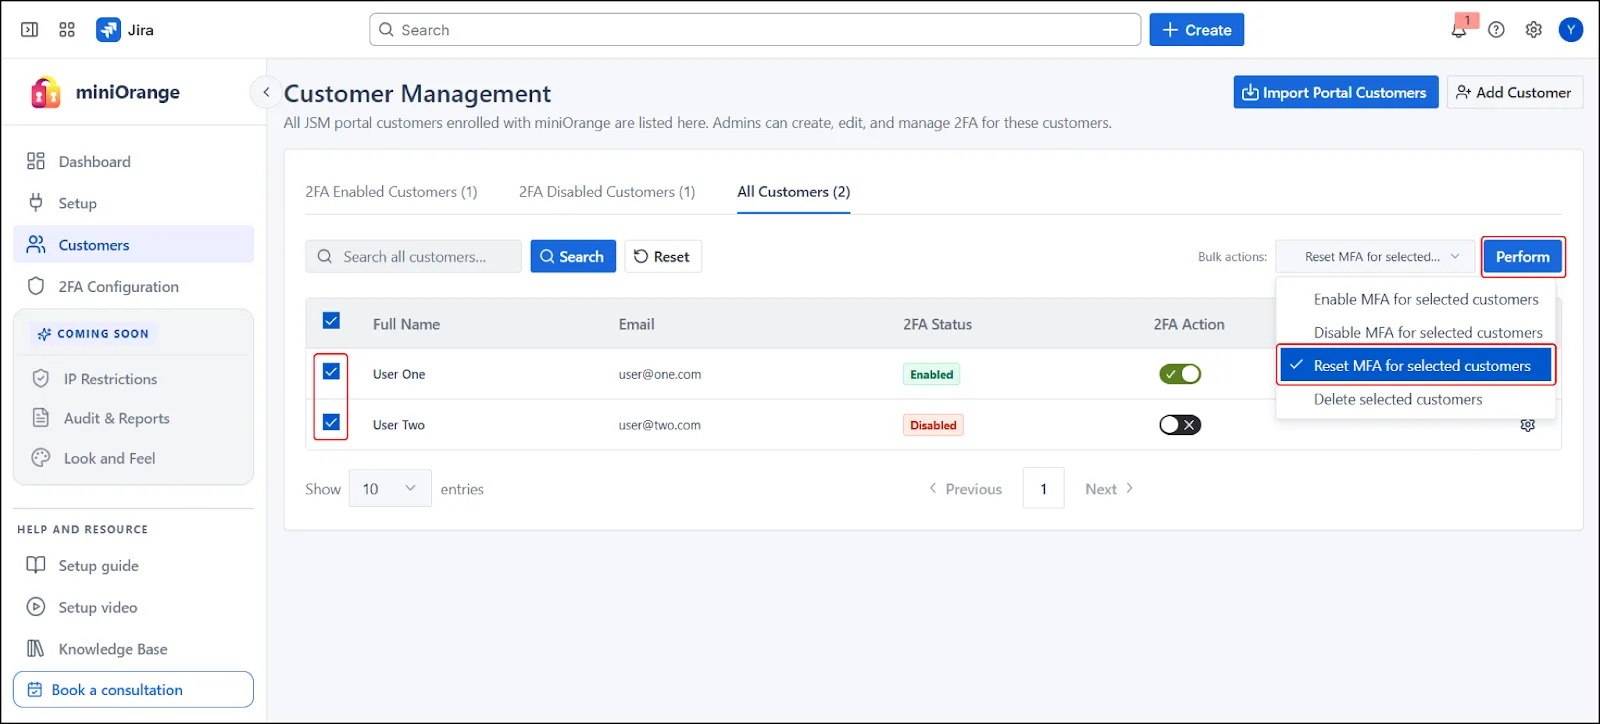
- Select multiple customers.
- Choose Reset MFA from Bulk Actions, then execute and confirm.
Note: This action removes existing MFA configuration and forces the customer(s) to set up MFA again on their next login.
9. Search Customers
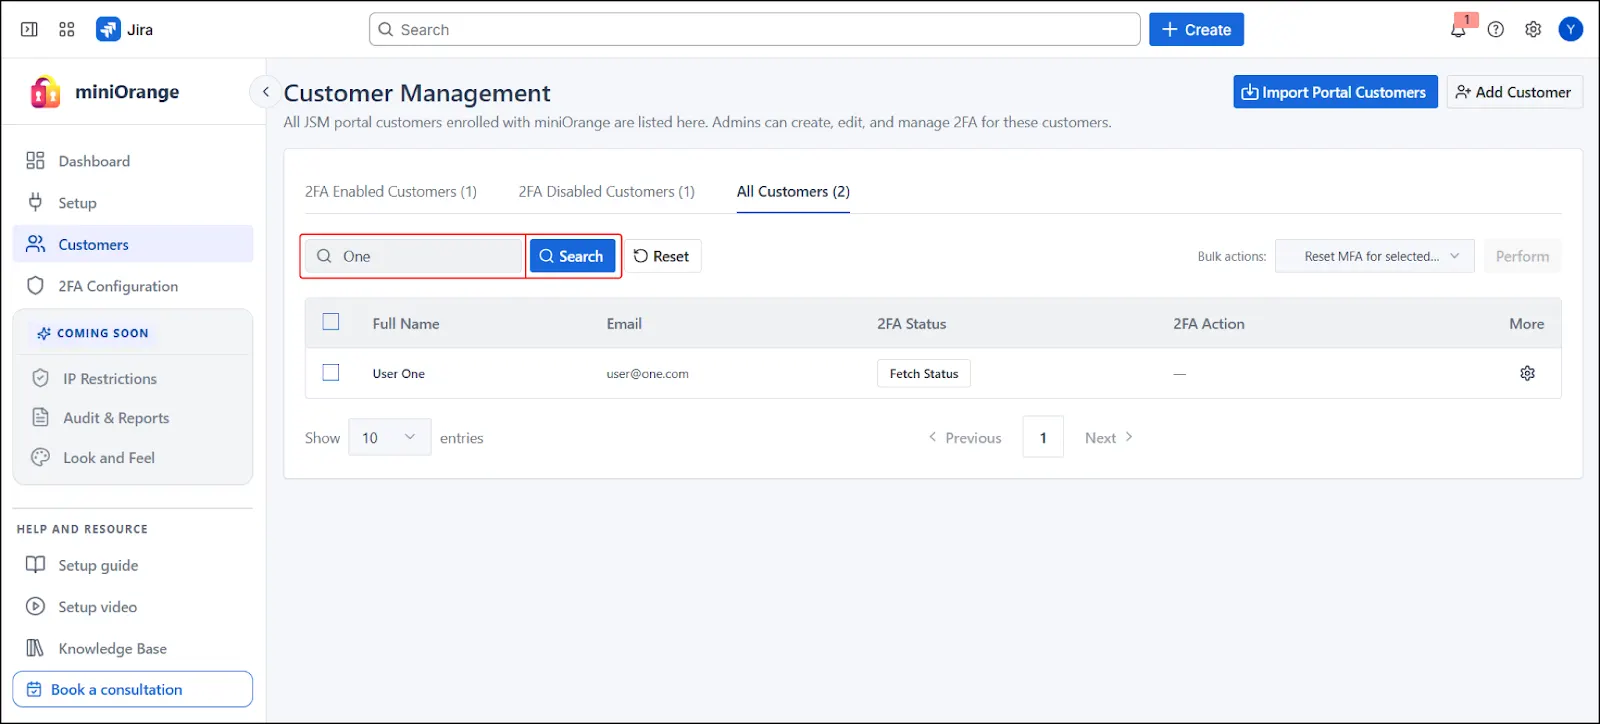
Use the search bar to locate customers by name or email. Search behavior depends on the active tab:
- Enabled / Disabled tabs, results are filtered by 2FA status.
- All Customers tab, shows all customers regardless of 2FA status.
If no results appear in a sub-tab, switching to All Customers provides complete visibility.
Identity Providers Tab
The Identity Providers tab lets you configure external Identity Providers (IdPs). This is useful when your portal-only customers are managed in an external IdP such as Okta, Microsoft Entra ID (Azure AD), Google, or any other SAML or OAuth/OIDC-compatible provider. You can configure one or multiple Identity Providers, allowing customers to access your JSM portal using their existing organizational credentials.
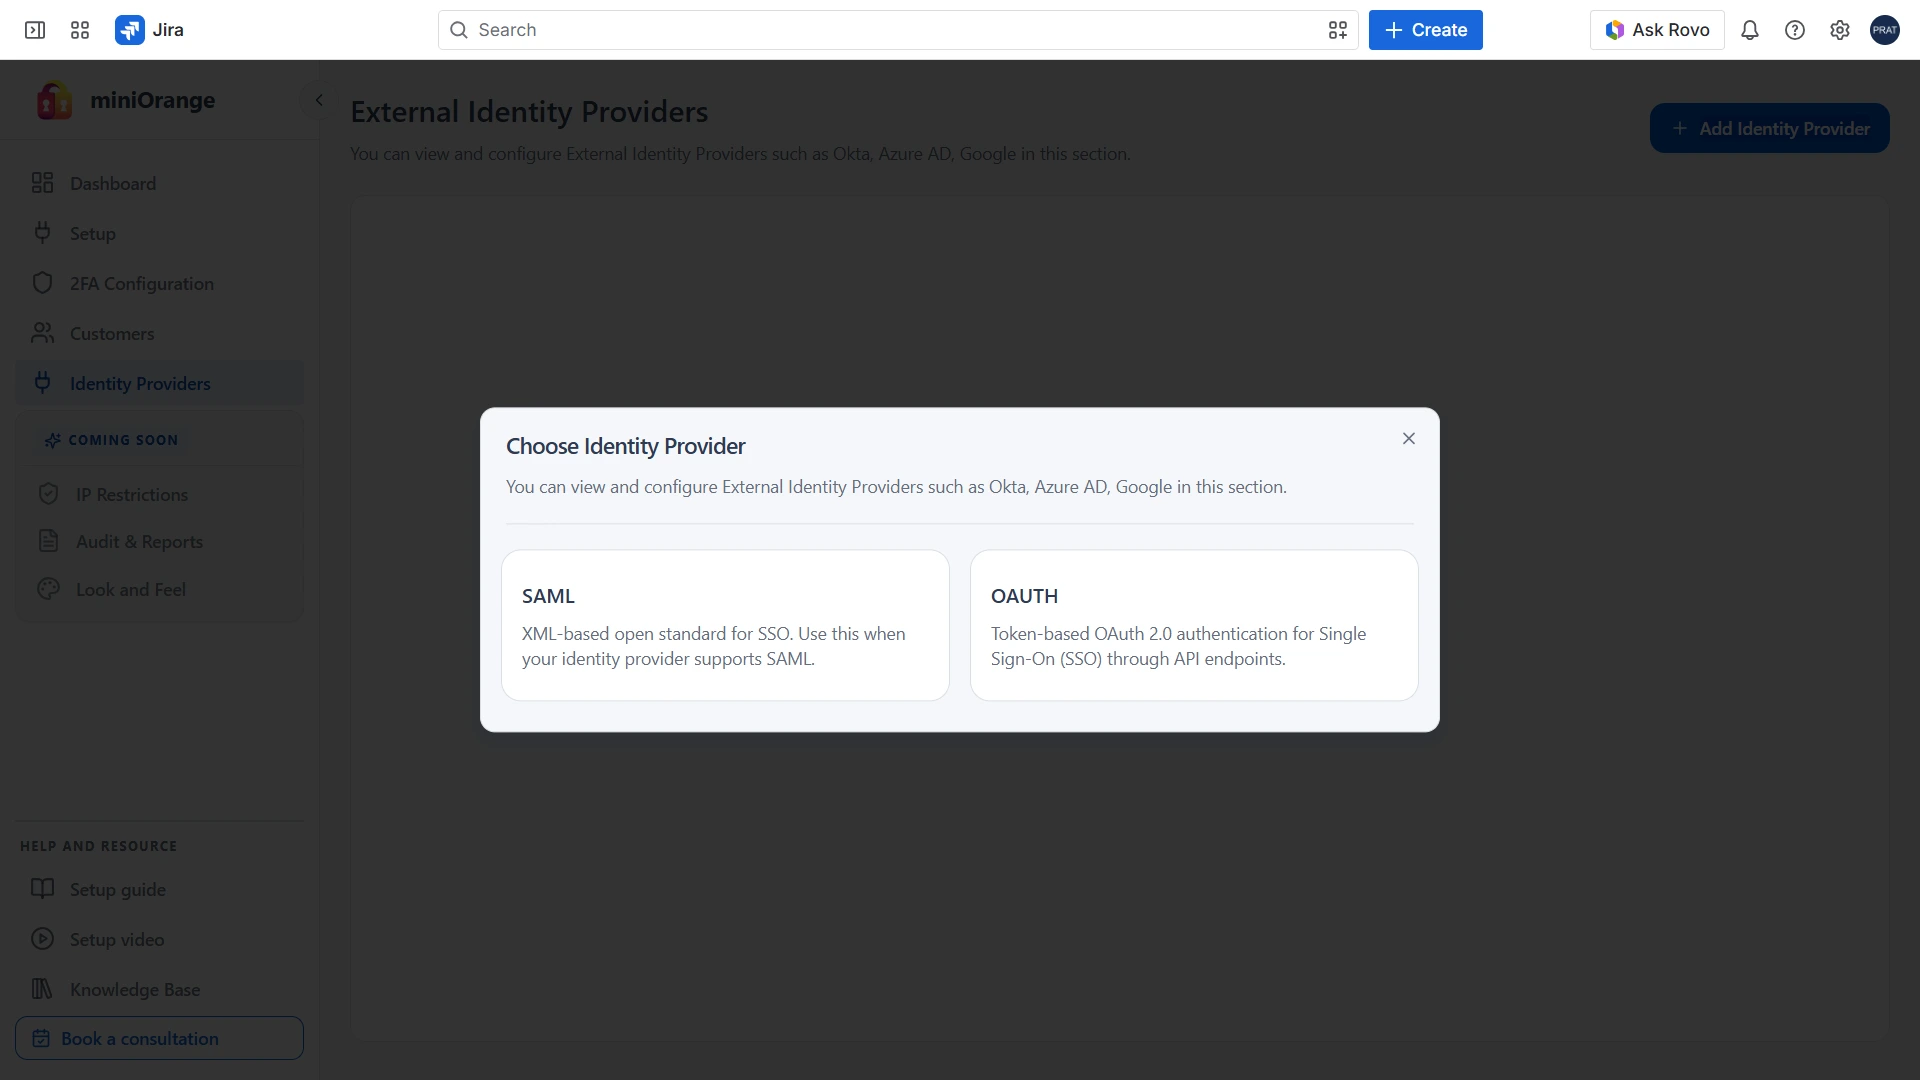
Add a New Identity Provider
- Open the Identity Providers tab and click Add Identity Provider in the upper-right corner.
- Select the authentication protocol your IdP supports, SAML or OAuth / OpenID Connect (OIDC).
Configure a SAML Identity Provider
If your Identity Provider supports SAML 2.0, follow the steps below to configure SAML-based Single Sign-On (SSO) for your JSM portal. After selecting SAML as the authentication protocol, complete the following configuration steps.
Step 1: Configure Your Application in the Identity Provider (IdP)
Create a new SAML application in your Identity Provider using the Service Provider (SP) configuration details provided by the plugin.
- Copy the SAML configuration metadata. The plugin displays the required SAML Service Provider (SP) details that must be entered in your IdP.
- Create a new SAML application in your IdP: log in to your IdP's administrator dashboard, navigate to the Applications section, click Create Application (also called Create App Integration, or the equivalent option), and when prompted for a sign-in protocol, choose SAML 2.0 and proceed.
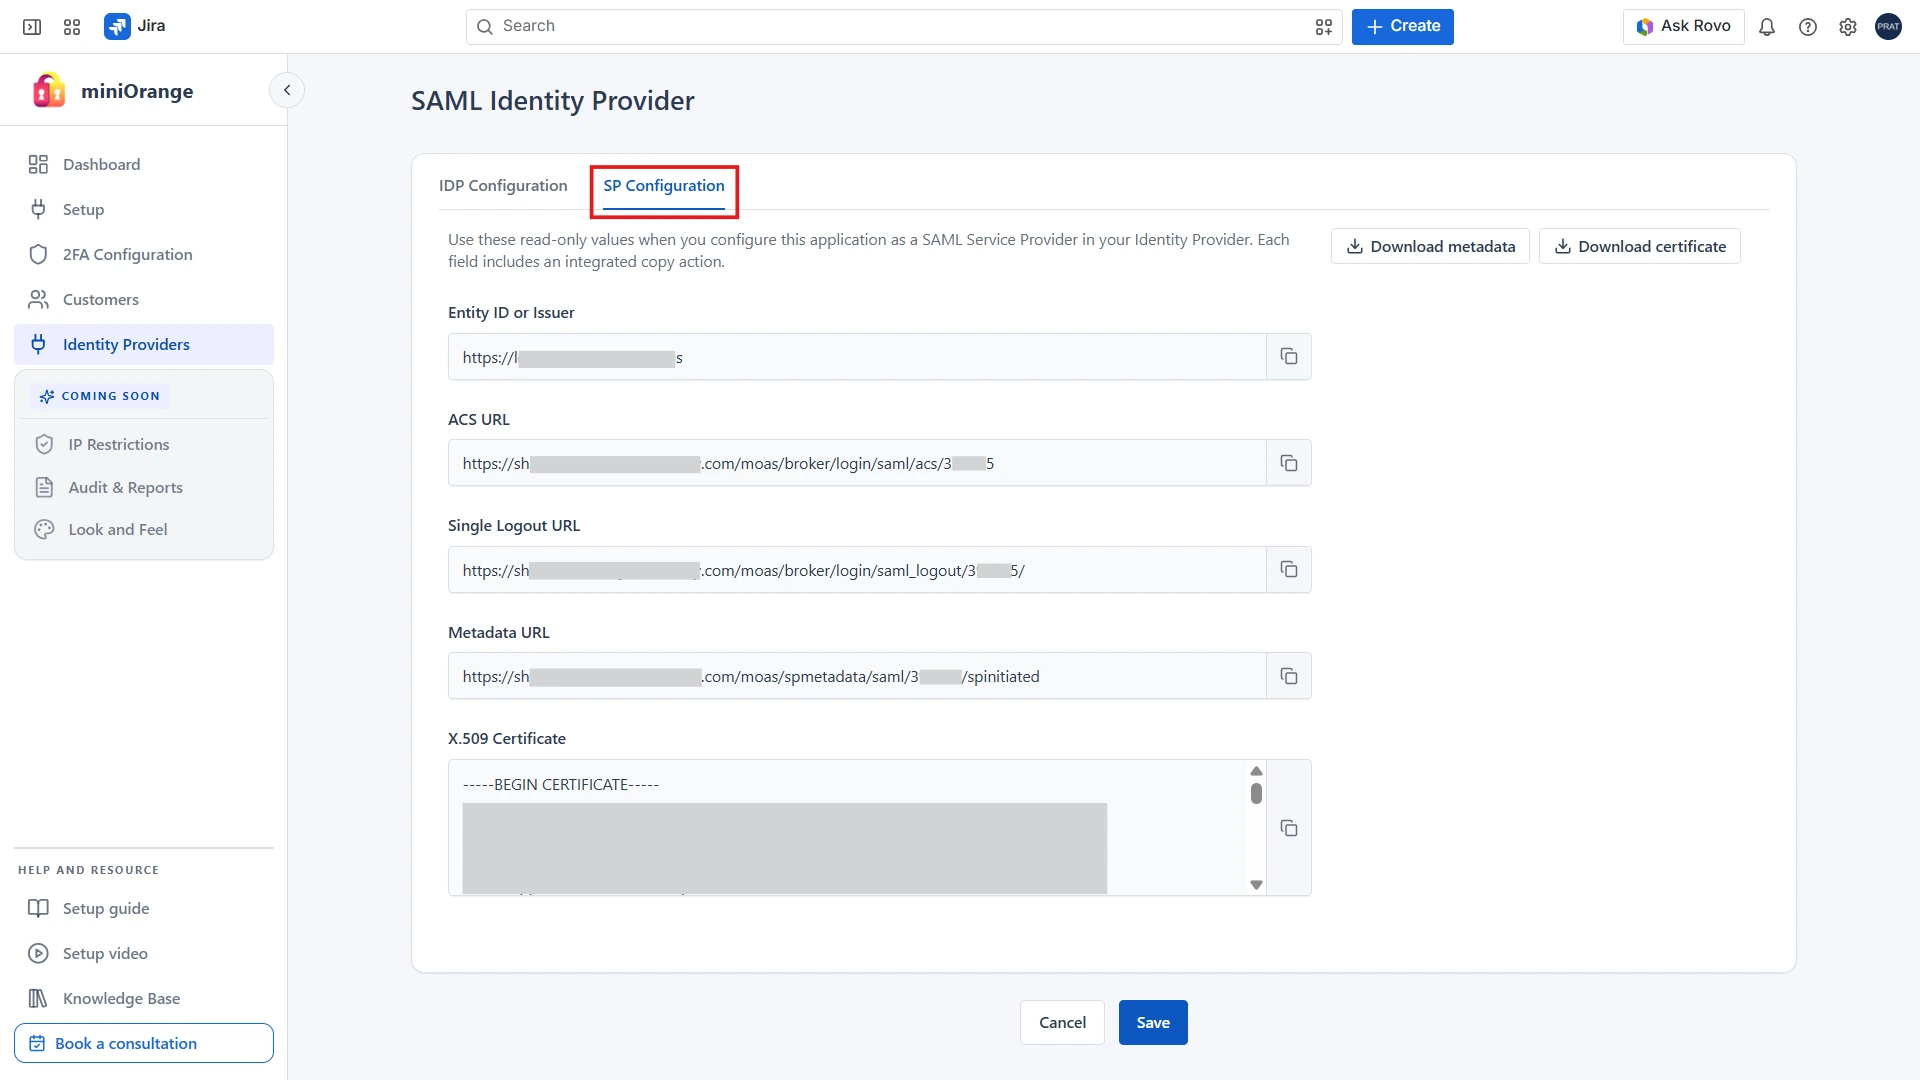
- Configure the application. During setup, your IdP will ask for details such as Application Name, Audience URI (SP Entity ID), Single Sign-On (ACS) URL, and other SAML-related settings. You can find these values on the SAML Identity Provider page, in the SP Configuration tab within the plugin.
- Complete the application setup: copy the required values from the plugin into the corresponding fields in your IdP, review the configuration, and complete the application creation process. Then assign the required users and/or groups to the application so they can access your Atlassian instance via SSO.
- Return to the plugin to configure the Identity Provider details once the SAML application has been created successfully.
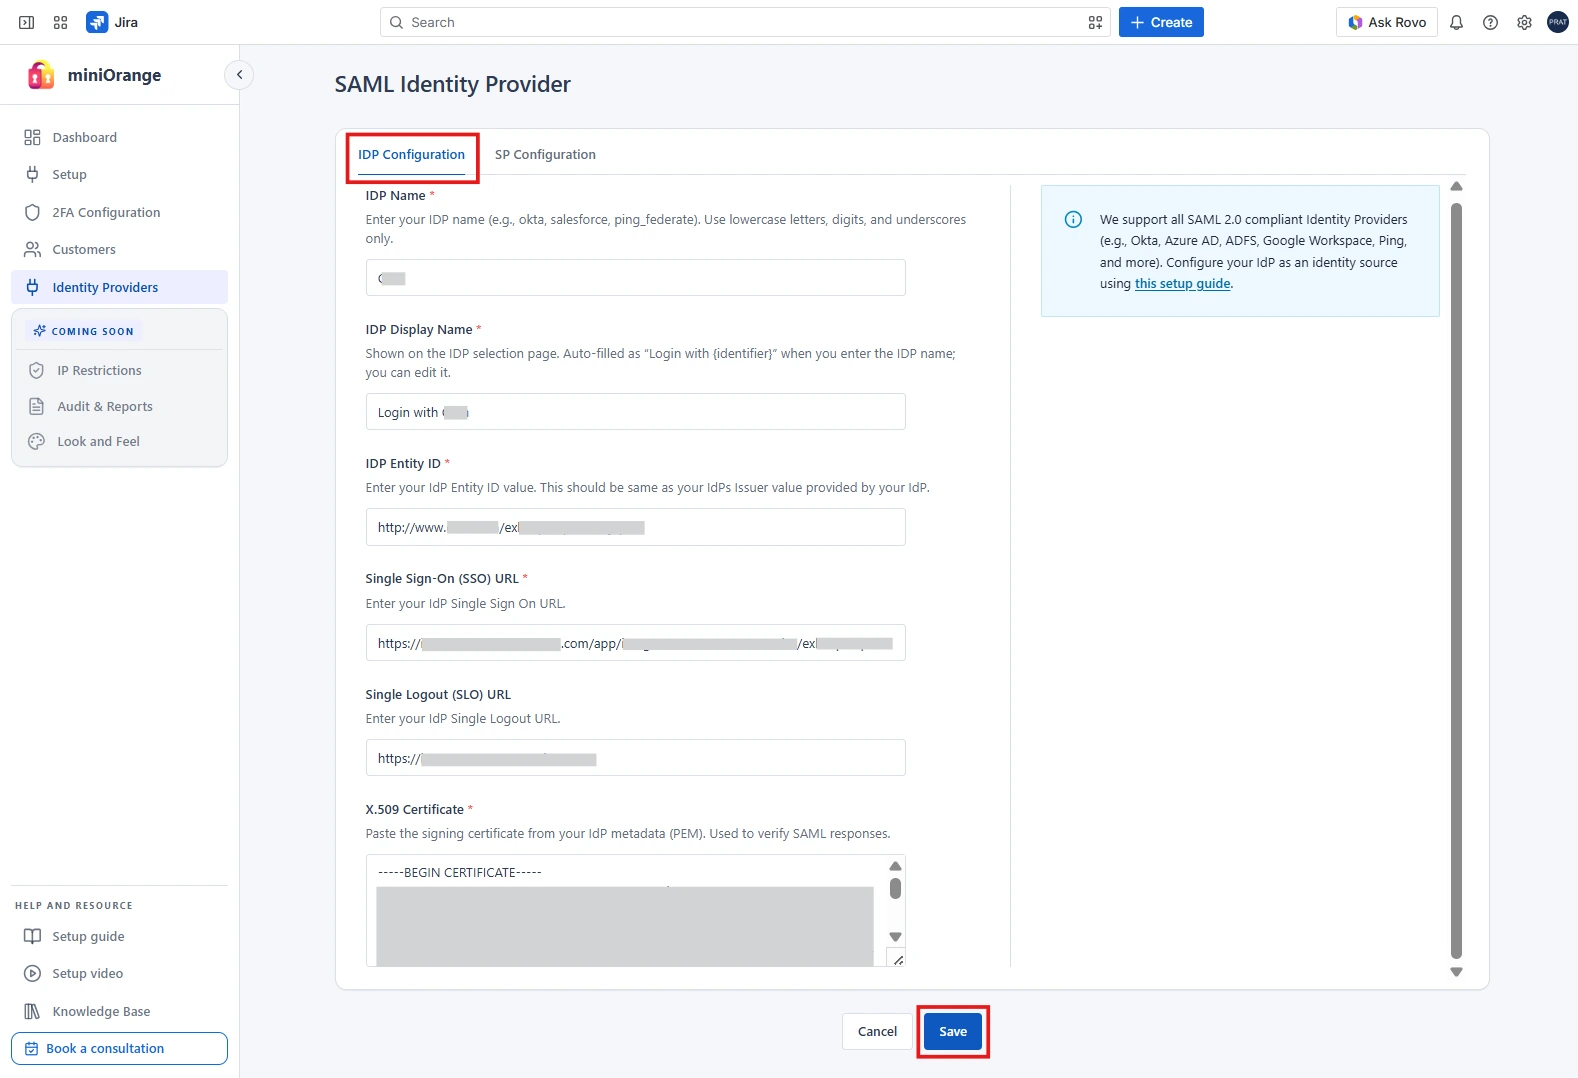
Step 2: Configure Identity Provider Details in the Plugin
After creating the SAML application, configure the external Identity Provider in the plugin using the SAML metadata provided by your IdP. The following values are required:
- IdP Name
- IdP Entity ID (Issuer)
- Single Sign-On (SSO) URL
- X.509 Certificate
These values can typically be found in the SAML configuration or metadata section of your IdP after the application has been created.
- Copy the IdP metadata: open the SAML application you created in your IdP and locate its SAML configuration or metadata page.
- Configure the plugin: navigate back to the SAML Identity Provider page in the plugin, enter the copied values into their corresponding fields, and click Save to complete the Identity Provider configuration.
Configure an OAuth / OpenID Connect (OIDC) Identity
Provider
If your Identity Provider supports OAuth 2.0 or OpenID Connect (OIDC), follow the steps below to configure OAuth/OIDC-based Single Sign-On (SSO) for your JSM portal. After selecting OAuth / OpenID Connect (OIDC) as the authentication protocol, complete the following configuration steps.
Step 1: Configure Your Application in the Identity Provider (IdP)
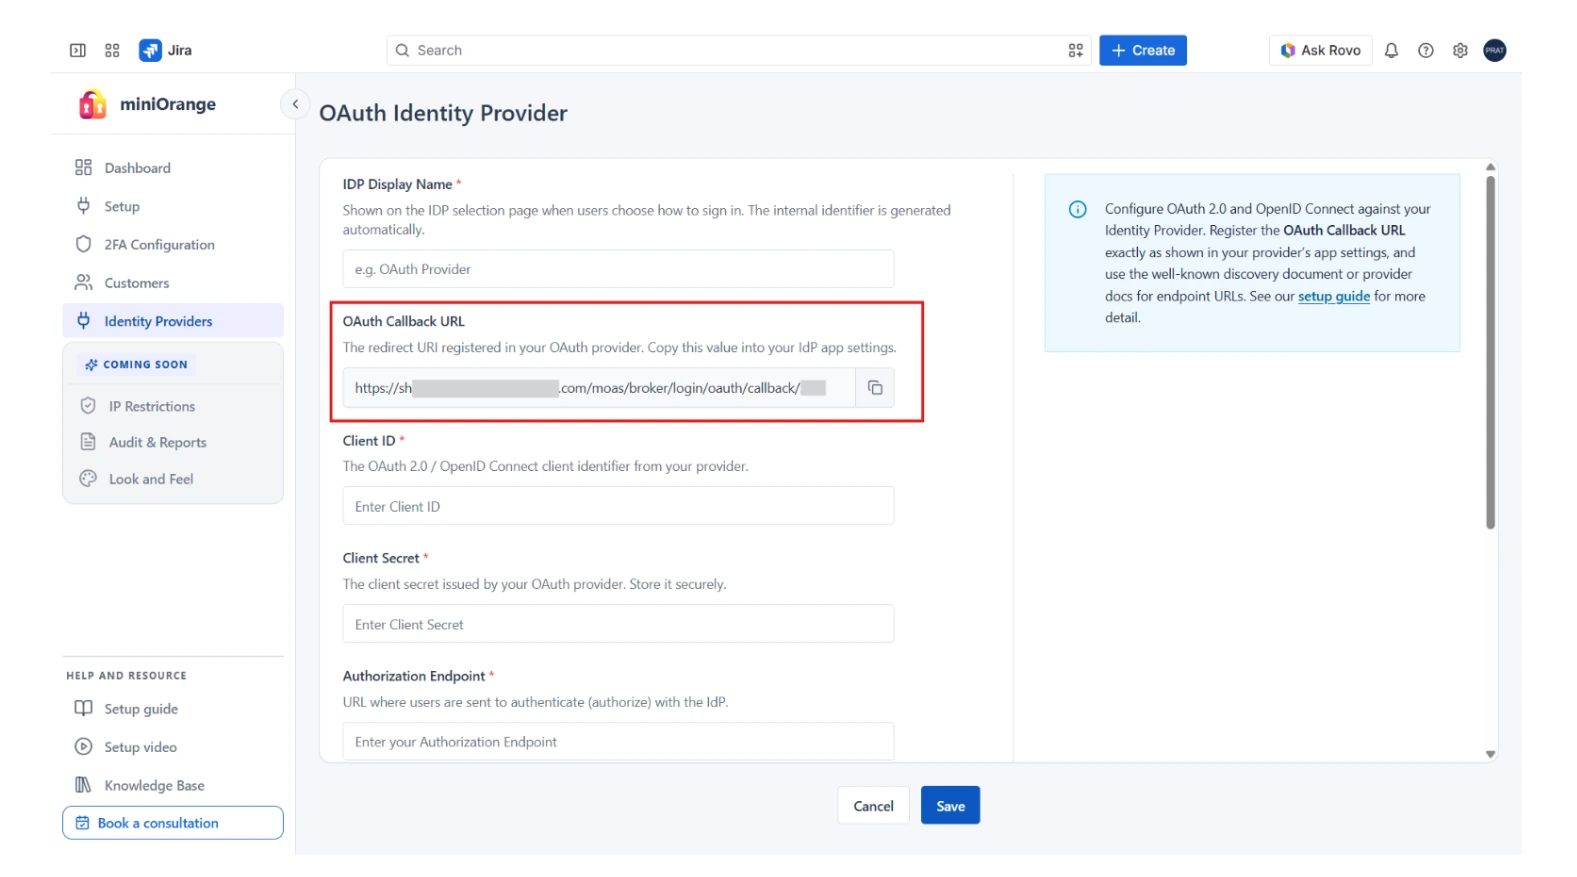
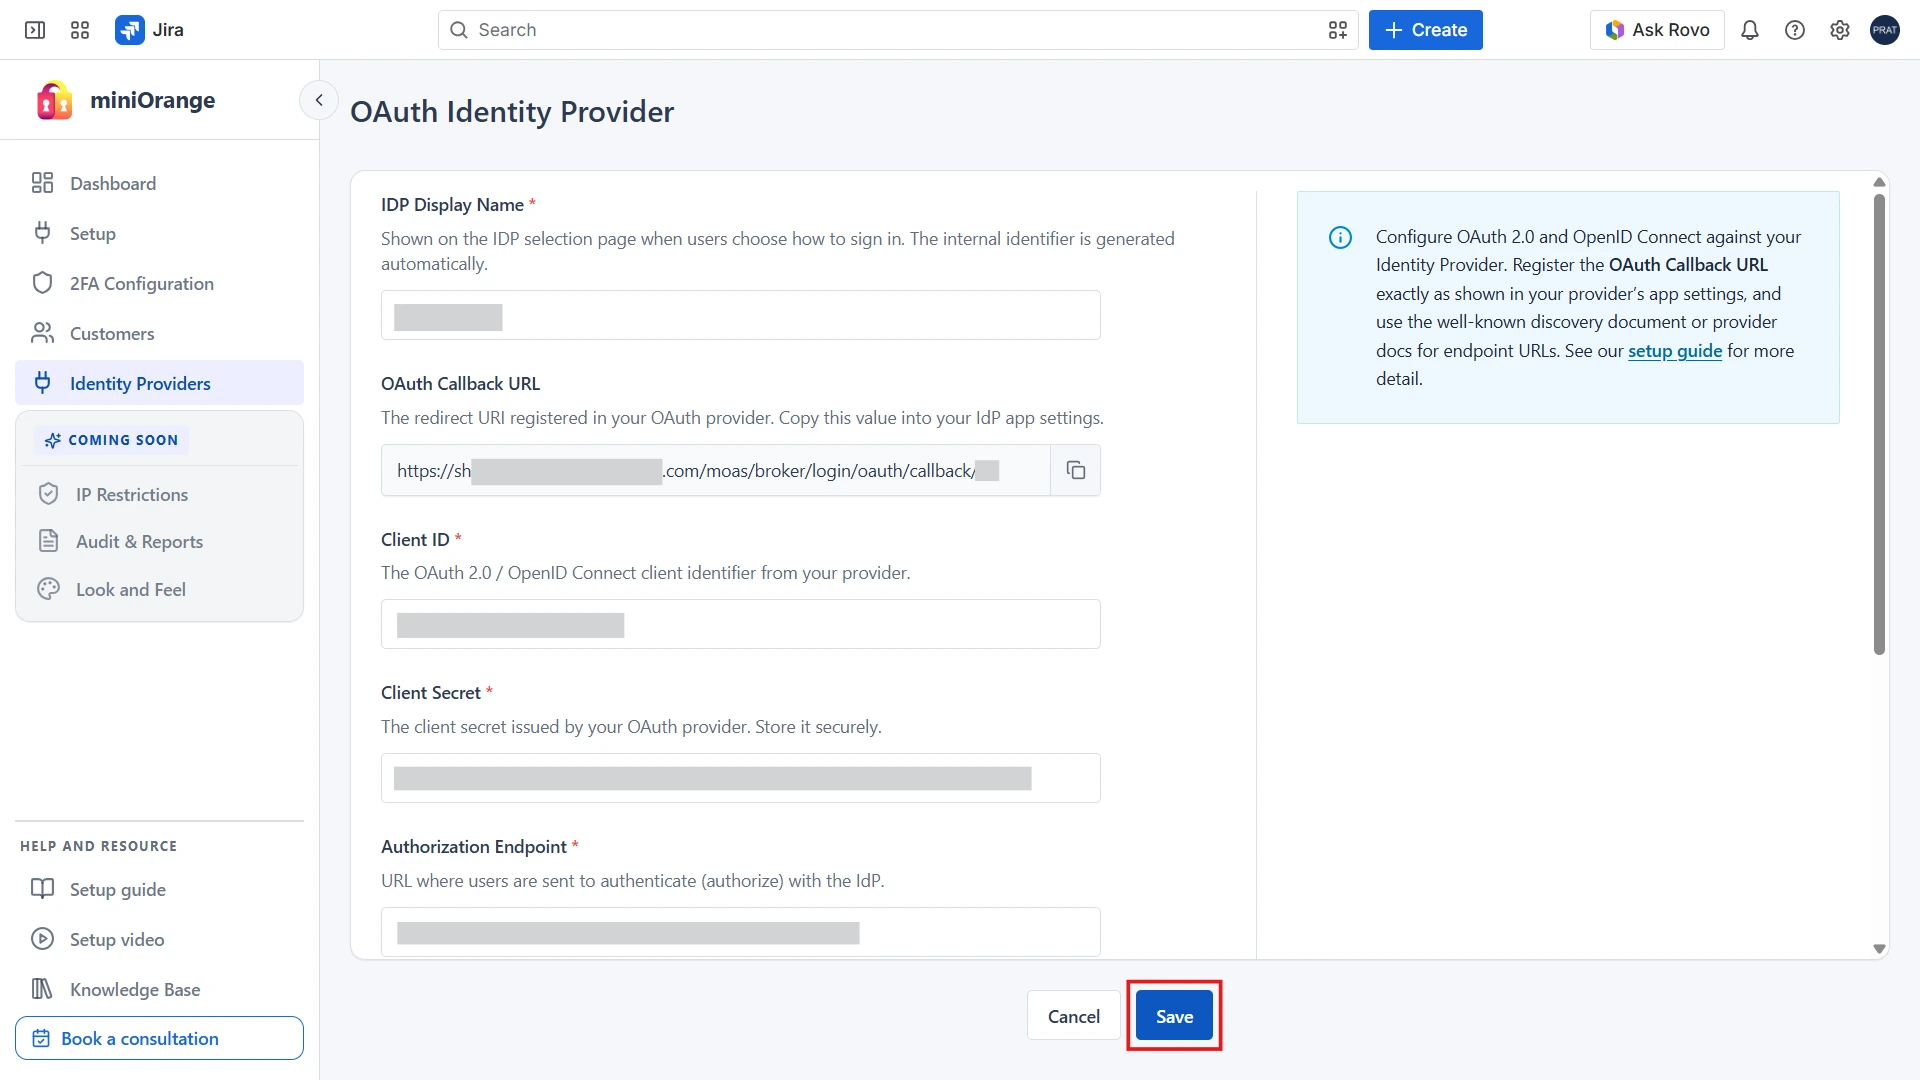
Create a new OAuth/OIDC application in your Identity Provider using the OAuth Callback URL provided by the plugin.
- Create a new OAuth/OIDC application in your IdP: log in to your IdP's administrator dashboard, navigate to the Applications section, and click Create Application (also called Create App Integration, or the equivalent option). When prompted for a sign-in protocol, choose OpenID Connect (OIDC) or OAuth 2.0, depending on your IdP. If asked for an application type, select Web Application and continue.
- Configure the application. During setup, your IdP will ask for details such as Application Name and Sign-in Redirect URL / OAuth Callback URL. Copy the OAuth Callback URL displayed on the OAuth Identity Provider page in the plugin and paste it into the corresponding field in your IdP.
- Complete the application setup: review the configuration, save or create the application, and assign the appropriate users and/or groups so they can authenticate via SSO.
- Return to the plugin to configure the Identity Provider details once the OAuth/OIDC application has been created successfully.
Step 2: Configure Identity Provider Details in the Plugin
Configure the external Identity Provider in the plugin using the OAuth/OIDC credentials generated by your IdP. The following values are required:
- IdP Name
- Client ID
- Client Secret
- Authorization Endpoint
- Token Endpoint
- Scopes (openid and email are mandatory)
These values are available in the OAuth/OIDC application you created in your Identity Provider.
- Copy the required values from your IdP: locate the OAuth credentials (Client ID, Client Secret) and endpoints in your IdP dashboard.
- Configure the plugin: navigate back to the OAuth Identity Provider page in the plugin and paste the copied values into their corresponding fields. Ensure the openid and email scopes are included, then click Save to complete the Identity Provider configuration.
Update the Authentication Source in Atlassian Guard
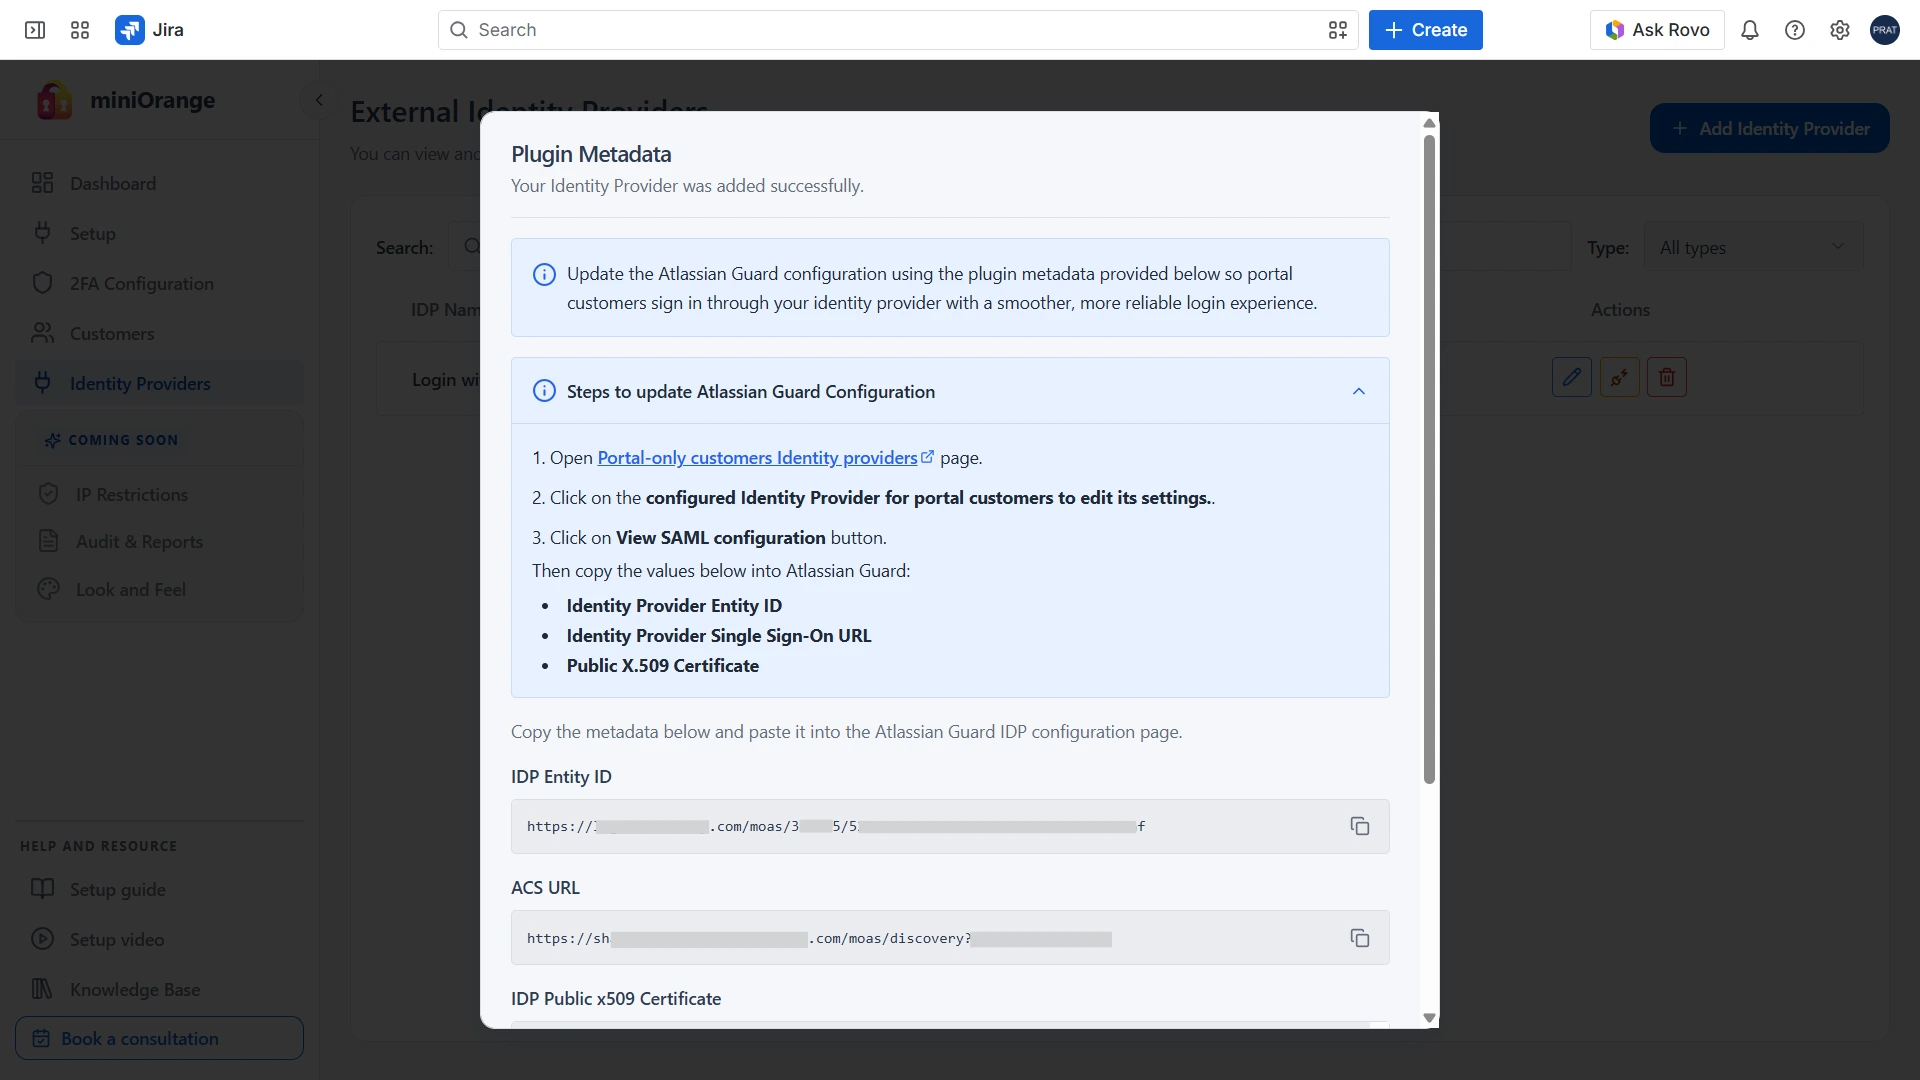
After the Identity Provider has been configured successfully, you are redirected to the Identity Providers landing page, and a confirmation dialog appears with the information required to update your authentication source in Atlassian Guard.
For reference, see: Configure Authentication Source (Step 4)
- On the SAML configuration page in Atlassian Guard, enter the Identity provider entity ID, Identity provider single sign-on URL, and Public X.509 certificate.
- Copy each value from the confirmation dialog displayed in the plugin and paste it into the corresponding field in Atlassian Guard.
- Click Save to update the authentication source.
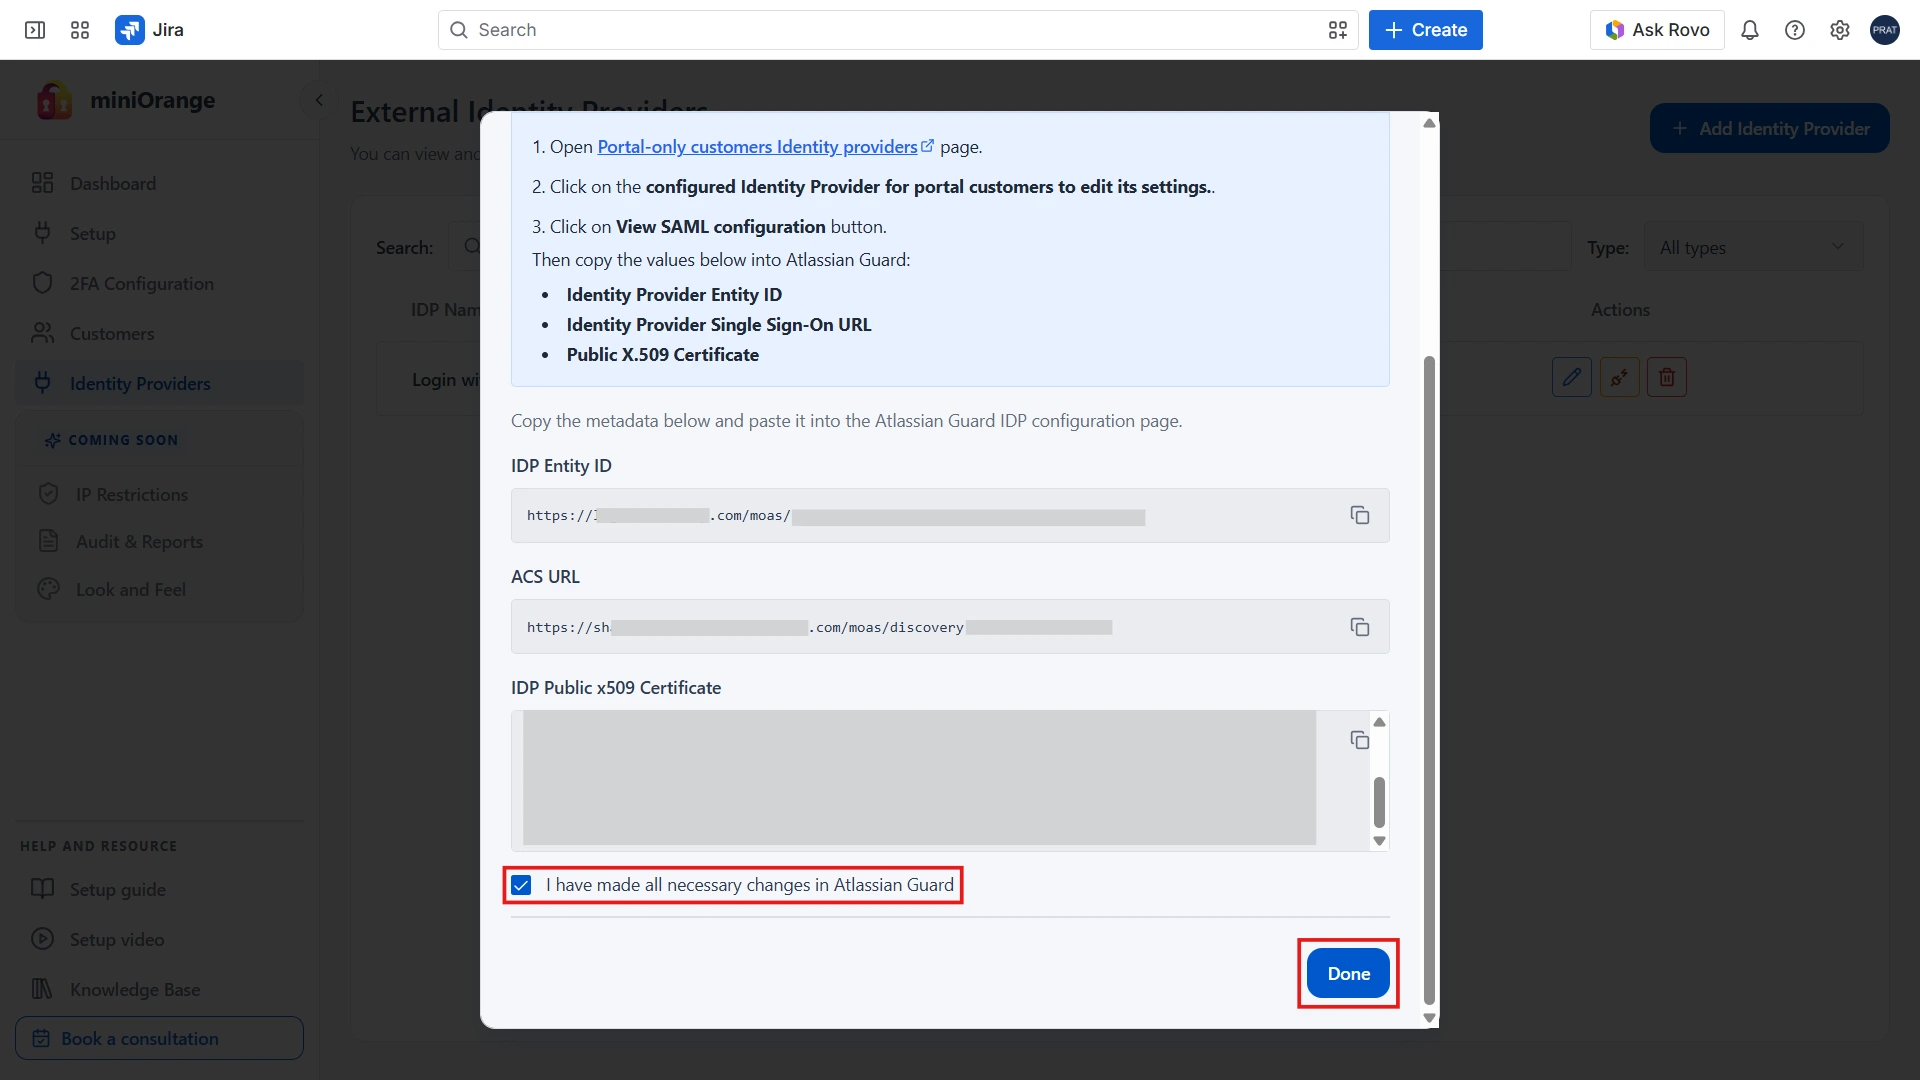
Complete the Configuration
Once the configuration has been saved successfully in Atlassian Guard, return to the plugin. In the confirmation dialog:
- Select the confirmation checkbox indicating that the authentication source has been updated.
- Click Done to complete the Identity Provider setup.
Identity Providers Tab Features
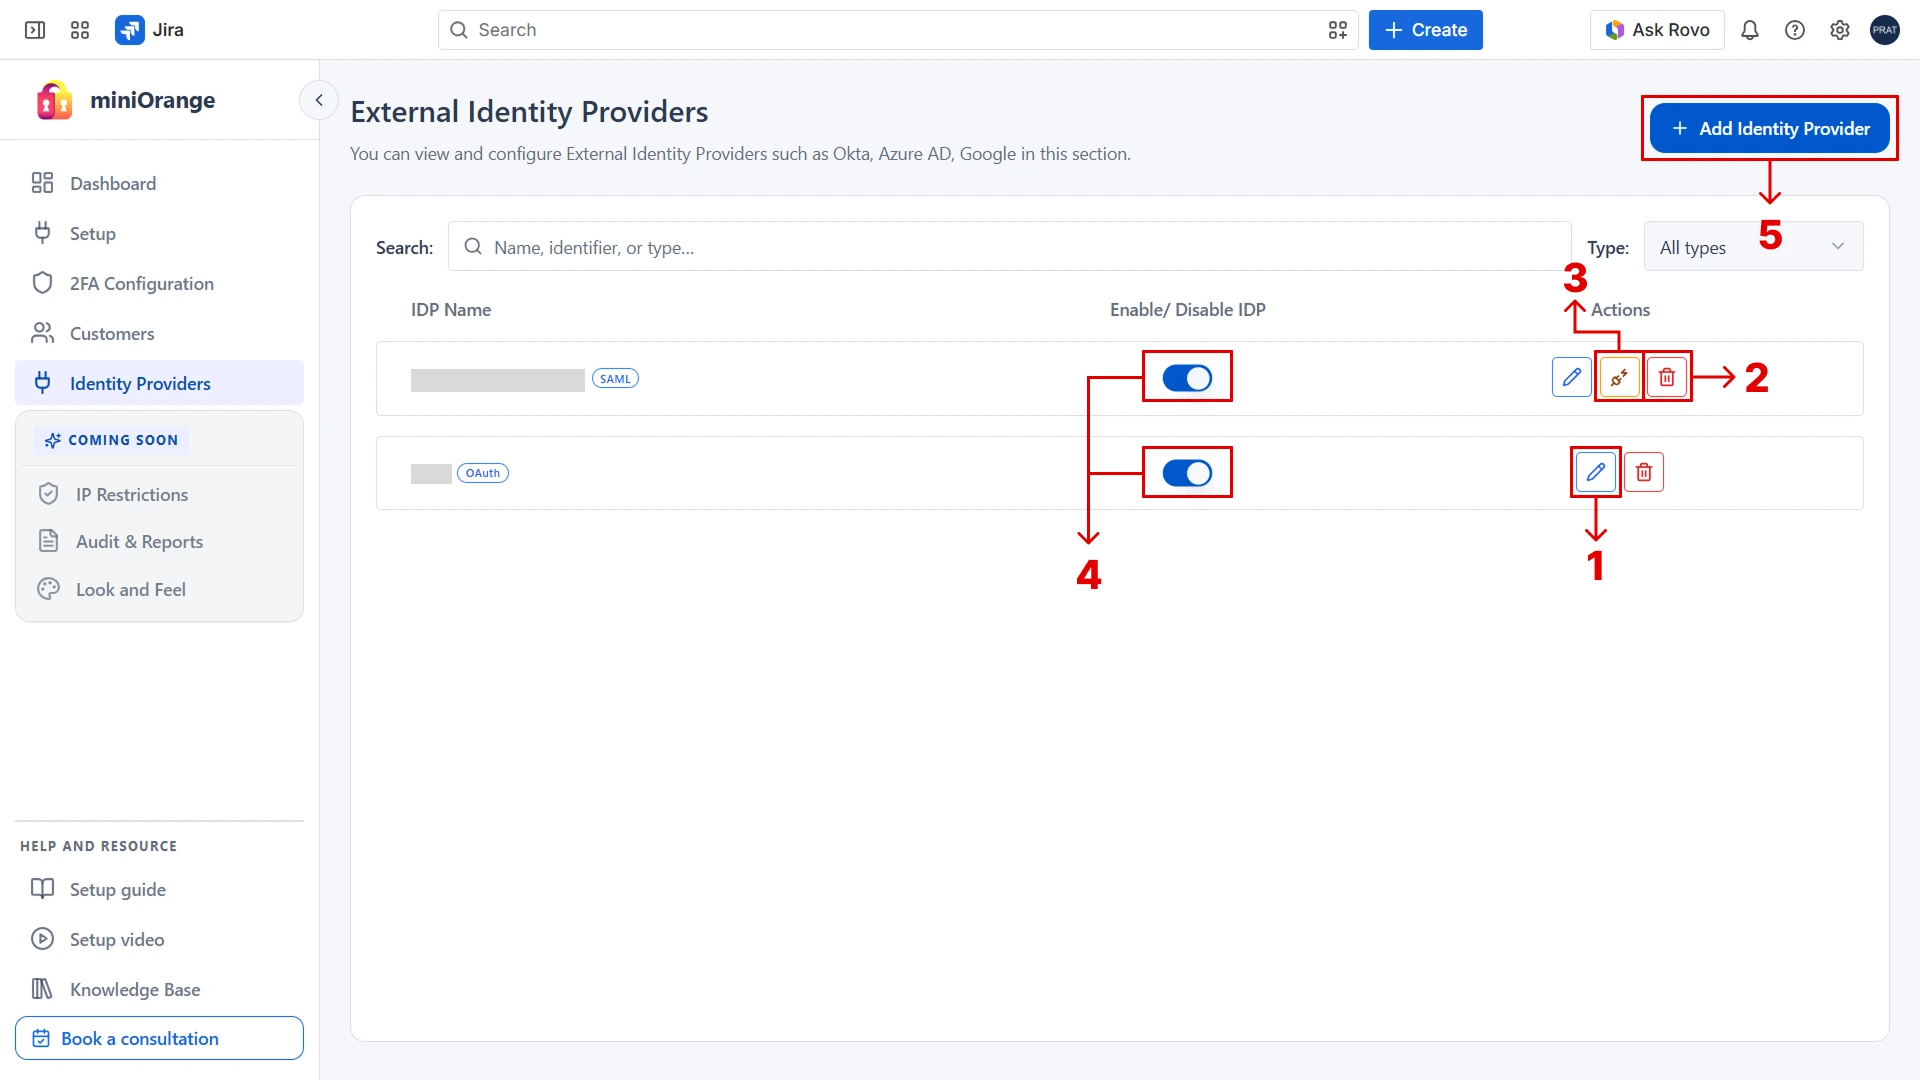
- Edit Identity Provider modify an existing configuration (for example, updated metadata, certificates, endpoints, or credentials) without creating a new one.
- Delete Identity Providerpermanently remove a configuration. Users authenticating through it can no longer sign in via SSO.
- Test Connection for SAML, click Test Connection to validate the configuration directly. For OAuth/OIDC, verify by signing in to the JSM portal with a user managed by that IdP.
- Enable / Disable temporarily control whether an IdP can be used for SSO while retaining its configuration.
- Add Identity Provider configure an additional Identity Provider.
Additional Resources
Did this page help you?
