Two Factor Authentication(2FA) is an extra step added to your log-in process. It enhances your security by one level and protects your Jira account from cyber criminals.
Two factor authentication uses two factors to verify your identity and to confirm that you are who you claim to be. It uses a combination of something you know and something you have. So here the 1st factor of authentication is your usual Jira login with username and password, it is something you know. The 2nd factor will verify something that only you have, like your mobile phone, your email account, a hardware token given to you by your company, etc.
The add-on verifies this 2nd factor. The most commonly used 2FA methods are Mobile Authenticator(TOTP), Hardware Token(Yubikey), OTP over Email, Security Questions, Backup code. So a time sensitive security code is sent to the user using any of these ways so that the user can securely log into Jira.
In this guide we will go through how to get started with 2FA.
How to Configure Mobile Authenticator(TOTP):
Download authenticator app:
- For using the mobile authenticator 2FA methods, you will need an Authenticator app on your mobile or any device to scan the QR code. Google Authenticator is the most popular authenticator app. (Here are the links for Google authenticator app: Google play, App store)
- You can use other apps like Microsoft Authenticator, Authy, Duo , LastPass, FreeOTP, Symantec VIP, etc.
- Contact your administrator if you are not sure about which authenticator application to download.
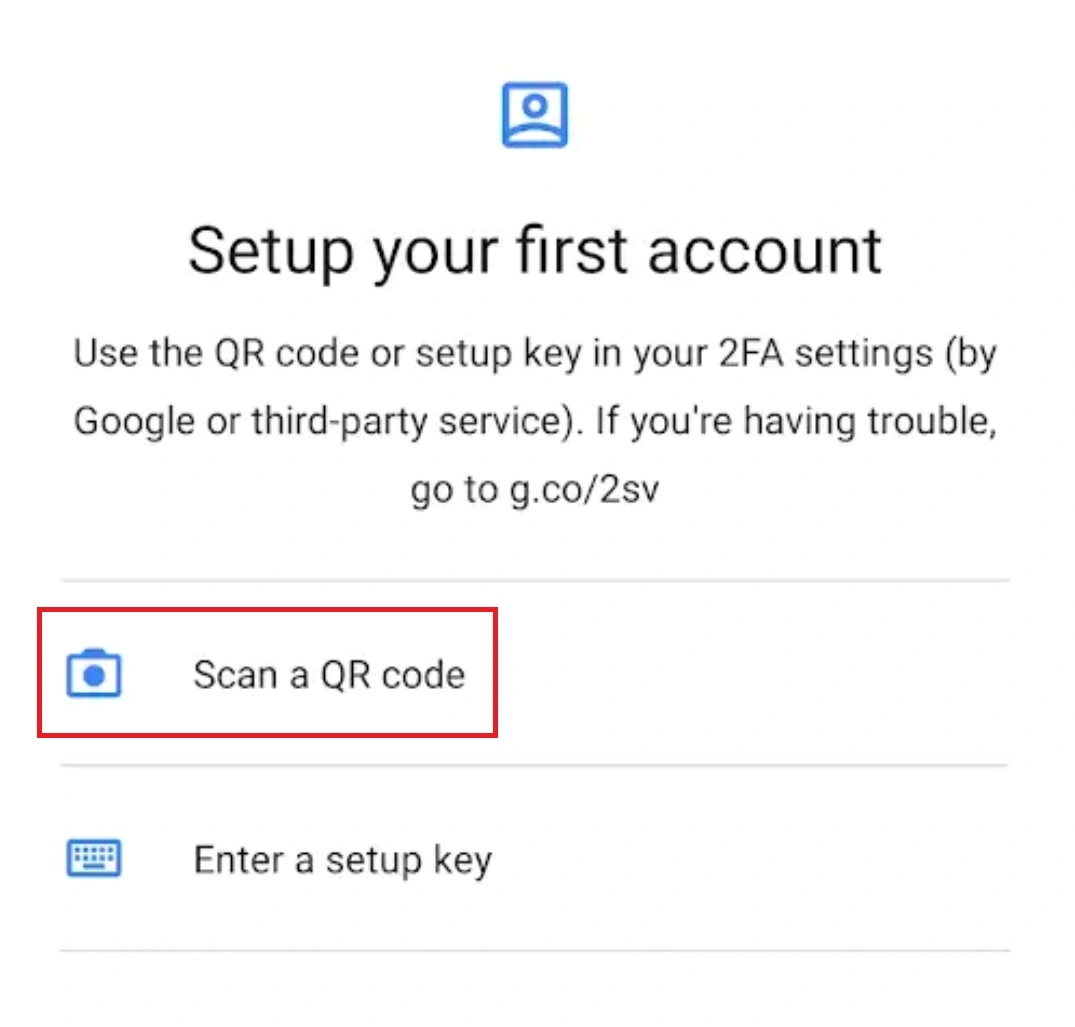
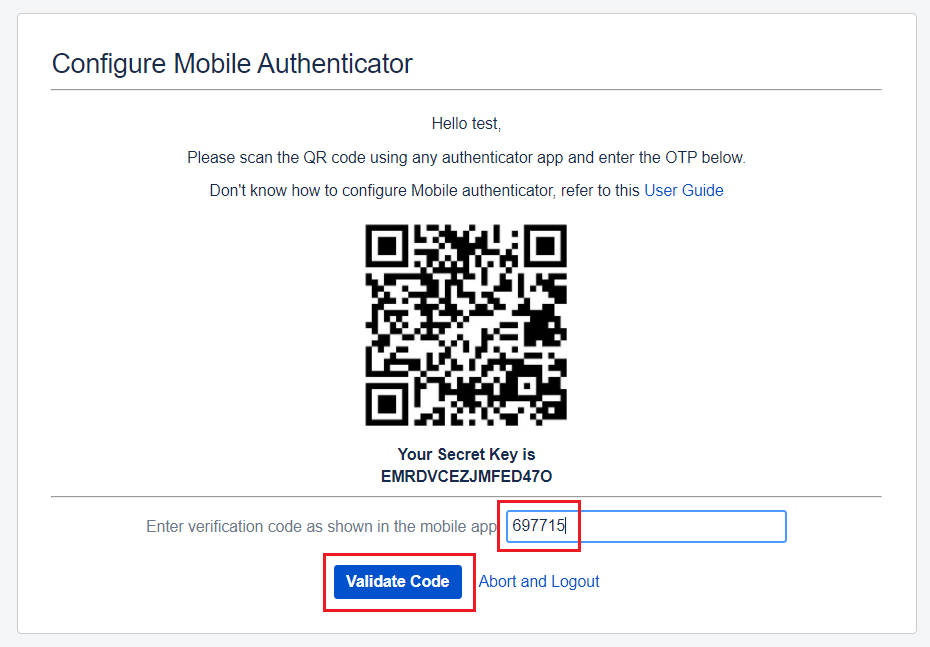
- Open your authenticator app on your mobile/device and click on Scan a QR code.
- If your device asks you to allow Authenticator to take pictures and record video, press Allow. This is required to scan the barcode using your phone's camera.
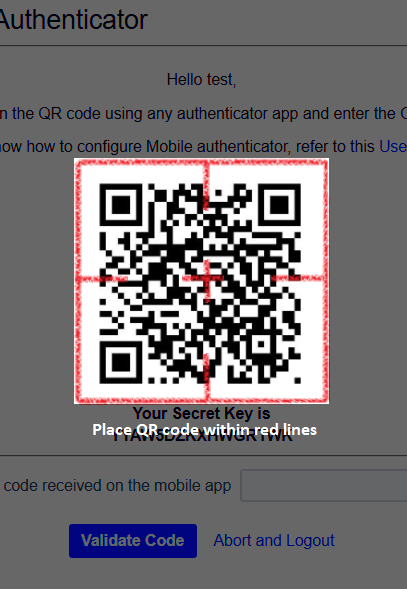
- Then scan the QR code given on the login page by placing the QR code within red lines.
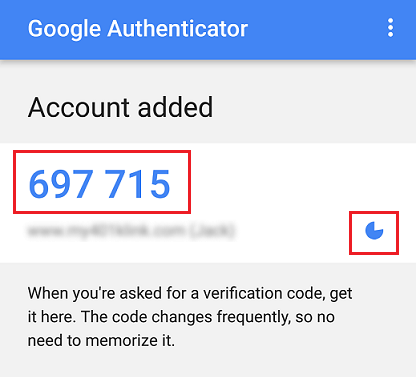
- When you scan the QR code, the Authenticator app will generate a verification code. The code is valid for only a certain time and once the code expires, you will see a new code.
- Copy that code and enter it in the Enter OTP field on the Jira Login page. Then Click on the Validate button.
Scan the QR code:
Verification code generated on the mobile:
How to Configure Backup Codes:
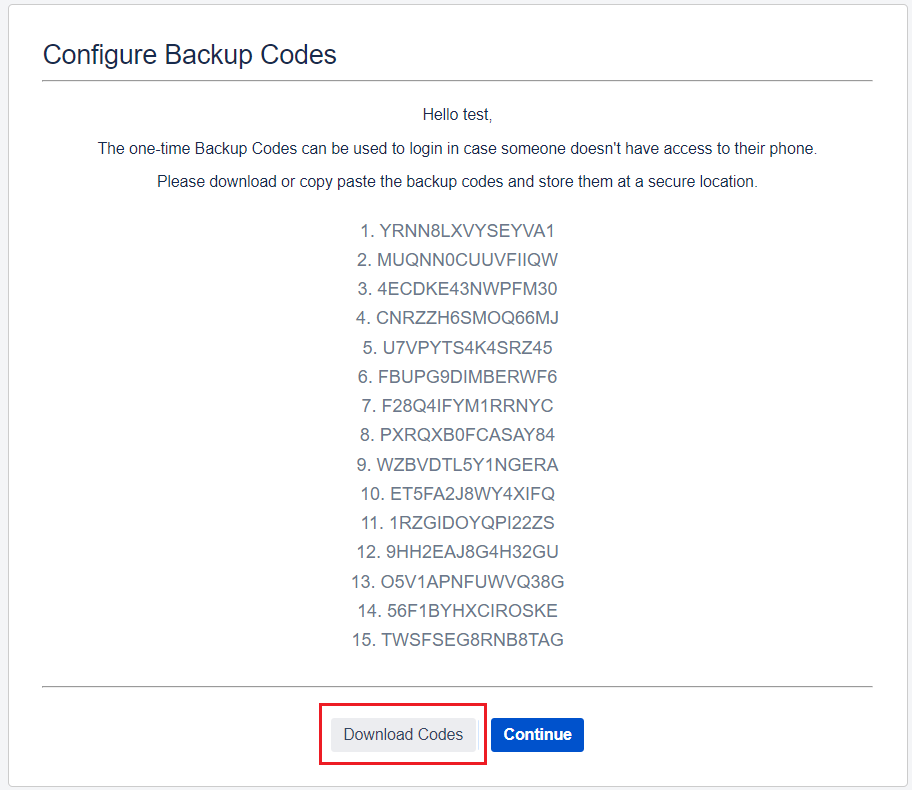
- Once you have configured the primary 2FA method then you will get redirected to Backup codes configuration page. On this screen you will see 15 unique backup/recovery codes.
- In future, in case if you lose your phone, then you can use these recovery codes to gain access to your account again.
- Click on the Download Codes button and click on Continue. Then store the downloaded file with backup codes at a secure location.
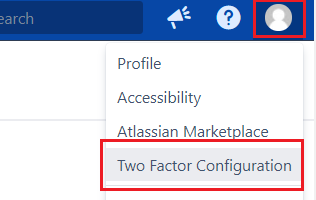
- Each backup codes can used only once. If you have used many backup codes then, if you want, you can download a new set of backup codes as well. For this, log into your account and go to the Two Factor Configuration page on your profile.
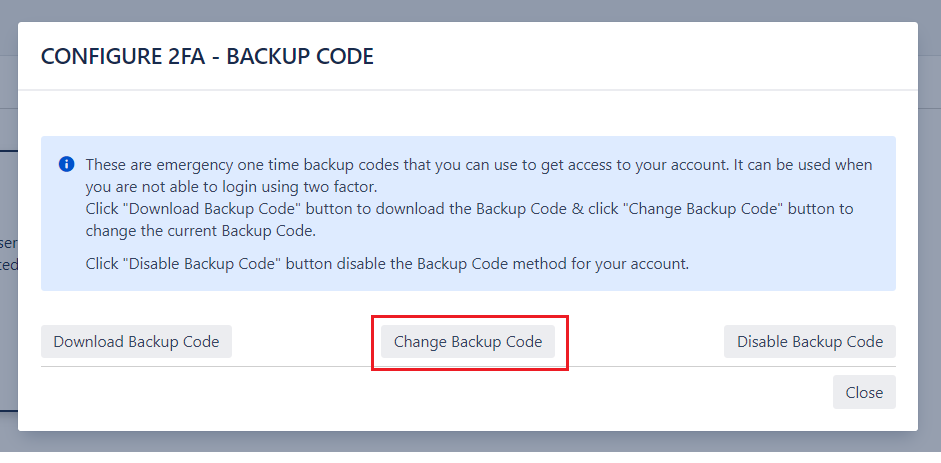
- Then click on show details for Backup codes and you will see this popup. Click on Change Backup Codes button and Download the codes again.
Hardware Token(Yubikey):
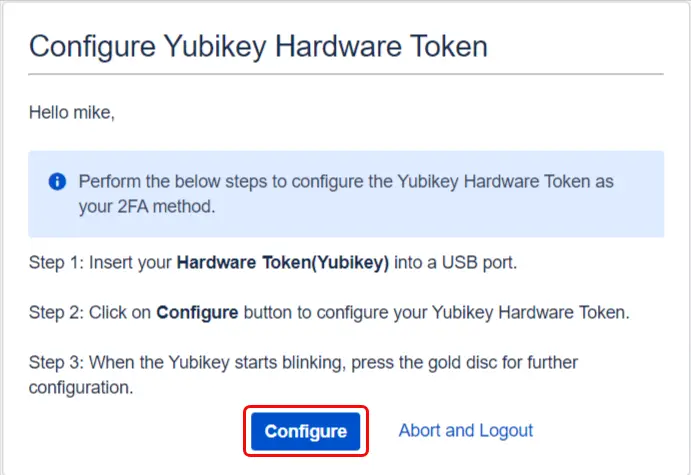
How to Configure Hardware Token(Yubikey)
- Insert the token given to you into a USB port.
- After inserting the token correctly, click on Configure U2F to start configuring it.
- Wait until the token starts blinking, then press the button on the token to successfully register the token.
After you log in using the first factor i.e Jira username and password, you will be asked to configure the hardware token given to you by your company. To configure the hardware token as a 2FA method, follow these steps:
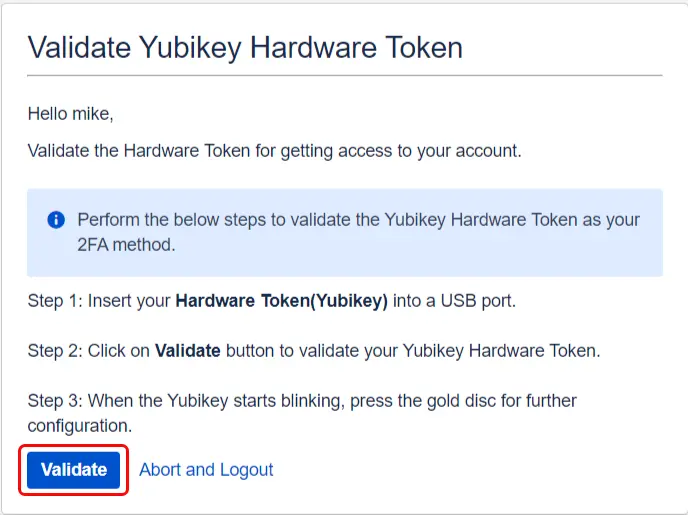
How to Validate Hardware Token(Yubikey)
- Insert your configured token into a USB port.
- After inserting the token correctly, click on Validate U2F.
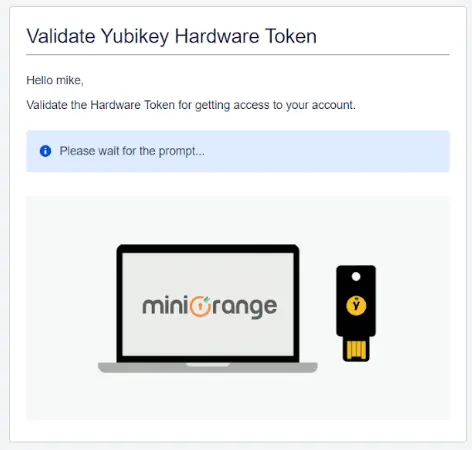
- Wait until the token starts blinking, then press the button on the token to successfully validate the token.
- Once the hardware token is validated, you will be granted access to your Jira account.
- Click on Configure to start configuring it.
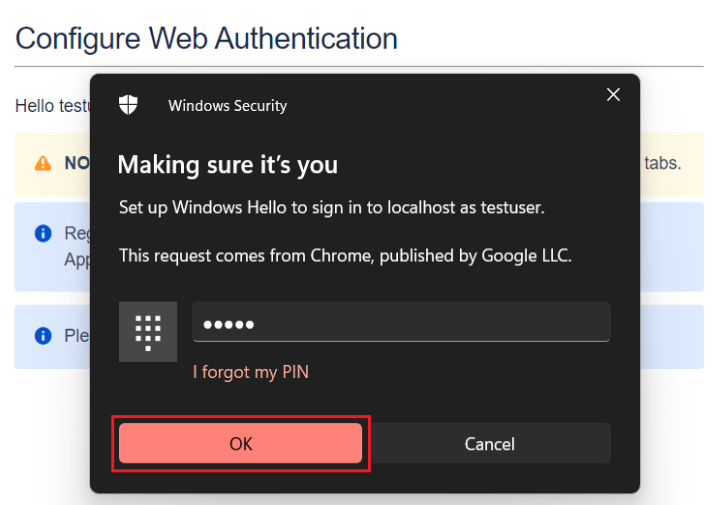
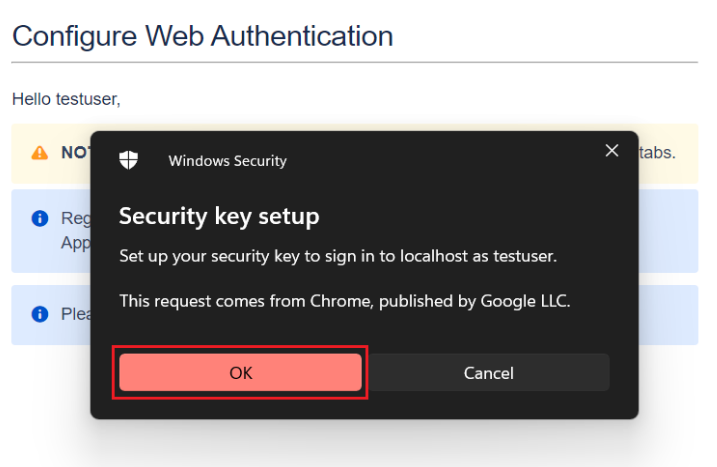
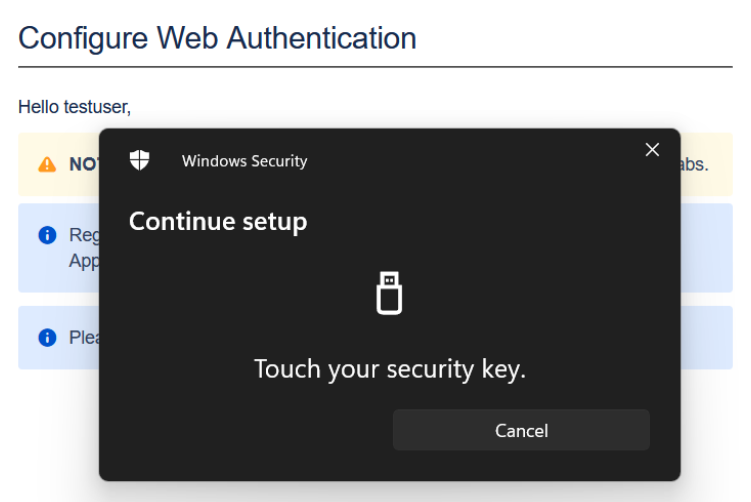
- You will be prompted to register either of your system authenticators like Hello PIN or Security Key or other biometric authenticators supported by your system.
- If you want to register with another supported authenticator, simply click on Cancel to navigate to the next authenticator.
- Upon completing the registration of the system authenticator, you have successfully configured Web Authentication as a 2FA method.
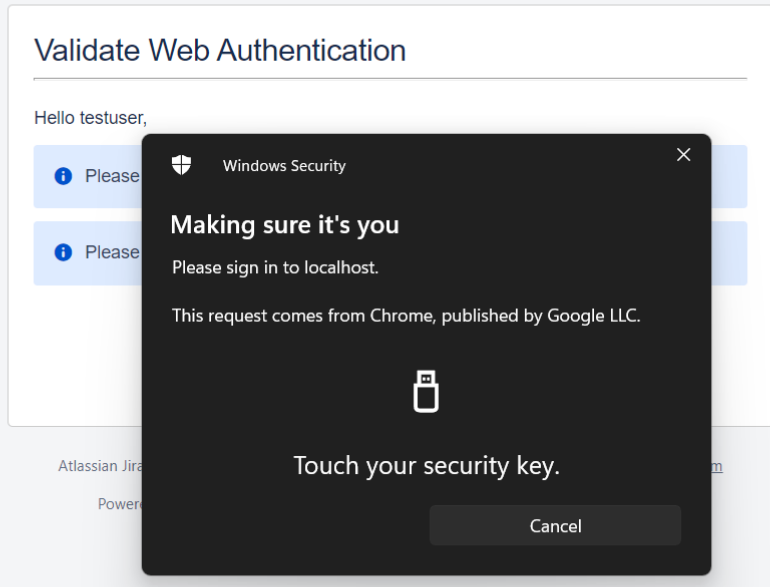
- Enter valid system credentials for the registered authenticator.
- For e.g enter a valid Windows Hello PIN or rightly validate the security key/fingerprint etc.
- Once authentication is successful, you will be granted access to the application.
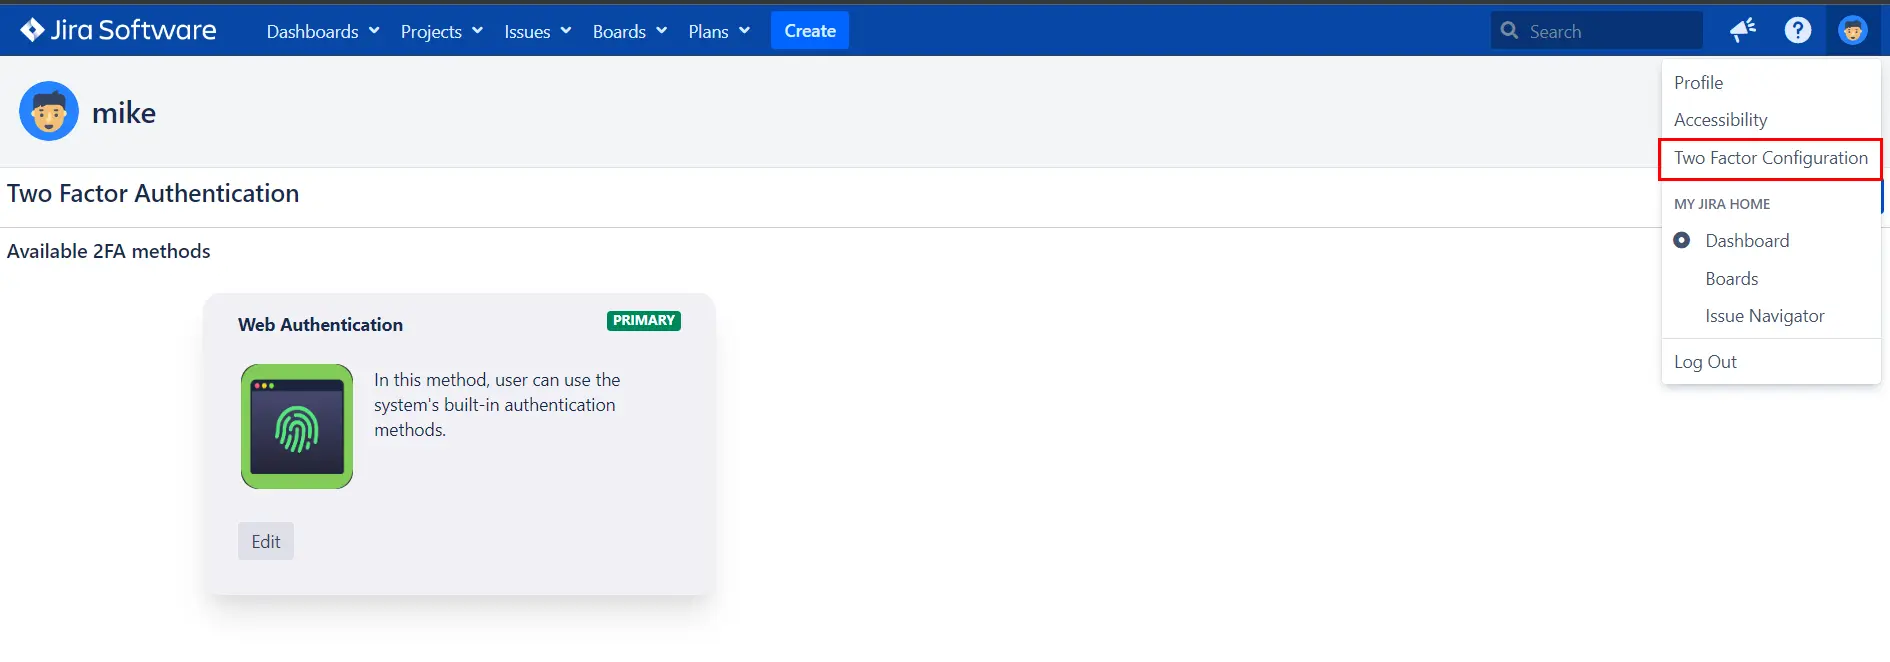
- Navigate to the User Profile and click on Two Factor Authentication. Under Web Authentication, click on Edit.
- Click on Register New Credentials to register a different system authenticator.
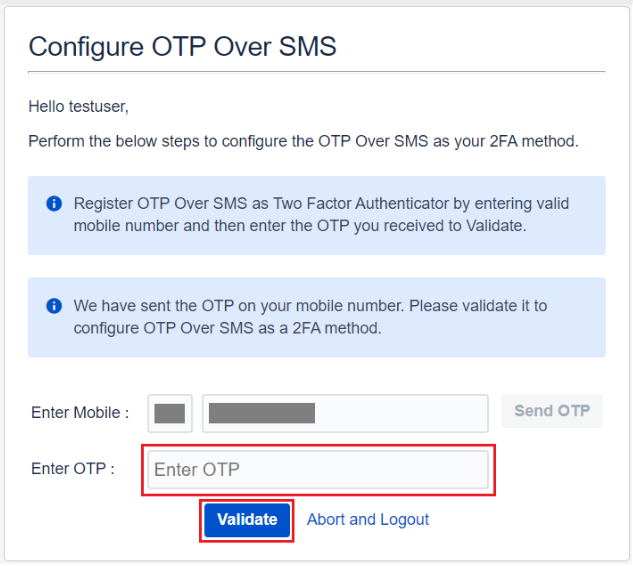
- Enter a valid country code and mobile number and click on Send OTP.
- Enter the OTP received on your mobile phone in the Enter OTP field.
- Validating the received OTP successfully completes the configuration process.
- Enter a valid country code and mobile number and click on Send OTP.
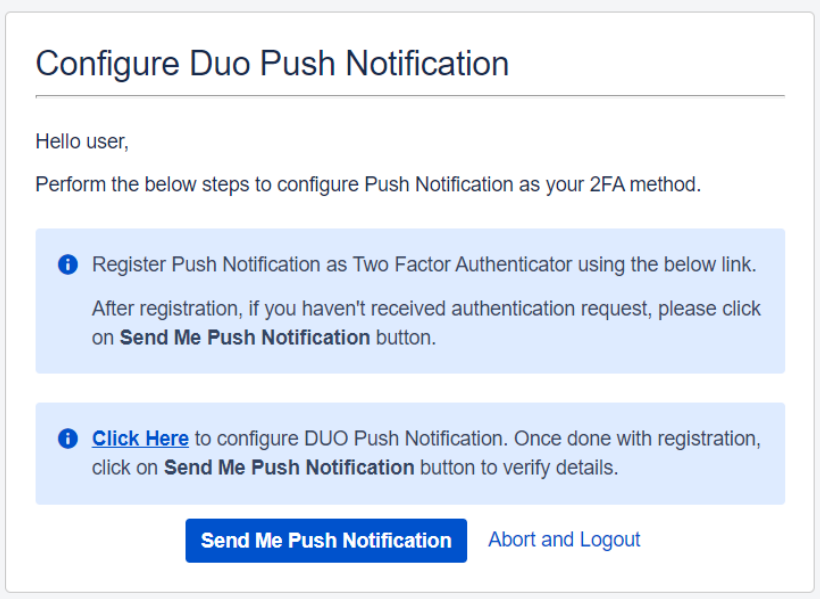
- To enable Push Notifications as your 2FA method, you will need the Duo Mobile app installed on your device. (Here is the link for the Duo Mobile app: Google play, App store)
- Hit the ‘Click Here’ link to register the device on which you wish to receive the Push Notification (eg. Mobile phone, Tablet etc).
- Click on Send Me Push Notification button and APPROVE the received request to authenticate your identity.
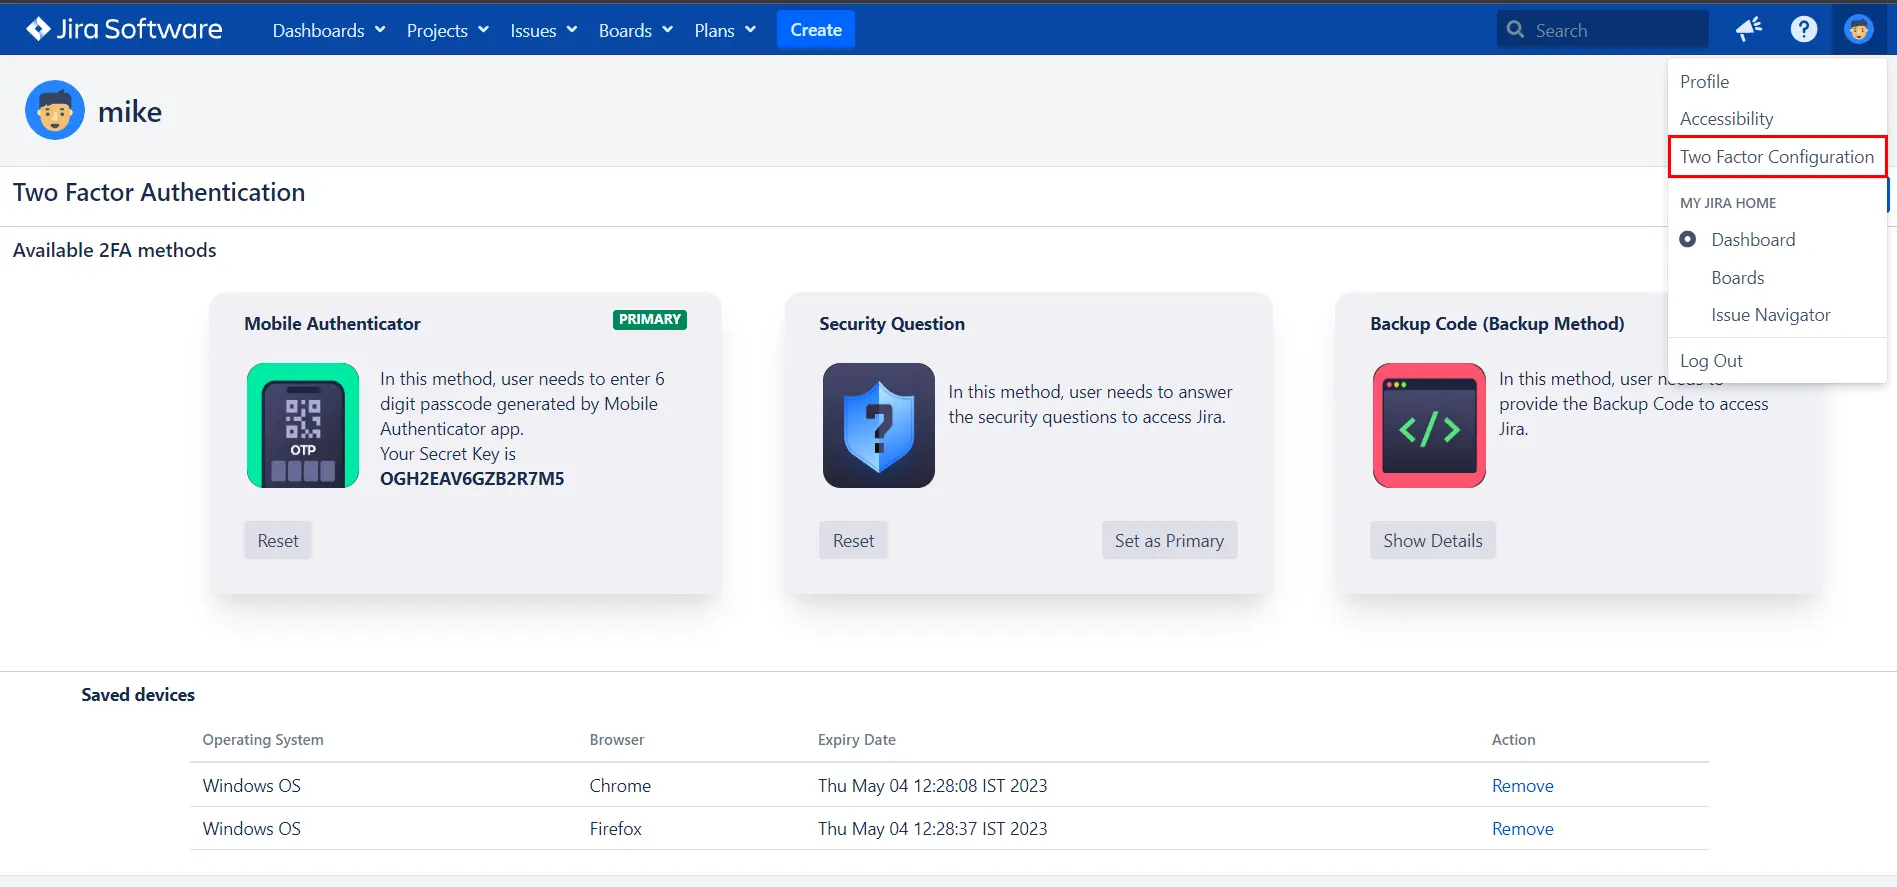
- To reconfigure/reset 2FA, navigate to the User Profile and click on Two-factor Authentication.
- Here, you will see all the 2FA methods that the admin has enabled for you and also the ones which you have configured. Along with this, you can view the devices which are remembered which will skip 2FA the next time you log in using them.
- Click on the Reset button to reconfigure specific 2FA methods. You can also configure additionally enabled 2FA methods from here if they are not previously configured.
Once the configuration is completed successfully, you will be asked to verify your identity by validating your configured hardware token during every login attempt.
On successful login, you will be prompted to validate your configured hardware token. Follow these steps to validate your token:
Web Authentication as a 2FA method:
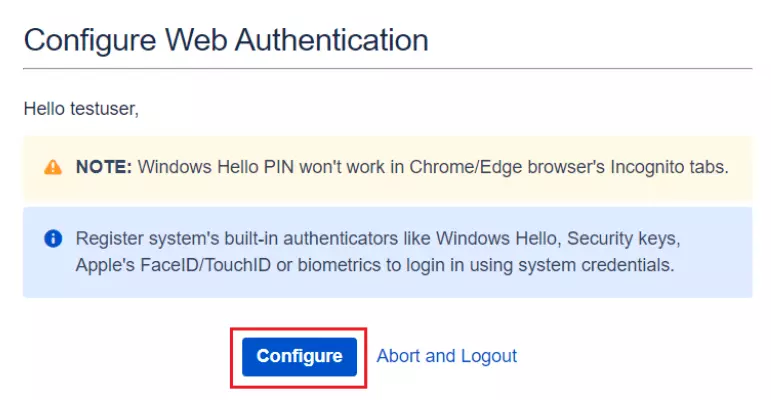
How to Configure Web Authentication
Web Authentication provides stronger authentication by allowing users to make a choice of authenticators like security keys, system PINs or built-in platform biometric authenticators such as fingerprint, iris scan, facial recognition etc. to protect their accounts.
After you log in using the first factor i.e username and password, follow the below steps to configure Web Authentication as a 2FA method.
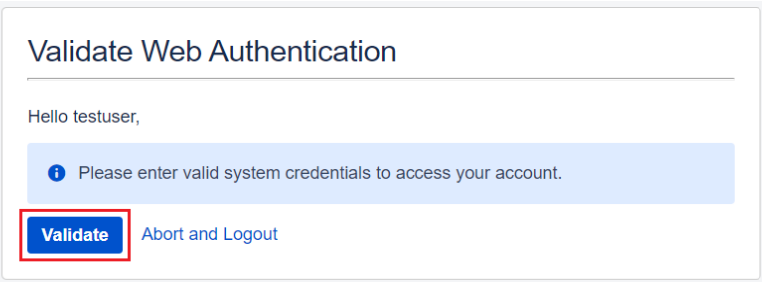
How to Validate Web Authentication
Once the configuration is completed successfully, you will be asked to verify your identity by validating your registered system authenticator during every login attempt.
Follow the below steps to validate your system authenticator after successfully validating your local credentials i.e username and password:

Reconfigure/Clear/Register another system authenticator
If you wish to modify or change your registered system authenticator, follow the steps given below :

OTP Over SMS:
How to Configure OTP Over SMS
In this method, you need to verify your identity by entering the OTP which you will receive via SMS on your mobile.
After you log in using the first factor i.e username and password, follow the below steps to configure OTP over SMS as a 2FA method.

How to Validate OTP Over SMS
Once your 2FA configuration is completed successfully, whenever you try to log in again, an OTP will be sent to your registered mobile number to verify your identity.
Enter the OTP sent to your configured mobile to get access to your account.
Duo Push Notification:
How to configure Duo Push Notification
Duo Push Notification as a 2FA method provides an additional layer of security by allowing users to APPROVE or DENY an authentication request received on their registered device.
After you log in using the first factor i.e username and password, follow the below steps to configure Duo Push Notification as a 2FA method.
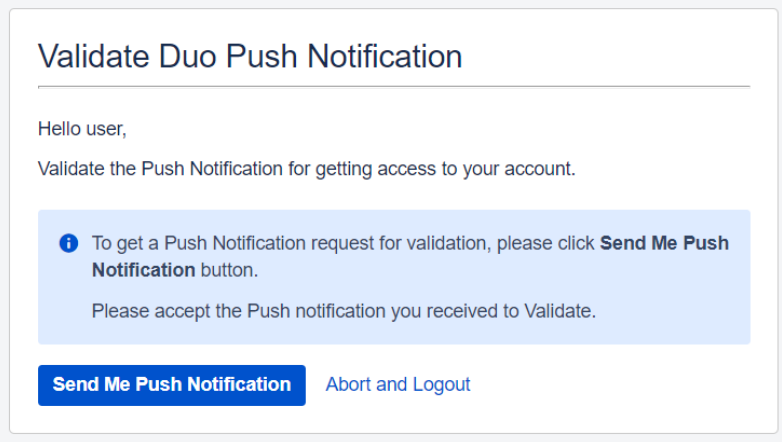
How to Validate Duo Push Notification
2FA configuration is a one-time process and once it is completed successfully, whenever you try to log in again, you need to APPROVE the authentication request received on your registered device.
Reconfigure 2FA
Bitbucket Git Authentication App | Kerberos/NTLM Apps | Word/PDF Exporter | WebAuthn | SonarQube SSO | Jenkins SSO
If you don't find what you are looking for, please contact us at support-atlassian@miniorange.atlassian.net or raise a support ticket here.