- Home
- Automated User Management
- Automated User Management Documentation
- Automated User Management for Confluence

Automated User Management & Auto-deactivation for Confluence
Automated User Management for the Confluence app, gives the ability to automatically and efficiently manage users in confluence and automatically deactivate inactive users to save licensed user count. Here we will go through a guide to configure Bulk User management with Confluence. By the end of the guide, You can bulk Activate, Bulk Delete and, Automatically Identify inactive users based on their last login time and deactivate users on a regular basis.
 Try it for free
Video Setup Guide
Pre-requisites
To configure Automated User Management for Confluence, you need the following items:
- Confluence should be installed and configured.
- Admin credentials are set up in Confluence.
- Valid Confluence Server or Data center Licence.
Download and Installation
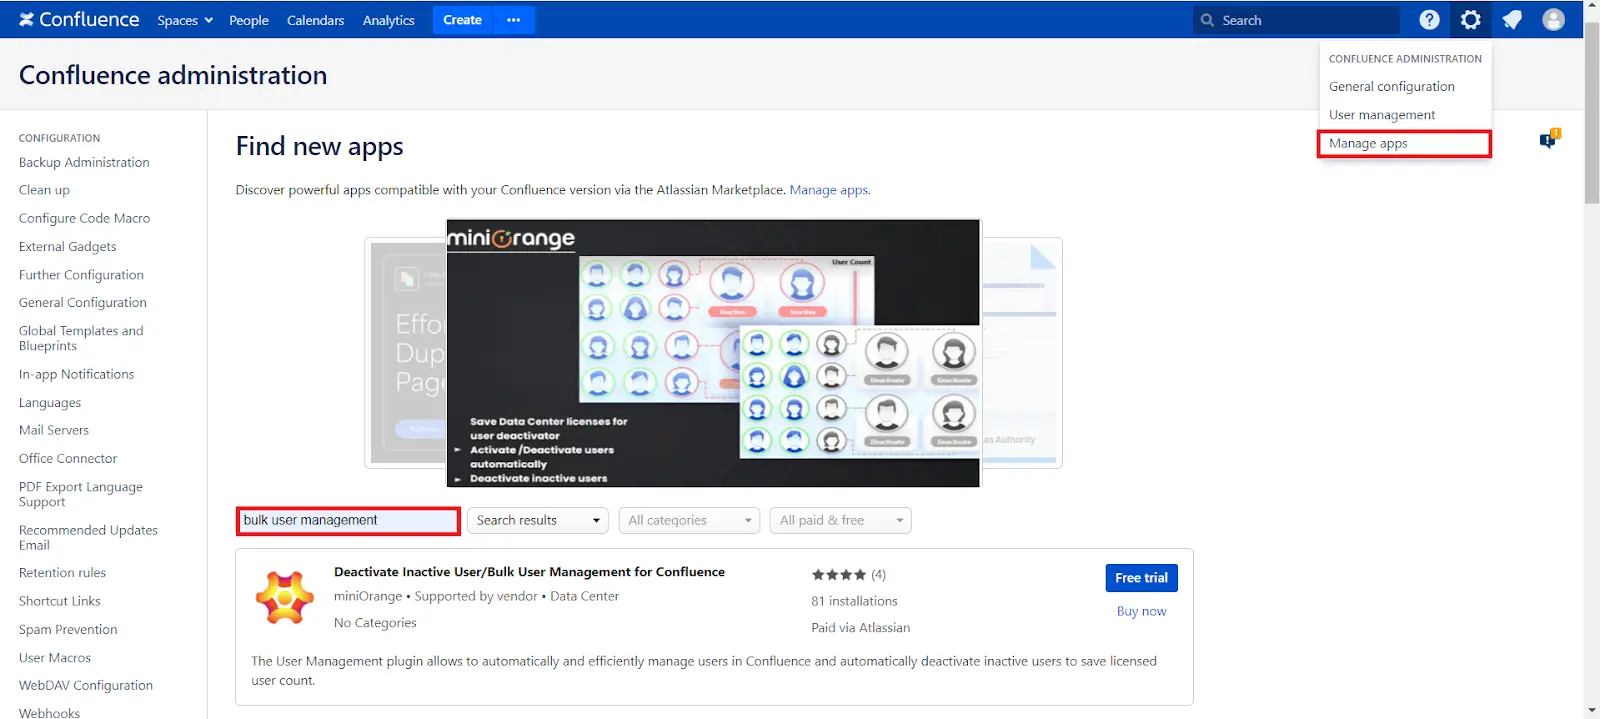
- Log into your Confluence instance as an admin.
- Navigate to the settings menu and Click Manage Apps.
- Click Find new apps or find new add-ons from the left-hand side of the page.
- Locate Automated User Management for Confluence via search.
- Click Try free to begin a new trial or buy now to purchase a license for Automated User Management for Confluence.
- Enter your information and click Generate license when redirected to MyAtlassian.
- Click Apply for a license.
1: Setup Automated User Management
In the MINIORANGE USER MANAGEMENT section, navigate to Automated User Management Tab. You can search or filter users based on their activity status (active, inactive, or all) and other user information. The filter section allows you to:
- Filter by Groups: Select one or more groups to filter users belonging to those groups.
- Filter by Activity Status: Choose to display active, inactive, or all users.
- Filter by Directory: Filter users from both internal and external directories.
- Filter by Date Range: Display users based on their last login date. Set a start date and an end date. To disable the date filter, set the start date to 01-01-1970 and the end date to the current date.
- Exclude Groups: Filter users by excluding those who belong to specific groups.
- Filter by License Type: Choose to display either licensed users(who can access confluence application) or all users.
- Users per Page: Select the number of users to display per page in the table. The default is 20, with options for 10, 50, and 100 users.
- Search by Username or Email: Use the search bar to find users by their usernames or email addresses.
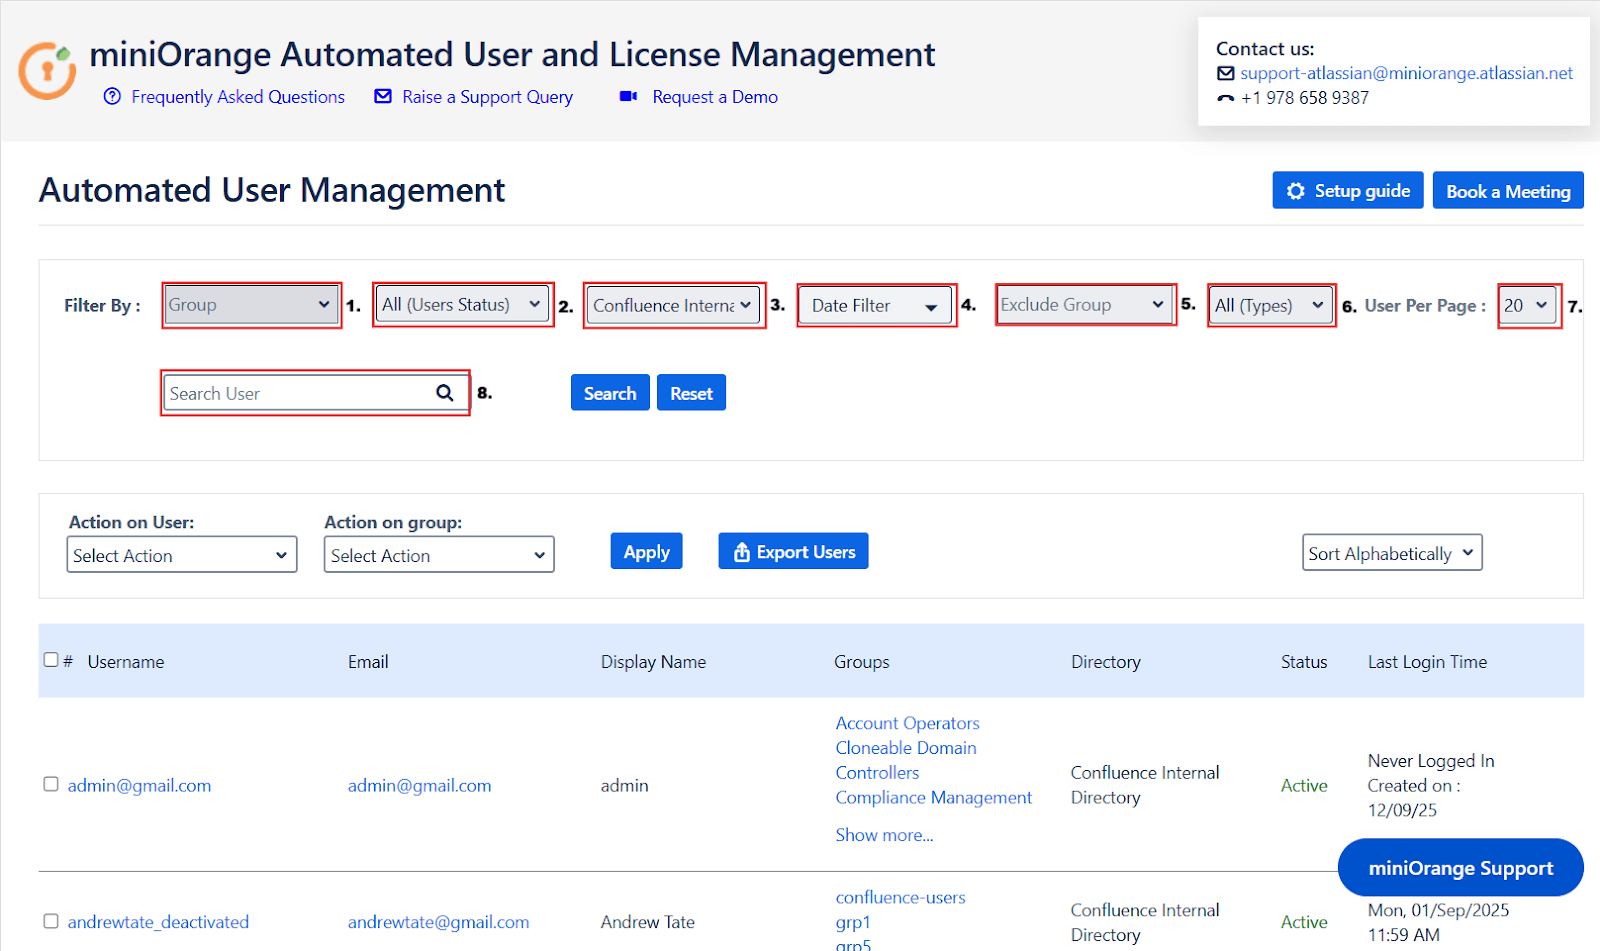
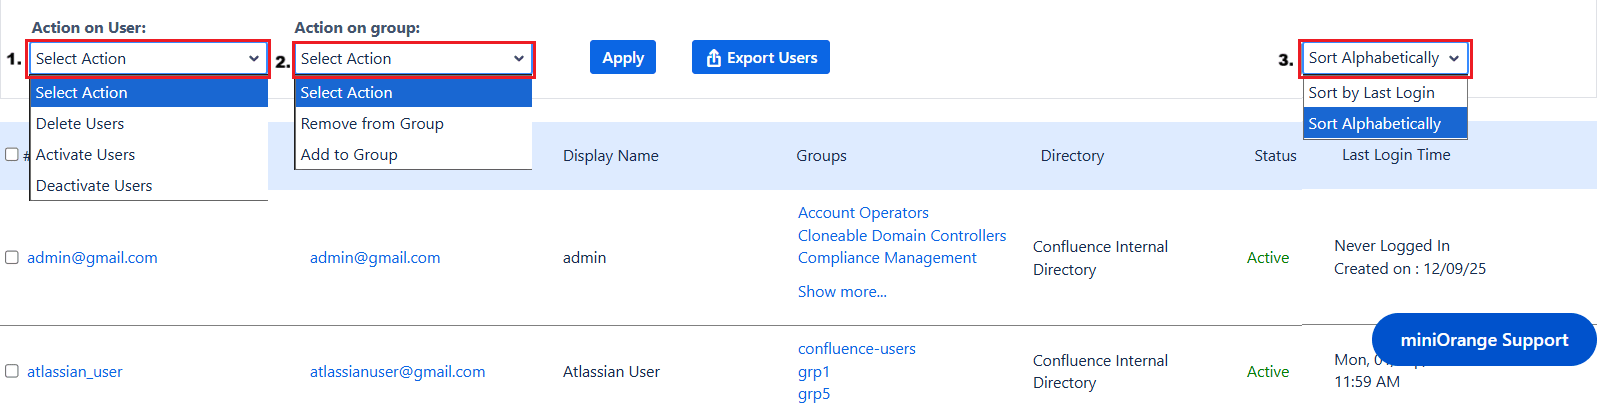
In the Action section, you can perform various bulk operations on users:
- Action on Users: Apply bulk operations such as Activate, Deactivate, or Delete using the Action on User dropdown.
- Action on Groups: Add or remove users from groups in bulk using the Action on Group dropdown.
- Sort/Filter Users: Filter users based on their last login time or sort them alphabetically.
- After selecting the required options from the dropdown, click on the Apply button.
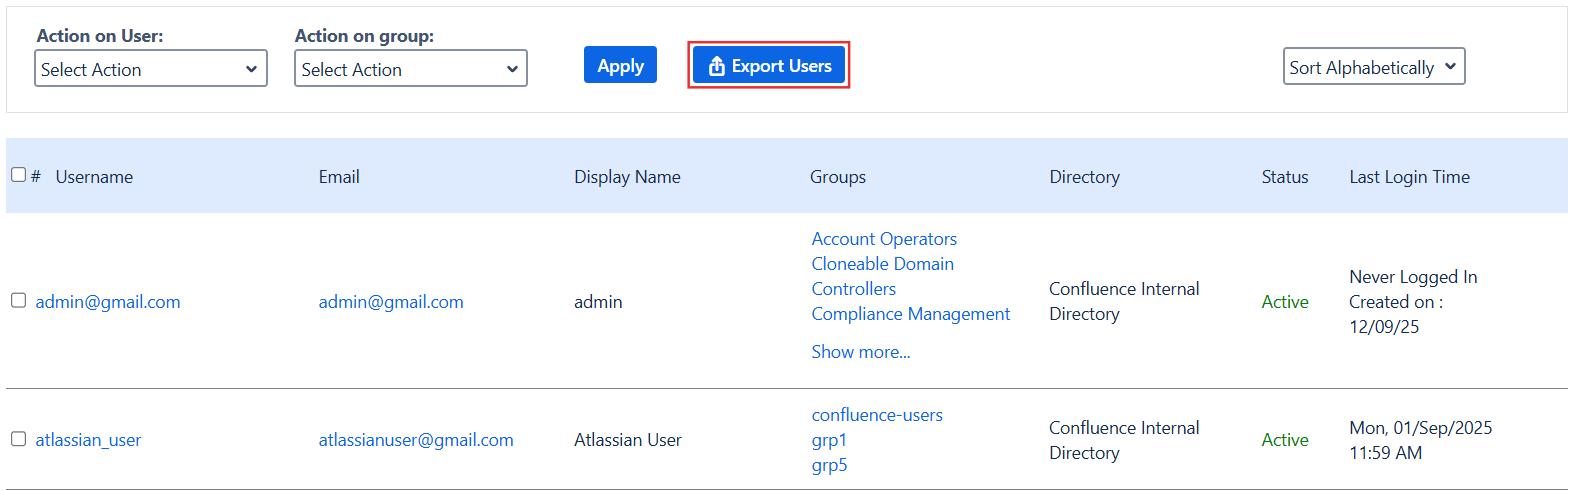
- You can export users by clicking on the Export Users button.
- If you select at least one user, only those selected users will be exported.
- If no user is selected, all users (based on the current filter) will be exported.
- If any filters are applied (e.g., by group, status, or directory), the export will be based on the filtered results.
- On selected users you can also perform action on users & action on groups at a time.
This means you can apply multiple filters and export only the users that match all selected criteria.
2: Setup Users Auto Deactivation
 Summary tab
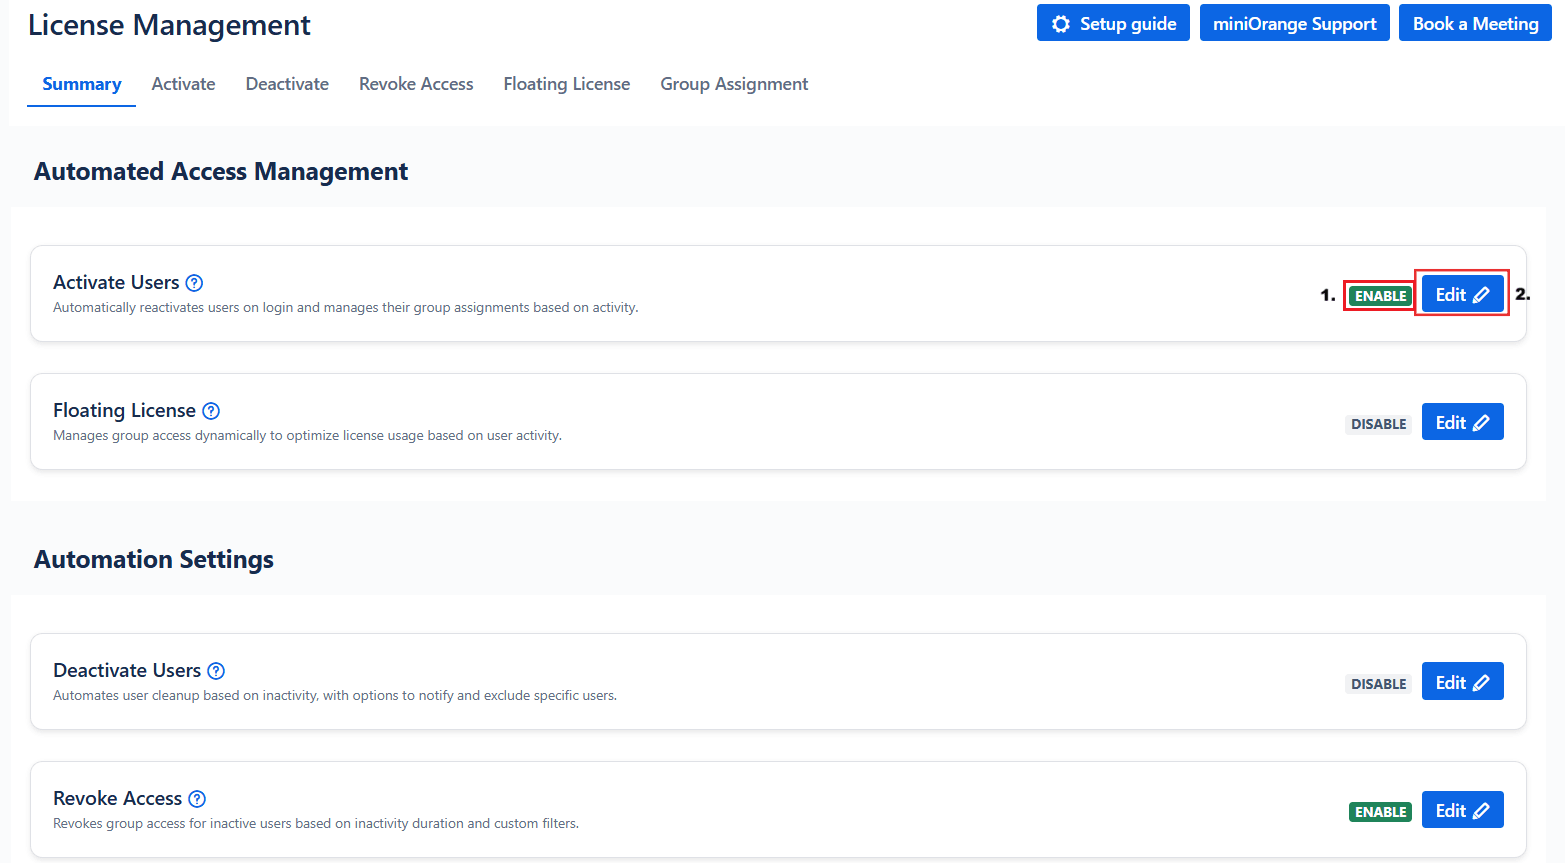
- In the MINIORANGE USER MANAGEMENT section, click on the Activate/Deactivate Users section.
- You will navigate to the summary tab where you can find the license management section, automation settings , set scheduler time and scheduler information.
- When toggle is turned on or off the active status is visible as enabled or disabled respectively.
- In license management and automation settings you will be able to navigate to the respective tab when clicked edit button.
Set scheduler settings
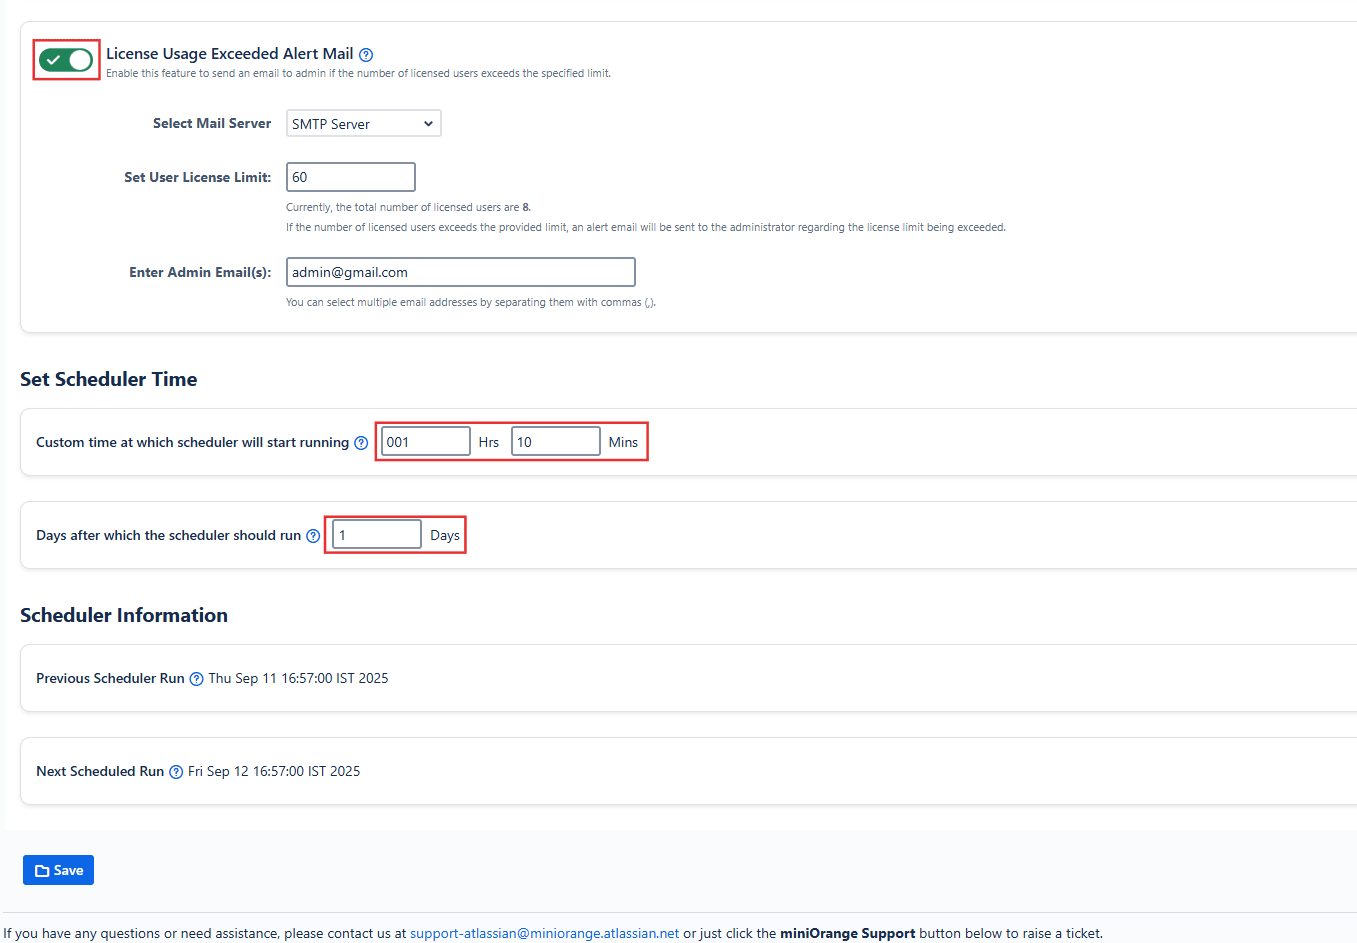
- The License Usage Exceeded Alert Mail toggle notifies the admin via email when the license usage exceeds the specified limit.
- You can set the Custom Time at which the Scheduler will start running where if the selected time (in hours and minutes) is before the current time, then the scheduler will start after the days mentioned below and if it is after the current time, then it will run on the day itself and after that according to scheduled days.
- (Note: If all automation settings are disabled, the scheduler settings will become non-editable.)
 Activate tab
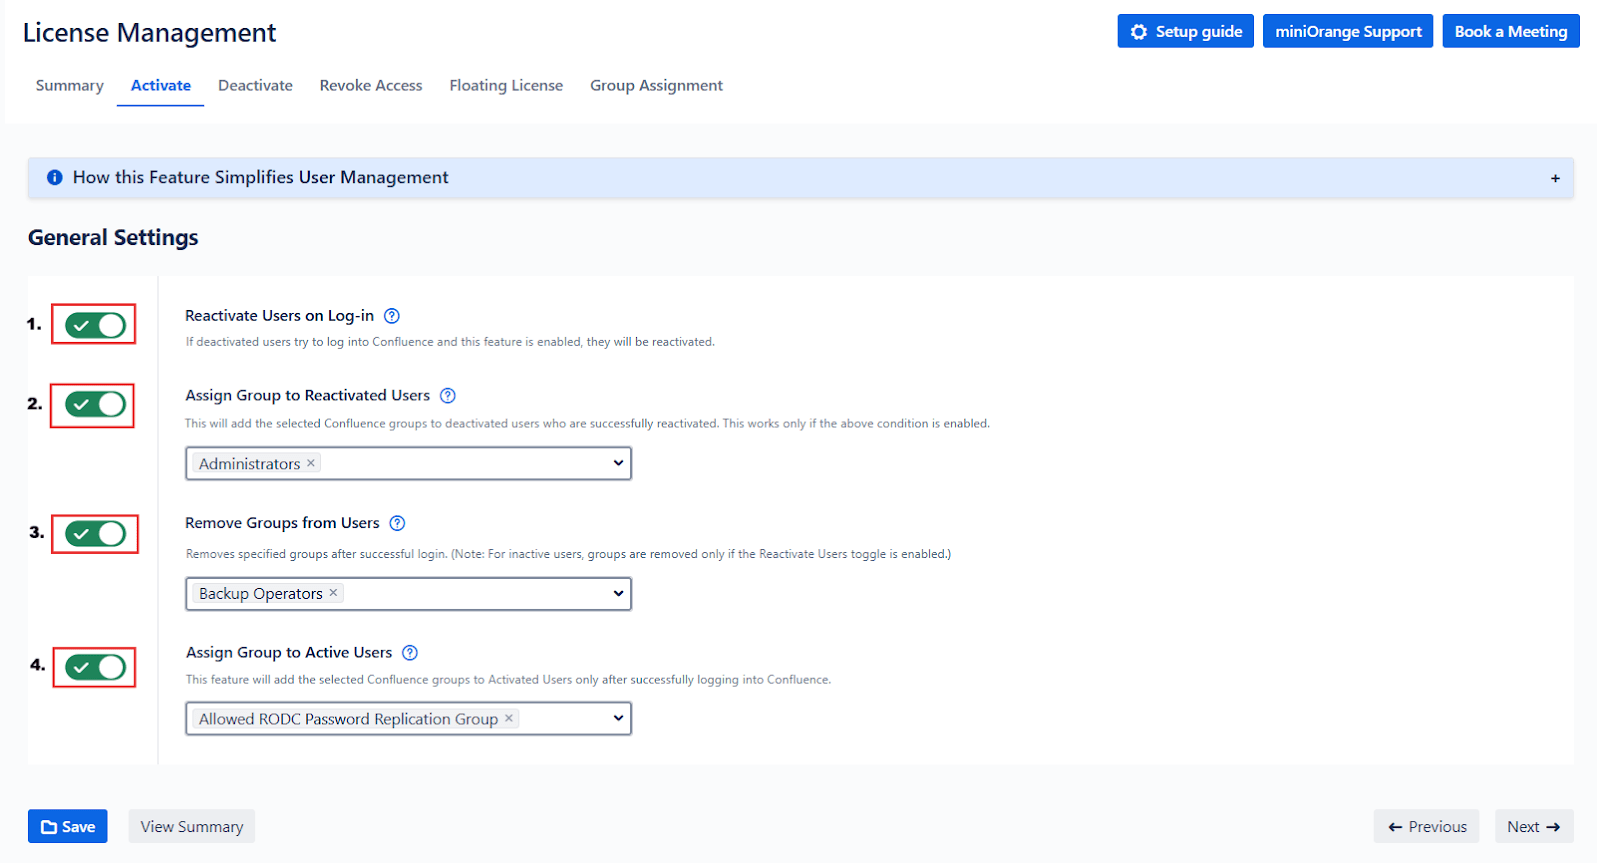
- If the Enable Reactivate Users toggle is enabled, then any inactive user who tries to log in will authenticate successfully and will be activated.
- You can add groups to the reactivated users after a successful login.
- You can remove groups from both active and inactive users.
- If an inactive user with the specified groups tries to log in, and the Reactivate Users toggle is enabled, the user will be reactivated and the specified groups will be removed, and logged in successfully.
- If the Reactivate Users toggle is disabled, the user will not be able to log in, and the groups will remain unchanged.
- If an active user logs in and matches the specified groups, those groups will be removed, and the user will log in successfully.
- You can also add groups to active users after a successful login.
 Deactivate tab
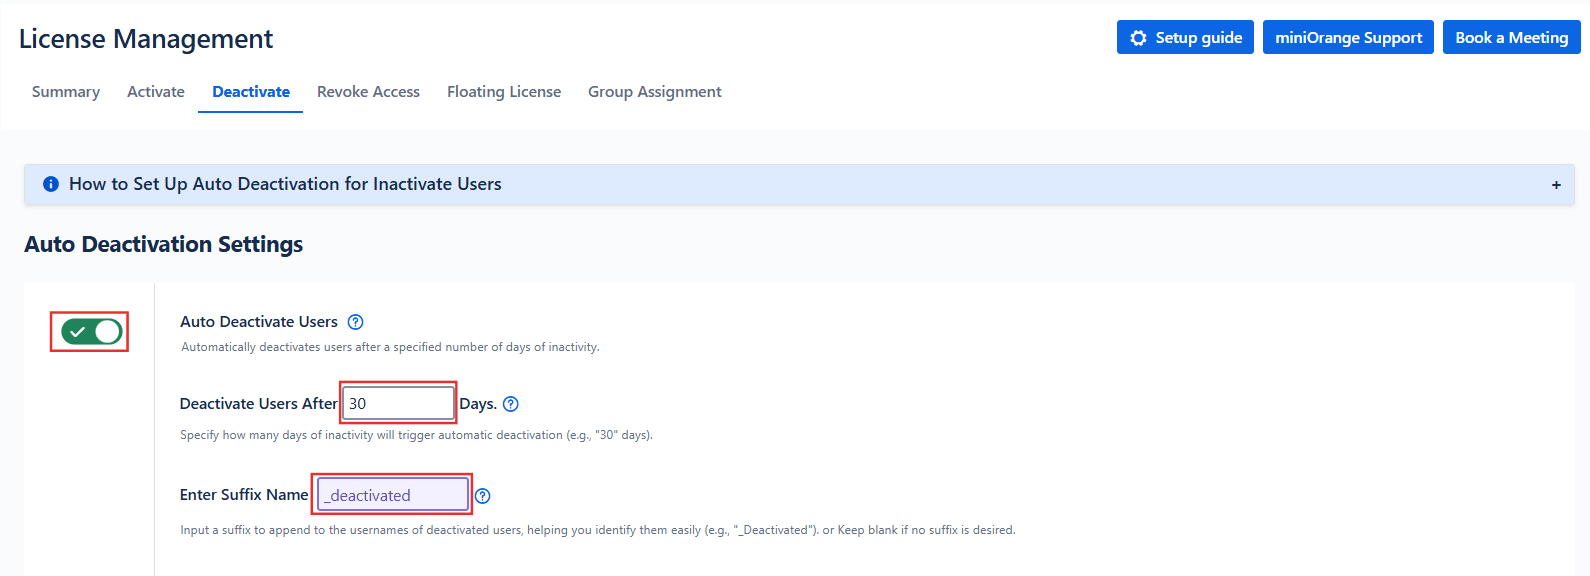
- If you wish to deactivate a user after a certain number of days of inactivity, you can enable the Auto Deactivate Users toggle and set the number of days accordingly. By default, it is set to 30 days automatically.
- "You can also add a suffix to the user’s name after deactivating them. If you don’t want to add one, simply leave the input box empty."
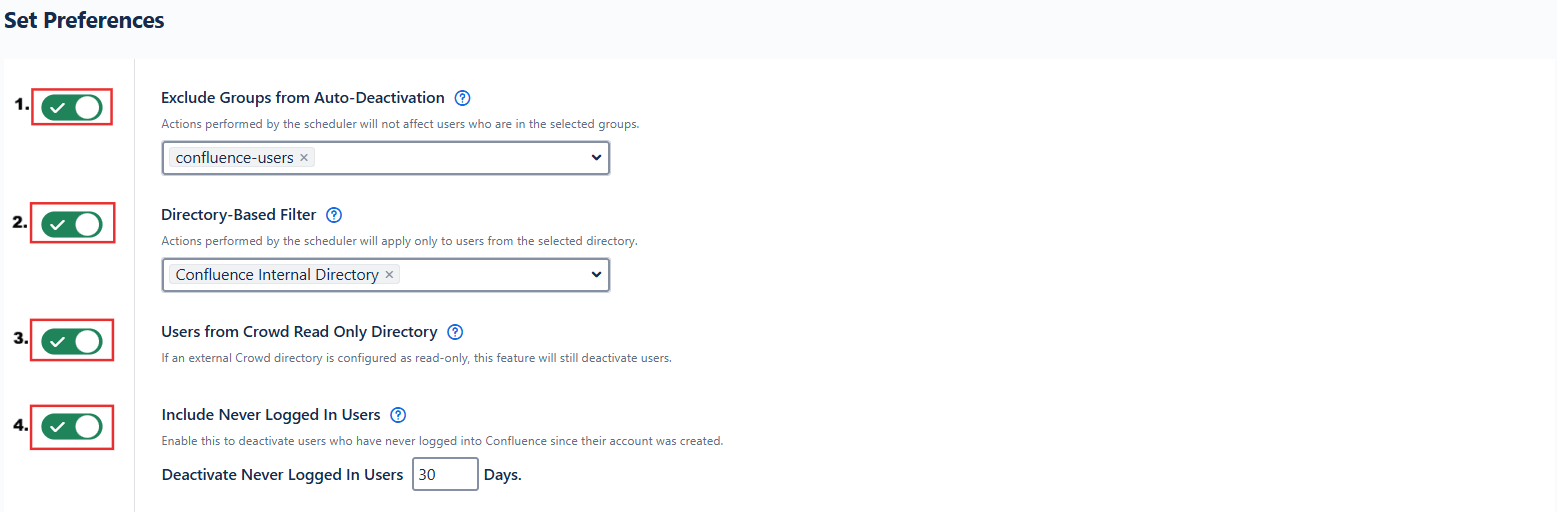
Set preference
-
Exclude Groups from Auto-Deactivation
If you do not want users from specific groups to be auto-deactivated, enable the Exclude Groups for Auto-Deactivation option. Once enabled, a dropdown will appear where you can select the groups to exclude. -
Select Directory for Deactivation
You can specify the directory from which users should be deactivated. -
Crowd Read-Only Directory
If you have configured an external Crowd directory as read-only, enable the Users from Crowd Read-Only Directory option to allow deactivation of those users. -
Include Never Logged-In Users
Enable the Include Never Logged-In Users toggle to deactivate users who have never logged into Confluence since their account was created. - Specify the number of days to check against the account creation date.
- If a user has never logged in, and the account age exceeds the specified days, the user will be deactivated.
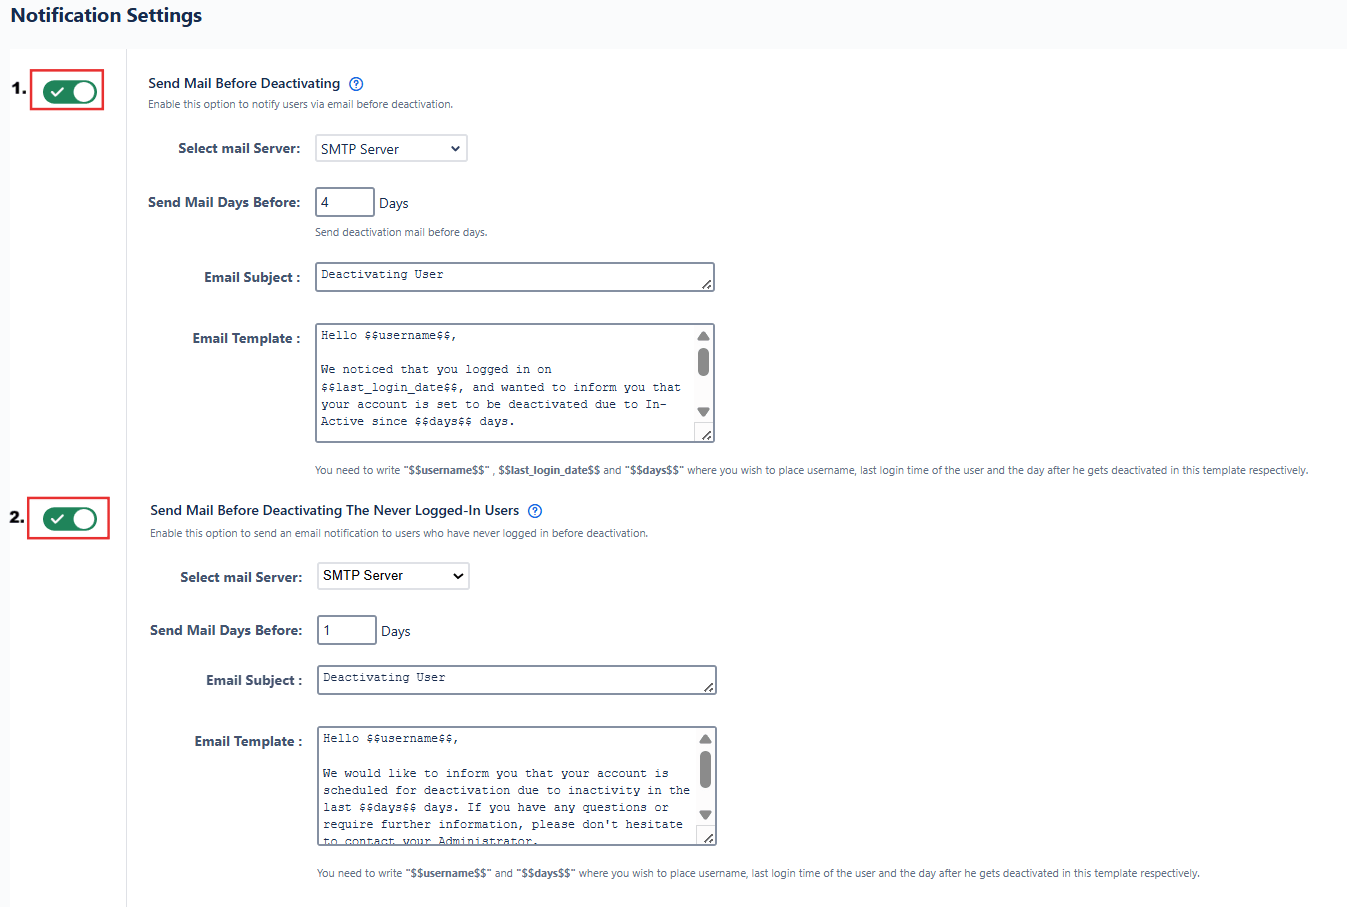
Email Notification before deactivation
- You can send deactivation alert emails to users a certain number of days before deactivation by setting the appropriate number of days. Additionally, you can customize the email subject and email text.
- If you want to deactivate a user who has never logged in, then enable the Deactivate Never Logged-In Users option. You can also send mail to never-logged-in users a certain number of days before deactivation by setting the appropriate number of days.
 Revoke Access
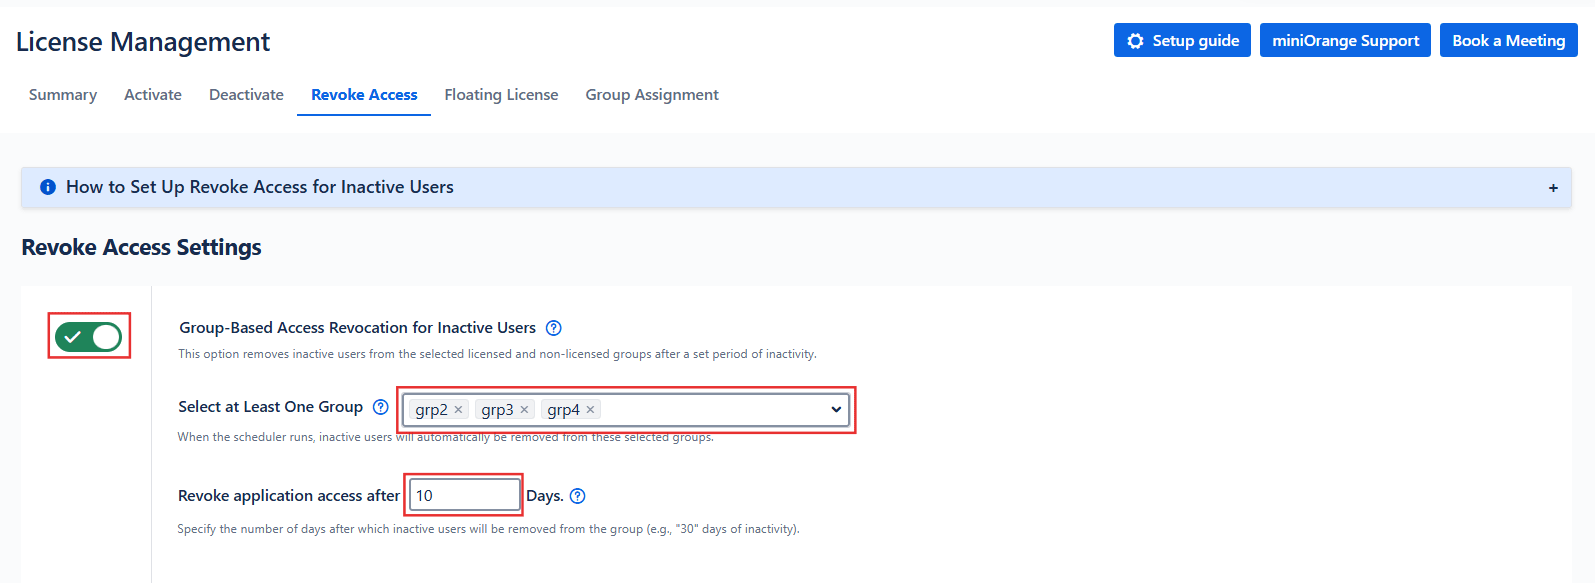
If you want to revoke application access for users after a certain period of inactivity, enable the Group-Based Access Revocation (Inactive Users) toggle.
- Specify the groups from which users should be removed to revoke their access.
- Set the number of inactive days after which the access should be revoked. (By default, this is set to 30 days.)
Set Preferences
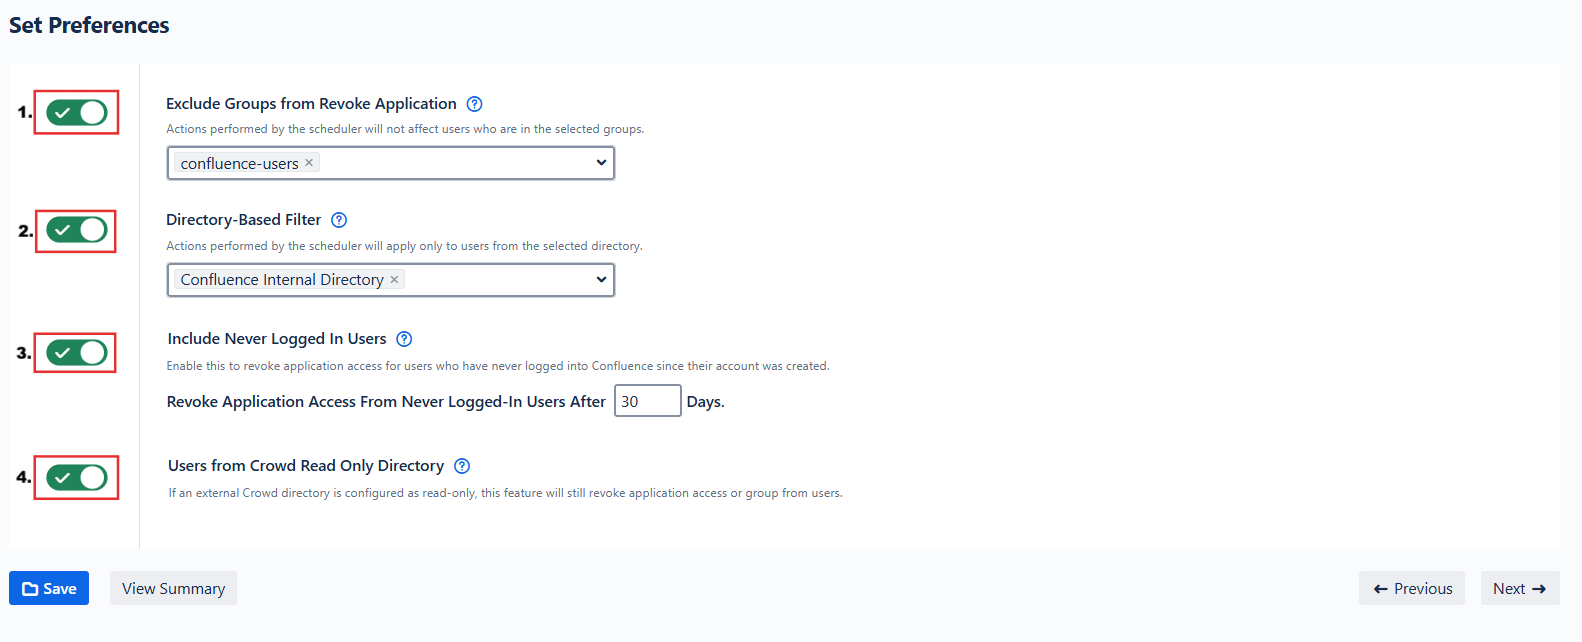
-
Exclude Groups from Revoking Access
If you do not want to revoke application access for users belonging to specific groups, enable the Exclude Groups for Revoke Access toggle. Once enabled, a dropdown will appear where you can select the groups to exclude. -
Select Directory for Revoking Access
Specify the directory from which application access should be revoked. -
Include Never Logged-In Users
Enable the Include Never Logged-In Users toggle to revoke access for users who have never logged into Confluence since their account was created. - Provide the number of days to check against the account creation date.
- If the user has never logged in and the account age exceeds the specified number of days, their access will be revoked.
-
Crowd Read-Only Directory
If you have configured an external Crowd directory as read-only, enable the Users from Crowd Read-Only Directory option to allow revoking access for those users.
 Floating License
The Floating License configuration allows you to assign license groups or other groups dynamically using rule-based logic. When a user logs in, their group membership is evaluated based on the rules you define.
-
Enable Rule-Based Group Assignment
Turn on the Add Groups Based on Rules toggle to activate floating license functionality.
This feature only applies to active users and excludes deactivated ones. -
Add Mapping Rules
Define rules based on your requirements to control how group assignments should occur. -
Specify Source Groups ("If User Belongs to These Groups")
Enter the user groups that should be matched when the user attempts to log in. -
Specify Target Groups ("Then Assign Them to These Groups")
Define the license or other groups to which the specified groups should be assigned. -
Remove Rules
If you want to delete an existing rule, click the cross (✕) icon next to the rule you wish to remove.
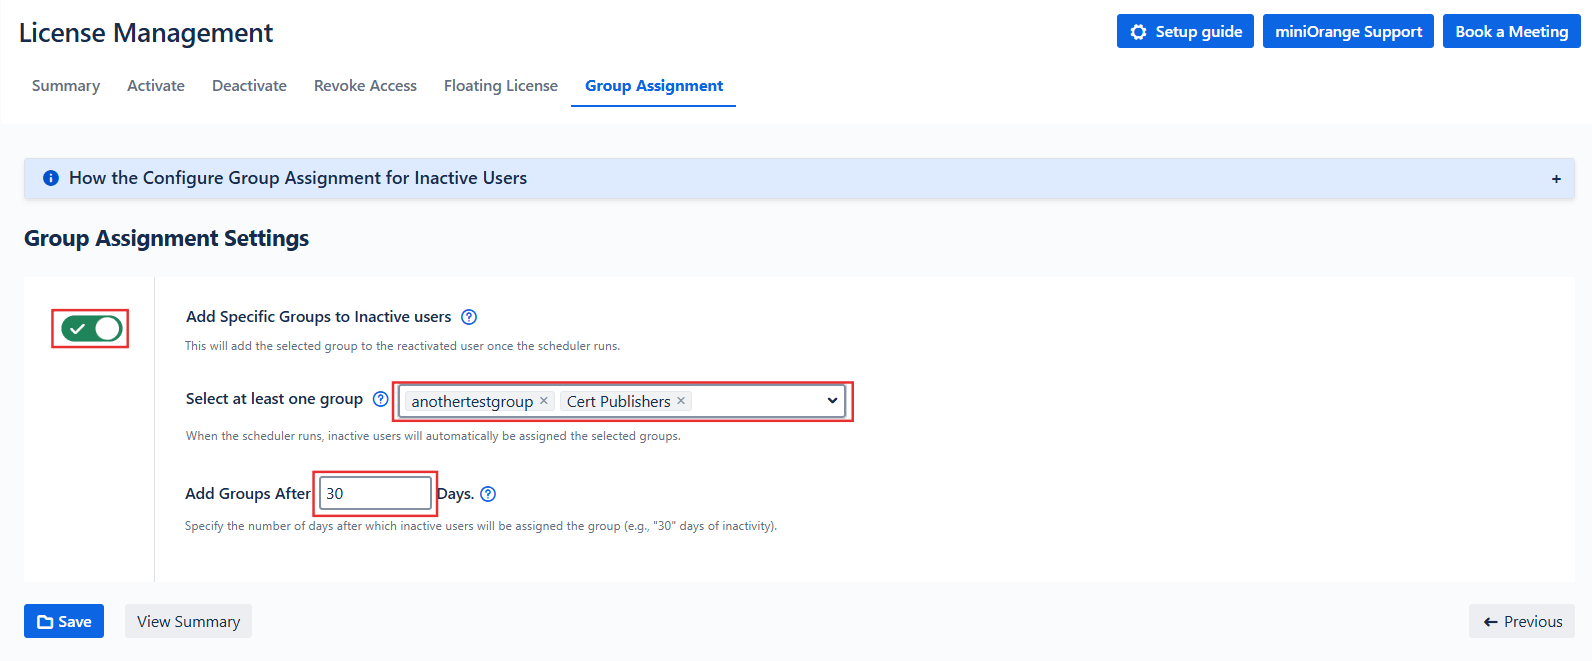
 Group Assignment
Enable the Add Specific Groups to Inactive Users toggle to assign specified groups to users who have been inactive for a defined period.
- Specify the Groups: Enter the groups you want to assign to inactive users.
- Set the Inactivity Period: Define the number of days after which users are considered inactive and will be assigned the specified groups.
- This feature helps in segregating inactive users without revoking their access. If you'd like to review or export these users, follow the steps below:
- Navigate to the Bulk User Management tab.
- Use the Filter by Groups option and enter the groups specified in the group assignment settings.
- Apply the filter and export the filtered users as needed.
3: Bulk Group Management
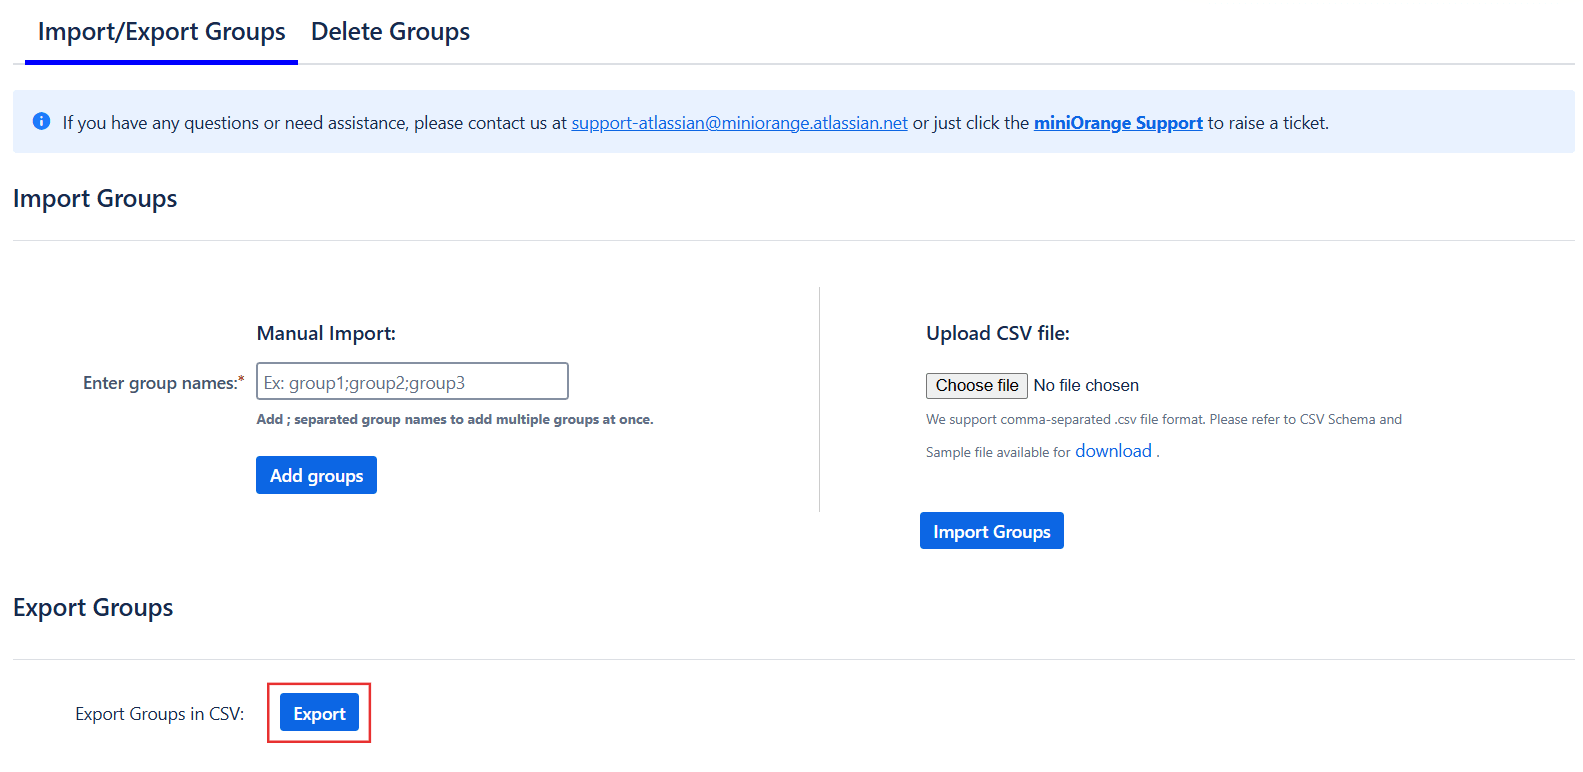
In the MINIORANGE USER MANAGEMENT section, Click on the Bulk Group Management section. Here, you can create and delete groups in bulk.
Create Groups
You can also add groups by importing them from a .CSV file.
1. Manual Entry
- In Enter group names field, enter the group names manually. You can add multiple groups at a time by adding multiple group names separated by semicolons.
- Then click on Add groups button.
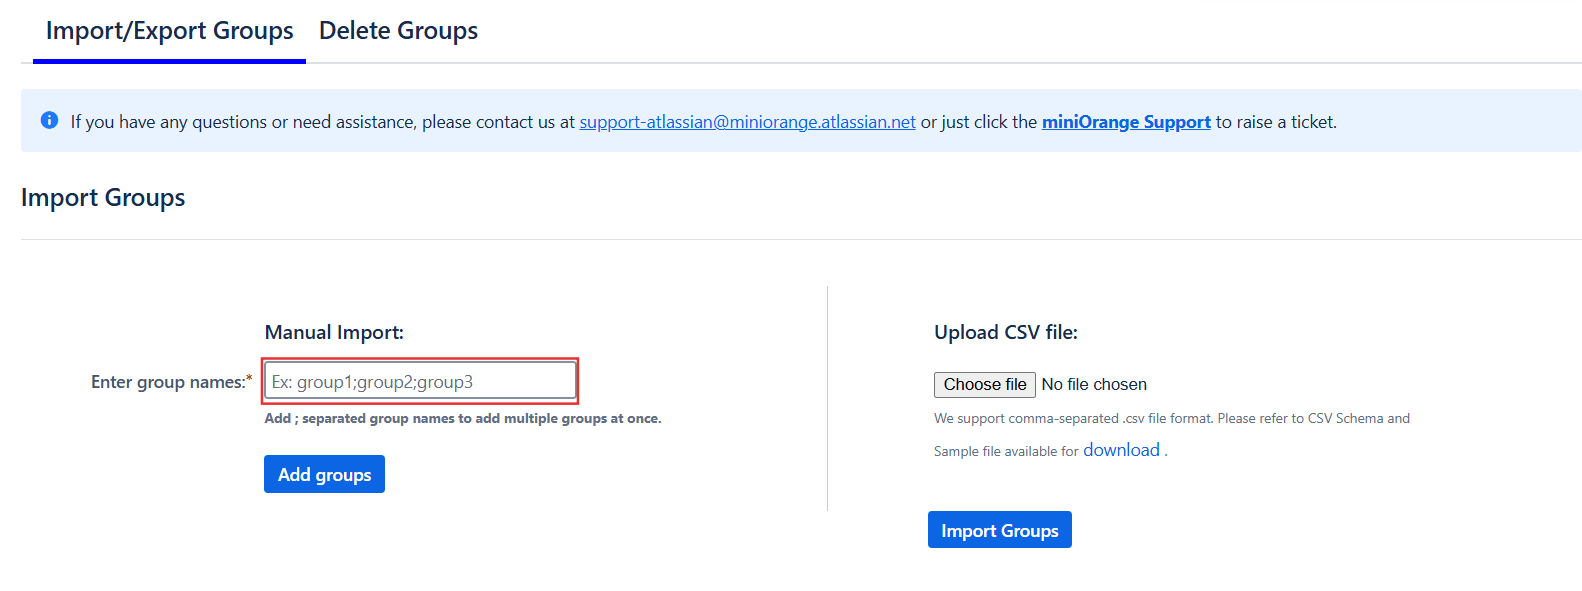
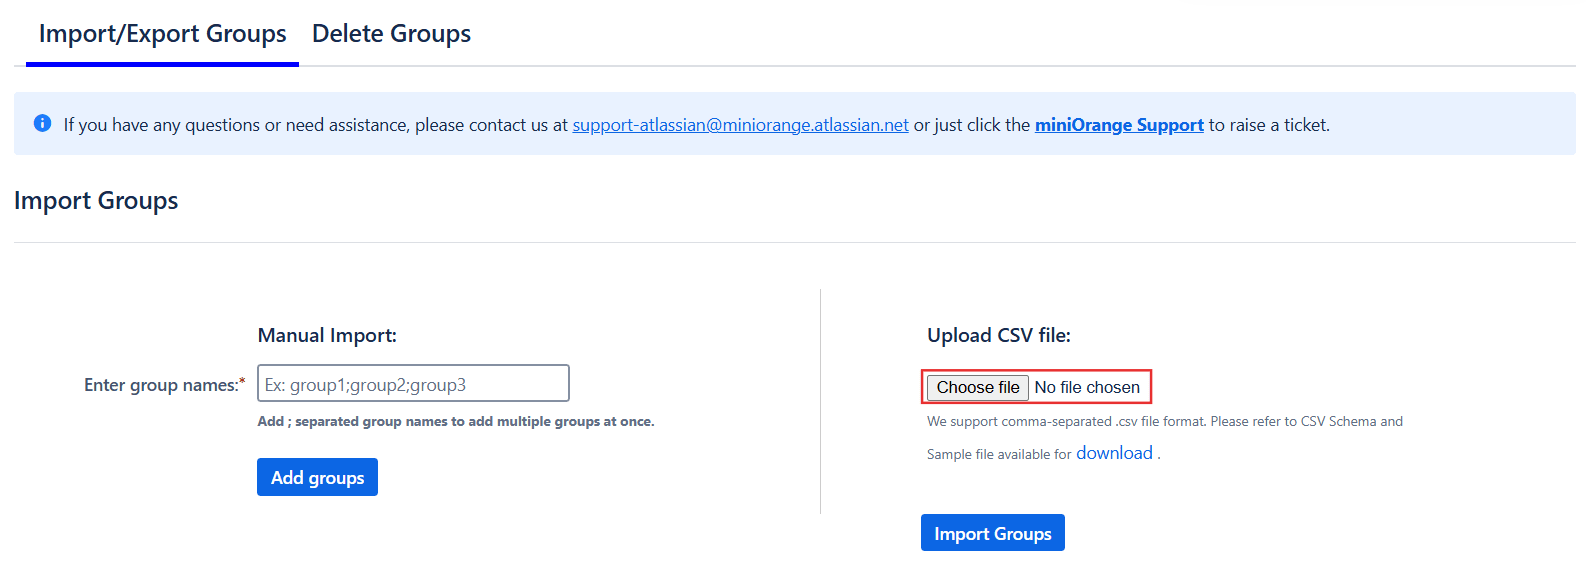
2. Upload CSV File
Import the groups by uploading the CSV file with Groups names that contain Group names in it. You can also get the Sample CSV file format by clicking on the download link.
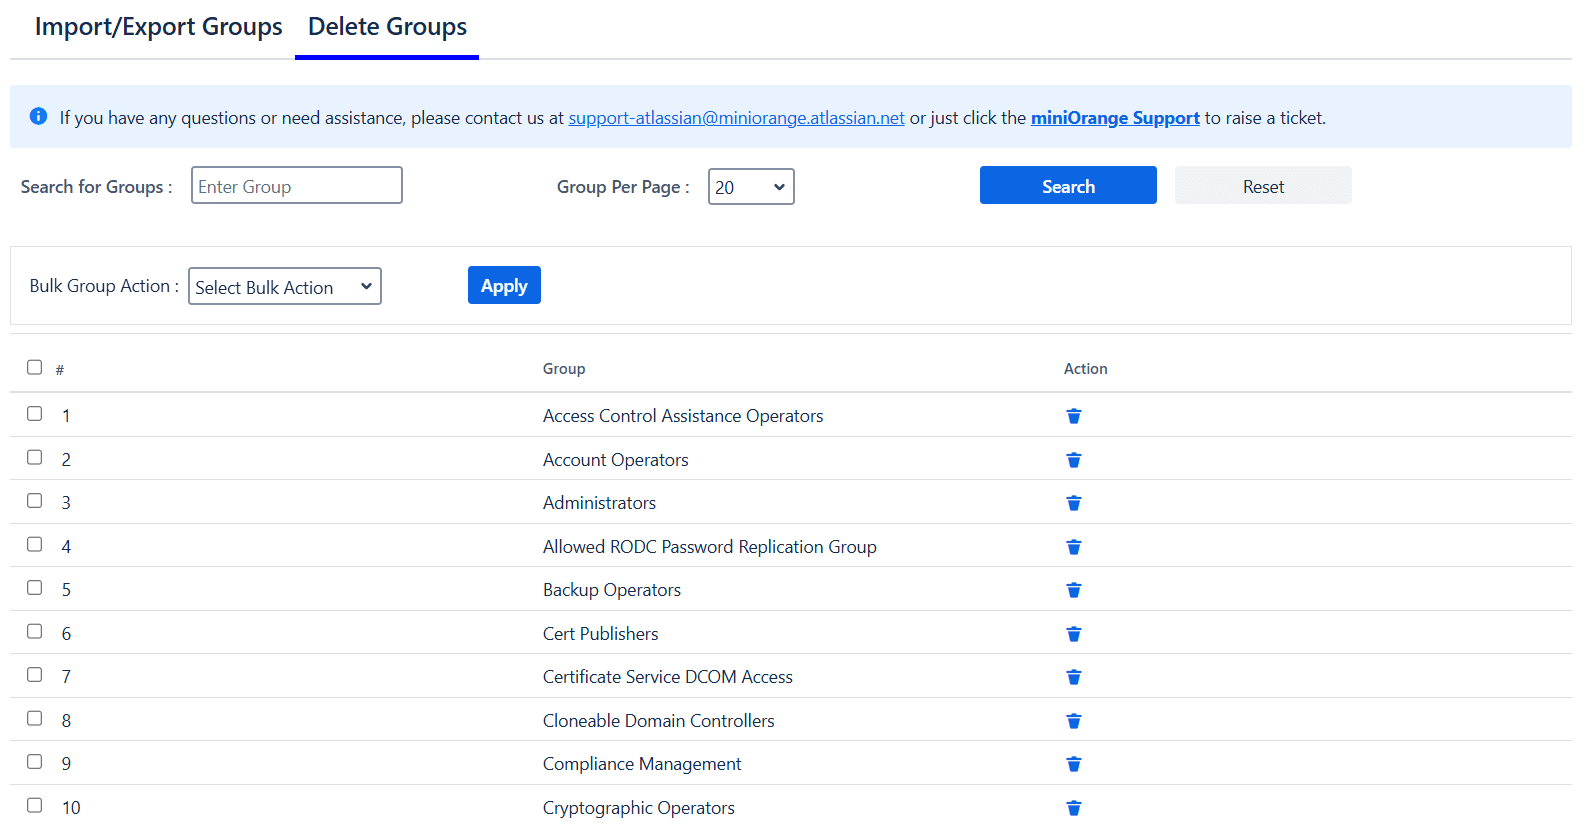
 Delete Groups
Select the required groups that you want to delete from the Select groups dropdown. You can select multiple groups here. Then click on the Delete Button.
 Export Groups
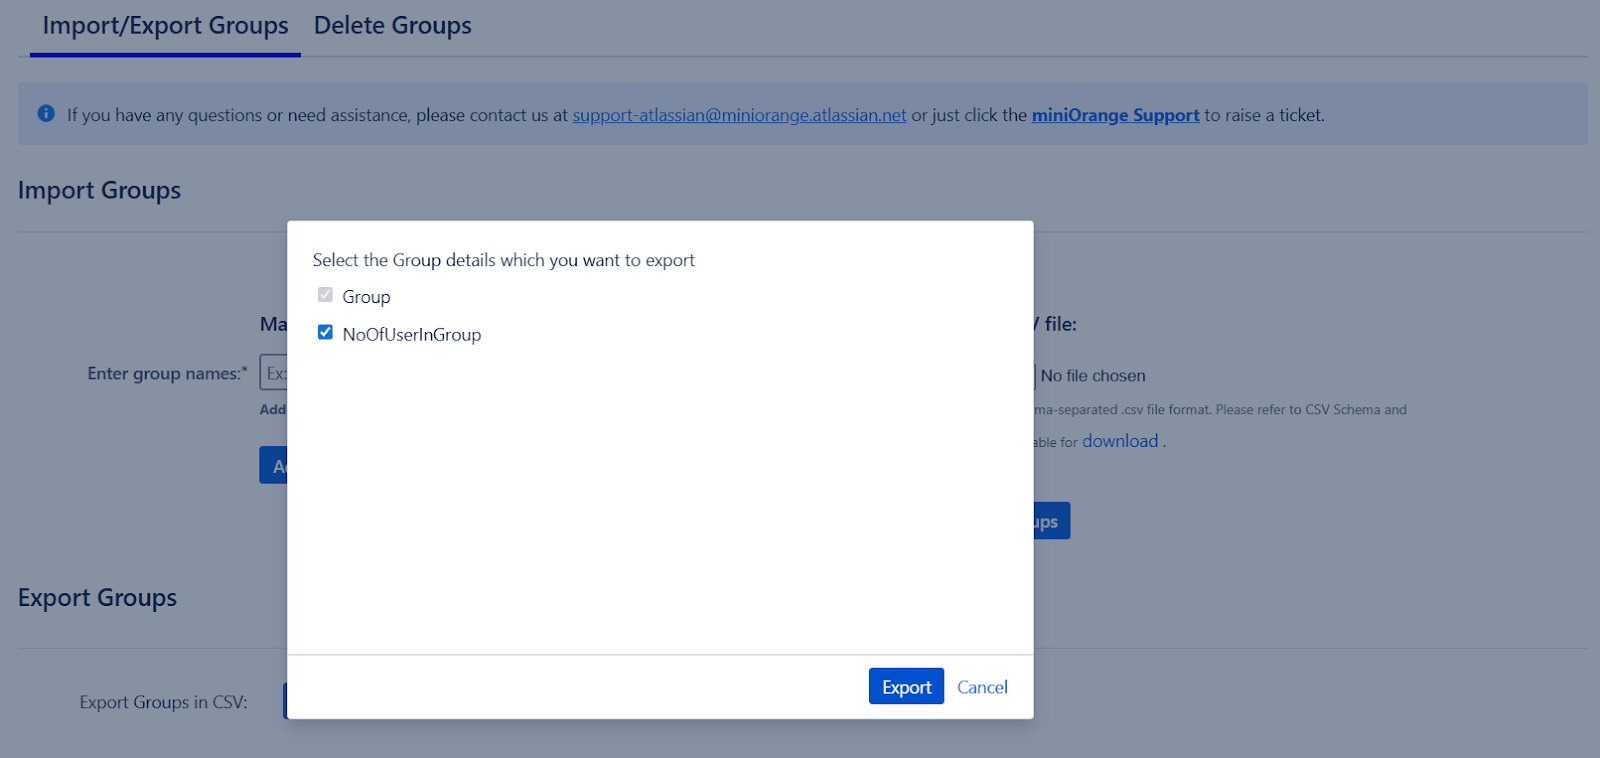
- Select Export Group in CSV option to export the group details in a csv file on your local system.
- Then select the details of the groups that you want to export.
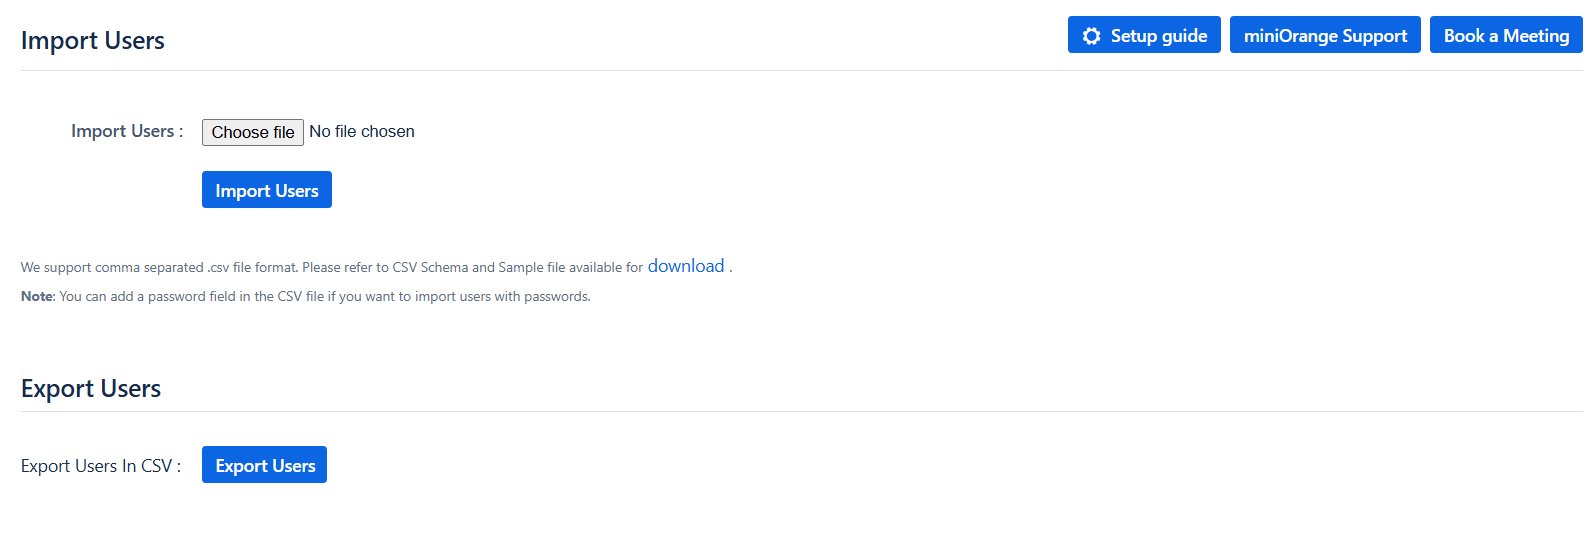
4: Import Export Users
- In the MINIORANGE USER MANAGEMENT section, Click on the Import Export Users section.
- To import the users, you can need upload .CSV file. You will find the format in by clicking on the download link as highlited in the below image.
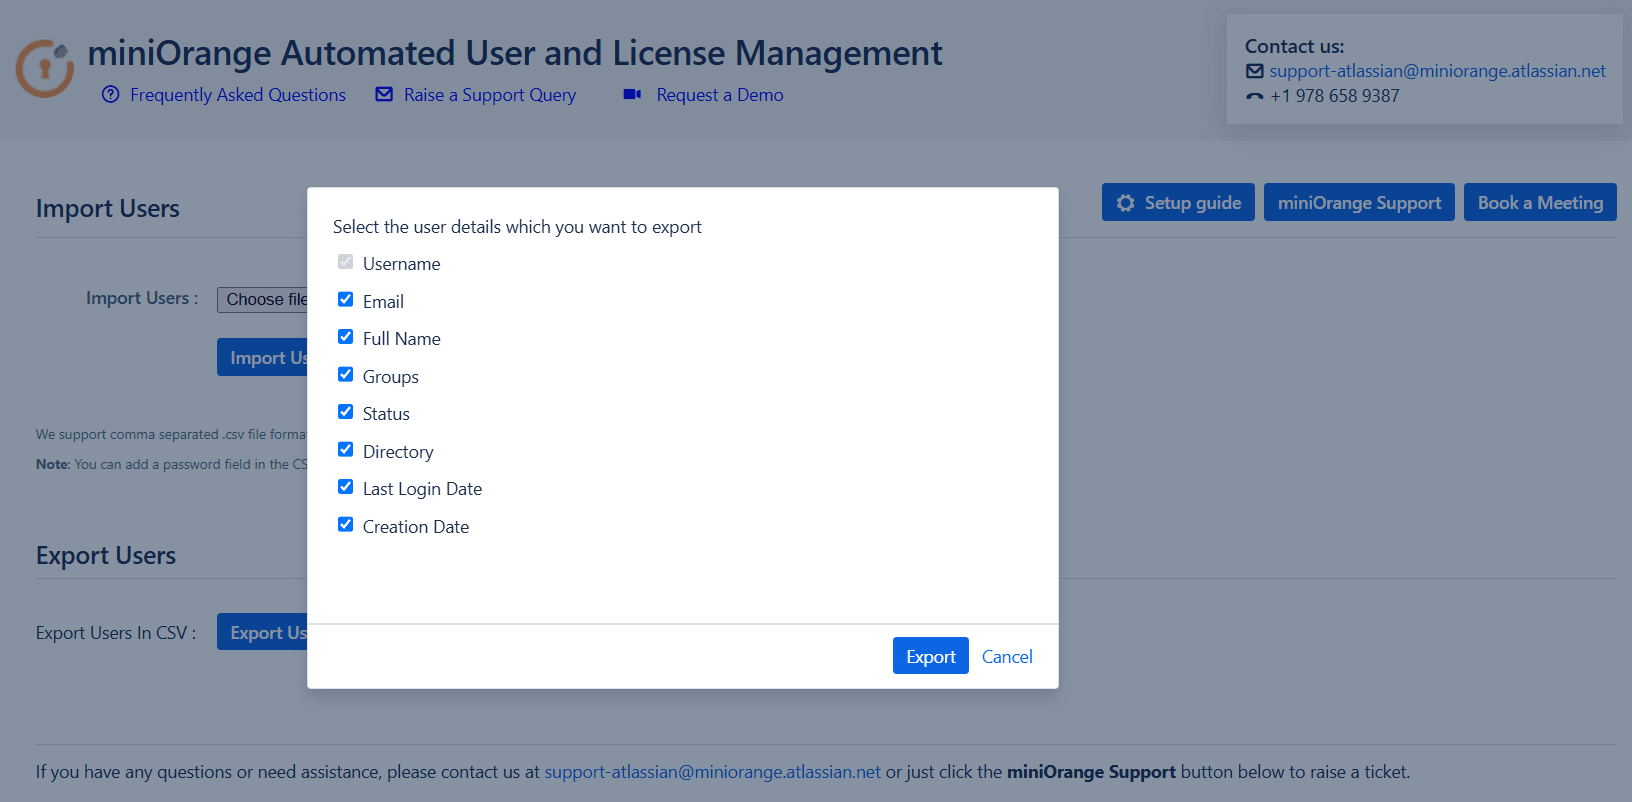
- In the export users section you can export the users in .CSV file format by selecting Export users in CSV option from the given dropdown.
- From the given options select the user details which you want to export.
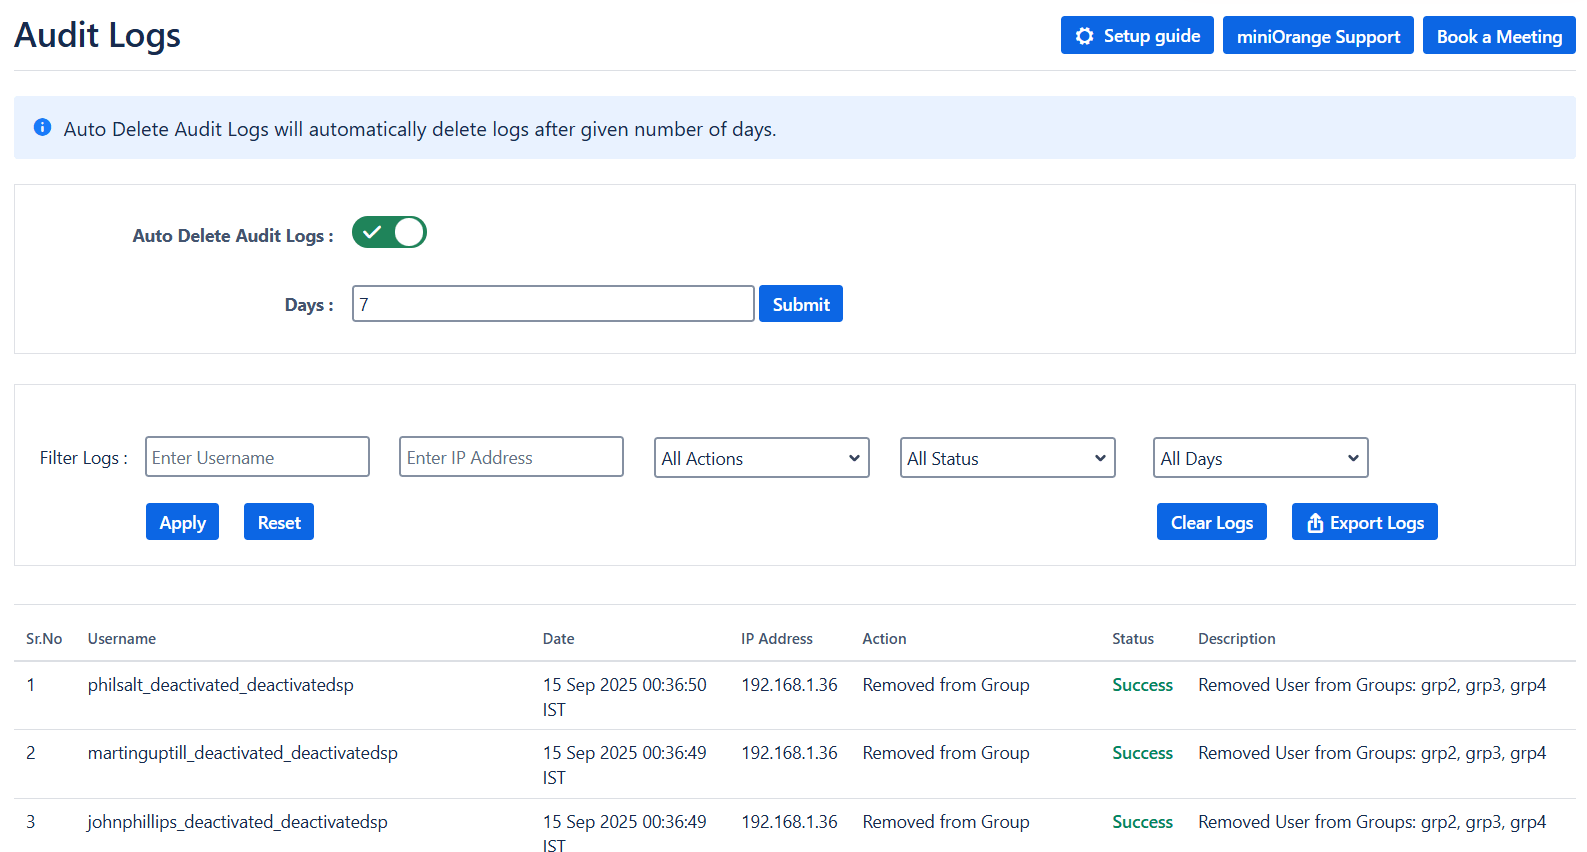
5: Automated User Management Plugin Audit Logs
- To get all the details of the actions performed in the Automated User Management plugin, click on the mo Audit Log option from the left menu in the MINIORANGE USER MANAGEMENT section.
- Enable the Auto Delete Audit Logs option to automatically delete the logs after the numbers of days mentioned in the Days text field.
- The logs include details like Username, Date, IP Address, Action, Description of the Action performed.
- You can export audit logs in a .CSV file based on the above filters.
- You can filter the logs based on Actions such as User Deactivated, User Activated, User Deleted, Removed from Group, Added to Group, Imported Users, Scheduler Enabled, Scheduler Disabled, Group Created, Group Deleted, Delete Logs Scheduler Enabled, Delete Logs Scheduler Disabled, and User Reactivated.
Additional Resources
Did this page help you?
