- Home
- Automated User Management
- Automated User Management Documentation
- Automated User Management for cloud

Automated User Management & Auto-deactivation for Jira Cloud
Automated User Management is the ultimate comprehensive user management solution for Jira Cloud. This modern, feature-rich application provides administrators with powerful tools to efficiently manage user accounts, automate cleanup processes, and maintain optimal license utilization across your Atlassian organization.
 Try it for free
Download and Installation
- Jira Cloud instance with admin access
- Atlassian Admin permissions
- API Token with appropriate scopes
- Access Jira Admin
- Log into your Jira Cloud instance as an administrator
- Navigate to Settings → Apps → Manage Apps
- Install the App
- Click Find new apps
- Search for "Automated user management"
- Click Try it free to begin trial or Buy now to purchase
- After clicking on Try it Free, select a site if you have multiple sites, and click on Review.
- Click on the Start Free Trial Button, and then you will be redirected to MyAtlassian.
- Click Apply license.
- Access the Application
- Navigate to Apps → User Management & Auto-deactivation for Jira
- The application will open in a new tab with the modern interface
Prerequisites
Installation Steps
1: Initial Configuration & API Setup
- To get started, go to the “Configure Token” tab in the app. To connect the plugin with your Atlassian instance, follow these steps to generate an Admin API Key:
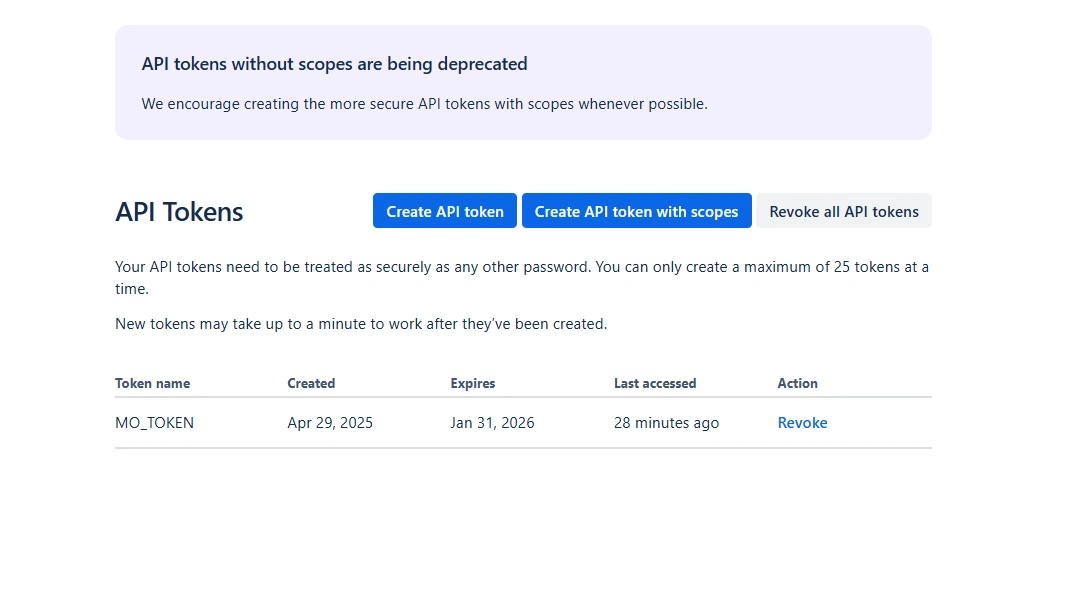
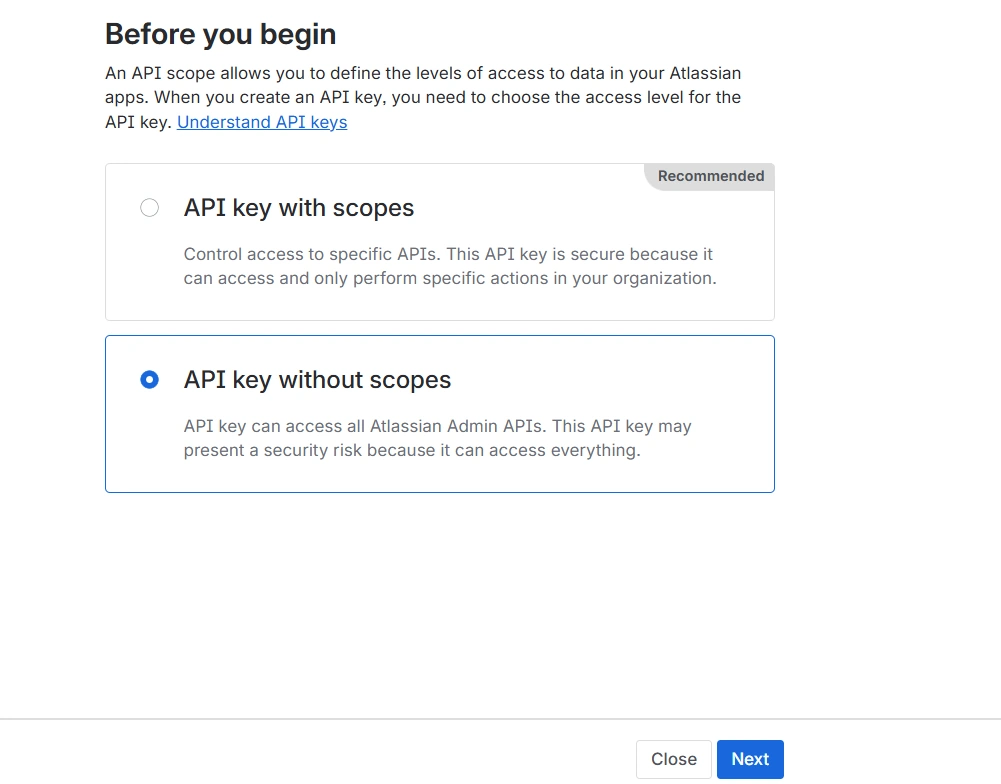
- Open the Atlassian API Token Manager.
- Click Create API token without scopes, assign a clear name (e.g., MO_TOKEN), and set an expiration date.
- Tip: We recommend 12 months expiration for easier maintenance.
- Copy the generated token and paste it into the plugin settings.
- Enter the Admin Email. This must match the Atlassian account that created the token.
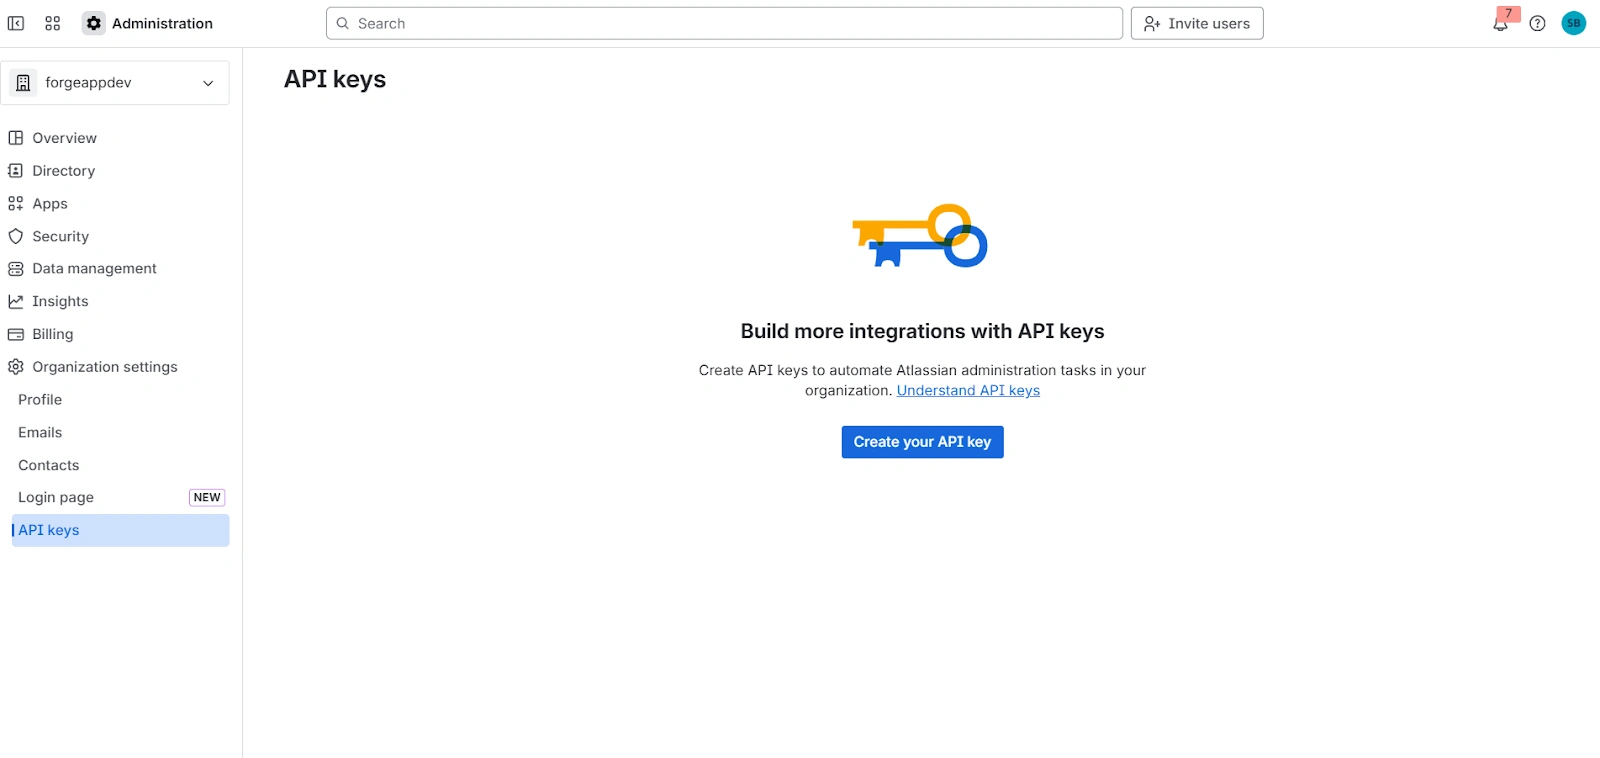
- Go to admin.atlassian.com.
- Select the site where the app is installed (e.g., your Atlassian organization).
- Navigate to Settings → API Keys and click Create API key.
- Choose the API key without scopes option, then click Next.
- Enter a name (e.g., MO_UMP_KEY) and set an expiration period.
- Tip: We recommend 12 months for easier maintenance. Copy the generated API key and paste it into the plugin configuration screen.
- Tip: click Save after entering both the Admin Email and API Token to avoid errors.
 1.1 : API Token Setup
1.2: API Key Setup
2: User Management
- Navigate to Users → Basic User Info tab.
- User Name / Email
- Account Status: All Users, Active, Deactivated
- Membership Status: All Users, Active, Suspended
- Claim Status: All Users, Managed Accounts Only
- Filter by Group
- Sort By: User Name, Last Login
- Select Users: Use checkboxes to select multiple users
- Choose Action:
- Deactivate: Disable managed accounts
- Suspend: Temporarily suspend access
- Delete: Remove users (with 15-day grace period)
- Add to Group: Assign group memberships
- Remove from Group: Remove group access
- Apply Changes: Click Apply to execute bulk operations
- Account Information: Name, email, status
- Last Login: Product-specific activity tracking
- Group Memberships: Current group assignments
- Directory Source: User account origin
- Navigate to Atlassian Admin: Go to https://admin.atlassian.com/.
- Open the Directory: Click Directory → Users.
- Export Users: Click the three-dot menu (⋮) in the top-right corner and select Export users.
- Configure Export:
- Select Active users as the export type.
- Enable Product access and role to include access-level details.
- Download CSV: Atlassian sends an email with a link to download the CSV file.
- Tip: Ensure the export contains the “Email” and “Product Access” columns, as they are required for mapping.
- Navigate to Bulk CSV Actions → Detailed User Info tab.
- Upload CSV: Drag and drop the downloaded CSV or use the Upload File button.
- Validation:
- The system verifies required columns like Email, User Status, and Product Access.
- If any columns are missing, you’ll receive a clear validation message.
- Column Mapping:
- The system auto-detects and maps fields such as User Name, Email, Added to Org Date, Group Memberships, and Last Seen Data for each application.
- You can manually adjust mappings if needed.
- Use the built-in Advanced Filtering System to refine the dataset before taking bulk actions.
- Available Filters:
- User Name / Email
- Account Status (All users , Active , deactivate)
- Membership Status (All users , Active , Suspended)
- Clam status (All Users , Managed Account Only)
- Filter By Group
- Sort By (User Name and Last Login)
- Activate – Reactivate inactive user accounts.
- Deactivate – Disable selected active users.
- Suspend – Temporarily suspend access to Atlassian products.
- Restore – Reactivate suspended accounts.
- Delete – Permanently remove users from the system. (Use with caution.)
- Add to Groups – Assign selected users to one or more groups.
- Remove from Groups – Remove users from specific groups.
- Protected Groups – Prevent modifications to specified protected groups during bulk actions.
- CSV Export: Export selected or filtered users along with their associated data for reporting or further processing.
- Data Persistence: Imported data remains available across sessions for continuous management without needing to reupload.
- Progress Tracking: Visual indicators show ongoing bulk operations and completion status.
- Audit Trail: Every bulk action (create, suspend, restore, delete) is automatically recorded in the audit logs with timestamps and user details.
- Individual or Bulk Selection: Select specific users manually or use the “Select All” option to apply actions to the entire filtered dataset.
- Smart Selection Awareness: The system ensures bulk actions are only performed on valid, processable users (e.g., prevents reactivation of already active users).
- Drag & Drop Interface: Upload CSV files directly by dragging them into the designated area.
- File Validation: The system automatically checks the CSV format and ensures required columns are present.
- Sample CSV Download: Download a template CSV to ensure proper formatting.
- File Information Display: View file name, size, and upload status for confirmation.
- Email Column Mapping: Required; maps the CSV column containing user email addresses.
- Group Column Mapping: Optional; maps CSV column for group assignments.
- Column Detection: Automatically detects all available columns from the CSV.
- Validation: Ensures the email column is correctly mapped before proceeding.
- Create New Users: Enable or disable automatic creation of user accounts.
- Add Users to Groups: Enable or disable group assignments for imported users.
- Create New Groups: Automatically create groups if they do not already exist.
- Feature Combinations: Flexible configuration to tailor import actions for different scenarios.
- Data Preview: Displays a sample of users to be imported with pagination for easy review.
- Import Summary: Shows total users, mapped columns, and selected features.
- Feature Summary: Provides a visual confirmation of enabled import features.
- Final Import: Executes the import process with real-time progress tracking.
- Access Audit Logs to view detailed logs of all actions taken during the import.
2.1 Basic User
Management
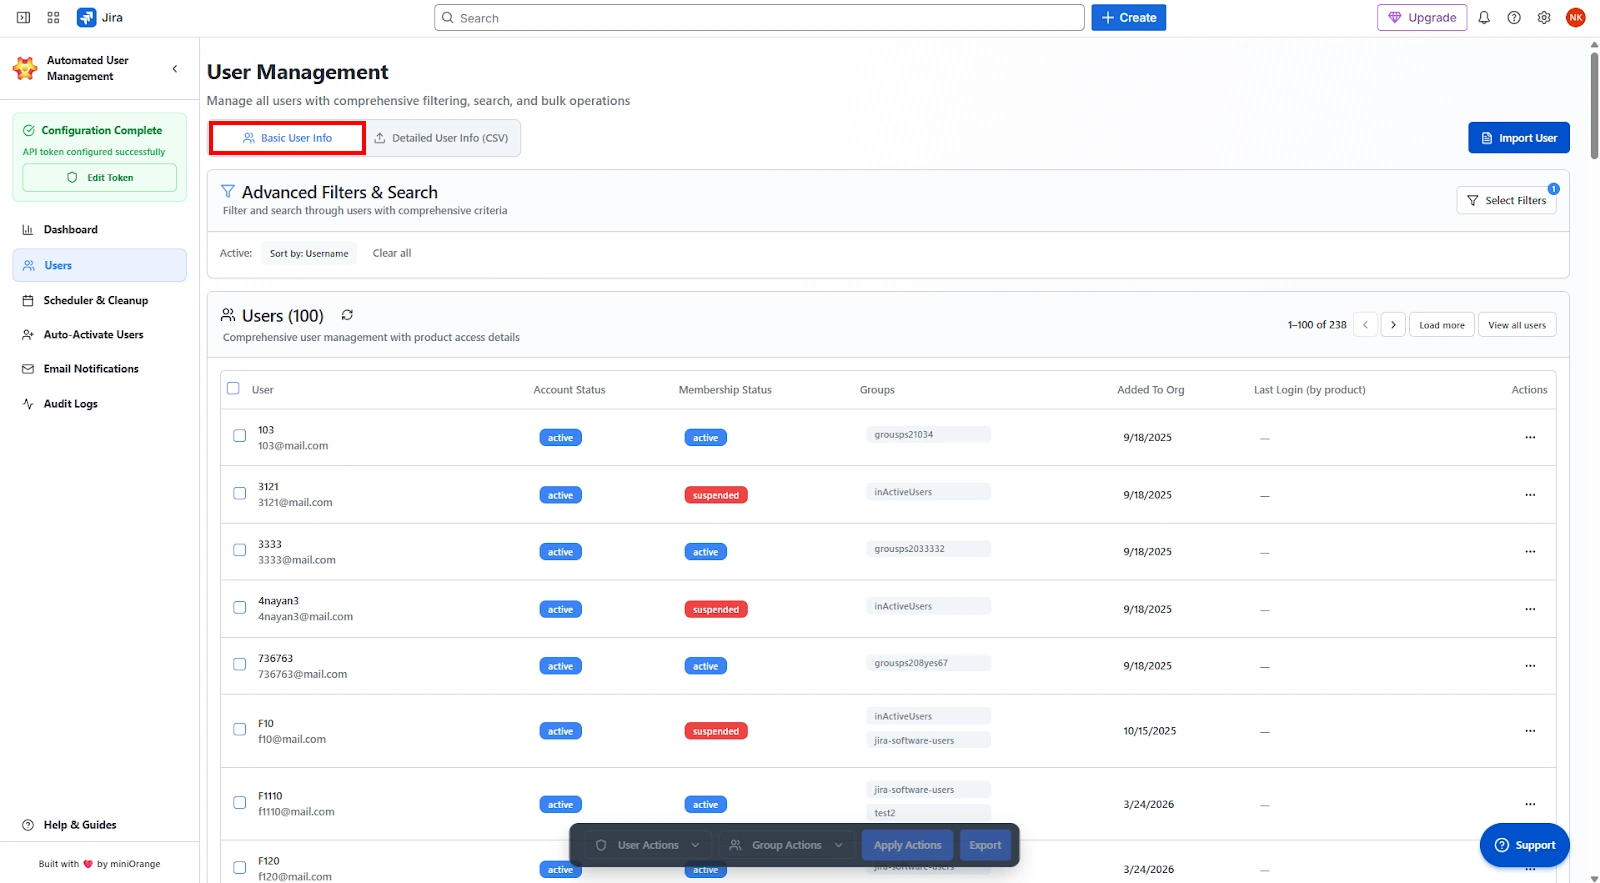
Load all users using the “View All Users” button and perform manual actions on a large number of users simultaneously.
User Filtering Options:
Bulk User Operations:
User Details:
2.2 Detailed user
info tab (CSV)
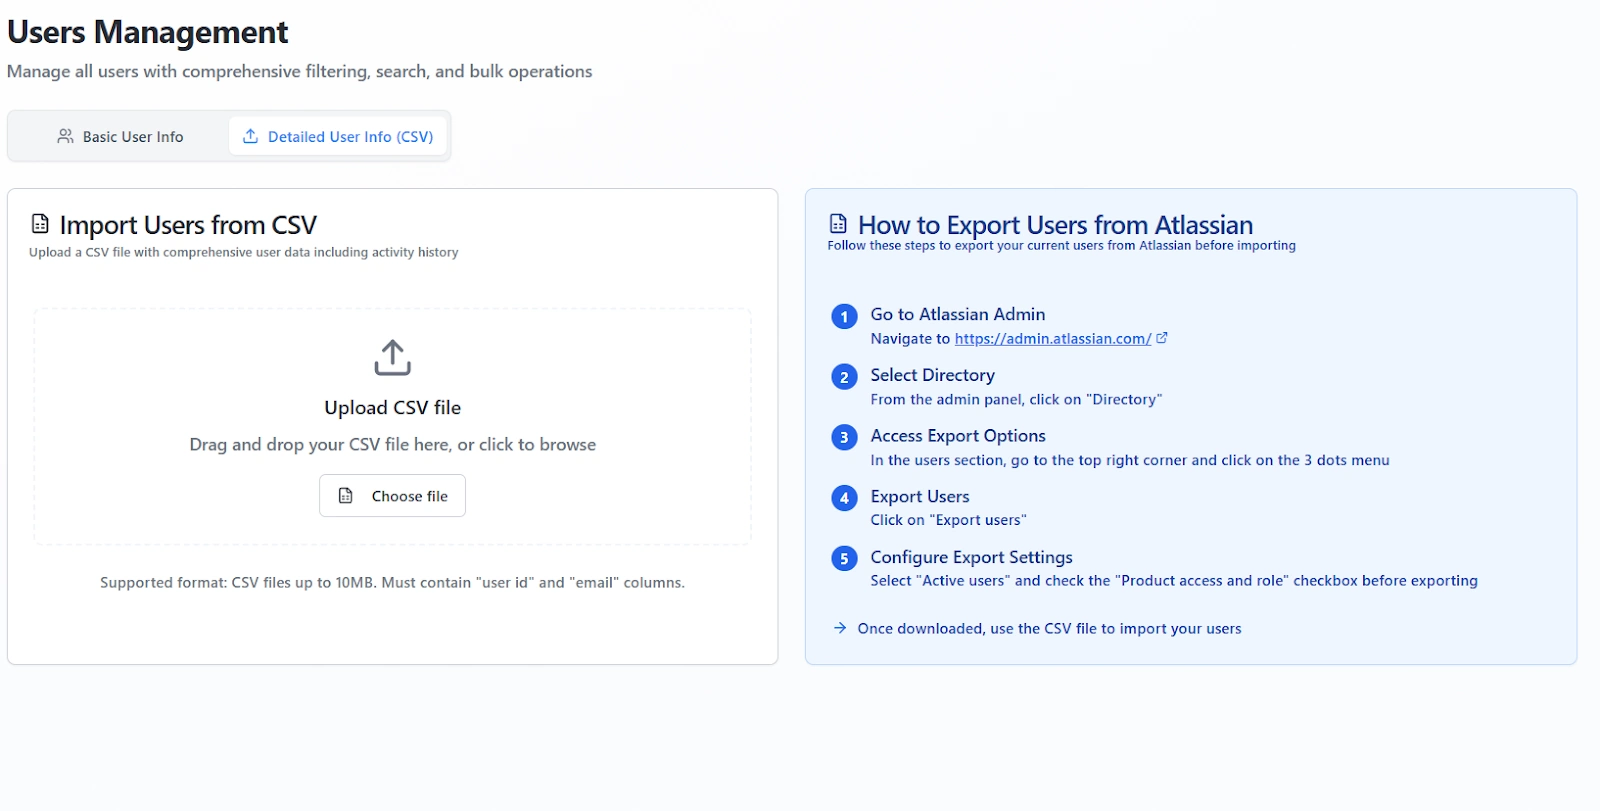
Step 1: Export Data from Atlassian Admin
To prepare data for bulk processing:
Step 2: Upload and Process the CSV
Step 3: Filter and Analyze User Data
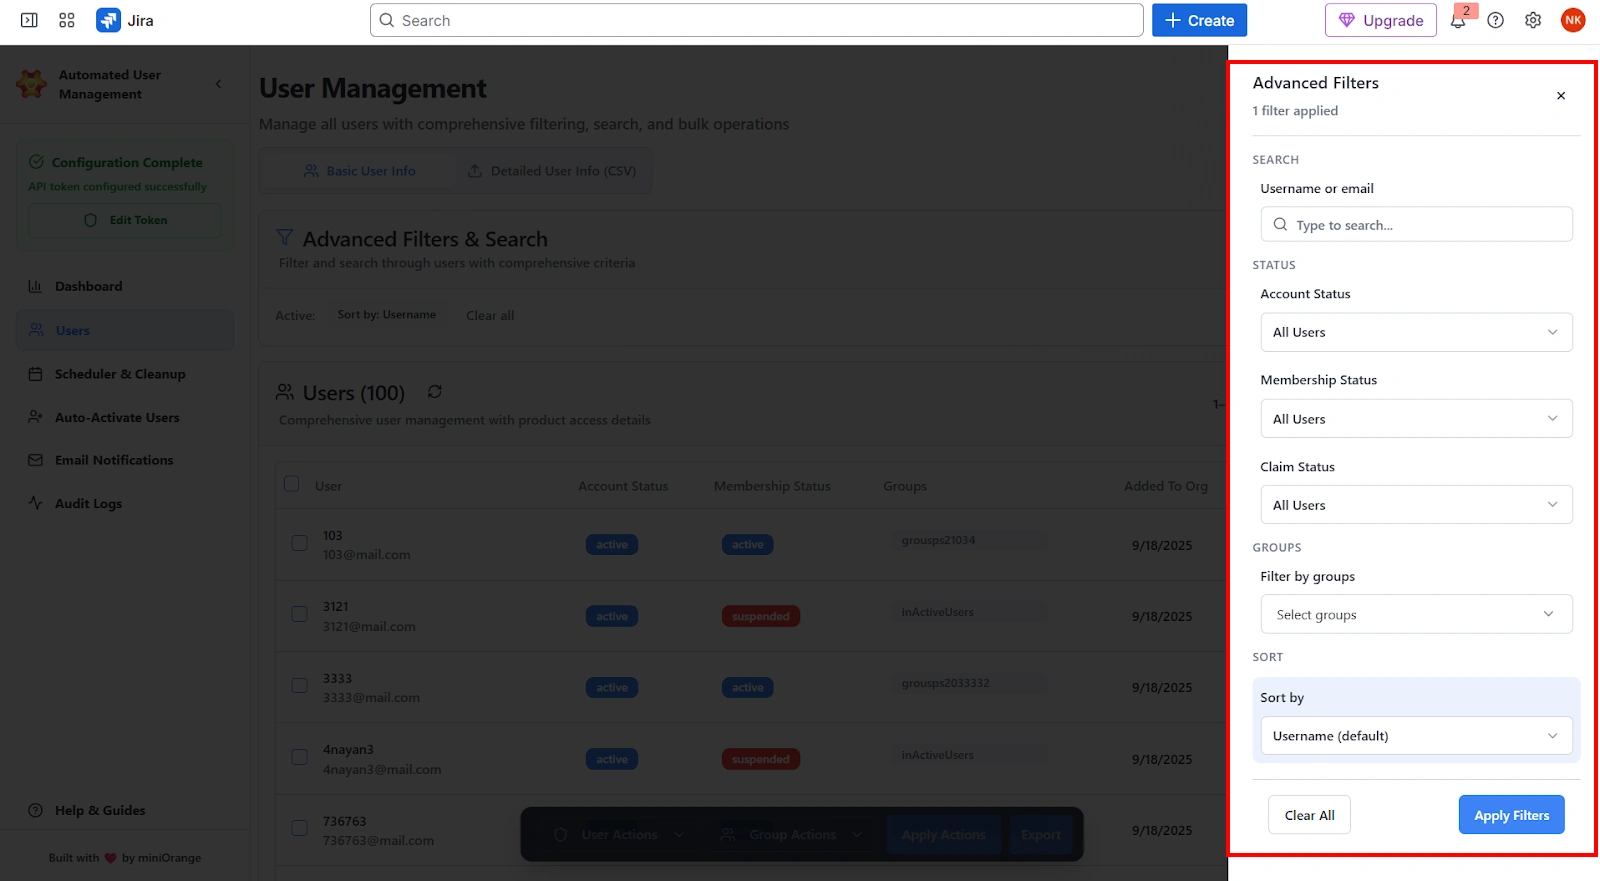
Filters are persistent across sessions, and active filters appear as badges above the table.
Step 4: Perform Bulk Actions
User Actions:
Select one or more users from the table and choose the desired action:
Group Actions:
All actions display real-time progress and can be tracked in the Audit Logs tab for accountability.
Step 5: Export & Data Management
The Bulk Operations feature in the Detailed User Info (CSV) tab enables administrators to perform multiple user and group management actions simultaneously, directly from the imported CSV data.
User Selection
2.3 Advanced User
Import
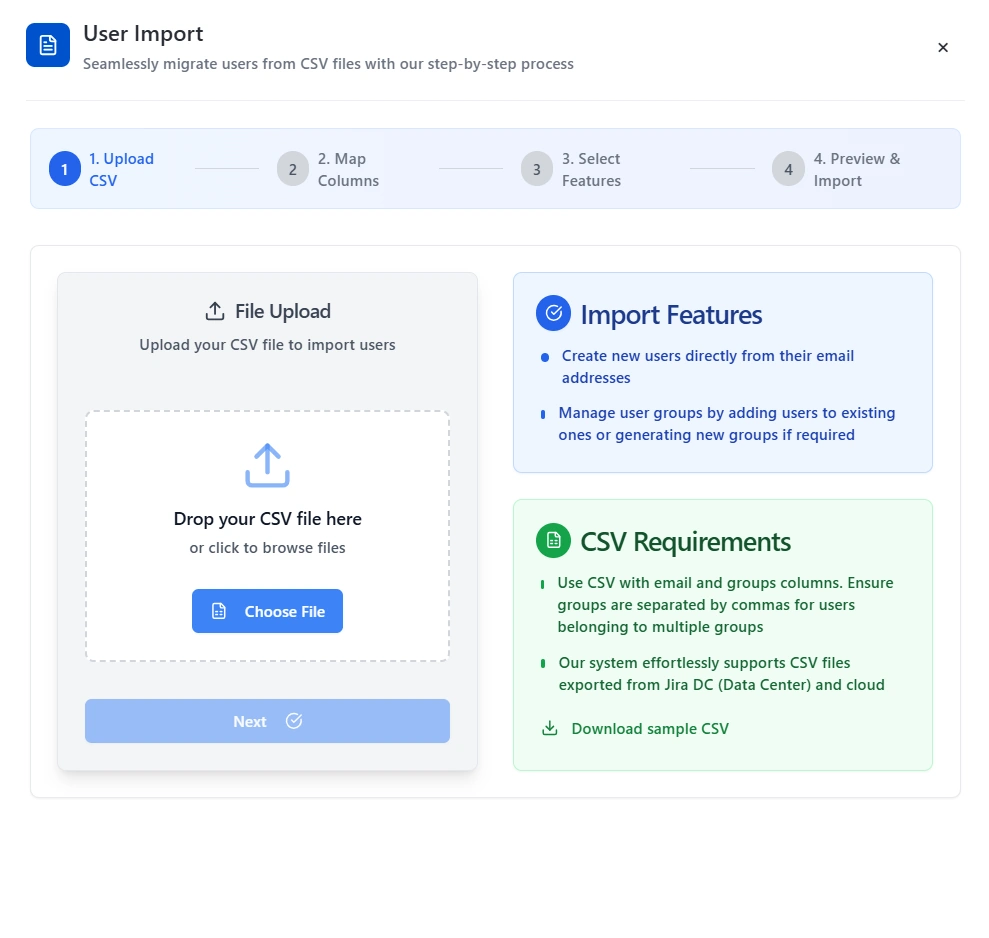
User Import Feature
The import workflow is designed to be simple, intuitive, and highly configurable:
Step 1: Upload CSV
Step 2: Map Columns
Step 3: Select Features
Step 4: Preview & Import
3: Scheduler & Cleanup Rules
- Inactivity Period - Define the number of inactive days before a user is deactivated.
- Product Scope - Apply rules to specific products (e.g., Jira, Confluence, Bitbucket).
- Group Exclusions – Exclude specific groups from deactivation actions.
- Notification Settings – Send warning emails to users before deactivation.
- Application-Specific Rules – Target individual products for access removal.
- Group Removal – Remove users from selected groups.
- Inactivity Thresholds – Define different inactivity periods per product.
- Never-Logged-In Handling – Automatically remove users who have never accessed the product.
- Suspension Period – Temporarily suspend inactive users for a defined duration.
- Auto-Deletion – Automatically delete users after the suspension period ends.
- Restoration Options – Allow quick reactivation for suspended users.
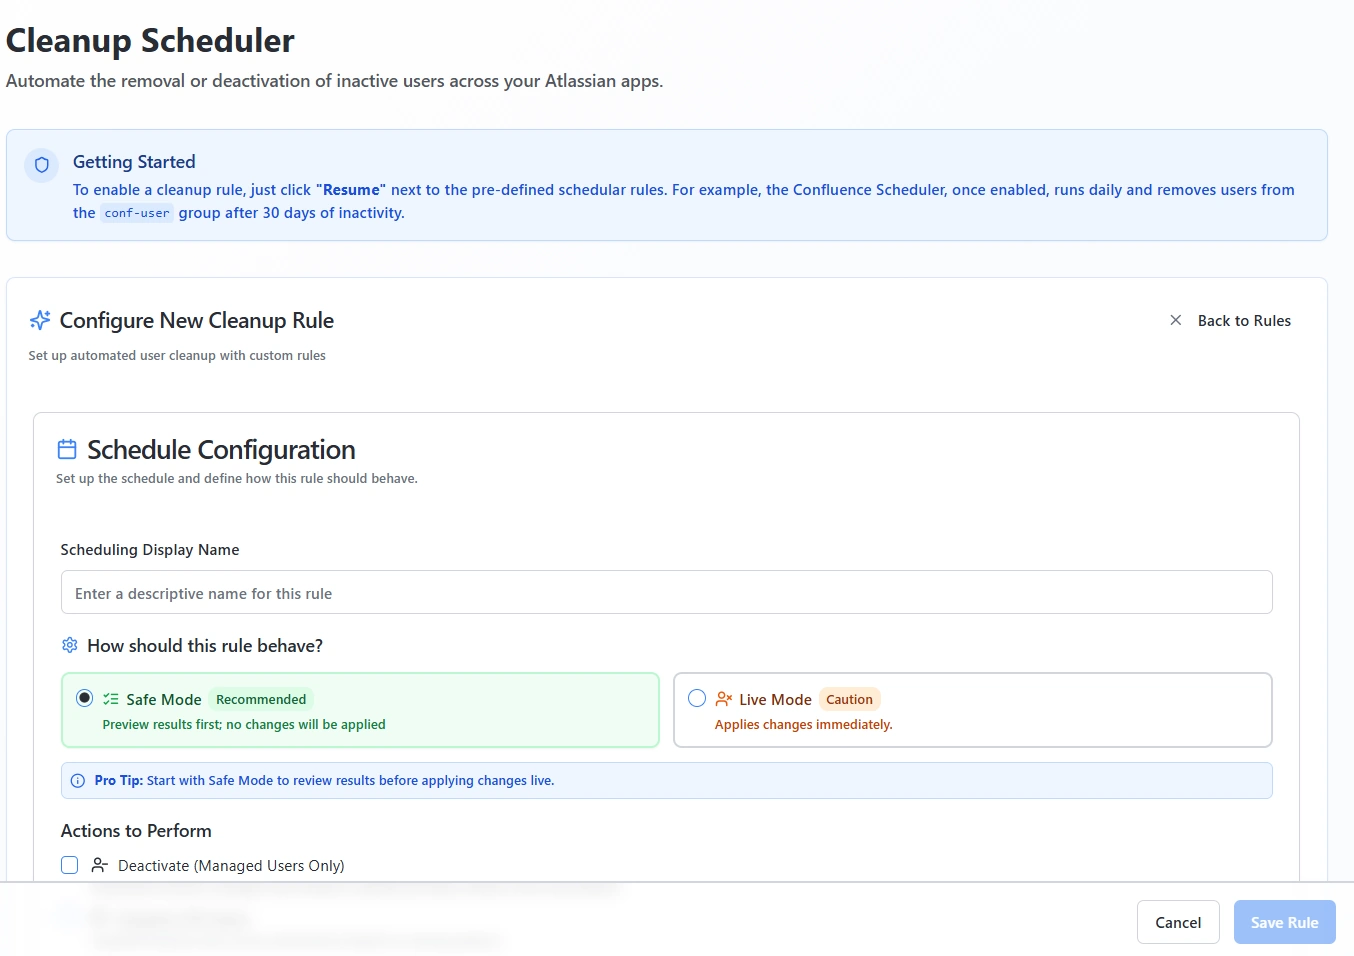
- Click Create New Rule.
- Configure the following rule settings:
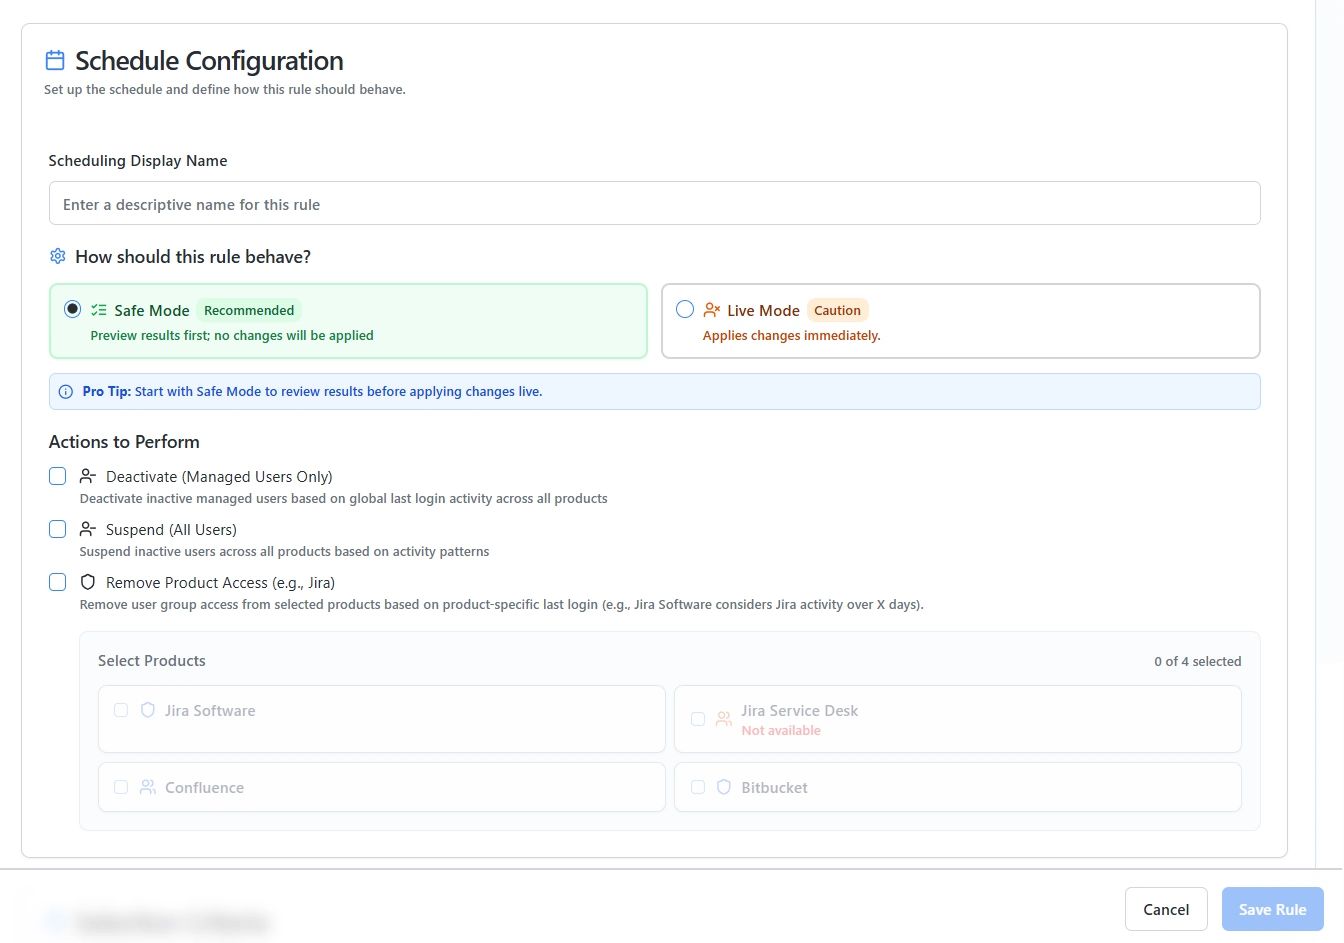
- Safe Mode (Review First) – The rule runs in audit-only mode and makes no live changes. (Recommended for initial setup)
- Live Mode – The rule executes and applies changes automatically.
- Deactivate (Managed Users Only) – Deactivates inactive managed accounts based on global last login activity across all products.
- Suspend Users (All Users) – Suspends inactive users across all products based on activity thresholds.
- Remove Product Access – Removes group access from specific products based on product-specific login activity. (e.g., If Jira is selected, the rule considers only Jira login activity for the X-day threshold.)
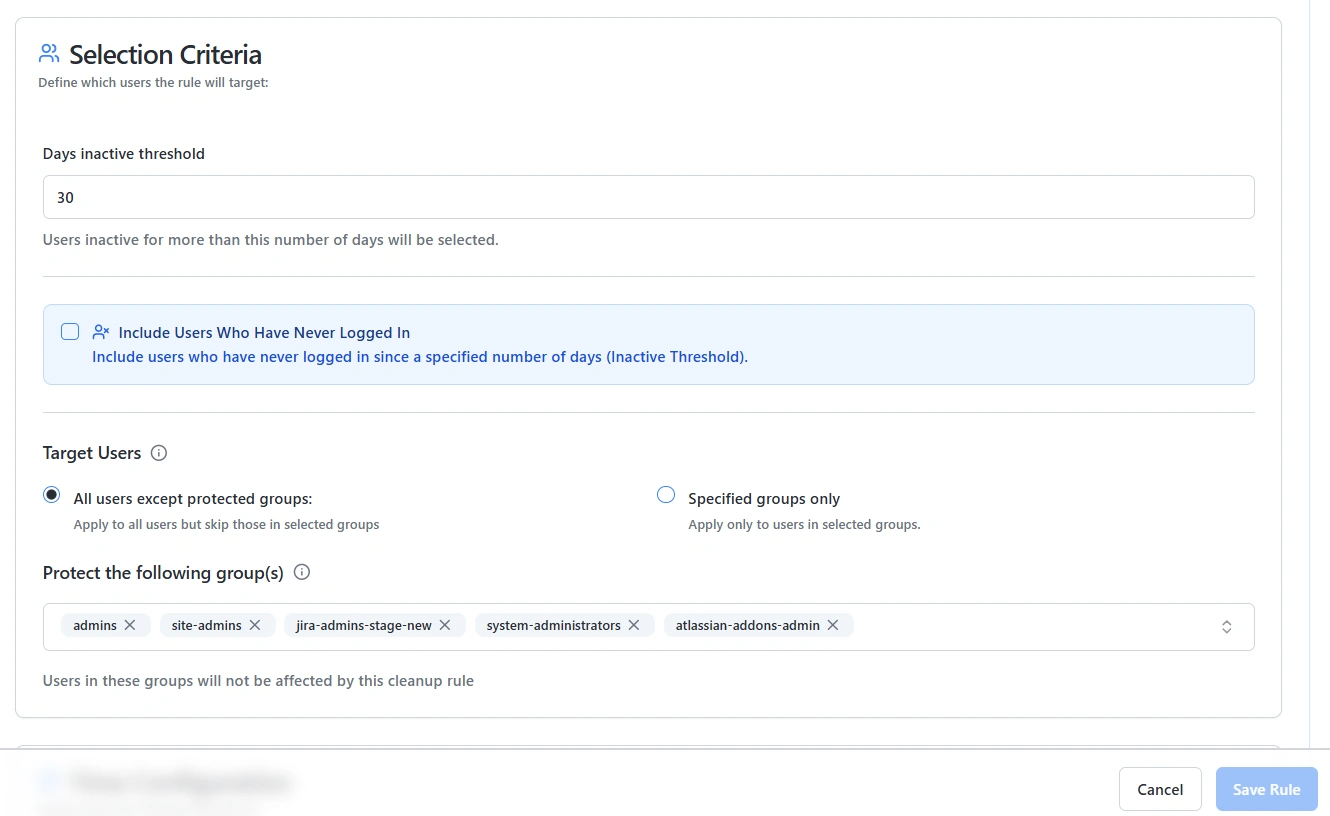
- Days Inactive Threshold – Define the number of inactivity days after which users will be selected for cleanup actions.
- Include Users Who Have Never Logged In – Optionally target users who have never accessed the system, regardless of creation date.
- All Users with Protected Groups – Run the rule on all users but exclude those belonging to protected groups.
- Specified Groups Only – Run the rule only for users in the selected groups.
- Search and select one or more groups to protect from cleanup actions.
- You must select at least one protected group to ensure critical accounts remain unaffected.
- Run Frequency – Set the interval (daily, weekly, or monthly).
- Execution Time – Choose the specific time for rule execution.
- Resume/Pause – Enable or disable rule execution.
- Edit Rule – Modify existing configurations.
- Run Now – Execute the rule immediately.
- Delete Rule – Permanently remove the rule.

Automated User Cleanup
Navigate to Scheduler & Cleanup in the sidebar.
This section allows administrators to configure automated cleanup and maintenance rules for user accounts across products.
Rule Types
A. User Deactivation Rules
B. Product Access Removal
C. User Suspension Rules
Creating Cleanup
Rules
Rule Name
Provide a descriptive name for the rule (e.g., “Deactivate Inactive Jira Users - 60 Days”).
Rule Mode
There are two rule execution modes:
Action to Perform
Choose one of the following actions:
Product Selection
Select the products to which the rule should apply, such as Jira, Confluence, JSM, Bitbucket, etc.
Selection Criteria
Target Users
Choose the target user group scope:
Protected Groups
Time Configuration
Define when the rule should execute:
Click Save Rule to finalize and activate your configuration.
Cleanup Rules Management
Once rules are created, they will appear in the Rules List.
Available Actions
4. Auto-Activate Users
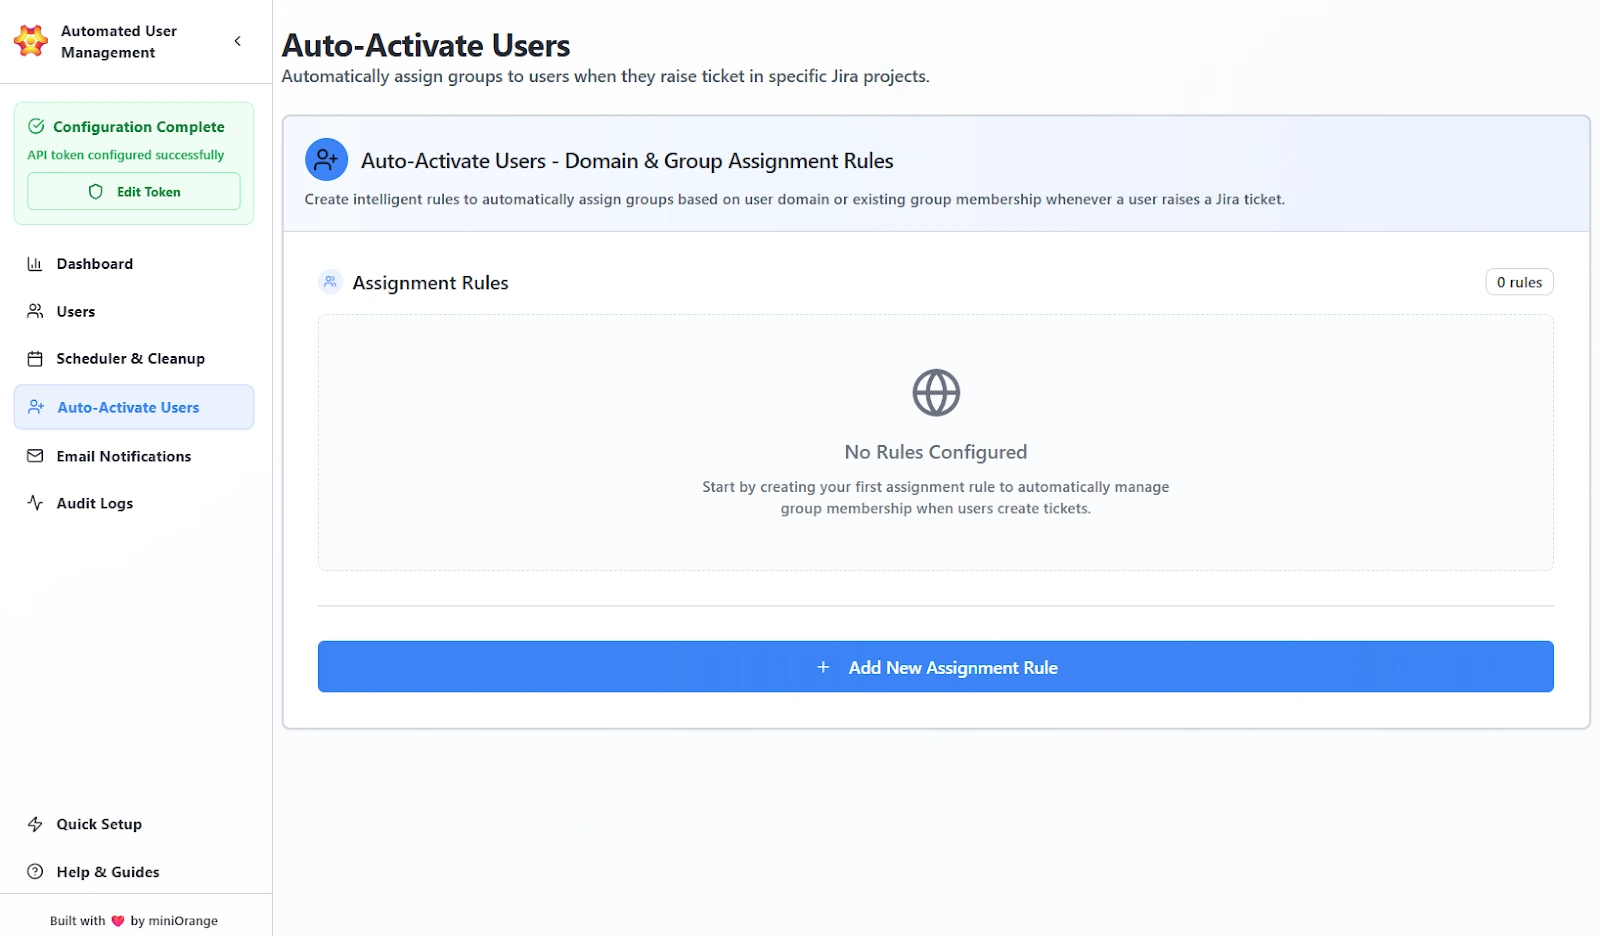
Auto Activate Users
Feature
- The system automatically discovers all Jira projects available to the admin.
- Request types dynamically load based on the selected project.
- Define the conditions and target groups for user assignment.
- Email Domain Targeting: Automatically adds users to a group based on their email domain.
- Source Group Logic: Assign users to new groups based on their existing memberships.
- Target Group Mapping: Define which group users will be added to when they already belong to a specific source group.
- Enable / Disable Rules: Use toggle controls to activate or deactivate specific rules.
- Edit or Delete: Modify existing rules or remove outdated ones easily.
- Real-Time Updates: The rule table provides live feedback for all status changes.
- Visual Overview: Each rule displays project name, request type, assignment method, and current activation status.
- Project Validation: Ensures the selected project contains valid request types before saving the rule.
- Rule Testing: Preview configuration results before enabling automation.
- Activity Tracking: All auto-activation events are recorded in the audit logs for traceability and compliance.
- Access the Feature: Go to Auto Activate Users from the main sidebar.
- Add New Rule: Click “Add New Assignment Rule” to start setup.
- Select Project & Request Type: Choose a Jira project and its corresponding request type.
- Configure Assignment Logic: Define either a Domain-Based or Group-Based assignment rule.
- Save & Activate: Save your configuration and toggle the rule to “Active.”
- Monitor Execution: Track activity logs to verify successful auto-assignments.
Rule Creation & Configuration
Create automated rules that define when and how users should be assigned to groups.
Two-Step Setup Process:
1. Select Jira Project and Request Type:
2. Configure Assignment Rules:
Assignment Methods
The Auto Activate system supports two intelligent assignment types:
1. Domain-Based Assignment
2. Group-Based Assignment
Rule Management & Control
Maintain complete oversight and flexibility over your automation rules:
Monitoring & Validation
Quick Setup Steps
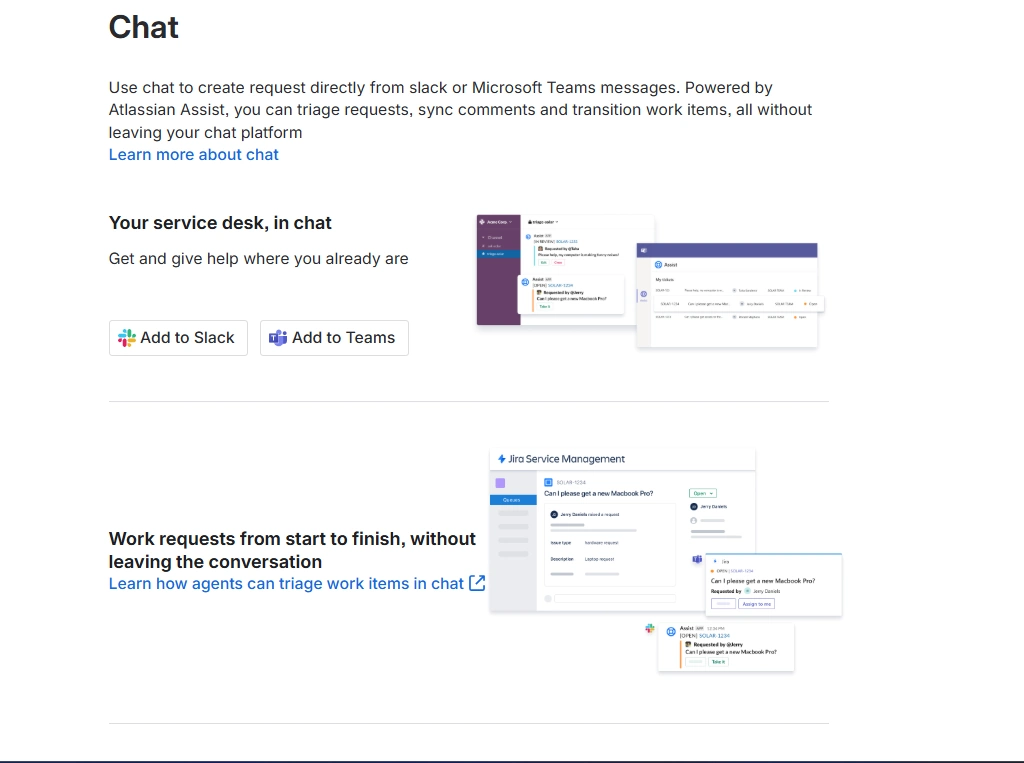
Slack Integration
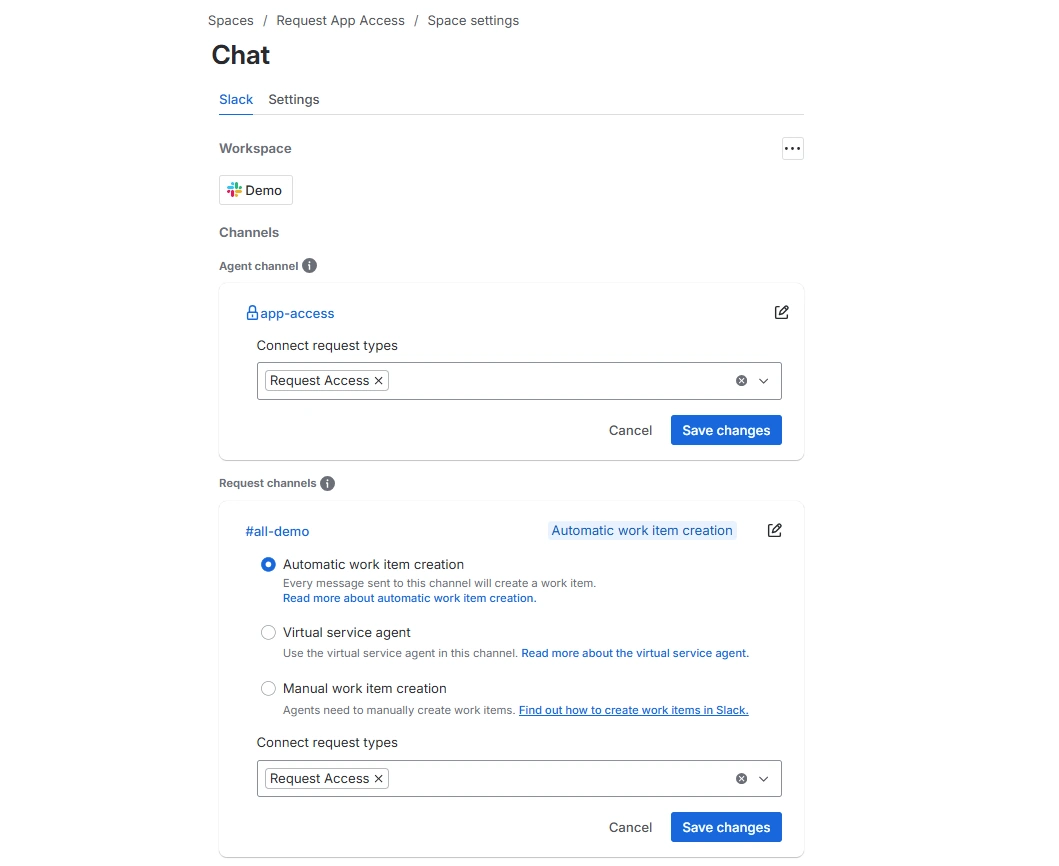
- Go to Space Settings → Chat.
- Click Add to Slack and authorize your Slack workspace.
- Select the Workspace and Channel for support.
- Run the /assist command in the selected Slack channel to enable the support bot.
- In Chat Settings, select the Request Type and enable Automatic Work Item Creation.
- Click Save to finalize the configuration.
- Connect Jira Service Management with Slack.
- Create support requests directly from Slack.
- Automatically create Jira work items from Slack conversations.
- Map requests to a selected request type.
- Manage support from a dedicated Slack channel.
Connect Slack with Jira Service Management to allow users to create support requests directly from Slack.
Setup Steps
Features
5. Email Notifications
- Enable/Disable Toggle – Turn notifications on or off.
- Preview – View the email content before sending.
- Edit Template – Modify template details and content.
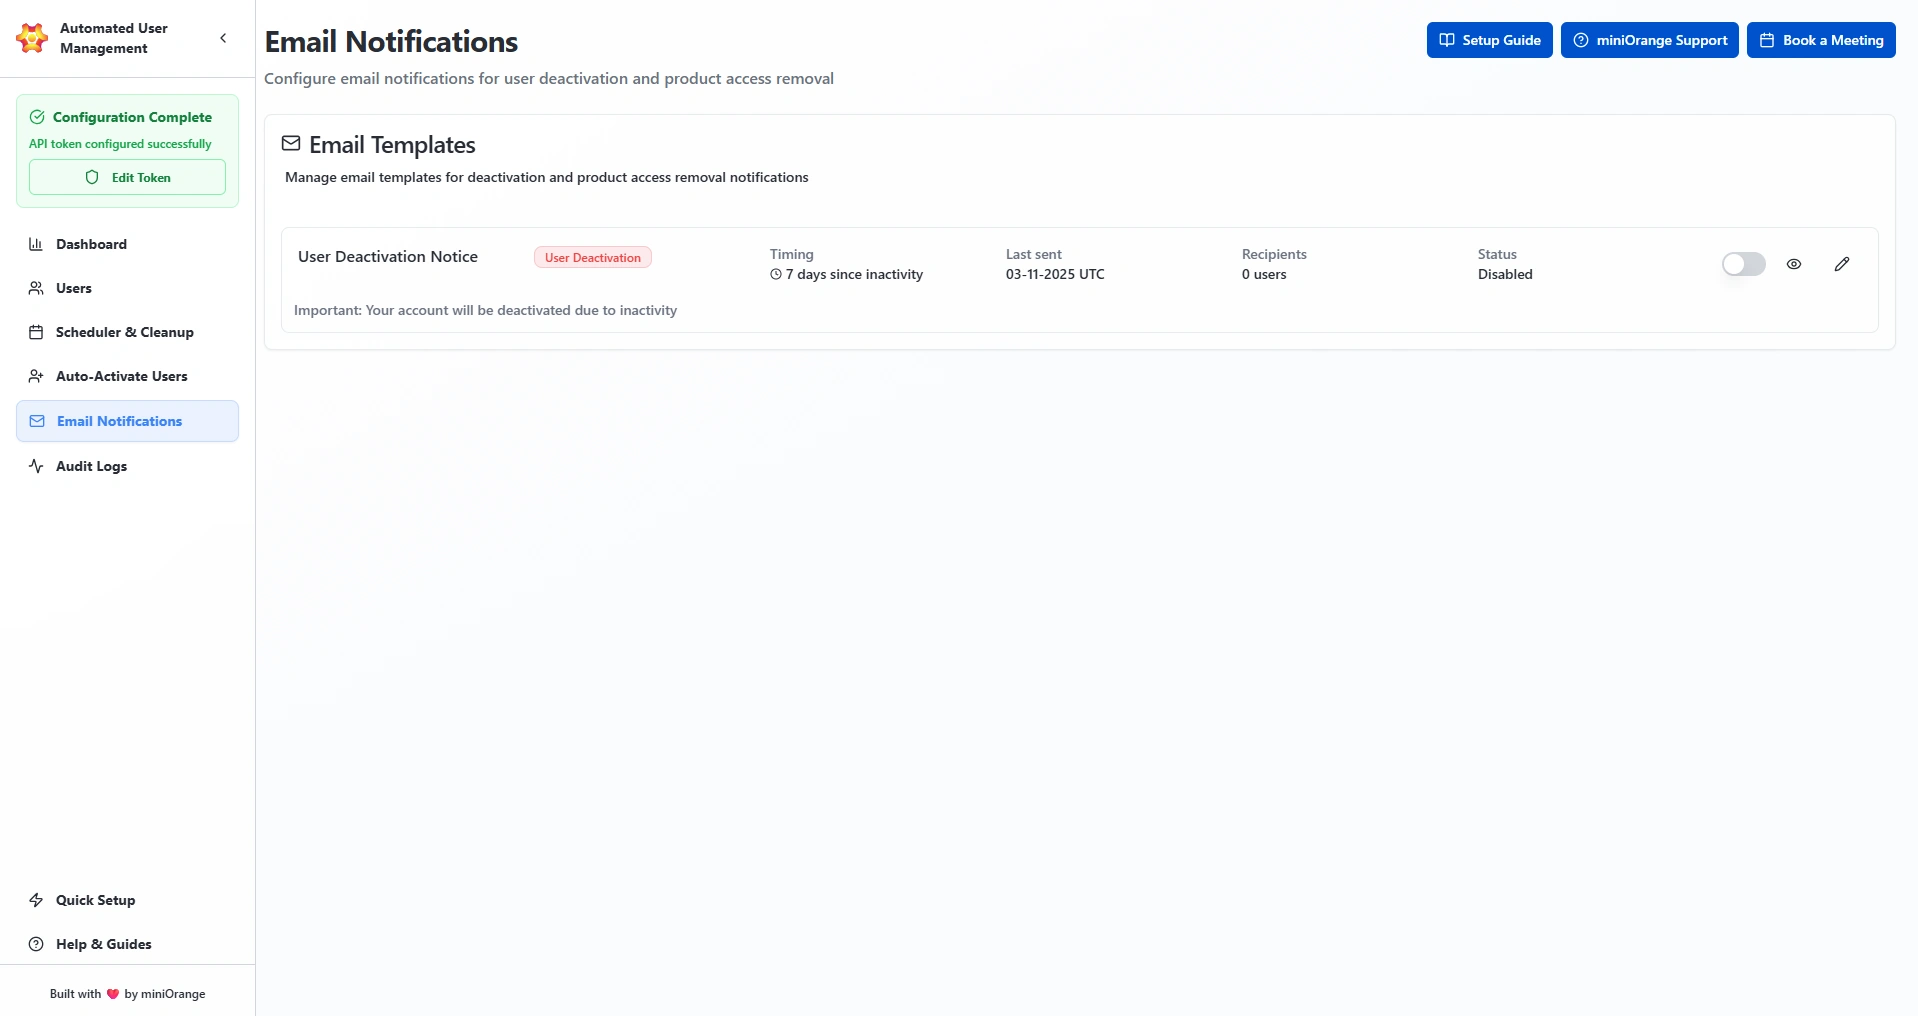
Accessing Notification
Templates
Navigate to Email Notifications from the sidebar.
You will find a list of available templates along with key details. Available actions for each template include:
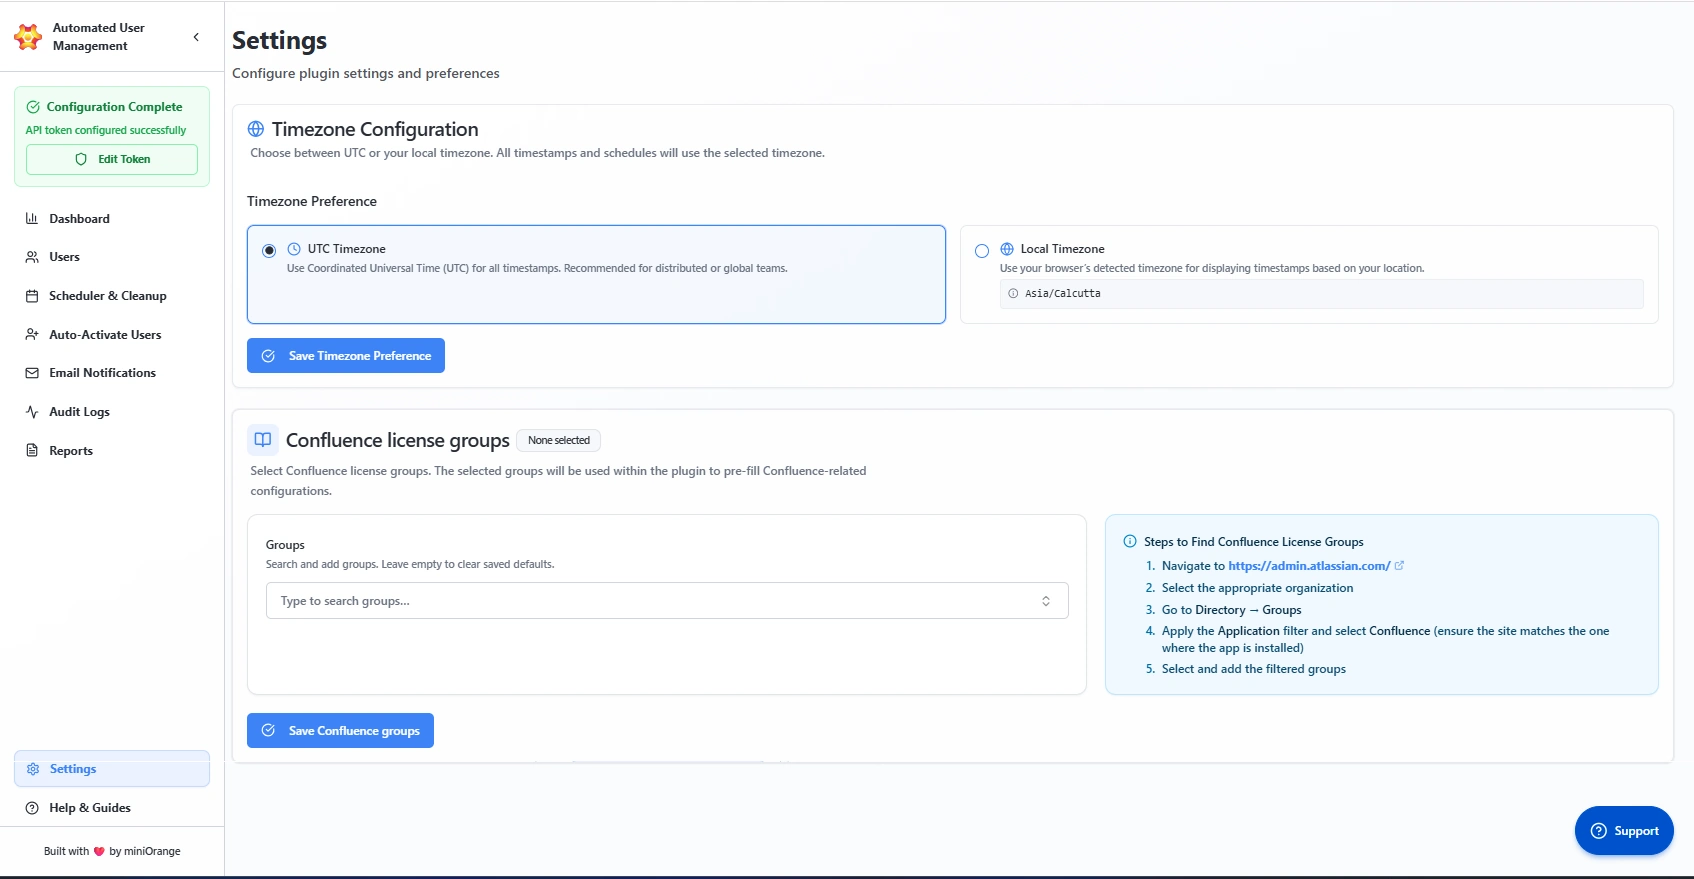
6. Settings Tab
- Go to the Settings tab.
- Select either UTC Timezone or Local Timezone.
- Click Save Timezone Preference.
- Search and select the required Confluence groups.
- Click Save Confluence Groups.
- Go to admin.atlassian.com.
- Select your organization.
- Navigate to Directory → Groups.
- Filter by the Confluence application.
- Select the required groups and save them in the plugin.
- Configure the plugin timezone (UTC or Local).
- Set default Confluence license groups.
- Automatically reuse saved groups in Confluence-related configurations.
Manage plugin preferences, including timezone settings and default Confluence license groups.
Timezone Configuration
Confluence License Groups
Configure default Confluence license groups used across the plugin.
Finding Confluence License Groups
Features
7. Migration Tab
- Navigate to the Help & Guide tab.
- Go to the Migration tab and click Retry Rules/Logs Migration.
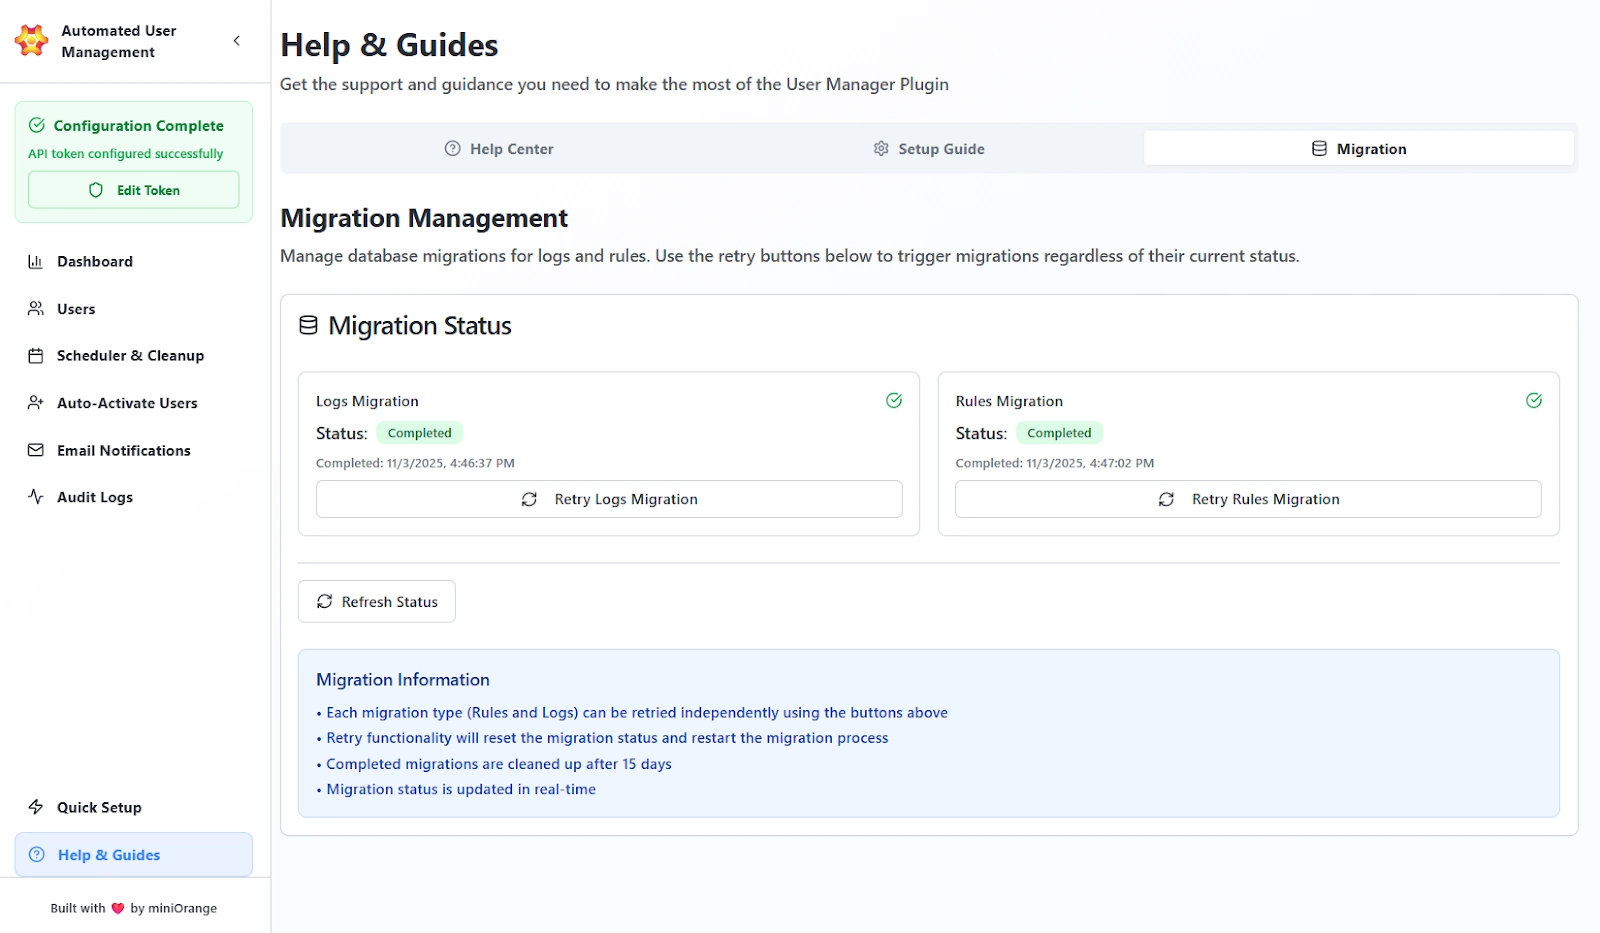
The Migration tab is useful for users migrating from the old User Management plugin to the new one. Once you update the app from an older version, all your previous settings will be automatically migrated. This tab allows you to check whether the migration was successful.
If the migration fails, you can manually trigger it to recreate all your old settings and data in the new plugin.
To manually trigger the migration in case of failure:
Additional Resources
Did this page help you?
