- Home
- REST API Authentication
- REST API Authentication Documentation
- REST API Authentication using JWT

REST API Authentication In Atlassian using JWT
JSON Web Tokens (JWT) provide a robust and widely adopted means of
authenticating access to APIs. JWT serves as a secure tokenization
method, encapsulating user claims and information in a compact,
self-contained format. Thus, we can use JWT to access Jira/Confluence
APIs without sharing the login credentials.
This guide will walk you through the steps to configure authentication
through JWT.
 Try it for free
Download and Installation
- Log into your Atlassian instance as an admin.
- Navigate to the settings menu and click Manage Apps.
- Click Find new apps or Find new add-ons from the left-hand side of the page.
- Locate API Token/OAuth Authentication app.
- Click Try free to begin a new trial or buy now to purchase a license.
- Enter your information and click Generate License when redirected to MyAtlassian.
- Click Apply License.
Authentication Methods


1: Configuring JWT Authentication Method
1.1 Configure JWT for Authenticating the tokens
- Click on the OAuth 2.0 Token from the menu and then select JWT.

1.2 Configuring the details in JWT
- Decoding the JWT - Using the public key we will decode the JWT and check if it is a valid token. If the token is valid, we will search for the username attribute and authenticate the username present to access the API
- Using the provider's introspection endpoint - If there is a custom provider that provides JWT and also has an introspection endpoint, JWTs will be validated through the POST call to the introspection endpoint.
We can validate tokens using two different methods:
To decode and validate tokens using a Public Key or Certificate, follow these steps:
Choose the preferred signature verification method by selecting either Public Key/Certificate or JWKS endpoint, based on your requirements.
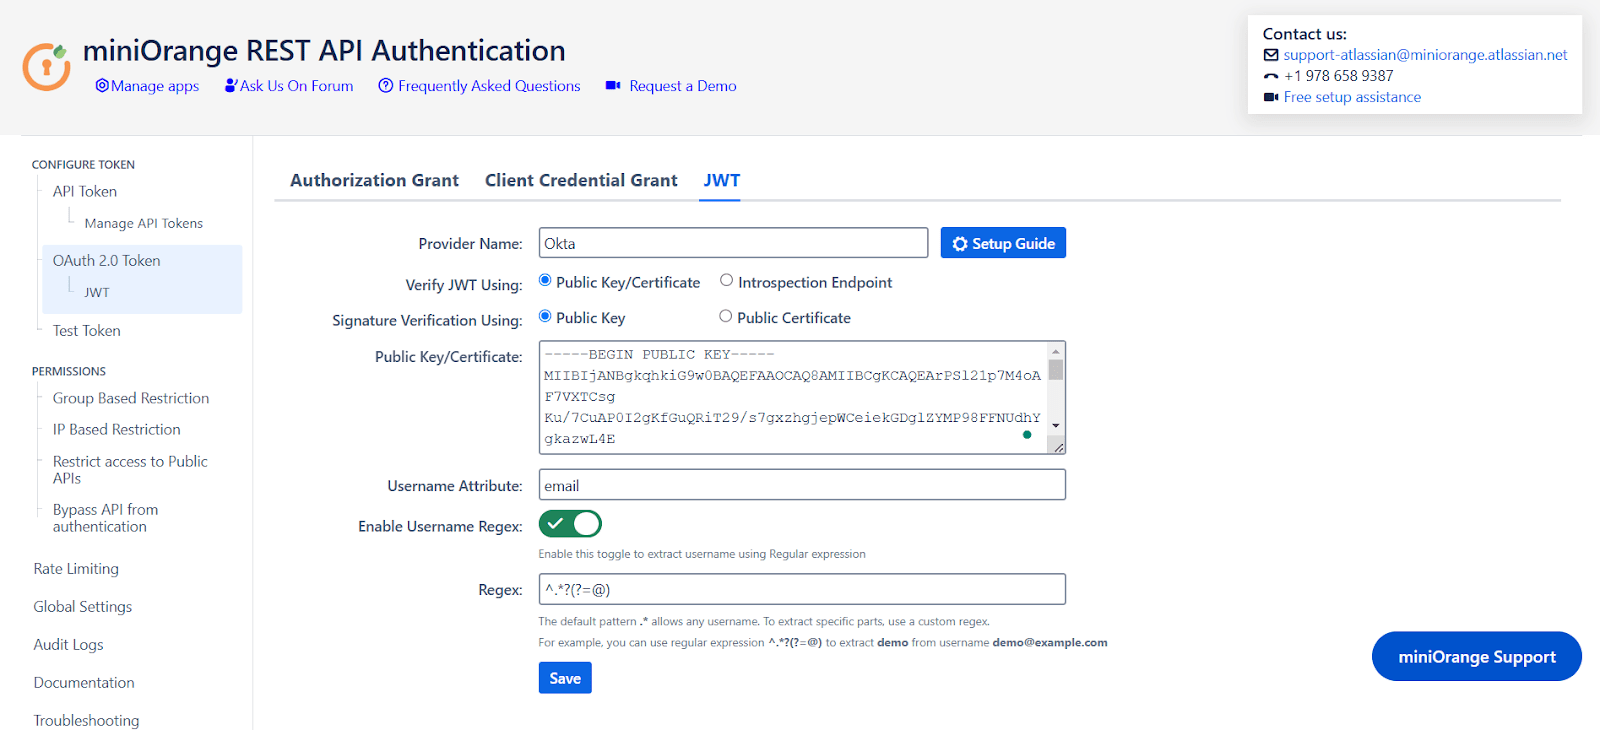
- If Public Key/Certificate is selected, provide the relevant key or certificate and specify the Username Attribute that returns the username or email.
- If required, use Regex to extract a specific value from the username attribute.
- Click Save to apply the changes.
To validate the token using the introspection endpoint follow the following steps:
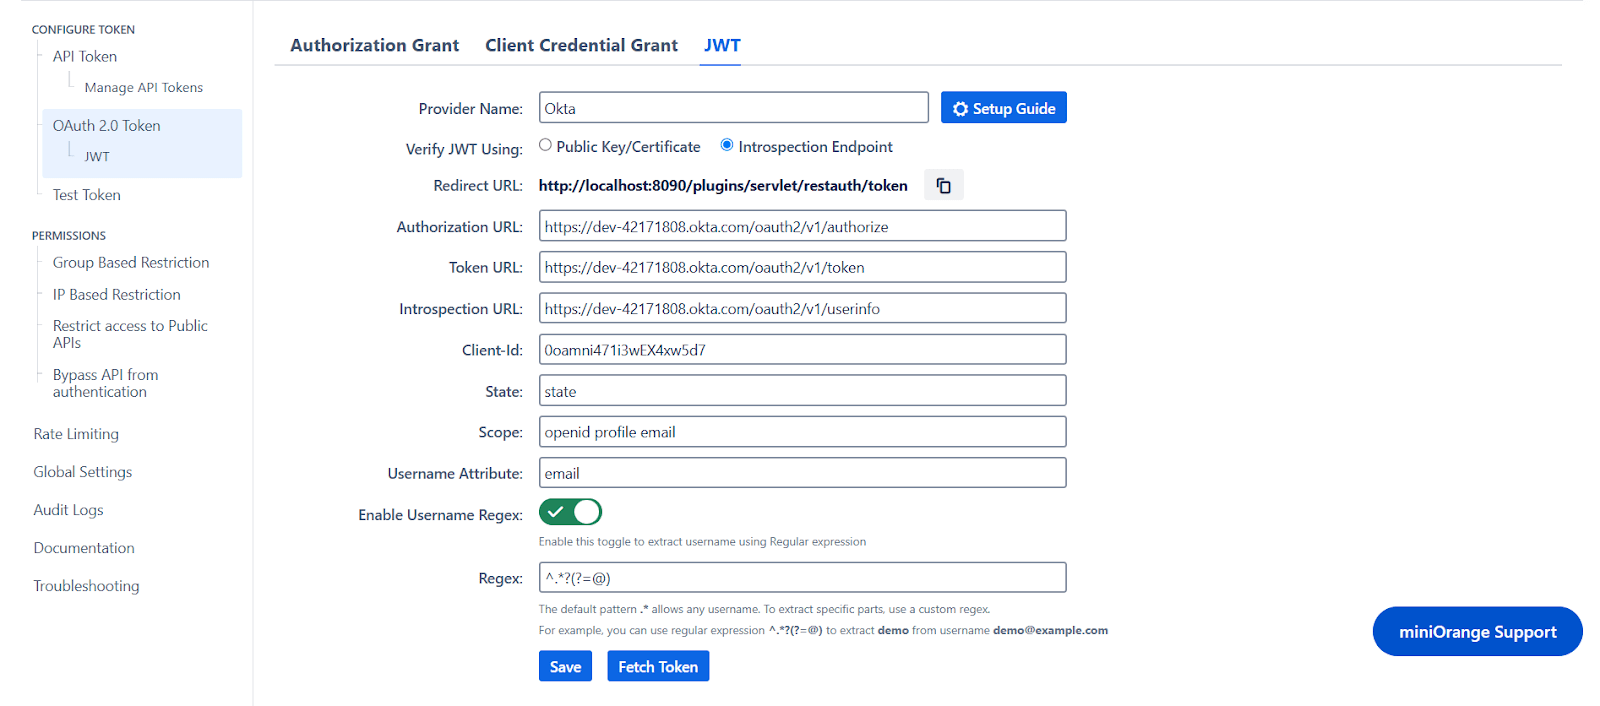
- Choose the option to Verify JWT using an Introspection Endpoint based on your requirements
- Set up the necessary URLs and configuration details.
- Map the username attribute returned by the IDP in the introspection response.
- If needed, use Regex to extract a specific part of the attribute.
- Click Save to apply the changes.
2: Test Configurations
- Select the appropriate token type.
- Paste the token and click on Test Token.
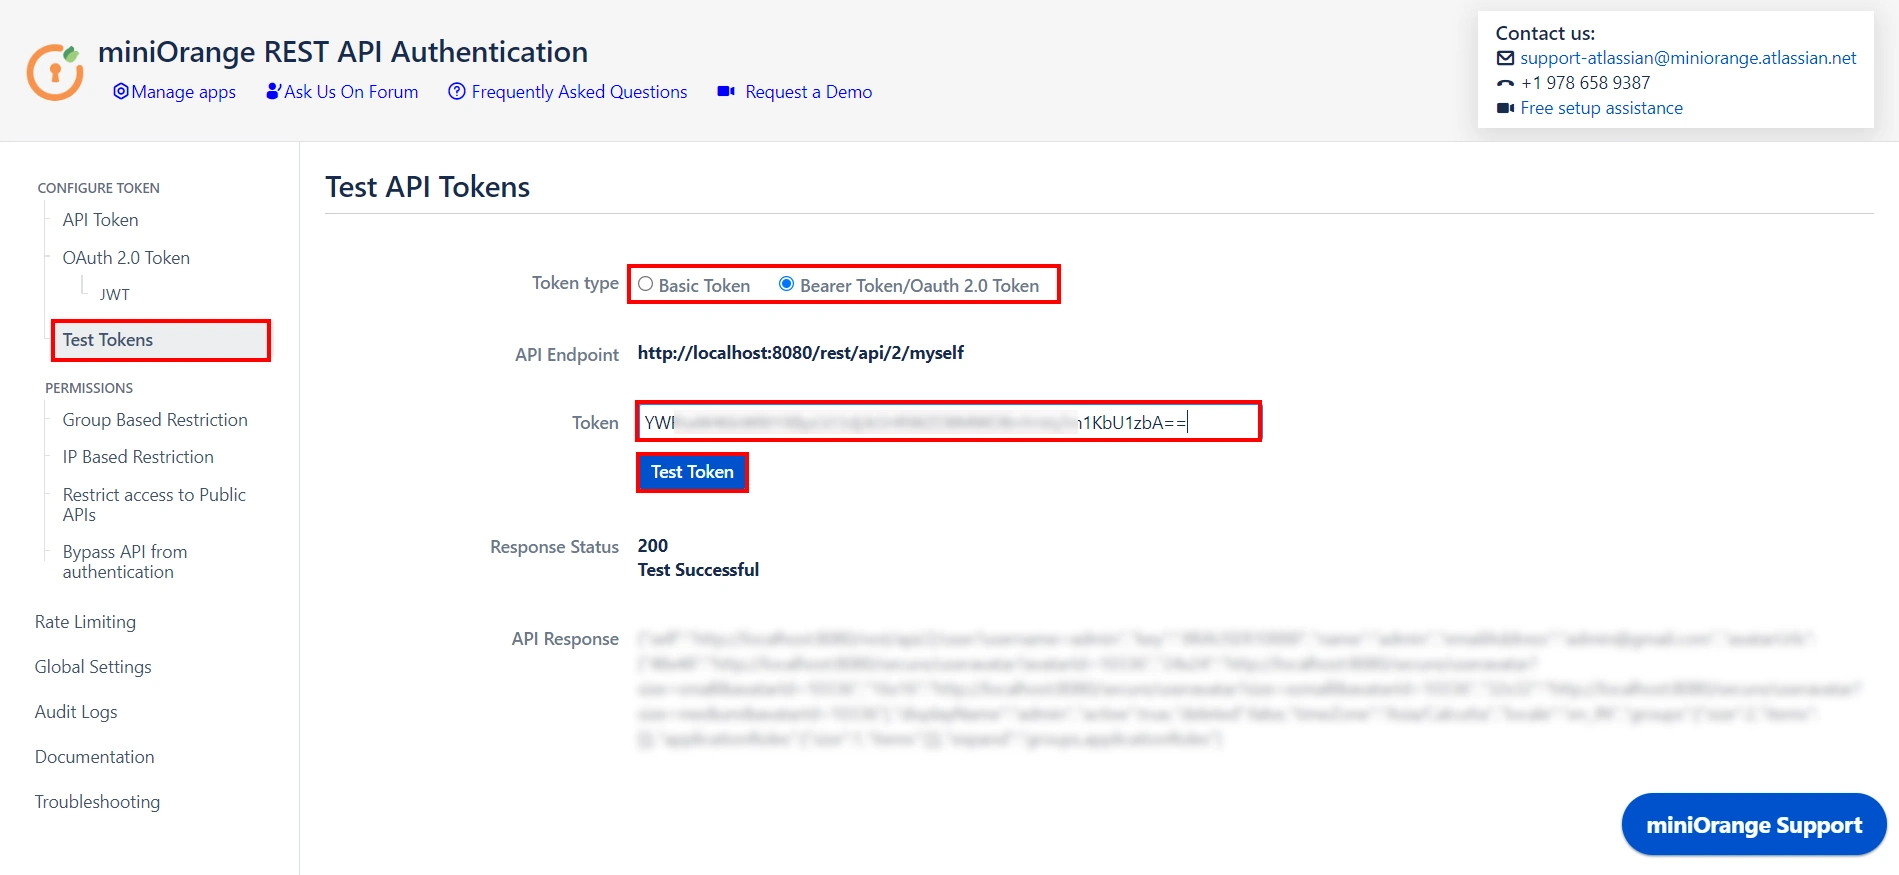
Test Successful! You can proceed further.
If you encounter any difficulties configuring add-ons, please contact us at atlassiansupport@xecurify.com or raise a support ticket here.
3: Adding Group and IP-Based Restriction
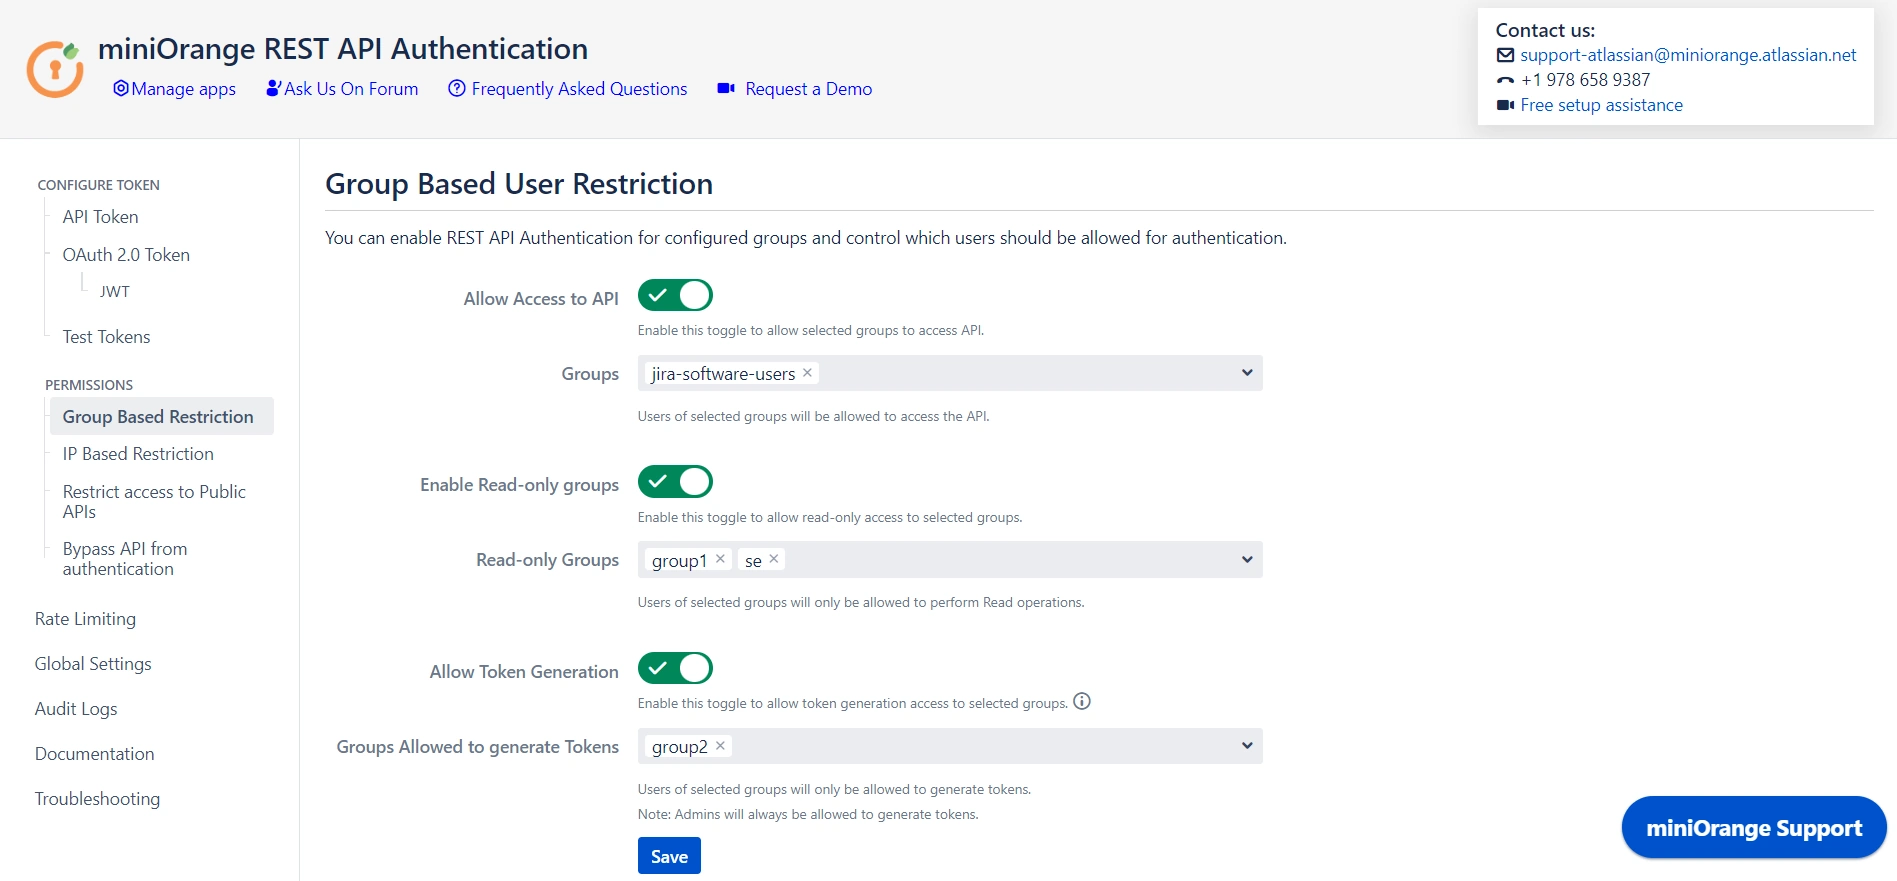
3.1 Group Based Restrictions
- You can Enable Allow API access and select groups who can access the APIs. Users who will not be part of selected groups cannot access the APIs.
- You can Enable Read-only Groups and allow selected groups to only access READ APIs. Users of selected groups will not be able to perform WRITE operations.
- You can Enable Allow Token Generation and select groups that can generate tokens. Users who will not be part of selected groups cannot generate tokens.
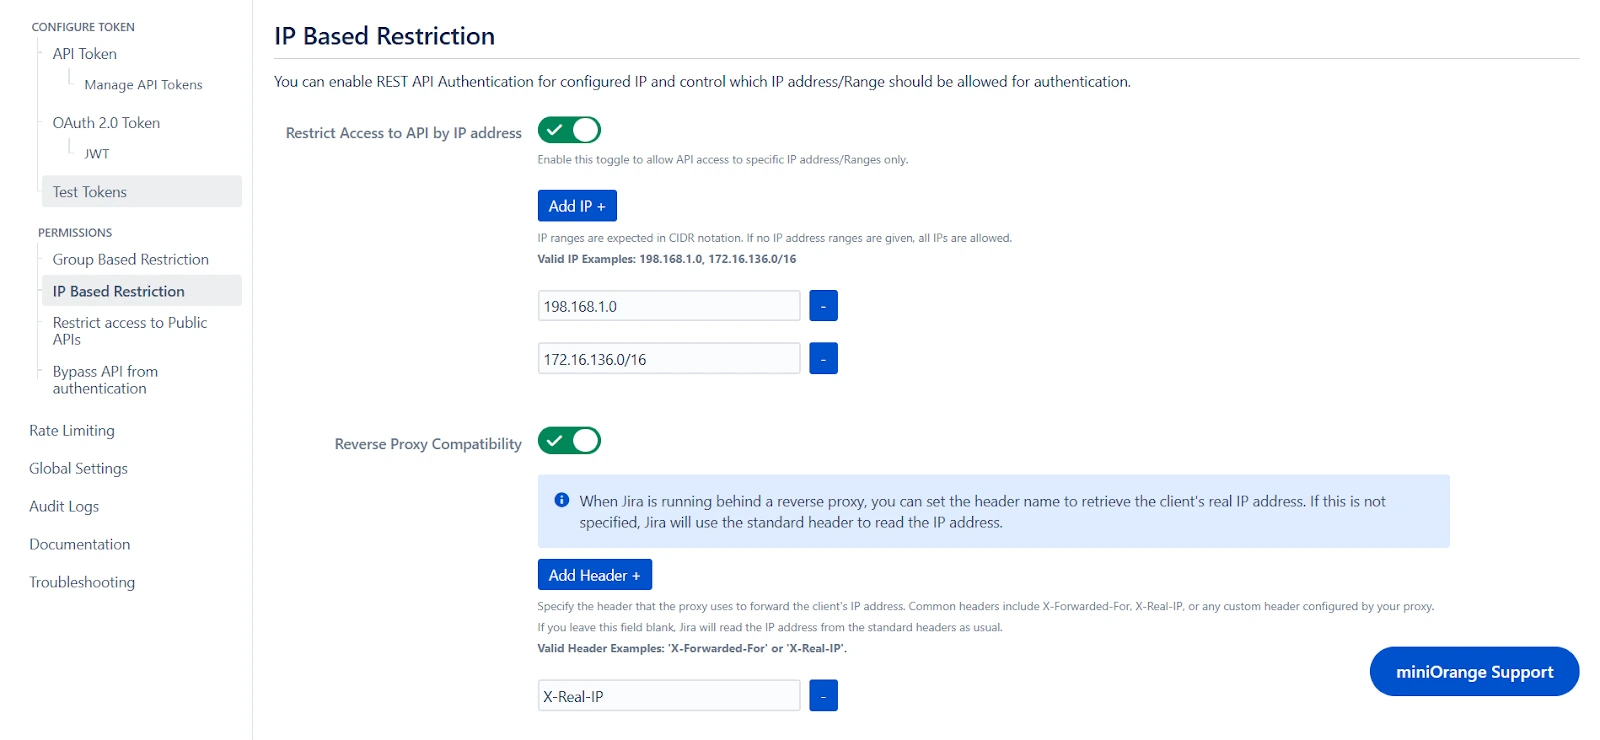
3.2 IP Based Restrictions
- You can enable Restrict Access to API by IP Address to allow API access from a specified network.
- You can add the specific IP address or IP range in CIDR notations; this will block all calls that do not belong to the configured values.
- You can enable Reverse Proxy Compatibility if your instance is running behind a reverse proxy and specify the header name to retrieve the client’s real IP address.
4: Public API Access
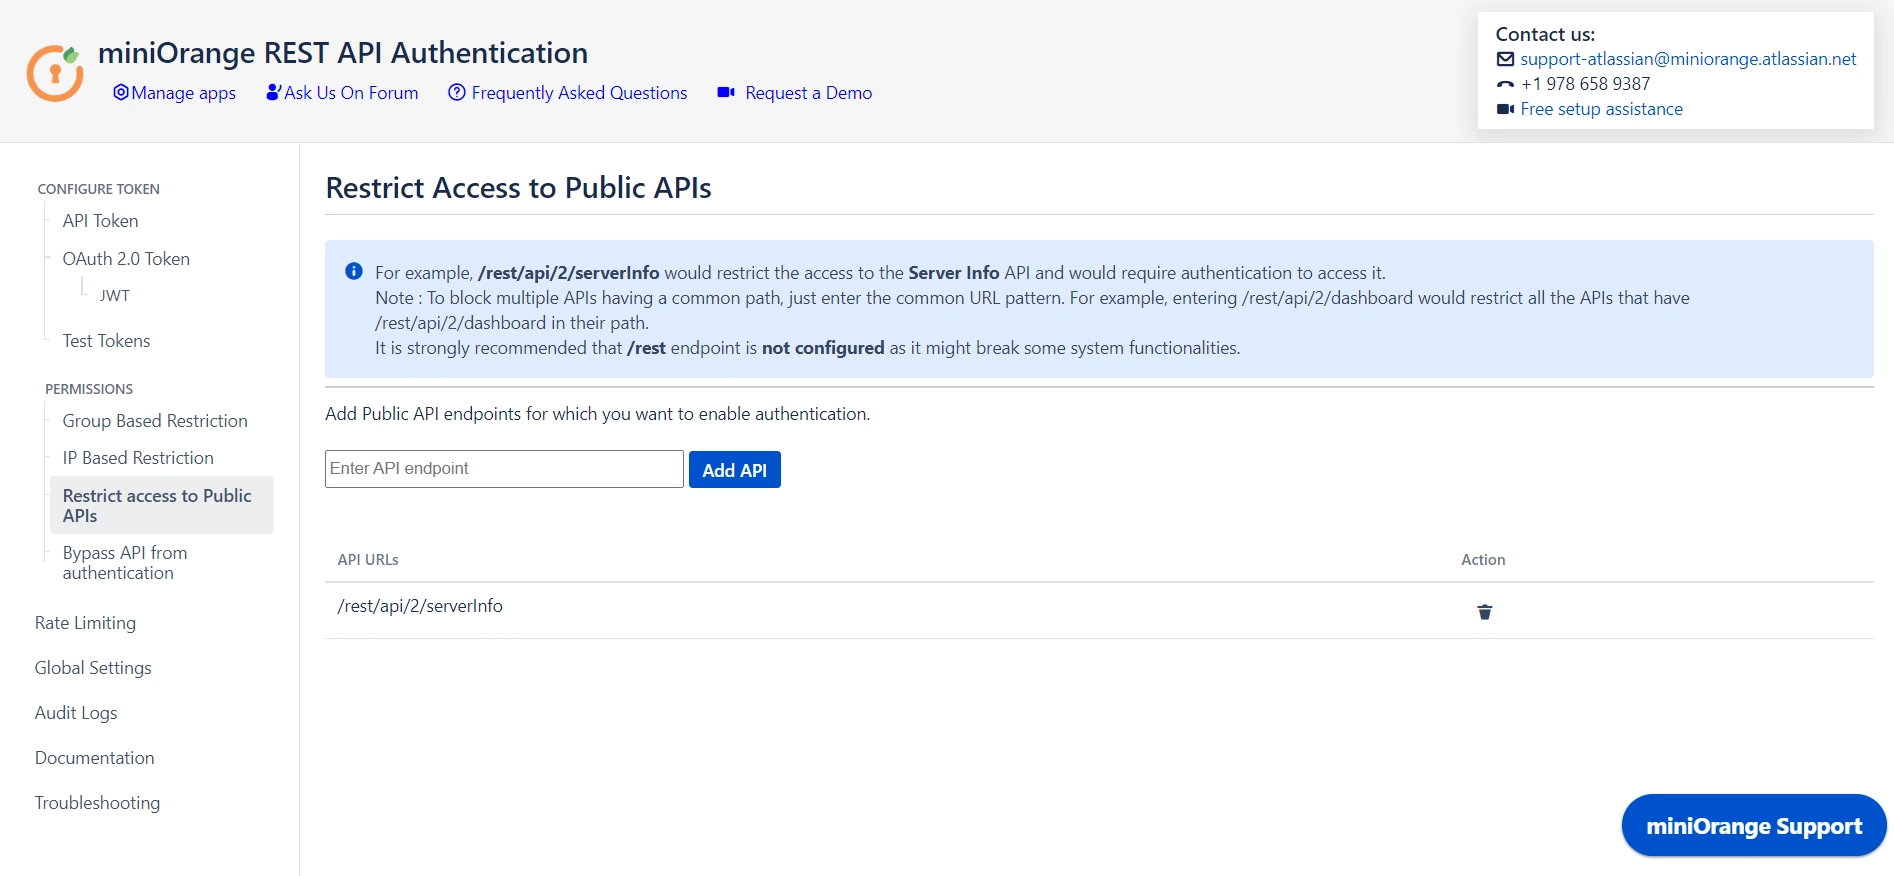
4.1 Restrict Access to Public APIs
- Public APIs do not require authentication and can be accessed anonymously. However, you can configure the API in Restrict Access to Public APIs and force authentication.
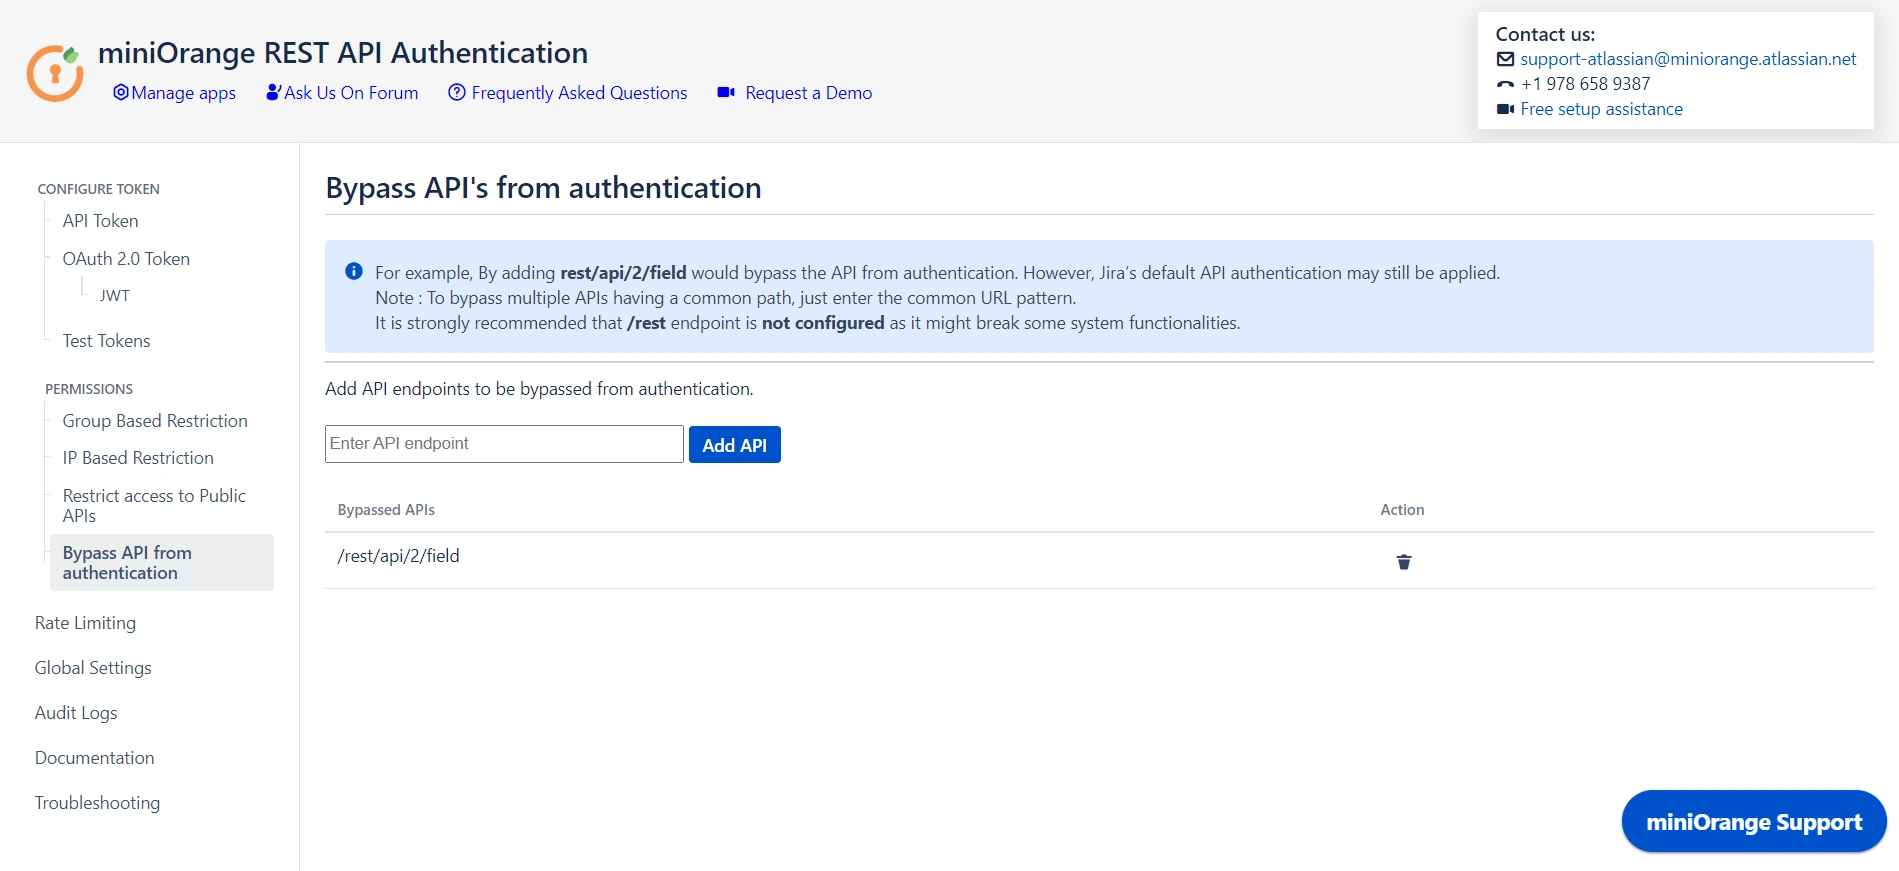
4.2 Bypass API from Authentication
- You can disable authentication through the plugin for specified APIs by adding them under Bypass API Authentication. However, default authentication might still be applicable.
5: Global Settings
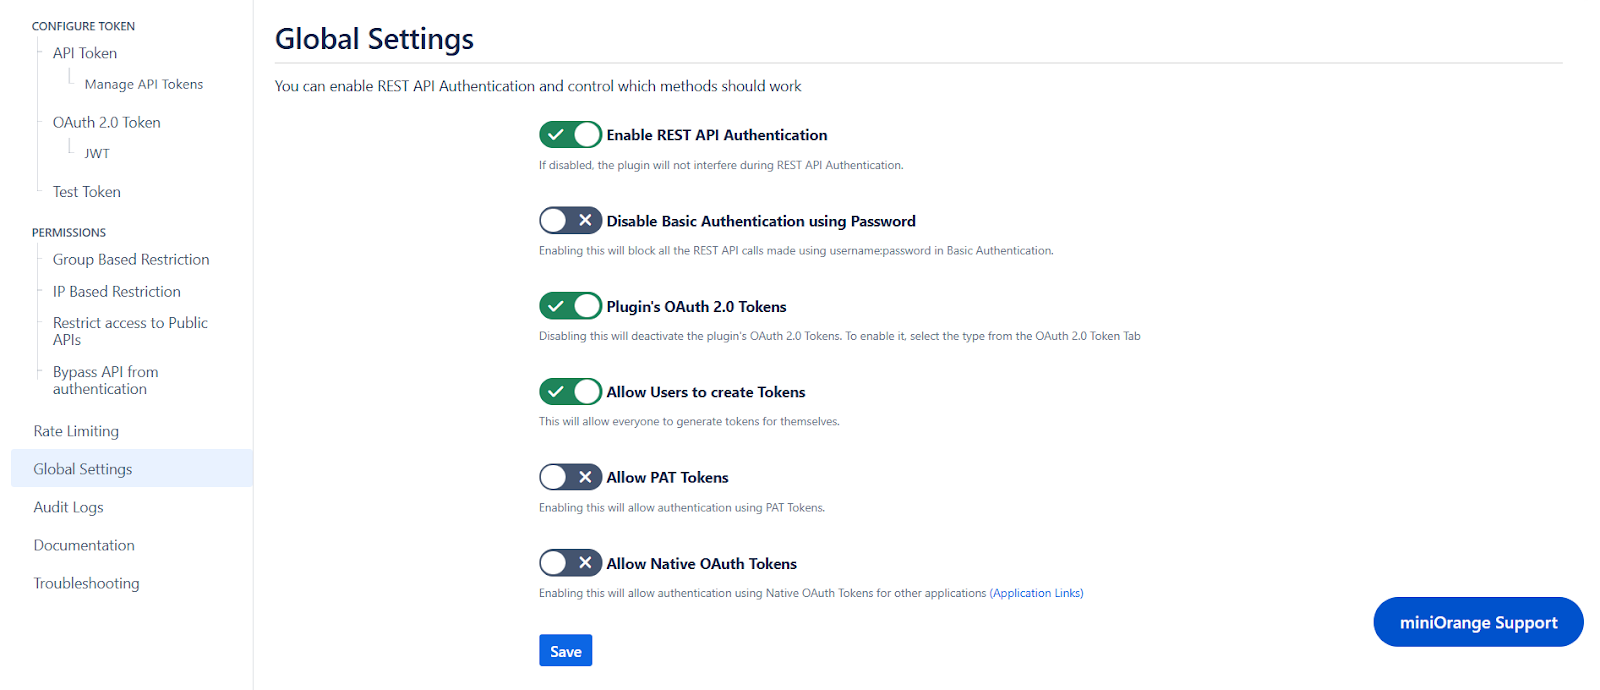
- The Enable REST API Authentication toggle ensures API authentication through the plugin. If disabled, the plugin will not be involved in API authentication.
- The Disable Basic Authentication toggle allows you to enforce authentication through the plugin. Basic authentication using username and password will be restricted.
- You can use the Plugin's OAuth 2.0 Tokens toggle to disable OAuth 2.0 tokens if not in use.
- The Allow PAT Tokens will allow users to use PAT tokens generated by Jira/Confluence to access the API. To restrict the use of PAT tokens and enforce authentication through the plugin you can disable the toggle.
- The Allow users to create Tokens toggle will allow all other users to generate tokens. If disabled, only admins will be able to generate tokens. However, if you have enabled Allow groups to generate tokens from group-based restrictions, you need to keep the toggle on.
- The Allow Native OAuth Tokens toggle enables Jira integration via Application Links, bypassing requests to Jira to authenticate Native OAuth 2.0 tokens. Disabling this toggle will enforce authentication through the plugin instead.
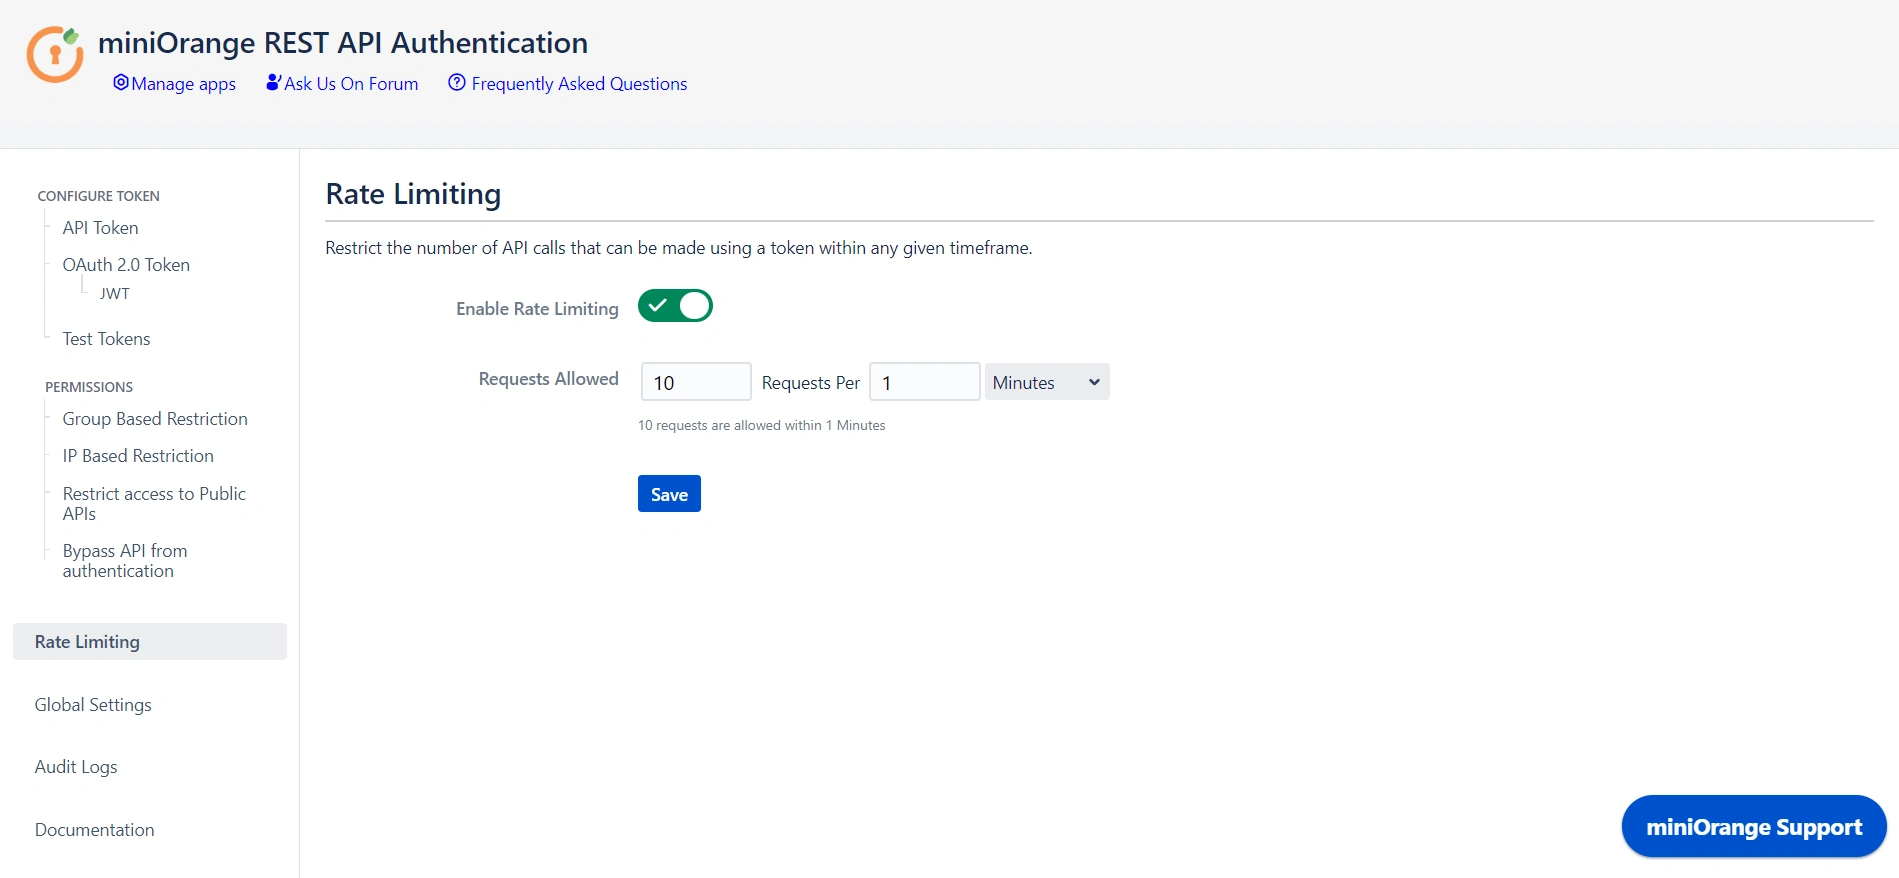
6: Rate Limiting
- Enable rate limiting to restrict the number of requests made by a token within the specified time frame.
- Then select the number of requests to be allowed and the time frame.
- This will enforce rate limiting on the API tokens generated through the plugin.
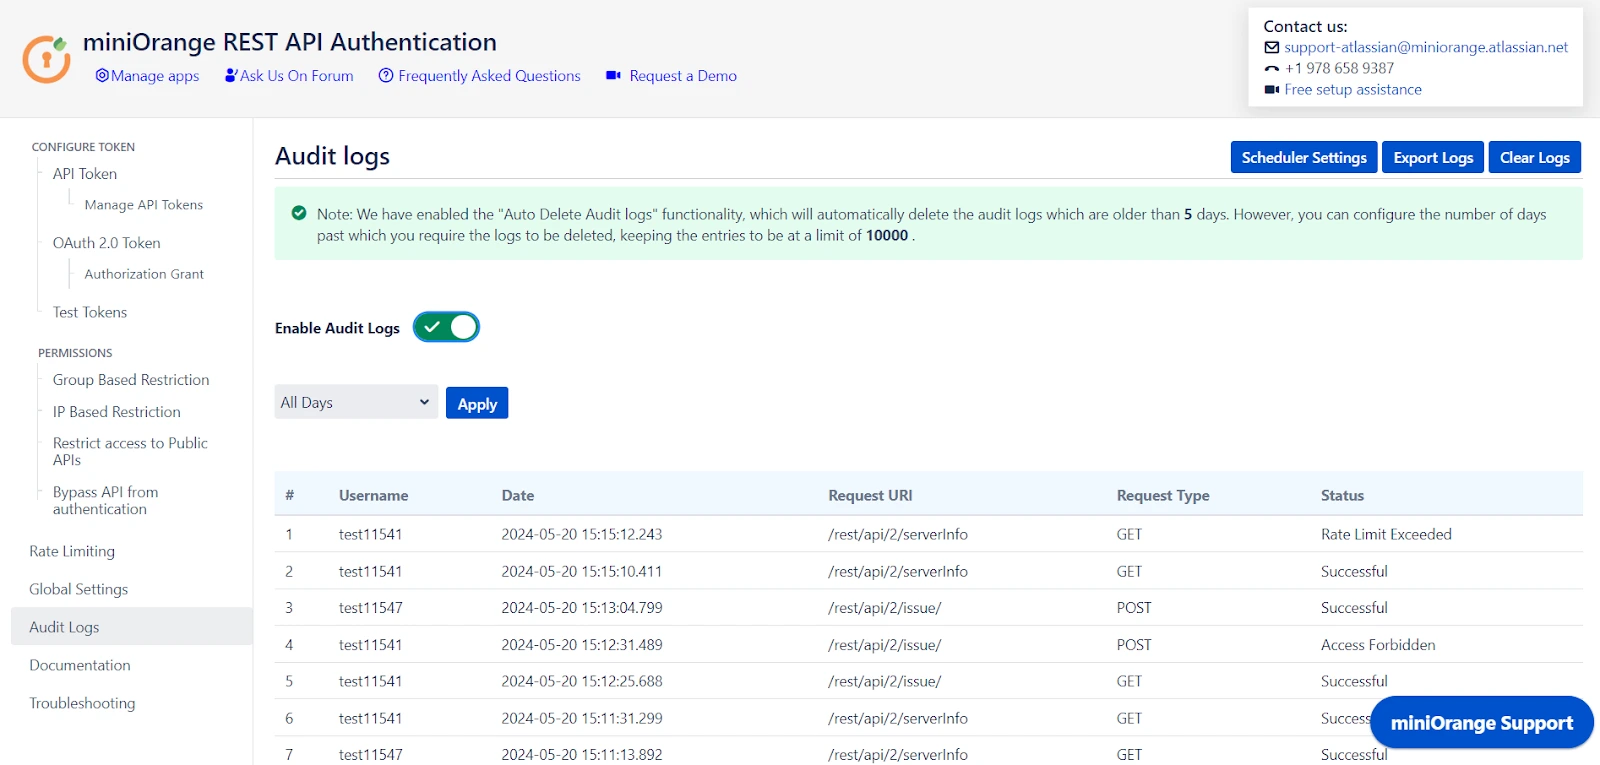
7: Audit Logs
- You can Enable Audit Logs to log the activity with REST APIs. This will help you monitor the REST API access.
- You can also update the Scheduler settings that automatically delete logs after a specific number of days or entries.
Additional Resources
Did this page help you?
