Choose IDPs for Helpdesk integration
You can select a maximum of 3 IDPs
You can now allow External Customers to login into Jira Service Management (previously Jira Service Desk or JSD) via SSO! SAML SSO for JSM Customers allows you to use your existing IDP to sign into Jira Service Management (Jira Service Desk or JSD) and it also supports multiple IDP's.
This guide will walk you through the process of configuring Jira Helpdesk with multiple identity providers. However, if you are looking for instructions on configuring Helpdesk SSO with a single IDP, please refer to this page instead.
Download And Installation
- Log into your Jira instance as an admin.
- Navigate to the settings and Click on Apps.
- Locate SAML SSO for JSM Customers.
- Click on free trial to begin a new trial SAML SSO for JSM Customers.
- On menu bar click on Apps. Locate SAML SSO for JSM Customers to start configuring SSO for customers.
Step 1: Get metadata from miniOrange
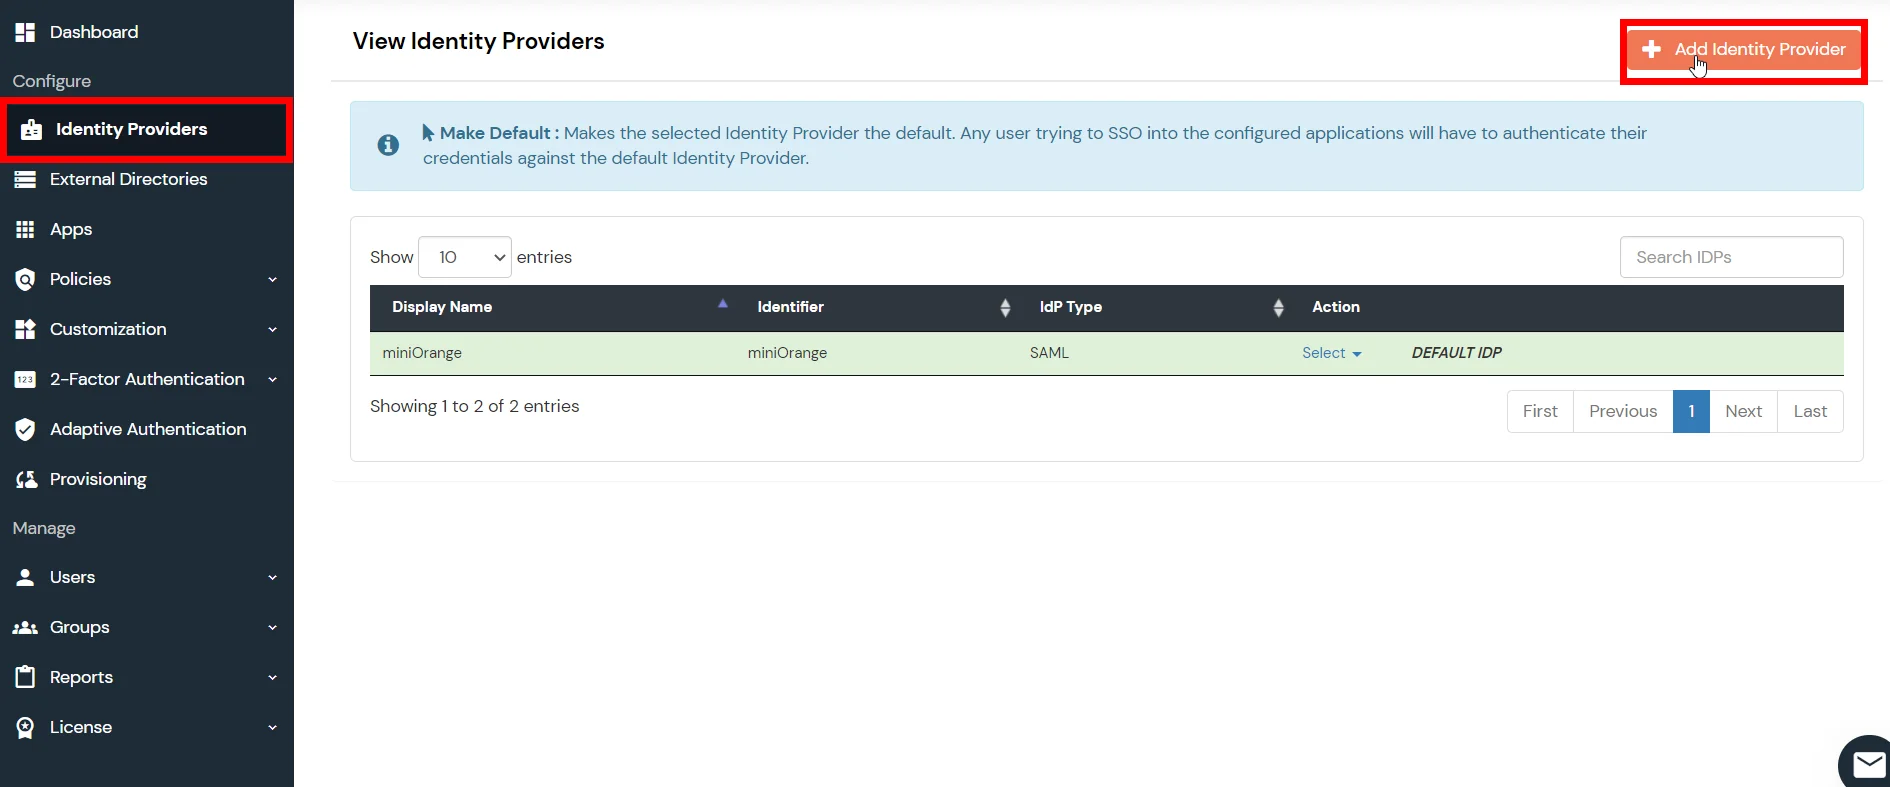
- Login to miniOrange Admin Dashboard
- Go to Identity Providers and click on Add Identity Provider button from top right corner.
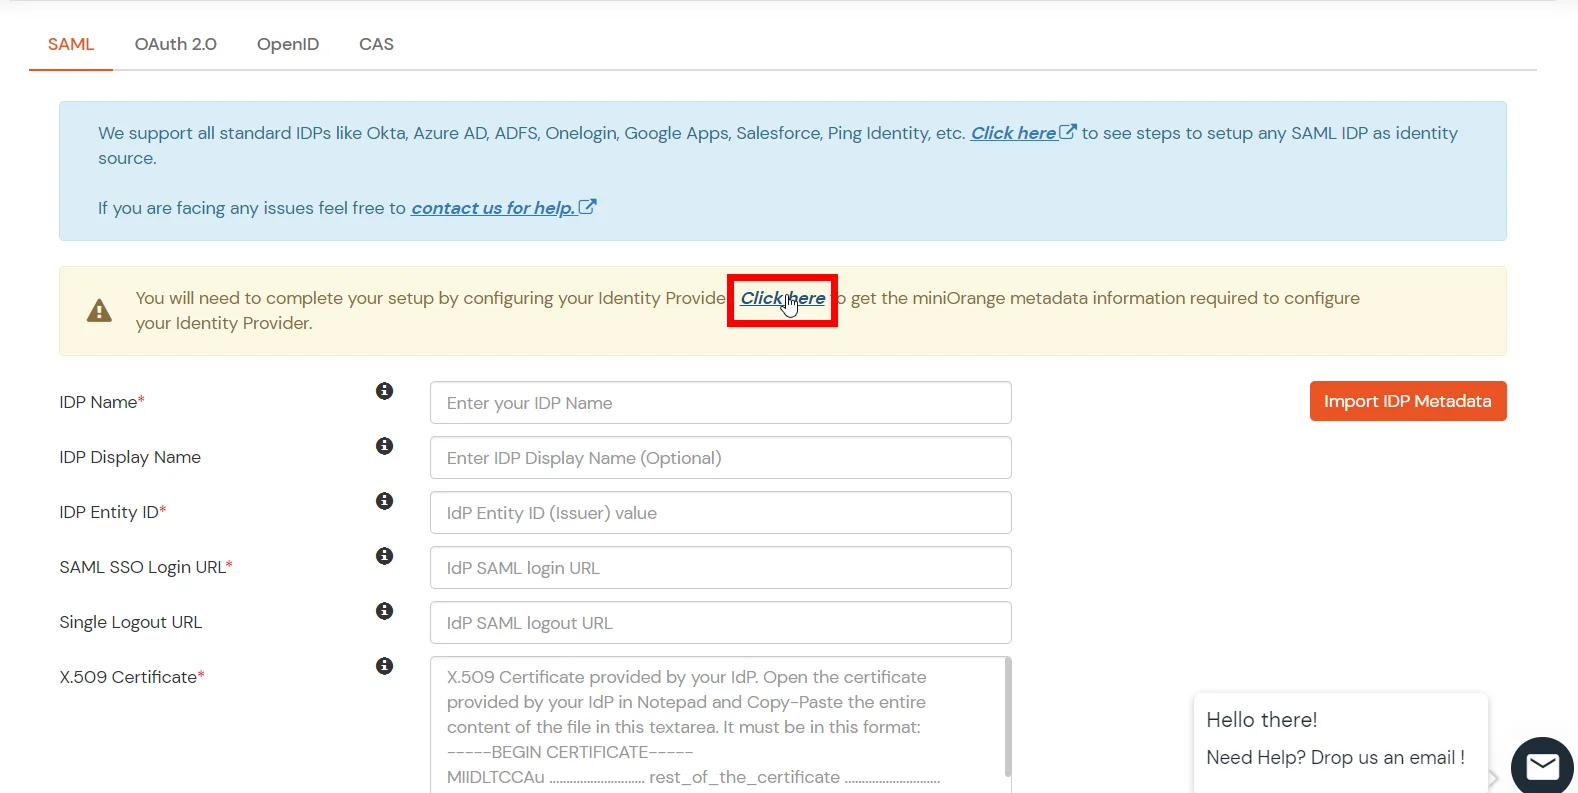
- Click on Click here link from the alert box.
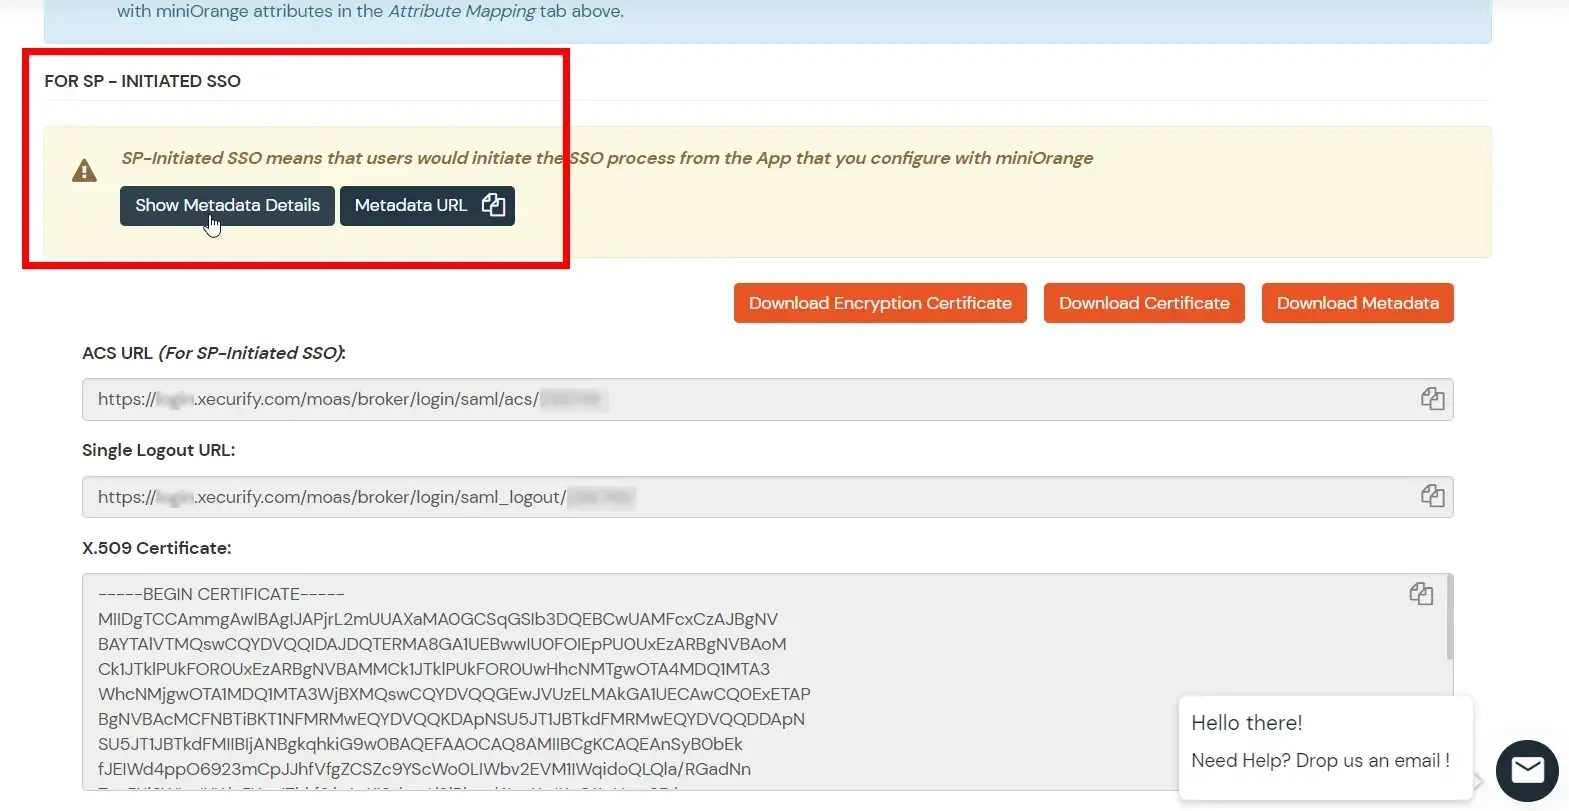
- Now, click on Show Metadata Details under FOR SP - INITIATED SSO heading. You can use the following metadata details to add an app inside your IDP.
Step 2: Configure IDP inside miniOrange
- Login to miniOrange Admin Dashboard
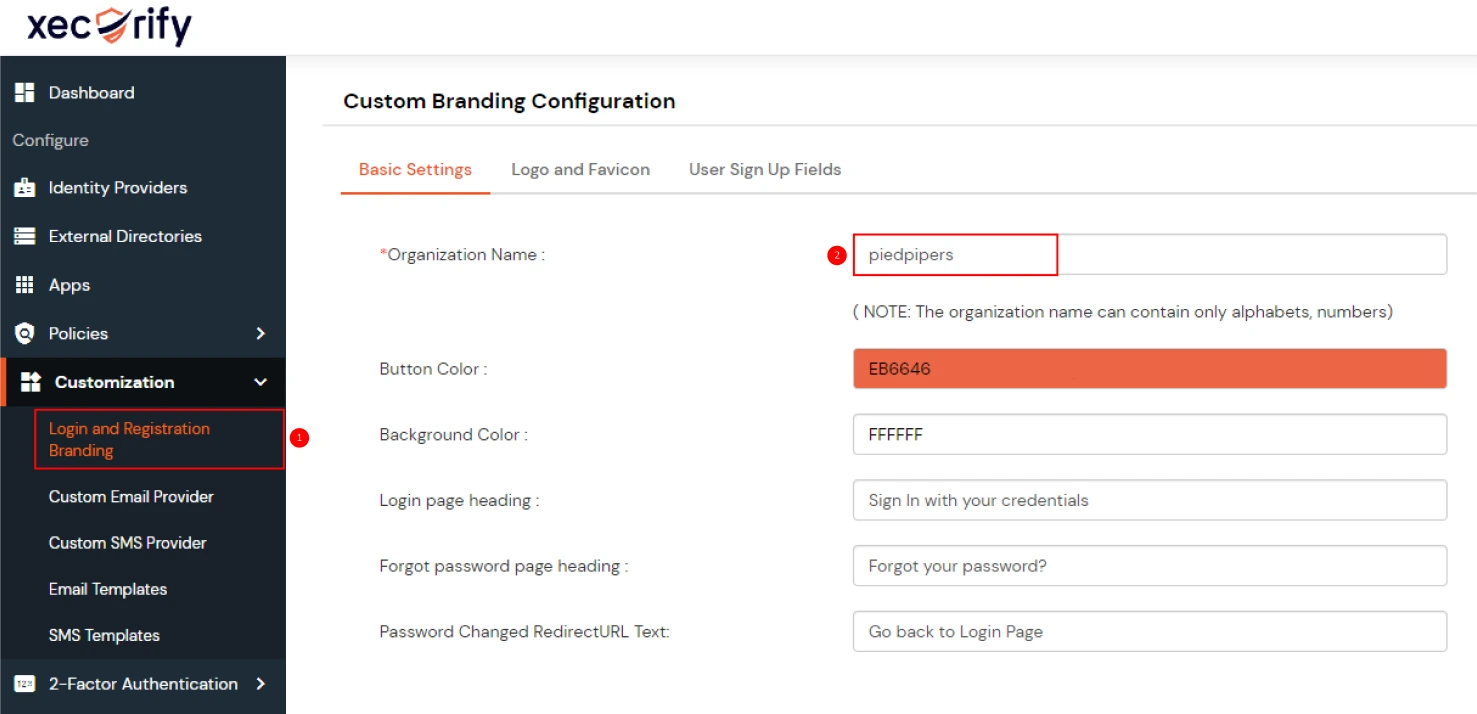
- From the left sidebar, expand Customization and click on Login and Registratin Branding.
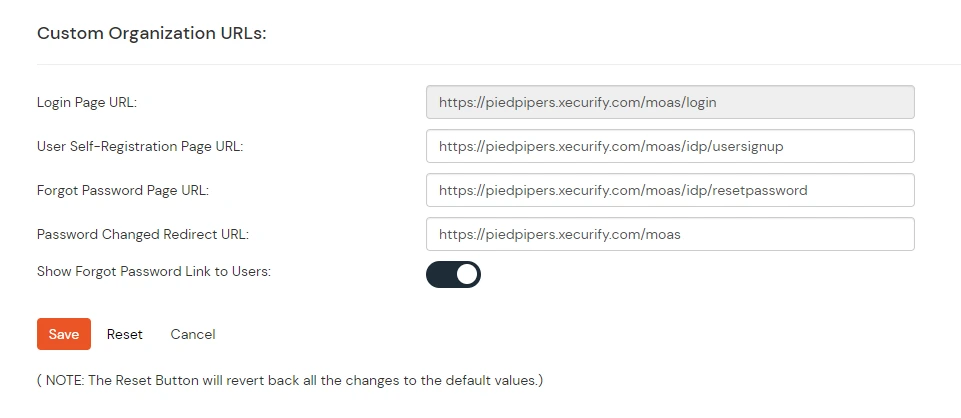
- Here you can change the Organization Name. This will change all your custom urls from login.xecurify.com to the organization-name.xecurify.com. For e.g. we have used name piedpipers, so our custom urls will be changed as piedpipers.xecurify.com
- Once you have changed the oraganization name and saved. you can see the changed urls under Custom Organization URLs section near Save button.
- Go to Identity Providers and click on Add Identity Provider button from top right corner.
- Enter the following details and click on Save button.
- Click on Save button.
| IDP Name | Enter IDP name here. |
| IDP Entity ID | Enter IDP Entity ID / Issuer ID from the Identity Provider info. |
| SAML SSO Login URL | Enter Single Sign On url provided by Identity Provider. |
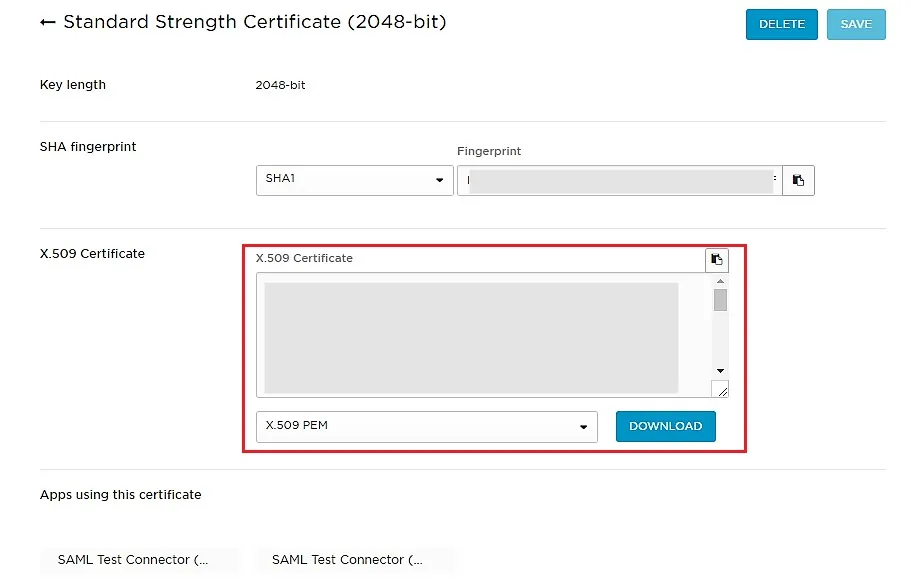
| X.509 Certificate | Enter the cetificate provided by Identity Provider. |
Step 3: Configure Selected IDPs
Step 1: Set Up ADFS as Identity Provider
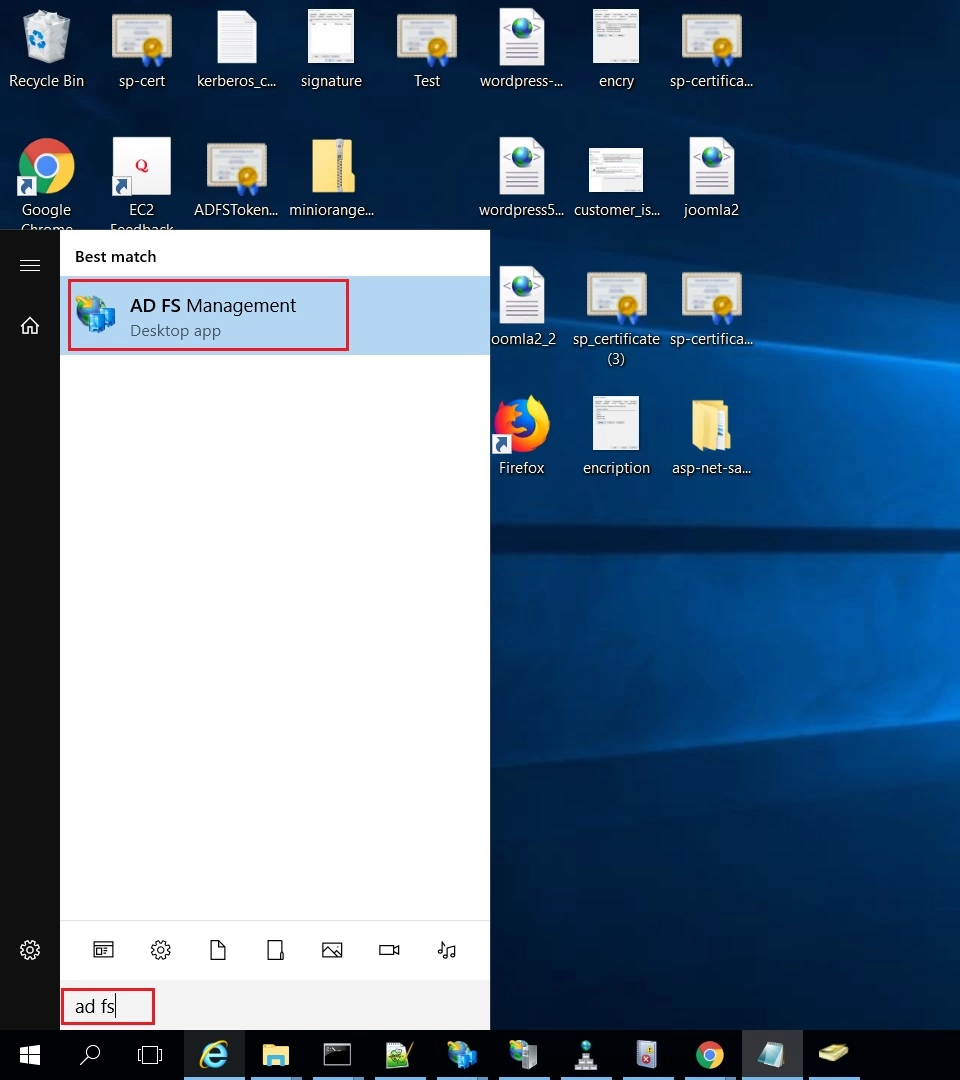
- On ADFS, search for ADFS Management application.
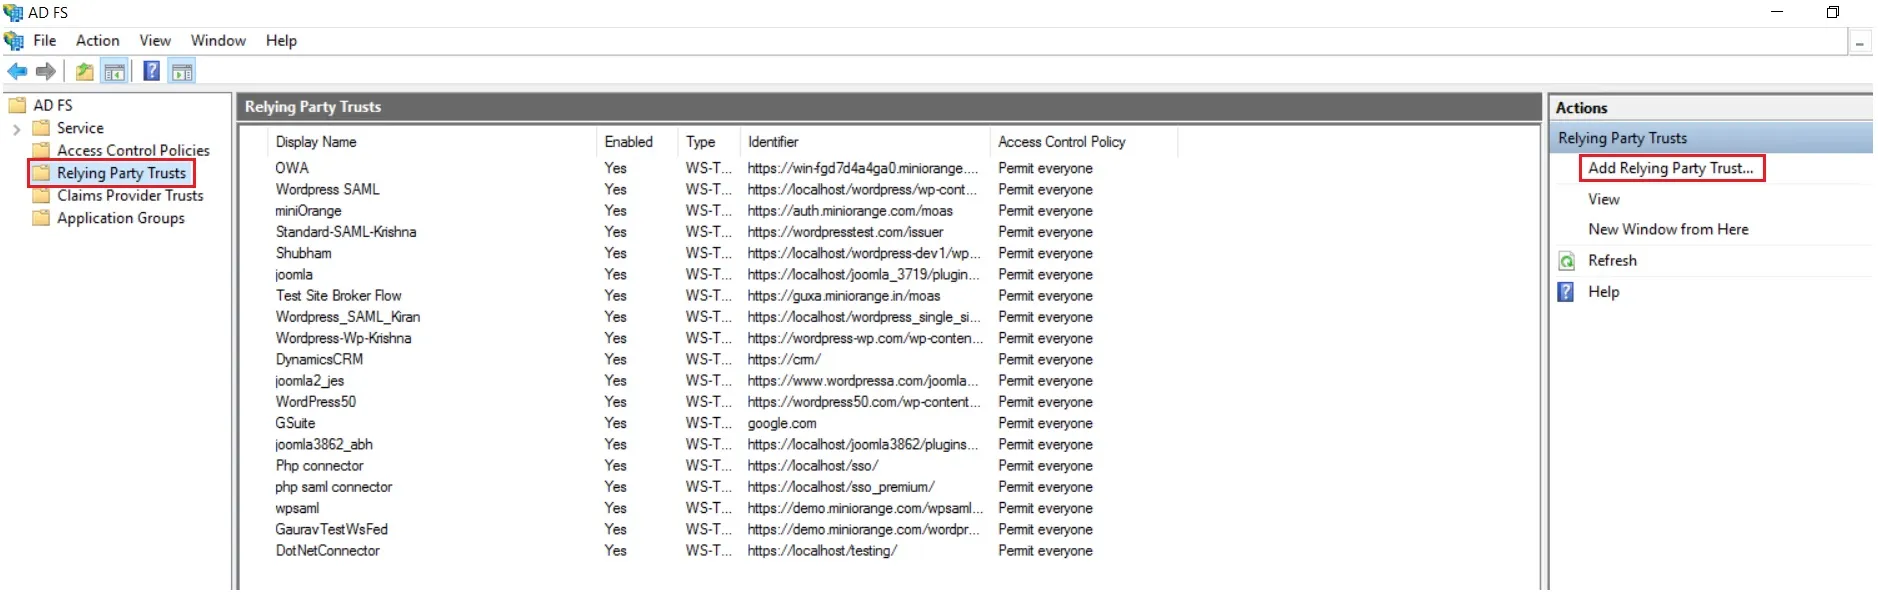
- After opening the AD FS Management, select Relying Party Trust & then click on Add Relying Party Trust.
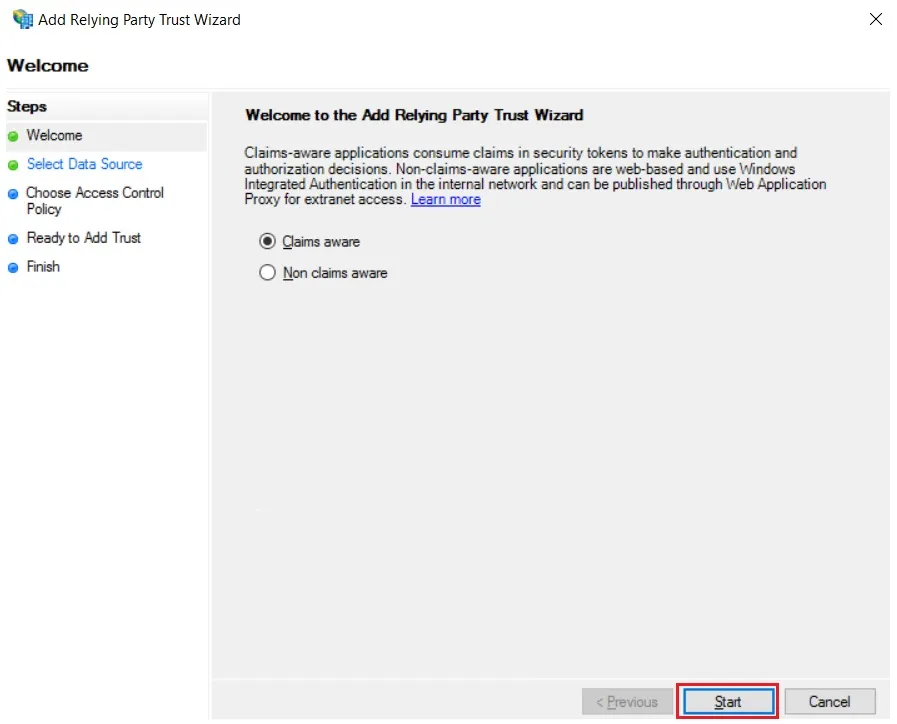
- Click the Start button from the Relying Party Trust Wizard pop up. But before that please make sure Claims Aware is selected.
- Select the options for adding a relying party trust.
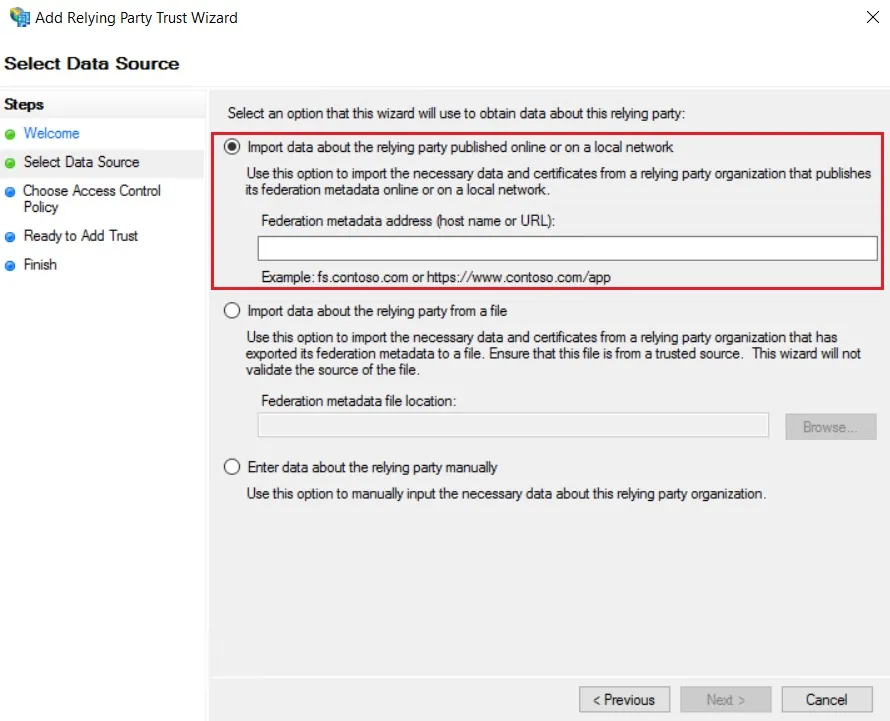
- In Select Data Source: Import data about the relying party published online or on the local network option & then add URL in Federation metadata address.
- Skip step-5 to step-8 & start configuring from step-9. Navigate to Service Provider Info tab from the plugin for getting SP Meatadata URL.
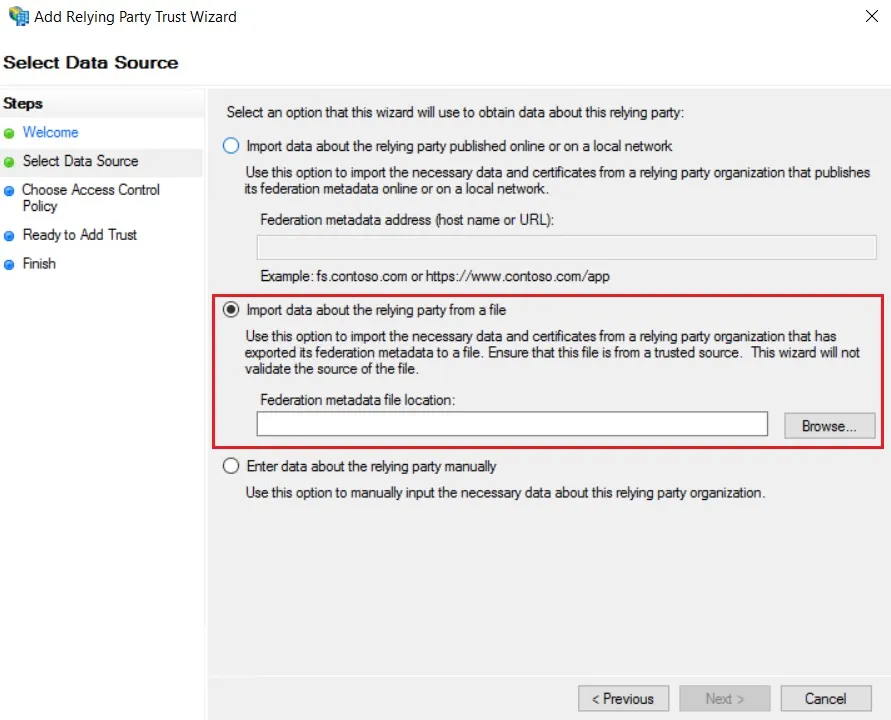
- In Select Data Source: Import data about the relying party from a file option & then browse the metadata file.
- Skip step-5 to step-8 & start configuring from step-9.
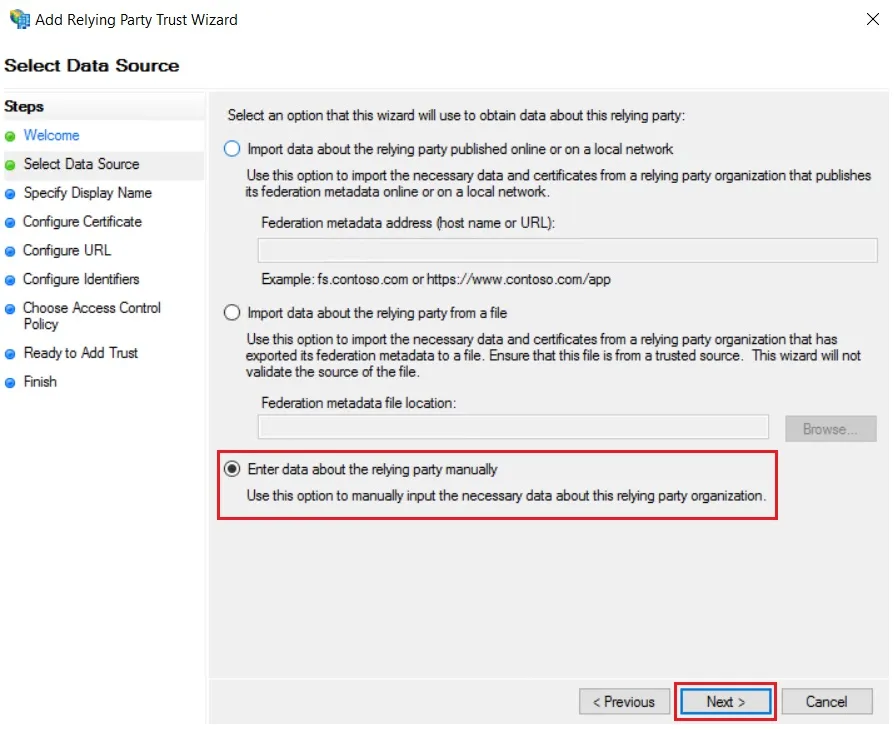
- In Select Data Source: Enter Data about the relying party manually & Click on Next.
- Enter Display Name & Click Next.
- Upload the certificate & click next. Download the certificate from plugin & use the same certificate to upload on ADFS.
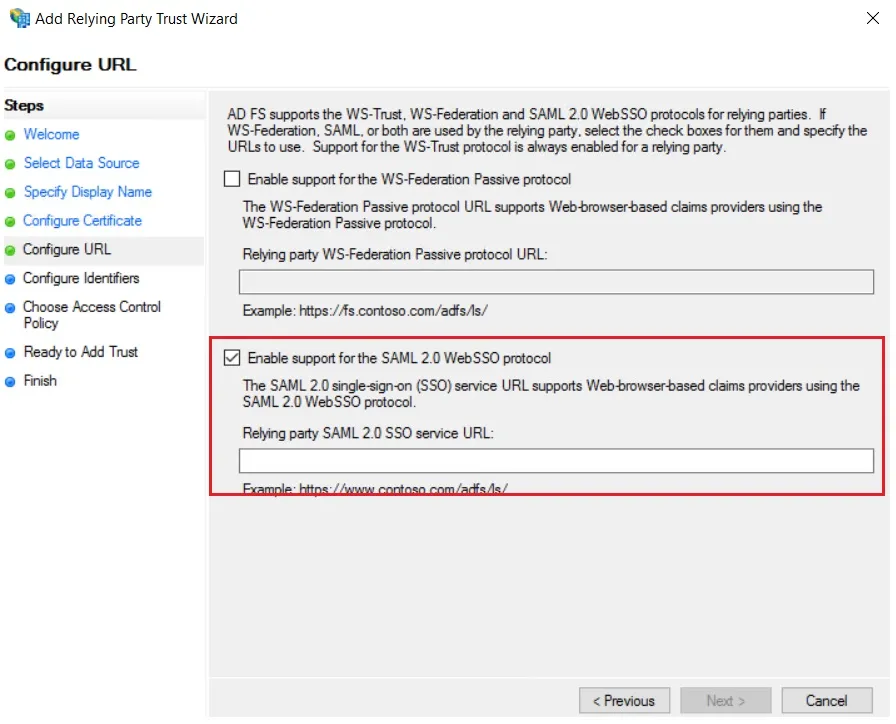
- Select Enable support for the SAML 2.0 WebSSO protocol & Enter ACS URL from the plugins Service Provider Info Tab. Click Next.
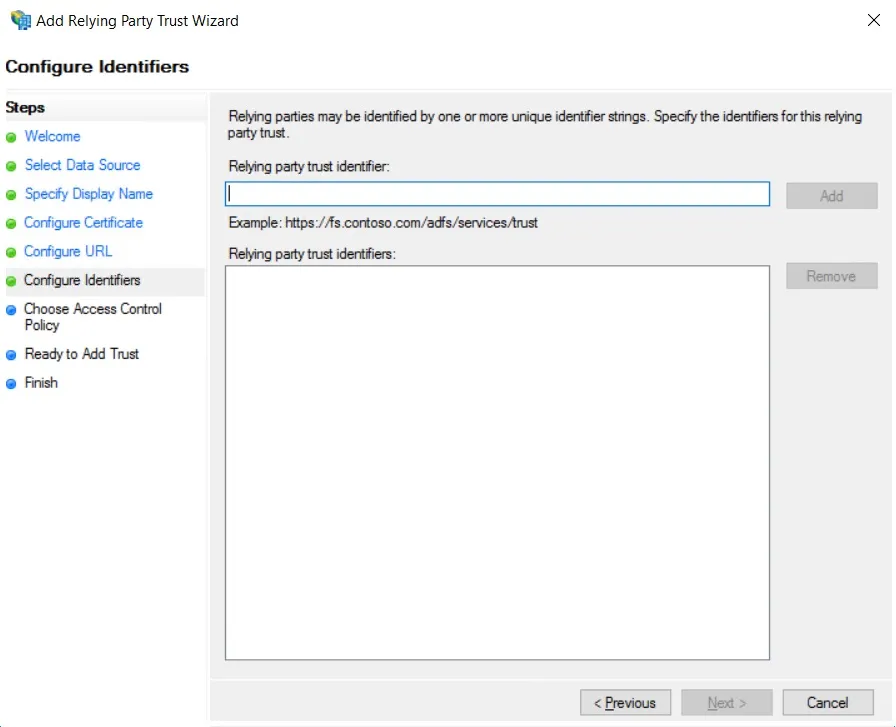
- Add Entity ID from plugins Service Provider Info Tab as Relying party trust identifier then click Add button & then click Next.
- Also download the Signing certificate from Service Provider Info Tab from the plugin.
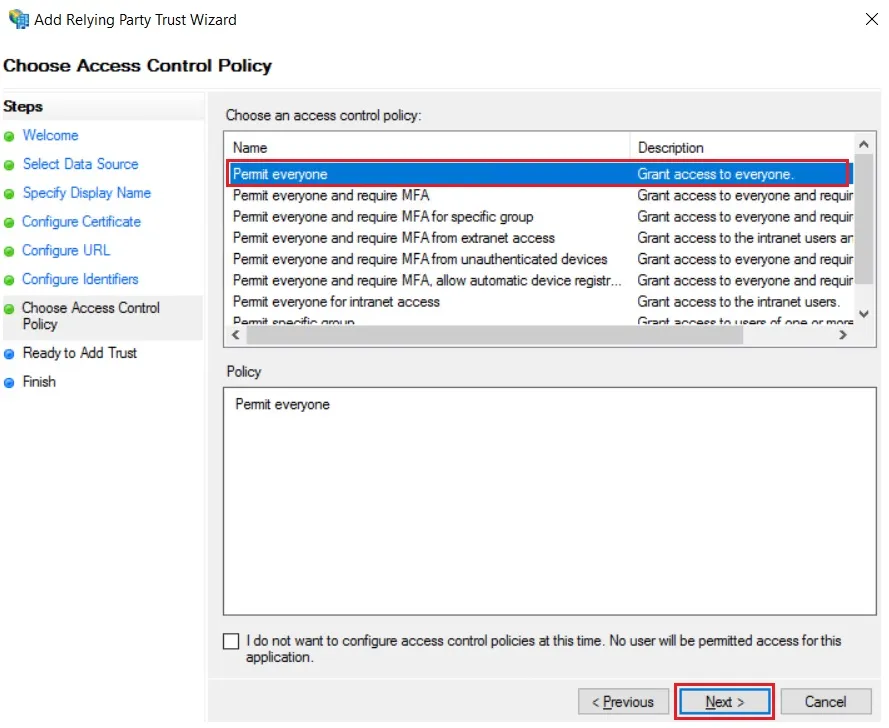
- Select Permit everyone as an Access Control Policy & click on Next.
- Click the Next button from Ready to Add Trust & click Close.
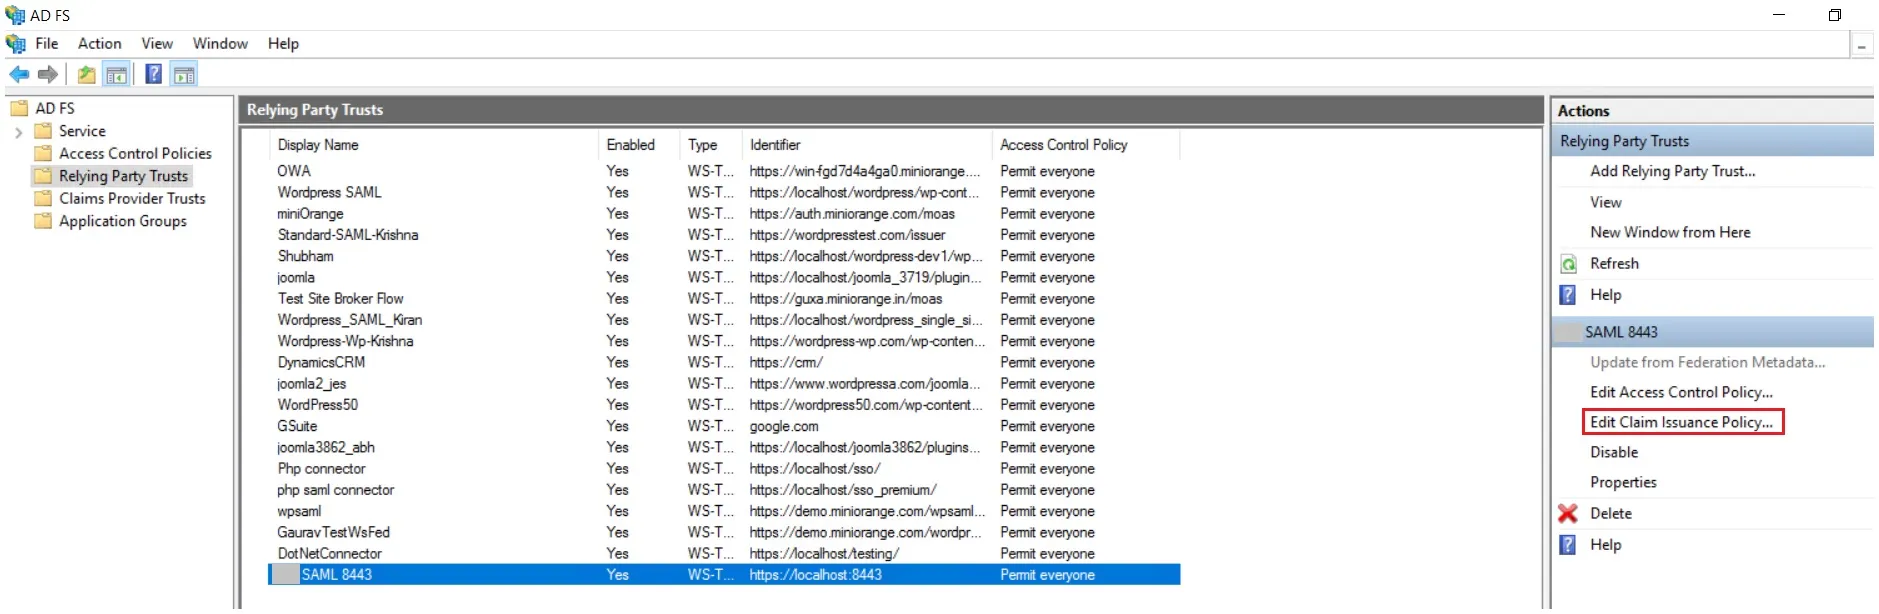
- It will show you the list of Relying Party Trusts. Select the respective application & click on Edit Claim Issuance Policy.
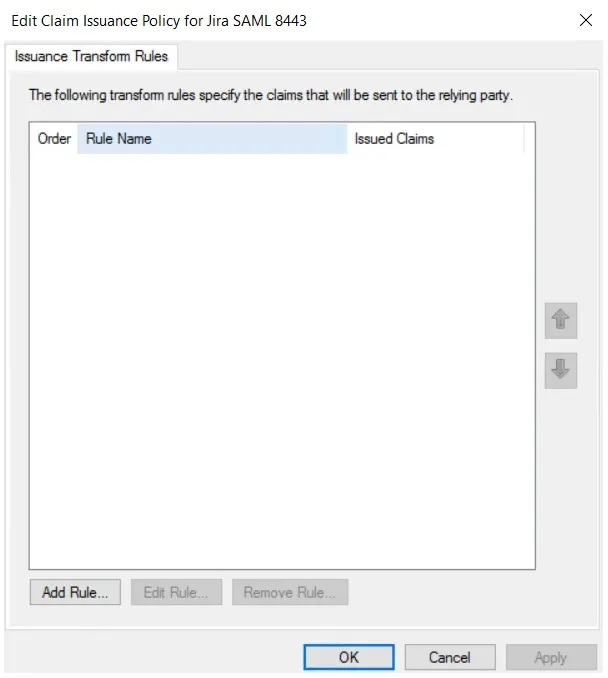
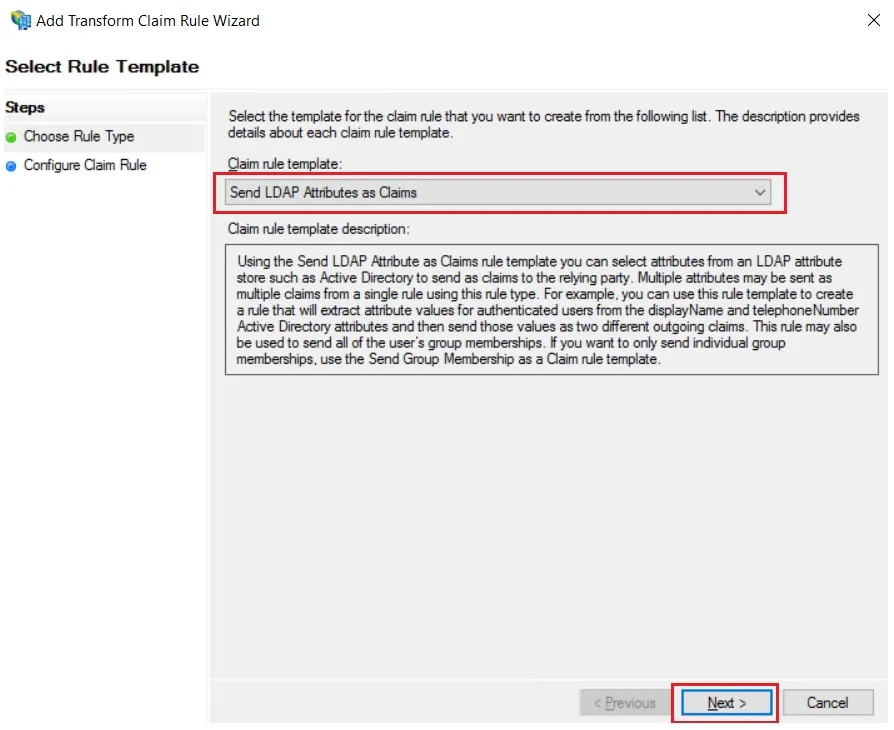
- Click on Add Rule button.
- Select Send LDAP Attributes as Claims & click on Next.
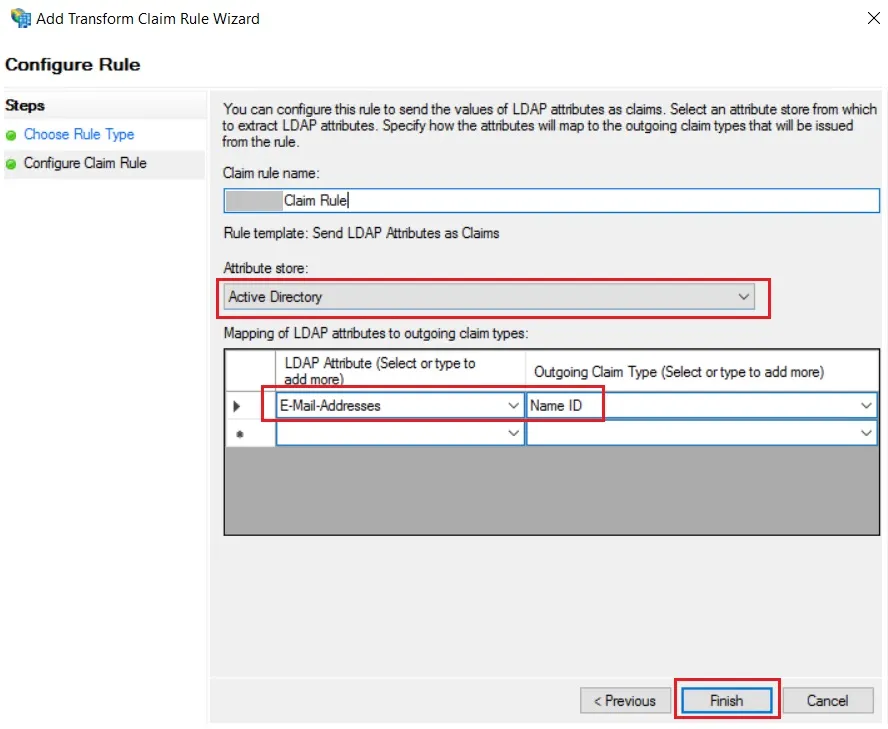
- Enter the following details & click on Finish.
- Click Apply Ok.
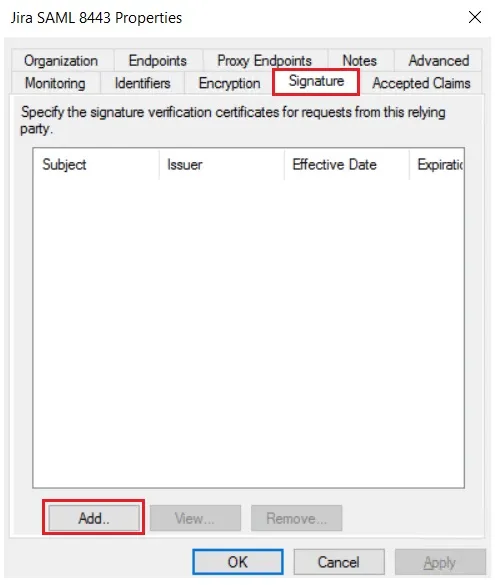
- Select property of the application & add the certificate downloaded from the add-on.
 Using Metadata URL
Using Metadata XML file
Using Manual configuration
| Claim rule name: | Attributes |
| Attribute Store: | Active Directory |
| LDAP Attribute: | E-Mail-Addresses |
| Outgoing Claim Type: | Name ID |
Step 1: Set Up Auth0 as Identity Provider
- SP Entity ID
- ACS URL
- Single Logout URL (to log users out from Auth0 when logged out from Atlassian)
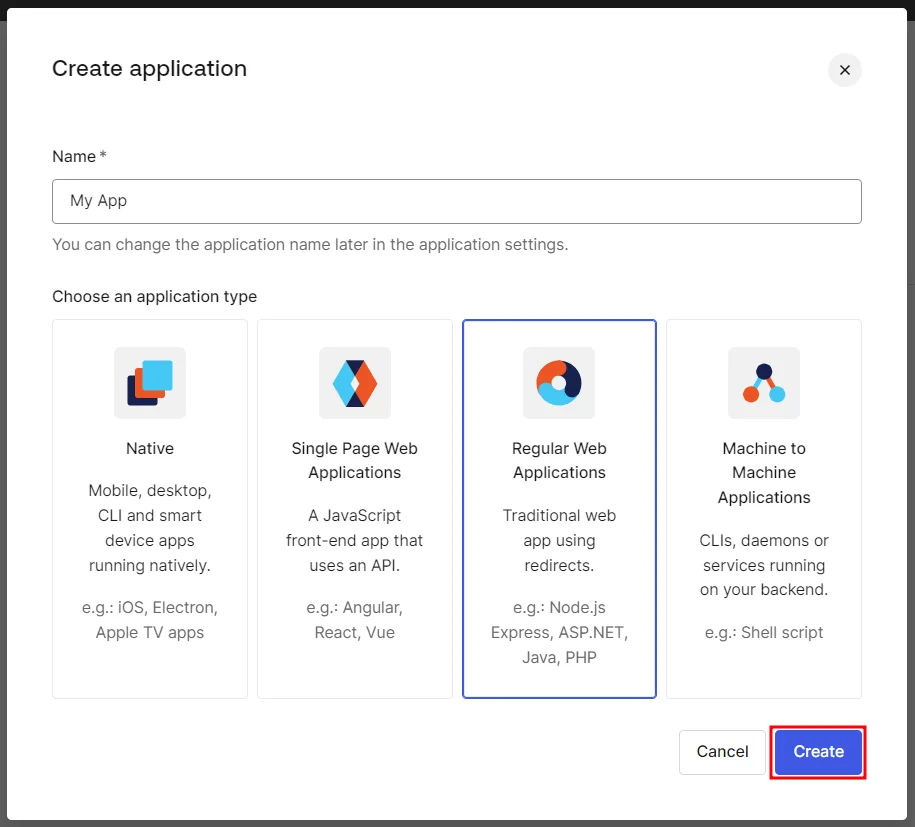
- Log in to your Auth0 dashboard.
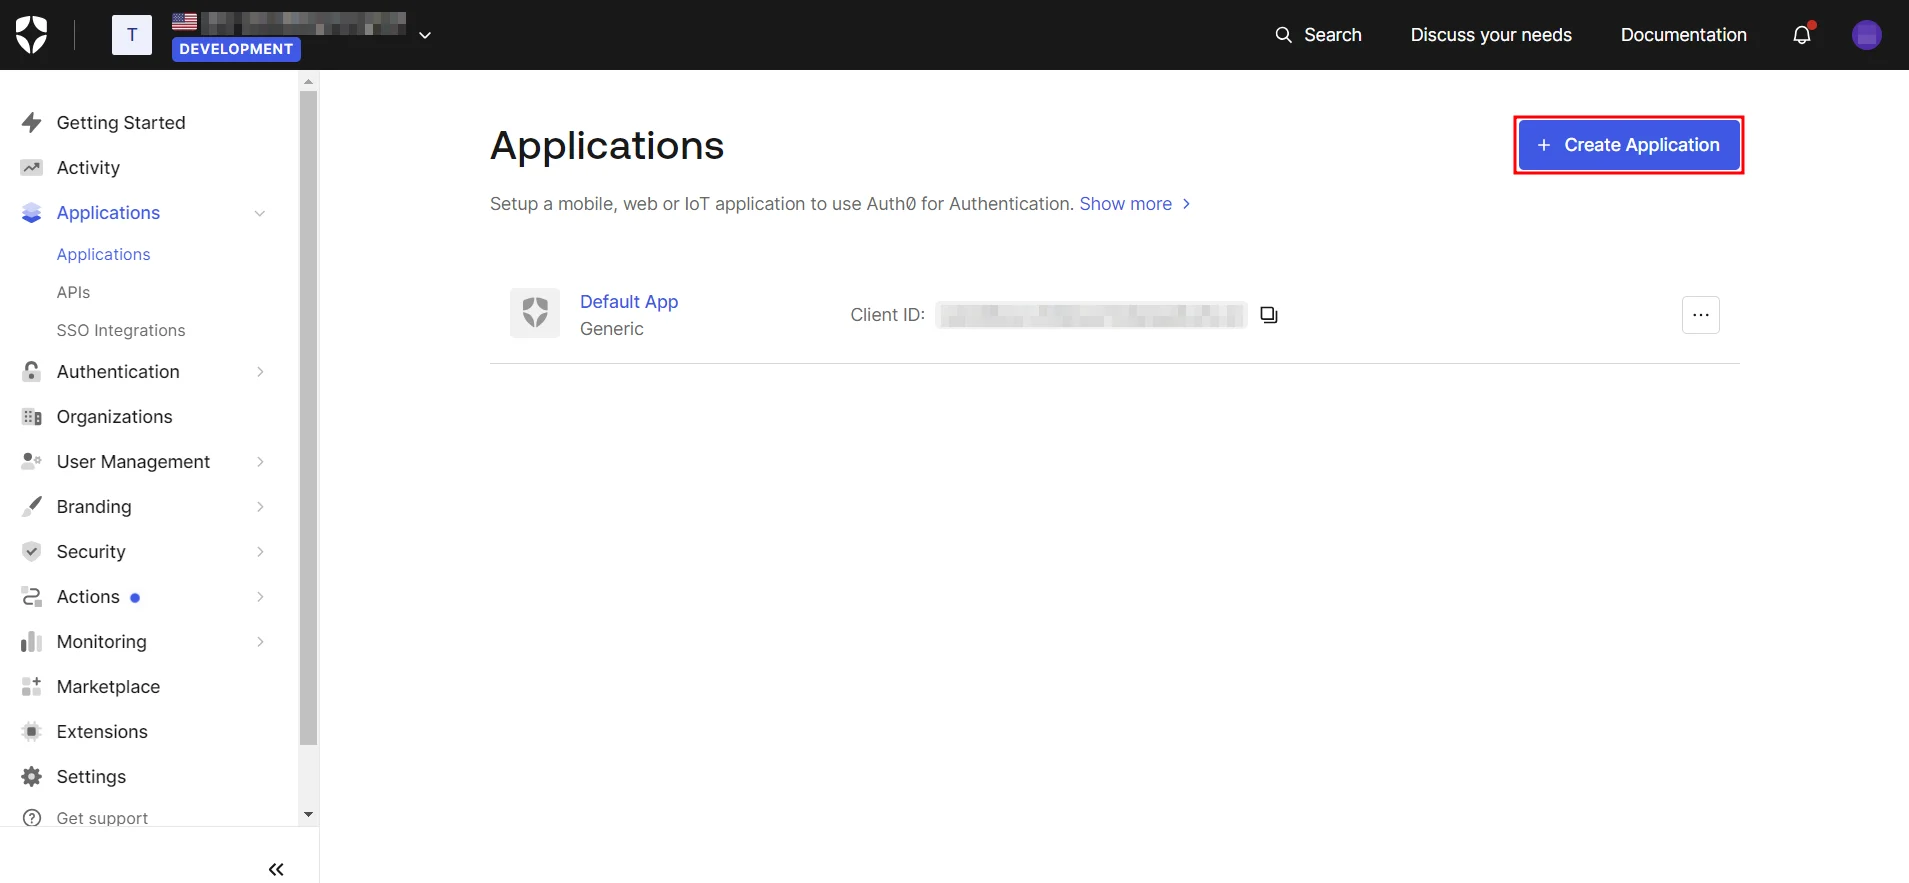
- Navigate to Applications and click on Create Application.
- Next, assign a name to the application, choose Regular Web App, and click Create.
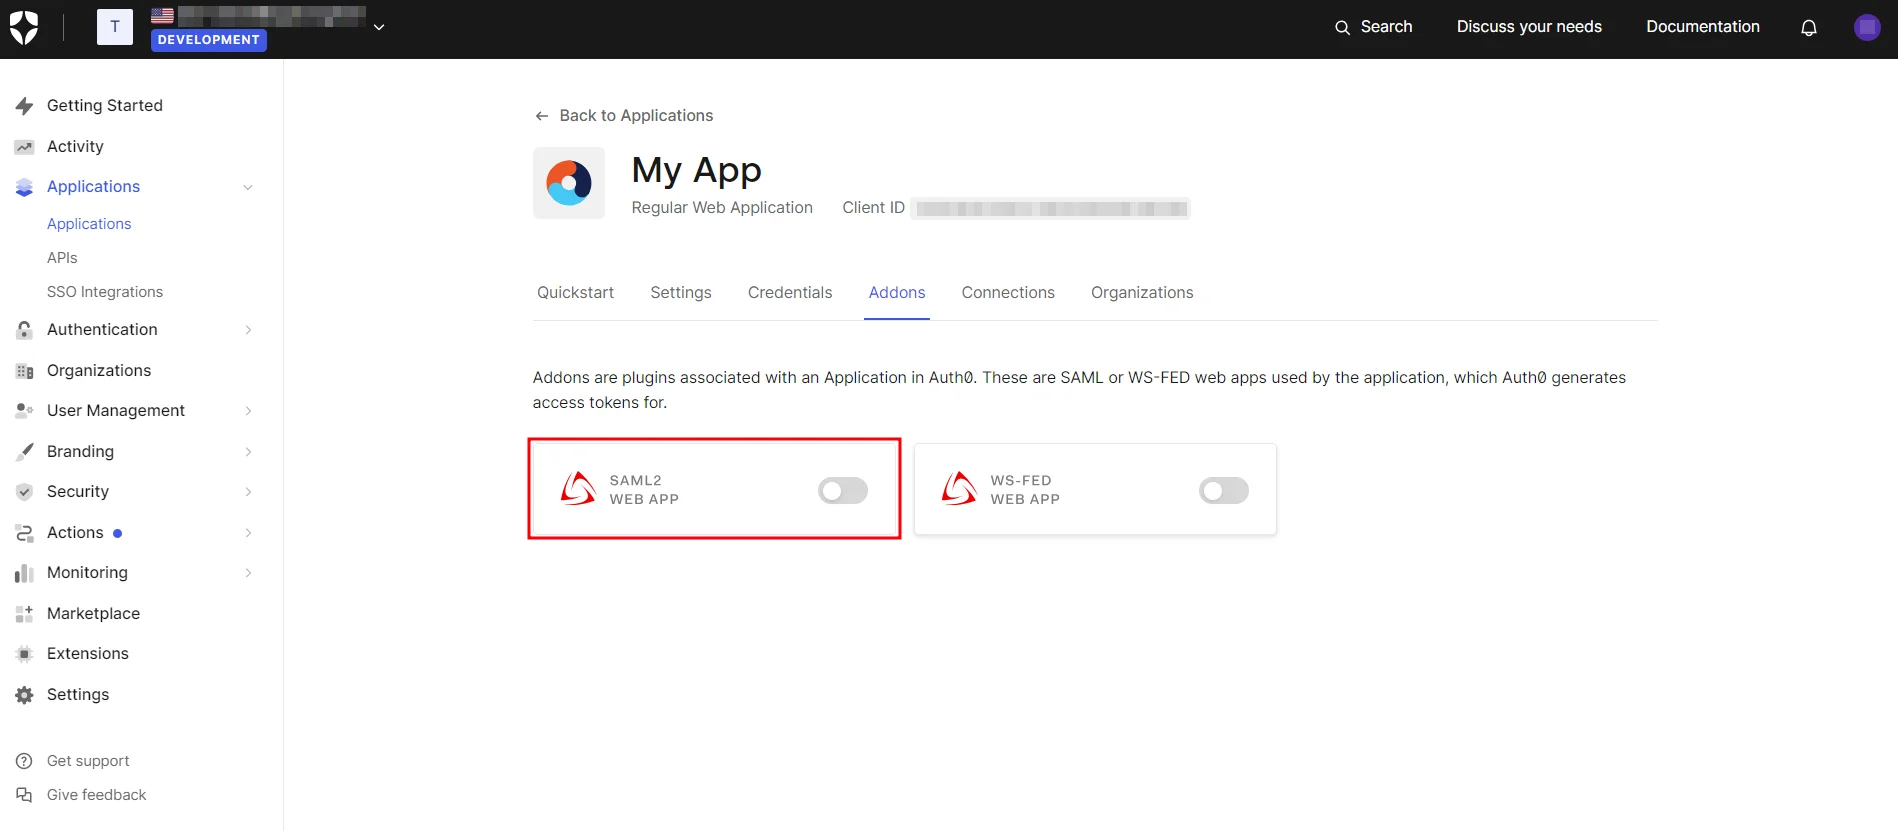
- In the Addons tab, enable the SAML2 option to configure it.
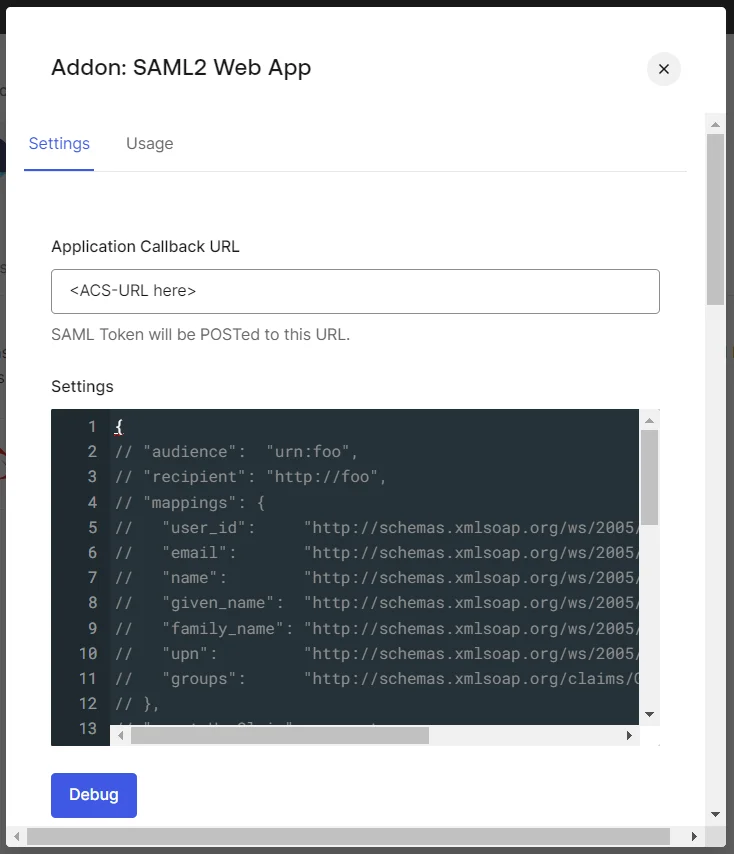
- Configure the Application Callback URL, Audience, Recipient, and other settings using the SP Entity ID and ACS URL from the SAML plugin.
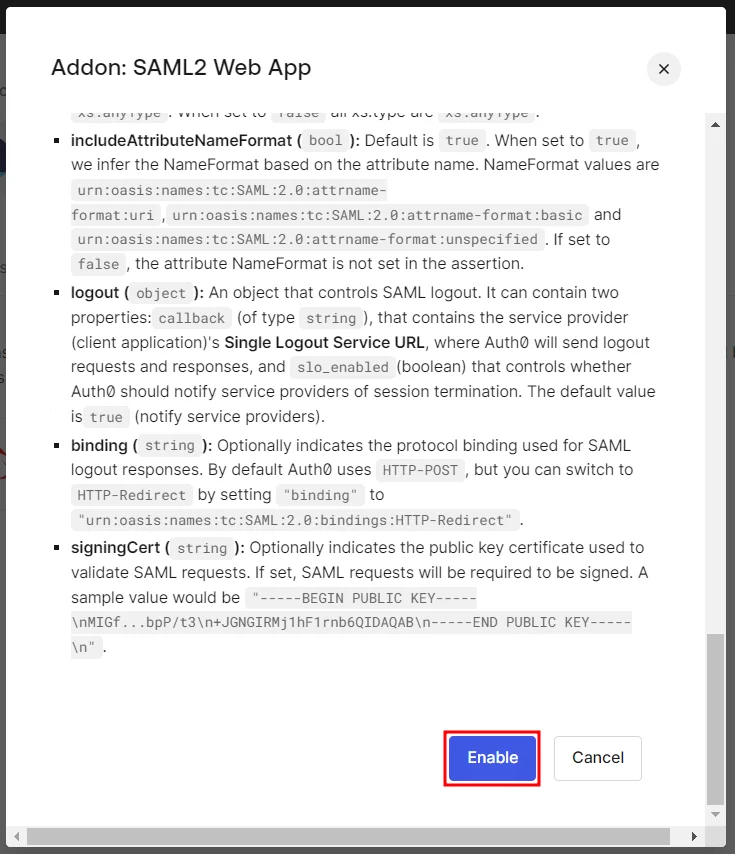
- Once you’re done configuring the settings, scroll down and click Enable.
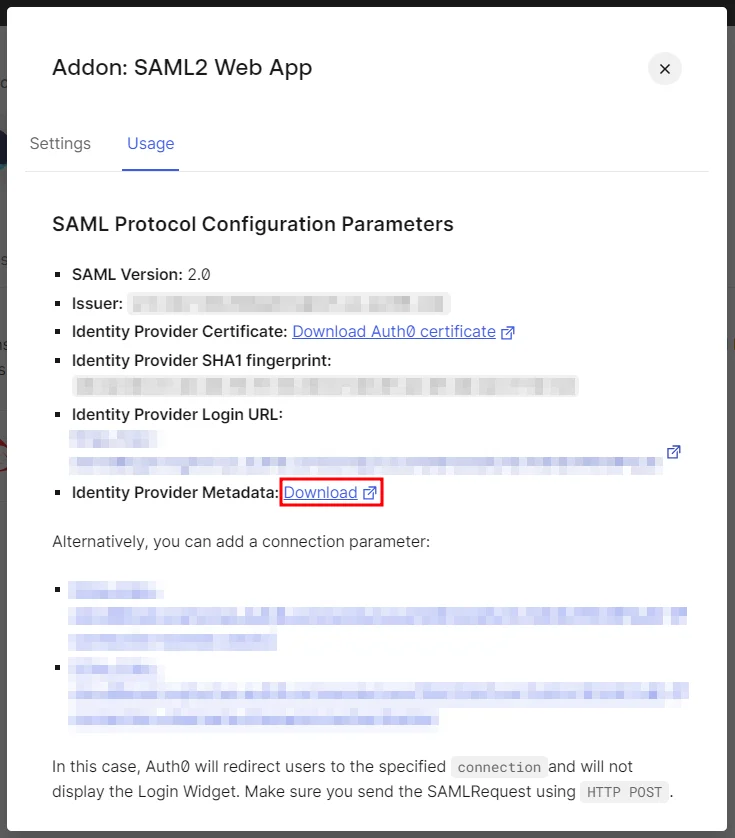
- Go to the Usage tab and download the Identity Provider Metadata XML file.
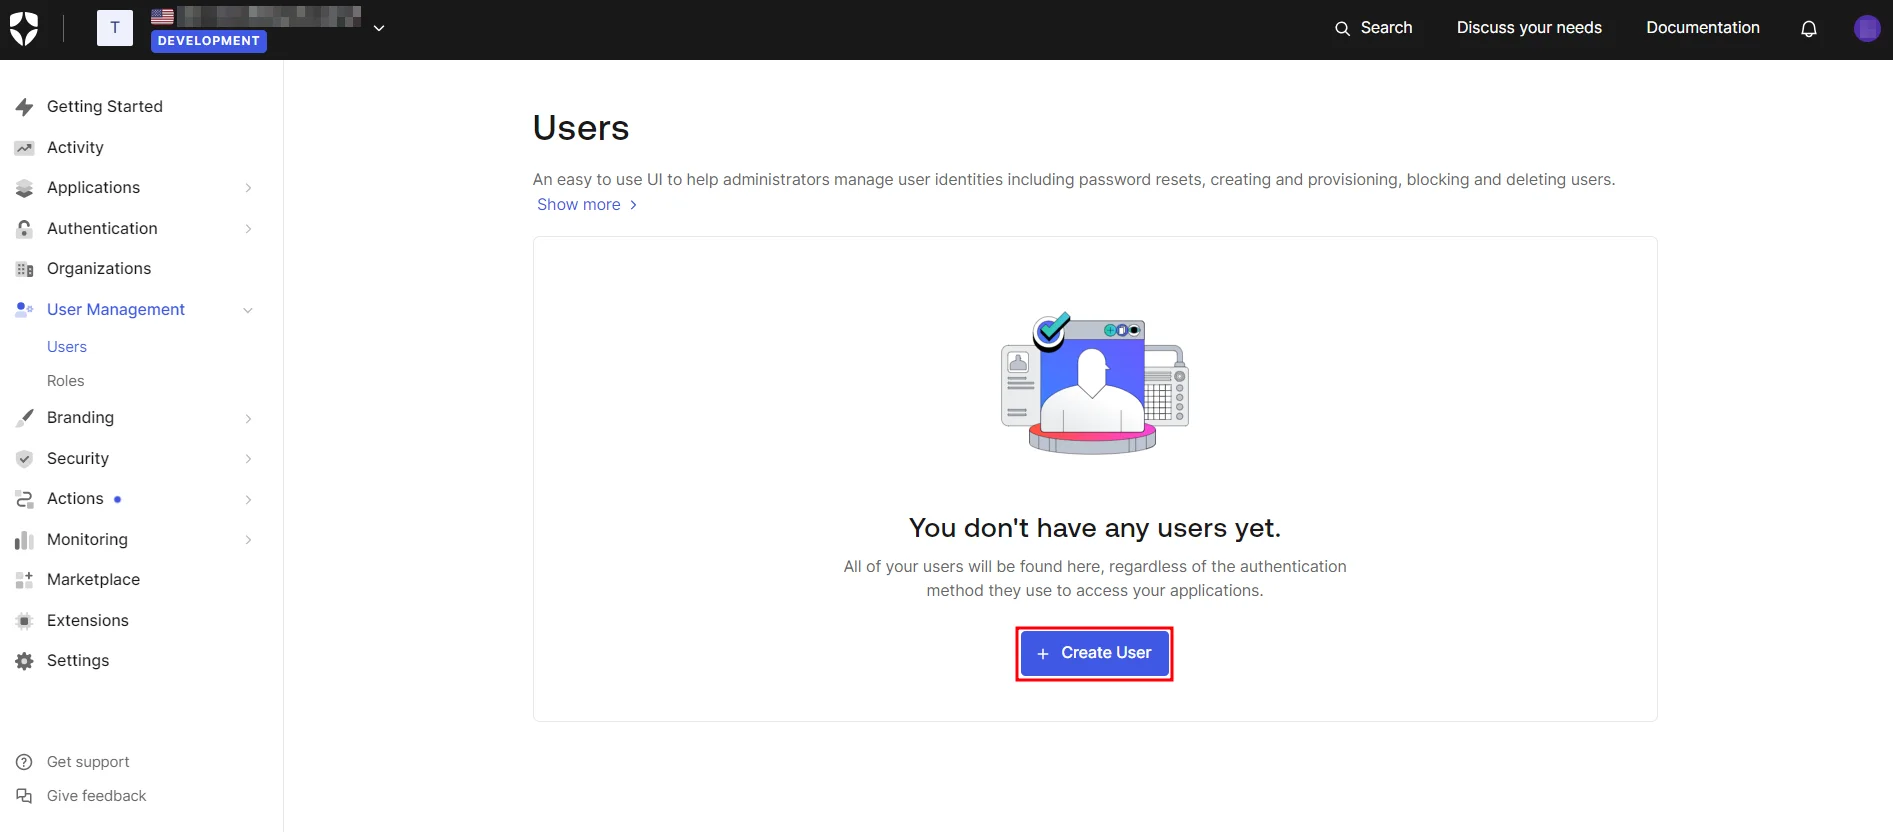
- Navigate to Users & Roles → Users and click on Create User.
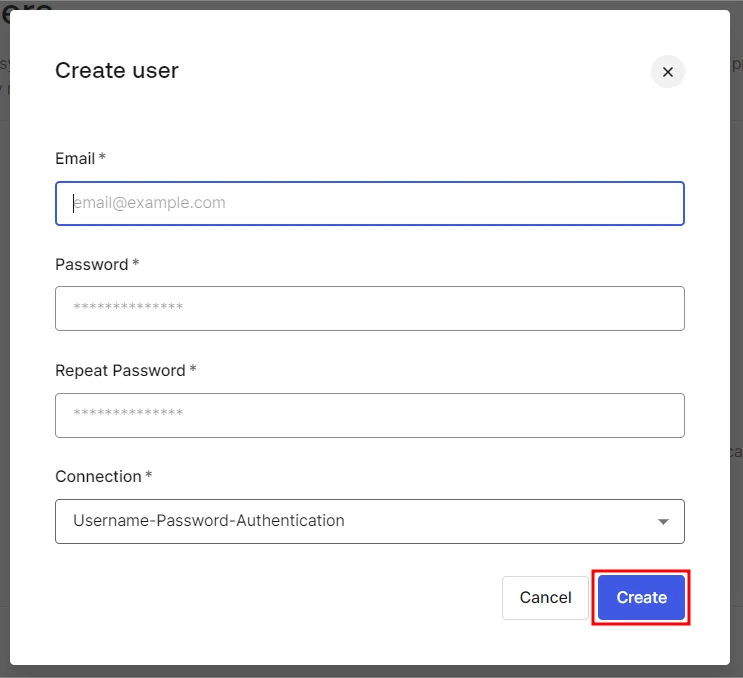
- Next, provide the email address and password for the new user and click Create.
1.1 Prerequisites:
Ensure you have these values from the Service Provider Info tab of the SAML plugin:
1.2 Instructions:
1.3 Create User in Auth0:
Step 1: Set Up AuthAnvil as Identity Provider
- Copy these values from the Service Provider Info tab of the SAML plugin.
- SP Entity ID
- ACS URL
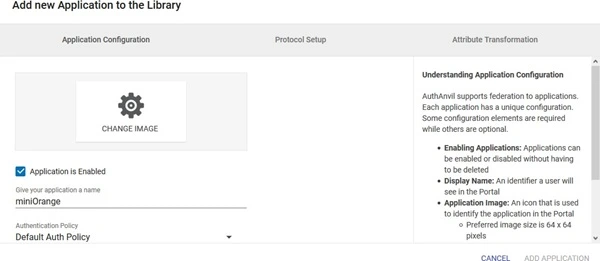
- Login to Authanvil and Go to SSO Manager +(add icon) and select Custom Application.
- Enter the Application Name.
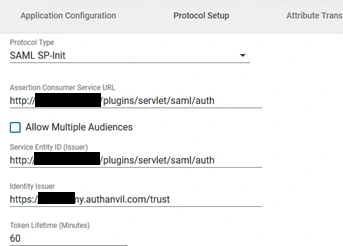
- Go to Protocol Type and Enter following info:
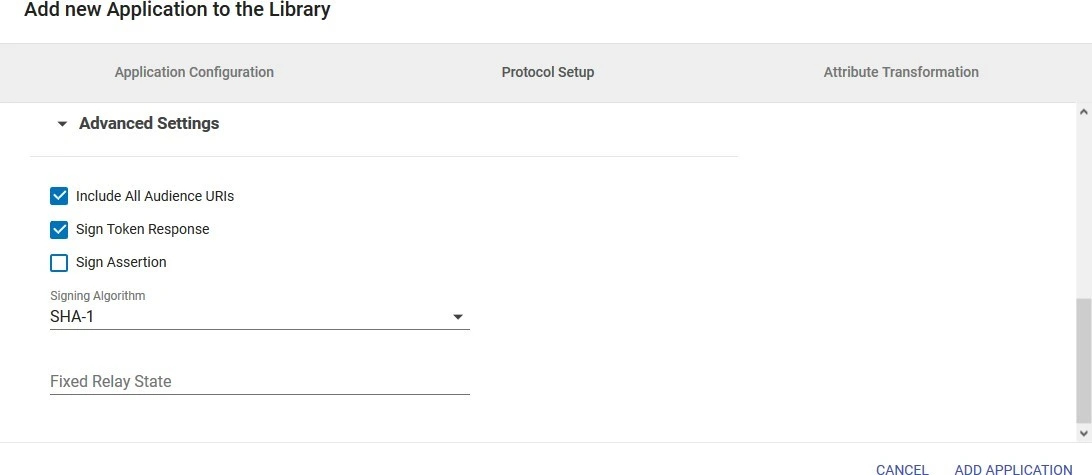
- Enter Advanced Settings.
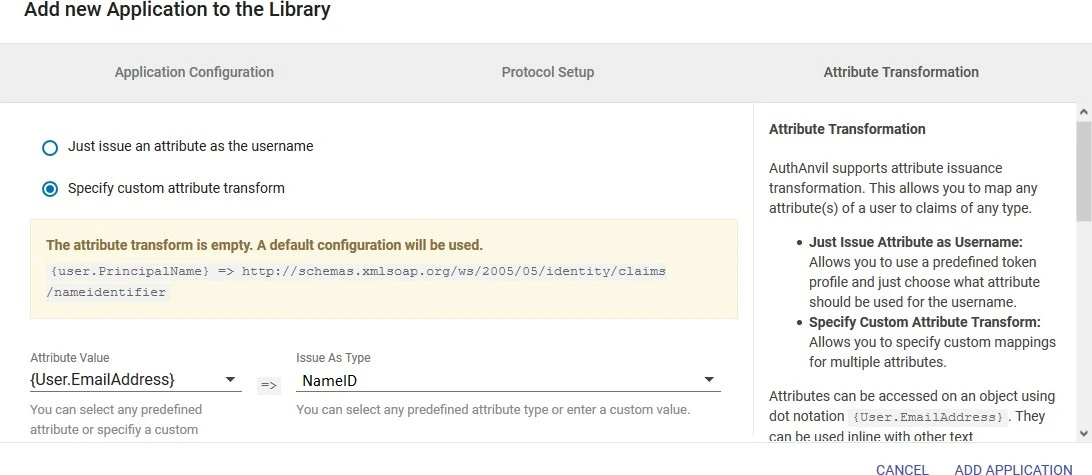
- Go to Attribute Transformation Tab and select Specify custom attribute transform. Add the NameID attribute and click on Add. Then add the name attribute as given in the image.
- Click on Add Application .
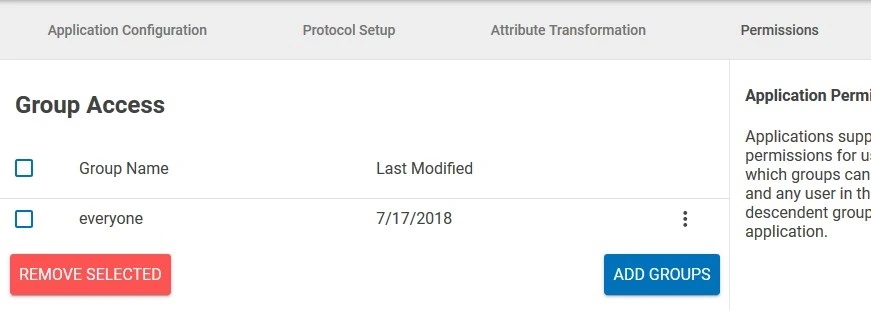
- Go to Permissions tab and add Groups to which you want to give access to this application.
- Click on Save Changes.
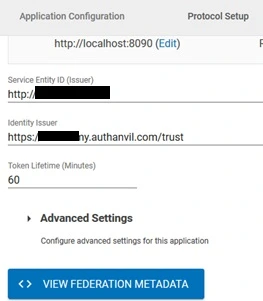
- Open the app. Click on View Federation Metadata in Protocol Type Tab and save the generated metadata xml file. This metadata file will be required to configure the plugin.
Prerequisites:
Instructions:
| Protocol Type | SP-INIT |
| Assertion Consumer Service URL | ACS URL copied from the plugin |
| Allow Multiple Audiences | Unchecked |
| Identity issuer | SP Entity ID copied from the plugin |
| Service Entity ID | SP Entity ID copied from the plugin |
| Include All Audience URIs | Checked |
| Sign Token Response | Checked |
| Sign Assertion | Unchecked |
| Signing Algorithm | SHA1 |
Step 1: Set Up AWS as Identity Provider
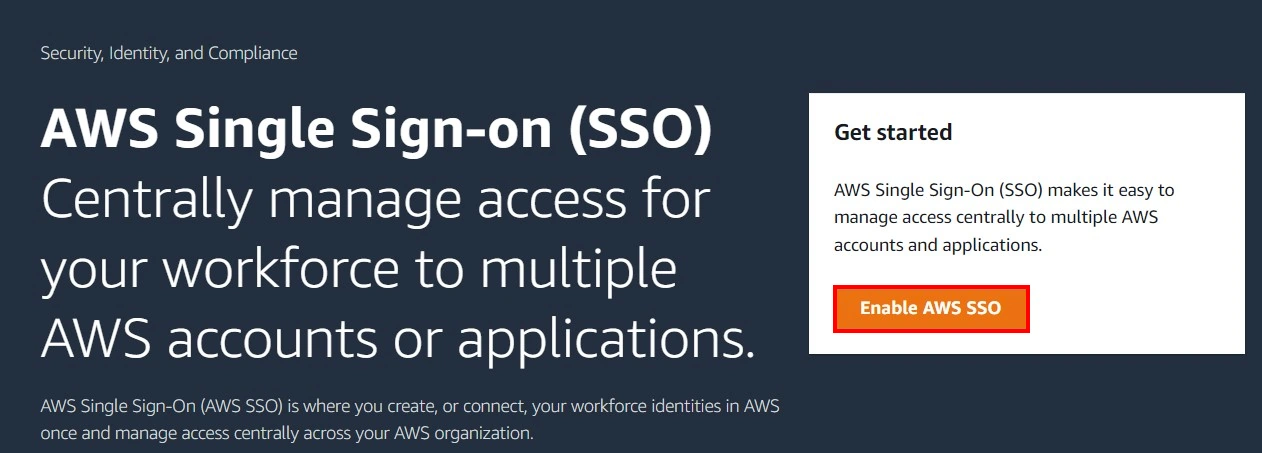
- Go to AWS, search for AWS Single Sign-On in AWS Services or click on this link.
- After opening the AWS SSO Service, select Enable AWS SSO.
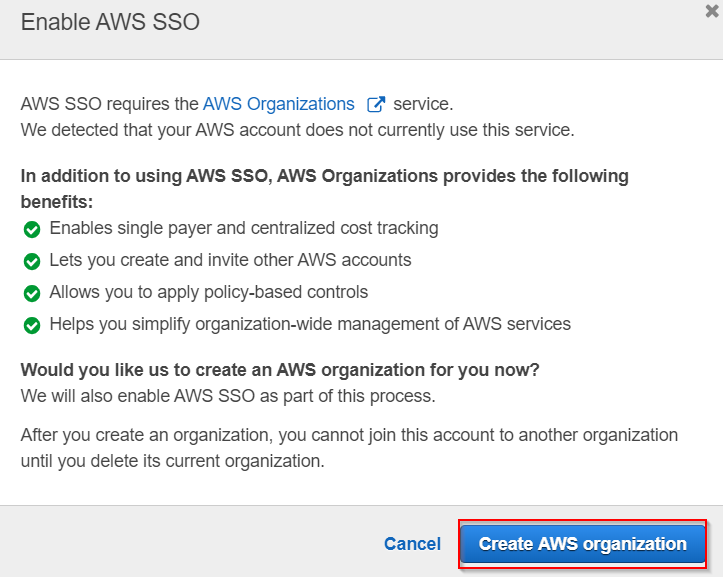
- Click on Create AWS Organisation .
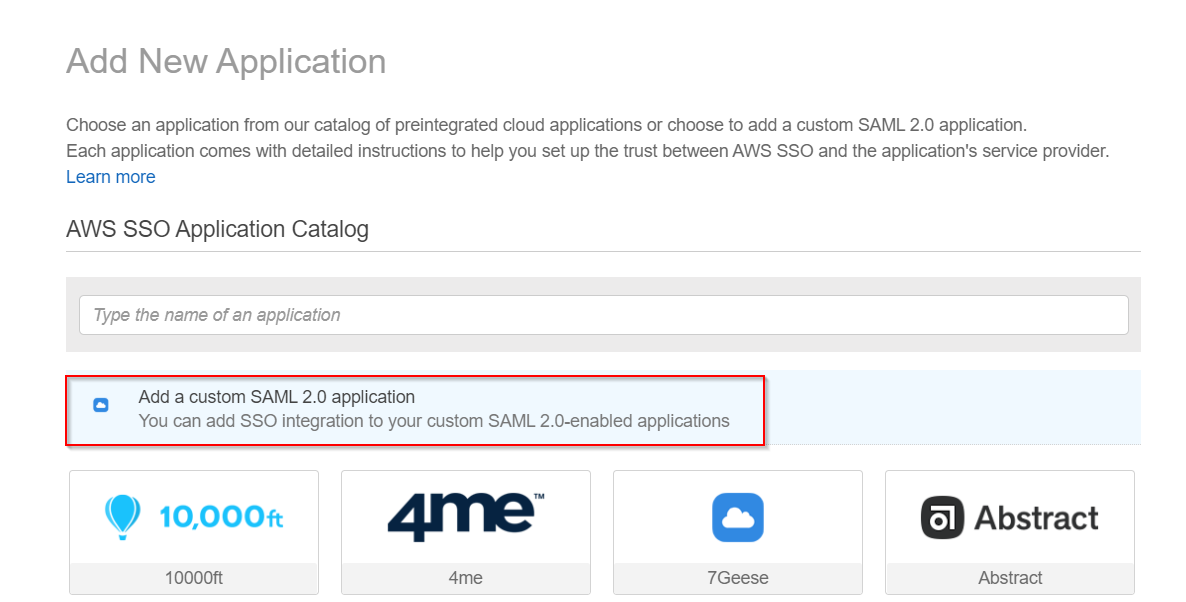
- Click on Applications → Add a new application.
- Select Add a custom SAML 2.0 application.
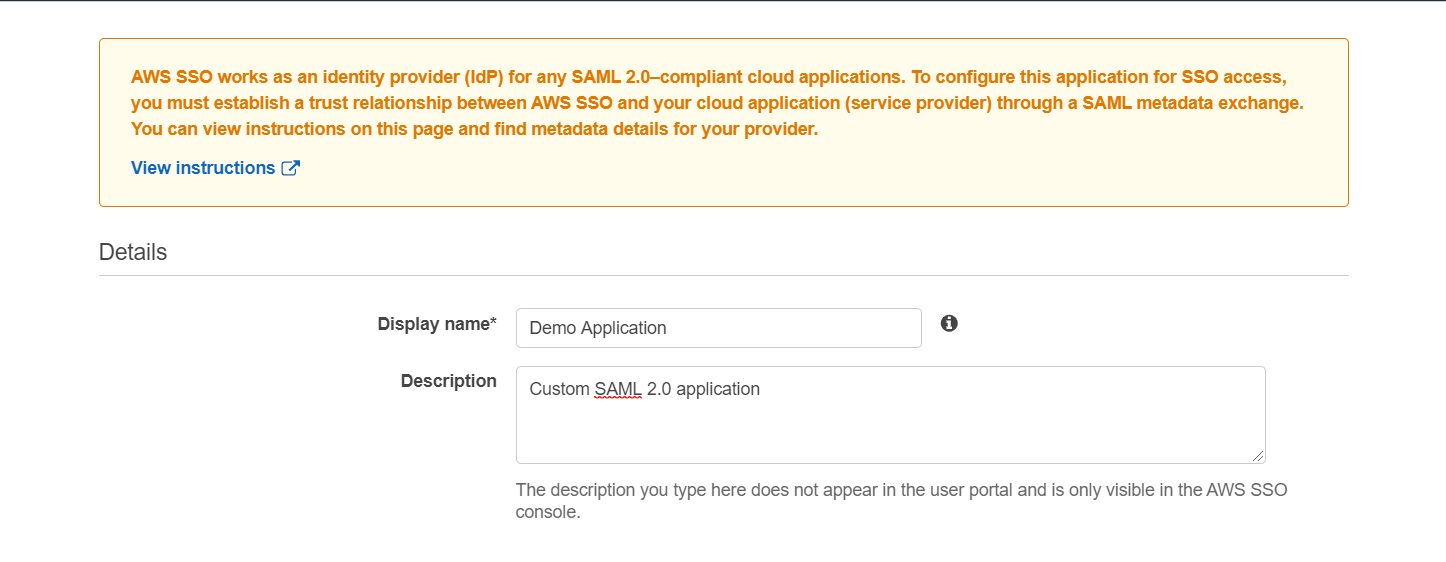
- Fill the Details of the application.
- Download AWS SSO SAML Metadata file as it will be required by Service Provider in step-2.
- Go to miniorange SAML Single Sign-On Plugin → Service Provider Info tab → Download Metadata and upload it to the AWS Application Metadata section or you can copy the SP Entity ID and ACS URL from the plugin and configure endpoints manually.
- Click on Save changes and your Demo Application has been configured.
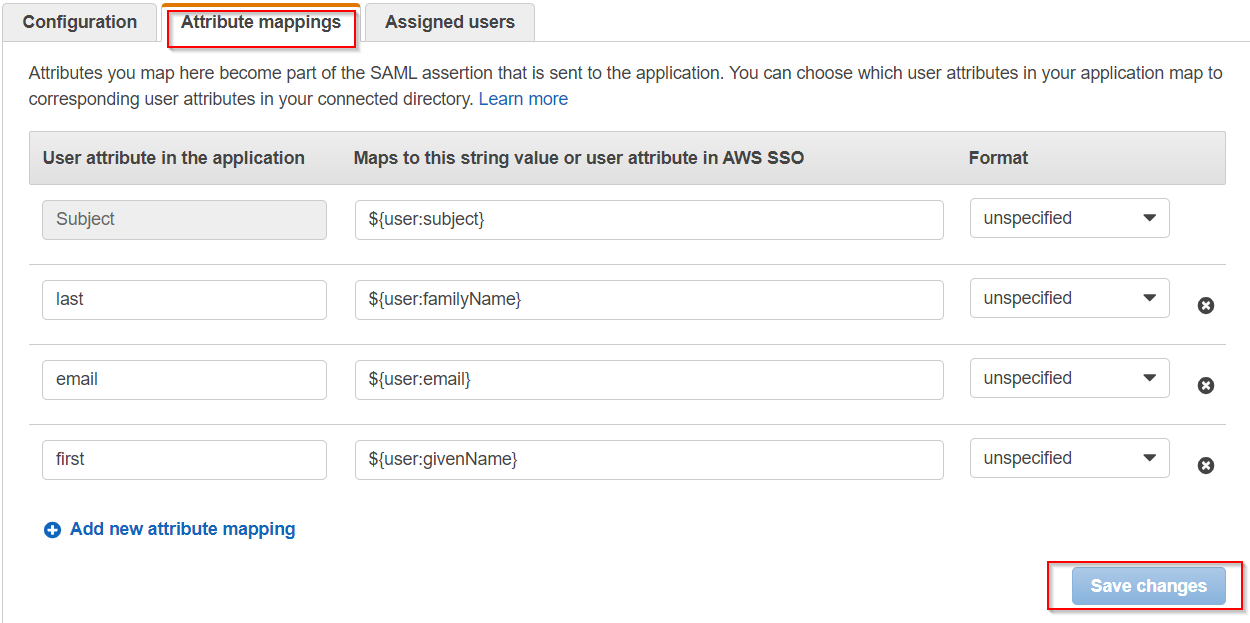
- Go to Attribute Mappings configure the various attributes (first name, last name and e-mail address) for the SAML response from the Attribute mappings tab as shown:
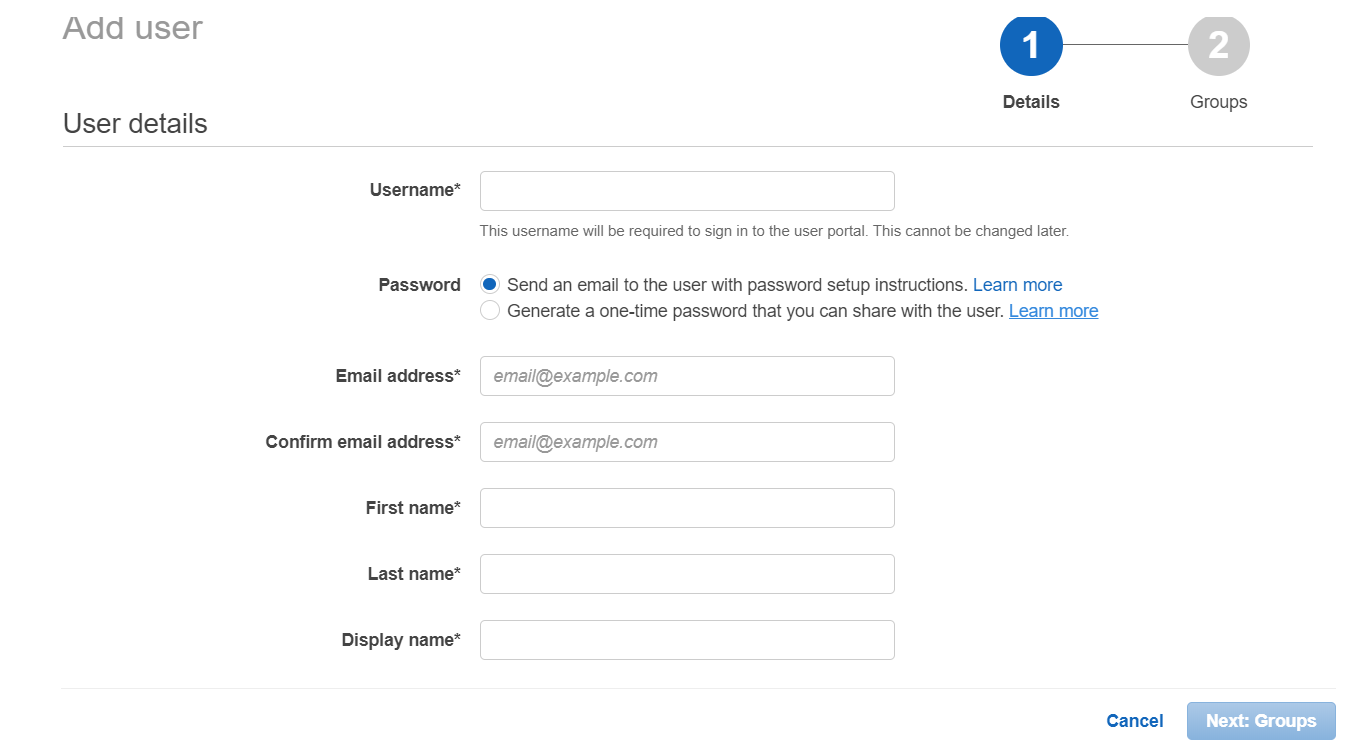
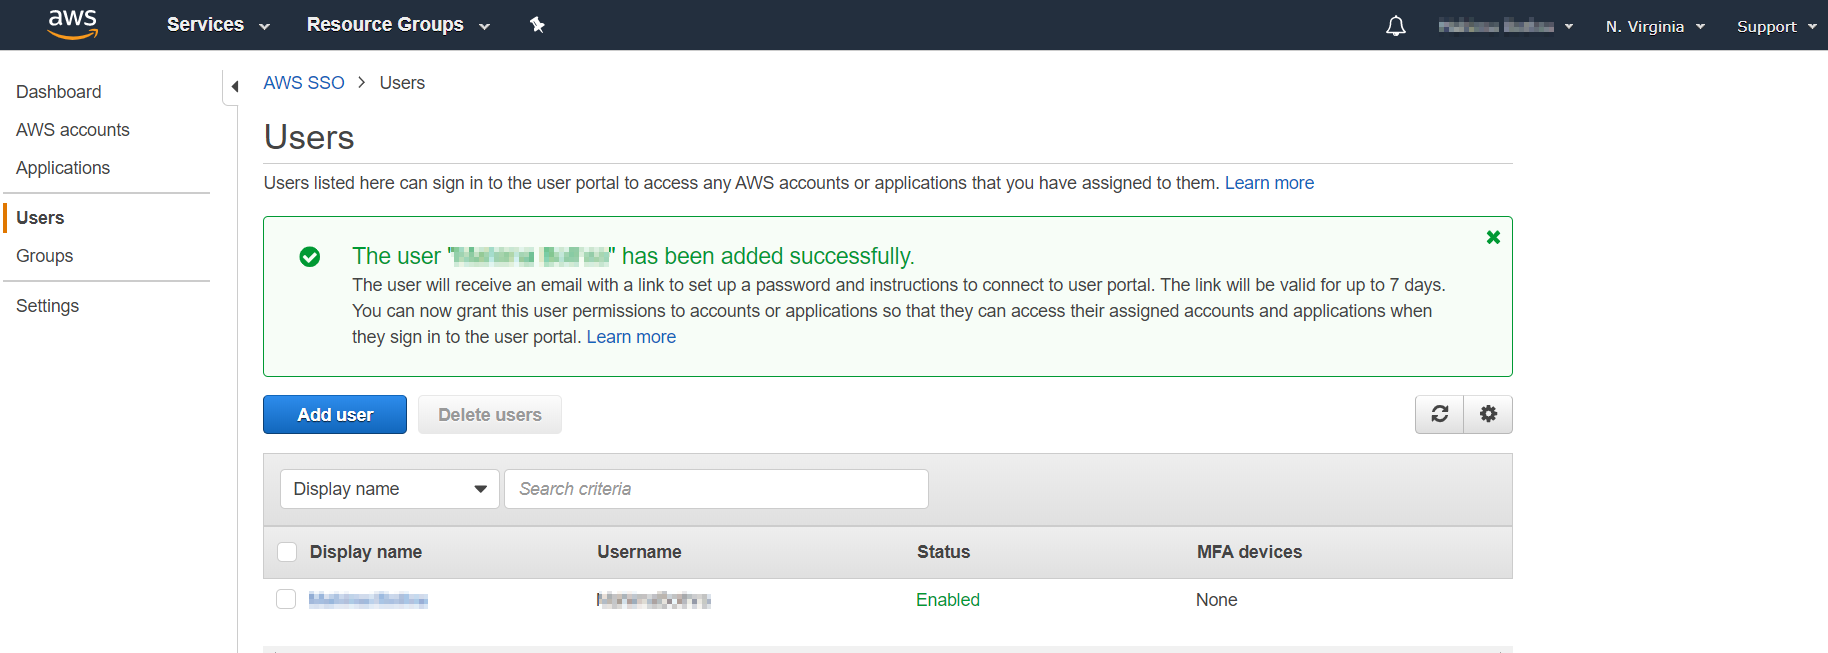
- Go to your configured Demo Application → Assigned users and add the users. If you want to assign new users you can navigate to the left section and go to Users→ Add User and Enter the User details and click on Next:Groups and assign group to users.
- Your user has been successfully added.


- SP Entity ID
- ACS URL
Prerequisites:
Copy these values from the Service Provider Info tab of the Plugin.
Instructions:
Note: Enterprise app configuration is the recommended option for SAML. If you do not have Azure subscription or using free account please setup App Registration Configuration.
To perform Single Logout using Microsoft Entra ID (Previously known as Azure AD), the Atlassian instance (E.g. Jira,Confluence) must be https enabled.
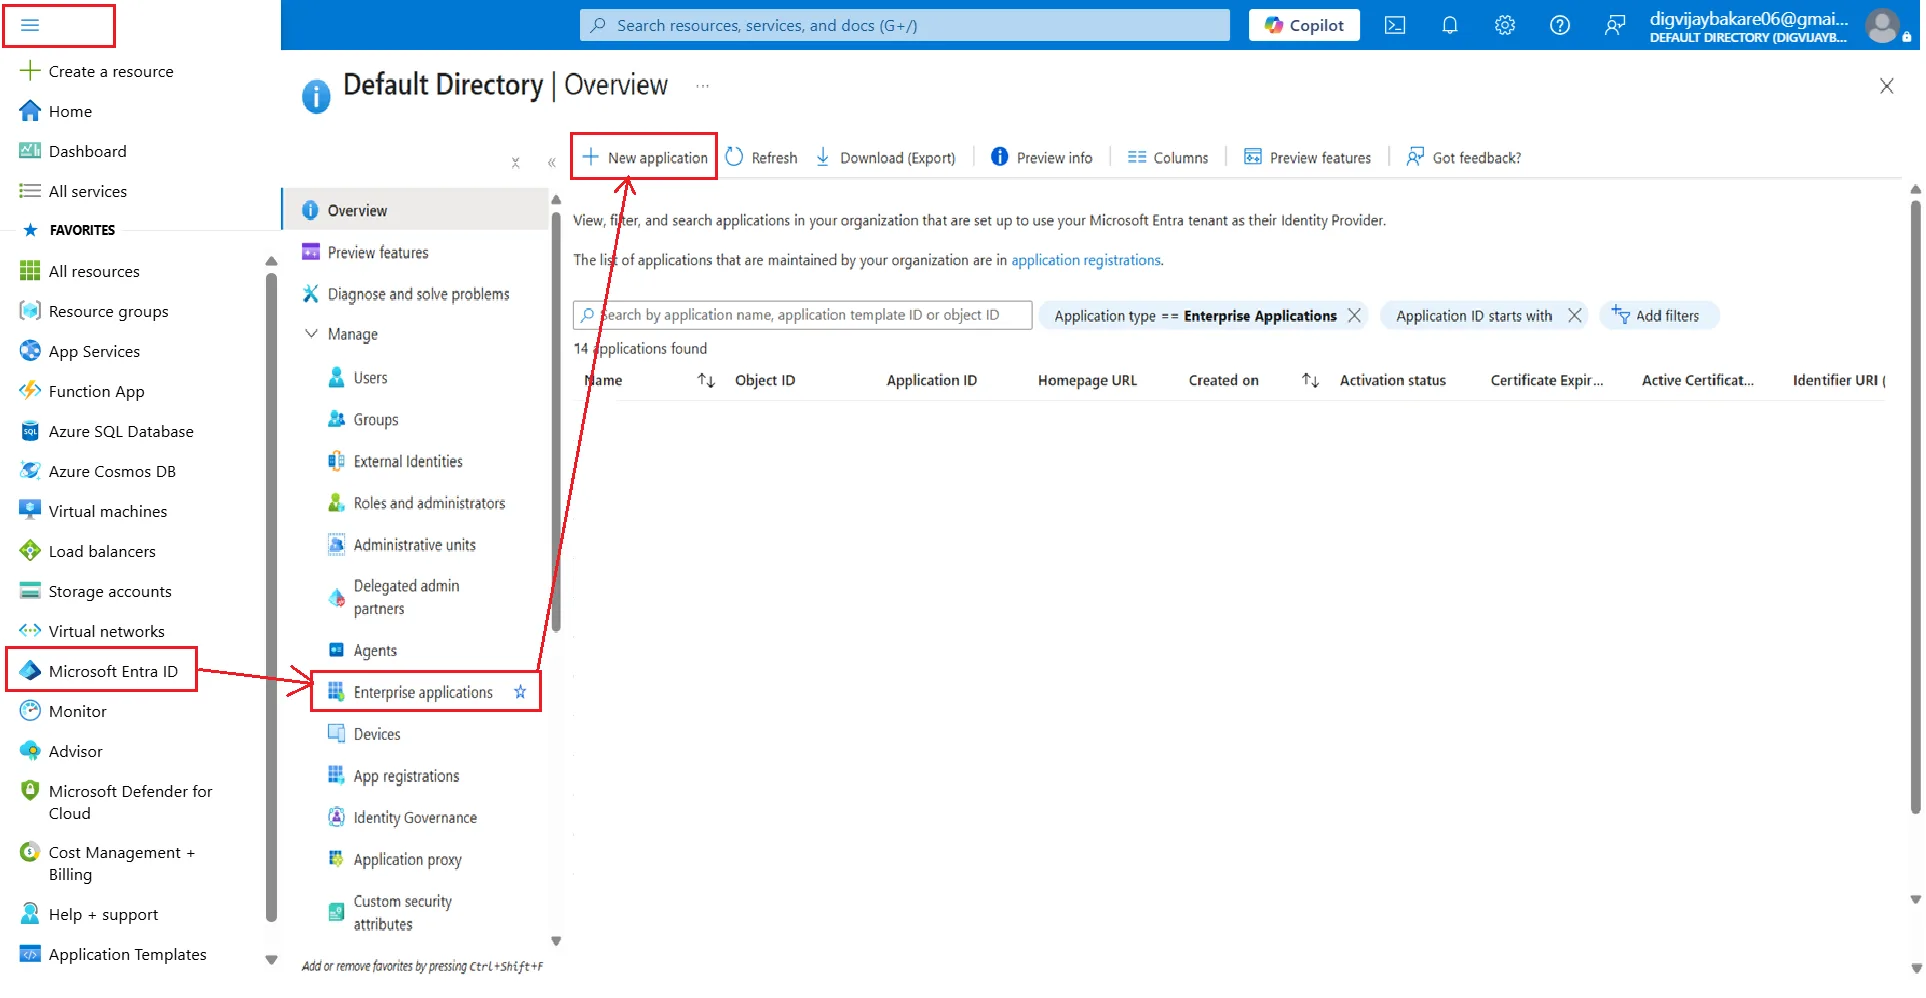
- Log in to Microsoft Entra ID (Previously known as Azure AD) Portal
- Select and Microsoft Entra ID Enterprise Applications New Application.
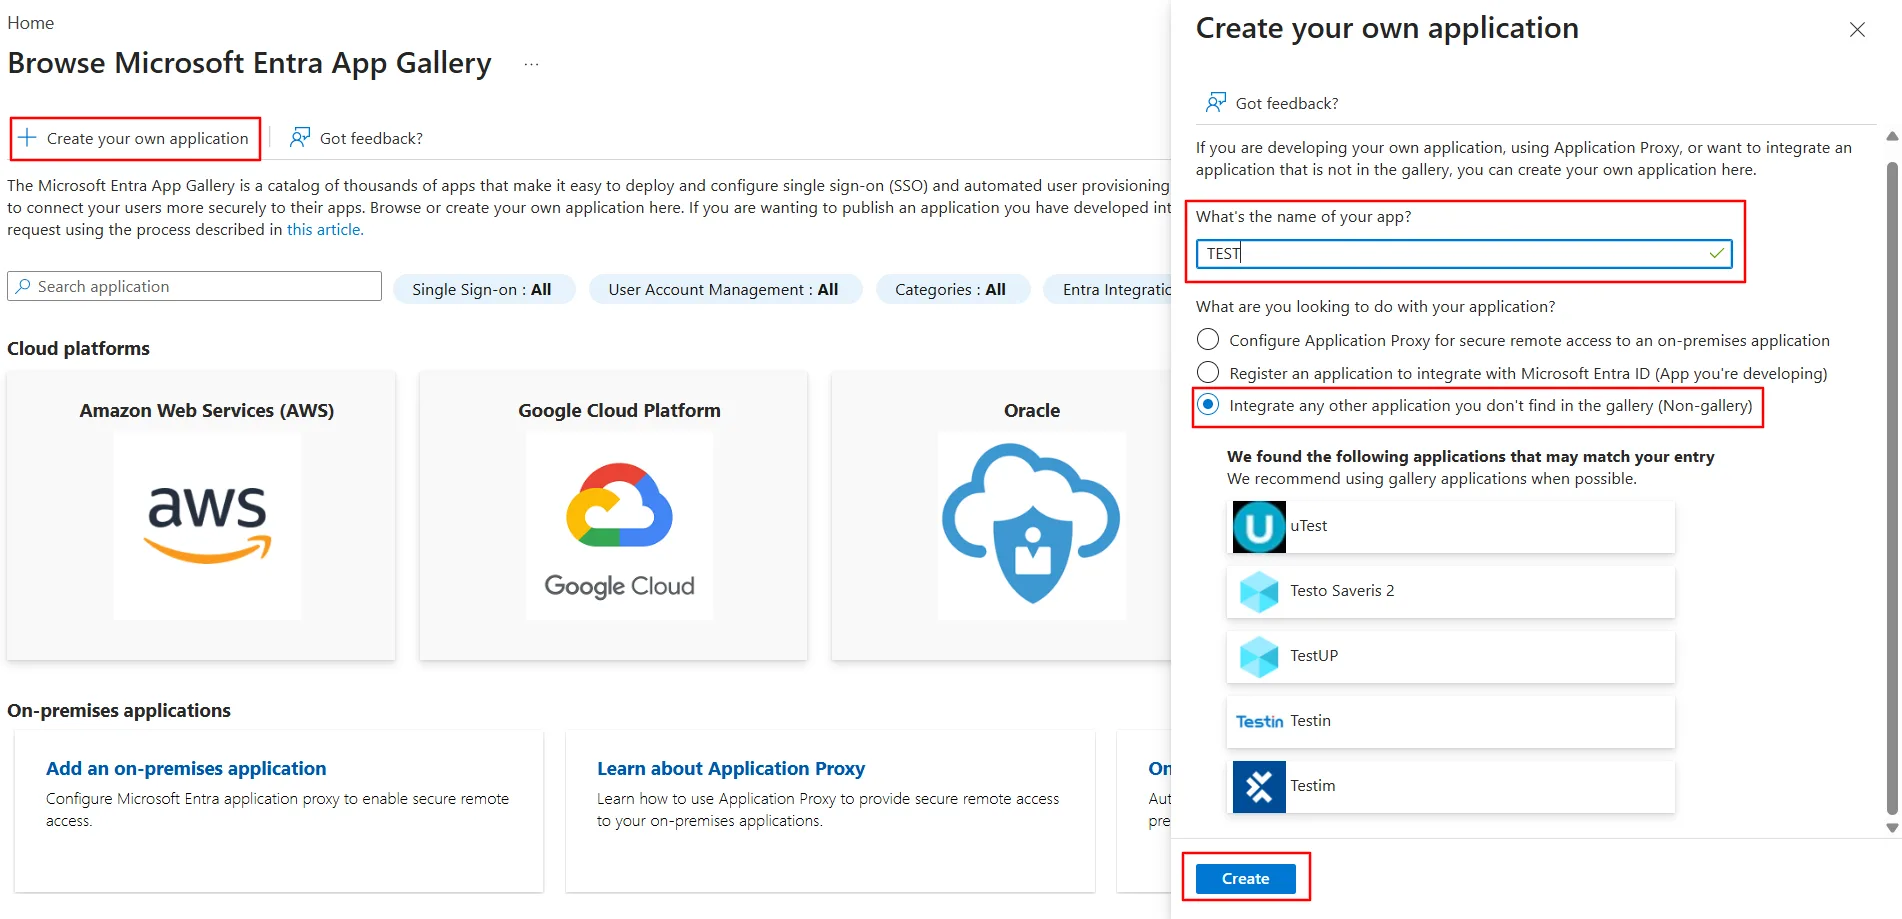
- Click on Create your own application. Then enter the name for your app, select the Integrate any other application you don't find in the gallery (Non-gallery) checkbox and click on Create button.
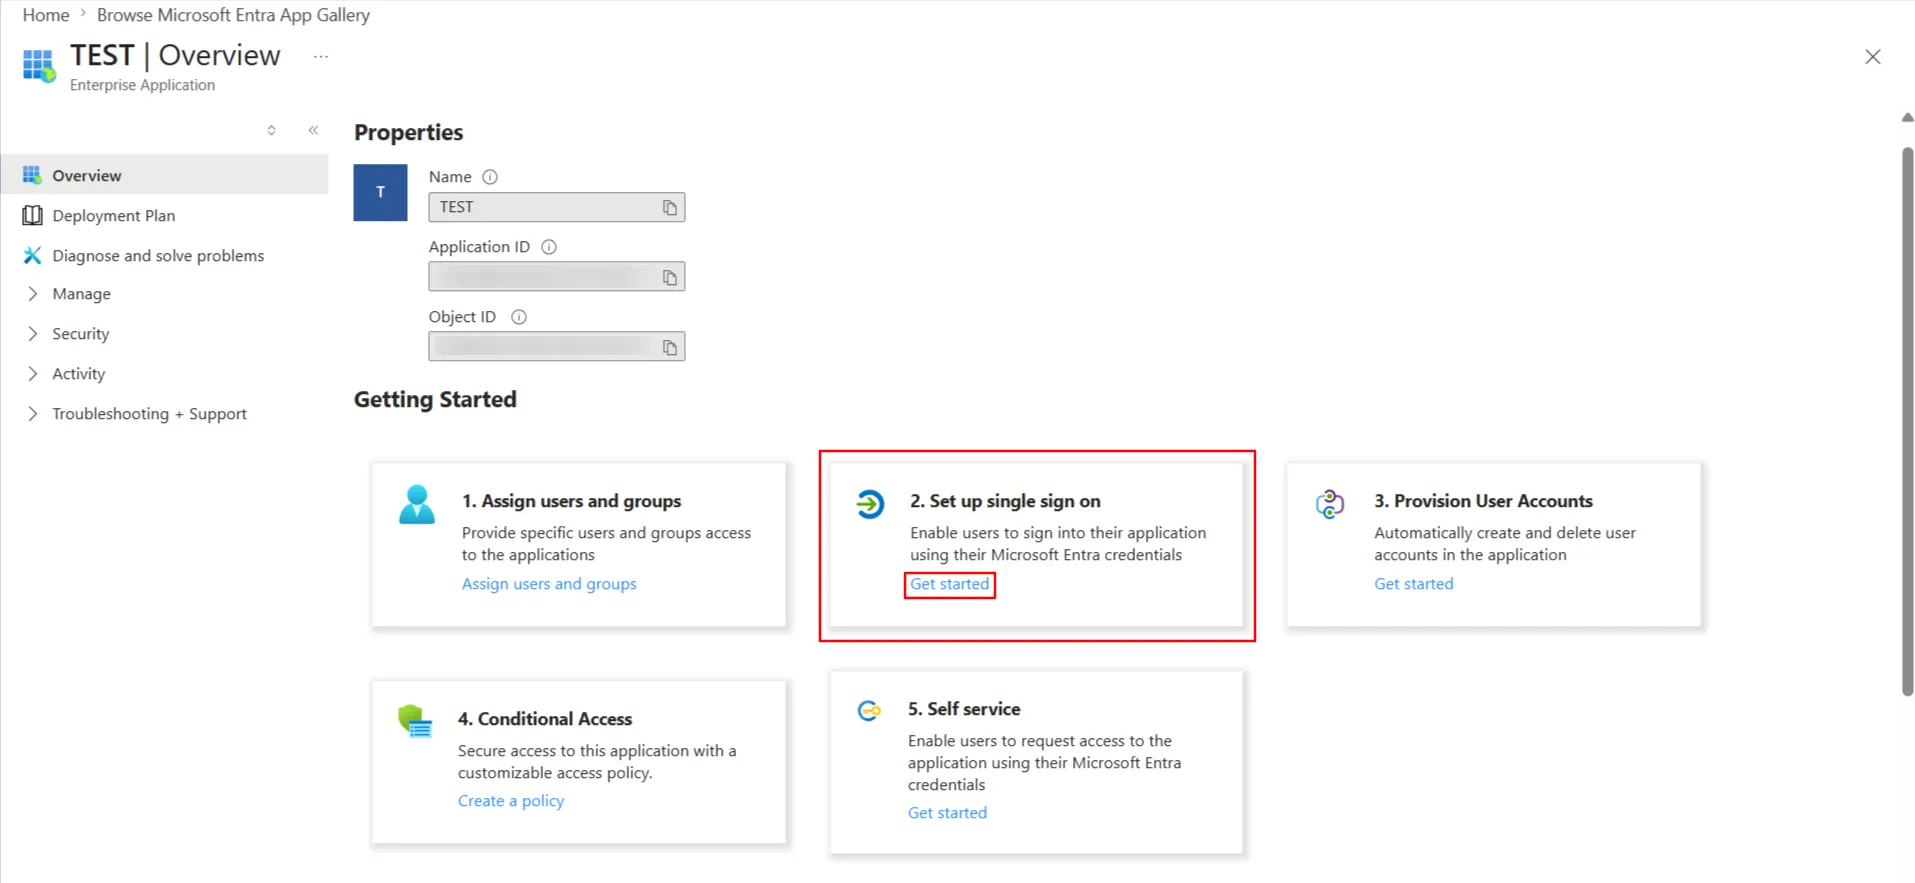
- Click on Set up Single sign-on.
- The next screen presents the options for configuring single sign-on. Click on SAML.
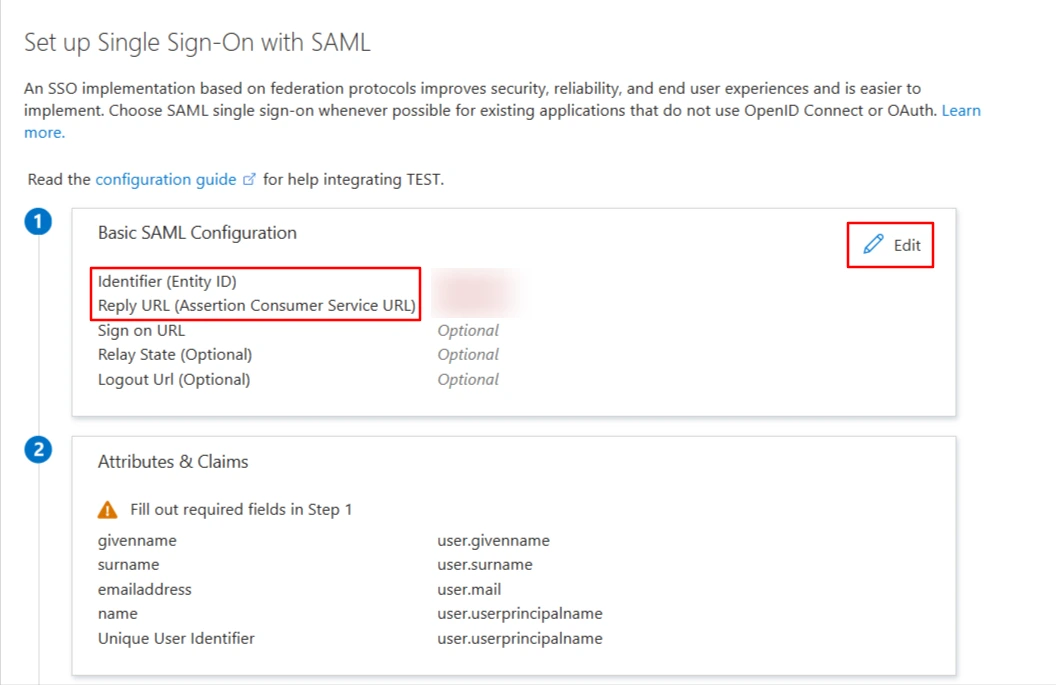
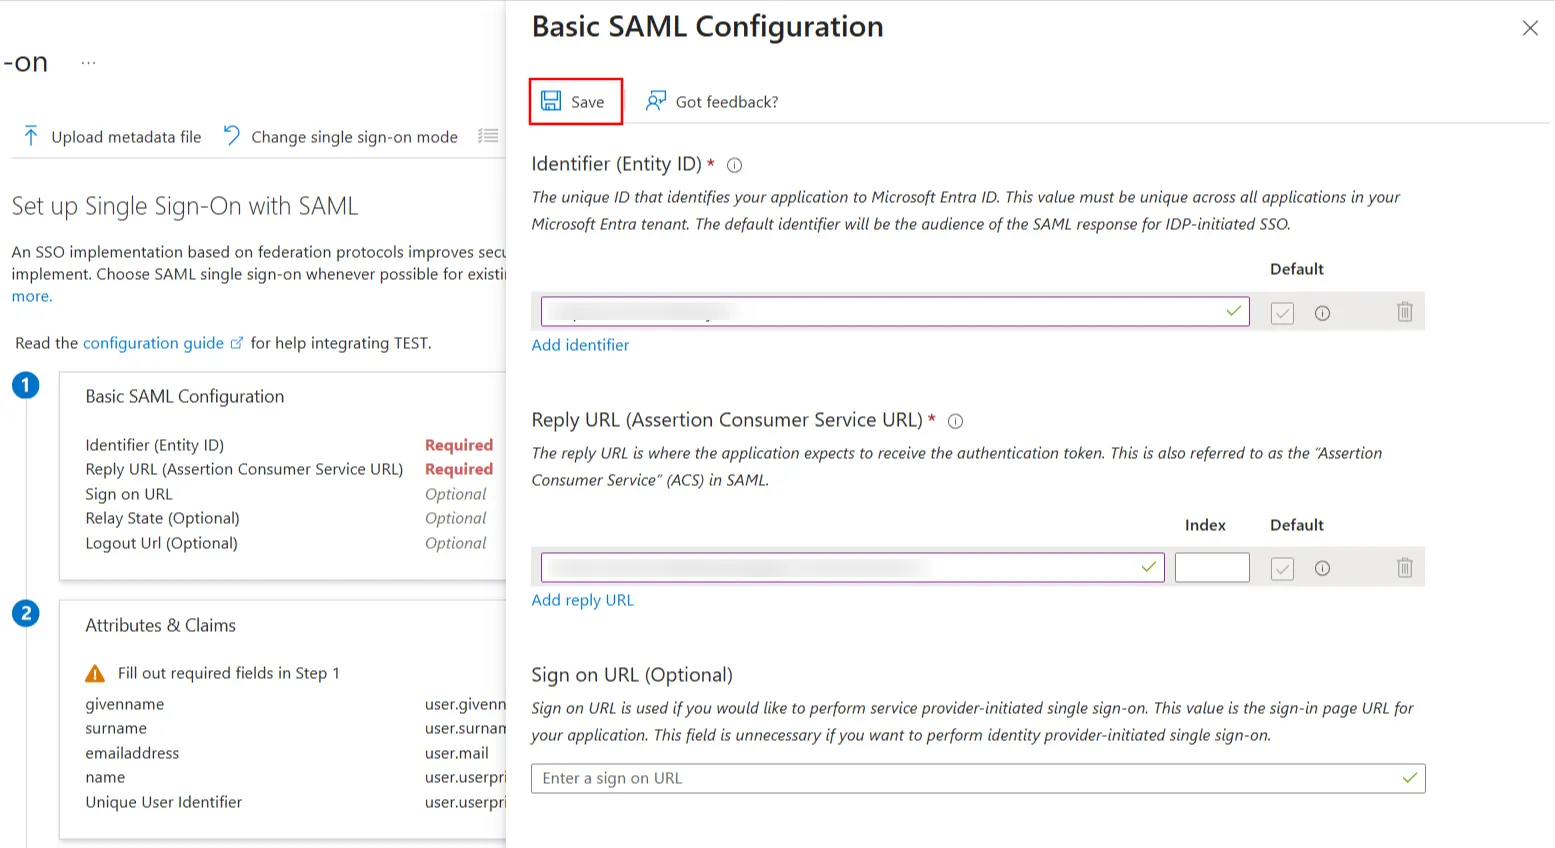
- Edit the option 1 :Basic SAML Configuration to configure plugin endpoints.
- Enter the SP Entity ID for Identifier and the ACS URL for Reply URL from Service Provider Info tab of the plugin.
- Click on Save icon.
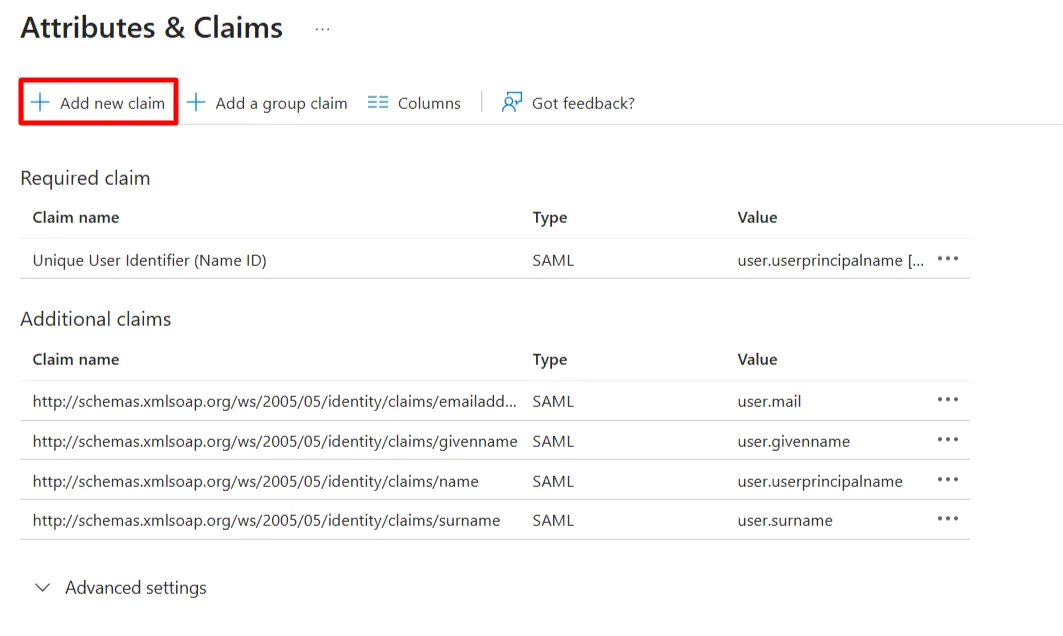
- By default, the following Attributes will be sent in the SAML token. You can view or edit the claims sent in the SAML token to the application under the User Attributes & Claims tab.
- You can add attribute using Add new claim.
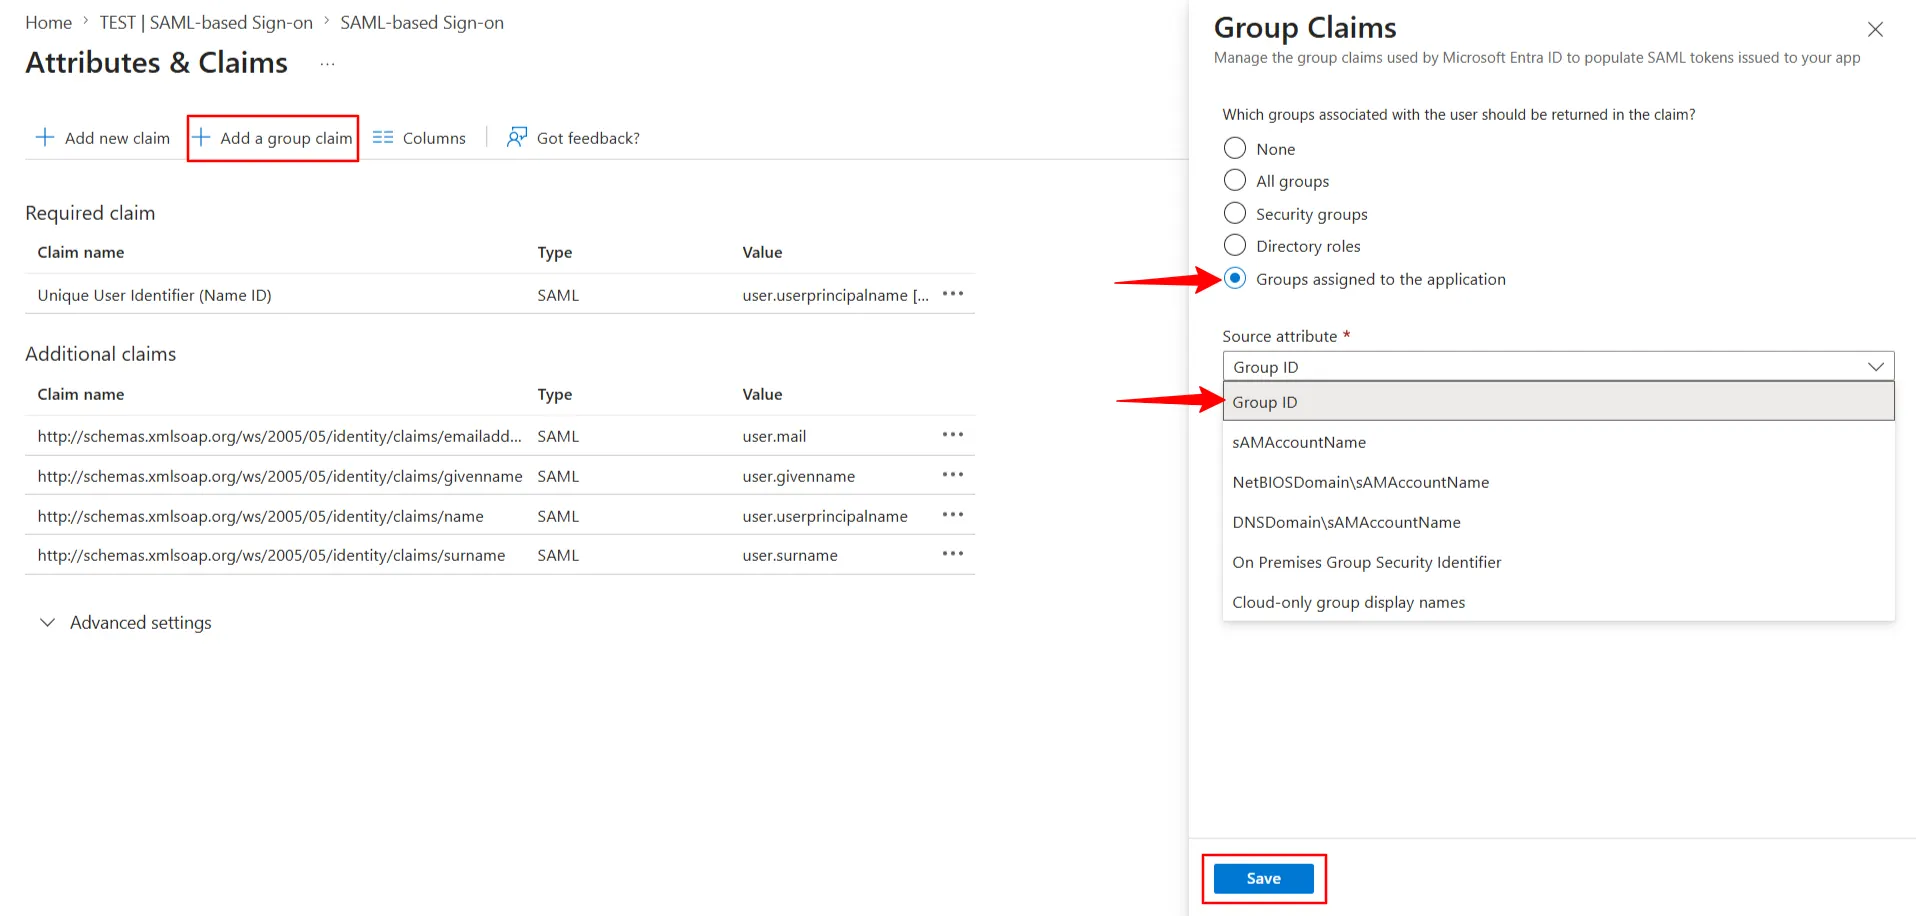
- You can add group attribute claim using Add a group claim.
- Copy App Federation Metadata Url from setup tab.
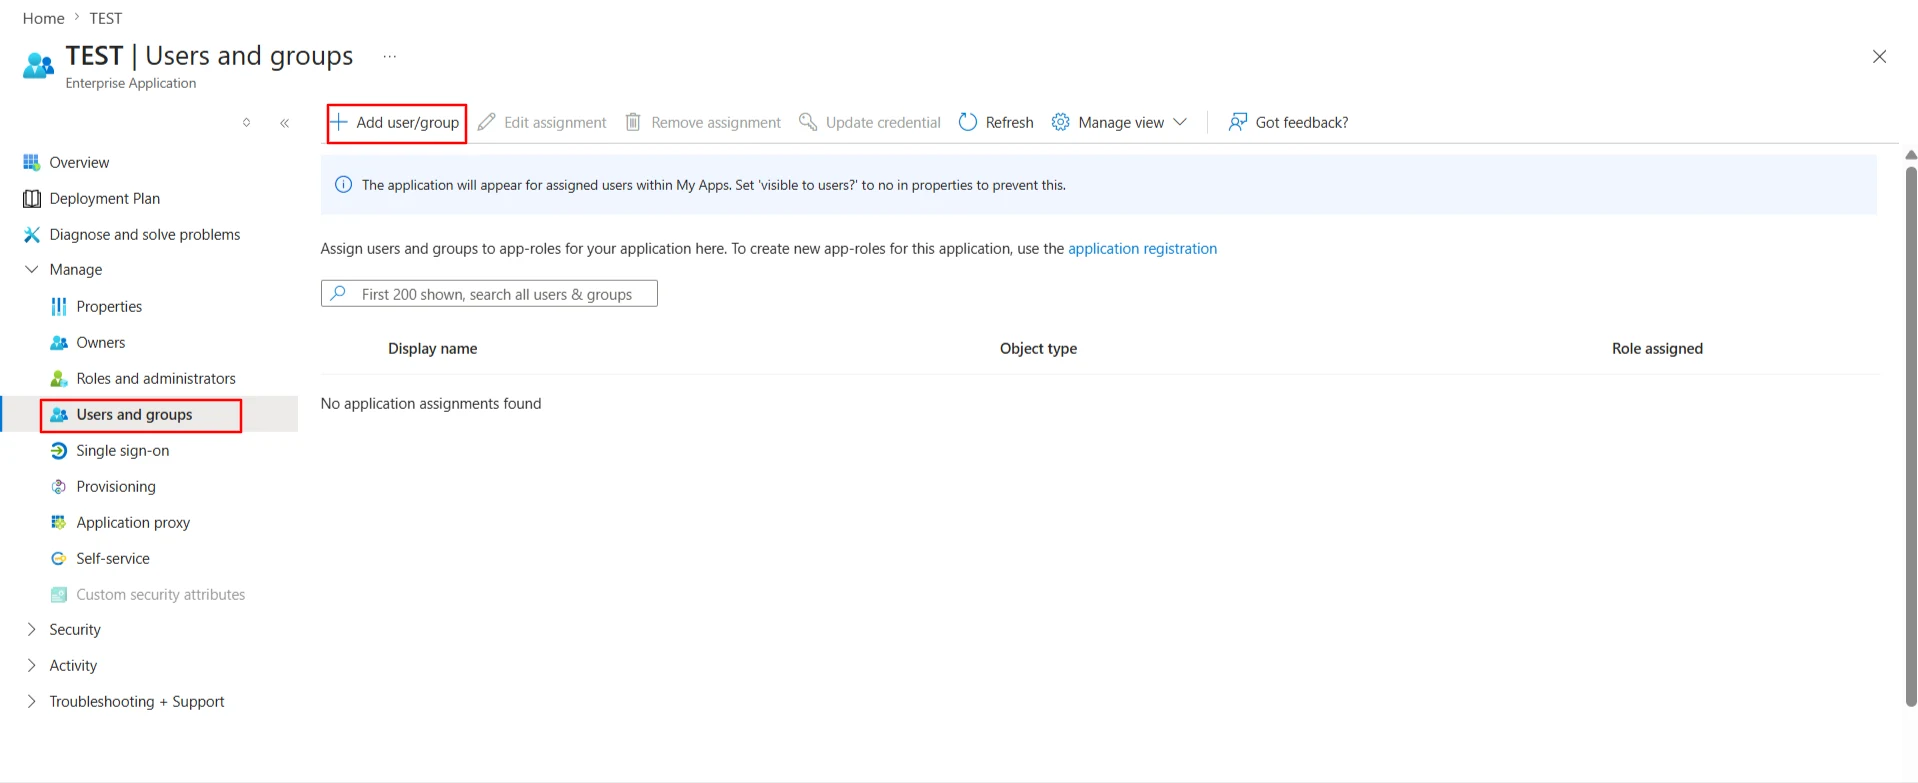
- Click on User and groups from the applications left-hand navigation menu. The next screen presents the options for assigning the users/groups to the application.


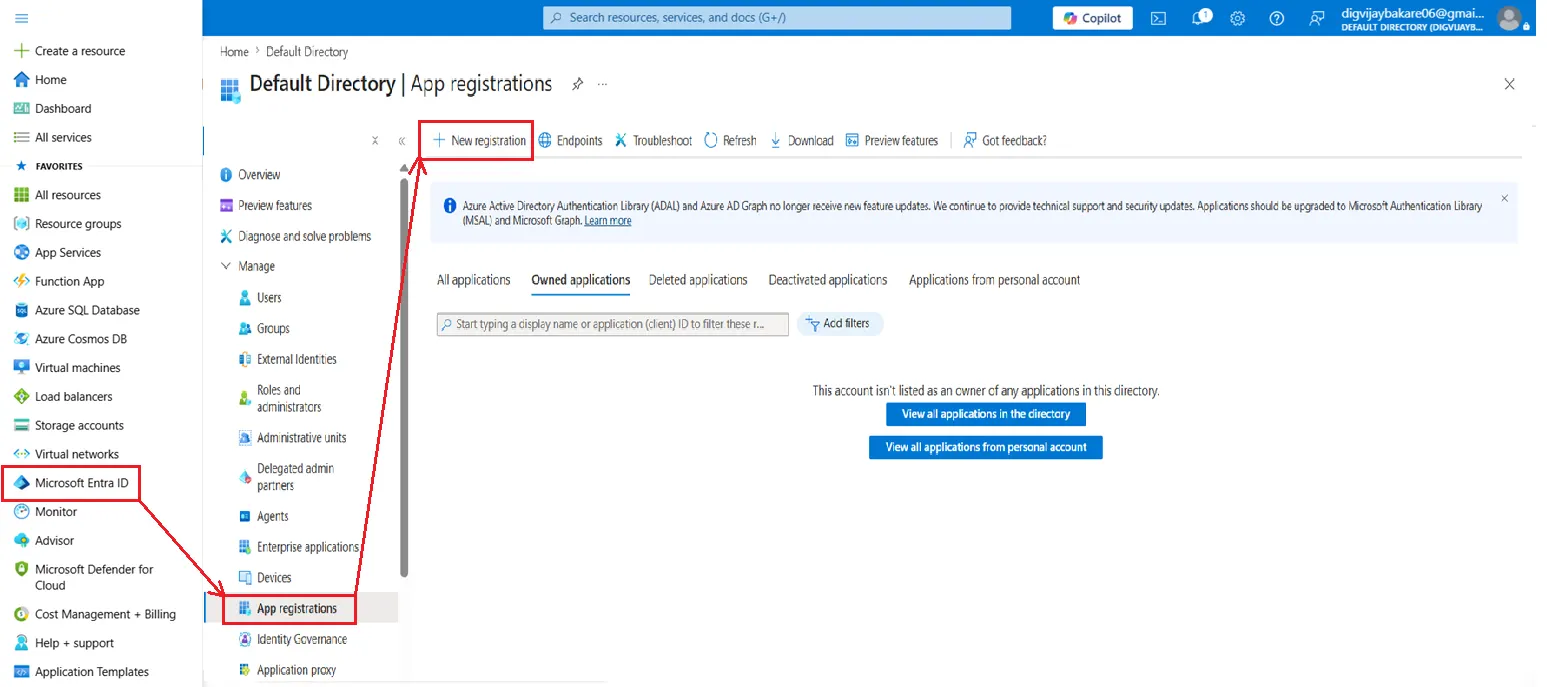
- Log in to Microsoft Entra ID (Previously known as Azure AD) Portal
- Select and Microsoft Entra ID App Registrations. Click on New Application Registration.
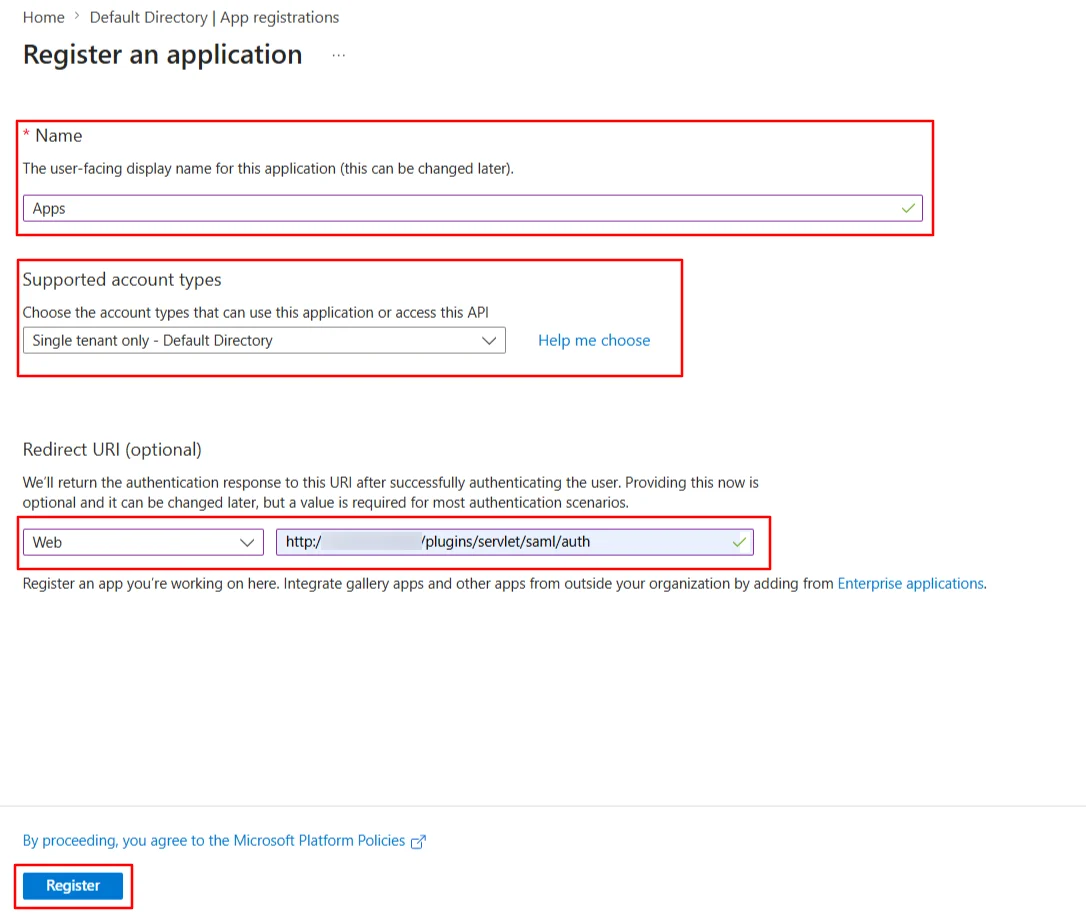
- Assign a Name and choose the account type. In the Redirect URI field, provide the ACS URL provided in the Service Provider Info tab of the plugin and click on the Register button.
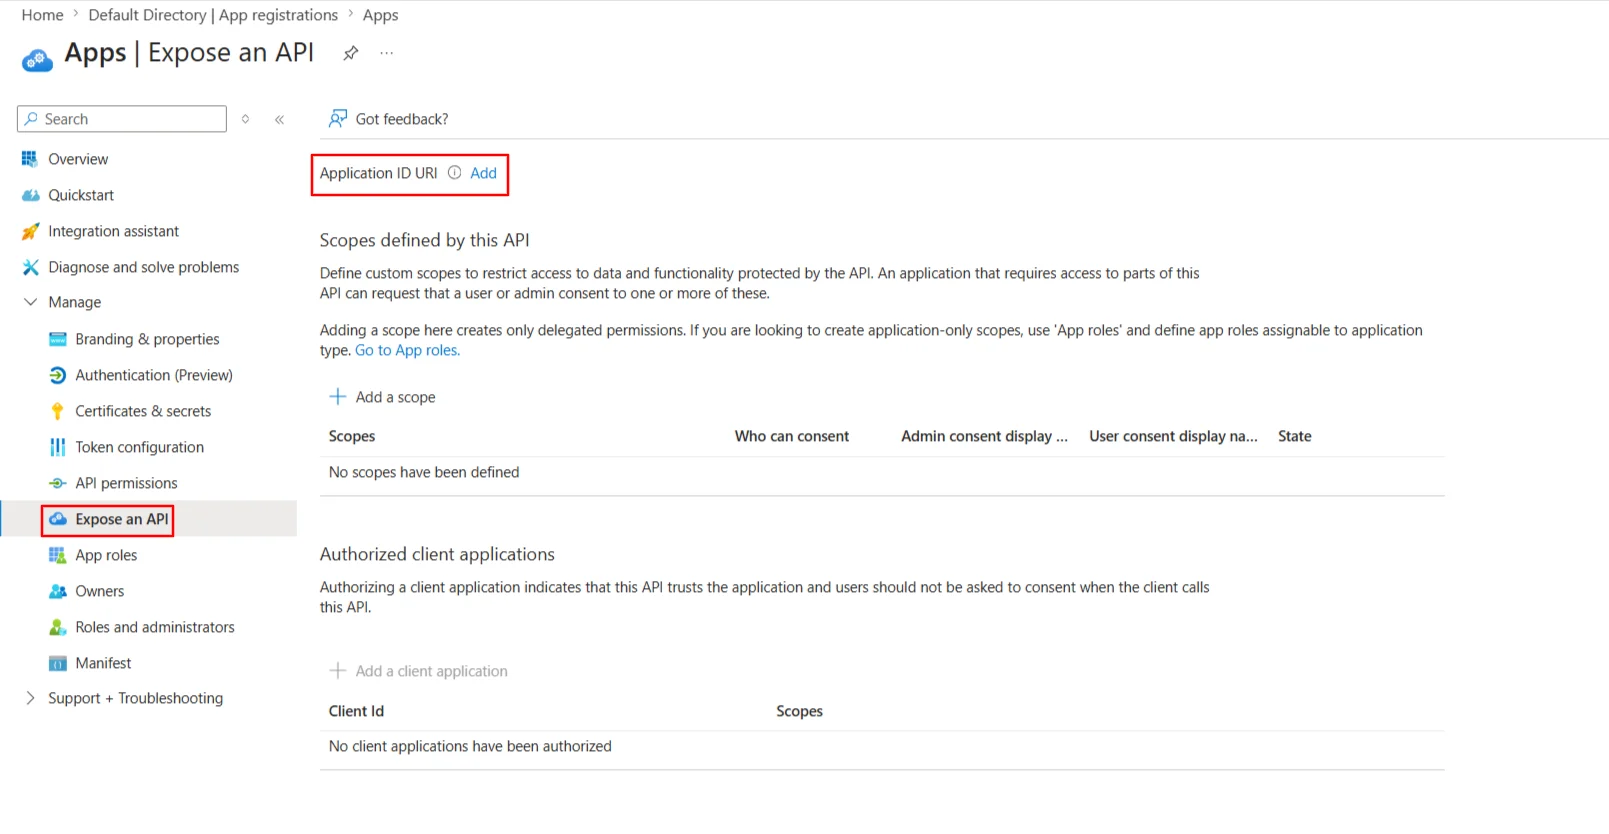
- Now, navigate to Expose an API menu option and click the Set button and replace the APPLICATION ID URI with the plugin's SP Entity ID
- By default, some Attributes will be sent in the SAML token. If you're not getting group information. Then, add Token configuration for Group information.
- Click on Add groups claim
- Copy the Federation Metadata URL given below. Replace the '{tenant_ID}' part (overview tab) with your Directory/Tenant ID. This will be required while configuring the SAML plugin.
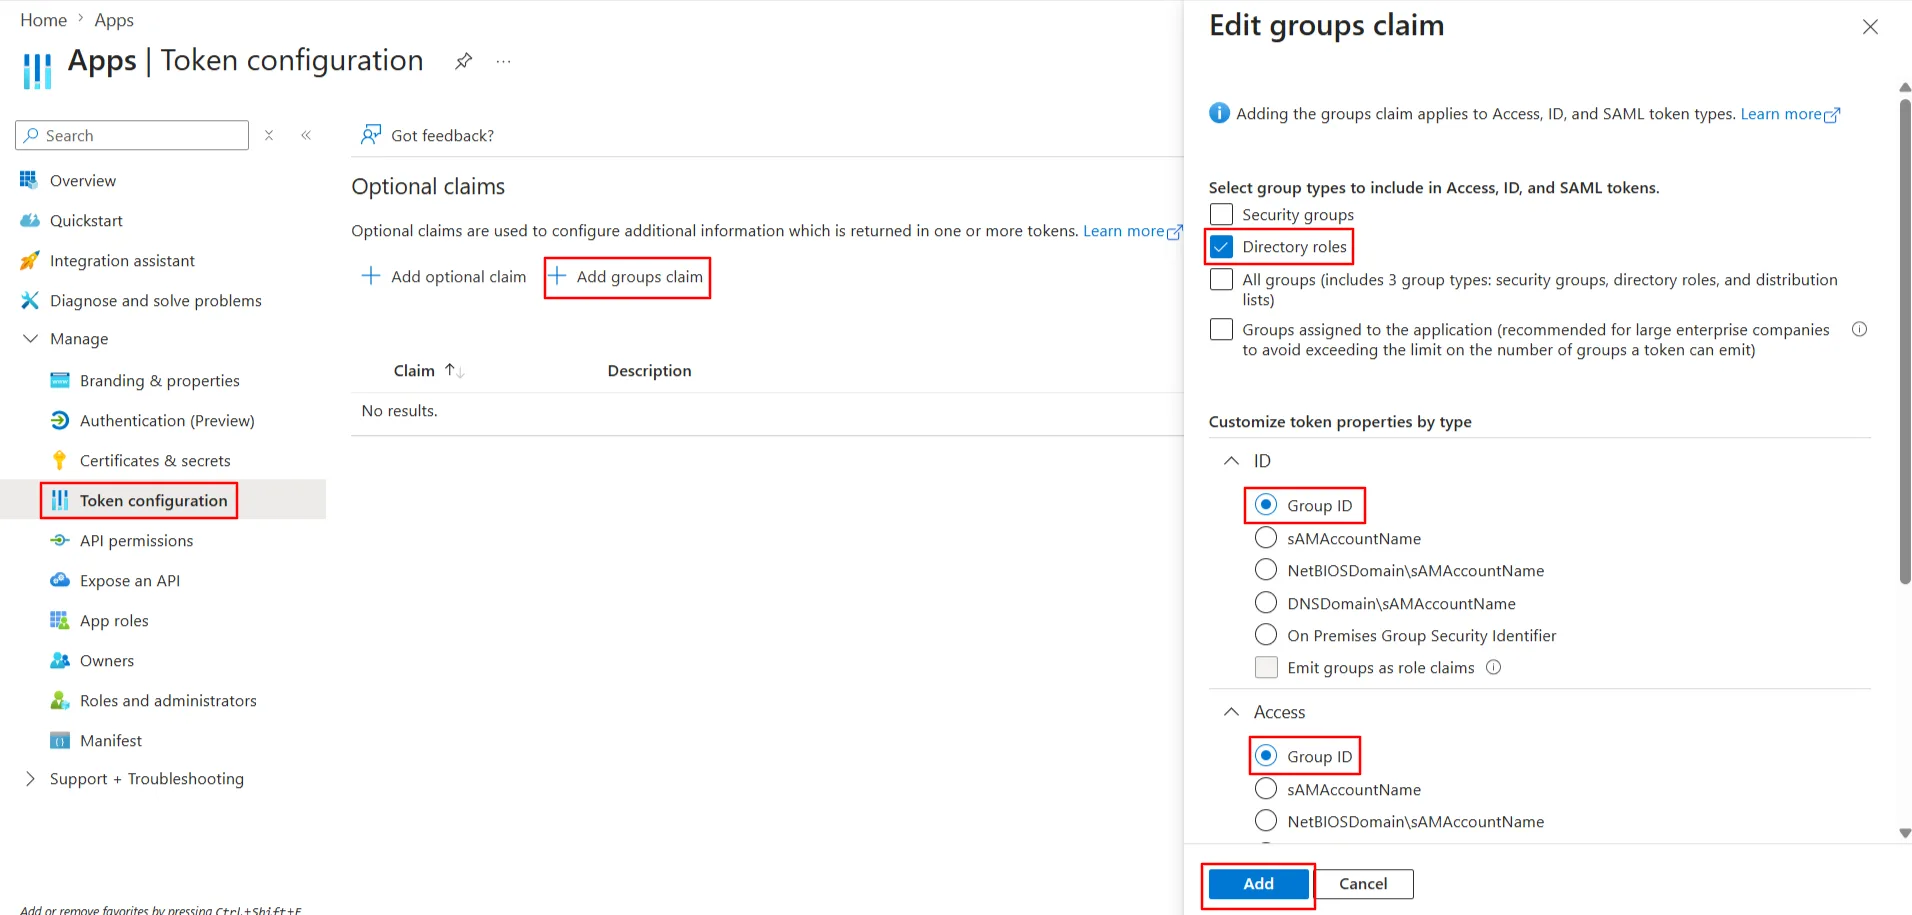
| Federation Metadata URL | https://login.microsoftonline.com/{tenant_ID}/federationmetadata/2007-06/federationmetadata.xml |
Step 1: Set Up Azure B2C as Identity Provider
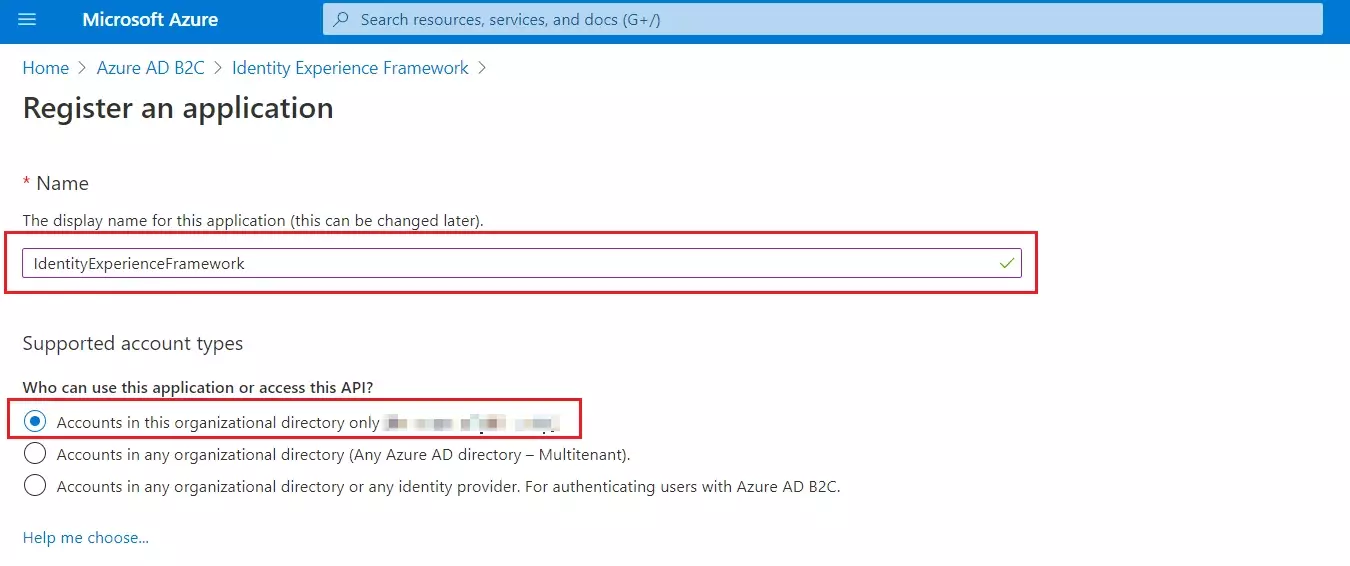
- From the Azure AD B2C tenant, select App registrations, and then select New registration.
- For Name, enter IdentityExperienceFramework.
- Under Supported account types, select Accounts in this organizational directory only.
- Under Redirect URI, select Web, and then enter https://your-tenant-name.b2clogin.com/your-tenant-name.onmicrosoft.com where your-tenant-name is your Azure AD B2C tenant domain name.
- Under Permissions, select the Grant admin consent to openid and offline_access permissions check box. Now, Select Register.
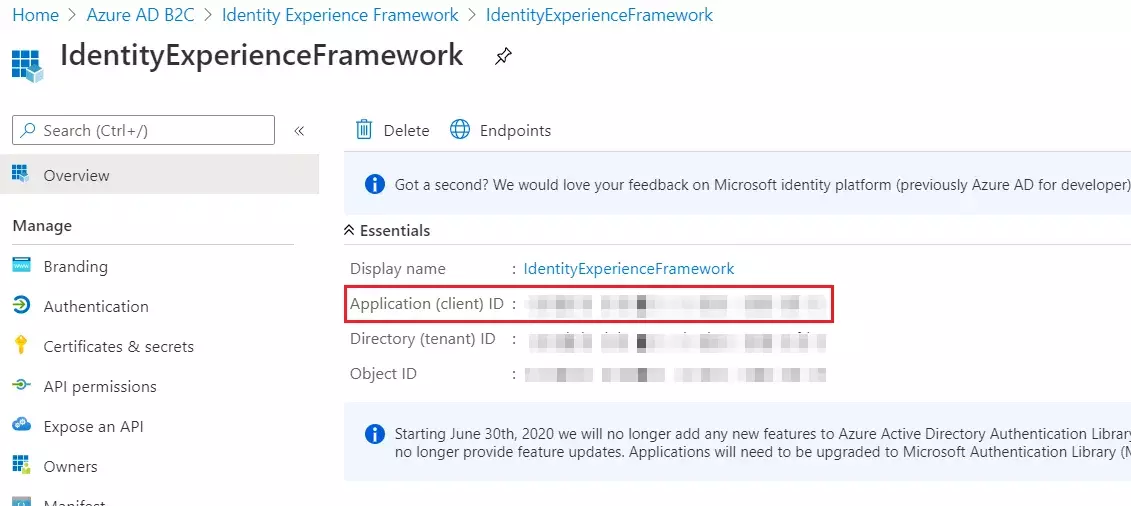
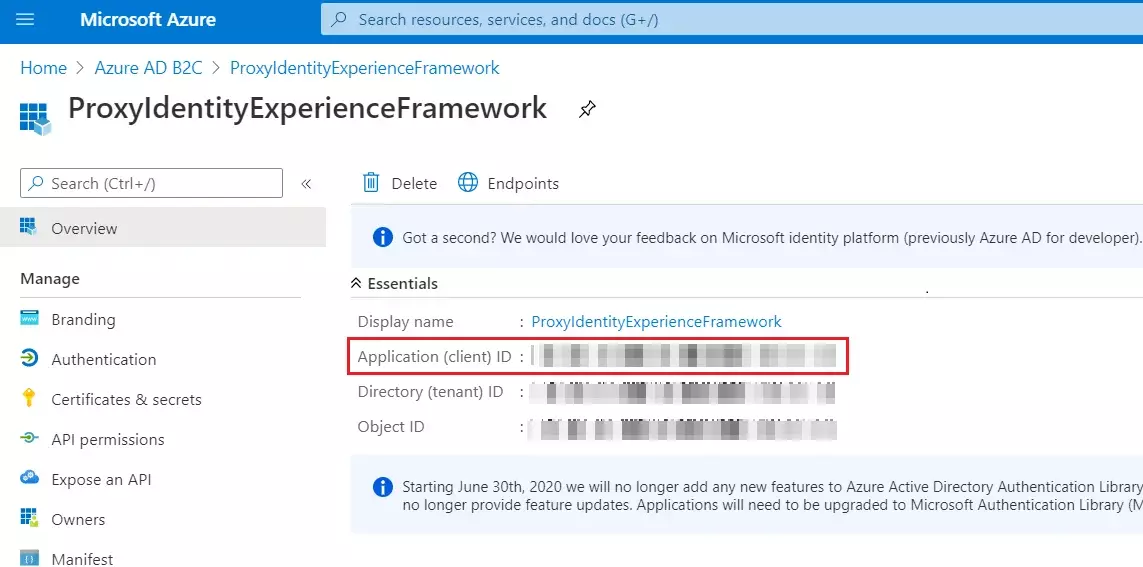
- Record the Application (client) ID for use in a later step.
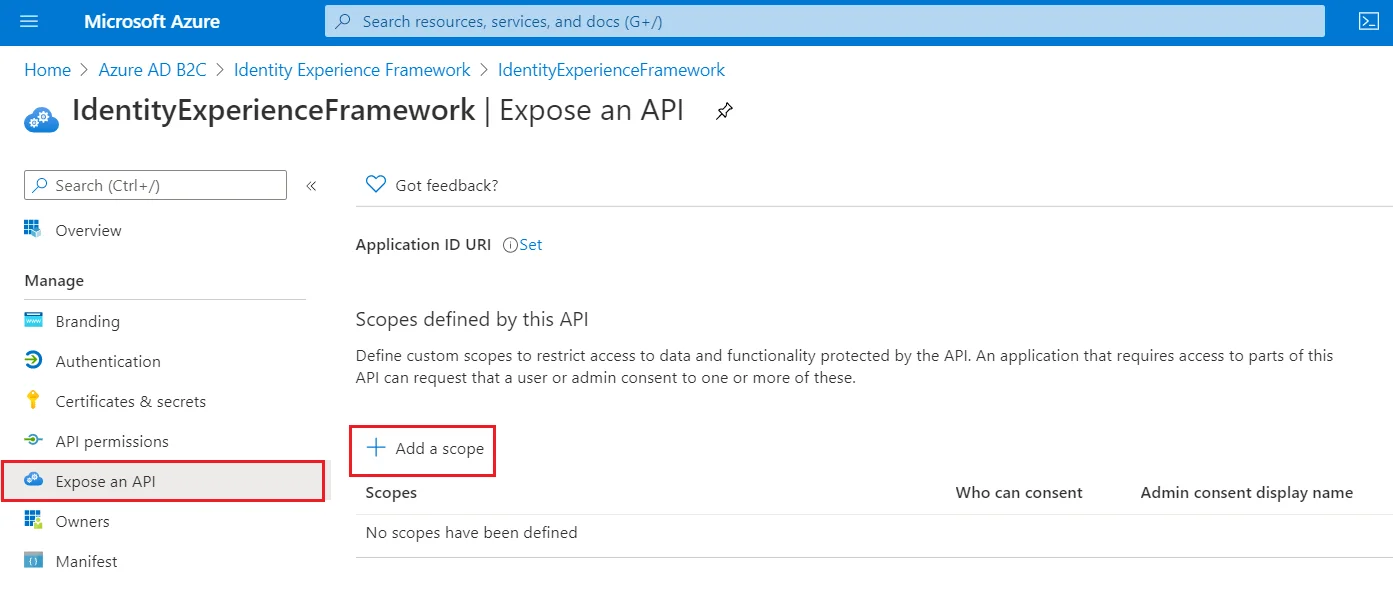
- To Expose the API add a scope under Manage, select Expose an API.
- Select Add a scope, then select Save and continue to accept the default application ID URI.
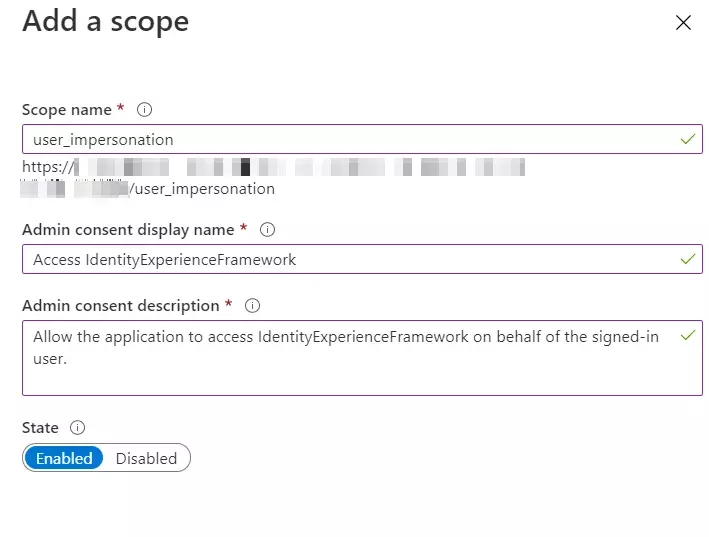
- Enter the following values to create a scope that allows custom policy execution in your Azure AD B2C tenant:
- Select Add scope and State:Enabled
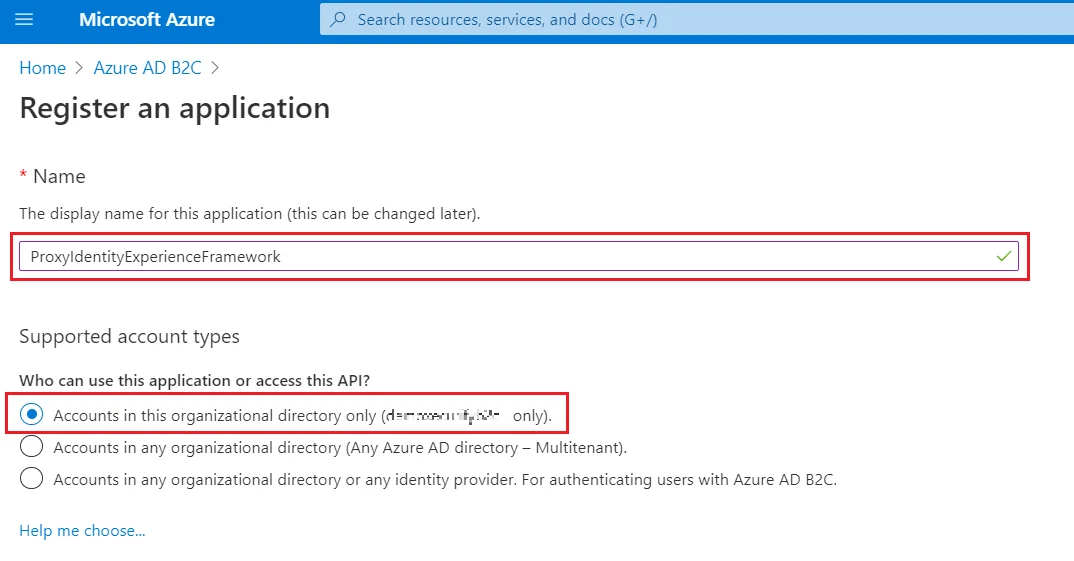
- Select App registrations, and then select New registration.
- For Name, enter ProxyIdentityExperienceFramework.
- Under Supported account types, select Accounts in this organizational directory only.
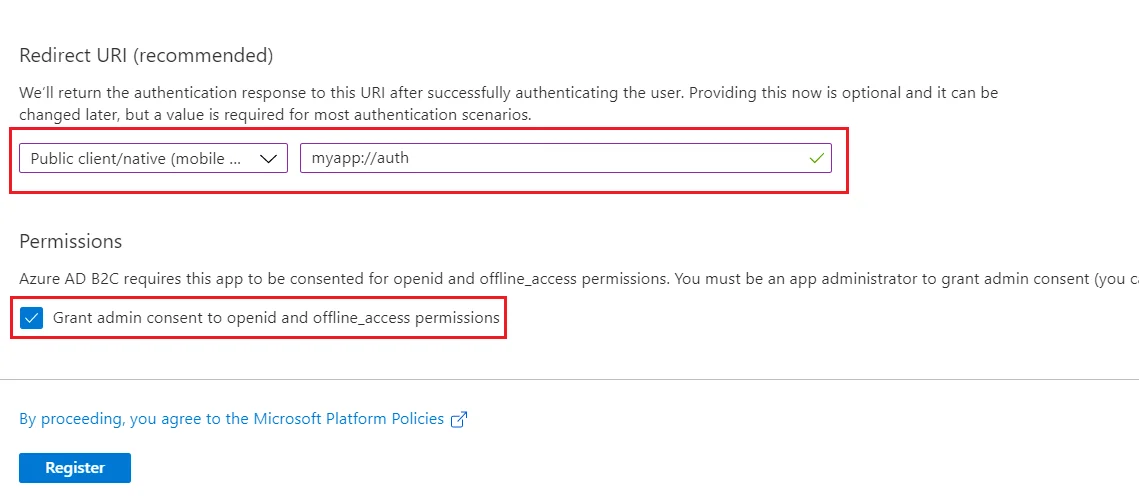
- Under Redirect URI, use the drop-down to select Public client/native (mobile & desktop).
- For Redirect URI, enter myapp://auth.
- Under Permissions, select the Grant admin consent to openid and offline_access permissions check box and select Register.
- Record the Application (client) ID for use in a later step.
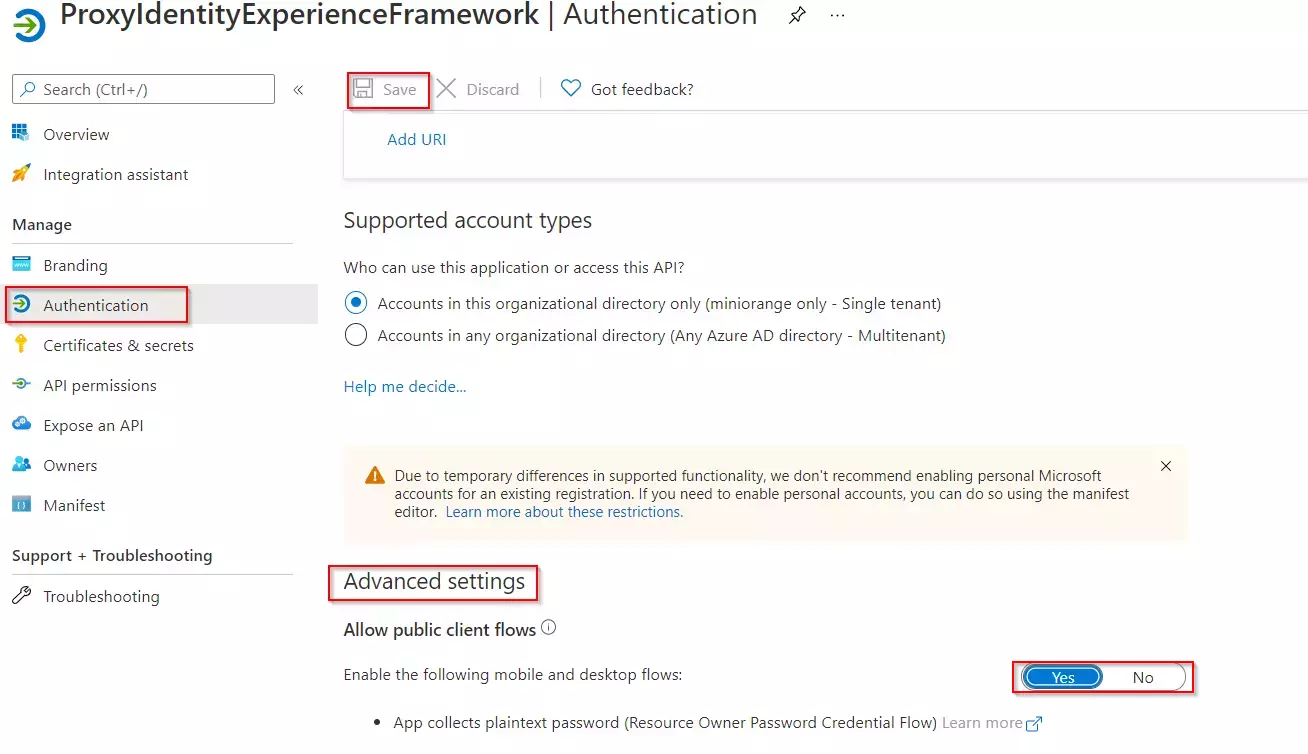
- Next, specify that the application should be treated as a public client. Under Manage, select Authentication.
- Under Advanced settings, enable Allow public client flows (select Yes).Select Save.
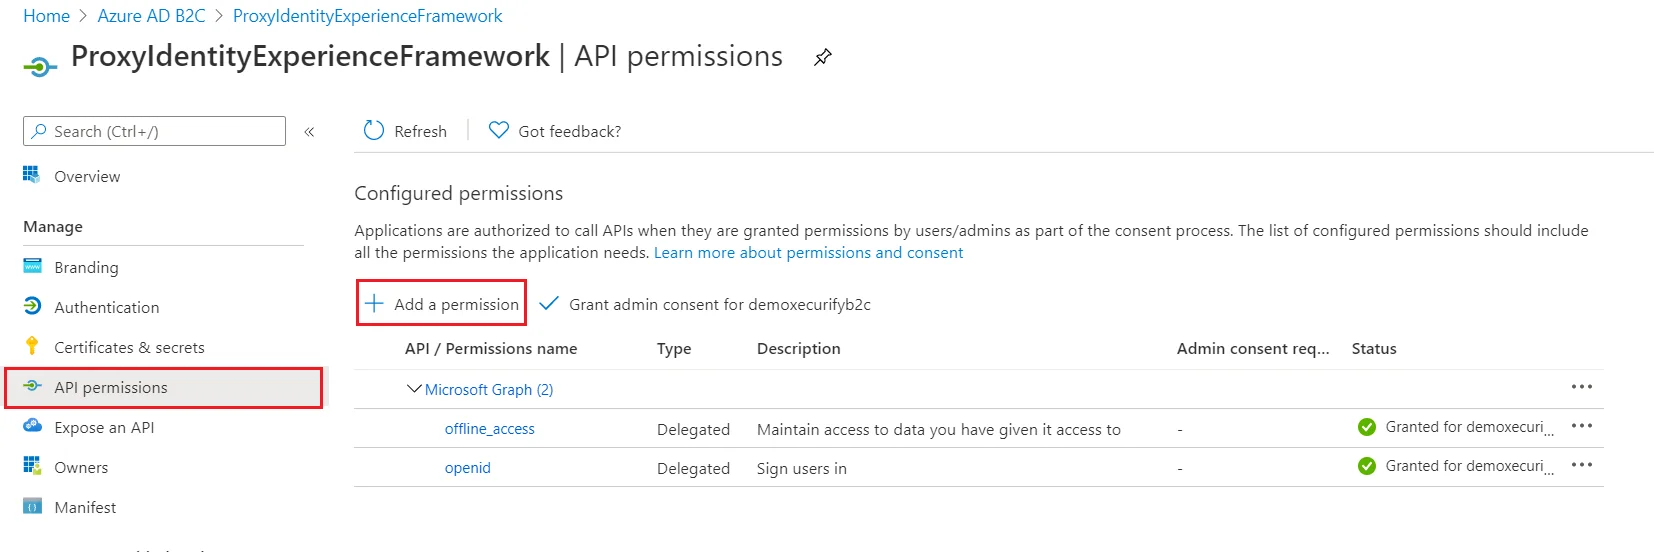
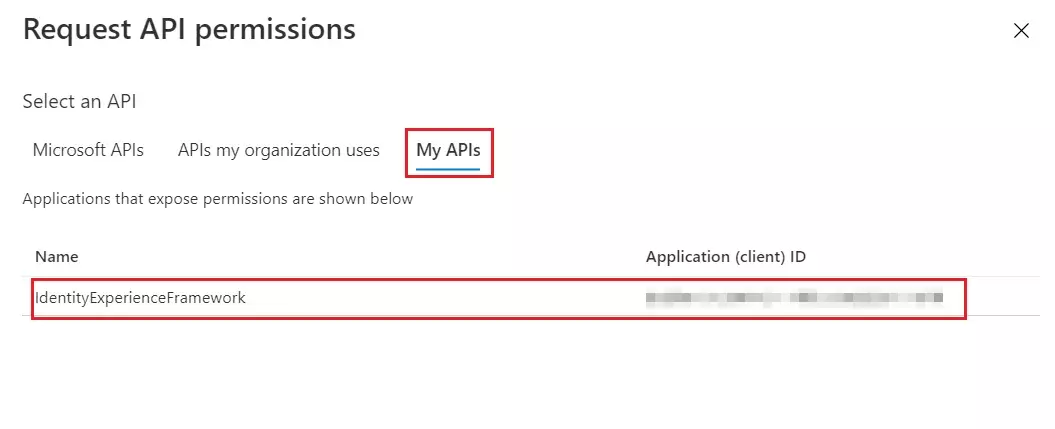
- Now, grant permissions to the API scope you exposed earlier in the IdentityExperienceFramework registration. Under Manage, select API permissions.
- Under Configured permissions, select Add a permission.
- Select the My APIs tab, then select the IdentityExperienceFramework application.
- Under Permission, select the user_impersonation scope that you defined earlier.
- Select Add permissions. As directed, wait a few minutes before proceeding to the next step.
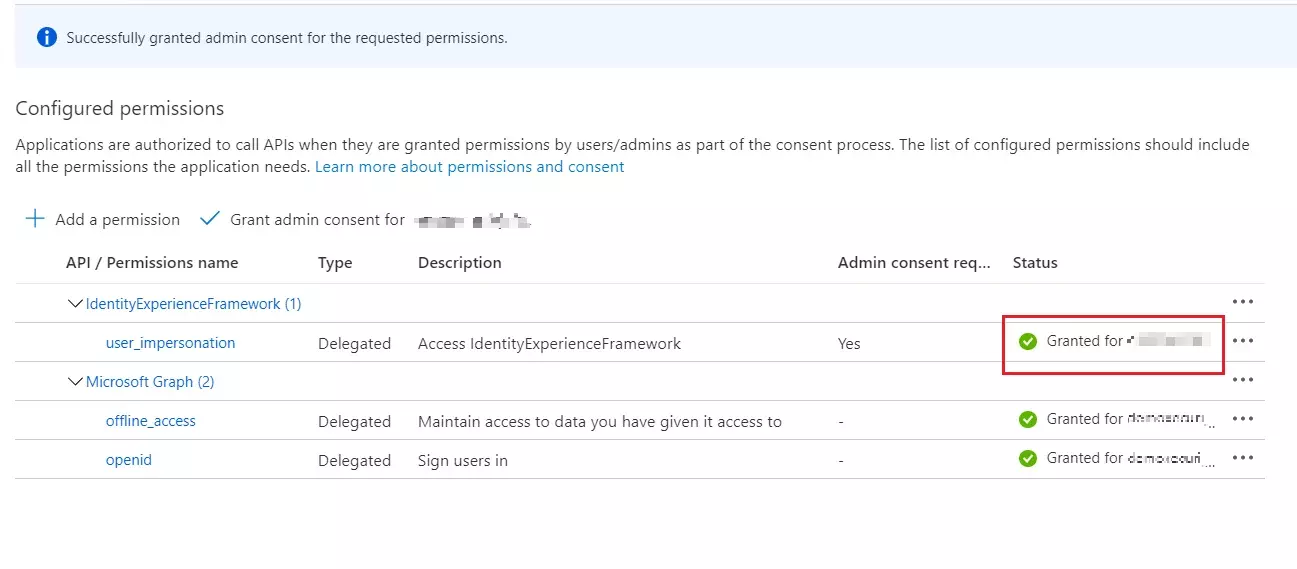
- Select Grant admin consent for (your tenant name).
- Select your currently signed-in administrator account, or sign in with an account in your Azure AD B2C tenant that's been assigned at least the Cloud application administrator role. Select Accept.
- Now Refresh, and then verify that "Granted for ..." appears under Status for the scopes: offline_access, openid and user_impersonation. It might take a few minutes for the permissions to propagate.
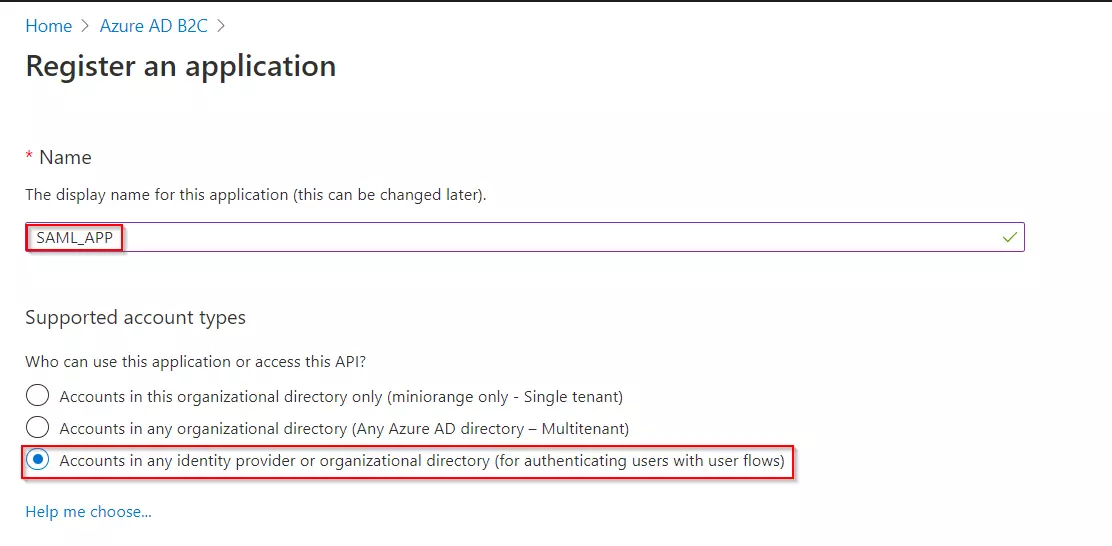
- Select App registrations, and then select New registration.
- Enter a Name for the application Eg:SAML_APP.
- Under Supported account types, select Accounts in any identity provider or organizational directory (for authenticating users with user flows).
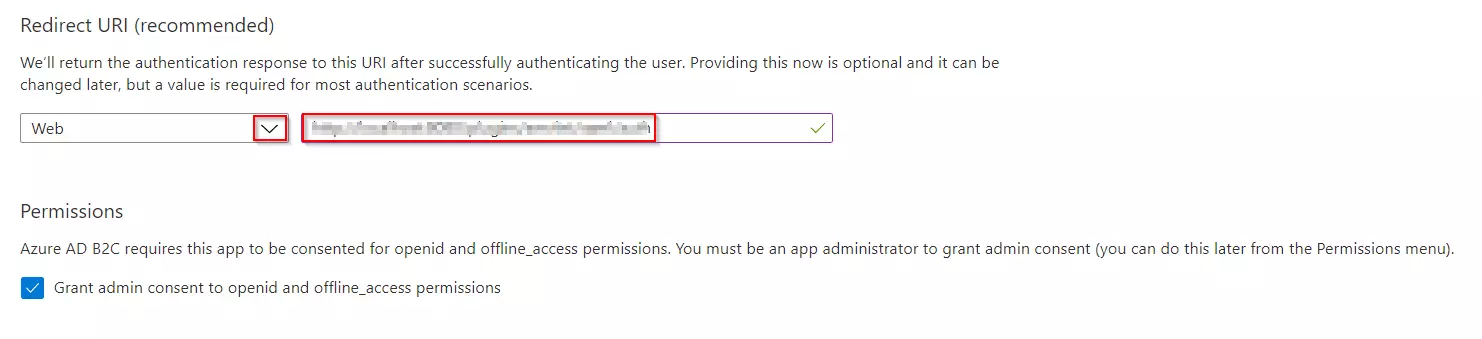
- Under Redirect URI, select Web, and then enter the ACS URL as {application_base_url}/plugins/servlet/saml/auth from the Service Provider Information tab of the miniOrange SAML SSO plugin. Select Register.
- Under Manage, click on Expose an API.
- Click on Set for the Application ID URI and then click on Save, accepting the default value.
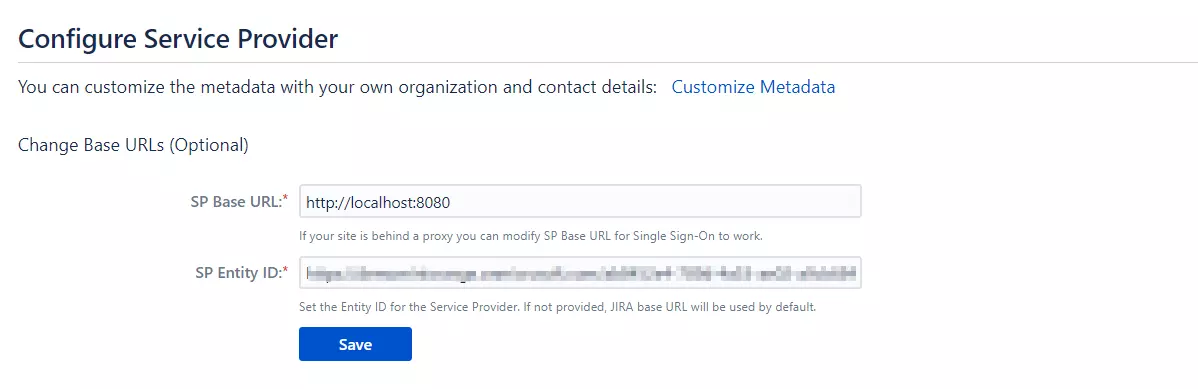
- Once saved, copy the Application ID URI and navigate to the Service Provider Information tab of the plugin.Paste the copied value under the SP Entity ID field provided in this tab. Click on Save.
- From our Azure AD B2C portal, navigate to the Overview section of your B2C tenant and record
your tenant name.
NOTE: If your B2C domain is demo.onmicrosoft.com, then your tenant name is demo. - Enter your Azure B2C tenant name below, along with the application ID for IdentityExperienceFramework and ProxyIdentityExperienceFramework apps as registered in the above steps.
Follow the steps below to configure Azure AD B2C as an Identity Provider
Register
the IdentityExperienceFramework application

| Scope name | user_impersonation |
| Admin consent display name | Access IdentityExperienceFramework |
| Admin consent description | Allow the application to access IdentityExperienceFramework on behalf of the signed-in user |
Register
the ProxyIdentityExperienceFramework application


Register
the SAML Application

Generate
SSO Policies

Upload
the Certificate
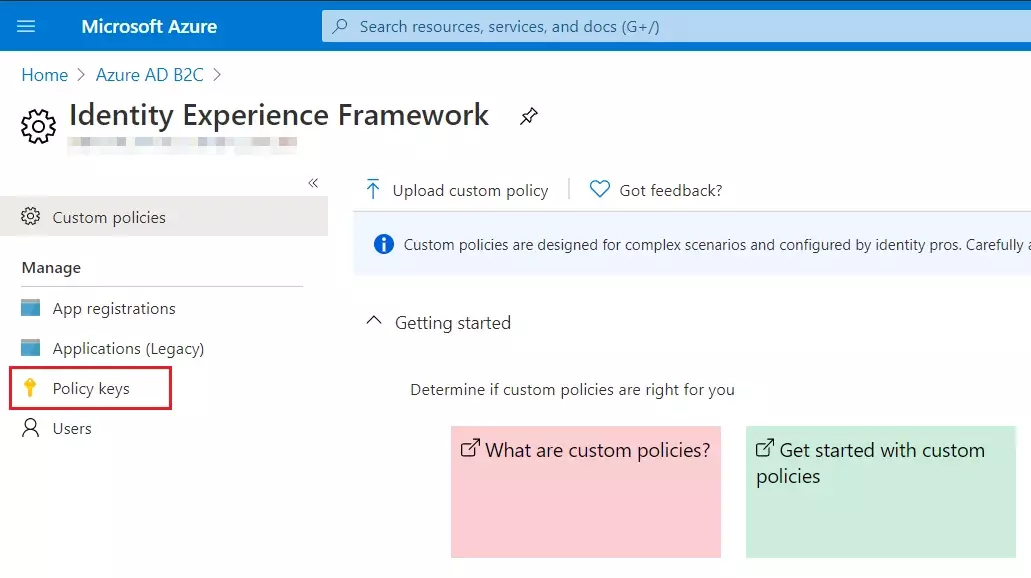
- Sign in to the Azure portal and browse to your Azure AD B2C tenant.
- Under Policies, select Identity Experience Framework and then Policy keys.
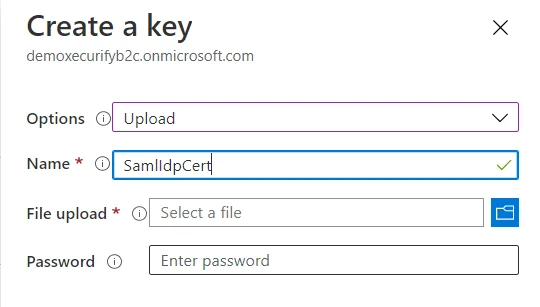
- Select Add, and then select Options > Upload
- Enter the Name as SamlIdpCert. The prefix B2C_1A_ is automatically added to the name of your key.
- Using the upload file control, upload your certificate that was generated in the above steps along with the SSO policies (tenantname-cert.pfx).
- Enter the certificate's password as your tenant name and click on Create.
For example, if your tenant name is demo.onmicrosoft.com, enter the password as demo. - You should be able to see a new policy key with the name B2C_1A_SamlIdpCert.

Create
the signing key
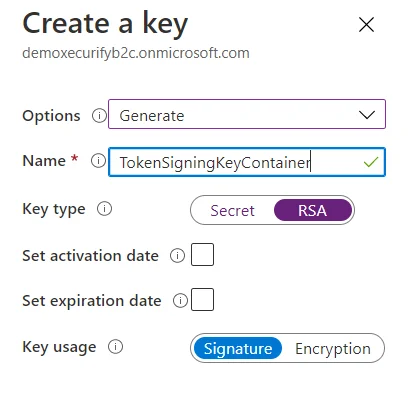
- On the overview page of your Azure AD B2C tenant, under Policies, select Identity Experience Framework.
- Select Policy Keys and then select Add.
- For Options, choose Generate.
- In Name, enter TokenSigningKeyContainer. For Key type, select RSA.
- For Key usage, select Signature. Now, Select Create.
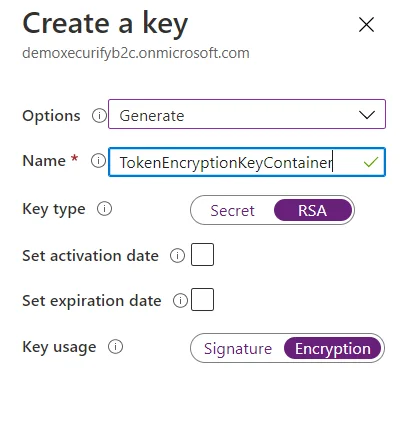
Create
the encryption key
- Follow the first three steps, used to create signing key.
- For Name, enter TokenEncryptionKeyContainer. For Key type, select RSA.
- For Key usage, select Encryption. Now, Select Create.
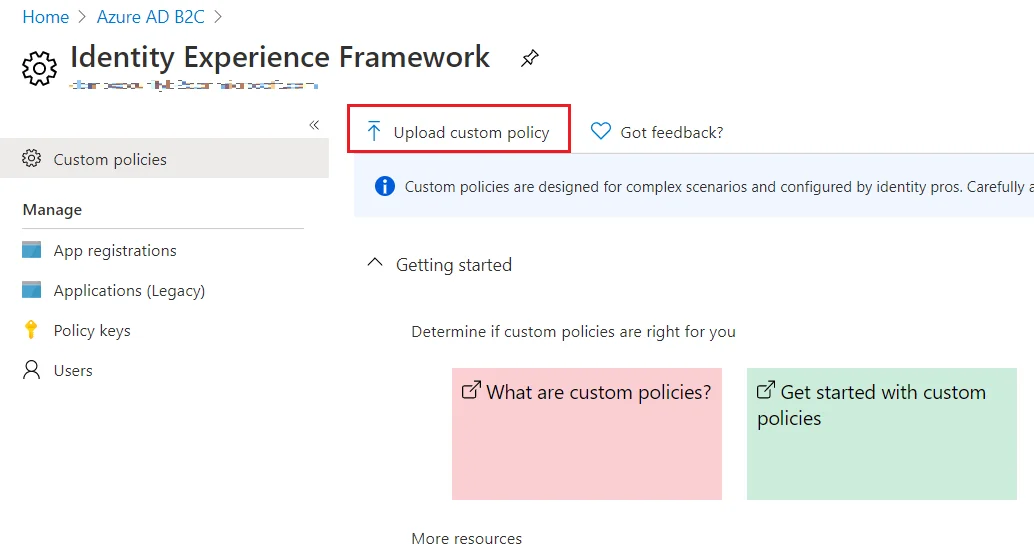
Upload
the Policies
- Select the Identity Experience Framework menu item in your B2C tenant in the Azure portal.
- Select Upload custom policy.
- As per the following order, upload the policy files downloaded in the above steps:
- As you upload the files, Azure adds the prefix B2C_1A_ to each.
| 1 | TrustFrameworkBase.xml |
| 2 | TrustFrameworkExtensions.xml |
| 3 | SignUpOrSignin.xml |
| 4 | ProfileEdit.xml |
| 5 | PasswordReset.xml | 6 | SignUpOrSigninSAML.xml |
Note: For next step, Use IDP Metadata URL as:
https://tenant-name.b2clogin.com/tenant-name.onmicrosoft.com/B2C_1A_signup_signin_saml/Samlp/metadata.
Step 1: Set Up Bitium as Identity Provider
- Login as an administrator in Bitium
- Once you have logged into your Bitium Admin portal, click on the Manage "your organization"
- Click on Manage Apps
- In the top right corner, click on Add More Apps. You'll see a search box, so search for ?custom_app? and add the app to your Bitium account.
- Click Single Sign-On tab and select SAML Authentication.
- Copy over into the following information for configuring the add-on:
-
1) Entity ID
- Paste information from SP Info tab in the plugin into Bitium
- Click Save in the application provider
- Click Save Changes in Bitium
Follow these steps to configure Bitium as an Identity Provider using SAML 2.0 Single Sign On protocol.
2) Login URL
3) Logout URL
4) X.509 Certificate
5) Metadata URL
Step 1: Set Up CA Identity as Identity Provider
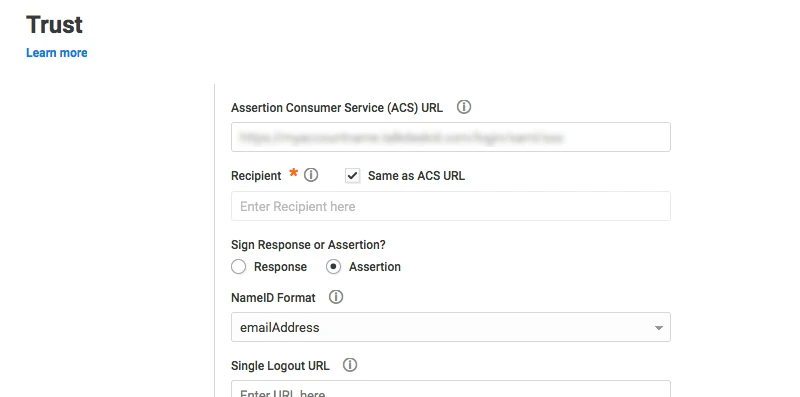
- Go to the Service Provider Info tab .
- Click on the link https://[application-Domain]/plugins/servlet/saml/metadata.
- choose Save As to save data in XML format on your system.
- Log in to your CA Identity service portal with the administrator account. You're going to be sent to the launchpad.
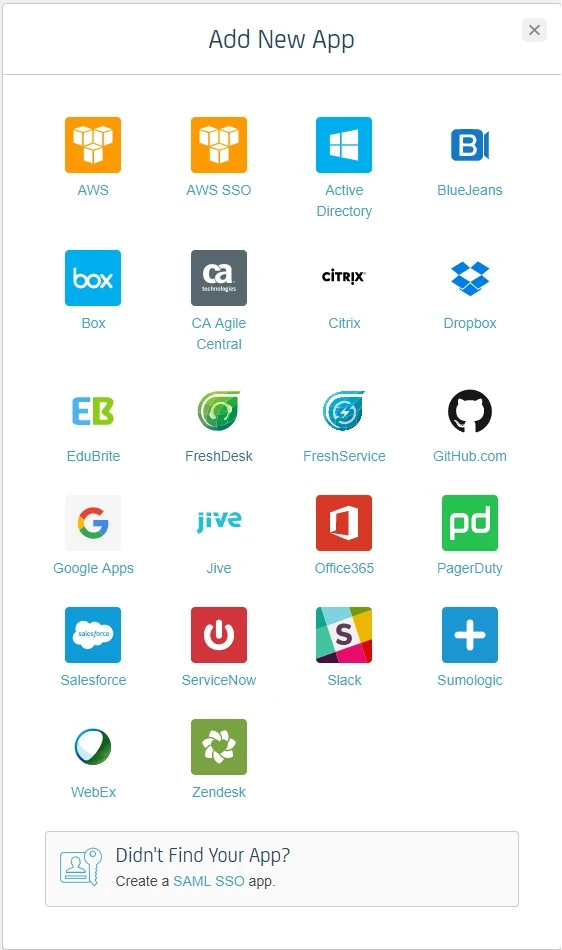
- Go to Apps and click on add an app.
- Scroll down in the Add App popup window and click Create a SSO app
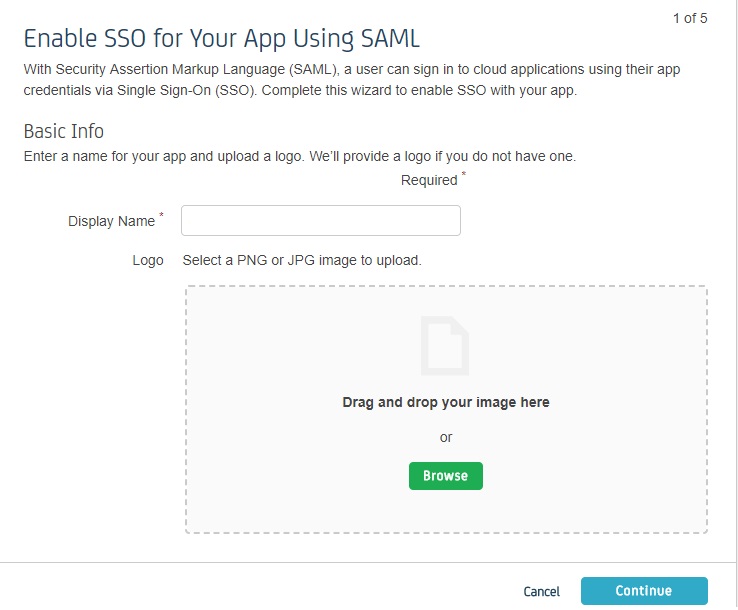
- Fill out the information in each of the steps as given below.
- In Display Name, enter the name of your app and click Continue.
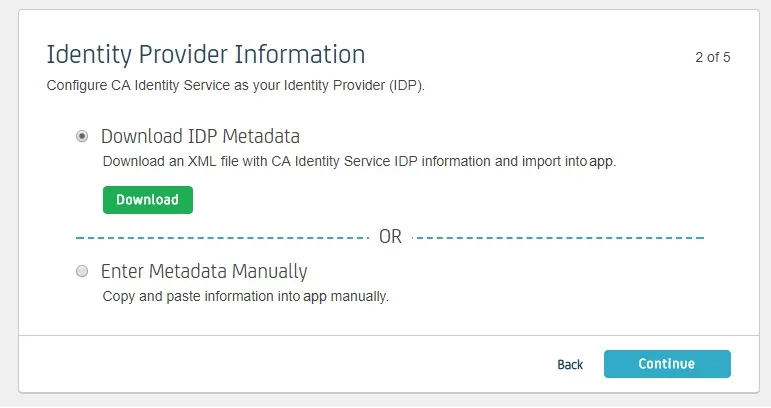
- Download IDP Metadata or you can copy the SP Entity ID and ACS URL from the plugin. This is necessary to configure the add-on later. Click on Continue.
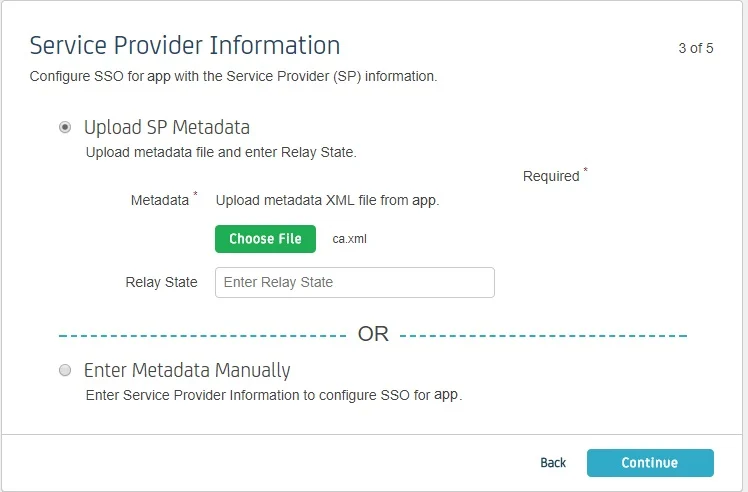
- Upload SP metadata to Upload SP metadata and click Continue.
- You can also manually enter data. The data can be found in the add- on's SP Info tab.
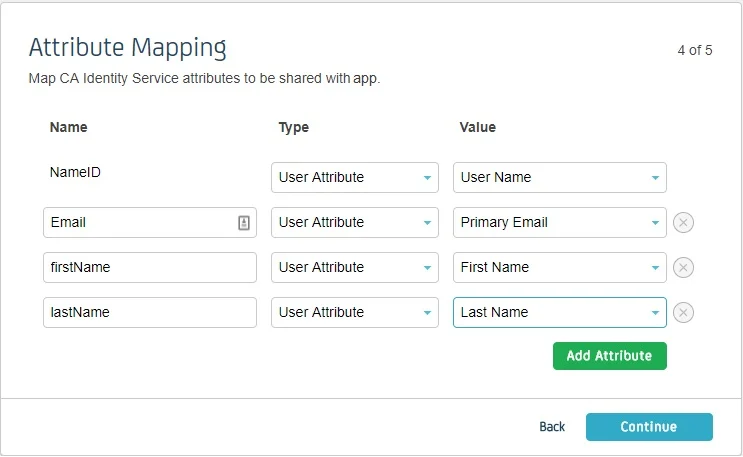
- Fill Attribute Mapping as per your requirement. Set Type against NameID to User Attribute and set Value as User Name or Primary Email. These attributes are used to create user in the SP.
- Click on Continue and click Finish .
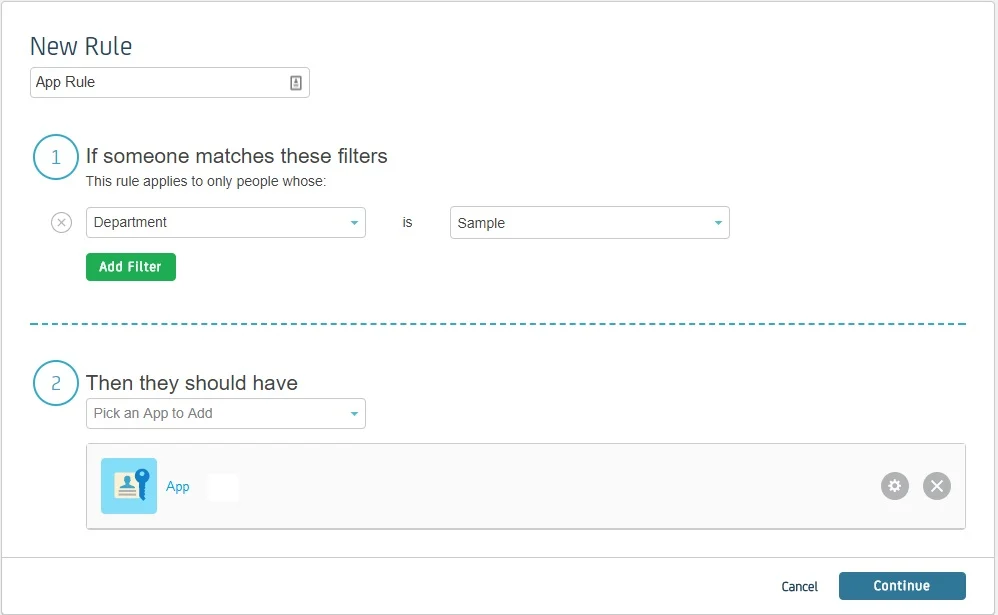
- You’ll be redirected to app Dashboard. Go to Rules. A Rule defines who has the access to app. Click on add rule.
- Enter the rule name. Click on Add Filter and select on which basis you want to assign app. You can select a department, type or title. You can add more filters according to your need. Click Continue.
- Select the SP app you setup in Then they should have. Click Continue.
- You can test the app by selecting a person from that department. Click Finish
Follow the steps below to configure CA Identity Manager as an Identity Provider.
Pre-requisite:
To configure CA Identity Manager as IDP, you need the metadata from SSO plugin.
Login as Administrator
Enable SSO for Your App Using SAML
Identity Provider Information
Service Provider Information
| Information to be entered in CA | Information to copy from the add-on |
| Assertion Consumer Service URL | ACS URL |
| Relay State | - |
| Entity ID | SP Entity ID |
| NameID Format | Email Address |
| Binding | POST |
| Requests Signed | Yes |
| Certificate | Download the certificate provided in SP Info tab and upload it here |
Attribute Mapping
Create a Rule
Step 1: Set Up Centrify as Identity Provider
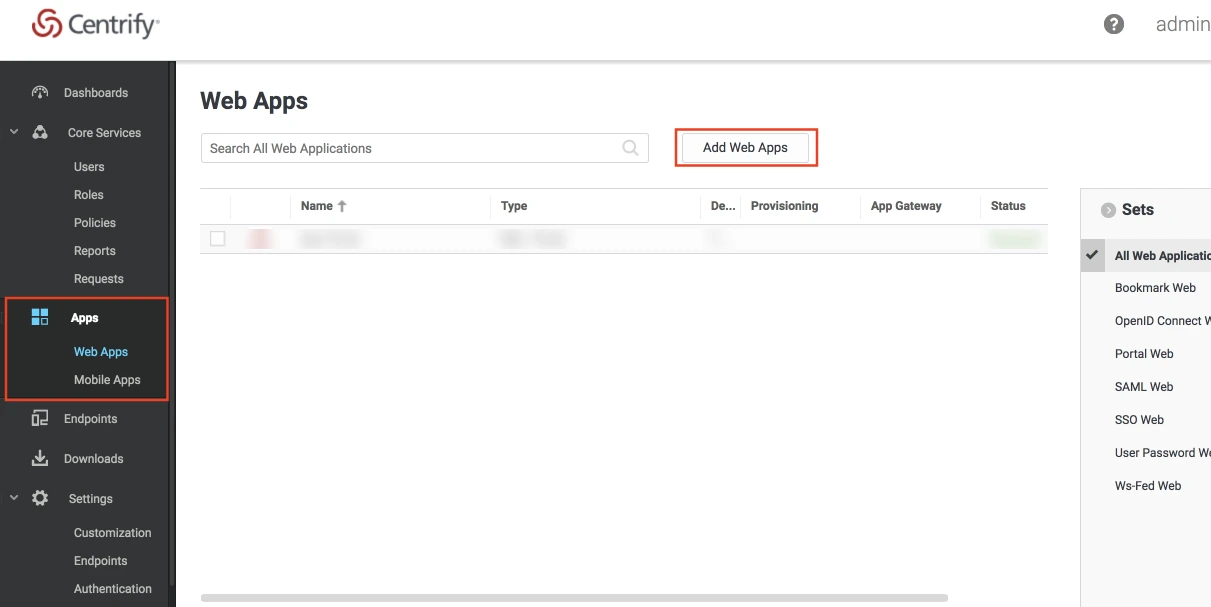
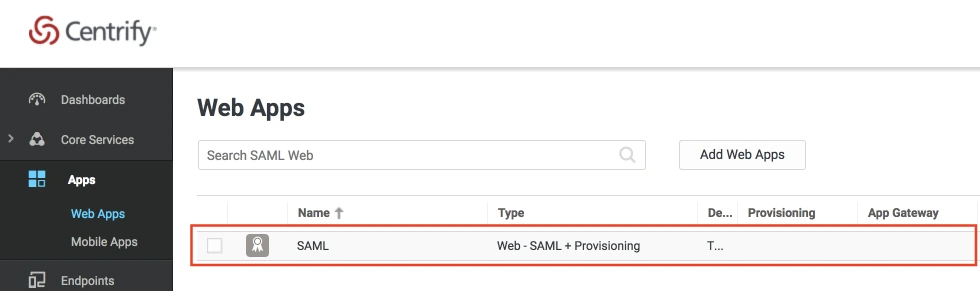
- Log into Centrify as an Administrator and click on Apps on the sidebar. Then Click on Web Apps.
- Click on the Add Web Apps button next to the search bar.
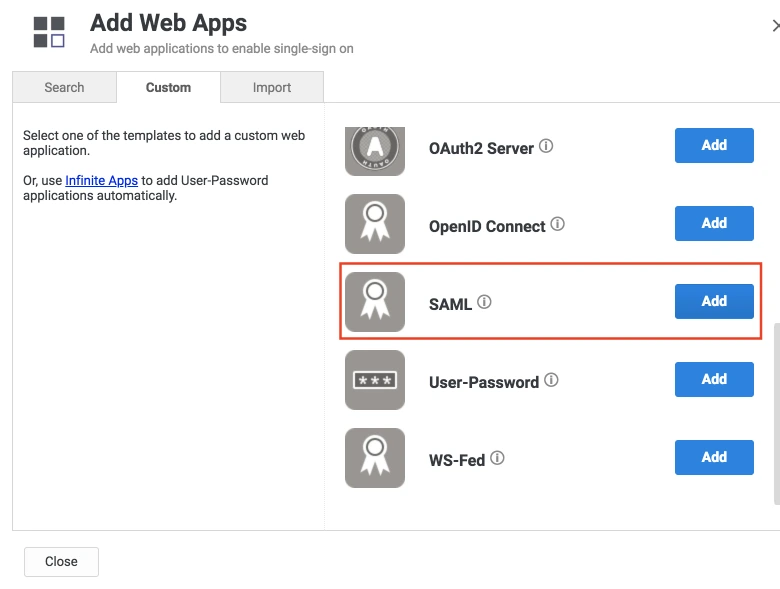
- Then select the Custom tab. Search for SAML and click on the Add button. Now press Yes to confirm.
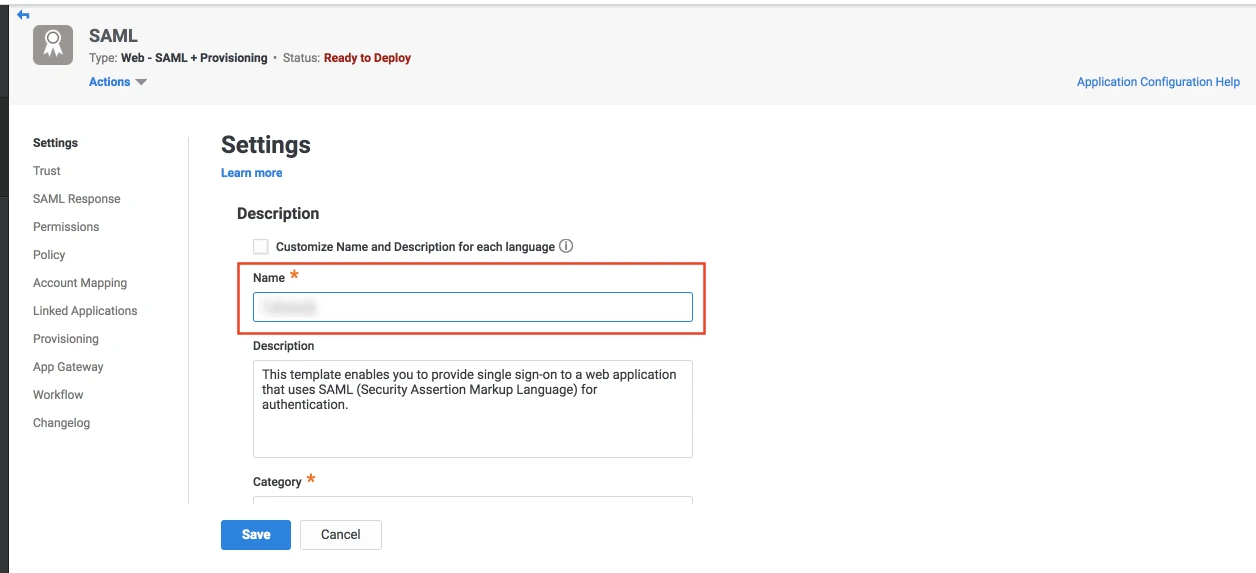
- When you create a web app, it will be listed in the Web Apps tab. Click on the newly created web app to configure.
- The name and description of the web app can be updated from this settings tab.
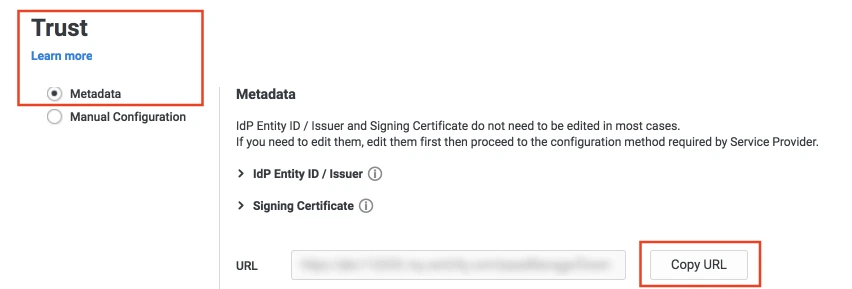
- Select the Trust tab from the sidebar. Trust tab will have metadata details for the configuration. Copy the metadata URL and save it for configuration with miniOrange.
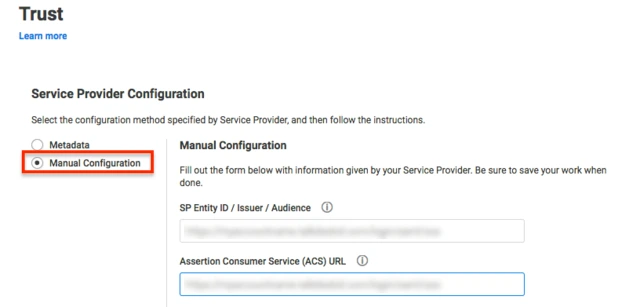
- Now scroll down until you see the Service Provider Configuration. Here you can configure the SP metadata either using the URL or manual configuration.
- Enter the configuration details and click on SAVE.
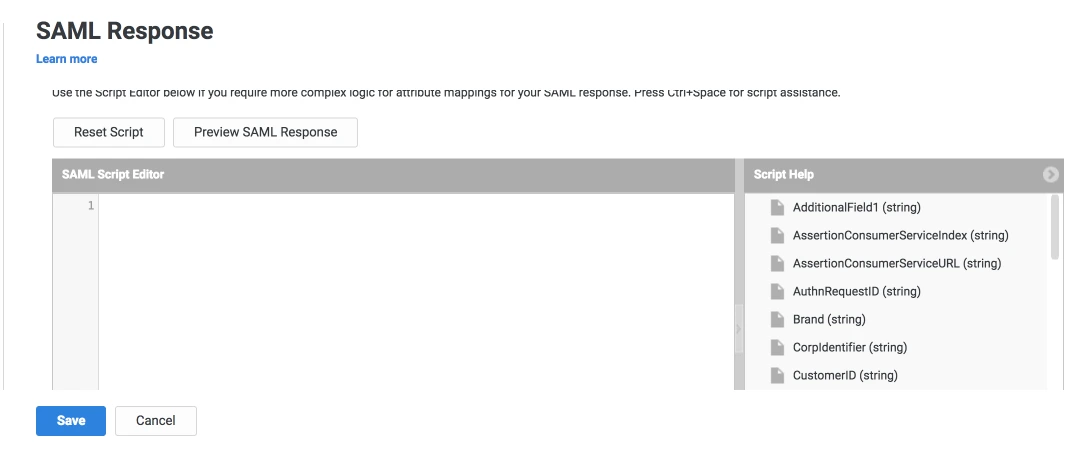
- Click on the SAML Response tab from the left sidebar.
- Here, you can map attributes from your source directory to SAML attributes that will be returned with the response.
- Also, Centrify provides a script editor under the custom logic section in the SAML Response tab to add more complex logic to map attributes.
- You will have to add below functions to the code -
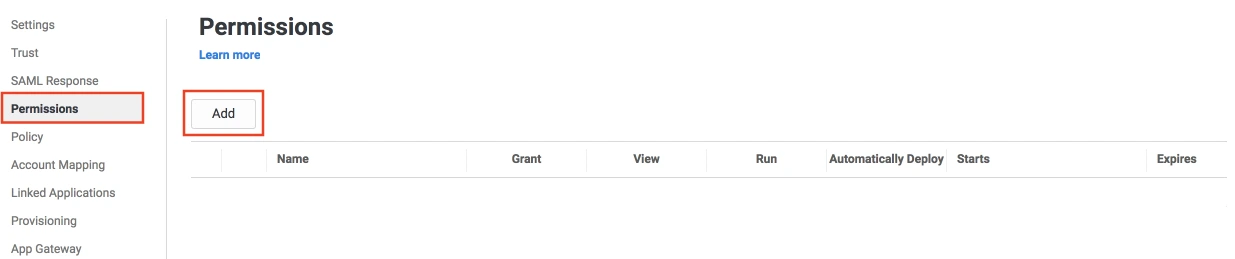
- From the left sidebar, select Permissions.
- Click on the Add button. The Select User, Group, or Role dialog will appear.
- Select the users, groups, or roles that will be accessing this web app. The role rules will be displayed on the User Access card.
- Click on the Save button.
Create SAML App
Configure SAML App
| setAudience() | SP-EntityID / Issuer from Step 1 of the plugin under the SP Info Tab. E.g: setAudience('https://example.com') |
| setRecipient() | Recipient URL from Step 1 of the plugin under the SP Info Tab. E.g: setRecipient('https://example.com/plugins/servlet/saml/auth') |
| sethttpsDestination() | Destination URL from Step 1 of the plugin, under the SP Info Tab. E.g: sethttpsDestination('https://example.com/plugins/servlet/saml/auth') |
Step 1: Set Up Duo as Identity Provider
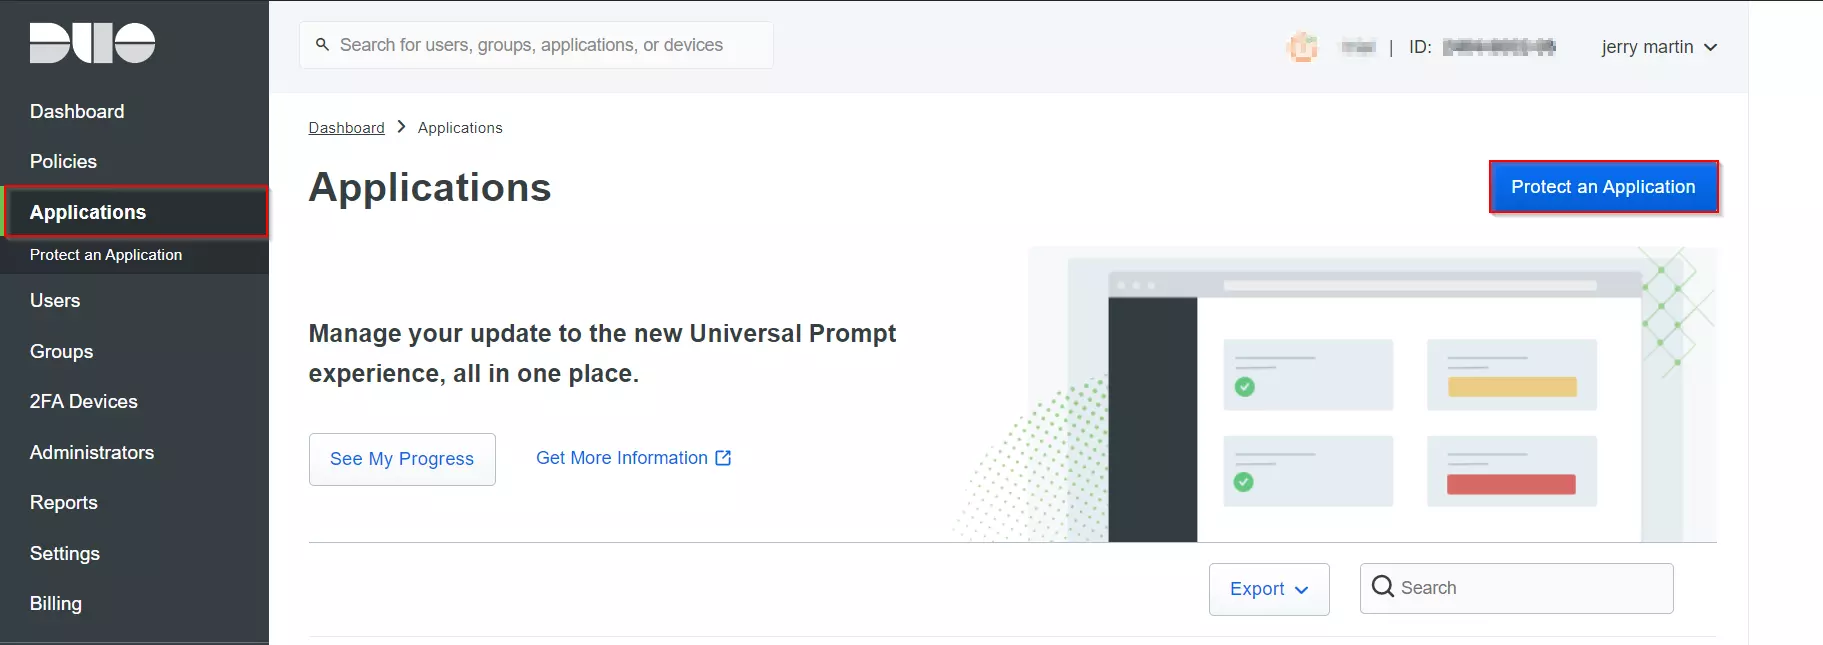
- Login to your Duo Admin Panel instance.
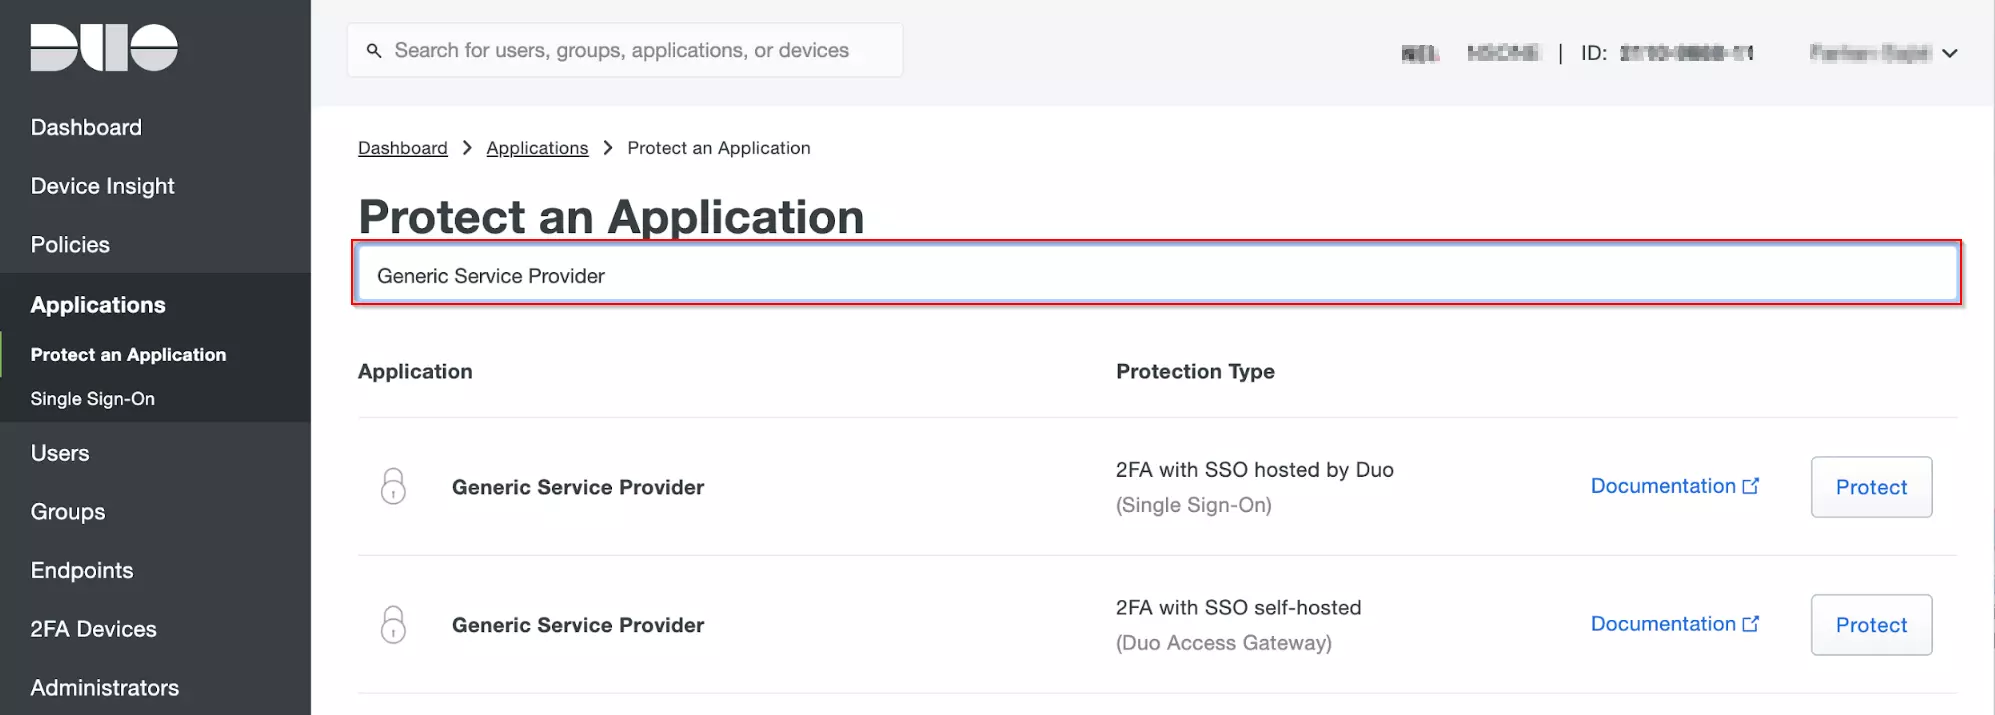
- Navigate to Applications and Click on the Protect an Application.
- Locate the entry for your Atlassian app (like Jira, Confluence or Generic Service Provider), with a protection type of "2FA with SSO self-hosted (Duo Access Gateway)" in the Applications list and click on the Protect.
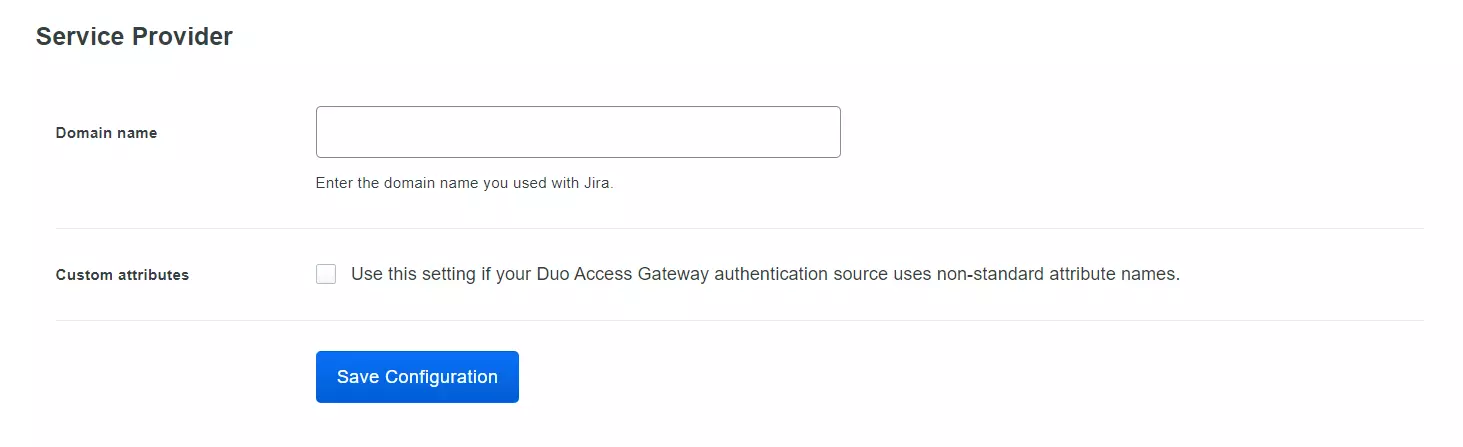
- Enter the Domain name of your app environment. For example, if your Jira login URL is https://yourdomain.com then enter yourdomain.com in this field.
- Standarly Duo maps sAMAccountName, but if you want to use a non-standard username attribute for your authentication source, check the Custom attributes box and enter the name of the attribute you wish to use instead.
- And click on the Save Configuration button.
- Now click the Download your configuration file link to obtain the Application settings details (as a JSON file).
Create
your Application in DUO
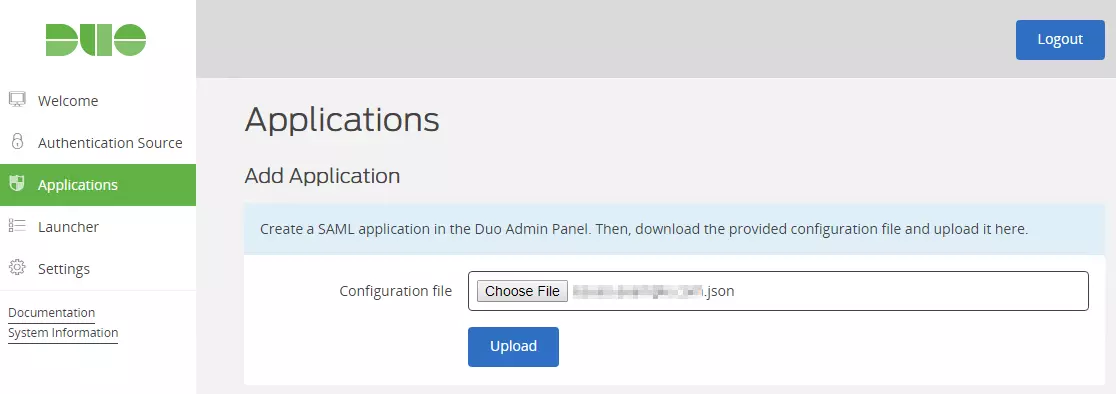
- Go to the Applications page of the DAG admin console session.
- Click on the Choose File button in the "Add Application" section of the page. Locate and upload Application JSON file you downloaded from the Duo Admin Panel earlier.
- And your Application will be added.
Add your SSO Application to
Duo Access Gateway
Step 1: Set Up Google Apps as Identity Provider
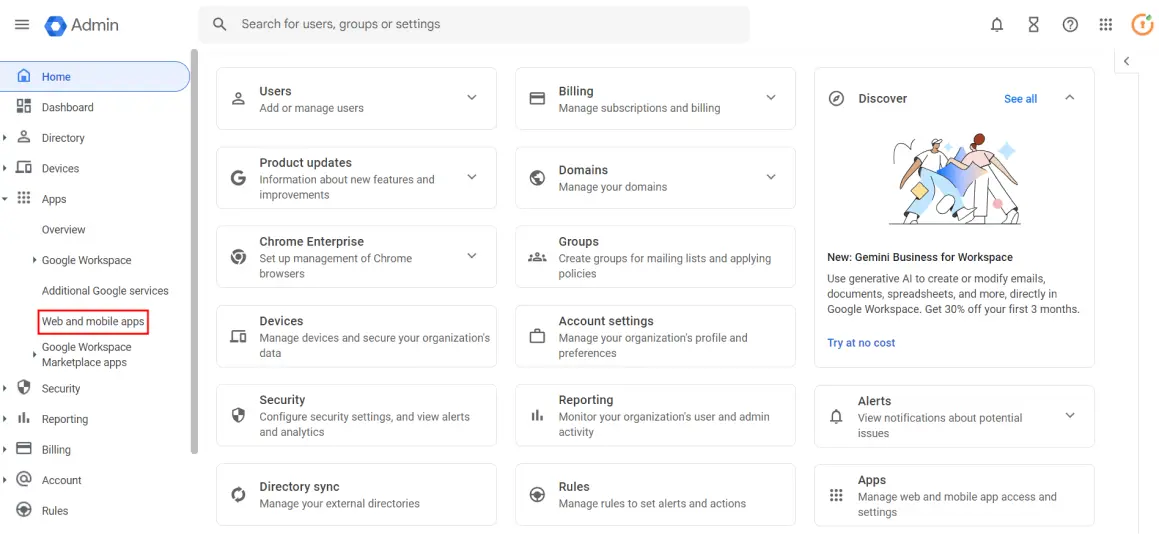
- Go to Google Admin Console and log in with your G Suite administrator account.
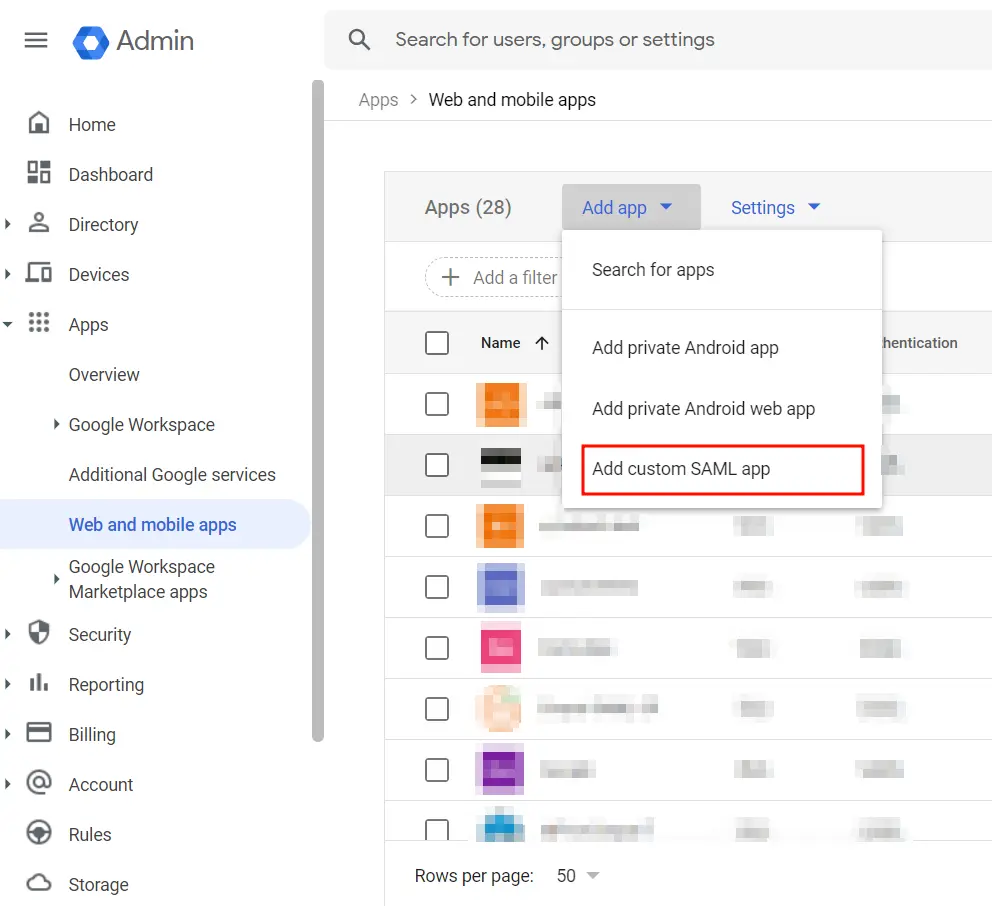
- Navigate to the Apps tab in the left menu and click on Web and mobile apps.
- Click on the Add App, then select Add Custom SAML app from the dropdown to create a new SAML app.
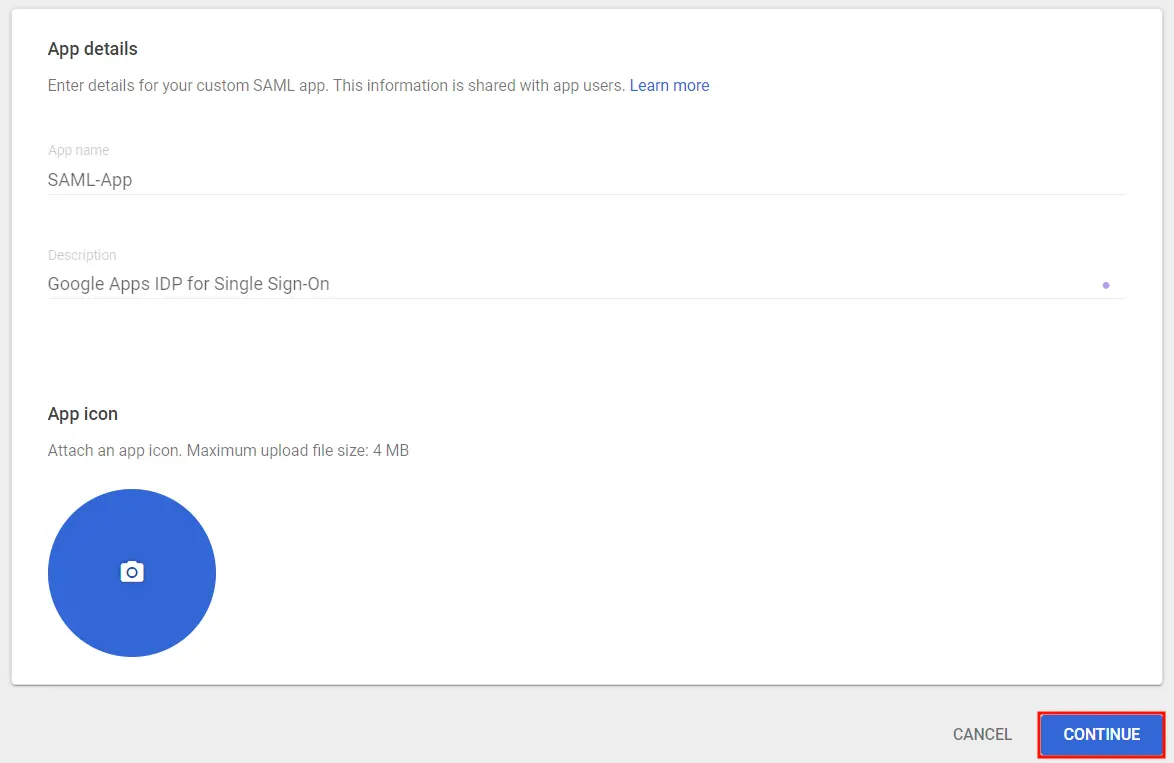
- Enter the details for your custom SAML app and click Continue.
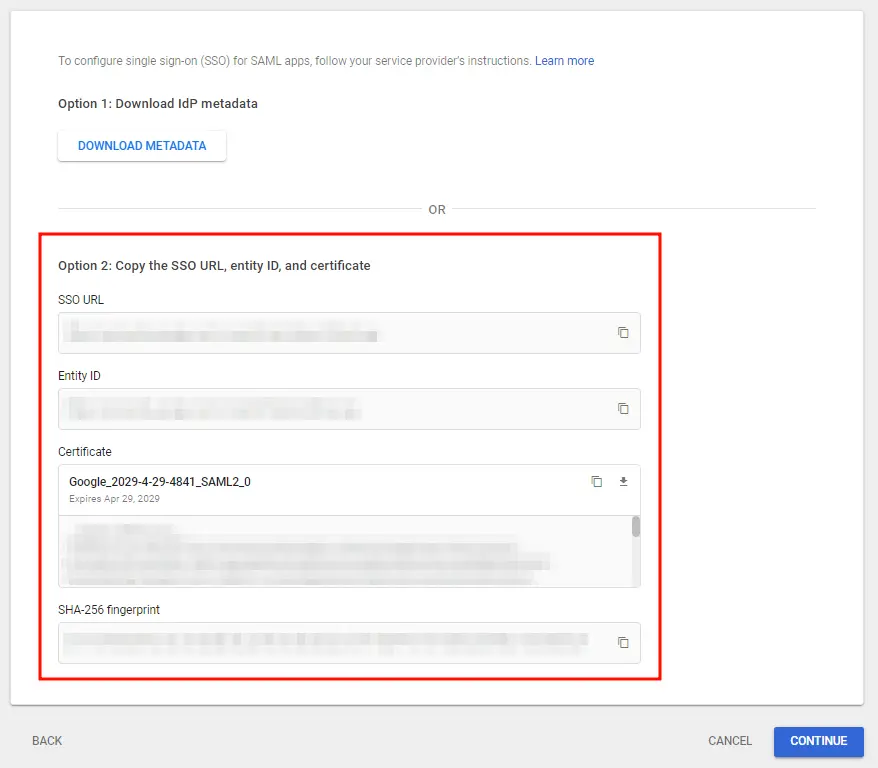
- On the next screen, click on Download Metadata to retrieve data needed to configure your Service Provider.
- Alternatively, you can copy GSuite details like SSO URL, Entity ID and Certificate to configure the Service Provider manually.
- Click Continue once you’re done.
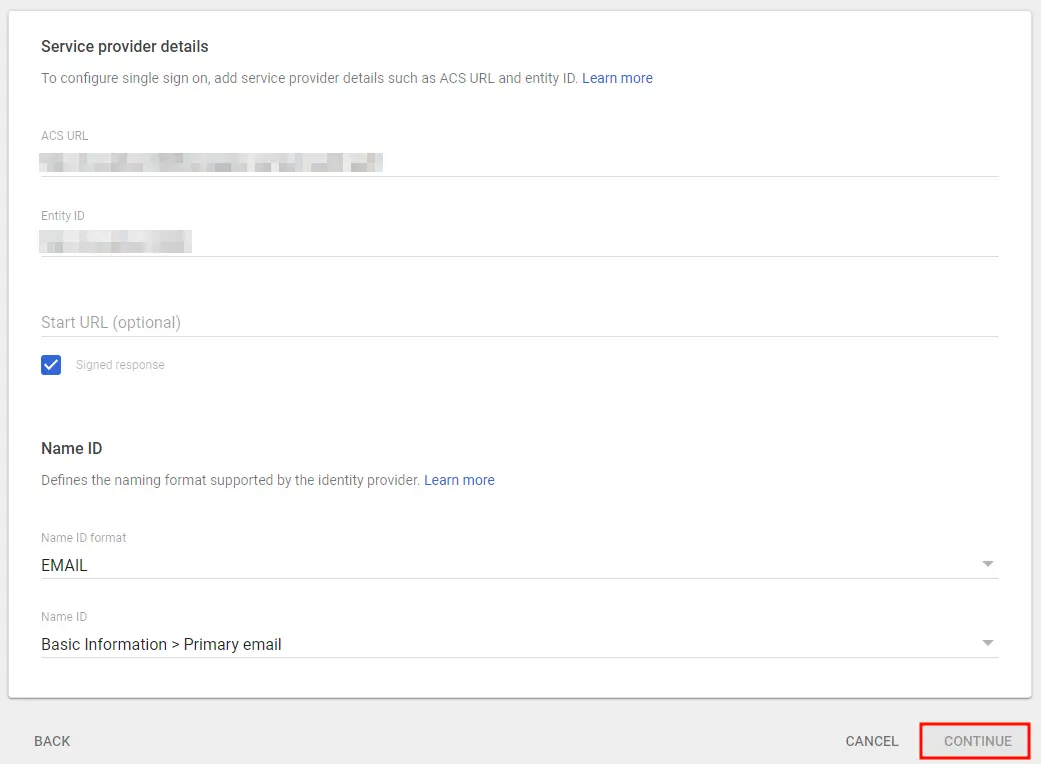
- Enter details from the Service Provider Metadata tab in the SAML SP plugin.
- Click Continue once you’re done entering the details.
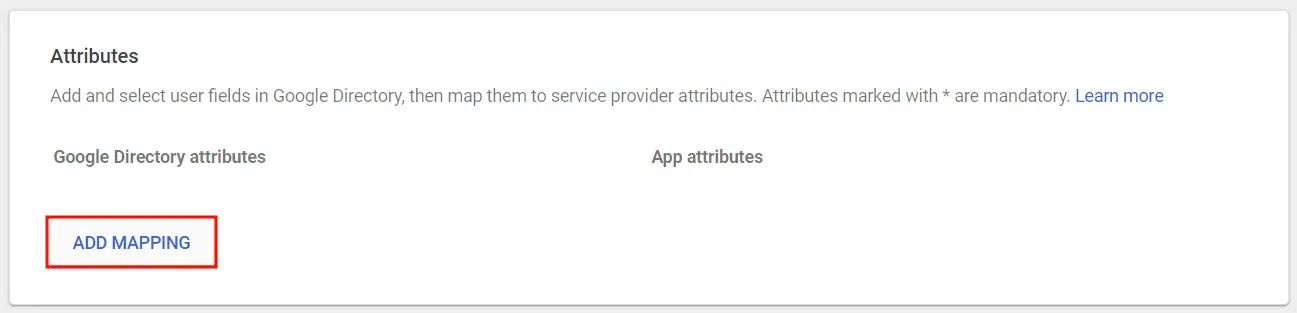
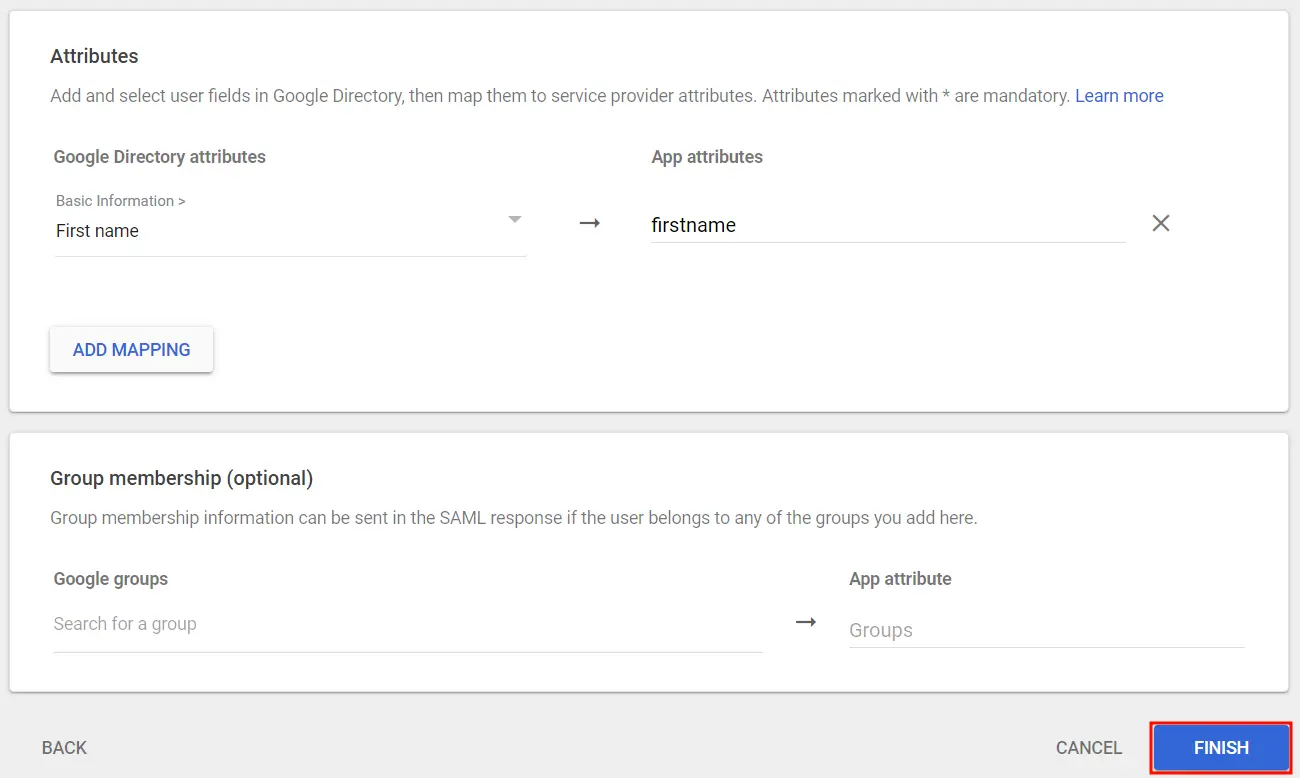
- Click on Add Mapping to add and select user fields in Google Directory.
- Next, map them to Service Provider attributes and click Finish once done.
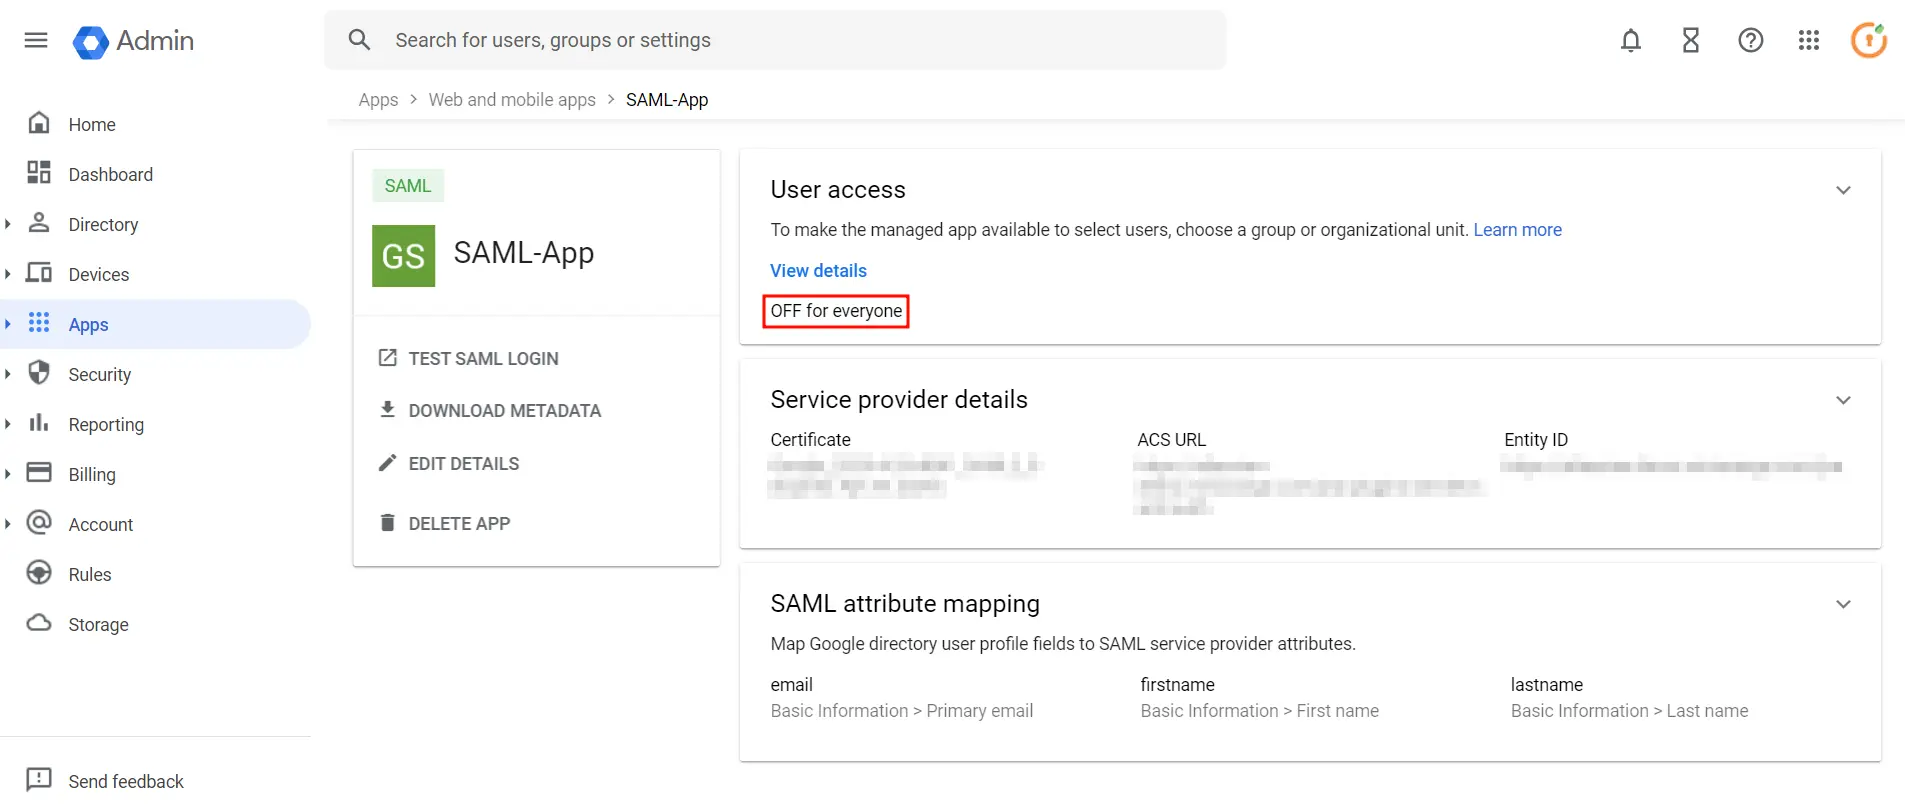
- Go to SAML Apps again and click on OFF for everyone .
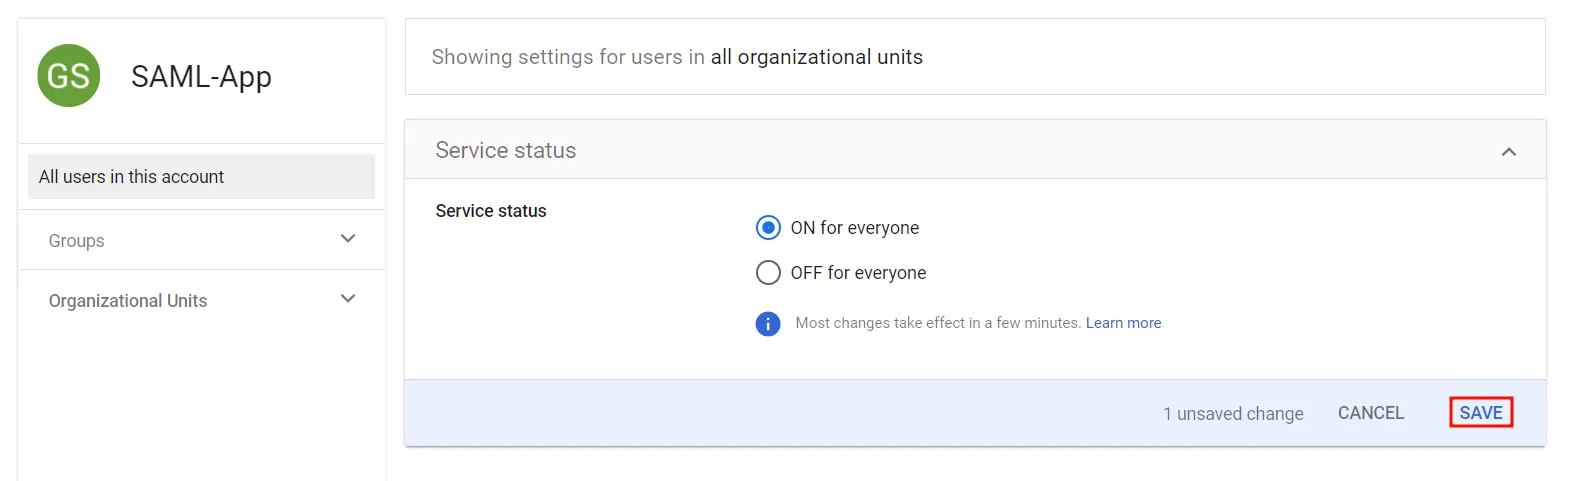
- Then, select ON for everyone to activate SSO.
- Note: After activating SSO, you can specify which users it applies to. For instance, if you choose organizational units, all users within that unit will be required to use SSO to access G Suite Apps. Likewise, you can choose to enforce SSO for specific groups or all users in the account.
Follow these steps to set up Google Apps/GSuite as an Identity Provider:
1.1 Login as Administrator
 1.2 Add a SAML app
 1.3 IDP Information

 1.4 Service Provider Details
| ACS URL | Copy and paste the ACS URL from the plugin. |
| Entity ID | Copy and paste the SP Entity ID/ Issuer from the plugin. |
| Signed Response | Check Signed Response ✓ |
| Name ID Format |
 1.5 Attribute Mapping
 1.6 Turn On SSO
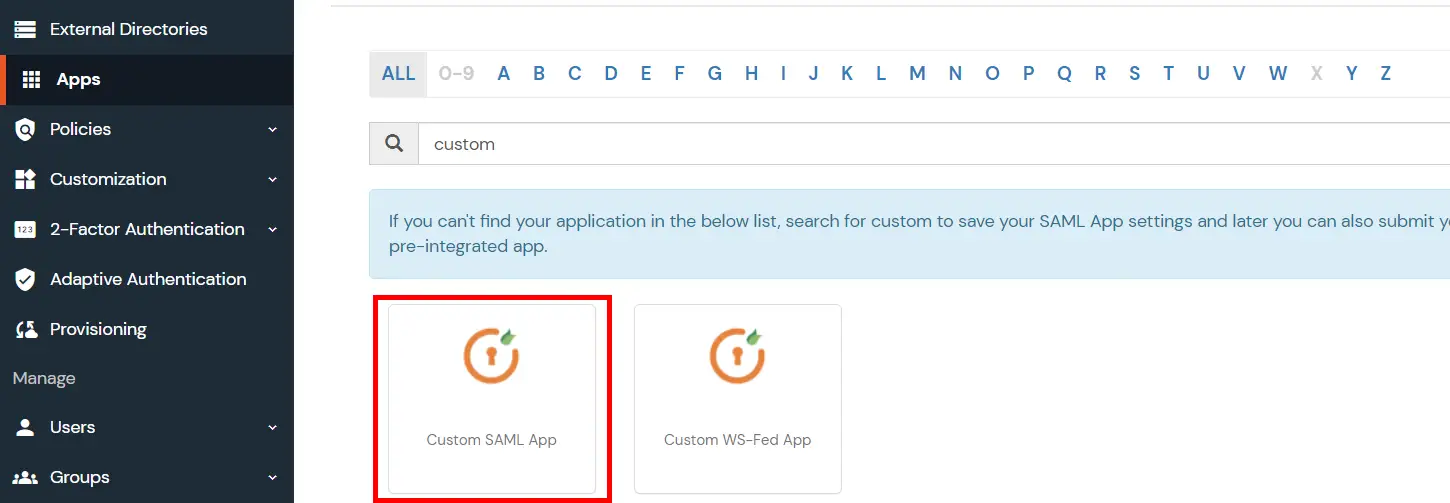
Step 1: Set Up miniOrange as Identity Provider
- Go to miniOrange Admin console https://login.xecurify.com/moas/login and login with your miniOrange credentials.
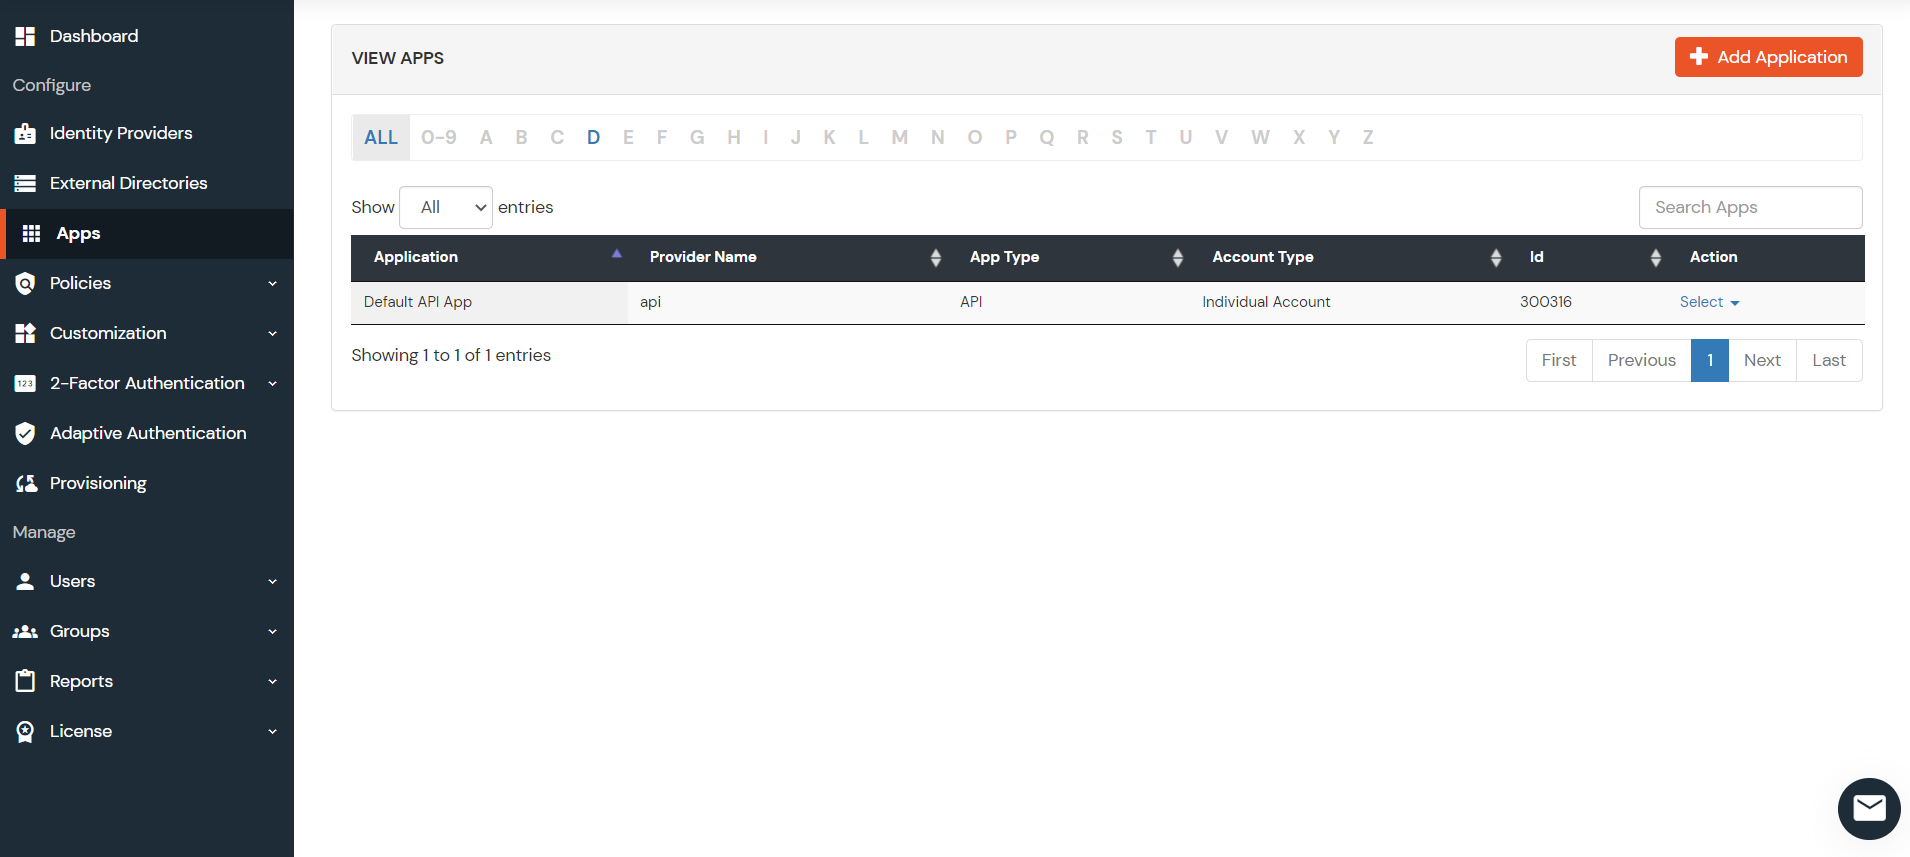
- From the left menu, go to Apps.
- Click on Add Applicaton button.
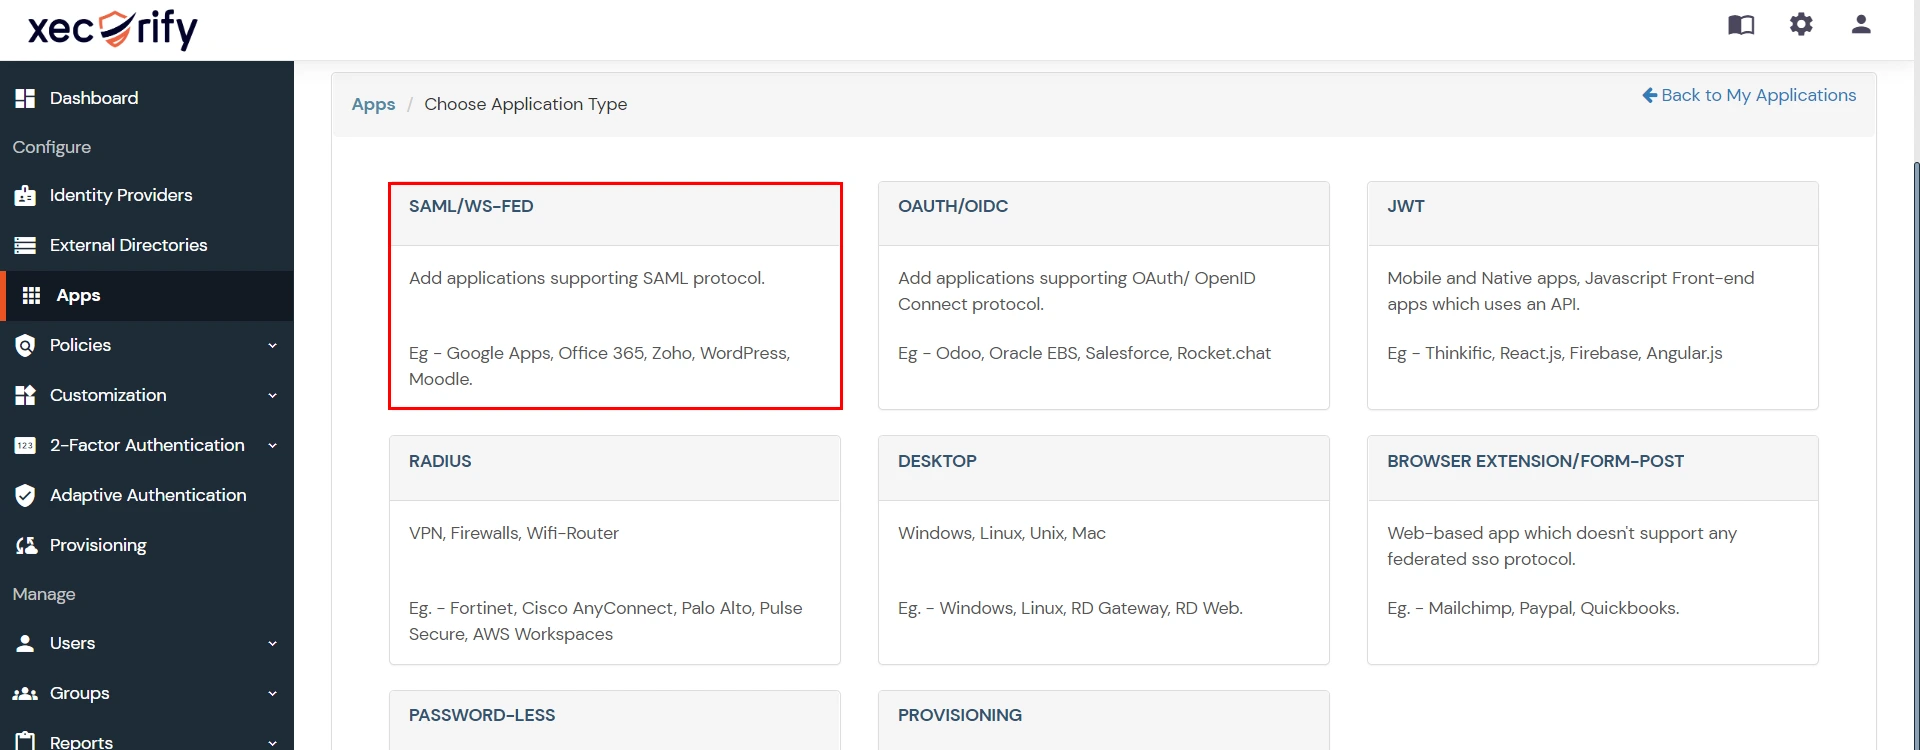
- In Choose Application Type click on Create App button in SAML/WS-FED application type.
- In the next step, search for your application from the list, if your application is not found. Search for "custom" and you can set up your app via Custom SAML App.
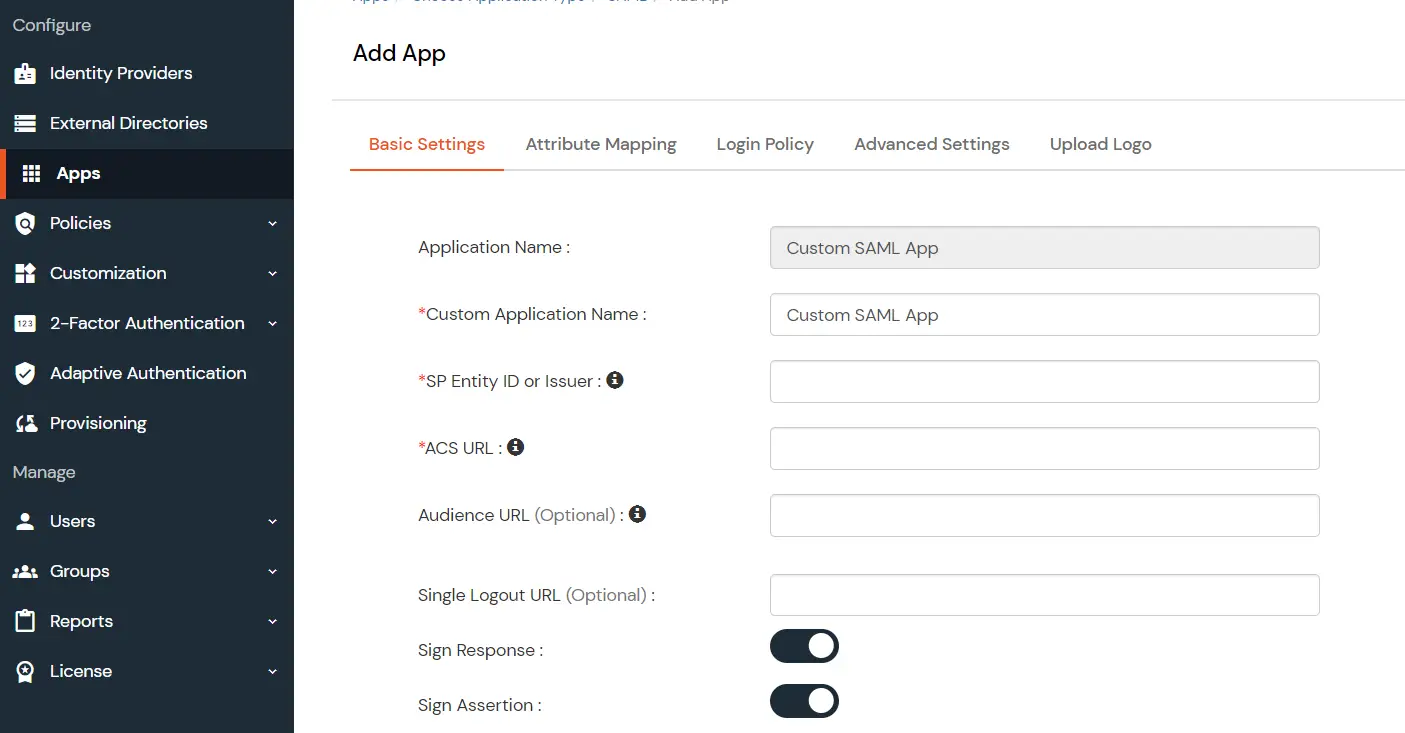
- Method 1: Manual Configuration
- Enter the following the textboxes:
-
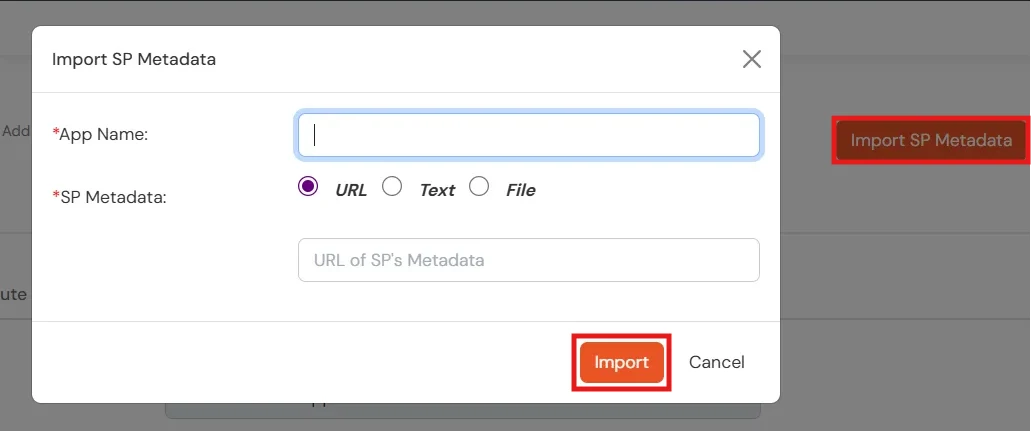
Method 2: Import SP Metadata:
- You can also import SP metadata to configure your app.
- Click on Import SP Metadata button.
- Enter your Custom Application Name in App Name text box.
- Upload plugin metadata in form of text, File or URL and Click Import.
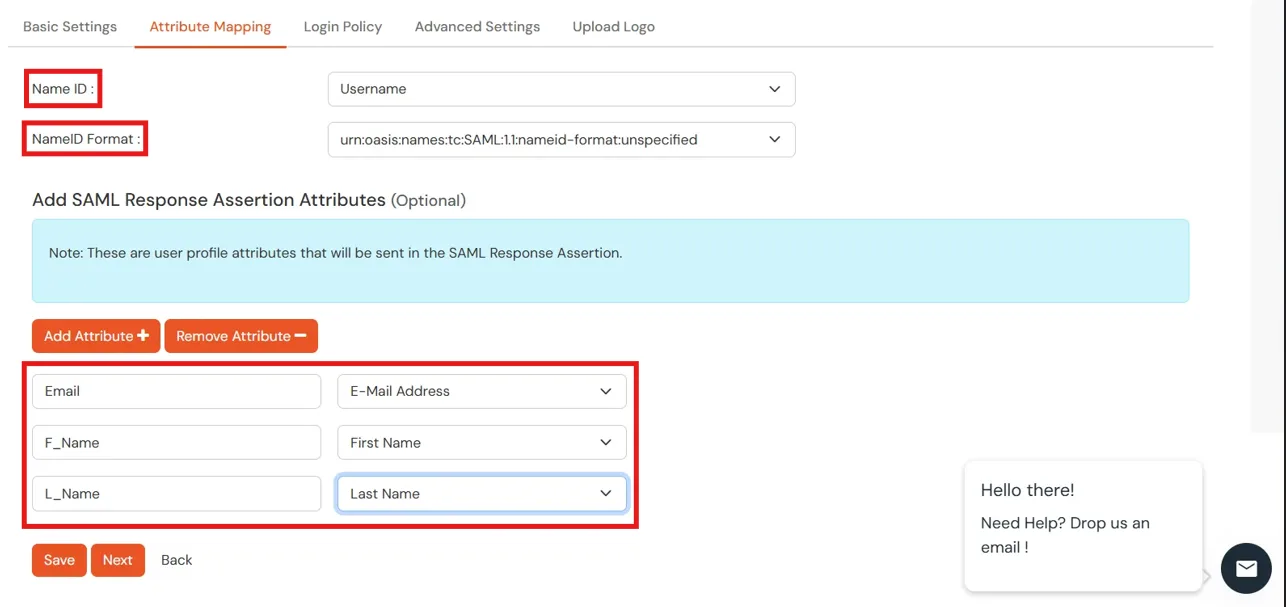
- Name ID Setup And Attribute Mapping :
- Enter the attribute name with which you want to log in your application in NameID field.. eg.Username, Email etc.
- Enter name ID format such as emailAddress, nameid etc. in Name ID Format.
- Attributes can be mapped using Add Attribute tab.
- Add attributes such as first name, last name, group Name, etc.with its corresponding value as per shown in image.
- Multiple attributes can be added using icon
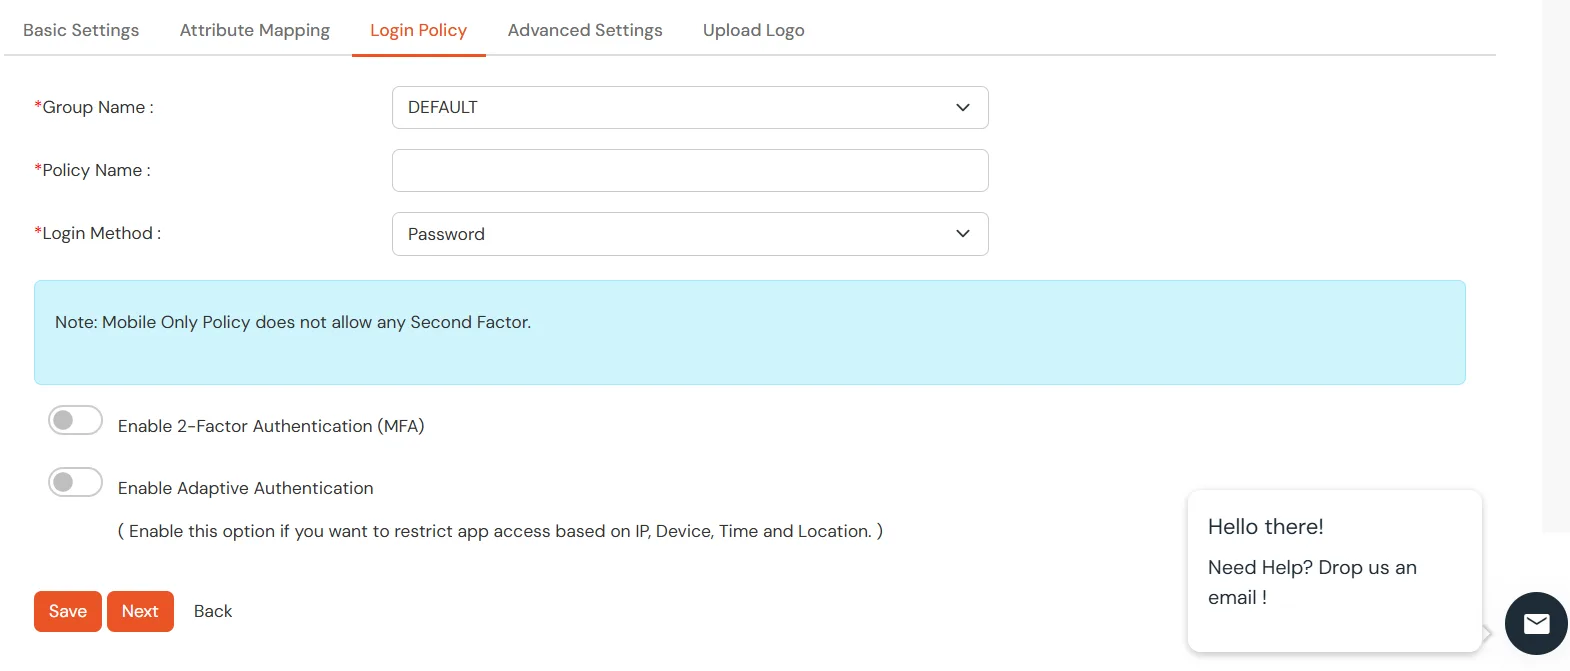
- Select Default from the Group Name dropdown.
- Enter Policy Name you would like to provide.
- Select Password from the Login Method Dropdown.
- Click on Save to add the App.
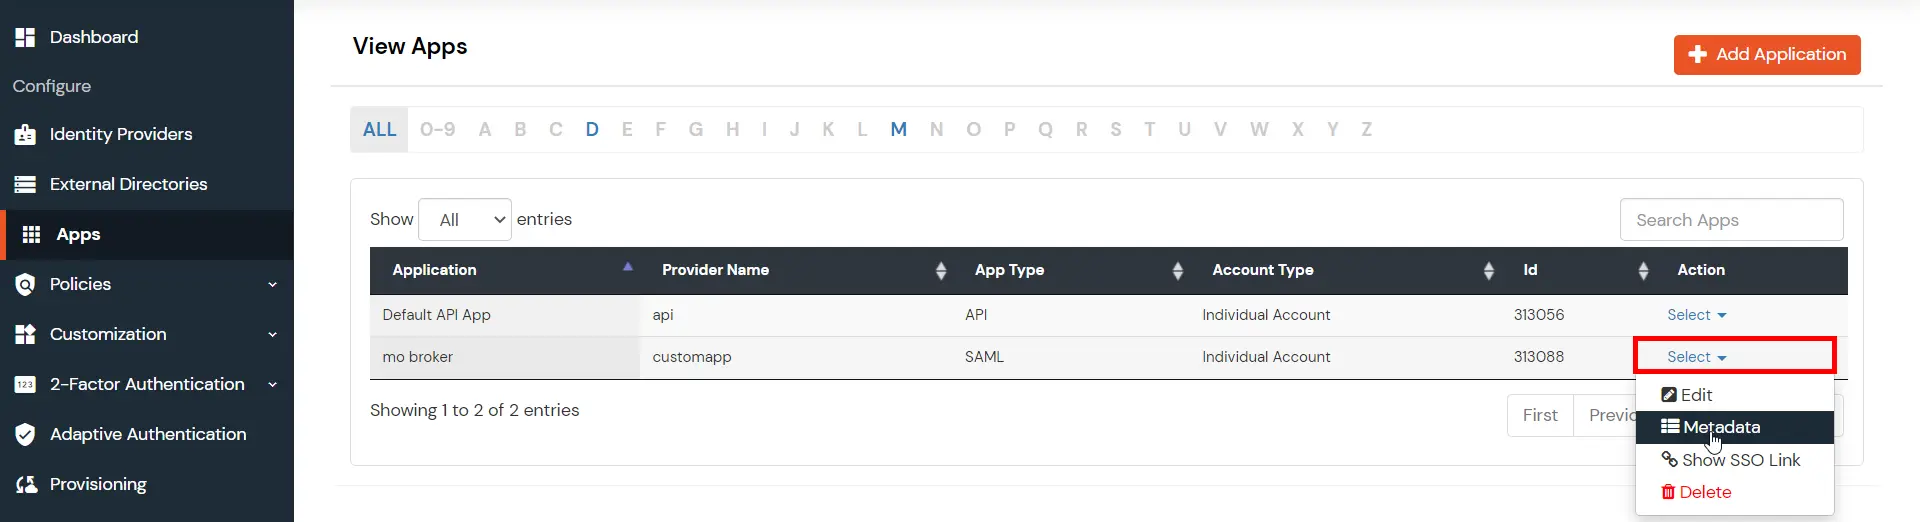
- Navigate to Apps Manage Apps.
- Click on the metadata link against your app.
- Download the Metadata XML File or note down the given information and keep it handy to configure the add-on.
- You can also provide Metadata URL in plugin settings.
Creating App in miniOrange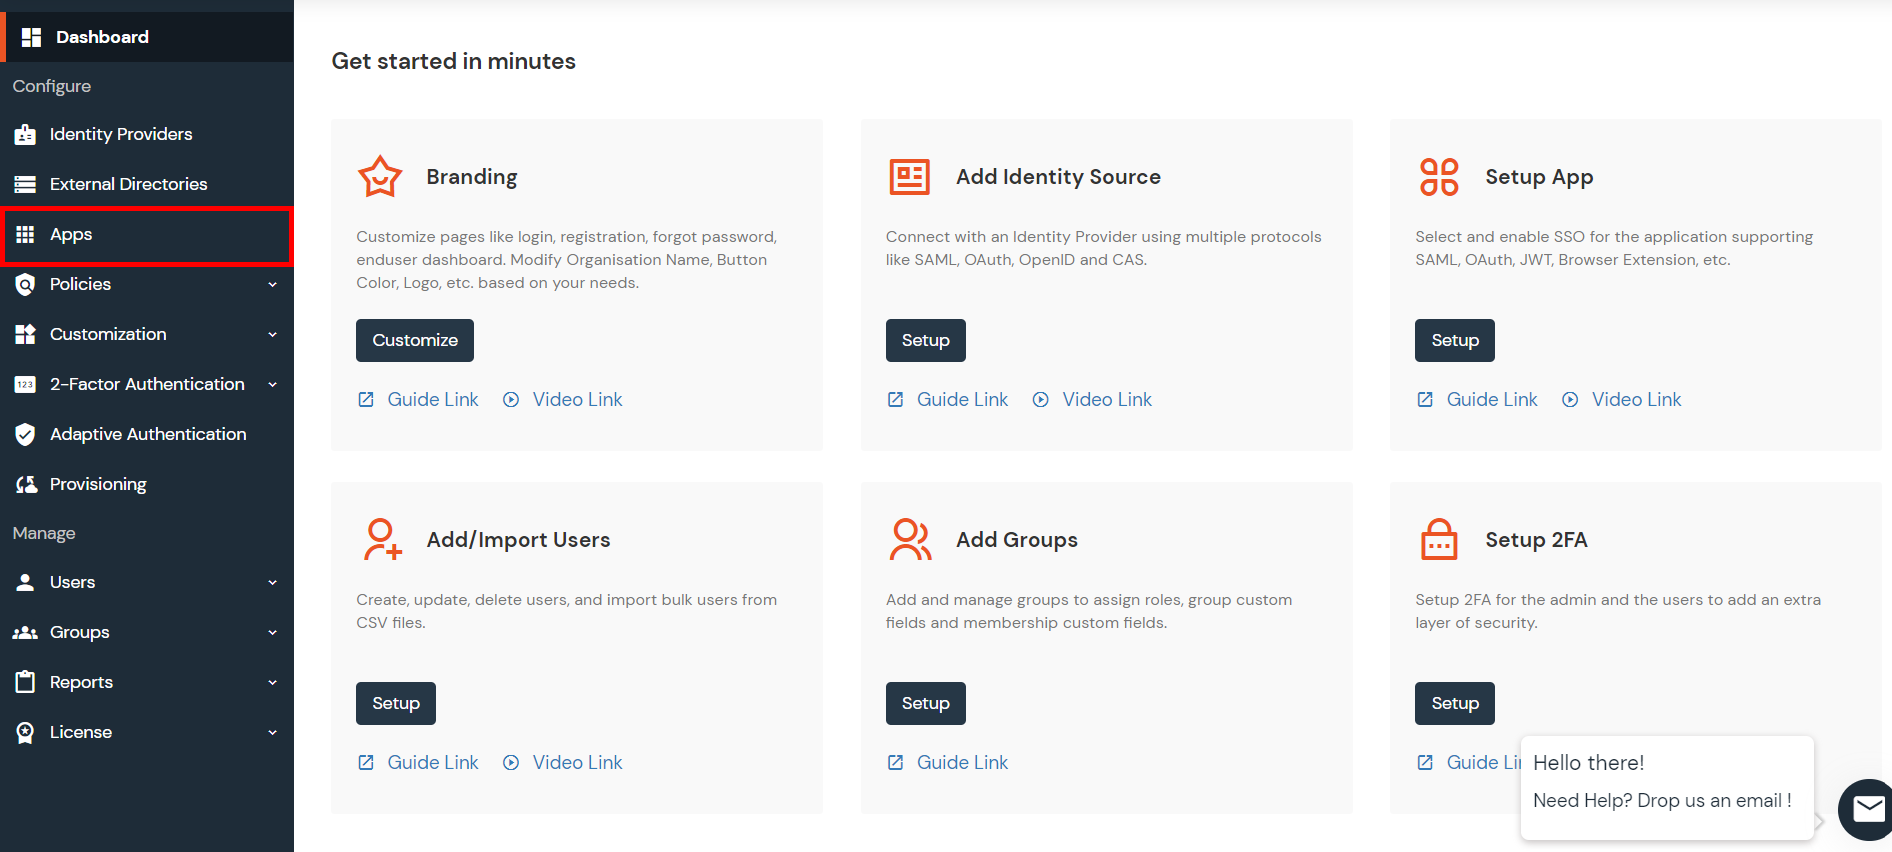
| Custom Application Name | App name you like to provide. |
| SP Entity ID or Issuer | Enter SP Entity ID / Issuer from Service Provider Info tab of the plugin |
| ACS URL | Enter ACS (Assertion Consumer Service) URL from Service Provider Info tab of the plugin |
| Single Logout URL | Enter Single Logout URL from Service Provider Info tab of the plugin |

Step 1: Set Up Okta as Identity Provider
With the plugin installed, you can move on to setting up Okta as an IDP.
1.1: Okta IDP Configuration
- Log into Okta Admin Console.
- For developer account, switch to Classic UI to configure app.
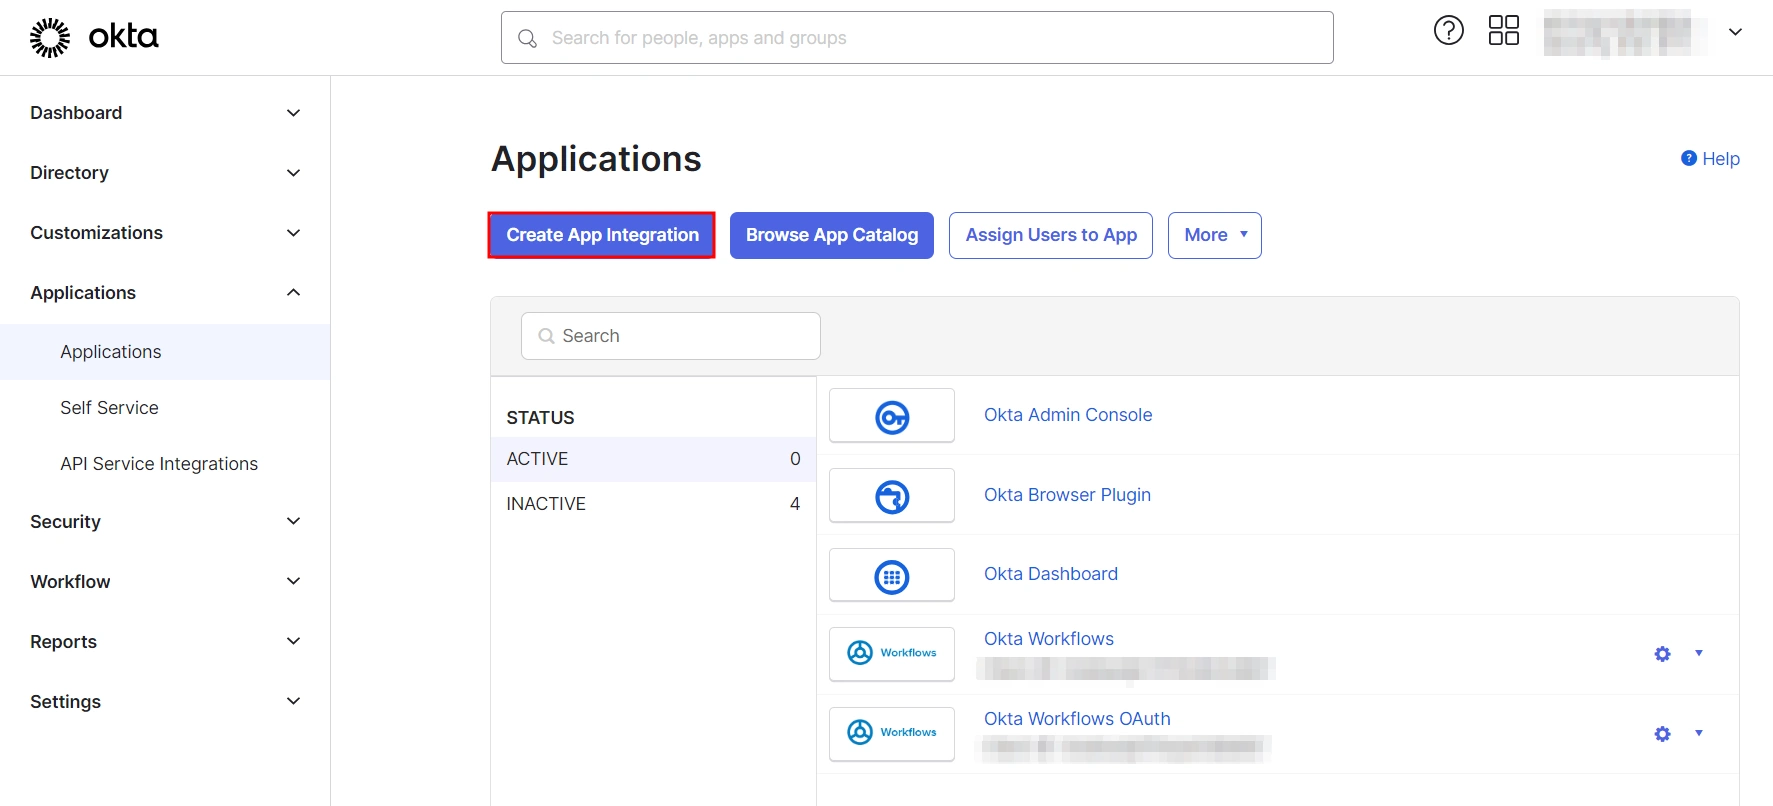
- In the left hand menu, go to Applications → Applications and then click on Create App Integration.
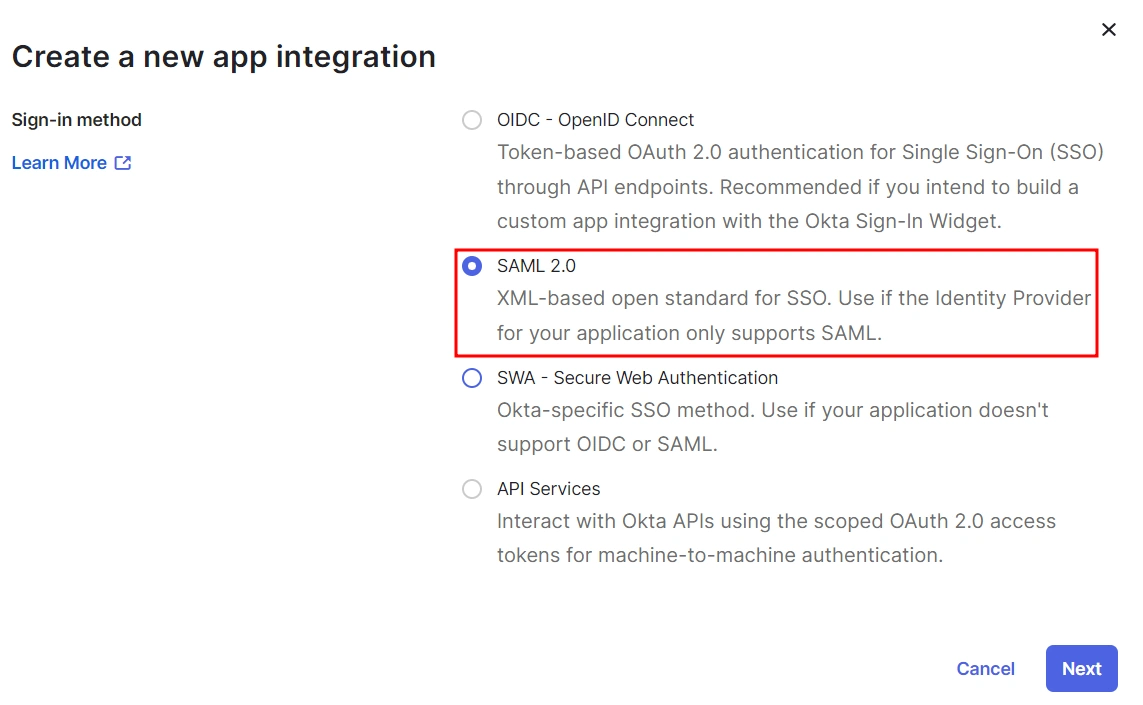
- Select SAML 2.0 as Sign on method and click Next.
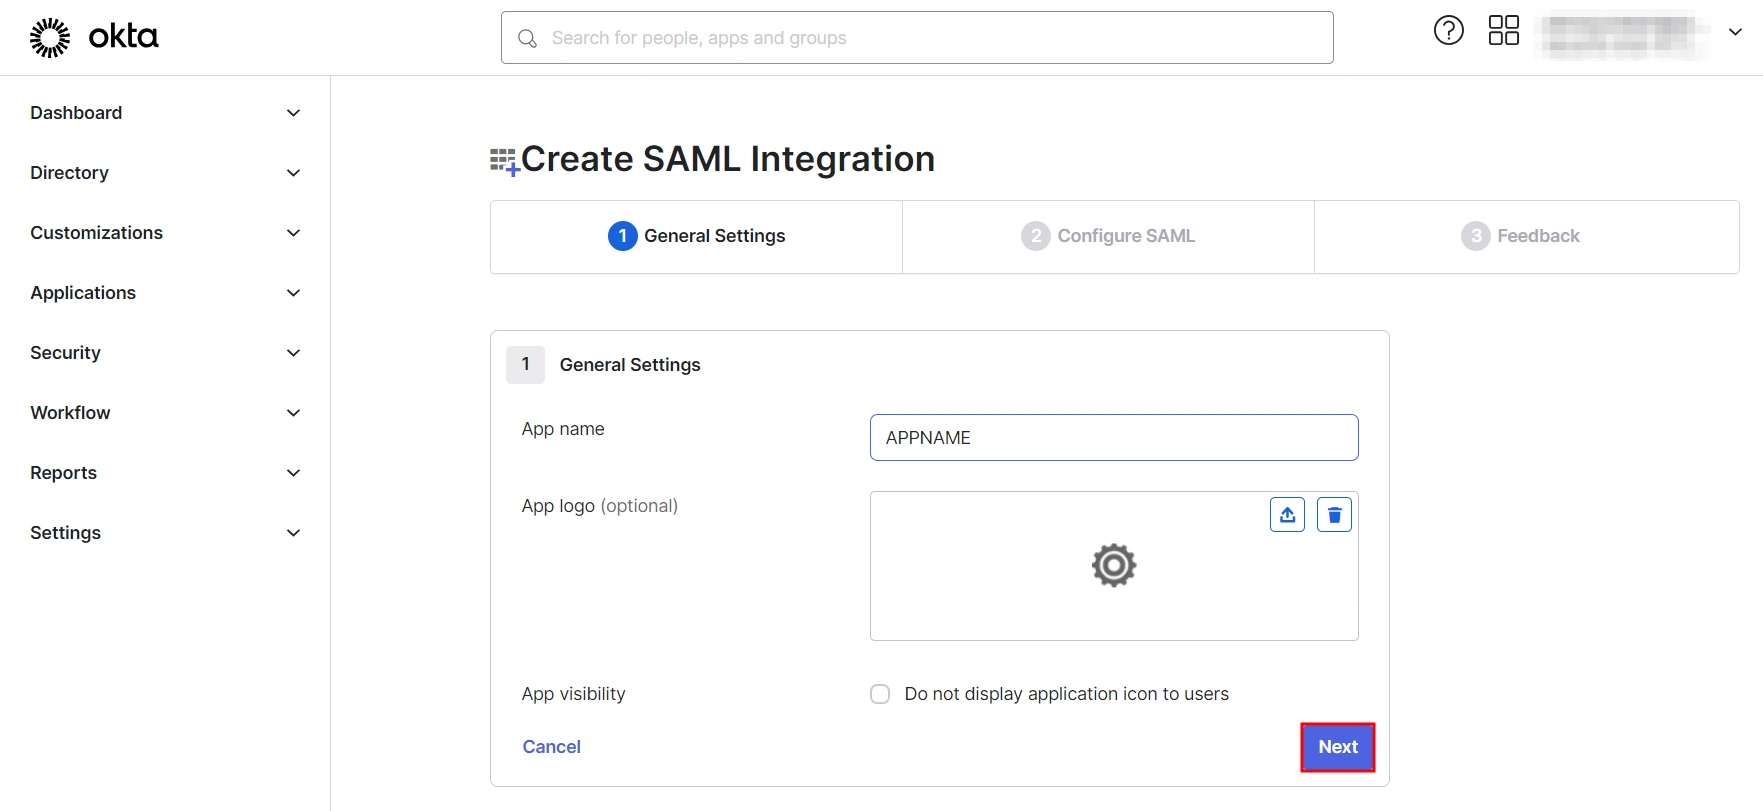
- In General Settings, enter the app name and click on Next.
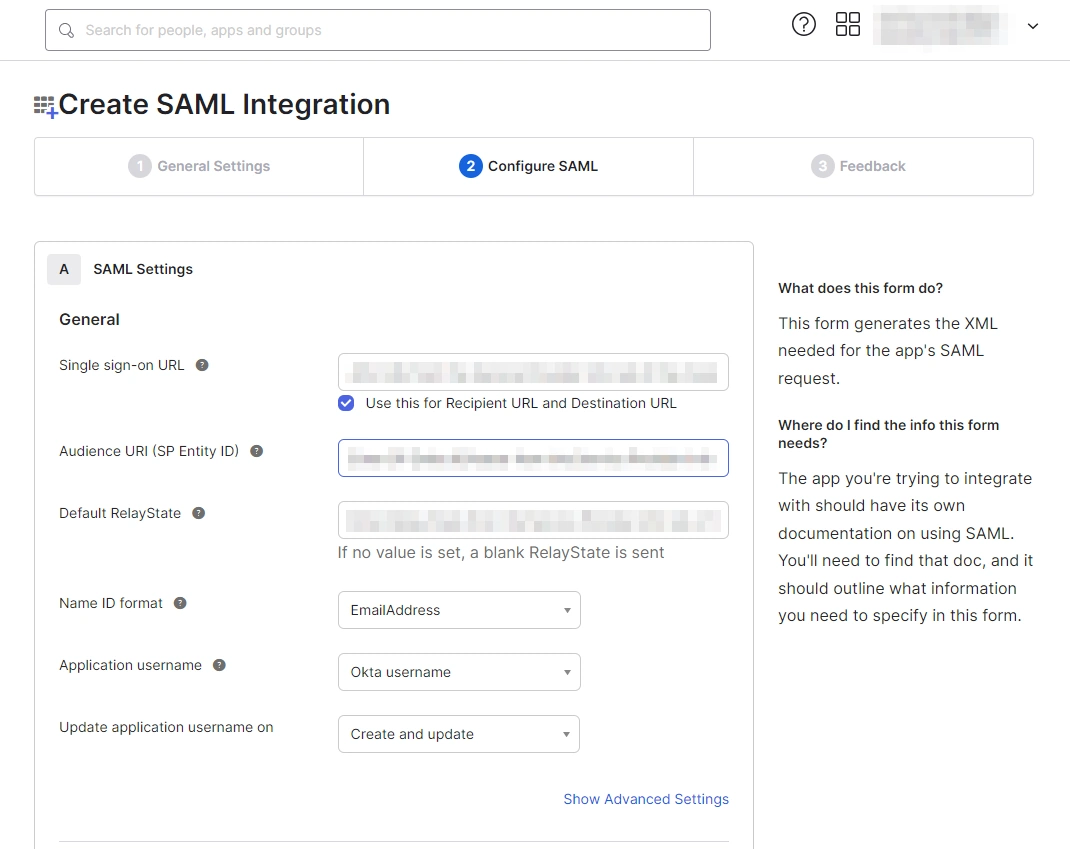
- Set up SAML parameters in the Configure SAML tab. You will find all the required information inside the SP Information tab of your plugin. The table below will help you map the right data to the fields.
- Next, scroll down inside the Configure SAML tab and fill out Attribute Statements and Group Attribute Statements (this step is optional).
- Here’s how you can populate these fields:
Follow the steps provided below:
| Single Sign On URL | Enter ACS (Assertion Consumer Service) URL from the Service Provider info tab of the plugin. |
| Audience URI (SP Entity ID) | Enter SP Entity ID/Issuer from the Service Provider info (or SP Information) tab of the module. |
| Default Relay State | Enter Relay State from the Service Provider info tab of the module. |
| Name ID Format | Select EmailAddress as the Name ID Format from the dropdown list. |
| Application Username | Set Application Username to Okta username. |
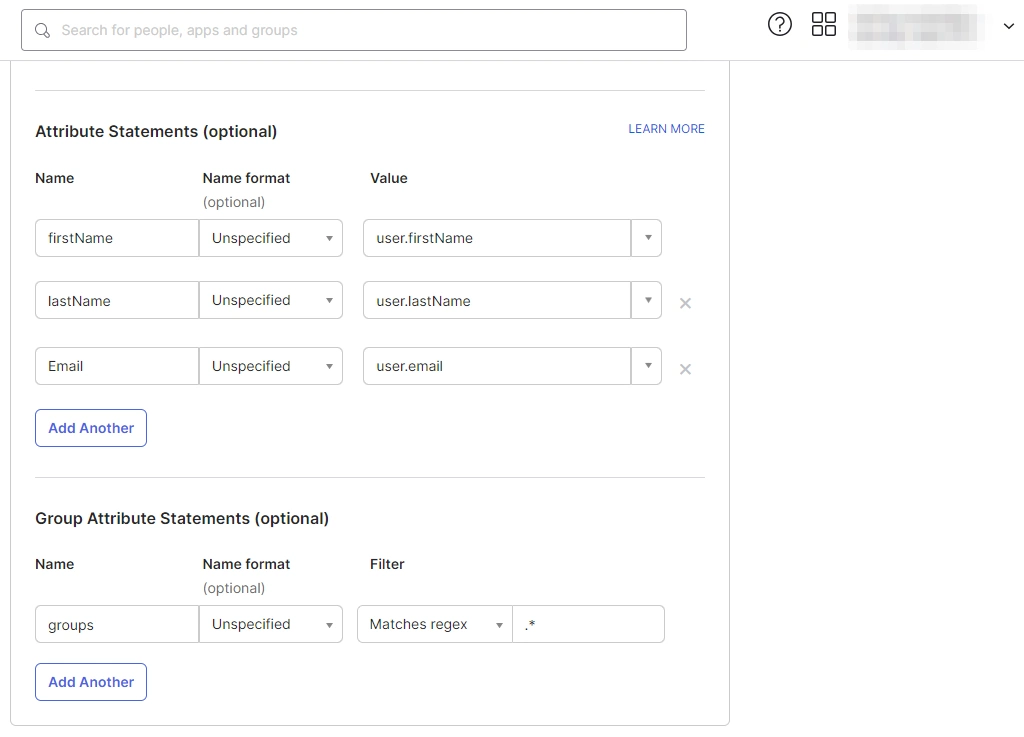
a. For Name, enter "firstName" and select user.firstName from the value dropdown.
b. For Name, enter "lastName" and select user.lastName from the value dropdown.
c. For Name, enter "Email" and select user.email from the value dropdown.
d. Under Group Attribute Statements, enter "groups" for Name and select Matches regex from the Filter dropdown and enter ".*" in the adjacent textbox.
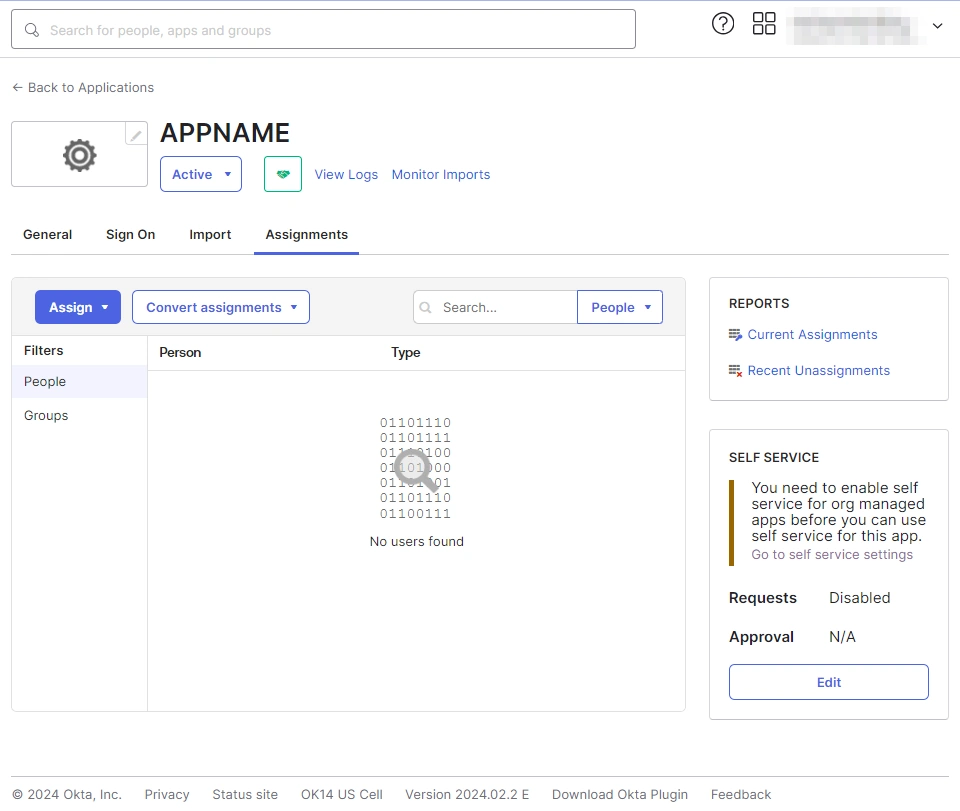
1.2: Assigning Groups/People
- After creating and configuring the app, you will be redirected to the Assignment Tab in Okta.
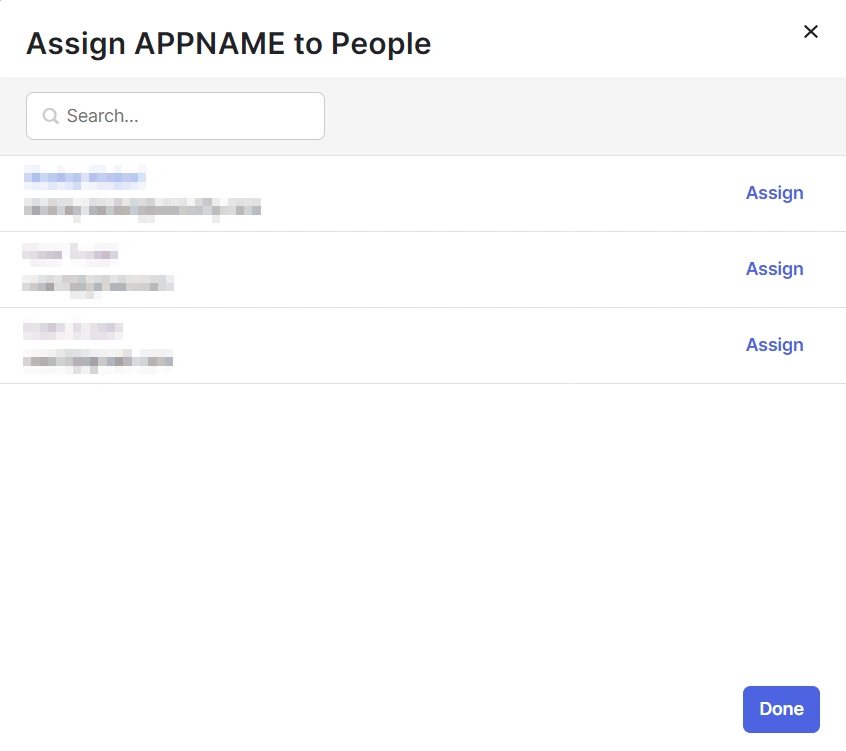
- Here, select the people and groups that you want to be able to log in through the app. You can do this by clicking Assign and selecting Assign to People to give access to specific people.
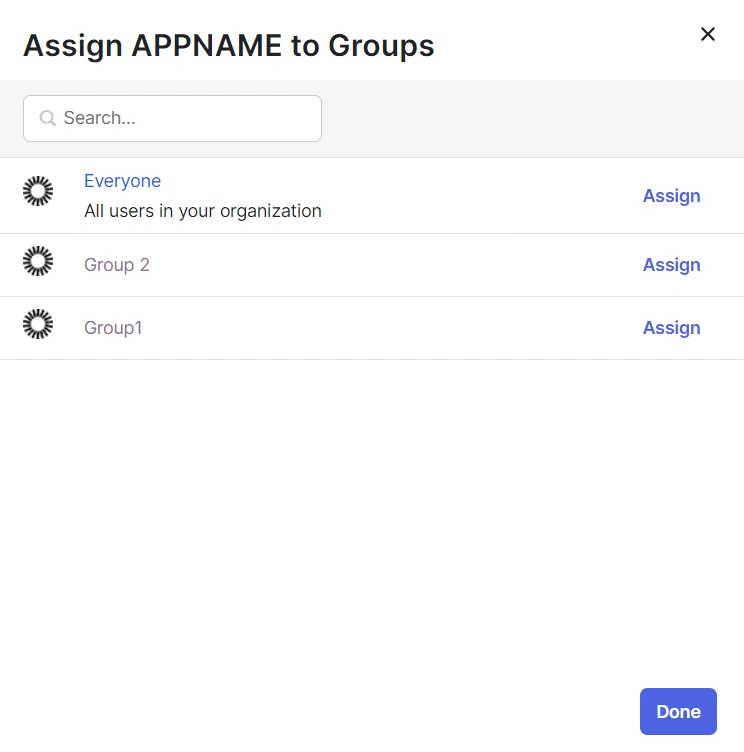
- You can also select Assign to Groups to give access to a specific group.
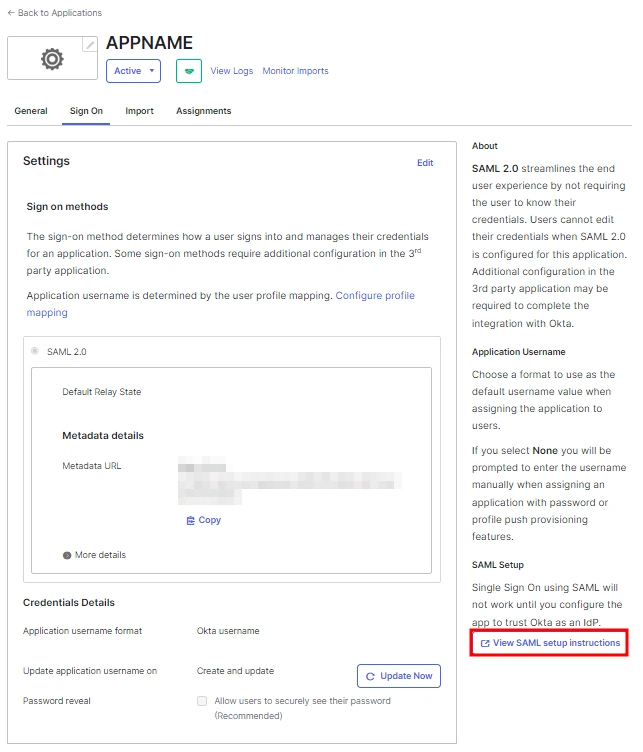
- Once you’re done assigning people and groups to your app, go to the Sign On tab.
- Here, click on View Setup Instructions to get the SAML Login URL (Single Sign on URL), Single Logout URL, IDP Entity ID, and X.509 Certificate. You will need these to configure the Service Provider.
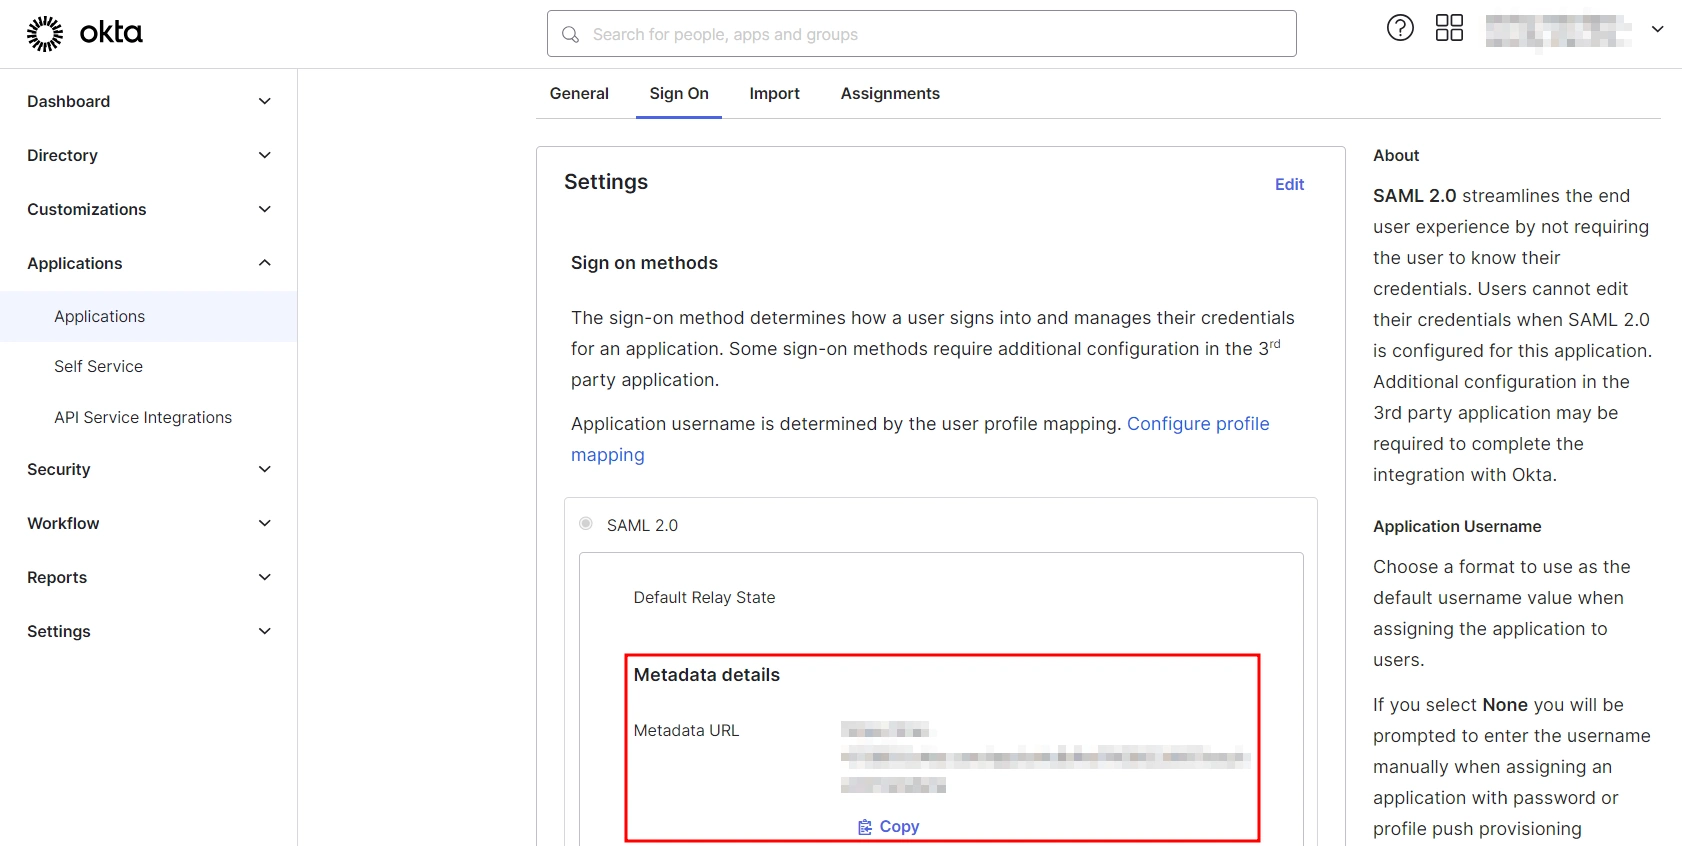
1.3: Fetching Metadata URL
- Log into your Okta Admin Console
- Navigate to Applications → [Your Application Name] → Sign On
- You will find the metadata URL under the Metadata details section.
- You can either leave this window open in another tab or copy and paste the URL to a note while setting up the service provider.
One important component you’ll require while setting up your service provider is the metadata URL of your Identity Provider.
You can follow these steps to find the metadata URL for your Okta Application:
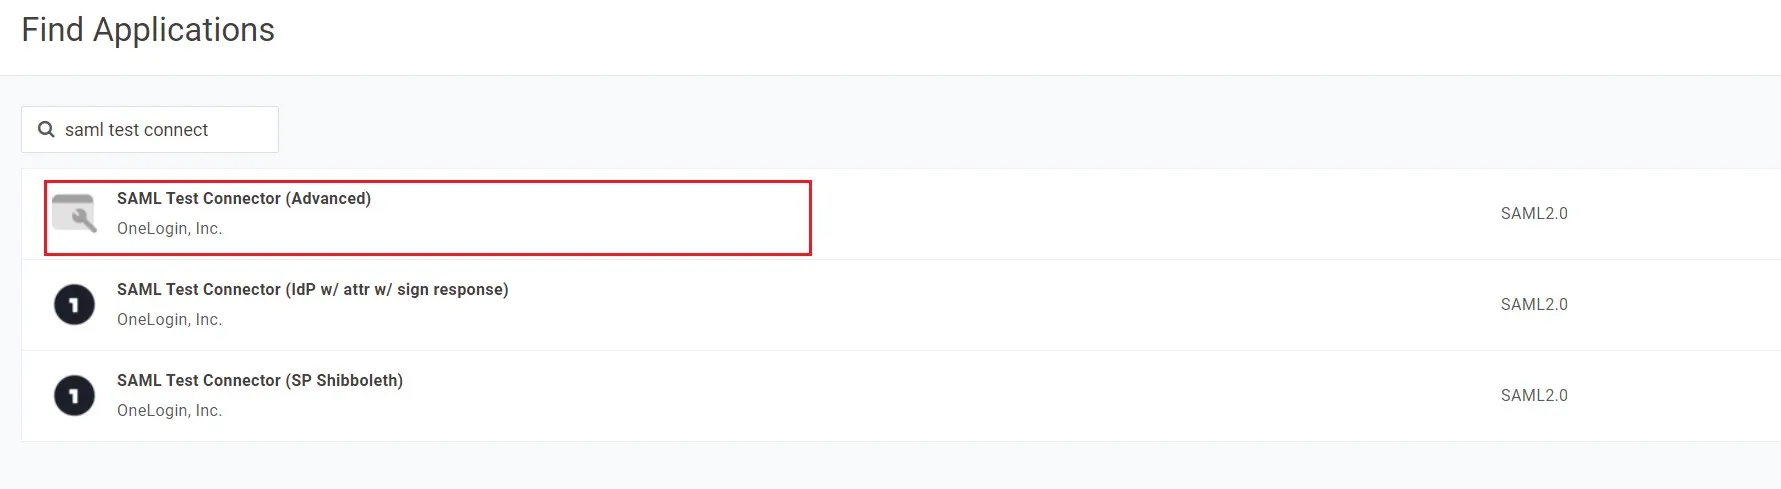
Step 1: Set Up OneLogin as Identity Provider
- Go to https:// <your_domain>.onelogin.com and login into OneLogin.
- Log into OneLogin as an Administrator and go to Apps Company Apps Add Apps from the Navbar.
- In the search box, type SAML Test Connector (Advanced) and click on the App to add it.
- Enter the display name and click Save.
- In Info enter App Name and click on Next.
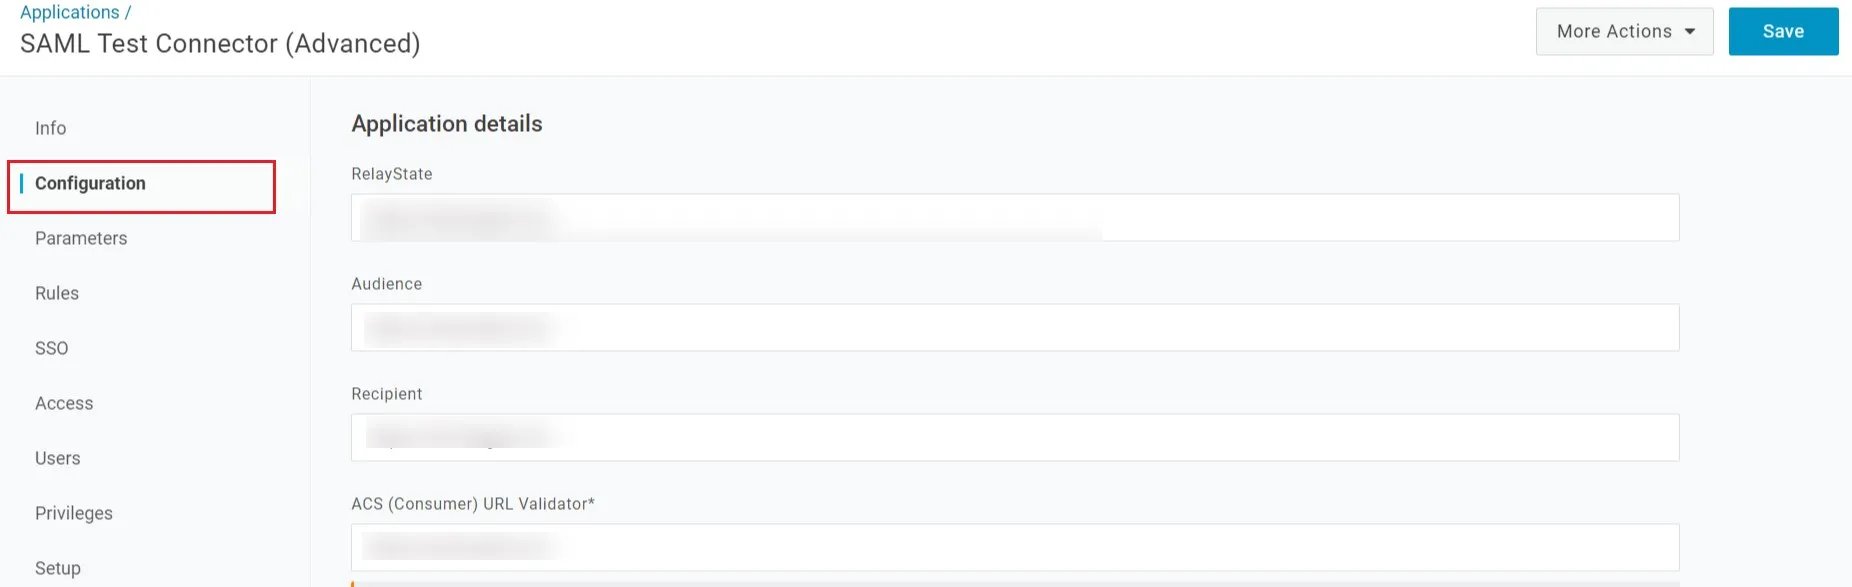
- After saving, go to Configuration Tab and enter the following:
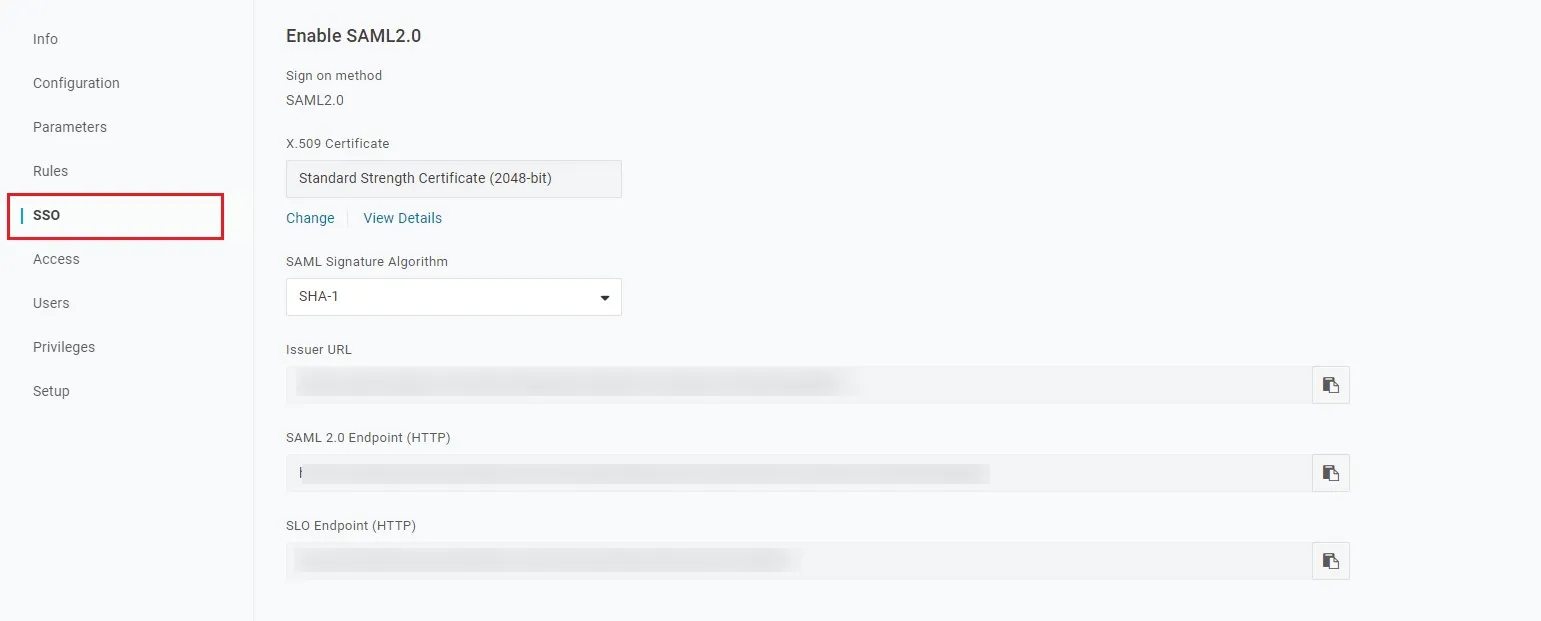
- Go to SSO tab. Note down the URL/Endpoints. These will be required while configuring the plugin.
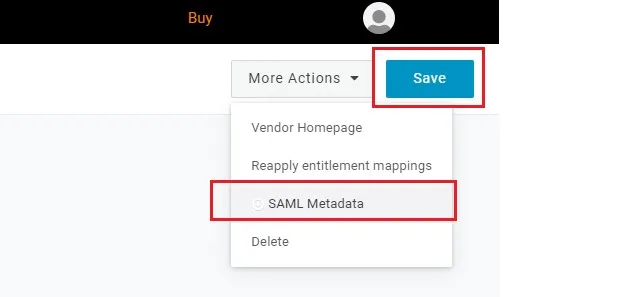
- Select SAML metadata options from More Actions dropdown list.
- Download this metadata or Copy the URL and provide it in plugin settings.
- You can also copy the URL's from SSO tab
- Save all the Settings.
Follow the steps below to configure OneLogin as an Identity Provider
Configuring OneLogin as IdP

| Audience | Audience URI from plugin under Service Provider info Tab. |
| Recipient | Recipient URL from plugin under Service Provider info Tab. |
| ACS (Consumer) URL Validator | ACS (Assertion Consumer Service) URL from plugin under Service Provider info Tab. |
| ACS (Consumer) URL | ACS (Assertion Consumer Service) URL from plugin under Service Provider info Tab. |
| Single Logout URL | Enter Single Logout URL from the Service Provider info tab of the module. |
Assigning Groups/People
Import IDP Metadata
Step 1: Set Up OpenAM as Identity Provider
- Login to the OpenAM admin console.
- From the REALMS, select realms, under which you want to create hosted IDP. You will be redirected to the Realm overview page.
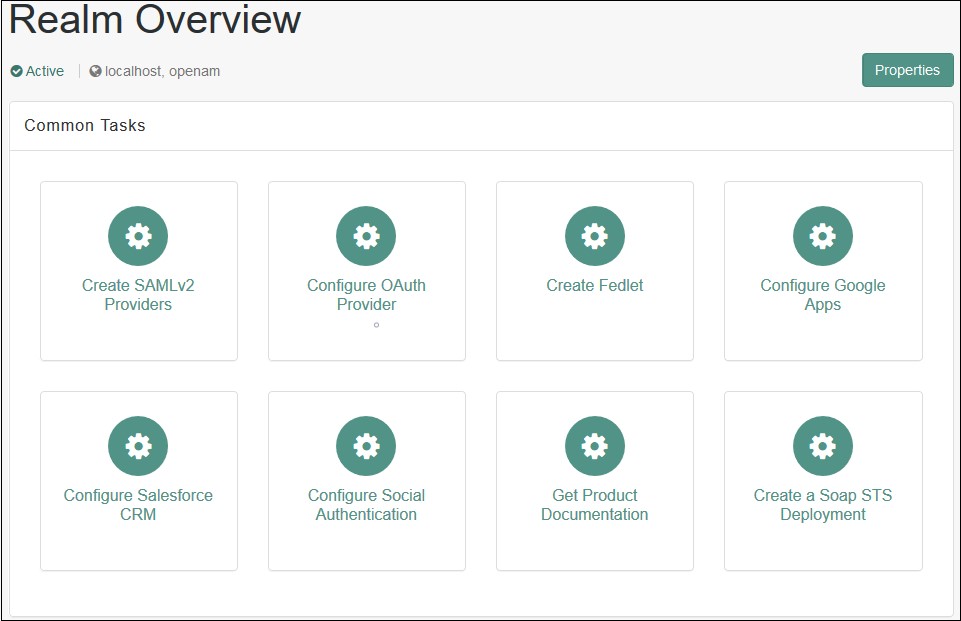
- Click on Create SAMLv2 Providers in the Realm Overview page.
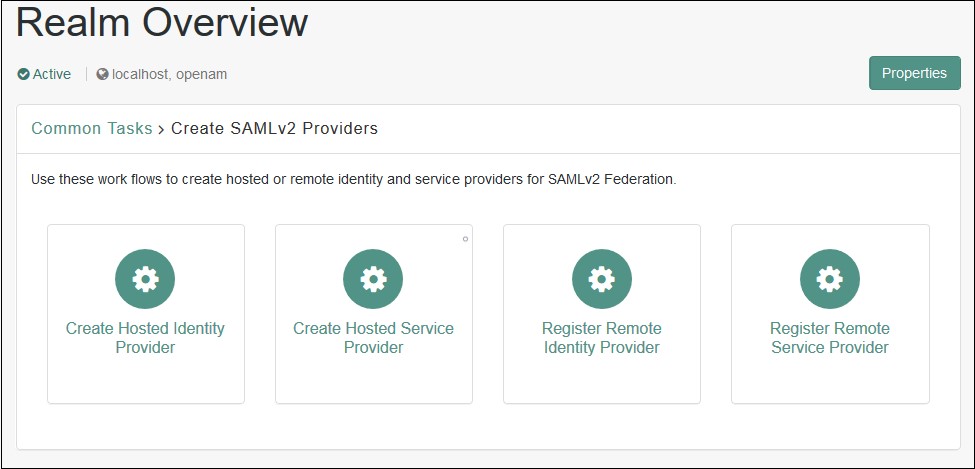
- Click on Create Hosted Identity Provider. You will be redirected to the configuration page.
- Configure IDP as given below.
- Name: Name of the IDP
- Signing Key: Select the signing key from the dropdown.
- New Circle of Trust: Provide a name of the groups of IDP and SP that trust each other.
- Attribute Mapping: Configure user profile attributes to be sent to the Service Provider application.
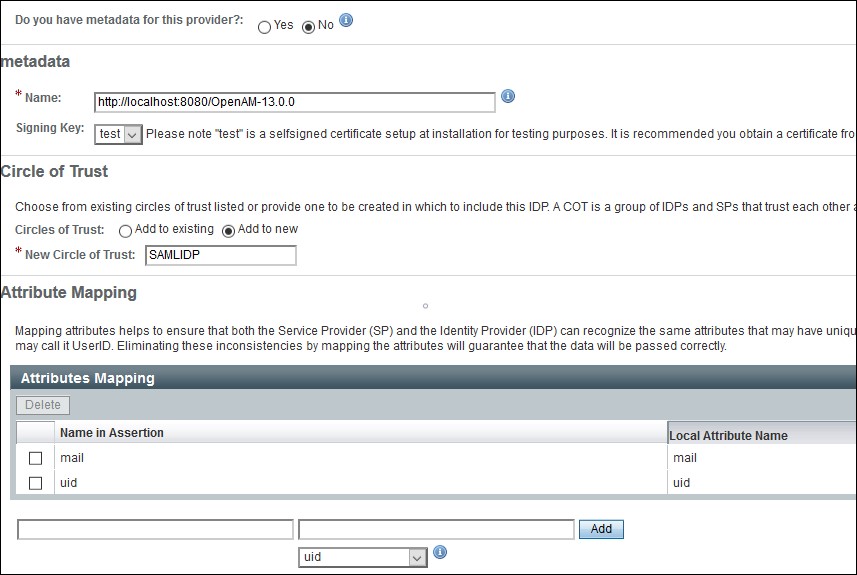
- Click on the Configure button on the top right corner.
- Verify the configuration from the Federation tab of OpenAM.
- Login to the OpenAM admin console.
- From the REALMS, select realms, under which you want to configure your application. You will be redirected to the Realm overview page.
- Click on Create SAMLv2 Providers.
- Click on Register Remote Service Provider. You will be redirected to the configuration page.
- Configure the Service Provider as given below.
- Where does the metadata file reside: URL.
- URL of metadata: Configure miniOrange plugin's metadata here.
- Circle of Trust: Add to existing.
- Existing Circle of Trust: Select the Circle of Trust (group) in which your hosted IDP is located.
- Attribute Mapping: Configure user profile attributes for mapping.
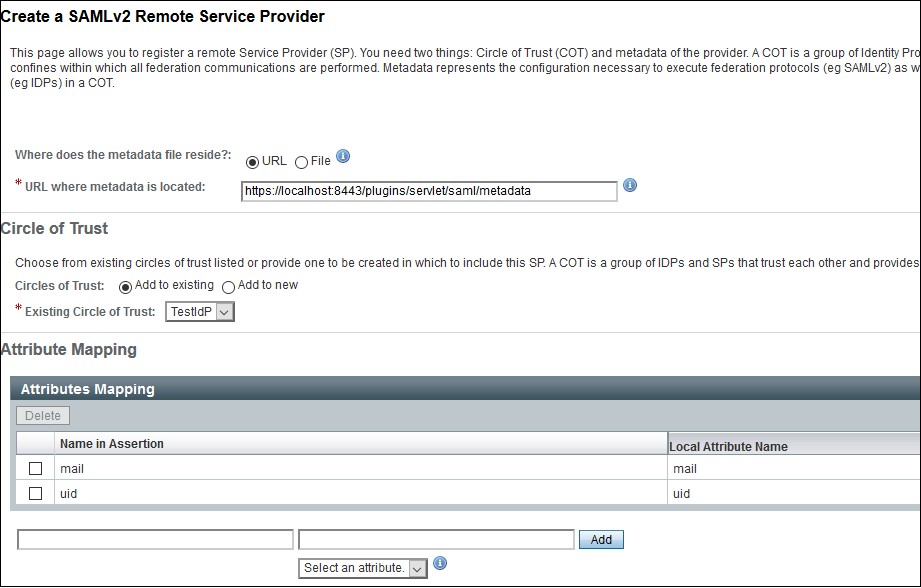
- Click on the Configure button on the top right corner.
- Verify the configuration from the Federation tab of OpenAM.
- Provide OpenAM SAML metadata to Service Provider application(miniOrange SAML plugin).
- You can download the OpenAM metadata using the URL given below. [OpenAM ServerURL]/saml2/jsp/exportmetadata.jsp
- In case if you have multiple realms and hosted identity Provider configured then use the URL given below. [OpenAM ServerURL]/saml2/jsp/exportmetadata.jsp?entityid=[IdPentityID]&realm=/realmname
All the information required to configure in the OpenAM i.e. plugin’s metadata is given in the Service Provider Info tab of the miniOrange plugin.
Create OpenAM as a Hosted Identity Provider
Note: – You can skip this step and navigate to Configure Remote Service Provider if you have already configured OpenAM hosted IDP.
Configure Remote Service Provider.
Step 1: Set Up Oracle Cloud as Identity Provider
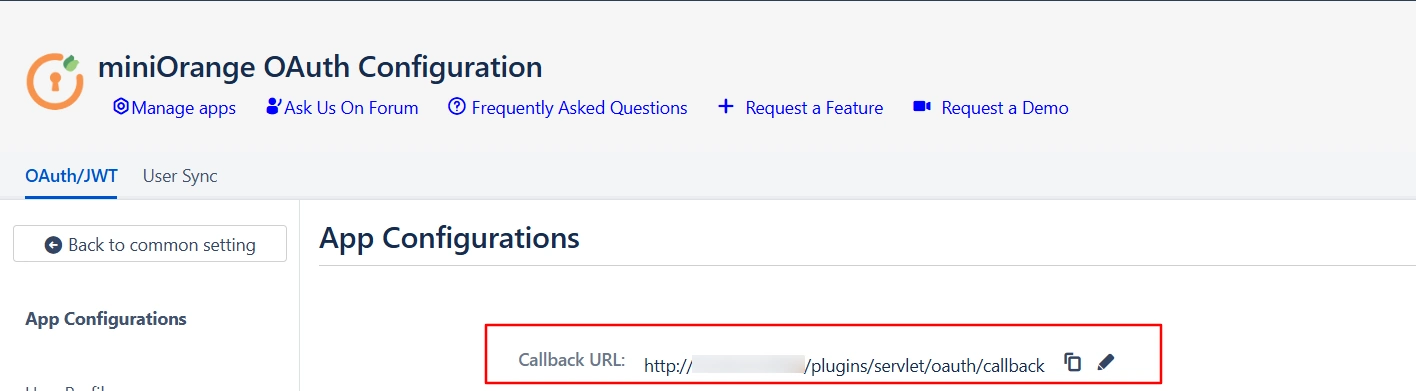
- Navigate to the plugin configuration page, click the "Add New Provider" button (located either in the middle or top-right corner), select Oracle Cloud as the application, and copy the callback URL from the plugin and keep it handy, as you'll need it to configure Oracle Cloud as the OAuth provider.
- Access the Oracle Identity Cloud Service (IDCS) administration console, select Applications, and then click Add
- Click on SAML Application
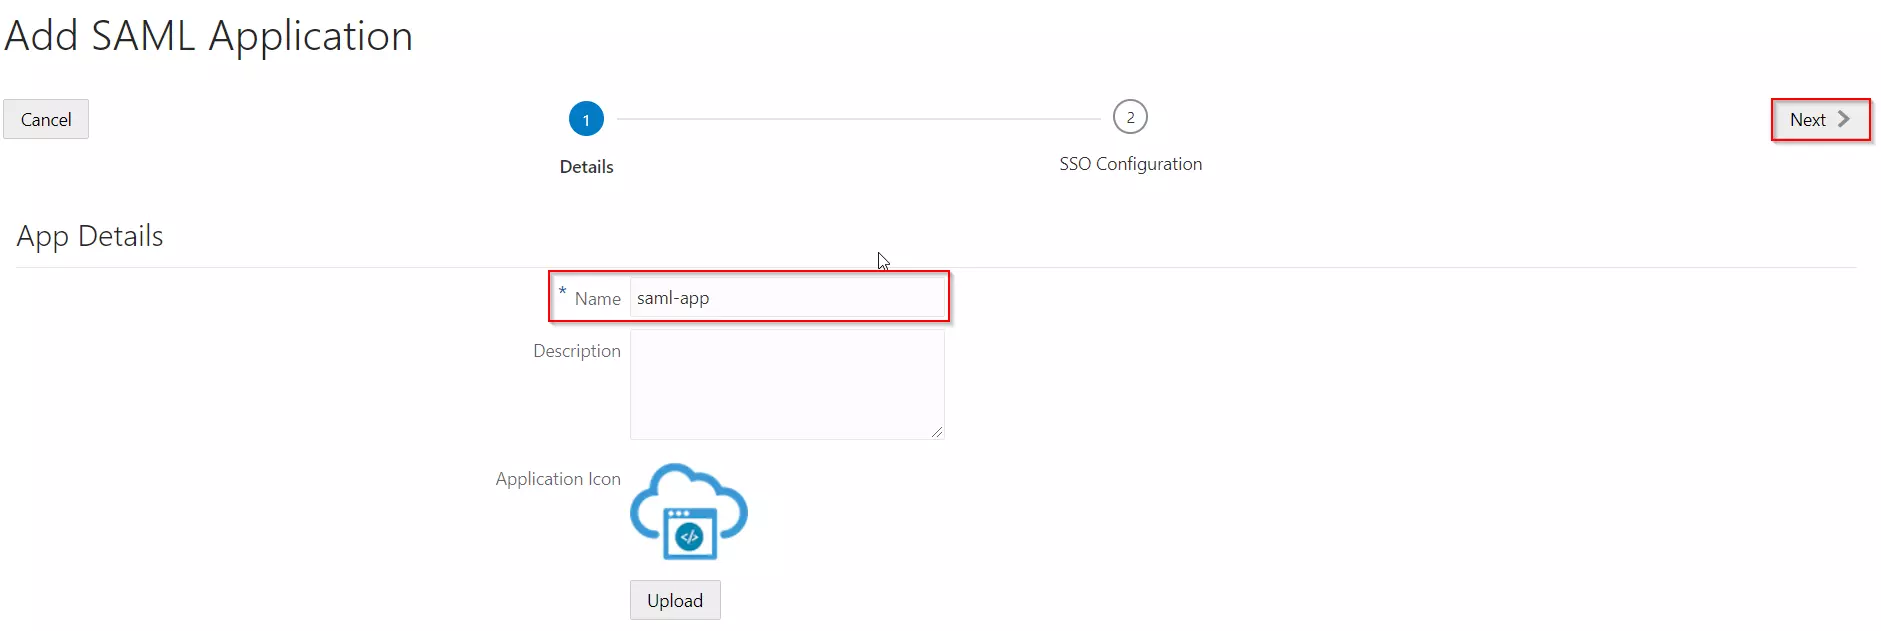
- Enter the name of your Application and select Display in My Apps option under Display Settings section. And then click on the Next button.
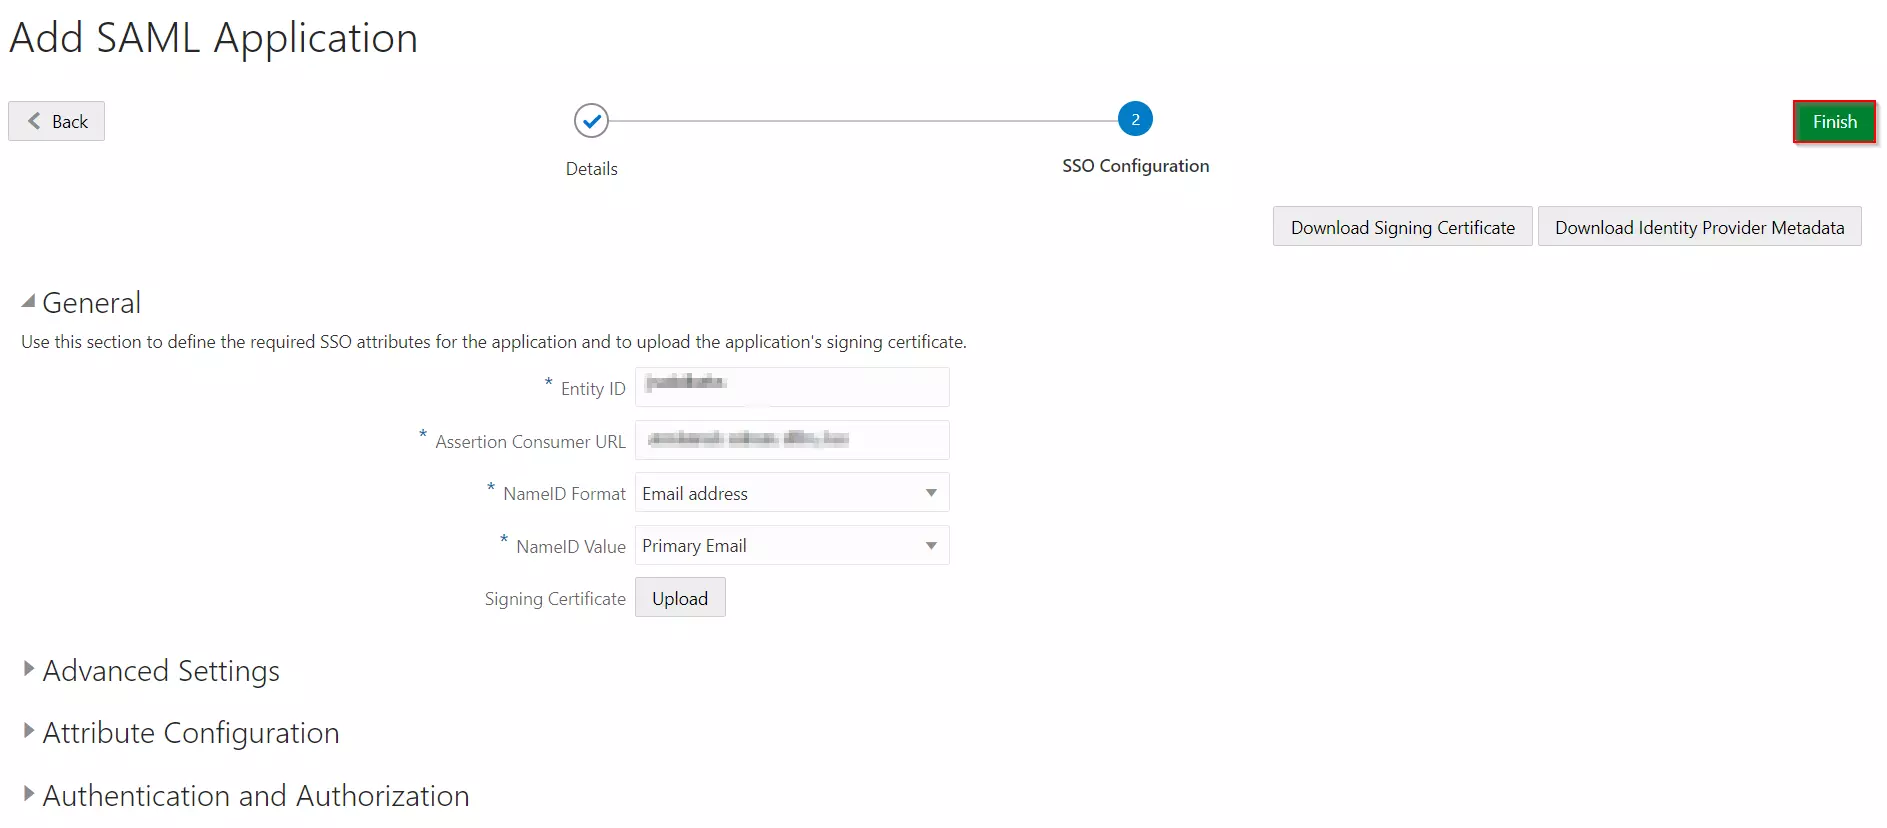
- In SSO Configuration, enter the following:
- Click on the Finish button to save the configuration.
- Configure Attribute Configuration under SSO Configuration Tab (Optional).
- For example, enter the name of attribute as "firstName" and select Basic from the Format dropdown, select User Attribute from Type dropdown, select User Name from the Value dropdown and click on the Save button.
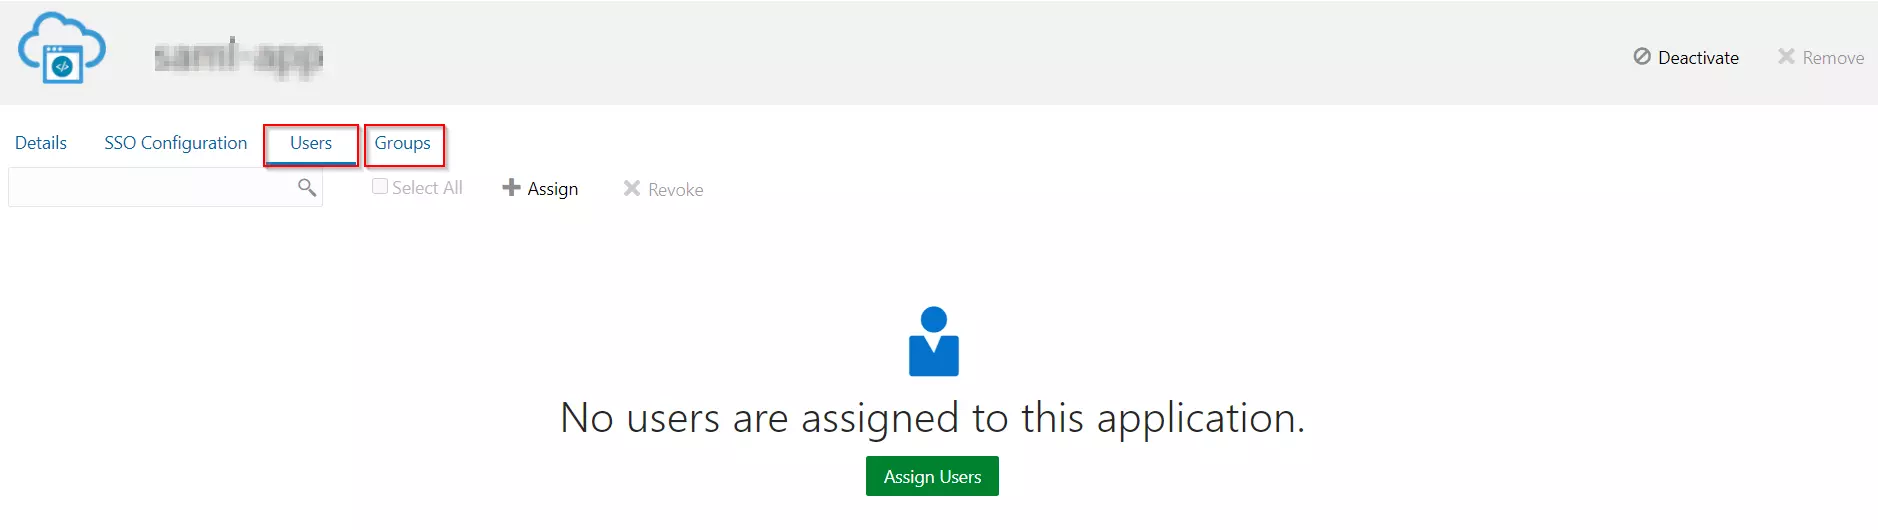
- After creating and configuring the app, go to Users / Groups tab.
- Here we can add the users and groups you want to give access to log in through this app. Assign this to the people/group you would to give access to.
- Go to the SSO Configuration.
- Click on the Download Identity Provider Metadata button to download the metadata.
Follow the steps below to configure Oracle Identity Cloud Service (IDCS) as an Identity Provider (IDP).
Configuring Oracle Identity Cloud Service (IDCS) as IdP
| Entity ID | Enter SP Entity ID / Issuer from the Service Provider Metadata tab of the module. |
| Assertion Consumer URL | Enter ACS URL from the Service Provider Metadata tab of the module. |
| NameID Format | Select Email address as a NameID Format from dropdown list. |
| NameID Value | Select Primary Email as a NameID Value from dropdown list. |
| Signing Certificate | Download certificate from Service Provider Metadata tab of the module. |

Assigning Groups/People
Import IDP Metadata

Step 1: Set Up Oracle Enterprise Manager as Identity Provider
All the information required to configure the Oracle Enterprise Manager as IDP i.e. plugin’s metadata is given in the Service Provider Info tab of the miniOrange plugin.
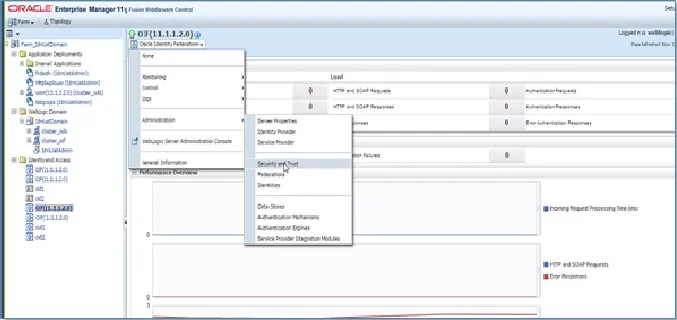
- Login to your Oracle Enterprise Manager (OEM) Console. From side menu go to Identity and AccessOracle Identity Federation (OIF).
- Select the Oracle Identity Federation dropdown from top. Go to AdministrationService Provider.
- In the Service Provider section, select the SAML 2.0 tab.
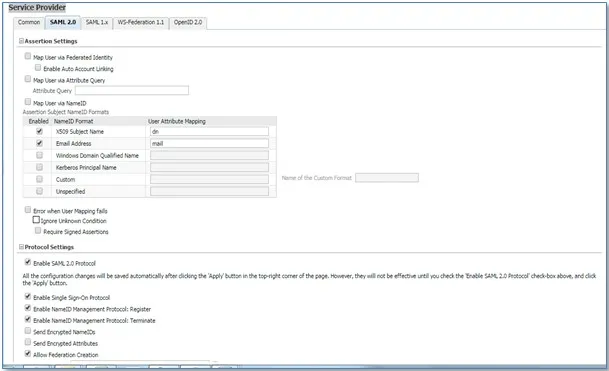
- Check Map User via NameID.
- Under Protocol Settings, check Enable SAML 2.0 Protocol.
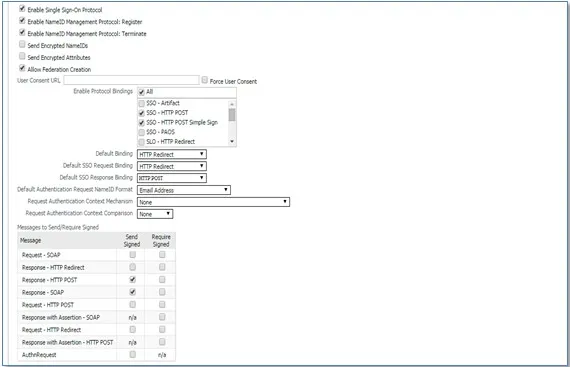
- Configure the additional SAML settings.
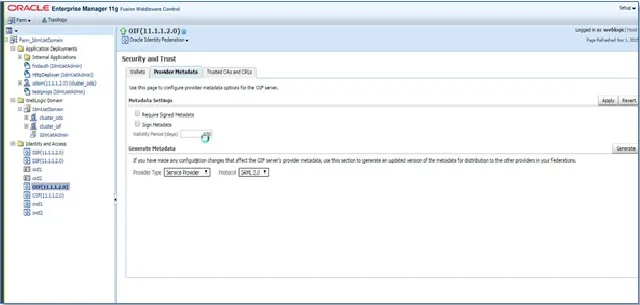
- Now, Select the Oracle Identity Federation dropdown from top. Go to Administration Security and Trust.
- Navigate to the Provider Metadata tab.
- Select Identity Provider in Provider Type dropdown and click Generate button to download metadata.
- Use the above metadata for further steps.
Step 1: Set Up PingFederate as Identity Provider
- Login to your Ping Federate user admin dashboard.
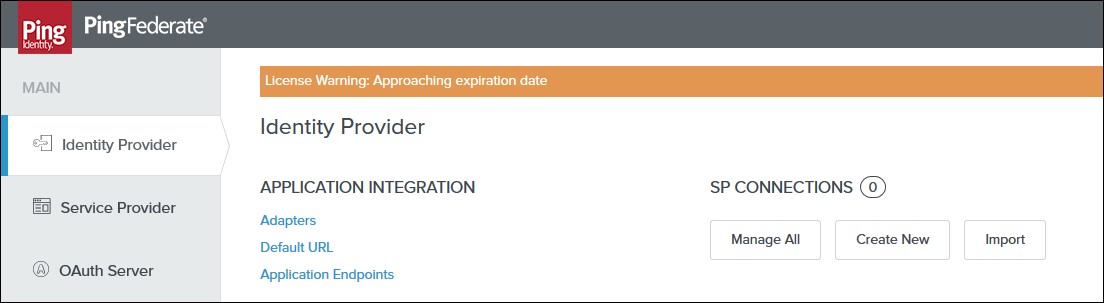
- Click on the Identity Provider in the left navigation menu.
- Under SP CONNECTION, click on Create New button.
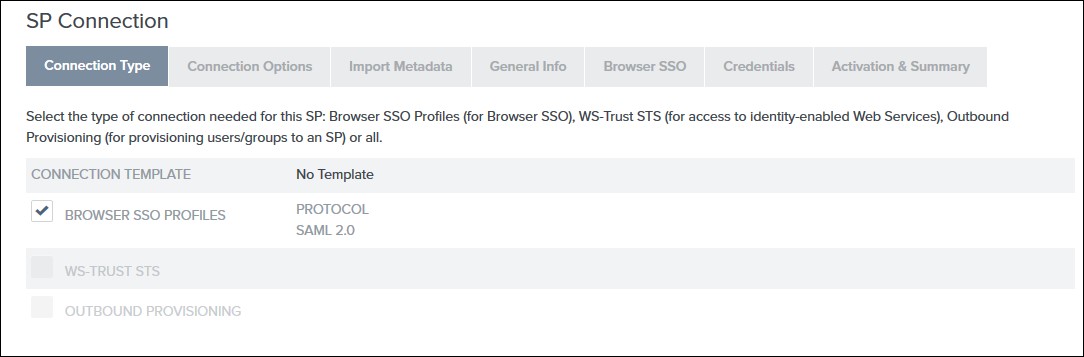
- Select the Browser SSO Profiles connection template on the Connection Type tab and click Next.
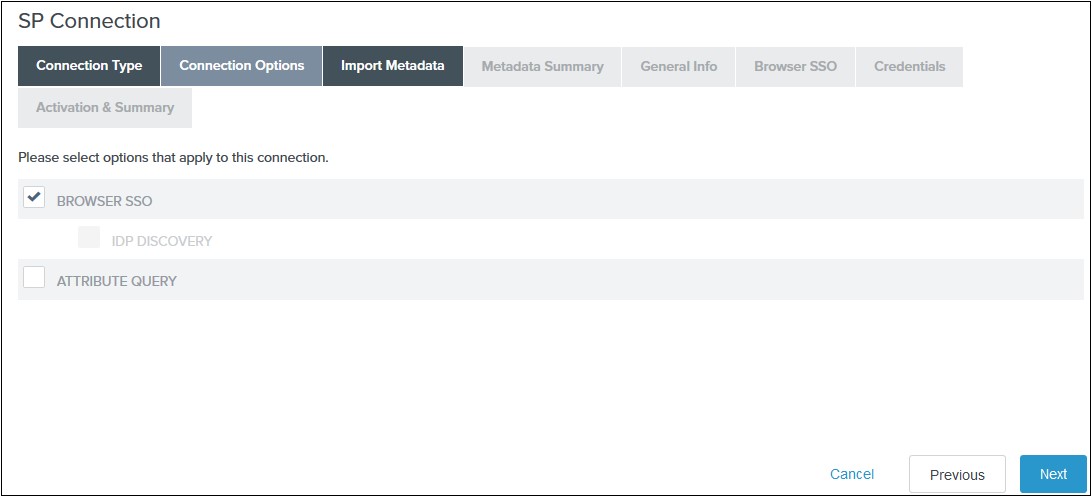
- Select Browser SSO on the Connection Options tab and click Next.
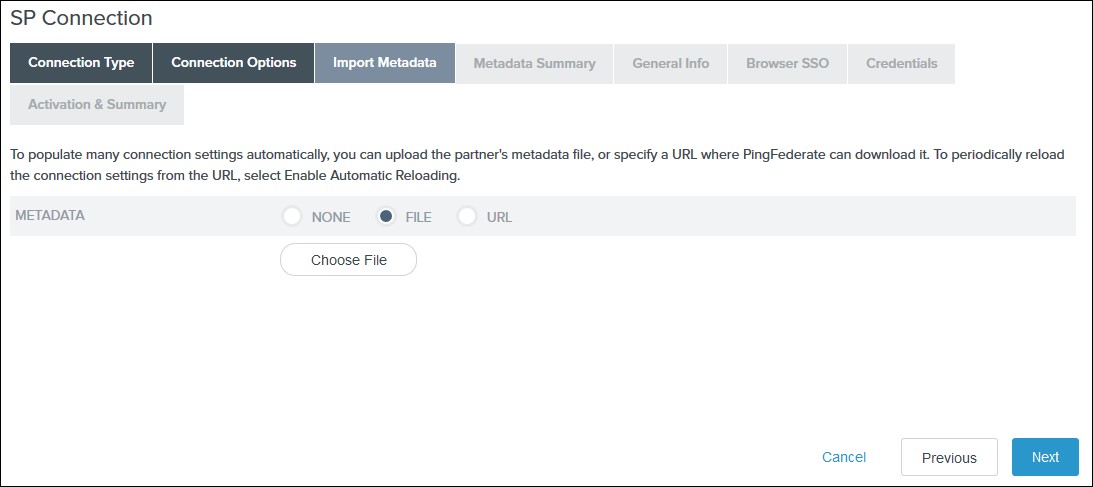
- Select File as the method for importing metadata and click Choose File to choose the miniOrange SSO plugin’s metadata on the Import Metadata tab or you can add SP Metadata information manually by selecting the None Option. You will need to copy SP Entity ID, SP ACS URL, and Certificate from Service Provider Tab.
- Review the information on the Metadata Summary tab and click Next.
- In the General Info tab ensure that the Service Provider’s Entity ID, Connection Name, and Base URL fields pre-populate based on the metadata. Click Next.
- Navigate to the Browser SSO tab and click on the Configure Browser SSO. You will be redirected to Browser SSO Setup wizard.
- Navigate to the Protocol Settings tab of the Browser SSO
wizard and click on the Configure Protocol settings.
-
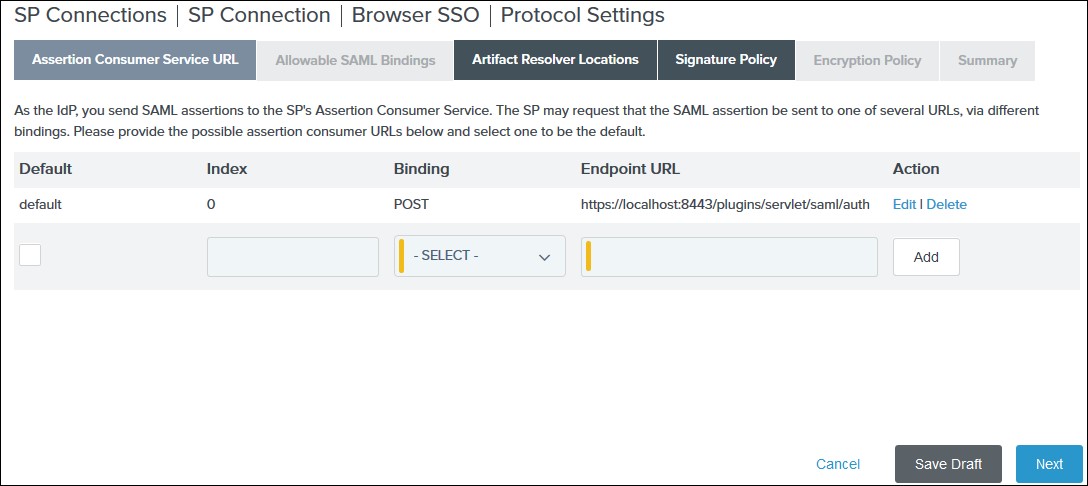
1) Select POST for Binding and specify the single
sign-on endpoint URL in the Endpoint URL field on
the Assertion Consumer Service URL. Click Next.
2) Select POST on the Allowable SAML Bindings tab and click Next.
3) Select your desired signature policies for assertions on the Signature Policy tab and click Next.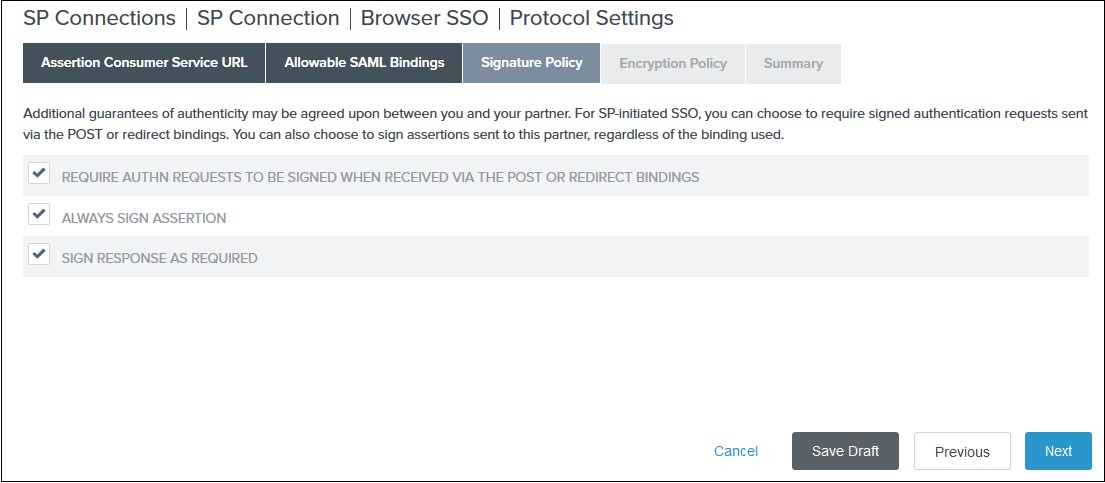
4) Select your desired encryption policy for assertions on the Encryption Policy tab and click Next.
5) Click Done on the Protocol Settings Summary tab.
6) Click Done on the Browser SSO Summary.
- Navigate to the Credentials and click on the Configure
Credentials. You will be redirected to the Credentials setup wizard.
-
1) Select the Signing Certificate to use with the Single Sign-On service
and select Include the certificate in the signature element in the
Digital Signature Settings tab. Click Done.
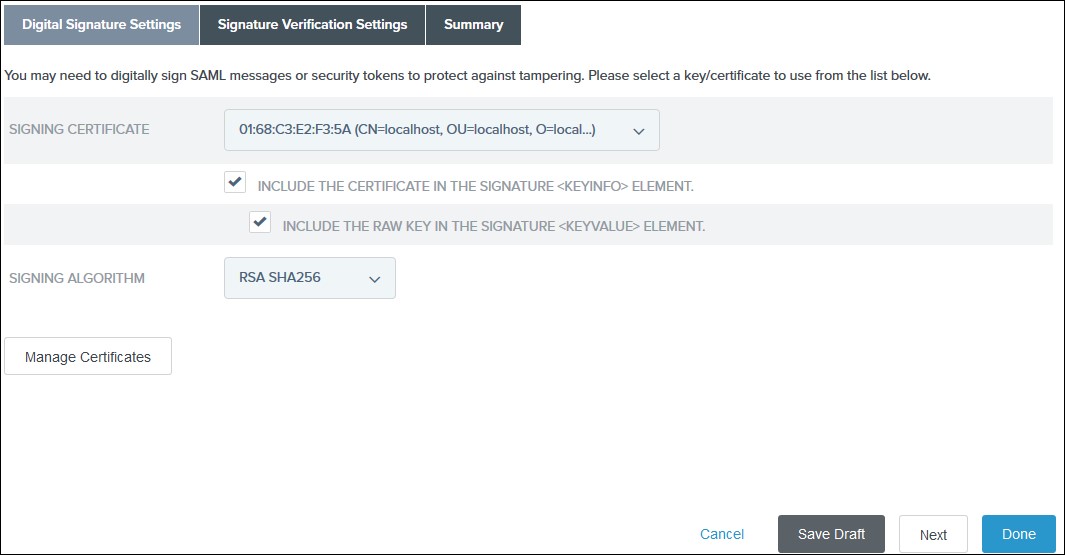
2) Click Done on the Summary.
3) Click Next on the Credentials.
- Select Active for the Connection Status on the Activation & Summary tab and click Save.
- Now, navigate to the Ping Federate User Admin dashboard Identity Provider.
- Click Manage All under SP Connections.
- Click Export Metadata for the desired service provider connection.
- Click Export on the Export & Summary tab and click Done.
All the information required to configure the Ping Federate as SAML IDP i.e. plugin’s metadata is given in the Service Provider Info tab of the miniOrange plugin.
-
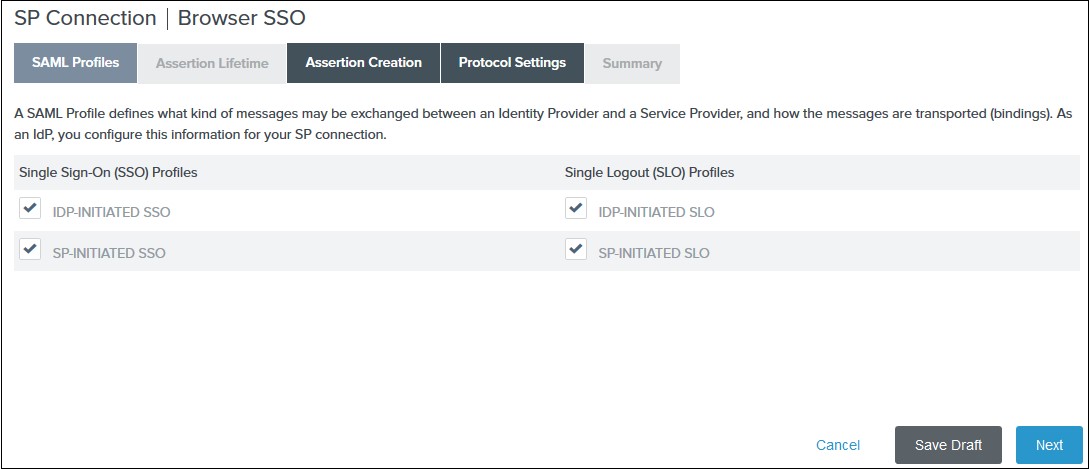
1) Select the IdP-Initiated SSO and SP-Initiated SSO options
on the SAML Profiles tab and click
Next.
2) Enter your desired assertion validity time from on the Assertion Lifetime tab and click Next. By default, it is configured 5 minutes for both. 3) Navigate to the Assertion Creation and click on the Configure Assertion Creation. You will be redirected to the assertion creation setup wizard.
-
I. In the Identity Mapping tab select STANDARD and click
Next.
II. Select a Subject Name Format for the SAML_SUBJECT on the Attribute Contract tab and click Next.
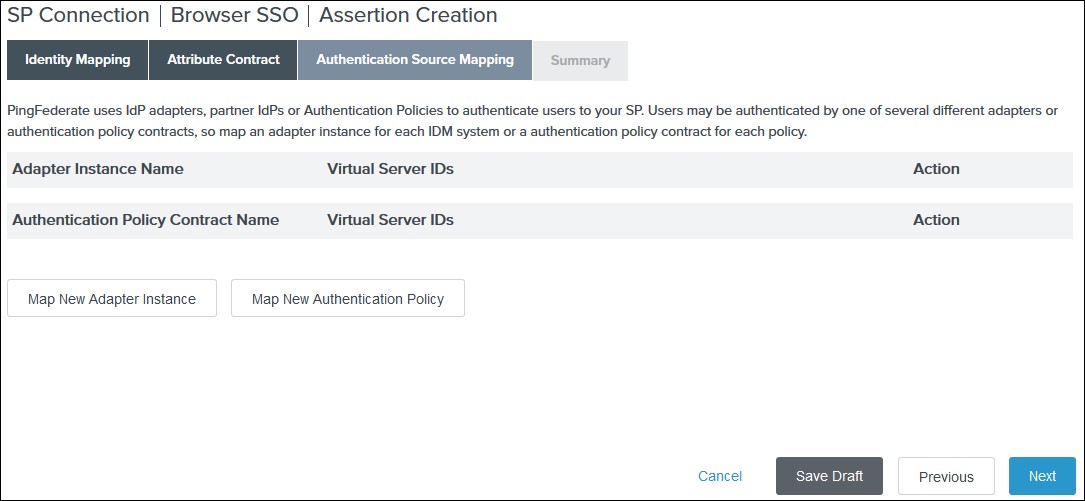
III. Click Map New Adapter Instance on the Authentication Source Mapping.
IV. Select an Adapter Instance and click Next. The adapter must include the user’s email address.
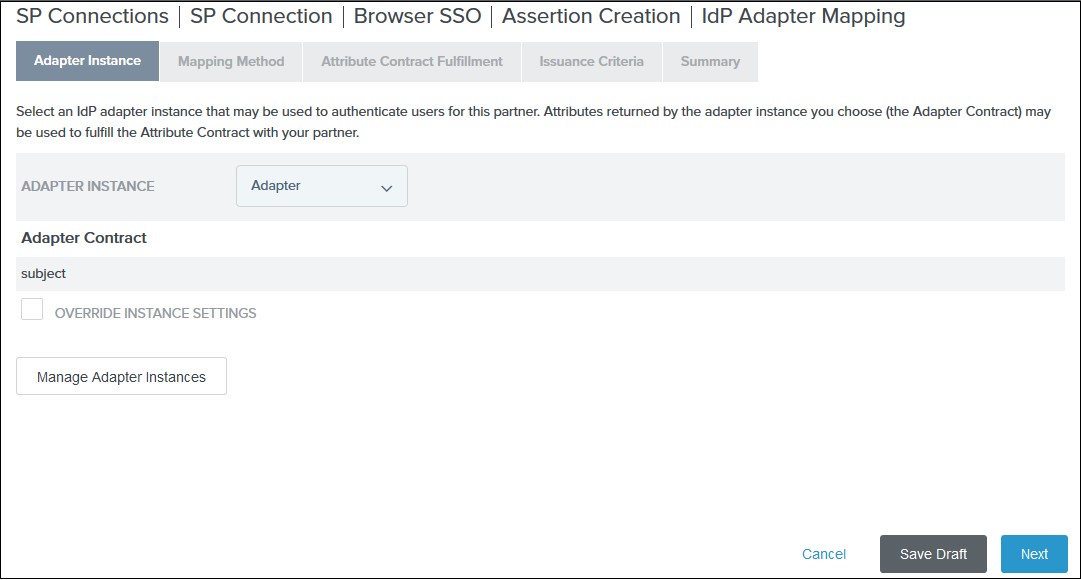
V. Select the Use only the adapter contract values in the SAML assertion option on the Mapping Method tab and click Next.
VI. Select your adapter instance as the Source and the email as the Value on the Attribute Contract Fulfilment tab and click Next.
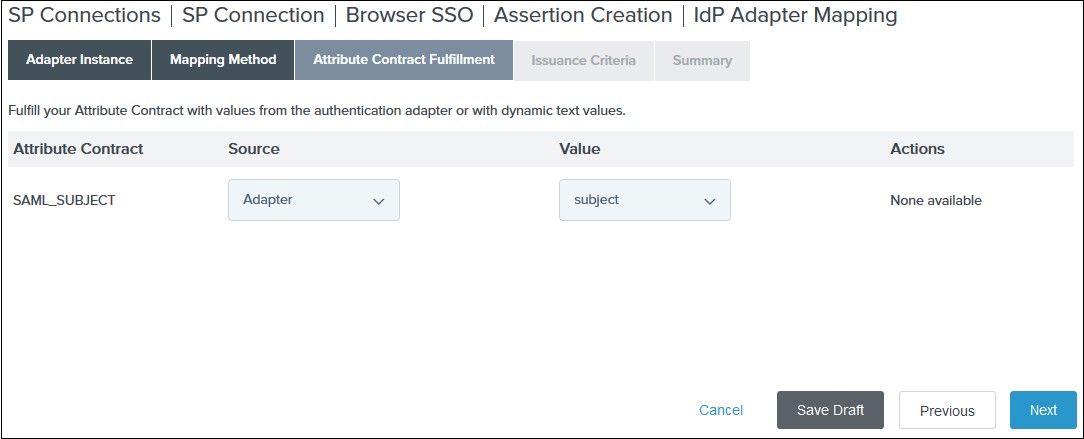
VII. (Optional) Select any authorization conditions you would like on the Issuance Criteria tab and click Next.
VIII. Click Done on the Summary. IX. Click Next on the Authentication Source Mapping tab. X. Click Done on the Summary tab. XI. Click Next on the Assertion Creation
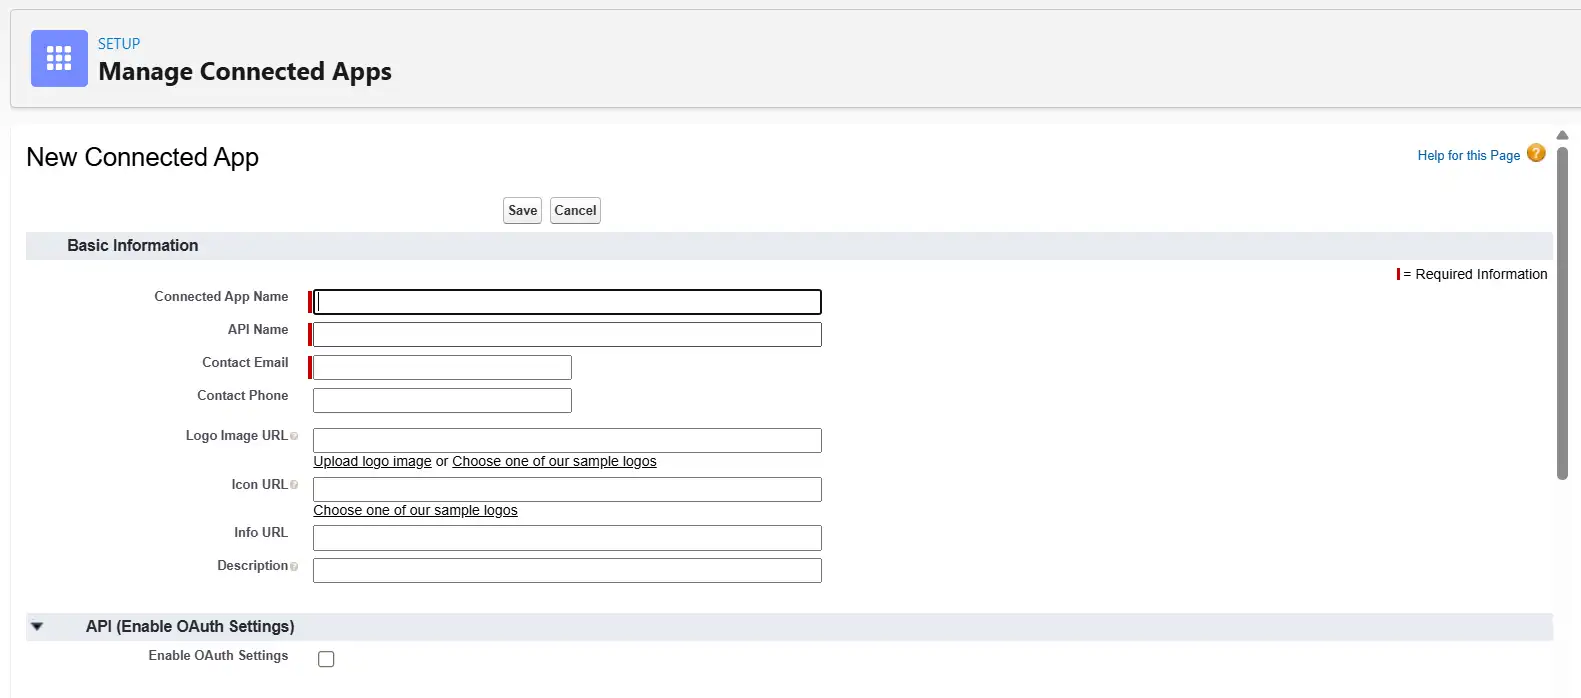
Step 1: Set Up Salesforce as Identity Provider
- Log into your Salesforce account.
- Go to settings and then go to the Setup page.
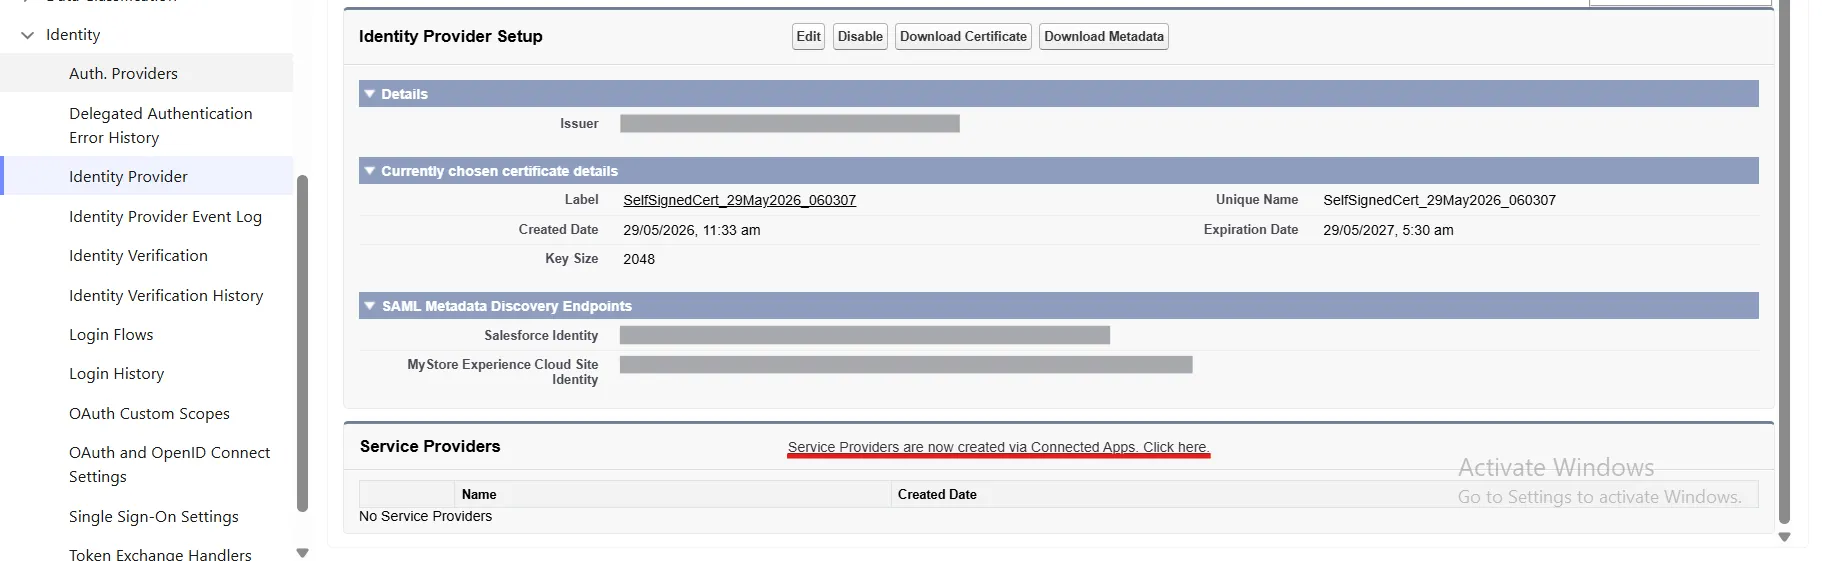
- From the left pane, select IdentityIdentity Provider.
- In the Service Provider section, if Identity provider is disable then enable Identity provider.
- Click on the link to create the Service Provider using Connected Apps.
- Enter Connected App Name, API Name and Contact Email.
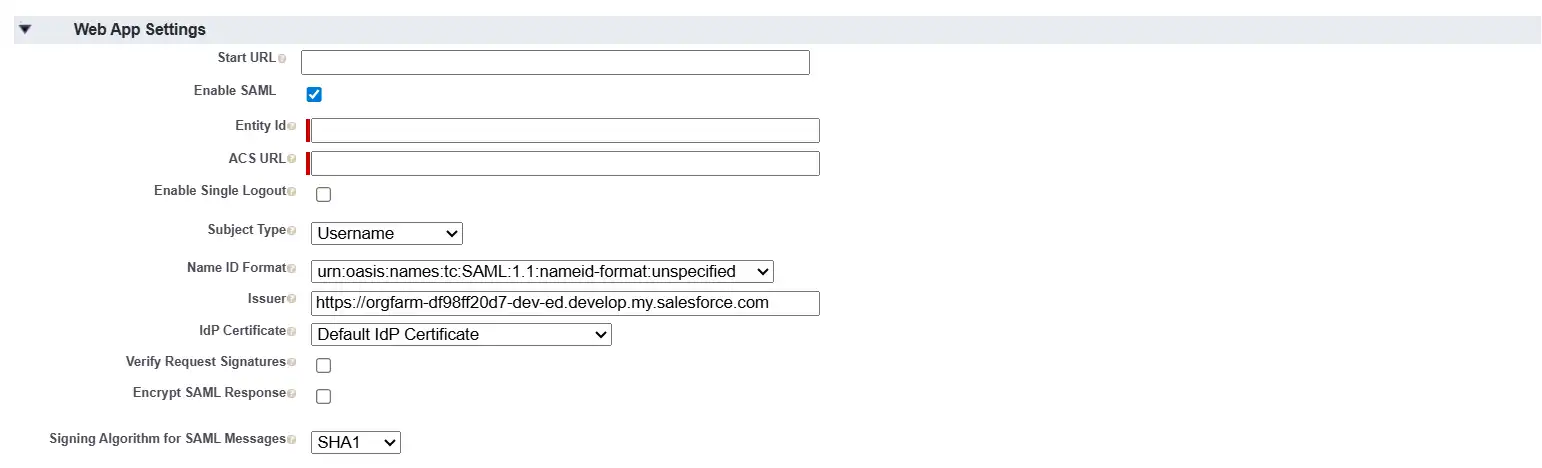
- Under the Web App Settings, check the Enable SAML checkbox and enter the following values:
- Now from the left pane, under Administer section, go to AppsConnected AppsManage Connected Apps. Click on the app you just created.
- Under Profiles section click Manage Profiles button and select the profiles you want to give access to log in through this app.
- Under SAML Login Information, click on Download Metadata.
- Keep this metadata handy for the next steps.
| Entity ID | SP-EntityID / Issuer from Service Provider Info Tab |
| ACS URL | ACS (AssertionConsumerService) URL from Service Provider Info Tab |
| Subject Type | Username |
| Name ID Format | urn:oasis:names:tc:SAML:2.0:nameid-format:persistent |

Step 1: Set Up Shibboleth2 as Identity Provider
- In conf/relying-party.xml, configure Service Provider like this
- Make sure your Shibboleth server is sending Email Address of the user in Name ID. In attribute-resolver.xml, get the email attribute as Name ID:
- In attribute-filter.xml, release the email attribute:
- Restart the Shibboleth server.
- You need to configure these endpoints in miniOrange plugin.
<MetadataProviderxsi:type="InlineMetadataProvider" xmlns="urn:mace:shibboleth:2.0:metadata" id="MyInlineMetadata">

  <EntitiesDescriptorxmlns="urn:oasis:names:tc:SAML:2.0:metadata">

    <md:EntityDescriptorxmlns:md="urn:oasis:names:tc:SAML:2.0:metadata" entityID="<ENTITY_ID_FROM_PLUGIN>">

      <md:SPSSODescriptorAuthnRequestsSigned="false" WantAssertionsSigned="true" protocolSupportEnumeration=

          "urn:oasis:names:tc:SAML:2.0:protocol">

        <urn:oasis:names:tc:SAML:1.1:nameidformat:emailAddress</md:NameIDFormat>

        <md:AssertionConsumerService Binding="urn:oasis:names:tc:SAML:2.0:bindings:https-POST"

          Location="<ACS_URL_FROM_PLUGIN>" index="1"/>

      </md:SPSSODescriptor>

    </md:EntityDescriptor>

  </EntitiesDescriptor>

</MetadataProvider>
<resolver:AttributeDefinitionxsi:type="ad:Simple" id="email" sourceAttributeID="mail">

   <resolver:Dependency ref="ldapConnector" />

   <resolver:AttributeEncoderxsi:type="enc:SAML2StringNameID" nameFormat="urn:oasis:names:tc:SAML:1.1:

    nameid-format:emailAddress"/>

</resolver:AttributeDefinition>
<afp:AttributeFilterPolicy id="releaseTransientIdToAnyone">

<afp:PolicyRequirementRulexsi:type="basic:ANY"/>

  <afp:AttributeRuleattributeID="email">

    <afp:PermitValueRulexsi:type="basic:ANY"/>

  </afp:AttributeRule>

</afp:AttributeFilterPolicy>
| IDP Entity ID | https://<your_domain>/idp/shibboleth |
| Single Login URL | https://<your_domain>/idp/profile/SAML2/Redirect/SSO |
| X.509 Certificate | The public key certificate of your Shibboleth server |
Step 1: Set Up Shibboleth3 as Identity Provider
- In conf/idp.properties, uncomment and set 'idp.encryption.optional' to true.
eg. idp.encryption.optional = true - In conf/metadata-providers.xml, configure Service Provider like below.
- In conf/saml-nameid.properties, uncomment and set default NameID as Email Address like this
- In conf/saml-nameid-xml, search for shibboleth.SAML2NameIDGenerators. Uncomment the shibboleth.SAML2AttributeSourcedGenerator bean and comment all other ref beans.
- Make sure you have defined AttributeDefinition in conf/attribute-resolver.xml.
- Make sure you have AttributeFilterPolicy defined in conf/attribute-filter.xml.
- Restart the Shibboleth server.
- You need to configure these endpoints in the miniOrange plugin.
   <MetadataProvider xmlns:samlmd="urn:oasis:names:tc:SAML:2.0:metadata"

     id="miniOrangeInLineEntity" xsi:type="InlineMetadataProvider" sortKey="1">

     <samlmd:EntityDescriptor ID="entity" entityID="<SP-EntityID / Issuer from Service Provider Info tab in plugin.>"

       validUntil="2020-09-06T04:13:32Z">

       <samlmd:SPSSODescriptor AuthnRequestsSigned="false" WantAssertionsSigned="true"

       protocolSupportEnumeration="urn:oasis:names:tc:SAML:2.0:protocol">

         <samlmd:NameIDFormat>

           urn:oasis:names:tc:SAML:1.1:nameid-format:emailAddress

         </samlmd:NameIDFormat>

       <samlmd:AssertionConsumerService Binding="urn:oasis:names:tc:SAML:2.0:bindings:HTTP-POST"

       Location="<ACS (AssertionConsumerService) URL from Step1 of the plugin under Identity Provider Tab.>"

         index="1" />

       </samlmd:SPSSODescriptor>

       </samlmd:EntityDescriptor>

   </MetadataProvider>
idp.nameid.saml2.default=urn:oasis:names:tc:SAML:1.1:nameid-format:emailAddress
   <!-- SAML 2 NameID Generation -->

   <util:list id="shibboleth.SAML2NameIDGenerators">

     <!--<ref bean="shibboleth.SAML2TransientGenerator" /> -->

     <!-->ref bean="shibboleth.SAML2PersistentGenerator" /> -->

     <bean parent="shibboleth.SAML2AttributeSourcedGenerator"

     p:format="urn:oasis:names:tc:SAML:1.1:nameid-format:emailAddress"

     p:attributeSourceIds="#{ {'email'} }" />

   </util:list>
   <!-- Note: AttributeDefinitionid must be same as what you provided in attributeSourceIds in conf/saml-nameid.xml -->

   <resolver:AttributeDefinitionxsi:type="ad:Simple" id="email" sourceAttributeID="mail">

     <resolver:Dependency ref="ldapConnector" />

     <resolver:AttributeEncoderxsi:type="enc:SAML2String" name="email"  friendlyName="email" />

   </resolver:AttributeDefinition >


   <resolver:DataConnector id="ldapConnector" xsi:type="dc:LDAPDirectory" ldapURL="%{idp.authn.LDAP.ldapURL}"

     baseDN="%{idp.authn.LDAP.baseDN}" principal="%{idp.authn.LDAP.bindDN}"

     principalCredential="%{idp.authn.LDAP.bindDNCredential}">


     <dc:FilterTemplate>

       <!-- Define you User Search Filter here -->

       <![CDATA[   (&(objectclass=*)(cn=$requestContext.principalName))   ]]>

     </dc:FilterTemplate>


     <dc:ReturnAttributes>*</dc:ReturnAttributes>

   </resolver:DataConnector>
   <afp:AttributeFilterPolicy id="ldapAttributes">

   <afp:PolicyRequirementRulexsi:type="basic:ANY"/>

     <afp:AttributeRuleattributeID="email">

       <afp:PermitValueRulexsi:type="basic:ANY"/>

     </afp:AttributeRule>

   </afp:AttributeFilterPolicy>
| IDP Entity ID | https://<your_domain>/idp/shibboleth |
| Single Login URL | https://<your_domain>/idp/profile/SAML2/Redirect/SSO |
| Single Logout URL | https://<your_domain>/idp/shibboleth |
| X.509 Certificate | The public key certificate of your Shibboleth server |
Step 1: Set Up SimpleSAML as Identity Provider
- In config/config.php, make sure that 'enable.saml20-idp' is true. Example: ‘enable.saml20-idp’ => true
- In metadata/saml20-idp-hosted.php, configure SimpleSAML as an Identity Provider by adding code below:
$metadata['__DYNAMIC:1__'] = array(

    'host' => '__DEFAULT__',

    /* X.509 key and certificate. Relative to the cert directory.*/

    'privatekey' => '<YOUR_PRIVATE_KEY_FILE_NAME>',

    //eg. RSA_Private_Key.pem 'certificate' => '<YOUR_PUBLIC_KEY_FILE_NAME>',

    //eg. RSA_Public_Key.cer

    /* Authentication source to use. Configured in 'config/authsources.php'. */

    'auth' => '<YOUR_AUTH_SOURCE_NAME>',

);
- In metadata/saml20-sp-remote.php, register your Servider Provider like this:
/* Replace example.com with your atlassian domain name. */$metadata['https://example.com/plugins/servlet/saml/metadata'] = array(
'AssertionConsumerService' => 'https://example.com/',
'SingleLogoutService' => 'https://example.com/',
'NameIDFormat' => 'urn:oasis:names:tc:SAML:1.1:nameid-format:emailAddress',
'simplesaml.nameidattribute' => 'mail',
'simplesaml.attributes' => true,
'attributes' => array('mail', 'givenname', 'sn', 'memberOf'),
);
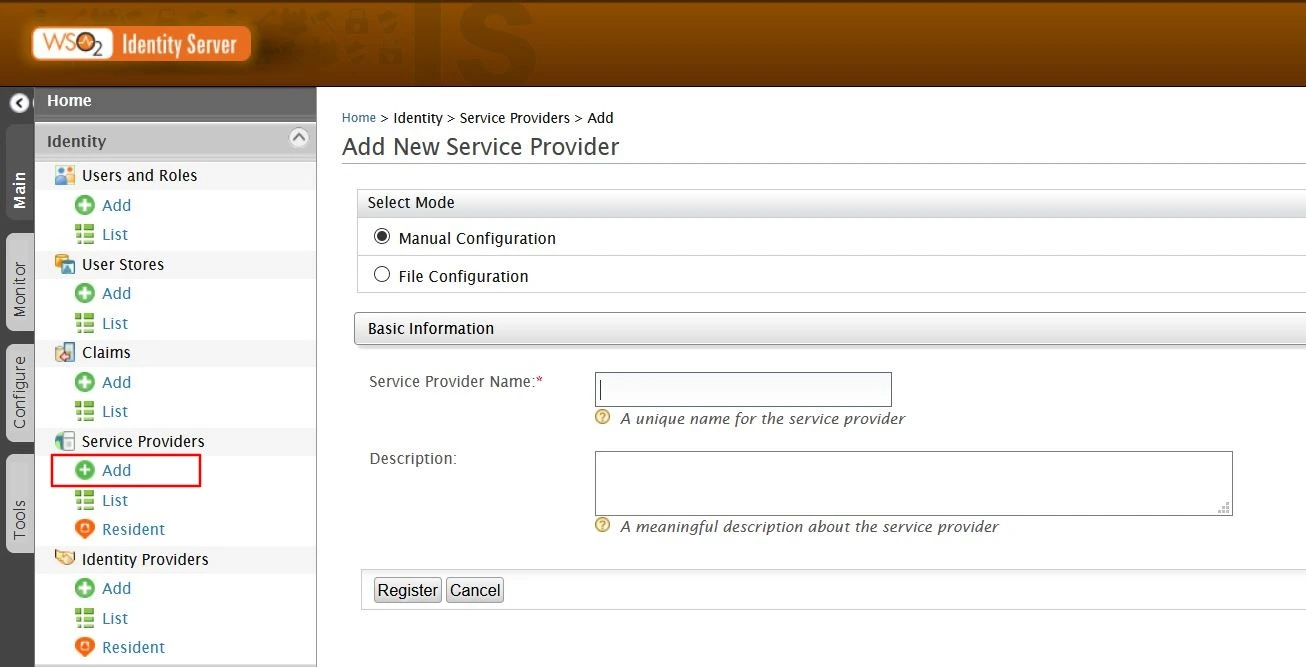
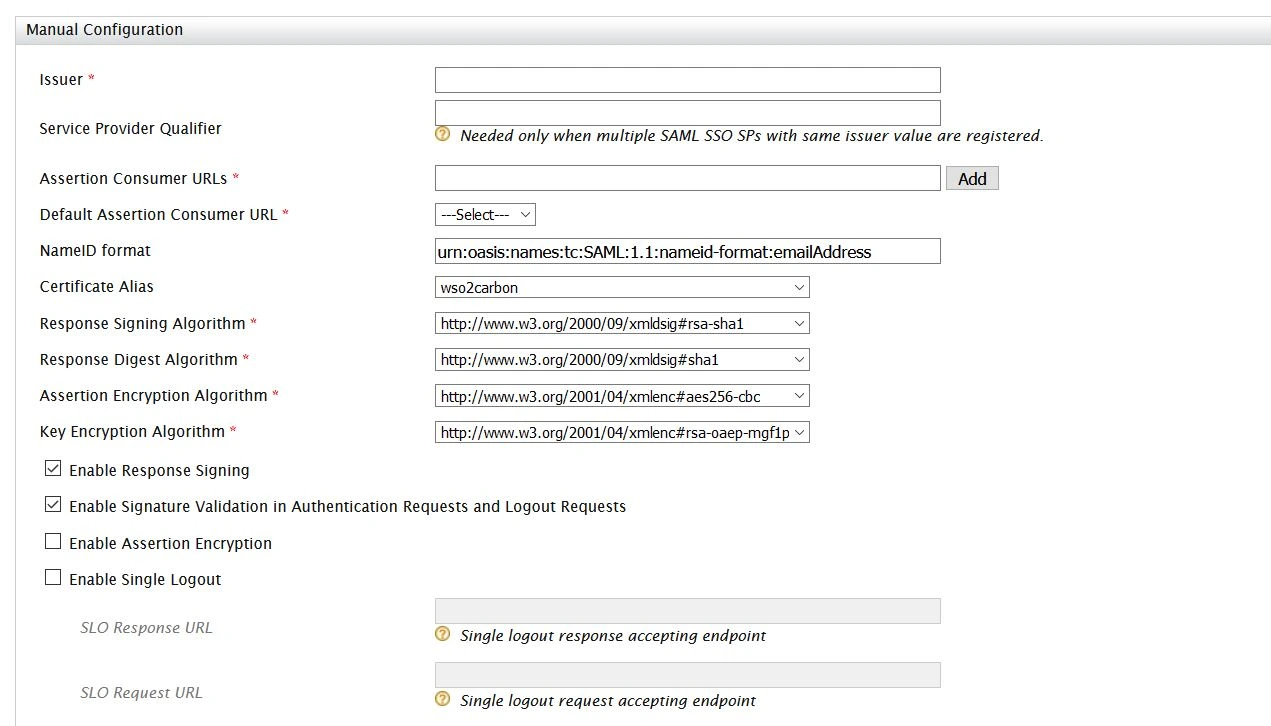
Step 1: Set Up WSO2 as Identity Provider
- Login to your WSO2 admin console.
- Select Add under the Service Providers tab.
- Select mode as Manual Configuration.
- Enter the Service Provider Name and click on Register button.
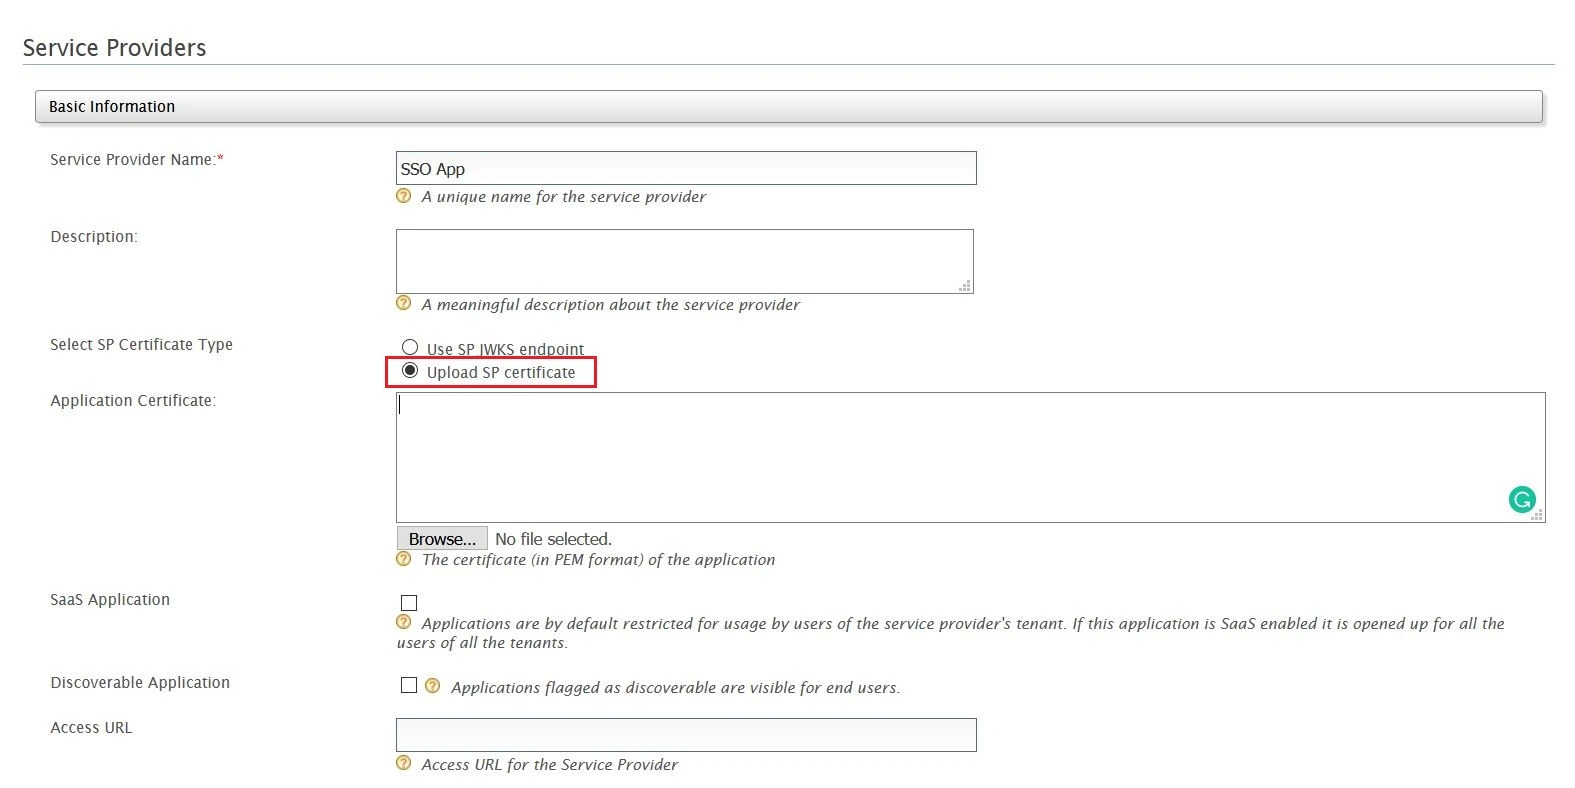
- Select Upload SP certificate option under SP Certificate Type.
- Copy the certificate from plugin and provide it into Application Certificate field.
- You can also download the certificate file and upload it through Browse file option.
- Under Claim Configuration, select Use Local Claim Dialect.
- For Requested Claims, add http://wso2.org/claims/emailaddress as a claim URI.
- Set Subject Claim URI to http://wso2.org/claims/nickname.
- Under Inbound Authentication Configuration > SAML2 Web SSO Configuration, click Configure.
- Enter Issuer value as provided under the Service Provider Info tab of the plugin.
- Enter Assertion Consumer URL (ACS) as provided under Service Provider Info tab and click on Add.
- Check Enable Response Signing.
- Check the Enable Attribute Profile and include attributes in the response always.
- Check the Enable Audience Restriction.
- Enter the Audience URL value provided under Service Provider Info tab of plugin and click on Add.
- Check the Enable Recipient Validation. Enter the Recipient URL value provided under Service Provider Info tab of plugin and click on Add.
- Click on Download IDP Metadata button save the IDP metadata file.
- Click on Register to save the configuration.
- Click on Update on Service Providers page to save the configuration.
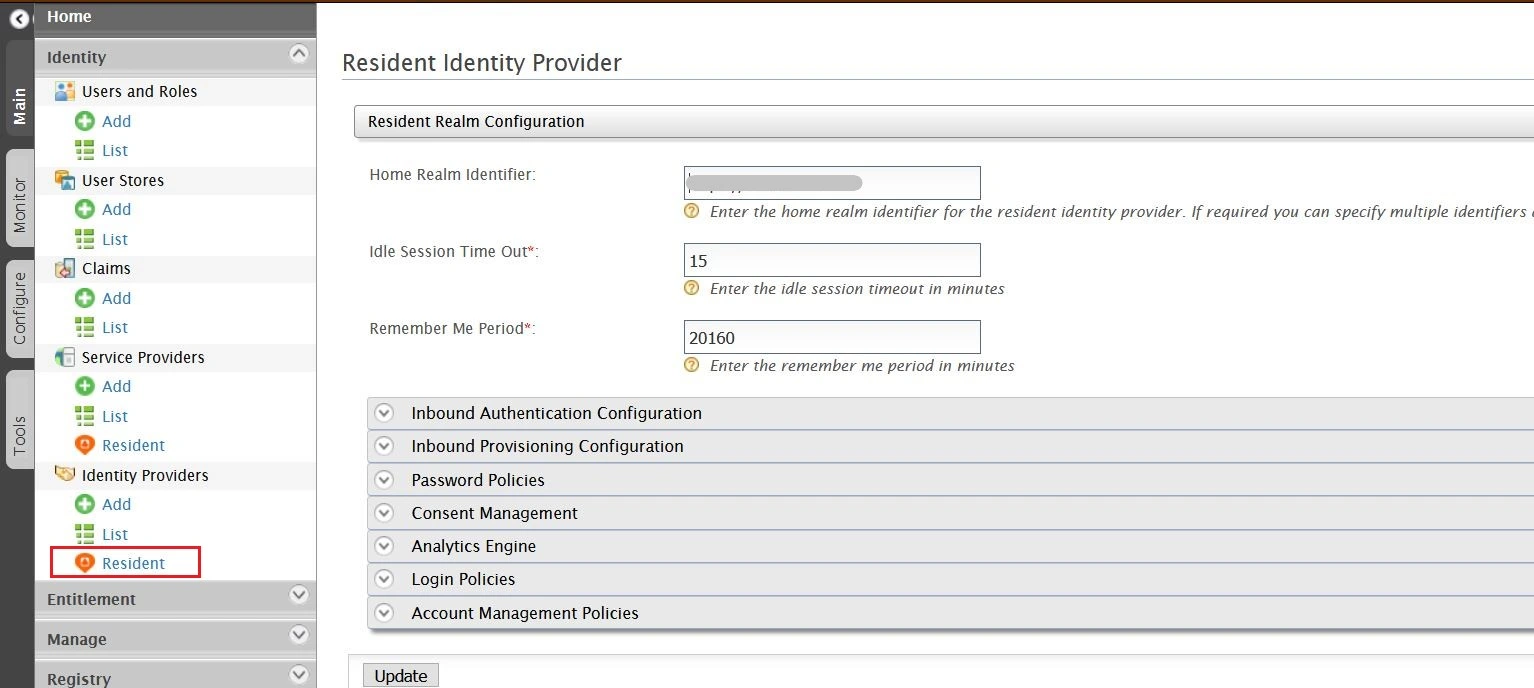
- Select Resident under Identity Providers tab from the menu.
- Enter Home Realm Identifier value that you want (usually your WSO2 server address).
- Click on Update to save the changes.


Step 4: Configure Helpdesk SSO with miniOrange
a. Get metadata from Helpdesk SSO
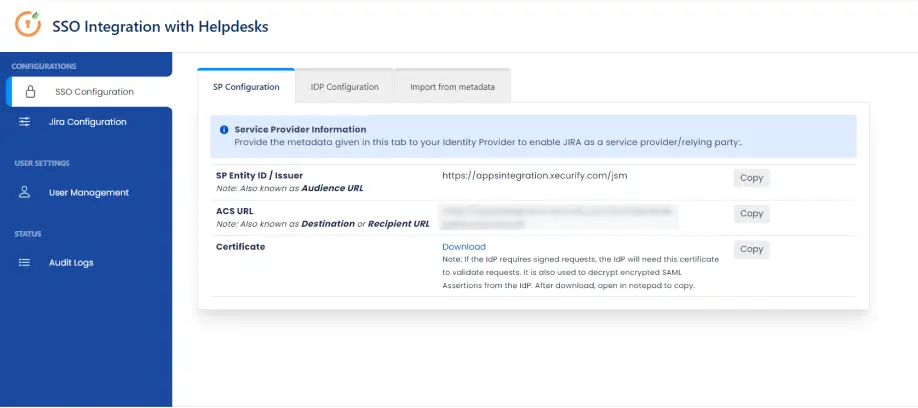
- In your Jira Cloud instance, click on the Apps drop-down menu and select SAML SSO for JSM Customers.
- Go to SP Configuration tab. Here you can access the metadata information to configure IDP.
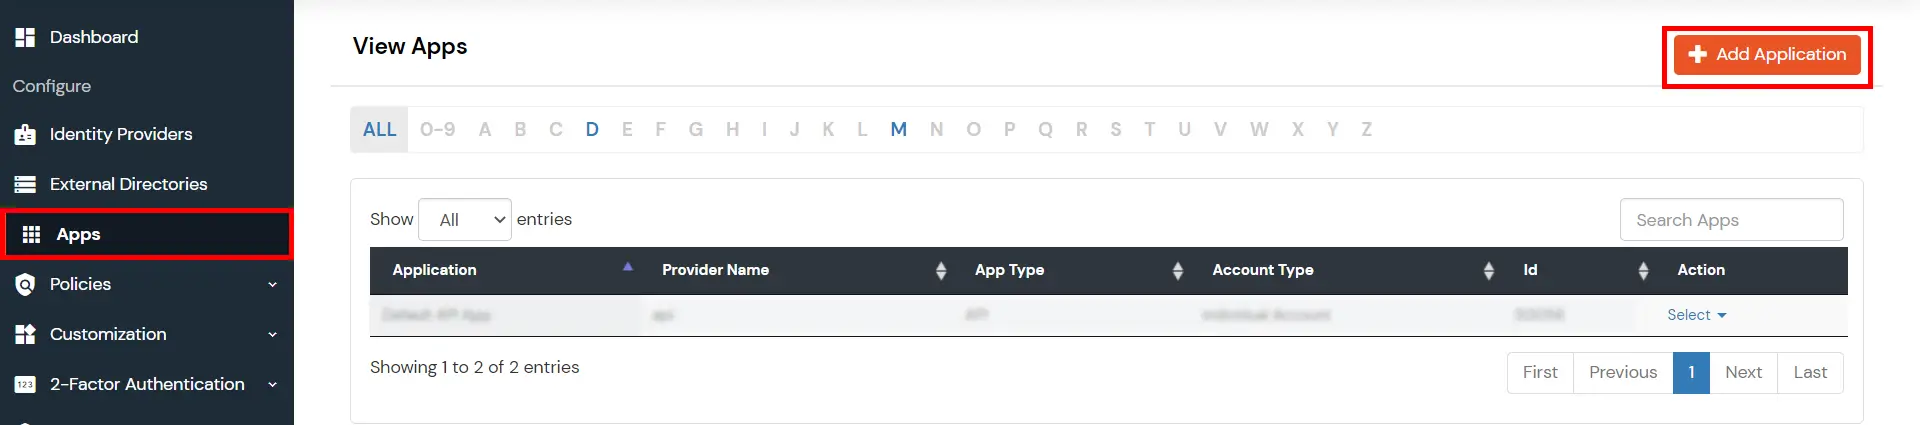
b. Create an app inside miniOrange
- Login into miniOrange Admin Console.
- Go to Apps and click on the Add Application button.
- Then click on SAML/WS-FED app.
- Enter details copied from Helpdesk SSO add-on and click on Save.
c. Add miniOrange as IDP in Helpdesk SSO
- In miniOrange Admin Dashboard, go to Apps from the left sidebar. Click on the Select dropdown next to your created app.
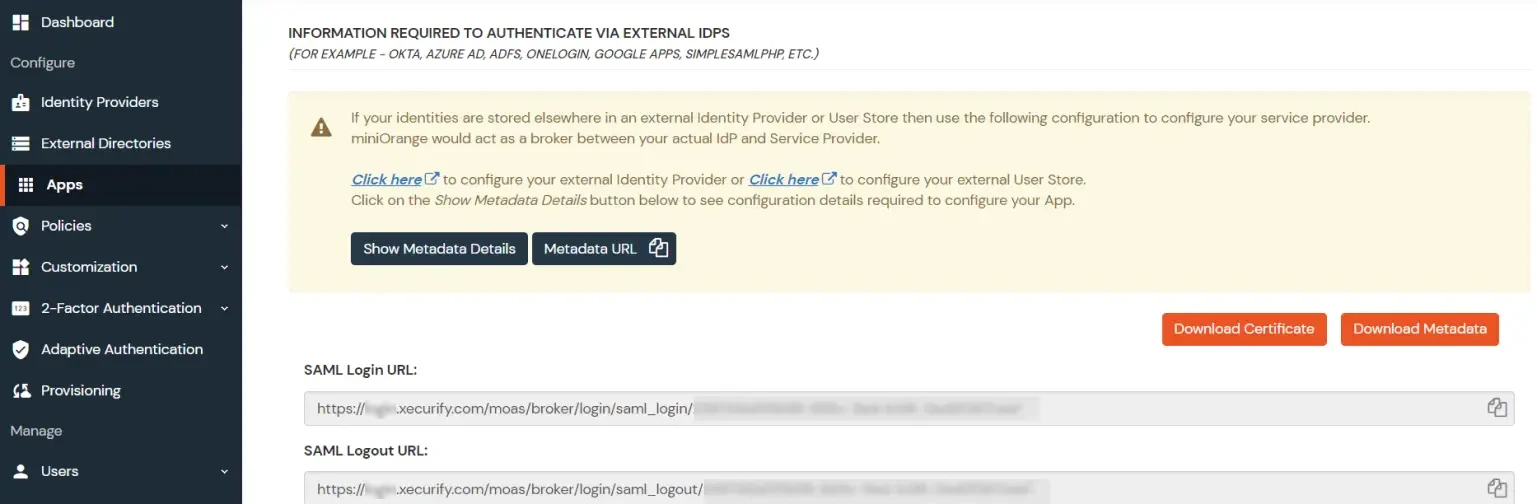
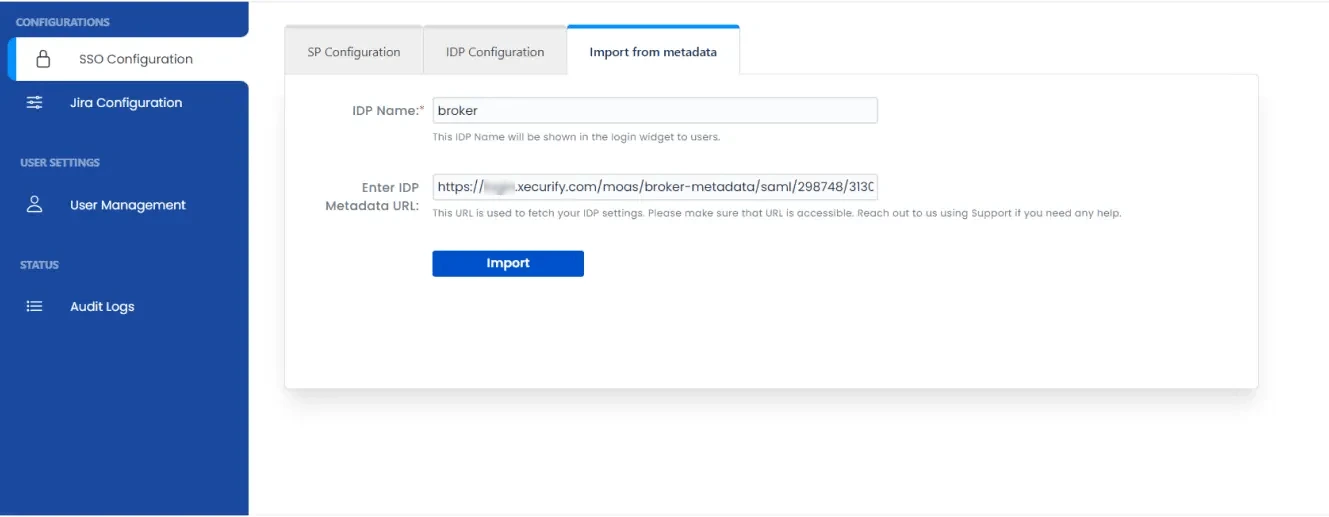
- Click on Show Metadata Details under the section INFORMATION REQUIRED TO AUTHENTICATE VIA EXTERNAL IDPS. You will need these metadata details in order to configure Helpdesk SSO add-on.
- Import metadata details or manually enter inside the helpdesk add-on.
d. Generate API Token for Authentication
- Before attempting to perform SSO in the Helpdesk you have to configure an API token. This token is required for performing SSO.
- Note : If you have not created an API token yet, you can do so by visiting Generate API Token page. Visit this page and click on Create API Token. Enter any label and click on Create. Please make sure to copy this API token as it will be necessary for additional configuration.
- Open Getting Started page for SAML SSO for JSM Customers app.
- Click on Jira Configuration tab from the left sidebar. Then click on Configure Api Token button.
- Enter site admin's email and API token in the popup and click on Submit.
e. Perform SSO in your Helpdesk portal
- In Jira Configuration tab, copy the link to the project in which you want to test SSO.
- Open your browser ( preferred incognito mode for testing ) and paste the link your IDP login page should appear. Login with your IDP account and you will also be logged in the Helpdesk Project.
 Hi! Do you need help with this guide?
Thank you for your response. We will get back to you soon.
Something went wrong. Please submit your query again

Recommended Add-Ons

Two Factor Authentication
Enable 2FA/MFA for users & groups and let users configure 2FA during their first login.
Know MoreUser Sync SCIM Provisioning
Synchronize users, groups & directory with SCIM & REST APIs for Server/DC.
Know MoreAPI Token Authentication
Secure your JIRA Data Center/Server REST API using API Tokens.
Know MoreBitbucket Git Authentication App | Kerberos/NTLM Apps | Word/PDF Exporter | WebAuthn | SonarQube SSO | Jenkins SSO
If you don't find what you are looking for, please contact us at support-atlassian@miniorange.atlassian.net or raise a support ticket here.