
OAuth / OpenID SSO App Overview
The OAuth / OpenID SSO app by miniOrange enables secure Single Sign-On (SSO) for Atlassian applications using OAuth 2.0 and OpenID Connect (OIDC) standards.
It allows users to authenticate using external Identity Providers (IdPs) such as Okta, Azure AD, Google, Keycloak, Ping, and custom OAuth/OIDC providers.
This document outlines the key features available in the app for Server and Data Center deployments, with platform-specific notes highlighted where required.
Supported Authentication Standards
- OAuth 2.0
- OpenID Connect (OIDC)
These industry-standard protocols ensure secure token-based authentication and identity verification across platforms.
Identity Provider Support
The app supports:
- Pre-configured providers (Google, Azure AD, Okta, Keycloak, Ping, etc.)
- Custom OAuth / OIDC providers
Admins can configure any OAuth 2.0 or OIDC-compliant IdP using endpoints such as:
- Authorization URL
- Token URL
- User Info endpoint
This flexibility allows integration with both commercial and in-house identity systems.
Single Sign-On (SSO)
Once configured, users can:
- Log in to Atlassian applications using their IdP credentials
- Access Jira, Confluence, or other supported apps without managing separate passwords
SSO improves:
- User experience
- Security posture
- Centralized identity management
Single Logout (SLO)
The app supports Single Logout, ensuring that when a user logs out:
- The session is terminated in Atlassian and the Identity Provider
- No orphan sessions remain active
Note: SLO behavior may vary depending on the IdP’s logout endpoint support.
User Profile & Attribute Mapping
Admins can map IdP attributes to Atlassian user fields, including:
- Username
- Display name
- Custom attributes
This ensures:
- Correct user identification
- Seamless user provisioning
- Consistent profile data across systems
Automatic User Provisioning
Users can be:
- Automatically created on first successful login
- Assigned default groups during provisioning
This reduces manual user management and accelerates onboarding.
Group Mapping & Role Assignment
Map IdP groups or claims to:
- Atlassian groups
- Application roles
Benefits:
- Role-based access control (RBAC)
- Automated permission assignment
- Centralized access governance
Login Redirection Rules
Admins can define rules to:
- Redirect users automatically to the IdP login page
- Enforce SSO for specific users or groups
This is useful for:
- Organization-wide SSO enforcement
- Hybrid authentication setups
Backdoor / Emergency Access URL
To prevent admin lockouts, the app provides:
- A Backdoor URL that bypasses SSO
- Direct access using Atlassian local credentials
This ensures administrators can always regain access during:
- IdP downtime
- Misconfiguration scenarios
Multi-Provider Support
Configure and manage:
- Multiple OAuth / OIDC providers simultaneously
Admins can:
- Assign different providers to different user groups
- Switch providers without disrupting users
Token & Session Management
This feature handles:
- Secure access token storage
- Token validation
- Session lifecycle management
This ensures compliance with OAuth/OIDC best practices.
Test Configuration Utility
Admins can validate configurations using a Test Configuration feature that:
- Verifies IdP connectivity
- Confirms correct attribute mapping
- Detects misconfigurations early
This reduces setup errors before enabling SSO for end users.
Audit Logs
For Server and Data Center deployments, the app provides:
- Authentication logs
- Error tracking
- Troubleshooting visibility
Useful for compliance and security audits.
Security & Compliance
- Token-based authentication (no password sharing)
- Secure OAuth/OIDC flows
- Compatible with enterprise security standards
OAuth SSO 2.0: Installation Guide
Apply this guide to install the OAuth SSO 2.0 app for Atlassian applications, including Jira, Confluence, Bitbucket, and other supported products.
This covers installation via Marketplace and manual upload for Server and Data Center deployments, with clear variants noted where appropriate.
Prerequisites
Before installation, ensure the following:
- You have administrator rights for the target Atlassian application.
- You have access to the Atlassian Marketplace (applicable to Server/DC).
- For Data Center or Server manual installation, you can upload app packages.
Installation Methods
There are two supported ways to install the OAuth SSO 2.0 app:
1) Install Directly from the Atlassian Marketplace
This is the recommended approach for most users, especially for Server and Data Center instances
Steps:
- Log in to your Atlassian product as an administrator.
- Navigate to Administration → Manage Apps.
- In the left navigation menu, click Find new apps (older versions may show “Find new add-ons”).
- Search for miniOrange OAuth in the Marketplace search bar.
- Click Free Trial (or Try it free) to begin a trial.
- Click Accept & Install to install the plugin.
- Once installed, click Get License and follow the prompt to MyAtlassian to generate and apply a license.
Notes: On Server/Data Center, after installing the plugin appears in the Manage Apps list where you can upload a downloaded license.
2) Manual Install by File Upload
Step A — Download the App:
- Go to the Atlassian Marketplace (marketplace.atlassian.com).
- Search for the appropriate miniOrange OAuth SSO app for your product (e.g., Jira, Confluence).
- Click Try it free.
- When prompted, select the hosting type (Server or Data Center) and click Start free trial.
- Enter your organization name and click Generate License.
- Copy the license key and download the plugin file (JAR).
Step B — Upload & Install:
- Log in to your Atlassian instance with an admin account.
- Go to Administration → Manage Apps (or Apps → Manage Apps).
- Click the Upload app (or the equivalent link/button).
- Upload the previously downloaded JAR file.
Step C — Apply License Key:
- After installation, remain on the Manage Apps page.
- Locate the installed OAuth SSO plugin in the list.
- Enter the license key you copied earlier into the license field.
- Save/apply the license — your plugin is now active.
Tip: Always keep the license key handy — especially for deployments that use automatic scaling, clustered Data Centers, or version upgrades.
Post-Installation
Once the OAuth SSO plugin is installed and licensed:
- Proceed to Configure OAuth settings (client ID, secret, callback URL).
- Complete OAuth client setup in your identity provider and in the Atlassian app.
- Verify configuration with Test Connection from the app UI.
Important Notes
- You must be an admin to install and license the plugin.
- On older versions, Marketplace menus may be labeled Find new add-ons instead of Find new apps.
- Always review app compatibility with your instance version before installing. (Atlassian Marketplace shows supported versions.)
Configure OAuth
The Configure OAuth tab defines how the Atlassian application integrates with an external OAuth 2.0 or OpenID Connect (OIDC) provider to enable Single Sign-On (SSO).
This section describes the available configuration options, their purpose, and how they influence authentication behavior and identity handling within the application.
Throughout this section:
- Provider refers to the configured OAuth/OIDC identity provider
- Application refers to the Atlassian instance acting as the client
Overview
Single Sign-On (SSO) is enabled by integrating the Atlassian application with an external OAuth/OIDC provider.
This integration is driven by:
- Application credentials issued by the provider
- OAuth/OIDC endpoints for authentication and token exchange
- Scopes that define access to user information
- Authentication responses to establish user sessions
The Configure OAuth tab acts as the central place to define and manage this integration.
Supported Providers
We support the following OAuth and OpenID providers.
The application supports both:
- Pre-configured providers, where endpoints are known and pre-filled
- Custom providers, where endpoints and configuration must be defined manually
| Provider Type | Provider Name | Jira Setup Guide | Confluence Setup Guide |
|---|---|---|---|
| OAuth | Azure AD | Setup Guide | Setup Guide |
| OAuth | Discord | Setup Guide | Setup Guide |
| OAuth | Setup Guide | Setup Guide | |
| OAuth | GitHub | Setup Guide | Setup Guide |
| OAuth | GitHub Enterprise | Setup Guide | Setup Guide |
| OAuth | GitLab | Setup Guide | Setup Guide |
| OAuth | Google Apps | Setup Guide | Setup Guide |
| OAuth | Meetup | Setup Guide | Setup Guide |
| OAuth | miniOrange | Setup Guide | Setup Guide |
| OAuth | Slack | Setup Guide | Setup Guide |
| OAuth | Salesforce | Setup Guide | Setup Guide |
| OAuth | Gluu Server | Setup Guide | Setup Guide |
| OAuth | Custom OAuth App | Setup Guide | Setup Guide |
| OpenID | ADFS | Setup Guide | Setup Guide |
| OpenID | AWS Cognito | Setup Guide | Setup Guide |
| OpenID | Azure B2C | Setup Guide | Setup Guide |
| OpenID | Keycloak | Setup Guide | Setup Guide |
| OpenID | Okta | Setup Guide | Setup Guide |
| OpenID | Custom OpenID App | Setup Guide | Setup Guide |
Configure the OAuth Tab
The Configure OAuth tab defines the parameters required for communication between the application and the provider.
General Settings
Callback URL (Redirect URI)
Represents the endpoint where the provider sends the authentication response after a successful login.
- Used to receive authorization data and tokens
- Plays a critical role in completing the authentication flow
The value must match the redirect URI configured on the provider.
Client ID
A public identifier assigned to the application by the provider.
- Used to identify the client during authentication requests
- Unique per application and provider
Client Secret
A confidential credential used to authenticate the application with the provider.
- Ensures secure token requests
- Must be securely stored
Scope
Defines the level of access requested from the provider.
Common scopes:
- openid
- profile
- address
- phone
Scopes determine the data included in authentication response and user consent.
Endpoint Configuration
Authorize Endpoint: Responsible for user authentication and consent.
Access Token Endpoint: Used to exchange the authorization code for tokens.
User Info Endpoint: Provides user identity attributes.
Fetch Group Endpoint (Optional): Returns group / role information for user mapping.
Logout Endpoint (Optional): Handles session termination and enables Single Logout (SLO).
Provider-Specific Settings
Azure AD / Azure B2C
- Tenant ID
- Represents the directory where the application is registered.
Keycloak
- Host Name
- Base URL of the server
- Realm Name
- Container for users, roles, configurations
Domain-Based Providers
- ADFS
- AWS Cognito
- Okta
- Salesforce
Domain Name
Represents the base URL of the provider environment.
Summary
The Configure OAuth tab provides a comprehensive interface for OAuth/OIDC integration.
It enables:
- Secure authentication
- Controlled access via scopes
- Flexible configuration
- Seamless SSO experience
Proper configuration ensures reliable authentication, secure data exchange, and accurate identity handling.
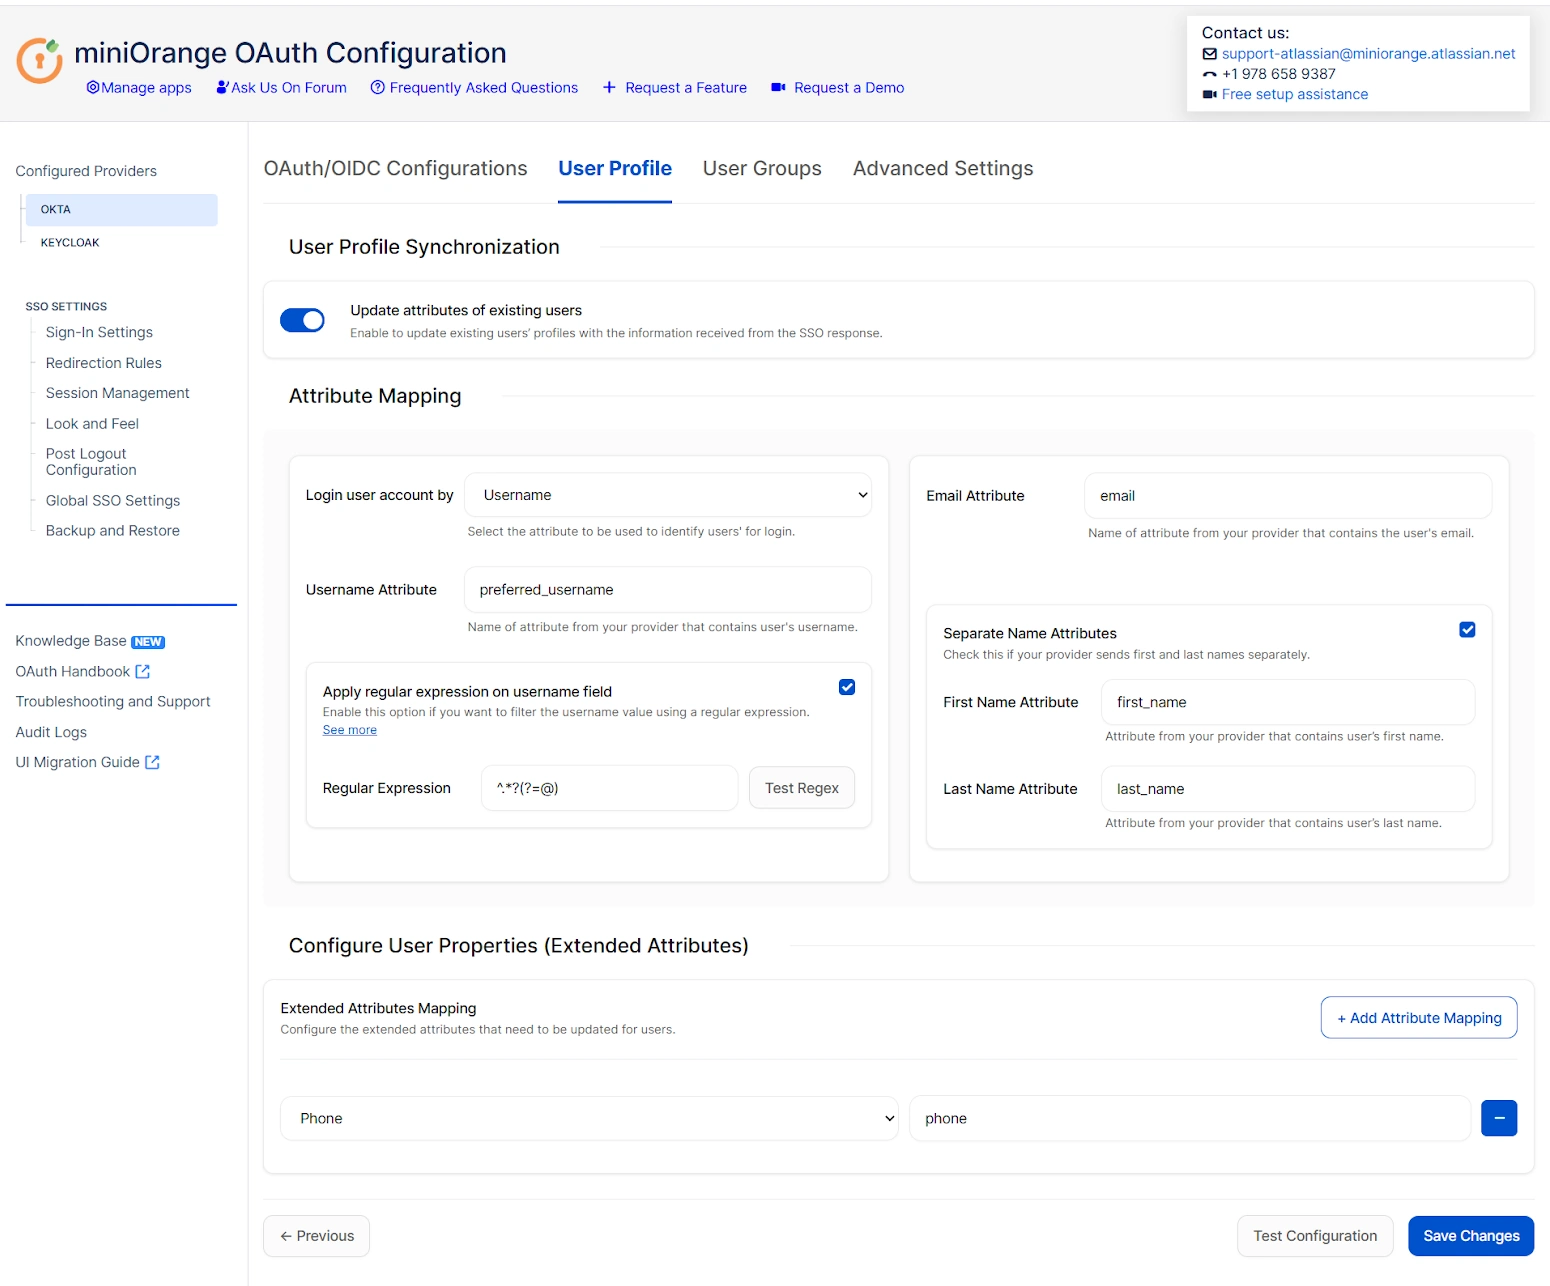
User Profile Mapping
The User Profile section allows you to control how user details from your OAuth/OpenID Connect (OIDC) provider are applied to accounts in your Atlassian application after a successful SSO login. This enables automatic user attribute synchronization and accurate identity mapping between your IdP and Atlassian instance.
Overview
During an OAuth/OpenID Connect SSO flow, the identity provider returns a set of user attributes (such as username, email, first name, last name, phone, etc.) in the authentication response. The User Profile tab lets you:
- Map those attributes from the provider to the appropriate fields in the Atlassian user profile.
- Automatically update or provision user accounts in your Atlassian application based on the mapped data.
- Extract specific values using custom patterns (for example, using regular expressions).
- Extend synchronization to additional custom user properties.
Throughout this section, “response” refers to the OAuth/OIDC response returned by your identity provider, and “provider” refers to the configured OAuth/OIDC identity provider.
Key Features and Configuration Settings
User Profile Synchronization
Enable this option if you want the profile attributes of existing users to be updated every time they authenticate via SSO.
- Enabled: Updates user attributes in the Atlassian application whenever the OAuth/OIDC provider returns new values.
- Disabled: Leaves existing profile data unchanged, regardless of the SSO response.
Note: If your user directory is read-only (for example, LDAP with no write permission), keep this option disabled to prevent update errors.
Login User Account Using Username or Email
This setting determines how the plugin matches the user in the Atlassian application:
- Username: The plugin will look for a match based on the username attribute received from the provider.
- Email: Allows login matching by email address.
Important: Atlassian systems can allow multiple accounts with the same email address, so using username matching is recommended where possible. If no existing user is found based on the selected attribute, a new user account will be created automatically.
Attribute Mapping
Attribute mapping tells the plugin how to translate provider claims into Atlassian user profile fields.
You must specify the attribute names from the OAuth/OIDC response that correspond to these Atlassian fields:
- Username: The attribute whose value should be used as the user’s username in the Atlassian application.
- Email: The attribute that contains the user’s email address (required if email login is enabled).
- Full Name / First Name / Last Name: Depending on how your provider returns user names, you can map a combined full name or separate first and last name fields.
If no attribute is mapped, the plugin will fall back to using the email address (if available) to identify the user.
Regular Expression (Regex) Extraction
If the username isn’t directly available or must be derived from another attribute (like email), you can enable a regular expression (regex) to extract it.
How it works:
- Enter the attribute name that contains the raw value (for example, the email).
- Enable the regex option.
- Provide a regex pattern to extract the desired substring.
- Test the regex using sample input to verify the output.
Example Use Case:
Extract username from email using this regex: ^.*?(?=@).
If the email is user@example.com, the extracted username will be user.
Separate Name Attributes
Use this option when your identity provider returns first and last name as individual attributes instead of a single full name value.
- Disabled: Only the full name field is used.
- Enabled: The plugin allows separate mapping for First Name and Last Name.
Extended User Properties (Custom Attributes)
If your OAuth/OIDC provider returns additional attributes (such as department, phone number, location, etc.), you can map them to corresponding user properties in the Atlassian application.
This allows for richer user profiles and more accurate identity representation inside Jira or other Atlassian tools.
Summary
The User Profile tab is essential for synchronizing identity data between your OAuth/OIDC provider and Atlassian applications. It supports flexible mapping, automated updates or provisioning, and advanced extraction logic to ensure users are correctly identified and onboarded during the SSO process.
User Groups — Atlassian OAuth SSO 2.0
Overview
The User Groups configuration in the miniOrange Atlassian OAuth SSO 2.0 plugin allows you to synchronize and manage user group memberships between your OAuth/OpenID Connect (OIDC) identity provider and Atlassian applications such as Jira, Confluence, and Bitbucket.
In this guide:
- Provider refers to the OAuth/OIDC identity provider
- Response refers to the OAuth/OIDC response containing user attributes
Using this feature, you can:
- Assign default groups to users after successful SSO
- Map OAuth provider groups to local application groups
- Automatically create groups in the Atlassian application based on provider data
- Control how group membership is updated for new and existing users
How Provider Groups Are Received
During authentication, the identity provider sends user profile attributes in the OAuth/OIDC response.
Group membership information is typically returned as a claim (for example, groups) within this response.
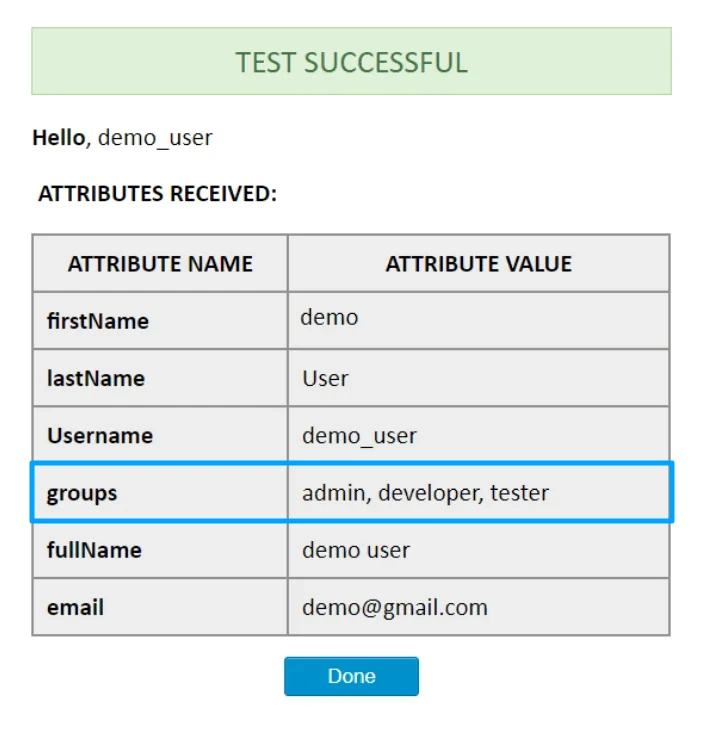
To identify the group attribute:
- Go to the User Groups tab in the plugin.
- Click Test Configuration.
- Review the response shown on the screen.
- Note the attribute that contains group values (for example, groups).
This attribute name must be configured correctly in the User Groups tab for mapping to work as expected.
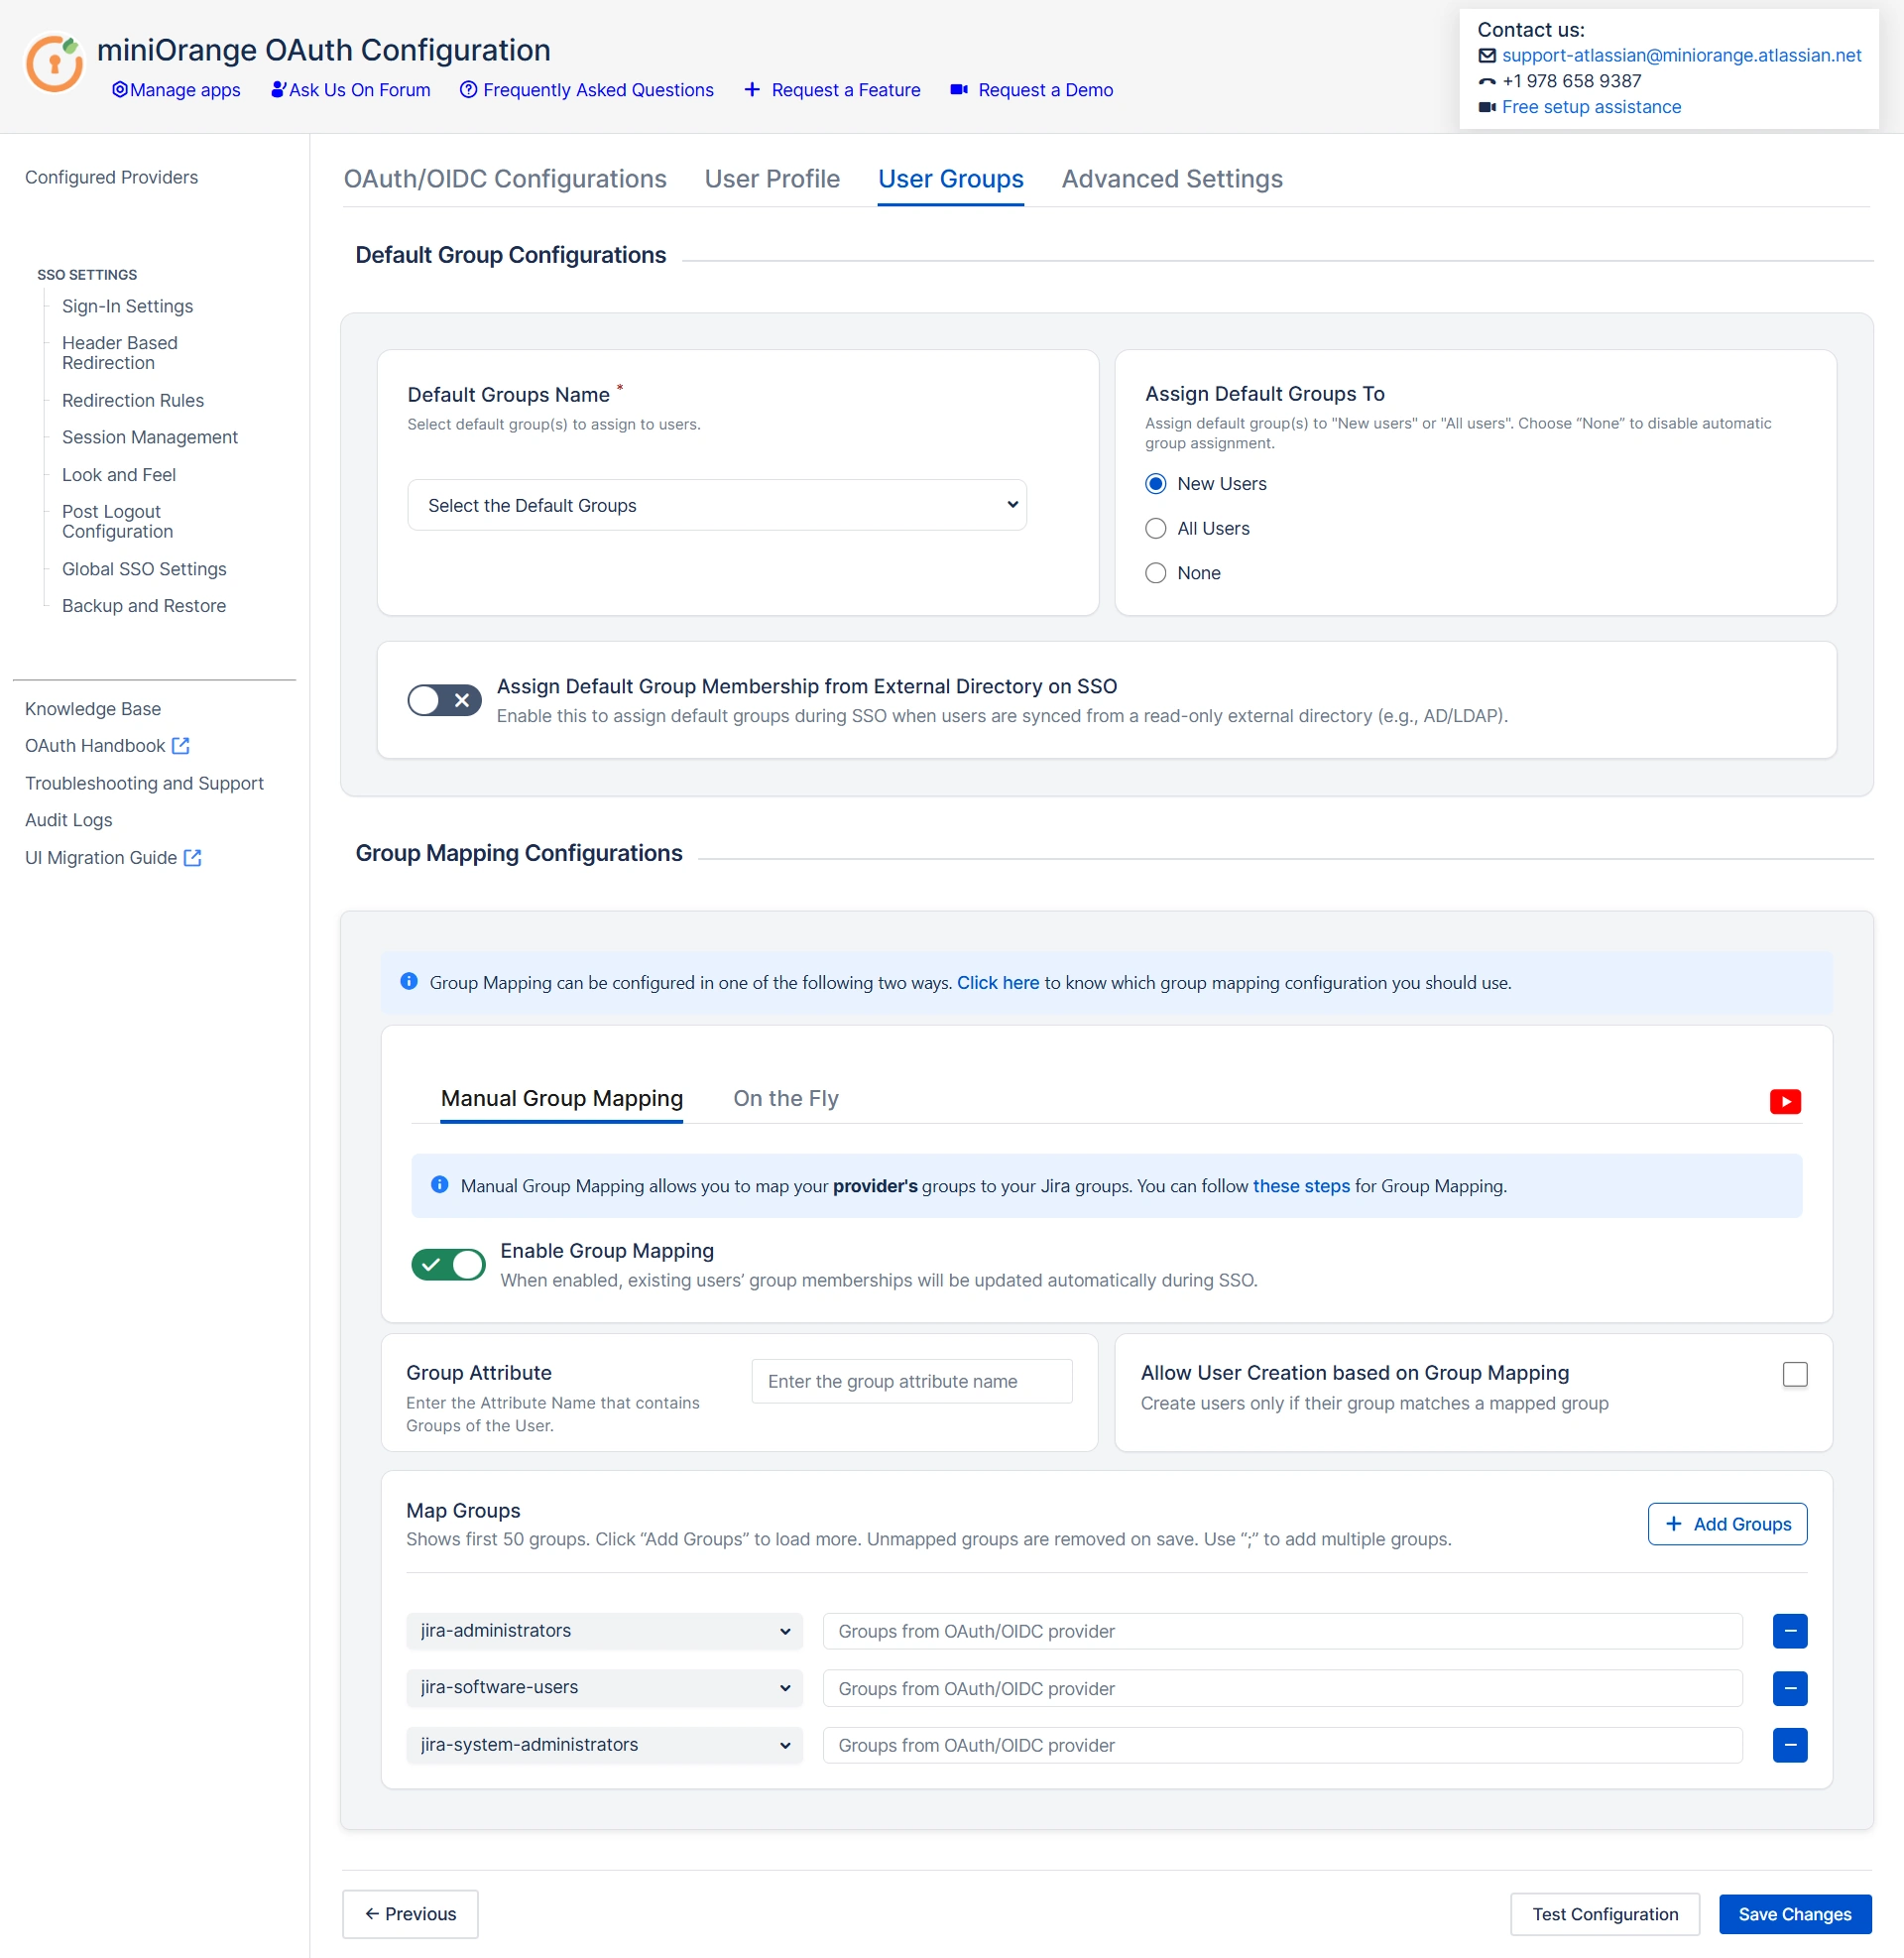
User Groups Configuration
The User Groups tab consists of the following main sections:
- Default Group Configuration
- Group Mapping Configuration
- External Directory Behavior
Default Group Configuration
Purpose
Default groups ensure that users receive baseline permissions immediately after successful SSO.
Behavior
Configured default groups are local application groups that users are added to automatically upon login via SSO.
It is recommended to assign at least one group that has application access permissions to prevent user login failures.
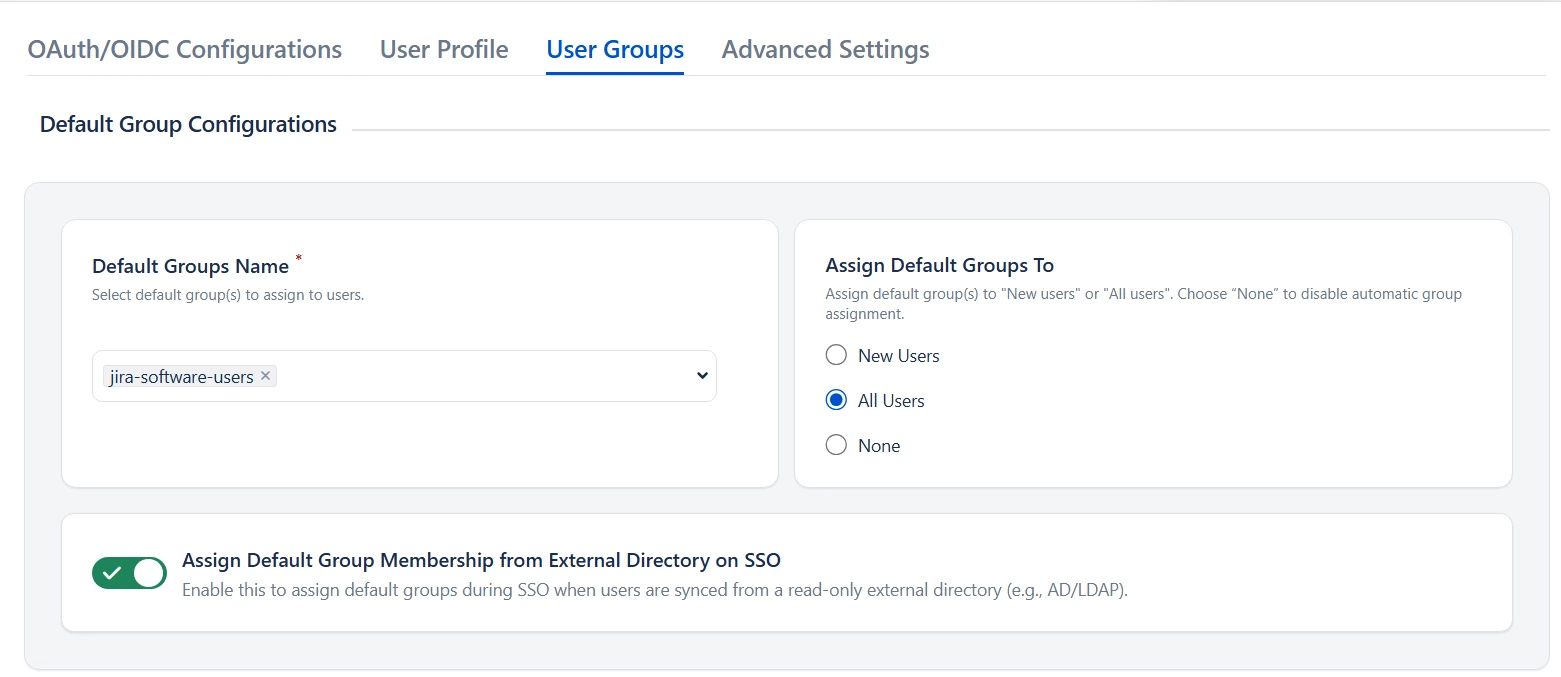
Assign Default Group To
| Option | Description |
|---|---|
| New User | Applies default groups only to newly created users. |
| All Users | Applies default groups to all users on every SSO login. |
| None | Default groups are not assigned; only mapped groups are used. |
If your users are managed in an external directory, with the option “Assign Default Group Membership from external directory on SSO” enables you to sync default groups from read-only external directory.
Group Mapping Configuration
Group mapping determines how identity provider groups are mapped into local Atlassian groups.
Two mapping modes are available:
- Manual Group Mapping
- On-The-Fly Group Mapping
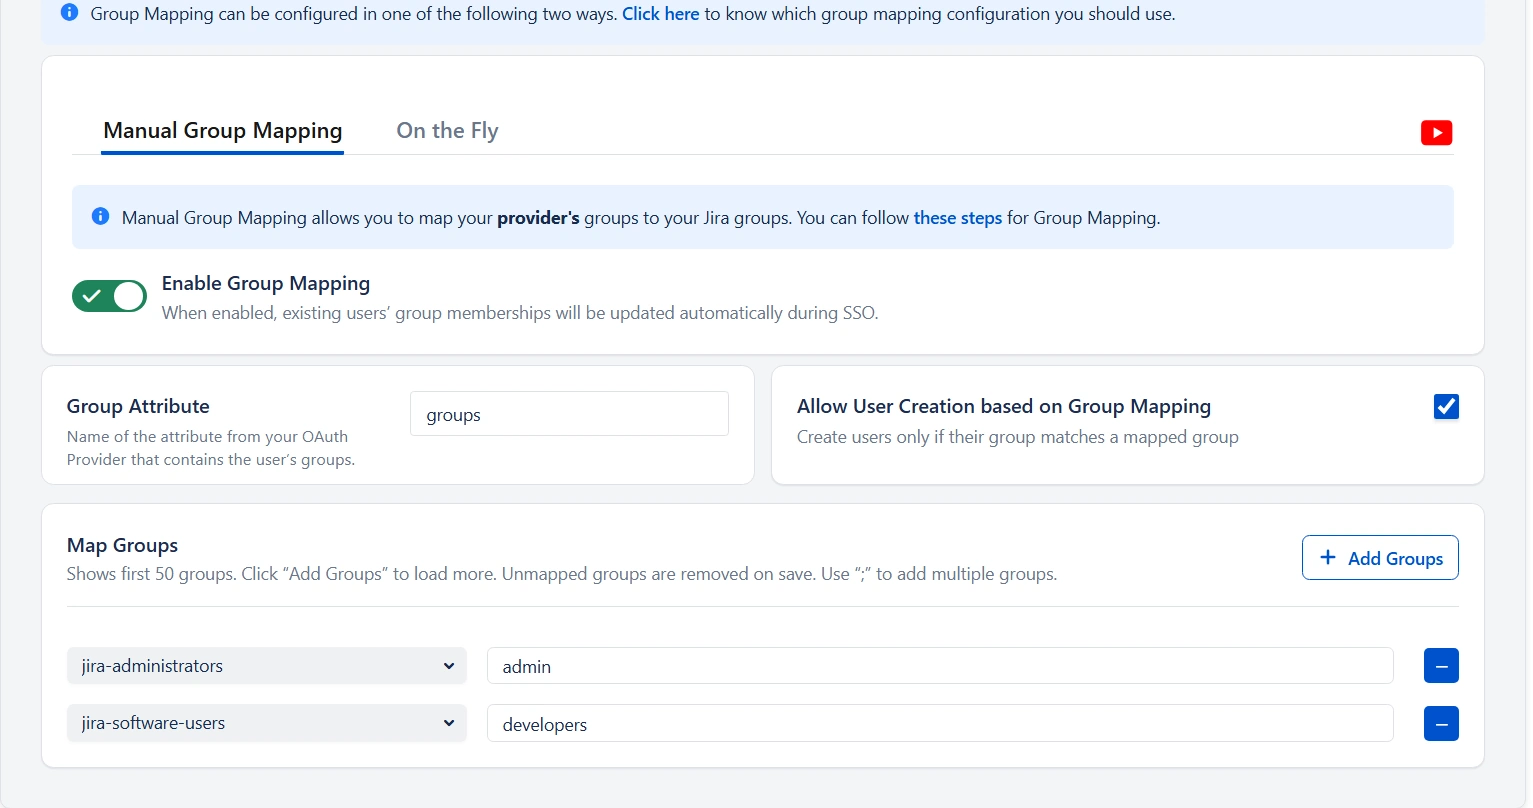
Manual Group Mapping
Use Manual Group Mapping when provider group names differ from local Atlassian application group names.
In this mode, you explicitly define how provider groups should be mapped into application groups.
Configuration Steps
- Enabling the Group Mapping option lets you update user group memberships upon SSO.
- Specify the Group Attribute (the provider claim containing group data identified earlier).
- Add mappings between provider groups and corresponding local groups.
- (Optional) Enable User Creation Based on Group Mapping to control provisioning.
How Allow User Creation Based on Group Mapping works
When enabled, a new user will be created only if the user belongs to at least one mapped provider group.
If no mapped group is found, the user will not be created in the Atlassian application.
This option is useful when you want to allow access only to specific teams or departments.
How Groups Are Mapped
This section is used to manually map the user’s OAuth/OIDC provider groups to the Atlassian application groups. The app displays a list of 50 Atlassian application groups, with an empty field next to each application group for the provider group to be mapped.
A provider group must be entered next to an application group. If one of the mapped groups matches with groups received in the response, then the user will be assigned to the corresponding local group. You can add new group mappings by clicking the ‘+’ and ‘+10’ buttons provided. There is a ‘-‘ button provided next to each mapping to delete that mapping.
Consider an example where a user belongs to 3 groups named admin, developer, and tester in the OAuth/OIDC provider. In the Atlassian application, there are groups named ‘administrators’ and ‘local_developer’. The ‘administrators’ and ‘local_developer’ are mapped to ‘admin’ and ‘developer’ respectively.
At the time of SSO, if admin or developer groups are present in the response then the app will assign the respective mapped group from the Atlassian application to the user. In the example, at the time of SSO, the response will contain ‘admin’, ‘developer’ and ‘tester’ groups. The app will find that the ‘admin’ group has been mapped to the ‘administrators’ group and the ‘developer’ group has been mapped to the ‘local_developer’ group. So the ‘administrators’ and ‘local_developer’ groups will be assigned to the user.
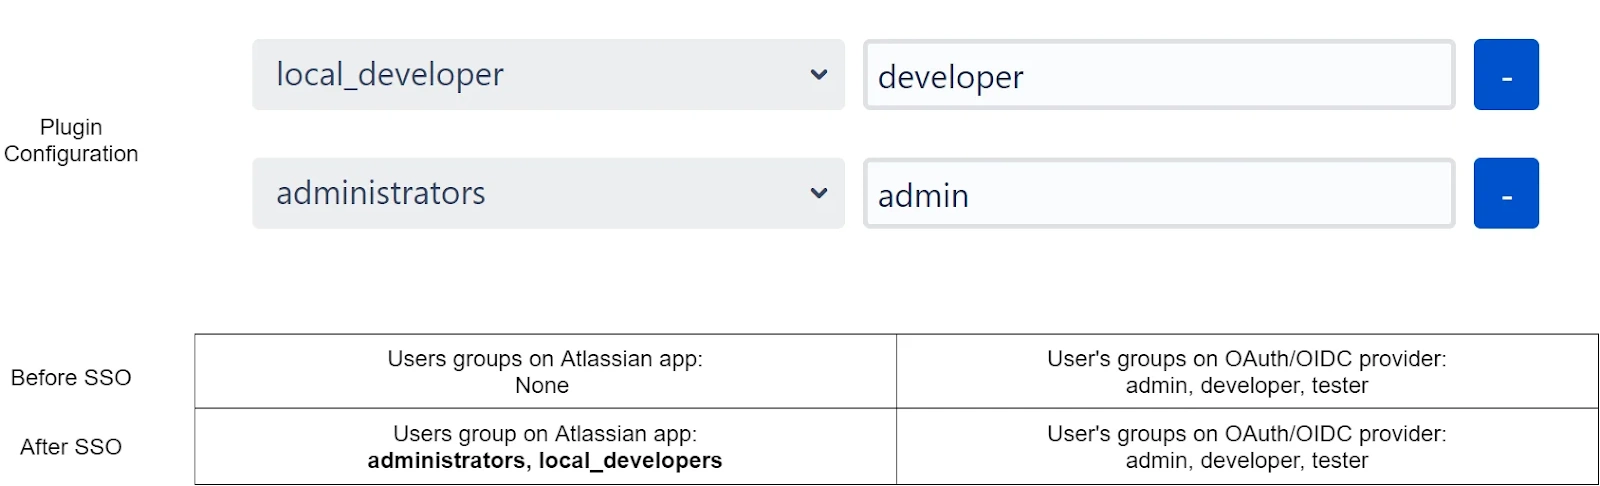
Now as the user is part of both ‘administrators’ and ‘local_developer’ groups, the user has permissions of an administrator and a developer in the local Atlassian application.
Let’s consider a scenario in which the user has been removed from the group ‘admin’ in the provider. Now when the app receives a response, it finds only the group ‘developer’
In the group attribute. The app retains the user’s membership in the ‘local_developer’ group but removes the user from the ‘administrators’ group as the mapped provider group ‘admin’ was not found in the response. So the user no longer possesses the admin permissions in the Atlassian application as well.

The app removes users from application groups that have been mapped but the corresponding provider groups have not been received from the provider.
On-The-Fly Group Mapping
This method of group mapping is recommended for either of the following scenarios:
- The group names in the application are the same as the group names in the provider.
- The app needs to create new groups in the application with the same name as the groups in the provider. If such groups already exist in the application, then the app just assigns them to the user.

Configuration Steps
- Enabling the Group Mapping option lets you update user group memberships upon SSO.
- Specify the Group Attribute (the provider claim containing group data identified earlier).
- Filter Groups (Optional) – Choose how to filter the groups received from your OAuth/OIDC identity provider before mapping them to Atlassian application.
- Apply regular expression on Group Name (Optional)– Use a regex pattern to transform or extract the required group name before creating it in Atlassian application
- Create New Groups – Automatically create missing groups in Jira if they do not already exist.
- Keep Existing Users Groups – Retain the user’s current Atlassian application group memberships while adding new groups during SSO login.
- Exclude Groups from Removal – Prevent users from being removed from selected Atlassian application groups even if those groups are not returned by the identity provider.
- Regular expression on Exclude Groups field – Exclude multiple groups dynamically using a regex pattern instead of selecting them individually.


Group mapping considerations if an external user directory is being used
In the case of an external directory being used for users, group mapping functionality depends on the access permissions of the directory. The recommended settings for each type of permission are :
- Read Only: The user groups cannot be updated in the directory. It is recommended to disable the Group Mapping option. If you’re using On-The-Fly group mapping, new groups won’t be created and only existing groups returned by the provider will be mapped. Make sure that all the groups in response are present in the Atlassian application or synced from the external directory, otherwise, the SSO will fail. The default groups won’t be assigned to any user.
- Read Only With Local Groups: Users can be added to or removed from local application groups. If you’re using On-The-Fly group mapping, the new groups will be created only if the application’s internal directory is the primary user directory. Local application groups can be assigned as default groups to all users. As all users are treated as existing users, it is recommended to Change the Assign Default Group To settings to All.
- Read/Write: The user groups can be updated. Users can be added to or removed from the application groups and new groups can also be created.
Troubleshooting
Users Are Not Assigned Correct Groups
- Confirm the configured Group Attribute matches the provider response
- Ensure the identity provider is configured to send group data
Users Are Created Without Access
- Verify default or mapped groups include application access permissions
- Check directory permissions if using an external user directory
Group Membership Is Not Updating
- Ensure group mapping is enabled
- Verify the provider is returning updated group data on each login
Advanced Settings
The Advanced Settings section allows administrators to fine-tune the behavior of OAuth/OpenID Single Sign-On (SSO) for Atlassian applications. These settings provide greater control over user provisioning, request customization, token validation, and overall security of the authentication flow.
Use these options when you need more flexibility beyond the basic SSO configuration.
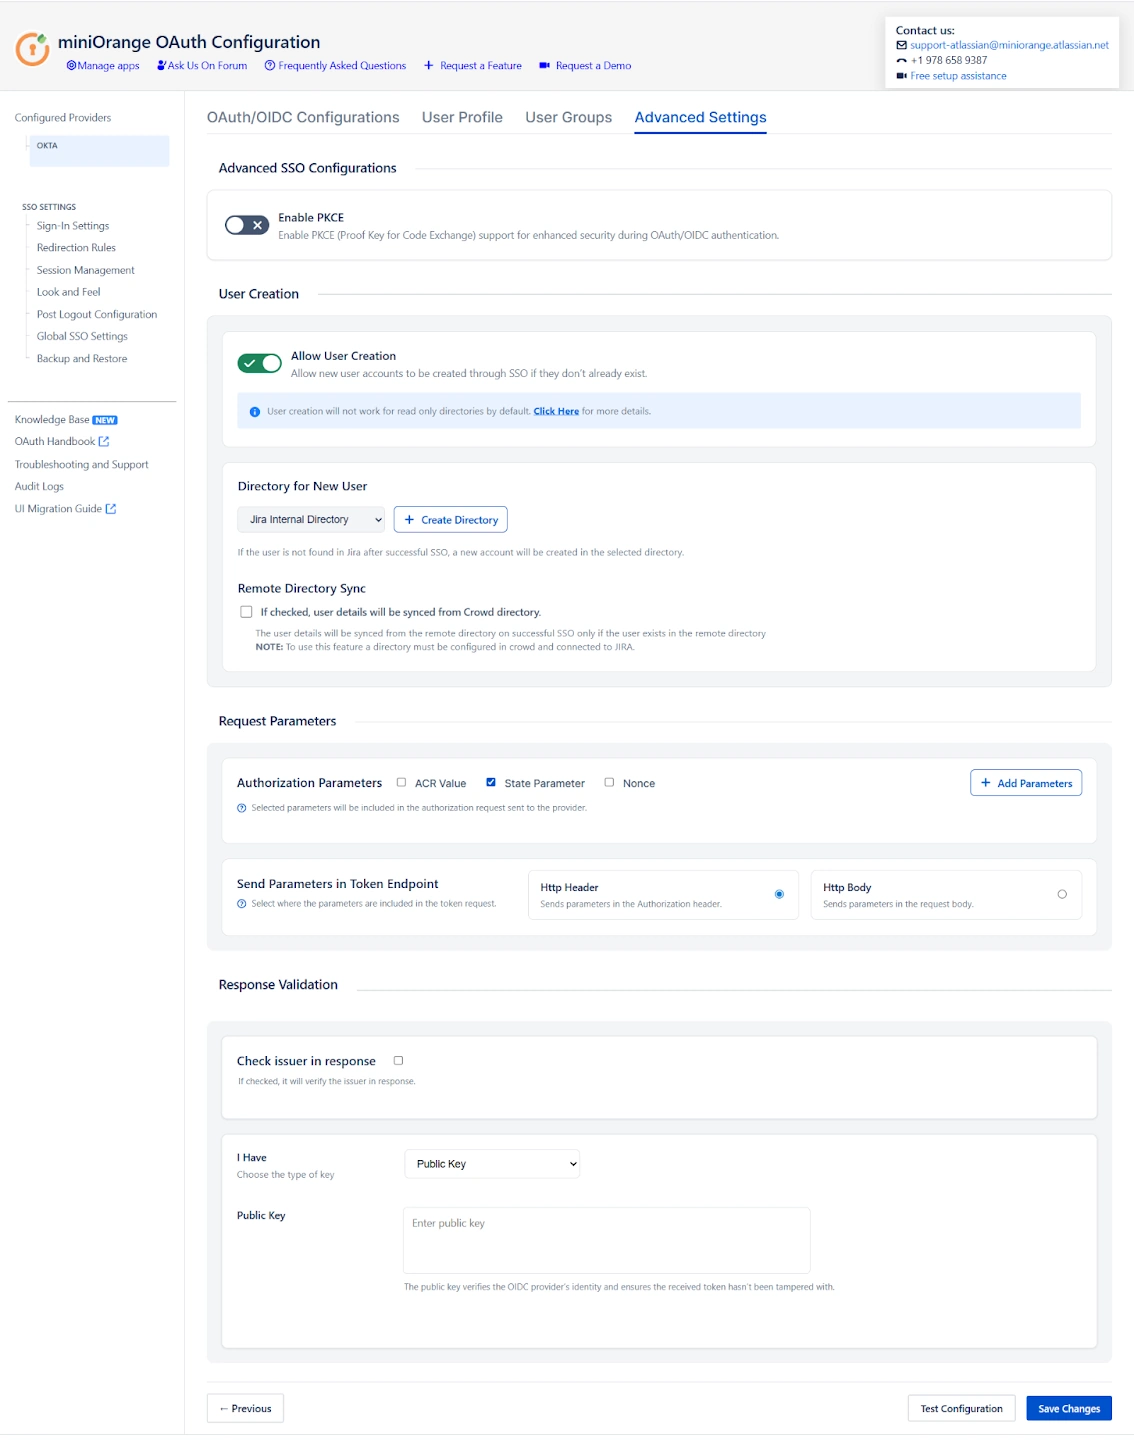
Enable PKCE (Proof Key For Code Exchange)
Enable PKCE to add an extra layer of security to the OAuth/OIDC Authorization Code flow.
PKCE protects against authorization code interception attacks by binding the authorization request and token exchange together.
When PKCE is enabled:
- A secure code verifier is generated by the client
- A derived code challenge is sent with the authorization request
- The Identity Provider validates the code verifier during token exchange
PKCE is highly recommended in the following scenarios:
- When the client secret cannot be securely stored
- When stronger protection against interception attacks is required
- When following modern OAuth 2.0 and OIDC security best practices
Note: Ensure that your Identity Provider supports Authorization Code flow with PKCE before enabling this option.
User Creation Settings
- Allow User Creation
Enable this option to automatically create a new user in the Atlassian application when the user successfully authenticates via OAuth/OIDC SSO for the first time. If this option is disabled, only users who already exist in the Atlassian application will be allowed to log in through SSO.
Note: User creation is not supported for read-only directories by default. Ensure that the selected directory allows user creation.
- Directory for New Users
When a new user is created through SSO, this setting determines which user directory the account will be added to. You can select an existing internal directory or any connected external directory based on your user management requirements.
If no suitable directory exists, you also have the option to create a new internal directory directly from this page and assign newly created SSO users to it.
- Remote Directory Sync
Enable this option to synchronize user information from a remote directory during SSO login. If the user already exists in a linked external directory, their user attributes are updated automatically at the time of authentication.
Note: This option applies only to Crowd directories. Ensure that the Crowd directory is properly configured and connected to the Atlassian application before enabling Remote Directory Sync.
Request Parameter Configuration
- ACR Value
The Authentication Context Class Reference (ACR) value is sent to the Identity Provider as part of the authentication request. This allows you to request a specific authentication level, such as multi-factor authentication or conditional access policies, if supported by your Identity Provider.
- State Parameter
The state parameter is used to protect against Cross-Site Request Forgery (CSRF) attacks. A unique state value is generated with each authorization request and validated when the response is received. This parameter is enabled by default and is strongly recommended for all OAuth/OIDC integrations.
- Add Custom Parameters
This option allows you to include additional parameters in the authorization request. Custom parameters are often required for provider-specific configurations such as prompt behavior, login hints, nonce values, or custom policy enforcement.
Token And Response Validation
- Check Issuer in Response
Enable this option to validate the issuer (iss) claim present in the authentication response or ID token. When enabled, the plugin verifies that the issuer value matches the expected Identity Provider, helping prevent token substitution and misconfiguration-related security issues.
You can choose between the following options:
- Default
When selected, the issuer is automatically validated against the Identity Provider configuration defined in the plugin. This is recommended for most standard OAuth/OIDC setups. - Custom
Select this option to manually specify a custom issuer value. This is useful in advanced scenarios where the issuer in the response differs from the standard provider configuration or when using custom or multi-tenant Identity Provider setups.
- Public Key
A public key is a fundamental component of asymmetric cryptography and is used to verify digitally signed data. OpenID Connect (OIDC) Providers sign all issued tokens using a private key, and the corresponding public key is used by the application to validate those tokens.
Provide the public key issued by your OpenID Connect Provider in this field to verify the digital signature of ID tokens received during authentication. This validation confirms the identity of the Identity Provider and ensures that the token has not been altered or tampered with in transit.
- JWKS Endpoint URL
The JSON Web Key Set (JWKS) is a collection of public keys published by the authorization server and used to verify JSON Web Tokens (JWTs). Instead of manually configuring public keys, you can specify a JWKS endpoint URL provided by your Identity Provider.
When configured, the plugin automatically retrieves the signing keys from the JWKS endpoint and uses them to dynamically validate JWT tokens included in the authentication response. This approach simplifies key management and ensures seamless token validation, especially when the Identity Provider rotates signing keys.
Summary
The Advanced Settings provide administrators with powerful controls to manage and optimize the OAuth/OIDC Single Sign-On experience for Atlassian applications. These settings enable seamless user provisioning and synchronization, allow fine-grained customization of authorization requests, ensure secure validation of authentication tokens, and enhance overall security through features such as PKCE. Together, these capabilities help deliver a secure, flexible, and enterprise-ready SSO implementation that aligns with modern identity and access management best practices.
SSO Settings
SSO Setting tab Control how your users and administrators login using SSO. The settings in SSO Settings tab define the user experience for Single Sign On.
You can Perform following operations on SSO setting tab :
- Sign In Settings
- Redirection Rules
- Session Management
- Look and Feel
- Post Logout Configurations
- Global SSO Settings
- Backup and Restore
Sign-In Settings
The Sign-In Settings section allows administrators to control how authentication is initiated and managed when users access the Atlassian application through OAuth/OpenID Connect (OIDC). These settings define the login redirection behaviour, fallback access methods, administrator protection mechanisms, and post-login navigation.
Relay State (Return URL/Post-Login Redirect URL)
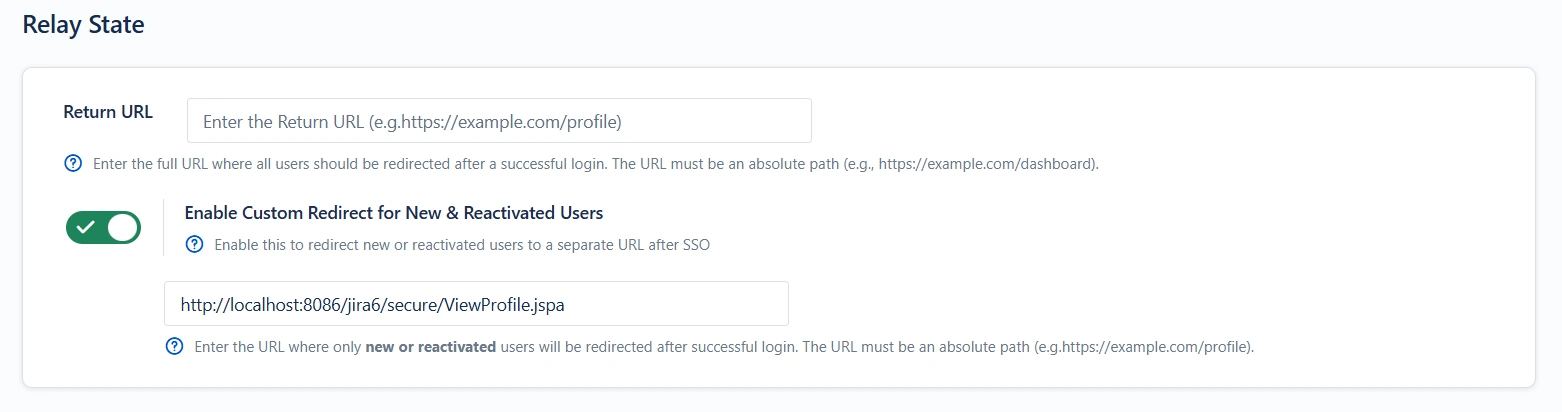
Return URL :
The Relay State specifies where users are redirected after successful SSO.
- If configured: Users are always redirected to the specified URL after login.
- If not configured: Users are returned to the resource or page they originally requested.
Example:
Administrators commonly use this setting to send users to a dashboard or a dedicated landing page.
Custom Redirect for New & Reactivated Users
This Relay State setting redirects newly created or reactivated users to the specified URL after successful SSO.
Login Restriction
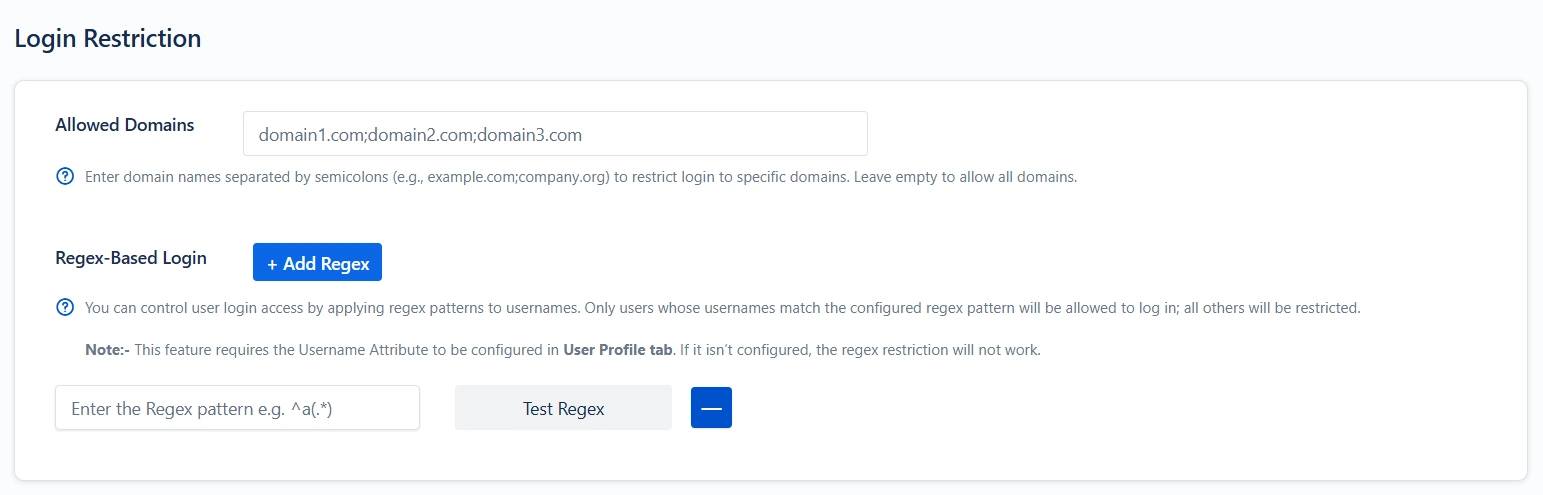
Allowed Domains:
This feature allows authentication only for users whose email addresses belong to approved domains.
- Provide one or more domains separated by commas.
- Users with email addresses outside these domains will not be allowed to do SSO.
Regex-Based Login:
This setting allows administrators to control which users are permitted to log in by validating their usernames against a defined regular expression pattern.
Only users whose usernames match the configured regex will be allowed to authenticate. Any user whose username does not satisfy the pattern will be denied access.
NOTE:
This feature depends on the Username attribute mapping configured in the User Profile tab.
If the Username Attribute is not mapped, the plugin will not have a value to evaluate, and the regex restriction will not take effect.
Example: If the regex is ^admin.*, only usernames that start with admin will be allowed to log in.
Bypass SSO for Specific URLs
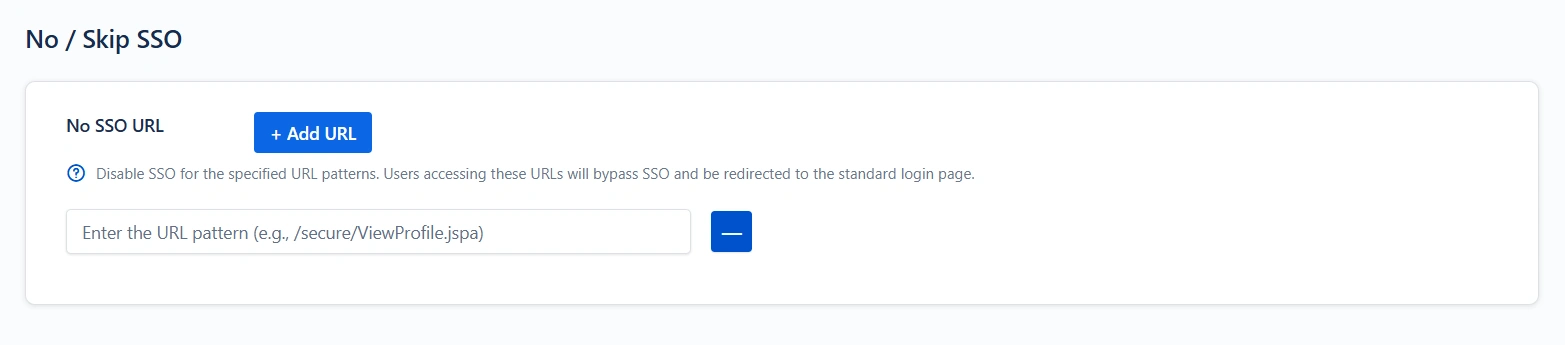
This feature allows you to exclude certain URLs from the SSO flow. Users who access the specified paths will bypass Single Sign-On and will be redirected to the default Atlassian login page instead.
Enter the URL pattern to be excluded.
Example: /secure/ViewProfile.jspa
Restrict Access

When this option is enabled, any unauthenticated attempt to access public Jira pages will automatically redirect the user to the login page for SSO.
Auto-Redirect to Application
Enable this to force users to authenticate via SSO only, bypassing the default login page completely.
- Users are immediately redirected to the configured OAuth/OIDC Provider’s login screen upon accessing the Atlassian login page.
- This is essential in environments where local credentials should not be used.
- Useful for enforcing strict corporate authentication policies.
Enable AutoRedirect Delay
Delays the redirect to the provider by showing a progress bar. Recommended when testing SSO rollout
- Allows users to cancel immediate redirection to the provider and log in with local credentials.
Backdoor / Emergency Login
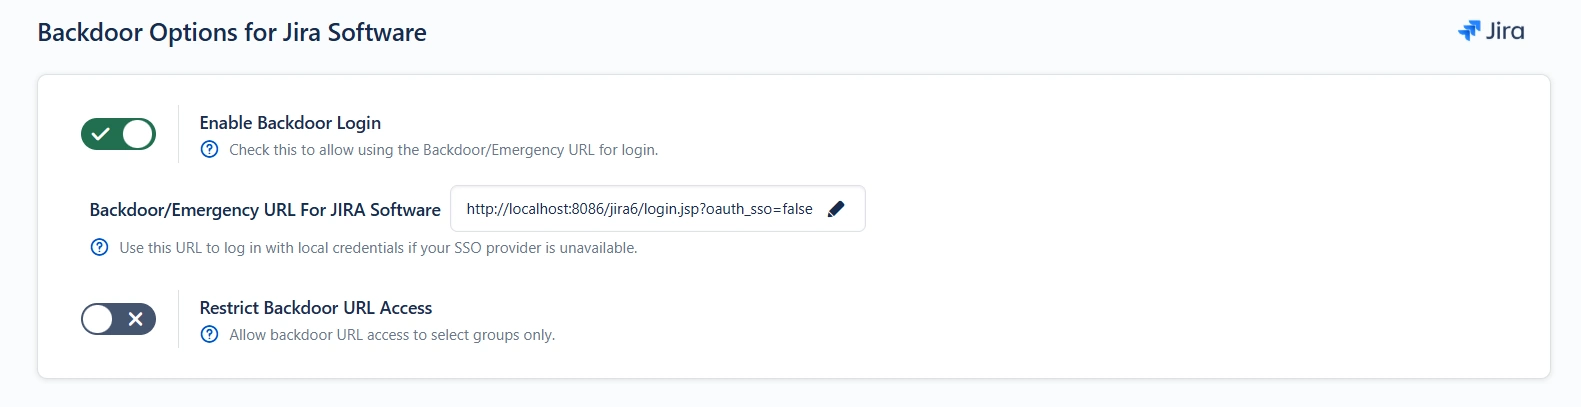
Enable Backdoor Login
This enables a separate login path (Emergency URL) that bypasses SSO. Recommended for all production environments
- Ensures admins can regain access if SSO is misconfigured, unavailable, or the provider is down.
- You can restrict access to the emergency URL to specific groups only.
Important: Always document your emergency URL securely and restrict it to trusted administrators.
Restrict Backdoor Access
You can limit which groups are allowed to use the emergency login. Highly recommended for security compliance.
- Only members of the specified groups will be able to access the backdoor URL.
- All other users must complete SSO through the provider.
This prevents misuse of the fallback mechanism.
Jira Service Management (JSM) Specific Auto-Redirection Settings
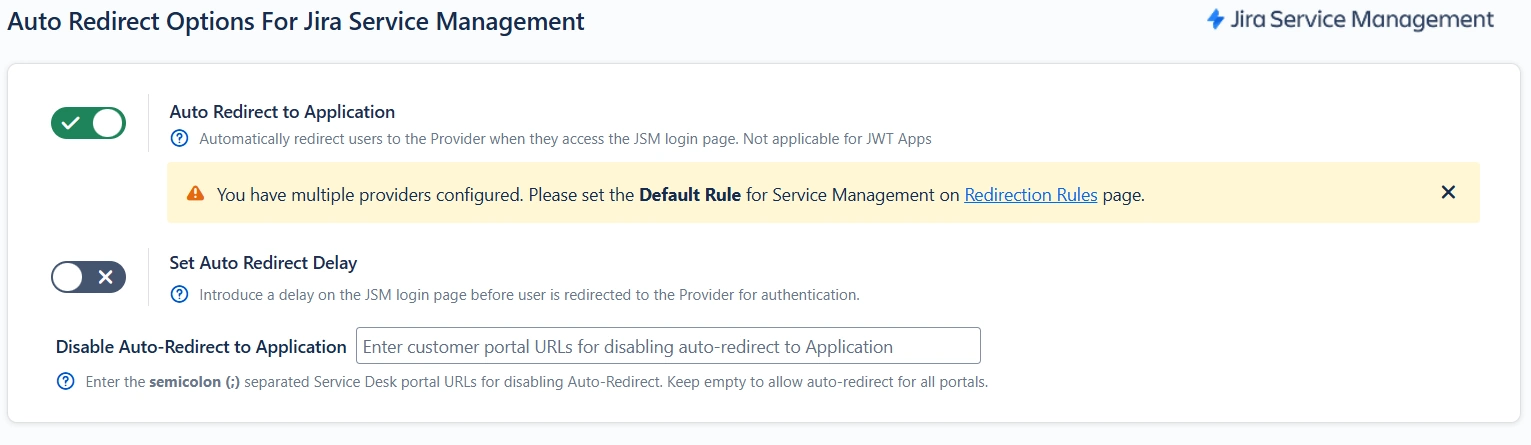
Enable this to force users to authenticate via SSO only, bypassing the default login page for JSM.
- Users are immediately redirected to the configured OAuth/OIDC Provider’s login screen upon accessing the Atlassian login page.
- This is essential in environments where local credentials should not be used.
Enable AutoRedirect Delay
Delays the redirect to the provider by showing a progress bar.
- Allows users to cancel immediate redirection to the provider and log in with local credentials.
Disable Auto-redirect to Application:
Enter the Service Desk portal URLs (separated by semicolons) for which Auto Redirect should be disabled. If left empty, auto-redirect will remain enabled for all portals.
Example
If you configure:
{baseurl}/servicedesk/customer/portal/1;{baseurl}/servicedesk/customer
/portal/2
Auto-redirect will be disabled for these specific portal URLs, and users accessing them will not be directly redirected to the Identity Provider.
JSM-Specific Emergency Access Settings
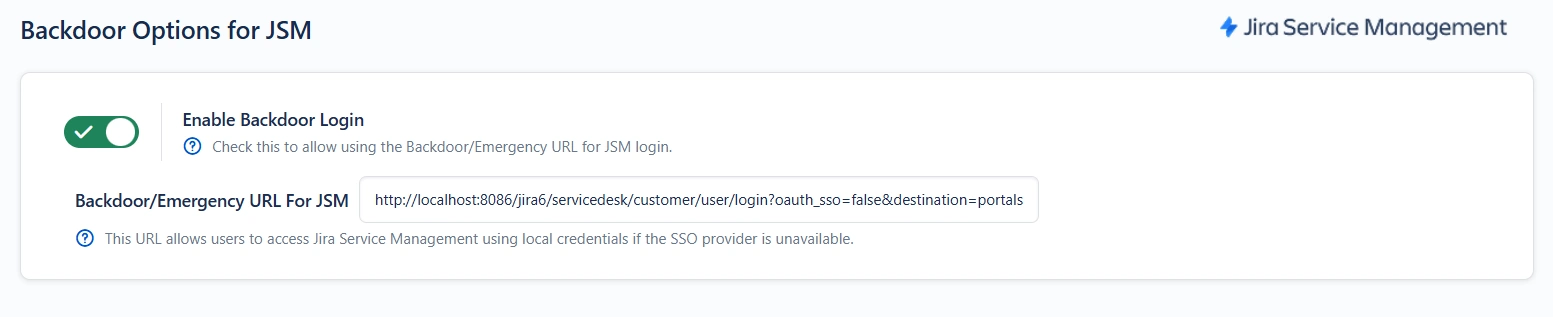
This enables a separate login path (Emergency URL) that bypasses SSO for JSM.
- Ensures admins can regain access if SSO is misconfigured, unavailable, or the provider is down.
Important: Always document your emergency URL securely and restrict it to trusted administrators.
Enable AutoRedirect Delay JSM
Delays the redirect to the provider by showing a progress bar.
- Allows users to cancel immediate redirection to the provider and log in with local credentials.
Confluence-Specific Sign-In Settings
Anonymous Access

When disabled, users accessing Confluence public pages will be automatically redirected to the SSO provider for authentication.
Allow Guest Login

When enabled, users who do not have an existing account in Confluence will be allowed to access the application as guest users
Secure Admin Login
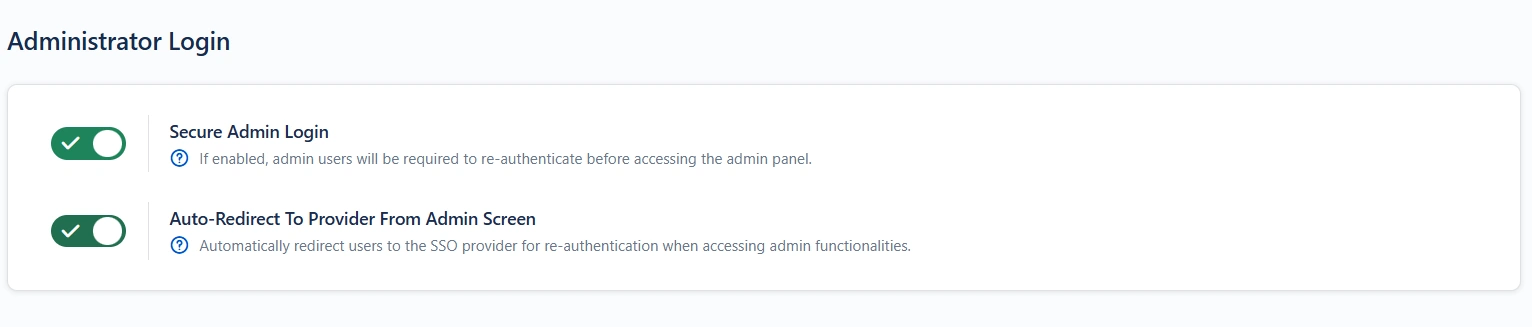
When enabled, administrators are required to re-authenticate via SSO even if already logged in.
- Requires a secondary confirmation before accessing admin/settings pages.
Why use it: Adds protection against session hijacking and unauthorised admin access.
Auto-Redirect To Provider From Admin Screen
When enabled, users attempting to access administrative functionalities will be automatically redirected to the SSO provider for re-authentication.
Header-Based Redirection
Overview
Header-based redirection allows you to automatically send users to a specific provider based on HTTP headers present in the incoming request. It eliminates the need for manual provider selection by evaluating custom headers and directing users accordingly, ensuring a seamless and efficient authentication experience.
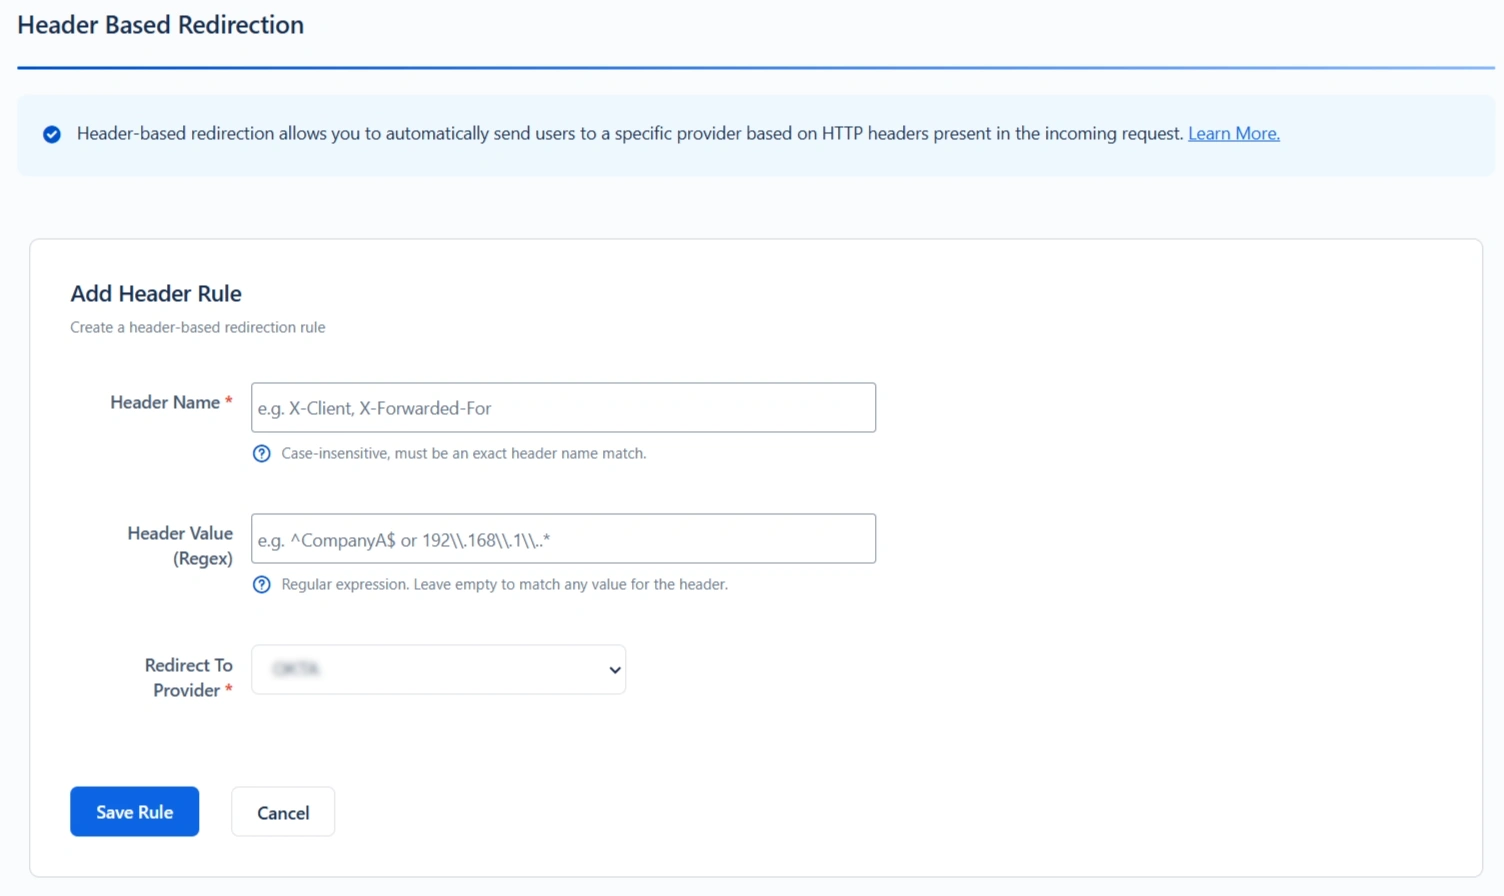
How It Works
- The specified header name must be present in the request. Header names are case-insensitive.
- The header value is evaluated using a regular expression.
- If the header value is left empty, the rule matches any value for that header.
- Rules are processed in a top-to-bottom order.
- The first matching rule determines which provider is used for redirection.
- If multiple headers with the same name exist in the request, only the first header value is evaluated.
Example: Multi-Company Jira Instance with Header-Based Redirection
If your application serves multiple organizations, each with its own identity provider (IdP), you can use header-based redirection to route users automatically. This is commonly implemented when requests pass through a reverse proxy, which adds custom headers based on the client network.
Configuration Scenario
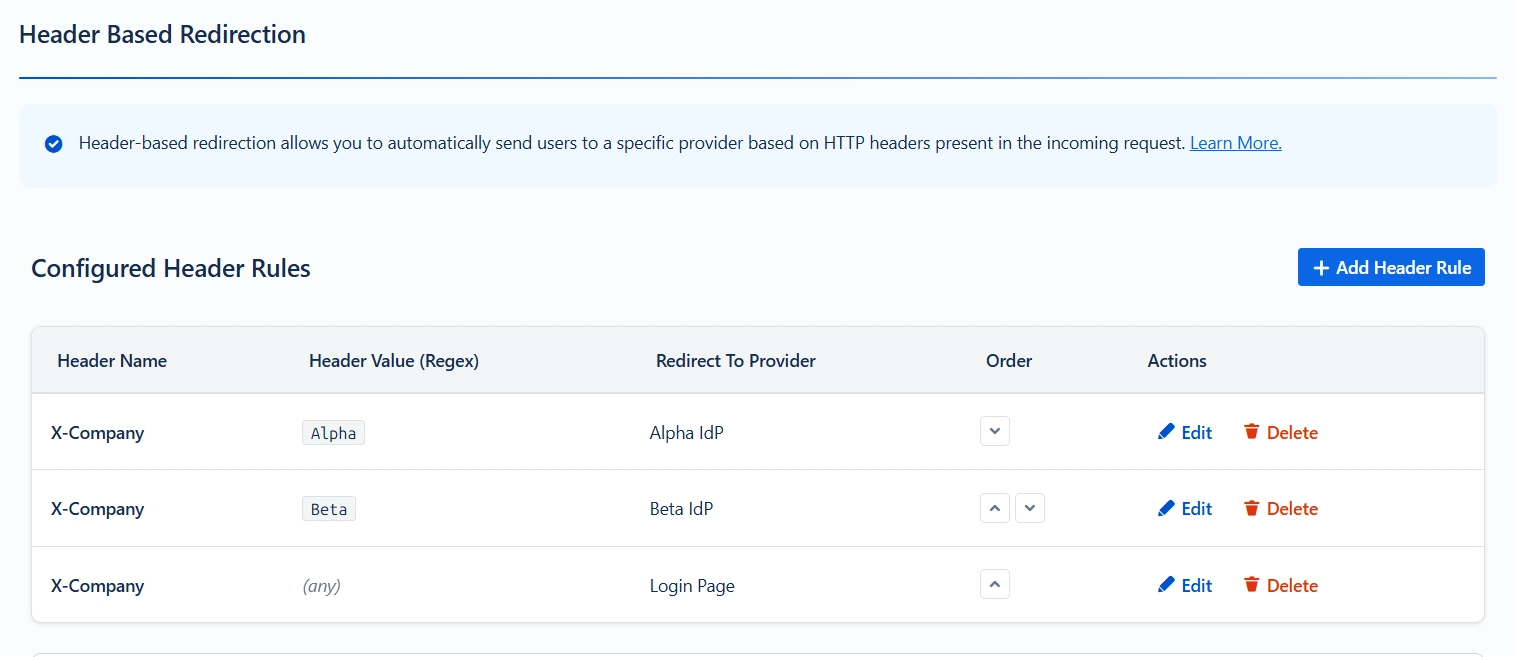
Request Flow:
- A user from Alpha Corp accesses Jira through a reverse proxy.
- The proxy injects the header: X-Company: Alpha
- The plugin evaluates the configured rules sequentially.
- The rule matching X-Company = Alpha is identified.
- The user is redirected to the Alpha IdP for authentication.
This feature enables seamless, automatic routing of users to the correct IdP based on their originating network, without manual intervention.
Test Header Matching
This feature allows you to test configured header rules by providing a header name and value, and determining the provider to where the user will be redirected.
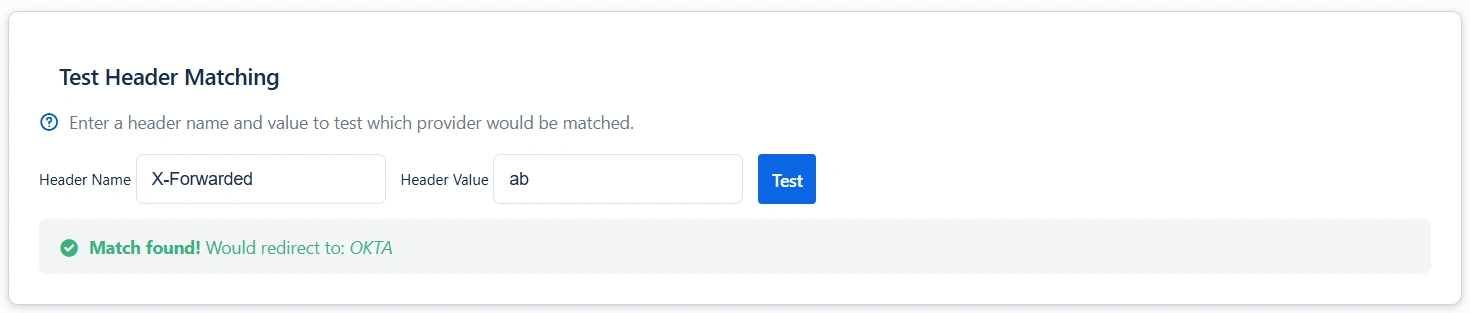
This feature allows administrators to validate header-based redirection rules before deploying them in production.
You can:
- Provide a header name and value
- Simulate rule evaluation
- Identify which IdP the request would be redirected to.
This helps ensure the correctness of regex patterns and rule ordering.
Redirection Rules
The Redirection Rules section allows you to automatically redirect users to their respective configured Identity Provider (IdP) based on the user's domain, group, or directory. You can configure redirection rules for both the Jira and Jira Service Management apps.

Types Of Redirection:
The miniOrange’s OAuth/OIDC plugin supports three types of redirection methods:
1. Domain-Based Redirection
Description:
Domain-based redirection redirects users to the configured Identity Provider based on their email domain. Redirection is triggered when the domain equals the specified domain value or contains the defined domain string.
Use Case:
Ideal for organizations managing multiple email domains that require users to authenticate through a designated IdP automatically.
Example:
If a user logs in with user@company.com, they are redirected to the IdP configured for the company.com domain.
When to Use:
- Multi-domain organizations
- Companies supporting subsidiaries or partner domains
- Environments requiring domain-specific authentication
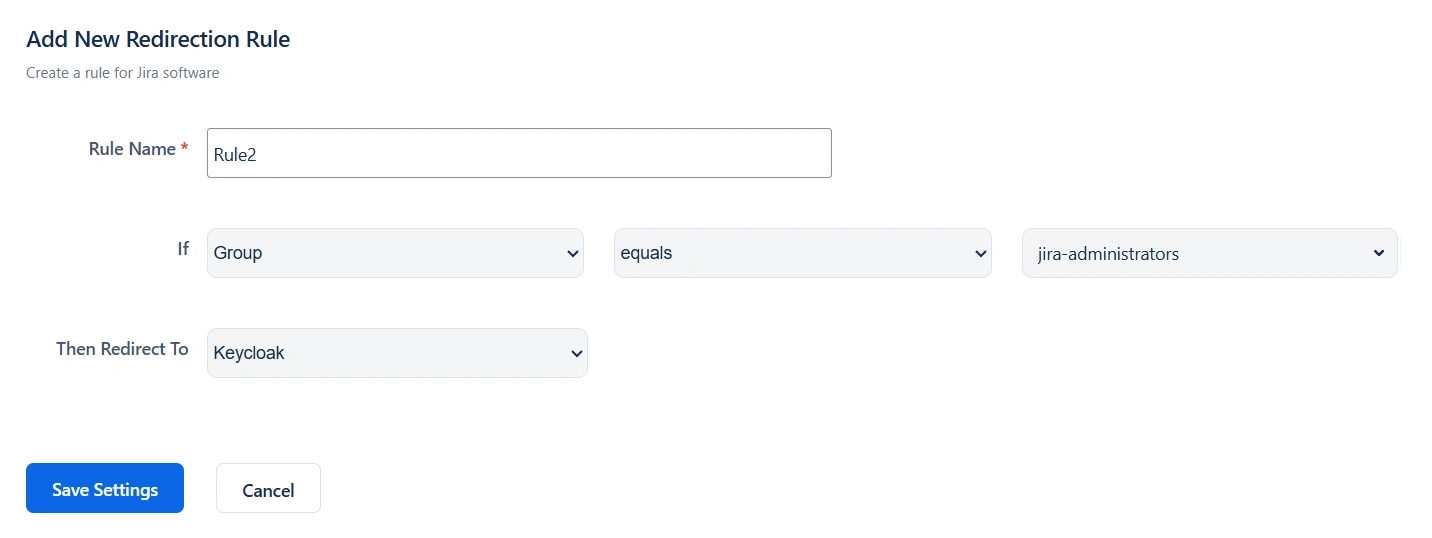
2. Group-Based Redirection
Description:
Group-based redirection redirects users according to the groups to which they are assigned in Jira. Redirection is triggered when the group name equals the specified group or when the group name contains the specified string value.
This method is particularly useful when different departments or teams rely on separate Identity Providers.
Use Case:
Recommended for enterprises where departments such as Finance, Engineering, or HR require different identity providers for authentication.
Example:
Users belonging to the Finance group can be redirected to one IdP, while members of the Engineering group are redirected to another.
When to Use:
- Department-level security requirements
- Organizations with varied authentication policies
- Role-based access strategies
3. Directory-Based Redirection
Description:
Directory-based redirection redirects users based on the directory they belong to. Redirection is triggered when the directory equals the specified directory or when the directory name contains the specified string value.
This is commonly used for external directories such as Microsoft Active Directory and LDAP, as well as newly created directories.
Use Case:
Best suited for organizations operating with multiple user directories or hybrid identity environments that require directory-specific authentication.
Example:
Users stored in a designated directory are automatically redirected to the IdP configured for that directory.
When to Use:
- Hybrid identity infrastructures
- Organizations with multiple user directories.
- Enterprises separating internal and external users
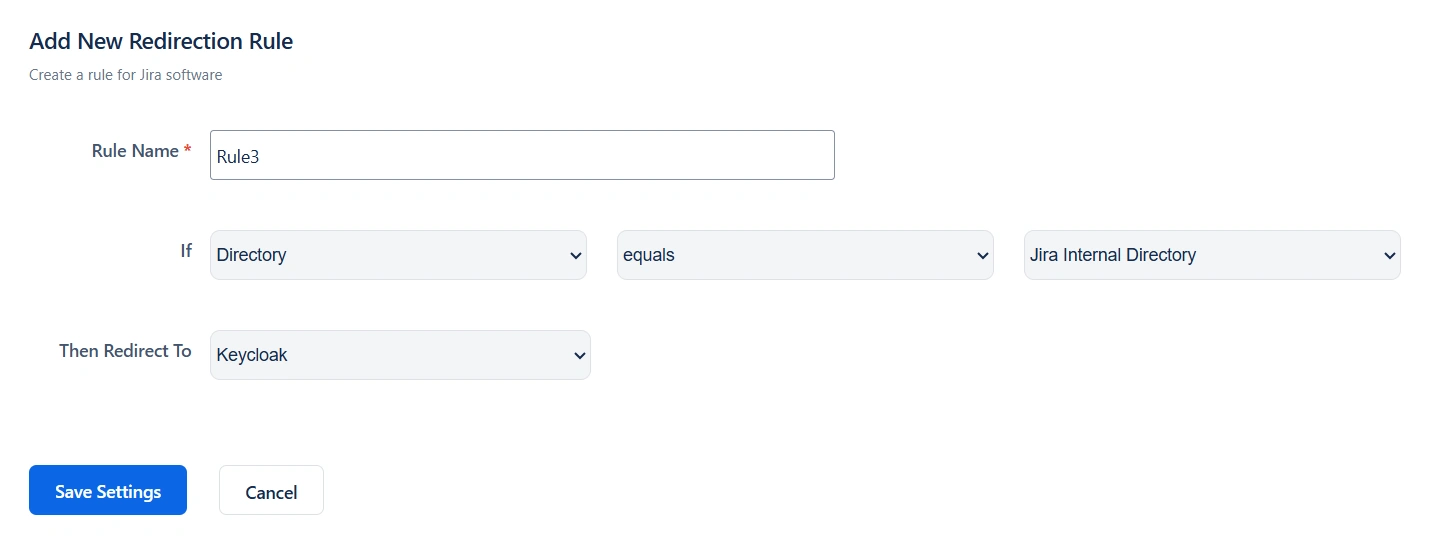
Note: You can configure multiple redirection rules and set their priority from top to bottom. The rule placed at the top has the highest priority and is evaluated first during the redirection process.
Default Rule:
Configure a default redirection rule to determine where users are directed if no other redirection rules match during login. You can choose to redirect users to the login page, a configured Identity Provider (IdP), or a specified URL.
Default Rule Options:
- Login Page: Redirect users to the application’s default login page.
- Configured IdP: Automatically redirect users to a selected, pre-configured Identity Provider.
- Redirect URL: Send users to a custom URL defined by the administrator.
Summary
Redirection Rules enhance both security and user experience by ensuring users authenticate through the correct Identity Provider automatically. By leveraging domain, group, and directory-based redirection, administrators can streamline access management while maintaining flexibility and organizational control within Jira and JSM.
Session Management
The Session Management feature allows administrators to control how long users remain authenticated within the application.
When the Set Remember Me Cookie option is enabled, a persistent cookie is created that keeps users logged in across sessions. Users remain logged in even after closing and reopening their browser, until they manually log out.
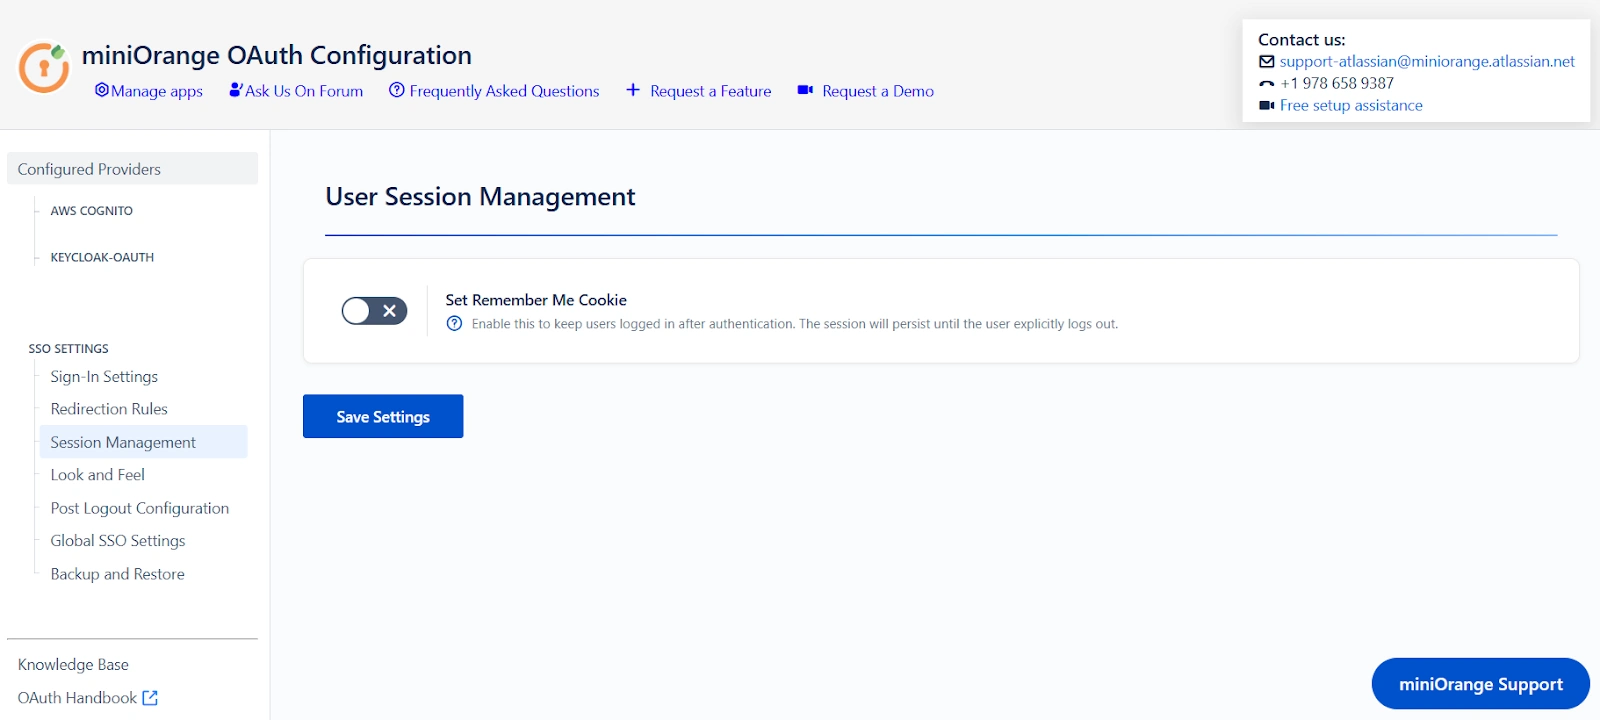
Key Functionality
- Persistent Login: When enabled, the Remember Me cookie preserves the user’s authenticated session, allowing them to stay signed in even after closing and reopening the browser.
- Improved User Experience: Minimizes login interruptions, especially for users who frequently access the application.
- Administrator Control: Ensures sessions remain active only according to the configured behavior and terminate when the user logs out.
When to Use
- Organizations that want to provide a seamless and uninterrupted login experience.
- Environments where users access the platform regularly throughout the day.
Look and Feel Configuration
Purpose
The Look and Feel section allows administrators to customize how the OAuth SSO login experience appears in the Atlassian instance.
This tab focuses only on UI behavior and presentation, without affecting authentication logic or provider selection.
Overview
Using the Look and Feel settings, you can:
- Customize the SSO login button text and placement
- Hide default Jira or Jira Service Management login forms
- Replace default login pages with custom SSO templates
- Control fallback access to default login pages
- Customize SSO error pages and messages
These settings help create a consistent and branded login experience for users accessing your Atlassian instance.
Key Features and Configuration Settings
Login Button Text
Customize the label of the SSO login button displayed on the login page.
- Applicable only when a single identity provider is configured
- When multiple providers are configured, provider names are shown automatically
Example:
Use OAuth Login
Login with Corporate Account
SSO Button Position
Controls where the SSO button appears on the login page.
- Before Login Button
- After Login Button
This setting affects only the visual placement and does not change login behavior.
Login Form Settings
Hide the Default Jira Login Form
- Enabled: Jira’s username and password fields are hidden. Only SSO login options are shown.
- Disabled: Jira’s default login form is displayed along with SSO options.
Hide the Default JSM Login Form
- Enabled: Jira Service Management login form is hidden and only SSO options are shown.
- Disabled: Default JSM login form remains visible.
Custom Login Template for Jira
Replace the default Jira login page with a custom-designed SSO login template.
- Supports HTML, CSS, and JavaScript customization
- Suitable for single OAuth/OIDC provider setups
- Administrators can fully control layout, messaging, and branding
The provided template is a default example and can be modified as needed.
Custom Login Template for Jira Service Management (Customer Portal)
Show Custom Login Template for Customer Portal
Replace the default JSM customer portal login page with a custom SSO login template.
- Applies only to customer-facing login pages
- Maintains compatibility with Jira Service Management navigation
- Supports custom messaging and branding
Default Login Page URLs (Fallback Access)
These URLs allow administrators or users to access default login pages when custom templates are enabled.
Default Jira Login Page URL
http://<your-domain>/login.jsp?show_login_form=true
Use this URL to access Jira’s default login page.
Default Customer Portal Login Page URL
http://<your-domain>/servicedesk/customer/user/login?oauth_sso=false&d
estination=portals&show_login_form=true
Use this URL to access the default Jira Service Management customer portal login page.
Code to Add a New SSO Button
Use the following snippet to add additional SSO buttons when multiple identity providers are configured:
<div class="field-group">
<input type="button"
class="aui-button aui-button-primary"
value="Single Sign-On"
onclick="redirectToProvider('Provider ID')">
</div>
Replace Provider ID with the actual provider ID from the configuration tab.
SSO Error Message Template
Redirect users to a custom error page if an SSO login attempt fails.
- Fully customizable HTML template
- Displays error codes and messages
- Can include help links or administrator contact information
This template controls only how errors are displayed, not how they are generated.
Custom Error Message Configuration
Configure custom messages for specific SSO failure scenarios:
- Invalid Client
- User Creation Disabled
- User Not Allowed
- User Is Deactivated
Example Error Code
INVALID_CLIENT
Occurs when SSO fails due to invalid or incorrect client credentials configured for the identity provider.
Summary
The Look and Feel tab helps tailor the visual and user-facing aspects of OAuth SSO in your Atlassian instance.
It enables branding, UI customization, and clear error messaging while keeping authentication logic and provider behavior unchanged.
Post Logout Configuration
The Post Logout Configuration section allows you to control what users see and where they are redirected after logging out from the Atlassian application.
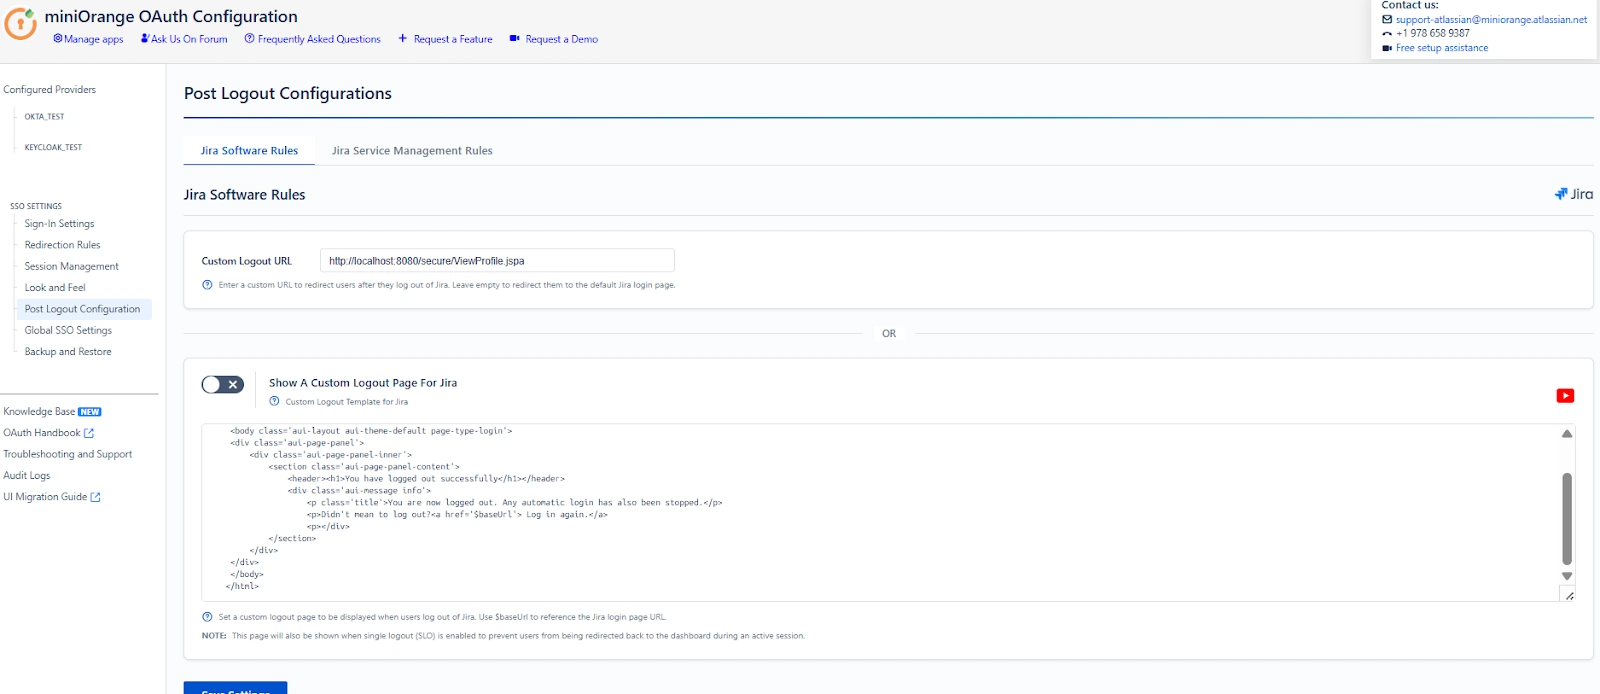
Overview
When a user logs out from the Atlassian application, their application session is terminated.
After logout, the user can either be redirected to a custom URL or shown a custom logout page.
The Post Logout tab lets you define this post-logout behavior within the OAuth/OIDC provider.
Key Features and Configuration Settings
Custom Logout URL
This option defines the URL where users are redirected after logging out from the Atlassian application.
Enabled (URL configured):
- Users are redirected to the specified URL after logout.
- The URL can be internal or external.
Disabled (left empty):
- Users are redirected to the default Atlassian login page.
Use case: Redirect users to a company portal or a logout confirmation page.
Custom Logout Template for Atlassian
This option allows you to display a custom page after logout instead of performing an automatic redirect.
Enabled:
- A custom HTML-based logout page is shown to the user.
- Useful for displaying logout confirmation messages or guidance.
- Supports the $baseUrl variable for referencing the Atlassian application URL.
Disabled:
- Users follow the standard logout redirect behavior.
Use case: Display a branded logout message or provide a manual login link.
Summary
The Post Logout Configuration controls how users are handled after logging out from the Atlassian application. It allows you to define post-logout redirection and customize the logout experience within the OAuth/OIDC provider, ensuring a clear and predictable exit flow for users.
Global SSO Settings
The Global SSO Settings section centralizes controls that affect how Single Sign-On (SSO) behaves across your Atlassian application. These settings determine where SSO is enabled, whether end users can perform certain actions (like resetting passwords), security boundaries for application APIs, and automatic account activation behavior.
Enable SSO for Jira Software / Confluence
- When this option is enabled, users will be able to authenticate into Jira Software / Confluence using the configured OAuth/OpenID Provider.
- If disabled, users will continue to authenticate using native login unless overridden by other settings.
Enable SSO for Jira Service Management
This option enables SSO for Jira Service Management, allowing both service desk agents and customers to sign in via SSO.
Restrict Access to Plugin APIs
When enabled, the plugin’s internal APIs are restricted to requests originating from the same Atlassian instance. This prevents external clients (for example, Postman, curl, or remote sessions) from accessing plugin APIs.
Important
- If your instance is deployed behind a reverse proxy, review your Referrer Policy configuration.
- When the web server or proxy is configured to suppress or modify the Referer header, the Restrict Access to Plugin APIs feature may not function as expected. In such cases, this option should be disabled to avoid unintended SSO or API access issues.
Allow Users to Change Password
This setting determines whether end users can use the application’s built-in password management features, such as Change Password and Forgot Password.
- Enabled: Users can reset or update their local application passwords on their own.
- Disabled: Only system administrators can modify or reset user passwords.
Auto Activate Users on SSO
When enabled, users who are currently deactivated in the application will be automatically activated if they successfully authenticate via SSO.
This setting simplifies user management when onboarding large teams, but should be used with caution if deactivated users should remain blocked for compliance reasons.
Automatically Login Users
When enabled, users who already have an active session with the Provider will be logged in automatically without being prompted to authenticate again.
Note: feature is supported with Keycloak and is not applicable for JWT-based applications.
Callback URL
{baseurl}/plugins/servlet/oauth/autocallback
Configure this callback URL in your OAuth provider under the Redirect URIs.
Force Re-Authentication
When enabled, users must re-authenticate at the Provider even if an active session already exists on the provider side.
Note: This option is not applicable for JWT-based applications.
Backup and Restore
The Backup and Restore tab in the miniOrange OAuth/OIDC plugin allows administrators to back up and restore their configuration by downloading and uploading configuration files.
This feature is particularly useful during environment migrations, disaster recovery, or when replicating configurations from a test environment to production within Atlassian applications.
Configuration Backup and Restore Methods:
The plugin provides the following methods to back up and restore configurations:
- Download/Upload App Configuration via File
- Download/Upload App Configuration via REST API
Download/Upload App Configurations via File
Download App Configuration File
Use the Download Configuration button to export your current plugin configuration settings. This file acts as a backup and can be reused to replicate configurations in another environment.
Upload App Configuration File
Use the Import Configuration option to upload a previously downloaded configuration file and restore the settings instantly.
Recommendation: Always maintain a recent backup before making significant configuration changes.
Download/Upload App Configurations via REST API
Fetch Plugin Configuration via REST API
Use the following endpoint to retrieve the current configuration in JSON format:
Endpoint Details:
URL: https://<base-url>/plugins/servlet/oauth/configureplugin
Replace <base-url> with your Jira instance URL.
- Method: GET
Request Parameters
Headers:
- Content-Type: application/json
- Authorization: Basic <base64 encoded admin_username:password>
When executed successfully, this request returns the complete plugin configuration in raw JSON format.
Upload App Configuration File via REST API
Use the following endpoint to upload and restore the plugin configuration in JSON format:
Endpoint Details:
URL: https://<base-url>/plugins/servlet/oauth/configureplugin
Replace <base-url> with your Jira instance URL.
- Method: POST
Request Parameters
Headers:
- Content-Type: application/json
- Authorization: Basic <base64 encoded admin_username:password>
Body:
- Select Raw format.
- Set content type to application/json.
- Paste the JSON configuration data obtained from the GET request response or the downloaded app configuration file.
After pasting the JSON data, execute the request. The plugin configuration will be uploaded successfully.
Troubleshooting
The Troubleshooting tab provides steps to download the necessary information, such as application log files, to help troubleshoot issues.
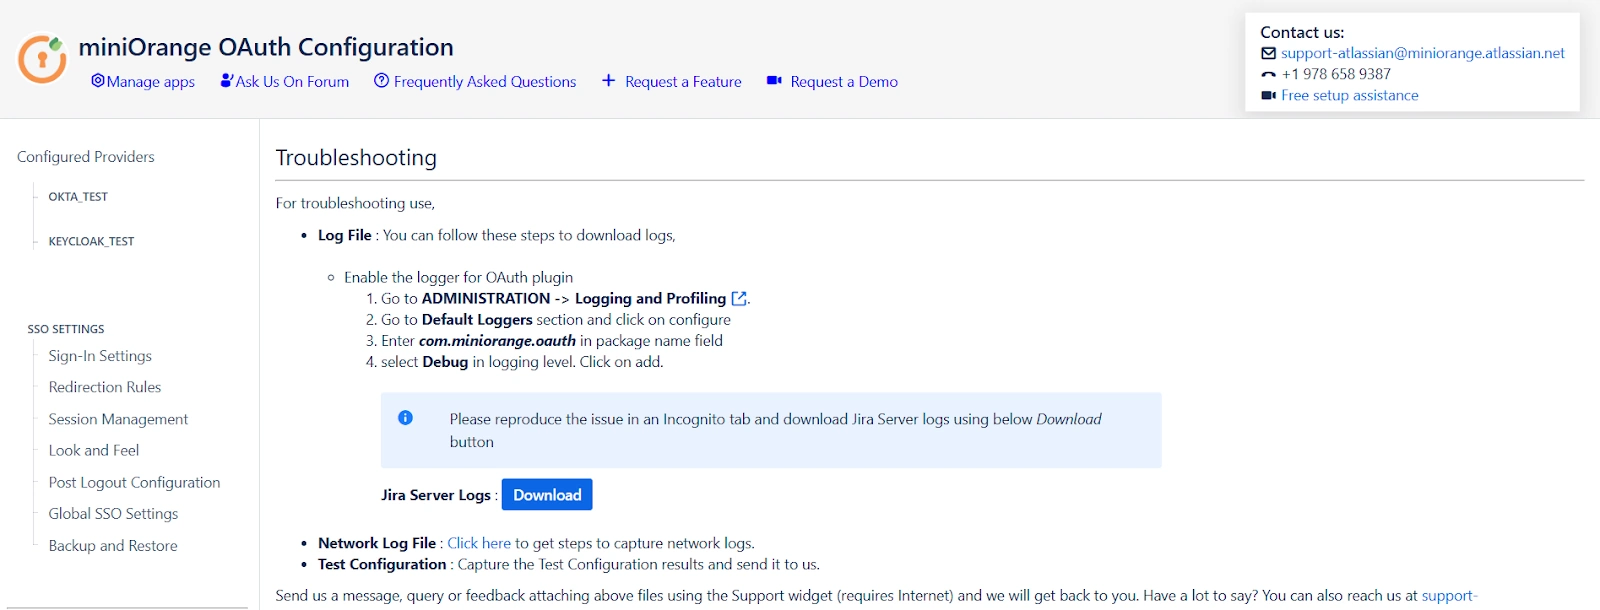
Overview
When an issue occurs, the plugin allows you to capture logs that help identify errors, misconfigurations, or unexpected behavior during the login process.
These logs are mainly used to analyze authentication and connectivity issues.
Key Features and Configuration Settings
Log File
Use this option to capture detailed logs generated by the OAuth plugin.
Steps to enable and collect logs:
- Go to Administration → Logging and Profiling
- Under Default Loggers, click Configure
- Enter com.miniorange.oauth in the package name field
- Select DEBUG as the logging level and click Add
- Open an Incognito / Private browser window and reproduce the issue
- Download the Server logs using the Download button
These logs capture detailed plugin execution details required for troubleshooting.
Network Log File
Use this option to capture browser network logs.
Steps to capture browser network logs:
- Open the browser in Incognito / Private mode
- Open Developer Tools
- Chrome / Edge: F12 or Ctrl + Shift + I
- Go to the Network tab
- Enable Preserve log
- Clear existing network entries
- Reproduce the issue (initiate the login flow)
- Use the Export option in the Network tab
- Export the logs as a HAR file with content
- Save the downloaded .har file
These network logs capture HTTP requests and responses exchanged during the login flow and help identify redirect, token, or connectivity issues.
Summary
The Troubleshooting section helps you collect essential diagnostic information from your Atlassian instance. By capturing plugin logs and browser network logs, issues can be identified and resolved more efficiently.