- Home
- Secure Share
- Secure Share Documentation
- Jira Cloud

Secure Share for Jira External Users
Secure Share for Jira External Users lets you share Jira issues, projects, boards, and filters with external, non-Jira, or unlicensed users through secure access links, without buying extra Jira licenses.
You can control what recipients can do with comments, attachments, linked issues, and sub-tasks, choose which issue fields they see, and protect each link with a password and an expiry date. Jira admins and project admins can set defaults that every new link follows (see How restrictions are applied).
By the end of this guide, you will be able to securely share your Jira issues, projects, boards, and filters with external users according to your organization's requirements.
It fetches issues, projects, boards, filters, and attachments directly from Atlassian in real time using REST APIs, ensuring that your content is always up to date and remains within your Jira instance.
 Try it for free
Installation
- Go to the Atlassian Marketplace and open Secure Share - Share issues for Jira (External Users).
- On the app page, click Try it free.
- Click Start Free Trial to continue with the installation.
- The app installs automatically and appears under Apps in the Jira sidebar.
Open the app
- From the Jira sidebar, go to Apps › mO Secure Share. Wherever this guide says “open the app”, start here.
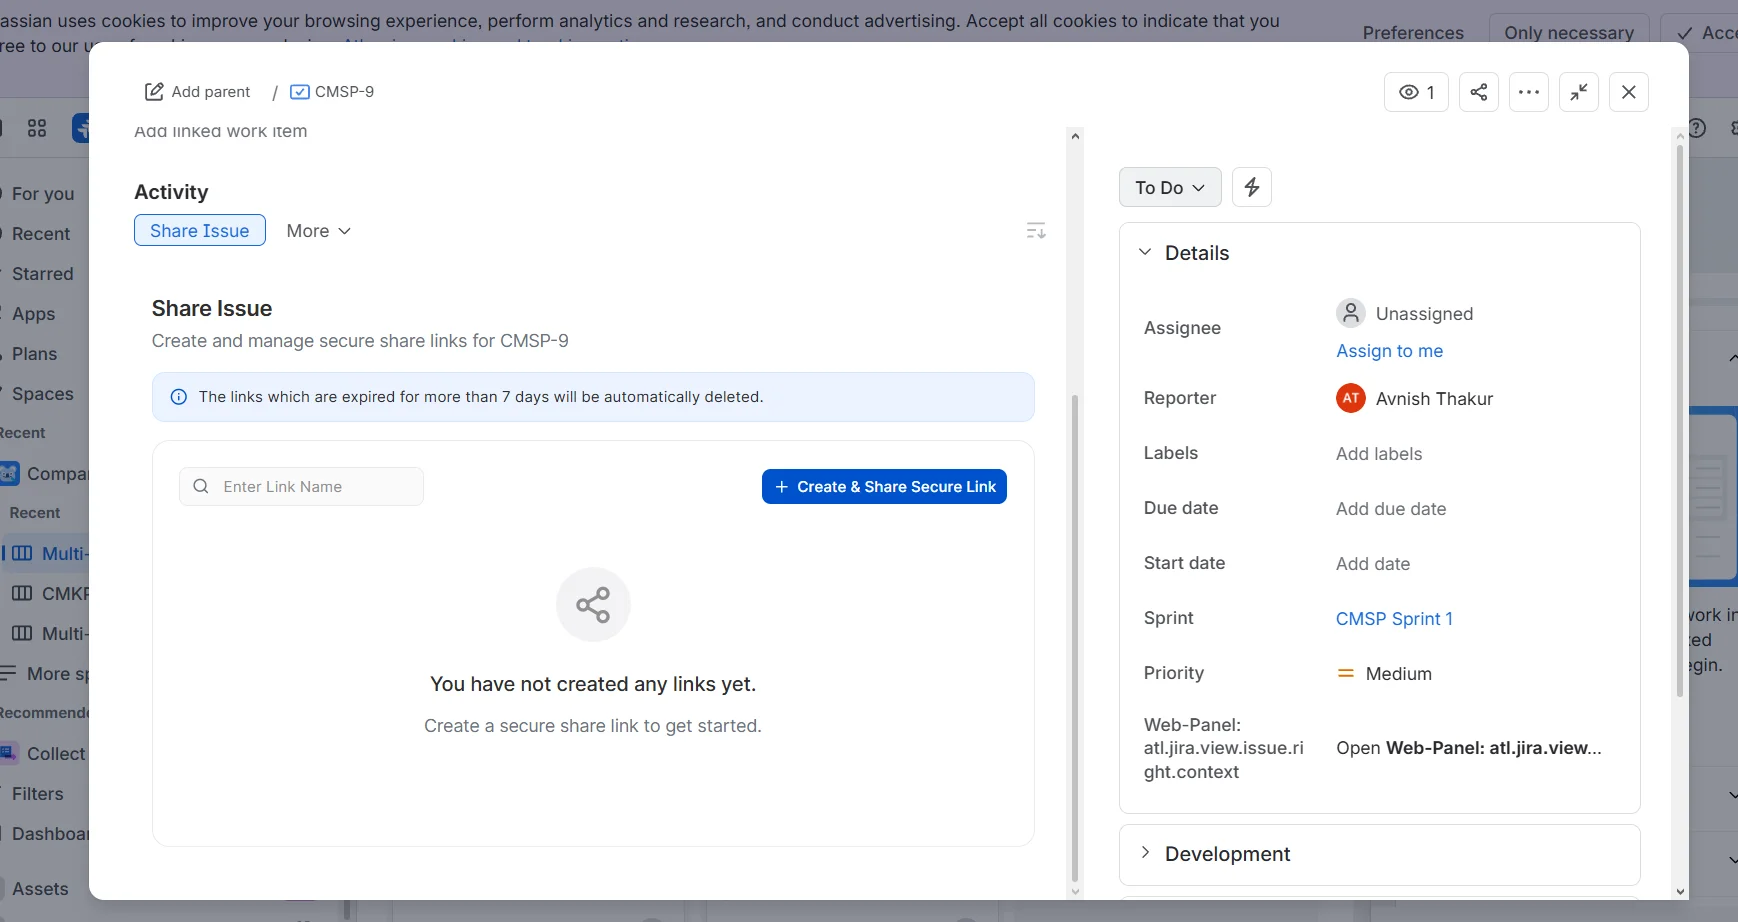
1: Share a Jira issue
- Open the Jira issue you want to share.
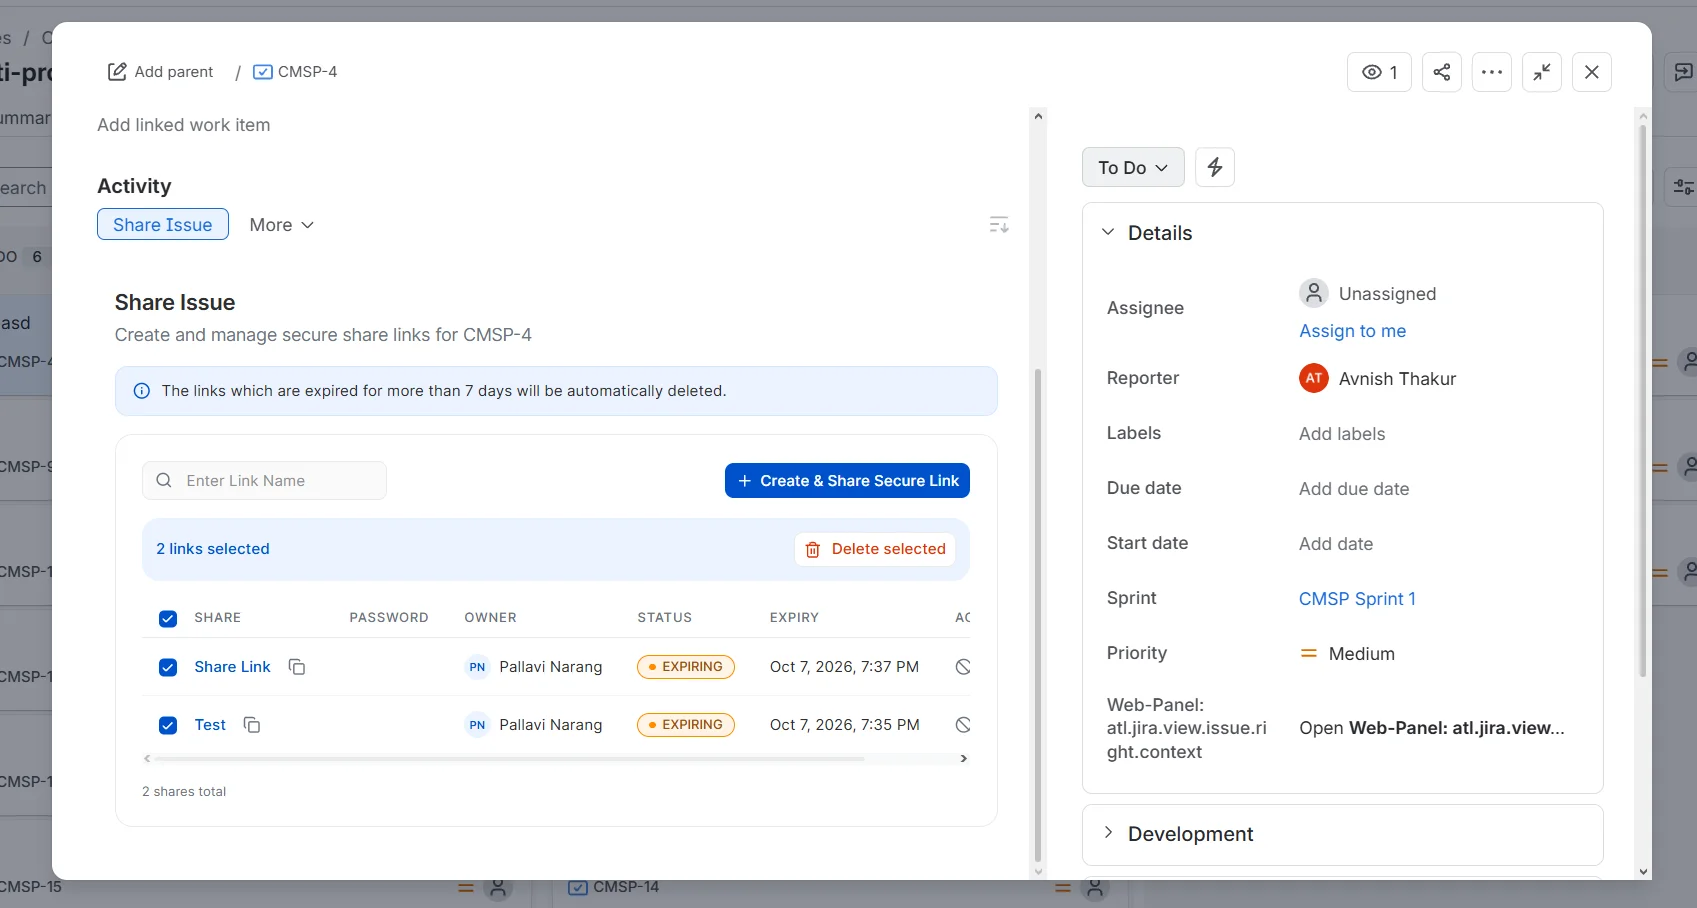
- Under Activity, click Share Issue. The Share Issue panel opens below, listing any links already created for this issue.
- Click Create & Share Secure Link.
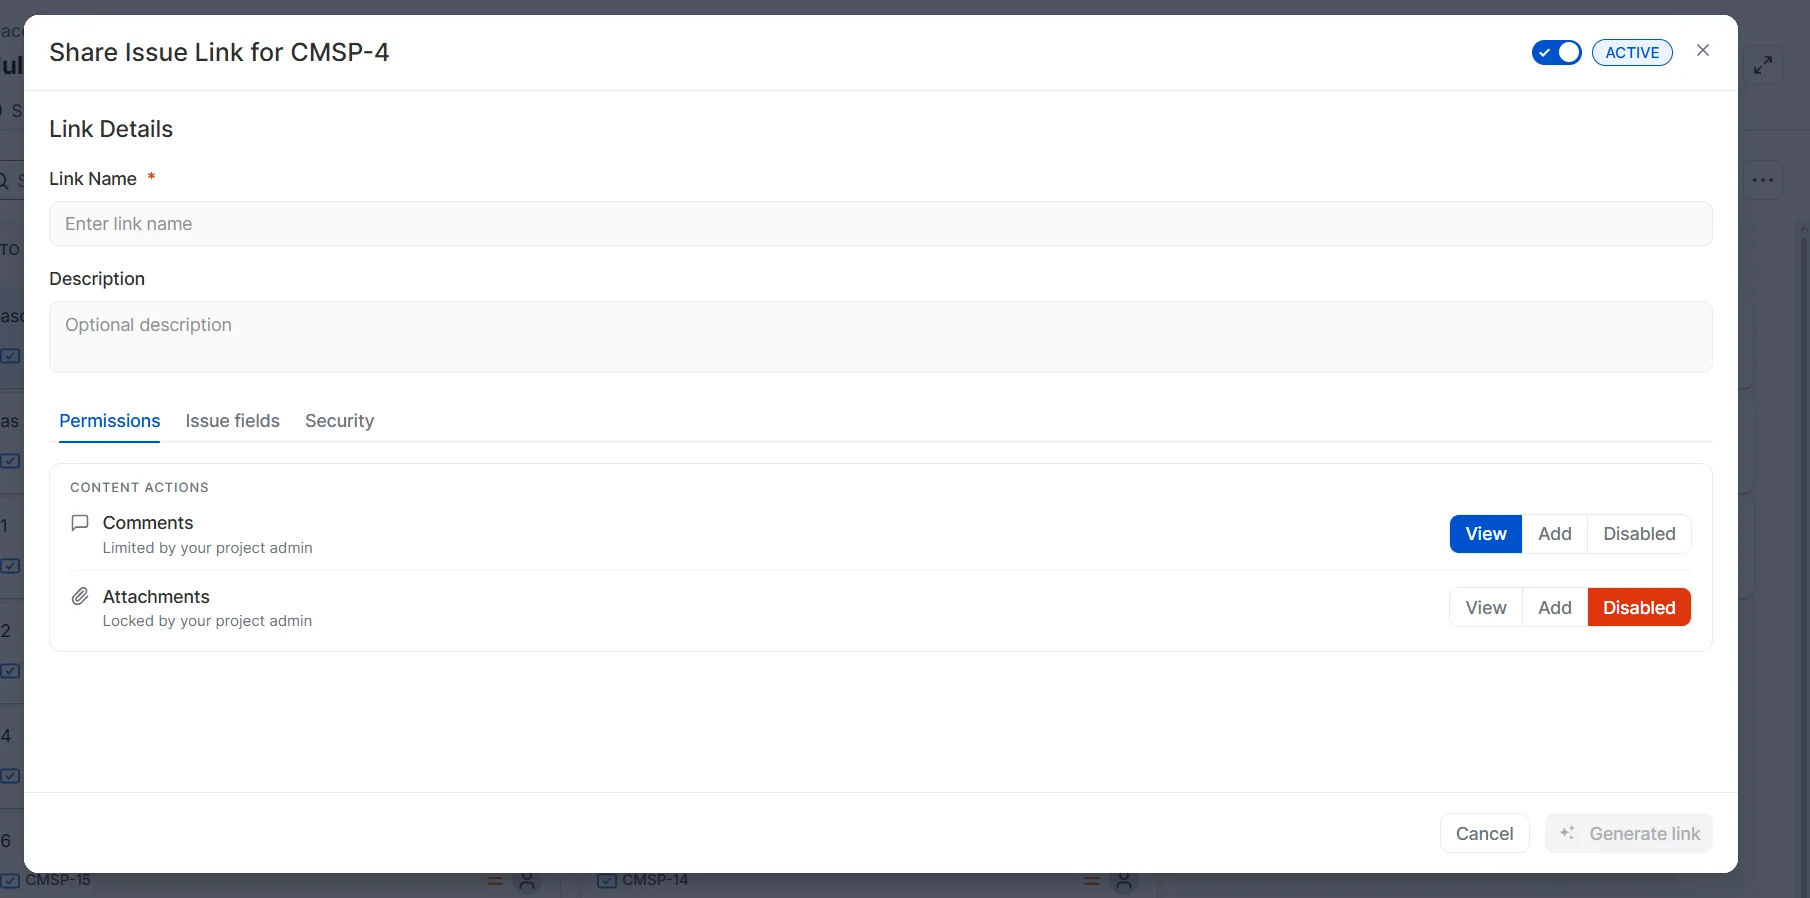
- In the Share Issue Link window, enter a Link Name and adjust any settings you need (see Link settings).
- Click Generate link. The new link appears in the Share Issue panel.
2: Share a Jira project or space
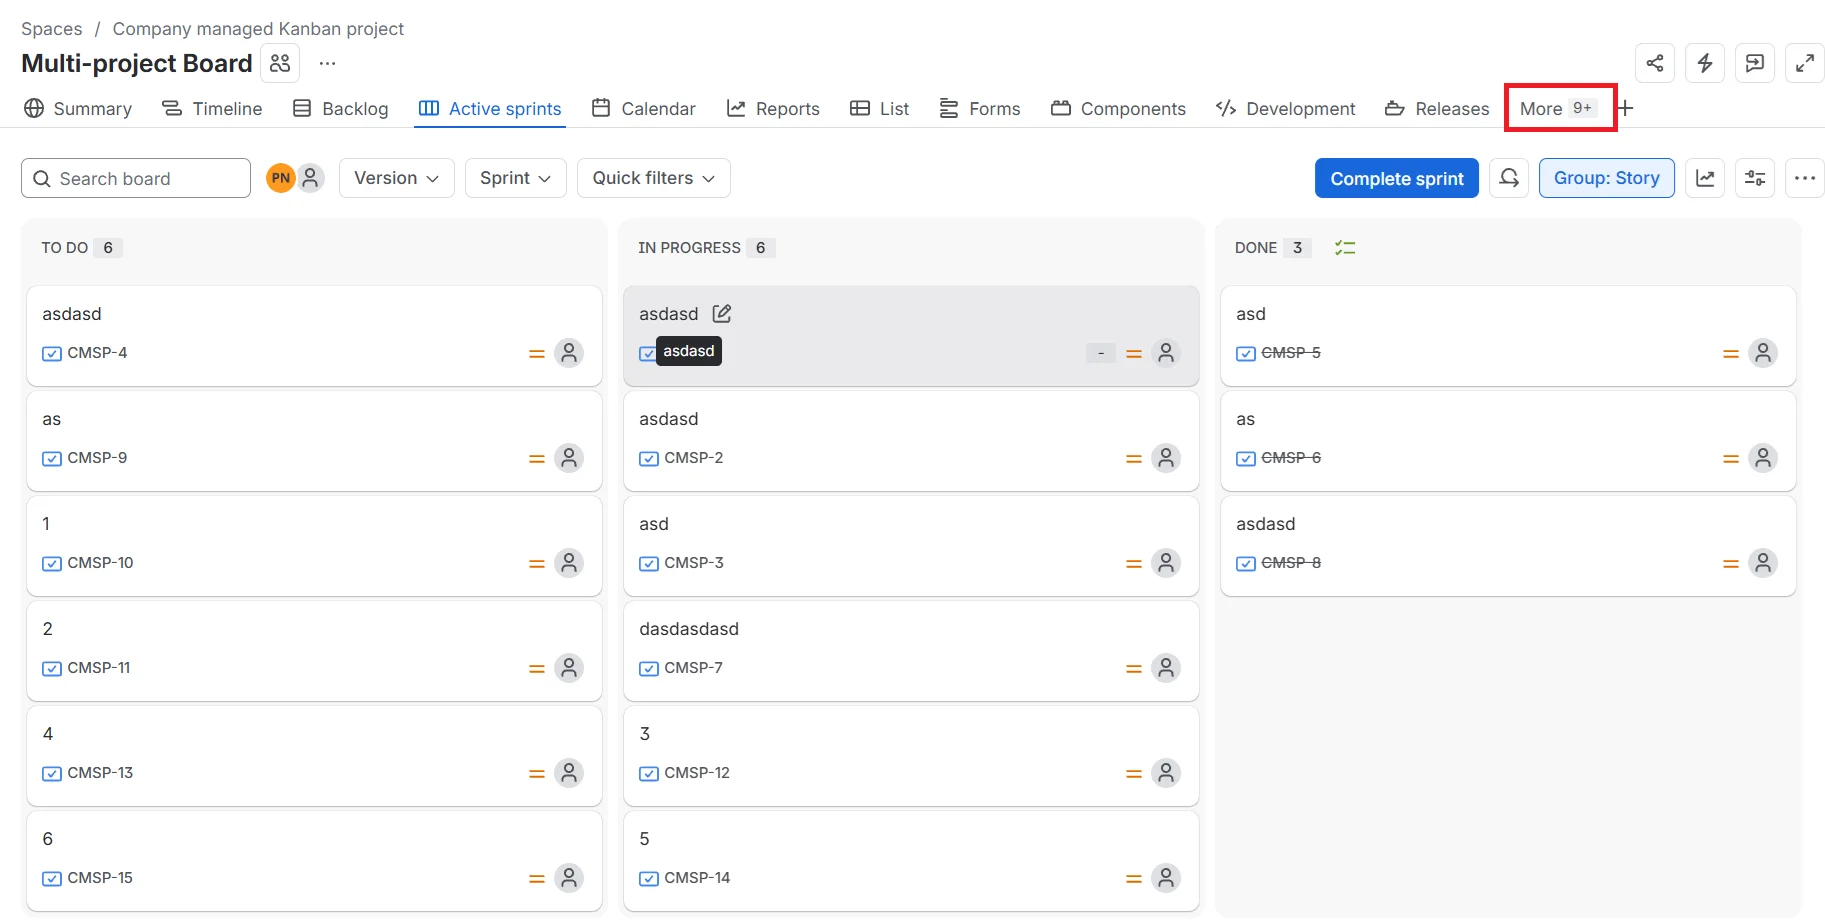
- Open the Jira project or space you want to share.
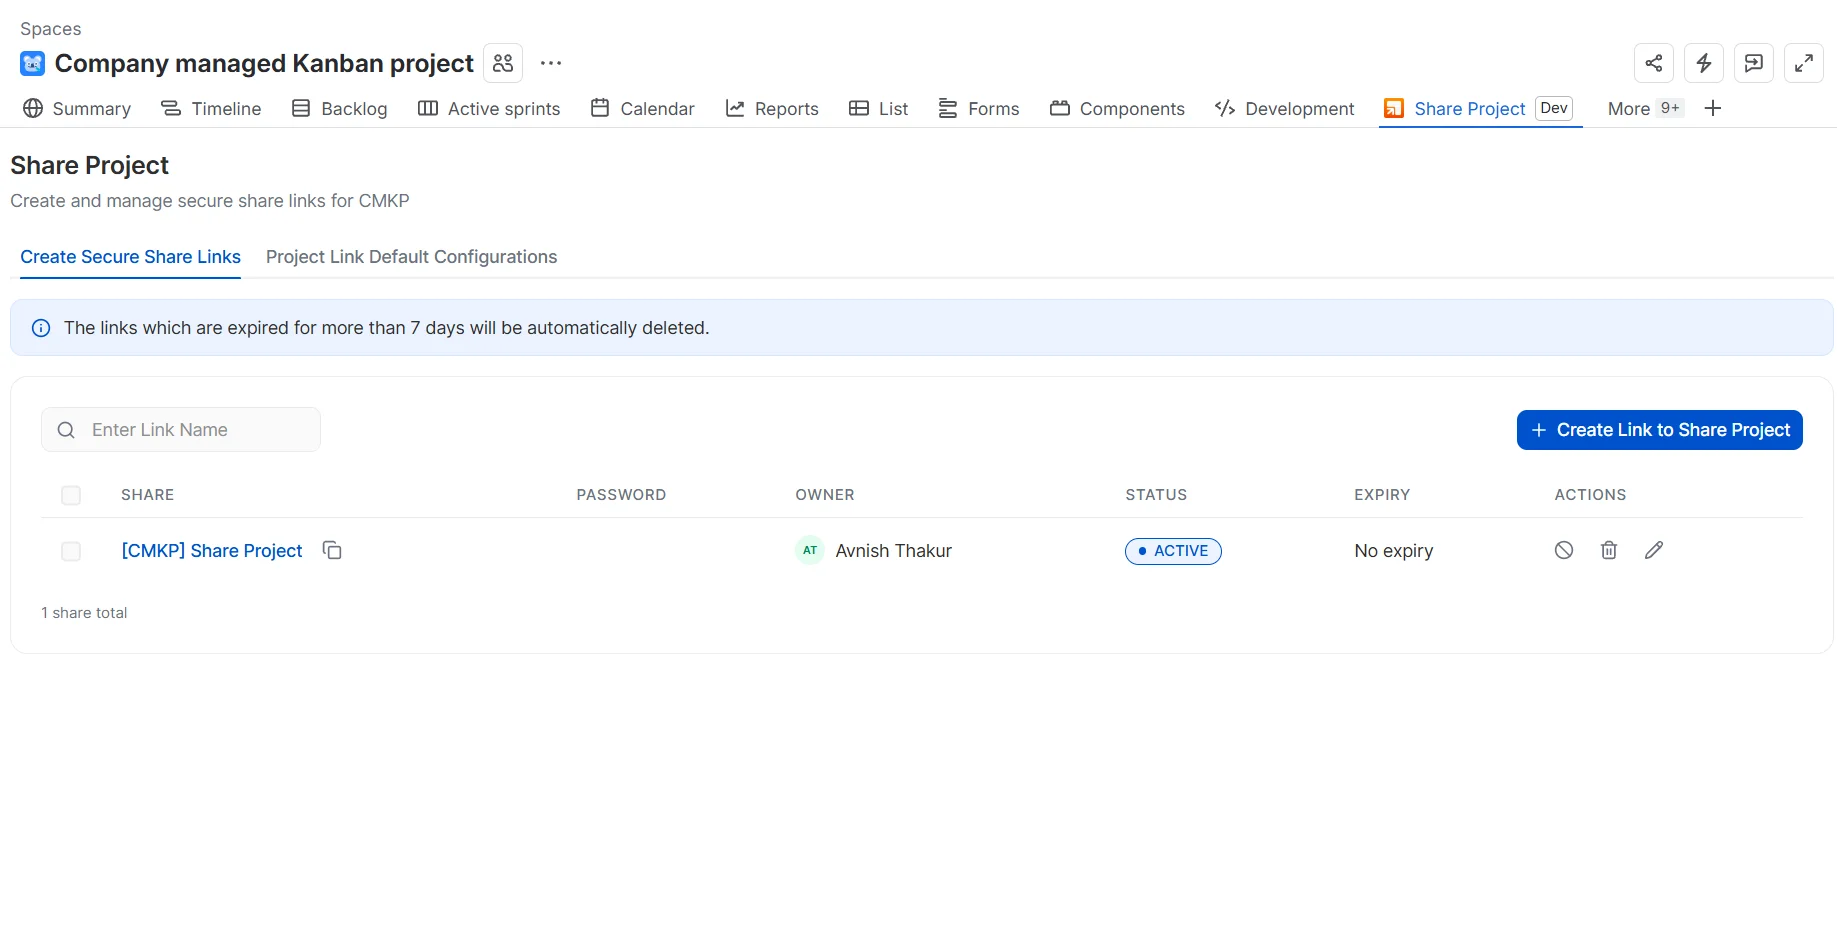
- In the project's top navigation, click More at the right end of the tab bar and select Share Project.
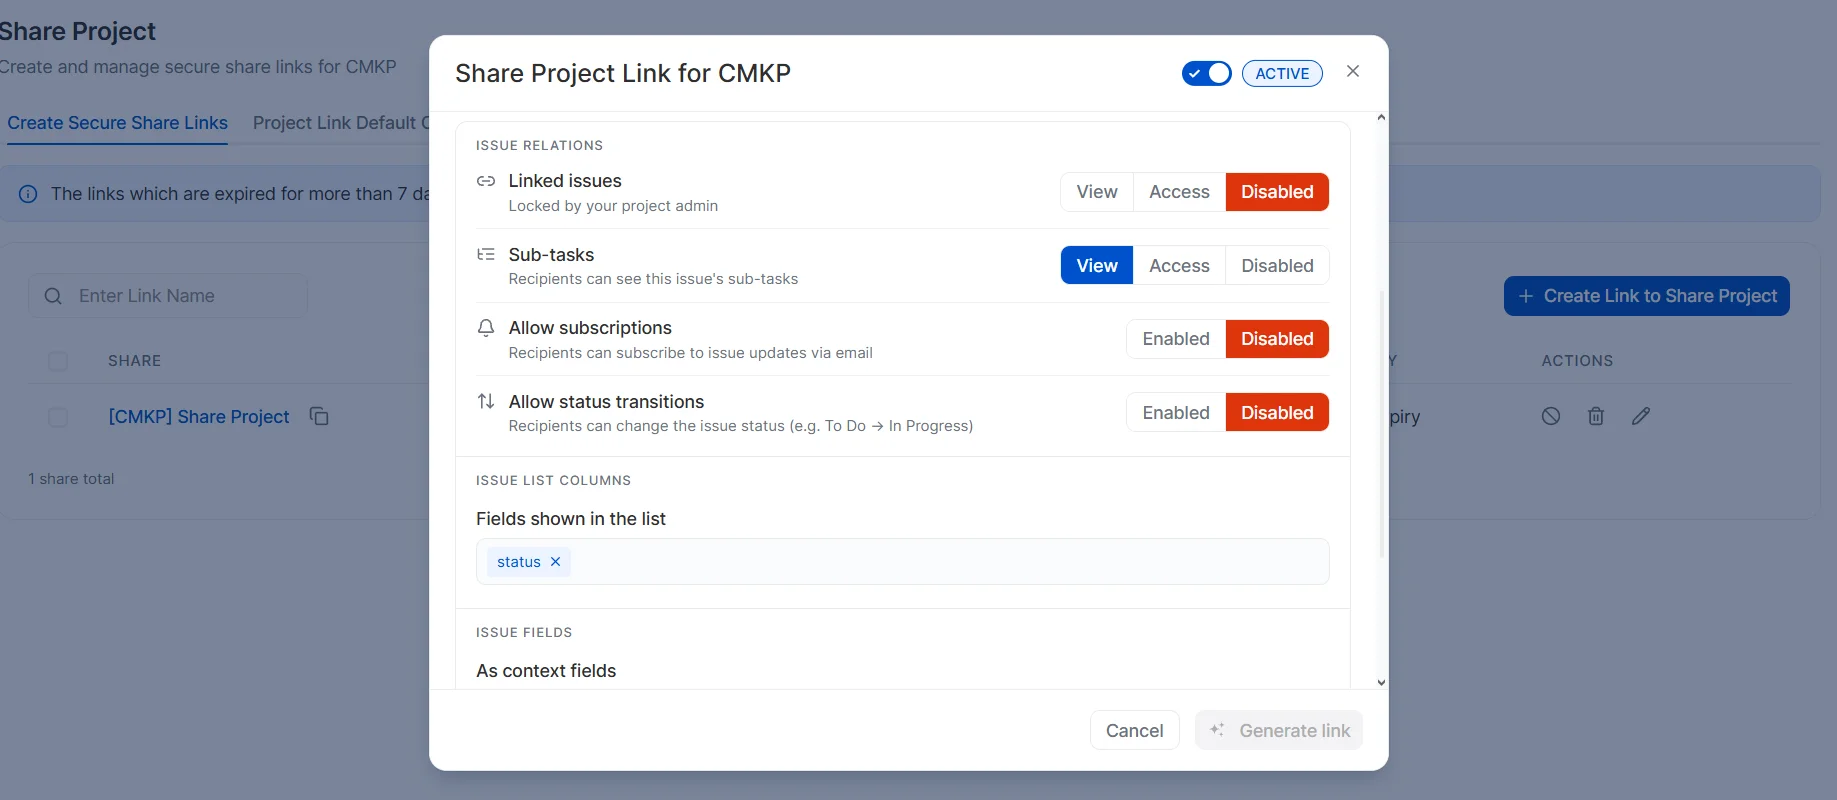
- The Share Project page opens on the Create Secure Share Links tab, listing links already created for this project. Click Create Link to Share Project.
- In the Share Project Link window, enter a Link Name and adjust any settings you need. Project links also let you choose the columns shown in the shared issue list (see Issue fields tab).
- Click Generate link. The new link appears on the Create Secure Share Links tab.
3: Share a Jira board
- Open the board you want to share.
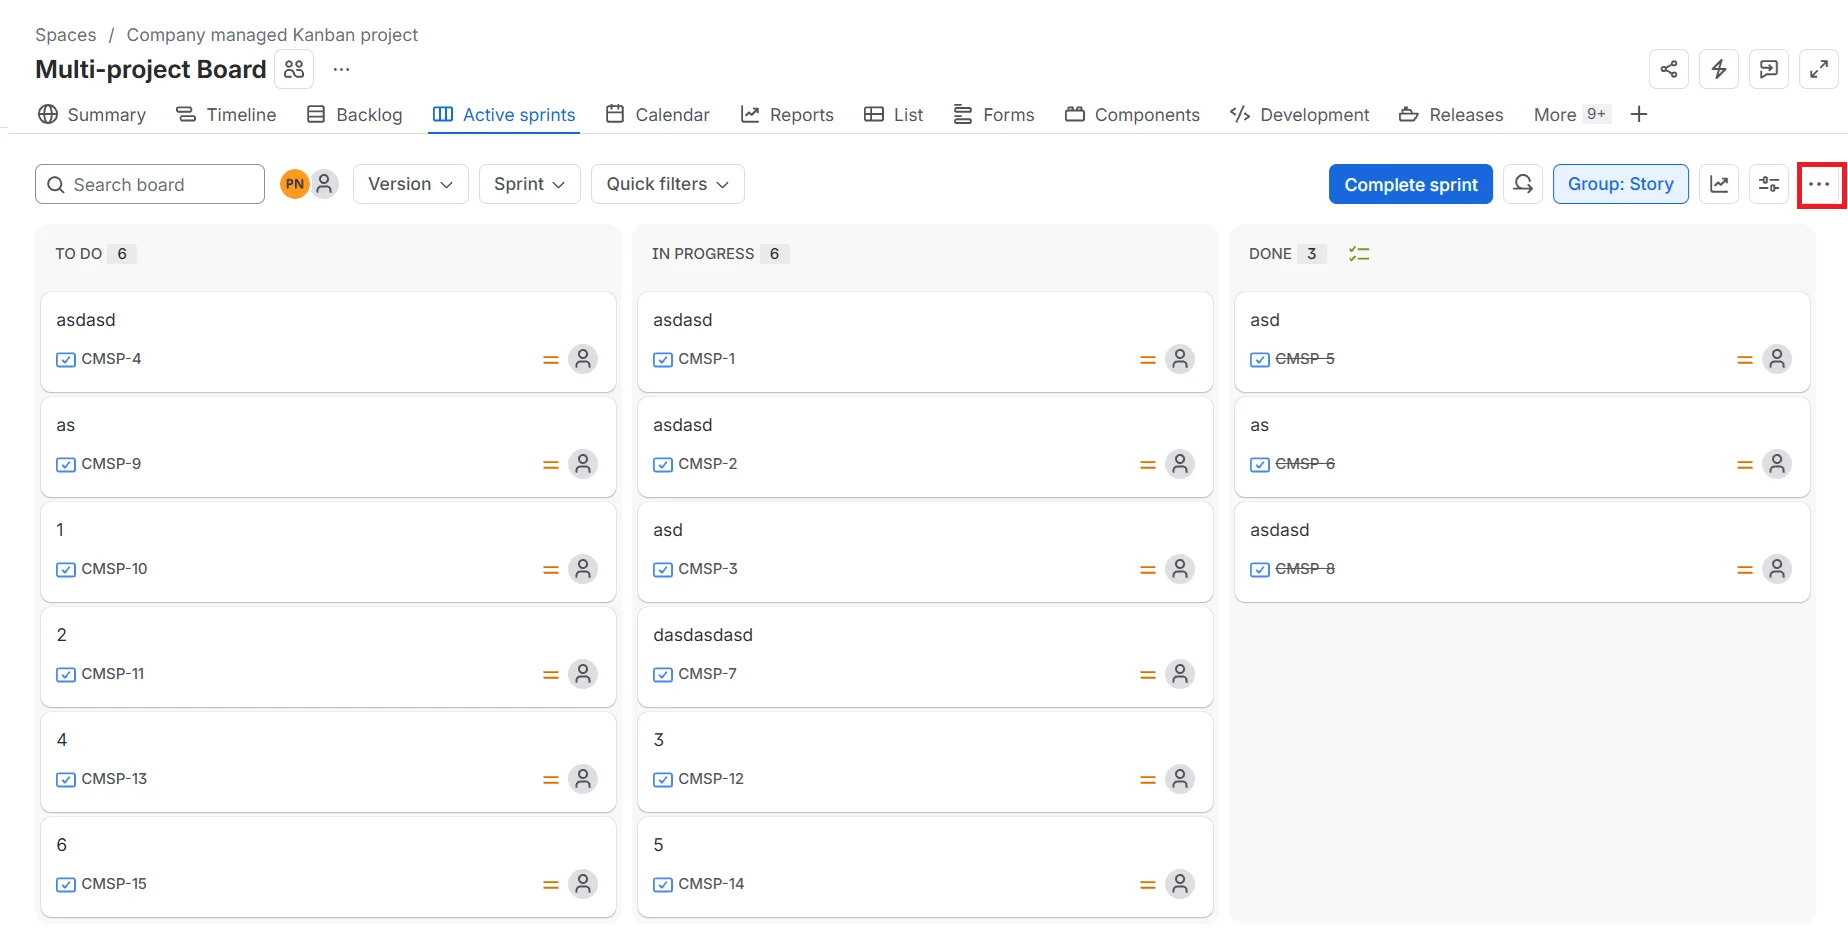
- Click More actions (⋯) at the top-right corner of the board and select mO Share Board.
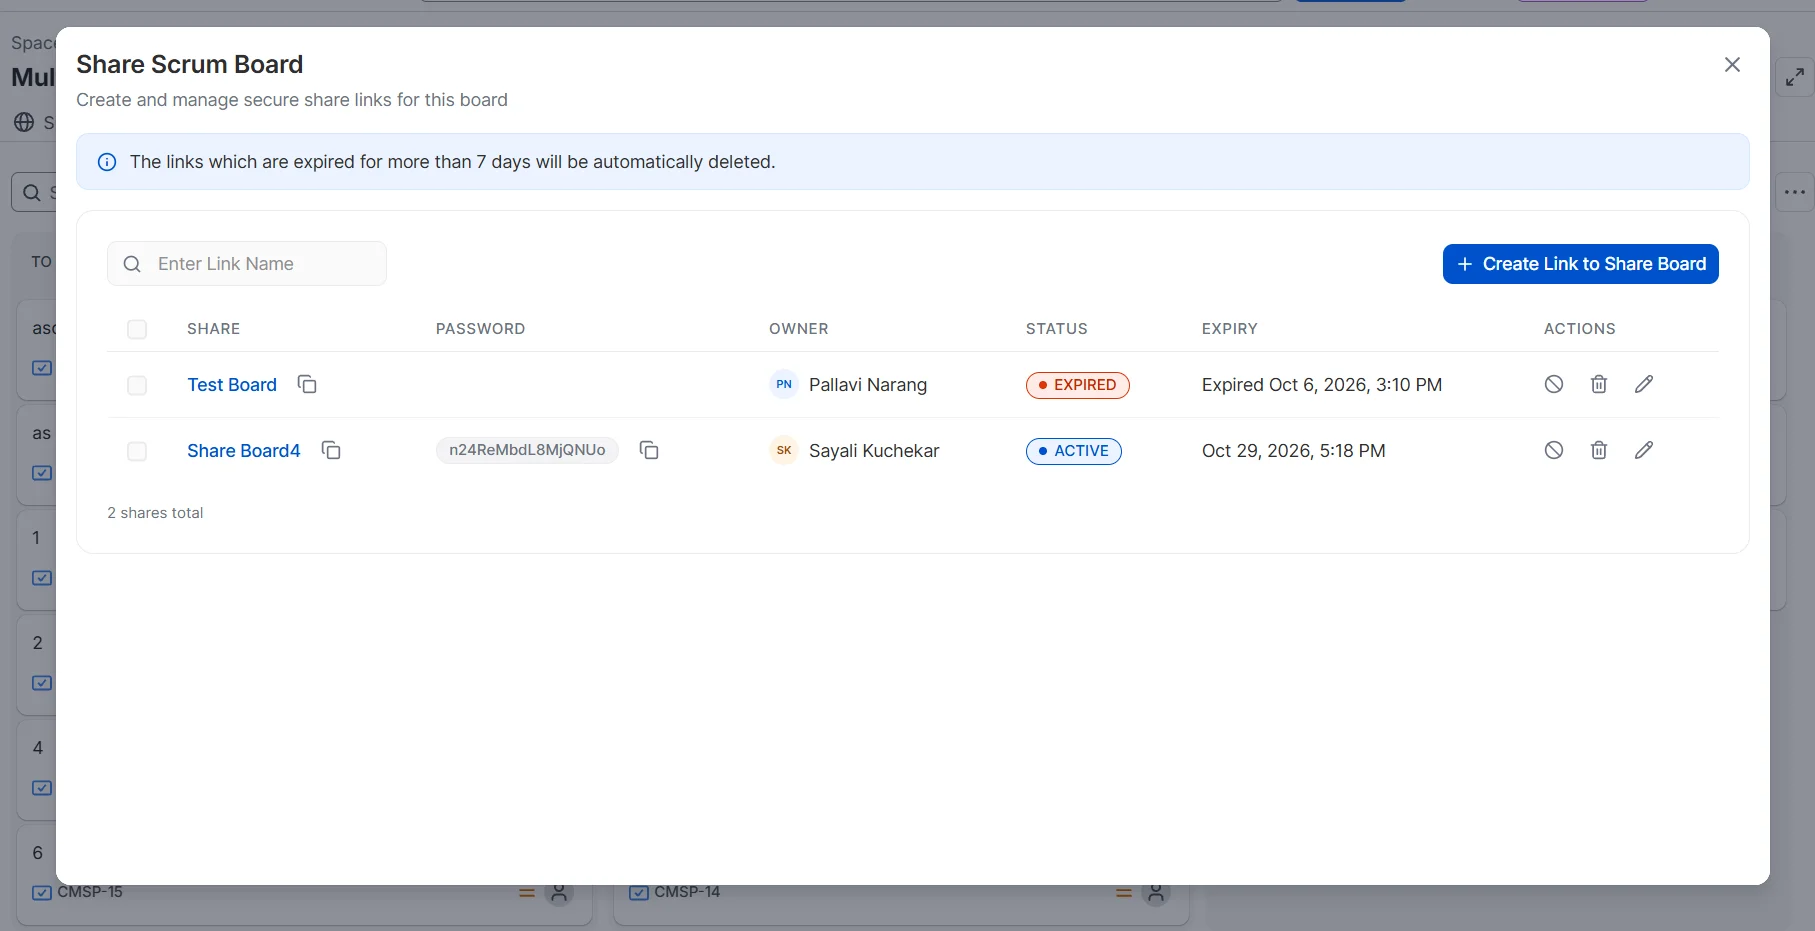
- The Share Scrum Board window opens, listing links already created for this board. Click Create Link to Share Board.
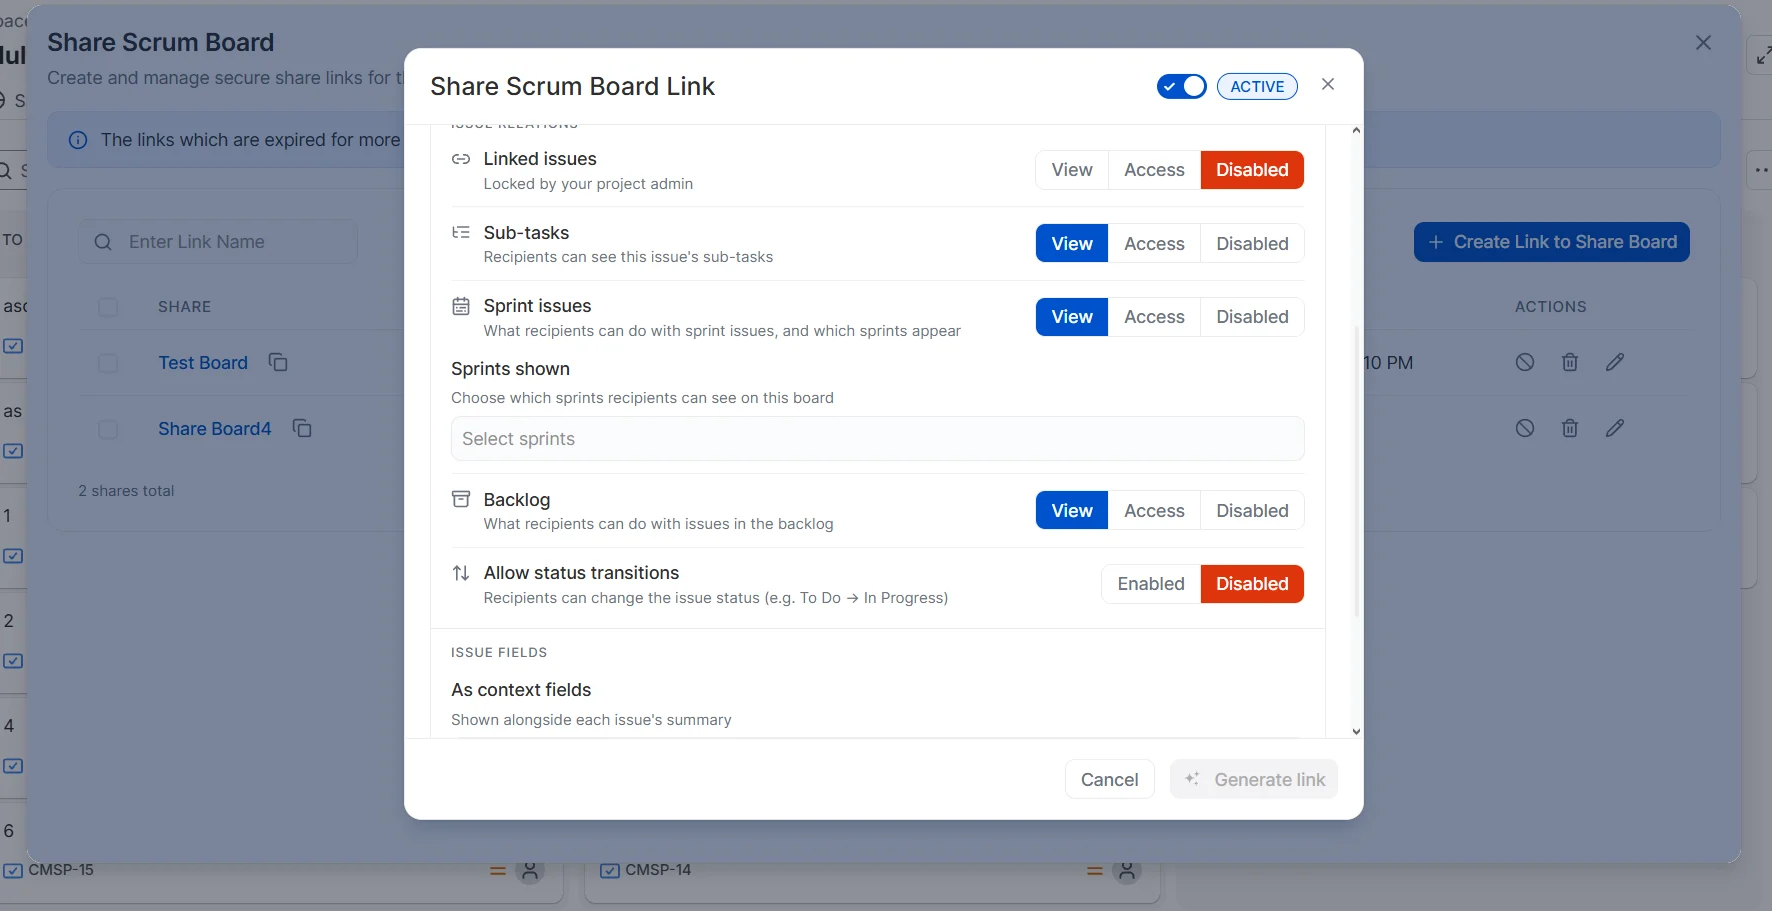
- In the Share Scrum Board Link window, enter a Link Name and adjust any settings you need. Board links add sprint and backlog options (see Issue fields tab).
- Click Generate link. The new link appears in the Share Scrum Board window.
4: Share a Jira filter
Use the JQL filter tab to share issues from a saved Jira filter or a custom JQL query, including issues from several projects.
- Open the app and click the JQL filter tab. The table lists every saved Jira filter in your instance, with its description and owner.
-
Optional: expand How does this work? and Writing a JQL query for in-app guidance and example queries. Queries without a filter condition (for example, only
ORDER BY) aren't allowed.
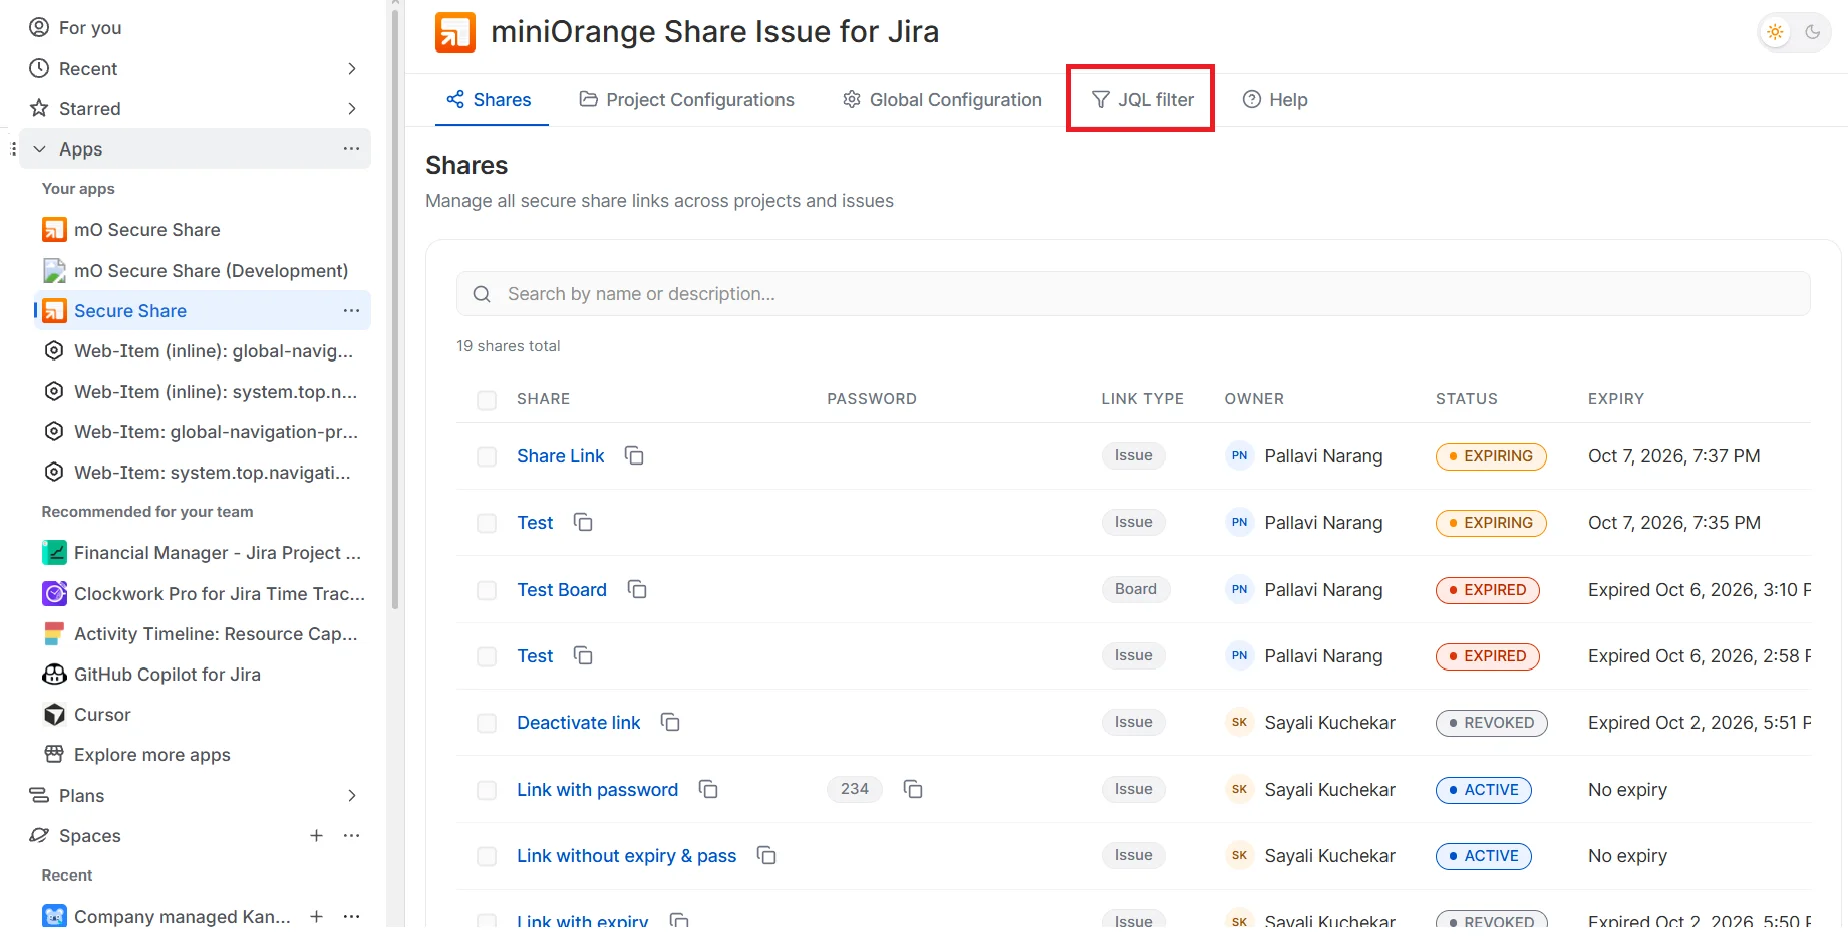
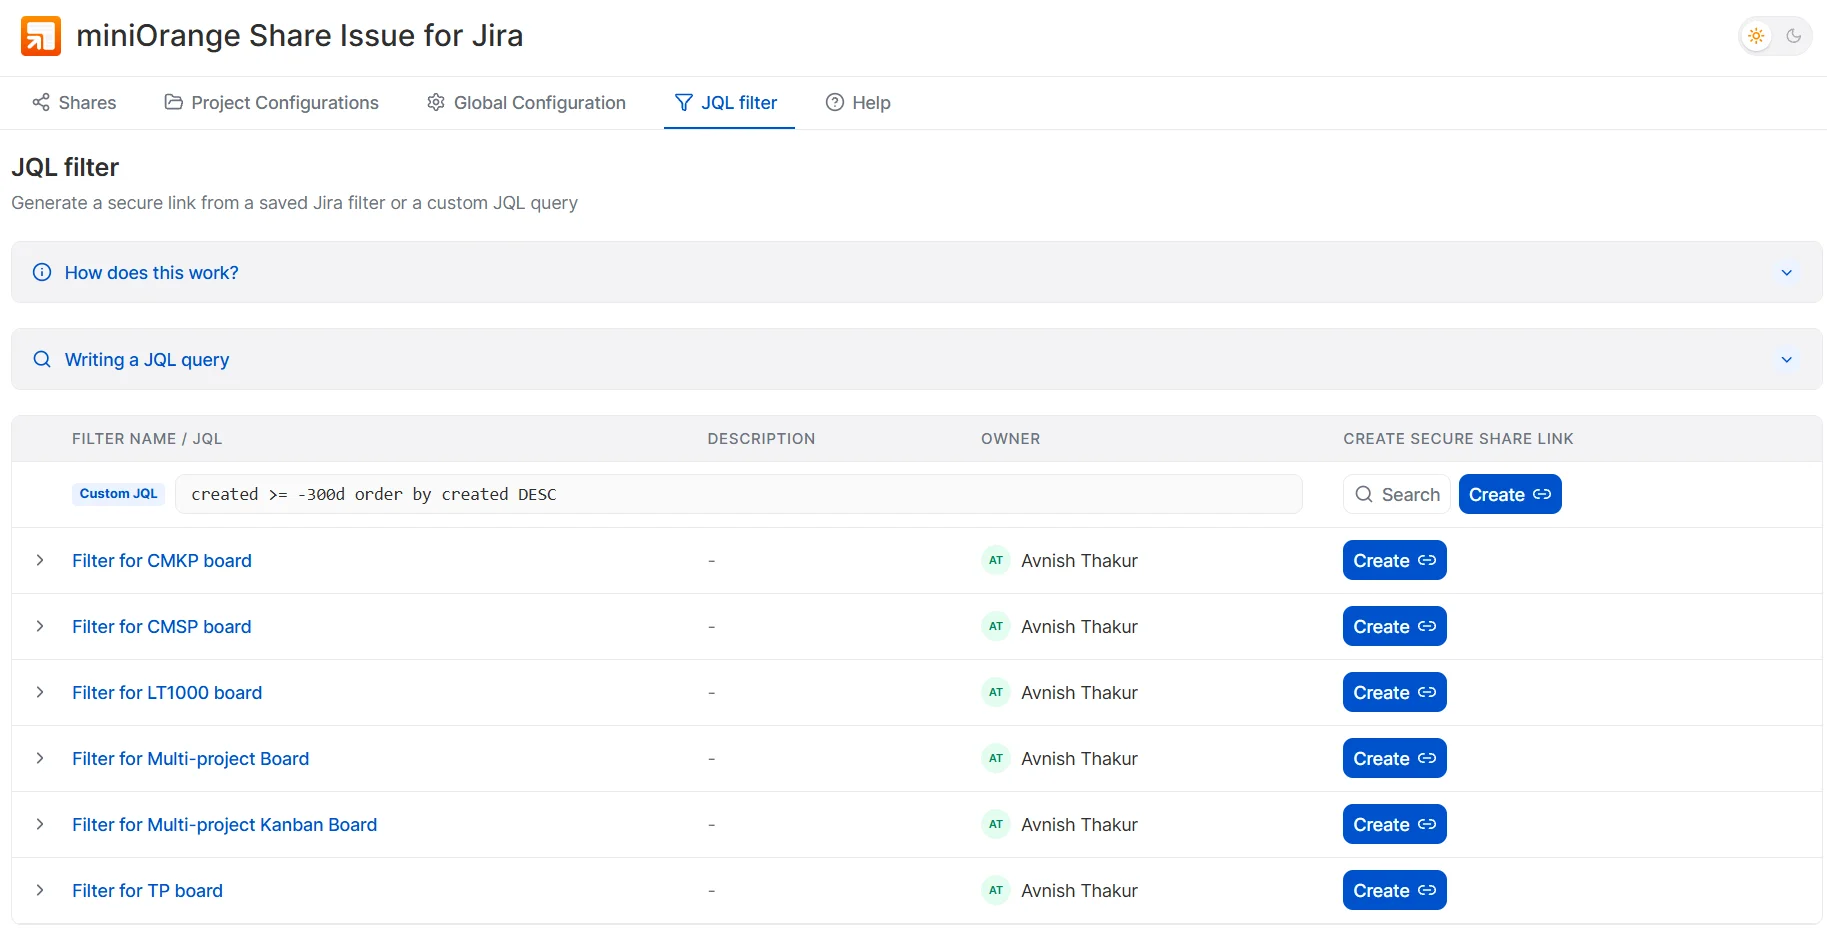
Choose what to share:
Custom JQL query:
- In the first row, marked Custom JQL, type your query and click Search to preview the matching issues. Then click Create. Recipients get access to the issues shown in the results.
Saved Jira filter:
- Click any filter row to preview its matching issues inline. Then click Create on that row. Recipients get access to the issues the filter returns.
- The Create New Link panel opens on the right. Enter a Link Name. The Filter field (required) is pre-filled with the filter you chose; change it from the dropdown if needed. Adjust any other settings you need (see Link settings).
- Click Generate link. The new link appears on the Shares tab.
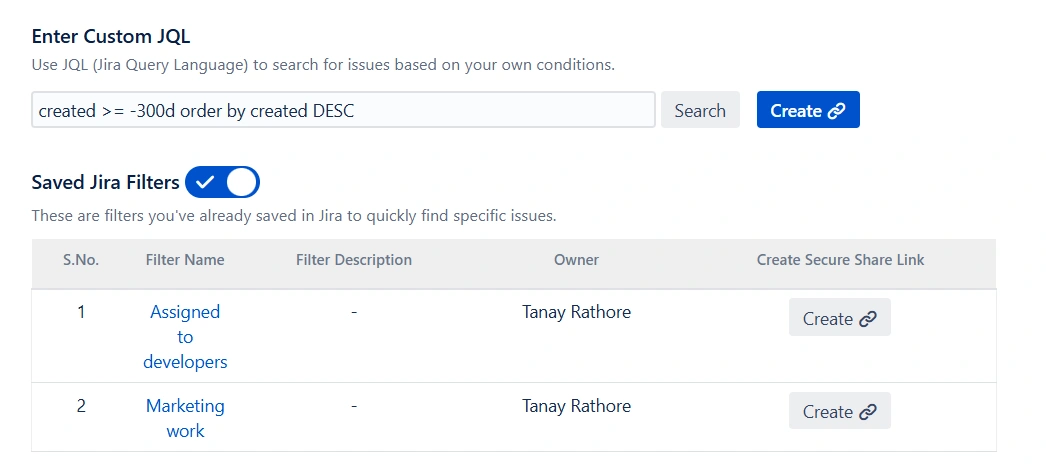
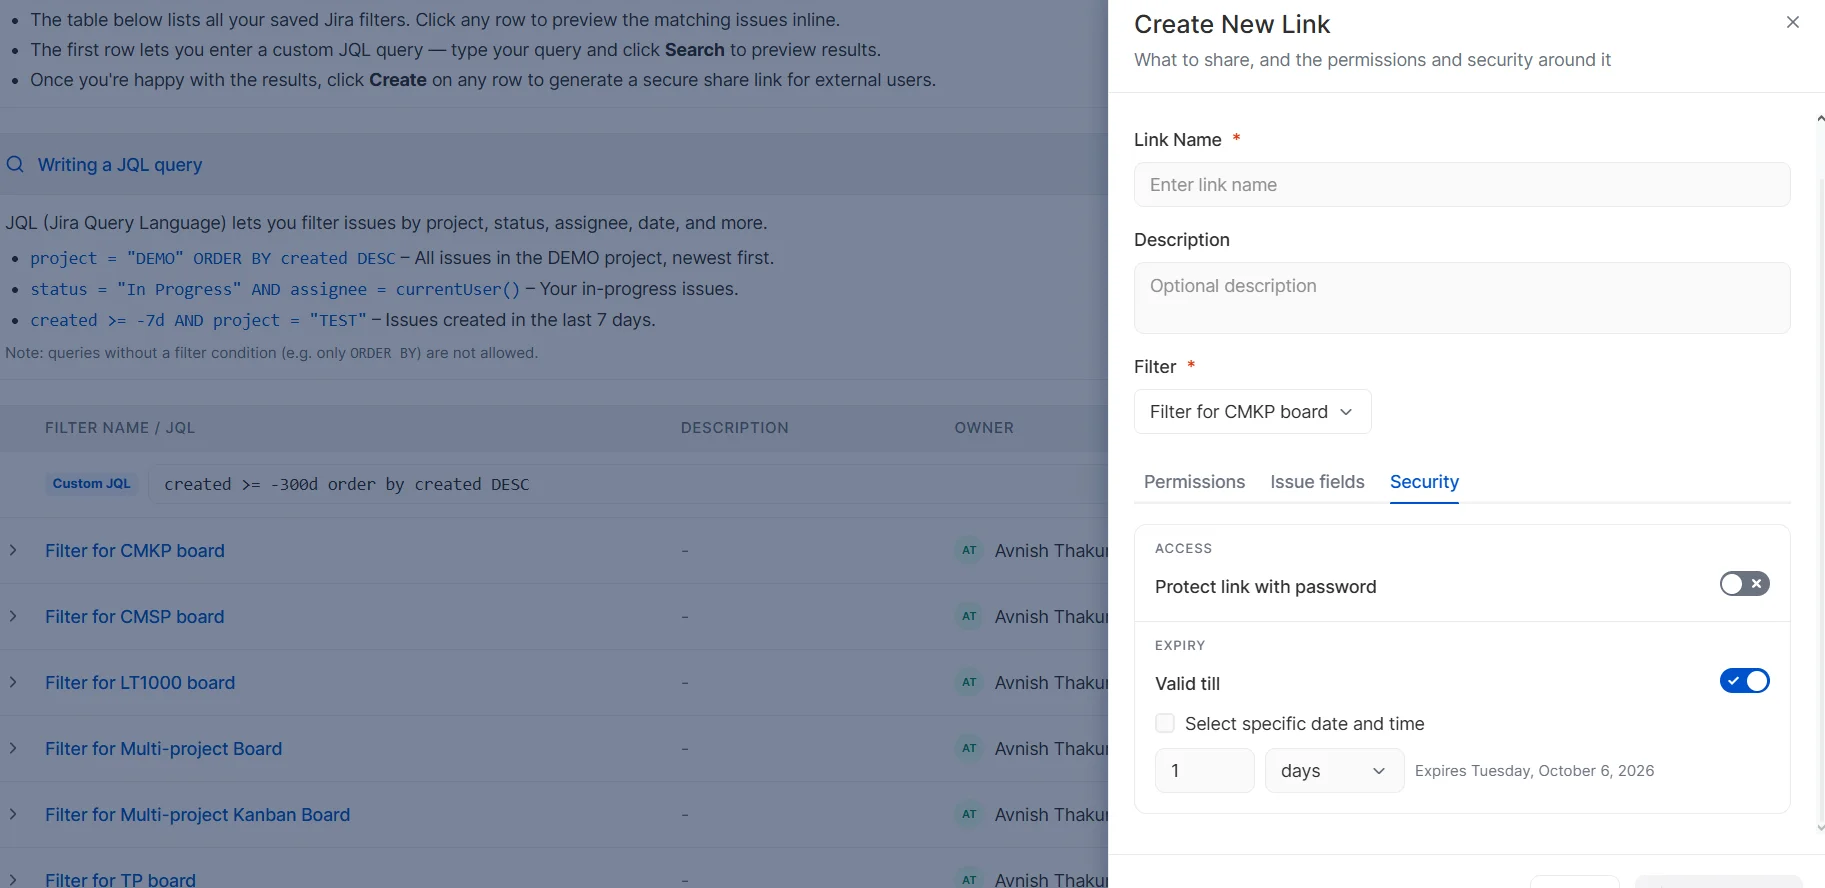
Link settings
The link window works the same way for every share type. Enter a Link Name (required) and an optional Description. The toggle in the window header sets whether the link is Active.
Everything on the Permissions, Issue fields, and Security tabs is optional. Any setting you don't change keeps its default value.
Which settings each share type offers
| Setting | Issue | Project | Board | Filter |
|---|---|---|---|---|
| Comments, Attachments | Yes | Yes | Yes | Yes |
| Linked issues, Sub-tasks | Yes | Yes | Yes | Yes |
| Allow subscriptions | Yes | Yes | – | – |
| Allow status transitions | Yes | Yes | Yes | Yes |
| Issue list columns | – | Yes | – | – |
| Sprint issues, Sprints shown, Backlog | – | – | Yes | – |
| Context and description fields | Yes | Yes | Yes | Yes |
| Password, Valid till | Yes | Yes | Yes | Yes |
Permissions tab
Choose what recipients can do with Comments and Attachments:
- View: recipients can see existing items.
- Add: recipients can see and add items.
- Disabled: the item is hidden.
Issue fields tab
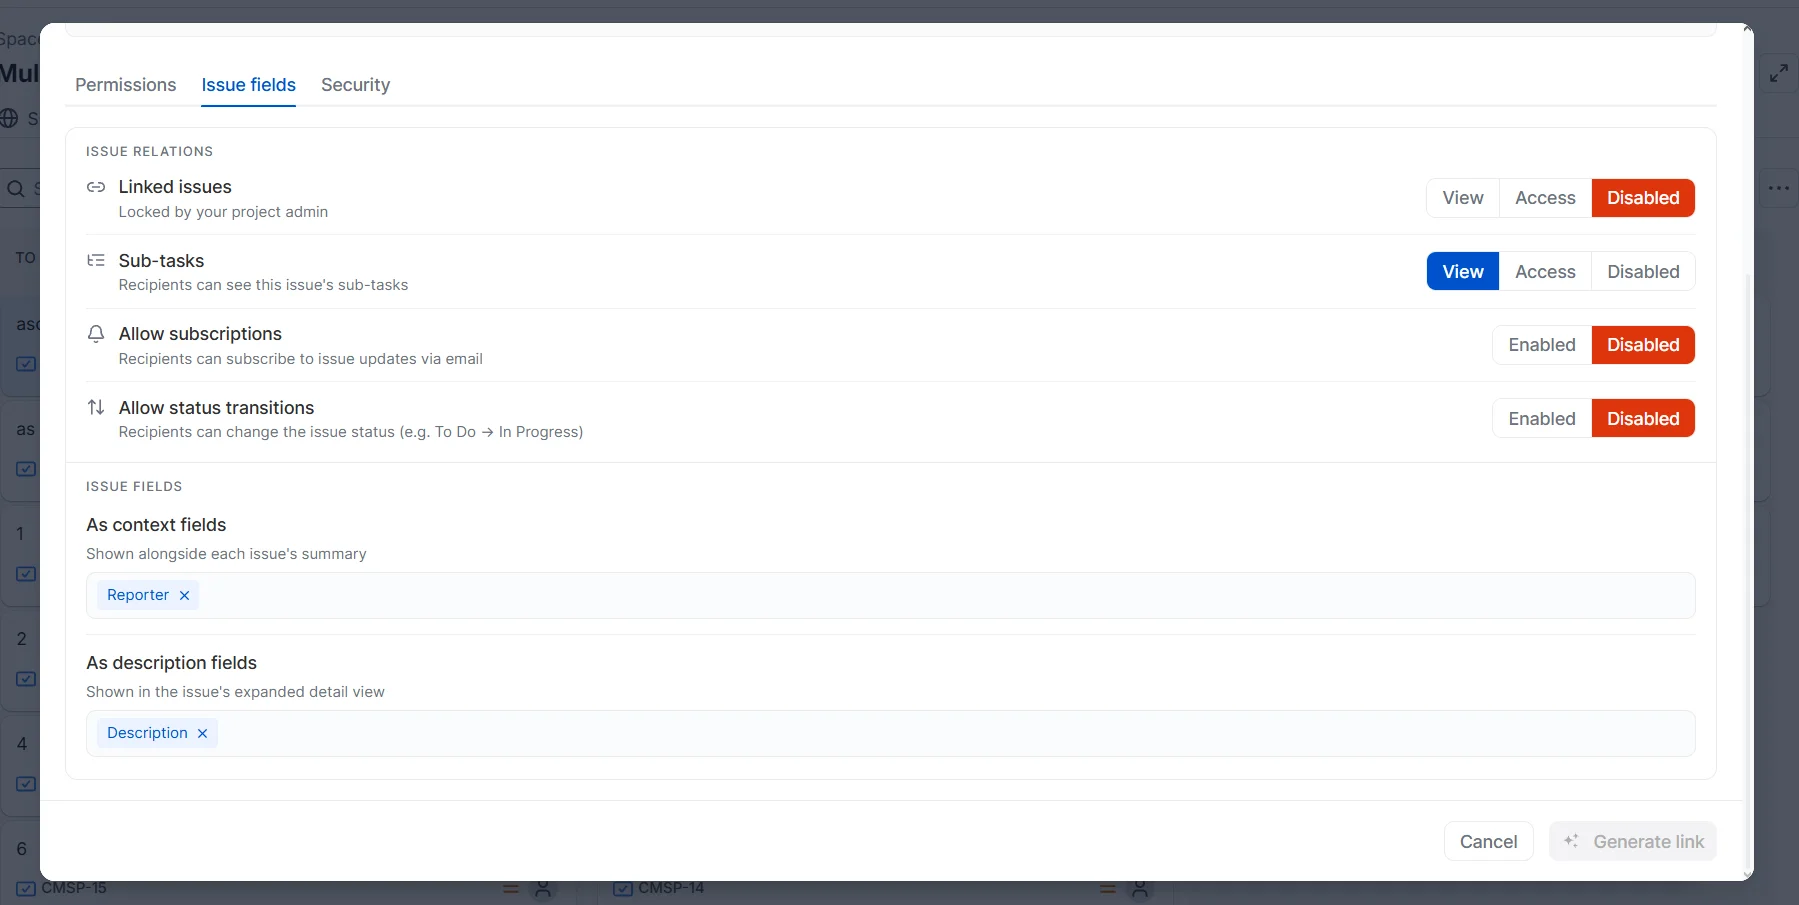
Issue relations (all share types)
- Linked issues and Sub-tasks: View shows the list, Access also lets recipients open each item, and Disabled hides it.
- Allow subscriptions: when Enabled, recipients can subscribe to email updates whenever a shared issue changes.
- Allow status transitions: when Enabled, recipients can change an issue's status (for example, To Do → In Progress). On a shared board, they do this by dragging the issue to a different column.
Board links only
- Sprint issues: what recipients can do with issues in sprints: View, Access, or Disabled.
- Sprints shown: select which sprints recipients can see on the board.
- Backlog: what recipients can do with backlog issues: View, Access, or Disabled.
Project links only
- Issue list columns › Fields shown in the list: choose the columns shown in the shared project's issue list.
Issue fields (all share types)
- As context fields: fields that appear alongside the issue summary.
- As description fields: fields that appear in the issue's expanded detail view.
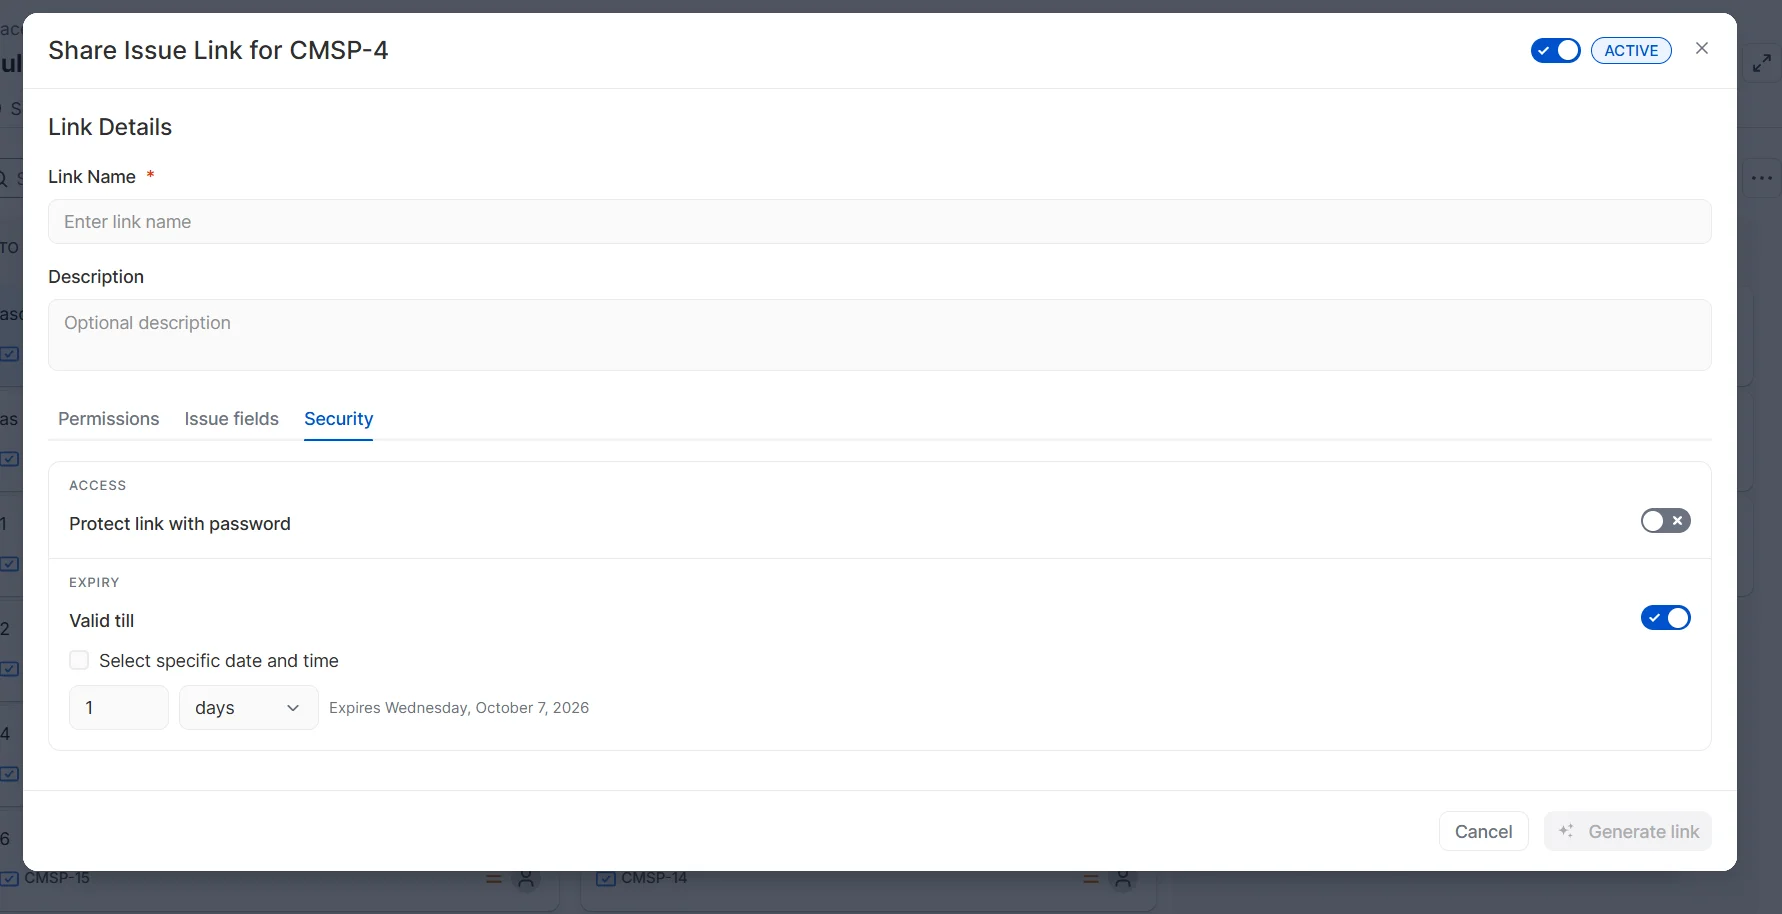
Security tab
- Protect link with password: turn on to make recipients enter a password before they can view the link content.
- Valid till: turn on to set an expiry for the link. The link stays accessible only until the date you set. After that, it expires automatically and can no longer be opened. Enter a duration (for example, 1 day) to see the exact expiry date, or tick Select specific date and time to pick one.
Manage shared links
Each share type lists its links where you created them: the Share Issue panel, the project's Create Secure Share Links tab, the Share Scrum Board window, or the app's Shares tab for filters. Each row shows the link's password, owner, status, and expiry.
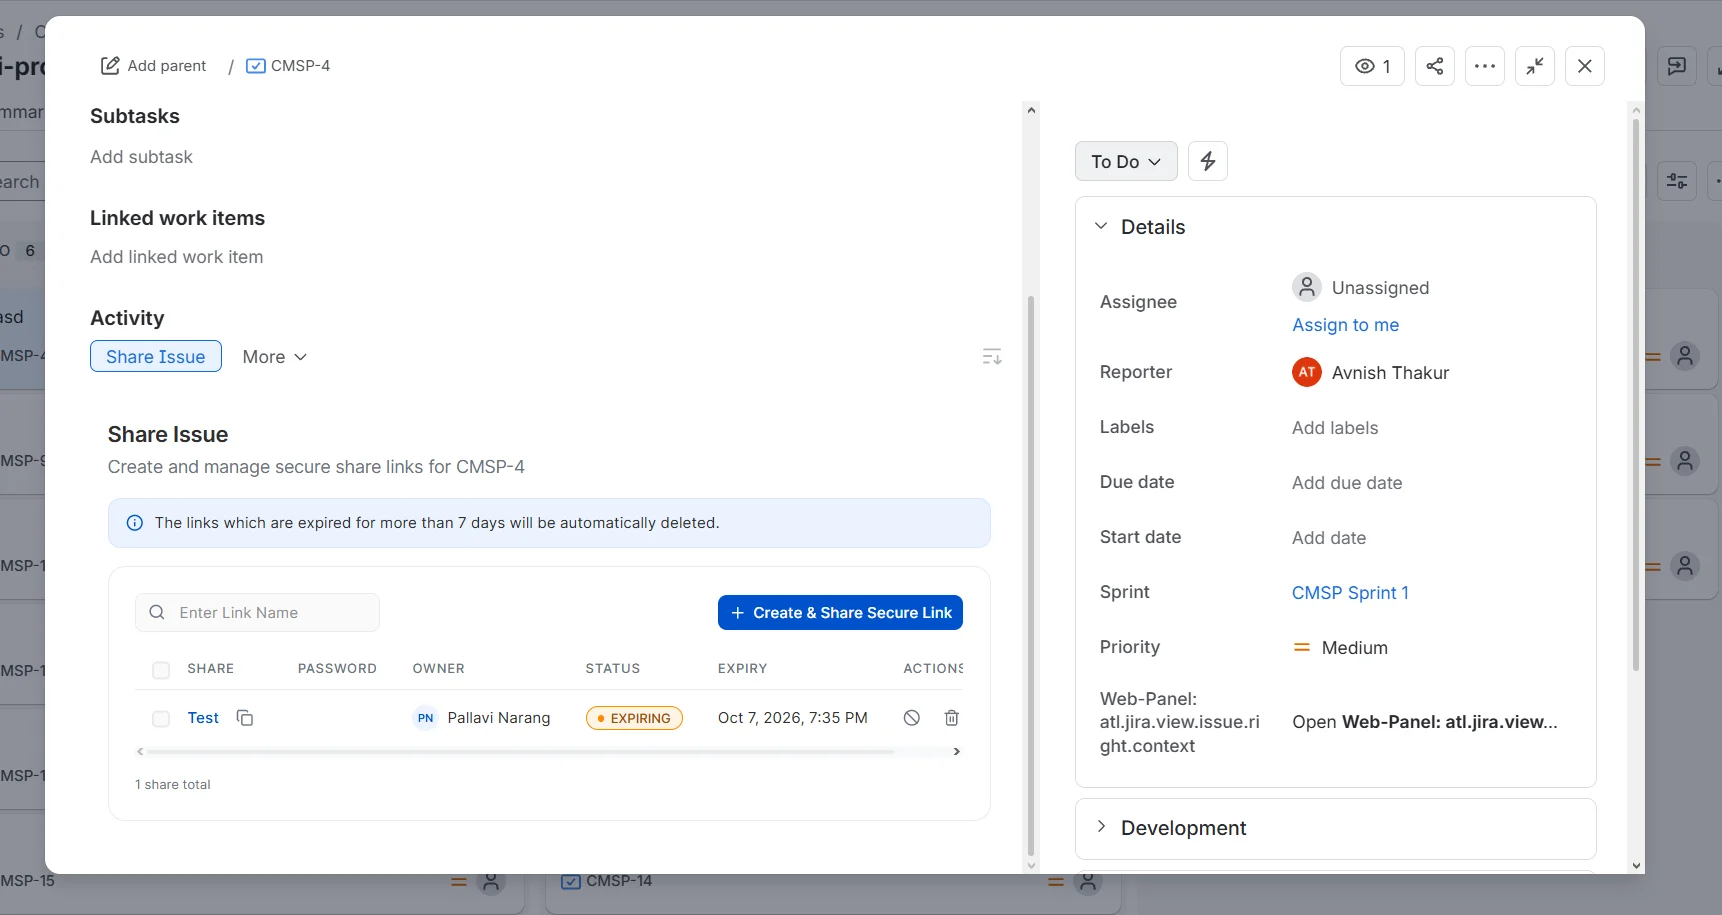
- Copy: click the copy icon next to the link name to copy the link to your clipboard. In the Share Scrum Board window you can also copy the password.
- Open: open the shared URL in your browser, or click the link name to open it directly. If the link is password-protected, enter the password first.
- Edit: click the edit icon in the Actions column.
- Deactivate: click the deactivate icon in the Actions column, or click the edit icon and switch off the toggle at the top of the window. The link stops working right away. You can reactivate it at any time.
- Delete: click the delete icon in the Actions column. To delete several links at once, select them and click Delete selected.
Admin configuration
 How restrictions are applied
Sharing rules are set at three levels. A lower level can only be the same as, or more restrictive than, the level above it.
- Global default configurations: set by Jira admins. They have the highest priority and apply to every project, board, filter, and individual issue.
- Project settings: set by project admins for every link created in that project.
- Individual link: users creating a link can choose only options that neither level above restricts.
Example: if the project allows comments to be viewed only, users creating a link can pick View for comments but not Add. The option shows Limited by your project admin in the link window.
Where you'll see a restriction
| Label | Where it appears | Restricted by |
|---|---|---|
| Limited by your project admin, Locked by your project admin | Link window | Project settings |
| Limited by your global default, Locked by your global default | Project settings, Permissions tab | Global defaults |
| Disabled by global configuration | Project settings, Link Details tab | Global defaults |
Set global and project default configurations
Global defaults and project settings use the same layout: Plugin Status toggles followed by the Permissions, Security, and Link Details tabs. They are described once below, with differences noted.
To open global defaults (Jira admins)
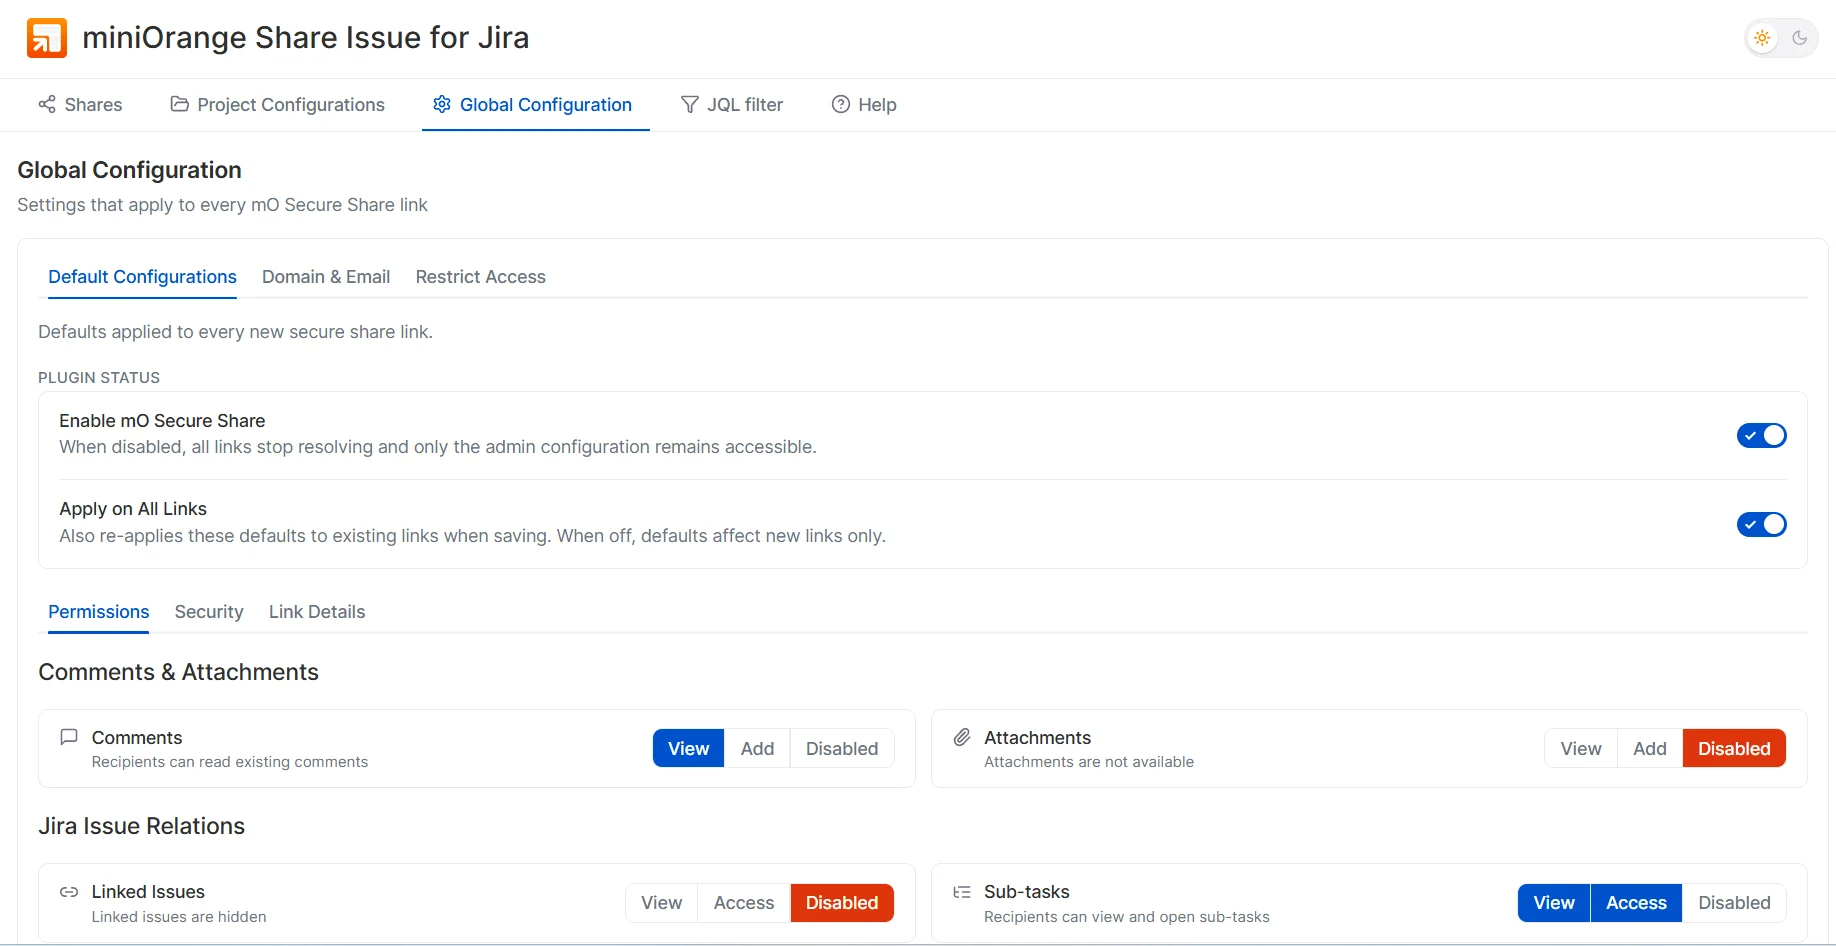
- Open the app and click the Global Configuration tab.
- It opens on Default Configurations. The other two tabs are Domain & Email and Restrict Access.
To open project settings (project admins)
- Open the project, click More in the top navigation, and select Share Project.
- Click the Project Link Default Configurations tab.
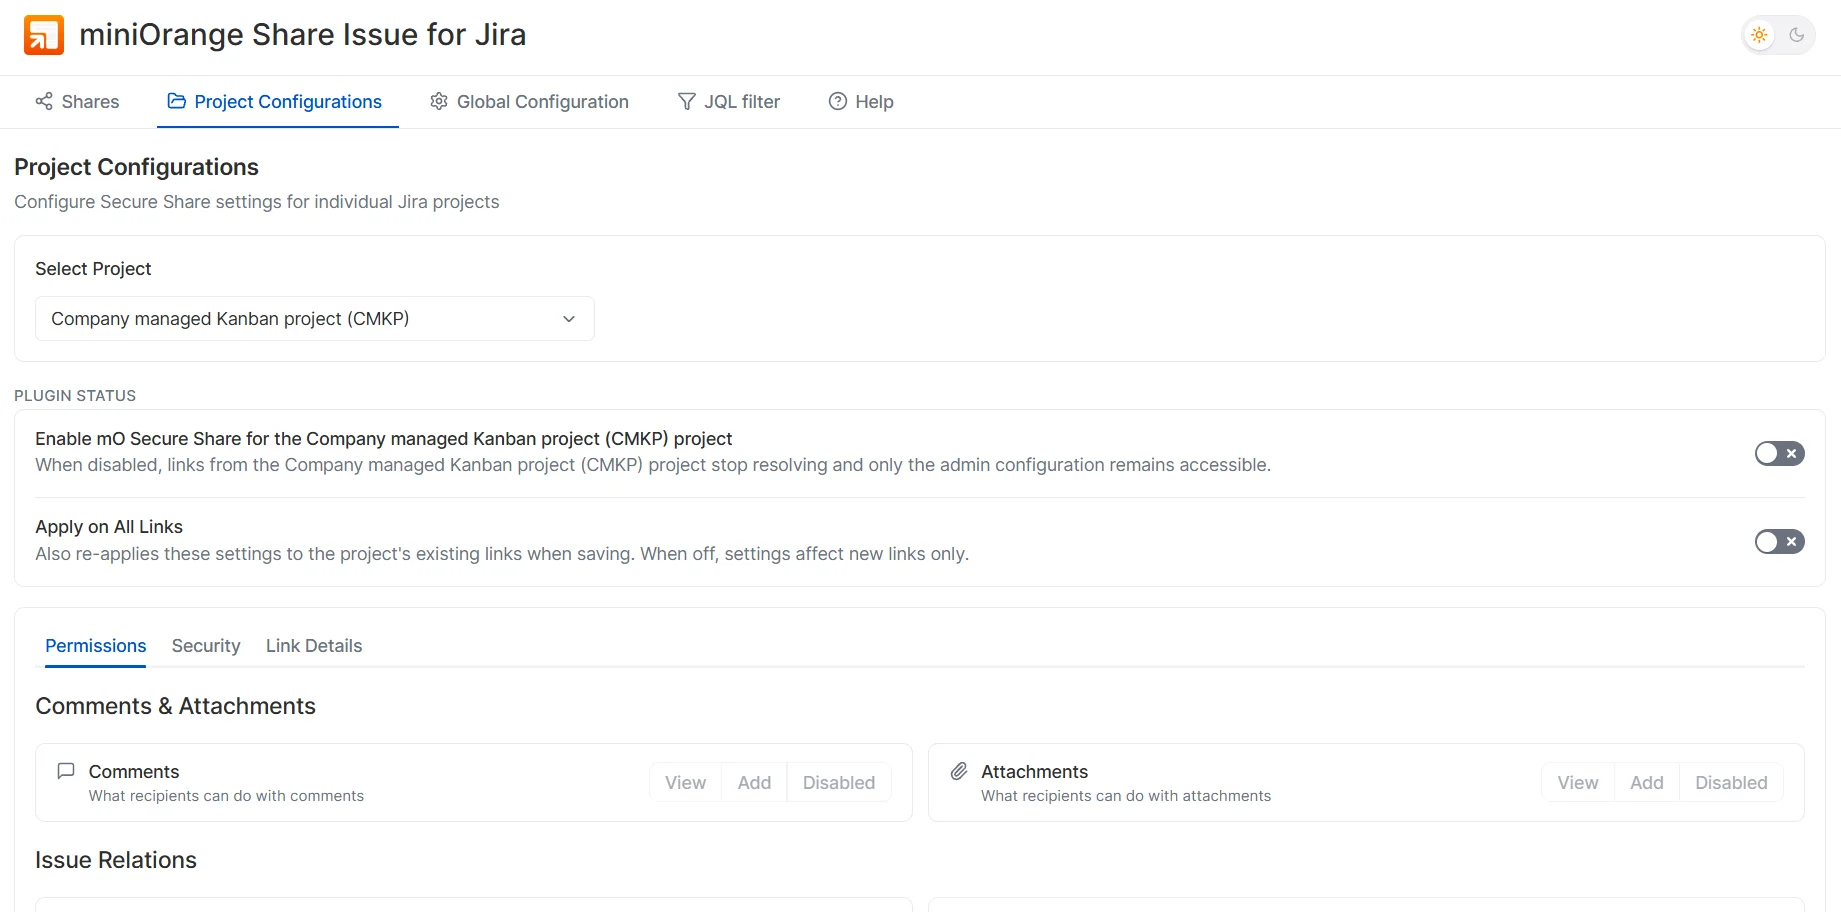
- Jira admins can also open the app, click the Project Configurations tab, and pick a project from Select Project to configure any project without leaving the app.
Plugin Status
- Enable mO Secure Share (global): turning this off disables the app on your Jira site. You can use it again once it's turned back on.
- Enable mO Secure Share for the project (project): turning this off stops the app from working for this project.
- Apply on All Links: when on, saving also re-applies these settings to existing links (all links for global defaults, or the project's links for project settings). When off, the settings affect new links only.
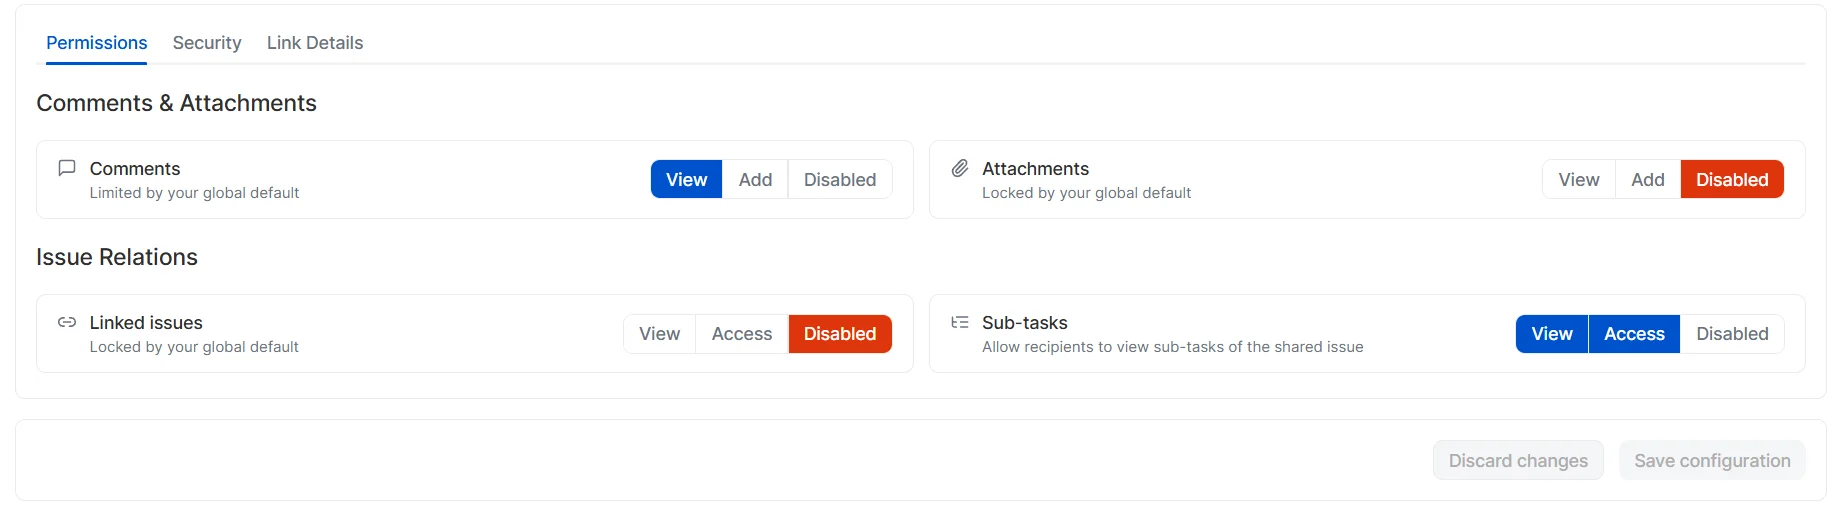
Permissions tab
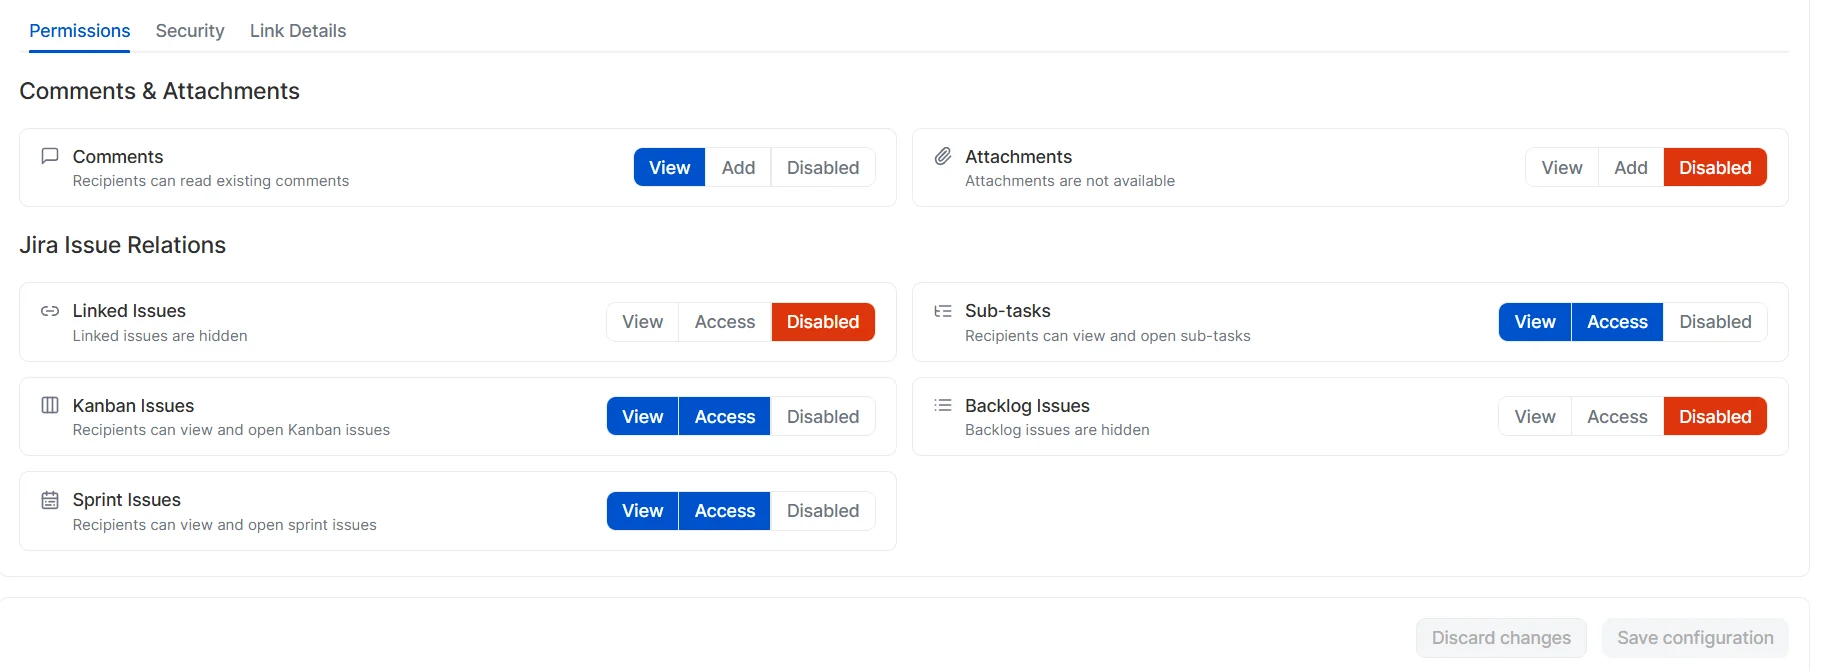
Option meanings are the same as in Link settings.
| Permission | Options | Global | Project |
|---|---|---|---|
| Comments | View, Add, Disabled | Yes | Yes |
| Attachments | View, Add, Disabled | Yes | Yes |
| Linked issues | View, Access, Disabled | Yes | Yes |
| Sub-tasks | View, Access, Disabled | Yes | Yes |
| Kanban issues | View, Access, Disabled | Yes | – |
| Backlog issues | View, Access, Disabled | Yes | – |
| Sprint issues | View, Access, Disabled | Yes | – |
Each row's helper text changes to describe the option you pick; for example, Linked issues are hidden. In project settings, options restricted globally show Limited by your global default or Locked by your global default.
Security tab
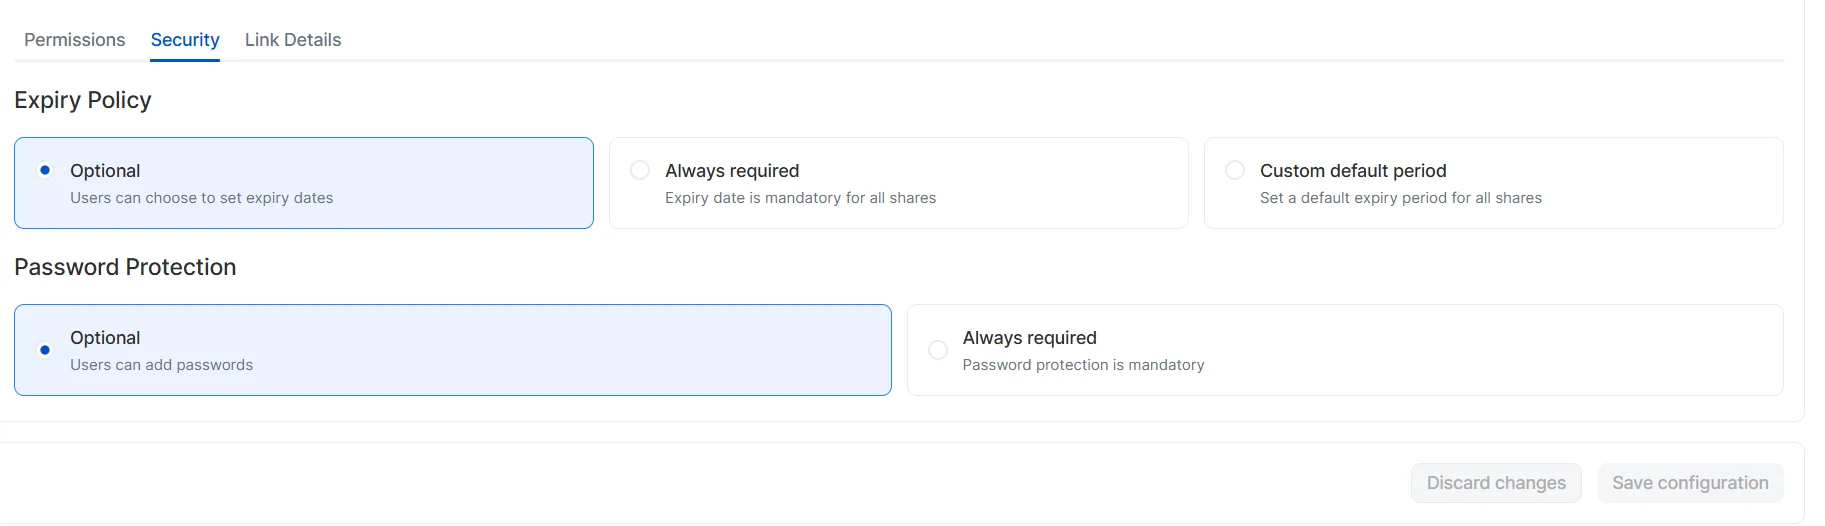
- Expiry Policy: Optional (users choose), Always required (every link must expire), or Custom default period (a default expiry for every link).
- Password Protection: Optional or Always required.
Link Details tab
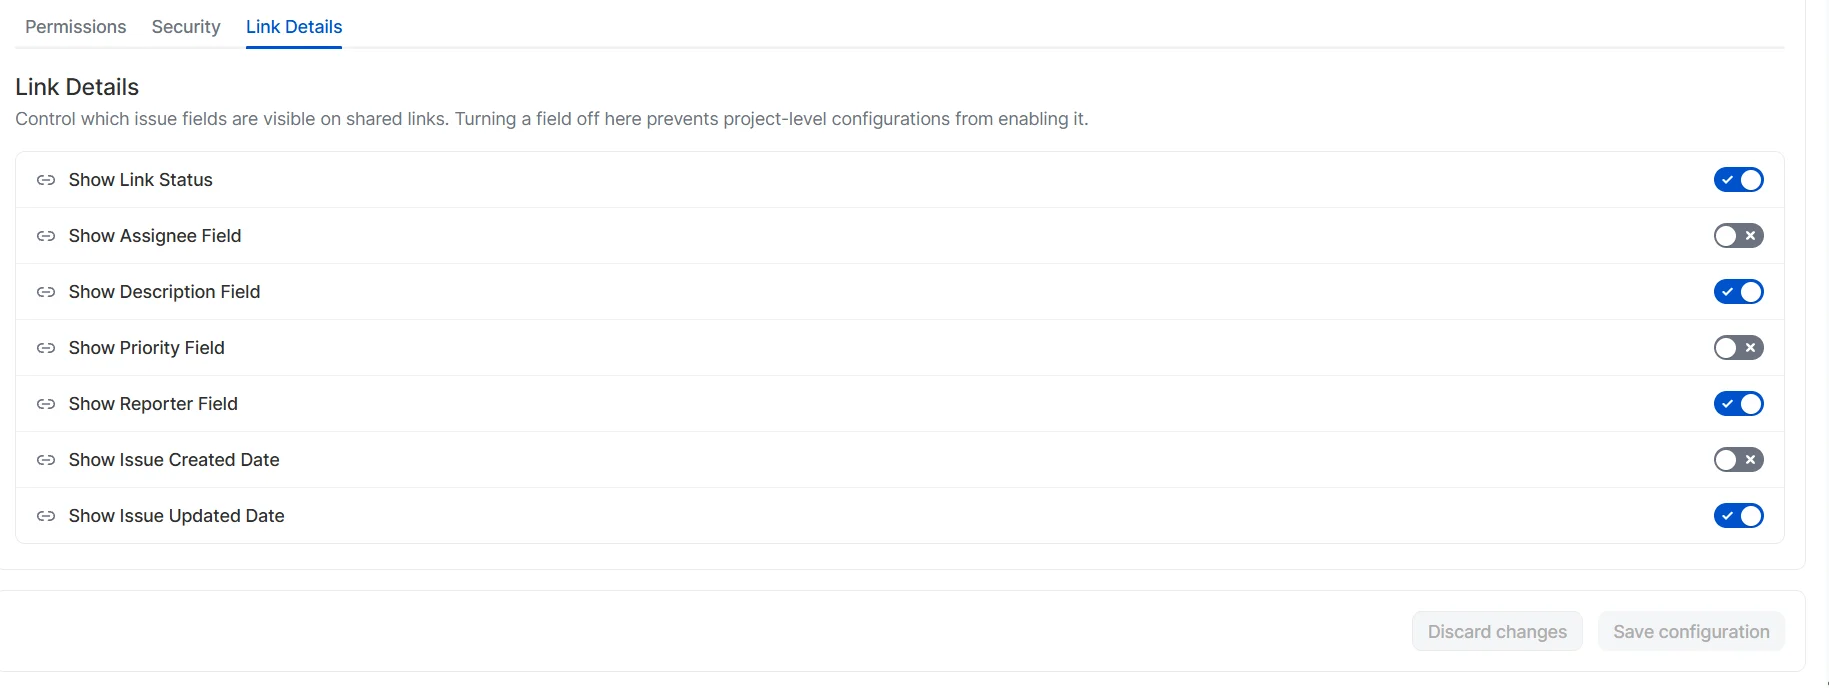
- Choose which details appear on shared links: link status, assignee, description, priority, reporter, issue created date, and issue updated date.
- Turning a field off in global defaults hides it from shared links and removes it from the custom fields and column fields lists when configuring a link. In project settings, it shows as Disabled by global configuration and can't be switched on.
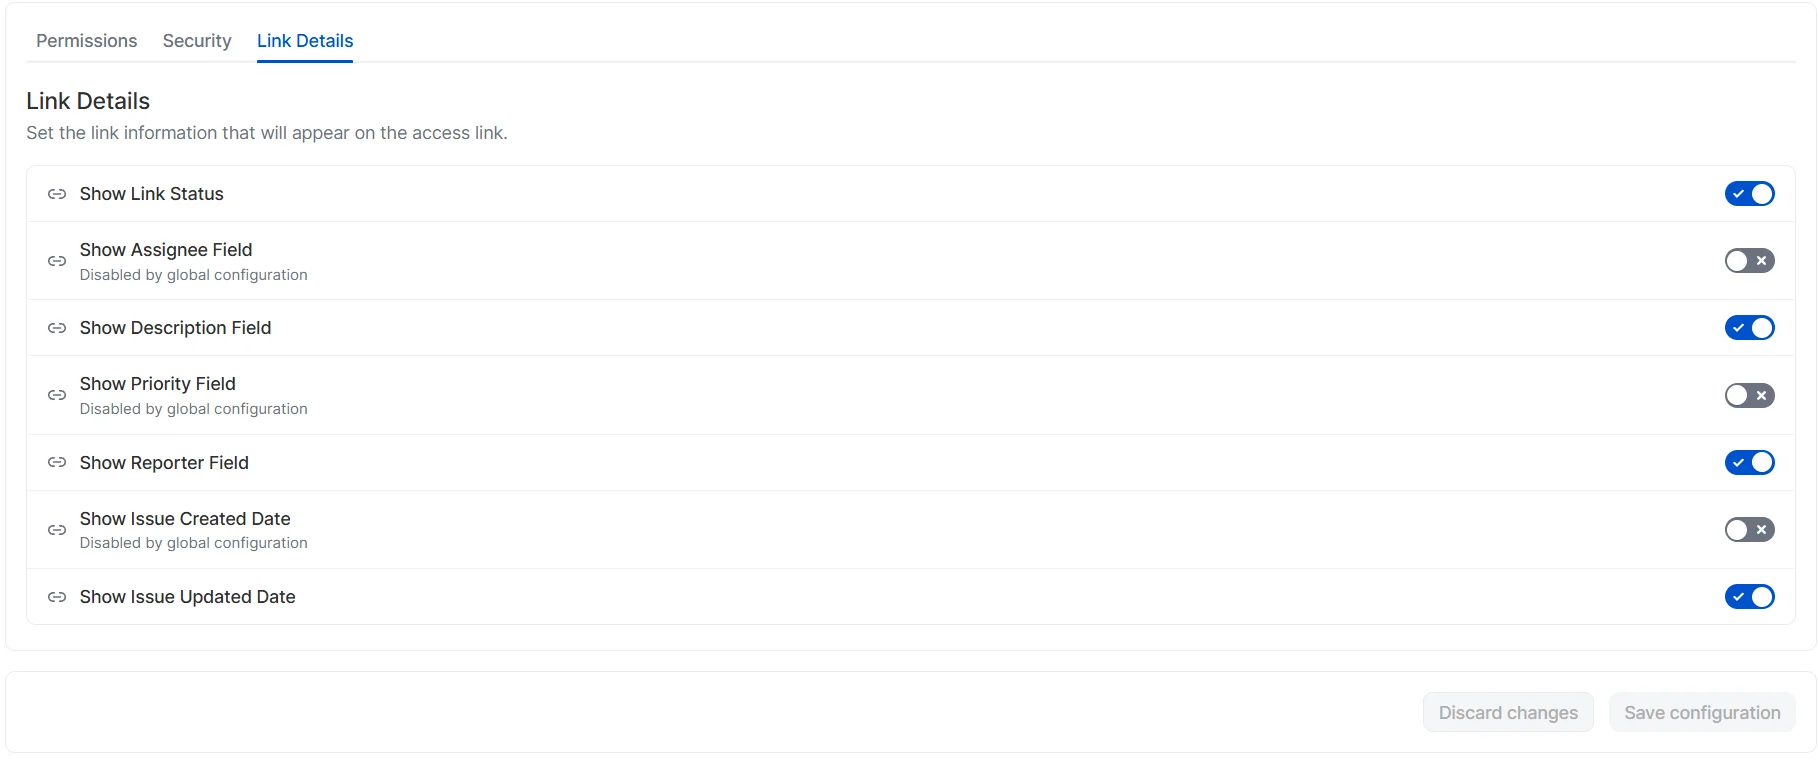
When you're done, click Save configuration, or Discard changes to revert.
Restrict Secure Share's access
Admins can limit who can create, edit, and delete links by user group and by project.
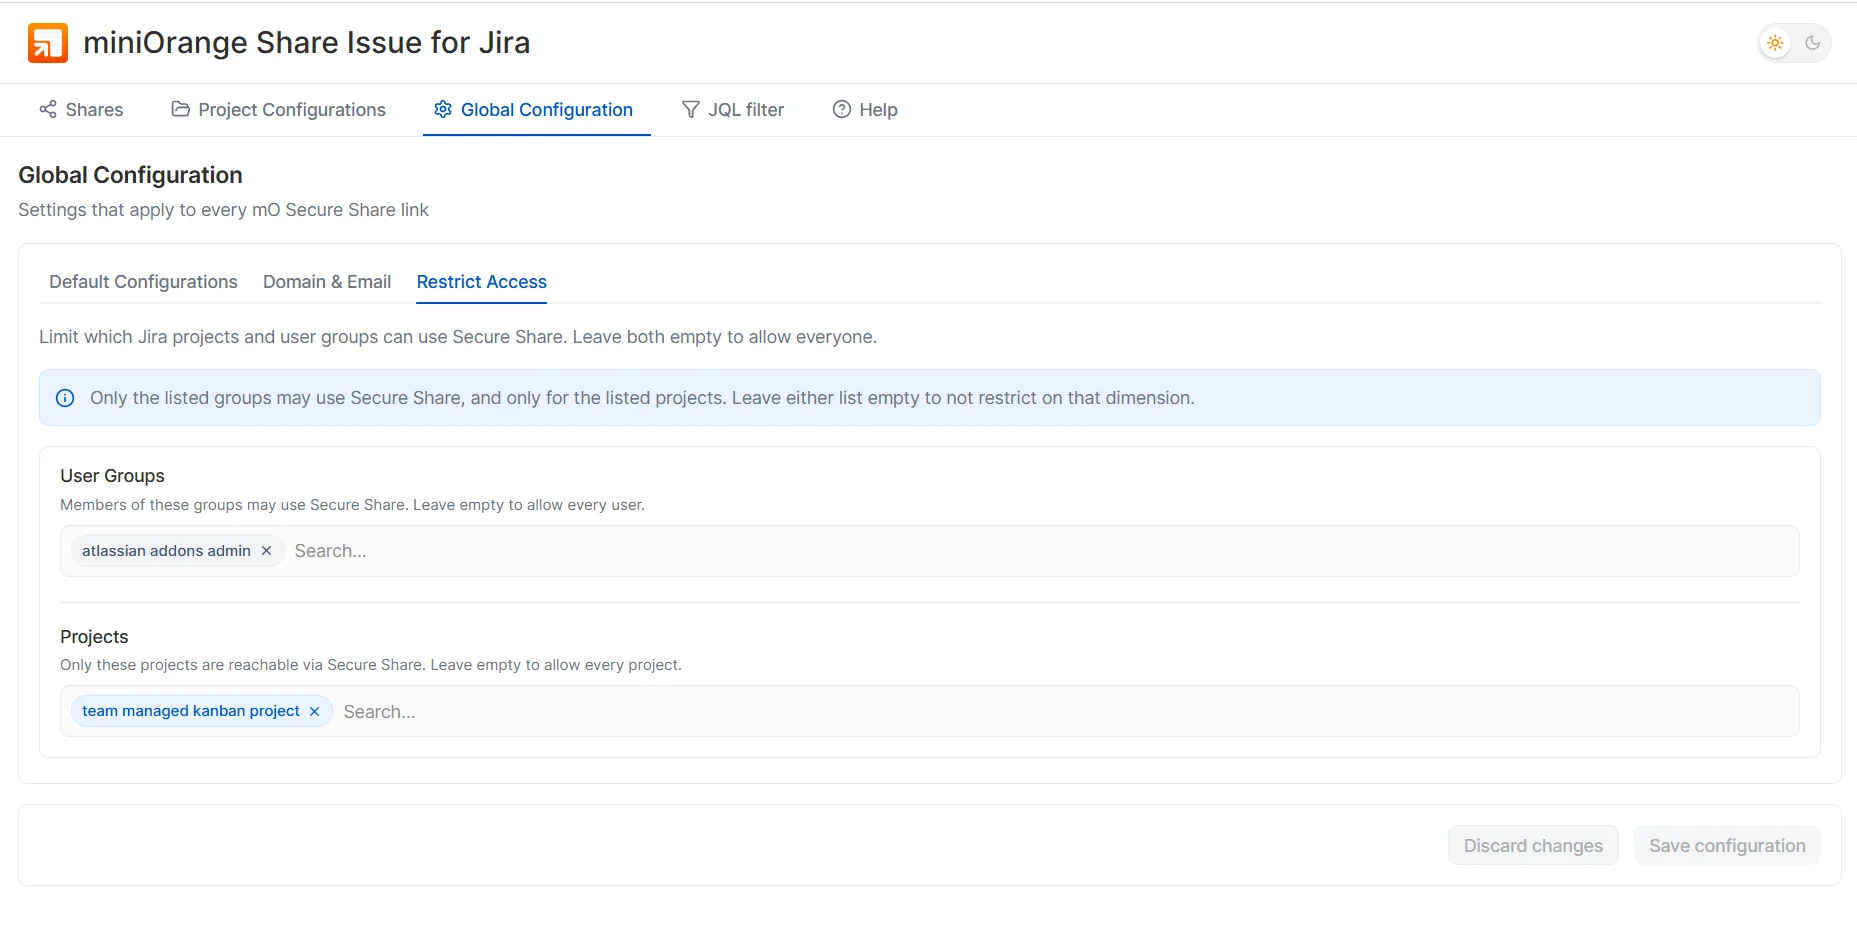
- Open the app, click Global Configuration, then the Restrict Access tab.
- Under User Groups, add the groups whose members may use Secure Share. Leave it empty to allow every user.
- Under Projects, add the projects that can be shared through Secure Share. Leave it empty to allow every project.
- Click Save configuration.
- When both lists are filled, only the listed groups can use Secure Share for the listed projects.
Custom domain and custom email
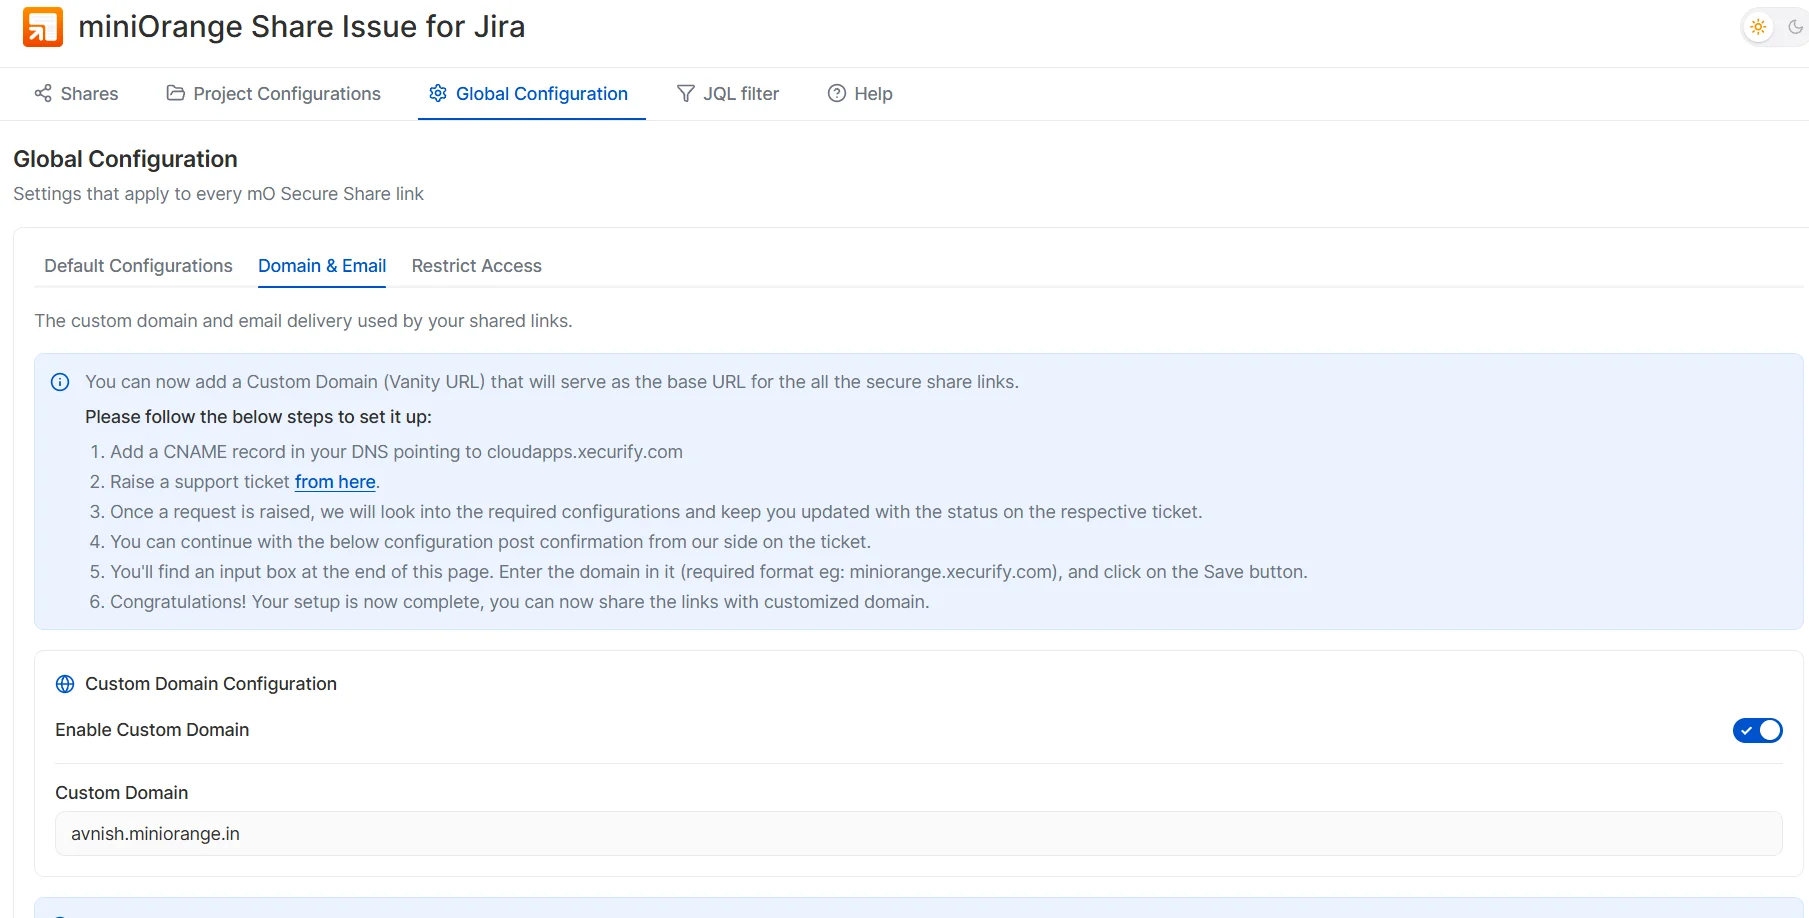
Both are set on one tab. Open the app, click Global Configuration, then the Domain & Email tab.
Custom domain configuration
Set up a personalised domain (vanity URL) as the base URL for all your secure share links.
- Add a CNAME record in your DNS pointing to cloudapps.xecurify.com.
- Raise a support ticket from here. We'll review the required configuration and keep you updated on the ticket.
- After we confirm on the ticket, turn on Enable Custom Domain.
- Enter your domain in Custom Domain (for example, miniorange.xecurify.com).
- Click Save configuration. Your links now use the custom domain.
Custom email configuration
Connect your own SMTP server so Secure Share emails are sent through it. By default, miniOrange uses its internal SMTP server.
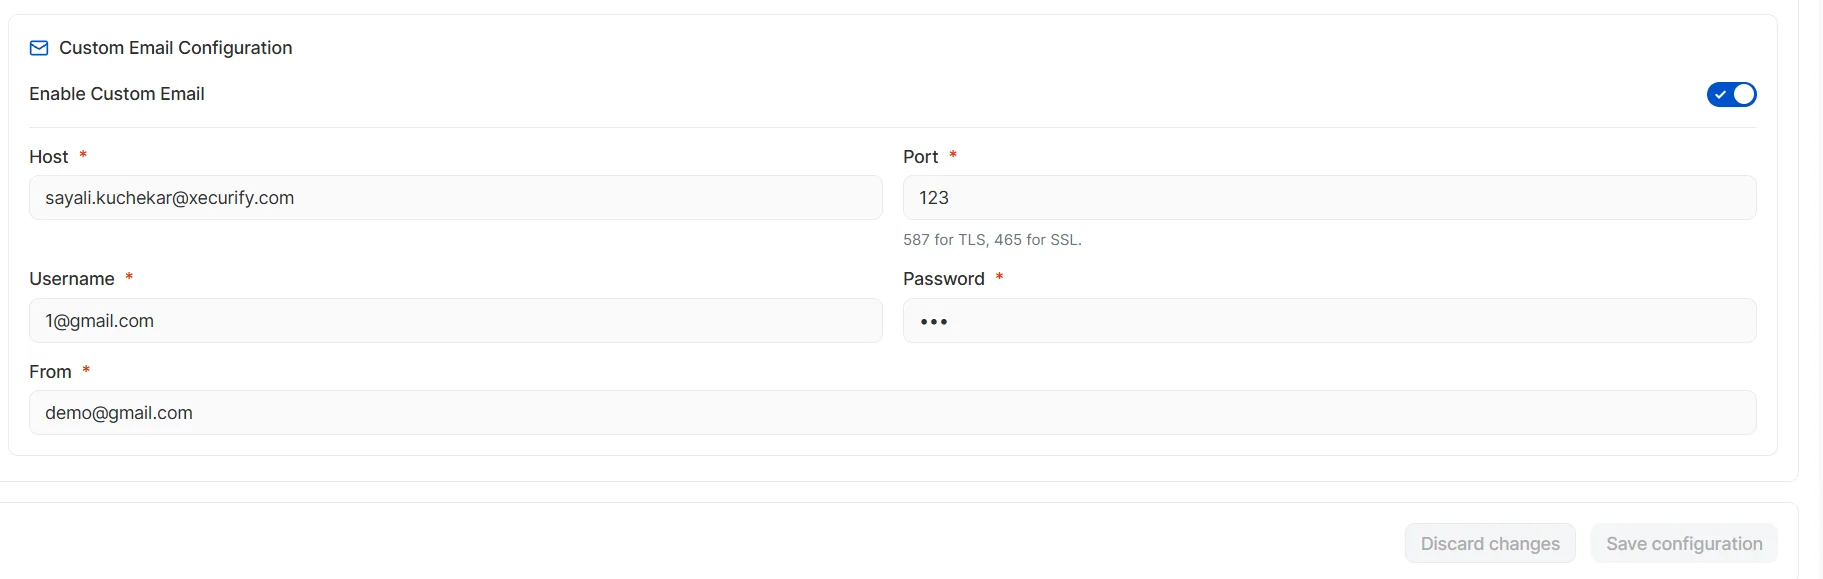
- Turn on Enable Custom Email.
- Enter Host, Port (587 for TLS, 465 for SSL), Username, Password, and From address. All fields are required.
- Click Save configuration.
Get help inside the app
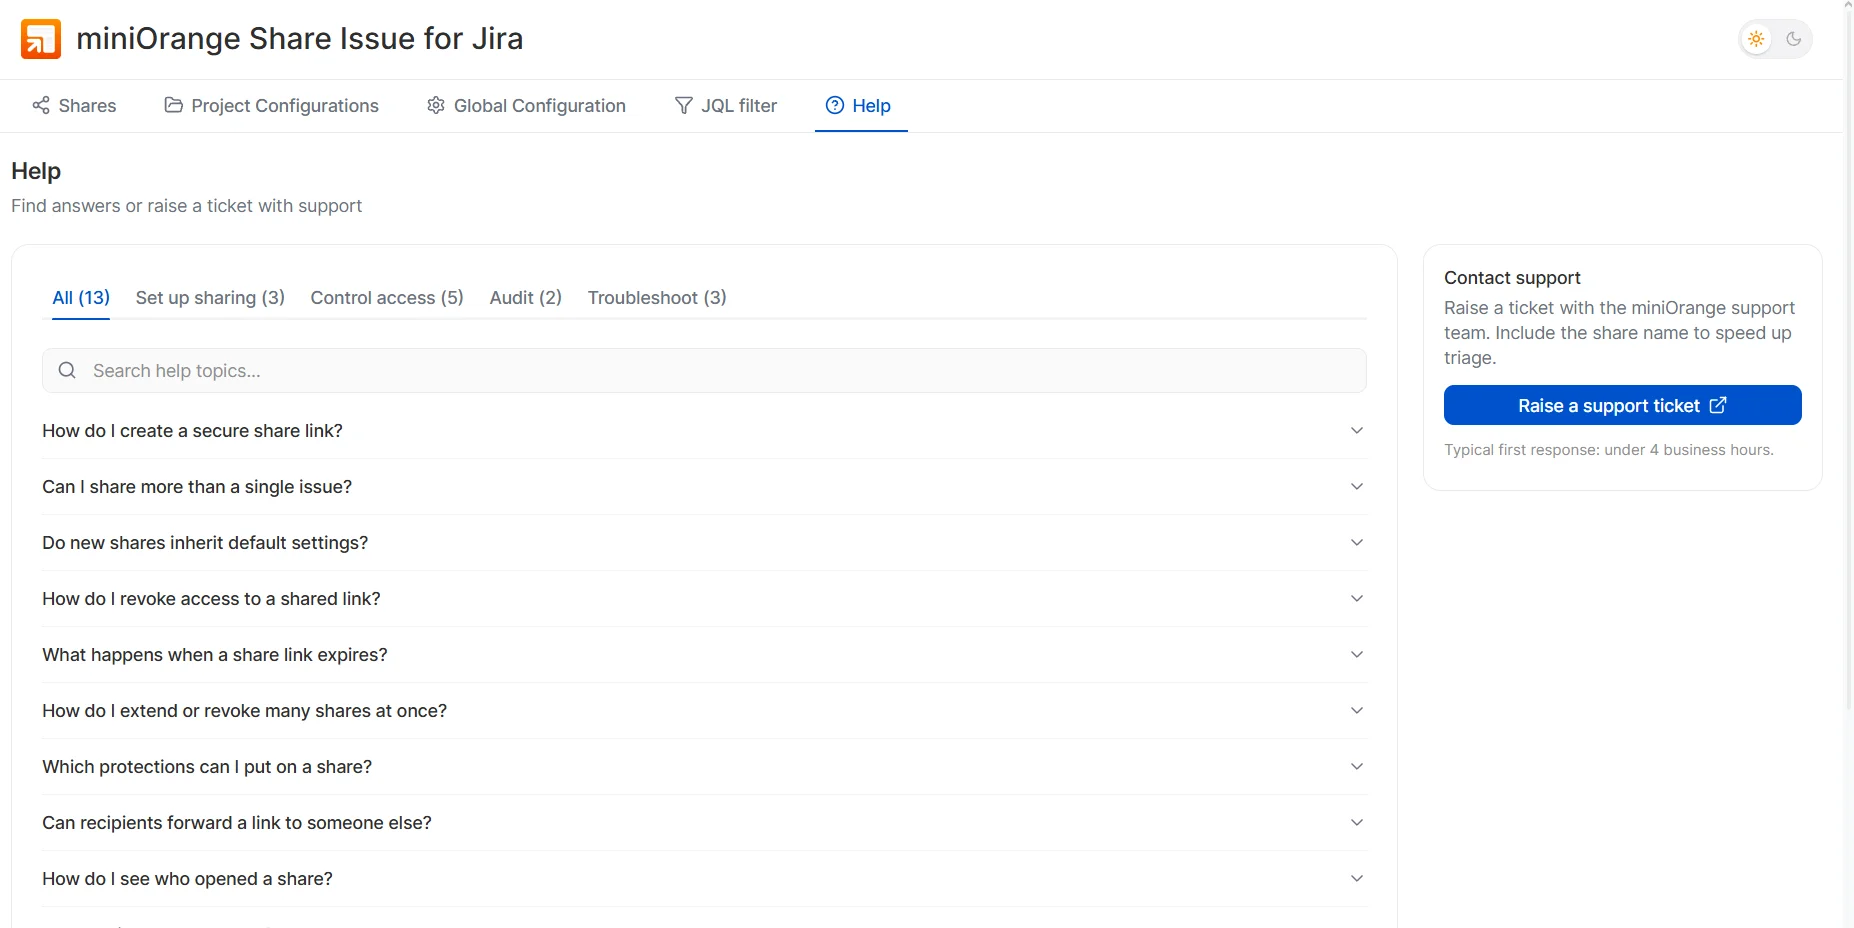
- The Help tab answers common questions without leaving Jira. Browse topics by category (Set up sharing, Control access, Audit, and Troubleshoot) or search them. Topics include how to create, revoke, and extend links, what happens when a link expires, and how to see who opened a share.
- To reach the miniOrange team, click Raise a support ticket under Contact support. Include the share name to speed things up; the first response typically comes within 4 business hours.
Exclusive features other miniOrange cloud app provides
- Multiple Identity Providers (IDPs) to authenticate different types of users with different IDP.
- Multiple Department Based Login to force the users to authenticate via a specific IDP based on the users' department.
- Domain Mapping that allow users to redirect to their IDP based on their email departments.
- Custom Attribute Mapping to update the user profile attributes in the application with the user attributes received from the IdP.
- Signed Request and Response to secure your SSO with signed requests and encrypted SAML assertions.
- Username Transformation to extract the required username from the received attribute using Regular Expression.
- Group Mapping allows mapping user’s Identity Provider (IdP) groups to application groups. The user groups are updated on SSO.
- User Store to integrate your application with multiple user stores like AD, LDAP, external database, etc. to easily manage your users.
- Server to Cloud Migration to easily migrate your server SSO settings into Cloud.
Did this page help you?