
SCIM Provisioning User Sync/Group Sync
miniOrange User Sync/SCIM allows seamless login into the JIRA, Confluence and other Atlassian applications through Identity Provider.
We support all capable Identity Providers (IdPs) like Microsoft Entra ID (Previously known as Azure AD), Google Apps, Keycloak, Okta, OneLogin, Oracle and many more.
The User & Group Sync app helps you synchronize user and group data from Identity Providers such as AWS, OneLogin, Oracle IDCS, Microsoft Entra ID (Previously known as Azure AD), Okta, G Suite, and many others.
Here are some of the key features of the miniOrange User Sync/SCIM plugin:
- Support SCIM into both Atlassian Server and Data Center installation
- Compatible with Any SSO App
- Real Time Provisioning
- Jira Directory Sync
- User Groups and Provisioning
- Transform username based on regex for Provisioning.
- Manual Synchronization
- Deactivate the users based on their status in Identity Provider.
Installation
There are two methods to install the app and use it on your Atlassian applications for SCIM. The two methods are explained below.
NOTE: You must have administrative rights to install an add-on.
1. Directly from Atlassian Marketplace
You can install the plugin directly from the Atlassian application’s admin console.
- Log in to the application with an admin account.
- Navigate to the administration section. You may need to log in again.
- Choose Manage apps and on the left navigation menu bar and click on Find new apps (Find new add-ons on the older versions)
- Search for “miniOrange User Sync” and click on Free Trial for the miniOrange User Sync App for eg. miniOrange User Sync/SCIM.
- Click on Accept & Install.
- Once the installation is complete, click on Get License. You will be redirected to MyAtlassian for generating a license.
2. Installing by file upload
1. Download app
- Navigate to the Atlassian Marketplace.
- Search for miniOrange User Sync/SCIM for your Atlassian application.
- Select the app (for eg. [miniOrange User Sync/SCIM]) from the search result.
- Click on Try it free button.
- You will be asked to select your application’s hosting type(Server or Datacenter) and then click on the start free trial link.
- Enter your organization name and click on the Generate License button.
- You will see the license key along with the link to download the add-on.
2. Install add-on
- Log in to the application with an admin account.
- Navigate to the administration section. You may need to log in again.
- Choose to Manage apps and on the left navigation menu bar.
- Click on the Upload app link and upload the jar file downloaded in the last step.
3. Apply license key
- Keep your generated license copied from MyAtlassian.
- Navigate to the “Manage Apps” page of your instance (the “Install” section in older versions).
- Locate your installed miniOrange User Sync/SCIM add-on in the list.
- Click the app entry and paste the license into the license box for your add-on. All done!
User Provisioning Options
This tab will show a list of all specific provisioning options.
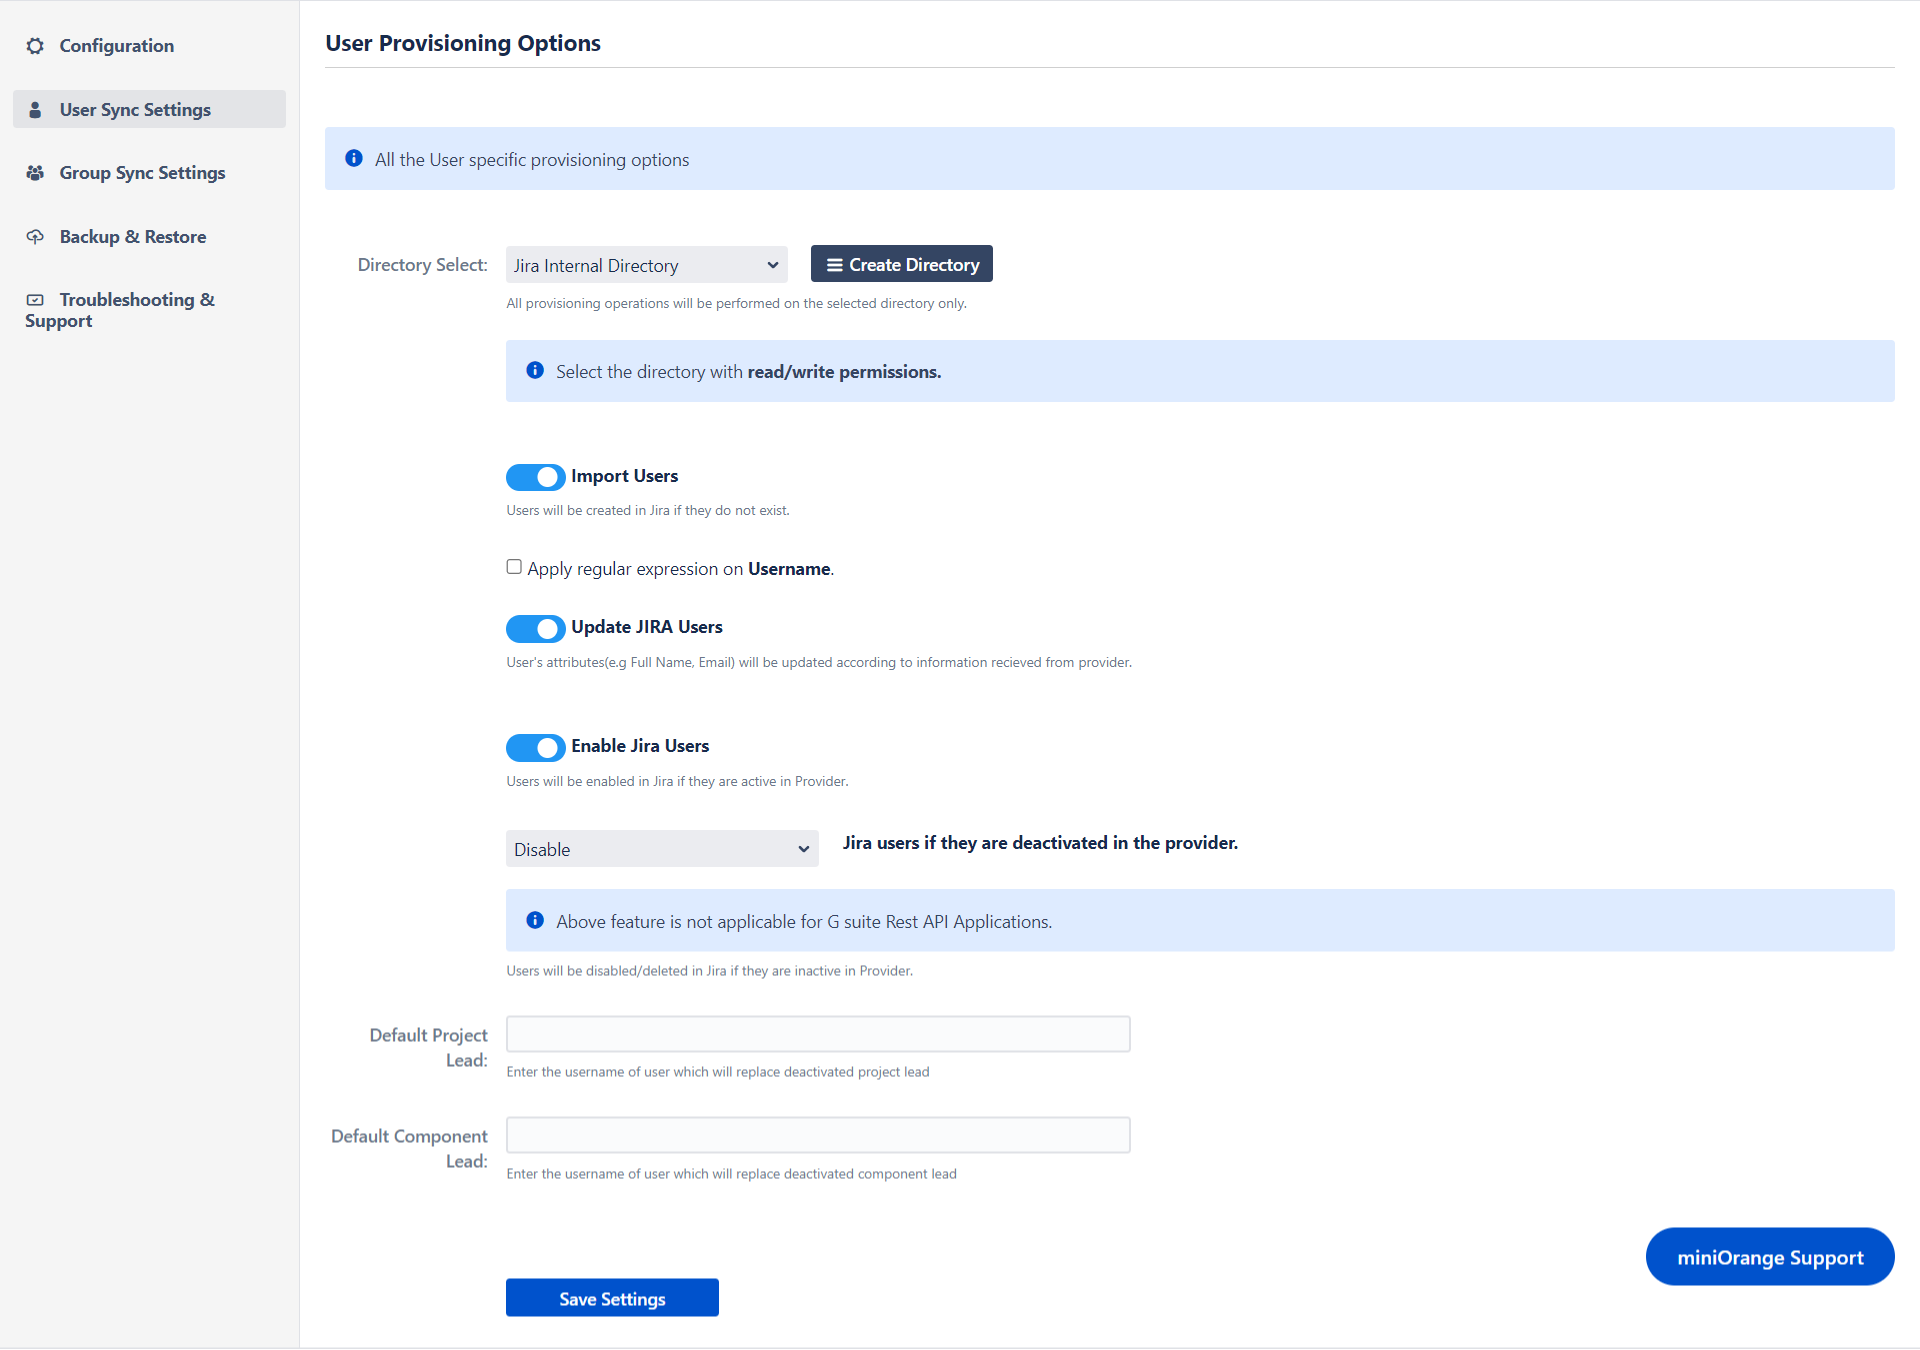
The selected directory will be the only one to receive provisioning operations.
Import Users
The purpose of this field is to create a new user via provisioning with the details from the Identity Provider.
Apply Regular expression on username field

Enter the regex and replacement to change the username received from Cloud application. You can capture matching groups using $1$2.
Example: To transform demouser@gmail.com to demouser, enter (.)@. as regex and $1 as replacement.
Similarly to transform demo0user to demouser enter (.)0(.) as regex and $1$2 as replacement.
Update Users
A user's attributes (such as Full Name and Email) will be updated based on information received from the provider.
Enable Users
When users are active in Provider, they will be enabled in Jira. Users will be disabled/deleted in Jira if they are inactive in Provider.
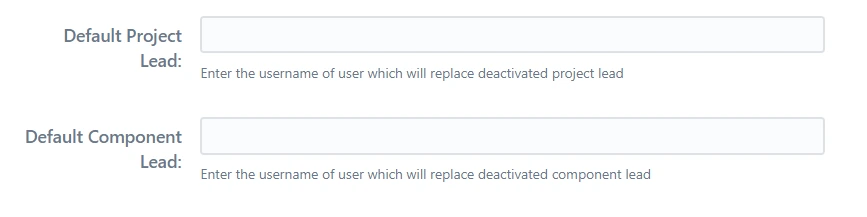
Default Project Lead
The username of the person who will replace the project leader who has been deactivated.
Default Component Lead
The username of the user who will replace the deactivated component lead should be entered.
User groups
Default Group Configurations
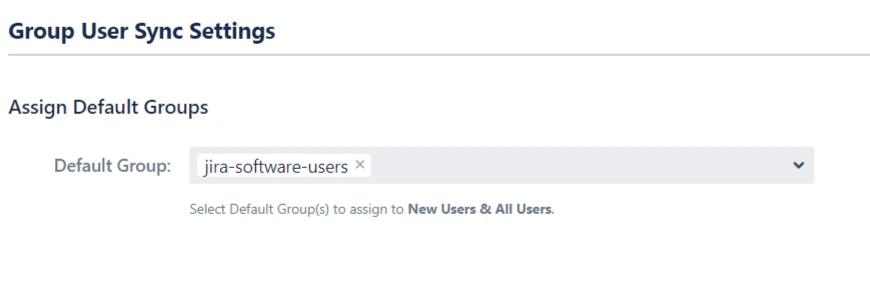
Default group configuration gives you an option to choose a set of groups all users.
1. Default Group
A set of groups that will be assigned the type of users selected in Assign Default Group To option. This is useful when you want to assign application access to all the users.
Group Sync Settings
Mapping IdP groups to application groups allows you to assign and update user groups and permissions whenever their groups change on the IdP. For example, if a user is part of the administrators group on IdP, he can be assigned admin permission through mapping. If the user is removed from the administrators group on IdP in the future, he’ll be automatically removed from the application admin group.
Groups can be mapped in two ways, Manually or On-The-Fly
Manual Group Mapping is useful when your IdP group names and local application group names are different. In this case, you have to map each IdP group to the application group manually.
On-The-Fly Group Mapping can be used when your IdP group names and local application group names are an exact match. In this case, the app detects the groups and add users to those groups automatically.
1. Manual Group Mapping
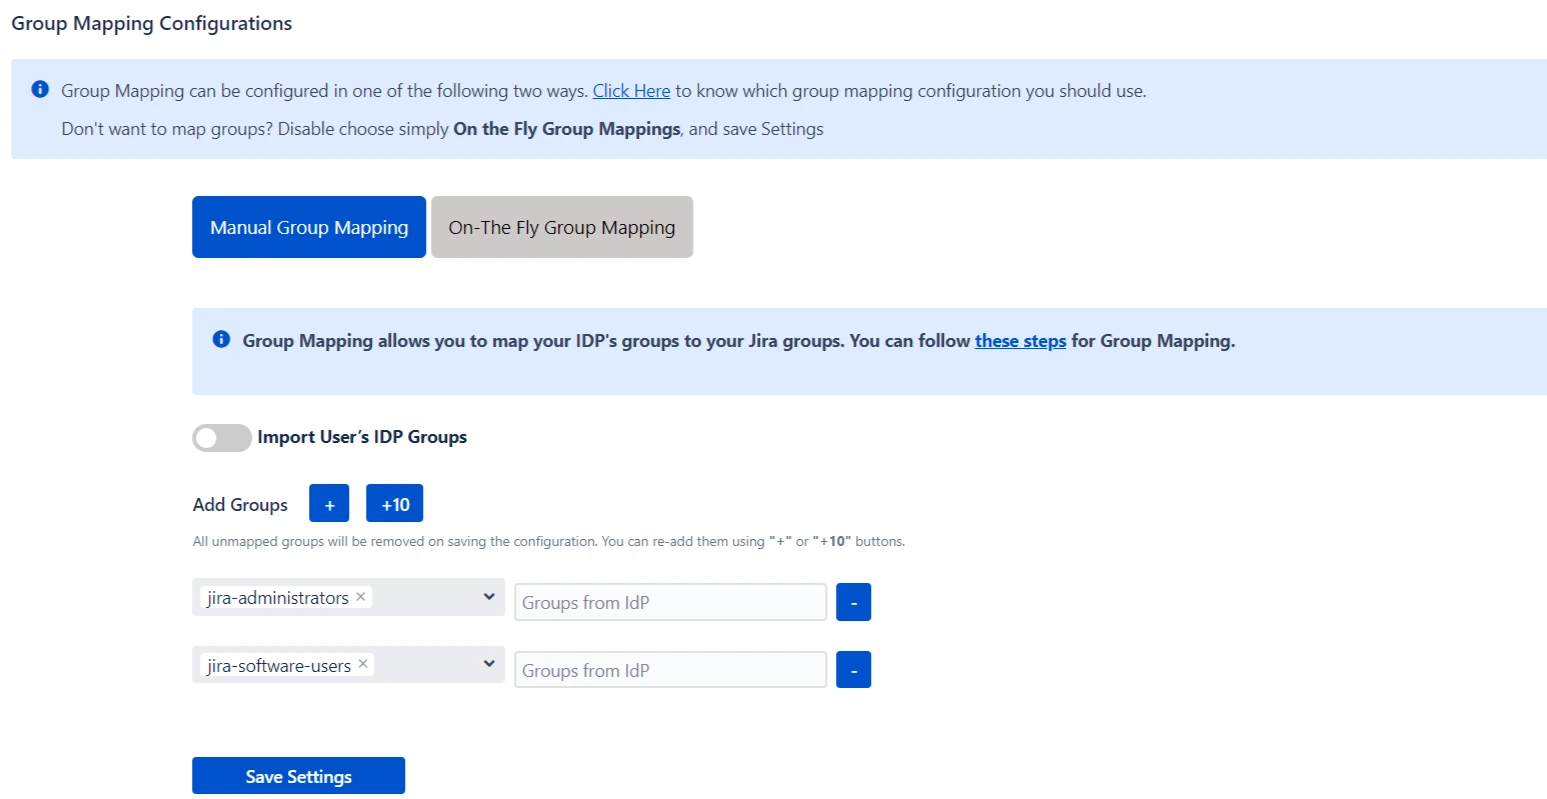
Here you can manually map Jira groups with the groups from IDP.
You can also configure to import IDP groups, filter groups and whether to keep existing users or not.
Manual Group Mapping is useful when you want to manage groups from the IdP but the names of application groups and IdP groups are different.
For example, if the name of the group in IdP is IdP_users but the name of a similar group in the application is jira-software-users. In such cases, you have to manually map each IdP group to the application group.
2. On-The-Fly Group Mapping
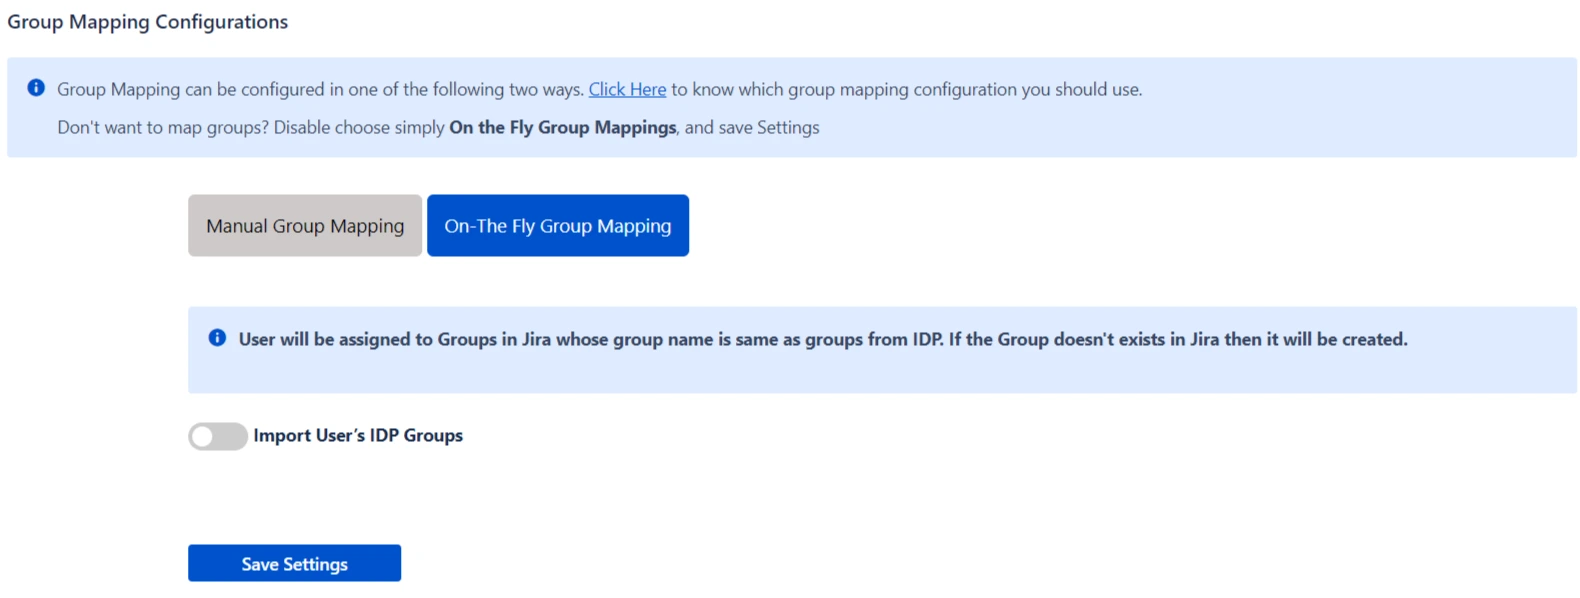
Here users will be assigned to groups in Jira whose group name is the same as groups from IDP. If the group doesn't exist in Jira then it will be created.
You can configure to keep the existing user groups, filter groups and apply regular expressions on the groups.
SCIM Microsoft Entra ID (Previously known as Azure AD) Configuration
miniOrange User Sync/Group Sync allows sync across Jira, Confluence, Bitbucket from Microsoft Entra ID (Previously known as Azure AD) as Identity provider!
miniOrange provides all essential Identity Providers (IdPs) built-in configuration like Microsoft Entra Directory, miniOrange, Okta, OneLogin, Oracle, Keycloak and G-suite. Also we support SCIM configuration with any IDP's by using custom SCIM App option.
The User & Group Sync app by miniOrange helps you synchronize user and group data from Identity Providers such as AWS, OneLogin, Oracle IDCS, Microsoft Entra ID (Previously known as Azure AD), Okta, G Suite, and many others.
Configuring miniOrange User Sync add-on with Microsoft Entra ID (Previously known as Azure AD) as Identity Provider requires you to have below information -
Tenant URL
An Microsoft Entra ID (Previously known as Azure AD) tenant is a reserved Microsoft Entra ID (Previously known as Azure AD) service instance that an organization receives and owns once it signs up for a Microsoft cloud service such as Microsoft Entra ID, Microsoft Intune, or Microsoft 365. Each tenant represents an organization, and is distinct and separate from other Microsoft Entra ID (Previously known as Azure AD) tenants.
Tenant URL is used to uniquely identify the app to sync the user details. The Tenant URL will be required for setting up Microsoft Entra ID (Previously known as Azure AD) SCIM provisioning. If you are running your environment behind a vpn or proxy, make sure to keep this endpoint accessible. When setting up the miniOrange User Sync add-on, you will be given the Tenant URL as the SCIM base URL to configure Microsoft Entra ID (Previously known as Azure AD) SCIM provisioning.
Secret Token
Secret token is a token used for authentication purposes. This token can be referred as the Client Secret. miniOrange User Sync add-on generates the Secret Token for SCIM provisioning authentication. While setting up Microsoft Entra ID (Previously known as Azure AD) SCIM provisioning you will be able to access the Bearer Token, also known as Secret Token in Microsoft Entra ID (Previously known as Azure AD).
Follow the below steps to configure Microsoft Entra ID (Previously known as Azure AD) with miniOrange User Sync/Group Sync app with Microsoft Entra ID (Previously known as Azure AD) SCIM:
- Log in to your Microsoft Entra ID (Previously known as Azure AD) dashboard.
- Go to Enterprise applications and create your own application.
- Search & select SCIM Provisioner with SAML ( SCIM V2 Core ). Then go to Configurations tab.
- Choose Automatic provisioning mode and type in Tenant URL and Secret Token. Both of these details will be available in the SCIM app under the name of SCIM Base URL & Bearer Token.
| Azure AD Term | User Sync Plugin Term |
|---|---|
| Tenant URL | SCIM Base URL |
| Secret Token | Bearer Token |
Get more information about integrating miniOrange User Sync/Group Sync with Microsoft Entra ID (Previously known as Azure AD):
SCIM Okta Configuration
miniOrange User Sync/Group Sync allows sync across Jira, Confluence, Bitbucket from Okta as Identity provider!
miniOrange provides all essential Identity Providers (IdPs) built-in configuration like Microsoft Entra ID (Previously known as Azure AD), miniOrange, Okta, OneLogin, Oracle, Keycloak and G-suite. Also we support SCIM configuration with any IDP's by using the custom SCIM App option.
The User & Group Sync app by miniOrange helps you synchronize user and group data from Identity Providers such as AWS, OneLogin, Oracle IDCS, Microsoft Entra ID (Previously known as Azure AD), Okta, G Suite, and many others.
Configuring miniOrange User Sync add-on with Okta as Identity Provider requires you to have below information.
SCIM Base URL
SCIM Base URL is used to uniquely identify the app to sync the user details. The Base URL will be required for setting up Okta SCIM provisioning. If you are running your environment behind a vpn or proxy, make sure to keep this endpoint accessible. When setting up the miniOrange User Sync add-on, you will be given the SCIM base URL to configure Okta SCIM provisioning.
OAuth Bearer Token
The Bearer Token is created by the Authentication server. When a user authenticates your application(client) then the authentication server generates a Token. Bearer Tokens are the predominant type of access token used with OAuth 2.0.
The Bearer Token will be provided to you in SCIM Configuration tab of miniOrange User Sync/Group Sync add-on.
Follow the below steps to configure Okta with miniOrange User Sync/Group Sync app with Okta SCIM:
- Log in to your Okta admin dashboard.
- Go to Applications and click add application.
- Search & select SCIM 2.0 Test App( OAuth Bearer Token ). Then click on Add button.
- Complete the installation process, then choose Provisioning and click on Configure API Integration.
- Using miniOrange SCIM plugin, enter SCIM Base URL and Bearer Token in Okta.
Get more information about integrating miniOrange User Sync/Group Sync with Okta:
SCIM OneLogin Configuration
miniOrange User Sync/Group Sync allows sync across Jira, Confluence, Bitbucket from Onelogin as Identity provider!
miniOrange provides all essential Identity Providers (IdPs) built-in configuration like Microsoft Entra ID, miniOrange, Okta, OneLogin, Oracle, Keycloak and G-suite. Also we support SCIM configuration with any IDP's by using the custom SCIM App option.
The User & Group Sync app by miniOrange helps you synchronize user and group data from Identity Providers such as AWS, OneLogin, Oracle IDCS, Microsoft Entra ID (Previously known as Azure AD), Okta, G Suite, and many others.
Configuring miniOrange User Sync add-on with OneLogin as Identity Provider requires you to have below information.
SCIM Base URL
SCIM Base URL is used to uniquely identify the app to sync the user details. The Base URL will be required for setting up OneLogin SCIM provisioning. If you are running your environment behind a vpn or proxy, make sure to keep this endpoint accessible. When setting up the miniOrange User Sync add-on, you will be given the SCIM base URL to configure OneLogin SCIM provisioning.
SCIM Bearer Token
The Bearer Token is created by the Authentication server. When a user authenticates your application(client) then the authentication server generates a Token. Bearer Tokens are the predominant type of access token used with OAuth 2.0.
The Bearer Token will be provided to you in SCIM Configuration tab of miniOrange User Sync/Group Sync add-on.
Follow the below steps to configure OneLogin with miniOrange User Sync/Group Sync app with Onelogin SCIM:
- Log in to your OneLogin admin dashboard.
- Go to Applications and click Add app.
- After creating your application inside OneLogin, Go to Provisioning tab. Then click on Get Started.
- Using miniOrange SCIM plugin, enter SCIM Base URL and Bearer Token in OneLogin.
Get more information about integrating miniOrange User Sync/Group Sync with OneLogin:
SCIM Oracle Configuration
miniOrange User Sync/Group Sync allows sync across Jira, Confluence, Bitbucket from Oracle as Identity provider!
miniOrange provides all essential Identity Providers (IdPs) built-in configuration like Microsoft Entra ID (Previously known as Azure AD), miniOrange, Okta, OneLogin, Oracle, Keycloak and G-suite. Also we support SCIM configuration with any IDP's by using the custom SCIM App option.
The User & Group Sync app by miniOrange helps you synchronize user and group data from Identity Providers such as AWS, OneLogin, Oracle IDCS, Microsoft Entra ID (Previously known as Azure AD), Okta, G Suite, and many others.
Configuring miniOrange User Sync add-on with Oracle as Identity Provider requires you to have below information.
Base URI
Base URI is used to uniquely identify the app to sync the user details. The Base URI will be required for setting up Oracle SCIM provisioning. If you are running your environment behind a vpn or proxy, make sure to keep this endpoint accessible. When setting up the miniOrange User Sync add-on, you will be given the SCIM base URL to configure Oracle SCIM provisioning.
Access Token
The Access Token is also referred as Bearer Token. Bearer Token is created by the Authentication server. When a user authenticates your application(client) then the authentication server generates a Token. Bearer Tokens are the predominant type of access token used with OAuth 2.0.
The Access/Bearer Token will be provided to you in SCIM Configuration tab of miniOrange User Sync/Group Sync add-on.
Client ID
Client ID is provided by the Oracle after creating an app. This Client ID is used to uniquely identify the App inside Oracle. This Client ID is required for configuring User Provisioning with REST API using miniOrange User Sync/Group Sync add-on.
Client Secret
Client Secret is also provided by the Oracle when you create an app. This Client Secret is used for authentication purposes in Oracle. The Client Secret is required for configuring User Provisioning with REST API using miniOrange User Sync/Group Sync add-on.
Oracle Base URL
Oracle Base URL is a URL provided by Oracle to an organization. Oracle manages all the apps and users of a specific organization under this domain. The typical Oracle Base URL is the tenant name (the subdomain), and then the domain name.
Example domain: example.identity.oraclecloud.com/
Oracle App ID
Enter the App Id of the SAML/OpenID Connect App that you have created in Oracle for this Jira instance so that provisioning operation will be performed on assigned users and groups only. To get the app id, open the application in Oracle, navigate to the URL and copy the ID from there.
Follow the below steps to configure Oracle with miniOrange User Sync/Group Sync app with Oracle SCIM:
- Log in to your Oracle Identity Cloud Service (IDCS) administration console. Select Applications, and then click Add.
- Click on App Catalog and Select Provision under Type of Integration from left sidebar.
- Using the search bar, look for GenericScim and click on the Add button next to GenericScim - Bearer Token.
- Enter name, description and then click on next button. Now, enter SCIM Base URL and Bearer Token provided by miniOrage usersync plugin.
Get more information about integrating miniOrange User Sync/Group Sync with Oracle:
SCIM miniOrange Configuration
miniOrange User Sync/Group Sync allows sync across Jira, Confluence, Bitbucket from miniOrange as Identity provider!
miniOrange provides all essential Identity Providers (IdPs) built-in configuration like Microsoft Entra ID (Previously known as Azure AD), miniOrange, Okta, OneLogin, Oracle, Keycloak and G-suite. Also we support SCIM configuration with any IDP's by using the custom SCIM App option.
The User & Group Sync app by miniOrange helps you synchronize user and group data from Identity Providers such as AWS, OneLogin, Oracle IDCS, Microsoft Entra ID (Previously known as Azure AD), Okta, G Suite, and many others.
Configuring miniOrange User Sync add-on with miniOrange as Identity Provider requires you to have below information.
SCIM Base URL
SCIM Base URL is used to uniquely identify the app to sync the user details. The Base URL will be required for setting up miniOrange SCIM provisioning. If you are running your environment behind a vpn or proxy, make sure to keep this endpoint accessible. When setting up the miniOrange User Sync add-on, you will be given the SCIM base URL to configure miniOrange SCIM provisioning.
SCIM Bearer Token
The Bearer Token is created by the Authentication server. When a user authenticates your application(client) then the authentication server generates a Token. Bearer Tokens are the predominant type of access token used with OAuth 2.0.
The Bearer Token will be provided to you in SCIM Configuration tab of miniOrange User Sync/Group Sync add-on.
Follow the below steps to configure miniOrange with miniOrange User Sync/Group Sync app with miniOrange SCIM:
- Log in to your miniOrange Admin Console with administrator account.
- Navigate to the Apps section, Add Application then select Provisioning.
- Enter your Custom Application Name, SCIM Base URL and Bearer token copied from the SCIM Configuration tab of the SCIM user provisioning plugin.
Get more information about integrating miniOrange User Sync/Group Sync with miniOrange:
Rest API Microsoft Entra ID (Previously known as Azure AD) Configuration
miniOrange User Sync/Group Sync allows sync across Jira, Confluence, Bitbucket from Microsoft Entra ID (Previously known as Azure AD) as Identity provider!
miniOrange provides all essential Identity Providers (IdPs) built-in configuration like Microsoft Entra ID (Previously known as Azure AD), miniOrange, Okta, OneLogin, Oracle, Keycloak and G-suite. Also we support Rest API configuration with any IDP's by using custom Rest API App option.
The User & Group Sync app by miniOrange helps you synchronize user and group data from Identity Providers such as AWS, OneLogin, Oracle IDCS, Microsoft Entra ID (Previously known as Azure AD), Okta, G Suite, and many others.
Configuring miniOrange User Sync add-on with Microsoft Entra ID (Previously known as Azure AD) as Identity Provider requires you to have below information.
Client ID
Client ID is provided by the Microsoft Entra ID (Previously known as Azure AD) after creating an app. This Client ID is used to uniquely identify the App inside Microsoft Entra ID (Previously known as Azure AD). This Client ID is required for configuring User Provisioning with REST API using miniOrange User Sync/Group Sync add-on.
Client Secret
Client Secret is also provided by the Microsoft Entra ID (Previously known as Azure AD) when you create an app. This Client Secret is used for authentication purposes in Microsoft Entra ID (Previously known as Azure AD). The Client Secret is required for configuring User Provisioning with REST API using miniOrange User Sync/Group Sync add-on.
Tenant ID
Tenant ID is used to uniquely identify the app to sync the user details. When you are configuring User Provisioning with REST API using miniOrange User Sync/Group Sync add-on you will require Application Directory (tenant) ID for configuration. You will get the Tenant ID in overview page of your created app inside Microsoft Entra ID (Previously known as Azure AD).
User Name Attribute
User provisioning configuration will require username of the users for identifying different users. To configure the provisioning, you need to select the field containing the User Name.
Synchronize Users from
Microsoft Entra ID (Previously known as Azure AD) let's you choose if you want to synchronize your users according to their groups or a specific app. Select a group/app from the dropdown if you want to sync users from a specific app/group.
Set Scheduler Time Interval
miniOrange User Sync/Group Sync add-on allows you to sync your users automatically after a particular time interval. For ex. Hourly, Daily, Twice Daily, Weekly etc.
Follow the below steps to configure Microsoft Entra ID (Previously known as Azure AD) with miniOrange User Sync/Group Sync app with Microsoft Entra ID (Previously known as Azure AD) Rest API:
- Log in to your Microsoft Microsoft Entra ID (Previously known as Azure AD) dashboard.
- Go to Microsoft Entra ID (Previously known as Azure AD) ⇒ App Registrations. Click on New Application Registration.
- You will get Application ID and the Directory (tenant) ID after registration. Navigate to Certificates & Secrets tab from the sidebar and generate a Client Secret
- Also you have to select API permissions ⇒ Add a permission, then click on Microsoft Graph ⇒ Application permissions.
- Search and select the Directory.Read.All permission, then search for user and select User.Read.All. After assigning permissions you click on Grant admin consent for Demo
| Azure AD Term | User Sync Plugin Term |
|---|---|
| Tenant URL | SCIM Base URL |
| Secret Token | Bearer Token |
Get more information about integrating miniOrange User Sync/Group Sync with Microsoft Entra ID (Previously known as Azure AD):
REST API Okta Configuration
miniOrange User Sync/Group Sync allows sync across Jira, Confluence, Bitbucket from Okta as Identity provider!
miniOrange provides all essential Identity Providers (IdPs) built-in configuration like Microsoft Entra ID (Previously known as Azure AD), miniOrange, Okta, OneLogin, Oracle, Keycloak and G-suite. Also we support REST API configuration with any IDP's by using the custom Rest API App option.
The User & Group Sync app by miniOrange helps you synchronize user and group data from Identity Providers such as AWS, OneLogin, Oracle IDCS, Microsoft Entra ID (Previously known as Azure AD), Okta, G Suite, and many others.
Configuring miniOrange User Sync add-on with Okta as Identity Provider requires you to have below information.
Okta Domain URL
Okta Domain URL is a URL provided by Okta to an organization. Okta manages all the apps and users of a specific organization under this domain. The typical Okta Domain URL is the tenant name (the subdomain), and then the domain name.
Example domain: companyname.okta.com
Okta API
Okta API is an token provided for provisioning access by Okta. This API token will be required to configure provisioning with Okta. You will find it from Okta Admin Dashboard->Security->API->Tokens. Click on the Create button to generate a new Token for Provisioning.
Okta App ID
If you want to sync users/groups that are assigned to a specific app, enter the app id in this field. You will have to enter the app id of the SAML/OpenID Connect App that you have created in OKTA for this Jira instance so that provisioning operation will be performed on assigned users and groups only.
Set Scheduler Time Interval
miniOrange User Sync/Group Sync add-on allows you to sync your users automatically after a particular time interval. For ex. Hourly, Daily, Twice Daily, Weekly etc.
Follow the below steps to configure Okta with miniOrange User Sync/Group Sync app with Okta Rest API:
- Log in to your Okta admin dashboard.
- Go to Security tab from the Left Menu and select API. Now, go to the Tokens tab and click on Create Token button.
- Create a Token and keep it handy for further configuration. This token will be further called as Okta API.
Get more information about integrating miniOrange User Sync/Group Sync with Okta:
User Provisioning G-Suite Configuration
miniOrange User Sync/Group Sync allows sync across Jira, Confluence, Bitbucket from G-suite as Identity provider!
miniOrange provides all essential Identity Providers (IdPs) built-in configuration like Microsoft Entra ID (Previously known as Azure AD), miniOrange, Okta, OneLogin, Oracle, Keycloak and G-suite.
The User & Group Sync app by miniOrange helps you synchronize user and group data from Identity Providers such as AWS, OneLogin, Oracle IDCS, Microsoft Entra ID (Previously known as Azure AD), Okta, G Suite, and many others.
Configuring miniOrange User Sync add-on with G-suite as Identity Provider requires you to have below information.
Client ID
Client ID is provided by the G-suite after creating an app. This Client ID is used to uniquely identify the App inside G-suite. This Client ID is required for configuring User Provisioning with REST API using miniOrange User Sync/Group Sync add-on.
Client Secret
Client Secret is also provided by the G-suite when you create an app. This Client Secret is used for authentication purposes in G-suite. The Client Secret is required for configuring User Provisioning with REST API using miniOrange User Sync/Group Sync add-on.
Set Scheduler Time Interval
miniOrange User Sync/Group Sync add-on allows you to sync your users automatically after a particular time interval. For ex. Hourly, Daily, Twice Daily, Weekly etc.
Follow the below steps to configure G-suite with miniOrange User Sync/Group Sync app with G-suite User Provisioning:
- Log in to your Google API Console with administrator account.
- Create a new project and select the newly created project from the dropdown.
- Click on ENABLE APIS AND SERVICES. Then search for Admin SDK and enable it.
- Navigate to OAuth consent screen select User Type as External, then provide a name for your app and click on Create button.
- Now, navigate to Credentials tab and create OAuth Client ID credentials. While creating credentials select type as Web application and enter Authorized redirect URIs. Eg. <server-base-url>/plugins/servlet/usersync/callback.
- After following these steps you will get your Client ID and Client secret details.
Get more information about integrating miniOrange User Sync/Group Sync with G-suite:
Rest API Keycloak Configuration
miniOrange User Sync/Group Sync allows sync across Jira, Confluence, Bitbucket from Keycloak as Identity provider!
miniOrange provides all essential Identity Providers (IdPs) built-in configuration like Microsoft Entra ID (Previously known as Azure AD), miniOrange, Okta, OneLogin, Oracle, Keycloak and G-suite. Also we support Rest API configuration with any IDP's by using the custom Rest API App option.
The User & Group Sync app by miniOrange helps you synchronize user and group data from Identity Providers such as AWS, OneLogin, Oracle IDCS, Microsoft Entra ID (Previously known as Azure AD), Okta, G Suite, and many others.
Configuring miniOrange User Sync add-on with Keycloak as Identity Provider requires you to have below information.
Client ID
Client ID is provided by the Keycloak after creating an app. This Client ID is used to uniquely identify the App inside Keycloak. This Client ID is required for configuring User Provisioning with REST API using miniOrange User Sync/Group Sync add-on.
Client Secret
Client Secret is also provided by the Keycloak when you create an app. This Client Secret is used for authentication purposes in Keycloak. The Client Secret is required for configuring User Provisioning with REST API using miniOrange User Sync/Group Sync add-on.
Keycloak Domain URL
Keycloak Domain URL is a URL provided by Keycloak to an organization. Keycloak manages all the apps and users of a specific organization under this domain. The typical Keycloak Domain URL is the tenant name (the subdomain), and then the domain name.
Example domain: companyname.keycloak.com
Realm Name
Keycloak Realm is a space where you manage objects. There are majorly two types of realms - Master, Other Realms. Master Realm is created & provided by Keycloak and the Realms created by admins are called Other Realms. You have to mention the Realm name to sync the users from a Realm.
Set Scheduler Time Interval
miniOrange User Sync/Group Sync add-on allows you to sync your users automatically after a particular time interval. For ex. Hourly, Daily, Twice Daily, Weekly etc.
Follow the below steps to configure Keycloak with miniOrange User Sync/Group Sync app with Keycloak Rest API:
- Log in to your Keycloak admin dashboard.
- Navigate to Clients tab and create a Client with Client ID as name, Client Protocol as open id connect.
- In the settings tab of the newly created client configure following settings -
- Also, make sure that you have enabled/Turned on Standard Flow Enabled, Direct Access Grants Enabled, Service Accounts Enabled, Authorization Enabled.
- Now save the settings and navigate to Roles tab and under uma_protection, turn on Composite Roles and transfer all the Realm roles from Available Roles to Associated Roles.
- Navigate to the Credentials tab. You will get the client secret details from here.
| Option | Value |
|---|---|
| Access Type | Confidential |
| Valid redirect URIs | Your Jira base URL |
Get more information about integrating miniOrange User Sync/Group Sync with Keycloak:
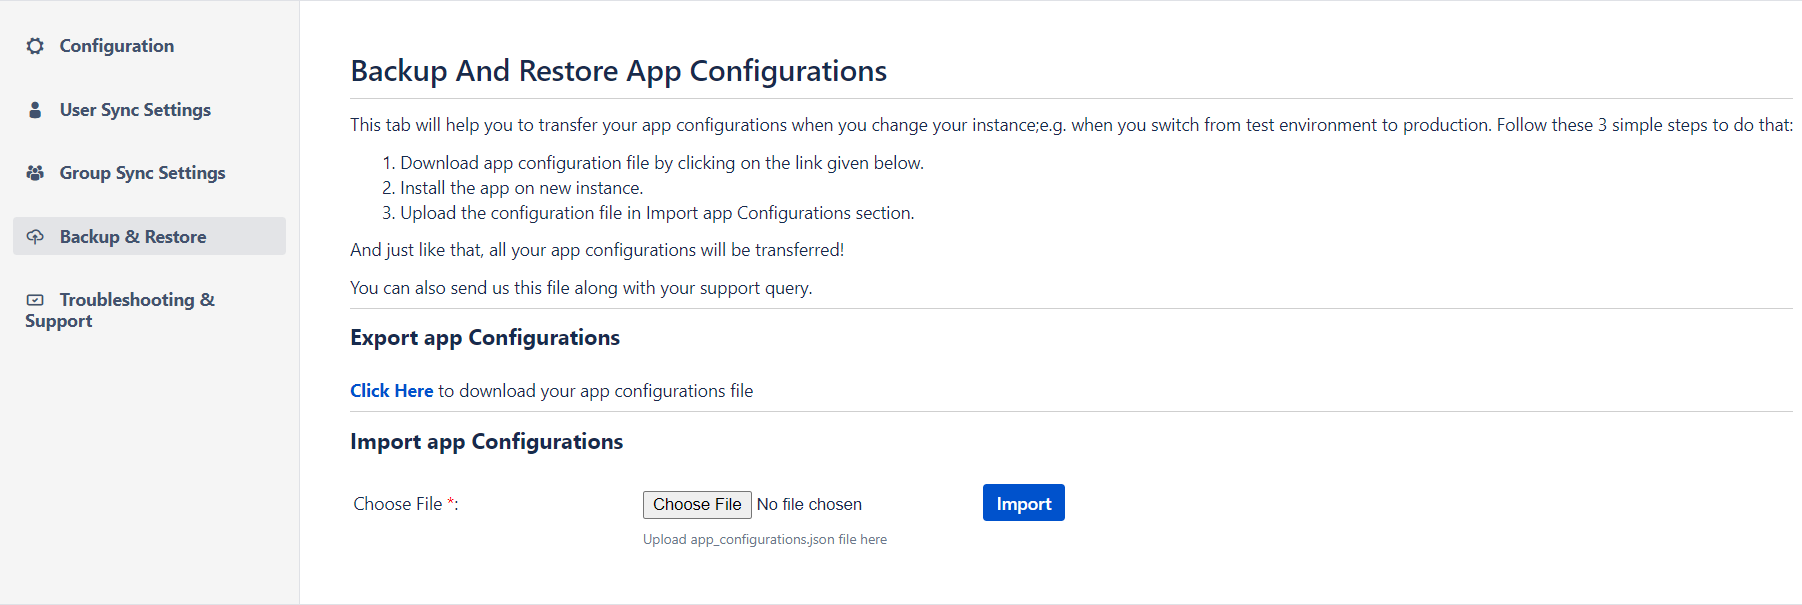
Backup and Restore
This tab allows you to download or upload the SCIM plugin's configuration. You can use this to:
1. Transfer configuration file: When moving from a Test instance to a Production instance, you don't need to reconfigure the plugin again. In production, you can simply upload configurations from the test instance. You can also use this feature if you want to move your settings between instances.
2. Backup: It is possible to take backups of the working configurations in case of disaster.
3. Troubleshoot: A configuration file can be sent to the support team for debugging and fixing if the user is experiencing problems.
This tab has the following options:
Download /Upload App configuration manually
- Download App Configuration: Downloads all the app configurations in a JSON file.
- Import App Configuration: You can upload the previously downloaded file to restore the app configurations.
Troubleshooting
The troubleshooting tab provides steps to download the necessary information like the application log file to troubleshoot any issue.
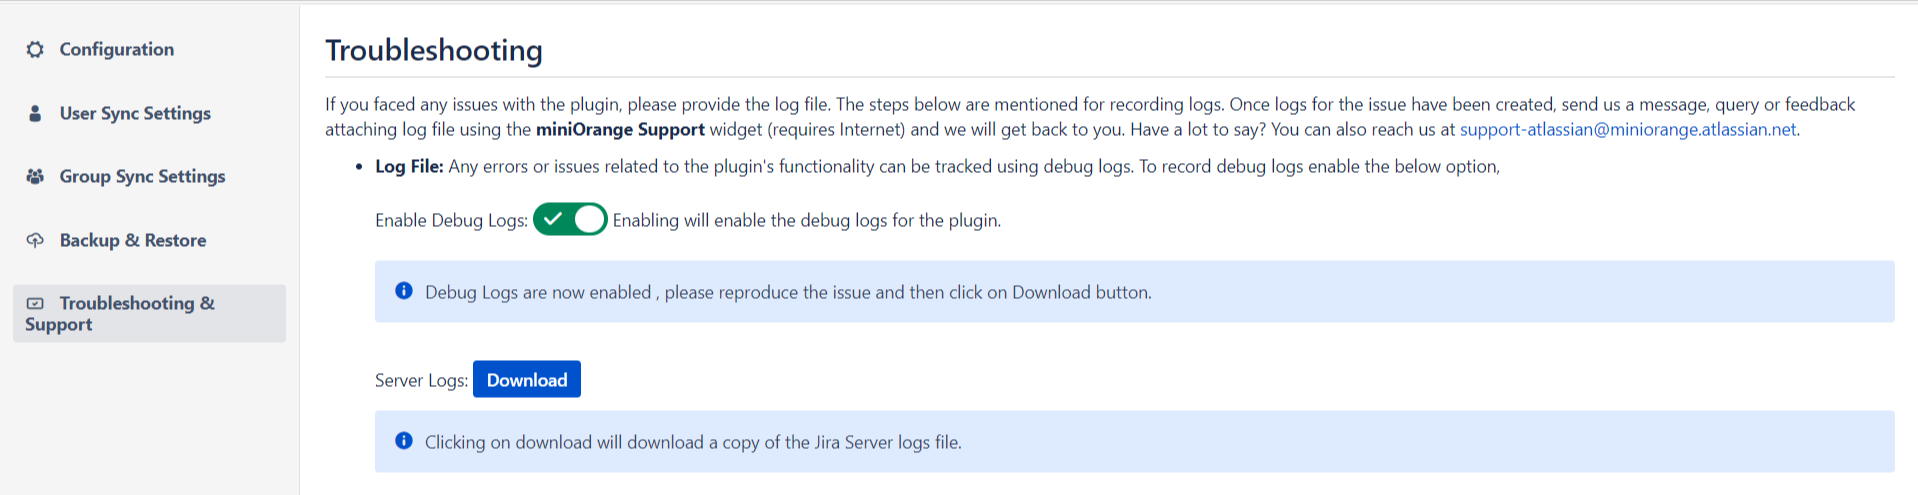
You can follow the instructions given here to enable debug logs for the plugin and download the logs and other files required to debug and fix your issue. You can also send all this information to the miniOrange support team.
For troubleshooting use :
-
Log File: Any errors or issues related to the
plugin's functionality can be tracked using debug logs. To record
debug logs enable the below option:
- Enable Debug Logs: Enabling will enable the debug logs for the plugin.
- Click on the download button in the plugin to download your app configurations file.