Hello there!
Need Help? We are right here!
Need Help? We are right here!
Search Results:
×[Latest Version: 1.6.0] [Releases & feature updates]
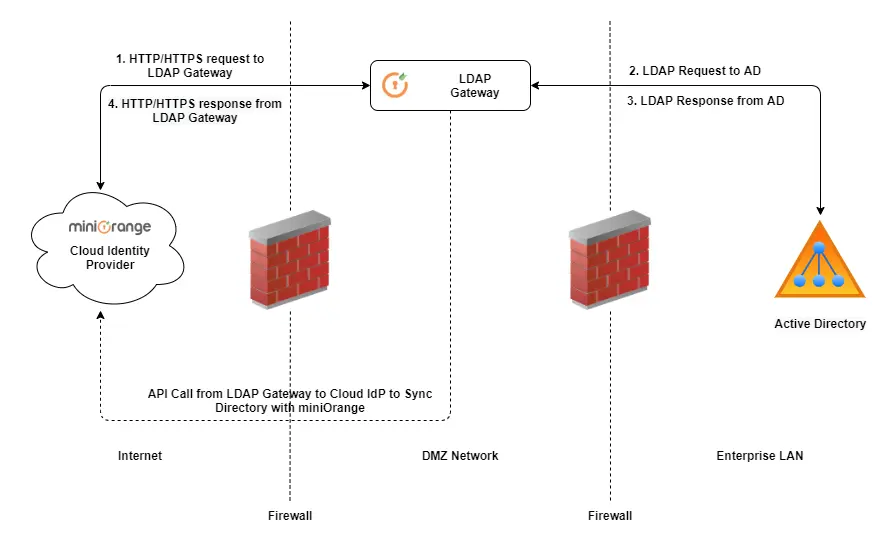
The miniOrange LDAP Gateway is a lightweight bridge that connects your on-premise Active Directory or LDAP server to the miniOrange cloud identity platform. It is installed inside your intranet (typically in the DMZ) and communicates outbound to miniOrange — your LDAP server never needs a public IP.
The gateway supports two distinct use cases:
Both use cases share a common installation and configuration sequence. This guide walks through the common steps first, then branches into use-case-specific instructions.
The following are the minimum requirements for the server on which the LDAP Gateway will be installed:
| Specifications | Minimum Requirement |
|---|---|
| CPU | 2 core |
| RAM | 4 GB |
| Disk | 30 GB free space |
| Operating System | Windows Server 2008 or later | Linux (see supported distributions below) |
| Java | Required only for the ZIP Manual Install. All other installers bundle Java 17 automatically. |
Supported Linux distributions:
Native DEB and RPM installers are available from v1.6.0 onward. No separate Java installation is required for package-based deployments.
Ensure the following network access is configured before installation:
| Direction | Protocol / Port | Purpose |
|---|---|---|
| Outbound (from gateway server) | TCP 443 → login.xecurify.com | Gateway communicates outbound to miniOrange cloud (User Sync Setup) |
| Outbound (from gateway server) | TCP 389 → AD/LDAP server | Standard LDAP (User Sync Setup) |
| Outbound (from gateway server) | TCP 636 → AD/LDAP server | Secure LDAP (LDAPS) — only if LDAPS is configured (User Sync Setup) |
| Inbound (to gateway server) | TCP 8080 (or custom port) | HTTP access to the gateway web UI and API. Must be reachable from miniOrange cloud IPs: 52.55.147.107, 52.86.38.163, 54.165.245.227 (User Authentication Setup) |
| Inbound (to gateway server) | TCP 443 | HTTPS access (if SSL is configured) (User Authentication Setup) |
Download the installer that matches your operating system:
| Installer (Latest Version: 1.6.0) | Supported OS | Download | SHA-256 Checksum |
|---|---|---|---|
| Windows Installer (.exe) | Windows Server 2008+ | Download |
|
| Linux DEB (.deb) | Ubuntu, Debian, Linux Mint | Download |
|
| Linux RPM (.rpm) | RHEL, Rocky Linux, AlmaLinux, CentOS, Fedora, openSUSE | Download |
|
| ZIP (manual) | Windows & Linux — all distributions | Download |
|
x
Follow the instructions for your chosen installation method.
Note: The Windows installer bundles OpenLogic JDK 17. If Java 17 is already installed on the system, the bundled JDK installation is skipped automatically.
C:\Program Files\miniOrange LDAP GatewayBy default, the gateway runs on port 8080. To change it:
After the port change, access the gateway at: http://<server-ip>:<new-port>/miniorangegateway/
http://<server-ip>:8080/miniorangegateway/
Note: If you configured a custom port in Step 1.2, use that port instead of 8080.
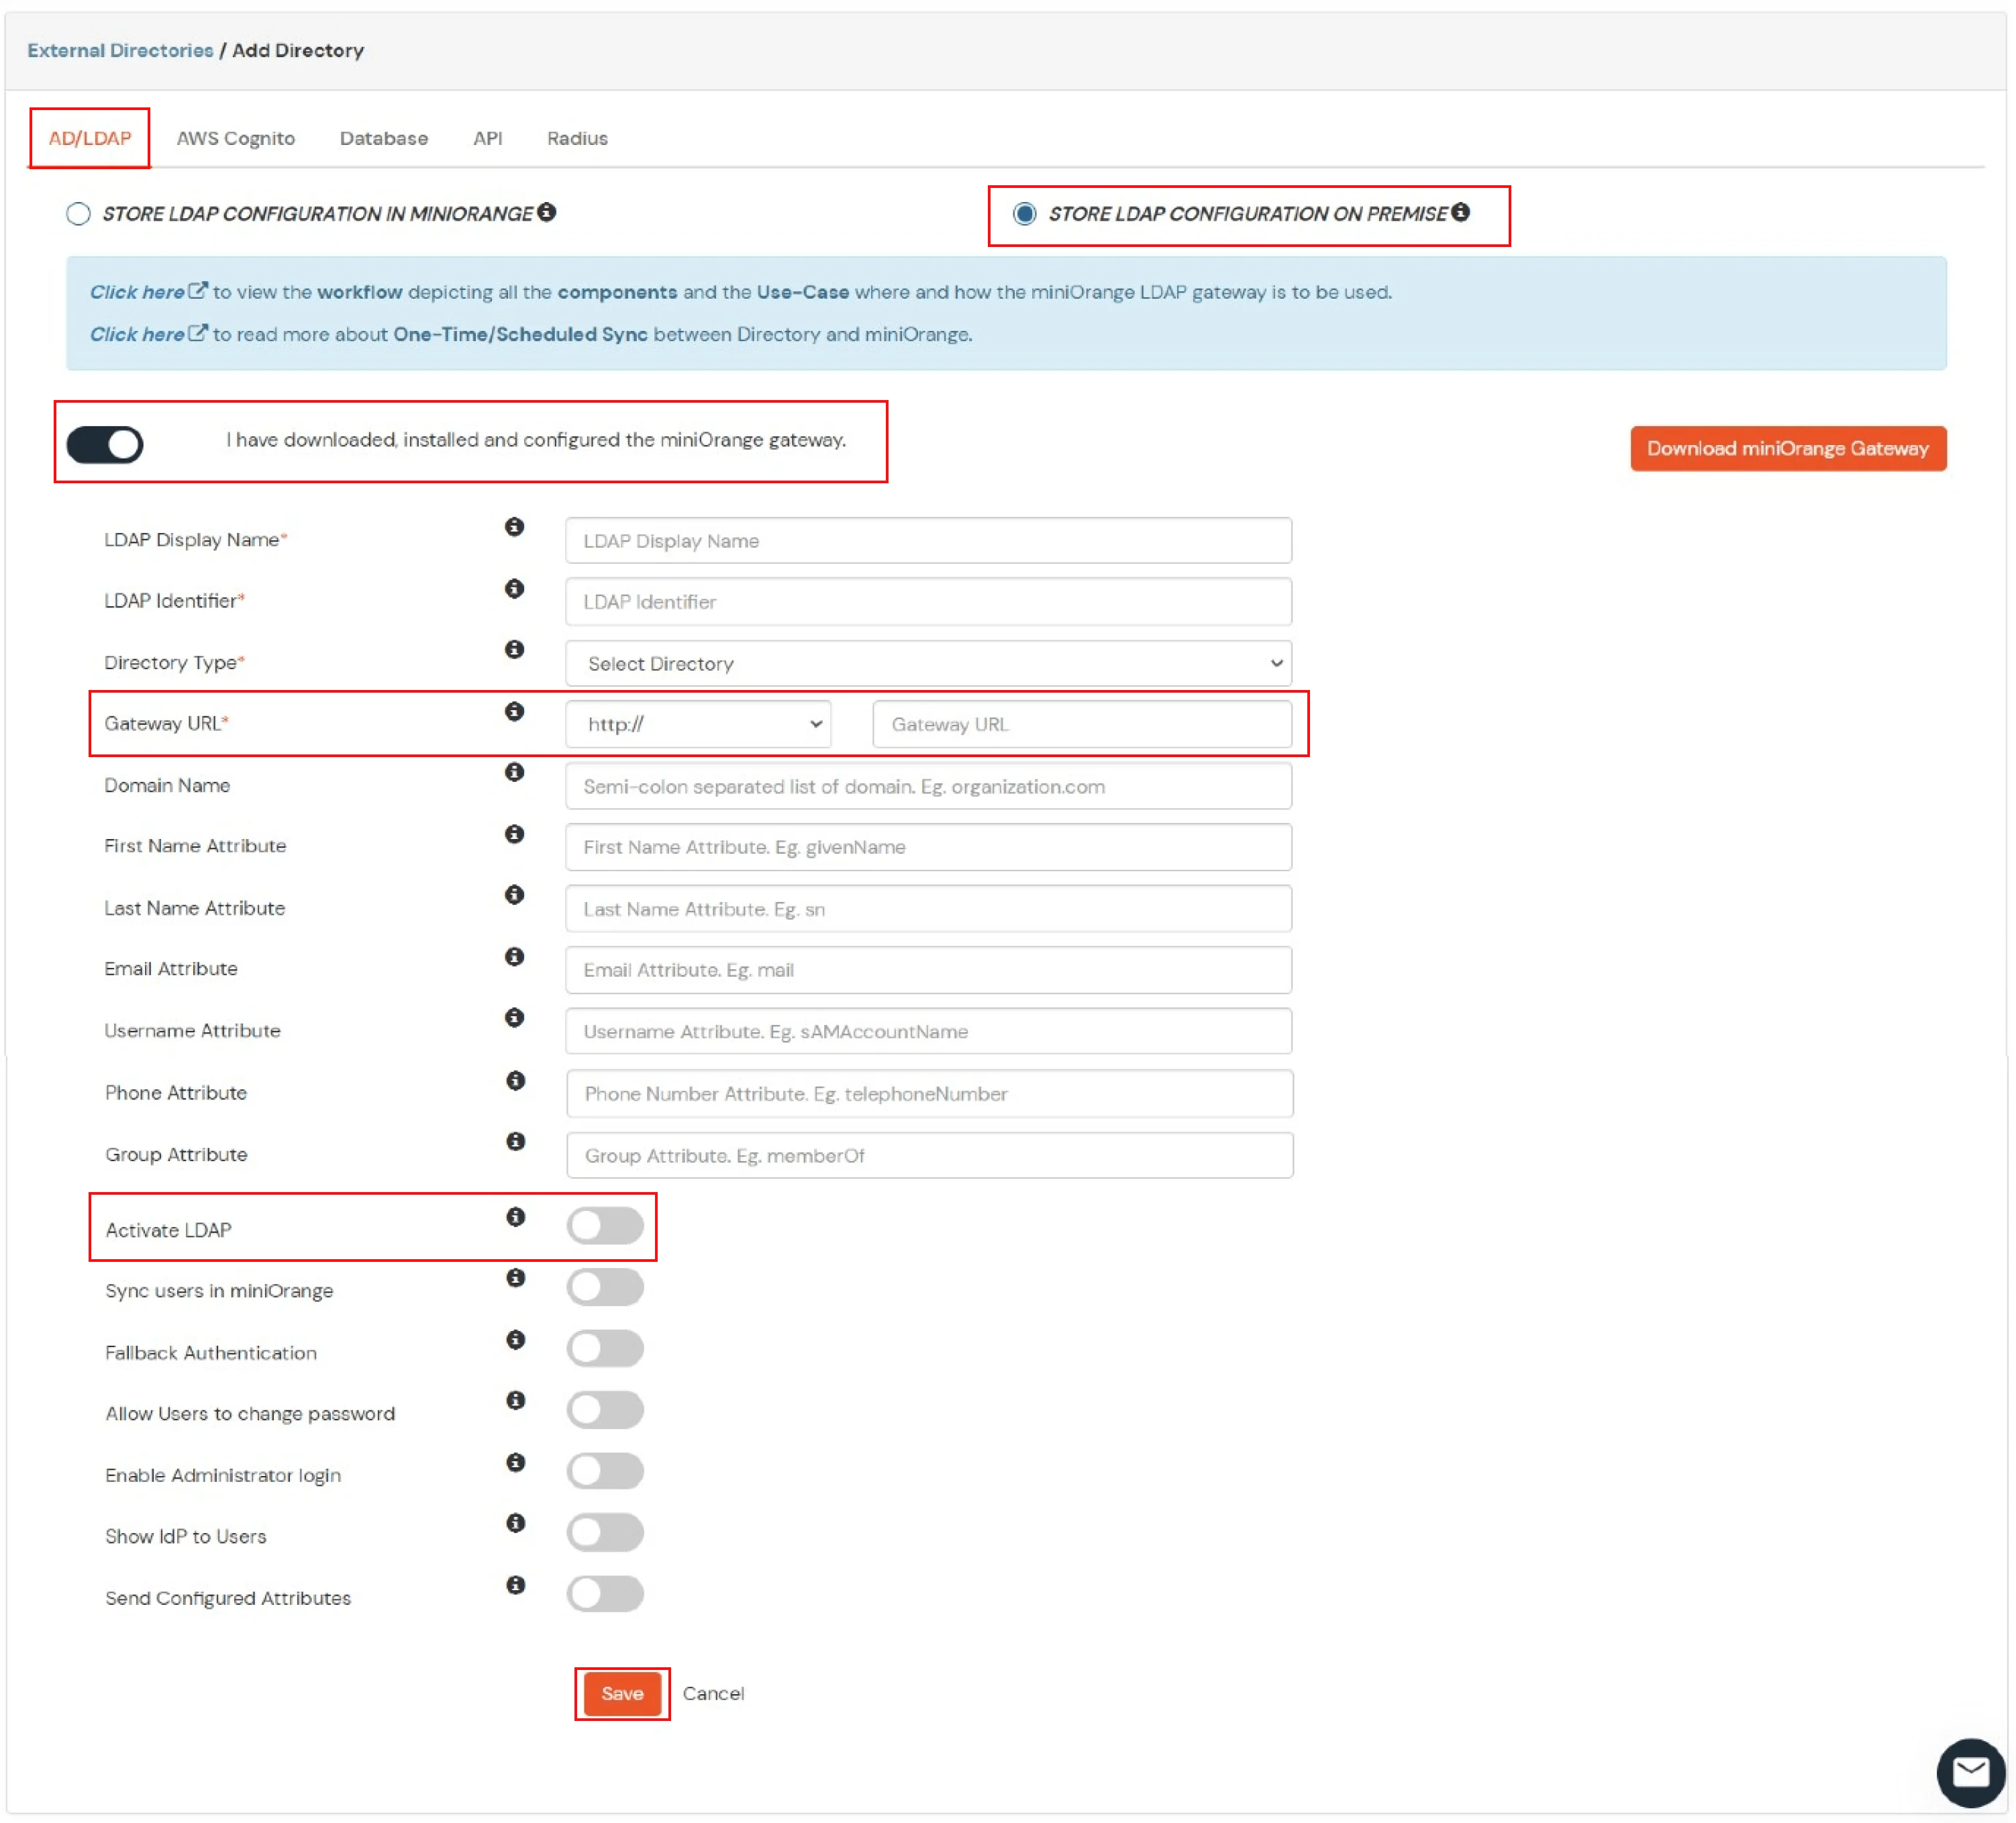
This step configures the connection between the gateway and your on-premise AD/LDAP server.
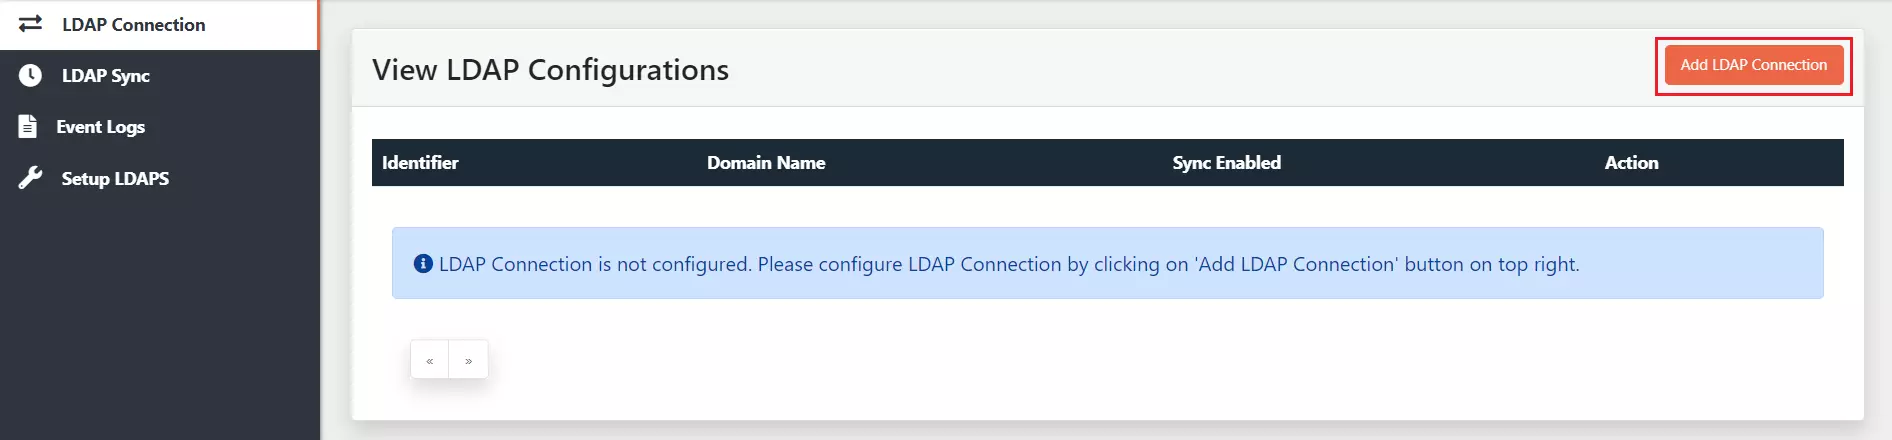
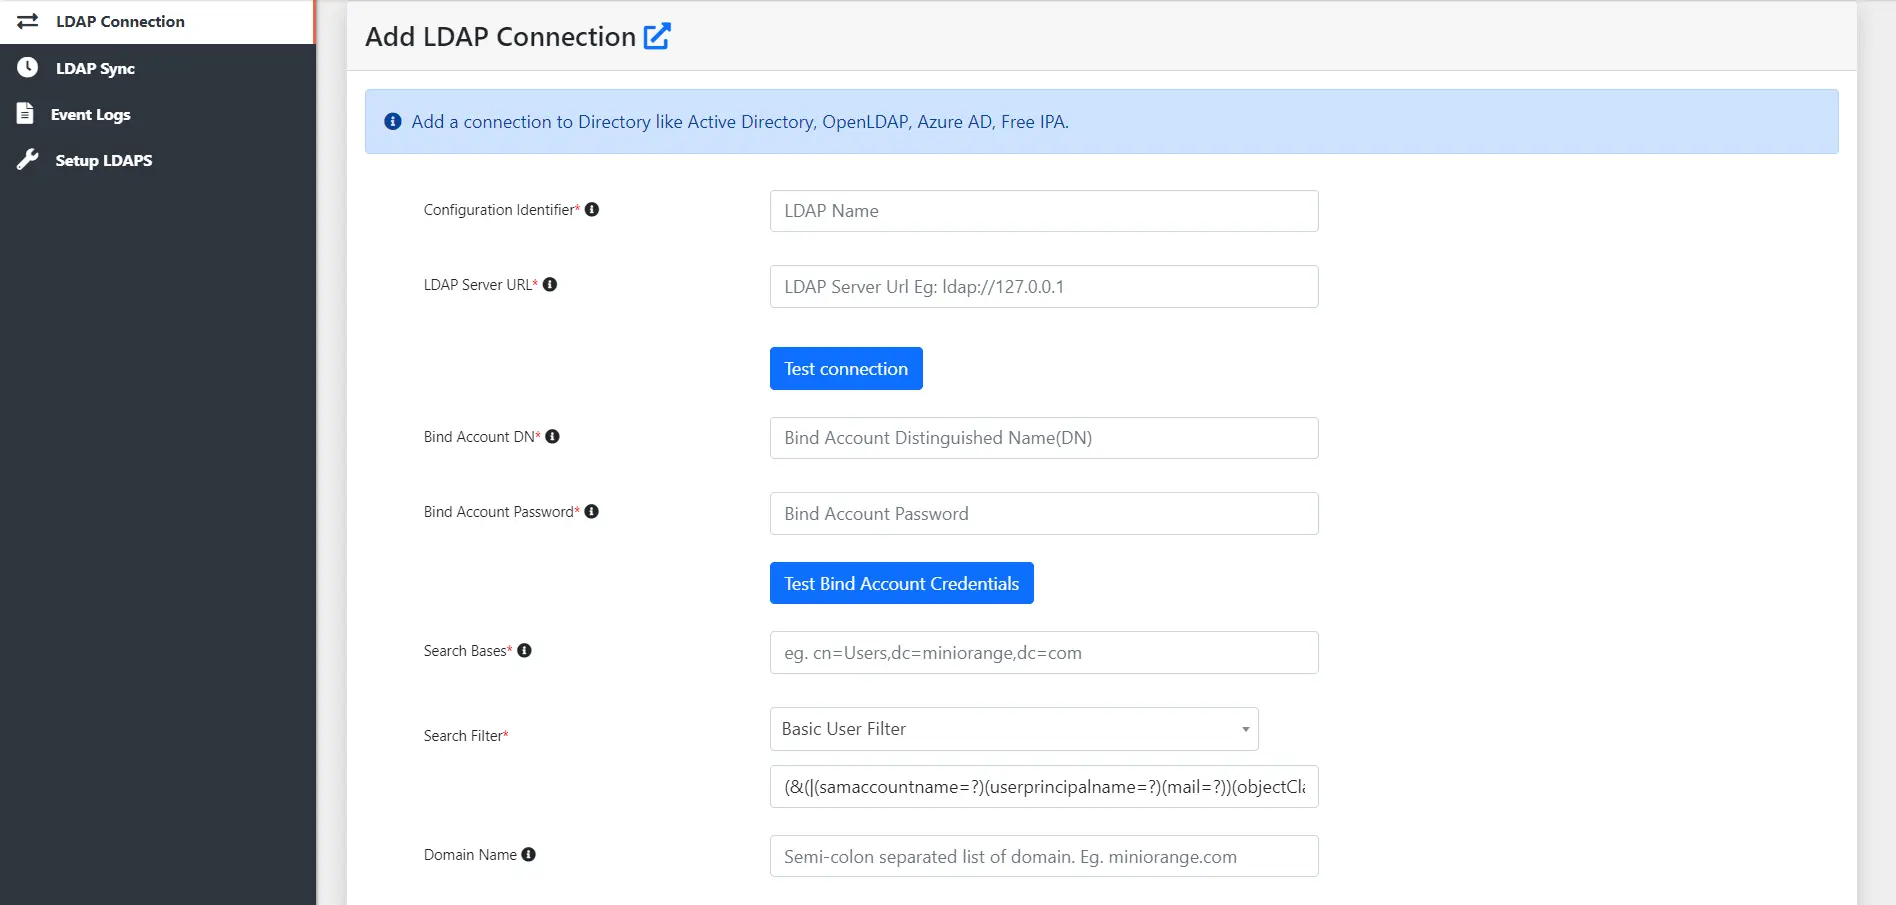
| Field | Description | Example |
|---|---|---|
| Configuration Identifier | A unique name for this LDAP configuration. | MyCompany-AD |
| LDAP Server URL | Hostname and port of your LDAP server. | ldap://myldapserver.domain:389 |
| Bind Account DN | The account used to connect to LDAP. Use UPN or DN format. | admin@domain.com or CN=admin,DC=domain,DC=com |
| Bind Account Password | Password for the Bind Account. | — |
| Search Bases | Distinguished name of the OU to search for users. | CN=Users,DC=domain,DC=com |
| Search Filter | LDAP filter to identify user objects. If using group-based filters, replace <group-dn> with the group DN. | (objectClass=user) |
| Domain Name | Semicolon-separated list of domain names. | company.com;subsidiary.com |
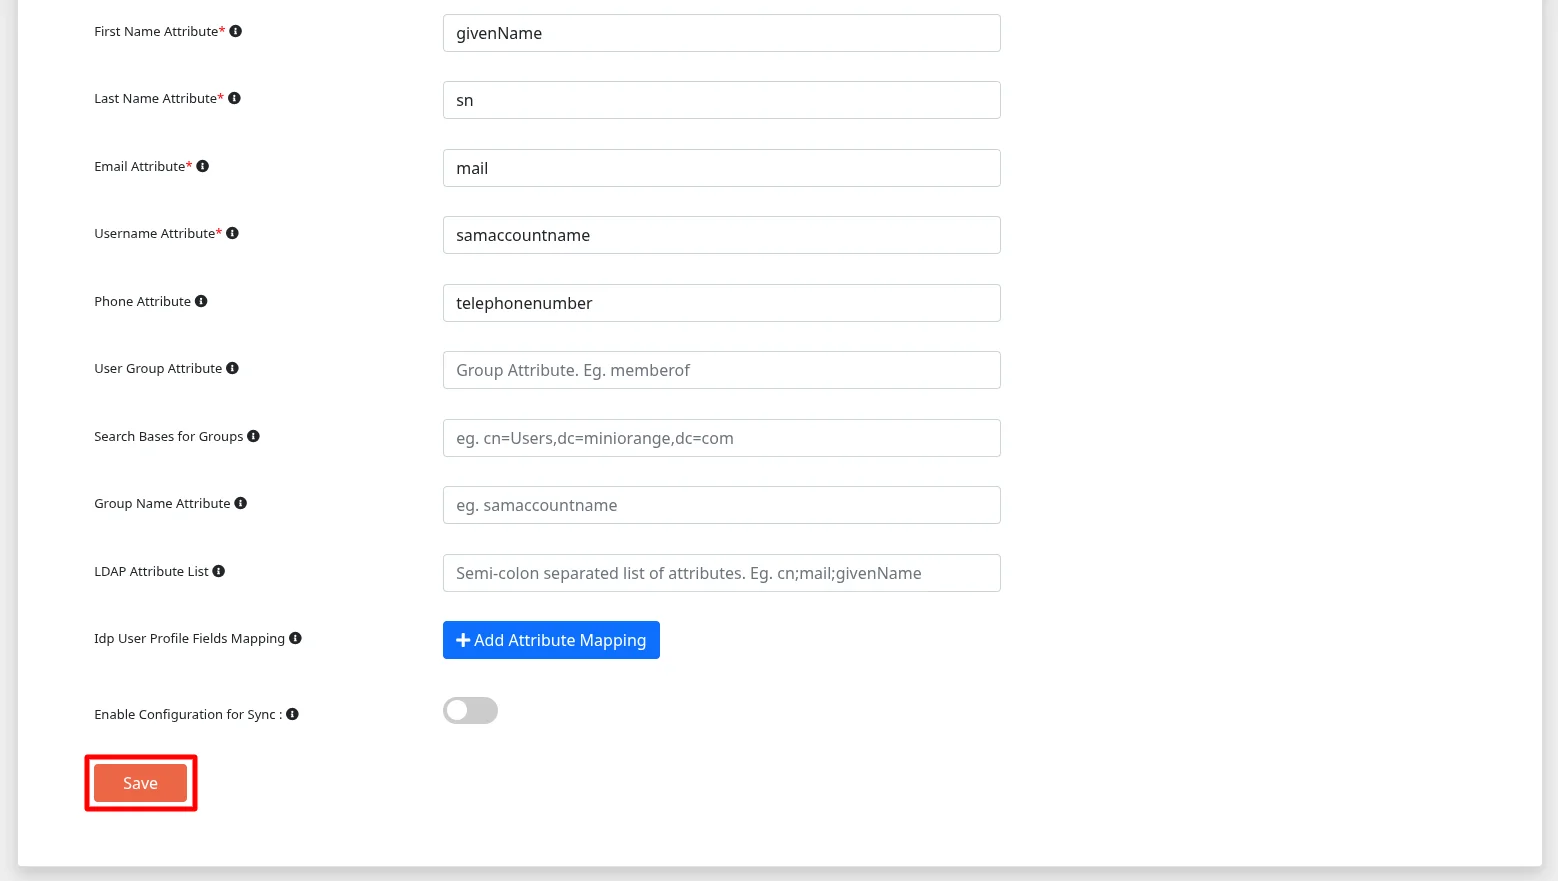
| First Name Attribute | LDAP attribute mapped to first name. | givenName |
| Last Name Attribute | LDAP attribute mapped to last name. | sn |
| Email Attribute | LDAP attribute mapped to email. | |
| Username Attribute | LDAP attribute mapped to username. | sAMAccountName |
| Phone Attribute | LDAP attribute mapped to phone number. | telephoneNumber |
| User Group Attribute | LDAP attribute for group membership. | memberOf |
| Search Bases for Groups | DN of the OU to search for groups. | CN=Groups,DC=domain,DC=com |
| Group Search Filter | LDAP filter to identify group objects. | (&(objectCategory=group)(!(cn=admin*))) |
| Group Name Attribute | LDAP attribute for the group name. | sAMAccountName |
| LDAP Attribute List | Semicolon-separated list of additional attributes to fetch. | cn;mail;givenName |
| IdP User Profile Fields Mapping | Maps LDAP attributes to miniOrange user profile fields. | [configure as needed] |
| Enable Configuration for Sync | Enables or disables this connection for scheduled sync. | Enable if using User Sync use case |
Gateway setup is now complete. Choose your use case to continue:
User Sync (sync users from AD/LDAP to miniOrange): Continue to Part 2.1 below. User Authentication (authenticate users via miniOrange against AD/LDAP): Skip to part 2.2.
Use this section if your goal is to sync users and groups from your AD/LDAP directory into the miniOrange cloud. Sync is configured and triggered entirely within the gateway web UI — no additional steps are required in the miniOrange cloud console.
| Field | Description |
|---|---|
| Enable Group Sync | Enable to sync groups from your Active Directory to miniOrange. |
| Enable User Sync | Enable to sync user accounts from your Active Directory to miniOrange. |
| Enable User Group Membership Sync | Enable to sync group membership assignments. Note: if Enable Group Sync is disabled but this is enabled, all group assignments for users will be removed in miniOrange. |
| Enable Import Nested Group | Enable to import and sync nested groups from your Active Directory to miniOrange. Users who are members of child groups will inherit memberships from their parent groups during synchronization. |
| Exclude Groups in User Sync | When enabled, users under the selected groups will always remain members of those groups. No group de-assignment will occur for these groups during LDAP user sync. |
| Enable Delete User Sync | Enable to delete users from miniOrange when they are removed from your directory. Use with caution — configure the exclusion list before enabling. |
| Configure Exclusion List | Select specific users to exclude from deletion sync. Recommended to protect admin accounts. |
| Sync Enable/Disable Status | When enabled, user enable/disable status changes in Active Directory will be synchronized to miniOrange during user sync. |
| Sync Locked/Unlocked Status | When enabled, user account lock/unlock status changes in Active Directory will be synchronized to miniOrange during user sync. |
| Start Time (hh:mm) | Time of day for the first scheduled sync. Any time before the current server time triggers an immediate sync. |
| Sync Interval (in hrs) | How often the scheduled sync repeats after the first run. |
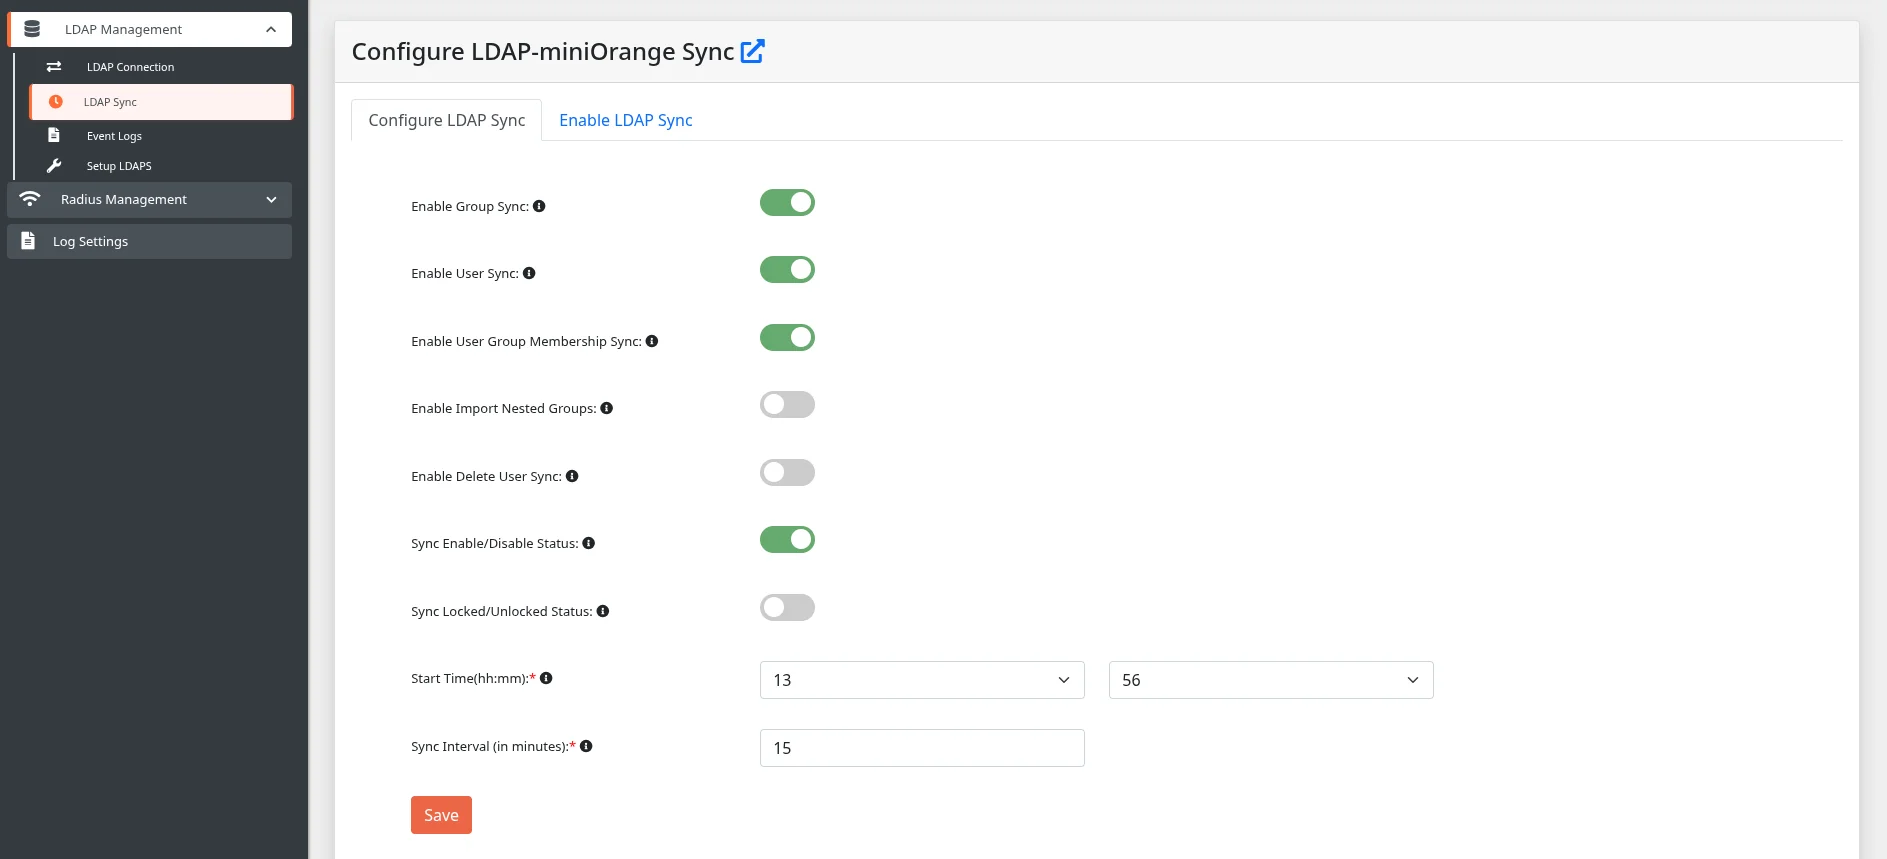
Important : The Enable Configuration for Sync toggle in the LDAP connection settings (Step 1) controls whether a given directory connection is included in the sync schedule. Make sure it is enabled for all connections you want to sync.
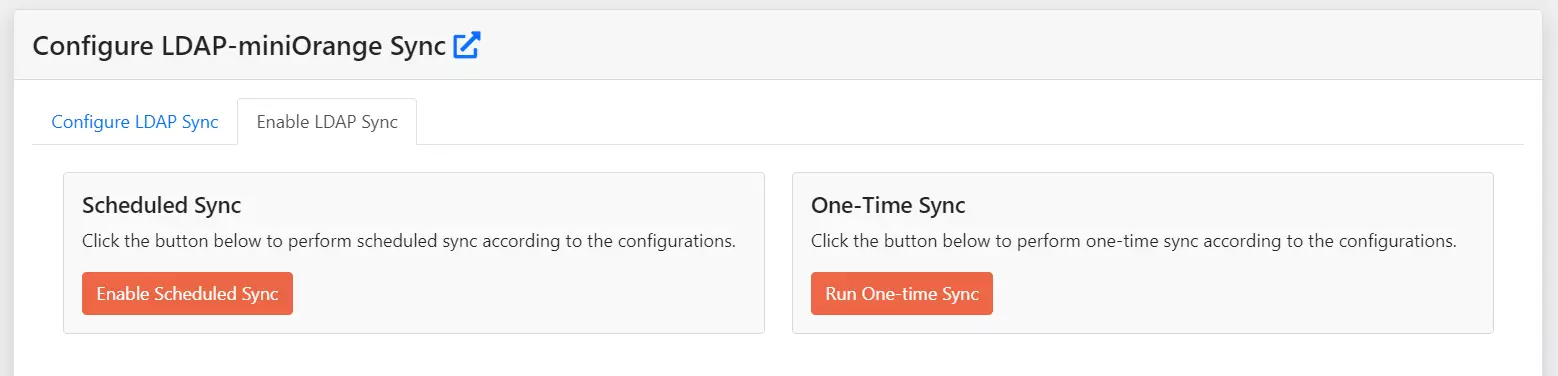
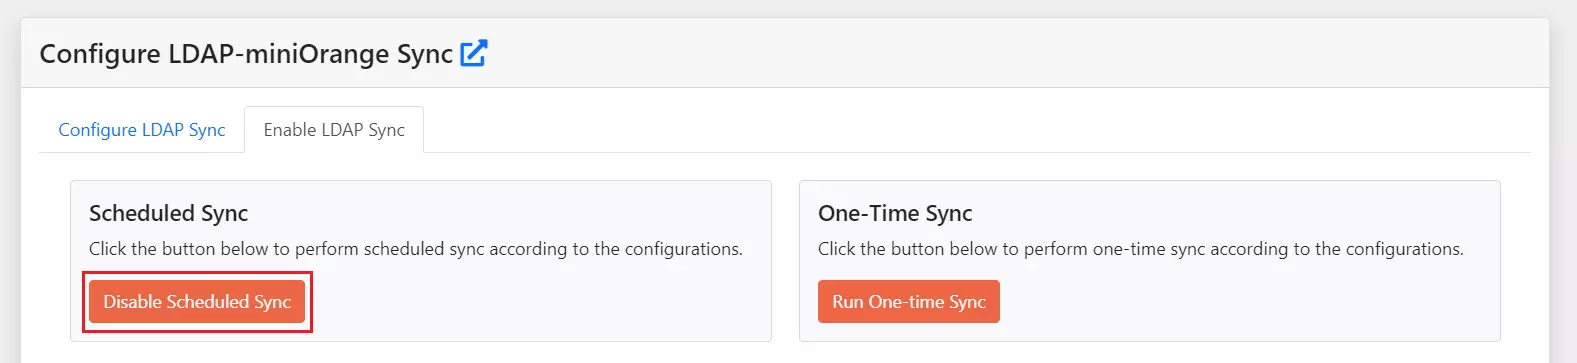
User Sync setup is complete.
Users and groups from your AD/LDAP directory will now sync to miniOrange according to your schedule. No further configuration is needed in the miniOrange cloud console for this use case.
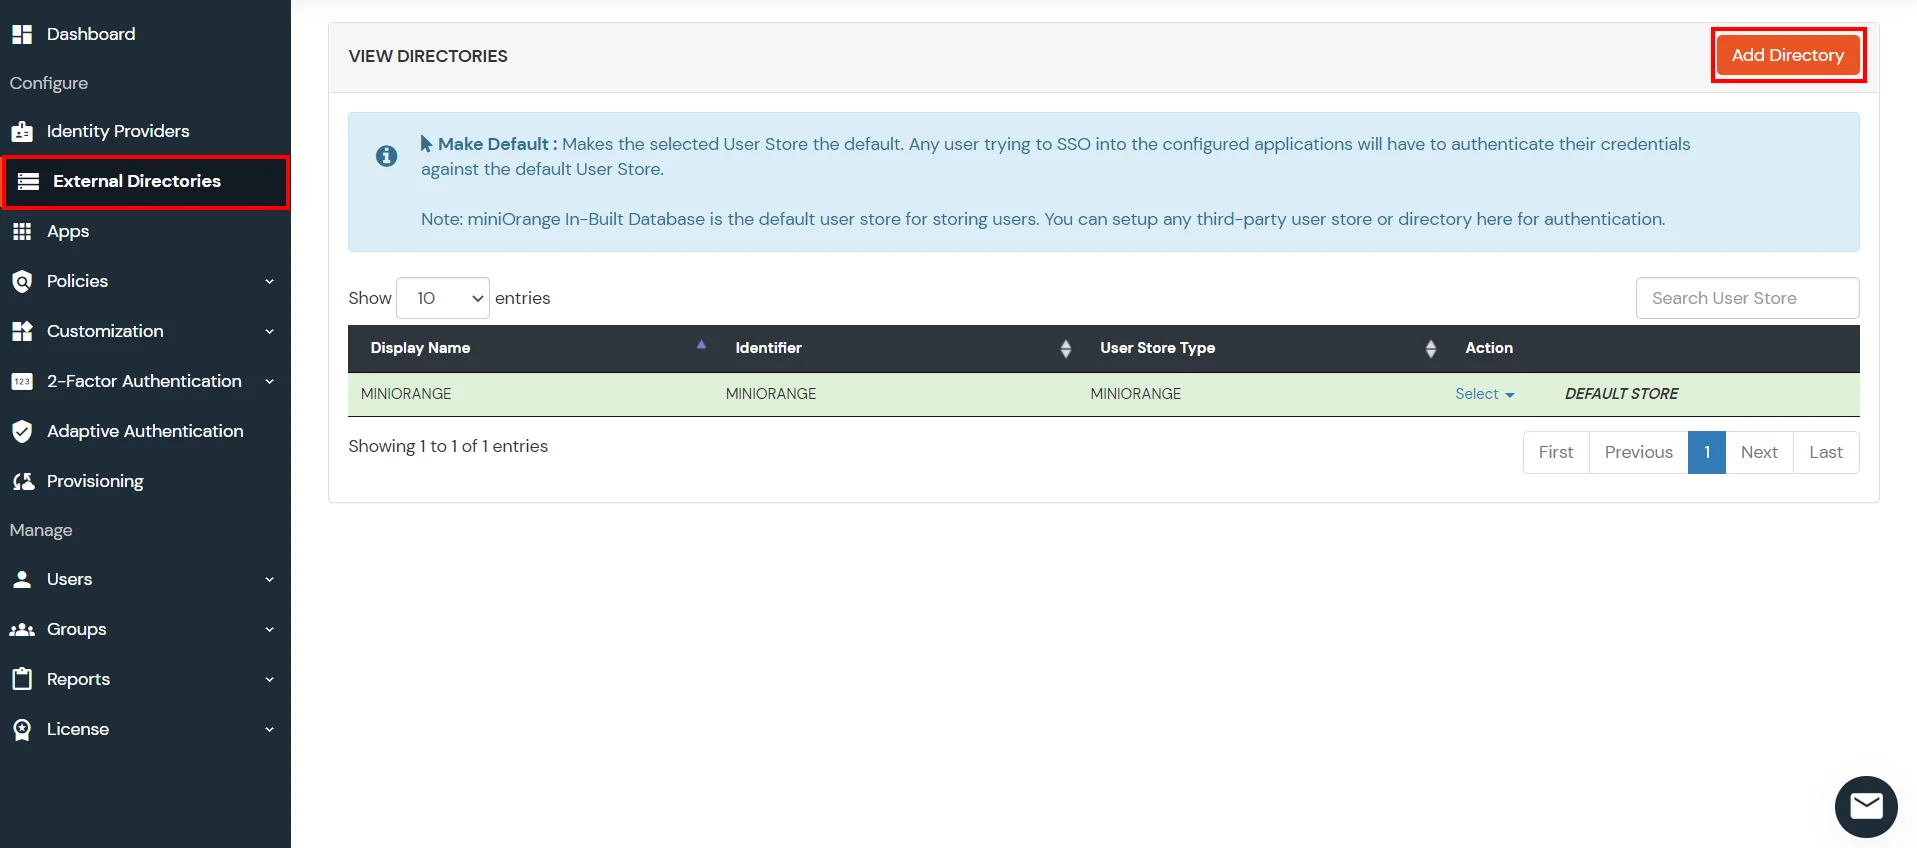
Use this section if your goal is to allow miniOrange to authenticate users against your on-premise AD/LDAP through the gateway. This requires one additional configuration step in the miniOrange cloud console.
This step tells miniOrange where to find your gateway so it can forward authentication requests to your AD/LDAP server.
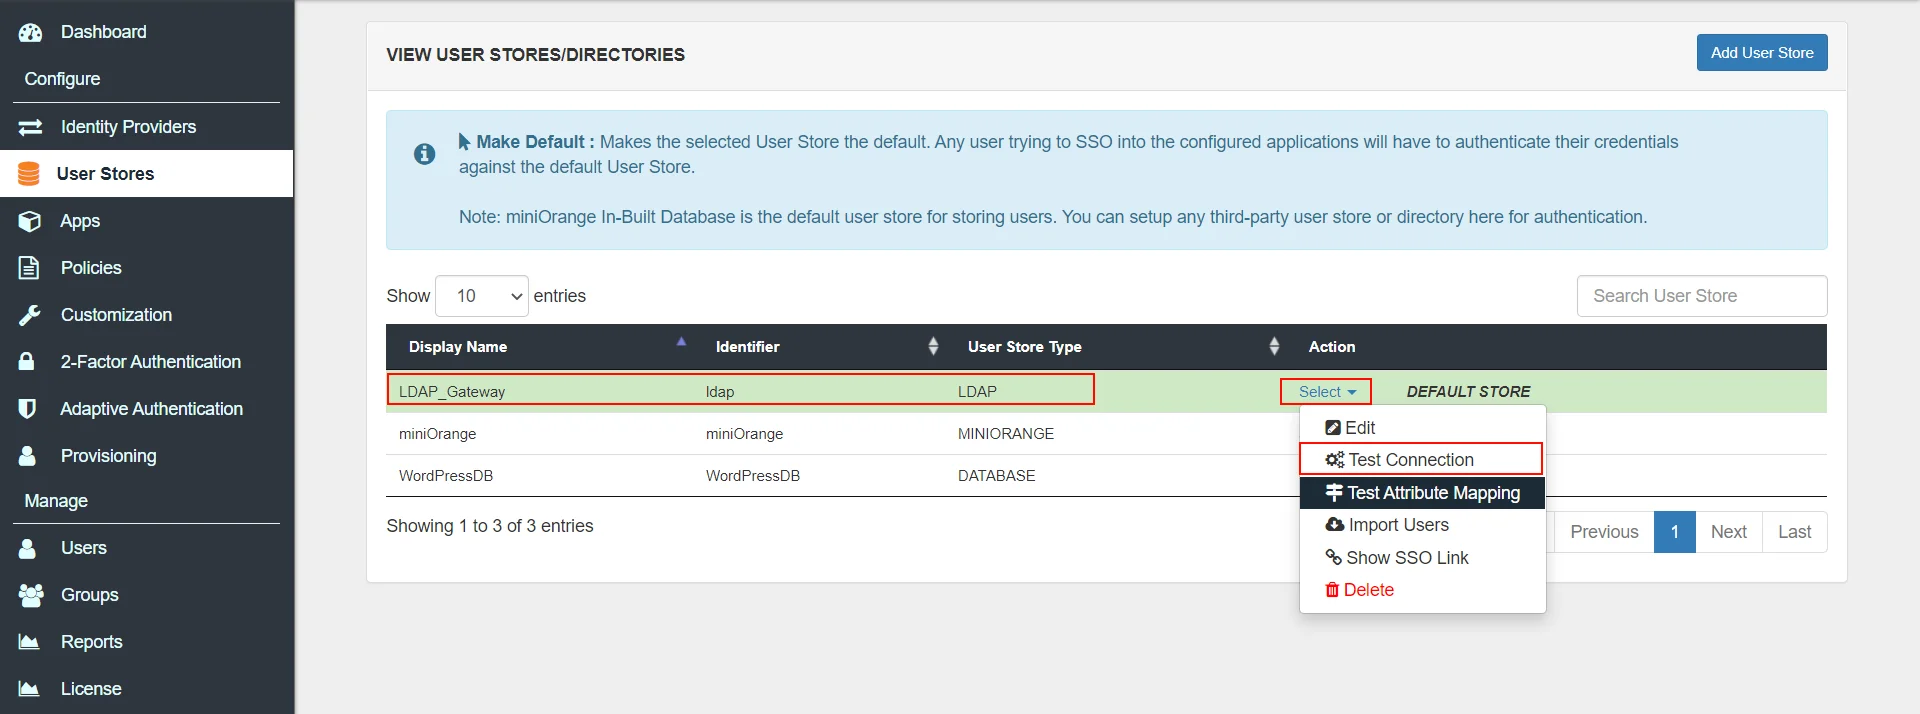
User Authentication setup is complete.
miniOrange will now authenticate users against your on-premise AD/LDAP via the gateway.
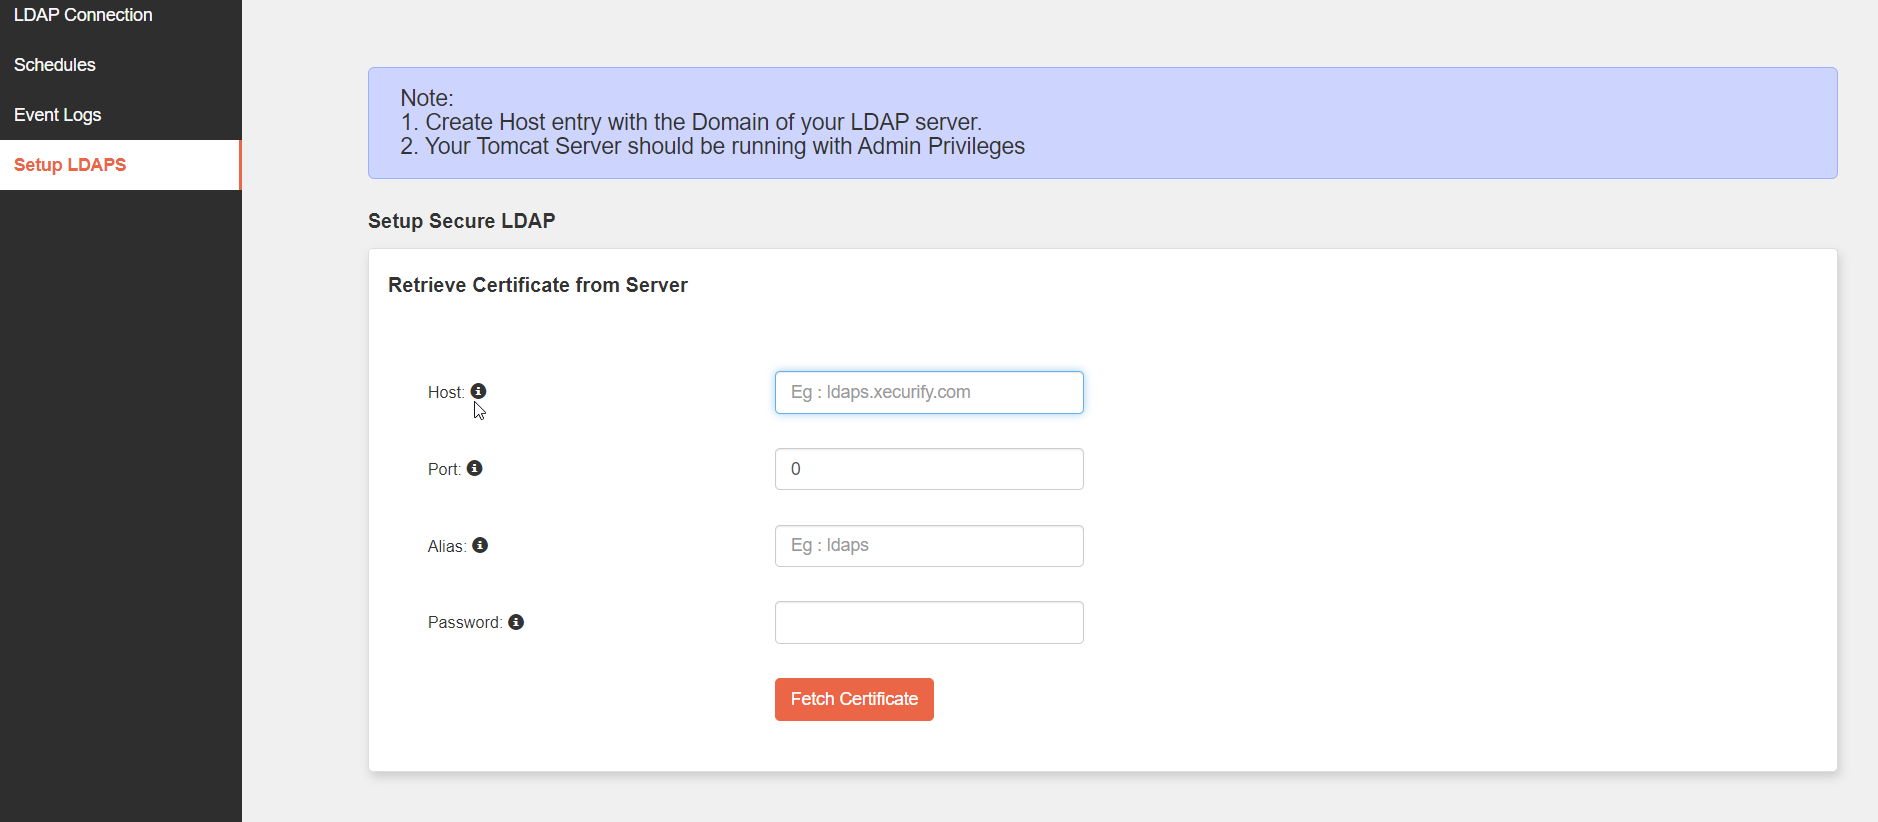
Configure this if your AD/LDAP server uses Secure LDAP (port 636) instead of standard LDAP (port 389).
Important: The gateway must be running with administrator/root privileges for this step.
| Field | Description | Example |
|---|---|---|
| Host | Hostname of your LDAP Domain Controller. | ldap.company.com |
| Port | Secure LDAP port. | 636 |
| Alias | Name used to store the certificate in the Java TrustStore. | myldap-cert |
| Password | Password for the Java TrustStore. | changeit (default) |
By default, the gateway web UI runs over HTTP. Configure HTTPS if your security requirements demand it. Before you begin, determine which applies to you:
Generate a Self-Signed Certificate (skip if you have a CA certificate)
<JAVA_HOME>/bin/ directory and create a certs/ subdirectory.
keytool -genkey -alias <ALIAS> -keyalg RSA -keystore <JAVA_HOME>/bin/certs/keystore.jks
Configure the HTTPS Connector in server.xml
conf/ directory inside your gateway installation:/opt/miniorangegateway/conf/C:\Program Files\miniOrange LDAP Gateway\conf\
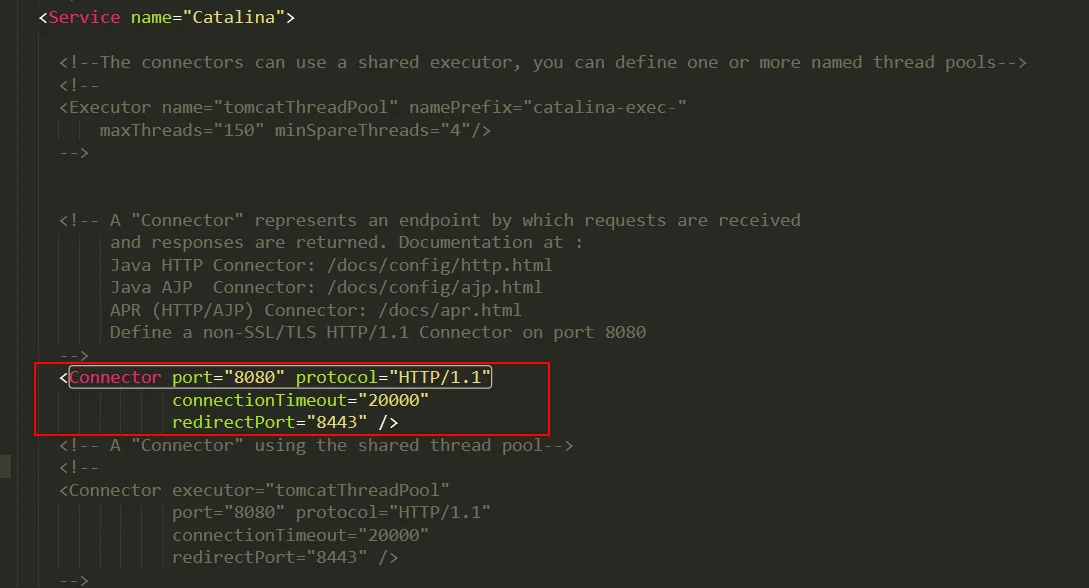
server.xml and add the following connector element inside <Service name="Catalina">:
            <Connector
  port="443"
  protocol="org.apache.coyote.http11.Http11NioProtocol"
  SSLEnabled="true"
  maxThreads="150"
  scheme="https"
  secure="true">
  <SSLHostConfig hostName="_default_">
    <Protocols>
      TLSv1.2,TLSv1.3
    </Protocols>
    <Certificate
      certificateKeystoreFile="<JAVA_HOME>/bin/certs/keystore.jks"
      certificateKeystorePassword="<KEYSTORE_PASSWORD>"
      certificateKeyAlias="<ALIAS>"
      type="RSA"
    />
  </SSLHostConfig>
</Connector>
Assign a Hostname to the Server
C:\Windows\System32\drivers\etc\hosts
/etc/hosts
127.0.0.1 <newhostname>
<Engine name="Catalina" defaultHost="localhost"> and replace localhost with <newhostname>.<Host> element and replace name="localhost" with name="<IP Address or DNS>".Important: After configuring HTTPS, remember to update the Gateway URL in the miniOrange cloud console (Part 2, Step 2.2) to use to use https:// instead of http://.
Follow the instructions for your installation method.
The installer handles the upgrade automatically and preserves your configurations.
            # Linux: sudo systemctl stop miniorangegateway
# Windows: stop the service via services.msc
# Linux: sudo systemctl start miniorangegateway
Important: SSL configuration (server.xml) is NOT automatically restored after upgrade. The installer backs up your existing server.xml to /var/backups/miniorangegateway/server.xml (Linux) before replacing it. If you have SSL configured, re-apply your server.xml SSL settings manually after the upgrade.
Choose the upgrade type based on what you need to update:
Option A — Upgrade the Gateway Application Only
webapps/miniorangegateway/ folder.webapps/miniorangegateway/ folder from it into your installation, replacing the existing one.application.properties to:/opt/miniorangegateway/webapps/miniorangegateway/WEB-INF/classes/application.propertiesC:\Program Files\miniOrange LDAP Gateway\webapps\miniorangegateway\WEB-INF\classes\application.propertiesOption B — Upgrade the Entire Installation (Gateway + Tomcat)
application.properties (path as above)conf/server.xml — only if you have made changes to it (e.g. SSL configuration, custom port)/opt/miniorangegateway/C:\Program Files\miniOrange LDAP Gateway\application.properties to:/opt/miniorangegateway/webapps/miniorangegateway/WEB-INF/classes/application.propertiesC:\Program Files\miniOrange LDAP Gateway\webapps\miniorangegateway\WEB-INF\classes\application.propertiesJava 17 is required. Earlier or later versions are not supported. Note: the Windows, DEB, and RPM installers bundle OpenLogic JDK 17 automatically — you only need to install Java manually when using the ZIP method.
Yes, the gateway requires Tomcat 11 or later for proper deployment and functionality. The Windows and Linux installers bundle the correct Tomcat version.
By default, the gateway only sends updates to miniOrange when a configured AD attribute changes. To force all users to be sent on every sync, set the following in application.properties:
            Force update all users on every sync: send.force.updates=true
# Default (only update on change): send.force.updates=false
If Enable Group Sync is disabled but Enable User Group Membership Sync is enabled, the gateway will remove all group assignments from users in miniOrange. To prevent any group changes in miniOrange, disable Enable User Group Membership Sync as well.