Hello there!
Need Help? We are right here!
Need Help? We are right here!
Search Results:
×
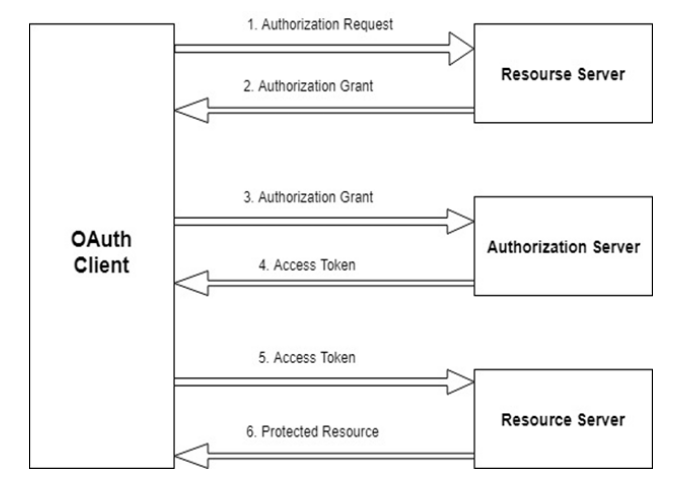
OAuth Server/OpenID Connect Server (OAuth 2.0 Server) also known as Authorization Server, It is the modern standard for securing access to APIs & implements network protocol flows which allow a client (OAuth Client) to act on behalf of a user.
OAuth Server allows clients to verify the identity of end-users based on the authentication performed by an Authorization Server and also to obtain basic profile information about the end-users in an interoperable and REST-like manner.
OAuth 2.0 Server is used to set up any Application as Identity Server to allow users to Single Sign-On / Login into their client site/application with login using OAuth / OpenID Connect protocol flows.
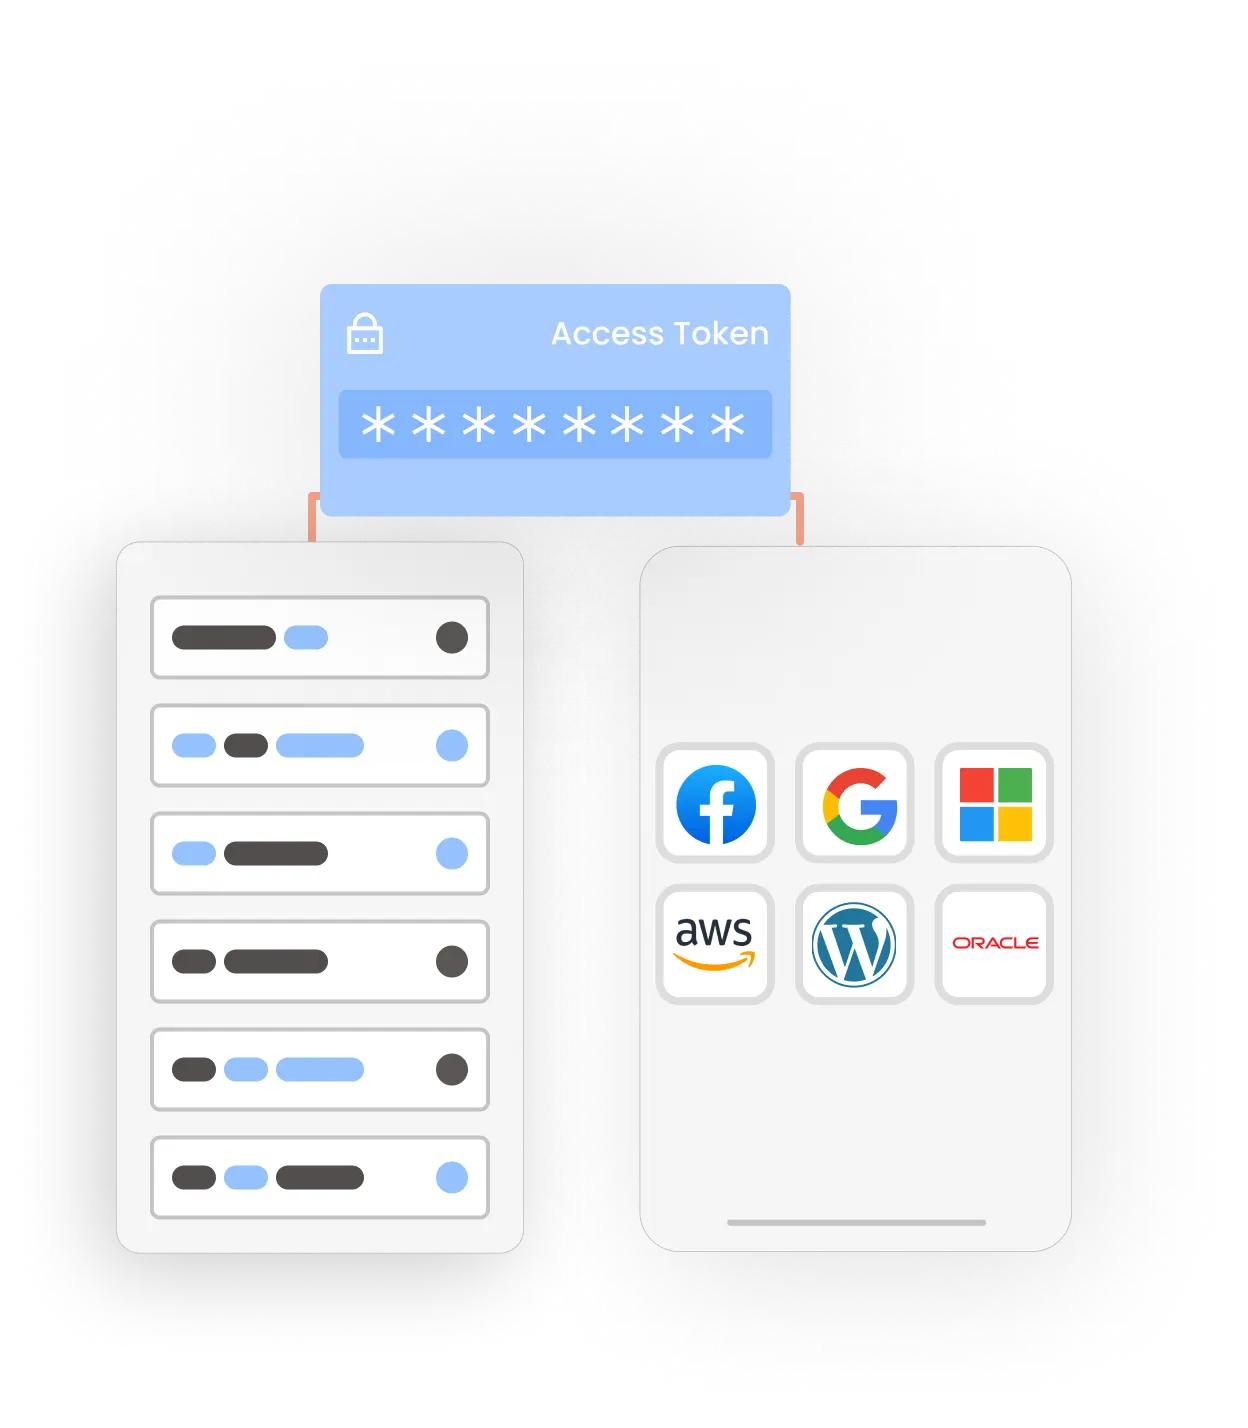
The primary goal of this OAuth 2.0 server/Oauth Provider is to allow users to interact with multiple apps without requiring them to store sensitive credentials. You can easily configure an OAuth 2.0/OpenID Connect server to protect your API with access tokens, or allow clients to request new access tokens and refresh them.

We support both OAuth 2.0 and OpenID Connect protocols. They offer a secure way of obtaining the user information from your provider. We use this user information to help you integrate Single Sign-On into your applications.
We provide grant type support like Authorization Code Grant, Resource Owner Credentials Grant (Password Grant), Client Credentials Grant, Implicit Grant, Refresh token Grant.
We support JSON Web Token (JWT) authentication. After user logs in, each request includes the JWT allowing the user to access resources that are accessible by that token.
We can integrate with any custom Oatuh provider including fameous Oauth providers like Google, LinkedIn. We allow our user to choose from multiple algorithms to sign the JWT.
Read more
A user gets logged out from the OAuth Server automatically on logging out with the OAuth Client.
Our OAuth / OpenID REST APIs enable integration and single sign-on into your Mobile Applications including iOS, Android, NodeJS, Cordova, Ionic etc.
OAuth (Open Authorization) is an open standard for token-based authentication and authorization which is used to provide single sign-on (SSO).
OAuth allows an end user's account information to be used by third-party services, such as Facebook, without exposing the user's password. It acts as an intermediary on behalf of the end user, providing the service with an access token that authorizes specific account information to be shared.
| OAuth 1.0 | OAuth 2.0 |
| OAuth 1.0 used complicated cryptographic requirements. | OAuth 2.0 is faster and easier to implement. |
| It requires to encrypt the OAuth token on the endpoints. | OAuth tokens no longer need to be encrypted on the endpoints in 2.0 since they are encrypted in transit. |
| OAuth 1.0 only supported three flows, and did not scale. | OAuth 2.0, on the other hand, has six flows for different types of applications and requirements, and enables signed secrets over HTTPS. |
OAuth is a slightly newer standard that was co-developed by Google and Twitter to enable streamlined internet logins. OAuth uses a similar methodology as SAML to share login information. SAML provides more control to enterprises to keep their SSO logins more secure, whereas OAuth is better on mobile and uses JSON.Facebook and Google are two OAuth providers that you might use to log into other internet sites.
| SAML | OAuth |
| SAML uses XML to send Messages. | OAuth uses JSON. |
| SAML is more into enterprise security. | OAuth 2.0 for Native and Mobile Apps. |
| SAML uses session cookie in a browser that allows a user to access certain web pages. | OAuth uses API calls extensively so mostly it used to provide a better experience in mobile applications, modern web applications, game consoles, and the Internet of Things (IoT) devices. |
Let us take an example to show you how to implement OAuth as a Consumer:
REGISTER YOUR APP
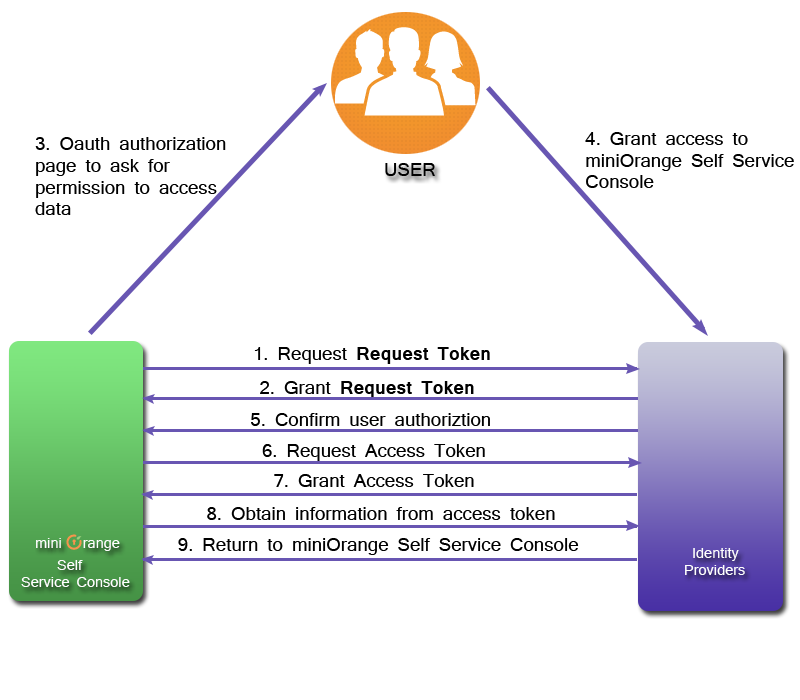
Create an App in any OAuth Provider like Facebook, Twitter etc. After registering your application, you will receive a Consumer Key which identifies you to OAuth Provider.You will also receive a Consumer Secret that will be required when asking for an Request Token. Save the Consumer Key and Secret so that you can use it into your code as required.
GET A REQUEST TOKEN
The miniOrange Authentication Service requests a Request Token.The Request Token is a temporary token used to initiate User authorization for your application. The Request Token tells OAuth Provider that you've obtained User approval, but must be exchanged, along with the OAuth Verifier, for an Access Token.
GET USER PERMISSION TO ACCESS DATA
After getting the Request Token from OAuth Provider, miniOrange Authentication Service presents to your Users an authorization page asking them to give permission to our application to access their data.The authorization page will only ask for permission to a limited amount of User data, based on the access scopes you specified during the initial registration process.
EXCHANGE THE REQUEST TOKEN AND OAUTH VERIFIER FOR AN ACCESS TOKEN
After the users authorize miniOrange Authentication Service access to their information,our application needs to exchange the approved Request Token for an Access Token, which tells OAuth Provider that miniOrange Authentication Service has been given authorization to access User data.
AUTHENTICATE THE USER
After obtaining user information from the Access Token, it queries miniOrange Authentication Service enduser database. If the user already exists in database, it redirects to user Self Service Console. If the user does not exist in enduser database, it redirects back to Login Page.