VMware Horizon View Two Factor Authentication (2FA/MFA)
Configure Multifactor Authentication (MFA/2FA) for VMware Horizon View (VDI)
miniOrange strengthens the security of VMware Horizon 2-factor Authentication (2FA) or VMware Horizon View MFA . This advanced approach requires not only your regular password but an additional piece of information it's like having a second lock on your Horizon account, making it exceptionally tough for unauthorized access.
miniOrange seamlessly integrates this added security layer into the VMware Horizon login process. Even if someone discovers your password, they can't get in without the second level of authentication, which can be generated by tools such as Google Authenticator. This extra layer of security, known as VMware Horizon MFA or VMware Horizon Two-factor authentication helps ensure your sensitive data stays well-protected in line with the latest security standards.
Be Cyber Insurance compliant with miniOrange MFA solution. Read More
Get Free POC - Book a Slot
miniOrange offers free POC and help through a consultation call with our System Engineers to Setup Multi-Factor Authentication for VMware Horizon View VPN in your environment with 30-day trial.
For this, you need to just send us an email at idpsupport@xecurify.com to get free POC and we'll help you setting up our solution in no time.
Get Free POC
miniOrange 2FA/MFA authentication for VMware Horizon View Login
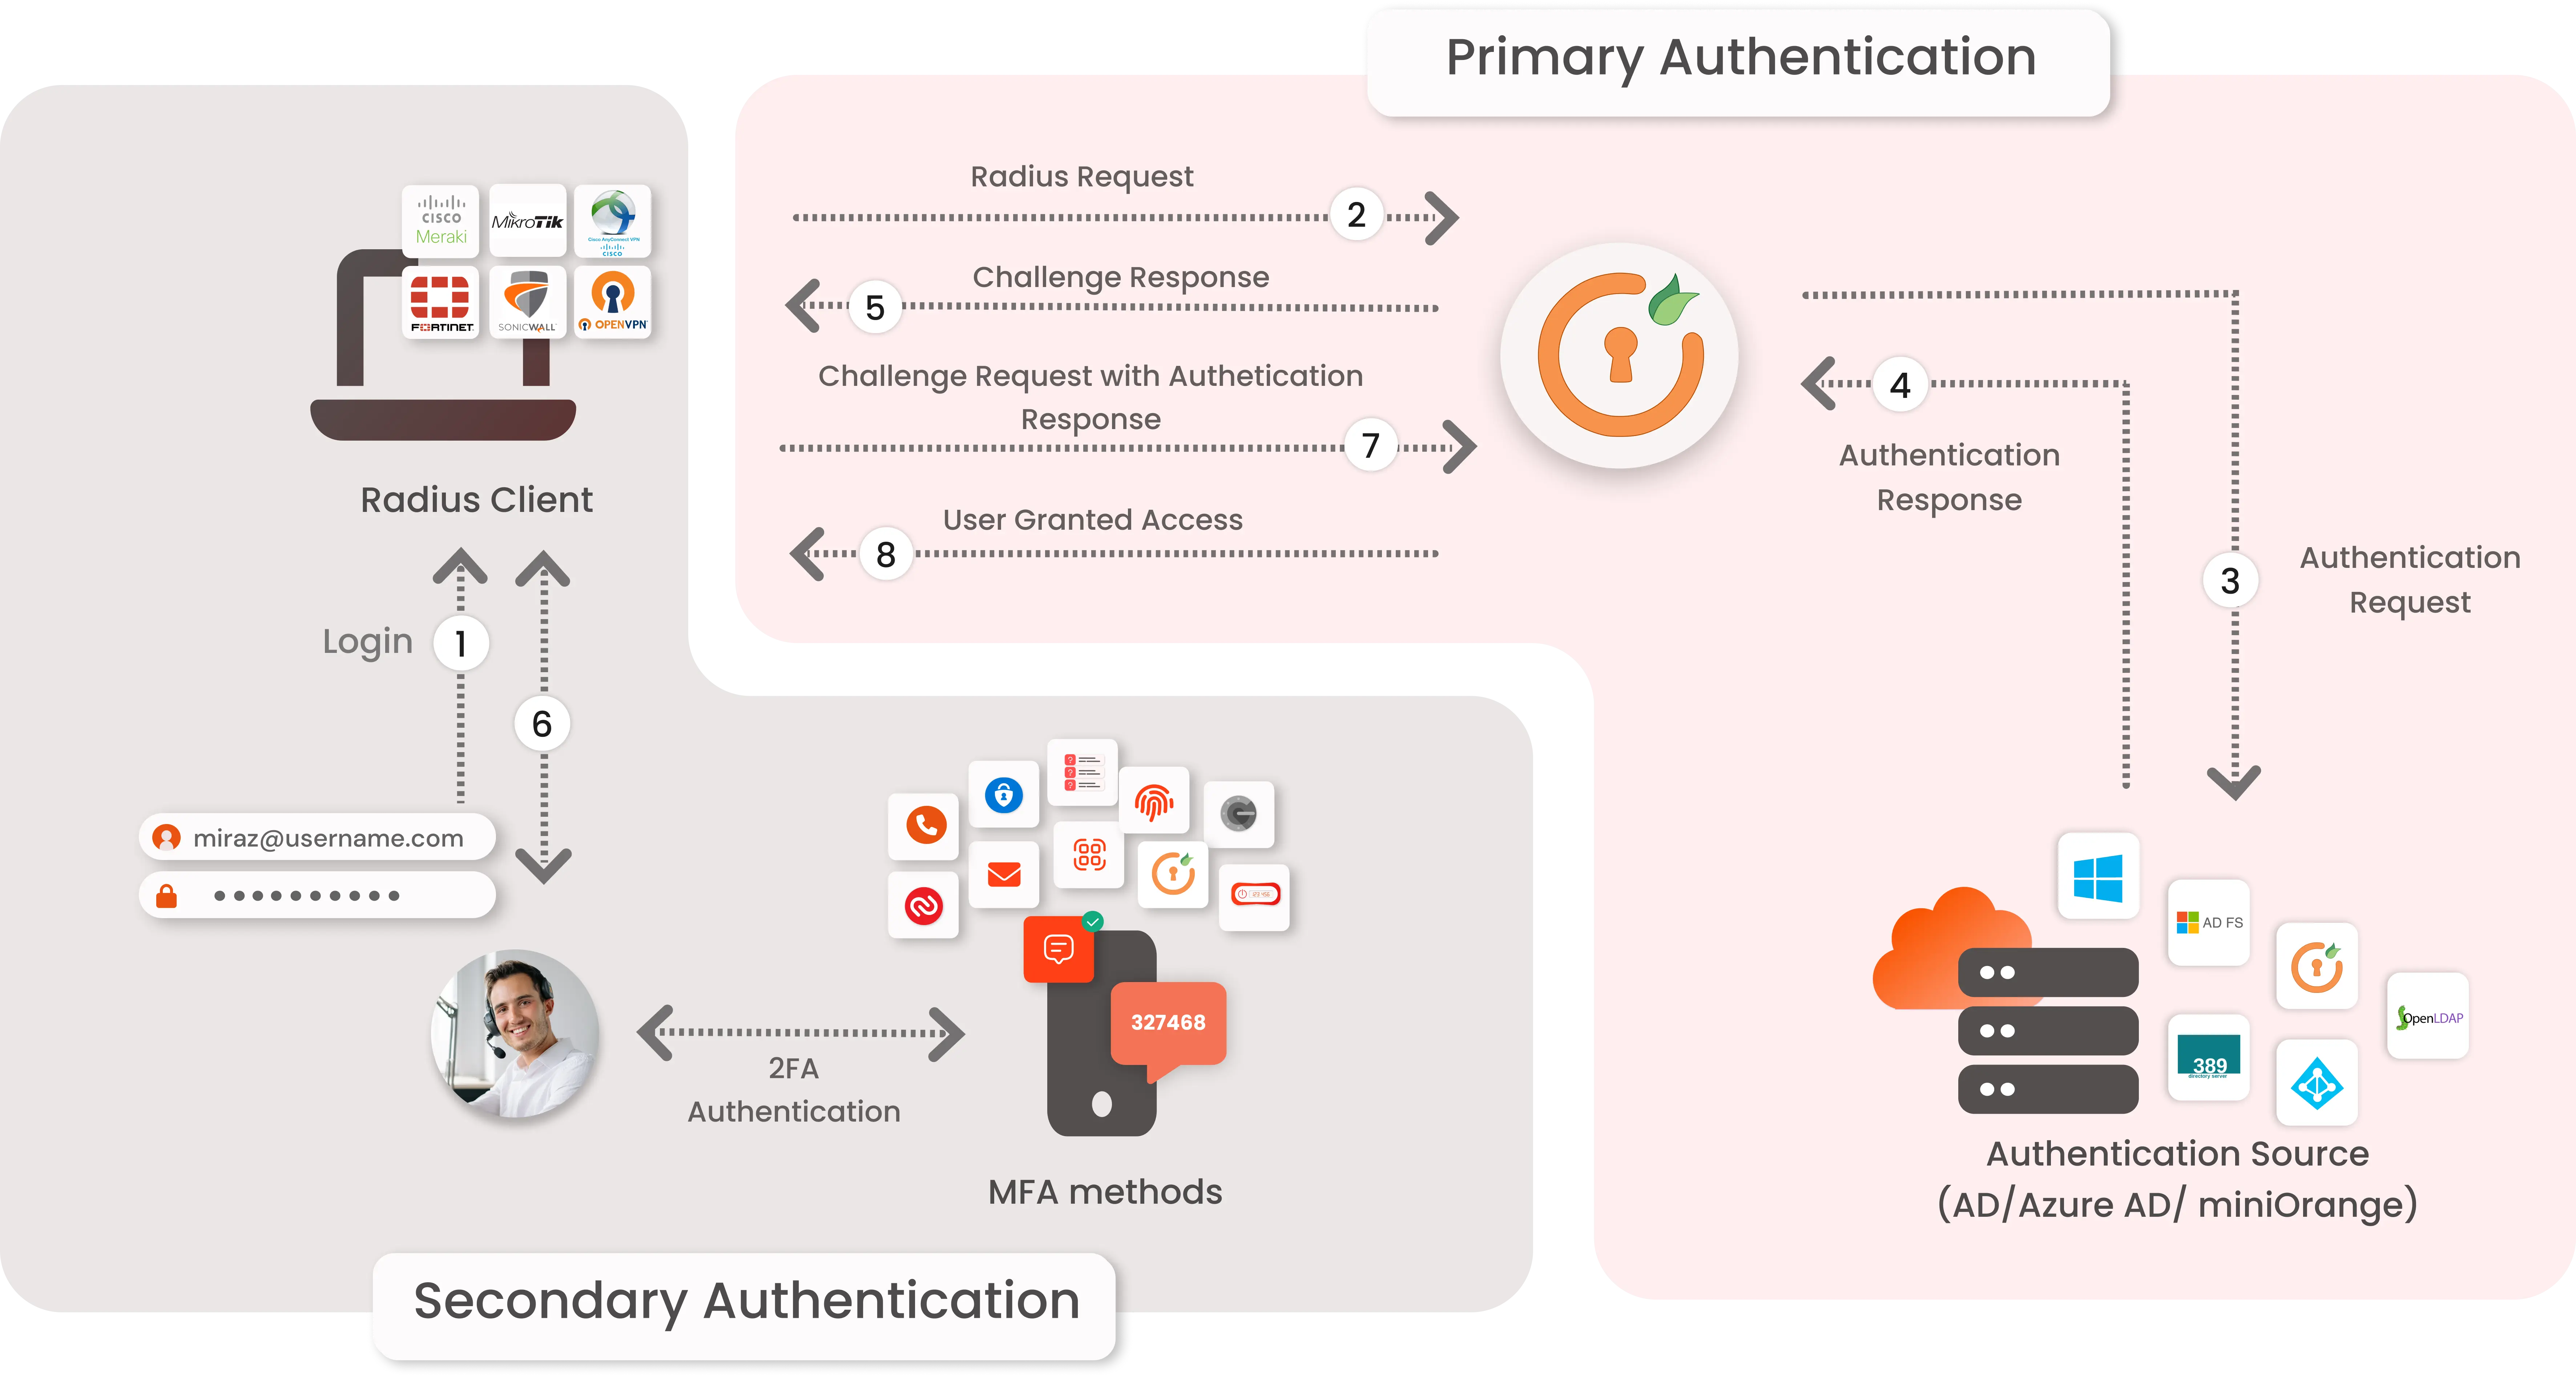
miniOrange accomplishes this by acting as a RADIUS server that accepts the username/password entered by the user as a RADIUS request and validates the user against a user store such as Active Directory (AD). After the first level of authentication, the miniOrange MFA solution prompts the user for a second authentication factor and grants or revokes access based on the user’s input.
Primary authentication initiates with the user submitting his Username and Password for VMware Horizon View.
User request acts as an authentication request to RADIUS Server(miniOrange).
miniOrange RADIUS server passes user credentials to validate against the credentials stored in AD (Active Directory) / Database.
Once the user's first level of authentication gets validated AD sends the confirmation to RADIUS Server.
Now miniOrange RADIUS Server asks for a 2-factor authentication challenge to the user.
Here user submits the response/code which he receives on his hardware/phone.
User response is checked at miniOrange’s RADIUS Server side.
On successful 2nd factor authentication the user is granted access to login.
Connect with any External Directories
miniOrange provides user authentication from various external directories such as miniOrange Directory, Microsoft AD, Microsoft Entra ID/LDAP, AWS Cognito and many more.
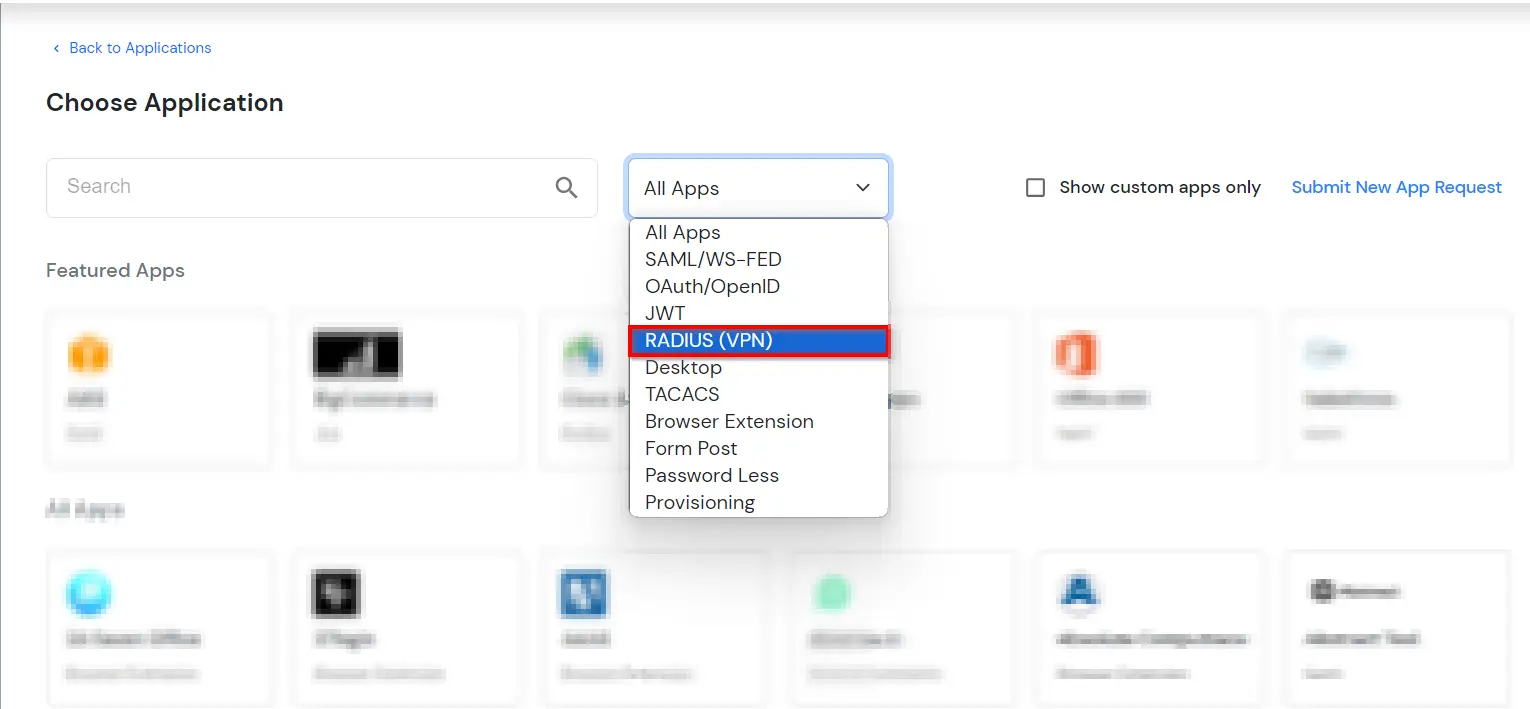
Go to Apps and click on Add Application button on the top right corner.
Choose RADIUS as Application type and click on Create App button.
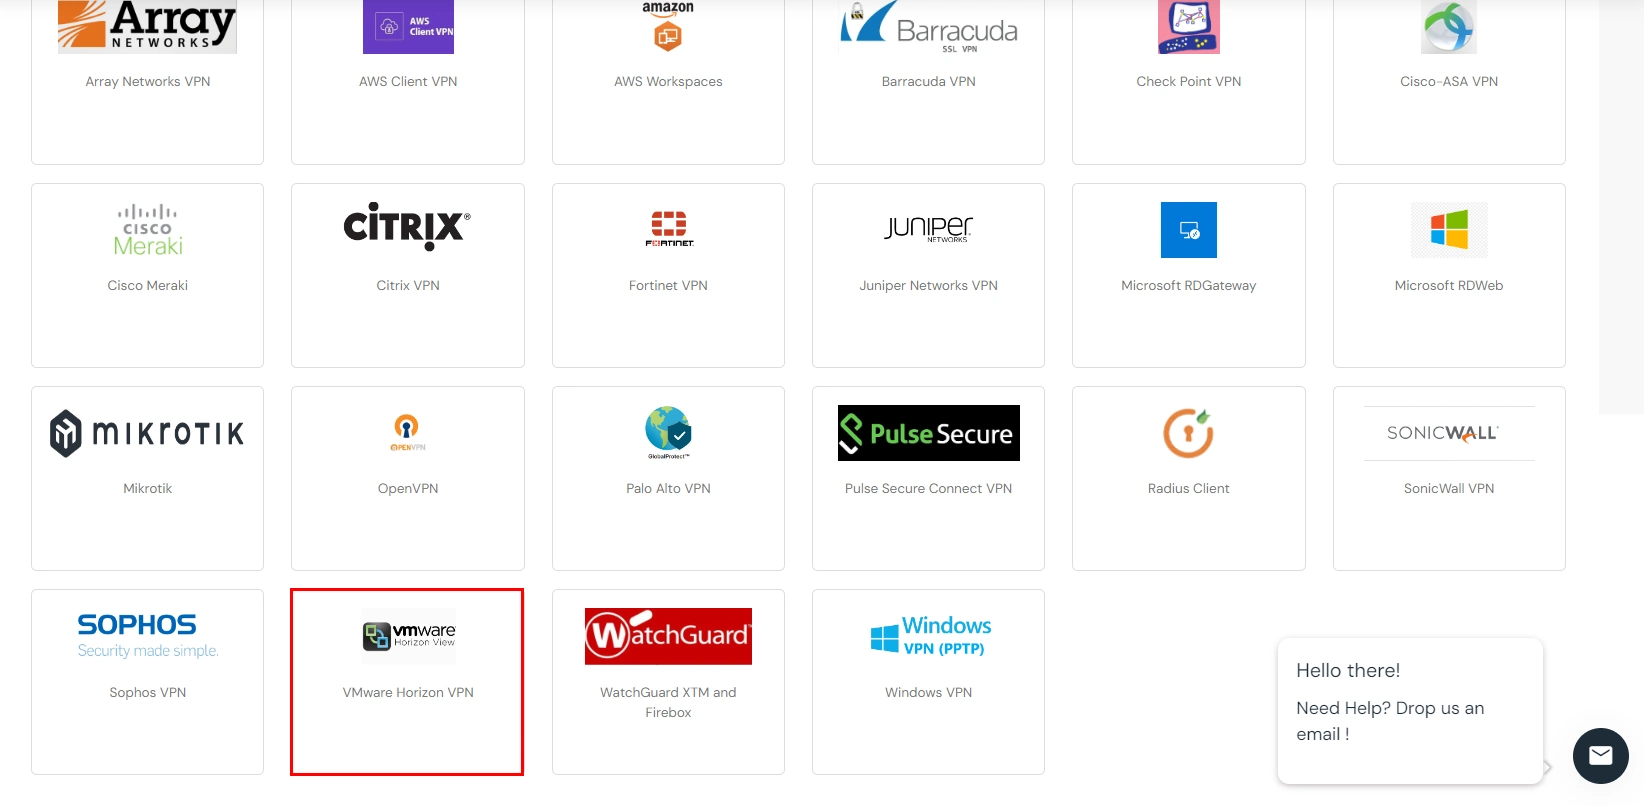
Click on VMware Horizon View application tab. If you don't find your application, click on Radius Client application tab.
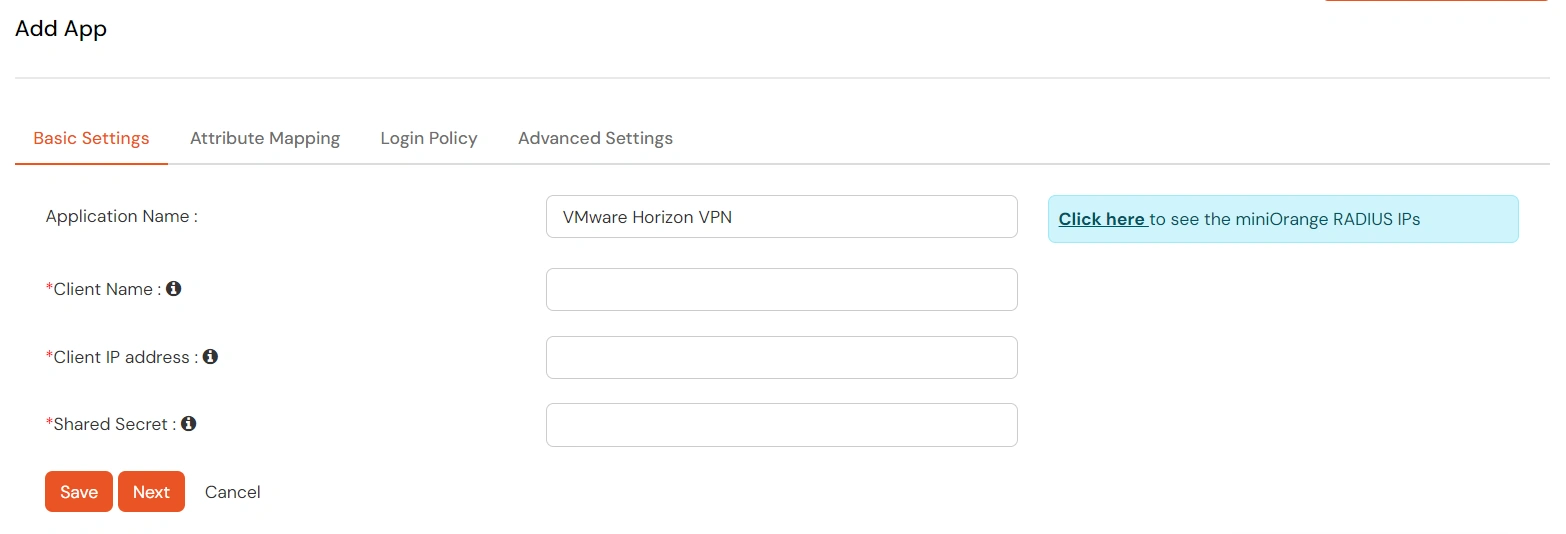
Configure details below to add Radius Client.
Client Name:
Any name for your reference.
Client IP:
IP address of VPN server which will send Radius authentication request.
Shared Secret:
Security key. For Eg. "sharedsecret" (Keep this with you, you will need to configure same on VPN Server).
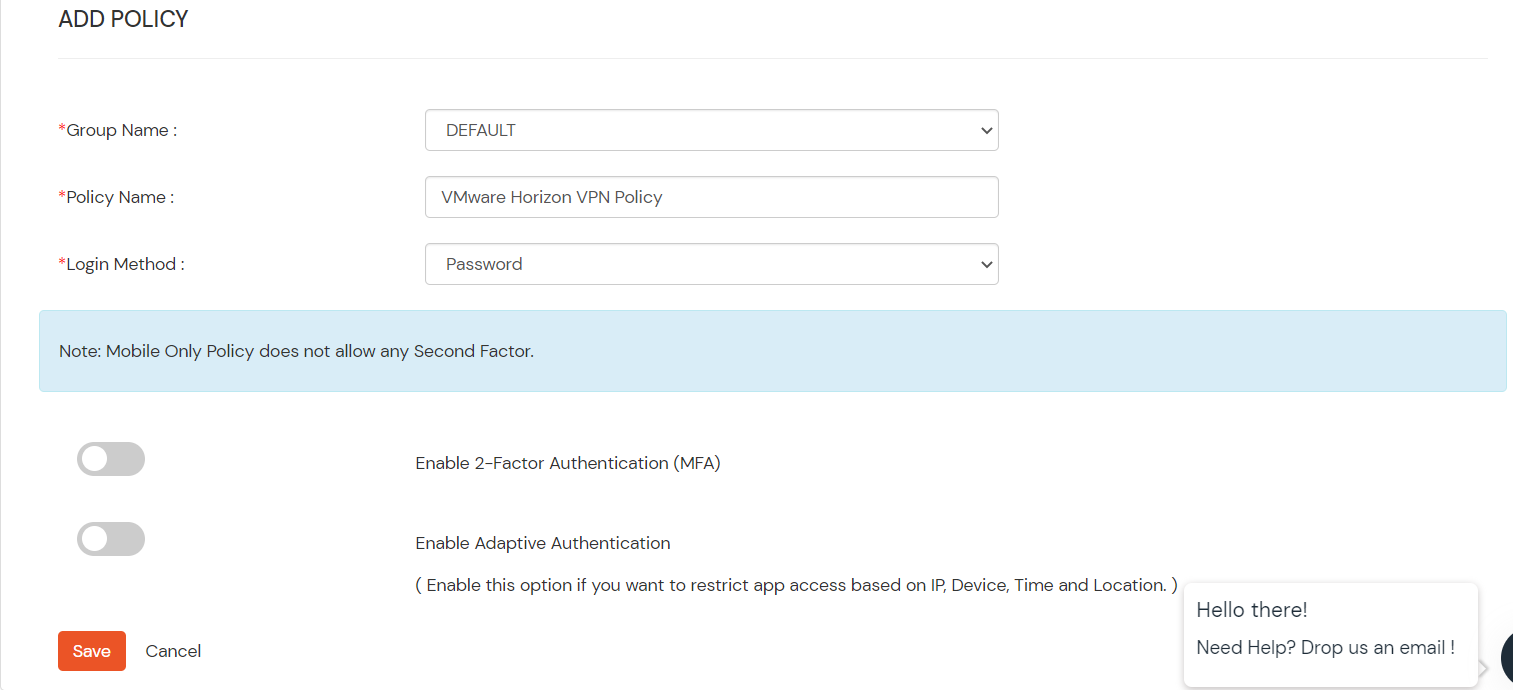
Click on Login Policy. Configure the following Policy details for the Radius App.
Group Name:
Group for which the policy will apply.
Policy Name:
Any Identifier that specifies policy name.
Login Method
Login Method for the users associated with this policy.
Enable Two-Factor Authentication
Enables Second Factor during Login for users associated with this policy.
Enable Adaptive Authentication
Enables Adaptive Authentication for Login of users associated with this policy.
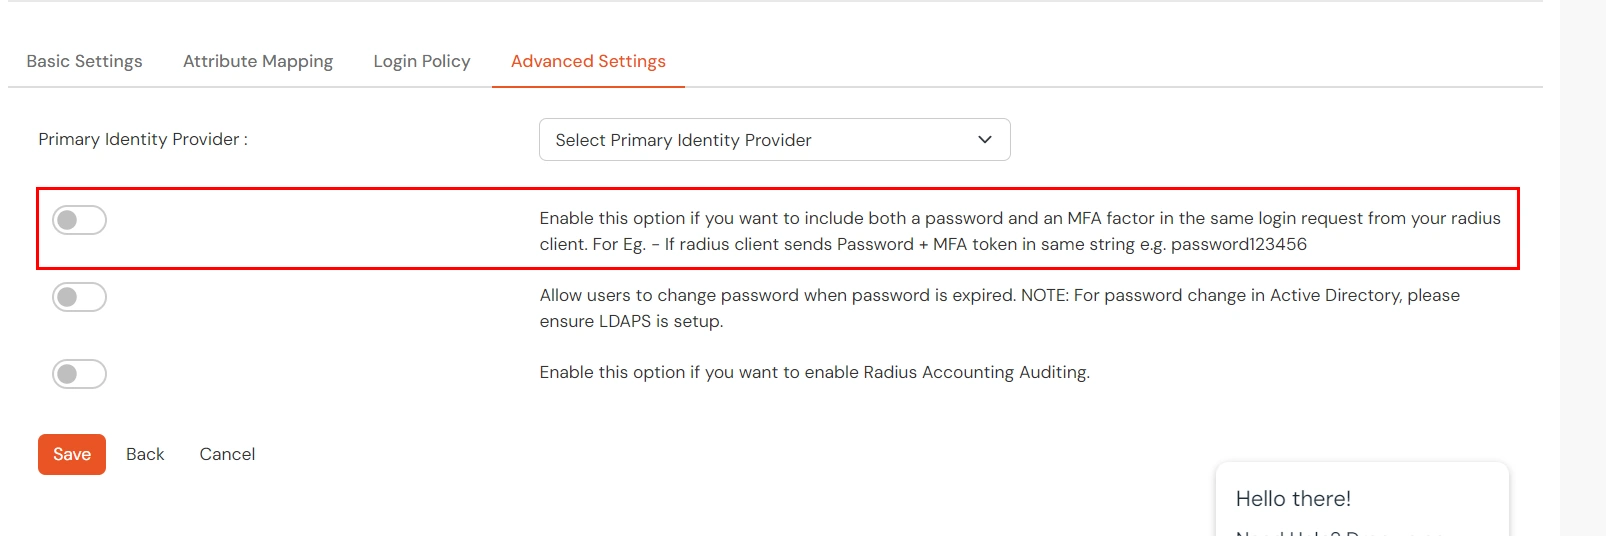
Click on Advance Settings. Here, Enable this option if you require both a password and a multi-factor authentication (MFA) factor in a single login request from your RADIUS client.
Click on Save.
NOTE: For On-Premise version follow the below steps before testing the connectivity.
Only For On-Premise Version
Step 1: Open Firewall Ports.
In order to receive the RADIUS request, it is necessary to open UDP traffic on ports 1812 and 1813 for the machine where On-Premise IdP is deployed.
If the hosting machine is a Windows Machine then you can follow this document.
If the hosting machine is a Linux Machine then you can follow this document.
NOTE: If your machine is hosted on AWS, then enable the ports from the AWS panel.
2. Configure VMware Horizon View
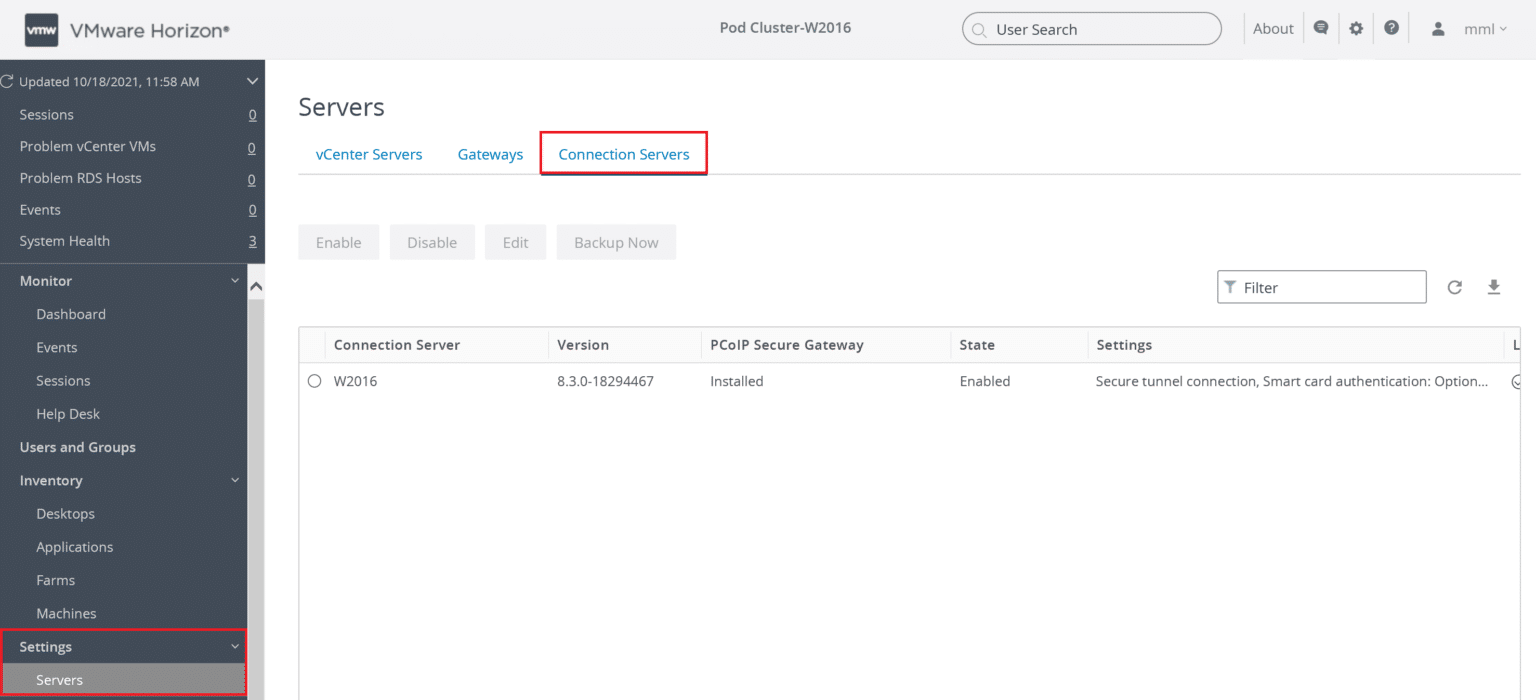
Log in to the VMware Horizon View Administrator web interface.
In the left pane, expand Settings and then click Servers in the administrative interface.
Select the Connection Servers tab.
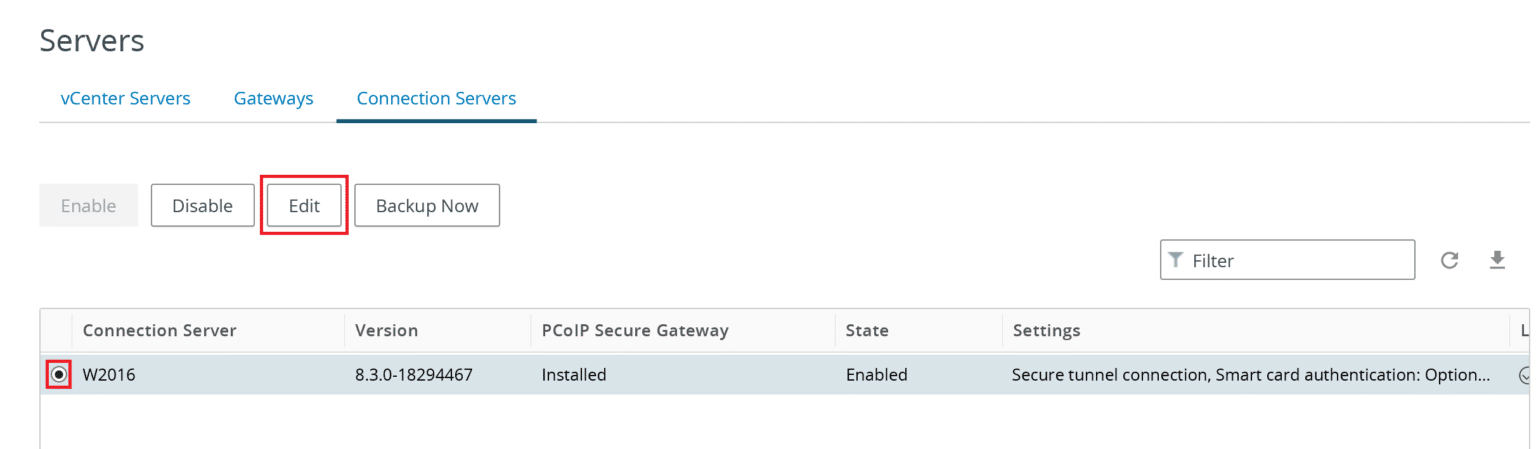
Select the connection server and click the Edit button.
Click the Authentication tab.
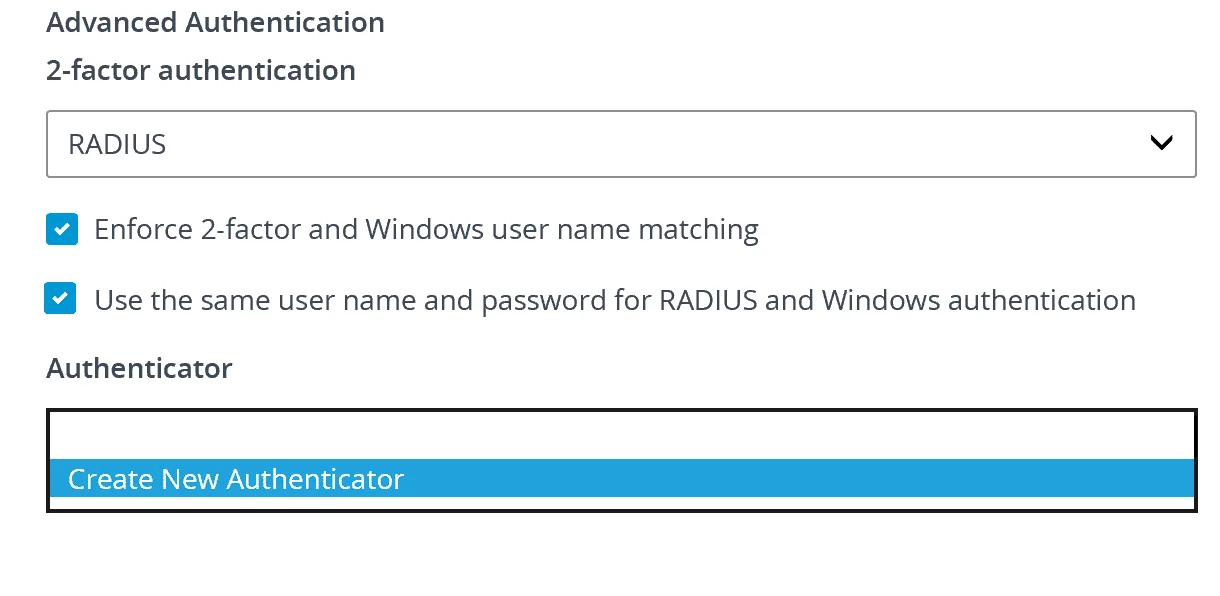
Navigate to the Advanced Authentication section and select RADIUS in the two-factor authentication dropdown.
Check the following checkbox:
Enforce two-factor and Windows user name matching
In the Authenticator dropdown, select Create New Authenticator.
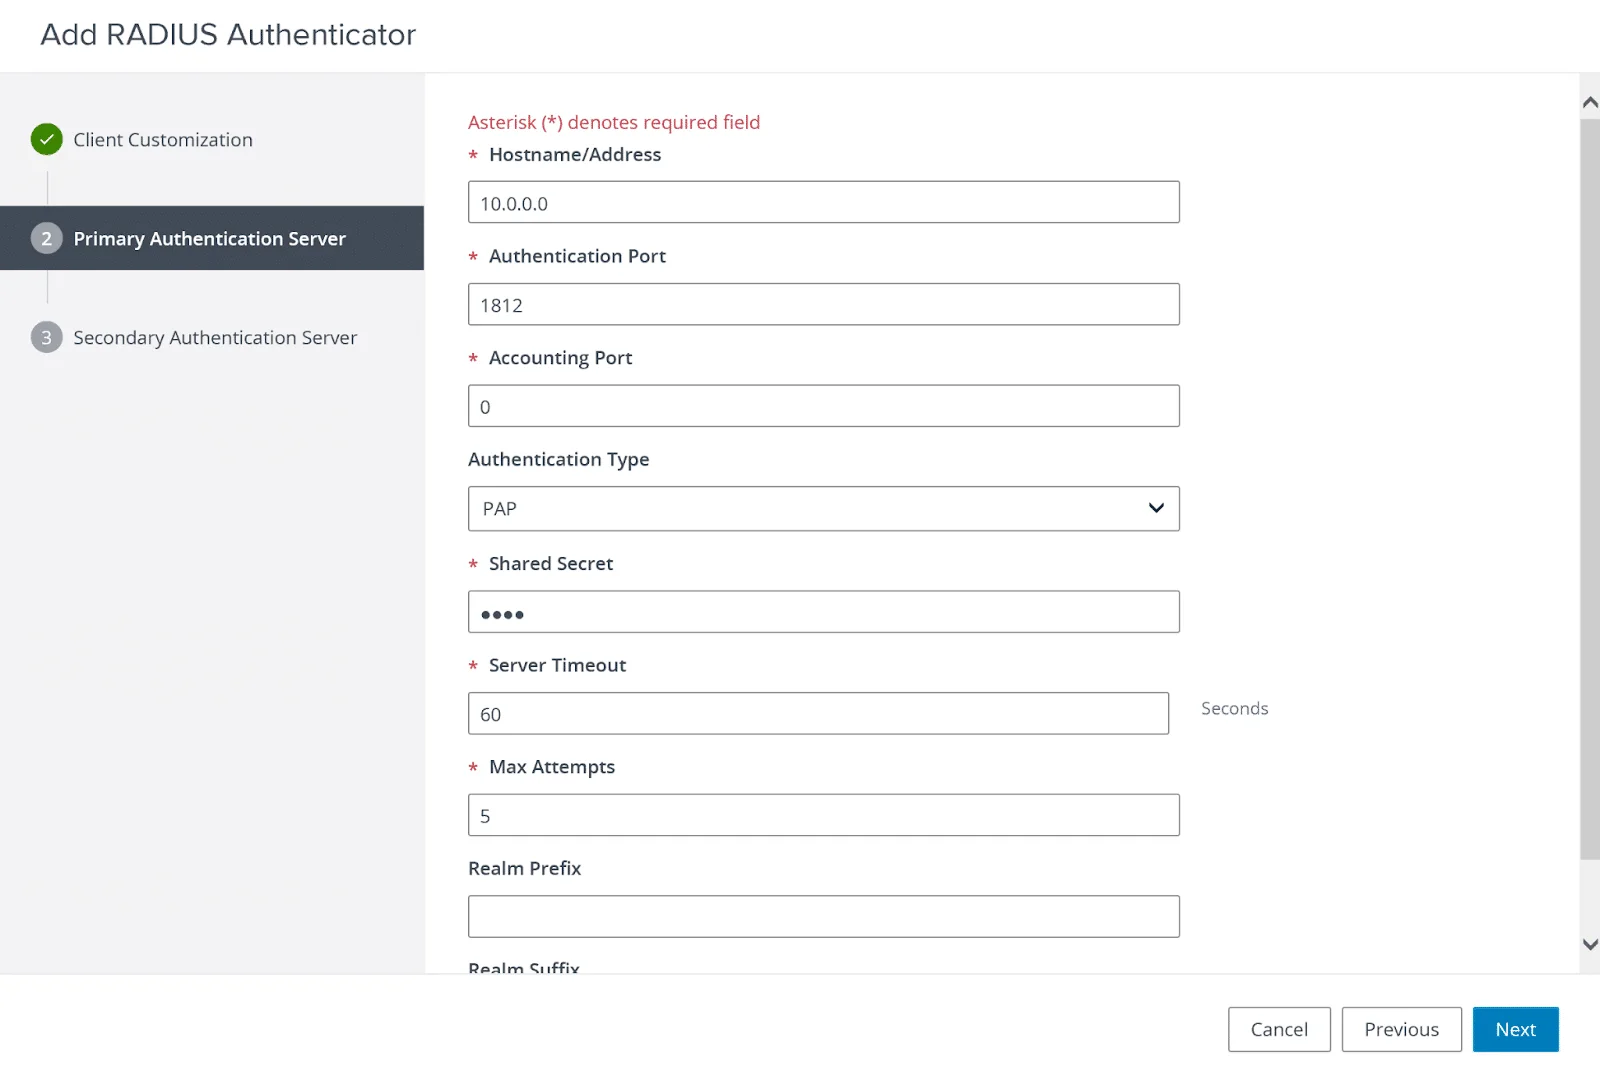
On the Client Customization page of the Add RADIUS Authenticator form, provide a name for your authenticator and click Next.
Fill in the Primary Authentication Server information. Refer to the following screenshot and table.
Hostname/Address
Enter the IP address of your miniOrange Authentication Proxy.
Authentication Port
Set to 1812.
Accounting Port
N/A. Leave the default value.
Authentication Type
Select PAP.
Shared Secret
Enter the RADIUS_SECRET from miniOrange Authentication Proxy.
Server Timeout
Controls how long the RADIUS server may take to respond to an authentication request. Set to 60.
Leave the default value for all other fields and click Next.
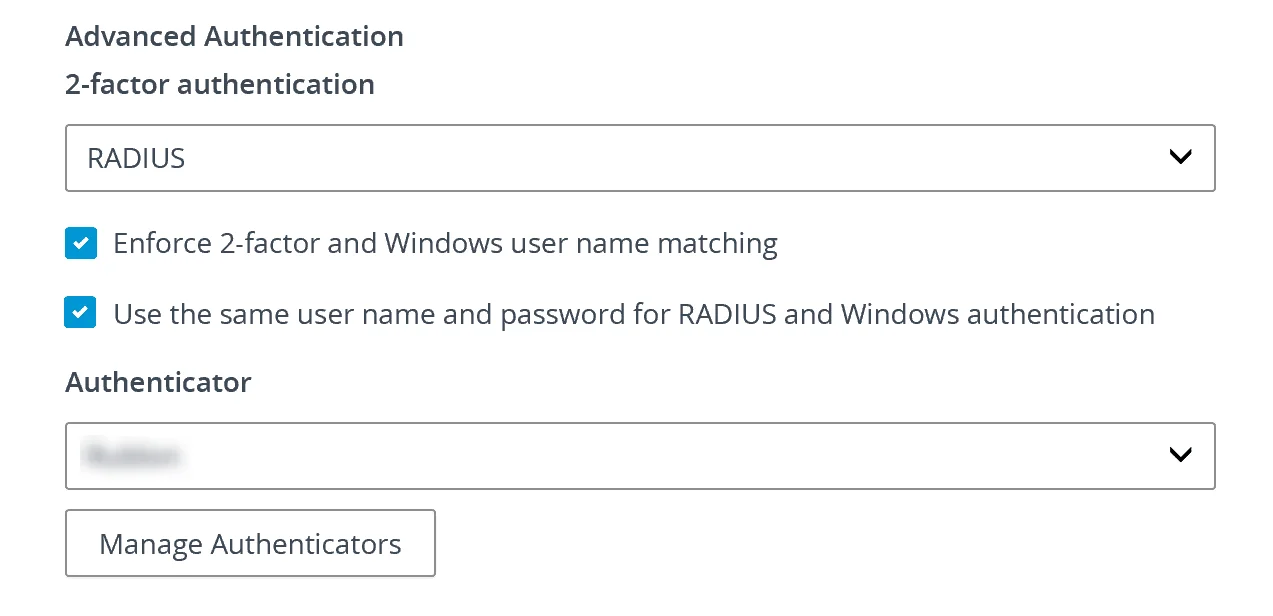
You can define a secondary authentication server. This is optional.
Click Finish to complete creating the RADIUS authenticator.
Ensure both user name options are enabled and that the newly-created miniOrange RADIUS authenticator is selected, and then click OK.
3. Configure 2FA for End-Users
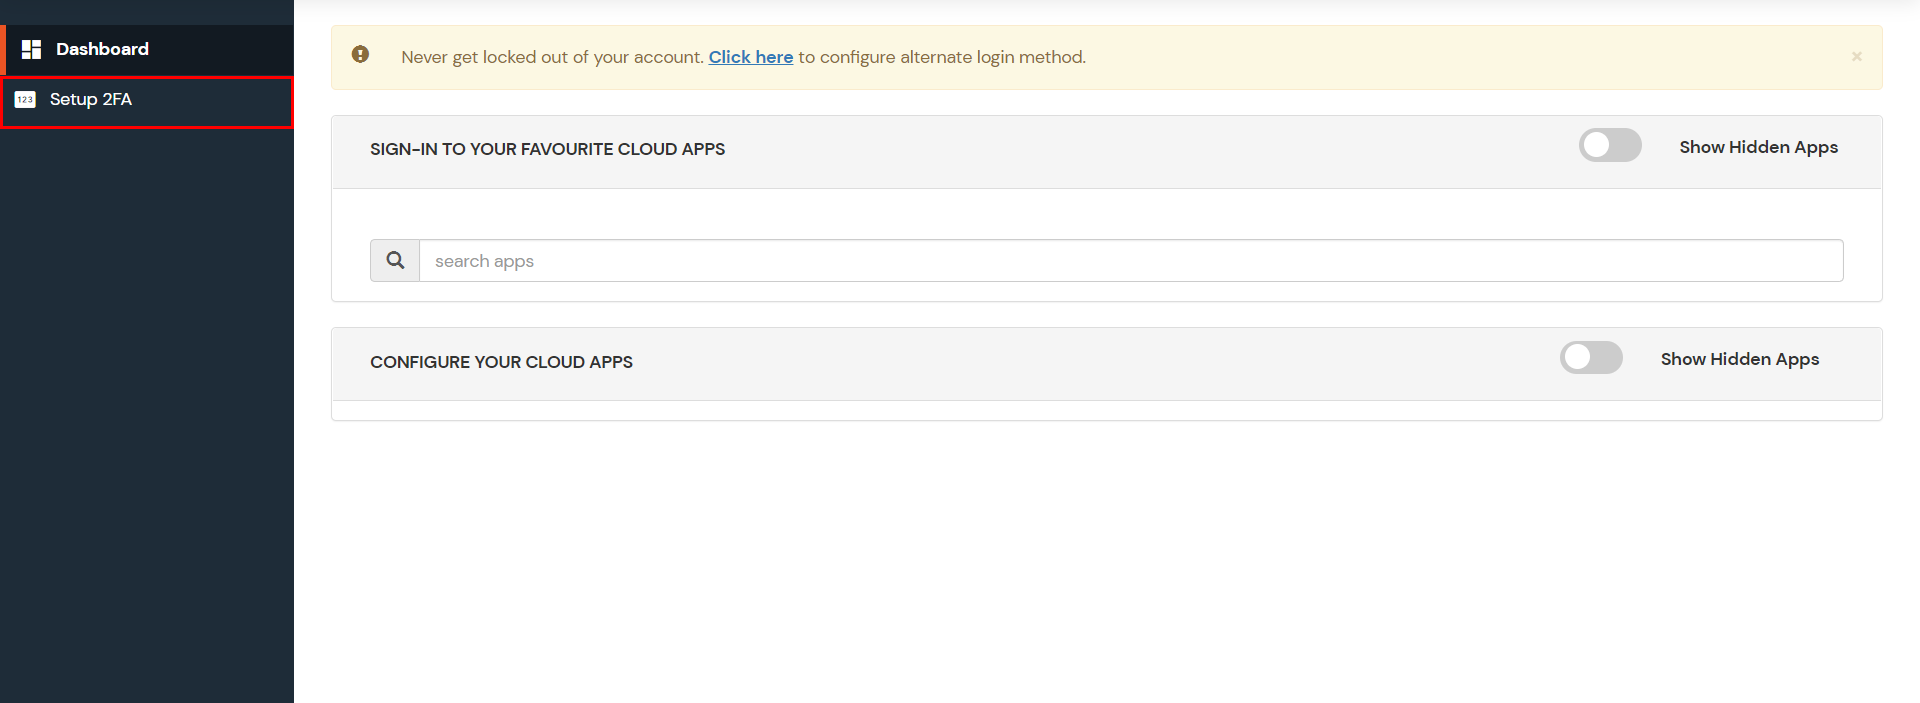
Login into End-User Dashboard using Default User Directory credentials..
Select Configure 2FA from left panel.
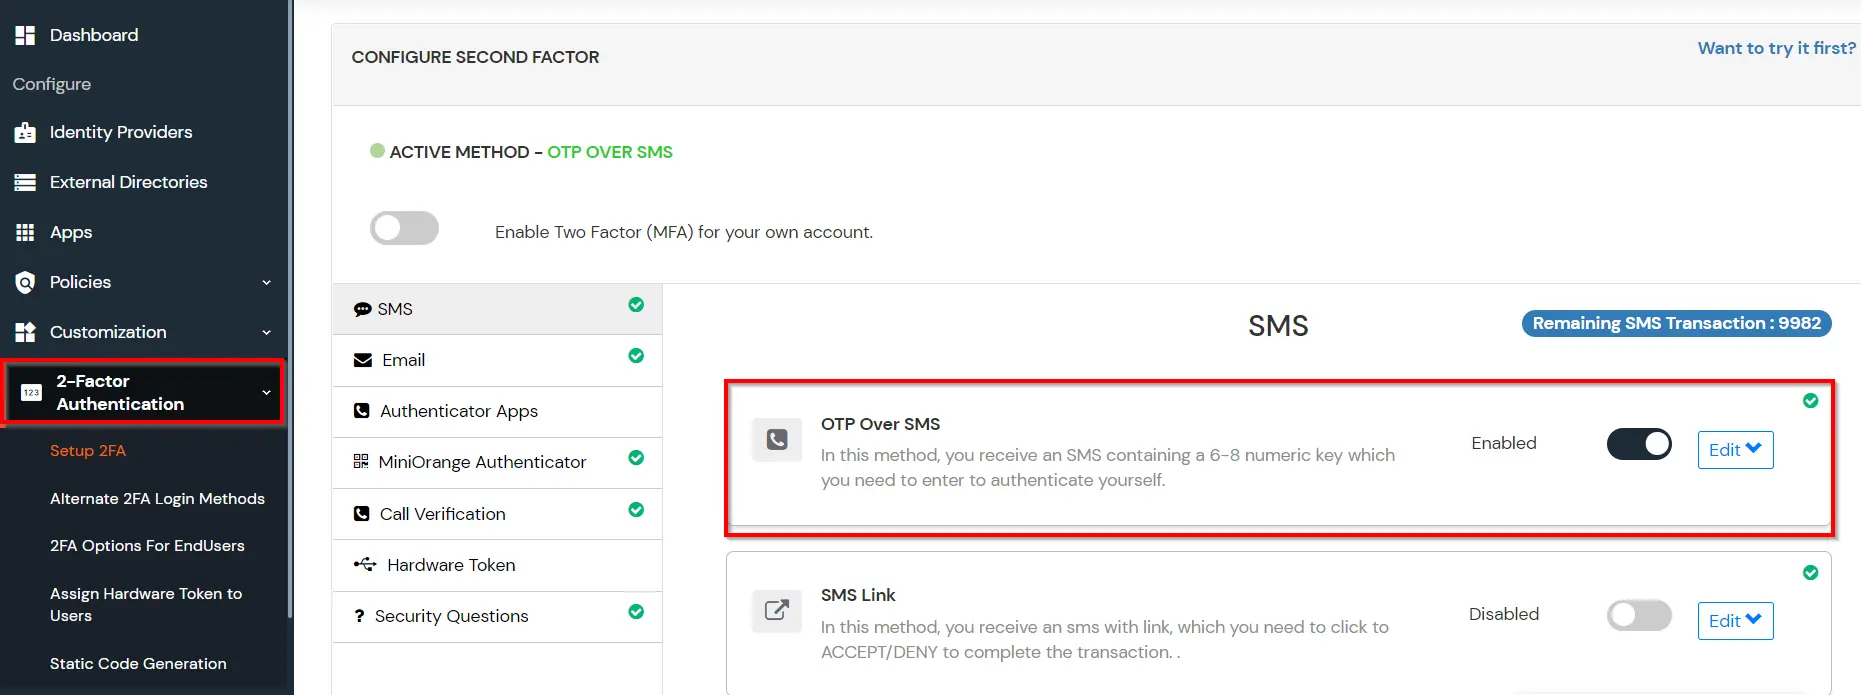
Browse through the Second factor options and choose an appropriate method to be used by end user during login.
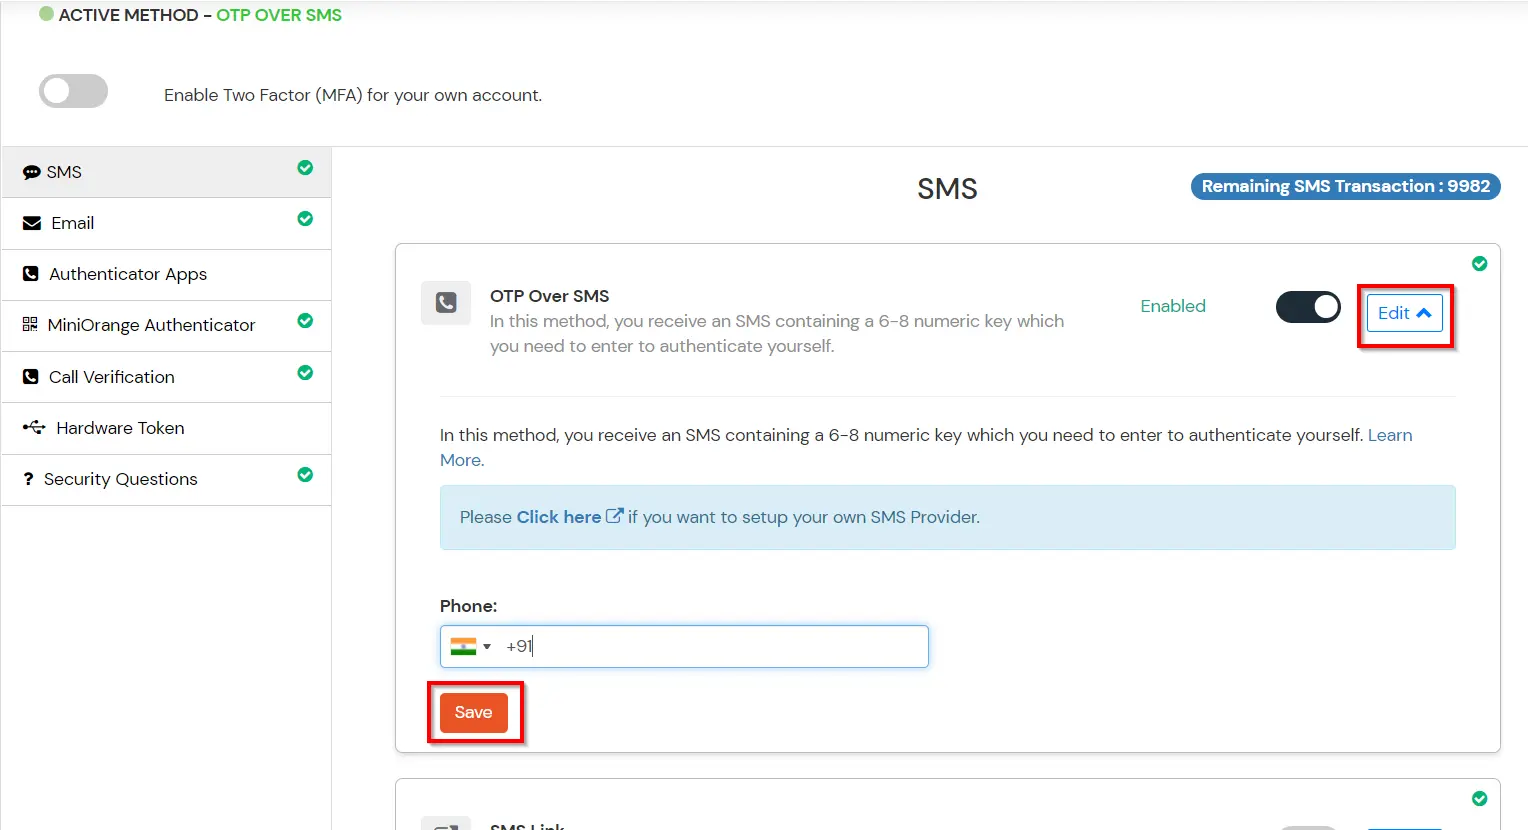
Enable the OTP over SMS if you have your phone number added under your profile section else click on Edit button.
Enter you Phone Number along with the necessary country code and click on the SAVE below.
4. Configure Your User Directory (Optional)
miniOrange provides user authentication from various external sources, which can be Directories (like ADFS, Microsoft Active Directory, Microsoft Entra ID, OpenLDAP, Google, AWS Cognito etc), Identity Providers (like Okta, Shibboleth, Ping, OneLogin, KeyCloak), Databases (like MySQL, Maria DB, PostgreSQL) and many more. You can configure your existing directory/user store or add users in miniOrange.
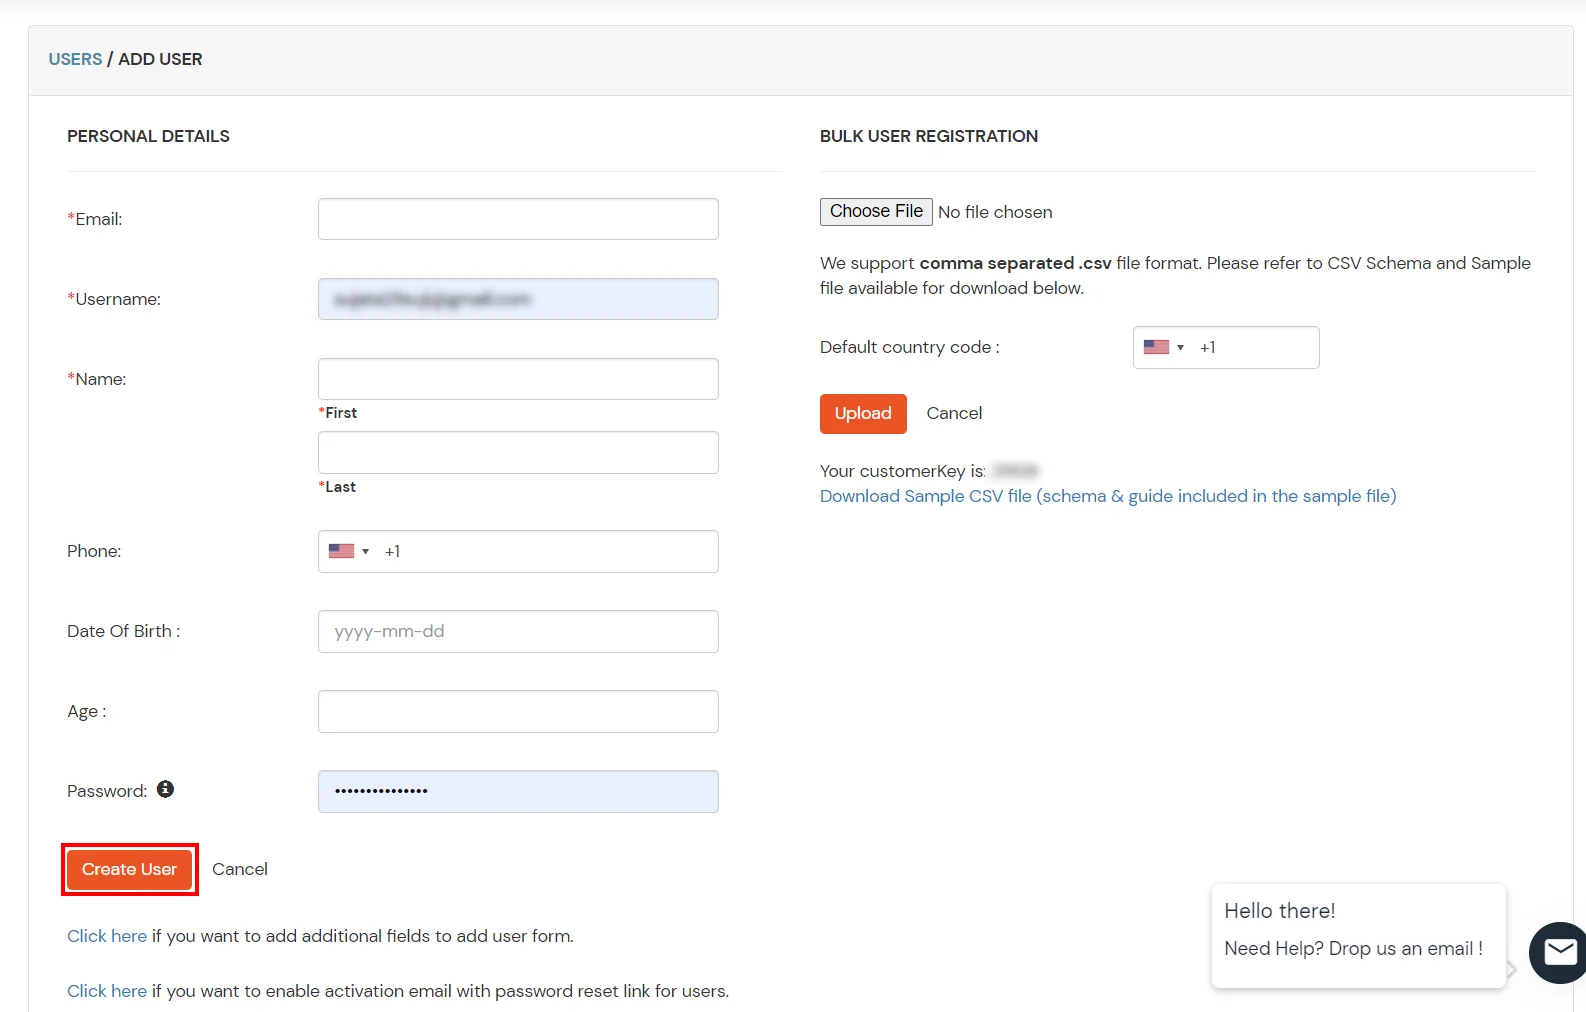
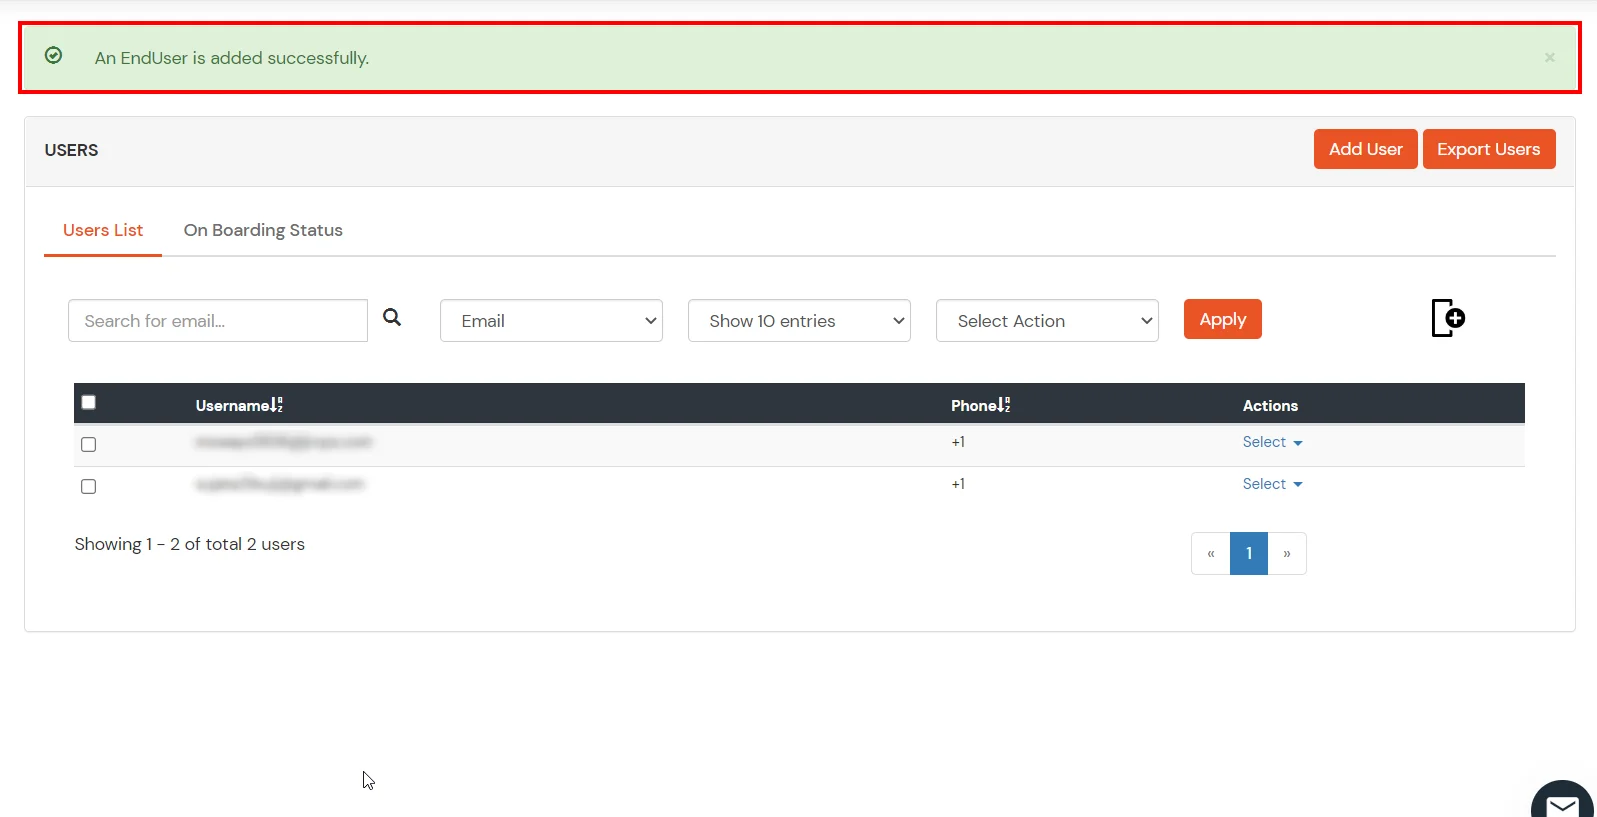
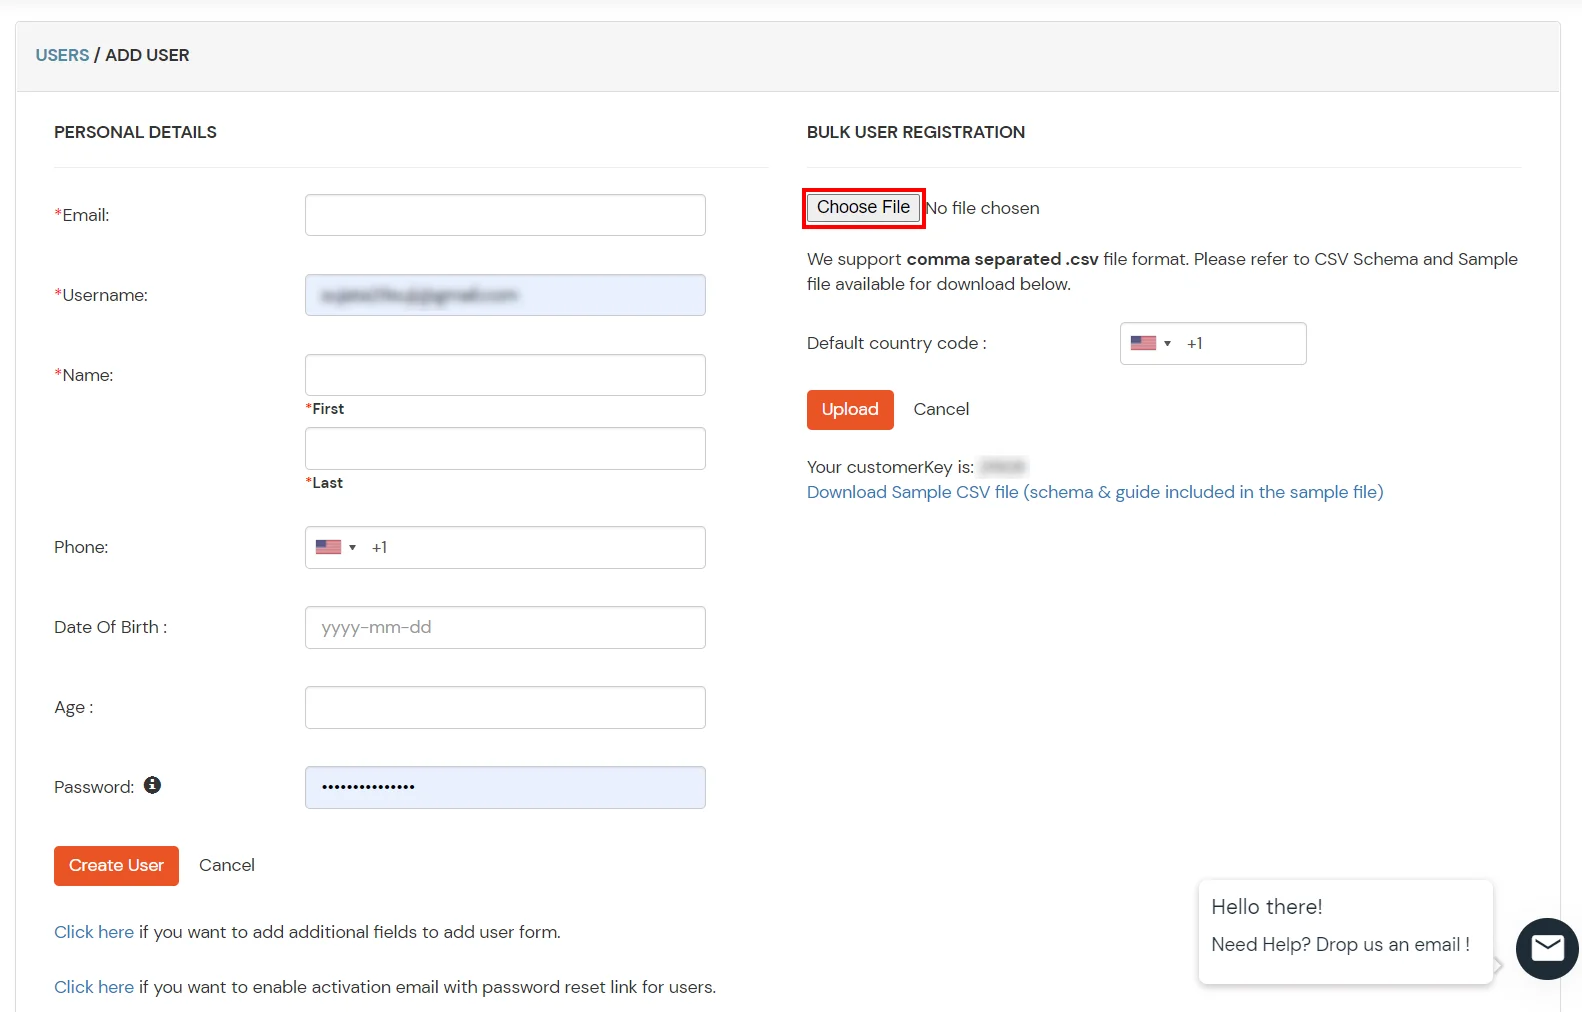
Here, fill the user details without the password and then click on the Create User button.
After successful user creation a notification message "An end user is added successfully" will be displayed at the top of the dashboard.
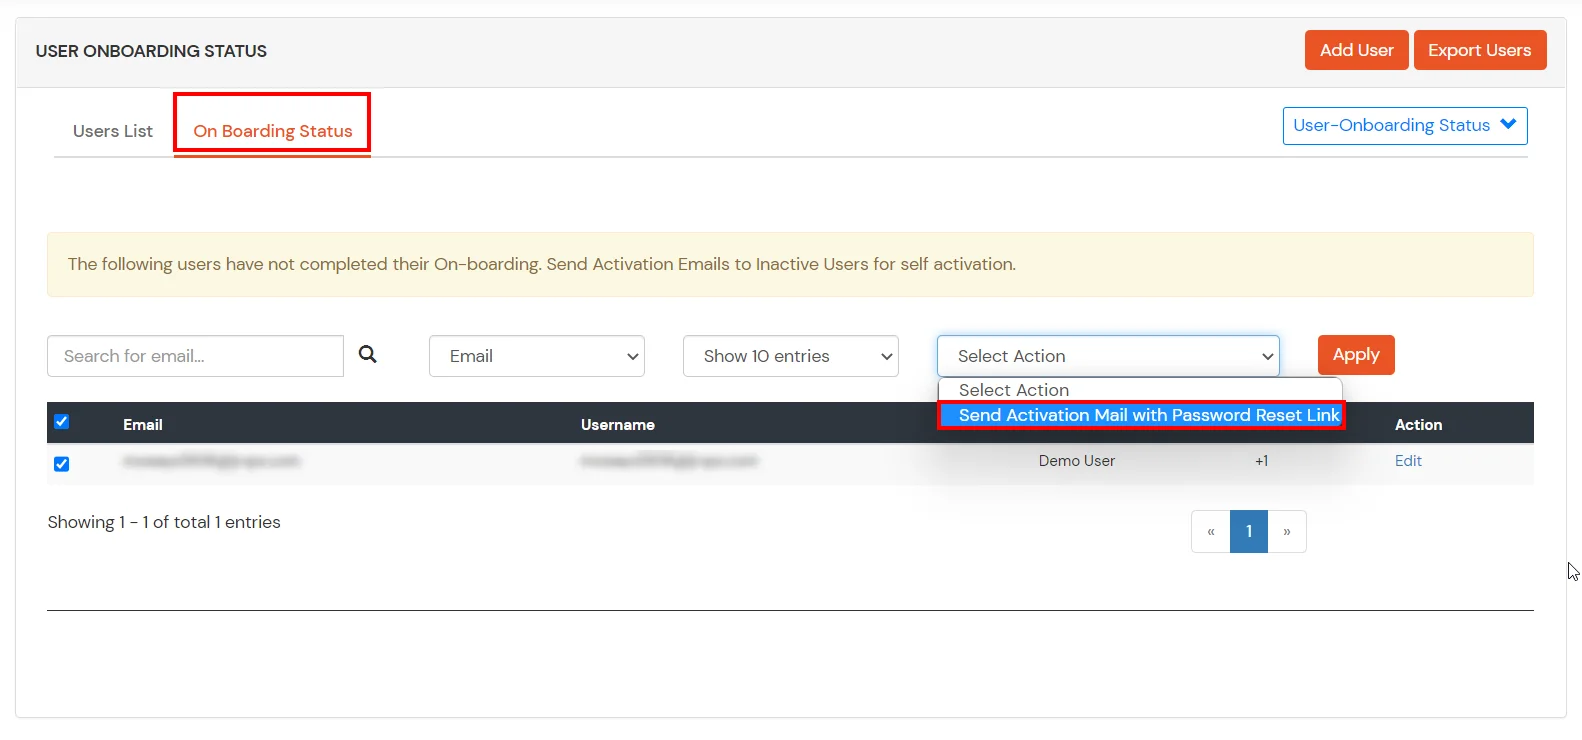
Click on Onboarding Status tab. Check the email, with the registered e-mail id and select action Send Activation Mail with Password Reset Link from Select Action dropdown list and then click on Apply button.
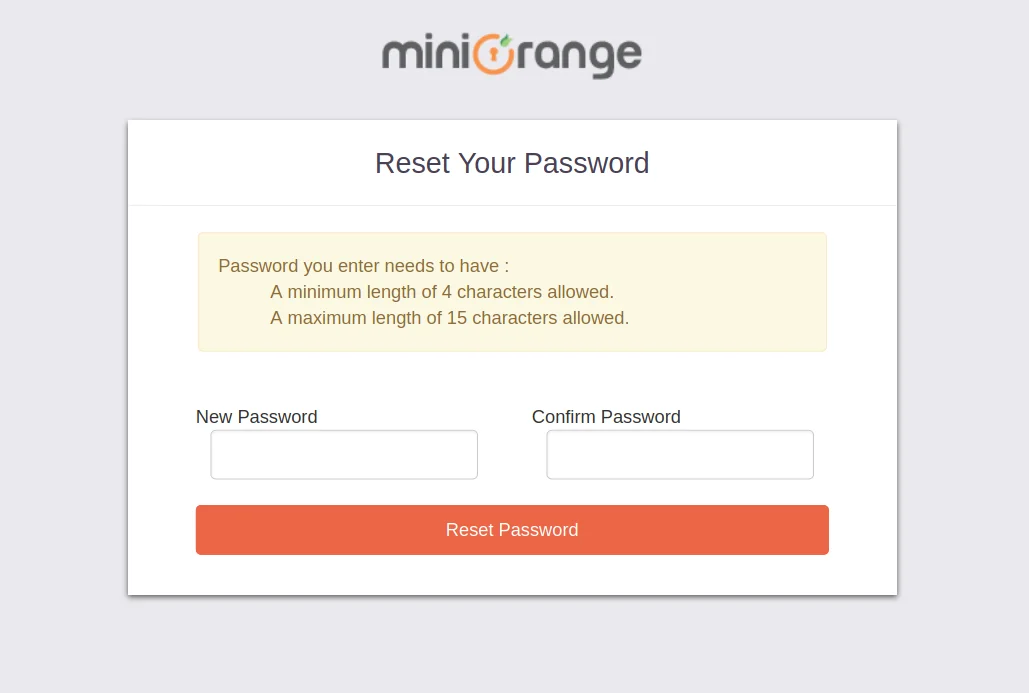
Now, Open your email id. Open the mail you get from miniOrange and then click on the link to set your account password.
On the next screen, enter the password and confirm password and then click on the Single Sign-On (SSO) reset password button.
Now, you can log in into miniOrange account by entering your credentials.
2. Bulk Upload Users in miniOrange via Uploading CSV File.
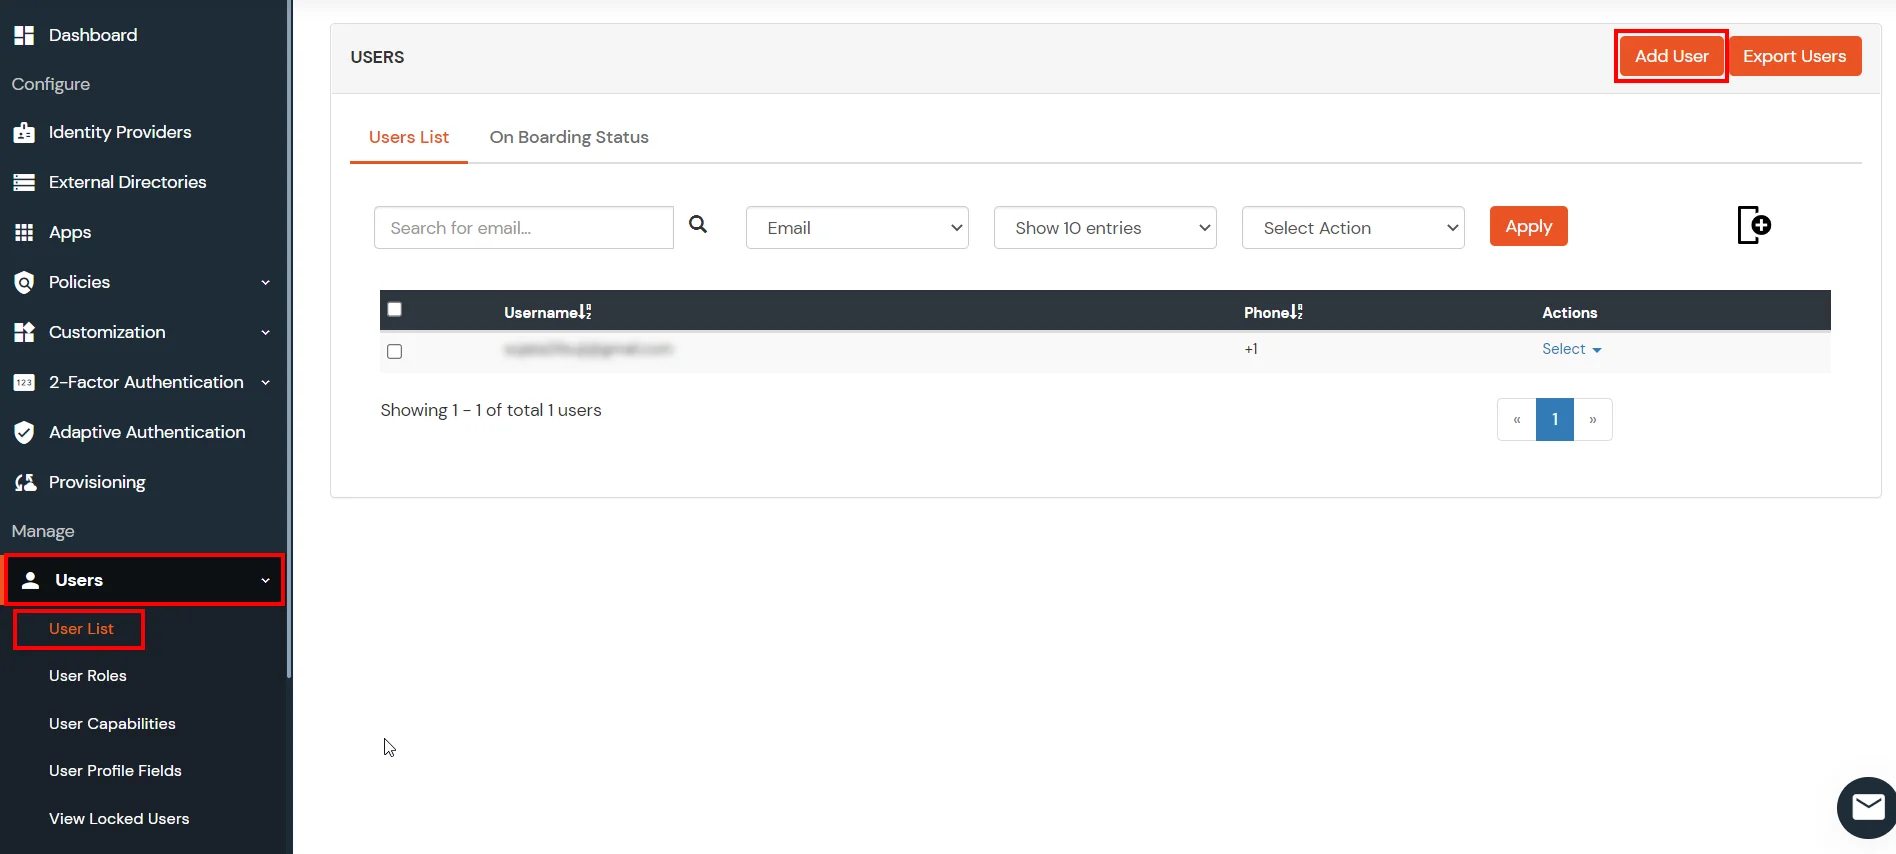
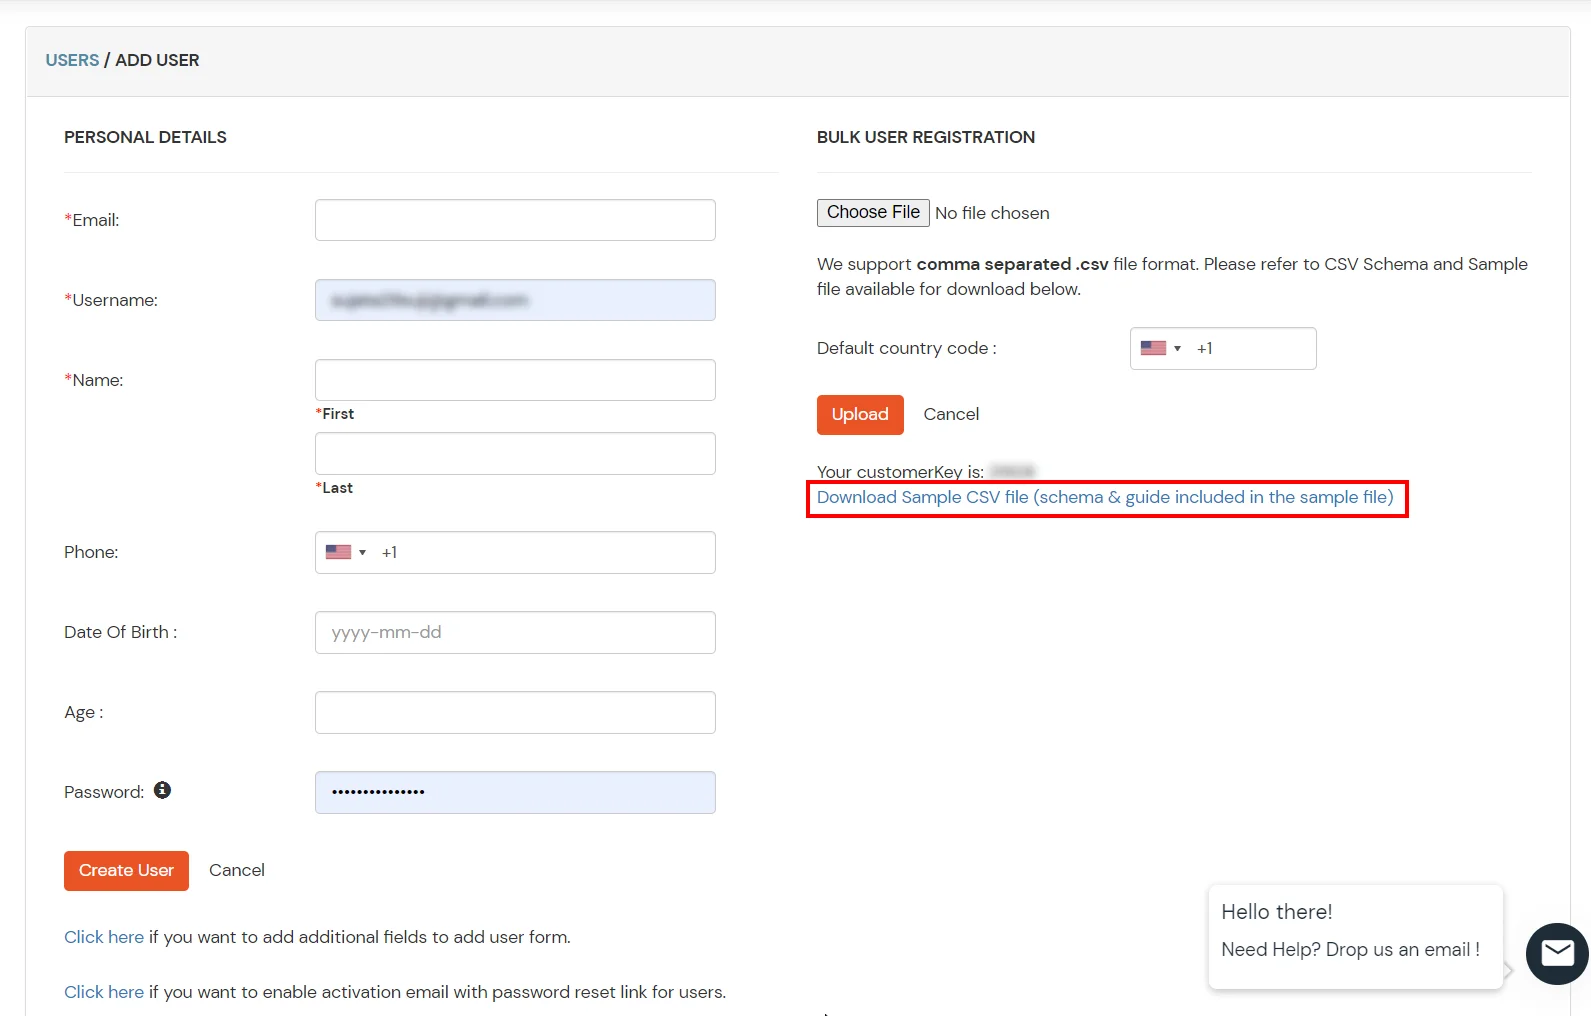
Navigate to Users >> User List. Click on Add User button.
In Bulk User Registration Download sample csv format from our console and edit this csv file according to the instructions.
To bulk upload users, choose the file make sure it is in comma separated .csv file format then click on Upload.
After uploading the csv file successfully, you will see a success message with a link.
Click on that link you will see list of users to send activation mail. Select users to send activation mail and click on Send Activation Mail. An activation mail will be sent to the selected users.
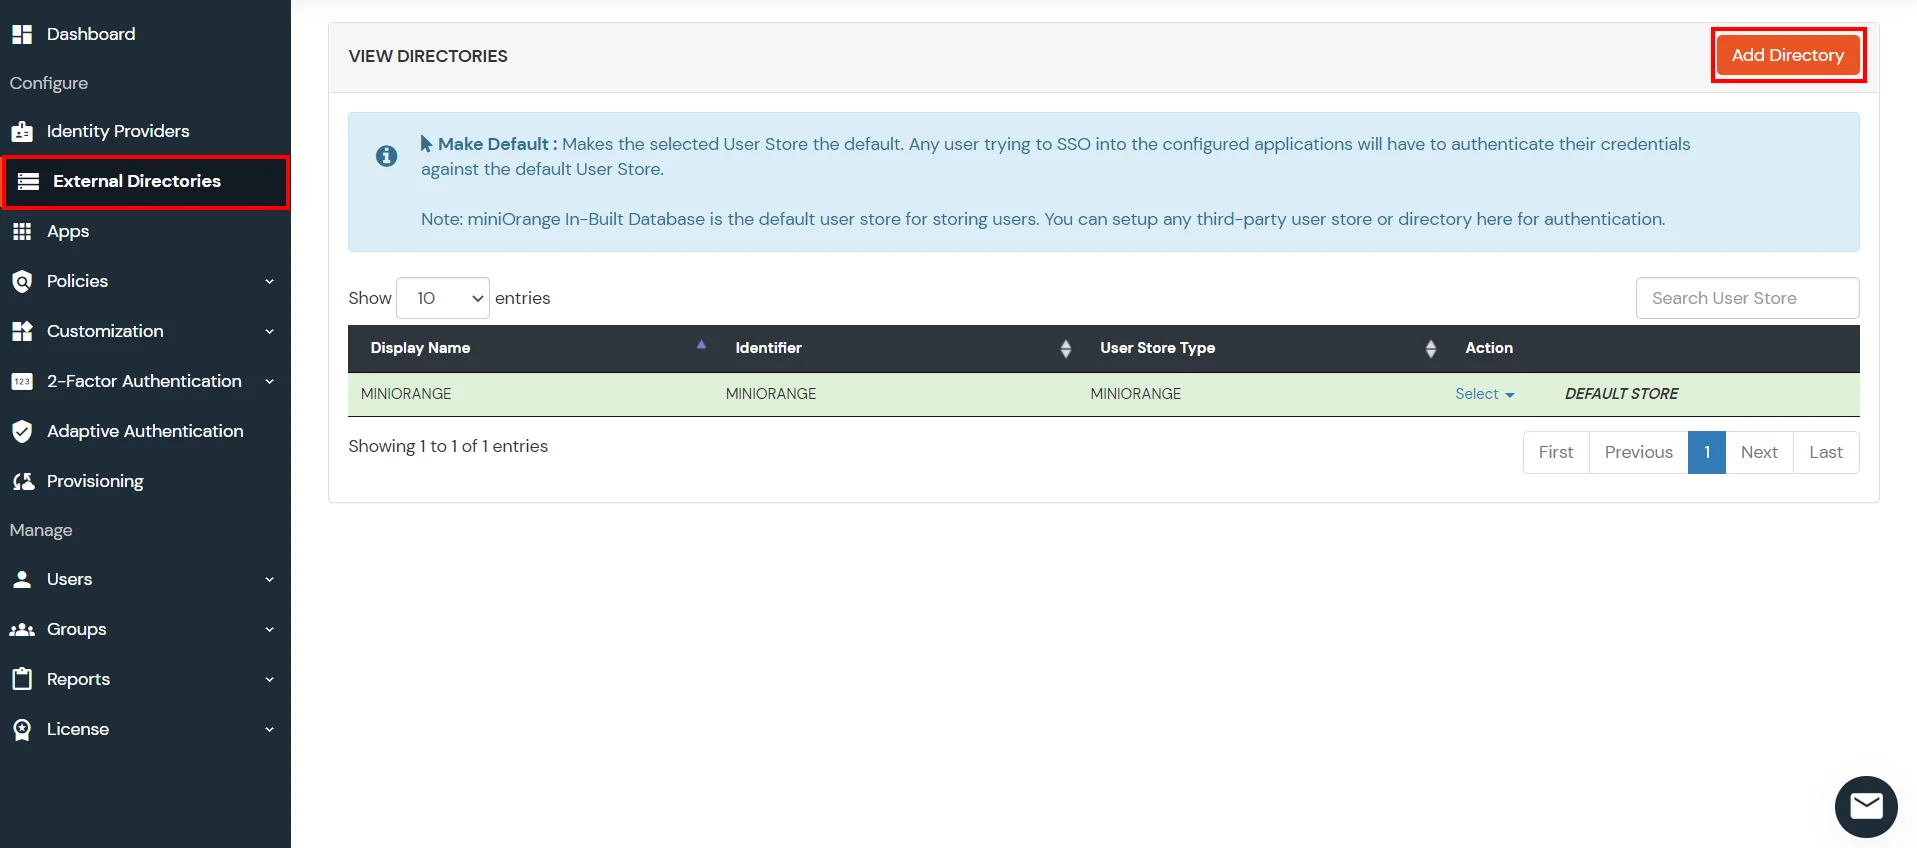
Click on Identity Providers >> Add Identity Provider in the left menu of the dashboard
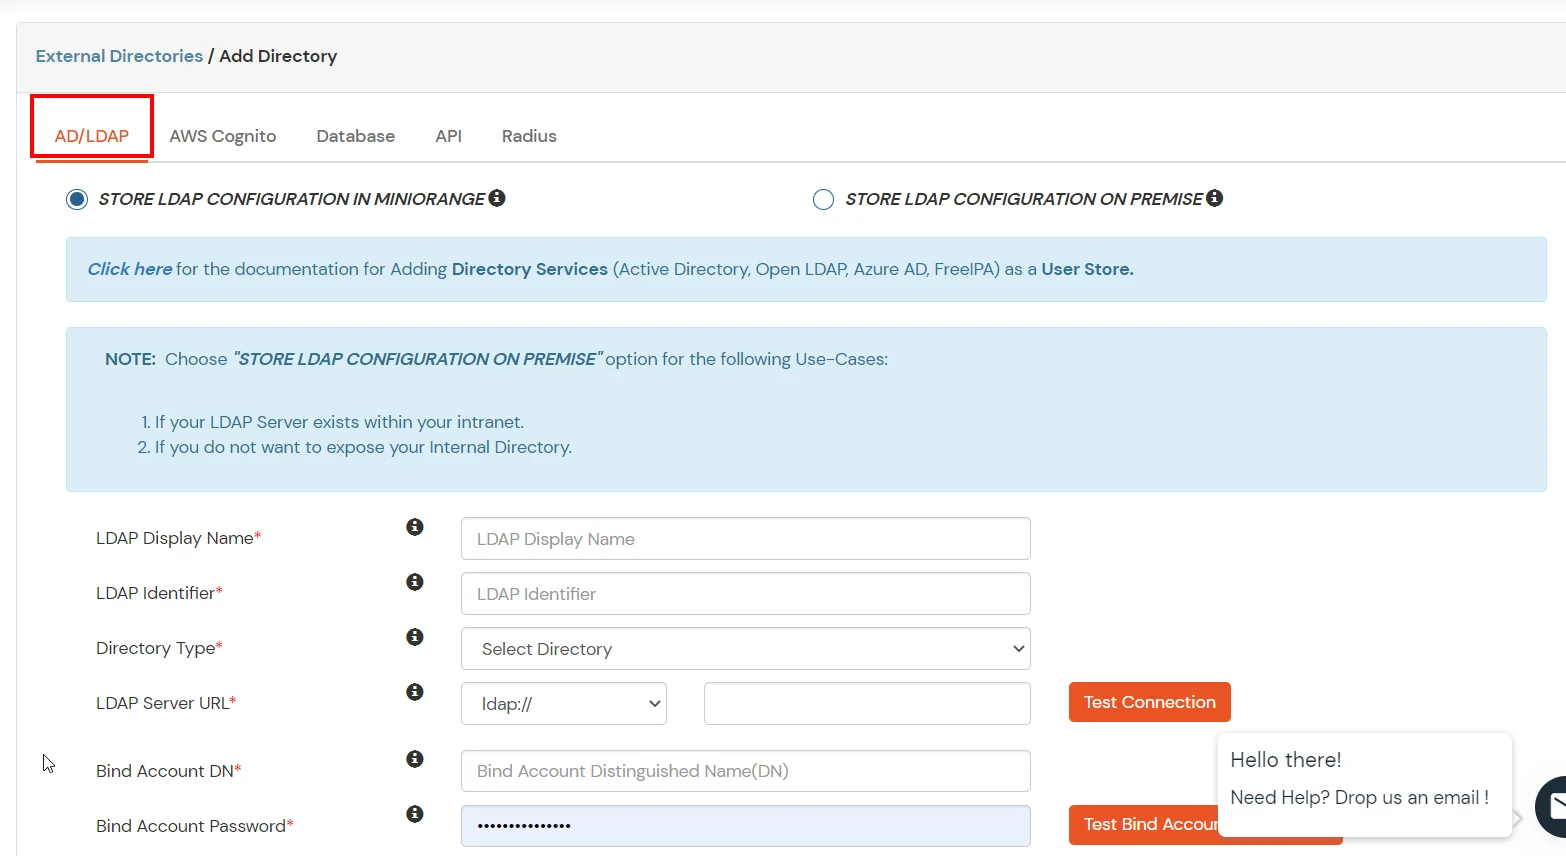
In Choose Identity Provider, select AD/LDAP Directories from the dropdown.
Then search for AD/LDAP and click it.
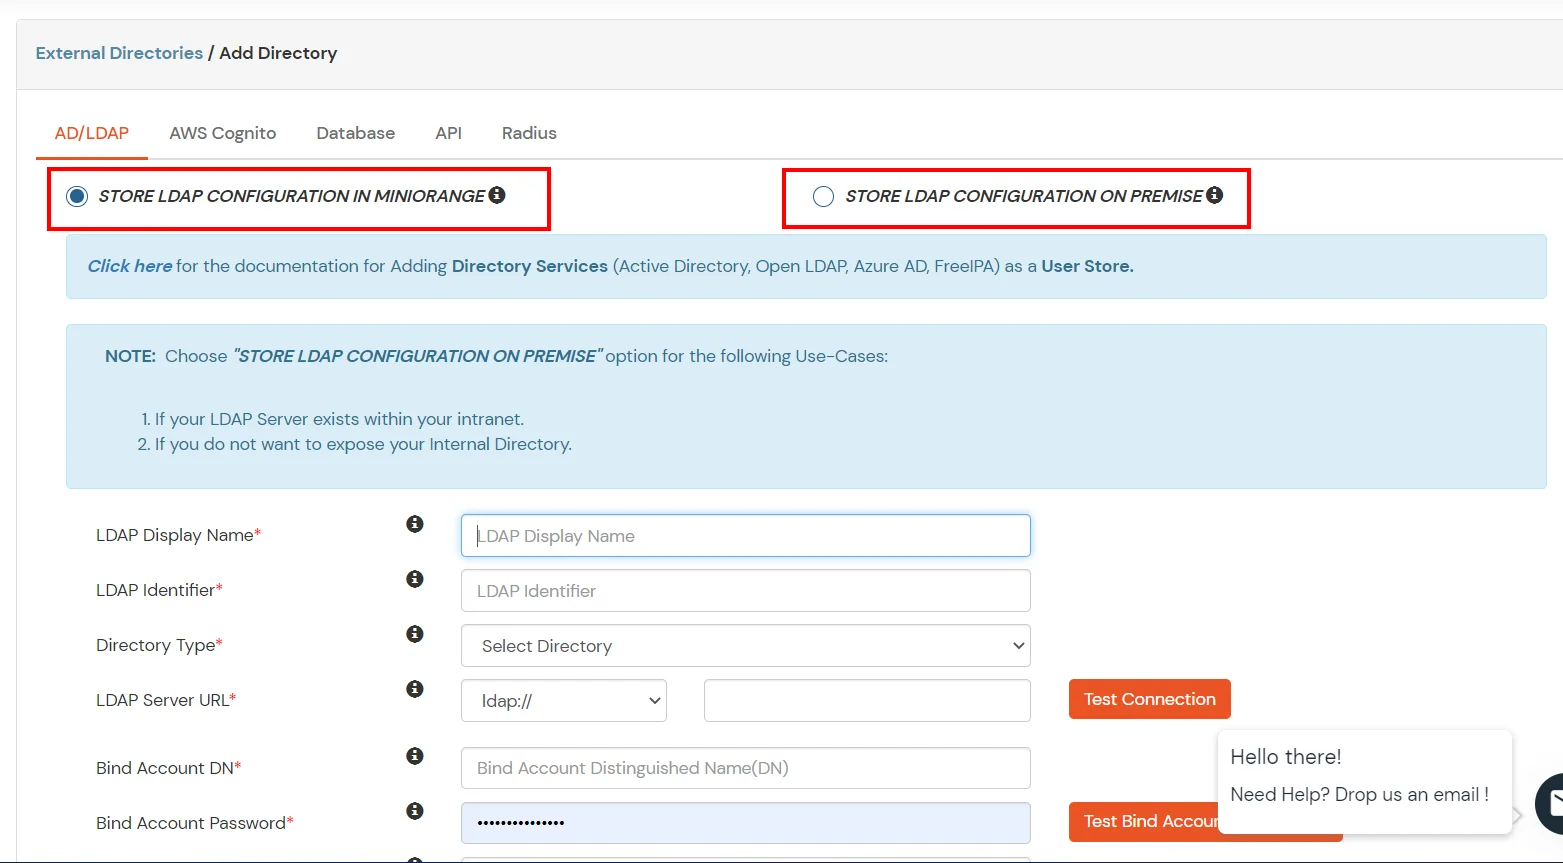
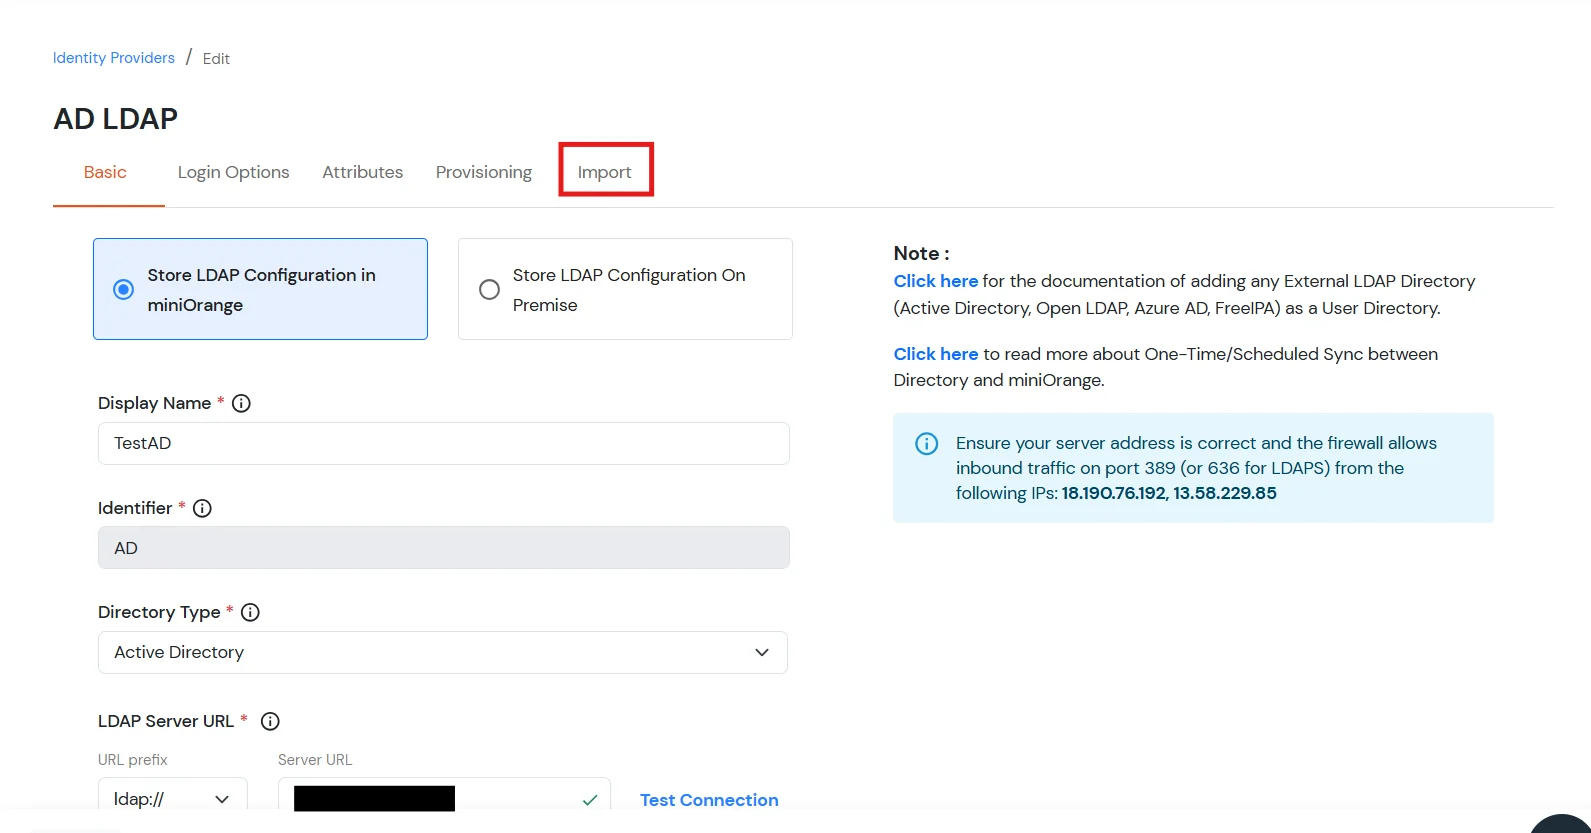
STORE LDAP CONFIGURATION IN MINIORANGE: Choose this option if you want to keep your configuration in miniOrange. If the active directory is behind a firewall, you will need to open the firewall to allow incoming requests to your AD.
STORE LDAP CONFIGURATION ON PREMISE: Choose this option if you want to keep your configuration in your premise and only allow access to AD inside premises. You will have to download and install miniOrange gateway on your premise.
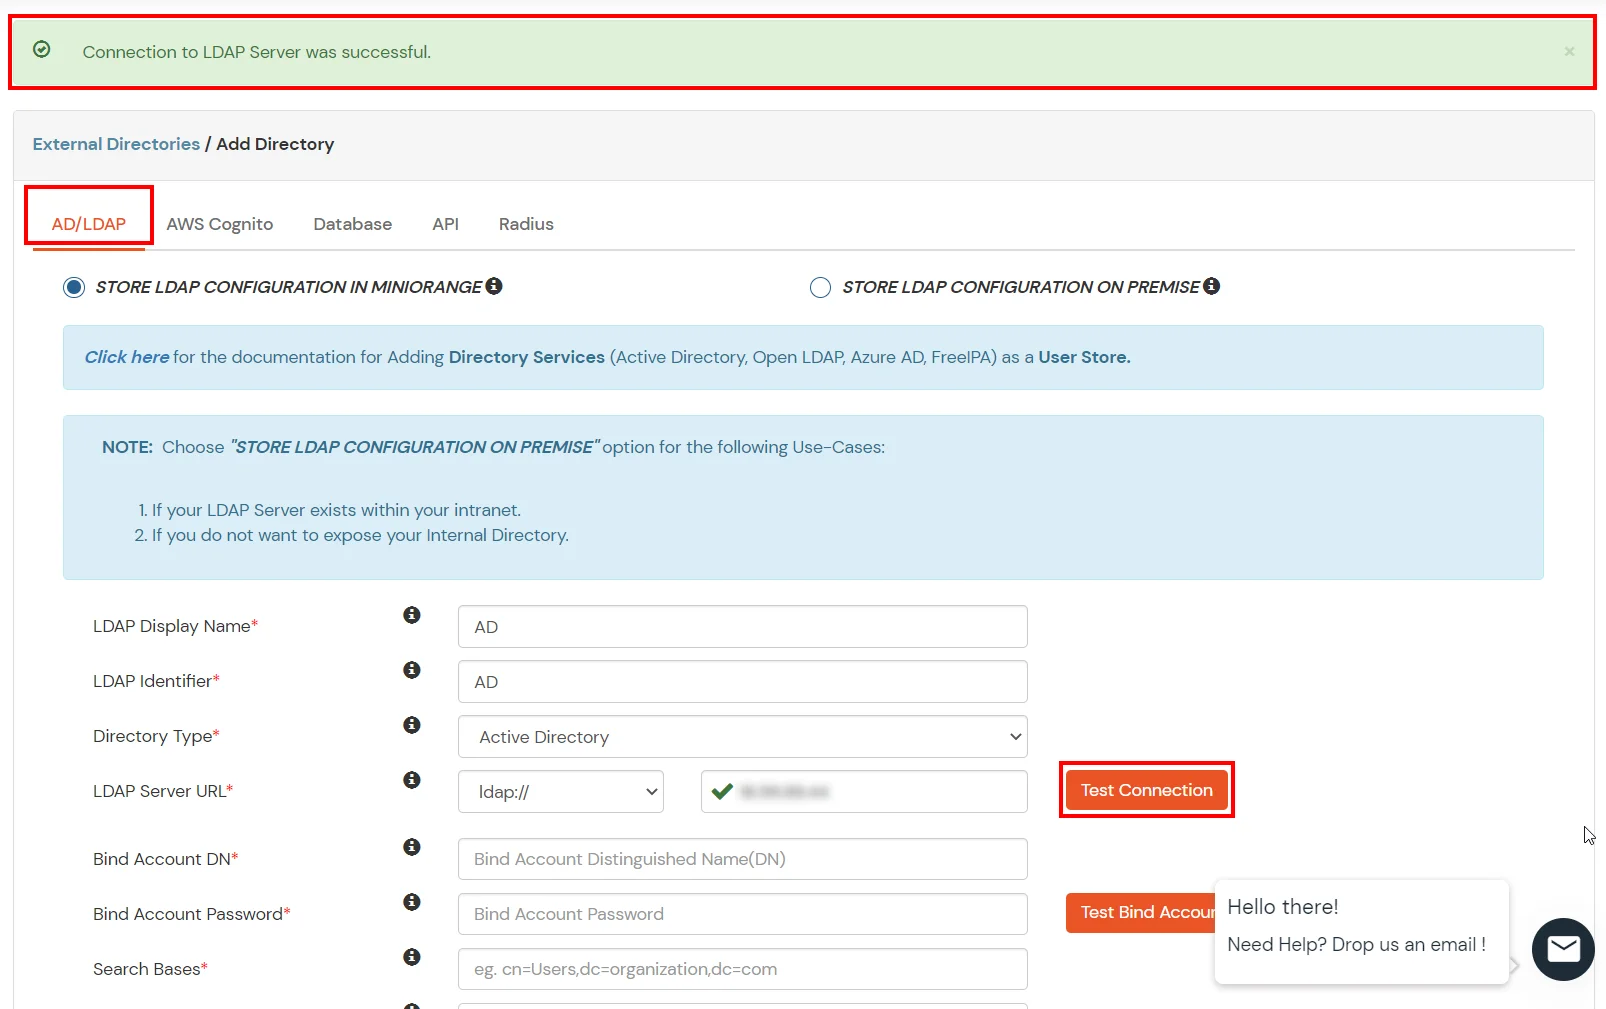
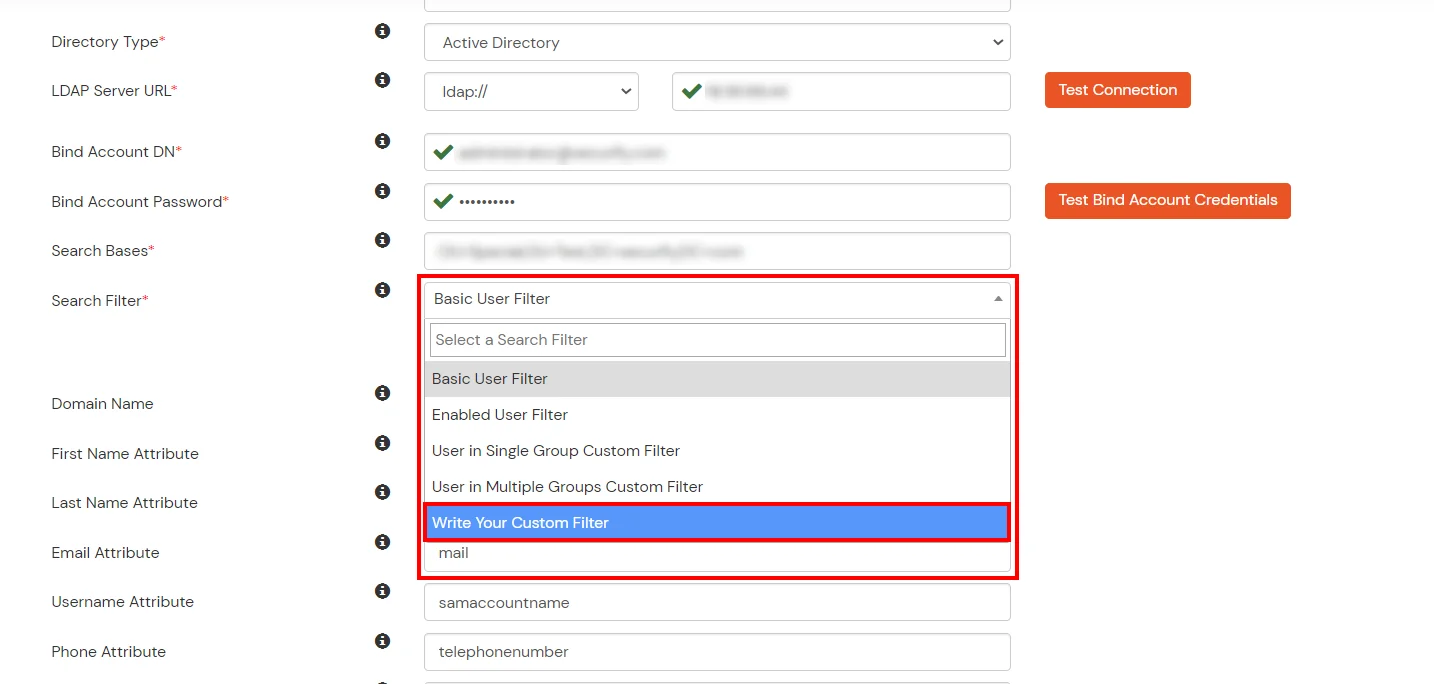
Enter AD/LDAP Display Name and Identifier name.
Select Directory Type as Active Directory.
Enter the LDAP Server URL or IP Address against the LDAP Server URL field.
Click on the Test Connection button to verify if you have made a successful connection with your LDAP server.
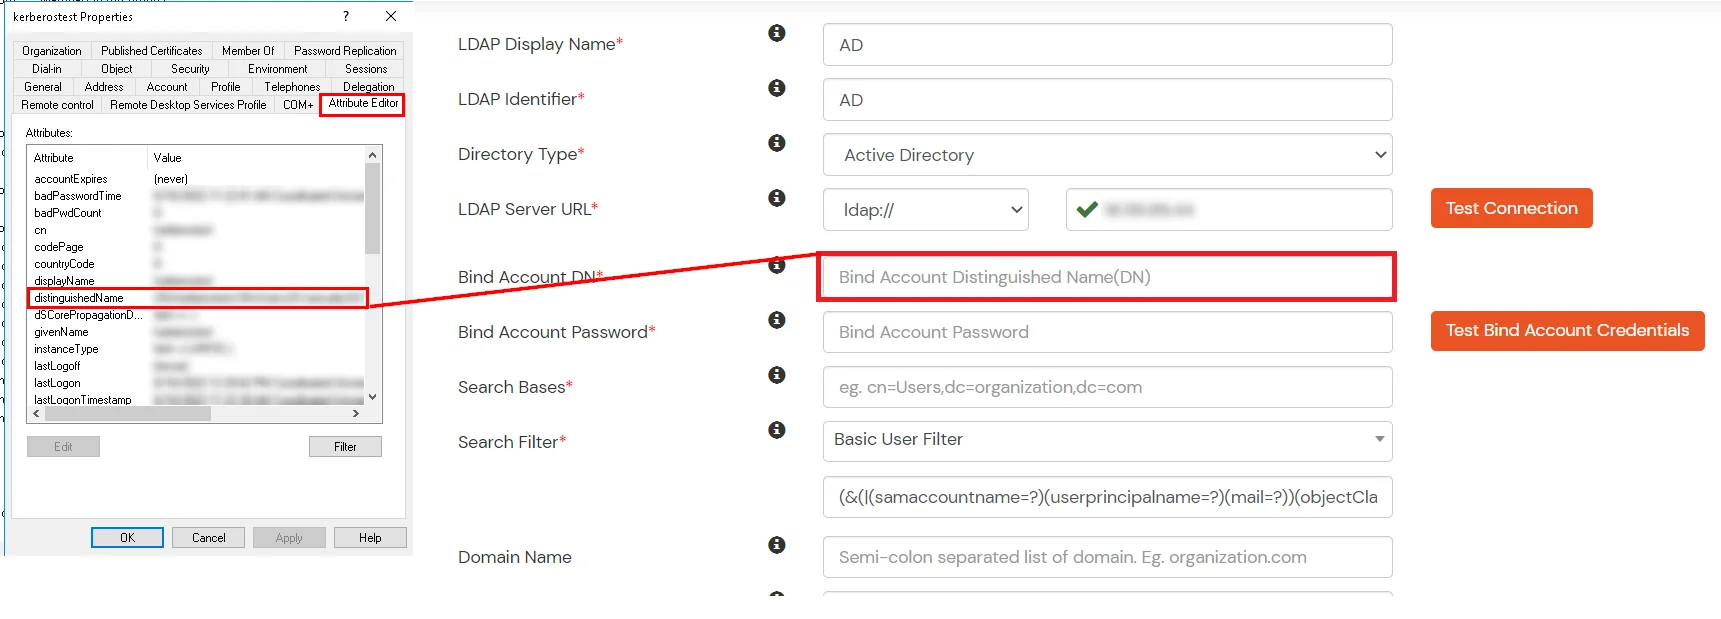
In Active Directory, go to the properties of user containers/OU's and search for the Distinguished Name attribute. The bind account should have minimum required read privileges in Active Directory to allow directory lookups. If the use case involves provisioning (such as creating, updating, or deleting users or groups), the account must also be granted appropriate write permissions.
Enter the valid Bind account Password.
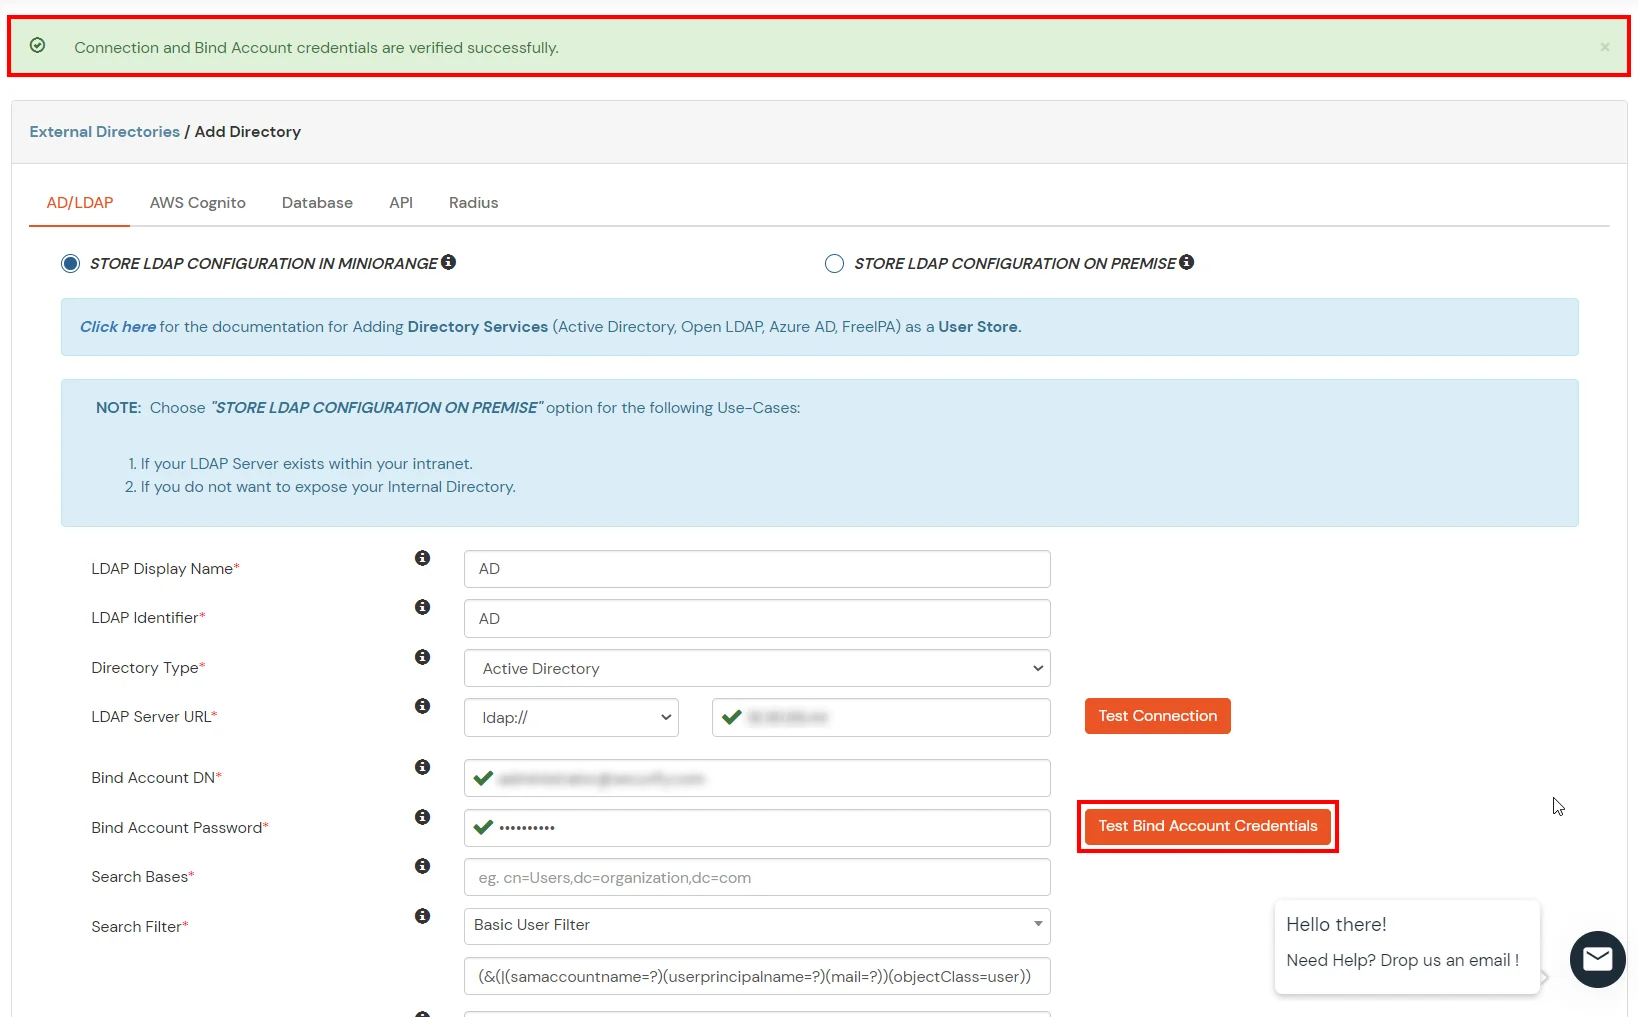
Click on the Test Bind Account Credentials button to verify your LDAP Bind credentials for LDAP connection.
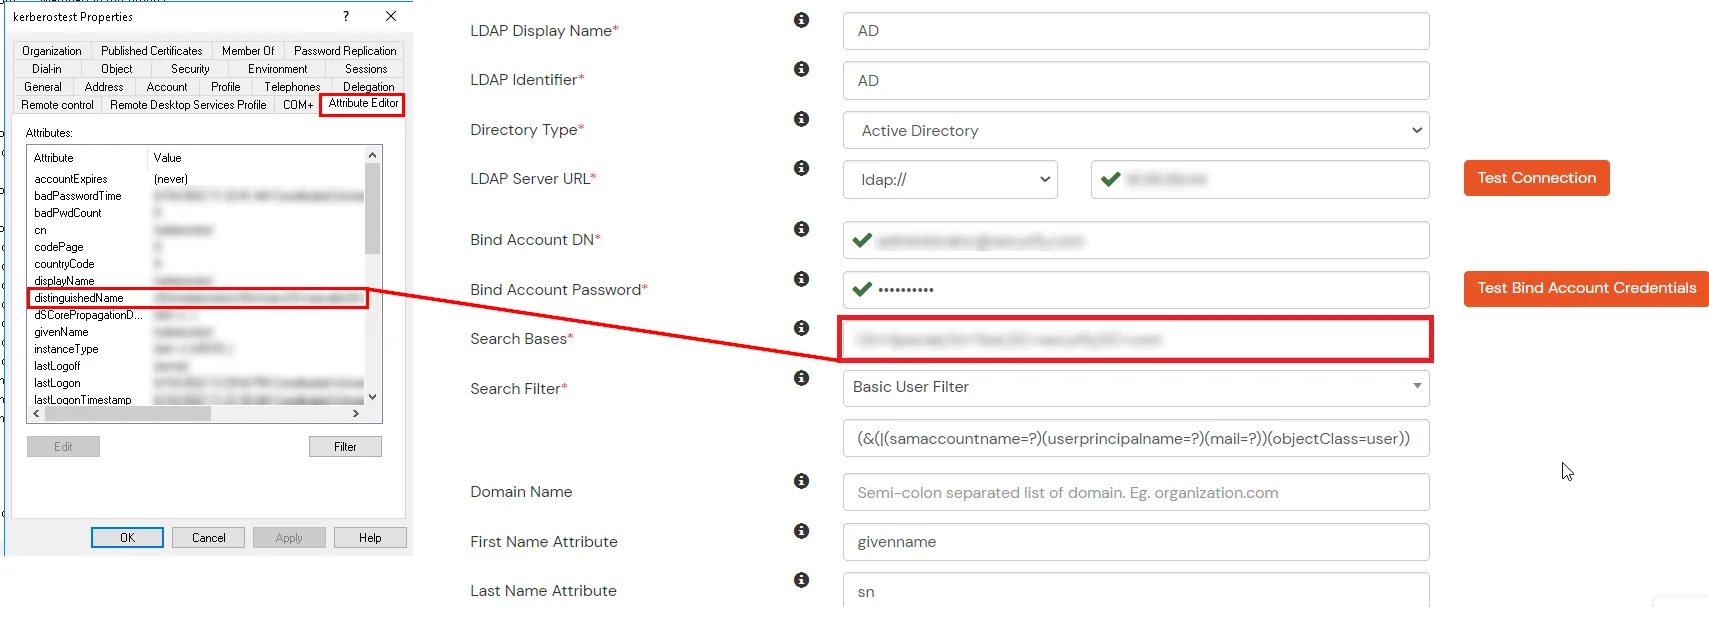
Search Base is the location in the directory where the search for a user begins. You will get this from the same place you got your Distinguished name.
Select a suitable Search filter from the drop-down menu. If you use User in Single Group Filter or User in Multiple Group Filter, replace the <group-dn> in the search filter with the distinguished name of the group in which your users are present. To use custom Search Filter select "Write your Custom Filter" option and customize it accordingly.
Click on the Next button, or go to the Login Options tab.
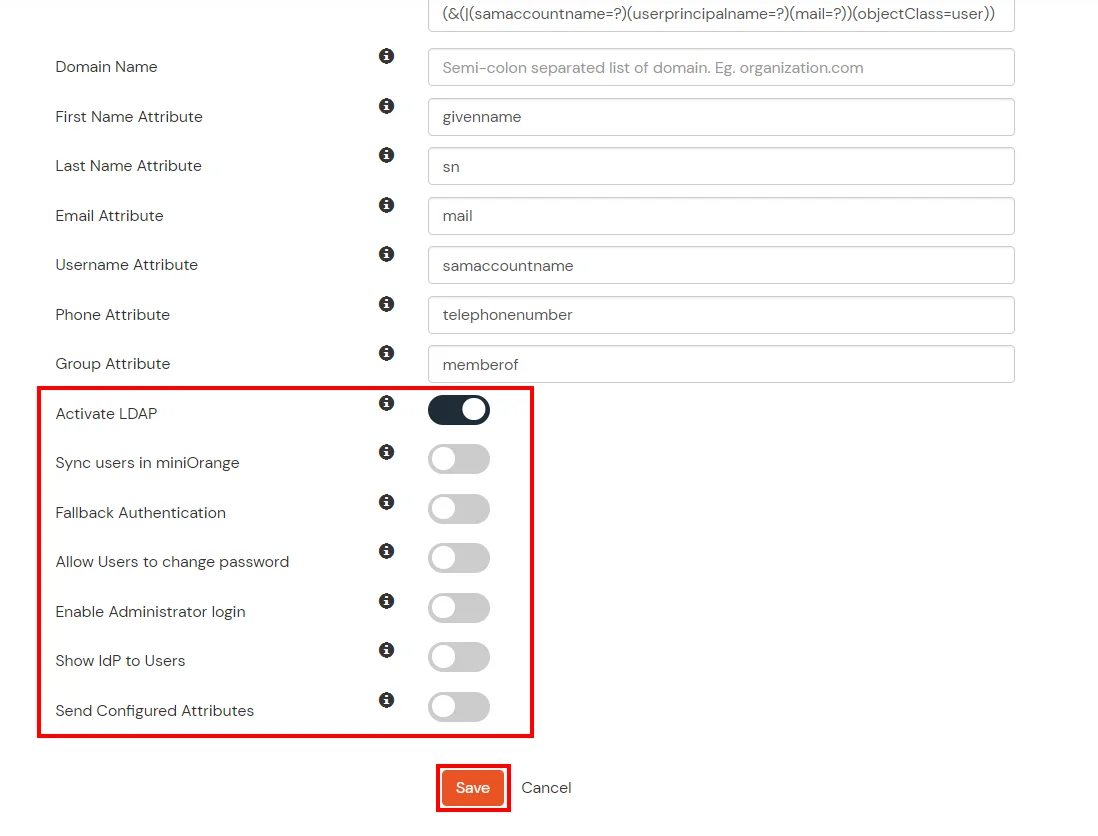
You can also configure following options while setting up AD. Enable Activate LDAP in order to authenticate users from AD/LDAP. Click on the Next button to add user store.
Here's the list of the attributes and what it does when we enable it. You can enable/disable accordingly.
Attribute
Description
Activate LDAP
All user authentications will be done with LDAP credentials if you Activate it
Fallback Authentication
If LDAP credentials fail then user will be authenticated through miniOrange
Enable administrator login
On enabling this, your miniOrange Administrator login authenticates using your LDAP server
Show IdP to users
If you enable this option, this IdP will be visible to users
Sync users in miniOrange
Users will be created in miniOrange after authentication with LDAP
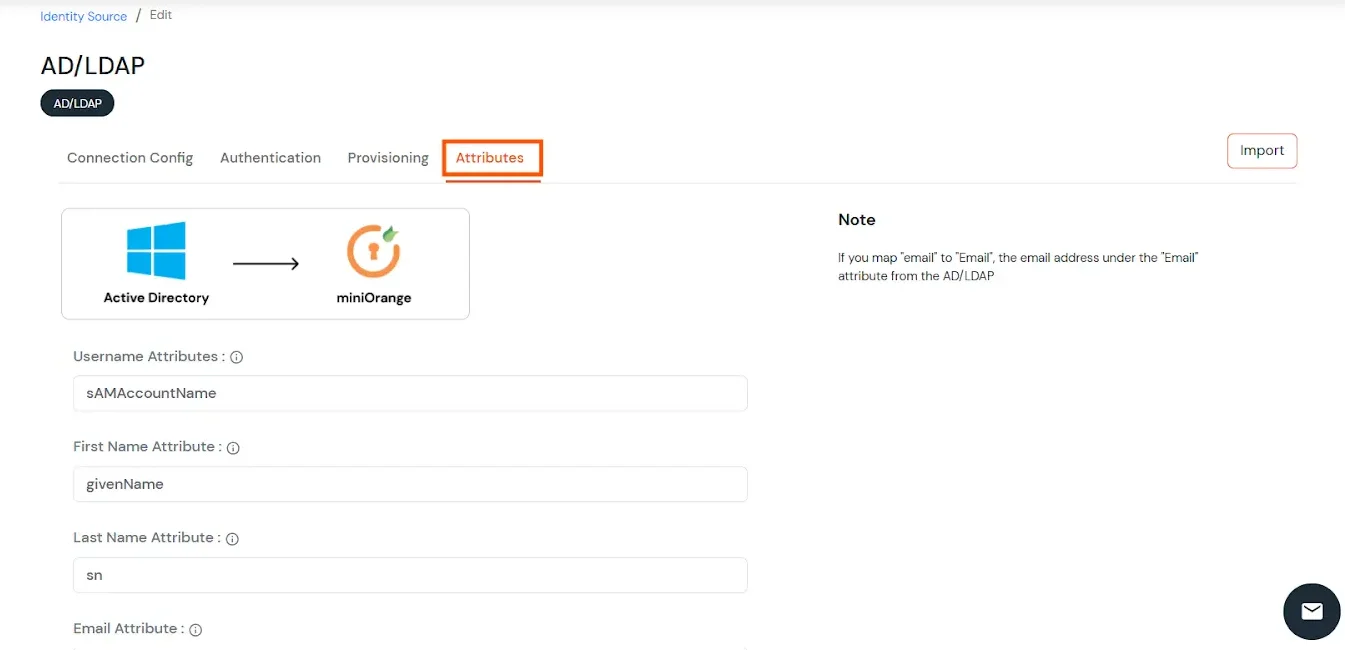
Click on the Next button, or go to the Attributes tab.
Attributes Mapping from AD
By default userName, firstName, lastName, email are configured. Scroll down and click on Save button. To fetch additional attributes from Active Directory, enable Send Configured Attributes. On the left side, enter the name that you wish to release to the applications. On the right side, enter the attribute name from Active Directory. E.g., if you wish to fetch company attribute from Active Directory, and send it as organization to configured applications, enter the following:
Attribute Name sent to SP = organization Attribute Name from IDP = company
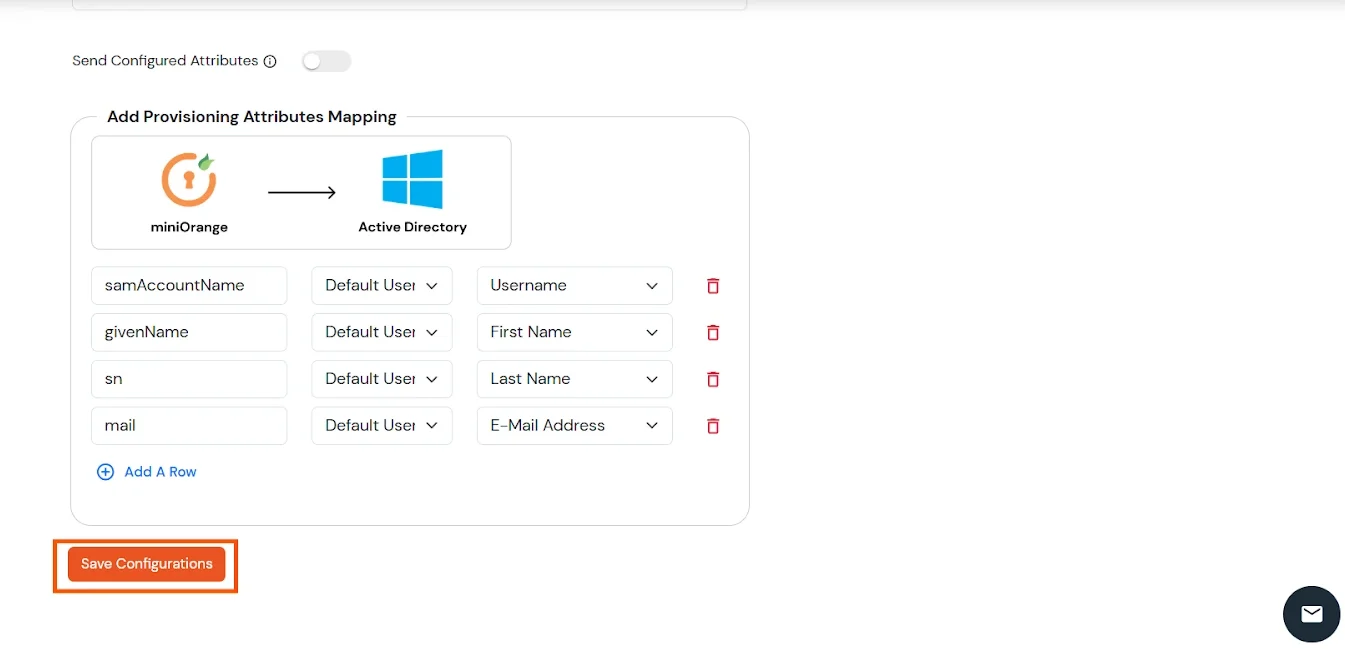
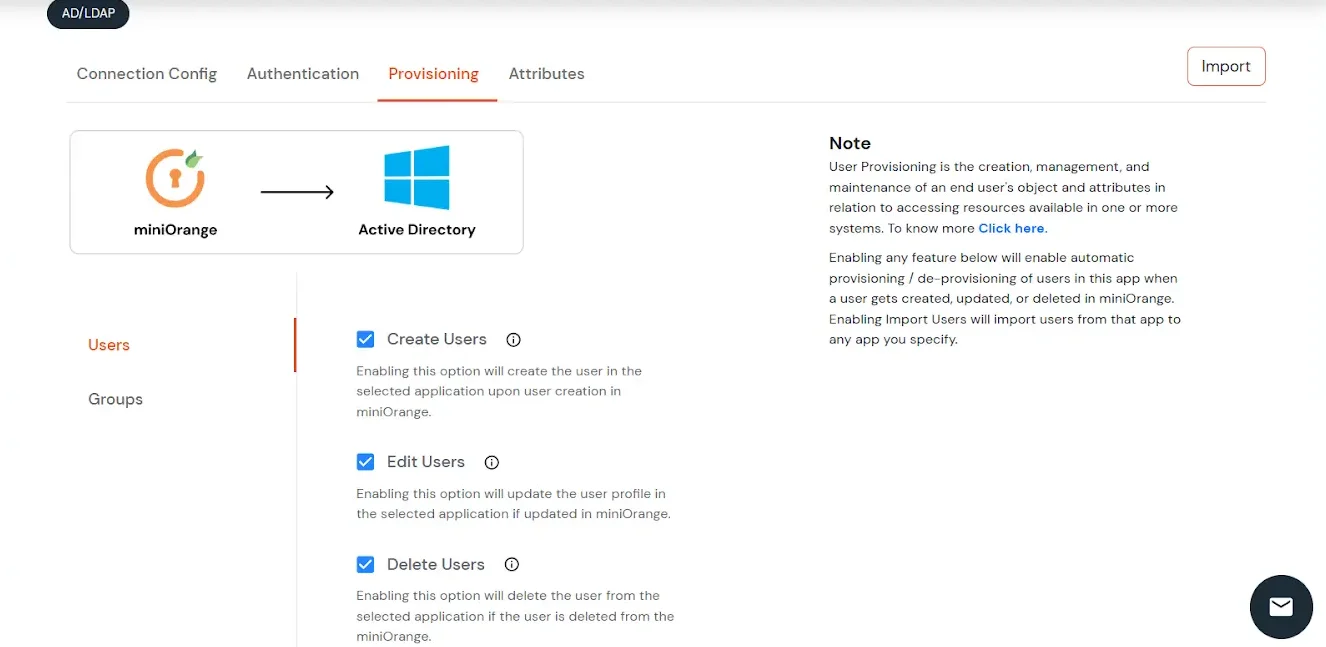
Click on the Next button, or go to the Provisioning tab.
User Import and Provisioning from AD
If you want to set up provisioning, click here for detailed information. We will skip this step for now.
Import Password Policy from AD
If you want to import your Active Directory password policy into miniOrange, click here for detailed information. We will skip this step for now.
Test Connections
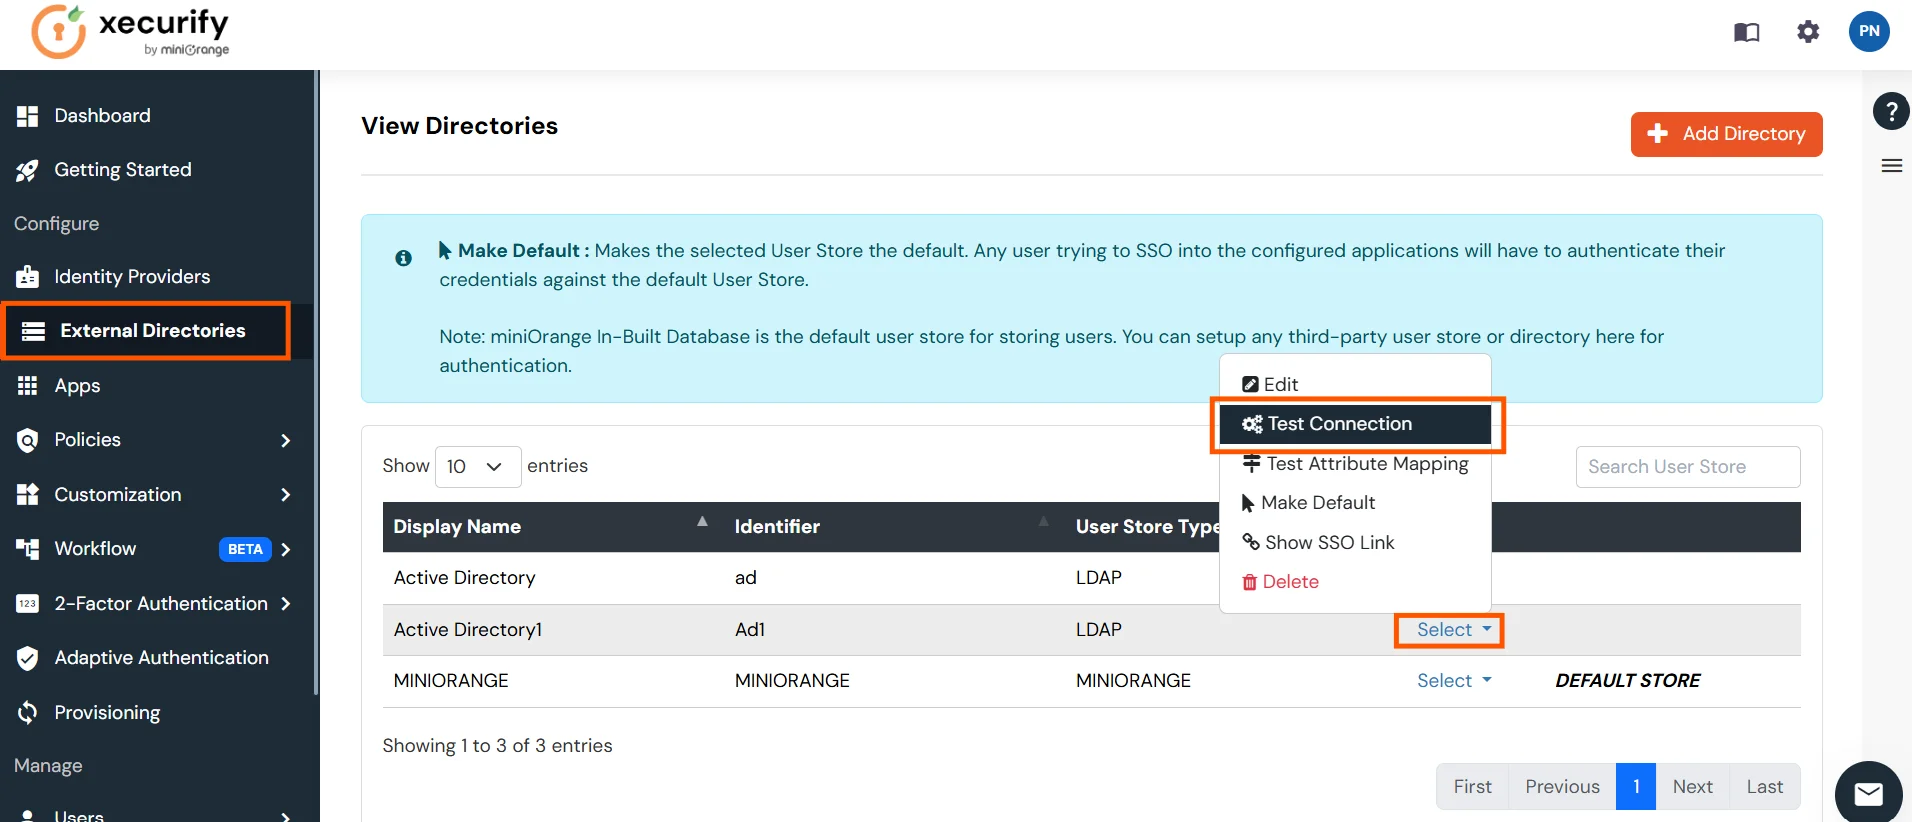
You will see a list of directories under Identity Providers. From the dropdown, select AD/LDAP Directories, search for your configured directory, click the three dots next to it, and select Test Connection.
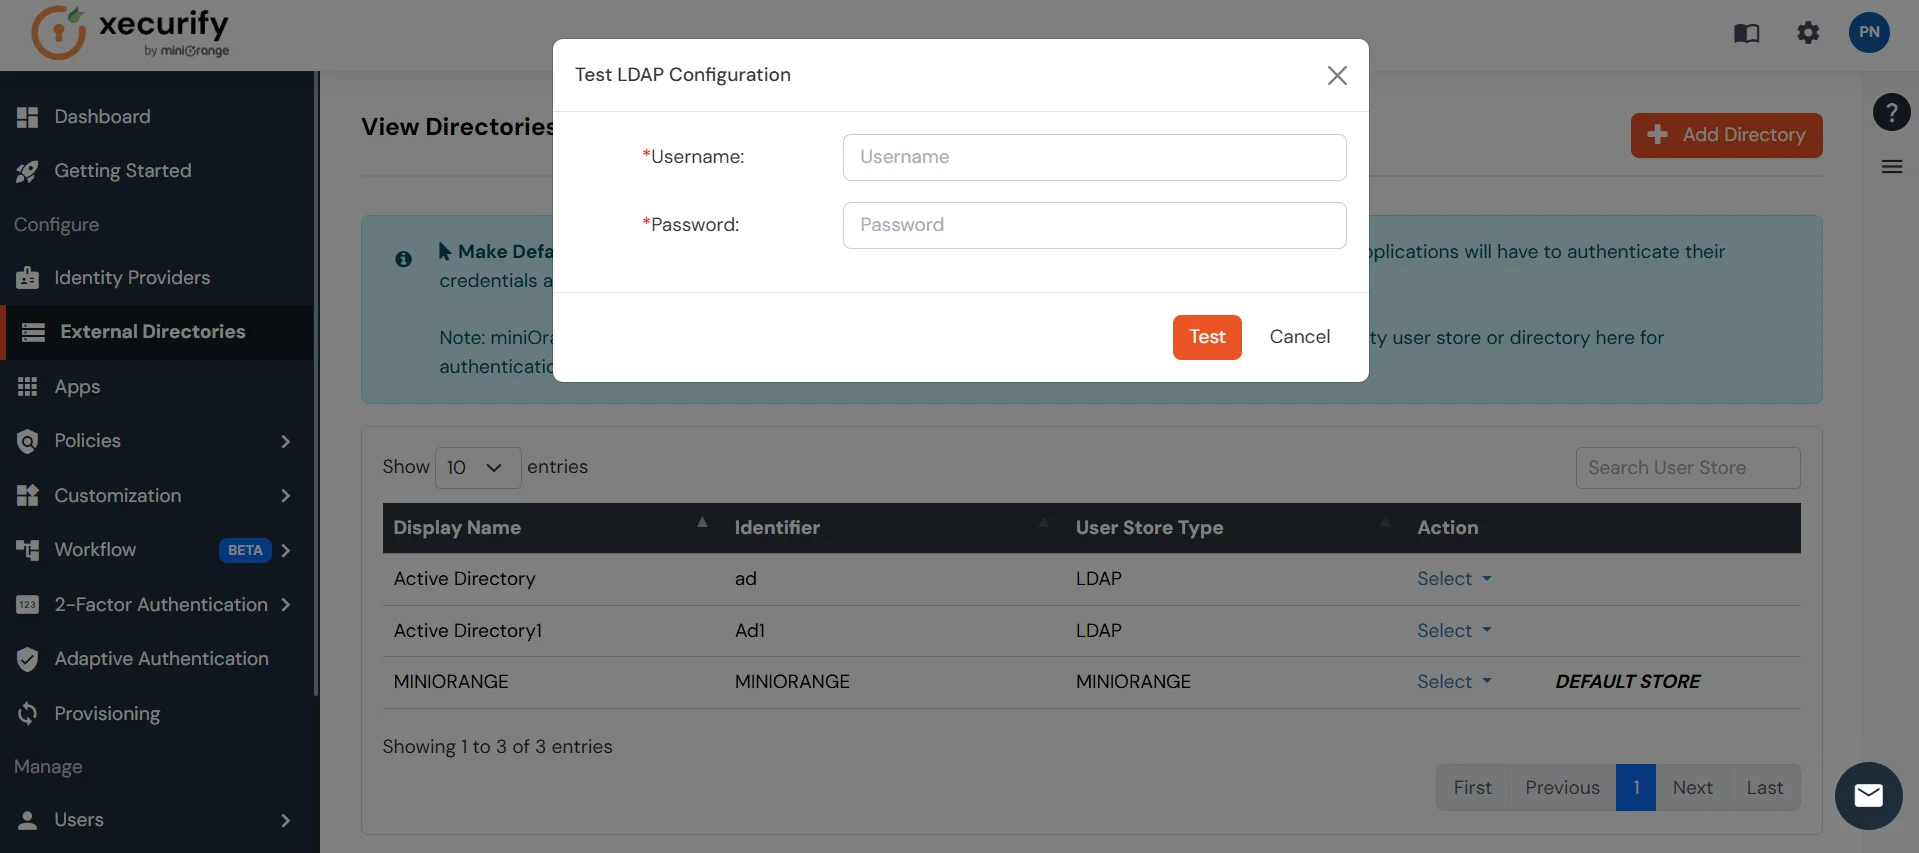
A pop-up appears prompting you to enter a username and password to verify your LDAP configuration.
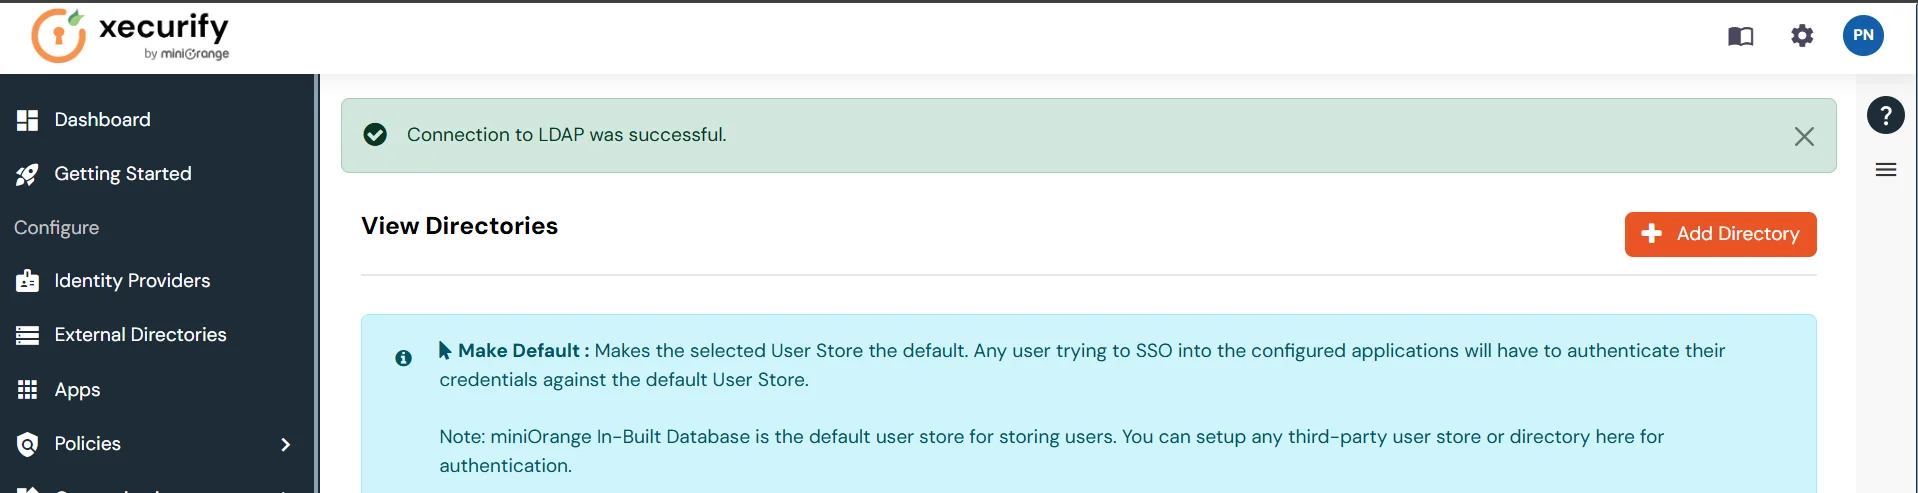
On Successful connection with LDAP Server, a success message is shown.
Test Attribute Mapping
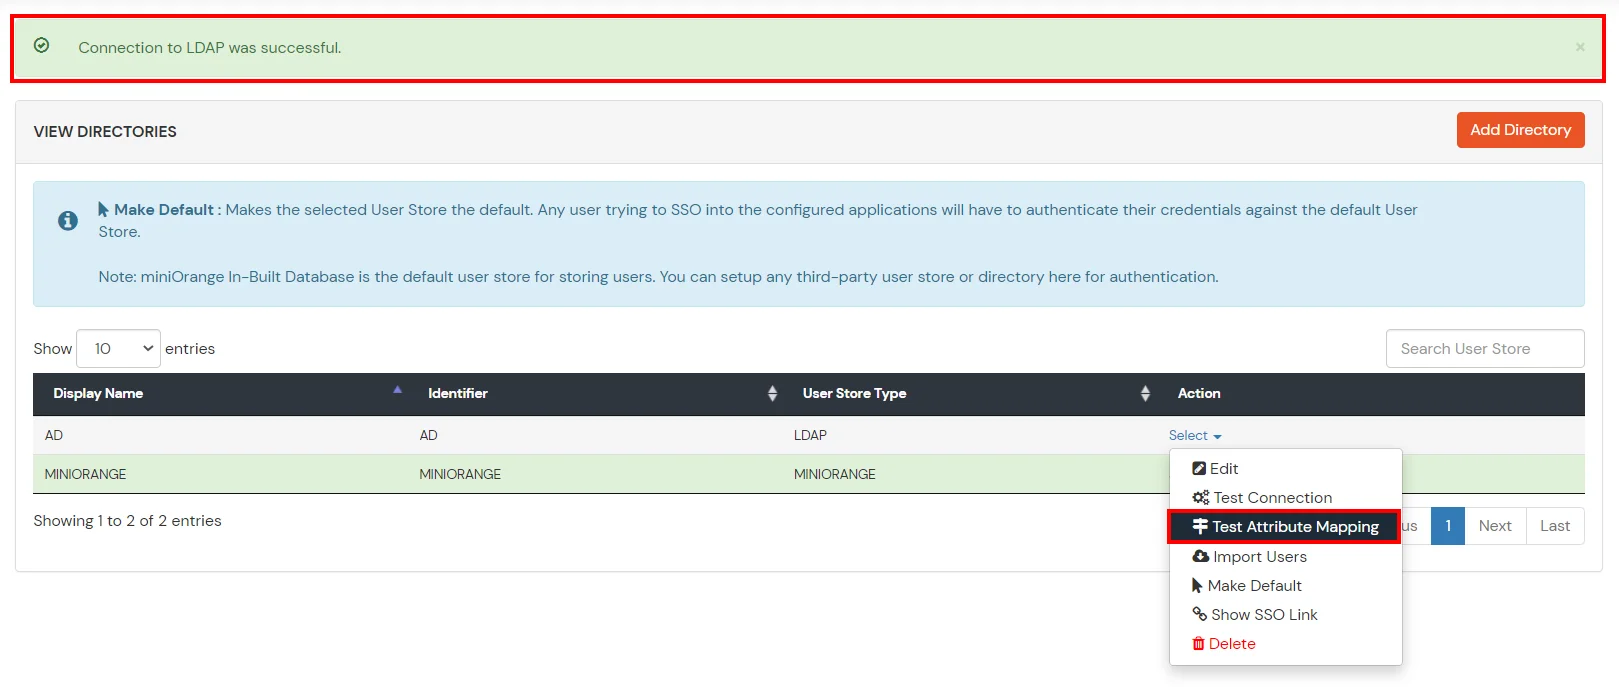
You will see a list of directories under Identity Providers. From the dropdown, select AD/LDAP Directories, search for your configured directory, click the three dots next to it, and select Test Attribute Mapping.
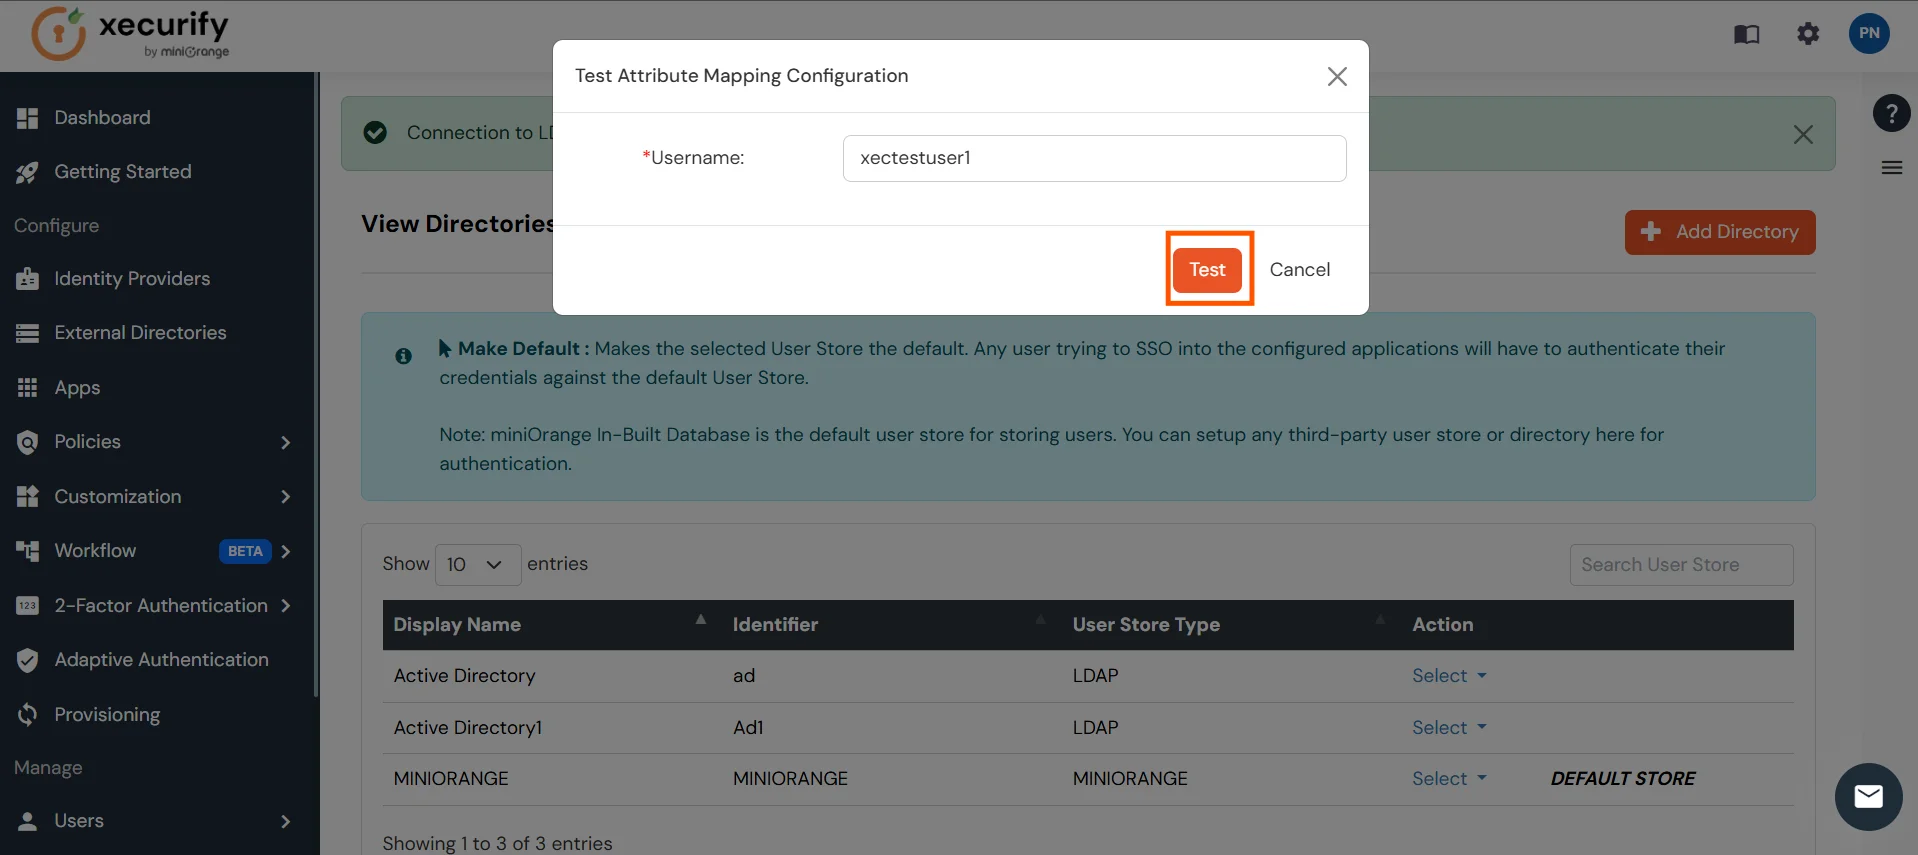
A pop‑up appears to enter a username and click Test.
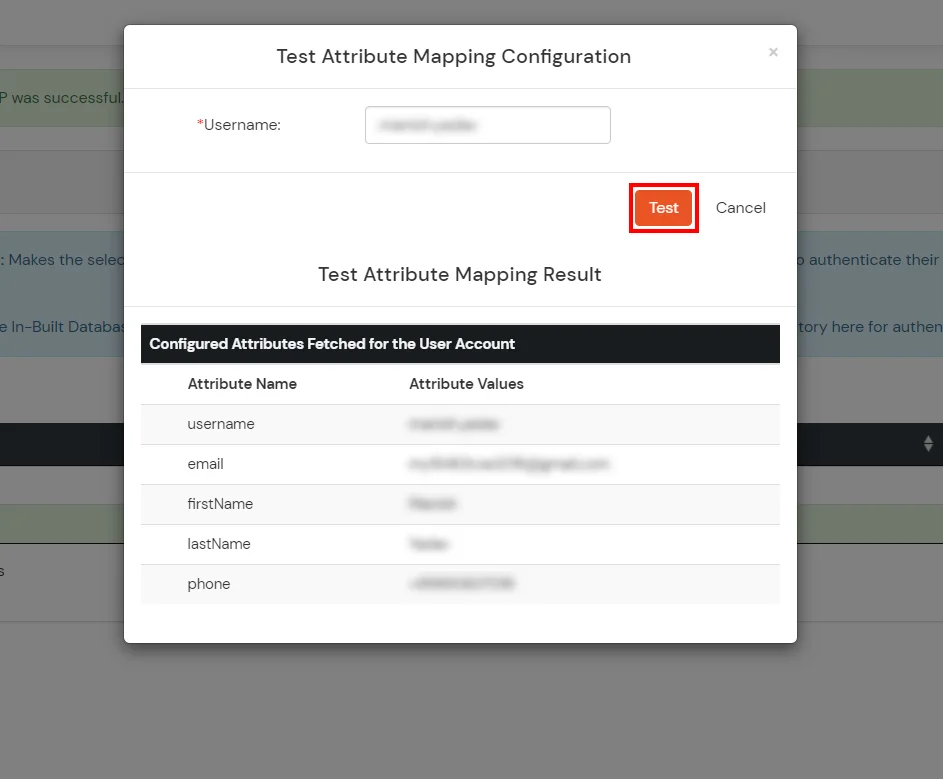
The Test Attribute Mapping Result will be displayed.
Set up AD as External Directory configuration is complete.
Note: Refer our guide to setup LDAP on windows server.
miniOrange integrates with various external user sources such as directories, identity providers, and etc.