Hello there!
Need Help? We are right here!
Need Help? We are right here!
Search Results:
×A step-by-step guide to installing and configuring miniOrange Access Gateway (MAG) for secure access and authentication.
miniOrange access Gateway server has the following system requirements.
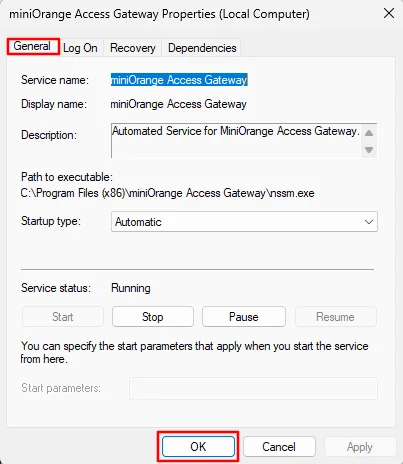
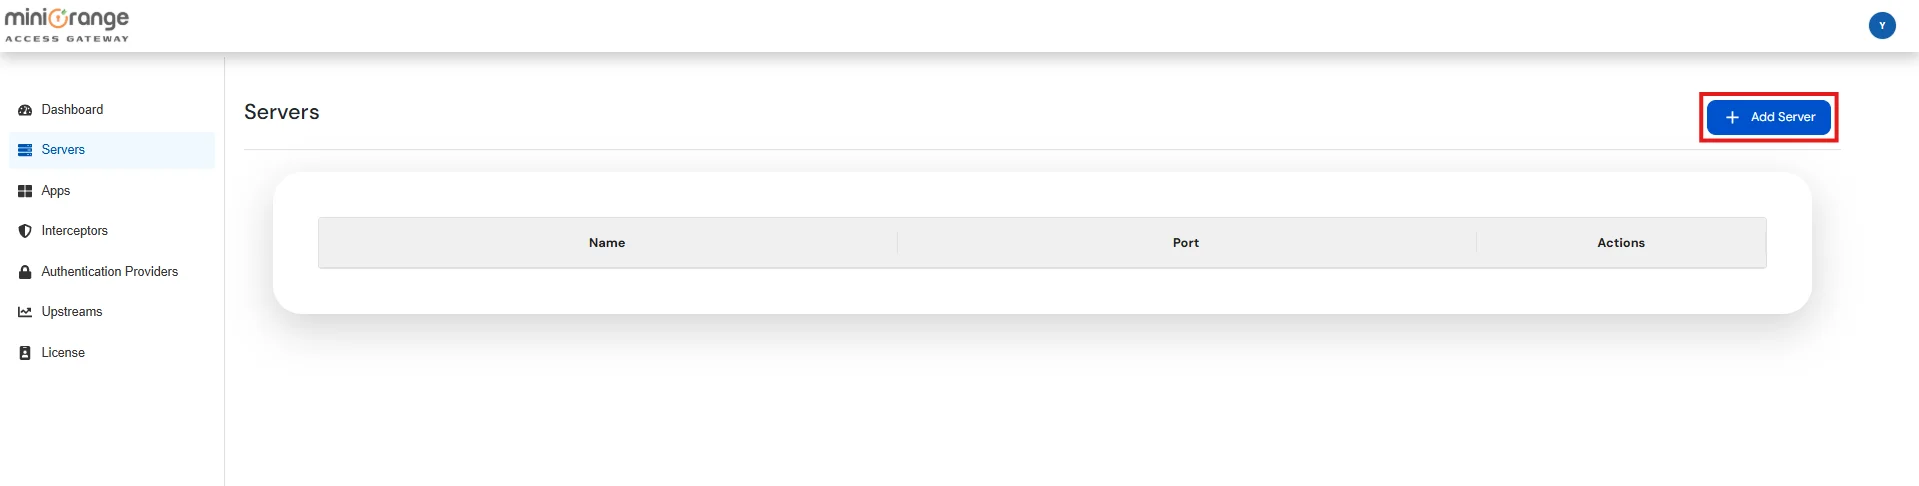
Follow the steps to deploy the miniOrange Access gateway server on your operating system:
C:\Program Files (x86)\miniOrange Access Gateway\conf\application.properties/opt/miniOrangeAccessGateway/conf/application.properties| Property | Values |
|---|---|
| database | Type of database to use:
|
| db_host | IP address or hostname of the machine where your database is running |
| db_name | Name of the database to connect to. Note: For PostgreSQL and SQL Server, make sure the database is already created. |
| db_port | Default Port:
|
username | Username used to authenticate with the database. |
| password | Password used to authenticate with the database. |
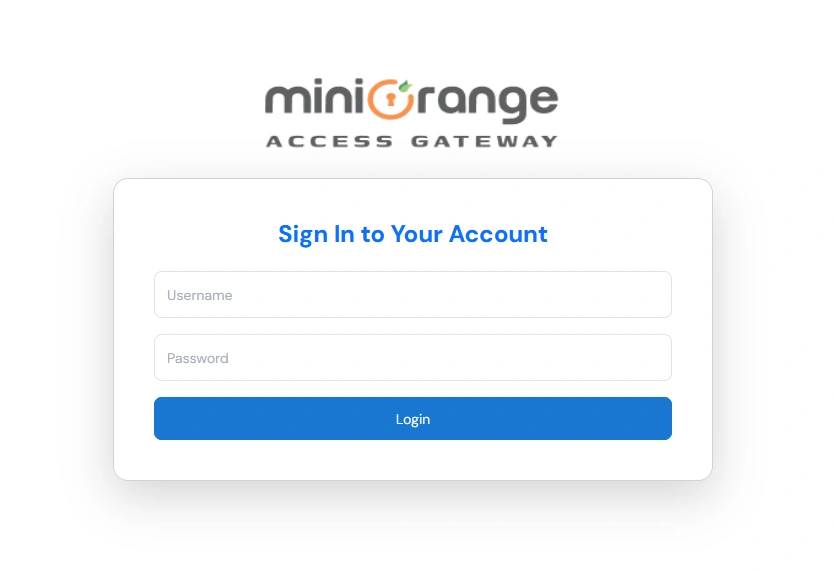
systemctl restart mo-access-gateway(Don’t have an account? No worries! Click here to create a new account.)

| Field | Values |
|---|---|
| Username | Enter the Username you use to sign in to miniOrange Cloud / Onpremise. |
| Password | Enter the Password you use to sign in to miniOrange Cloud / Onpremise. |
| miniOrange IAM Branding | Enter your miniOrange IAM Branding URL -
|
| db_port | Default Port:
|
username | Username used to authenticate with the database. |
| password | Password used to authenticate with the database. |
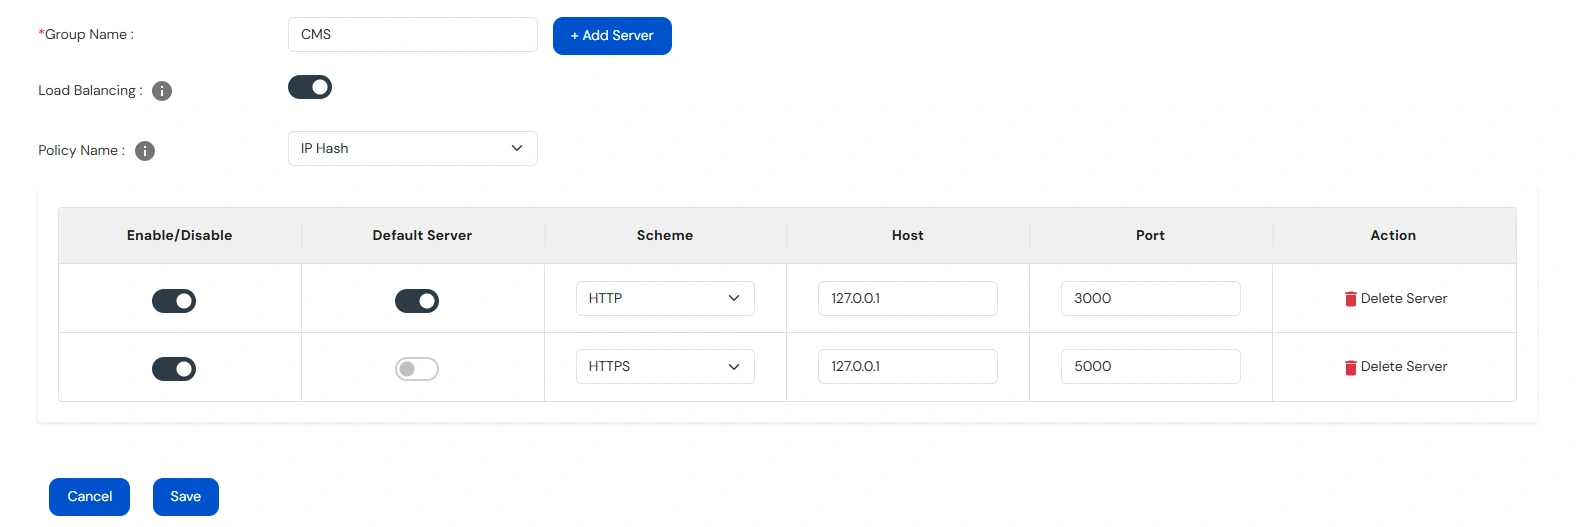
Note: Upstream Group contains the details of servers on which your application is deployed.
| Group Name | Enter a unique name for the Group of Upstream Servers. |
| Load Balancing |
|

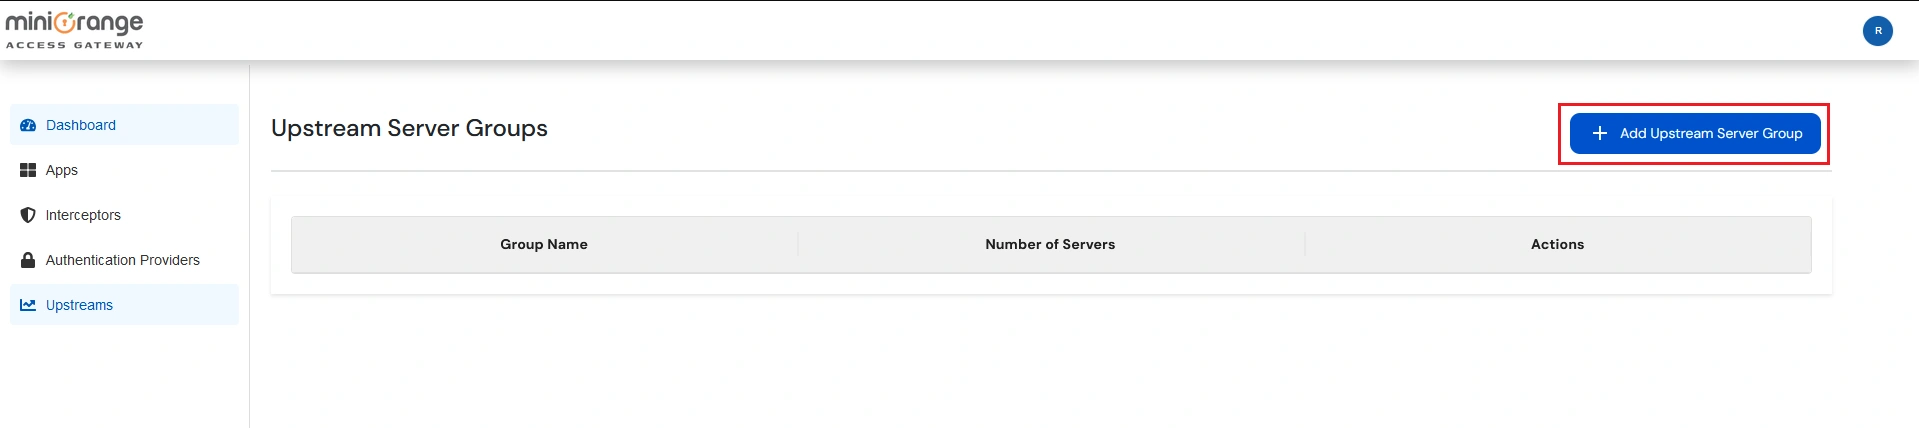
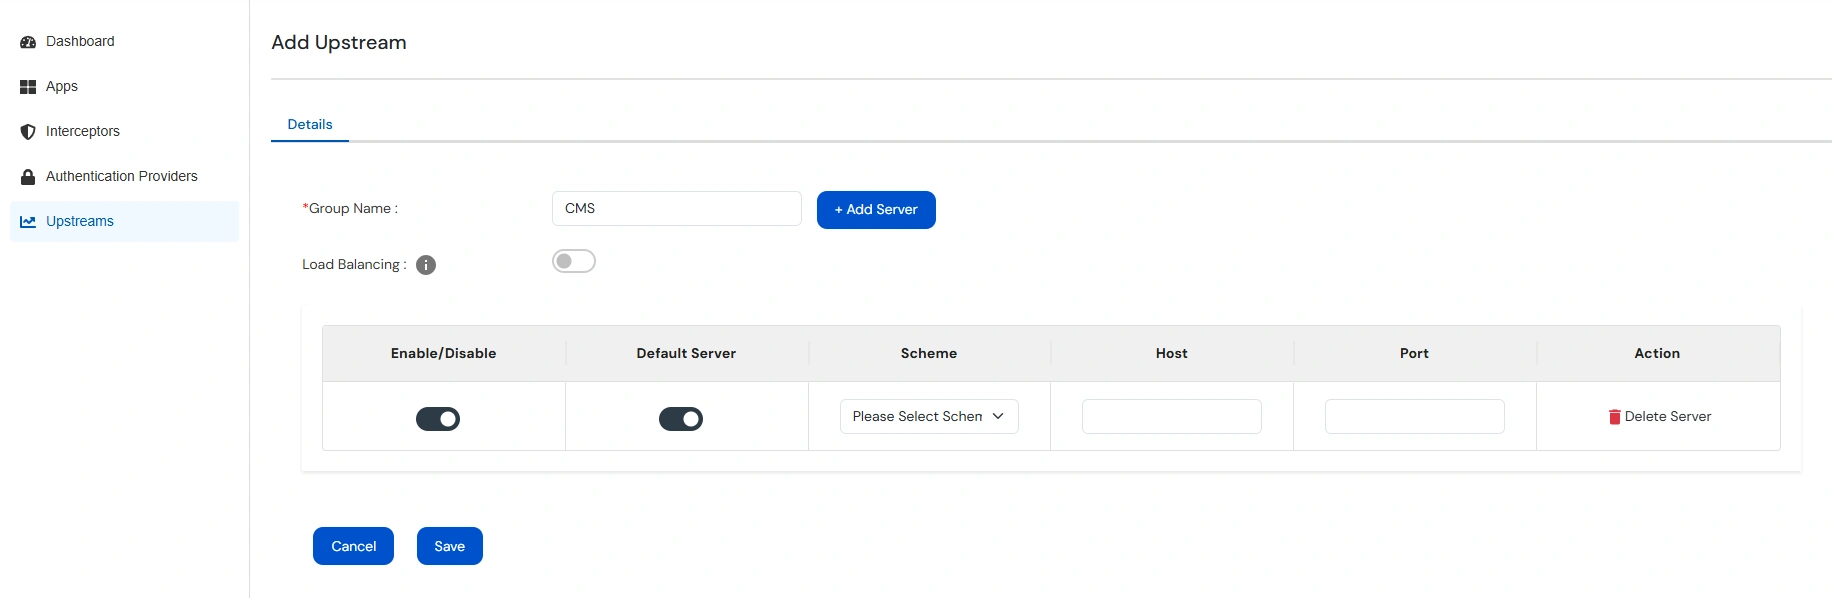
| Scheme | Select the scheme/protocol used to access your Application Server. This field can only have one value either HTTP or HTTPS. |
| Host | The FQDN or IP Address of your Application Server. |
| Port | The Port on which the your Application Server is listening. |
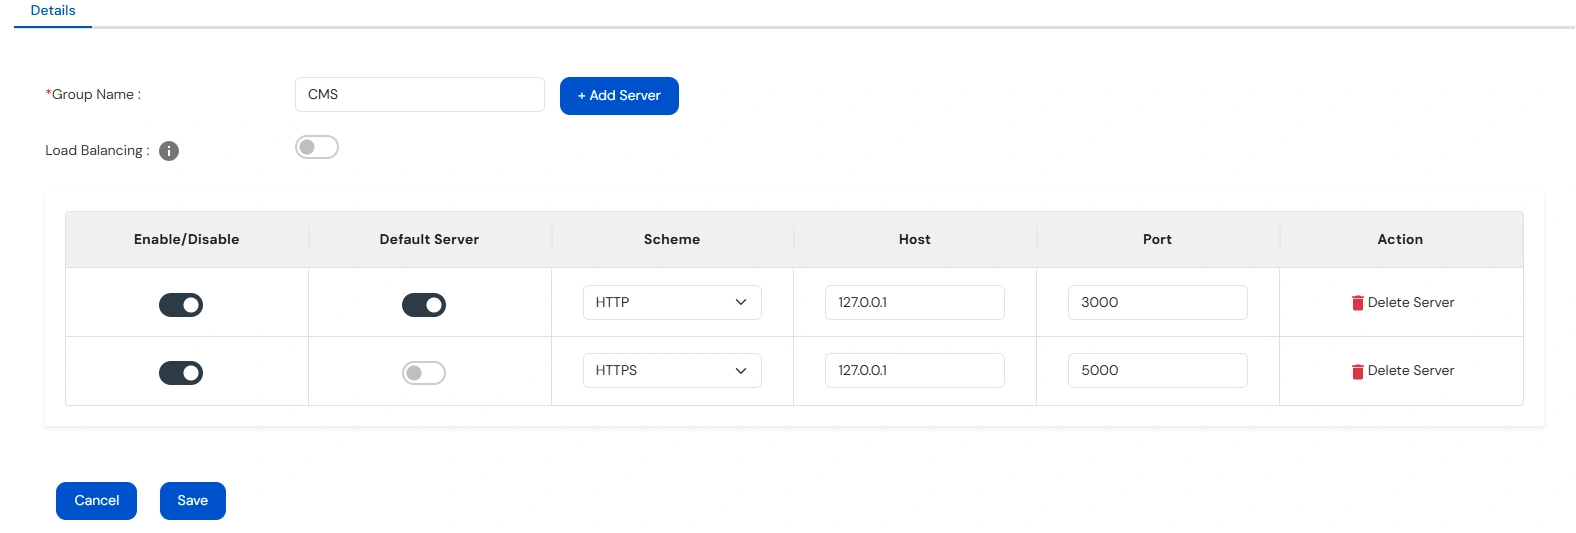
Note: Load Balancing can only be enabled if at least 2 servers are enabled.
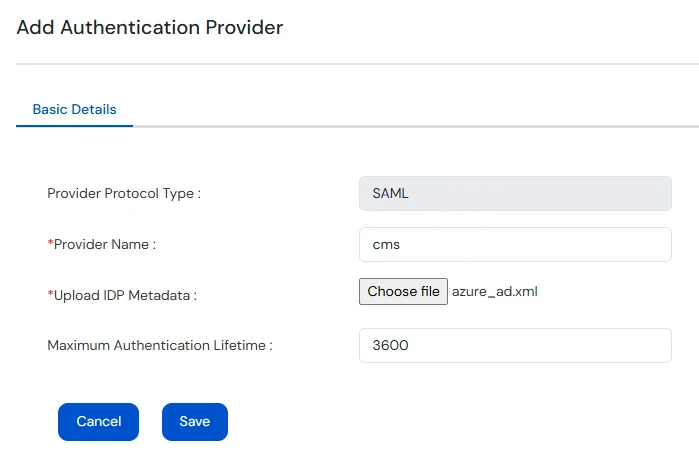
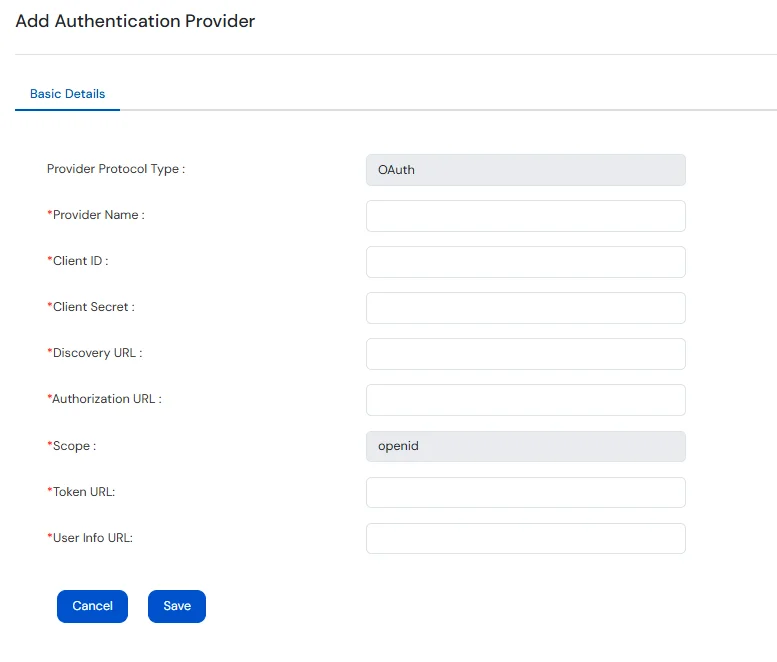
Note: Authentication Providers contain IDP configurations used for user authentication.
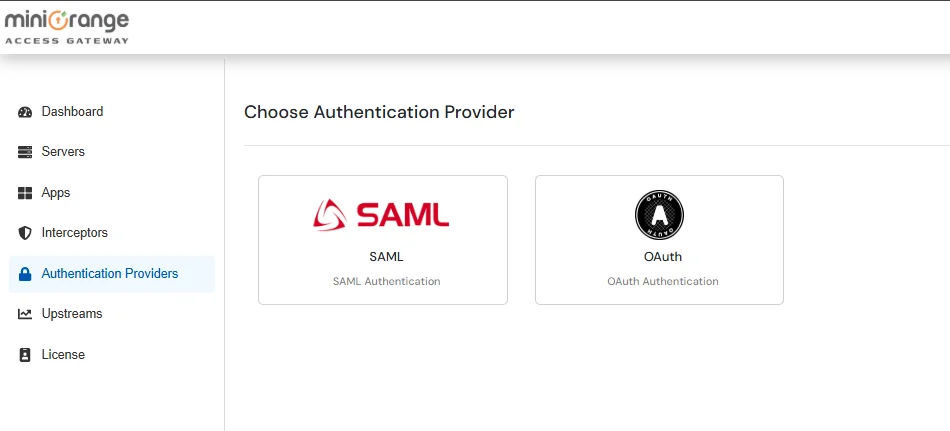
If SAML is Selected:
Note: miniOrange Access Gateway metadata will be provided per application.

If OAuth is Selected:
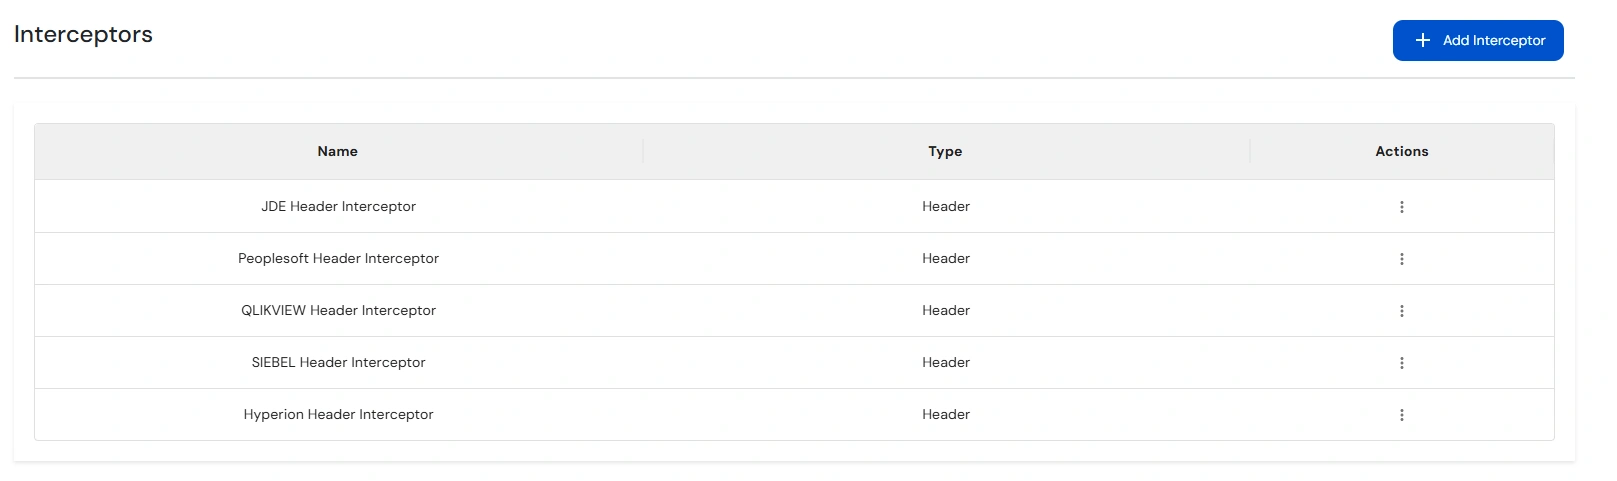
Note: Interceptors are components which act like filters, that process incoming requests before they are forwarded to the Upstream Server.
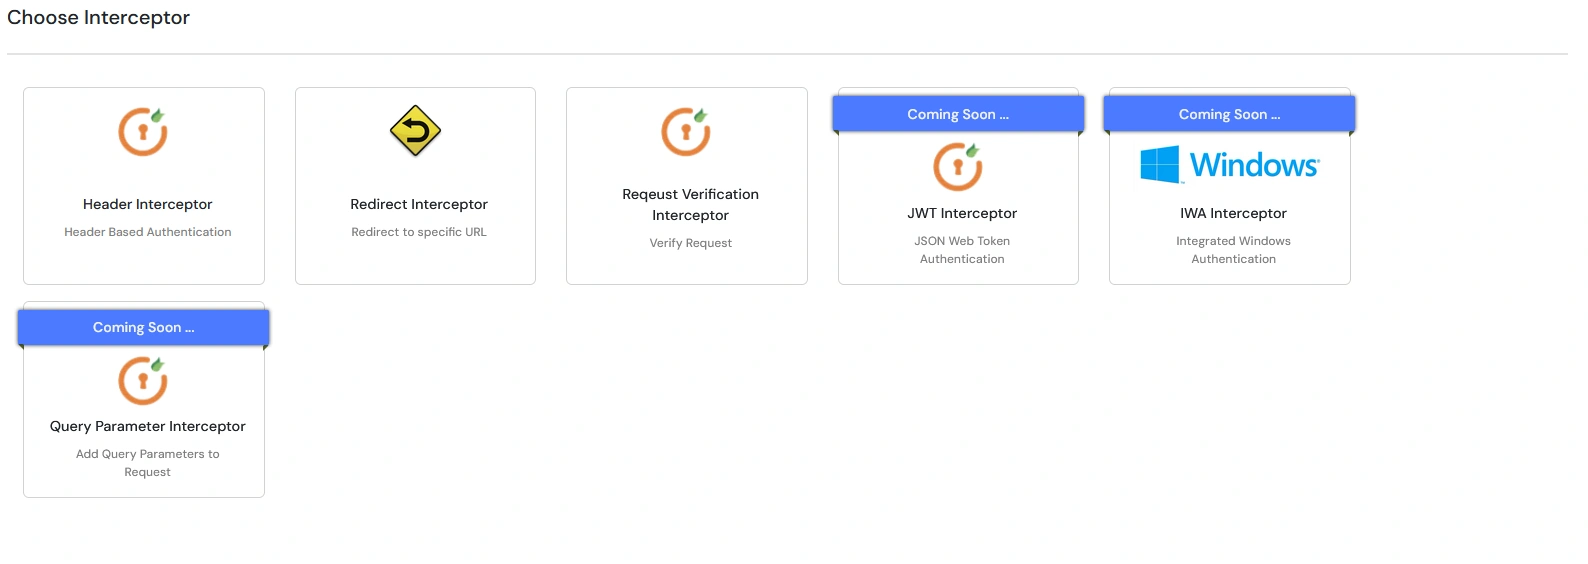
The Header Interceptor adds or modifies request headers before forwarding them to the upstream application.
This is useful for sending identity details or additional metadata to backend services, without requiring changes to the upstream application.
| Interceptor Type | Function |
|---|---|
| Interceptor Name | Name to Identify under all interceptors the Header Interceptor. |
| Header Name |
TEST_HEADER: (nameId / sub value from IdP) |
| Header Value Prefix | Prefix Value that must be added to the Header’s Value |
| Header Value | Fixed Value of Header. |
| Send SAML Headers | Enable this Toggle to send all SAML Attributes as Headers. |
| Add Header Button | Click to add Custom Header. |
| Custom Header Fields | Define fixed header names and their corresponding values. |
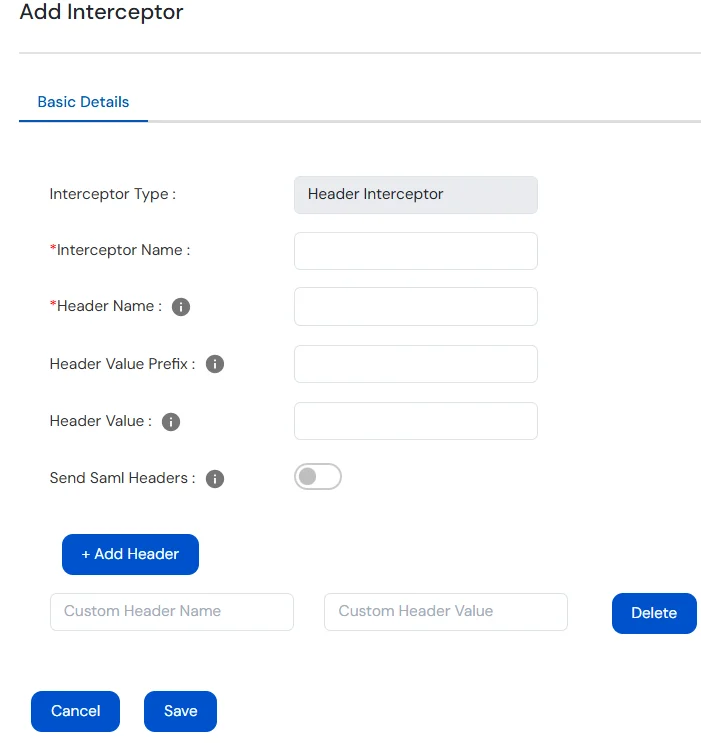
The Redirect Interceptor sends a redirect response to the client instead of forwarding the request to the upstream application.
This happens before the request reaches the upstream application.
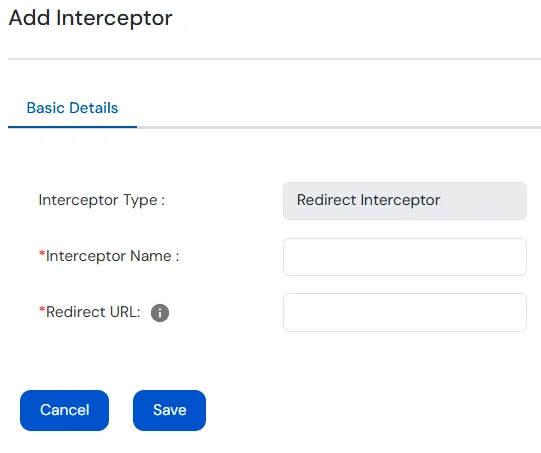
| Field | Values |
|---|---|
| Interceptor Name | Name to Identity the Redirect Interceptor. |
| Redirect URL | Provide the URL to redirect to. |
The Request Verification Interceptor evaluates incoming requests against configured verifiers (e.g., headers, query params, IP address, etc.).
This is useful for enforcing custom security rules, filtering requests, or dynamically modifying behavior based on request content.
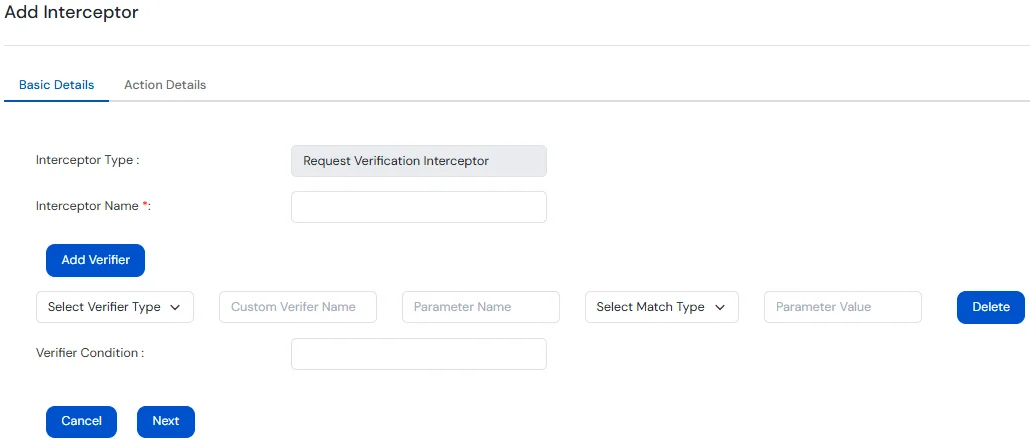
Under Basic tab, provide the following details:
| Field | Values |
|---|---|
| Interceptor Name | Name to identify the Request Verification Interceptor. |
| Verifier Type |
Select the part of the request to verify -
|
| Custom Verifier Name | Logical label for this verifier; used in the condition expression. |
| Parameter Name / Path to Verify / Cookie Name |
Enter the exact name of the field to verify -
|
| Match Type |
Choose how the value should be matched -
|
| Parameter Value | Enter the expected value to match against. |
| Verifier Condition | Use logical expressions to combine verifiers. |
| Verifier Type: IP Address | |
| Protocol Type |
Select Protocol Type -
|
| Start IP / End IP | Define IP range to match incoming requests. |
In Action Details, provide the following details:
| Request Type |
Select the HTTP method to which the action should apply -
|
| Action Type |
Choose the action to perform when the request matches the verifier condition. See below for Action Options. |
| Strict Verification Mode | Enable this to block request if verification fails. |
| Add Action Parameters | Allows configuration of additional request-specific modifications. |
| Add Rule | Adds the configured rule to the interceptor. |
Action Type Options
| Action Type | Description |
|---|---|
| pass | Forwards the request without any modifications. |
| block | Stops the request and returns a blocked response. |
| redirect | Sends a redirect response to a specified URL. |
| modify |
Modifies request components -
|
| inject |
Injects new components into the request -
|
| delay | Adds a delay to the response before responding. |
| log | Logs request details for monitoring or debugging purposes. |
The JWT Interceptor generates a JWT token after successful authentication and appends it to the URL path.
Useful for integrating with applications that expect JWTs in the request path for access or session validation.
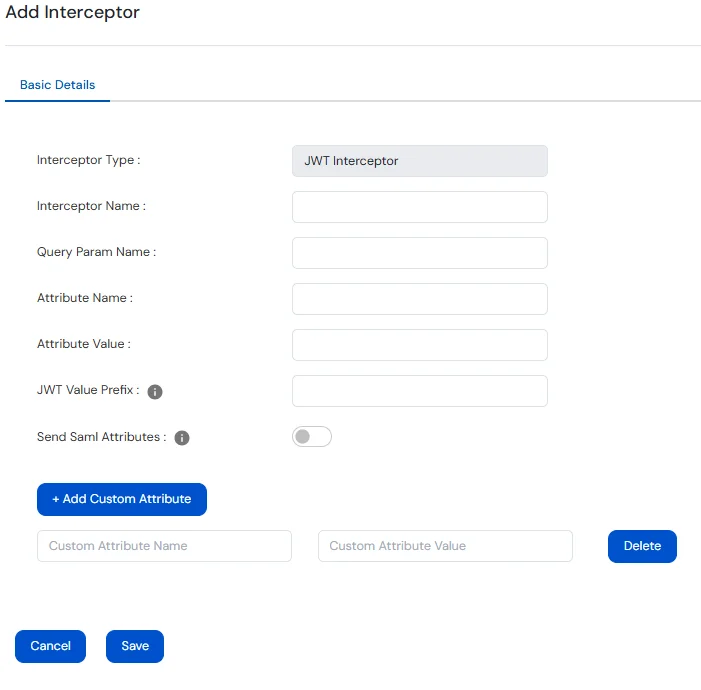
| Field | Values |
|---|---|
| Interceptor Name | Name to identify the JWT Interceptor. |
| Query Param Name | The query parameter name where the JWT will be appended in the URL. Defaults to access_token if left blank. |
| Attribute Name | JWT claim that holds the NameId (SAML) / sub (OAuth) value. Defaults to sub if left blank. |
| Attribute Value | A fixed value to be used in place of the username. If specified, the NameId (SAML) / sub (OAuth) value is ignored. |
| JWT Value Prefix | A prefix added before the attribute value or NameId (SAML) / sub (OAuth) value in the JWT. Applied only if the corresponding value is present. |
| Send SAML Attributes | If enabled, all SAML attributes are included as claims in the JWT. |
| Add Custom Attribute | Allows adding custom fixed key-value pairs to the JWT. |
| Custom Attribute Name | Name of the custom JWT claim to be added. |
| Custom Attribute Value | Value assigned to the corresponding custom claim. |
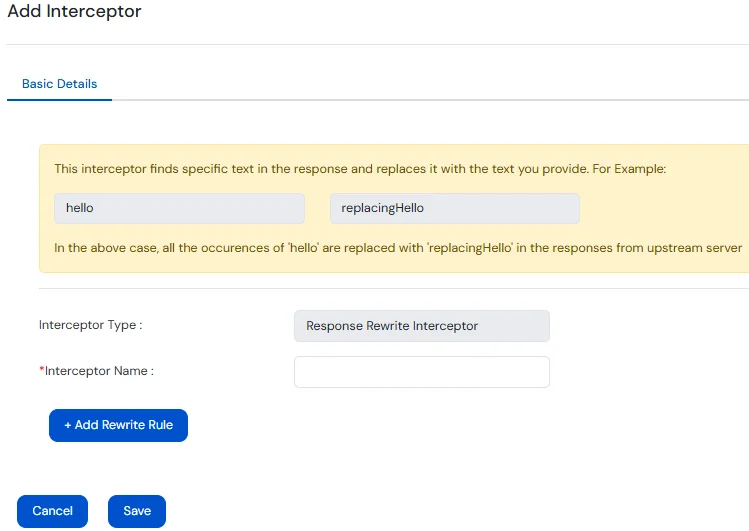
The Response Rewrite Interceptor is used to inspect and modify the response returned from the upstream (end-user) application before it reaches the client. It allows you to update elements such as headers, cookies, or even parts of the response body (HTML, JSON, etc.). This is useful for:
Changes are applied dynamically and transparently, without requiring any changes in the upstream application itself.
| Field | Values |
|---|---|
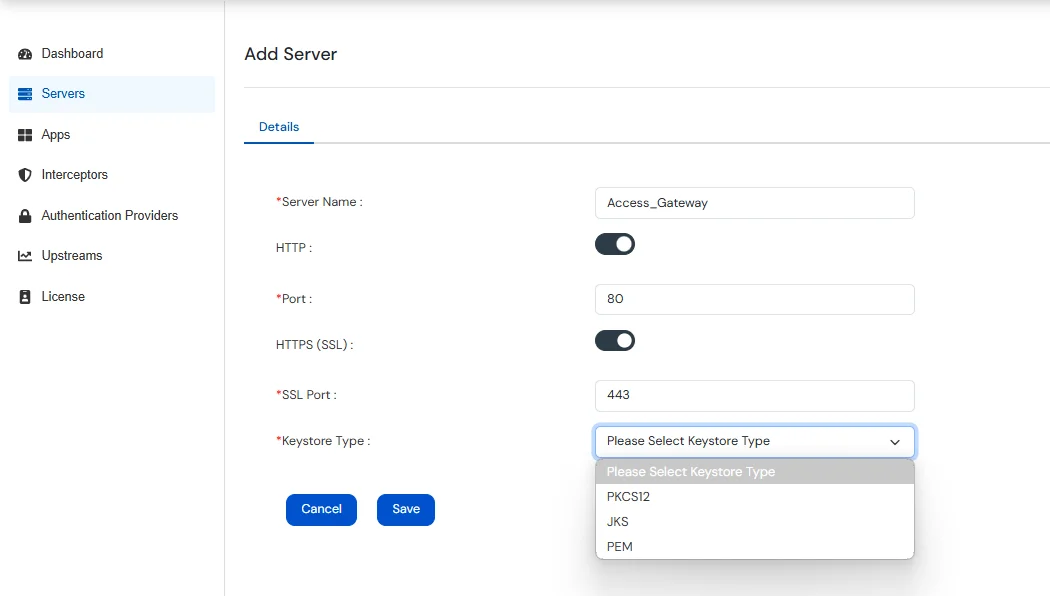
| HTTP | Enable this button if you want to allow Access Gateway to run on HTTP. |
| Port | Enter the Port number that the Access Gateway will listen on for HTTP Requests. |
| HTTPS | Enable this button if you want to allow Access Gateway to run on HTTPS. |
| SSL Port | Enter the SSL Port number that the Access Gateway will listen on for HTTPS Requests. |
| Keystore Type | Type of keystore used to SSL Certificates ( JKS, PKCS12, PEM ). |
| Upload Keystore | If Keystore Type is JKS / PKCS12, then upload keystore files with extensions .jks, .p12, .pfx. |
| Upload PEM Certificate | If Keystore Type is PEM, then upload file with .pem extension |
| Upload Private Key | If Keystore Type is PEM, then upload private key with .pem extension |
| Add Domain | Specify the domains that this server should handle. Enter the domain & click on +Add. |
| Domains | Configured Domains for the current server. |
Note: After creating a server, go to the Applications section, click Edit on the desired application, and select the server where the application should be deployed.
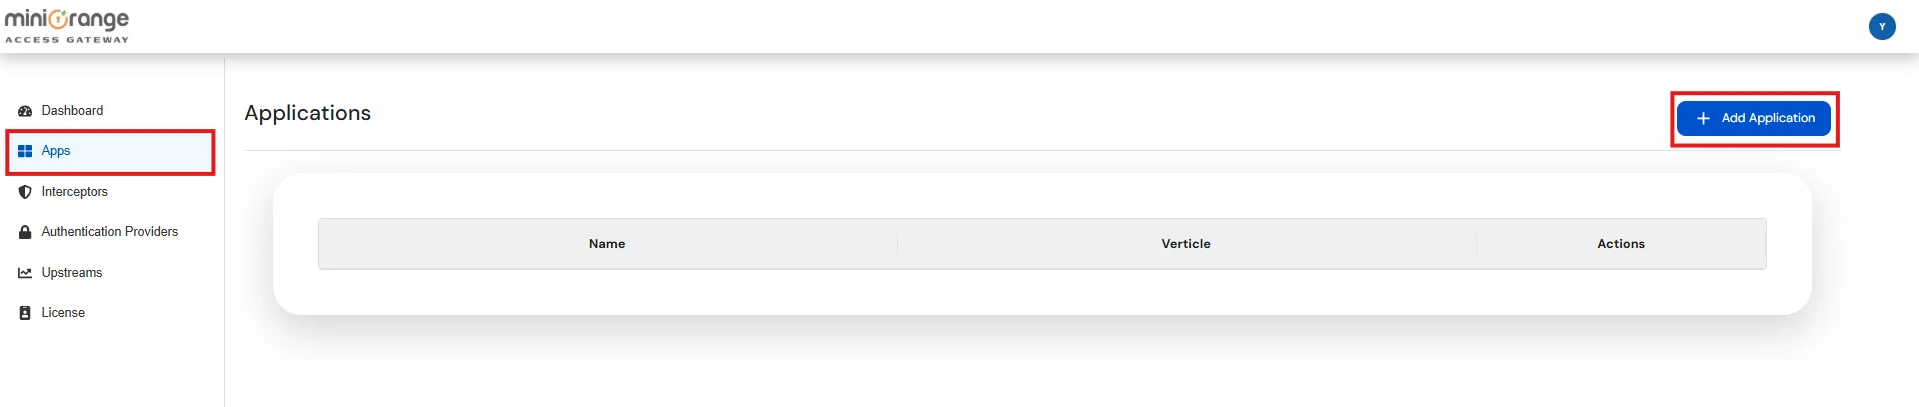
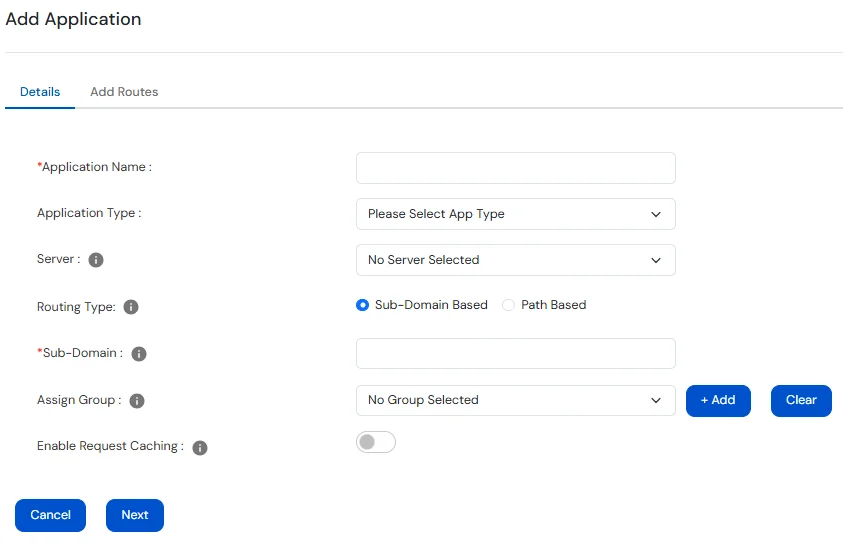
Enter the Basic details:
| Field | Values |
|---|---|
| Application Name | Enter a unique name to identify Application. |
| Server | Select the Access Gateway Server from the dropdown where you want to deploy the application. |
| Domain | Choose the domain to be used for this application from the list of domains configured on the server. |
| Routing Type |
Subdomain-based Routing: Routes requests based on subdomains (e.g., app1.example.com, app2.example.com). Each subdomain maps to a different internal application. Path-based Routing: Routes requests based on URL paths (e.g., example.com/app1, example.com/app2). Different paths under the same domain point to different internal applications. The Context Path value must always start with a / (forward slash). |
| Sub-Domain / Context Path | Enter the Sub-Domain or Context Path. |
| Assign Groups |
Assign user groups to the application (synced in real-time with MiniOrange IAM). After selecting a group, click +Add to assign it. Note: If groups are assigned, the application must have authentication interceptors (SAMLAuth/OAuth) on all routes. The authentication provider must also send the following attribute:
|
| Enable Request Caching | Enable or disable Request Caching. If enabled, specify the URL paths for which responses should be cached on the browser side. |
The Hostname entered above must have a DNS entry pointing to the server on which miniOrange Access Gateway is deployed.
Group Assignment will only work if SAML / OAuth is configured for the application and an attribute MAG_USER_GROUPS is being sent by the IdP.
Switch to Add Routes tab and enter the following details:
| Field | Value |
|---|---|
| Path | Defines the request URL pattern (e.g. /jde/owhtml, /*) that this route will handle. Supports exact paths or wildcards. |
| Interceptors | A list of interceptors that process the request before it's forwarded. You can add, remove, or reorder them. |
| Authentication Provider Name | Select the name from the list of configured Authentication Providers . This option will be enabled only if SAML / OAuth Interceptor is present. |
| Upstream Group | Select the name from the list of configured Upstream Groups where the request should be forwarded. |
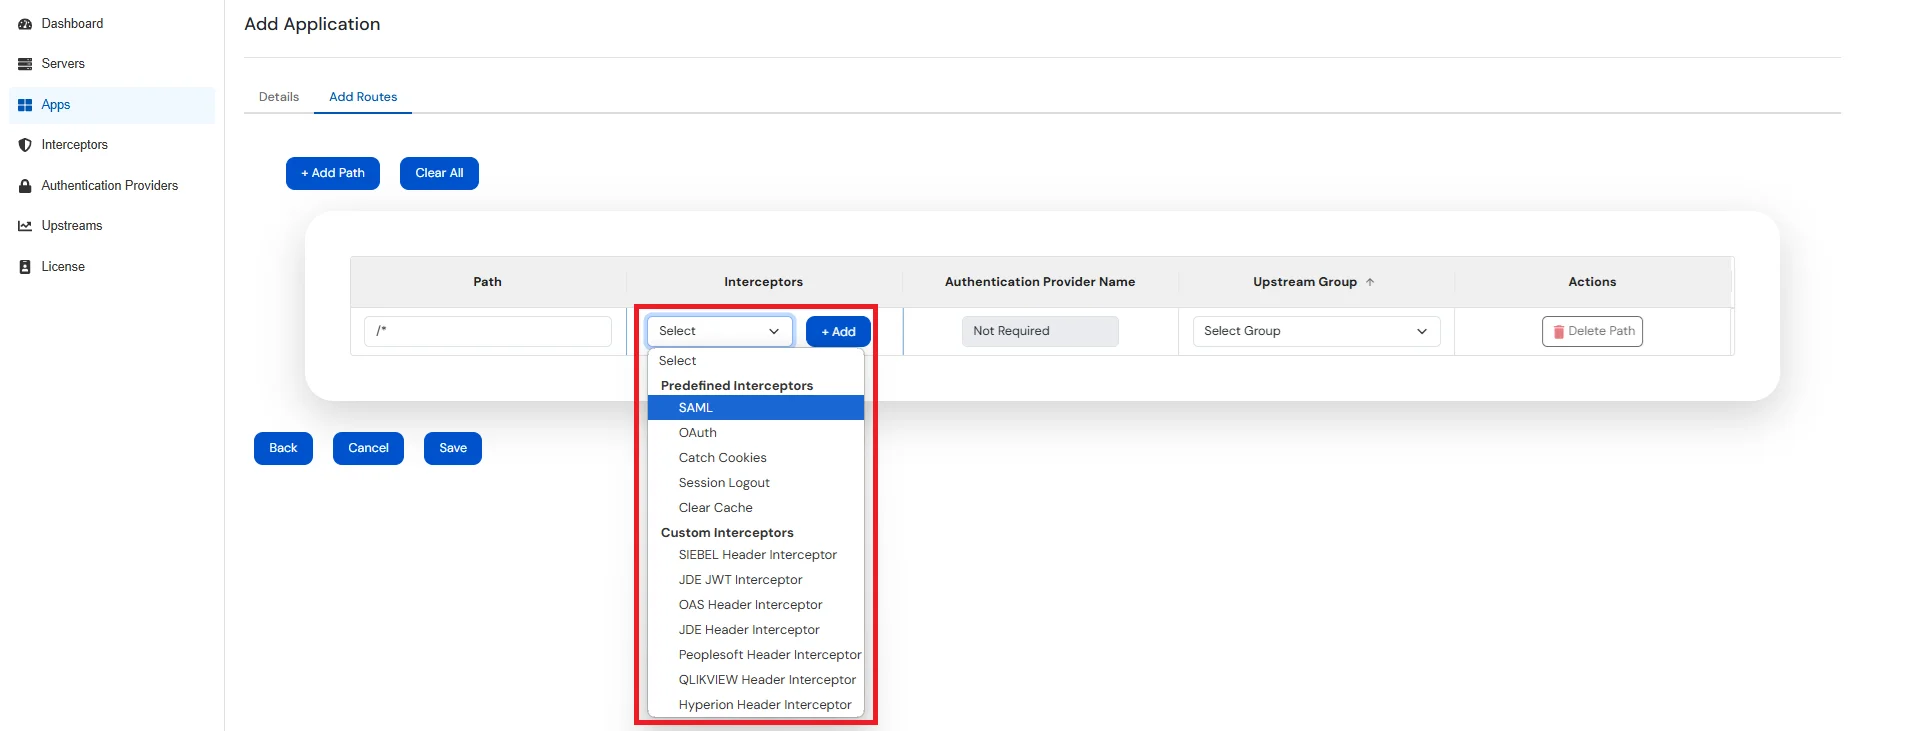
| Predefined-Interceptor Type | Function |
|---|---|
| SAML | Forces SAML Authentication before forwarding the request to upstream server. |
| OAuth | Forces OAuth Authentication before forwarding the request to upstream server. |
| Catch Cookies | Fetch cookies from the request and add these to the corresponding response from upstream server. |
| Session Logout | Destroys the session of the user in Access Gateway. |
| Clear Cache | Disable Caching |
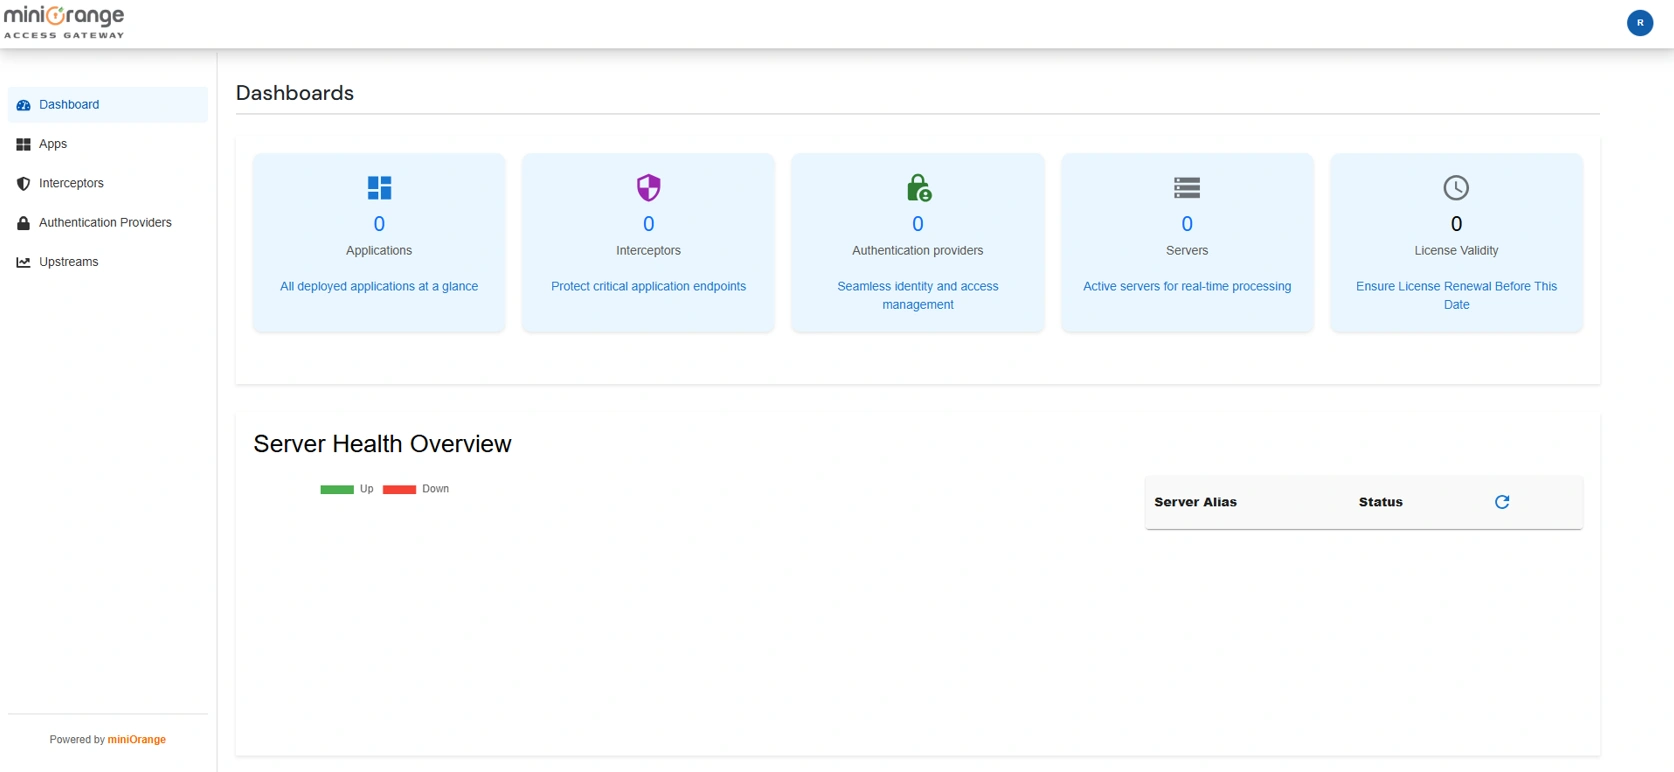
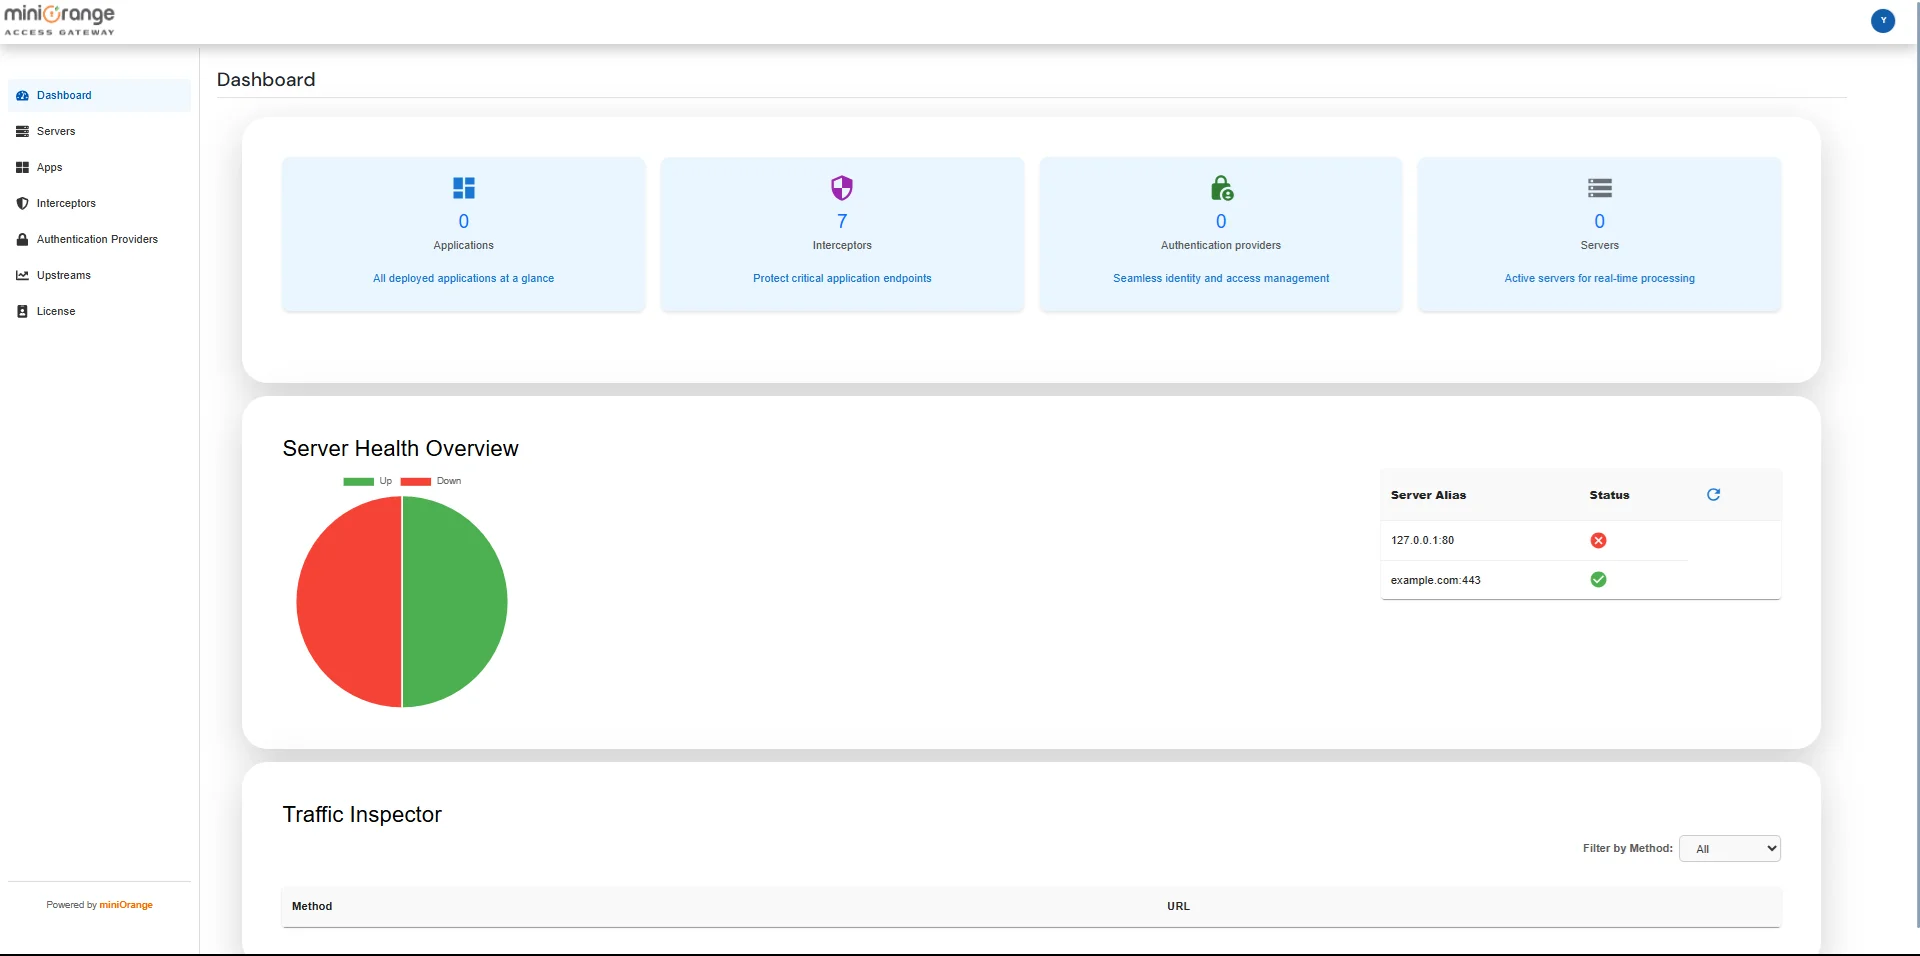
On the Admin Dashboard, you can view configuration summaries, monitor server health status, and inspect live request traffic.
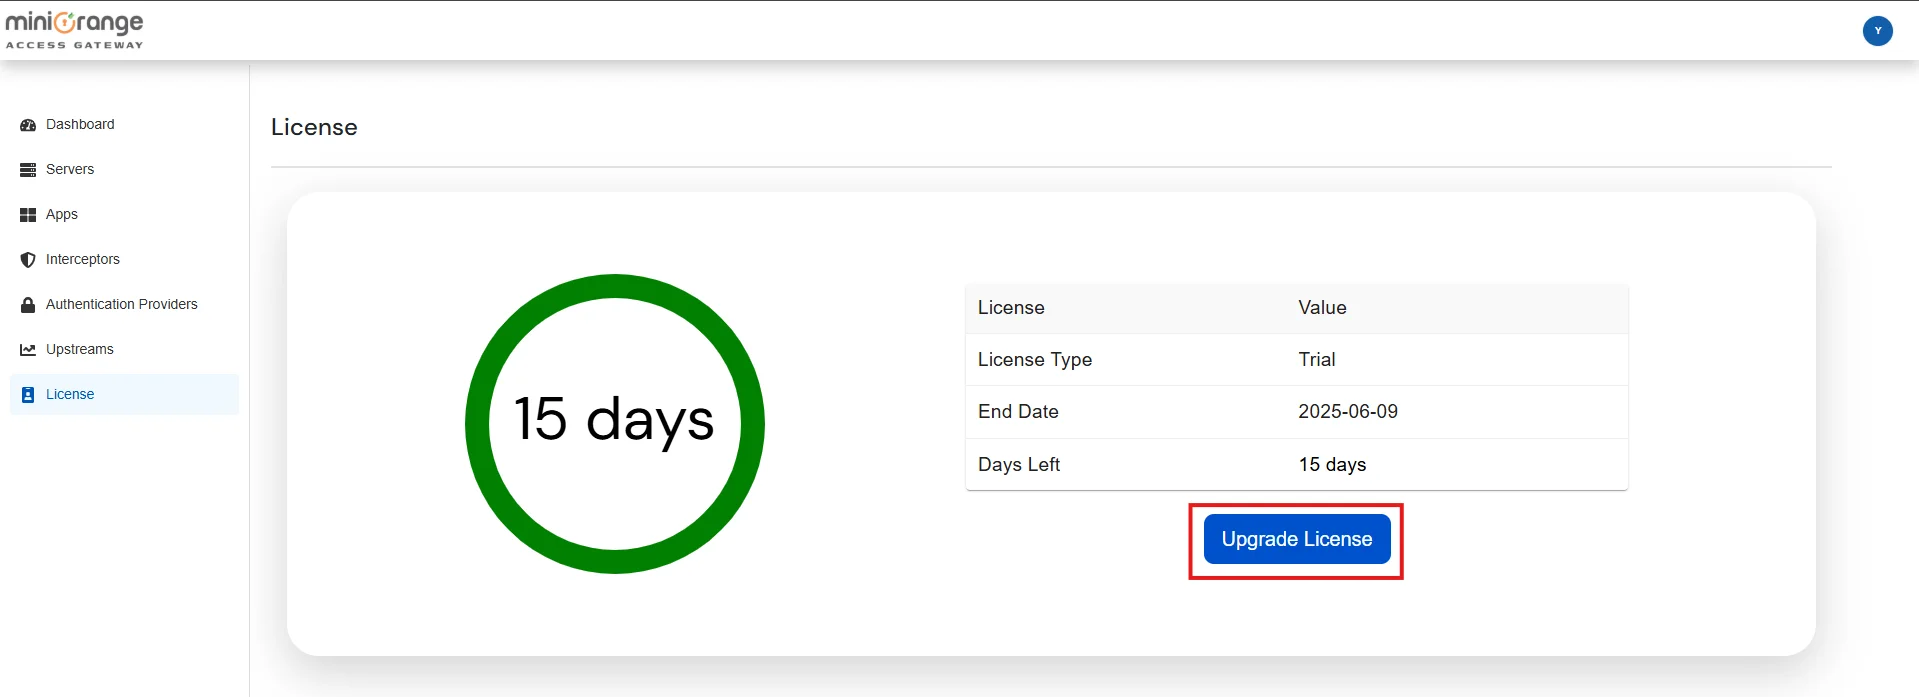
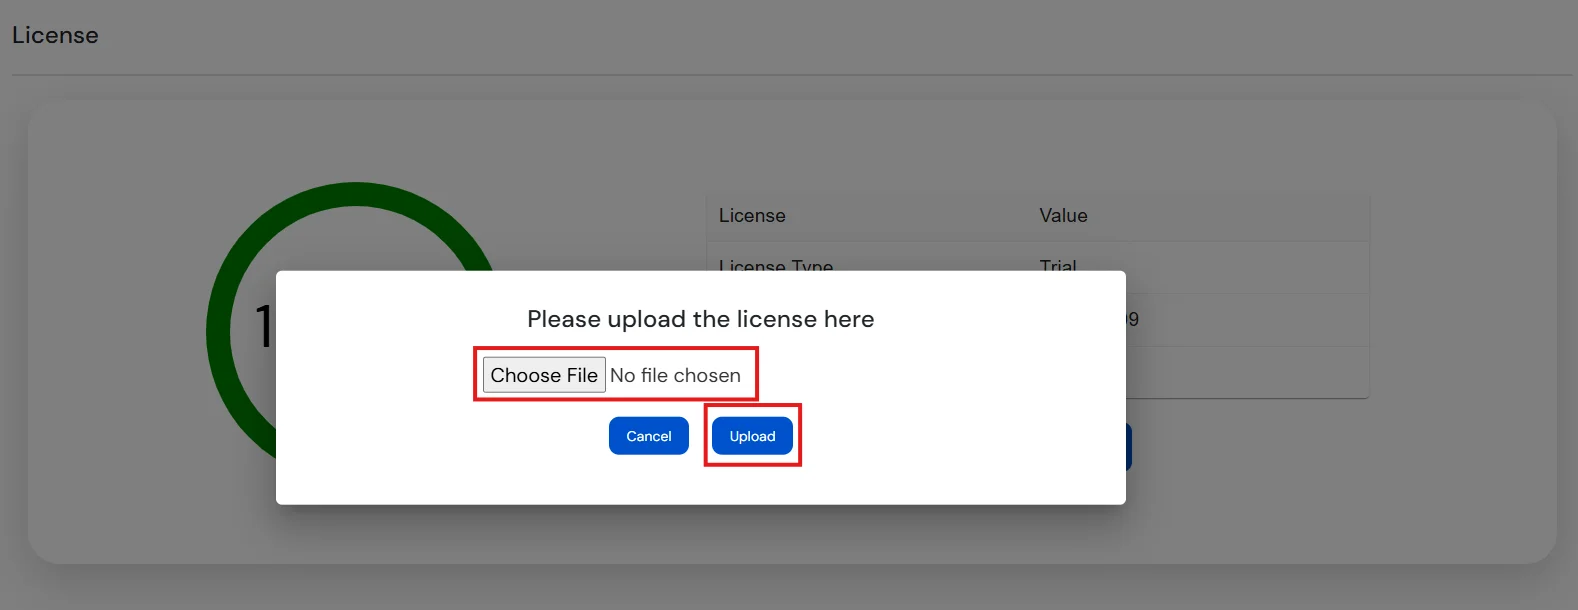
Note: Initially, a trial license valid for 15 days is provided. To upgrade the license, please Contact Us.
