Apple Single Sign-On SSO
Apple SSO login can be achieved by integrating your app as Service Provider and Apple ID OAuth IDP (Identity Provider) in miniOrange.
Here, we will go through a step-by-step guide to test SSO connection by setting up miniOrange as SP & Apple as IDP. You can follow the same steps to set up your own application as SP instead of miniOrange.
Connect with External Source of Users
miniOrange provides user authentication from various external sources, which can be Directories (like ADFS, Microsoft Active Directory, OpenLDAP, AWS etc), Identity Providers (like Microsoft Entra ID, Okta, AWS), and many more. You can configure your existing directory/user store or add users in miniOrange.
Follow the Step-by-Step Guide given below for Apple Single Sign-On (SSO)
1. Configure miniOrange as Service Provider (SP) in Apple ID
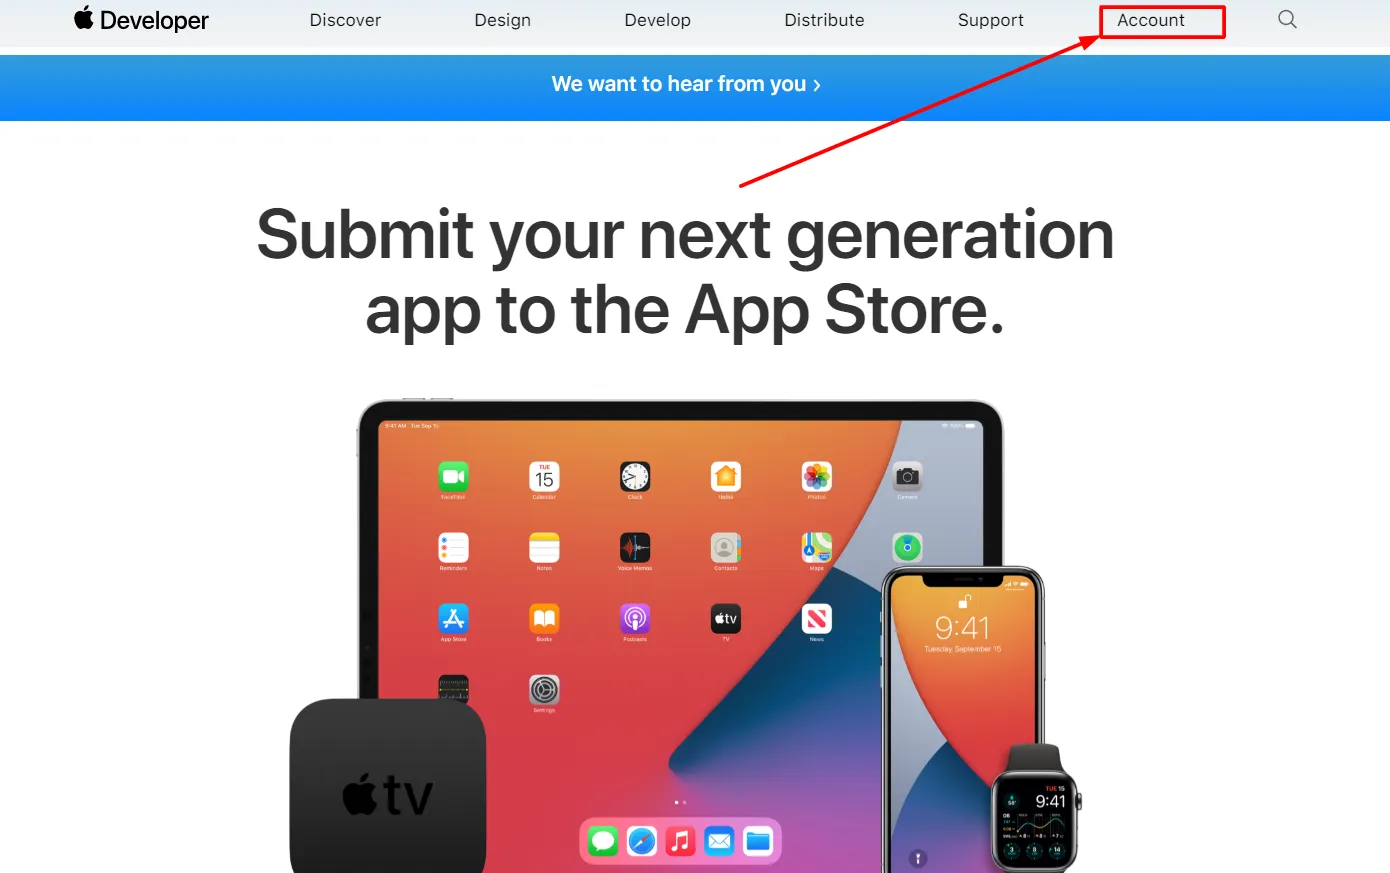
- Go to https://developer.apple.com click on Account and Login with your Apple developer account.
- Click on Certificates.
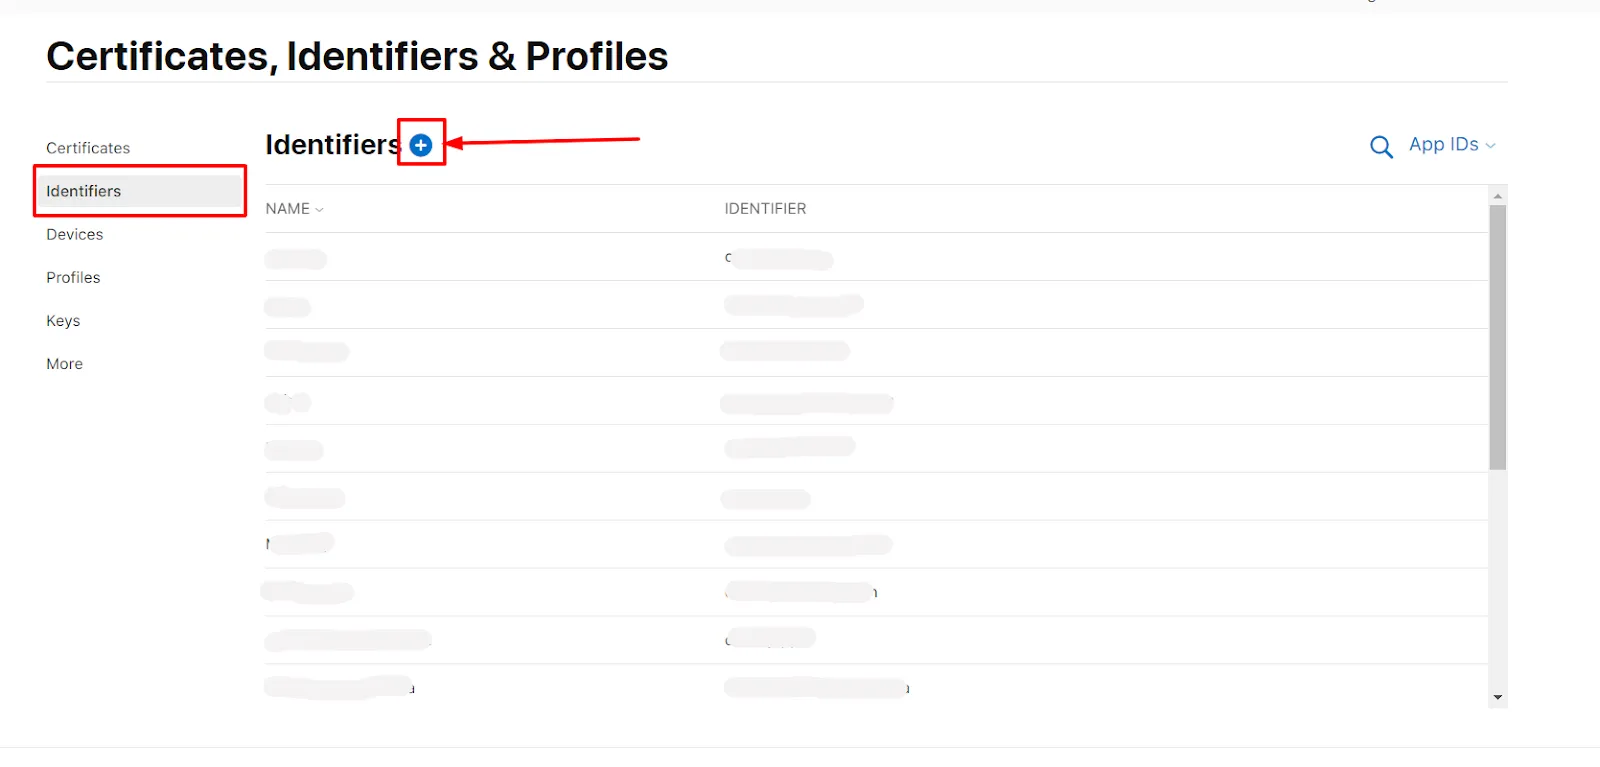
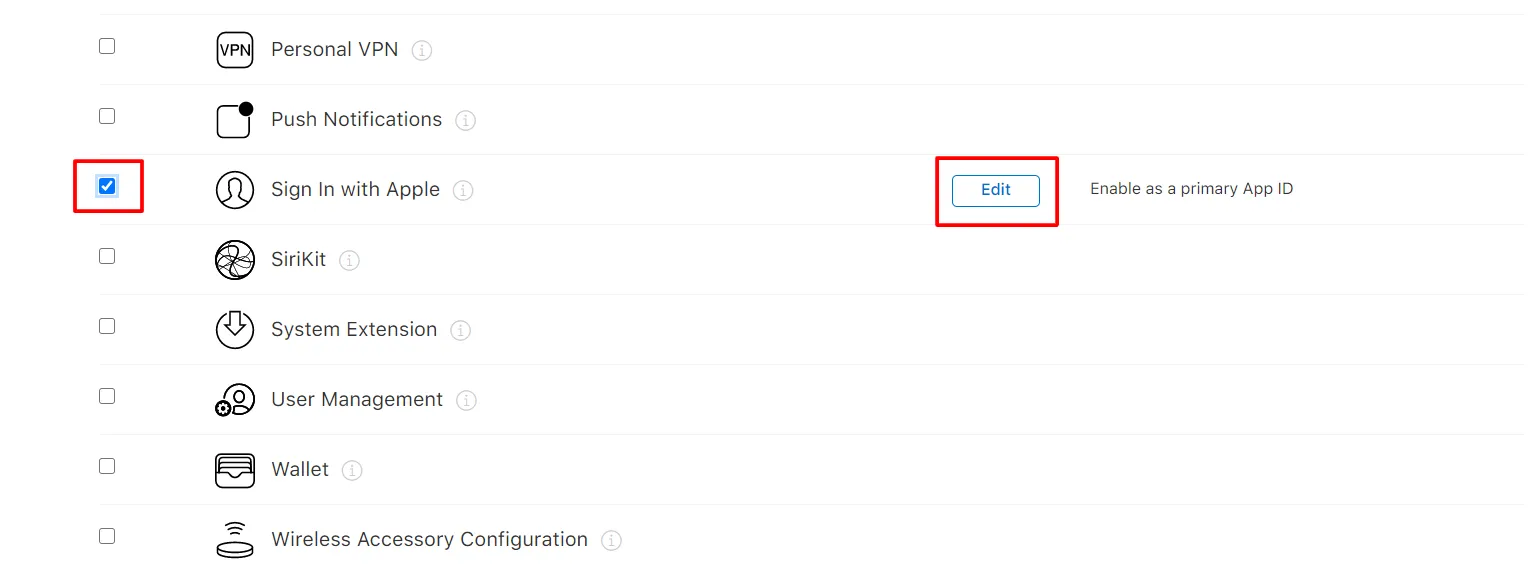
- In the left menu Click on Identifiers and after that click on the Plus Icon(blue color). Click on Continue for the next 2 pages of Apple Account.
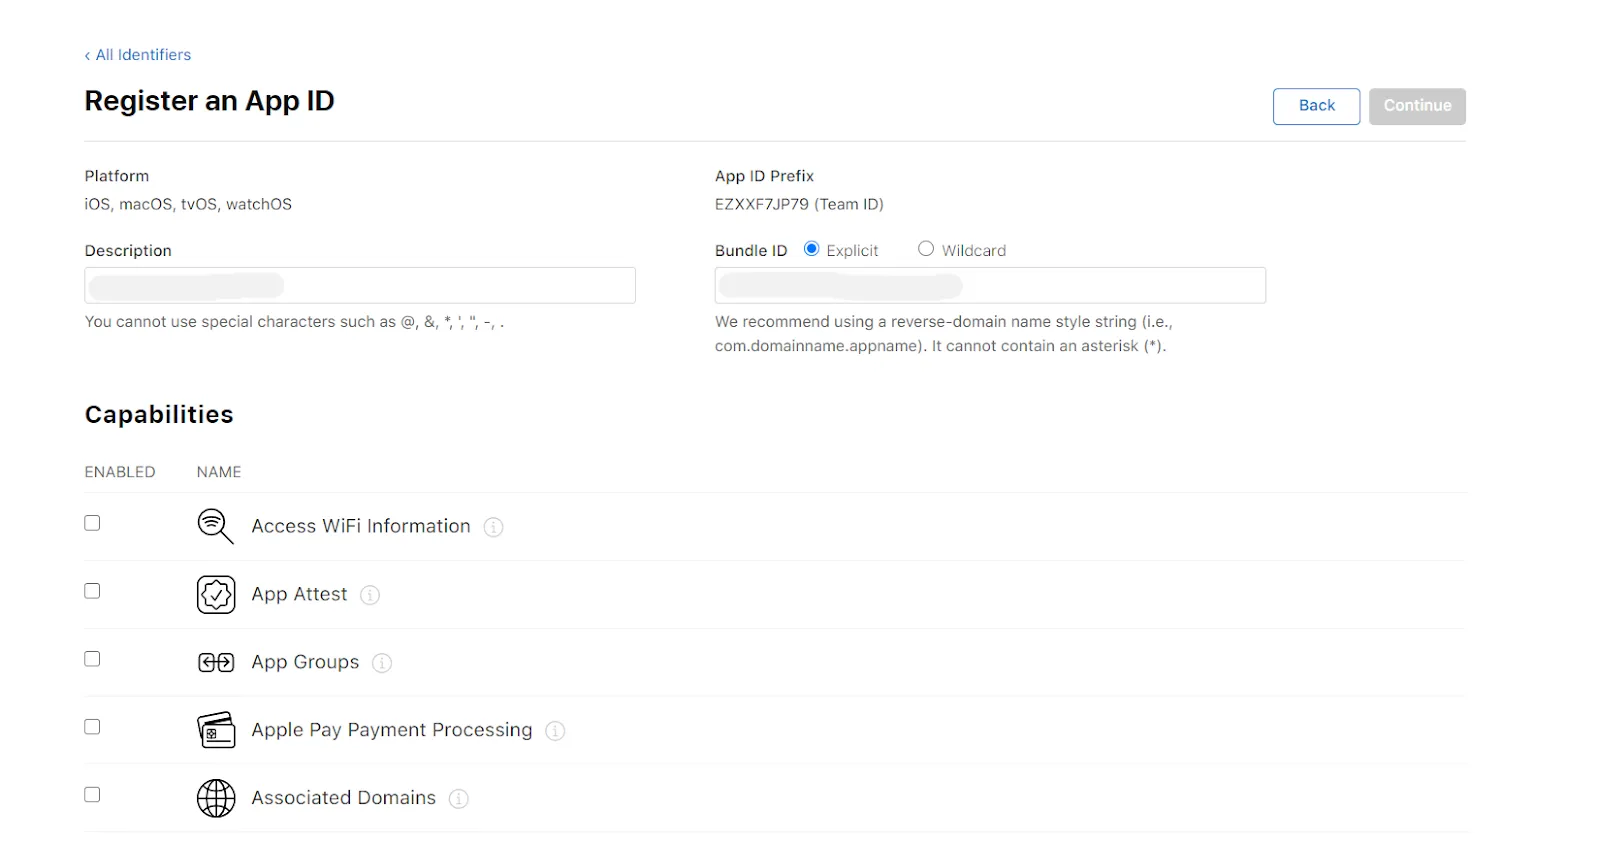
- Enter Description and Bundle ID for the App ID. (The Bundle ID is best when it’s a reverse-dns style string.)
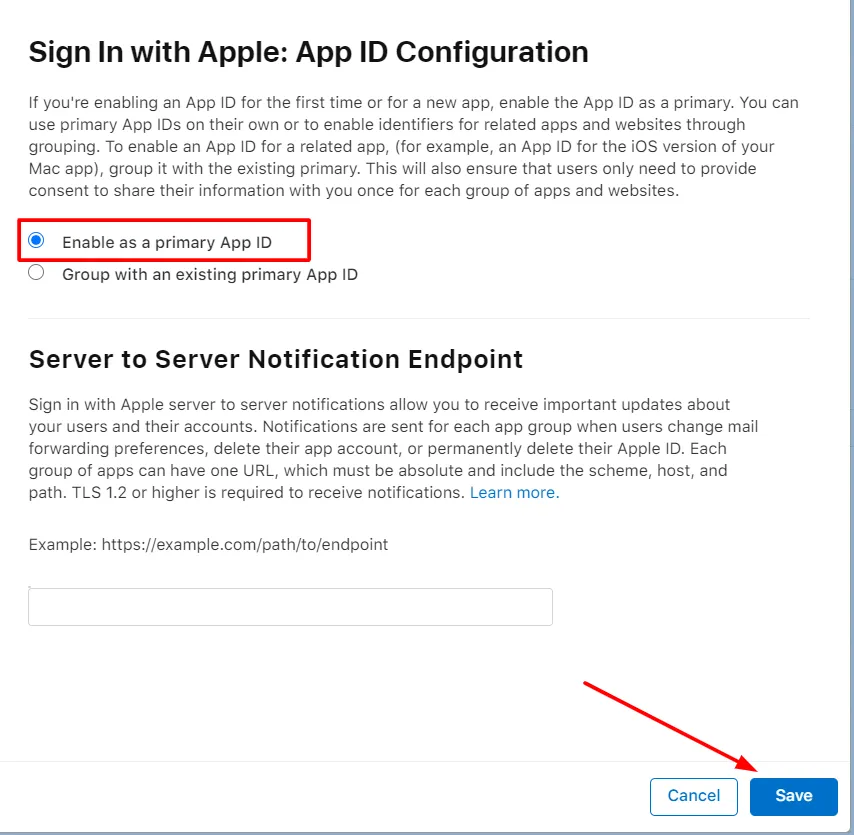
- In the Capabilities section scroll down and select sign up with apple. Click on Edit and select Enable as a primary App Id and click on Save. Click on Continue and then click on Register.
- In the right corner click on Continue and after that Register button.
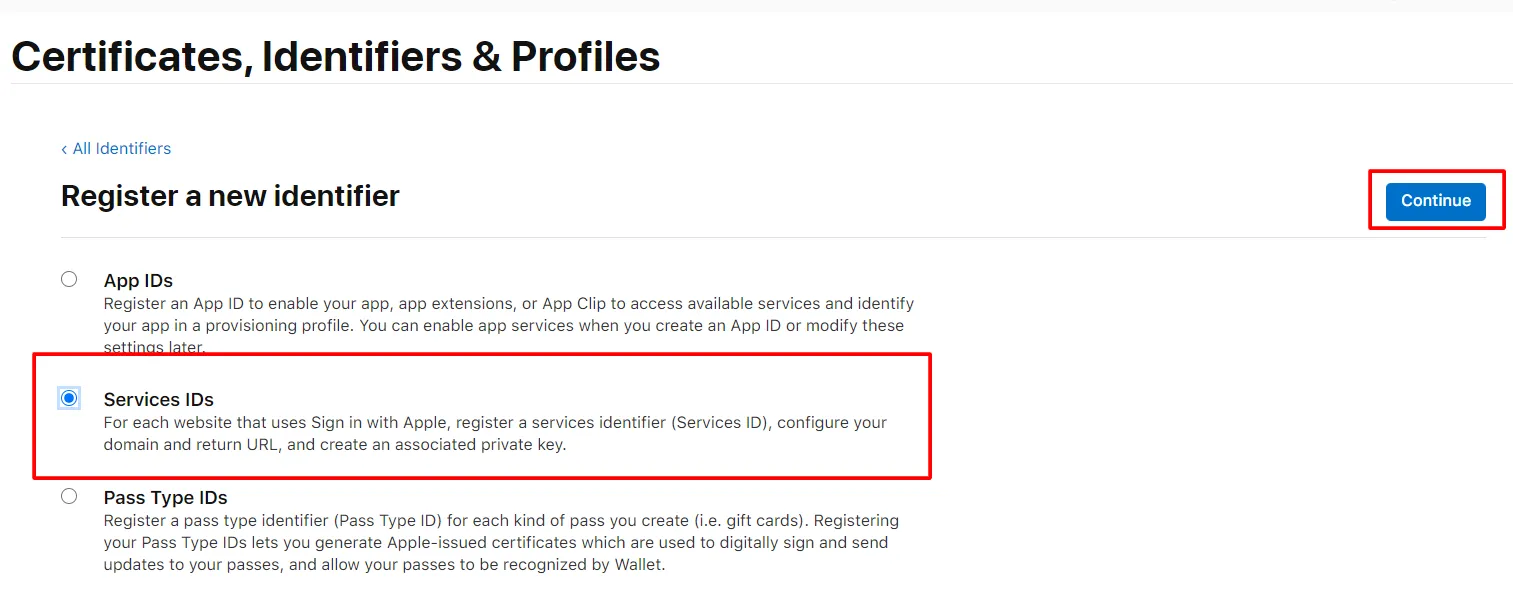
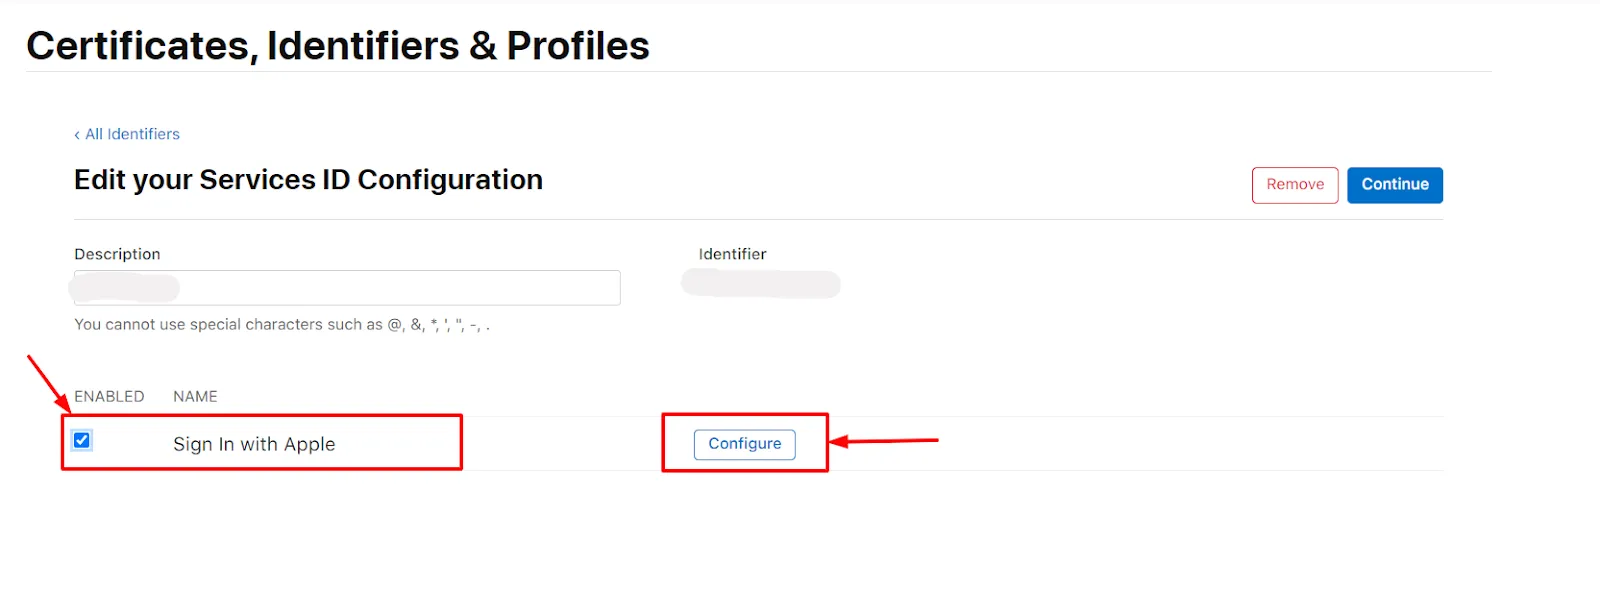
- Again click the Plus icon( blue color). Select Service IDs and click on Continue.
- Enter Description and Identifier ( Identifier would be your client id - Copy this id, it will be used in further steps ).Click on the Continue and after that Register button.

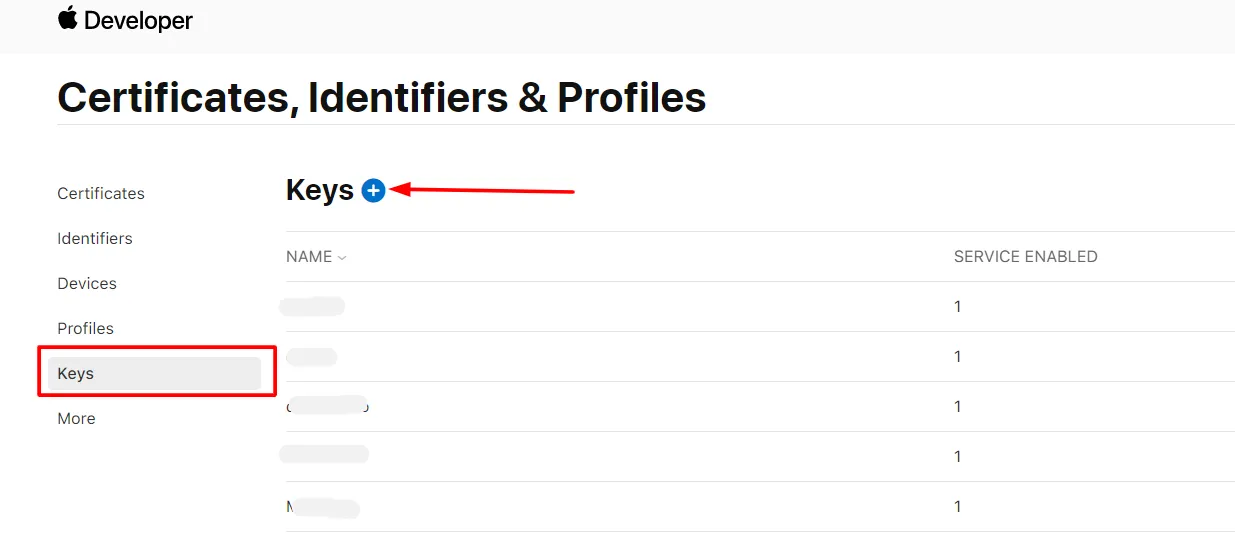
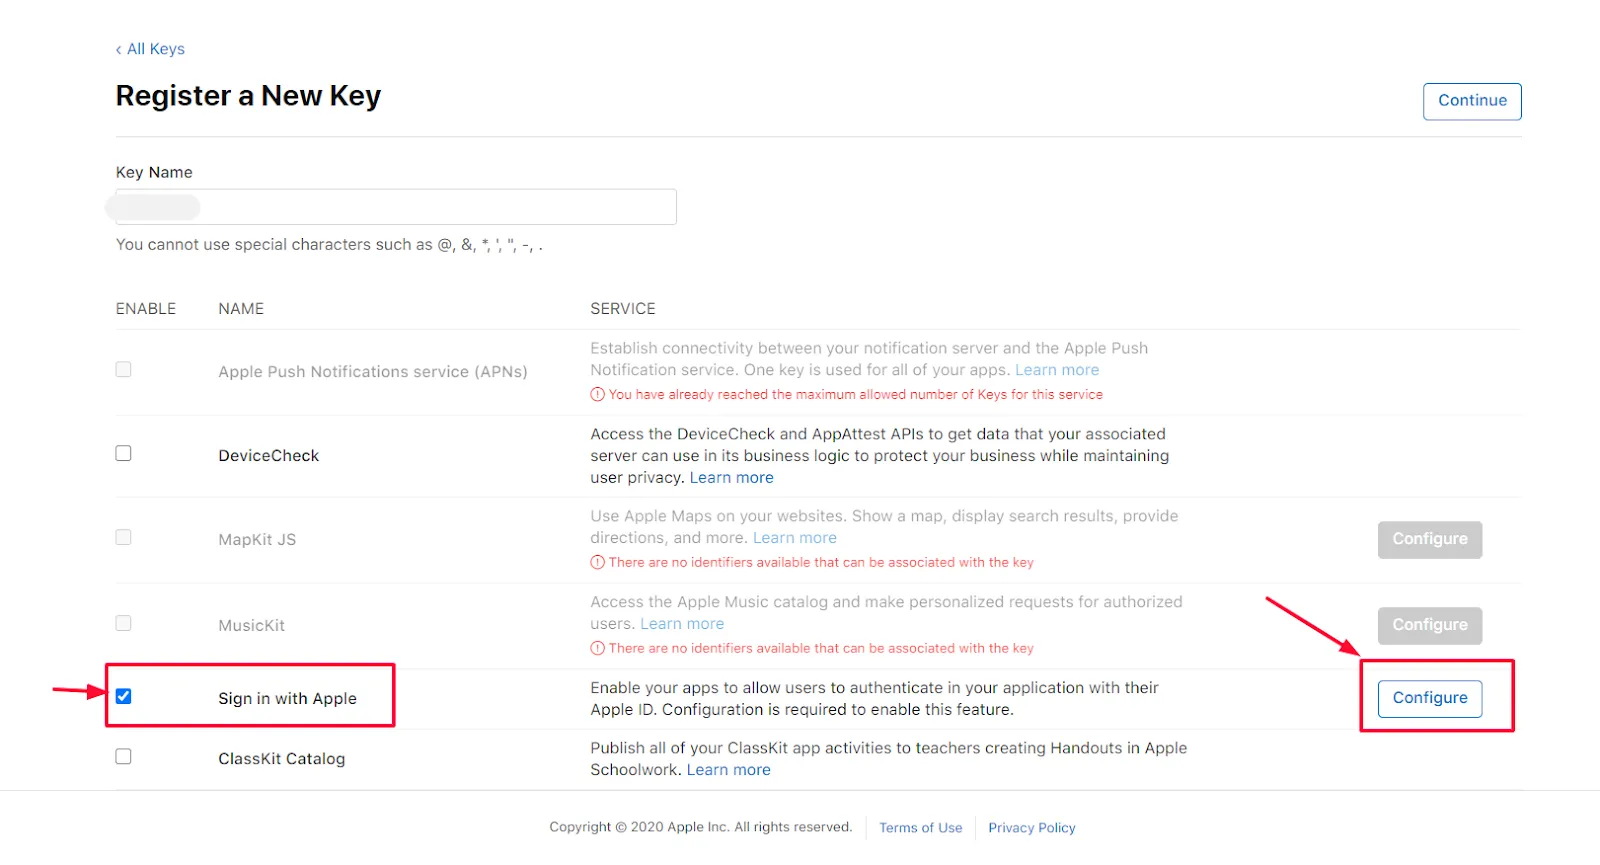
- Click Keys from the left menu.Click on the Plus icon to register a new key.
- Give your Key a name, and select Sign In with Apple and click on Configure button
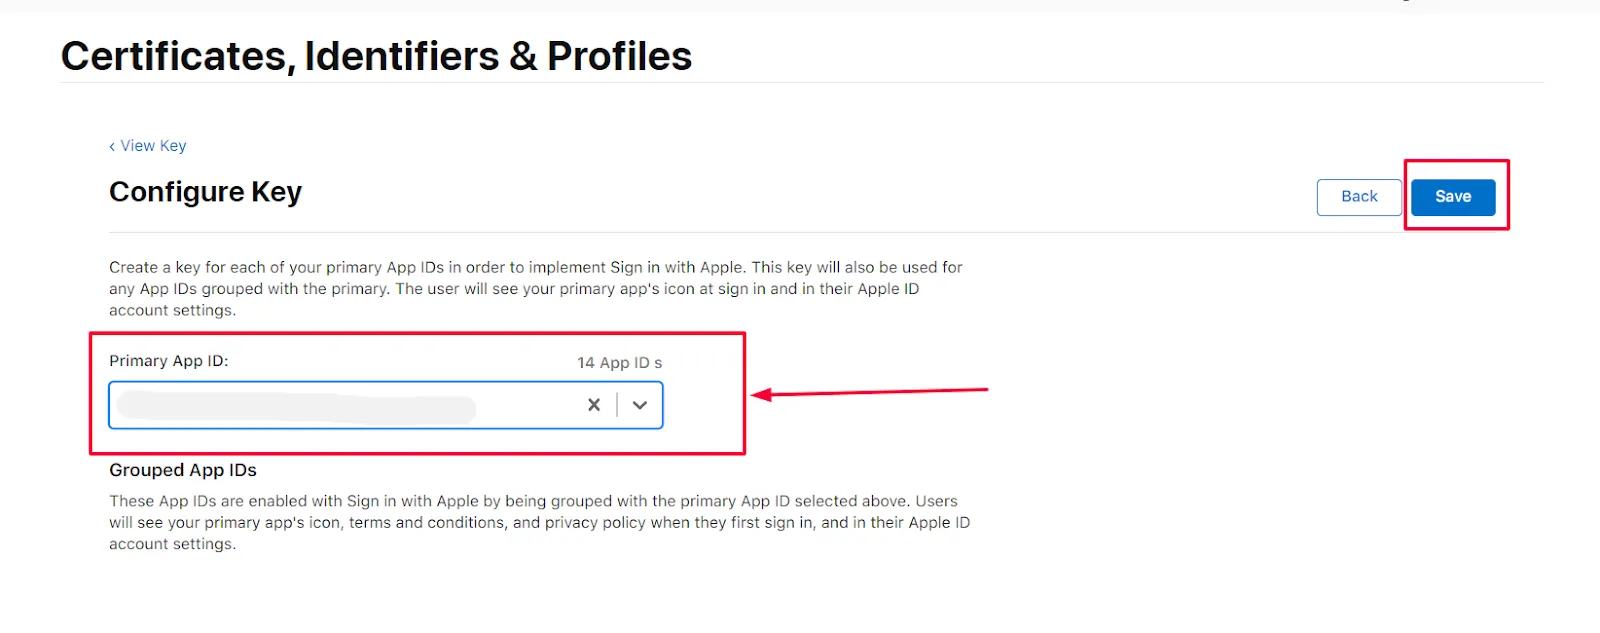
- Select your Primary Id and click on the Save button and after that at the right corner click on Continue and Register button.
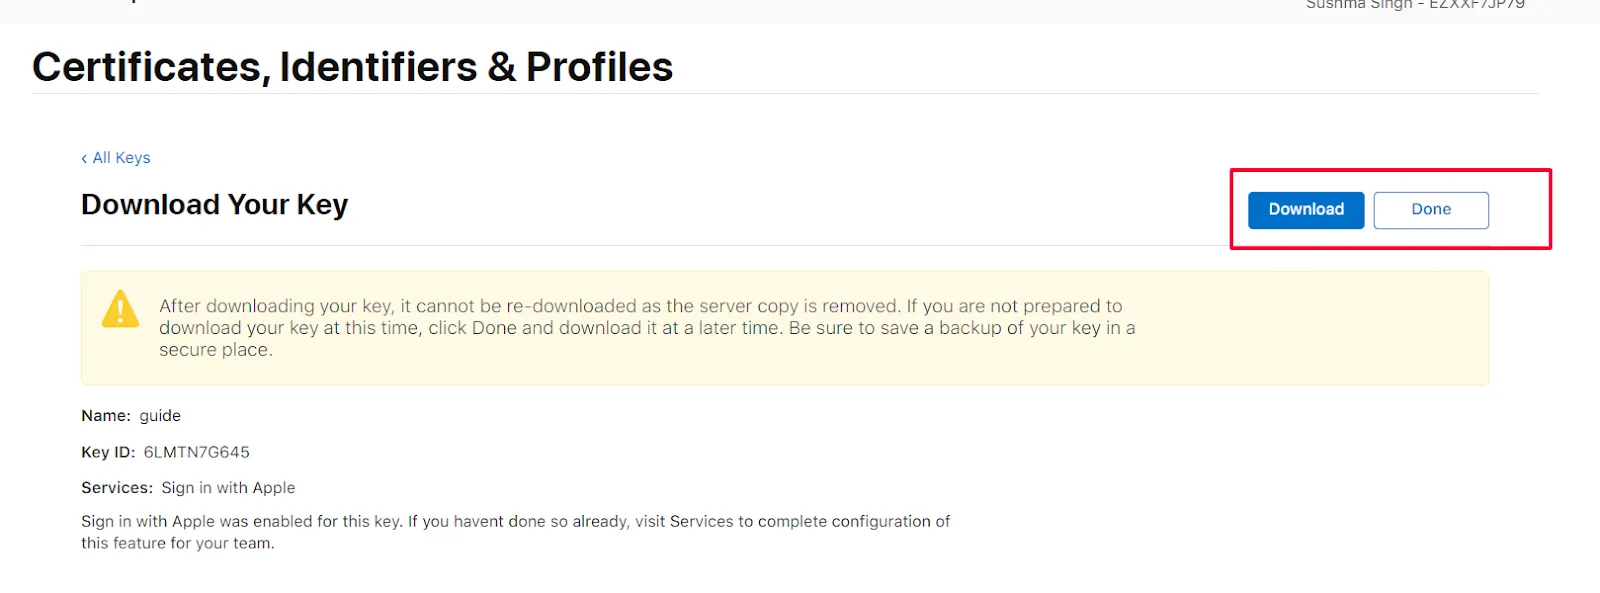
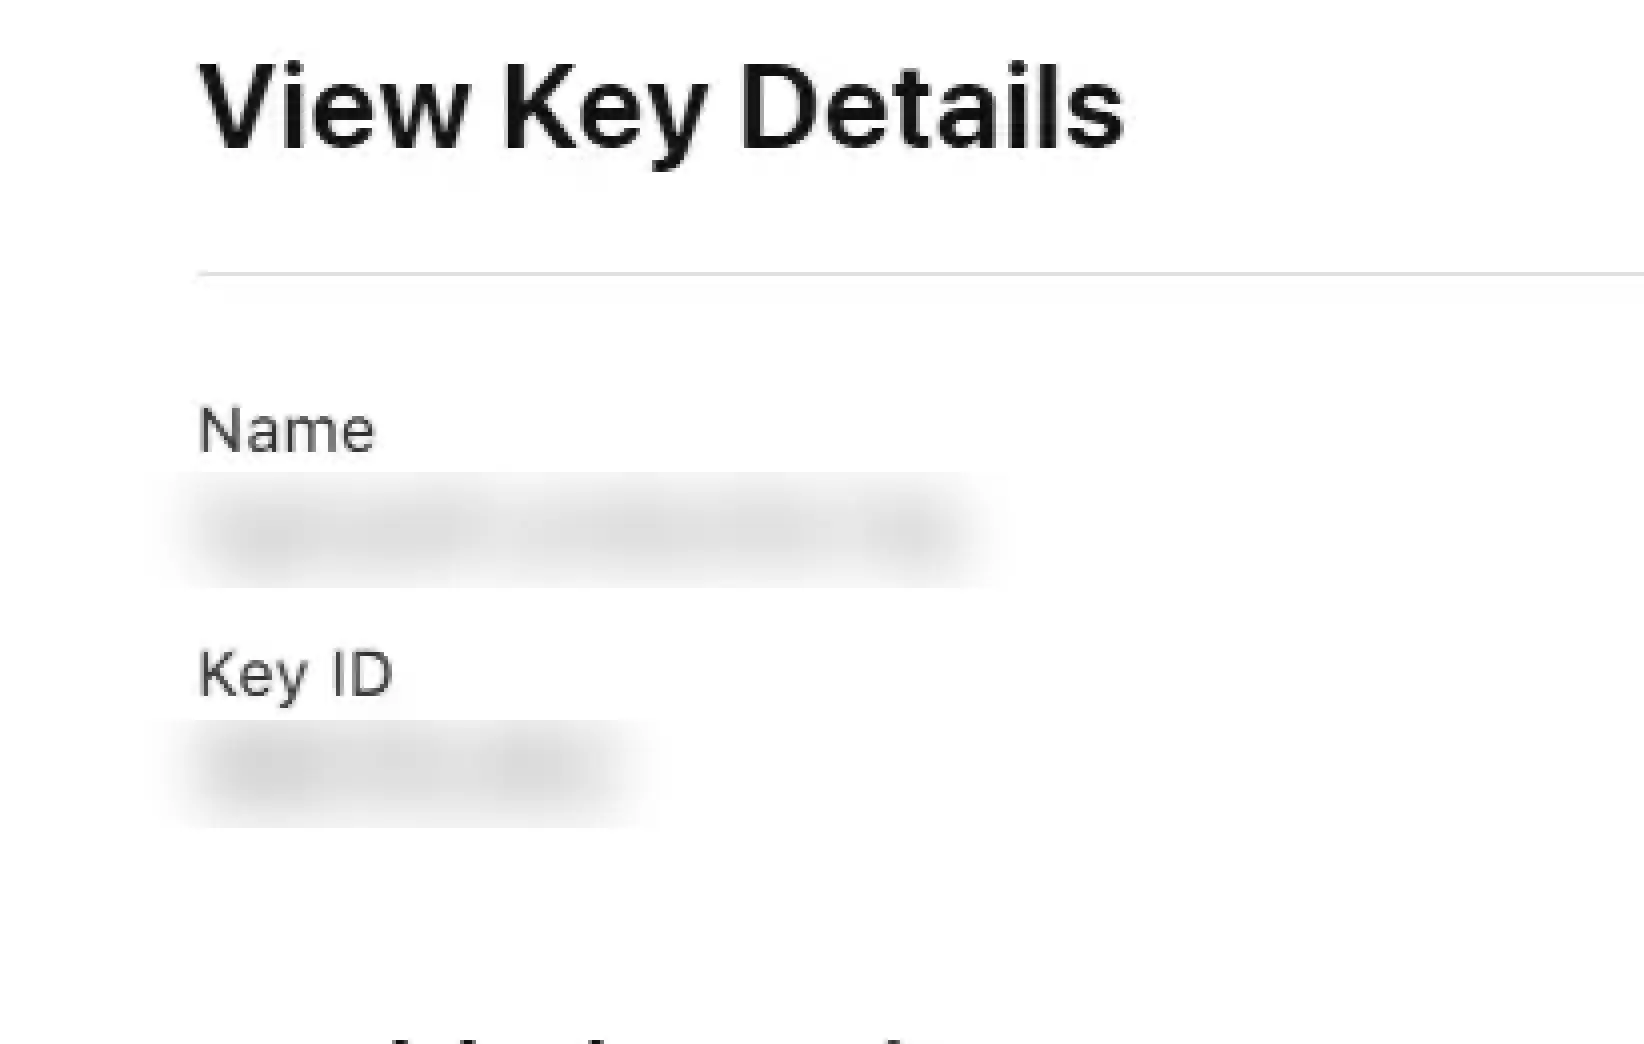
- Click on the Download button once the key is downloaded click on the Done button.
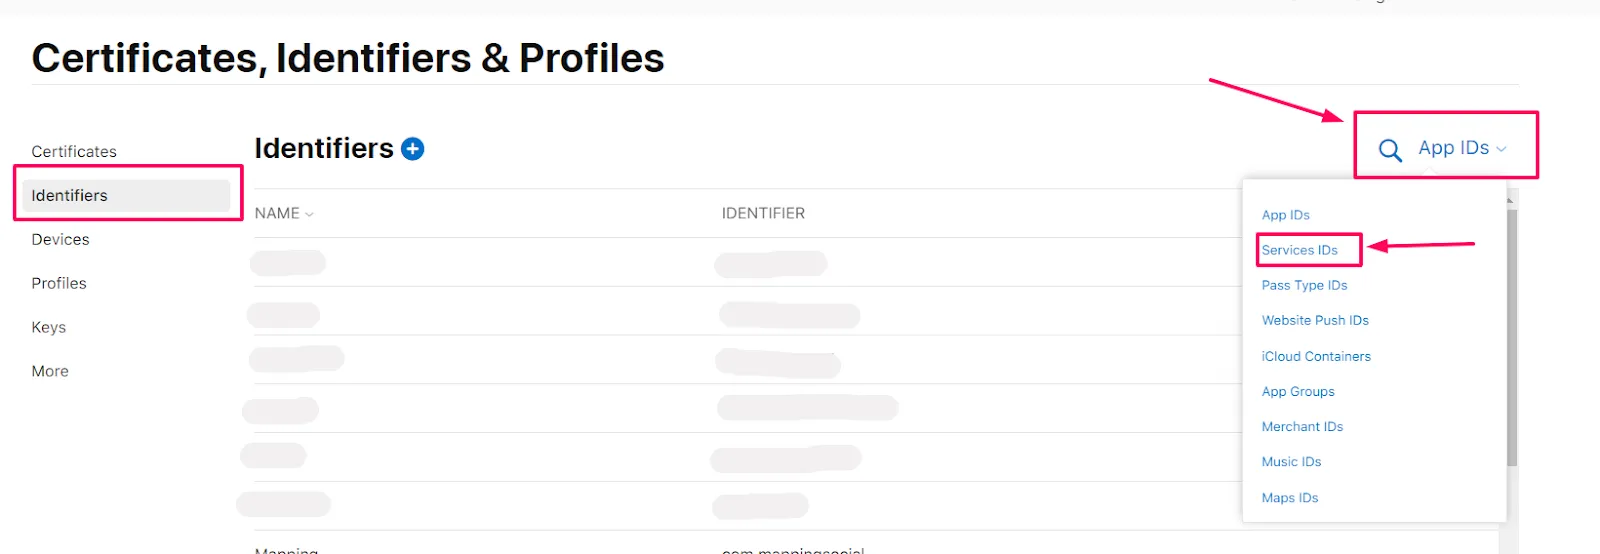
- In the left menu click on Identifiers.
- At the right top click on App IDs.
- Select Service IDs from the drop-down menu.
- Select your Service Id from the List.
- Select Sign In with Apple and click on Configure button
- Select the Primary App Id from the drop-down, and Enter the Domain and Redirect URL in Domains and Subdomains and Return URLs respectively and click on the Next button (You will get the Domain name and Redirect URL from miniOrange dashboard)
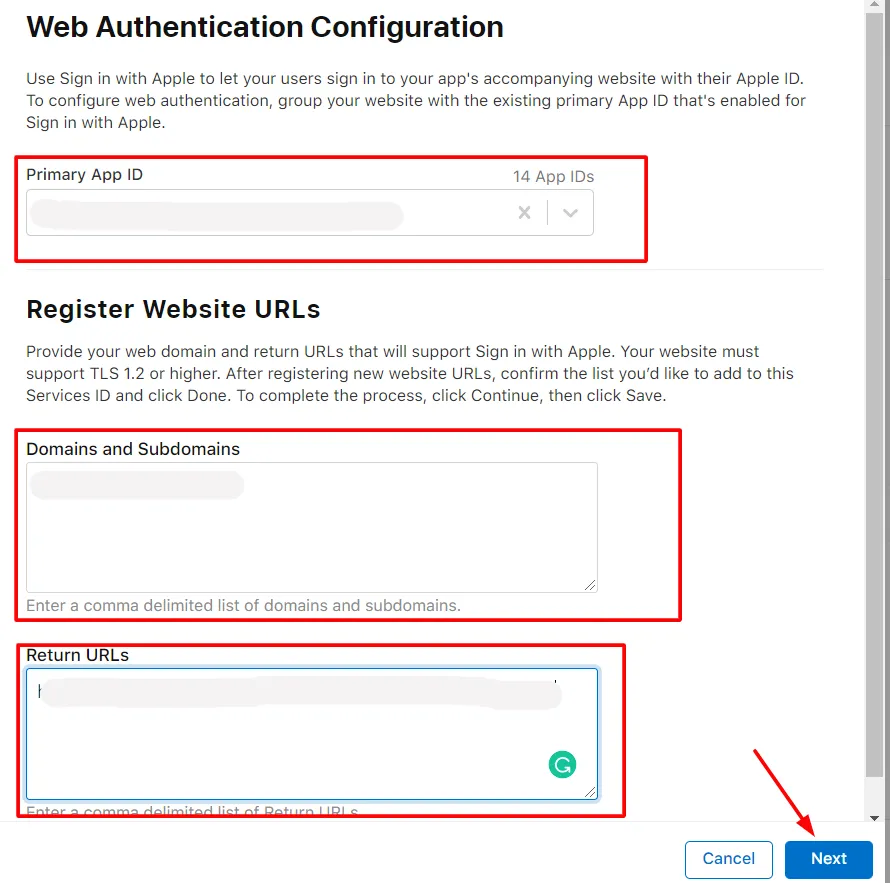
- Verify the details and click on the Done button. After that at the right corner click on the Continue button.
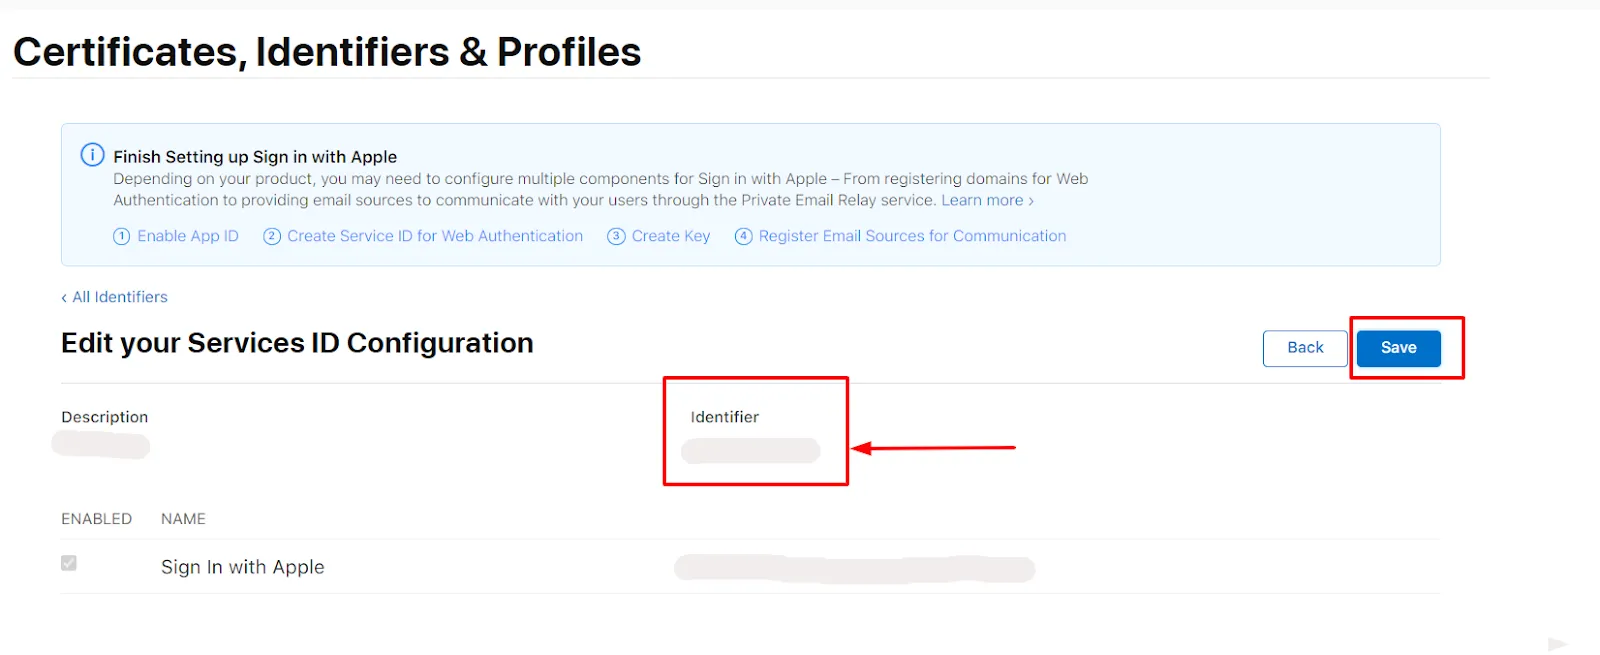
- Copy the Identifier value and click on the Save button.
- Now follow below steps to generate the client secret key
Generating Secret Key
- Download the Ruby installer from the following link https://rubyinstaller.org/downloads/ and then install it.
- Search for the Ruby in windows search bar. Click on Start command prompt with ruby. Ruby command prompt will be opened.Now, install the JWT gem by running the following command on the command line:
gem install JWT.
- Copy the below code in a file and save the file with the .rb extension. Keep this .rb file and downloaded .p8 file in the same folder
require 'jwt'
             key_file = 'key.P8'
             team_id = ''
             client_id = ''
             key_id = ''
             ecdsa_key = OpenSSL::PKey::EC.new IO.read key_file
             headers = {
              'kid' => key_id
            }
            claims = {
              'iss' => team_id,
              'iat' => Time.now.to_i,
              'exp' => Time.now.to_i + 86400*180,
              'aud' => 'https://appleid.apple.com',
              'sub' => client_id,
            }
            token = JWT.encode claims, ecdsa_key, 'ES256', headers puts token
- Now replace below values in the code as given below:
- key_file = 'AuthKey_S86CR2U9KZ.P8' , give it the name of the downloaded P8 file
- Key_id = It will be the Key ID you will get from your configured Key
- Client_id: It is the identifier
- Team_id: You will get this from top right corner as shown below:

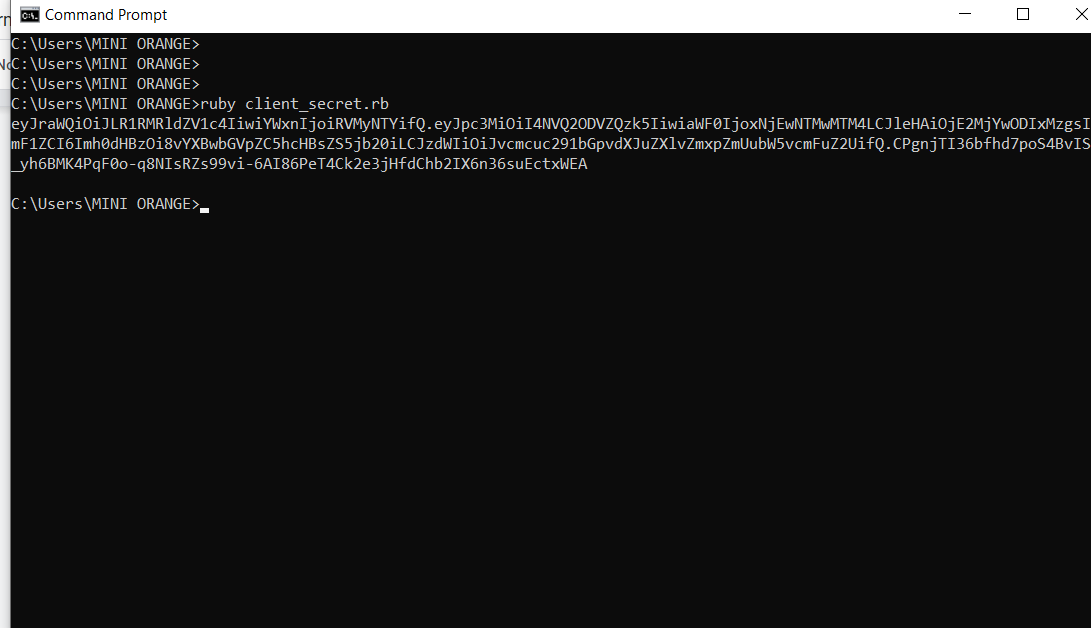
- Go to the folder location in command prompt which consists of rb and p8 file. Now run the above code using the following command:
ruby filename.rb
- You will be provided with your Client secret key. Copy and save the secret key; you will need it to configure Apple ID in miniOrange Dashboard.
2. Configure Apple ID as OAuth 2.0 Provider(IDP) in miniOrange.
- Login into miniOrange Admin Console.
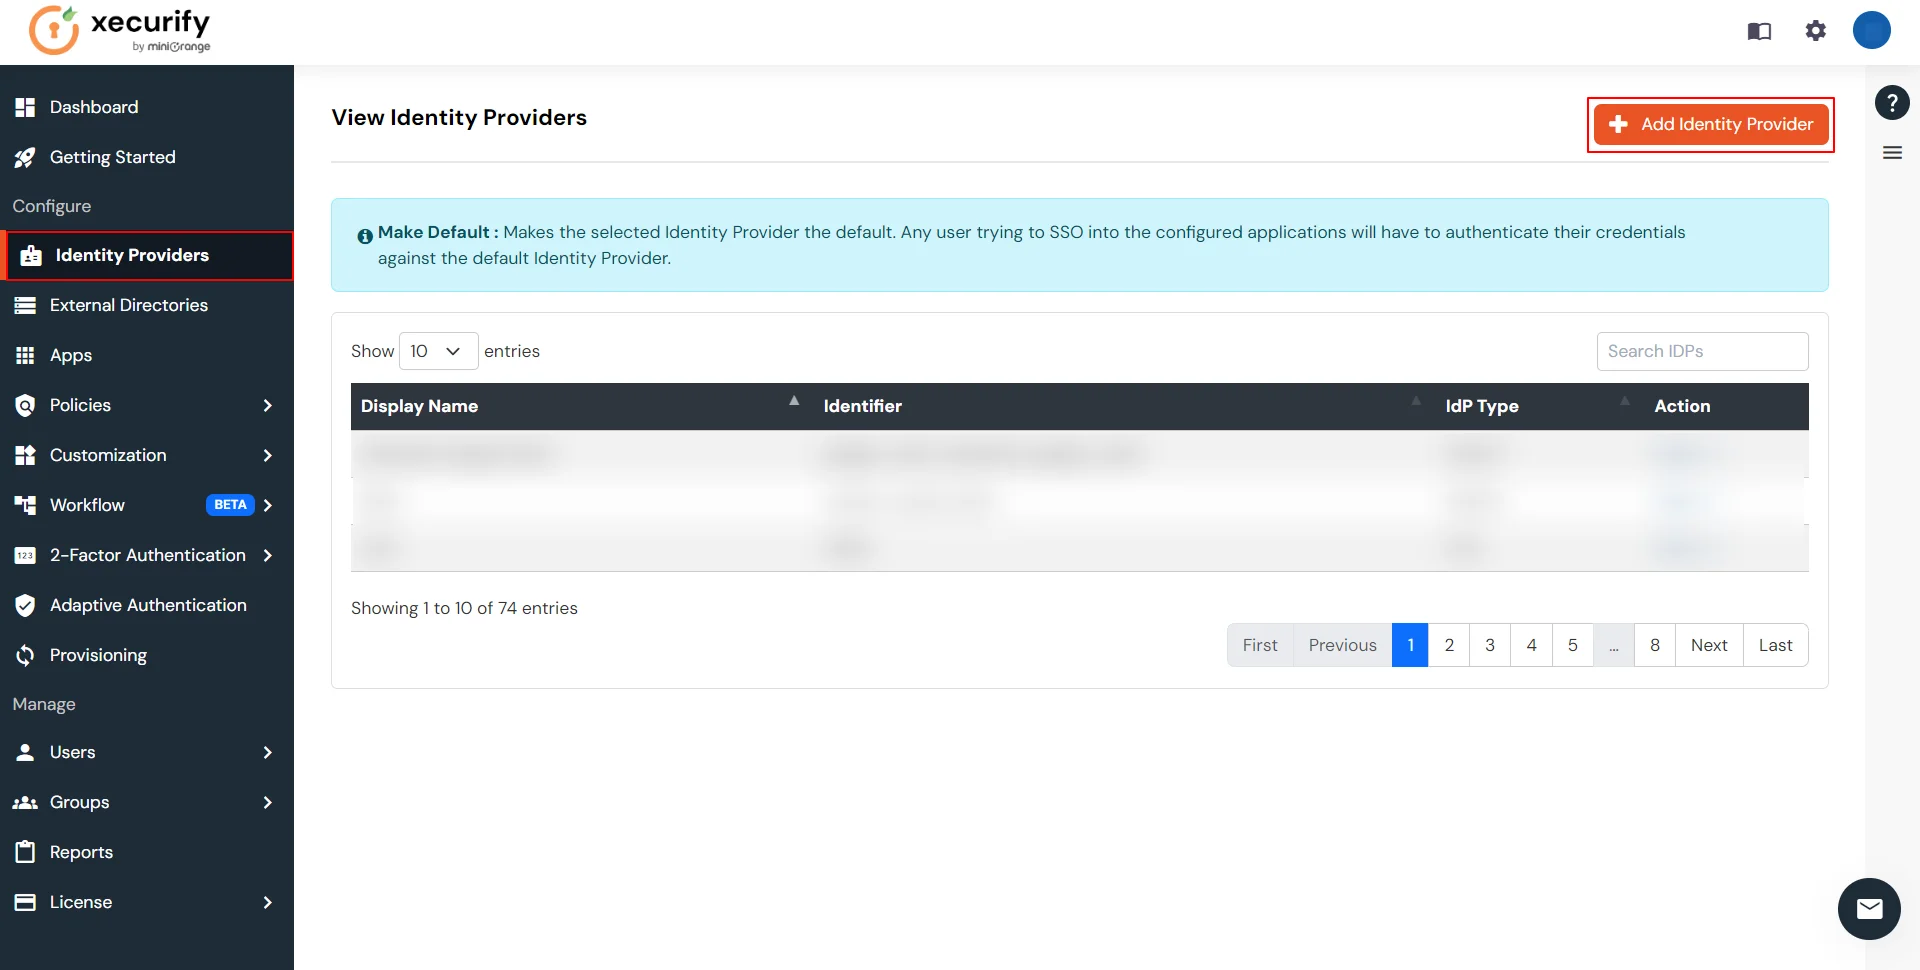
- Go to Identity Providers and click on Add Identity Provider button.
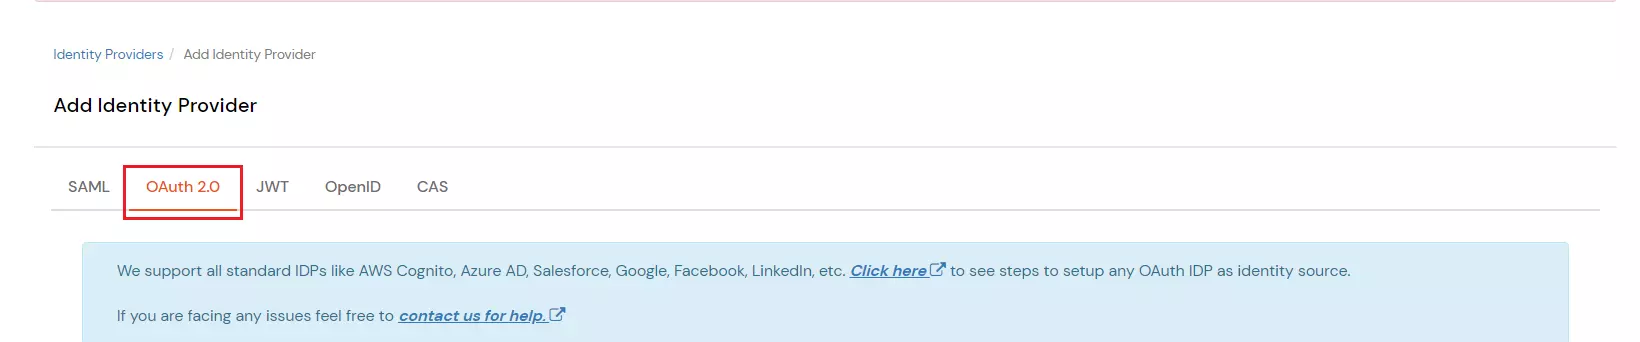
- Select OAUTH 2.0.
- Fill in the details shown in the below image.
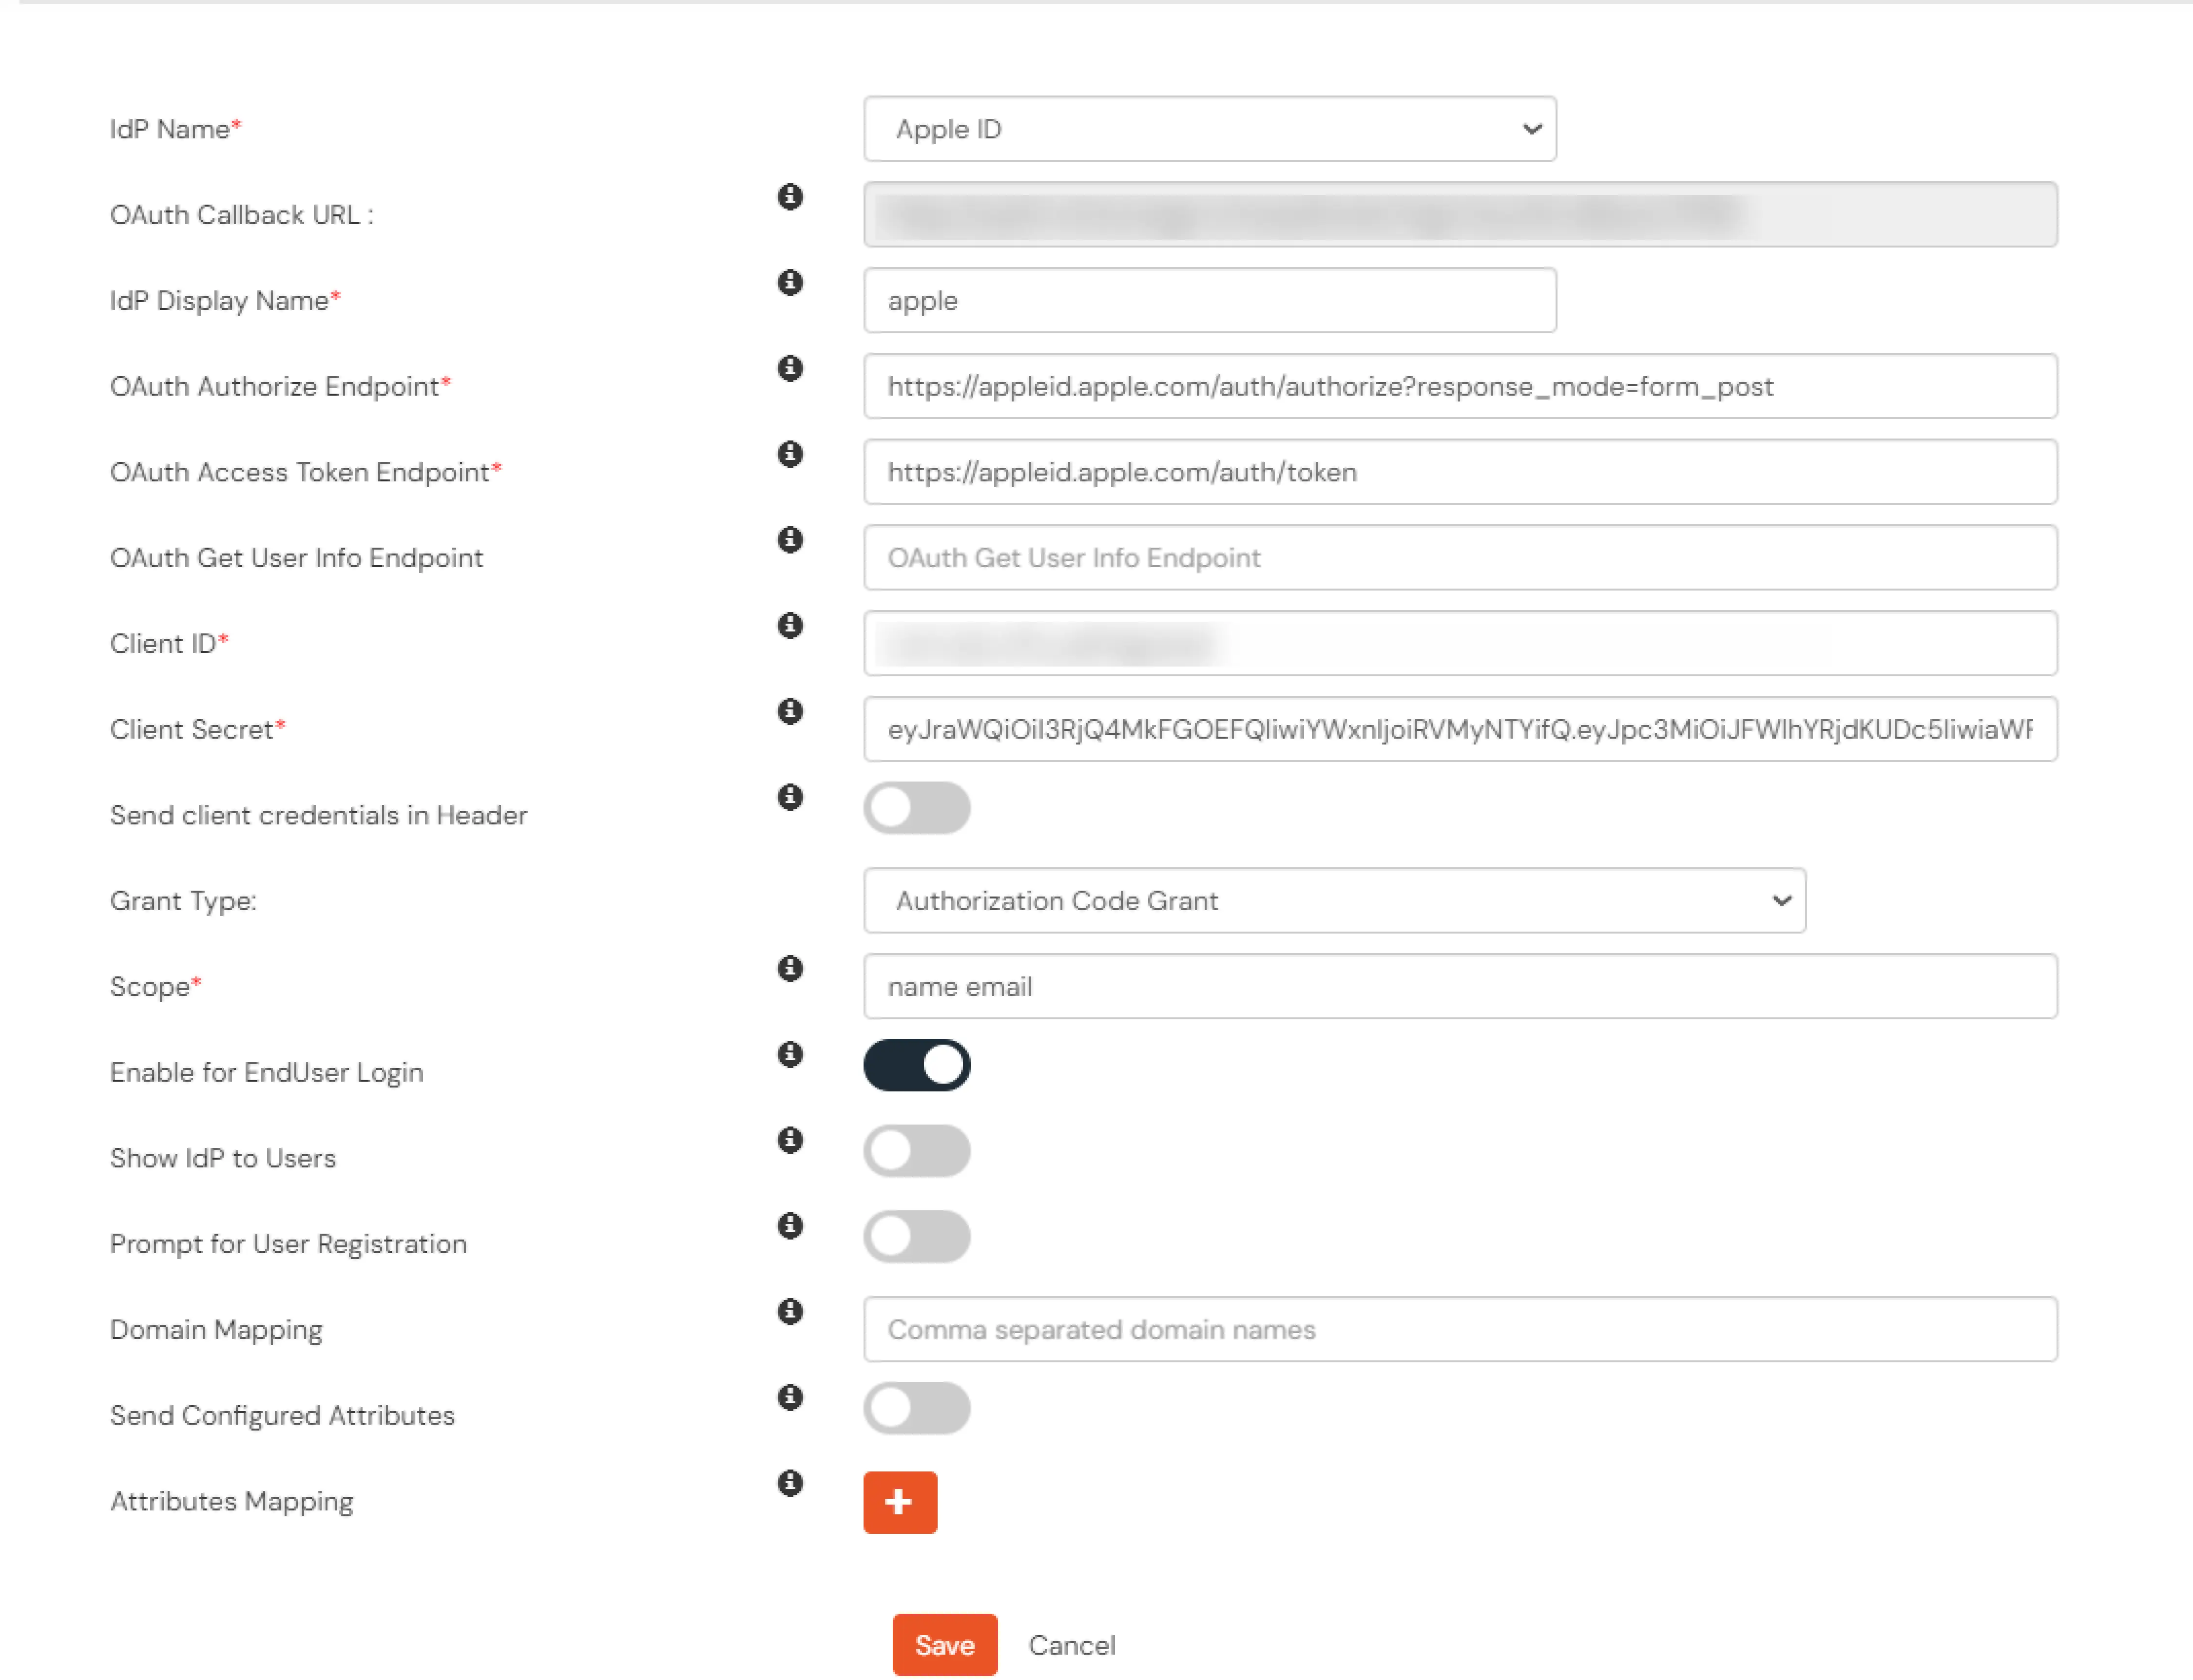
| IDP Name: |
Apple ID |
| OAuth Authorize Endpoint |
https://appleid.apple.com/auth/authorize?response_mode=form_post |
| OAuth Access Token Endpoint* |
https://appleid.apple.com/auth/token |
| Client ID* |
{Your service id} e.g. com.john.serviceid |
| Client Secret* |
eyJraWQiOiJCOTJQUDg1VUw4IiwiYWxnIjoiRVMyNTYifQ.eyJpc3MiOiJFW.... |
| Scope |
email name |
- Click Save.
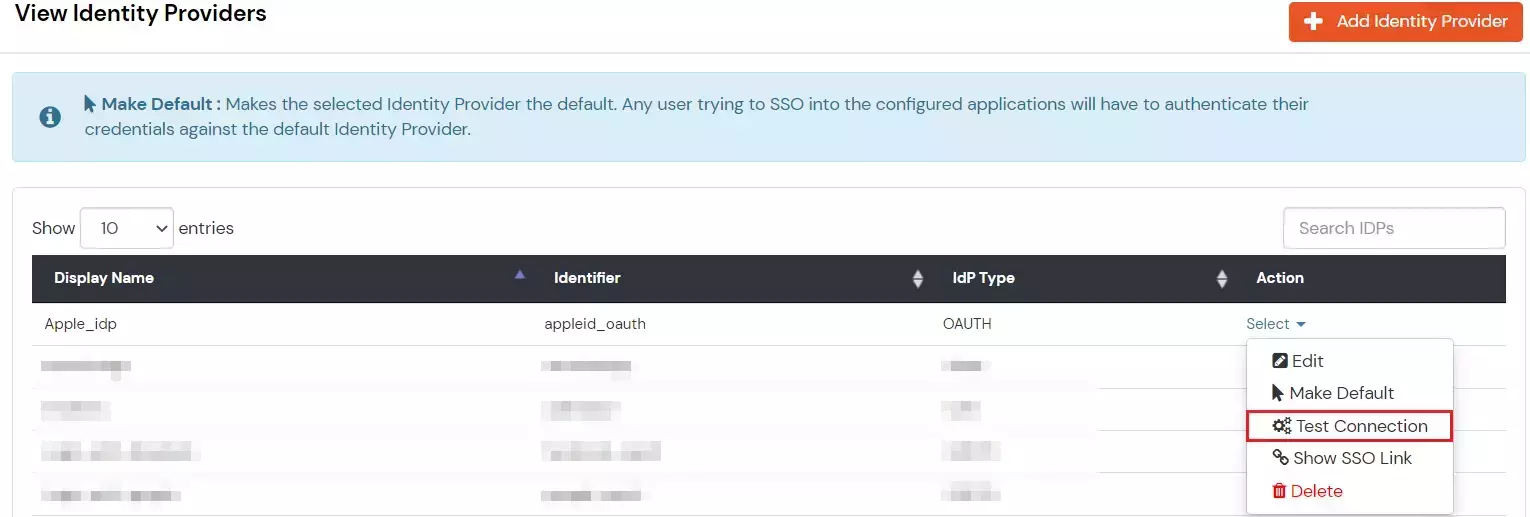
3. Test Connection
- Now go to the /account page. Click on Users and Access in your Apple account and create a user.

- Navigate back to Identity Providers.
- Click on Select >> Test Connection against the configured IDP.
- You will be directed to enter your Apple Id.
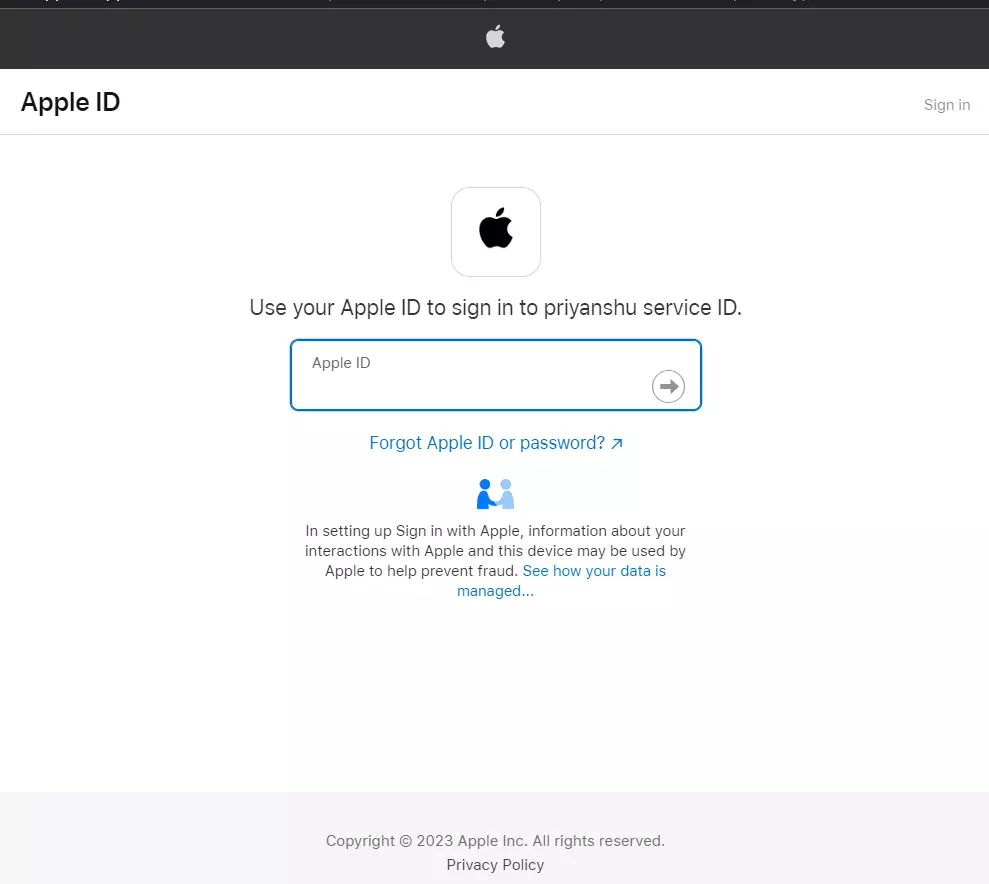
- On entering valid Apple credentials you will see a pop-up window which is shown in the below screen.
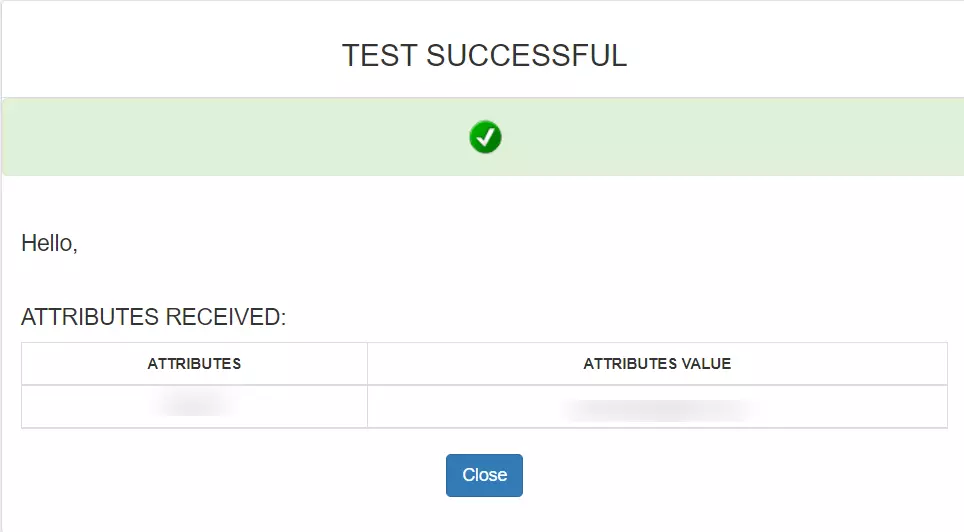
- Hence your configuration of Apple as IDP in miniOrange is successfully completed.
External References
