Hello there!

Need Help? We are right here!

Support Icon
miniOrange Email Support
success

Thanks for your Enquiry. Our team will soon reach out to you.

If you don't hear from us within 24 hours, please feel free to send a follow-up email to info@xecurify.com

Search Results:

×

Configure Azure B2C SSO for Multiple Apps


miniOrange Identity Broker service solution enables cross protocol authentication. You can configure Azure B2C as an IDP for Single Sign-On (SSO) into your applications/websites. Here, Azure B2C will act as an Identity Provider (IDP) and miniOrange will act as a broker.

We offer a pre-built solution for integrating with Azure B2C, making it easier and quick to implement. Our team can also help you set up Azure B2C as SAML or OIDC IDP to login into your applications.


Get Free Installation Help


miniOrange offers free help through a consultation call with our System Engineers to configure Single Sign-On (SSO) for different apps using Azure B2C as an Identity Provider in your environment with 30-day free trial.

For this, you need to just send us an email at idpsupport@xecurify.com to book a slot and we'll help you in no time.


Prerequisites

Please make sure your organisation branding is already set under Customization >> Login and Registration Branding in the left menu of the dashboard.


Follow the Step-by-Step Guide to configure Azure B2C SSO

1. Configure miniOrange as Service Provider (SP) in Azure B2C


Follow the steps below to configure Azure AD B2C as an Identity Provider:
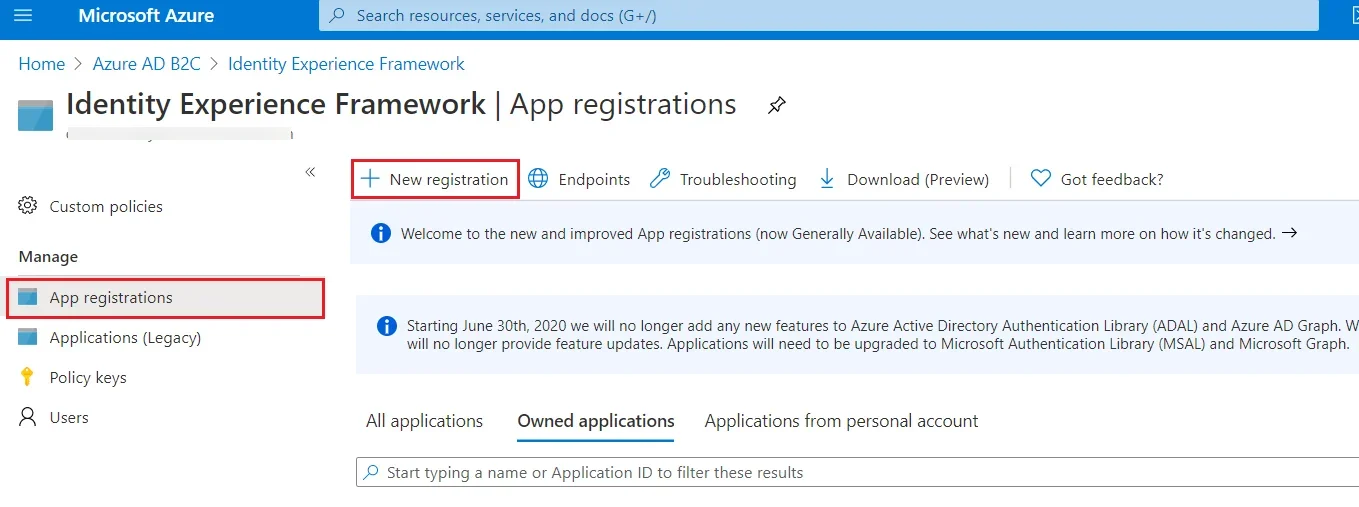
Register the Identity Experience Framework application:

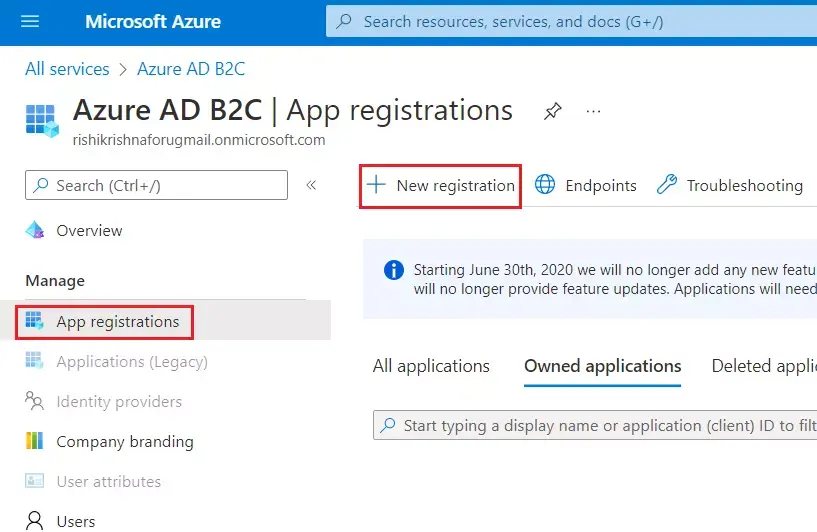
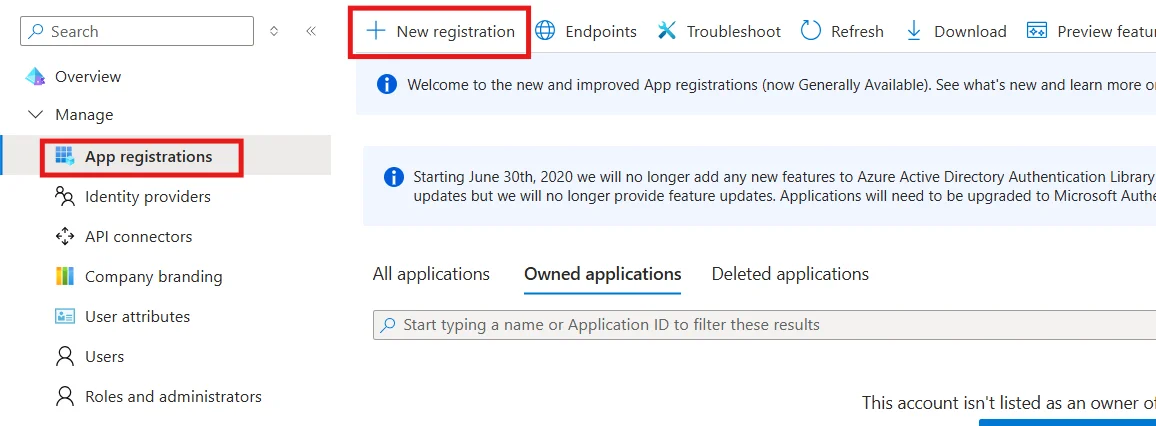
  • From the Azure AD B2C tenant, select App registrations, and then select New registration.
  • Azure B2C SSO : Go to App registration and click New registration

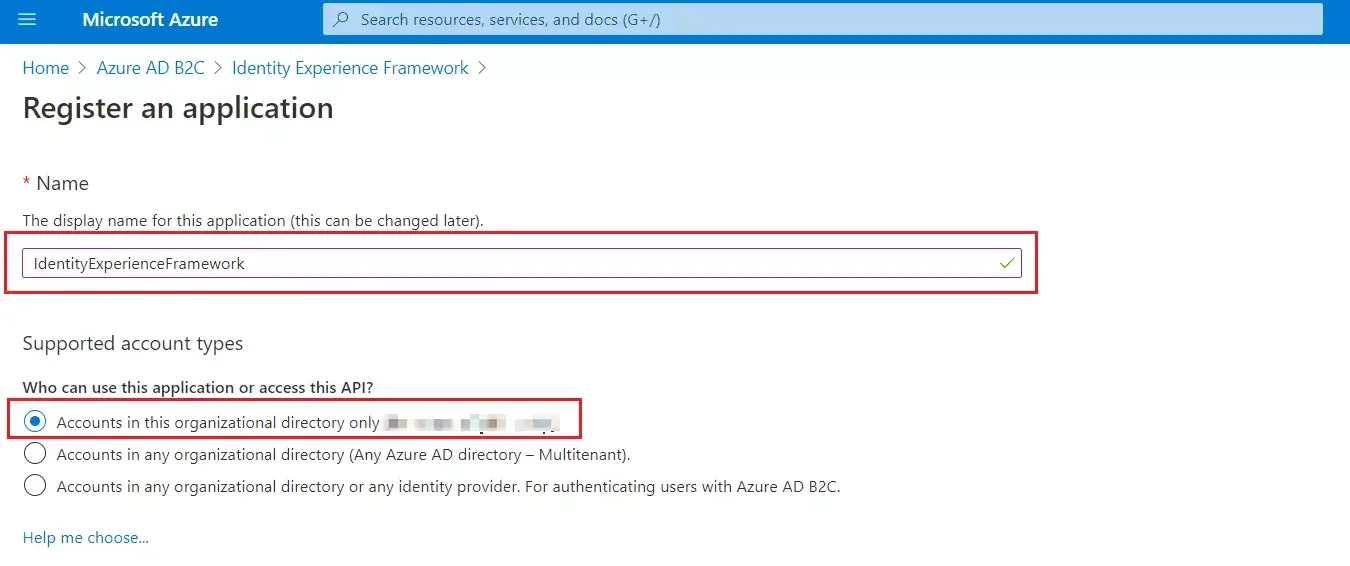
  • For Name, enter IdentityExperienceFramework.
  • Under Supported account types, select Accounts in this organizational directory only.
  • Azure B2C SSO : Enter Name and Supported Account type

  • Under Redirect URI, select Web, and then enter https://your-tenant-name.b2clogin.com/your-tenant-name.onmicrosoft.com where your-tenant-name is your Azure AD B2C tenant domain name.

    Note

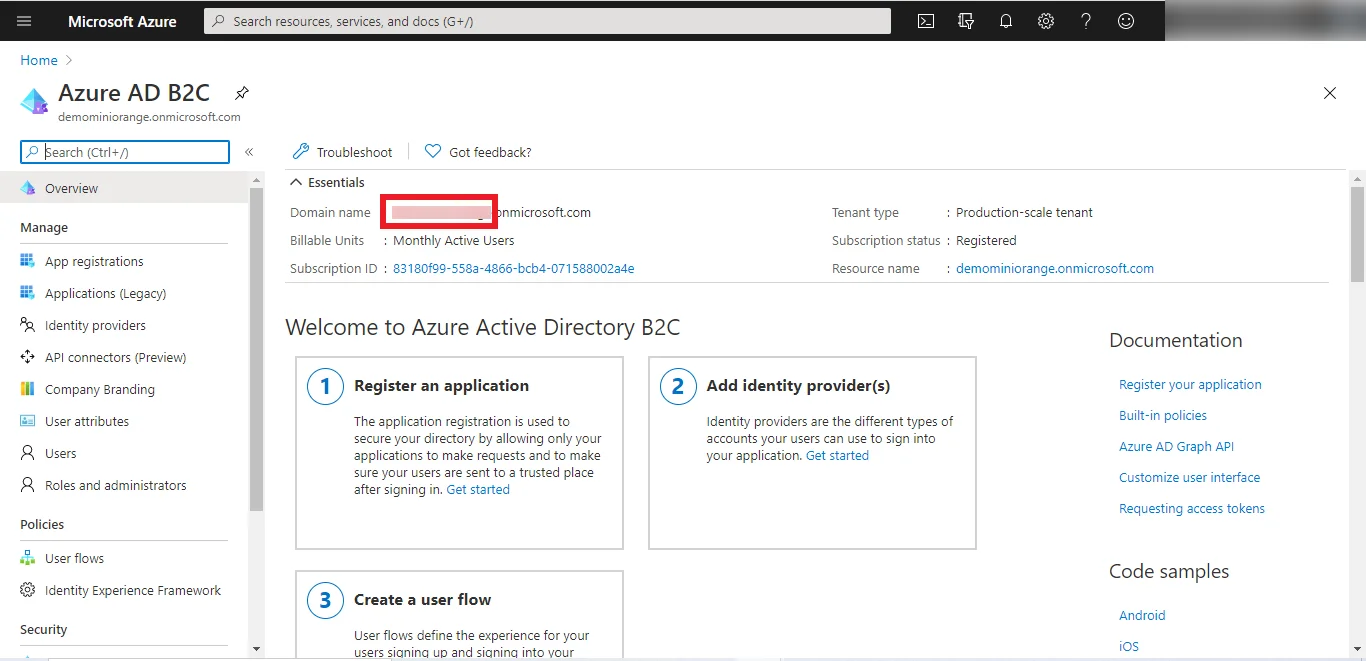
    To find your Tenant name, go to the Azure B2C home page. In the Overview section, under Essentials, you'll see a Domain name field. The part before .onmicrosoft.com is your tenant name.


  • Azure B2C SSO : Under Essentials, find Domain name

  • Under Permissions, select the Grant admin consent to openid and offline_access permissions check box. Now, Select Register.
  • Azure B2C SSO : Enter Redirect URI and Enable Grant admin consent to openId

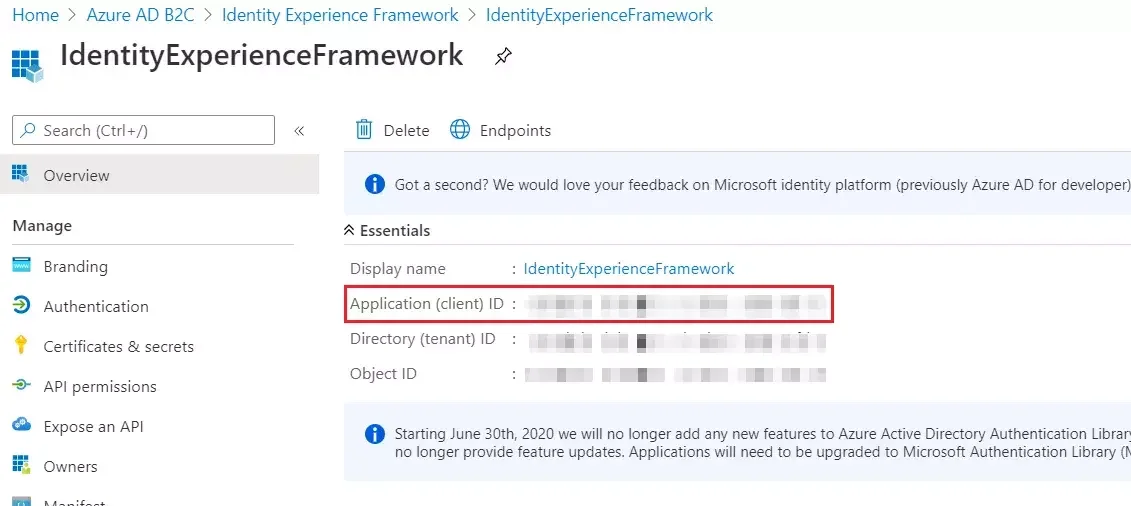
  • Record the Application (client) ID for use in a later step.
  • Azure B2C SSO : Copy Application (client) ID

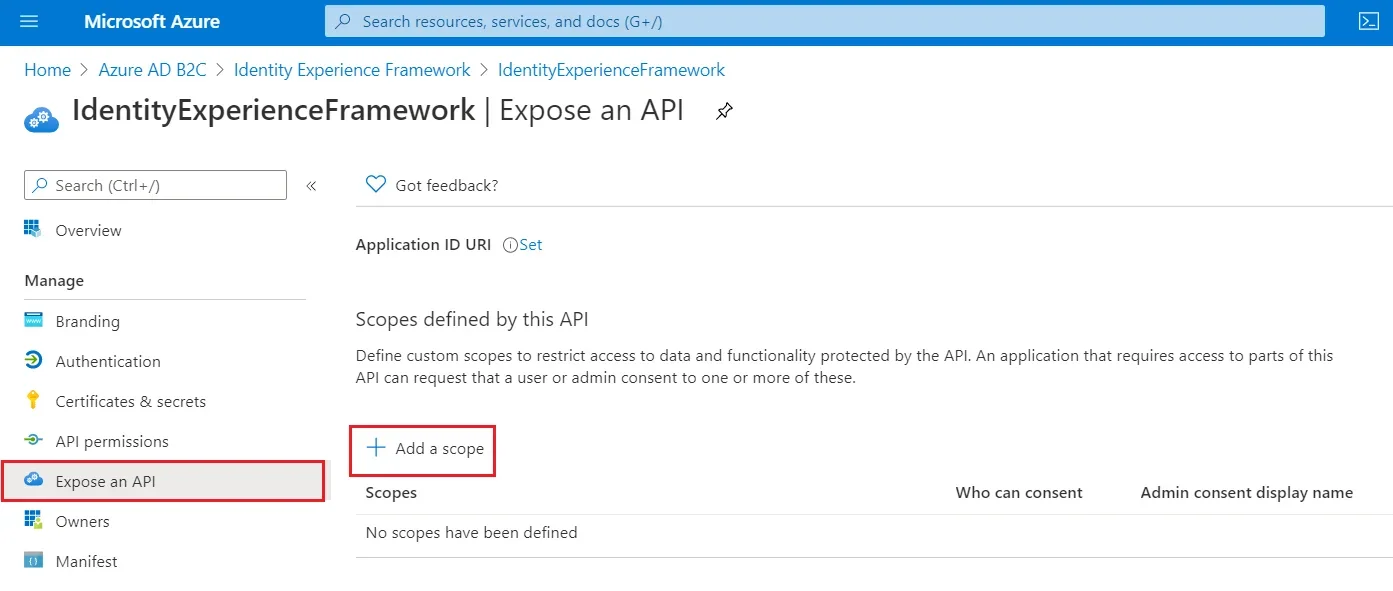
  • To Expose the API add a scope under Manage, click on Expose an API.
  • Select Add a scope, then select Save and continue to accept the default application ID URI.
  • Azure B2C SSO : Copy Application (client) ID

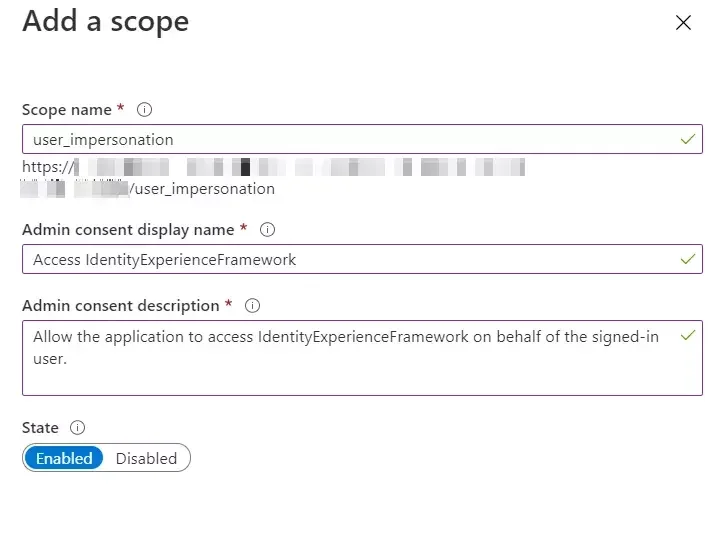
  • Enter the following values to create a scope that allows custom policy execution in your Azure AD B2C tenant.
  • Azure B2C SSO : Allows custom policy execution in Azure AD B2C tenant

  • Click on Add scope, enter the values as mentioned above and select State as Enabled.
  • Azure B2C SSO : Add Scope


Register the ProxyIdentityExperienceFramework application

  • Select App registrations, and then select New registration.
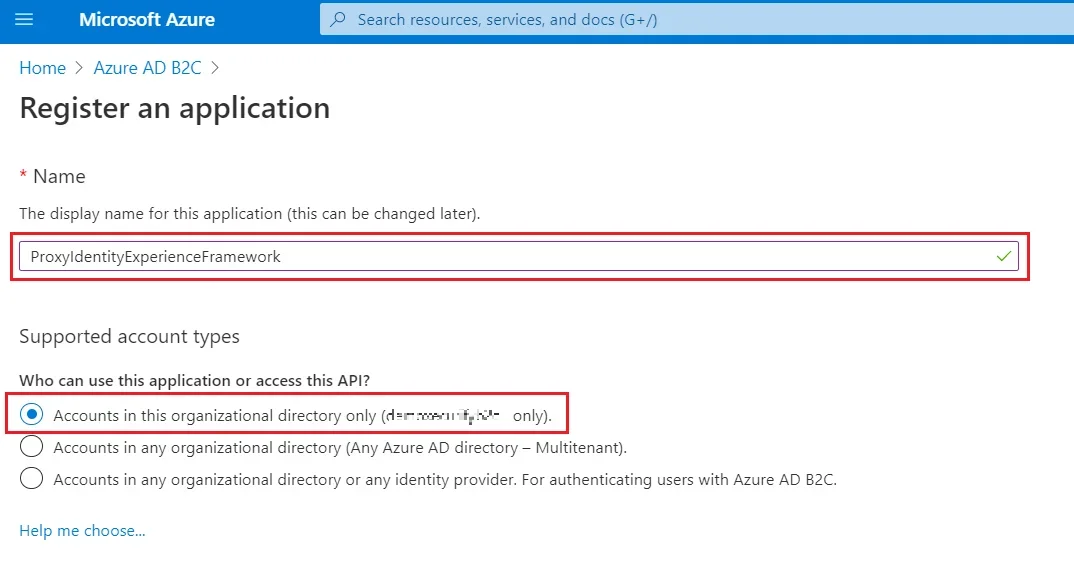
  • For Name, enter ProxyIdentityExperienceFramework
  • Under Supported account types, select Accounts in this organizational directory only.
  • Azure B2C SSO : Register for Proxy Apps

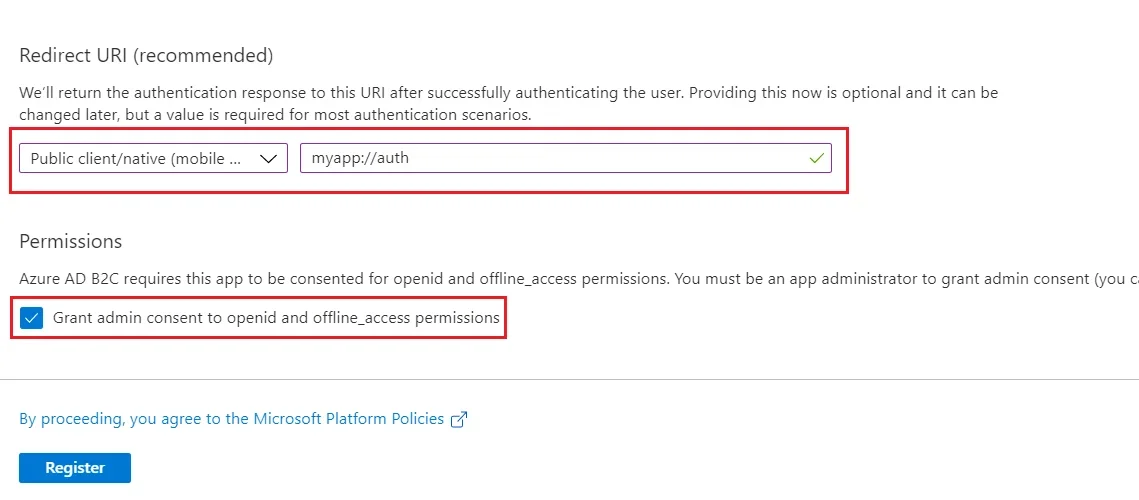
  • Under Redirect URI, use the drop-down to select Public client/native (mobile & desktop).
  • For Redirect URI, enter myapp://auth.
  • Under Permissions, select the Grant admin consent to openid and offline_access permissions check box and select Register.
  • Azure B2C SSO : Redirect URIs Select Public client/native (mobile & desktop)

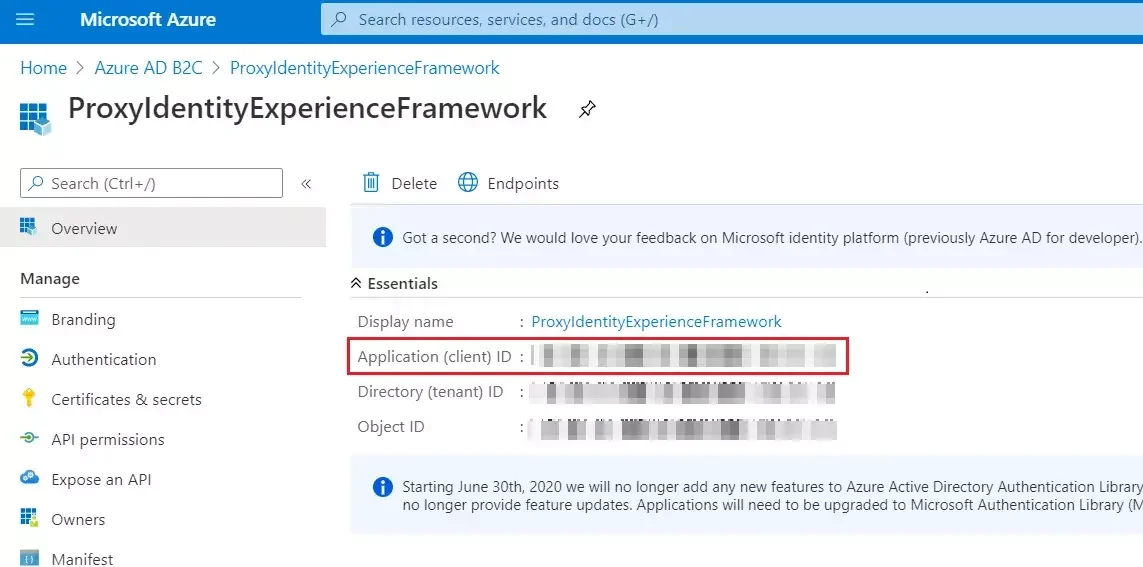
  • Record the Application (client) ID for use in a later step.
  • Azure B2C SSO : Copy Proxy application client id

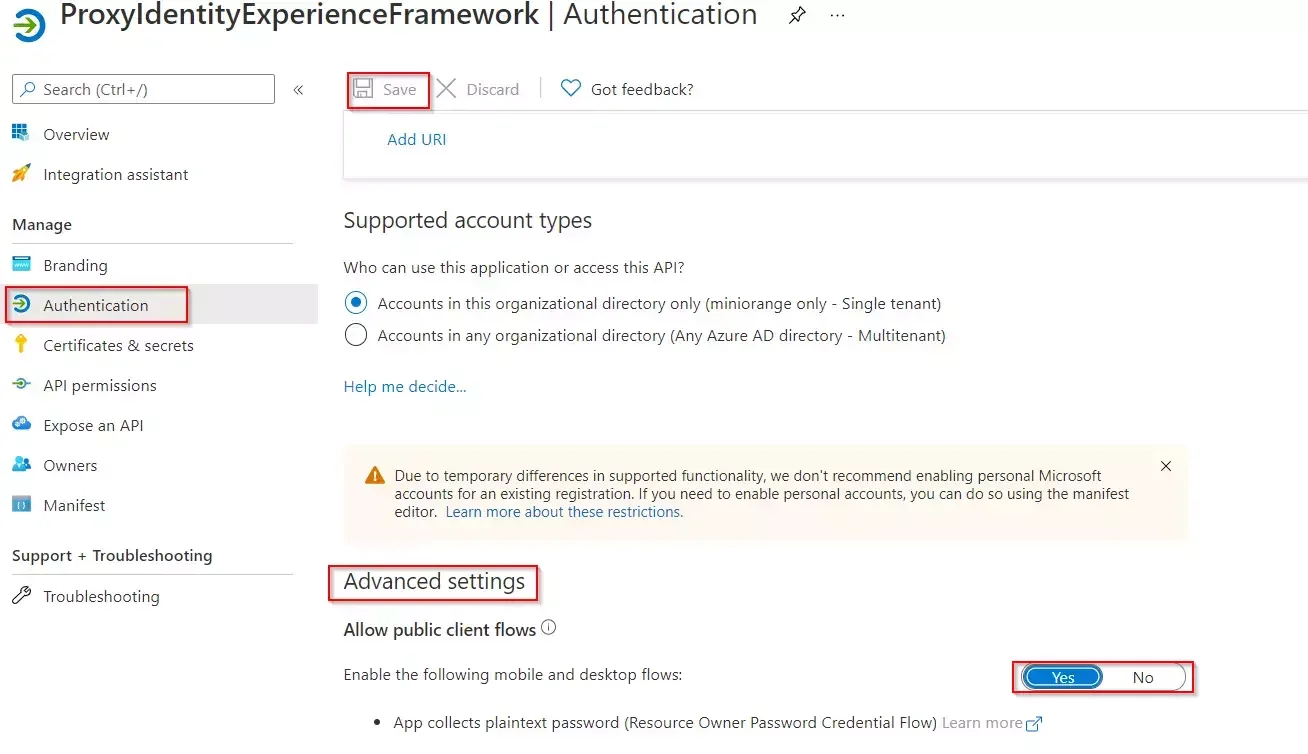
  • Next, specify that the application should be treated as a public client. Under Manage, select Authentication.
  • Under Advanced settings, enable Allow public client flows (select Yes). Select Save.
  • Azure B2C SSO : Under Manage, and select Authentication

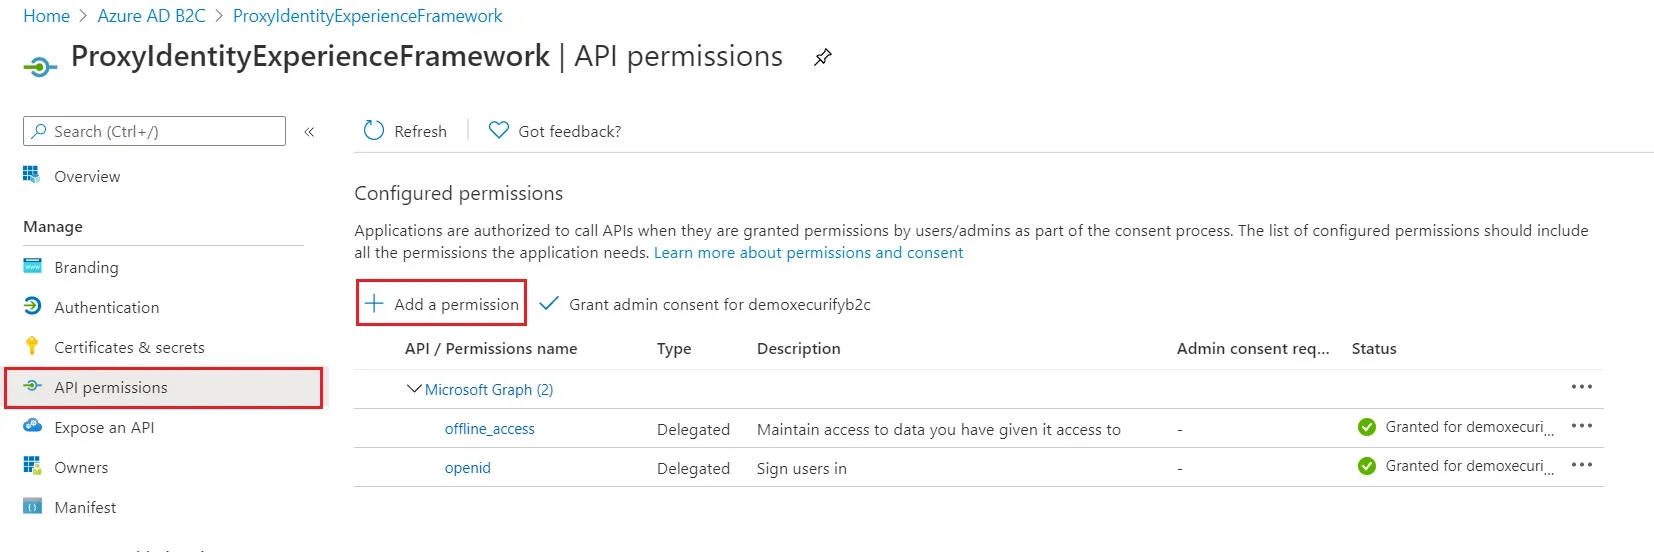
  • Now, grant permissions to the API scope you exposed earlier in the IdentityExperienceFramework registration. Under Manage, select API permissions.
  • Under Configured permissions, select Add a permission.
  • Azure B2C SSO : Navigate to API permission and select Add a permission

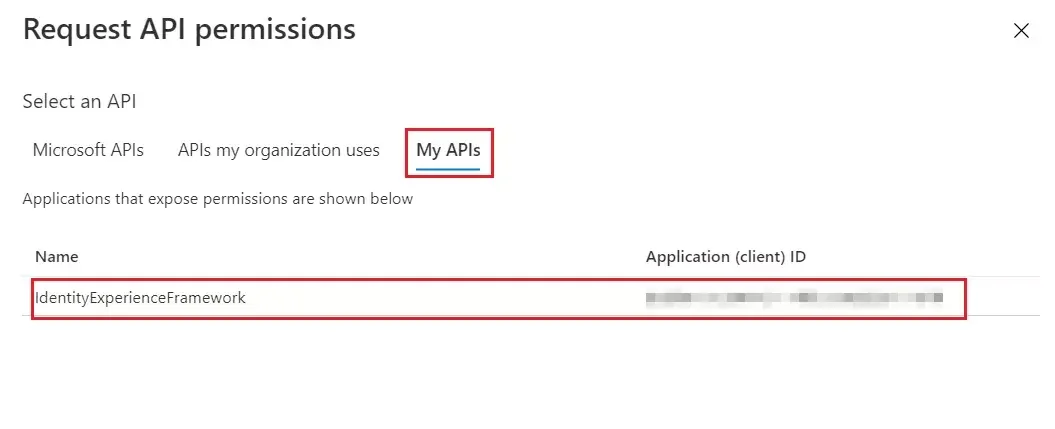
  • Select the My APIs tab, then select the IdentityExperienceFramework application.
  • Azure B2C SSO : Request API Permissions Select My APIs

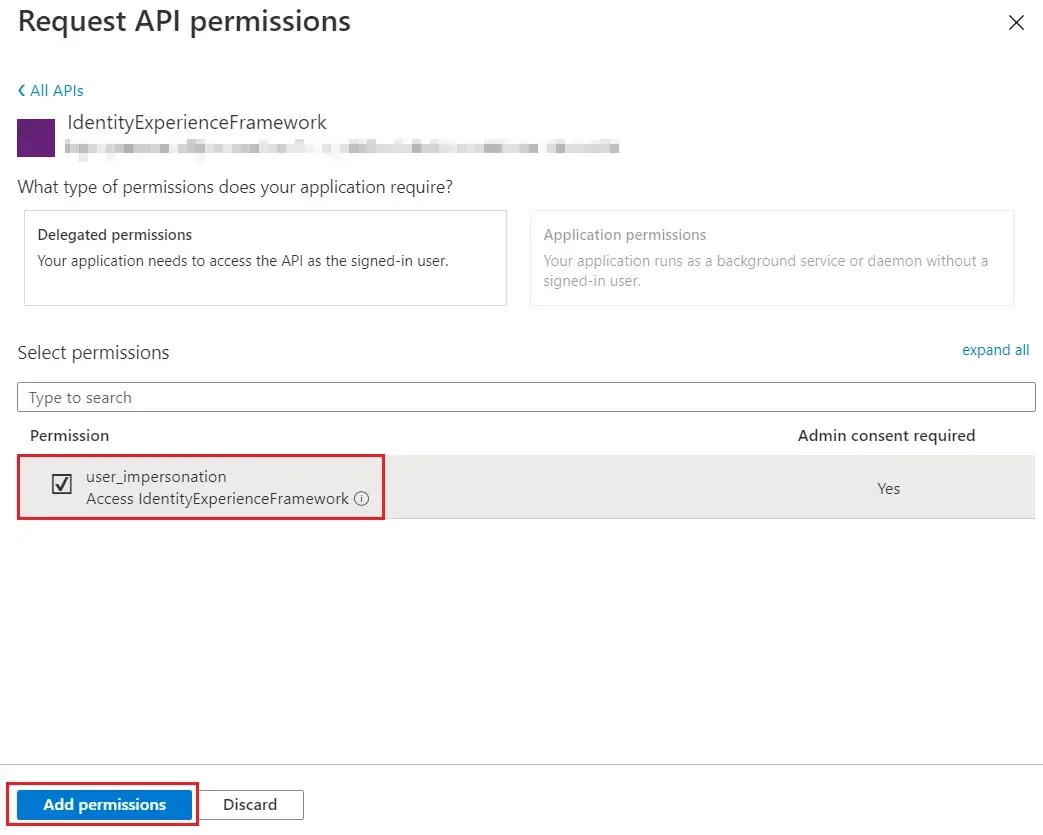
  • Under Permission, select the user_impersonation scope that you defined earlier.
  • Select Add permissions. As directed, wait a few minutes before proceeding to the next step.
  • Azure B2C SSO : Permission select user-impersonation scope that define earlier

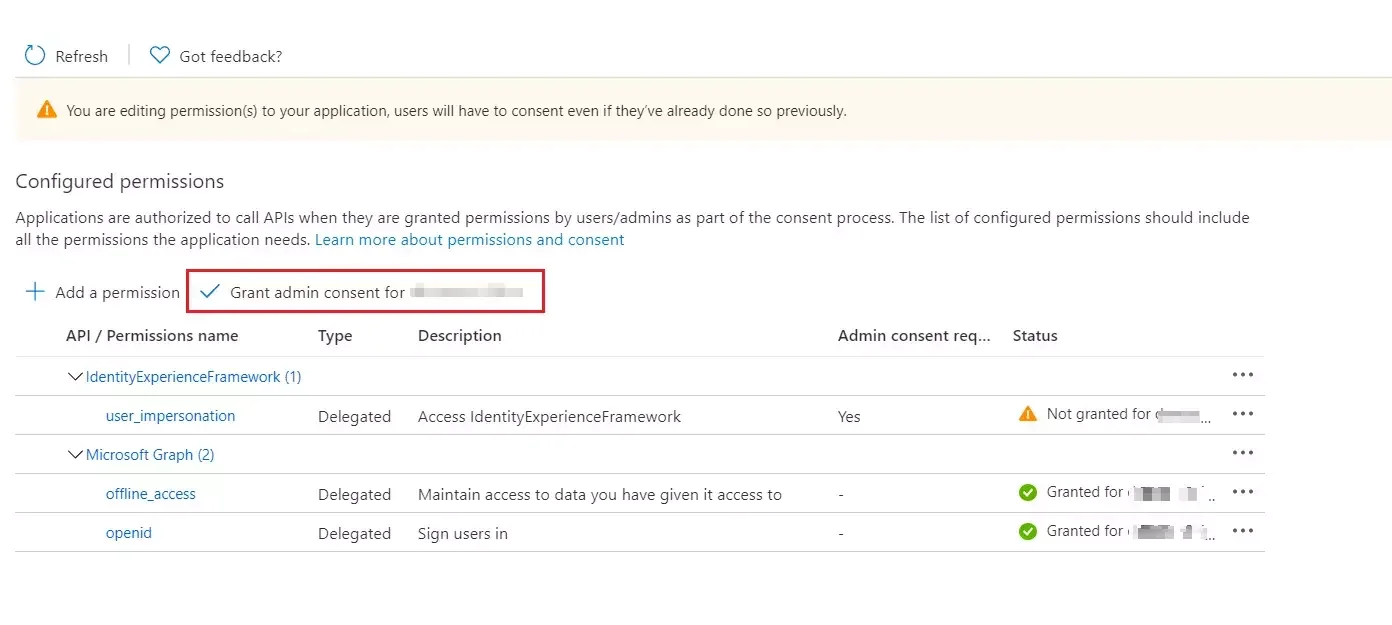
  • Select Grant admin consent for (your tenant name).
  • Azure B2C SSO : Grant Admin consent

  • Select your currently signed-in administrator account, or sign in with an account in your Azure AD B2C tenant that's been assigned at least the Cloud application administrator role. Select Accept.
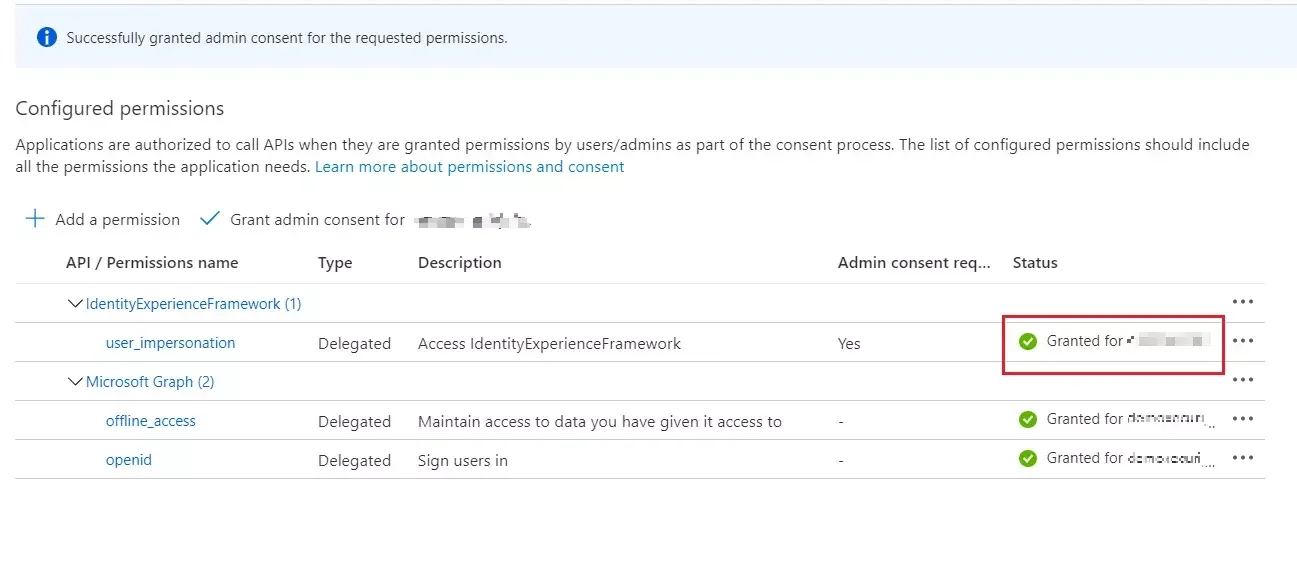
  • Now Refresh, and then verify that "Granted for ..." appears under Status for the scopes: offline_access, openid and user_impersonation. It might take a few minutes for the permissions to propagate.
  • Azure B2C SSO : Refresh Granted Status

  • To enable SAML flow in Azure B2C, you'll need to modify the SocialAndLocalAccounts custom policy from the Custom Policy Starter Pack. To complete this process, follow the detailed steps provided here.
  • If you're setting up custom policies for the first time, click here for a comprehensive guide to help you through the setup process.

Add signing and encryption keys for Identity Experience Framework applications

Obtain a certificate:- If you don't already have a certificate, you can use a self-signed certificate. A self-signed certificate is a security certificate that is not signed by a certificate authority (CA) and doesn't provide the security guarantees of a certificate signed by a CA.
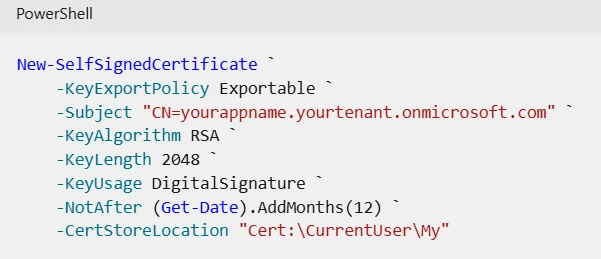
  • On Windows, use the New-SelfSignedCertificate cmdlet in PowerShell to generate a certificate.
  • Run the following PowerShell command to generate a self-signed certificate. Modify the -Subject argument as appropriate for your application and Azure AD B2C tenant name such as contosowebapp.contoso.onmicrosoft.com. You can also adjust the -NotAfter date to specify a different expiration for the certificate.
  • Azure B2C SSO : Run the following commond in powershell to generate a certificate

  • On Windows computer, search for and select Manage user certificates
    • Under Certificates - Current User, select Personal > Certificates>yourappname.yourtenant.onmicrosoft.com.
    • Select the certificate, and then select Action > All Tasks > Export.
    • Select Next > Yes, export the private key > Next.
    • Accept the defaults for Export File Format, and then select Next.
    • Enable Password option, enter a password for the certificate, and then select Next.
    • To specify a location to save your certificate, select Browse and navigate to a directory of your choice.
    • On the Save As window, enter a File name, and then select Save.
    • Select Next > Finish.
  • For Azure AD B2C to accept the .pfx file password, the password must be encrypted with the TripleDES-SHA1 option in the Windows Certificate Store Export utility, as opposed to AES256-SHA256.
  • On macOS, use Certificate Assistant in Keychain Access to generate a certificate.
  • Follow the instructions for how to create self-signed certificates in Keychain Access on a Mac.
  • In the Keychain Access app on your Mac, select the certificate that you created.
  • Select File > Export Items.
  • Select a file name to save your certificate. For example: self-signed-certificate.p12.
  • For File Format, select Personal Information Exchange (.p12).
  • Select Save.
  • Enter a password in the Password and Verify boxes.
  • Replace the file extension to .pfx. For example: self-signed-certificate.pfx.

You must store your certificate in your Azure AD B2C tenant. Follow the steps below to do so :

  • Sign in to the Azure portal.
  • If you have access to multiple tenants, select the Settings icon in the top menu to switch to your Azure AD B2C tenant from the Directories + subscriptions menu.
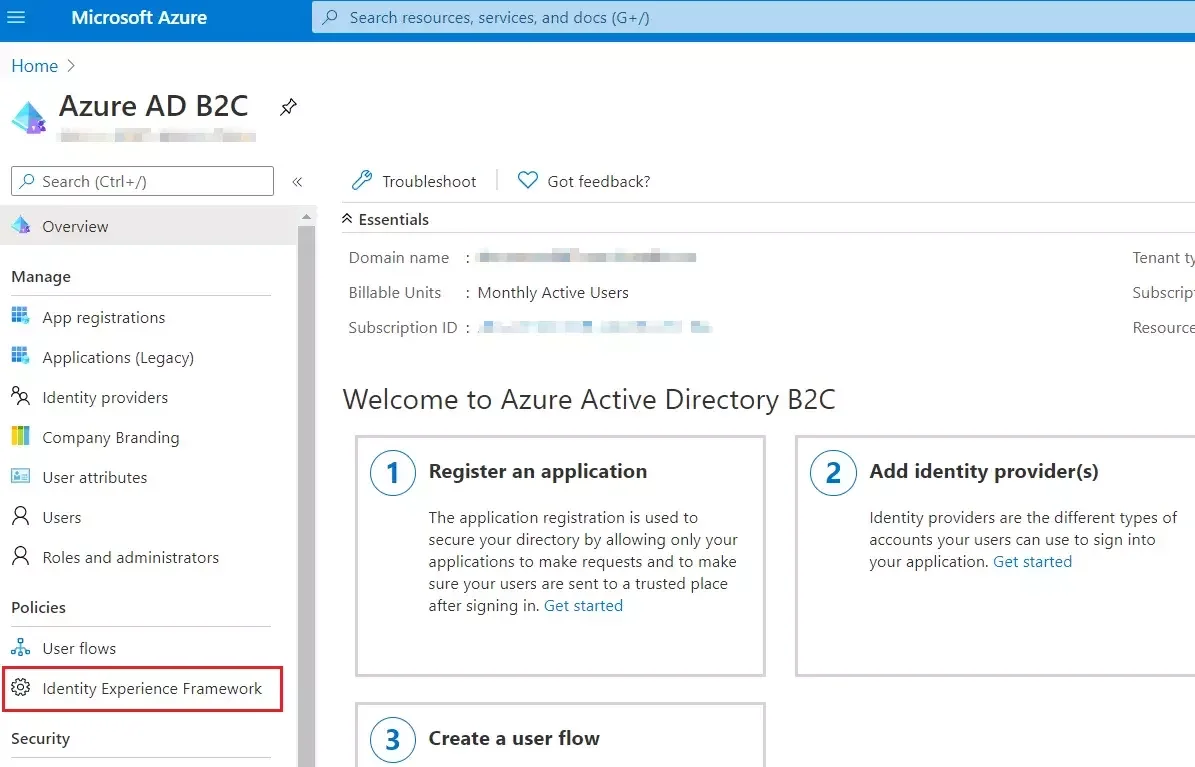
  • Select All services in the upper-left corner of the Azure portal, and then search for and select Azure AD B2C. On the Overview page, select Identity Experience Framework.
  • Azure B2C SSO : Select Identity Experience Framework

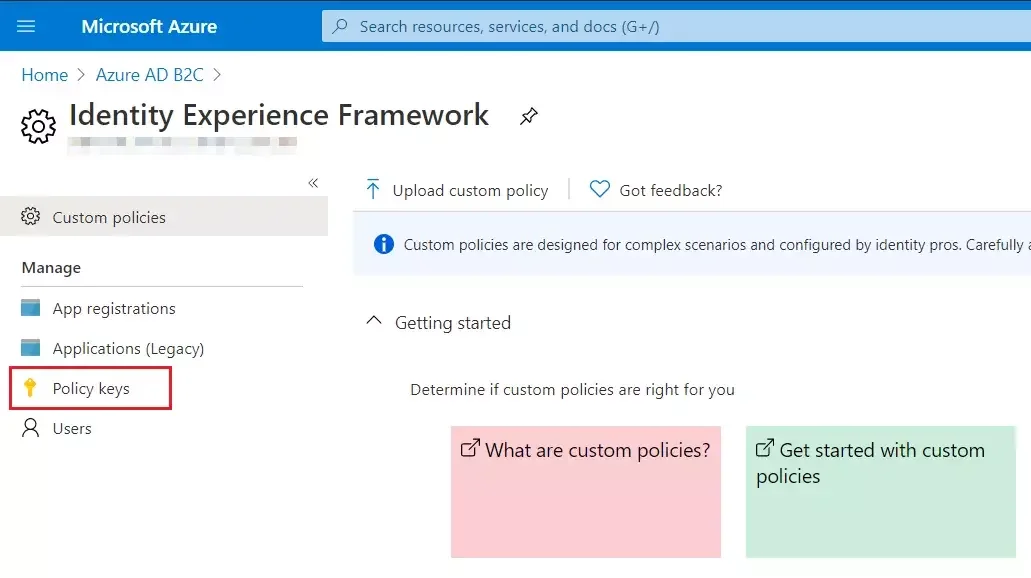
  • Select Policy Keys, and then select Add.
  • Azure B2C SSO : Select Policy Keys then click add

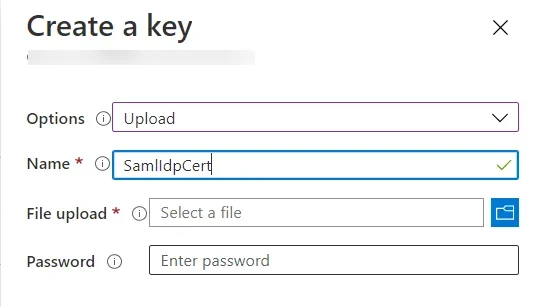
  • For Options, select Upload.
  • For Name, enter a name for the policy key. For example, enter SamlIdpCert. The prefix B2C_1A_ is added automatically to the name of your key.
  • Azure B2C SSO : Create a Key

  • Browse to and select your certificate .pfx file with the private key.
  • Select Create.

Create the encryption key:

  • On the overview page of your Azure AD B2C tenant, under Policies, select Identity Experience Framework.
  • Select Policy Keys and then select Add.
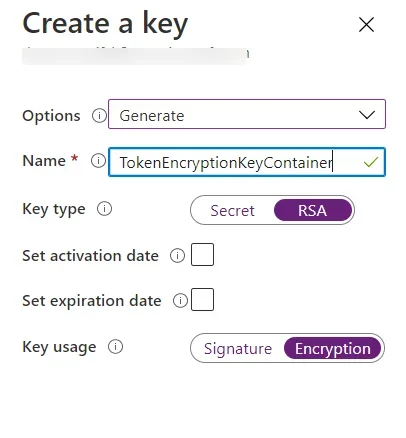
  • For Options, choose Generate.
  • For Name, enter TokenEncryptionKeyContainer. For Key type, select RSA.
  • For Key usage, select Encryption. Now, select Create.
  • Azure B2C SSO : select Encryption

Upload the Policies:
  • Select the Identity Experience Framework menu item in your B2C tenant in the Azure portal.
  • Azure B2C SSO : Select Identity Experience Framework

  • Select "Upload custom policy", then upload the SAML-configured policy in the same order specified in the Azure guide above.
  • Go to miniOrange Admin Console.
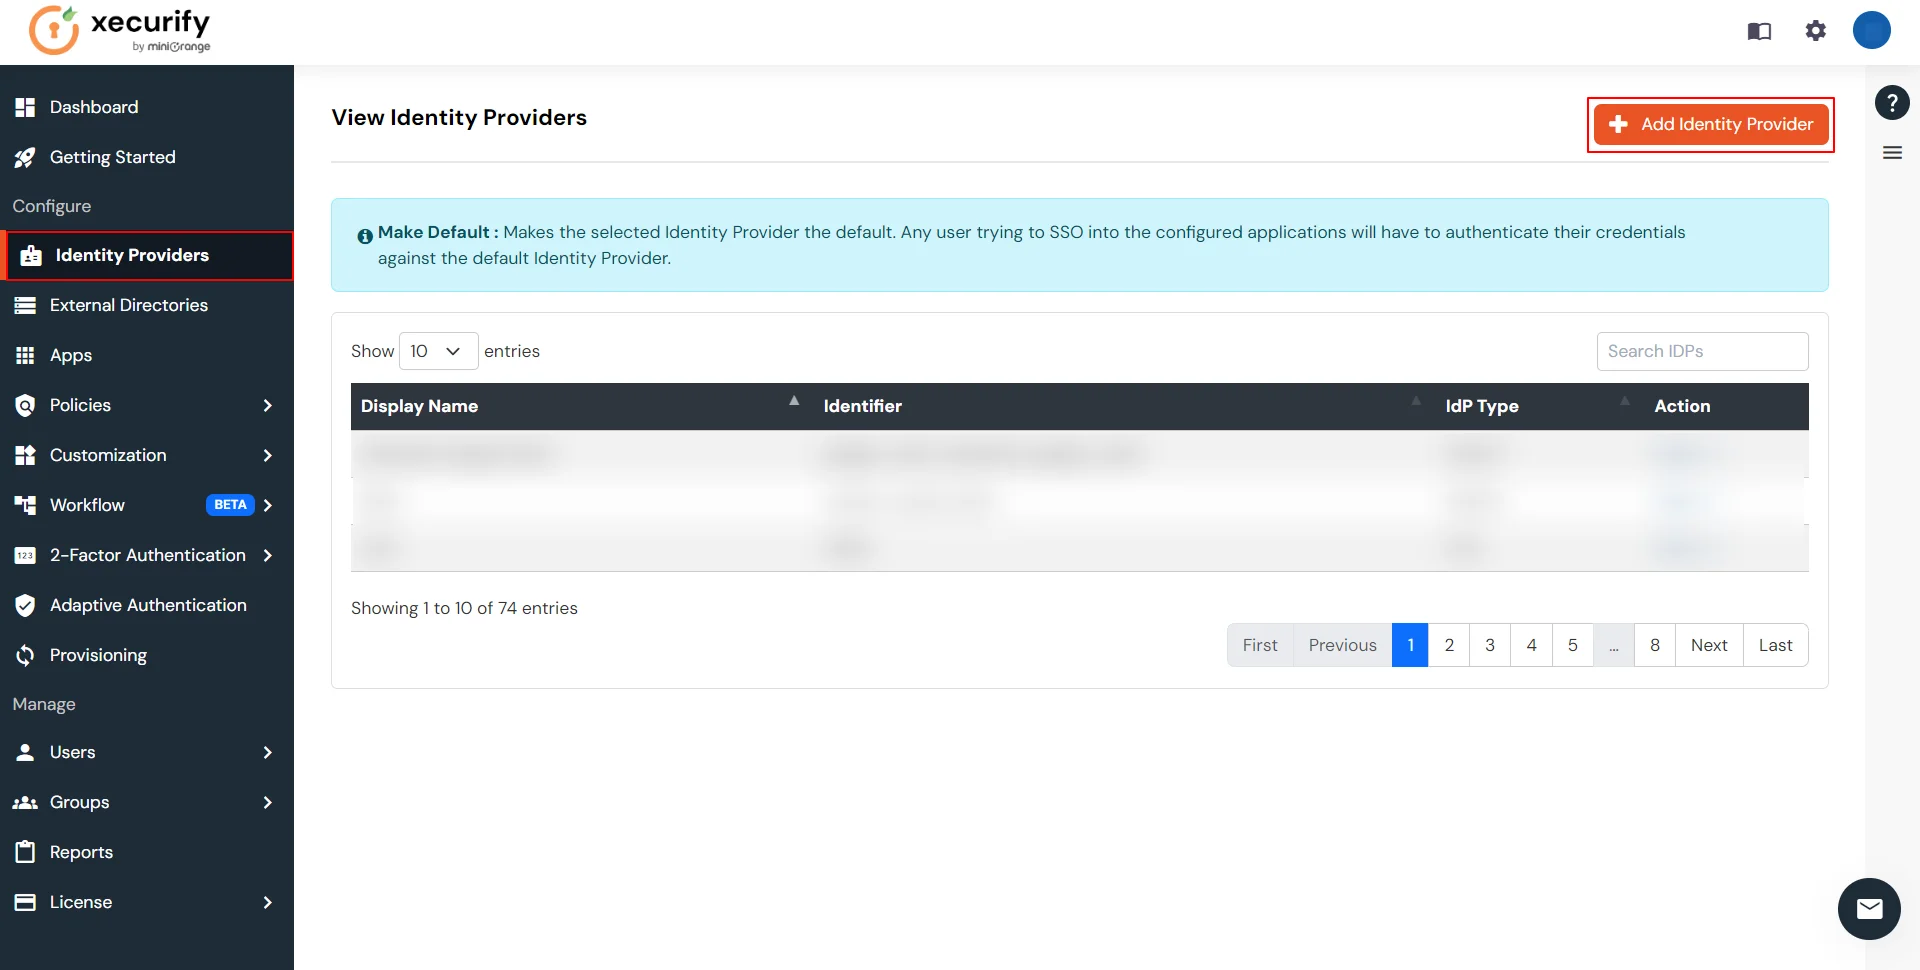
  • From the left navigation bar select Identity Providers >> click Add Identity Provider.
  • Azure B2C SSO : Go to Identity Providers

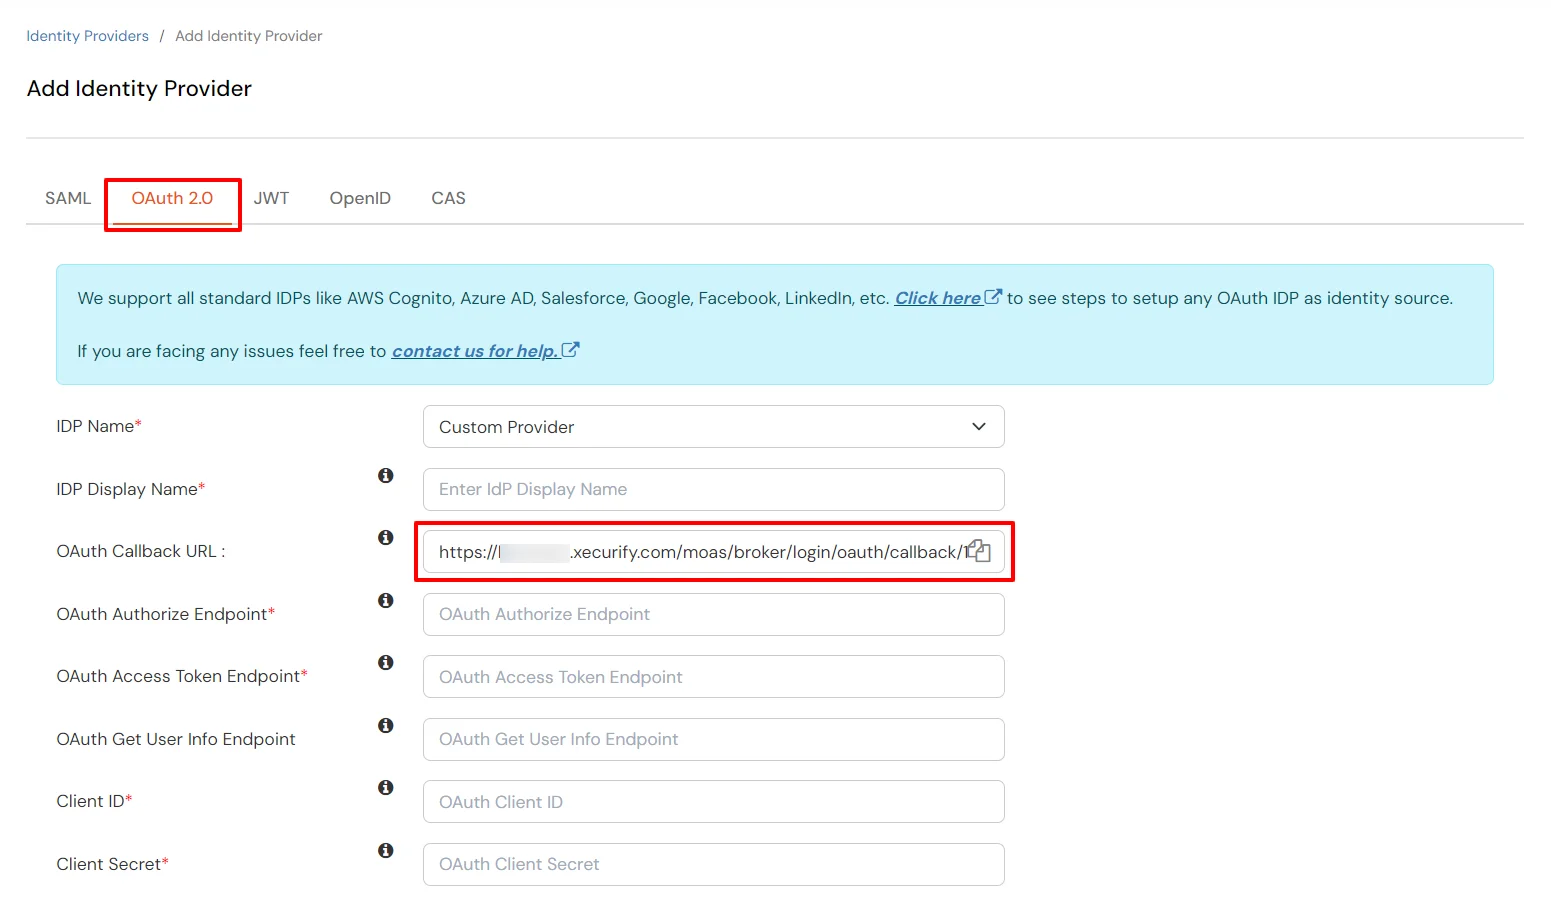
  • Select OAuth 2.0 and copy the OAuth Callback URL which we will use to configure Azure B2C as OAuth Server/Provider.
  • Azure B2C Single Sign On : Select OAuth 2.0

  • Now, sign in to Azure Portal.
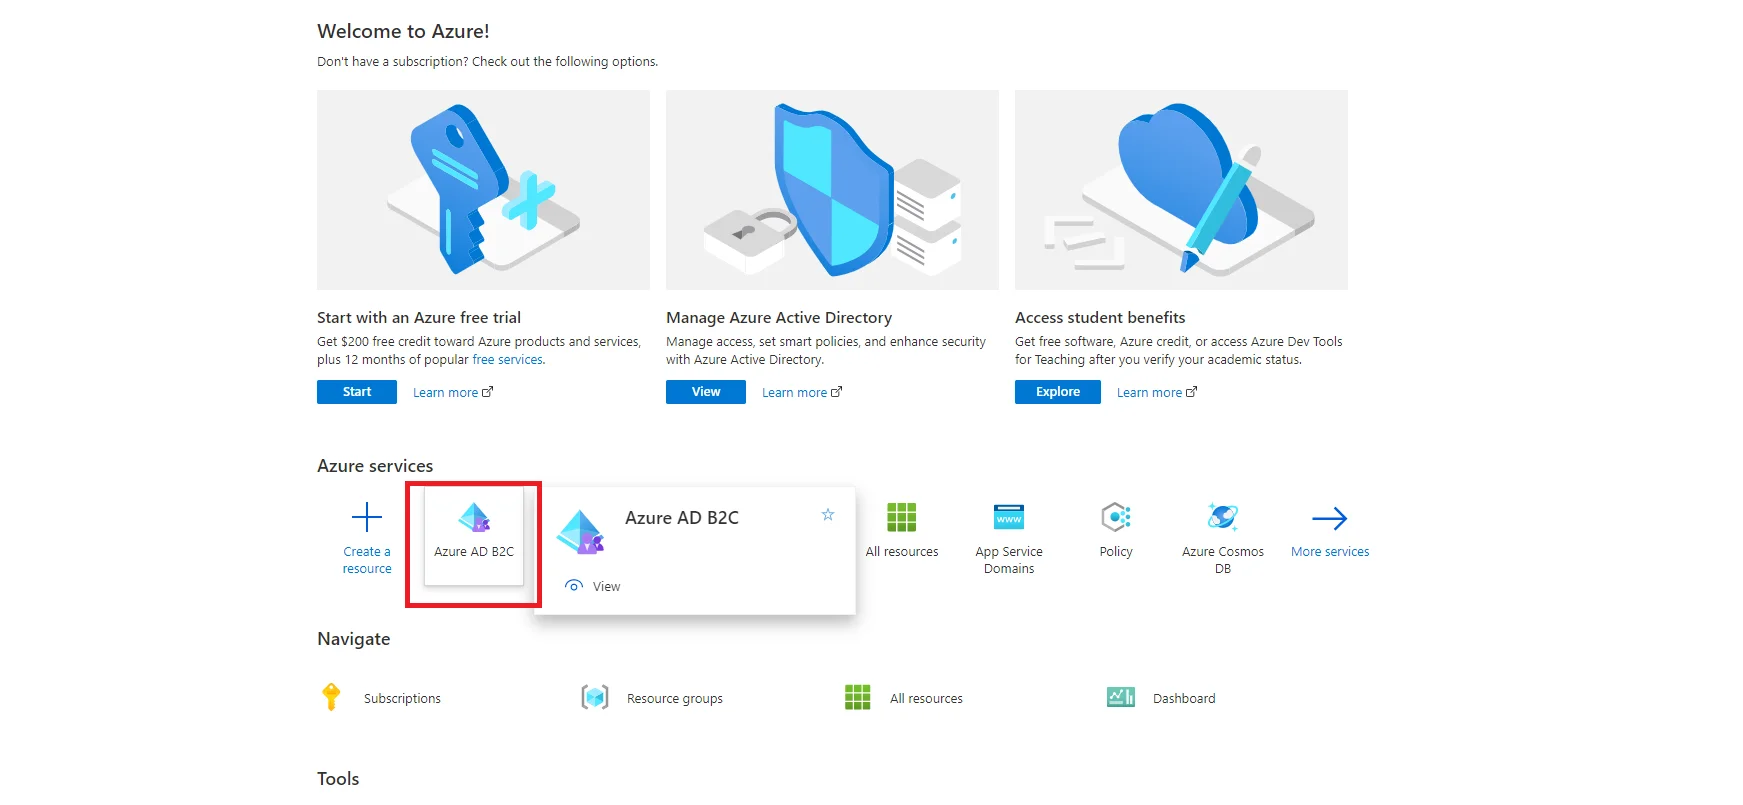
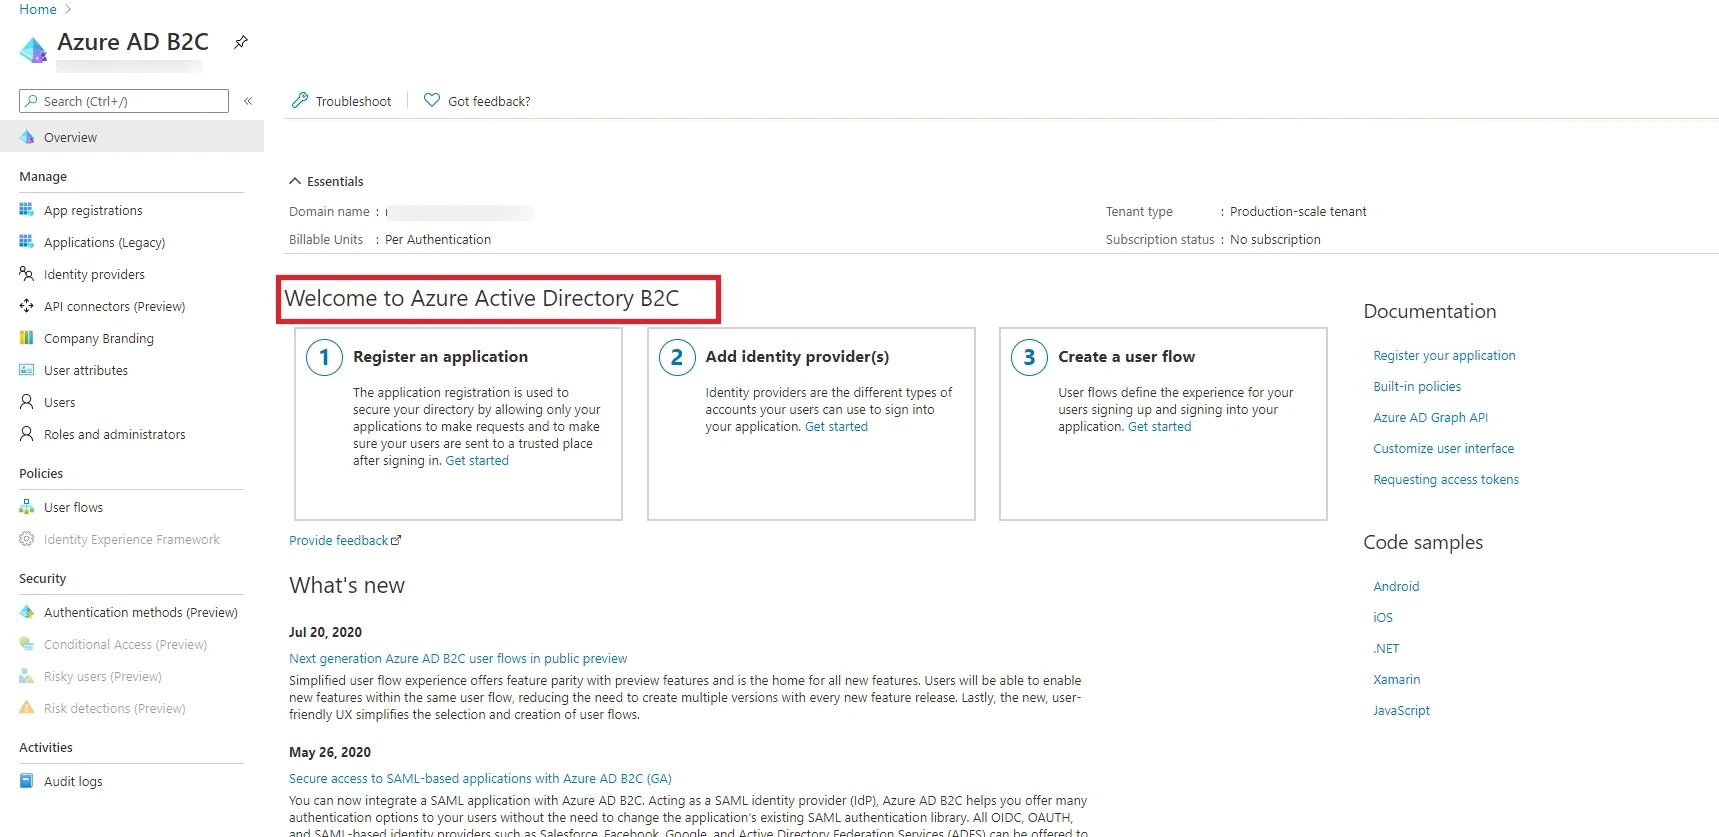
  • Go to home and in the Azure Services, select Azure AD B2C.
  • Azure B2C SSO: Select Azure B2C App

  • Please make sure you are in Azure AD B2C directory with an active subscription and if not, you can switch to the correct directory.
  • Azure B2C SAML: Active Directory B2C Instructions

  • In the Essential tab, you will find the Azure B2C domain name, Save it for futher configuration.
  • Azure B2C SSO Login: Add Domain Name

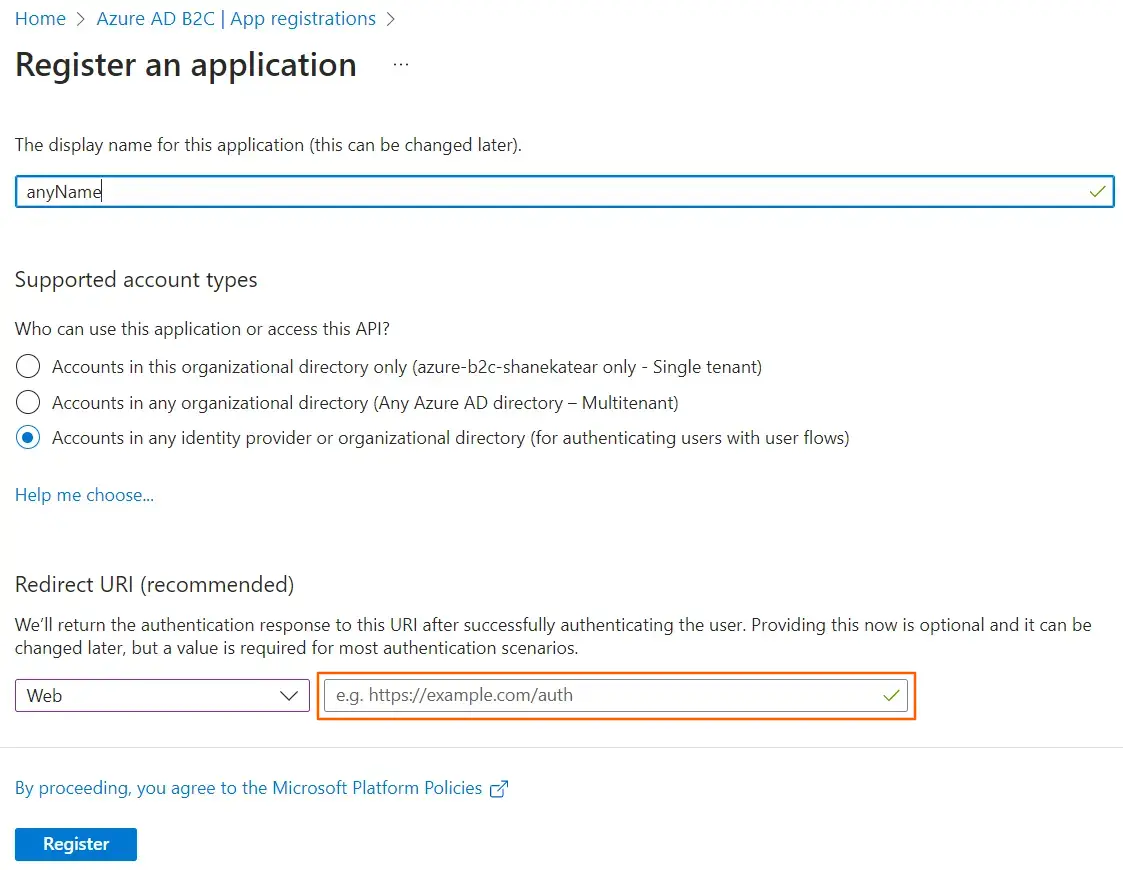
  • Now, click on App registerations and then click on the New registeration option to create a new Azure B2C Application.
  • Azure B2C SSO: Add new registration

  • When the Register an application page appears, enter your application's registration details:
    • Name: Name of the application.
    • Supported account types: Select 3rd option ‘Accounts in any organizational directory (for authenticating users with user flows)’. You can also refer to Help me choose... an option if needed.
    • Select a Platform: select Web as a platform and paste the copied OAuth Callback URL (which we copied in the above step) in the Redirect URI text field.
    • Azure B2C SSO Login: Azure B2C App Create

  • Click on Register.
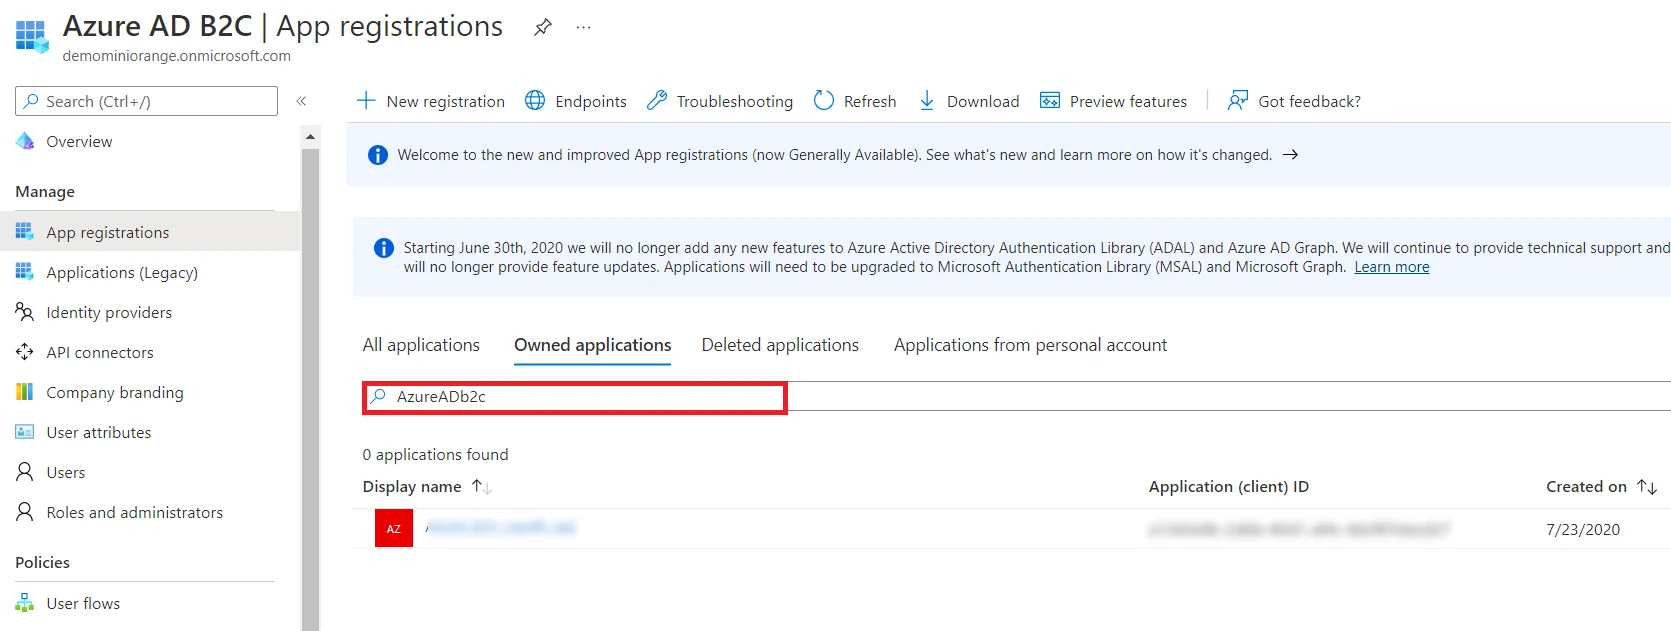
  • After successful application creation, you will be redirected to the newly created application’s overview page. If not, you can go to the app registrations and search the name of your application and you will find your application in the list.
  • Azure B2C as IDP : Select App

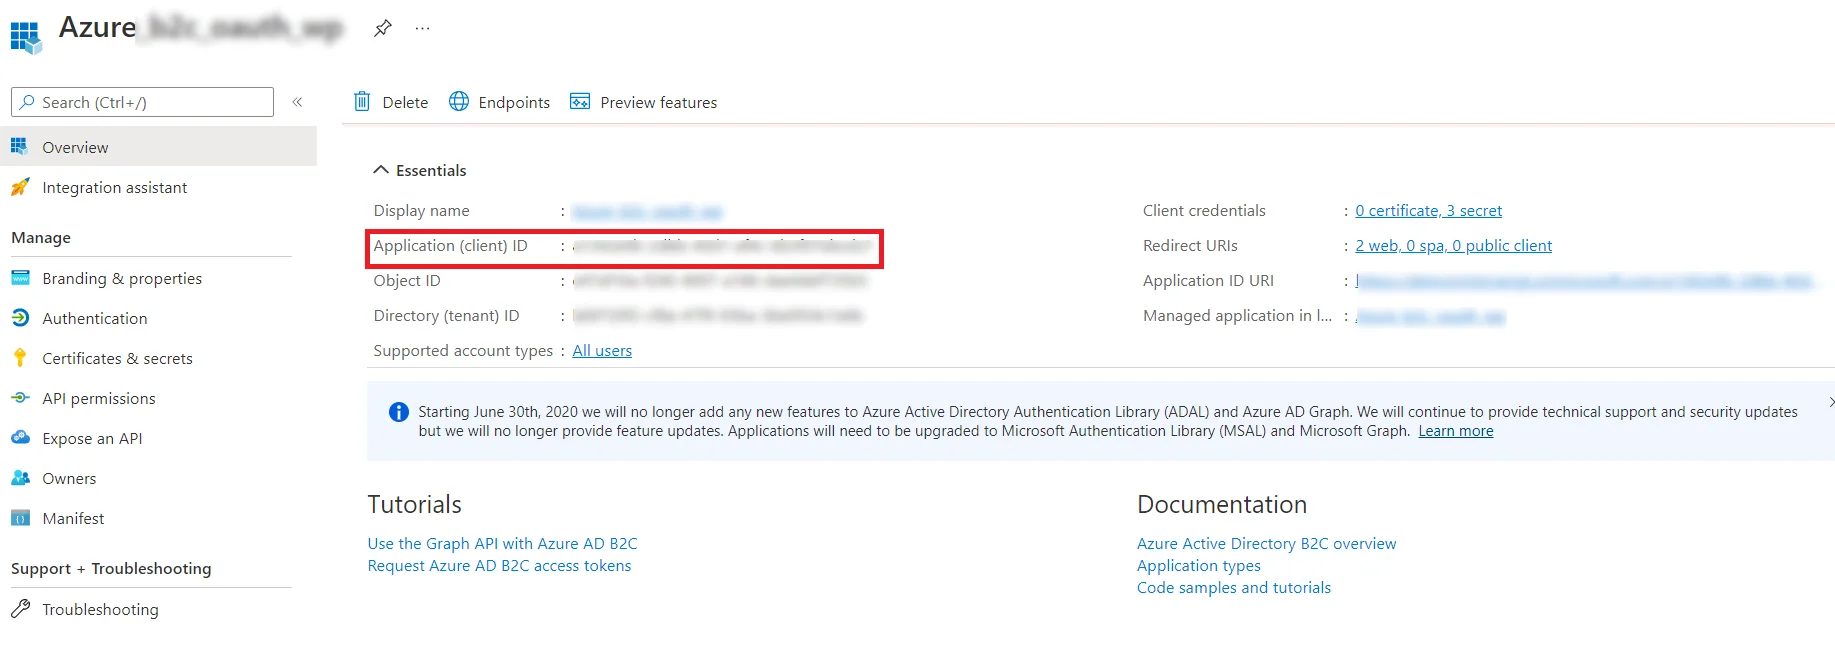
  • Copy your Application ID and keep it handy, you will need it later for configuring the Client ID under miniOrange Service Provider.
  • Azure B2C as IDP : Copy Application ID and Keep it

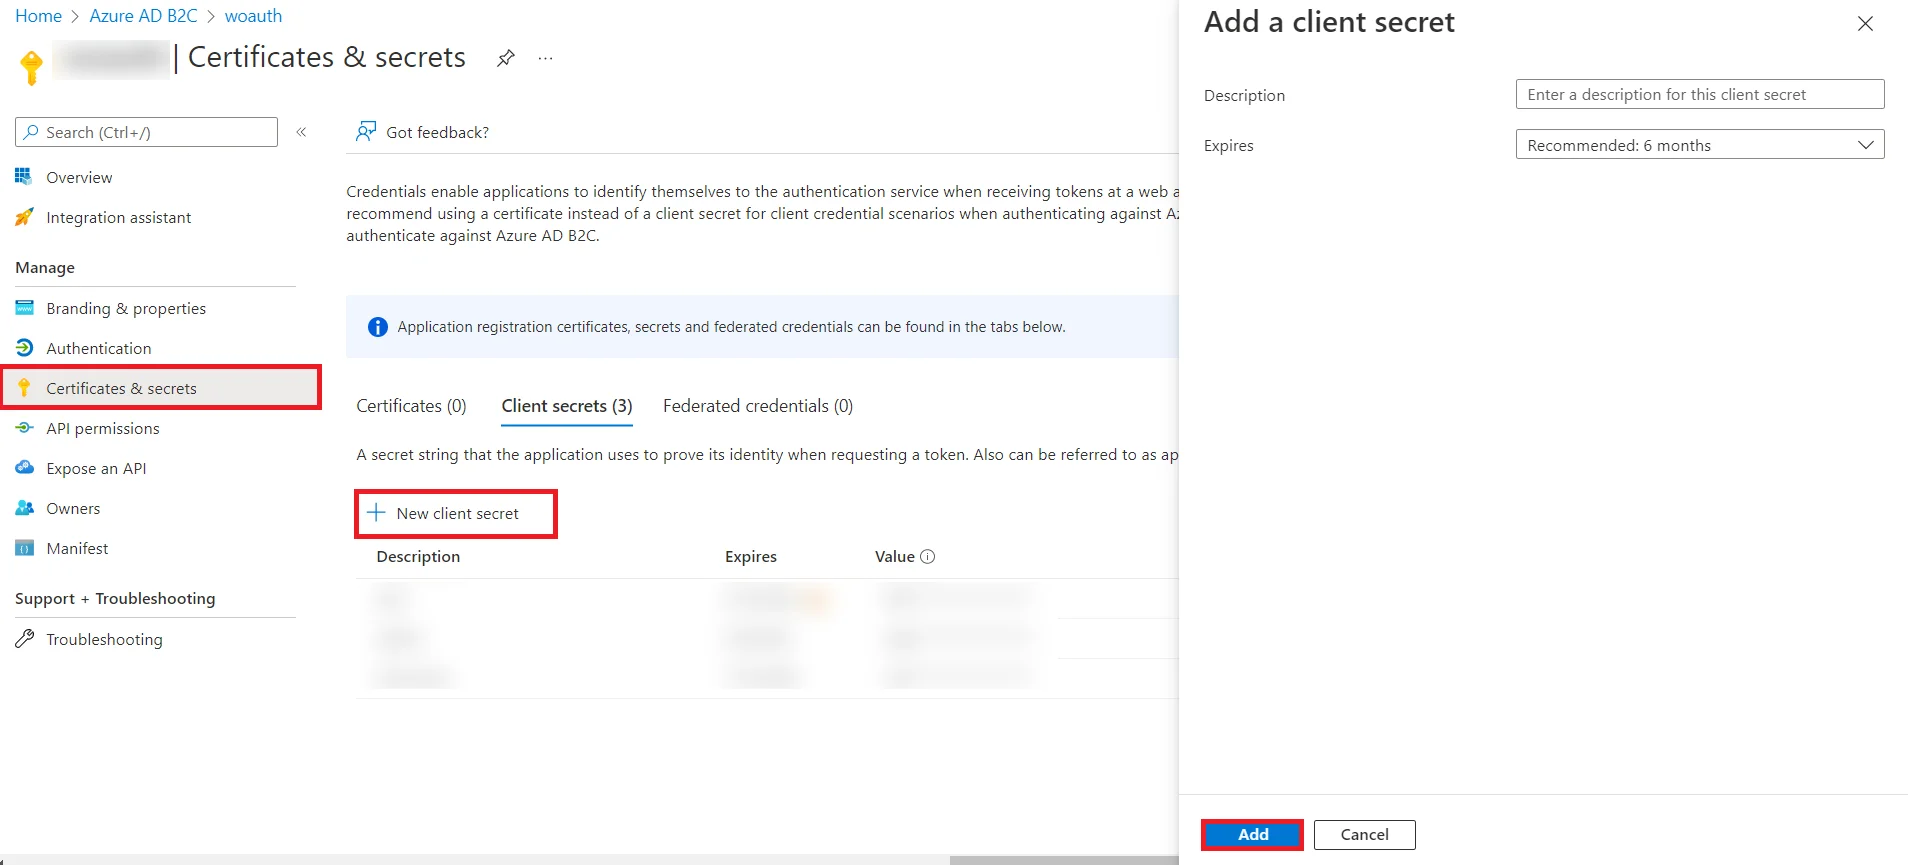
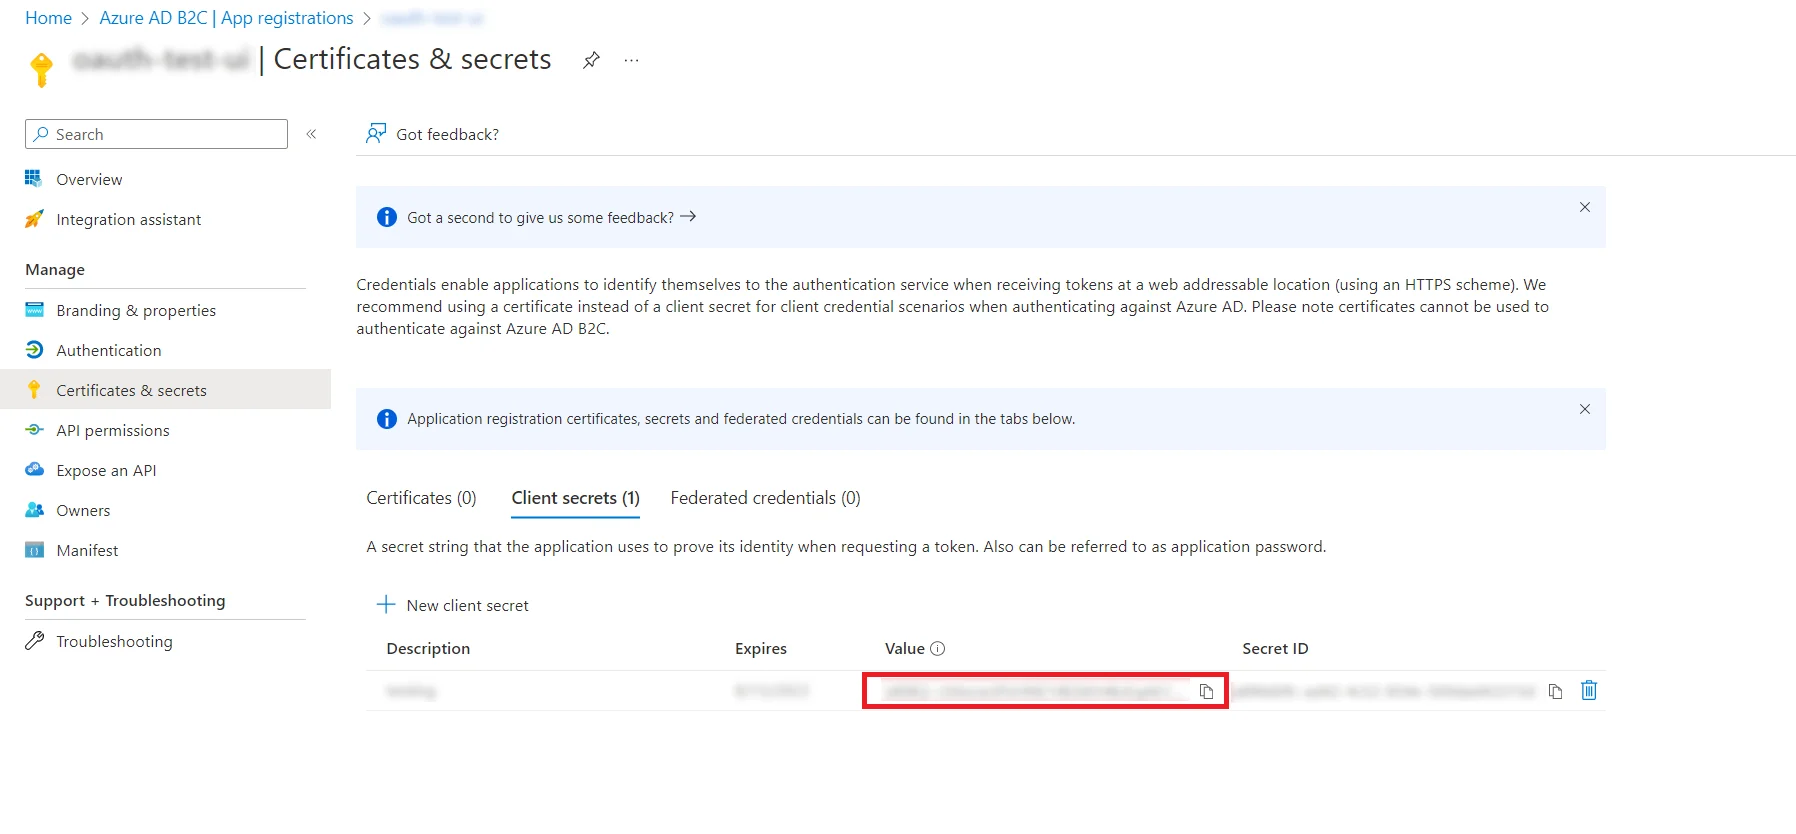
  • Now, click on Certificates and secrets and then click on New client secret to generate a client secret. Enter a description and click on the Add button.
  • Azure B2C as IDP : Generate New Client Secret

  • Copy the secret key Value and save it, as you'll need it later in Step 2 to configure the Client Secret in the miniOrange as Service Provider.
  • Azure B2C as IDP : Copy client secret value

      Step 1.1: Add Users in your B2C Application

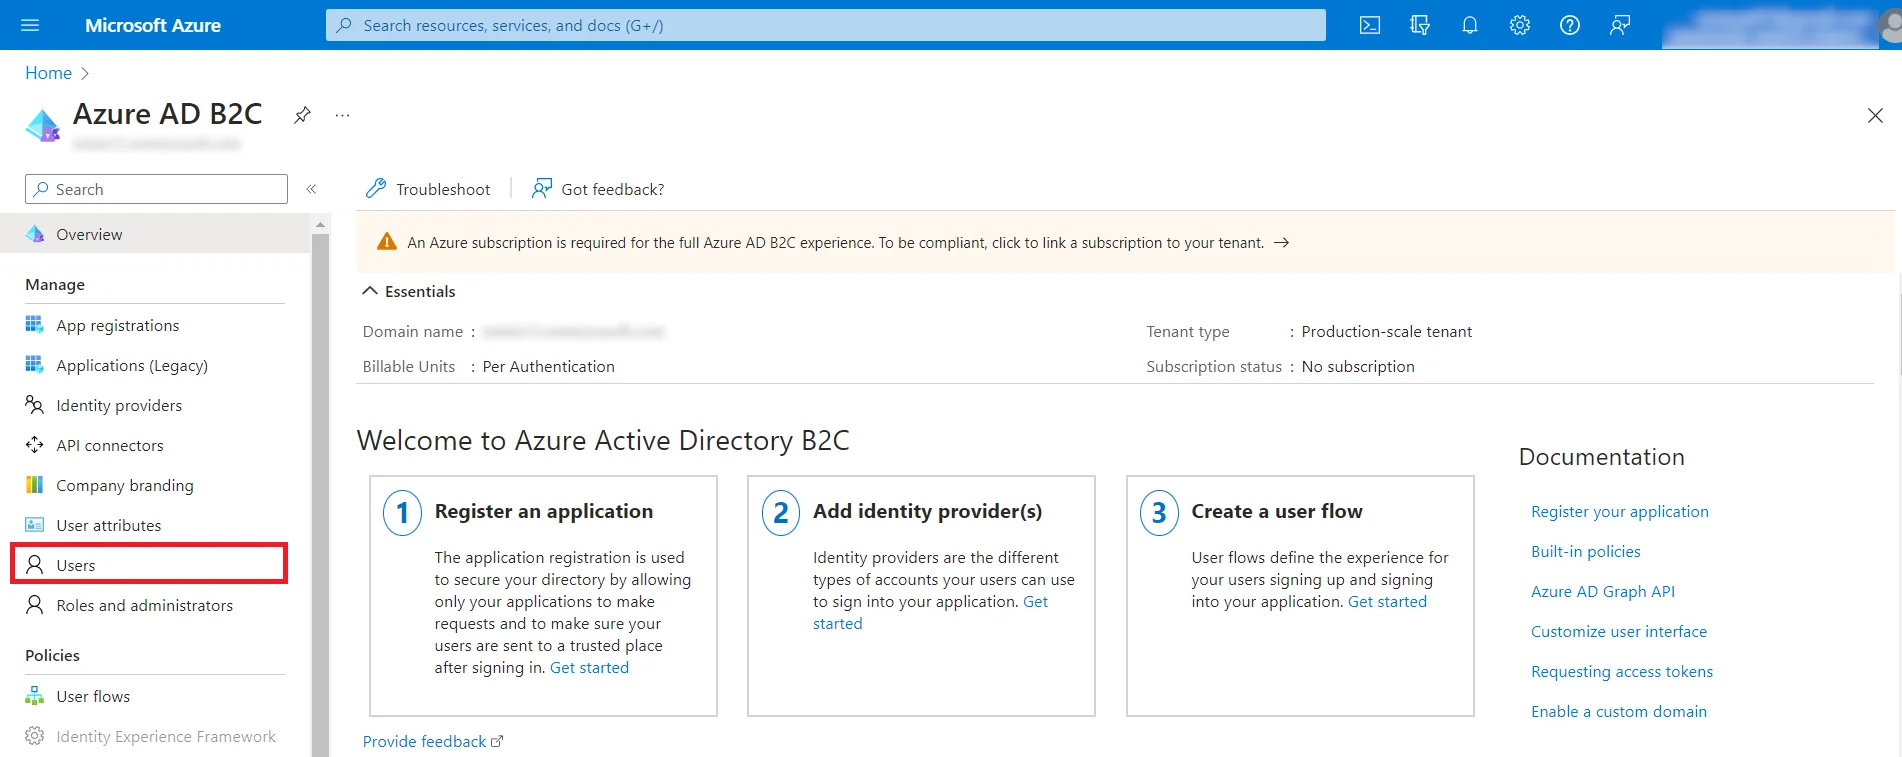
      • On the homepage, go to Users tab in the left menu.
      • Azure B2C as IDP : Go to users

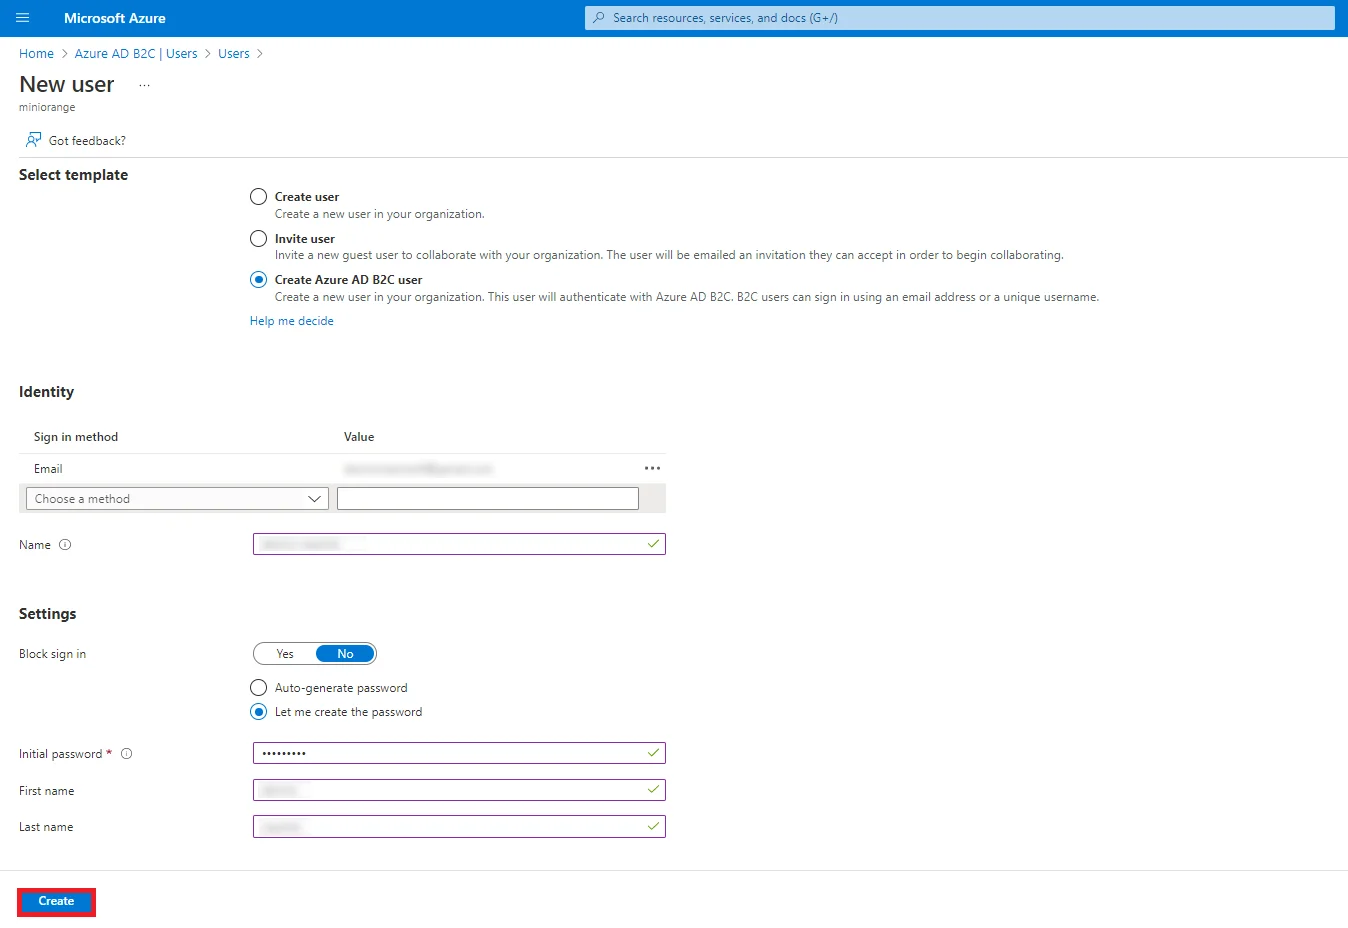
      • Click on New user >> Create new user.
      • Azure B2C as IDP : Click New user to create new user

      • Open a new user window and enter the required information.
        • Select Create Azure AD B2C user from the Select template section.
        • Select Email in the Sign-in method section and set a password.
        • Azure B2C as IDP : Add new user

        • Click Create to save the user details for test configuration.

      Step 1.2: How to create & add Azure B2C Policy

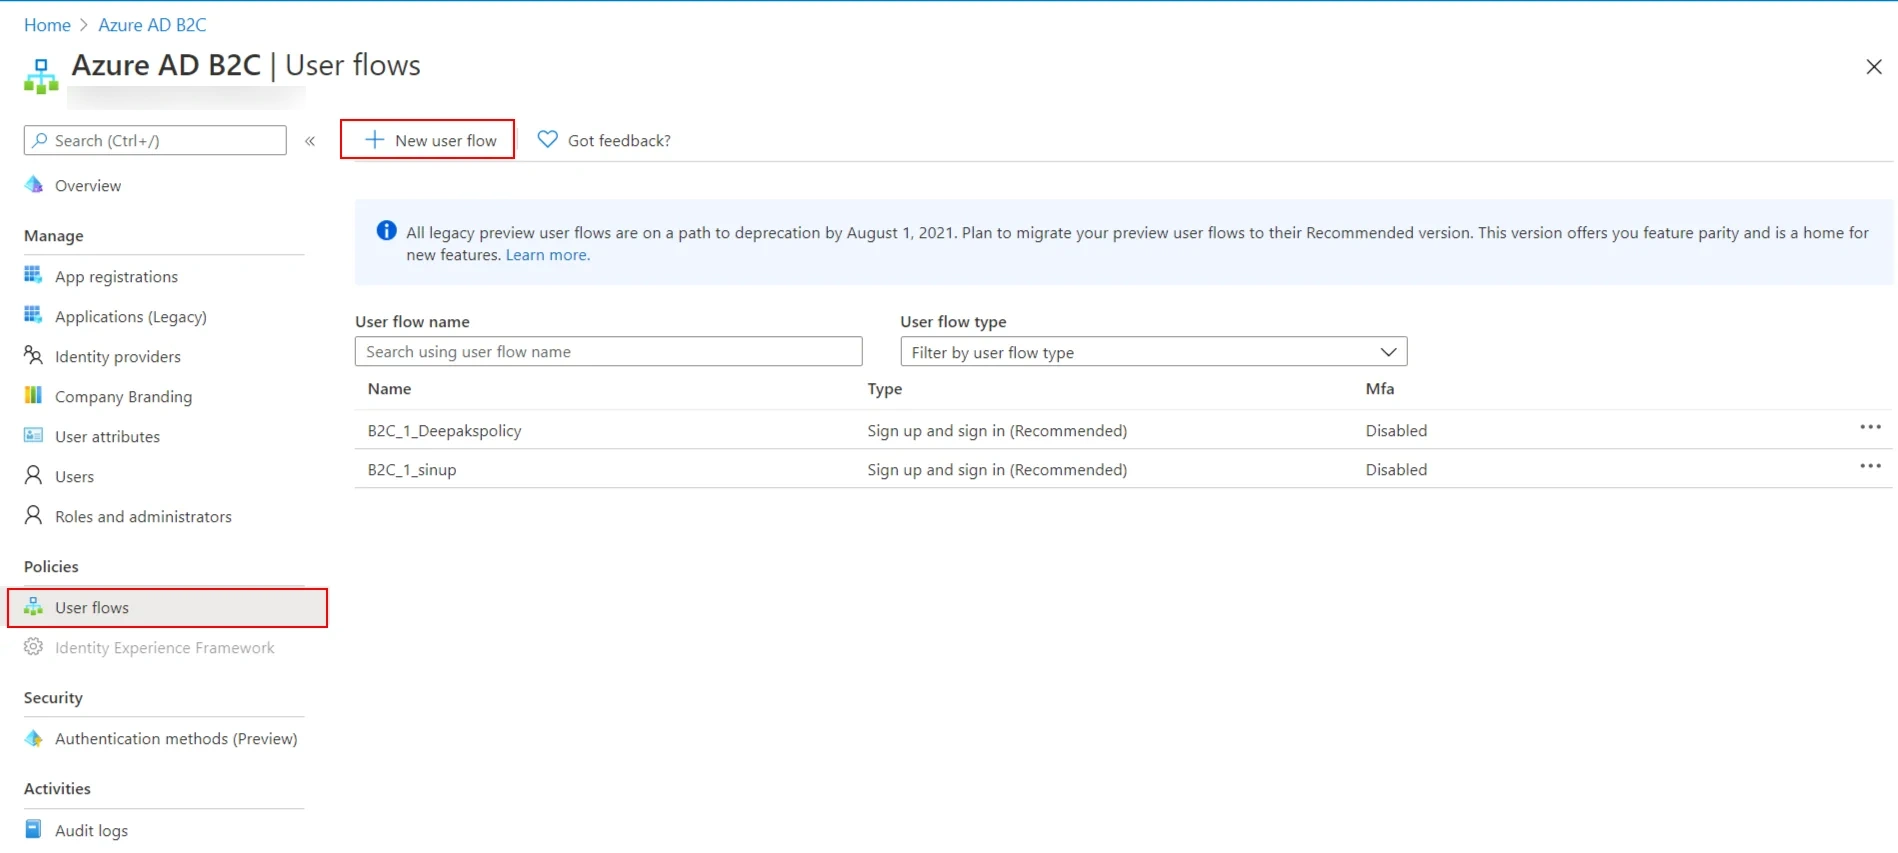
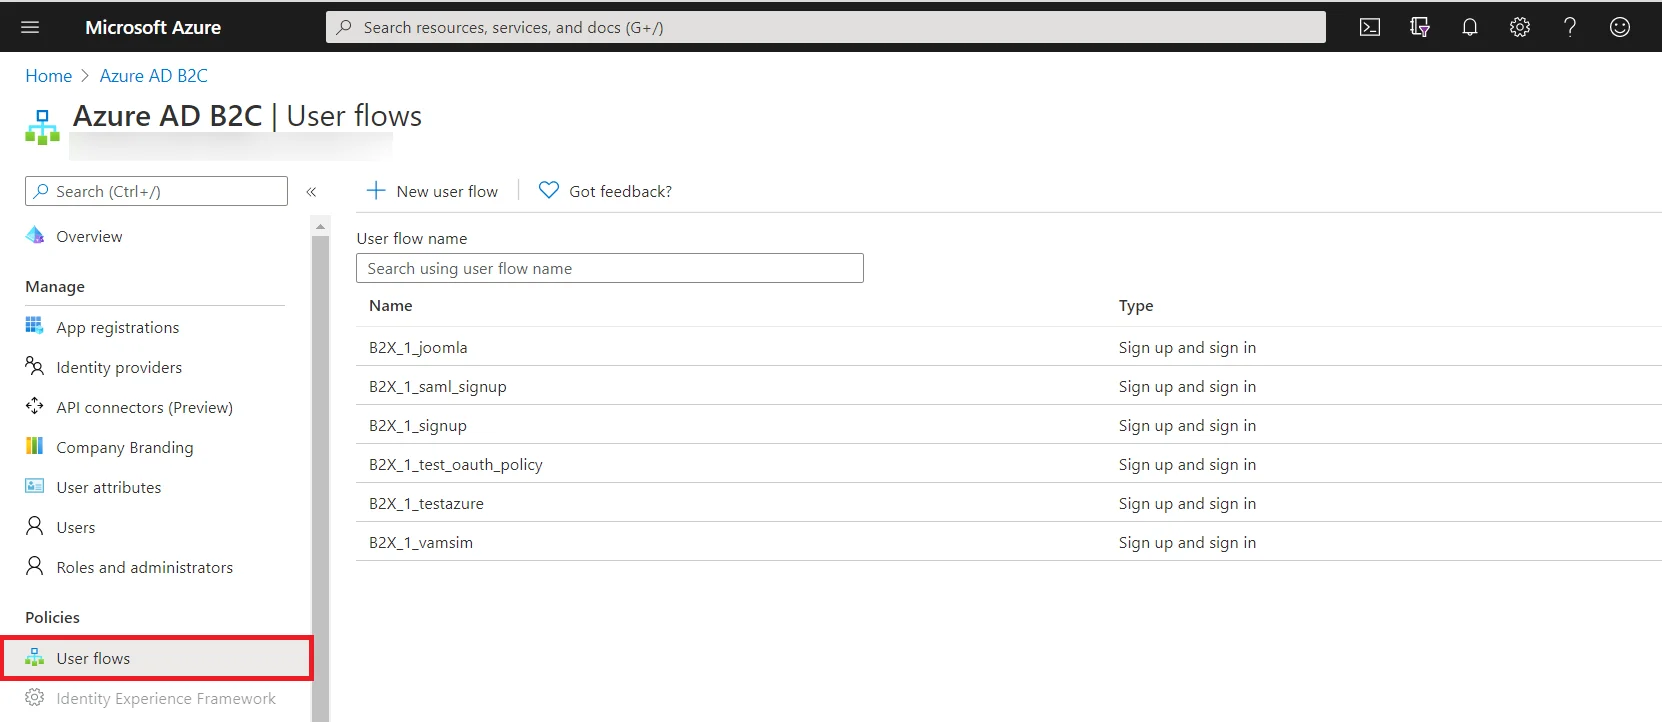
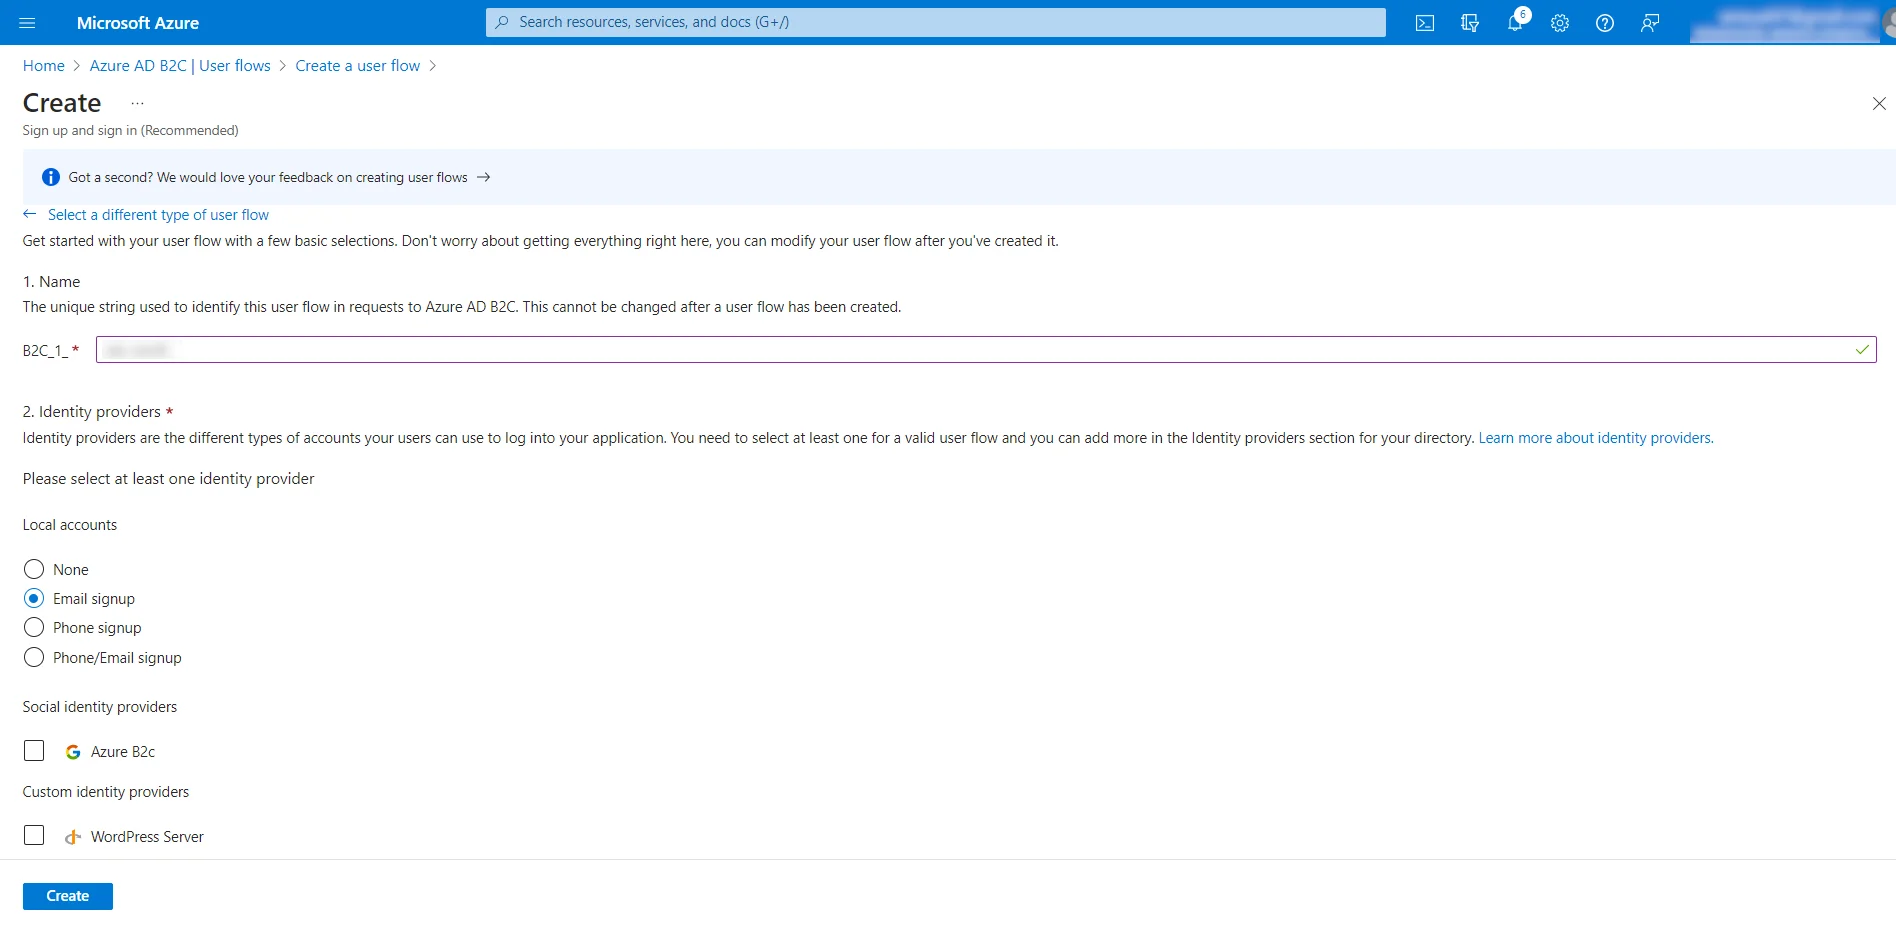
      • Go to Policies >> User flows and click New user flow.
      • Azure B2C as IDP :Go to Policies and click User flows

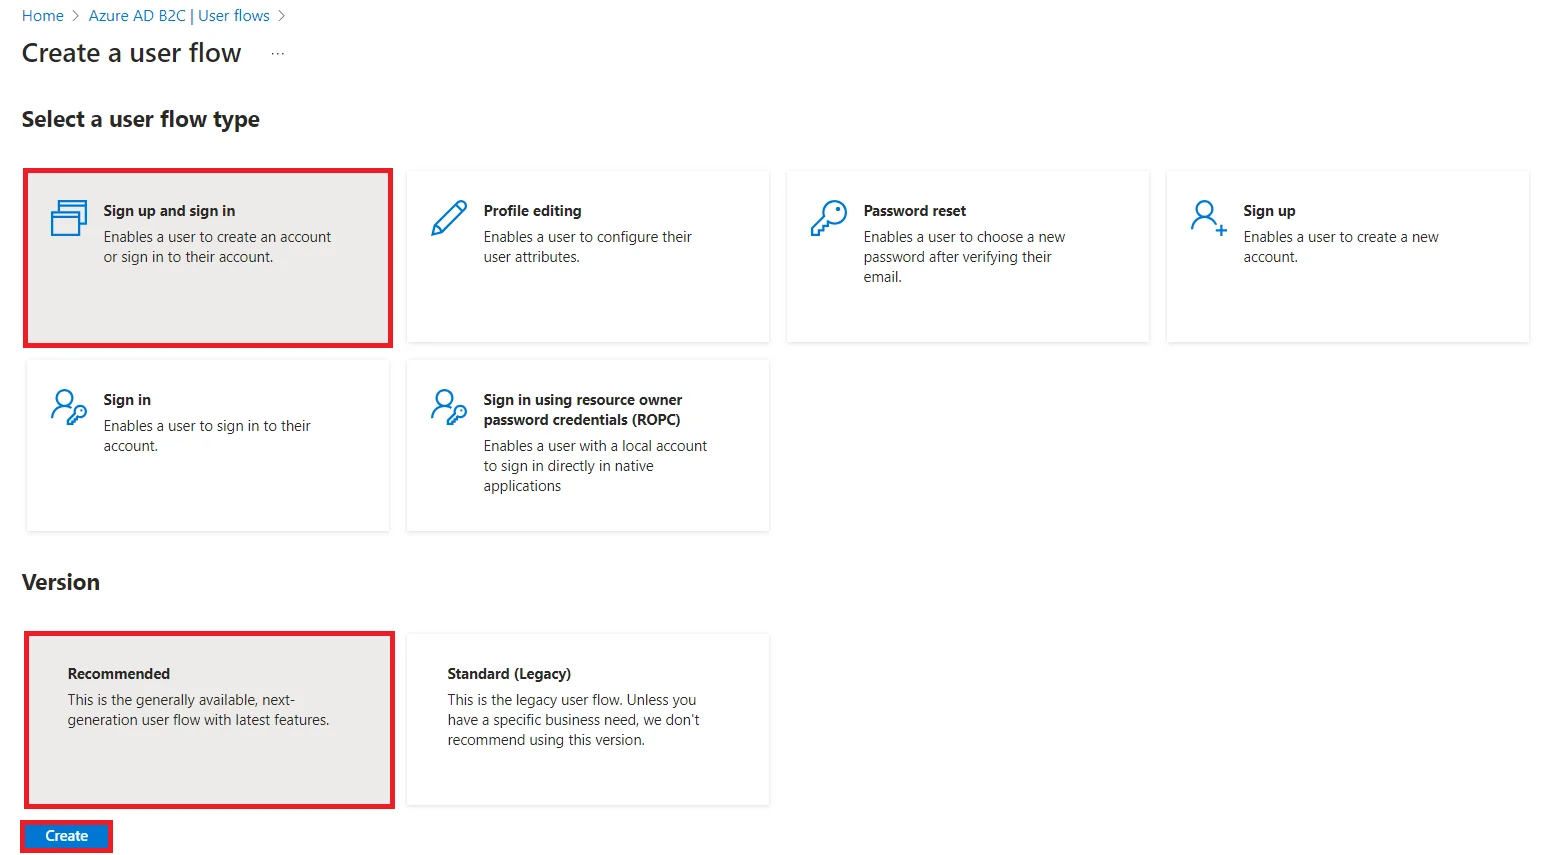
      • Choose the Sign up and Sign in user flow type, then click Create.
      • Azure B2C as IDP : Select Sign up Sign in

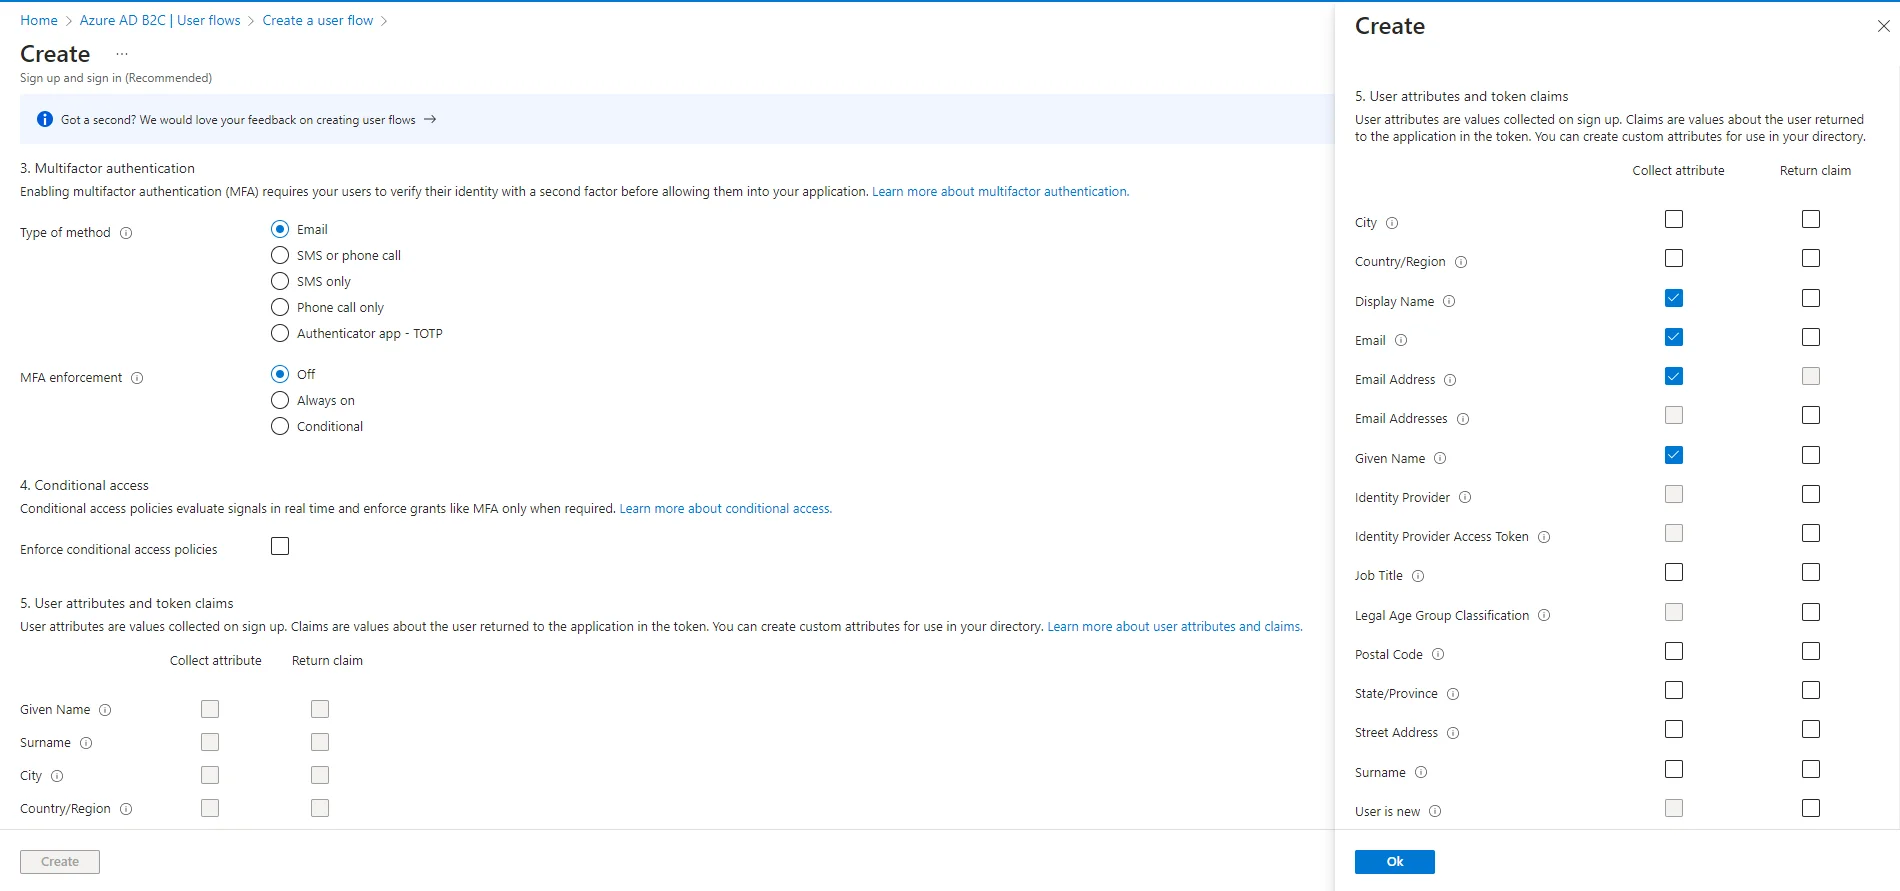
      • Complete the details, such as Name, Identity providers, etc.
        • Select the User attributes you want to fetch during sign-up.
        • Click on Create.
        • Azure B2C as IDP : Enter user flows details

          Azure B2C as IDP : Add user Attribute

      • Copy the Policy name this value will be required when configuring Azure B2C Policy in the miniOrange Service Provider.

      Step 1.3: Add user claims to your application

      • Go to User flows under policies in the left menu and select the configured policy.
      • Azure B2C as IDP : Go to User flows

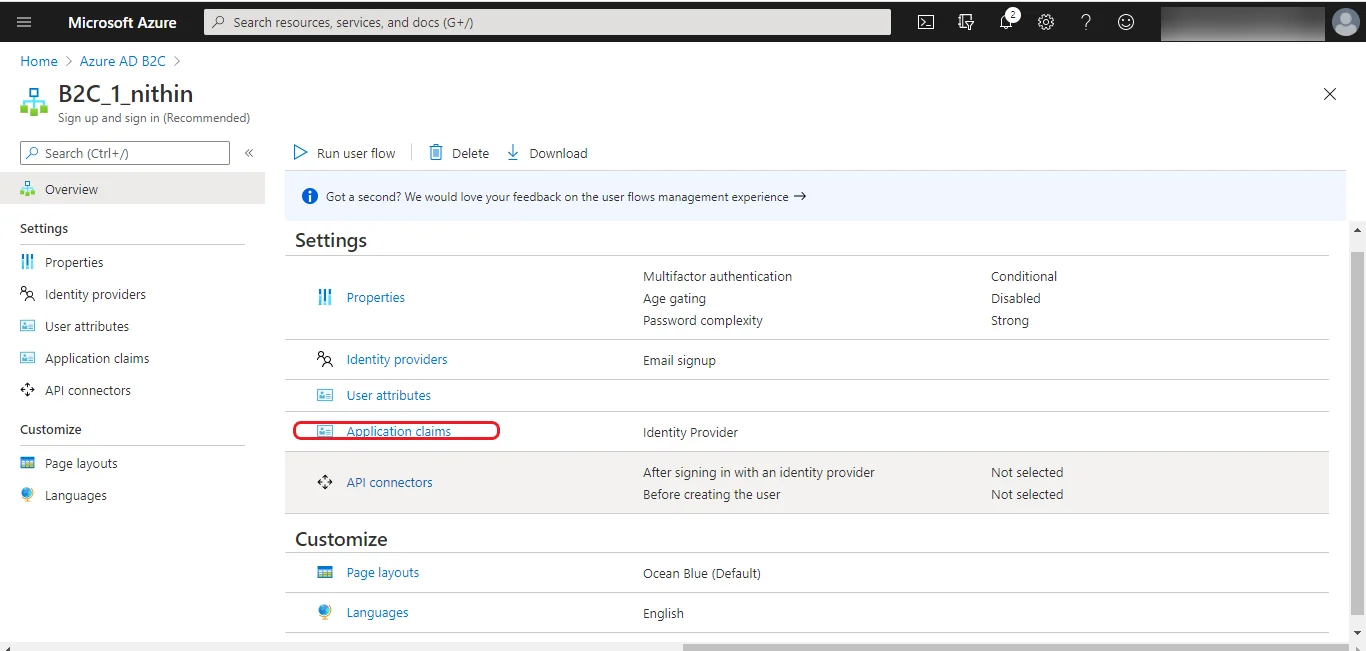
      • In the Settings section, select Application claims.
      • Azure B2C as IDP : Application Claim

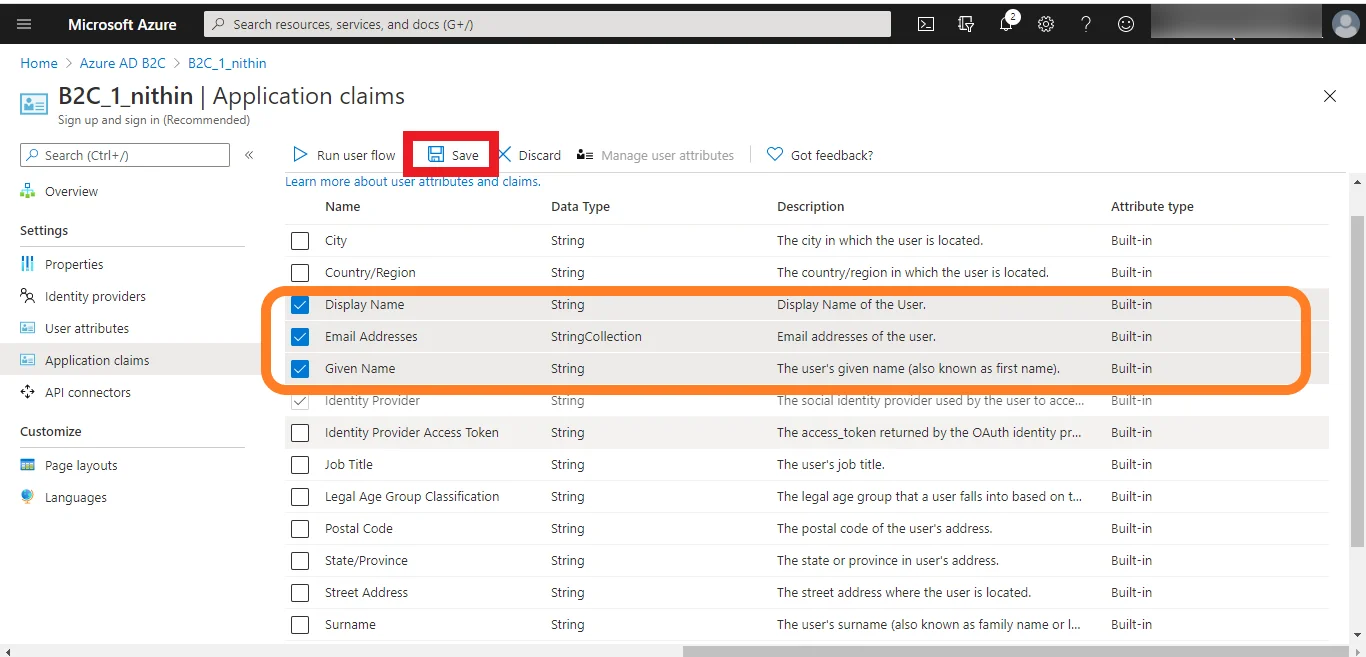
      • Select the desired attributes to be displayed on the test configuration and save it.
      • Azure B2C as IDP : Click on Save

      Step 1.4: Configure ID-Token Claims in Azure B2C [Premium]

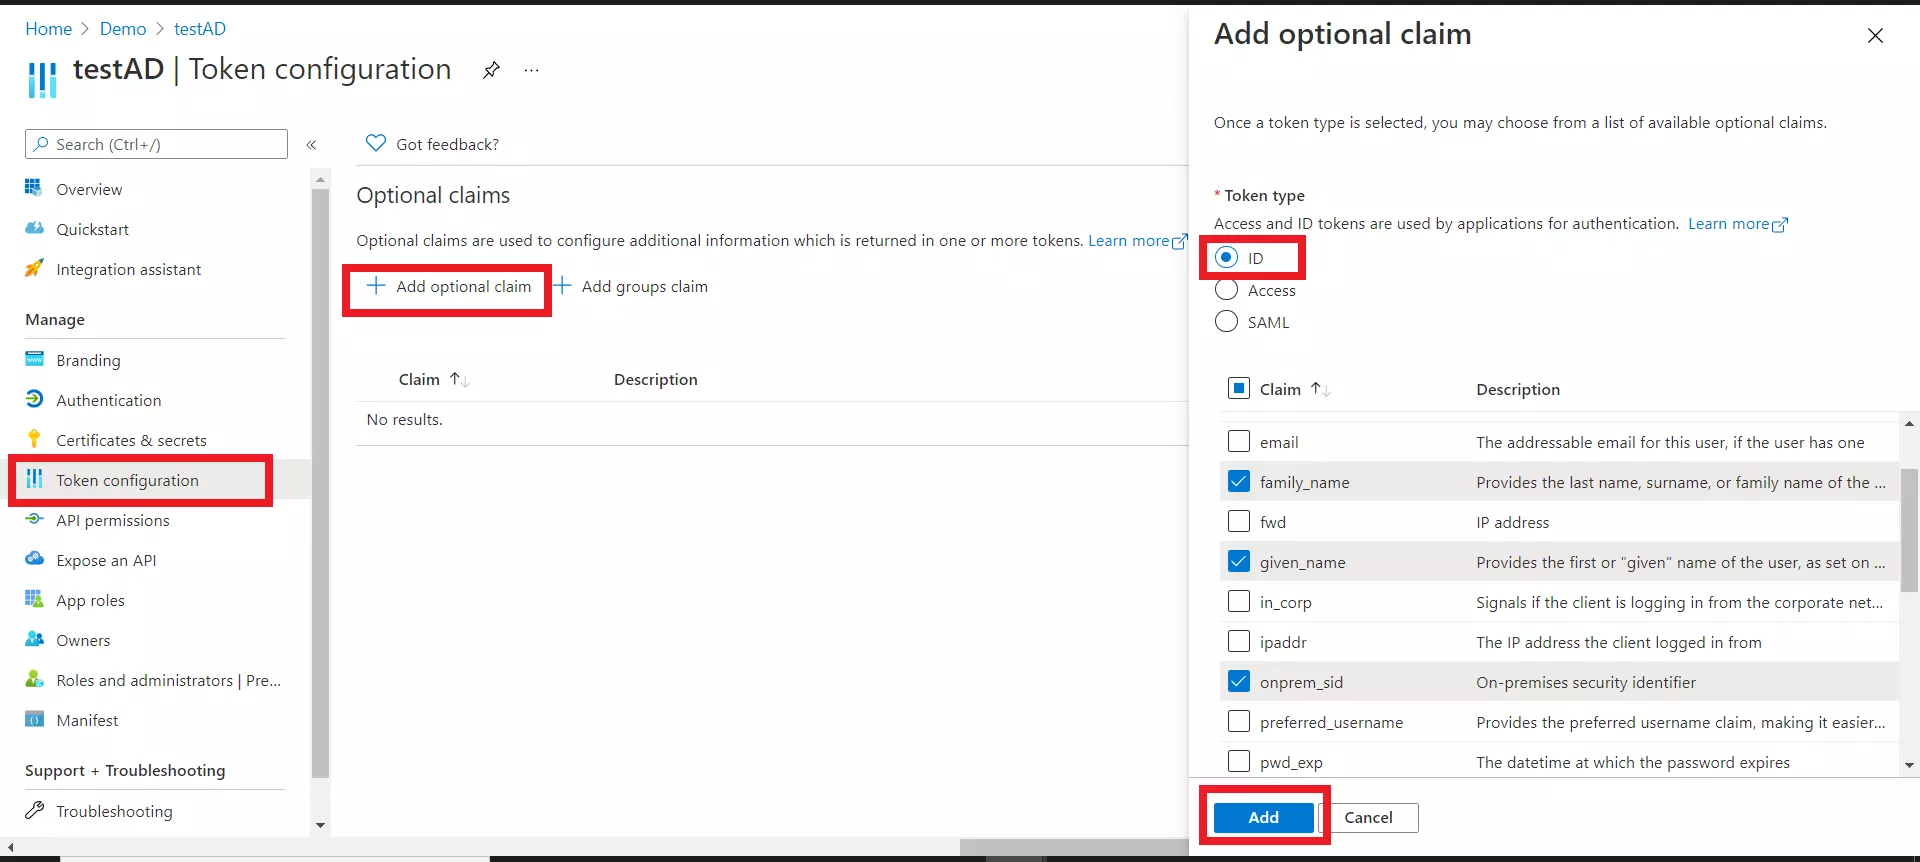
      • Open your application in Azure Active Directory and select Token configuration from the left menu.
      • Click on Add optional claim and select ID from the right section.
      • Now choose all the attributes you want to fetch during SSO (e.g family_name, given_name, etc) and click on Add button.
      • You might see a popup to Turn on the Microsoft Graph profile permission (required for claims to appear in token), enable it, and click on Add button.
      • Azure B2C as IDP : Map Custom Attributes


2. Configure Azure B2C as IDP in miniOrange


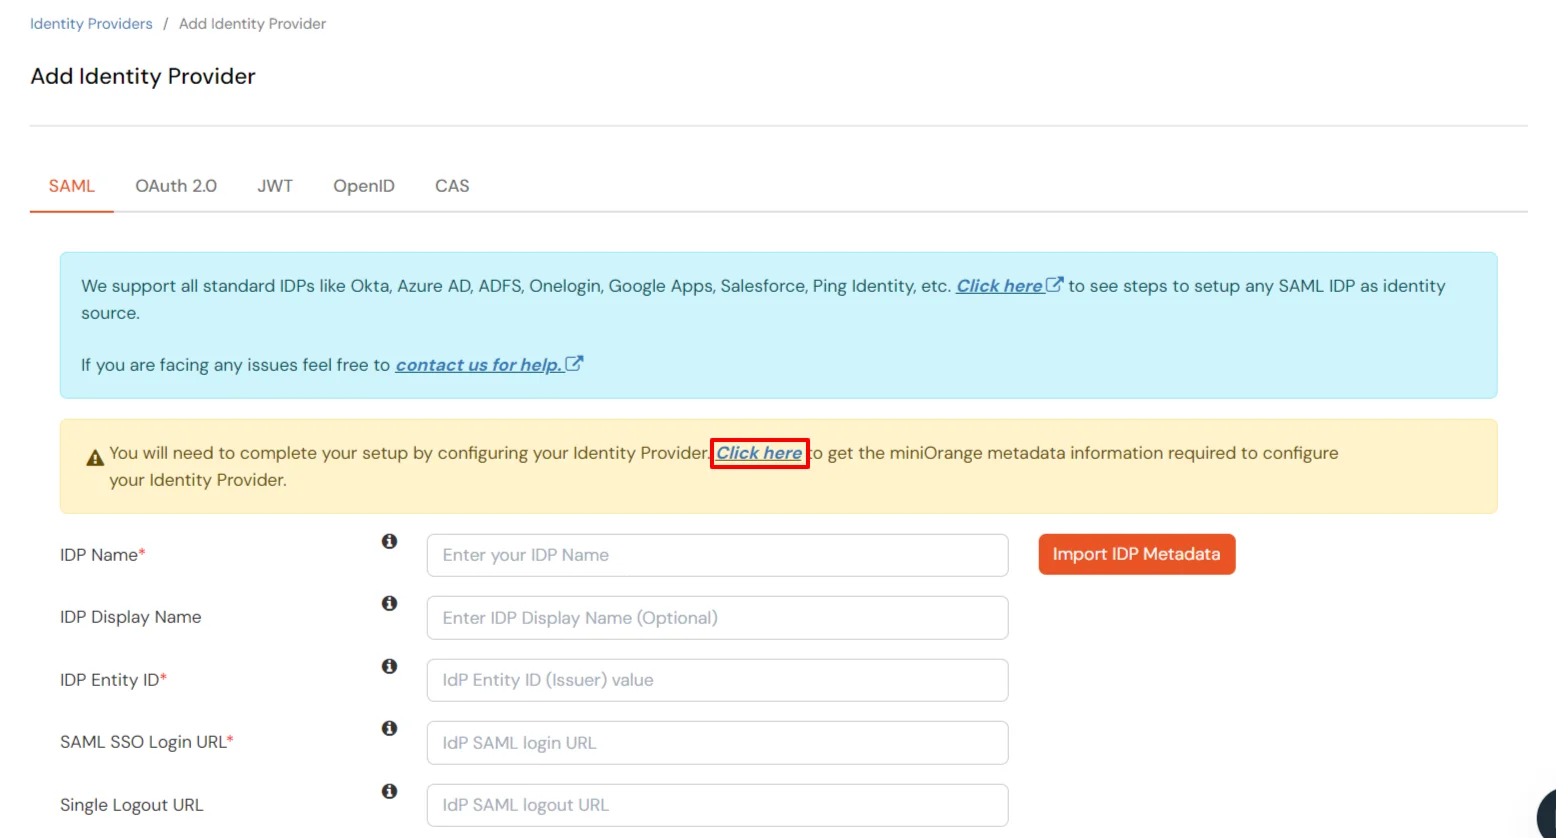
  • Go to miniOrange Admin console and navigate to Identity Providers in the left navigation menu. Then, click on the Add Identity Provider button.
  • Azure B2C as IDP: Navigate to Identity Provider and click Add Identity Provider

  • Now click on the Click here link to get miniOrange metadata as shown in Screen below.
  • Azure B2C as IDP: Click here link to get SP Metadata

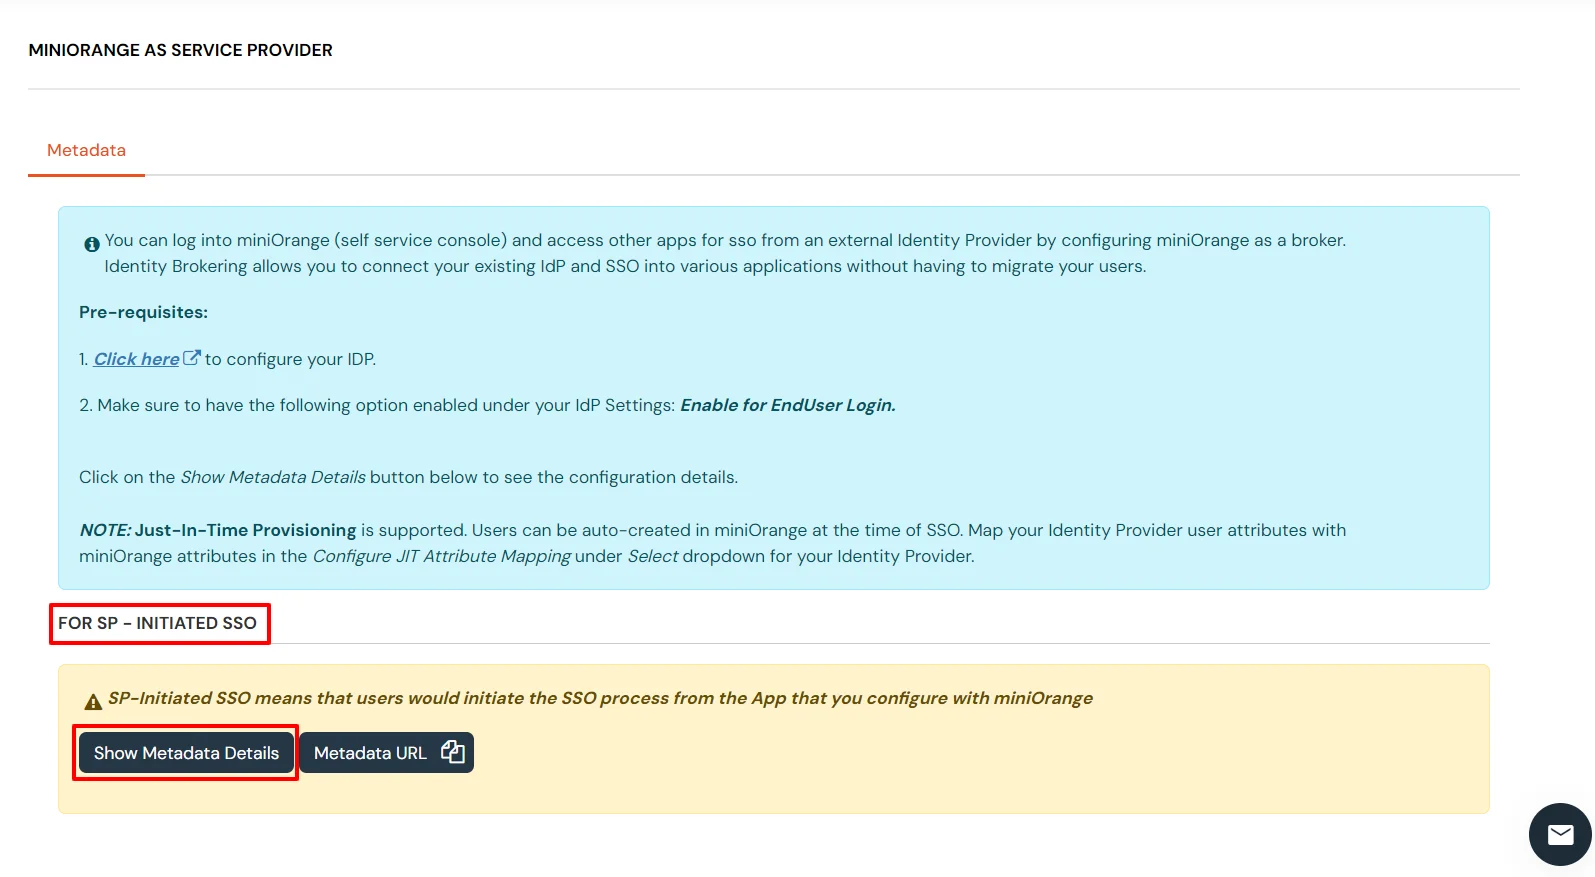
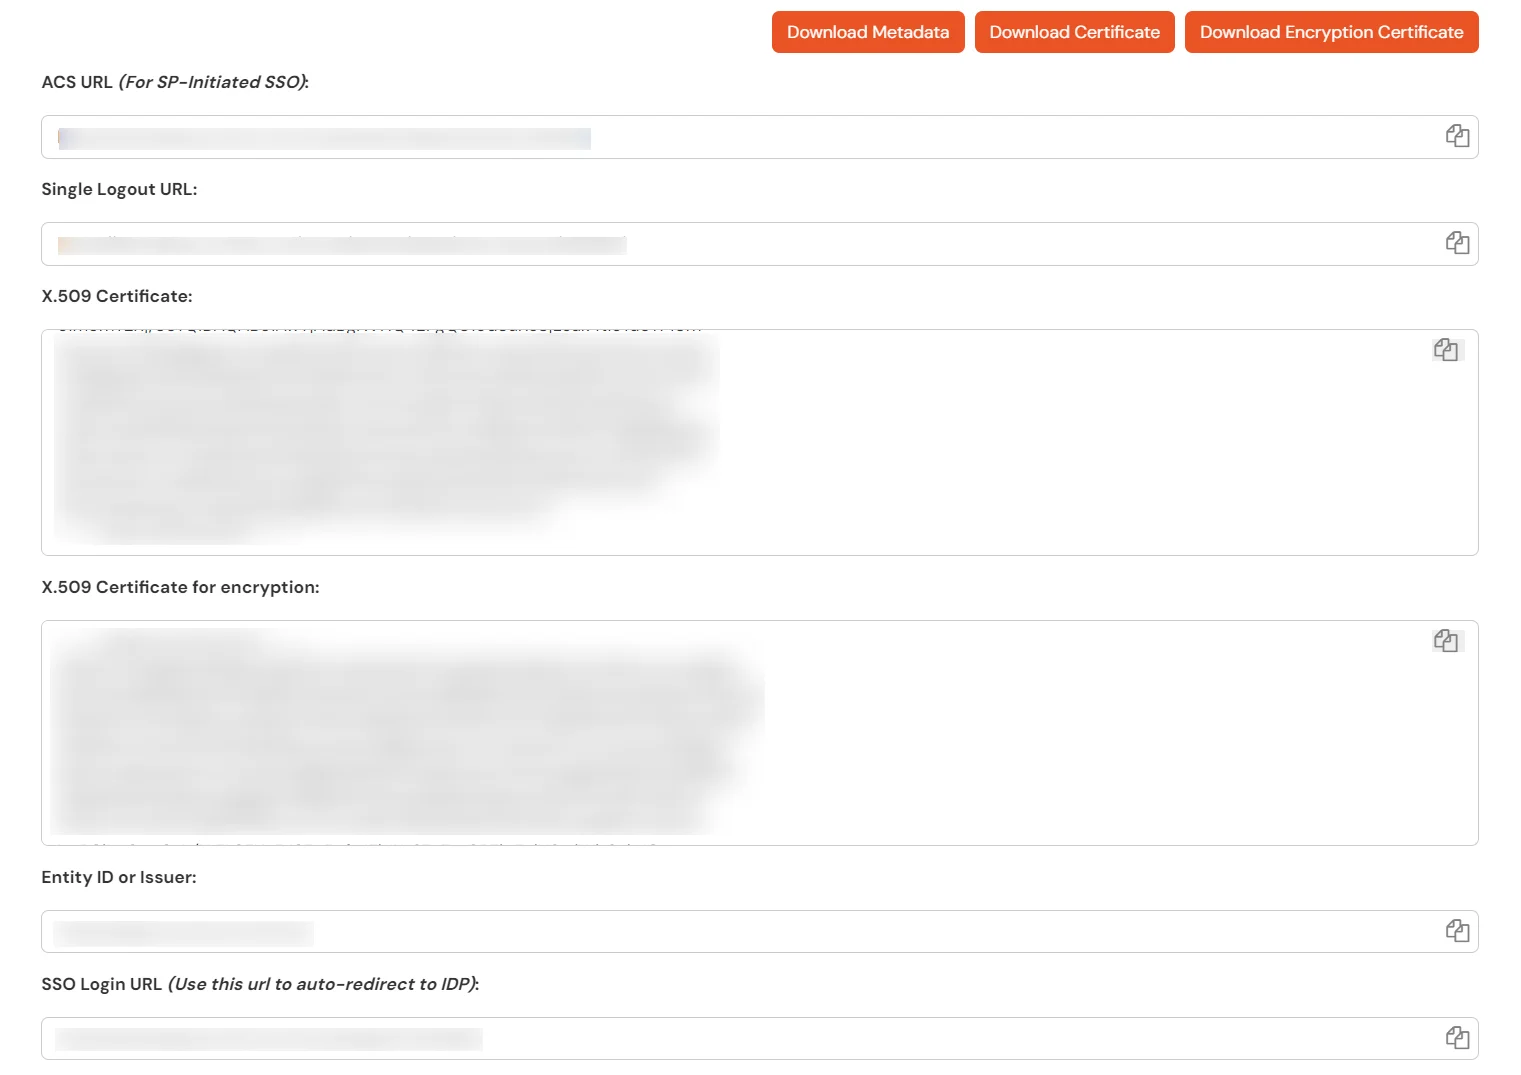
  • For SP - Initiated SSO section, select Show Metadata Details.
  • Azure B2C as IDP: For SP Initiated SSO - Click Show Metadata Details

    Azure B2C as IDP: SP Metadata Details

  • From the above section copy the ACS URL and Entity ID or Issuer and store them well will use it further configuration.
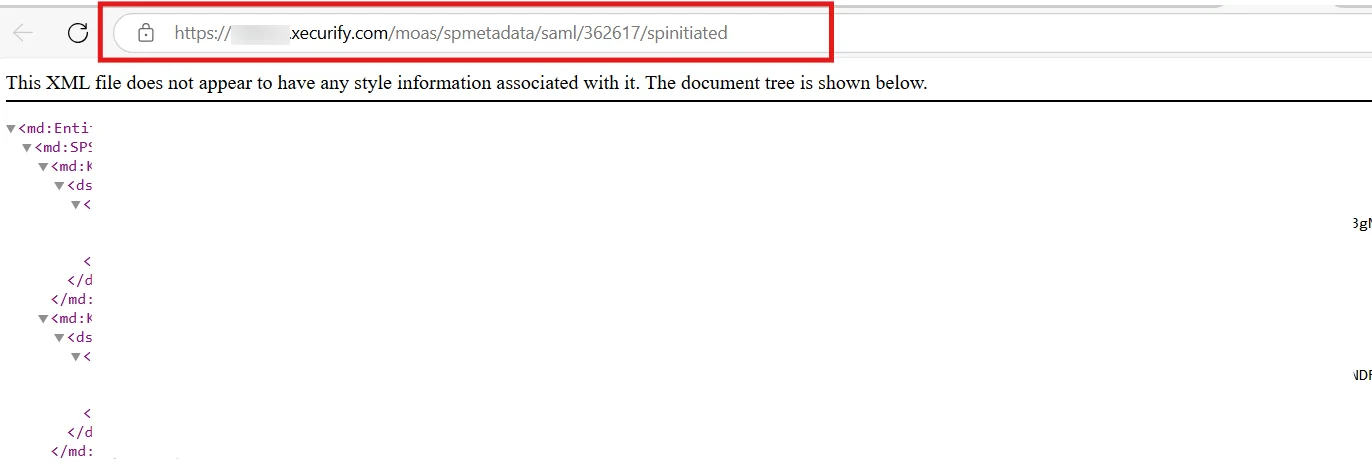
  • Now click on the Metadata URL.
  • Azure B2C as IDP: Click SP Metadata URL Button

  • A new tab will be open copy that URL of the newly open tab and store it for further.
  • Azure B2C as IDP: Copy SP Metadata URL

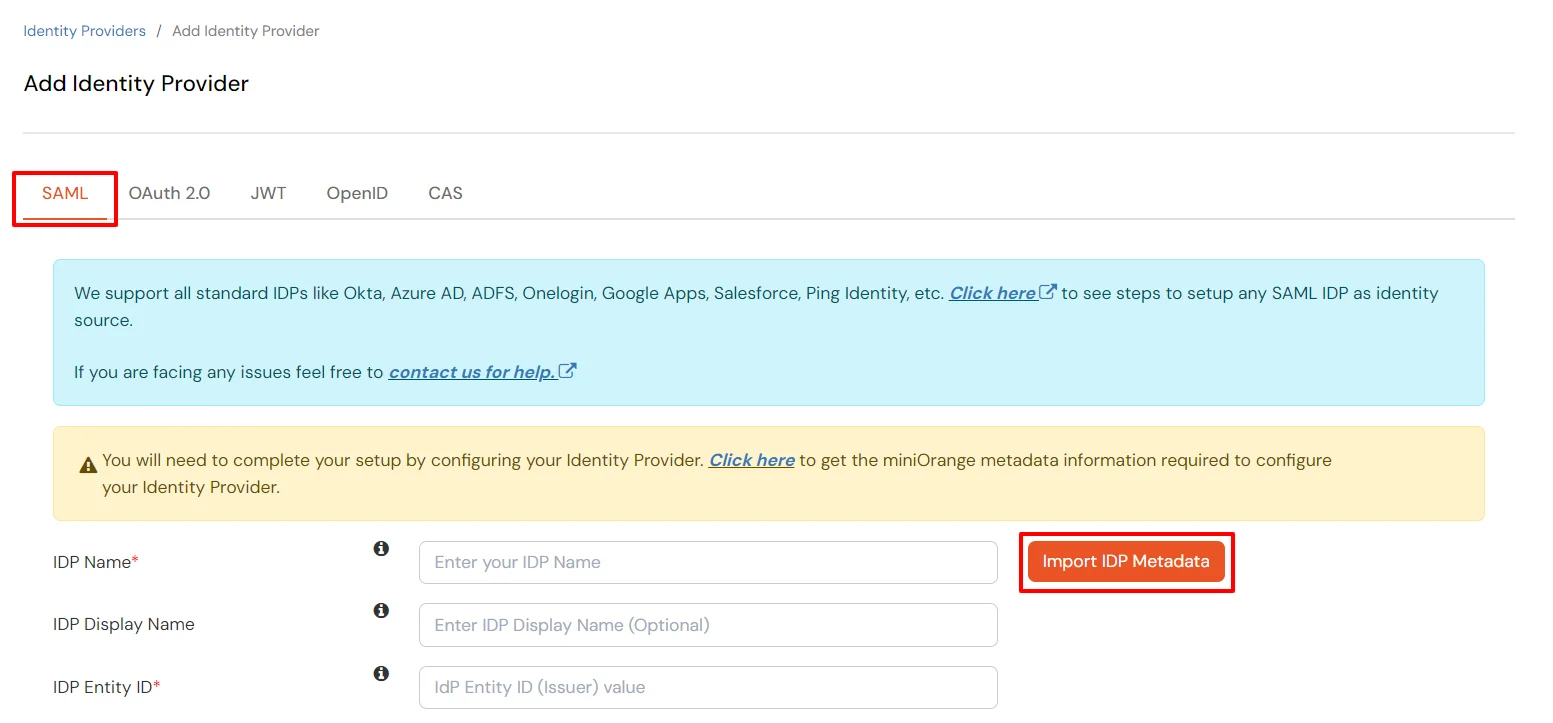
  • Now, go back to the SAML configuration page and click on the Import IDP metadata button.
  • Azure B2C as IDP: In SAML, click on Import IDP Metadata

  • Provide any IDP Name. For example, AzureB2C
  • Enter the Metadata URL as : https://<tenant-name>.b2clogin.com/<tenant-name>.onmicrosoft.com/B2C_1A_policy_Name/Samlp/metadata

    Note

    In this url section you have to replace the tenant-name with your tenant name and policy_Name with your actual policy name.

    For example your tenant name is MiniOrange and policy name is signup_signin_saml then your URL will be https://MiniOrange.b2clogin.com/MiniOrange.onmicrosoft.com/B2C_1A_signup_signin_saml/Samlp/metadata
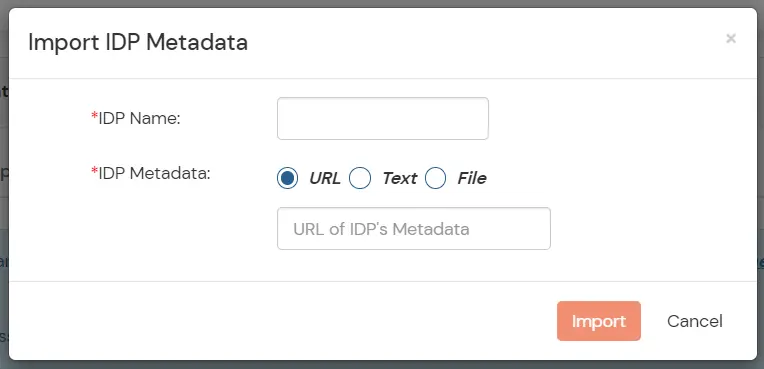
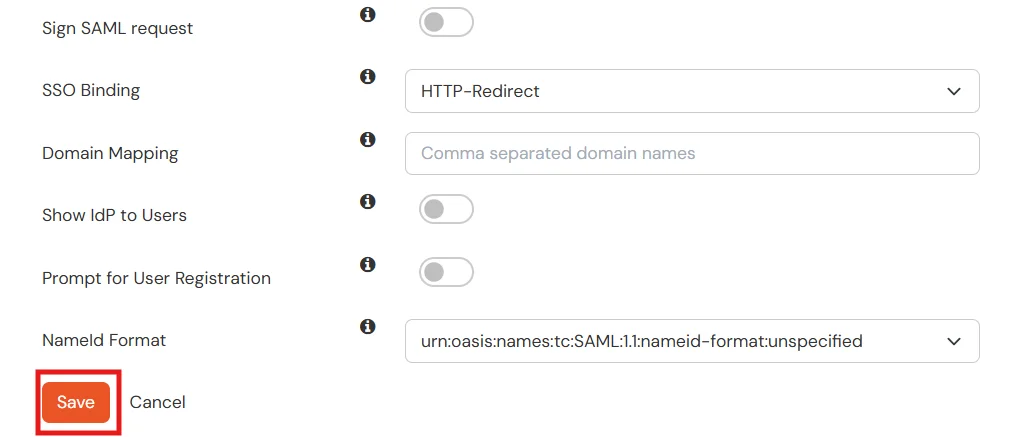
  • Then click on the Import button and the metadata of Azure B2C will be fetched on your side.
  • Azure B2C as IDP: Import IDP Metadata

  • And then click on the save button present on the bottom of the page.
  • Azure B2C as IDP: Click Save

Register the SAML Application in AZURE B2C

  • From the Azure AD B2C tenant, select App registrations, and then select New registration.
  • Azure B2C as IDP: Register SAML App

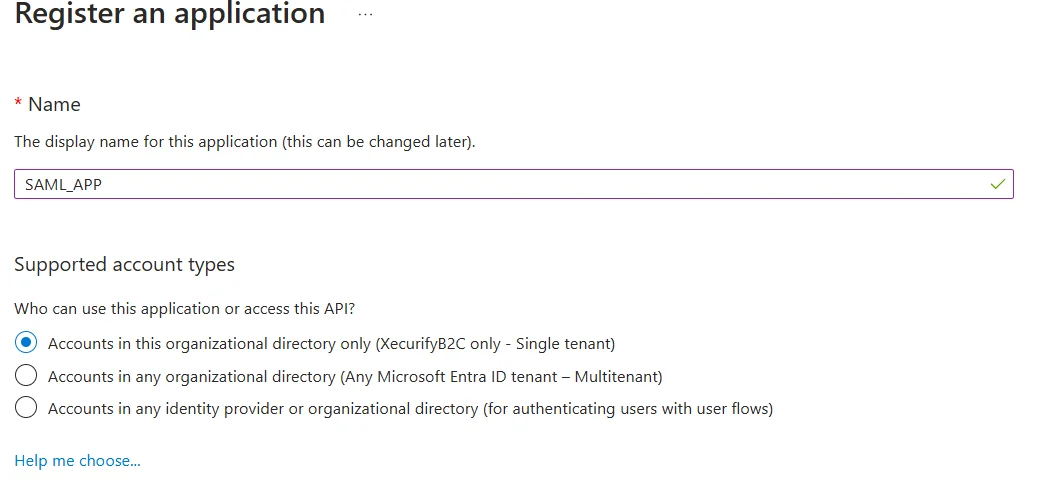
  • Enter a Name for the application Eg: SAML_APP.
  • Under Supported account types, select Accounts in this organizational directory only.
  • Azure B2C as IDP: Enter details

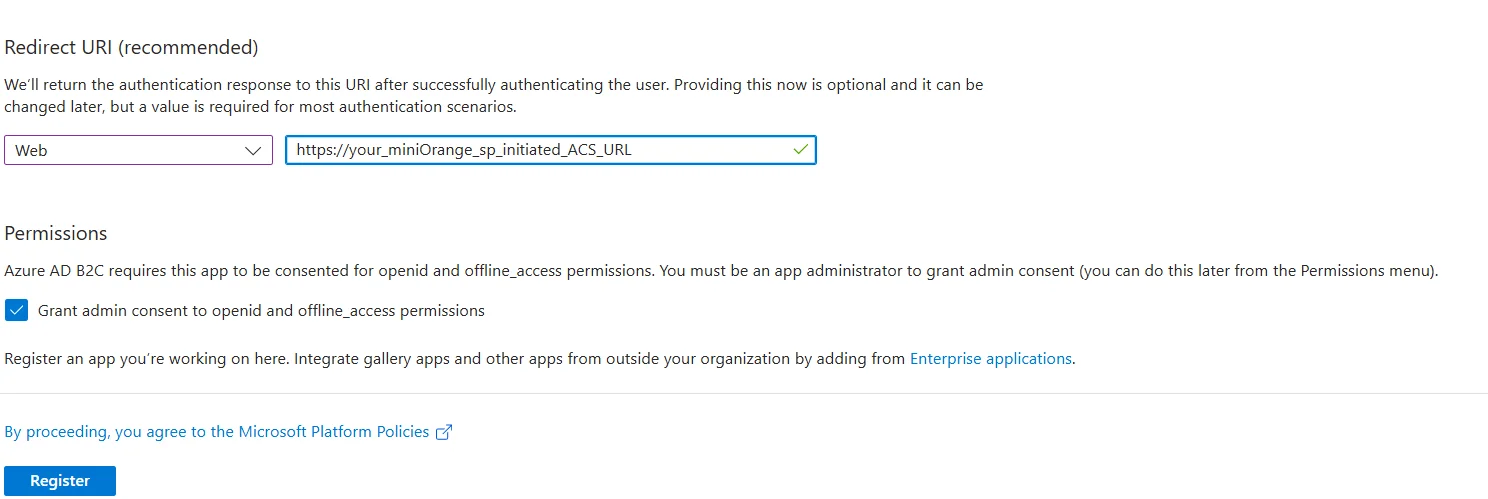
  • Under Redirect URI, select Web, and then enter the ACS URL of the IDP configured in the miniOrange which we copied in the earlier and checkout the Grant admin consent to openid and offline_access permissions. Select Register.
  • Azure B2C as IDP: Enter Redirect URI

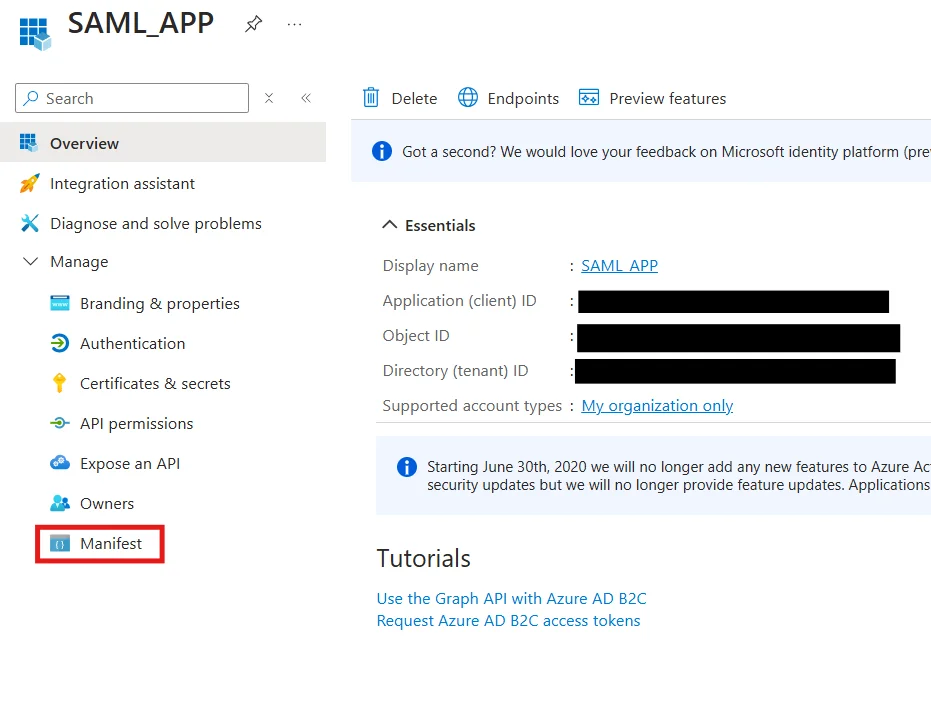
  • In the left panel and select the Manifest tab.
  • Azure B2C as IDP: Select Manifest

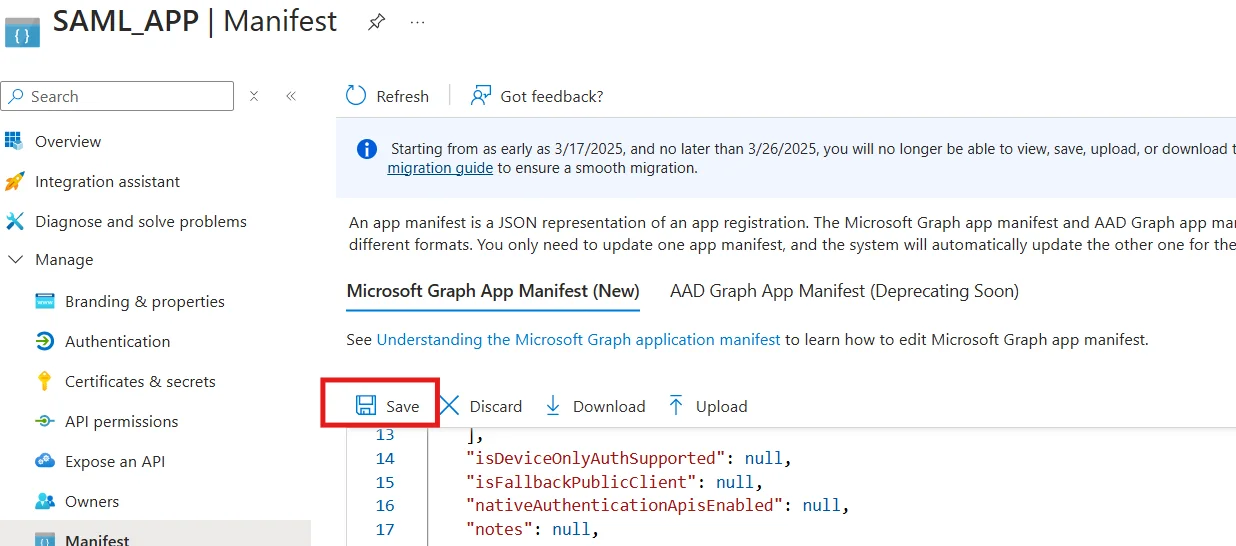
  • In the Microsoft Graph App Manifest (New) section make the following changes.
  • Azure B2C as IDP: In Microsoft Graph App Manifest (New)

  • Set the values in the table below according to your IDP configuration in miniOrange.
    identifierUris Place Your Entity ID or Issuer url
    requestedAccessTokenVersion 2
    samlMetadataUrl Place your For SP - Initiated SSO metadata URL here
  • Click on the save button to save the changes done in this section.
  • Azure B2C SSO : Click on Save

  • Now that the SAML configuration setup is complete, you can verify its correctness by accessing the miniOrange Admin Console.
  • Go to Application registrations -> Endpoints.
  • Azure B2C SSO : go to application registrations and click endpoints

  • Copy token and authorization endpoints.
  • Now, go to miniOrange Admin Console.
  • From the left navigation bar select Identity Providers -> click Add Identity Provider.
  • Azure B2C as IDP: Add Identity Provider

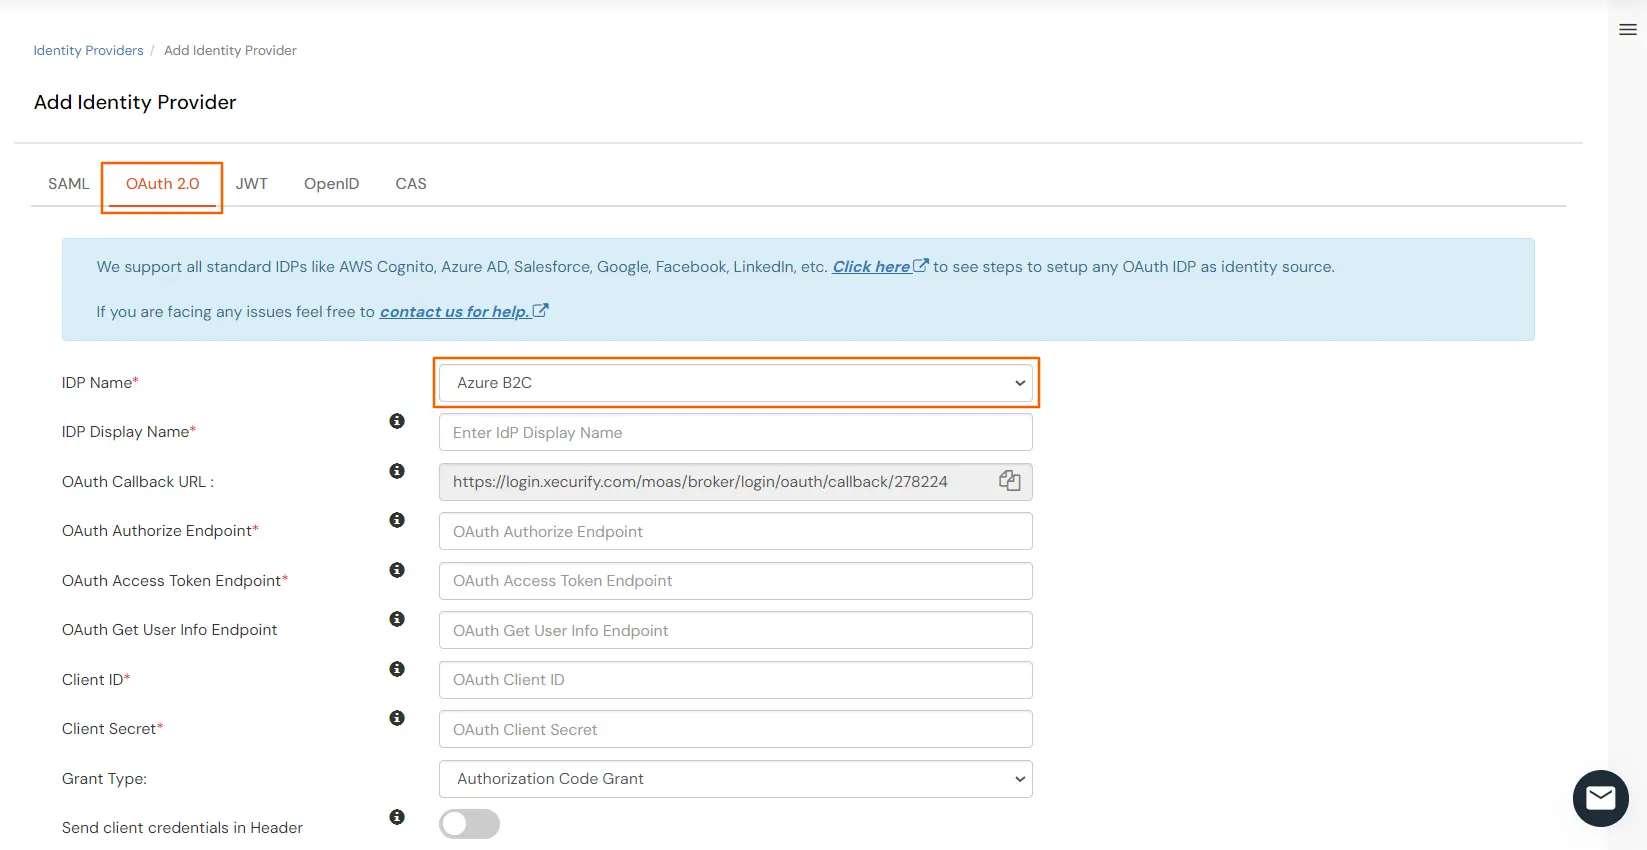
  • Select OAuth 2.0 and choose Azure B2C as IDP Name from the dropdown list.
  • Azure B2C SSO: Click on OAuth 2.0 and select Azure B2C

  • Enter the following values.
    IdP Display Name Choose appropriate Name
    OAuth Authorize Endpoint From step 2
    OAuth Access Token Endpoint From step 2
    Client ID From step 1
    Client secret From step 1
    Scope openid email profile

3. Test Connection

  • Visit your Login Page URL.
  • Go to Identity Providers tab.
  • Click on Select >> Test Connection option against the Identity Provider (IDP) you configured.
  • Azure B2C-IDP-TestConnection

    Azure B2C Single Sign-On (SSO) login

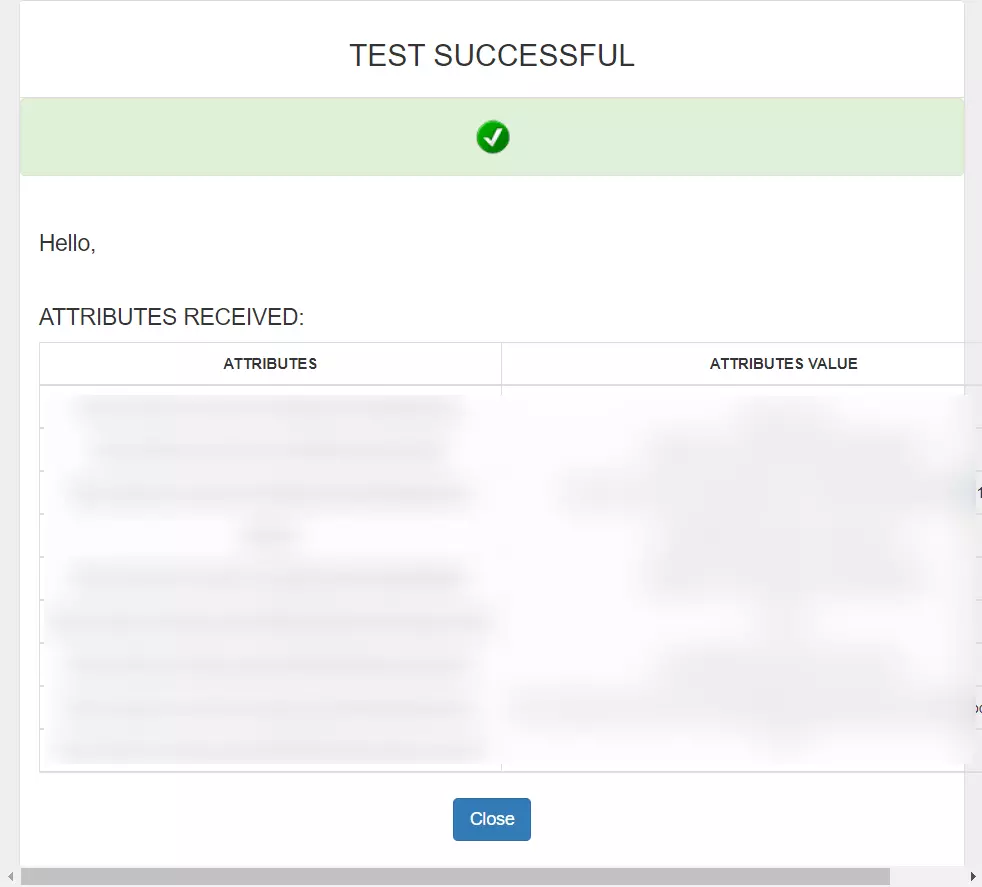
  • On entering valid Azure B2C credentials (credentials of user assigned to app created in Azure B2C), you will see a pop-up window which is shown in the below screen.
  • SucessTestConn-Azure B2C-IDP

  • Hence your configuration of Azure B2C as IDP in miniOrange is successfully completed.

Note:

You can follow this guide, if you want to configure SAML/WS-FED, OAuth/OIDC, JWT, Radius etc
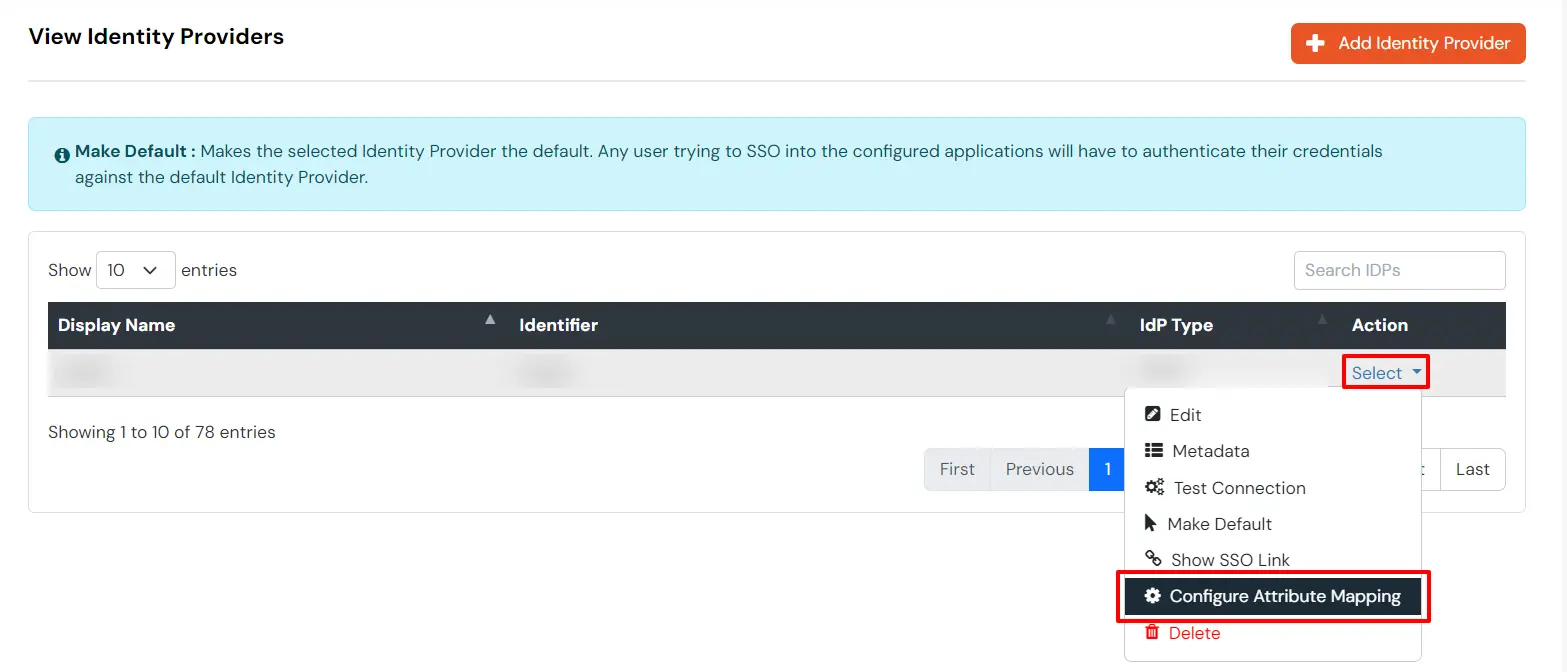

Configure Attribute Mapping

  • Go to Identity Providers >> View Identity Providers >> Your configured Azure B2C as IdP.
  • Now click on Select and then Configure Attribute Mapping of your application.
  • Azure B2C Single Sign-On SSO Select and Configure Attribute Mapping


Maps information, such as email and username, during Just-In-Time (JIT) user creation. Email and Username attributes are necessary to create the user profile.
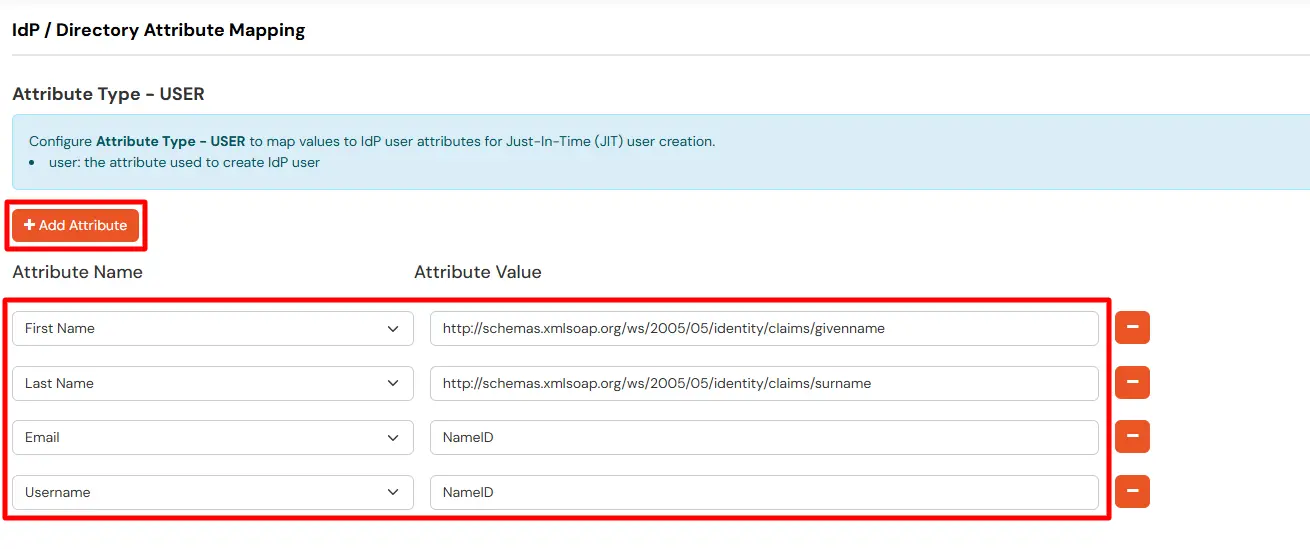
  • Click on the + Add Attribute button to add the attribute fields.
  • Azure B2C Single Sign-On SSO Map USER Attribute

  • Check the attributes in the Test Connection window from the previous step. Choose any attribute names you want to send to your application under Attribute Name sent to SP.
  • Enter the values of the attributes coming from IdP into the Attribute Name from IdP field on the Xecurify side.

EXTERNAL mappings help alter incoming attribute names before sending them to apps, ensuring that the data is in the correct format.
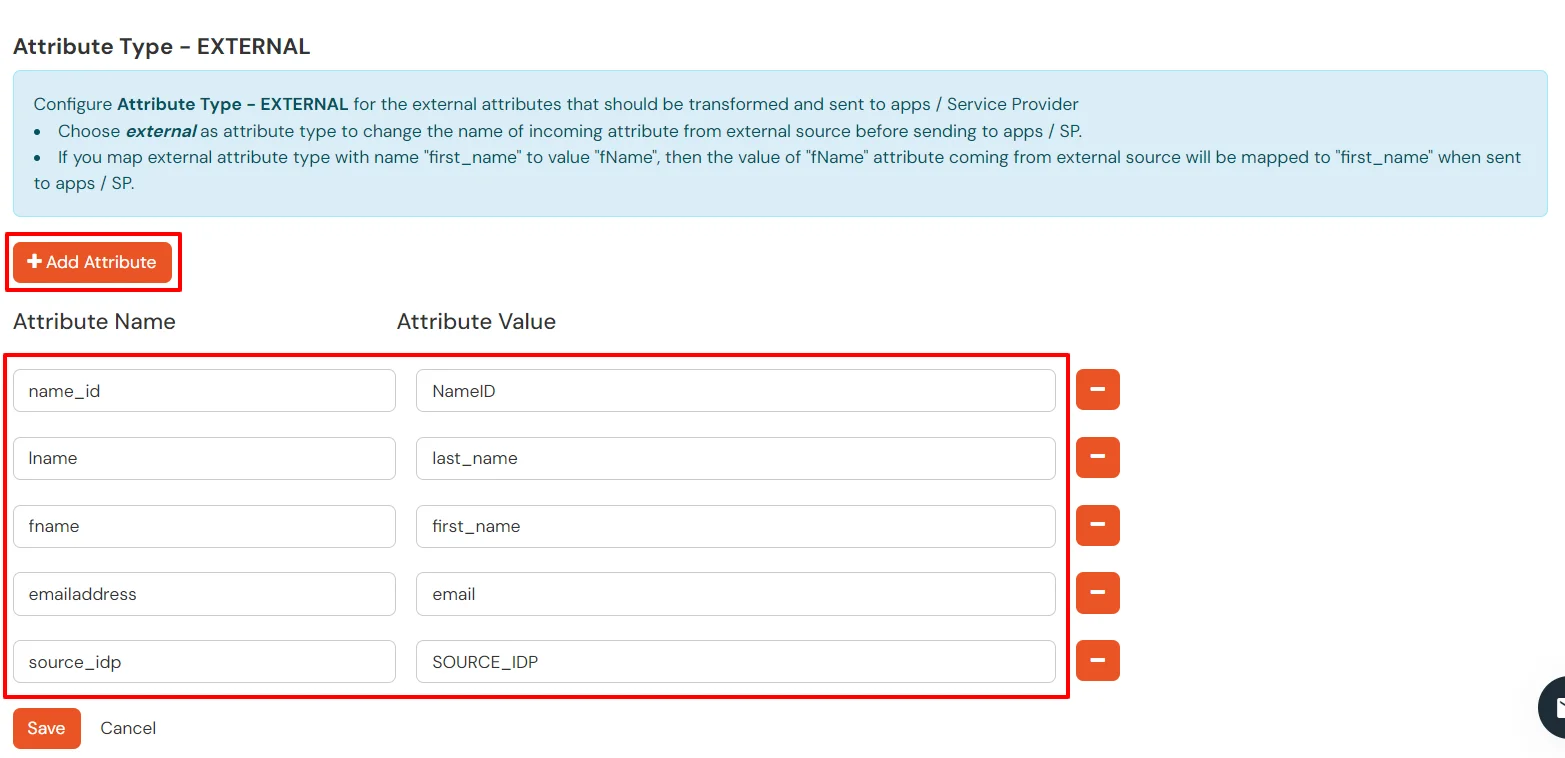
  • Click on the + Add Attribute button to add the attribute fields.
  • Azure B2C Single Sign-On SSO Map EXTERNAL Attribute

  • Check attributes in test connection window from last step. Enter the attribute names (any name) that you want to send to your application under Attribute Name sent to SP.
  • Enter the value of attributes that are coming from IdP into the Attribute Name from IdP field on the Xecurify side.

Configure Multiple IDPs:

You can follow this guide, if you want to configure multiple IDPs (Identity Providers) and give users the option to select the IDP of their choice to authenticate with.


External References


Want To Schedule A Demo?

Request a Demo


Our Other Identity & Access Management Products