Hello there!
Need Help? We are right here!

Need Help? We are right here!
Search Results:
×This guide explains how to upgrade the Apache Tomcat engine bundled with the miniOrange On-Premise Identity Provider / IAM installation from one 9.0.x release to another (for example 9.0.108 → 9.0.120), without losing application data, configuration, or customizations.
Ensure the following before starting the Tomcat upgrade:
| Requirement | Windows | Linux |
|---|---|---|
| Access | Administrator access (elevated Command Prompt) | Root or sudo access |
| Tomcat package | Apache Tomcat 9.0.x Windows zip from the official archive | Apache Tomcat 9.0.x tar.gz from the official archive |
| Maintenance window | Required — the Identity Provider service will restart and briefly deregister from Eureka | |
| Disk space | Enough free space for a full backup of the install directory | |
| Dependent services | Stop miniOrange Redis and RabbitMQ before backup (IAM version 4.9.3 or later) | |
| Additional | - | Correct file ownership after copying as root |
sc qc miniorange# 1) reg query "HKLM\SOFTWARE\Apache Software Foundation\Procrun 2.0\miniorange\Parameters\Java"
# 2) reg query "HKLM\SOFTWARE\WOW6432Node\Apache Software Foundation\Procrun 2.0\miniorange\Parameters\Java"reg query "HKLM\SOFTWARE" /f "miniorange" /s /kreg query "HKLM\SOFTWARE\WOW6432Node\Apache Software Foundation\Procrun 2.0\miniorange\Parameters\Log"net stop miniorangemkdir C:\Backupspowershell -Command "Compress-Archive -Path 'C:\Program Files\miniOrange Identity Provider' -DestinationPath 'C:\Backups\moas_backup.zip'"reg export "HKLM\SOFTWARE\WOW6432Node\Apache Software Foundation\Procrun 2.0\miniorange" "C:\Backups\service_config.reg" /yWarning:
Stop all the services before backing up, including miniOrange Redis and RabbitMQ (required for IAM version 4.9.3 or later).
Start from a clean extraction of the new Tomcat and bring your application into it. This guarantees every new engine file is present:
copy "C:\Program Files\miniOrange Identity Provider\bin\tomcat9.exe" "C:\Program Files\miniOrange Identity Provider\bin\miniOrange.exe" /YNote:
Keeping the final path identical: The registry stores the install path as literal text (catalina.home / catalina.base). If the final directory name and path match the original exactly, no registry path edits are needed — the service simply launches the new engine from the same location.
"<Old_InstallDir>\bin\miniorange.exe" //DS//miniorangesc query miniorange"C:\Program Files\miniOrange Identity Provider\bin\miniorange.exe" //IS//miniorange ^
--DisplayName="miniOrange Identity Provider" ^
--Description="Identity Provider Authentication Server" ^
--Install="C:\Program Files\miniOrange Identity Provider\bin\miniorange.exe" ^
--Jvm="<path-to-jvm.dll>" ^
--Classpath="C:\Program Files\miniOrange Identity Provider\bin\bootstrap.jar;C:\Program Files\miniOrange Identity Provider\bin\tomcat-juli.jar" ^
--StartMode=jvm --StartClass=org.apache.catalina.startup.Bootstrap --StartParams=start ^
--StartPath="C:\Program Files\miniOrange Identity Provider" ^
--StopMode=jvm --StopClass=org.apache.catalina.startup.Bootstrap --StopParams=stop ^
--StopPath="C:\Program Files\miniOrange Identity Provider" ^
--JvmOptions="-Dcatalina.home=C:\Program Files\miniOrange Identity Provider;-Dcatalina.base=C:\Program Files\miniOrange Identity Provider;-Djava.io.tmpdir=C:\Program Files\miniOrange Identity Provider\temp;-Djava.util.logging.manager=org.apache.juli.ClassLoaderLogManager;-Djava.util.logging.config.file=C:\Program Files\miniOrange Identity Provider\conf\logging.properties;-Dspring.profiles.active=redis" ^
++JvmOptions9="--add-opens=java.base/java.lang=ALL-UNNAMED;--add-opens=java.base/java.io=ALL-UNNAMED;--add-opens=java.rmi/sun.rmi.transport=ALL-UNNAMED" ^
--JvmMs=256 --JvmMx=1024 ^
--LogPath="C:\Program Files\miniOrange Identity Provider\logs" --LogPrefix=commons-daemon ^
--StdOutput=auto --StdError=auto ^
--Startup=autosc config miniorange obj= "NT AUTHORITY\LocalService" password= ""Note:
A warning such as Failed to grant service user write permissions to log path … during install is harmless - it concerns procrun's own diagnostic log location, not Tomcat or the application.
Navigate to Windows Services and start all the services. List all miniOrange services and start any that should be running:
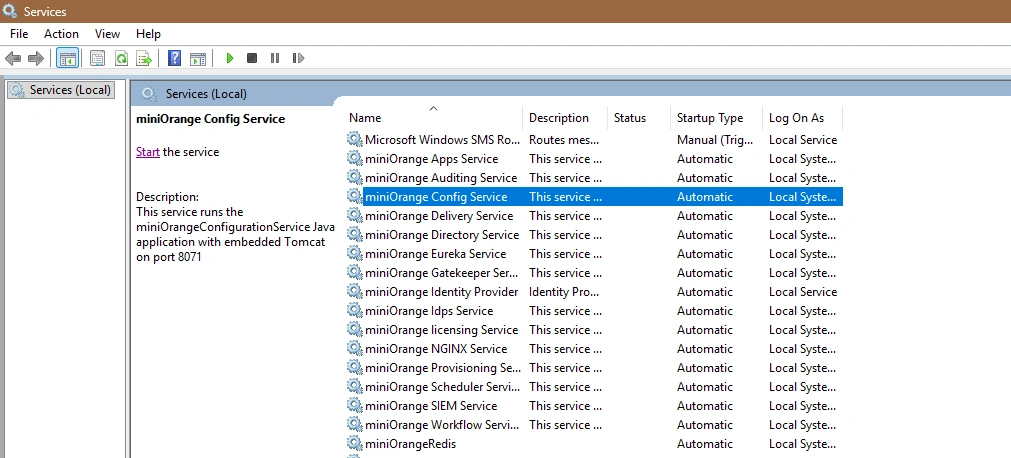
powershell -Command "Get-Service | Where-Object {$_.DisplayName -like '*miniOrange*'} | Format-Table Name, Status, StartType -AutoSize"findstr /i "Server version name" "C:\Program Files\miniOrange Identity Provider\logs\catalina.<date>.log"On Linux, miniOrange typically runs Tomcat under systemd. The service configuration lives in the unit file and, often, in bin/setenv.sh.
Note:
Confirm the install path, the symlink target, the running Tomcat, and the service configuration:
ls -la /opt/tomcat/readlink -f /opt/tomcat/latestps -ef | grep -i catalina | grep -v grepsystemctl cat mo-idp-miniorange.servicecat /etc/mo-idp-server.envConfirm the Tomcat unit uses ${MO_IDP_FOLDER} (pointing at the symlink) and that other services launch their JARs from ${MO_IDP_FOLDER}/services/*.jar - this is why re-pointing the symlink upgrades the whole stack at once.
sudo tar -czf /opt/mo-idp-backup-<ver>-$(date +%Y%m%d).tar.gz \
-C /opt/tomcat --exclude='mo-idp-server-<ver>/services/logs' mo-idp-server-<ver>ls -lh /opt/mo-idp-backup-<ver>-*.tar.gzsudo tar -tzf /opt/mo-idp-backup-<ver>-*.tar.gz > /dev/null && echo 'Archive OK'Note: Excluding services/logs keeps the backup small (logs are disposable). Drop the --exclude for a full archive.
cd /opt/tomcatsudo wget https://archive.apache.org/dist/tomcat/tomcat-9/v<NewTomcatVer>/bin/apache-tomcat-<NewTomcatVer>.tar.gzsudo tar -xzf apache-tomcat-<NewTomcatVer>.tar.gzls -la /opt/tomcat/apache-tomcat-<NewTomcatVer>/Use cp -a (copy, not move) so the old folder stays intact for instant rollback.
sudo cp -a /opt/tomcat/latest/conf/. /opt/tomcat/apache-tomcat-<NewTomcatVer>/conf/sudo grep -i moas /opt/tomcat/apache-tomcat-<NewTomcatVer>/conf/server.xml # confirm Context copied# 1) sudo cp -a /opt/tomcat/latest/moas /opt/tomcat/apache-tomcat-<NewTomcatVer>/moas
# 2) sudo cp -a /opt/tomcat/latest/license.txt /opt/tomcat/apache-tomcat-<NewTomcatVer>/license.txt
# 3) optional: carry historical logs / temp / work (or let them regenerate)
sudo rm -rf /opt/tomcat/apache-tomcat-<NewTomcatVer>/logs /opt/tomcat/apache-tomcat-<NewTomcatVer>/temp /opt/tomcat/apache-tomcat-<NewTomcatVer>/work
# 4) sudo cp -a /opt/tomcat/latest/logs /opt/tomcat/apache-tomcat-<NewTomcatVer>/logs
# 5) sudo cp -a /opt/tomcat/latest/temp /opt/tomcat/apache-tomcat-<NewTomcatVer>/temp
# 6) sudo cp -a /opt/tomcat/latest/work /opt/tomcat/apache-tomcat-<NewTomcatVer>/work# 1) sudo mkdir -p /opt/tomcat/apache-tomcat-<NewTomcatVer>/services
# 2) sudo rsync -a --exclude 'logs' \
/opt/tomcat/latest/services/ /opt/tomcat/apache-tomcat-<NewTomcatVer>/services/
# 3) sudo mkdir -p /opt/tomcat/apache-tomcat-<NewTomcatVer>/services/logs# 1) sudo chown -R root:root /opt/tomcat/apache-tomcat-<NewTomcatVer>
# 2) verify — JAR count auto-counts, so it matches whatever the mesh contains
sudo find /opt/tomcat/apache-tomcat-<NewTomcatVer>/services/ -maxdepth 1 -name '*.jar' | wc -l
# 3) sudo ls /opt/tomcat/apache-tomcat-<NewTomcatVer>/services/ | grep -E 'config|certs'
# 4) sudo ls /opt/tomcat/apache-tomcat-<NewTomcatVer>/ # bin conf lib logs moas services temp webapps work
# 5) sudo ls -la /opt/tomcat/apache-tomcat-<NewTomcatVer>/bin/catalina.sh # must exist and be executable
# 6) df -h /opt# 1)MO_SERVICES=$(systemctl list-units 'mo-idp-*.service' --all --no-legend | awk '{print $1}')
# 2) sudo systemctl stop $MO_SERVICES
# 3) sudo systemctl stop nginx.service rabbitmq-server.service redis-server.service
# 4) systemctl list-units --type=service | grep -iE 'orange|redis|rabbit|nginx' # confirm all stoppedsudo ln -sfn /opt/tomcat/apache-tomcat-<NewTomcatVer> /opt/tomcat/latest
readlink -f /opt/tomcat/latest # must show the new versioned folder# 1) infrastructure
sudo systemctl start redis-server.service rabbitmq-server.service nginx.service
sudo ss -tlnp | grep -E ':6379|:5672|:80' # confirm listening
# 2) registry + config first
sudo systemctl start mo-idp-eurekaserver.service mo-idp-configserver.service
sleep 25
# 3) all remaining mo-idp services, discovered by pattern
sudo systemctl start $(systemctl list-unit-files 'mo-idp-*.service' --no-legend | awk '{print $1}')# 1) systemctl list-units --type=service | grep -iE 'orange|redis|rabbit|nginx'
# 2) sudo /opt/tomcat/latest/bin/version.sh | grep 'Server version'
# 3) sudo tail -30 /opt/tomcat/latest/logs/catalina.$(date +%Y-%m-%d).log
# 4) curl -I -k https://<miniorange_URL> 2>&1 | head -5Note:
Where to check the version: The version banner appears via bin/version.sh and in logs/catalina.<date>.log written by Tomcat itself. It does not appear in the application's own log (catalina-moas.out).
# 1) sudo systemctl stop $(systemctl list-units 'mo-idp-*.service' --all --no-legend | awk '{print $1}')

# 2) sudo ln -sfn /opt/tomcat/mo-idp-server-<ver> /opt/tomcat/latest

# 3) sudo systemctl start mo-idp-eurekaserver.service mo-idp-configserver.service && sleep 25 && \

# 4) sudo systemctl start $(systemctl list-unit-files 'mo-idp-*.service' --no-legend | awk '{print $1}')sudo rm -rf /opt/tomcat/mo-idp-server-<ver> # old folder
sudo rm -f /opt/tomcat/apache-tomcat-<NewTomcatVer>.tar.gz # downloaded tarball
# keep /opt/mo-idp-backup-<ver>-*.tar.gz a while longer