Hello there!

Need Help? We are right here!

Support Icon
miniOrange Email Support
success

Thanks for your Enquiry. Our team will soon reach out to you.

If you don't hear from us within 24 hours, please feel free to send a follow-up email to info@xecurify.com

Search Results:

×

Steps to Setup On-Premise IDP


The miniOrange identity provider (IdP) is a service that stores and verifies user identity. IdPs are typically cloud-hosted services, and they often work with single sign-on (SSO) providers to authenticate users.The purpose of this guide is to get you up and run as quickly as possible so that you can play with and test-drive various features that miniOrange has. It is a standalone application with default database and packaged tomcat and does not cover any complex deployment options. We support both windows and linux os for installation.

This short tutorial walks you through starting up the server in standalone mode, setting up the initial admin account, and logging into the miniOrange admin dashboard.


System Requirements

miniOrange On-Premise server has the following system requirements. This section lists recommended versions and requirements.

  • Operating System: Any operating system that runs minimum Java 8
  • CPU Core: 4 Core
  • RAM: 4GB or above
  • HDD: 20GB or above
  • JAVA Environment: jdk1.8.0_381 and above
  • Server Access Policies: Port 80 (HTTP Port) Port 1812, 1813 (Radius UDP Port), RDP Port(Windows Server)- For login, SSH Port(Linux Server)- For login
  • Database: Find the list of all supported versions here.

Install On-Premise Server

You can download miniOrange On-Premise server from here

Follow the steps to deploy miniOrange On-Premise server on your operating system:


  • Run the downloaded installer (exe) file.
  • Note:

    You can verify the integrity of the installer using the SHA256 checksum. To verify the checksum, please follow the below steps:

    • Run the below command from command prompt in the directory where the exe file is.
      CertUtil -hashfile mo-idp-server-4.1.0-installer.exe SHA256
    • Compare the hash generated to the checksum below.
      64FCB390BB85A8583FA9373225C85F558324383B4CB704F13F83657667946488

    On-Premise IDP Server Windows Install

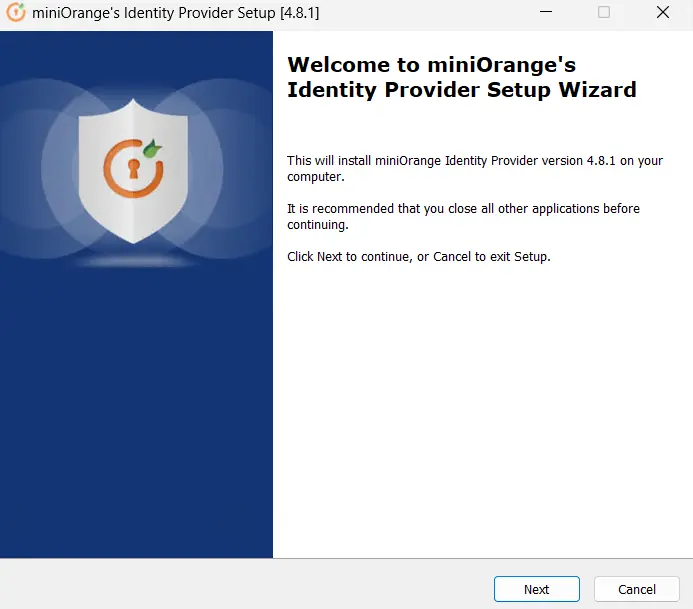
  • You will be presented with a Welcome Screen simply click the Next button to proceed with the installation.
  • On-Premise IDP Server Windows Next Wizard

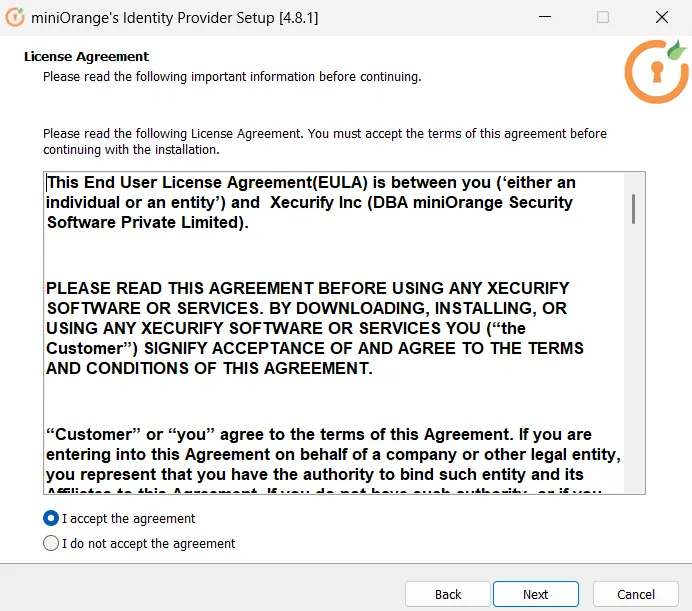
  • Select the checkbox I accept the agreement after reading the License Agreement carefully and then click the Next button.
  • On-Premise IDP Server Windows Accept Policy

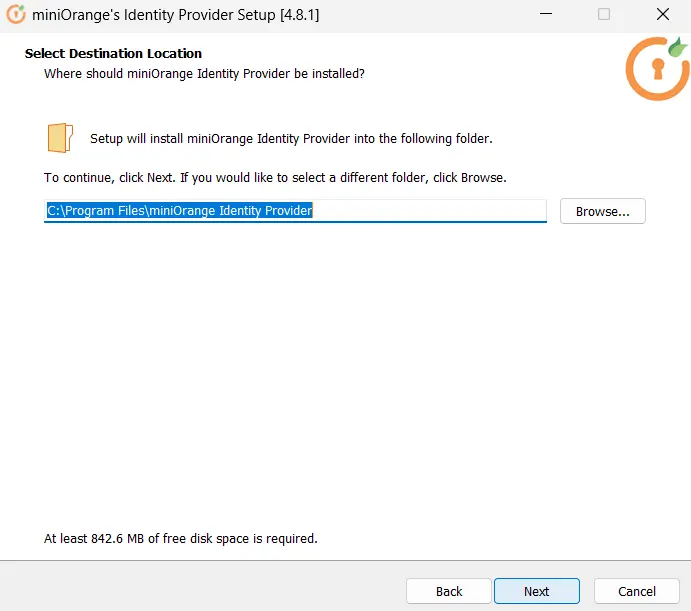
  • Now Choose the Destination Location for the miniorange identity provider installation. If you prefer to continue with the Default Location, simply click the Next Button.
  • On-Premise IDP Server Windows Next

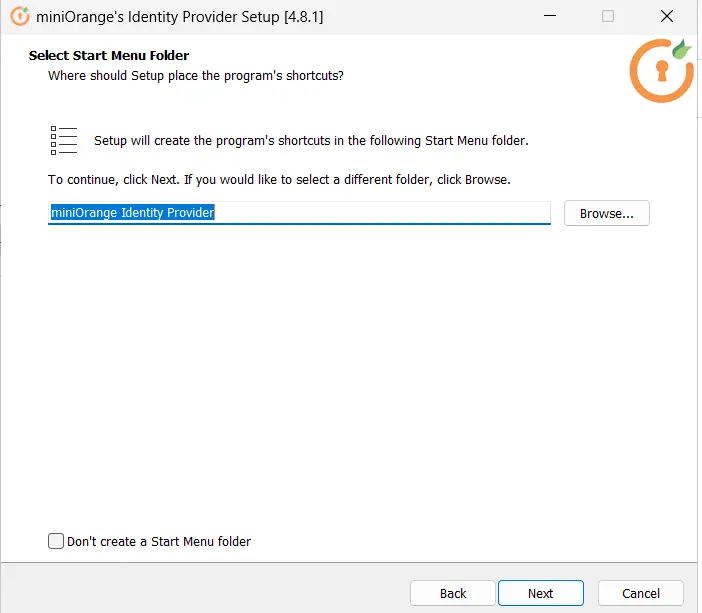
  • Choose the location of your Start Menu Folder. If you wish to return to the default location, simply click the next button.
  • On-Premise IDP Server Windows Installer Path

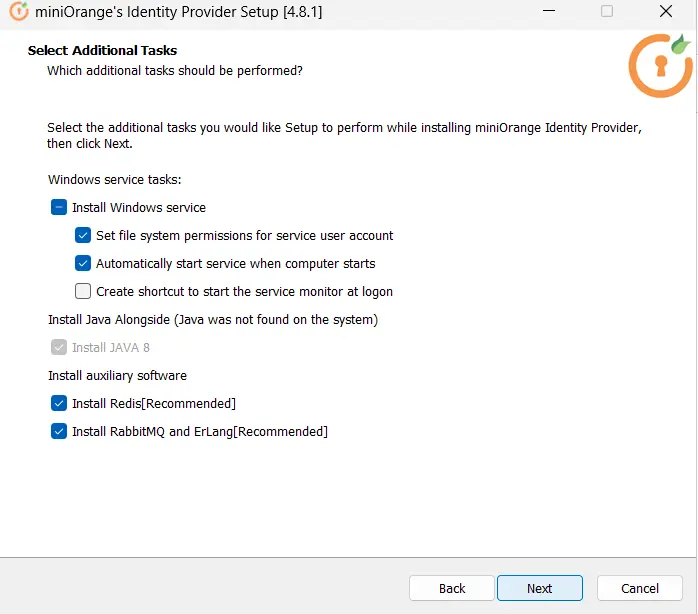
  • You will then be greeted with the Select Additional Tasks screen, where you may choose to install the Windows service. For windows service Java must be installed on your computer. If it isn't already installed, it will be installed with the Windows service.
  • On-Premise IDP Server Windows additional task

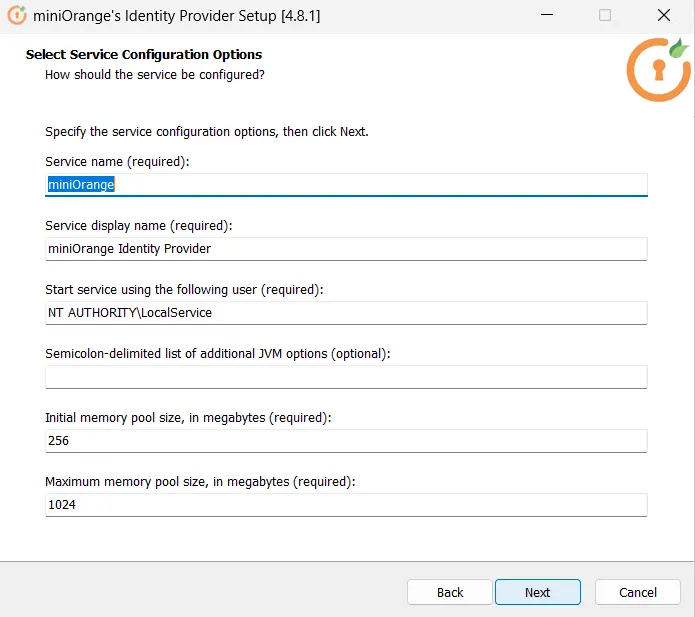
  • Select the configuration choices on the Select Service Configuration Options Page, then click next
  • On-Premise IDP Server Windows Service

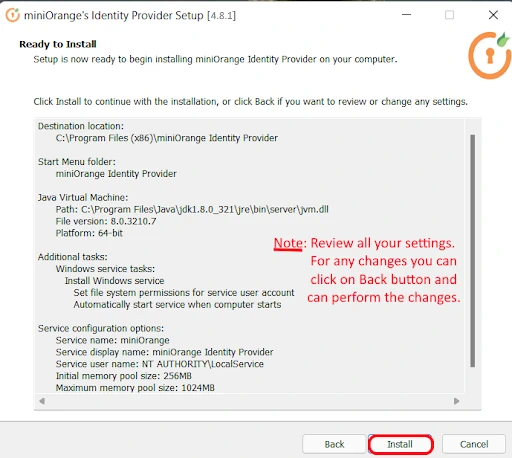
  • You are now ready to begin installing the setup. You may review the details here and then click Install button to complete the installation, or click Back button to make any changes in the settings.
  • On-Premise IDP Server Windows Install

  • When you click the Install button, it will automatically download and extract all of the required additional files that you have selected in the previous steps.

    Note:

    In case of no internet connectivity. You can choose and download the offline installer from here.
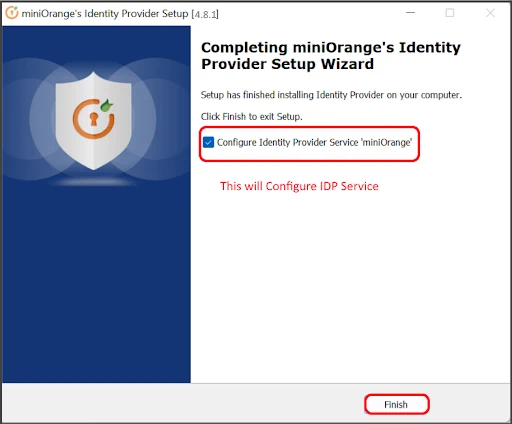
  • Finally, Identity Provider has been installed on your computer by Setup. Make sure the Configure Identity Provider Service'miniorange' option is selected before clicking the Finish Button.
  • On-Premise IDP Server Windows Installed

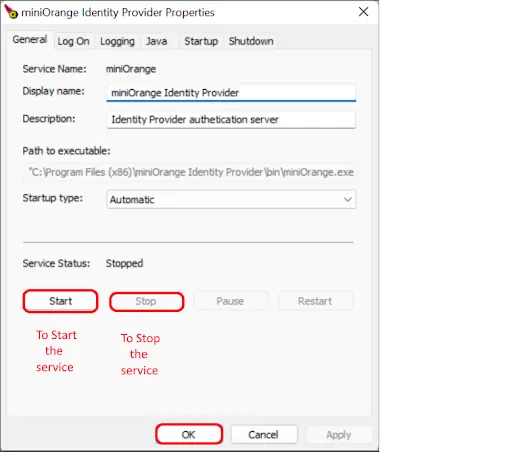
  • Now is the time to begin the service. Click the Start Button. A progress bar will appear once you click the Start Button. Simply wait 30 seconds, and your service will be started. You can see it by visiting to http://localhost:8080 in your browser and after that you will be landing on the Initialize page.
  • On-Premise IDP Server Windows Start

Prerequisites:

  • Installation of JDK 1.8 requires login through the oracle account. If you don't have the oracle account, Click here to directly install JDK 1.8.
  • If JAVA is already installed and Environment variables are set correctly on your system, then you don't need to follow this step, you can directly go to Install On-Premise Server.
  • Note:

    Once the Java installation is complete, check that the JAVA_HOME environment variable has been set correctly.Open a command prompt and type echo %JAVA_HOME% and hit Enter. If you see a path to your Java installation directory, the JAVA_Home environment variable has been set correctly. If nothing is displayed, or only %JAVA_HOME% is returned, you'll need to set the JAVA_HOME environment variable manually.


  • Set Java environment variables i.e. JAVA_HOME and JRE_HOME and path variables. Lets say JDK software is installed on your computer, for example, at C:\Program Files\Java\jdk1.8.0_381 then JAVA_HOME and JRE_HOME paths can be as mentioned -
    • JAVA_HOME - C:\Program Files\Java\jdk1.8.0_381
    • JRE_HOME - C:\Program Files\Java\jdk1.8.0_381\jre
  • To Save these variables, right click My Computer and select Properties > Advanced System Settings.Click the Environment Variables button.Under System Variables, click New.In the Variable Name field, enter:
    • JAVA_HOME - C:\Program Files\Java\jdk1.8.0_381
    • JRE_HOME - C:\Program Files\Java\jdk1.8.0_381\jre
  • Also update the path variable set with path : path_to_JAVA_HOME/bin. You can Read more about java specfic environment variables.
  • You can verify whether above environment variables are set correctly. Execute below commands to verify environment variables -
  • echo %JAVA_HOME% echo %JRE_HOME%

    Start miniOrange On-Premise IDP Server:

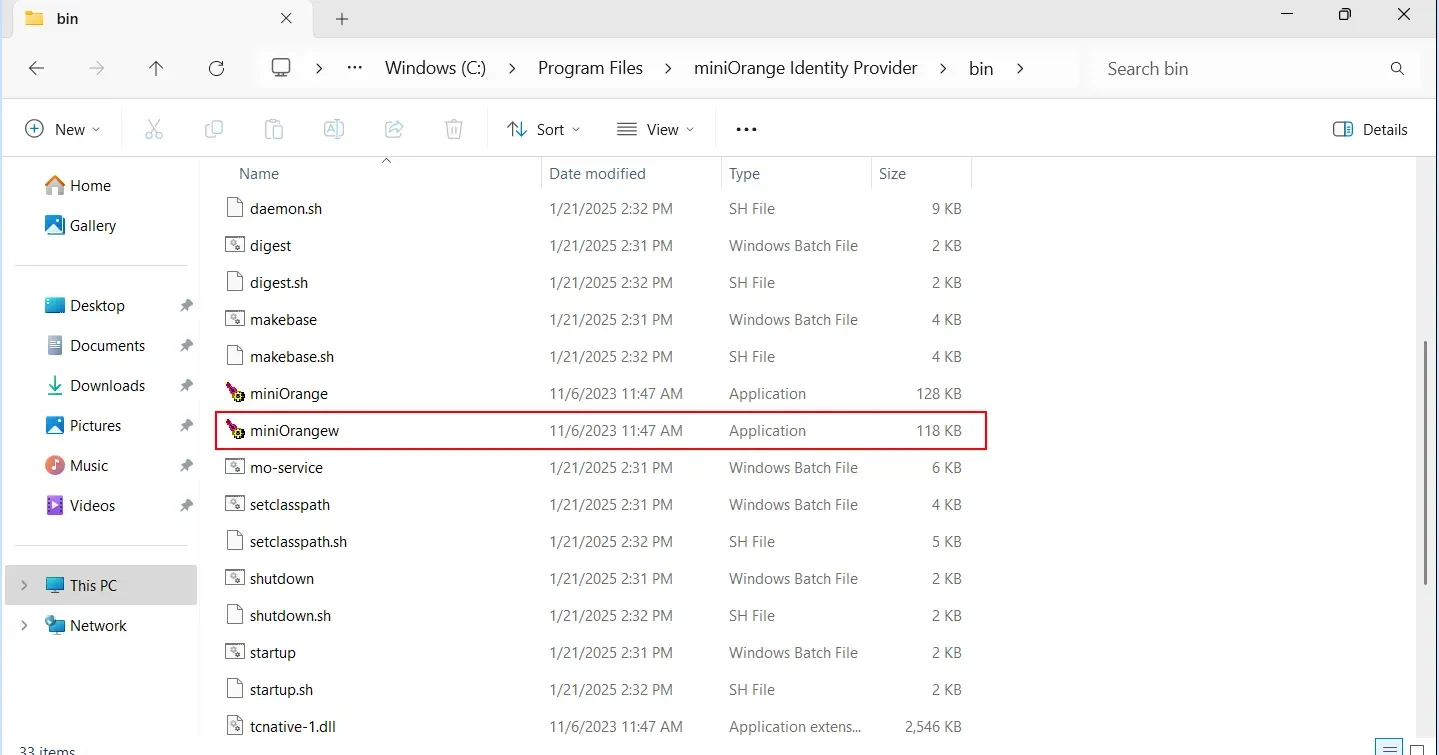
  • To start the miniOrange server, go to the mo-idp-server-<version>/bin directory of the server distribution (i.e. folder with name similar to mo-idp-server-1.0.3 (version may vary)). Execute the startup file based on your environment.
  • > ...\bin\startup.bat

Run Tomcat as a Service for miniOrange IDP

  • Make sure your environment variable like JAVA_HOME and CATALINA_HOME are set.
  • Navigate the to <Tomcat Root Directory>/bin.
  • Open a CMD in the current directory and run mo-service.bat
  • You will be prompted with an administrator grant screen. Click Yes.
  • Enter the required information and hit Enter.
  • Tomcat as a Service

  • The miniOrange Service should be installed successfully.
  • Open linux terminal using your root profile.
  • Locate folder which contains the downloaded on-premise mo-idp-installer.sh script file (mo-idp-installer.sh).
  • On-Premise IDP Server Linux Install Locate Server

  • Run the following command in terminal: sh mo-idp-installer.sh
  • You will be prompted to install JAVA. Type "n" if JAVA 8 is already installed, if not type "y". As shown below:
  • On-Premise IDP Server Linux Install Java

  • After pressing "y", JAVA 8 will be installed.
  • Once the Java installation is completed, miniOrange Onpremise zip file will be downloaded & extracted from the source
  • On-Premise IDP Server Install

  • In case if JAVA 8 is already present, the script will directly download miniOrange onpremise zip and extract it in the same folder.
  • On-Premise IDP Server Linux Extract Folder

  • In case, some other version of JAVA is already installed, you will receive the message "Java 8 not found". Let the script install JAVA 8 by pressing "y" when requested.
  • Once the extraction is completed, IDP server will automatically start up and can be accessed through http://localhost:8080/initialize
  • After extraction of the file you can see the folder "mo-idp-server-X as shown below.
  • On-Premise IDP Server

  • As Tomcat has already started up, you can check the logs in catalina.out file */mo-idp-server-X/logs/catalina.out as shown below:
  • On-Premise IDP Server Initialize

  • Go to http://localhost:8080/initialize and setup your database.
  • You can download OpenJDK8 package using apt install openjdk-8-jdk for Debian, Ubuntu, etc. OR yum install java-1.8.0-openjdk for Fedora, Oracle Linux, Red Hat Enterprise Linux, etc.
  • If JAVA is already installed and Environment variables are set correcty on your system, then you don't need to follow this step, you can directly go to Install On-Premise Server.
  • Note:

    Once the Java installation is complete, check that the JAVA_HOME environment variable has been set correctly. Open a terminal and type echo $JAVA_HOME and hit Enter. If you see a path to your Java installation directory, the JAVA_Home environment variable has been set correctly. If nothing is displayed you'll need to set the JAVA_HOME environment variable manually.


  • Linux users can use below commands to set JAVA_HOME and JRE_HOME variables using below commands -
    • export JAVA_HOME=/path/to/jdk export JRE_HOME=/path/to/jre
  • You can verify whether above environment variables are set correctly. Execute below commands to verify environment variables -
  • echo $JAVA_HOME echo $JRE_HOME
  • To start the miniOrange server, go to the mo-idp-server-<version>/bin directory of the server distribution (i.e. folder with name similar to mo-idp-server-1.0.3 (version may vary)). Execute the startup file based on your environment.
  • Linux/Unix: Execute chmod +x startup.sh to give executable permission to this file. Set relevant permission of mo-idp-server folder to allow the creation of new folder like temp or logs folder – chmod 755.
    $ .../bin/startup.sh

Run Tomcat as a Service for miniOrange IDP

  • Install Tomcat as Linux Service from Apache project site.
  • Unpack the tomcat folder in opt directory. For this, you will need a terminal and root access.
  • Create Tomcat user with restricted permissions:
  • groupadd tomcat
    useradd -s /sbin/nologin -g tomcat -d /opt/mo-idp-server tomcat
    passwd tomcat
  • Set the tomcat user as the owner of the $CATALINA_HOME folder.
  • chown -R tomcat.tomcat /opt/mo-idp-server
  • Configure Tomcat to run as a Service
  • Using init.d
  • Navigate to /etc/init.d , create a directory named as tomcat and paste the below code.
    #!/bin/bash ## Change the path of mo-idp folder below ### BEGIN INIT INFO # Provides: tomcat # Required-Start: $network $remote_fs $syslog # Required-Stop: $network $remote_fs $syslog # Default-Start: 2 3 4 5 # Default-Stop: 0 1 6 # Short-Description: Start Tomcat at boot time # Description: Start Tomcat at boot time ### END INIT INFO export JAVA_HOME=/usr/lib/jvm/jre export CATALINA_HOME=/opt/<PATH OF MiniOrange IDP Folder> export JAVA_OPTS="-Xms250m -Xmx1024m" RETVAL=$? case $1 in start) if [ -f $CATALINA_HOME/bin/startup.sh ]; then echo $"Starting Tomcat" su -p -s /bin/sh tomcat $CATALINA_HOME/bin/startup.sh fi ;; stop) if [ -f $CATALINA_HOME/bin/shutdown.sh ]; then echo $"Stopping Tomcat" su -p -s /bin/sh tomcat $CATALINA_HOME/bin/shutdown.sh fi ;; *) echo $"Usage: $0 {start|stop}" exit 1 ;; esac exit $RETVAL
  • The script shown above would have a LSB type header to define dependencies and runlevels.
  • To make the script executable:
    chmod ug+x /etc/init.d/tomcat
  • Configure the system to run the script at boot:
    sudo update-rc.d tomcat defaults # Debian, Ubuntu
    sudo chkconfig --add tomcat # Red Hat & co.
  • If you want to remove the service:
    sudo update-rc.d -f tomcat remove # Debian, Ubuntu
  • To start/stop the script manually:
    service tomcat [start | stop]
  • Or the old-fashioned way (Ubuntu):
    /etc/init.d/tomcat [start | stop]


1. Setup Database

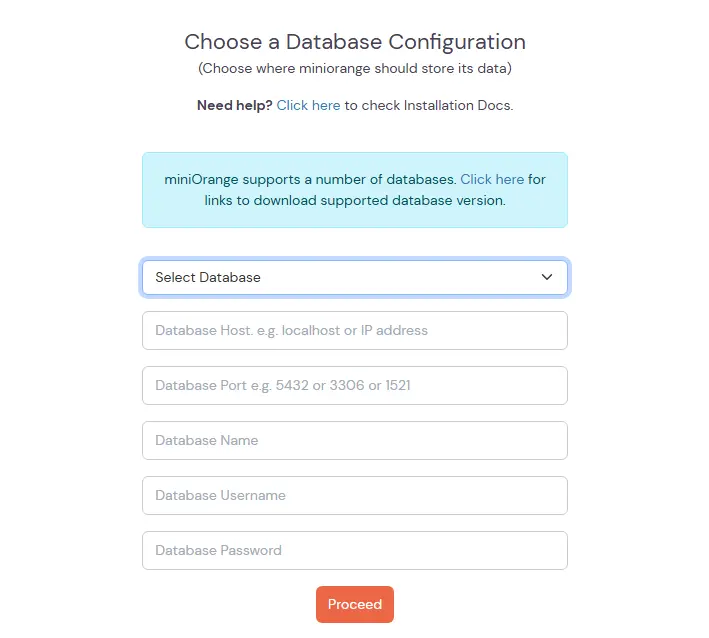
  • After tomcat startup, open http://localhost:8080 in browser. You will see a page to choose a database configuration for the identity server. You can choose where you would like to store its data.
  • miniOrange On-Premise Identity Provider gives you the flexibility to choose your database type. We support Embedded H2 Database which is a light weight database good for testing purposes. Later you can migrate to your production database type that is supported in the external database section. In External Database section, we support PostgreSQL (11+), MySQL (8+), MS SQL (2017+) and Oracle Databases.


Note:

Before you proceed with Embedded H2 database, make sure your system has given write permission to the IdP folder i.e. mo-idp-server-<version> folder. If not then first assign the write permission to the IdP folder to avoid getting stuck in permission issues. Write permission is required because Embedded H2 database is created in IdP folder with the folder named data.


  • Select embedded Database and click on proceed.
  • Database Type

  • Set up miniOrange with the embedded H2 database to get you started. You’ll need to migrate to a supported external database before using miniOrange as a production system. This option is recommended if you’re just using miniOrange for a test trial. The database folder is created inside the mo-idp-server folder named data.
  • Note:

    In case if you are stuck in permission issues, you can run commands specific to your OS to perceed or you can follow the instructions given on pop-up.

    Windows icacls “path upto mo-idp-server-X ” /remove:d Users /grant:r Users:(OI)(CI)F /T
    Linux chmod -R 775 “path upto mo-idp-server-X”

  • If you don't have enough privileges to run above commands, in that case either you can follow instructions from pop-up or can contact us.
  • permission flow

  • Once database is created successfully, you will be redirected to the admin set up page where you will configure admin account for Identity Provider.
  • Set up miniOrange with the external database supported in the list below. This is recommended for production systems. miniOrange supports a number of databases and if you don’t have an established database of choice within your organization and do not have a strong preference for any of our supported databases, we recommend PostgreSQL, which is free and thoroughly tested against.
  • You can refer to the below document to see supported versions of MySQL, PostgreSQL, MS SQL, and Oracle DB: click here.
  • Note:

    If you already have a database setup which is not in the list below, you can contact us to add support for that database.


  • Create an empty database in your database server: PostgreSQL/MySQL/MS SQL/Oracle DB. Once done, start filling the form shown below:
  • External database

  • Enter Database Host: localhost or IP address.
  • Enter the Database Name created in your database server.
  • Enter username and password of your database server for the connection.
  • External Database configuration

  • Once database is created successfully, you will be redirected to the admin set up page where you will configure admin account for Identity Provider.


2. Setup Admin Account

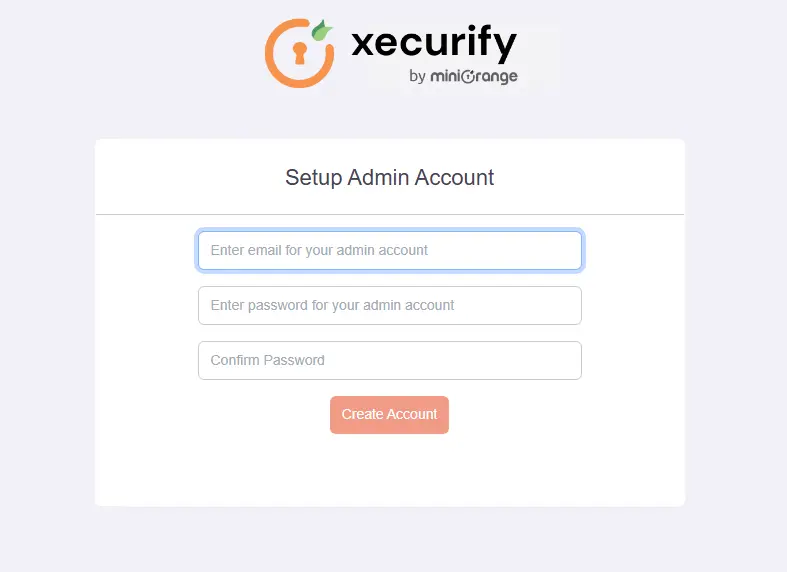
  • Setup your Admin Account. Enter a Username and Password for your admin account.
  • Admin Setup Page

  • Once your admin account is created, you will be auto logged in to the dashboard screen.
  • Admin dashboard


3. Instruction to deploy microservices

    Prerequisites

    • RabbitMQ is installed in your system.
    • Redis is installed in your system.
    • miniOrange IDP is successfully installed in your System.
      • miniOrange IDP is set to use redis profile.
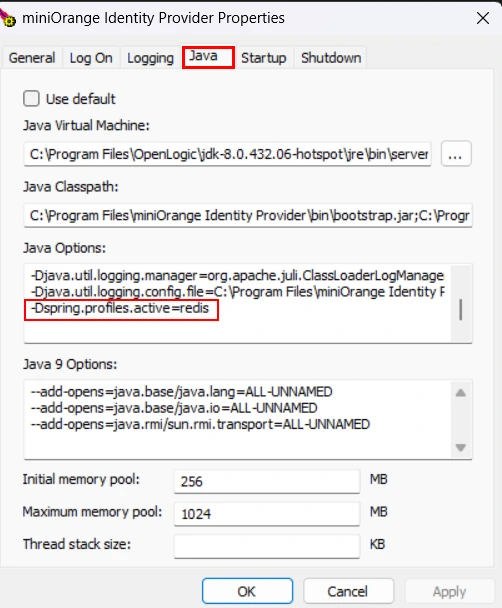
        • In case of miniOrange installed as a service then configure the profile in the JAVA tab by executing <miniOrange_Directory>/bin/tomcat9w.exe and navigate to the java tab. Add the line under the Java Options
          -Dspring.profiles.active=redis
        • On-Premise IDP Server Windows Tomcat9W file

        • In case of execution via bat file add the line in <miniOrange_Directory>/bin/catalina.bat file , just below rem ----- Execute The Requested Command ---------- The line is -
          set "JAVA_OPTS=%JAVA_OPTS% -Dspring.profiles.active=redis"
        • On-Premise IDP Server Catalina bat file

    • Provisioning service is set to use the IDP DB.
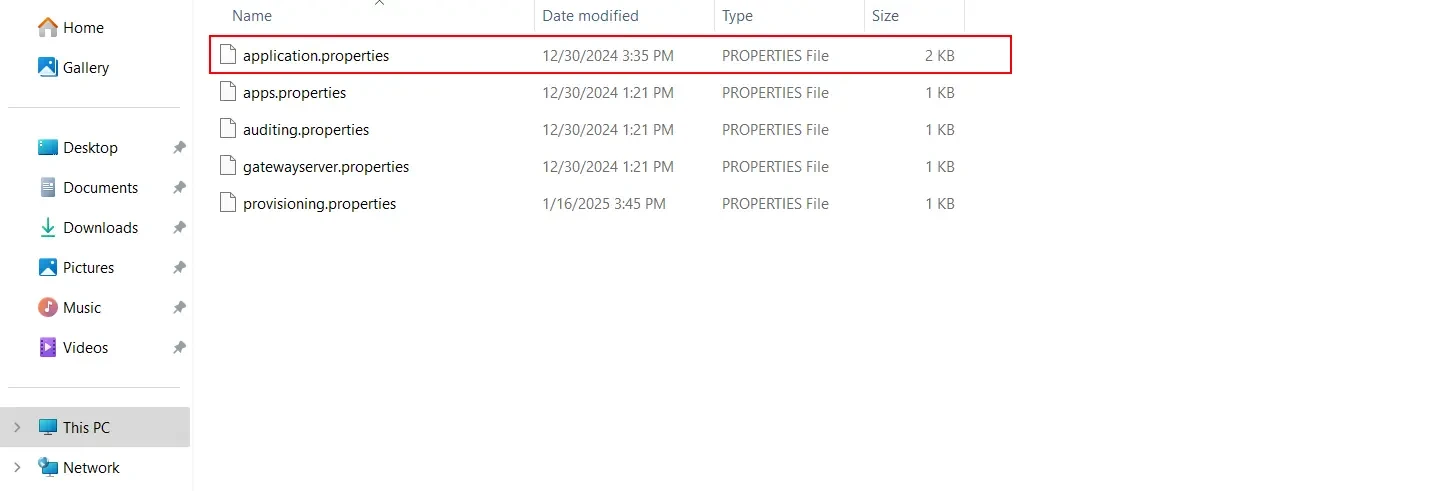
      • Navigate to <miniOrange_Directory>/webapps/provisioning-service/WEB-INF/classes and edit the application.properties file.
      • On-Premise IDP Server application properties file

    • Following ports to be free on System: (If you use defaults)
        a. 8080
        b. 80
        c. 8070
        d. 8071
        e. 8073
        f. 9081

    We assume the entire suite of services will be installed on a standalone system. In case of a distributed system setup you can reach out to us and our engineers will help you to install this in a distributed, Highly Available manner.

    • Navigate to your miniOrange Directory.
    • Navigate to services/services/windows/
    • Open the command terminal in the current directory. You can do this by right-clicking and selecting Open in Terminal.
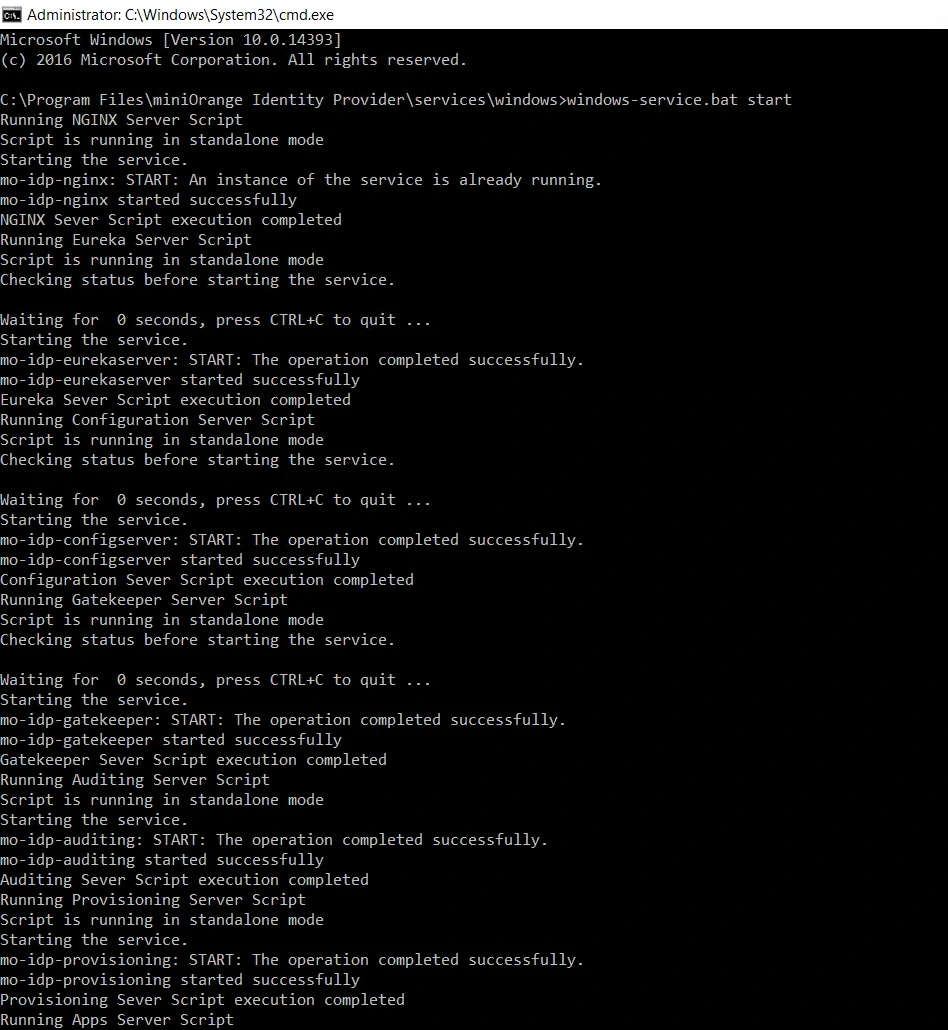
    • Run the command: windows-service.bat. This will prompt you for consent, select Yes and continue.
    • On-Premise IDP Server Windows Prompt Consent

    • The installation will set some of the system variables for you. We will be using system defaults for the StandAlone installation. These Include
      • MO_CONFIG_PATH - This is the path where the configurations for the microservices will be saved. By default, the path is <miniOrange Directory\services\config>. This path should be considered for standalone installation.
      • ROOT_LOG_LEVEL - DEBUG by default.
      • MINIORANGE_LOG_LEVEL - DEBUG by default.
      • MO_LOG_PATH - Path where all the log files will live. By default, the path is <miniOrange Directory\services\logs>
      • MO_SERVICES_UTIL_TOKEN - (Optional) A manually set authorisation token for critical internal service communication
      • On-Premise IDP Server Windows Standalone Installation

    • The installation will then proceed to Install all the individual services. Use all the default values stated as they are calibrated specifically for a standalone installation.
      • Installation begins with the NGINX Proxy Server. Use the default Path and continue. Just Hit enter to use the default path.
      • Eureka Service. This will ask for two inputs. The JAR Path and the port. As stated above use defaults in case of standalone installation.
      • Configuration Service. This will ask for two inputs. The JAR Path and the port. As stated above use defaults in case of standalone installation.
      • Gatekeeper Service. This will ask for two inputs. The JAR Path and the port. As stated above use defaults in case of standalone installation.
      • Auditing Service. This will ask for two inputs. The JAR Path and the port. As stated above use defaults in case of standalone installation.
      • On-Premise IDP Server Windows Install Individual Services

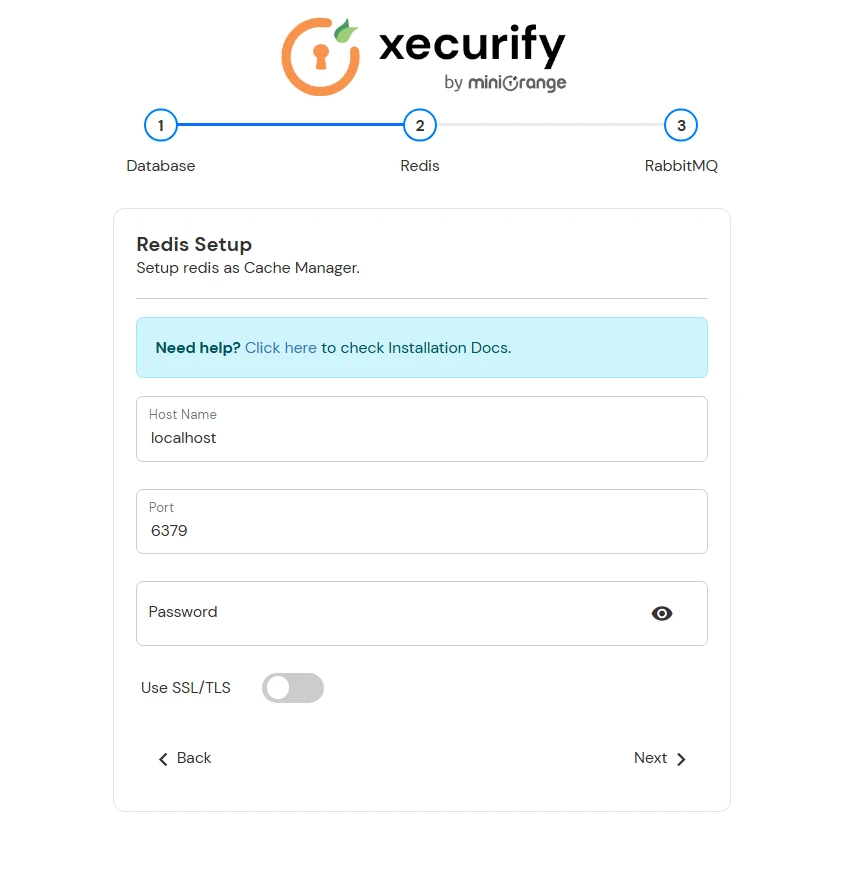
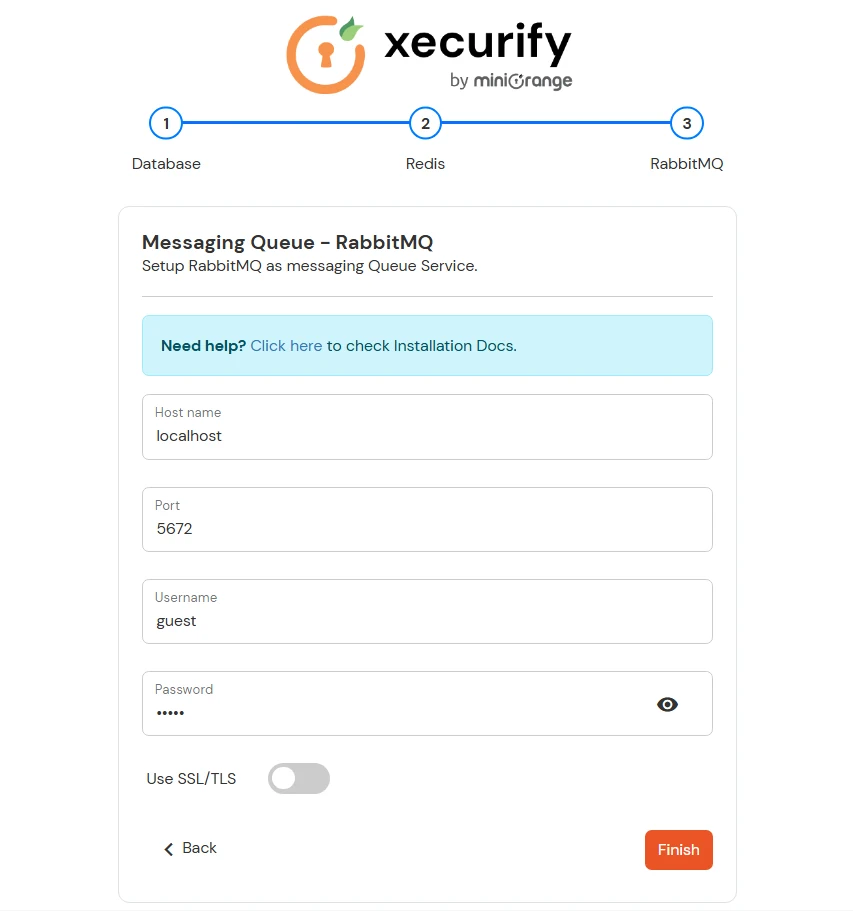
    • Now we need to configure RabbitMQ and Redis configurations settings in the Microservices Configurations. For this Navigate to the Configuration folder <miniOrange Directory>\services\config>. (This path will change if you have not used the defaults in the earlier setup)
    • On-Premise IDP Server Windows Redis Configuration

    • Edit the application.properties
      • Setup Database
        • jdbc.driverClassName : This can be one of the following based on the database you are using.
          • PostgresSQL: org.postgresql.Driver
          • MySQL: com.mysql.cj.jdbc.Driver
          • MicrosoftSQL: com.microsoft.sqlserver.jdbc.SQLServerDriver
          • Oracle: oracle.jdbc.OracleDriver
        • Jdbc.url : This can be one of the following based on the database you are using.
          • PostgresSQL: jdbc:postgresql://<host>:<port>/<database_name>
          • MySQL: jdbc:mysql://<host>:<port>/<database_name>
          • MicrosoftSQL: jdbc:sqlserver://<host>:<port>/<database_name>
          • Oracle: jdbc:oracle:thin:@<host>:<port>/<database_name>
        • Jdbc.username: Username for accessing the Database.
        • Jdbc.password: Password for accessing the Database.
      • Setup Redis
        • Spring.redis.port: Port where the Redis Service is running
        • Spring.redis.host= Hostname of the server where redis is running.
        • spring.redis.password= If Redis is using a password. Otherwise comment it. This can be done by adding # in the beginning of the property.
      • Setup Rabbit MQ
        • rabbitmq.host=Hostname of the server where the RabbitMQ is Deployed.
        • rabbitmq.port=Port where the Rabbit MQ Service is running.
        • rabbitmq.username=Rabbit MQ Username. The default is guest
        • rabbitmq.password=Rabbit MQ Password. The default is guest
      • On-Premise IDP Server Windows Edit Application Properties

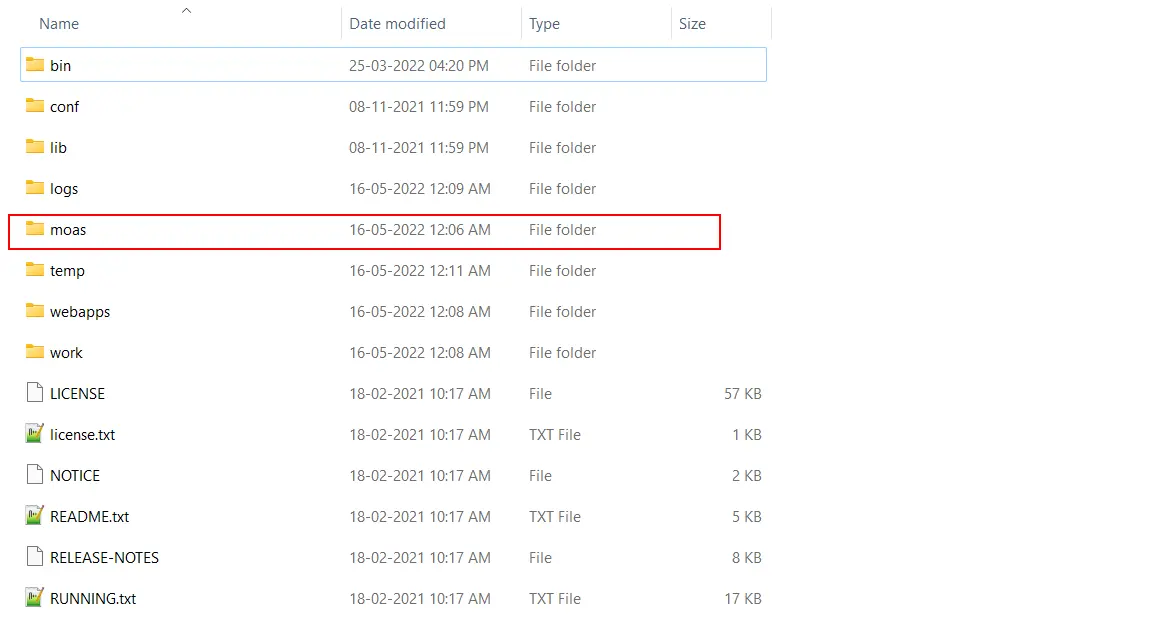
      Note: Make sure that you have also added the same details in the application.properties of the main miniOrange IDP Service. It should be present in the given location <miniOrange Directory>\moas\WEB-INF\classes\.

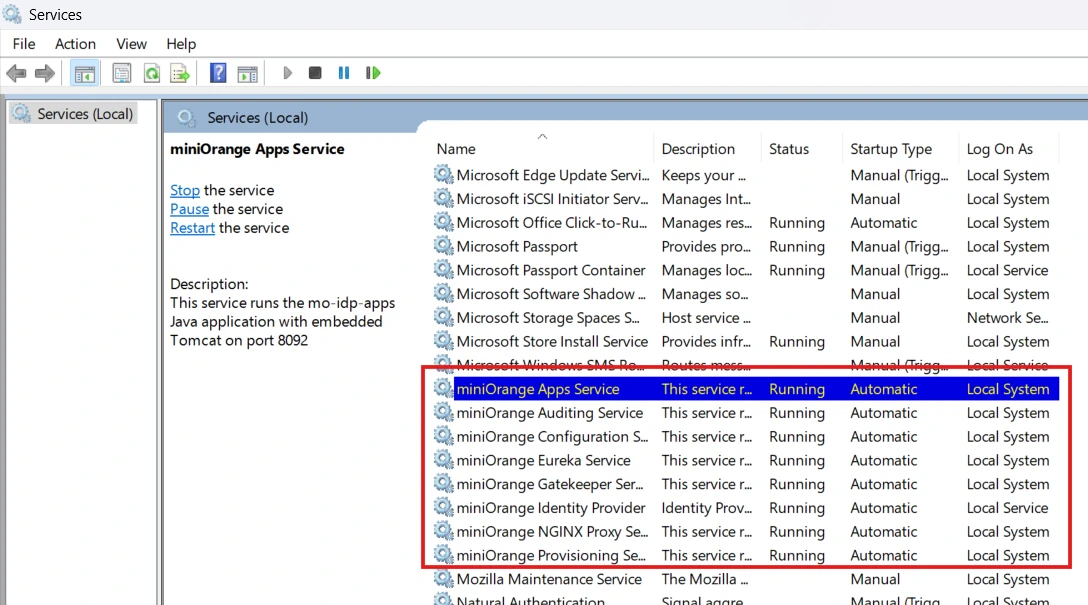
    • Start the Auditing Service, NGINX Service, miniOrange Service and the Eureka Service. Navigate to the Windows Services tray and initiate both the services.
    • On-Premise IDP Server Windows Services Tray


4. Setup Custom Branding

    i. Modify the Server Base URL:

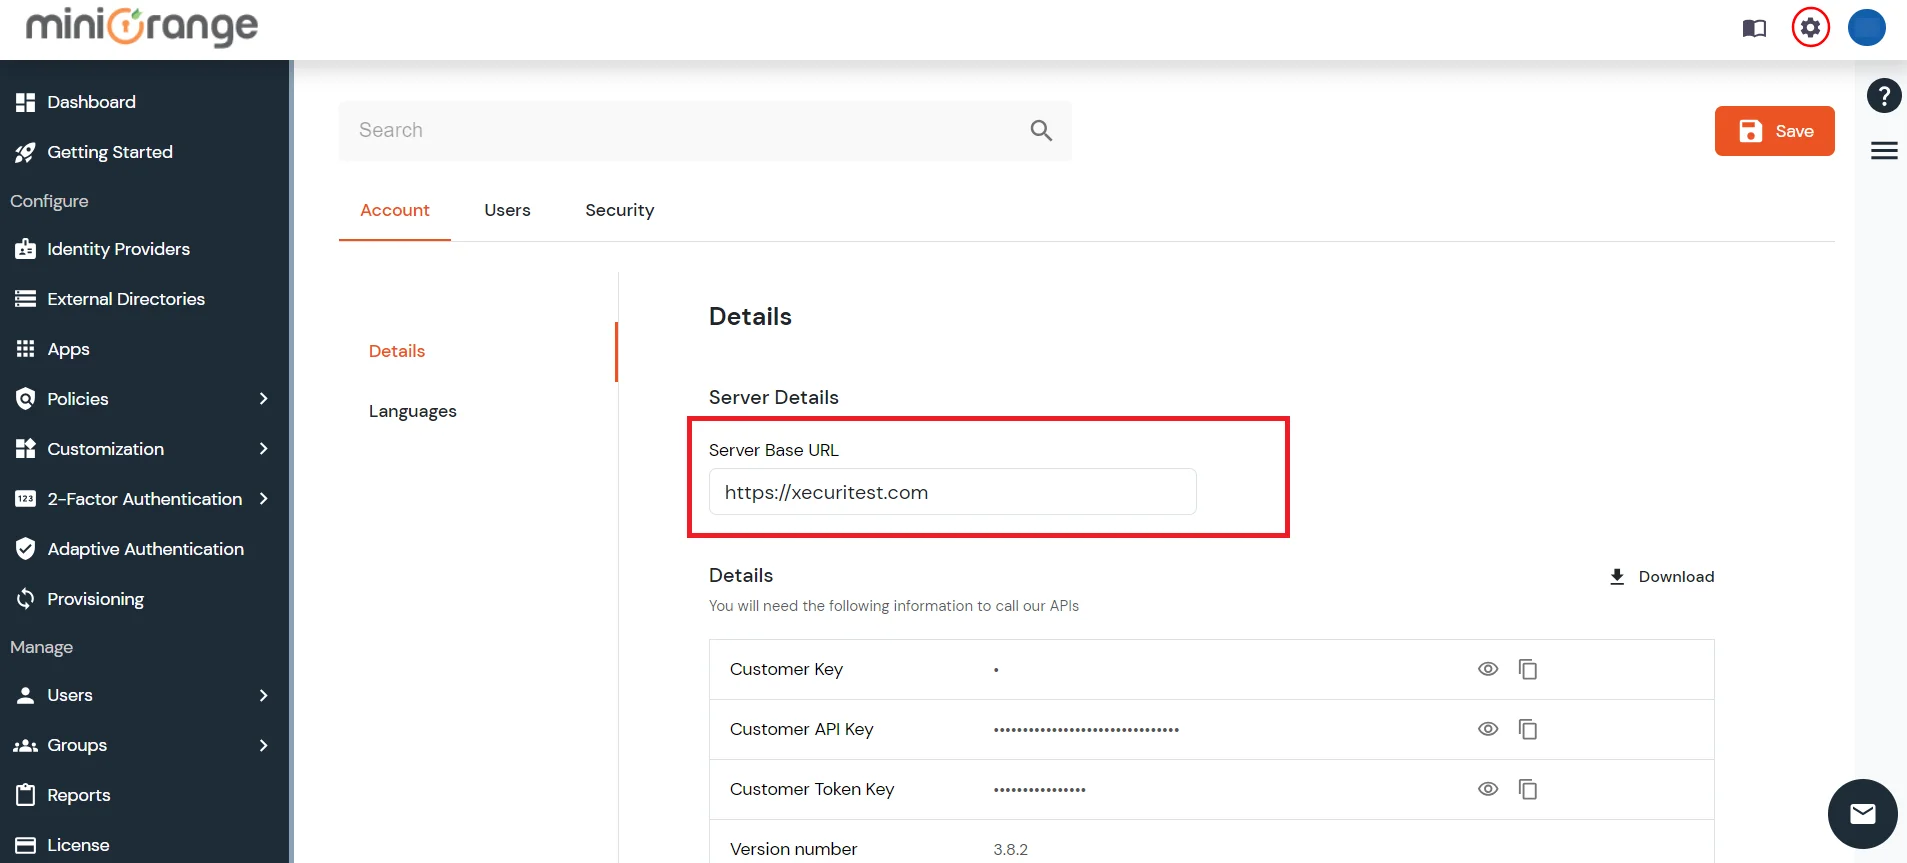
    • Log in to the miniOrange admin dashboard.
    • Navigate to Settings (located at the top right).
    • Enter the Server Base URL to your liking (for eg. https://xecuritest.com)
    • server file

    • Click Save.

    ii. Update Hosts File:


    • Open the folder C:\Windows\System32\drivers\etc
    • Locate the file named hosts and open it.
    • Enter the IP address, followed by a space, and then the new Server Base URL as shown in the screenshot.
    • newhosts window

    • Save the changes.
    • Open the terminal / command prompt using administrative rights (example: use sudo su)
    • Edit the /etc/hosts
    • Enter the IP address, followed by a space, and then the new Server Base URL as shown in the screenshot.
    • newhosts linux

    • Save the changes.


Run miniOrange IDP server over SSL (Optional)

Note:


Before moving forward, you need to make two changes related to same site cookie. Starting with version 80, Google Chrome will change the default value for the SameSite cookie parameter to Lax. Therefore, changes are required and SameSite parameter has to be set to NONE.

To do changes, follow the path: mo-idp-server-<version>/moas/WEB-INF/classes. In this folder search for the file spring-context-onpremise and open it in editor. Search for bean id="customCookie". you will see a bean with name,samesite and secure properties. Update value of samesite from LAX to NONE and of secure to true.


    1. Generate a Keystore
    • Open a command prompt or terminal. And go to <Path to JAVA_HOME/bin> path and enter the command given below.
      keytool -genkey -alias onpremssoidp -keyalg RSA -keystore onpremssoidp.jks
    • If you get a permission error (mostly on a windows machine) in this step.Then change the location in command prompt or terminal to Desktop or any other location of your choice.
    • Enter your convenient password and remember it.(If the password you entered didn’t work then keep the password as “changeit” ).
    2. Generate SSL Certificate
    • After Pressing the Return key it will prompt for a password for <onpremssoidp>. Hit Return to continue.
      (Note: firstname and lastname needs to be the server DNS name/hostname of the server)
    • generate ssl certificate

    • SSL self-signed certificate is generated at the given location.
    3. Configure Tomcat with above-generated Keystore

      1. Open Tomcat Configuration:

      • Navigate to the conf directory within the miniOrange installation folder.
      • Open the server.xml file in a text editor.

      2. Edit server.xml:

      • Locate the line <Service name=”Catalina”>.
      • Immediately after this line, insert the following snippet:
        <Connector port="443" protocol="HTTP/1.1" SSLEnabled="true" maxThreads="150" scheme="https" secure="true" clientAuth="false" sslProtocol="TLS" keystoreFile="<JKS Keystore Path>" ciphers="ALL" keystorePass="<Password while keystore generation>"/>
      • Replace <JKS Keystore Path> with your keystore file path and <Password while keystore generation> with your keystore password.

        Note: Make sure the .jks file has appropriate permissions/run command prompt as Administrator.

Using a certificate from Trusted CAs like LetsEncrypt, GoDaddy, Comodo SSL.

  • The following steps assume that you have a valid certificate generated through Certbot. In case you do not have the certificates, you can use the Certbot commands below to generate the certificate for your domain
    certbot certonly --standalone -d.example.com
  • Once the certificate is generated, the following folder structure will be obtained.
    #:/etc/letsencrypt/live/example.com# ls
    cert.pem chain.pem fullchain.pem privkey.pem README
  • Copy over the cert.pem, chain.pem, fullchain.pem and privkey.pem in the conf directory of the IdP.
  • Edit the conf/server.xml and add the following connector element.
     <Connector port="443" protocol="org.apache.coyote.http11.Http11NioProtocol"
                        maxThreads="150" SSLEnabled="true">
                        <SSLHostConfig>
                        <Certificate certificateFile="conf/cert.pem"
                        certificateKeyFile="conf/privkey.pem"
                        certificateChainFile="conf/chain.pem" />
                        <SSLHostConfig>
                        <Connector>
                        
  • Restart the IdP. The IdP should now use the valid certificate from LetsEncrypt.
  • The steps below assume that you have downloaded the valid SSL certificates from GoDaddy. The certificates need to be imported in a Java Keystore (JKS). In order to create a JKS, the keytool utility can be used.
    keytool -genkey -alias onpremssoidp -keyalg RSA -keystore onpremssoidp.jks
  • The original certificates need to be removed from the keystore. That can be done using the below command.
    keytool -delete -alias onpremssoidp -keystore onpremssoidp.jks
  • OpenSSL commands can be used to import the certificates downloaded from GoDaddy into the Java Keystore.
    openssl pkcs12 -export -in <GoDaddyCertificate>.crt -inkey <PrivateKey>.key
    -out <PublicPrivateKeyPair>.p12 -name tomcat -CAfile gd_bundle-g2-g1.crt -caname root
  • The keystore can now be used to configure the connector in conf/server.xml.
    <Connector port="443" protocol="HTTP/1.1" SSLEnabled="true" maxThreads="150" scheme="https" secure="true"
                        clientAuth="false" sslProtocol="TLS" keystoreFile="<JKS Keystore Path>" ciphers="ALL"
                        keystorePass="<Password while keystore generation>"/>
                        
  • Restart the IdP. The IdP should now use the valid certificate from GoDaddy.

    Creating a New Keystore

  • Navigate to the directory where you plan to locate the new keystore.
  • Enter the following command:
    keytool -genkey -alias server -keyalg RSA -keysize 2048 -keystore your_site_name.jks
  • When prompted, create a password for your new Keystore.
  • Enter the required information (Note: Do not type your own name into the name field, type your FQDN).
  • When finished, verify your information by typing “Y” or “Yes”.
  • Finally, enter the password you just created in step three.

  • Creating a CSR on Tomcat Servers

  • Run the following command:
    keytool -certreq -alias server -file csr.txt -keystore your_site_name.jks
  • Once prompted, enter the password you created in step three of the Keystore instructions
  • Use the information you supplied when creating the keystore. The CSR will be generated and saved in the chosen directory as “CSR.txt.”
  • We recommend saving and backing up the keystore file once you’ve complete generating the CSR. Once you’ve got the CSR complete, choose the SSL certificate you’d like to install on your Tomcat server and then purchase it, copy/pasting the CSR (open the .txt file) into the relevant field (usually the one labelled CSR).
  • Once the purchase and validation are complete, the CA will email you a bundle that includes your SSL certificate and an intermediate certificate that needs to be installed with it.

  • How to Install an SSL Certificate on Your Tomcat Server

  • Save your certificate(s) to the Keystore directory you created.
  • Use the following command to import the keystore:
    keytool -import -alias server -file your_site_name.p7b -keystore your_site_name.jks
  • You should see a confirmation message that says: “Certificate reply was installed in keystore.”
  • Type “Y” or “Yes” to trust the certificate.
  • Now, finally, we just need to configure the Tomcat server to serve the website via HTTPS.

  • Configuring Your SSL/TLS Connector

  • Using a text editor, open your Tomcat server.xml file.
  • Locate the connector you want to secure with your new keystore.
  • Configure the connector to use port 443 (HTTPS), your configuration file should look something like this:
    <Connector port="443" maxHttpHeaderSize="8192" maxThreads="100"
                        minSpareThreads="25" maxSpareThreads="75"
                        enableLookups="false" disableUploadTimeout="true"
                        acceptCount="100" scheme="https" secure="true"
                        SSLEnabled="true" clientAuth="false"
                        sslProtocol="TLS" keyAlias="server"
                        keystoreFile="/home/user_name/your_site_name.jks"
                        keystorePass="your_keystore_password" />
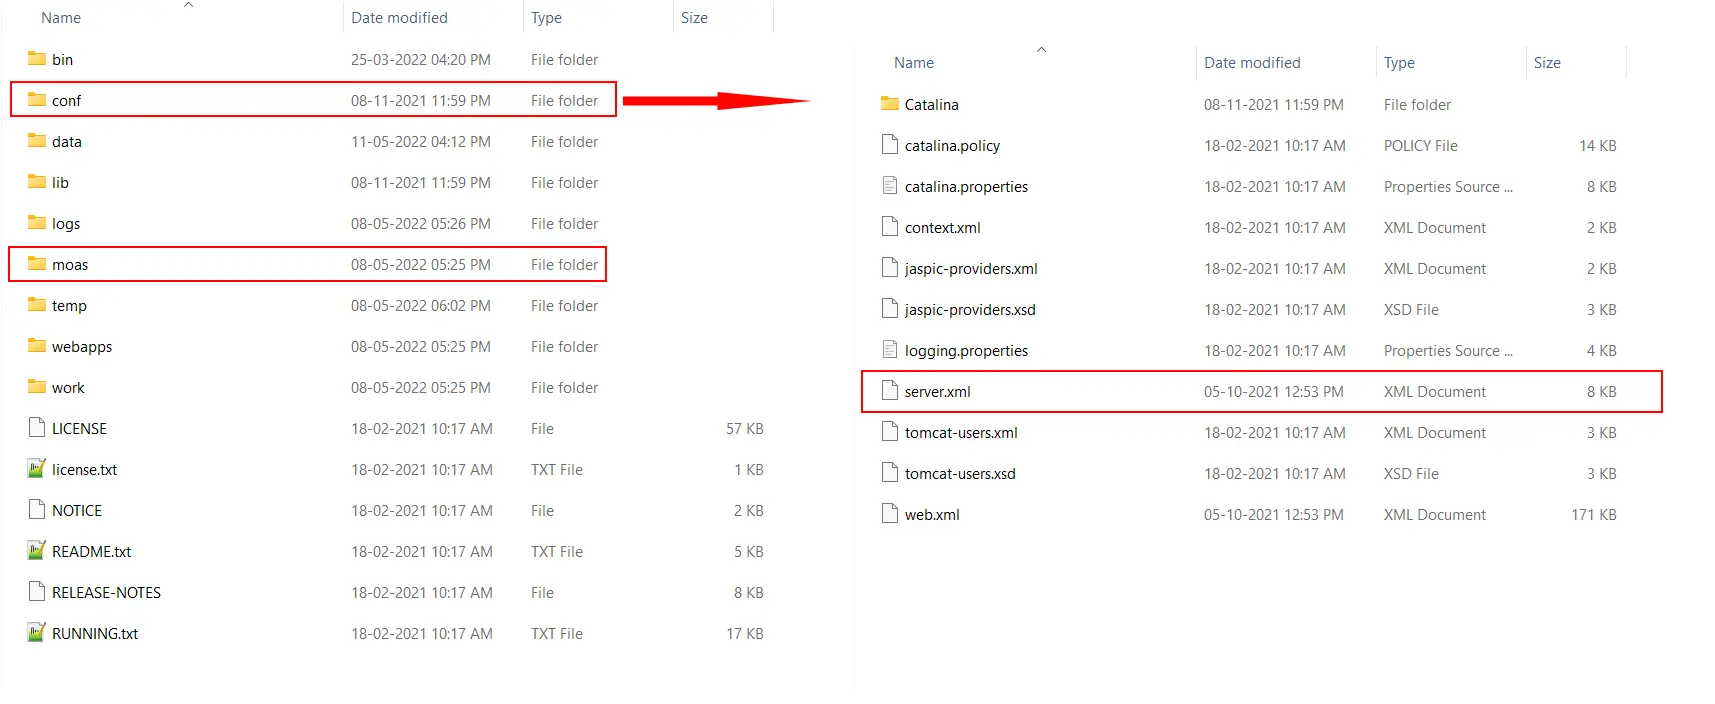
  • Save the changes to your server.xml file.
  • Restart your Tomcat server.
  • If the above methods don't work follow the link given below
  • Click here to follow the steps if you have any other CA certificates.


Migration from Zip Distribution to Installer

  • Navigate to your current Tomcat Installation Directory and take backup of your current moas directory present in <tomcat-root>
  • Take a backup of your database. In case you are using the internal integrated database,then you can take a backup of the data folder present in the <tomcat-root>. In the case of an external database, you can take a snapshot of the DB.
  • Take backup of <tomcat-root>/conf/server.xml file if you have added additional connectors for SSL in tomcat itself.
  • On-Premise IDP Server Windows Migration from Zip to Installer

  • Delete the current tomcat installation.
  • In case of it being installed as a service then make sure to uninstall the Windows Service.
  • Download the installer and run the downloaded installer file and install the latest On-Premise Server.
  • Stop the On-Premise service which was just installed.
  • Go to the installed directory root.
  • Go to path <moas-backup-root>/WEB-INF/classes/ and copy db.properties and license files.
  • Go to path <On-Premise-service-root>/moas/WEB-INF/classes/ and paste the db.properties and license files.
  • Start the On-Premise IDP Server service that you installed.


Upgrade On-Premise IDP


  • Download the latest version of the Windows Installer from the downloadables section.
  • Run the installer, it will automatically detect and install the latest version.
  • Stop the IDP Server.
  • Navigate to your current Tomcat Installation Directory and take backup of your current moas directory present in <tomcat-root>.
  • On-Premise IDP Server Windows Upgrade Zip Distribution

  • Take a backup of your database. In case you are using the internal integrated database,then you can take a backup of the data folder present in the <tomcat-root>. In the case of an external database, you can take a snapshot of the DB.
  • Now replace the moas folder in the Tomcat Root Directory with the moas folder present in the downloaded package.
  • Now copy over the following files from backup moas to the newly deployed moas.
    • \moas\WEB-INF\classes\db.properties
    • \moas\WEB-INF\classes\license.
    • \moas\images\logo.png
    • \moas\images\favicon.ico
  • Start the Tomcat Server.
    Prerequisites:
  • Login to your admin account and go to Settings>>Product Settings. Copy your Server Base URL.
  • Take a backup of the miniorange db in your db instance.
  • Take a backup of the following files in the server.
    • mo-idp-server-3.*/moas/WEB-INF/classes/db.properties
    • mo-idp-server-3.*/moas/WEB-INF/classes/license
  • Go to mo-idp-server-3.*/bin and Shut down the running tomcat instance. (you can use sh shutdown.sh)

  • Steps to upgrade:
  • Download the latest version to your linux server and unzip it.
  • You will find moas folder inside the uncompressed folder. Replace the mo-idp-server-3.3.*/moas with the new moas folder
  • Replace the backups of db.properties and license file on the same path as mentioned above.
  • Go to mo-idp-server-3.*/bin and Shut down the running tomcat instance. (you can use sh shutdown.sh)
  • Restart the tomcat instance using sh startup.sh
  • Open a browser and go to < Your-Server-Base-URL >/initialize


Uninstall On-Premise IDP


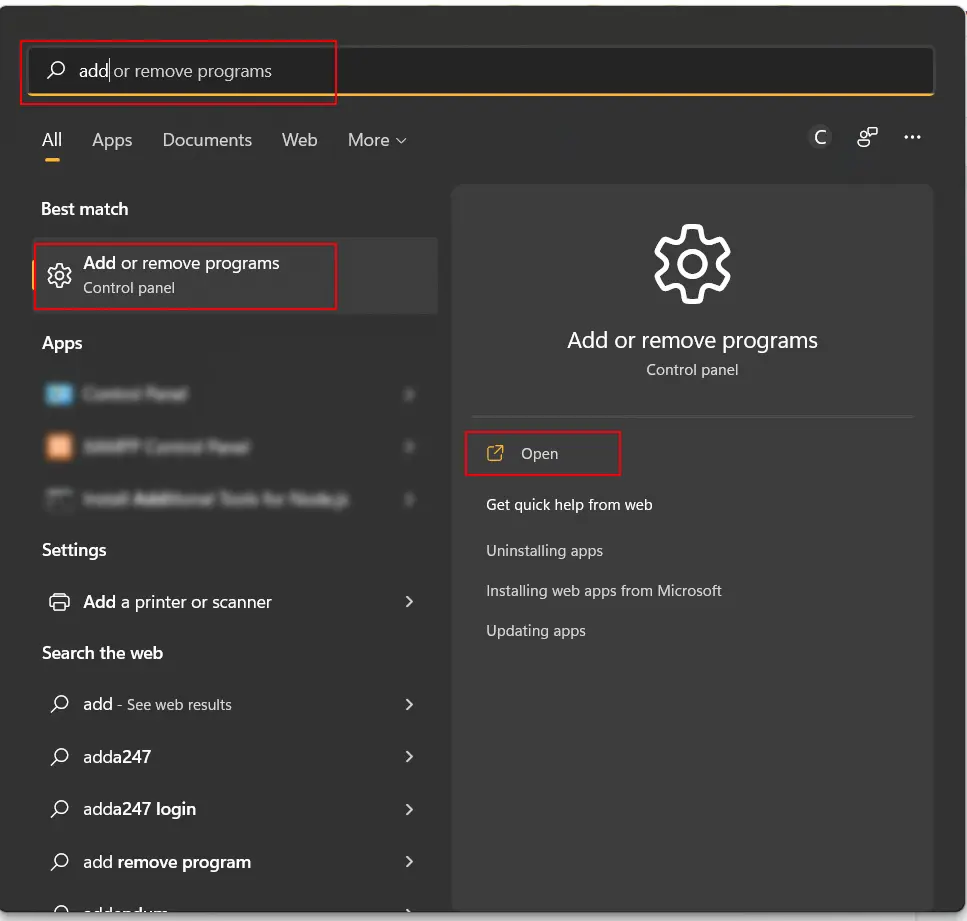
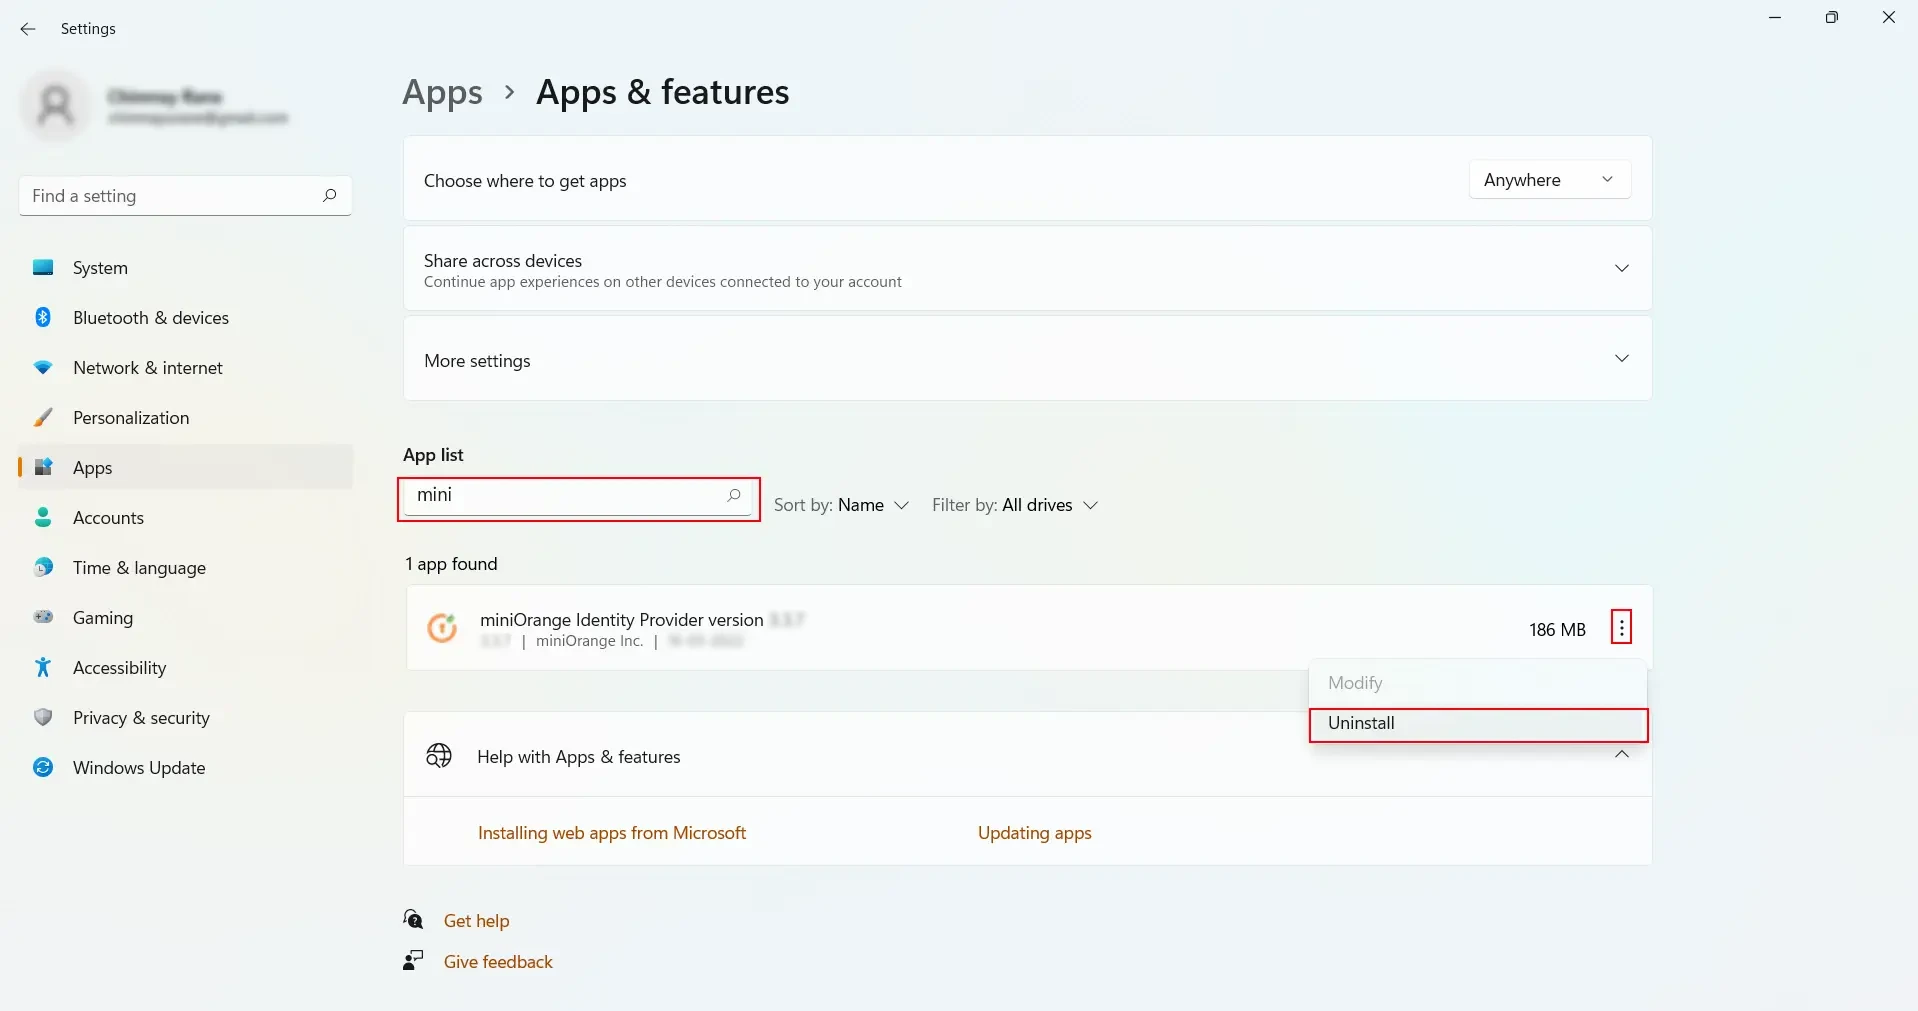
  • Navigate to Add or remove Programs on your windows System.
  • On-Premise IDP Server Windows Uninstall

  • Search for miniOrange in the list and click on uninstall.
  • On-Premise IDP Server Windows Uninstall Search

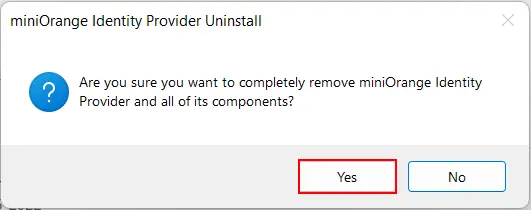
  • Click Yes when prompted for confirmation.
  • On-Premise IDP Server Windows Confirm Uninstall

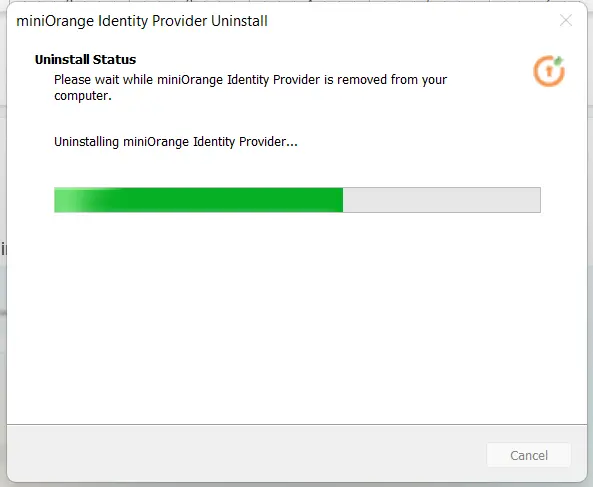
  • Let the uninstall process be completed.
  • On-Premise IDP Server Windows Uninstall Progress

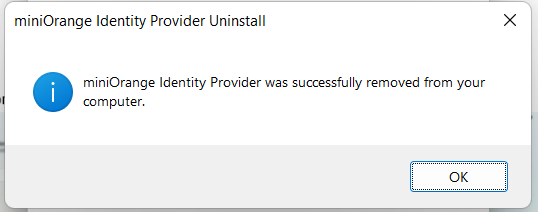
  • Click OK on the confirmation prompt.
  • On-Premise IDP Server Windows Windows Uninstall

  • If you have installed the Tomcat as a Windows Service then we need to remove that first. Navigate to <Tomcat Root>/bin directory and open a CMD in the current directory. Run the command mo-service.bat uninstall
  • Delete the Tomcat Directory.
  • Shutdown any running miniorange tomcat process/ service.
  • Take any backups you might need for the database.
  • Go to the folder mo-idp-server-3.* and delete it.

Frequently Asked Questions

If you encounter the error:"keytool error: java.lang.Exception: Key pair not generated, alias <onpremssoidp> already exists"

This indicates that the keystore file already exists. To resolve this, follow these steps:

  • Delete the existing keystore file located from path <Path to JAVA_HOME/bin> file named as "onpremssoidp.jks"
  • Rerun the key generation command “keytool -genkey -alias onpremssoidp -keyalg RSA -keystore onpremssoidp.jks” and fill in the details.

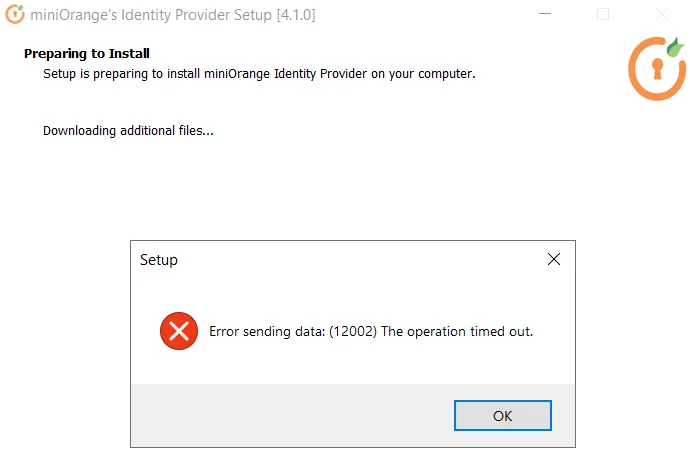
Encounter the error:

On-Premise IDP Server Online Error Time Out

If you get an error similar to the above image, follow these steps.

Disable IPv6 on Windows:
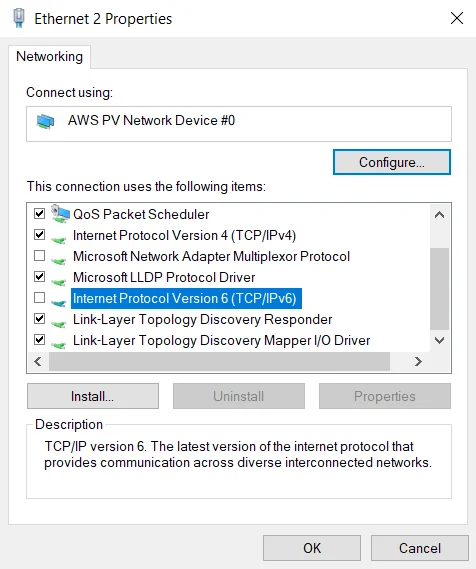
  • Open Network and Sharing Center:
    • Go to Control Panel > Network and Sharing Center.
  • Change Adapter Settings:
    • Click on Change adapter settings on the left sidebar.
  • Disable IPv6:
    • Right-click on your active network connection (Ethernet or Wi-Fi) and select Properties.
    • Uncheck the box for Internet Protocol Version 6 (TCP/IPv6). Click OK to save the changes.
    • On-Premise IDP Server Disable IPv6 on Windows


Further References

Want To Schedule A Demo?

Request a Demo


Our Other Identity & Access Management Products