Hello there!
Need Help? We are right here!
Need Help? We are right here!
Search Results:
×This guide provides an introduction into some of the key solutions provided by the miniOrange Single Sign On server to secure your Windows infrastructure, some of them being able to authenticate into connected applications after you are logged in to your Windows domain, adding a 2nd layer of authentication when you are gaining access to protected resources through a VPN or a Remote desktop server, etc.
In any of the above cases, LDAP is a significant aspect since it has the advantage of consolidating the information for an entire organization into a central repository. miniOrange provides a wide range of solutions for LDAP, such as LDAP Proxy/Gateway, Support for multiple Active Directories as user stores, Active Directory Sync with the miniOrange server, etc.
miniOrange provides user authentication from various external sources, which can be Directories (like ADFS, Microsoft Active Directory, OpenLDAP, AWS etc), Identity Providers (like Microsoft Entra ID, Okta, AWS), and many more. You can configure your existing directory/user store or add users in miniOrange.
You are logged in to your Windows system, and you want to log in to an application, say a on-premise app like SharePoint or a cloud app like GSuite. Don't you get tired of logging in to each application with the same credentials every single time? Trust us, we can make it effortless for you.
miniOrange provides a solution which, once you are logged in to Windows, lets you Single Sign On into connected applications hosted both in the cloud and on-premise, given the applications are configured within the domain for SSO. You can configure intranet portals or applications like Google Apps, Office 365, etc. that will log you in automatically when you try to access them.
Windows Challenge/Response (NTLM) is the authentication protocol used on networks that include systems running the Windows operating system and on stand-alone systems.
The Kerberos protocol defines how clients interact with a network authentication service. Clients obtain tickets from the Kerberos Key Distribution Center (KDC), and they present these tickets to servers when connections are established. Kerberos tickets represent the client's network credentials.
Windows authentication uses either Kerberos authentication or NTLM authentication, depending upon the client and server configurations. This document follows the example of an use case in which NTLM is the best choice - The applications are deployed on Windows Servers joined to the Active Directory domain. i.e) A whole Microsoft Active Directory setup exists.
miniOrange SSO server allows you to login to your applications without re-entering your credentials after you authenticate yourself into the Windows domain.
miniOrange achieves this by, installing a component on the Windows Server that, basically acts as an Identity Provider. When the user tries to access a cloud application like Salesforce, the request is sent to the miniOrange SSO Server which in turn asks the miniOrange SAML module installed in the Windows machine if the user can be logged in, and performs SSO based on the response from the module.
This, involves 3 steps basically:
1. Open up command prompt in Administrative mode.
2. Execute the following command on it:
setspn -a HTTP/## Server FQDN## ##Domain Service Account##
3. Open up Active Directory Users and Computers.
4. Search for the service account which was used to create the Service Principal Name(SPN).
5. Navigate to the Delegation tab.
6. Select Trust this user for delegation to any service (Kerberos only).
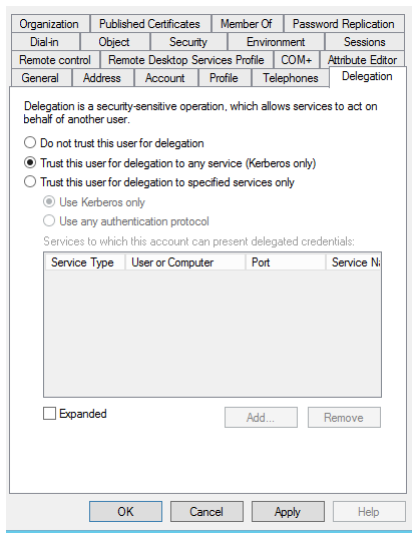
7. Click Apply.
8. Open up IIS Manager.
9. Select the site which you want to apply Windows Authentication to.
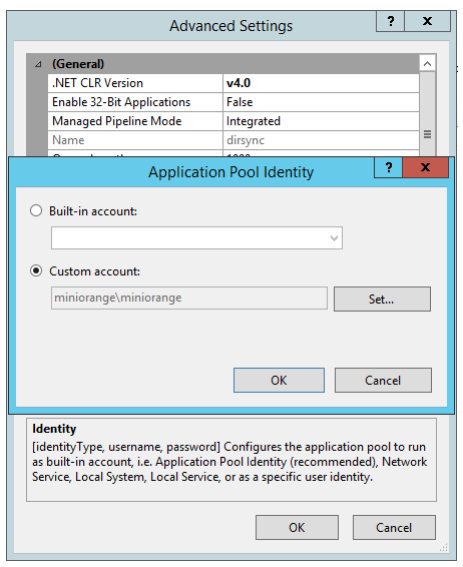
10. Select the Application Pool for that website. Right click on it a select Advanced Settings.
11. Use Custom Account and set the account as the service account for which delegation was enabled. You would need to enter the password of the service account as well.
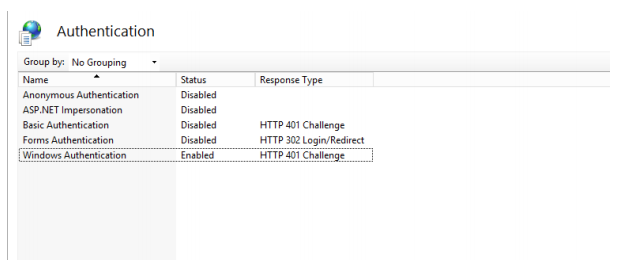
12. Navigate to the Authentication section for the website.
13. Enable Windows Authentication and disable Anonymous Authentication.
14. In the Configuration Editor, search for system.webServer/security/authentication/windowsAuthentication.
15. Set useKernelMode as False and useAppPoolCredentials as True

16. Click Apply.
17. Open up Internet Explorer and open Internet Options.
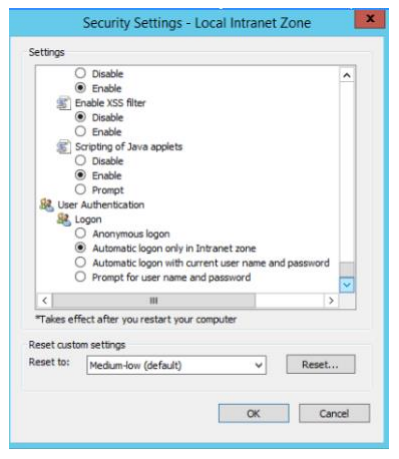
18. Add the FQDN of IIS Server to the list of sites in Local Intranet.
19. Select Custom Level for the Security Zone. In the list of options, select Automatic Logon only in Intranet Zone.
You will be installing a SAML module on the IIS Server joined to the Windows Domain. And this module will be responsible for identifying if the user who is logged in Windows can be logged in to connected applications as well, within the domain.
When the user is trying to access a cloud application, say Salesforce for example, the request is received by miniOrange which forwards the request to this SAML module installed on-premise, which determines if the user can be auto-logged in, and sends the response accordingly.
1. Put in the URLs in the samlsso.php in the SAML Module.
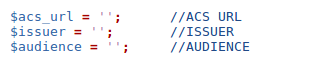
| Parameter | Value |
|---|---|
| ACS URL | Of the format: https://auth.miniorange.com/moas/endusersamlresponse |
| Issuer | The hostname of the server |
| Audience | https://auth.miniorange.com/moas |
2. Save the file.
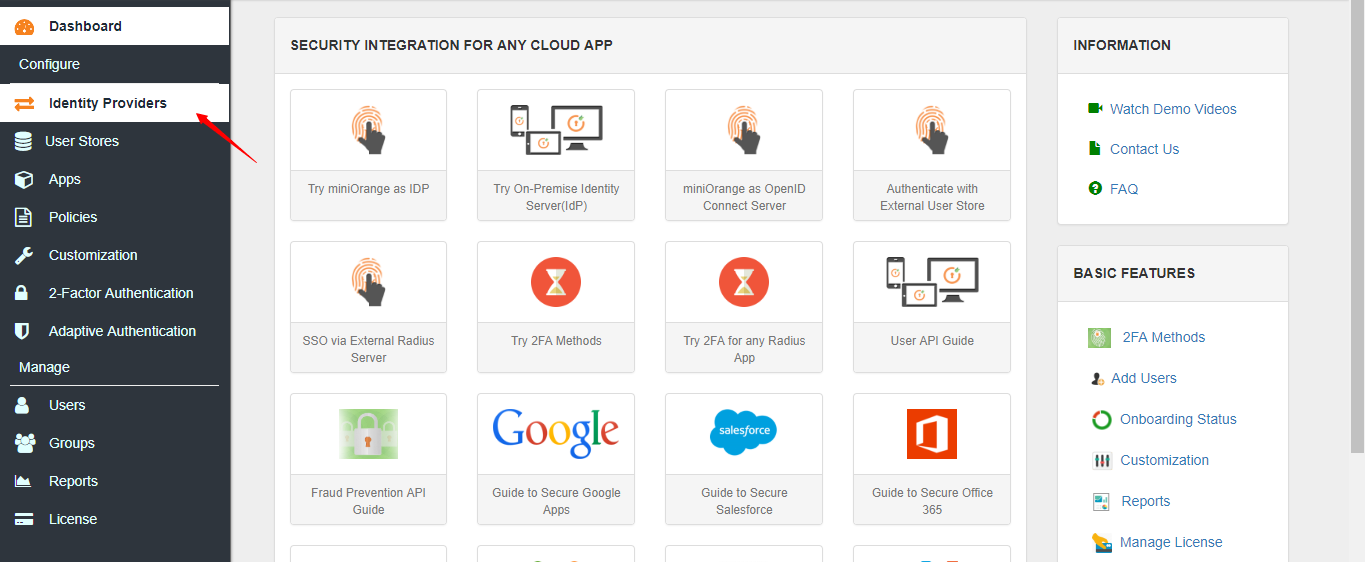
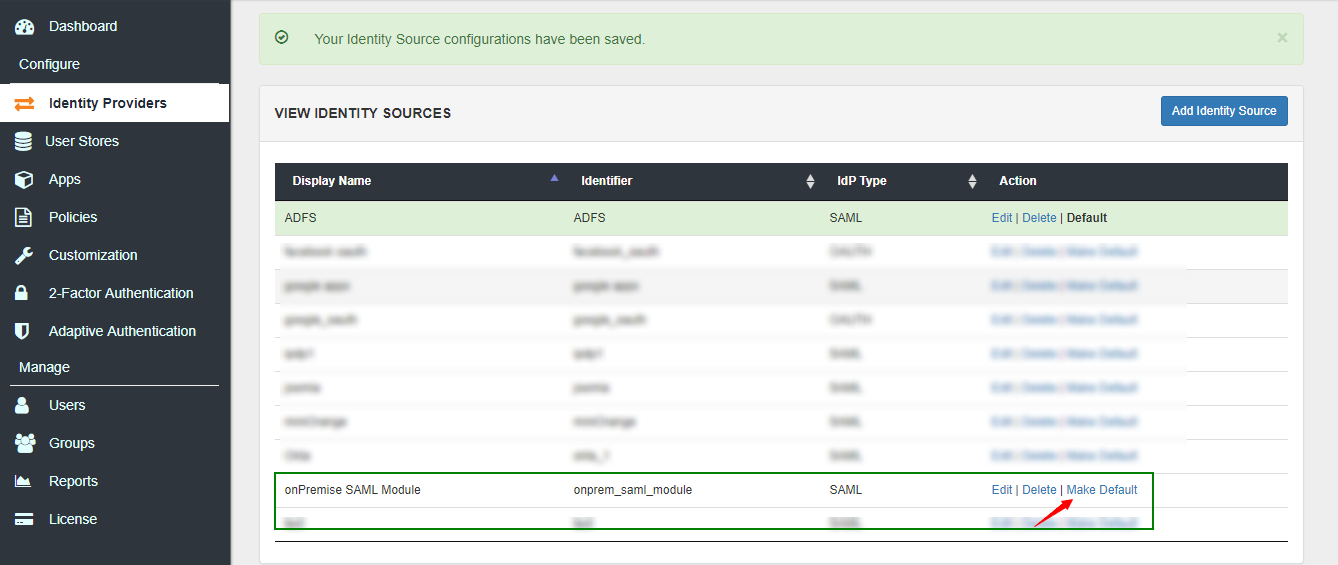
1. Login to the admin dashboard.
2. Navigate to Identity Providers in the left navigation bar.
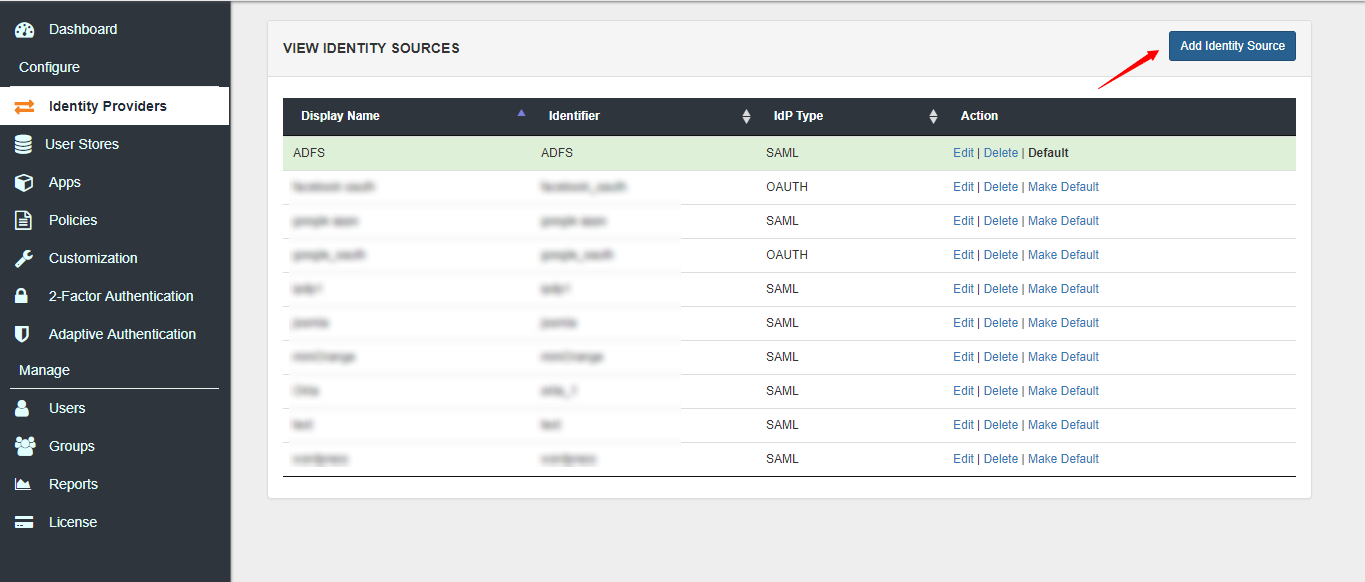
3. Click on Add Identity Source.
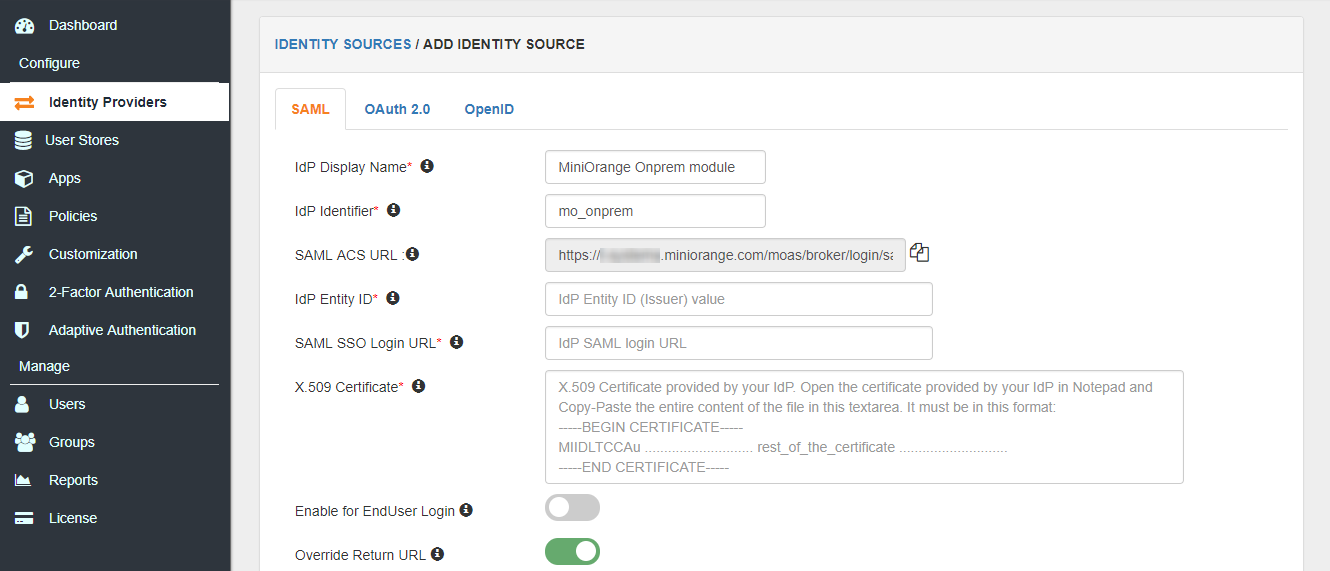
4. Add a SAML Identity Source in miniOrange with the details of the on-premise SAML Module.
| Parameter | Value |
|---|---|
| IdP Entity ID / Issuer | As set in the above step |
| SAML SSO Login URL | Of the format http://< hostname_of_server >/saml/samlsso.php |
| X.509 Certificate | The SP Certificate in the SAML Module |
5. Save the Identity Source and make it as the Default Identity Source by clicking on Make Default.
miniOrange gateway is a small piece of software that can reside on a shared machine. It wont need its own machine and our customers generally install it on any server thats already in the DMZ.
Click here for more.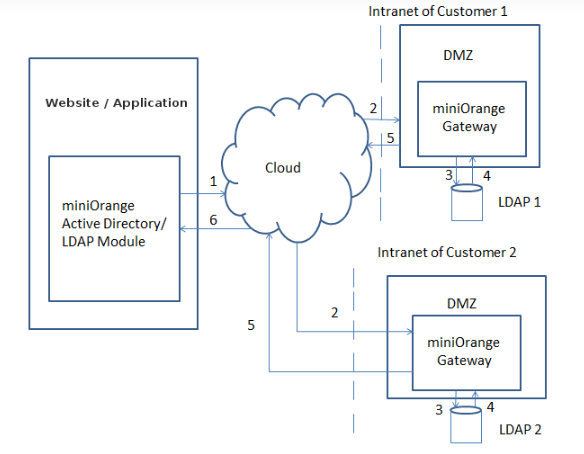
This is used to set an external properties file which Tomcat uses to read and write the LDAP configuration. To set the external properties file, follow the steps below:
1. Open up the catalina.bat(catalina.sh in Linux servers) if the Tomcat installation.
2. Add the following line below # ----- Execute The Requested Command -------------------------------------
Linux
JAVA_OPTS="$JAVA_OPTS-Dexternal.properties.file=/home/user/application.properties
Windows
set JAVA_OPTS=%JAVA_OPTS%-Dexternal.properties.file=C:\Users\user\Documents\application.properties
3. Save the file.
4. Restart Tomcat.
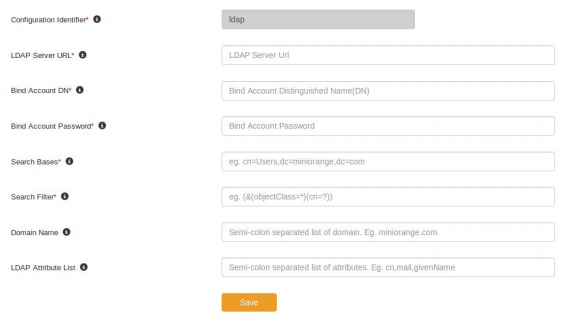
This step is required to setup the LDAP Connection on the Gateway. Follow the steps below:
1. Login into the miniOrange LDAP Gateway.
2. Navigate to the Configure Keys section.
3. Set the Customer ID and Token Key of the miniOrange account and click on Save.
4. Navigate to the LDAP Configurations section. Click on Edit for the default LDAP Configuration.
5. Add the following configuration details. Click on Save.
Follow the steps below to configure the scheduled sync
1. Navigate to the Scheduler section.
2. Set the Sync Interval in hours. This determines the number of hours after which the scheduled sync will run. In typical setups, it is 24 hours.
3. Set the Sync time in HH:mm format. This determines the time of the day in which the first scheduled sync will run. Click on Save.
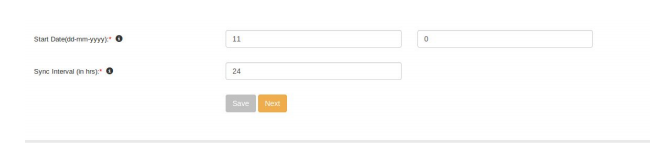
The scheduled sync will now run at the set time.
Follow the steps below to configure the LDAP Gateway in miniOrange Admin Console:
1. Navigate to the miniOrange Admin Console. Login with your miniOrange credentials.
2. Navigate to the User Stores section.
3. Click on Add User Store.
4. Select the type as AD/LDAP and set Store LDAP Configuration On-Premise.

Set the miniOrange Gateway URL.
Select Activate LDAP.
Click on Save.
The miniOrange LDAP Gateway Sync tool acts as an intermediary between an on-premise Active Directory/LDAP Server and miniOrange Cloud-based service.
It allows for the following functionalities:
The miniOrange LDAP Gateway Sync tool acts as an intermediary between an on-premise Active Directory/LDAP Server and miniOrange Cloud-based service. It allows for the following functionalities:
This lets you configure multiple Active Directories in miniOrange for authentication, and which Active Directory is to be used for authentication into which application.Eg, You can configure AD1, AD2,....ADN as an authentication source for apps. With this, users in all these directories will be able to single sign on into all the apps.
LDAP as a proxy acts as a middleware layer between the LDAP client, eg. anyCMS ( Wordpress for eg.) and the Active Directory, the LDAP Directory Server.
LDAP Proxy resides in the DMZ between a cloud-based application and an internal LDAP and is responsible for forwarding LDAP requests from the application to the on-premise server. This allows the application to access the proxy for LDAP integration and the internal directory remains unexposed within the network.
If you are using a Virtual Private Network ( VPN ) to allow your users to connect over a public network, enhancing the security becomes a concern since users gain access to sensitive digital assets. miniOrange can be of great value here by providing 2-factor Authentication on top of VPN Authentication. This secures the access to protected resources instead of relying on only the VPN username / password.
Remote Authentication Dial-In User Service (RADIUS) is a client/server protocol that provides client authentication and authorization. It enables remote access servers to communicate with a server to authenticate users and authorize their access to the requested system or service.
| Clear-text | NT hash(ntlm_auth) | MD5 hash | Salted MD5 hash | SHA1 hash | Salted SHA1 hash | Unix Crypt | |
|---|---|---|---|---|---|---|---|
| PAP | |||||||
| CHAP | |||||||
| Digest | |||||||
| MS-CHAP | |||||||
| PEAP | |||||||
| EAP-MSCHAPv2 | |||||||
| Cisco LEAP | |||||||
| EAP-GTC | |||||||
| EAP-MD5 | |||||||
| EAP-SIM | |||||||
| EAP-TLS |
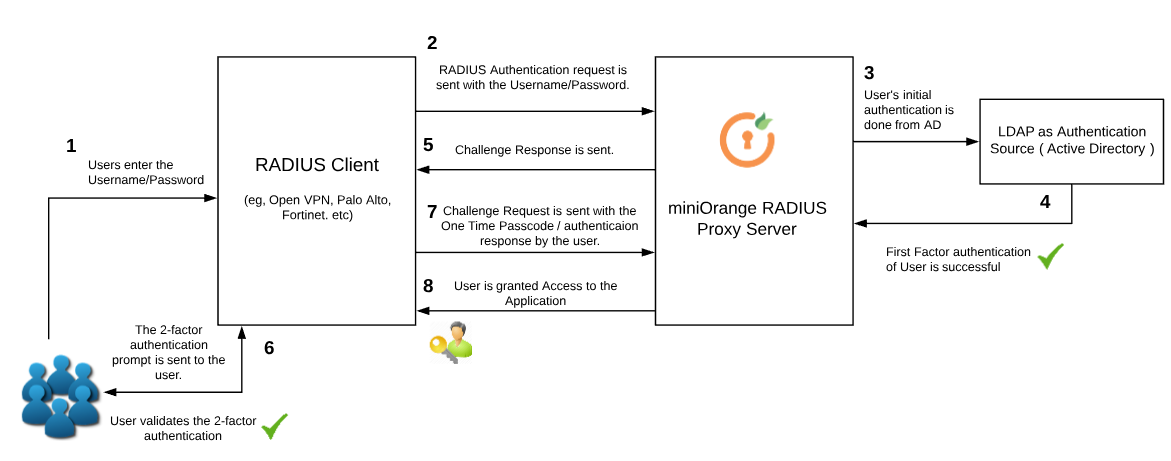
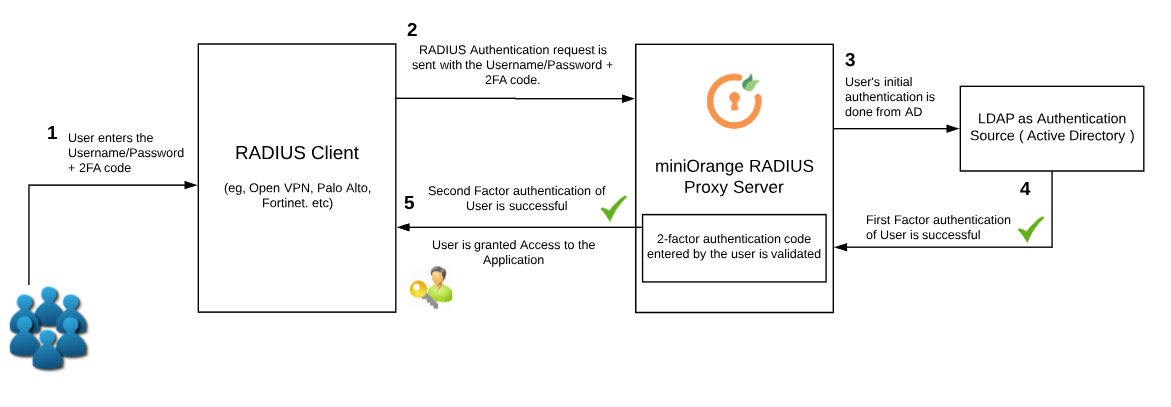
miniOrange accomplishes this by acting as a RADIUS server, that accepts the username/password of the user entered as a RADIUS request, validates the user against the user store as Active Directory ( AD ), prompts him for the 2-factor authentication and either grants/revokes access based on the input by the user.
The 2-factor authentication can be of two types depending on the VPN clients.
In this case, there are two requests. The initial one is with the user's username/password that is validated against the credentials stored in Active Directory. After the first request sends a success response, a challenge request is sent to validate the 2-factor authentication of the user( for eg, in the case of OTP Over Email, an One Time Passcode is sent to the user's email ). The user validates the second factor after which he is granted access to the application.
Authentication methods that can be used:
RADIUS Clients that support this authentication type:
Further down, there are two types of authentication in this:
In both of the above cases, miniOrange accepts the request and validates the username/password first and then the 2-factor code entered by the user.
Authentication methods that can be used:
RADIUS Clients that support this authentication type:
1. Login to the admin dashboard.
2. Navigate to Apps >> Manage Apps in the left navigation bar.
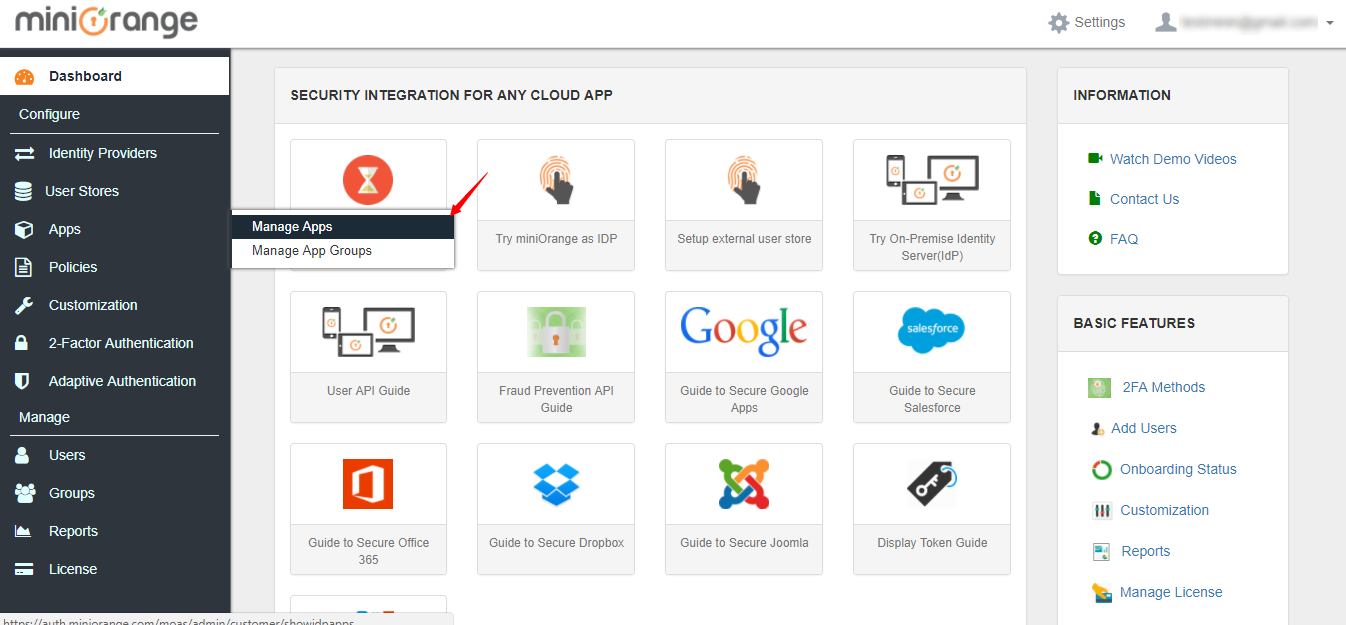
3. Click on Configure Apps.
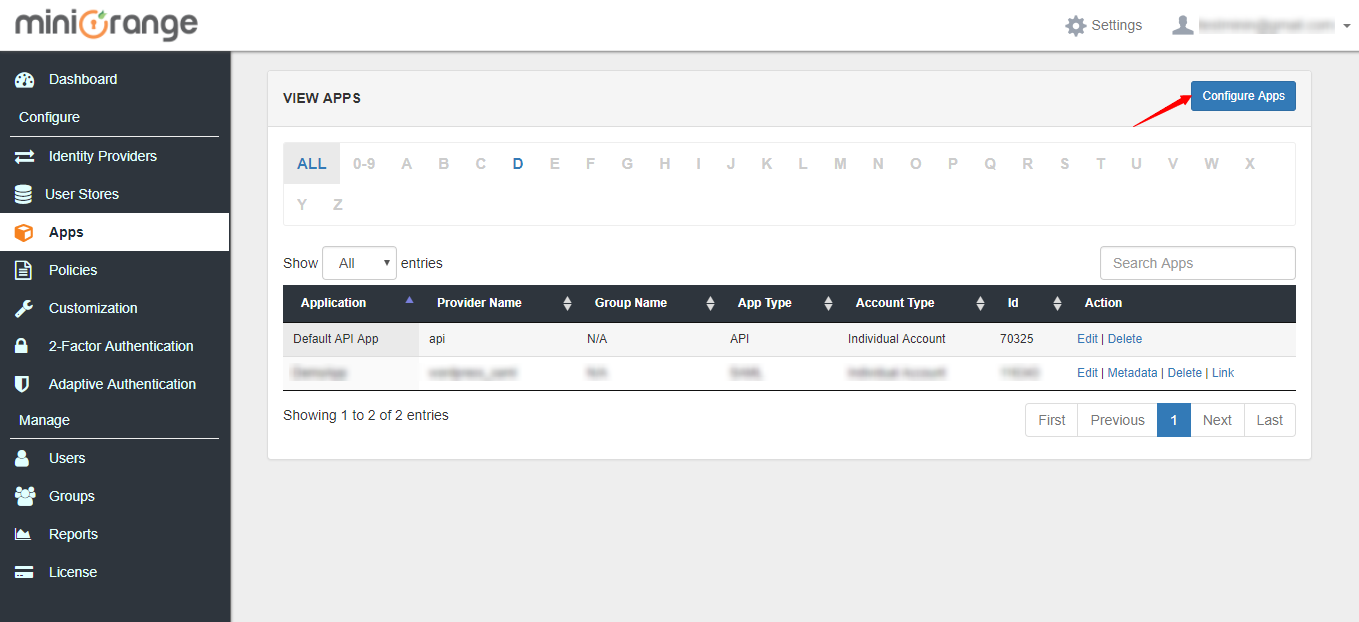
4. Go to Radius applications tab and select Radius Server app. Click on Add App button.
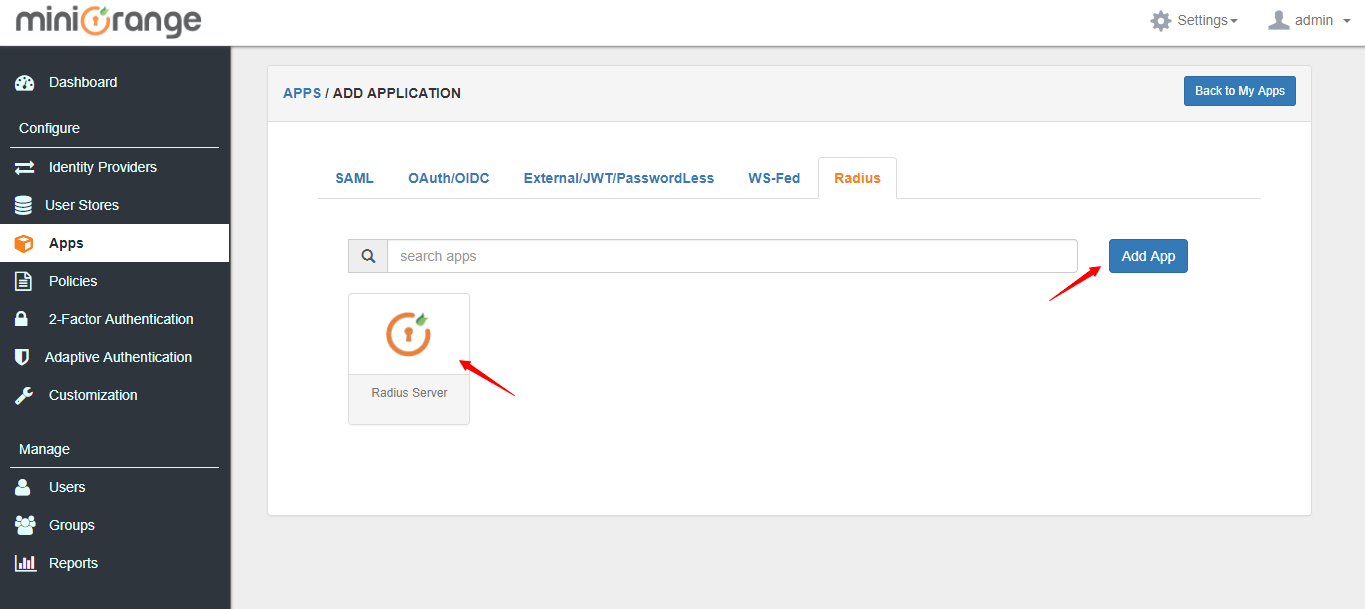
5. Enter the radius Client Name, Client IP and Shared Secret which you will need to configure in radius client as well.
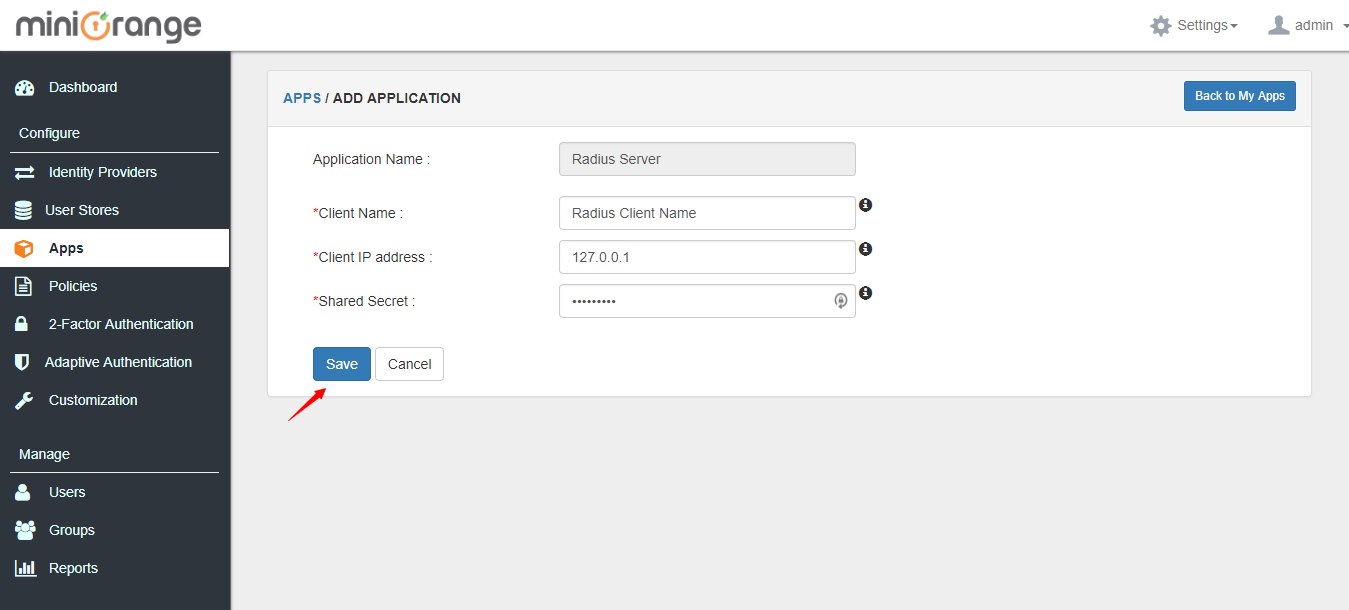
6. Click on Save button.
1. Go to User Stores menu and click on Add User Store button.
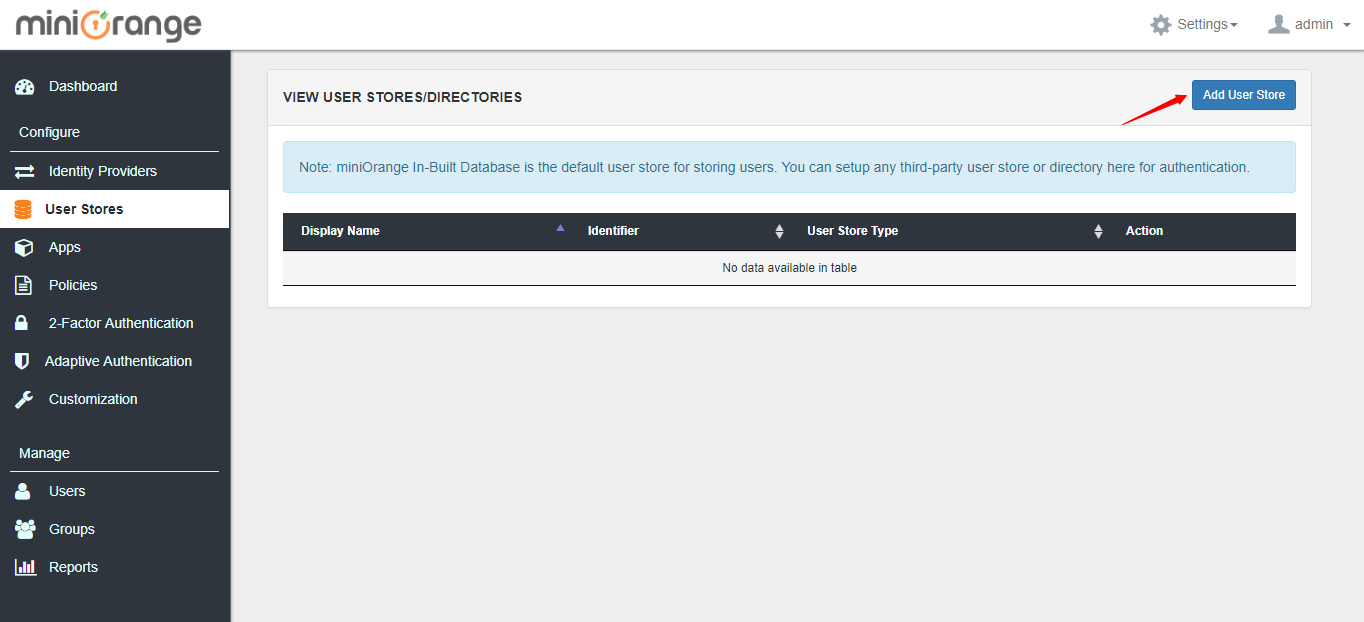
2. Configure your LDAP settings.
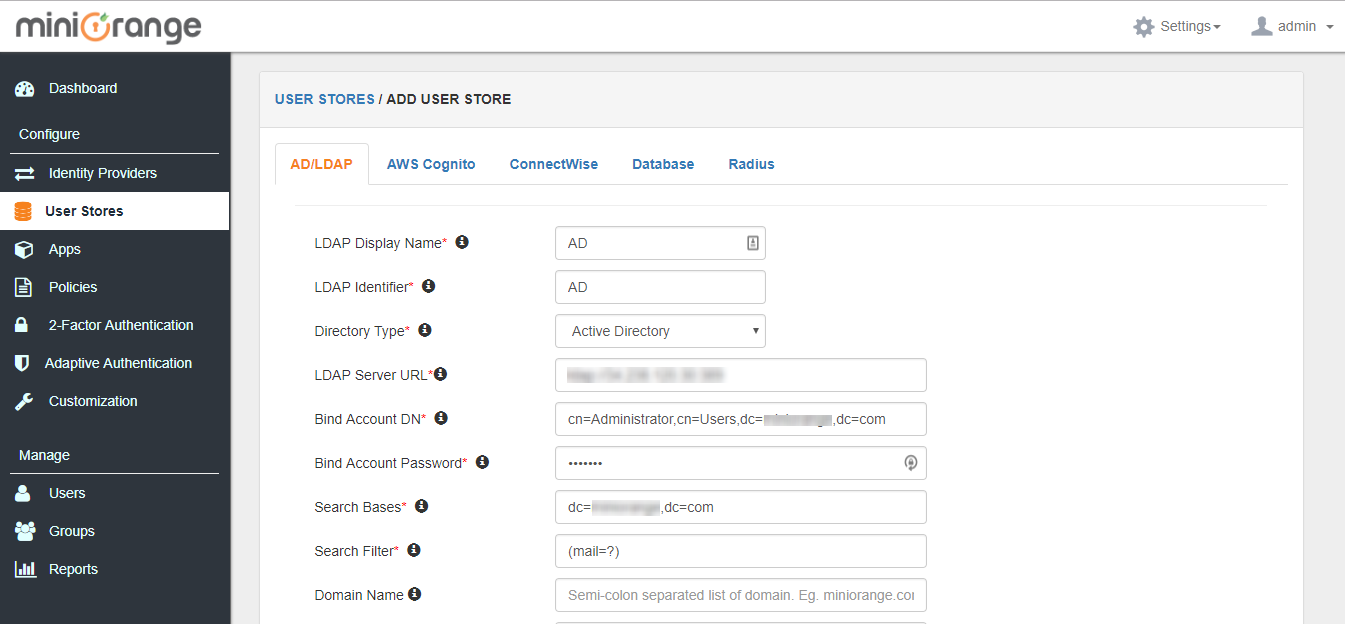
3. Make sure to keep the below options enabled.
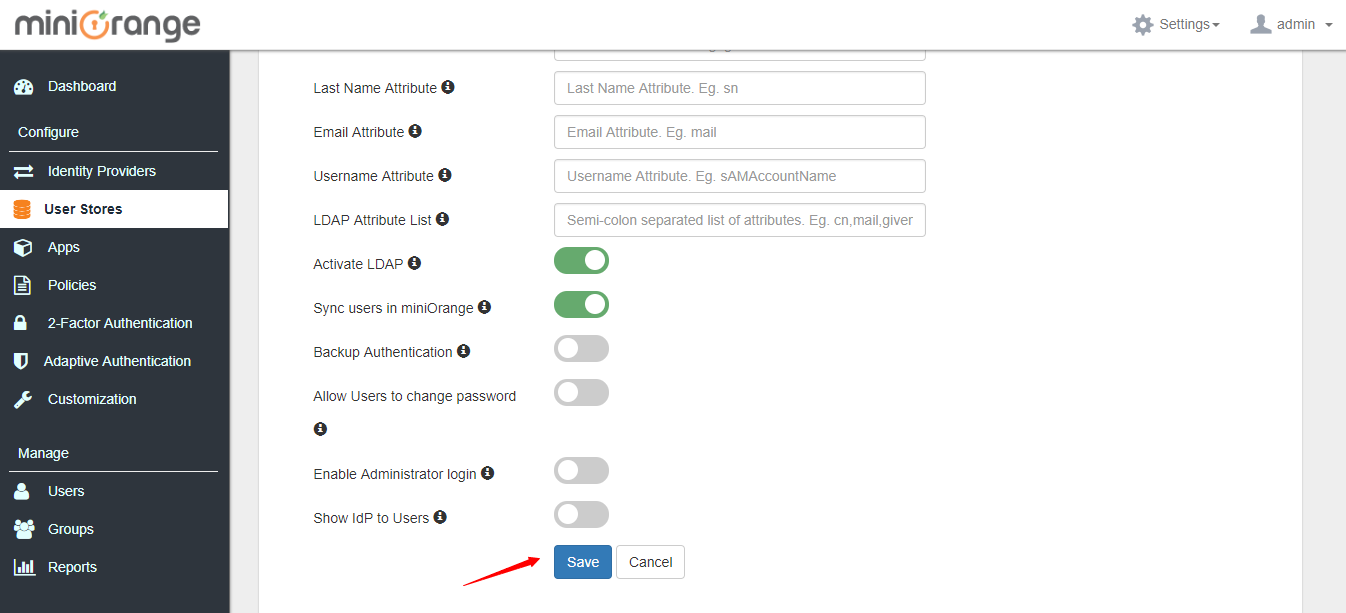
4. Click on Save.
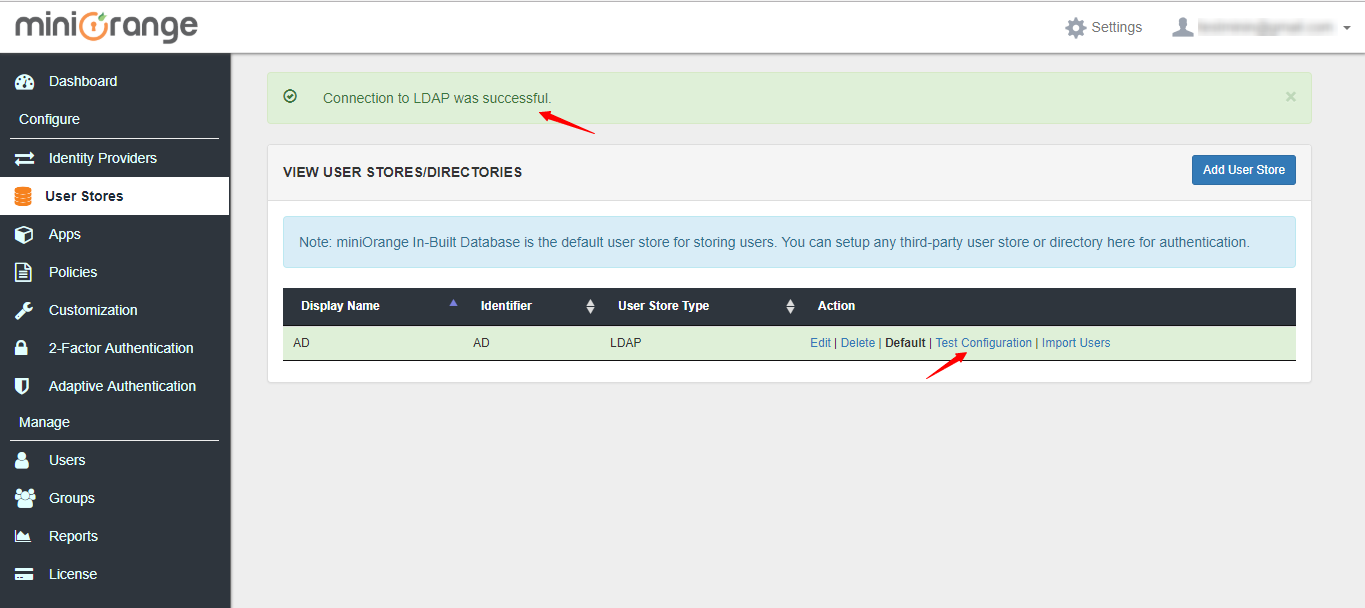
5. After you save, click on Test Configuration to verify your LDAP settings
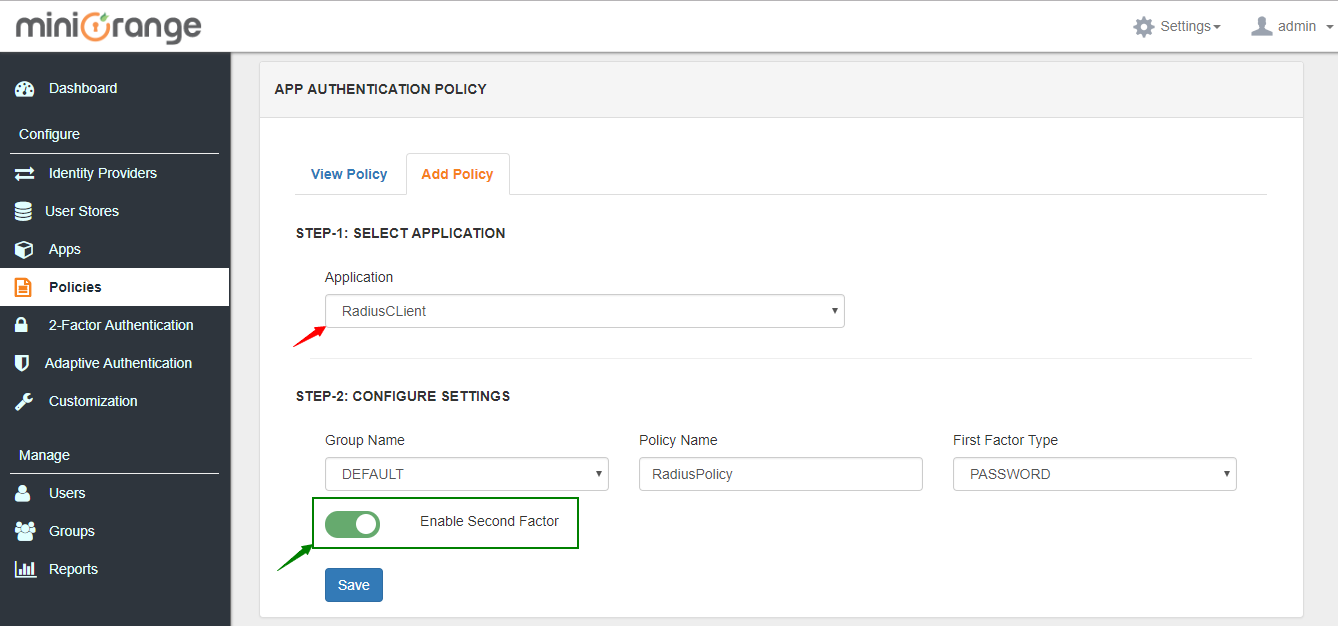
1. Go to Policies tab and click on App Authentication Policy.
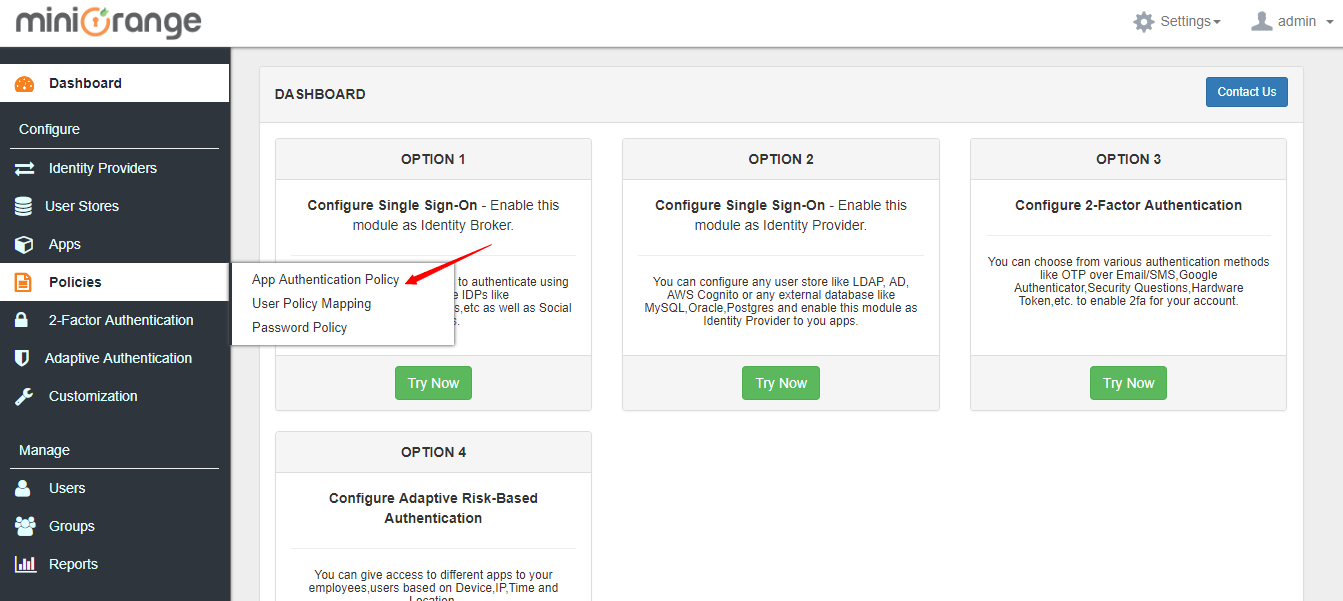
2. Go to Add Policy tab and add policy for application added in step 1.
You can configure your radius client with details below:
Radius Server IP / Host : IP or domain name of server where you have installed miniOrange.
Server Port : 1812
Shared Secret : Configured in Step 1.
The configuration at the RADIUS client's side depends on the VPN Client. OpenVPN has been demonstrated as an example here.
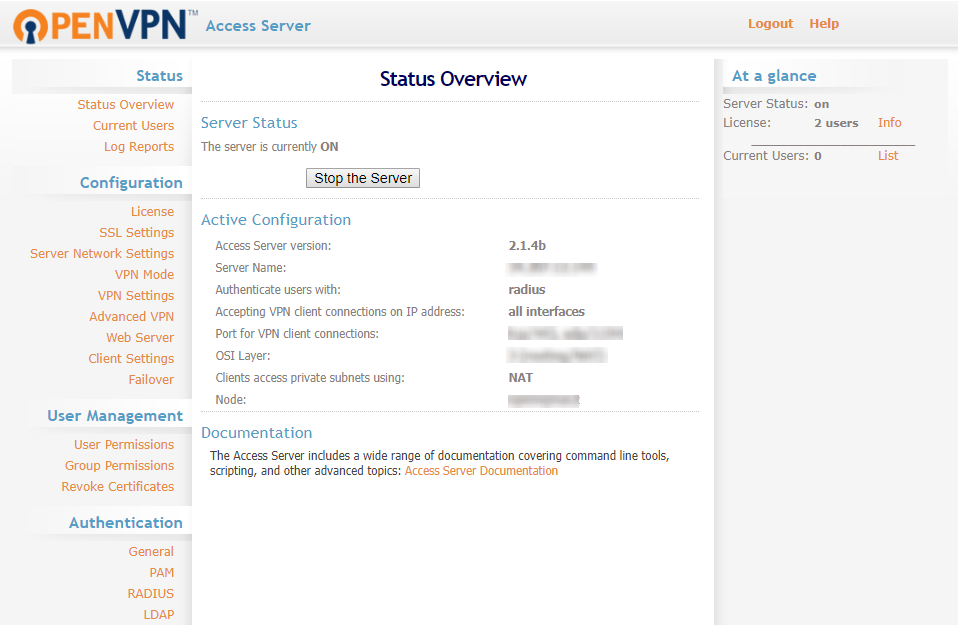
Click here to see the detailed steps.1. Login to the OpenVPN admin dashboard.
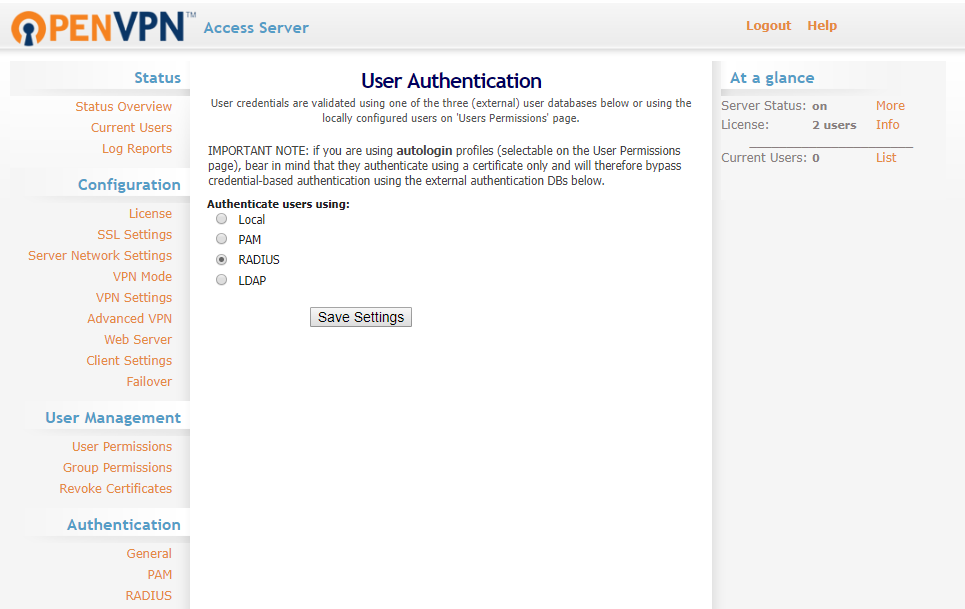
2. Navigate to Authentication >> General in the left navigation bar. Select RADIUS and save the settings.
3. Navigate to Authentication >> RADIUS in the left navigation bar. Select PAP as the RADIUS authentication method.
In the RADIUS Settings below, enter the Radius Server IP / Host as the IP or domain name of server where you have installed miniOrange, Server Port as 1812 and Shared Secret configured in the previous step.
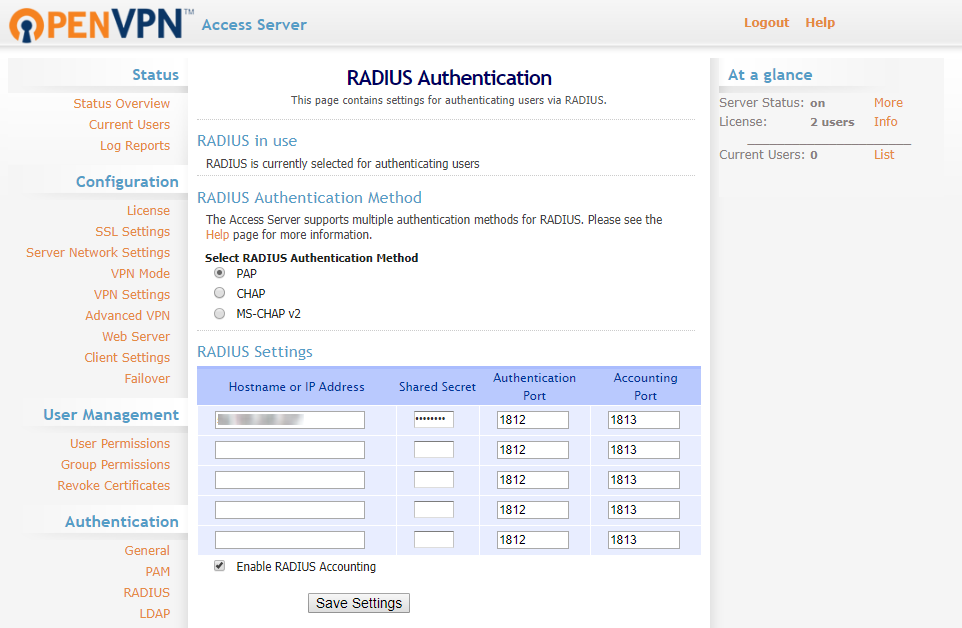
4. Click on Save Settings.
This is how the actual VPN login with 2FA works.
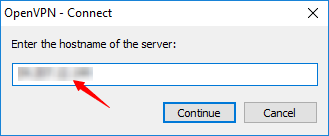
1. Connect to OpenVPN by entering the hostname of the server.
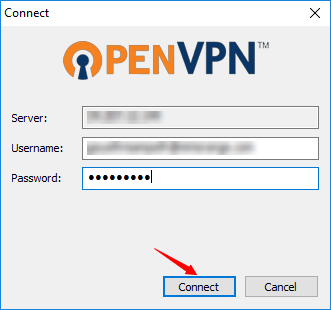
2. Enter your AD username & password and click on Connect.
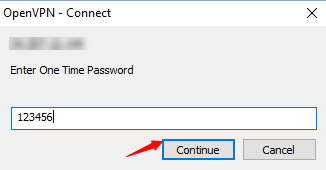
3. Now, you are prompted for the 2-factor authentication code. Enter the code and click on Continue.
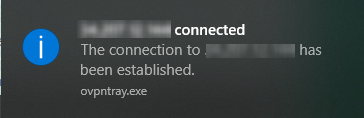
4. After successful validation, you are connected.
The users enter their AD credentials to log in to Palo Alto, the Radius Client, and after the username/password validation, an One Time Passcode is sent to the user's mobile number. The user enters the One Time passcode received, which is validated by miniOrange to gain/deny access to the user.
The users enter their AD credentials and the 2FA code ( Software Token ) to log in to OpenVPN, the Radius Client, and after the username/password validation, are prompted for the 2-factor authentication. Post validation of 2nd factor, users are logged in to OpenVPN.
The users enter their AD credentials to log in to FortiNet, and after the username/password validation, an push notification is sent to the user's mobile, that he needs to accept to get logged in to AWS.
When users connect to a Remote Desktop Service, 2-factor authentication is essential to enforce high security protection of your business resources. Installing miniOrange 2-Factor Authentication for Windows Logon adds two-factor authentication to Windows login attempts over RDP.
The user initiates the login to Remote Desktop Service either through a Remote Desktop Client or via the RD Web login page from his browser, after which the RADIUS request is sent from the miniOrange RD Web component installed on the target machine to the miniOrange RADIUS server, which authenticates the user via Local AD, and after successful authentication, 2-factor authentication of the user is invoked. After the user validates himself, he is granted access to the Remote Desktop Service.
A user can try to connect to RDS (Remote Desktop Services) via 2 ways :
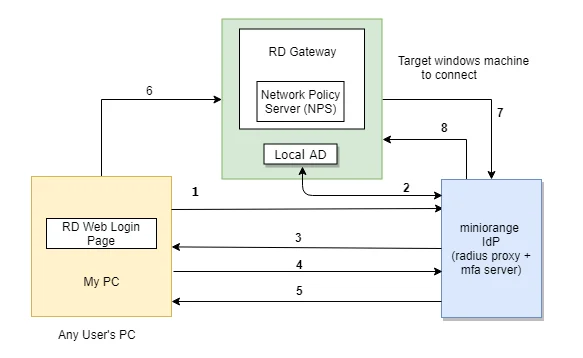
1. User goes to the RD Web login page from his browser, and enters his username/password and clicks on Submit.

2.

This error is usually caused by a time mismatch between the miniOrange server and your mobile device (or a mismatch between your machine time and mobile device time in the case of Offline Authentication for Windows/Linux/Mac).
Security tokens generated by Authenticator apps are "Time-based" (TOTP). They are valid only for a specific 30–60 second window. If the system time on your phone running the Authenticator or your machine(in case of offline authentication) is fast or slow by even 2 minutes, the code will be considered expired by the server/machine.
