Google Workspace (GSuite) IP Restriction - Google Marketplace
Configure Google Workspace (GSuite) IP Restriction - Google Marketplace
By enabling G Suite's IP, device, time, and location restriction features, users can enhance the security of Google Workspace. miniOrange Single Sign-On (SSO) & IP Restriction app can be integrated with any G Suite app and offers granular options for access policies like IP address, time-based, device, and location-based restrictions.
By configuring adaptive authentication methods, users can add an extra layer of security and reduce the burden of 2-factor Authentication (2fa). Admins can use this solution to control user access and provide multi-factor authentication security based on risk, making it a simple, easy-to-set-up, and beneficial solution for all users.
Video Setup Guide
Follow the Step-by-Step Guide given below for enabling the adaptive
authentication for Google Workspace
1. Google Workspace (GSuite) IP restriction integration
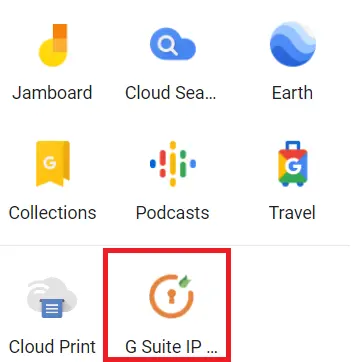
Once the app is installed for your GSuite account, you can initiate the login from the Apps Section.
This will open the dedicated xecurify admin dashboard for your admin account using which you can configure and enable Single Sign-On as well as
Restriction for your GSuite users.
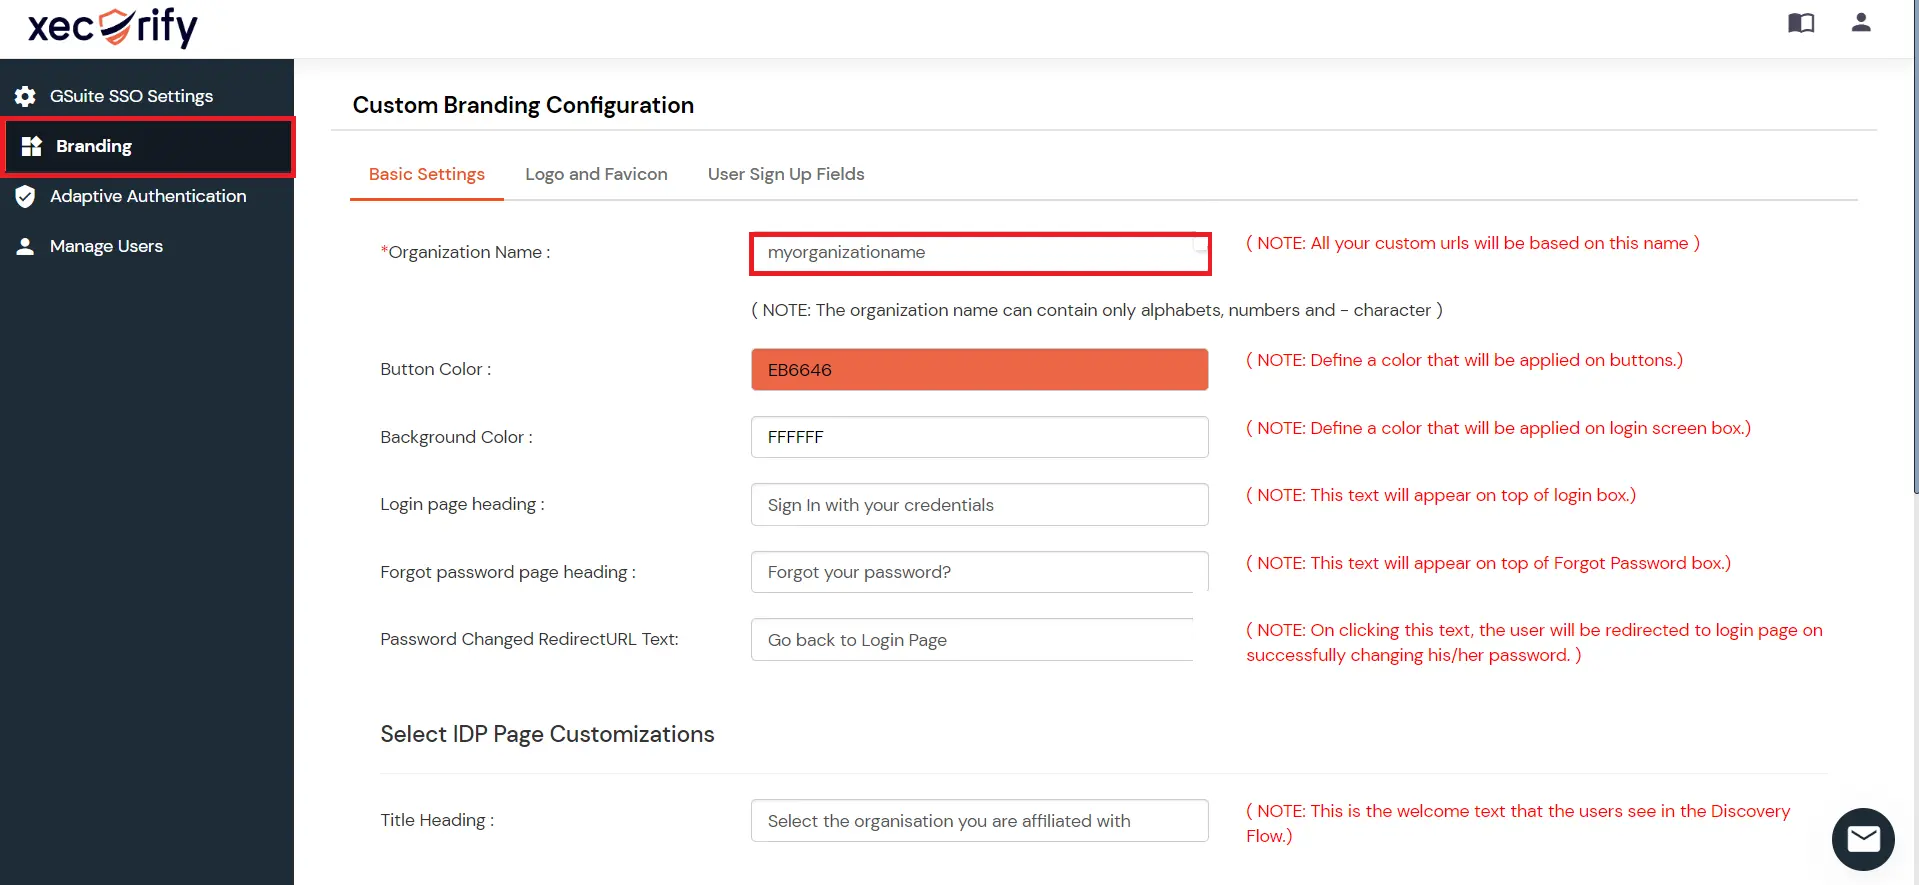
2. Setup Branding
First of all, you will have to set up branding for your account. Go to the Branding section from the side menu to set up a dedicated branded
subdomain for your account in our solution. You can also change the look and feel of the login pages from this section..
In Basic Settings, set the Organization Name of your choice. You will get your dedicated service URL based on the
organization name you will provide. For e.g if the organization's name is abc, your dedicated service URL will be https://abc.xecurify.com
Click Save. Once that is set, the branded login URL would be of the format https://<abc>.xecurify.com/moas/login if your organization's name is abc.
Once the branding is set for your organization, you are ready to enable Single Sign-On & Restrictions based on IP Address, Location, Time &
Device.
You can follow the below steps to enable Single Sign-On in a single click :
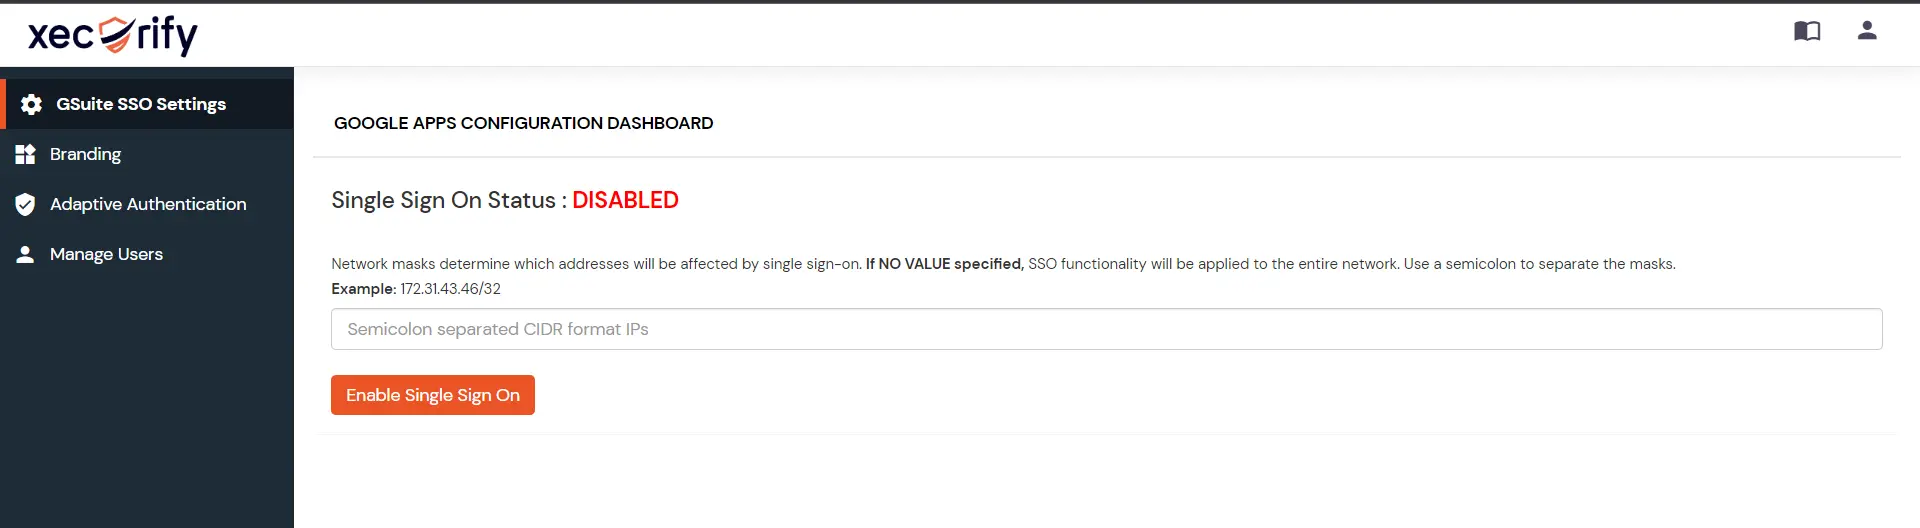
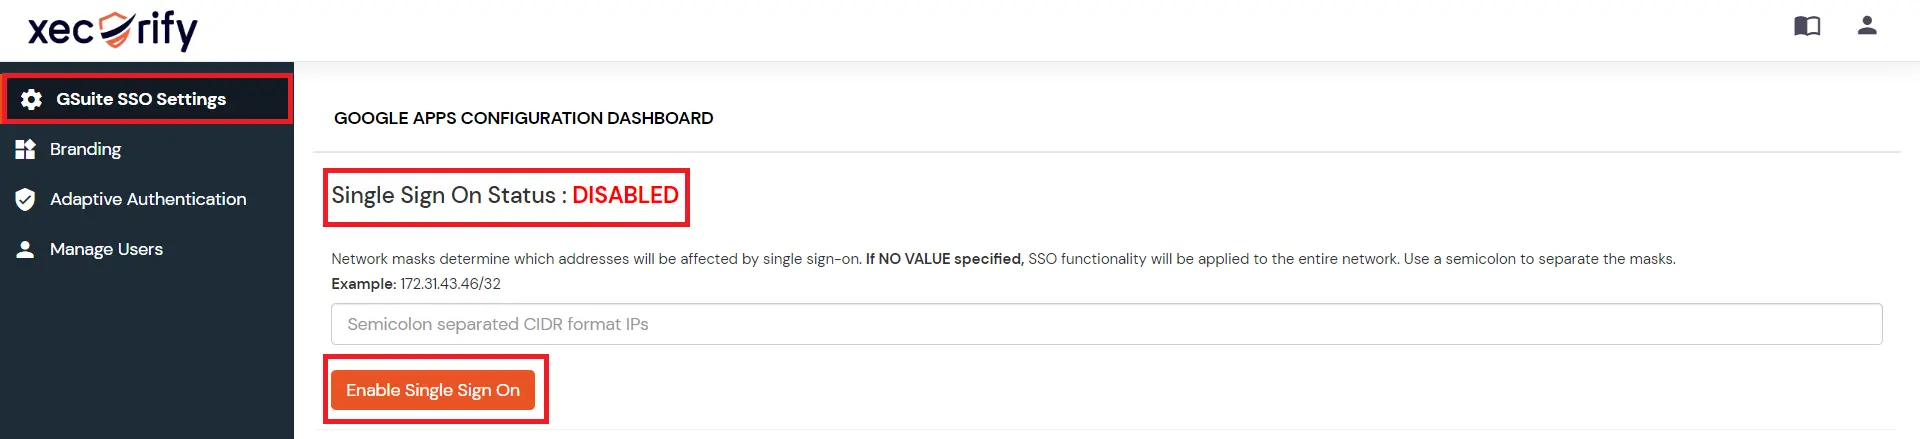
Go to the GSuite SSO Settings option from the Side Menu.
On the loaded page, you will be able to see the current status of the Single Sign-On. It will be disabled by default when you create a new
account.
You can click on the Enable Single Sign On button to enable SSO for your organization.
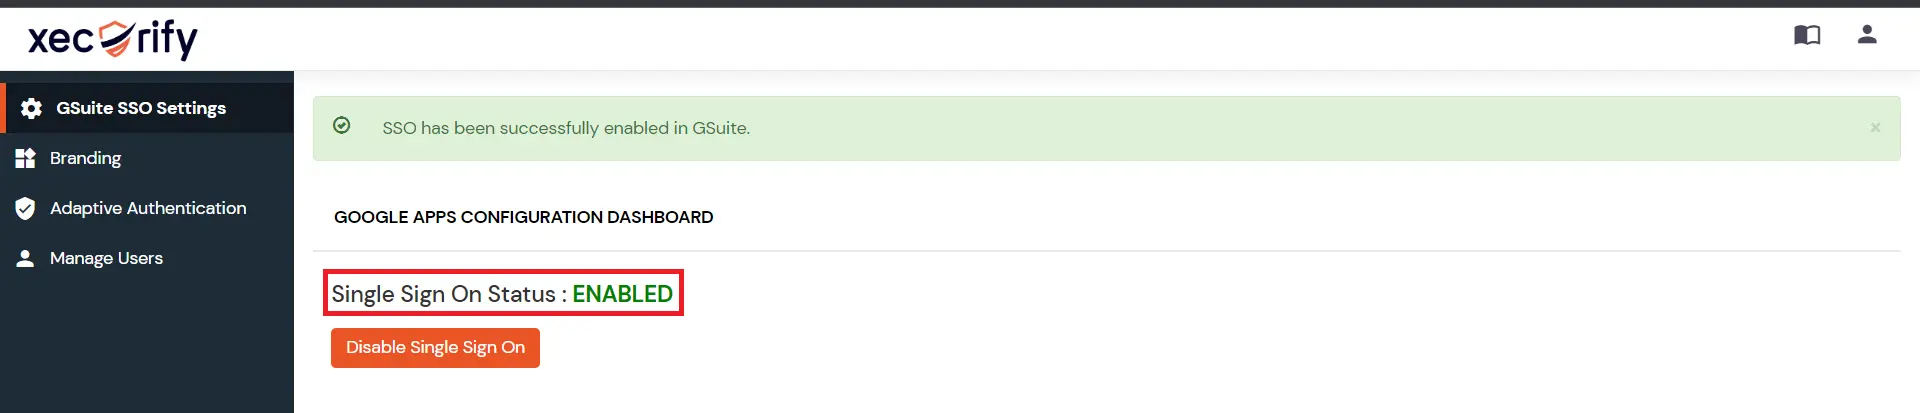
Once the operation is complete, you will see the SSO status changed to Enabled which means that the SSO is enabled successfully for your
organization.
Upon enabling the Single Sign-On, all of our GSuite users will be redirected to your xecurify service URL for authentication.
4. Enable Adaptive Authentication
Once the SSO is enabled, Adaptive Authentication can be enabled on top of it, to restrict the users based on different factors such as IP, Device,
Location & Time. You can follow the below steps to enable different restriction for your organization.
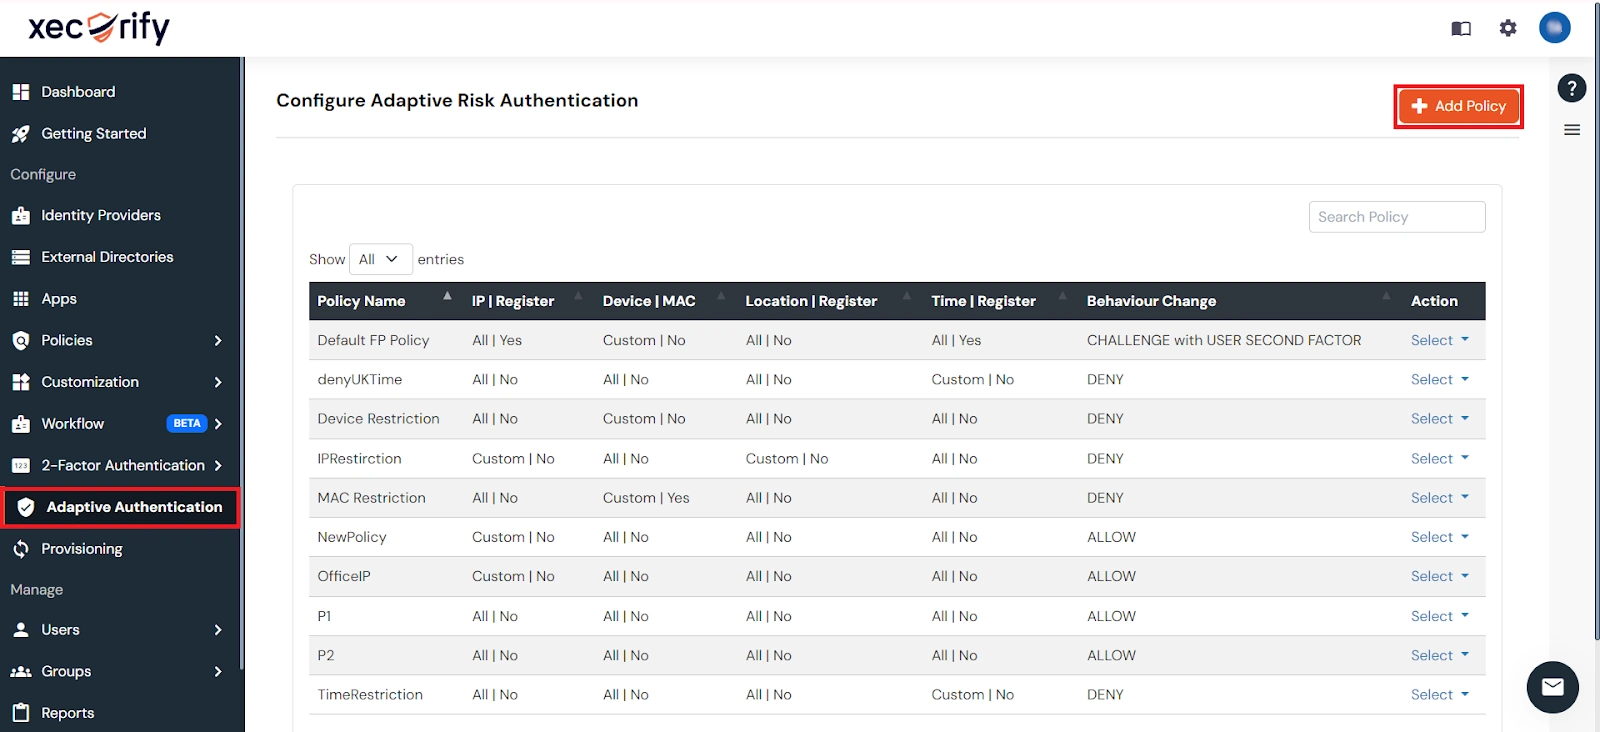
Go to the Adaptive Authentication option from the side menu. Click on Add Policy. This will open the Restriction policy configuration page from where you can configure & enable different restrictions.
There are six different sections you can configure in a Adaptive Authentication Policy :
IP Restriction Configuration
Device Restriction Configuration
Location Restriction Configuration
Time Restriction Configuration
Action for behavior Change Configuration
Email Alerts and Custom Error message
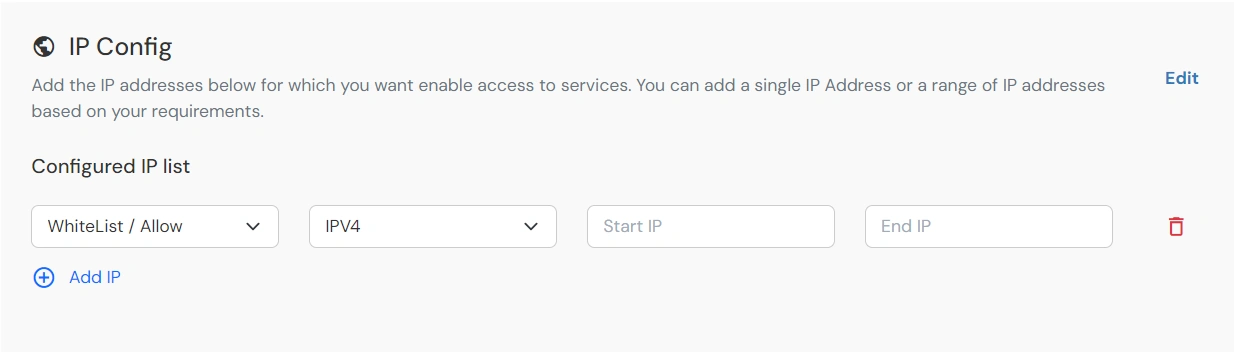
To enable restriction based on the IP Address:
In this restriction method admin configures a list of IP addresses to allow or deny access on and when a user tries to login into any of the applications
configured with adaptive authentication, his IP address is checked against the configured IP list and based on that the action is decided as per the
configuration (.i.e. Allow, Deny or Challenge).
Enable the Enable IP Restriction option. This will expand the configuration section.
Select Action for behavior Change if the Users IP Address is not in the configured list.
Specify the IP Address which you want to whitelist. For the IP Range other that the whitelisted one, you can select the above setting to reflect.
Choose either allow or deny by selecting the radio button next to it.
If a user tries to login with the whitelisted IP address, they will always be allowed access.
We support IP addresses range in three formats i.e. IPv4, IPv4 CIDR and IPv6 CIDR. You can choose whichever is suitable for you from the dropdown menu.
You can add multiple IP's and IP ranges by clicking on the + button.
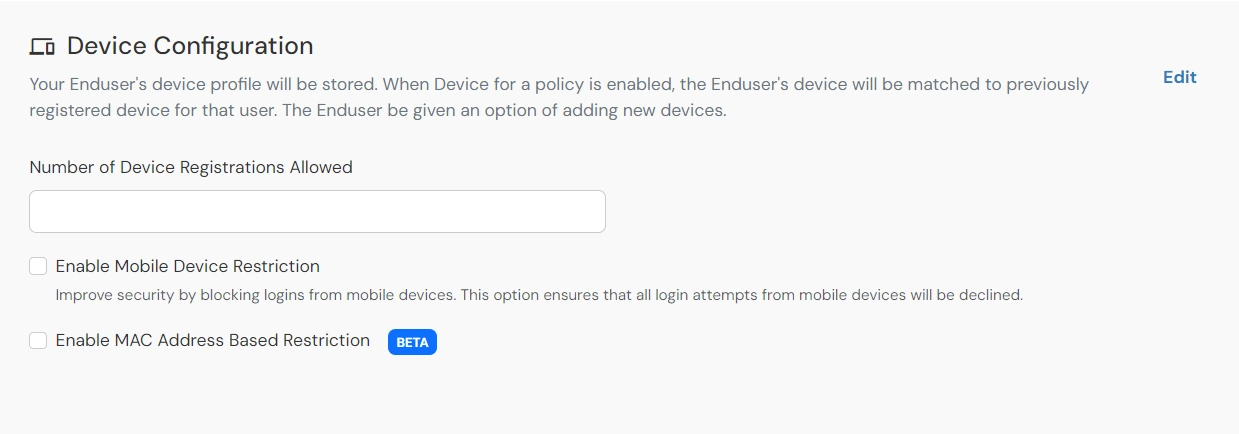
To enable Device Based Restriction:
In this restriction method admin allow end-users to add a fixed number of devices as Trusted devices for their account(A device here refers to a Browser Session). Once a device is registered for a user, then that user will be allowed to login without any Restriction (This works with all other Restriction methods also). If the users registered Device exceeds the total registered device limit specified by the admin,In that case the user will be either Challenged or Denied as specified in the policy by the admin.
Enable the Enable Device Restriction option. This will expand the configuration section.
Enable the Allow Users to Register Device option.
In the input field next to Number of Device Registrations Allowed enter the no. of devices you want your end-users to register.(2-3 devices are recommended). The end-users will be able to register that many devices for their accounts.
Select your action if the number of devices registered by users exceeds the allowed limit. (.i.e Challenge or Deny)
Enable the option Send email alerts to Users if number of Device registrations exceeded allowed count if you want to alert the user about no of devices exceeding the limit.
Select the action that you want the system to perform in case user is logging in from an unregistered device and has already registered the
max allowed devices.
Notes :
Users are only allowed to register devices when Challenge is selected as the Action.
Once a Device is registered, users will be allowed to login seamlessly without any restriction.
If you select Challenge as the action then select the same option in the Action for behavior Change Configuration section.
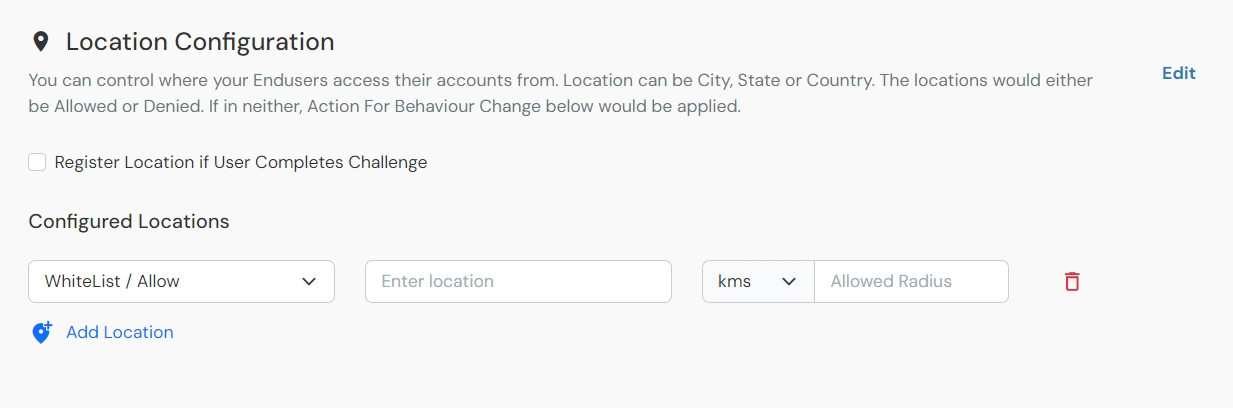
To enable Location Based Restriction:
In this restriction method admin configures a list of locations where we want to allow end-users to either login or deny based on the condition set by the
admin. When a user tries to login with adaptive authentication enabled, his Location Attributes such as (Latitude, Longitude and Country Code) are verified
against the Location list configured by the admin. And based on this user will be either allowed, challenged or denied.
Enable the Enable Location Restriction option. This will expand the configuration section.
In the enter location input field enter the Location Name and then select the correct location from the search results using the UP & DOWN
navigation keys.
Add the In and Around Distance for your location in the next input field. This will be the total area in and around the location we have
configured using the Latitude and Longitude points.
In the next select list, select your distance parameter as either KMS(KiloMeters) or Miles.For each Location you add, you can choose to either allow or
deny it by enabling or disabling the switch button next to it.
You can click on the + button to add more than one location and then follow steps 2-4 as mentioned above.
To enable Time Based Restriction:
In this restriction method admin configures a time zone with Start and End Time’s for that time zone and users are either allowed, denied or challenged
based on the condition in the policy. When an end-user tries to login with the adaptive authentication enabled, his time zone related attributes such as
Time-Zone and Current System Time are verified against the list configured by the admin and based on the configuration the user is either allowed, denied or
challenged.
Enable the Enable Time Restriction option.
On the Add Policy tab navigate to TIME OF ACCESS CONFIGURATION section and enable the Enable Time Based Restriction option.
From the select Timezone list, select the timezone. From the Start Time and End Time lists select the appropriate values. For each Time configuration you
add, you can choose to either allow or deny it by enabling or disabling the switch button next to it.
Enter the a value in minutes in the input field next to Time Difference allowed for Fraud Prevention check. This value allows you to specify some
relaxation before your start time and after your end time. (so if the start time is 6 AM and the end time is 6PM with a time difference value set to 30
minutes, then the policy will consider time from 5:30AM to 6:30 PM). If no value is entered in this field, the default value is set which is 15 minutes.
You can click on the + button to add more than one Time Configurations and then follow steps mentioned above.
Action For Behavior Change Section :
You can configure one of the three possible actions for your Adaptive Authentication Policy as explained below :
Action for behavior Change Options :
Attribute
Description
Allow
Allow user to authenticate and use services if Adaptive authentication condition is true.
Challenge
Challenge users with one of the three methods mentioned below for verifying user authenticity.
Deny
Deny user authentications and access to services if Adaptive authentication condition is true.
Challenge Type Options :
Attribute
Description
User second Factor
The User needs to authenticate using the second factor he has opted or assigned for such as
OTP over SMS
PUSH
Notification
OTP over Email
And 12 more methods.
Security Questions
The System will ask the user for 2 of 3 questions he has configured in his Self Service Console. Only after the right answer to both questions is the
user is allowed to proceed further.
OTP over Alternate Email
User will receive a OTP on the alternate email he has configured threw Self Service Console. Once user provides the correct OTP he is allowed to
proceed further.
Action for behavior Change and Challenge Type can be configured from the Action For behavior Change section of the Adaptive Authentication page.
Notification and Alert Message Configuration :
This section handles the notifications and alerts related to Adaptive Authentication.It provides the following options :
Get email alerts if users login from unknown devices or locations : Admin need to enable this option to enable receiving alerts for different alert
options.
Option
Description
Challenge Completed and Device Registered
Enabling this option allows you to send an email alert when an end-user completes a challenge and registers a device.
Challenge Completed but Device Not Registered
Enabling this option allows you to send an email alert when an end-user completes a challenge but do not registers the device.
Challenge Failed
Enabling this option allows you to send an email alert when an end-user fails to complete the challenge.
Next subsection is Send email alerts which allows us to enable or disable alerts for admin and end-users. To enable alerts for admins, you can enable the
“Administrators” switch button.
In case you want multiple admins accounts to receive alerts then you can enable the option for admin and then enter the admin emails separated by a ‘,’
in the input field next to Administrators email to receive alerts label. To enable alerts for the end-users, you can enable the “End Users” switch button.
In case you want to customize the deny message that end user receive in case his authentication denied due to adaptive policy, you can do this by
entering the message inside “Deny message for Adaptive Authentication” text box.