Hello there!

Need Help? We are right here!

Support Icon
miniOrange Email Support
success

Thanks for your Enquiry. Our team will soon reach out to you.

If you don't hear from us within 24 hours, please feel free to send a follow-up email to info@xecurify.com

Search Results:

×

Setup guide for miniOrange LDAP Proxy


The miniOrange LDAP Proxy is a lightweight and secure middleware component designed to enable Multi-Factor Authentication (MFA) on top of traditional LDAP connections. It acts as a bridge between your LDAP client and the LDAP server, ensuring that any bind request is authenticated not only via LDAP credentials but also through a secondary MFA check.


Prerequisites

Before configuring the miniOrange LDAP proxy, ensure the following requirements are met:

  • Java 11: Ensure Java 11 is installed (only Java 11 is supported).
  • User Registration: The user must be registered in miniOrange.
  • MFA Configuration: Enable the MFA method [ Push Notifications, out of band Email, out of band SMS ] for the user.
  • Application Creation: must have a custom desktop application created in miniorange.

Setting Up 2FA for Users

For detailed instructions on setting up two-factor authentication (2FA) for users, visit the following link: [miniOrange Documentation - Configure MFA Methods for Users]


Creating Desktop application in miniOrange

For detailed instructions on how to create desktop application in miniorange and setting user policy for 2FA push notification, visit the following link: [miniOrange Documentation - Creating Desktop application and miniOrange Documentation - Creating Policy for Application]


Note: Ensure to create an application for each and every configuration (if different) for every client it is necessary to create an application and configure it, if you want to enable/disable MFA for all users go to default policy for application and enable/disable MFA from policy section.


Configuring 2FA in miniOrange IAM

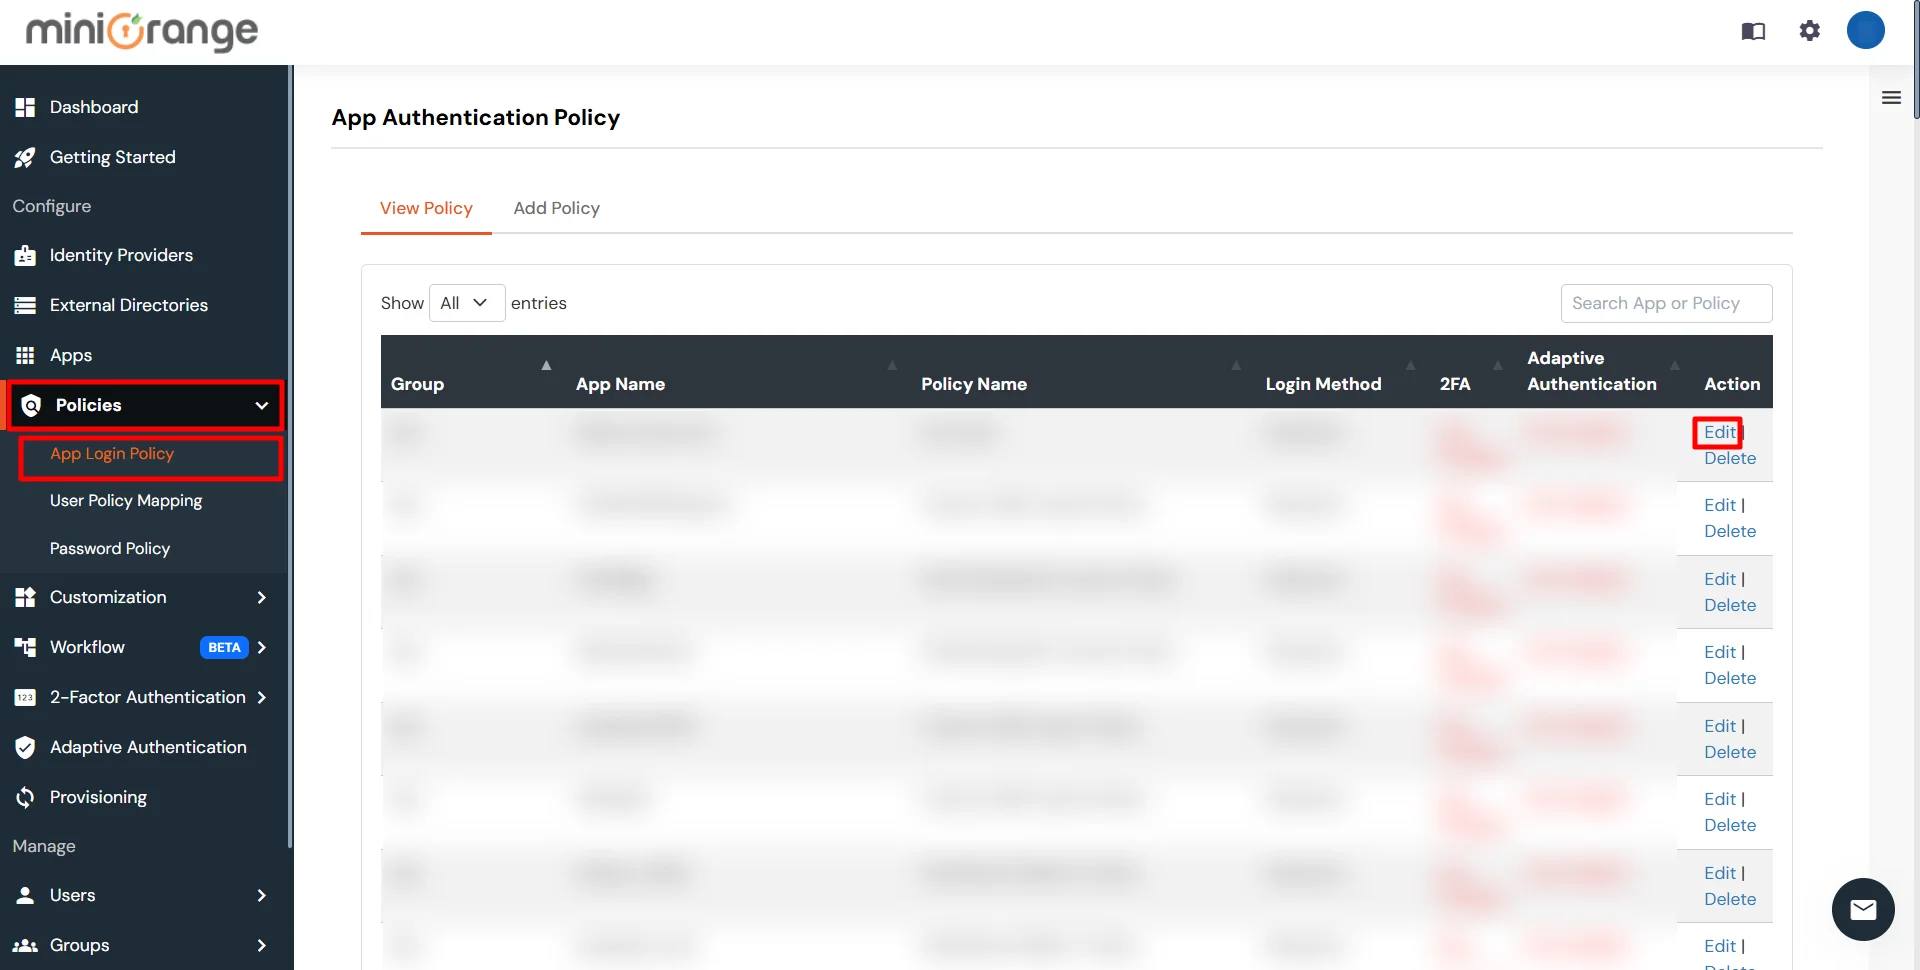
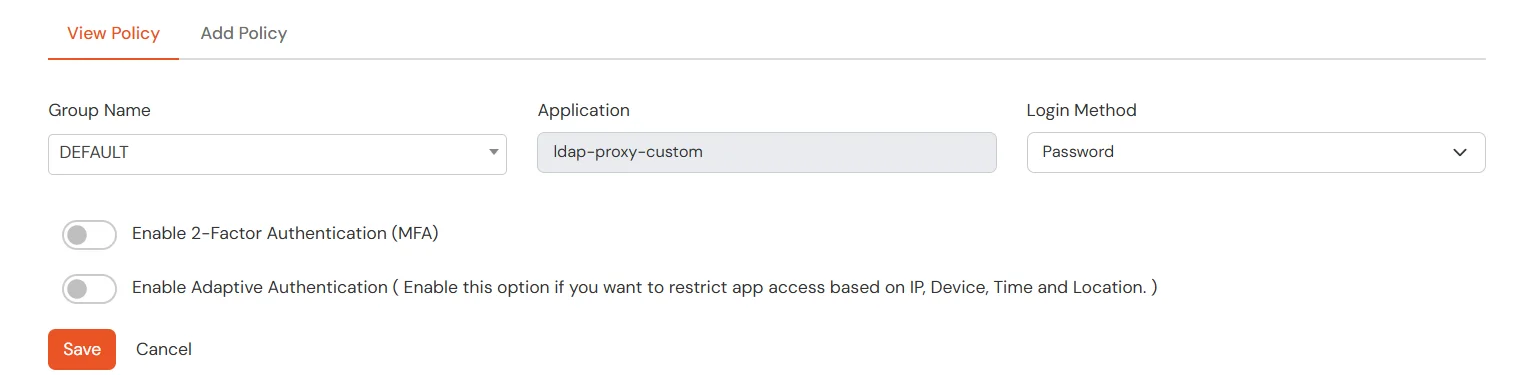
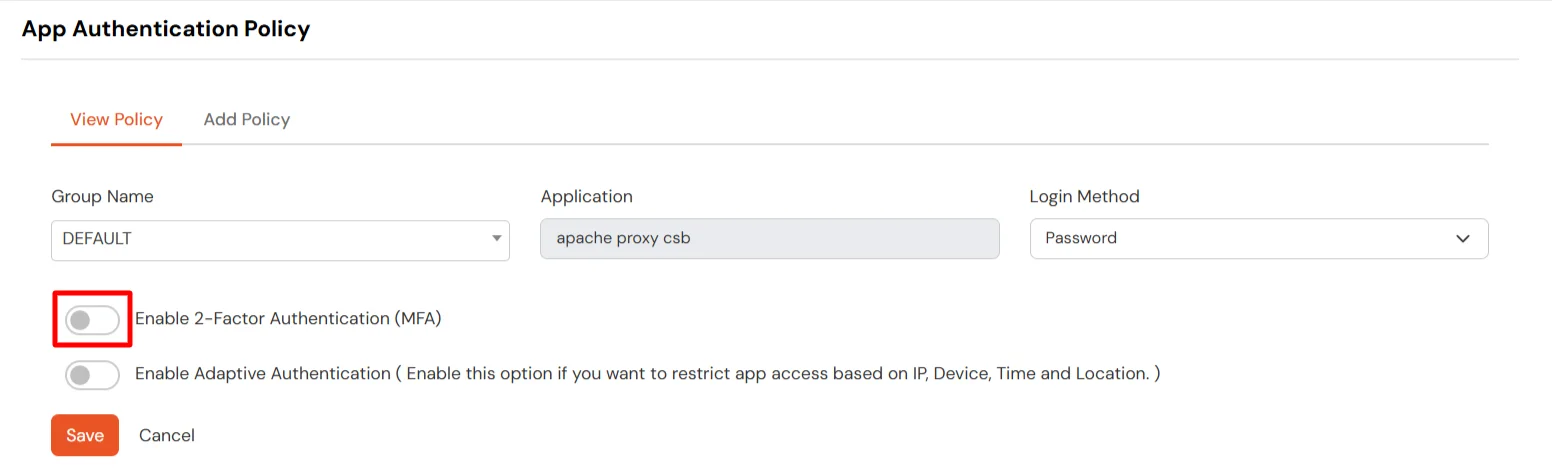
To enable or disable 2FA (Two-Factor Authentication) for your application in miniOrange LDAP proxy, follow these steps:

  • Go to the Policies > Add Login Policy section in miniOrange IAM.
  • Find your application in the list.
  • Click Edit on the rightmost side of your application's row.
  • miniOrange LDAP Proxy : Going to Policies, then click Add Login Policy

    miniOrange LDAP Proxy : Search for application and click Edit

  • Locate the toggle button to enable or disable 2FA for the application.
    • Disabling the toggle will turn off 2FA on the Interceptor, allowing users to log in without MFA.
    • Enabling the toggle will require you to select an MFA method.
    miniOrange LDAP Proxy : Enable 2-factor Authentication (MFA)

  • In the dropdown under "Select MFA Method for Policy", choose your preferred authentication method:
    • Push Notification
    • Out-of-Band Email
    • Out-of-Band SMS
    • miniOrange LDAP Proxy : From the dropdown, select the MFA method for policy

  • Click Save Policy to apply the changes.

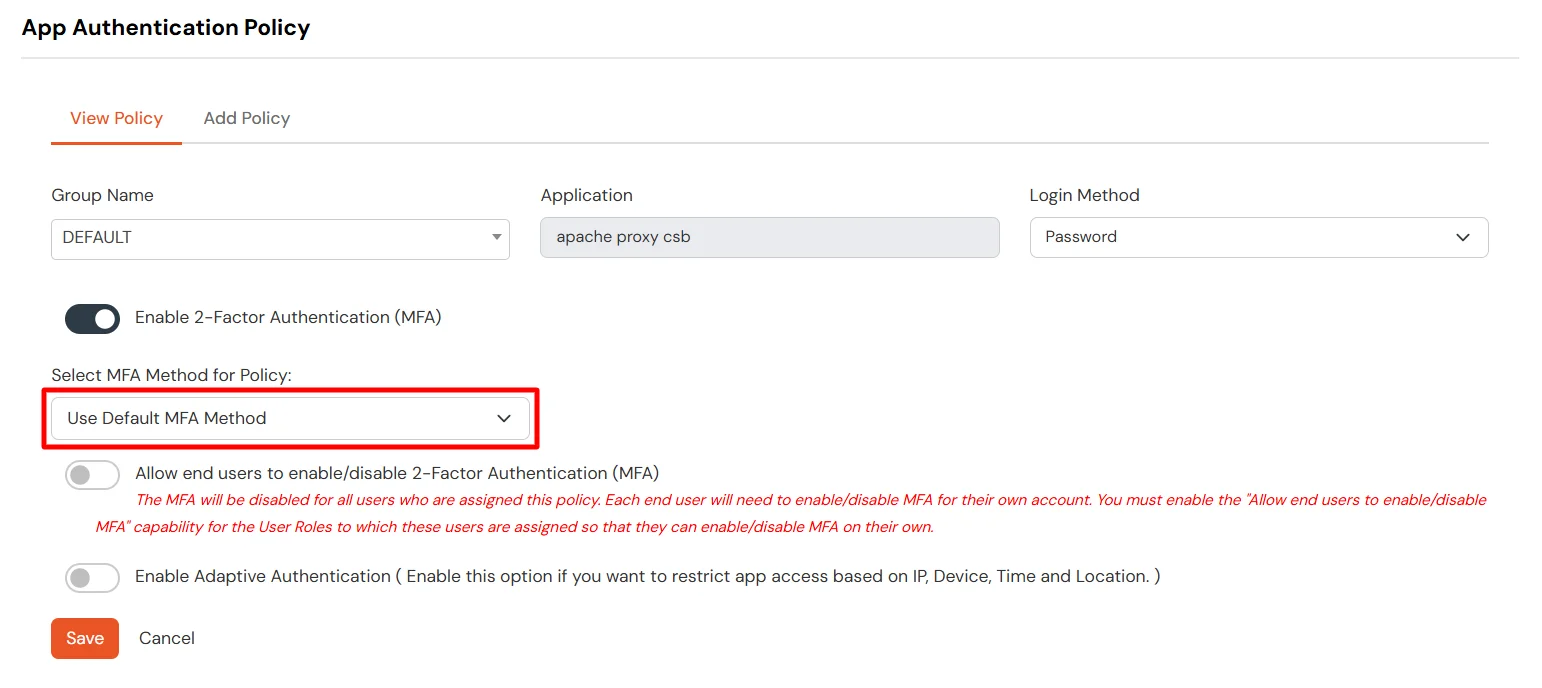
The selected MFA method will be enforced for all users within the group where this policy is configured.


Configuring miniOrange LDAP Proxy

1. Setting the Log Level for miniOrange LDAP Proxy

To configure the log level for LDAP proxy, follow these steps:

  • Open Environment Variables on your system.
  • Under System Variables, click New (or Edit if it already exists).
  • Set the Variable Name to LDAP_LOG_LEVEL.
  • Set the Variable Value to INFO.
  • Click OK and restart your application for the changes to take effect.

2. Open the Config.json File

  • Open the `Config.json` file in any text editor. The file will look like the image below.

    Note: You will find the config.json file at the same path where your ldap proxy jar is located.


  • miniOrange LDAP Proxy : Open Config.json File


3. Setting up Clients

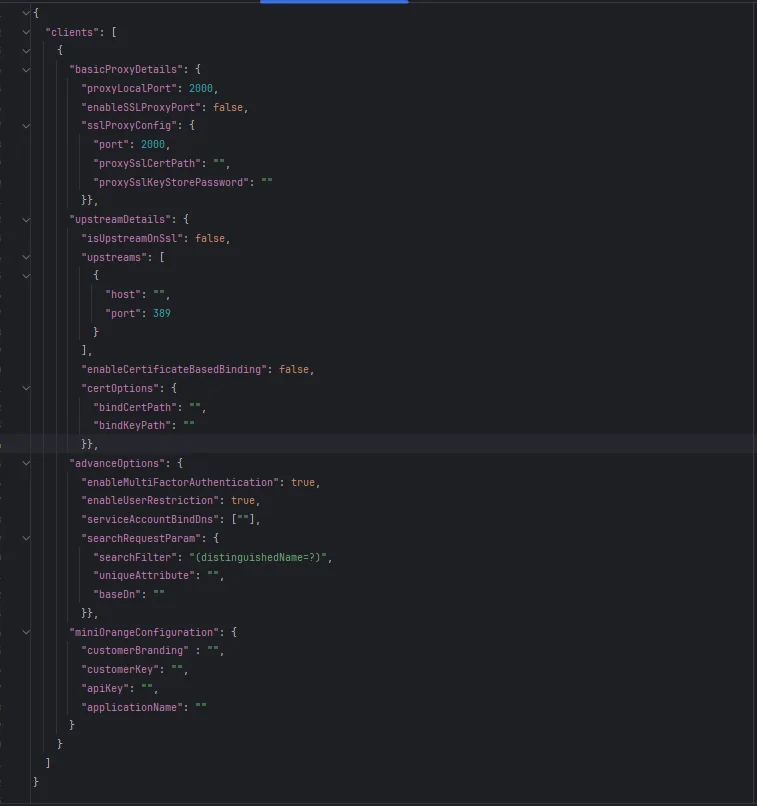
Note: Above shown is the template of one client Configuration in Json format. Clients is Array of all the clients collections that you want to configure.


miniOrange LDAP Proxy : Client configuration in JSON format

Client JsonObject details

  • Basic proxy Details configuration:
  • miniOrange LDAP Proxy : Basic Proxy Details

    • proxyLocalPort” : set the value of non-ssl port.
    • enableSSLProxyPort” : set this property to true/ false depending on the weather to run proxy on SSL or non SSL port.
    • sslProxyConfig” : this is a collection containing 3 keys.
      • Port” : value of ssl port.
      • proxySslCertPath” : path of keystore certificate.
      • proxySslKeyStorePassword” : Password of your ssl keystore.

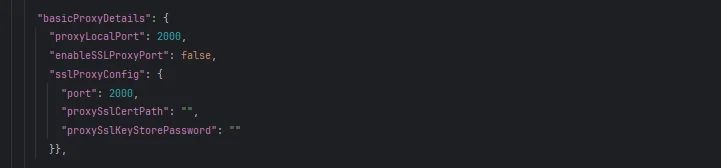
    Note: If “enableSSLProxyPort” : true remove “proxyLocalPort


  • Upstream Details Configuration:
  • miniOrange LDAP Proxy : Upstream Details Configuration

    • Property Descriptions:

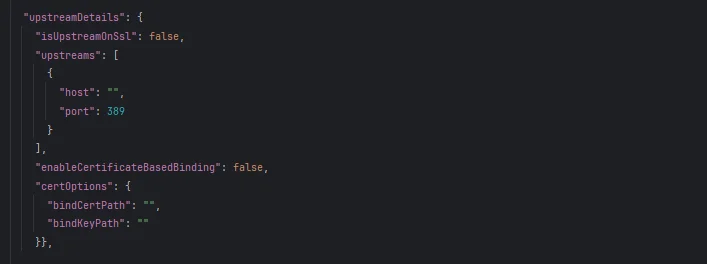
      Note: Here upstream servers defines your Active directory server.


      • isUpstreamOnSsl= true/false
        • Set this property to true or false depending on whether the upstream is on ssl port or not.
      • upstreams= array of All the upstreams
        • This is the Array of a collection which consists of the host and port of the ldap upstream server.
        [ { “host”:”host-ip”, ”port”:port-number } ];
      • Note: For now you can only configure one upstream for one client.


      • enableCertificatebasedBinding= true/false
        • Set this property depending upon whether your active directory supports certificate based binding or not.

        Note: If setting this property true then it doesn't matter what you configure in isUpstreamOnSsl. It will always consider upstream to be on a ssl port.


      • certOptions=a collection of path of client certificate and client key
        • It is the collection of the path of Client-certificate and client-key provided by the upstream server in the case of certificate based binding.
    • Advance Options Configuration:
    • miniOrange LDAP Proxy : Advance Options Configuration

      • enableMultiFactorAuthentication= true/false
        • Set this property depending upon whether to enable MFA or not. if set FALSE it will disable the MFA.
      • enableUserRestriction= true/false
        • Setting this property will decide whether to allow/deny user’s access if its authentication is successful with active directory but policy fetch from miniorange is failed.
      • serviceBindAccountDns= <Array_of_binddn>
        • Specify the array of all the bindDn to skip MFA on those accounts.
      • searchRequestParam= collection of searchRequestParameter.
        • It consists of 3 key value pairs :
          • searchFilter” : “set the search filter for the user to find the user in AD. its default value is (distinguishedName=?)”.
          • uniqueAttribute” : “the unique attribute is the name of an attribute whose value in AD is the same as in miniOrange username/email”.
          • baseDn” : “Here enter the base DN of your AD to search the user”
    • miniOrange Configuration:
    • miniOrange LDAP Proxy : miniOrange Configuration

      • customerBranding= <miniorange_customer_Branding>
        • The customer branding of miniOrange instance [for example : for miniOrange cloud “https://abc.com/moas” or for miniOrange on premise “https://abc.com” ]
      • customerKey= <customer_key>
        • here you will configure the customer Key provided by miniOrange.
      • apiKey= <api_key>
        • here you will configure the api key provided by miniOrange
      • applicationName = <application_name>
        • Specify the application name which is configured in miniorange to apply policies. This application name will also be used as the transaction name for miniorange MFA push notification.

4. Configure Multiple Connections

If you need to configure multiple connections:

  • Replicate the collection of the connection mentioned above in the client Array.

Running the miniOrange LDAP proxy

  • Navigate to the directory where the <appName>.jar file is located.
  • Open a command prompt and execute the following command: java -jar <appName>.jar
  • Once the command runs successfully, your miniOrange LDAP proxy is ready for use.

Retrieving miniOrange Configuration

  • Log in to your miniOrange IAM with admin credentials.
  • Navigate to the Settings section.
  • Locate your Customer Key and API Key.
  • miniOrange LDAP Proxy : Navigate to Settings Icon from top right corner

    miniOrange LDAP Proxy : Under Details, collect Customer Key and API Key

This guide provides a streamlined, step-by-step approach for configuring and running a miniOrange LDAP proxy. Ensure all configurations are validated before deployment to avoid errors.


Want To Schedule A Demo?

Request a Demo


Our Other Identity & Access Management Products