Hello there!

Need Help? We are right here!

Support Icon
miniOrange Email Support
success

Thanks for your Enquiry. Our team will soon reach out to you.

If you don't hear from us within 24 hours, please feel free to send a follow-up email to info@xecurify.com

Search Results:

×

Slack Provisioning and Deprovisioning


Slack SCIM Provisioning makes it easy to create user accounts and connect them to the apps your team already uses (or new ones). It automates the process of setting up users, so you don't have to do it manually every time someone joins.

With miniOrange, you can:

  • Create, update and delete user accounts.
  • Remove access for users who leave or change roles
  • Keep user information (like names, emails, roles) in sync across all your connected systems.

This saves time when onboarding new employees or teams, and makes it easier to manage what each person can access throughout their time with your organization.

Provisioning works both ways, you can create a user in Slack and have it sync to miniOrange, or create the user in miniOrange first and have it pushed out to Slack and other connected apps.

Slack SCIM Deprovisioning

Deprovisioning is the process of removing a user's access from all connected apps and systems at once, usually when someone leaves the company or moves to a different role.

Instead of manually removing access from each app one by one, deprovisioning does it automatically in a single step. This helps keep your organization secure by making sure former employees (or people who no longer need access) can't get into sensitive systems or data.

Prerequisites

Follow the Step-by-Step Guide to Setup Slack SCIM Provisioning

1. Configure Slack SCIM Provisioning in miniOrange

  • Log in to the miniOrange Admin Console.
  • In the Configure section, select Apps.
  • Under the Apps section, click on Add Application.
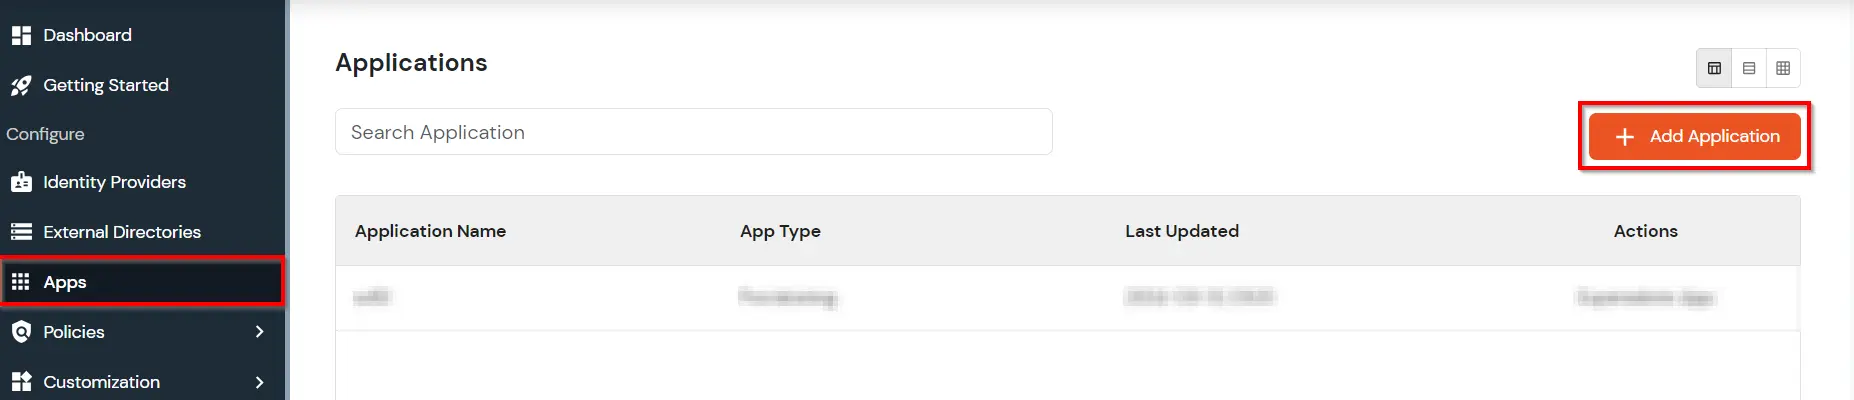
  • Slack SCIM Provisioning setup - add application in miniOrange admin console

  • Under the Choose Application section, select Provisioning from the All Apps dropdown.
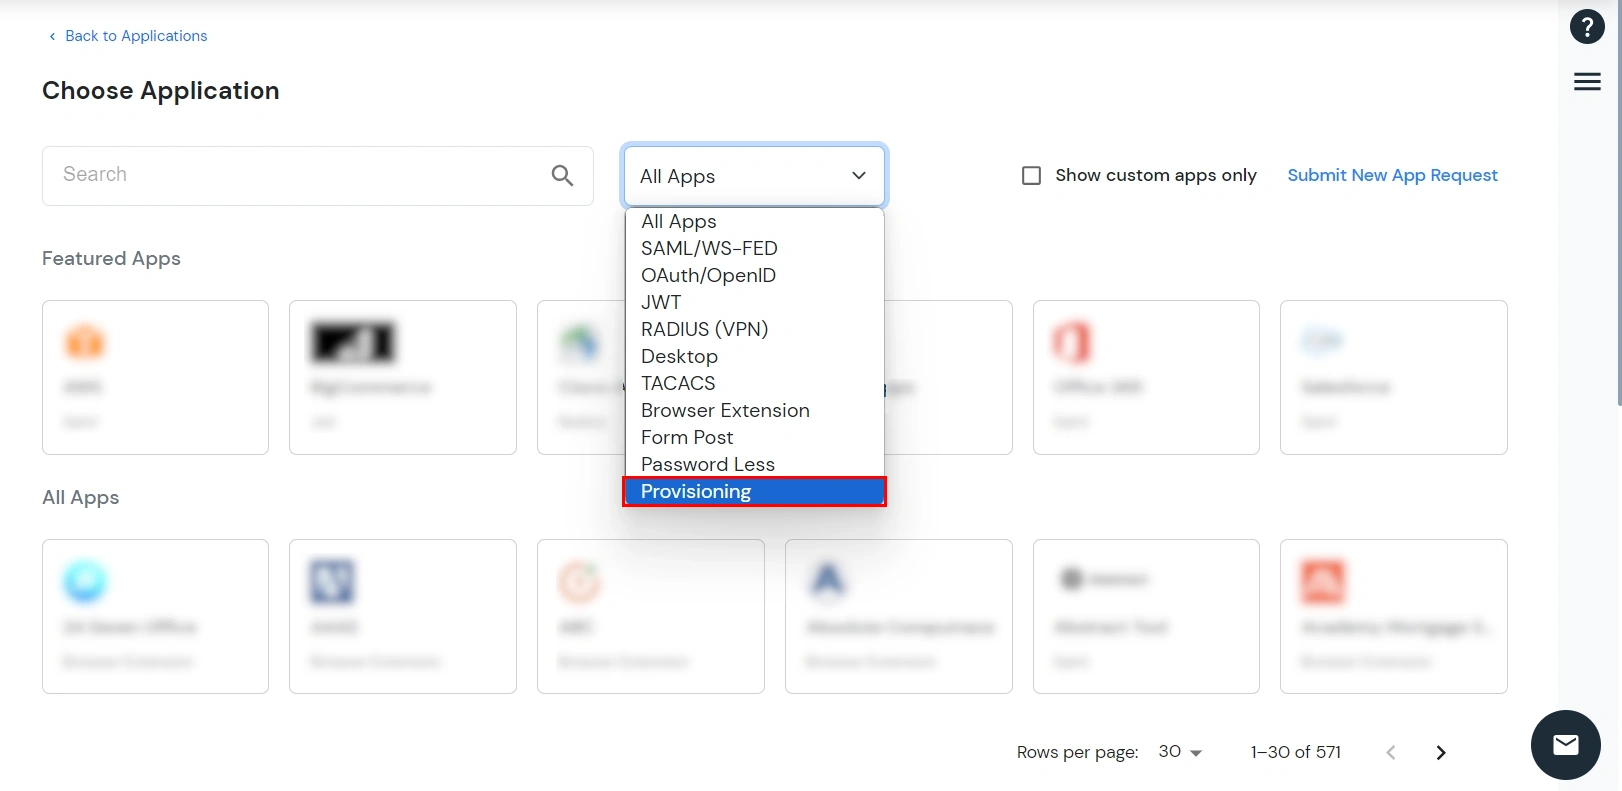
  • Slack SCIM Provisioning setup - select Provisioning app type in miniOrange

  • Search for Slack SCIM and select the Slack SCIM Server.
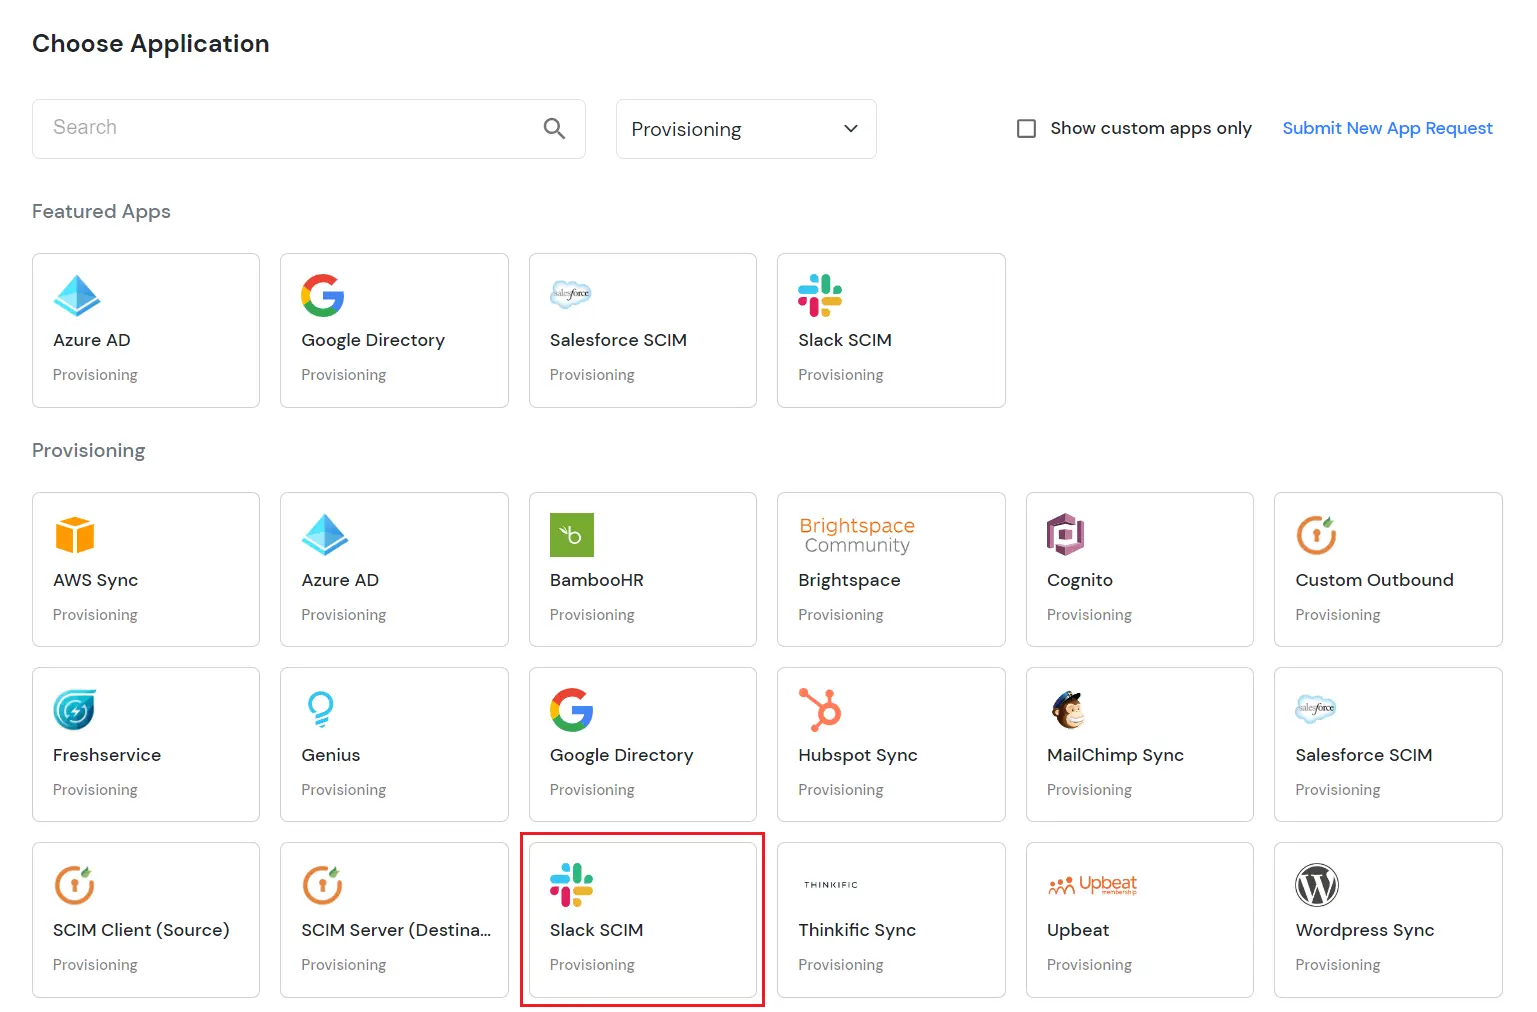
  • Slack SCIM Provisioning setup - search and select Slack SCIM Server app

  • Enter a Display Name for the app and click Save & Next.
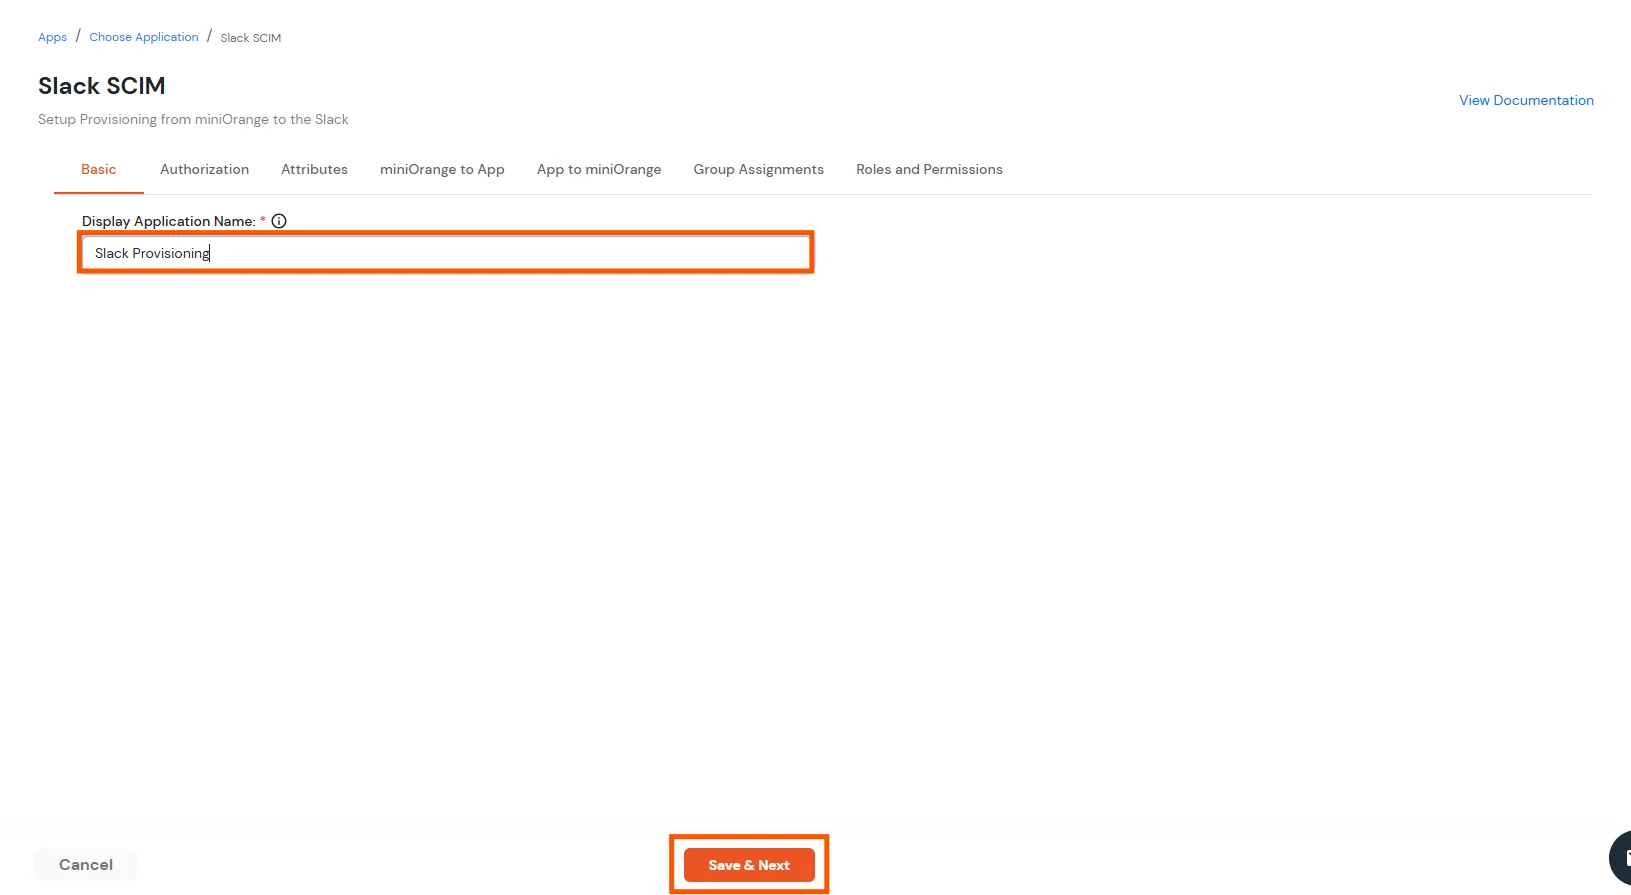
  • Slack SCIM Provisioning setup - enter display name for Slack SCIM app

Note: On the Authorization screen, choose Default Authorization or Custom Authorization based on your setup and follow the corresponding steps below.


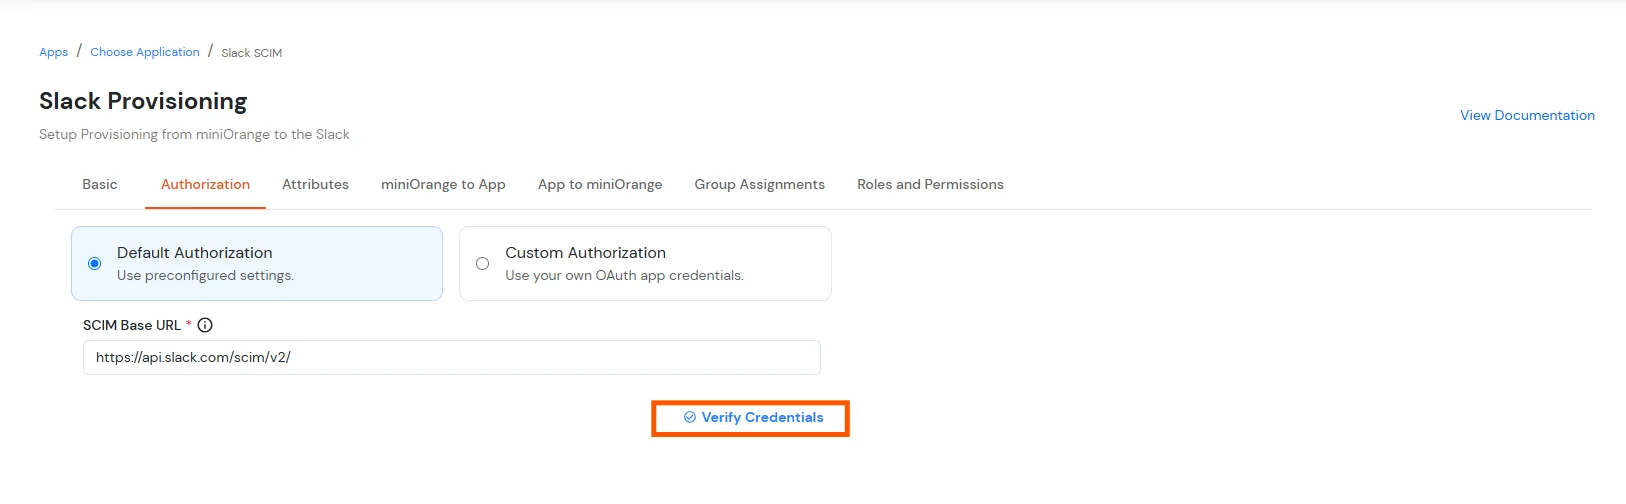
  • In the Default Authorization tab, add the following link in the SCIM Base URL field: https://api.slack.com/scim/v2/
  • Click on Verify Credentials link.
  • Slack SCIM Provisioning setup - verify Slack SCIM credentials in miniOrange

  • Enter your Slack Workspace’s URL and click on Continue.

  • Slack SCIM Provisioning setup - enter Slack workspace URL for authorization

  • Enter Slack workspace admin credentials and click on Continue.
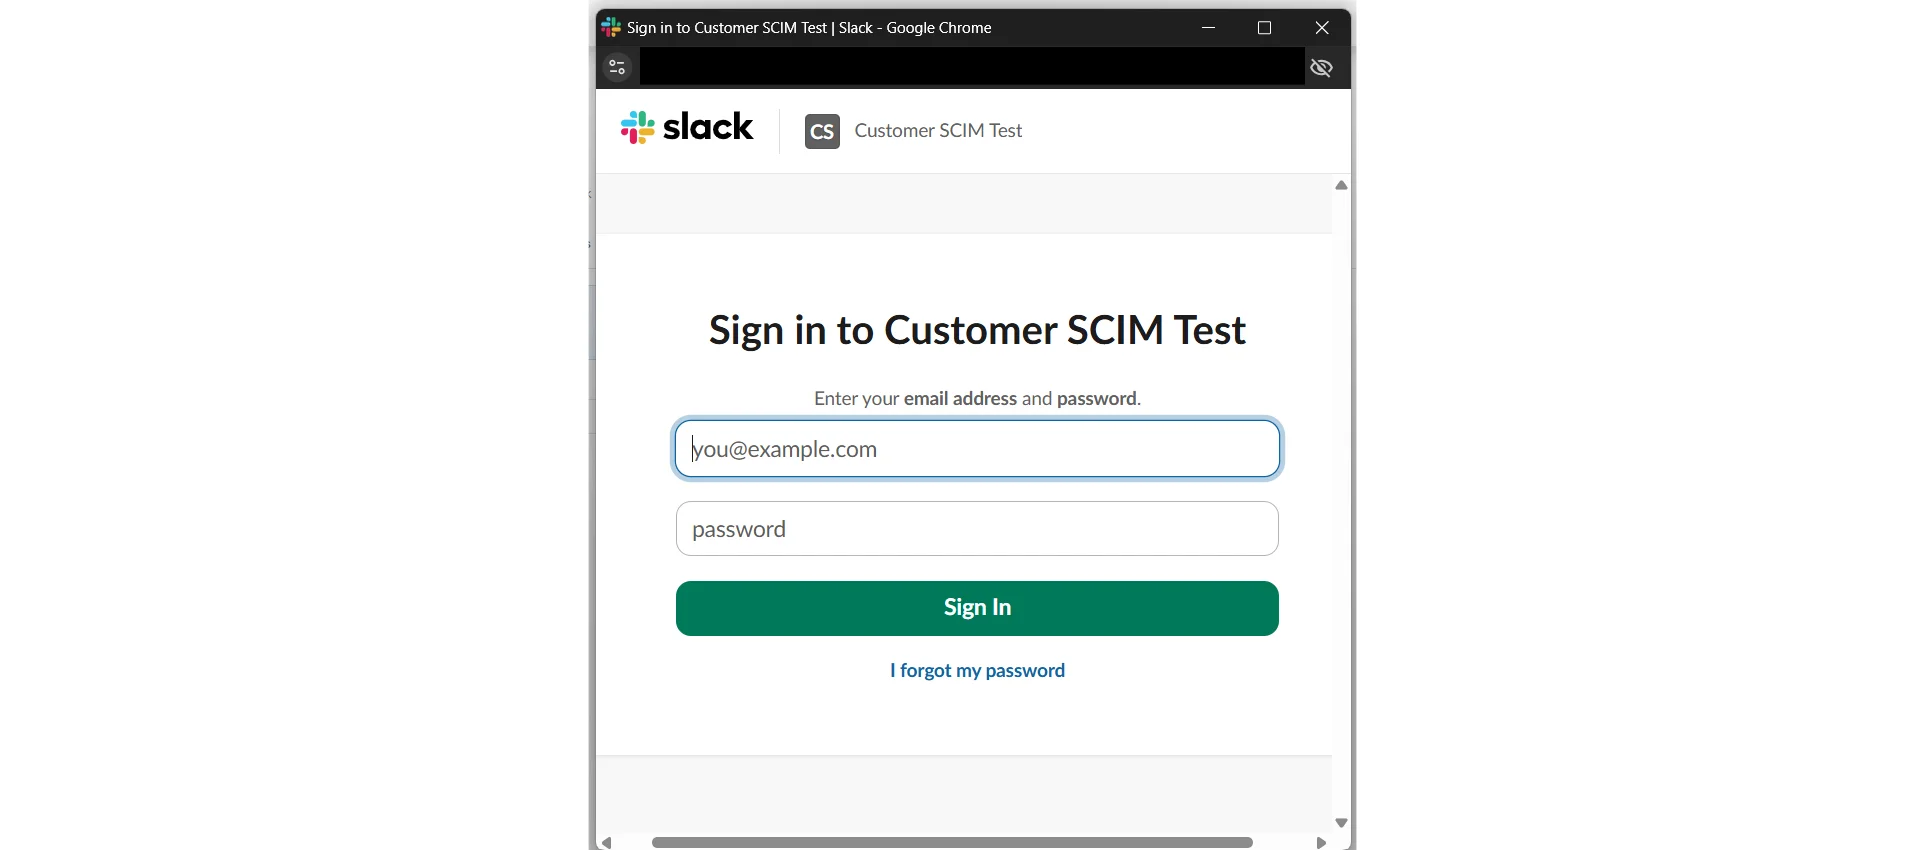
  • Slack SCIM Provisioning setup - sign in with Slack workspace admin account

  • Once logged in successfully, click the Allow button to authorize miniOrange to view and manage the provisioning of users on your Slack.
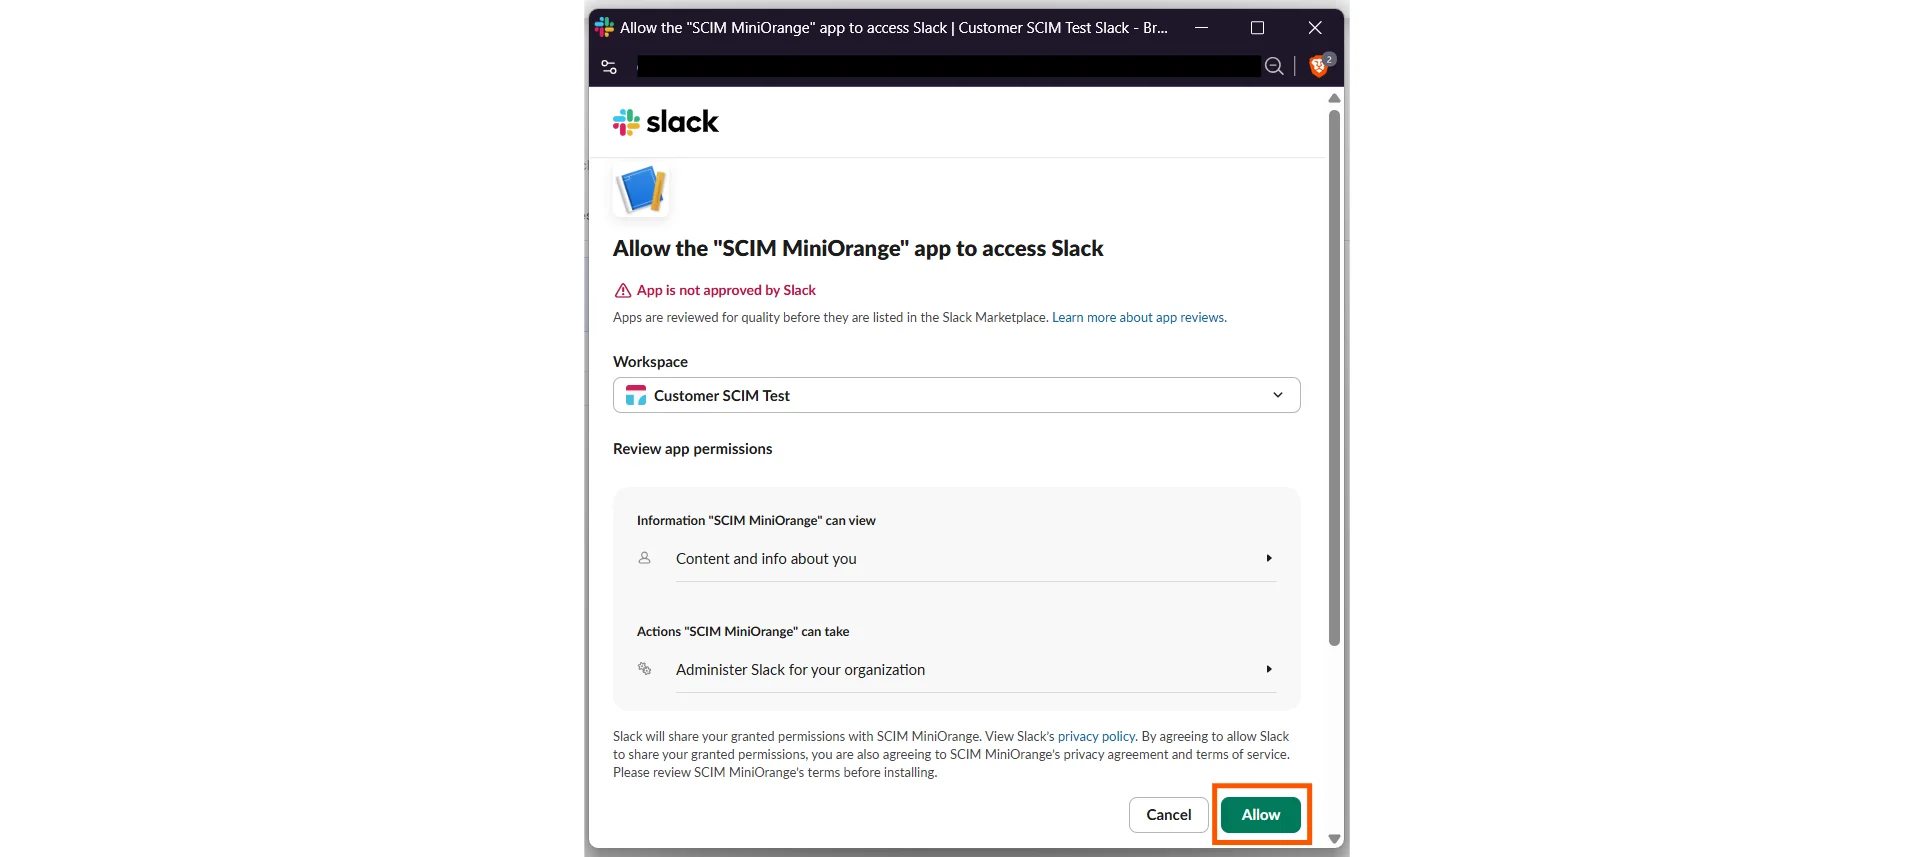
  • Slack SCIM Provisioning setup - authorize miniOrange Slack SCIM app access

  • Once verification is complete, the Verify Credential button will change to Reverify Credentials.
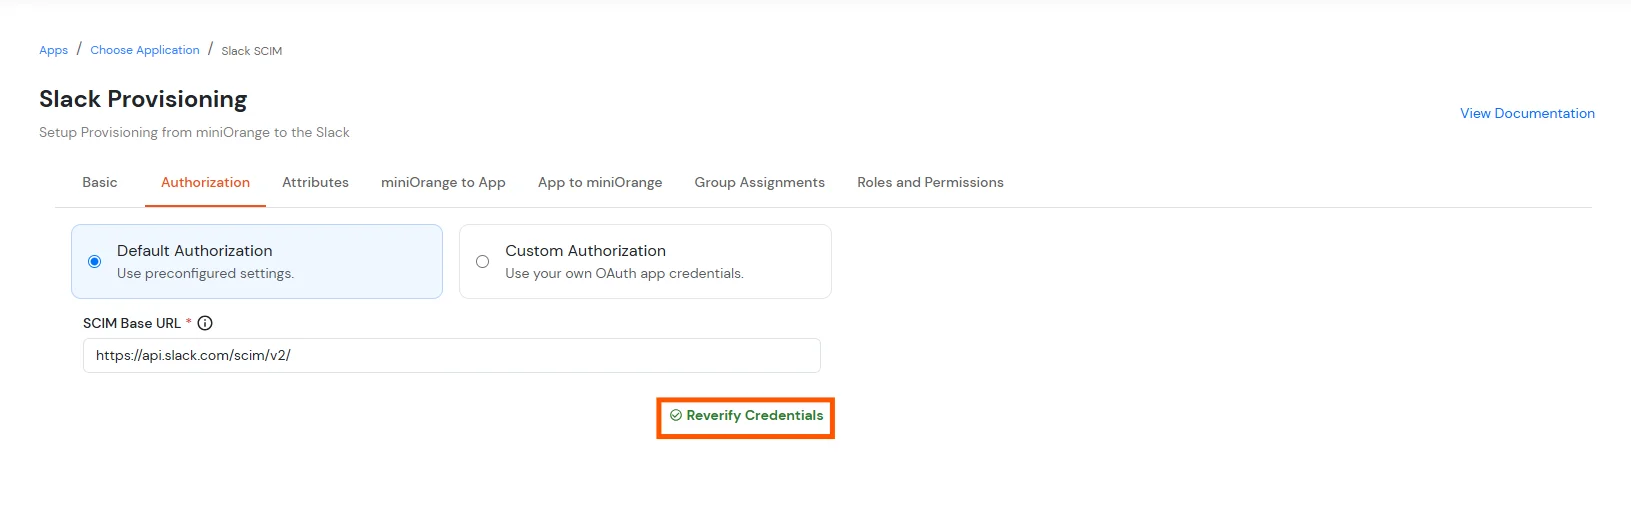
  • Slack SCIM Provisioning setup - Slack SCIM credentials successfully verified

Prerequisite

  • Select Custom Authorization.
  • Copy Redirect URL that is needed in Next steps.
  • Slack SCIM Provisioning setup - copy redirect URL for custom authorization

1. Create the Slack Application

  • Open Your Apps in Slack API, click Create New App, and complete the following steps.
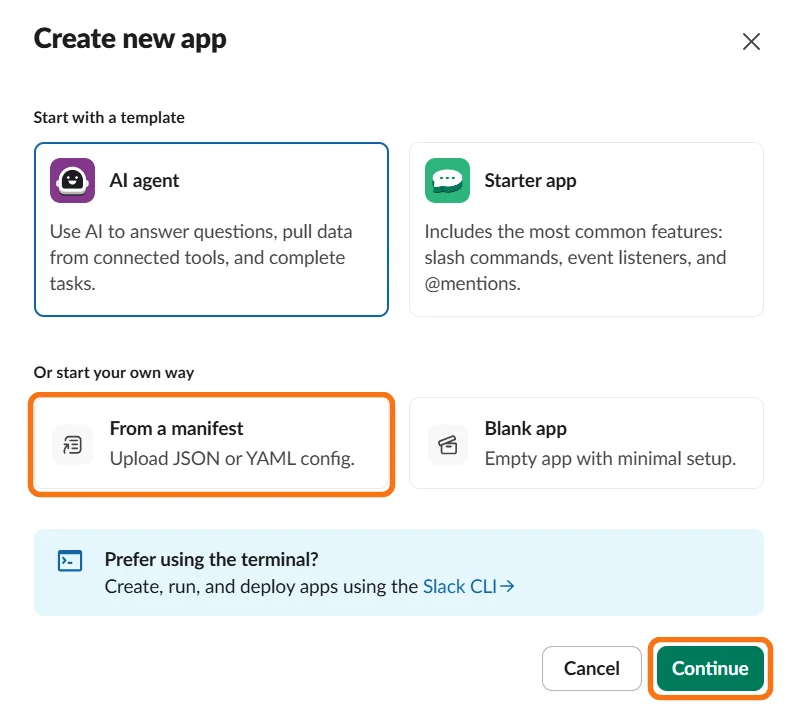
  • Select From a manifest under Or start your own way.
  • Click Continue.
  • Slack SCIM Provisioning setup - select from manifest option for custom authorization

Paste the Slack App Manifest

  • Open the YAML tab.
  • Replace any existing content with the following manifest. Keep the redirect URL exactly as shown.
    display_information:
      name: miniOrange SCIM Provisioning
    
    features:
      bot_user:
        display_name: miniOrange SCIM Provisioning
        always_online: false
    
    oauth_config:
      redirect_urls:
        - https://login.xecurify.com/services/api/provisioning/app/authorize/custom-provisioning/callback
      scopes:
        user:
          - admin
        bot:
          - team:read
      pkce_enabled: false
    
    settings:
      org_deploy_enabled: true
      socket_mode_enabled: false
      token_rotation_enabled: false
      is_mcp_enabled: false

    Note: Replace <redirect_urls> with the actual Redirect URL copied from the Prerequisite step above.

Slack SCIM Provisioning - enable user create update and delete from miniOrange to Slack

Slack SCIM Provisioning - enable group create update and delete from miniOrange to Slack

  • Click on Save & Next button.
  • Note:
    User provisioning to Slack is based on Group Assignment Logic: When a user is added to the assigned group(s) in Group Assignments, they will be provisioned according to the features that have been enabled. You will configure these group assignments in the next steps.

    Select the Workspace and Create the App

    • Select a workspace that belongs to the target Slack Enterprise Grid organization.
    • Click Next.
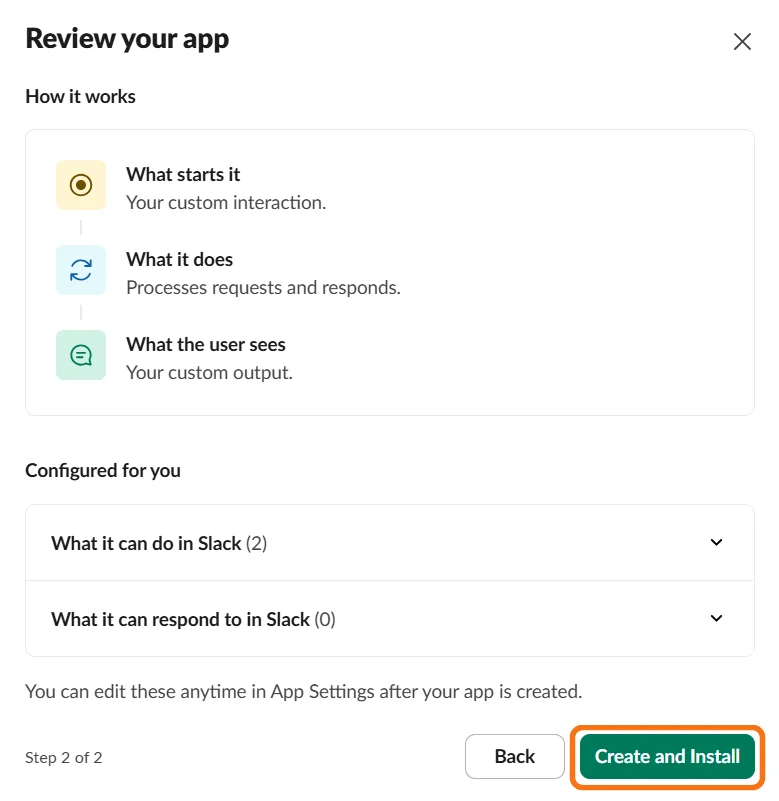
    • Review the app configuration and click Create and Install.
    • Slack SCIM Provisioning setup - review app configuration for custom authorization

    • Confirm the requested permissions are selected. The manifest should request the admin user scope and team:read bot scope.
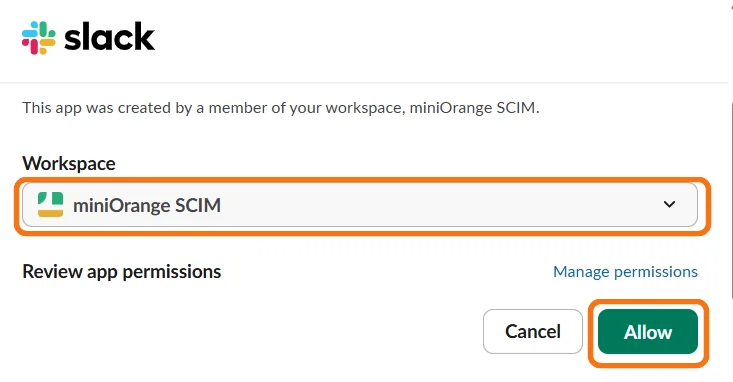
    • Verify the selected workspace and click Allow.
    • Slack SCIM Provisioning setup - verify selected workspace for custom authorization

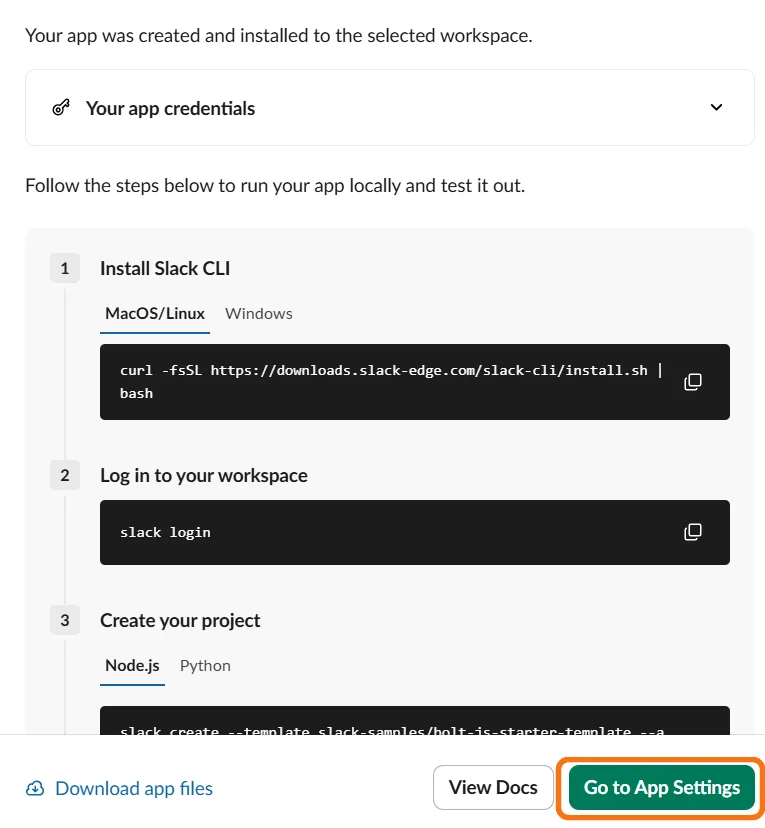
    • Click Go to App Settings.
    • Slack SCIM Provisioning setup - go to app settings for custom authorization

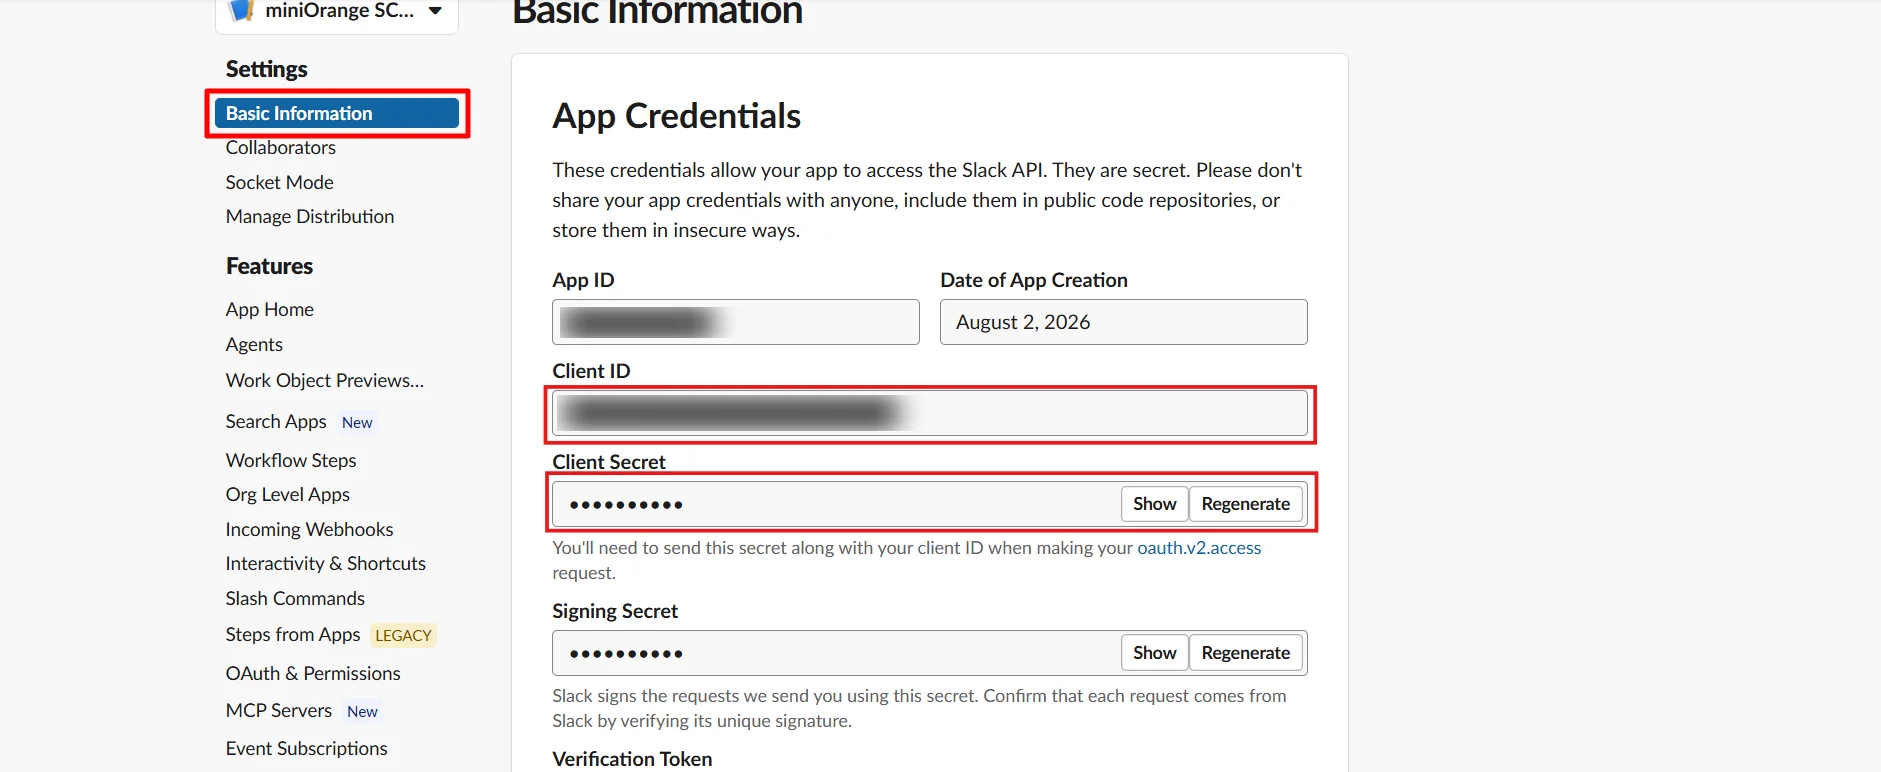
    • Copy the Client ID and Client Secret.
    • Slack SCIM Provisioning setup - copy client ID and client secret for custom authorization

    2. Configure Custom Authorization in miniOrange

    • Log in to the miniOrange Admin Console, go to Apps, and open your Slack SCIM Provisioning application.
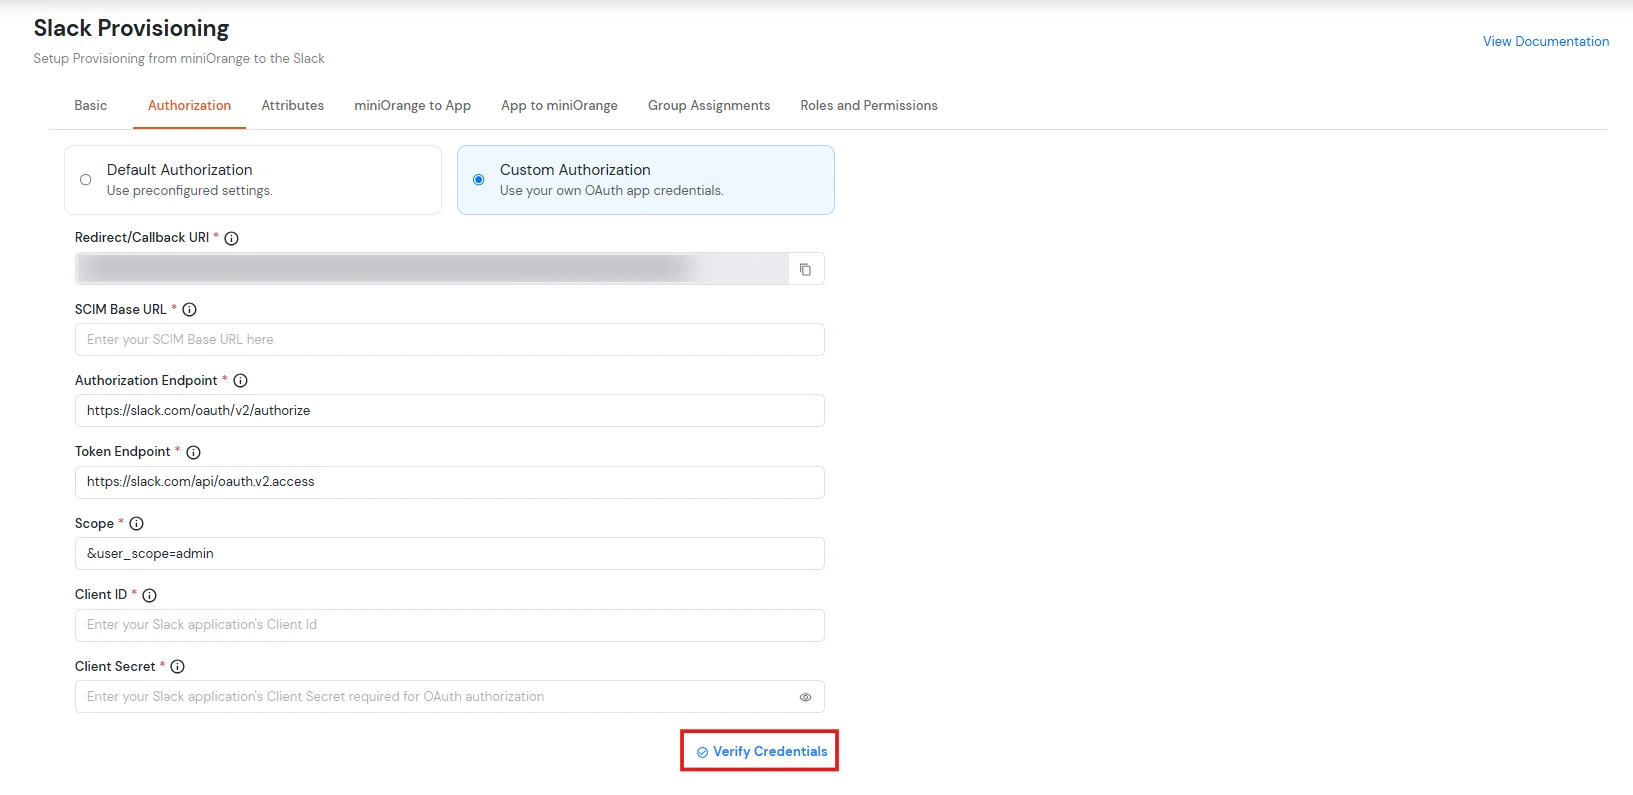
    • On the Authorization screen, select Custom Authorization.
    • Slack SCIM Provisioning setup - select custom authorization for custom authorization

    • Enter SCIM Base URL: https://api.slack.com/scim/v2/
    • Enter the Client ID and Client Secret copied from the step above.
    • Click on Verify Credentials.

    2. Attributes Mapping

    • Map the user attributes between miniOrange and Slack.
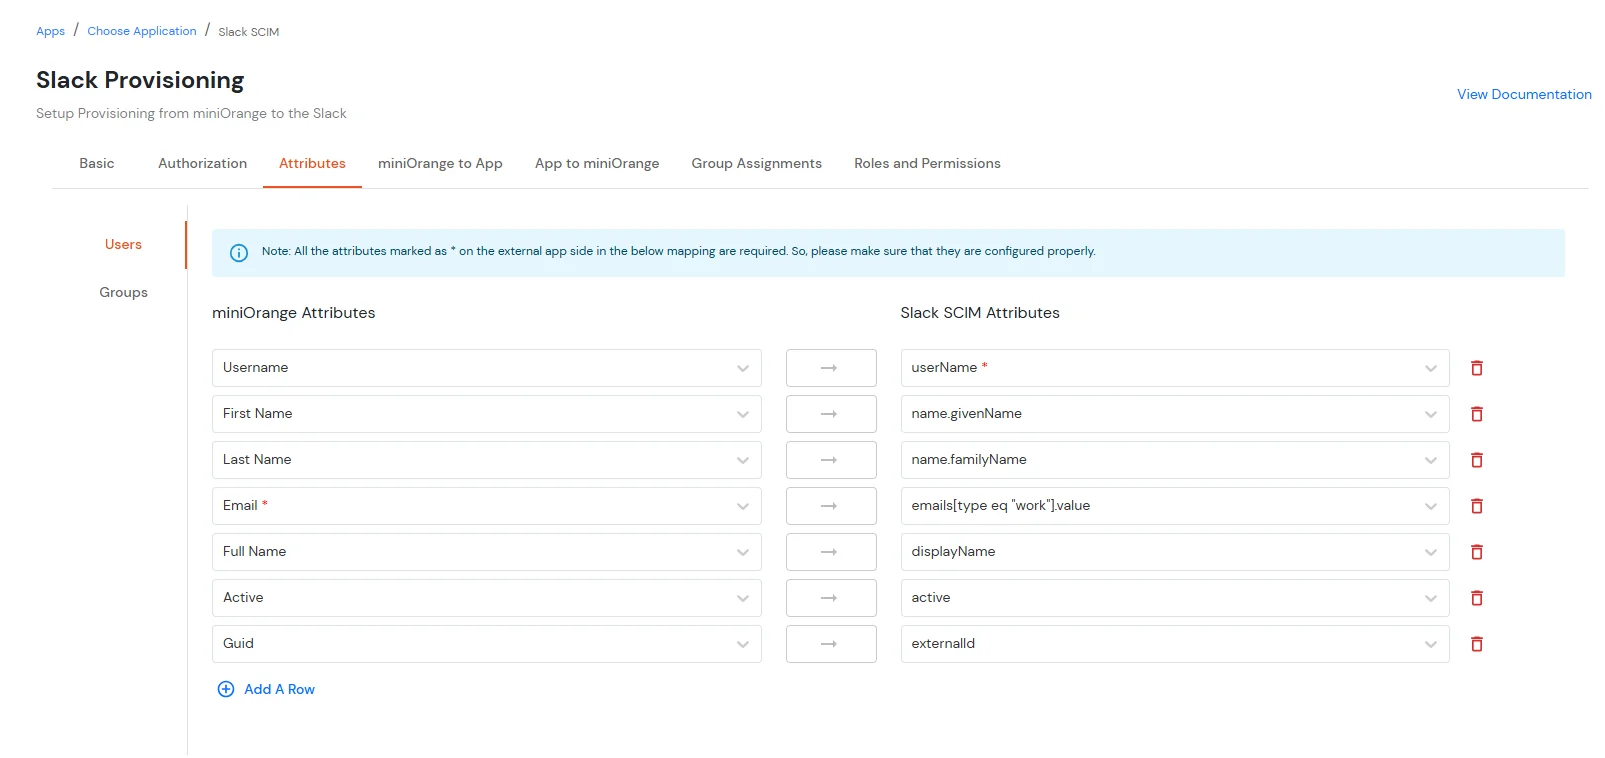
    • Slack SCIM Provisioning - map user attributes between miniOrange and Slack

    • Click on Save & Next button.

    3. Provisioning Users and Groups from miniOrange to Slack (Outbound)

    This section outlines the process for provisioning (creating, updating, and deleting) user accounts and groups from miniOrange to Slack.

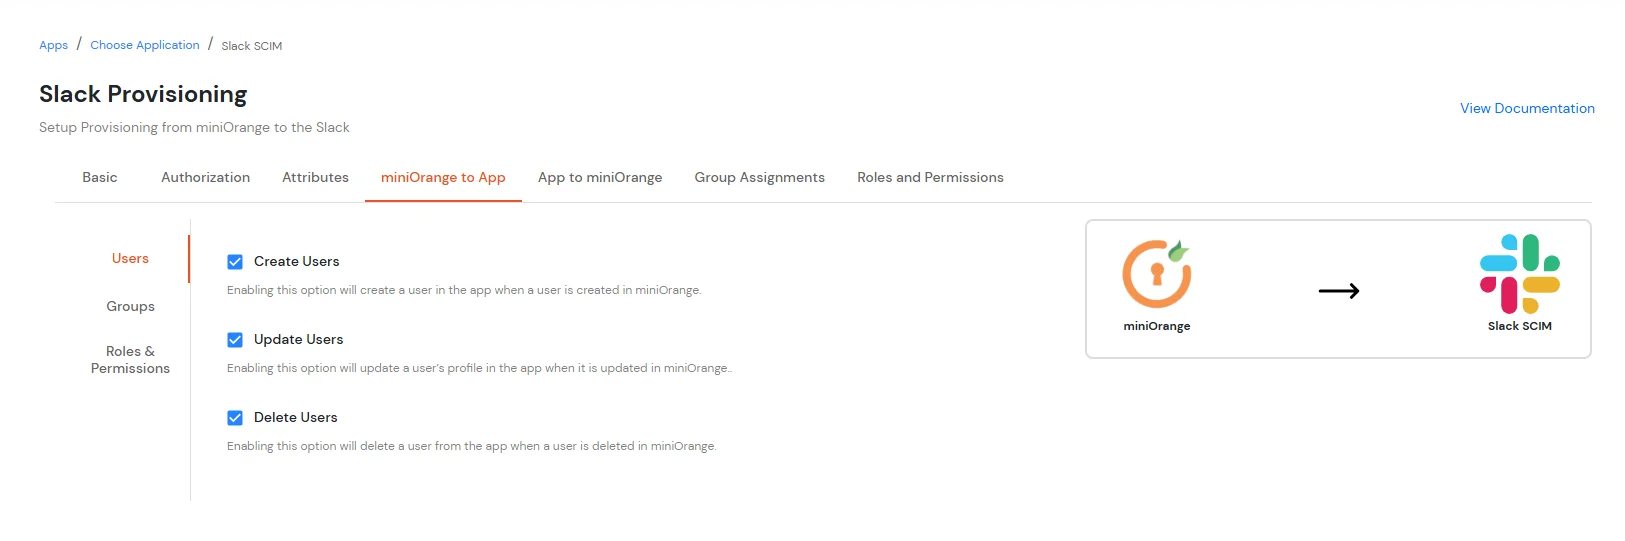
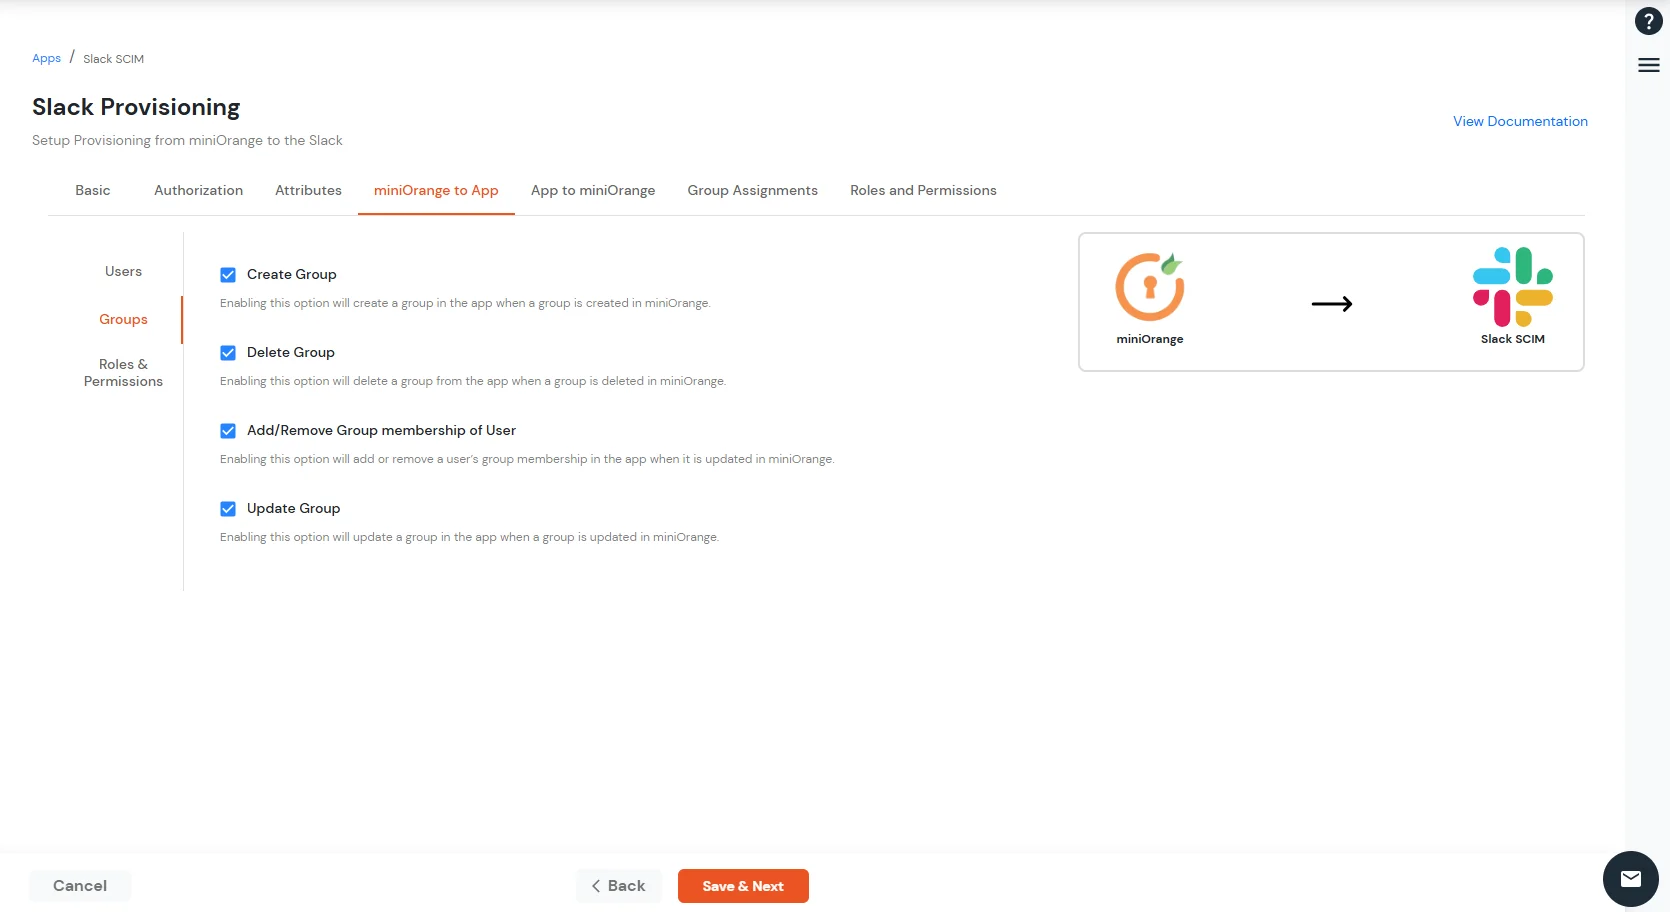
    • Enable the provisioning features you require, such as:
      • Create User
      • Update User
      • Delete User
      • Create Group
      • Update Group
      • Delete Group
      • Add/Remove group membership of user
      Slack SCIM Provisioning - enable user create update and delete from miniOrange to Slack

      Slack SCIM Provisioning - enable group create update and delete from miniOrange to Slack

    • Click on Save & Next button.

    Note:
    User provisioning to Slack is based on Group Assignment Logic: When a user is added to the assigned group(s) in Group Assignments, they will be provisioned according to the features that have been enabled. You will configure these group assignments in the next steps.

    4. Group Assignments

    • Assign the Groups here that you want to provision to Slack. Only users belonging to these assigned groups will be provisioned from miniOrange to Slack.
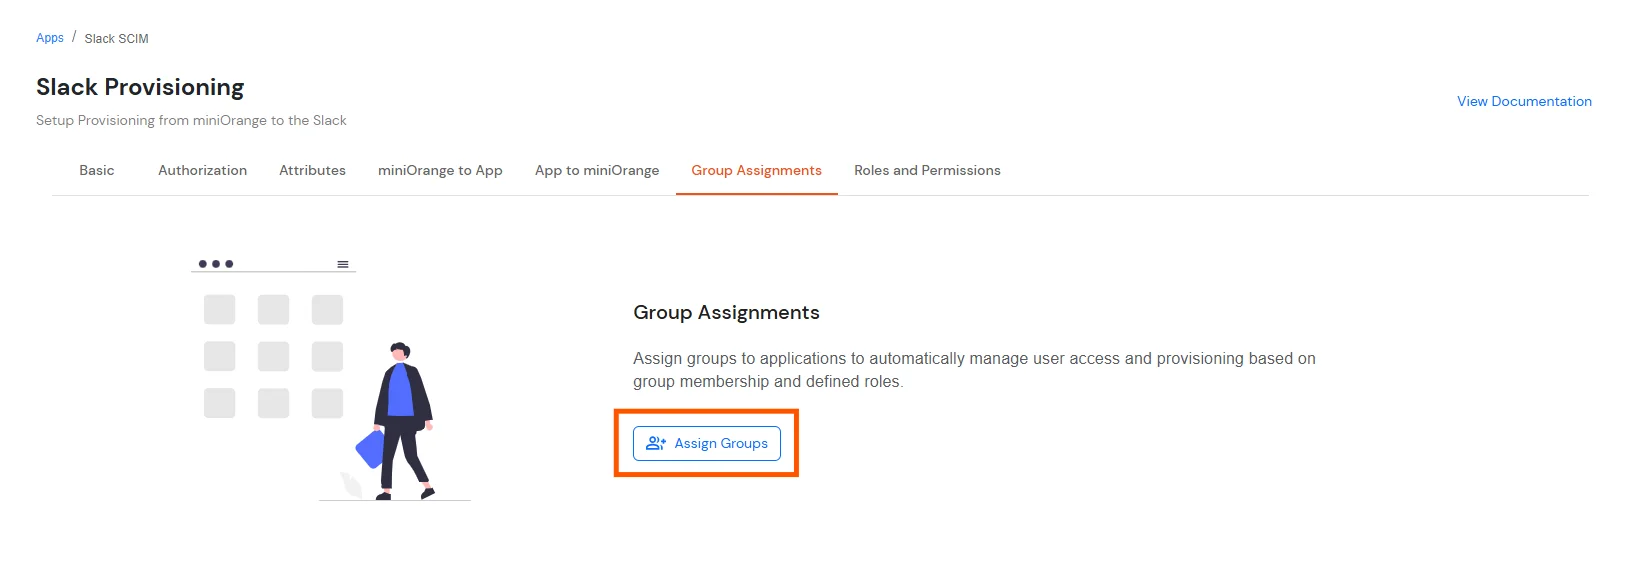
    • Slack SCIM Provisioning - assign groups for automated user provisioning to Slack

    • Select groups that you want to provision and click on Save button.
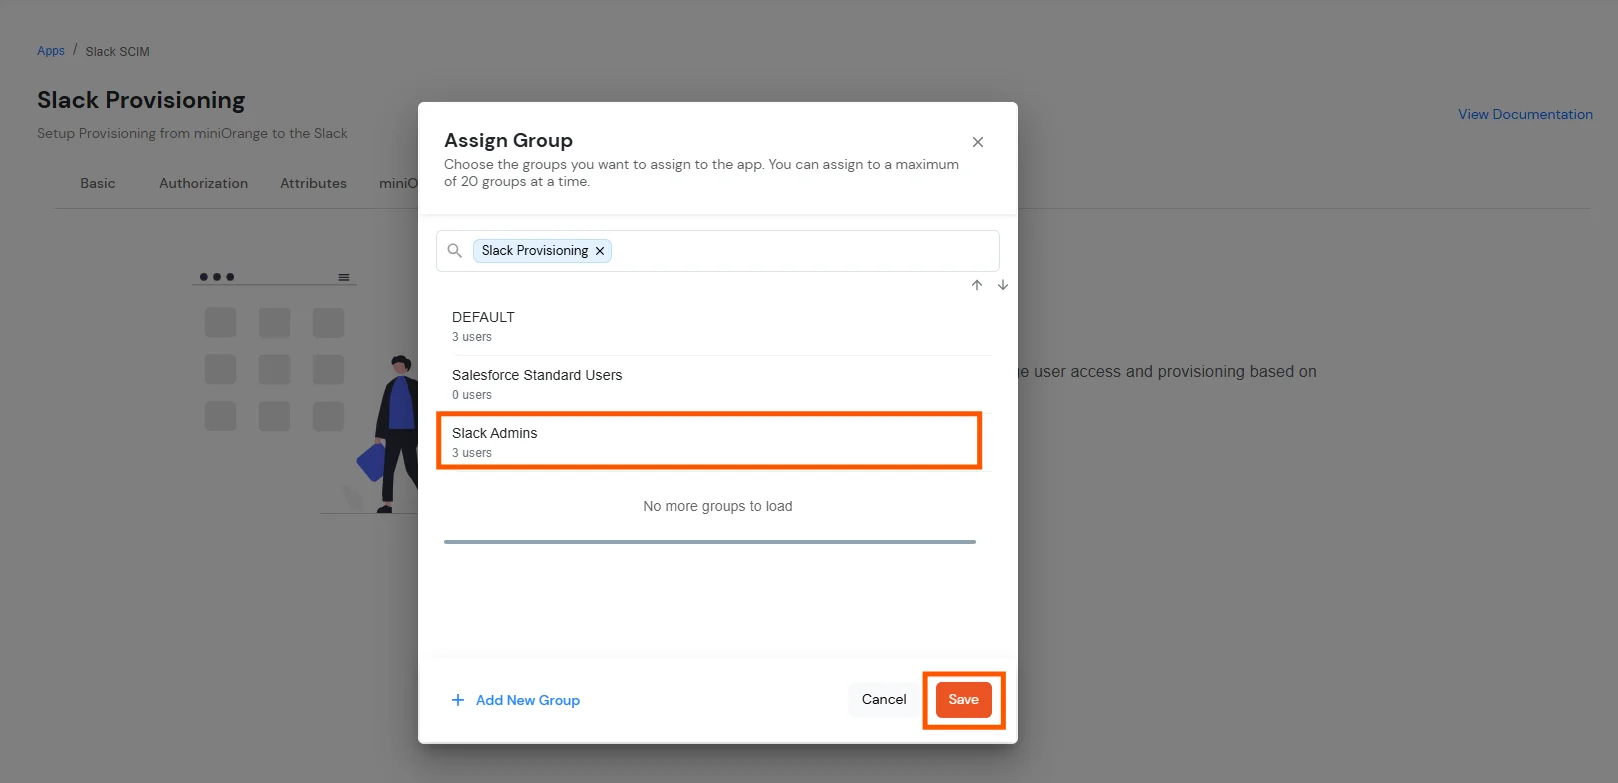
    • Slack SCIM Provisioning - save group assignments for Slack user sync

    5. User and Group Provisioning

    After the app tabs are configured, use the steps below to create, update, and delete users and groups from the miniOrange admin console.


    Create Users

    • To create a user in miniOrange, go to Users >> User List >> click on the Add User button.
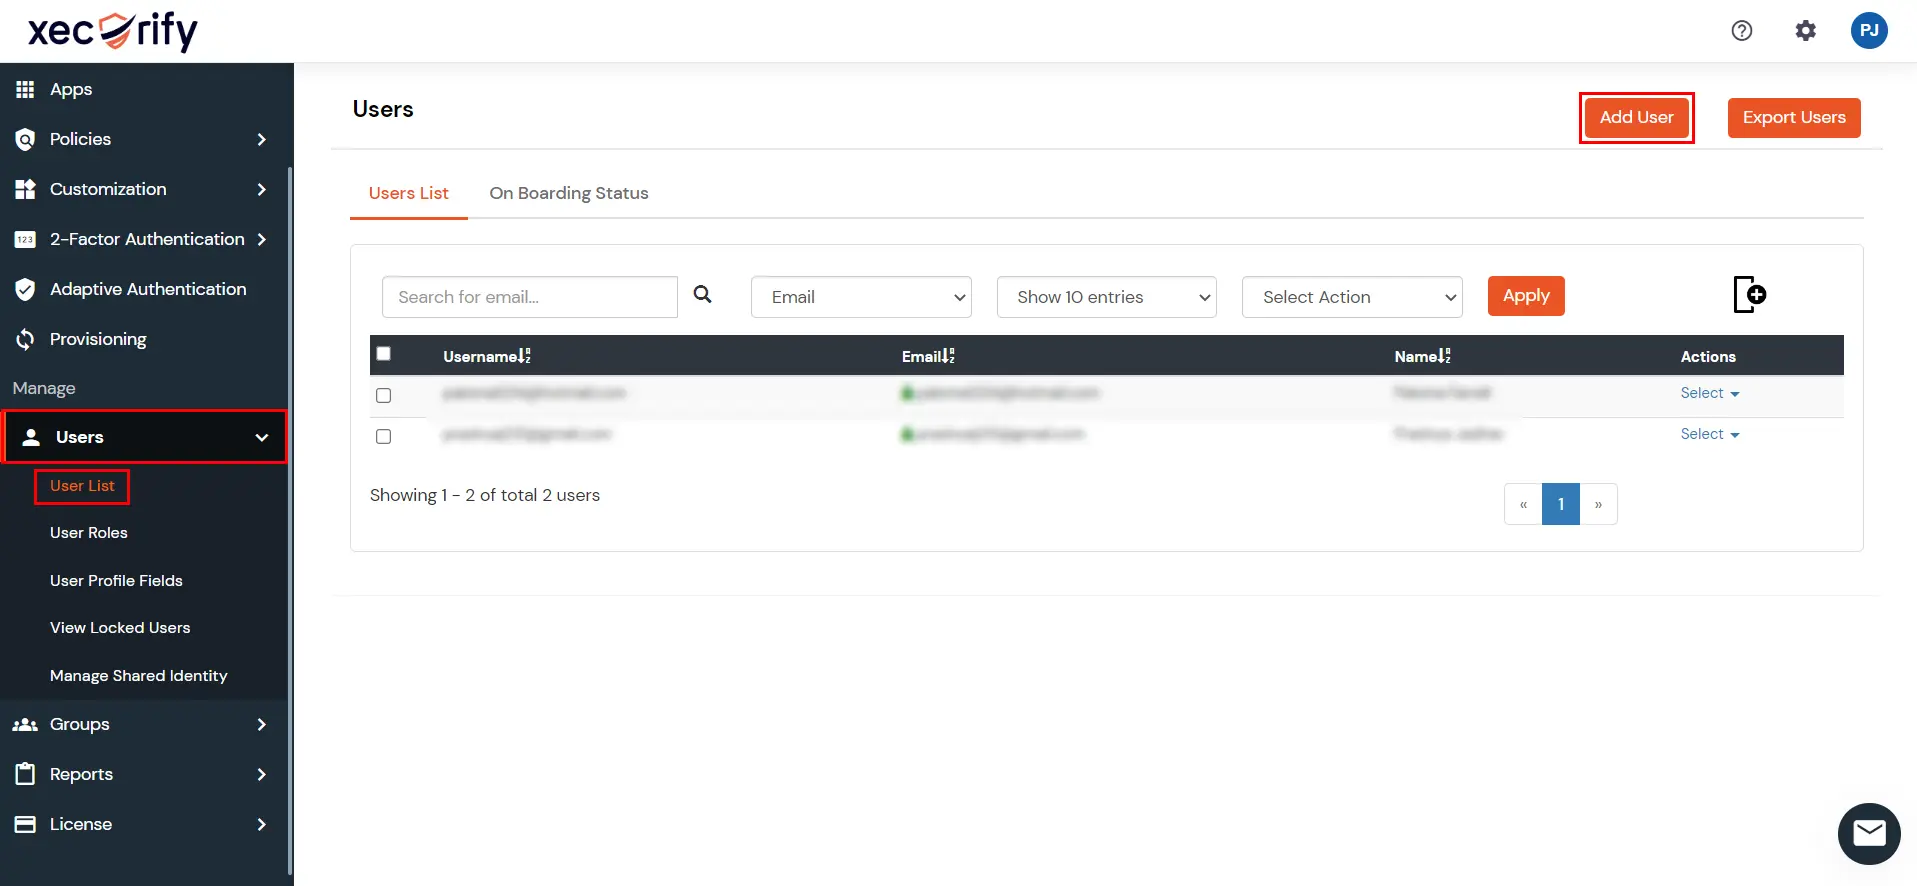
    • Slack SCIM user provisioning - add new user in miniOrange admin console

    • Fill out user basic information and click on the Save button.
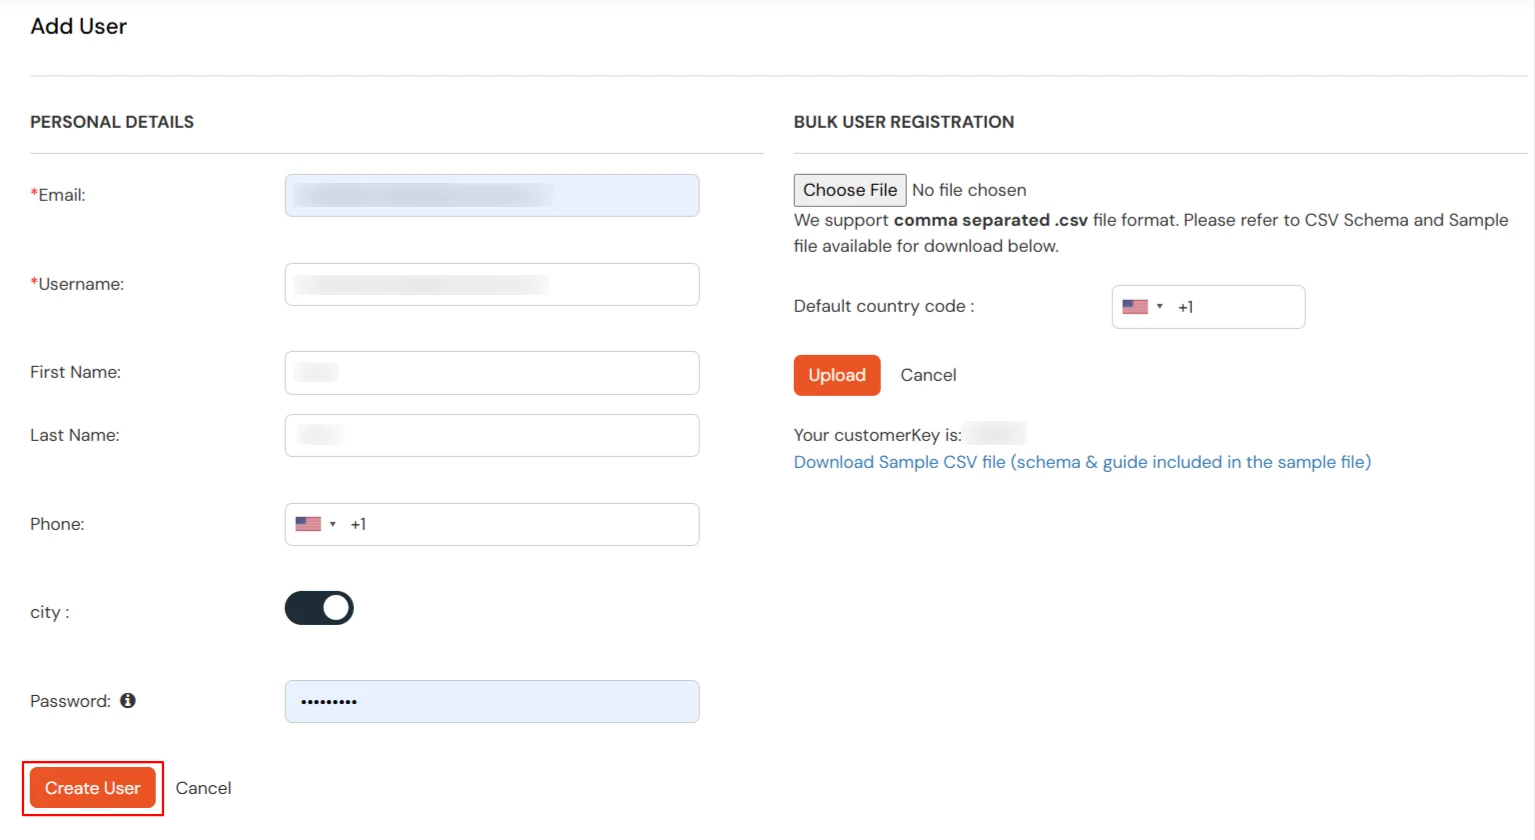
    • Slack SCIM user provisioning - enter user profile details in miniOrange

    • After creating a user, go to Groups >> Manage Groups.
    • Select a group that you have added in Group Assignment and assign users to it.
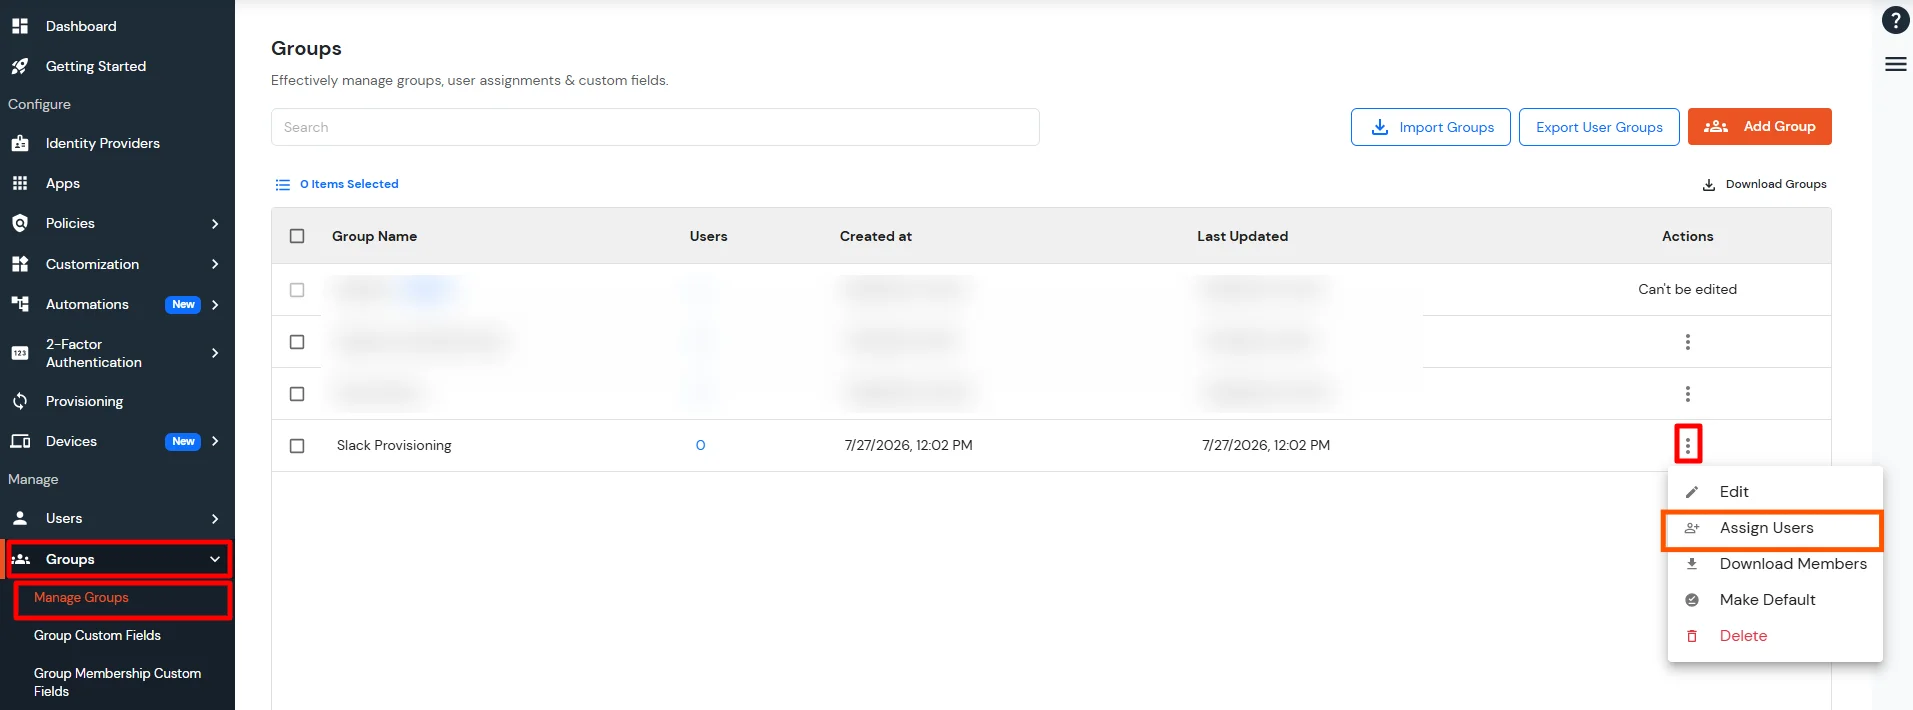
    • Slack SCIM user provisioning - assign users to group for Slack sync

    • After assigning a user into a group, it will automatically create the same user in Slack.

    Edit Users

    • To update the user profile, go to Users >> User List.
    • Select a particular user and in the Actions dropdown select Edit.
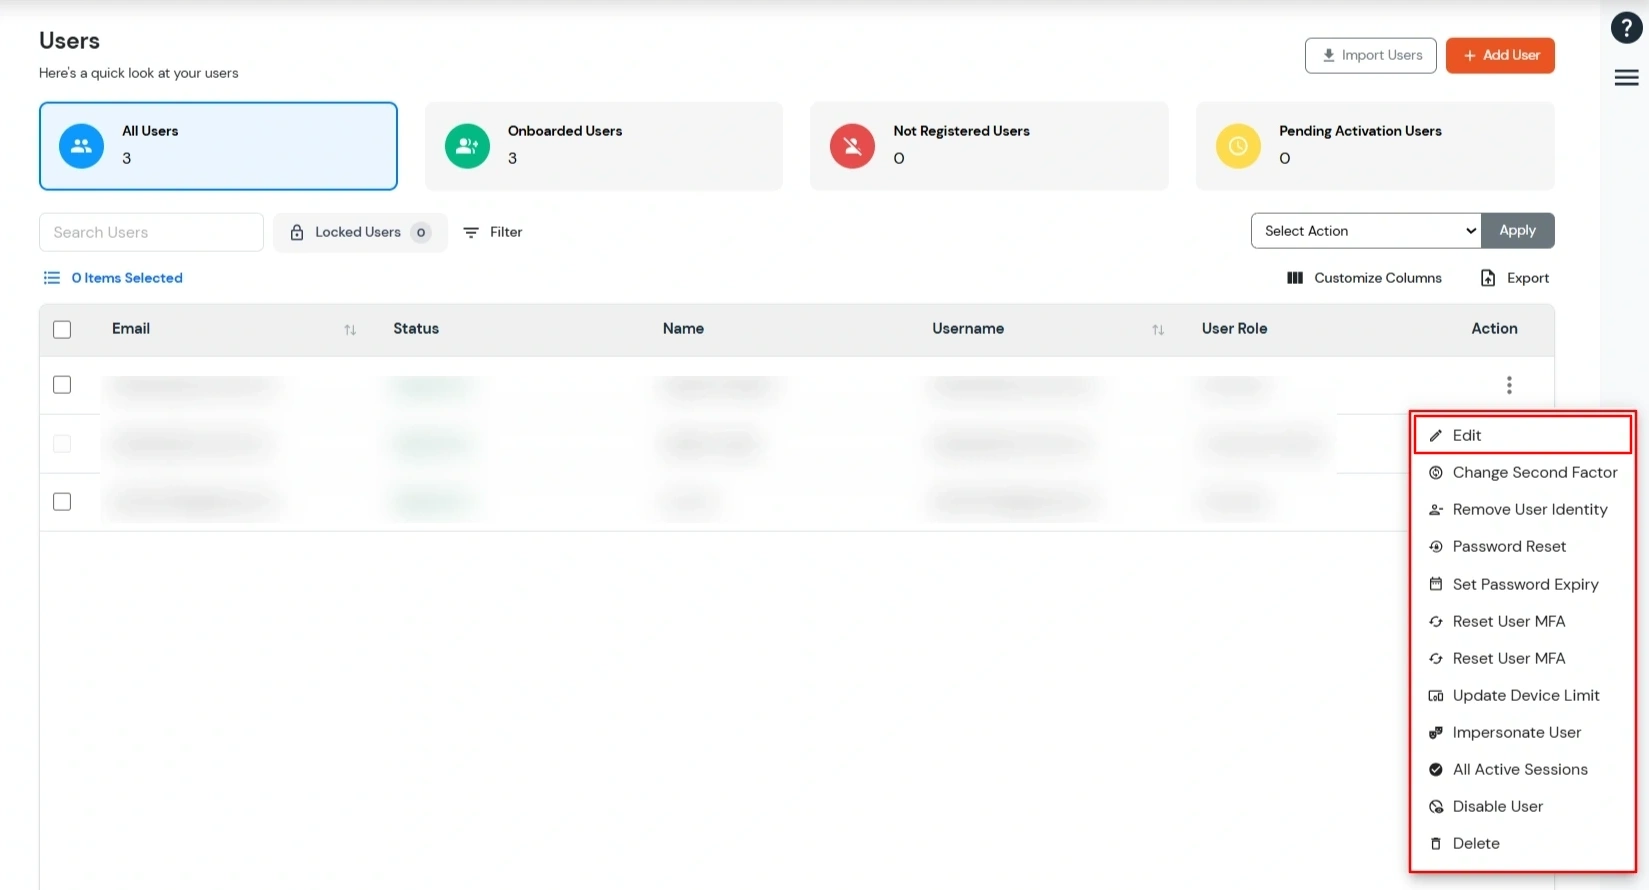
    • Slack SCIM user provisioning - edit user profile in miniOrange

    • Fill out user updated information and click on the Save button.
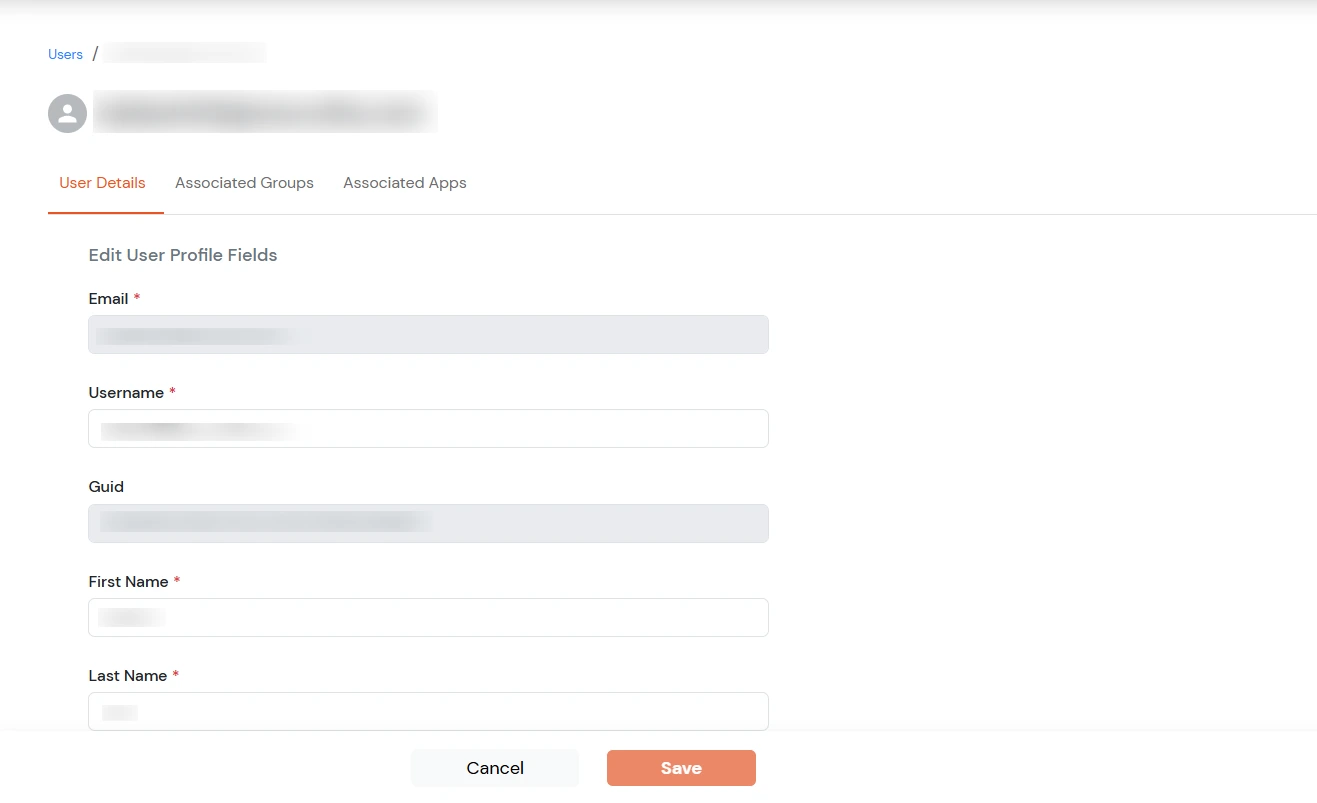
    • Slack SCIM user provisioning - update user details synced to Slack

    • Once the user profile is updated in miniOrange, the changes will be automatically reflected in Slack.

    Delete Users

    • To delete users, go to Users >> User List.
    • Select a particular user and in the Actions dropdown select Delete.
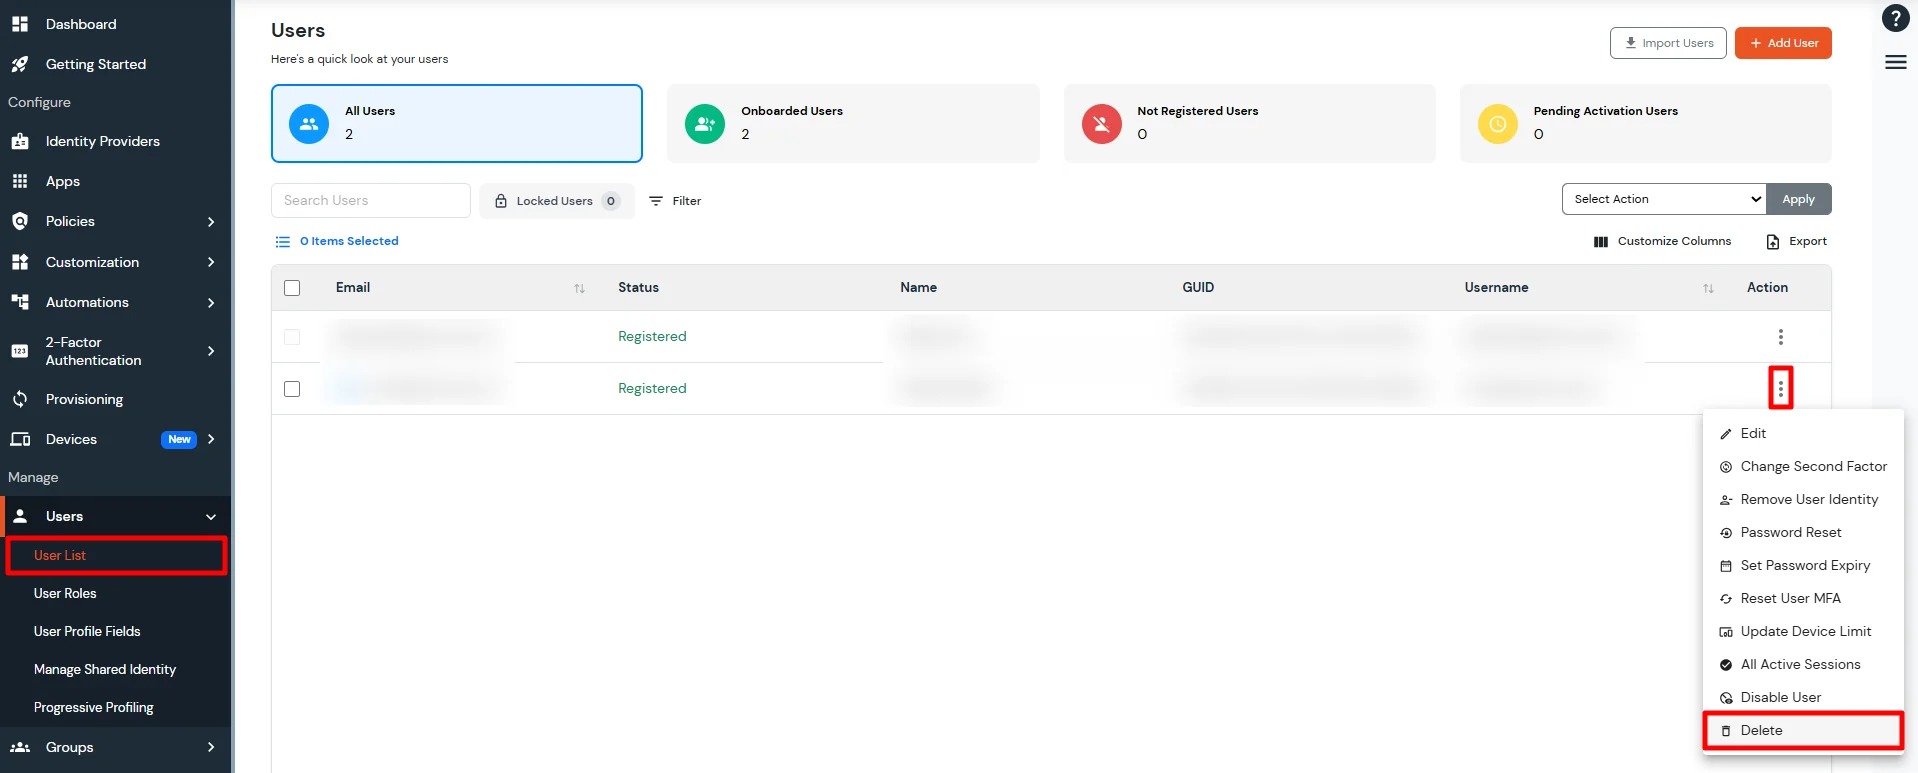
    • Slack SCIM user deprovisioning - delete user from miniOrange admin console

    • A pop up will appear when you click on the Yes button.
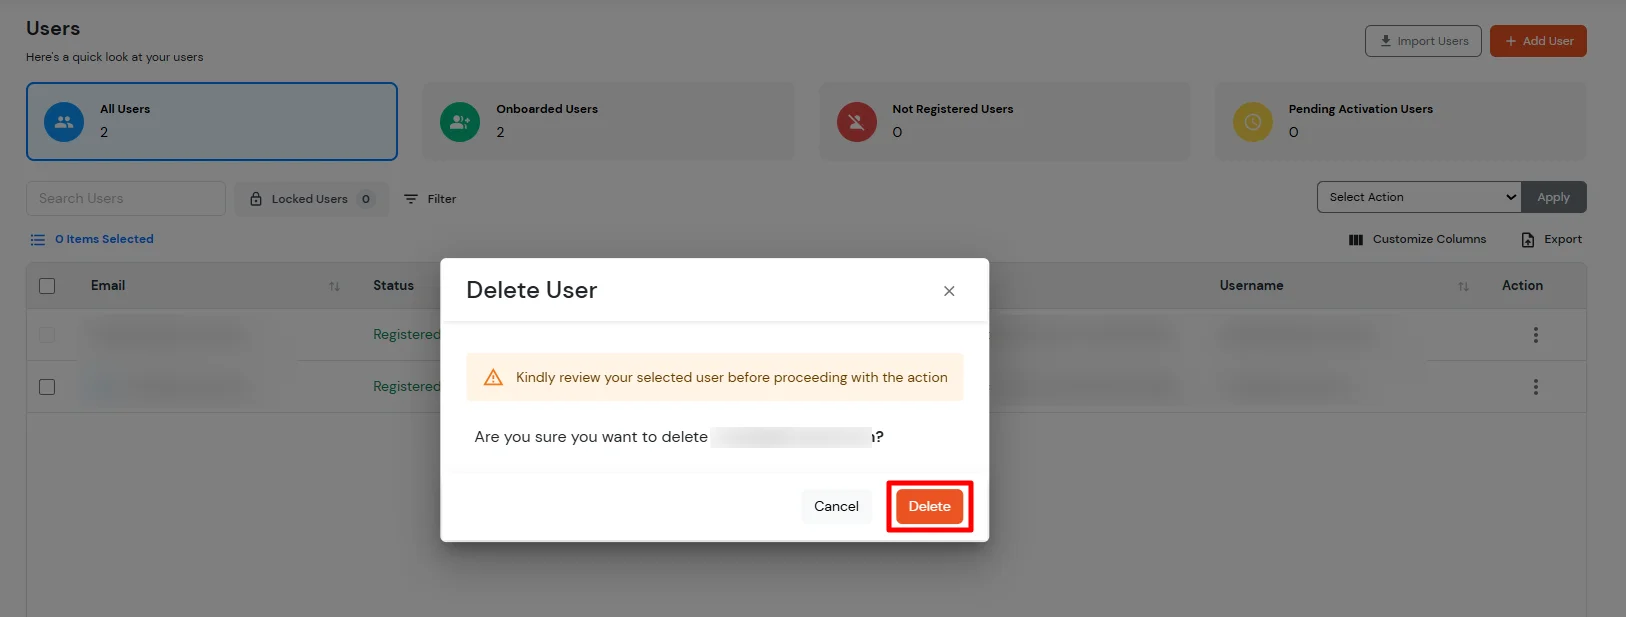
    • Slack SCIM user deprovisioning - confirm user deletion from Slack

    • Once the user is deleted in miniOrange, it will be automatically deleted from Slack.

    Create Group

    • To create a group, go to Groups >> Manage Groups.
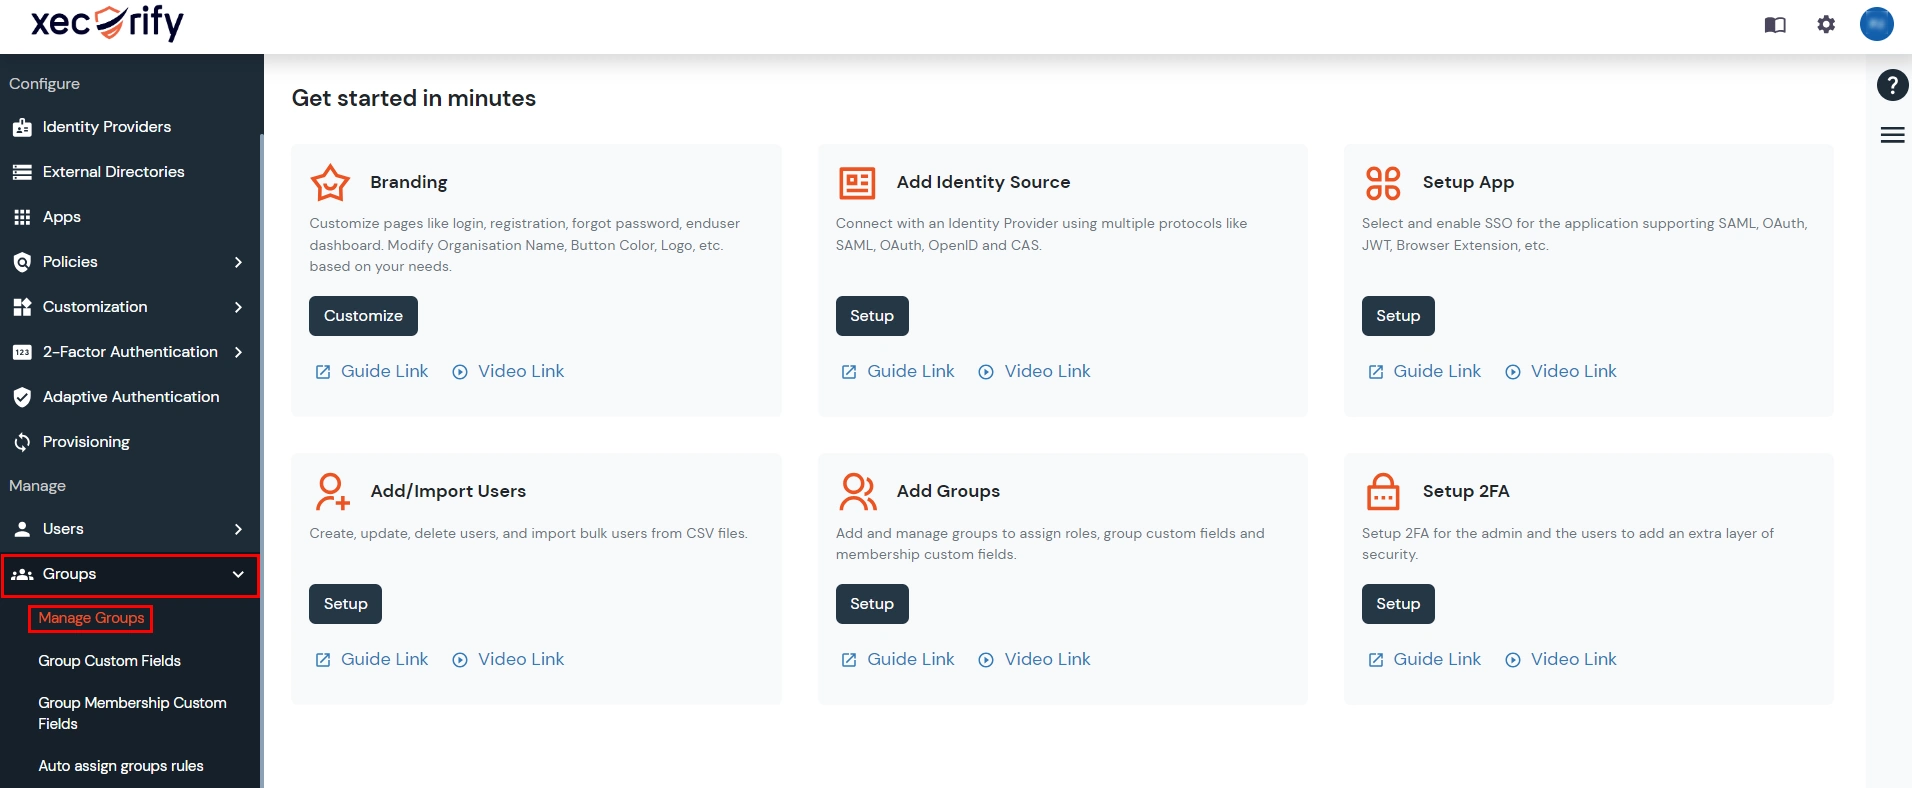
    • Slack SCIM group provisioning - manage groups in miniOrange admin console

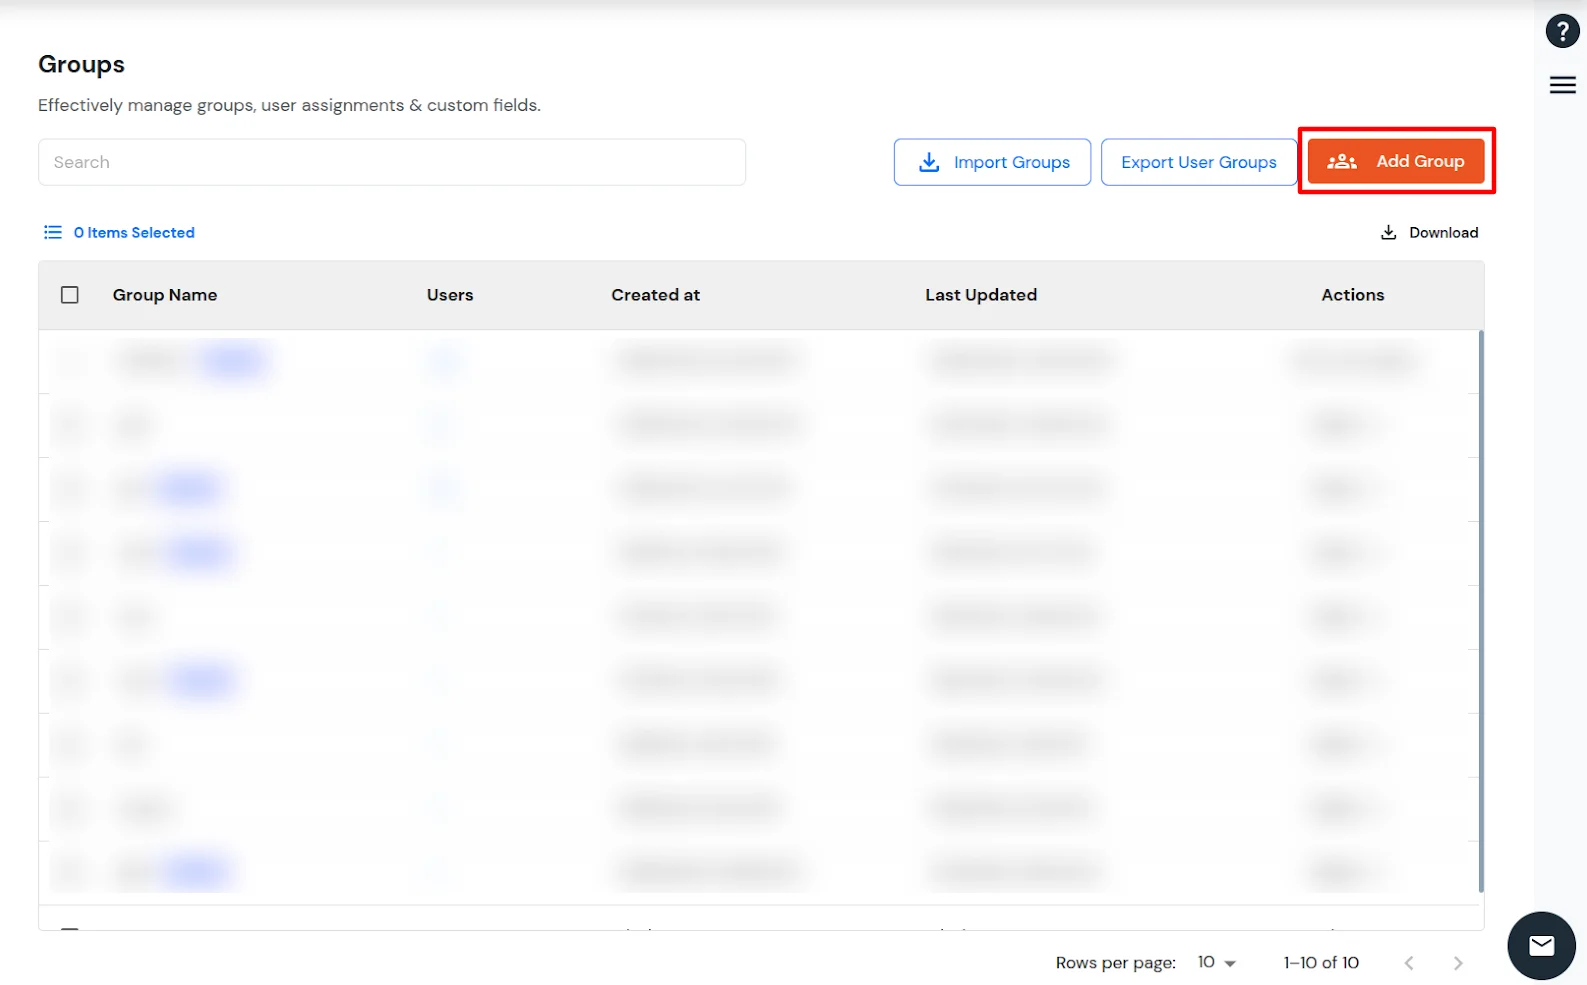
    • Click on Add Group.
    • Slack SCIM group provisioning - create new group in miniOrange

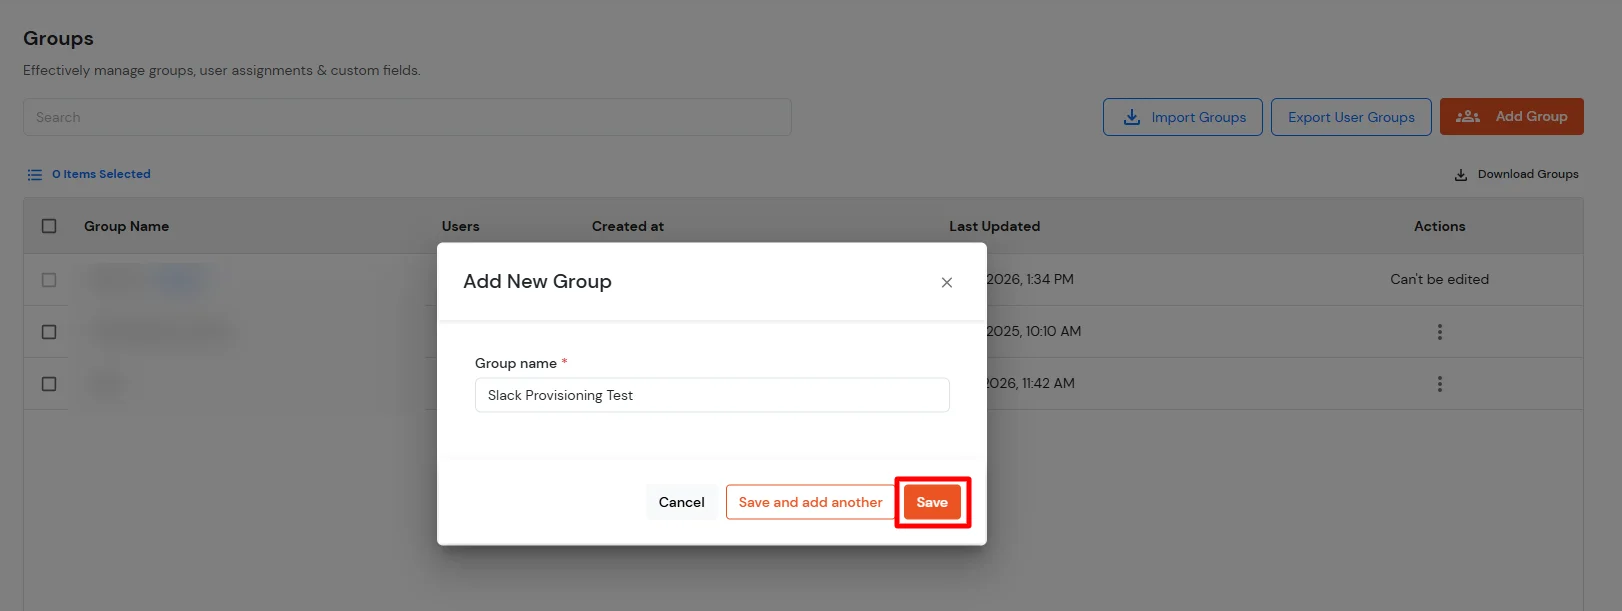
    • Enter group name and click on Save.
    • Slack SCIM group provisioning - enter group name to sync with Slack

    • Now go to Apps >> select Slack Provisioning App. Under action, click on edit.
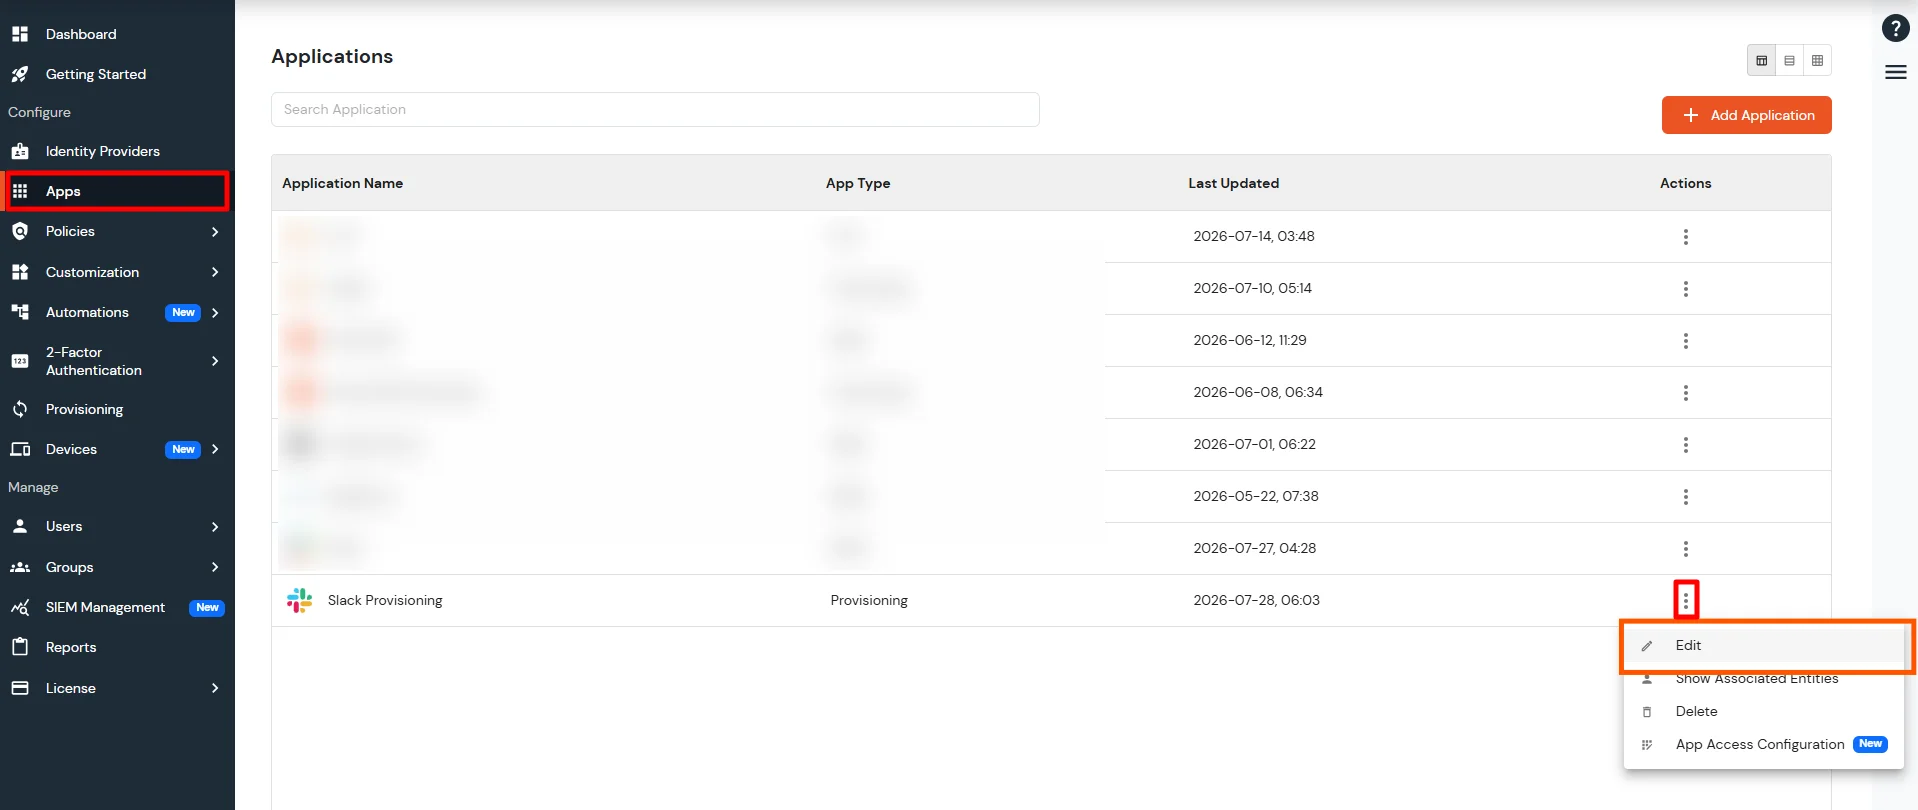
    • Slack SCIM group provisioning - edit Slack SCIM app in miniOrange

    • Make sure you have enabled the Create Group option.
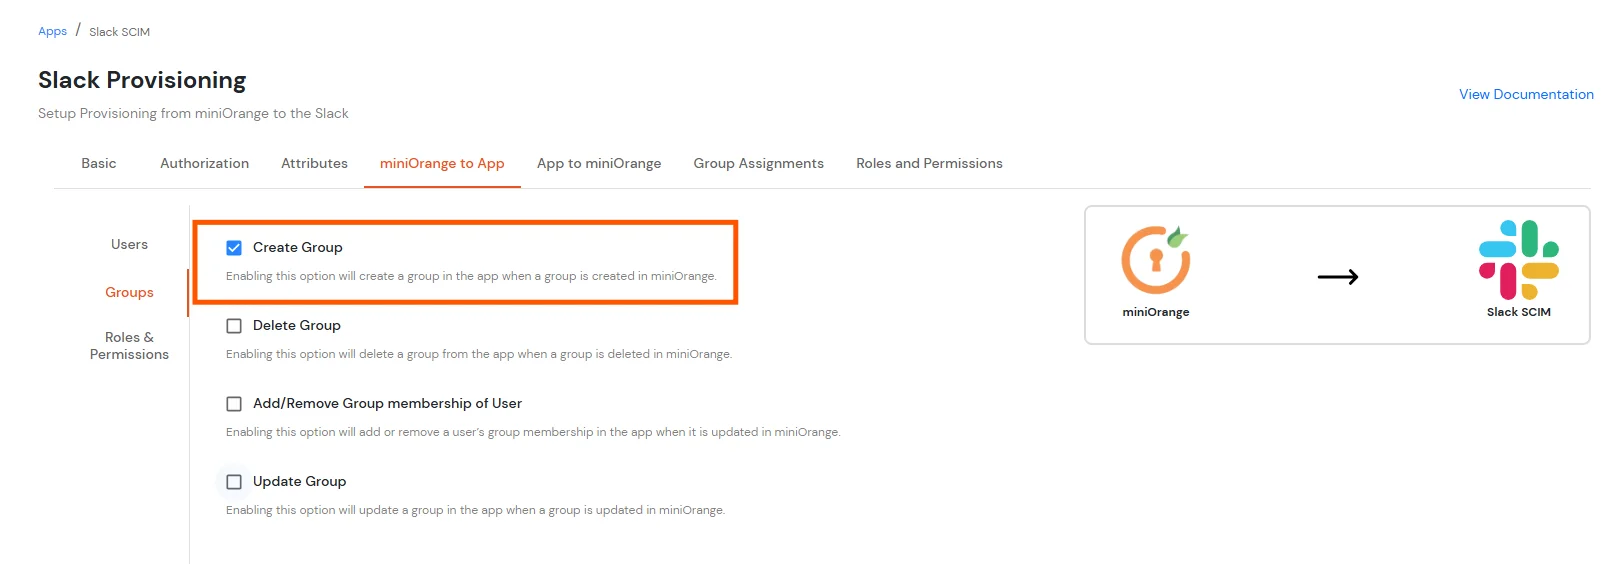
    • Slack SCIM group provisioning - enable create group option for Slack

    • Go to Group Assignments and click on Assign Groups.
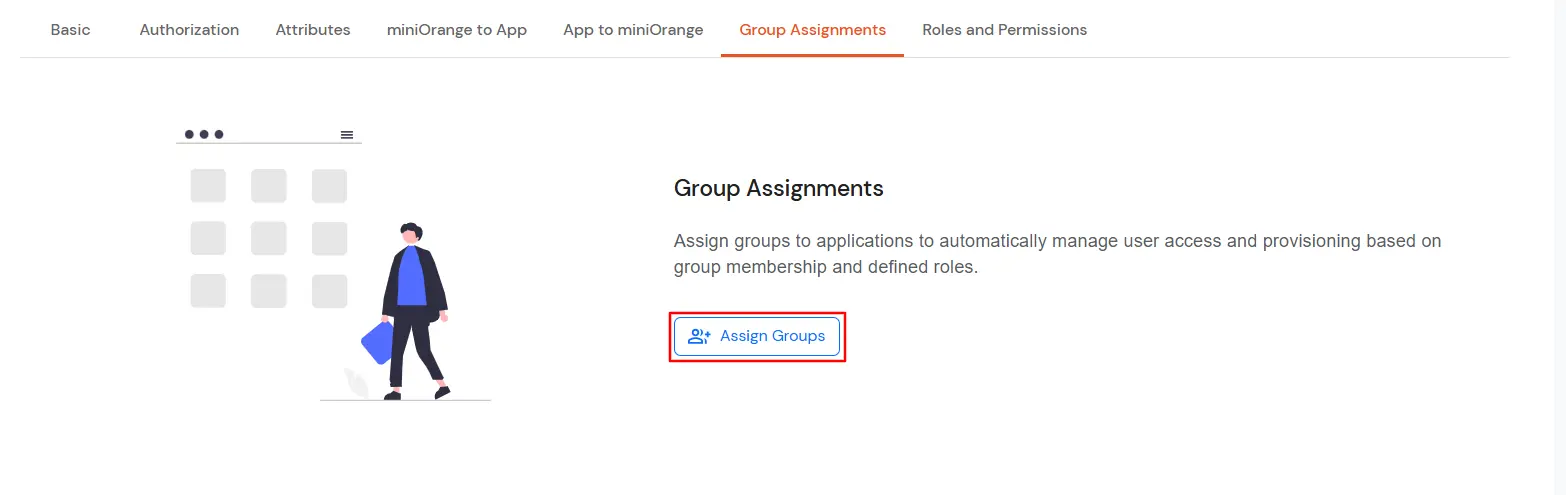
    • Slack SCIM group provisioning - open group assignments tab in miniOrange

    • Assign groups that you want to provision to Slack and click on Save.
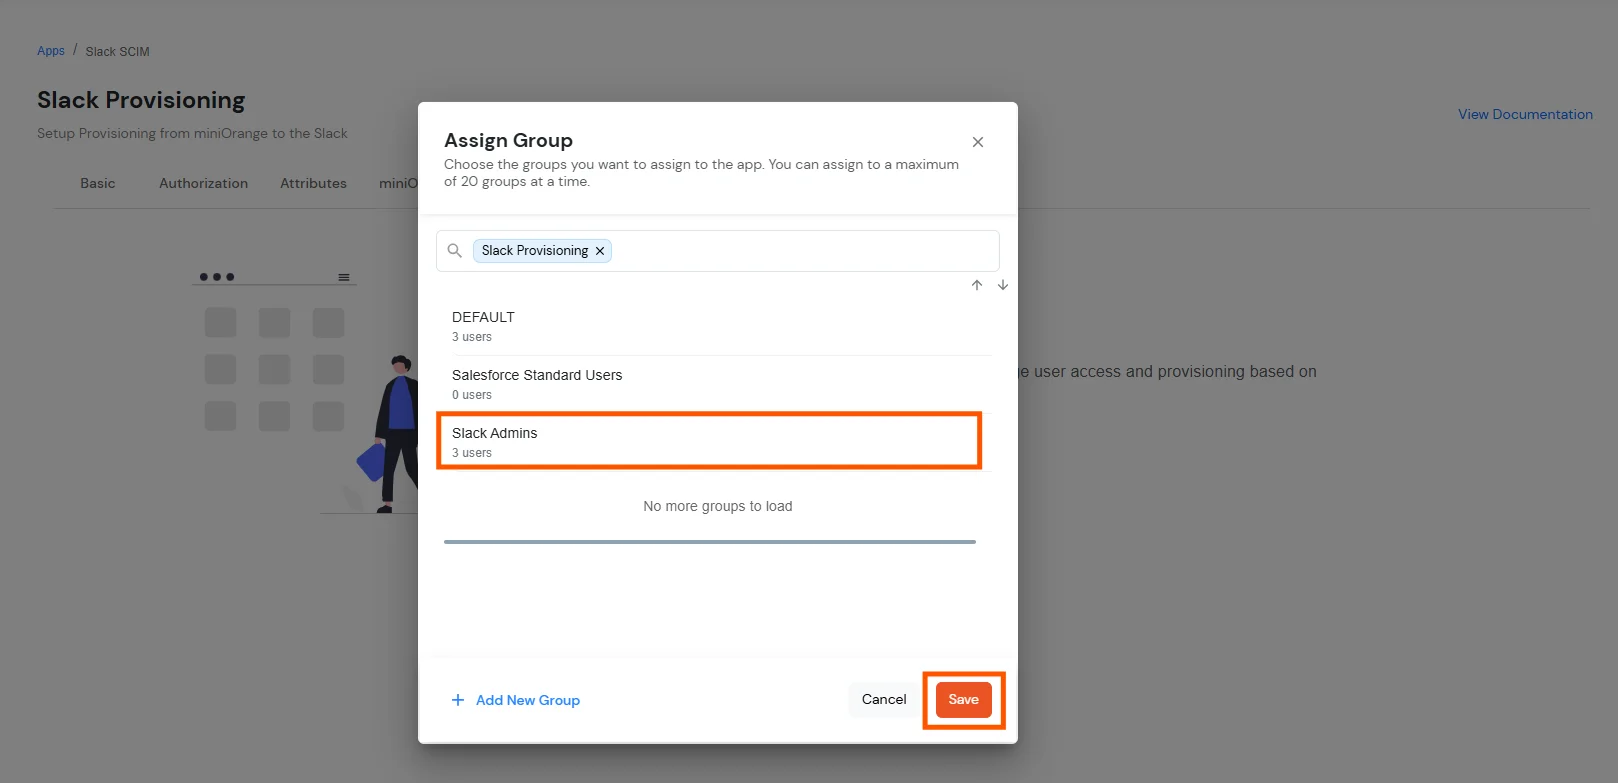
    • Slack SCIM group provisioning - assign groups to Slack SCIM application

    • Select the group and click on Save.
    • Now your group has been successfully provisioned to Slack.

    Delete Group

    • Make sure that you have enabled Delete Groups options in the Slack Provisioning App.
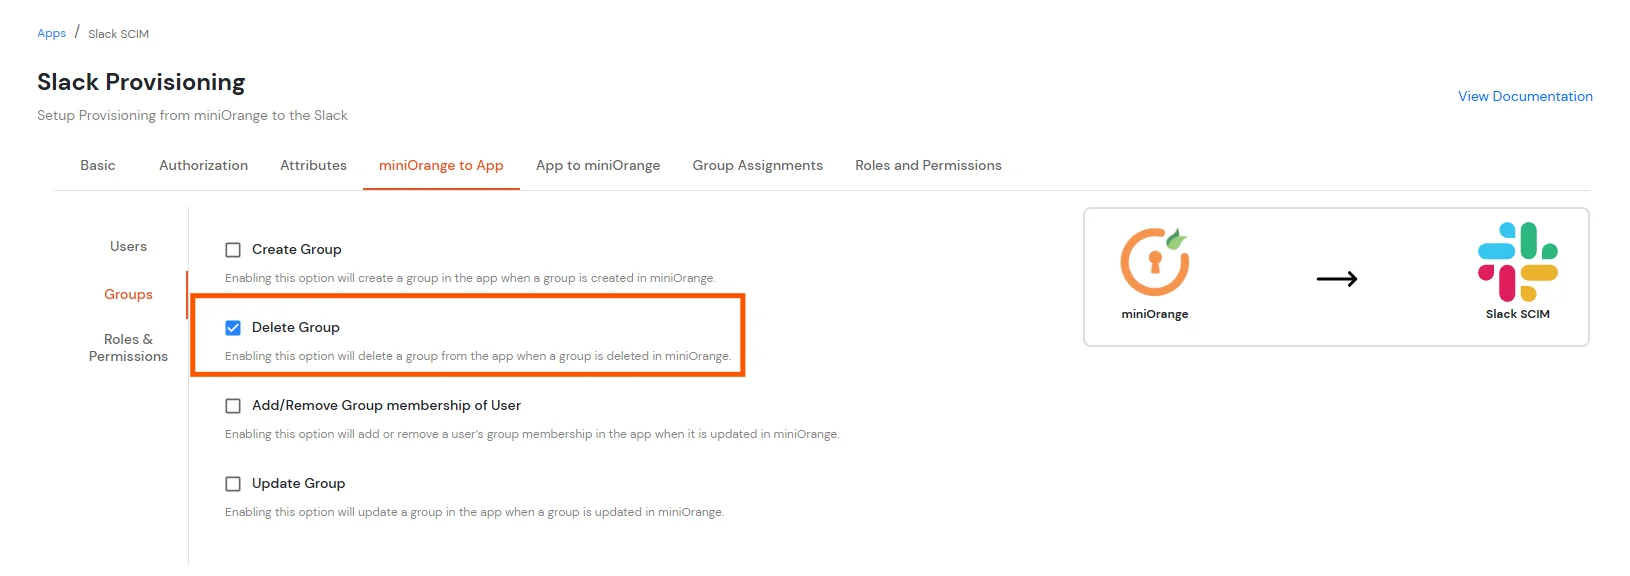
    • Slack SCIM group deprovisioning - enable delete group option for Slack

    • Go to Groups >> Manage Groups.
    • Delete the group that you want to delete from Slack.
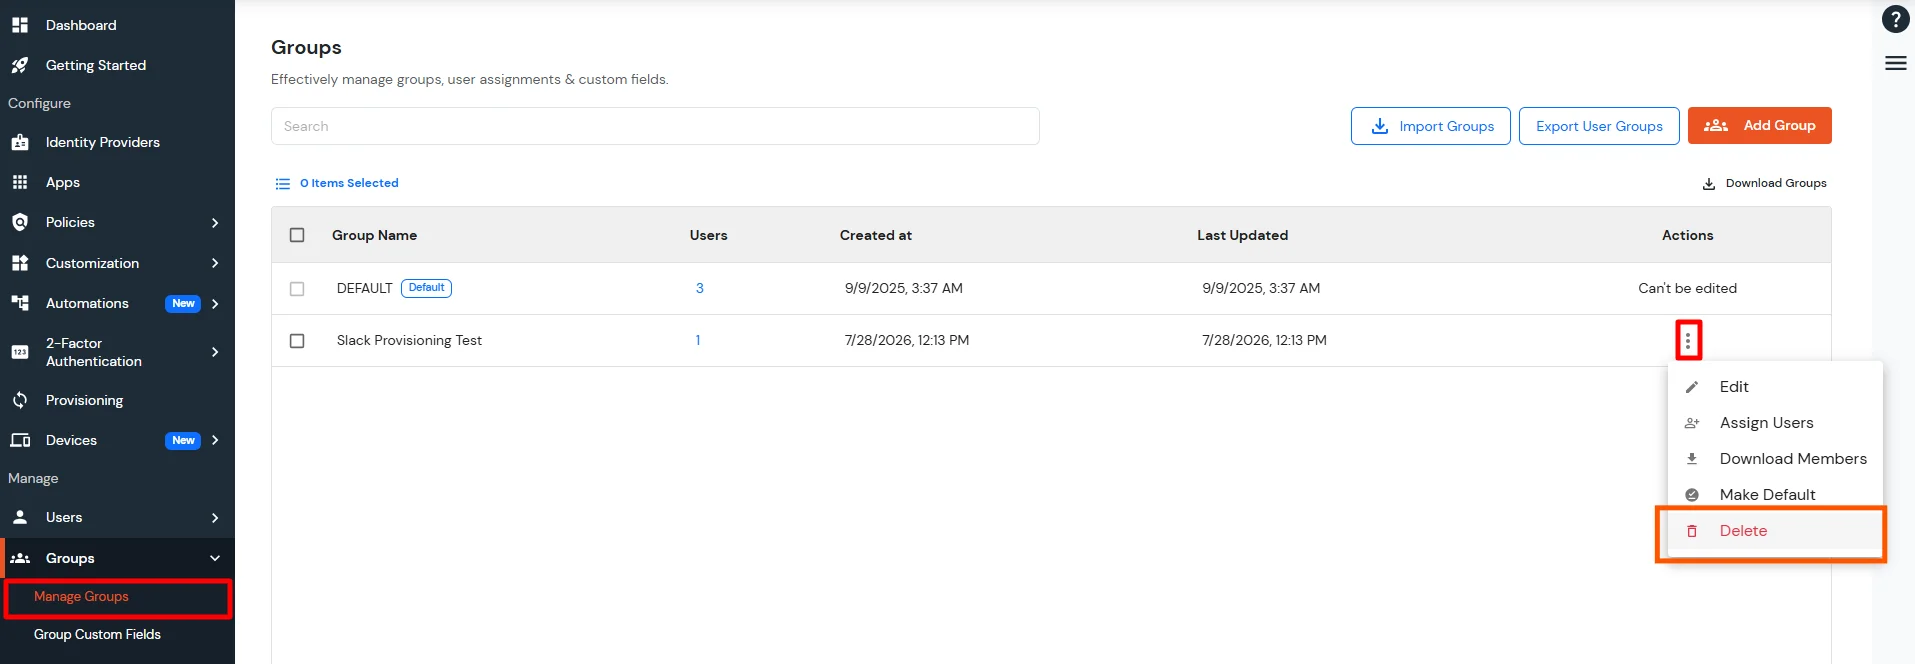
    • Slack SCIM group deprovisioning - delete group from miniOrange and Slack

    • Now your group has been successfully deleted from Slack.


    View Provisioning Reports

    How to access Provisioning Reports?

    • Navigate to Reports in the left-hand navigation pane, search for Provisioning, and select Provisioning Report.
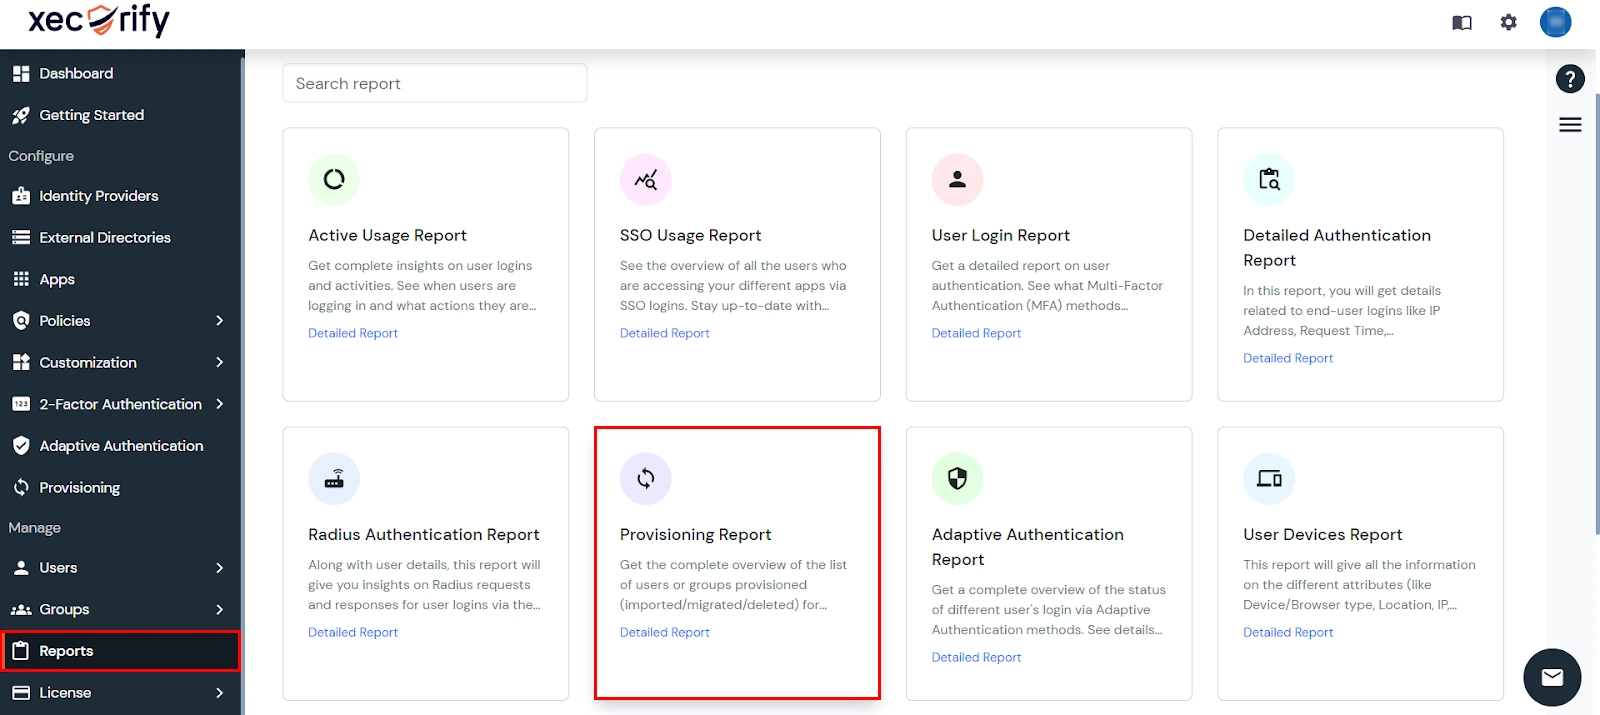
    • Provisioning Report

    • Filter the reports by specifying Enduser Identifier and Application Name criteria. Additionally, choose the desired timespan for the reports. Once done, click on the Search.
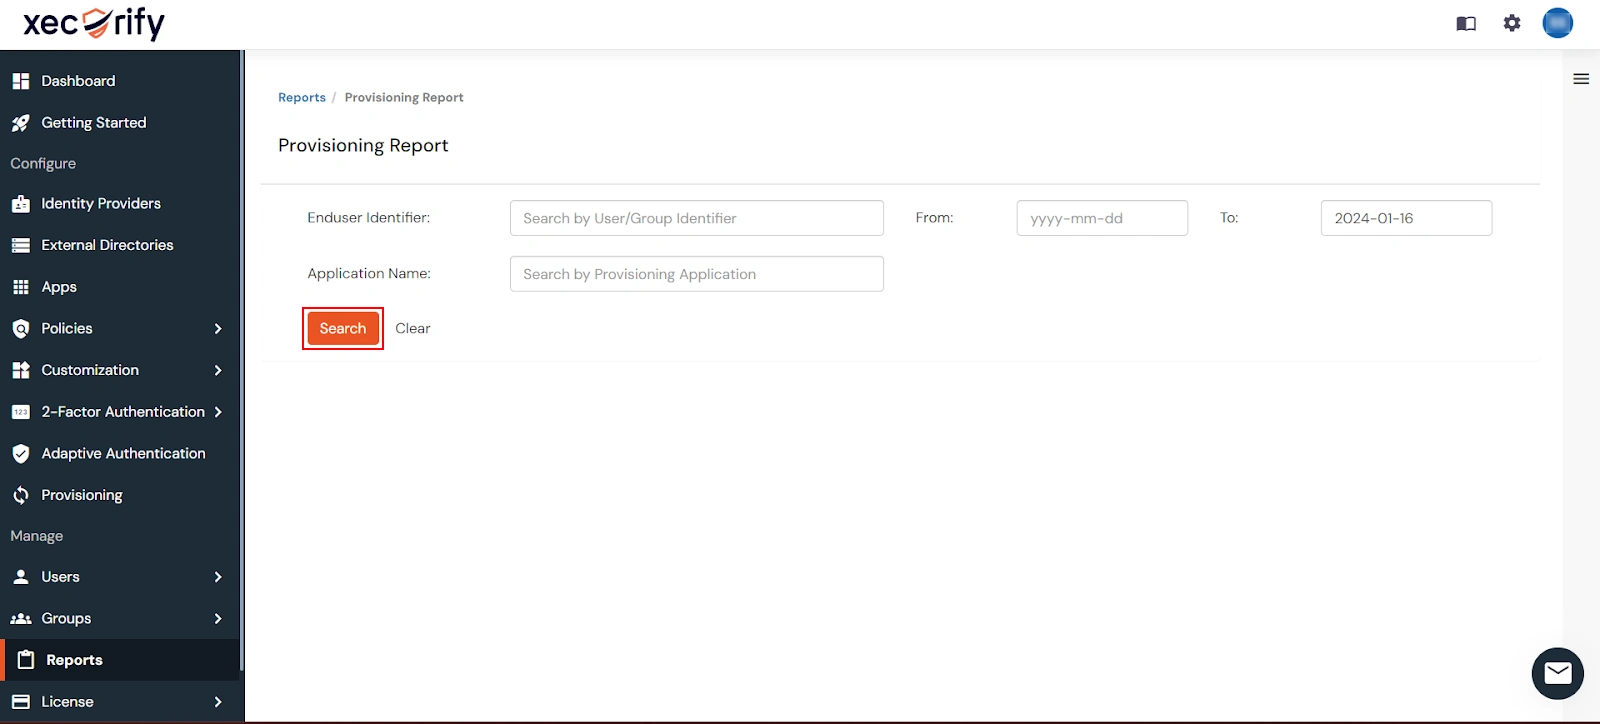
    • Search Provisioning Report

    • Alternatively, you can directly click on Search to retrieve all provisioning reports based on time without applying any specific filters.


    External References

    Want To Schedule A Demo?

    Request a Demo


    Our Other Identity & Access Management Products