Hello there!

Need Help? We are right here!

Support Icon
miniOrange Email Support
success

Thanks for your Enquiry. Our team will soon reach out to you.

If you don't hear from us within 24 hours, please feel free to send a follow-up email to info@xecurify.com

Search Results:

×

Two-Factor Authentication (2FA) for BugSnag


BugSnag Two-Factor Authentication (2FA) or Multi-Factor Authentication (MFA) is an additional layer of security in which a user or an organizational employee have to provide two factors to gain access to the BugSnag account. With BugSnag 2FA being enabled, anyone trying to login to your BugSnag account from an unrecognized computer/device must provide additional authorization. Authentication starts with a user submitting his traditional username and password. Once the user successfully gets authenticated with the 1st step verification, configured 2FA (OTP over SMS, Push Notifications, YubiKey, TOTP, Google Authenticator etc) method prompts for 2nd-step verification. After successfully authenticating with both of the steps a user is granted with the access to the BugSnag account. This extra layer prevents the unauthorized person from accessing the resources even if cyber attackers get to know your credentials.

miniorange provides 15+ authentication methods and solutions for various use cases. It allows users and organizations to set up certain authentication and settings which includes password restrictions, restricting sign-in methods, as well as other security settings. miniorange also makes way for authentication apps that support Time-Based One-Time Password (TOTP) Google Authenticator, Microsoft Authenticator, Authy 2-Factor authentication app and our own miniorange Authenticator app.


Connect with External Source of Users


miniOrange provides user authentication from various external sources, which can be Directories (like ADFS, Microsoft Active Directory, Azure AD, OpenLDAP, Google, AWS Cognito etc), Identity Providers (like Shibboleth, Ping, Okta, OneLogin, KeyCloak), Databases (like MySQL, Maria DB, PostgreSQL) and many more.


Apps supported by miniOrange


two factor authentication (2FA) miniOrange authenticator app

miniOrange
Authenticator App

Download miniOrange Authenticator App from Google Play Store    Download
two factor authentication (2FA) google authenticator app

Google
Authenticator App

Download Google App Authenticator from Google Play Store    Download Google App Authenticator from Apple Store
two factor authentication (2FA) authy authenticator app

Authy 2-Factor
Authentication App

Download Authy 2-Factor
Authentication App from Google Play Store    Download Authy 2-Factor
Authentication App from Apple Store
two factor authentication (2FA) Microsoft authenticator app

Microsoft
Authenticator App

Download Microsoft Authenticator App from Google App store    Download Microsoft Authenticator App from Apple store

Follow the Step-by-Step Guide given below for BugSnag Single Sign-On (SSO)

1. Configure BugSnag in miniOrange

  • Login into miniOrange Admin Console.
  • Go to Apps and click on Add Application button.
  • BugSnag Single Sign-On (SSO) add app

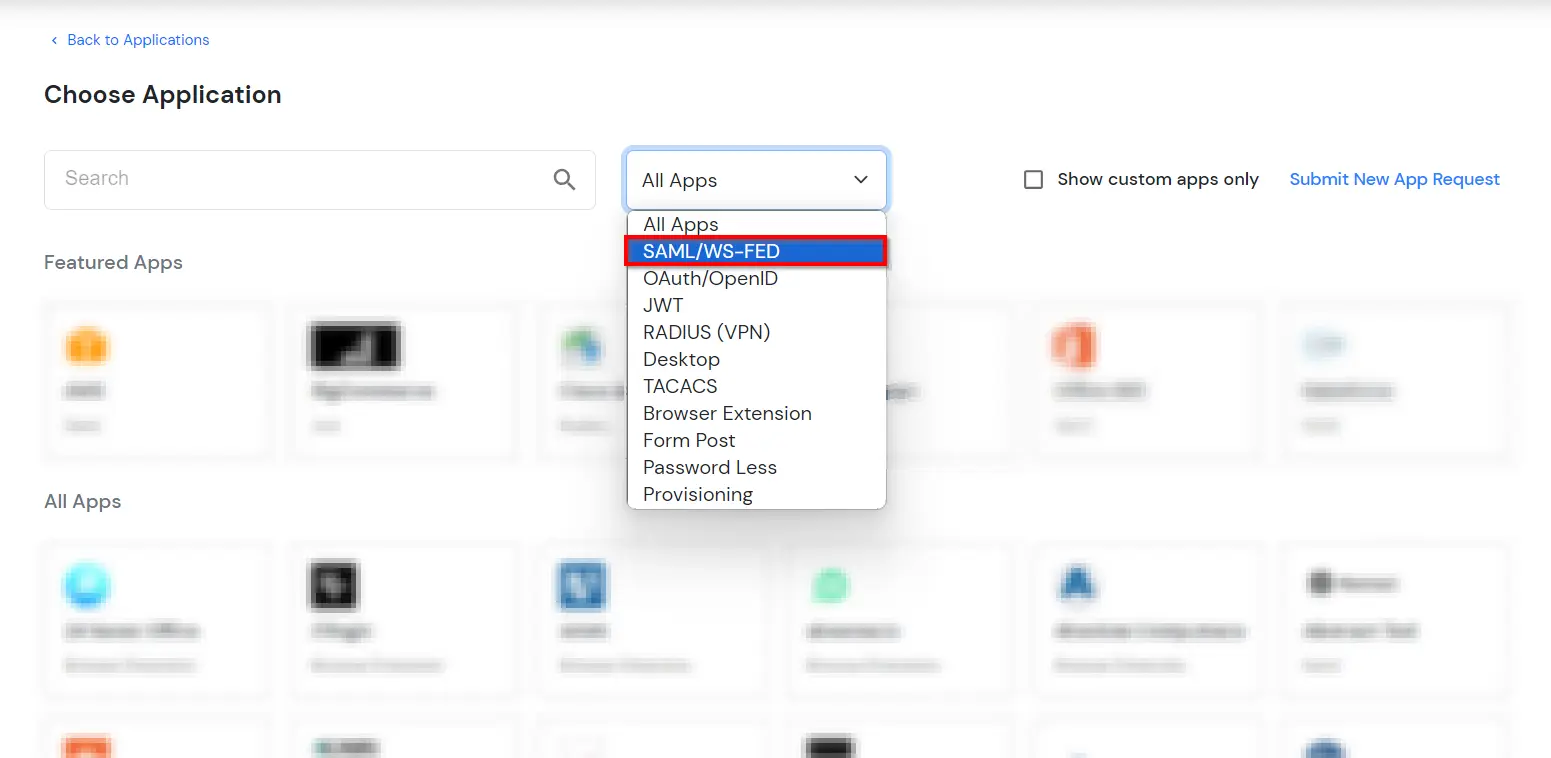
  • In Choose Application, select SAML/WS-FED from the application type dropdown.
  • BugSnag Single Sign-On (SSO) choose app type

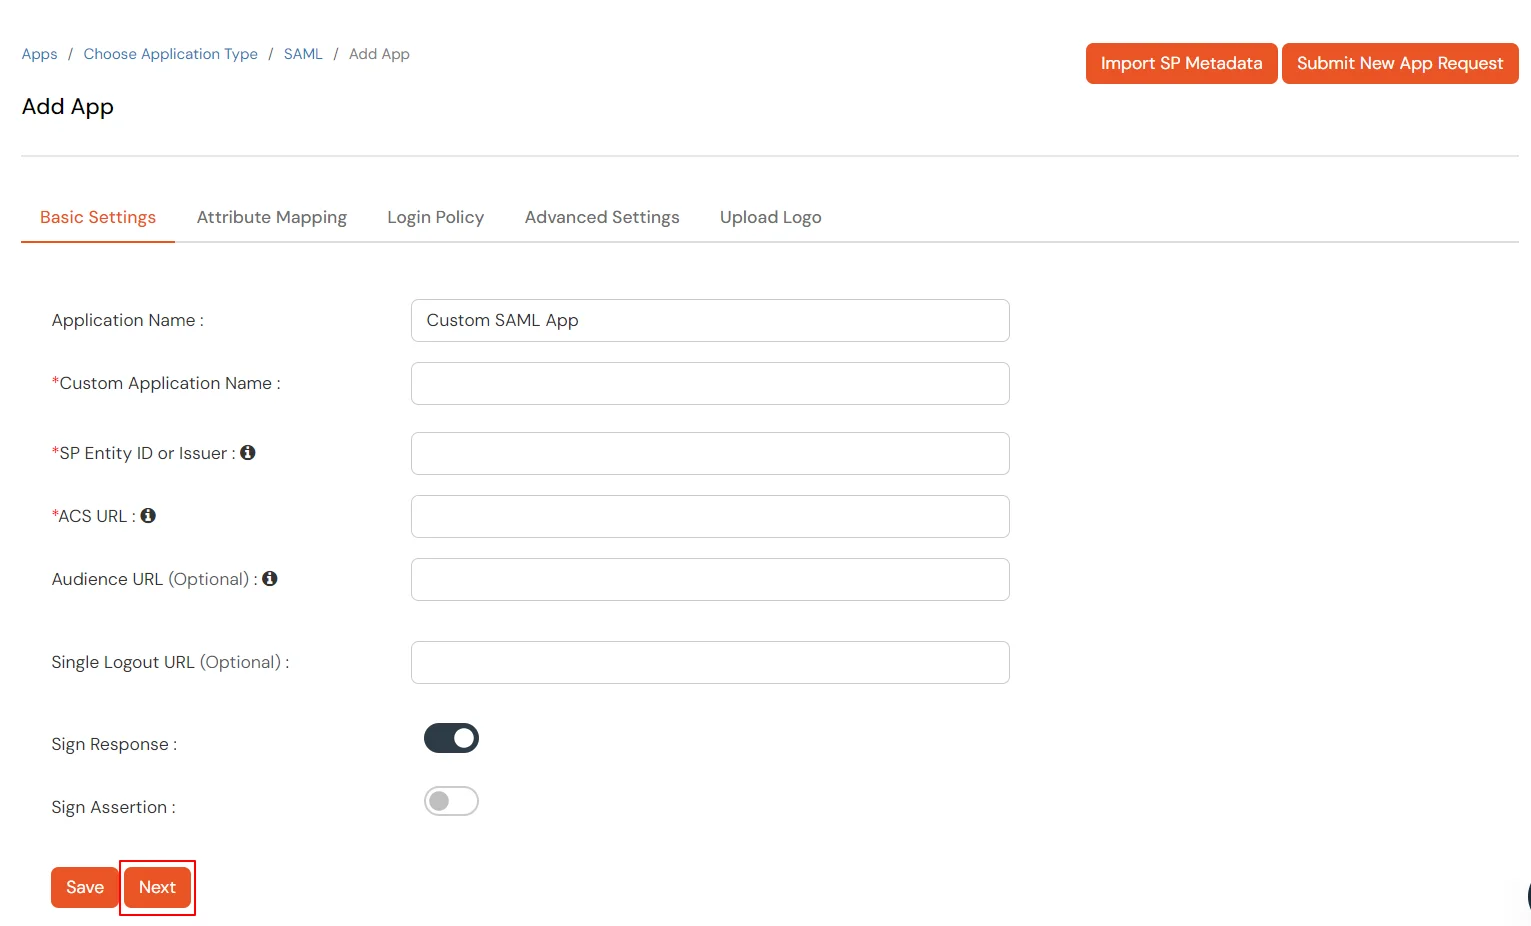
  • Search for BugSnag in the list, if you don't find BugSnag in the list then, search for custom and you can set up your application in Custom SAML App.
  • BugSnag Single Sign-On (SSO) manage apps

  • Enter the SP Entity ID or Issuer : https://app.bugsnag.com
  • Enter the ACS URL : https://app.bugsnag.com/user/sign_in/saml/<organization_name>/acs
  • Enter the Audience URI (Optional) : https://app.bugsnag.com
  • Click on Next to proceed further.
  • Configure bugSnag Single Sign-On (SSO)

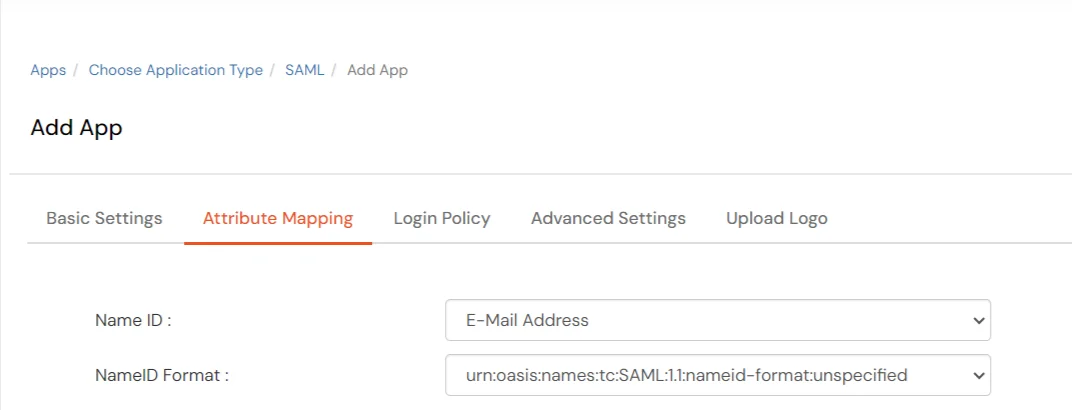
  • In the Attribute Mapping tab configure the following attributes as shown in the image below.
  • bugSnag Single Sign-On (sso) Add Attribute

  • To upload respective app logo for a Custom SAML App, click on Upload Logo tab.
  • bugSnag Single Sign-On (sso) Update Logo

  • Click on Save.
  • To get miniOrange metadata details in order to configure BugSnag:

  • Go to Apps >> Manage Apps.
  • Search for your app and click on the select in action menu against your app.
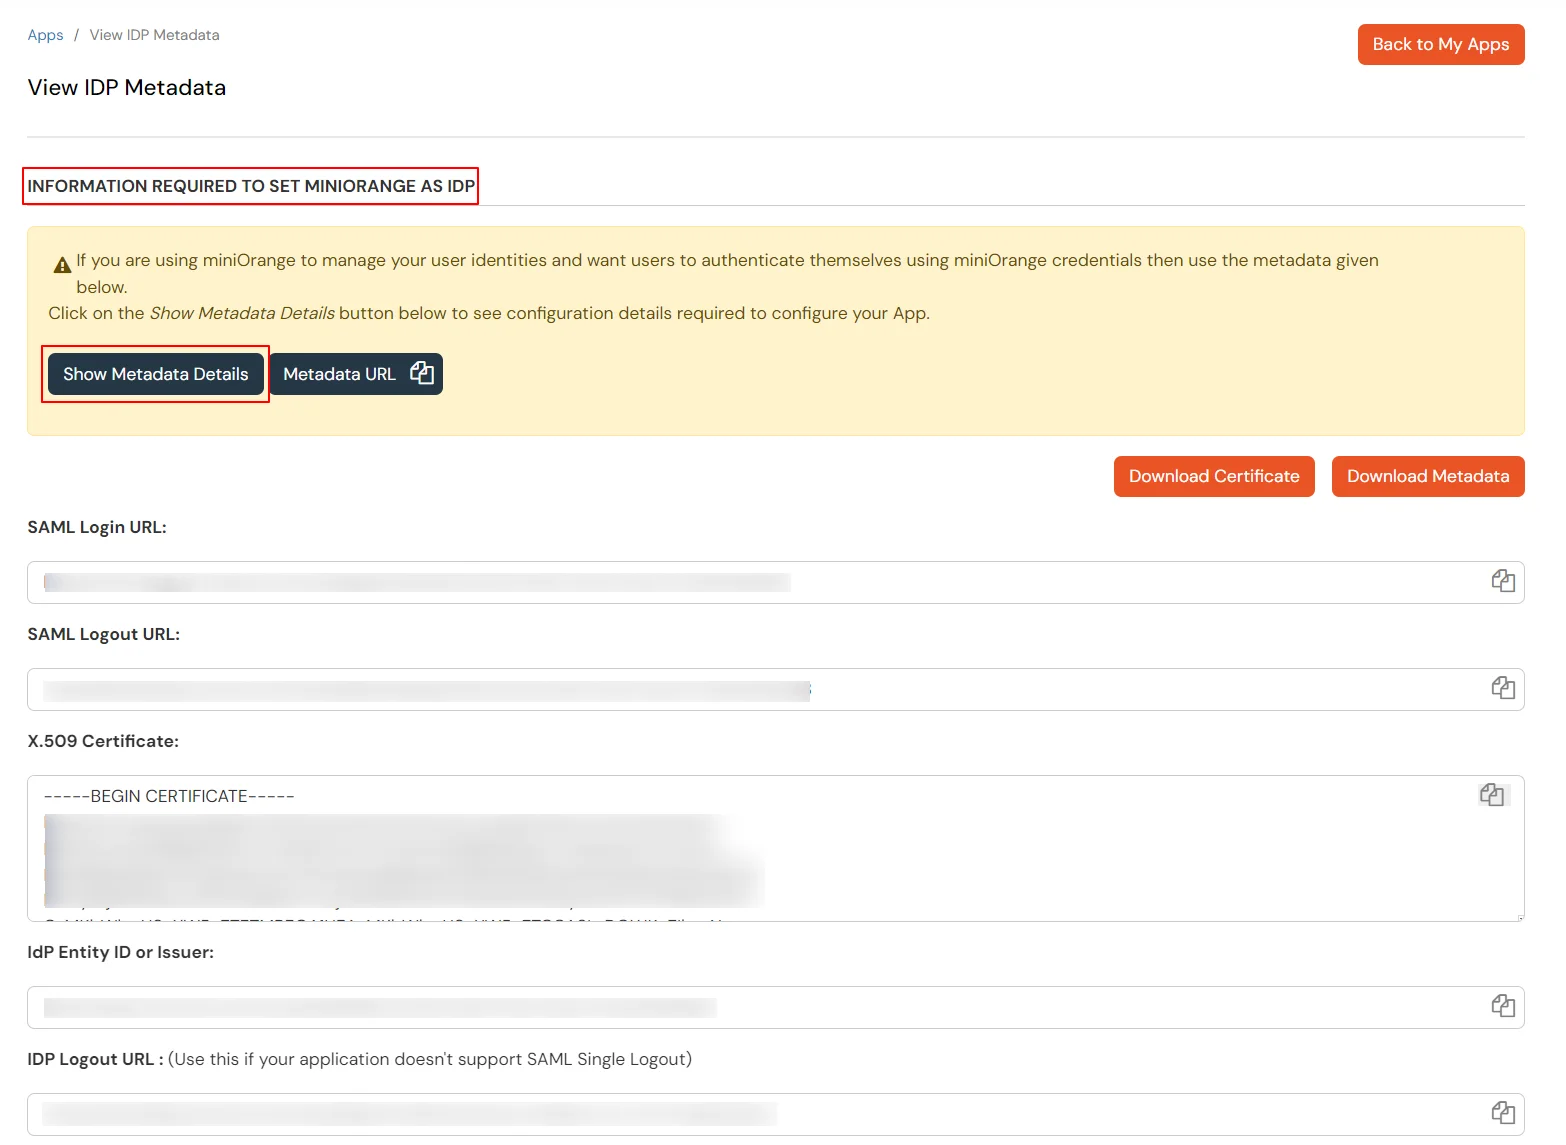
  • Click on the Metadata Option under the Select Dropdown to get the miniOrange Metadata details. You can also click on the Show SSO Link to see the IdP initiated SSO link for BugSnag.
  • Go to Metadata link BugSnag SAML SSO

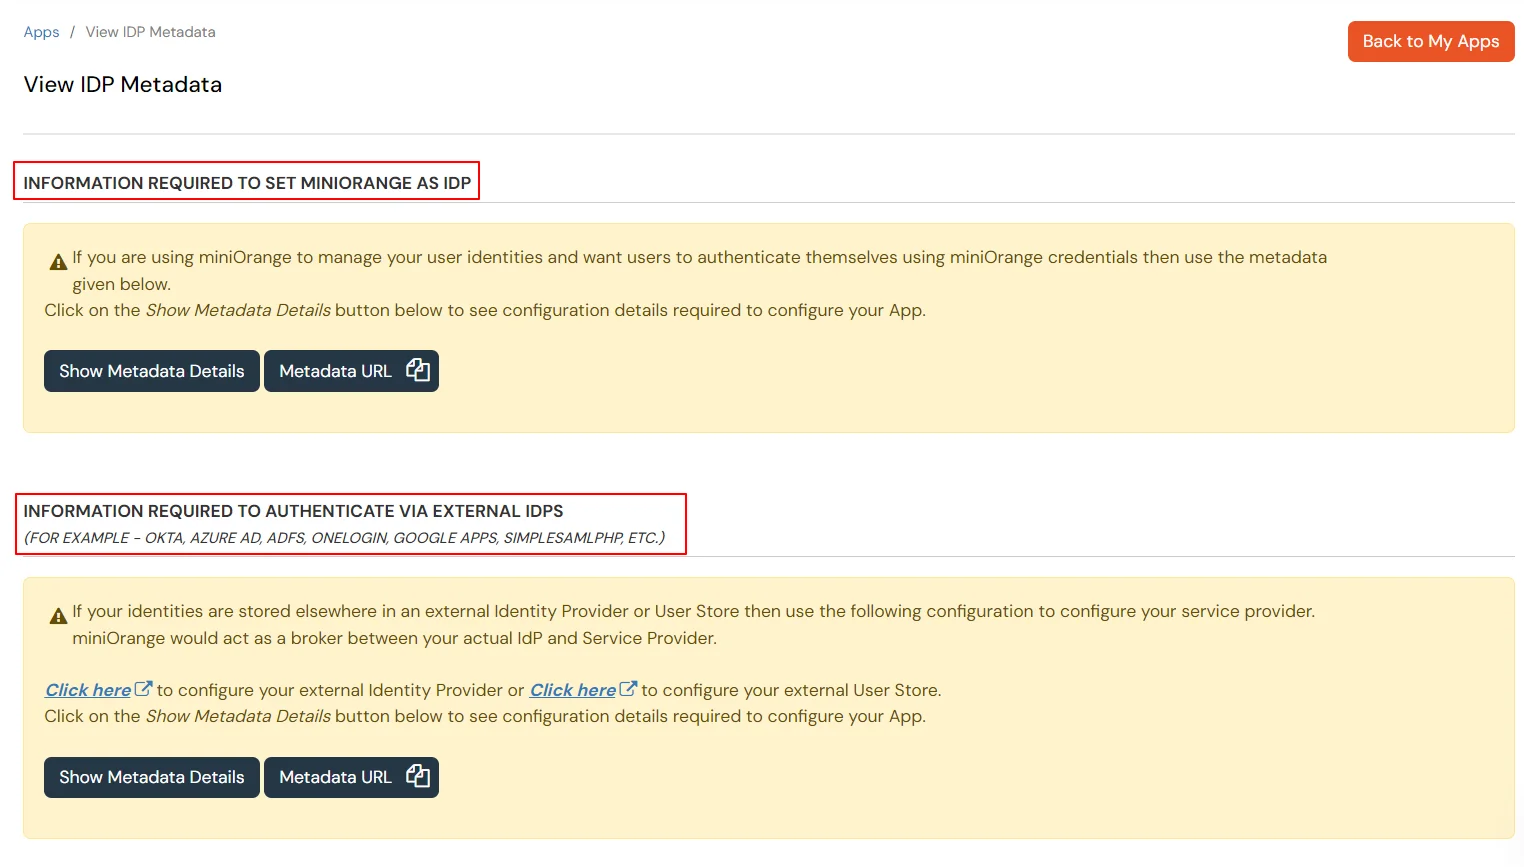
  • Here you will see 2 options, if you are setting up miniOrange as IDP copy the meta details related to miniOrange, if you required to be authenticated via external IDP's (Okta, Azure AD, ADFS, OneLogin, Google Workspace) you can get metadata from the 2nd Section as shown below.
  • BugSnag Single Sign-On (sso) Add SAML Application

  • Keep SAML Login URL, SAML Logout URL and click on the Download Certificate button to download certificate which you will require in Step 2.
  • BugSnag Single Sign-On (SSO) Select Metadata details external IDP or miniOrange as IDP

2. Configure SSO in BugSnag

  • Login to your BugSnag as admin account.
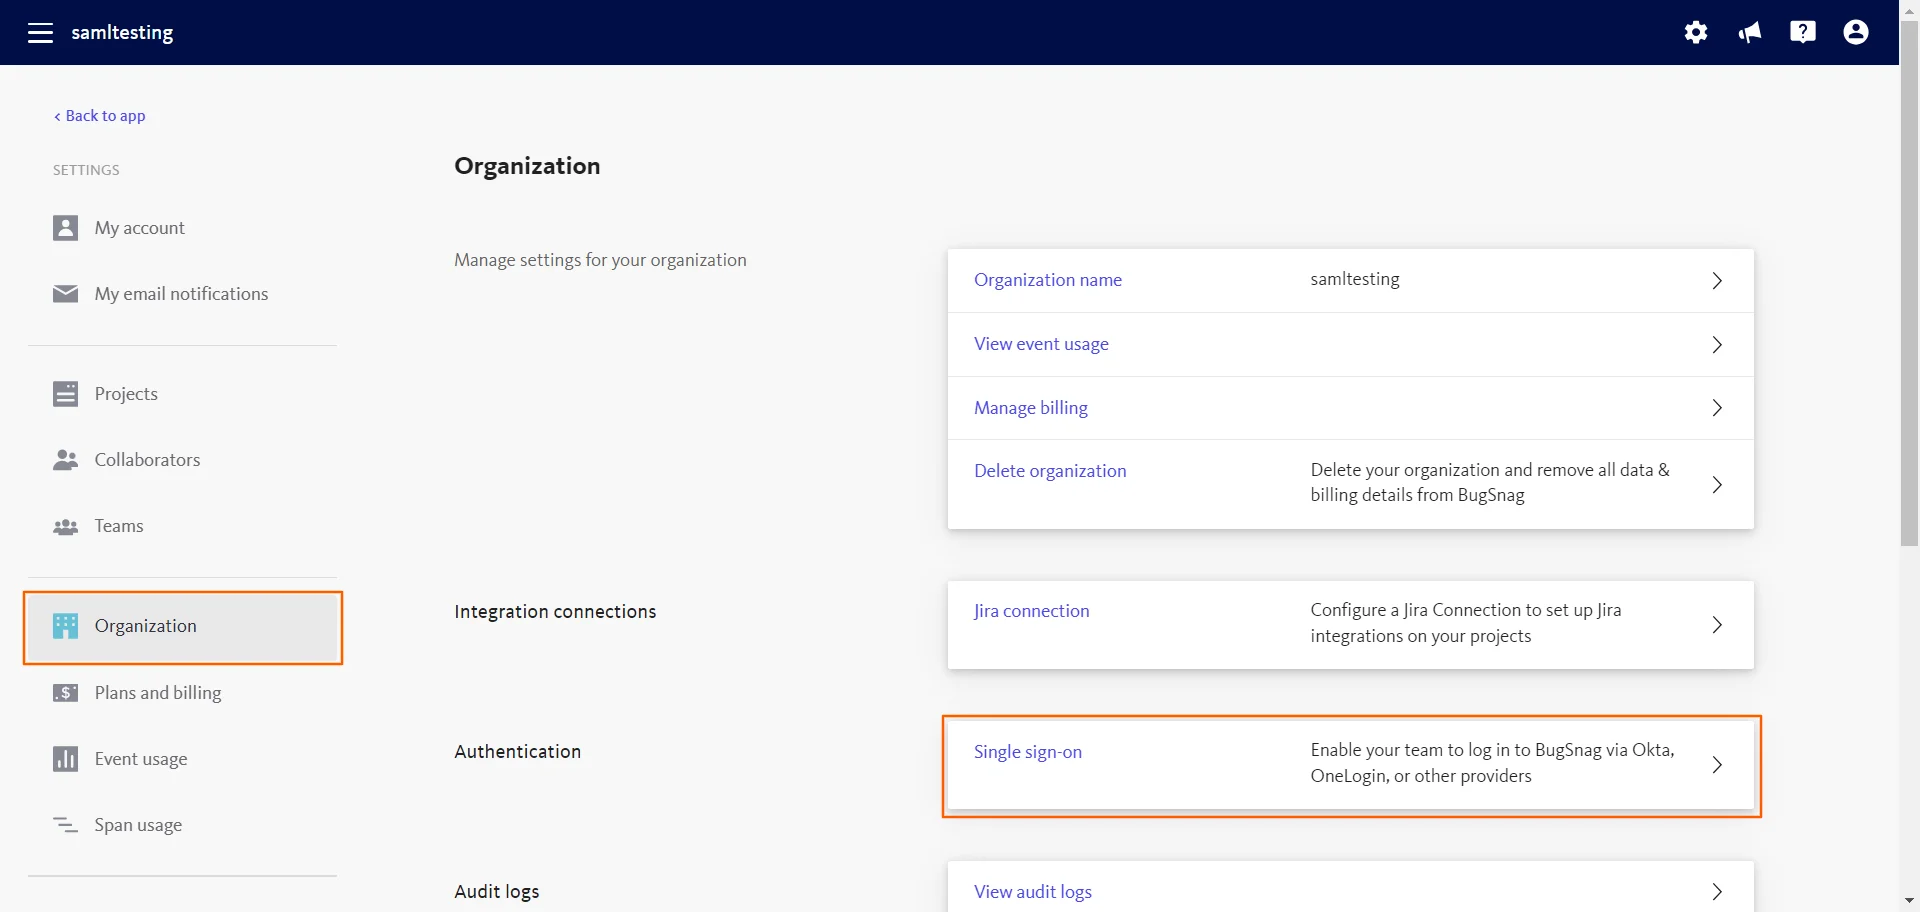
  • Click on Organizational >> Authentication >> click Single sign-on.
  • BugSnag single sign-on click Organization

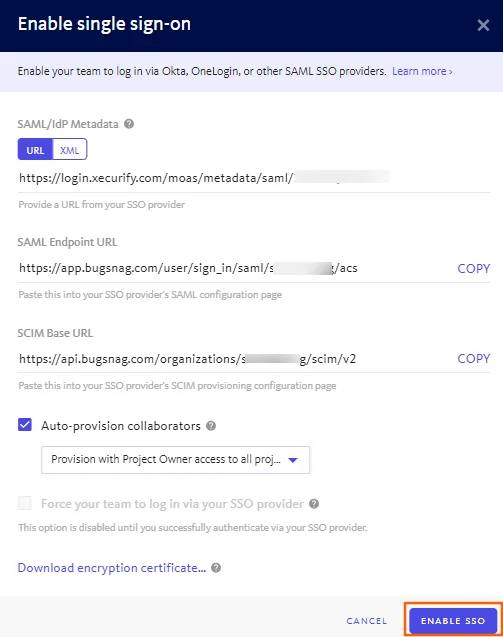
  • In Enable single sign-on enter the metadata URL which you will get from the Step 1 and paste it into Provide a URL from your SSO provider field.
  • BugSnag single sign-on (sso) provide metadata url

  • Click on ENABLE SSO button to save SAML settings.

3. Configure 2FA for BugSnag

3.1: Enable 2FA for Users of BugSnag app
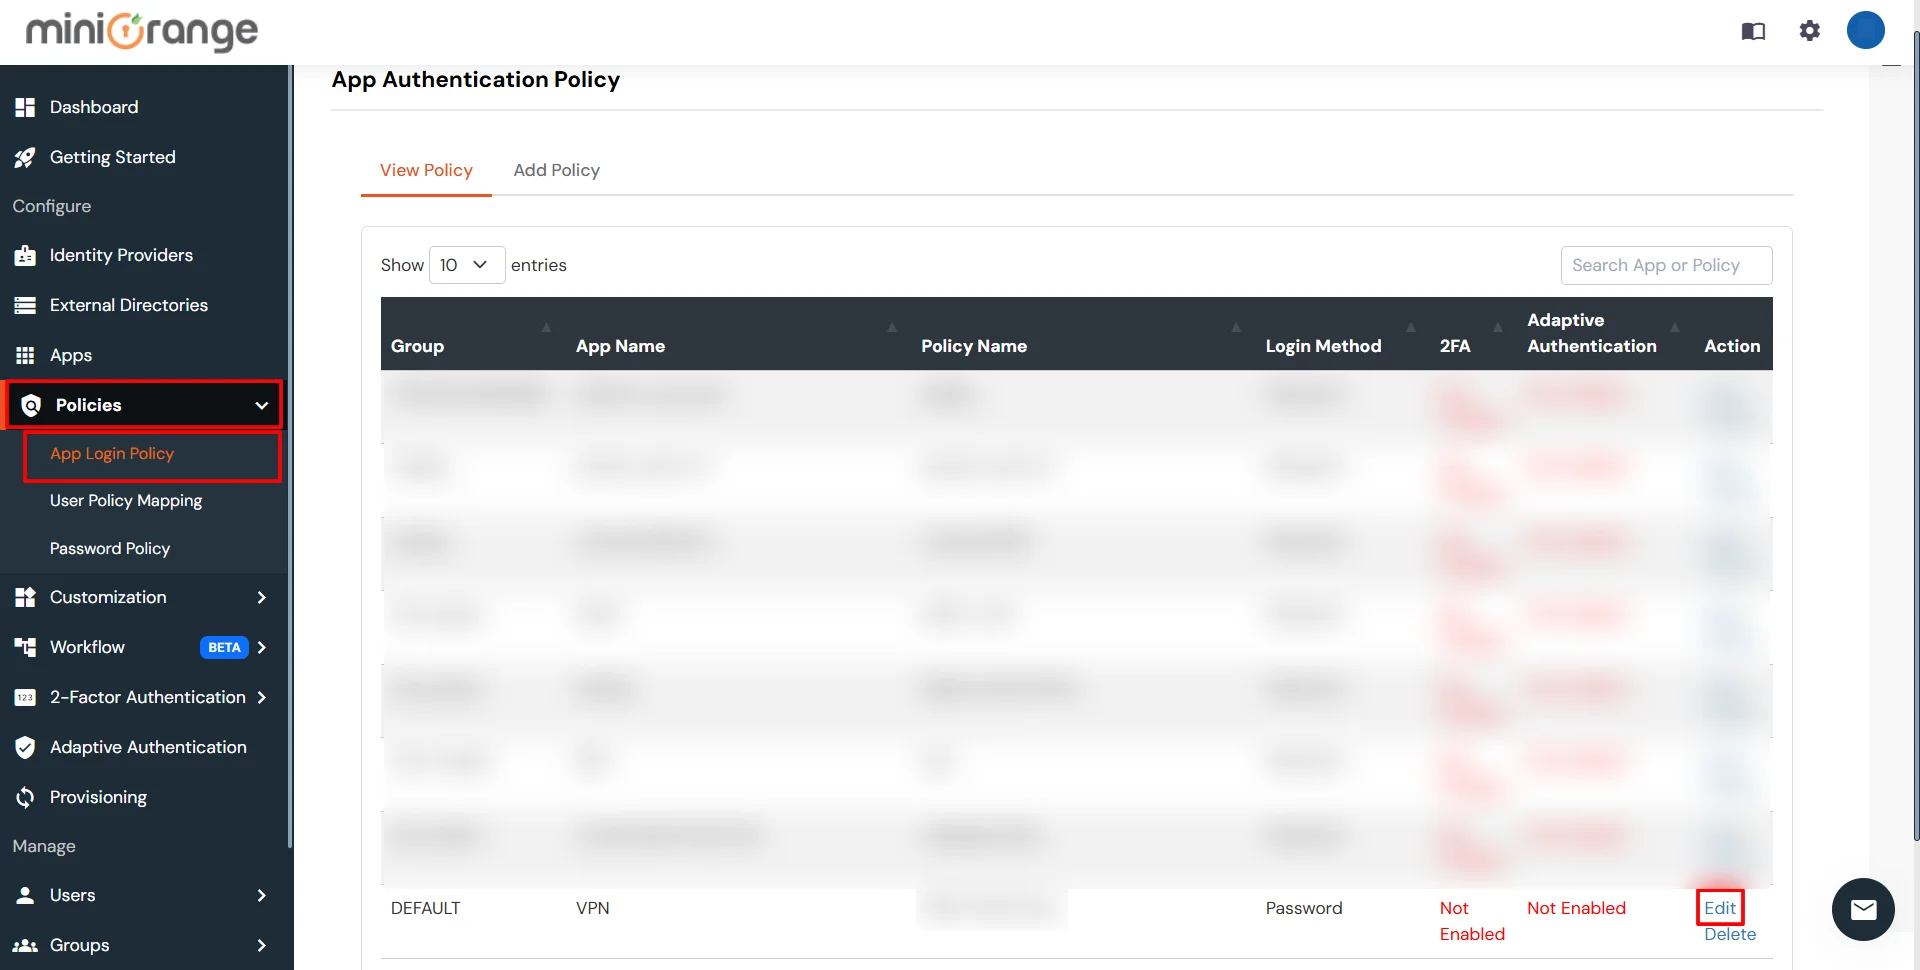
  • To enable 2FA for Users of BugSnag application. Go to Policies >> App Authentication Policy
  • Click on Edit against the application you have configured.
  • Two factor-authentication for BugSnag | Two Factor Authentication configure 2fa of application

  • Enable the Enable 2-Factor Authentication (MFA) option.
  • Two factor-authentication for BugSnag | Two Factor Authentication enable 2fa

  • Click on Save.

3.2: Configure 2FA for your Endusers
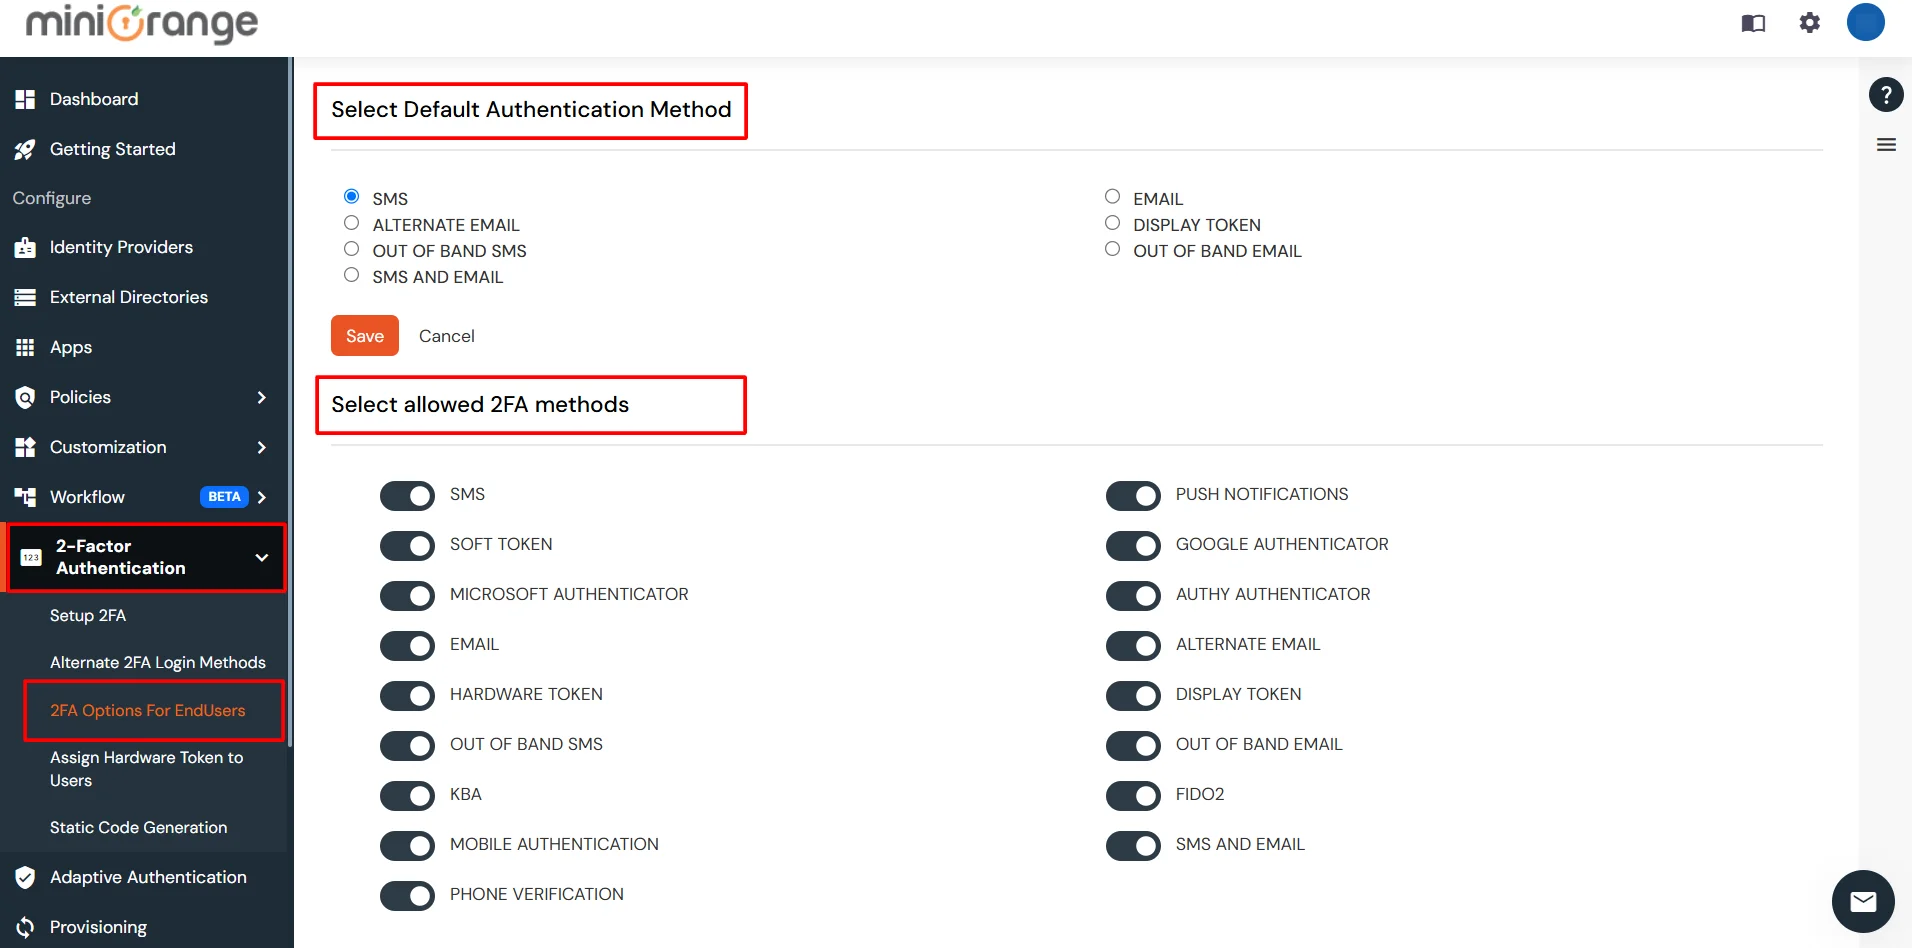
  • To enable 2FA/MFA for BugSnag endusers, go to 2-Factor Authentication >> 2FA Options For EndUsers.
  • Select default Two-Factor authentication method for end users. Also, you can select particular 2FA methods, which you want to show on the end users dashboard.
  • Once Done with the settings, click on Save to configure your 2FA settings.
  • MFA/Two-Factor Authentication(2FA) for BugSnag  Configure 2FA Panel

3.3: Enduser 2FA Setup

  • Login to End-User Dashboard using end user login URL.
    • For Cloud Version: The login URL (branding url) which you have set.
    • For On-Premise version: The login URL will be the same as of Admin Login URL.
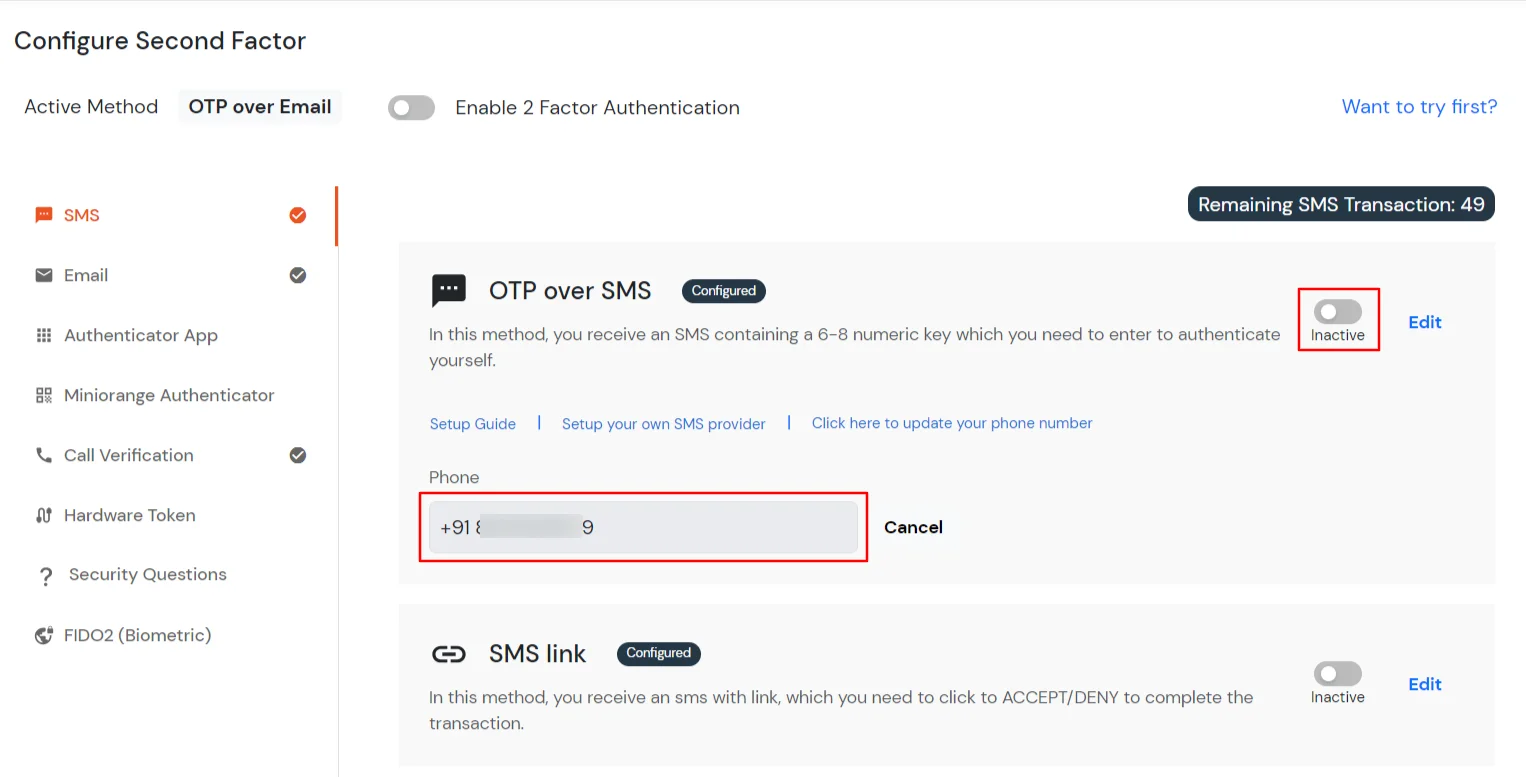
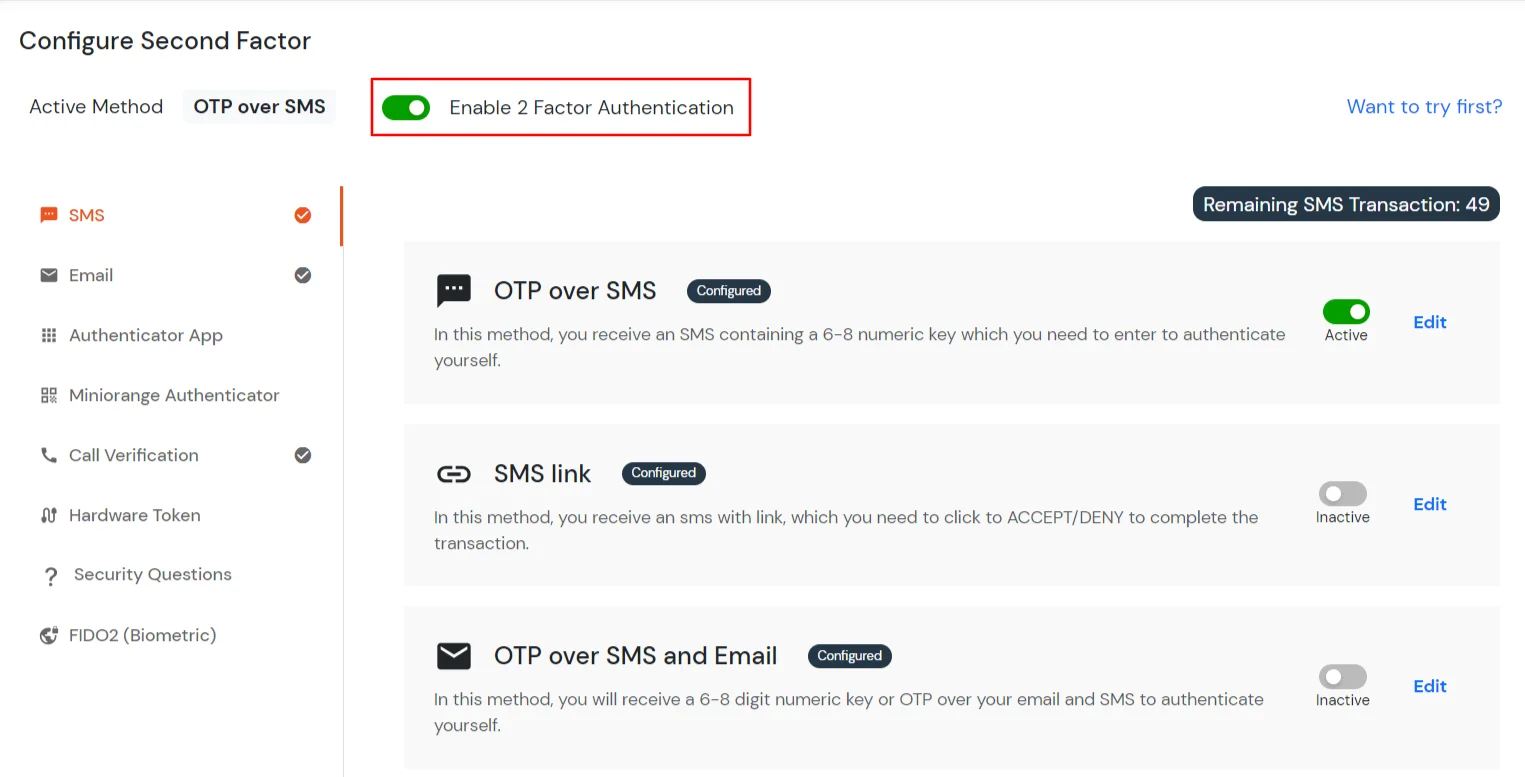
  • Select Setup 2FA from left panel. Then select any of the 2FA method available.
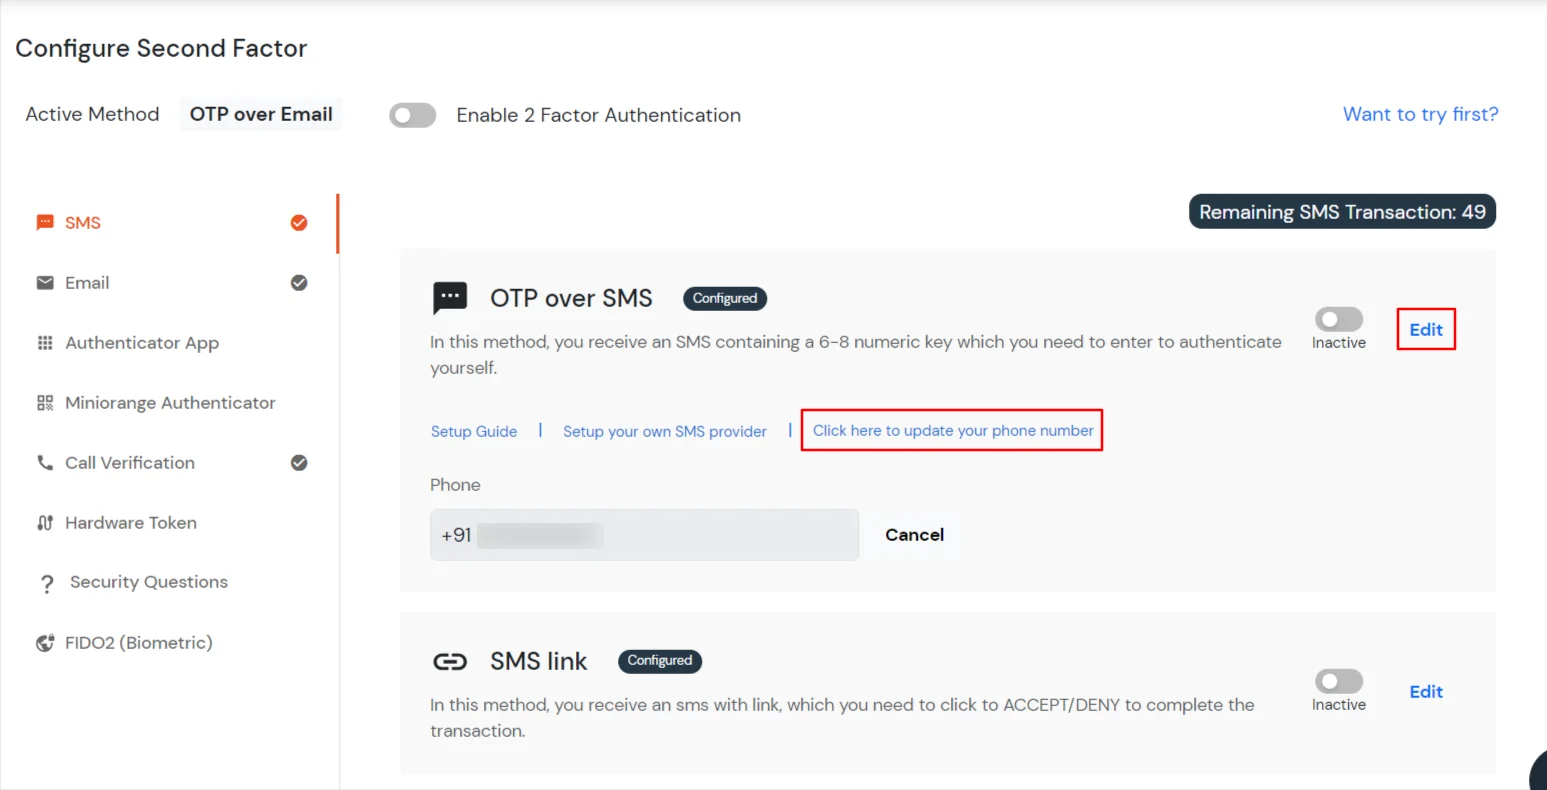
  • For now, we have selected the SMS >> OTP OVER SMS as our 2FA method. You can explore the guide to setup other 2FA methods here.
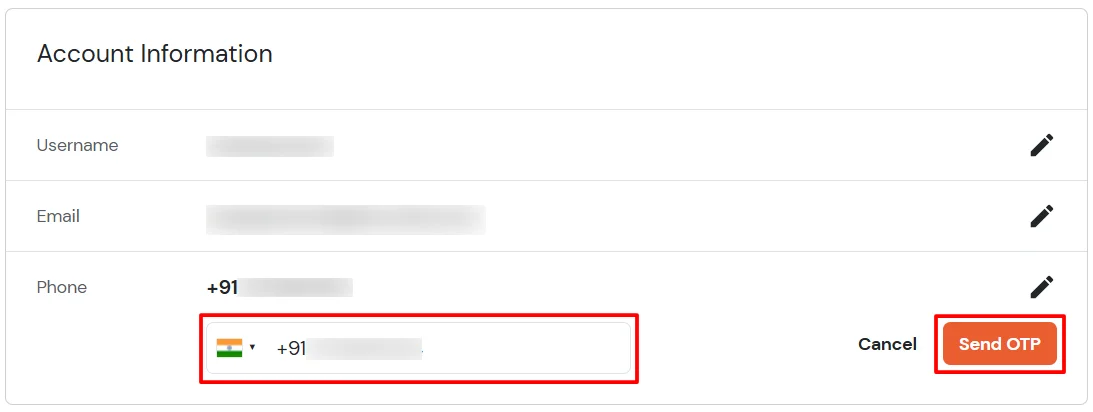
  • Enable the OTP over SMS if you have your phone number added under your profile section else click on Edit button.
  • MFA/Two-Factor Authentication(2FA) for BugSnag  Configure 2FA Panel

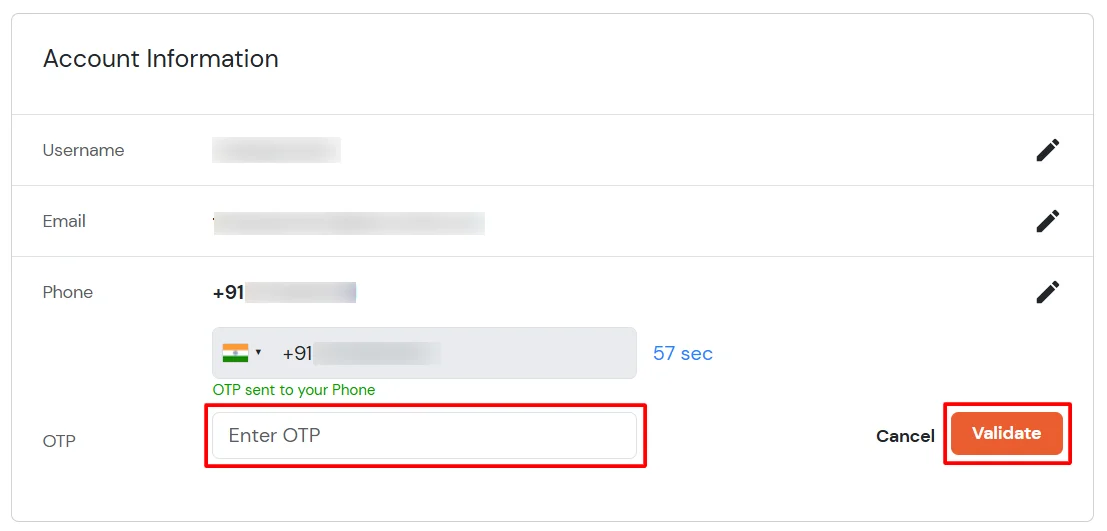
  • Enter you Phone Number along with the necessary country code and click on the SAVE button.
  • MFA/Two-Factor Authentication(2FA) for BugSnag  Configure Second Factor-SMS(Enter Mobile Number)

4. Test BugSnag 2FA

    a. If 2FA for for End-user is configured

  • Go to your BugSnag Domain. It will redirect you to miniOrange Single Sign-On Service console.
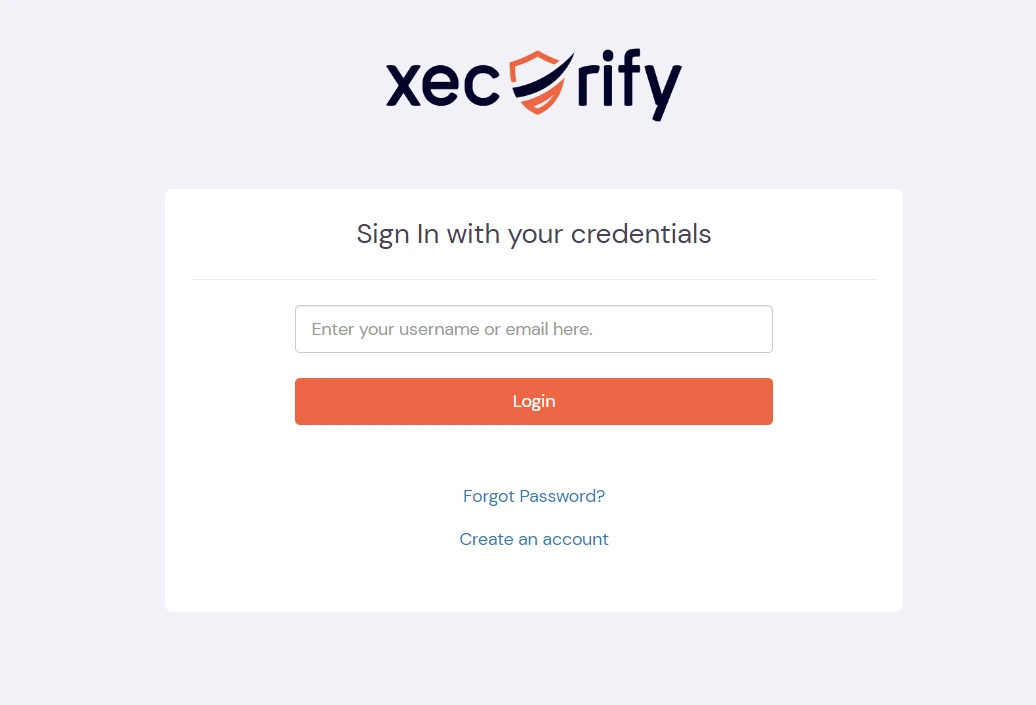
  • zoom two factor authentication(2fa) user credentials

  • Enter your login credentials, and click on login. It will prompt to verify yourself against the configured 2fa method.
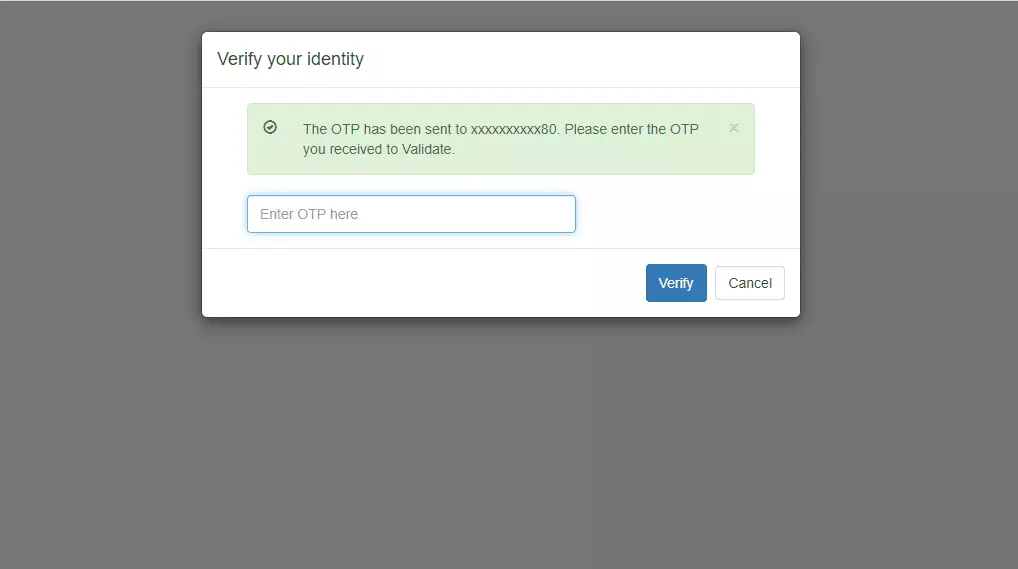
    e.g. If you have configured OTP over SMS, after login into BugSnag it will prompt for OTP.
  • zoom two factor authentication(2fa) otp prompt

  • Enter the OTP received in your phone, after successful 2fa verification, you will be redirected to the BugSnag dashboard.
  • b. If 2FA for end-user is not enabled

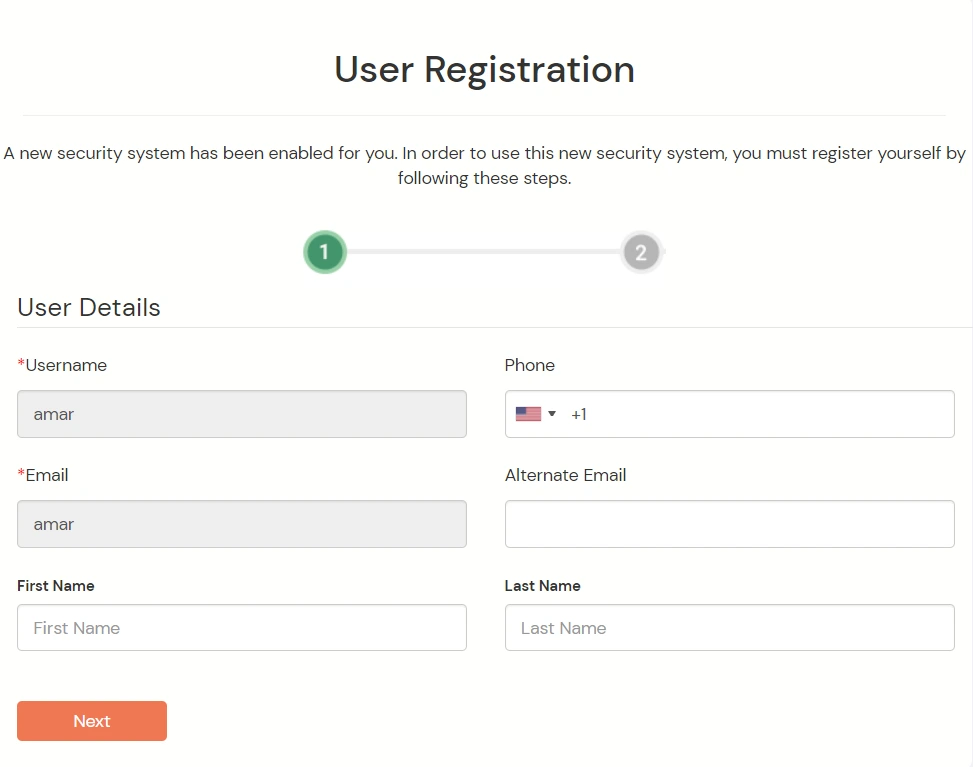
  • You will be prompted to register for 2Fa for end-user. It's a one time process.
  • Configure your basic details.
  • zoom two factor authentication(2fa) user registration

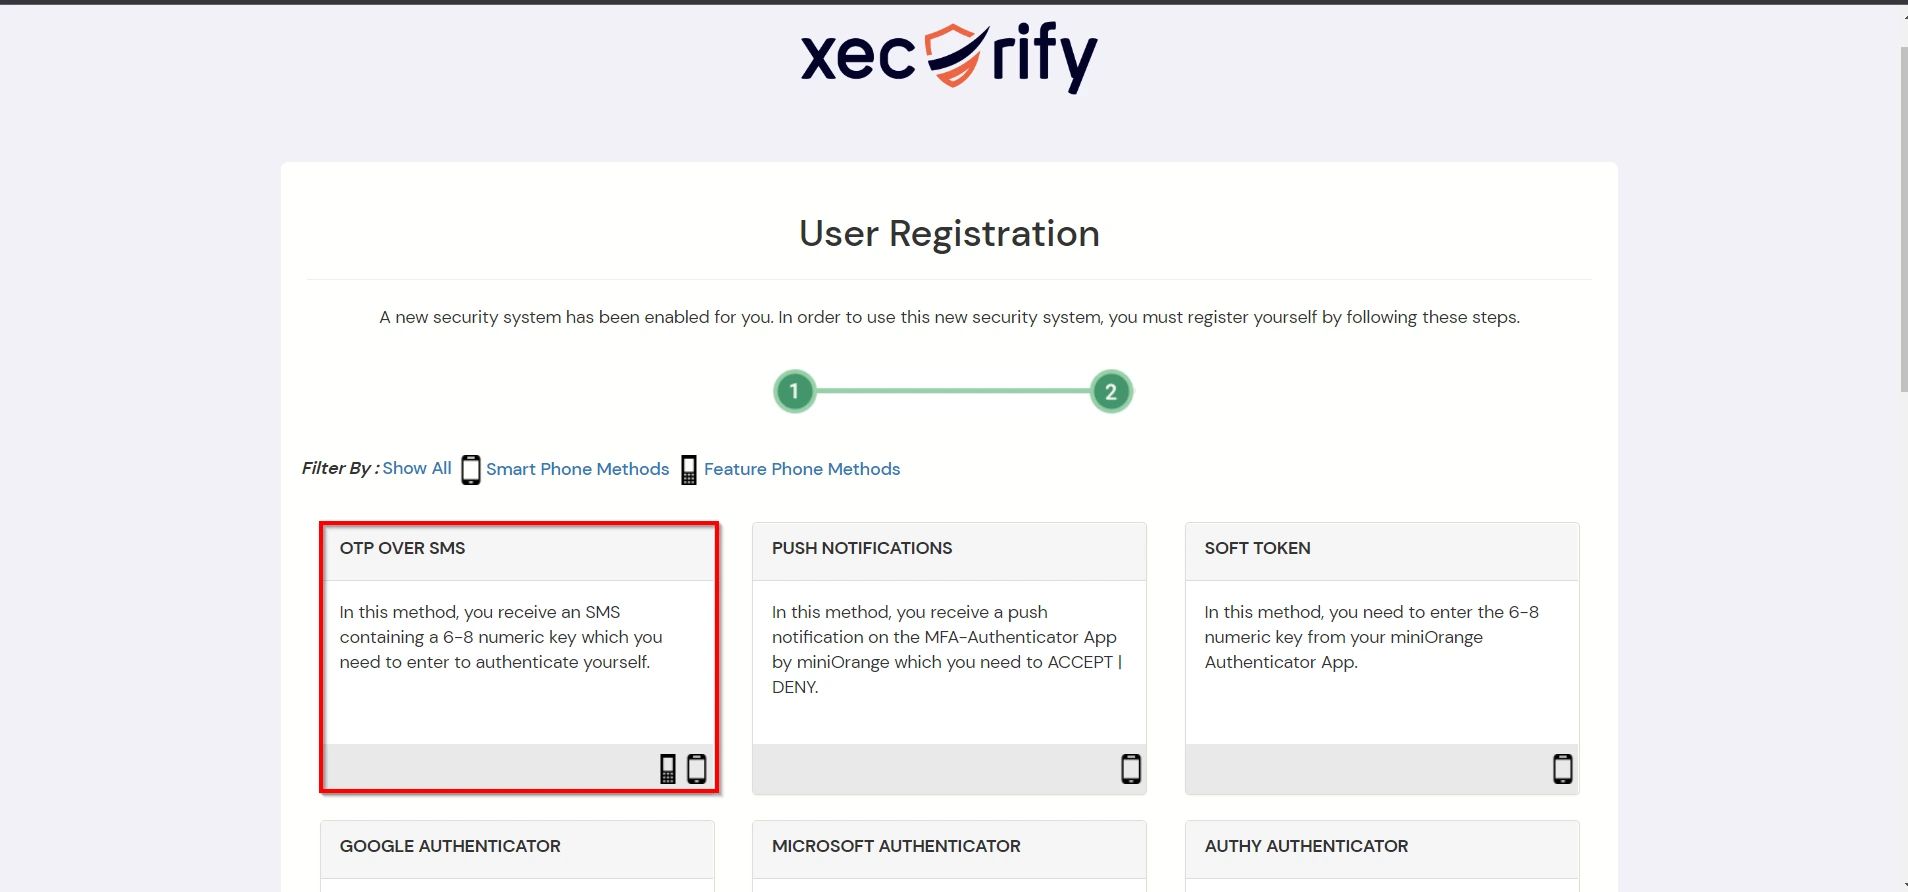
  • Configure any authentication method of your choice.
  • zoom two factor authentication(2fa) add new security

  • After successful registration, you will be logged in to your BugSnag account.

  • Not able to configure or test MFA?


    Contact us or email us at idpsupport@xecurify.com and we'll help you setting it up in no time.


5. Adaptive Authentication with BugSnag

A. Restricting access to BugSnag with IP Blocking

    You can use adaptive authentication with BugSnag Single Sign-On (SSO) to improve the security and functionality of Single Sign-On. You can allow a IP Address in certain range for SSO or you can deny it based your requirements and you can also challenge the user to verify his authenticity. Adaptive authentication manages the user authentication bases on different factors such as Device ID, Location, Time of Access, IP Address and many more.

    You can configure Adaptive Authentication with IP Blocking in following way:
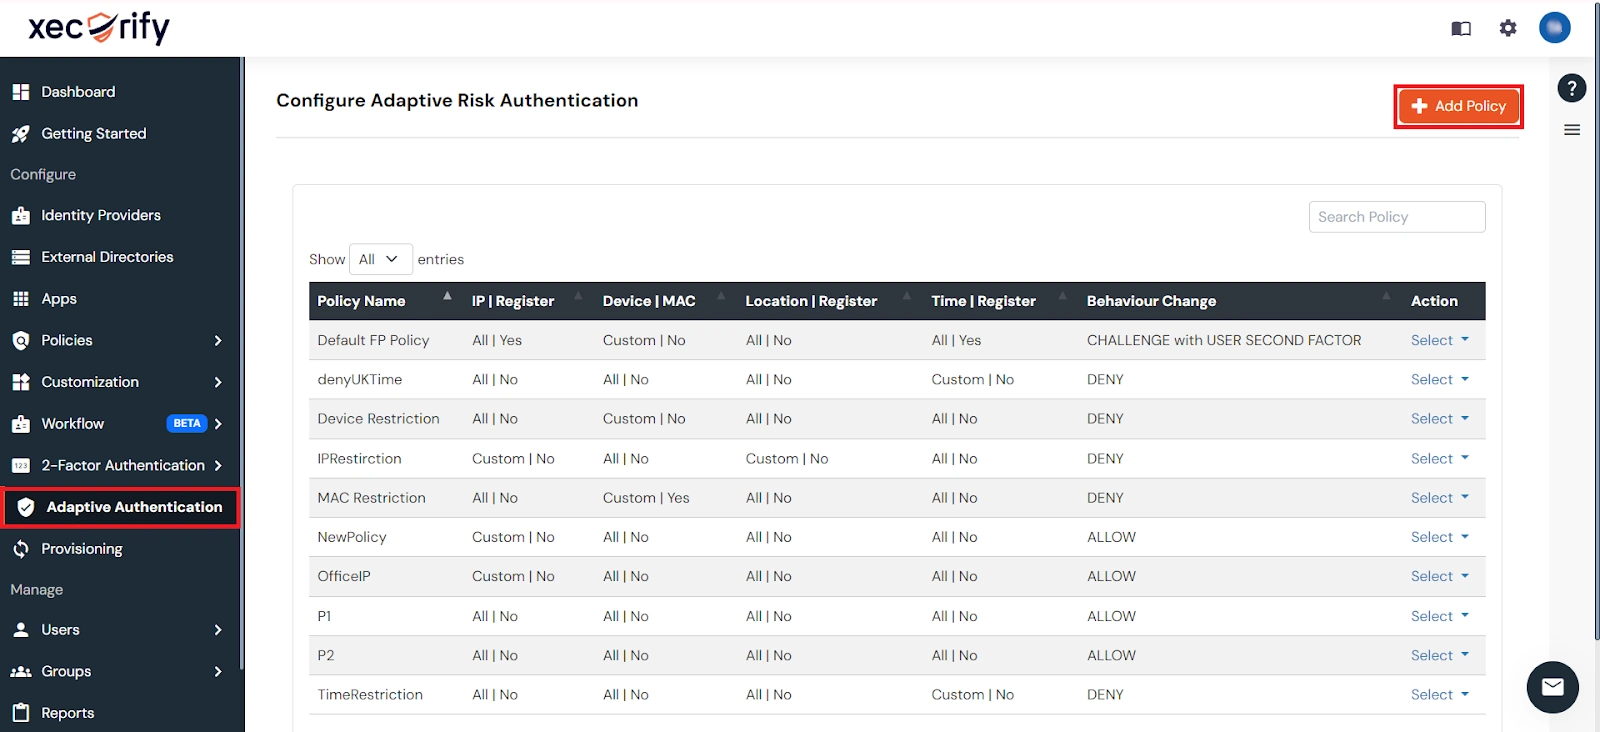
  • Login to Self Service Console >> Adaptive Authentication.
  • Add a Policy Name for your Adaptive Authentication Policy.
  • BugSnag Single Sign-On (SSO) Restrict Access adaptive authentication policy

  • Select your Action for behavior Change and Challenge Type for user from the Action for behavior Change Section.
  • BugSnag Single Sign-On (SSO) Restrict Access adaptive authentication behavior change


    Action for behavior Change Options :


    Attribute Description
    Allow Allow user to authenticate and use services if Adaptive authentication condition is true.
    Challenge Challenge users with one of the three methods mentioned below for verifying user authenticity.
    Deny Deny user authentications and access to services if Adaptive authentication condition is true.

    Challenge Type Options :

    Attribute Description
    User second Factor The User needs to authenticate using the second factor he has opted or assigned for such as
  • OTP over SMS
  • PUSH Notification
  • OTP over Email
  • And 12 more methods.
  • KBA (Knowledge-based authentication) The System will ask user for 2 of 3 questions he has configured in his Self Service Console. Only after right answer to both questions user is allowed to proceed further.
    OTP over Alternate Email User will receive a OTP on the alternate email he has configured threw Self Service Console. Once user provides the correct OTP he is allowed to proceed further.

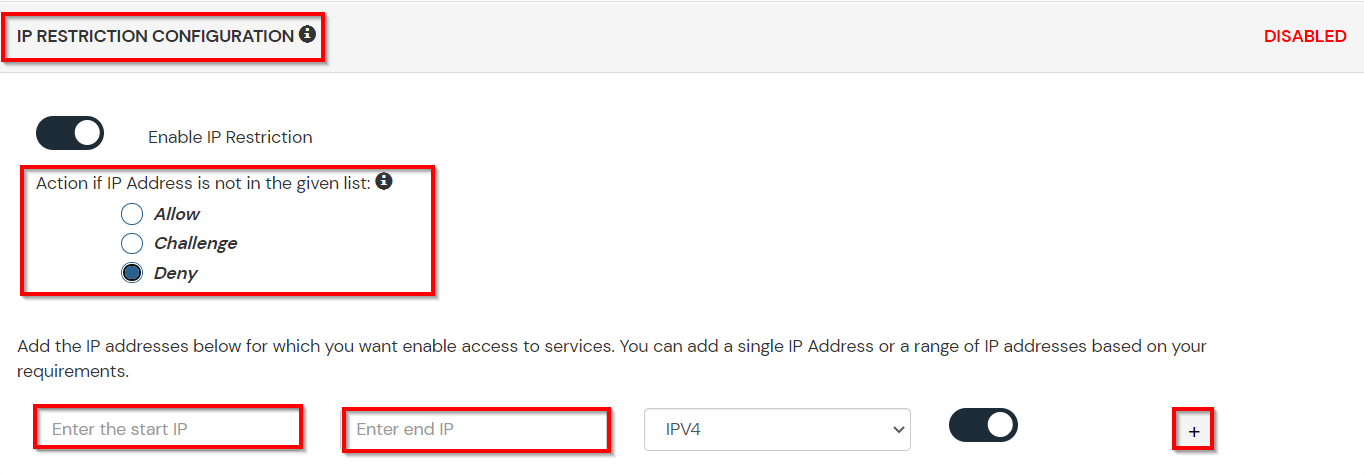
  • Now Enable Enable IP Restriction option from the IP RESTRICTION CONFIGURATION section to configure custom IP range.
  • BugSnag Single Sign-On (SSO) Restrict Access adaptive authentication ip blocking

  • Select the Action you want to perform if the IP address is out of the range. i.e. Allow, Challenge & Deny.
  • Specify the IP Address range for which you want above setting to reflect. You can add more than one IP Address ranges by clicking on following button +.
  • Scroll to the end and click on save.

B. Adaptive Authentication with Limiting number of devices.

    Using Adaptive Authentication you can also restrict the number of devices the end user can access the Services on. You can allow end users to access services on a fixed no. of devices. The end users will be able to access services provided by us on this fixed no. of devices.

    You can configure Adaptive Authentication with Device Restriction in following way
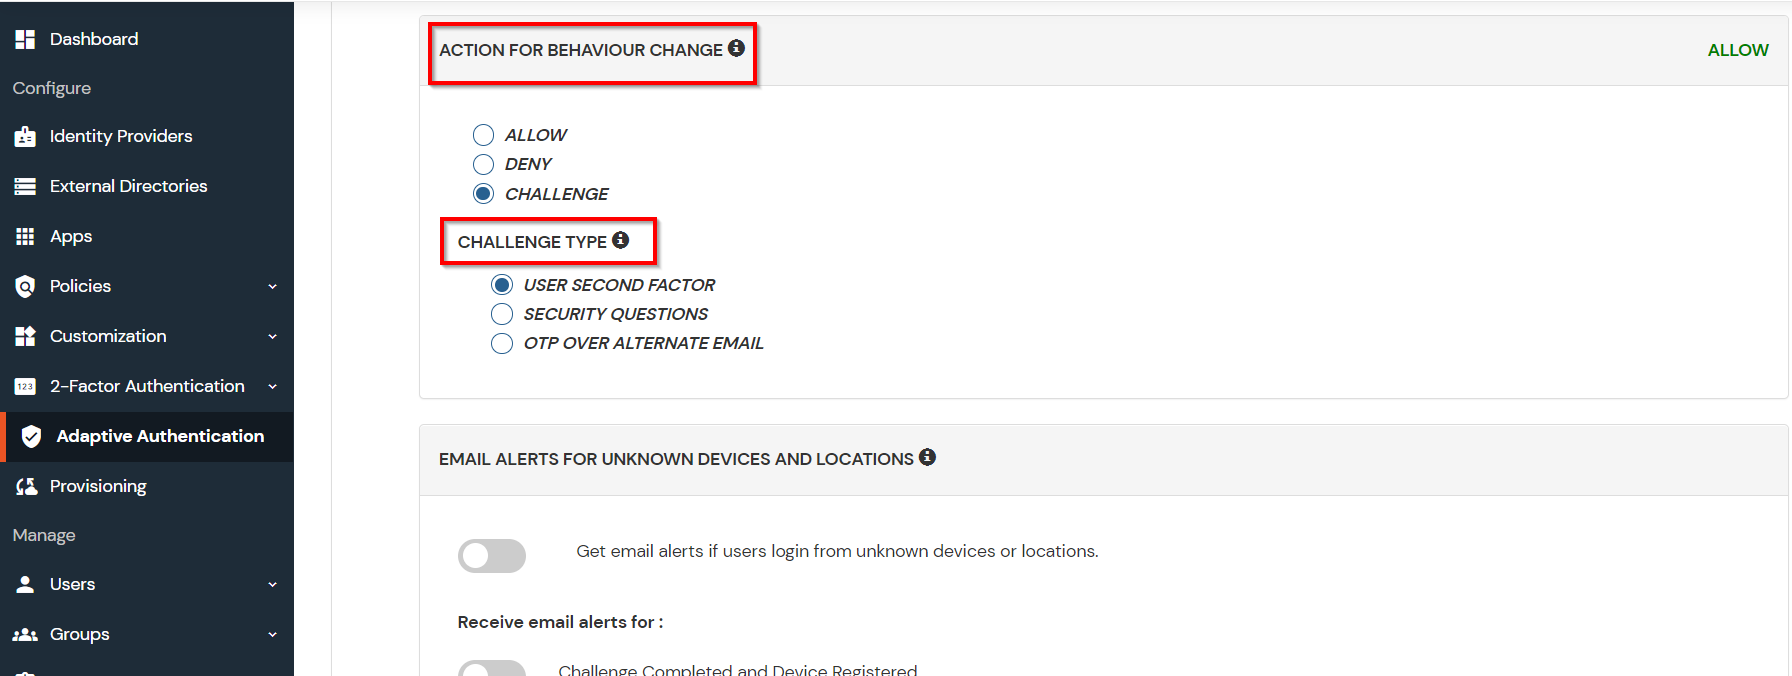
  • Login to Self Service Console >> Adaptive Authentication.
  • Add a Policy Name for your Adaptive Authentication Policy.
  • Select your Action for behavior Change and Challenge Type for user from the Action for behavior Change Section.
  • BugSnag Single Sign-On (SSO) Restrict Access adaptive authentication behavior and challenge type


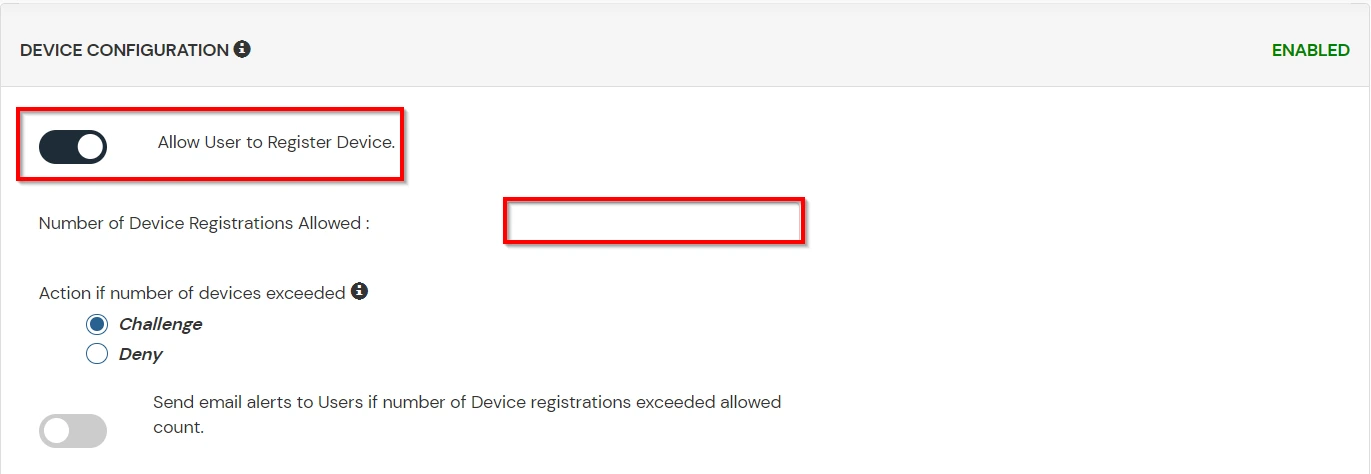
  • Scroll down to Device Configuration section and enable Allow User to Register Device option to allow users to register their devices.
  • Enter the Number of Devices which are allowed to register in field next to Number of Device Registrations Allowed
  • Choose Action if number of devices exceeded (This will override your setting for Action for behavior Change.)
    1. Challenge: The user needs to verify himself using any of the three methods mentioned in table in step 5.1
    2. Deny : Deny users access to the system
  • Enable option Send email alerts to Users if number of Device registrations exceeded allowed count if you want to alert the user about no of devices exceeding the limit. Save the configuration.
  • BugSnag Single Sign-On (SSO) Restrict Access adaptive authentication enable device restriction


C. Add Adaptive Authentication policy to BugSnag.

  • Login to Self Service Console >> Policies.
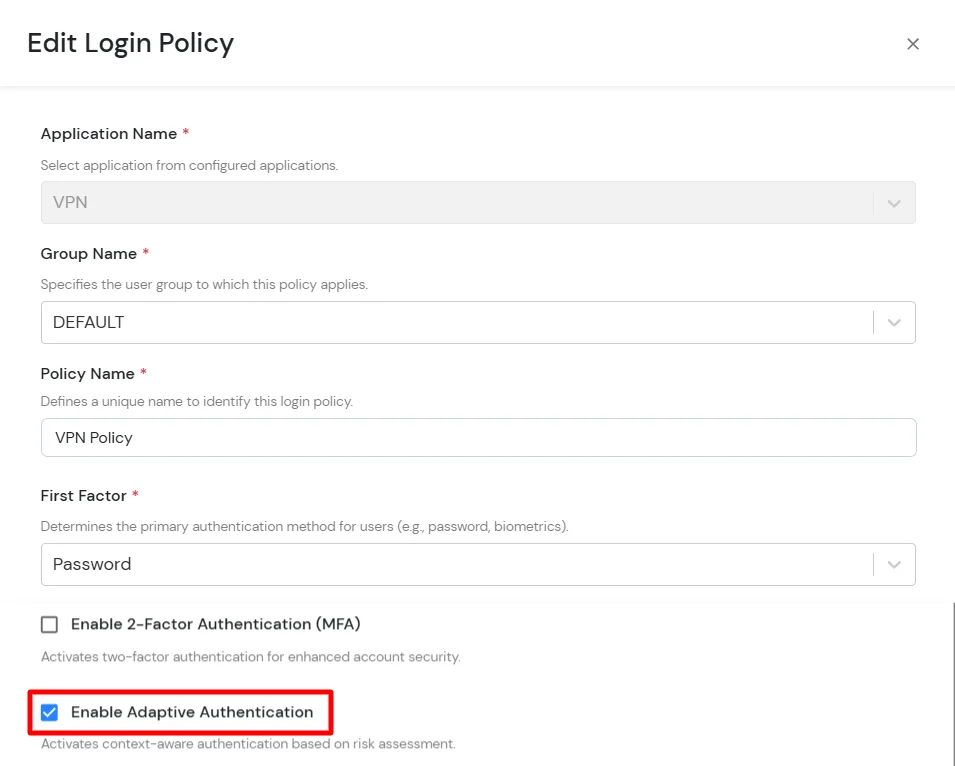
  • Click on Edit option for predefined app policy.
  • BugSnag Single Sign-On (sso) edit device restriction policy

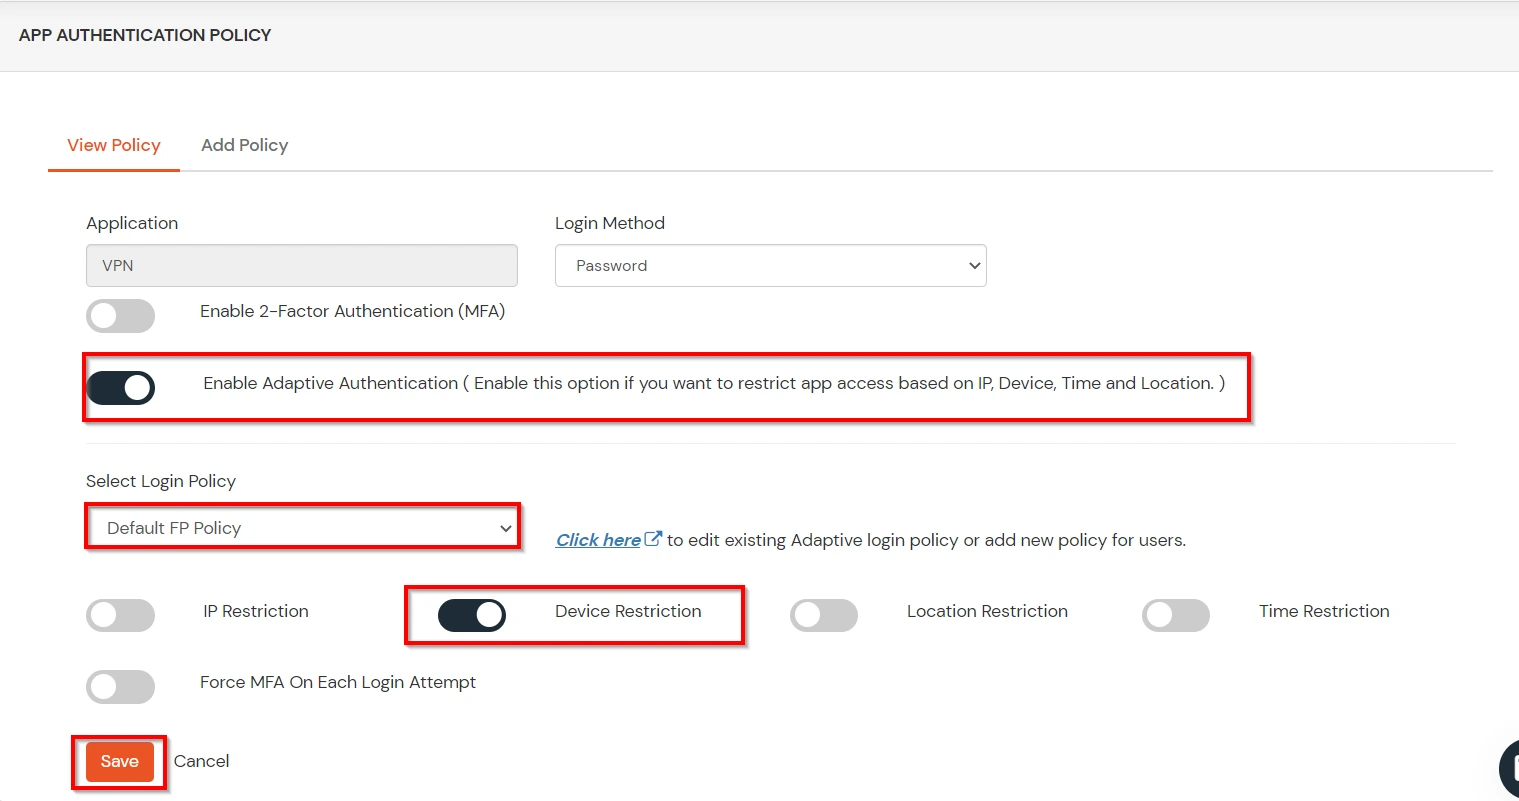
  • Set your application name in the Application and select password as Login Method.
  • Enable Adaptive Authentication on Policy page and select the required restriction method as an option.
  • From Select Login Policy dropdown select the policy we created in last step and click on save.
  • BugSnag Single Sign-On (SSO) Restrict Access save device restriction policy

    D.Notification and Alert Message.

      This section handles the notifications and alerts related to Adaptive Authentication.It provides the following options :

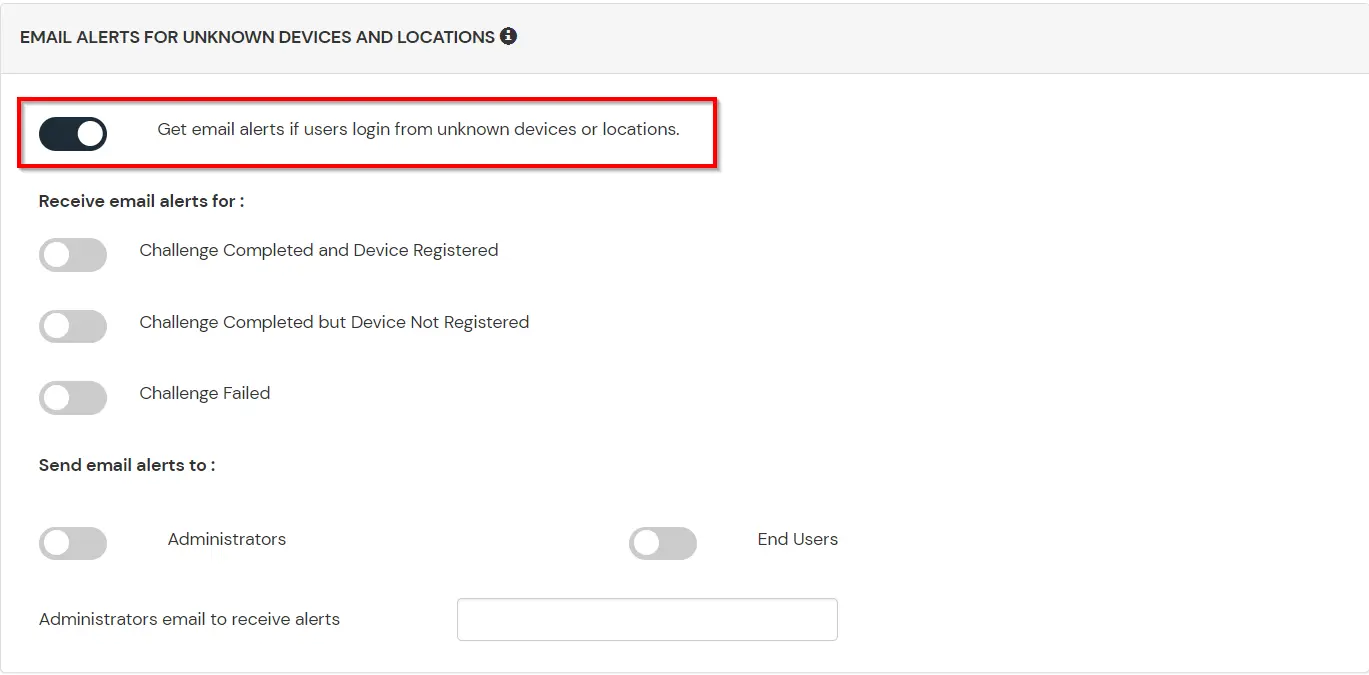
    • Get email alerts if users login from unknown devices or locations : Admin need to enable this option to enable receiving alerts for different alert options.
      adaptive authentication Action for behavior Change Configuration

    • Option Description
      Challenge Completed and Device Registered Enabling this option allows you to send an email alert when an end-user completes a challenge and registers a device.
      Challenge Completed but Device Not Registered Enabling this option allows you to send an email alert when an end-user completes a challenge but do not registers the device.
      Challenge Failed Enabling this option allows you to send an email alert when an end-user fails to complete the challenge.


      adaptive authentication Action for behavior Change Configuration

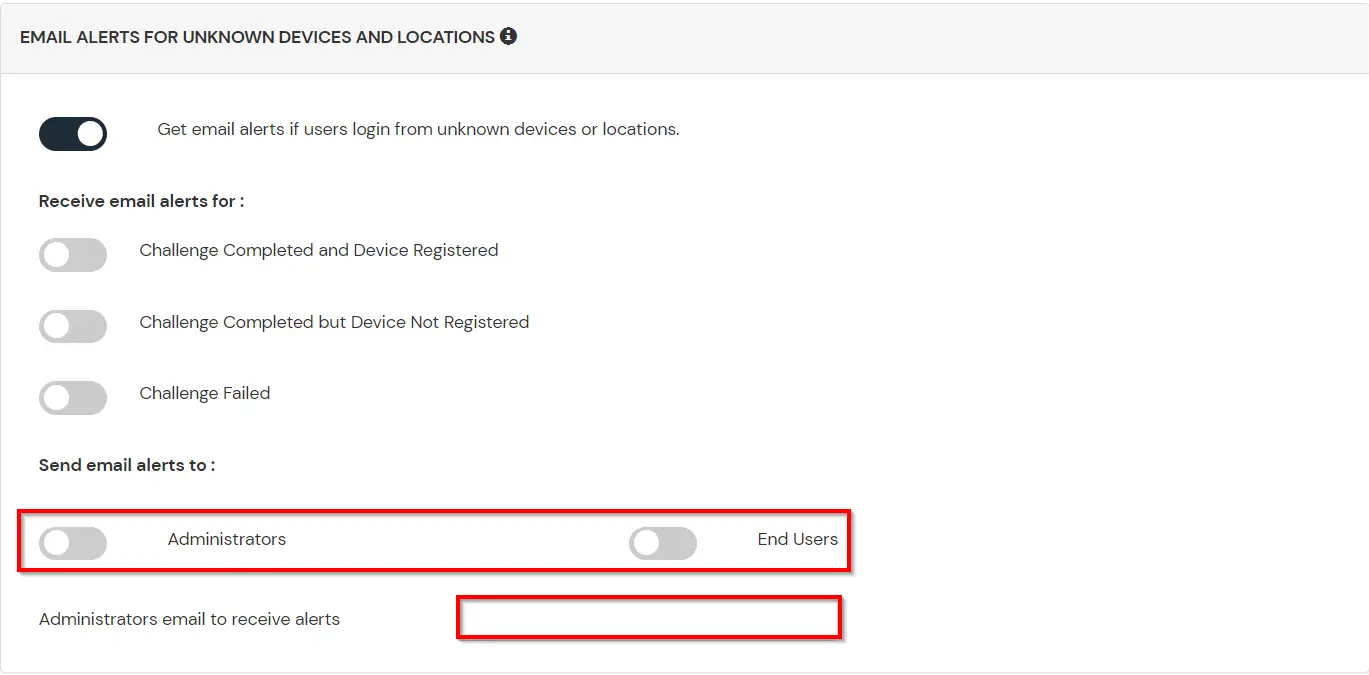
    • Next subsection is Send email alerts which allows us to enable or disable alerts for admin and end-users. To enable alerts for admins, you can enable the “Administrators” switch button.

    • adaptive authentication Action for behavior Change Configuration

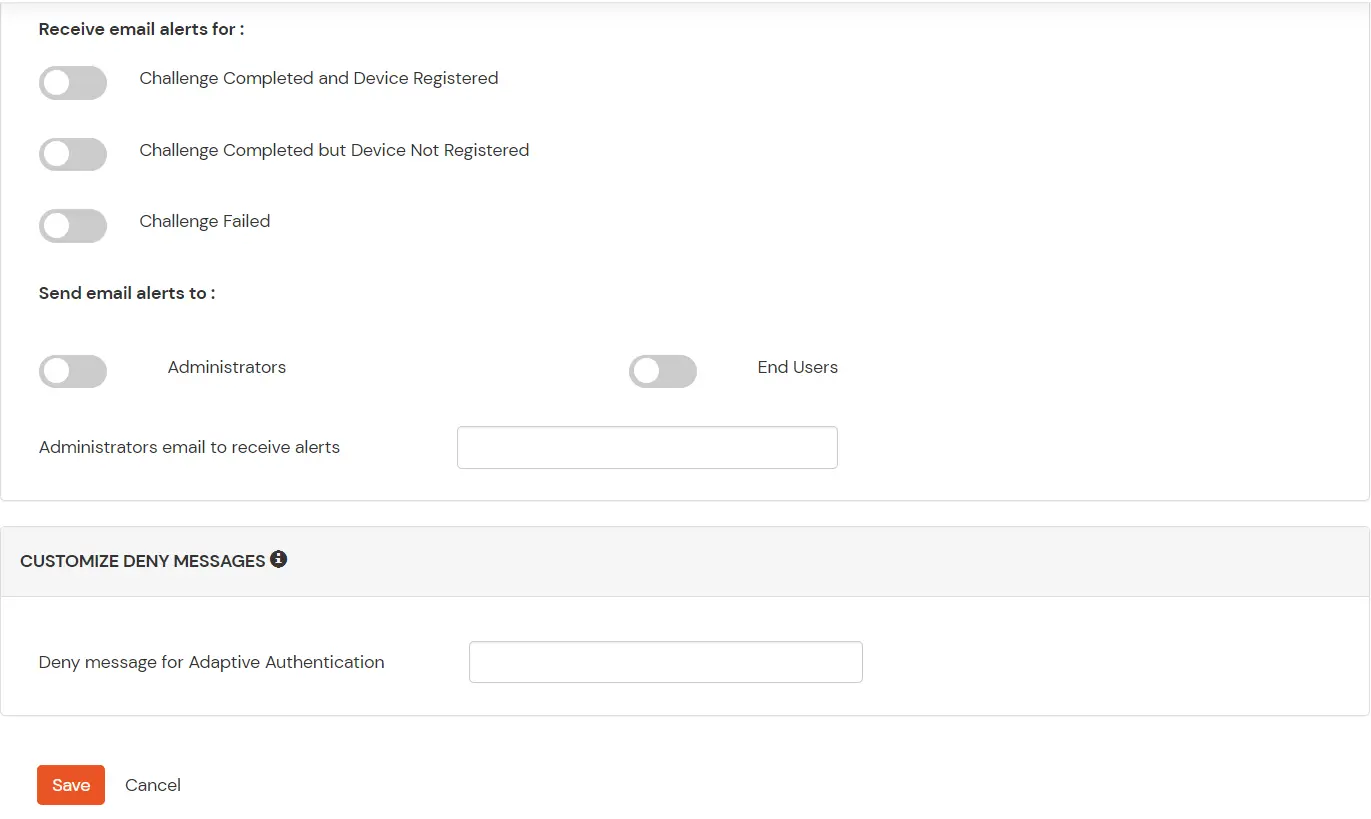
    • In case you want multiple admins accounts to receive alerts then you can enable the option for admin and then enter the admin emails separated by a ‘,’ in the input field next to Administrators email to receive alerts label. To enable alerts for the end-users, you can enable the “End Users” switch button.
    • In case you want to customize the deny message that end user receive in case his authentication denied due to adaptive policy, you can do this by entering the message inside “Deny message for Adaptive Authentication” text box.
    • adaptive authentication Action for behavior Change Configuration
    How to add a trusted Device
    1. When End-user log in to the self service console after the policy for device restriction is on, he is provided the option to add the current device as a trusted device.

External References

Want To Schedule A Demo?

Request a Demo


Our Other Identity & Access Management Products