Hello there!

Need Help? We are right here!

Support Icon
miniOrange Email Support
success

Thanks for your Enquiry. Our team will soon reach out to you.

If you don't hear from us within 24 hours, please feel free to send a follow-up email to info@xecurify.com

Search Results:

×

Oracle EBS Shibboleth SSO Integration


Oracle EBS Partner logo

Oracle E-Business Suite is a major product line of Oracle Corporation. Oracle EBS is a combined set of business applications for automating customer relationship management (CRM), Enterprise Resource Planning (ERP) and Supply Chain Management (SCM) which helps in automating the processes within organizations.

"miniOrange SSO connector enables the Single Sign-On (SSO) between Oracle EBS and Shibboleth without the need to purchase and install Oracle Access Manager (OAM) and Oracle Internet Directory (OID) license."

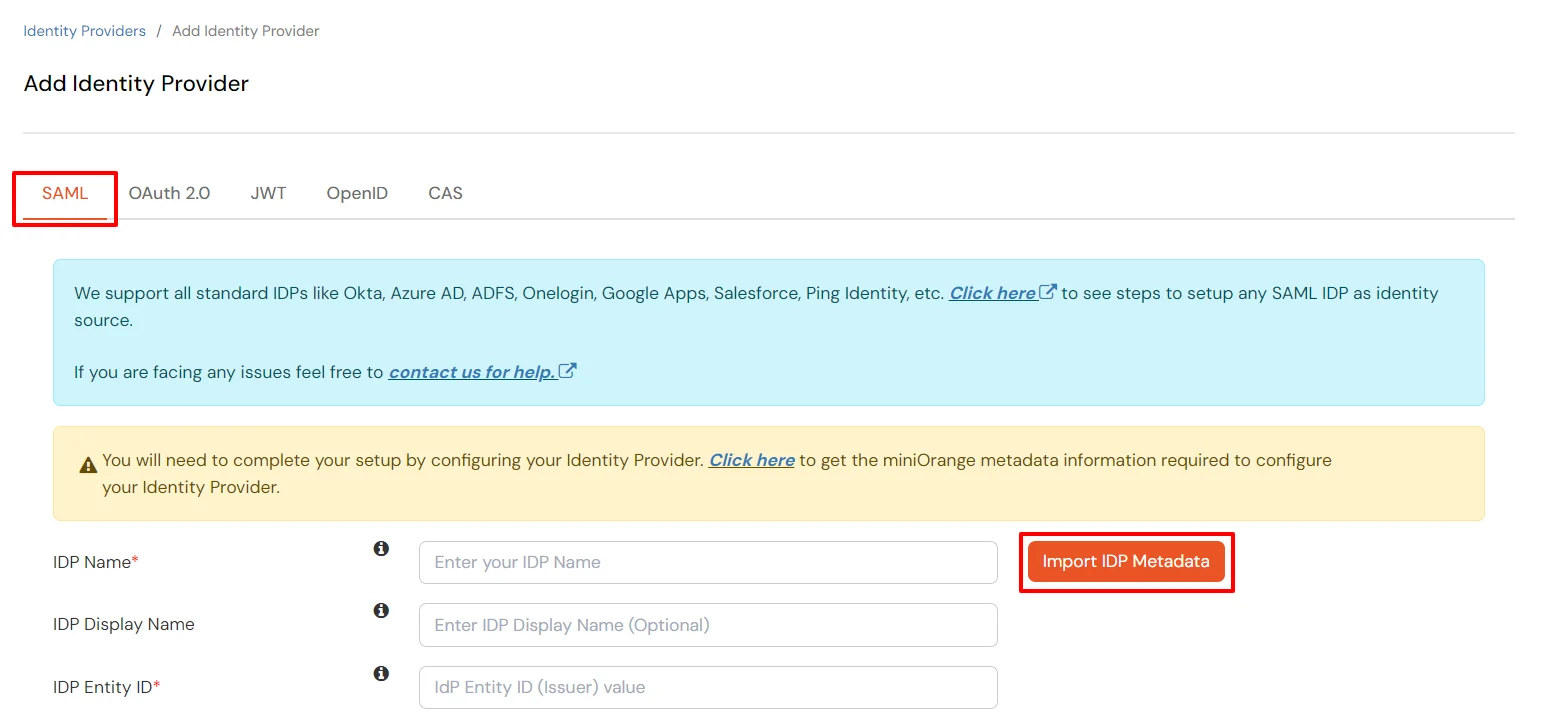
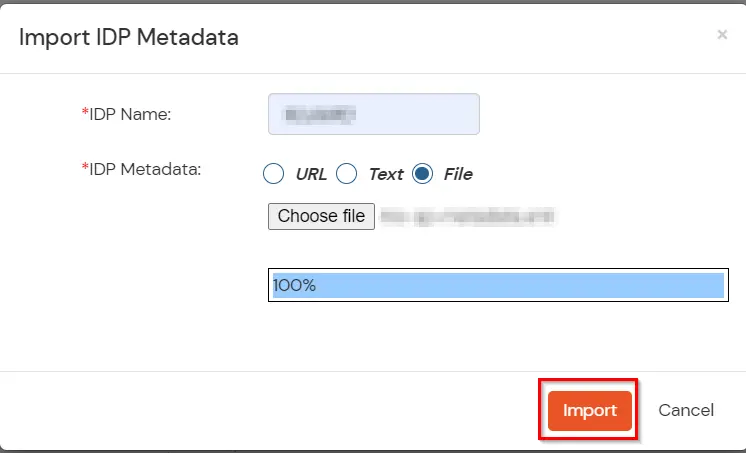
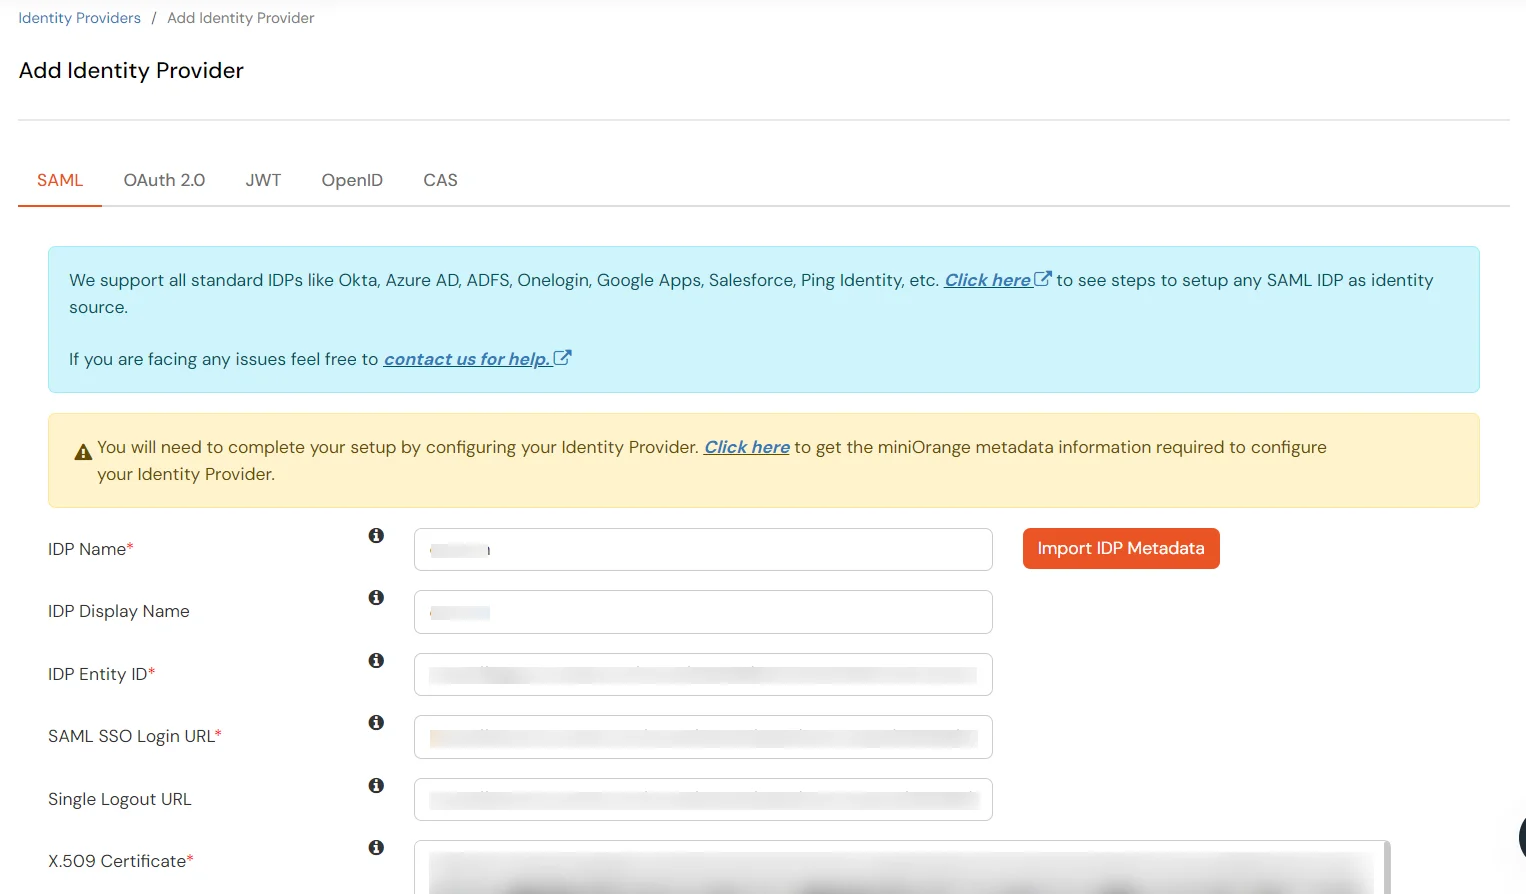
Oracle EBS Shibboleth SSO integration is enabled with the help of miniOrange SSO Connector. This integration involves registering the miniOrange connector as a SAML Service Provider (SP) in Shibboleth, and Shibboleth as a SAML Identity Provider (IdP) in the miniOrange connector. The authentication flow works like this: when a user tries to login into Oracle EBS, the authentication is delegated to miniOrange, which redirects the user to Shibboleth for Single Sign On Login, thereby triggering Oracle EBS Shibboleth SSO. Upon successful authentication, the user is granted access to Oracle EBS. Oracle EBS can also be protected with Shibboleth Multi-Factor Authentication, apart from Oracle EBS Shibboleth SSO. Oracle EBS URL can be added to Shibboleth Applications Dashboard by Shibboleth Admin, and users can launch it like any other Shibboleth Application. miniOrange SSO connector can enable Shibboleth SSO for the following supported Oracle EBS versions - R12 and R12.2 and it can also enable Oracle EBS integrations such as OBIEE, Hyperion/EPM Suite, ADF Applications, WebCenter and Agile. miniOrange SSO Connector can also enable Shibboleth Cloud SSO for other Oracle Products as well such as Peoplesoft, Siebel and JD Edwards.


Oracle EBS Shibboleth SSO Authentication Flow with miniOrange Oracle EBS Solution:


Oracle EBS(E-Business Suite) Shibboleth SSO Authentication

1. The User sends the request to access the Oracle E-Business Suite.

2. Oracle EBS redirects the request to the miniOrange SSO Connector for authentication.

3. The miniOrange SSO Connector redirects the user to Shibboleth for authentication.

4. The user is prompted for their Shibboleth credentials, and is authenticated upon a successful response.

5. The connector receives the user’s Oracle EBS registered username/email from Shibboleth via SAML attributes.

6. The connector checks the value of the username/email received from Shibboleth against the FND_USER table in the Oracle EBS Database & creates a session for them.

7. Upon successfully creating a session, user is redirected to the Oracle E-Business Suite portal as logged-in user


Connect with External Source of Users


miniOrange provides user authentication from various external sources, which can be Directories (like ADFS, Microsoft Active Directory, Azure AD, OpenLDAP, Google, AWS Cognito etc), Identity Providers (like Shibboleth, Ping, Okta, OneLogin, KeyCloak), Databases (like MySQL, Maria DB, PostgreSQL) and many more.


Follow the step-by-step guide given below for Oracle E-Business Shibboleth Single Sign-On (SSO)

1. Configure miniOrange Broker Agent as a SAML Service Provider in Shibboleth

  • In conf/idpproperties, uncomment and set 'idp.encryption.optionaI' to true.
  • eg. idp.encryption.optional = true
  • In conf/metadata-providers.xml, configure Service Provider like this
  • <MetadataProvider xmlns:samlmd="urn:oasis:names:tc:SAML:2.0:metadata"
      id="miniOrangeInLineEntity" xsi:type="InlineMetadataProvider" sortKey="1">
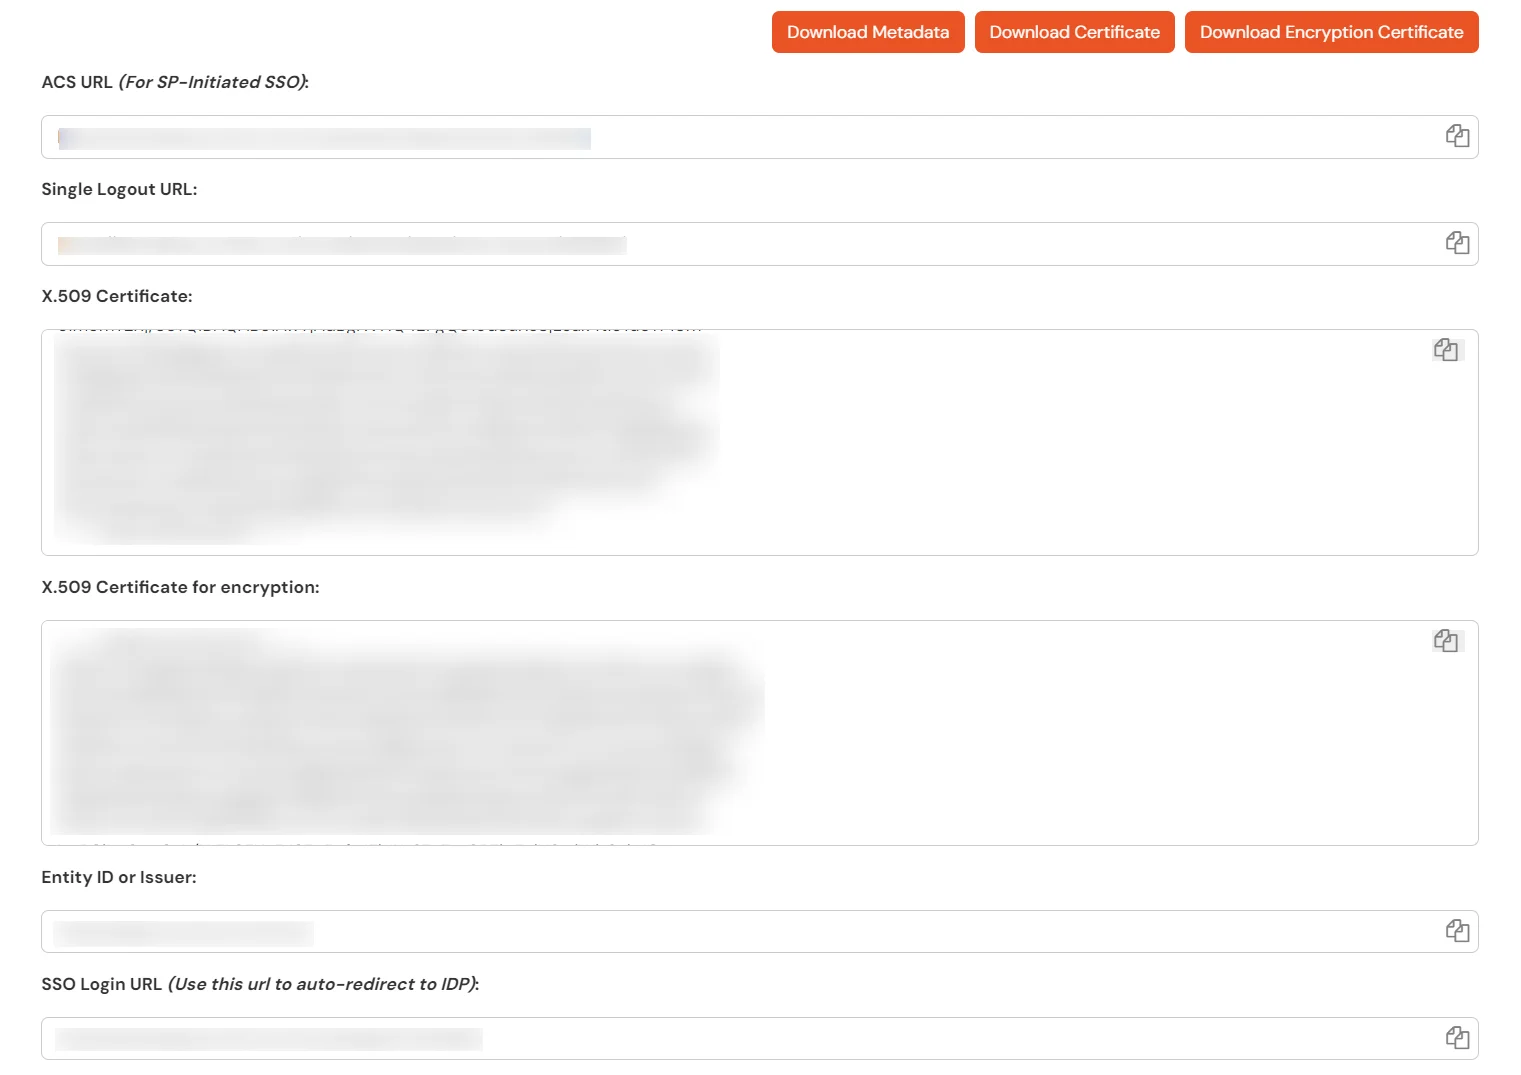
      <samlmd:EntityDescriptor ID="entity" entityID="<SP-EntityID / Issuer from Service Provider Info tab in plugin.>"
        validUntil="2020-09-06T04:13:32Z">
        <samlmd:SPSSODescriptor AuthnRequestsSigned="false" WantAssertionsSigned="true"
        protocolSupportEnumeration="urn:oasis:names:tc:SAML:2.0:protocol">
          <samlmd:NameIDFormat>
            urn:oasis:names:tc:SAML:1.1:nameid-format:emailAddress
          </samlmd:NameIDFormat>
        <samlmd:AssertionConsumerService Binding="urn:oasis:names:tc:SAML:2.0:bindings:HTTP-POST"
        Location="<ACS (AssertionConsumerService) URL from Step1 of the plugin under Identity Provider Tab.>"
          index="1" />
        </samlmd:SPSSODescriptor>
        </samlmd:EntityDescriptor>
    </MetadataProvider>

  • In conf/saml-nameid.properties, uncomment and set default NameID as Email Address like this
  • idp.nameid.saml2.default=urn:oasis:names:tc:SAML:1.1:nameid-format:emailAddress
  • In conf/saml-nameid-xml, search for shibboleth.SAML2NameIDGenerators. Uncomment the shibboleth.SAML2AttributeSourcedGenerator bean and comment all other ref beans.
  • <!-- SAML 2 NameID Generation -->
    <util:list id="shibboleth.SAML2NameIDGenerators">
      <!--<ref bean="shibboleth.SAML2TransientGenerator" /> -->
      <!-->ref bean="shibboleth.SAML2PersistentGenerator" /> -->
      <bean parent="shibboleth.SAML2AttributeSourcedGenerator"
      p:format="urn:oasis:names:tc:SAML:1.1:nameid-format:emailAddress"
      p:attributeSourceIds="#{ {'email'} }" />
    </util:list>

  • Make sure you have defined AttributeDefinition in conf/attribute-resolver.xml.
  • <!-- Note: AttributeDefinitionid must be same as what you provided in attributeSourceIds in conf/saml-nameid.xml -->
    <resolver:AttributeDefinitionxsi:type="ad:Simple" id="email" sourceAttributeID="mail">
      <resolver:Dependency ref="ldapConnector" />
      <resolver:AttributeEncoderxsi:type="enc:SAML2String" name="email" friendlyName="email" />
    </resolver:AttributeDefinition >

    <resolver:DataConnector id="ldapConnector" xsi:type="dc:LDAPDirectory" ldapURL="%{idp.authn.LDAP.ldapURL}"
      baseDN="%{idp.authn.LDAP.baseDN}" principal="%{idp.authn.LDAP.bindDN}"
      principalCredential="%{idp.authn.LDAP.bindDNCredential}">
      <dc:FilterTemplate>
        <!-- Define you User Search Filter here -->
        <![CDATA[ (&(objectclass=*)(cn=$requestContext.principalName)) ]]>
      </dc:FilterTemplate>

      <dc:ReturnAttributes>*</dc:ReturnAttributes>
    </resolver:DataConnector>

  • Make sure you have AttributeFilterPolicy defined in conf/attribute-filter.xml.
  • <afp:AttributeFilterPolicy id="ldapAttributes">
    <afp:PolicyRequirementRulexsi:type="basic:ANY"/>
      <afp:AttributeRuleattributeID="email">
        <afp:PermitValueRulexsi:type="basic:ANY"/>
      </afp:AttributeRule>
    </afp:AttributeFilterPolicy>

  • Restart the Shibboleth Server.

2.Configure Shibboleth as a SAML Identity Provider in the miniOrange Broker Agent

  • Go to miniOrange Admin Console.
  • From the left navigation bar select Identity Provider and click on Add Identity Provider button.
  • Oracle EBS Shibboleth SSO: Add Identity Provider

  • Select SAML. Click on Import IDP metadata and browse for the file downloaded in step 1.
  • Oracle EBS Shibboleth SSO: Select SAML IDP and import metadata

  • Enter Shibboleth as IDP name and click on Save.
  • You can also provide the details manually. You need to configure following endpoints:
  • IDP Entity ID https://<your_domain>/idp/shibboleth
    Single Login URL https://<your_domain>/idp/profile/SAML2/Redirect/SSO
    Single Logout URL https://<your_domain>/idp/shibboleth
    X.509 Certificate The public key certificate of your Shibboleth server

3. Configure miniOrange Broker Agent in miniOrange EBS Connector

  • Add the miniOrange EBS SSO Connector as an OpenID Connect application in the Broker Agent
  • Log in as a customer from the Admin Console.
  • Go to Apps. Click Add Application button at right corner of your screen.
  • Oracle EBS Shibboleth SSO: Add Application

  • In Choose Application Type click on Create App button in OAUTH/OIDC application type.
  •  Oracle EBS shibboleth SSO: Choose Application type

  • Click on the 'OAuth2/OpenID Connect’ App Type
  • Oracle EBS shibboleth SSO: Select Oauth/OpenID

  • Enter the Redirect URL for the miniOrange EBS SSO Connector. For example, https://ebsauth.example.com/ebsauth/redirect
  • Select the Group Name from dropdown & enter Policy Name (Optional).
  • Select Password as your login method. You can also opt for 2-factor authentication.
  • Scroll down and click on the “Save Button”.
  • Oracle EBS shibboleth SSO : Submit Configuration Details

  • The miniOrange EBS SSO Connector is now successfully configured with the Broker Agent.
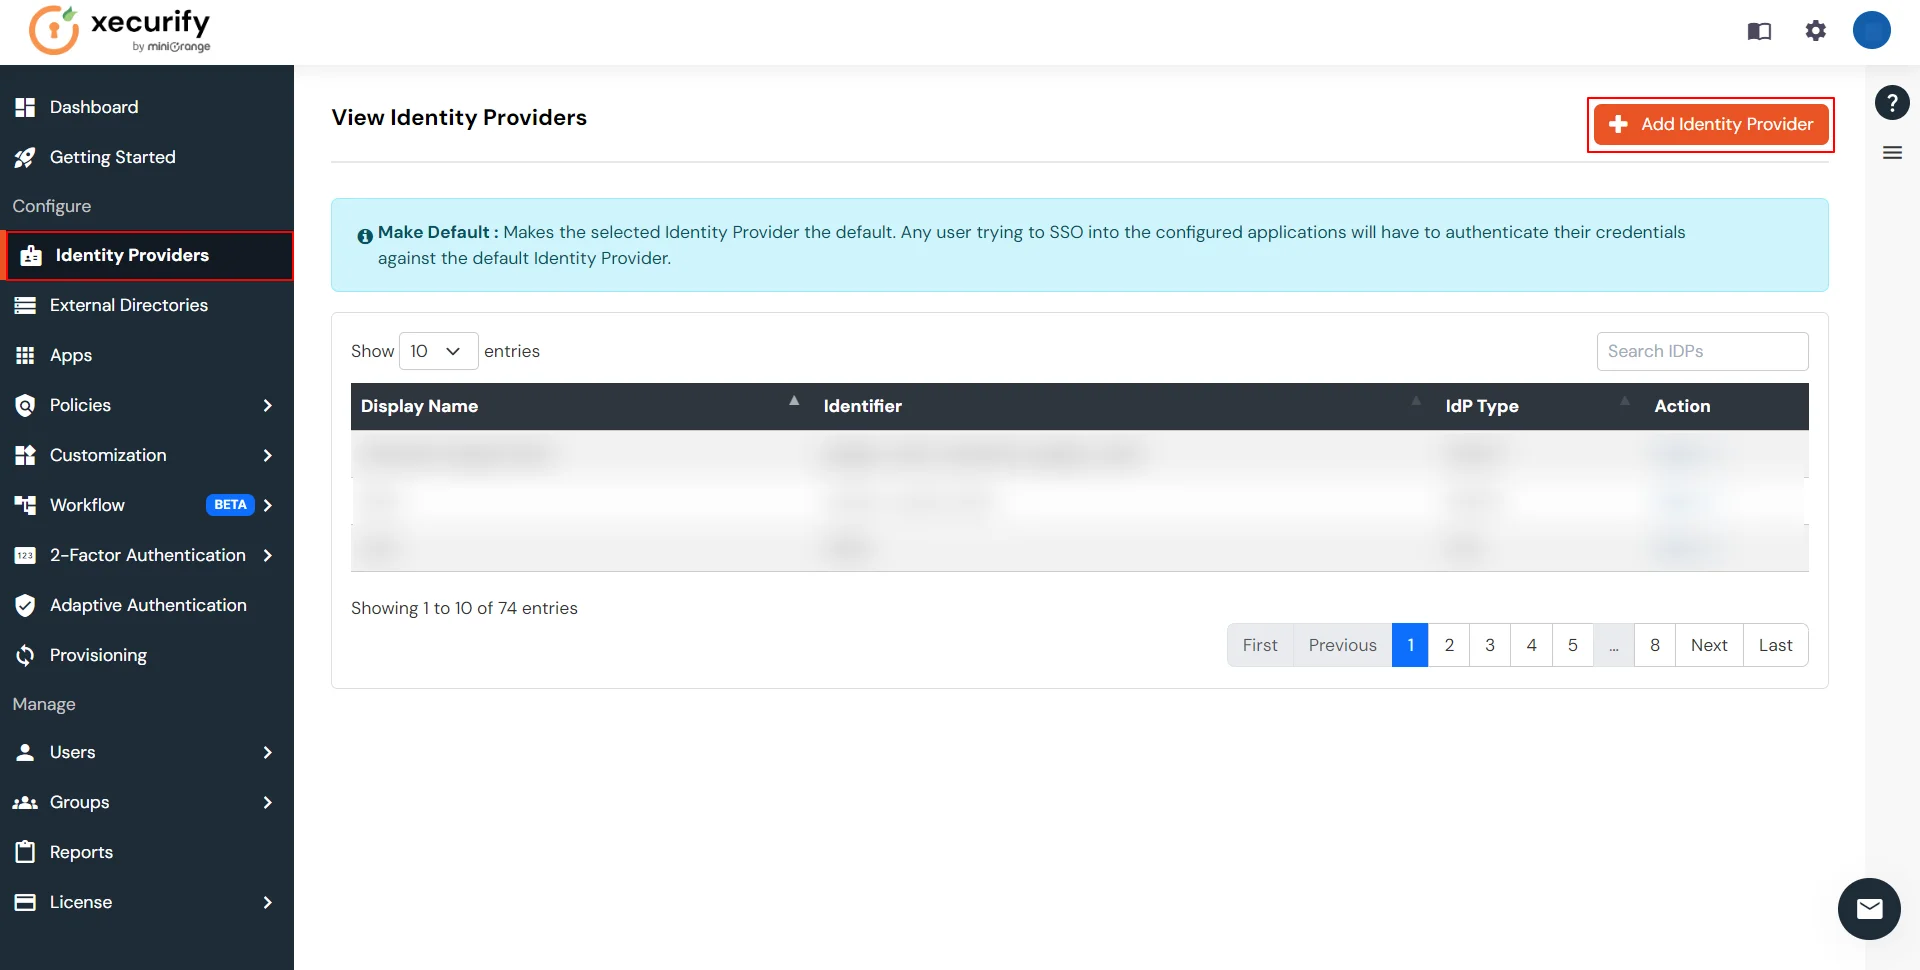
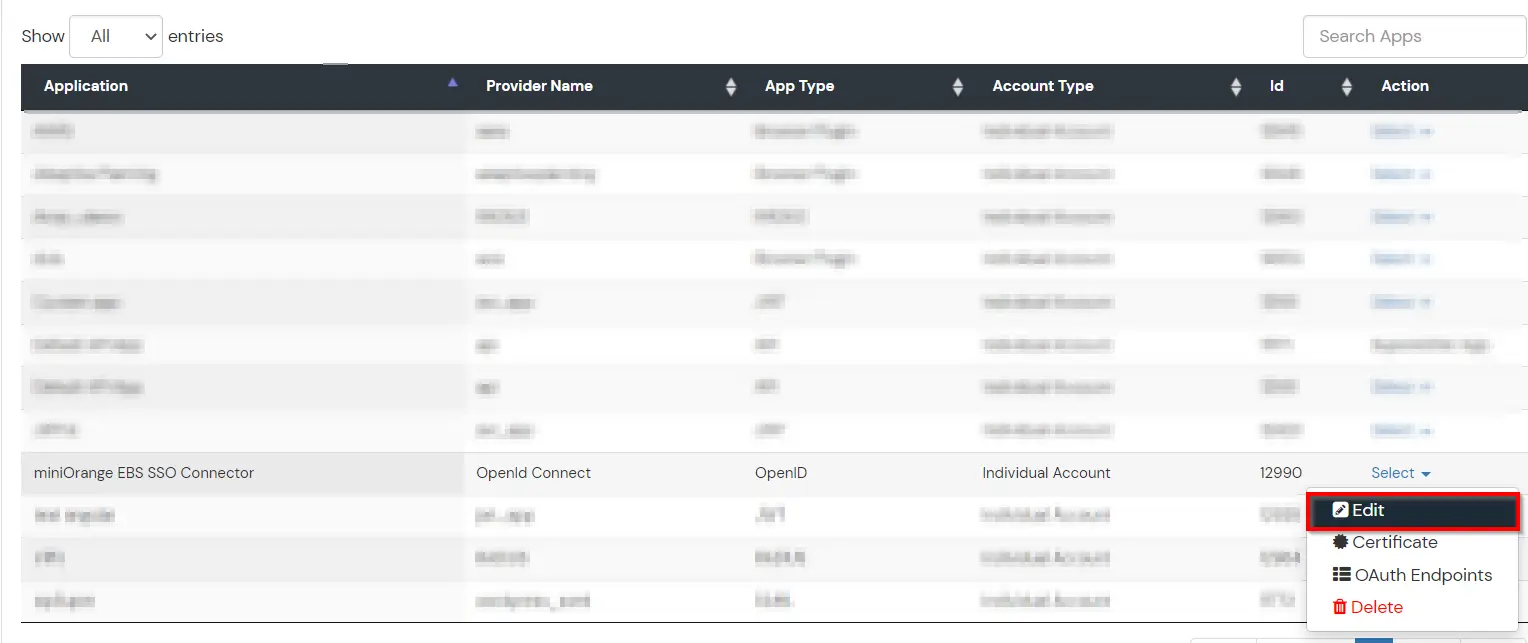
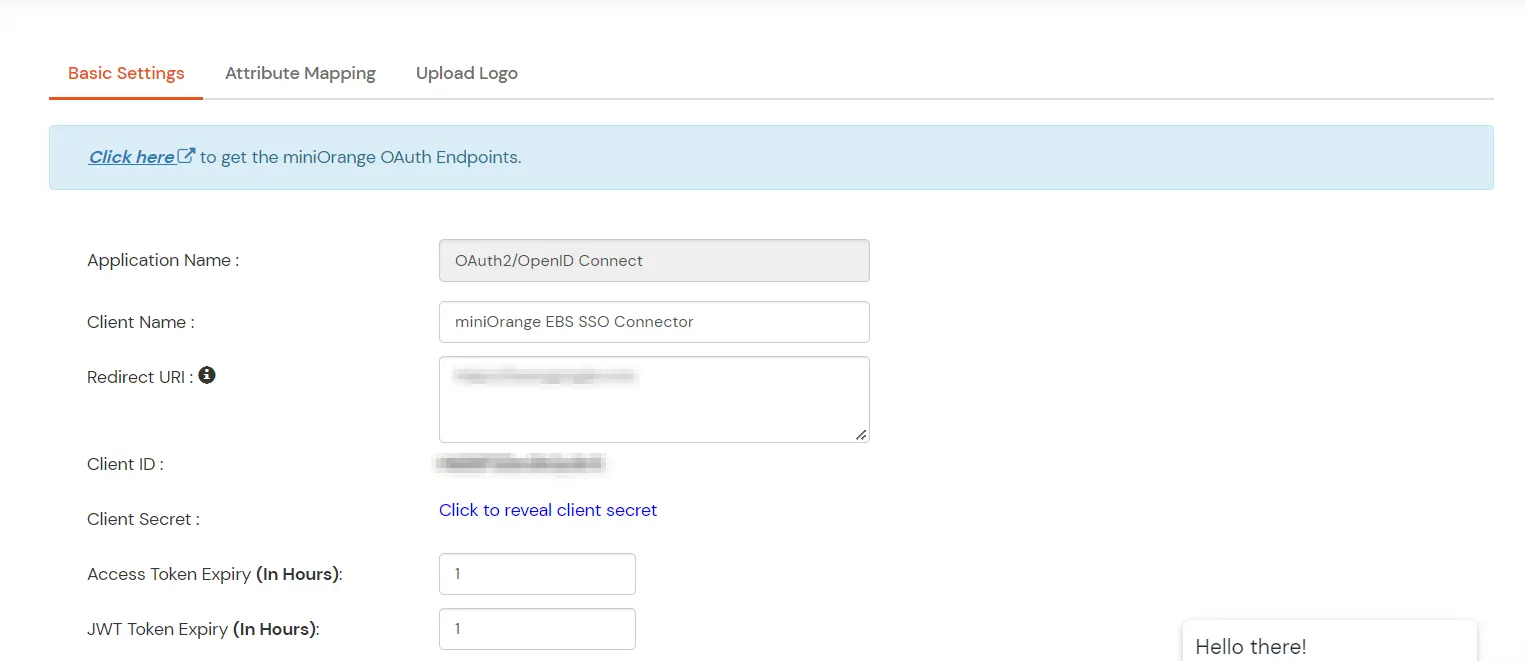
  • You can edit Application by using the following steps:

  • Go to Apps.
  • Search for your app and Click on the edit in action menu against your app.
  • Oracle EBS Shibboleth SSO: Search your App

  • Note down Client id and Client secret, you will need this info for configuring the miniOrange EBS SSO connector.
  • Get Client ID and Secret for Oracle EBS shibboleth SSO

  • Open the miniOrange EBS SSO Connector connector.properties file located under /webapps/ebsauth/WEB-INF/classes for editing.
  • Set the miniorange.base.url property to the base URL of your miniOrange tenant. For Cloud version, this is the base URL: https://.xecurify.com/moas For On-Premise version, this is the base URL: https://fqdn-of-onpremise-server
  • Set the customer.id property to the customer ID of your Broker Agent (found under product settings).
  • Set the 'authentication.source' and property to ‘external’.
  • Set the value of the redirect.uri property to the FQDN of your EBS connector, with /redirect appended to it For example, https://ebsauth.example.com/ebsauth/redirect
  • Set the client.id & client.secret properties to the values from the miniOrange Broker Agent OIDC application
  • Set the value of the identity.attribute property to either ‘username’ or ‘email’, depending on whether you want to log into Oracle EBS using your EBS username or your EBS email. Note that email should be unique in Oracle EBS in case you set this property to ‘email’.
  • Set the value of the username.attribute & email.attribute to the name of the attributes sent from Shibboleth, that contain the user’s Oracle EBS username & email respectively. Leave email.attribute blank in case you set the identity.attribute property to ‘username’
  • miniOrange Broker Agent is now configured with the miniOrange EBS SSO connector.

4. Configure Oracle EBS with miniOrange SSO Connector

  • Set aside a sub-domain for the miniOrange EBS SSO connector on the same domain as the EBS installation. For example, if the EBS installation has the FQDN apps.example.com, then miniOrange EBS SSO connector could be installed on the sub-domain ebsauth.example.com.
    • Create a new user, and assign them the role with code: UMX|APPS_SCHEMA_CONNECT. Make a note of the credentials for this user.
    • Navigate to Functional Administrator → Core Services → Profiles, and make the following changes:
      • Search for the Profile with code APPS_SSO; change its site value from SSWA to SSWA w/SSO.
      • Search for the Profile with the code APPS_AUTH_AGENT; change its site value to the full URL (FQDN) of the miniOrange EBS SSO connector (e.g. http://ebsauth.example.com/ebsauth).
      • Search for the Profile with the name Oracle Applications Session Cookie Domain; change its value from Host to Domain.
    • Bounce the Application Tier of the E-Business Suite to reflect the changes.
  • Generate a DBC file with the miniOrange EBS SSO connector domain (e.g. ebsauth.example.com) using the AdminDesktop utility in EBS; make a note of the APPL_SERVER_ID value present in this newly generated file.
  • Update the connector.properties file in your miniOrange EBS SSO connector to reflect the credentials for the user created, the path of the DBC file & the APPL_SERVER_ID and the endpoint URLs from the above points.

References

Note: Oracle and Java are registered trademarks of Oracle and/or its affiliates. miniOrange is a separate entity.

Want To Schedule A Demo?

Request a Demo


Our Other Identity & Access Management Products