How to setup 2FA/MFA for Windows Logon & RDP
With the increasing number of password-based security breaches, relying on just usernames and passwords to secure Windows local logins or Remote Desktop Protocol (RDP) is no longer enough. Cyber attackers can easily exploit weak or stolen credentials, putting your business-critical systems at risk.
That’s why organizations today are turning to the miniOrange MFA product, which adds an extra layer of security in the form of Two-Factor Authentication (2FA) to prevent unauthorized access.
Why Choose miniOrange MFA for Windows and RDP?
The miniOrange Windows Two-Factor Authentication (2FA) solution protects against password compromise by introducing two successive levels of authentication.
1. First Factor: User’s standard Windows AD credentials.
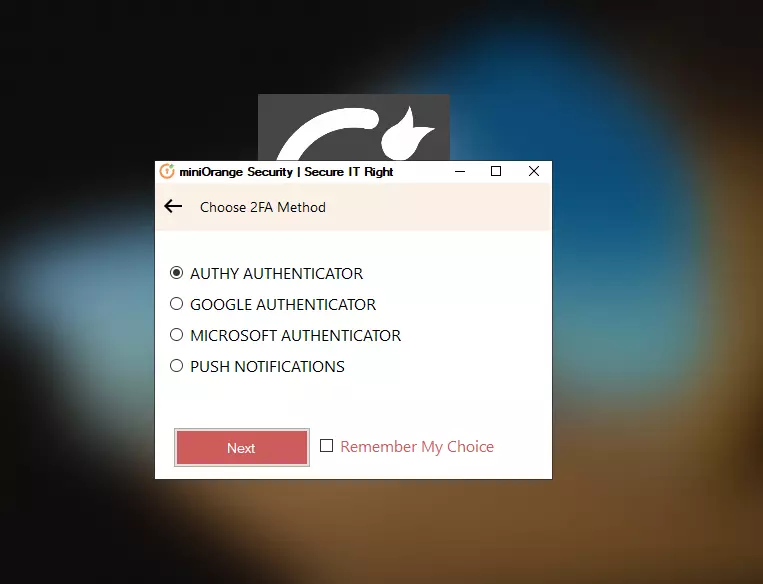
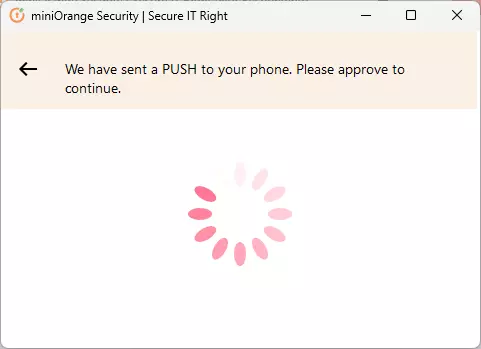
2. Second Factor: A secure authentication method chosen from 15+ authentication methods offered by miniOrange, including OTPs, push notifications, biometric authentication, hardware tokens, and more.
Key Capabilities of miniOrange Windows MFA/2FA
- 2FA for User Access Control (UAC) elevation requests
- Swift deployment via Group Policy Object (GPO), push, or import/export function
- Self-Service Password Reset (SSPR) ability
- Azure AD or Local AD integration through LDAP
- Passwordless login option
- Machine-based 2FA
- Offline 2FA
By deploying miniOrange’s 2FA product, organizations can fortify Windows and RDP environments against credential theft, phishing, and brute-force attacks, so only trusted users gain access.
miniOrange 2FA Solution for Windows Logon and Remote Desktop (RDP) access supports following Two-Factor Authentication (2FA/MFA) Methods:-
| Authentication Type | Method | Supported |
|---|
| miniOrange Authenticator | Soft Token | |
| miniOrange Push Notification | |
| Mobile Token | Google Authenticator | |
| Microsoft Authenticator | |
| Authy Authenticator | |
| SMS | OTP Over SMS | |
| SMS with Link | |
| Email | OTP Over Email | |
| Email with Link | |
| Call Verification | OTP Over Call | |
| Hardware Token | YubiKey Hardware Token | |
| Display Hardware Token | |
System Requirements for miniOrange Two-Factor Authentication (2FA / MFA) login Credential Provider :
miniOrange Credential Provider for Windows Logon and RDP Access supports both client and server operating systems.
Supported Microsoft Windows Client versions:
- Windows 7 SP1
- Windows 8.1
- Windows 10
- Windows 11
Supported Windows Server versions (GUI and core installs):
- Windows Server 2008 R2 SP1
- Windows Server 2012
- Windows Server 2012 R2
- Windows Server 2016
- Windows Server 2019
- Windows Server 2022
Apart from the Windows operating system, miniOrange supports 2FA for MAC and Linux operating systems.
Get Free Installation Help - Book a Slot
miniOrange offers free help through a consultation call with our System Engineers to Install or Setup Two-Factor Authentication (2FA) for Windows Logon and RDP solution in your environment with 30 days trial.
For this, you need to just send us an email at idpsupport@xecurify.com to book a slot and we'll help you setting it up in no time.
How Windows Logon 2FA Works
Prerequisites for setting up Windows Two-Factor Authentication (2FA)
- .NET Framework 4.8
- miniOrange Cloud Account or Onpremise Setup.
- Enroll Users in miniOrange before Configuration:
- The username of the user in miniOrange should be the same as in Windows Username.
- This is required so that the service can prompt the appropriate 2FA for the customer based on the defined policy and provide secure access to machine/RDP.
- There are multiple methods to add users in miniOrange.
Step by step guide to setup Two-Factor Authentication (2FA/MFA) for Windows Logon
1. Download 2FA Module
- Click here to download the Windows 2FA/MFA module.
2. Setup your miniOrange dashboard for Windows 2FA
In this step, we are going to setup your Two-Factor Authentication (2FA) preferences, such as:
- Which users should be asked for 2FA during windows logon.
- What 2FA methods can they use.
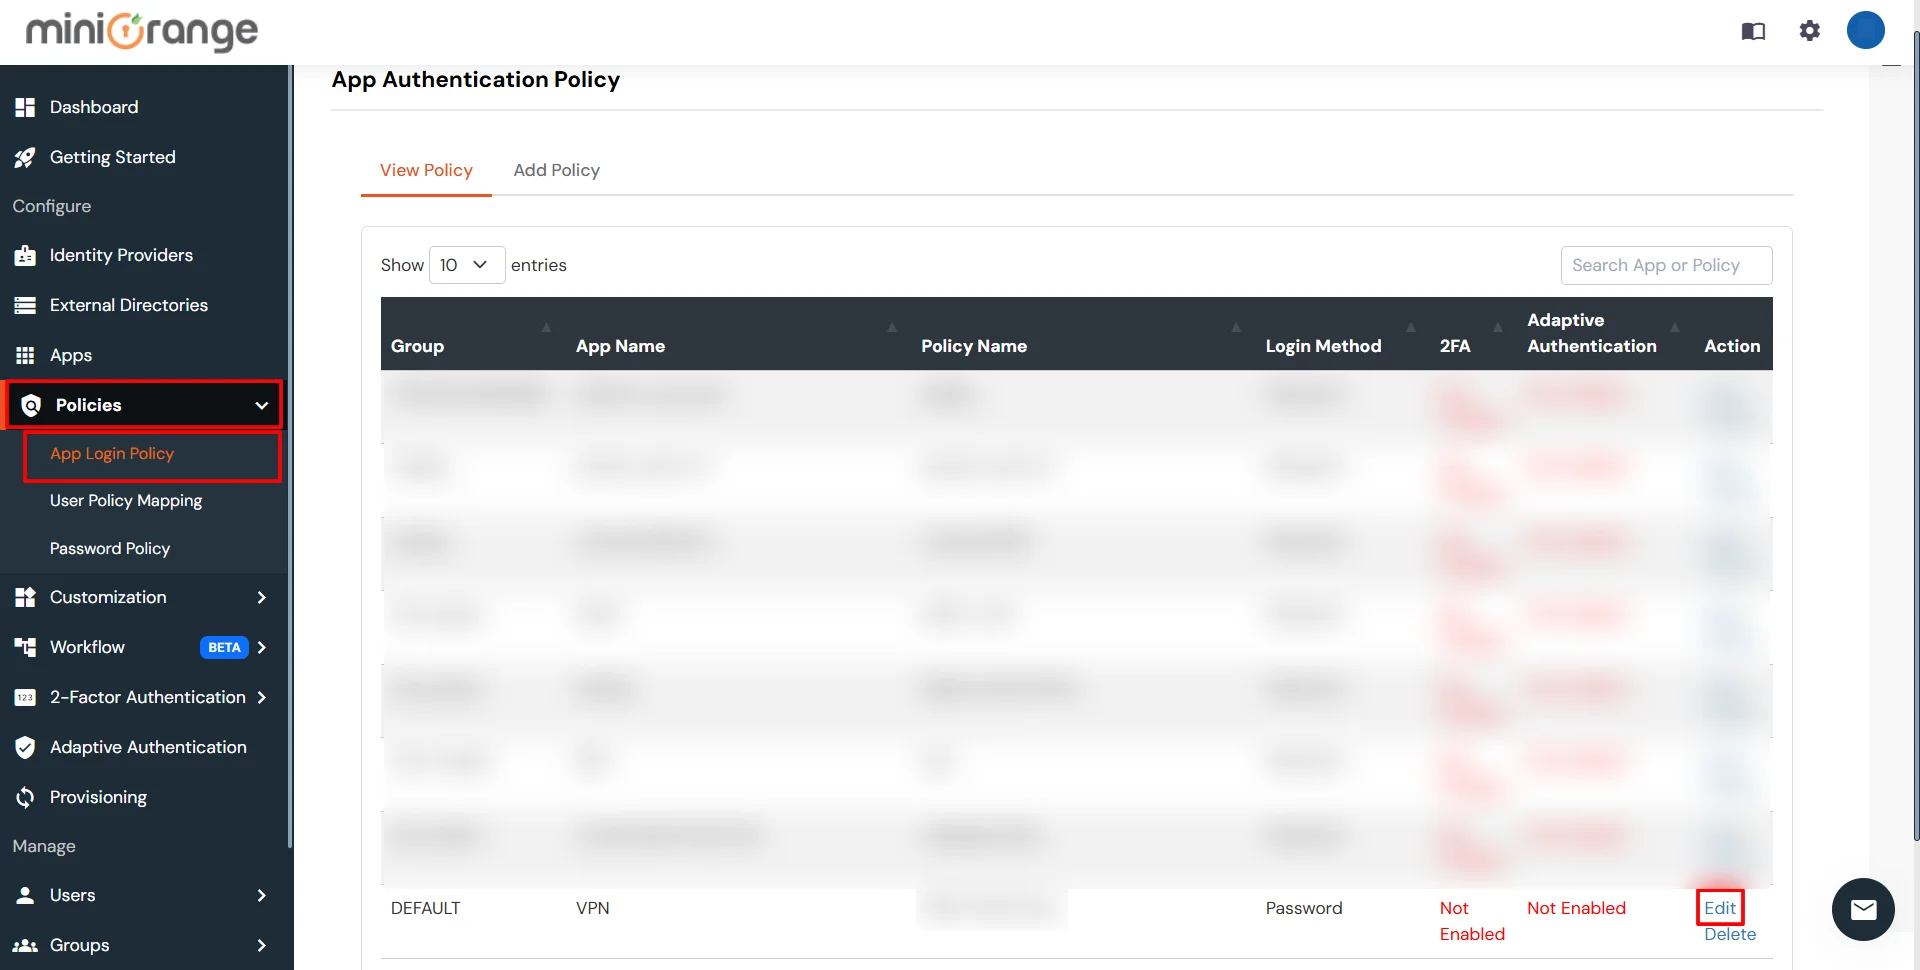
2.1 : Adding app and policy for 2FA
- Login into miniOrange Admin Console.
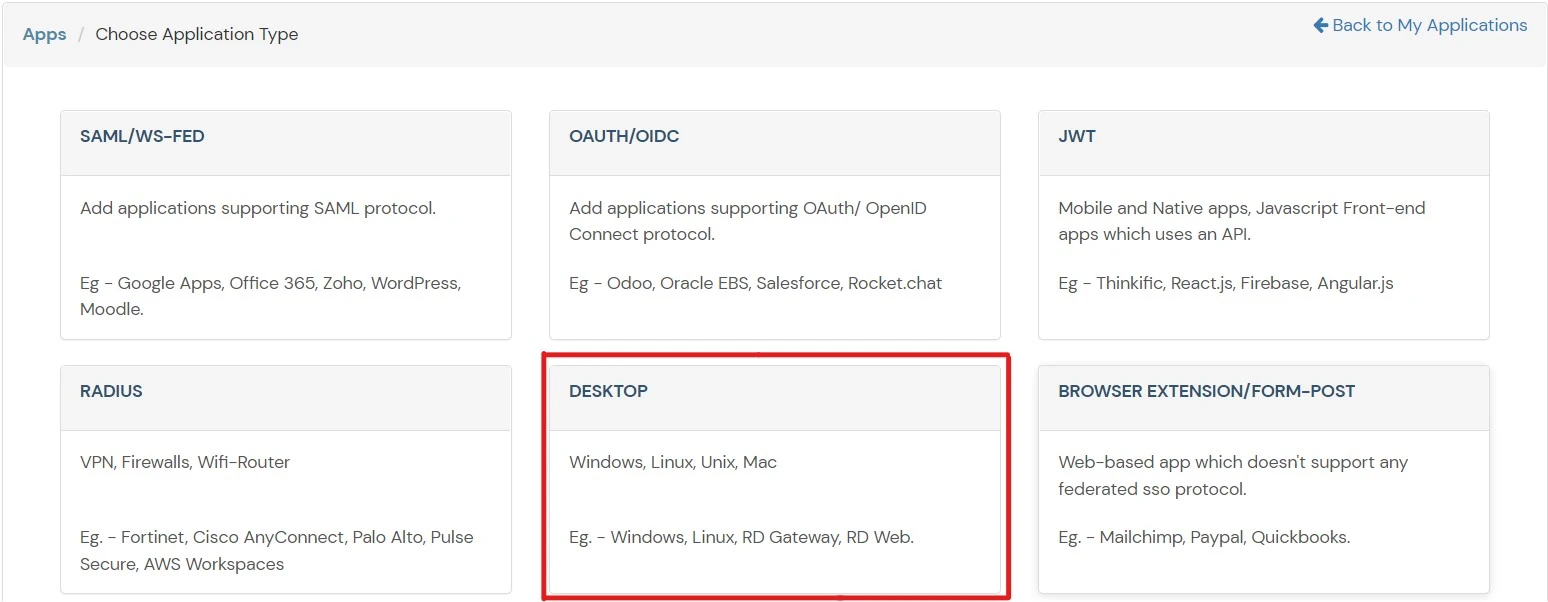
- Go to Apps and click on Add Application button.

- Select Desktop from All Apps dropdown .
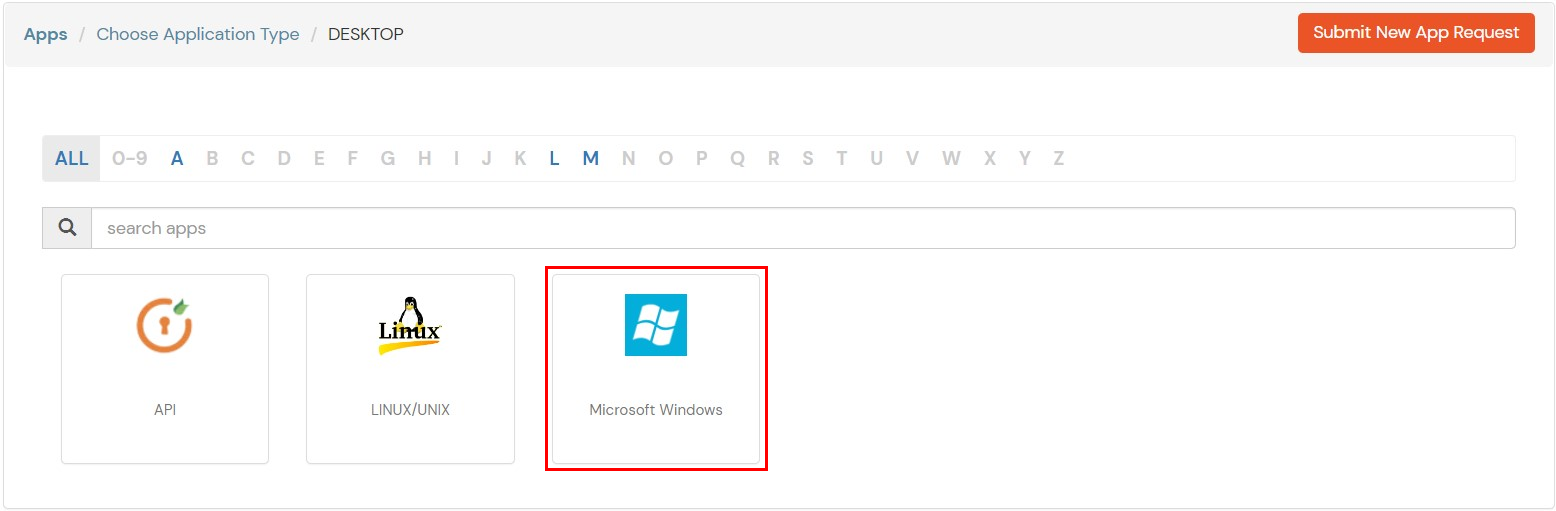
- Add Windows app on miniOrange.
- In the Basic tab, enter the Display Name. Description is optional.
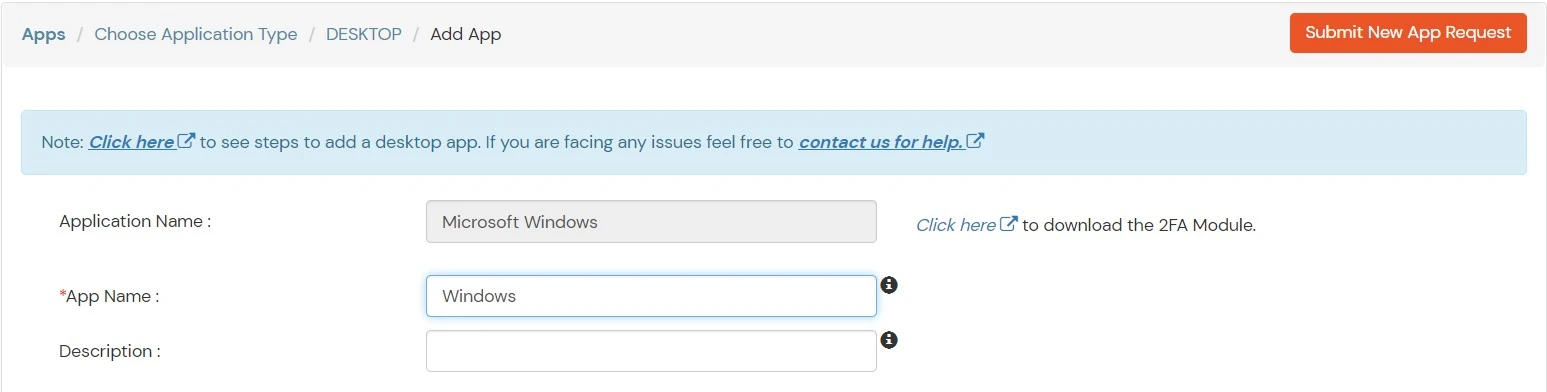
- Click Save to continue. You will be automatically redirected to the Policies tab.
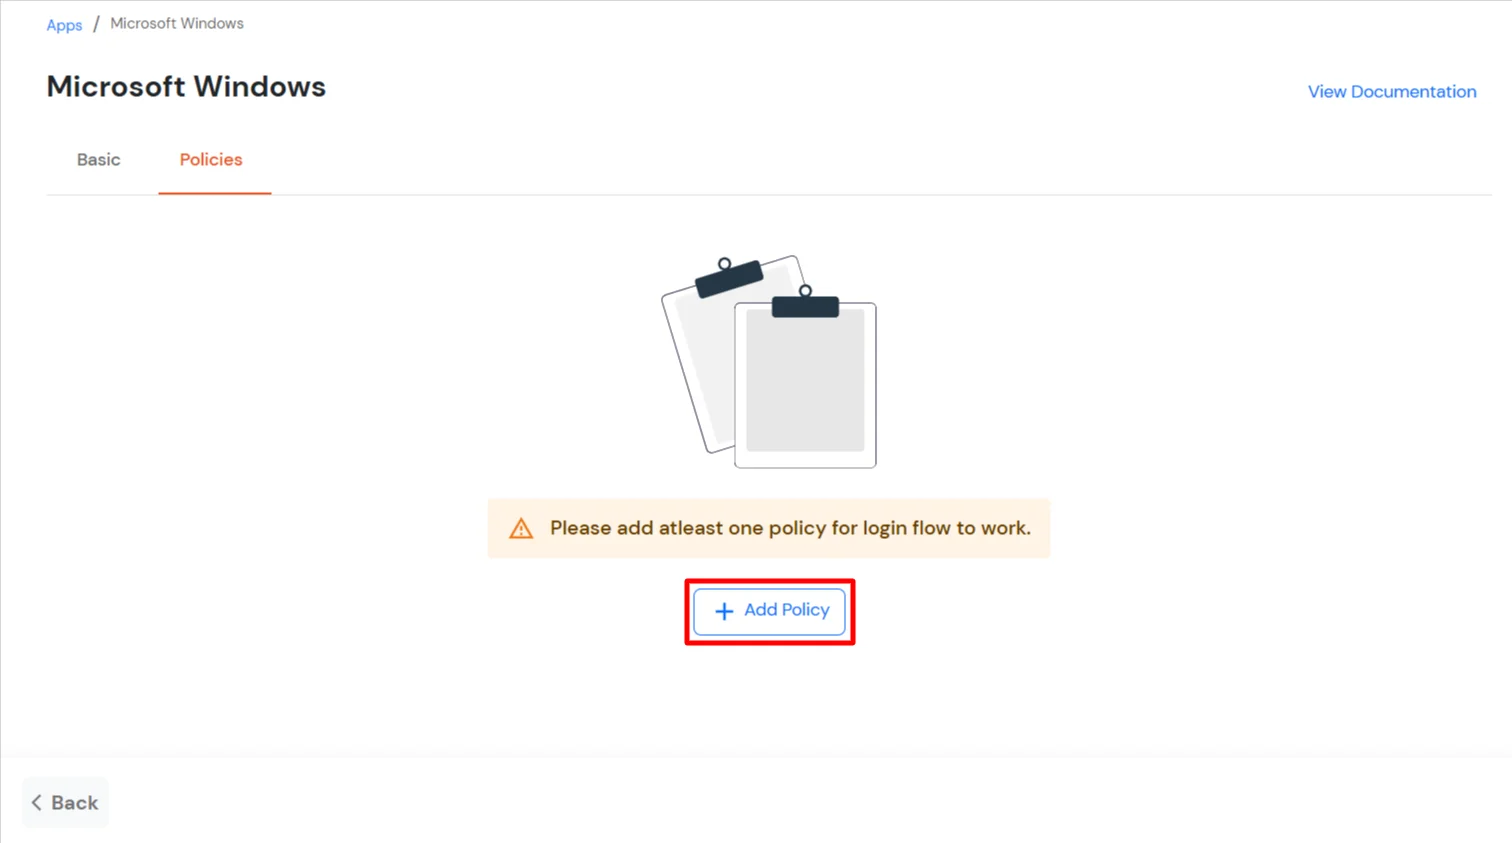
- Click on the Assign group button. A new Configure Group Assignment Modal will open.
- Assign Group: Select the groups you want to link with the application. You can select up to 20 groups at a time.
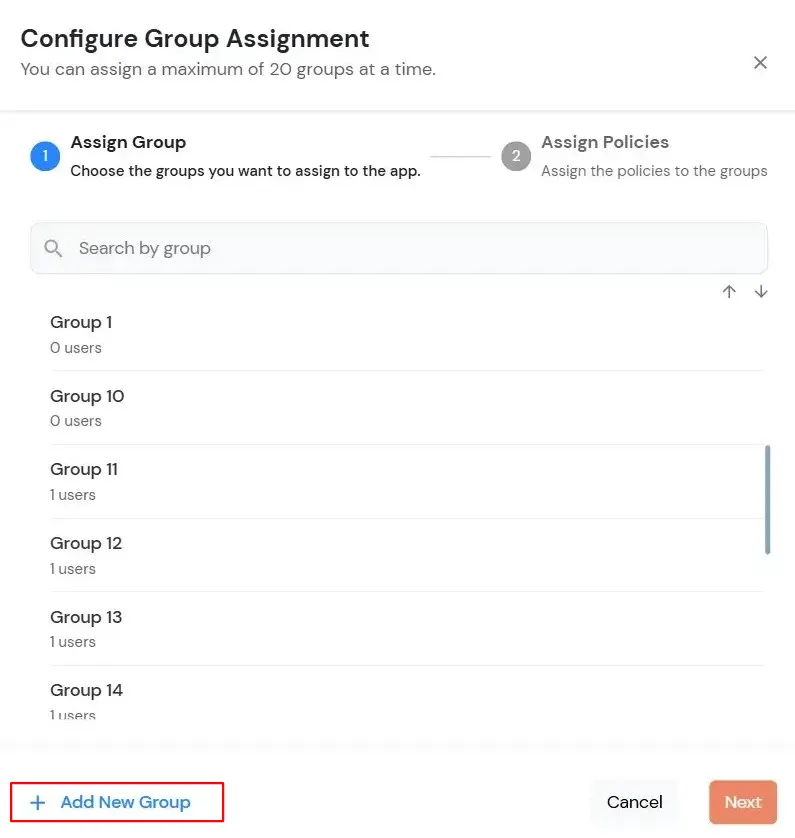
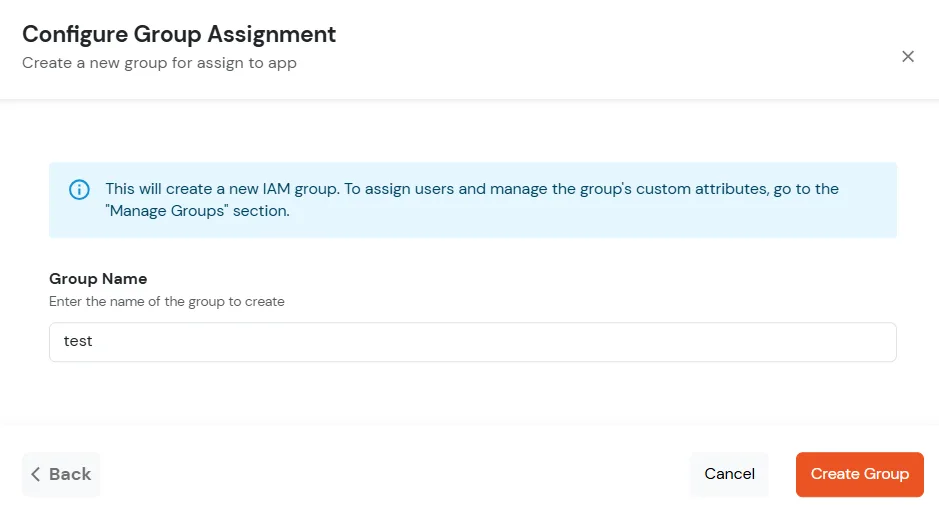
- If you need to create new group. Click on Add New Group button.
- Enter the Group name and click on Create Group.
- Click on Next.
- Assign Policies: Add the required policies to the selected groups. Enter the following details:
- First Factor: Select the login method from the dropdown.
- If you select Password as the login method, you can enable 2-Factor Authentication (MFA) and Adaptive Authentication, if needed.
- If you select Password-less as login method, you can enable 2-Factor Authentication (MFA) if needed.
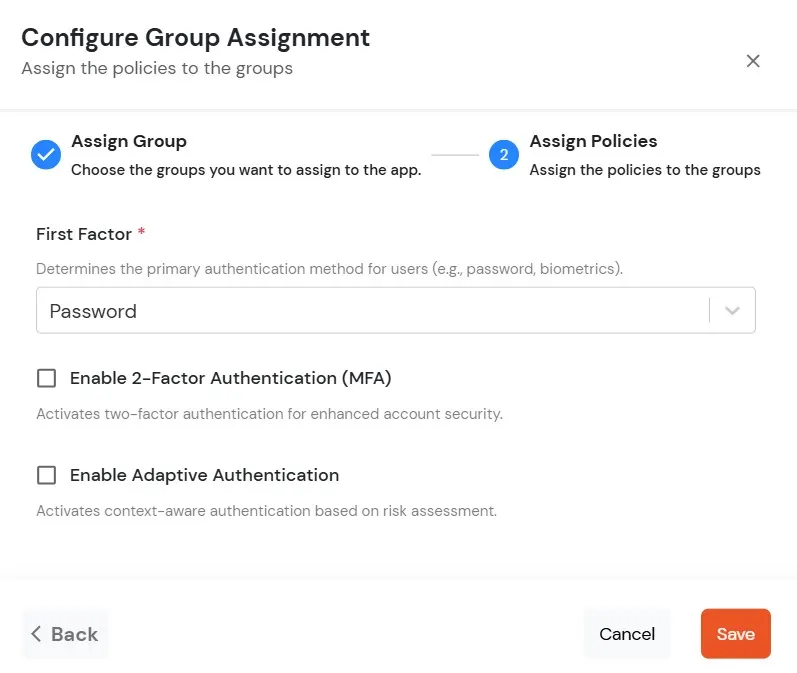
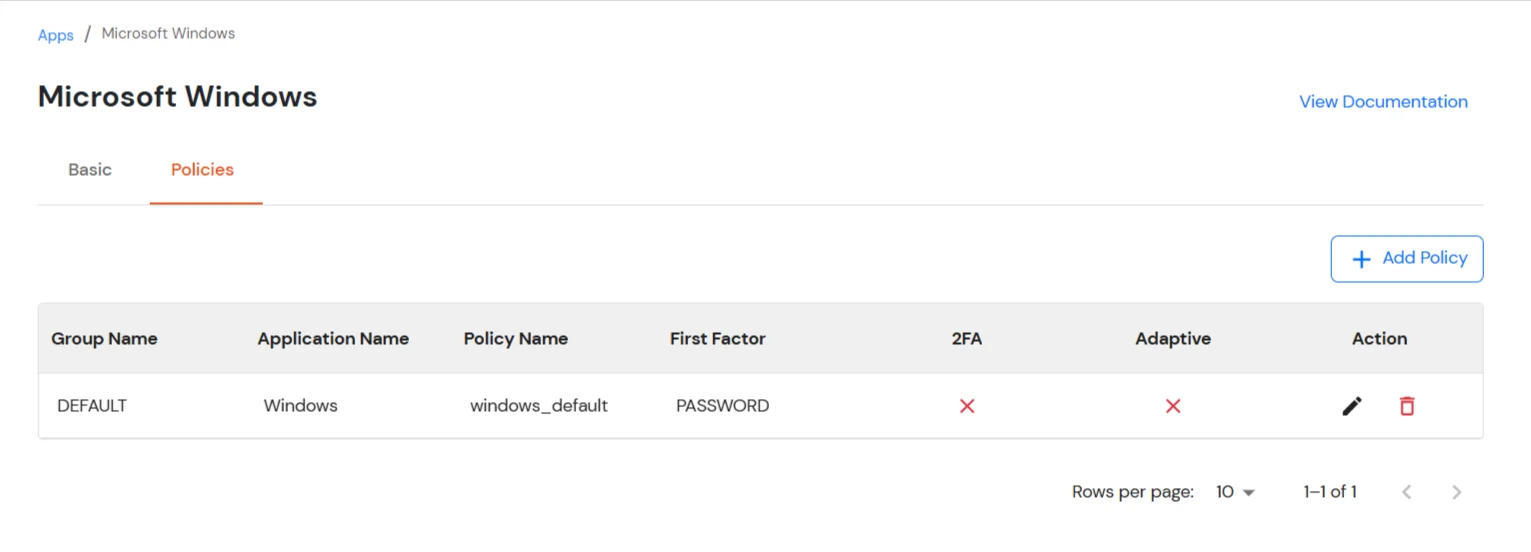
- Click on Save. Policies will be created for all the selected groups.
- Once submitted, the newly added policy will appear in the list.
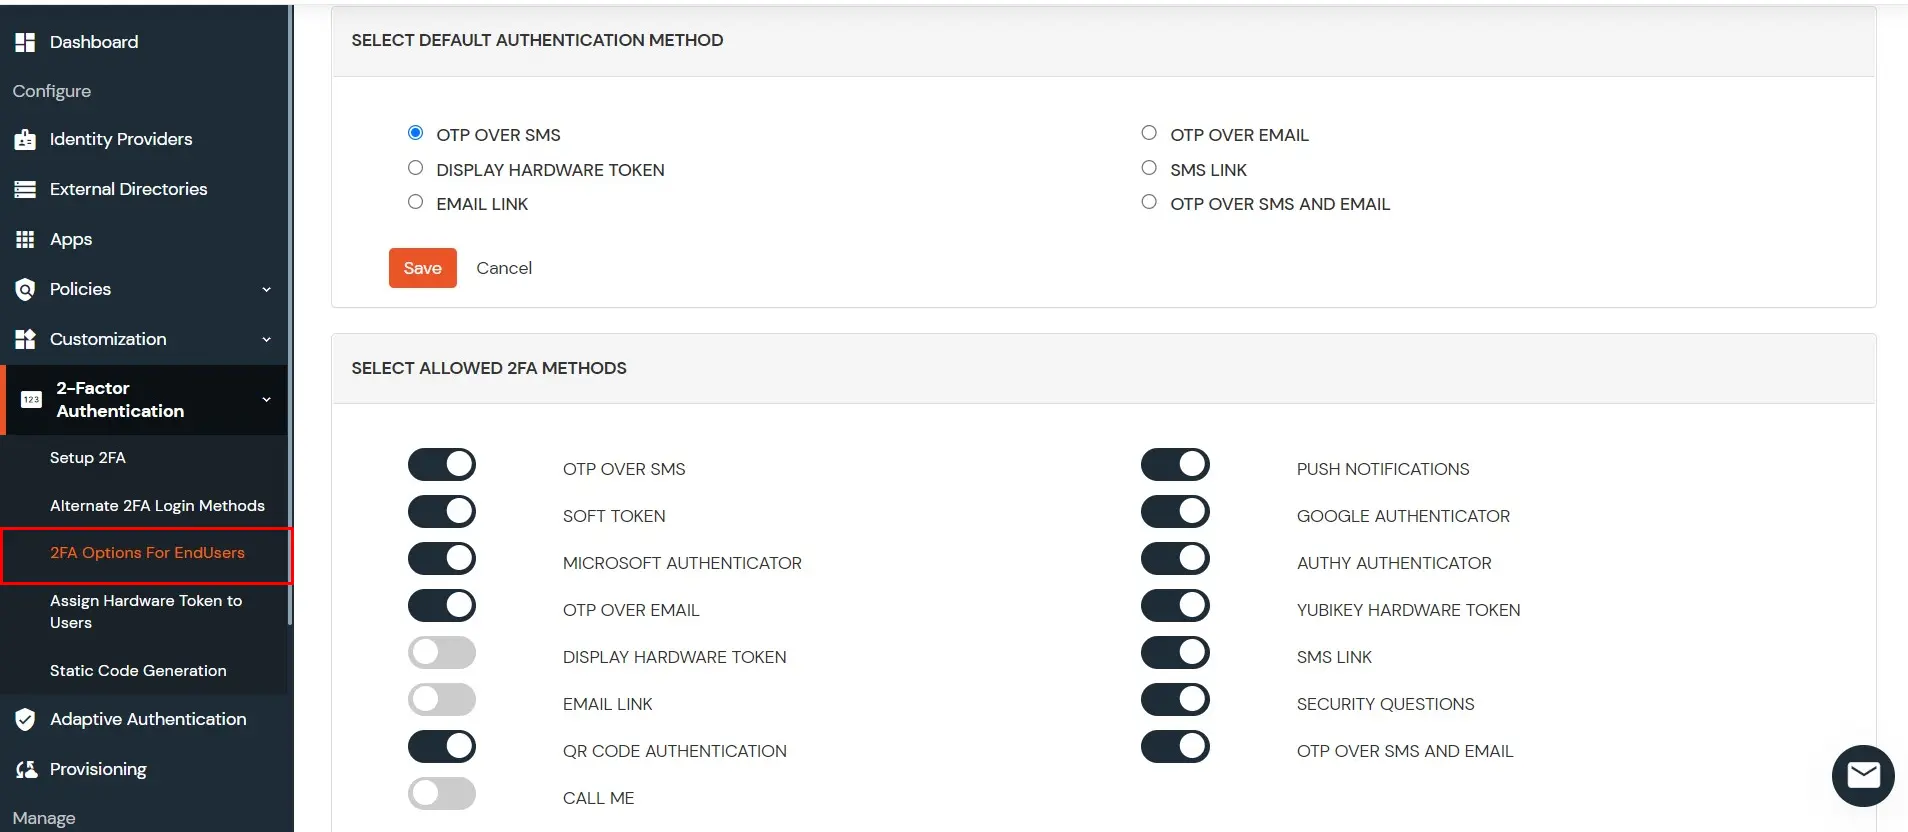
2.2 : Choose which 2FA options the users can use
- Go to 2-Factor Authentication >> 2FA Options for End User
- Disable the methods you don’t want your users to configure or use for 2FA
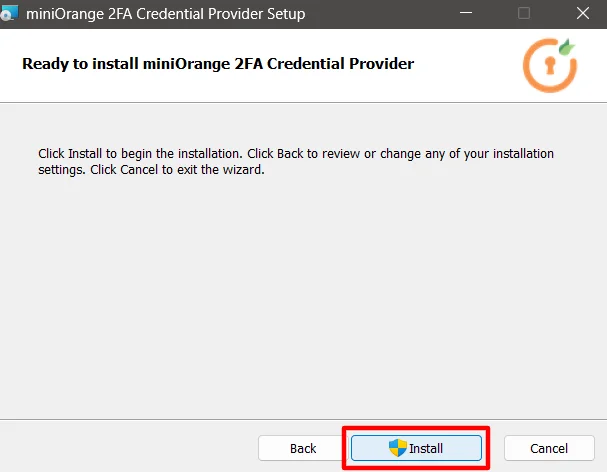
3. Setup miniOrange Two-Factor Authentication (2FA/MFA) Credential Provider for Windows Logon
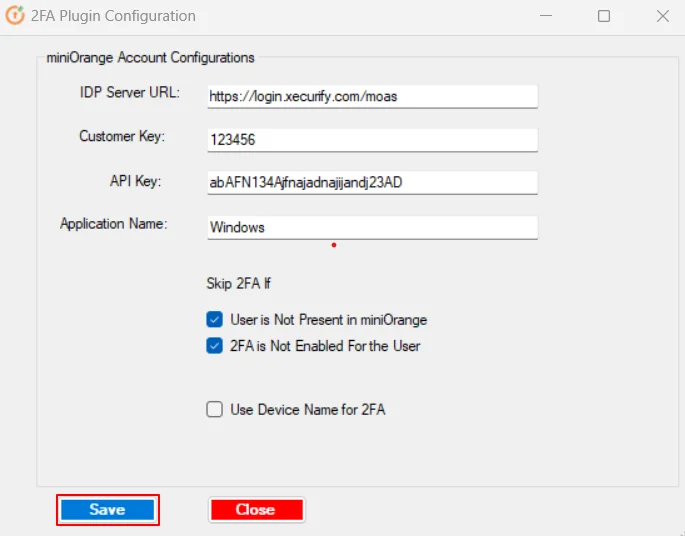
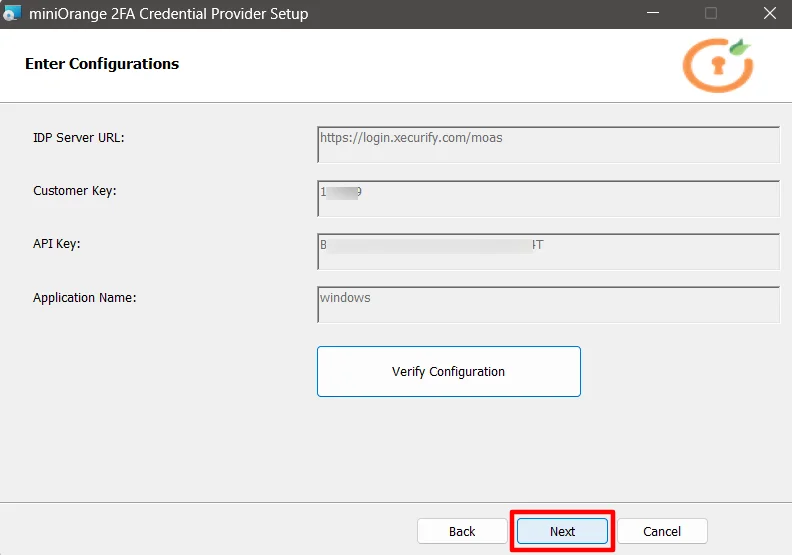
3.a : Integrate the module to miniOrange Account
3.b : Configure Domain
Note:
Skip this step if you’re not configuring this on a domain joined machine
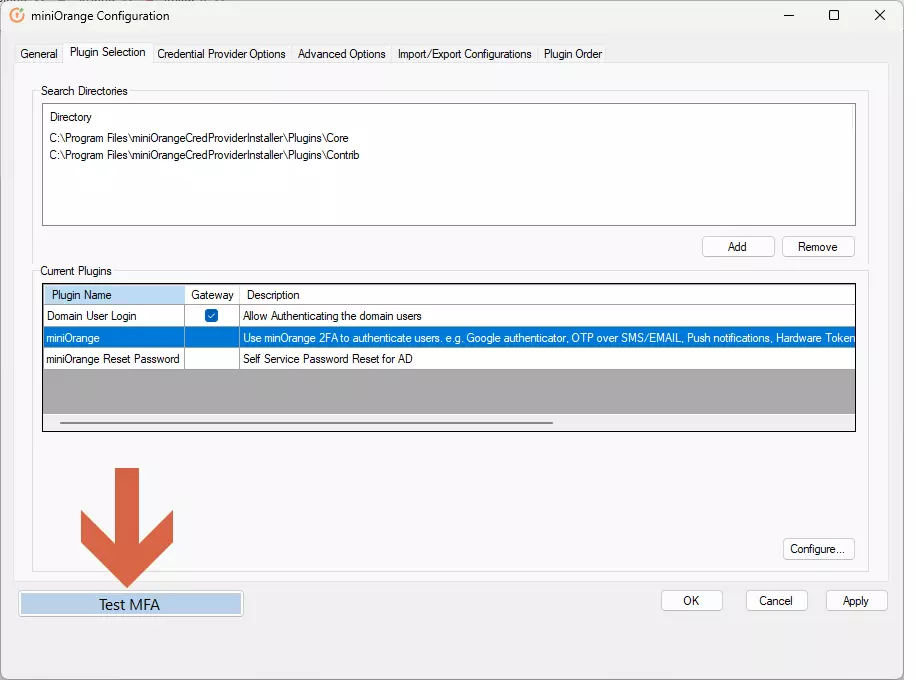
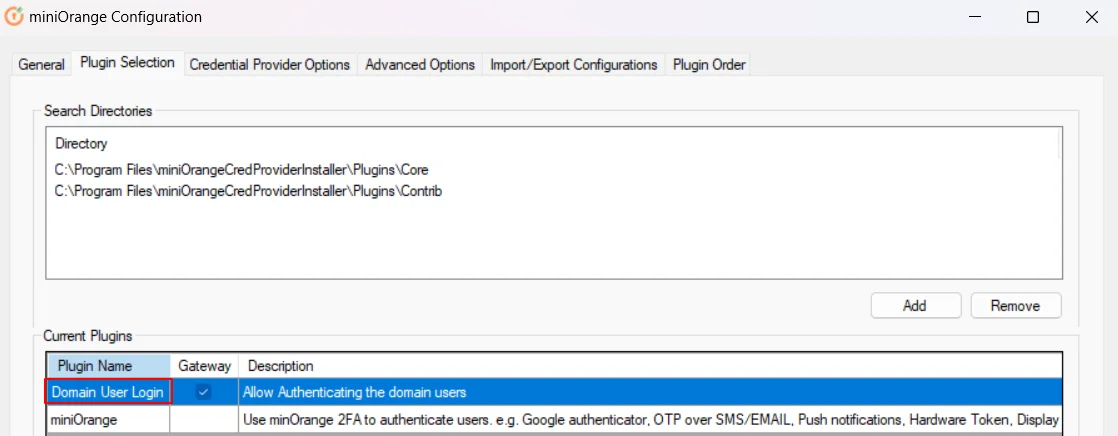
- In Plugin Selection tab, Double click on Domain User Login.
- Replace the domain name with your AD domain used before the username.
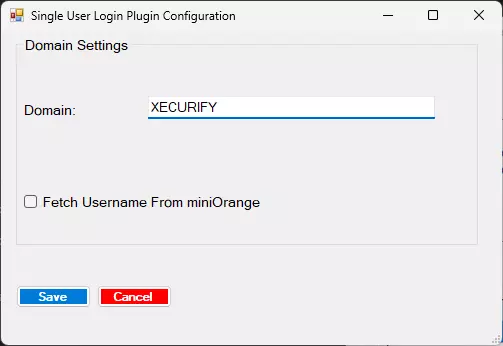
- To check your domain name, you can also use the command: SET USERDOMAIN
- Click on Save.
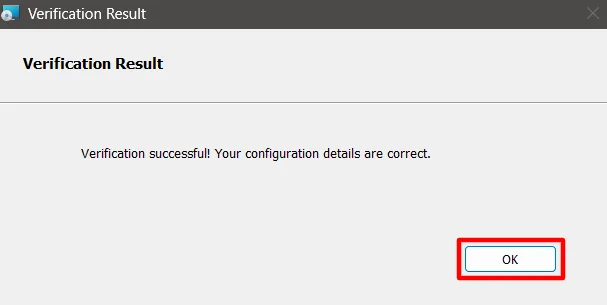
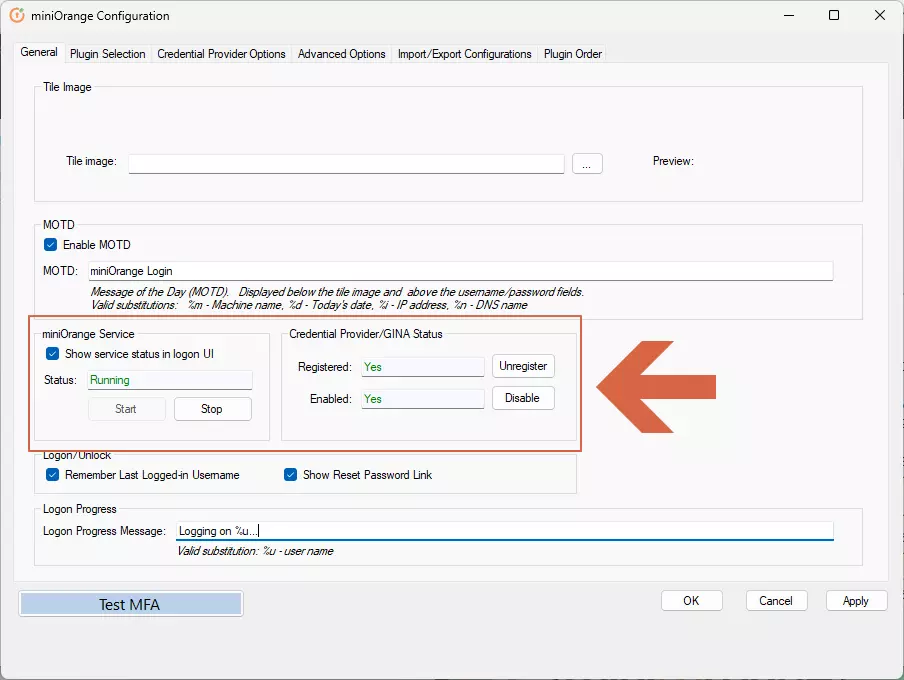
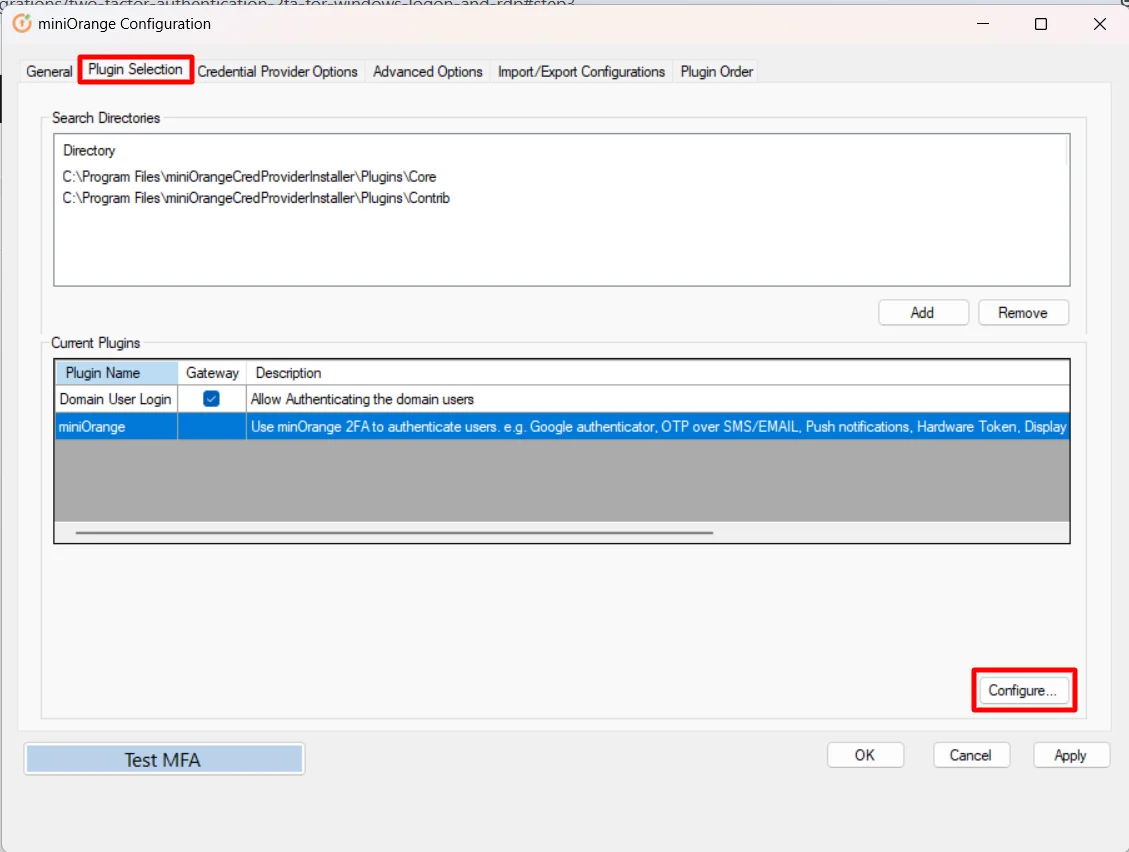
3.c : Test MFA
Note: Please make sure that at this point the user with same username as windows exists in miniOrange and has 2FA set up.
For instructions on setting up 2FA from Self Service Console, see this link.
4. Use miniOrange 2FA during login
4.a : Disable other login methods (Optional)
- Go to Credential Provider Options tab.
| Option |
Description |
| Make miniOrange Default Login Tile |
Shows the miniOrange credential provider as the default sign-in tile on the Windows login screen so users start in the miniOrange flow first. |
| Force miniOrange 2FA on Logon |
Requires miniOrange 2FA after primary Windows authentication on each interactive logon (not optional for that logon path). Use together with policy and testing so users are not locked out. |
| Enable MFA for UAC login |
Prompts for MFA when a user elevates through User Account Control (UAC), for example when an action needs administrator approval. |
| 2FA on Remote Sessions Only |
Applies miniOrange 2FA only to remote sessions (such as RDP), not to local console logons at the machine. |
| Enable Passwordless Login |
Allows sign-in using configured miniOrange factors without entering the traditional Windows password, where supported by your deployment. |
- Check the box Force miniOrange 2FA on Logon.
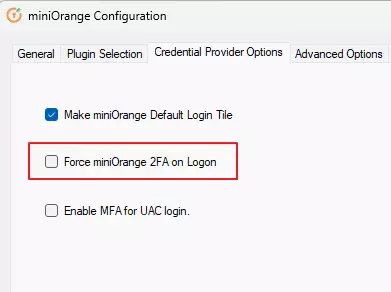
- Click on Apply then OK.
5. Adaptive Access Policy
Note : Device-Based Restriction cannot be applied to Windows Devices.
A. Enable Adaptive Authentication Policy
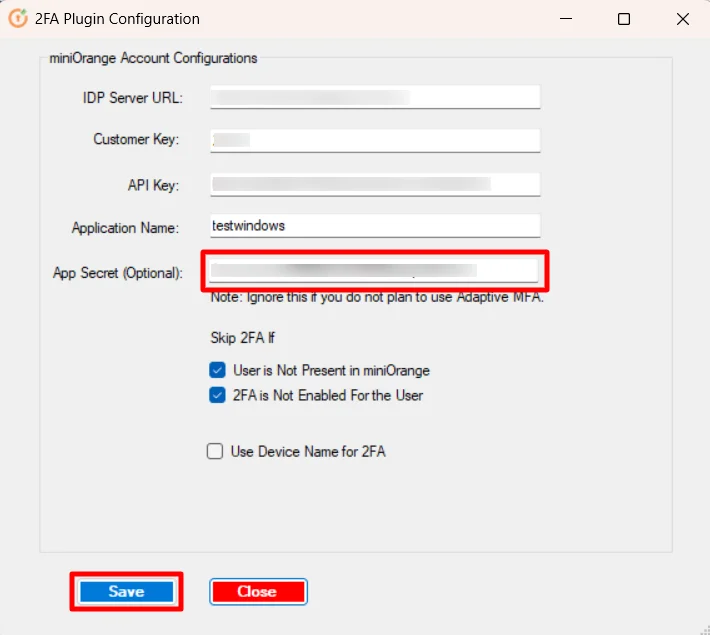
- To enable Adpative Authentication over Windows, add the app secret in MFA agent from Step2.1
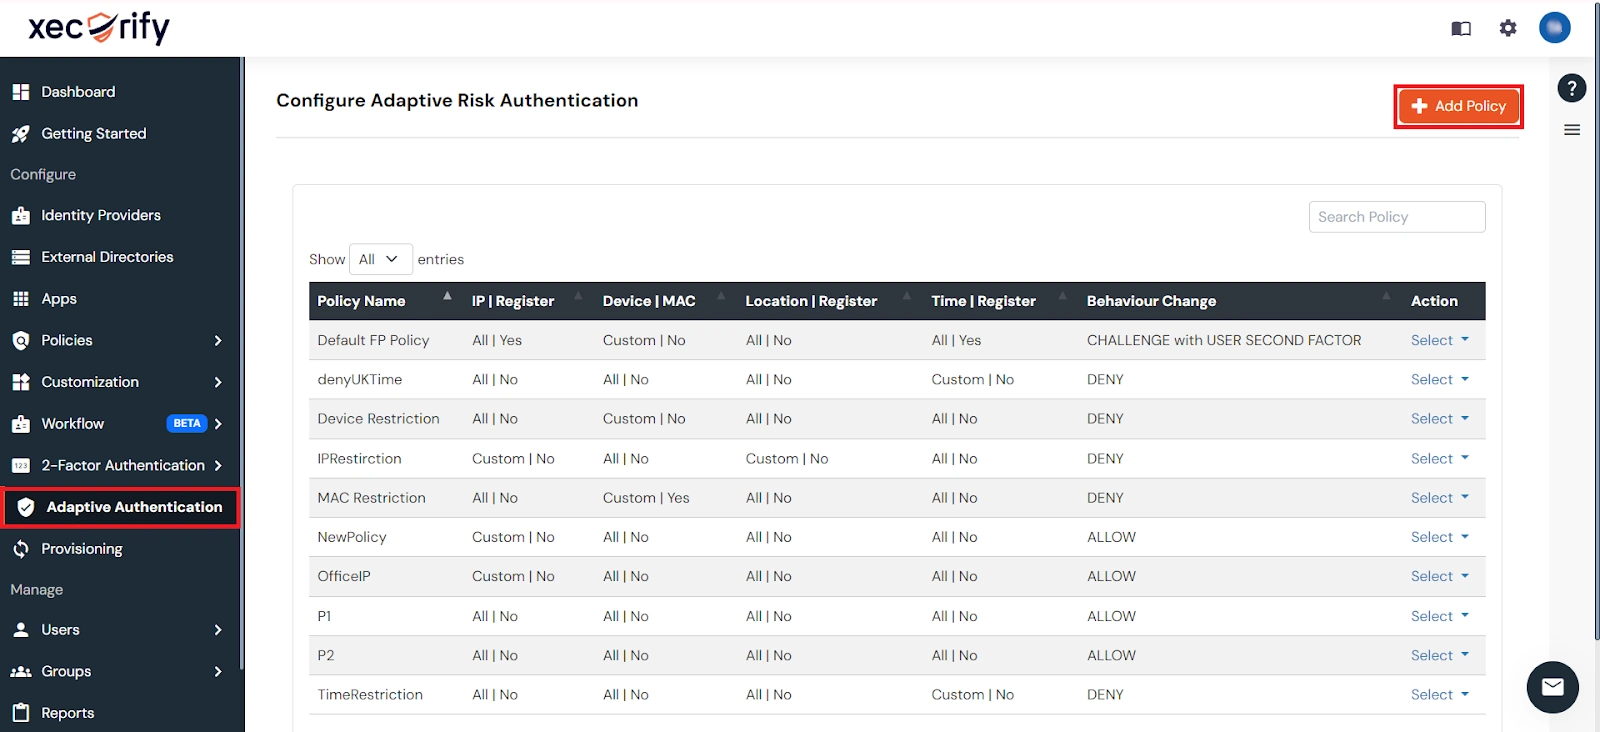
- Login to Admin dashboard, then go to Policies >> Adaptive Access Policy section.
IP Configuration
In IP restriction, admin configures a list of IP addresses to allow or deny access on and when a user tries to log into any of the applications configured with adaptive authentication, his IP address is checked against the configured IP list and based on that the action is decided as per the configuration (.i.e. Allow, Deny or Challenge).
How to Configure IP Address:
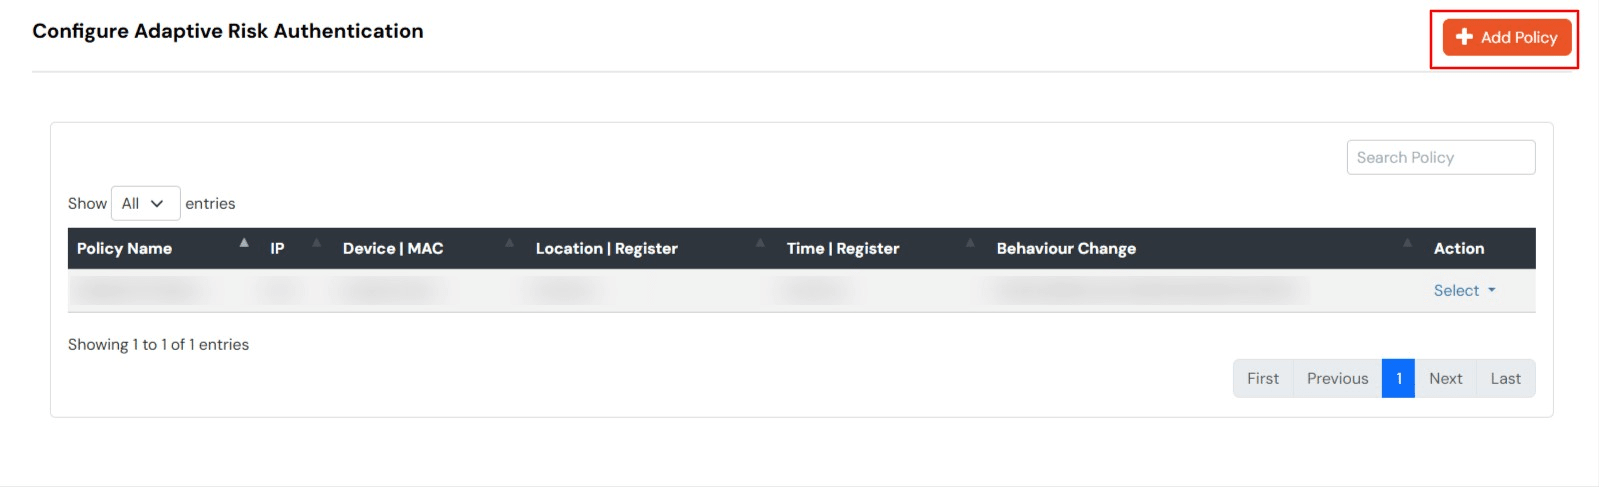
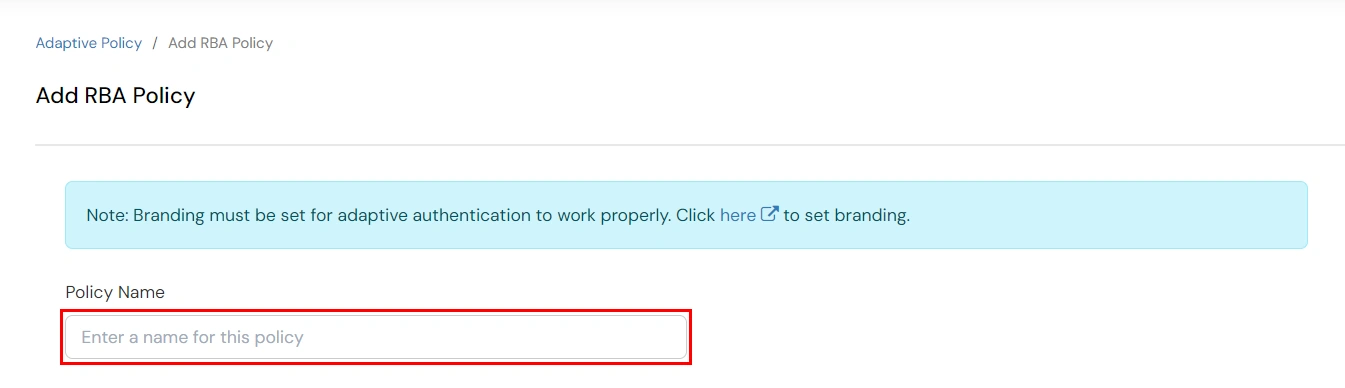
- Click on Create Policy.
- Enter a Policy Name for your Adaptive Authentication Policy in the required field.
- Specify the IP Address that you want to whitelist. For the IP Range other than the whitelisted one, you can select the above setting to reflect.
- Choose either allow or deny by selecting the radio button next to it.
- If a user tries to login with the whitelisted IP address, they will always be allowed access.
- We support IP address range in three formats i.e., IPv4, IPv4 CIDR, and IPv6. You can choose whichever is suitable for you from the dropdown menu.
- You can add multiple IP and IP ranges by clicking on the Add IP Range button.
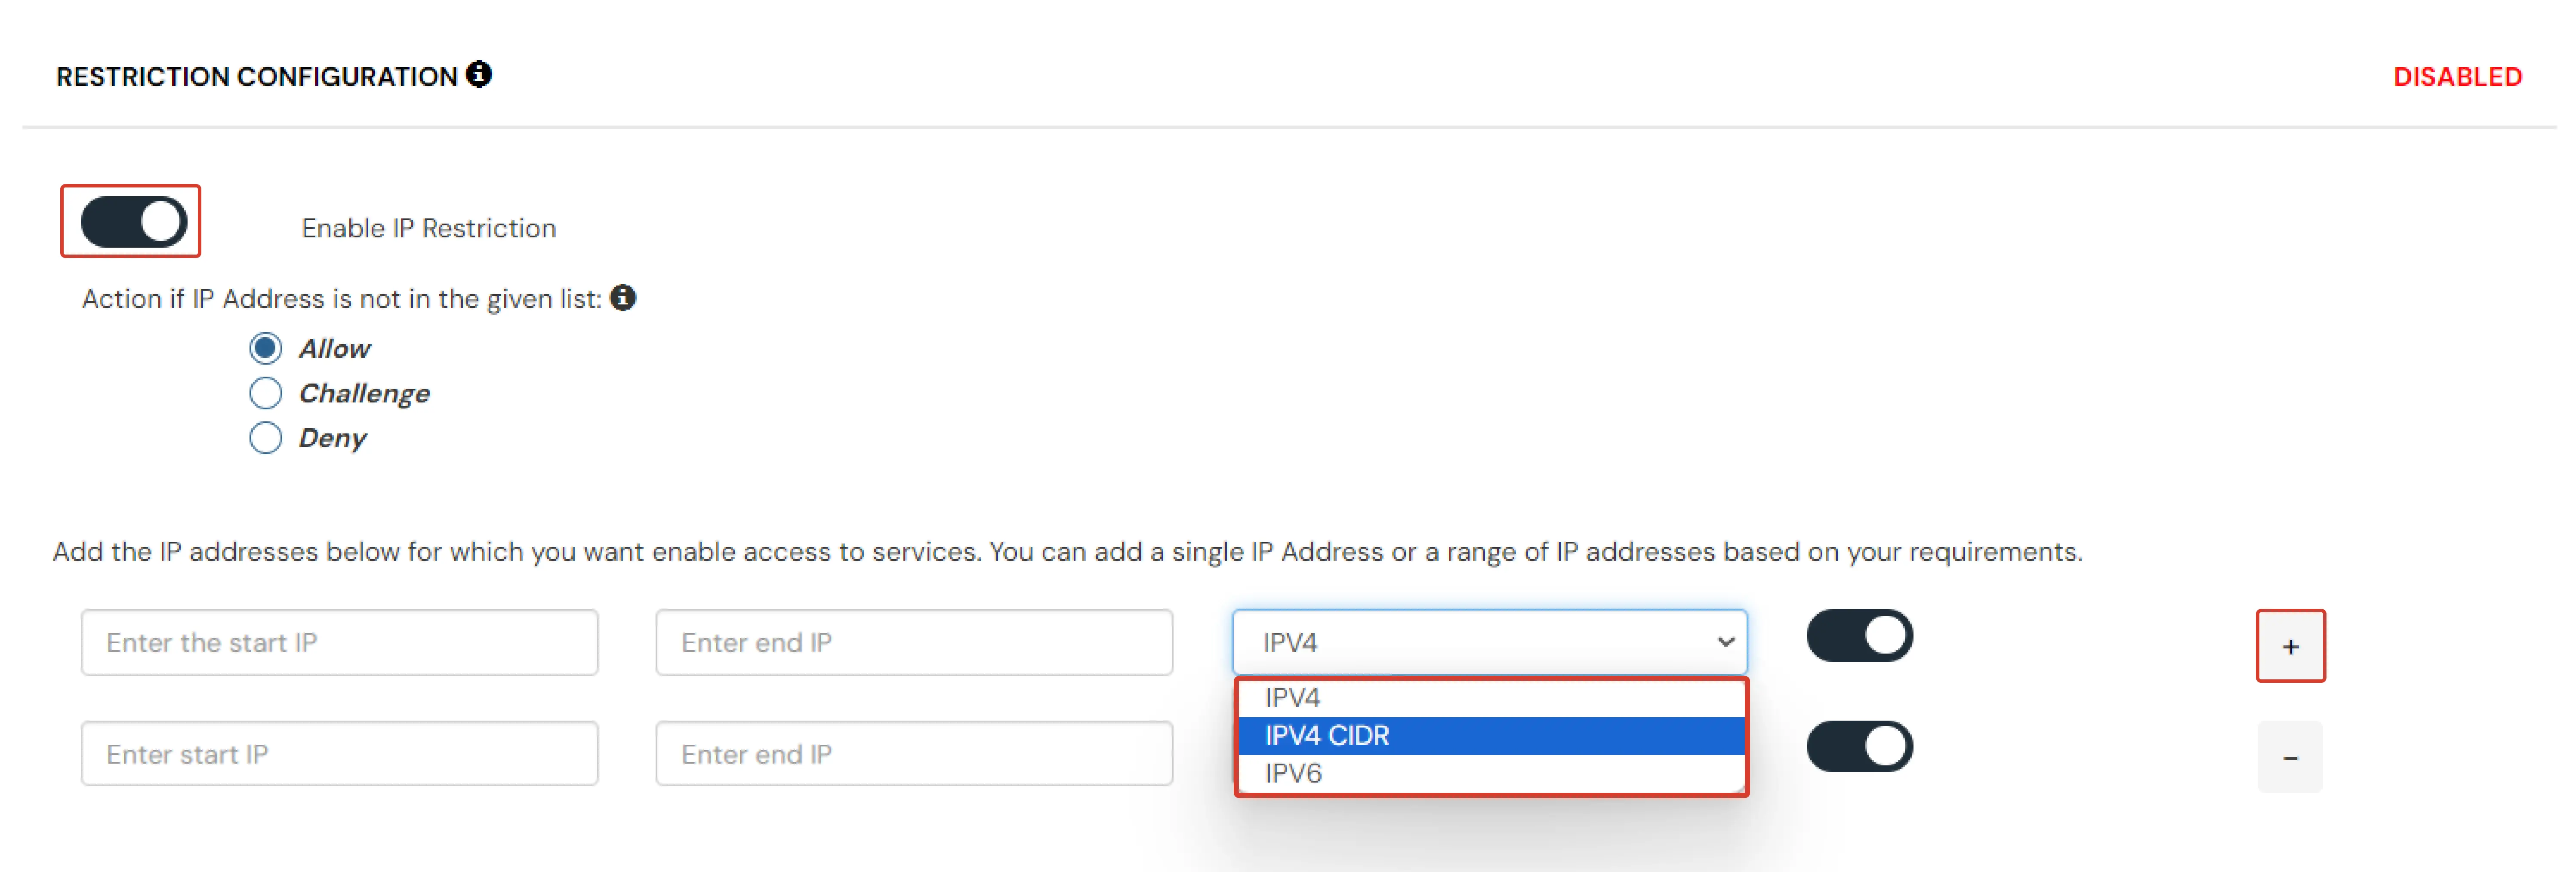
- Before saving, visit the Action for Behavior Change section.
- Once the changes are made, click on Next.
Location Configuration
In location restrictions, admin configures a list of locations where they want to allow end-users to either login or deny based on the condition set by the admin. When a user tries to login with adaptive authentication enabled, their Location Attributes, such as (Latitude, Longitude, and Country Code) are verified against the Location list configured by the admin. Based on this user will be either allowed, challenged or denied.
How to configure Location-based Configuration:
- Click on Create Policy.
- Enter the Location Name and select it from the search results.
- Add the In and Around Distance for your location.
- Select the distance unit from the dropdown KMS or Miles.
- Enable or disable the switch to allow or deny access for each location.
- Click on the Add Location to add more locations and repeat the above steps.
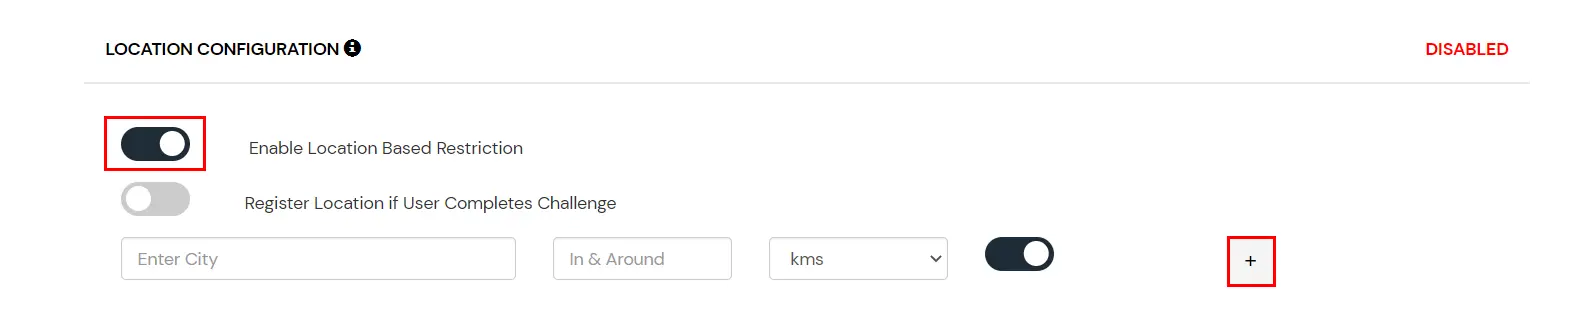
- Before saving, visit the Action for Behavior Change section.
- Click on Next.
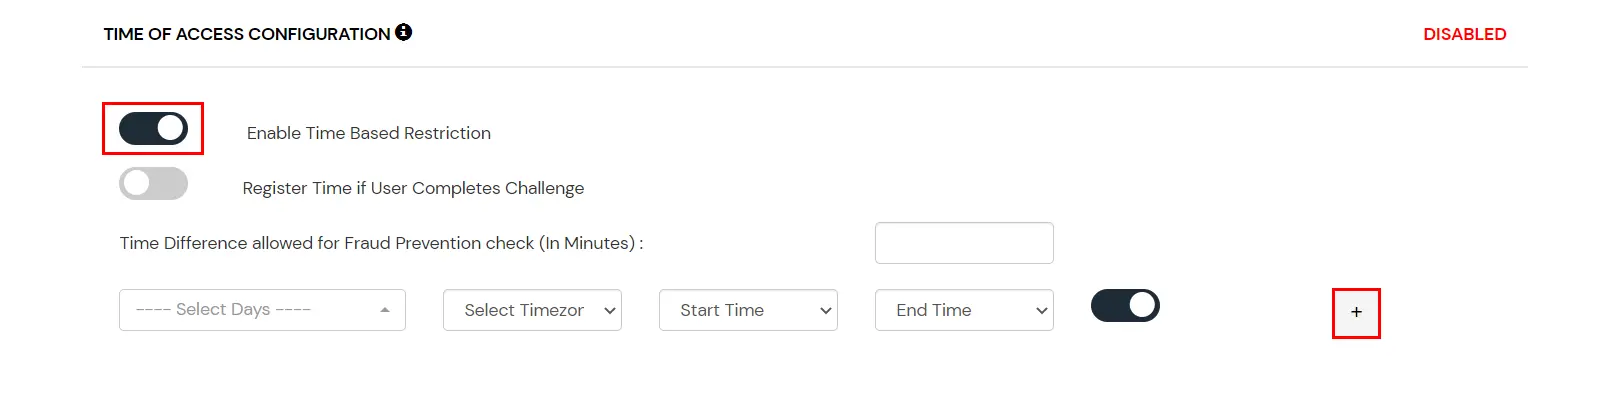
Time of Access Configuration
In time restriction, admin configures a time zone with Start and End Times for that timezone, and users are either allowed, denied, or challenged based on the condition in the policy. When an end-user tries to login with the adaptive authentication enabled, their time zone-related attributes such as Time-Zone and Current System Time, are verified against the list configured by the admin, and based on the configuration, the user is either allowed, denied, or challenged.
How to configure Time-based Configuration:
- Click on Create Policy.
- From the Select Timezone list, select the timezone. From the Start Time and End Time lists select the appropriate values. For each Time configuration you add, you can choose to either allow or deny it by enabling or disabling the switch button next to it.
- Enter the value in minutes in the input field next to the Time Difference allowed for the Fraud Prevention check. This value allows you to specify some relaxation before your start time and after your end time. (so if the start time is 6 AM and the end time is 6 PM with a time difference value set to 30 minutes, then the policy will consider the time from 5:30 AM to 6:30 PM). If no value is entered in this field, the default value is set which is 15 minutes.
- You can click on the Add Time button to include more than one Time Configuration and then follow the above step.
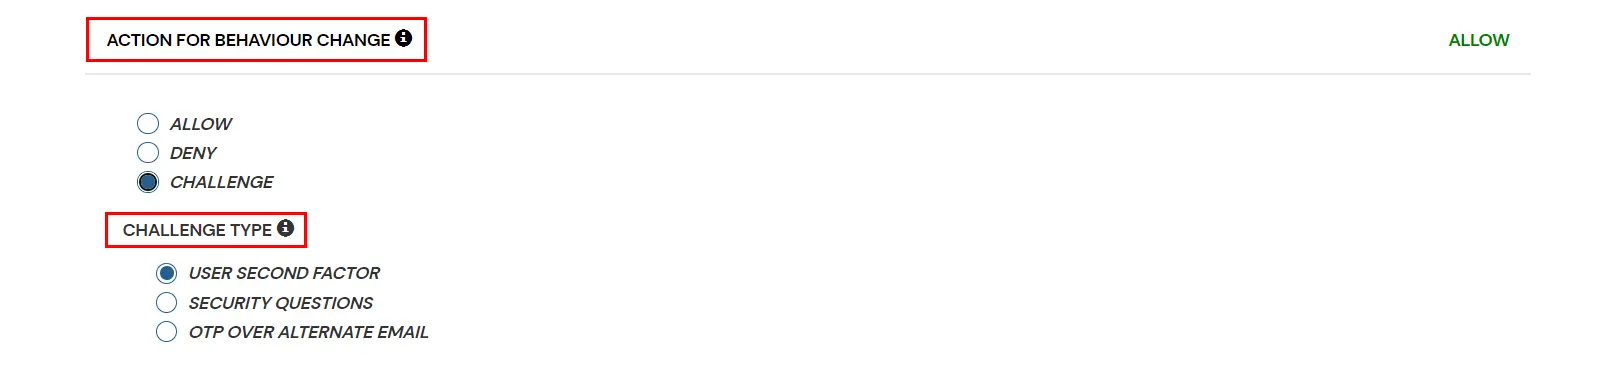
Action for Behavior Change
You can configure one of the three possible actions for your Adaptive Authentication Policy as explained below :
| Attribute |
Description |
| Allow |
Allow users to authenticate and use services if Adaptive authentication condition is true. |
| Deny |
Deny user authentications and access to services if Adaptive authentication condition is true. |
| Challenge |
Challenge users with one of the three methods mentioned below for verifying user authenticity. |
Challenge Type Options :
| Factors |
Description |
| User second Factor |
The User needs to authenticate using the second factor he has opted or assigned for such as
- OTP over SMS
- PUSH Notification
- OTP over Email and, many more.
|
| KBA |
The System will ask the user for 2 of 3 questions he has configured in his Self-Service Console. Only after the right answer to both questions is the user allowed to proceed further. |
| OTP over Alternate Email |
User will receive an OTP on the alternate email they have configured through the Self Service Console. Once the user provides the correct OTP, they are allowed to proceed further. |
B. Apply the Adaptive Authentication Policy in App
- Login to Admin dashboard, then go to Policies >> Add Login Policy.
- Click on Edit icon option for predefined app policy.
- Set your policy in the Policy Name and select Password as First Factor.
- Enable Adaptive Authentication on Edit Login Policy page and select the required restriction method as an option.
- From the Select Login Policy dropdown, select the policy created in step 2.1.
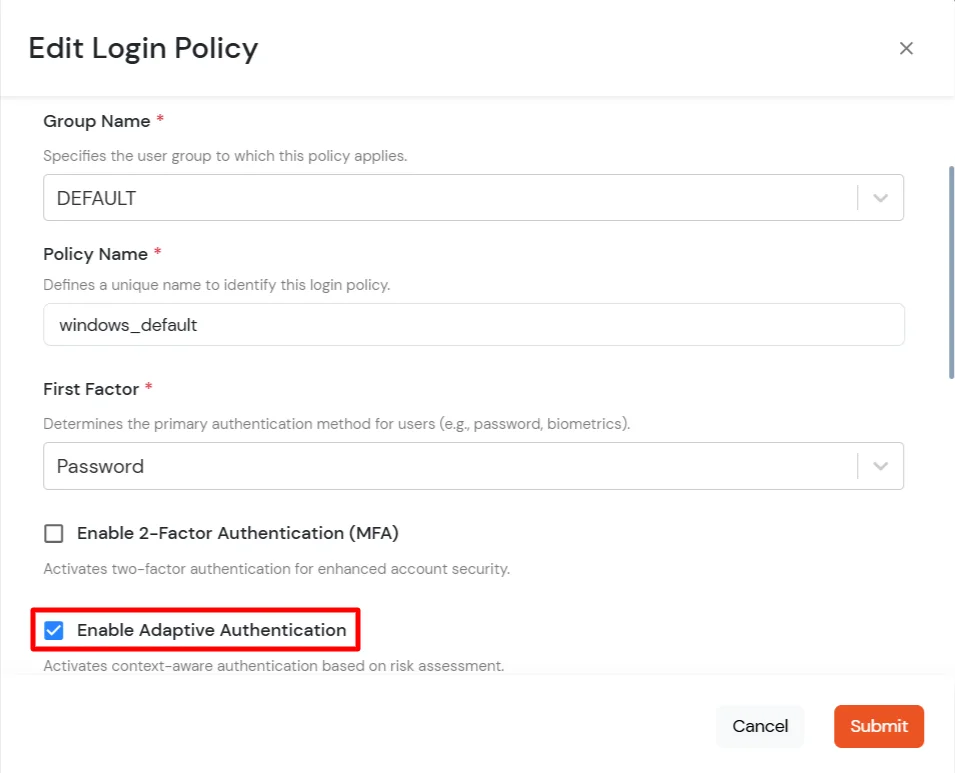
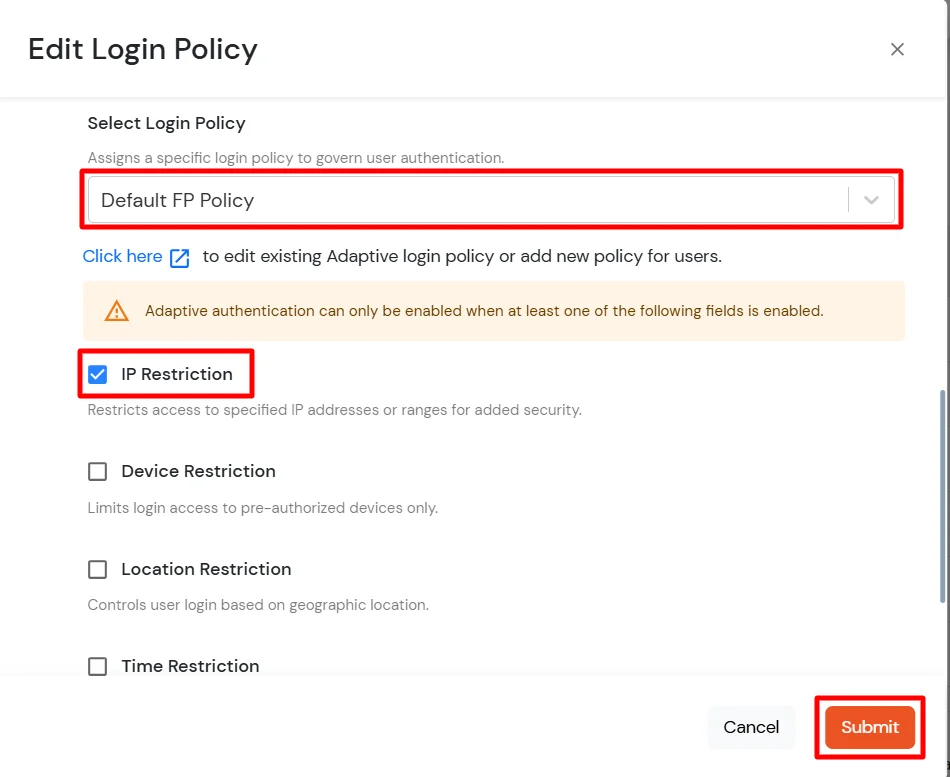
- Click Submit to apply policy changes.
6. Deployment using Group Policy
For deployment and configuration using group policy, please see our miniOrange 2FA for Windows Logon Group Policy Documentation.
Further References
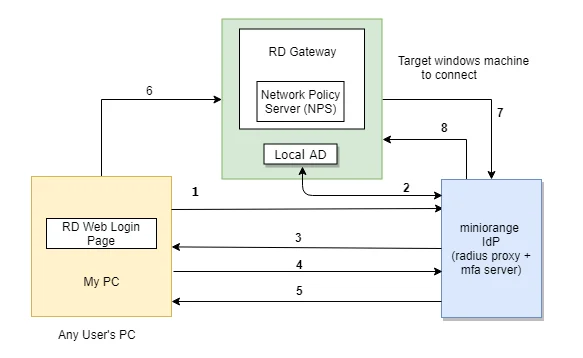
miniOrange Credential Provider for Remote Desktop (RDP) and Windows Logon
The user initiates the login to Windows or Remote Desktop Service either through a Remote Desktop Client or via the RD Web login page from his browser, after which the RADIUS request is sent from the miniOrange RD Web component installed on the target machine to the miniOrange RADIUS server, which authenticates the user via Local AD, and after successful authentication, Two-factor authentication (2FA) of the user is invoked. After the user validates himself, he is granted access to the Remote Desktop Service (RDP).
A user can try to connect to RDS (Remote Desktop Protocol - RDP) via 3 ways :
- RDC - Remote Desktop Client: If the RemoteApp is launched through a Remote Desktop client application, the users validate their 2-factor authentication while they enter the Username and Password to get access to the resources. (as this method doesn't support access-challenge response, only out of band authentication methods are supported).
- RD Web Access - RD login page via browser: If the desktop or RemoteApp is launched through a RD Web Login page, the initial user authentication is done from the machine's AD, after which miniOrange challenges the user for 2-factor authentication via a RADIUS challenge request. After the users correctly authenticate themselves, they get connected to their resources.
- RD Gateway: If the organizations resources or server are protected by a Remote Desktop Gateway, you can setup 2-Factor Authentication on top of that as well. First level authentication will be done using the AD credentials and then miniOrange will prompt for the configured 2FA.
Check the guide to setup RD Gateway 2FA
Two-Factor Authentication (2FA/MFA) for RDS via RD Web
- In this case, the user goes to RD Web login page from his browser to connect to the Remote Desktop Service. He enters his Username and Password, and on submission, the RADIUS request from RD Web component installed on target machine is sent to the miniOrange RADIUS server which authenticates the user via local AD in the target machine.
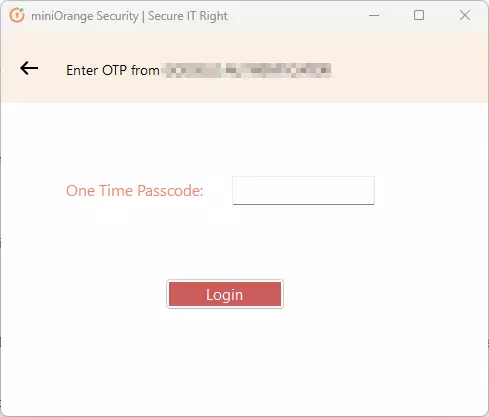
- Once authenticated, it sends a RADIUS challenge to RD Web, and the RD Web shows OTP screen on browser now. Once the user enters the One Time Passcode, the miniorange IdP verifies it and grants/denies access to the RDS.
- With this, after the user is connected to the Remote Desktop Service, the user can also gain access to published remote app icons on his browser screen, since the session has already been created for the user. Know more about Remote Desktop (RD) Web 2FA
Frequently Asked Questions (FAQs)
What is Windows Two-Factor Authentication?
Windows Two-Factor Authentication (2FA) requires users to verify their identity using two separate factors before gaining access to their Windows machine or Remote Desktop (RDP).
Is Two-Factor Authentication necessary for Windows login in my organization?
Yes, password-based security alone is no longer sufficient, especially with rising credential phishing and brute-force attacks. Implementing Windows MFA with miniOrange ensures that even if passwords are compromised, unauthorized users cannot gain access.
Which Windows 2FA solution is suitable for adoption within my organization?
The ideal choice is the one that combines security, flexibility, and ease of deployment. The miniOrange Windows MFA product is designed exactly for this.
How does 2FA for Windows Logon work?
- Initial Login: Users enter their AD domain credentials or use miniOrange to verify their identity.
- Second Factor: Users receive a time-sensitive authentication code via SMS, email, or a third-party authentication provider. They must enter this code to proceed.
- Access Granted: After successfully entering the code, users are logged in to their Windows machines.
Why is my OTP being rejected even though I entered the correct code from my Google/Microsoft Authenticator?
This error is usually caused by a time mismatch between the miniOrange server and your mobile device (or a mismatch between your machine time and mobile device time in the case of Offline Authentication for Windows/Linux/Mac).
Security tokens generated by Authenticator apps are "Time-based" (TOTP). They are valid only for a specific 30–60 second window. If the system time on your phone running the Authenticator or your machine(in case of offline authentication) is fast or slow by even 2 minutes, the code will be considered expired by the server/machine.
How do I view and manage MFA agents in the miniOrange Admin Console?
MFA agents are miniOrange software on Windows endpoints that add MFA at logon and RDP. The MFA Agents Dashboard shows enrolled machines and related audit activity. Sign in to the Admin Console, then go to Configure → Devices → MFA Agents.

To know more about MFA agents, click here.
External References