Oracle Database User Provisioning and Deprovisioning
What is Oracle Database User Provisioning?
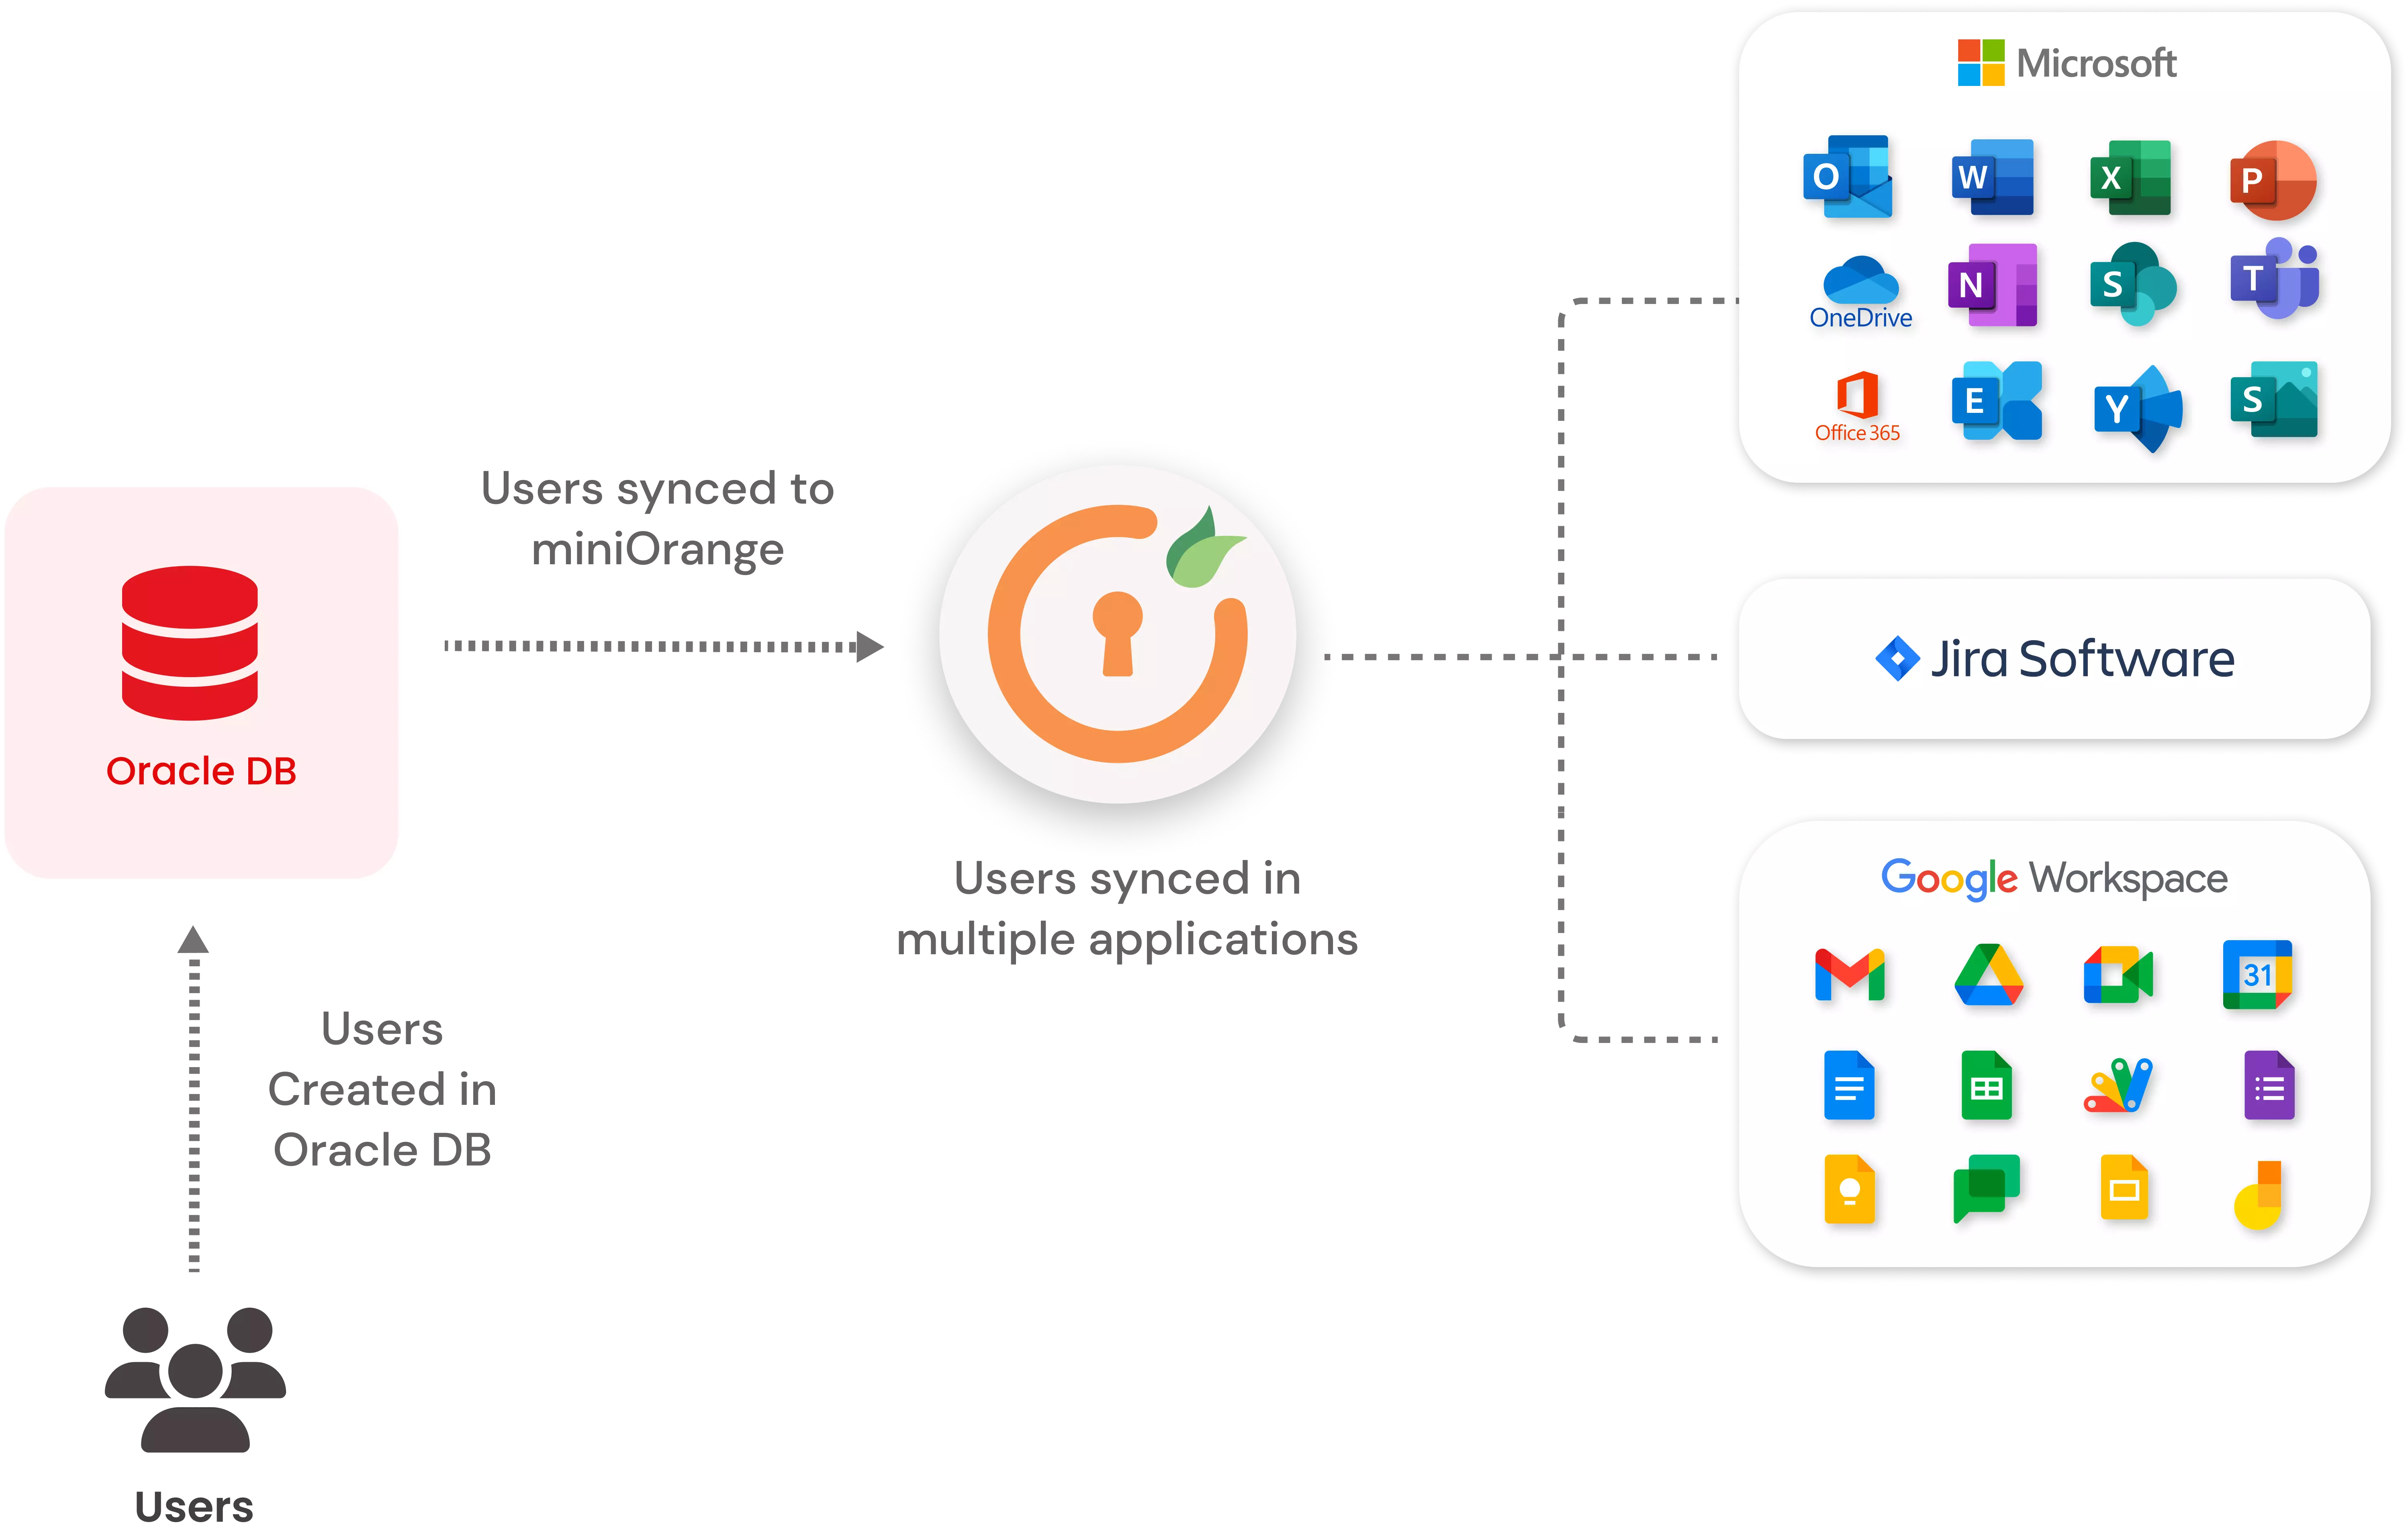
Oracle Database User provisioning is an automated solution for Identity access management (IAM) and maintenance of users data across various Oracle DB instances (11g, 12c, 18c+). In Oracle Database Provisioning, whenever a user is created (new hire), updated (role change), or deleted (termination) from the database, the relevant Oracle Database access is automatically synchronized with the External Directory and integrated applications grant permissions and access according to the latest change. User sync and data sync are the main features of user provisioning.
Deprovisioning involves the automatic removal of the access privileges of the users from all the resources & services such as Active Directory, Google, AWS or from different integrated downstream applications and targeted systems whenever a user is deleted from the database. Oracle DB User deprovisioning helps in mitigating the serious security risks of unauthorized access to miniOrange provides automatic Oracle Database User deprovisioning of the user accounts when the user leaves the team or organization.
This step-to-step provisioning guide will help you to configure User Provisioning for Oracle Database to automate provisioning in all the integrated applications.
User Provisioning between miniOrange and Different Databases
There are three major parts to configure user sync between your Oracle DB and miniOrange IdP. They are as follows:
- A: Adding any of your Oracle Database as a External Directory in miniOrange IdP
- B: Configuring Queries for User Provisioning
- C: Configuring User Provisioning & Attribute Mapping
Consider the following schema for setting up the Oracle database user provisioning/deprovisioning. We have used this schema to illustrate how to configure the options for a simple database. You can use this example to configure your own Oracle database as a External Directory in miniOrange.
Example Setup:
| Database Type |
Oracle DB 12c |
| Database Name |
APPSDB |
| Database JDBC URL (for Oracle) |
jdbc:oracle:thin:@serverdomain:1521/APPSDB |
| Table where user info is stored |
USERS |
USERS table description:
| Column |
Type |
Description |
| USERNAME |
VARCHAR |
Username column |
| PASSWORD |
VARCHAR |
Stores password of the user; will store default password during user creation |
| FIRSTNAME |
VARCHAR |
Firstname of user |
| LASTNAME |
VARCHAR |
Lastname of user |
| EMAIL_ADDRESS |
VARCHAR |
Email address of user |
A. Add Oracle Database as a External Directory in miniOrange IdP
- Refer to steps 1-3 from this document to add your Oracle Database.
B. Configure User Provisioning Queries for Oracle Database
There are two directions in which user provisioning can be configured: Inbound (i.e. from your Oracle DB into miniOrange) and Outbound (from miniOrange into your Oracle DB).
Inbound provisioning deals with user import, whereas Outbound deals with user creation/deletion/update. In both cases, attribute mapping is necessary. Attribute mapping between database columns and miniOrange IdP attributes is done via a special notation. Column values are inferred by the miniOrange IdP using this notation.
- To configure user provisioning for your Oracle database, you will first have to navigate to the External Directory section. Here, you will see the list of configured External Directorys.
- Click on the dropdown near your configured Oracle database and select Edit.
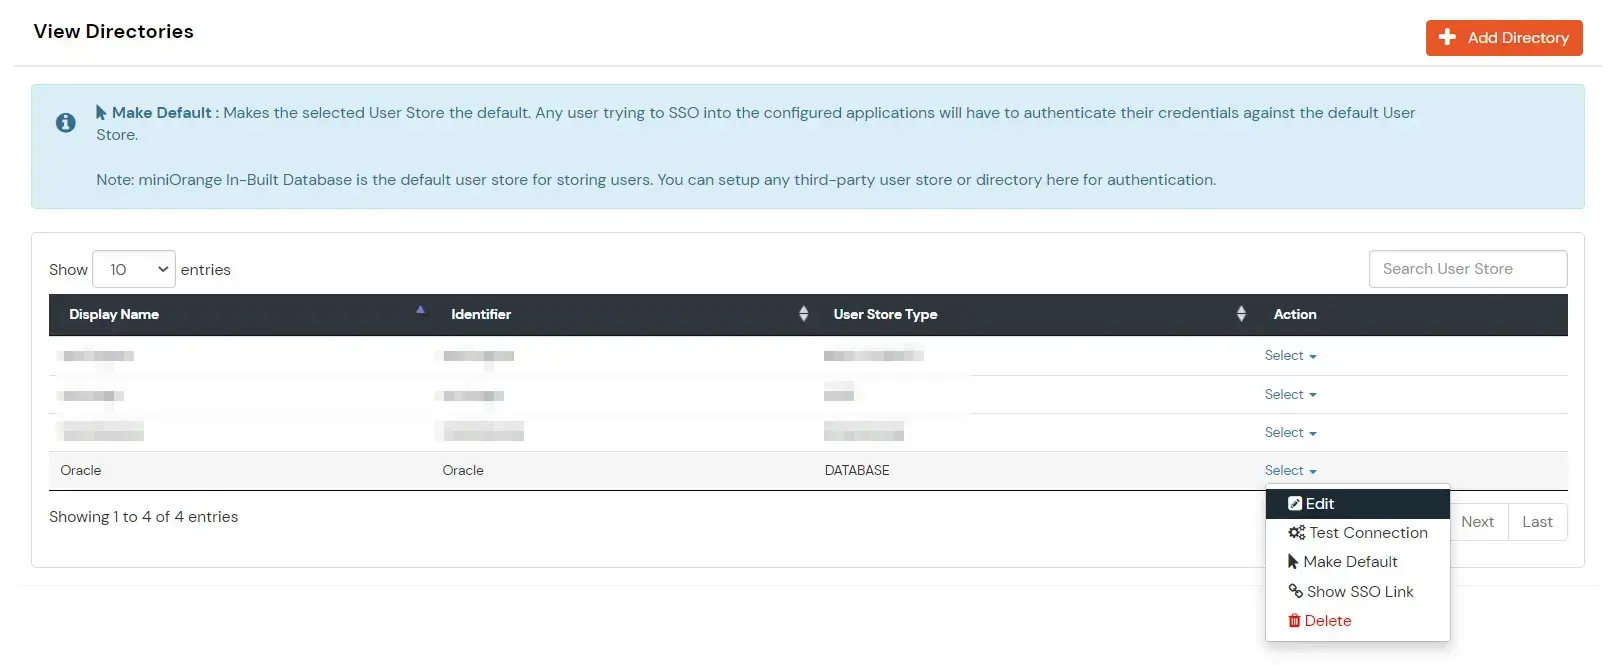
- This will open the edit page for your configured External Directory.

- Now you are ready to configure all the required provisioning features.
1. Import Users
- This is an example of inbound provisioning. Users are imported from the database into the miniOrange default External Directory. The attributes to be selected are specified in the attributes section of Database as a User Store. For each attribute (except for username and password) that you want to import & map to a user in the miniOrange default user store, you must specify a SELECT query.
- You do not need to specify a SELECT query for username and password column values; they are imported automatically using the column names used when setting up your database as a user store.
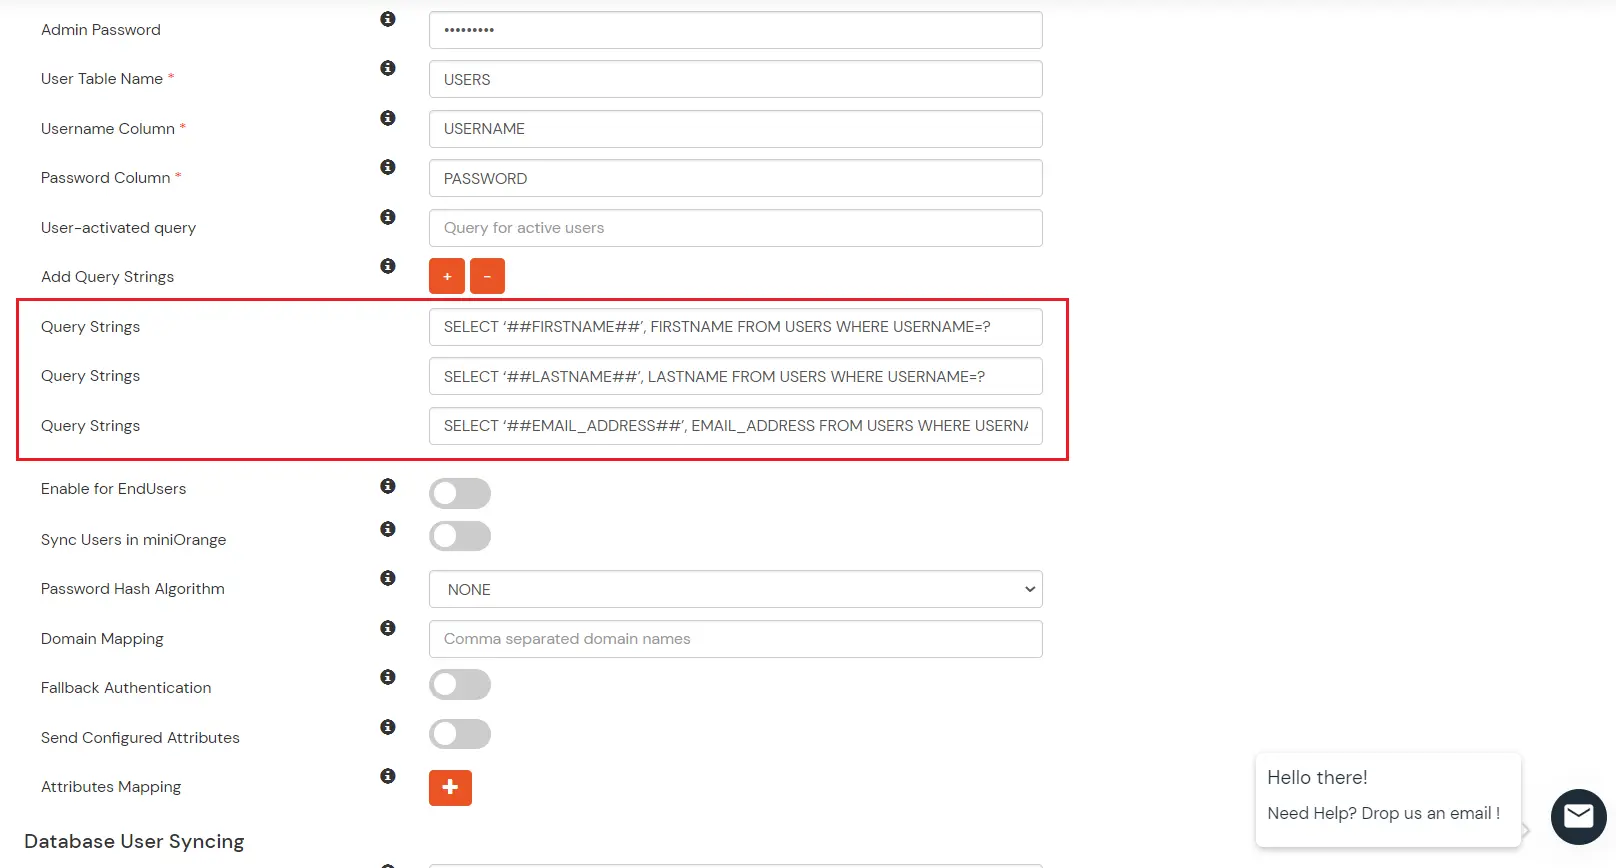
- In the edit user store page, scroll down until you can see the option for adding database attributes.
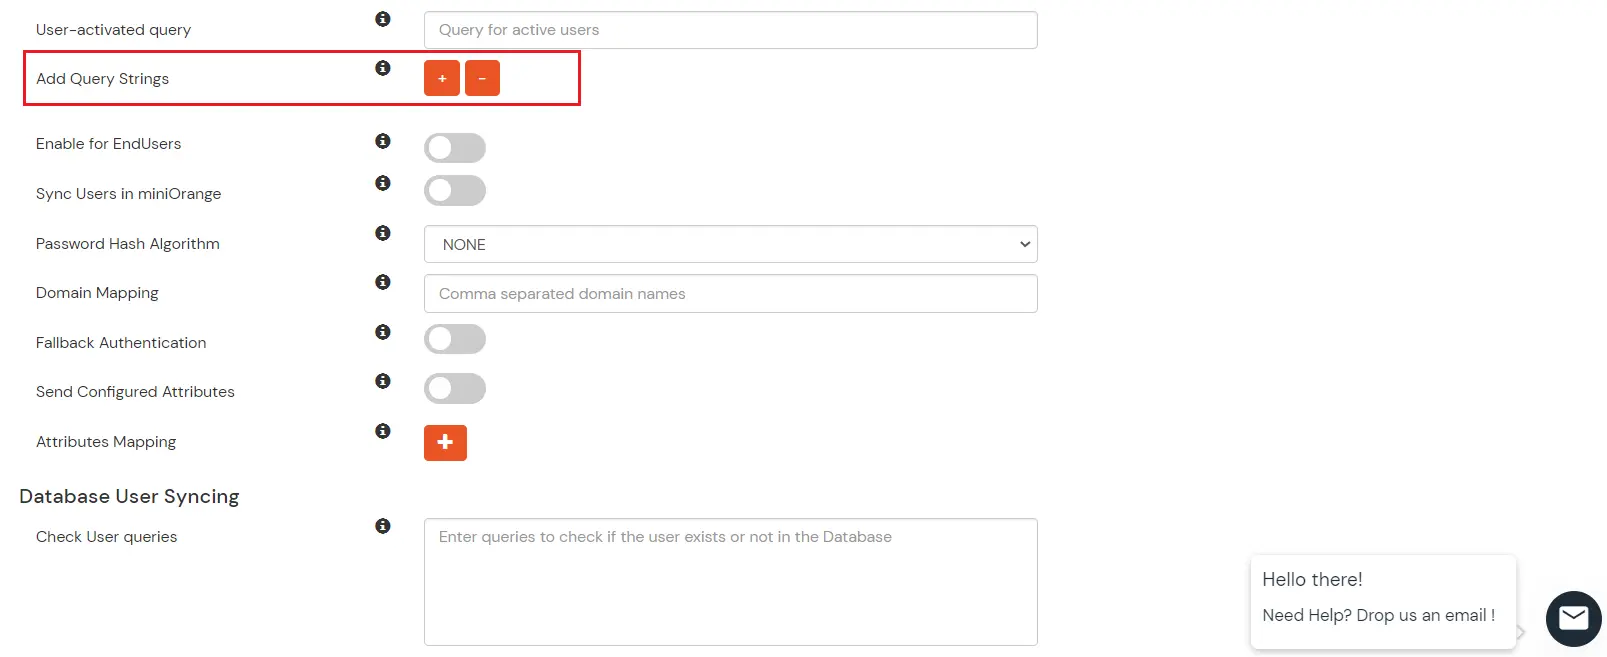
- Add as many input fields as required. For this example, we have 3 database columns - FIRSTNAME, LASTNAME, and EMAIL_ADDRESS - excluding the USERNAME and PASSWORD columns. The queries for these columns will be as follows:
- Query for Firstname →
SELECT ‘##FIRSTNAME##’, FIRSTNAME FROM USERS WHERE USERNAME=?
- Query for Lastname →
SELECT ‘##LASTNAME##’, LASTNAME FROM USERS WHERE USERNAME=?
- Query for Email Address →
SELECT ‘##EMAIL_ADDRESS##’, EMAIL_ADDRESS FROM USERS WHERE USERNAME=?
- The [ ‘##COLUMN_NAME##’, COLUMN_NAME ] notation in the query tells miniOrange that this field should be populated with the value of the column from the database, based on the unique username identifier.
- Your configuration should look like this after you’re done adding the queries:
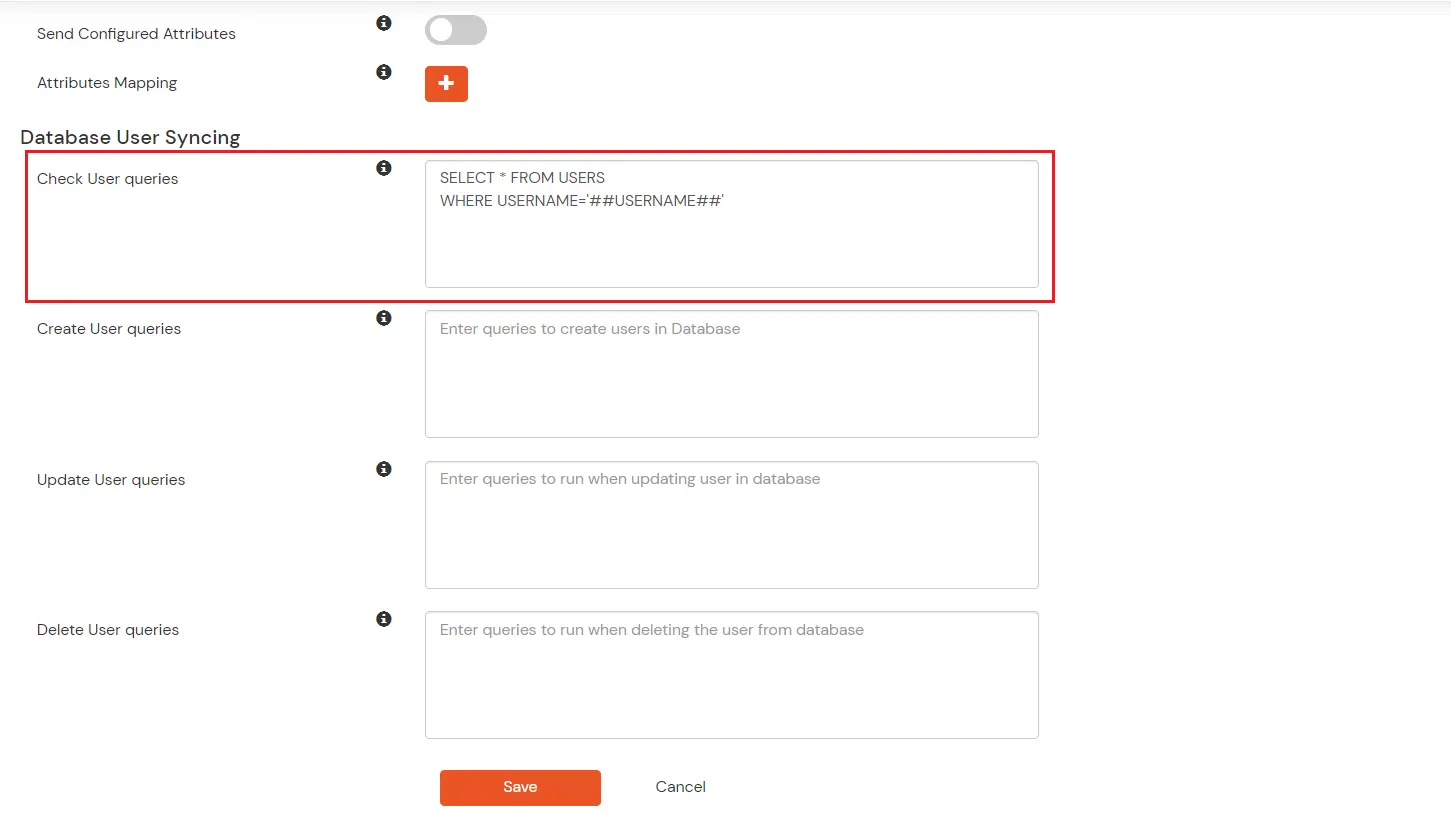
2. Check Users
- This query is used to check if a particular user already exists in the database. A user that already exists in the database will not be created again. The structure of this query should be such that it checks all the columns in the table that define a distinct user.
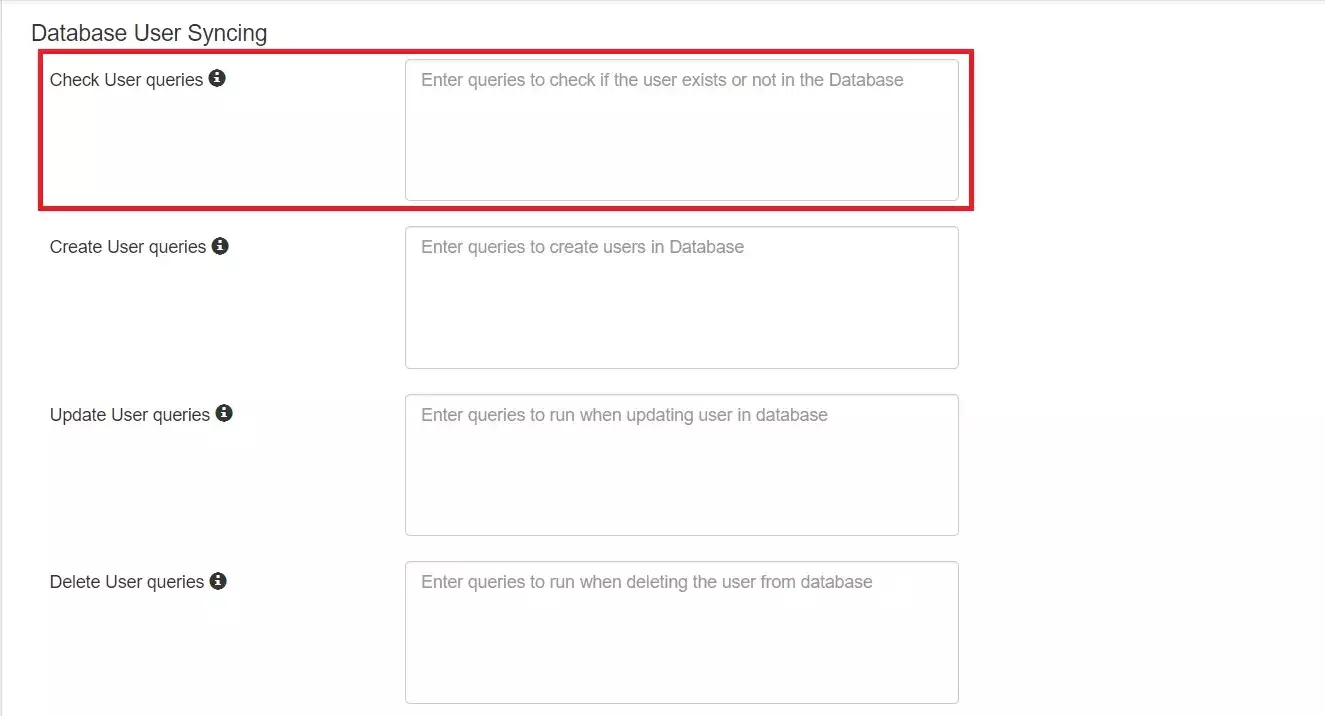
- For our example, we will compare the value of the USERNAME column against the relevant field in miniOrange:
SELECT * FROM USERS WHERE USERNAME='##USERNAME##'
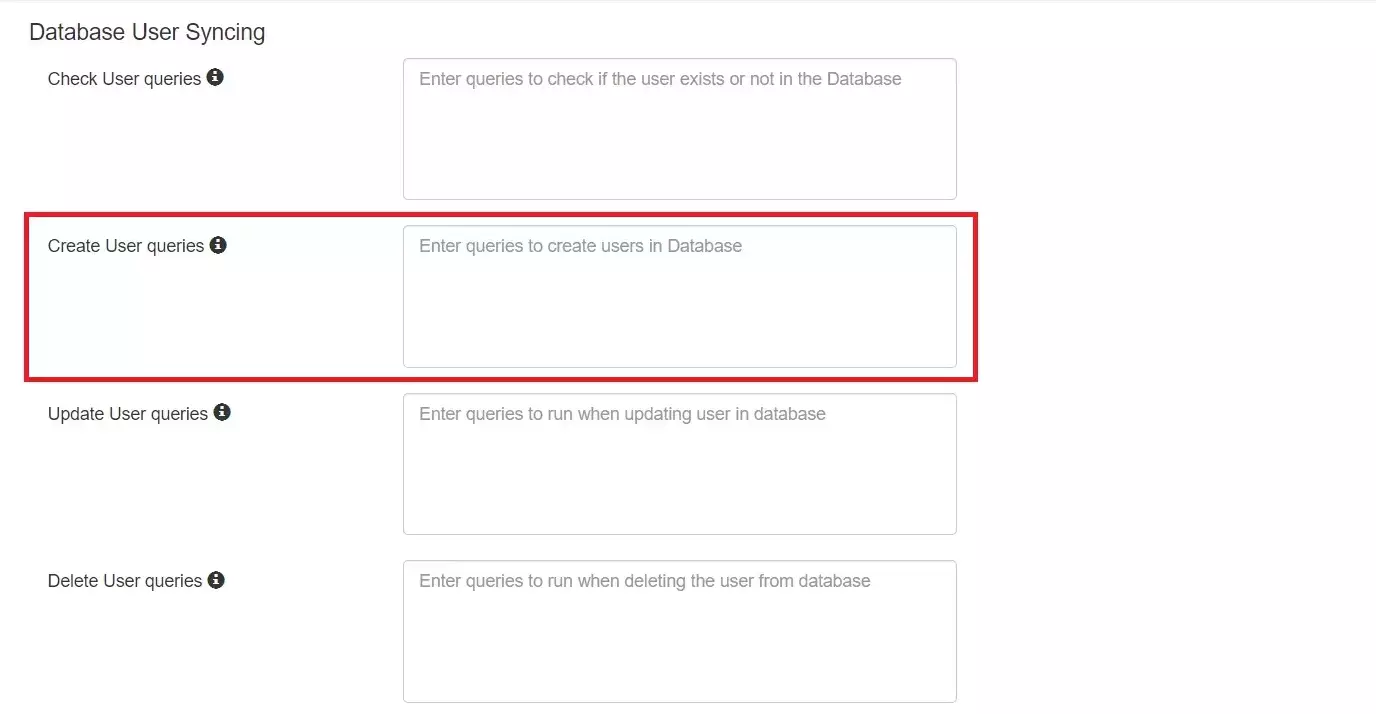
3. Create User
- These queries create a user in the database whenever a user is created in miniOrange. The query should contain the appropriate column names. Here, the password is set to a default string (that must be changed later).
- These queries use the same notation to specify the attributes that must be mapped from miniOrange IdP to the Oracle DB. This is an example of outbound provisioning.
- In our example, we will sync the username, firstname, lastname, and email address of the newly created user from miniOrange to the database. We will pass a default password string (‘defaultPassword123#’) to the Oracle DB:
INSERT INTO USERS (USERNAME, PASSWORD, FIRSTNAME, LASTNAME, EMAIL_ADDRESS) VALUES
('##USERNAME##', 'defaultPassword123#', '##FIRSTNAME##','##LASTNAME##','##EMAIL_ADDRESS##')
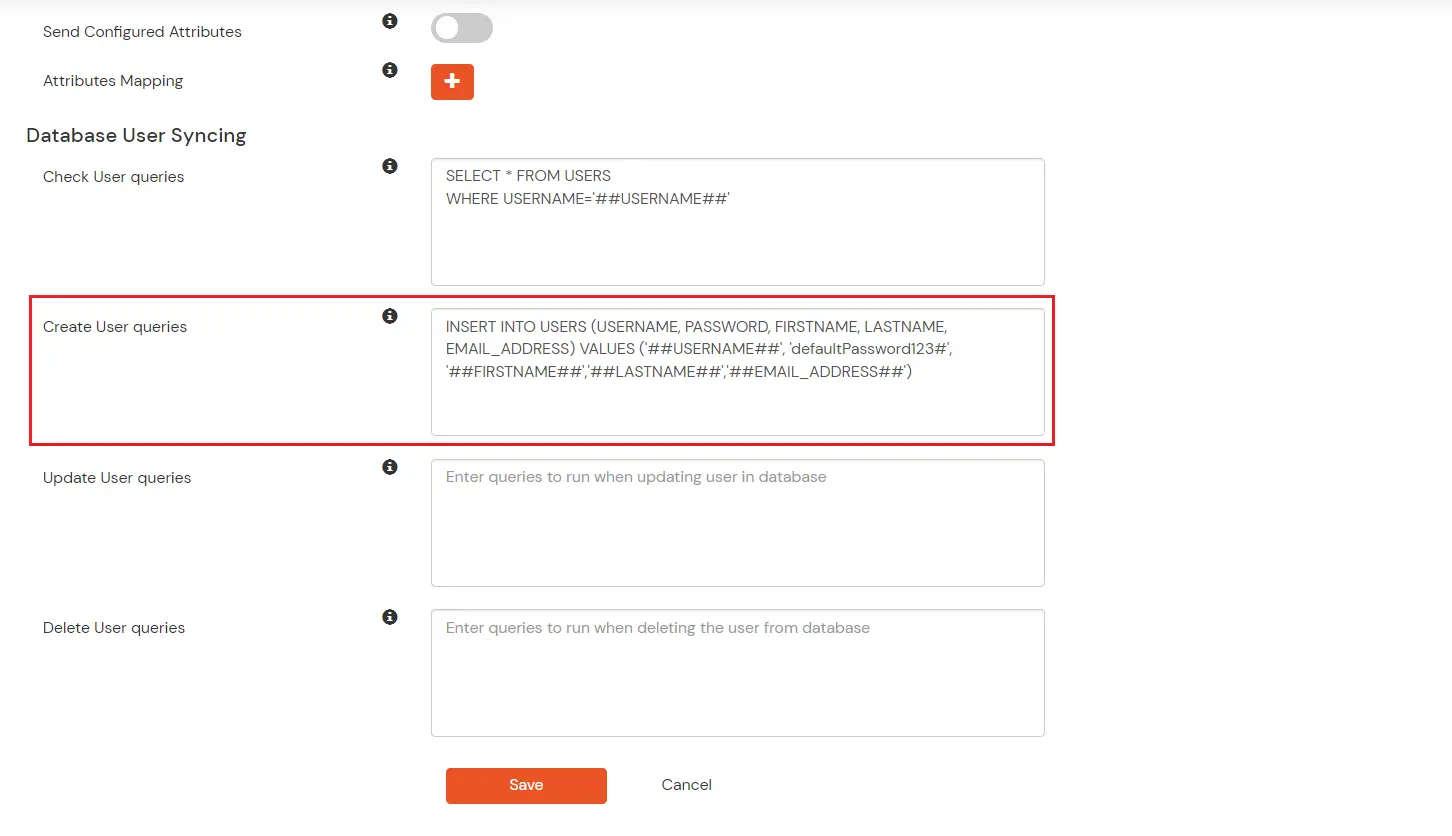
- In this example, the [ ‘##USERNAME##’, ‘##FIRSTNAME##’, ‘##LASTNAME##’ ] strings will be replaced by the username, firstname, and lastname values of the newly created user in miniOrange.
4. Update User
- These queries update a user in the database whenever the relevant user details are changed in miniOrange. This is an example of outbound provisioning.

- In this example, all the fields for a particular user are updated in the database when an update is triggered in miniOrange. The username value is immutable in miniOrange, hence it has been used in the WHERE clause:
UPDATE USERS SET FIRSTNAME='##FIRSTNAME##', LASTNAME='##LASTNAME##',EMAIL_ADDRESS='##EMAIL_ADDRESS##' WHERE USERNAME='##USERNAME##'
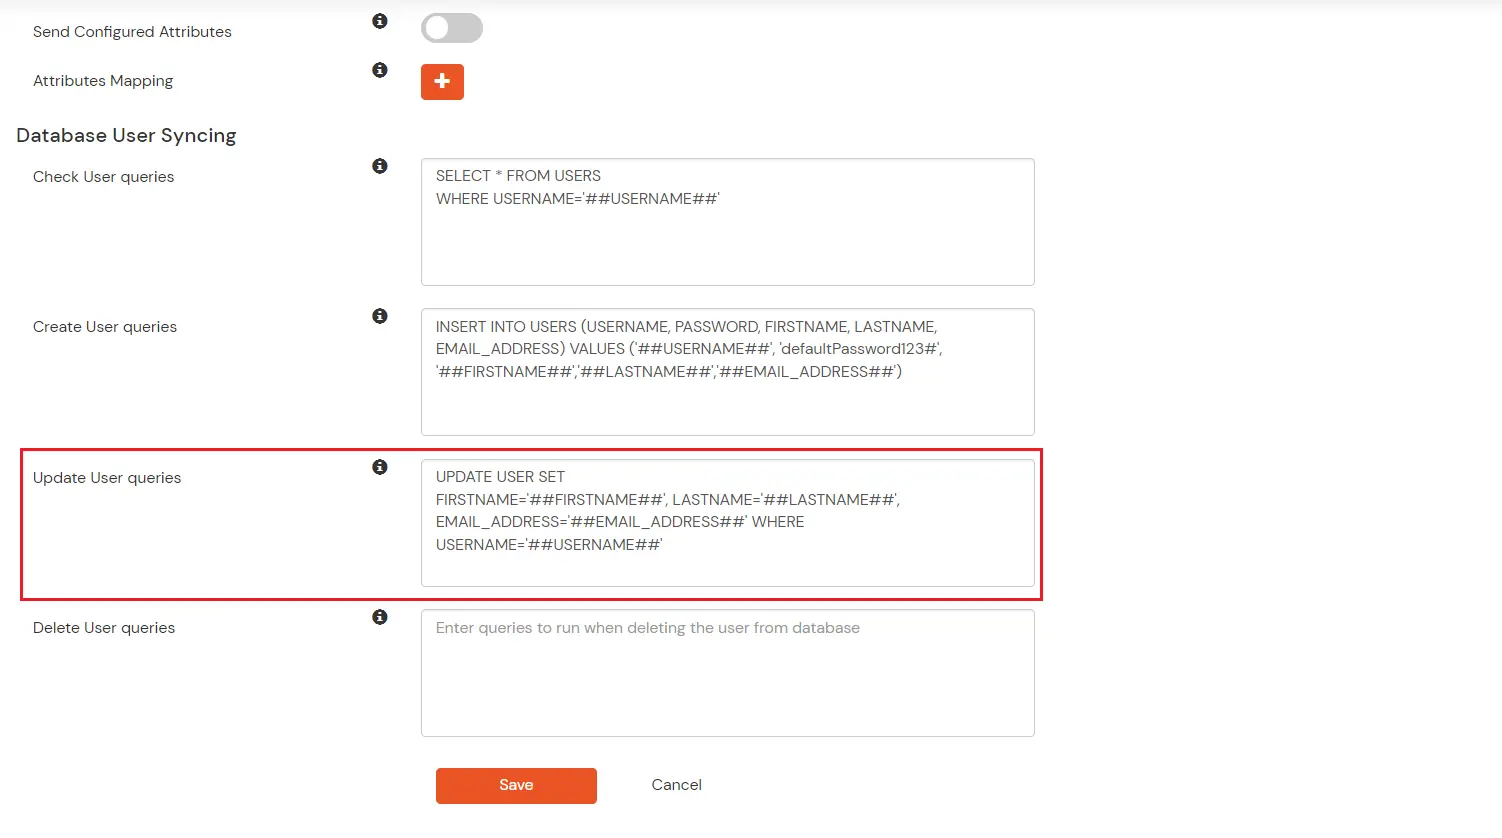
- In this example, only those users’ details are updated, whose username is the same in both miniOrange and the database.
5. Delete Users
- These queries delete a user from the database whenever a user is deleted in miniOrange. This is an example of outbound provisioning.
- In this example, we will delete those users from the database whose username column value matches the username field value in miniOrange:
DELETE FROM USERS WHERE USERNAME='##USERNAME##'
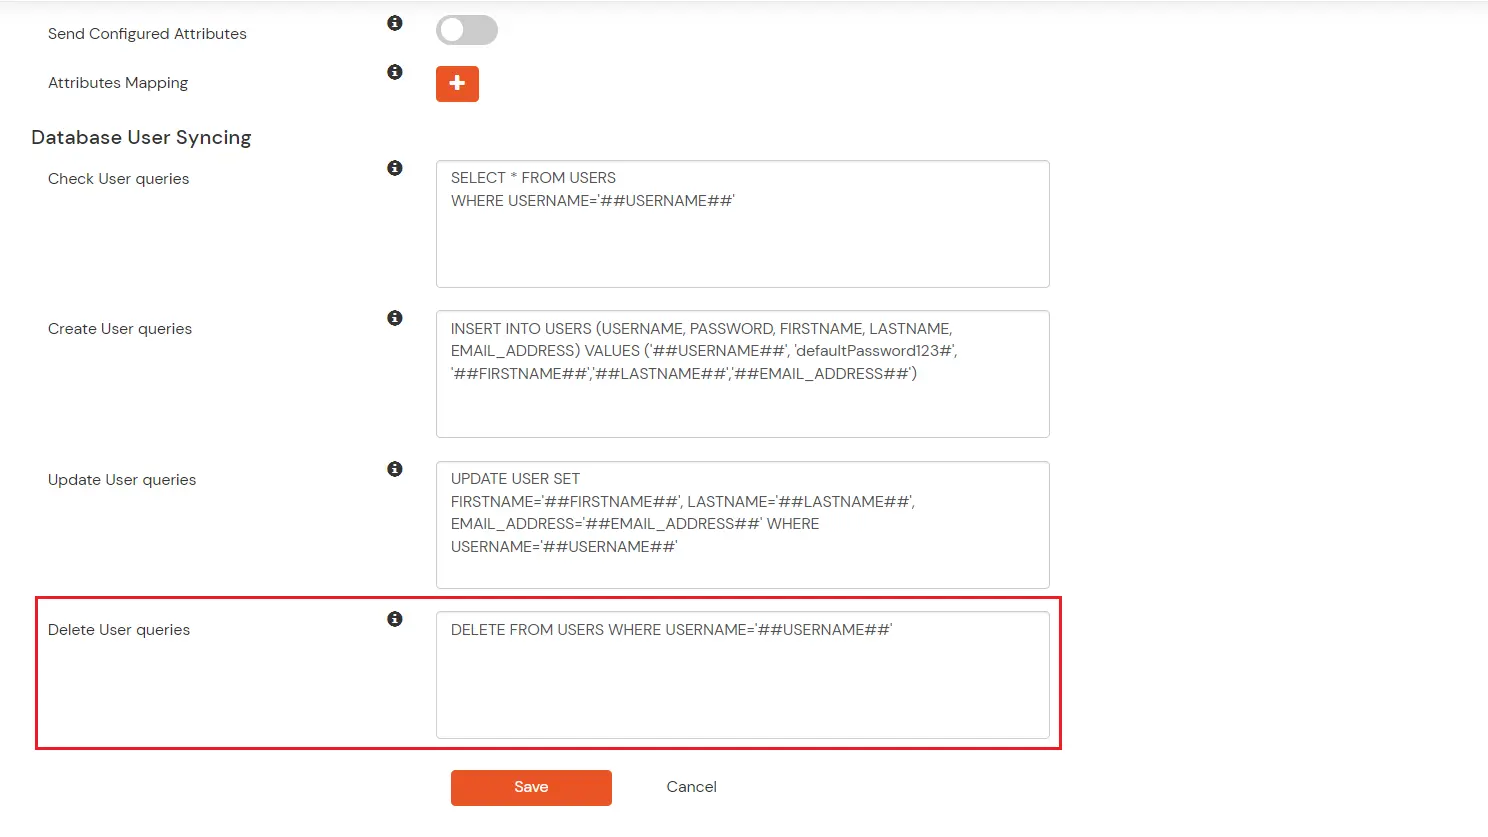
- In this example, only those users whose username, firstname and lastname match exactly in both - the database as well as in miniOrange - are deleted from the database.
Once you have filled in the required values, scroll down and click on Save to save your current configuration.
C. Configure User Provisioning & Attribute Mapping
We have successfully set up our Oracle DB as a External Directory and entered all the queries for inbound as well as outbound provisioning. Now, we must configure the user provisioning section to activate user provisioning for our database.
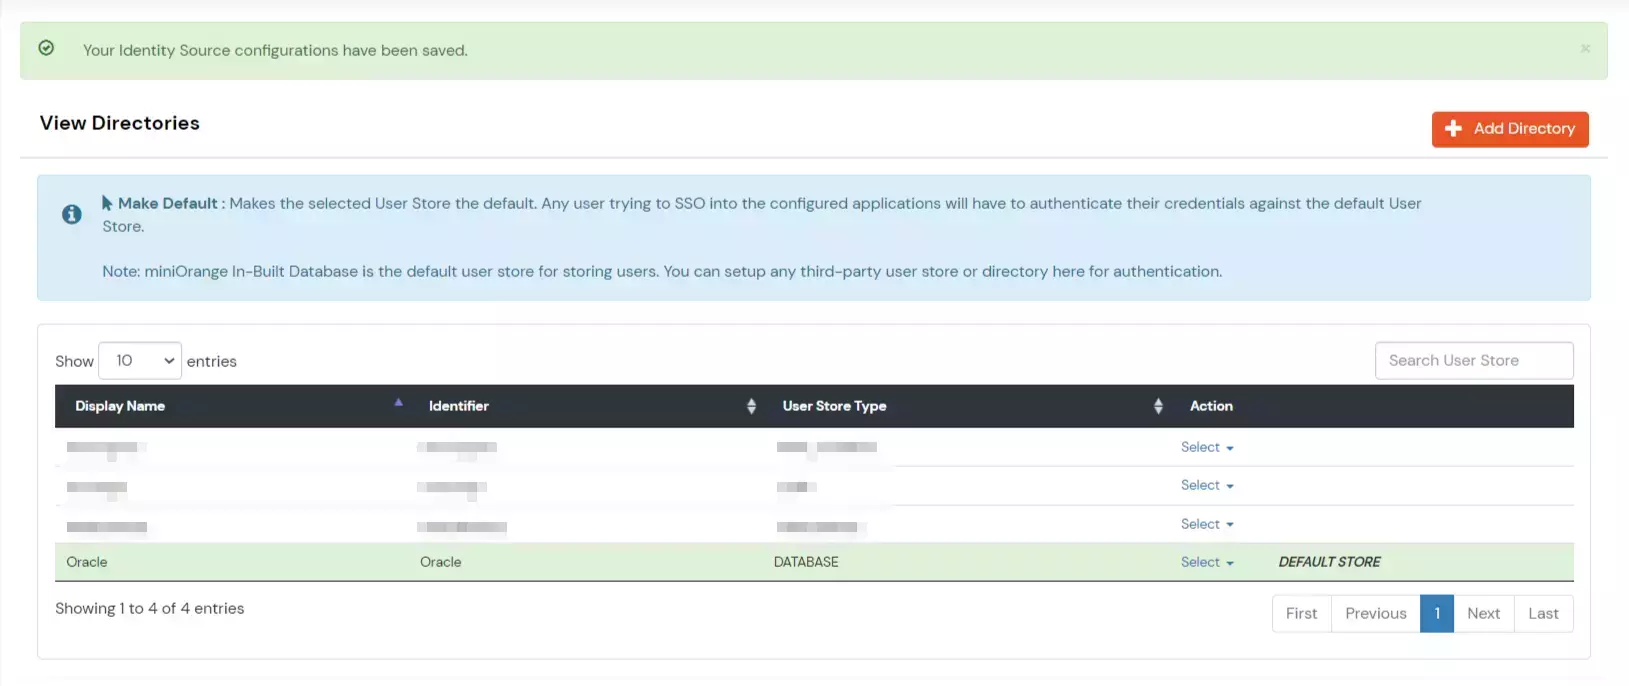
1. Set Oracle Database as the default External Directory
- Navigate to the External Directory section. You will be shown a list of all your configured External Directories. Check if you can see the External Directory you set up in Part A.
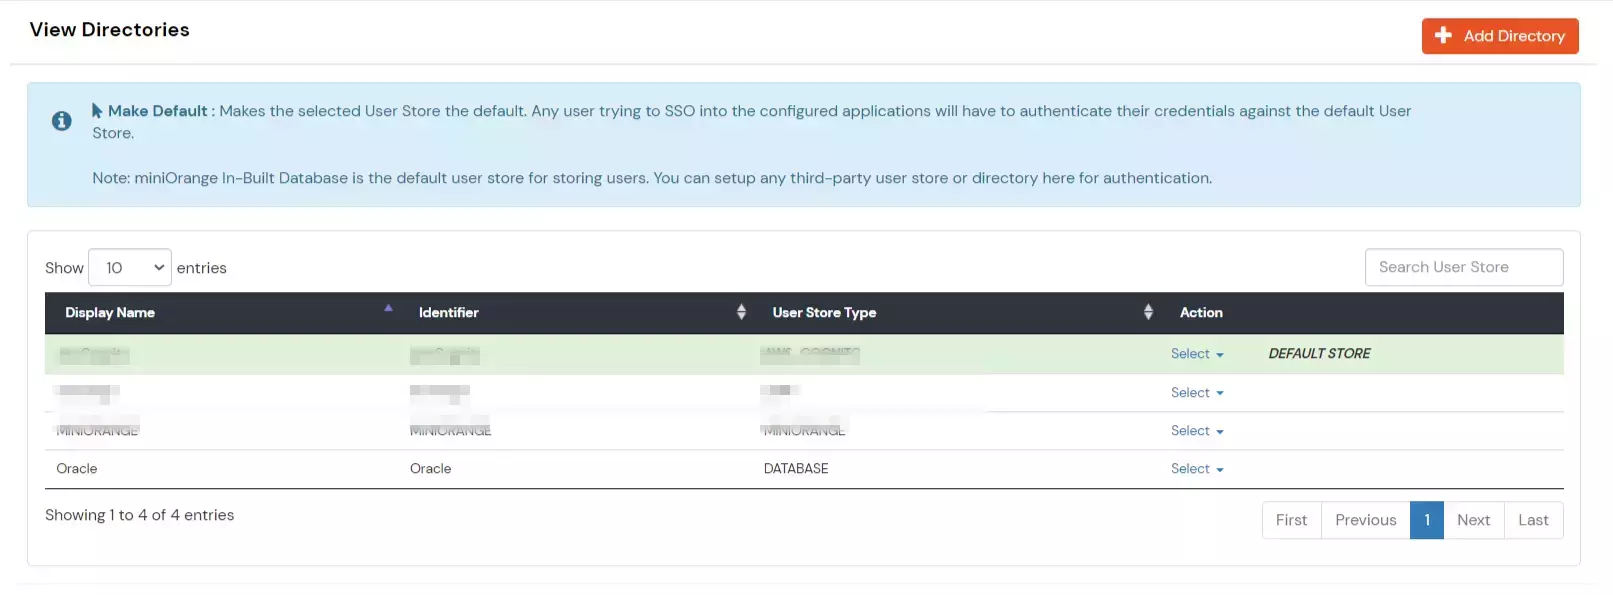
- Click on the dropdown for your database entry, and select Make default.
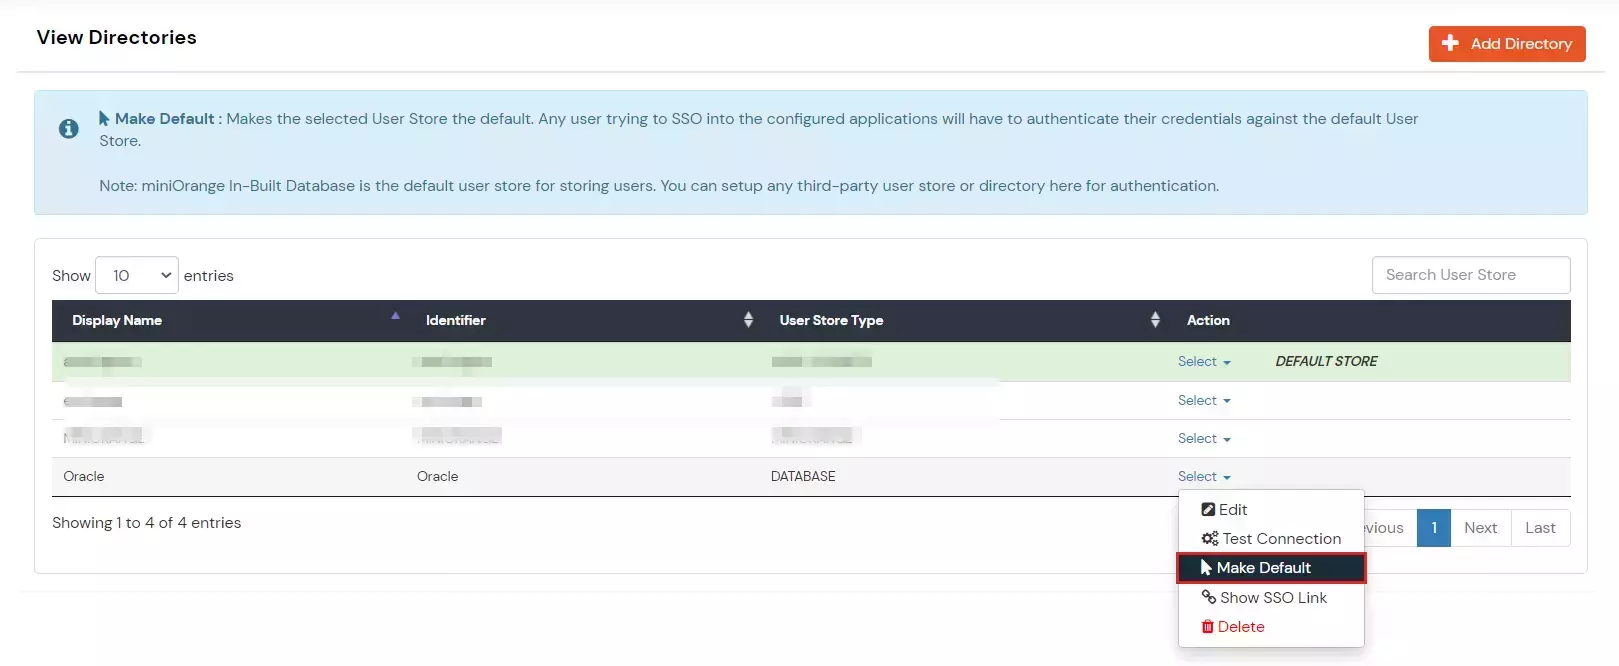
- Once you have done that, you should see the following success message, and your database will be marked as the default External Directory.
2. Navigate to the user provisioning section.
- Select Provisioning in the left navigation.
- From the dropdown, select Database.
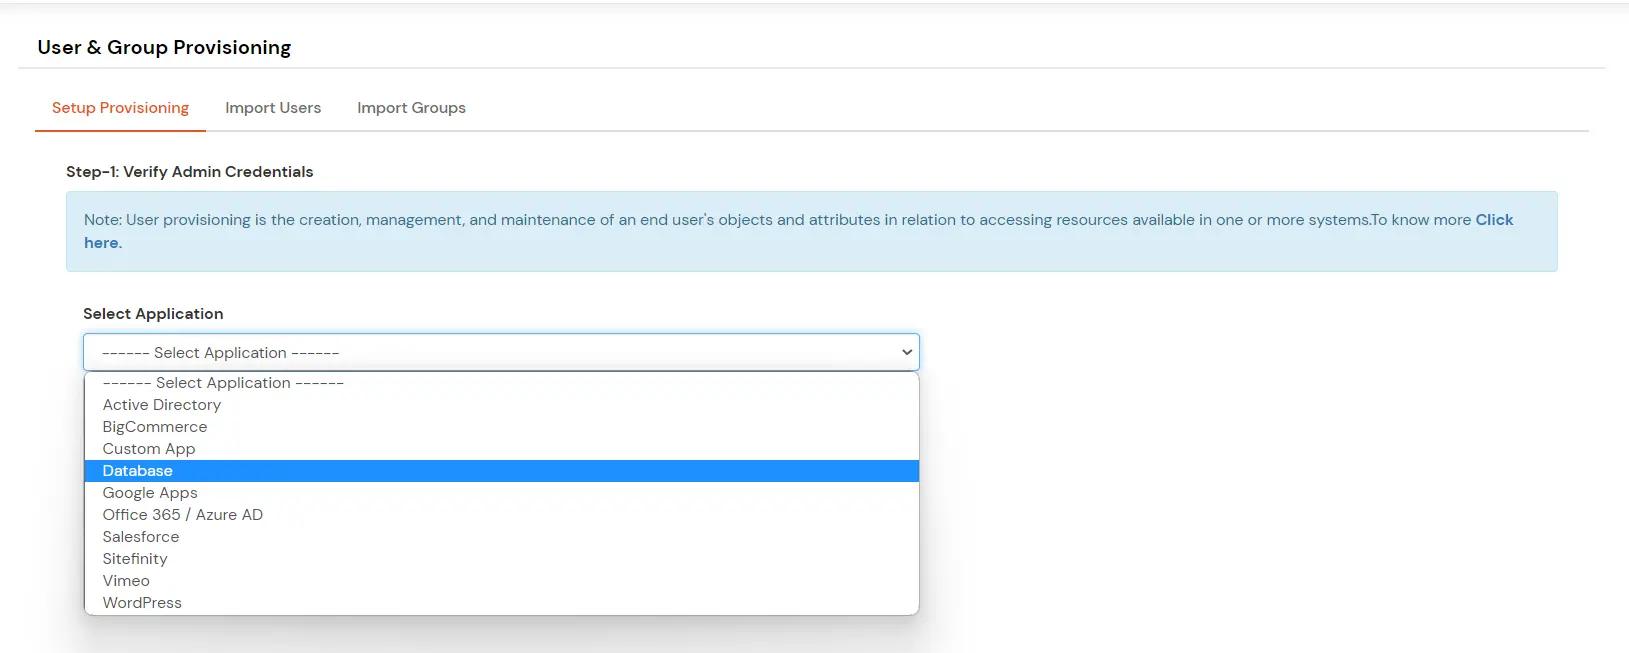
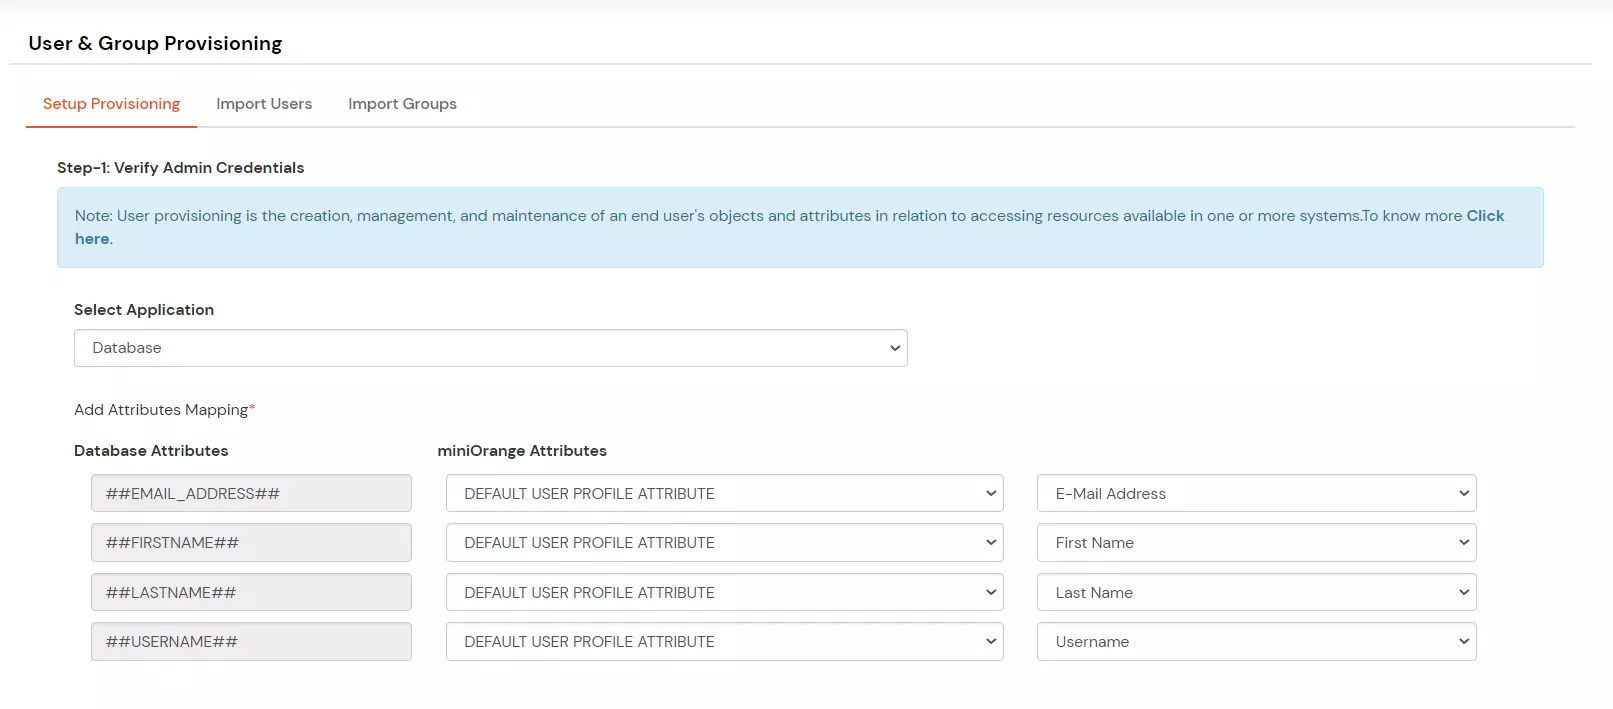
- You should be able to see the database attributes that we have configured in Part B. These database attributes are as yet unmapped, so the values of the ‘miniOrange Attributes’ column will be blank.

3. Map the database attributes to their respective field names in miniOrange
- The Oracle database attributes can be mapped to 3 different types of attributes:
- Default User Profile Attributes
- Custom User Profile Attributes
- Custom Attributes
- For this example, all fields configured for our database are mapped to the Default User Profile Attributes.
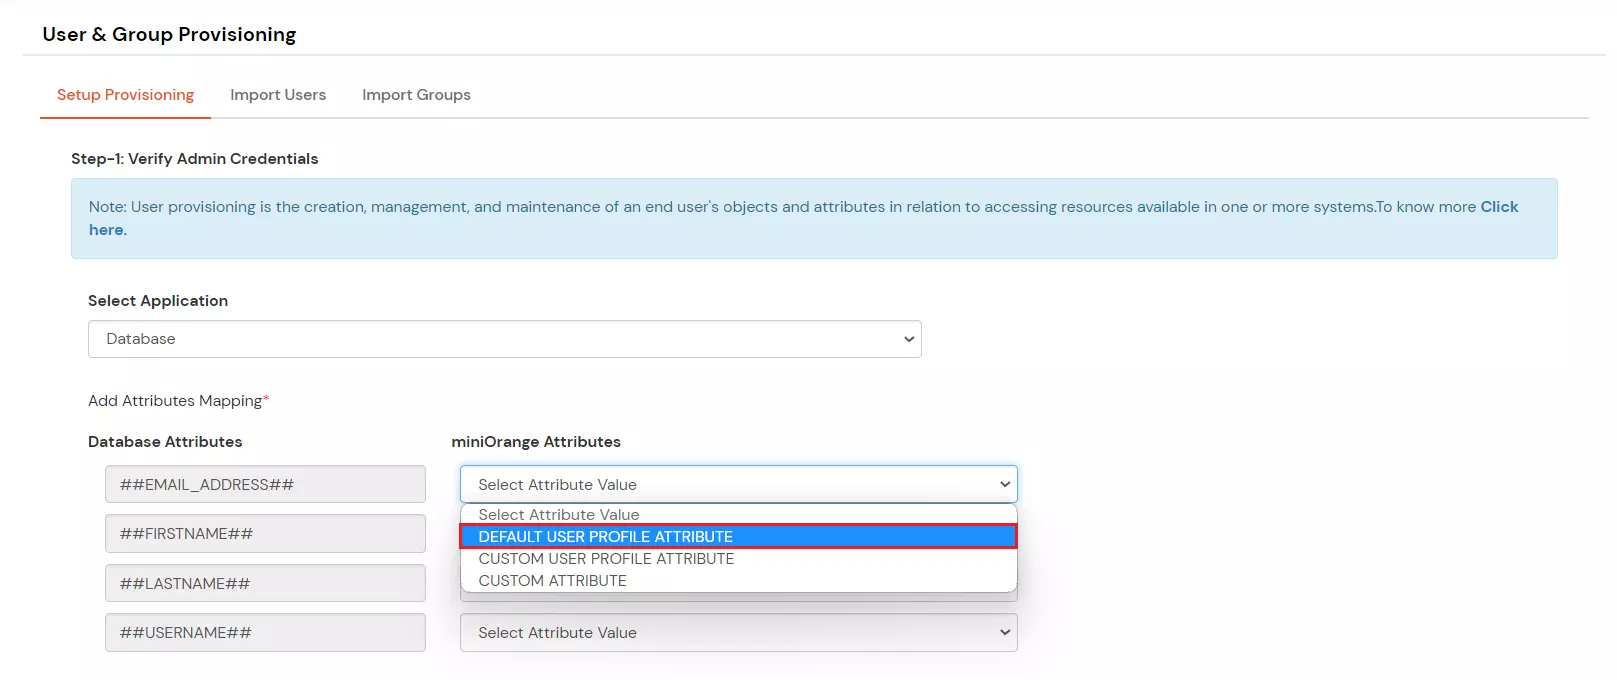
- The list of default attributes is shown when a database attribute is mapped to a Default User Profile Attribute:
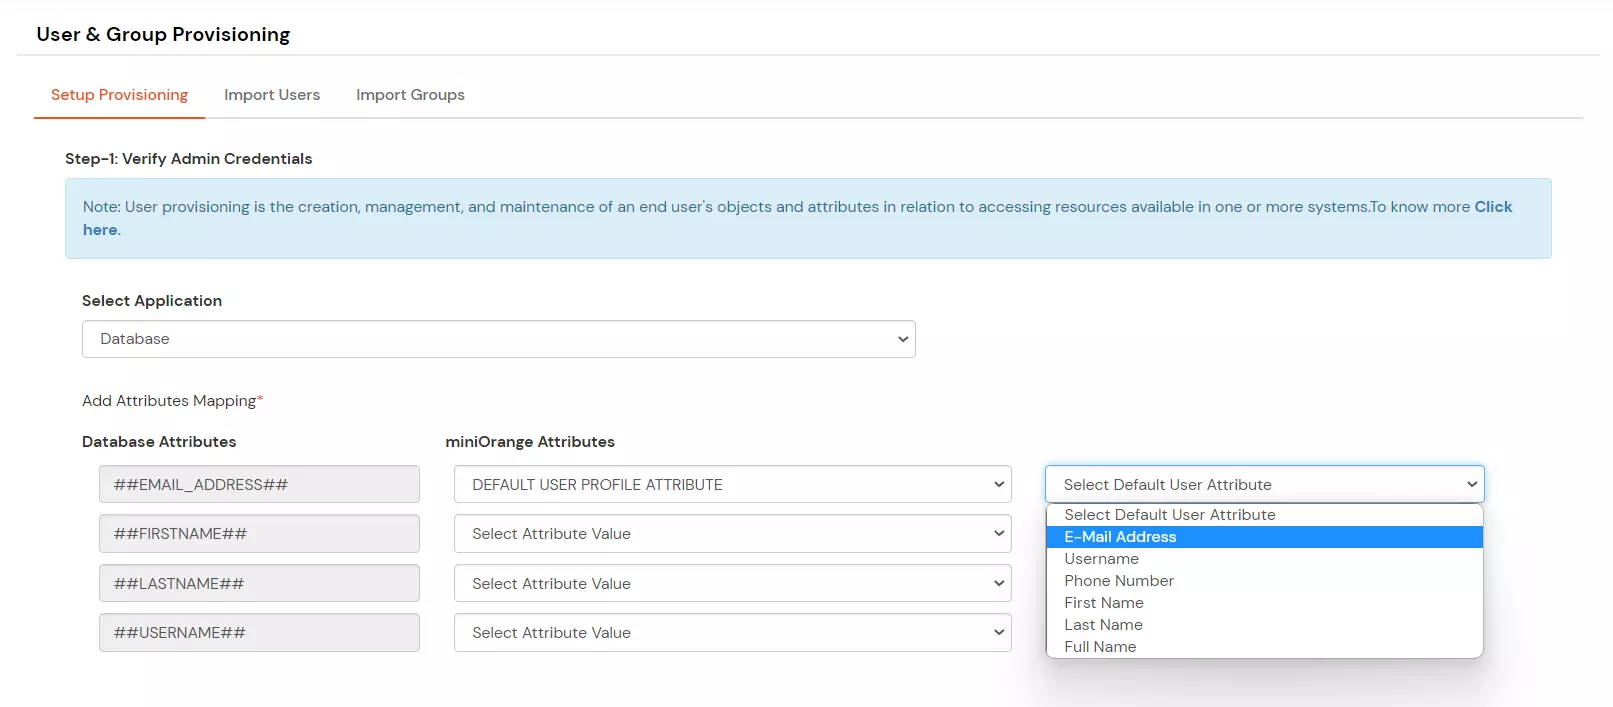
- Map all the required attributes to their values in the miniOrange IdP. This is how the mapping will look for our example.
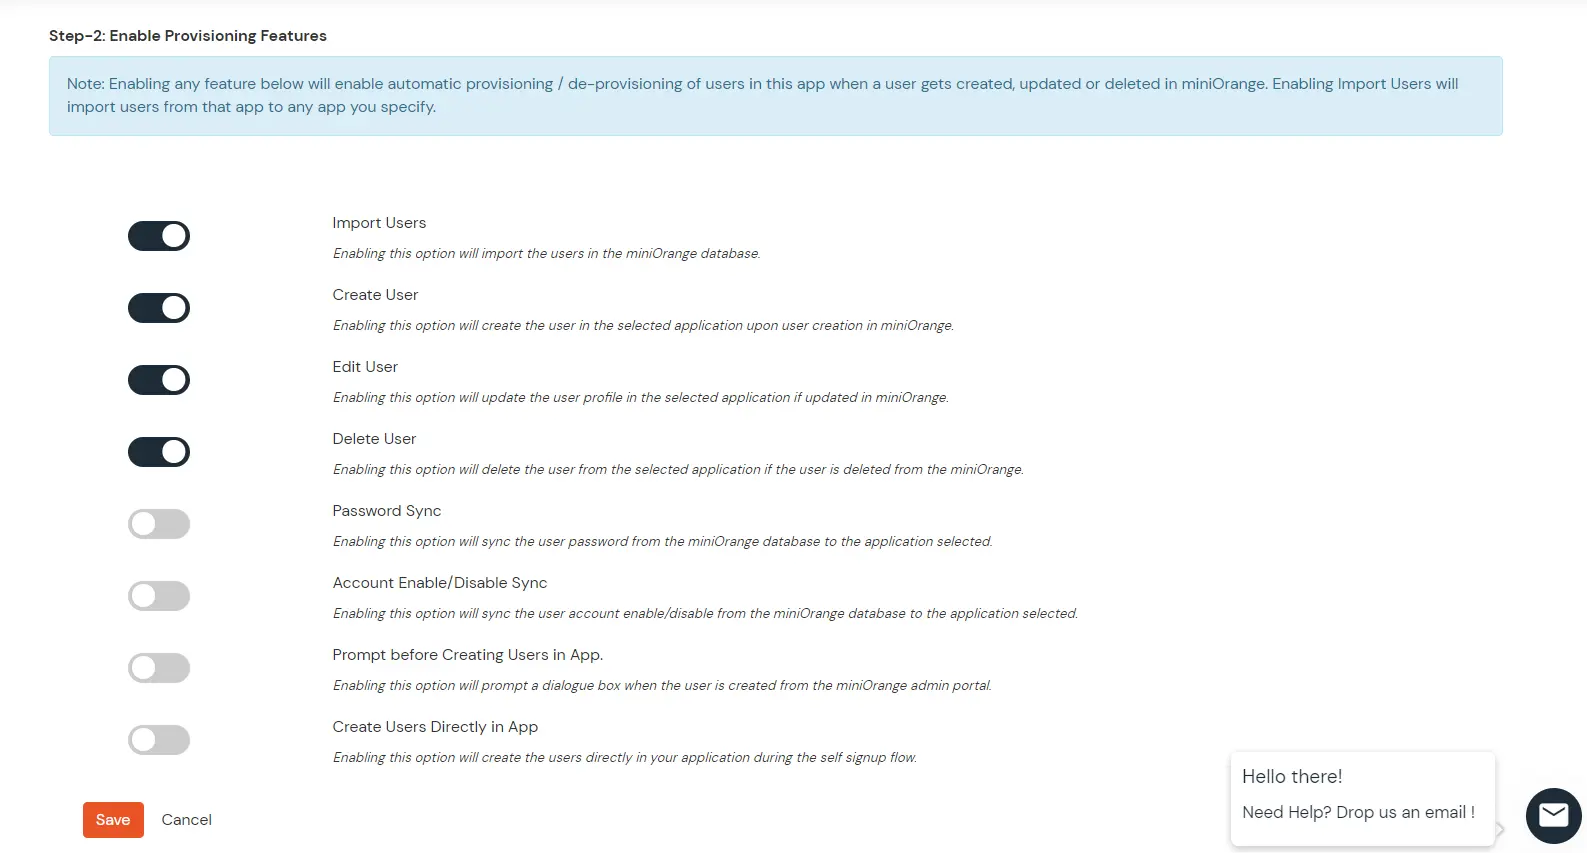
4. Enable Provisioning Features
- Here, you have to choose which provisioning features you want to enable for your Oracle database.
- You can choose some or all of these features, as per your requirement. For this example, we will choose the basic inbound & outbound provisioning features:
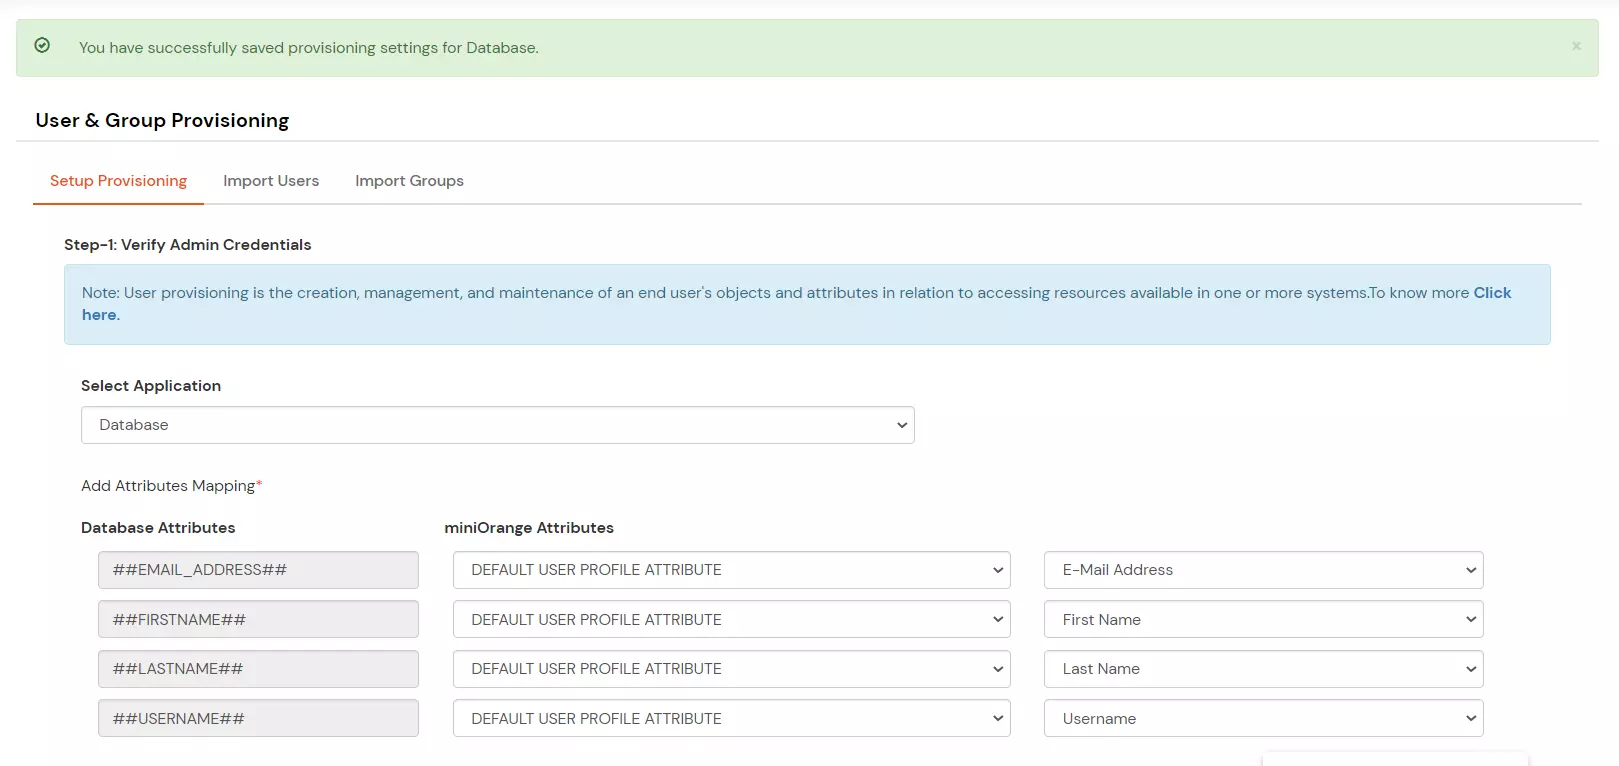
5. Save the database configuration
- Once you have mapped your database attributes to the miniOrange IdP attributes & enabled your desired features, you can go ahead and save this configuration. If everything is properly configured, you should see the following success message:
6. Test configuration
- You can test your configuration by performing one of the actions for which you have enabled the provisioning feature. In this example, we will test it by importing any of your Oracle database users into miniOrange.
- Initially, these are the users present in the database:

- And these are the users present in miniOrange:
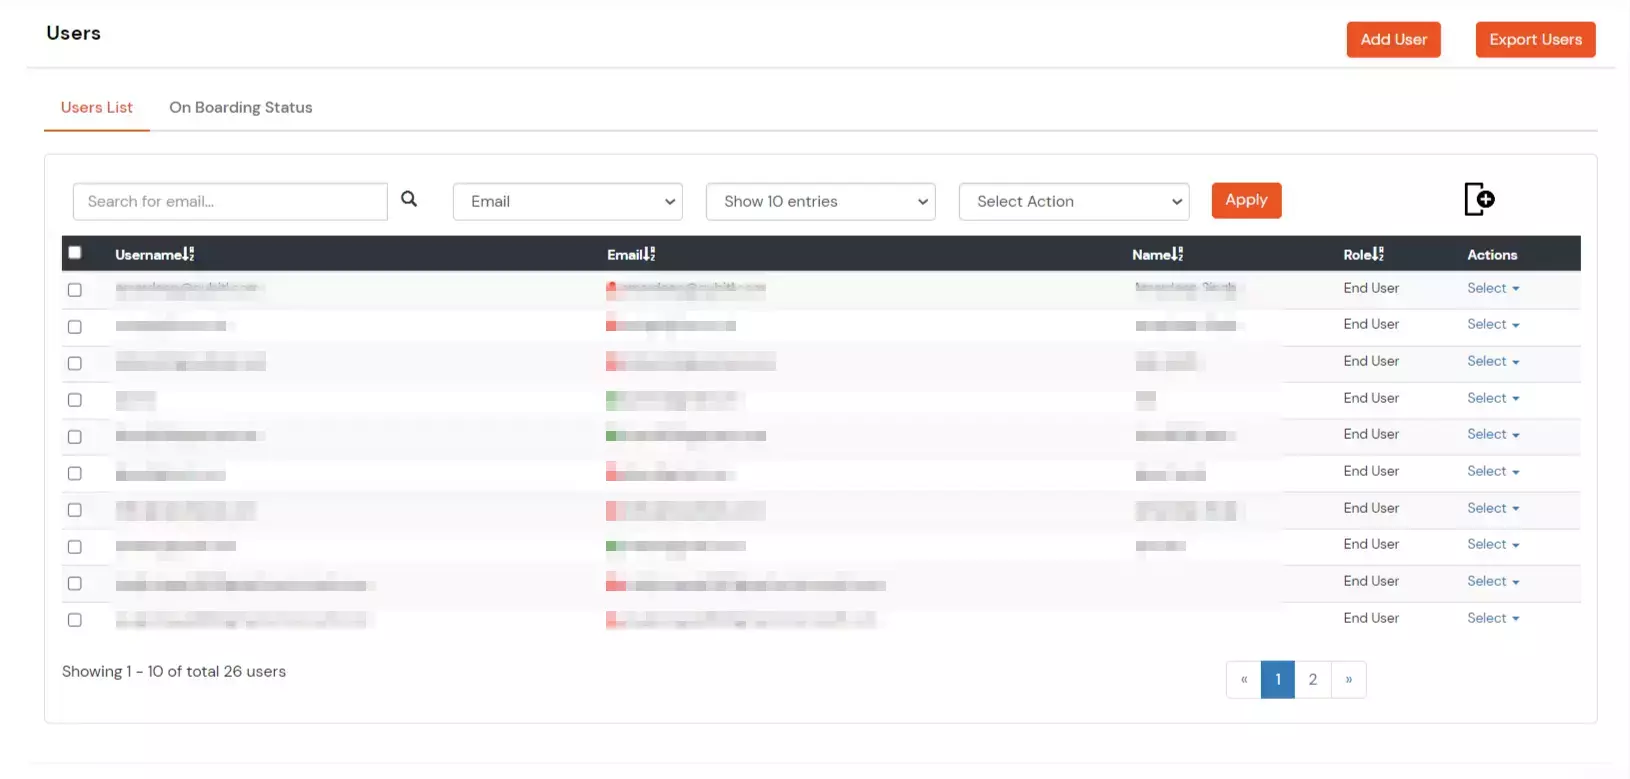
- We will now import the users from the Oracle DB into miniOrange. Navigate to Provisioning → Import Users, and select Database from the dropdown.

- Click on Import. If the configuration was set up correctly, you should see the following message: Import Users successfully
- You can verify if the import was successful by navigating to Users → Users List
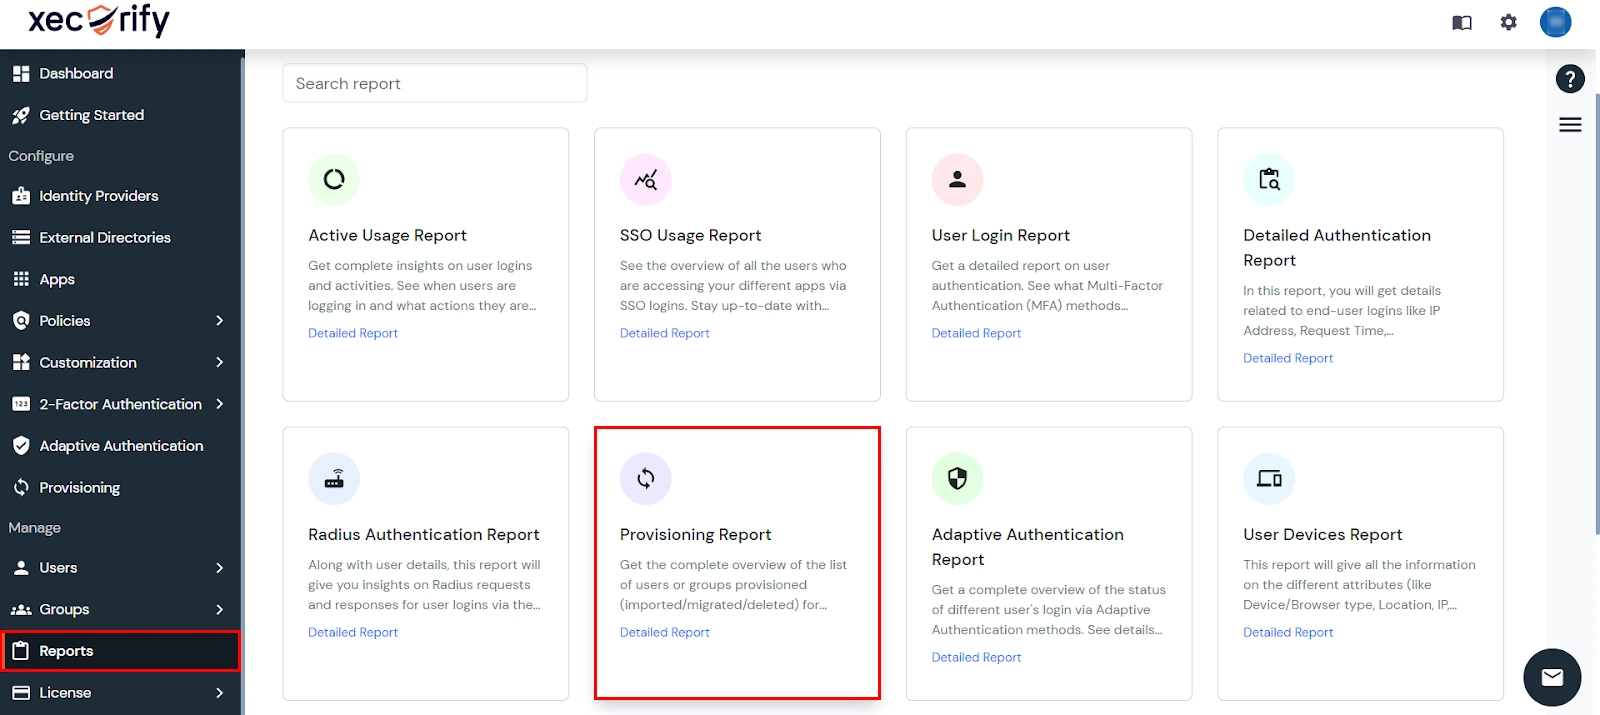
View Provisioning Reports
How to access Provisioning Reports?
- Navigate to Reports in the left-hand navigation pane, search for Provisioning, and select Provisioning Report.
- Filter the reports by specifying Enduser Identifier and Application Name criteria. Additionally, choose the desired timespan for the reports. Once done, click on the Search.
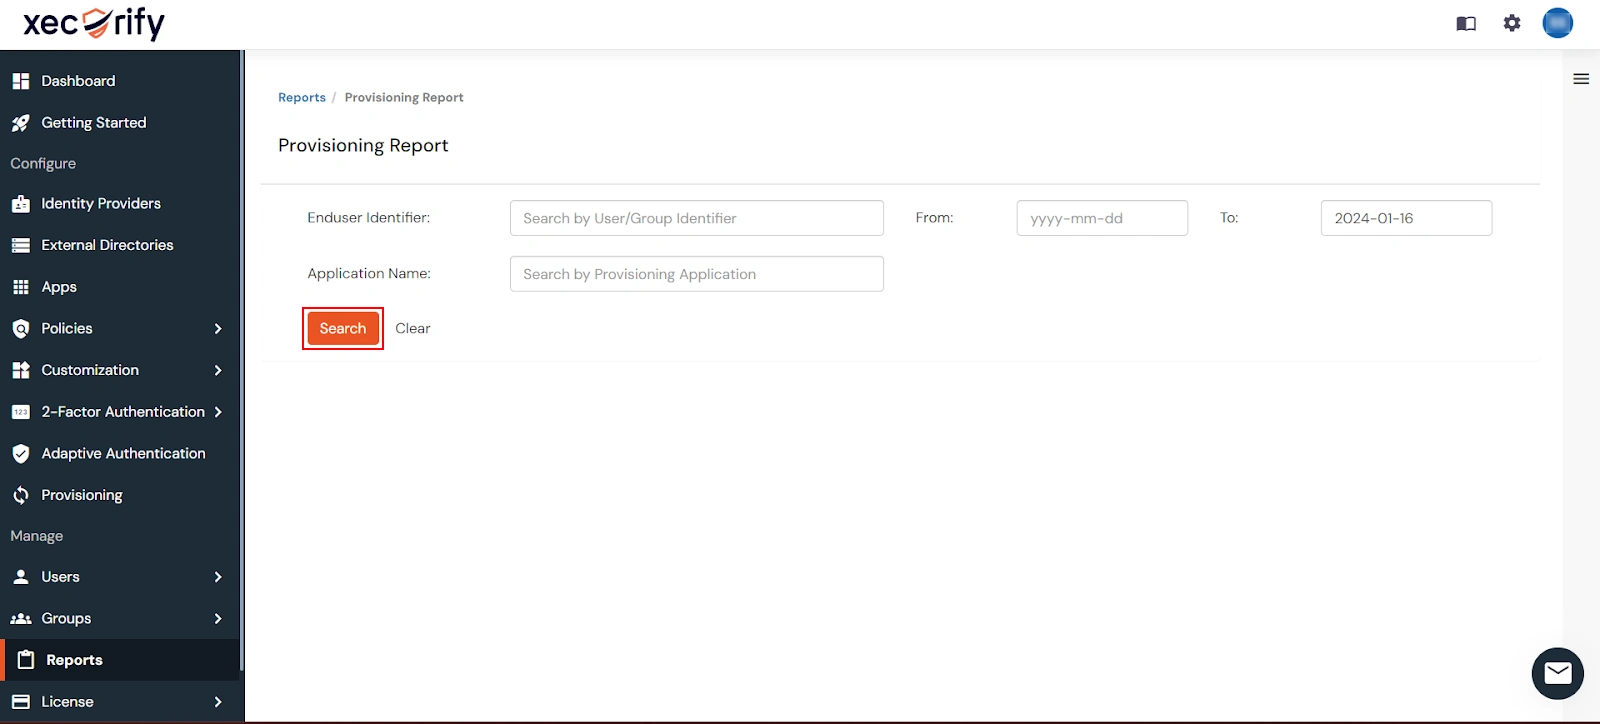
- Alternatively, you can directly click on Search to retrieve all provisioning reports based on time without applying any specific filters.
Additional Resources
