Two Factor Authentication - 2FA for Citrix Workspace
Secure your Citrix Workspace login for your employees, teachers, and basically any other members of the organization with miniOrange’s easy-to-setup MFA solution. You can add MFA within minutes and ensure a secure login for your end users.
What is Virtual Desktop Infrastructure (VDI) & Why VDI Security Solutions important?
VDI is a desktop-centric service that hosts user desktop environments on remote servers and storage systems, which are accessed over a network using a remote display protocol. Enterprises are converting physical desktops to Virtual Desktop Infrastructure (VDI) since it provides efficient hardware utilization and centralized management while reducing costs.
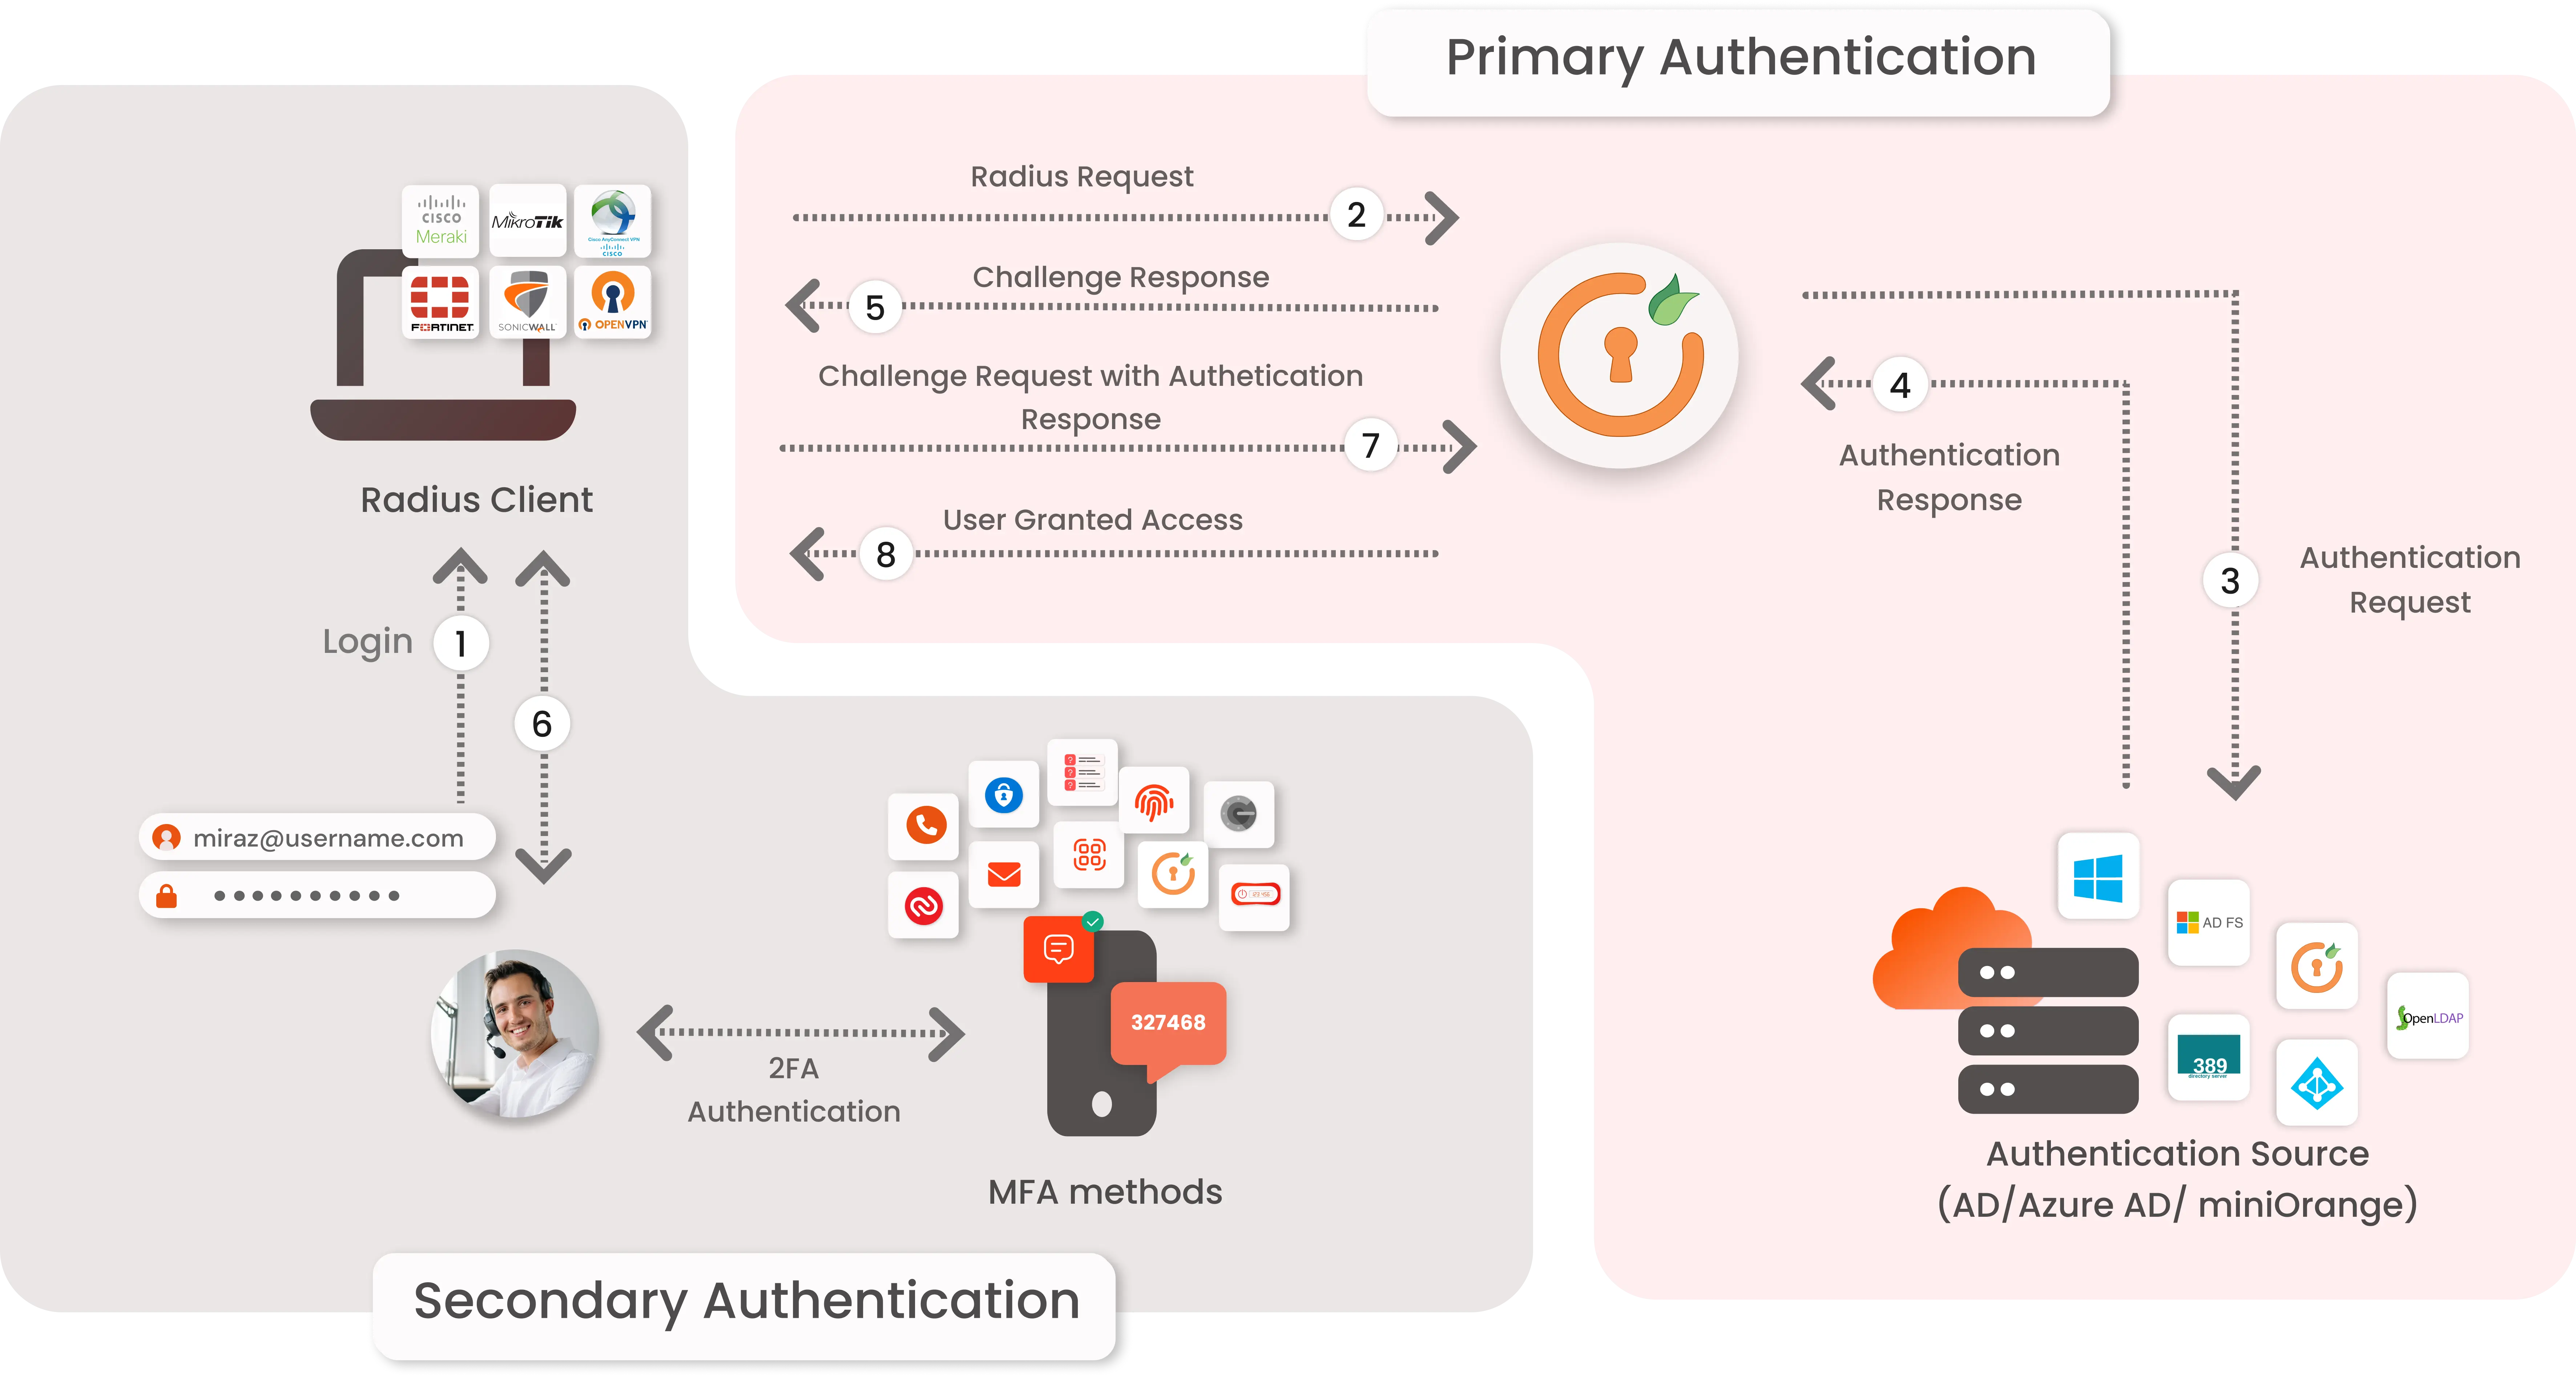
Due to the growing hybrid workplace culture, many businesses must figure out how to enable remote work. One of their options is the VDI solution. Citrix Workspace can offer a quick-win VDI solution, but some authentication and security settings, like MFA, still require work to set up. Some SME businesses might not have their own OTP (one-time password) server or RADIUS (Remote Authentication Dial-In User Service) server to allow 2FA/MFA. For Citrix Workspaces VDI using RADIUS authentication, miniOrange offers a ready-to-use Two-Factor Authentication [2FA/MFA] solution. This solution enables an additional layer of authentication while you log into your Citrix Workspace and ensures that you roll out secure access to your employees within minutes.
To use miniOrange Two-FActor Authentication (2FA) you can enable RADIUS authentication in Citrix Workspace and configure policies in miniOrange to enable or disable 2FA for users.
Types of 2FA Authentication with RADIUS
The 2-factor authentication can be of two types depending on the Application.
- Applications that support RADIUS Challenge.
- Applications that do not support RADIUS Challenge.
In Applications that support RADIUS Challenge :
- First step is user's username & password get validated against the credentials stored in Active Directory and 2nd request sends a success response, this request is sent to validate the 2-factor authentication of the user, on successful authentication user is granted access to the application.
- Authentication methods : All Authentication methods are supported by miniOrange. Software Token, Push Notification, OTP over Email to name a few.
Connect with any External Directories
miniOrange provides user authentication from various external directories such as miniOrange Directory, Microsoft AD, Microsoft Entra ID/LDAP, AWS Cognito and many more.
Can't find your Directory? Contact us on idpsupport@xecurify.com
Enable Two-Factor Authentication (2FA) for Citrix Workspace VDI to increase security level.
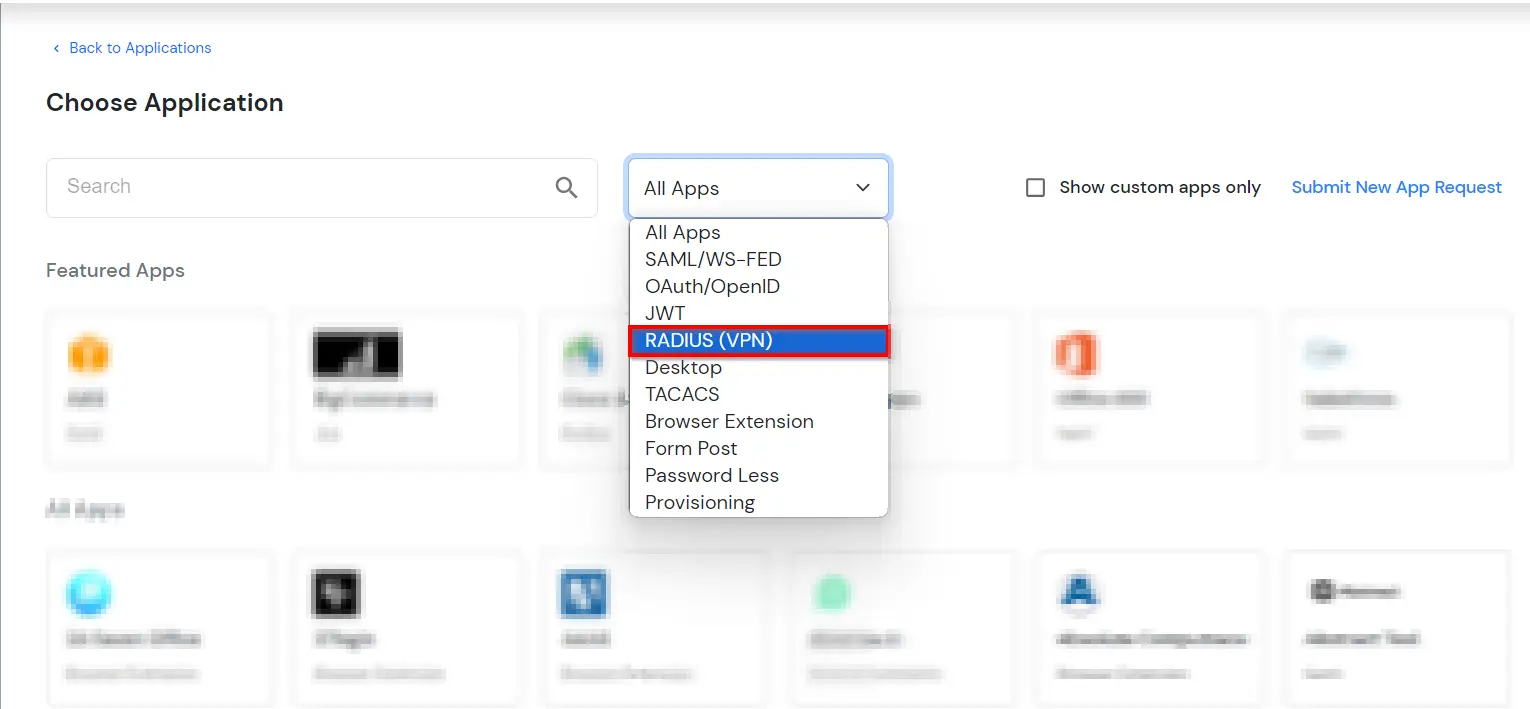
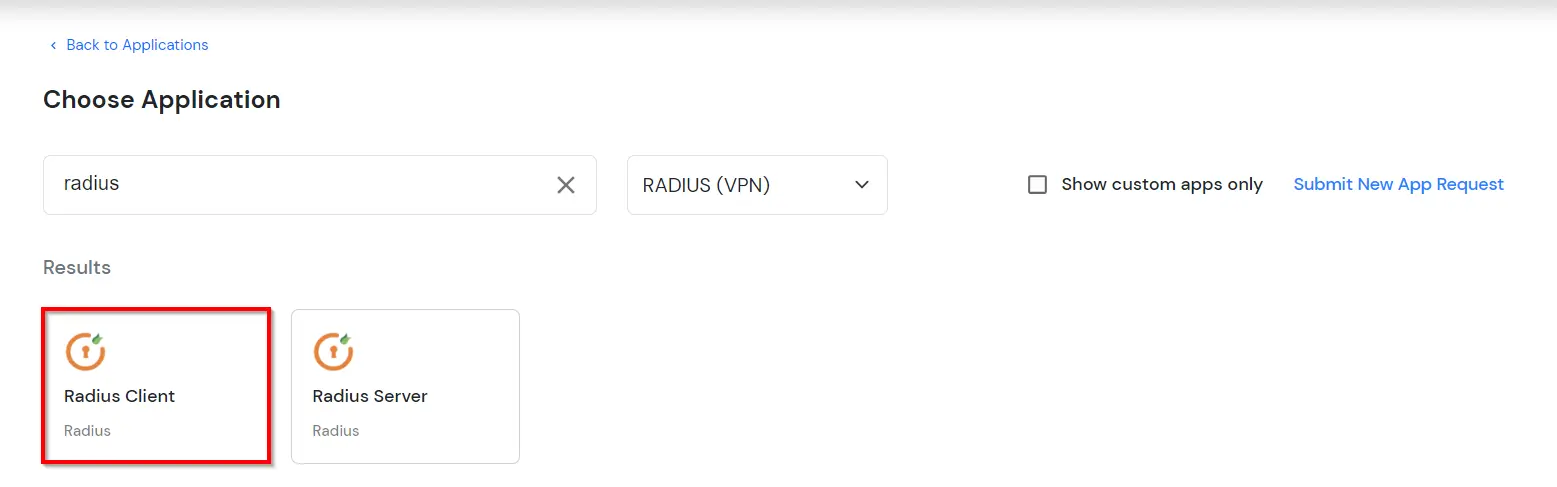
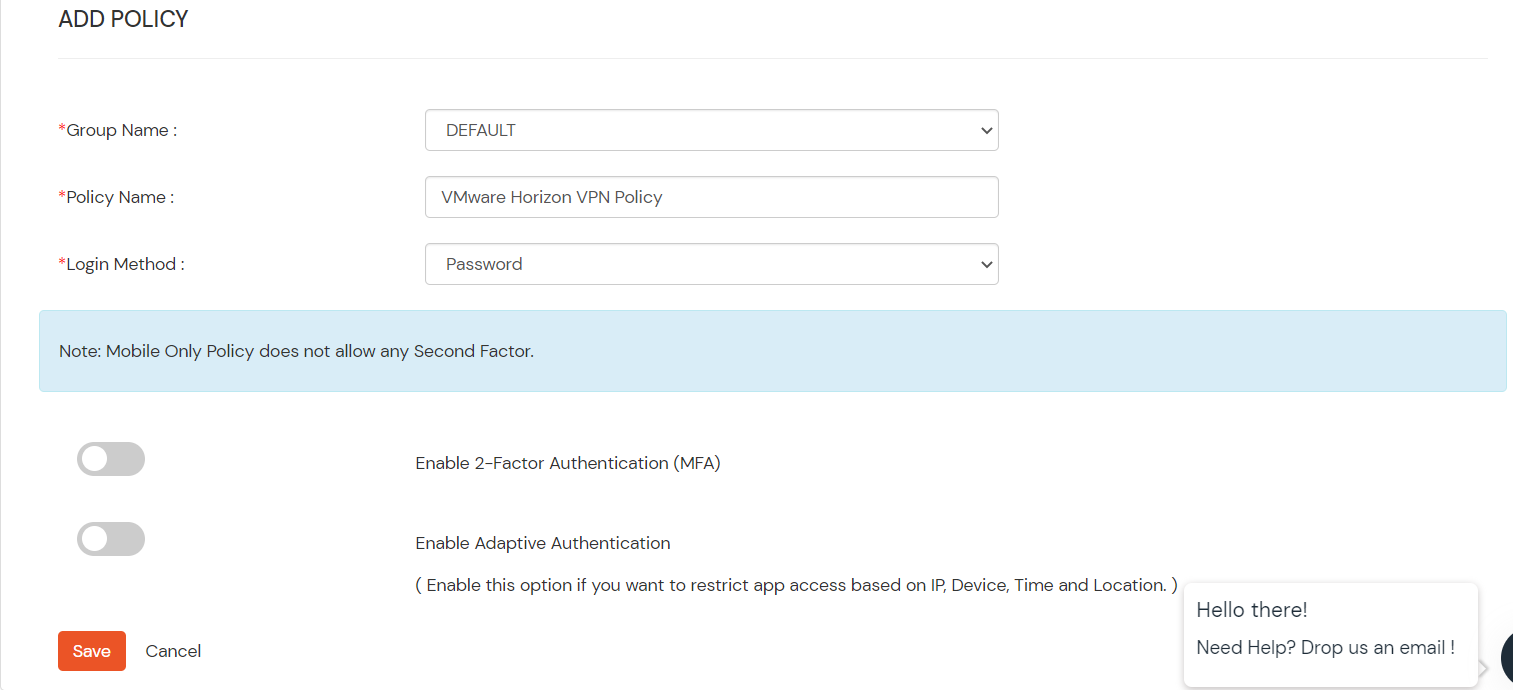
1. Add Radius Client in miniOrange
2. Configure Citrix Workspace
- Log in to the Citrix Gateway administrative interface.
- Navigate to the Citrix Gateway → Virtual Servers in the left panel of the administrative interface.
- Select your existing Citrix Gateway Virtual Server, and then click Edit.
- On the "VPN Virtual Server" page, click the plus sign (+) next to Basic Authentication to add a new authentication policy.
- On the "Choose Type" page, select the RADIUS policy and Primary type from the drop-down menus and click Continue.
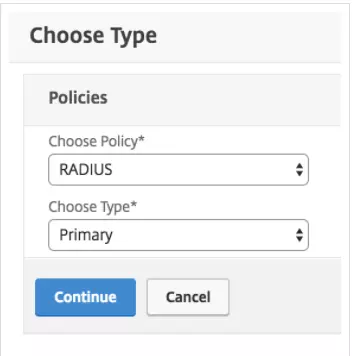
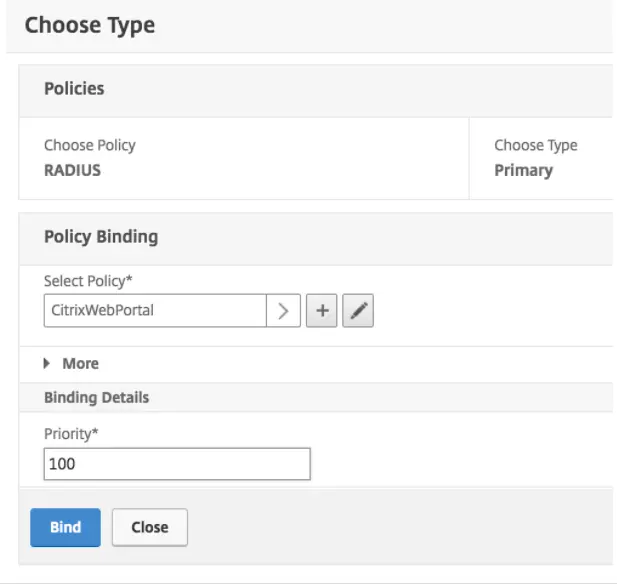
- On the next "Choose Type" screen, click the plus sign (+) next to the "Policy Binding" → "Select Policy" box.
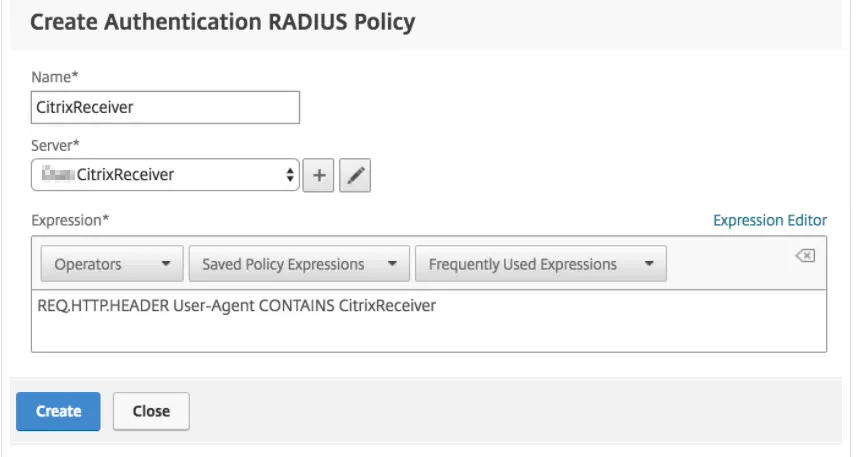
- On the "Create Authentication RADIUS Policy" page, enter a name for the policy (like CitrixWebPortal), and then click the plus sign (+) next to the "Server" box to create a new RADIUS server.
- On the "Create Authentication RADIUS Server" page, enter the information for your miniOrange Radius server:
| Name |
CitrixWebPortal (or some descriptive name) |
| Server Name or IP Address |
The hostname or IP address of your miniOrange Radius server. |
| Port |
The port configured for radius_server_iframe on the miniOrange IDP (1812 in the example) |
| Time-out(60 seconds) |
60 |
| Secret Key |
The RADIUS secret that you got in this step. |
| Confirm Secret Key |
The RADIUS secret that you got in this step. |
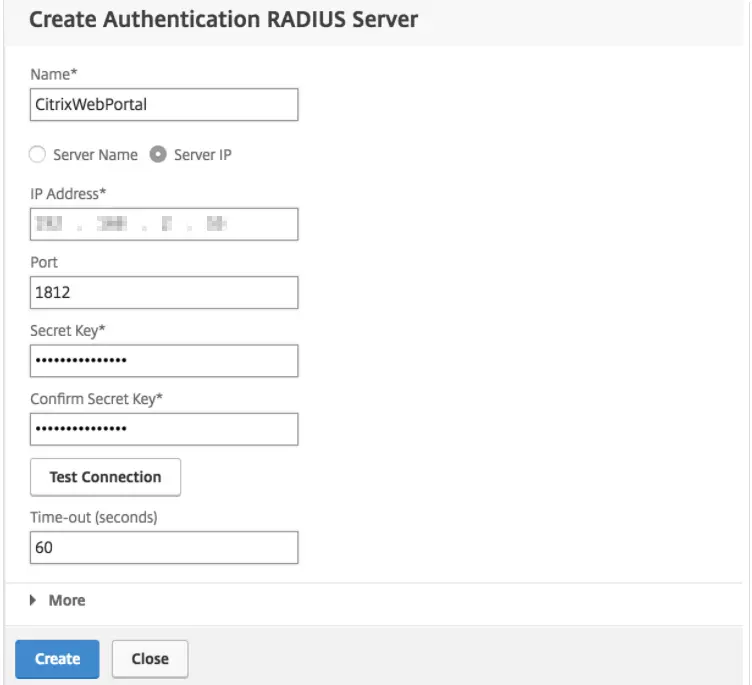
- Click Create to add the miniOrange RADIUS server and return to the "Create Authentication RADIUS Policy" page.
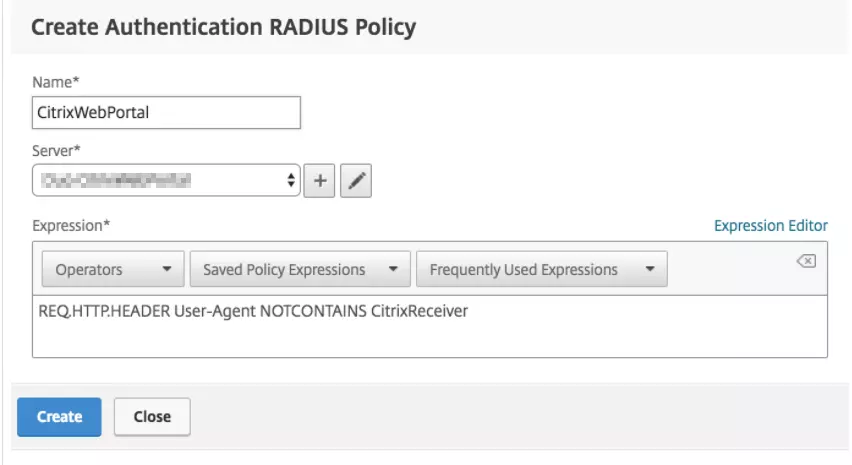
- Click the Expression Editor link on the "Create Authentication RADIUS Policy" page to add an expression with the following details:
| Expression Type |
General |
| Flow Type |
REQ |
| Protocol |
HTTP |
| Qualifier |
Header |
| Operator |
NOTCONTAINS |
| Value* |
CitrixReceiver |
| Header Name* |
User-Agent |

- When the Server and Expression information is correct click Create to save the new CitrixWebPortal policy and return to the "Choose Type" page.
- On the "Choose Type" page, make sure the new RADIUS authentication policy you just created is selected. Set the Priority under "Binding Details" to 100 and click Bind.
- Verify that your new policies for browser clients are listed. Click Close to save the new policy configuration.

- Verify that you have this RADIUS policy for Primary Authentication. Remove any other non-miniOrange primary authentication policies (or increase the priority value so the NetScaler invokes miniOrange policies first) and click Done.
- Save all of the changes made to the running config.
- Log in to the Citrix Gateway administrative interface.
- Navigate to the Citrix Gateway → Virtual Servers in the left panel of the administrative interface.
- Select your existing Citrix Gateway Virtual Server, and then click Edit.
- On the "VPN Virtual Server" page, click the plus sign (+) next to Basic Authentication to add a new authentication policy.
- On the "Choose Type" page, select the RADIUS policy and Primary type from the drop-down menus and click Continue.
- On the next "Choose Type" screen, click the Add Binding button.
- Click the plus sign (+) next to the "Policy Binding" → "Select Policy" box.
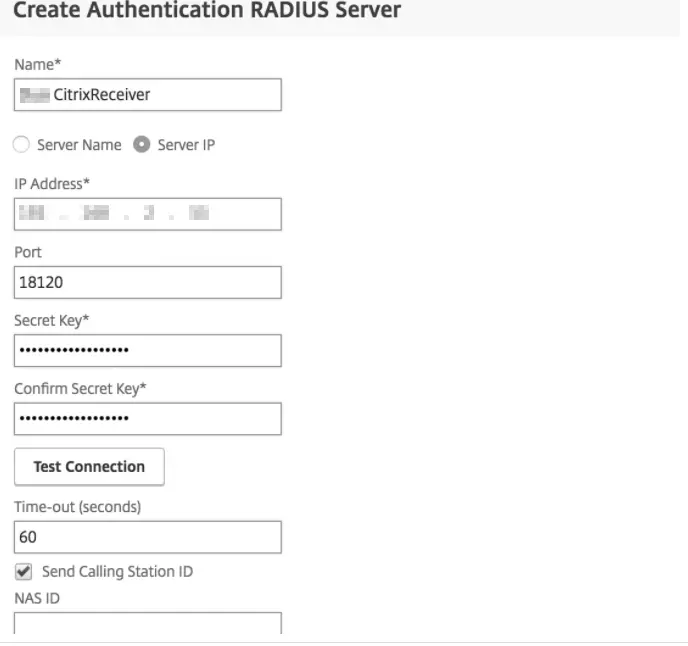
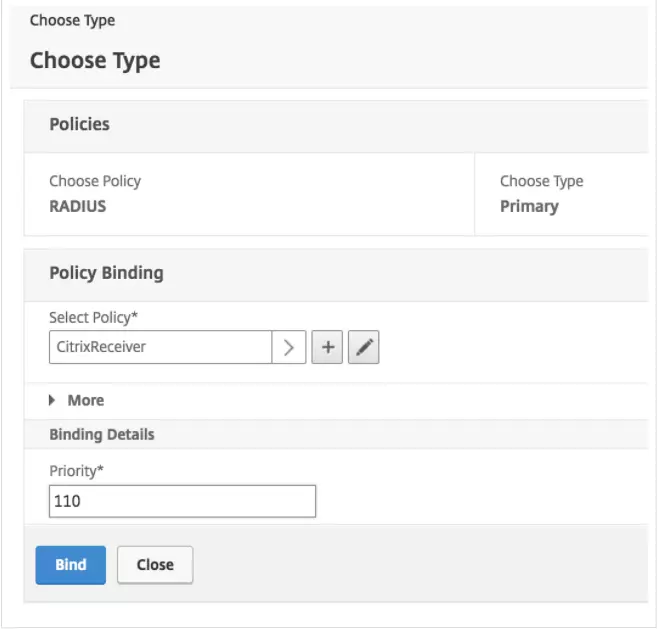
- On the "Create Authentication RADIUS Policy" page, enter a name for the policy (like CitrixReceiver), and then click the plus sign (+) next to the "Server" box to create a new RADIUS server for miniOrange authentication for Citrix Receiver or Workspace clients.
- On the "Create Authentication RADIUS Server" page, enter the information for your miniOrange Radius server:
| Name |
CitrixReceiver (or some descriptive name) |
| Server Name or IP Address |
The hostname or IP address of your miniOrange Radius server. |
| Port |
The port configured for radius_server_auto on the miniOrange IDP (18120 in the example) |
| Time-out (seconds) |
60 seconds |
| Secret Key |
The RADIUS secret that you got in this step. |
| Confirm Secret Key |
The RADIUS secret that you got in this step. |
| Send Calling Station ID |
Check this box in order to send the IP address of Citrix Receiver or Workspace clients to miniOrange (click > More to expose this option) |
- Click Create to add the CitrixReceiver RADIUS server and return to the "Create Authentication RADIUS Policy" page.
-
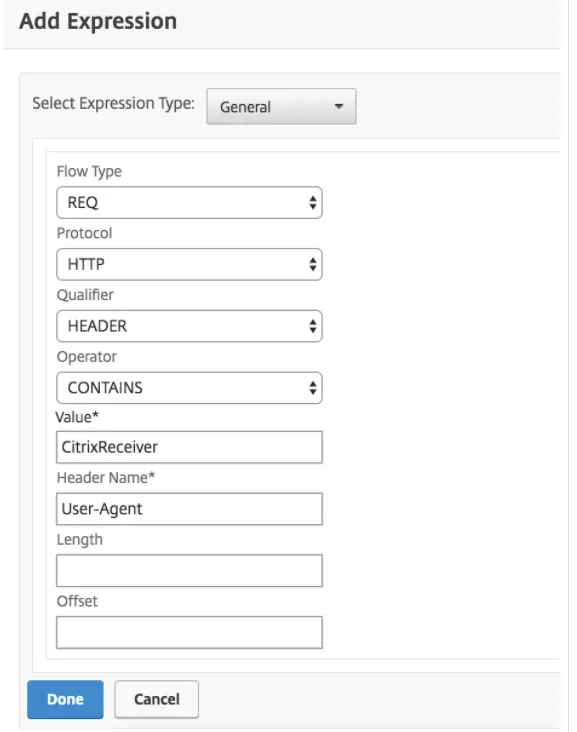
- Click the Expression Editor link on the "Create Authentication RADIUS Policy" page to add an expression with the following details:
| Expression Type |
General |
| Flow Type |
REQ |
| Protocol |
HTTP |
| Qualifier |
HEADER |
| Operator |
CONTAINS |
| Value* |
CitrixReceiver |
| Header Name* |
User-Agent |
- When the Server and Expression information is correct click Create to save the new CitrixReceiver policy and return to the "Choose Type" page.
- On the "Choose Type" page, make sure the new RADIUS authentication policy you just created is selected. Set the Priority under "Binding Details" to 110 and click Bind.
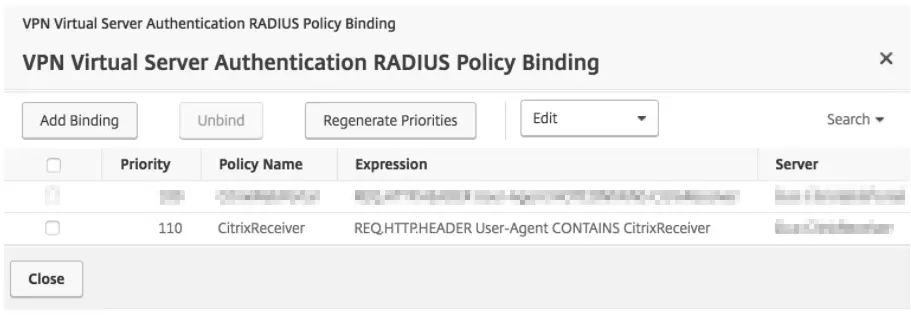
- Verify that your new policies for CitrixReceiver clients are listed. Click Close to save the new policy configuration.
- Verify that you have this RADIUS policy for Primary Authentication. Remove any other non-miniOrange primary authentication policies (or increase the priority value so the NetScaler invokes miniOrange policies first) and click Done.
- Save all of the changes made to the running config.
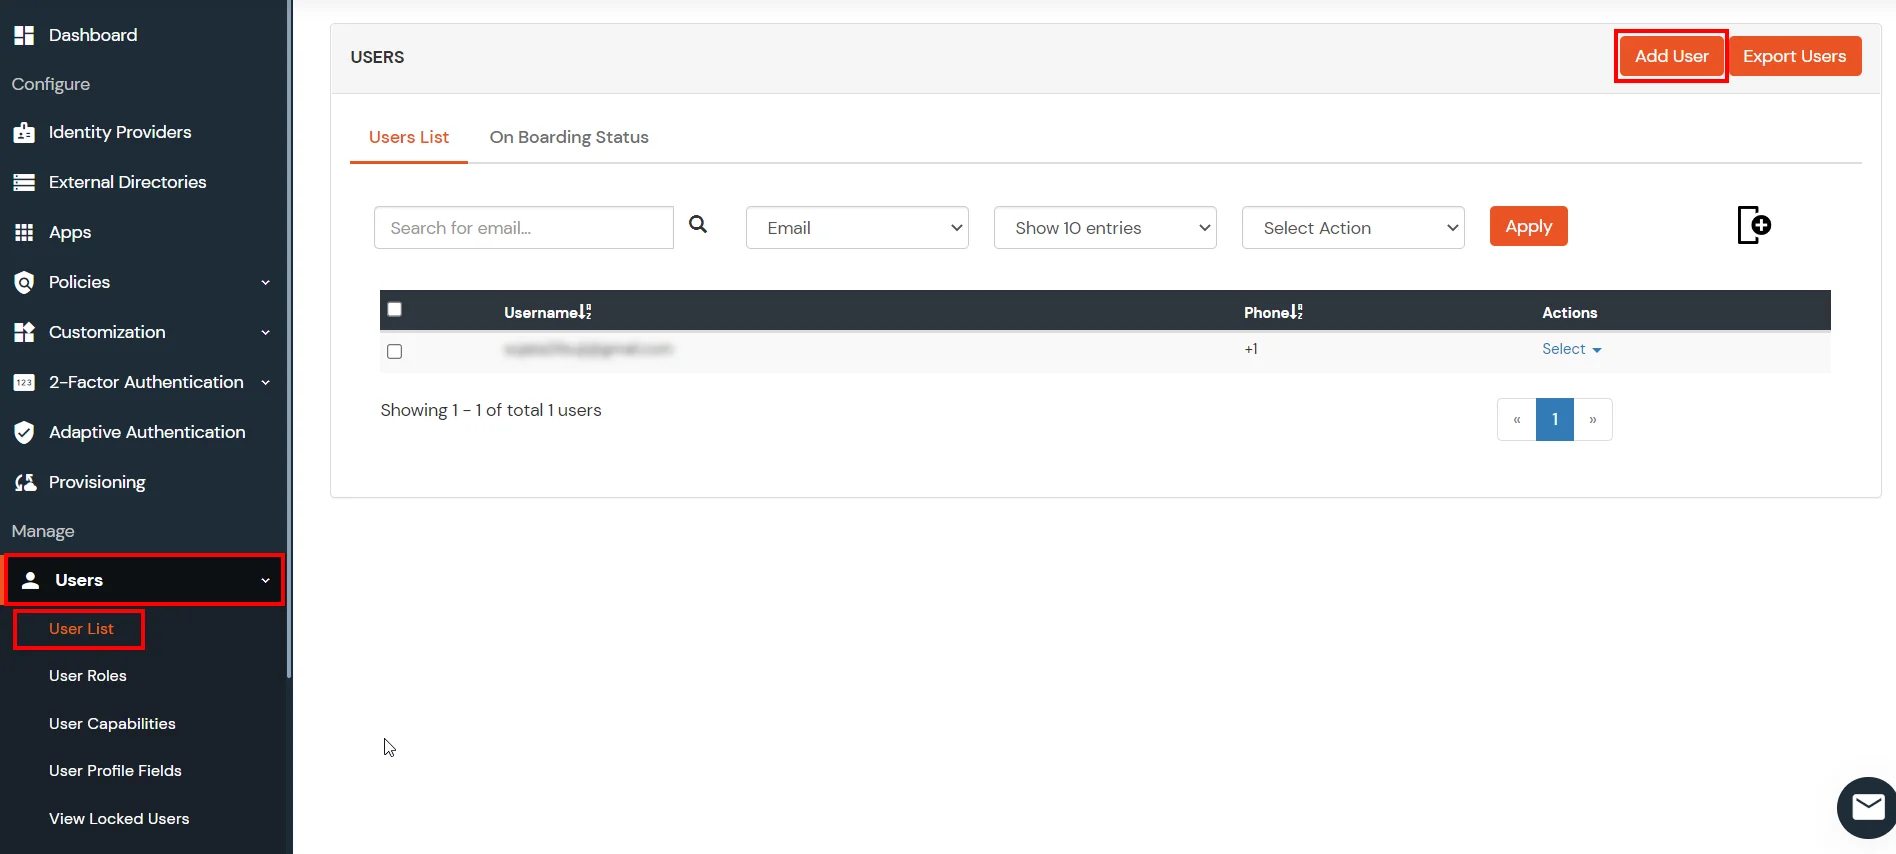
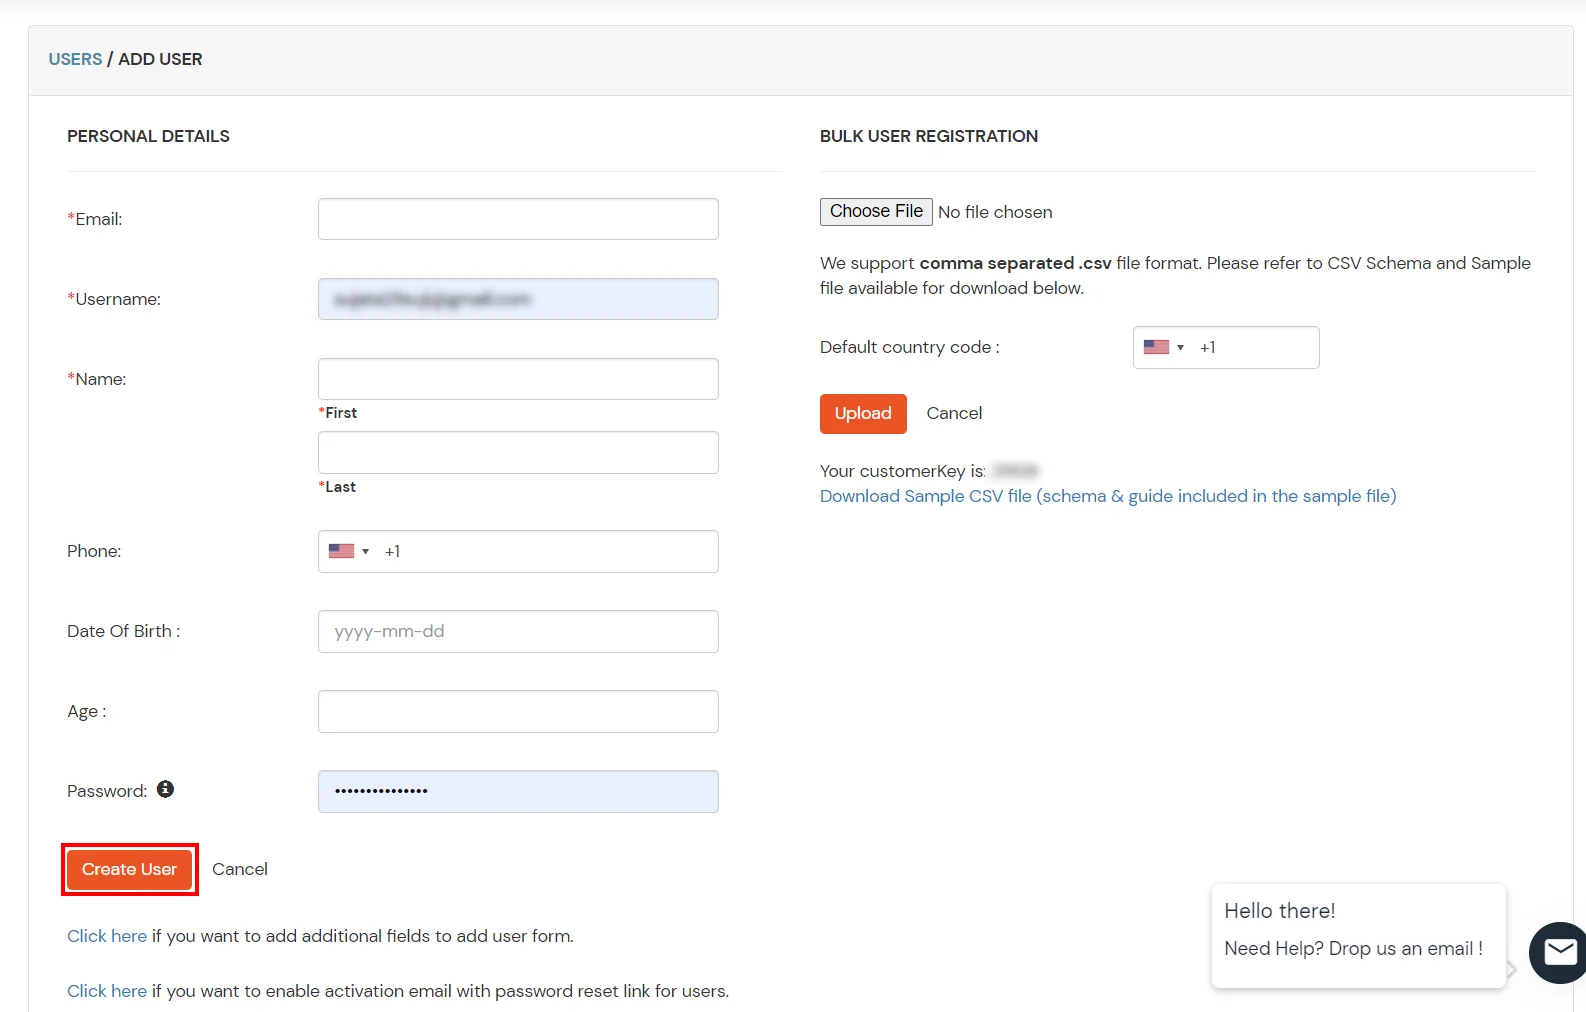
3. Configure 2FA for End-Users
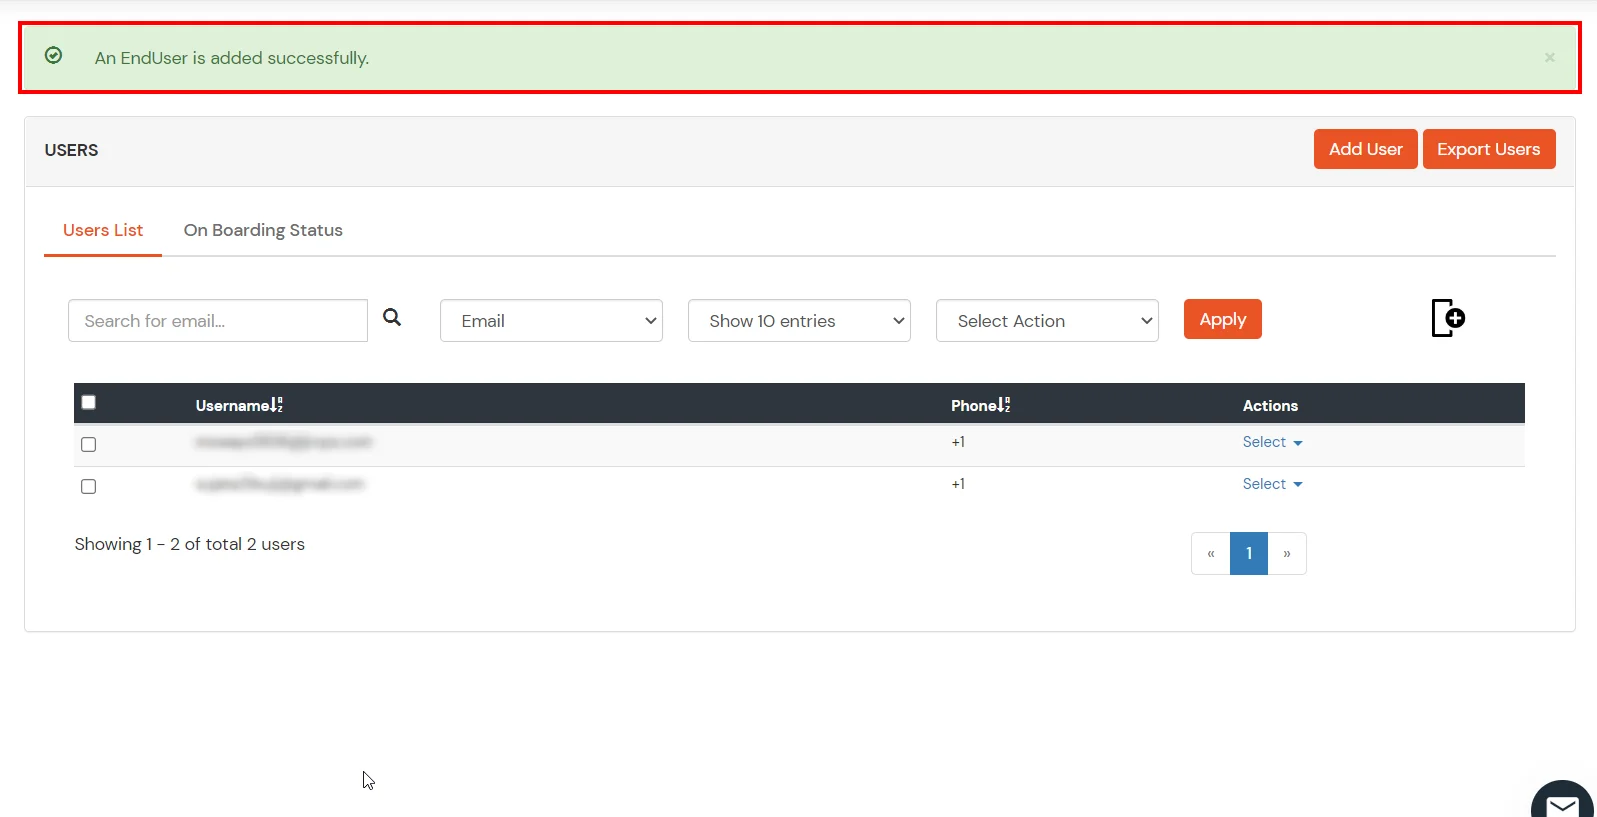
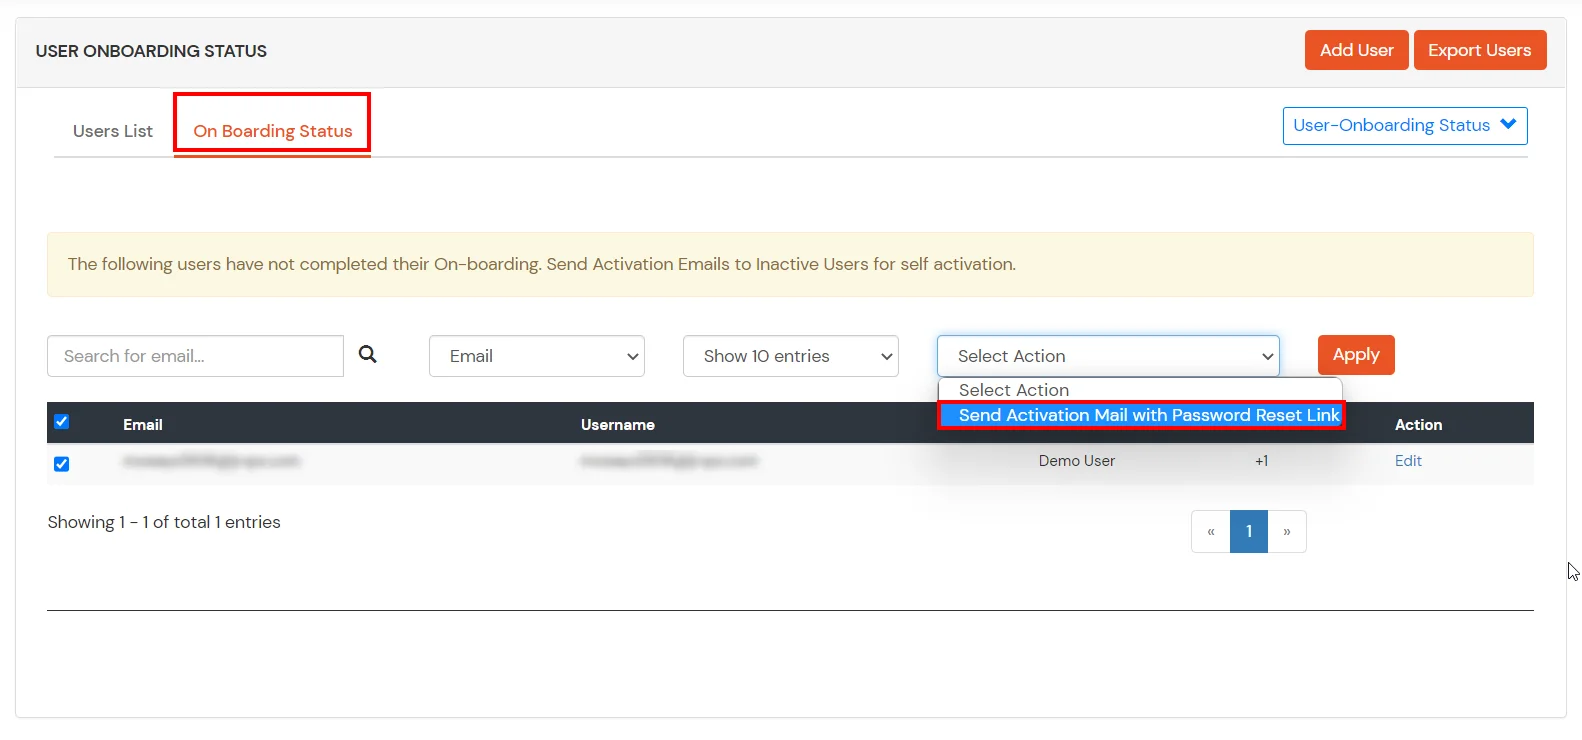
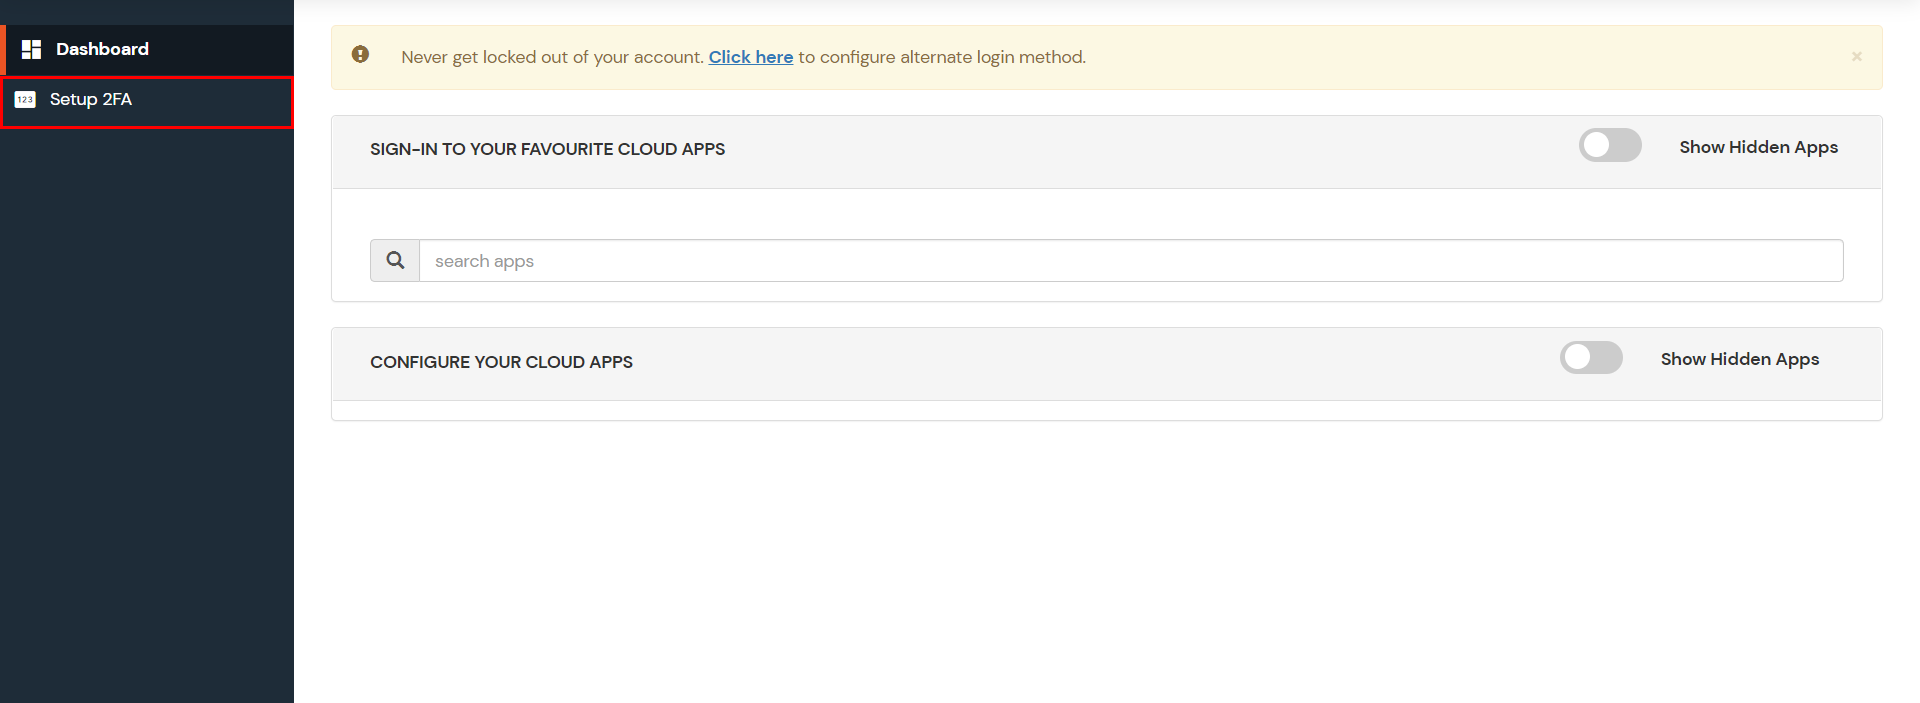
- Login into End-User Dashboard using Default User Directory credentials..
- Select Configure 2FA from left panel.
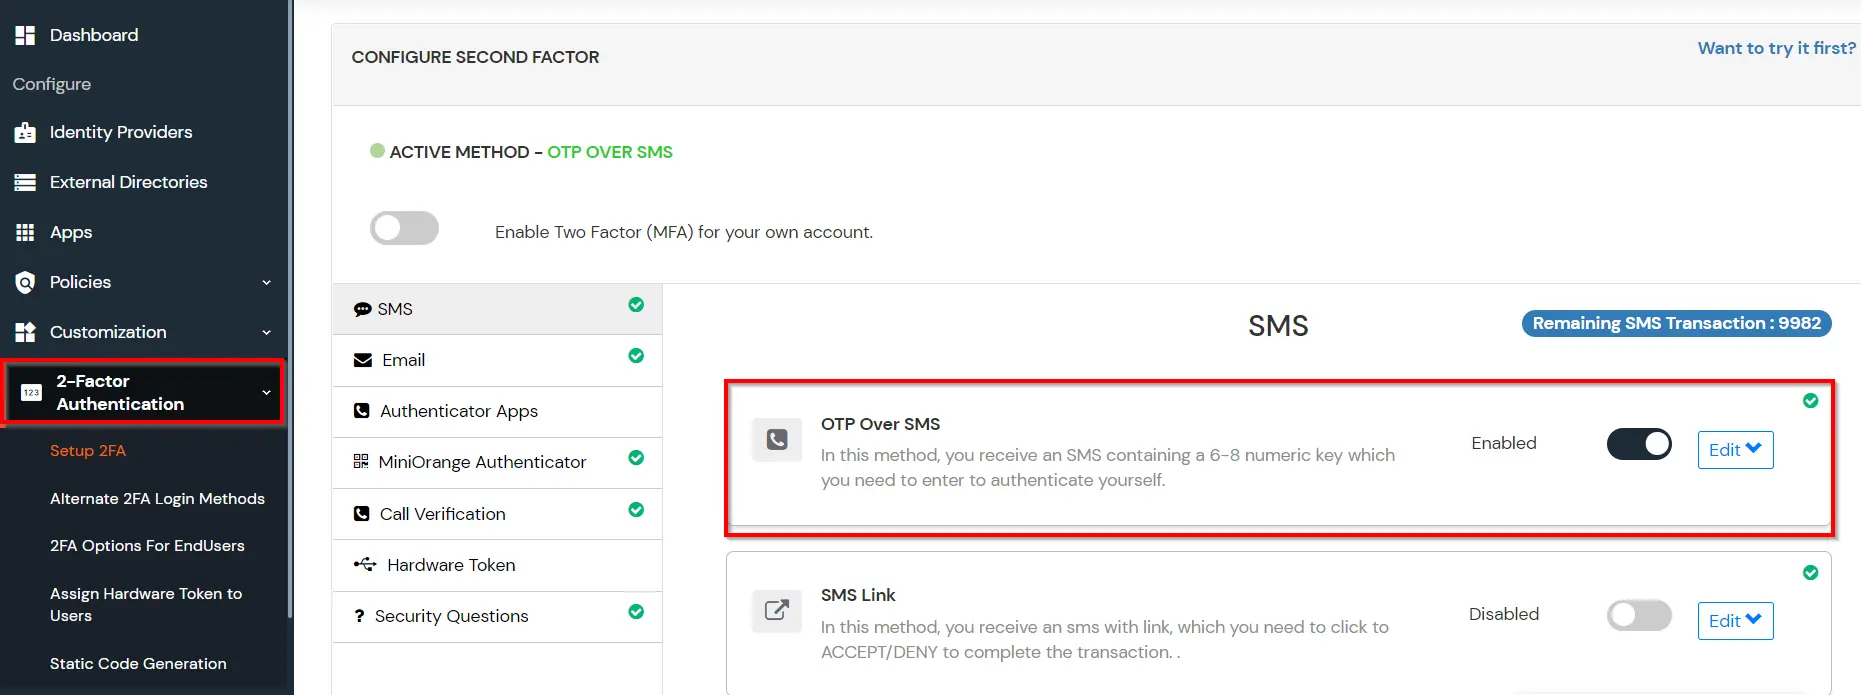
- Browse through the Second factor options and choose an appropriate method to be used by end user during login.
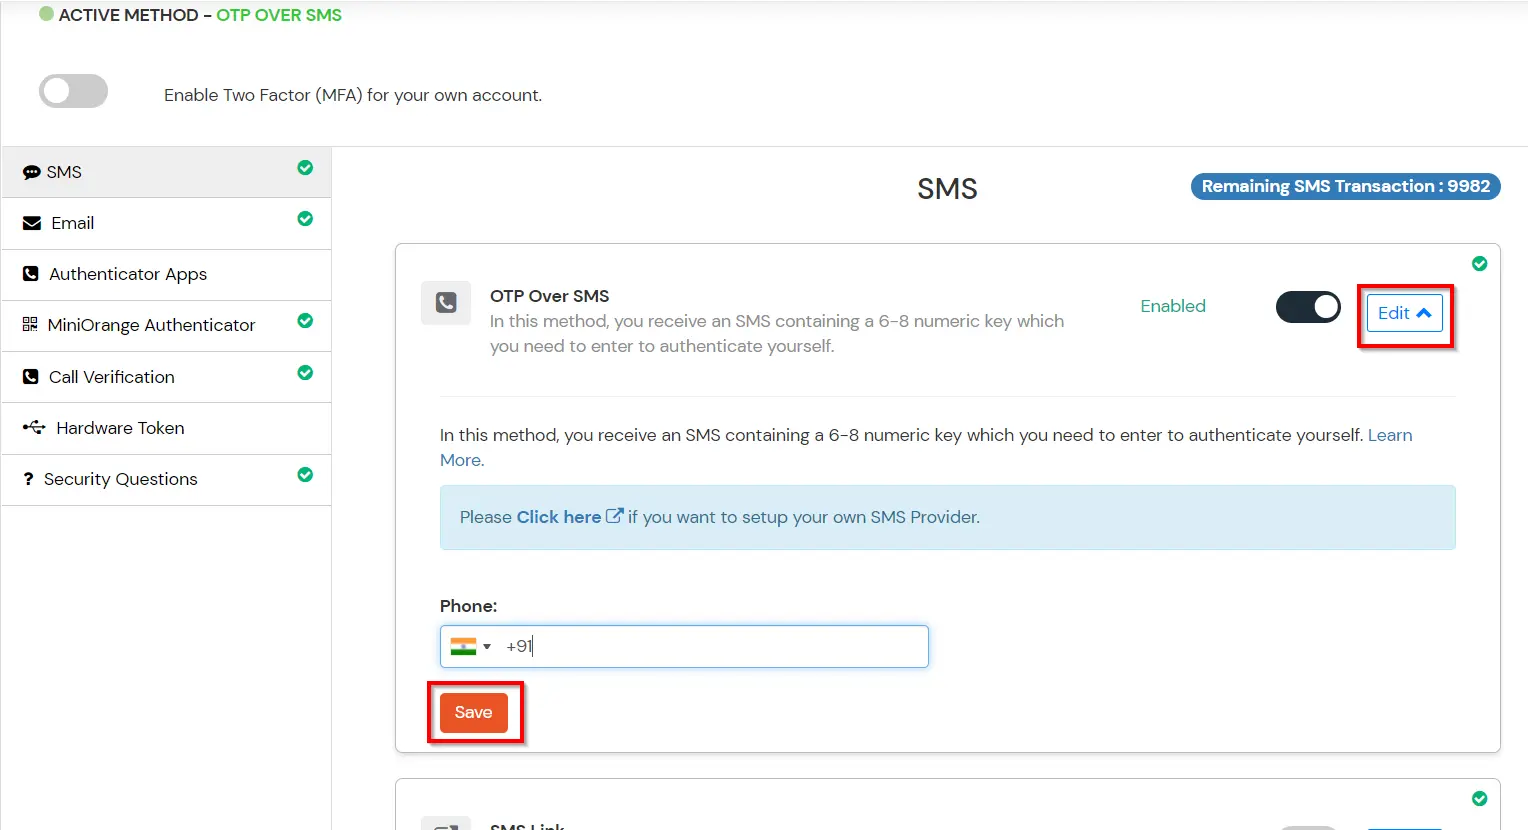
- For now, we have selected the "OTP OVER SMS"as our 2FA method. You can explore the guide to setup other 2FA methods.
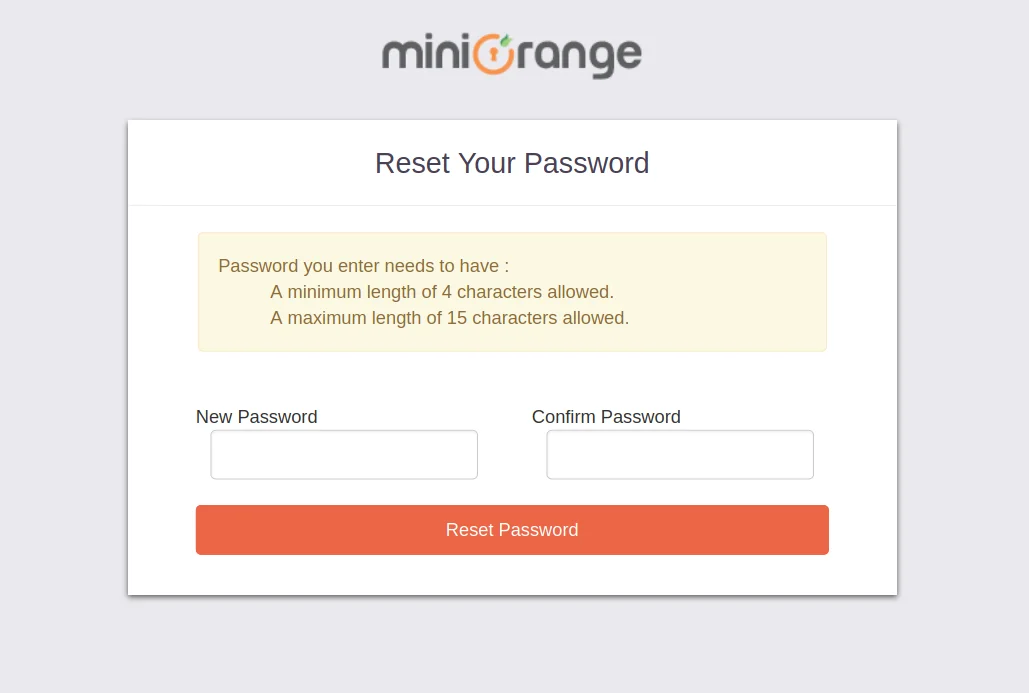
- Enable the OTP over SMS if you have your phone number added under your profile section else click on Edit button.
- Enter you Phone Number along with the necessary country code and click on the SAVE below.
4. Configure Your User Directory (Optional)
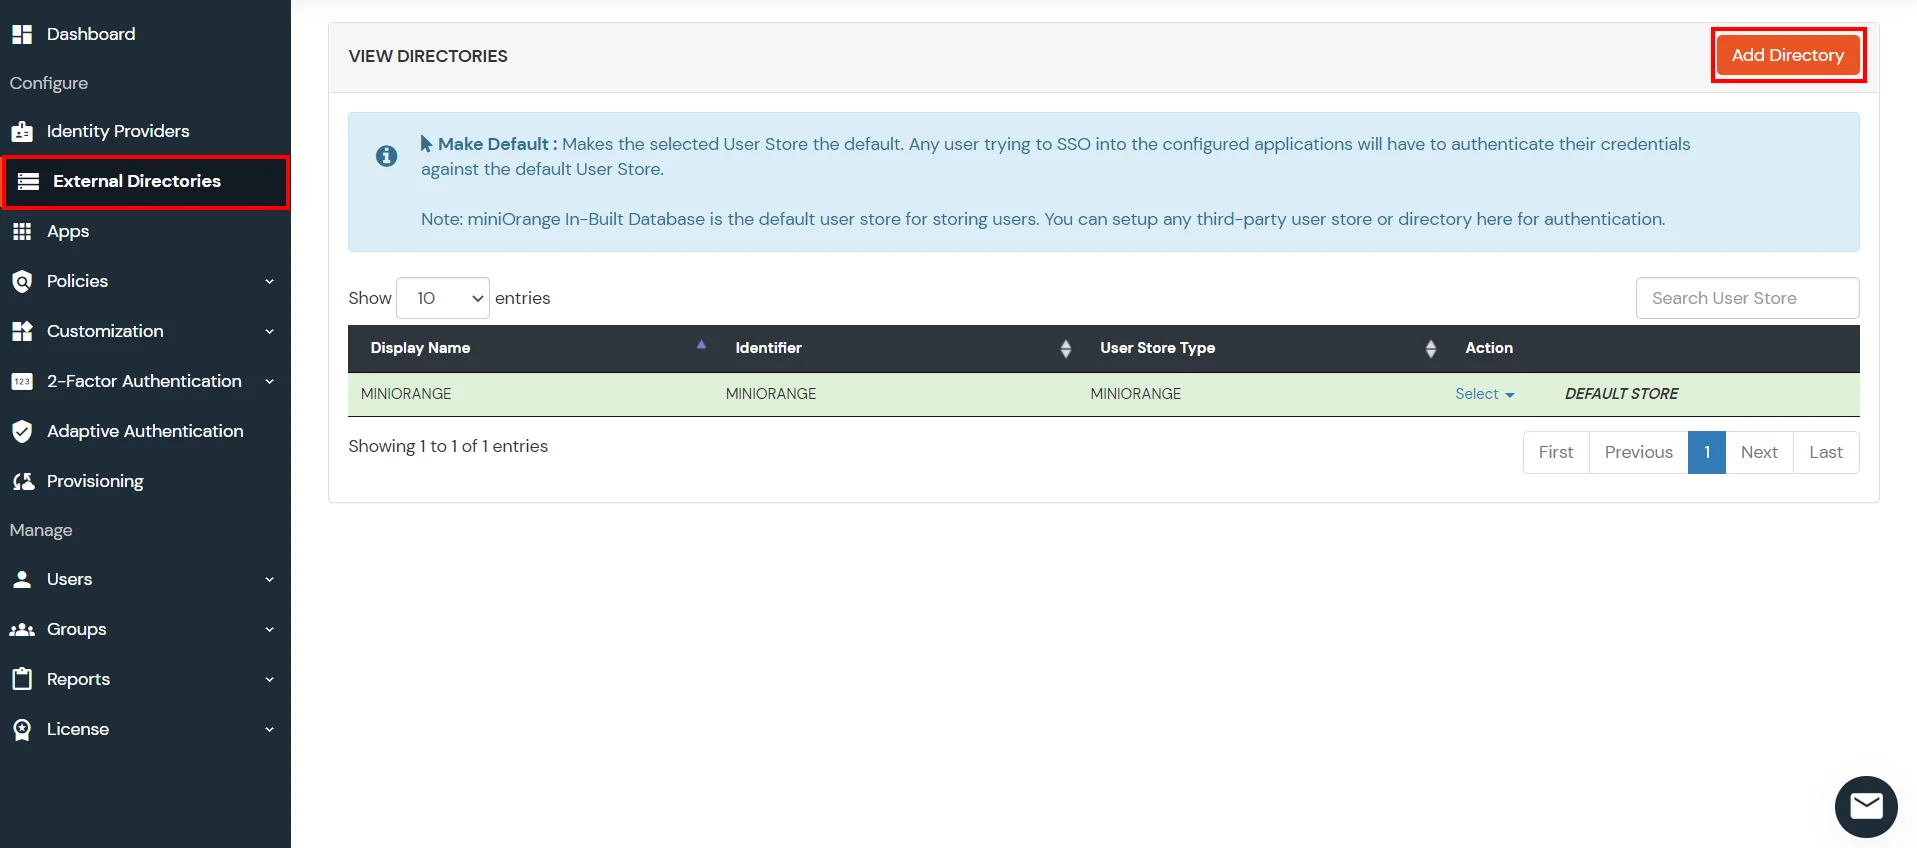
miniOrange provides user authentication from various external sources, which can be Directories (like ADFS, Microsoft Active Directory, Microsoft Entra ID, OpenLDAP, Google, AWS Cognito etc), Identity Providers (like Okta, Shibboleth, Ping, OneLogin, KeyCloak), Databases (like MySQL, Maria DB, PostgreSQL) and many more. You can configure your existing directory/user store or add users in miniOrange.
- Click on Identity Providers >> Add Identity Provider in the left menu of the dashboard
- In Choose Identity Provider, select AD/LDAP Directories from the dropdown.

- Then search for AD/LDAP and click it.
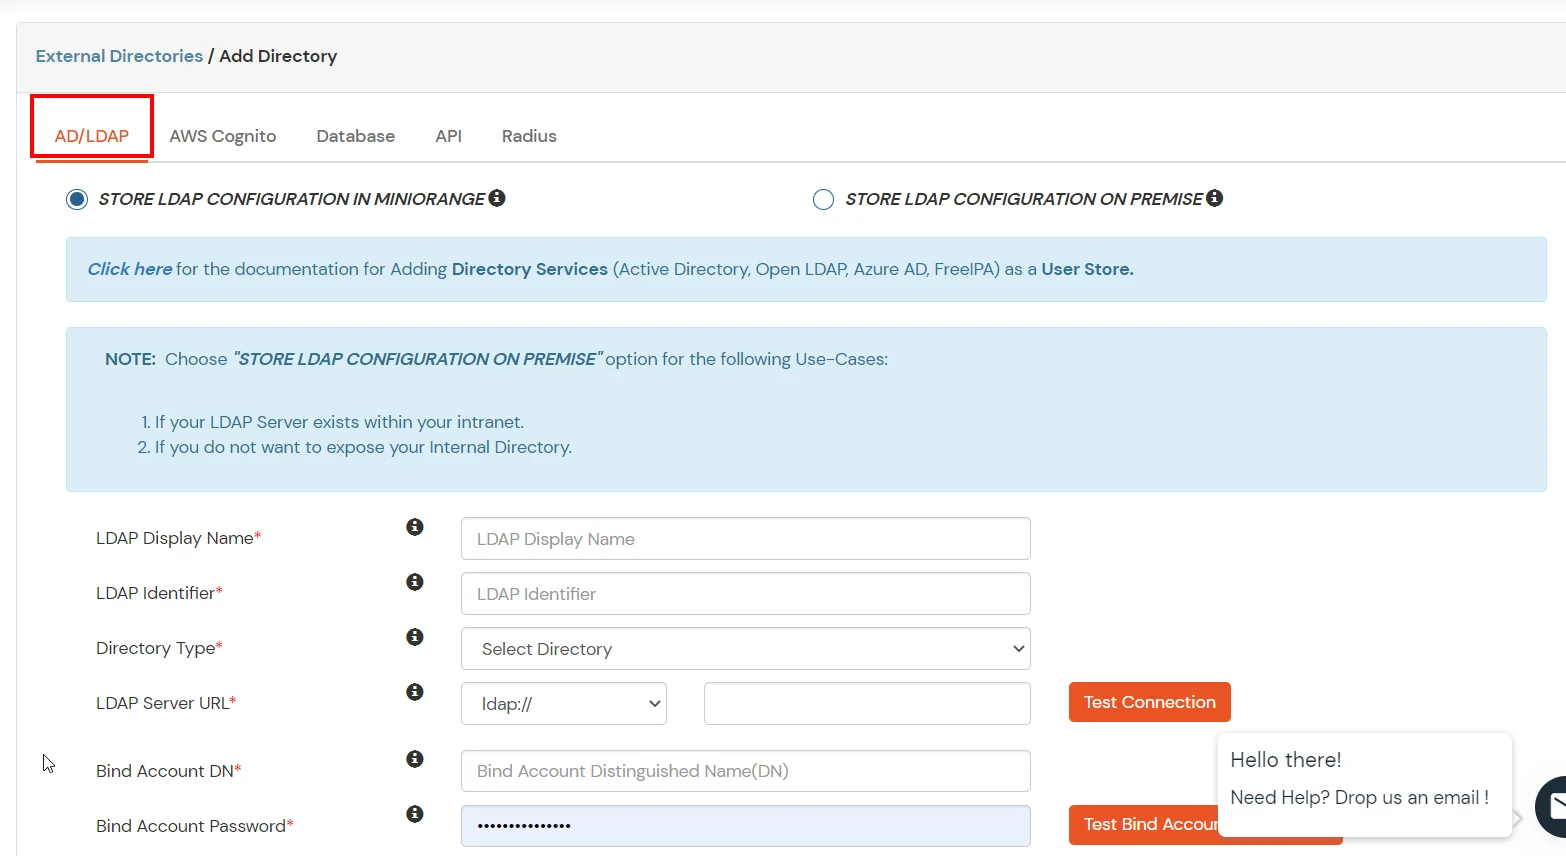
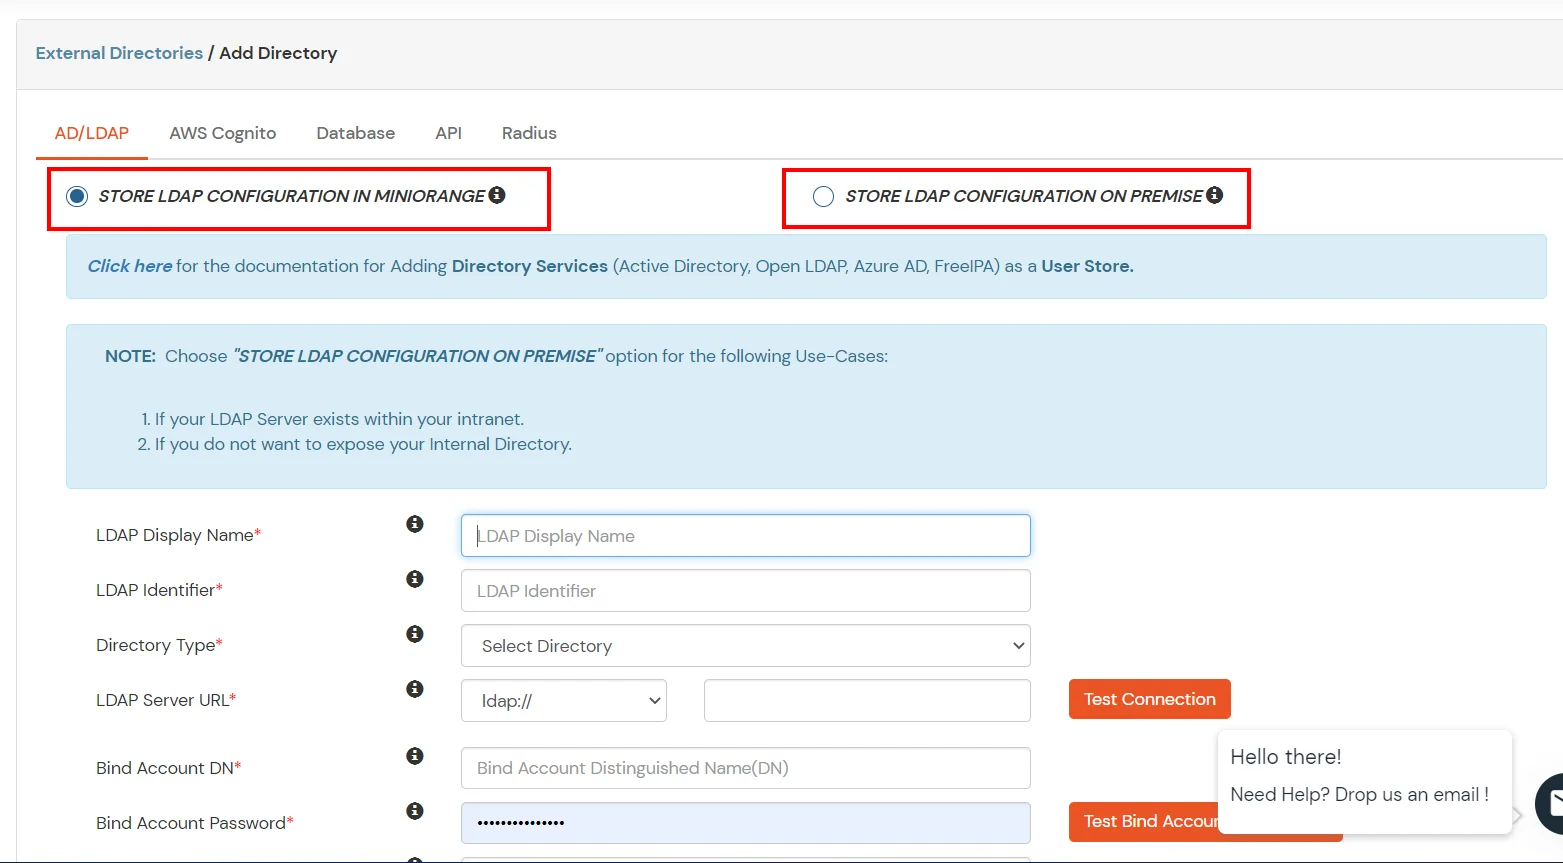
- STORE LDAP CONFIGURATION IN MINIORANGE: Choose this option if you want to keep your configuration in miniOrange. If the active directory is behind a firewall, you will need to open the firewall to allow incoming requests to your AD.
- STORE LDAP CONFIGURATION ON PREMISE: Choose this option if you want to keep your configuration in your premise and only allow access to AD inside premises. You will have to download and install miniOrange gateway on your premise.
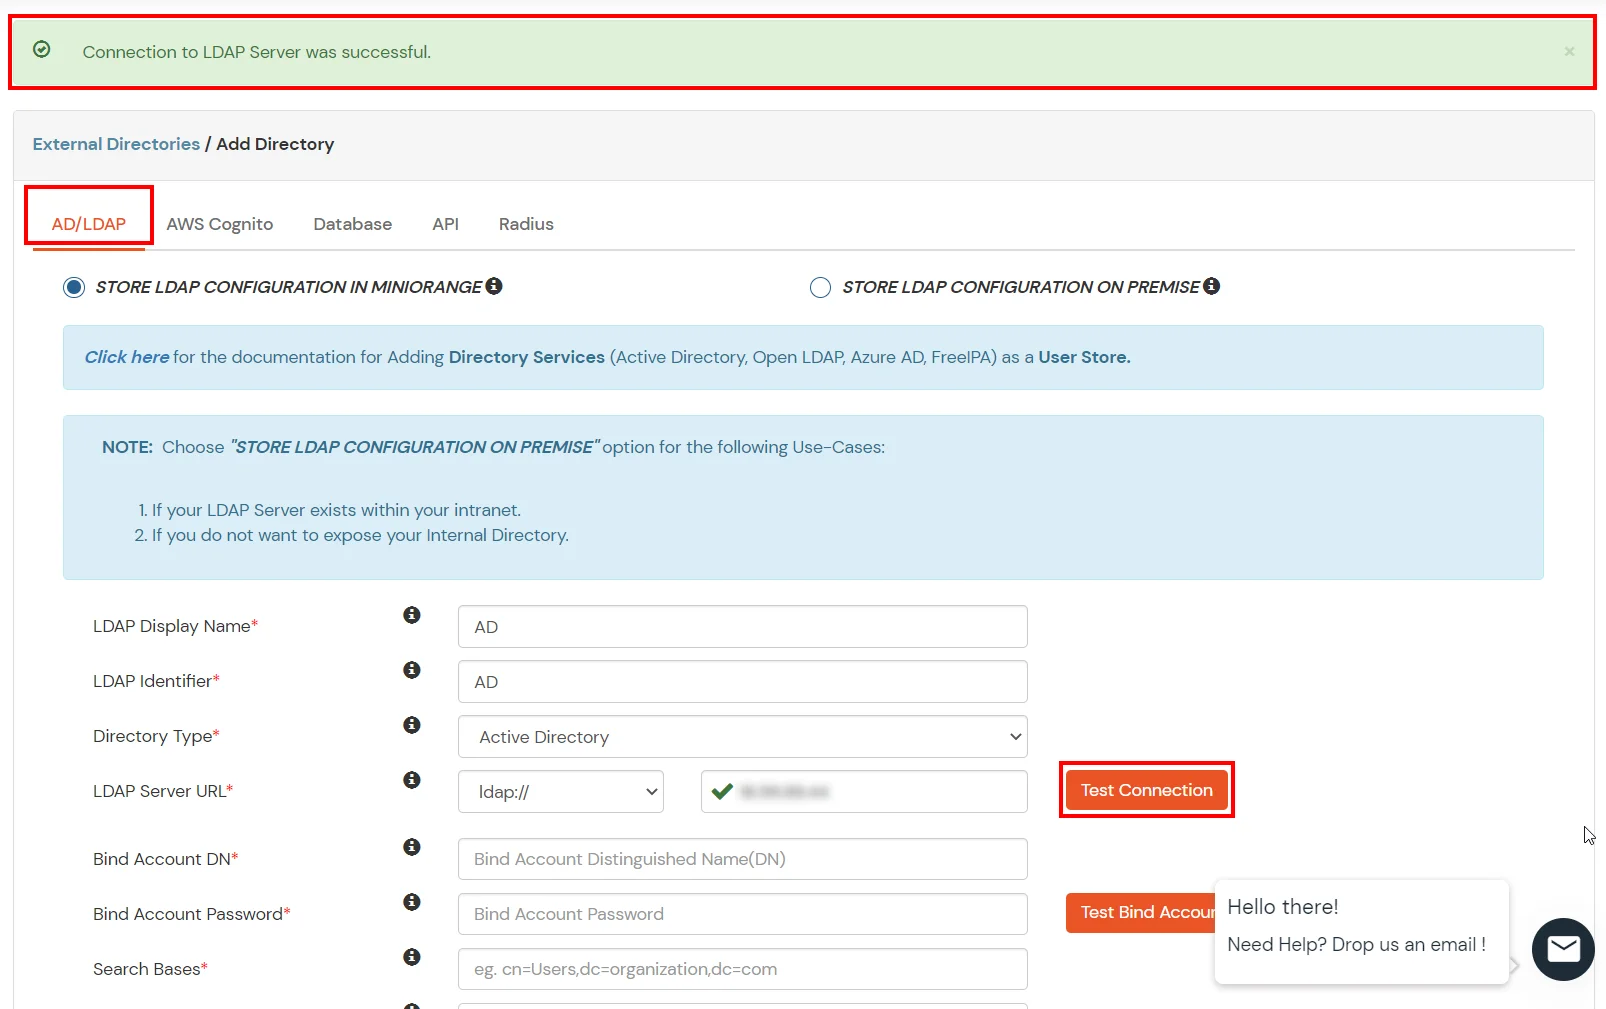
- Enter AD/LDAP Display Name and Identifier name.
- Select Directory Type as Active Directory.
- Enter the LDAP Server URL or IP Address against the LDAP Server URL field.
- Click on the Test Connection button to verify if you have made a successful connection with your LDAP server.
- In Active Directory, go to the properties of user containers/OU's and search for the Distinguished Name attribute. The bind account should have minimum required read privileges in Active Directory to allow directory lookups. If the use case involves provisioning (such as creating, updating, or deleting users or groups), the account must also be granted appropriate write permissions.
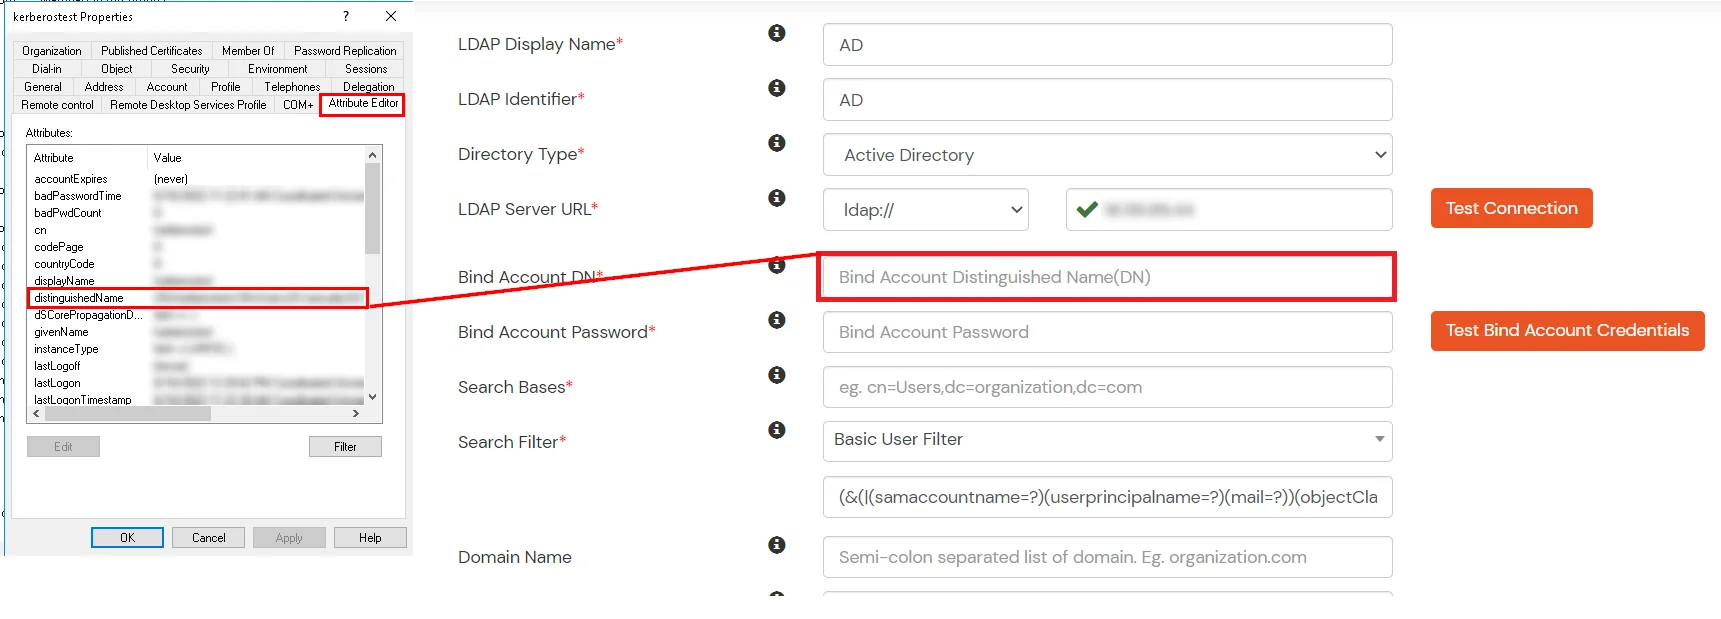
- Enter the valid Bind account Password.
- Click on the Test Bind Account Credentials button to verify your LDAP Bind credentials for LDAP connection.
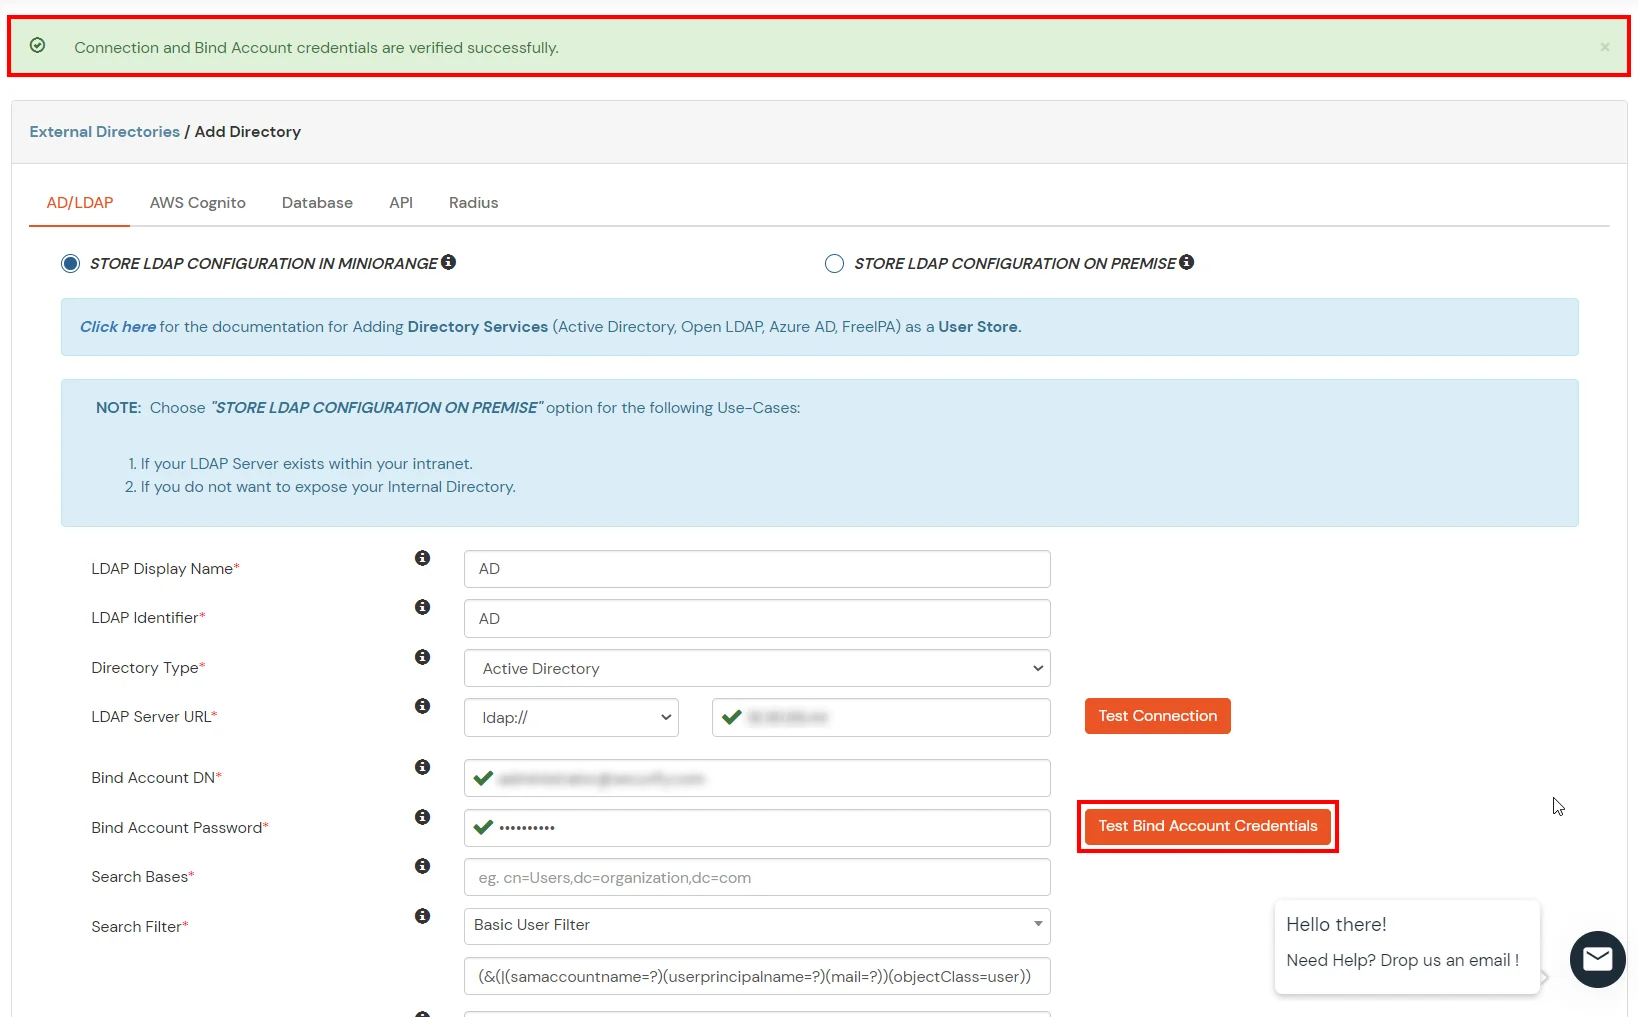
- Search Base is the location in the directory where the search for a user begins. You will get this from the same place you got your Distinguished name.
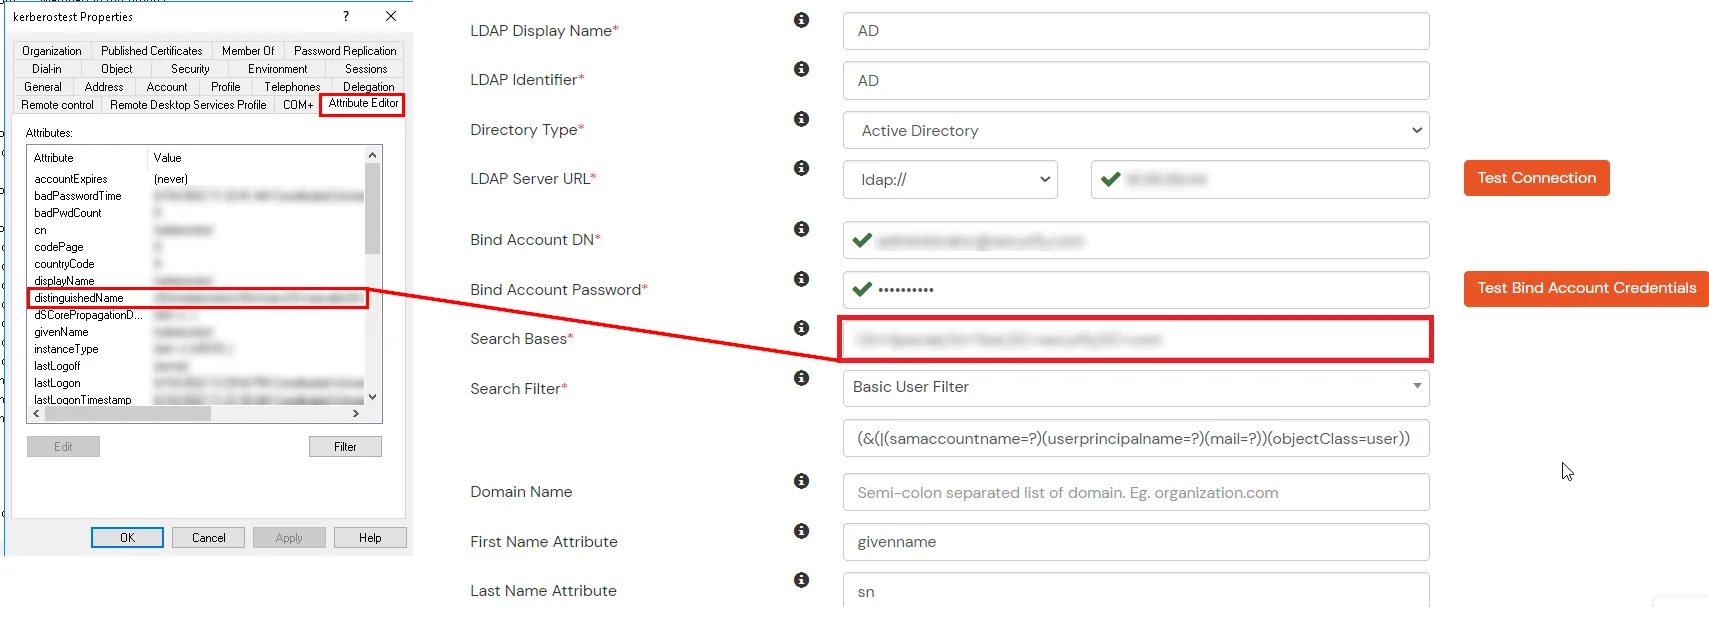
- Select a suitable Search filter from the drop-down menu. If you use User in Single Group Filter or User in Multiple Group Filter, replace the <group-dn> in the search filter with the distinguished name of the group in which your users are present. To use custom Search Filter select "Write your Custom Filter" option and customize it accordingly.
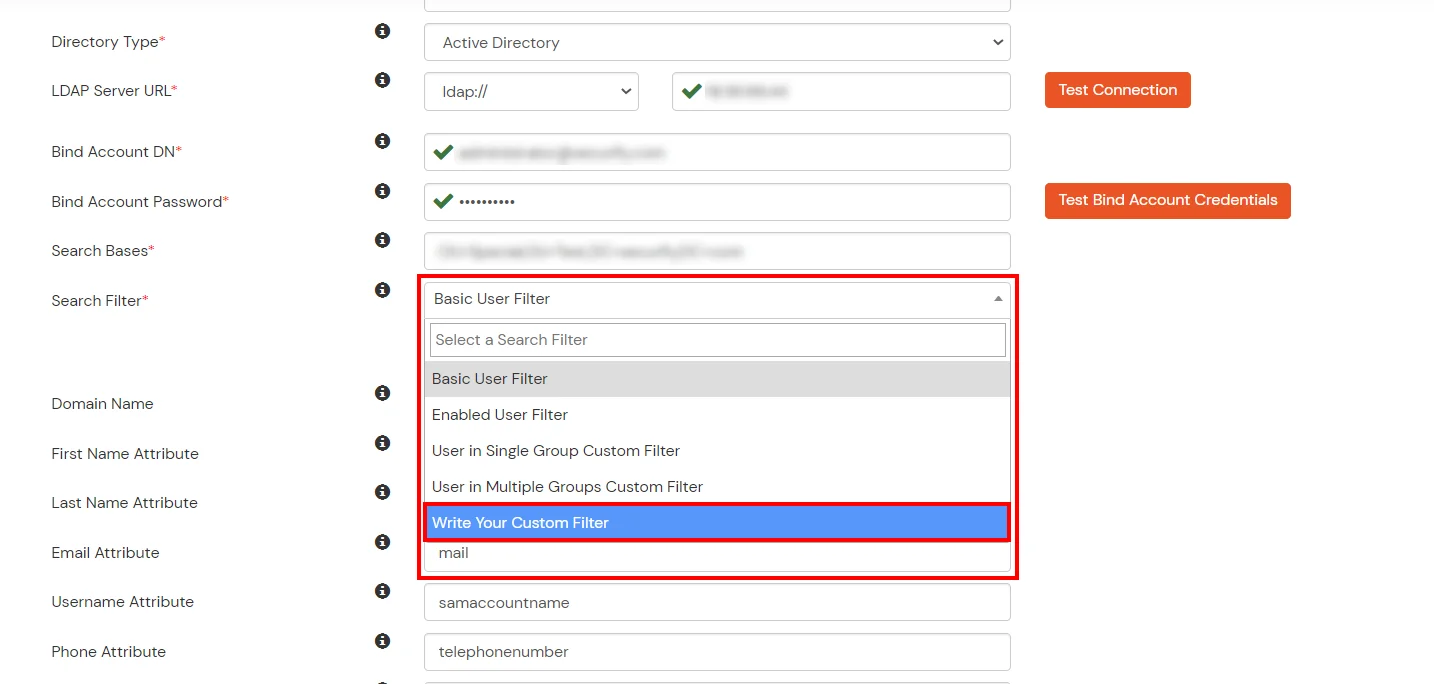
- Click on the Next button, or go to the Login Options tab.
- You can also configure following options while setting up AD. Enable Activate LDAP in order to authenticate users from AD/LDAP. Click on the Next button to add user store.
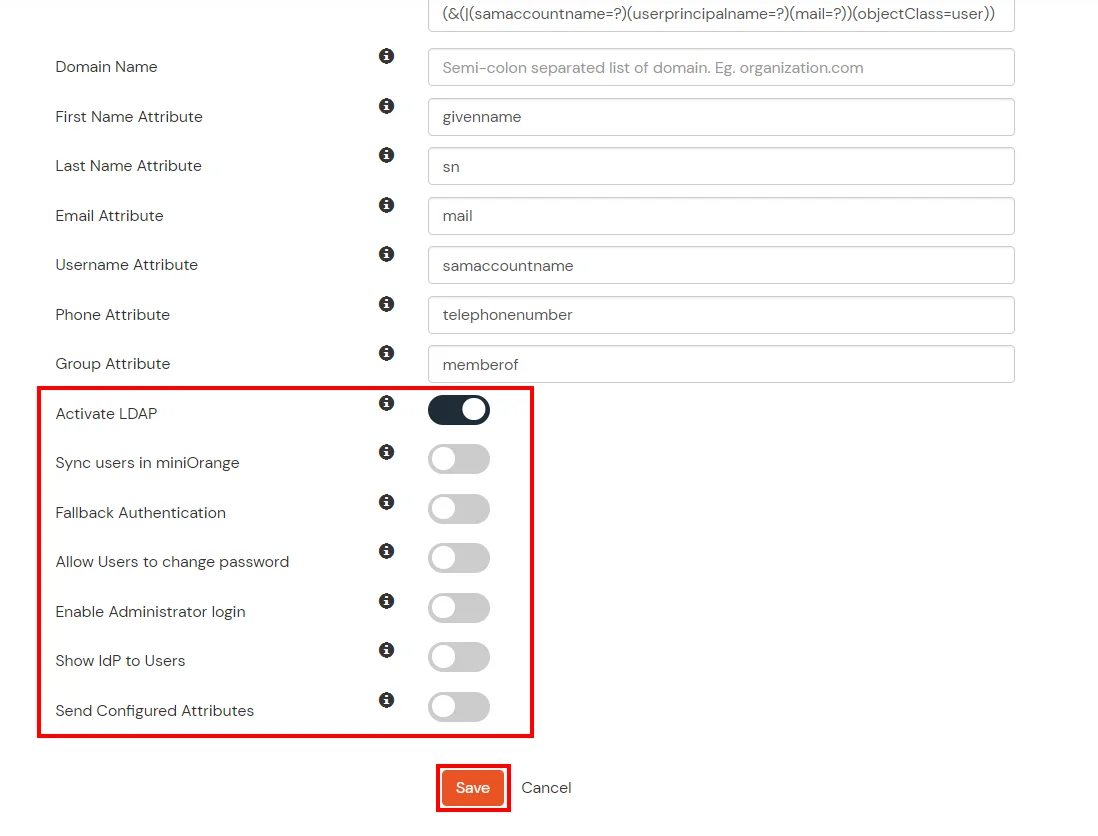
Here's the list of the attributes and what it does when we enable it. You can enable/disable accordingly.
| Attribute |
Description |
| Activate LDAP |
All user authentications will be done with LDAP credentials if you Activate it |
| Fallback Authentication |
If LDAP credentials fail then user will be authenticated through miniOrange |
| Enable administrator login |
On enabling this, your miniOrange Administrator login authenticates using your LDAP server |
| Show IdP to users |
If you enable this option, this IdP will be visible to users |
| Sync users in miniOrange |
Users will be created in miniOrange after authentication with LDAP |
- Click on the Next button, or go to the Attributes tab.
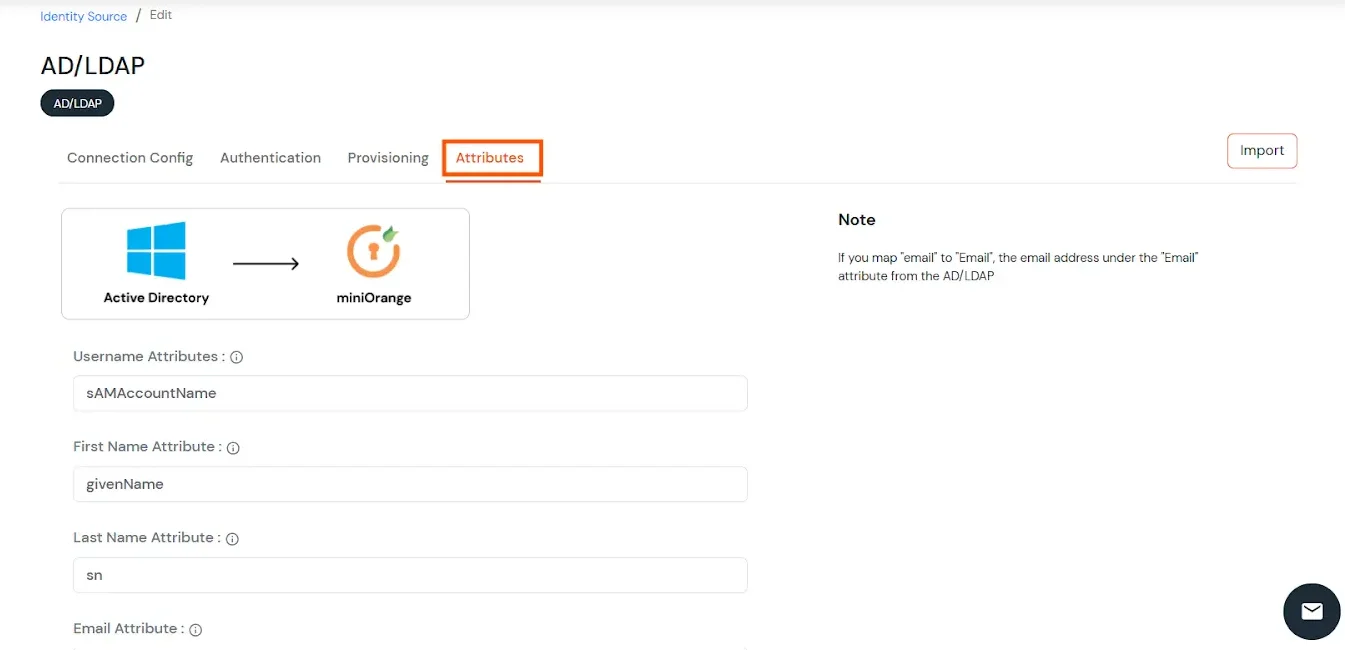
Attributes Mapping from AD
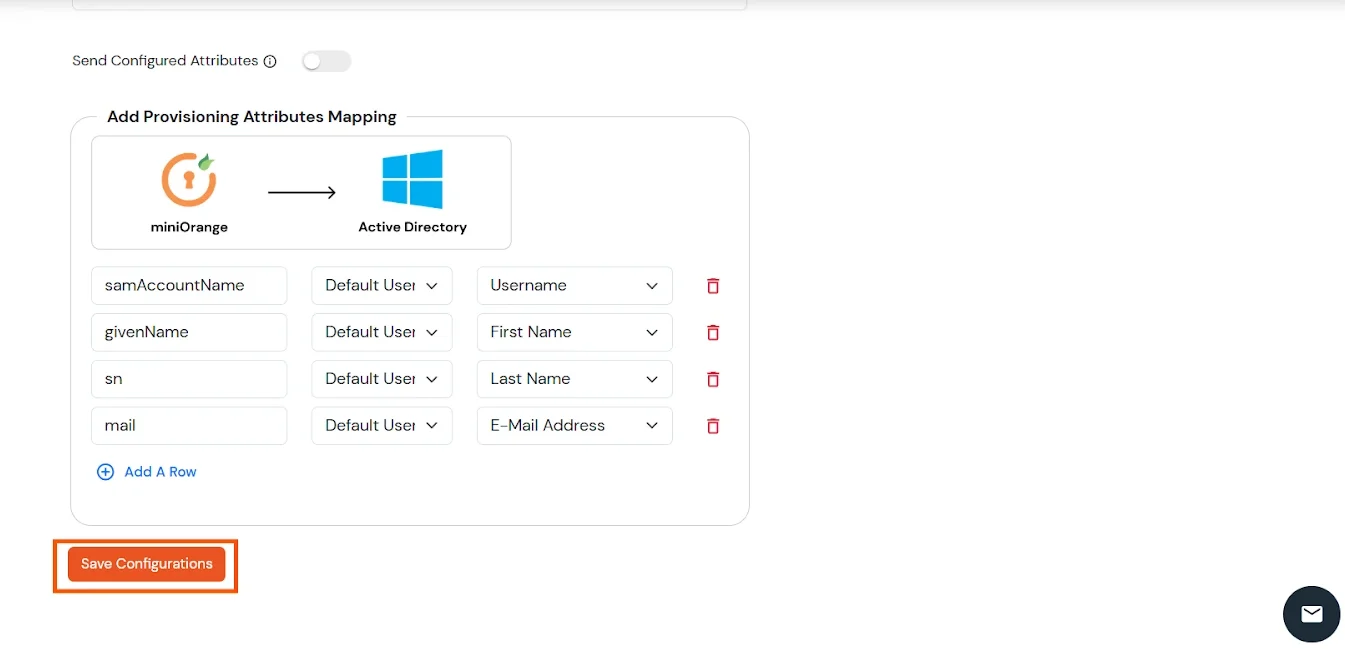
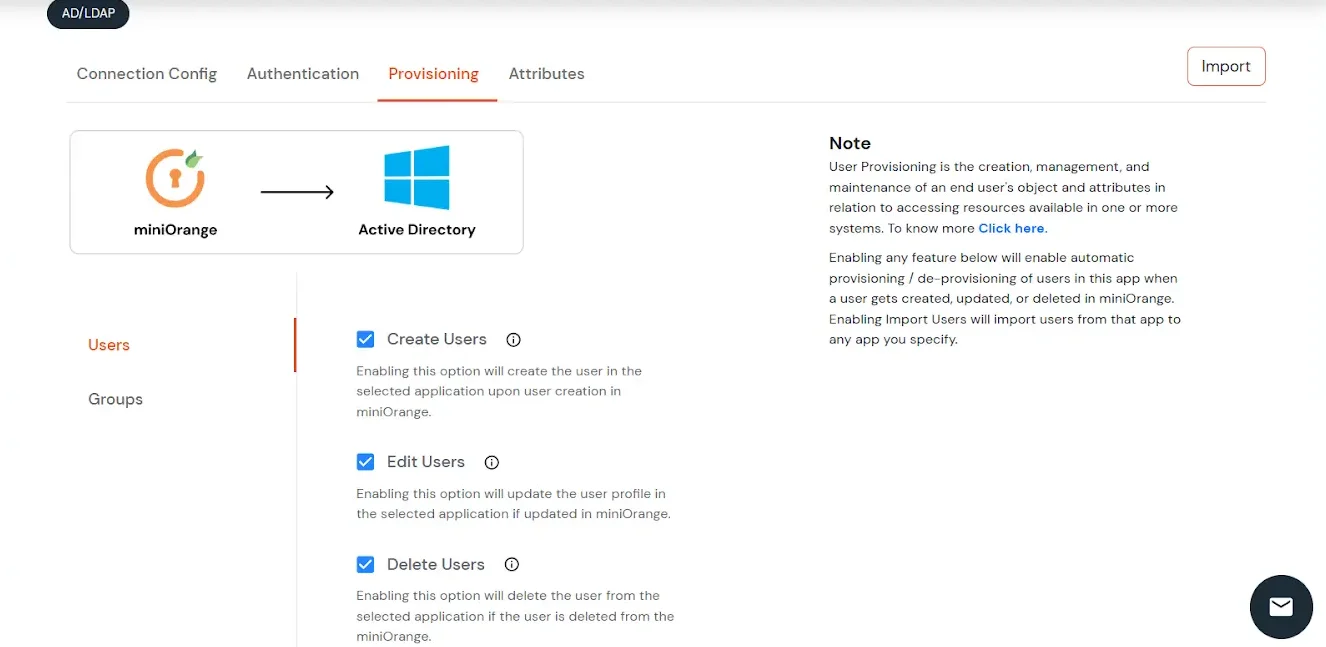
User Import and Provisioning from AD
- If you want to set up provisioning, click here for detailed information. We will skip this step for now.
Test Connections
- You will see a list of directories under Identity Providers. From the dropdown, select AD/LDAP Directories, search for your configured directory, click the three dots next to it, and select Test Connection.
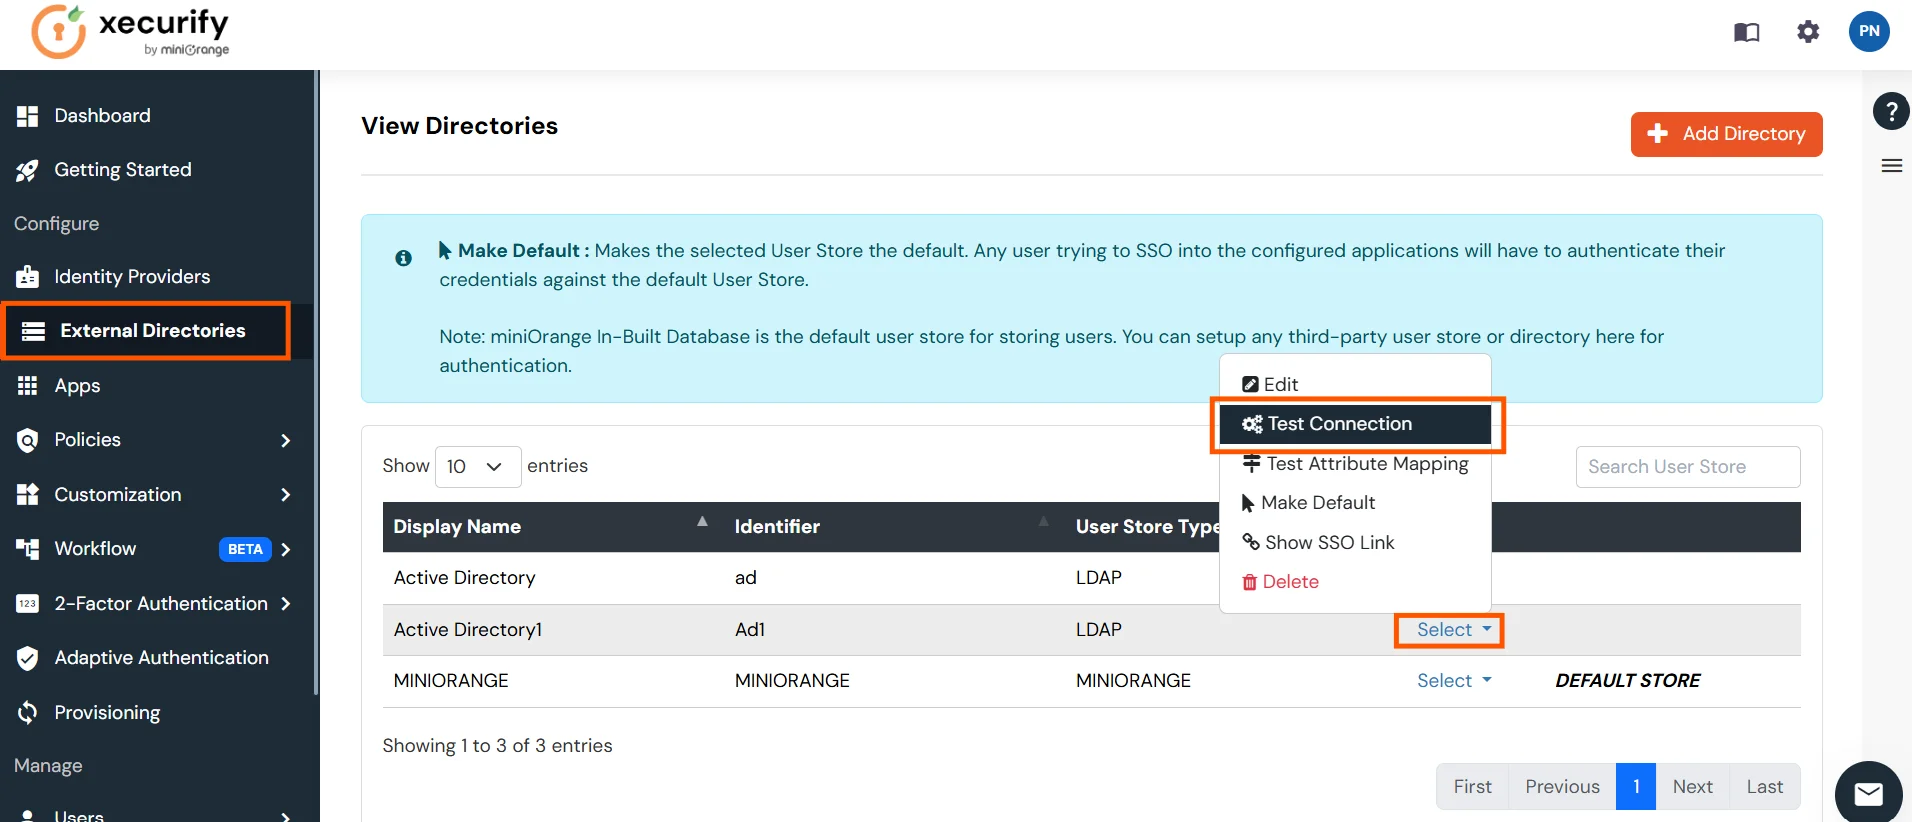
- A pop-up appears prompting you to enter a username and password to verify your LDAP configuration.
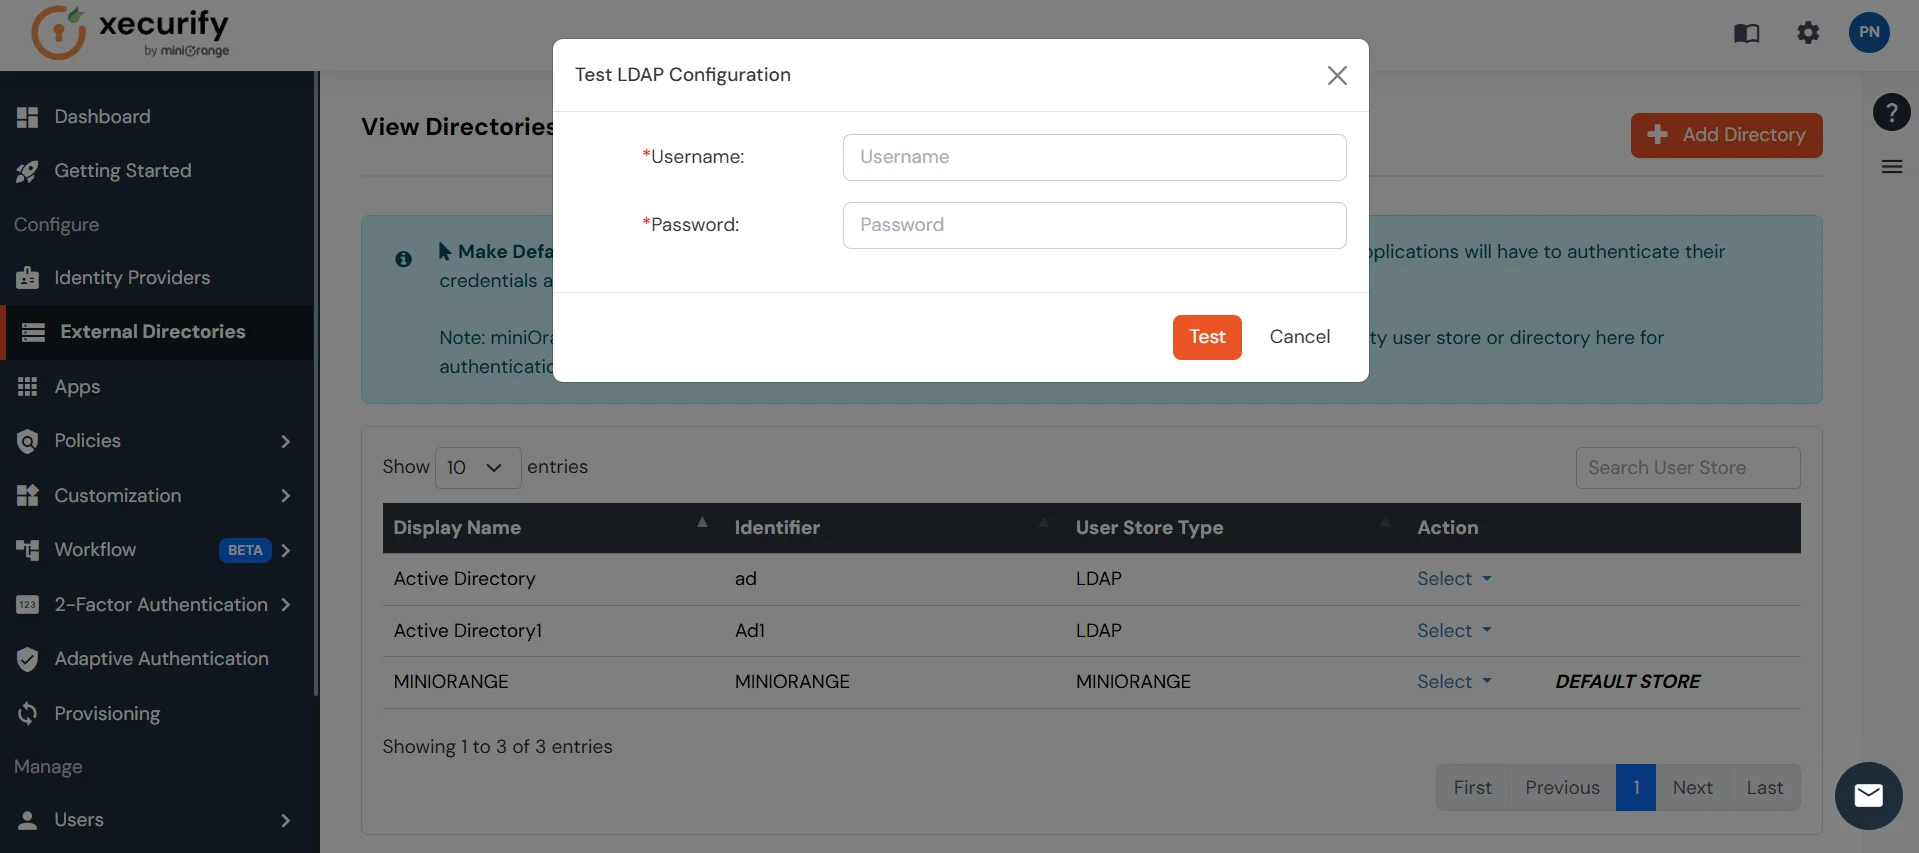
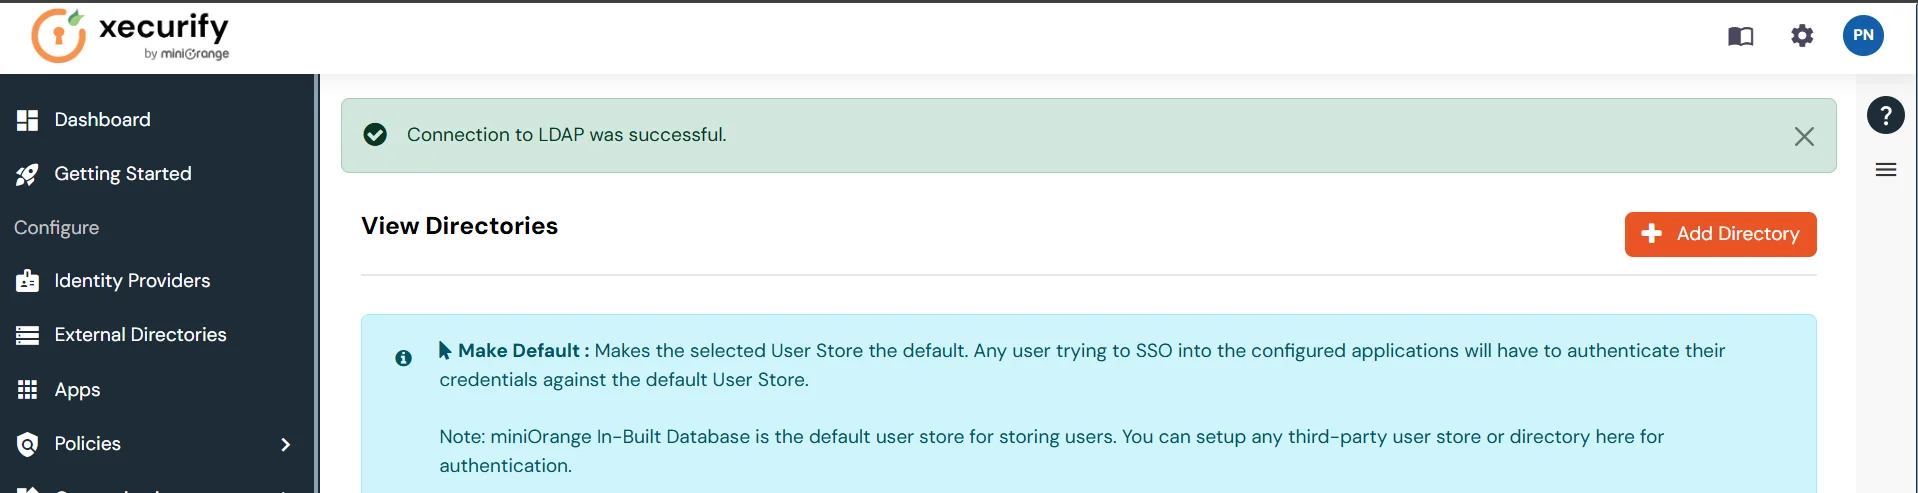
- On Successful connection with LDAP Server, a success message is shown.
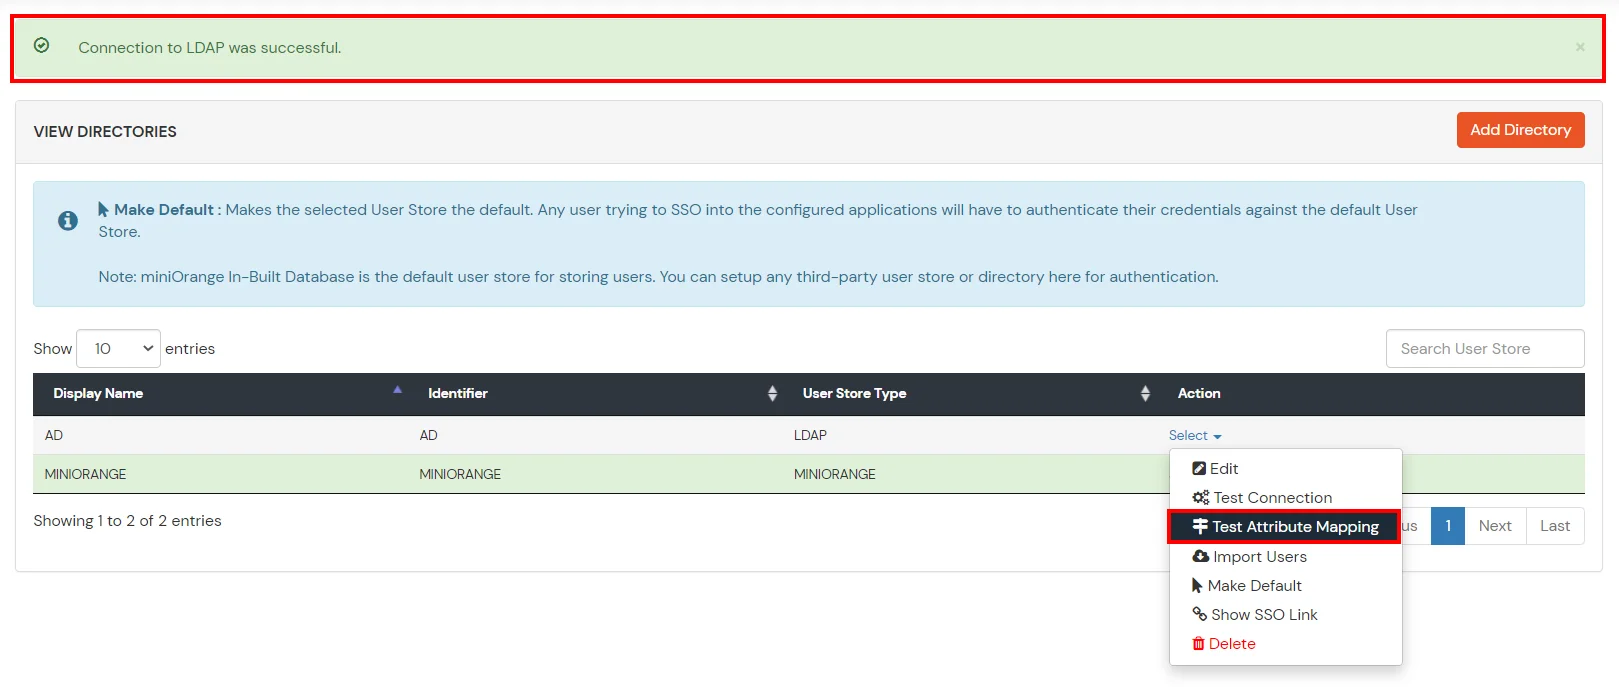
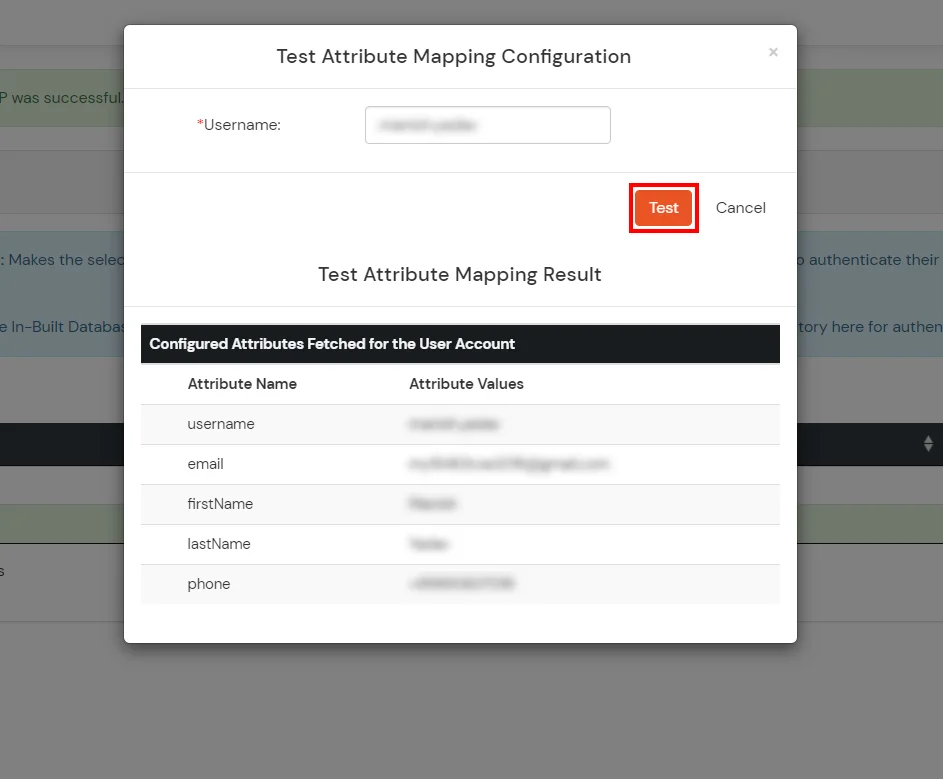
Test Attribute Mapping
- You will see a list of directories under Identity Providers. From the dropdown, select AD/LDAP Directories, search for your configured directory, click the three dots next to it, and select Test Attribute Mapping.
- A pop‑up appears to enter a username and click Test.
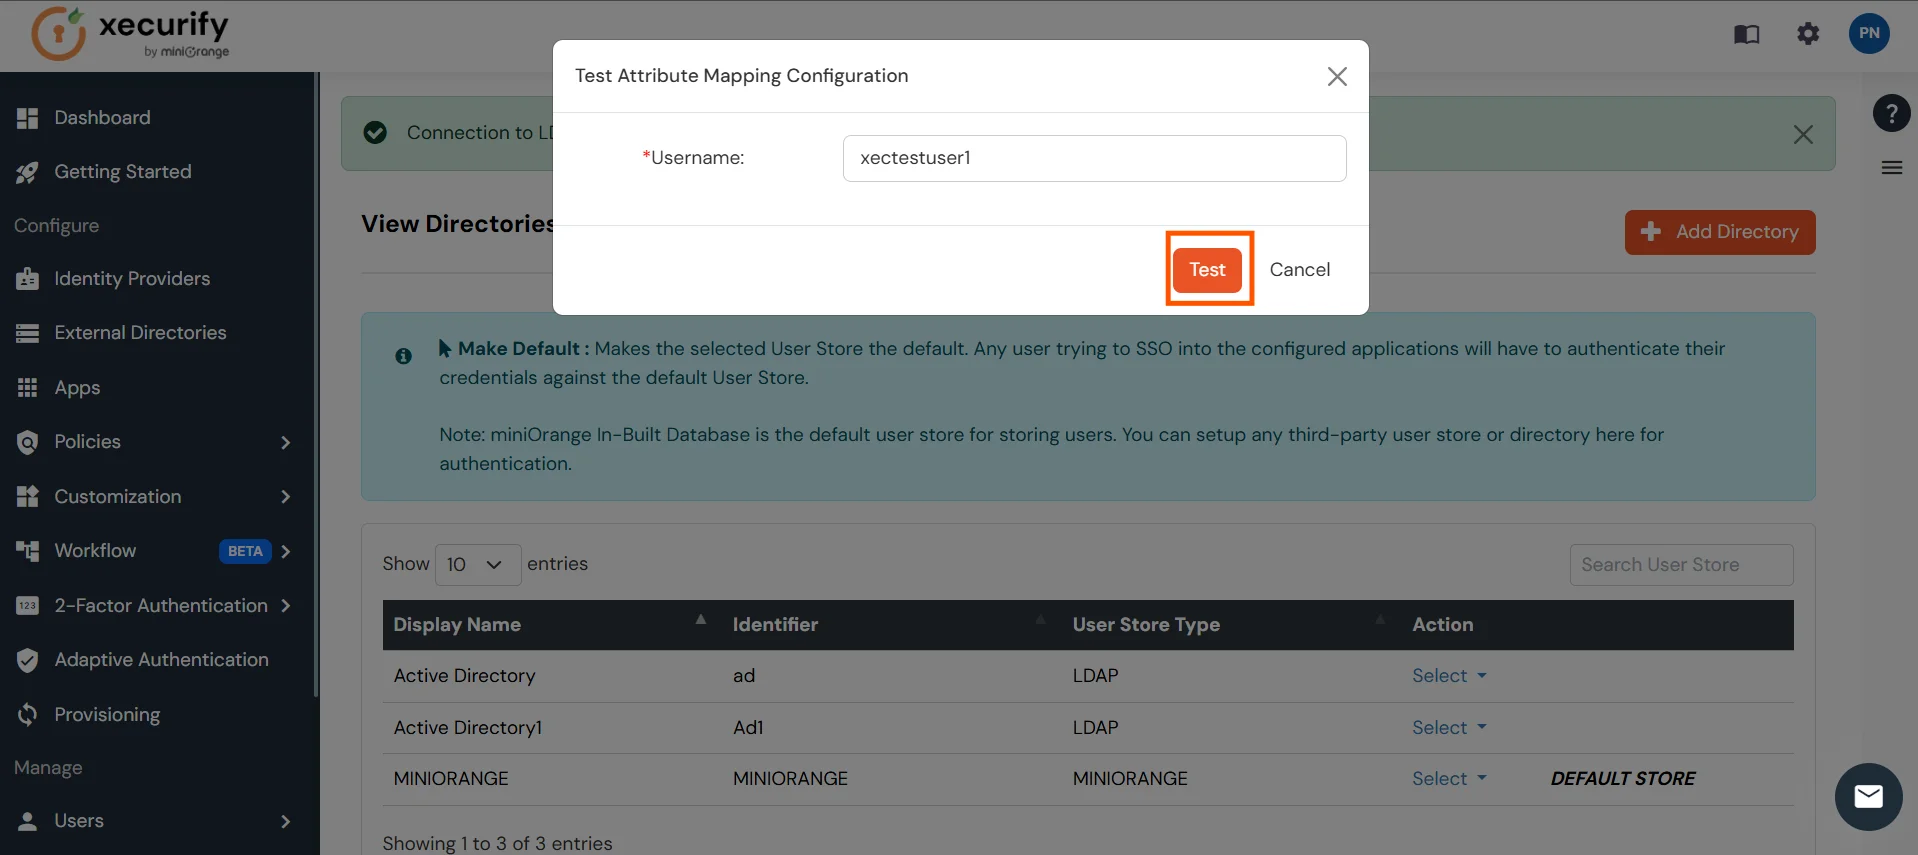
- The Test Attribute Mapping Result will be displayed.
Set up AD as External Directory configuration is complete.
Note: Refer our guide to setup LDAP on windows server.
miniOrange integrates with various external user sources such as directories, identity providers, and etc.
Further References