Hello there!
Need Help? We are right here!
Need Help? We are right here!
Search Results:
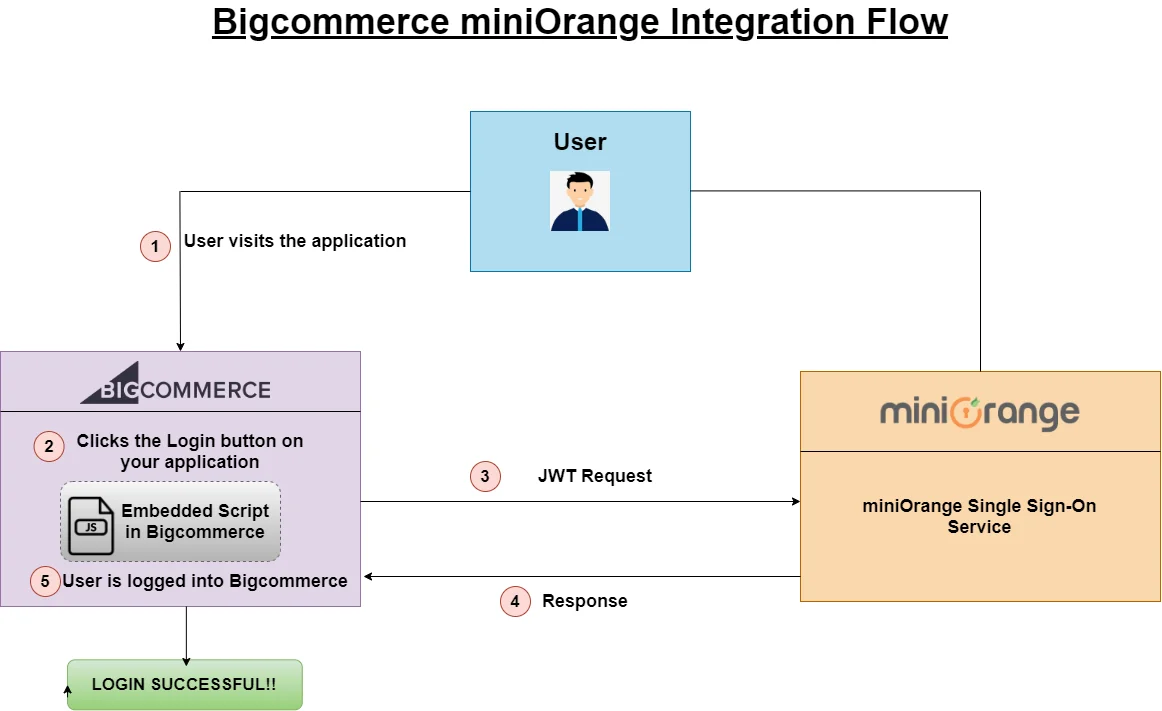
×Okta Single Sign-On (SSO) login for BigCommerce Store can be achieved by integrating miniOrange as Service Provider & Okta as SAML IDP (Identity Provider). Users can seamlessly access their BigCommerce Store along with other cloud apps/websites using existing Okta credentials. This allows organizations to securely access their BigCommerce Store and easily manage user access without migrating the users from the existing system. One-stop solution for - Centralized Management & Storage of customer data, Store to Store sync, Order status notification, Social login —> for your BigCommerce Store.
With BigCommerce SSO & CIAM features, you can:
Verified Technology Partner of BigCommerce
SSO + MFA Support for any BigCommerce Plan (Standard, Plus, Pro, Enterprise)
miniOrange offers free help through a consultation call with our System Engineers to Install or Setup BigCommerce SSO solution in your environment with 30-day free trial.
For this, you need to just send us an email at idpsupport@xecurify.com to book a slot and we'll help you in no time.
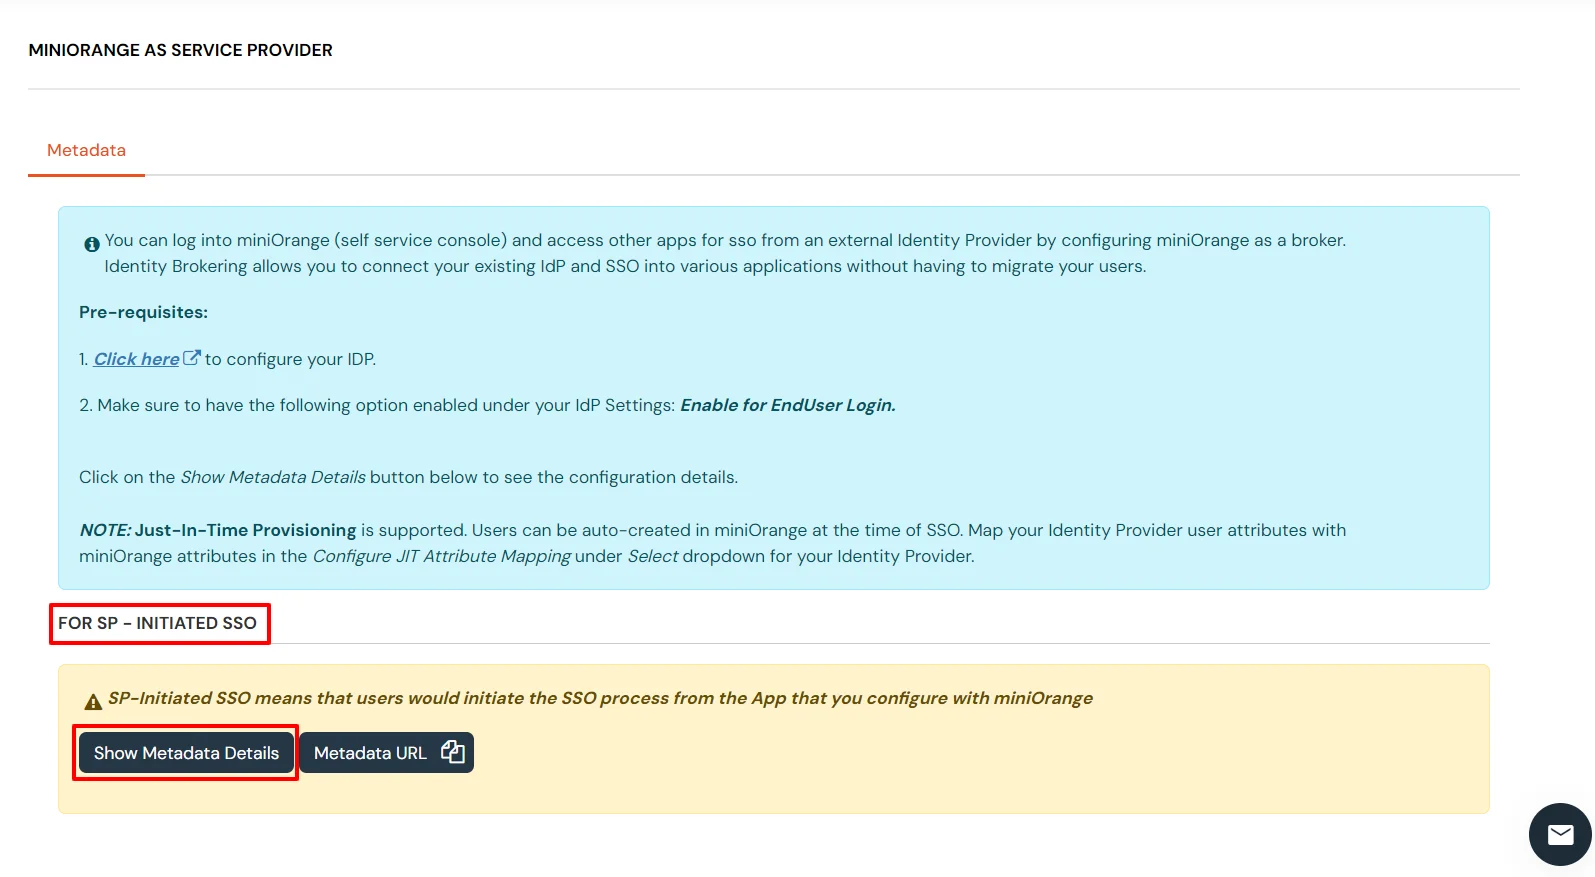
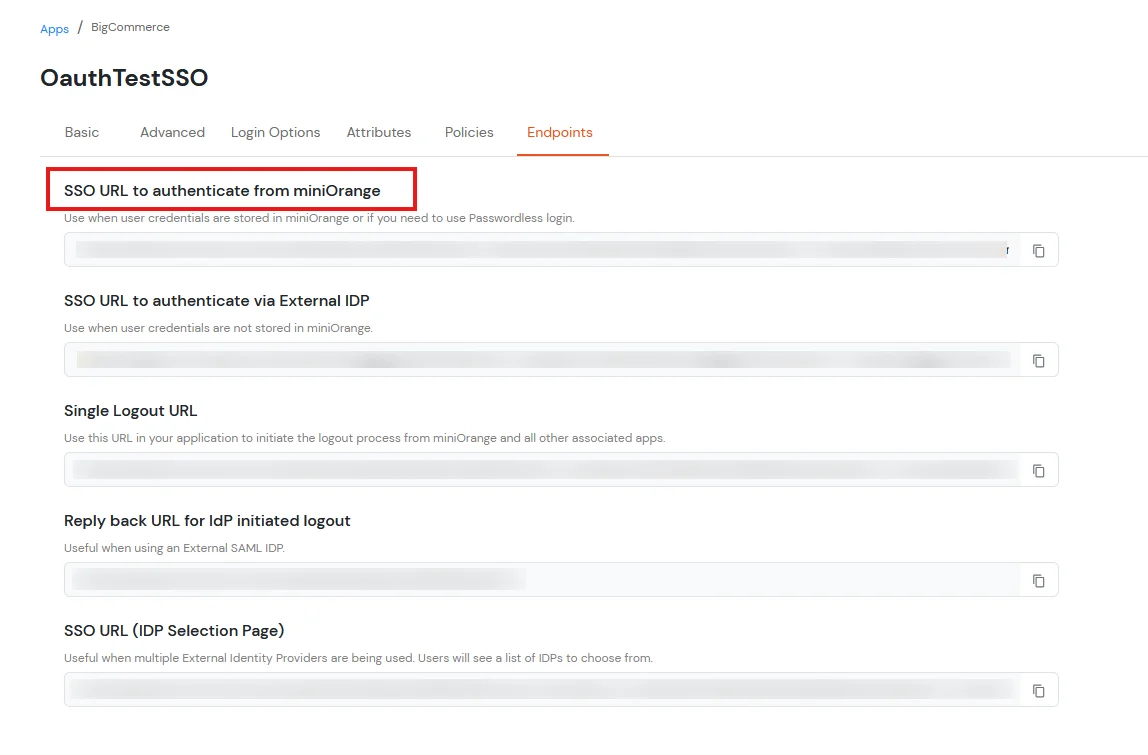
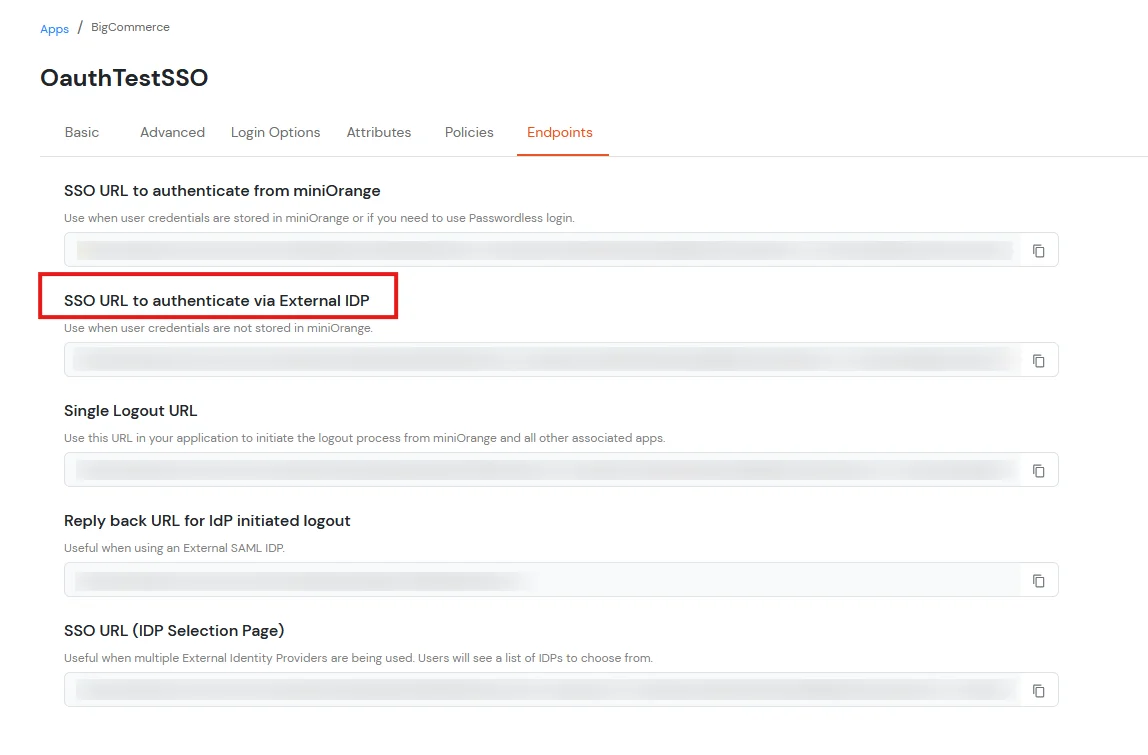
miniOrange provides user authentication from various external sources, which can be Directories (like ADFS, Microsoft Active Directory, OpenLDAP, AWS etc), Identity Providers (like Microsoft Entra ID, Okta, AWS), and many more. You can configure your existing directory/user store or add users in miniOrange.
Please make sure your organisation branding is already set under Customization >> Login and Registration Branding in the left menu of the dashboard.
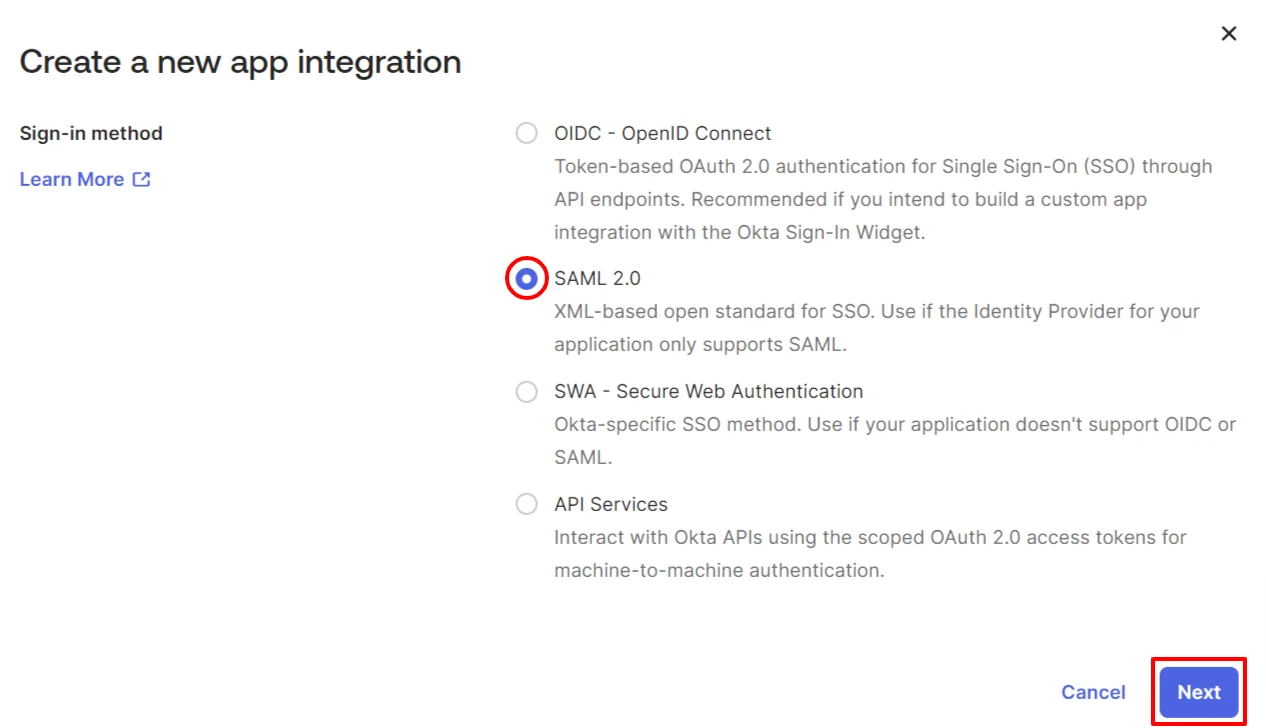
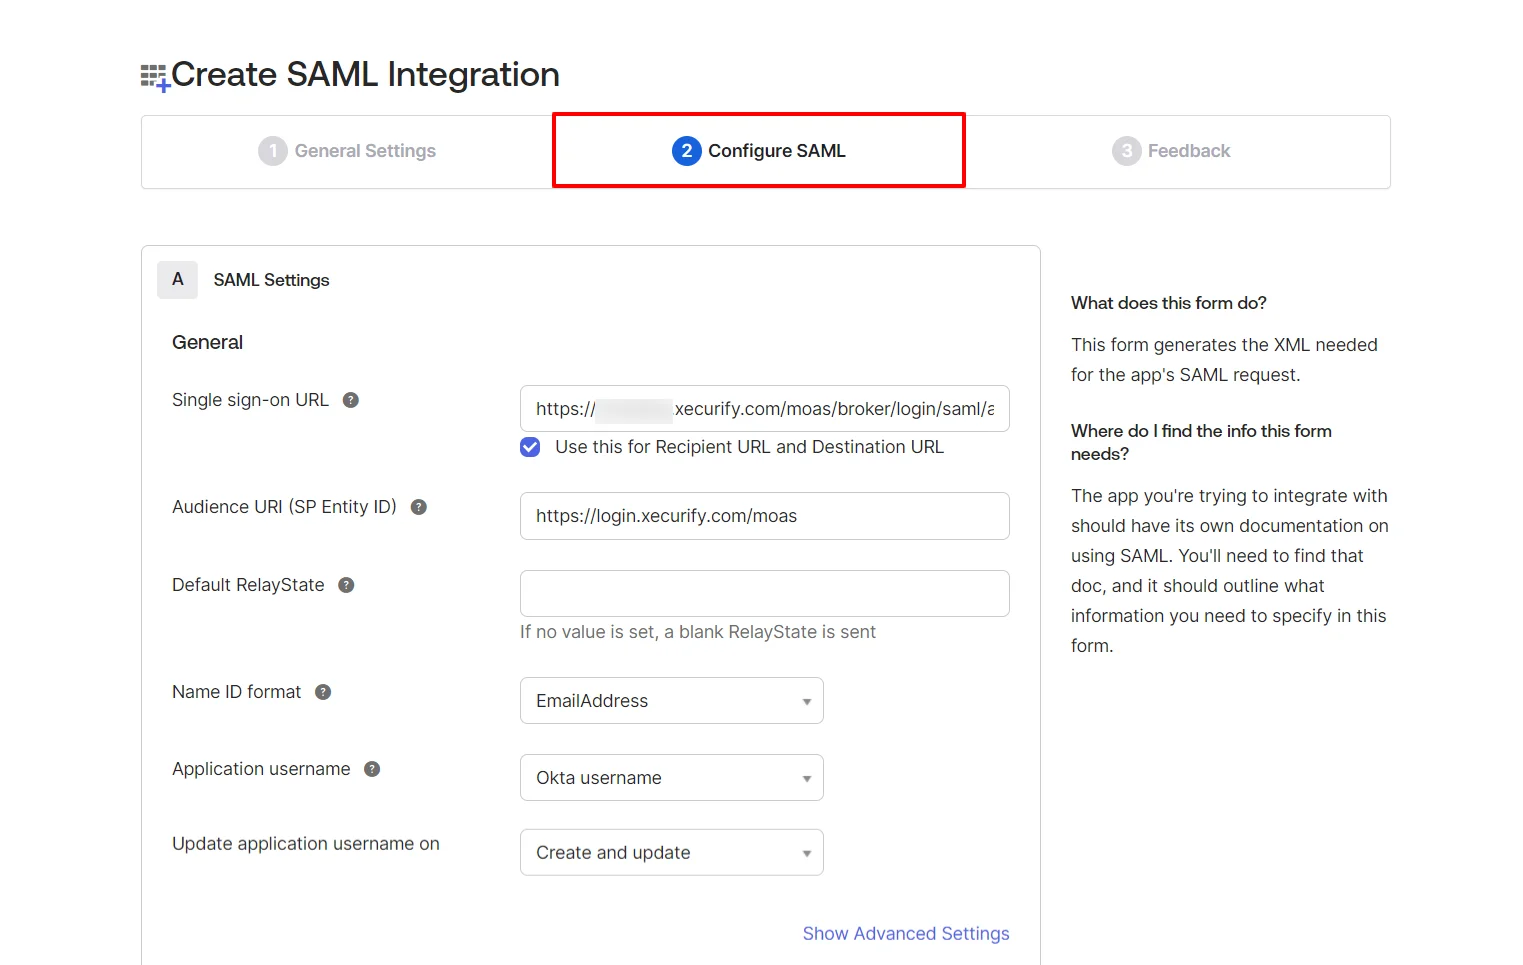
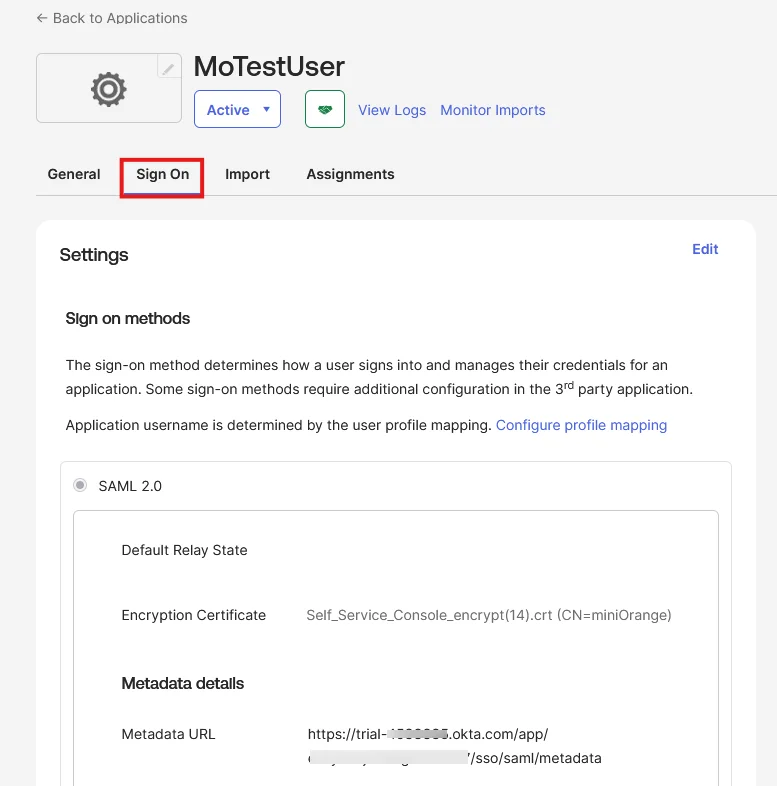
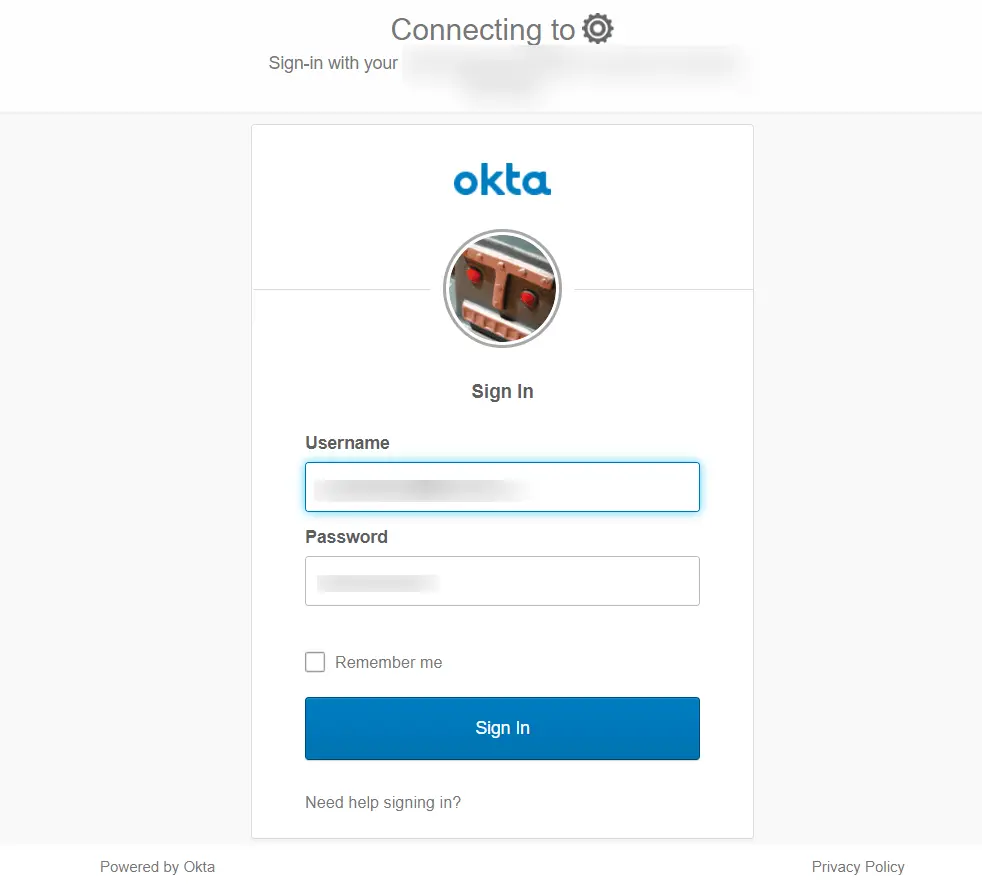
Note: Switch to the Classic UI from the Okta Developer Console by selecting Admin in the upper-right corner, then navigating to Developer Console > Classic UI.
https://okta-domain-name/admin/apps/add-apphttps://trial-4533335-admin.okta.com/admin/apps/active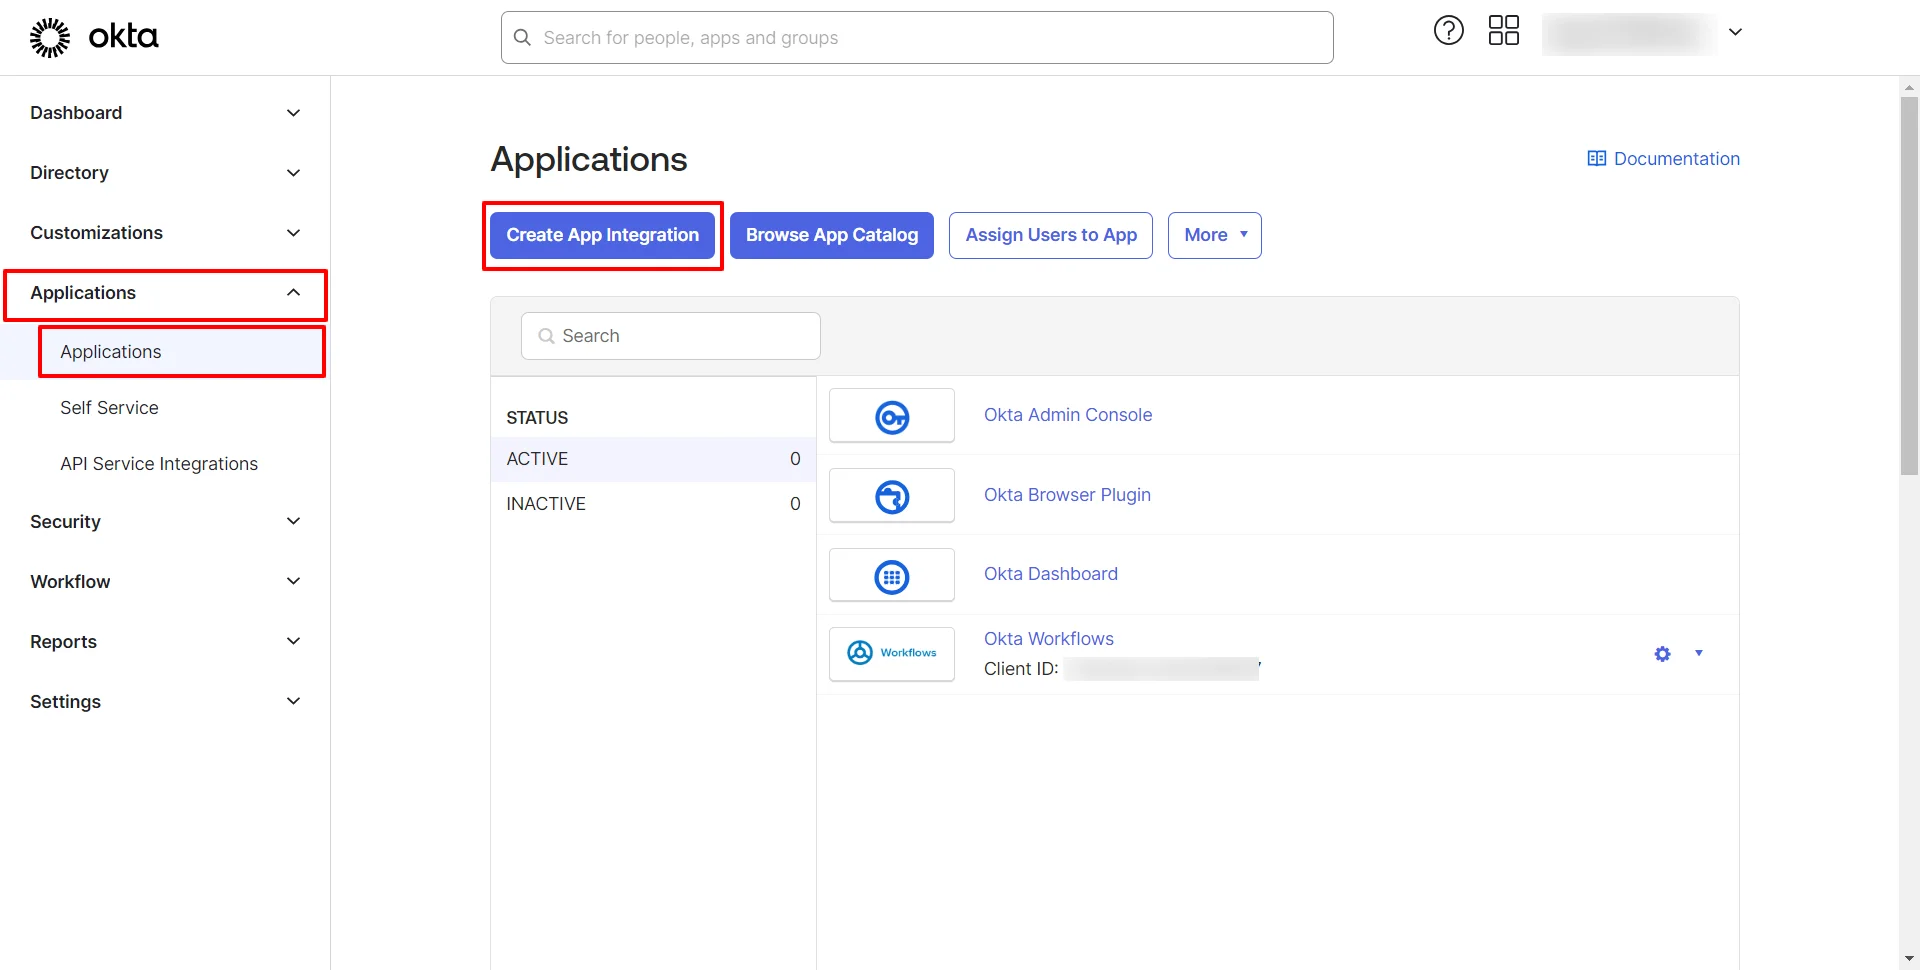
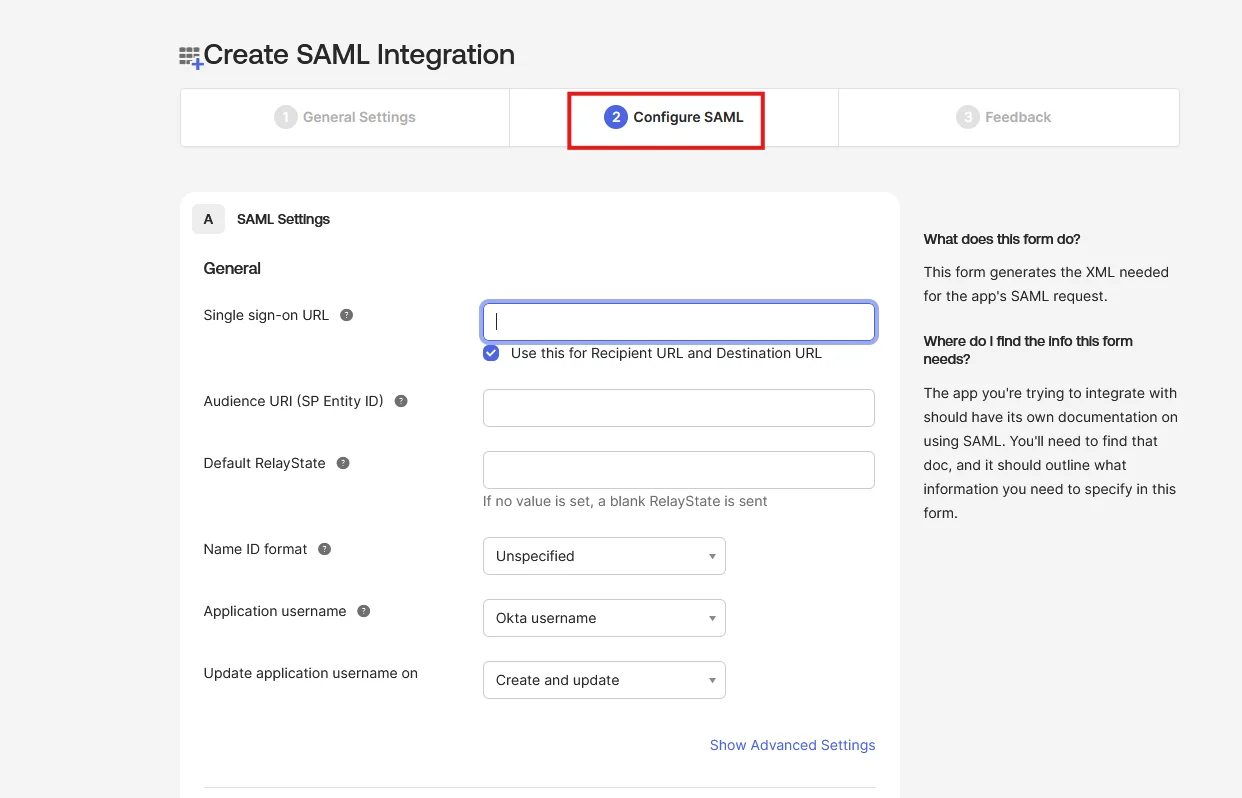

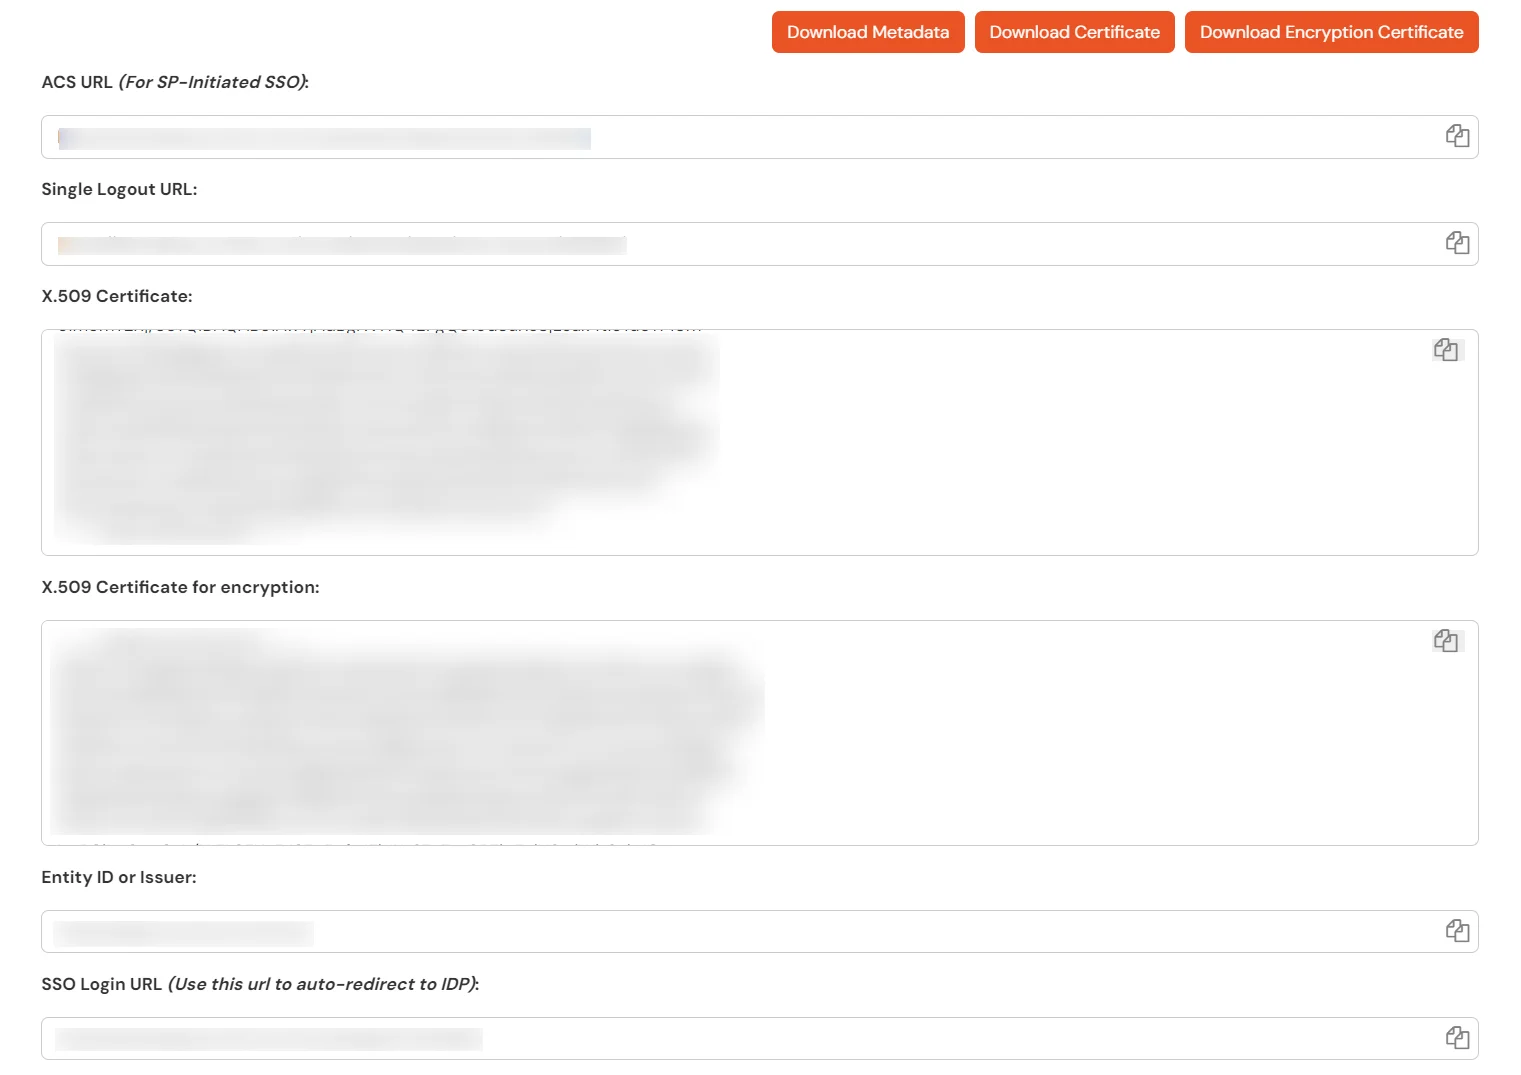
| Single sign-on URL | ACS URL |
| Audience URI (SP Entity ID) | Entity ID or Issuer |
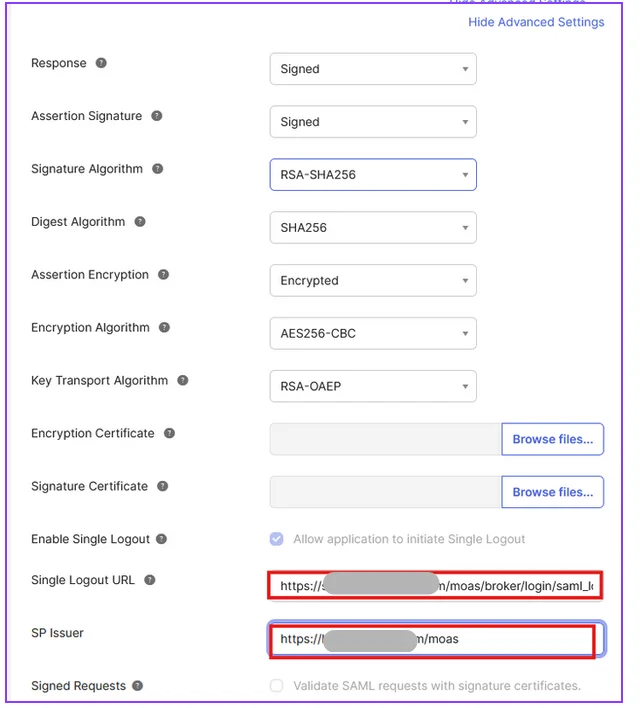
| Encryption Certificate | This is Optional |
| Enable Single Logout | Enable the check box to Allow application to initiate Single Logout |
| SP Issuer | Entity ID or Issuer as mentioned in the Metadata Section |
| Single Logout URL | Single Logout URL as mentioned in the Metadata Section |
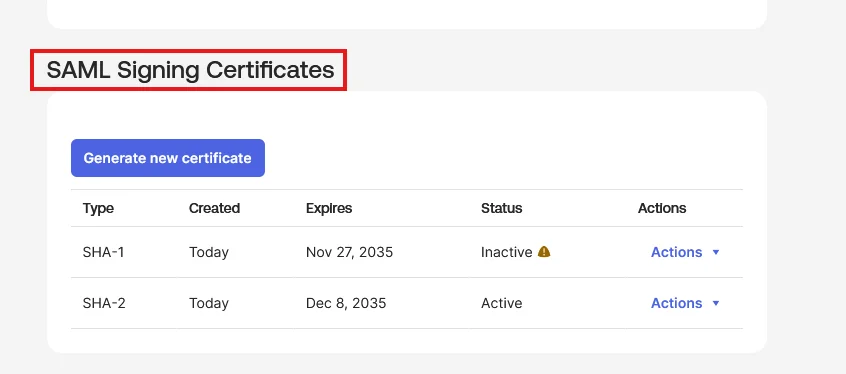
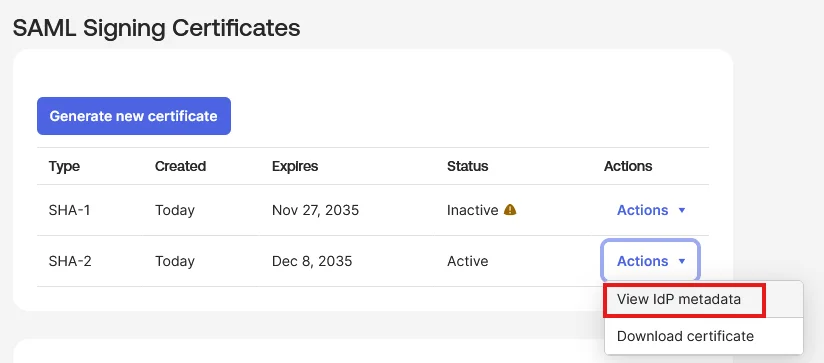
| Signature Certificate | X.509 Certificate can be downloaded from the Metadata Section |


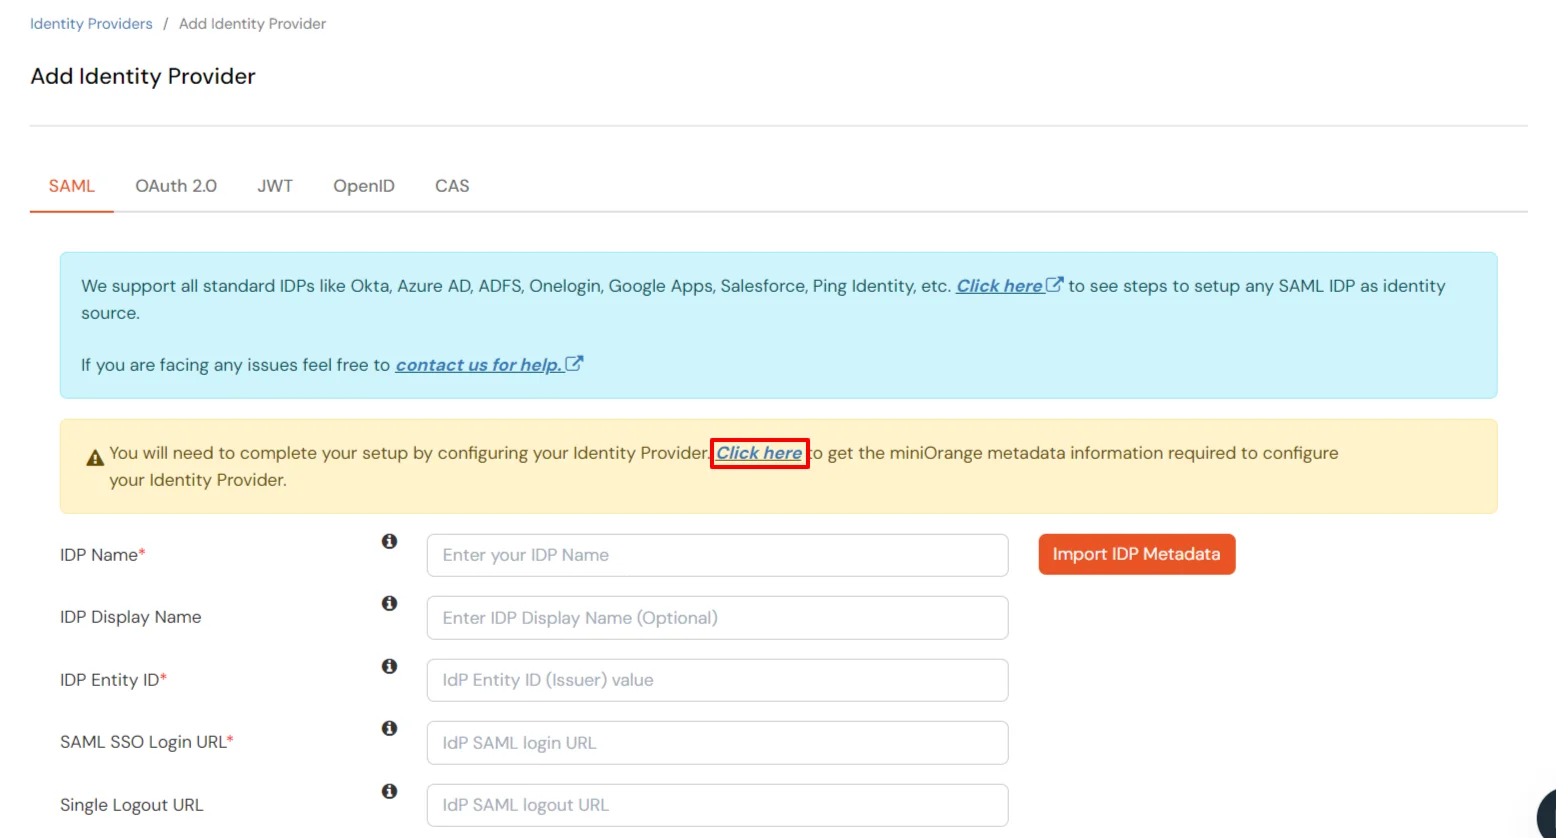
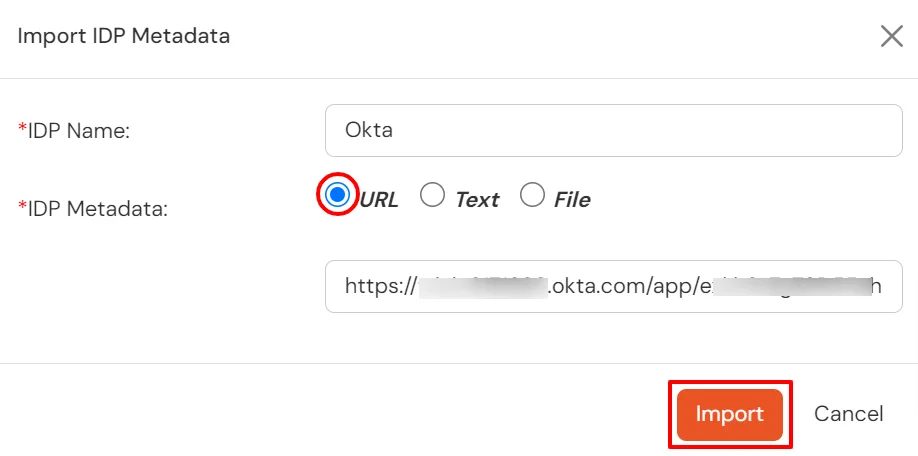
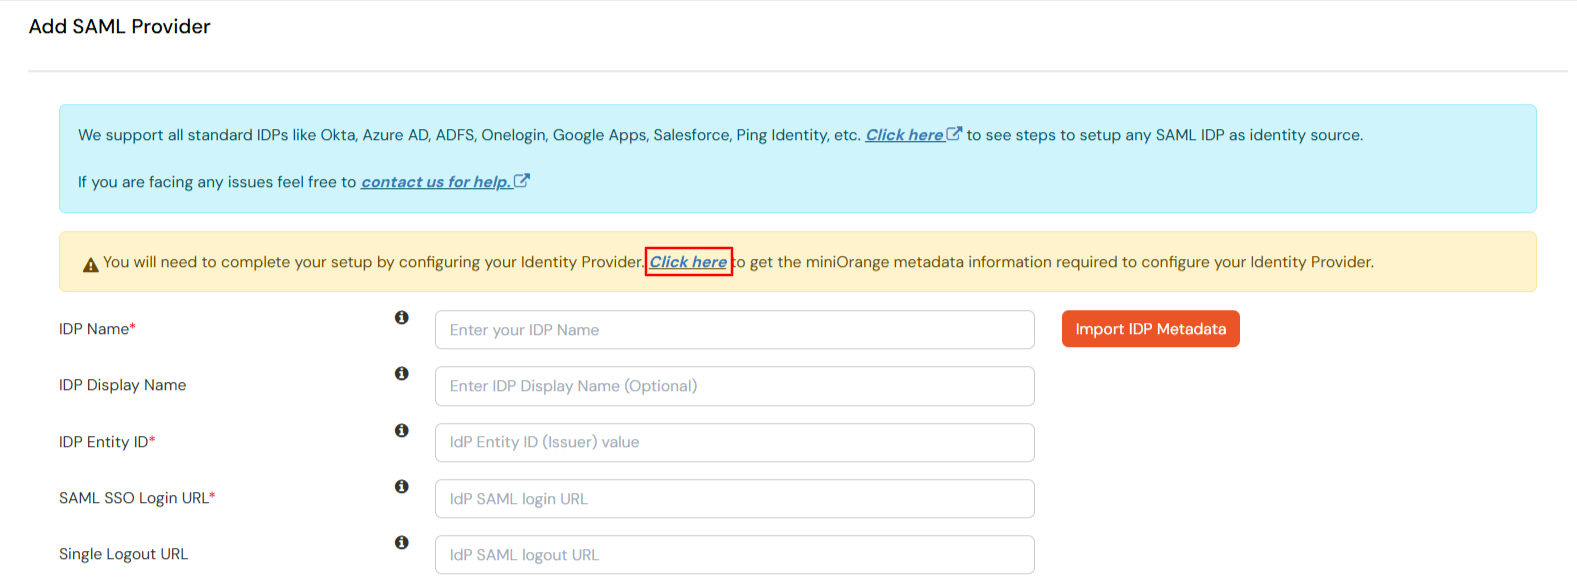
| IDP Entity ID | Entity ID of IDP |
| Single Login URL | Login Url from IDP |
| Single Logout URL | Logout Url from IDP |
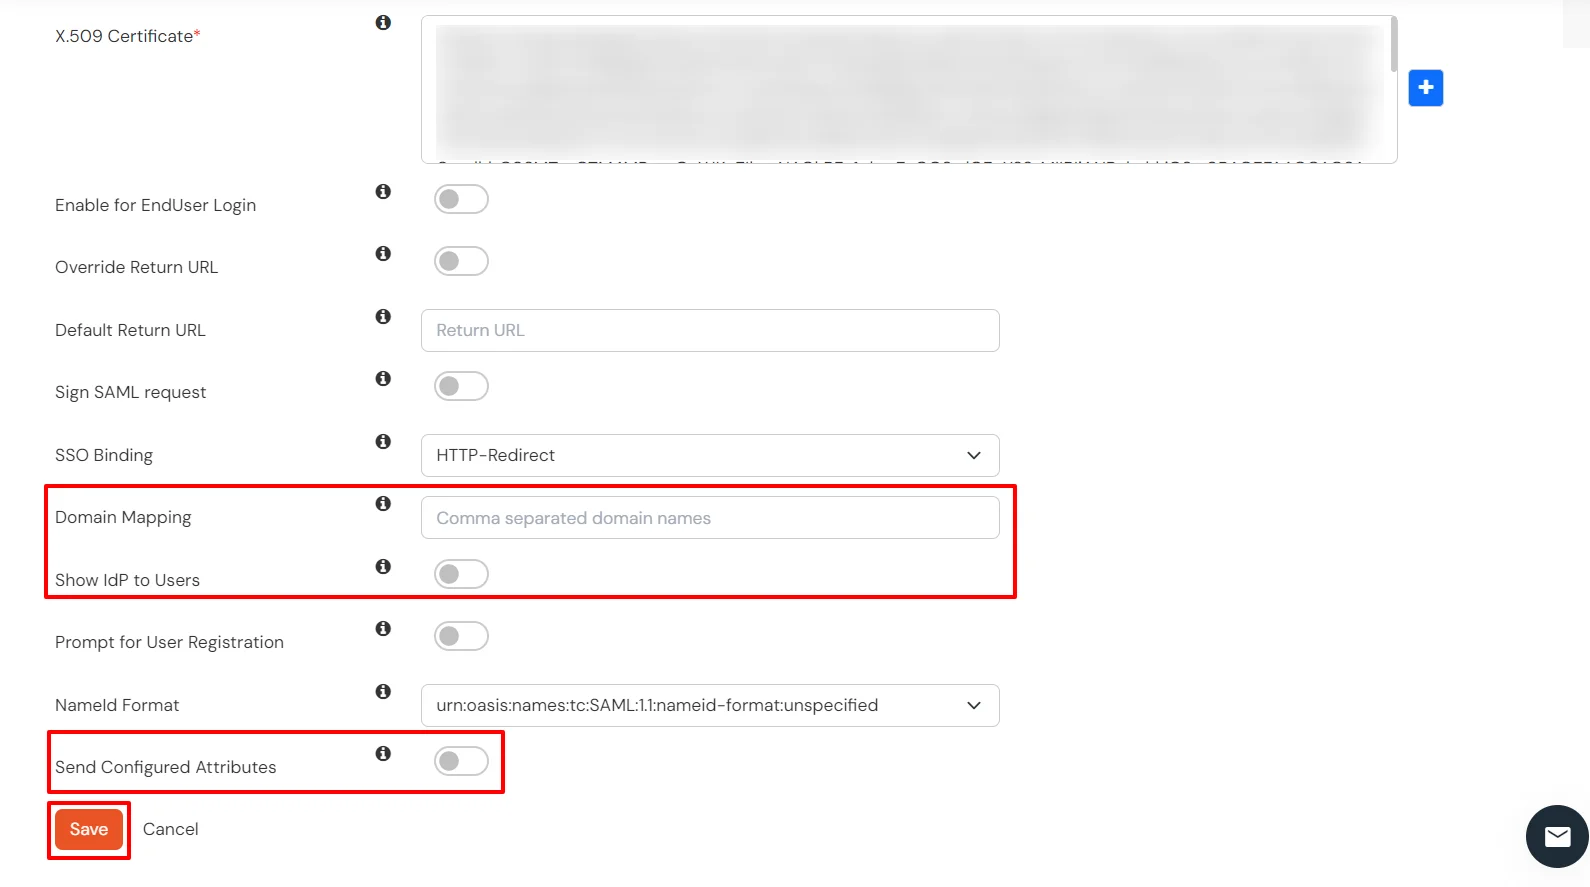
| X.509 Certificate | The public key certificate of your Okta application. |
| Domain Mapping | Can be used to redirect specific domain user to specific IDP |
| Show IdP to Users | Enable this if you want to show this IDP to all users during Login |
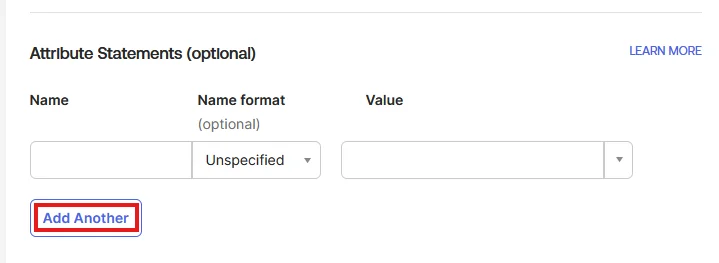
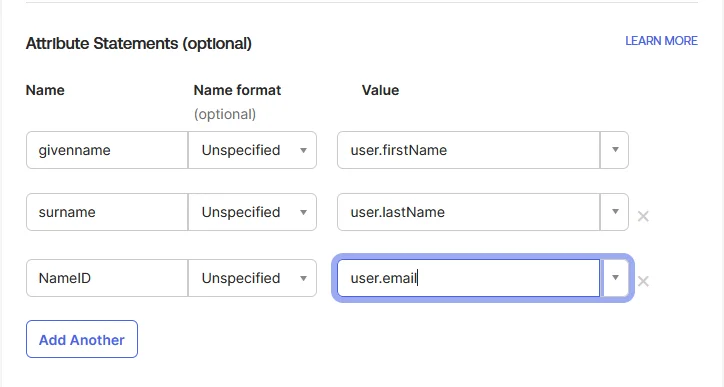
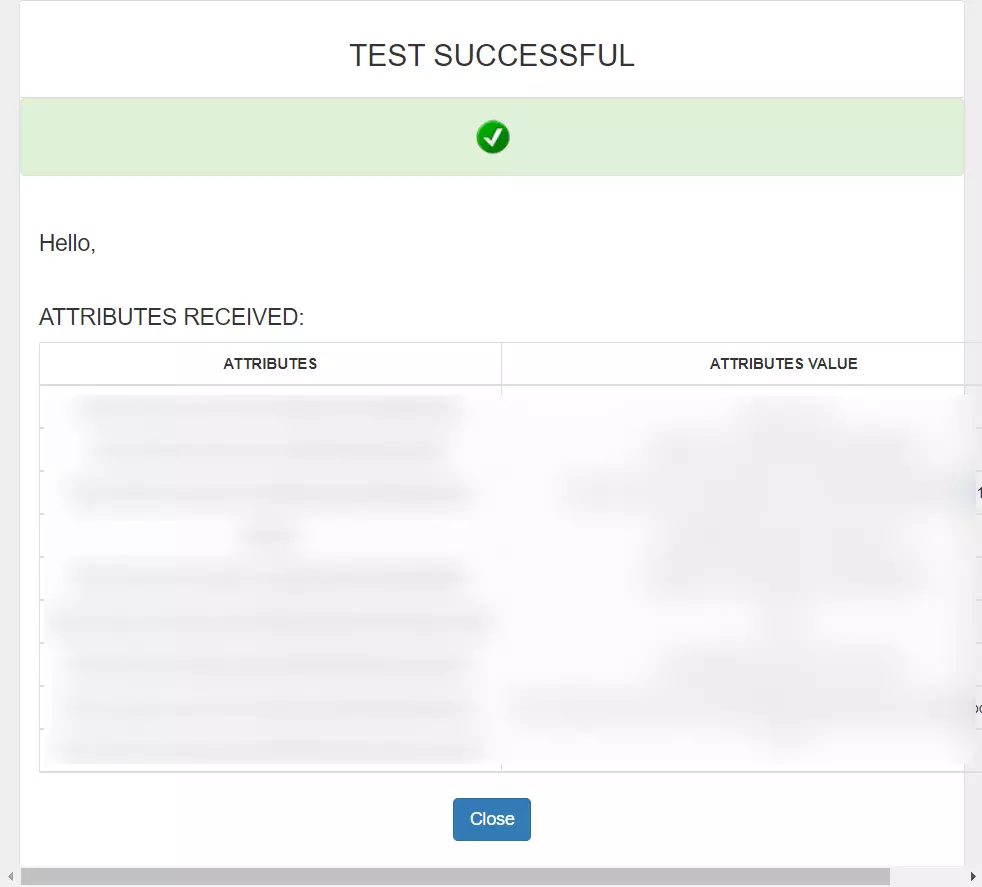
| Send Configured Attributes | Enabling this would allow you to add attributes to be sent from IDP |
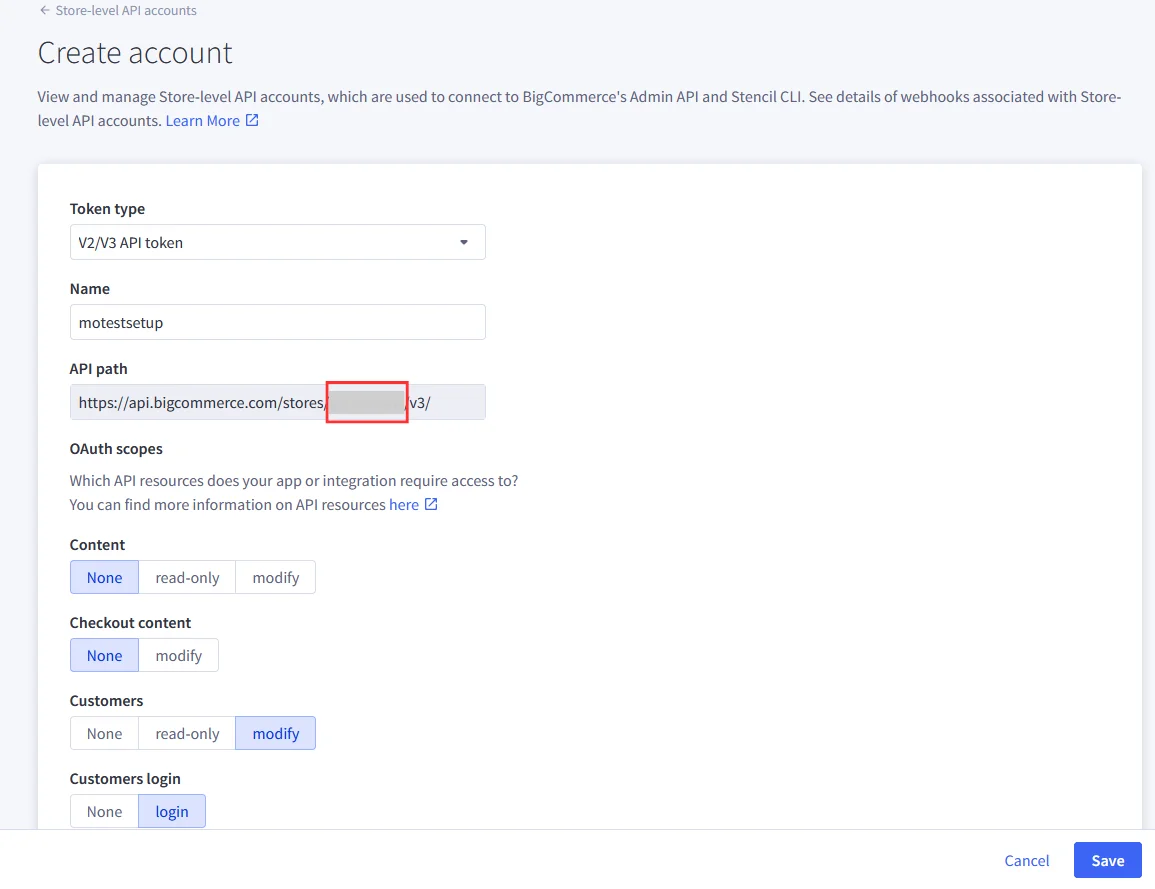
Note: In BigCommerce, the API Path is the base URL that your application or integration uses to connect to your store’s data through BigCommerce APIs. The Store Hash is a unique identifier automatically generated by BigCommerce for each store. It appears in the API Path.

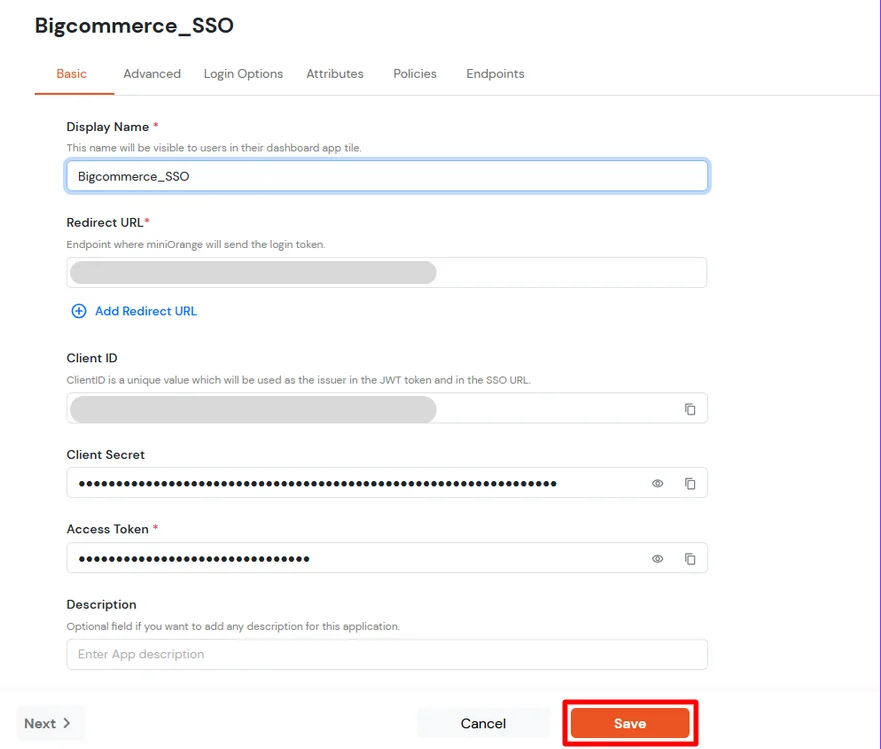
| Display Name [Required] | BigCommerce (According to your choice) |
| Redirect-URL [Required] | Storefront URL, e.g. https://{{my-store}}.mybigcommerce.com/login/token/ |
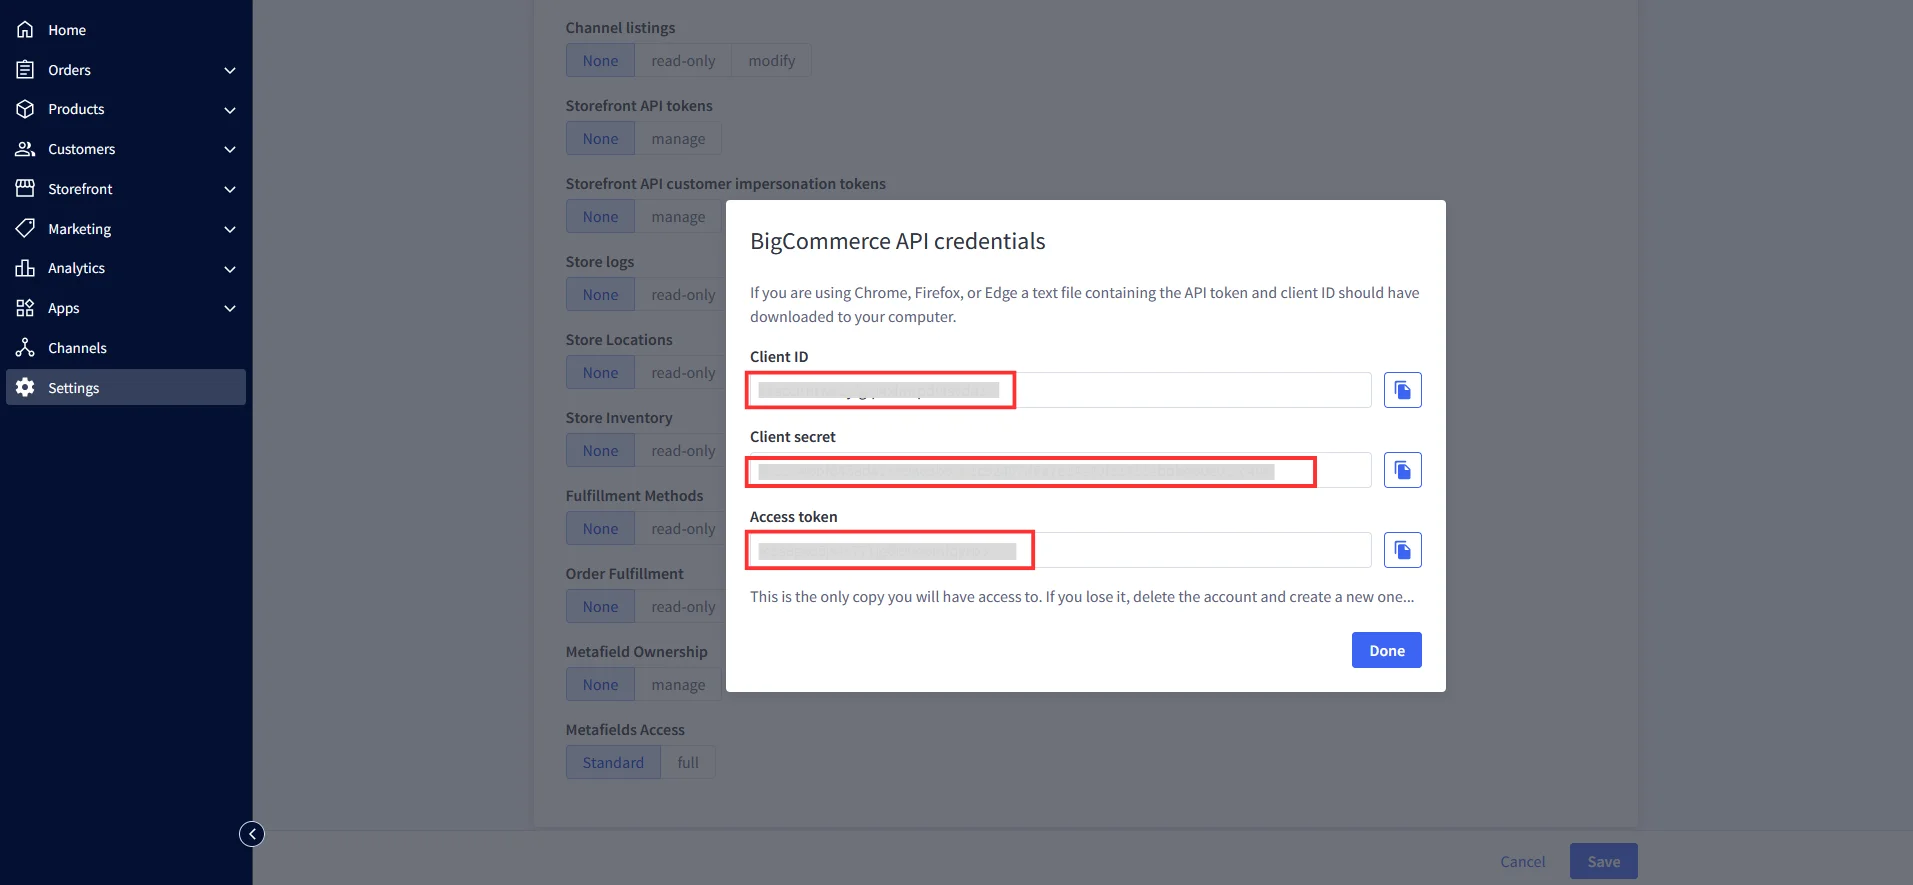
| Client ID | Copy from the downloaded file in Step 4.1 |
| Client Secret | Copy from the downloaded file in Step 4.1 |
| Access Token | Copy from the downloaded file in Step 4.1 |
| Description | According to your choice |
Note: Your Redirect URL should be: <Storefront URL>/login/token/
For Example: https://mystore.mybigcommerce.com/login/token/
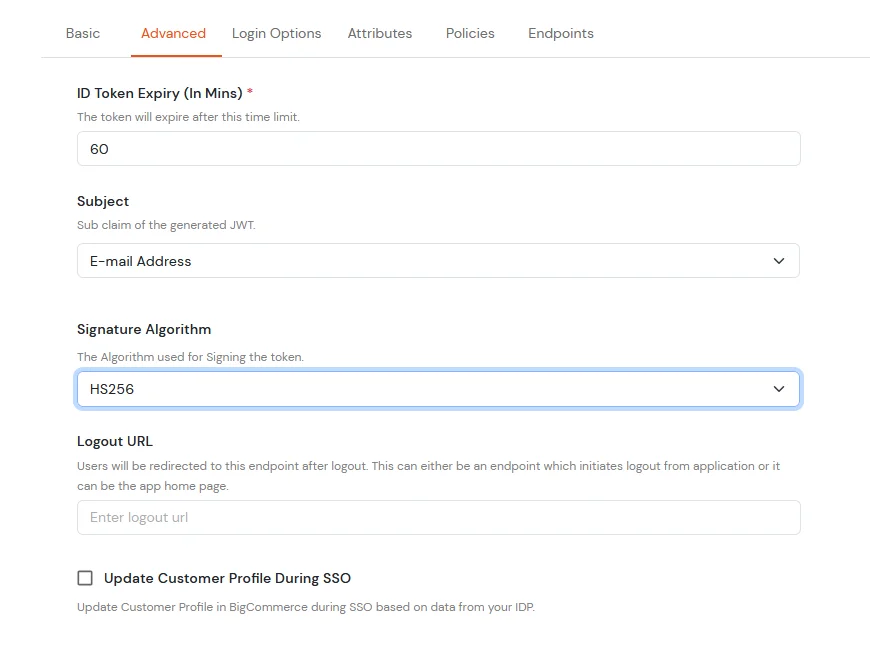
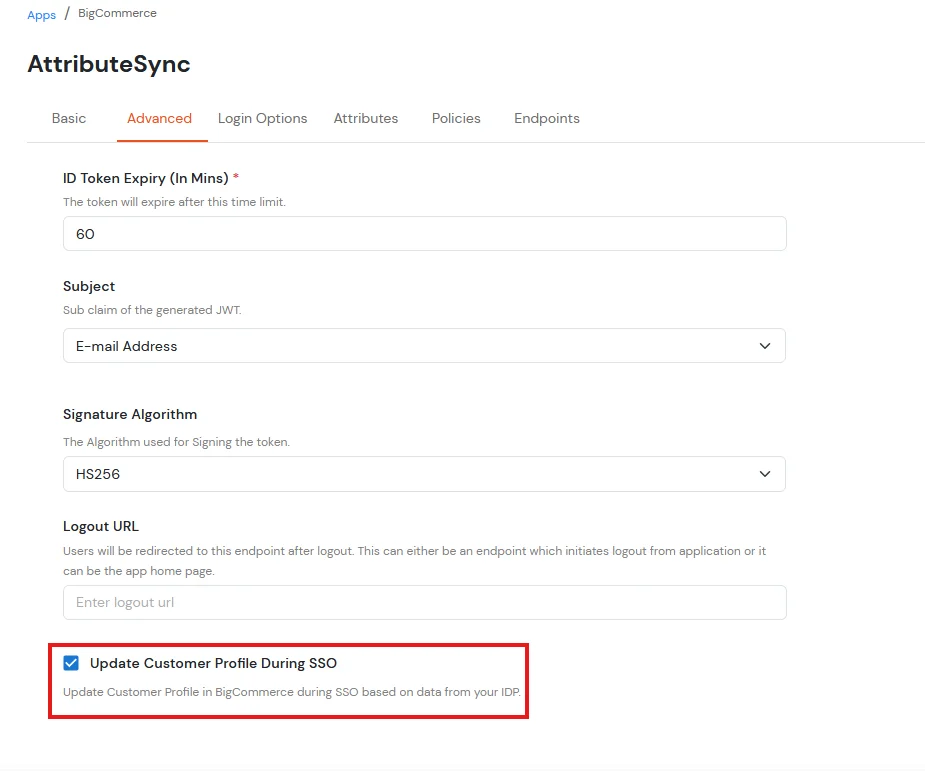
| Subject | E-Mail Address. |
| Signature Algorithm | HS256 |
| Logout URL | Copy the storefront URL as mentioned above and append /login.php?action=logout
e.g., https://{{my-store}}.mybigcommerce.com/login.php?action=logout |
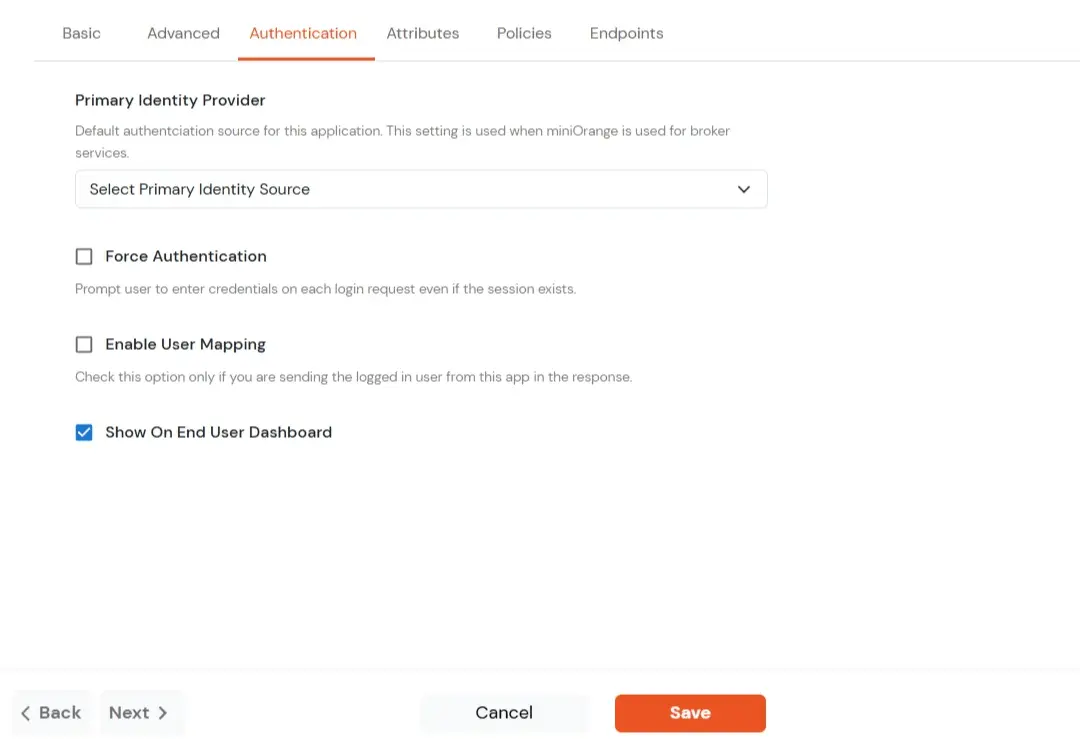
| Primary Identity Provider | The identity source against which user will be authenticated |
| Force Authentication | Enable if you want user to authenticate even if the user has a session |
| Enable User Mapping | Enable if you are sending the logged-in user from this app in the response |
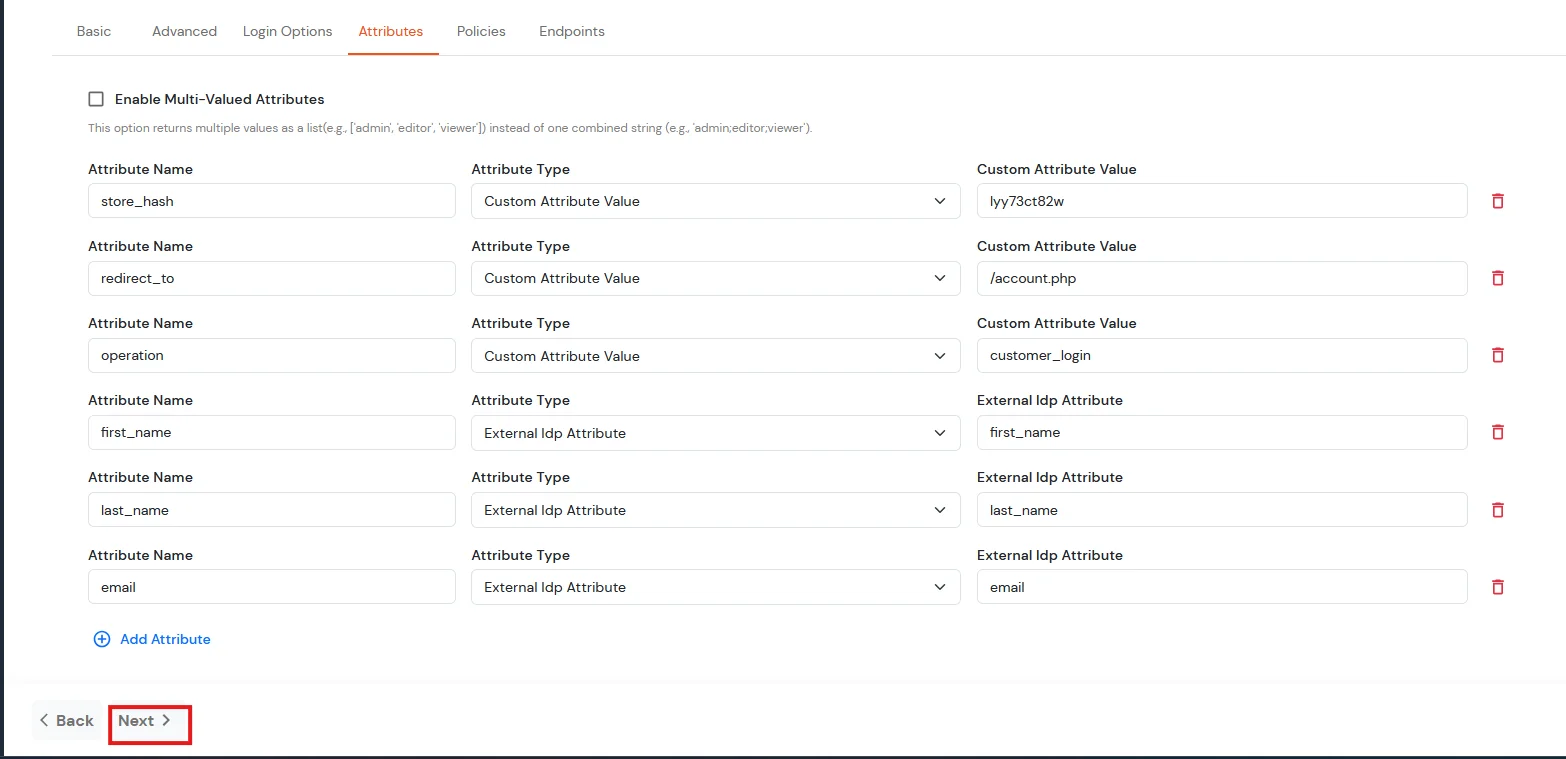
| Attribute Name | Attribute Type | Attribute Value |
|---|---|---|
| store_hash | Custom Attribute Value | Refer to Step 4 above. |
| redirect_to | Custom Attribute Value | Endpoint where you wish to redirect the user to after sso. [Homepage or account page e.g. /account.php] |
| operation | Custom Profile Attribute | customer_login |
| first_name | External Idp Attribute | first_name |
| last_name | External Idp Attribute | last_name |
| External Idp Attribute |
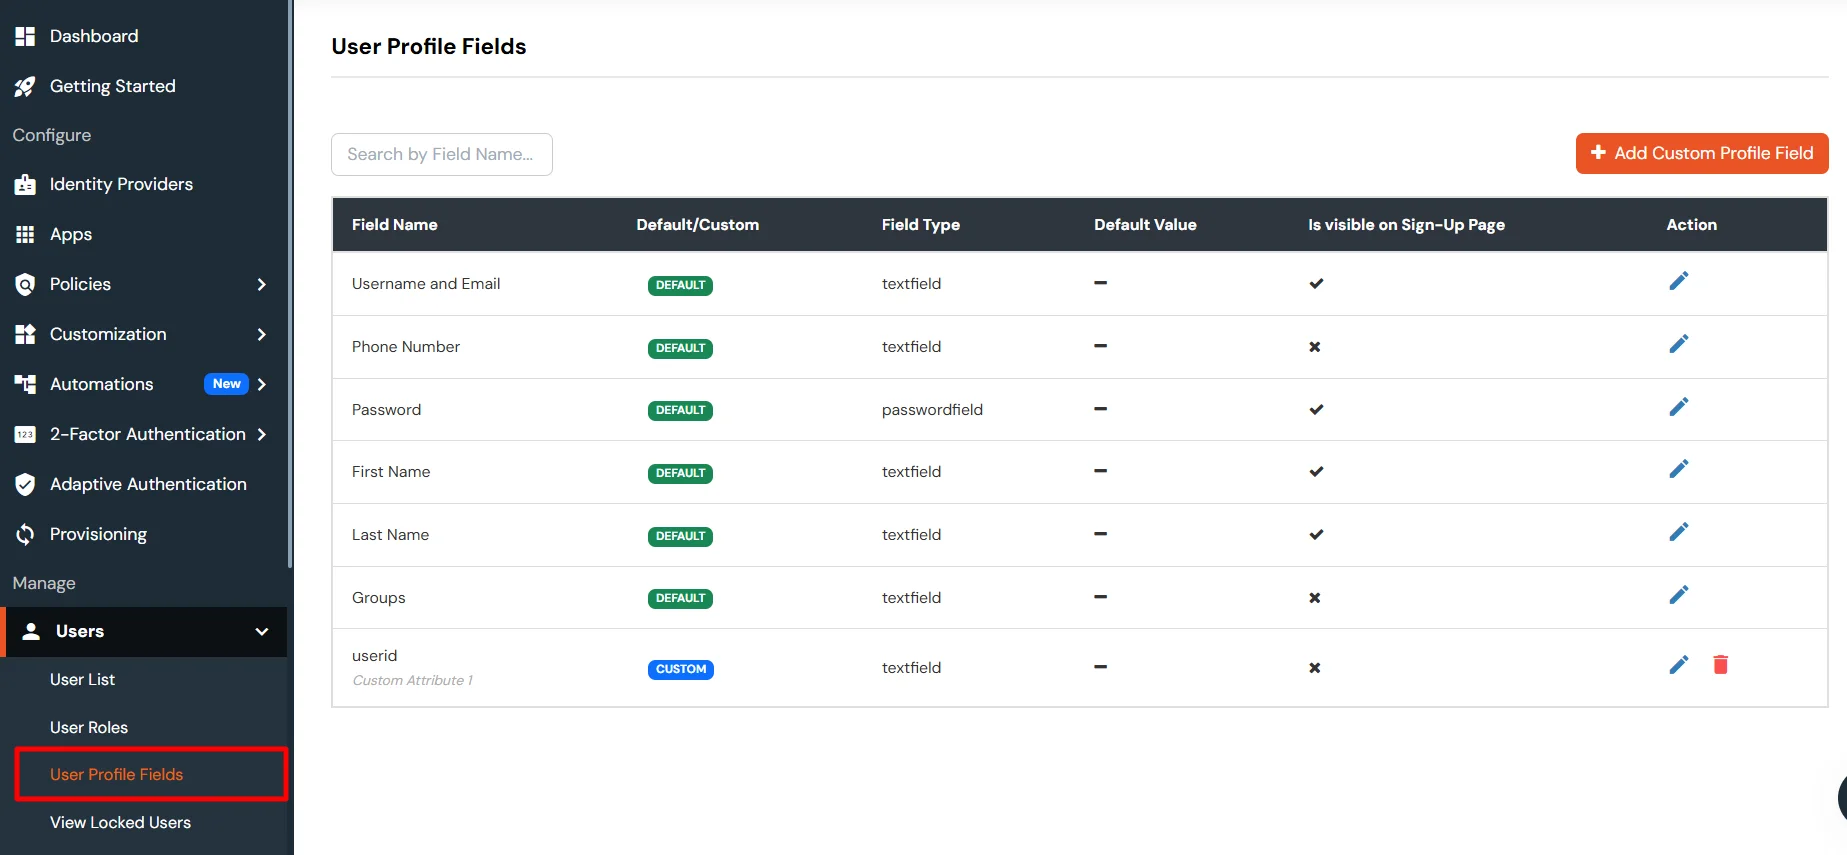
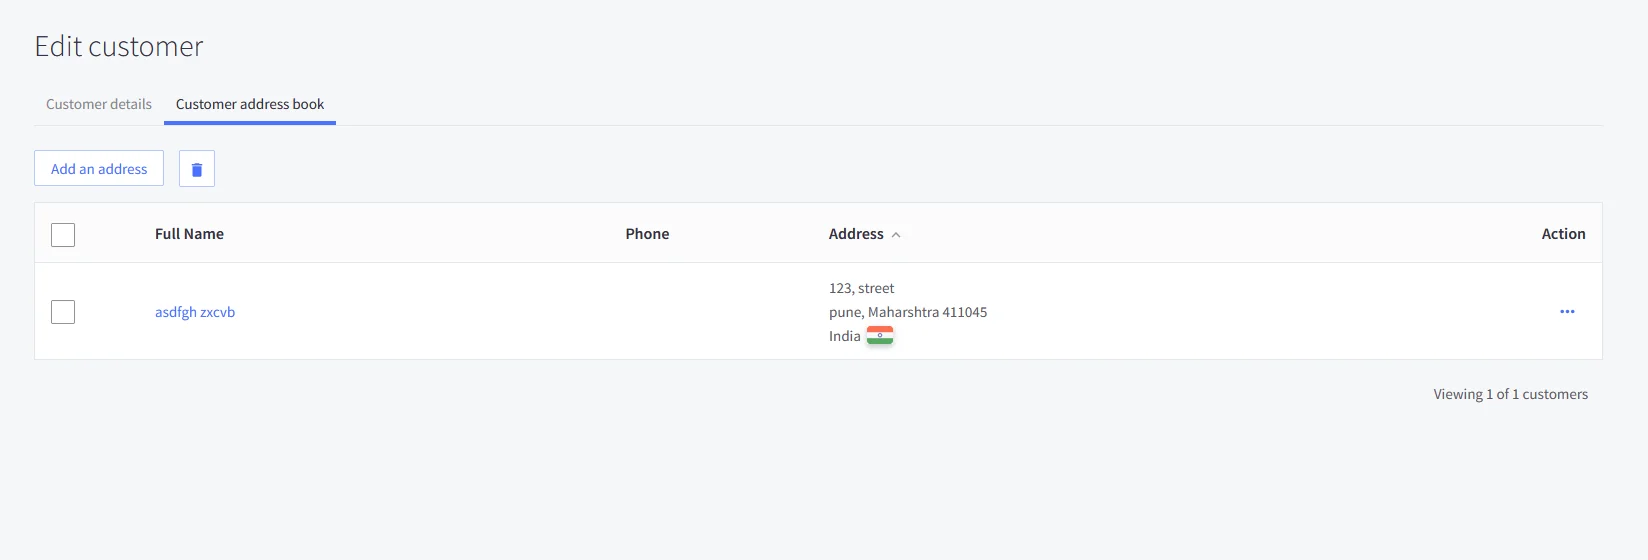
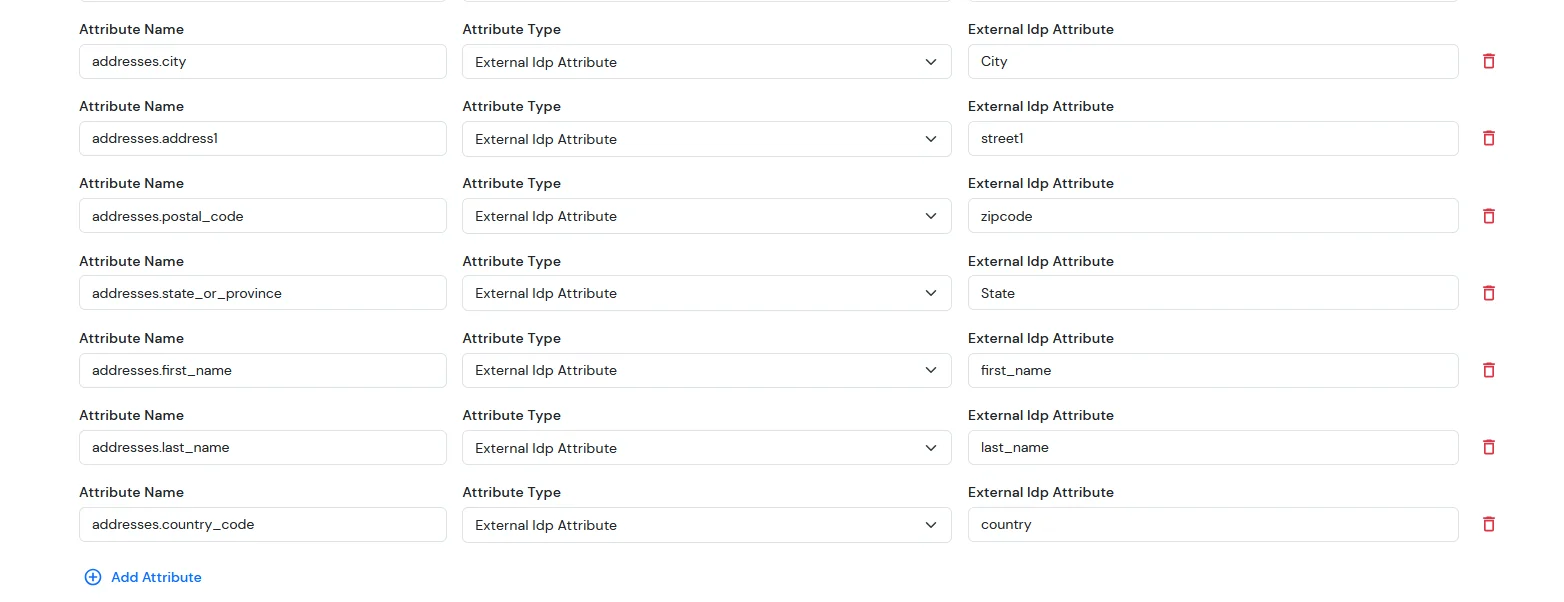
To synchronize address, custom attributes, and form fields from the Identity Provider (IDP) to BigCommerce, the following details must be configured:
Address Fields
To successfully sync customer address information, the following attributes are required:
In the below diagram, we are using miniOrange as the IDP.
| Attribute Name | Attribute Type | Value |
|---|---|---|
| addresses.first_name | First Name | - |
| addresses.last_name | Last Name | - |
| addresses.address1 | Custom Profile Attribute | address1 |
| addresses.city | Custom Profile Attribute | city |
| addresses.state_or_province | Custom Profile Attribute | state/province |
| addresses.country_code | Custom Profile Attribute | country |
| addresses.postal_code | Custom Profile Attribute | postal_code |
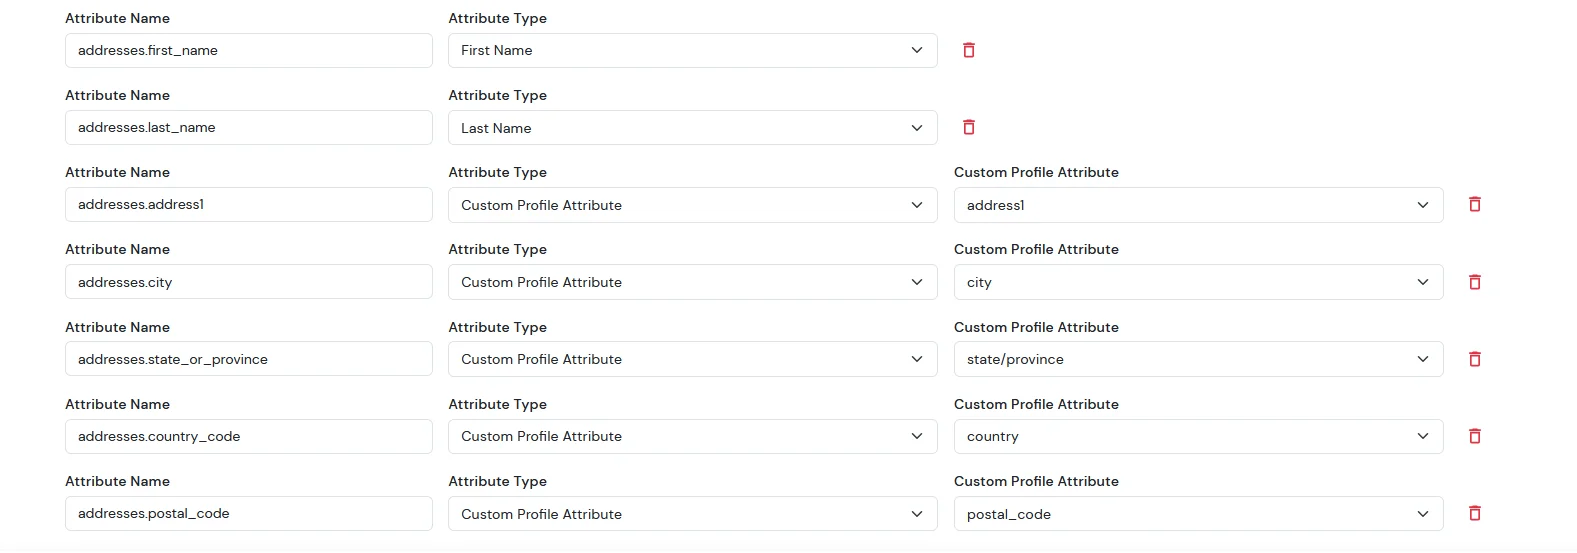
Note: When sending the country value, always use the country code (e.g., US, IN). If you pass the full country name such as “United States”, the value will not be updated — only country codes are supported for correct mapping.
While syncing address fields, ensure that the city, state, and country values you provide are valid options supported by BigCommerce and exist in their respective dropdown lists.
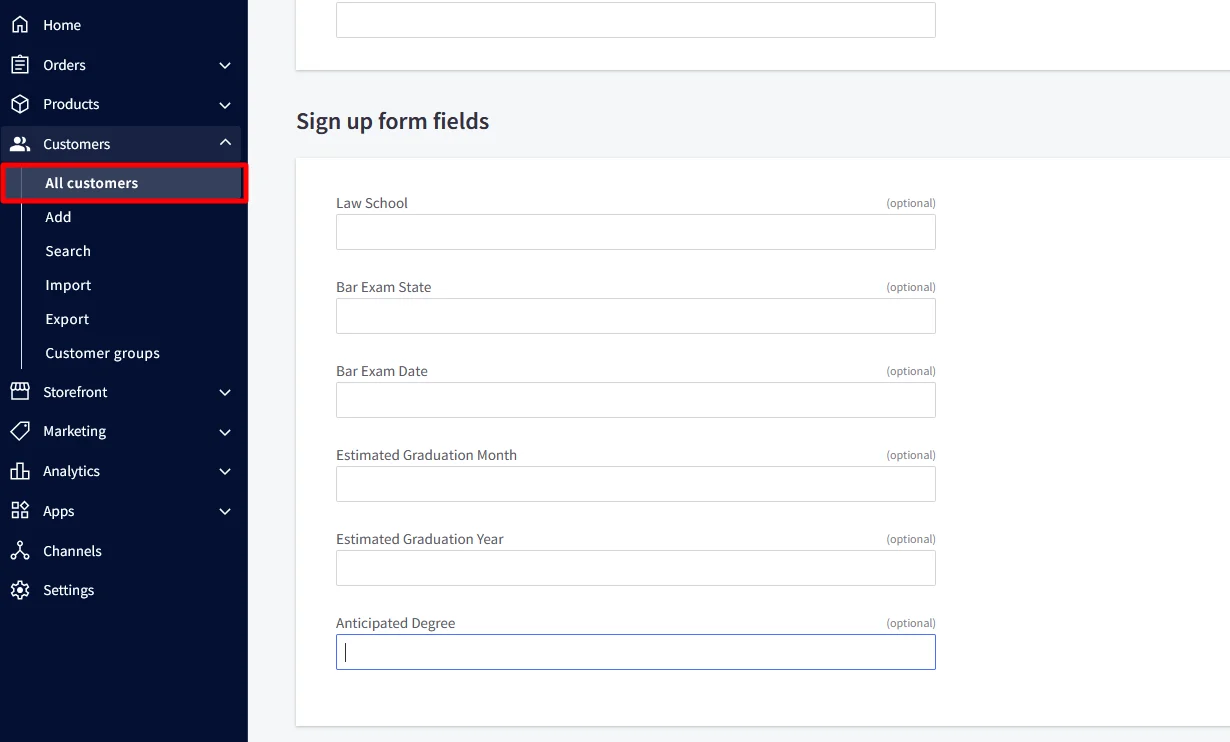
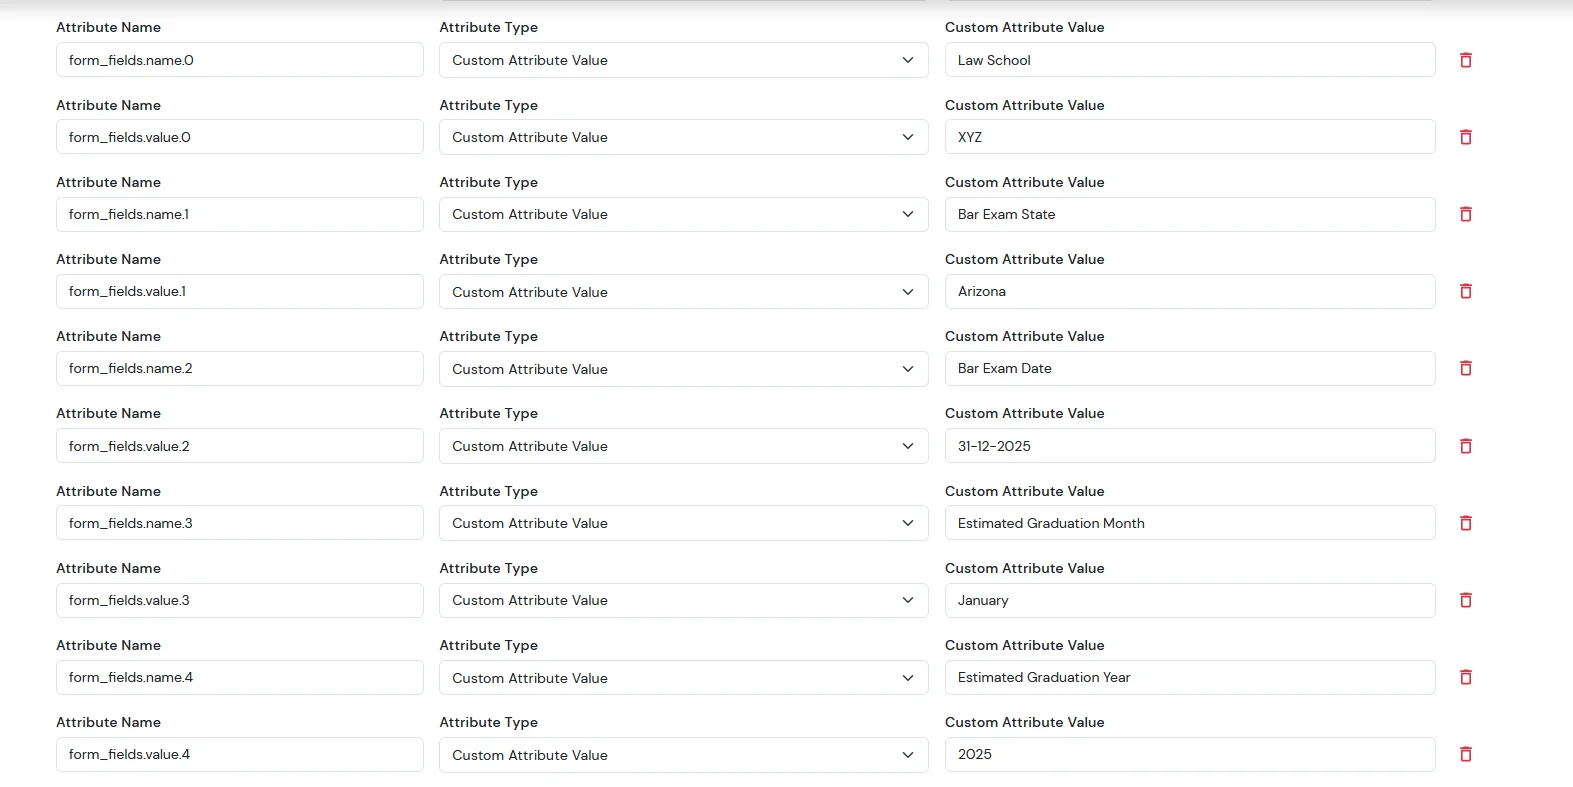
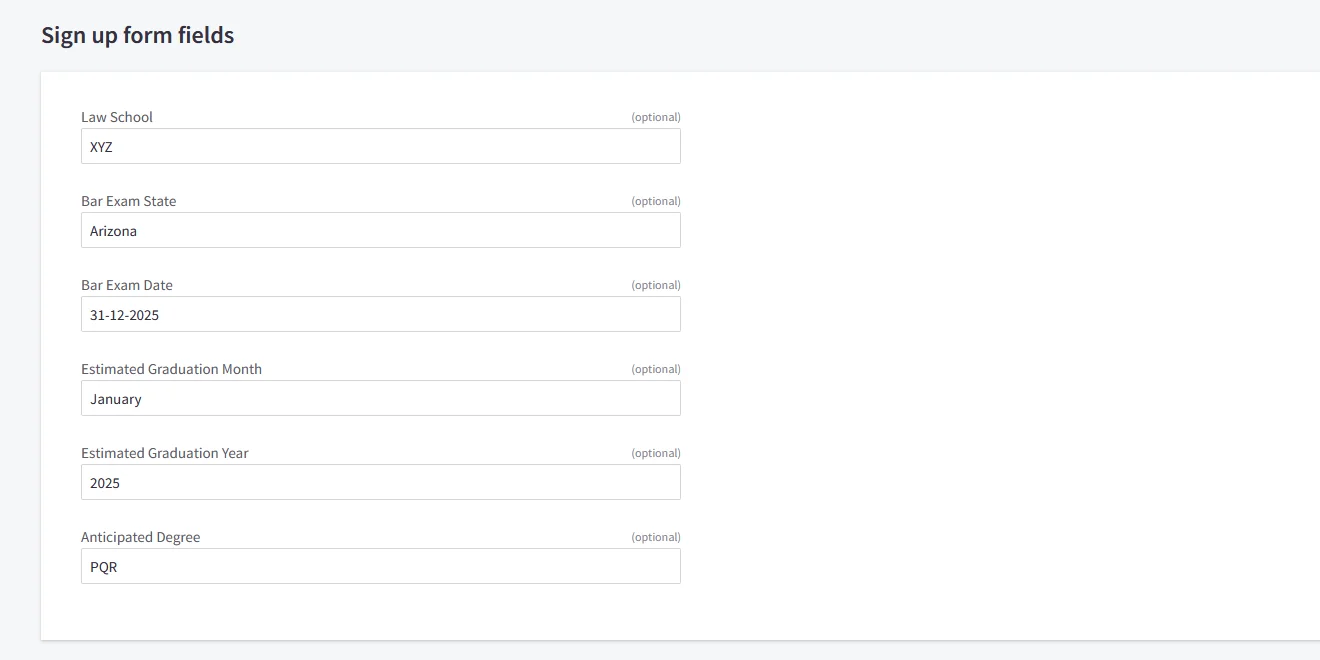
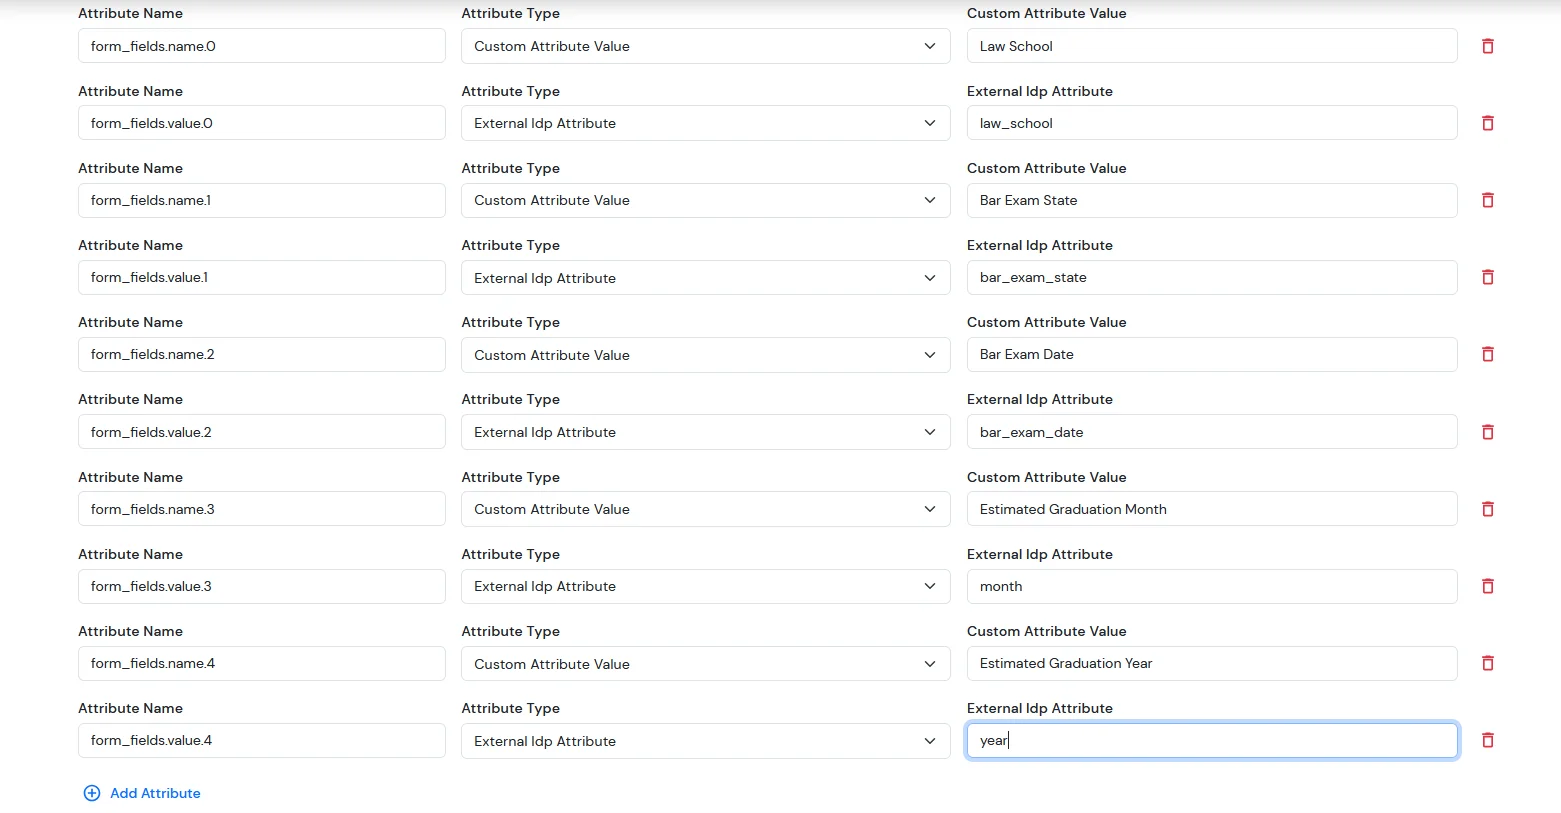
For the Sign up form fields:
| Attribute Name | Attribute Type | Value |
|---|---|---|
| addresses.first_name | First Name | - |
| addresses.last_name | Last Name | - |
| addresses.address1 | Custom Profile Attribute | address1 |
| addresses.city | Custom Profile Attribute | city |
| addresses.state_or_province | Custom Profile Attribute | state/province |
| addresses.country_code | Custom Profile Attribute | country |
| addresses.postal_code | Custom Profile Attribute | postal_code |
| form_fields.name.0 | Custom Attribute Value | Law School |
| form_fields.value.0 | Custom Attribute Value | XYZ |
| form_fields.name.1 | Custom Attribute Value | Bar Exam State |
| form_fields.value.1 | Custom Attribute Value | Arizona |
| form_fields.name.2 | Custom Attribute Value | Bar Exam Date |
| form_fields.value.2 | Custom Attribute Value | 31-12-2025 |
| form_fields.name.3 | Custom Attribute Value | Estimated Graduation Month |
| form_fields.value.3 | Custom Attribute Value | January |
| form_fields.name.4 | Custom Attribute Value | Estimated Graduation Year |
| form_fields.value.4 | Custom Attribute Value | 2025 |
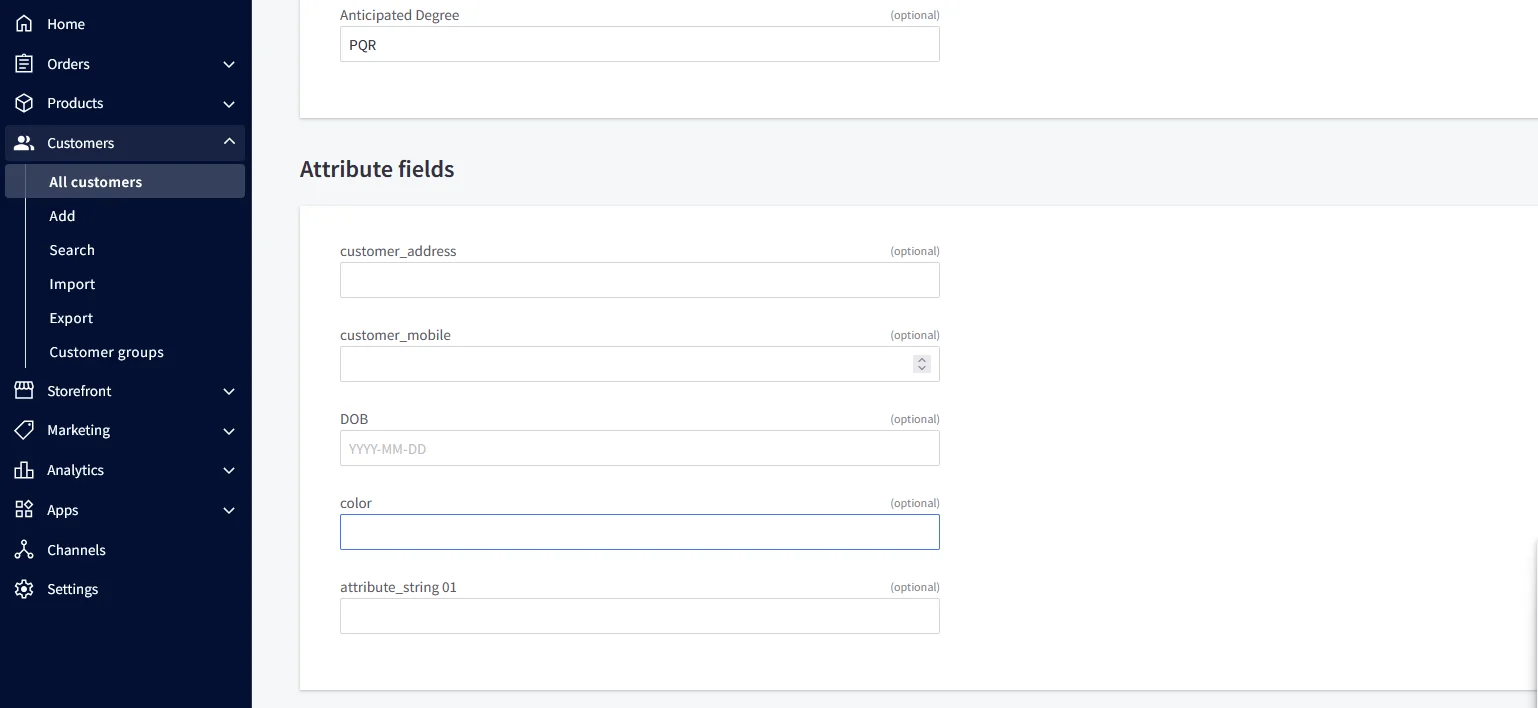
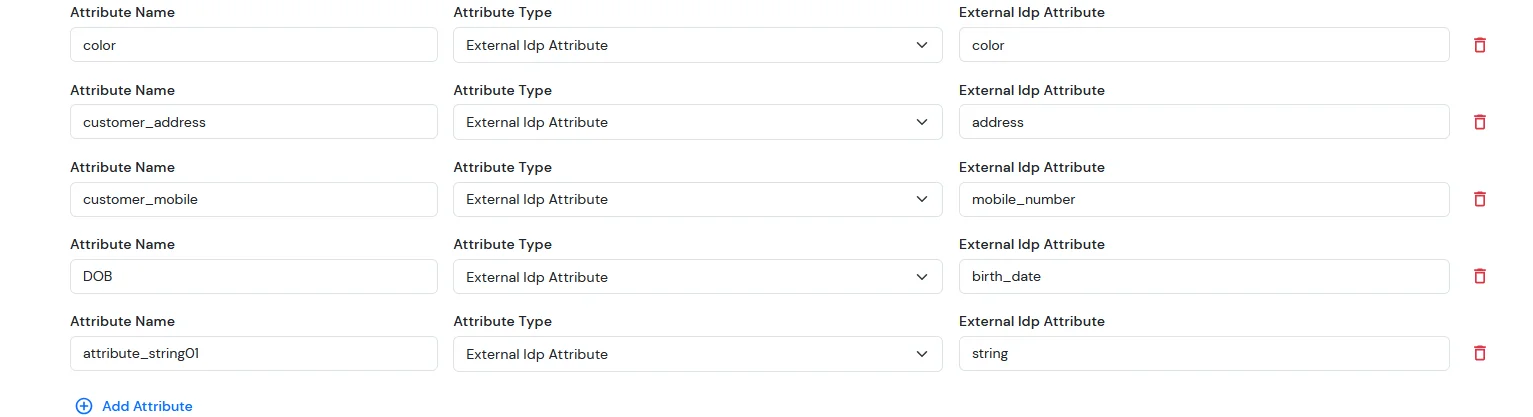
For the Attribute Fields
| Attribute Name | Attribute Type | Value |
|---|---|---|
| color | Custom Profile Attribute | blue |
| customer_address | Custom Profile Attribute | MG road |
| customer_mobile | Custom Profile Attribute | +911234567890 |
| DOB | Custom Profile Attribute | 2002-01-01 |
| attribute_string 01 | Custom Profile Attribute | testing |
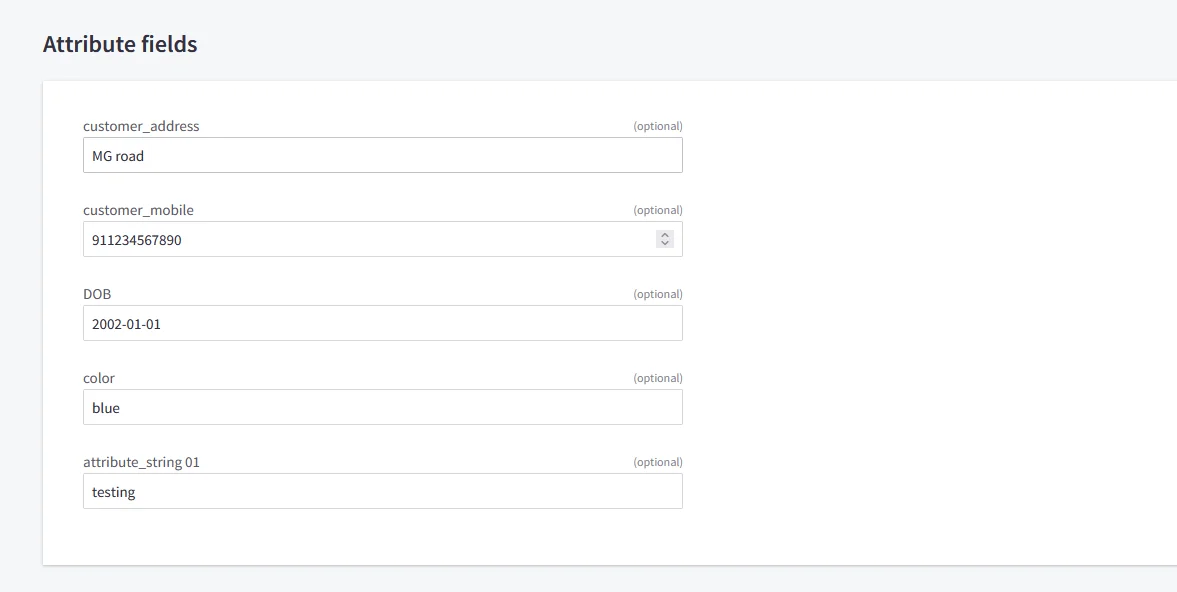
NOTE: Update customer profile during sso
For ExternaI Identity Provider
| Attribute Name | Attribute Type | Value |
|---|---|---|
| addresses.first_name | External Idp Attribute | first_name |
| addresses.last_name | External Idp Attribute | last_name |
| addresses.address1 | External Idp Attribute | address1 |
| addresses.city | External Idp Attribute | city |
| addresses.state_or_province | External Idp Attribute | state/province |
| addresses.country_code | External Idp Attribute | country |
| addresses.postal_code | External Idp Attribute | postal_code |
Note: When sending the country value, always use the country code (e.g., US, IN). If you pass the full country name such as “United States”, the value will not be updated — only country codes are supported for correct mapping.
While syncing address fields, ensure that the city, state, and country values you provide are valid options supported by BigCommerce and exist in their respective dropdown lists.
For the Sign up form fields:
| Attribute Name | Attribute Type | Value |
|---|---|---|
| form_fields.name.0 | Custom Attribute Value | Law School |
| form_fields.value.0 | External Idp Attribute | XYZ |
| form_fields.name.1 | Custom Attribute Value | Bar Exam State |
| form_fields.value.1 | External Idp Attribute | Arizona |
| form_fields.name.2 | Custom Attribute Value | Bar Exam Date |
| form_fields.value.2 | External Idp Attribute | 31-12-2025 |
| form_fields.name.3 | Custom Attribute Value | Estimated Graduation Month |
| form_fields.value.3 | External Idp Attribute | January |
| form_fields.name.4 | Custom Attribute Value | Estimated Graduation Year |
| form_fields.value.4 | External Idp Attribute | 2025 |
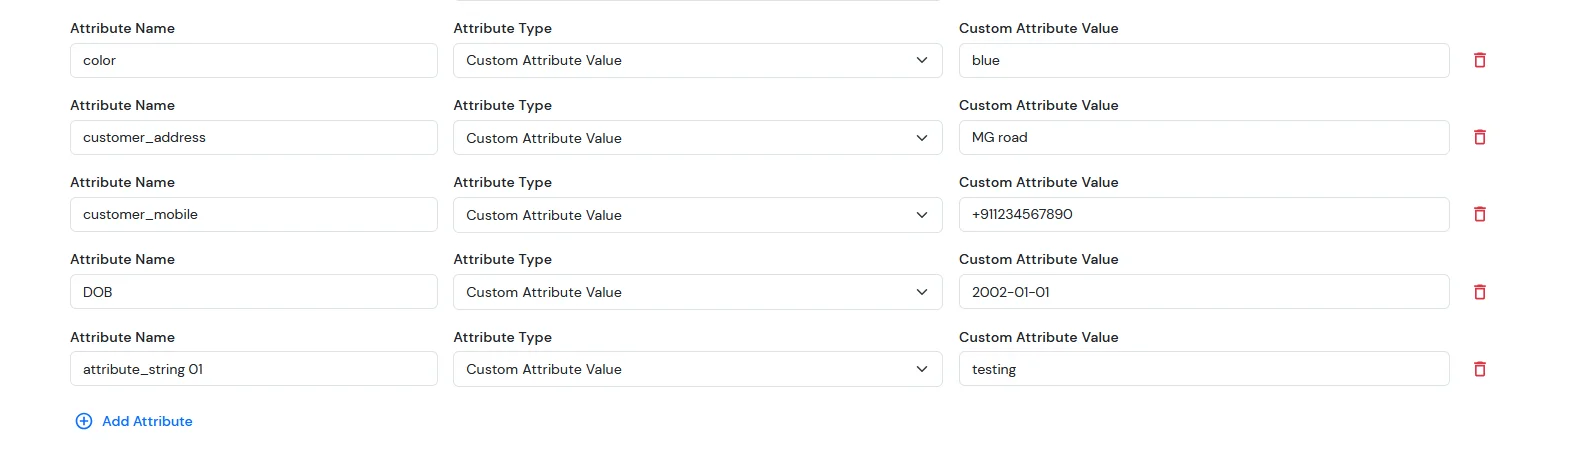
For Custom Attribute Fields
| Attribute Name | Attribute Type | Value |
|---|---|---|
| color | External Idp Attribute | blue |
| customer_address | External Idp Attribute | MG road |
| customer_mobile | External Idp Attribute | +911234567890 |
| DOB | External Idp Attribute | 2002-01-01 |
| attribute_string 01 | External Idp Attribute | testing |
NOTE: Update customer profile during sso
Yes, we support SSO into BigCommerce using Azure AD , Okta and Office 365 credentials.
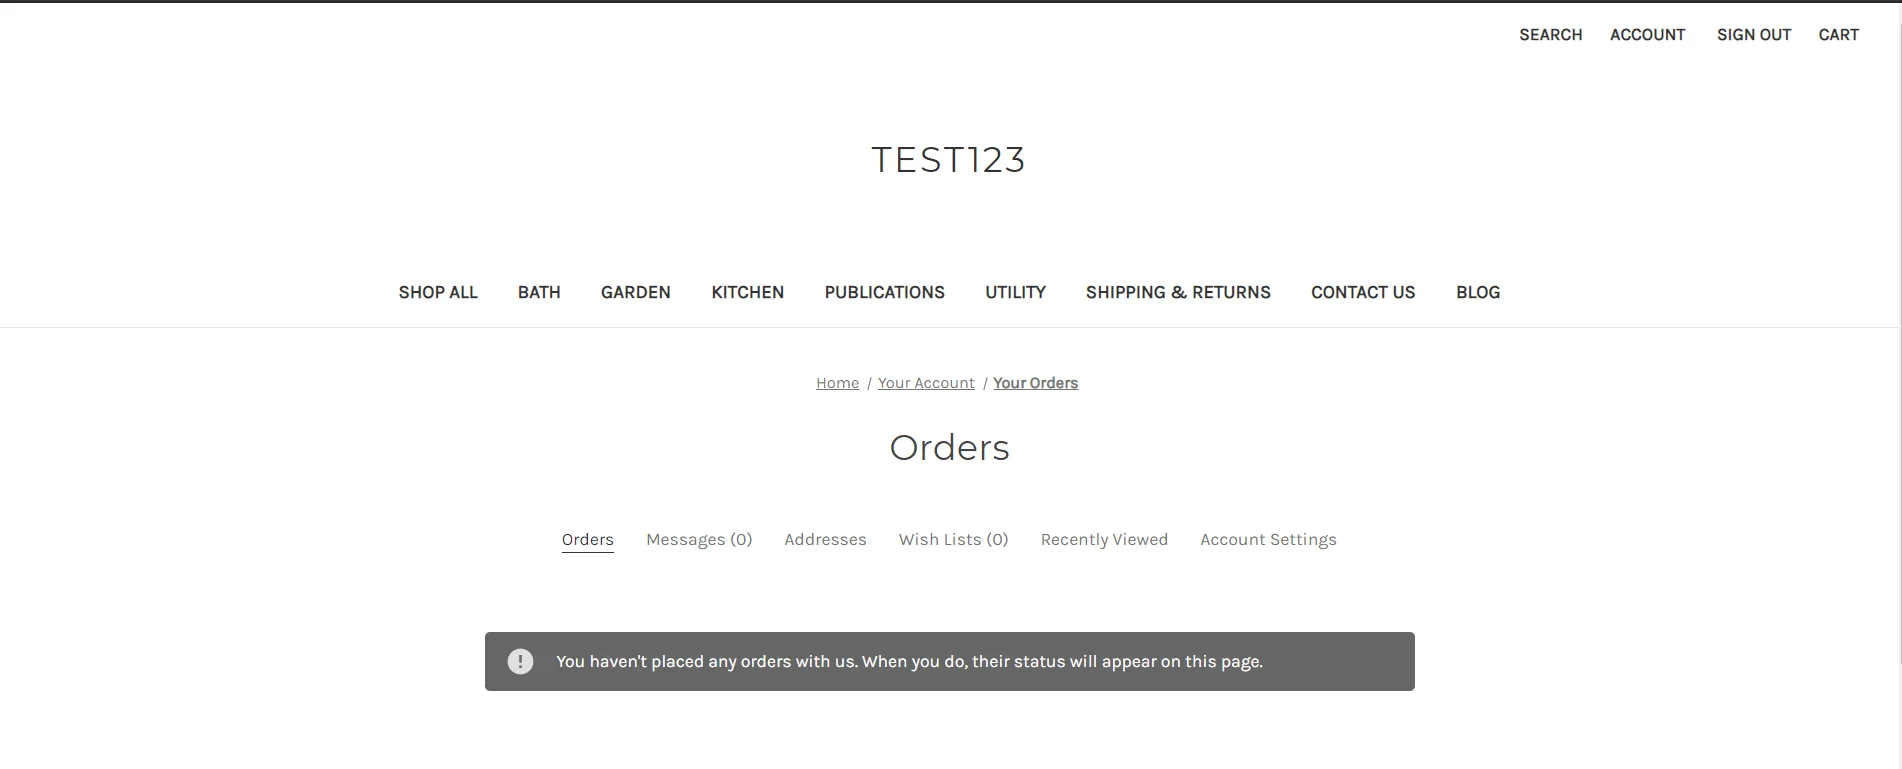
If the user does not exist in your bigcommerce store, our SSO solution will automatically create the user on bigcommerce and perform a seamless login.
Yes, we support social login providers such as google, facebook, twitter and many more. You can set up your Social login app by following the guide here : https://www.miniorange.com/iam/login-with-external-idp/
