Threat Detection
Score logins, resource access, and system-user access for suspicious behavior, and automatically respond when the risk is too high.
What is Threat Detection
Threat Detection monitors login attempts, resource access, and system-user access, and scores each event for risk using a combination of machine learning and rule-based checks. When a session's risk score crosses your configured threshold, PAM can automatically lock the user, lock the session, trigger a step-up MFA challenge, or send an alert - based on the response you configure.
What It Detects
- IP / network risk - a new IP for the user, an IP from a known hosting/cloud provider, a new ASN, or an IP that has never been seen anywhere in your organization.
- Time-of-day and day-of-week anomalies - off-hours or weekend access compared to the user's own history and the organization-wide average.
- Behavioral patterns - rapid consecutive actions, access from an unusual location, and privilege escalation.
- Failed logins / brute force - the risk score increases with repeated failed attempts. Five or more failed attempts in a short period are flagged as a brute-force attack. A separate check flags 10 or more failed attempts within 24 hours as a sustained attack.
- Resource access anomalies - a user accessing a resource in a way that is unusual for them.
- Organization-wide activity anomalies - a user's activity volume is unusually high or low compared to the rest of the organization.
Follow the Step-by-Step Guide given below for Threat Detection
1. Turn It On and Set the Learning Window
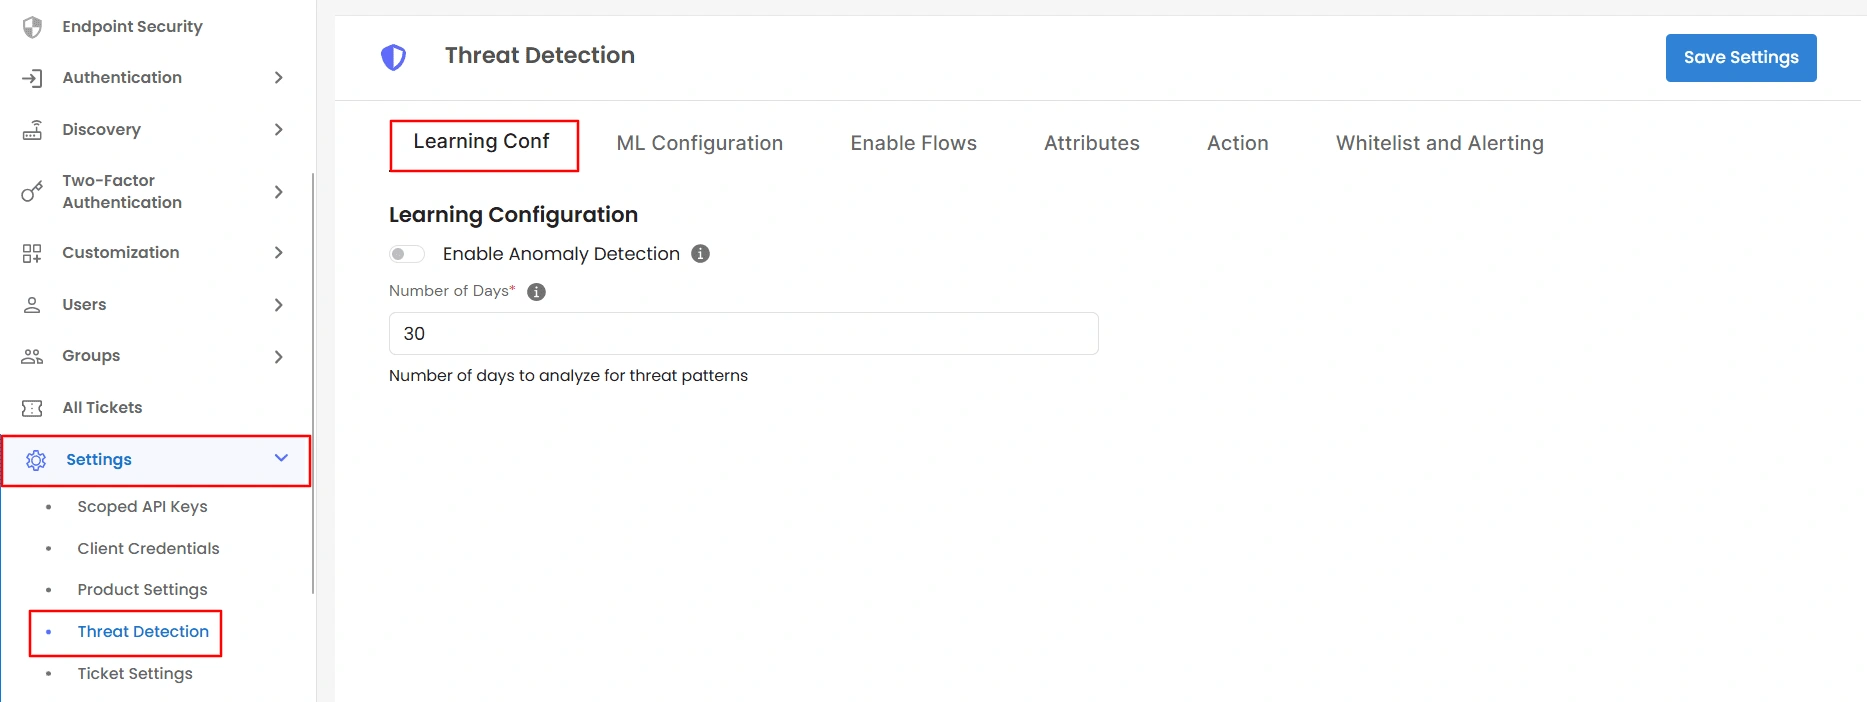
- Go to Settings >> Threat Detection from the side menu.
- On the Learning Conf tab, turn on Enable Anomaly Detection. This is the master switch; nothing runs until it is enabled.
- Set Number of Days - the amount of historical activity to analyze when establishing what "normal" looks like for each user. The value must be between 30 and 365.
2. ML Configuration
On the ML Configuration tab:
- Training Time - the time of day when the ML model retrains.
- Minimum Data Points - the number of behavior events required before the model scores a user. The minimum is 20.
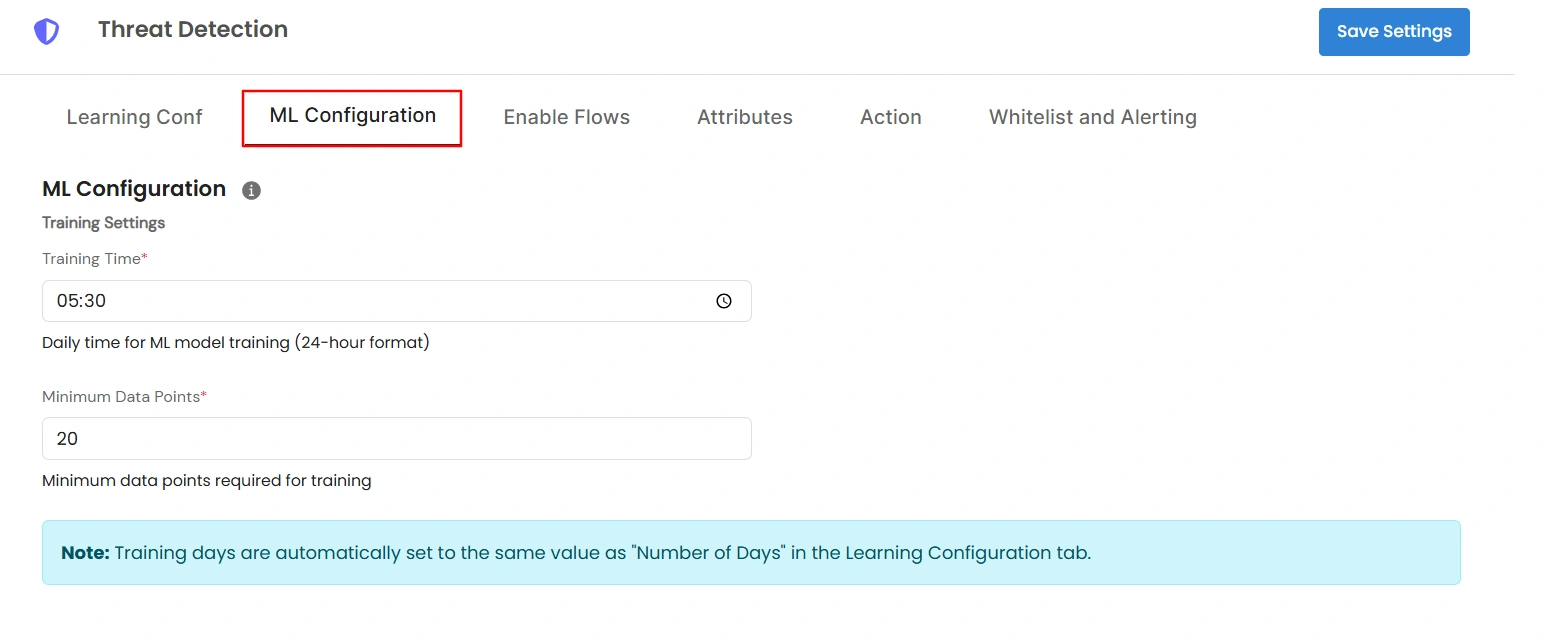
Note: Training days automatically match the Number of Days set on the Learning Conf tab. There is no separate field for this setting.
3. Choose What to Monitor
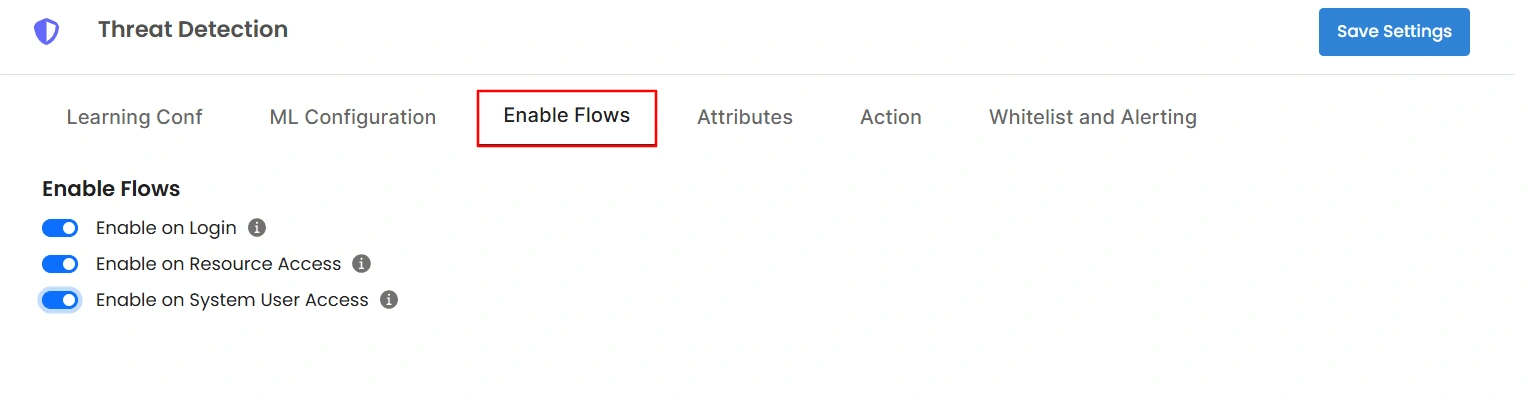
On the Enable Flows tab, turn on detection for each event type you want to monitor:
- Enable on Login - detects failed-login patterns and suspicious login locations.
- Enable on Resource Access - detects unusual access patterns and privilege escalation while accessing resources.
- Enable on System User Access - detects anomalies in service/system account usage.
4. Choose Which Signals Feed the Score
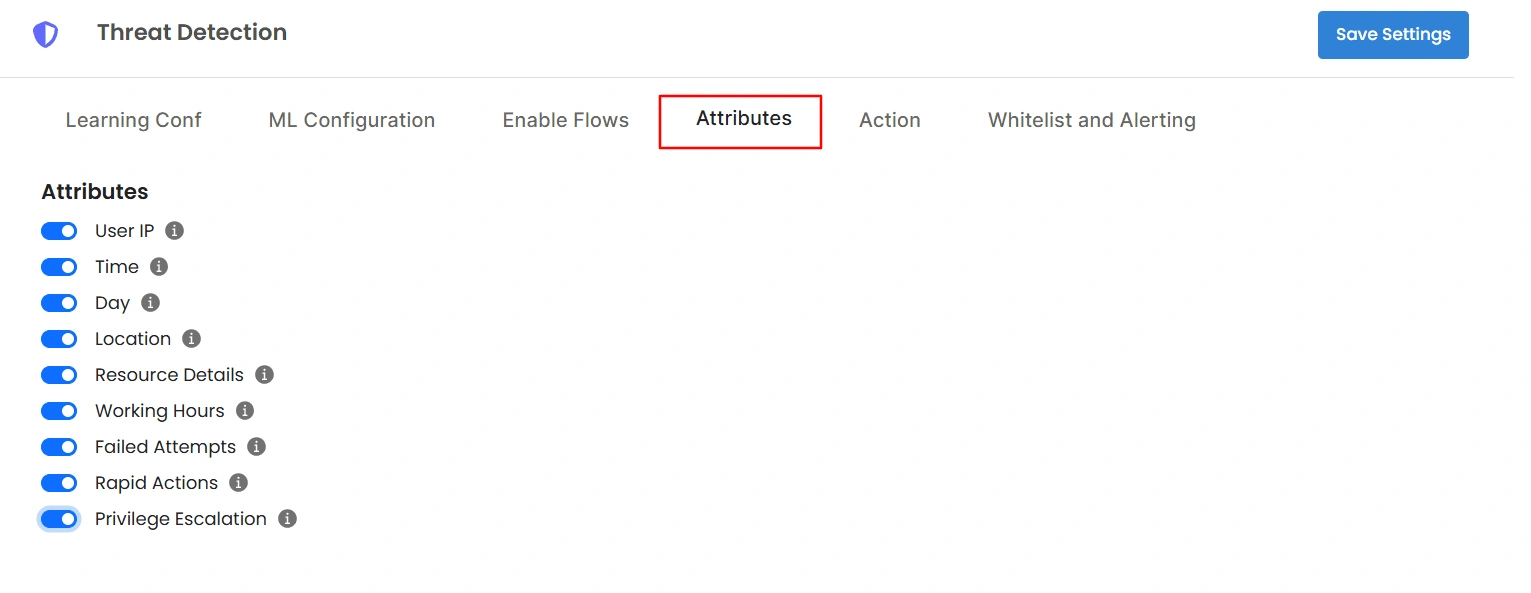
- On the Attributes tab, turn on the signals you want to include in the risk score: User IP, Time, Day, Location, Resource Details, Working Hours, Failed Attempts, Rapid Actions, and Privilege Escalation. All are off by default.
- Note: These 9 toggles are not fully independent. Time, Day, and Working Hours share one underlying check. Turning on any one of them enables the entire check. Rapid Actions, Location, Privilege Escalation, and Failed Attempts share another check. For example, turning on only Rapid Actions also enables detection of privilege escalation and failed attempts because they are evaluated together in the background.
5. Set the Threshold and Response
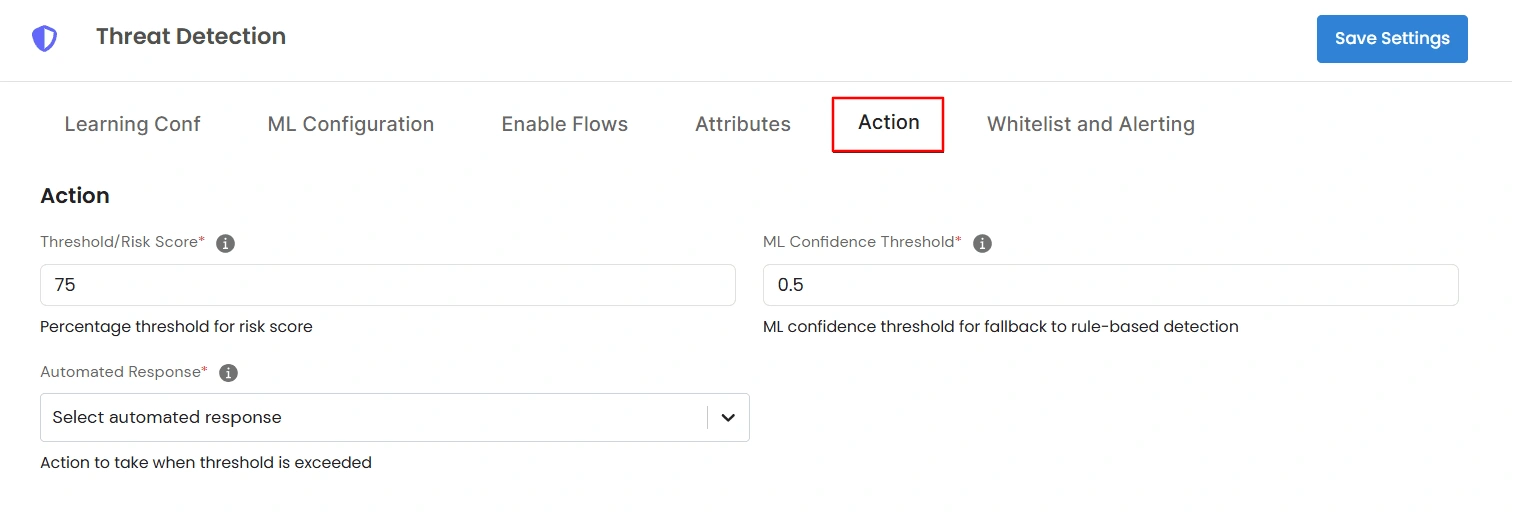
On the Action tab:
- Threshold/Risk Score - the risk percentage (20–100) that triggers your automated response. The default is 75.
- ML Confidence Threshold - a value from 0.0–1.0 that determines how confident the ML model must be before its score is trusted over the rule-based fallback. The default is 0.5.
- Automated Response - required. Select one of the following:
- Auto-lock user - locks the account and invalidates all of the user's active sessions.
- Auto-lock session - locks only the specific session that triggered the detection.
- Trigger MFA challenge - forces a step-up MFA prompt. If the user does not have an MFA method configured, this does not force enrollment. Instead, it logs that MFA was not available and continues.
- Send Alert - takes no action on the account and only notifies the users selected in Step 6.
6. Whitelist and Alerting
On the Whitelist and Alerting tab:
- Whitelist Users - users who are fully exempt from Threat Detection. This skips all detection for them, not just alerts. Use this carefully, for example, for service accounts or admins whose usage patterns are expected to look unusual.
- Send Alert to Users - users who receive the alert email/notification. This is required if you selected Send Alert as the Automated Response. Your customer's Admin user always receives these emails, regardless of who else is selected.
- Click Save Settings to apply the settings from all six tabs.
What Happens When a Threat Is Detected
- An email is sent to the Admin and any users selected under Send Alert to Users, using a fixed alert template. The subject line identifies the threat type, and this template cannot be customized through Custom Templates like other alert emails.
- An in-app notification is posted to the bell icon - Threat Blocked or Threat Alert - which links to the relevant list page (see below).
- The configured Automated Response (lock user, lock session, trigger MFA, or send alert) is executed automatically.
Top 10 Sessions at Risk
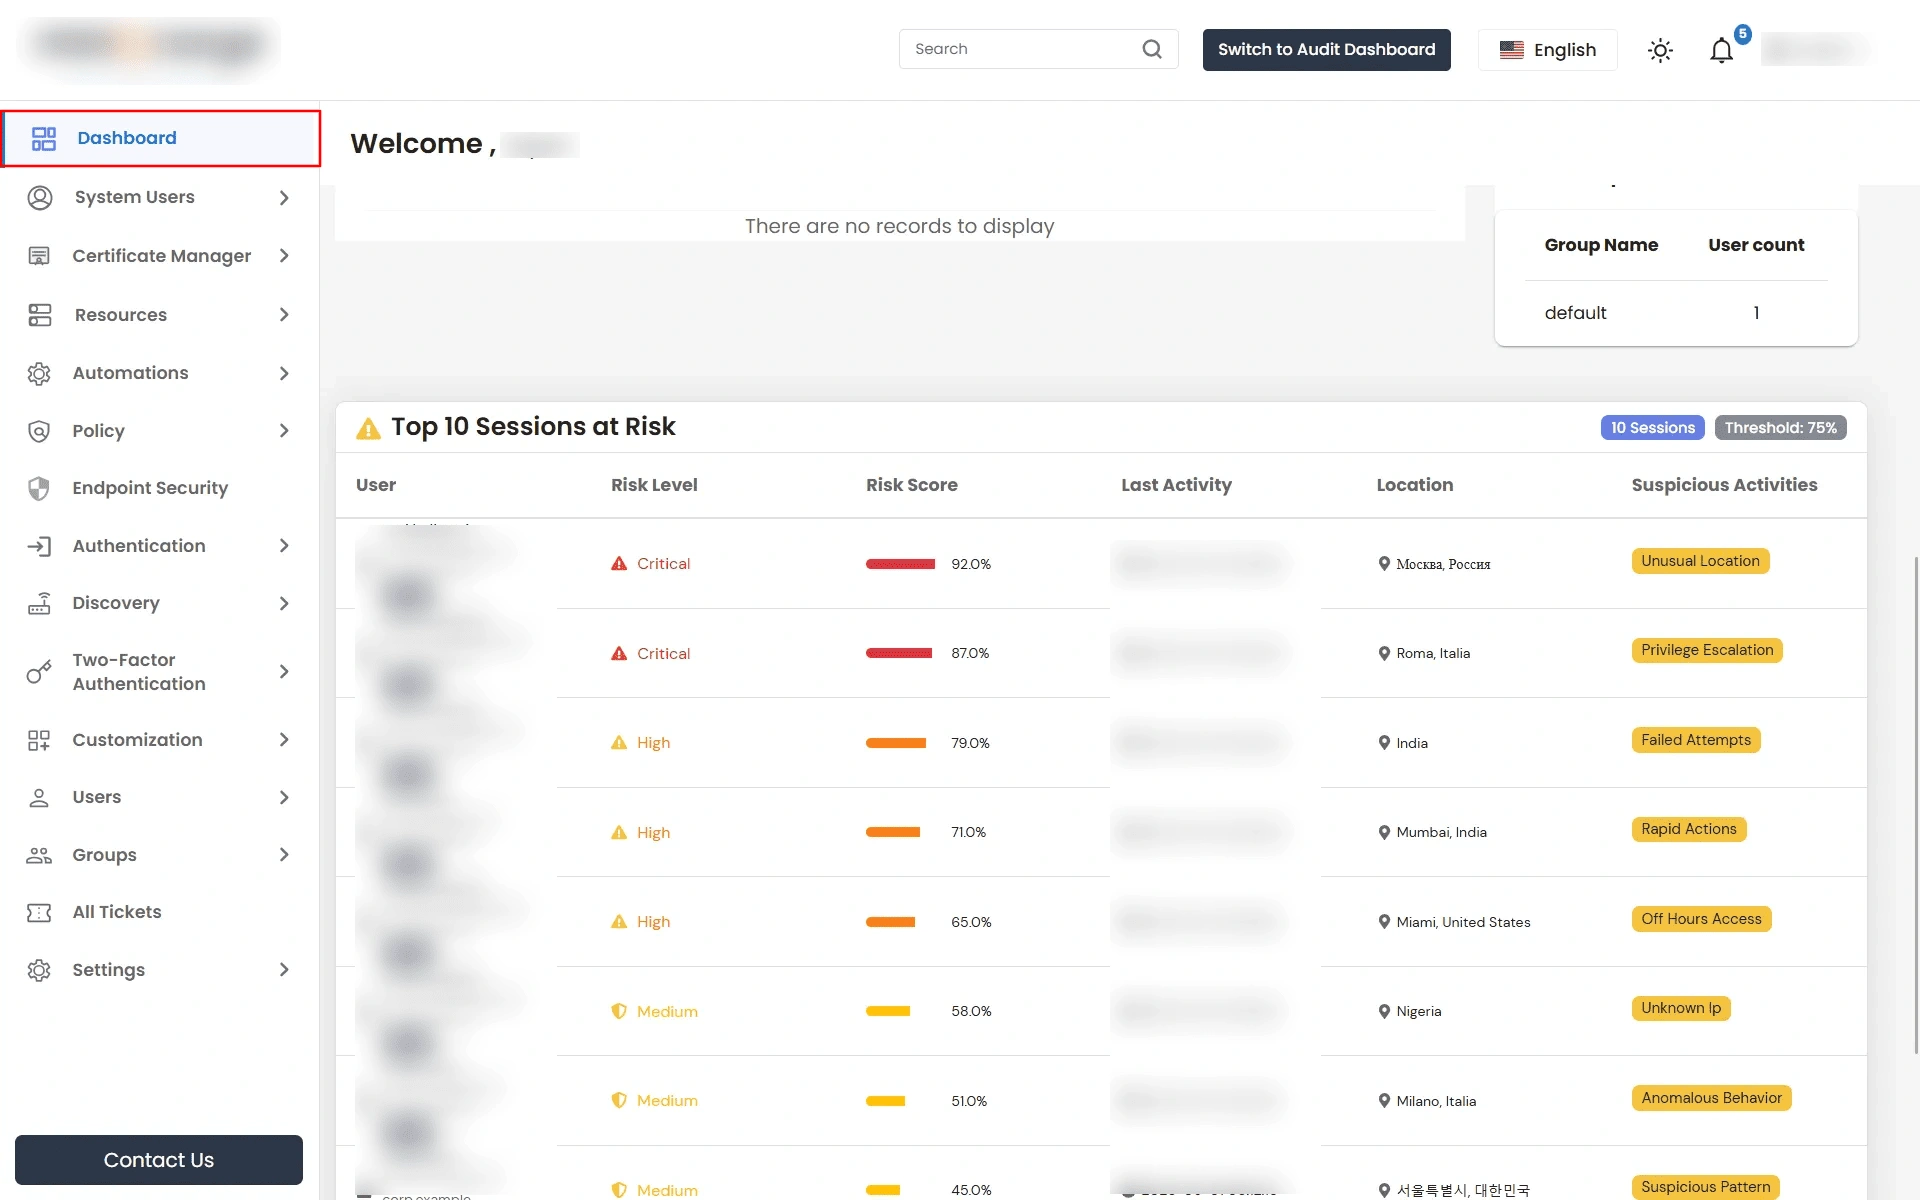
- A widget on the Home dashboard shows the ten riskiest current sessions: User, Risk Level, Risk Score, Last Activity, Location, and Suspicious Activities.
- Risk Level bands are fixed:
- Critical - 80% and above
- High - 60–79%
- Medium - 40–59%
- Low - below 40%
- If Threat Detection is not enabled, this widget shows a prompt to enable it in Settings instead of displaying data.
Reviewing Detected Threats
Go to the Home dashboard and click the Threats Blocked Today or Alerts Sent Today tile, or click a Threat Blocked or Threat Alert notification from the bell menu.
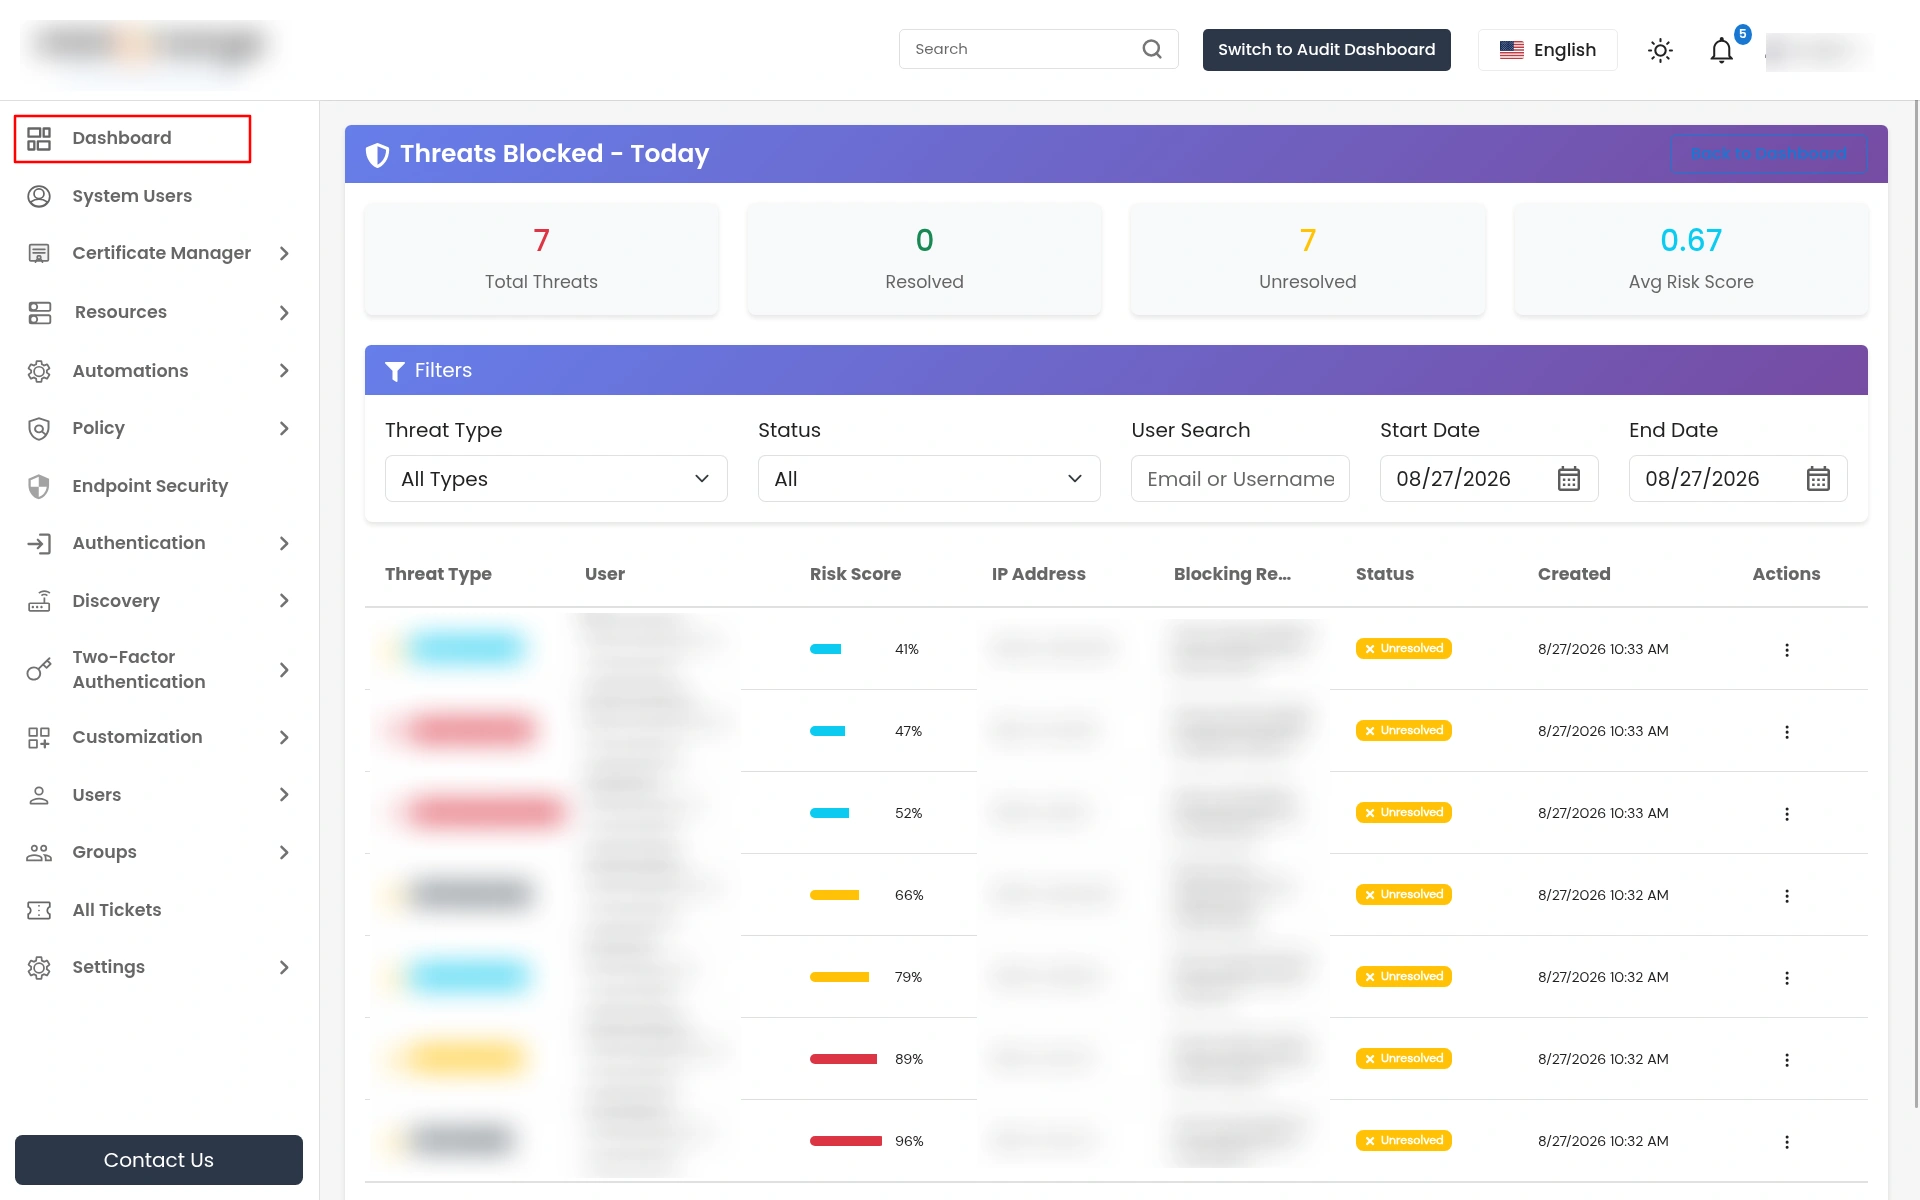
Threats Blocked
- On the PAM Dashboard, click on Threats Blocked Today, and you will be redirected to the Threats Blocked - Today page.
- Here, you can get detailed information about all the threats blocked: Threat Type, User for which the threat was detected, Risk Score of the threat detected, IP Address of the user, Blocking Reason, Status of the threat, and Date and Time of the potential threat activity.
- You can also sort all the data for the columns, by simply clicking the column name.
- To mark a threat as Resolved, click on the 3 dots in the Action column and click on Mark as Resolved.
Alerts Sent
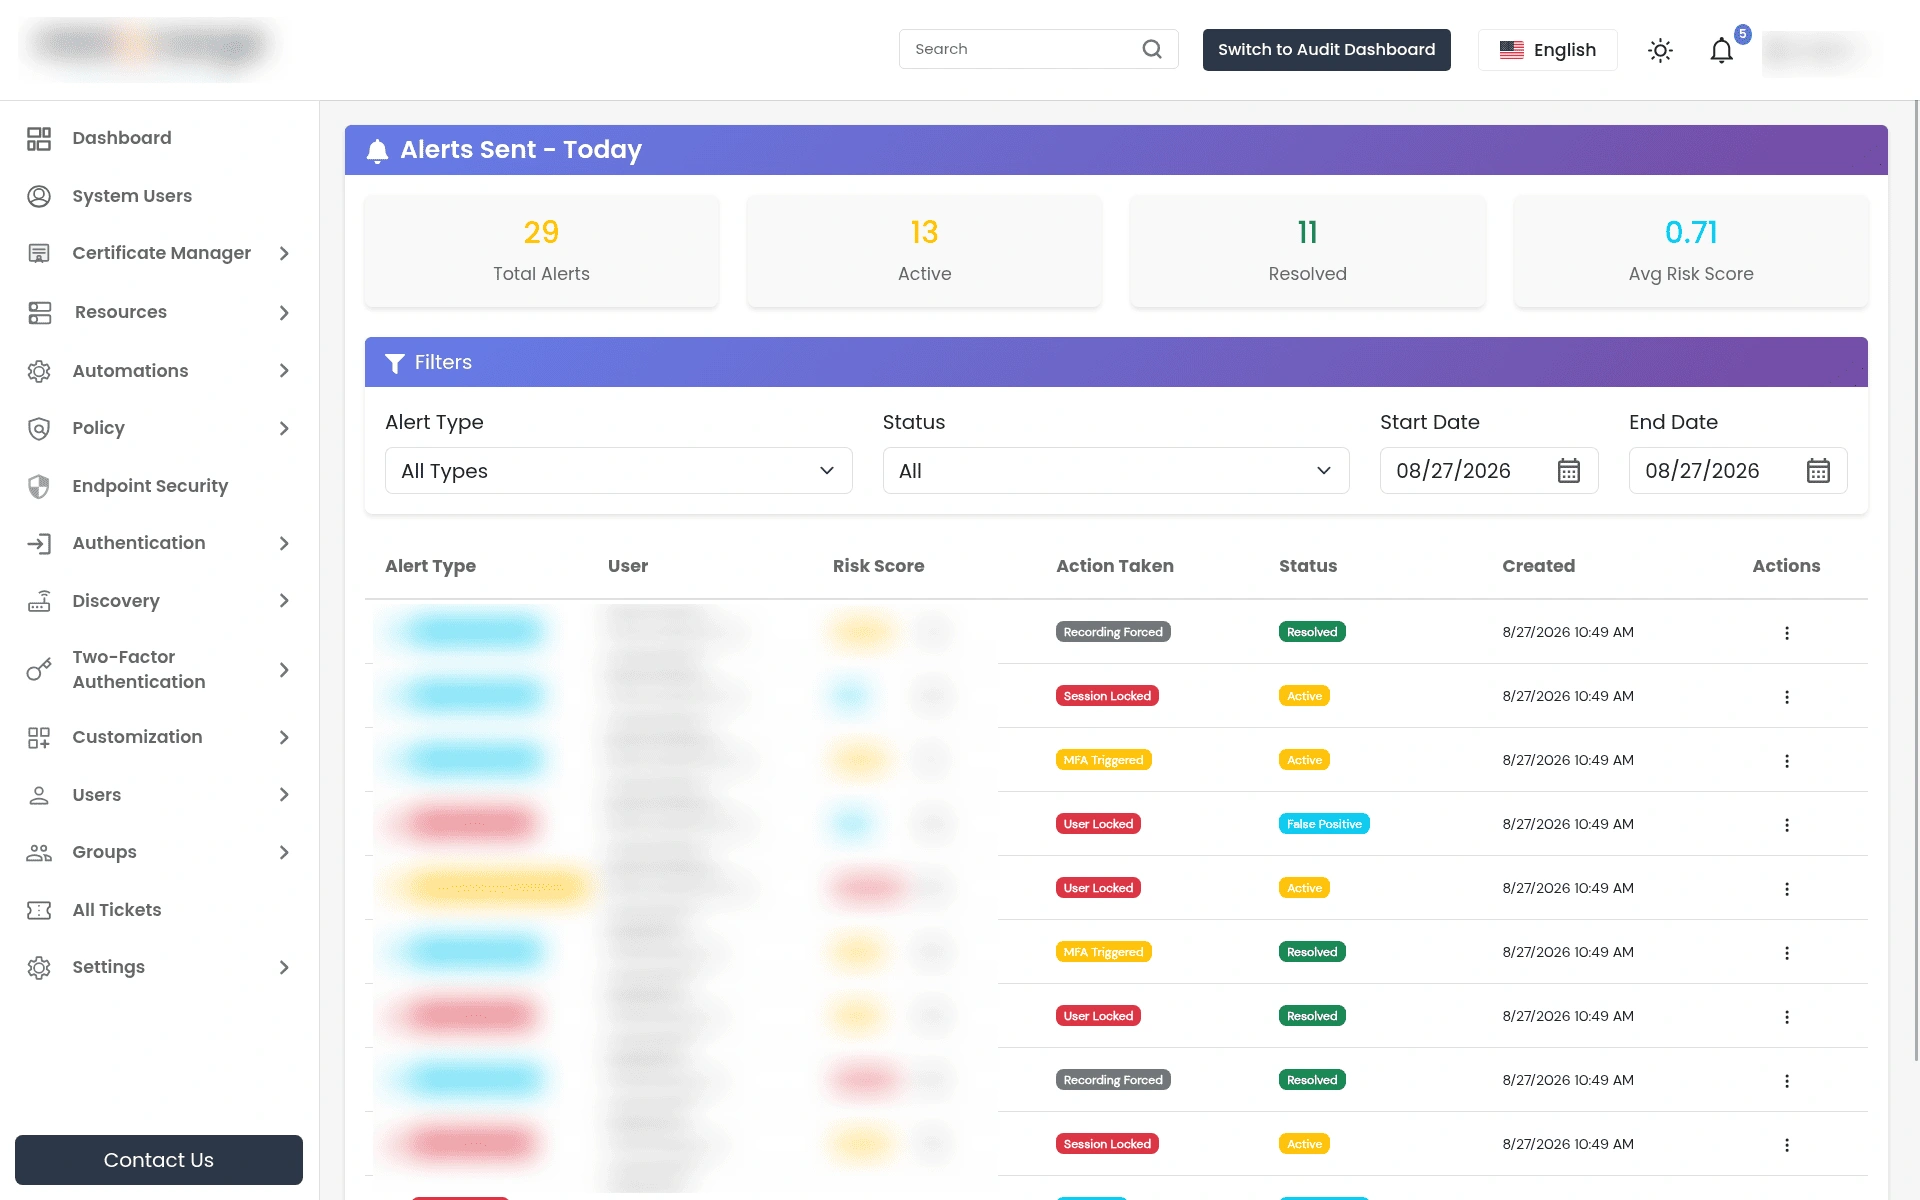
- On the PAM Dashboard, click on Alerts Sent Today, and you will be redirected to the Alerts Sent - Today page.
- Here, you can view detailed info about the threats for which notifications have been sent: the Alert Type, User for which notification was sent, Risk Score of the threat detected, the action taken for the threat detected, Status of the threat, and Time and Date of notification.
- If you want to resolve the threat, click on the 3 dots in the Action column and click on Mark as Resolved.
- If you think that the threat detected is false, click on the 3 dots in the Action column and click on Mark as False Positive.
Who Can Do What
A single capability - Threat Detection Settings - controls the entire feature: viewing the sidebar link, configuring the six tabs, and viewing or resolving threats and alerts.
There is no separate permission for configuring rules and viewing/resolving threats. Access is all-or-nothing per role. See User Roles for more on assigning capabilities.
Good to Know
- Threat Detection alert emails use one fixed template. Unlike some other PAM alert emails, they cannot be customized through Custom Templates.
- Whitelisting a user skips detection for them entirely across every event type. It is not a per-alert or per-rule exemption.

