Office365 Device Restriction
Restrict users with unmanaged devices from accessing your MS Office 365 apps and the data stored on them. Onboard users with miniOrange and configure Device Restrictions to allow access only from specific devices. Select the solution that fits your business needs, to prevent users from accessing, downloading, uploading, or sharing your business data via MS Office 365 apps.

Authenticate Devices In-use
Authenticate user devices before granting access to your MS Office 365 apps to verify user identity with IAM.
Learn More
Setup Now

Mobile App Restrictions for MS Office 365
Allow access to MS Office 365 apps on mobile devices (Android/iOS) that are enrolled with your organization, and restrict access for unmanaged devices using Mobile Device Management (MDM).
Learn More
Setup Now
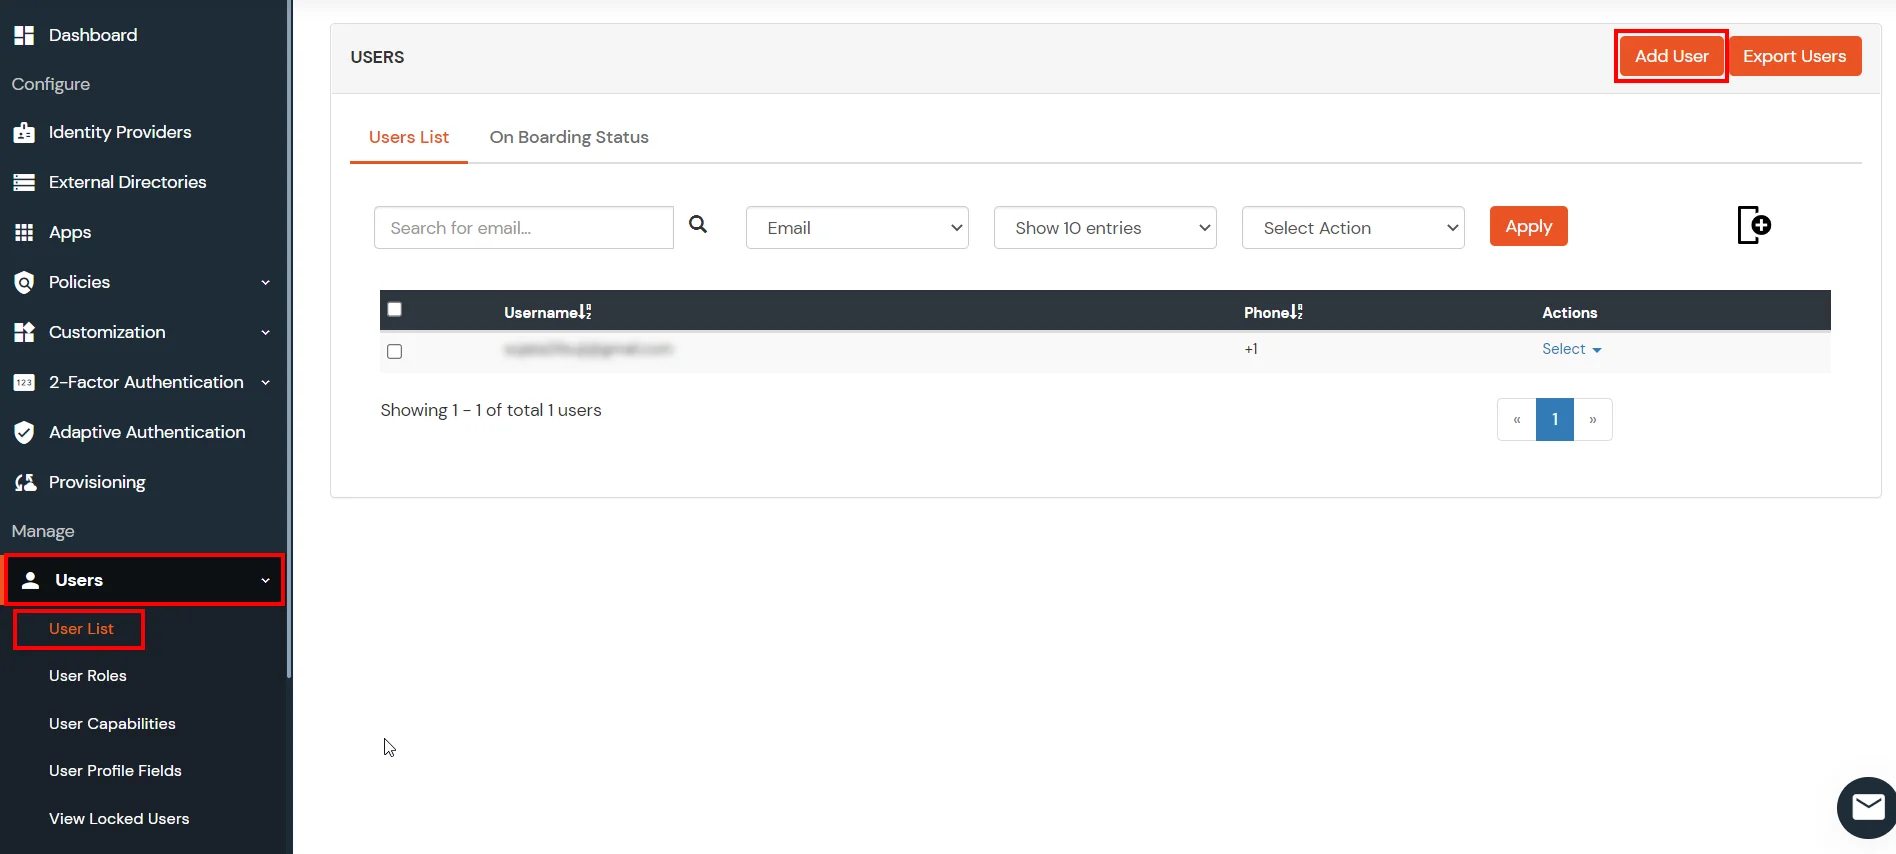
Connect with External Source of Users
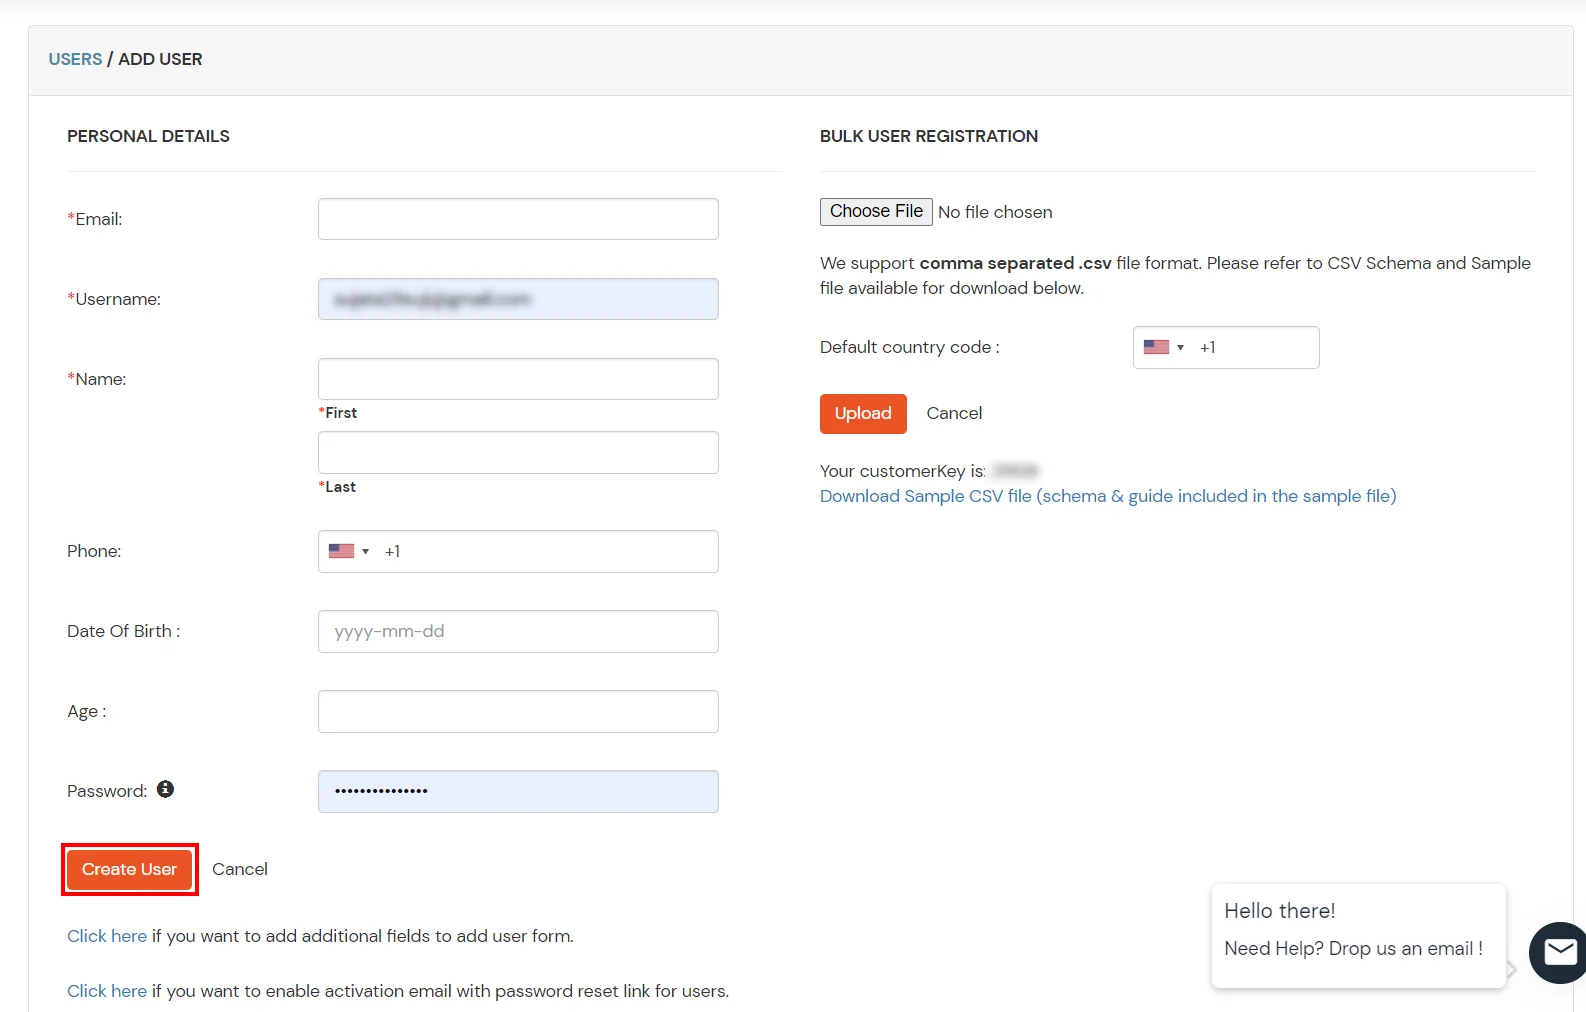
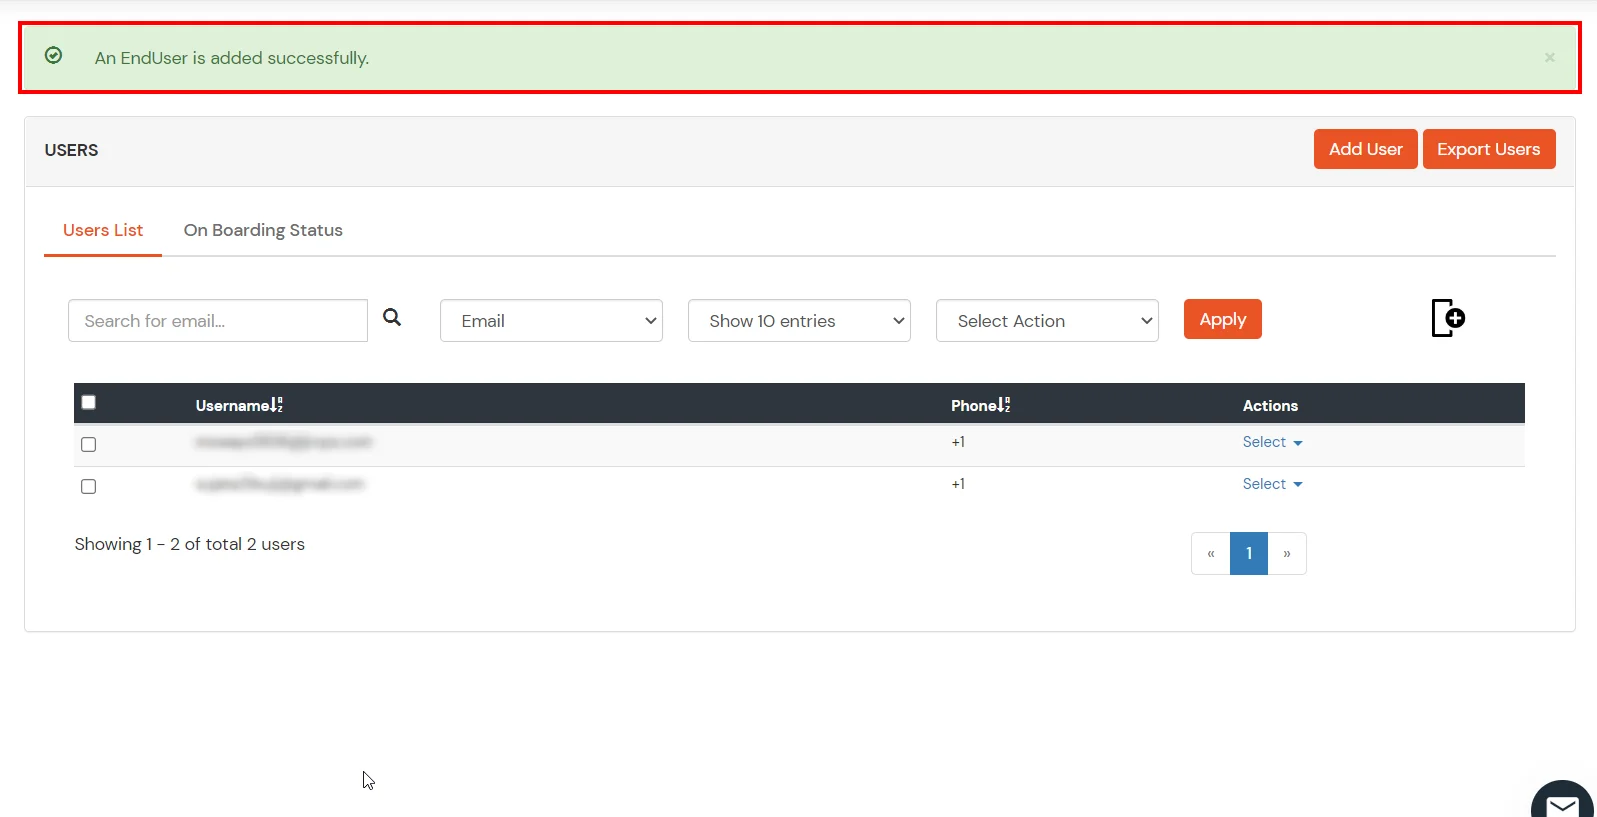
miniOrange provides user authentication from various external sources, which can be Directories (like ADFS, Microsoft Active Directory, OpenLDAP, AWS etc), Identity Providers (like Microsoft Entra ID, Okta, AWS), and many more. You can configure your existing directory/user store or add users in miniOrange.
Prerequisites
1. Sync On-Premise Active
Directory with Azure Active Directory
NOTE: If you want to use your On-Premise Active Directory as a user store to
Single Sign-On into Office 365 then follow the below steps to sync your AD and Microsoft
Entra ID.
- Download the Microsoft Entra ID Connect
- Run the Microsoft Entra ID installer on your domain machine and follow the setup.
2. Verify your UPN Domain in
Azure Portal
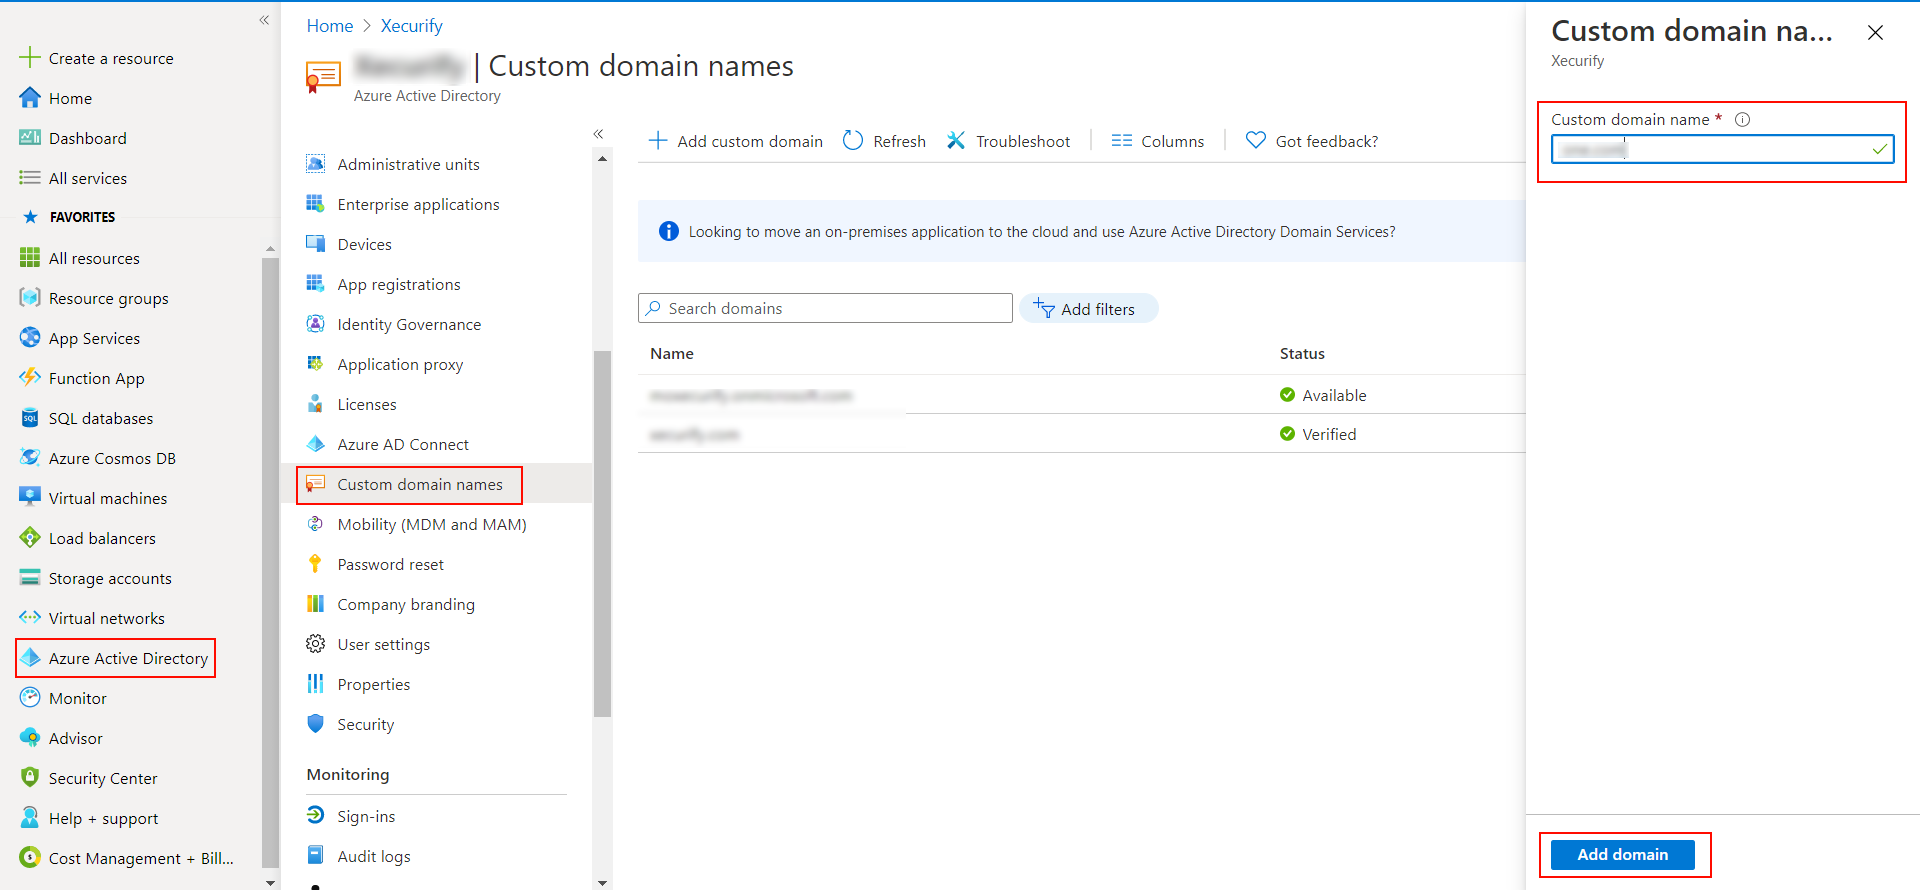
- In the Azure portal navigate to Azure Active Directory >> Custom domain names and
click on Add custom domain.
- Enter the full domain name in the right pane that pops up and click on Add
domain.
- A new window will open up with TXT/MX records for the domain. You will have to
add the resented entry in your domain name registrar.
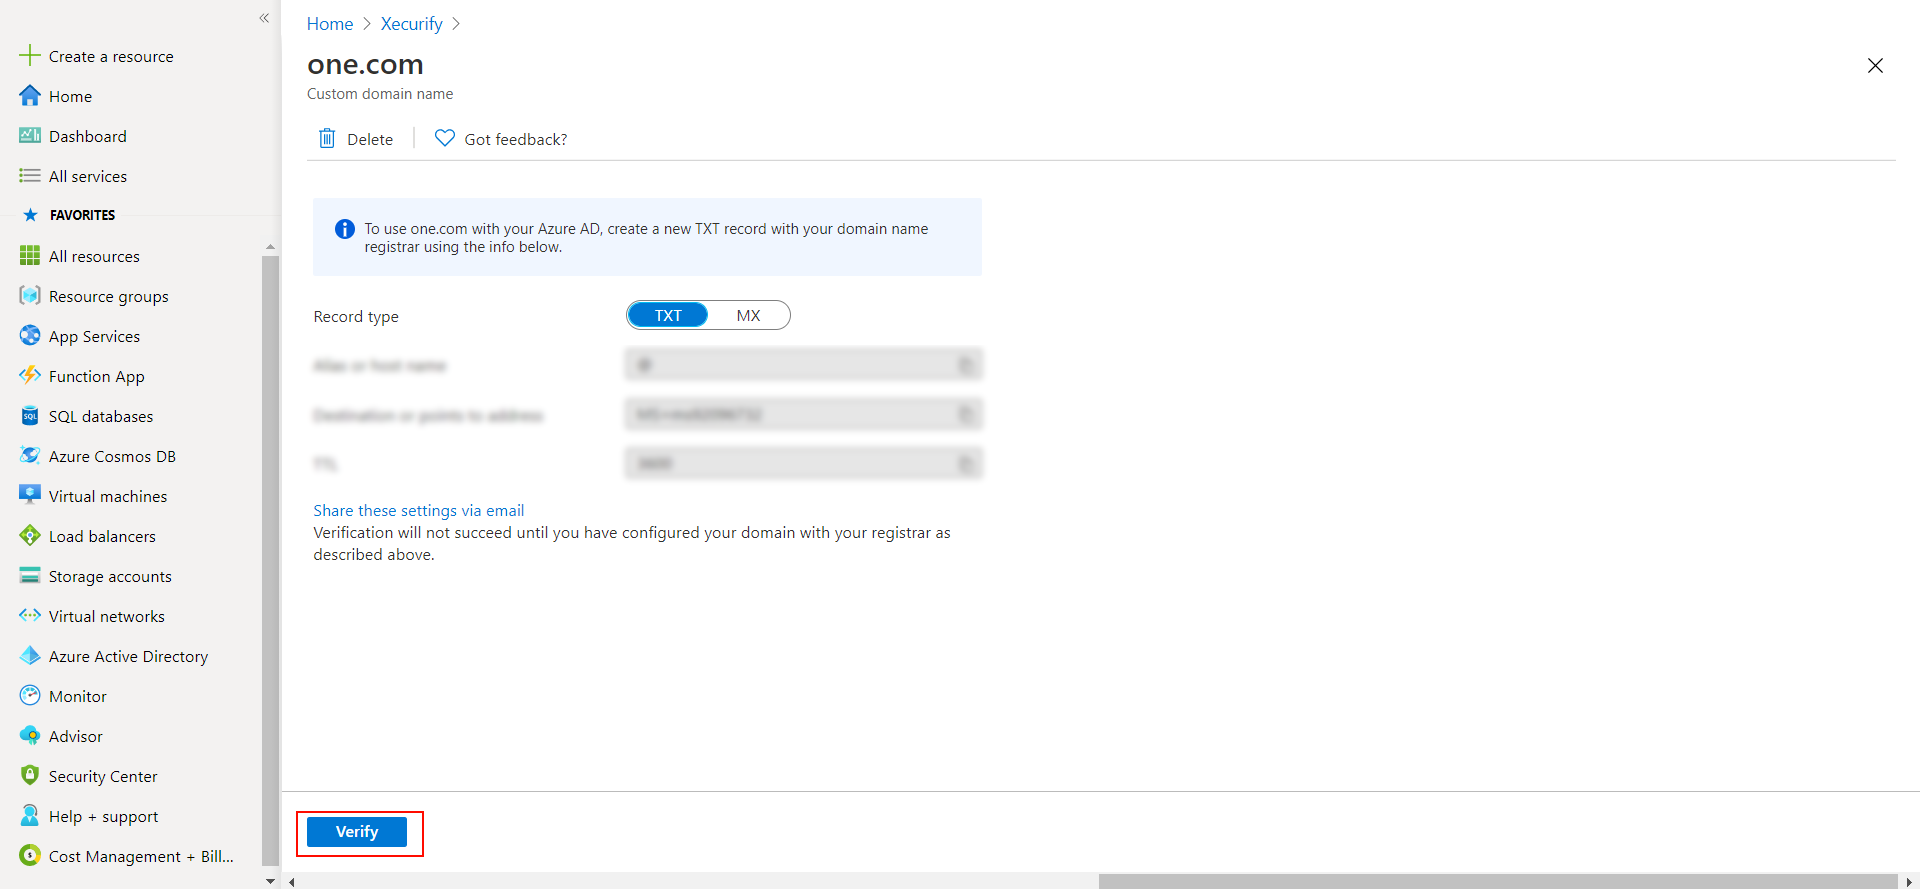
- Click on verify once you have added the entry
Configure User Device Authentication for Office 365
Configure Mobile Device Restriction for Office 365
1. Setup a Custom Branded URL in
miniOrange Admin Console
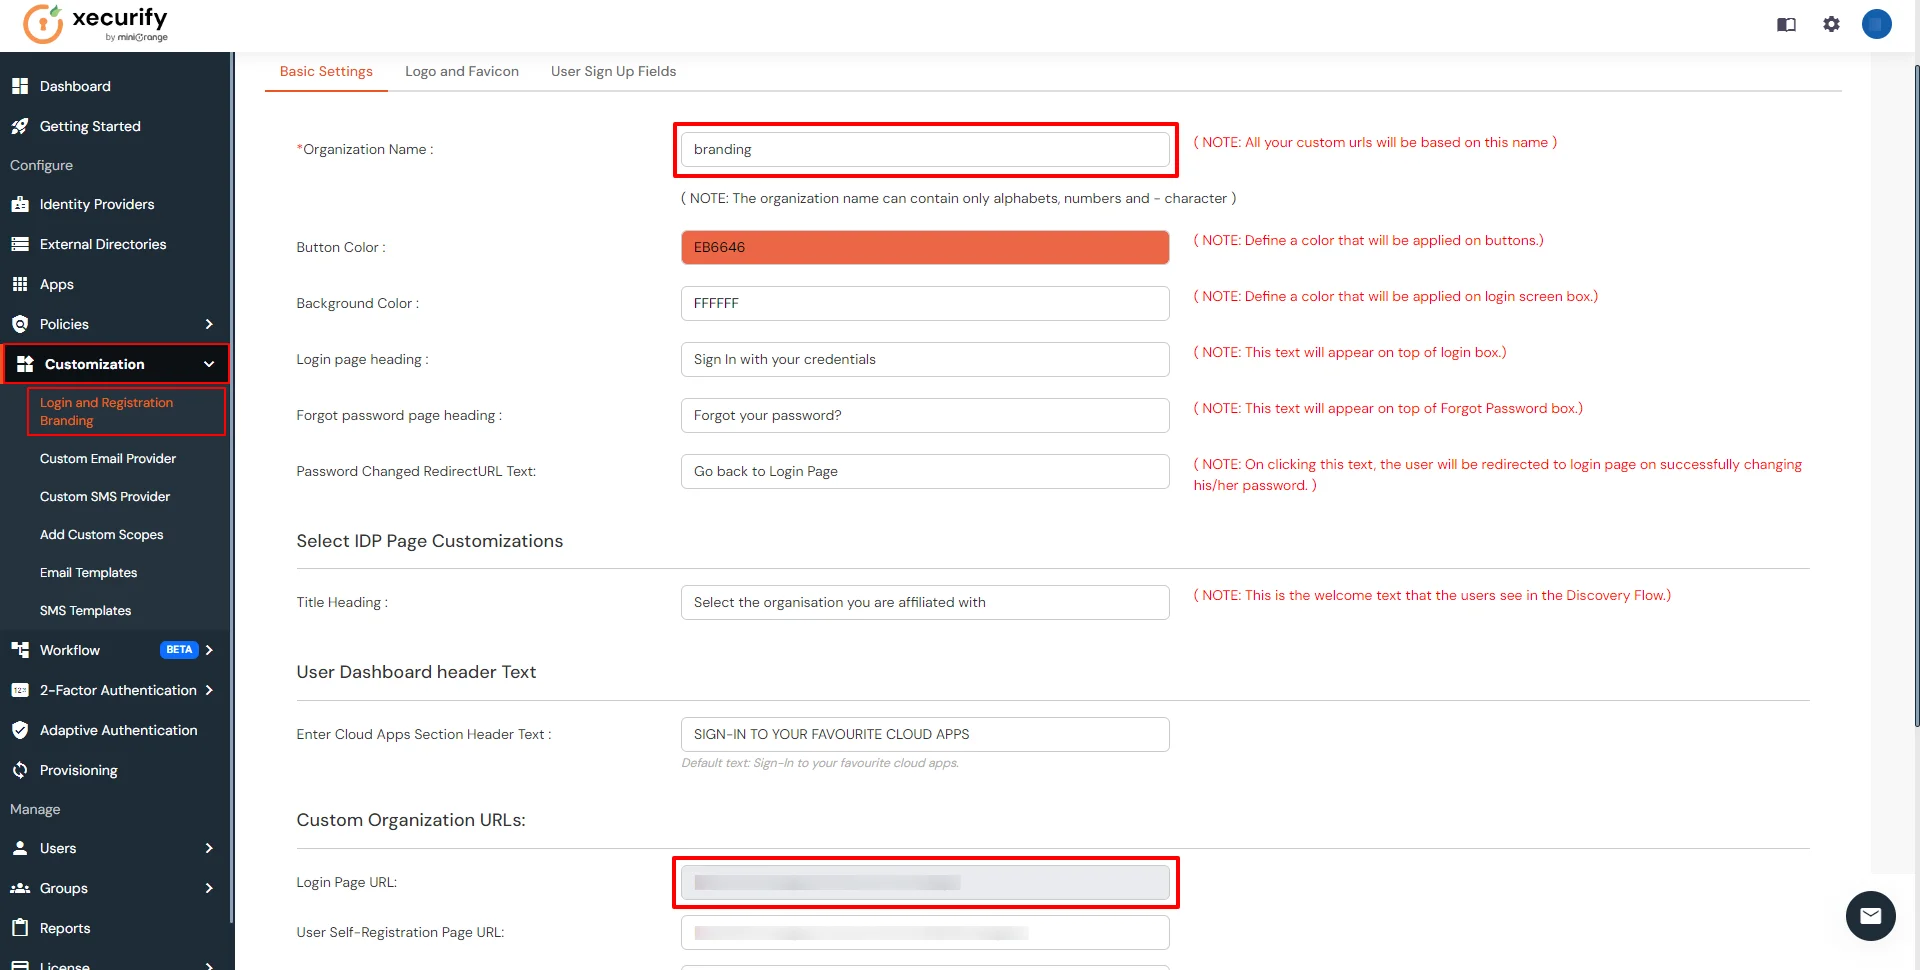
Single Sign-On into Office 365 requires a custom branded URL to be set. Access to miniOrange and
connected resources will need to be through the custom branded URL in the format:
https://<custom_domain>.xecurify.com/moas
- Login to miniOrange Admin
Console.
- Click on Customization in the left menu of the dashboard.
- In Basic Settings, set the Organization Name as the custom_domain name.
- Click Save. Once that is set, the branded login URL would be of the format
https://<custom_domain>.xecurify.com/moas/login
2. Configure Office 365 in
miniOrange
- Login into miniOrange Admin
Console.
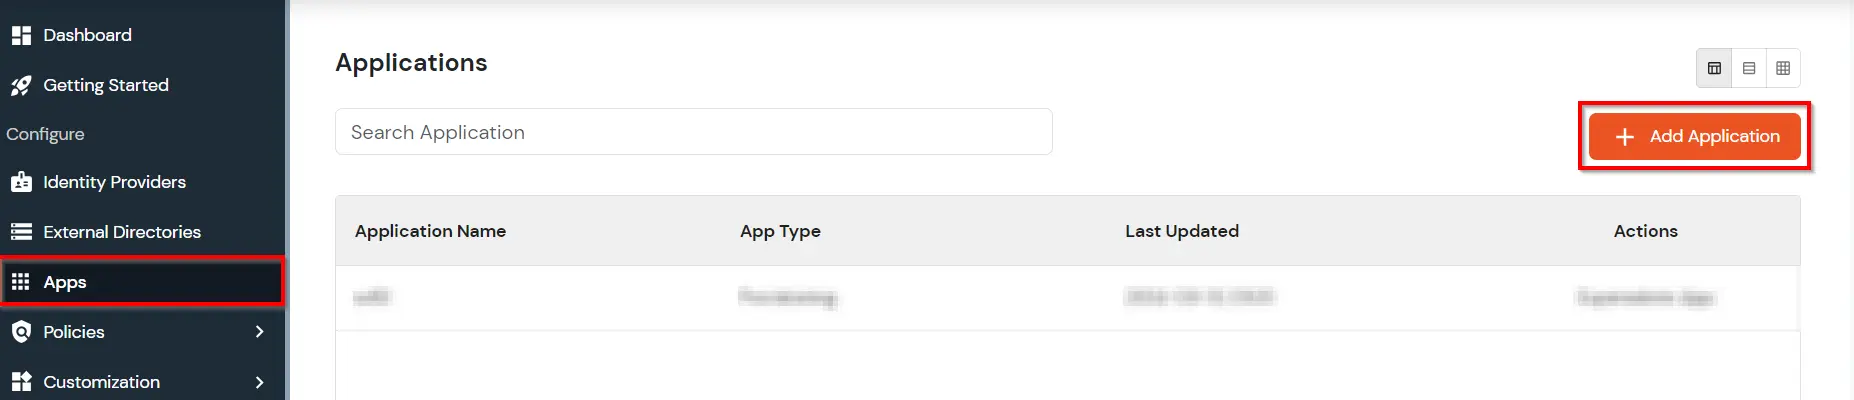
- Go to Apps and click on Add Application button.
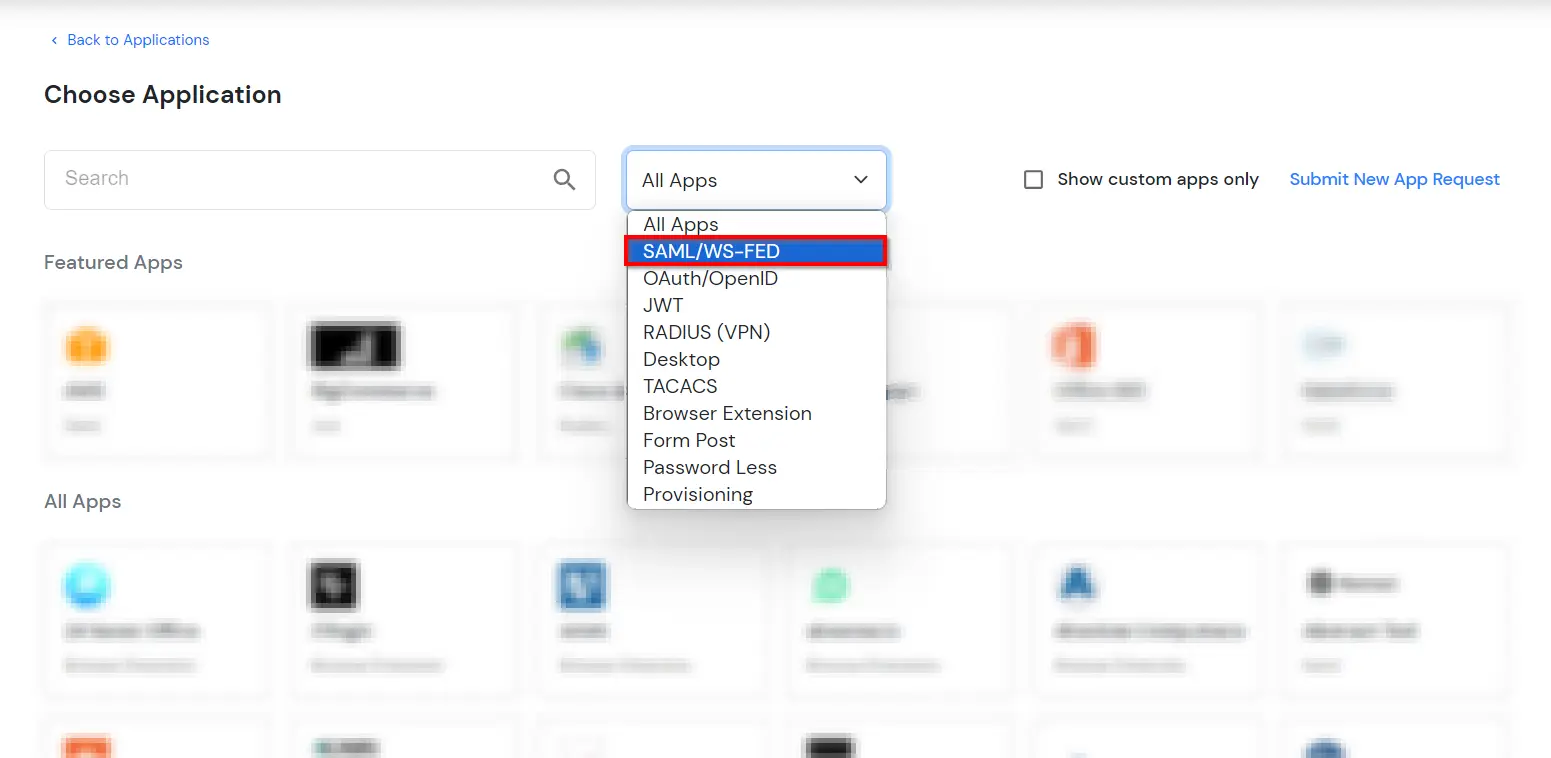
- In Choose Application Type click on Create App button in SAML/WS-FED
application type.
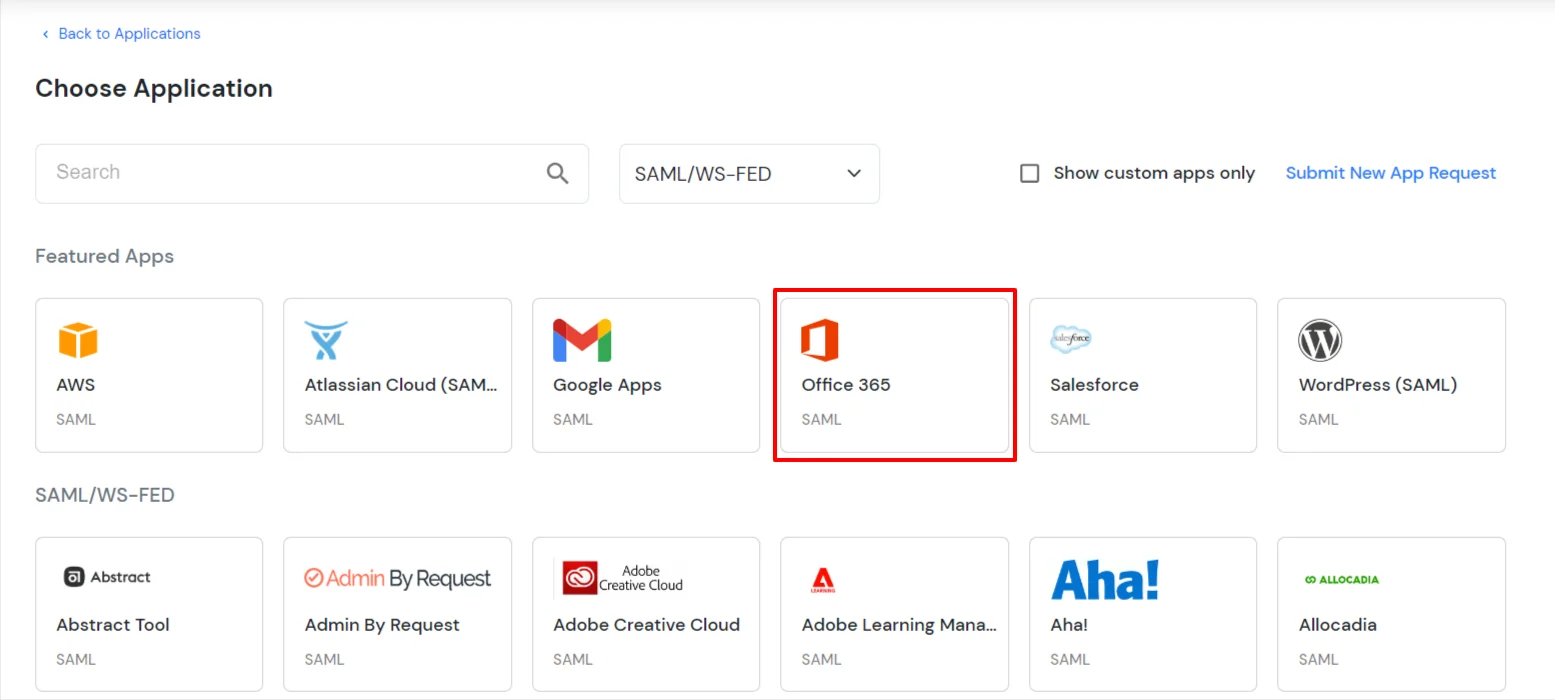
- In the next step, search for Office 365. Click on Office 365 app.
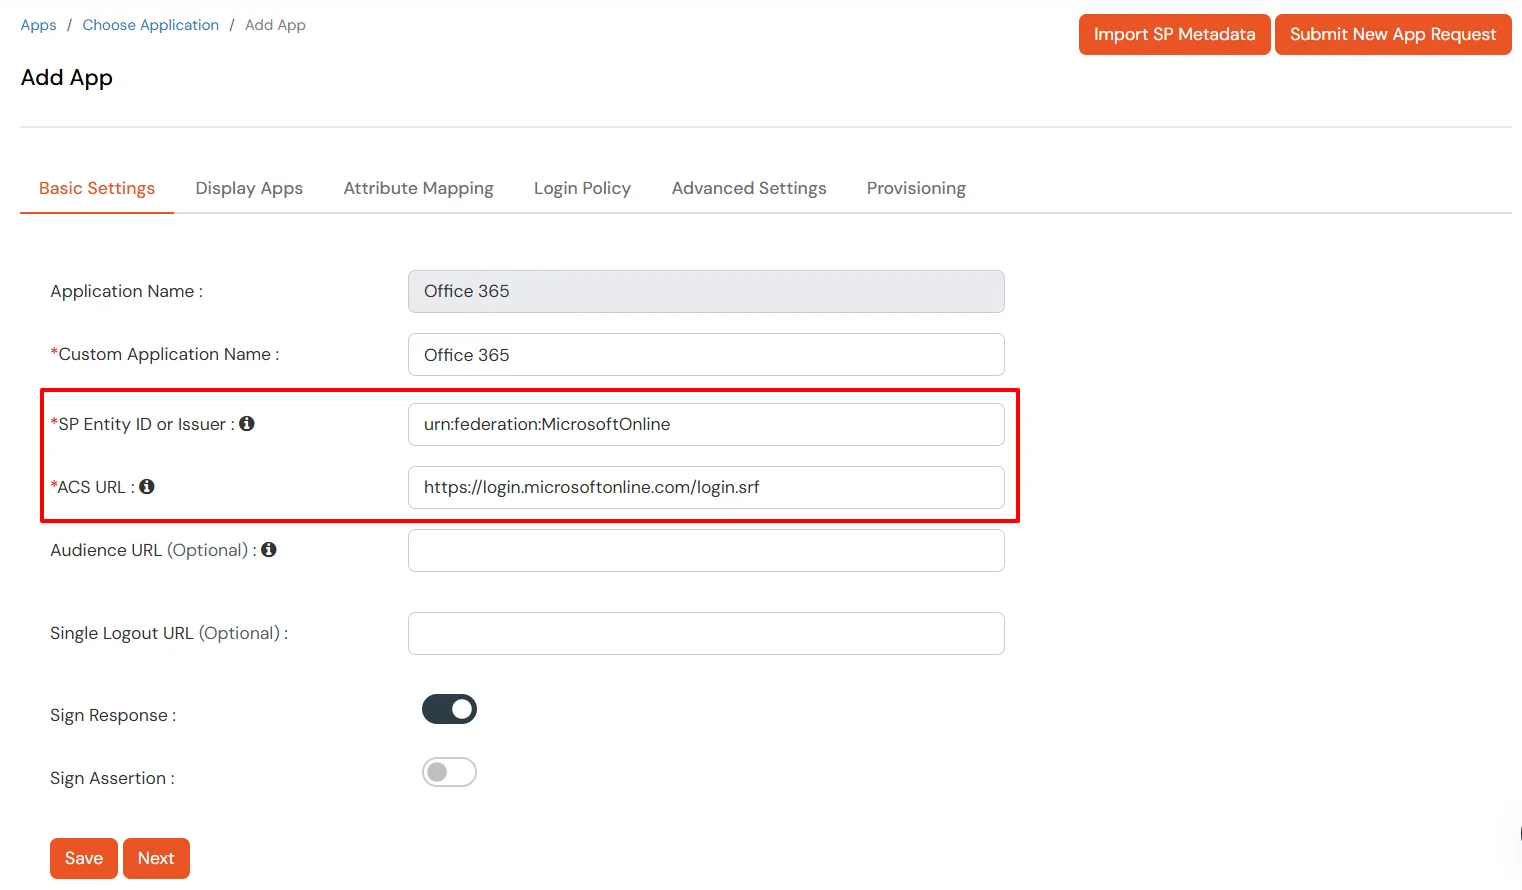
- Make sure the SP Entity ID or Issuer is: urn:federation:MicrosoftOnline
- Make sure the ACS URL is: https://login.microsoftonline.com/login.srf
- Click on Next.
-
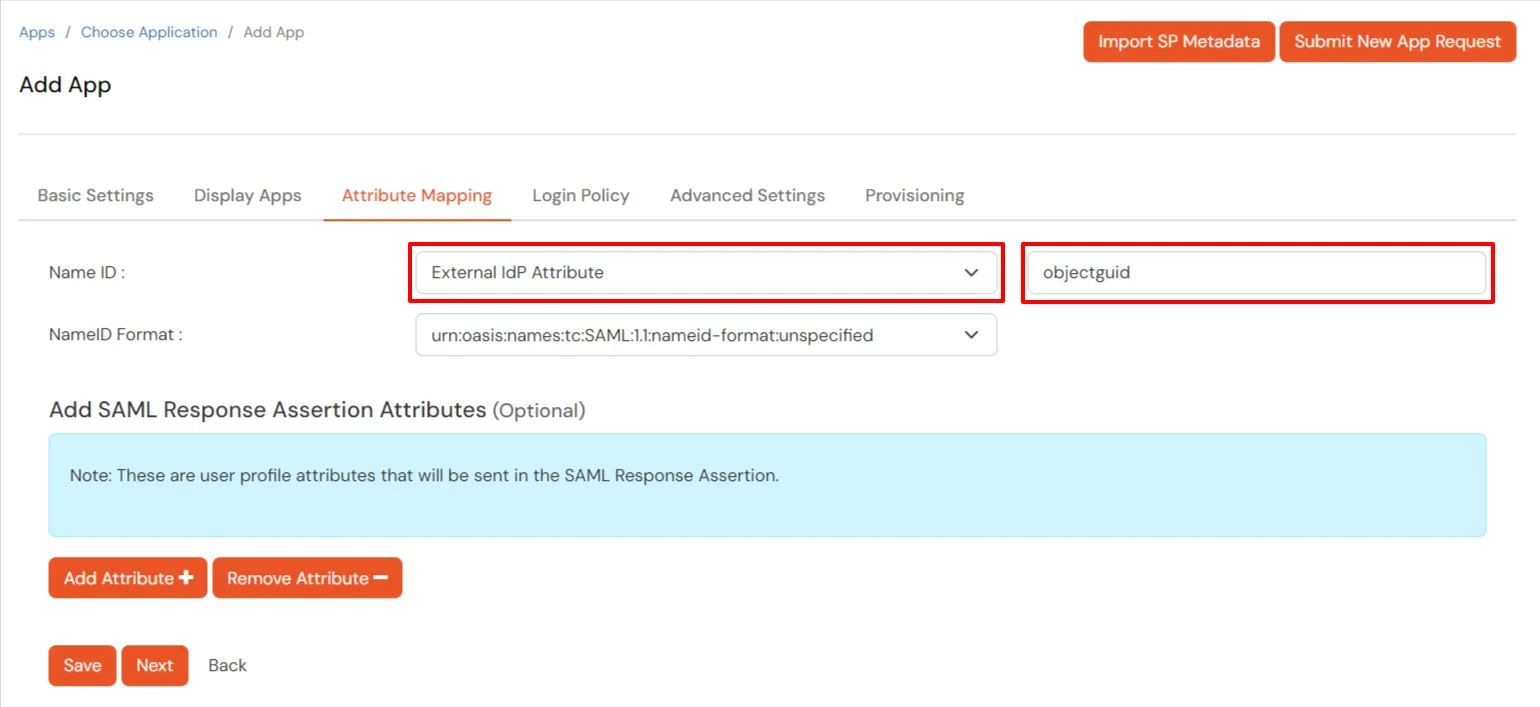
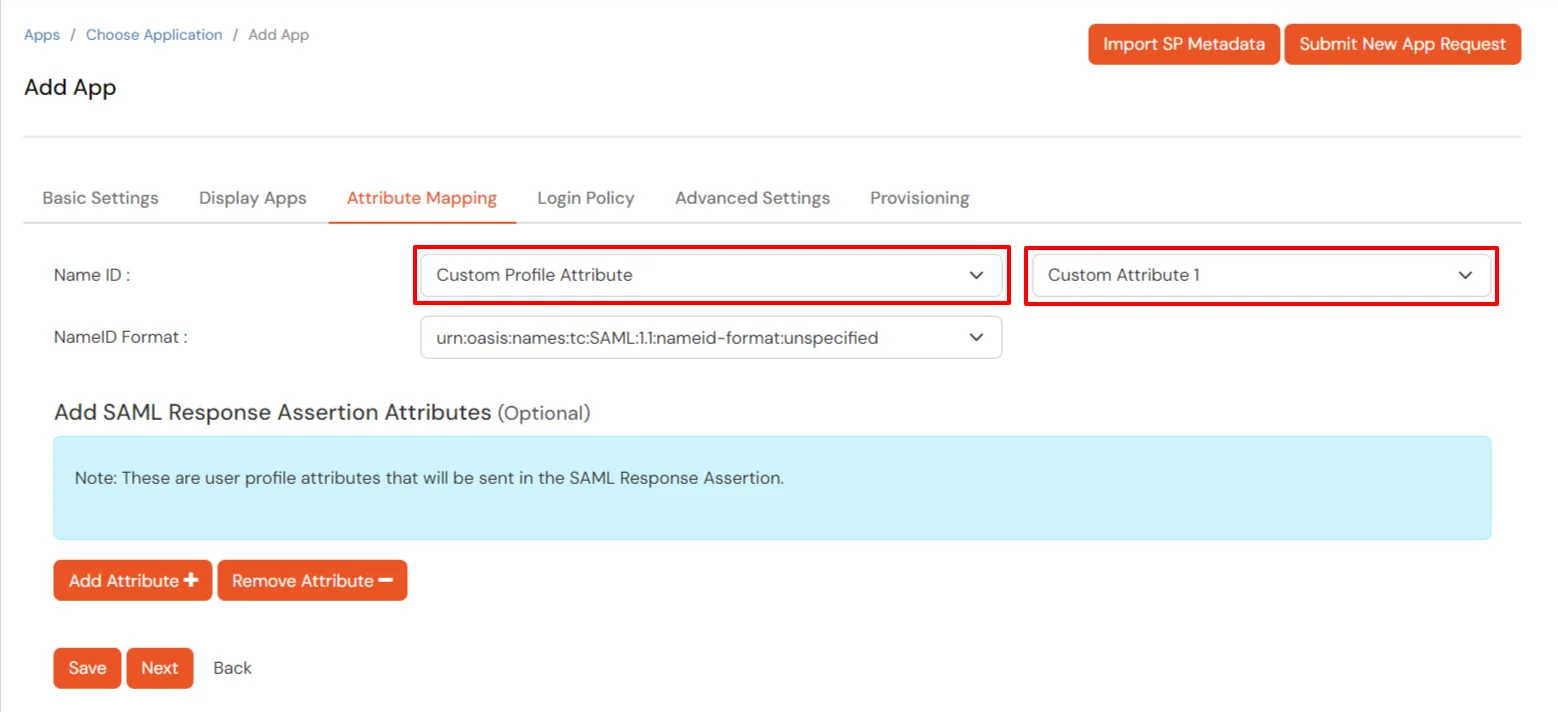
Configure Name ID based on the User Store you are using:
- Using Active Directory / miniOrange brokering service: Select External IDP
Attribute from the dropdown and add objectguid in the text-box that appears.
- Using miniOrange as a User Store: Select Custom Profile Attribute and select
a Custom Attribute from the drop-down.
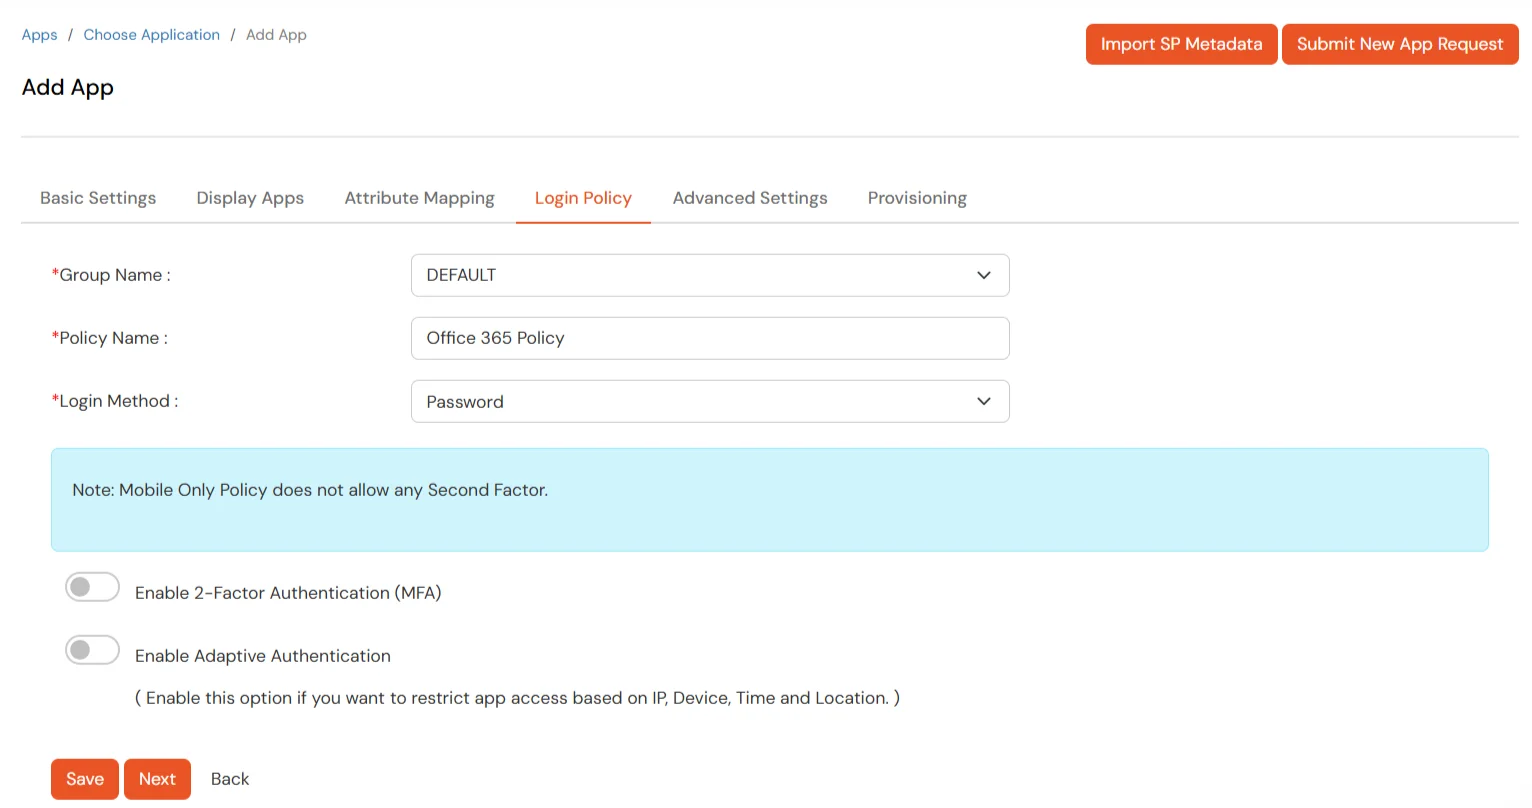
- Set the login policy. You can choose to enable 2FA for login or have users login
using a standard username-password.
- Click on Save to configure Office 365.
3. Configure Microsoft Online
Services
- Click on Select dropdown and choose Metadata.
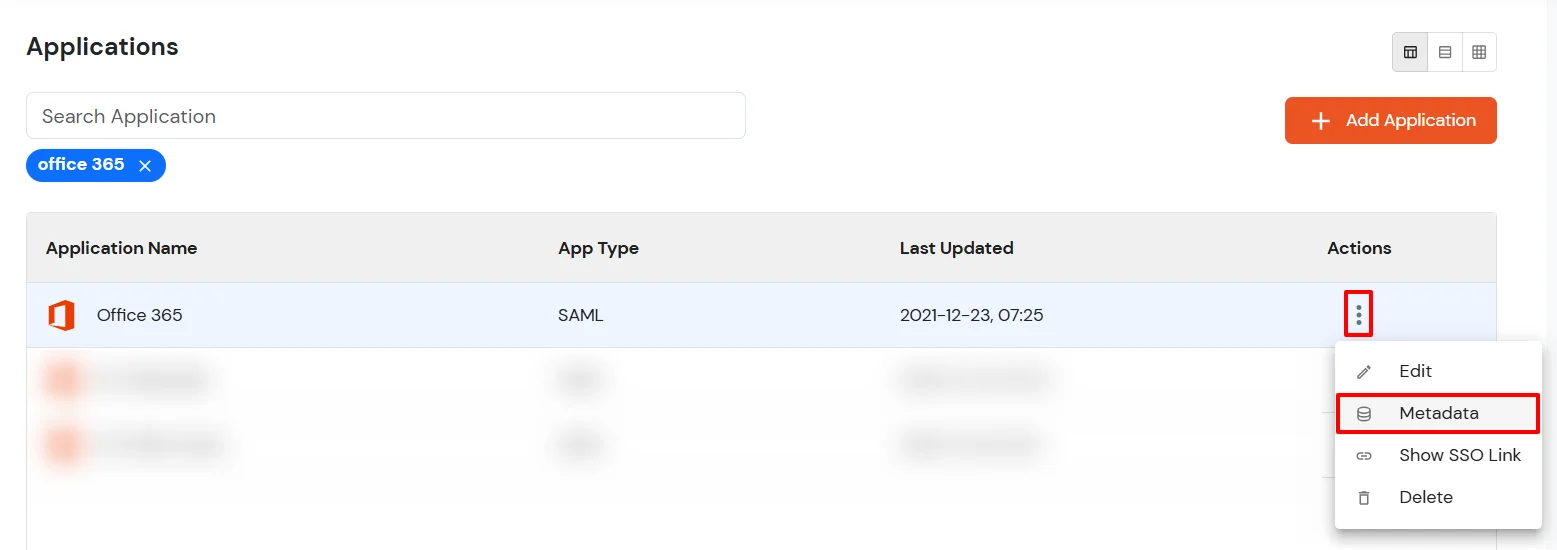
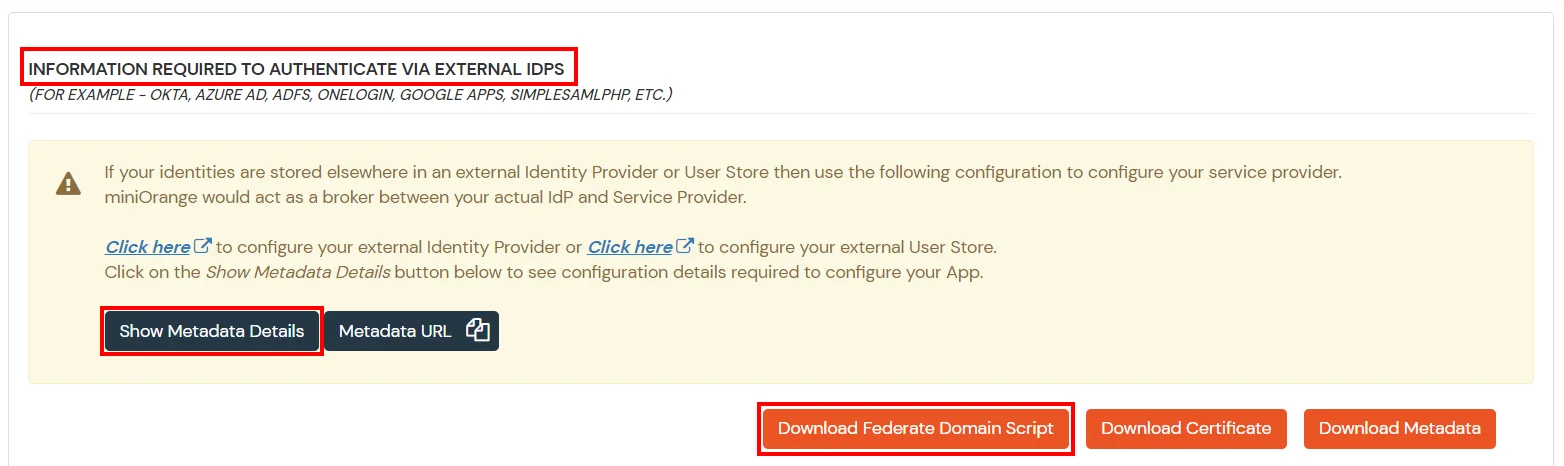
- Click on the Download Federate Domain Script button under "INFORMATION REQUIRED TO
AUTHENTICATE VIA EXTERNAL IDPS"
- Enter the domain name that you want to federate and click on Download.
Note: You cannot federate your default "onmicrosoft.com" domain. To federate
your Office 365 tenant, you must add a custom domain to Office 365.
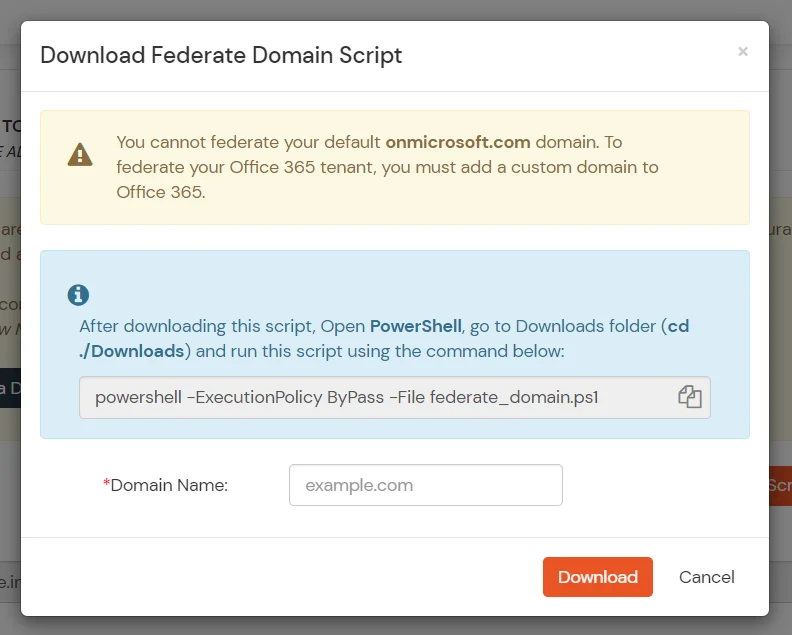
- After downloading the script, Open PowerShell run the federate_domain script using:
cd ./Downloads
                        powershell -ExecutionPolicy ByPass -File federate_domain.ps1
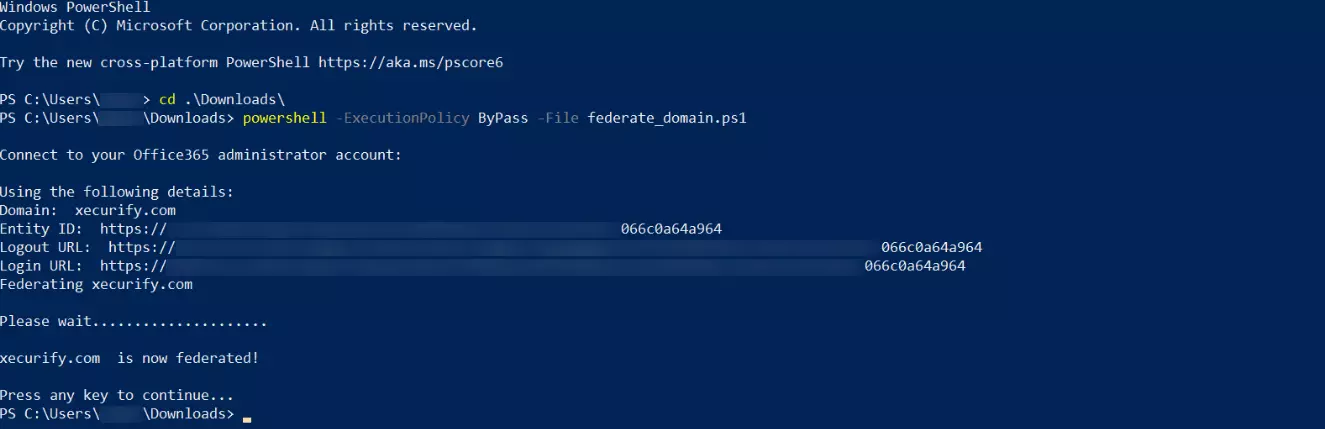
- Your domain is now federated. Use the commands below to check your federation settings:
Connect-MsolService
                        Get-MsolDomainFederationService

4. Configure Device Restriction Policy
Device restriction lets admins control application access using device trust. You can use Agentless Device Restriction (browser-based fingerprinting) or Agent-Based Device Restriction (installed agent with risk scoring) depending on your security requirements.
- Login to Self Service Console >> Policies >> Adaptive Access Policy section from the left side menu.
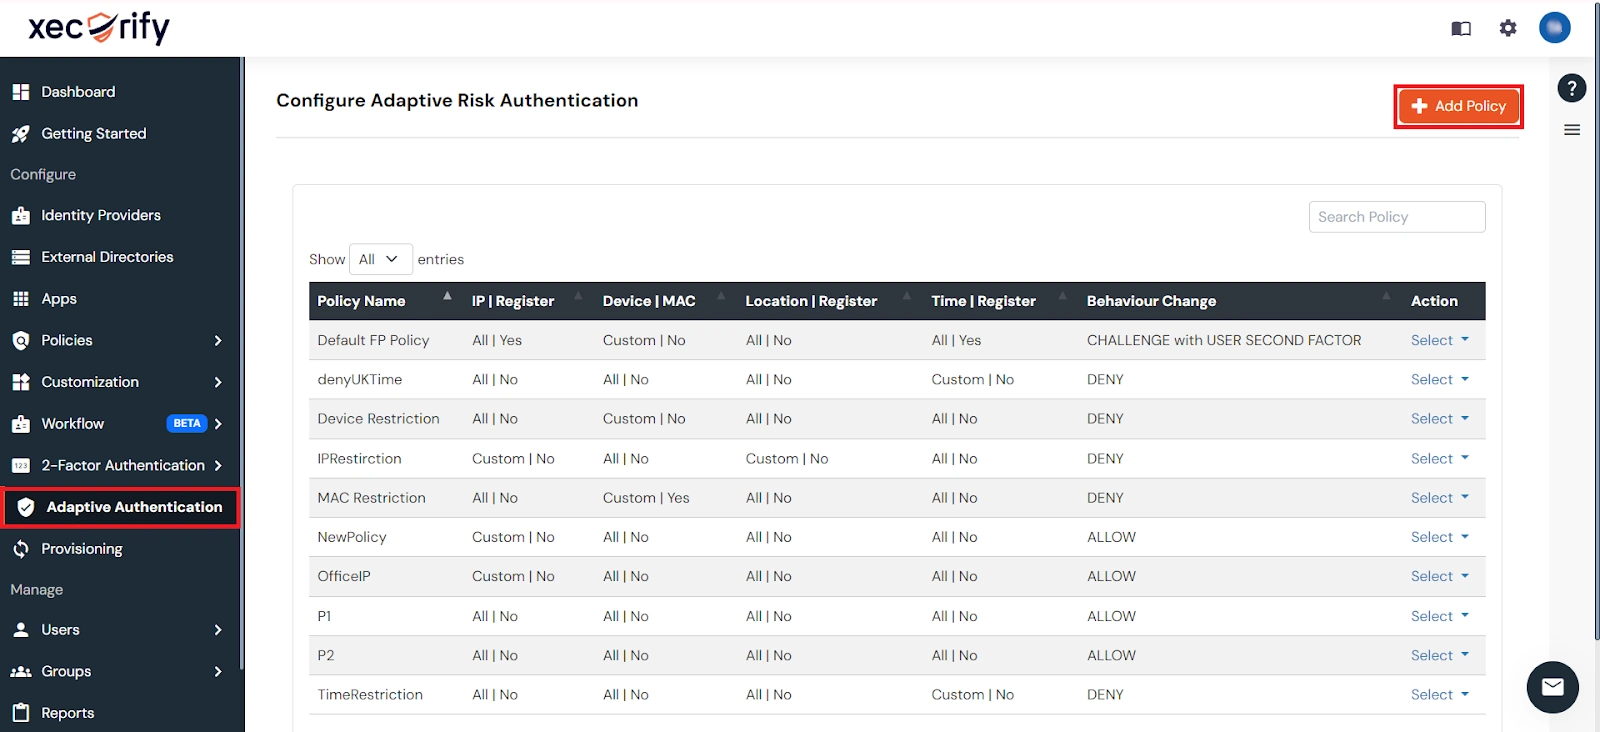
- Click on the Create Policy button on the upper right. Add a suitable policy name and click on Create Policy.
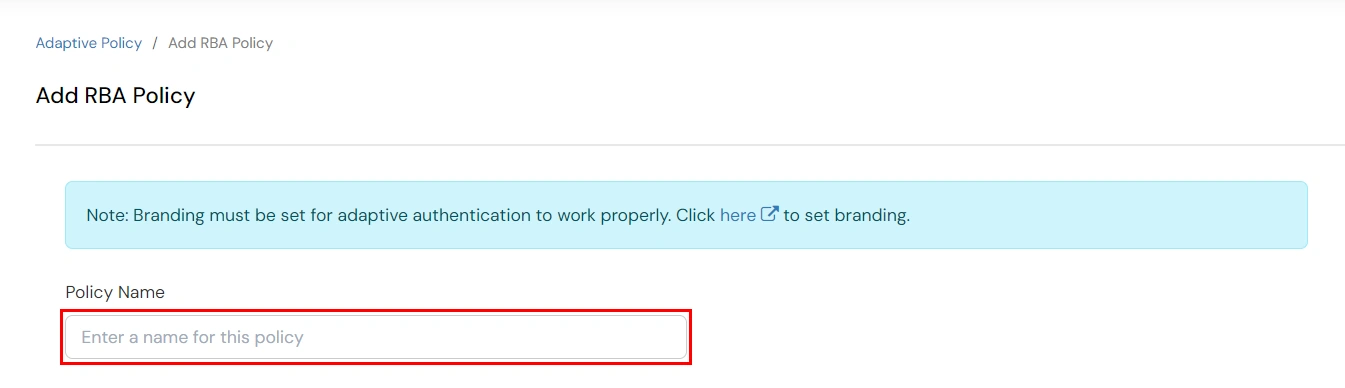
4.1 Policy Overview
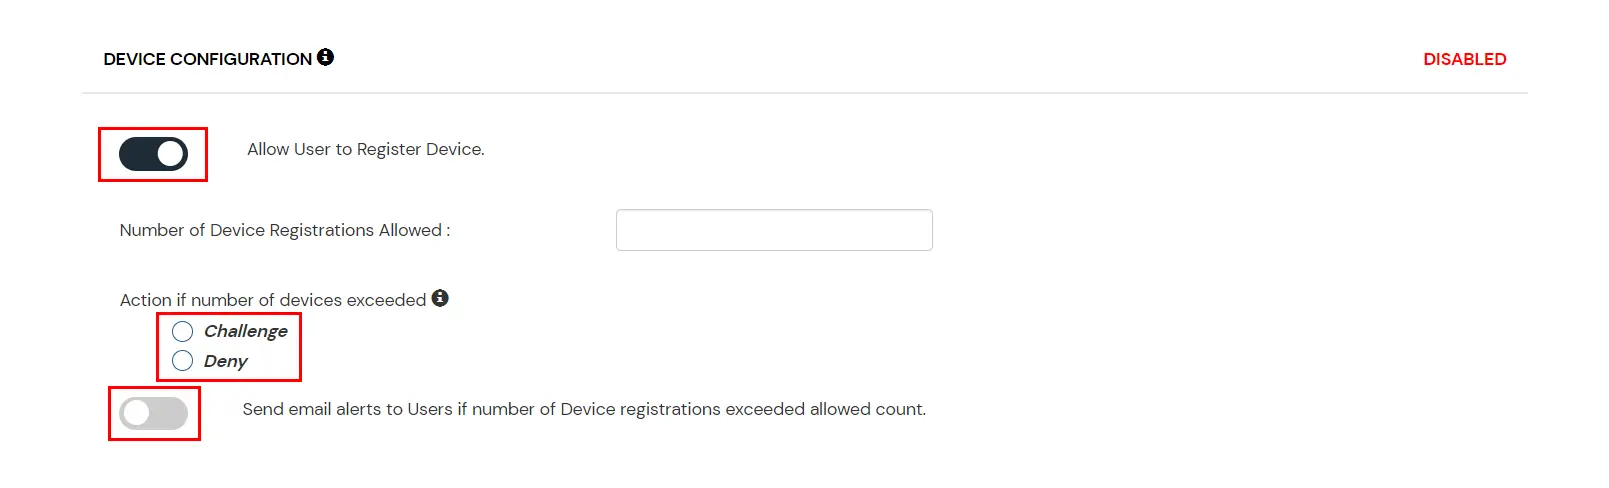
- Enable the Device Configuration toggle.

- You can configure device restriction using either Agentless or Agent-Based methods:
Agentless Device Restriction
- Number of Device Registrations Allowed: Specifies the maximum number of devices a user can register.
- Enable Mobile Device Restriction: Blocks login attempts from mobile devices.
- Enable Device Auto-Registration: Allows automatic device registration.
Agent-Based Device Restriction
- Prerequisites for enabling Agent-Based Device Restriction:
- All end users must install the Device Agent on their devices before accessing the application.
- Users without the agent are blocked and see: Please install the miniOrange Device Agent on your device and try again.
- The Device Agent is currently supported on Windows devices only.
- Click Download Agent to get the installation file for end users.
- Under Device Registration Method, choose one of the following:
- Self Registration by User: Users can register their own devices up to the defined limit. Provides flexibility with moderate security.
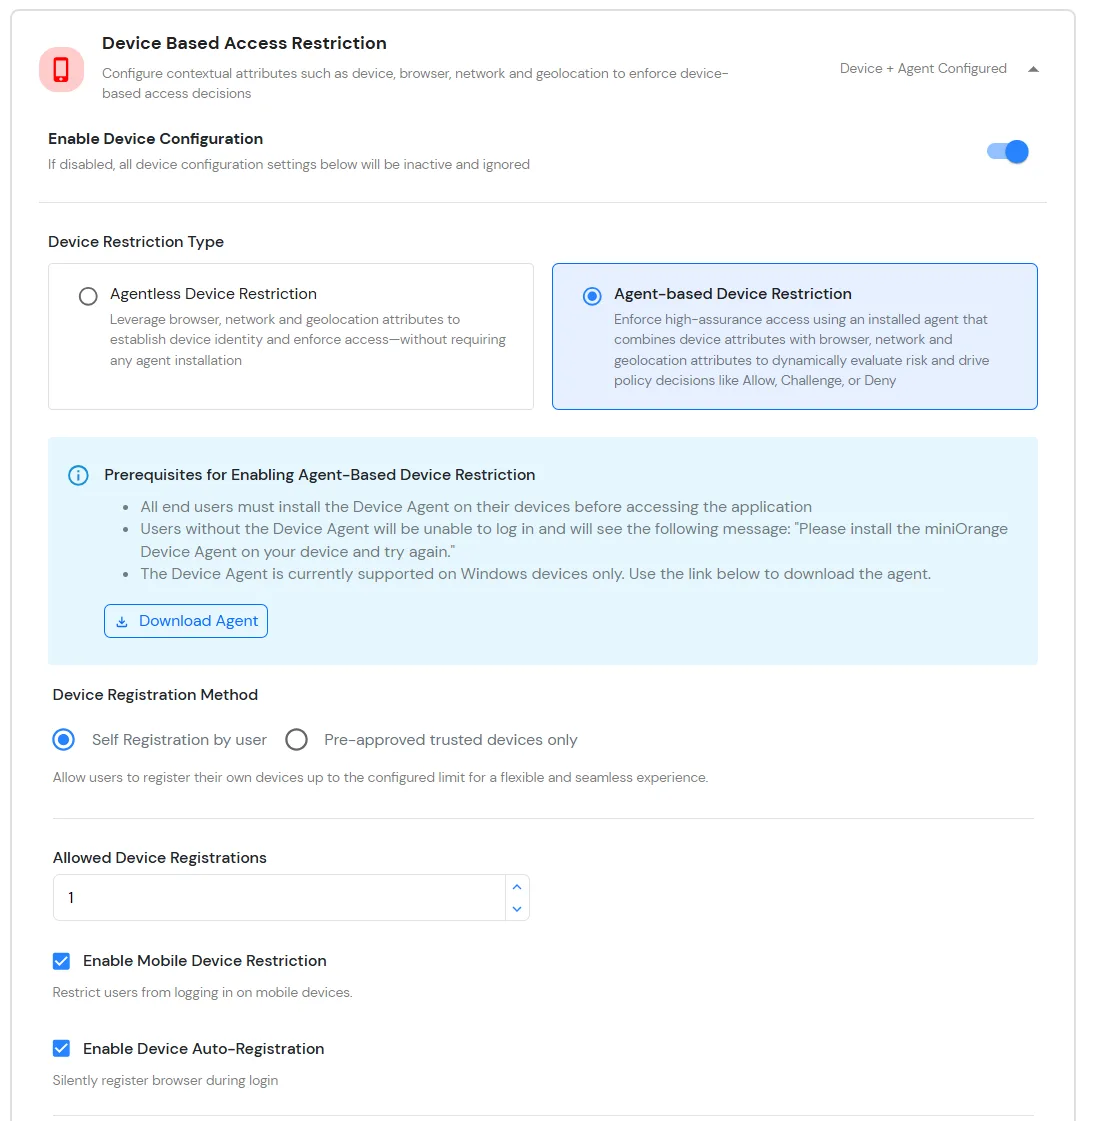
- Number of Device Registrations Allowed: Specifies the maximum number of devices a user can register.
- Enable Mobile Device Restriction: Blocks login attempts from mobile devices.
- Enable Device Auto-Registration: Allows automatic device registration.
- Pre-Approved Trusted Devices Only: Higher security. The admin manually manages trusted device information. Select this option and click Upload Pre-Approved Trusted Devices (CSV) to import devices (you can skip this step if devices are already uploaded).
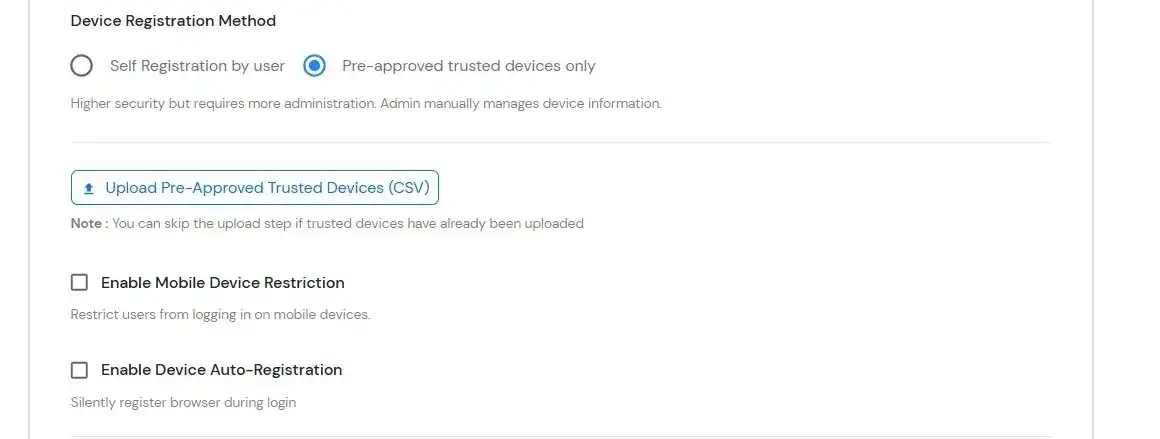
- Upload a CSV file containing pre-approved users and devices (users must already exist in miniOrange). Download Sample CSV for reference.
- Configure the following options:
- Enable Mobile Device Restriction: Blocks login attempts from mobile devices.
- Enable Device Auto-Registration: Allows automatic device registration.
- Configure Risk Engine for Device Trust Evaluation
The Risk Engine allows you to evaluate device trustworthiness by analyzing multiple device attributes and calculating a risk score. Based on this score, user access is allowed, challenged or denied during login and device registration.
- Navigate to the Risk Engine section and click Configure.

- Configure Risk Parameters:
- In the Risk Parameters tab, review the list of device attributes grouped by category.
- The Device Identifiers category contains mandatory attributes (such as Installation ID, BIOS UUID, Machine SID, etc.). These attributes are always enabled and cannot be disabled or reprioritized, as they are critical for device fingerprinting.
- For other categories (Hardware, Network, Software, Location), enable the attributes you want to use for device trust evaluation.
- Set a Priority for each enabled attribute:
- High: Strong impact on risk score
- Medium: Moderate impact
- Low: Minimal impact
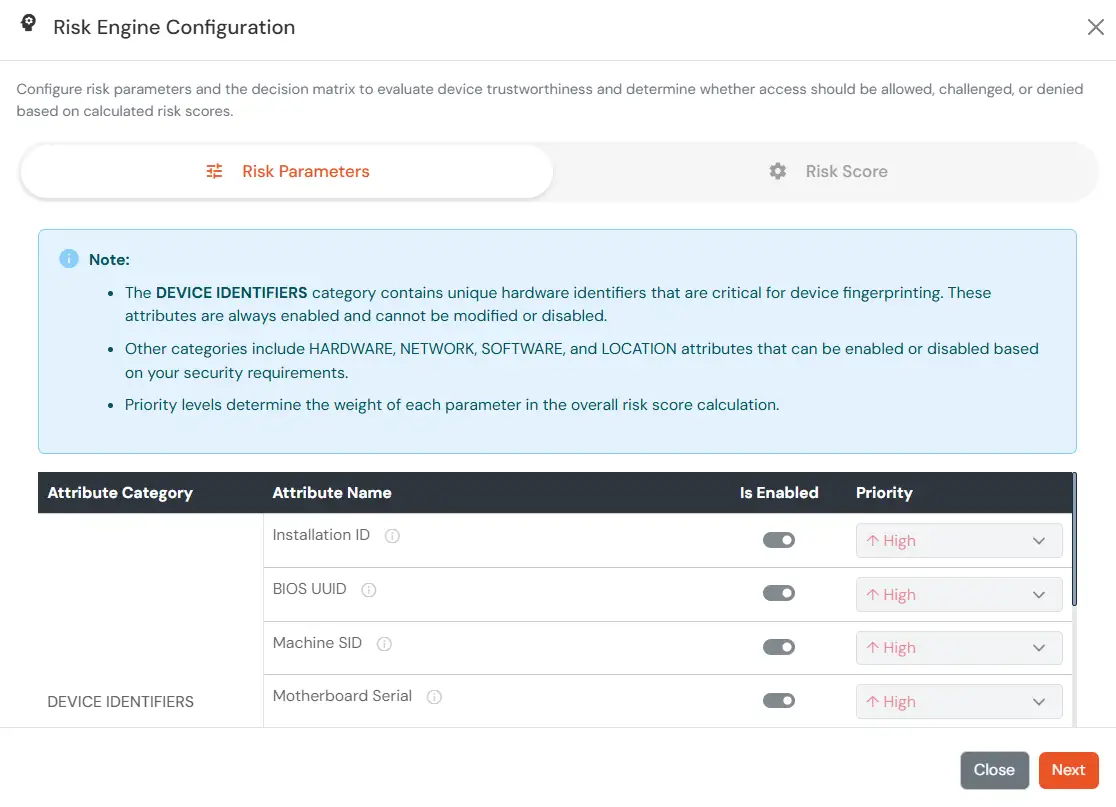
- Click on Save Changes.
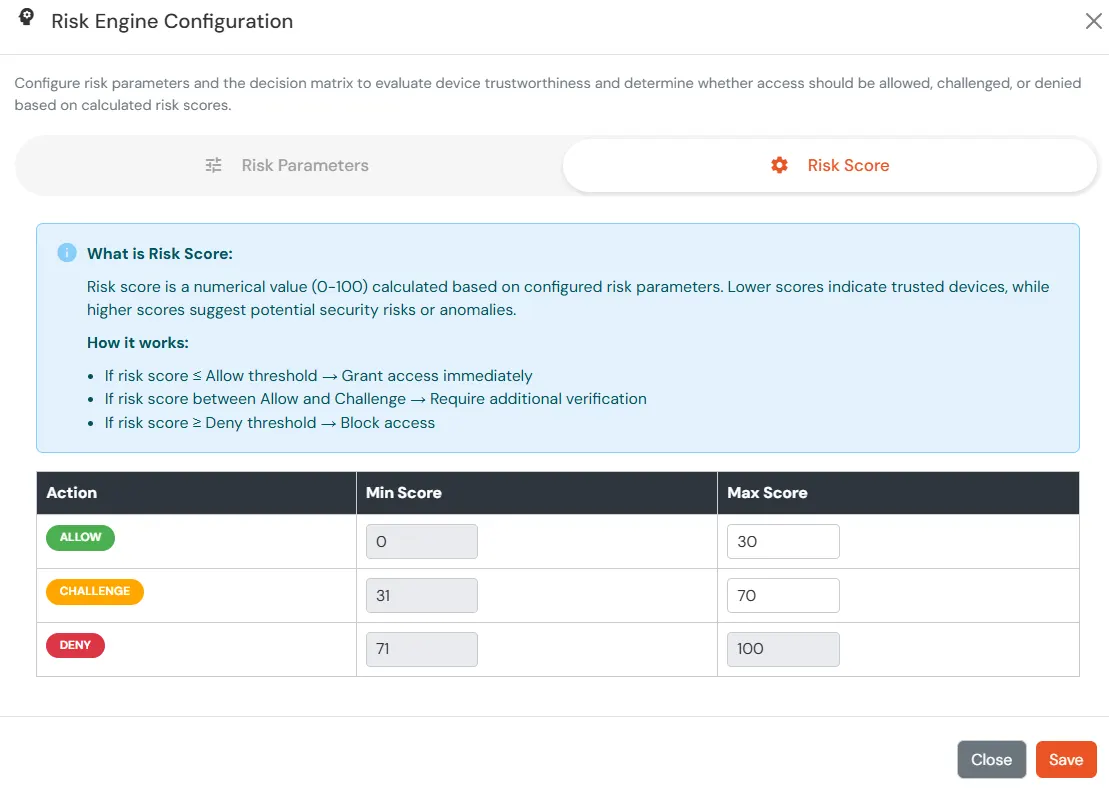
- Configure Risk Score
- In the Risk Score, define the score ranges (0–100) that determine the authentication outcome during user login.
- Lower risk scores indicate trusted devices.
- Higher risk scores indicate potential security risks or anomalies.
- Configure the thresholds as follows:
- Allow: Allow user to authenticate without challenge and registration.
- Challenge: Allow user authentication with a challenge, e.g., when the device limit is exceeded.
- Deny: Deny user authentication, e.g., when the device limit is exceeded, when device attribute is mismatch.
4.2 Action for Behavior Change
- You can configure one of the three possible actions for your Adaptive Access Policy as explained below:
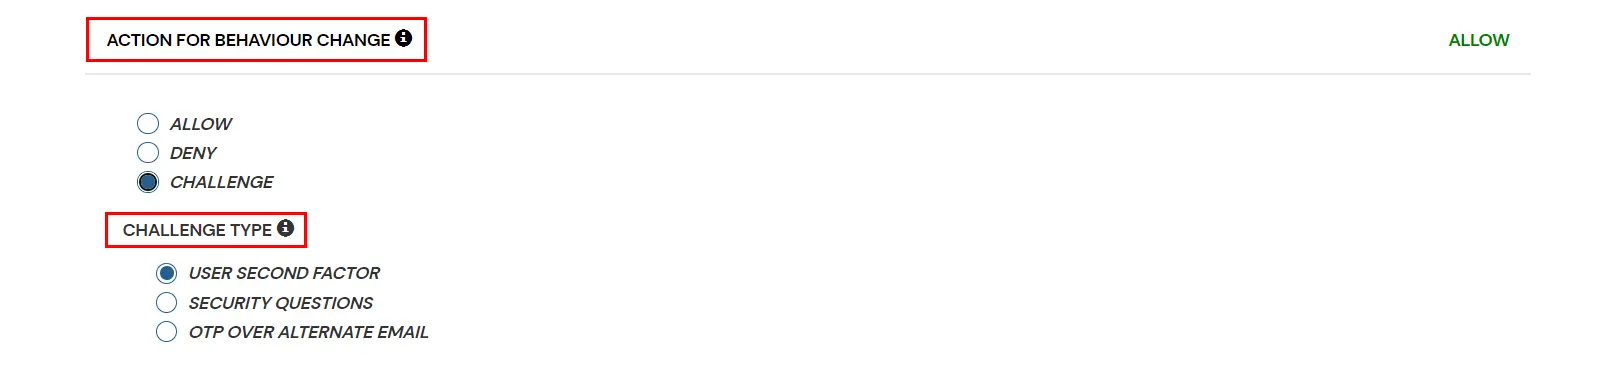
| Attribute |
Description |
| Allow |
Allow users to authenticate and use services if Adaptive Access Policy condition is true. |
| Deny |
Deny user authentications and access to services if Adaptive Access Policy condition is true. |
| Challenge |
Challenge users with one of the three methods mentioned below for verifying user authenticity. |
Challenge Type Options:
| Factors |
Description |
| User Second Factor |
The user needs to authenticate using the second factor they have selected or been assigned, such as
- OTP over SMS
- PUSH Notification
- OTP over Email and many more.
|
| KBA |
The system will ask the user for 2 of 3 questions they have configured in their Self-Service Console. Only after the correct answers to both questions will the user be allowed to proceed further. |
| OTP over Alternate Email |
User will receive an OTP on the alternate email they have configured through the Self Service Console. Once the user provides the correct OTP, they are allowed to proceed further. |
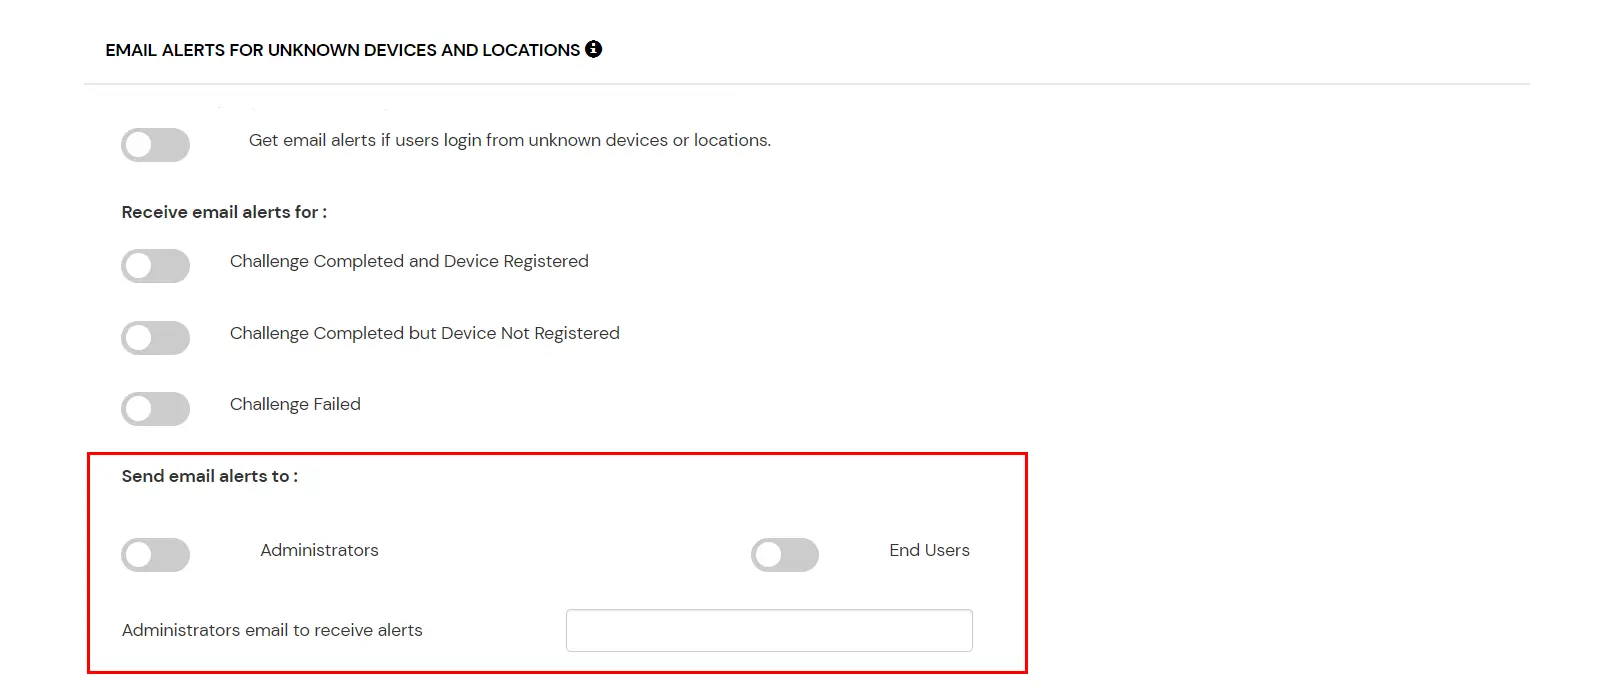
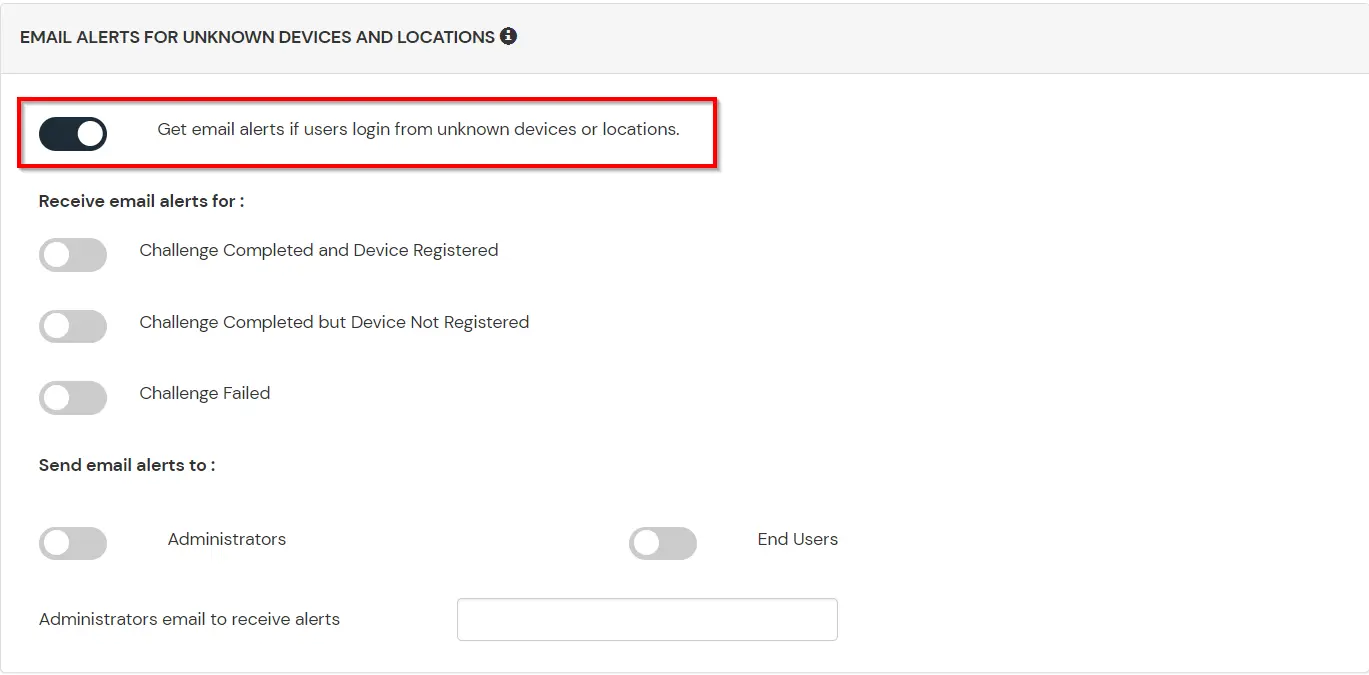
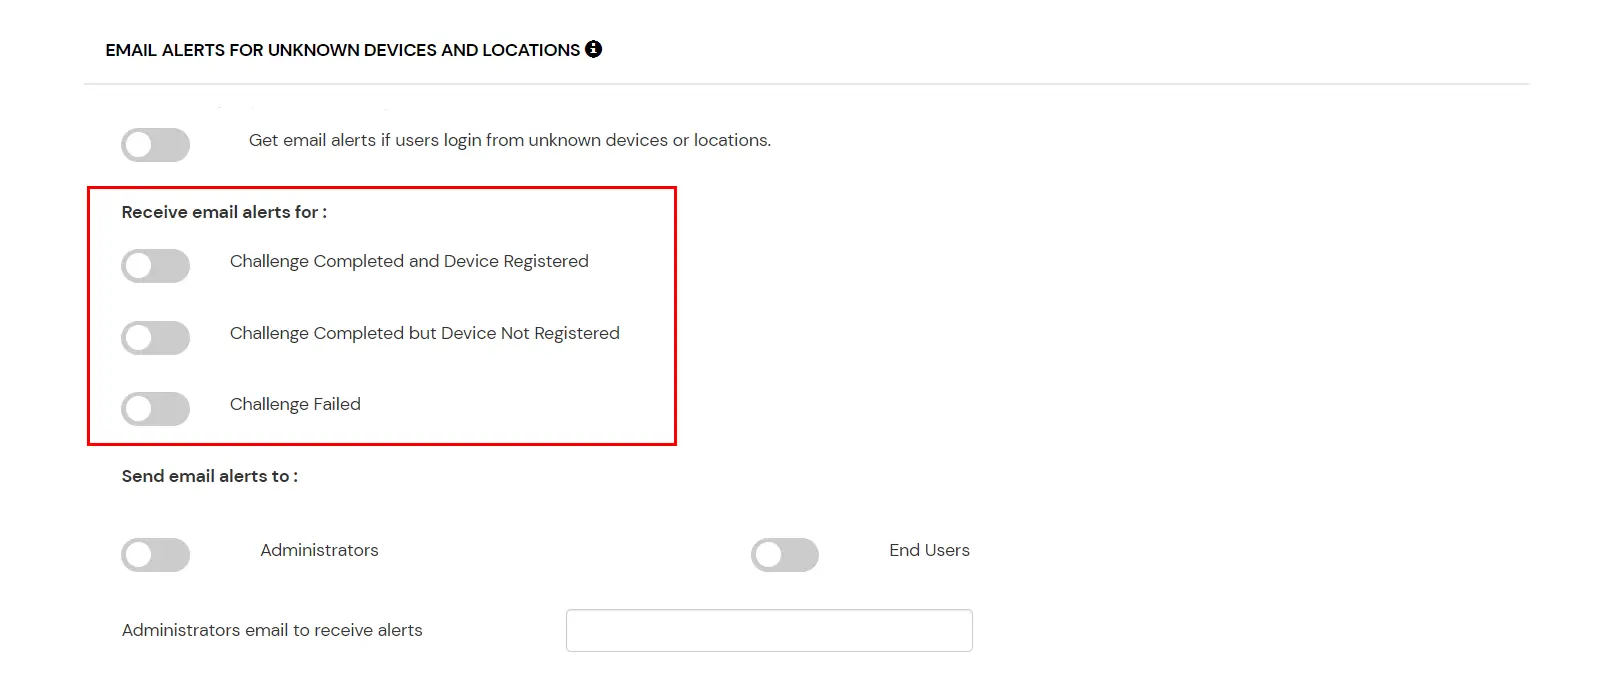
4.3 Email Alerts and Custom Error Message
4.4 Review
Review the configured policy conditions, behavior change actions, email alert settings and custom error messages before creating the adaptive authentication policy. This step provides a consolidated view of all configured settings, allowing you to verify the policy configuration and make any necessary changes before saving.
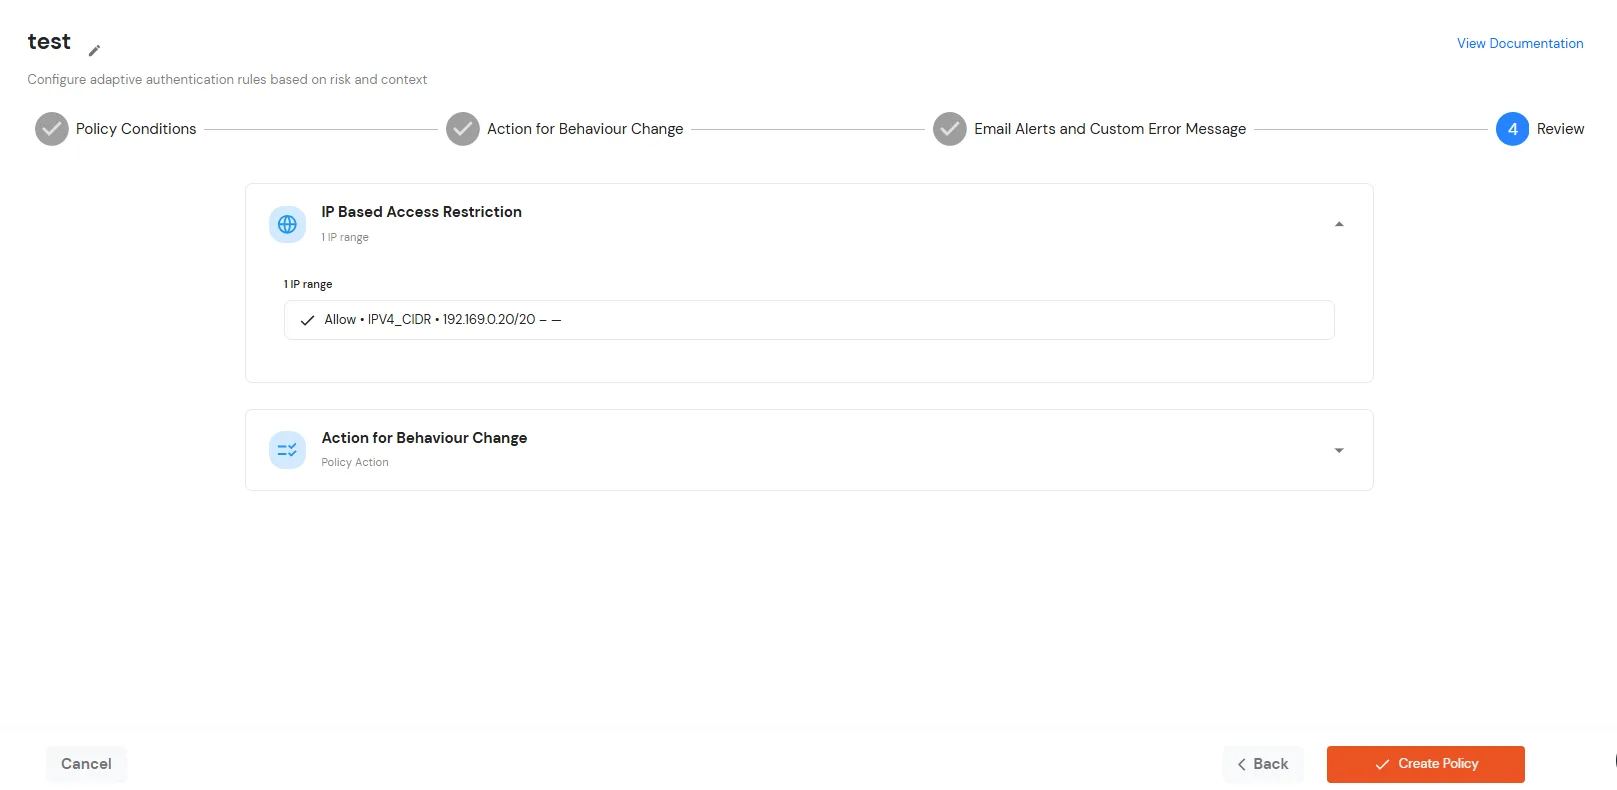
- Once you have verified all configurations, click Create Policy to save and activate the policy.
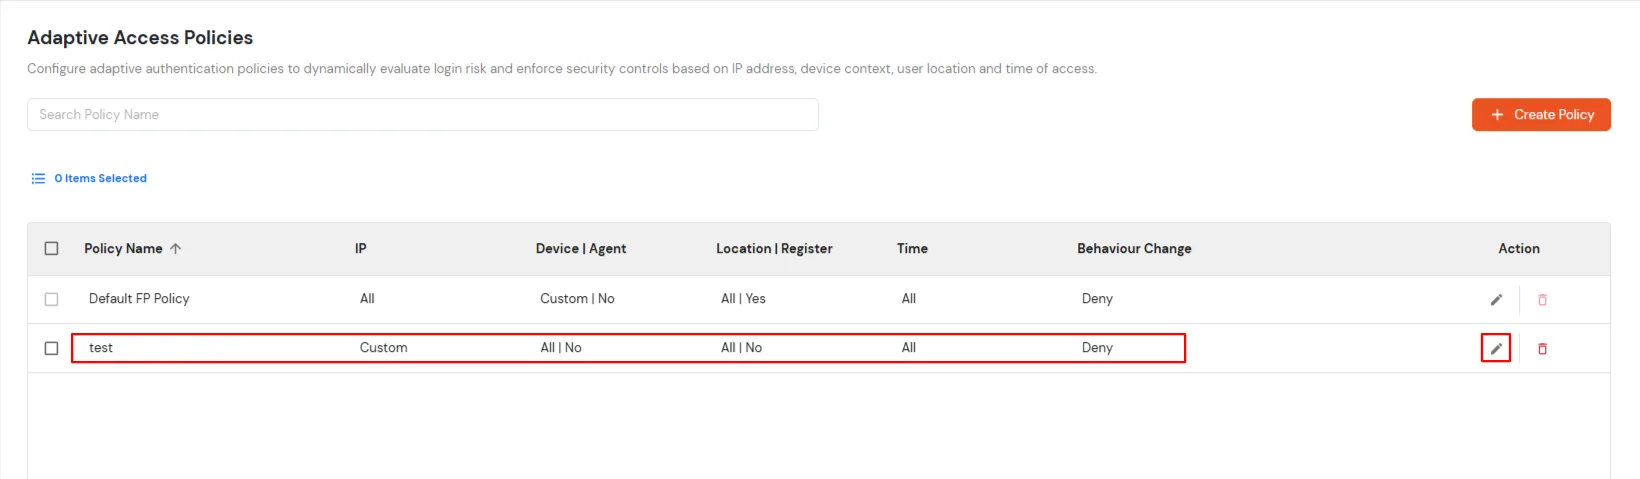
- You will see the policy listed once it’s successfully added.
5. Enable Restriction for Office 365
- Login to Self Service Console >> Policies >> App Login Policy.
- Click on the Edit icon for the predefined app policy.
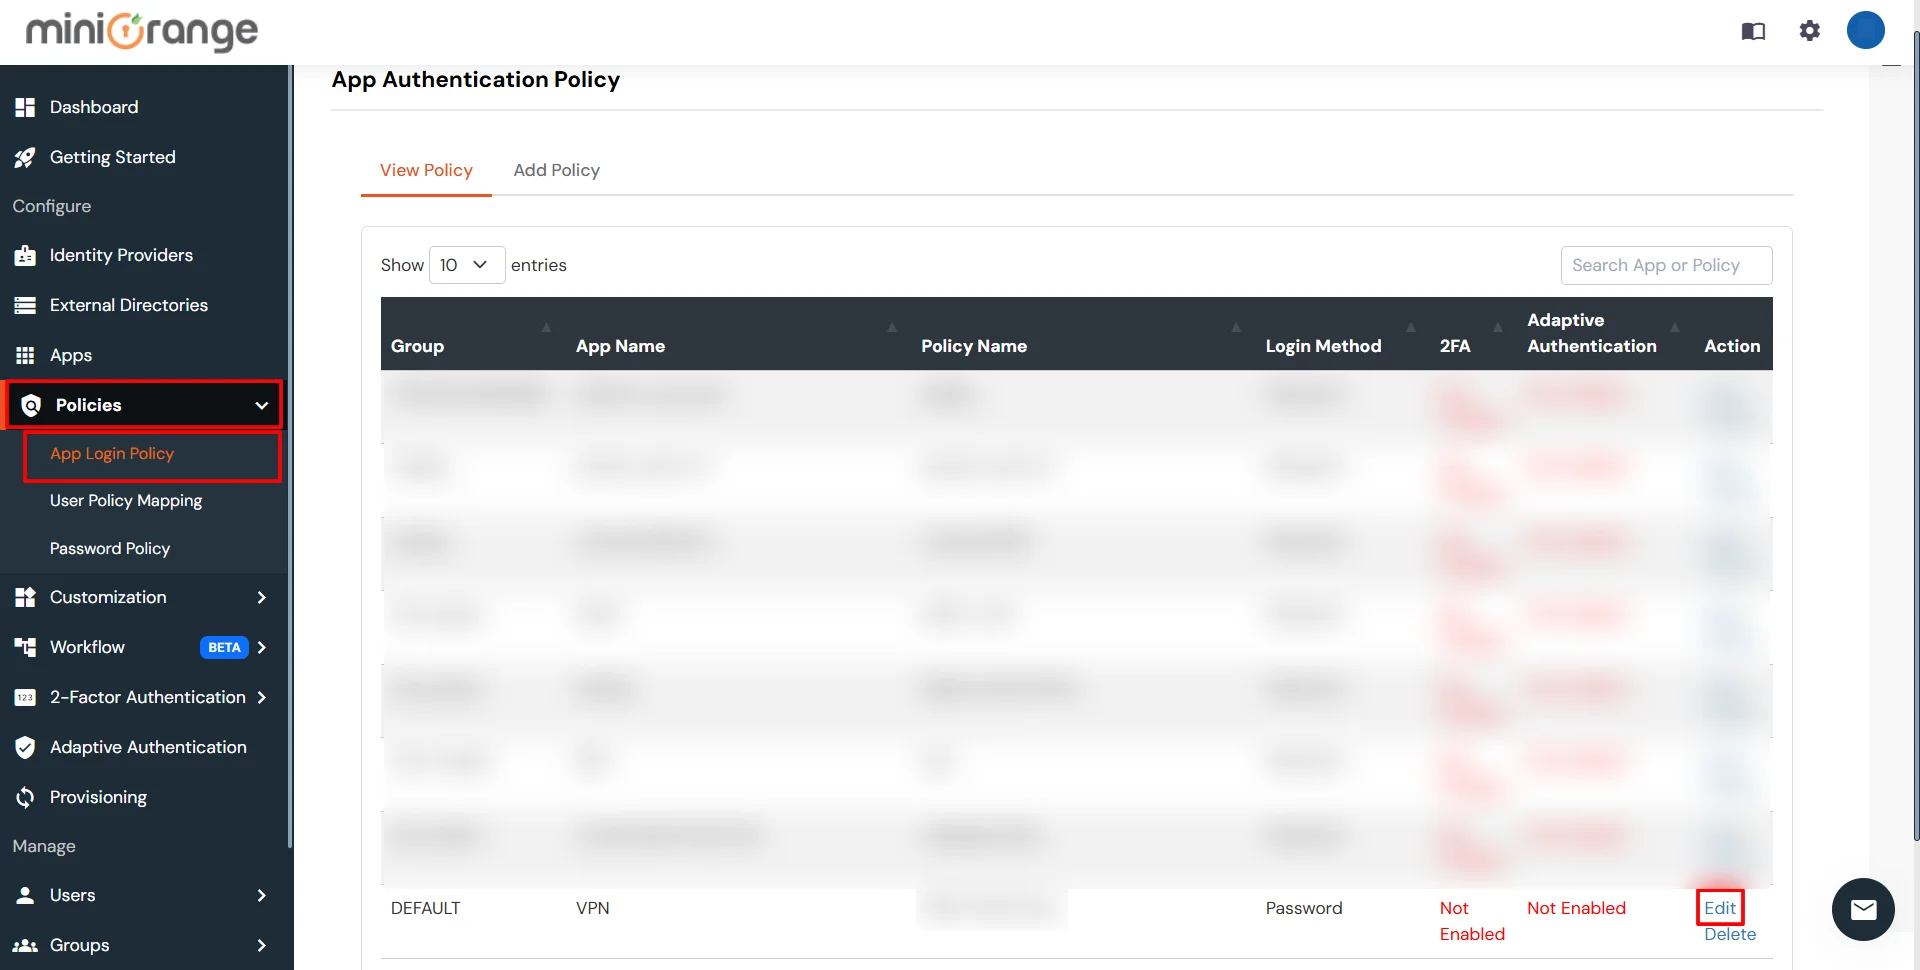
- Set Group Name and Policy Name as required. Select Password as First Factor.
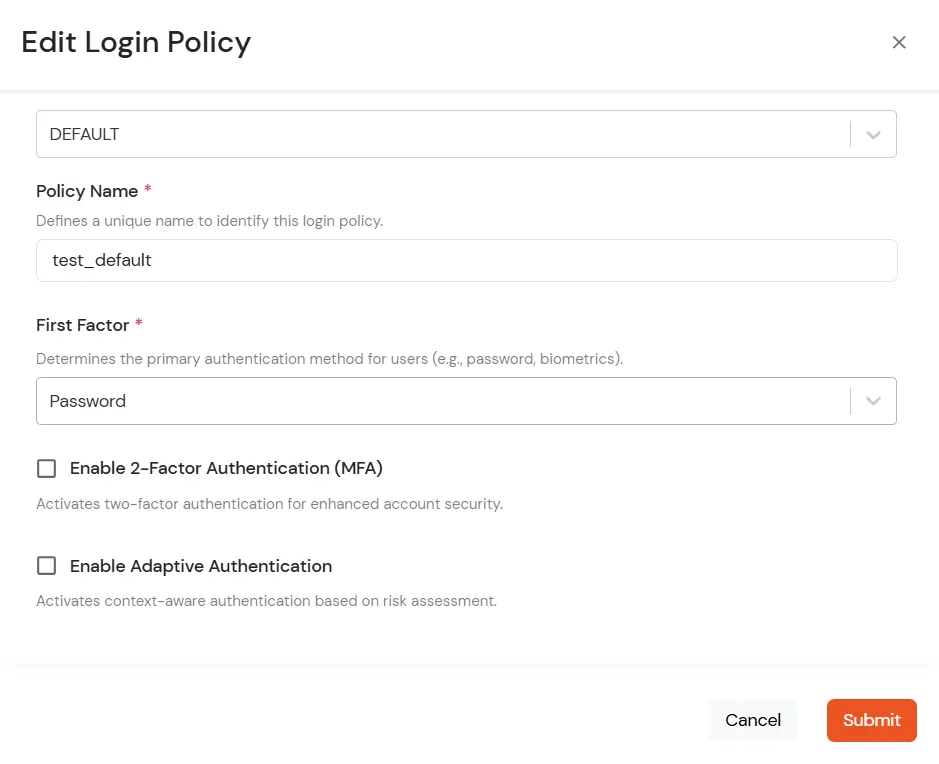
- Enable Adaptive Authentication on Edit Login Policy page and select the required restriction method as an option.
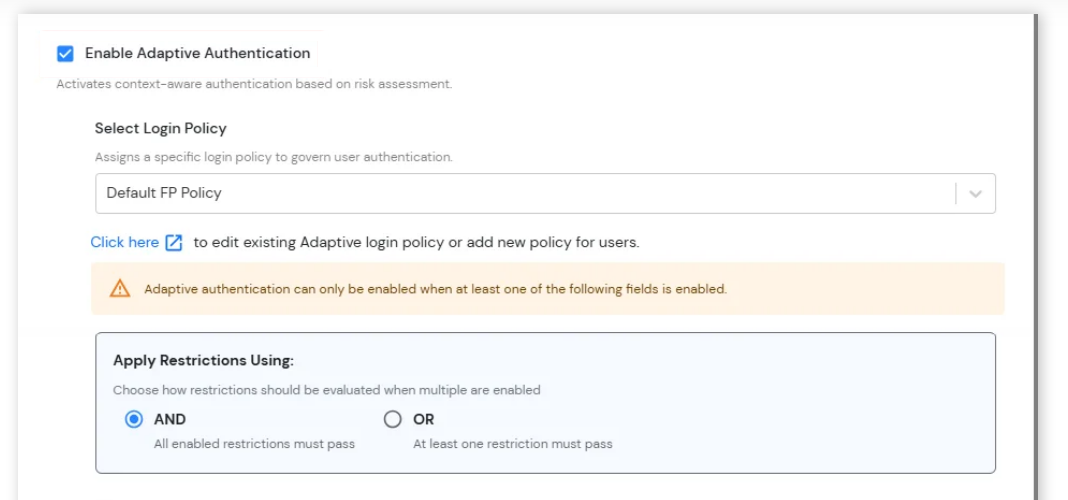
- From Select Login Policy dropdown select the policy we created in last step.
- Apply Restrictions Using: Select how IP Restriction should be evaluated when multiple adaptive authentication restrictions are configured.
- AND: The configured IP Restriction and all other enabled restrictions must be satisfied before access is granted.
- OR: The configured IP Restriction or at least one other enabled restriction must be satisfied before access is granted.
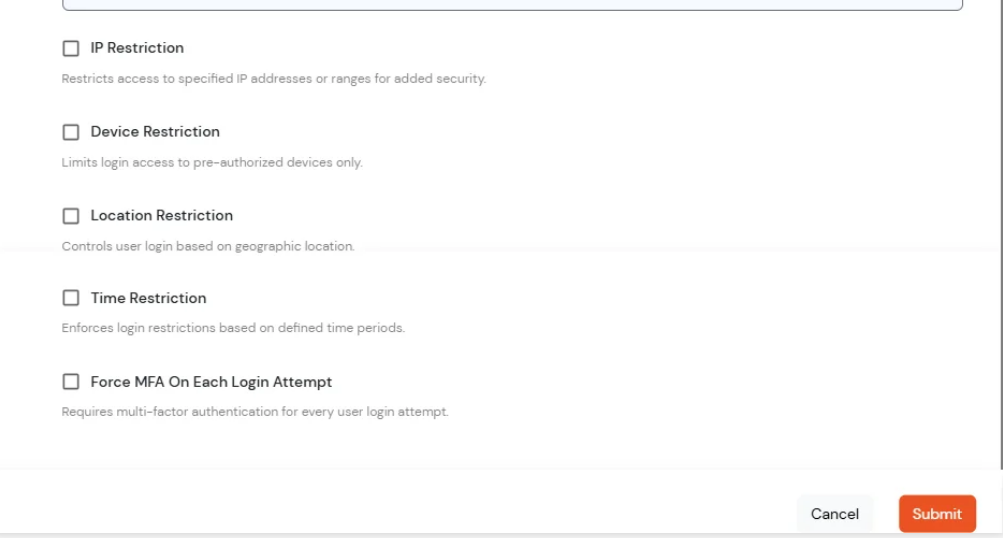
- Adaptive Authentication Restrictions: Configure additional login restrictions and verification conditions along with the existing configured Restriction to strengthen account security and control user access based on contextual risk factors.
1. Register your organization with
Android Enterprise.
- Login into miniOrange MDM dashboard by clicking here.
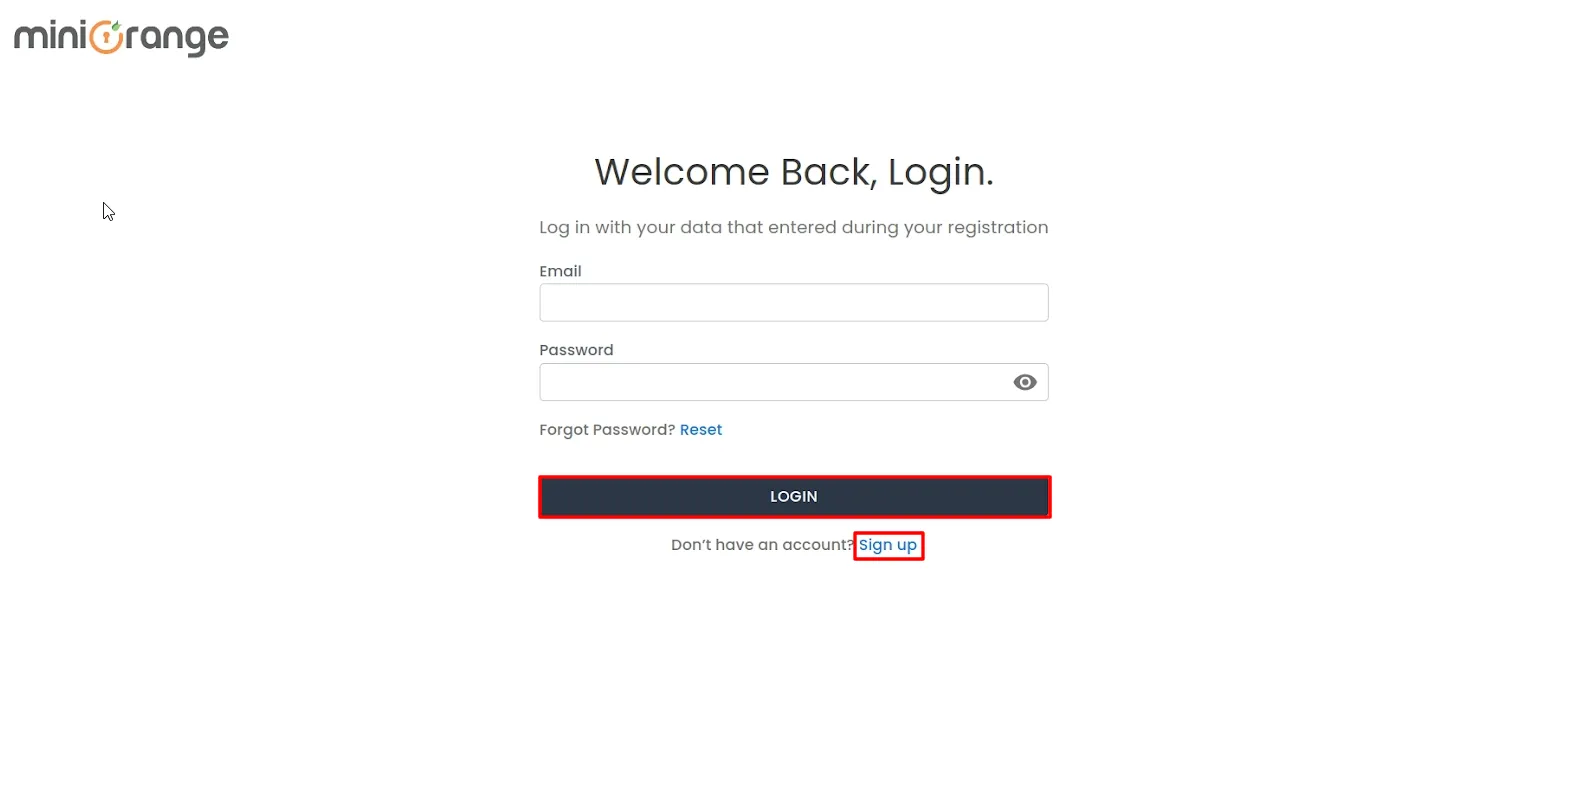
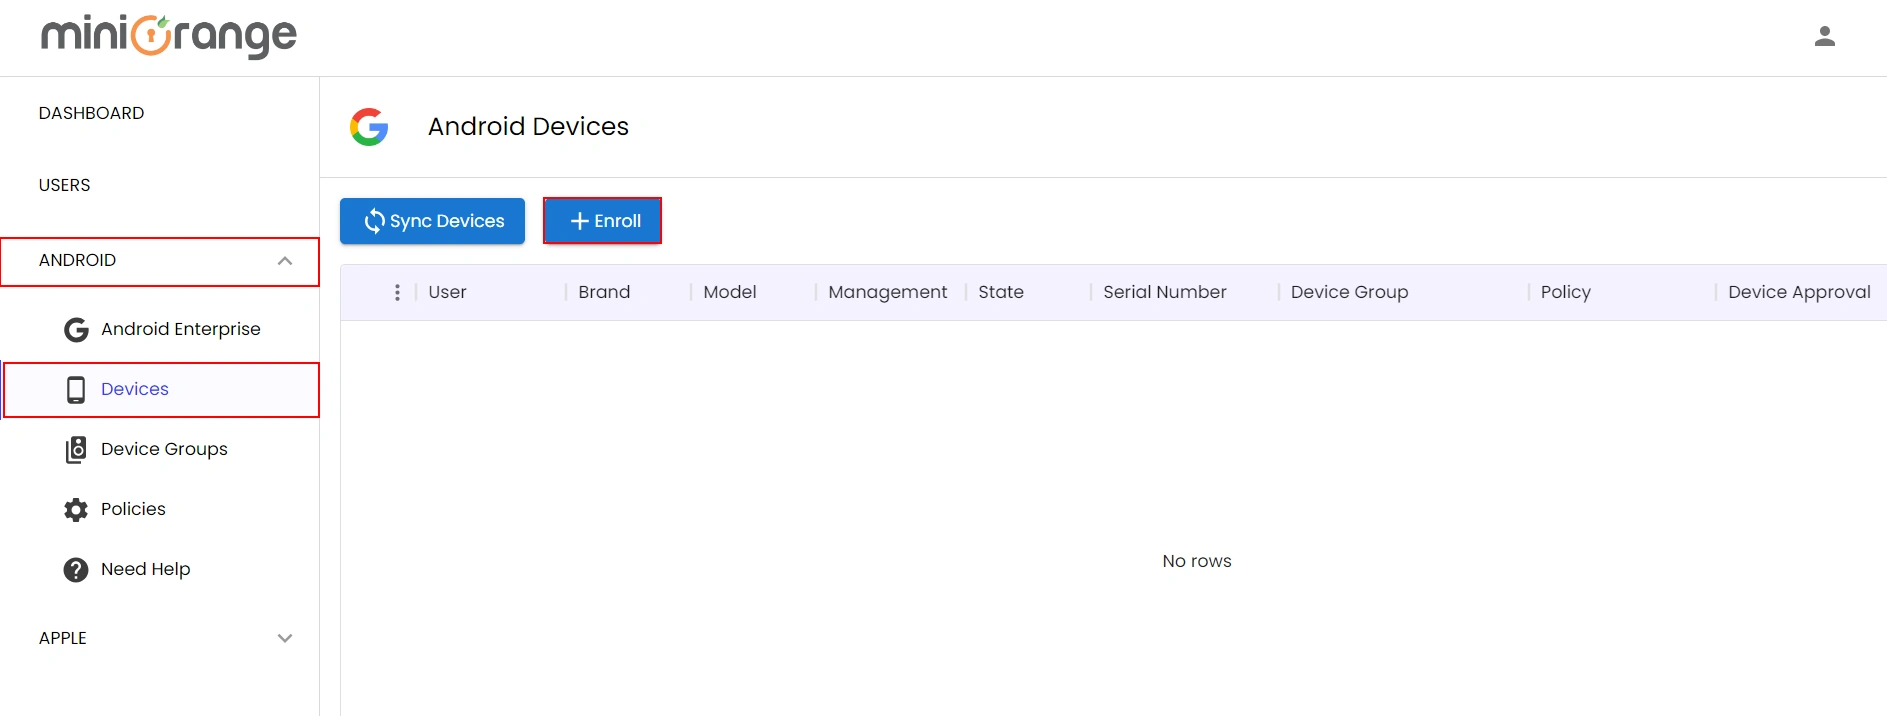
- Once logged in, Navigate to ANDROID -> Android Enterprise and click on
Register button.
You will need to Register your organization with Android Enterprise initially and this will
be a one-time
process.
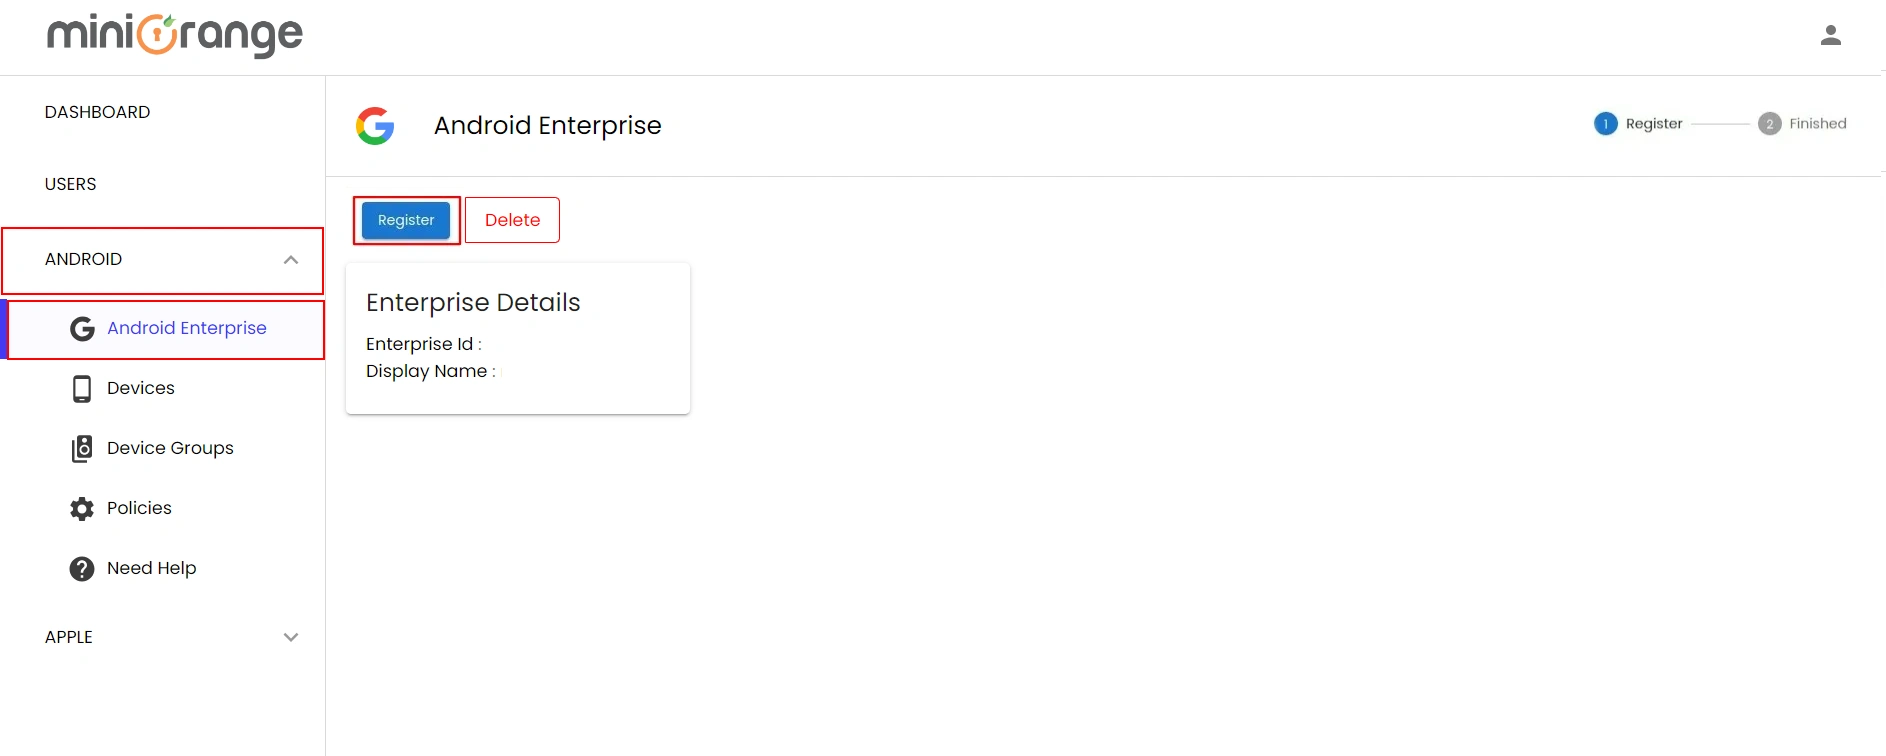
- Click here for detailed instructions on registering your
organization with Android
Enterprise.
2. Create a new policy
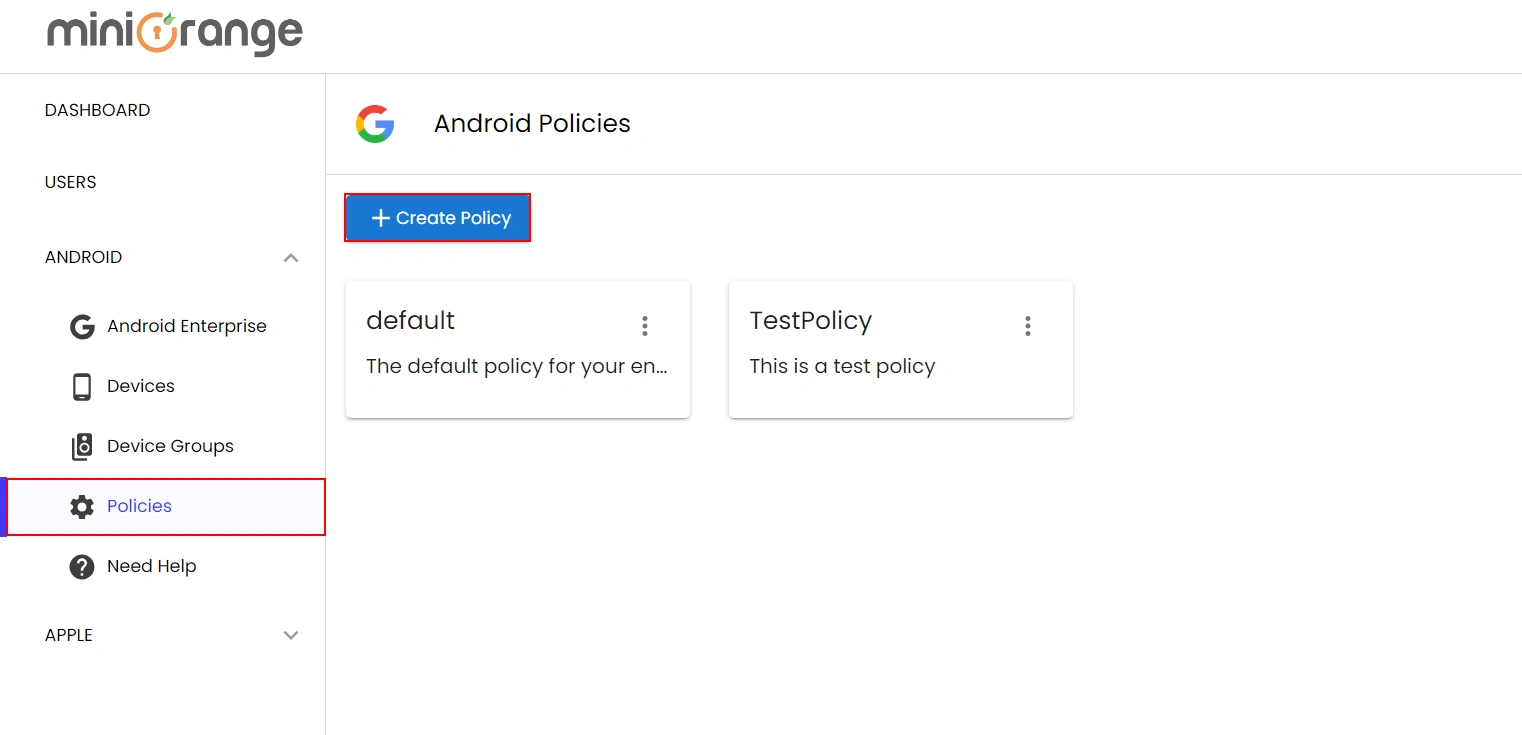
- Go to ANDROID -> Policies in the miniOrange MDM dashboard. Here the default policy is already
created for you with no Play Store apps added. You can use this policy to get the device enrolled without
giving access to any application.
- Click the Create Policy button to design a new policy.
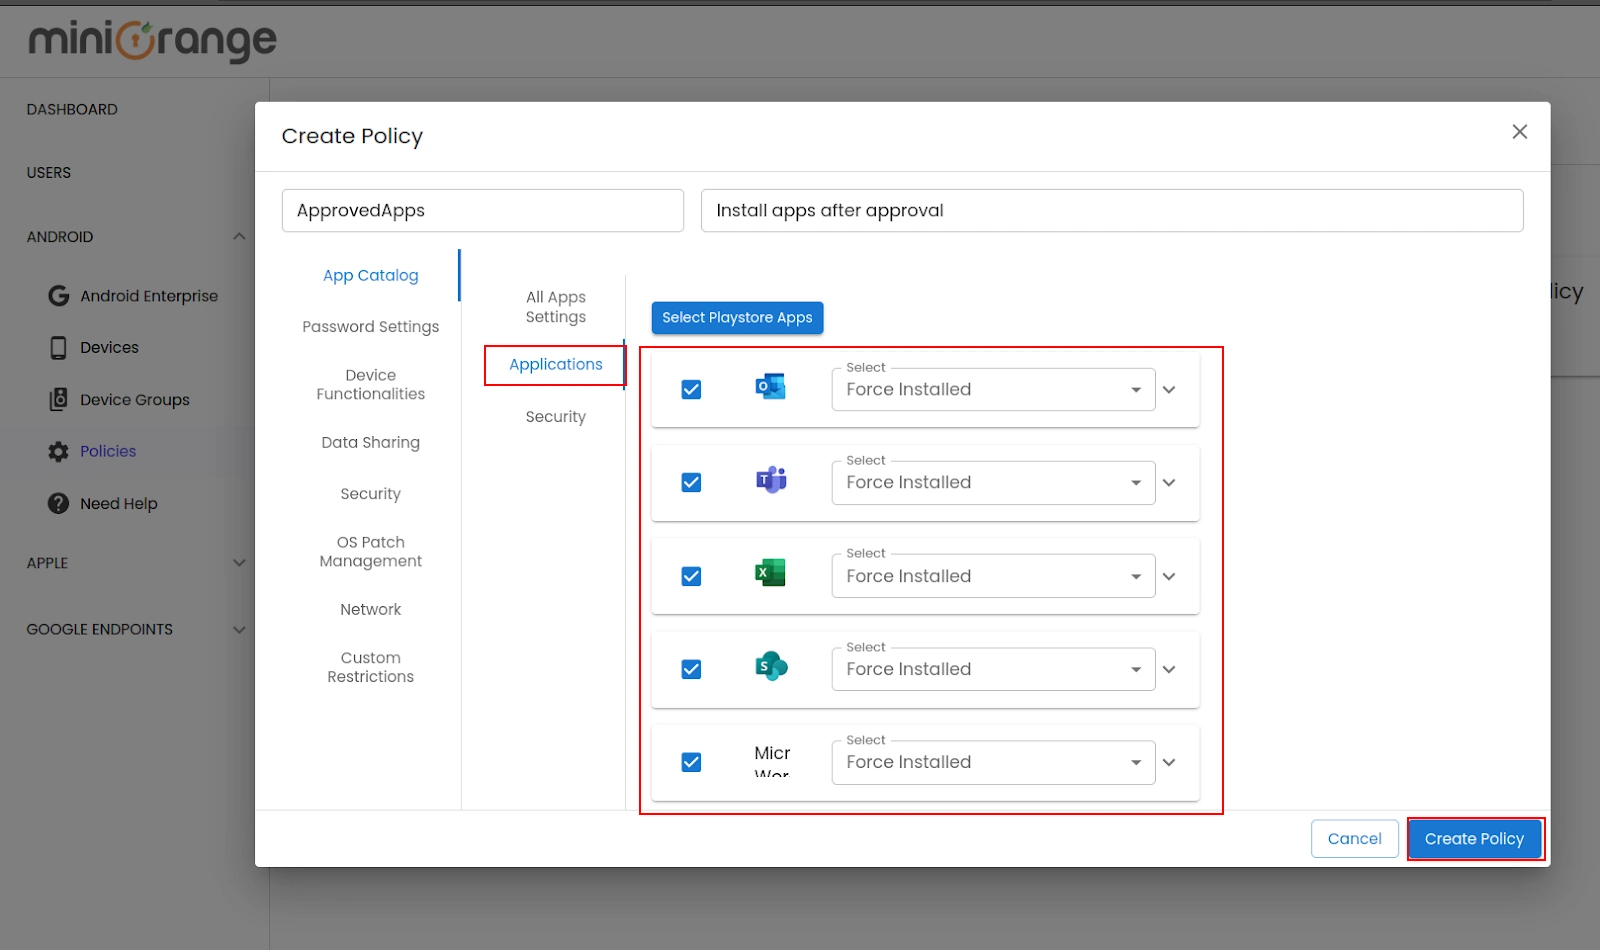
- Now, go to the Application section and choose the specific Microsoft 365 applications for which you
want to get installed on the approved devices.
- Double-check all the previous settings. Once done, click on the Create Policy button
to finalize
the policy.
- Similarly, you can create multiple policies with different application sets and restrictions that can get
attached to the mobile device based on its device approval status, e.g. PENDING, USER MFA COMPLETED, ADMIN
APPROVED, etc
3. Attach Policy to Device Group
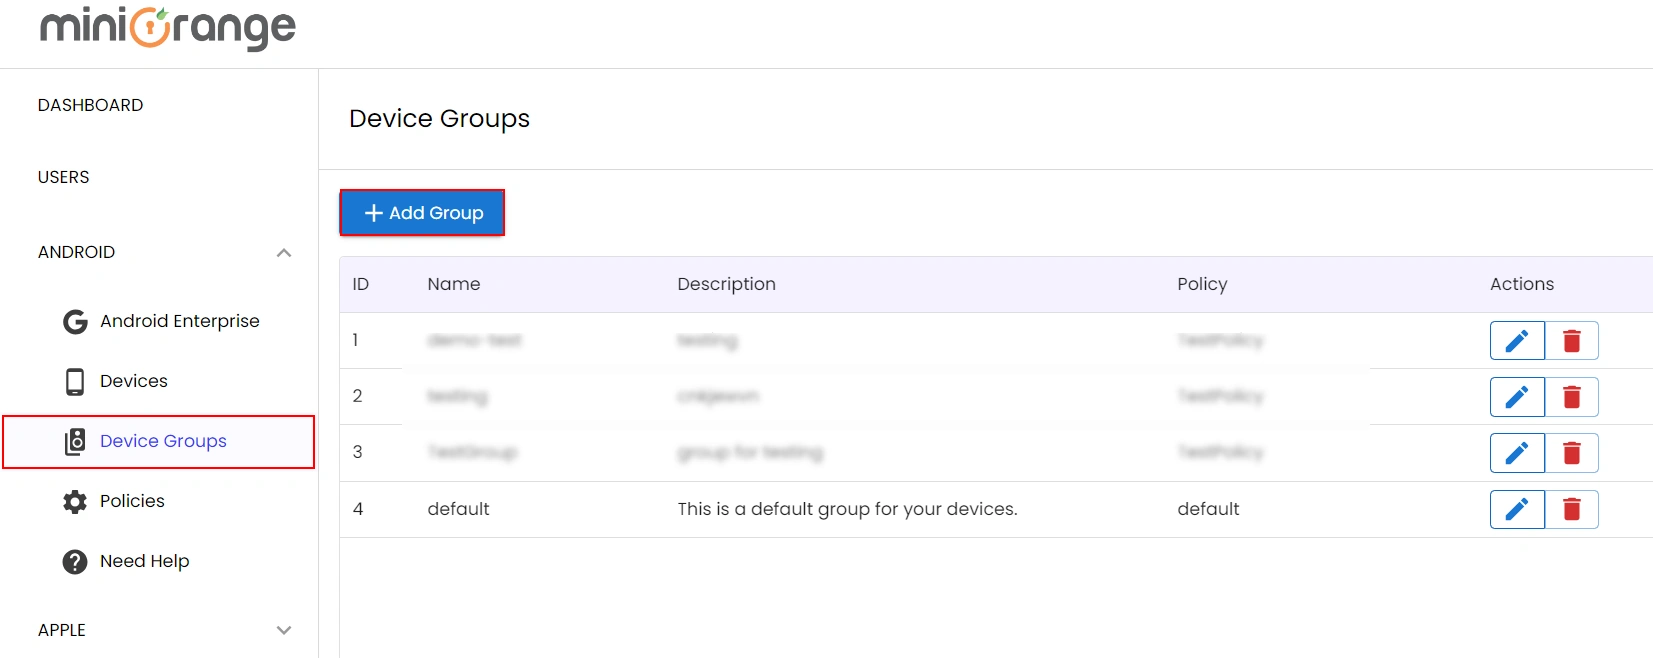
- Go to ANDROID -> Device Groups, click on Add Group to create a group for approved devices.
- Attach the newly created policy to the selected device group. This will ensure that the policy is enforced
for all devices within that group.
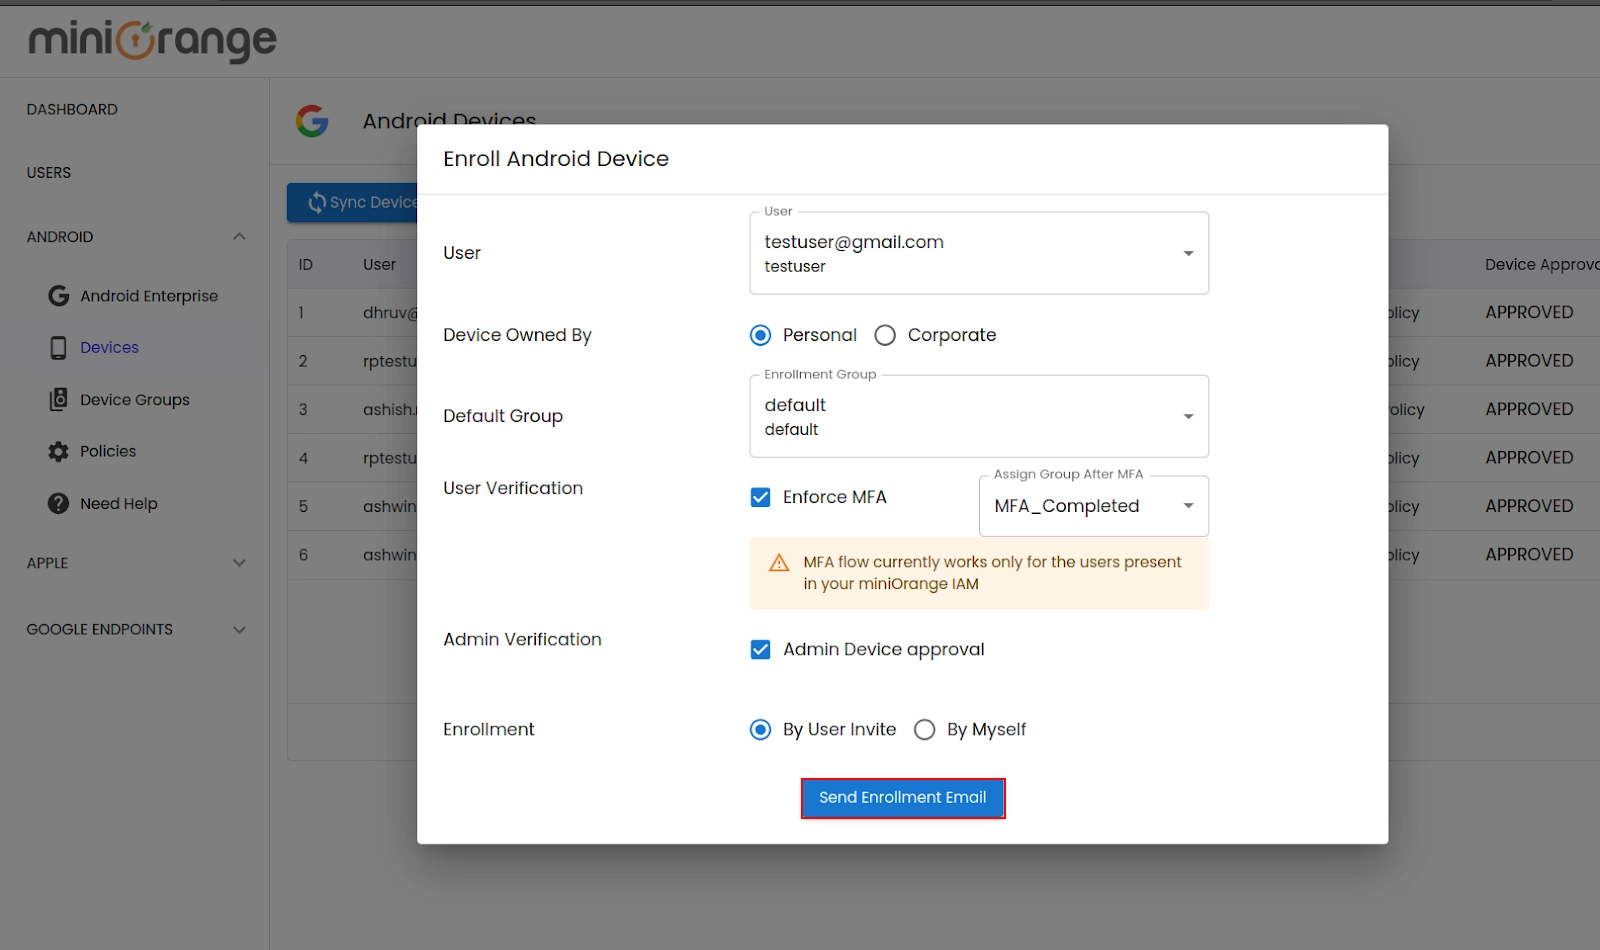
4. Configure device enrollment settings
5. Admin approval for enrolled devices
- Based on the enrollment token settings, the enrolled device will be listed on the dashboard. We can check
the current status of the device in the Device Approval column where it is listed for Admin to approve,
approved, MFA verification pending, etc
.
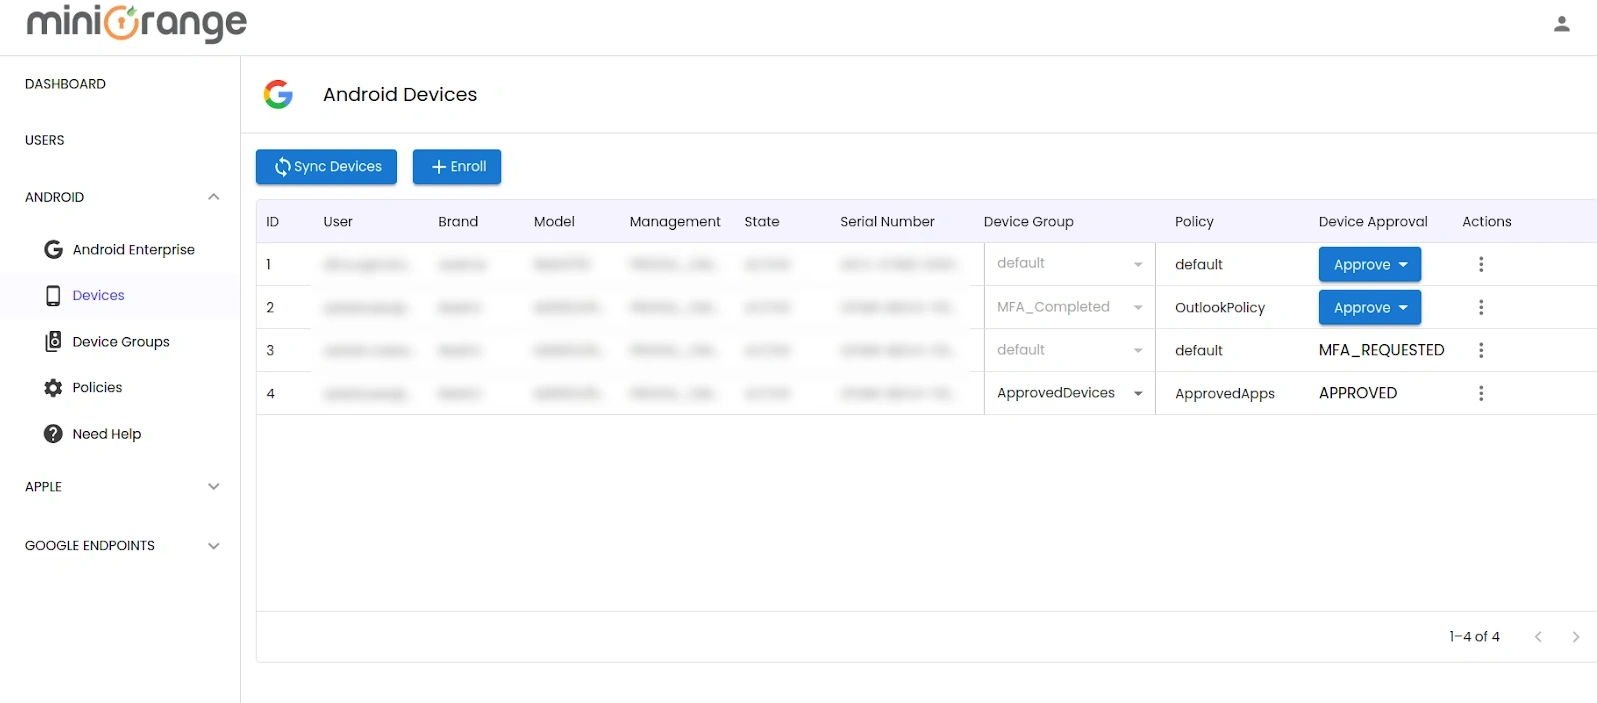
- After accessing the user, and device details, Admin can click on the Approve button to approve and
assign appropriate policy to the device.
6. Configure Your User Directory (Optional)
miniOrange provides user authentication from various external sources, which can be Directories (like ADFS, Microsoft Active Directory, Microsoft Entra ID, OpenLDAP, Google, AWS Cognito etc), Identity Providers (like Okta, Shibboleth, Ping, OneLogin, KeyCloak), Databases (like MySQL, Maria DB, PostgreSQL) and many more. You can configure your existing directory/user store or add users in miniOrange.
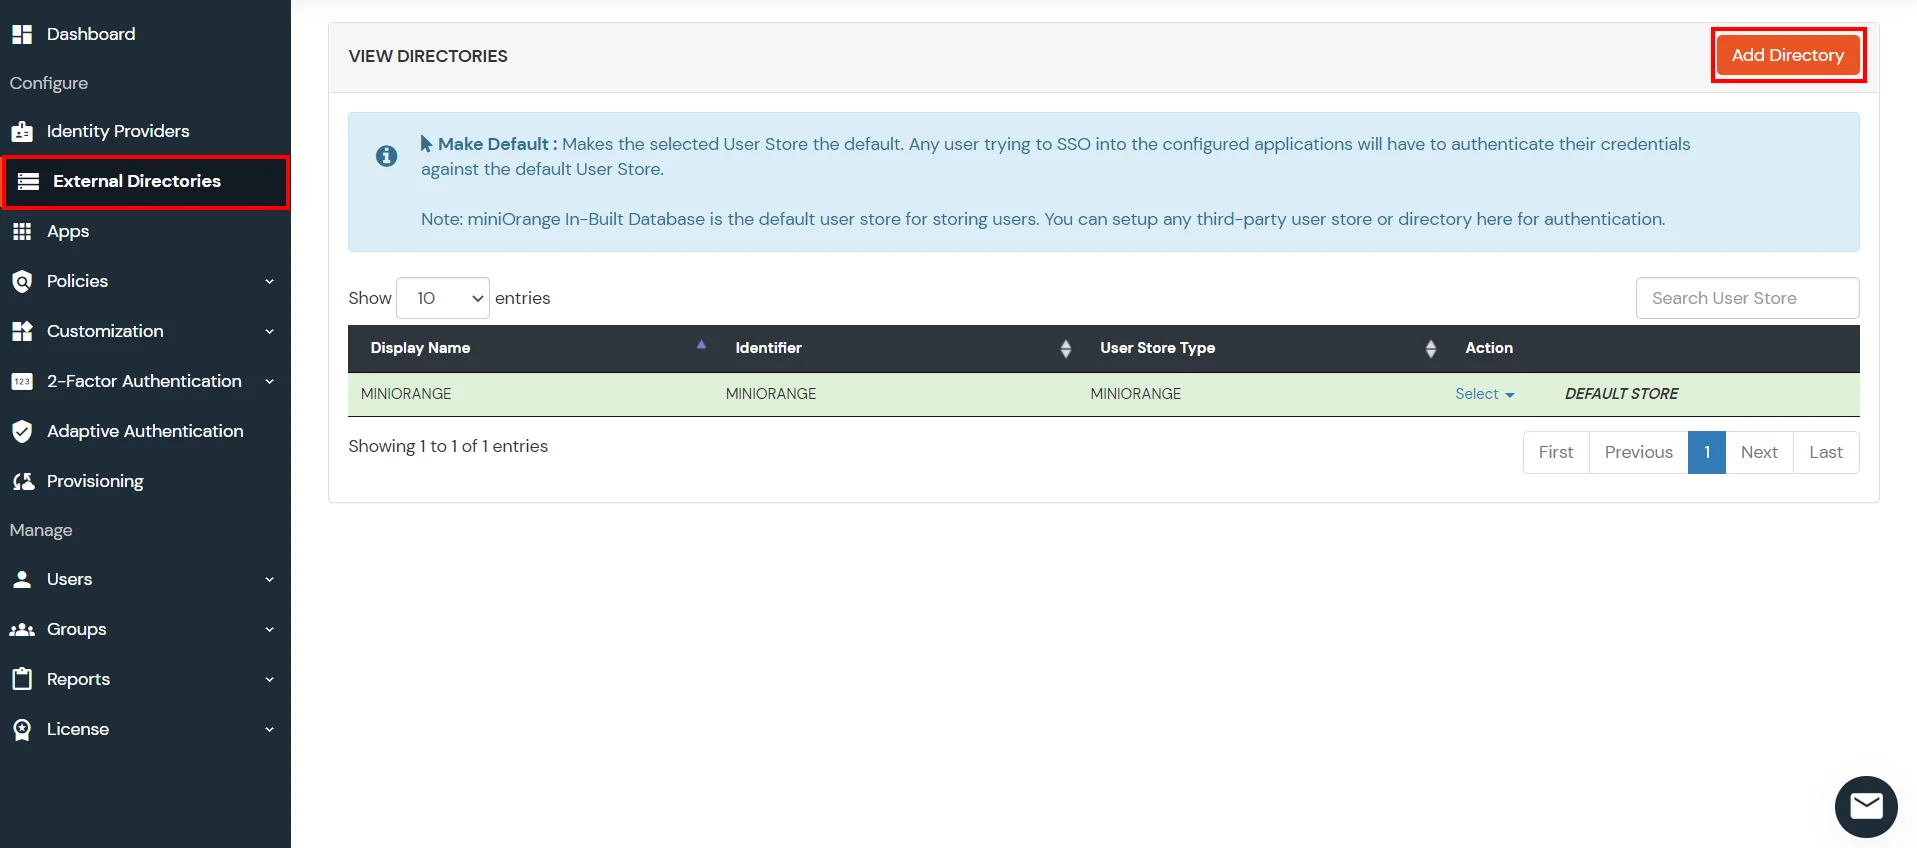
- Click on Identity Providers >> Add Identity Provider in the left menu of the dashboard
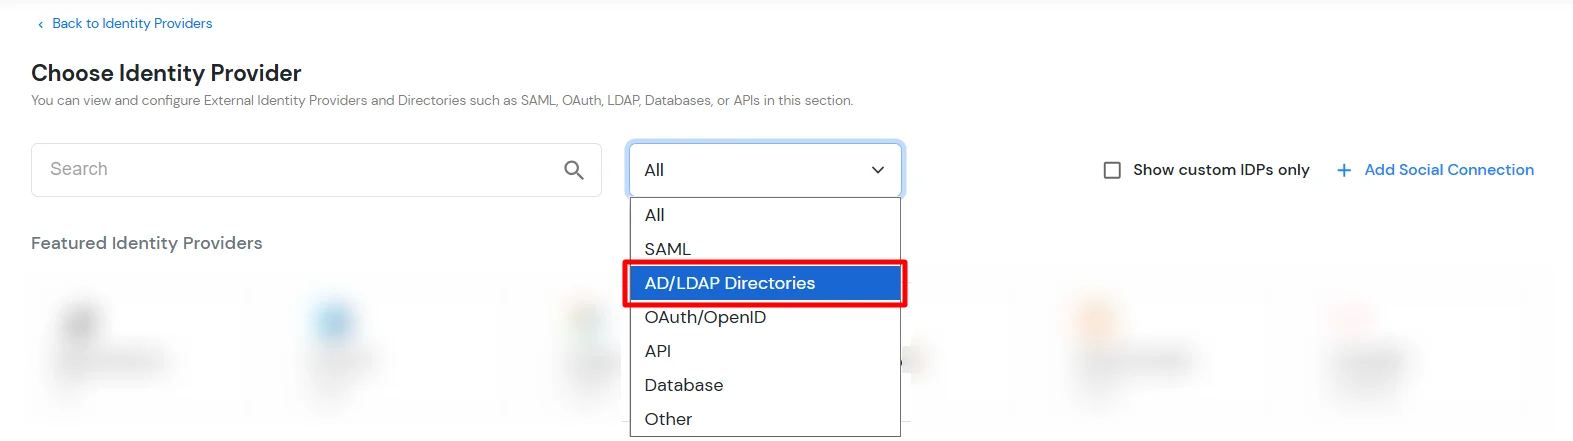
- In Choose Identity Provider, select AD/LDAP Directories from the dropdown.
- Then search for AD/LDAP and click it.
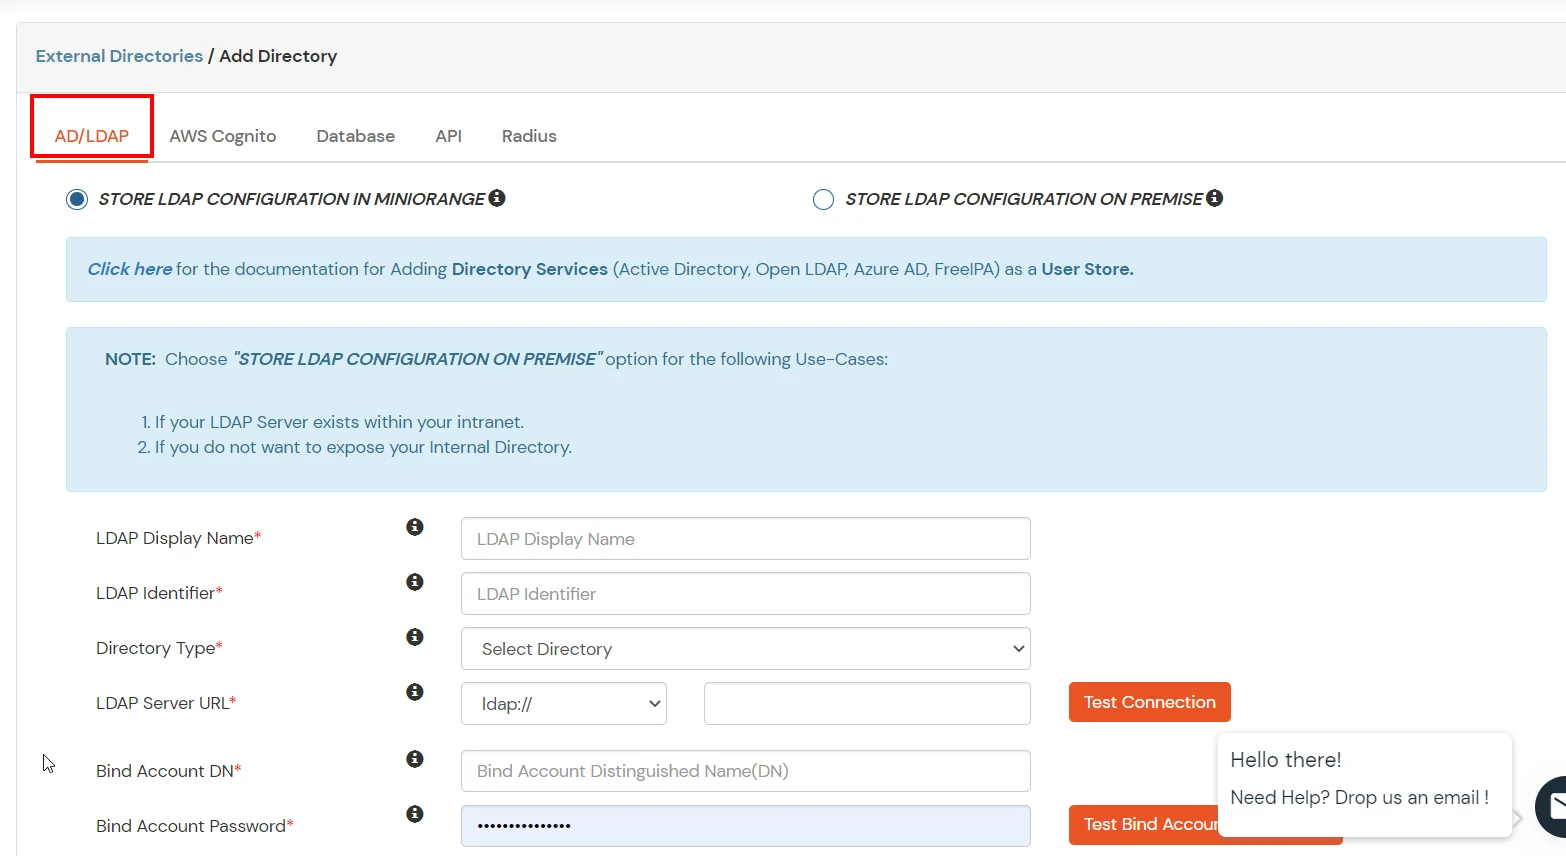
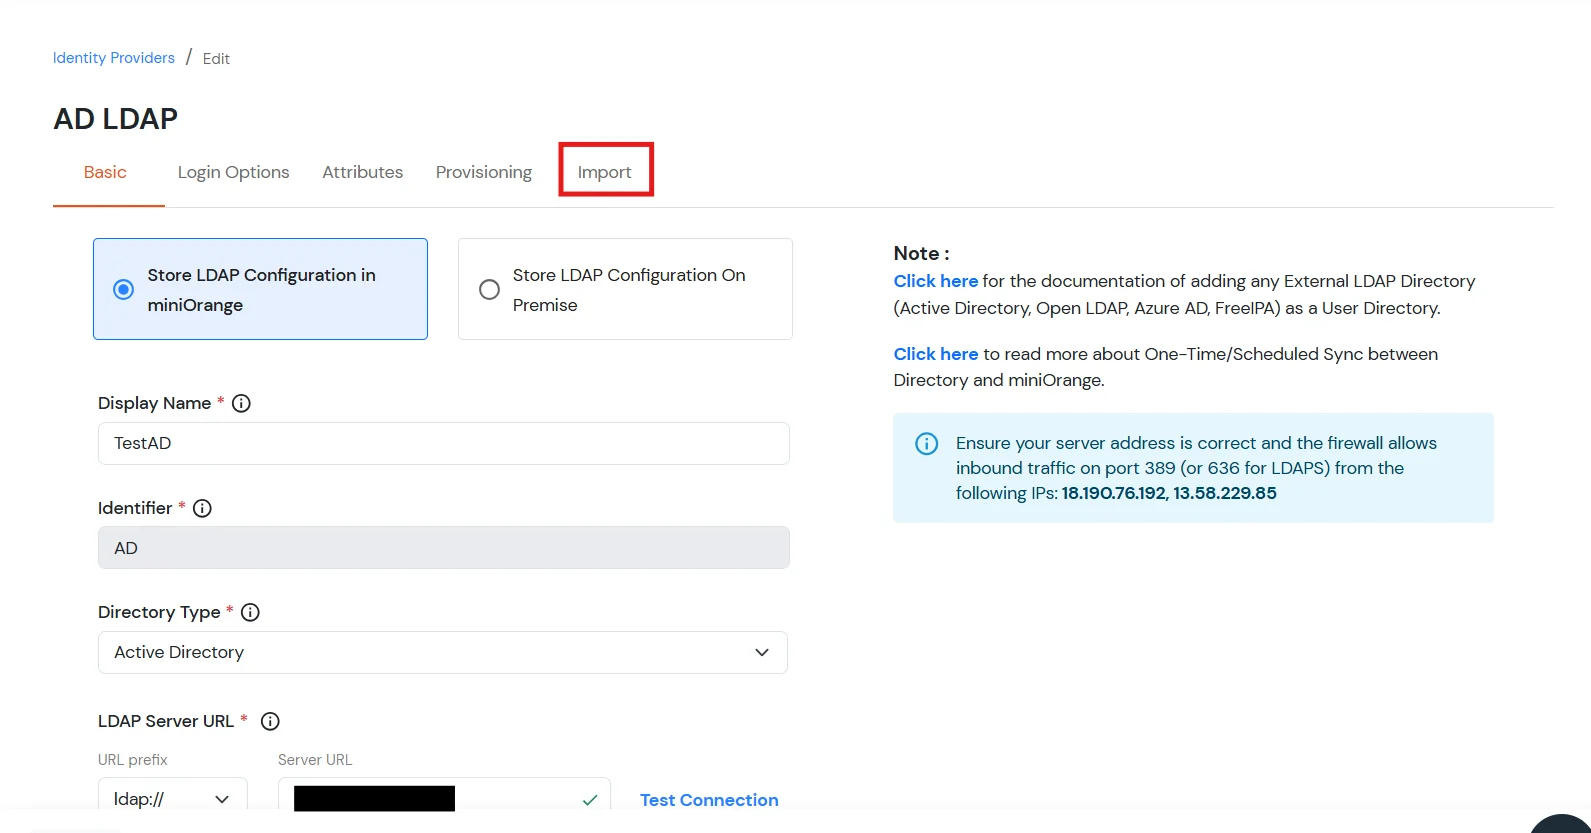
- STORE LDAP CONFIGURATION IN MINIORANGE: Choose this option if you want to keep your configuration in miniOrange. If the active directory is behind a firewall, you will need to open the firewall to allow incoming requests to your AD.
- STORE LDAP CONFIGURATION ON PREMISE: Choose this option if you want to keep your configuration in your premise and only allow access to AD inside premises. You will have to download and install miniOrange gateway on your premise.
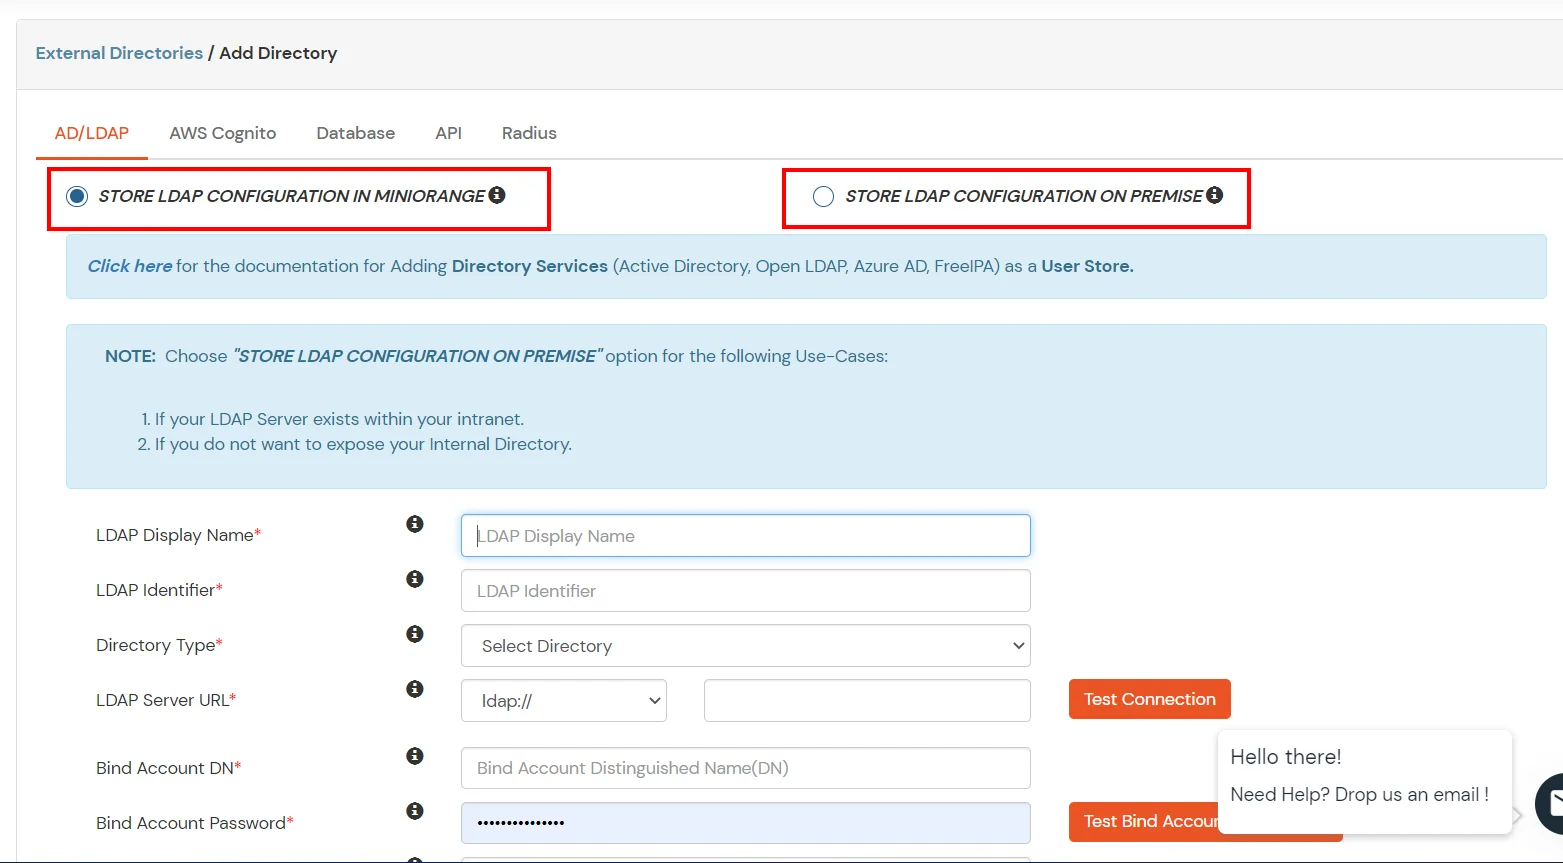
- Enter AD/LDAP Display Name and Identifier name.
- Select Directory Type as Active Directory.
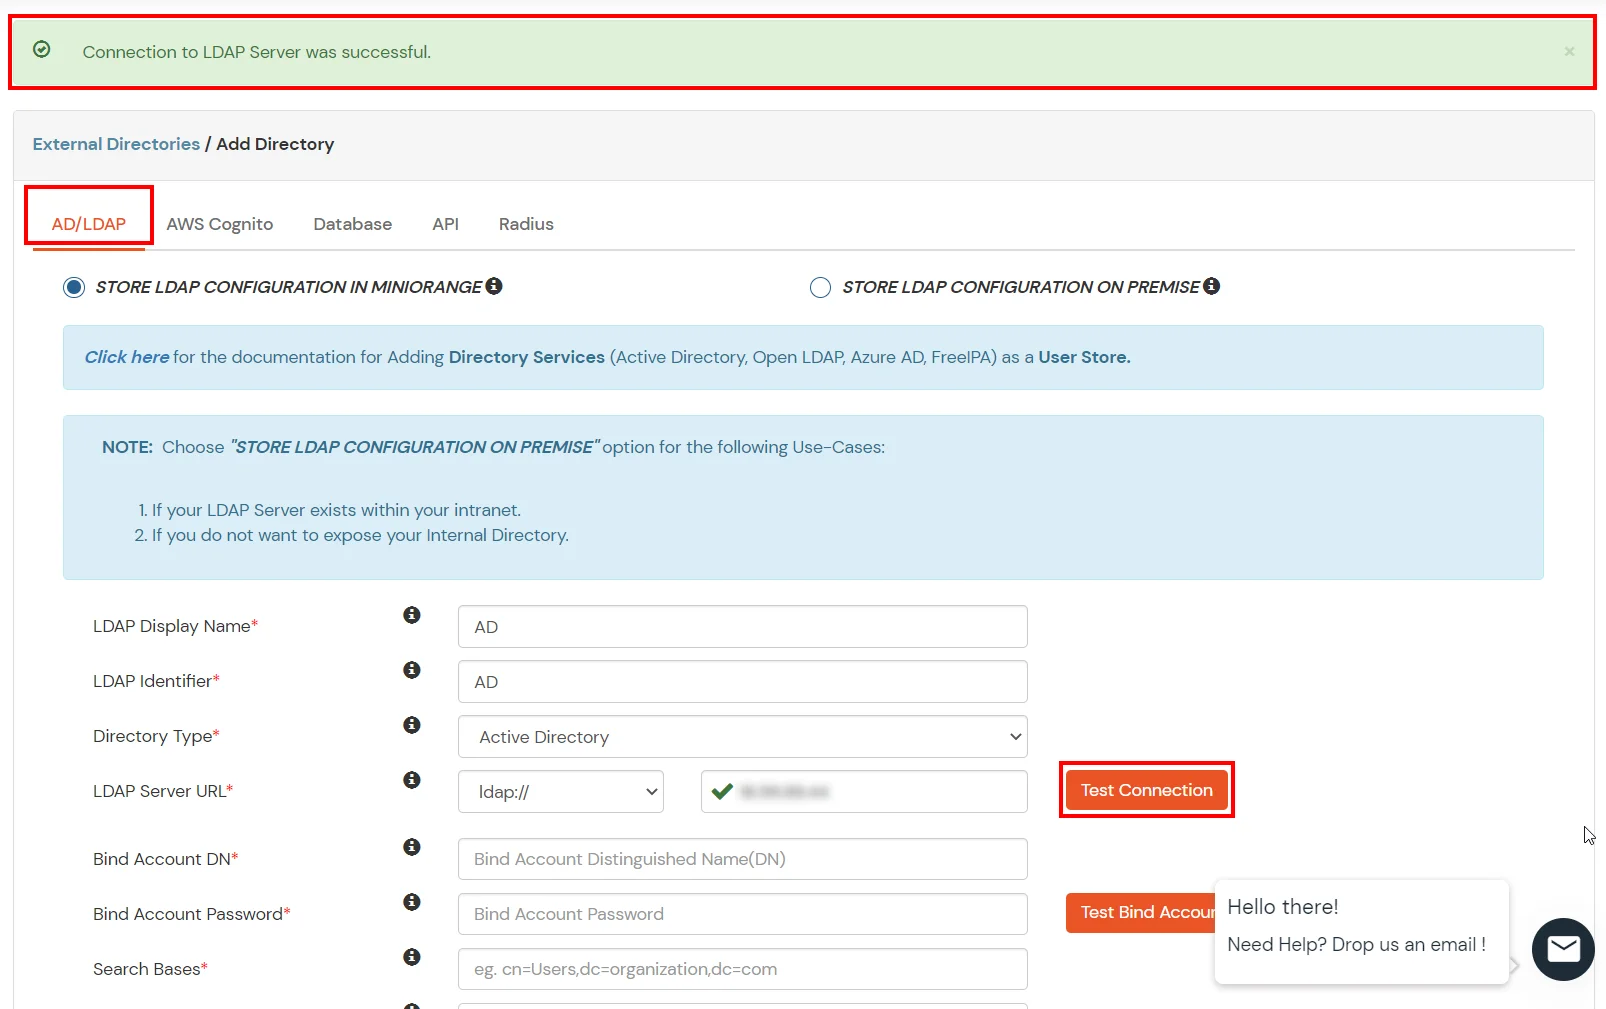
- Enter the LDAP Server URL or IP Address against the LDAP Server URL field.
- Click on the Test Connection button to verify if you have made a successful connection with your LDAP server.
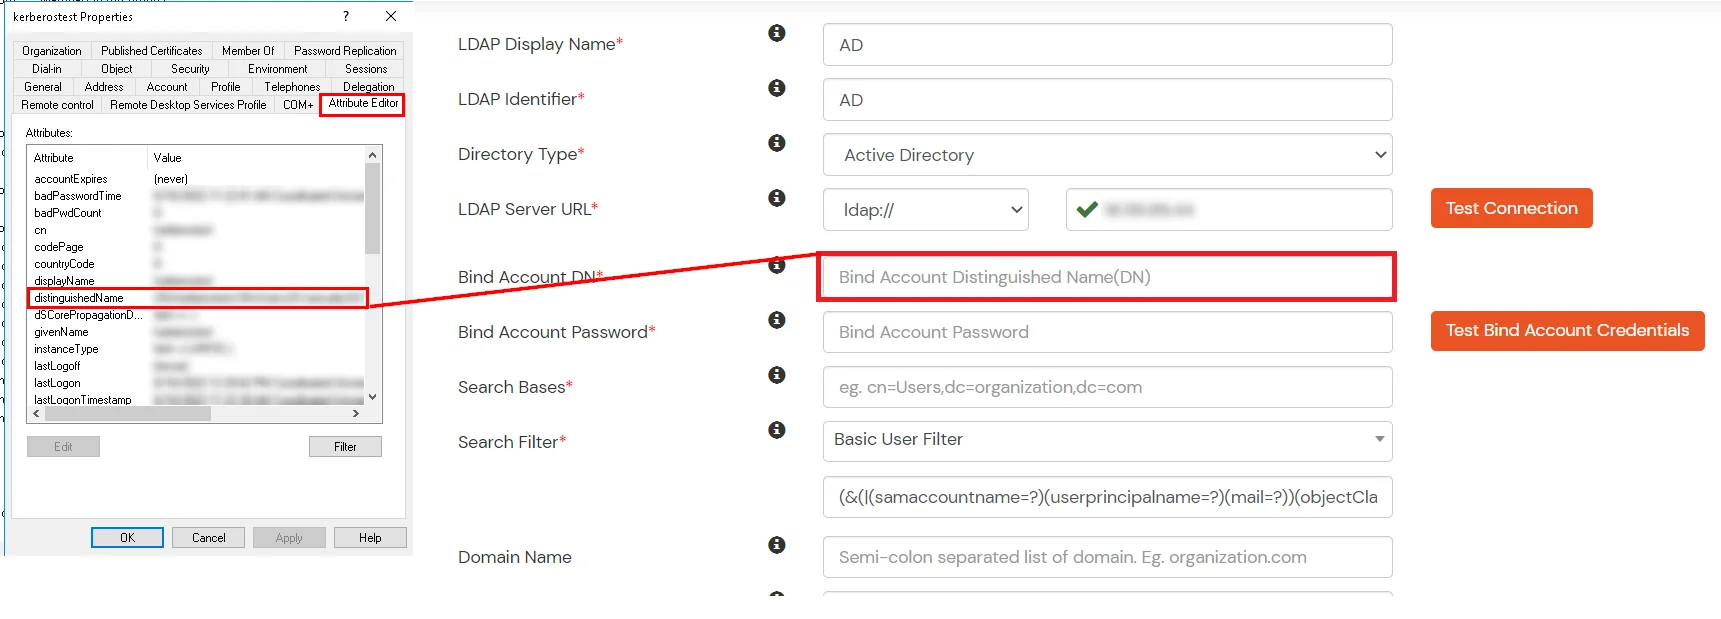
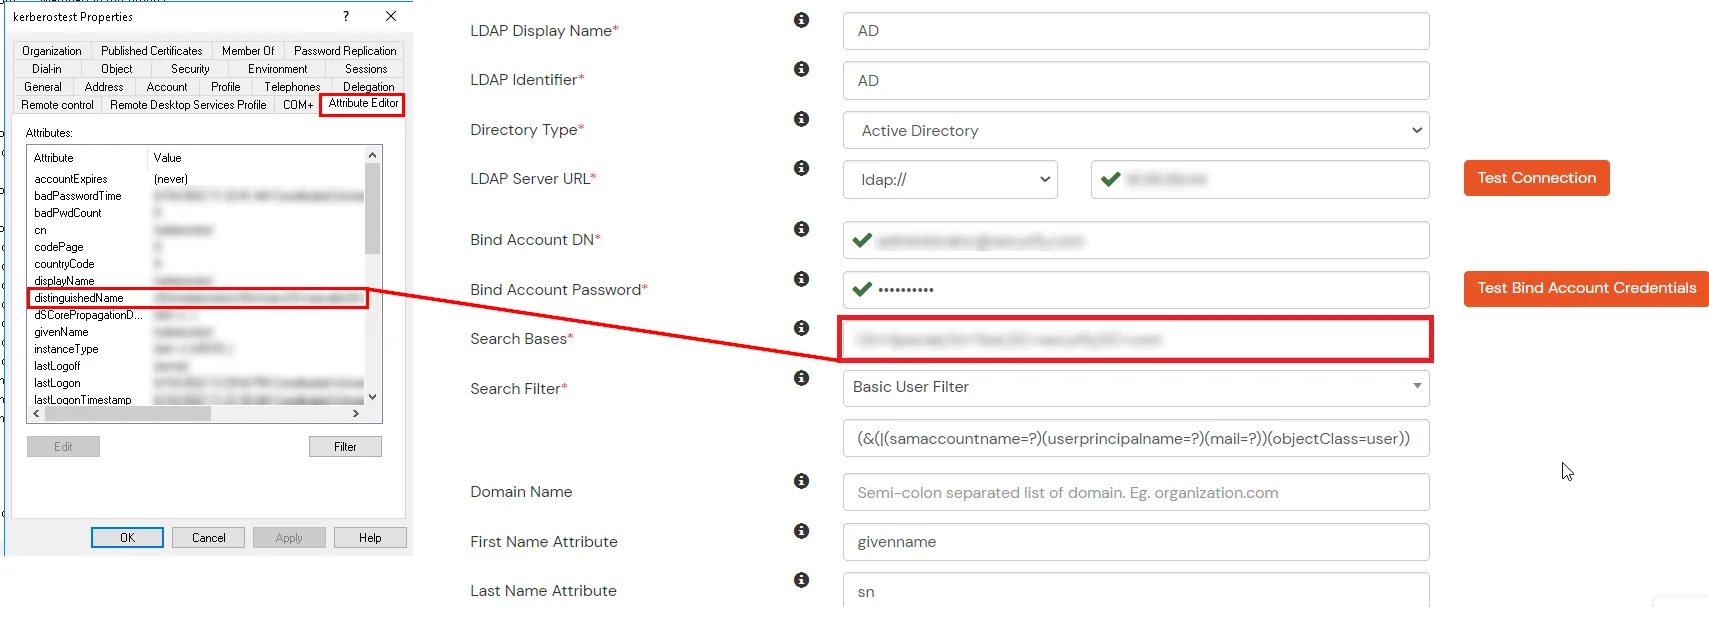
- In Active Directory, go to the properties of user containers/OU's and search for the Distinguished Name attribute. The bind account should have minimum required read privileges in Active Directory to allow directory lookups. If the use case involves provisioning (such as creating, updating, or deleting users or groups), the account must also be granted appropriate write permissions.
- Enter the valid Bind account Password.
- Click on the Test Bind Account Credentials button to verify your LDAP Bind credentials for LDAP connection.
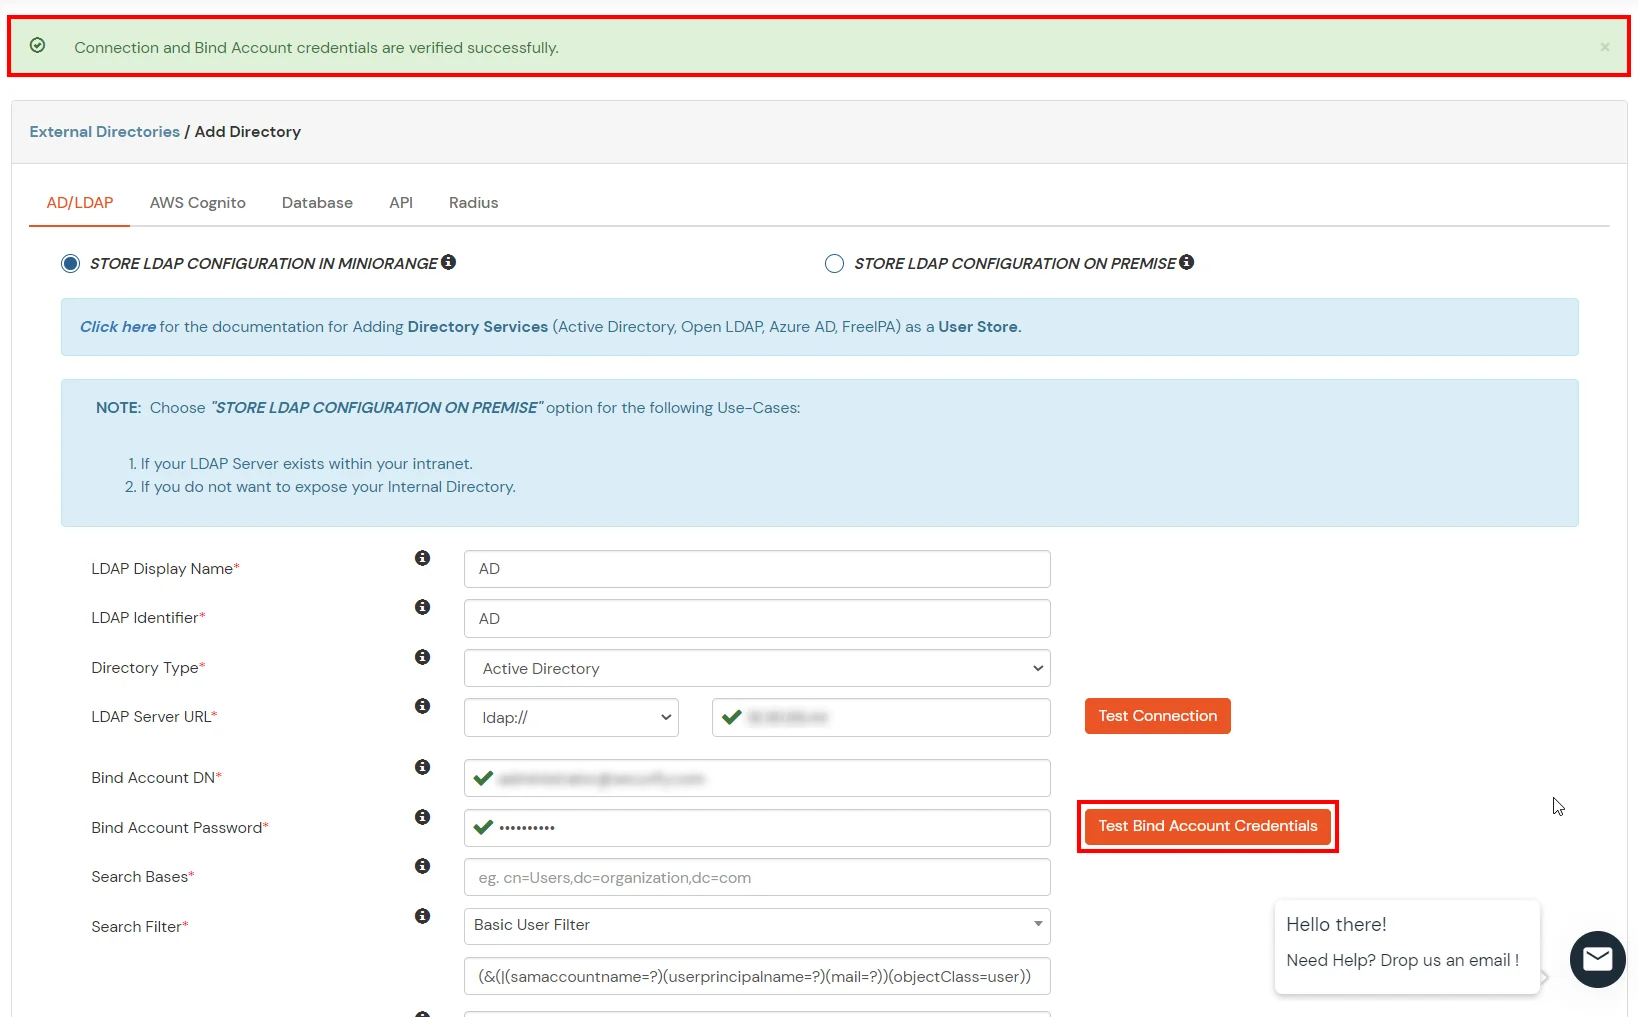
- Search Base is the location in the directory where the search for a user begins. You will get this from the same place you got your Distinguished name.
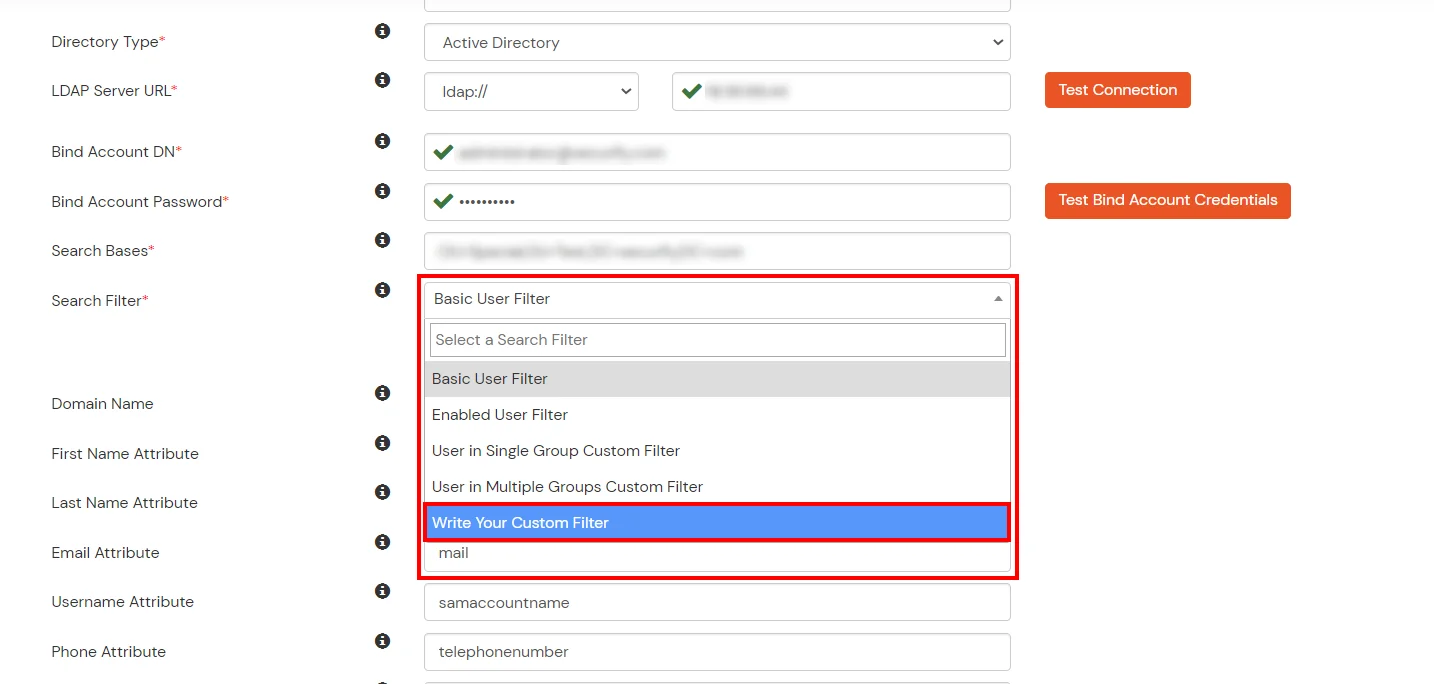
- Select a suitable Search filter from the drop-down menu. If you use User in Single Group Filter or User in Multiple Group Filter, replace the <group-dn> in the search filter with the distinguished name of the group in which your users are present. To use custom Search Filter select "Write your Custom Filter" option and customize it accordingly.
- Click on the Next button, or go to the Login Options tab.
- You can also configure following options while setting up AD. Enable Activate LDAP in order to authenticate users from AD/LDAP. Click on the Next button to add user store.
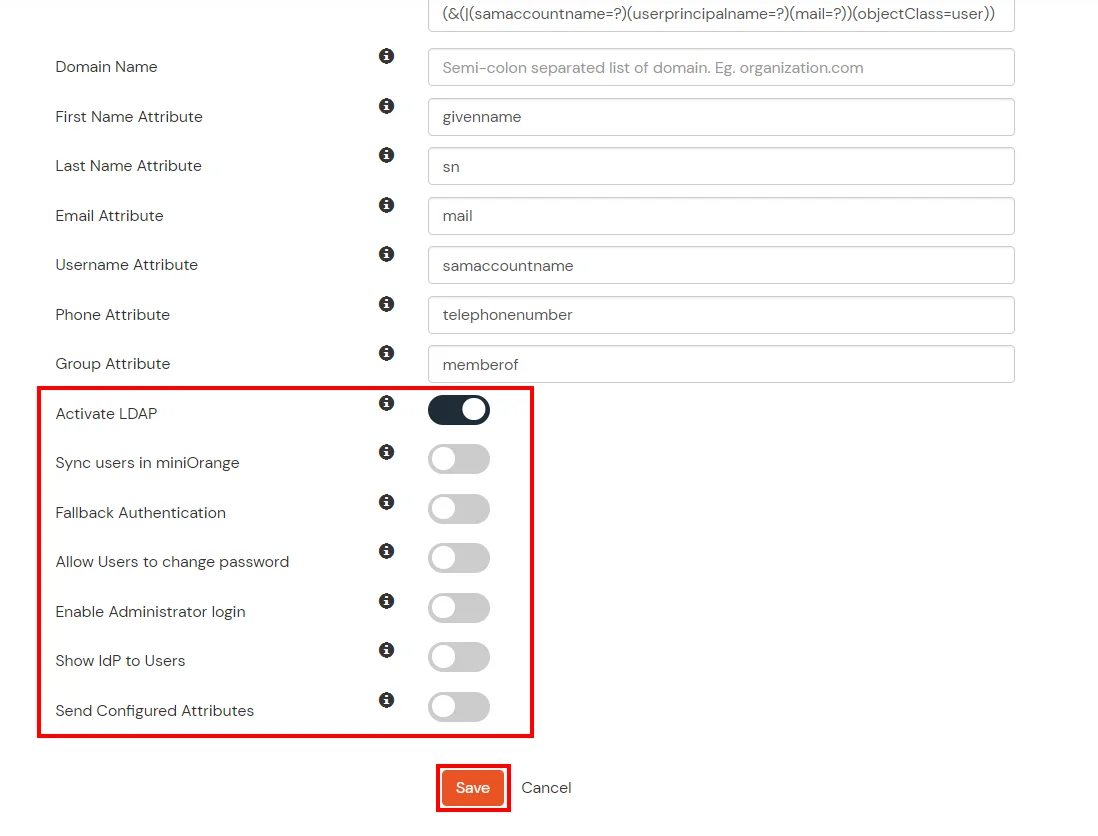
Here's the list of the attributes and what it does when we enable it. You can enable/disable accordingly.
| Attribute |
Description |
| Activate LDAP |
All user authentications will be done with LDAP credentials if you Activate it |
| Fallback Authentication |
If LDAP credentials fail then user will be authenticated through miniOrange |
| Enable administrator login |
On enabling this, your miniOrange Administrator login authenticates using your LDAP server |
| Show IdP to users |
If you enable this option, this IdP will be visible to users |
| Sync users in miniOrange |
Users will be created in miniOrange after authentication with LDAP |
- Click on the Next button, or go to the Attributes tab.
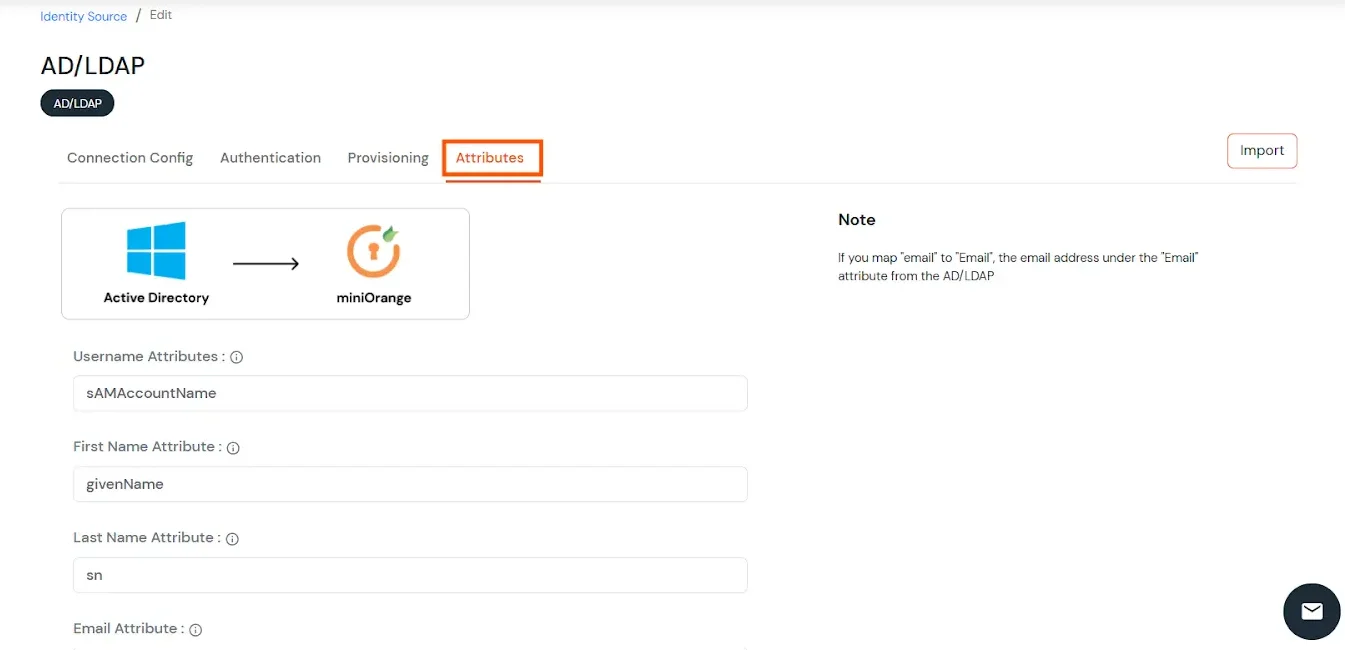
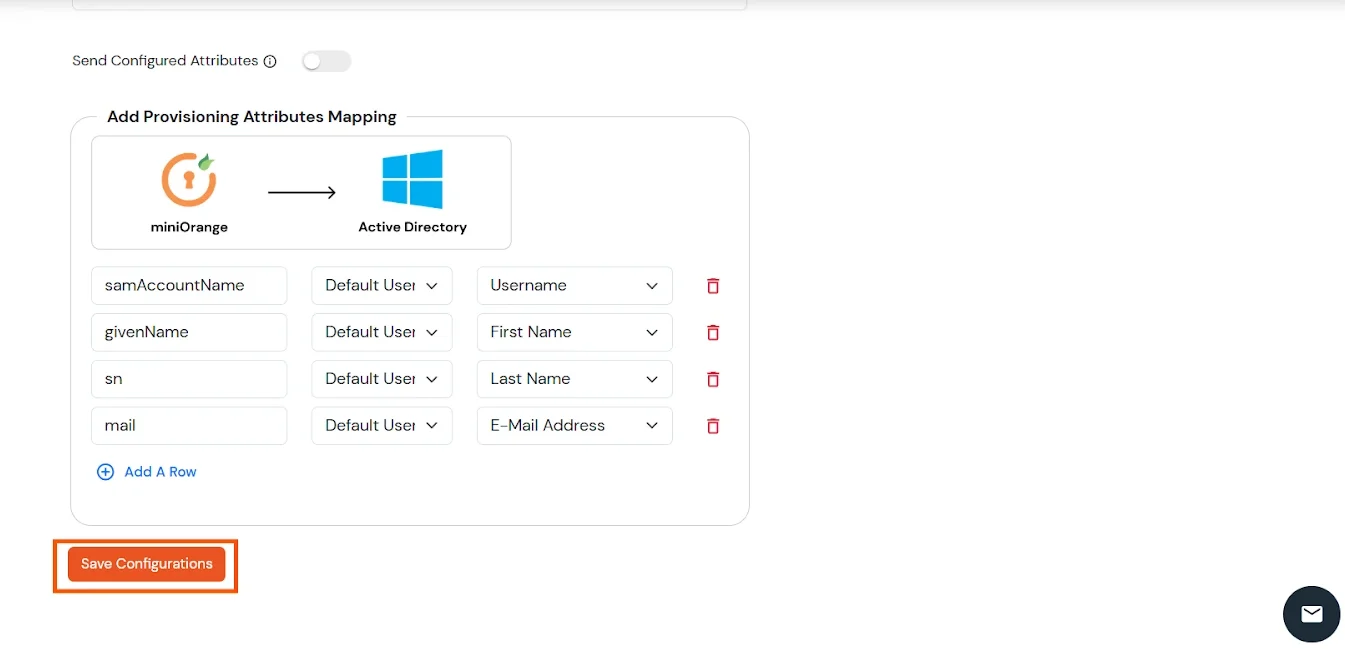
Attributes Mapping from AD
User Import and Provisioning from AD
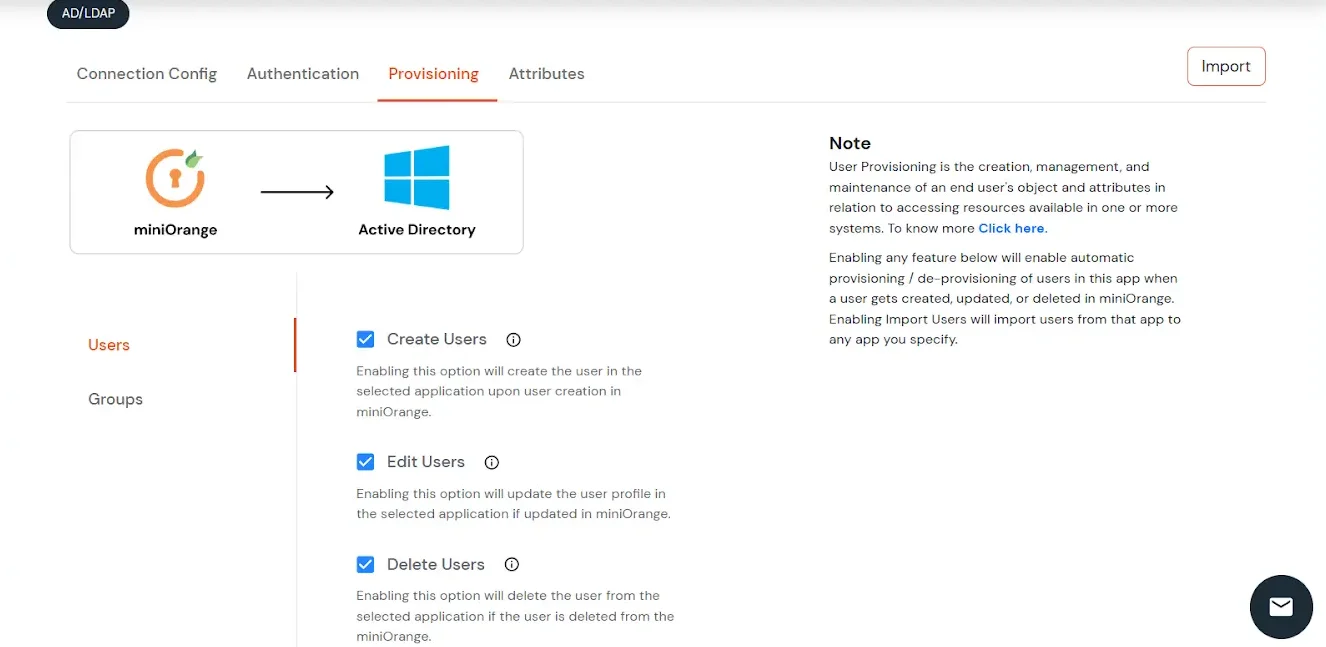
- If you want to set up provisioning, click here for detailed information. We will skip this step for now.
Import Password Policy from AD
- If you want to import your Active Directory password policy into miniOrange, click here for detailed information. We will skip this step for now.
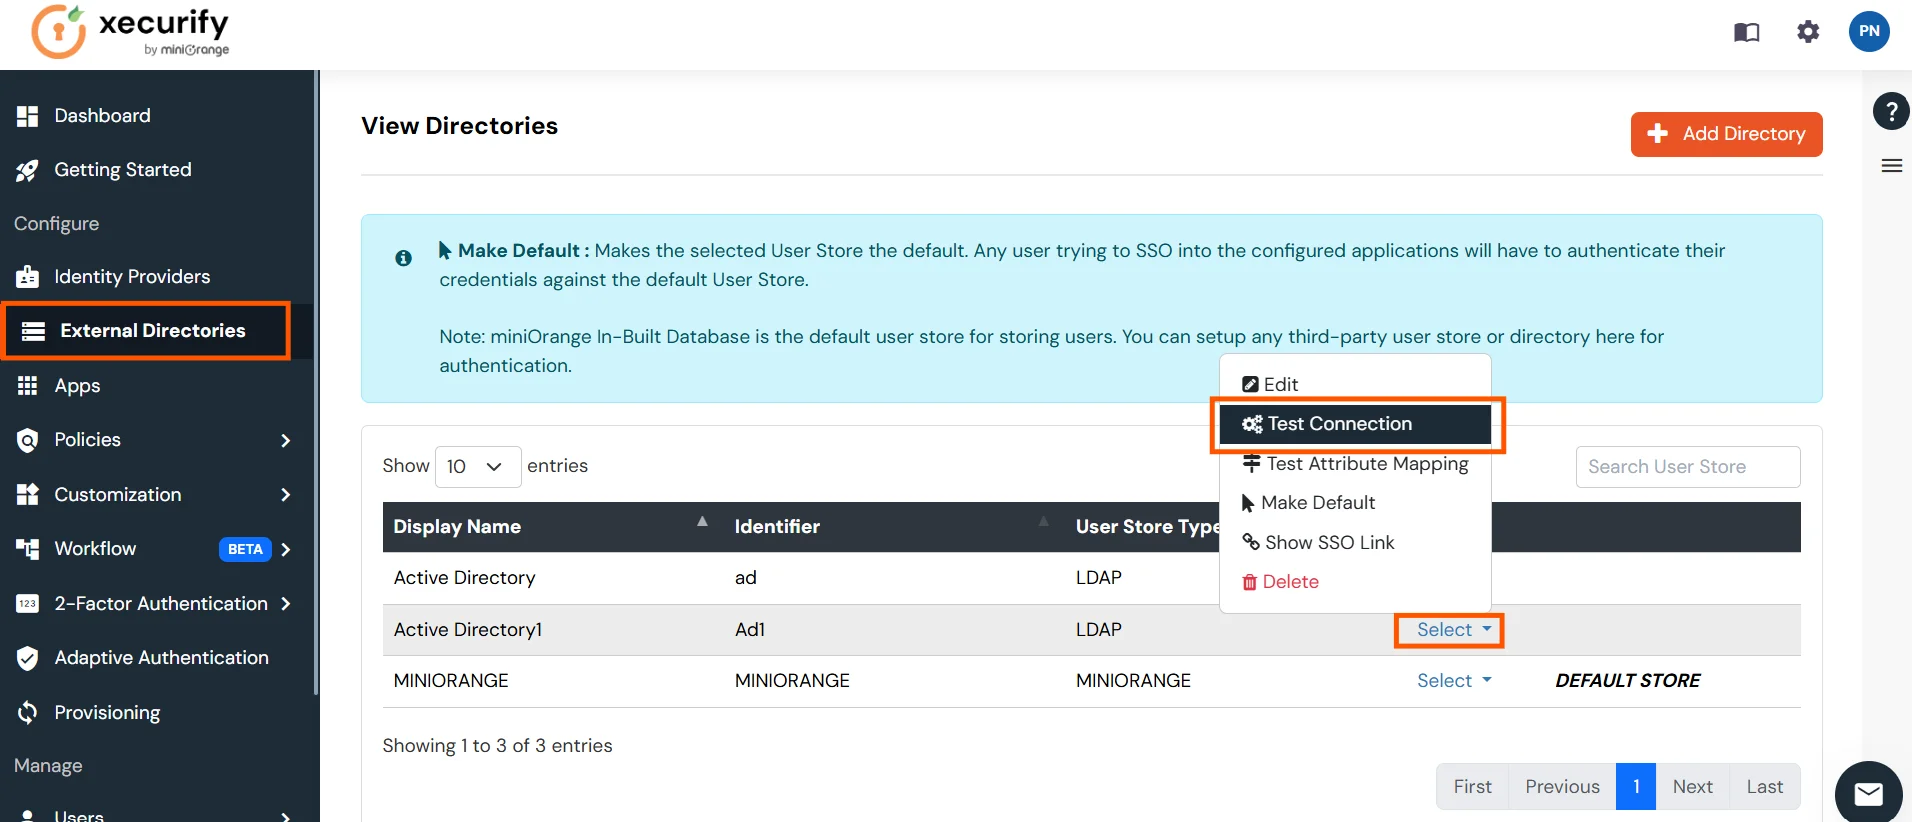
Test Connections
- You will see a list of directories under Identity Providers. From the dropdown, select AD/LDAP Directories, search for your configured directory, click the three dots next to it, and select Test Connection.
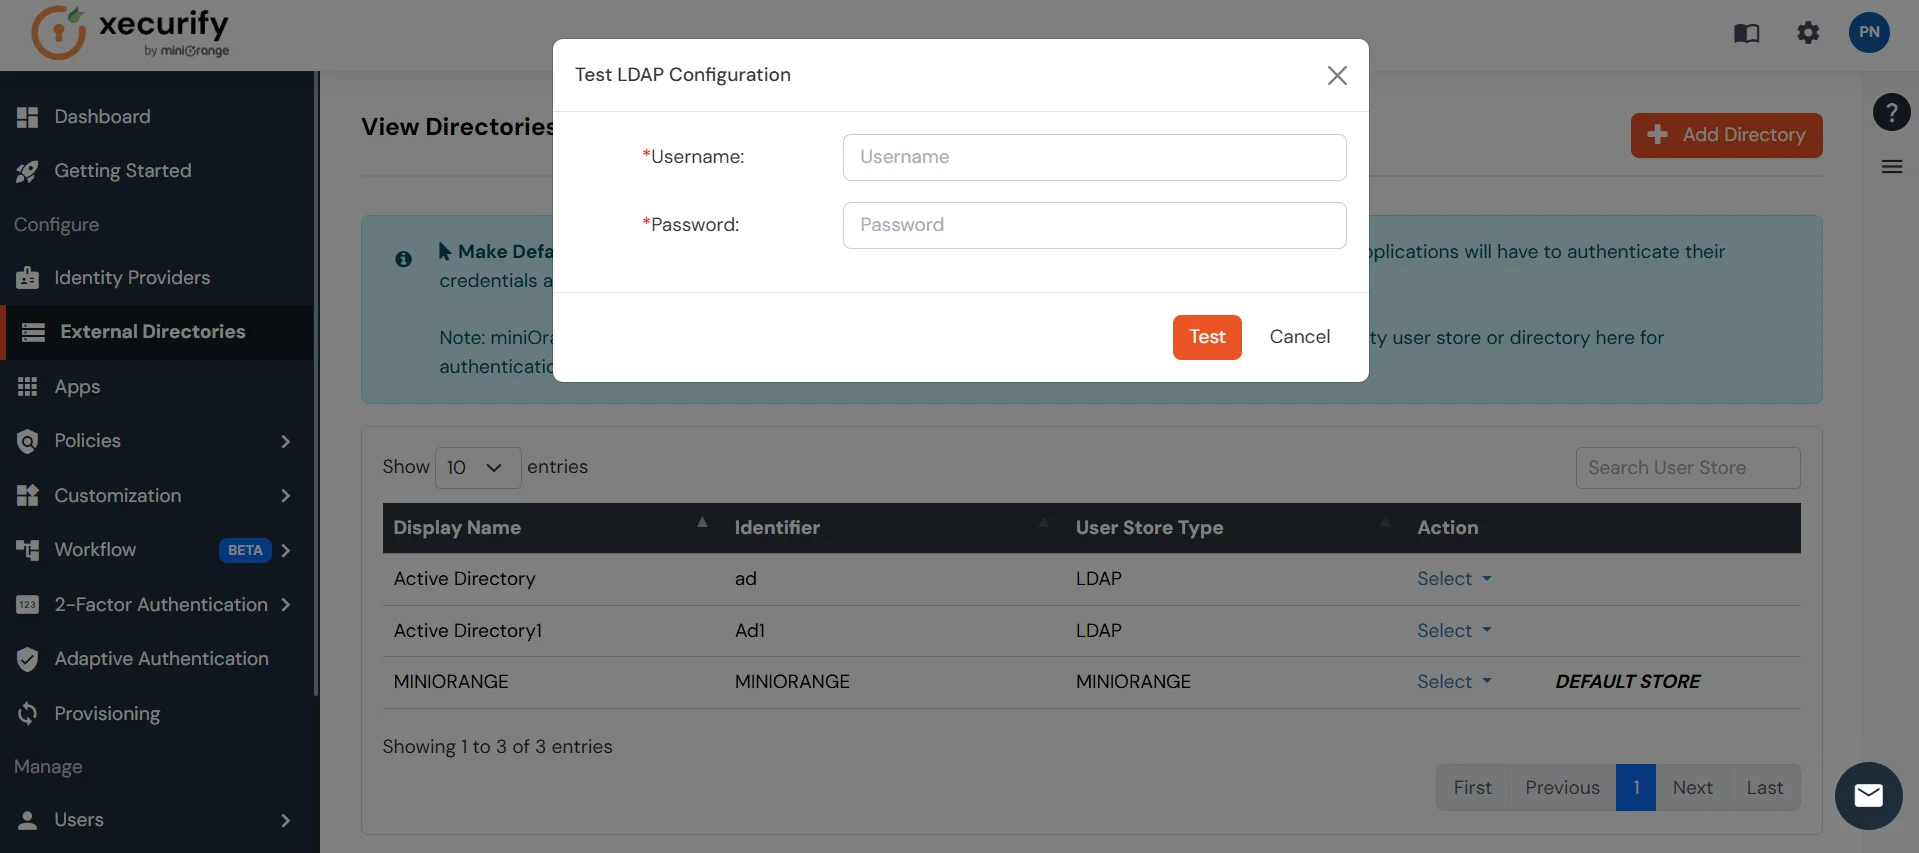
- A pop-up appears prompting you to enter a username and password to verify your LDAP configuration.
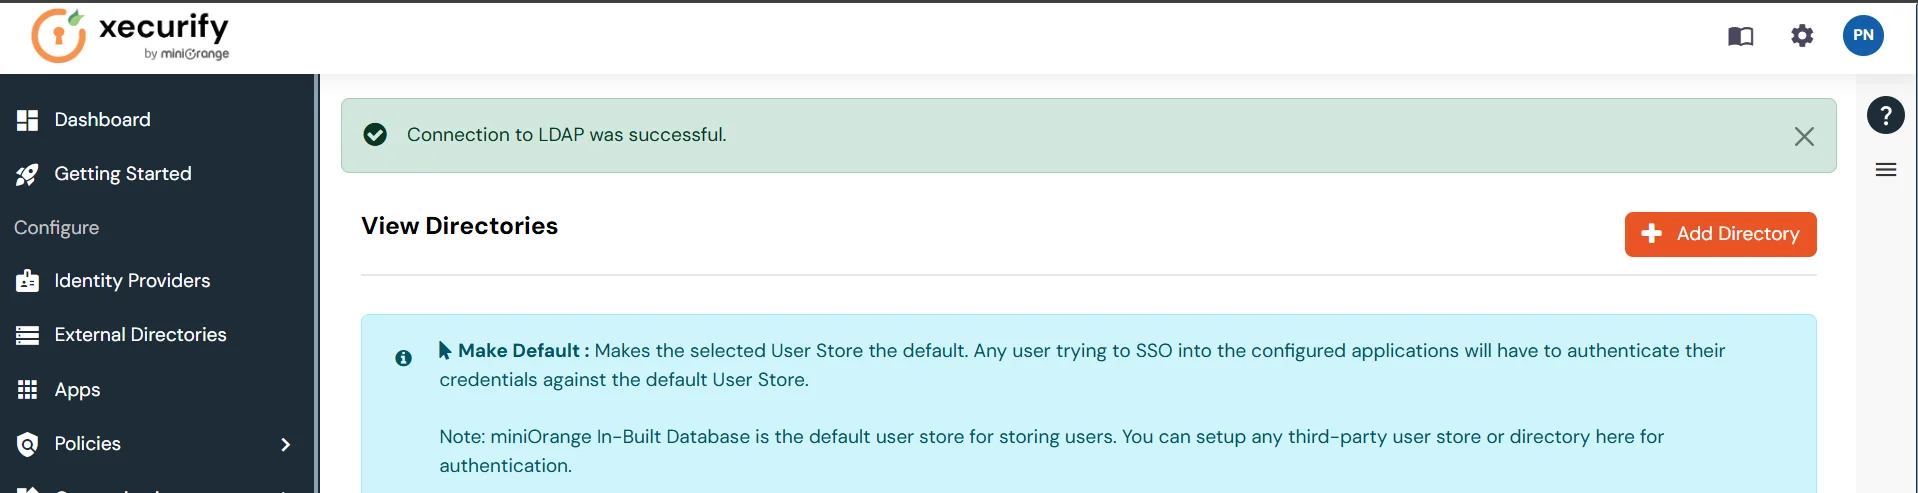
- On Successful connection with LDAP Server, a success message is shown.
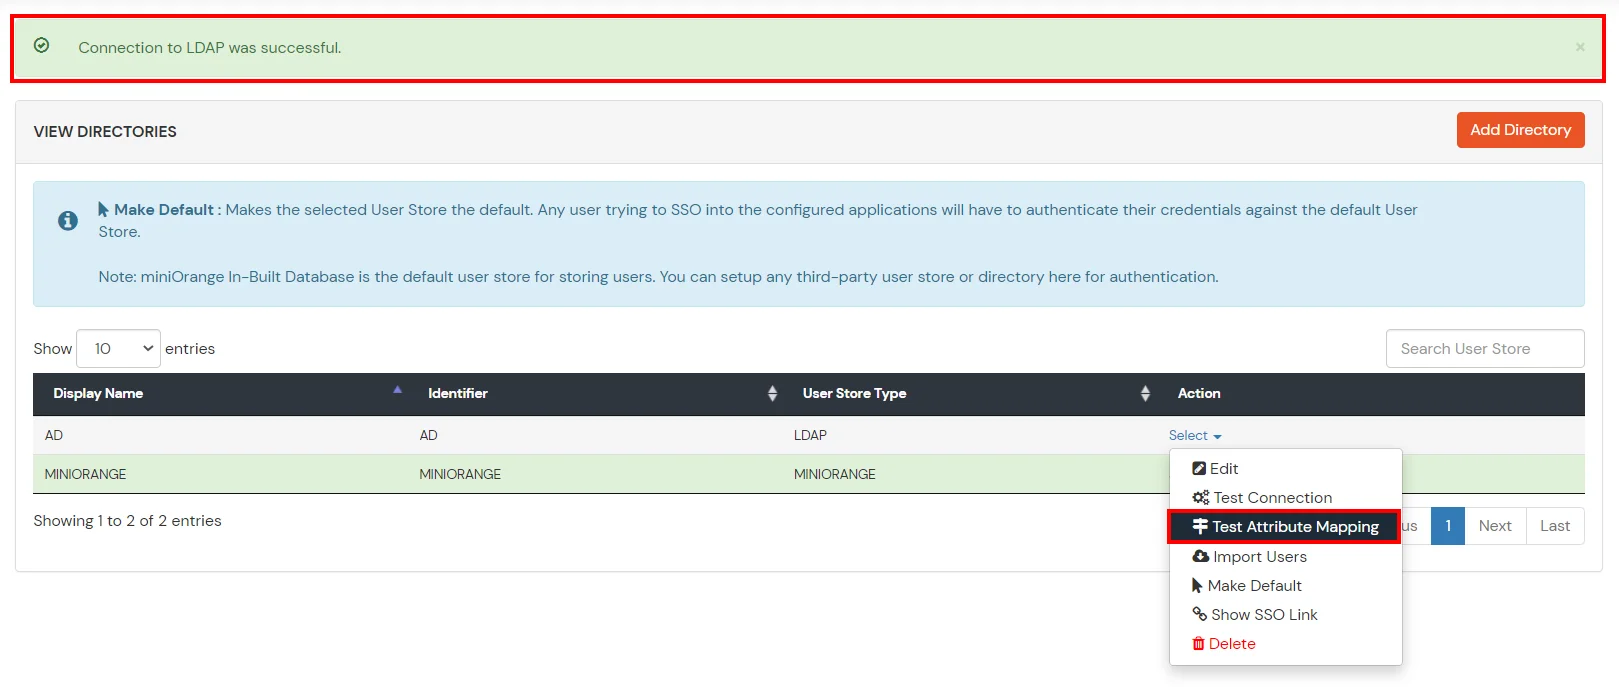
Test Attribute Mapping
- You will see a list of directories under Identity Providers. From the dropdown, select AD/LDAP Directories, search for your configured directory, click the three dots next to it, and select Test Attribute Mapping.
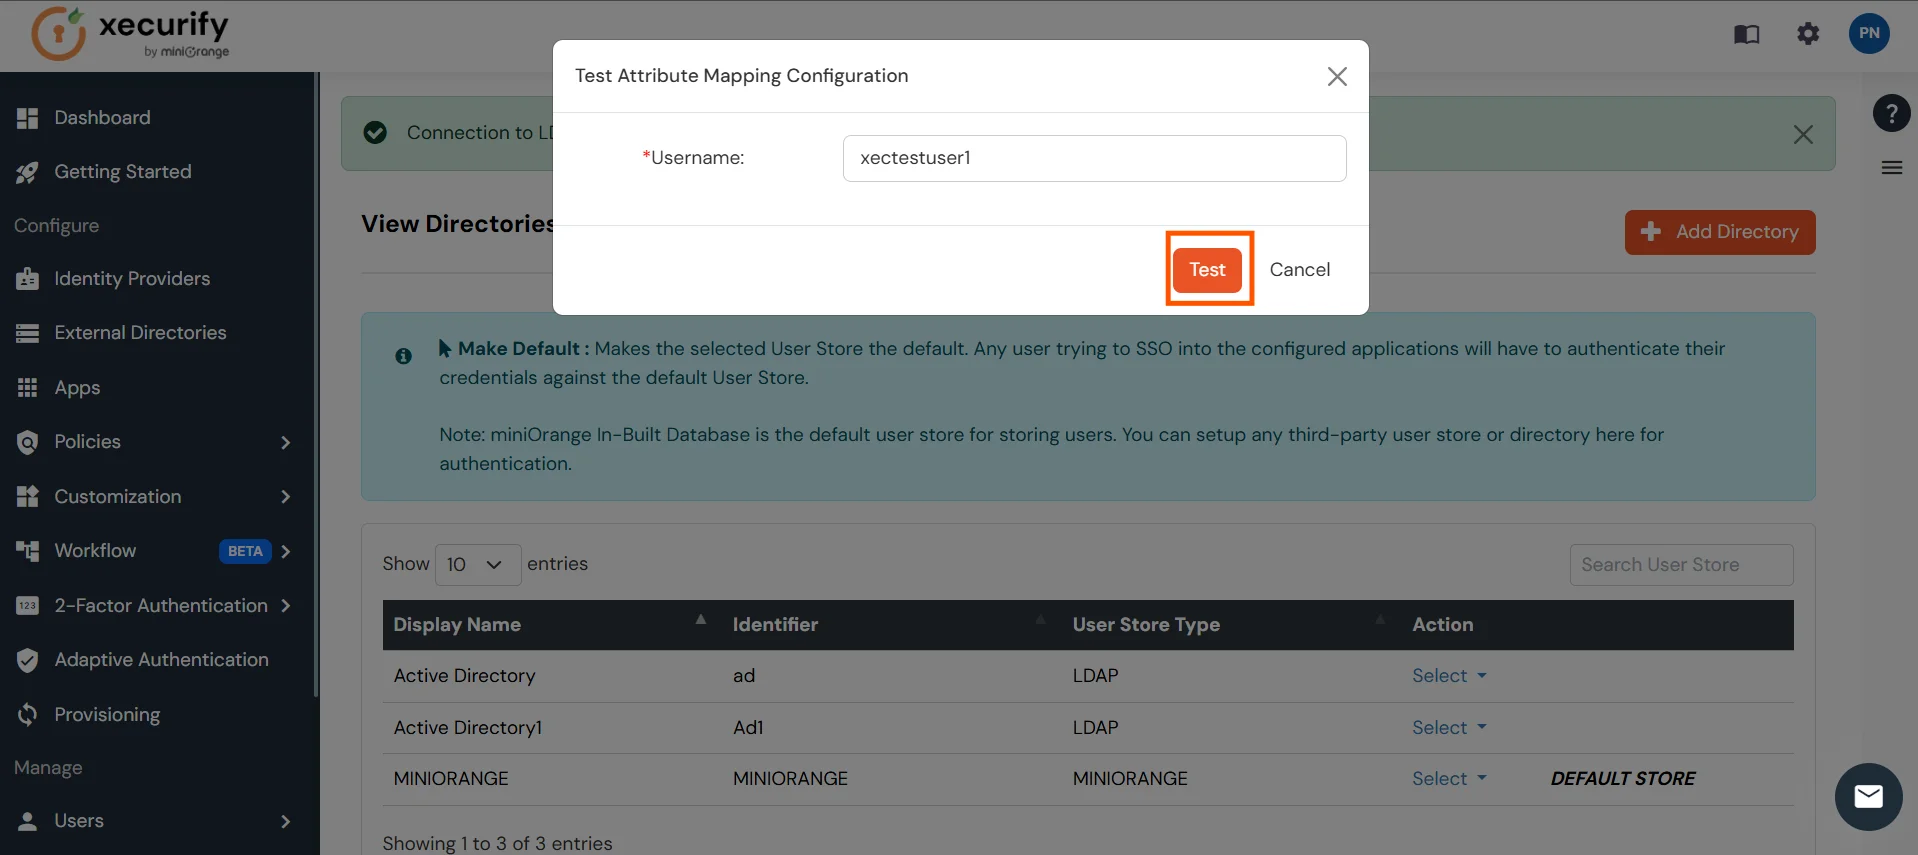
- A pop‑up appears to enter a username and click Test.
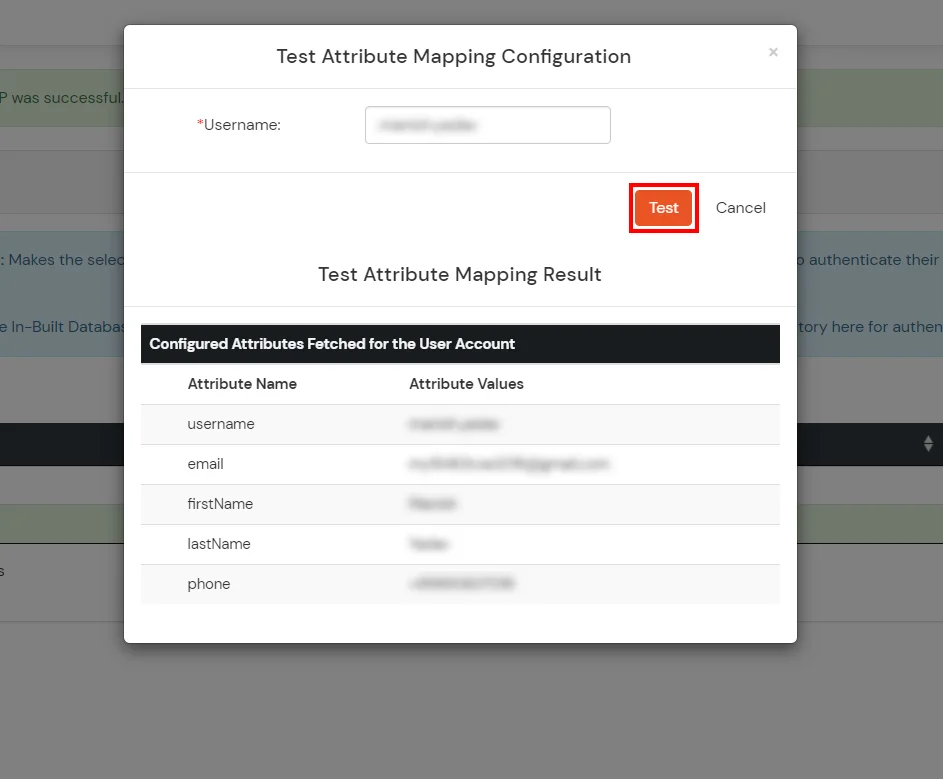
- The Test Attribute Mapping Result will be displayed.
Set up AD as External Directory configuration is complete.
Note: Refer our guide to setup LDAP on windows server.
miniOrange integrates with various external user sources such as directories, identity providers, and etc.
External
References