Session Recording
Save what people do while using a resource through PAM, so you can watch it back later as a full replay.
What This Does
When someone connects to a server, database, or web app through PAM, PAM can quietly save everything they do - every screen, every command, every click - so an admin can watch it back at any time afterward, with a full timeline and search.
This is mainly used for security and compliance - proving what a privileged user actually did, and investigating anything unusual after the fact.
Step 1: Turn On Recording (PAM Dashboard)
Note: Perform this step if you want to record all activities performed by a user on the PAM dashboard. This is separate from resource recordings; for resource recordings, refer to Step 2.
- Log in to the PAM Admin Dashboard.
- Go to Settings >> Product Settings, then open the Dashboard tab.
- Under the Session Recording heading, turn on Enable User Session Recording.
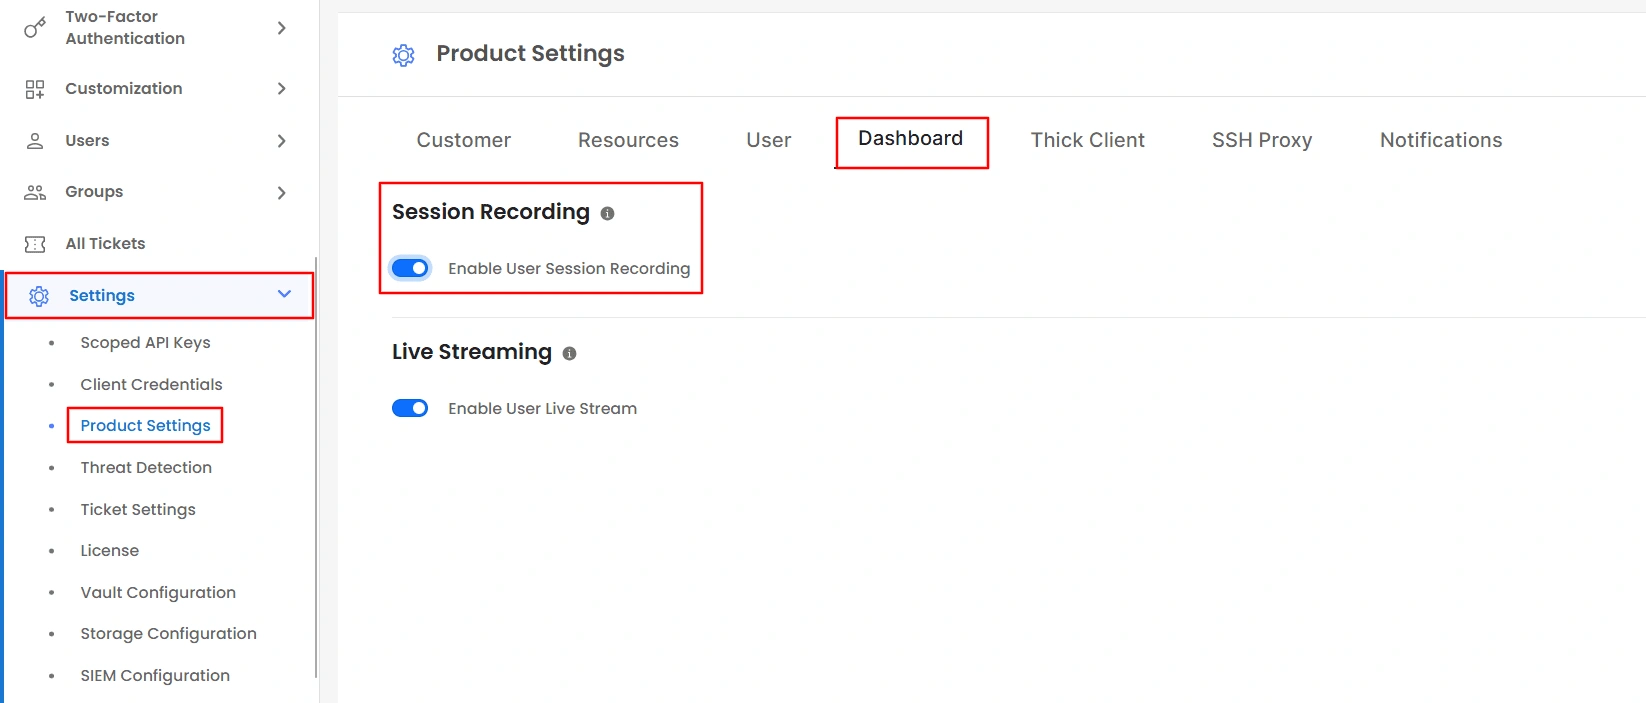
- This is the master on/off switch for the entire organization. Once enabled, the dashboard activities of all users accessing the PAM dashboard will be recorded.
Step 2: Turn It On for Each Resource Type
- The master switch in Step 1 doesn't automatically record everything. Each policy - the rules that control access to your Servers, Databases, RDP/VNC connections, and Web Apps - has its own recording switch.
- Recording only happens for a resource if the resource's policy switch is turned on.
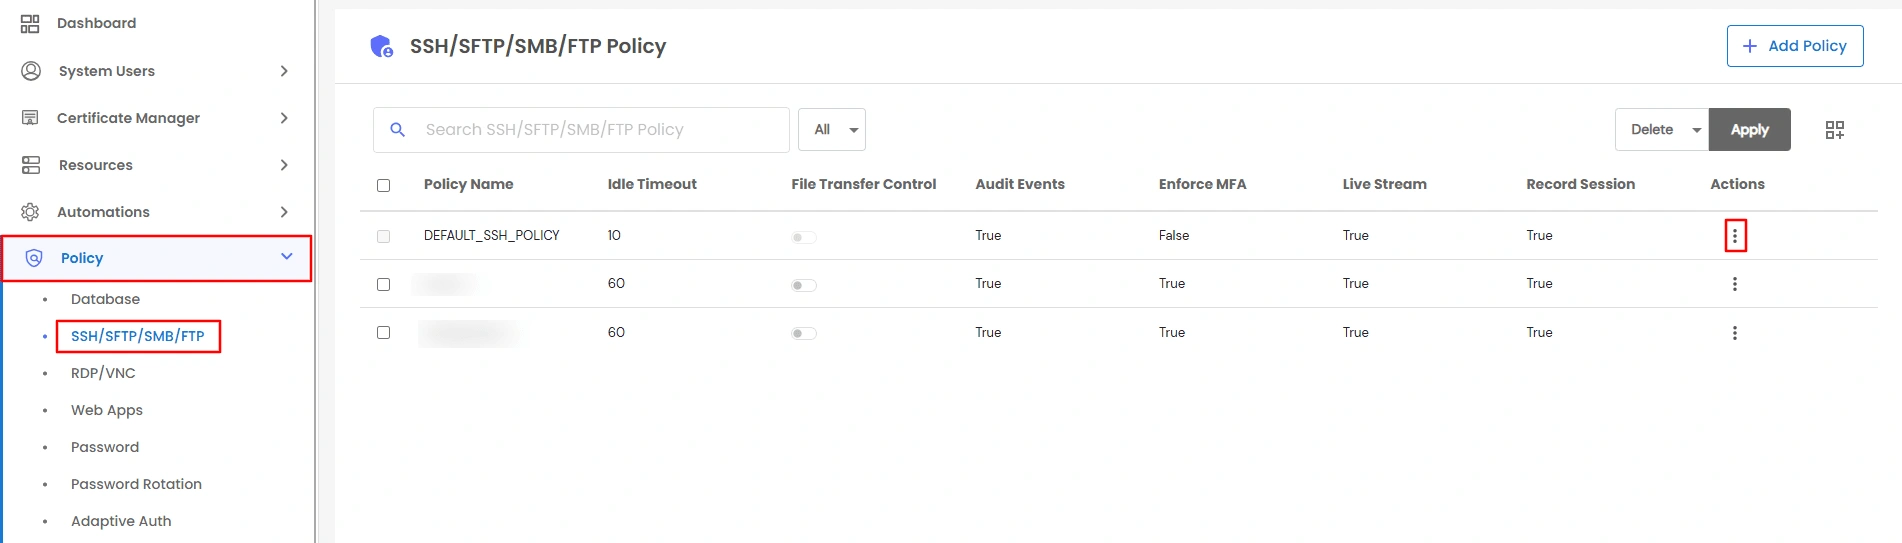
- Go to Policy in the side menu and open the policy for the resource type you want: Server/SSH, RDP/VNC, Database, or Web Apps.
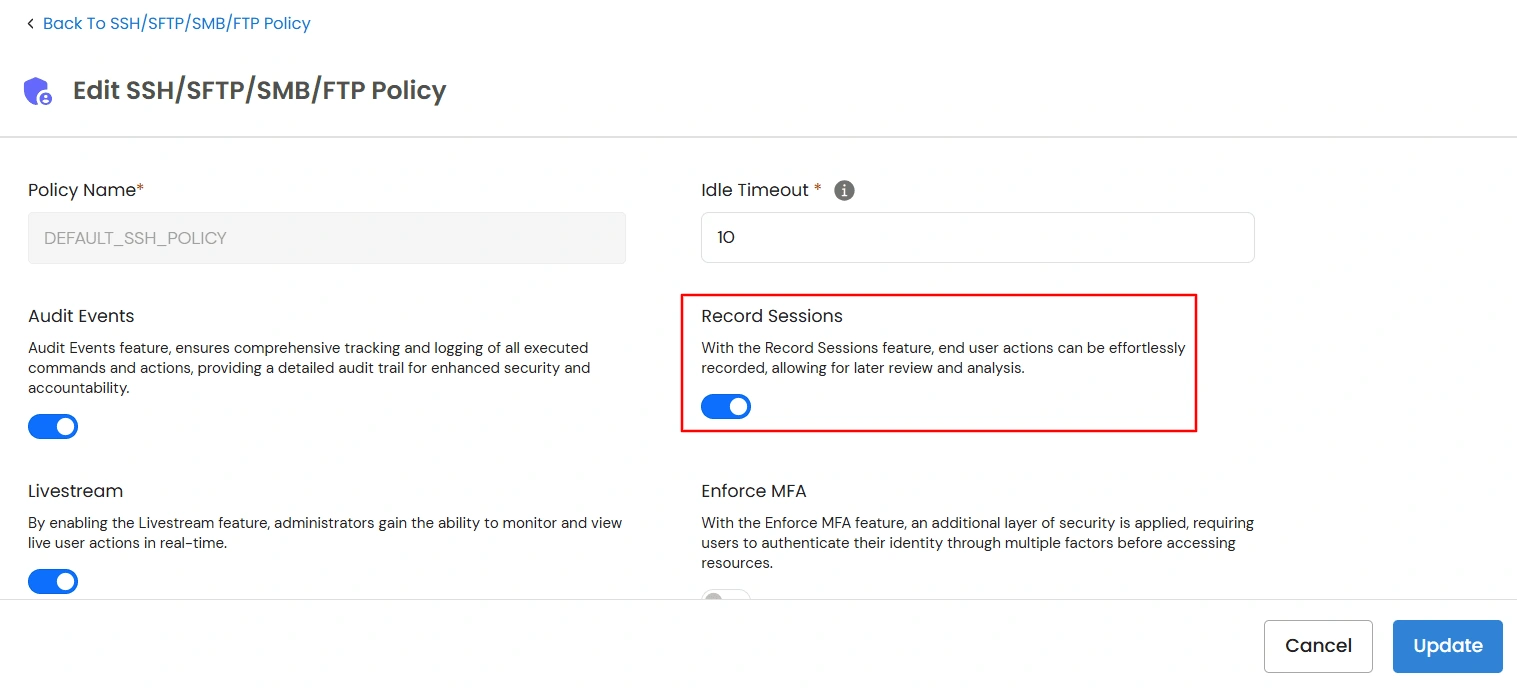
- In the General section, turn on Record Sessions.
Note: Don't confuse this with Session Share. Session Share is a completely different feature - it lets two people jointly view or control the same live session together, like screen-sharing on a call. It has nothing to do with recording or saving anything for later. Web App policies don't have a Session Share option.
Retention Policy
By default, PAM retains all recordings indefinitely. If you want PAM to automatically delete older recordings, you can configure a retention policy.
- Go to Settings >> Product Settings, select the Customer tab, and locate Session recording files retention policy.
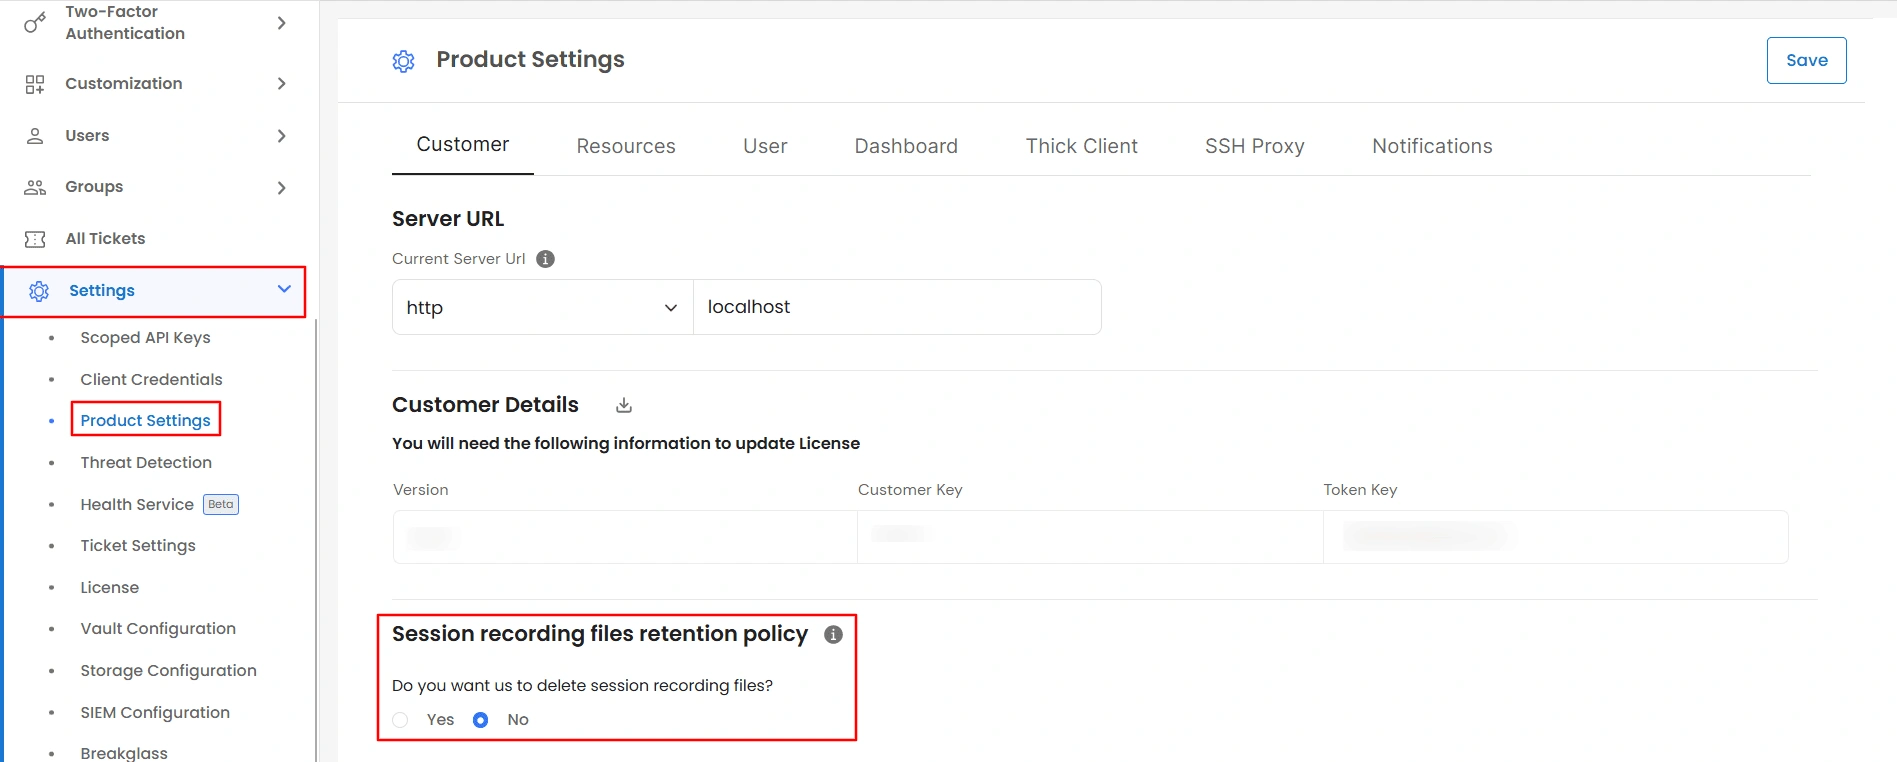
- Under Do you want us to delete session recording files?, select:
- No — Keeps all recordings indefinitely (default).
- Yes — Enables automatic deletion based on the configured retention period.
- When Yes is selected, two fields appear under Destroy in:
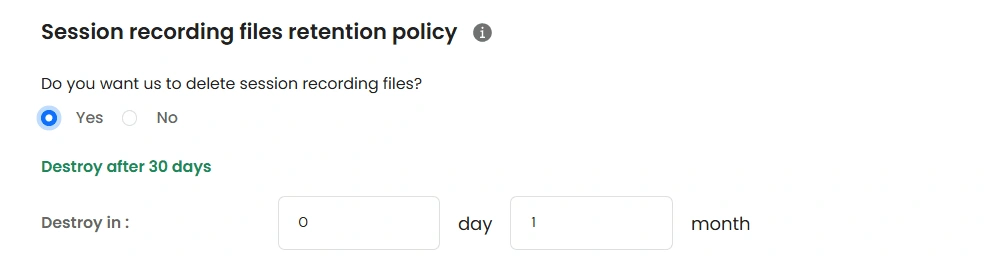
- You can enter a value in either or both fields. The values are added together to determine the total retention period. A month is treated as 30 days, rather than a calendar month.
- A summary above the fields displays the configured retention period, for example, Destroy after 90 day(s).
Note: This retention policy applies to all recording types covered by this setting, including RDP/VNC, SSH, Database, Web App, and PAM Dashboard activity recordings. You cannot configure different retention periods for individual recording types or exclude specific recordings.
How PAM Handles Deletion
- PAM checks for expired recordings once every 24 hours.
- The retention period is calculated from the session start time, not from the last time the recording was viewed.
- If you reduce the retention period, the new policy also applies to existing recordings. During the next daily check, any recordings that are already older than the new limit will be deleted.
Additional Considerations
- If an MP4 version of a recording was previously generated (see Downloading a Recording as a Video File), it will become invalid once the source recording is deleted. The MP4 cannot be downloaded again.
- PAM does not display a confirmation prompt when you enable the deletion policy. Verify the Days and Months values carefully before saving.
- Disabling the retention policy only prevents future deletions. Recordings that have already been deleted cannot be restored.
Where Recordings Are Saved
- By default, PAM saves recordings on its own server.
- If you'd rather store them somewhere else - for example, your company's own cloud storage - go to Settings >> Storage Configuration and connect one of these:
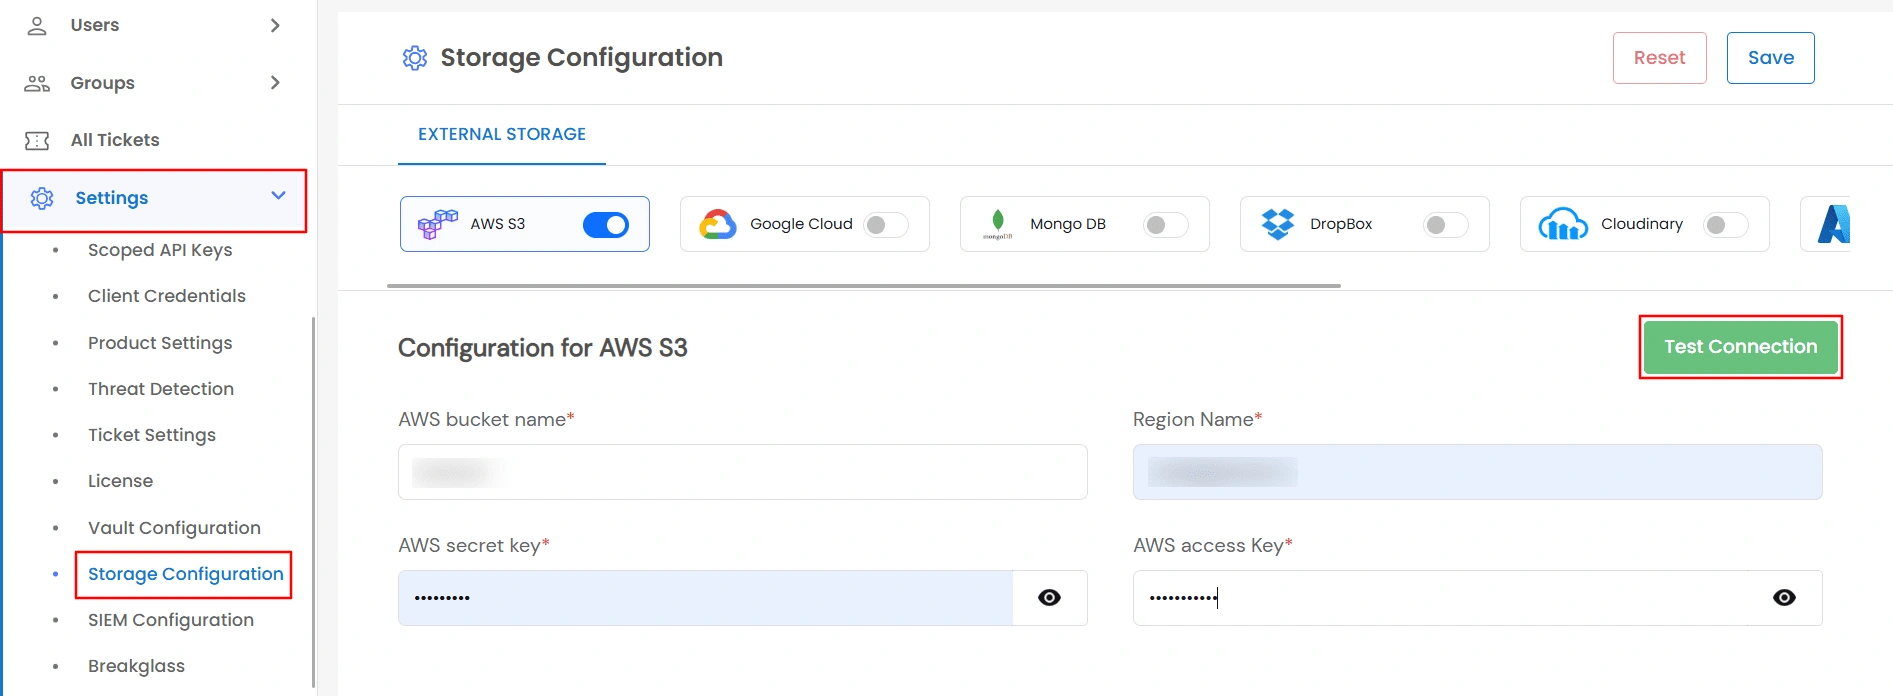
- Google Cloud Storage
- AWS S3
- Azure Blob Storage
- MongoDB
- Dropbox
- Cloudinary
- SFTP Server
- Alibaba OSS
Each option asks for that provider's own connection details, such as an access key or connection string, and has a Test Connection button so you can confirm it works before relying on it.
Once connected, all new recordings are saved there automatically instead of on the local server. See Storage Configuration for the full setup steps.
Viewing Recorded Sessions
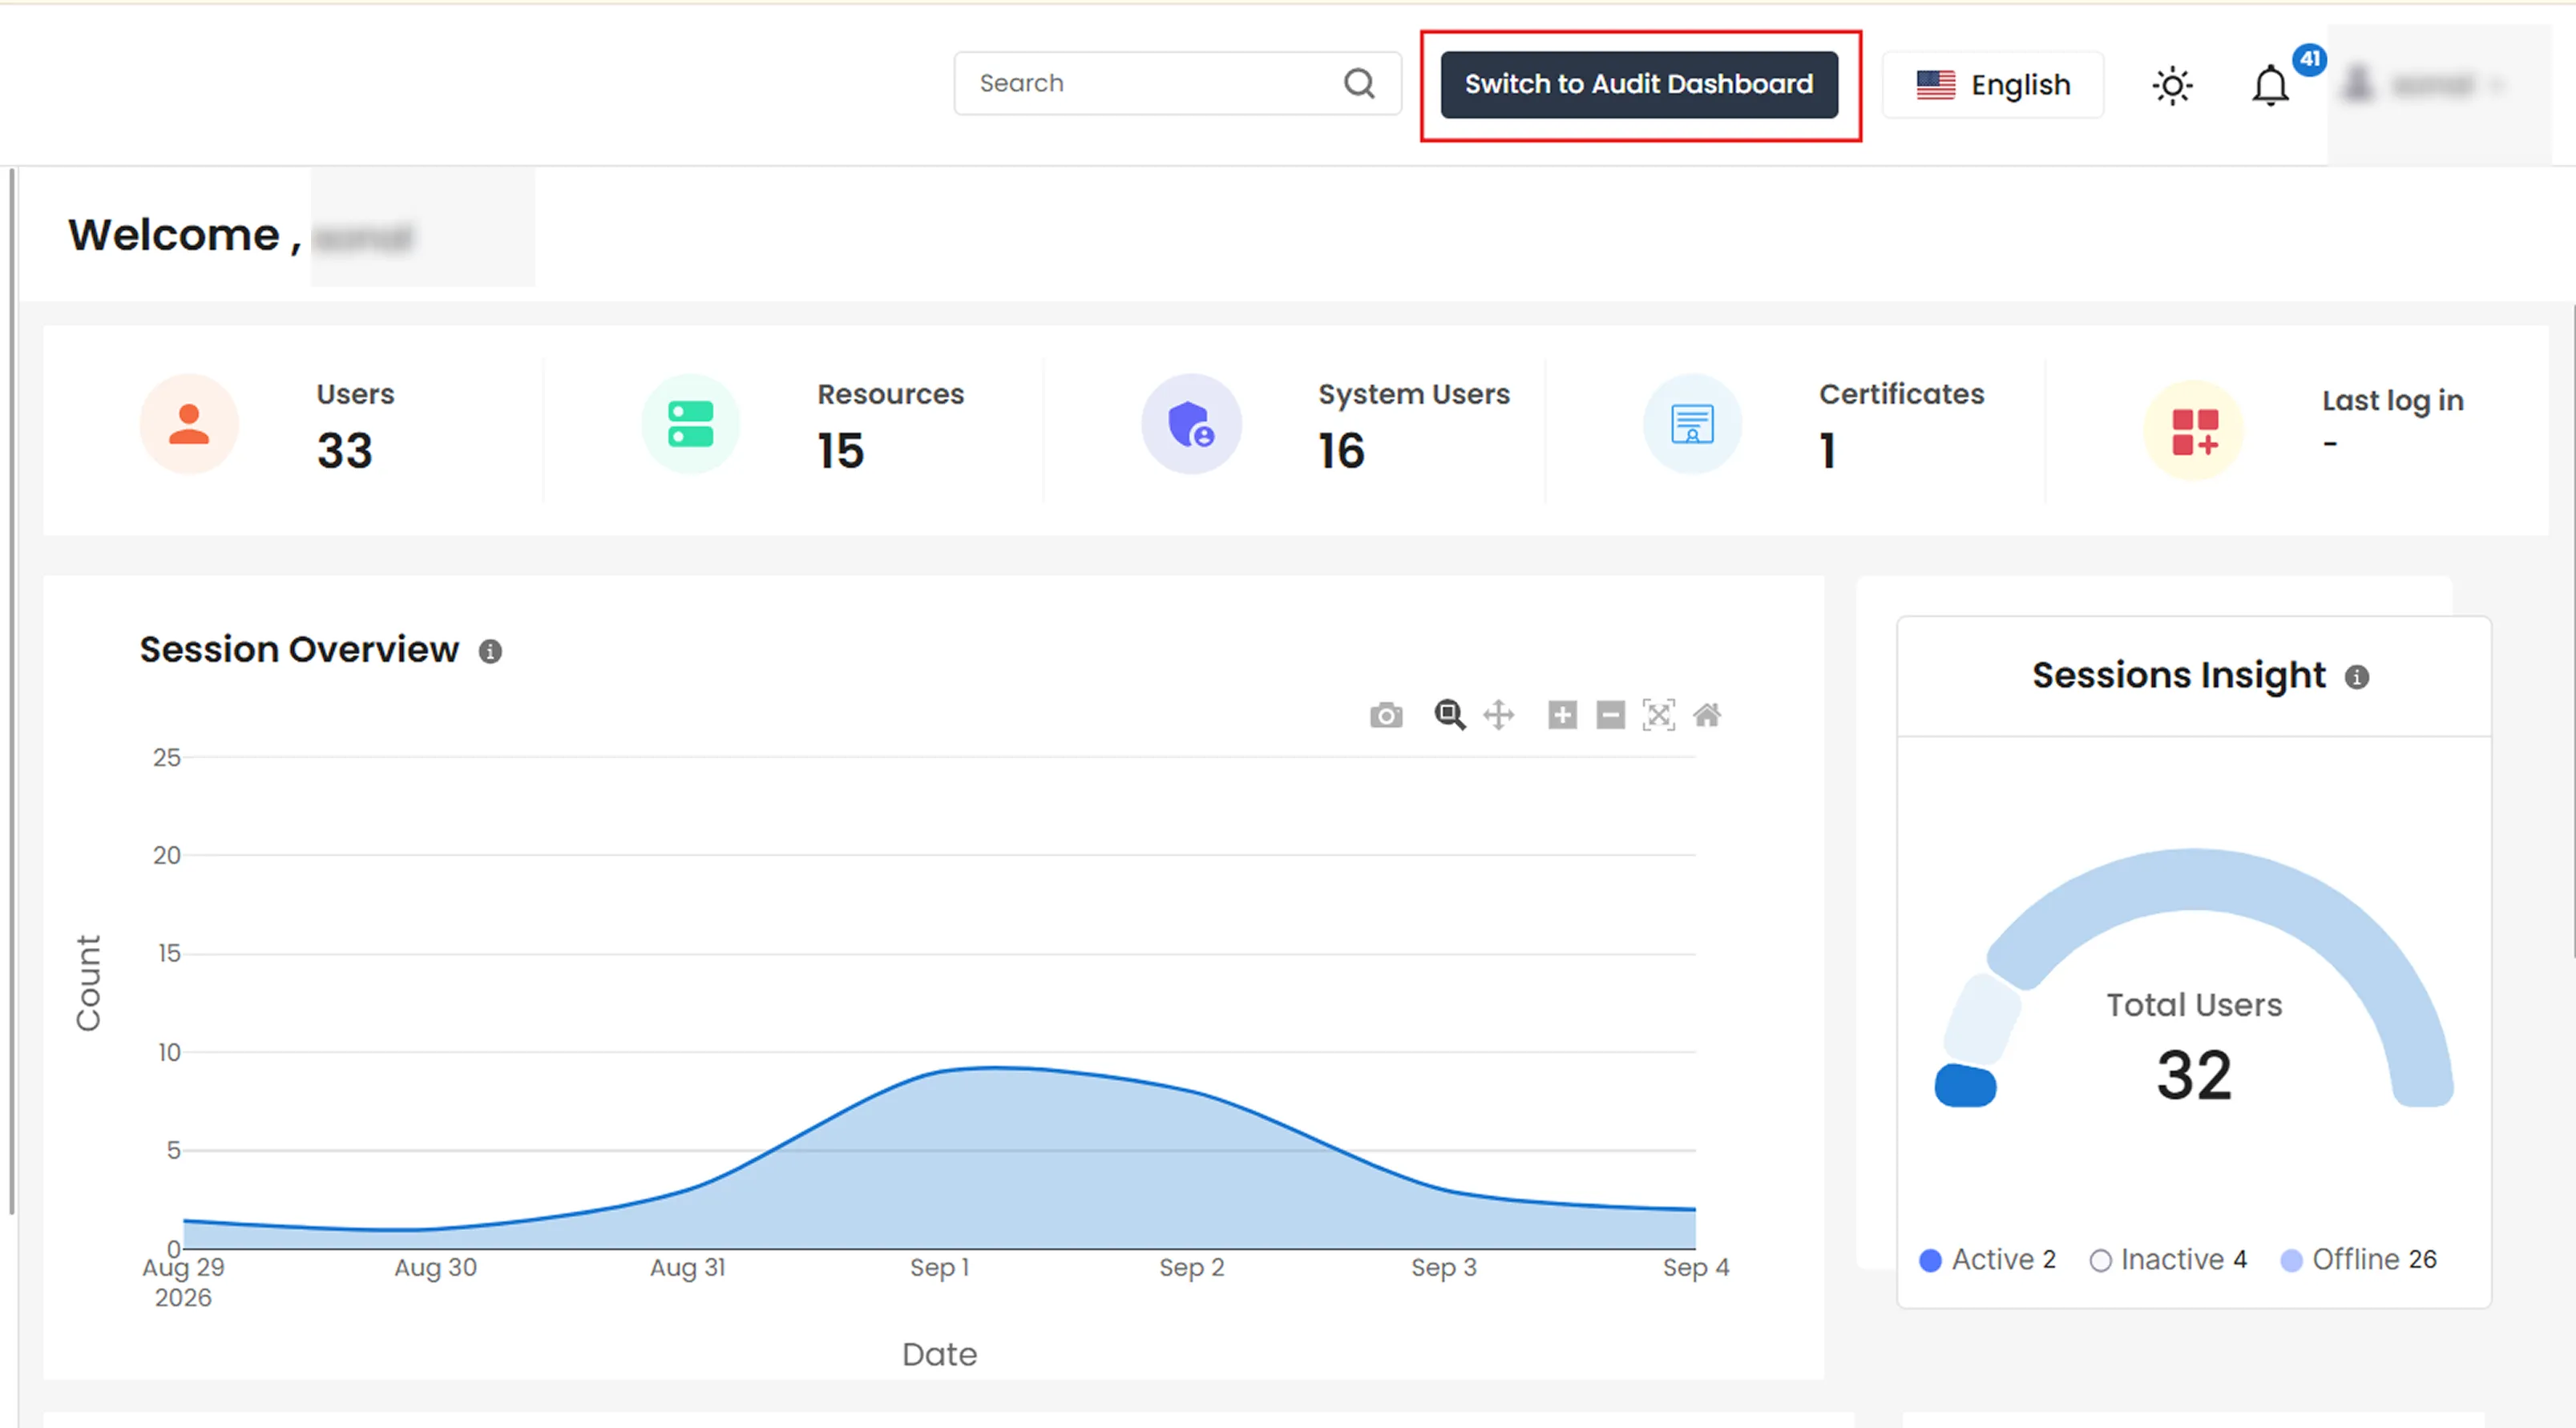
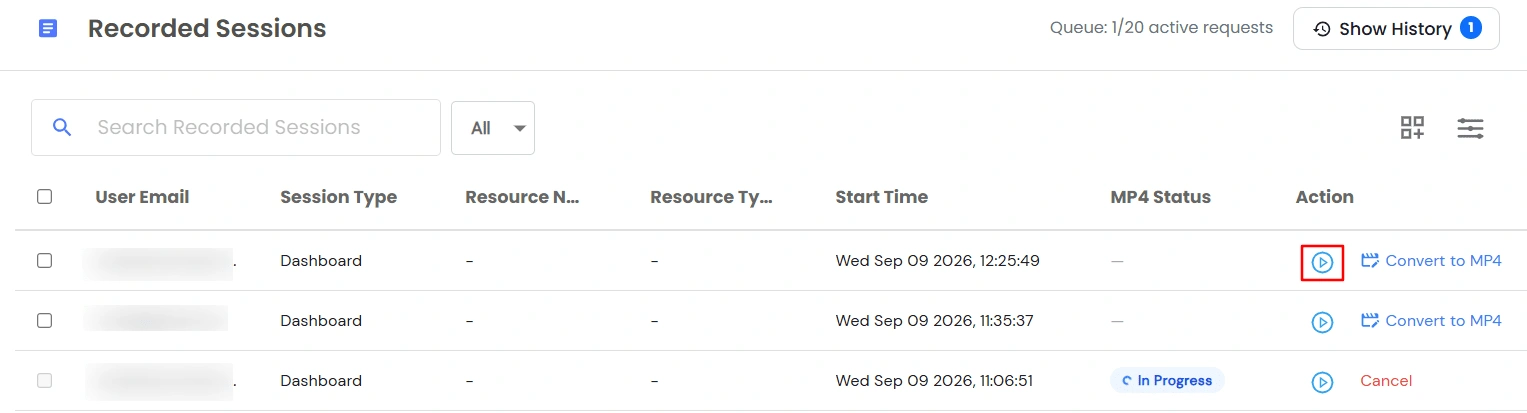
- Recorded Sessions lives in a different part of PAM called the Audit Dashboard, not the main dashboard you've been using so far. In the top navigation bar, click Switch to Audit Dashboard.
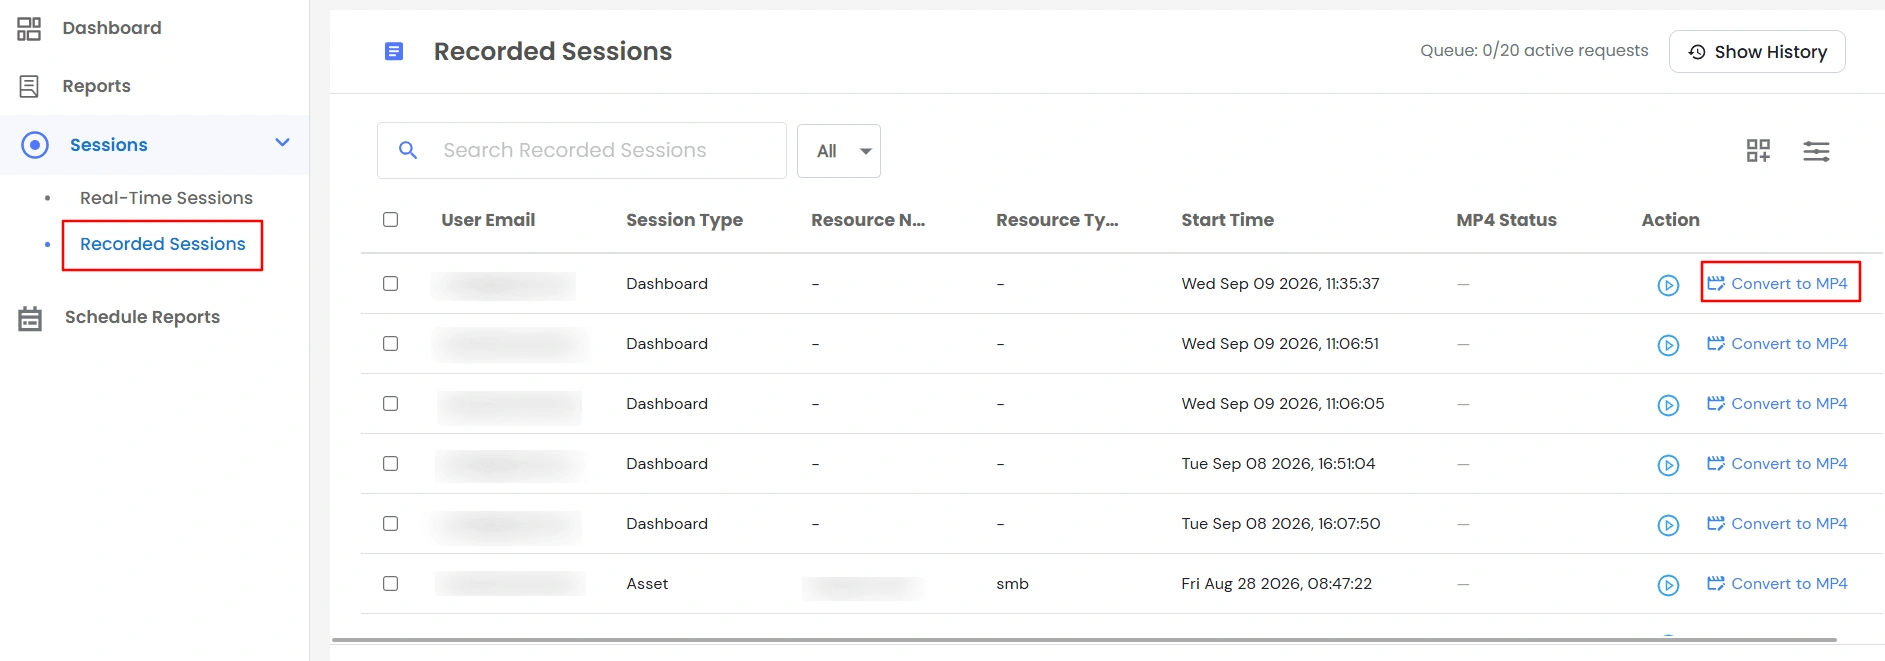
- In the side menu, go to Sessions >> Recorded Sessions.
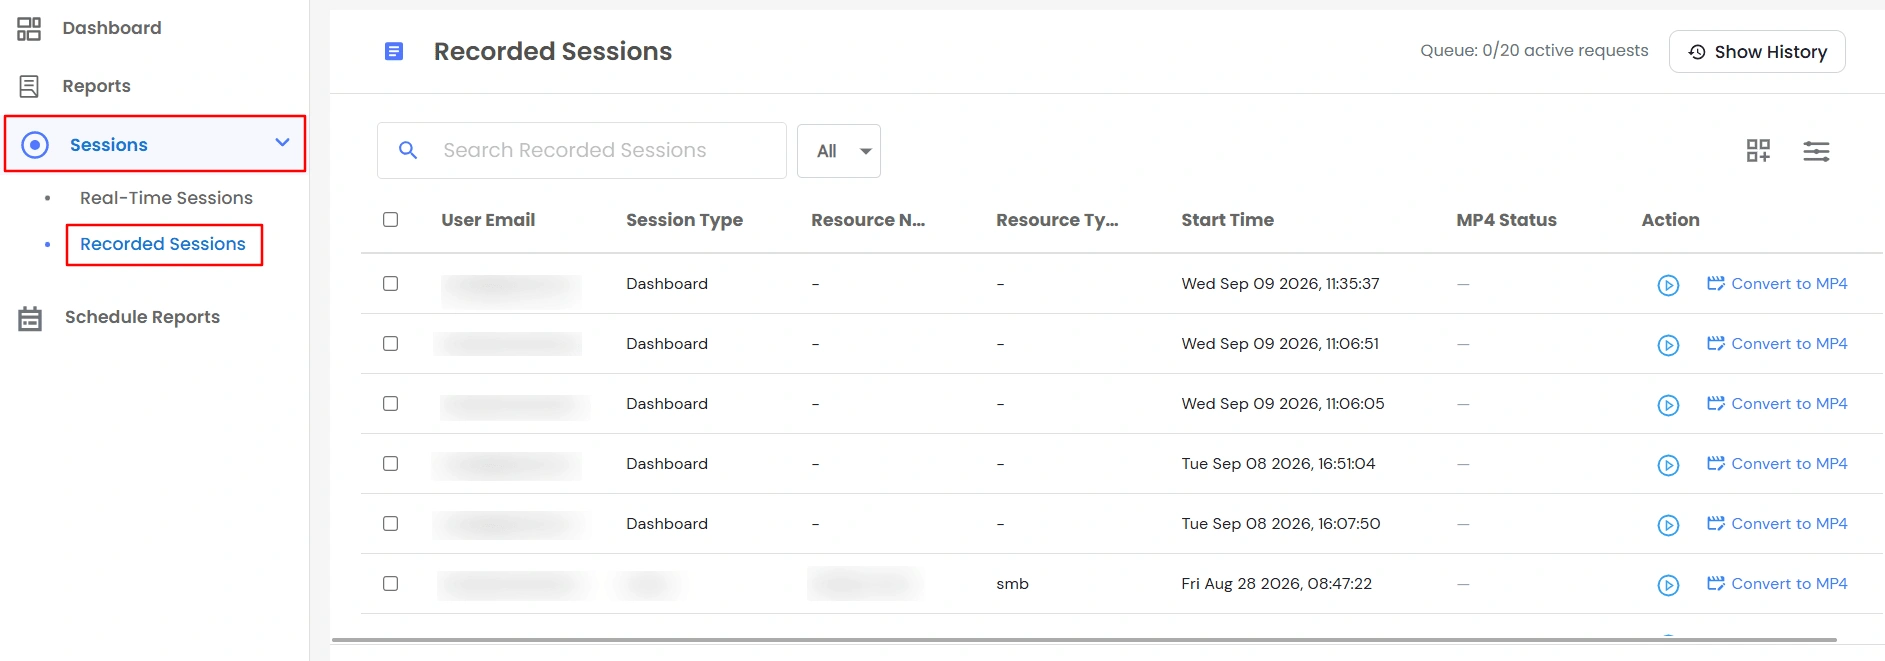
- You'll see a list of every saved recording, with these columns:
| Column |
What it shows |
| User Email |
Who the session belonged to. |
| Session Type |
What kind of session it was, such as RDP, SSH, Database, or Web App. |
| Resource ID |
The internal ID of the resource. This is hidden by default - turn it on if you need it. |
| Resource Name |
The resource that was accessed. |
| Resource Type |
What category the resource belongs to. |
| Start Time |
When the session began. |
| User IP |
The IP address the session came from. This is hidden by default. |
| MP4 Status |
Whether this recording has been converted into a downloadable video file yet - see Downloading a Recording as a Video File. |
| Action |
A Play button, plus the option to convert the recording to MP4. |
- Use the search box or the filter options above the list to narrow it down - for example, by email, resource, or session type. You can also click a column's own filter to search just that field.
Note: If you're not the person whose session it was, the User Email and User IP columns are shown partially hidden for privacy. Full details are only shown to the recorded user themselves and to admins who specifically need them.
Downloading a Recording as a Video File
- PAM stores recordings in its internal format so that you can view the command history and jump to different points in the session. To download and share a recording as a standard video file, you first need to convert it to MP4.
- Before you start: A recording can only be converted after the session has finished. If the session is still active, the conversion request will not be queued. Wait until the session is complete and then start the conversion.
- Start the conversion: In the recording row, go to the Action column and click Convert to MP4.
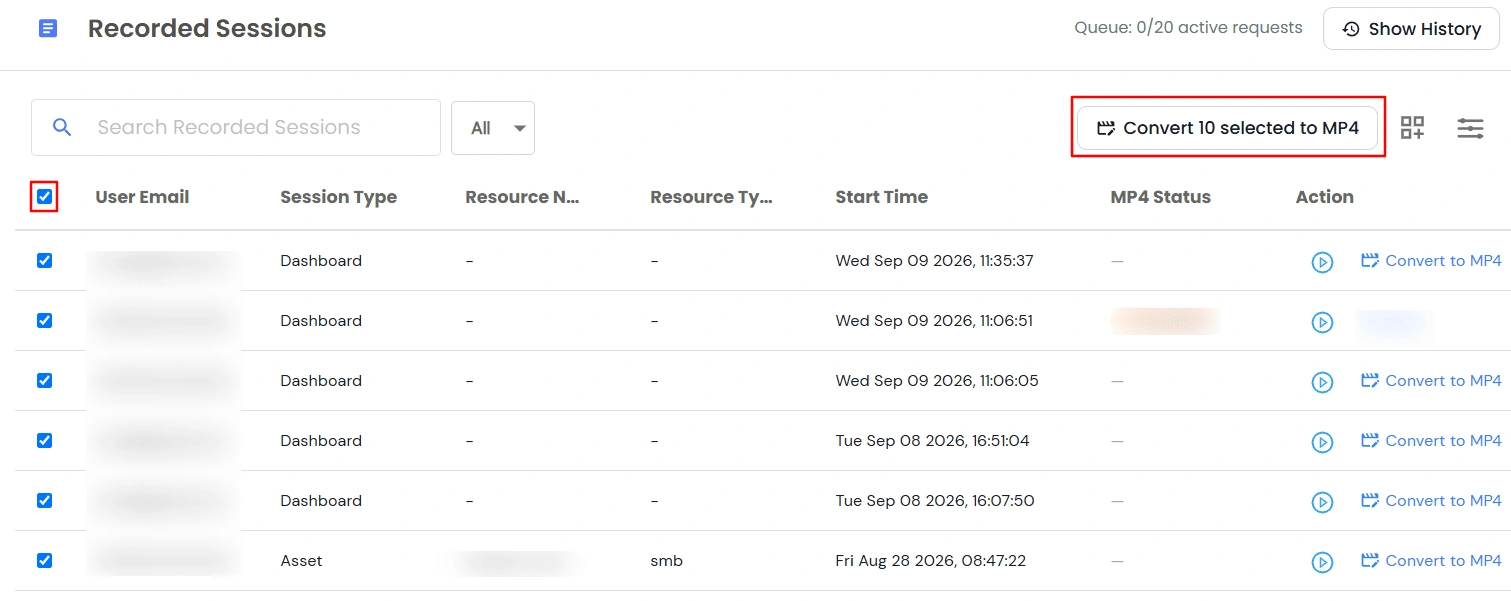
- To convert multiple recordings, select the required recordings and use the bulk Convert action.
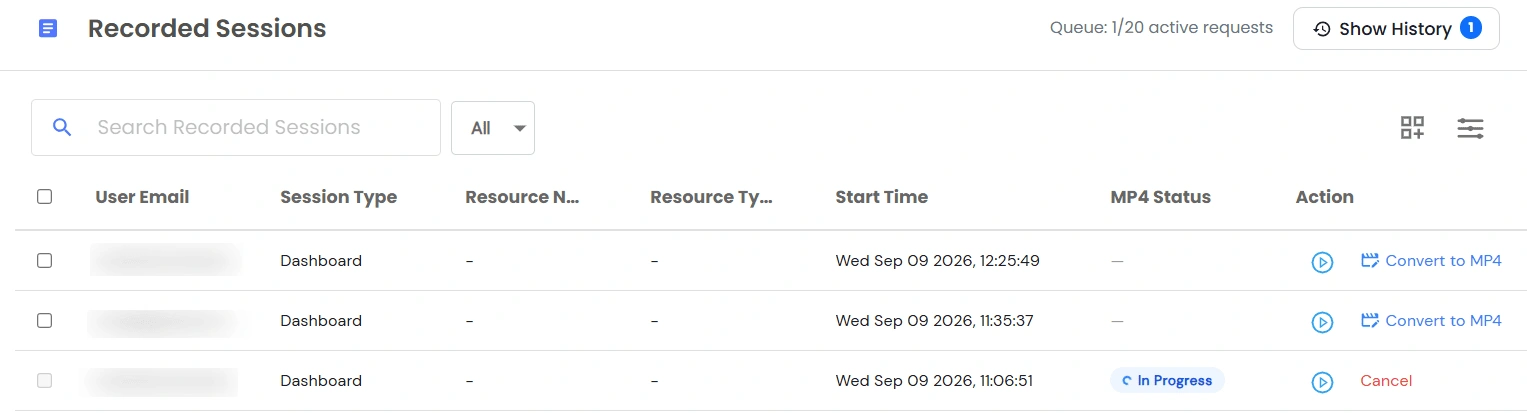
- Track the conversion status: The MP4 Status column shows the current conversion state:
| Status |
What it means |
| Queued |
The conversion is waiting to be processed. |
| In Progress |
The recording is currently being converted. |
| Ready |
The MP4 has been successfully generated and is available for download. |
| Failed |
The conversion could not be completed. |
- Retry or cancel a conversion: A conversion with Queued or In Progress status can be cancelled.
- A conversion with Failed or Cancelled status can be retried.
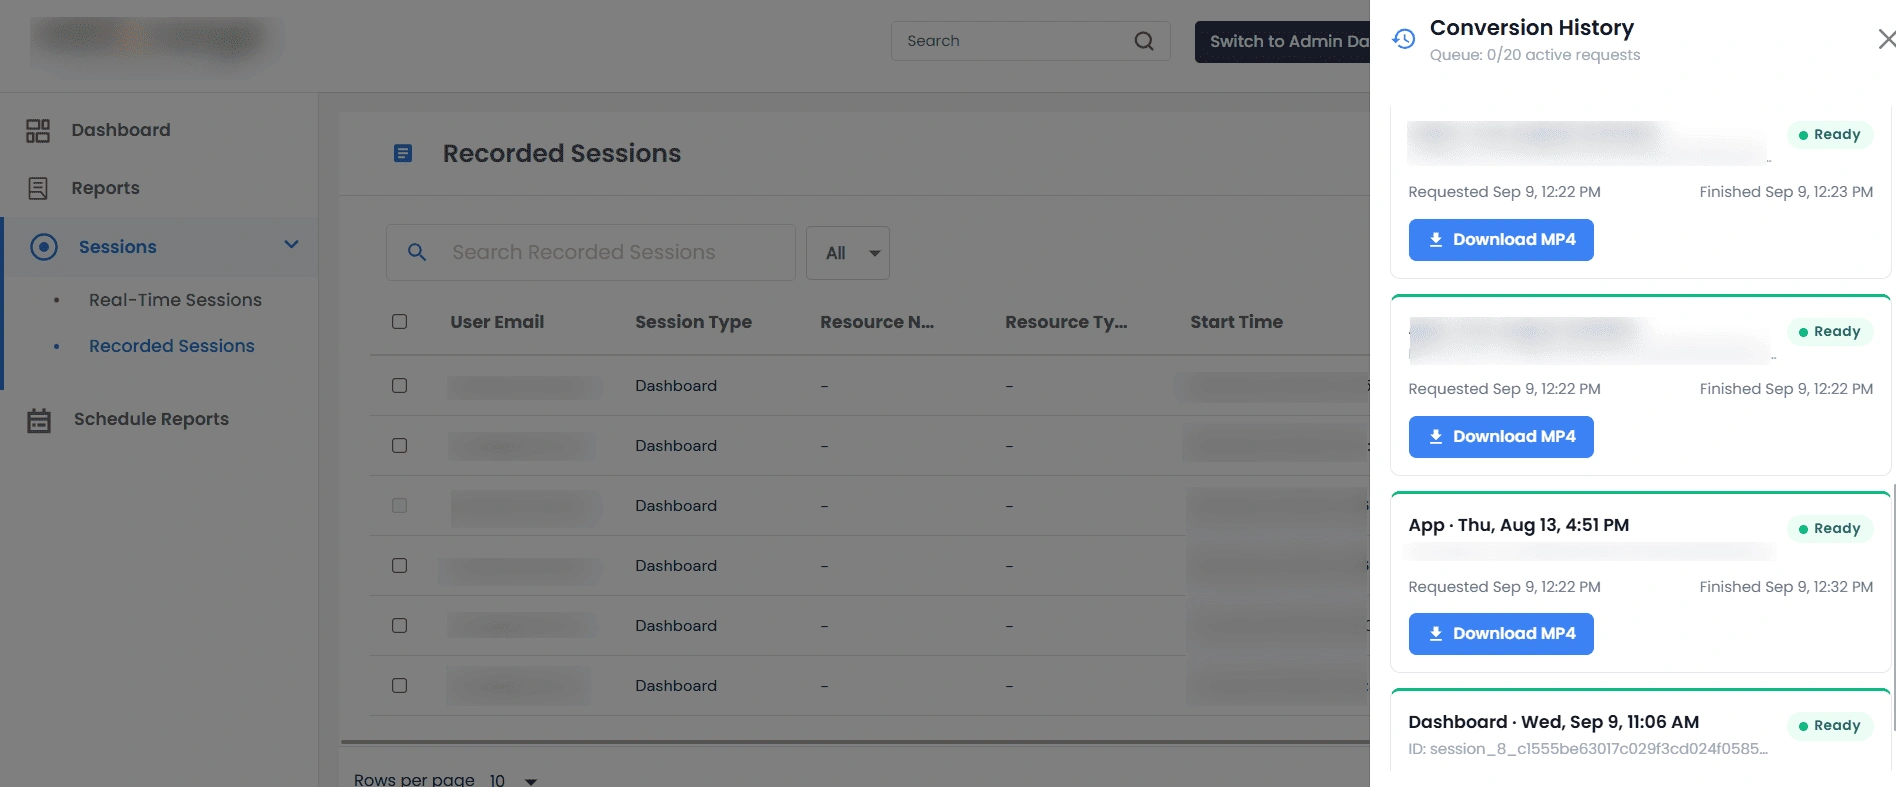
- Download the video: Once the status changes to Ready, click Download to save the MP4 file to your computer.
- View conversion history: Click Show History to view previous conversion attempts for a recording.
Notes:
- If a recording is already Queued, In Progress, or Ready, requesting another conversion will not create a duplicate. The existing conversion request will be retained.
- For cloud storage, conversions are subject to a queue limit. The header displays the number of active conversion requests. If the queue is full, wait for an existing conversion to finish before starting another.
- On-premise deployments do not have a conversion queue limit.
Playing Back a Recording
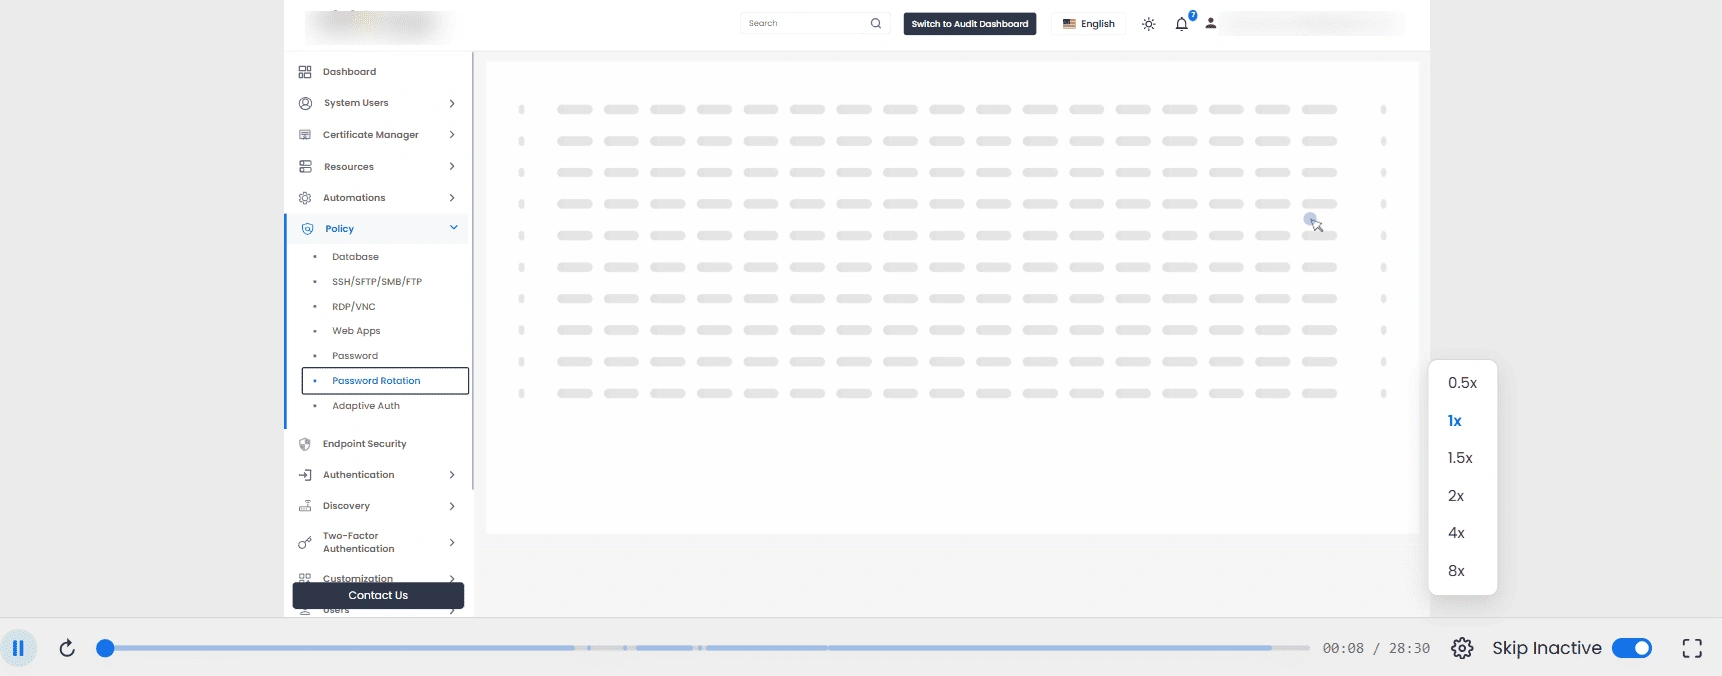
- Click Play on any row in Recorded Sessions to open the player.
- What the player actually shows depends on what kind of session it was:
- SSH sessions - a terminal replay, showing exactly what was typed and displayed.
- RDP/VNC sessions - a full visual screen replay, like watching a video of the desktop.
- Web App sessions - a reconstruction of what was shown in the browser.
- Some recordings, such as thick-client RDP sessions, simply play as a standard video.
Player Controls
- Play / Pause and Restart - standard playback controls.
- Skip to Next / Previous Command - jumps straight to the next or previous command that was run, instead of scrubbing manually.
- Skip Inactive - automatically skips over quiet stretches where nothing was happening, so you don't have to sit through idle time.
- Playback Speed - watch faster, up to 8x, or slower, down to 0.5x.
- Fullscreen and Picture-in-Picture - expand the player, or pop it into a small floating window so you can keep working while it plays.
- On the side, a panel called Video Breakdown lists every command that was run, with its timestamp.
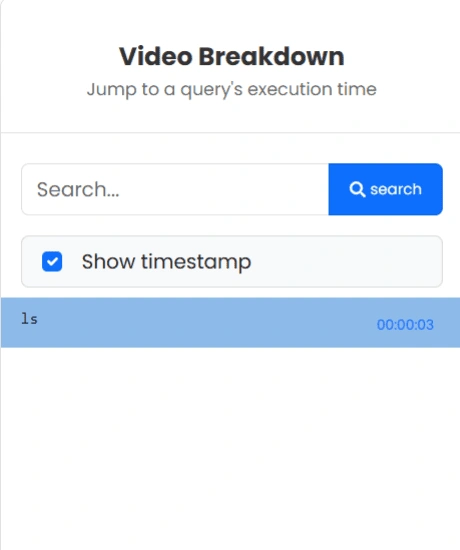
- Click any command to jump straight to that moment in the recording.
- Use the search box above the list to find a specific command, and the Show timestamp checkbox to show or hide the times next to each command.
- This panel doesn't appear for Web App sessions or for RDP sessions where no commands were captured.

