Hello there!

Need Help? We are right here!

miniOrange Email Support
success

Thanks for your Enquiry.

If you don't hear from us within 24 hours, please feel free to send a follow-up email to info@xecurify.com

Search Results:

×

Single Sign-On (SSO) for TYPO3
miniOrange provides a ready to use solution for TYPO3. This solution ensures that you are ready to roll out secure access to TYPO3 to your employees within minutes.

TYPO3 Single Sign-On (SSO)

TYPO3 Single Sign-On solution by miniOrange has developed a ready to use SSO solution for your websites created on TYPO3 platform including TYPO3. TYPO3 is one of the most popular free CMS. It is very easy to understand and maintain your website with. No license is ever required to use TYPO3 and it is very well documented in multiple languages. TYPO3 SSO provides secure access to your TYPO3 websites with one set of login credentials. With this service you need only one password to login into multiple websites. It removes the need of repeatedly typing usernames and passwords, which indirectly saves time, increase productivity and prevent your users from multiple online frauds and cyber attacks.

TYPO3 SAML SP Single Sign-On (SSO) extension

TYPO3 SAML Single Sign-on (SSO) extension acts as a SAML Service Provider (SP) which can be configured to establish the trust between the SAML SP (Service Provider) extension and SAML capable Identity Providers to securely authenticate the user to the TYPO3 site. SAML Single Sign-On (SSO) for TYPO3 allows users to sign in to TYPO3 website with your SAML 2.0 capable Identity Provider. SAML Single Sign-on (SSO) acts as a SAML 2.0 Service Provider (SP) and securely authenticate users with your SAML 2.0 Identity Provider.

miniOrange Identity Management Features

  • Single Sign-On

    miniOrange Single Sign-On (SSO) Solution provides easy and seamless access to all enterprise resources with one set of credentials. miniOrange also provides secure authentication by establishing a trust relationship between the Service Provider and Identity Provider. miniOrange Single Sign-On supports SSO to any type of devices or applications whether they are in the cloud or on-premise. Learn More

  • Multi-factor Authentication

    Secure your TYPO3 website from password thefts using multi-factor authentication methods with 15+ authentication types provided by miniOrange. Our multi-factor authentication methods prevent unauthorized users from accessing information and resources having password alone as an authentication factor. Enabling second-factor authentication for TYPO3 protects you against password thefts. Learn More

  • IP Blocking

    miniOrange provides IP blocking/IP restriction for TYPO3 login which adds security to Gmail, Web and other applications. In this, we provide you option for IP blocking which includes both automatic (based on user behavior) and manual IP blocking which includes blacklisting and whitelisting of IP addresses to provide access restriction, the office only access, intranet access & network restriction.

  • Adaptive Authentication

    miniOrange Adaptive Authentication aims to provide a better experience to reduce the authentication burder on users while enforcing strong authentication where it is needed the most. For example, when a user attempts to access an application or a well via an unregistered device then they may be prompted to register it. If the user logs in from a geographical location other than their office, they may be asked to answer security questions. Learn More

  • User Provisioning

    miniOrange User Provisioning provides an easy way of creation, management and maintenance of end users especially for large enterprises to reduce the risk for unauthourized access of information. User proviosiong includes the creation, updation and deletion of user accounts. User provisioning makes life easier for admins because they do not have to manually arrange access for each user. Learn More

miniOrange supports both IdP (Identity Provider) and SP (Service Provider) initiated Single Sign On (SSO)

  • IdP Initiated Single Sign On (SSO)

    In IdP Initiated Login, SAML request is initiated from miniOrange IdP.

    • Enduser first authenticates through miniOrange Idp by login into miniOrange Self Service Console.
    • The Enduser will be redirected to their TYPO3 account by clicking the TYPO3 icon on the Enduser Dashboard - there is no need to log in again.
  • SP Initiated Single Sign On (SSO)

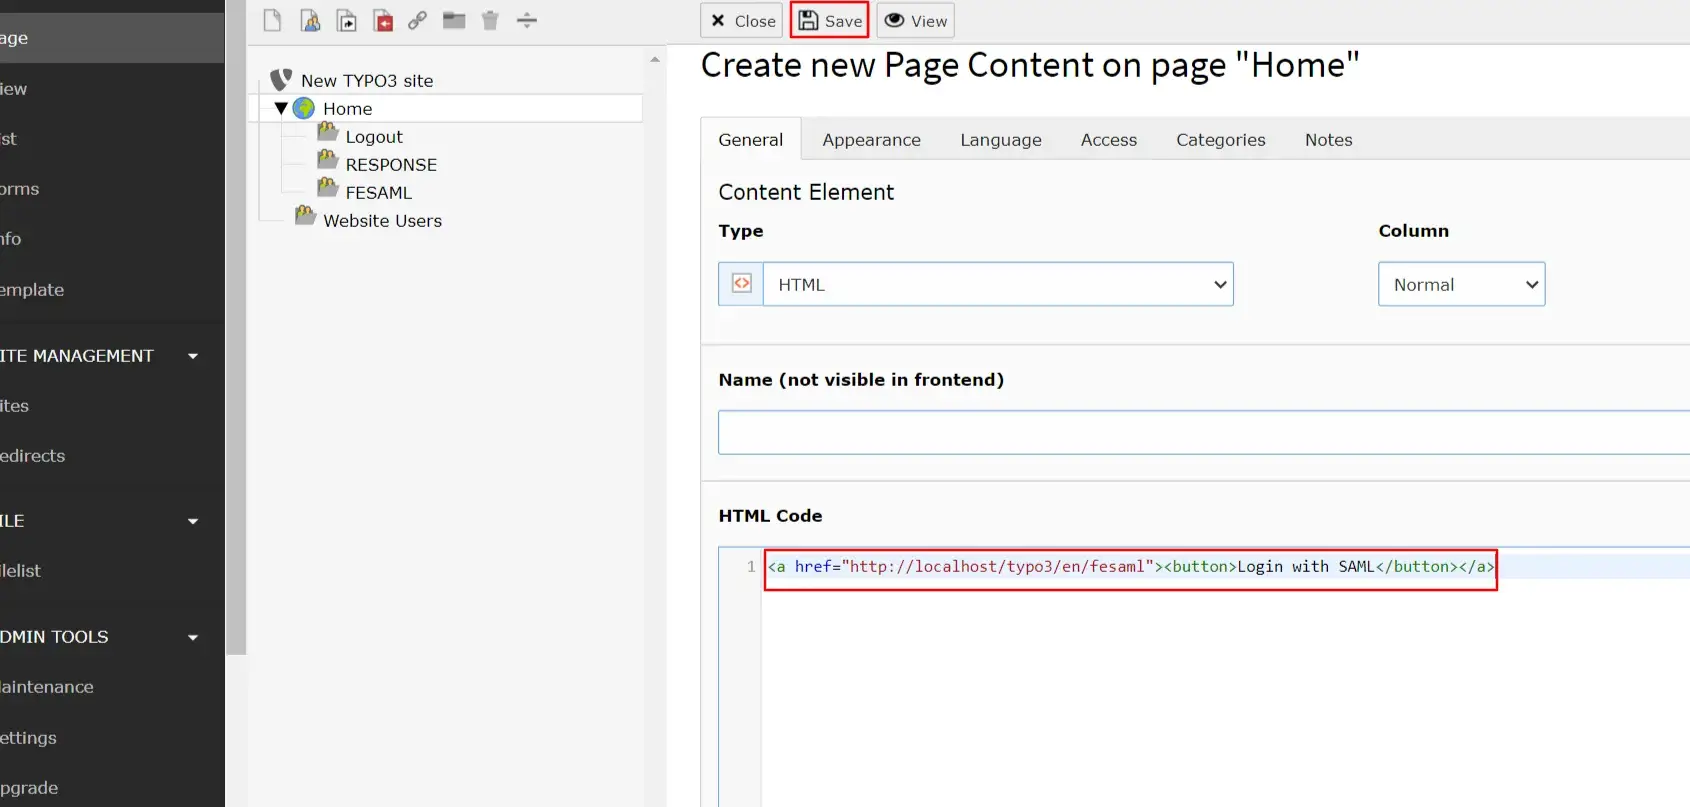
    In SP Initiated Login, SAML request is initiated by TYPO3.

    • An Enduser tries to access their Account by going to TYPO3 domain.
    • Here they can enter the miniOrange login credentials and login to their TYPO3 Account.

We can connect with any External IDP/Directory

miniOrange provides user authentication from external directories like ADFS, Microsoft Active Directory, Microsoft Entra ID, OpenLDAP, Google, AWS Cognito etc. It also provides user authentication with other IDPs like Shibboleth, PING, Okta, OneLogin, KeyCloak and many more.

Can't find your IDP ? Contact us on idpsupport@xecurify.com. We'll help you set it up in no time.


Follow the Step-by-Step Guide given below for TYPO3 SAML SP Single Sign On ( SSO )

Step 1: Installing SAML SP extension in TYPO3

  • Download the zip file of the SAML SP extension from TYPO3 marketplace. You can also download it from TYPO3 extensions.
  • Go to your TYPO3 backend, and click on Extensions section at the left side of your screen.
  • Upload the zip file,as represented in the below image.
  • Install SAML SP Extension for TYPO3 SSO

  • Now search for the "SAML" in Installed extensions section and activate the extension by clicking on activate button.
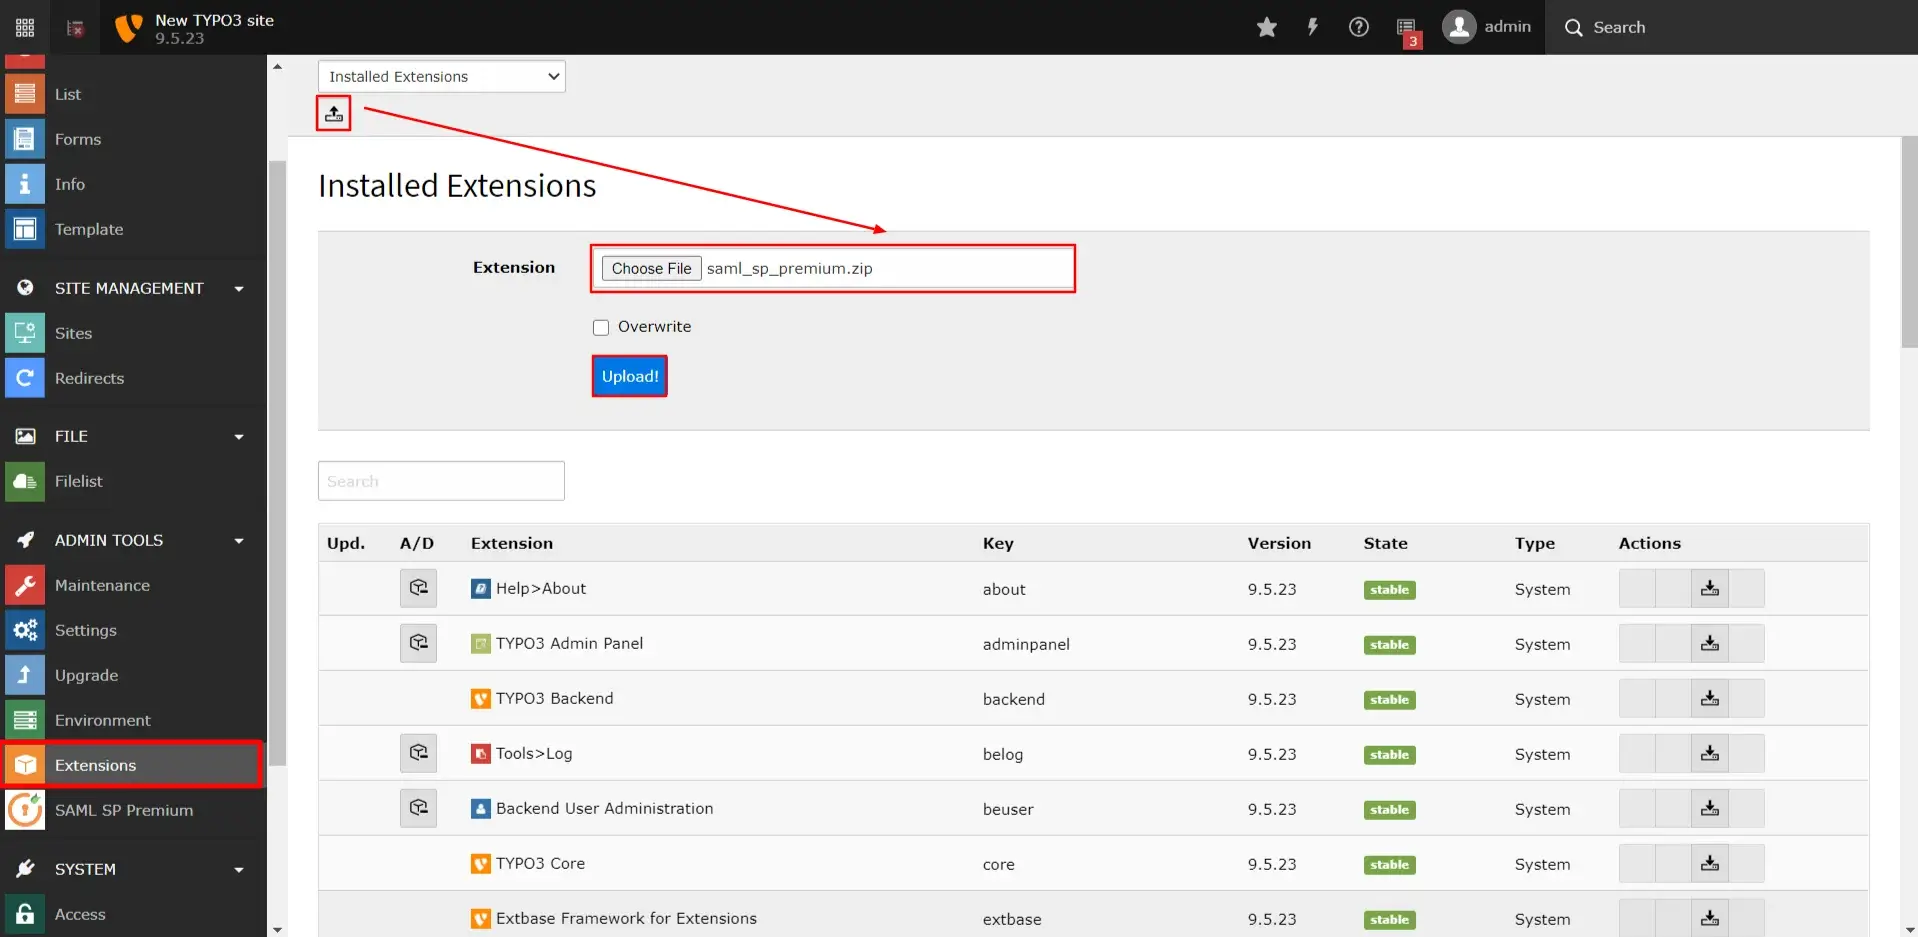
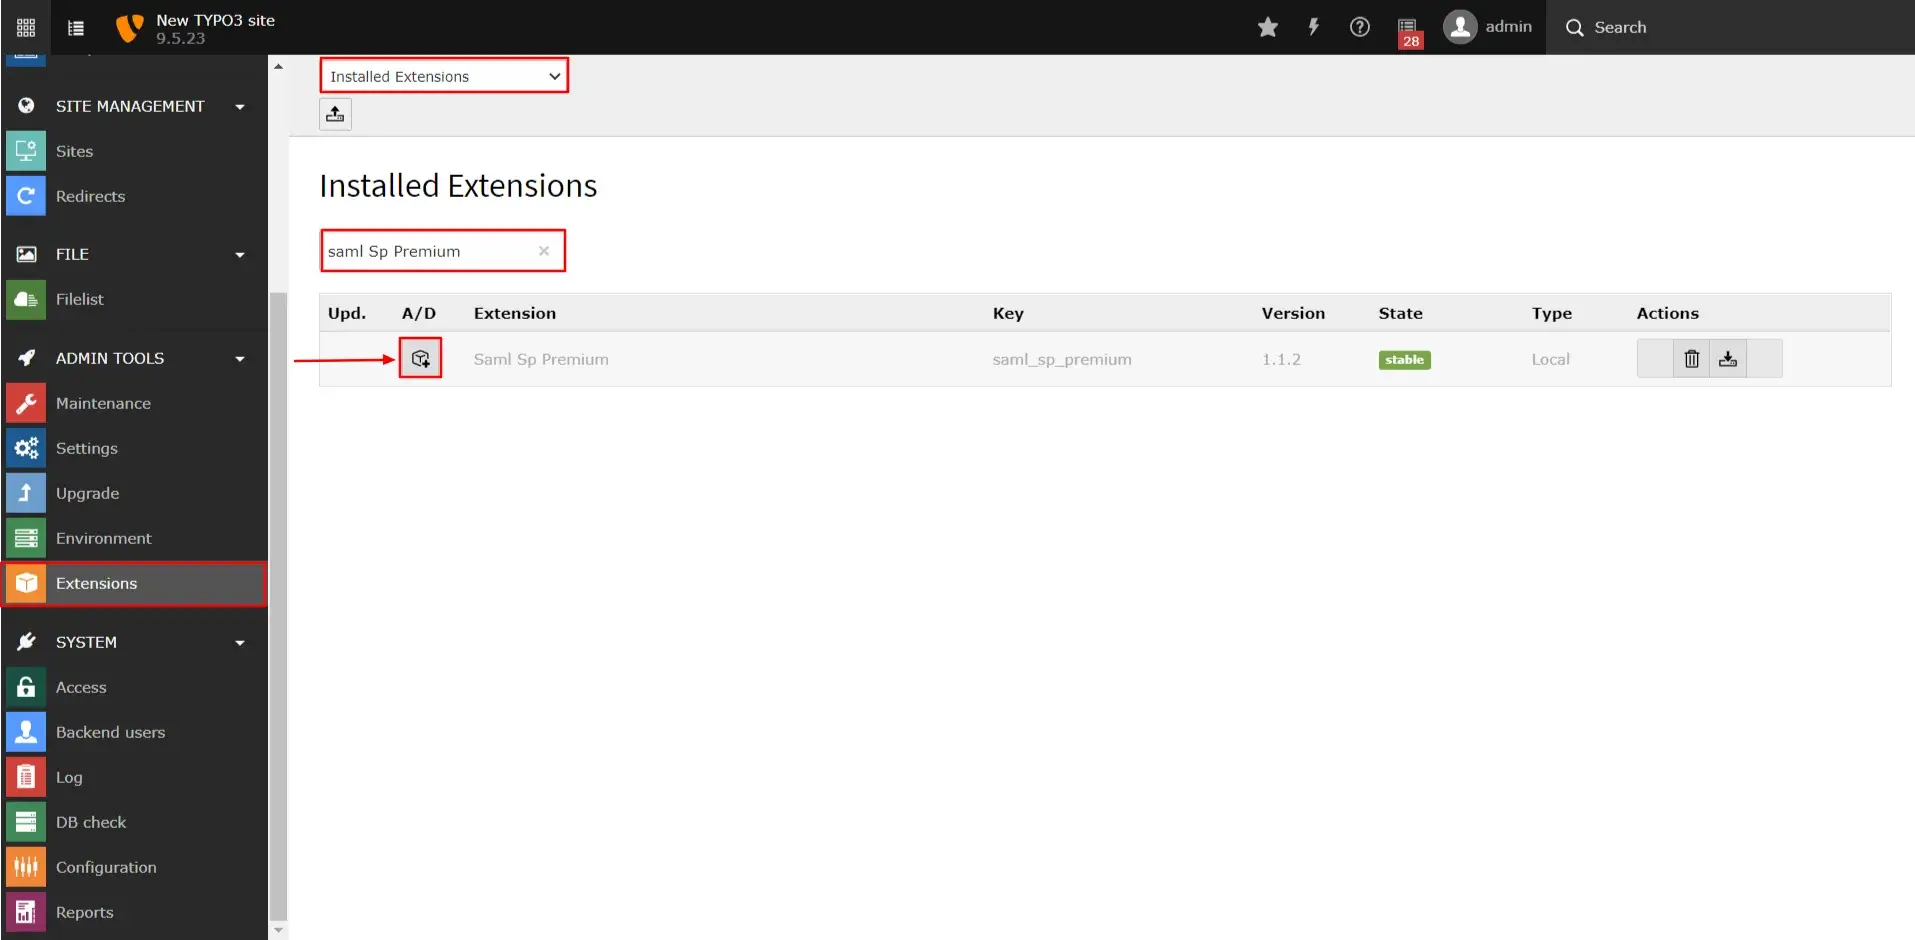
  • (miniOrange has different extensions for premium and non-premium users. Premium extension is named as "SAML SP Premium" and non Premium extension named as "miniorange SAML").

    TYPO3 Single Signm-On activate saml sp plugin

  • After installation, click on the newly installed extension "miniOrange SAML SP extension" for TYPO3 SSO and login with your registered miniOrange credentials.
  • Enter miniorange credentials to login to TYPO3 SSO extension.

  • After entering username and password you will require license key to proceed further if you are a premium customer.
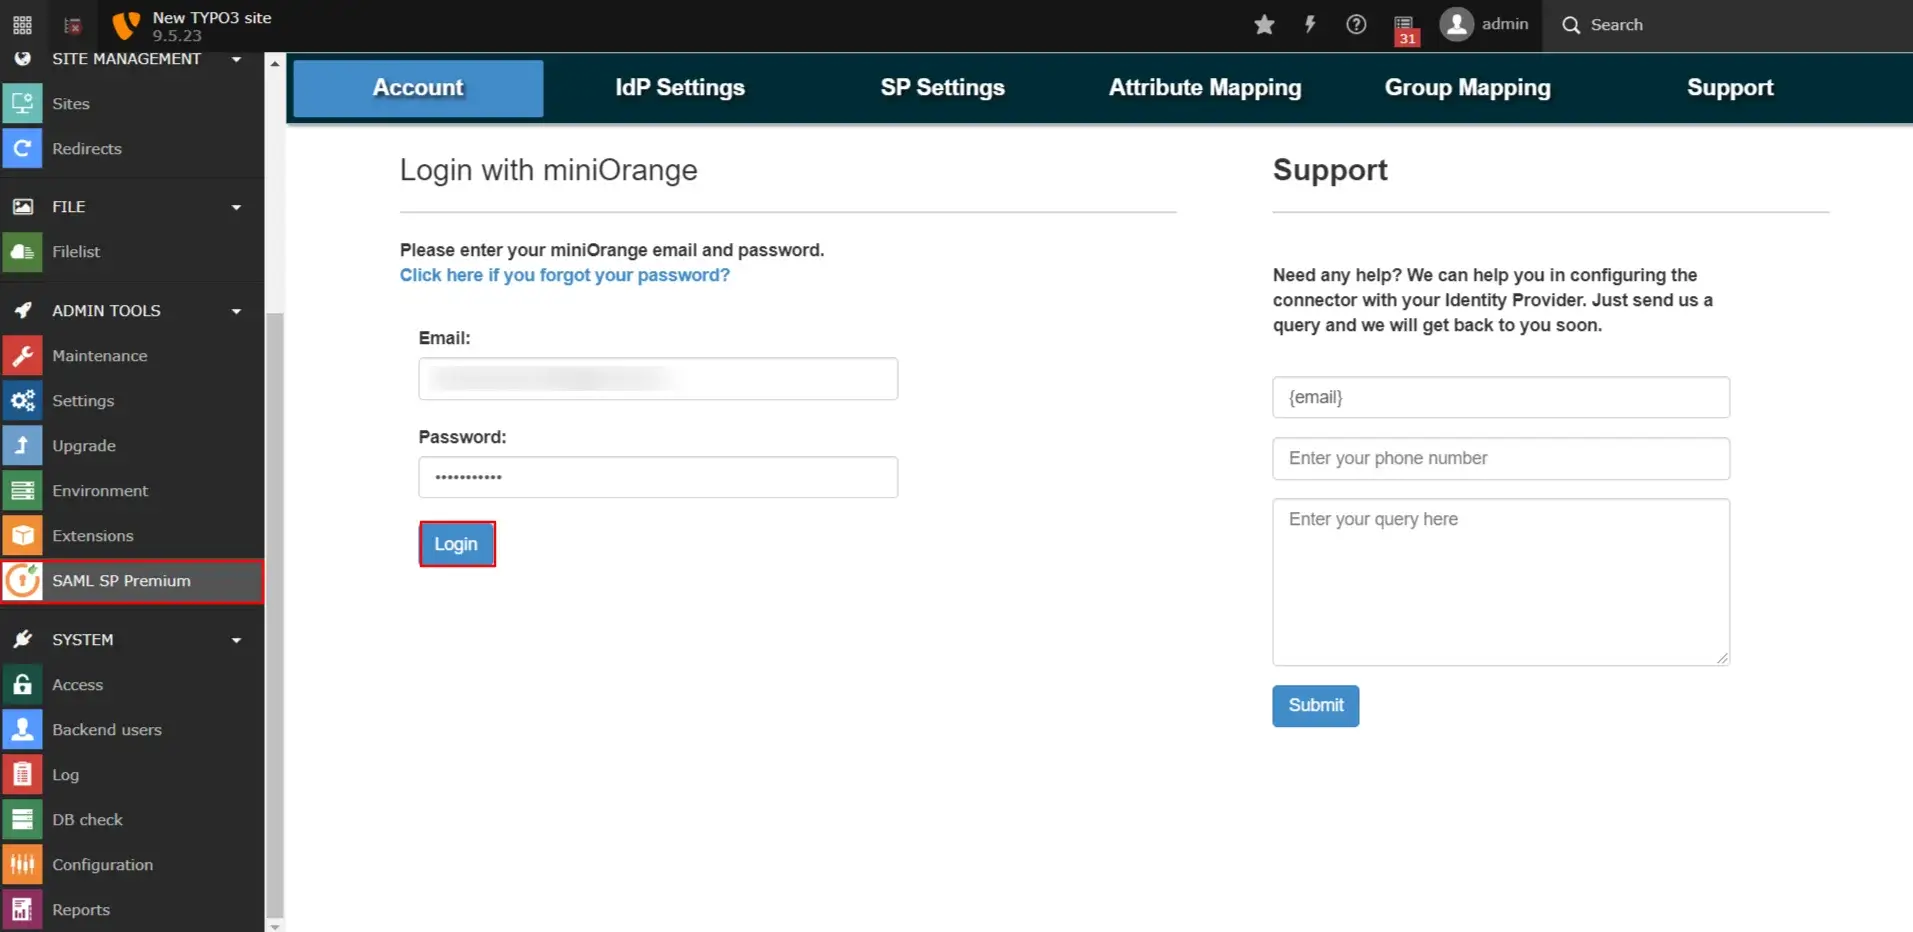
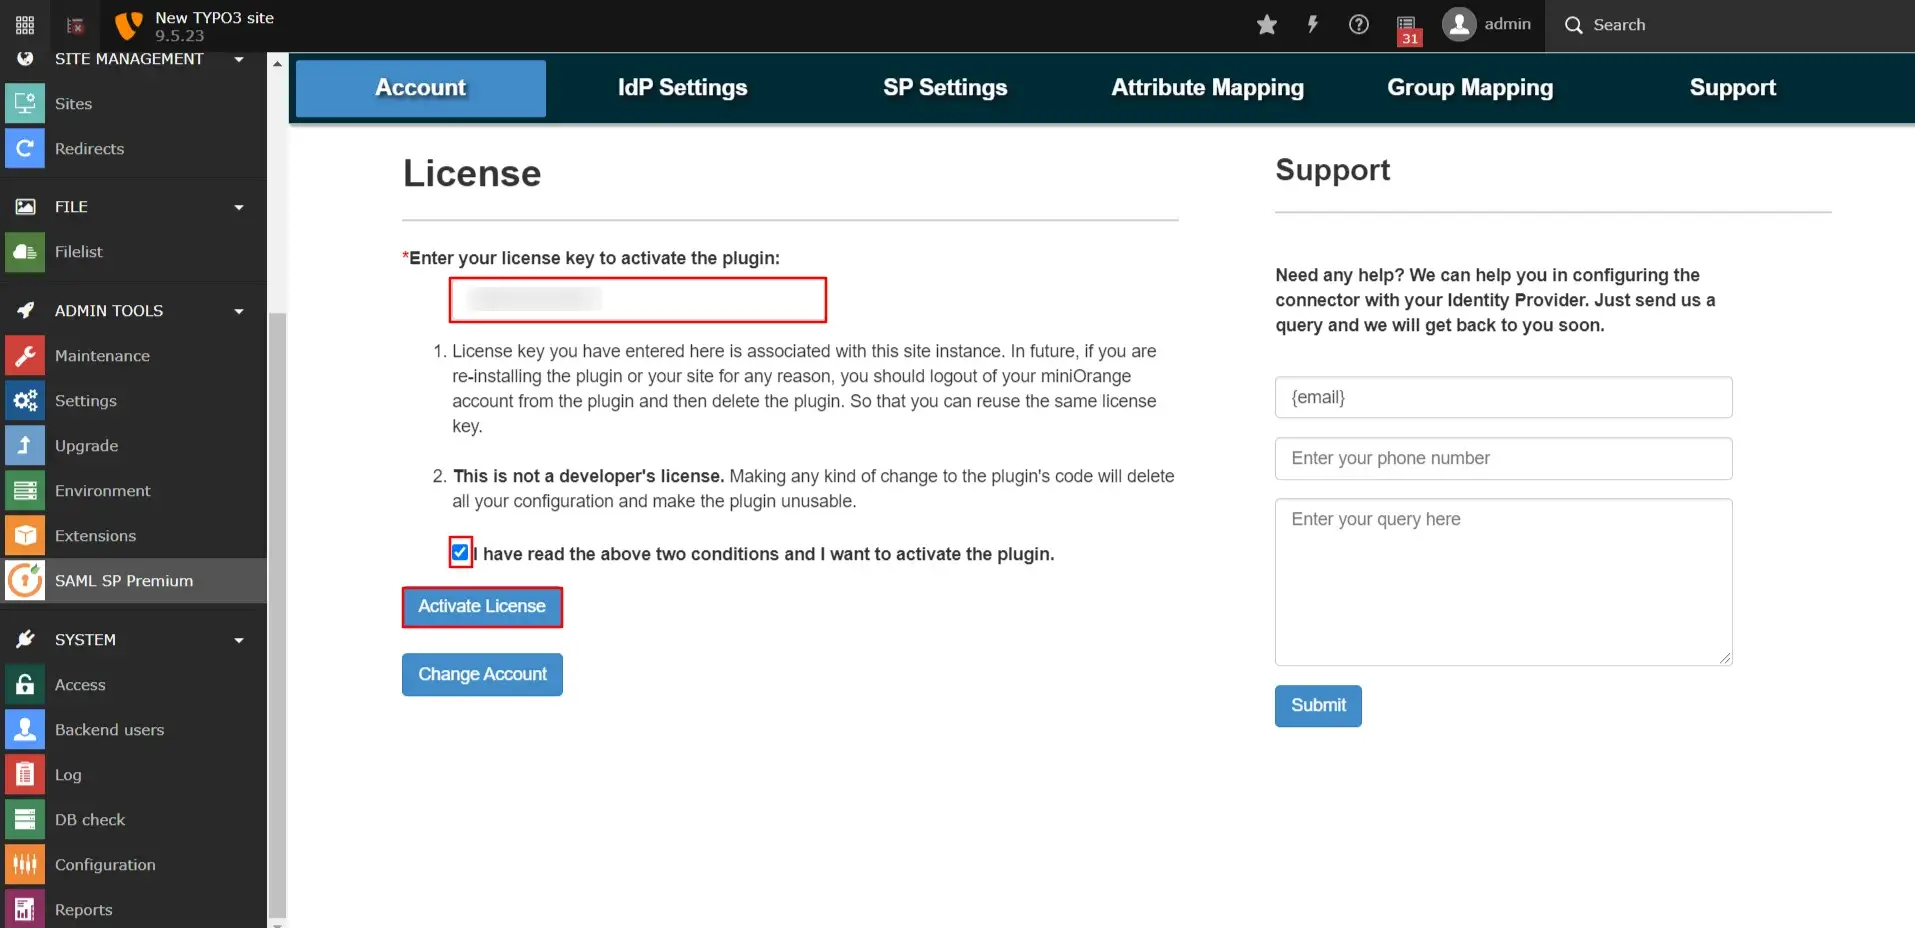
  • (You will get this key from the miniOrange team. After entering license key, you can activate the license and proceed further.)

    Get license key and activate TYPO3 extension for SSO

  • If you are not a premium customer you can direcly login submitting miniOrange credentials.
  • After successful login, you can see the details related to your account.
  • Extension related account details for TYPO3 SSO

  • Now you are ready to configure your IDP. But, it's important to integrate frontend first.

Step 2: Integrate extension with TYPO3

  • Now you have to design your frontend by clicking on the PAGE tab in the left top corner of the menu bar.
  • You need to add two STANDARD pages within the HOME page. If you are using Premium Plugin you can create three pages.
  • Here we will consider Page Names as: FESAML, RESPONSE, LOGOUT (Logout is optional for premium customers).
  • To create pages, right click on the HOME page and click on NEW to add new pages.
  • Add new Standard Page in frontend to initiate TYPO3 SSO

  • Enter the Standard Page name as: FESAML.
  • Set page name as FESAML to SSO using TYPO3

  • To edit properties, right click on newly created "FESAML" page and select "edit" option and switch to Behavior tab.
  • TYPO3 Single Sign-On switch to behavior tab

  • Scroll down to the last and select “website users” from the Contains plugin dropdown of “USE AS CONTAINER” and save the settings.
  • Select website users to SSO using TYPO3

  • Now click on the FESAML page, here you will get option to create Content. We will add Plugin to it.
  • Add plugin to the standard page for Single Sign-On

  • Switch to plugins tab and select Fesaml for sending SSO request.
  • Add fesaml plugin

  • Now you will be shifted to the new Page Content of "FESAML". Switch to Plugin tab. Select fesaml from the Selected plugin. Along with this in record storage click on folder icon in the right side of your screen.
  • Select folder settings for TYPO3 single sign-on

  • Select Website users and save all the settings you did.
  • Add Plugin and include website users to Single Sign-on

    Save the plugins and folder settings for further sso configurations

  • If you need to make changes in URL segment, which will aso be your initial SSO URL, right click on FESAML page, select edit and click on "toggle URL" button to set URL according to your way.
  • TYPO3 fesaml page sso url settings

  • Follow the same steps to create and configure Standard pages of Response and Logout.
  • Ensure you will be selecting Response Plugin for Response page and Logout Plugin for Logout Page.
  • Your TYPO3 directory should look like this.
  • TYPO3 directory format before sso configuration

  • Also, you must create at least one group as TYPO3 doesn’t allow to create users unless there’s one usergroup at least.
  • To create group go to list tab from the left panel, click on Website users folder and hit the "+" button at the top of the screen.
  • Create group for SSO login to TYPO3

  • Now select Websiteuser group ? from the list.
  • Select website user group of TYPO3

  • Insert Group Name in group title section and click on Save button at the top. User group will be created.
  • User group created for TYPO3 SSO login

  • You can also create a SSO button on login page. Click on Home, proceed to the +Content option
  • Add content to TYPO3 frontend

  • Switch to Special elements tab and select Plain HTML.
  • Select plainhtml to insert button code for TYPO3 SSO

  • Here what you will be doing is, you are adding SSO login button, URL in the button section will be of FESAML Standard Page.
  • The code snippet to do so is mentioned in the given image. Enter the code and hit the Save button at the top.
  • Insert button code to SSO into TYPO3

  • Now you can configure plugin in the backend.
  • Step 3: Configure Service Provider

    • Go to miniOrange SAML SP, and switch to Service Provider settings tab.
    • Enter all the URL fields with their respective URL's.
    • You will get URL with fesaml from the fesaml standard page, URL with Response from the response standard page and SINGLE LOGOUT URL from the Logout standard page.
    • Revising again you can get URL by going to Pages section, in that right click on FESAML Page select edit and you will get your FESAML URL.
    • Get SP related URL's from Created pages for TYPO3 SSO

    • Don't get confused over ACS URL, your response URL itself is your ACS URL.
    • SP entity ID and Base URL will be your basic TYPO3 URL.
    • After filling all the fields, Save the SP settings accordingly.
    • TYPO3 Single Sign-On SP URL's

    • Keep all this URL with you, as you wil require this to configure IDP.

    Step 4: Configure Identity Provider

    • Go to miniOrange SAML SP Plugin, and switch to Identity provider settings tab, fill the necessary configuration options provided by your Identity Provider (IdP). ( Identity Provider Name, IdP Entity Id, SAML Login URL, SAML x509 Certificate ) and click on “Save”. You will get all these inputs by your Identity Provider.
    • To use features like Force Authentication and Custom Binding, upgrade to premium plugin.
    • Let's see how IDP is configured, here we will consider miniOrange as IDP.
    • Log in to miniOrange Admin Console.
    • Go to Apps >> Manage Apps. Click on Configure App button.
    • TYPO3 Single Sign-On (sso)click on configure app

    • Click on Create App in the SAML tab.
    • TYPO3 Single Sign-On (sso)click on configure app

    • Search for TYPO3.
      If you can't find your application you can select Custom App
    • TYPO3 Single Sign-On (sso) select custom app

    • Now you will be directed to the “Add/Application” Panel.
    • In SP Entity ID/Issuer and Audience URL section enter the base URL of your TYPO3, from SP settings of the TYPO3 which we configured before.
    • Enter your TYPO3 Response URL in ACS URL section.
    • Enter the Single Logout URL(optional).
    • Click on Save button to add TYPO3 Application.
    • TYPO3 Single Sign-On (sso) Add SAML Application

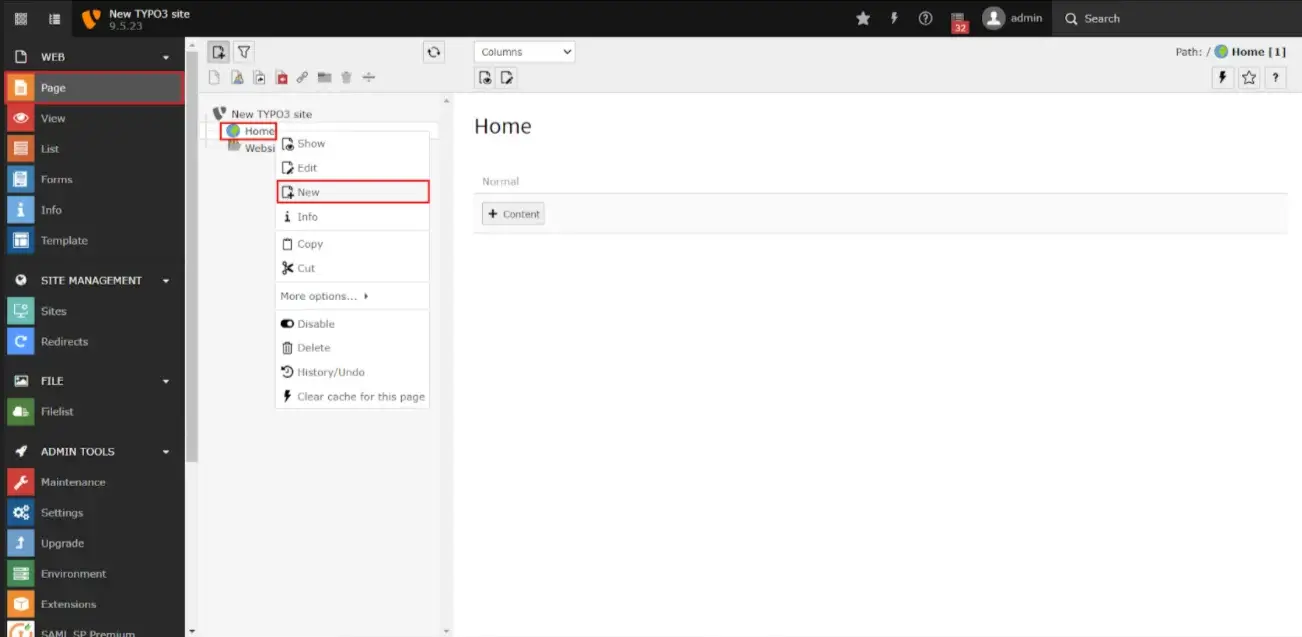
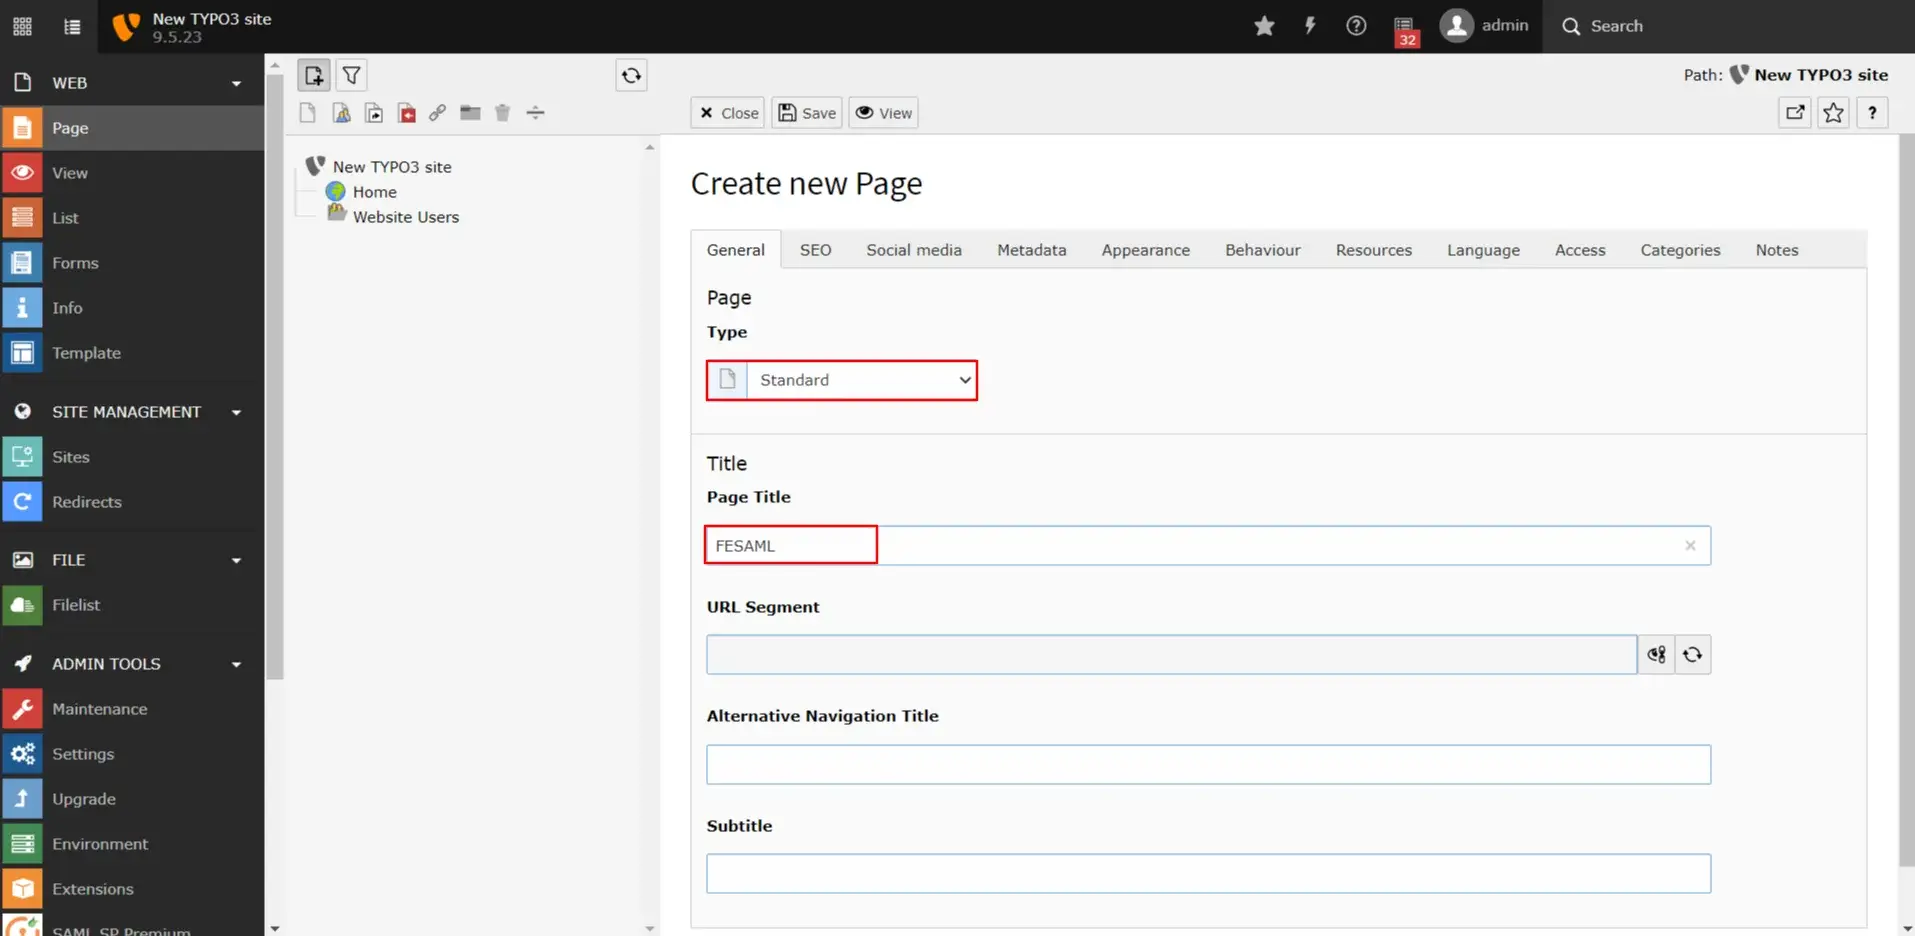
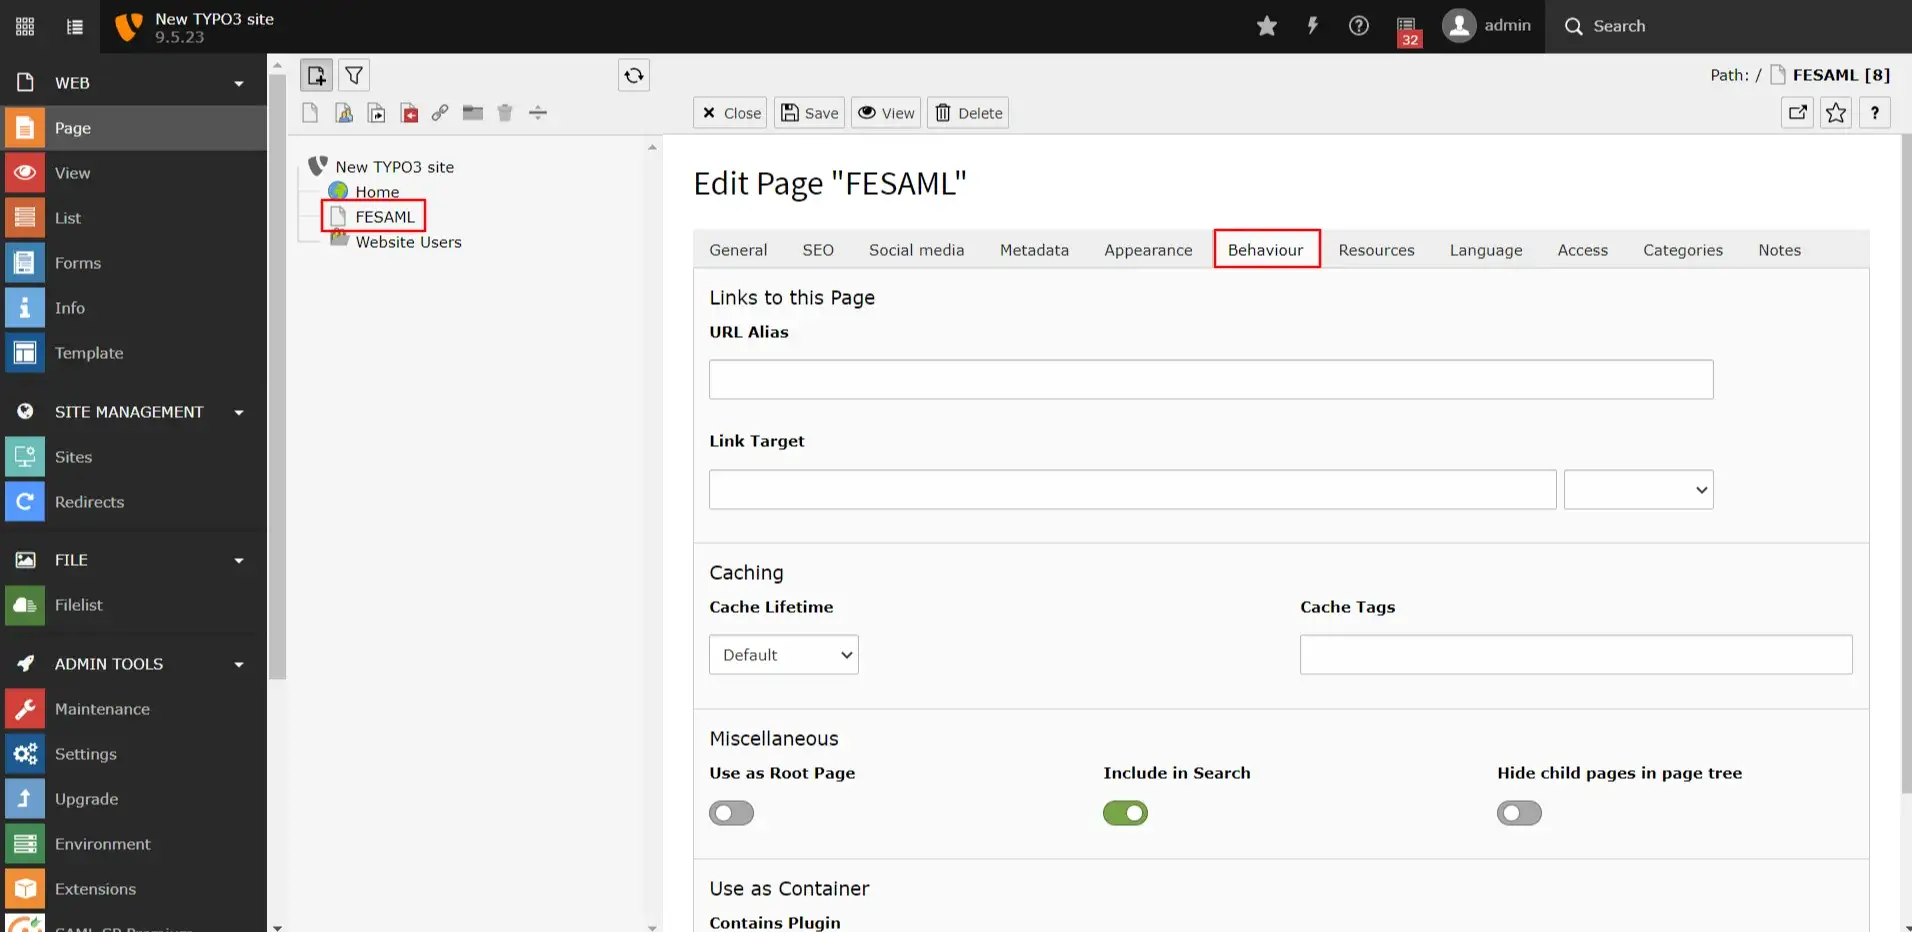
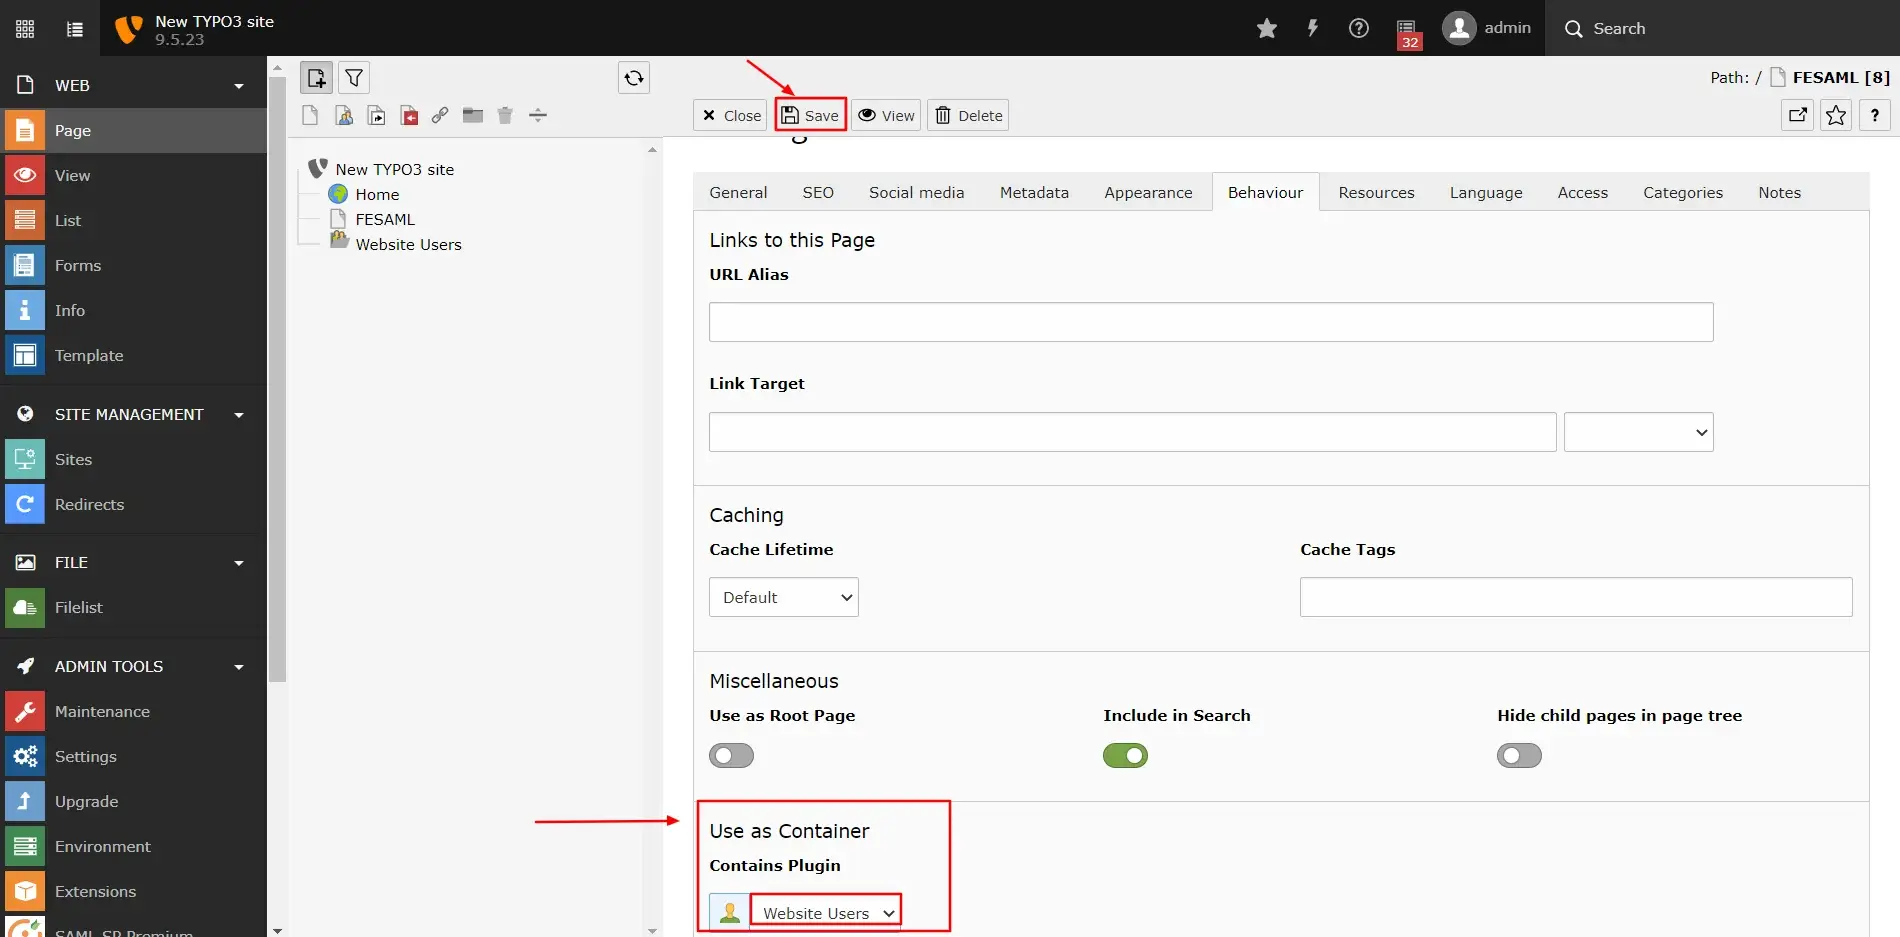
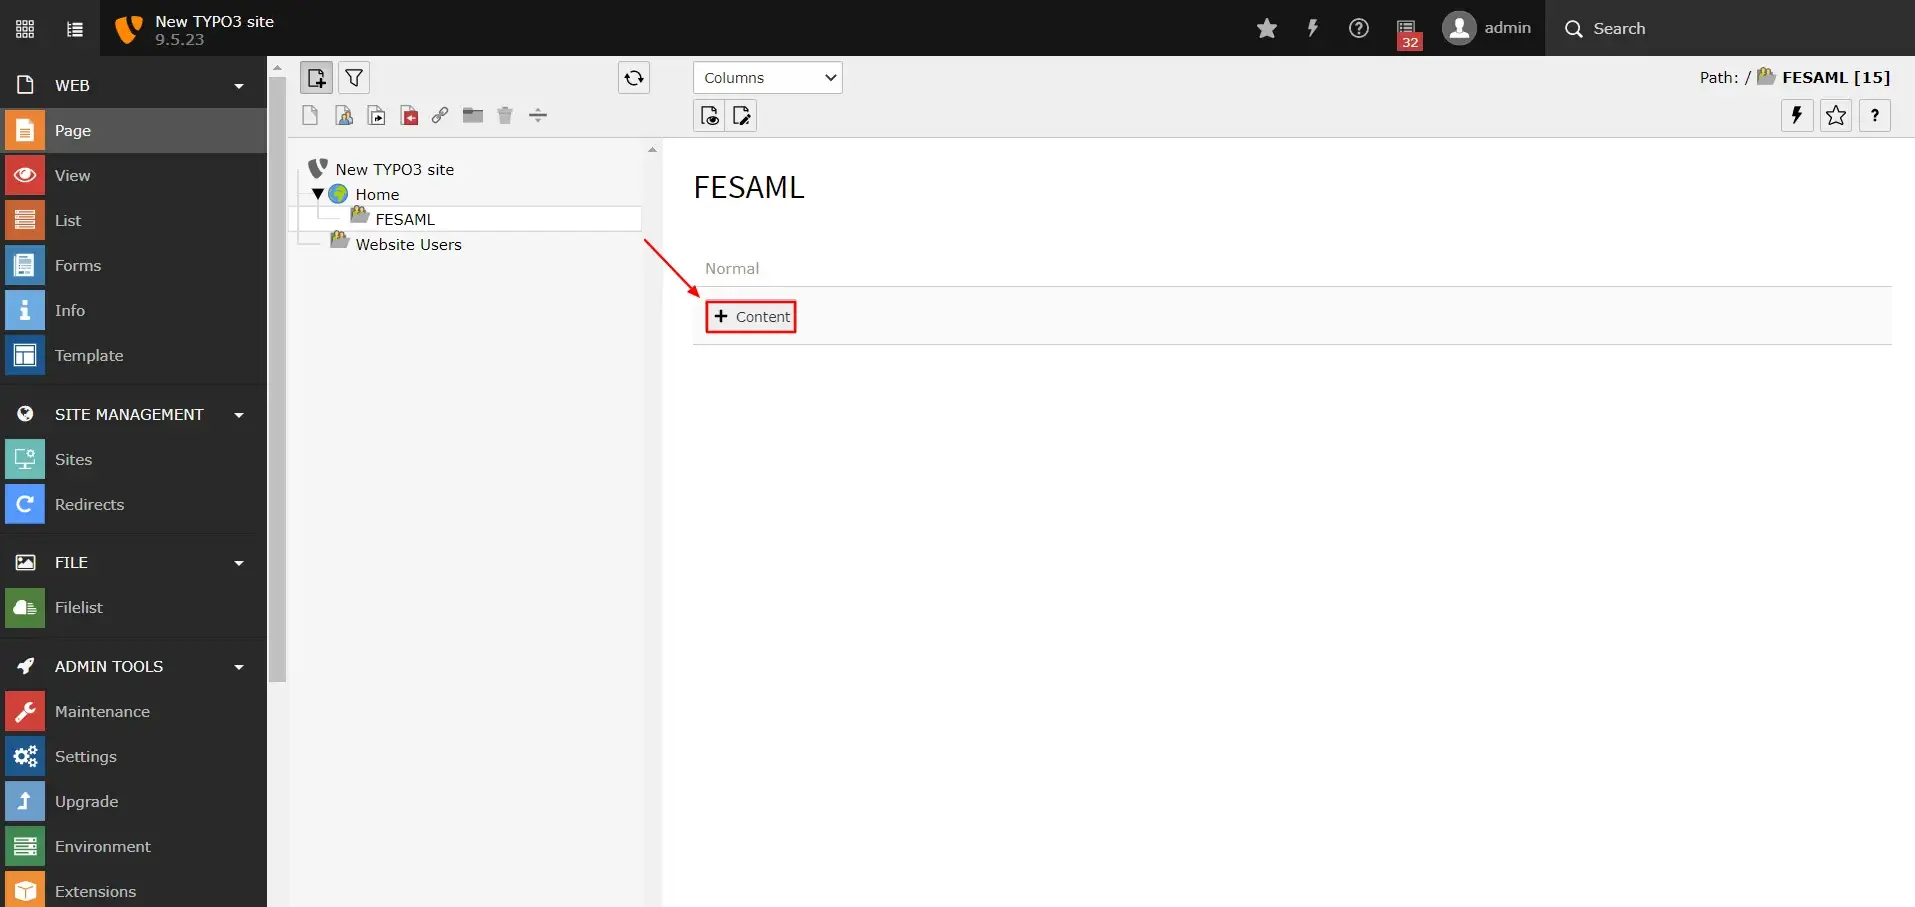
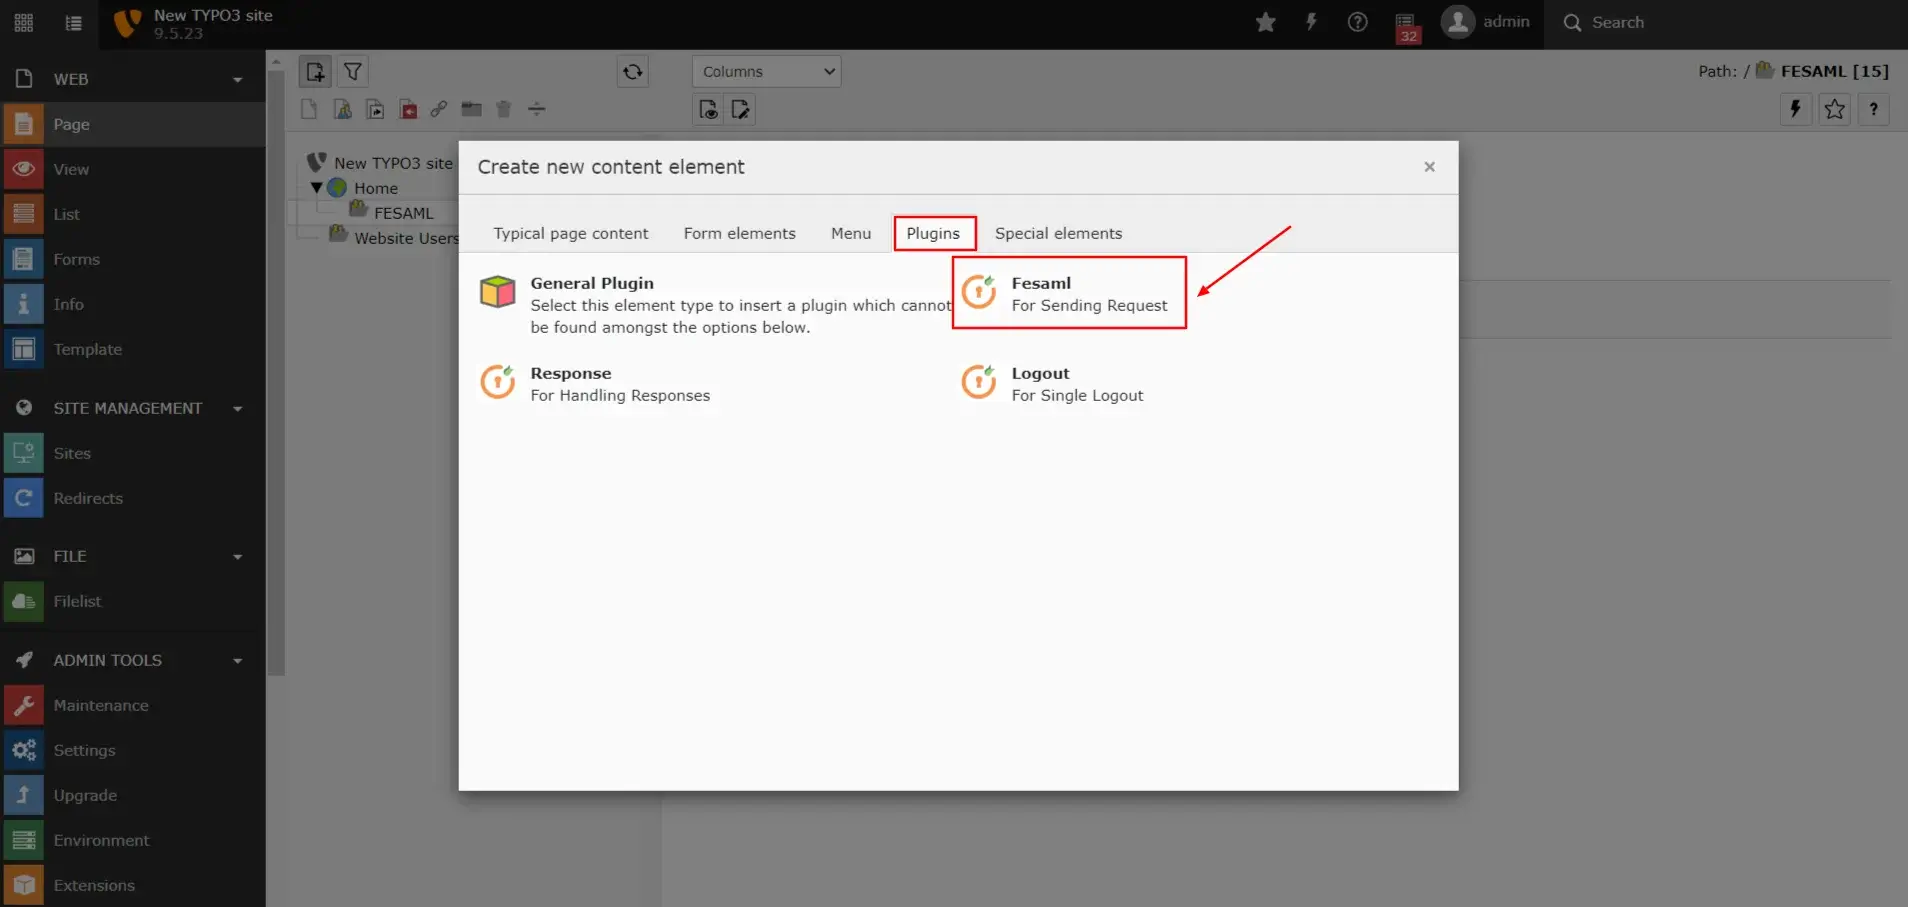
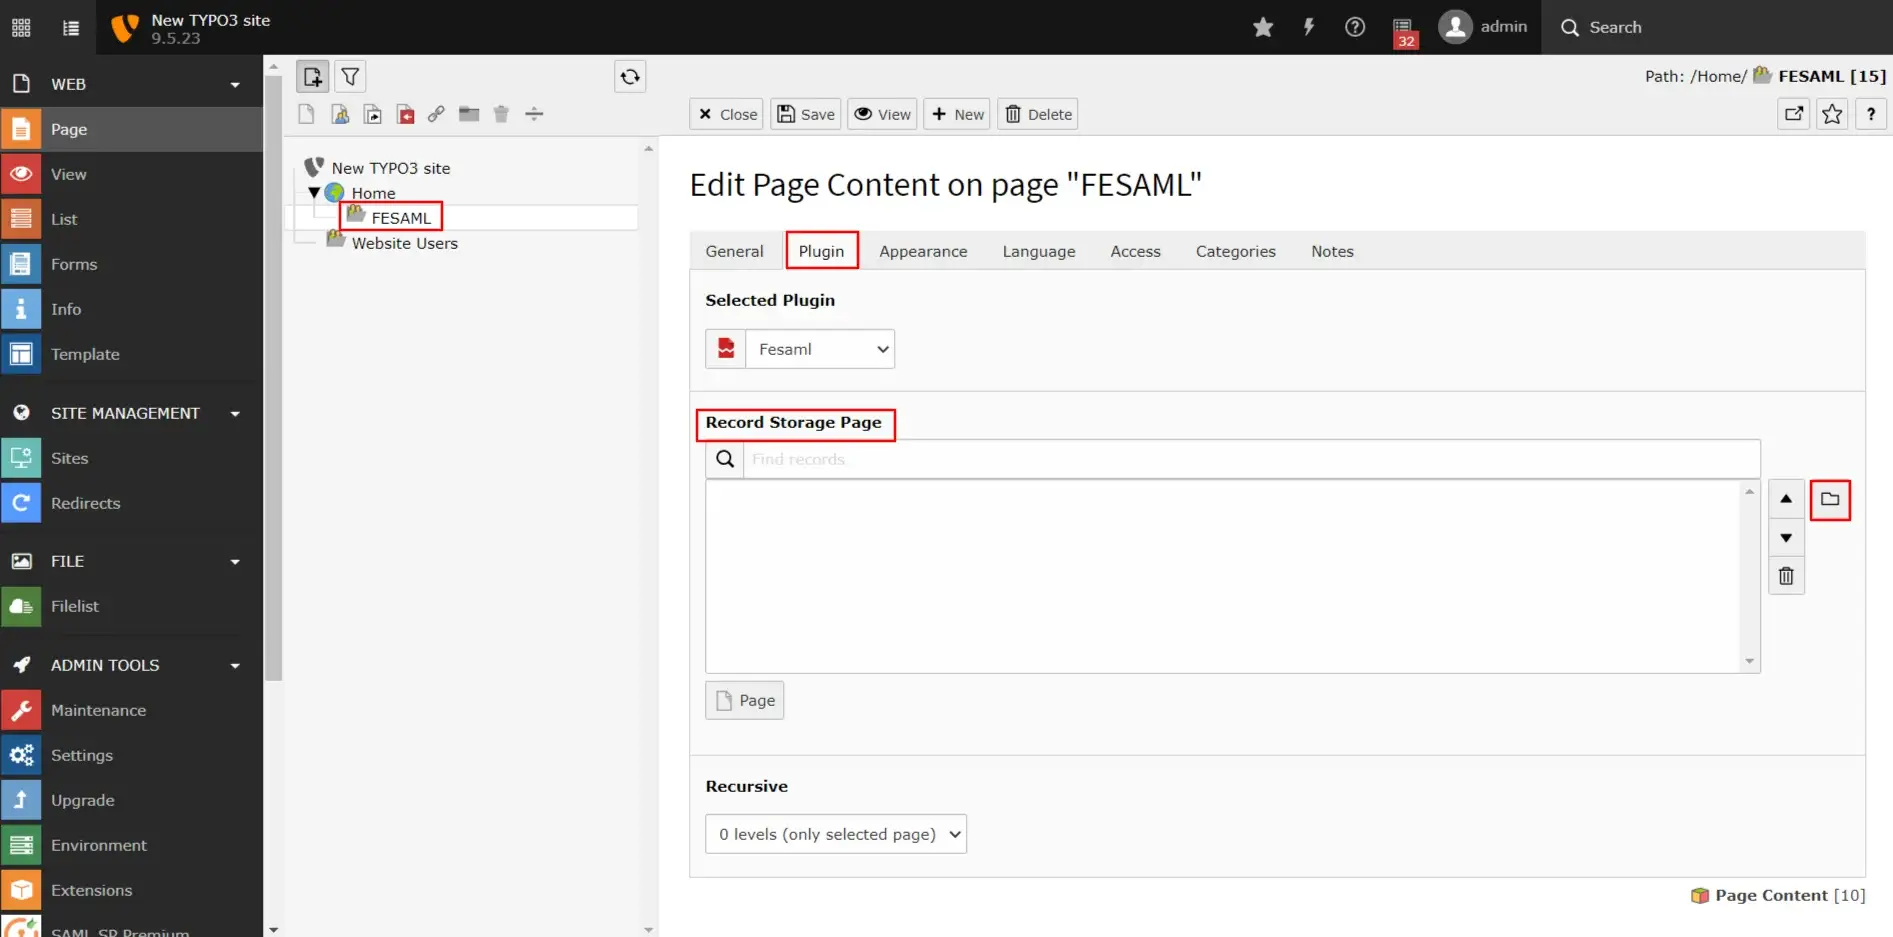
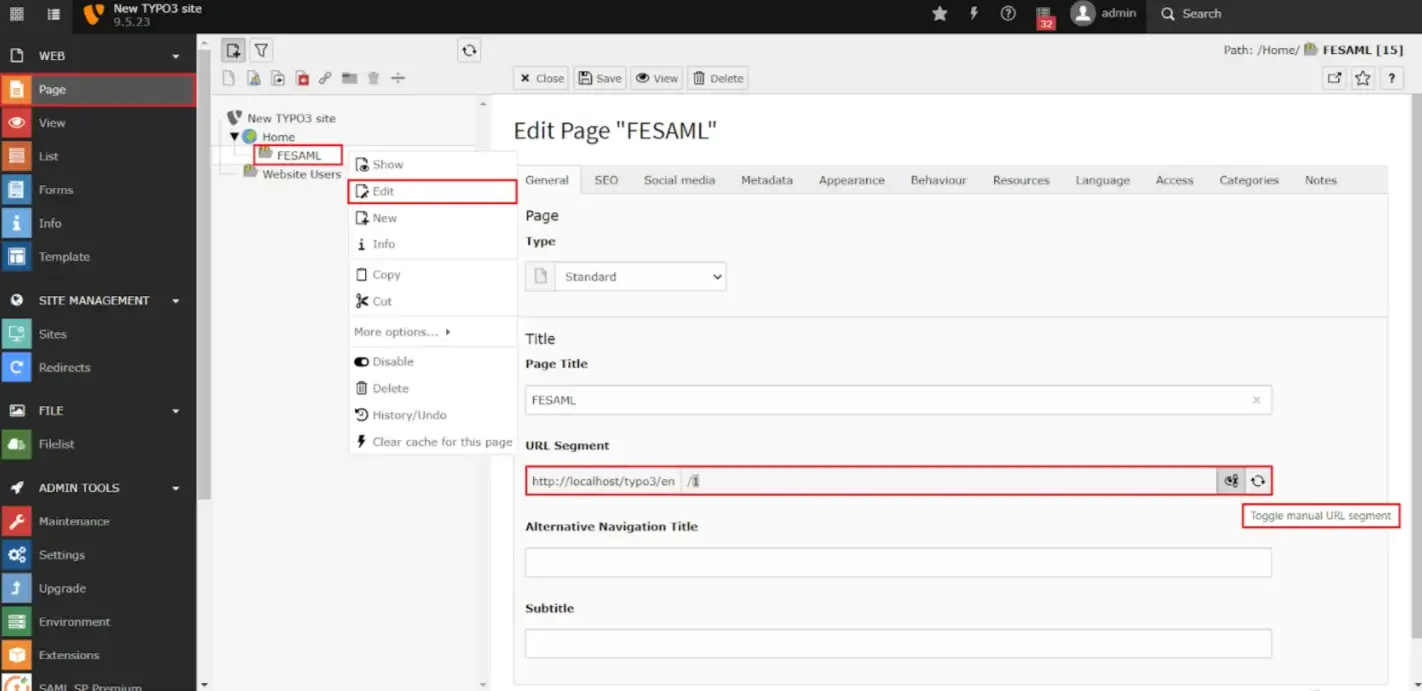
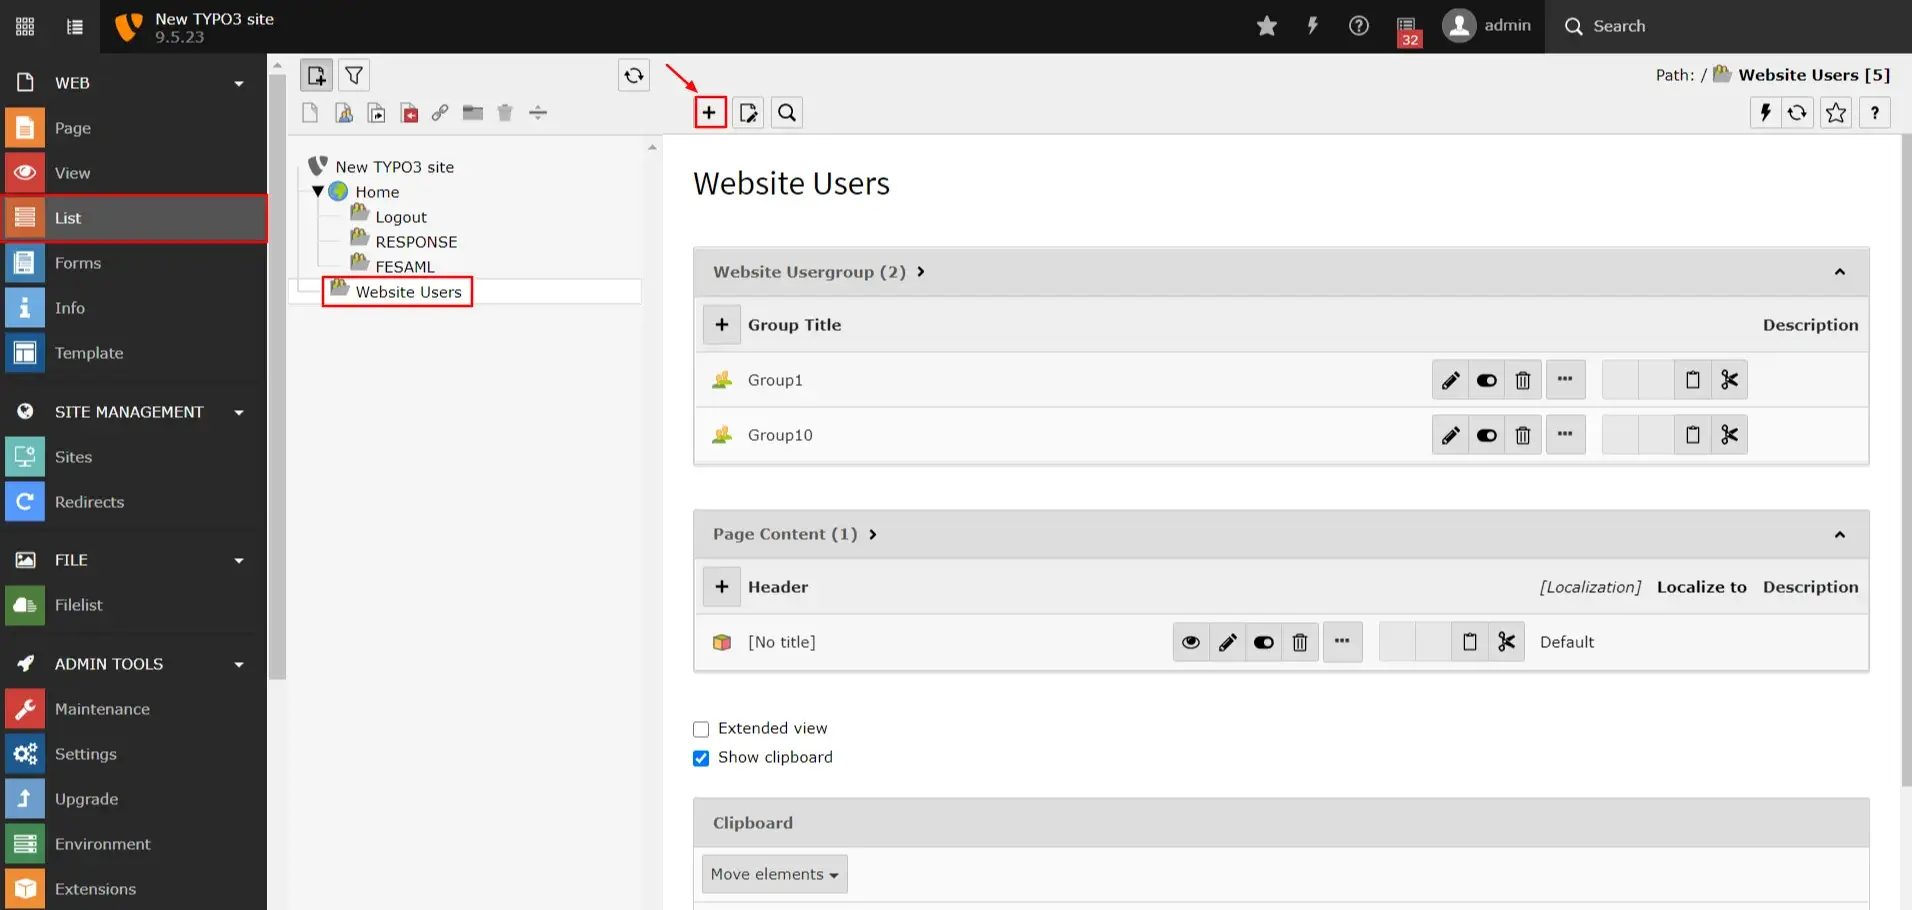
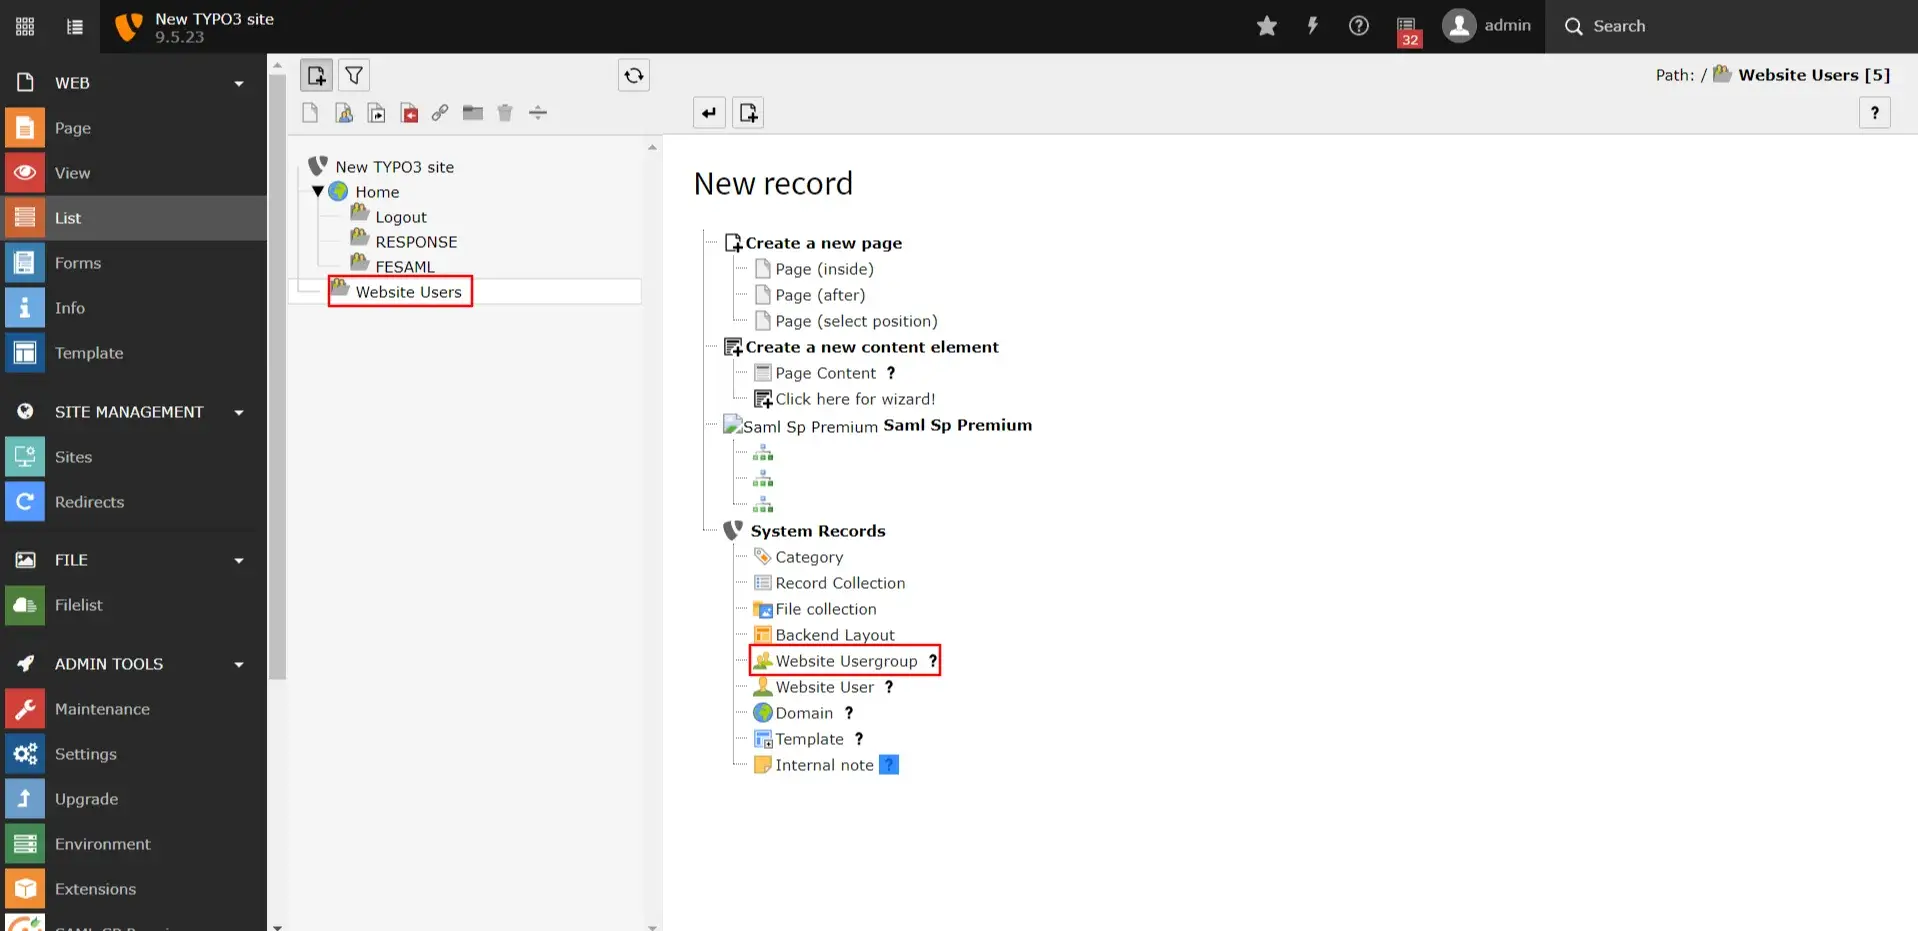
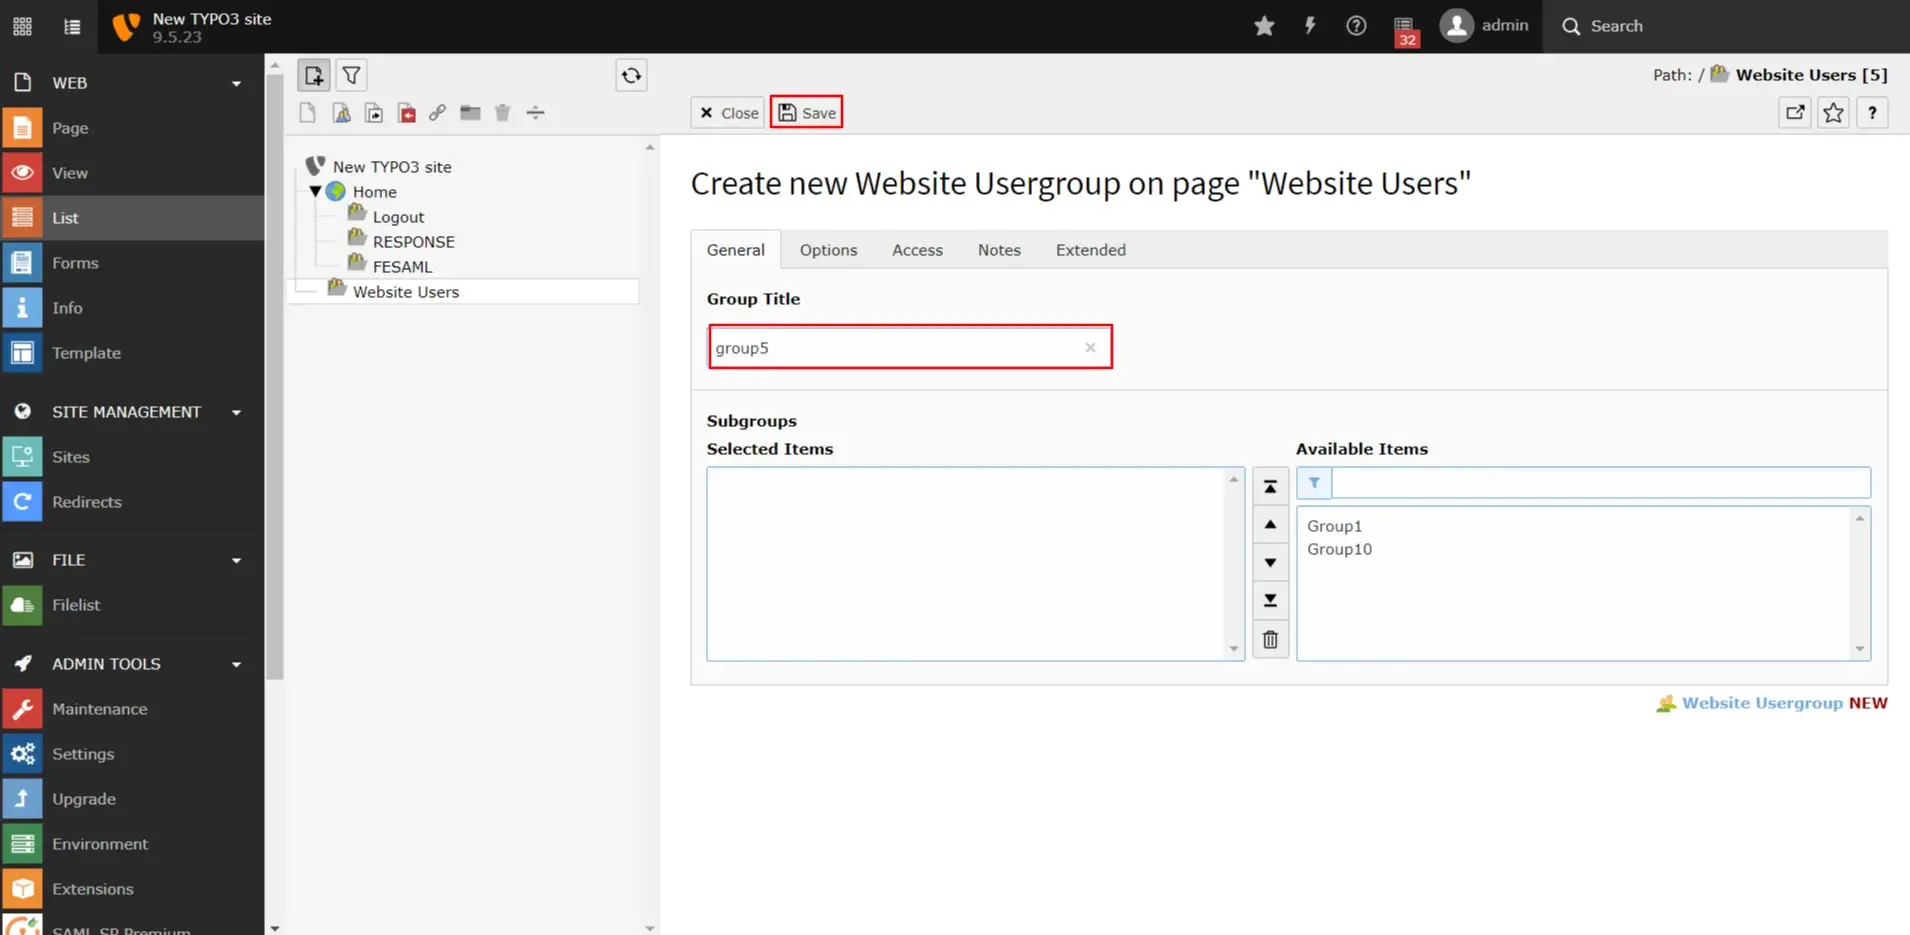
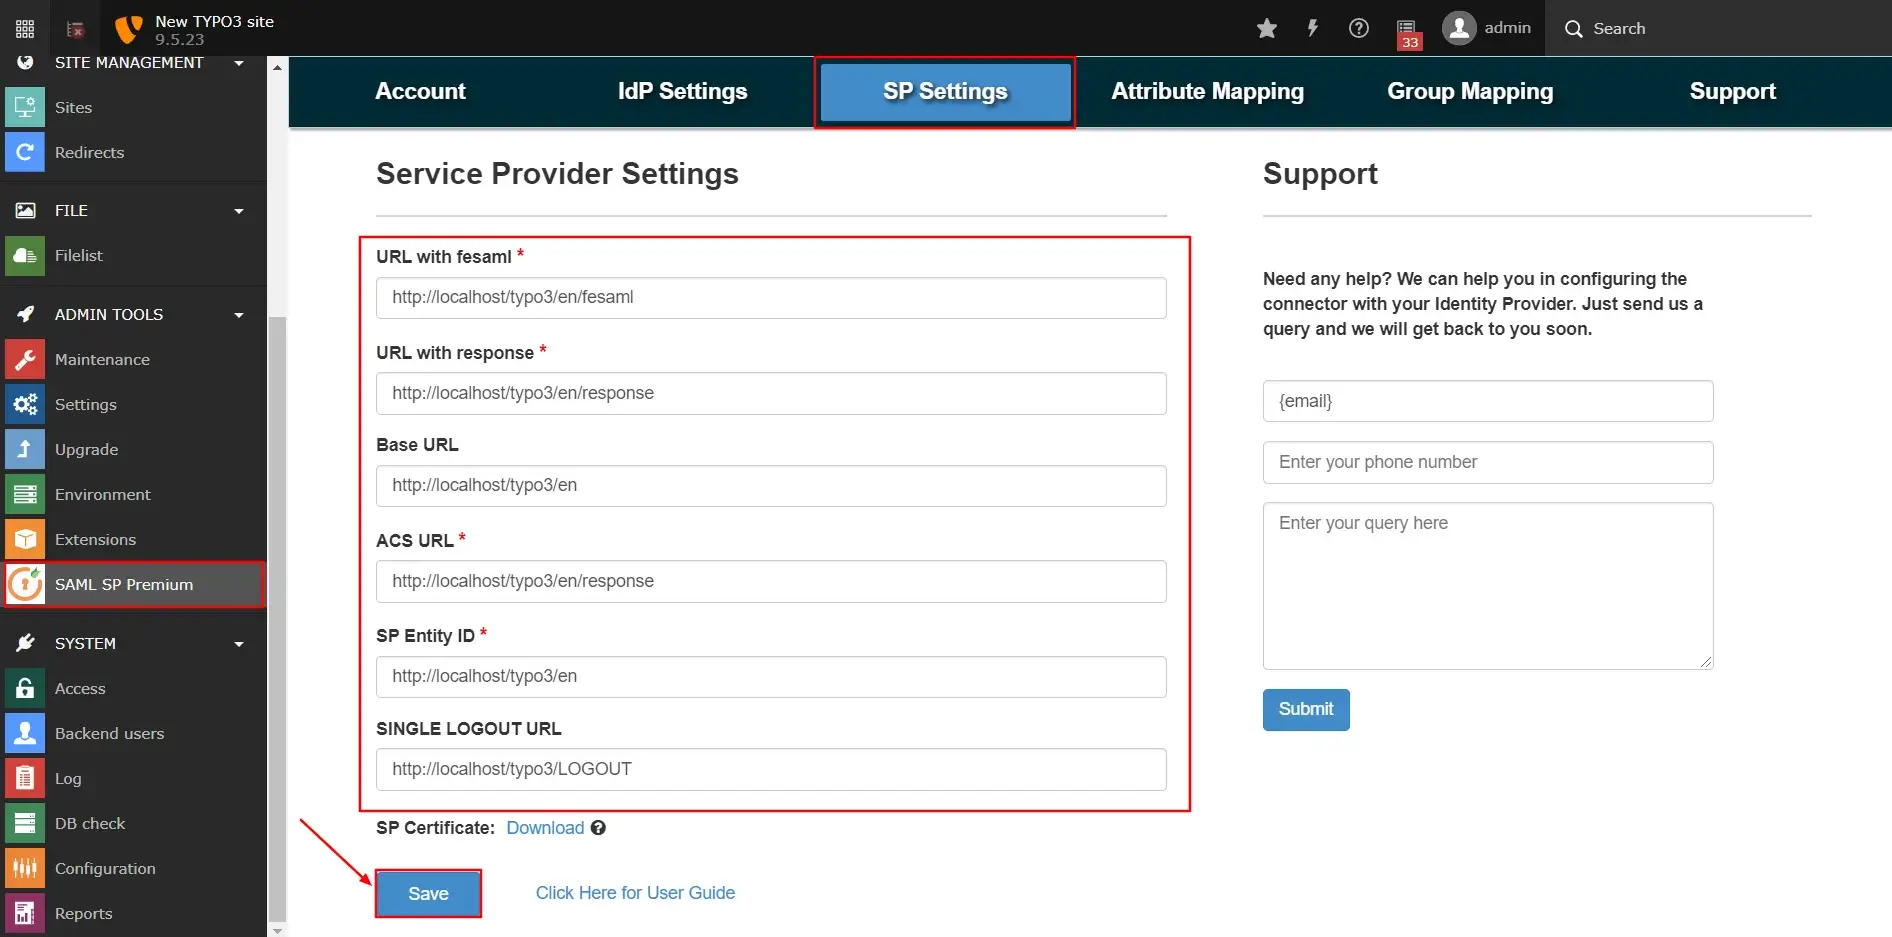
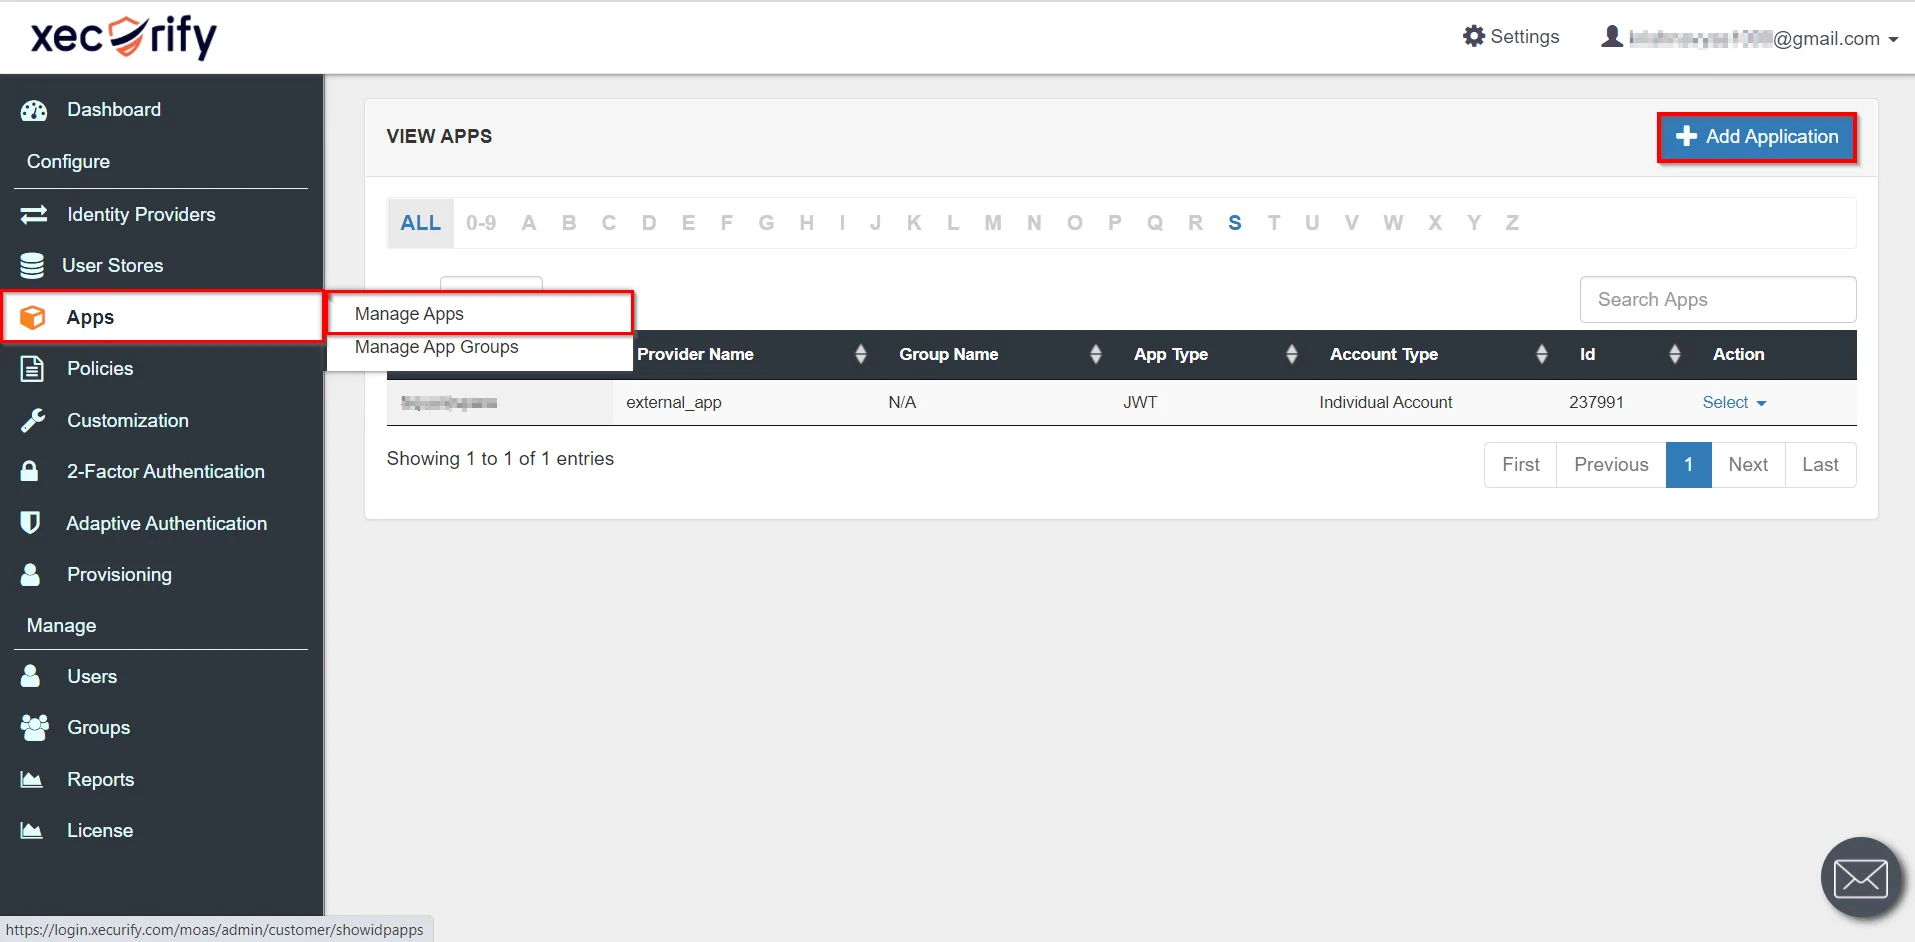
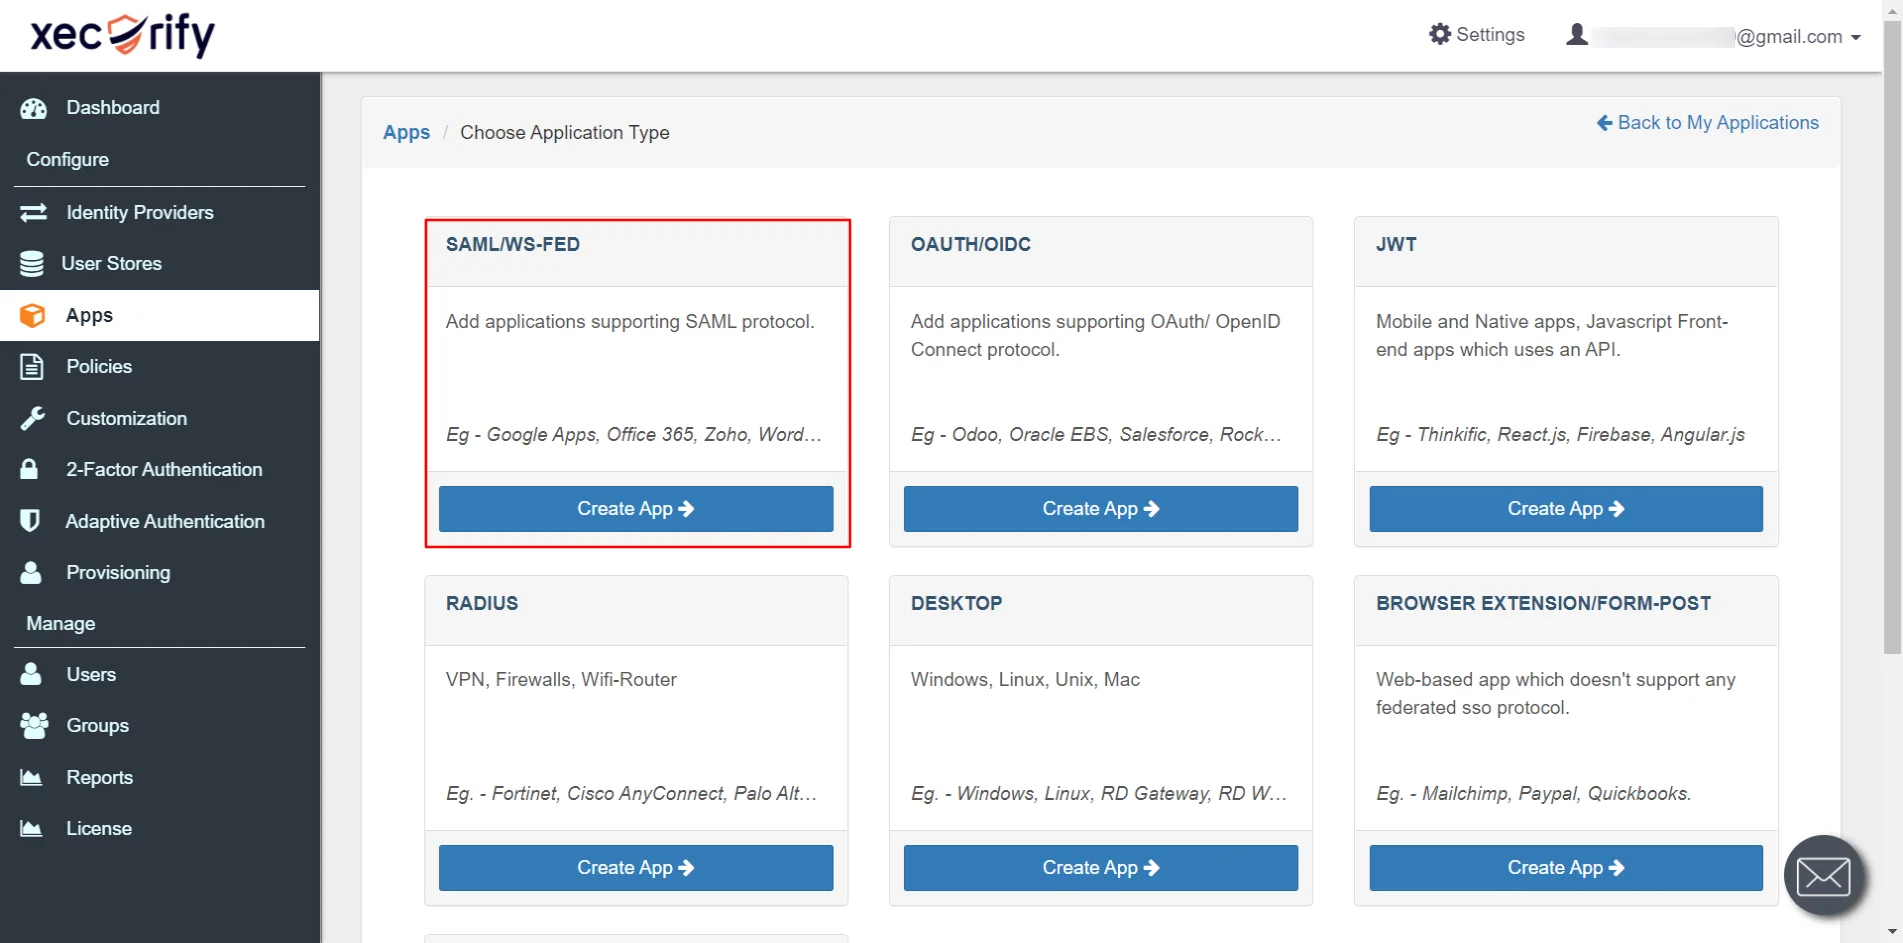
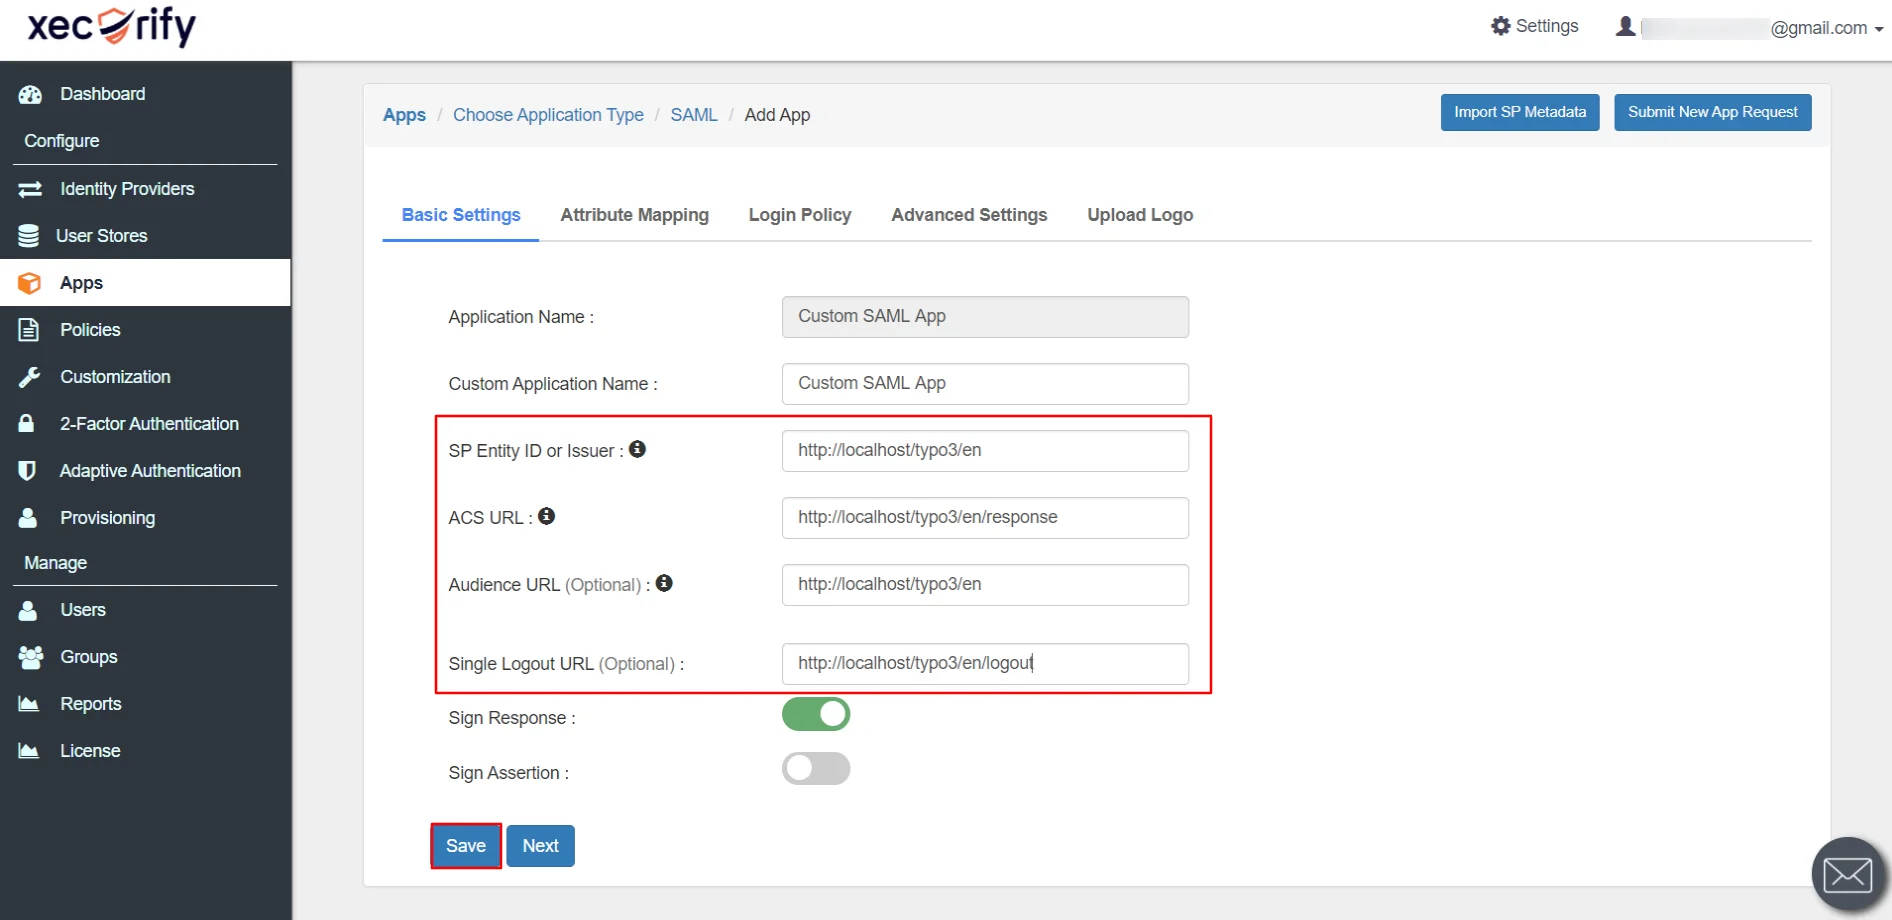
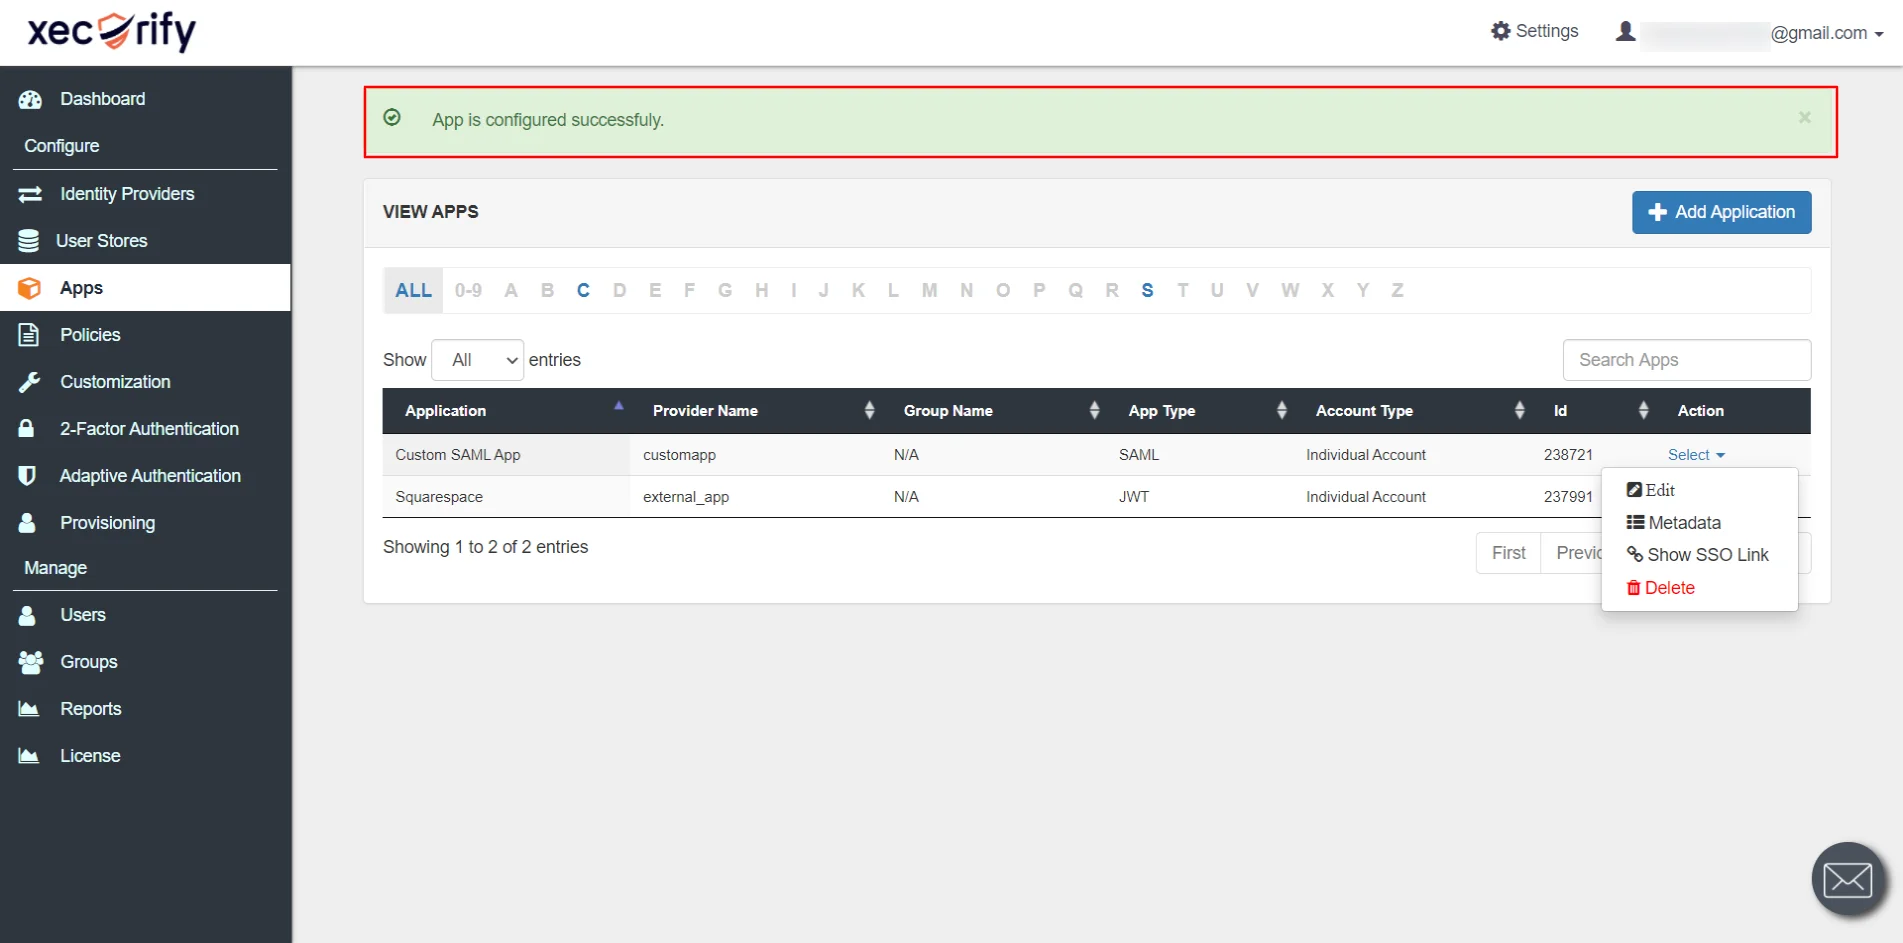
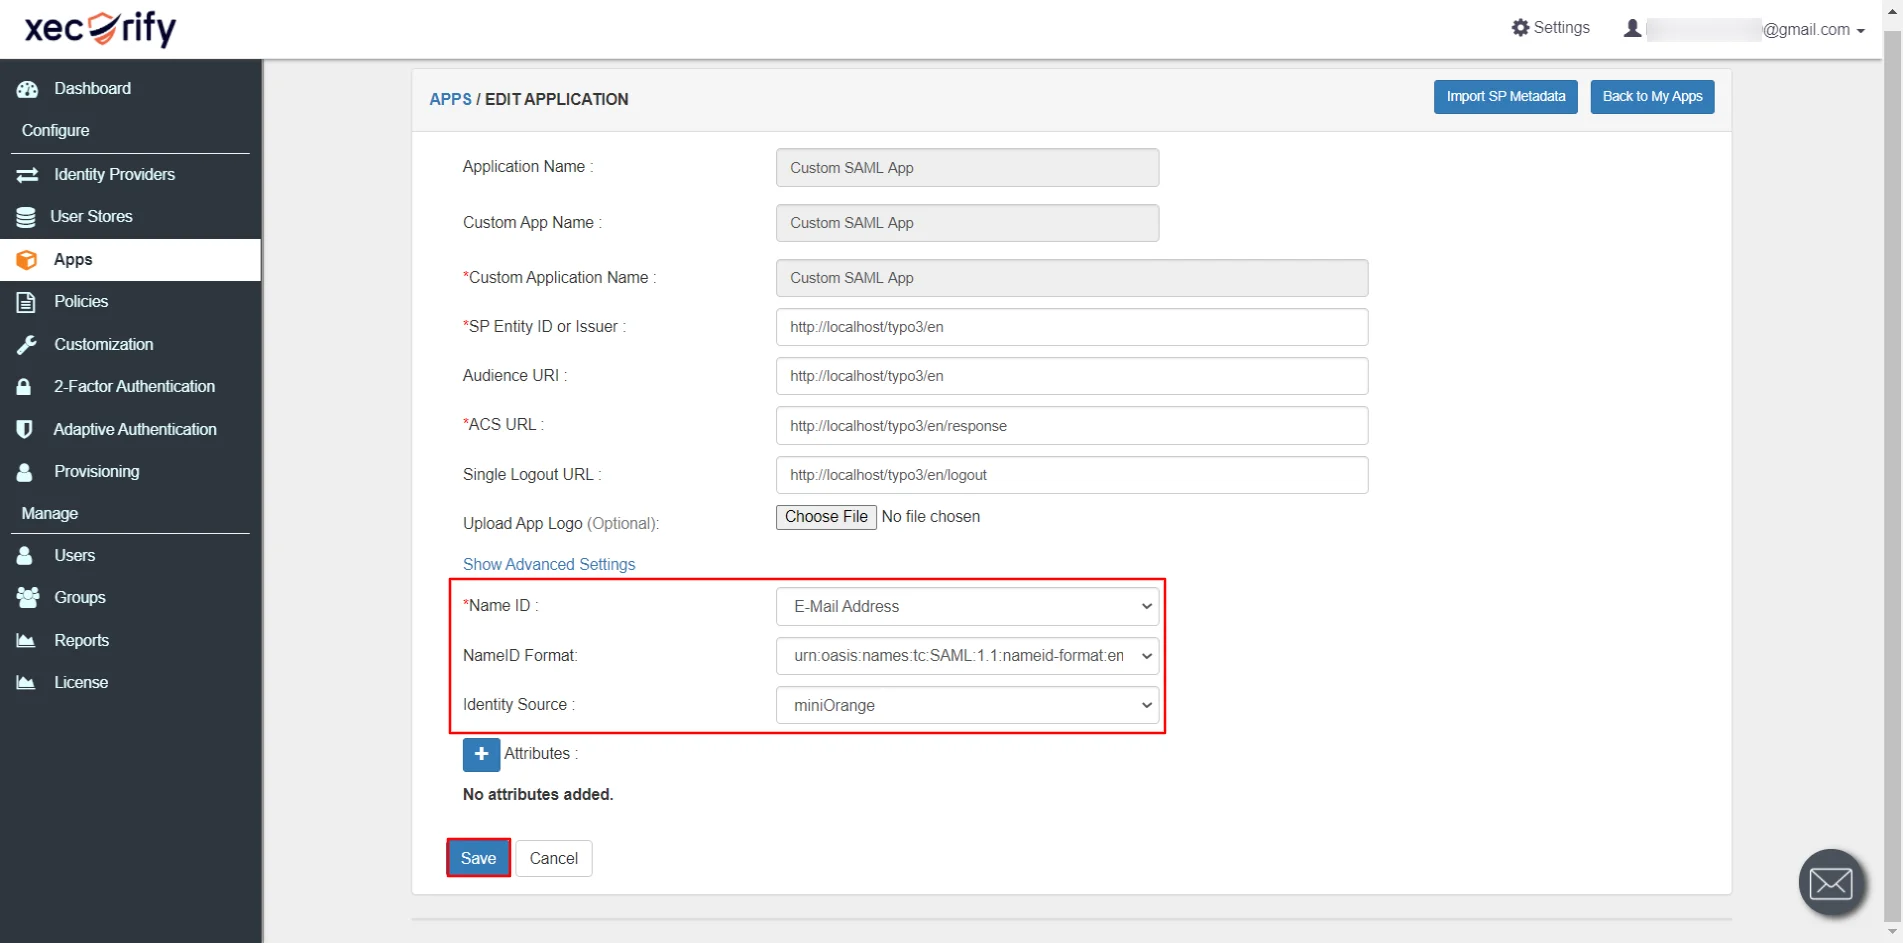
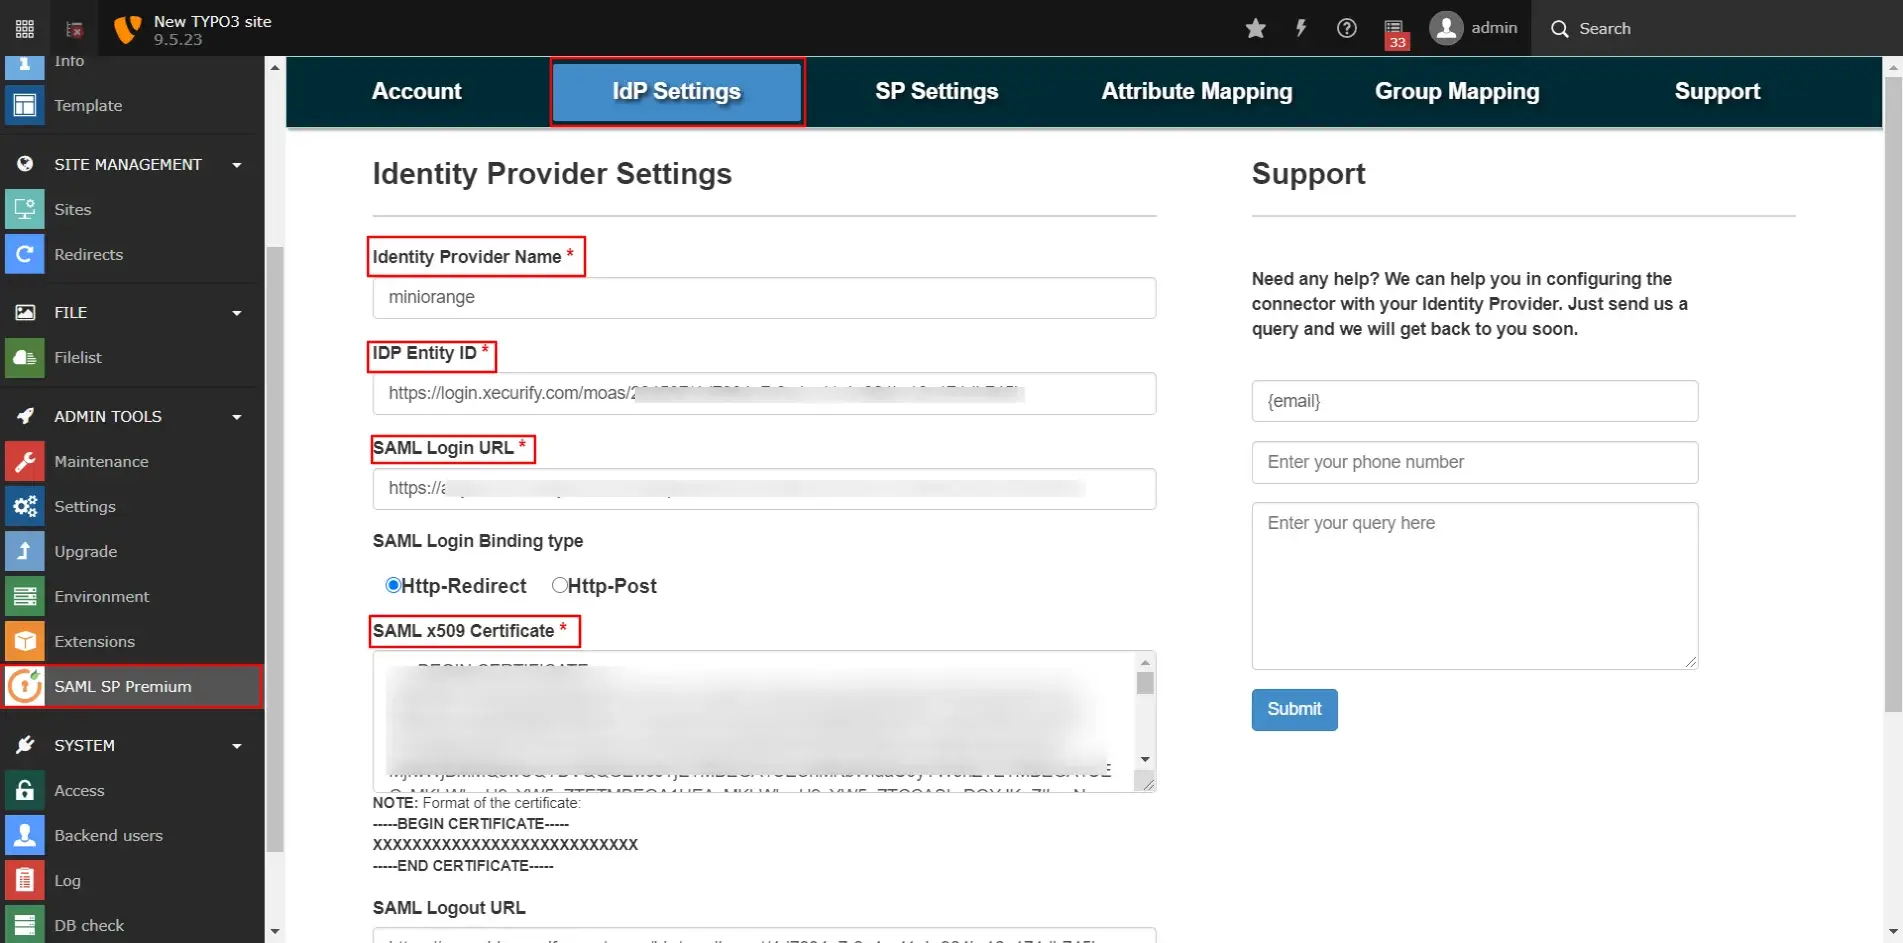
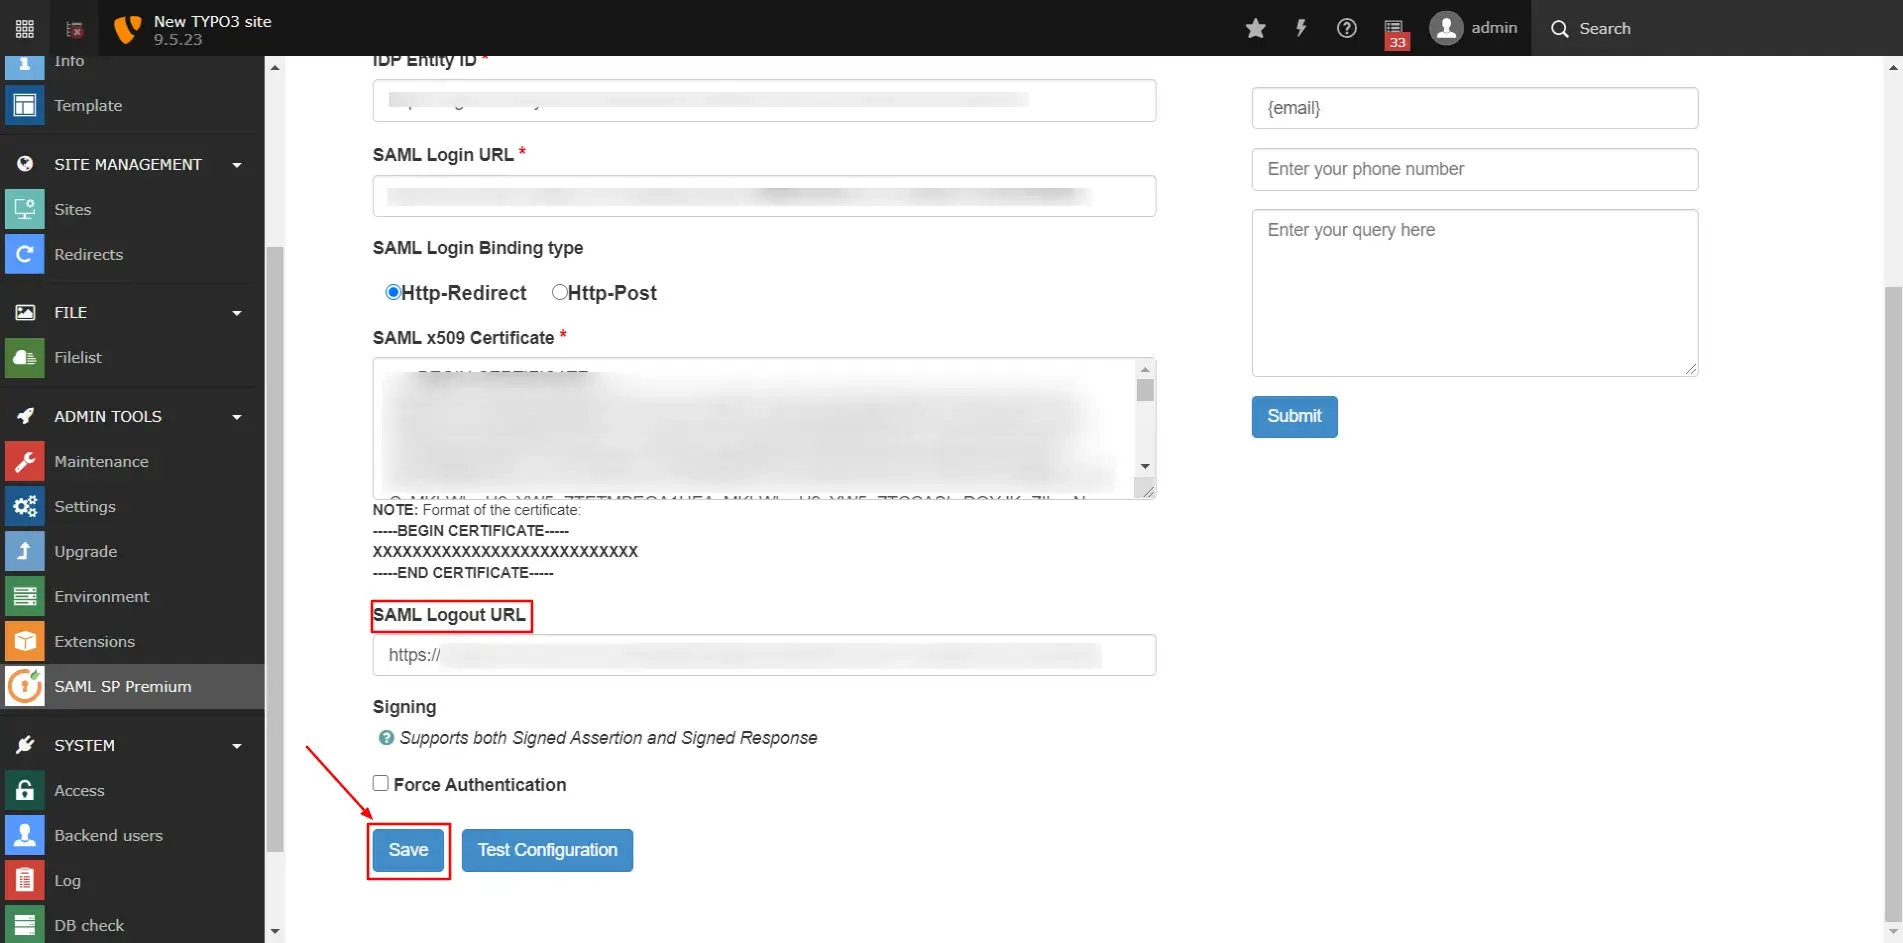
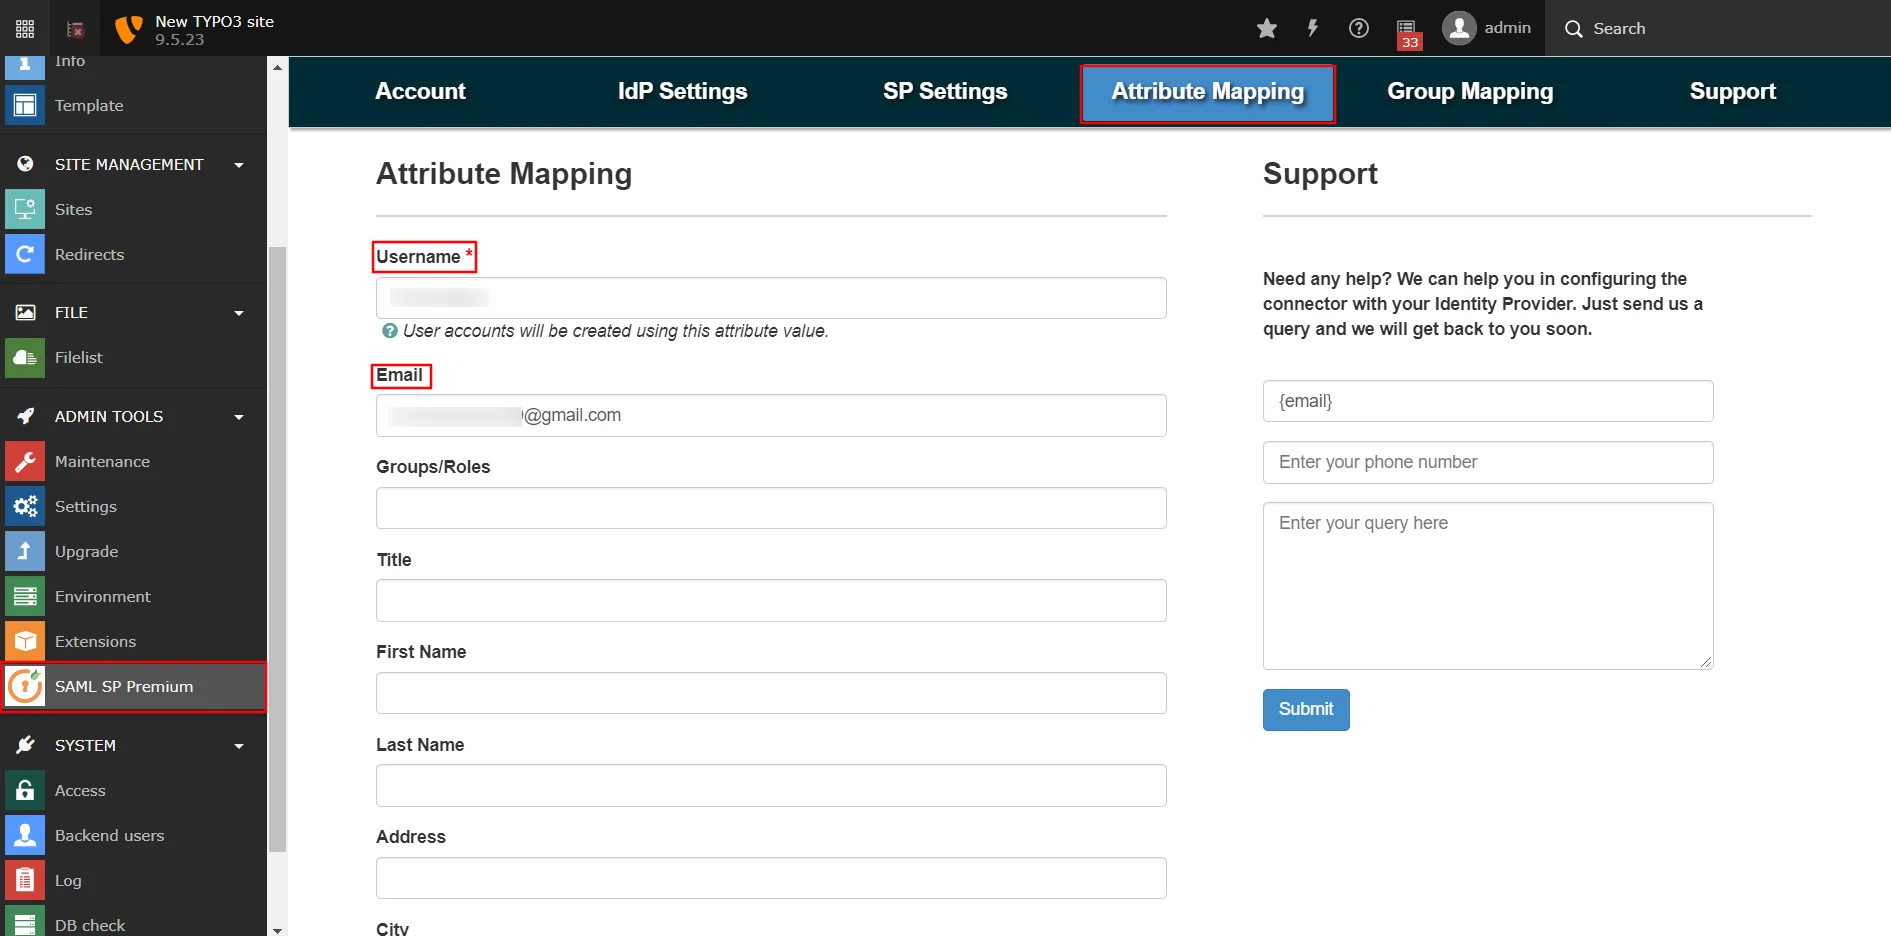
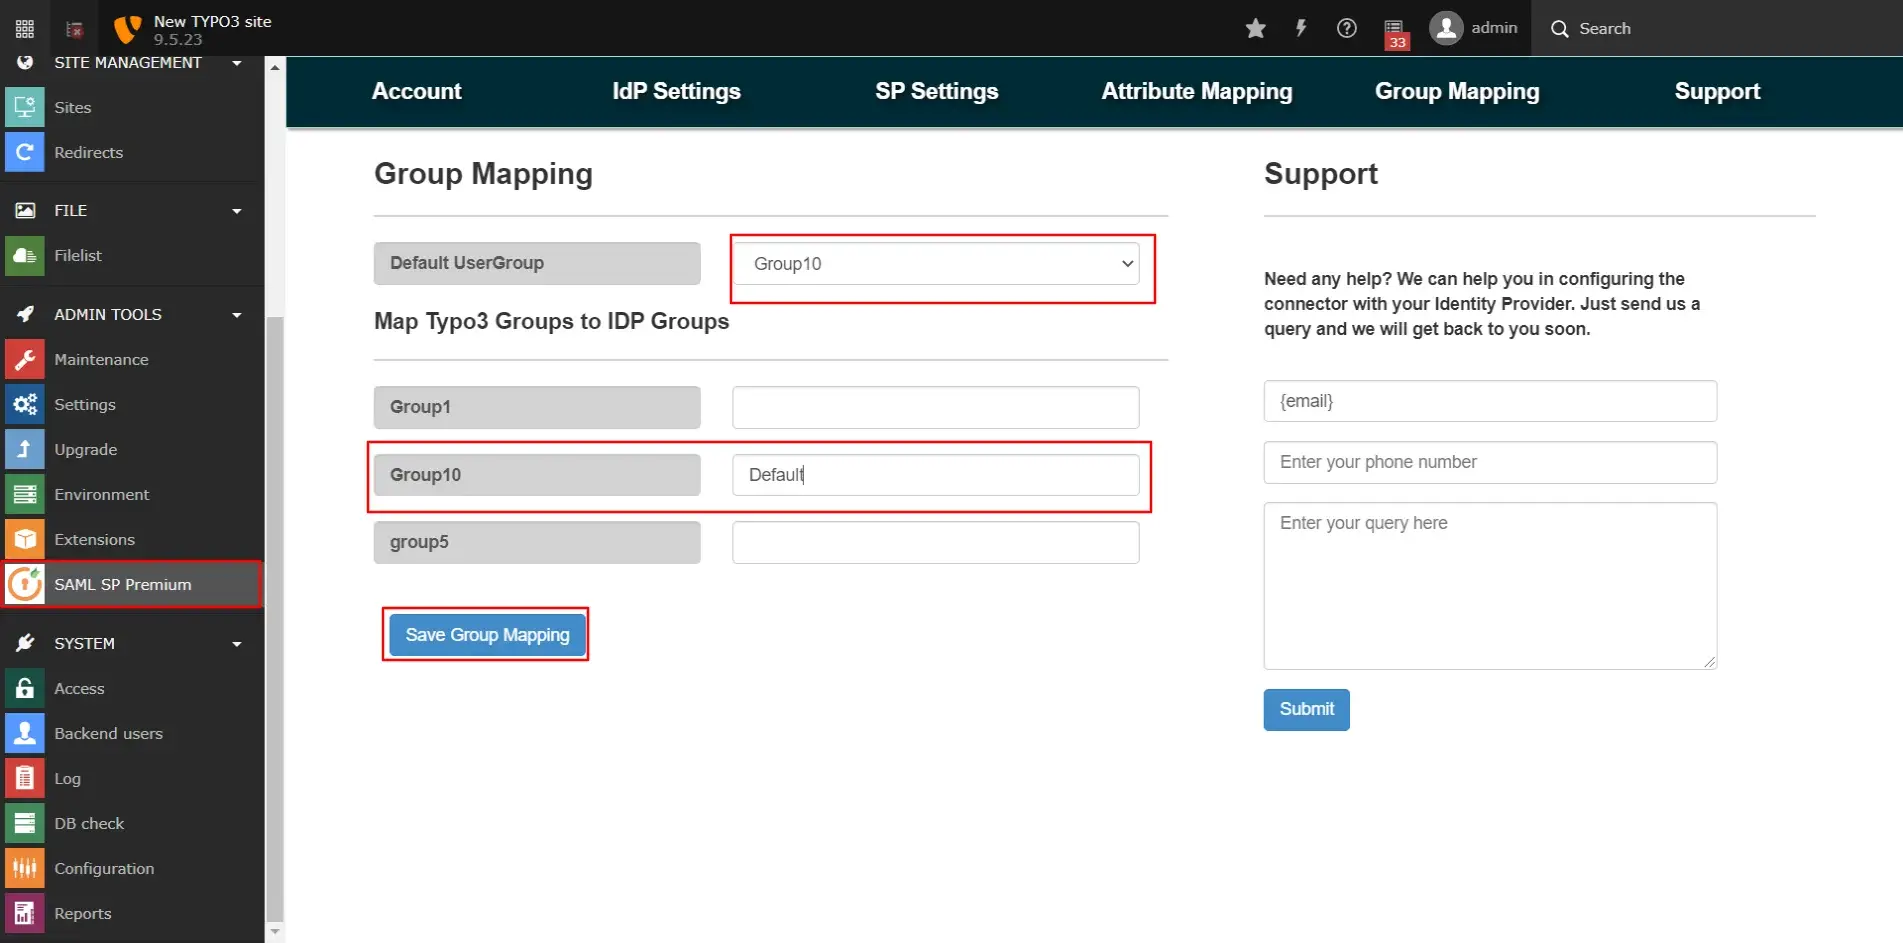
      Now configure your Application by using the following steps:

    • Go to Apps >> Manage Apps.
    • Search for your app and click on the Select in action menu against your app.
    • Click on Editand configure the required settings.
    • TYPO3 Single Sign-On (sso) Add SAML Application

    • Select attribute.(Here we will select email as an attribute)
    • Click on Save to add TYPO3 settings.
    • TYPO3 Single Sign-On (sso) Add SAML Application

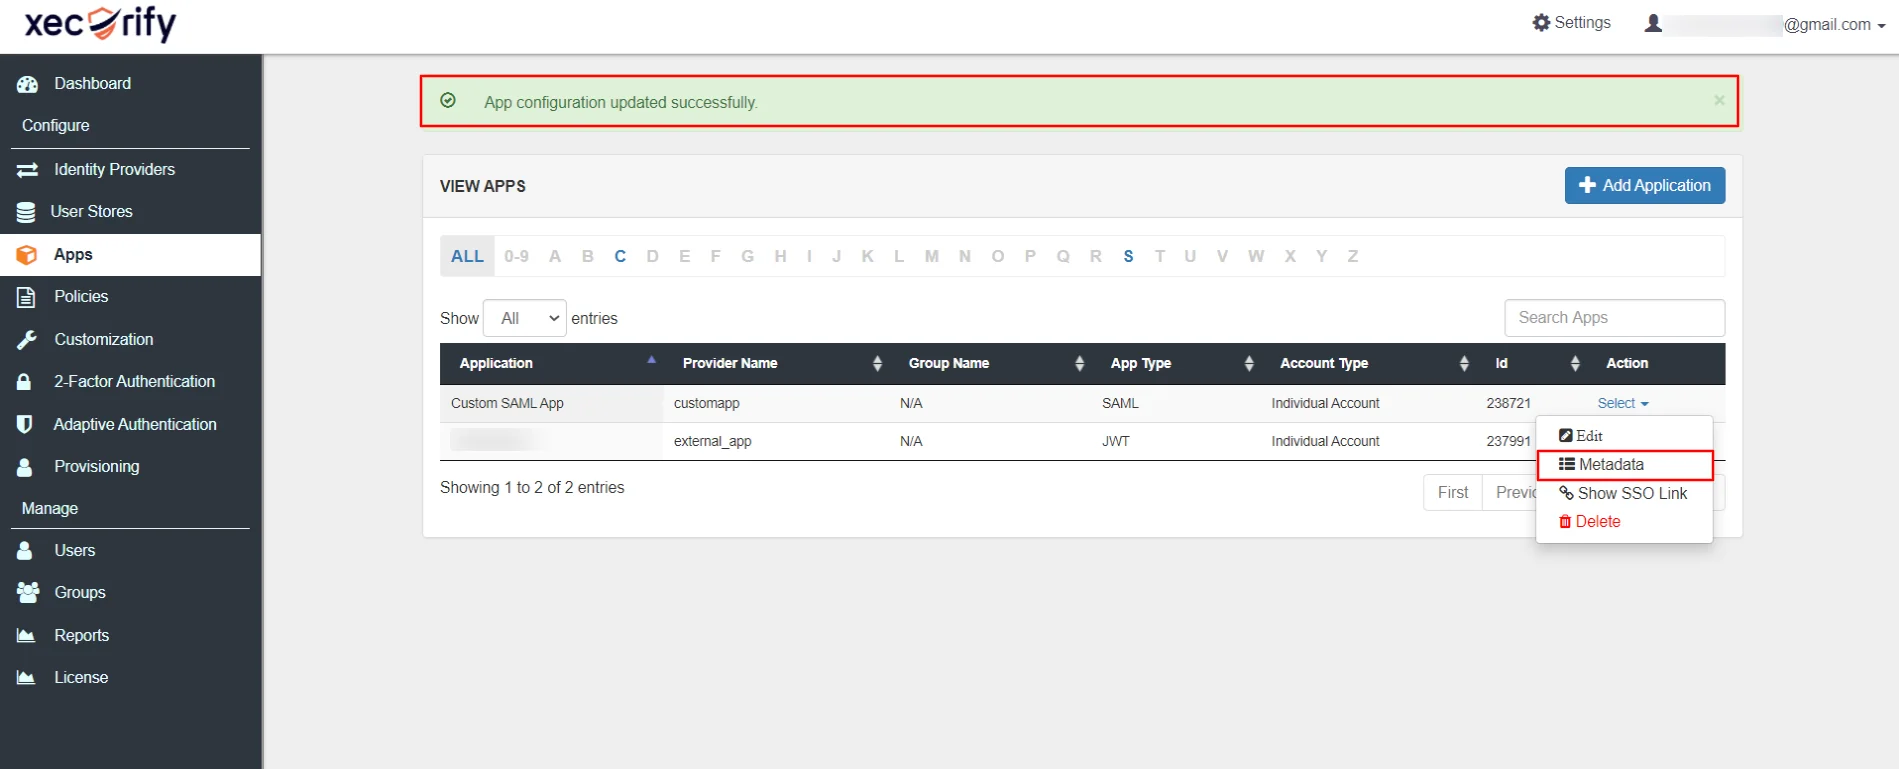
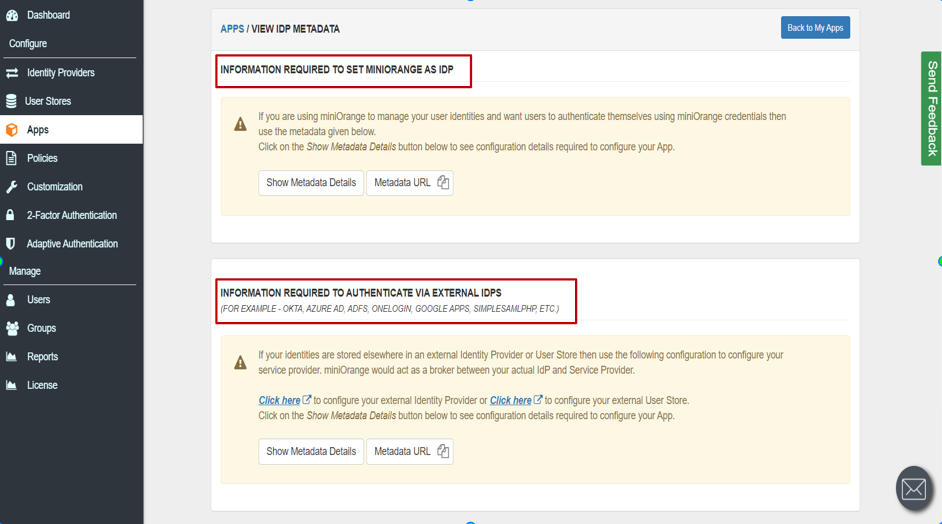
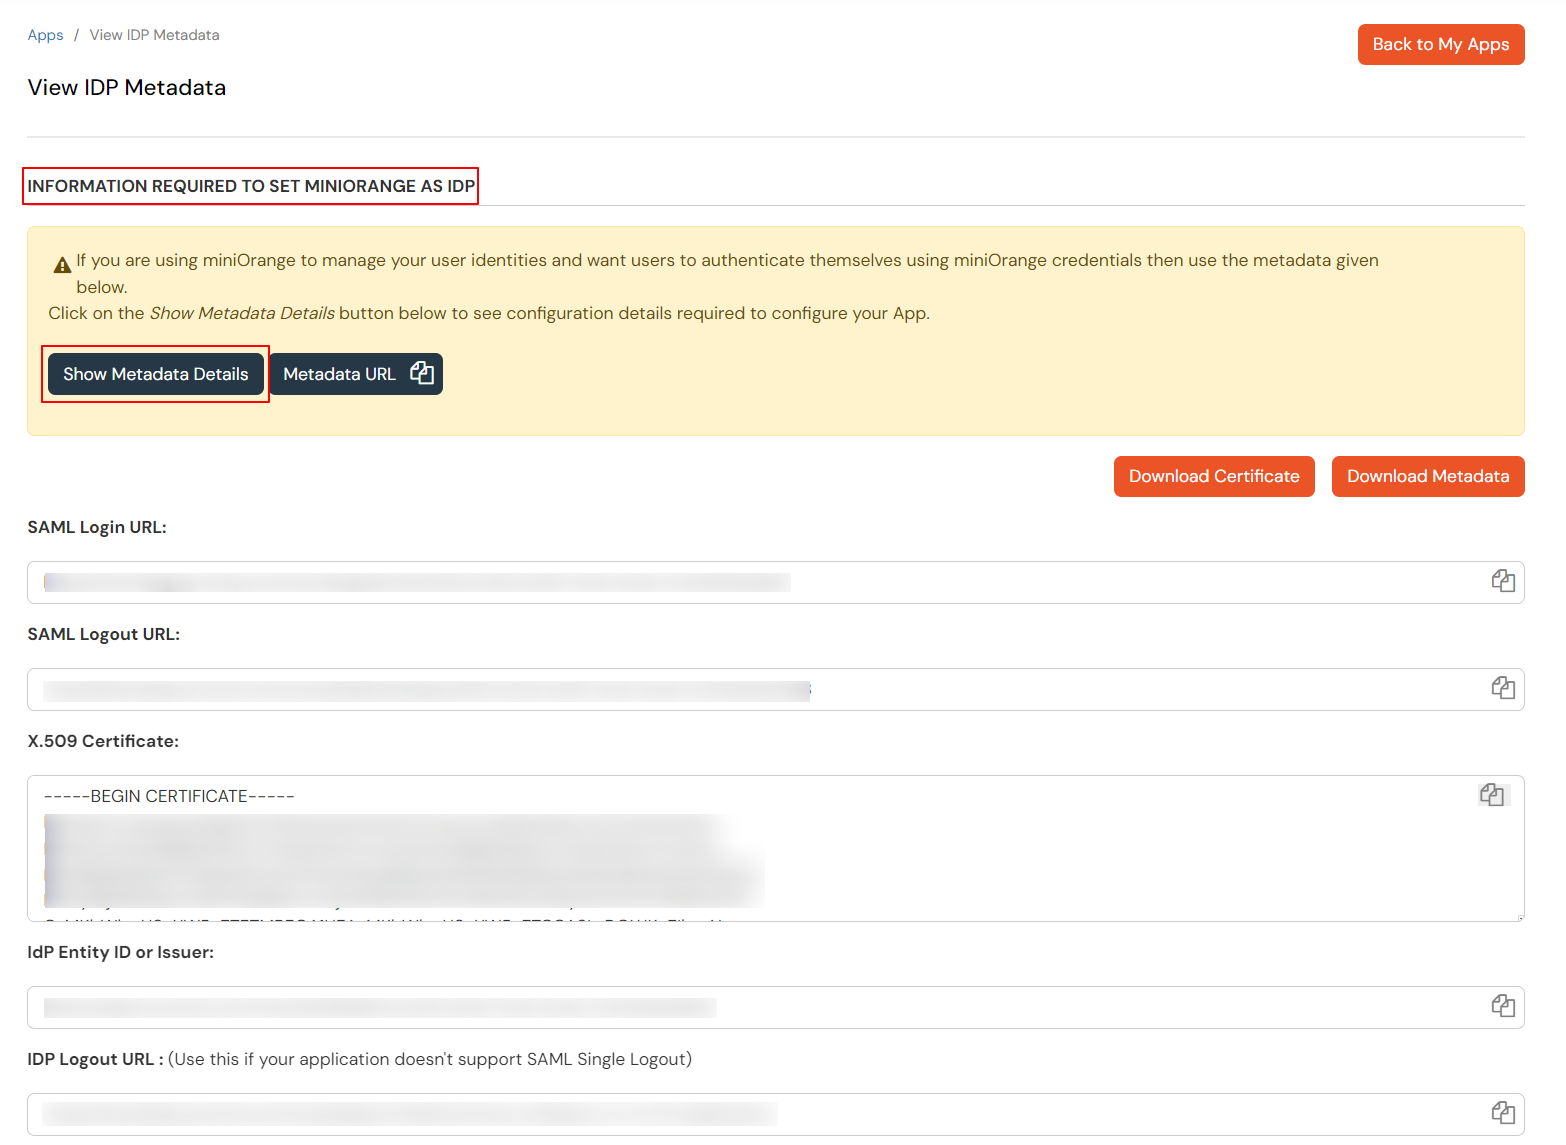
      You can get metadata certificate and metadata details by using the following steps:

    • Go to Apps >> Manage Apps.
    • Search for your app and click on the select in action menu against your app.
    • Click on Metadata to get metadata details, which you need to fill up in Typo3 Identity Provider Settings. Click on Link to see the IDP initiated SSO link for TYPO3.
    • TYPO3 Single Sign-On (sso) Add SAML Application

    • Here you will see 2 options, if you are setting up miniOrange as IDP copy the metadetails related to miniOrange, if you required to be authenticated via external IDP's(okta,AZURE AD, ADFS, ONELOGIN, GOOGLE APPS) you can get metadata from the 2nd Section as shown below.
    • TYPO3 Single Sign-On (sso) Add SAML Application

    • Copy SAML Login URL , SAML Logout URL IDP entity ID and SAML x509 Certificate.
    • TYPO3 Single Sign On (sso) configuration steps

    • Paste the respective URL in Identity Provider settings respectively anc click on save button to complete your IDP configuration.
    • Entity id, SAML certificate and SAML login URL for TYPO3 SSO

      TYPO3 Single Sign-On SAML Logout URL.


    Step 5: Test Configuration

      • This feature will help you to find out if submitted configurations are correct or not. You will also get the attributes you have configured in response.
      • To get test Configuration checked go to SAML SP plugin, in that go to IDP settings section, in the bottom you will find Test Configuration button, click on it it will show you the results as shown in the given diagram.
      • TYPO3 SAML SSO test configuration

      Step 6: Attribute Mapping

      • Attribute Mapping is not provided in the free version of SAML SP extension. To enable Attribute Mapping upgrade your SAML SP extension to the premium plugin.
      • Attribute mapping maps the incoming attributes from SAML Response to user profile of TYPO3 website.
      • To map attributes go to SAML SP Plugin and switch to attribute mapping tab, enter attribute fields and scroll down to save the settings.
      • TYPO3 SAML Single Sign-On attribute mapping

      Step 7: Group Mapping

      • Group Mapping is not provided in the free version of SAML SP extension. To enable Group Mapping upgrade your SAML SP extension to the premium plugin.
      • Group mapping maps group name of IDP to the group name of SP and passes user attributes accordingly.
      • For group mapping go to miniOrange SAML SP Plugin and switch to group mapping tab enter the required fields and scroll down to save the settings.
      • As shown in the given diagram "Default" is user group of IDP while "Group10" is the group we created in TYPO3 which is your SP.
      • TYPO3 SSO group mapping

Why Our Customers choose miniOrange Secure Identity Solutions ?


24/7 Support

miniOrange provides 24/7 support for all the Secure Identity Solutions. We ensure high quality support to meet your satisfaction.

Try Now

Affordable Pricing

miniorange provides most affordable Secure Identity Solutions for all type of use cases and offers different packages based on customer's requirement.

Request A Quote


We offer Secure Identity Solutions for Single Sign-On, Two Factor Authentication, Adaptive MFA, Provisioning, and much more. Please contact us at -

   +1 978 658 9387 (US)   ,   +91 97178 45846 (India)    |       info@xecurify.com