Network
The Network tab allows you to configure VPN, Wi-Fi, and proxy settings
for managed Android devices. These settings help ensure devices connect securely
to your organization's network resources, simplify network access for users,
and enforce organization-wide network policies across enrolled devices.
Prerequisite
-
Before configuring the network policy, create a new Android policy or open an
existing policy. For instructions, refer to the
How to create policy
guide.
Configure VPN Settings
Use the VPN Configuration tab to securely connect managed Android devices
to your organization's private network. This ensures users can safely access
internal applications and resources while maintaining secure communication.
-
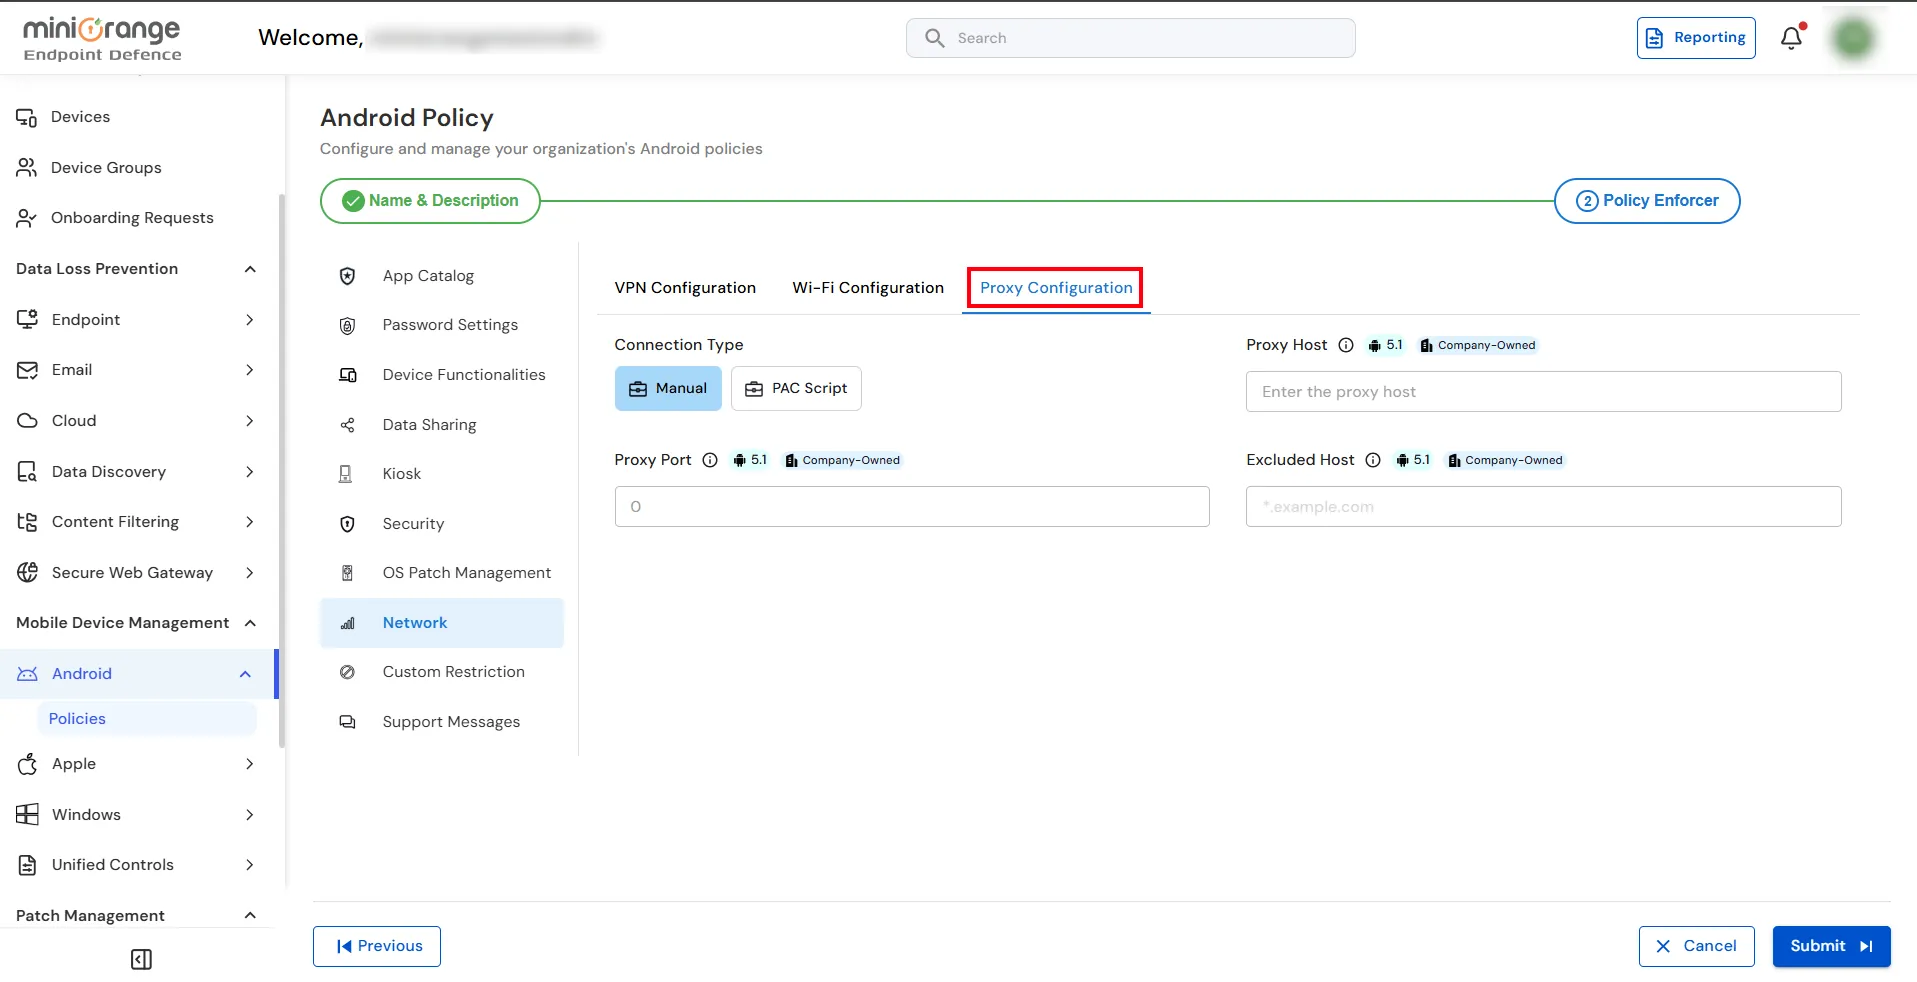
Navigate to Policy Enforcer > Network > VPN Configuration.
-
Under VPN Configuration, select Allow to enforce VPN usage on
managed devices, or Deny to disable VPN enforcement.
-
Configure Allow Networking Without VPN:
-
Select Allow to permit network access even when the VPN is not connected.
-
Select Deny to require devices to establish a VPN connection before
accessing the network.
-
From the Select VPN App drop-down menu, select
Unified Endpoint Management as the VPN application for managed devices.
-
Click Submit to save and apply the VPN configuration.
Configure Wi-Fi Settings
Use the Wi-Fi Configuration tab to preconfigure wireless network settings
for managed Android devices. This allows devices to connect to trusted Wi-Fi
networks automatically without requiring users to configure network settings manually.
-
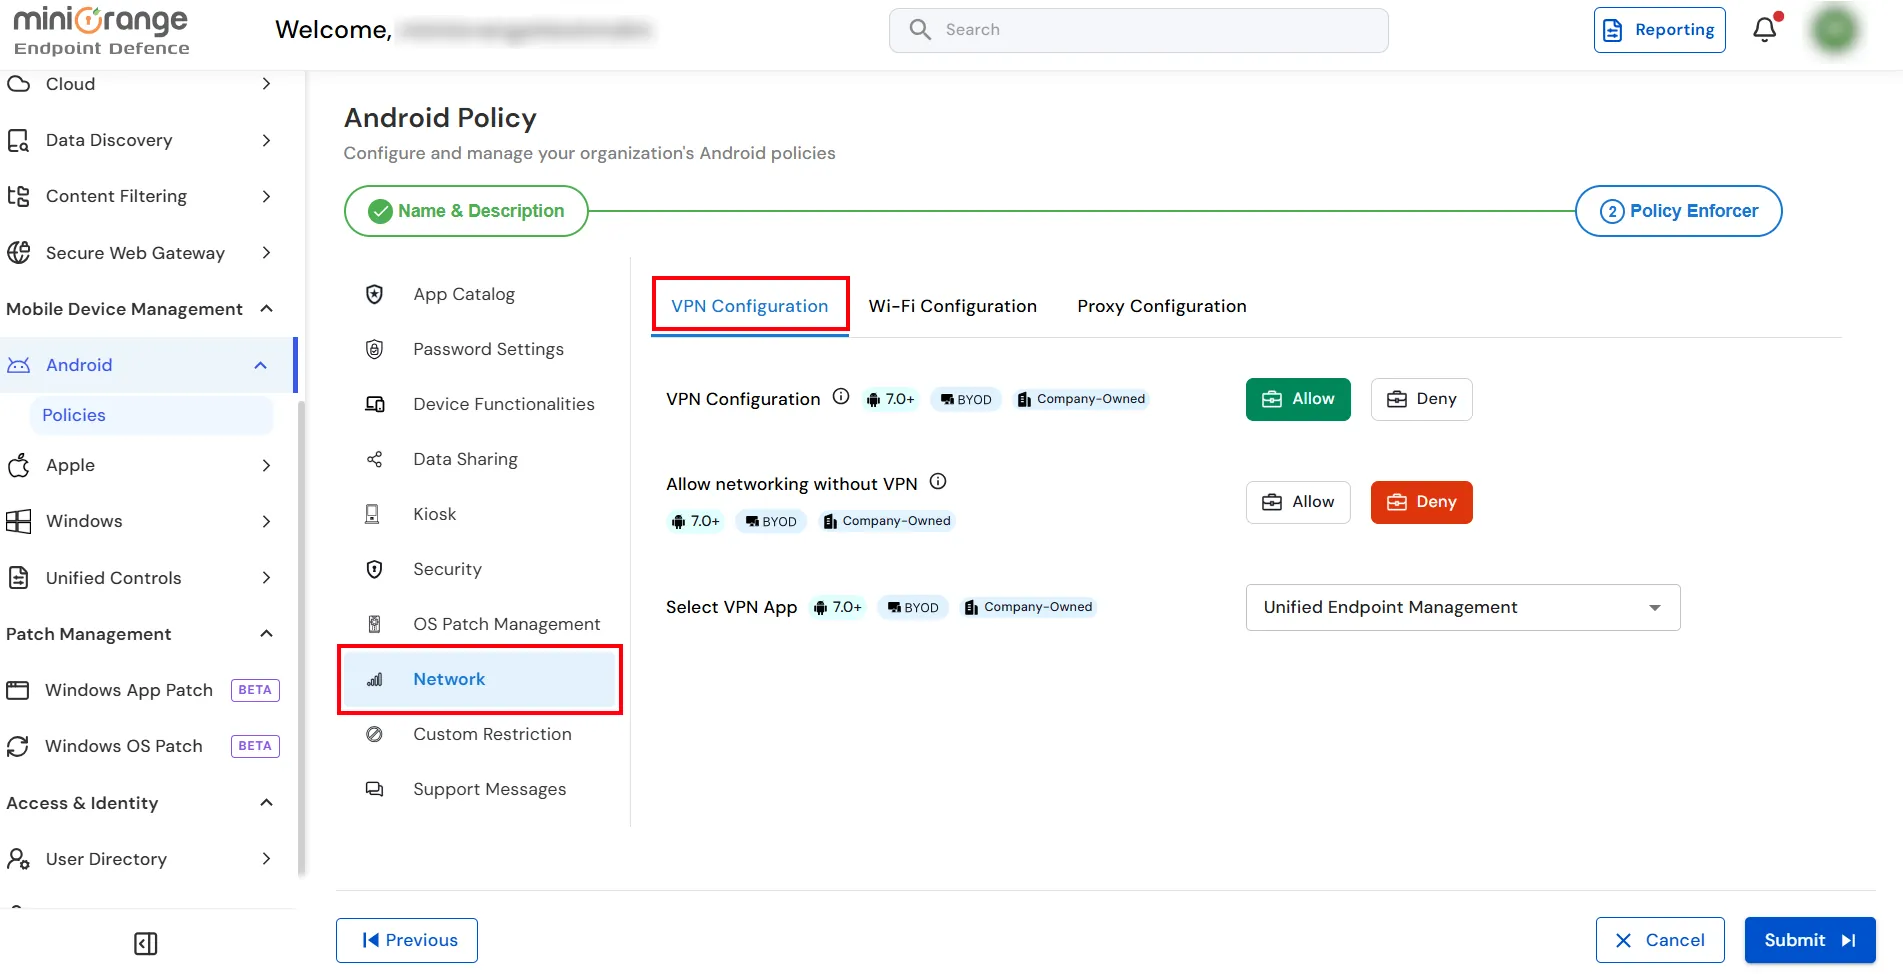
Navigate to Policy Enforcer > Network > Wi-Fi Configuration.
-
Under Configure other Wi-Fi networks, select one of the following options:
-
Allow – Allows users to add and configure Wi-Fi networks on their devices.
-
Deny Add Network – Prevents users from adding new Wi-Fi networks.
-
Deny Configuration – Prevents users from modifying existing
Wi-Fi configurations.
-
Under SSID Access Control, select one of the following options:
-
No Restriction – Allows devices to connect to any Wi-Fi network.
-
Allow List – Allows devices to connect only to the Wi-Fi networks
specified in the list.
-
Deny List – Blocks devices from connecting to the Wi-Fi networks
specified in the list.
-
Click Add Wi-Fi Configuration.
-
Enter the Network Name and SSID.
-
Select the appropriate Security type (such as None, WEP-PSK, WPA-PSK,
WPA-EAP, WEP-8021X, or WPA3-Enterprise_192) .
-
Configure additional settings such as Auto Connect and
MAC Address Randomization Mode, if required.
-
Click Save to add the Wi-Fi configuration.
-
Repeat the process to add additional Wi-Fi networks, if required.
-
Click Submit to save and apply the network policy.
Configure Proxy Settings
Use the Proxy Configuration tab to route network traffic through a proxy
server. This helps organizations control internet access, enforce network policies,
improve security, and monitor network traffic on managed Android devices.
-
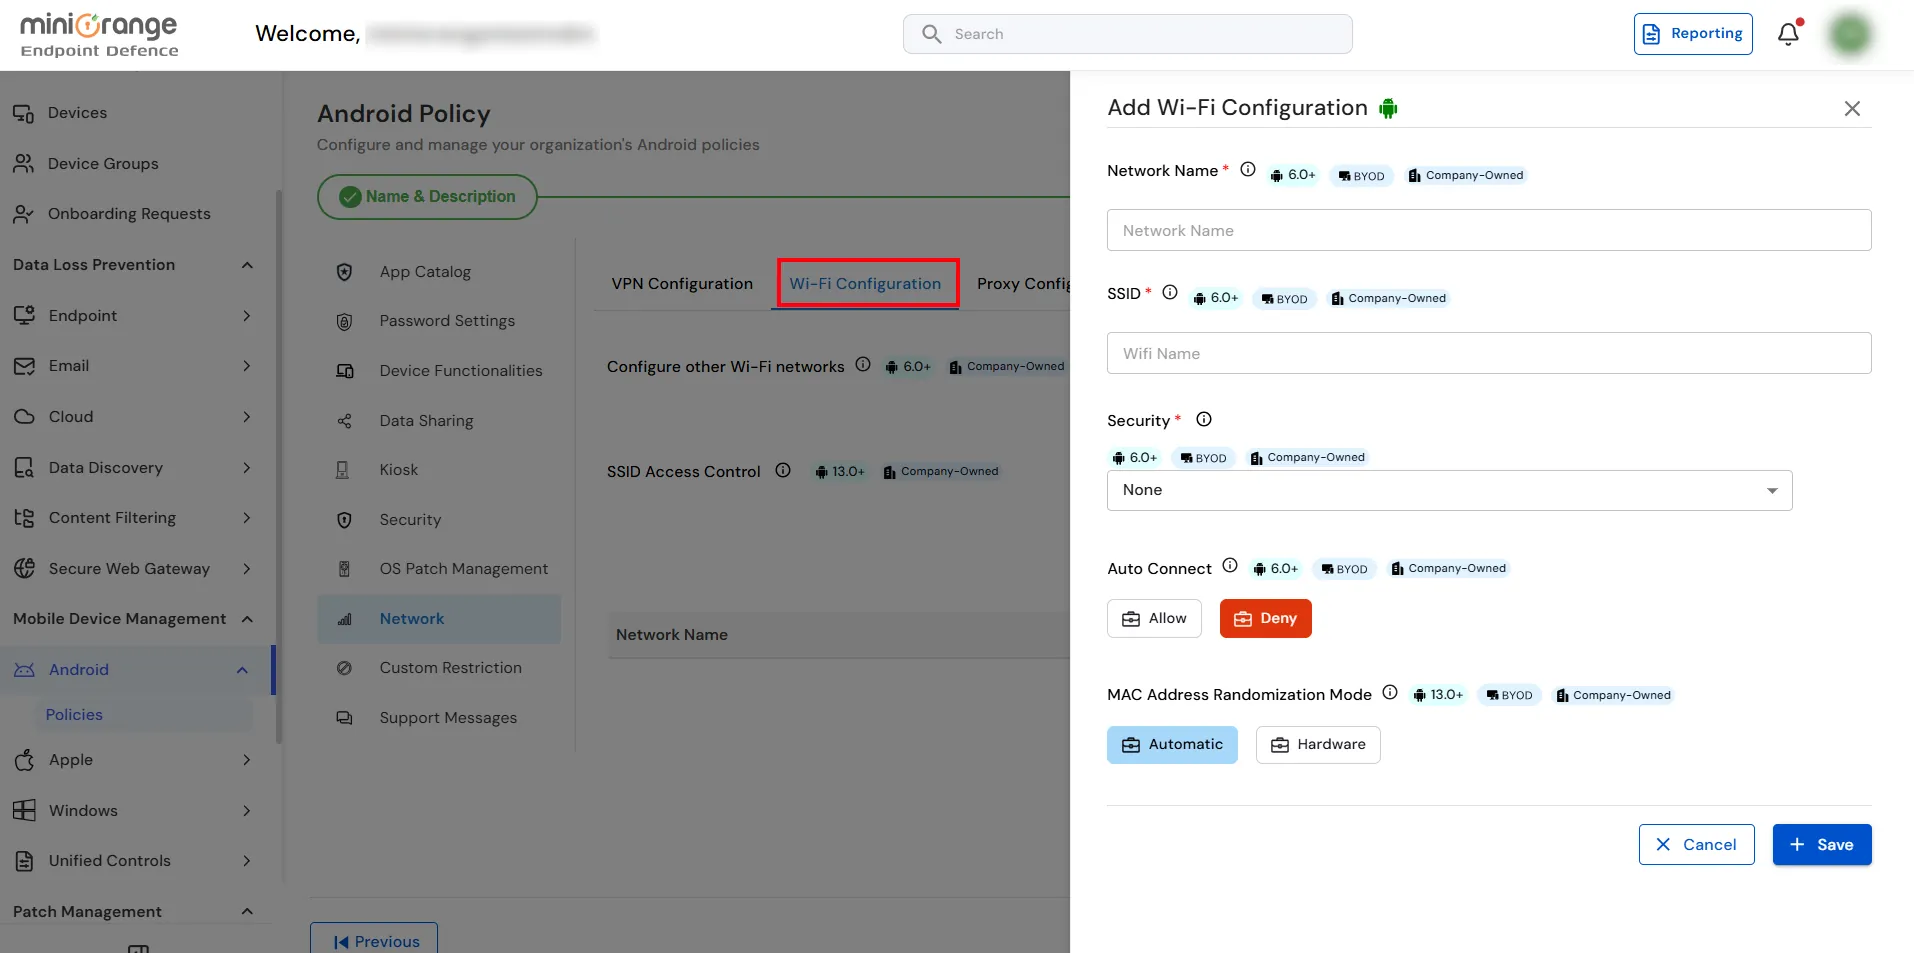
From the Network tab, select Proxy Configuration.
-
Under Connection Type, choose one of the following:
-
Manual – Configure the proxy server details manually.
-
PAC Script – Configure the proxy using a Proxy Auto-Configuration
(PAC) script.
-
If you select Manual:
- Enter the Proxy Host.
- Specify the Proxy Port.
-
Enter any Excluded Hosts that should bypass the proxy server.
-
If you select PAC Script, provide the PAC Script URL.
-
Click Submit to save the network policy.