Workplace Single Sign-On SSO
miniOrange provides secure access to Workplace for enterprises and full control over access of Workplace application. Single Sign-On (SSO) solution for Workplace is a cloud based service. With this service you need only one password for all your web & SaaS apps including Workplace. miniOrange provides secure access and full control to Workplace for enterprises and applications. With the help of the given guide you can configure Workplace easily.
miniOrange and Workplace Single Sign-On (SSO) integration supports the following features:
- SP Initiated Single Sign-On (SSO)
- IdP Initiated Single Sign-On (SSO)
Connect with External Source of Users
miniOrange provides user authentication from various external sources, which can be Directories (like ADFS, Microsoft Active Directory, OpenLDAP, AWS etc), Identity Providers (like Microsoft Entra ID, Okta, AWS), and many more. You can configure your existing directory/user store or add users in miniOrange.
Follow the Step-by-Step Guide given below for Workplace Single Sign-On (SSO)
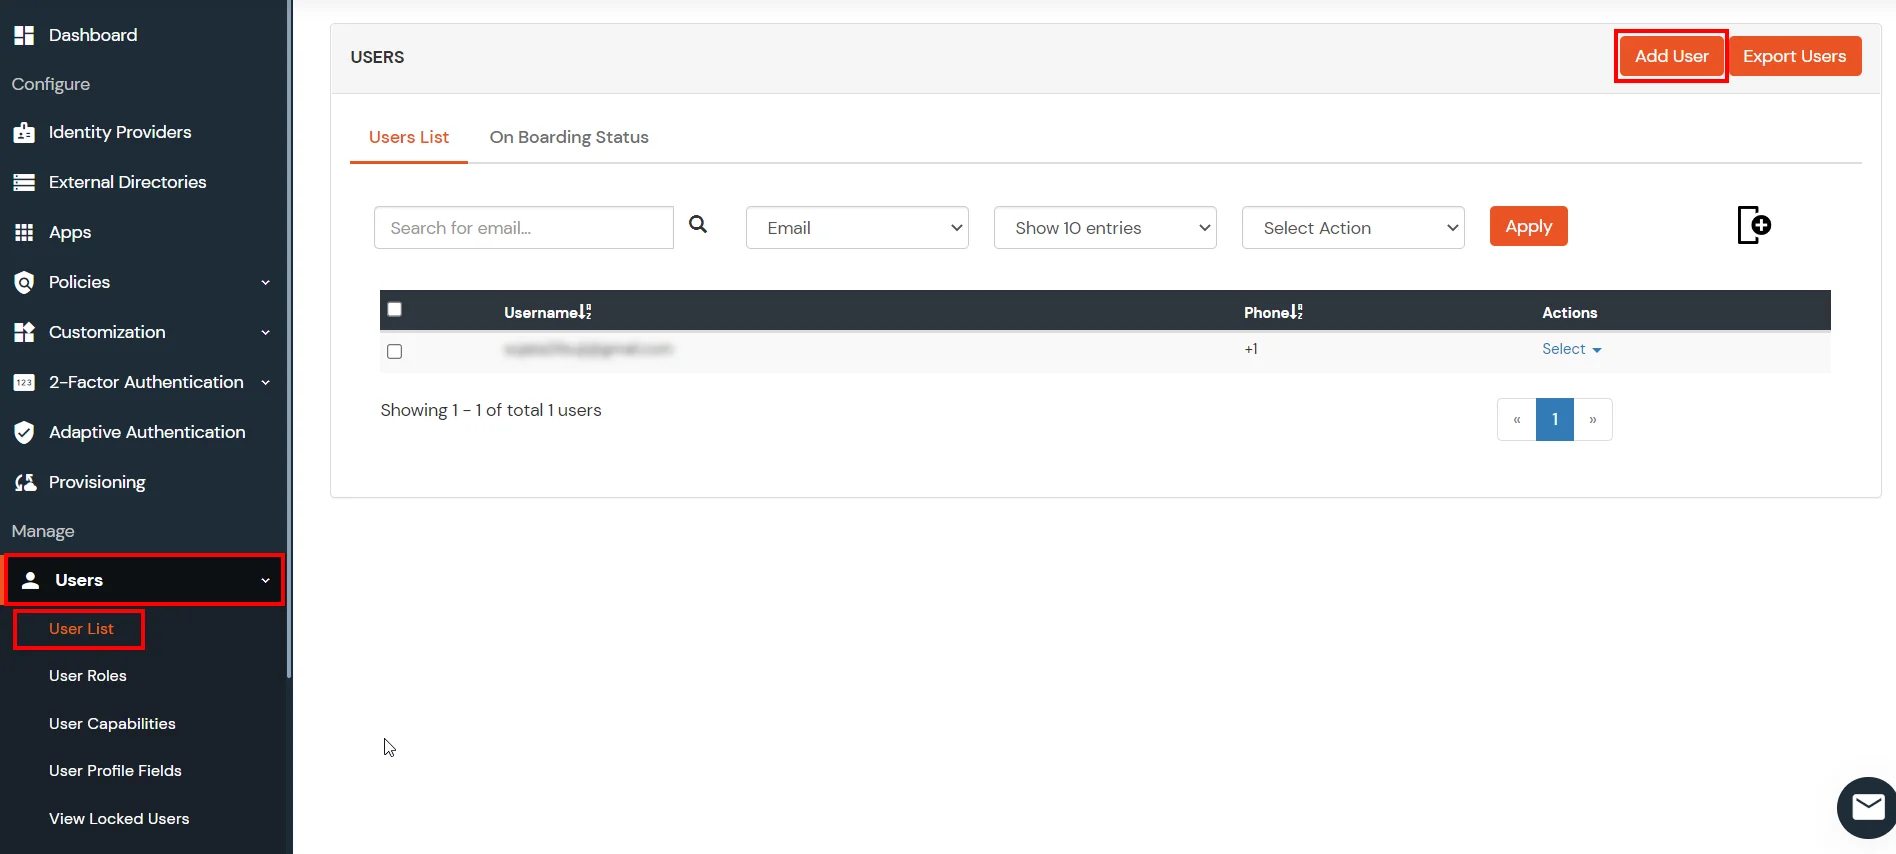
1. Configure workplace in miniOrange
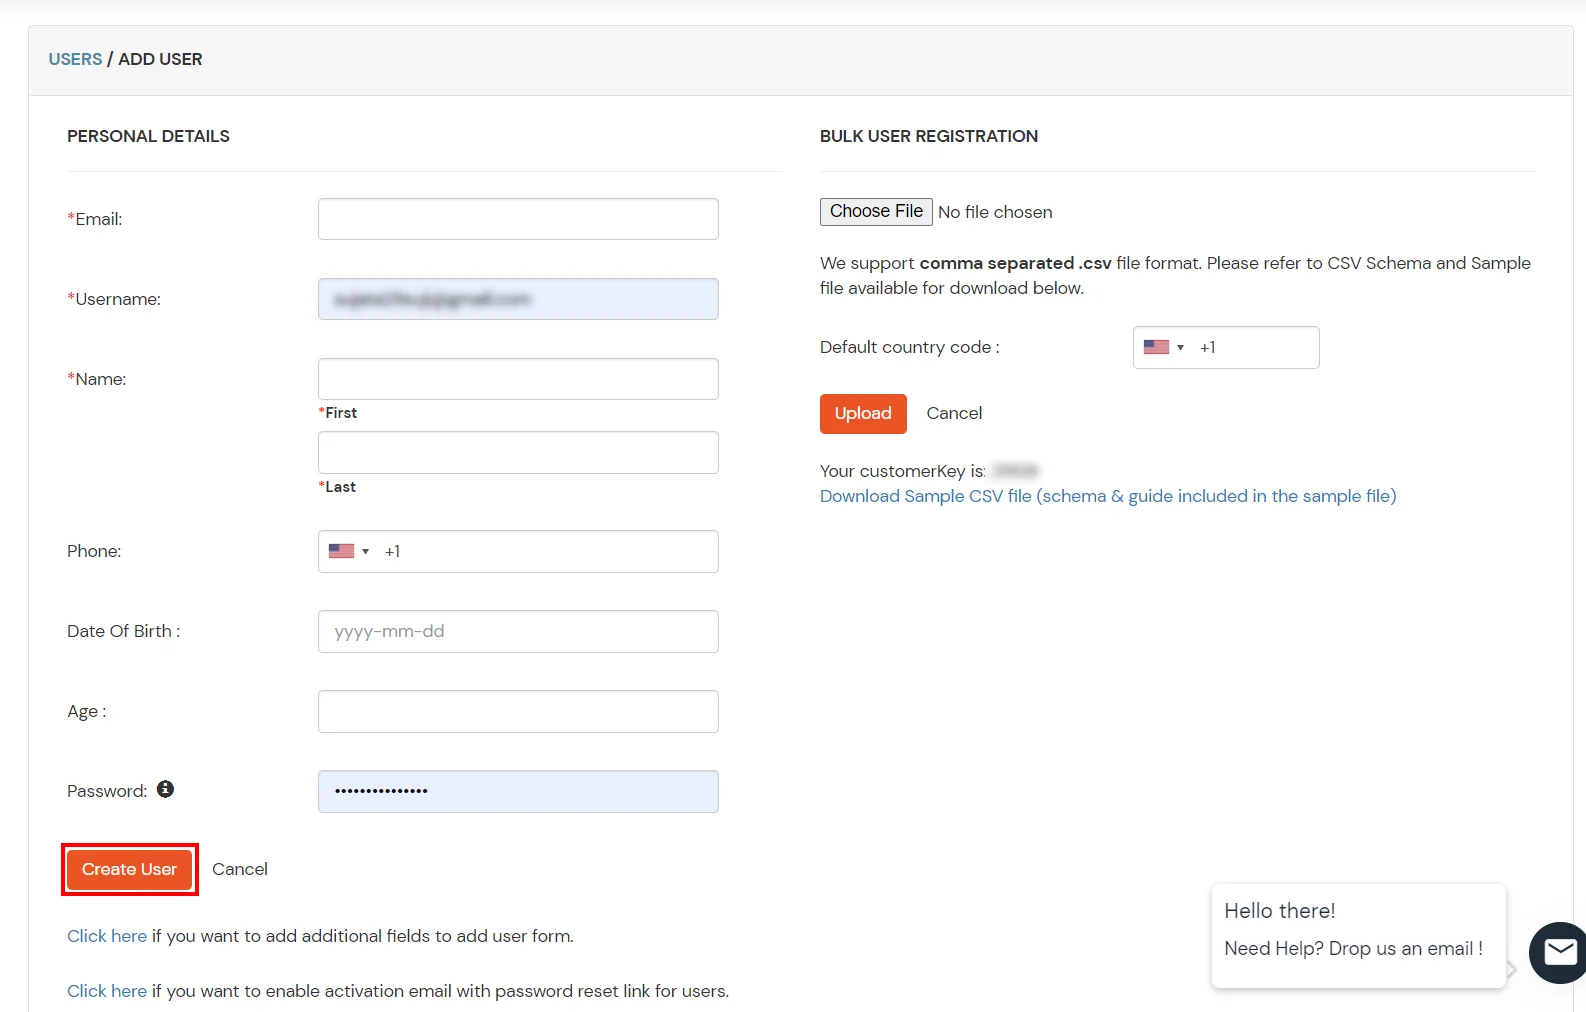
- Login into miniOrange Admin Console.
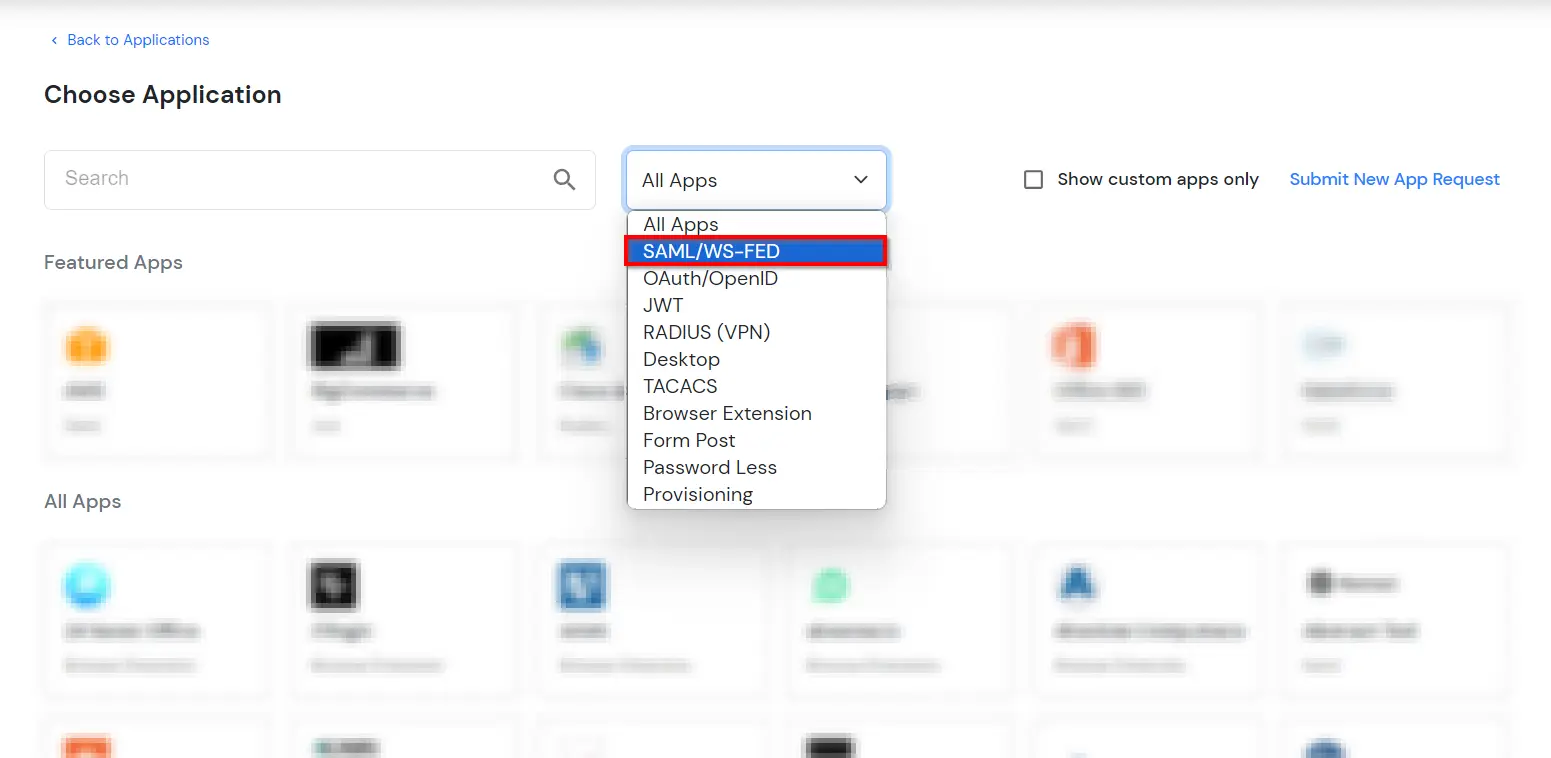
- Go to Apps and click on Add Application button.

- In Choose Application Type, select SAML/WS-FED from the All Apps dropdown.
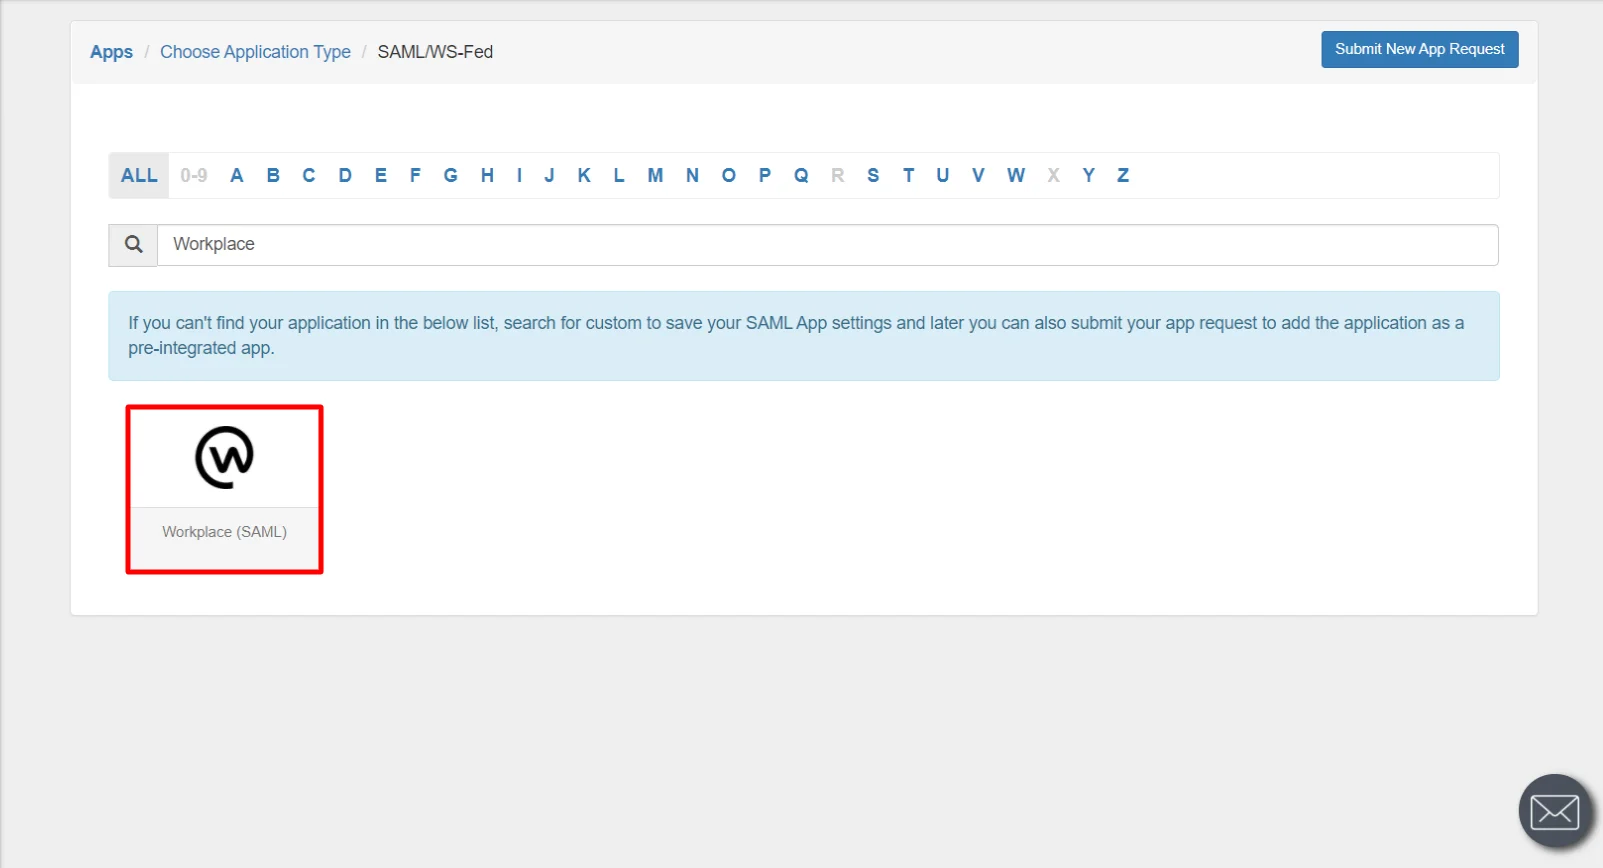
- Search for workplace in the list, if you don't find workplace in the list then, search for custom and you can set up your application in Custom SAML App.
- Enter the following values in the respective fields.
|
SP Entity ID or Issuer:
|
https://www.facebook.com/company/[your-company-id] |
|
ACS URL:
|
[https://your-company-name].facebook.com/work/saml.php |
|
Name ID:
|
E-mail Address |
- It is not compulsory to insert any URL in Single Logout URL section.
- Click on Advanced Settings. Relay State section could be kept empty.
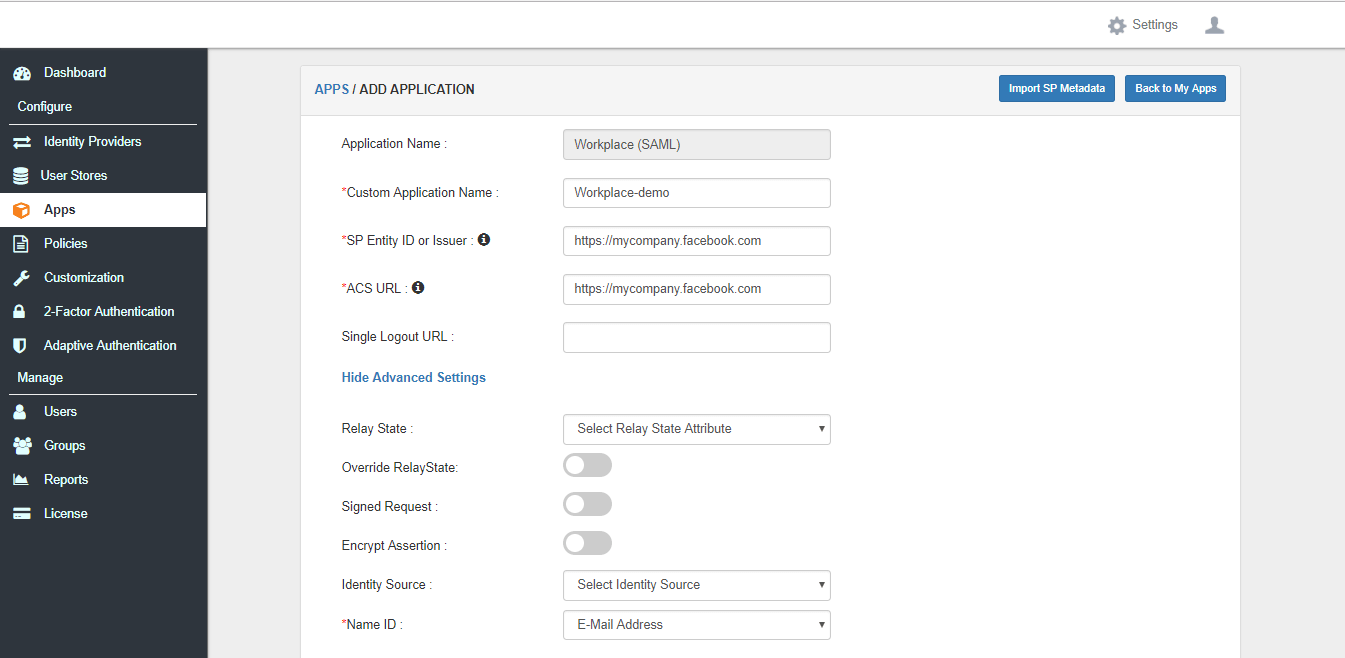
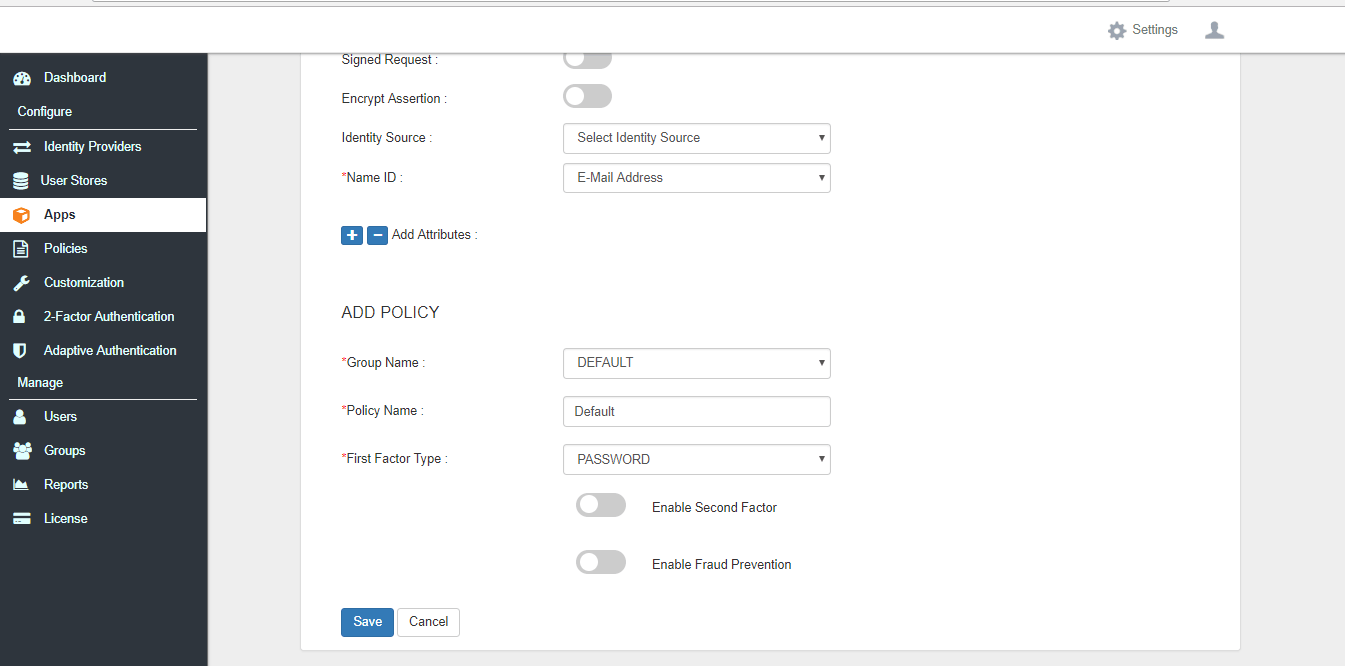
- Leave the Attributes section empty.
- Add a new policy for the workplace.
- Select the workplace from Application dropdown.
- Select a Group Name from the dropdown - the group for which you want to add workplace policy.
- Give a policy name for the workplace in the Policy Name field.
- Select the First Factor Type for authentication.
- Enable Second Factor for authentication if required.
- Click on Save button to add policy for workplace Single Sign On (SSO).
- Click on Save to configure workplace.
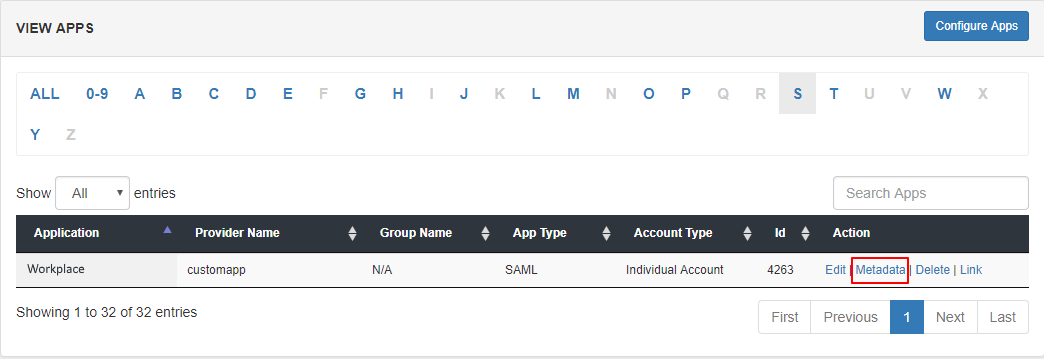
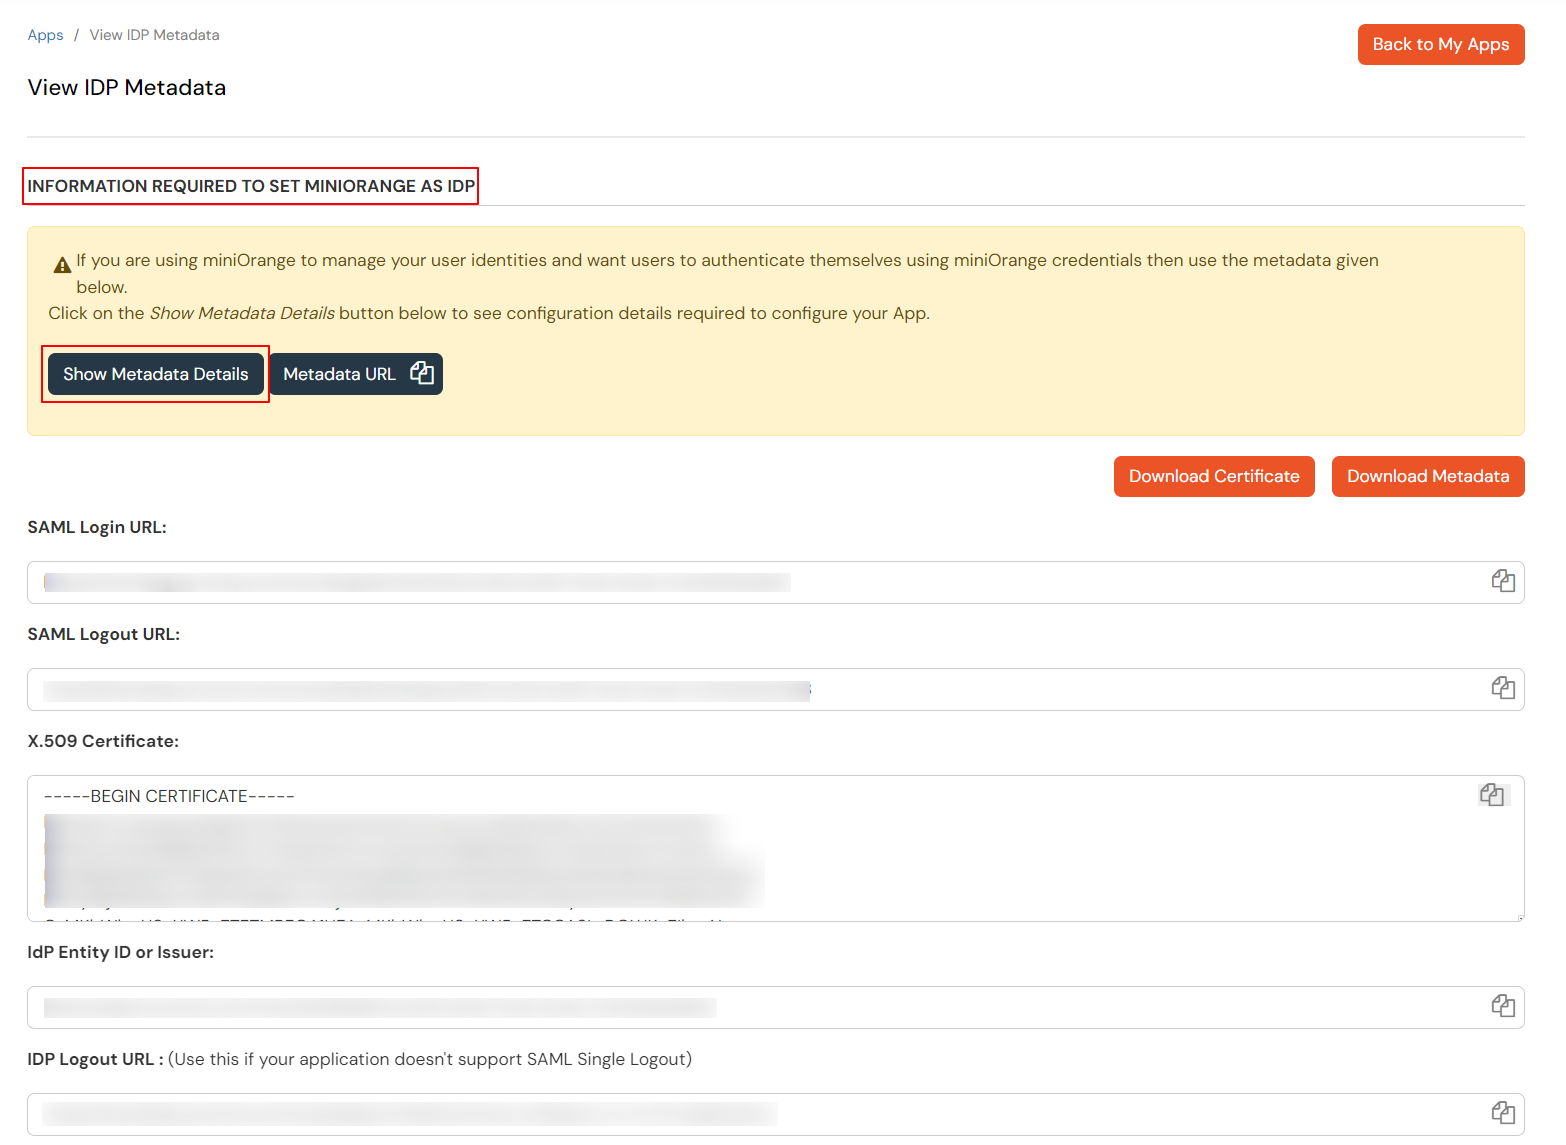
- Click on Metadata link to download the metadata which will be required later. Click on Link to see the IDP initiated SSO link for Workplace.
- Keep SAML Login URL and IdP Entity ID or Issuer and click on the Download Certificate which you will require in Step 2.
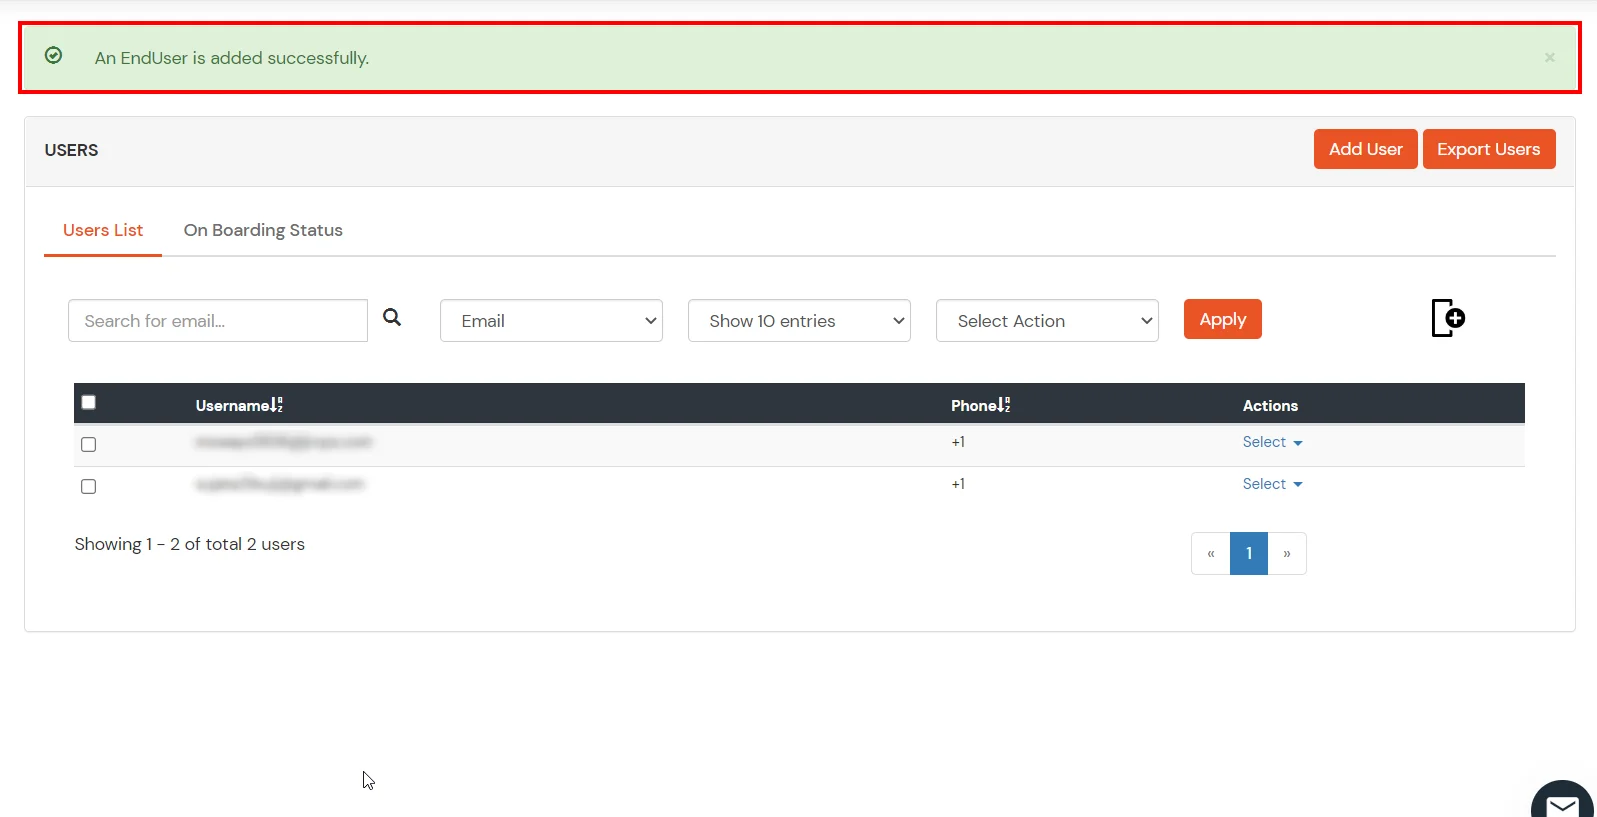
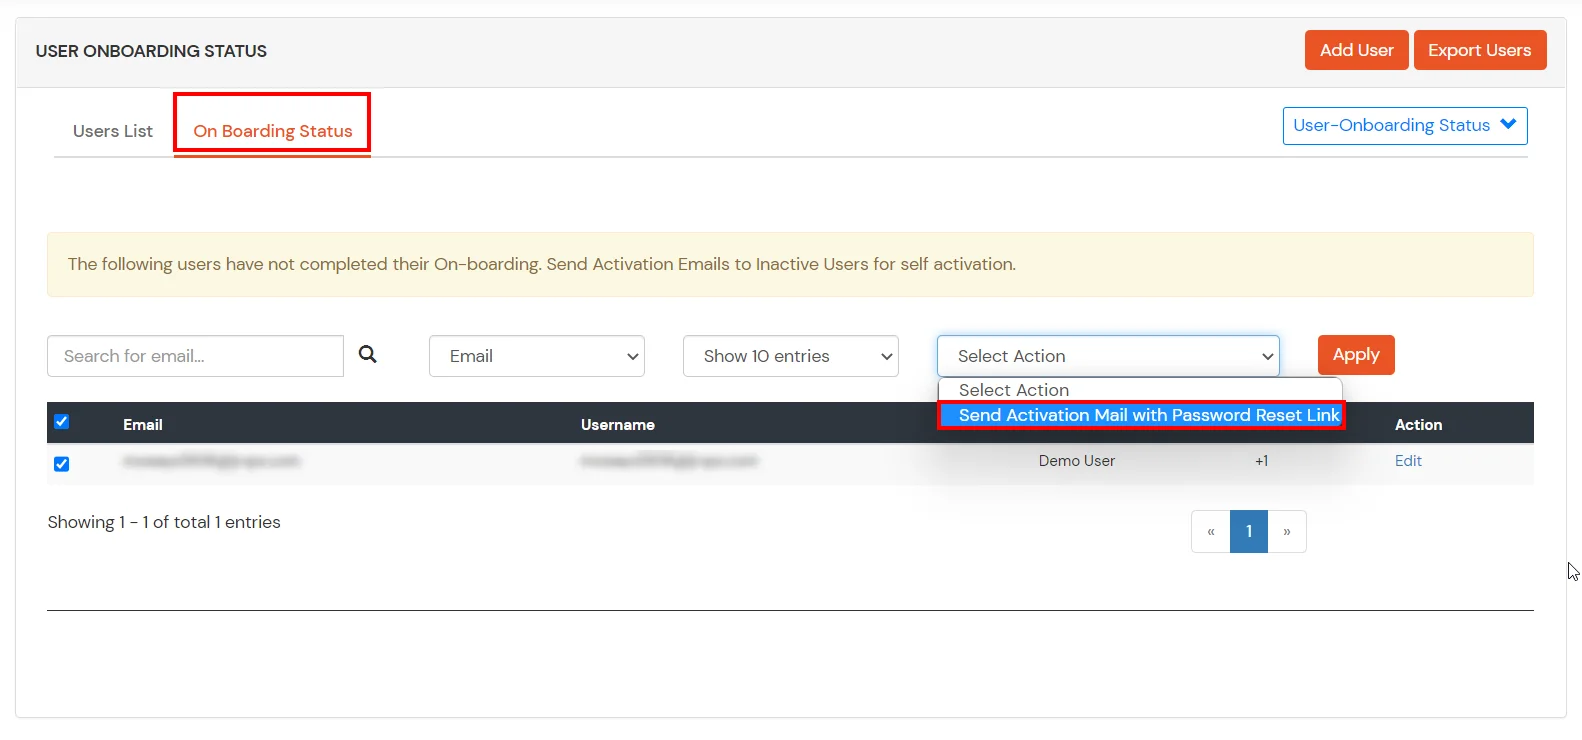
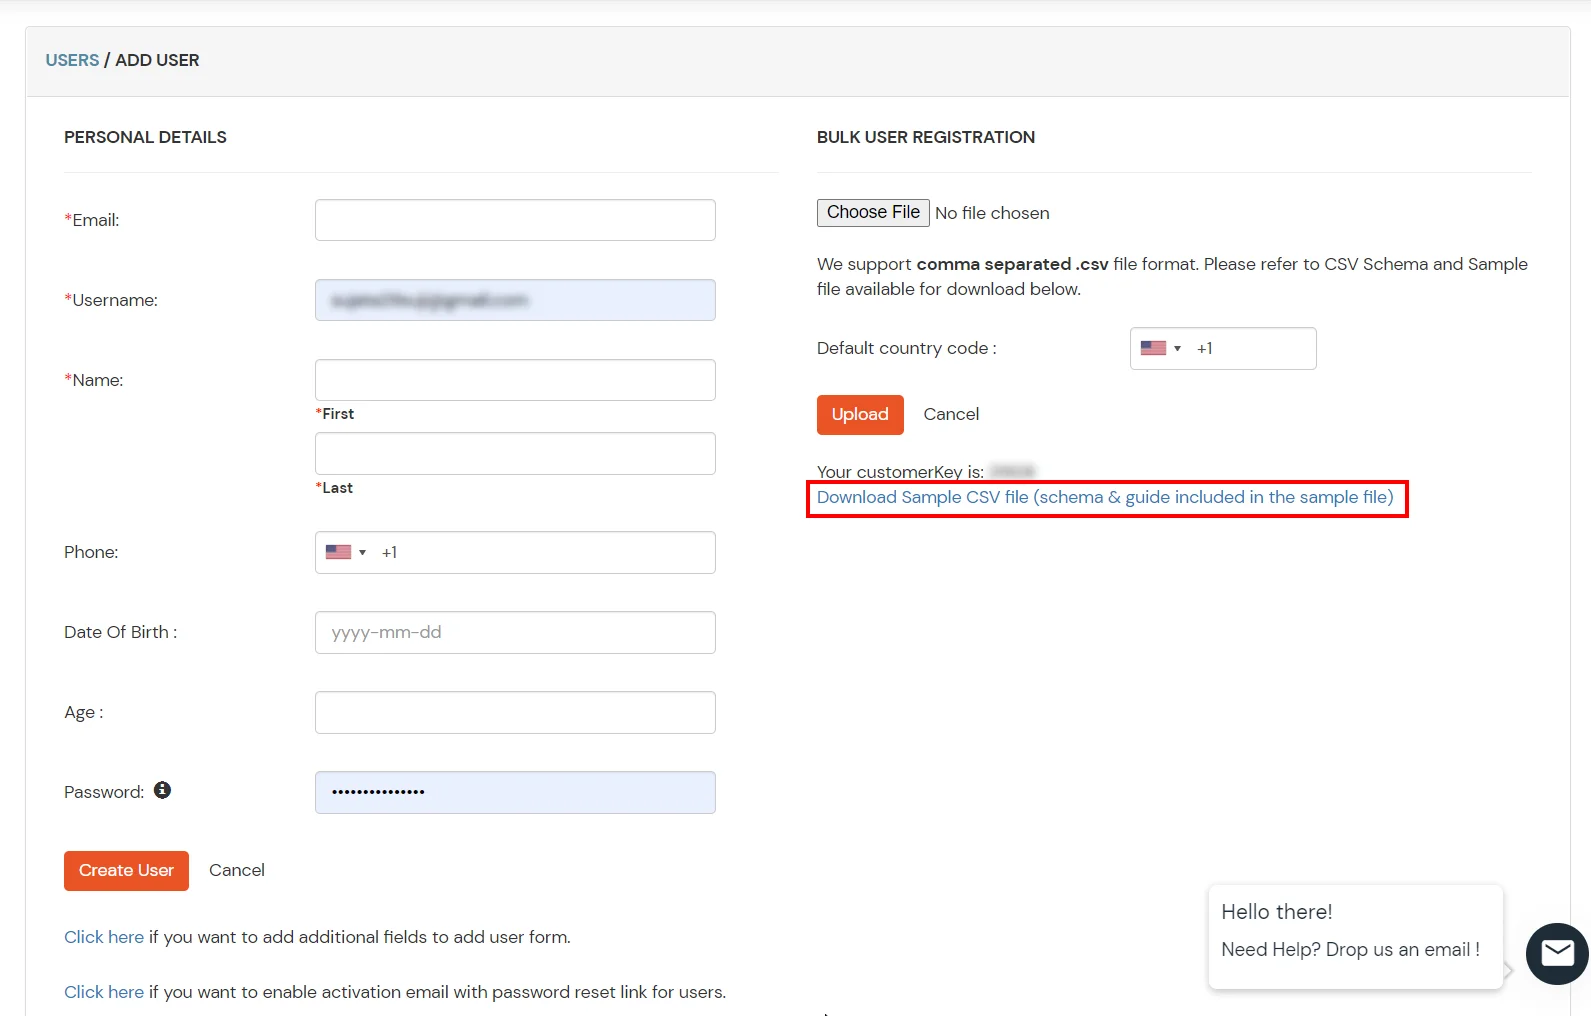
- Now click on Onboard users into our system from View Policy Tab.
2. Configure SSO for your domain in the workplace
- In the Company Dashboard, go to the Authentication tab.
- Under SAML Authentication, select SSO Only from the drop-down list.
- Input the values of miniorange IdP into the corresponding fields as given below:
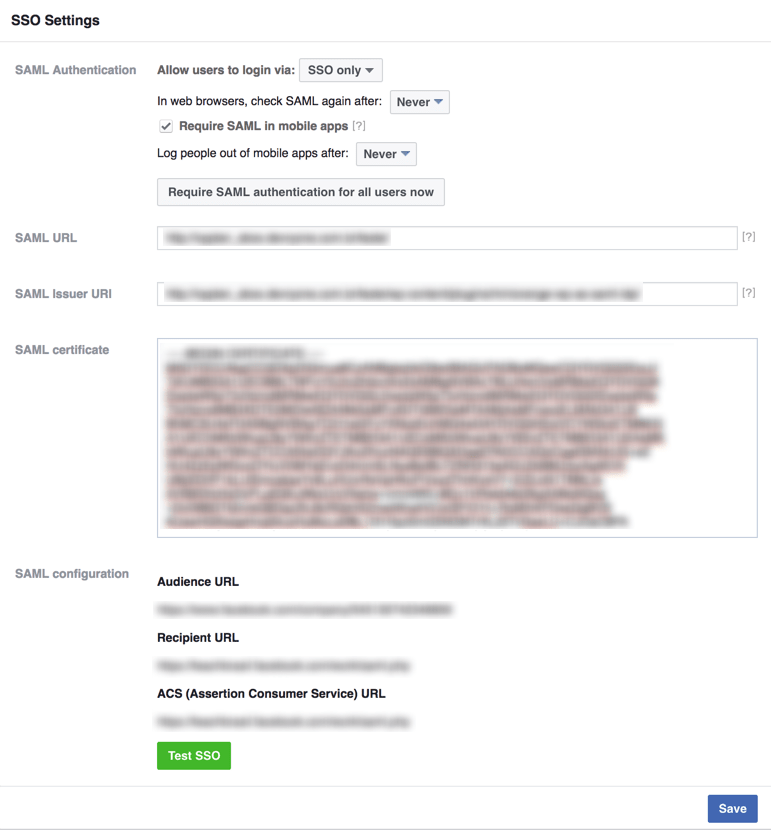
| Attribute | Description |
|---|
| SAML URL | Enter SAML URL value that you got from Step 1. |
| SAML Issuer URL | Enter SAML Issuer URL value that you got from Step 1. |
| SAML Certificate | You may need to open up the downloaded certificate in a text editor in order to copy/paste this into the field |
- Depending on miniorange IdP, you may need to enter the Audience URL:(not compulsory), Recipient URL:(not compulsory) and ACS (Assertion Consumer Service) URL listed under the SAML Configuration section in the workplace.
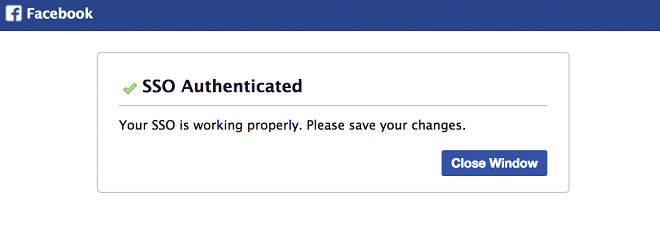
- Scroll to the bottom of the section and click the Test SSO button. This will result in a pop-up window appearing with miniOrange IdP login page presented. Enter your credentials in as normal to authenticate.
Troubleshooting: Ensure the email address being returned back from miniorange IdP is the same as the Workplace account you are logged in with.
- Once the test has been completed successfully, scroll to the bottom of the page and click the Save button.
- All users using workplace will now be presented with miniOrange IdP login page for authentication.
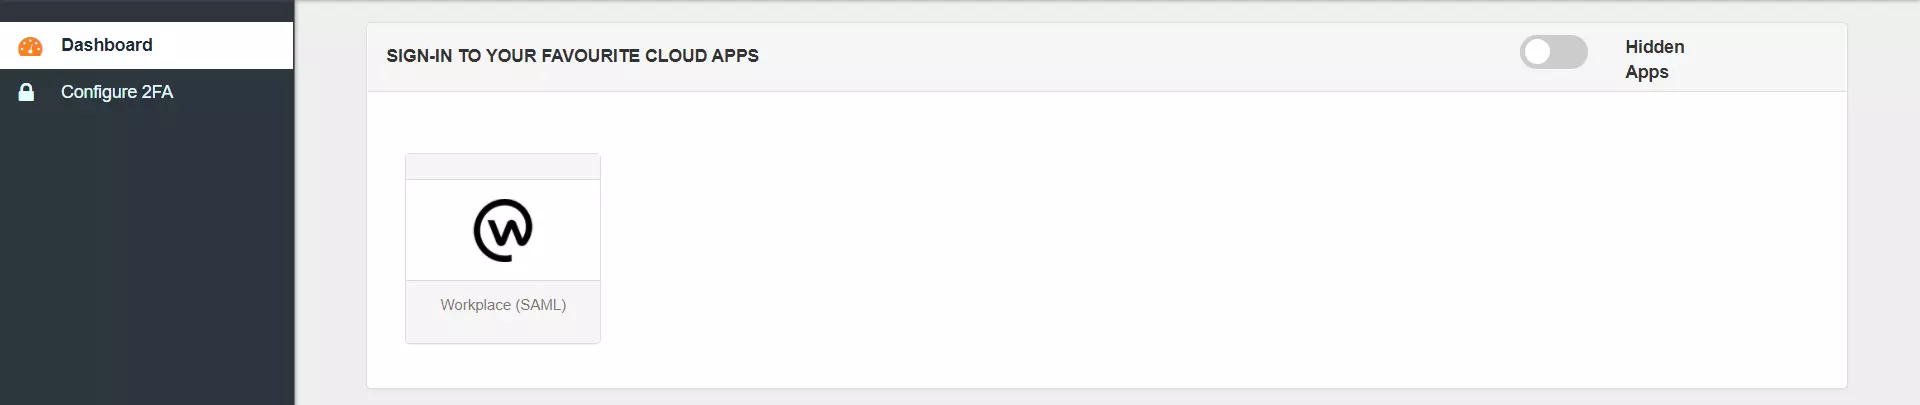
3. Test SSO Configuration
Test SSO login to your workplace account with miniOrange IdP:
4. Configure Your User Directory (Optional)
miniOrange provides user authentication from various external sources, which can be Directories (like ADFS, Microsoft Active Directory, Microsoft Entra ID, OpenLDAP, Google, AWS Cognito etc), Identity Providers (like Okta, Shibboleth, Ping, OneLogin, KeyCloak), Databases (like MySQL, Maria DB, PostgreSQL) and many more. You can configure your existing directory/user store or add users in miniOrange.
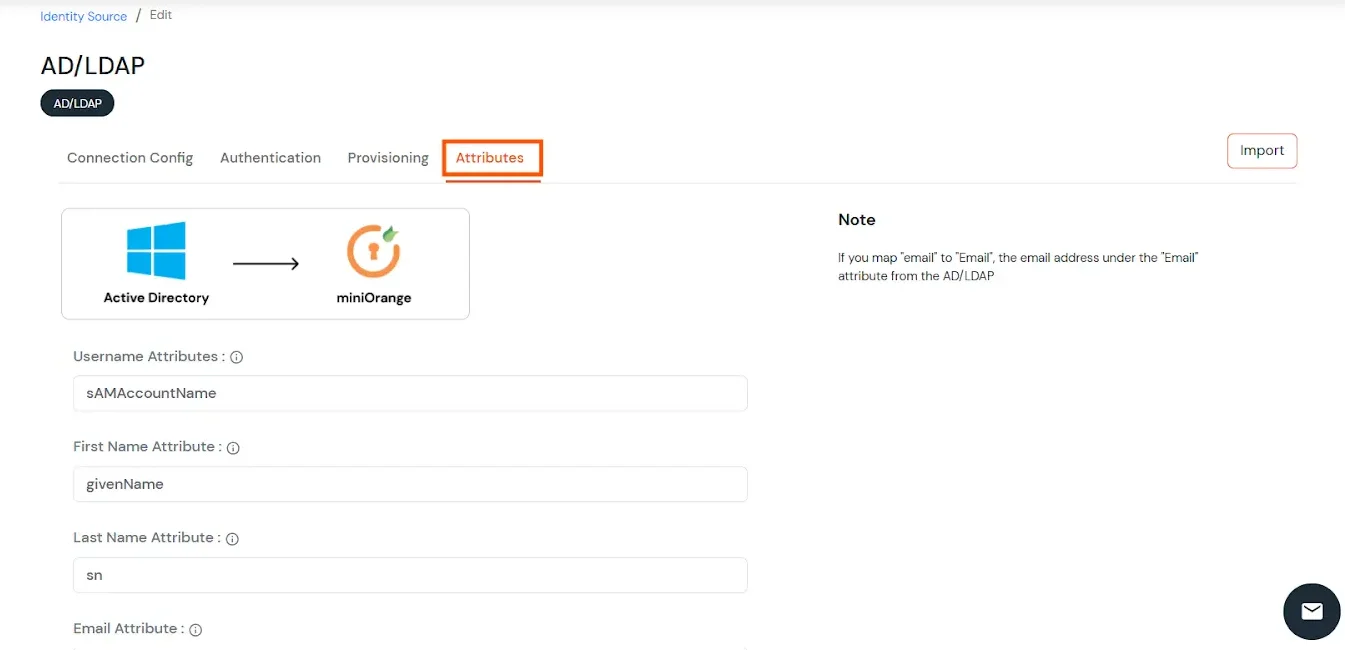
- Click on Identity Providers >> Add Identity Provider in the left menu of the dashboard
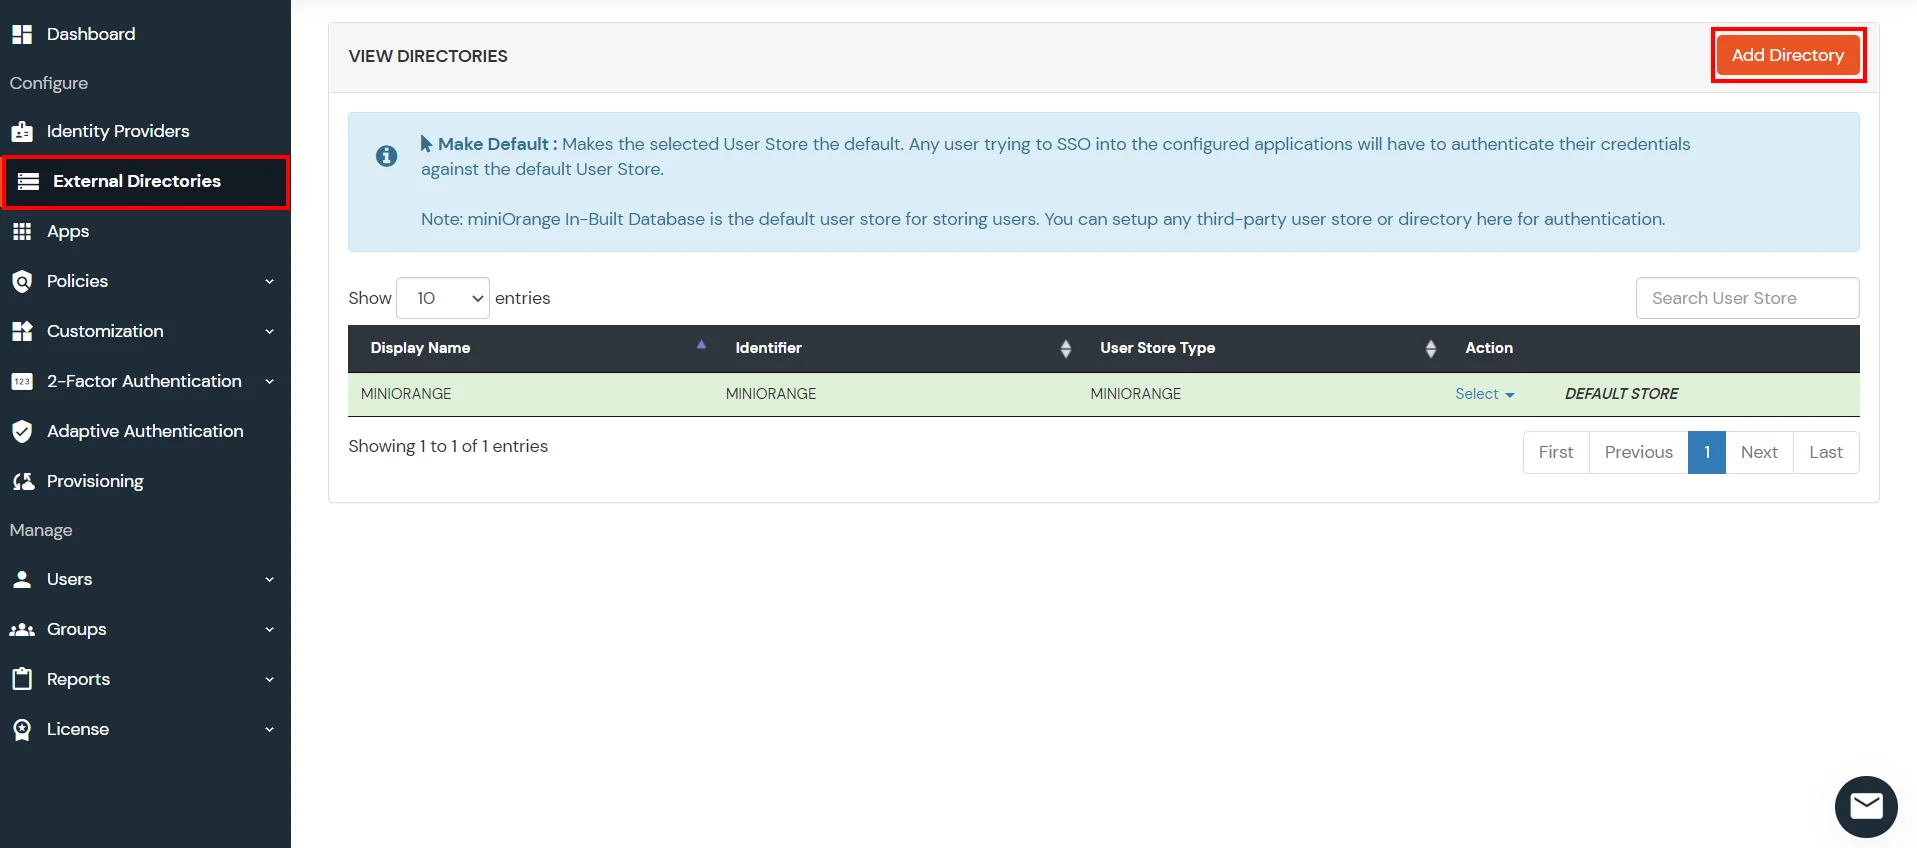
- In Choose Identity Provider, select AD/LDAP Directories from the dropdown.

- Then search for AD/LDAP and click it.
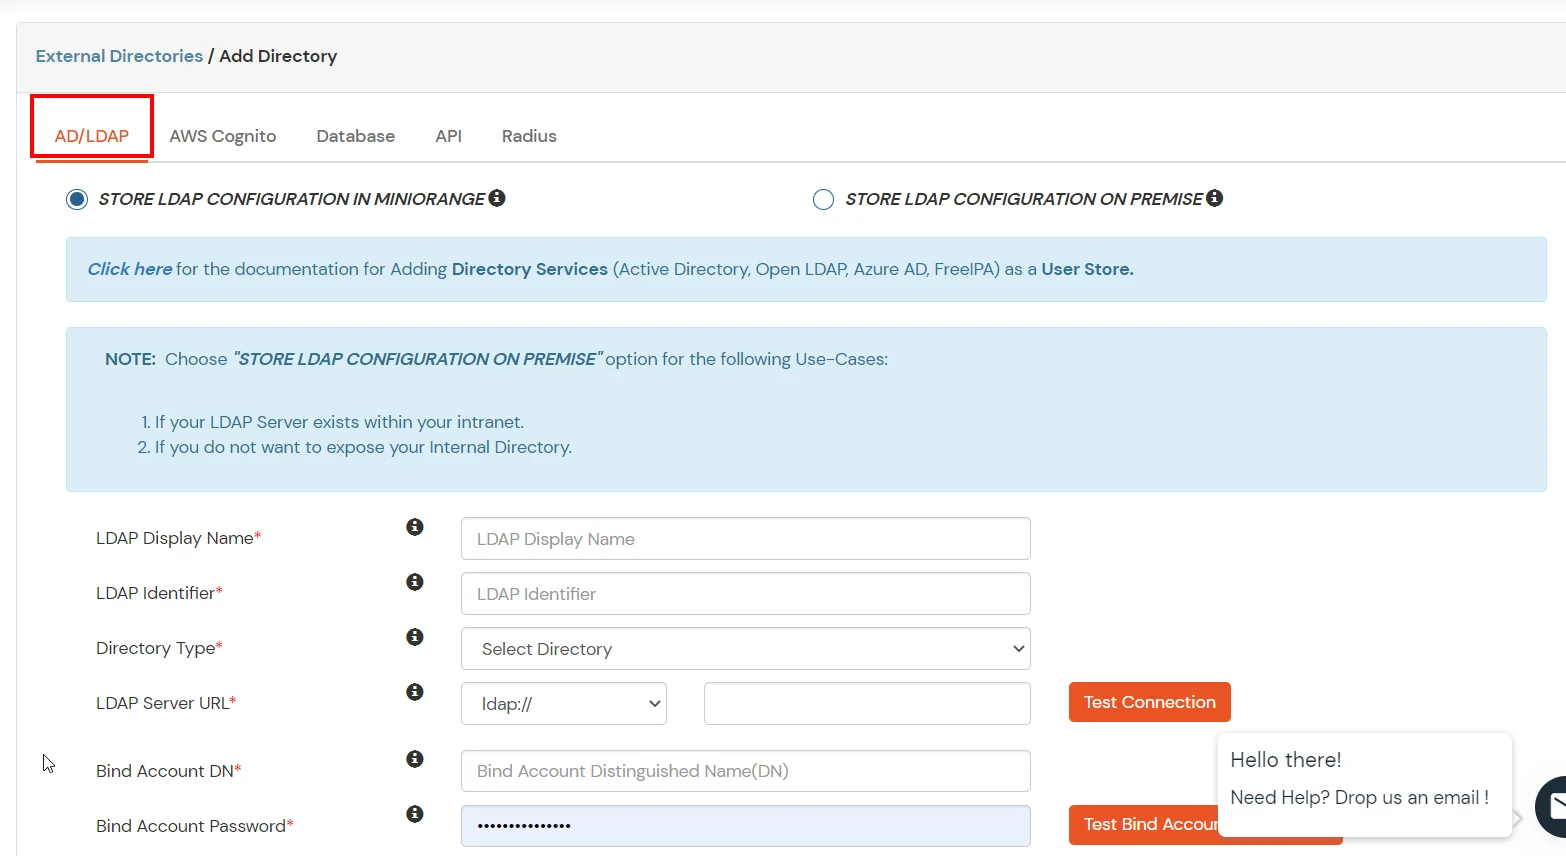
- STORE LDAP CONFIGURATION IN MINIORANGE: Choose this option if you want to keep your configuration in miniOrange. If the active directory is behind a firewall, you will need to open the firewall to allow incoming requests to your AD.
- STORE LDAP CONFIGURATION ON PREMISE: Choose this option if you want to keep your configuration in your premise and only allow access to AD inside premises. You will have to download and install miniOrange gateway on your premise.
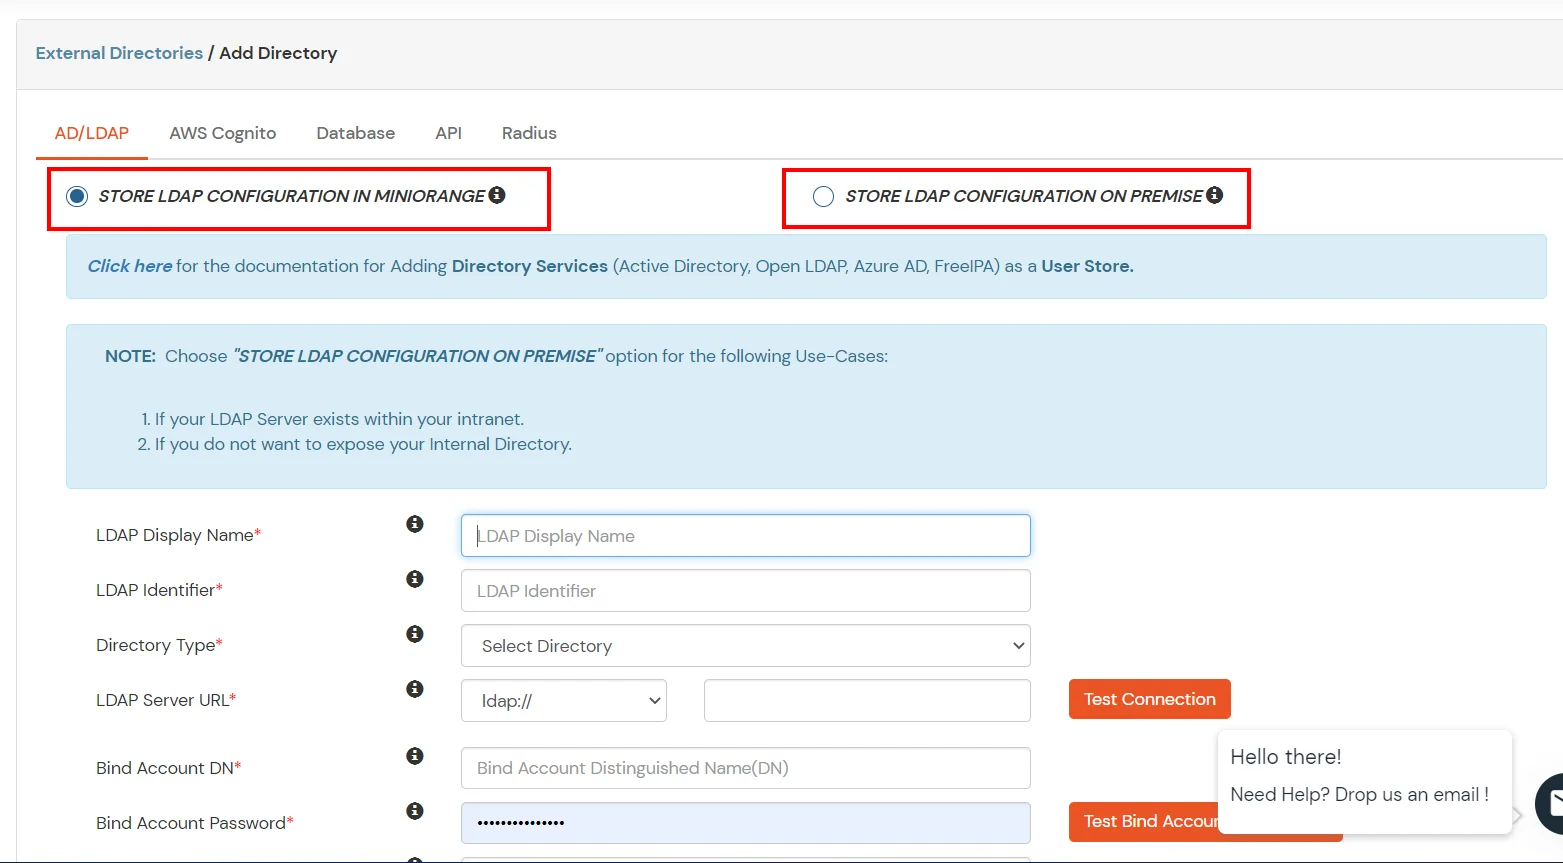
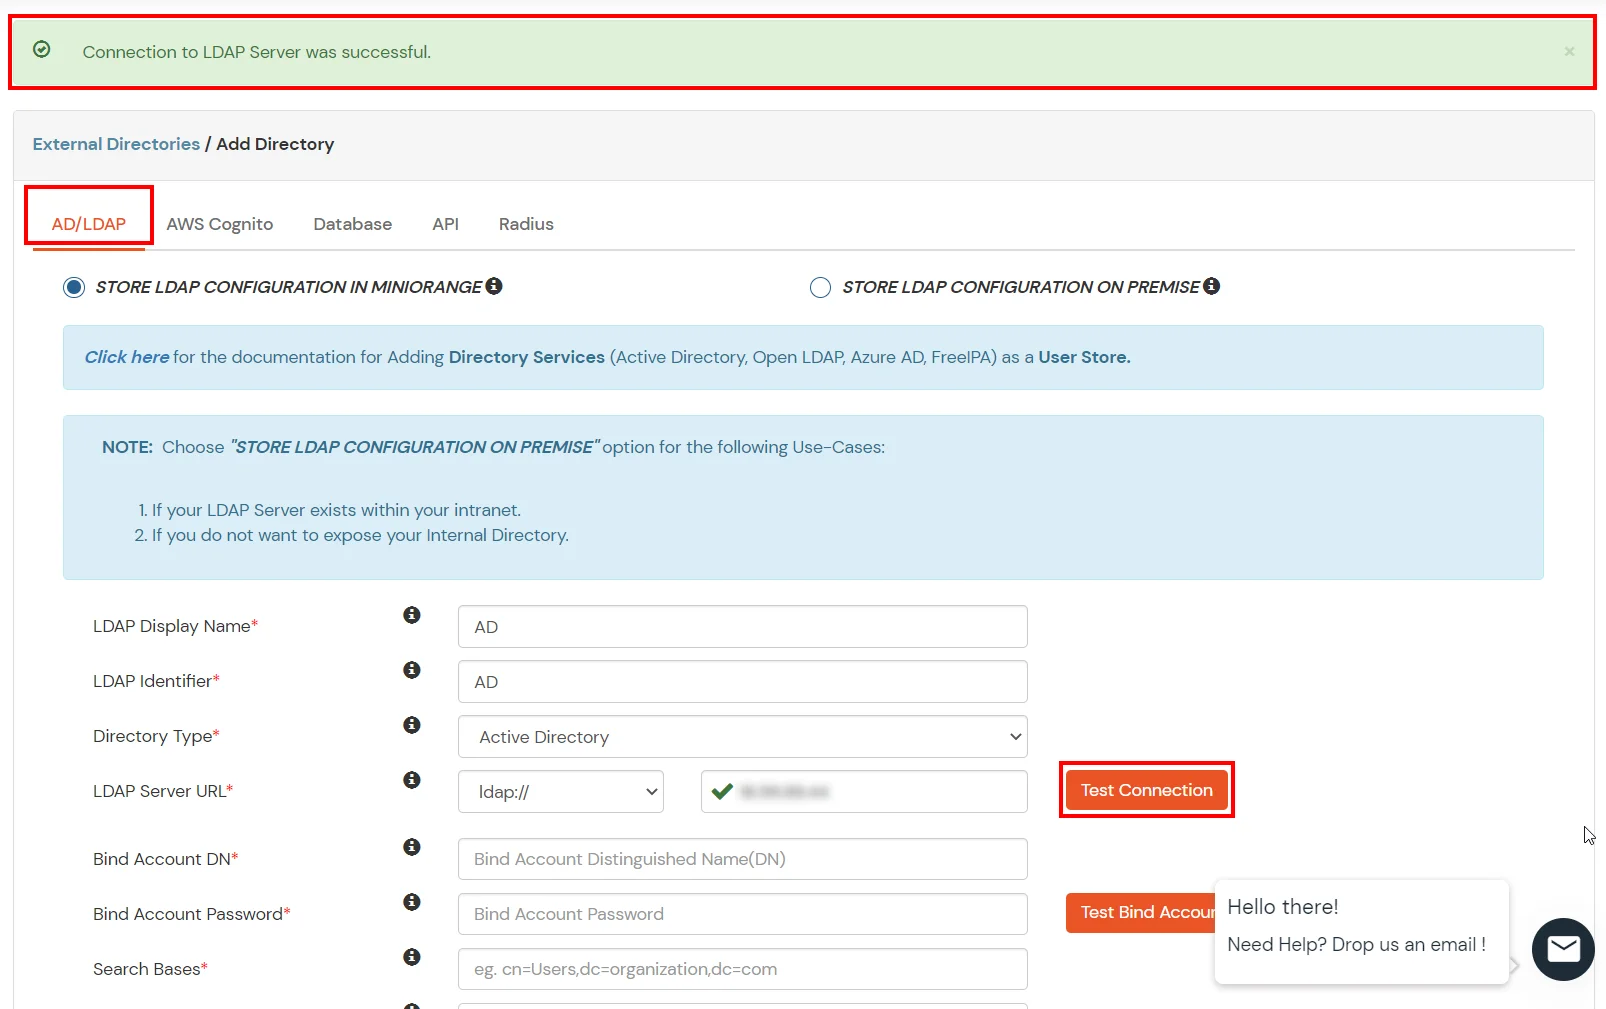
- Enter AD/LDAP Display Name and Identifier name.
- Select Directory Type as Active Directory.
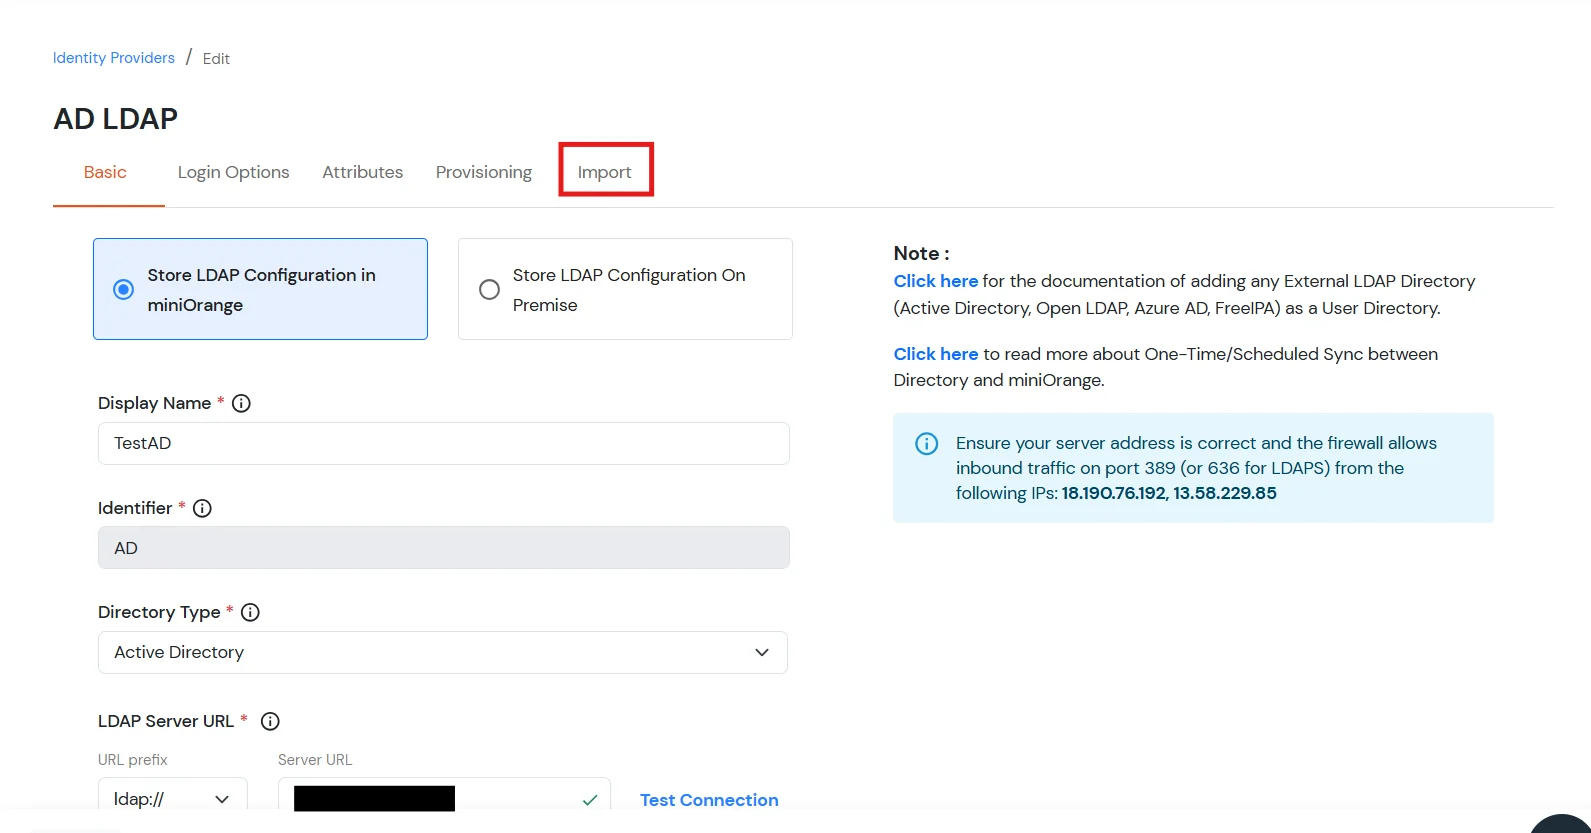
- Enter the LDAP Server URL or IP Address against the LDAP Server URL field.
- Click on the Test Connection button to verify if you have made a successful connection with your LDAP server.
- In Active Directory, go to the properties of user containers/OU's and search for the Distinguished Name attribute. The bind account should have minimum required read privileges in Active Directory to allow directory lookups. If the use case involves provisioning (such as creating, updating, or deleting users or groups), the account must also be granted appropriate write permissions.
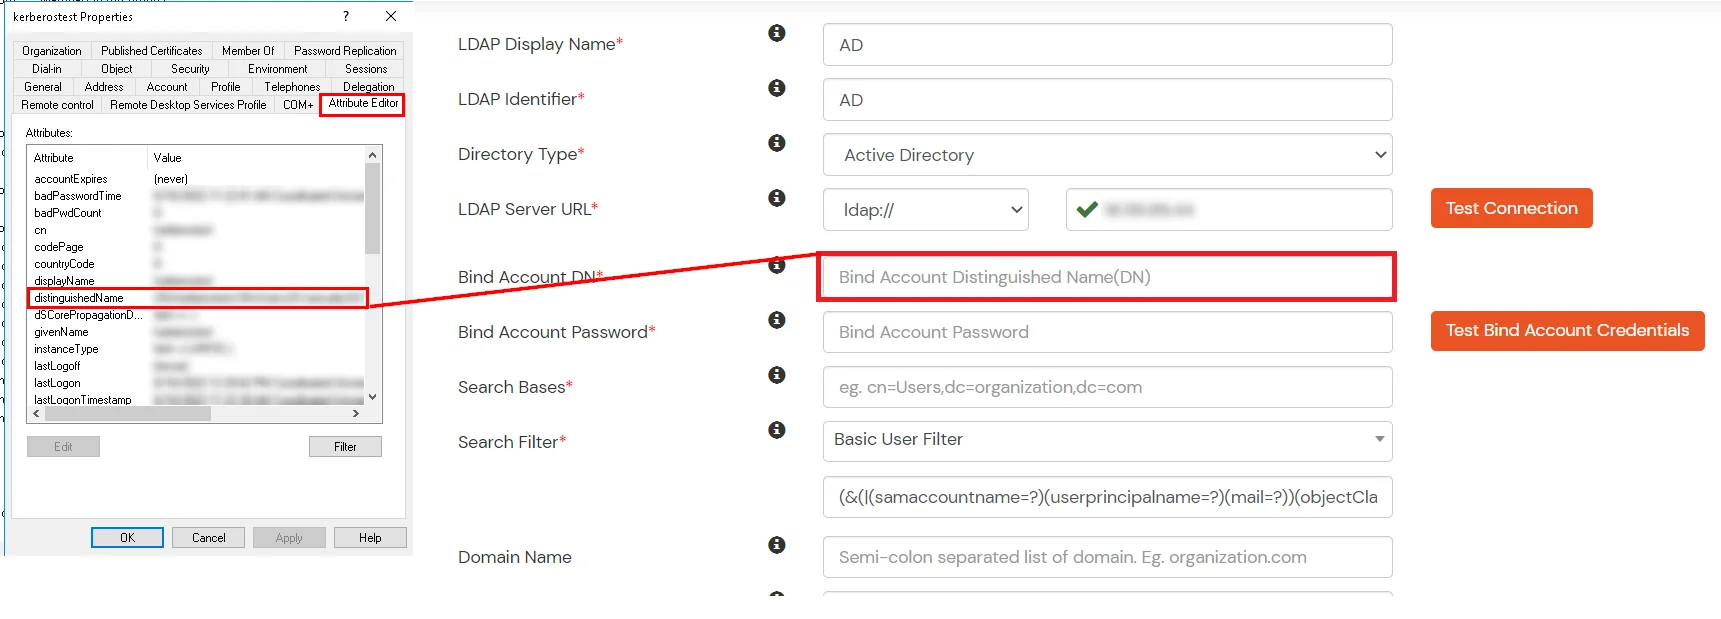
- Enter the valid Bind account Password.
- Click on the Test Bind Account Credentials button to verify your LDAP Bind credentials for LDAP connection.
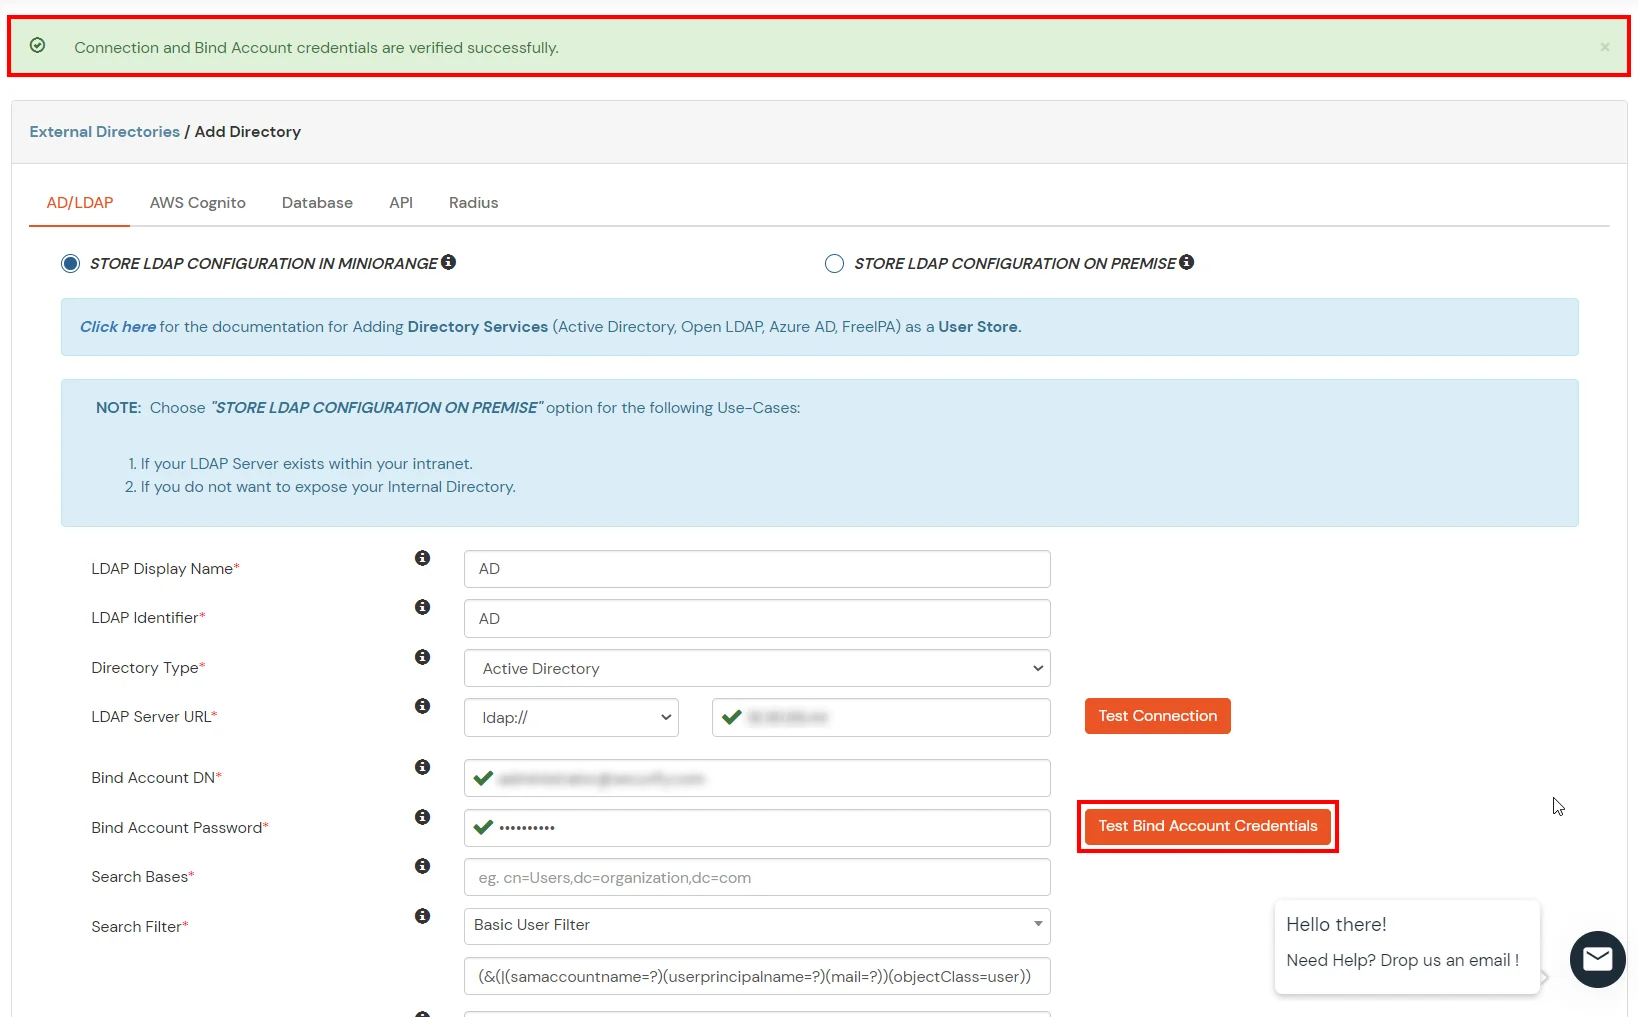
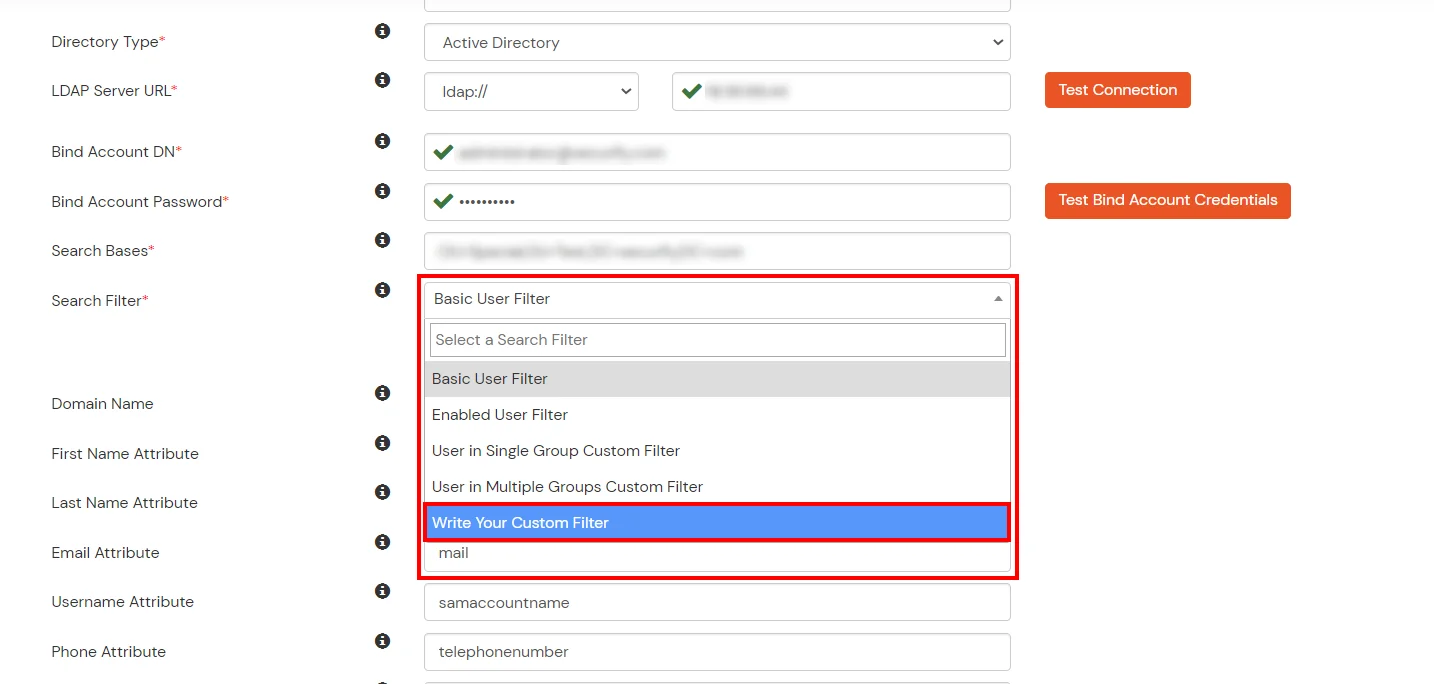
- Search Base is the location in the directory where the search for a user begins. You will get this from the same place you got your Distinguished name.
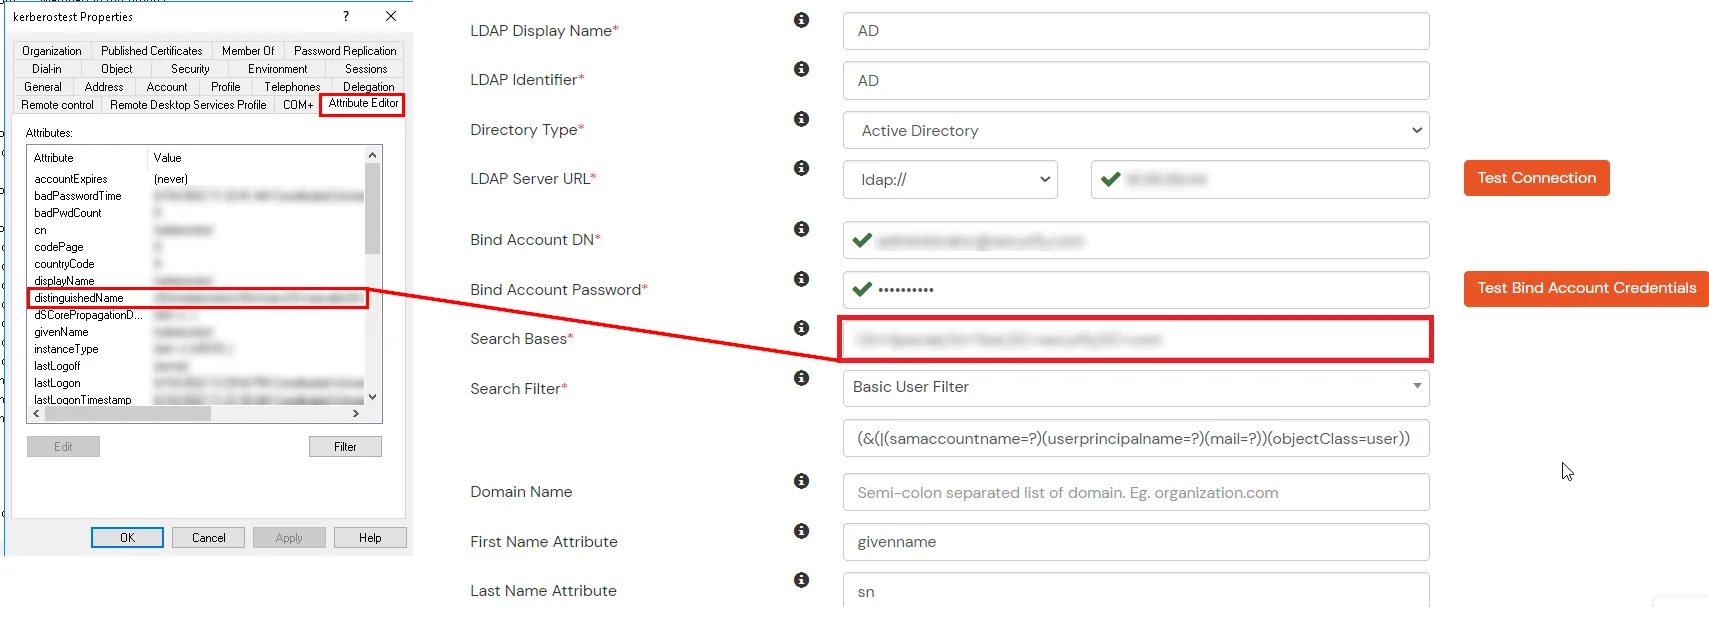
- Select a suitable Search filter from the drop-down menu. If you use User in Single Group Filter or User in Multiple Group Filter, replace the <group-dn> in the search filter with the distinguished name of the group in which your users are present. To use custom Search Filter select "Write your Custom Filter" option and customize it accordingly.
- Click on the Next button, or go to the Login Options tab.
- You can also configure following options while setting up AD. Enable Activate LDAP in order to authenticate users from AD/LDAP. Click on the Next button to add user store.
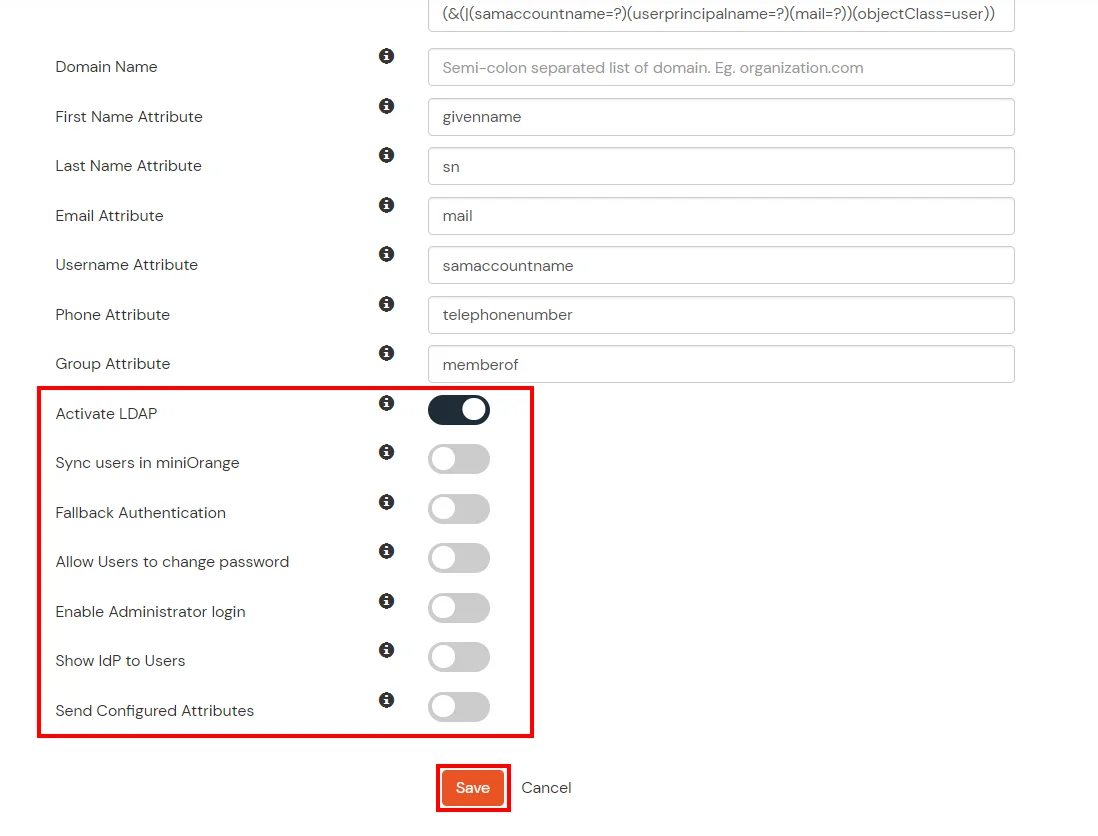
Here's the list of the attributes and what it does when we enable it. You can enable/disable accordingly.
| Attribute |
Description |
| Activate LDAP |
All user authentications will be done with LDAP credentials if you Activate it |
| Fallback Authentication |
If LDAP credentials fail then user will be authenticated through miniOrange |
| Enable administrator login |
On enabling this, your miniOrange Administrator login authenticates using your LDAP server |
| Show IdP to users |
If you enable this option, this IdP will be visible to users |
| Sync users in miniOrange |
Users will be created in miniOrange after authentication with LDAP |
- Click on the Next button, or go to the Attributes tab.
Attributes Mapping from AD
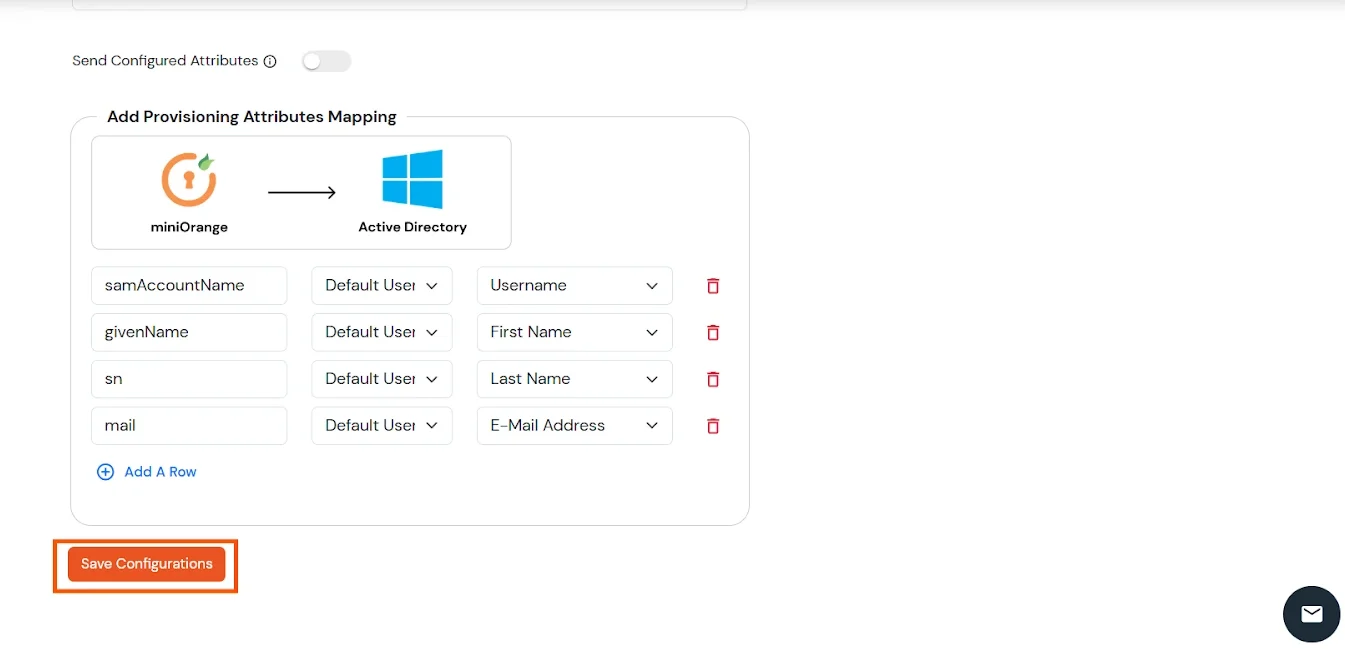
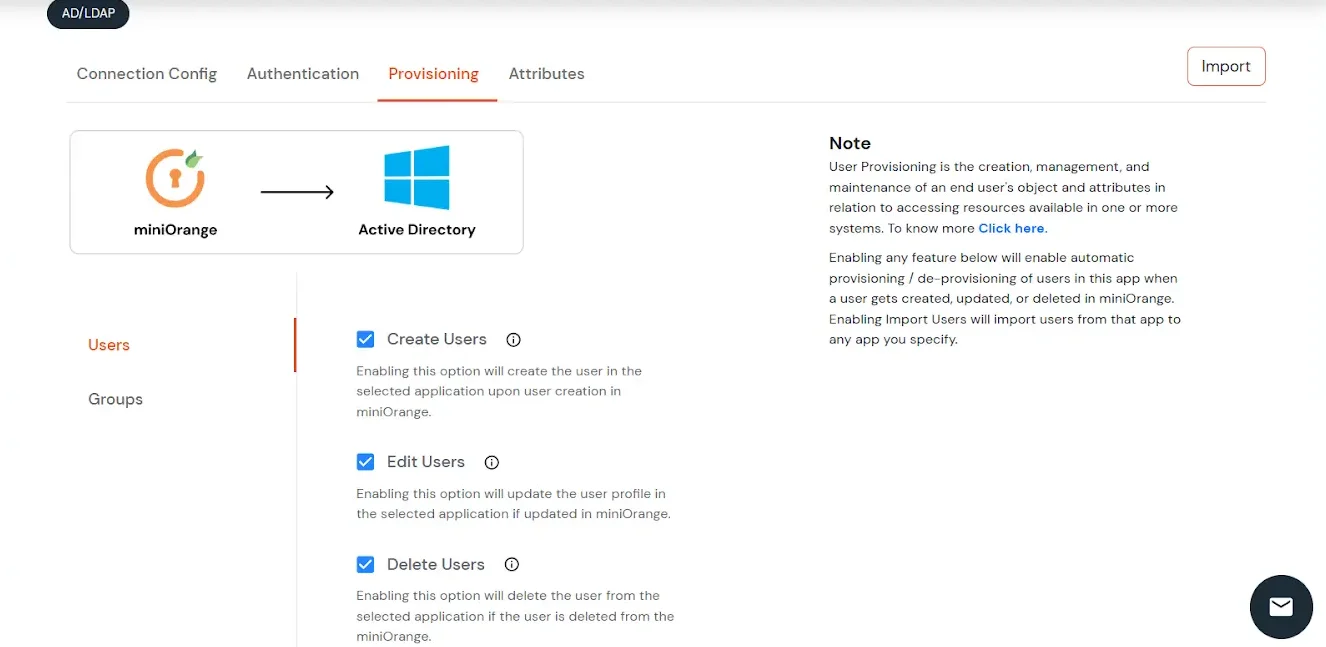
User Import and Provisioning from AD
- If you want to set up provisioning, click here for detailed information. We will skip this step for now.
Import Password Policy from AD
- If you want to import your Active Directory password policy into miniOrange, click here for detailed information. We will skip this step for now.
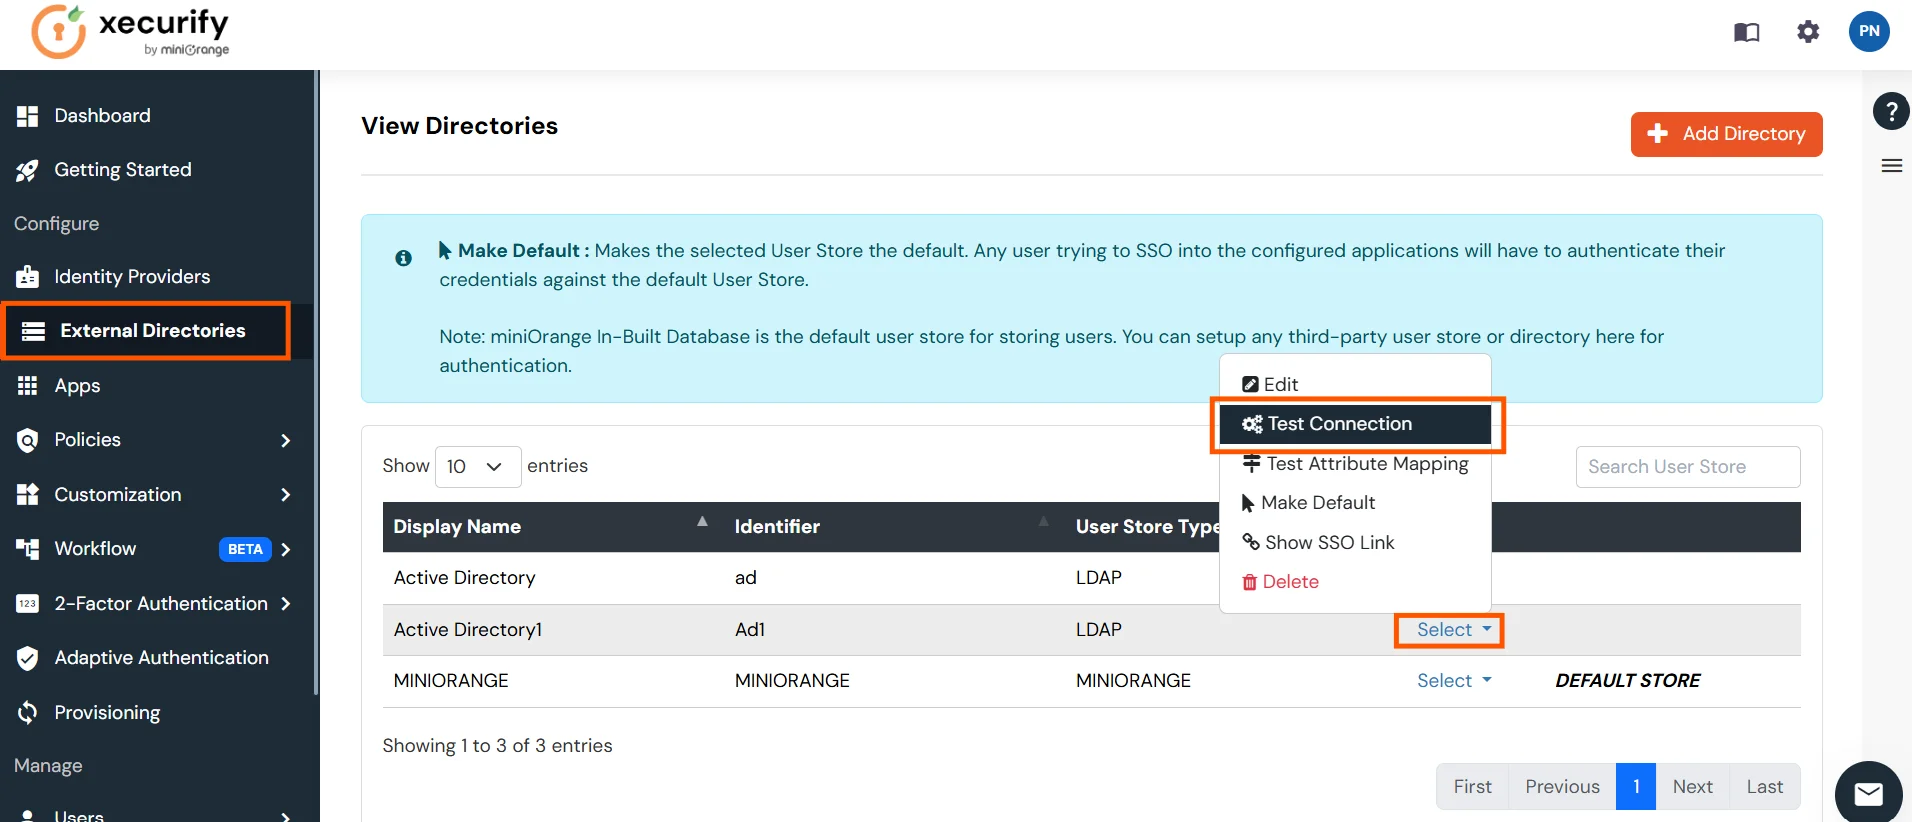
Test Connections
- You will see a list of directories under Identity Providers. From the dropdown, select AD/LDAP Directories, search for your configured directory, click the three dots next to it, and select Test Connection.
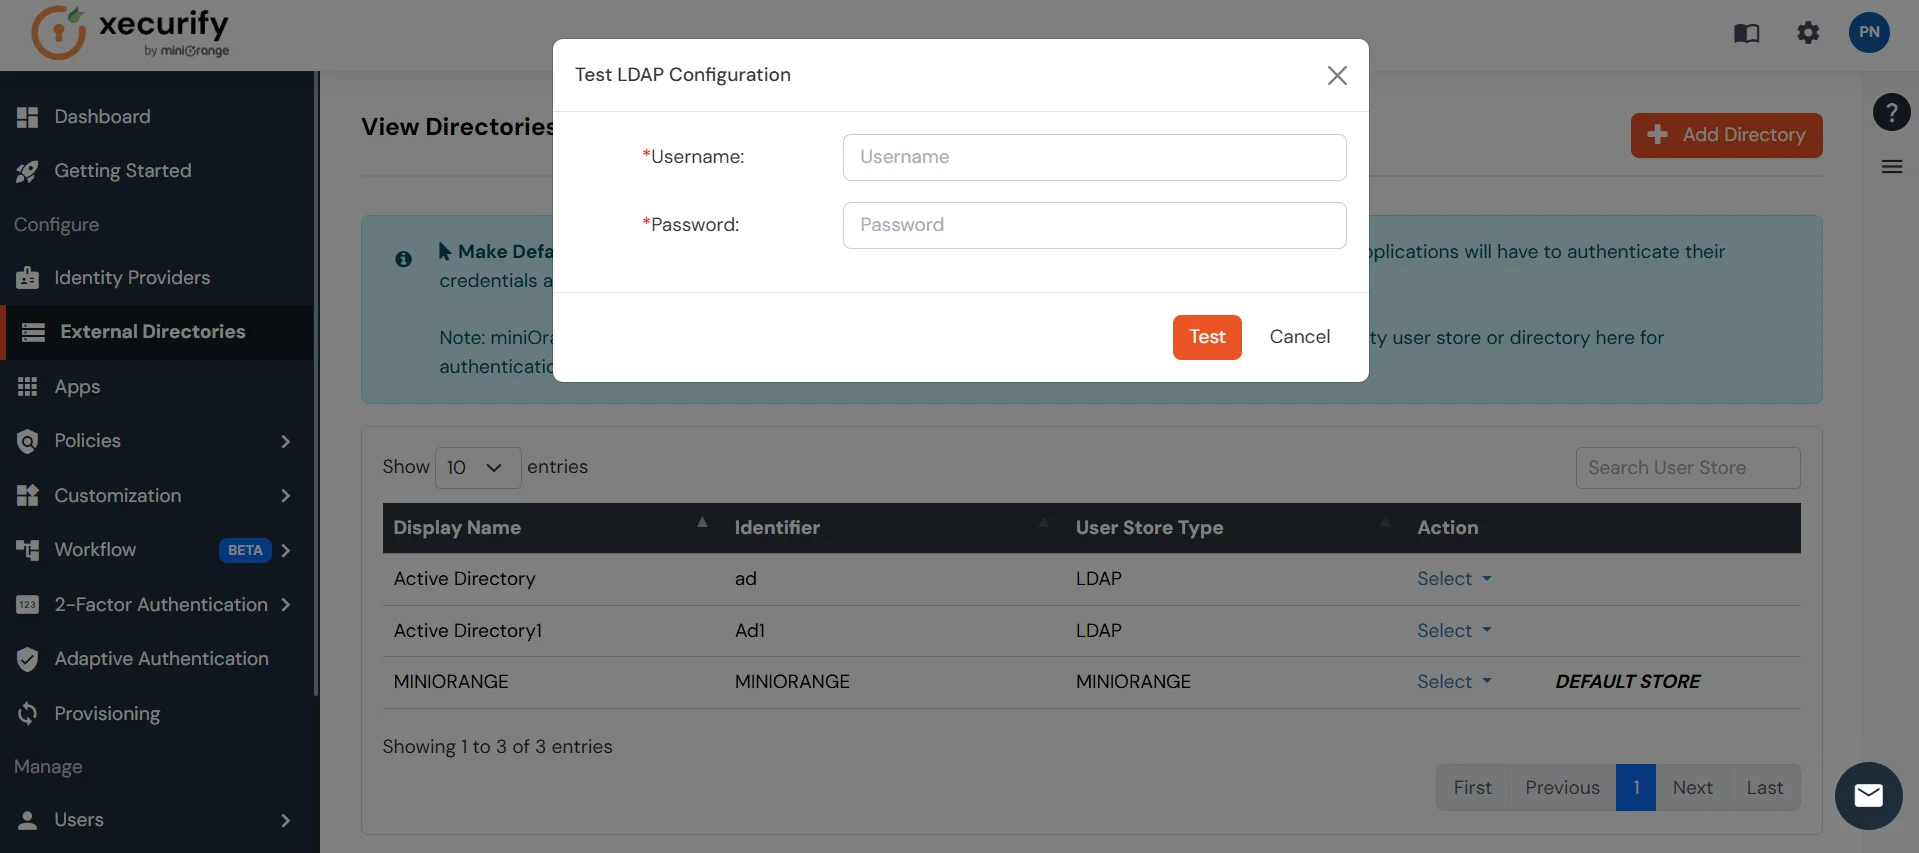
- A pop-up appears prompting you to enter a username and password to verify your LDAP configuration.
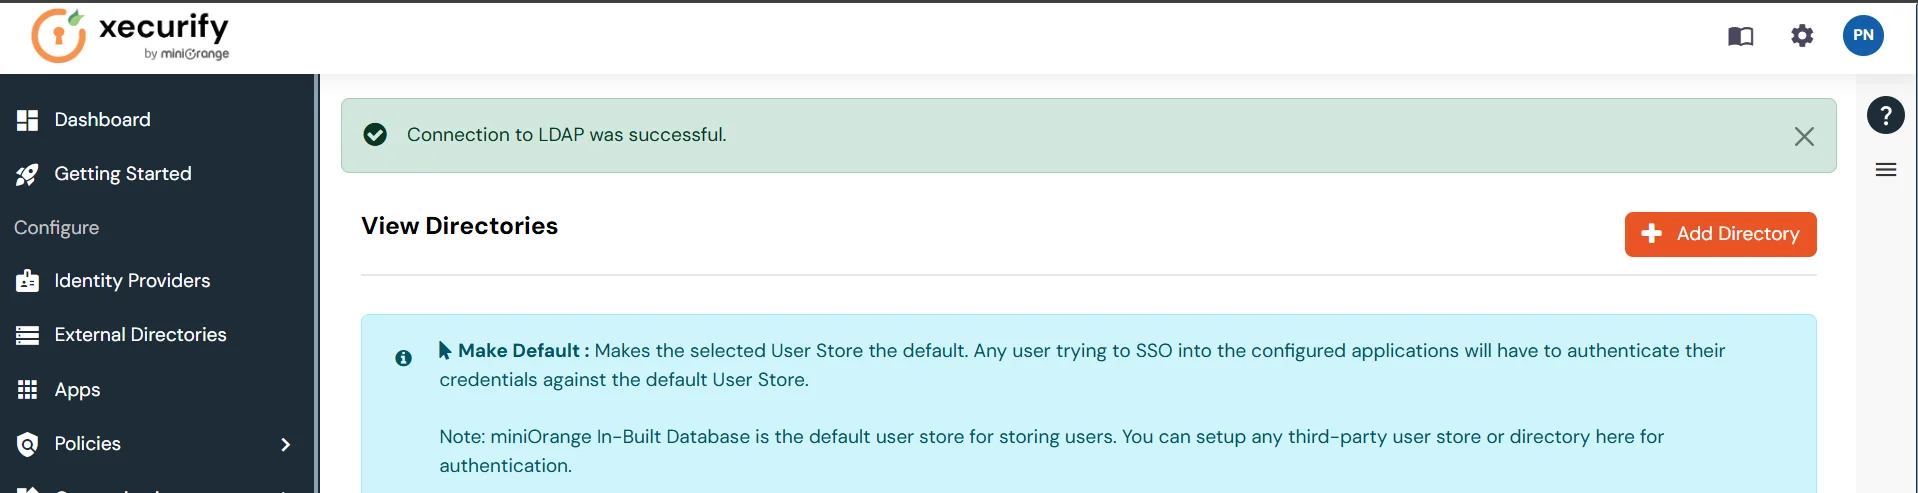
- On Successful connection with LDAP Server, a success message is shown.
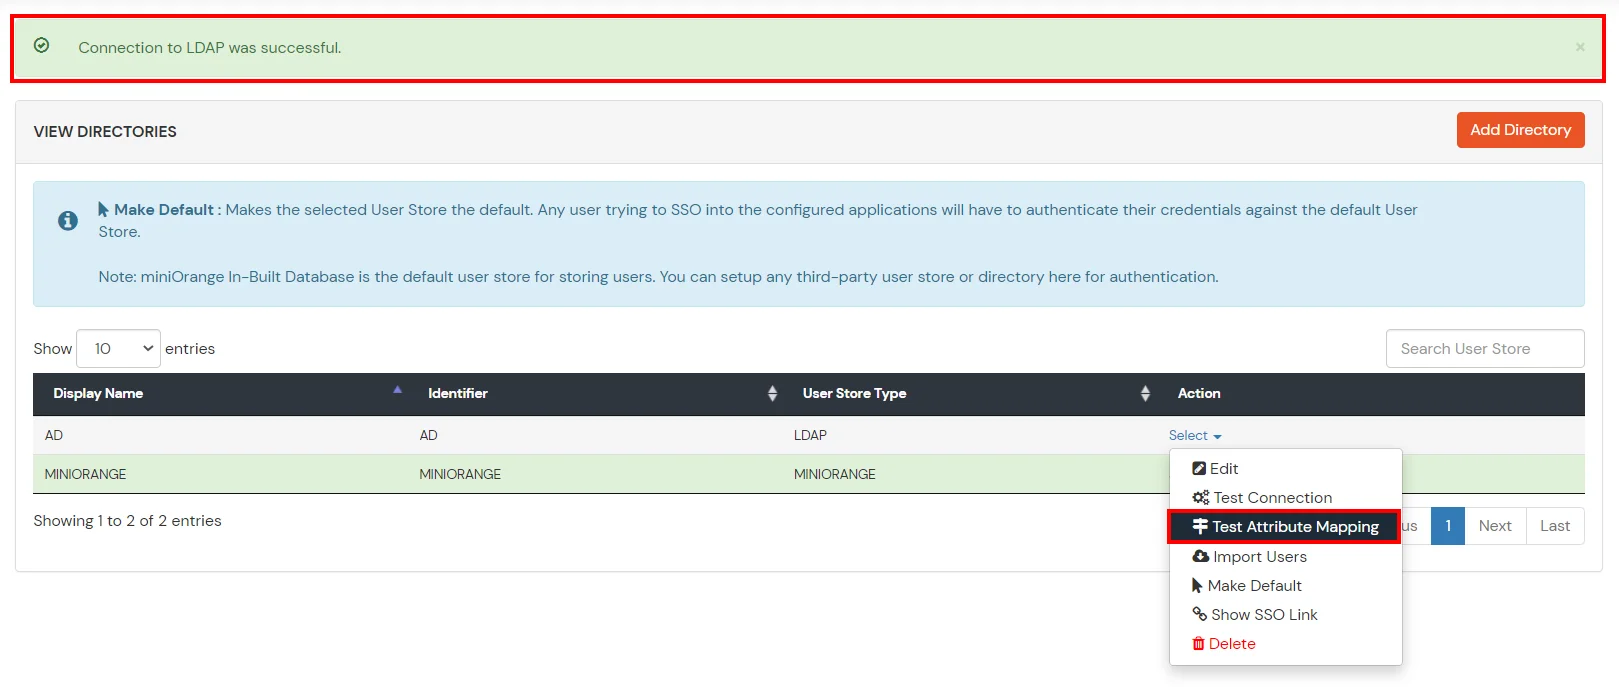
Test Attribute Mapping
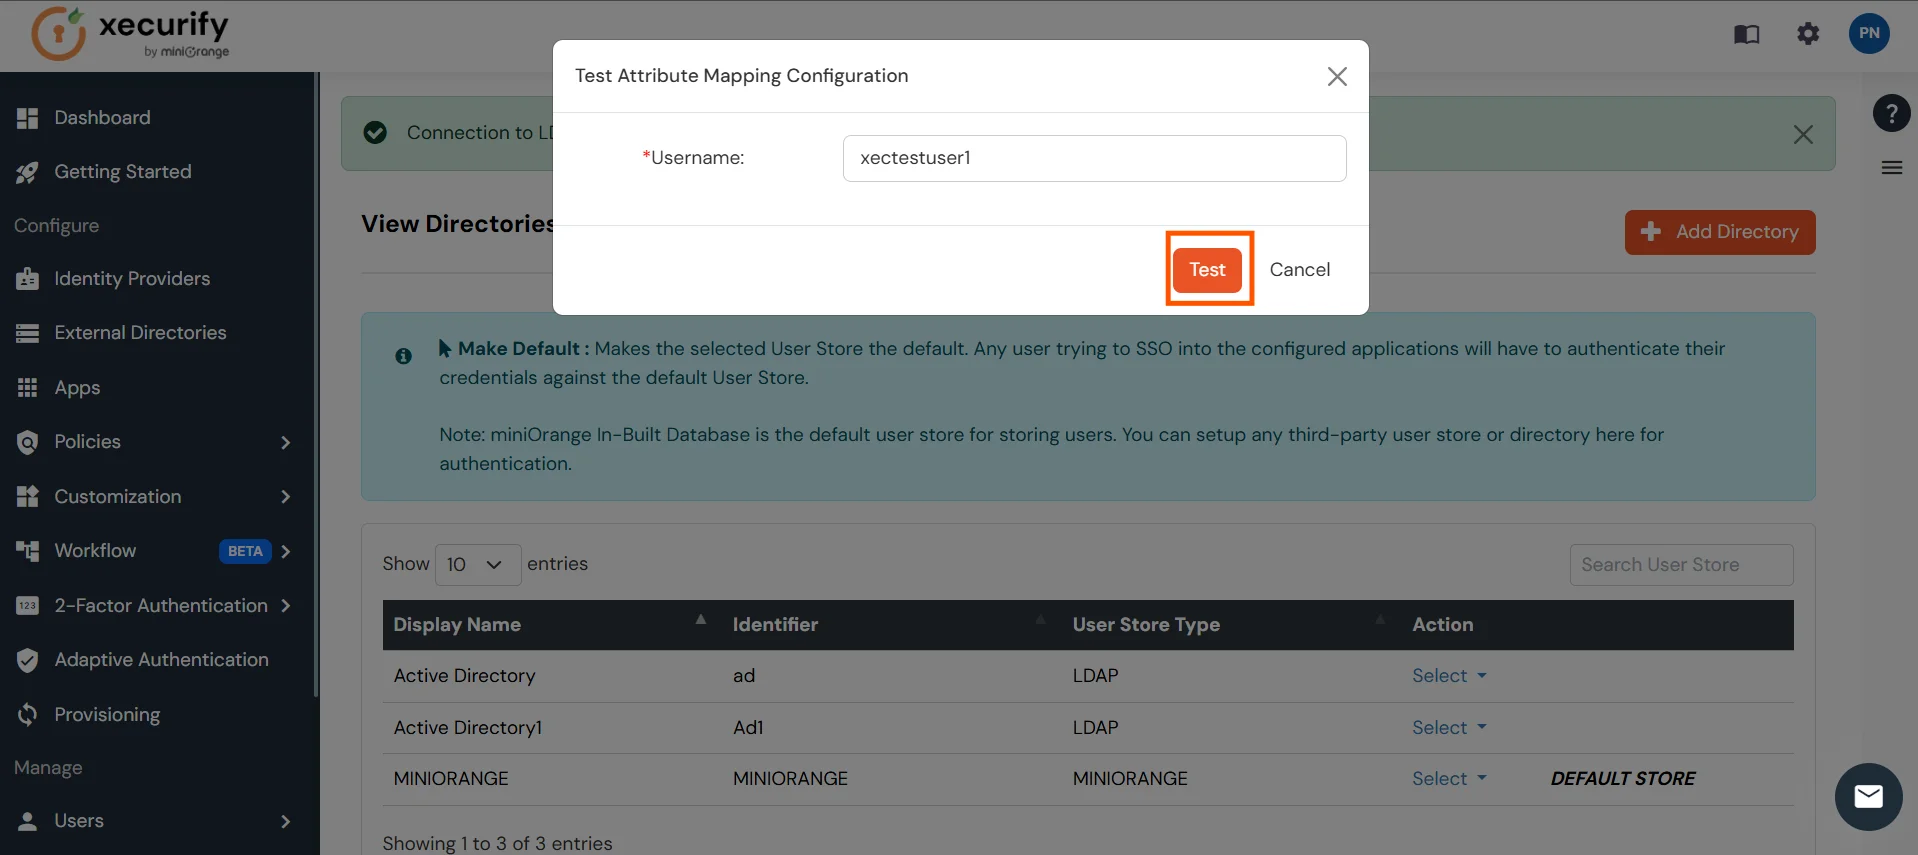
- You will see a list of directories under Identity Providers. From the dropdown, select AD/LDAP Directories, search for your configured directory, click the three dots next to it, and select Test Attribute Mapping.
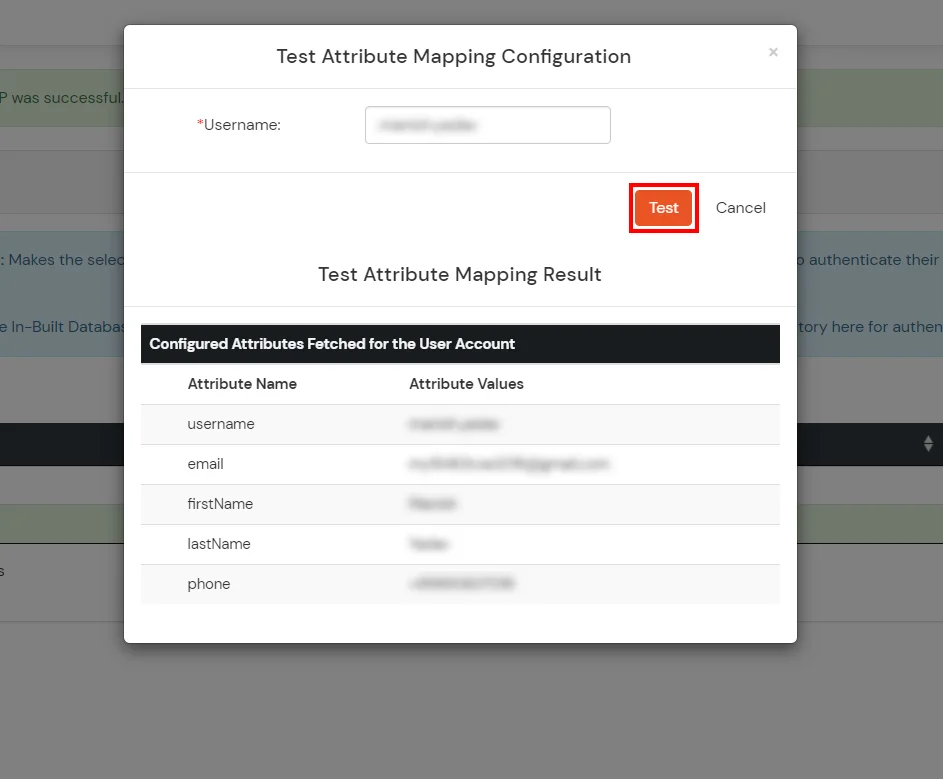
- A pop‑up appears to enter a username and click Test.
- The Test Attribute Mapping Result will be displayed.
Set up AD as External Directory configuration is complete.
Note: Refer our guide to setup LDAP on windows server.
miniOrange integrates with various external user sources such as directories, identity providers, and etc.
5. Adaptive Authentication with workplace
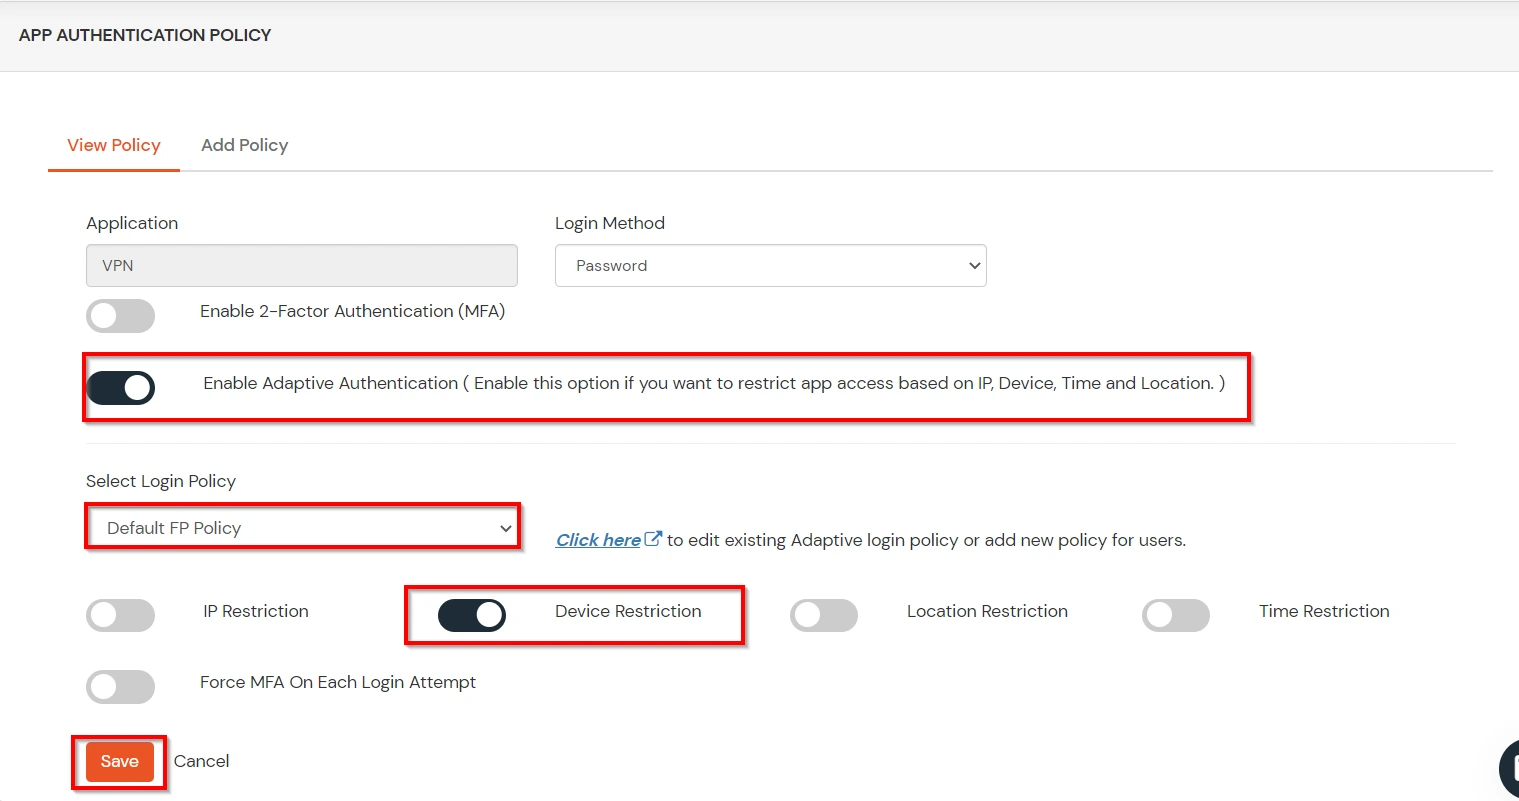
A. Restricting access to workplace with IP Configuration
You can use adaptive authentication with Single Sign-On (SSO) for workplace to improve the security and functionality of Single Sign-On. You can allow a IP Address in certain range for SSO or you can deny it based your requirements and you can also challenge the user to verify his authenticity. Adaptive authentication manages the user authentication bases on different factors such as Device ID, Location, Time of Access, IP Address and many more.
You can configure Adaptive Authentication with IP Blocking in following way :
- Login to Self Service Console >> Adaptive Authentication >> Add Policy.
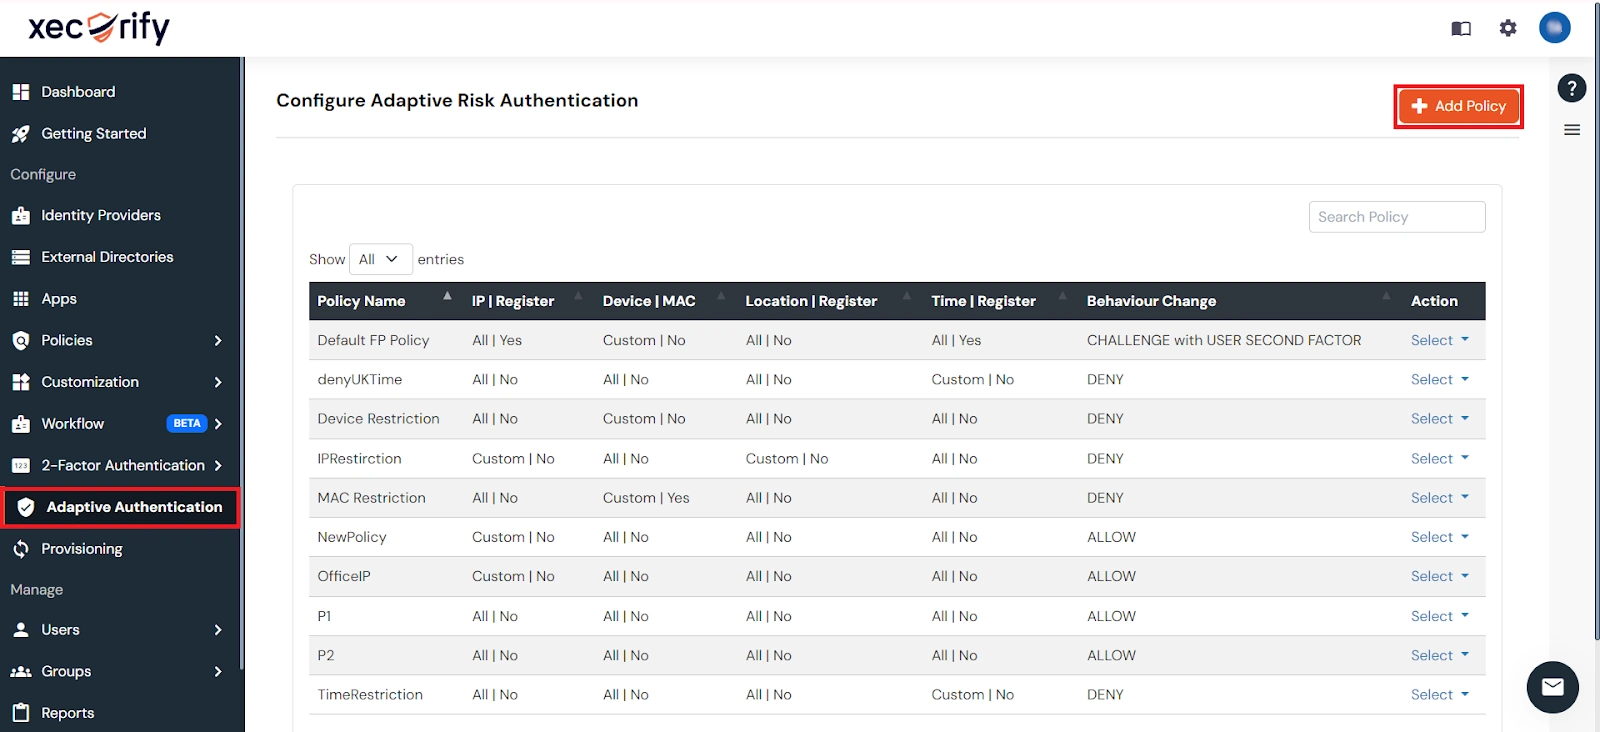
- Add a Policy Name for your Adative Authentication Policy.
- Select Action for Behavior Change, click the Edit link, and then choose the appropriate Action and Challenge Type for the user from that section.
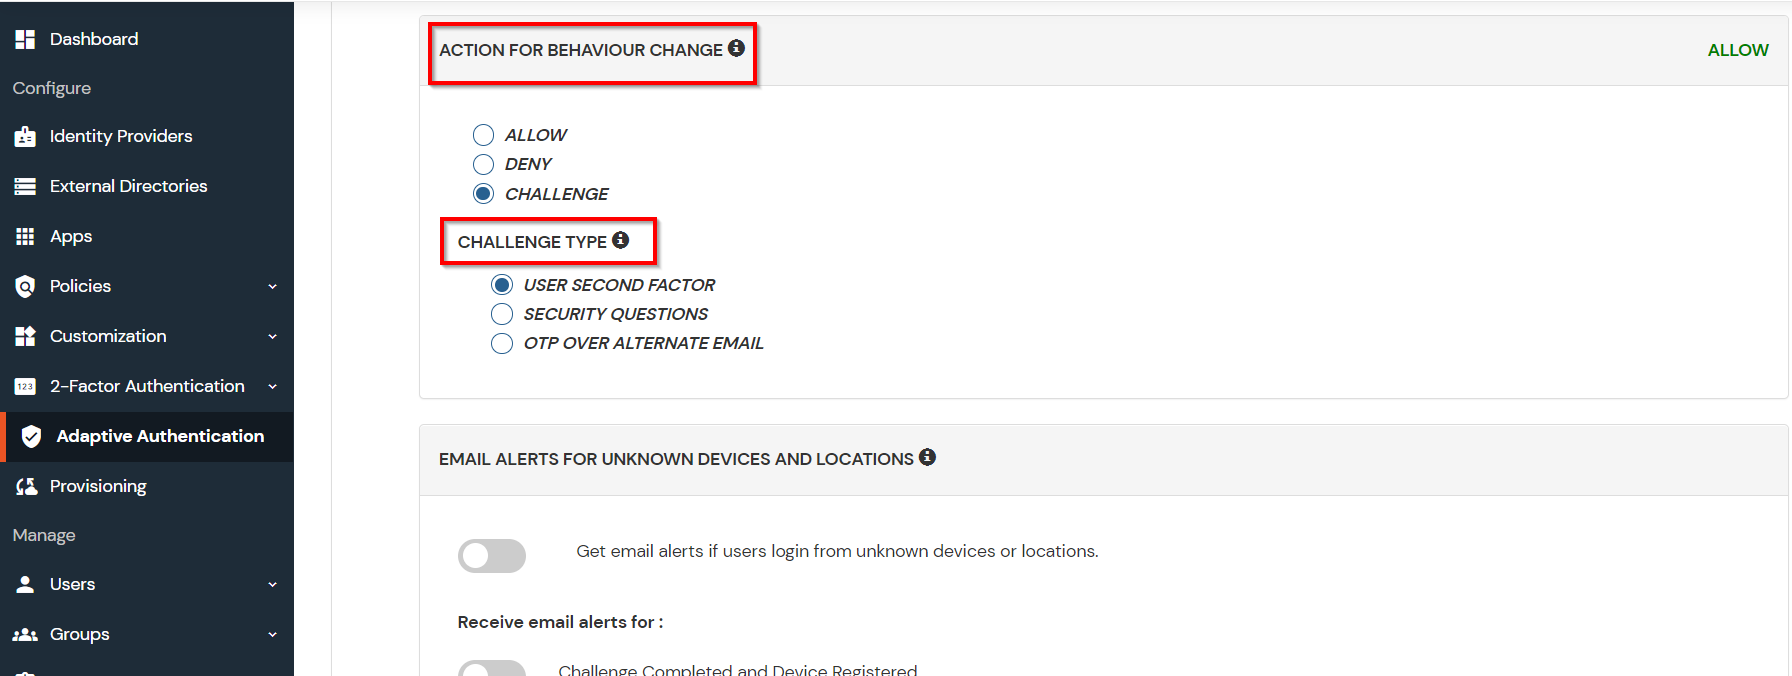
Action for behavior Change Options :
| Attribute |
Description |
| Allow |
Allow users to authenticate and use services if Adaptive authentication condition is true. |
| Deny |
Deny user authentications and access to services if Adaptive authentication condition is true. |
| Challenge |
Challenge users with one of the three methods mentioned below for verifying user authenticity. |
Challenge Type Options :
| Attribute |
Description |
| User second Factor |
The User needs to authenticate using the second factor he has opted or assigned for such as
- OTP over SMS
- PUSH Notification
- OTP over Email and, many more.
|
| KBA (Knowledge-based authentication) |
The System will ask the user for 2 of 3 questions he has configured in his Self-Service Console. Only after the right answer to both questions is the user allowed to proceed further. |
| OTP over Alternate Email |
User will receive an OTP on the alternate email they have configured through the Self Service Console. Once the user provides the correct OTP, they are allowed to proceed further. |
- Now click Edit option from the IP Configuration section to configure custom IP range.
- Select Add IP if the User's IP Address is not in the configured list.
- Specify the IP Address that you want to whitelist. For the IP Range other than the whitelisted one, you can select the above setting to reflect.
- Choose either allow or deny by selecting the corresponding option from the dropdown.
- If a user tries to login with the whitelisted IP address, they will always be allowed access.
- We support IP address range in three formats i.e., IPv4, IPv4 CIDR, and IPv6 CIDR. You can choose whichever is suitable for you from the dropdown menu.
- You can add multiple IPs or IP ranges by clicking the + Add IP button.
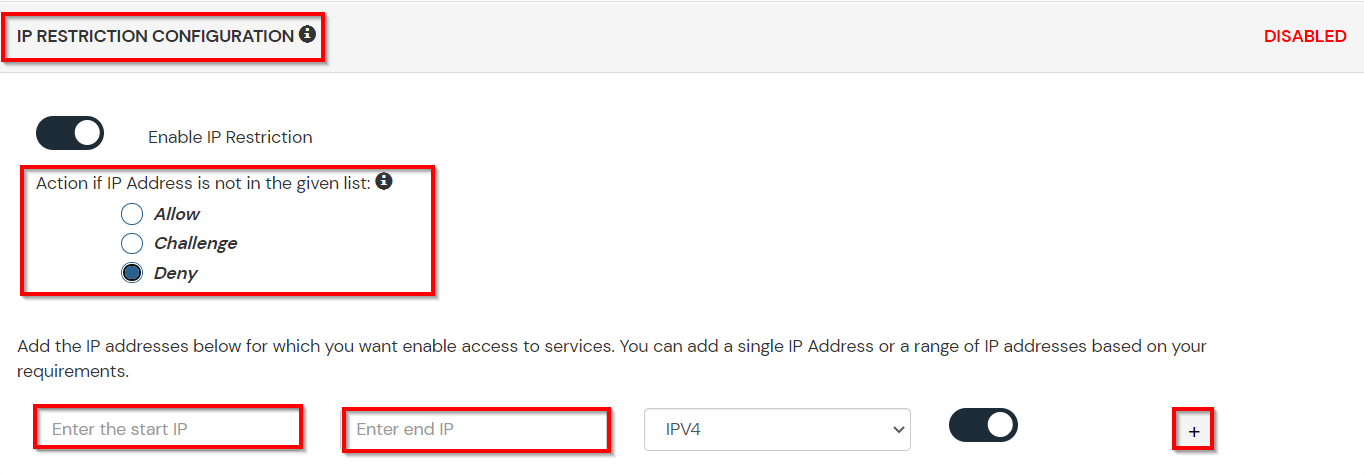
- Once the changes are made, scroll down to the end and click on Save.
B. Adaptive Authentication with Limiting number of devices
Using Adaptive Authentication you can also restrict the number of devices the end user can access the Services on. You can allow end users to access services on a fixed no. of devices. The end users will be able to access services provided by us on this fixed no. of devices.
You can configure Adaptive Authentication with Device Restriction in following way
- Login to Self Service Console >> Adaptive Authentication >> Add Policy.
- Add a Policy Name for your Adaptive Authentication Policy.
- Select your Action for behavior Change and Challenge Type for user from the Action for behavior Change Section.
- On the Add Policy tab, go to the Device Configuration section and click the Edit button.
- Enter the Number of Device Registrations Allowed as per your requirement. (2-3 devices are recommended.)
- Choose Action if number of devices exceeded (This will override your setting for Action for behavior Change.)
- Challenge: The user needs to verify himself using any of the three methods mentioned in table in step 5.1
- Deny : Deny users access to the system
- Enable Mobile Device Restriction to block logins from mobile devices. This ensures all login attempts from mobile devices will be declined.
- Enable MAC Address Based Restriction if you want to restrict access based on device MAC address.
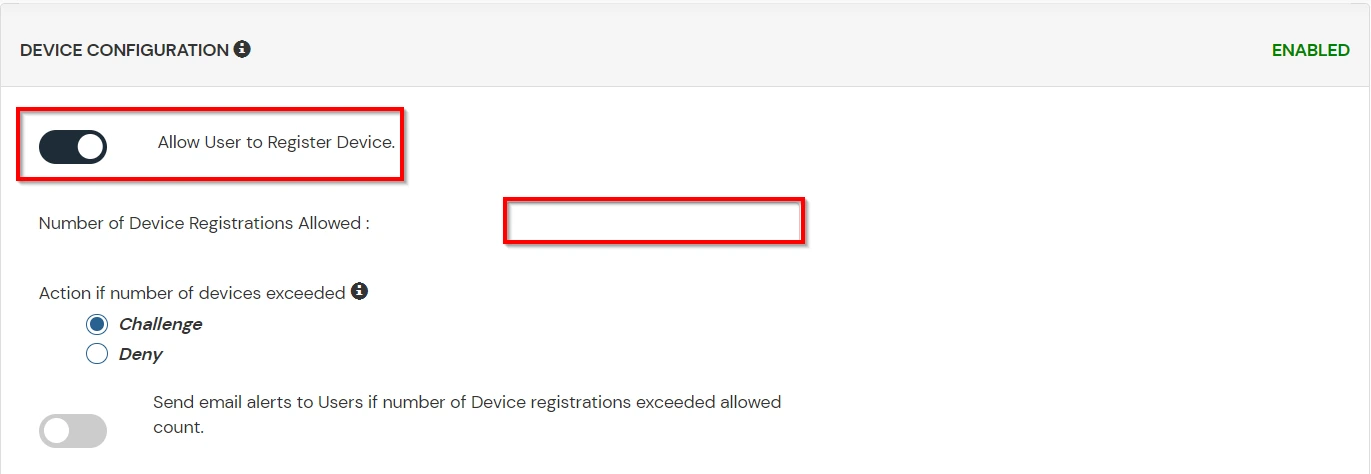
- Scroll down to the bottom of the page and click on Save.
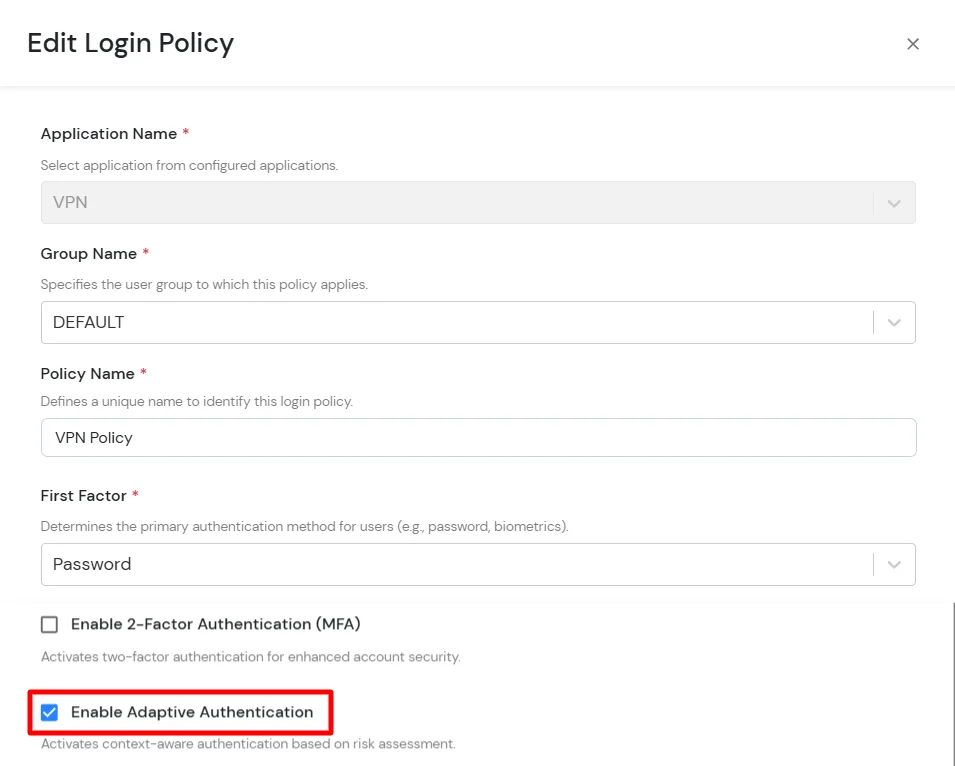
C. Add Adaptive Authentication policy to workplace
- Login to Self Service Console >> Policies >> Add Login Policy.
- Click on Edit icon option for predefined app policy.
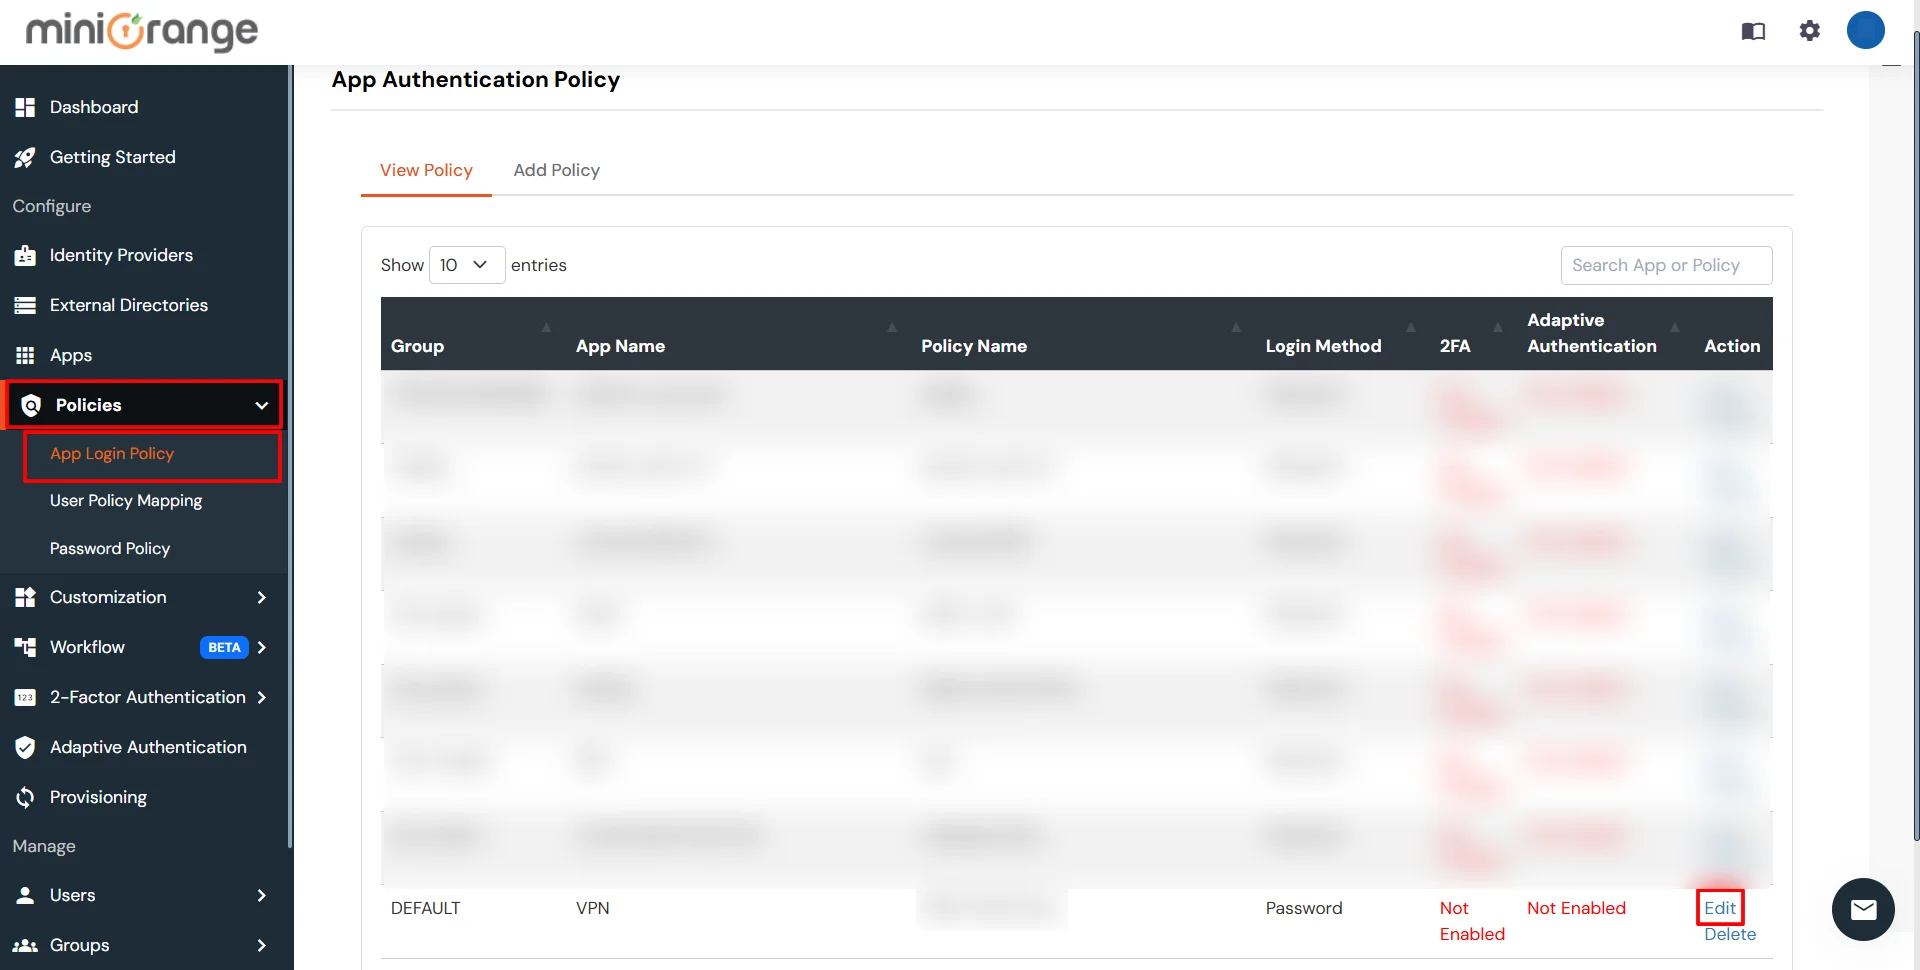
- Set your policy in the Policy Name and select Password as First Factor.
- Enable Adaptive Authentication on Edit Login Policy page and select the required restriction method as an option.
- From Select Login Policy dropdown select the policy we created in last step and click on Submit.
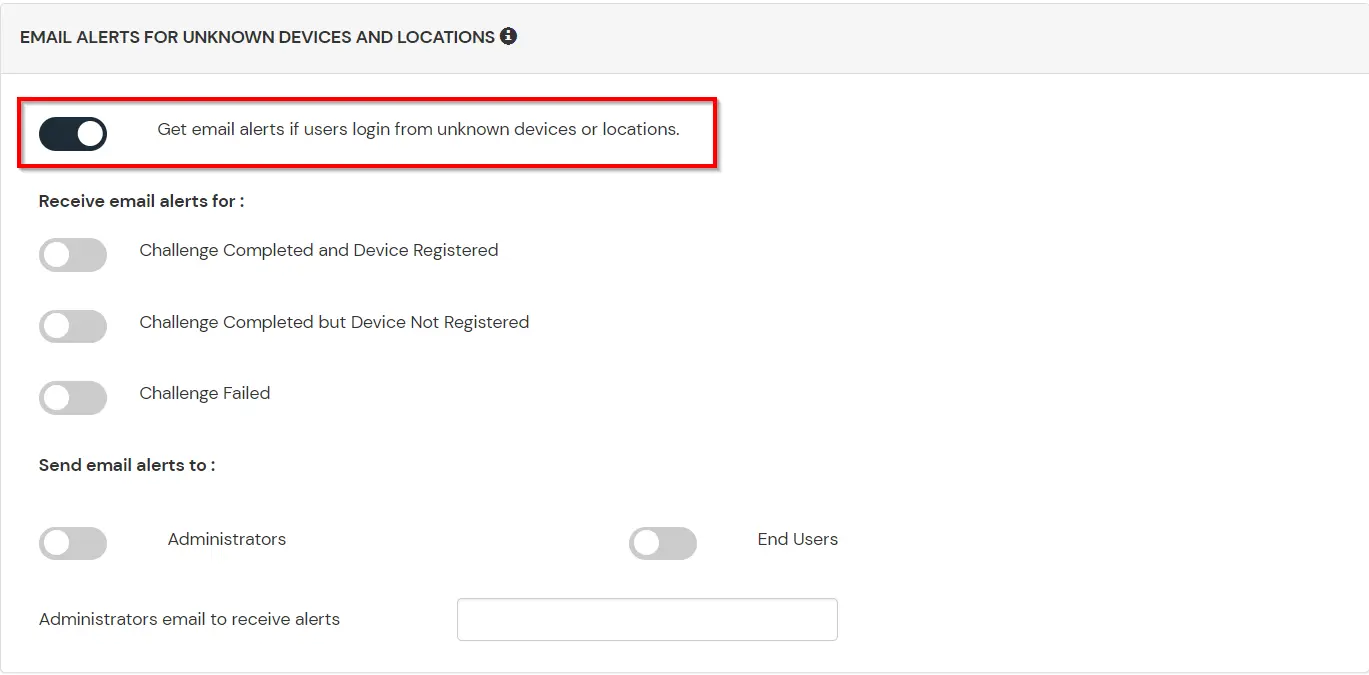
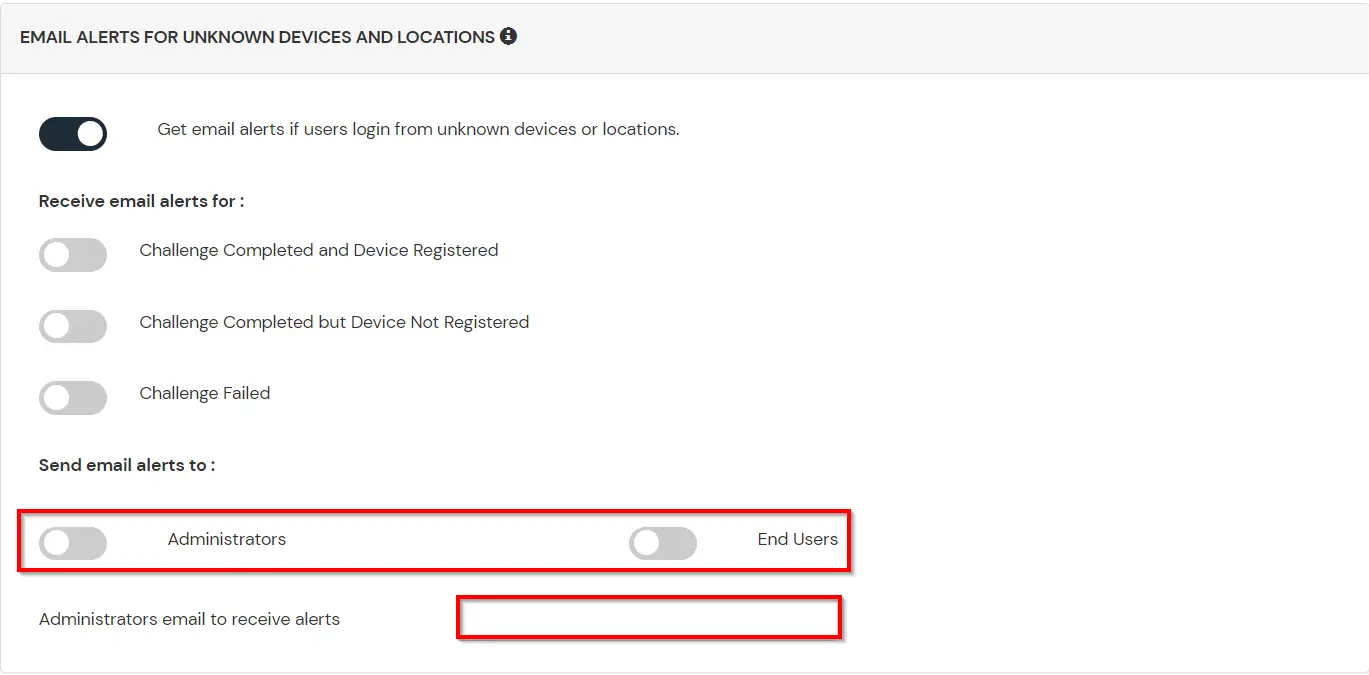
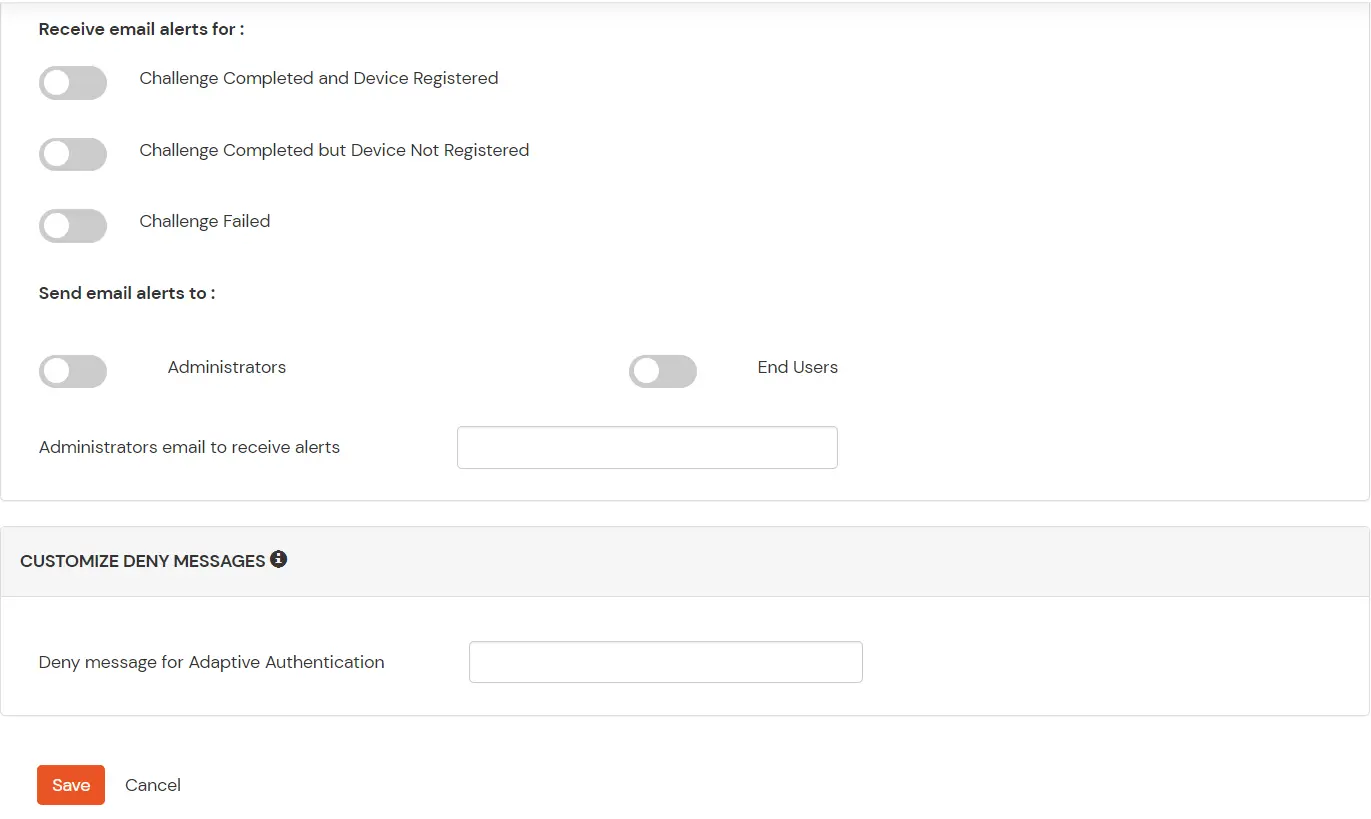
D. Notification and Alert Message.
How to add a trusted Device
- When End-user log in to the self service console after the policy for device restriction is on, he is provided the option to add the current device as a trusted device.
External References