Hello there!

Need Help? We are right here!

Support Icon
miniOrange Email Support
success

Thanks for your Enquiry. Our team will soon reach out to you.

If you don't hear from us within 24 hours, please feel free to send a follow-up email to info@xecurify.com

Search Results:

×

How to add a Passwordless App


  • Login into miniOrange Admin Console.
  • miniOrange Identity Platform Admin Handbook: Dashboard applications

  • Click on Apps. It shows a list of all configured applications and option to modify them. Click on Add Application.
  • miniOrange Identity Platform Admin Handbook: Add Application

  • Under Choose Application, select Passwordless/Bookmarks from the All Apps dropdown.
  • miniOrange Identity Platform Admin Handbook: Passwordless app type

  • Click on Add Bookmark App.
  • miniOrange Identity Platform Admin Handbook: Add Passwordless app

  • Add the following details to configure your app :
    • Display Name : The Display name of the application that will be visible to the user.
    • Redirect URI : You can include user attributes in the redirect URL using placeholders like {{username}}, {{primaryEmail}}, {{customAttribute1}}, etc. These placeholders will be dynamically replaced with the actual user values during the IdP-initiated SSO flow.

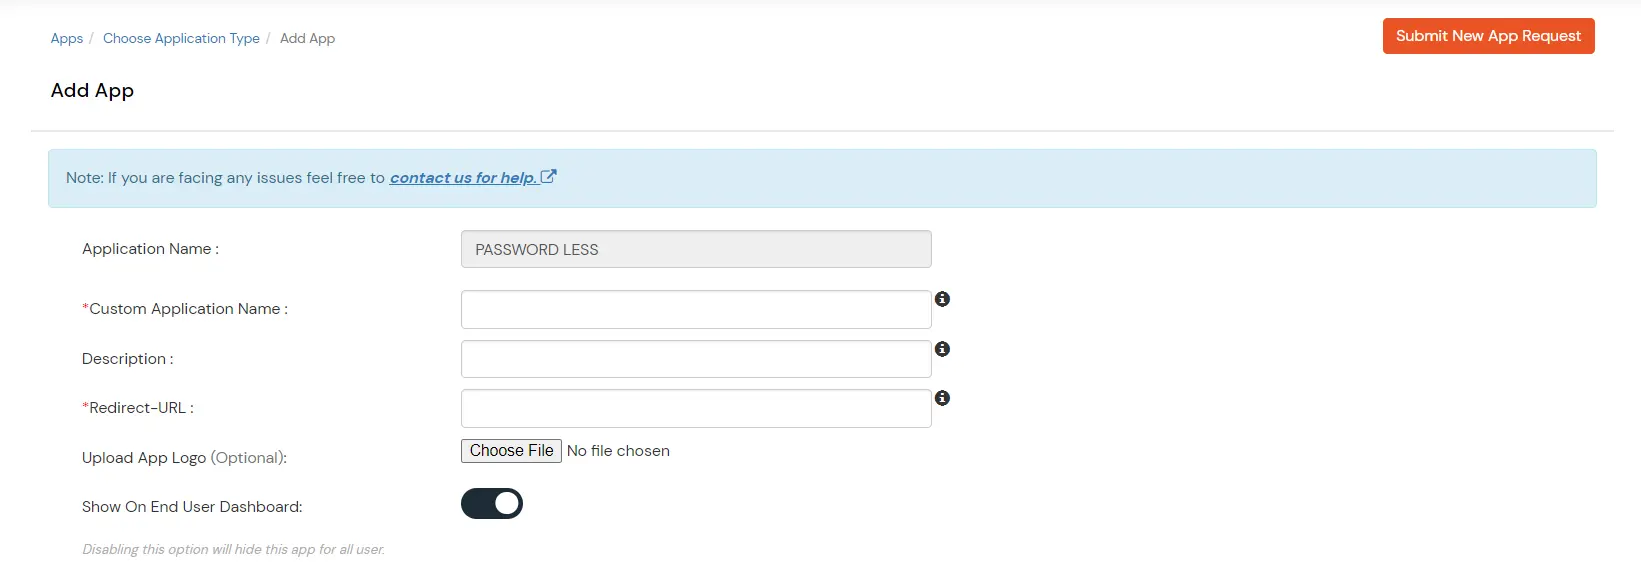
      You can generate url using following attributes: username, primaryEmail, alternateEmail, fname, lname, primaryPhone and customAttribute1.

      The url could be like this login.com/{{username}}/?primaryEmail={{primaryEmail}}

    • Query Parameter Format: https://<sso-url>>?username={{username}} https://<sso-url>>?username={{username}}&email={{primaryEmail}}
    • Path Parameter Format: https://<sso-url>>/{{customAttribute1}}/{{customAttribute2}}/?username={{username}}
    • Description (Optional) : Any additional information that you would like to add.
    • Upload App Logo (Optional) : Upload any custom logo for your application.
    • Show on End User Dashboard : Enable this option if you want to show this app in the end-user dashboard.
    miniOrange Identity Platform Admin Handbook: Passwordless App details

  • Click on Save button.
  • Click Save to continue. You will be automatically redirected to the Policies section.
  • miniOrange Identity Platform Admin Handbook: In Policies, click Add Policy

  • Click on the Assign group button. A new Configure Group Assignment Modal will open.
    • Assign Group: Select the groups you want to link with the application. You can select up to 20 groups at a time.
    • miniOrange Dashboard: Go to Policies and Add Policy

    • If you need to create new group. Click on Add New Group button.
    • Enter the Group name and click on Create Group.
    • miniOrange Dashboard: Go to Policies and Add Policy

    • Click on Next.
    • Assign Policies: Add the required policies to the selected groups. Enter the following details:
    • First Factor: Select the login method from the dropdown.
      • If you select Password as the login method, you can enable 2-Factor Authentication (MFA) and Adaptive Authentication, if needed.
      • If you select Password-less as login method, you can enable 2-Factor Authentication (MFA) if needed.
  • miniOrange Dashboard: Under the Add Login Policy, provide the details

  • Click on Save. Policies will be created for all the selected groups.
  • You will see the successfully added policy in the list.
  • miniOrange Identity Platform Admin Handbook: Passwordless Policy was successfully added