Hello there!
Need Help? We are right here!

Need Help? We are right here!
Search Results:
×Just-In-Time (JIT) provisioning creates a local miniOrange user the first time a user signs in through your external identity provider (IdP), and keeps that profile up to date on every sign-in after that. USER attribute mapping defines which values from your External Identity Source map to miniOrange fields — such as username, email, and name — so users are provisioned automatically without manual account setup.
When configuring attribute mappings, you choose one of the following attribute types:
This page covers the USER attribute type. For the EXTERNAL type, see Attribute Transformation.
Note: If you leave the USER section empty, JIT is skipped — an existing user can still sign in, and no new user is created or modified. Add mappings here only when you want miniOrange to provision users from this IdP.
Follow these steps to map user attributes for JIT provisioning in the miniOrange Admin Console:

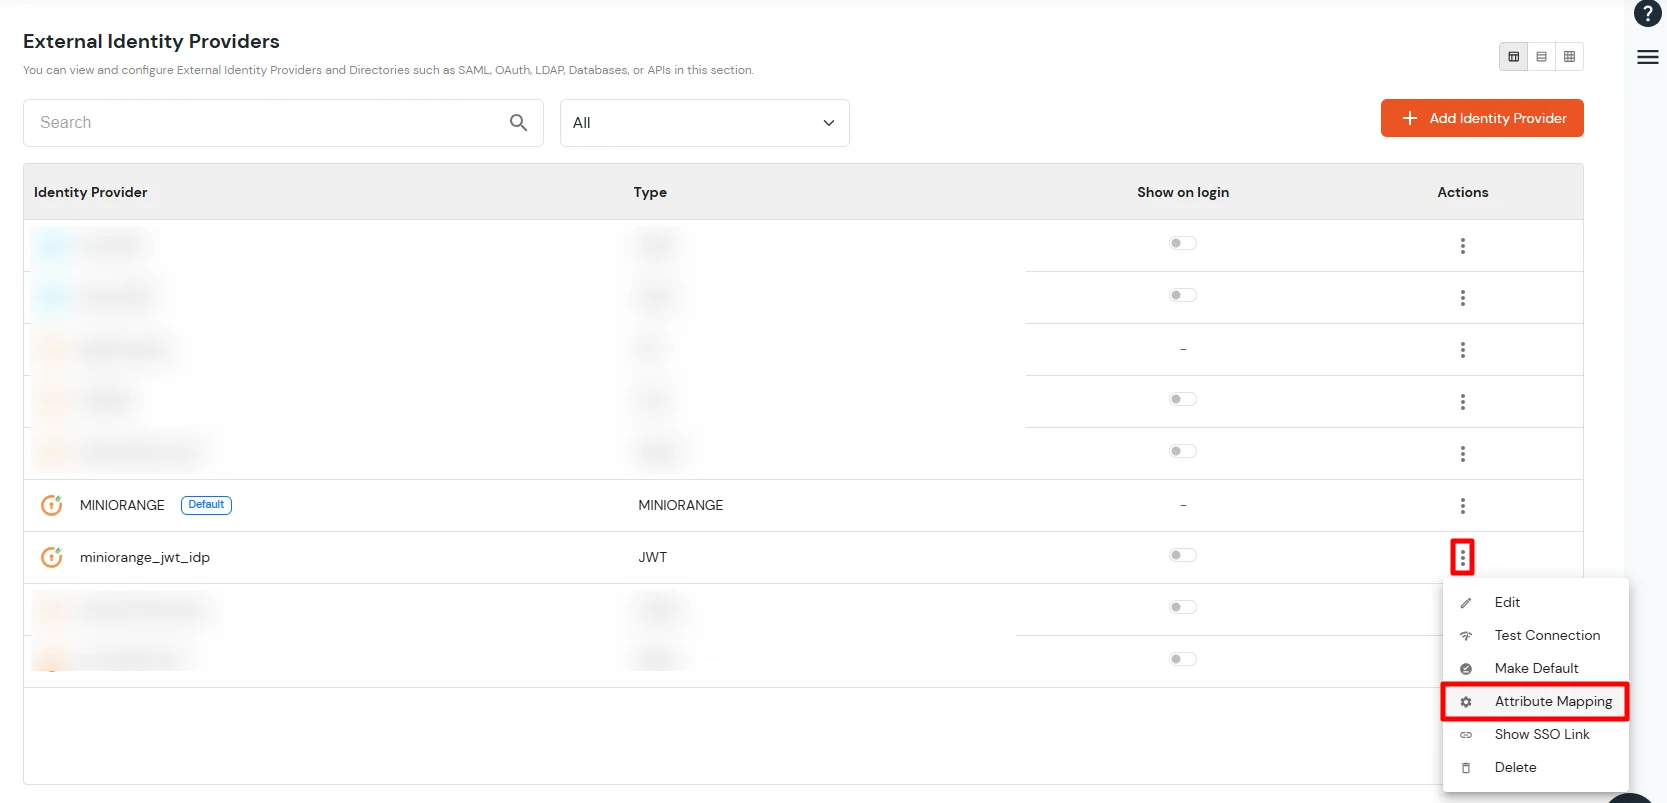
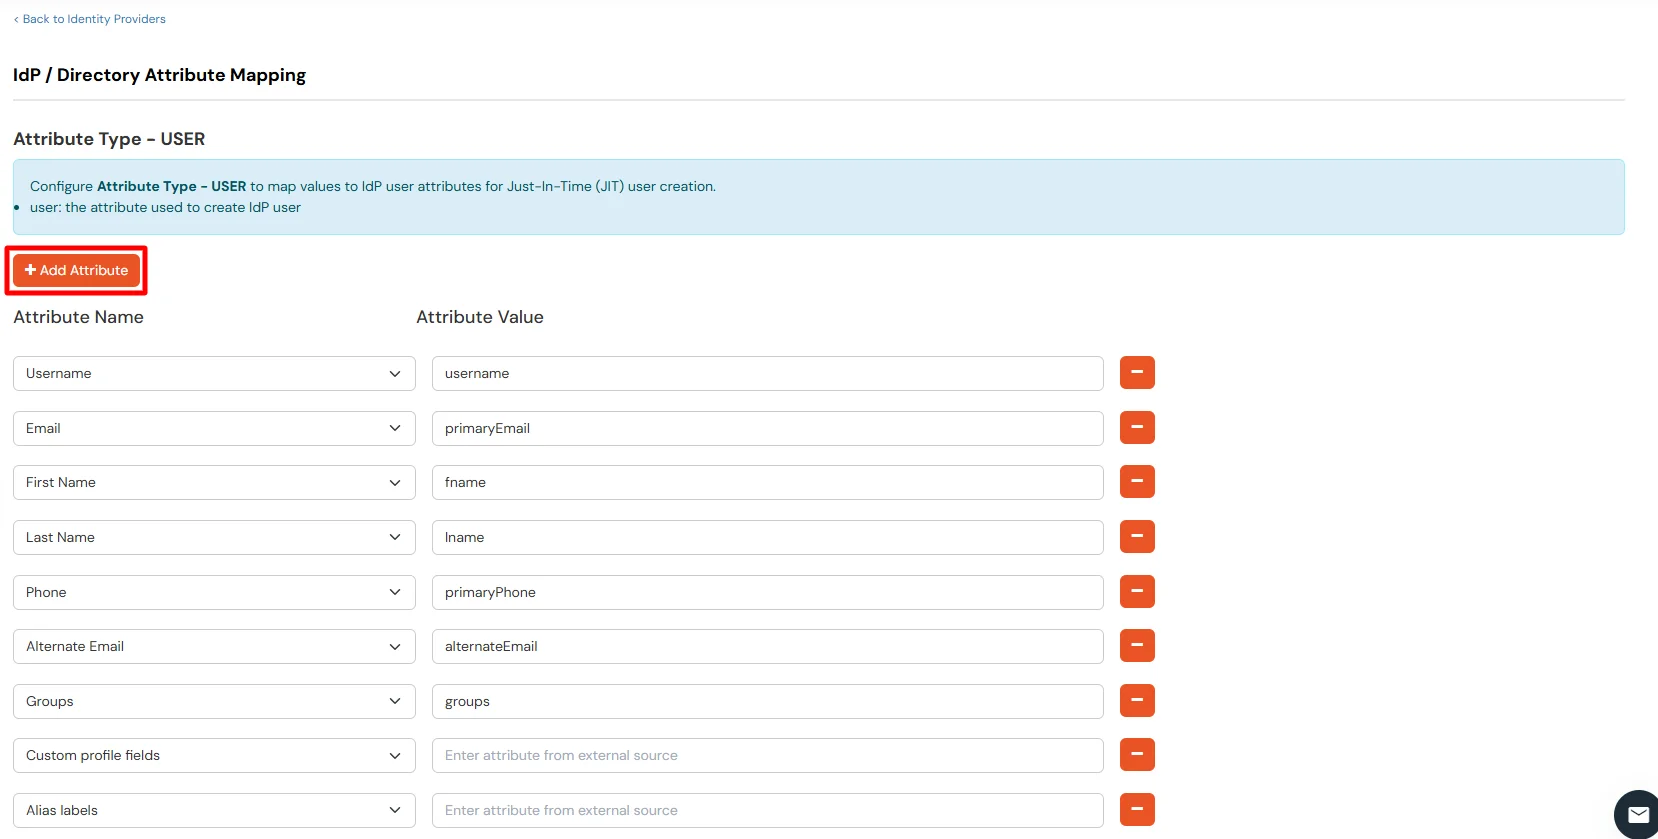
The Attribute Name dropdown lists your standard user fields, and grows as you add more fields to your account:
| Attribute Name | Attribute Value |
|---|---|
| Username | username |
| primaryEmail | |
| First Name | fname |
| Last Name | lname |
| Phone | primaryPhone |
| Alternate Email | alternateEmail |
| Group | groups |
| Custom Attributes | Appear as you add them |
| Alias Labels | When username aliases are enabled |
Note: Custom profile attributes you create under Users › User Profile Fields automatically appear in this dropdown, so you can map IdP attributes onto your own fields. Alias labels added under Users › Alias Labels also appear here (with an alias_ prefix), but only when Enable Username Aliases is turned on for your account.
Username and email anchor every user, so they are always required for JIT provisioning. First name, last name, and phone are required only when your configuration calls for them.
| Attribute Name | When it is required | If the IdP does not send it |
|---|---|---|
| Username (Always) | On every JIT sign-in. The value must not be blank. | Sign-in stops and no user is created until a username is received. |
| Email (Always) | On every JIT sign-in. Must be a valid email address. | Sign-in stops and no user is created until a valid email is received. |
| First / Last name (Conditional) | Only when the field is mapped and marked Required in User Profile Fields — and only for new users. | New user: creation stops. Existing user: the blank value is ignored and the current value is kept. |
| Phone (Conditional) | Only for new users, when Login with Phone Number is enabled. | New user: creation stops. Existing user: the blank value is ignored and the current phone is kept. |
Tip: Username and email are stored in lowercase, so John.Doe and john.doe from your IdP resolve to the same account. Case differences in the assertion never create a duplicate user.
Whether a blank name blocks user creation is controlled in one place. Navigate to Users › User Profile Fields, open First Name / Last Name, and set Required.
Important: The required setting affects both the First Name and Last Name fields together — you cannot require one without the other.
Because a blank name blocks creation only when the field is both mapped and required, a confirmation appears when you save a mapping that includes first or last name:
First Name / Last Name may be required. You have mapped First Name and/or Last Name under Attribute Type — USER. If First Name or Last Name is also marked required in your User Profile Fields configuration, it becomes mandatory for Just-In-Time (JIT) user creation: when the IdP does not send a value, a new user will not be created and login will fail. If the fields are not marked required in User Profile Fields, a blank value is skipped and creation proceeds. Existing users are unaffected (blank values are ignored on update).
Phone becomes mandatory for new users when Login with Phone Number is enabled. To review the phone-login setting, navigate to Settings › Security › Login & Logout and locate Enable Login with Phone Number.
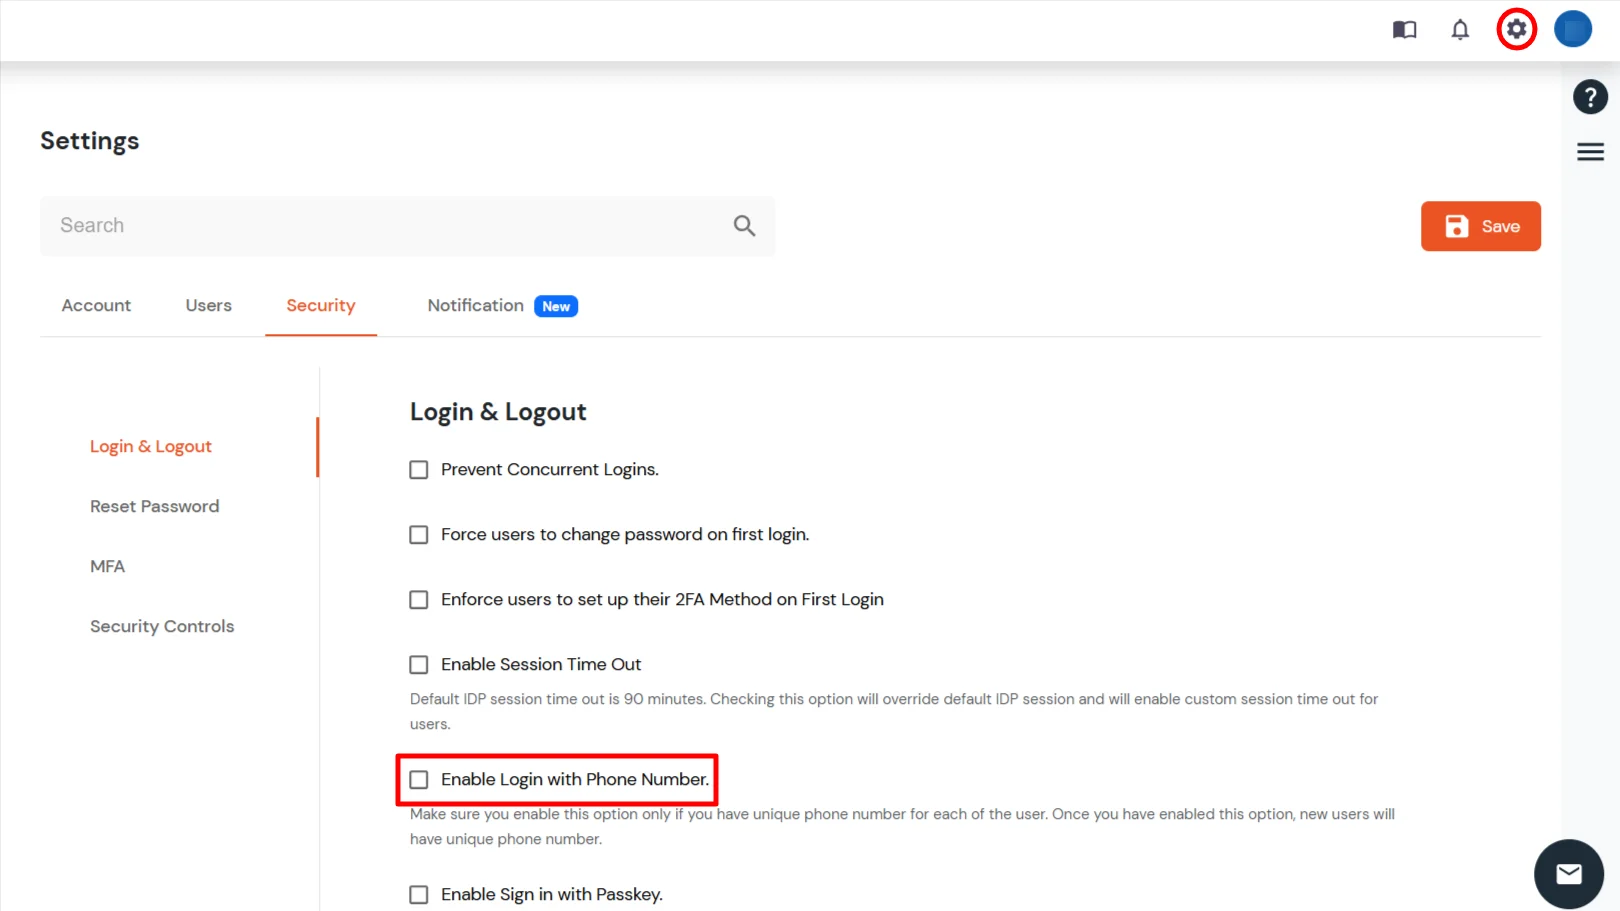
Important: Enable this option only if you have a unique phone number for each of your users. With it enabled, a new JIT user cannot be created without a valid phone number.
Groups can also be assigned and updated through JIT. Map the Groups field under Attribute Type — USER to the IdP attribute that carries the user's group names, and miniOrange keeps the user's group membership in step with your IdP on every login.
On each sign-in, the user's membership is synced to match the groups in the response: the user is added to every group sent in that response, and removed from any group that is no longer sent. This applies to both new and existing users, so group membership always reflects the source of truth in your IdP without manual assignment.
Important: The groups named in the response must already exist in miniOrange — JIT does not create new groups. Create your groups under Manage Groups first, and make sure the group names match the values your IdP sends exactly. Names that don't match an existing group are ignored.
Note: Send each group as a separate value in a multi-valued attribute (for SAML, multiple AttributeValue elements; for OIDC, a JSON array claim). A single comma-separated string such as admins,users is treated as one group name, not two. Group names are matched case-insensitively. Your account's default group is never changed by JIT, and if the IdP does not send the Groups attribute at all, the user's existing groups are left untouched.
The same mapping behaves differently for a new user than for one who already exists. As a rule, new users are validated strictly, while existing users are never broken by a blank value.
| Attribute | New user (create) | Existing user (update) |
|---|---|---|
| Username | Required — blank stops creation. | Kept in sync; a value already used by another user is not applied. |
| Required and must be valid — blank or invalid stops creation. | Kept in sync; a value already used by another user is not applied. | |
| First name | Blank stops creation only if mapped and marked Required. | Blank is skipped — the existing name is preserved. |
| Last name | Blank stops creation only if mapped and marked Required. | Blank is skipped — the existing name is preserved. |
| Phone | Required when Login with Phone Number is enabled — blank stops creation. | Blank is skipped — the existing phone is preserved. |
Note: On update, if the mapping would set a username, email, or phone that another user already has, that change is not applied. The user still signs in to their own account, and the conflict is recorded in your audit reports so you can correct the mapping.
When JIT cannot complete, the sign-in shows a message naming the attribute your external system did not send. The table below explains each message and how to resolve it.
| Message | What to check |
|---|---|
| JIT User sync failed: username was not sent by the External System. | Confirm Username is mapped, and that its Attribute Value matches an attribute the IdP actually sends (and is not empty for this user). |
| JIT User sync failed: a valid email address was not sent by the External System. | Confirm Email is mapped to an attribute that returns a properly formatted address — not blank, and not a value such as not-an-email. |
| JIT User sync failed: first name was not sent by the External System. | First name is mapped and marked Required, but arrived blank. Either send it from the IdP, or clear Required in User Profile Fields. |
| JIT User sync failed: last name was not sent by the External System. | Last name is mapped and marked Required, but arrived blank. Same fix as first name. |
| JIT User sync failed: Valid Phone number was not sent by the External System. | Login with Phone Number is enabled, but the phone number arrived blank or invalid. Send a valid phone number, or turn off Login with Phone Number if it is not needed. |
Tip: After correcting the mapping (or the IdP attribute), have the user sign in again — the updated configuration takes effect on the next SSO attempt.
Every provisioning outcome is recorded, so you can confirm a success or diagnose a failure:
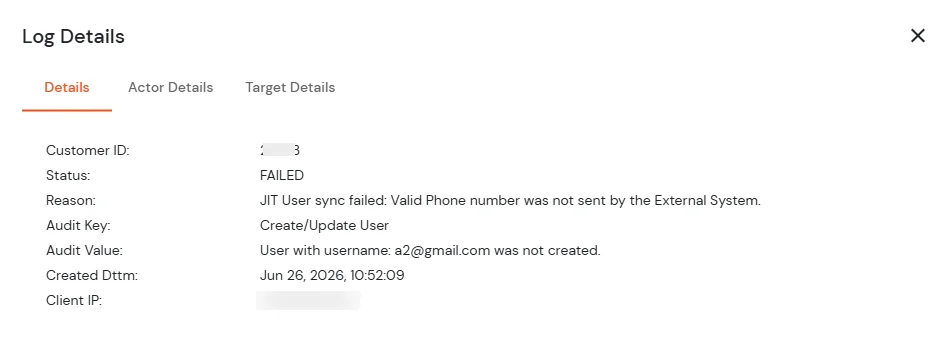

Note: A Success entry means the user was created or updated. A Failed entry names the check that did not pass in its Reason — match it to the Validation Messages table to know what to change.
